| Author |
Message |
 |
|
|
|
|
Advert
|
Forum adverts like this one are shown to any user who is not logged in. Join us by filling out a tiny 3 field form and you will get your own, free, dakka user account which gives a good range of benefits to you:
- No adverts like this in the forums anymore.
- Times and dates in your local timezone.
- Full tracking of what you have read so you can skip to your first unread post, easily see what has changed since you last logged in, and easily see what is new at a glance.
- Email notifications for threads you want to watch closely.
- Being a part of the oldest wargaming community on the net.
If you are already a member then feel free to login now. |
|
 |
2015/10/11 02:09:09
Subject: Stormtide project - overhauling the Stormsurge & Farsight
|
|

Longtime Dakkanaut
|
Because I can't leave my models alone and feel compelled to alter everything I've been putting in some thought on what I'd want to do to the Stormsurge kit to make it a bit more unique. I went to the local GW today to give the kit a good look over and brainstorm, inspiration hit so I picked one up.
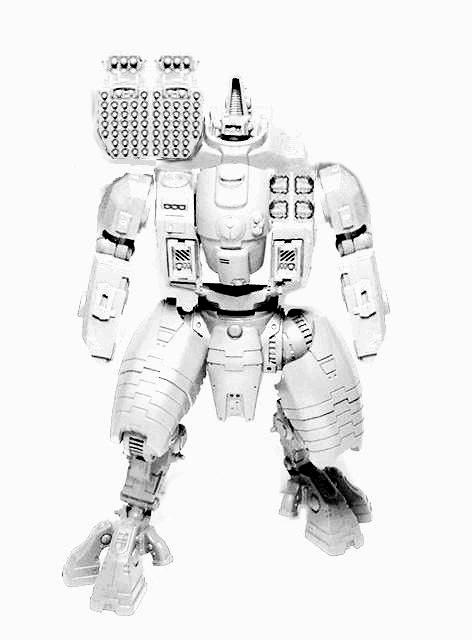
Here's a very rough photoshop concept of what I'm thinking about, it'll require a lot of kitbashing and scratch building to achieve but I think it'd be pretty killer when it's all done. Not sure if it's something I'll tackle by hand or if I'll be using some 3d, perhaps a bit of both. I want to keep the tank like goodness but make it a bit more battlemech feeling at the same time.
What I'll be dubbing the "Stormtide"

First step will be building the legs, at this point I'm thinking they will be kept pretty much stock although for the time being I'll probably be leaving off the stabilizer pistons. Everything else about the leg design is pretty solid looking and I'll be going for a more upright stance as I'll want it to be be in an imposing stride type position.
The standard Riptide arms are going to be too small so I'll be scratch building a new set that follow the same design but are scaled up to match the size of the Stormsurge. I'll be mounting the gun in an underslung fashion to emulate the FW style weapons in addition to how the riptide is patterned. If I really want to complete the mechwarrior battlemech vibe I could add a second one to the left arm for balance. I'm not sure I'll end up gaming with this so much as building it for display so I don't think I'll need to worry too much about it being WYSIWYG.
I'll partially assemble the torso to get a feel for where all it needs to be cut and moved around. I foresee a lot of plasticard work and axpoy sculpt coming up 
|
|
This message was edited 1 time. Last update was at 2015/11/10 05:50:57
Paulson Games parts are now at:
www.RedDogMinis.com |
|
|
 |
|
2015/10/11 02:15:50
Subject: Stormtide project - overhauling the Stormsurge
|
|

[MOD]
Making Stuff
|
It definitely looks better with arms...
|
|
|
|
|
|
2015/10/11 02:26:31
Subject: Stormtide project - overhauling the Stormsurge
|
|
The New Miss Macross!
|
Looks like we had some similar ideas (like where to put the missiles). Subbed and anxious to see what type of roof you come up with for your model (and hopefully the community too!).
|
|
|
|
|
2015/10/11 02:34:43
Subject: Re:Stormtide project - overhauling the Stormsurge
|
|
Longtime Dakkanaut
|
The torso profile I'm aiming to pattern a bit after the Macross/Robotech Tomahawk aka Battletech Warhammer, but softened with a bit of the rounded edges from the Triax mech that's on the Rifts NGR cover, which has very similar profile lines but a more sleek tau-esque vibe to it. The front on stock stormsurge has some of that going on but the height of it makes it look like a water heater, but making into more of a wedge shape intersecting a vertical cylinder it'll recreate much of the tomahawks look. I may also pull the cockpit back further to further accent the center torso's wedge.
 
|
|
This message was edited 2 times. Last update was at 2015/10/11 02:37:29
Paulson Games parts are now at:
www.RedDogMinis.com |
|
|
|
|
2015/10/11 02:35:36
Subject: Stormtide project - overhauling the Stormsurge
|
|
Big Mek in Kustom Dragster with Soopa-Gun
|
Looks good.
My idea was along the lines of my broadsides "fix" where the big gun they carry houses the missiles rather than a railgun. I was going to leave the giant cannon over the shoulder.
Probably will take me a lot longer to kitbash it that way though. But i want my BFG o' Missiles! lol
|
 An ork with an idea tends to end with a bang. An ork with an idea tends to end with a bang. 
 14000pts Big 'n Bad Orkz 14000pts Big 'n Bad Orkz
 6000pts Admech/Knights 6000pts Admech/Knights
 7500pts Necron Goldboys 7500pts Necron Goldboys |
|
|
|
|
2015/10/11 04:51:20
Subject: Re:Stormtide project - overhauling the Stormsurge
|
|
Regular Dakkanaut
|
Subbed. I like the Tau models, I like converted models, and I dislike the current Stormsurge design. Boom, trifecta.
Looking forward to your progress on this build, and good luck to you.
|
Leigen_Zero wrote:nectarprime wrote:
Um, isn't styrene + gasoline = napalm?
More or less yes...Great, we've gone from cheap resin substitutes to weapons banned by the geneva convention...
|
|
|
|
|
2015/10/11 05:55:49
Subject: Re:Stormtide project - overhauling the Stormsurge
|
|
Longtime Dakkanaut
|
Here's the planned cuts, basically removing the center piece and lifting it while shortening the front face. The right side also needs to be cut away in order to be brought in. That way it's the same distance from the center line as the other side. Then removing the armored collar where the gunner sits and rebuilding the chest panel so they are the same height. Going to think some more about it overnight and I should start all the physical cutting tomorrow. Step by step pics to follow.

|
|
This message was edited 1 time. Last update was at 2015/10/11 06:05:21
Paulson Games parts are now at:
www.RedDogMinis.com |
|
|
|
|
2015/10/11 06:37:21
Subject: Stormtide project - overhauling the Stormsurge
|
|
Slippery Scout Biker
|
Awesome. I'm looking forward to see what you do with this. Im definitely in a similar situation where the concept has potential ,but gw's execution just fell a bit short for me. Looks like your already on the path to something better.
|
|
|
|
|
|
2015/10/11 07:44:41
Subject: Stormtide project - overhauling the Stormsurge
|
|

Water-Caste Negotiator
|
Maybe you will transform it into something likable! Your ideas look good, keep us updated!
Kahnawake
|
|
|
|
|
2015/10/12 02:39:37
Subject: Re:Stormtide project - overhauling the Stormsurge
|
|
Longtime Dakkanaut
|
|
|
This message was edited 1 time. Last update was at 2015/10/12 02:49:09
Paulson Games parts are now at:
www.RedDogMinis.com |
|
|
|
|
2015/10/12 05:59:45
Subject: Stormtide project - overhauling the Stormsurge
|
|

Pious Palatine
|
Cool. Always gotta give big kudas when people buy an expensive kit and start converting it right away...
It obvious you plan quite meticulously, but do you get nervous before you make the cuts?
D
|
|
|
|
|
2015/10/12 10:40:58
Subject: Stormtide project - overhauling the Stormsurge
|
|

Inquisitorial Keeper of the Xenobanks
|
Eh, that's interesting !
Curious to see the results, looks good for the moment.
|
|
|
|
|
|
2015/10/12 12:10:36
Subject: Stormtide project - overhauling the Stormsurge
|
|
Longtime Dakkanaut
|
 evildrcheese wrote: evildrcheese wrote:Cool. Always gotta give big kudas when people buy an expensive kit and start converting it right away... It obvious you plan quite meticulously, but do you get nervous before you make the cuts?
Not usually with plastic stuff, I try and have a good idea in my head of what I want before hand. I also use a jewelry saw which makes a very very thin cut compared to a razor saw so in the rare instance where I do screw something up it can usually be repaired with a bit of work with glue and greenstuff. I do take some extra care if I'm trying to remove small details while keeping them intact, like the tau sept symbols or the fire warrior emblems as the cuts are more tedious as you really want to keep things straight or it'll gouge details. It's just lots of practice, I've screwed up tons of stuff in the past while I was developing my skill set but just keep at it and you build up a lot of confidence as you practice. Ripping apart a $150 does give me some pause, not because I'm unsure about the cuts, putty work, or technical ability, but because I'm not always sure if the idea is going to translate as well as I picture it in my head. On a cheaper model I'm far less reserved and if I dismantle a $20-$30 model and it doesn't work out it's not a big deal, on a $100 model I'd prefer to have it come out right if possible so I put a little bit more effort into the planning end. My last mess up was on one of the Sunsharks, had an idea for using the wings on some weird frankenstein conversion with a hammerhead that got completely scrapped, honestly I have no idea why I thought it was a good idea at the time and it wasn't planned at all so it was a spur of the moment idea. You have the occasional oops and you go to the next project and salvage whatever you can of the previous wreck. The models that I stress over are the 3d prints that I use for my custom stuff, it's very brittle material and prone to flaking apart when you clean them. It's more like working with a ceramic. They also runs into the hundreds of dollars so I really don't want to ruin one. The upside is I can always have a part reprinted, but it costs money each time and when you have something like an arm or a leg or an infantry gun that might cost you $100 by itself it makes you very cautious in your approach and handling it. So far I've never had anything major of my own get ruined, but I may spend a full hour cleaning a 3d part by carefully sanding it where if it were plastic kit I'd just rip into it with a knife and be done in 2-3 minutes. When I work on 3d models that run me $800 or $1000 that's when I really start to sweat  My story of ultimate terror however was doing some work for Catalyst on some Shadowrun prototypes that they needed emergency cast, the material was very well detailed but it was done as one part models that were impossible to cast without being split and taken apart. There wasn't time to get them reprinted so the decision was to risk doing it by hand, I made it crystal clear about the risk of them being damaged so that if it came to worse they were prepared and unfortunately they didn't hold up to the separation. Because they were like ceramic when they would break it'd completely disintegrate into tiny crumbles and there was no way to greenstuff repair it to a quality that'd match the original print. I ended up ruining 3 out of the 5 prints with a total price tag of around $2500. That was not a good day.
|
|
This message was edited 3 times. Last update was at 2015/10/12 12:25:50
Paulson Games parts are now at:
www.RedDogMinis.com |
|
|
|
|
2015/10/13 10:50:00
Subject: Re:Stormtide project - overhauling the Stormsurge
|
|
Longtime Dakkanaut
|
The rip tide arms are pretty small, so they look awkward in a T-Rex sort of way. I'm waiting to see how the Ghostkeel arms stack up but I think they are likely in the same category as the riptide ones and will be too small. I have a feeling that I'll be copying the design of the riptide arms in 3d then scaling them up 150%-200% I may also consider doing an enlarged version of the riptide's shield. Unfortunately it's not stuff I'd be able to sell as it'd be replicating GW's design so it'll strictly be for personal use.
The missile launcher's I'm still toying with, I've looked at rotating them 90 degrees but it looks a little funny to have the pop up SMS launchers opening out to the sides (instead of upwards). An alternate idea that's also popped up is that I could remove the forwards portion of the chest and the intakes and house the launchers on each side of the torso. I don't have a final plan just yet and I'll need to do some more tinkering to figure out the best approach.
Here's the stock riptide arm, it's really small and weedy. So constructing a larger arm is going to be a must.

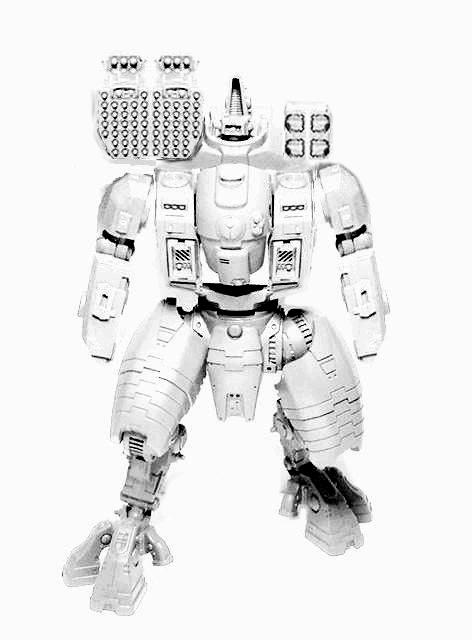
Here's a couple mock ups of what it could look like with the arms being rescaled along with options for placing the missile launchers.
 
And a concept for moving the launchers to the torso while adding arms.

|
Paulson Games parts are now at:
www.RedDogMinis.com |
|
|
|
|
2015/10/13 11:17:09
Subject: Re:Stormtide project - overhauling the Stormsurge
|
|
Decrepit Dakkanaut
|
Looking good, have you considered joining the two missile pods together , removing the little head altogether and using that frontal 'head' as a forward facing one, like some form of giant welding mask? Have the single giant missile pod up on a central turntable where the current little head is?
|
|
|
|
|
|
2015/10/13 11:42:26
Subject: Re:Stormtide project - overhauling the Stormsurge
|
|
Longtime Dakkanaut
|
I'd looked at placing the burst cannon or frag launcher there. The missile launchers are really beefy though so I'm not sure how well they'd fit as it's be a fairly small pivot/turntable joint. They do match up pretty nicely with the turret piece from the sky ray and I could rig them up on that, but it'd require a lot of modification to the top of the hull to tie it all together.
|
Paulson Games parts are now at:
www.RedDogMinis.com |
|
|
|
|
2015/10/13 13:00:26
Subject: Stormtide project - overhauling the Stormsurge
|
|
Tunneling Trygon
Carrickfergus, Northern Ireland
|
I am pleased with your progress. From the instant I saw the Stormsurge I knew exactly what I wanted to do with it, and I'm glad to see that we've had some of the same ideas but ultimately they will look quite different. It'll be nice to see how yours turns out. You can look forward to seeing mine sometime in the next twelve centuries or so.
EDIT: While I intend for mine to have heavily modified, CML-style missile pods, your first configuration (the Battletech-style horizontal ones) looked great. It gives me fond memories of Armoured Core.
|
|
This message was edited 1 time. Last update was at 2015/10/13 13:02:07
|
|
|
|
|
2015/10/13 13:26:12
Subject: Stormtide project - overhauling the Stormsurge
|
|
The New Miss Macross!
|
The 2 up arms look good. Of the missile options you posted, I'd say the one on the top right is the best. Have you considered putting the missiles together attached as a bar where the central piece sticking up from the torso is ala the Beta fighter from Robotech? Please excuse my crude 10 second MSpaint mod of your pic but this should give you a rough estimate as to what I mean. I'd agree with the above and even move it forward to where the tiny beetlejuice head is and turn the vision slit on the torso into the head ala the NGR Rifts mech cover robot (my favorite Rifts book btw!).
|
|
This message was edited 2 times. Last update was at 2015/10/13 13:31:06
|
|
|
|
|
2015/10/14 11:38:58
Subject: Re:Stormtide project - overhauling the Stormsurge
|
|

Camouflaged Zero
|
It's coming along nicely; well done.
How large is the Forgeworld KX139 in comparison to the Stormsurge? Would its arms fit a similar Stormsurge conversion?
|
|
|
|
|
2015/10/14 14:58:42
Subject: Stormtide project - overhauling the Stormsurge
|
|
Jinking Ravenwing Land Speeder Pilot
|
I like the Missile Pods in the Torso plus the Arms! Looks amazing! Can't wait to see what you decide to move forward with!
|
|
|
|
|
|
2015/10/15 06:02:54
Subject: Re:Stormtide project - overhauling the Stormsurge
|
|
Longtime Dakkanaut
|
 Minx wrote: Minx wrote:It's coming along nicely; well done.
How large is the Forgeworld KX139 in comparison to the Stormsurge? Would its arms fit a similar Stormsurge conversion?
[/spoiler]
It's about twice the height, so unfortunately the arms are far too large to use. Otherwise I'd love to just be able to buy a pair that fit.
|
Paulson Games parts are now at:
www.RedDogMinis.com |
|
|
|
|
2015/10/15 19:09:56
Subject: Stormtide project - overhauling the Stormsurge
|
|
The Marine Standing Behind Marneus Calgar
|
It might be worth mocking up the missiles when the gun arm is on. Having both of them stacked on the opposite shoulder might help balance out the massive gun arm.
The missiles built into the torso is very mech-like.
|
|
|
|
|
|
2015/10/16 16:53:29
Subject: Stormtide project - overhauling the Stormsurge
|
|
Jinking Ravenwing Land Speeder Pilot
|
@Nevelon - I love that MechWarrior look on this model
|
|
|
|
|
|
2015/10/16 16:54:51
Subject: Stormtide project - overhauling the Stormsurge
|
|
Longtime Dakkanaut
|
I like the way your mind works. Torso launcher is my fav. Could you put his big gun on his shoulder?
|
All That Is Dread project ------ CSM WIP blogKrautScientist wrote:It looks like your talent for constructing huge killing machines transcends all notions of race. How egalitarian of you!
tipios wrote: When it's finished it's gona be a missile launcher on legs 
Moltar wrote:Almost everything in 40k should fall under this guideline.
|
|
|
|
|
2015/10/16 21:46:00
Subject: Re:Stormtide project - overhauling the Stormsurge
|
|
Longtime Dakkanaut
|
Have you thought about putting the long gun through the chest (there seems to be enough space to make it look interesting)? Then you could put the shield thingy on top (so it's not too empty up there) and use the missile pods to make the arms look bigger and need less conversion work for the arms. If you put them right after the elbow you only need two joints (shoulder, elbow) and one arm part for each side each. Or something that that is inspired by a tank turret connected to the missiles (instead of going for an arm-like look) articulated at the shoulder on each side (the turret being attached at 90° instead of like a regular one).
|
|
|
|
|
2015/10/17 11:54:53
Subject: Stormtide project - overhauling the Stormsurge
|
|
Using Inks and Washes
|
Moving the Launchers to the torso reminds me of a Battletech Archer.
|
|
|
|
|
|
2015/10/17 22:02:04
Subject: Re:Stormtide project - overhauling the Stormsurge
|
|
Insect-Infested Nurgle Chaos Lord
|
I hope you don't mind but I gave your edits an edit.
Basically just made it a giant broadside.
I put the seeker (?) missiles in the chest because I like your chest missile design. I imagine they launched at an angle and hit a certain altitude before finding their target. I mean alternatively these could sit above the left shoulder.
I figure if the main gun platform is on the right shoulder it could hold the weight of these rockets.
I kept the arms the same length but made them slightly thinner.
|
|
This message was edited 5 times. Last update was at 2015/10/17 23:01:48
|
|
|
|
|
2015/11/10 05:57:19
Subject: Re:Stormtide project - overhauling the Stormsurge & Farsight
|
|
Longtime Dakkanaut
|
|
|
This message was edited 1 time. Last update was at 2015/11/10 05:58:39
Paulson Games parts are now at:
www.RedDogMinis.com |
|
|
|
|
2015/11/10 06:54:04
Subject: Stormtide project - overhauling the Stormsurge
|
|
Pious Palatine
|
 paulson games wrote: paulson games wrote: evildrcheese wrote:Cool. Always gotta give big kudas when people buy an expensive kit and start converting it right away...
It obvious you plan quite meticulously, but do you get nervous before you make the cuts?
Not usually with plastic stuff, I try and have a good idea in my head of what I want before hand. I also use a jewelry saw which makes a very very thin cut compared to a razor saw so in the rare instance where I do screw something up it can usually be repaired with a bit of work with glue and greenstuff. I do take some extra care if I'm trying to remove small details while keeping them intact, like the tau sept symbols or the fire warrior emblems as the cuts are more tedious as you really want to keep things straight or it'll gouge details.
It's just lots of practice, I've screwed up tons of stuff in the past while I was developing my skill set but just keep at it and you build up a lot of confidence as you practice. Ripping apart a $150 does give me some pause, not because I'm unsure about the cuts, putty work, or technical ability, but because I'm not always sure if the idea is going to translate as well as I picture it in my head. On a cheaper model I'm far less reserved and if I dismantle a $20-$30 model and it doesn't work out it's not a big deal, on a $100 model I'd prefer to have it come out right if possible so I put a little bit more effort into the planning end.
My last mess up was on one of the Sunsharks, had an idea for using the wings on some weird frankenstein conversion with a hammerhead that got completely scrapped, honestly I have no idea why I thought it was a good idea at the time and it wasn't planned at all so it was a spur of the moment idea. You have the occasional oops and you go to the next project and salvage whatever you can of the previous wreck.
The models that I stress over are the 3d prints that I use for my custom stuff, it's very brittle material and prone to flaking apart when you clean them. It's more like working with a ceramic. They also runs into the hundreds of dollars so I really don't want to ruin one. The upside is I can always have a part reprinted, but it costs money each time and when you have something like an arm or a leg or an infantry gun that might cost you $100 by itself it makes you very cautious in your approach and handling it. So far I've never had anything major of my own get ruined, but I may spend a full hour cleaning a 3d part by carefully sanding it where if it were plastic kit I'd just rip into it with a knife and be done in 2-3 minutes. When I work on 3d models that run me $800 or $1000 that's when I really start to sweat
My story of ultimate terror however was doing some work for Catalyst on some Shadowrun prototypes that they needed emergency cast, the material was very well detailed but it was done as one part models that were impossible to cast without being split and taken apart. There wasn't time to get them reprinted so the decision was to risk doing it by hand, I made it crystal clear about the risk of them being damaged so that if it came to worse they were prepared and unfortunately they didn't hold up to the separation. Because they were like ceramic when they would break it'd completely disintegrate into tiny crumbles and there was no way to greenstuff repair it to a quality that'd match the original print. I ended up ruining 3 out of the 5 prints with a total price tag of around $2500. That was not a good day.
Interesting stuff, thanks for sharing your experiences.
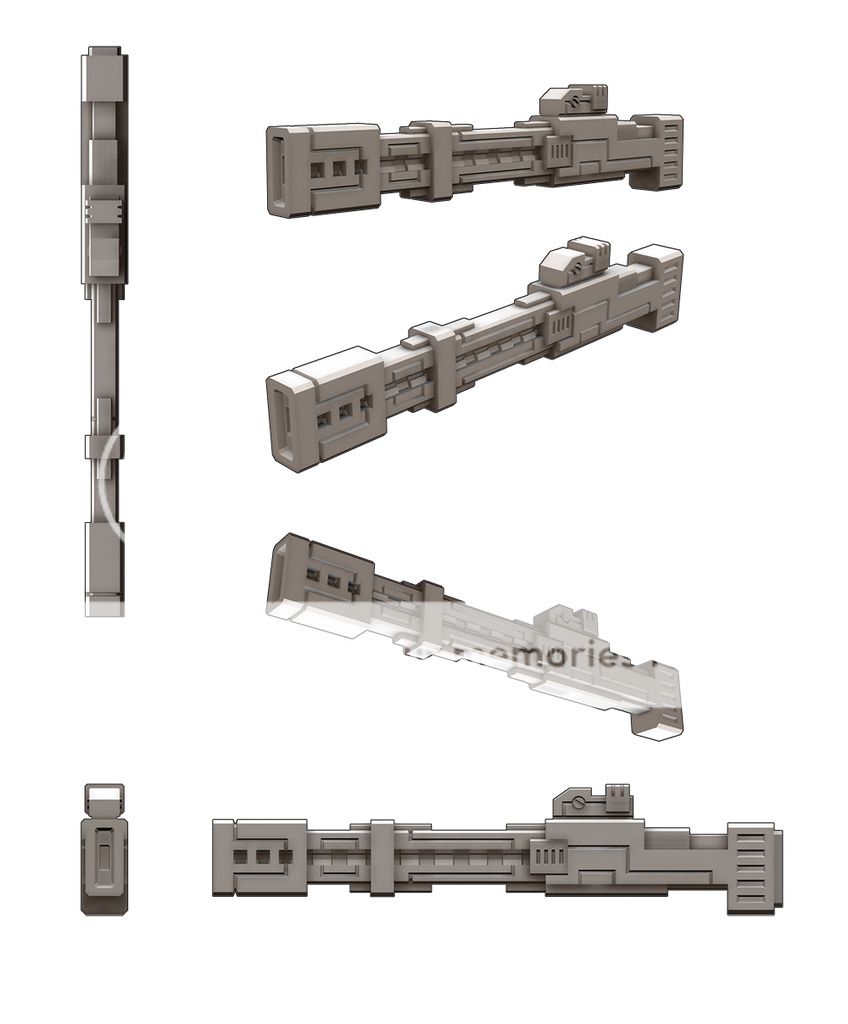
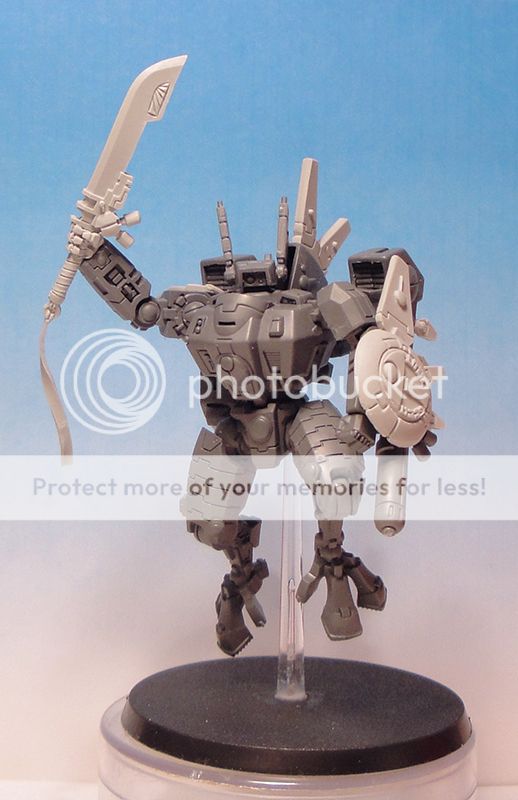
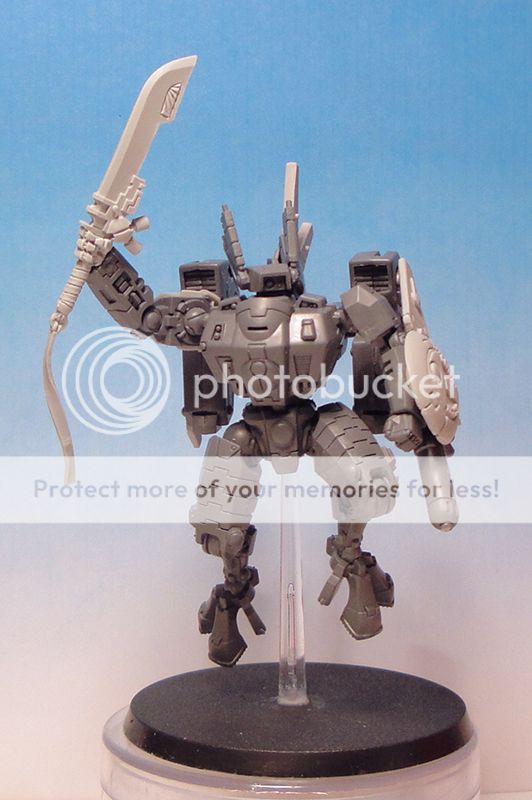
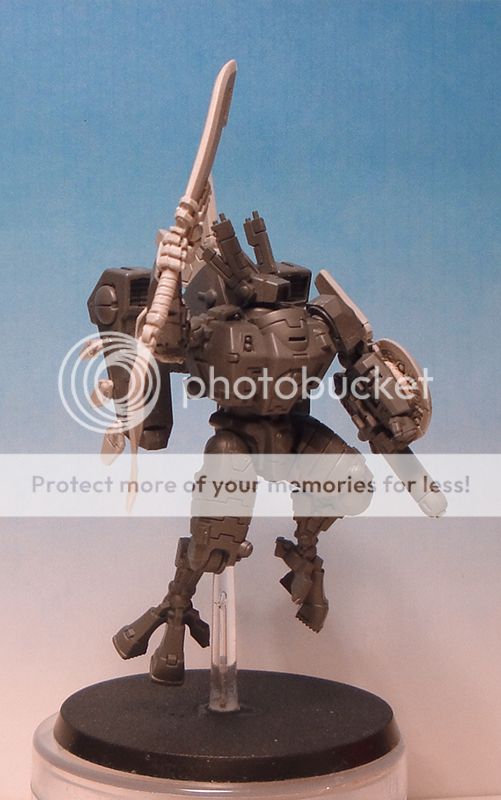
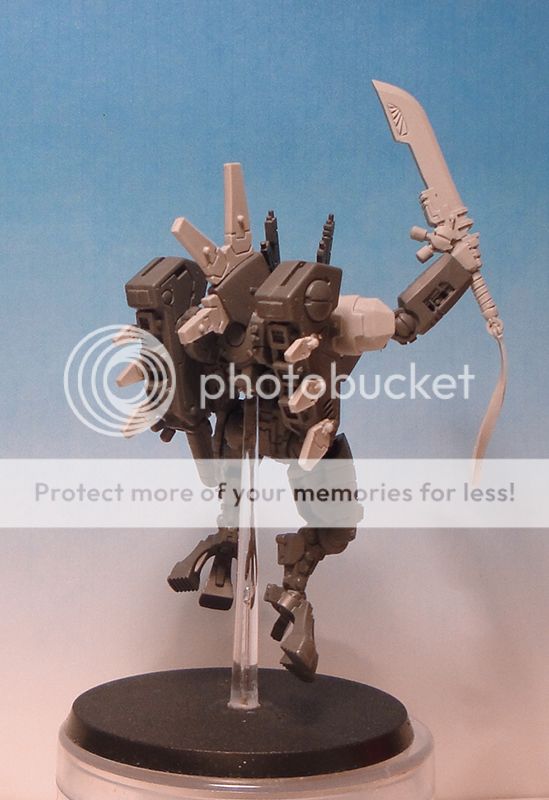
Farsight I looking great, and the railgun looks solid. Looking forward to seeing it to get a sense of scale.
EDC
|
|
|
|
|
2015/11/10 08:07:10
Subject: Re:Stormtide project - overhauling the Stormsurge & Farsight
|
|
Longtime Dakkanaut
|
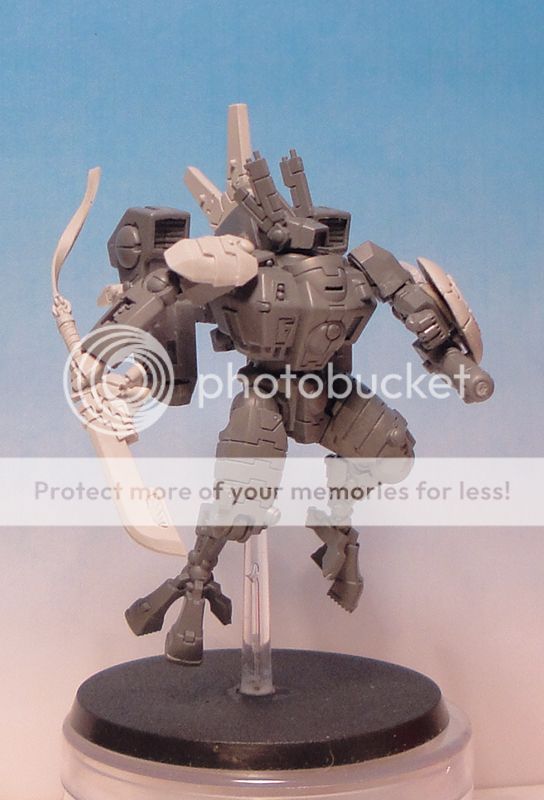
Option 3
|
Paulson Games parts are now at:
www.RedDogMinis.com |
|
|
|
|
|
|


 Ultramarines, 3rd Co. and friends, 16k+
  4k
4k  4k Points
 Competition Index
 I haven't made a final decision on their placement yet, likely going to hold off on that until I get the arm prints in which is going to be a couple weeks off.