| Author |
Message |
 |
|
|
|
|
Advert
|
Forum adverts like this one are shown to any user who is not logged in. Join us by filling out a tiny 3 field form and you will get your own, free, dakka user account which gives a good range of benefits to you:
- No adverts like this in the forums anymore.
- Times and dates in your local timezone.
- Full tracking of what you have read so you can skip to your first unread post, easily see what has changed since you last logged in, and easily see what is new at a glance.
- Email notifications for threads you want to watch closely.
- Being a part of the oldest wargaming community on the net.
If you are already a member then feel free to login now. |
|
 |
2017/01/17 01:44:30
Subject: Terrain Walkthrough - SciFi Stockyard
|
|

[MOD]
Making Stuff
|
A little something I put together for the Maelstrom's Edge Comm Guild Blog.
A walkthrough of how it was made:
 - by Iain Wilson - by Iain Wilson
Someone once declared that there are no cows in space. Which would be disappointing, because then there would be no Space Cowboys... and then where would we all be?
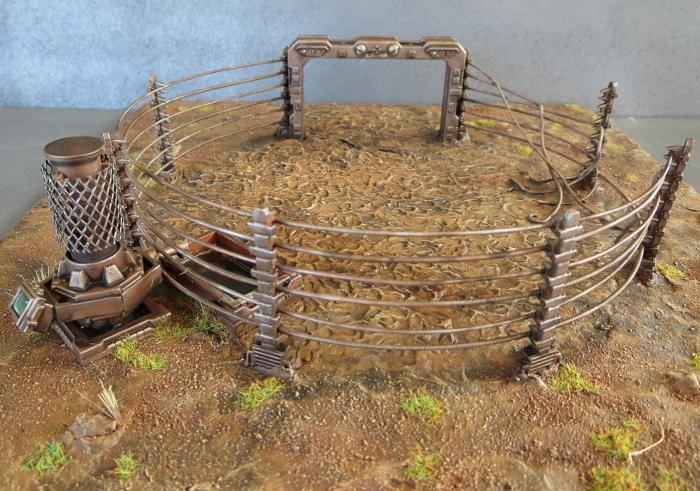
Since I prefer to believe that there are cows in space (can't stop the signal!), I decided to have a bash at building somewhere to put them, using the Maelstrom's Edge terrain sprue, some old guitar strings and some air-drying clay.
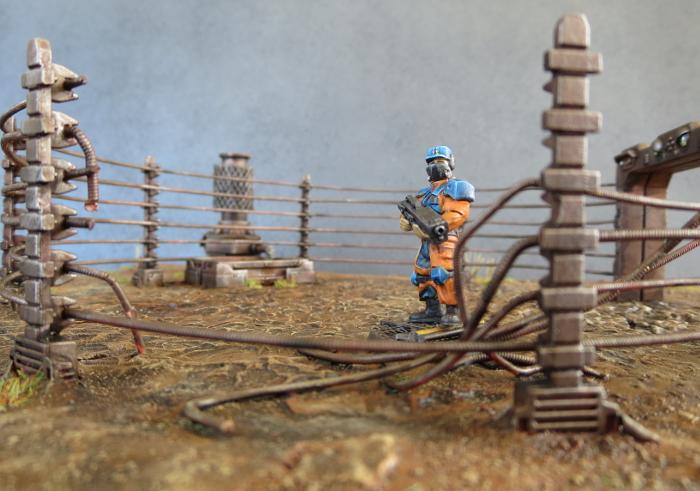
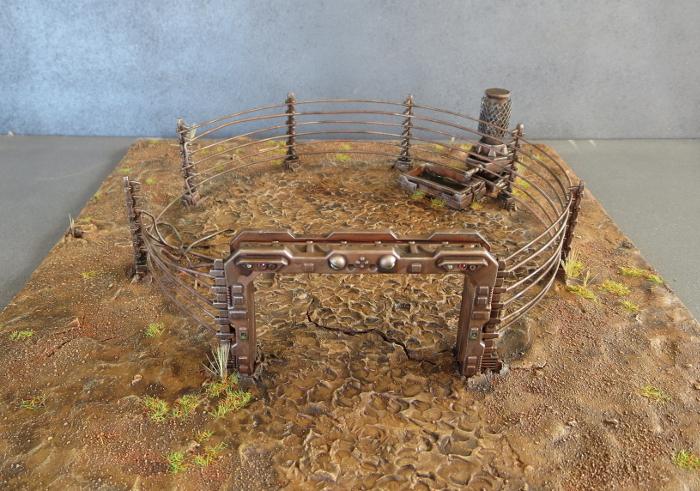
The aim here is for a terrain piece that will block movement in certain directions while still allowing fairly open fire lanes, just to mix things up a bit. To this end, rather than building a nice, neat yard, I decided to make it a bit of a beaten-up derelict - something that you would find on an old battlefield, rather than in the midst of a new settlement.
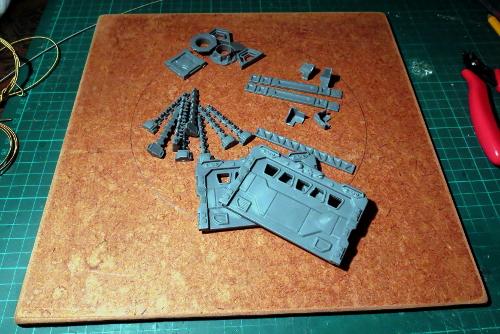
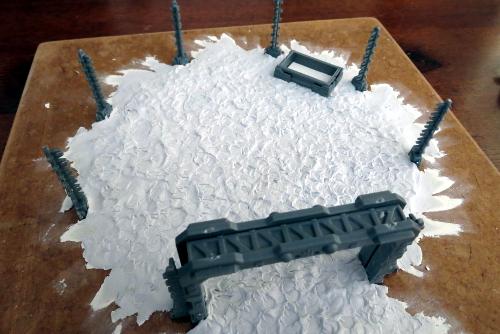
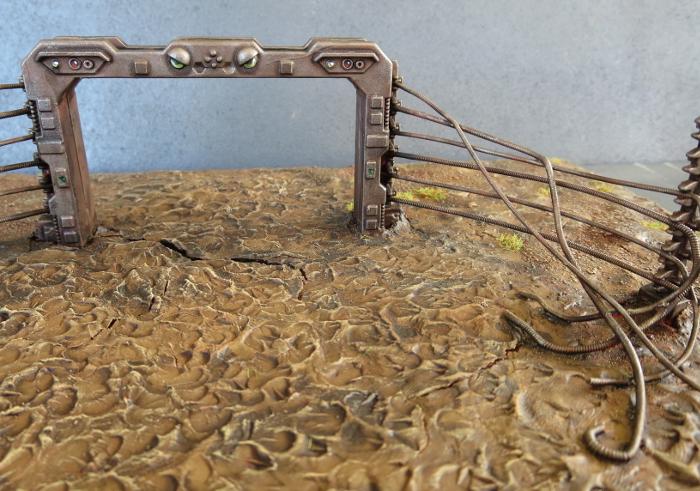
The first thing to do was to remove the doors from the doorframes. I cut as far down each side of the door as I could with a razor saw, and then scored around the top with an exacto knife until it was weak enough to snap the door out. This was repeated on the other door, and then the two door frames glued together back-to-back with a support strut running along the top joint and some fence posts on either side.

Next I traced a circle onto the base board using a bowl as a guide, and spaced out the doorway and the fence posts around the circumference. This would form the boundary of the yard.
I wanted the ground in the yard to look churned up by the constant stream of livestock that would have been going in and out when it was operational. To this end, I pressed a thin, rough layer of air-drying modeling clay over the interior of the circle and the area just outside the doorway.
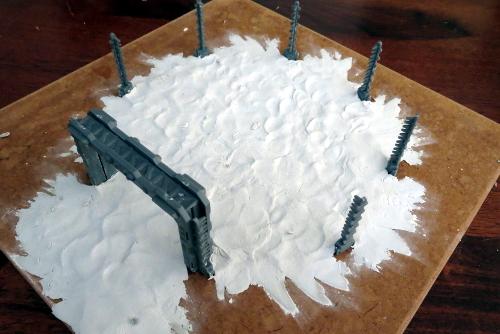
Into this, I pressed hoof-prints with a piece of sprue trimmed off square and carved into a rough hoof shape.

While this was drying, I built a trough out of the corner pieces and the cut-down support struts. This was pushed into the clay beside the fence line, so that it would sit flat once the clay was dry.
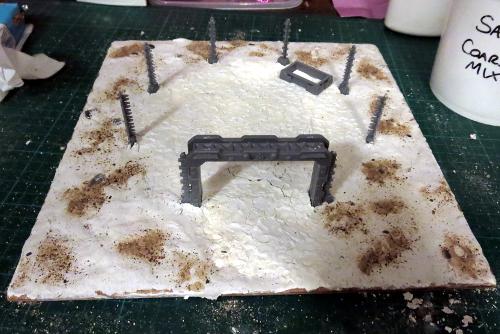
Once the first lot of clay was dry, I prepared a second batch of clay by kneading in some fine sand/gravel mix for texture and a little PVA glue to help the gravel bond in. I pressed this around the area outside the fence, wearing rubber gloves to avoid leaving fingerprints. To create some patches of slightly chunkier texture, I then pressed some scattered patches of gravel into the surface.
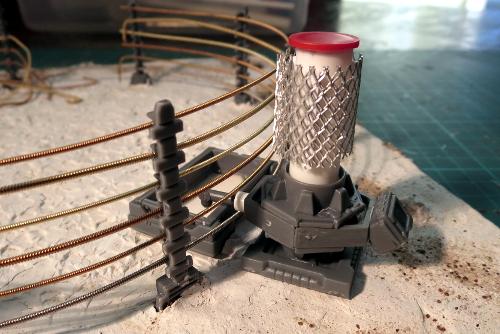
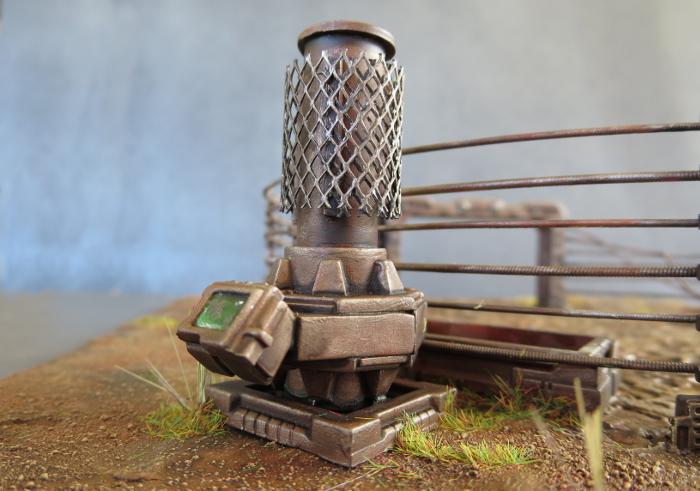
As this left me once again waiting for clay to dry, I built a condenser unit to fill the trough. This used the square hatch as a baseplate. On top sits an upside-down large pipe fitting, then two trapezoid windows butted up together along their bottom edges to create a hexagon shape, and then another large pipe fitting. A length of plastic pipe with some metal mesh wrapped around it over some spacers, capped off with the top of a knife blade cylinder, finished off the condenser itself, and then I added a control panel using a cut down display unit and a piece cut off the end of a lintel.
The condenser unit would sit on the outside of the fence, with a fill pipe running between the railings and over the trough.
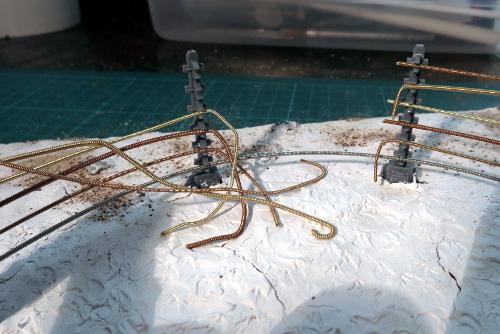
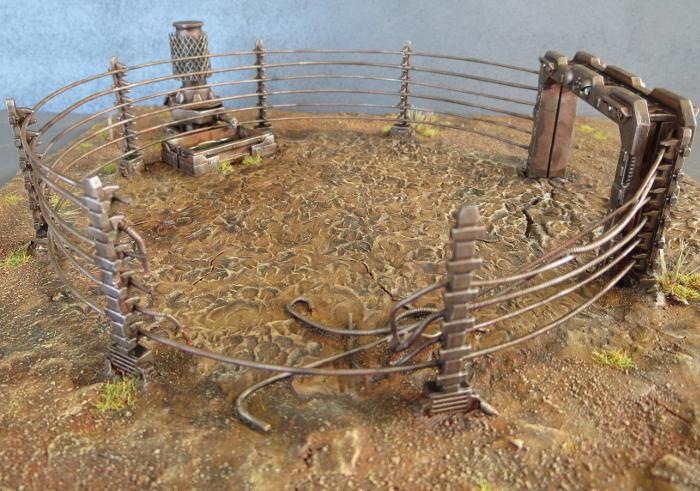
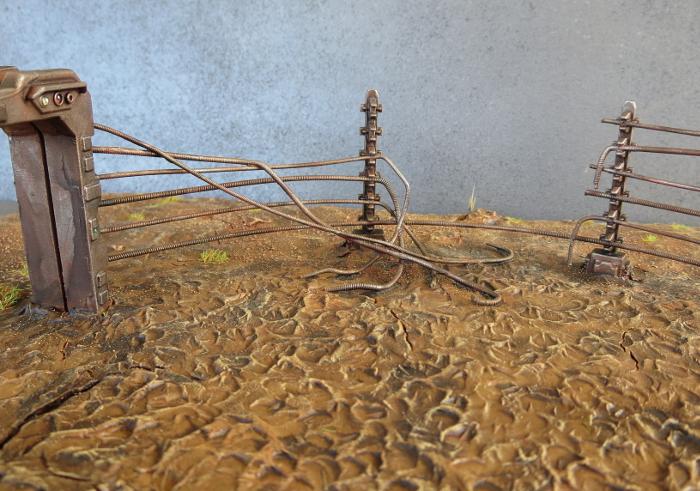
At this point, it was time to add the fence. I ran lengths of guitar string around the perimeter, gluing the strings into the emitter forks on the fence posts.
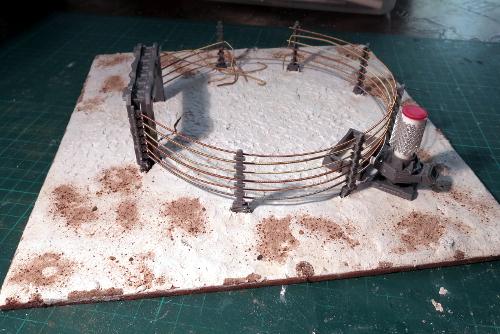
To create a little extra detail and avoid only having a single entrance to the terrain piece, I put a break in the fence on the side opposite the trough.
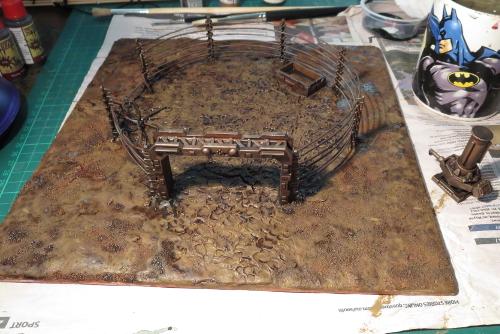
From there, all that's left is to paint it.
The whole thing was sprayed with some matt red. I then basecoated the metal parts with Coat D'arms Hairy Brown, followed by a heavy drybrush with Citadel Boltgun Metal. The ground was painted with a coat of Vallejo Heavy Brown, slightly watered down so that the red tint would show through in patches. The whole thing was then doused in a liberal coat of Army Painter Strong Tone.
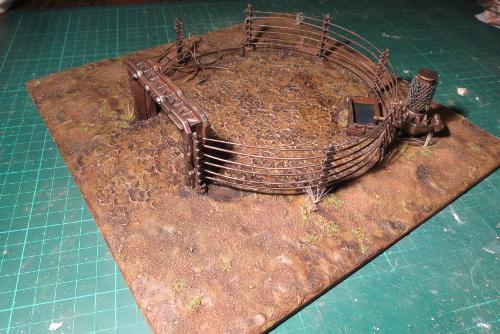
Once that dried, the metal was given another light drybrush with Boltgun Metal and the various panels and lights painted in. The ground was drybrushed with P3 'Jack Bone.
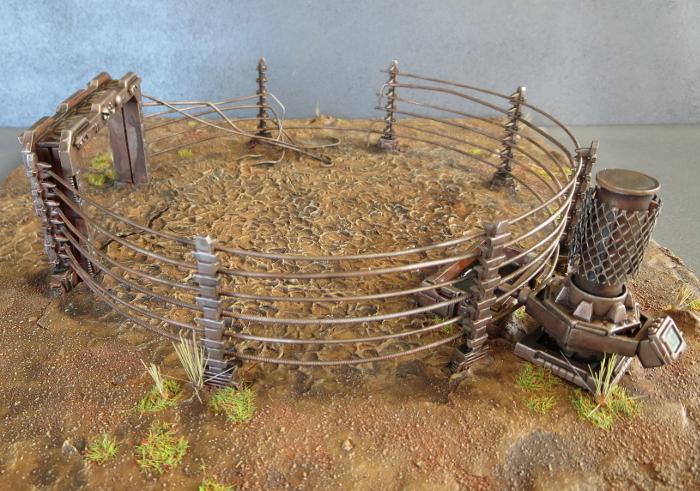
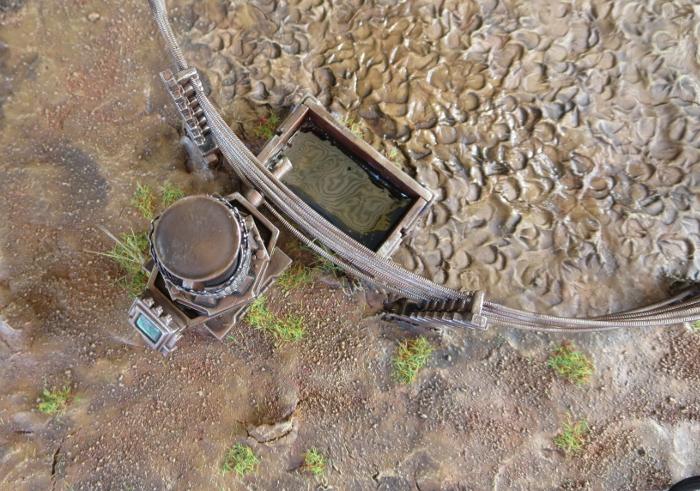
Some tufts of static grass were scattered around for some colour, and some longer grass tufts made from toothbrush bristles placed wherever seemed appropriate. I concentrated the grass patches a little around the condenser and trough, as the plan was for this to still be functional. To this end, I poured a small amount of Woodland Scenics water effect liquid into the trough, and stirred in a couple of drops of Strong Tone and Green Tone to make it look sufficiently ick.
You may notice a shiny patch in front of the trough in the above picture. This was the result of some messy pouring from the water effects bottle dripping onto the ground in front of the trough. Accidental, but I decided I liked the effect so made sure the shiny patch goes all the way up to the side of the trough where it is presumably leaking out through a hole or crack underneath somewhere.
With the first layer of water effects dry, I added just a touch extra on top to reduce the concave shape of the water surface. As a final touch, the toothbrush bristle grass tufts were given a wash of Strong Tone and a drybrush of Coat D'arms Putrid Green.
If you would like to have a go at building your own stockyard, you can get the Maelstrom's Edge Terrain Sprue (in a handy two-pack) from the online store here. If you don't happen to play a guitar, cultivate a friend who plays for their cast-off strings. Otherwise, stores that sell guitars will often have discount strings that they are clearing out (the quality of the string as an actual guitar string is irrelevant here, so cheap ones are just fine!) and may even have some broken strings laying around that they would be happy to get rid of.
As always, we would love to see what you come up with, so please feel free to share your creations on the Comm Guild Facebook page here!
|
|
|
|
 |
|
2017/01/17 02:19:13
Subject: Terrain Walkthrough - SciFi Stockyard
|
|

Stealthy Warhound Titan Princeps
|
That is a nice piece! Very evocative of life under an alien sun.
|
|
|
|
|
2017/01/17 05:06:17
Subject: Terrain Walkthrough - SciFi Stockyard
|
|
Pustulating Plague Priest
|
There's no manure!
|
There’s a difference between having a hobby and being a narcissist. |
|
|
|
|
2017/01/17 07:01:03
Subject: Terrain Walkthrough - SciFi Stockyard
|
|
[MOD]
Making Stuff
|
Of course not. You don't leave that stuff just laying around... That's valuable filler for the recycling vats!
|
|
|
|
|
|
2017/01/17 08:32:26
Subject: Terrain Walkthrough - SciFi Stockyard
|
|

Boosting Ultramarine Biker
|
Really great looking scenery piece! Many thanks for the run through...
|
|
This message was edited 1 time. Last update was at 2017/01/17 08:32:43
My Element Games referal code: SVE5335 |
|
|
|
|
2017/01/17 18:28:19
Subject: Terrain Walkthrough - SciFi Stockyard
|
|

Using Inks and Washes
|
Always great seeing how something comes together - I may need to add air-drying clay to my stock pile. Many thanks for posting this, and a characterful final product!
|
|
|
|
|
2017/01/17 19:15:04
Subject: Re:Terrain Walkthrough - SciFi Stockyard
|
|
Longtime Dakkanaut
|
Great looking corral. 
I need to invest in some guitar string. That is one bit of kit missing from my terrain supplies.
Regarding manure, there is always this fine pack of pewter turds in case you want to re-visit the dung idea. It comes with an assortment of cow, dog, horse and human feces so no matter what you are securing in that pen their poo is covered! 
|
|
|
|
|
2017/01/19 12:05:32
Subject: Re:Terrain Walkthrough - SciFi Stockyard
|
|
Pustulating Plague Priest
|
 DarkTraveler777 wrote: DarkTraveler777 wrote:Great looking corral.
I need to invest in some guitar string. That is one bit of kit missing from my terrain supplies.
Regarding manure, there is always this fine pack of pewter turds in case you want to re-visit the dung idea. It comes with an assortment of cow, dog, horse and human feces so no matter what you are securing in that pen their poo is covered!
I got a 404 on that link, but it's ok, I know how to make poo and successfully make my own!
|
There’s a difference between having a hobby and being a narcissist. |
|
|
|
|
2017/01/19 15:46:57
Subject: Re:Terrain Walkthrough - SciFi Stockyard
|
|

Dakka Veteran
|
Amazing piece of terrain. Reminds me of the Brahmin patches in Fallout 2
|
|
This message was edited 1 time. Last update was at 2017/01/19 15:47:19
|
|
|
|
|
2017/01/20 20:18:20
Subject: Re:Terrain Walkthrough - SciFi Stockyard
|
|
Longtime Dakkanaut
|
Joyboozer wrote: DarkTraveler777 wrote:Great looking corral.
I need to invest in some guitar string. That is one bit of kit missing from my terrain supplies.
Regarding manure, there is always this fine pack of pewter turds in case you want to re-visit the dung idea. It comes with an assortment of cow, dog, horse and human feces so no matter what you are securing in that pen their poo is covered!
I got a 404 on that link, but it's ok, I know how to make poo and successfully make my own!
Sorry about that! Not sure why the link isn't working.
Try this one, and scroll down to "sack of gak"
http://mindwormgames.myshopify.com/collections/exiles
|
|
|
|
|
|
|
