Today's tip comes off the heels of a great thread over on
DakkaDakka by
corpsesarefun showing the
effects of the various GW washes on metallics. This is a method I've been taking serious advantage of on lots of different projects since the washes were released. One wash in particular has caught my fancy, Gryphonne Sepia. My initial tests with the wash was as an easy way to shade a white primer into a bone color. From there I began to wonder how it could change metallic paints for me while I was working on
my entry for the the
Old School Dakka Painting Challenge. I was already using Badab Black in a similar fashion from a technique I picked up from White Dwarf on the model and decided to try it out as an alternative to using gold paint. And thankfully, it panned out better than I could have expected!
I've gotten many questions on how I paint gold recently since finishing my latest entry for a local painting contest here in Texas. And after seeing the simple yet
effective results pan out for a close friend of mine from Pennsylvania, I decided it high time to get around to sharing it with the community!

To start out, I normally work from a black basecoat when I'm painting metallic pieces/parts. You can either have started out from a black spray coat or paint black over the parts to be metallic.

And on building from what
we've learned from Gentleben a while back I've gone with a Bestial Brown to start us off. This coat is very loose, don't worry too much about coverage, just a quick single coat to get you off the ground and running should be good.

For the purposes of this tutorial I've gone with Chainmail for the metallic paint. I've also applied this in a loose wetbrush fashion. Be a little more careful to cover over large flat areas a bit more thoroughly and leave the bestial brown showing through in the crevices. You can already see the depth of the metals at this stage. From here is where the magic begins.

It's finally time to break out my new miracle paint: Gryphonne Sepia. I normally start the wash off a bit lighter, just enough to cover the surfaces and get a bit into the crevices. Starting lighter gives you more control over the process from start to finish.

Your second layer is really where you start to pull everything together. Again coating over the entirety of the area, you get a stronger color with a nice natural shading to it. Be sure you're allowing the wash to dry in between layers!

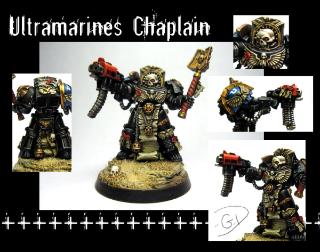
Our final picture shows the dried efforts of our second wash. From this point you can go many different directions. Adding another wash over the entire area to darken the metal even further. Maybe just a bit of selective washing to darken certain areas. I've used Shining Gold several times at this stage to 'clean up' some areas, then hitting the gold with Gryphonne Sepia again to tie it all together more. You can also use the base metal color to highlight the metals. Be sure you check out the examples suplied that have used this technique on for more ideas.
Has anyone seen any good use of the other colored washes on any projects around the web?


 3500+ points and counting


 - For the eldar.!

