Tuesday was a big night for me. First of all, 2000pt game, which is the highest I've played so far. Second, I got to play another opponent, Loy. He's the one who played Andrew last week (when I played Rob), and Rob the week before (when I played Andrew). So the four of us are getting some good games in on a weekly basis, now. And Ilan joined the "group" on Tuesday as well, playing Rob on the table next to us.
Oh, and I also finally got to try out the Screaming Bell. Read on to see why I wasted 200 points!
Anyway, after shopping, chatting and dicking around for almost an hour, we set up and rolled Battle for the Pass. Oooh.
My list:
Grey Seer w/ Power Scroll, Screaming Bell (
Pestilent Breath, Wither, Cloud of Corruption, Plague)
BSB Chieftan w/ Enchanted Shield, Battle Standard
Warlock Engineer w/ Level 2 (
Warp Lightning, Howling Warpgale)
34 Clanrats w/ Shields, Full Command
30 Clanrats w/ Shields, Musician, Standard, Poisoned Wind Mortar
30 Clanrats w/ Shields, Musician, Standard, Poisoned Wind Mortar
20 Plague Monks w/ Plague Banner
5 Gutter Runners w/ Slings, Poisoned Attacks
Doomwheel
Warp Lightning Cannon
Hell Pit Abomination
His list:
Prophetess w/ Dispell Scroll, Barded Warhorse (
Curse of the Midnight Wind, Urannon's Thunderbolt, Comet of Cassandora, Chain Lightning)
Paladin w/ Royal Pegasus, Wyrmlance
BSB Lord w/ Virtue of Heroism, Barded Warhorse, Grail Vow
7 Grail Knights w/ Musician, Standard (Banner of Chalons)
12 Knights of the Realm w/ Standard, Gallant
12 Knights of the Realm w/ Standard, Gallant
Grail Reliquae w/ 12 Battle Pilgrims
17 Peasant Bowmen
6 Mounted Yeomen w/ Shields
Field Trebuchet
Initial Thoughts
I've got the Bell, a Level 4 Seer, three awesome Rare choices and some PWMs that ignore (the Knights' 2+) armour saves and all that. What can go wrong?
N.B. As usual, the images show a pretty good appoximation of relative distances. There will be discrepencies that I will make note of.
Set Up and Deployment
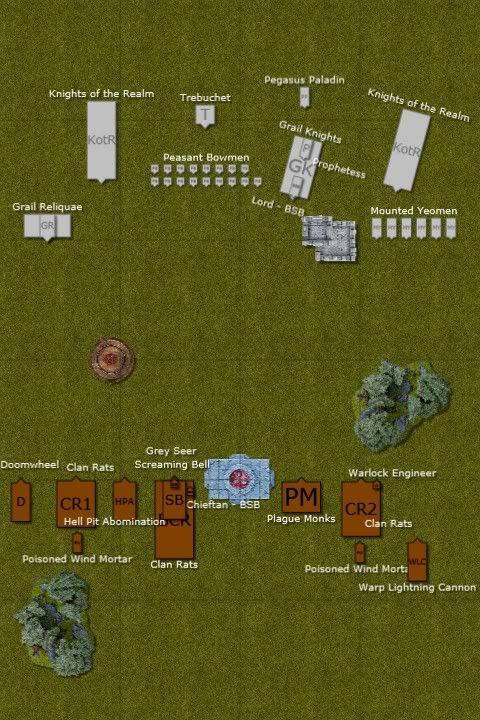
So again, Battle for the Pass.
Not much terrain to be had: 2 Forests, Watchtower, Dwarf Brewhouse and Magic Circle.
Loy takes the North, so I get the South.
Loy opts for me to start deploying first, which I do.
When Loy deploys, he makes sure that there is no room for my Gutter Runners to deploy behind his lines. Grr. So they opt to come in later as Sneaky Infiltrators.
The Yeomen make their Vanguard move, the Brets pray, and the game begins.
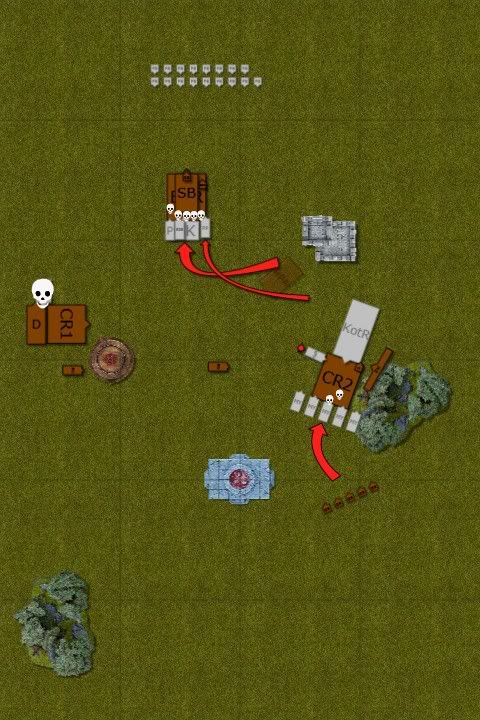
Skaven 1
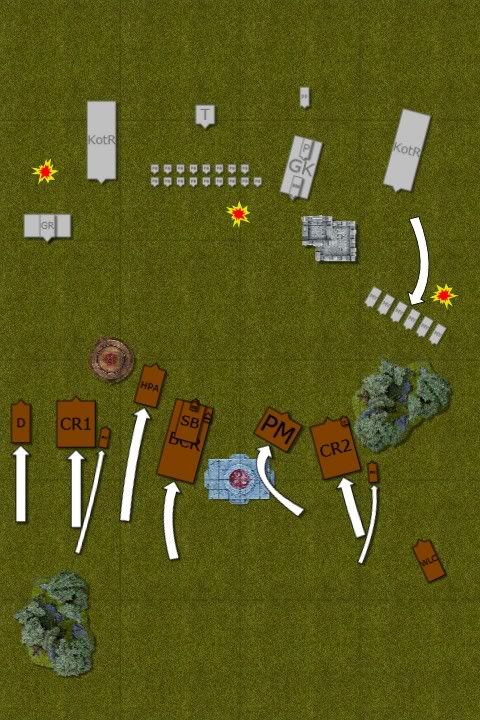
I very often get the first turn, and most of the time my initial shooting is pretty good. I fully intended to repeat this.
*Movement: Both the Doomwheel and the Hell Pit move on up, and I advance the rest of my units forward. If not for wanting some support for the Wheel and the Abom, I would have left my units back and let the Brets come to me. It hit me almost immediately that I should have done just that, and tried picking off his Trebuchet with my WLCannon. Hindsight is worse when you see it only one phase later.
*Magic: Winds roll a 7, and I Channel both dice! Not a huge deal, but this is the second time that both of my Wizards have rolled 6s. I ring the bell and it comes up Emboldened, allowing my units to re-roll failed
Ld tests. Yay. And since all of the Seer's spells are range 18" or less, he just sits atop his Bell twidling his rat thumbs. The Engineer casts
Howling Warpgale without interference, but
Warp Lightning is dispelled.
*Shooting: Here we go, usually my most successful phase! The WLCannon lines up a shot that could fly through the Bowmen and hit the Trebuchet. The shot ends up fizzling, not doing anything. The rightmost PWMortar lobs a ball at the Yeomen, and it veers off. The other PWM takes a shot at either the Grail Reliquae or the closer Knights, but either way it scatters too far away.
Well that was a cruddy turn, alright!
Bretonnia 1

Having gotten off scot free on my turn, it was as if Loy had gotten the first turn. What havoc could he wreak?
*Movement: The Yeomen decided to go around the forest, not wanting to find out what it was, and got within short bow range of the WLCannon. All three units of Knights moved up, but not much, as did the Grail Reliquae. It's sad that my rats moved up more than a bunch of horses and "chivalrous" knights. Pfft. Pansies.
*Magic: I think Loy rolled, like, a million for Winds. I knew it was going to be a bad phase. So the Prophetess starts off with
Urannon's Thunderbolt, frying three of my Plague Monks. I hate when people using Lightning against my rats. They're just jealous of our
WARP Lightnin, that's for sure. Anyway, next comes
Chain Lightning, of course, but this time the Prophetess casts with Irresistable Force! Woo. Side note: She did this last game against the Lizardmen, and ended up taking out almost her entire unit through the Miscast. I was hoping that would happen again, of course. So she targets the Plague Monks first, dropping another four. It successfully moves on and hits the Bell-pushing Clanrats, dropping three of them, and then it stops. Just in time for the Miscast Show, starring the Prophetess! One Calamitous Detonation! later and five Grail Knights have just
poofed into thin air, and the rest of the Power dice are gone. And here I am, still sitting on 6 Dispell Dice, wasted. I mean the dice, not me.
*Shooting: The Yeomen start off by managing to hit the WLCannon for one Wound. The Peasant Bowmen
somehow manage to knock off another four Plague Monks, even though they need 6s to hit and 4s to wound. Rubbish. But then it gets worse when the Trebuchet lands a direct hit on the Bell, clanging it for one Wound and killing off six more Clanrats! You know what the worst part it? I think I was supposed to ring the bell here, because of of the high-strength hit to it. Sonofa!
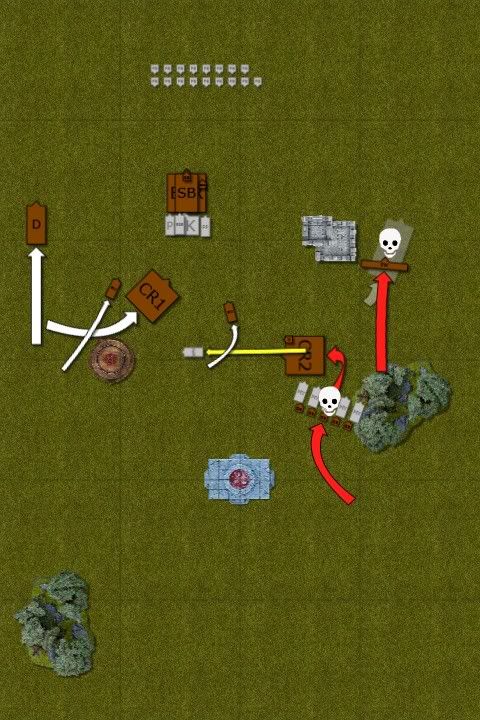
Skaven 2
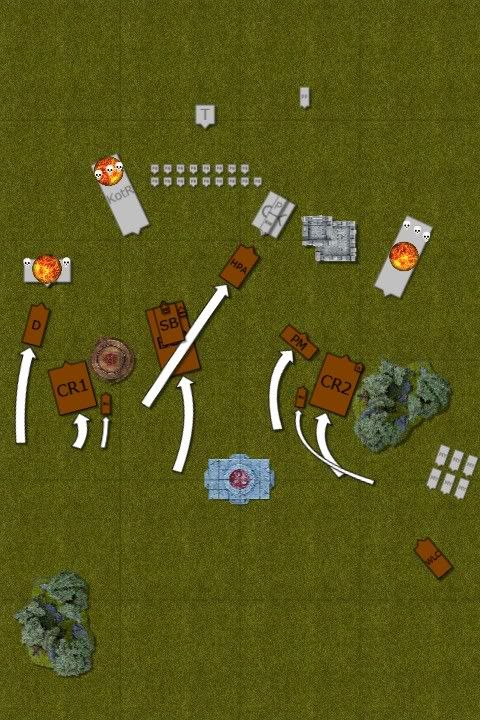
Well that was an annoying turn. Maybe I can turn things around a little.
*Movement: Once again everyone but the WLCannon move up closer to the Brets. Again, I'm moving up much further than I usually do, but again, the Wheel and the Abom decide to move up and stop just 4" and 3" from the enemy. Well done there. I knew the HPA would be double charged, so I set the Bell unit up so that it could flank charge the Knights of the Realm that hit the HPA, but also in case they charge the Bell instead they won't get its flank or anything. The depleted Plague Monks and the Clanrats over there move on up, angled to protect each other from the nearby Knights.
*Magic: Not many dice, but guess who forgets to ring the Bell! Yeesh! What a dolt. To be honest, I don't remember much about this turn's magic phase. I think I only rolled three for Winds, and only decided to zap the right Knights with
Warp Lightning, killing one or two. Yeah, that sounds about right.
*Shooting: This is when I remembered that I had forgotten to ring the Bell. Quite upsetting me. At leas the WLCannon hit the Knights of the Realm with a S6 shot through them, landing in the back. I managed to take out three knights there. The leftmost PWMortar popped another guy or two from the rightmost Knights, so they've now lost three. The rightmost PWMortar decided to malfunction, but it was only clogged, so nothing serious. The Wheel's shots take out two of the Battle Pilgrims nearby.
And that was it for my turn! I dropped a few Knights, but not ringing the Bell was a real let down.
Bretonnia 2
*Movement: Lots of Charges this turn: the Grail Reliquae into the Doomwheel (dang); both the Knights of the Realm and the Grail Knights into the HPA (dang); the other Knights of the Realm into the Clanrats; and the Yeomen into the WLCannon (dang). He also moved his Pegasus Paladin, who he forgot to move in the first turn.
*Magic: Whatever Winds were rolled did not really matter, as Loy no longer wanted to use much Magic.
*Shooting: The Peasants took aim at the leftmost Clanrats and dropped only two. Maybe I raised
Howling Warpgale last turn? Anyway, the Trebuchet took aim and, like a kick in the teeth, got another direct hit on the Bell, killing, like, seven more dudes. At least the Bell didn't take another hit. But, of course, I forgot to ring the Bell. Wow, I've got to really learn my units before I play them!
*Close Combat: Here we go. So on the left, the Battle Pilgrims couldn't touch the Wheel, which knocked out a pair of Pilgrims there. On the right, the Knights killed a whopping five rats, losing none, but the rats stayed put (on a reroll, I believe). And in the middle, the HPA, before I could do anything else, got a nice whopping Heroic Killing Blow strike from the Lord. I didn't even know he had it until he took off the HPA's head clear off. Oi! But, because the Great Horned Rat deemed that I deserve at least a little pick-me-up, and I rolled "It's Alive!" bringing the Abom back with 6 Wounds! Haha, what revelry I enjoyed there. Anyway, when the stupification of that wore off, the Knights Overran into the Plague Monks (dang), and the Grail Knights reformed to face the HPA. A pretty cruddy thing losing the HPA before he could do anything fun, but he bounced back, which was pretty awesome. Oh, and not surprisingly, the WLCannon fell to the Yeomen, which was real drag as I do love that thing, and could definitely have used it some more.
Skaven 3

Time for some revenge! At least that was the plan.
*Movement: The newly revived HPA Charged into the Knights, and the left Clanrats Charged into the Grail Reliquae. The PWMortars shuffled to get a better shot and the Gutter Runners arrived behind the Yeomen.
*Magic: With vengeance dripping from the Seer's lips and a lot of Power dice, he casted
Wither on the Knights of the Realm. Then, ready for more, cast
Plague on the Grail Knights, not hurting anyone, and with Irresistable Force. A Power Drain later and the now Level 3 Grey Seer had forgotten
Plague. Oi. I think the Engineer cast
Howling Warpgale again. I think.
*Shooting: This phase was reminiscent of the first turn. One PWMortar Misfired, but it was just a clog again. The other PWMortar miraculously...Misfired as well, and hot dog, landed (with Loy's help) right on the Screaming Bell. Another five rats dead, but the Bell was safe. And the Doomwheel, yes, you guessed it, Misfired, but it was engaged so it could not go Out of Control. Oh, and the Gutter Runners managed to take down one Yeoman.
*Close Combat: At least the Doomwheel and the Clanrats put some hurt on the Grail Reliquae and company, doing five wounds, and only taking one (in the rats). The Clanrats fighting the Knights did exceptionally well, not killing any Knights but not taking any losses. The Knights held. And in the middle, an Avalanche of Flesh and a few sideways attacks from the Plague Monks, took down 5 Knights. Two Plague Monks died in the fight, and the HPA Regenerated what he took.
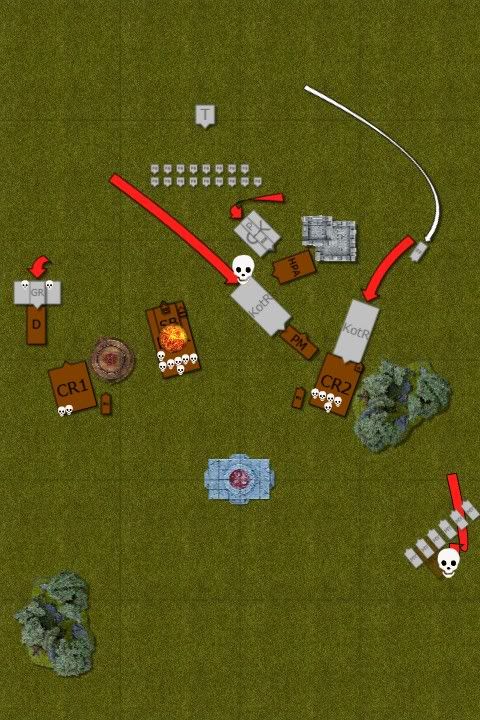
Bretonnia 3
*Movement: The Grail Knights and the Paladin both flank Charged the HPA (even though here it looks like the Paladin was behind the HPA).
*Magic: Scared of hurting himself again, I think, the Prophetess chose to not do anything here.
*Shooting: The Bowmen all failed to hit whoever they shot at, while the Trebuchet managed to smush a Gutter Runner.
*Close Combat: In the left fray, two more Battle Pilgrims fell, to no Skaven losses. In the right fray, the Clanrats took no losses AND managed to kill one Knight. w00t! The Lord was not able to Heroic Killing Blow the HPA apart, who managed to take a few Wounds, not Regenerating everything. Also, a Plague Monk died. But not before a flurry of blows (they reformed after the first round of combat) helped by the Plague Banner, and another Avalanche of Flesh, all managed to kill a Grail Knight, wound the Paladin and slay two Knights of the Realm. But, all little victories aside, the Skaven lost the combat. The Monks fled, through their own guys and the Knights they were fighting, but survived, ending up partially in the forest, which turned out to be a Wildwood. The picture makes it look like they were in the forest, but in reality only one was. The HPA stayed put, by the way.


 65/4/6,
  10/2/1,
  10/3/0,
  2/0/1,
  0/1/1
0/1/1
 1/0/0
1/0/0


 )
)


 40k/HH Night Lords 5000pts.
 Orks Waaaghmacht Spearhead 2500pts.