Another Tuesday, another Warhammer Fantasy Battle. But this week, we had a few pleasant surprises.
First, Andrew and I finished a game! That's right, we finished a game, right to the end. That doesn't happen very often, let me tell you.
And, more importantly, Andrew's Lizards officially won a game! Now, the fact that we do not always finish our games completely means that Andrew
could have won many times, but we just never got that far.
Anyway, kudos to him. Let's see how it all went down...
Lists
Mage (General) - Level 2 (
Shield of Saphery, Curse of Arrow Attraction, Drain Magic)
Noble (
BSB) - Heavy Armour, Shield
20 Spearmen - Musician, Standard
20 Archers - Musician, Standard
20 Swordmasters of Hoeth - Musician, Standard
Saurus Oldblood (General) - Light Armour, Shield
Saurus Scar-Veteran (
BSB) - Light Armour, Shield
Skink Priest - Level 2 (
Iceshard Blizzard, Comet of Casandora)
16 Saurus Warriors - Full Command
15 Saurus Warriors - Full Command
5 Chameleon Skinks
2 Salamander Hunting Packs - 4 Handlers each
Initial Thoughts
I hadn't used the Elves since my first demo game using the Island of Blood set, oh so many months ago, so I felt this would be a treat. Although I've been pretty pleased with the Skaven, I wanted a bit of a change. And I just recently began building and painting some of my Elves (IoB + Battalion + Prince/Noble + Dragon), so a bunch of white primed models is a nice change from the brown of my Skaven.
I was not worried about having only three units on the field. As long as I played the three right (1 ranged, 1 offensive melee and 1 defensive melee), I should be just fine. Especially with the help of High Magic.
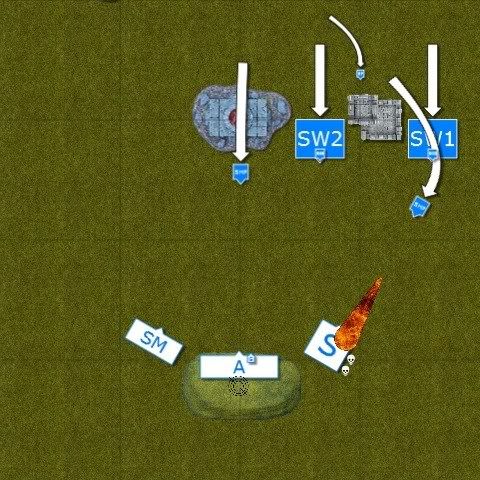
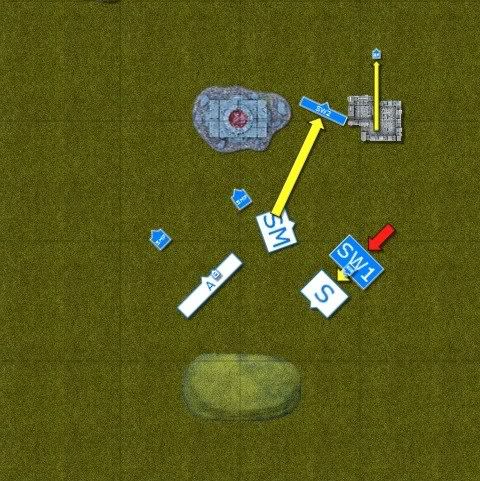
Set Up and Deployment
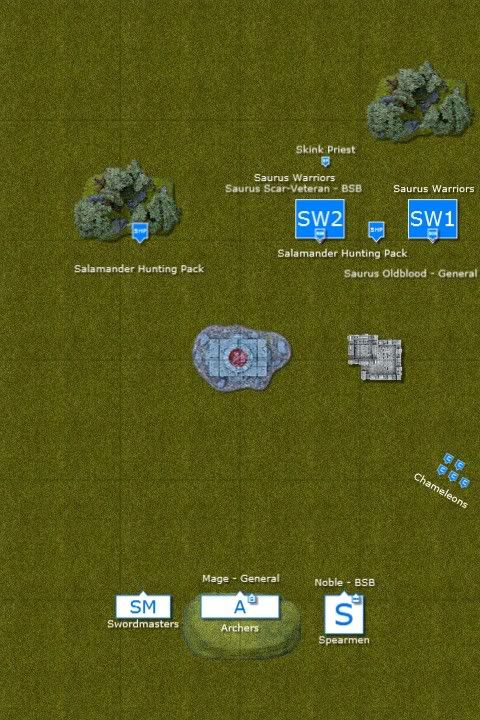
As you can see, we rolled Battle for the Pass. I learned last time in my game against the Bretonnians that if my army does better at sitting back and waiting, I should do that. So I did. I deployed only a foot away from the edge of the board, placing my units just right so that his Chameleons could not start behind me. My Archers began atop a hill.
In the middle of the table was a Temple of Skulls and a watchtower.
Up amongst a couple of Mysterious Forests Andrew deployed his units as shown. The only-slightly larger Saurus unit with the
BSB was in the middle, and the General-toting unit to my far right.
I got the first turn.
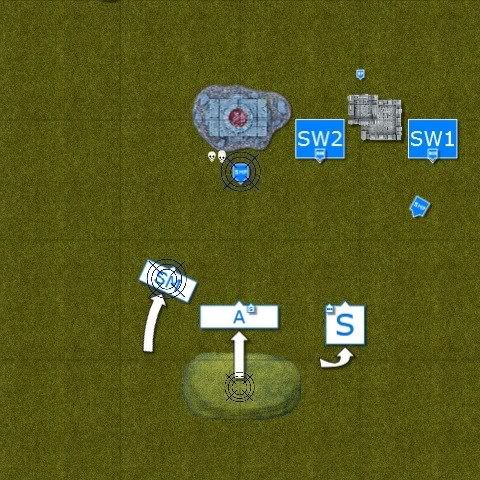
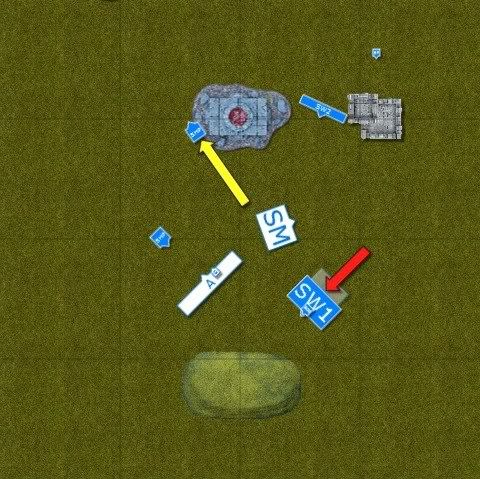
High Elves 1
Movement: I swift reformed the Archers to face the Chamelon threat. The Swordmasters and Spearmen both moved up, slightly.
Magic: I successfully cast
Curse of Arrow Attraction on the Chameleons. No other spells cast.
Shooting: Twenty arrows arched up and came back down among the Chameleons. With the help of the
Curse I managed to down four of the Lizards, and the last one Panicked and ran off the board. 60 points, no sweat!
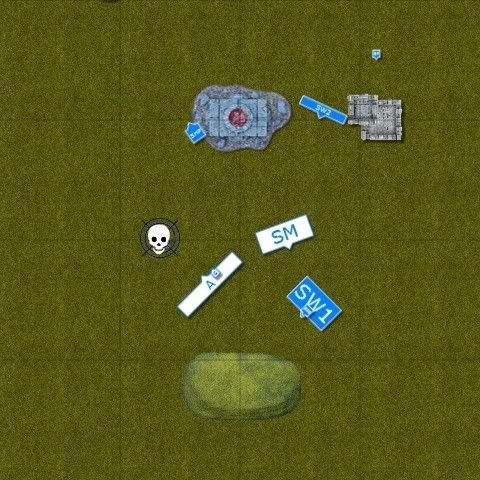
Lizardmen 1
Movement: Everybody moved up a bunch. Everyone but the Scar-Vet's unit was hiding behind terrain.
Magic: Seeing how deadly my Archers could be, the Skink Priest cast
Iceshard Blizzard]/i] on them. He then attempted to drop the [i]Comet just behind the Archers, but either he failed or I dispelled it.
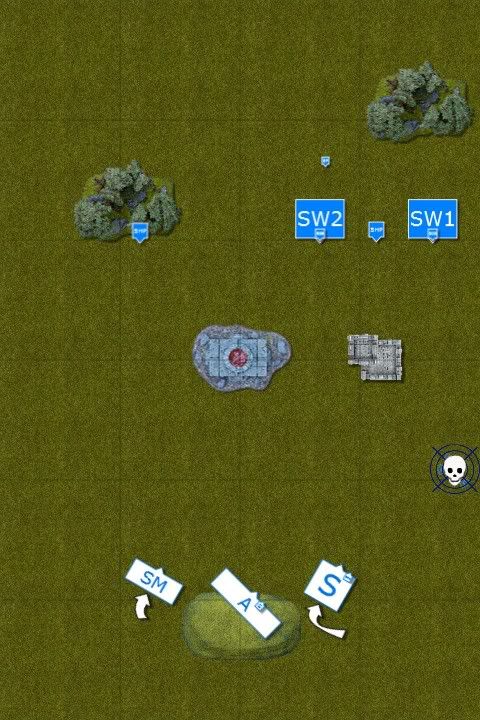
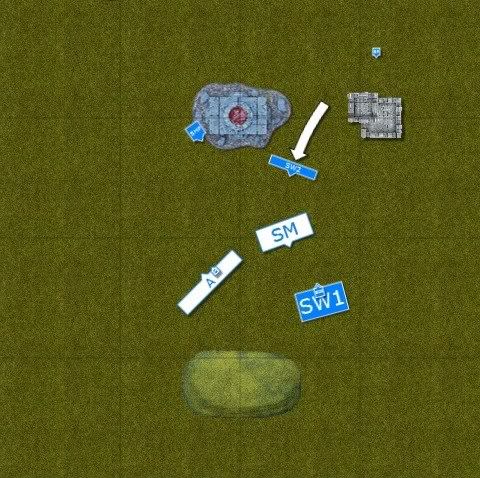
High Elves 2
Movement: The Archers swift reformed back into their orginal position. The other units stayed put.
Magic: The Mage successfully cast
Shield of Saphery on the Swordmasters, thinking the Salamander would probably try and roast them next chance they got. He also put the
Curse on the Scar-Vet's unit.
Shooting: The Archers shot at the Saurus Warriors, and with both spells affecting them, they could only muster one dead Lizard.
Lizardmen 2
Movement: Everyone moved up, with the Salamanders managing around 18" away from the two outer units, meaning they needed a "10" on the Artillery die to get a few of the warriors under their template.
Magic: The Priest manages to get the
Comet start heading down, just behind the Archers.
Shooting: The leftmost Salamander fails to roll his "10," but the rightmost one does. Five Spearmen are under the template, but only two die.
High Elves 3
Movement: With the threat of the
Comet coming down, I decided it was time to start moving up a bit. The Archers moved up, as did the Spearmen, while the Swordmasters marched up a bit further.
Magic: The
Comet failed to land, but the shadow did get bigger. I was able to put the
Shield on the Swordmasters again, and the
Curse on the closer Salamander. Plus I got off
Drain Magic, so the Winds must have blown well this turn.
Shooting: A few *pew pews* later, I knocked two wounds off of the Salamander, with a third wound being saved by that dang Scaly Skin.
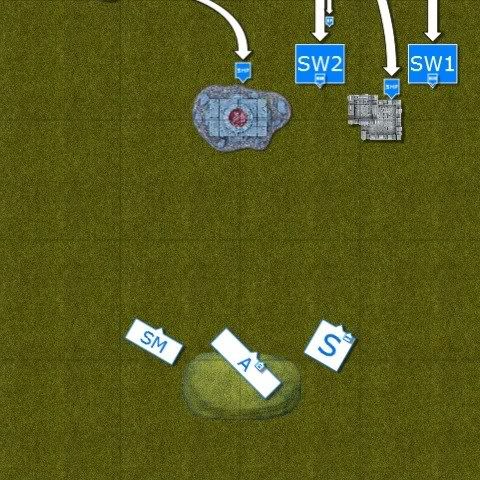
Lizardmen 3
Movement: Not happy with the way the Archers have been taking so many potshots at his forces, the Salamanders both swung down into the danger zone, ready to roast them. The other units came closer, and the Priest got into the building.
Magic: Nothing doing for the Priest, as he failed to cast the
Blizzard.
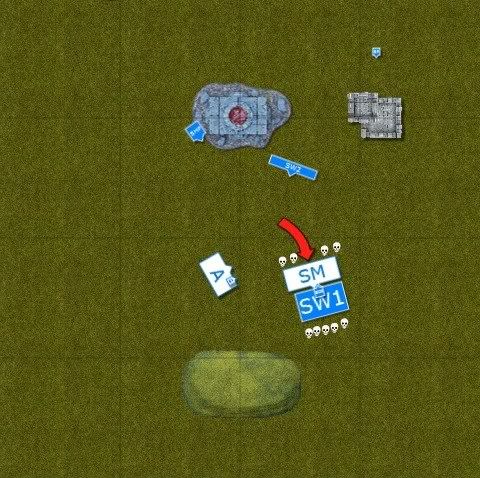
Shooting: Time for some pain. Both Lizards shot into the Archers, doing a total of eight kills! Yeesh! They did not Panic, however.
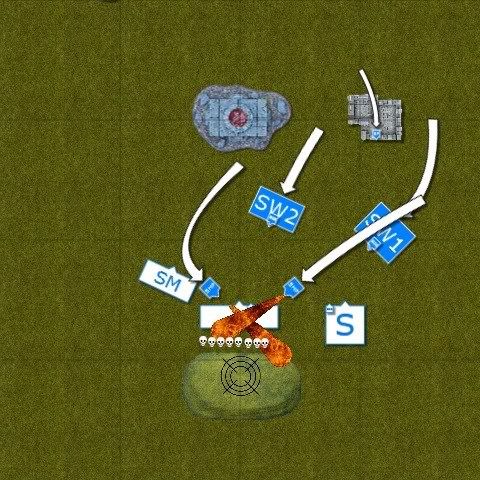
High Elves 4
Movement: Time for the Elves to get a little offensive! The Archers Charged the Salamander, who Fled. The Swordmasters Charged the Scat-Vet's unit, who took it. And the Spearmen Charged the other Salamander, who Fled, then redirected the Charge into the other Saurus unit. Which, I would later see, was a huge mistake. I should have just moved them up and let them take the Charge on the next turn.
Magic: The
Comet just got bigger. I think I was able to get off
Drain Magic, but failed to put the
Shield on anyone.
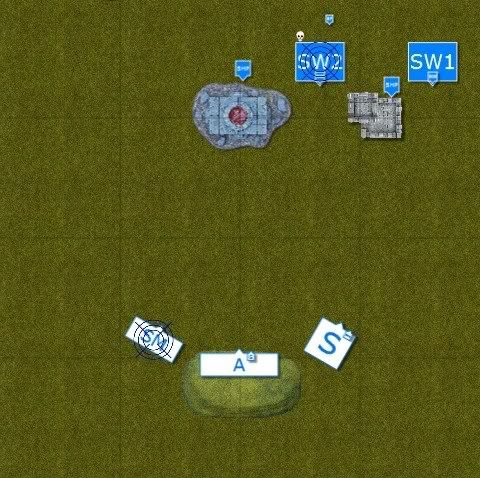
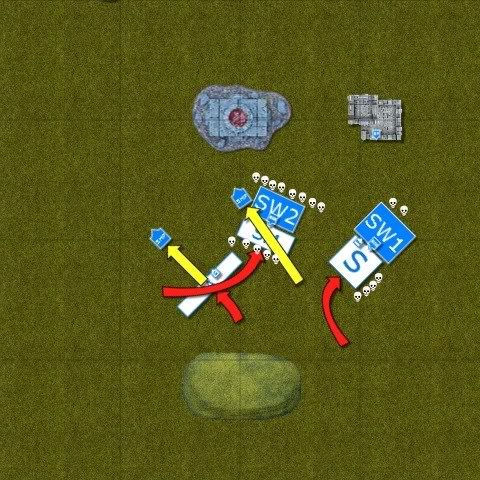
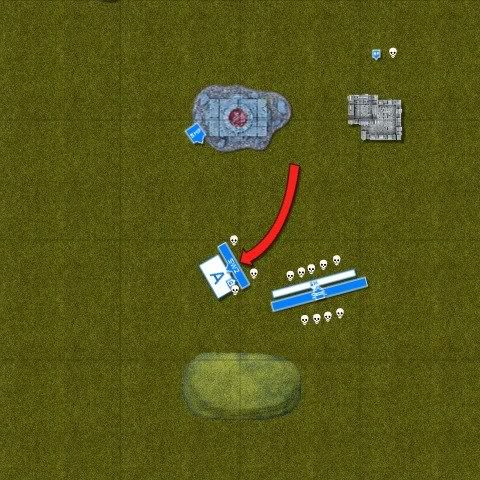
Close Combat: The Swordmaster went to town on the Saurii, slicing up (and down) eight of their number. In return the Saurii killed a respectable five Elves. In the silly fight, the Spearmen managed to kill two Saurii, taking four kills in return...including the Noble
BSB! Now I know why people kit them out to not die easily!
In the Swordmaster's fight, the Lizards rolled two VERY high
Ld tests, and took off running, losing both their standard and the Scar-Vet and his Battle Standard. This caused the Priest to Panic as well, even though the pictures make it look like he was beyond 6". So much for Cold Blooded.
Nearby, the foolhardy Spearmen, with no
BSB nearby, could do nothing about their
Ld roll of 10 and broke. They lost their standard, but did manage to run just a tad (1") further than the pursuing Lizards. Yeesh.
That combat was definitely a mistake and cost me dearly, but with a good Flee! roll next turn, it would be possible for them to get to safety and rally to fight some more.
Lizardmen 4
Movement: Well, so much for a good Flee! roll. "3" can't get you very far, and only a snake eyes could save me now. No such luck, the Saurii caught and wiped out the running Spearmen. Otherwise, everyone but the one Salamander rallies.
Magic: The
Comet...*music starts*...lands...*intensifies*...and...*crescendo*...flubs and hits no one...*decrescendo*. That was anti-climactic. No other Magic to report, as my
Drain Magic punk'd this phase.
High Elves 5
Movement: The Swordmasters reform to face that killer unit of Saurii, even though they probably should have went after the depleted one, and the Priest who was up there as well. Possibly another critical mistake.
Magic: I put the
Curse on the nearby Salamander, and got
Drain Magic off, again.
Shooting: The Salamander was easy pickings for the Archers.
Lizardmen 5
Movement: The surviving Salamander rallies. The depleted Saurus unit moves up. The big Saurus unit reforms to face the Swordmasters. Blood will be shed, soon. They could smell it.
Magic: The Priest fails to drop another
Comet.
High Elves 6
Movement: The Archers attempt to swift reform but fail, so they just reform. The Swordmasters do what they do second best and Charge into the Oldblood and his Saurus Warriors.
Magic: The Mage puts the
Shield on his own unit of Archers (not shown in image), and
Drains Magic one last time.
Close Combat: The Swordmasters do what they do (first) best, and strike down five Saurii. Wait...only five!? Oh crud. The Saurii, in return, kill a whopping four Swordmasters. Not a good fight, at all. The Lizards stay put. We check the rules and roll off, so I choose Andrew to combat reform first. He goes 10-wide. It would have been funny if I pulled into 5-wide, but that's no fun, so I go 11-wide.
Lizardmen 6
Movement: The five Saurii Charge the Archers and lose one to Stand & Shoot. The Priest and Salamander, unable to do much this last turn, do nothing.
Magic: The Priest goes all in and casts
Iceshard Blizzard, with Irresistable Force, on the Swordmasters. "Roll a 4! Roll a 4!" Yeah, he rolls a "4" on the Miscast table, takes a Wound from the S10 hit and then...survives. UGH! One more Wound and I could have made another 100 points!
Close Combat: In the Archer-Saurus fight, the Saurii take two in losses, while the Archers only take a SINGLE wound to the Mage. Fight goes to the Elves, but the Lizards, sadly, don't break. The Swordmaster-Saurus fight goes like this: four Saurii drop to the Swordmasters, but FIVE Swordmasters are slain by the Lizards. What!? BUT, the Swordmasters stay, and just barely.
Game End and Final Thoughts
Well, slight victory goes to the Lizards. And only slight!...but slight enough. It was a really good game. I enjoyed playing the High Elves, and I'm going to enjoy tabling them over the next month or so (details on why only that long coming soon).
A couple of mistakes I made cost me a) the
BSB and his unit of Spearmen, and b) not getting the points of that Saurus unit, which I should have run down. Not placing the Spearmen to protect the Swordmaster flank/take the Saurus Charge was just plain dumb. I got overzealous and foolhardy.
But, good game, and glad to see the Lizards officially win.
Thanks for reading, C&C appreciated (especially regarding the format of these newest battle reports - Are the vertical images okay? Is writing the report to the right of the images working? Is it alright if I crop out the unused parts of the field? etc.


 ), but I must say after reading many of the batreps here on Dakka, this was a good one. I agree, the vertical format is very nice. Being able to read the narrative while looking at the picture is great!
  Quick noob question: Are these pics made with a program? Looks like that would make sense (and be very convienient). Thanks and good job! Can't wait to post one of these myself!


 ) no, seriously, uve had some terrible luck in the other games, but in this one you've managed to understand exactly what is happeninig, where to move/when to fight etc. and to really take advantage of oppurtunities, my hat off to you sir!