Hey folks.
I recently purchased a Nikon D3100 DSLR camera. This is one of the more basic DSLR cameras available, but it does have virtually all the options you'll ever need to crank out great pictures of your miniatures. You can take full control with these cameras (not just DSLRs, but more "complicated" cameras as well) but it is a little daunting to start. So I thought I would write down my experiences thus far on my quest to make perfect pictures.
NOTE: this guide is more geared towards using camera's that have a high degree of manual options. A lot of models have these options these days, so it's not like you need a 5000+$ camera for this, but this is for your 500+$ cameras with lots of bells and whistles.
A lot of subjects can be covered, but for my first installement, I'm going to cover some of the basic settings of you camera in an attempt to give you some understanding in basic photography (although it'll be mostly geared towards miniature photography). This basic understanding will make sure you take pictures that make near full use of your equipment.
Using your aperture priority mode (A or Av stand on your camera).
You'll read a lot of (often outdated) guides on miniature photography that will say that you need a macro function in order to take nice and sharp pictures. To a certain degree, that'll get you good results... for anything that's 28mm big, but it'll fall short for your big monsters/tanks/regiments or even army wide shots.
Macro function allows you to get REALLY close to your miniature (I'm talking a few inches) and still get sharp pictures. Unfortunatly, in your macro function, you'll have a very shallow depth-of-field. This means that the miniatures torso will be nice and sharp, but that lovely little powersword sticking out that you worked hard on, will be completely blurred and out of focus.
And why would you want to be superclose to your subject anyway? It's not like he's gonna leg it! With a decent zoom lens, you'll be able to set your camera up to half a meter away, zoom in (this is optical zoom, so you won't have loss of picture quality) and still fill up your shot with the miniature.
So macro is really handy if you have a lens with a low focal point (like most compact cams have), but totally unnecesary if you have a lens that can set it's focal point to more then 50mm. Virtually every standard kitlens with a DSLR can do that these days. Most bridge cams can do that as well.
So what you'll want to do, is set your camera to
Aperture priority mode (A or
Av, depending on the brand of camera you have). This will allow you to manually set your aperture (a ring inside your lens) to be very open, or nearly closed. Both extremes have a very distinct result for your camera.
This is shown in the simple diagram below:

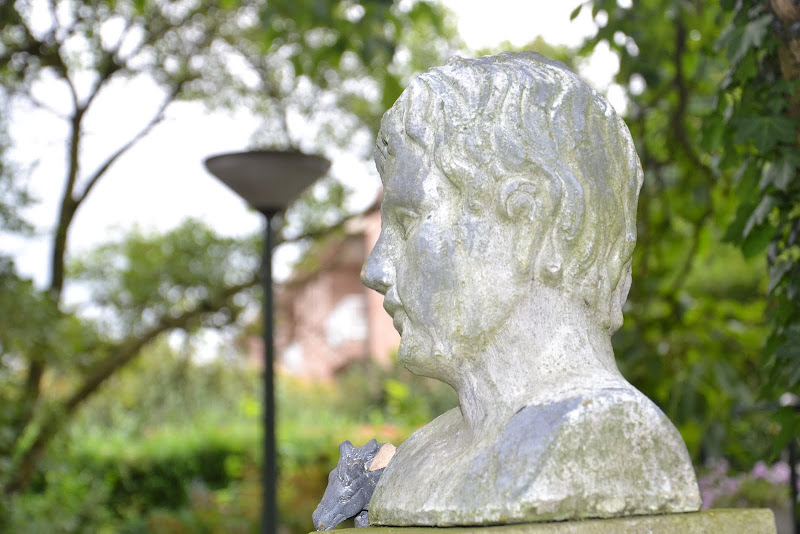
Now in order to explain this a little better, I went outside and started taking pictures of a bust we have standing there, and started playing with the aperture setting. I started at the lowest possible f-stop value (meaning, the largest possible aperture opening) and progressed to the highest possible f-stop (being the smallest possible aperture). Watch what happens to the background:
At f-stop 5.0:
At f-stop 8.0

At f-stop 13.0

At f-stop 16.0

At f-stop 22.0

At f-stop 32.0

You can see that the depth-of-field increases dramaticaly depending on the f-stop value I take. The higher you crank it up, the more of your pictures will be sharp!
But this comes at a dramatic cost! You cannot see it here, but my camera had to do all sorts of extra tricks in order to make sure it could work with this little light. That pinhole aperture forces my camera to increase it ISO settings (more on this later, but it means my pictures will become more "grainy") and to increase the shutter opening time (meaning more chances of me moving my hands while the shutter is open and blurring everything) to allow more light to come in.
And this is what will happen when you go and take pictures of your miniatures. You want clear pictures, not grainy ones... so upping the ISO value isn't really an option. If you get a bipod however, slow shutter speeds aren't a problem. A bipod will hold your camera in place really well (more so then your shaky hands ever could).
So I'm gonna leave it at this for now, but next installements should include more info on "studio setup", lights, ISO settings, over and underexposure, white balance and all that crazy other gak you have to take into account!

I hope this was a usefull read thus far! Stay tuned for more!


 18.000
  3.500
3.500  8.200
8.200  3.300
3.300  2.400
2.400  3.100
3.100  5.500
5.500  2.500
2.500  3.200
3.200  3.000
3.000


 's in my life!