Switch Theme:

Magnetising GK Strike Squads: Two-handed and special weapons  [RSS] Share on facebook Share on Twitter Submit to Reddit
»
Author Message
Advert


Forum adverts like this one are shown to any user who is not logged in. Join us by filling out a tiny 3 field form and you will get your own, free, dakka user account which gives a good range of benefits to you:
  • No adverts like this in the forums anymore.
  • Times and dates in your local timezone.
  • Full tracking of what you have read so you can skip to your first unread post, easily see what has changed since you last logged in, and easily see what is new at a glance.
  • Email notifications for threads you want to watch closely.
  • Being a part of the oldest wargaming community on the net.
If you are already a member then feel free to login now.


Made in gb
Screaming Banshee


Cardiff, United Kingdom


Okay, this is intended as a short guide to show how I magnetise up two-handed (2h) weapons and special weapons as, from what I could see, no guide actually covers this and instead seems to deal with one-handed (1h) stuff. I wish I had more pictures, but as a lot of work required two hands, it was difficult to take pictures; I'll thus try to describe with as much detail as possible what to do where my pictures are insufficient.

In my opinion, if you are magnetising your GKs so that you can take every possible weapon configuration, then you want to pose all of your models to hold the 2h stuff. If you need to switch out your gear, you'll find the 1h weapons will fit easily enough and not look too bad. If the poses aren't doing it for you, magnetising the left arm can also allow a bit of repositioning when you change the weapon options. I just think it's good sense to use as many 2h weapons as possible since it frees up your 'reserve' 1h gear.

I am unsure as to this time whether or not you can swap the Incinerators easily with Psycannons, but they look the same size to me and use the same arms, so I see no reason why they shouldn't fit nicely.


What I used:
-A handheld drill
-A 2mm drill bit
-GW superglue
-2mmx1mm magnets (wide enough to be fairly strong, but not very deep, so they fit into Marine hands practically perfectly)


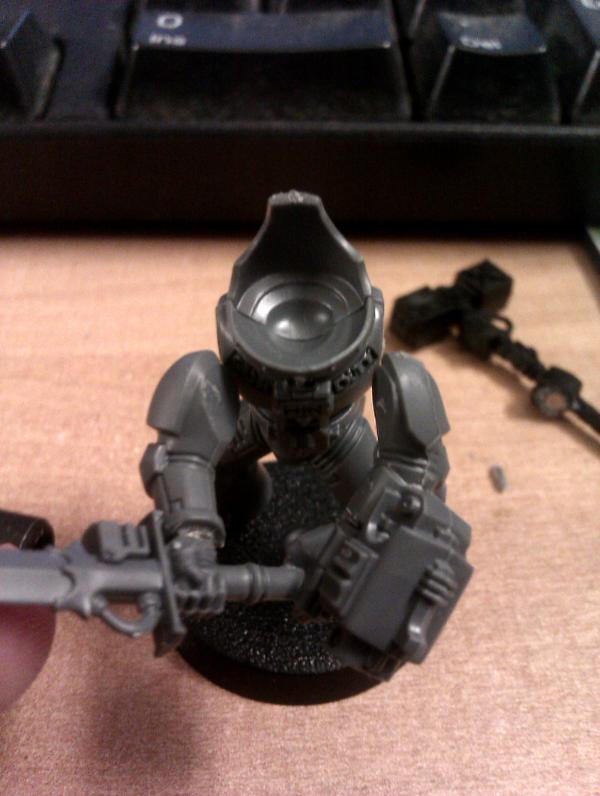
Here's an example of a 2h posed model switching out:
Spoiler:


Anyway, this is probably a no-brainer to most people. But ensure that you read the instructions that come with the kit and, when you choose your 2h weapons, use the correct arms! I was a bit of a fool and put together so many arms simultaneously that I mixed them up. It took a lot of trial and error to get everything right again; I think other people should be saved this hassle and know to be careful

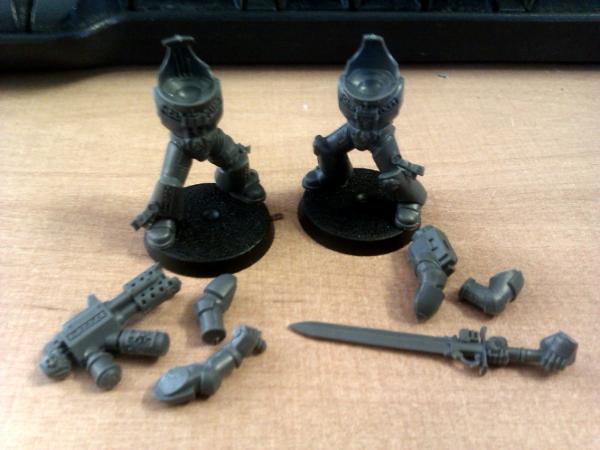
Here's what you need for both the special weapon and the 2h sword (which fortunately uses the same arms as a Daemon Hammer and is actually immediately interchangeable if you magnetise the left arm to allow mild re-posing) and a special weapon:
Spoiler:


Special Weapons
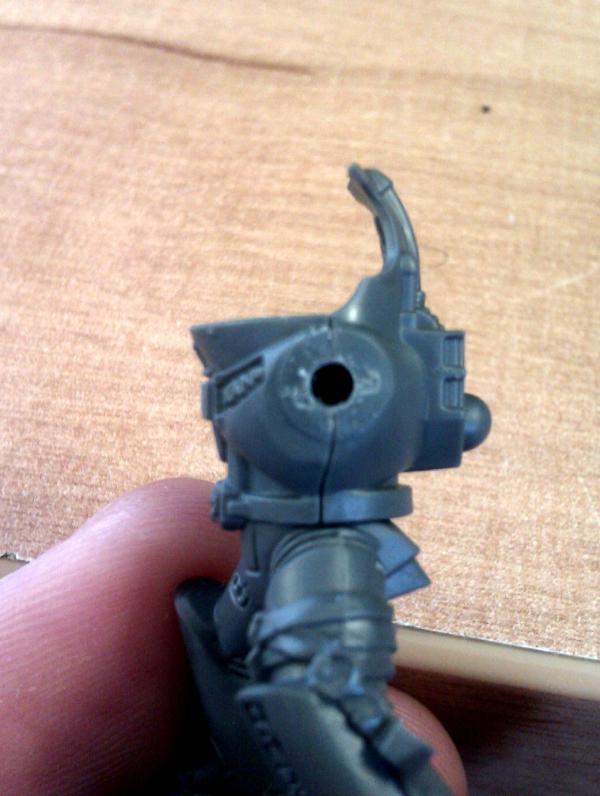
First, drill a hole in the left side of your marine's torso (I glue on the right arm to save magnets). I use a handheld hobby drill and like to start off light so I make a slight scoring; thataway I can see if I am on target (i.e. on the centre). If you find you're off, the scoring is slight so you won't be guided back into the hole you started drilling. I'd recommend always scoring your model before you start drilling proper. If you've made a bigger hole than you should have, you can 'point' the drill in the direction the hole should be and reposition the hole, albeit, now a bit bigger than it should be. But GS/superglue can fix this.
Spoiler:


Do the same with the left arm, try to line it up with the torso as best as you can; again, score the arm and hold it up next to the torso to see how well you've done:
Spoiler:


Apply superglue to one of the holes, then put in a magnet, do the same for the other hole. I like to keep the magnets stacked onto another GK's weapon (or arm, if relevant) so I remember the polarity. For example, if I'm glueing a magnet into a GK's torso, I'll grab an arm I've already done and stack the magnets on it to ensure that the polarity will be correct. If you are doing a magnetised army, you want *all* of your minis and weapons to have the same polarities on their stuff. There is nothing more irritating than getting this wrong as it can be very difficult to retrieve your magnets, so use caution!

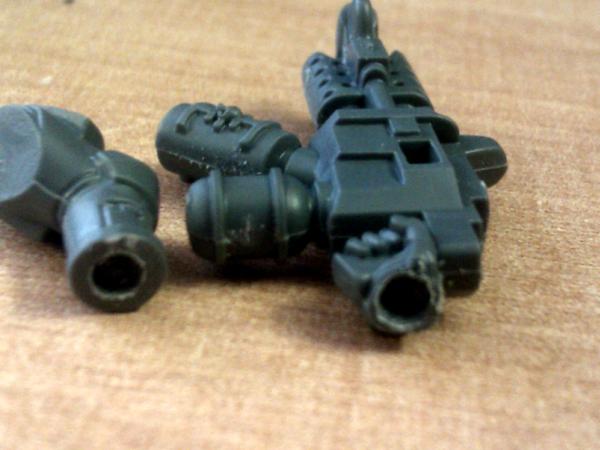
Next, drill into the hand holding the special weapon (in this case, an incinerator) and the right arm. Notice that the 2mm hole is pretty much the maximum size possible:
Spoiler:


Apply the magnets

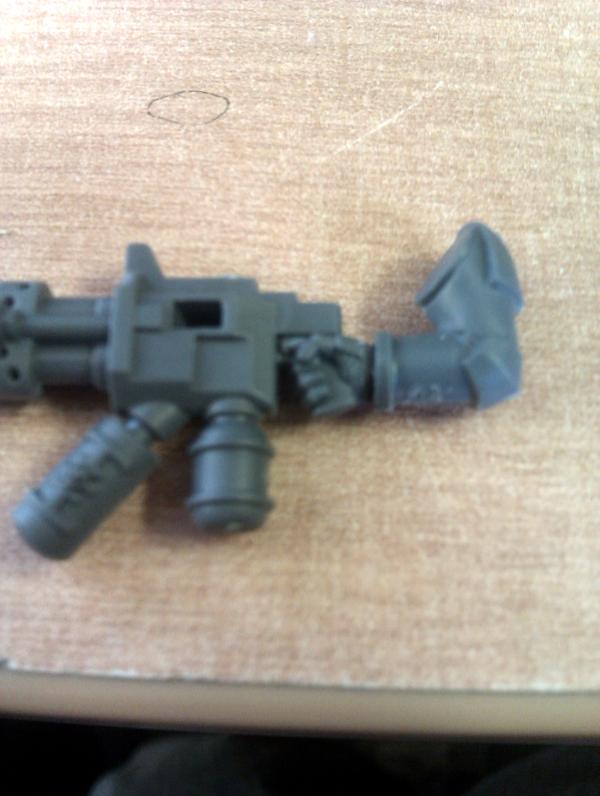
Here's what you'll have (hopefully):
Spoiler:


Pop on the left arm and glue the right, whilst it's still malleable, position the right arm, using the left arm as a guide, until the weapon lines up nicely with the grip. You are then done:
Spoiler:

Edit: I've said it already, but just to be clear; I glue the right arm and position it whilst the glue is wet. You could magnetise it if you wish, but I prefer to save the (rather expensive) magnets and just pose the left arm to suit the right if I happen to change the weapon loadout.

You'll see that I didn't get it perfect, but I am by no means proficient at this yet!


Swordsman/(M.C.)Hammer

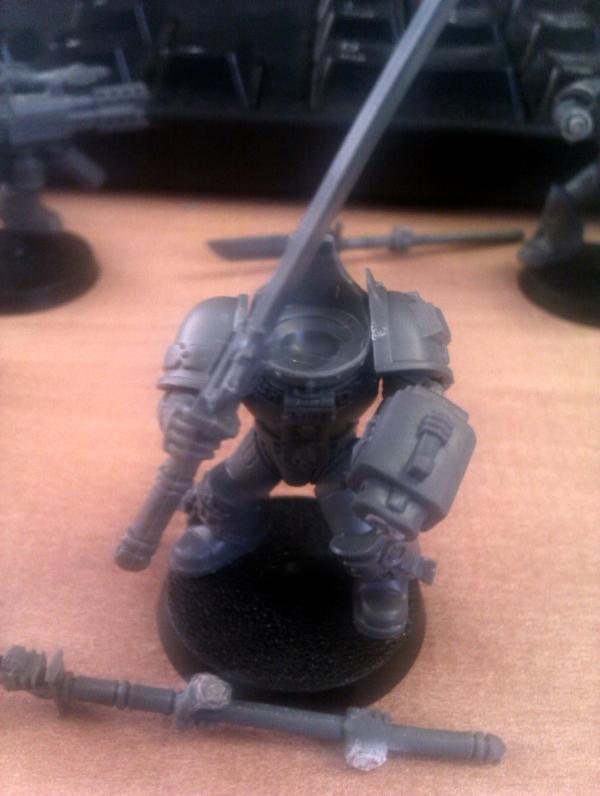
Drill the hands on the sword:
Spoiler:


Magnetise them, then magnetise the left side of the torso and left arm.

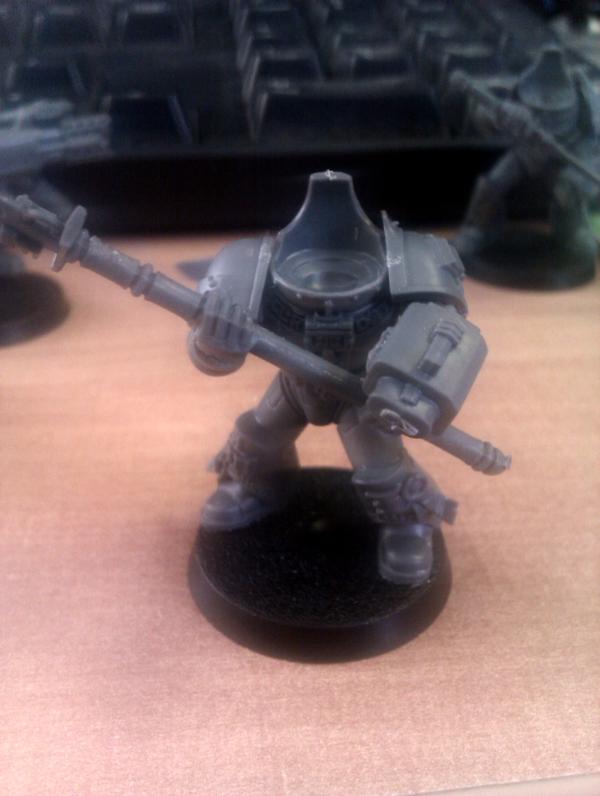
Pop the arms onto the weapon, use the magnets to let you position the weapon onto the torso as pictured, you will then know where to glue the right arm, just like with the special weapon.
Spoiler:

(Ignore the fact that the picture has no magnet on the left arm)
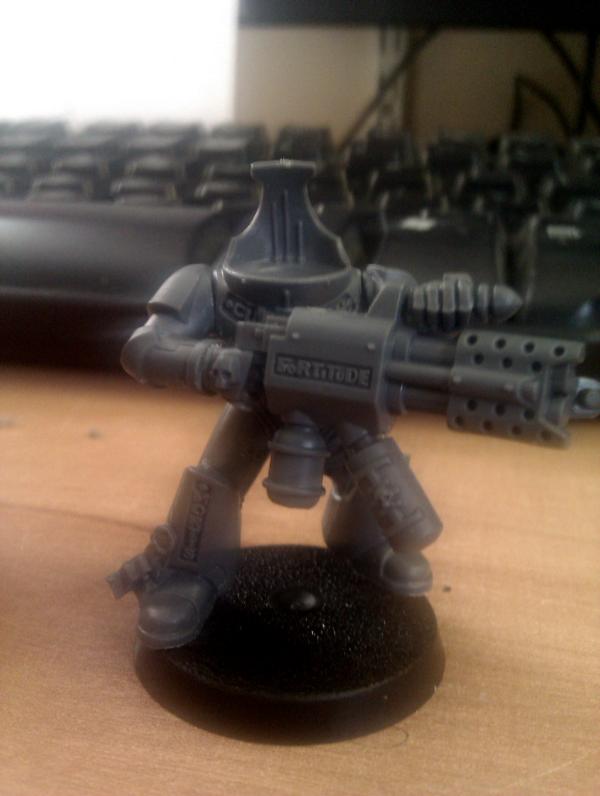
You're then done!

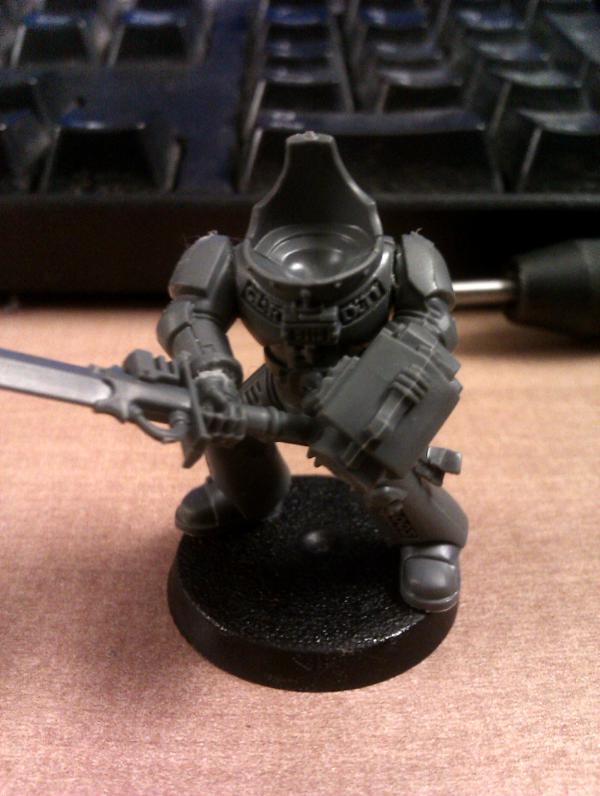
Finished product (same pic as at the top):
Spoiler:


And there you have it, pretty easy. I found the process very intimidating at first as I had no idea how to go about it, but a little bit of trial and error got me there in the end (I think my biggest mistake was glueing on left arms, although it's possible to do all this with both arms glued, it means that my Justicars can't easily swap their DHs for 2h swords, which would free up some of the 1h variants). Hopefully what I've put here is enough to magnetise up a whole squad as, obviously, if you can magnetise up 2h stuff like this, 1h stuff is a picnic! Again, I recommend using as much 2h stuff as possible so it can be switched to 1h reserve gear. This wasn't something I realised until about half my stuff was done, but for my first all-magnetised army, it's a good start and a learning experience.

I hope the tutorial was useful!


This message was edited 7 times. Last update was at 2012/02/05 15:33:00


Made in be
Scarred Ultramarine Tyrannic War Veteran


The Fortress Of Macragge

this tut is devine.. you saved me hundreds of euros, instead of bying a box extra to make all the other weapons.. i'm going to try the magnetizing..

thanks man !

5000pts W15-D10-L6


Made in gb
Screaming Banshee


Cardiff, United Kingdom

Thanks, just the thought that at least one person's saving money makes it worth the 30m or so I spent making said tutorial

Only fair to share my experiences, kind of went in blind... a lot of stuff went wrong (eek.)

Good luck with it, lemme know how it goes!

This message was edited 1 time. Last update was at 2012/02/04 14:53:16


Made in gb
Storm Trooper with Maglight


UK - Down South - GB

Great work. I wish i had thought about doing something like this. I wonder if i can do with necrons, or are they too thin...
   
Made in gb
Screaming Banshee


Cardiff, United Kingdom

You can get much smaller magnets. I don't remember where I got them from, but my Eldar are done with TEENY that are 1mm wide and 2mm deep. This was back when (and tbh it's still a problem) I had no idea how to perceive the width of 1mm so I thought they'd be sufficient for holding arms on (I had to use two in the end, next to one another, to get sufficient force).

For Necrons though? Not massively familiar with the models but you could try a dual usage; where ever the hands are on something else (say, a hand holding a gun) you could prolly get away with a 2mm in the hand. Then just tag team it up with a smaller magnet in the arm. 1mm magnets are also just fine for magnetising something like a gun or one-handed weapon on, especially if the model is lending it some support of its own. For instance, my Plague Marines have magnetised bolters/plasma guns on the special weapons dudes and they sit there just fine 'n' snug with the magnet on the hilt and resting on the supporting hand.

Don't know if that helps?

   
Made in gb
Storm Trooper with Maglight


UK - Down South - GB

i got some 2mm magnets to try with my necrons. So far ive not tried them with minis, but i magnetised the command barge options.
   
Made in gb
Screaming Banshee


Cardiff, United Kingdom

Lemme know how it goes with the infantry

   
Made in gb
Scouting Shade


What drill do you use for this? sorry late post

"We have more soldiers than you have bullets." The Imperial Guard  
   
Made in gb
Longtime Dakkanaut


As above thats what I was wondering thanks for the link to the magents though def useful

40kGlobal AOA member, regular of Overlords podcast club and 4tk gaming store. Blogger @ http://sanguinesons.blogspot.co.uk/
06/2013: 1st at War of the Roses ETC warm up.
08/213: 3rd place double teams at 4tk
09/2013: 7th place, best daemon and non eldar/tau army at Northern Warlords GT
10/2013: 3rd/4th at Battlefield Birmingham
11/2013: 5th at GT heat 3
11/2013: 5th COG 2k at 4tk
01/2014: 34th at Caledonian
03/2014: 3rd GT Final 
   
Made in gb
[DCM]
Moustache-twirling Princeps


Gone-to-ground in the craters of Coventry

I use 1.5mmx2mm cylinder magnets for SM and some Eldar bits.
If you can put a 3mmx2mm magnet in the torso, the 1.5s are fine for most arms. They go in wrists pretty well, for replacement hands.
The 1.5mm ones are good for the narrow slots used by Eldar heavy weapons used in WW, WL and Guardian pplatforms. Use them in pairs, next to each other. Fitting iss fiddly, but good when in.

I fit them using a 1.5mm bit in a GW pin vice, after a 1mm guide hole has been drilled. The 1.5 bits are pretty long, so the guide hole saves a lot of trouble.

The only problem with small magnets is if you don't push them in far enough. There's not enough contact to keep the arm in place, and it'll droop if it sticks out.

Also, the best way to fit magnets into arms is to fit a torso magnet first. Use that to hold the magnet for the arm, drip a drop of glue onto it, and press the shoulder on.
Use an existing torso every time you do another batch, and you'll never put them in backwards.
Swap the process when fitting torso magnets.
If you're worried about getting glue on the reference model, drop it in a clear plastic bag.

6000 pts - Harlies: 1000 pts - 4000 pts - 1000 pts - 1000 pts DS:70+S+G++MB+IPw40k86/f+D++A++/cWD64R+T(T)DM+
IG/AM force nearly-finished pieces: http://www.dakkadakka.com/gallery/images-38888-41159_Armies%20-%20Imperial%20Guard.html
"We don't stop playing because we grow old; we grow old because we stop playing." - George Bernard Shaw (probably)
Clubs around Coventry, UK https://discord.gg/6Gk7Xyh5Bf 
   
Made in us
Quick-fingered Warlord Moderatus


Lost in the Warp

BLAHHH.

I wish that I saw this before I built my Strike Squad.

Click here for my Swap Shop post - I'm buying stuff!
DR:90-S++G++M+B++I+Pw40kPbfg99#+D++A++/eWDR++T(T)DM+
Black Legion/Iron Warriors/Night Lords Inquisitorial Friends & Co. (Inq, GK, Elysians, Assassins) Elysian Droptroops, soon-to-add Armored Battlegroup Adeptus Mechanicus Forge World Lucius


Made in us
Drone without a Controller


USA, CA

Another method I find useful for fitting magnet is to get a much larger magnet to push against magnet you're fitting into the hole, using the opposite polarity to your advantage, Once the larger magnet is flush against the surface, you are safe to glue-in your magnet and have the perfect surface for your magnets to snap on to!

   
Made in gb
Screaming Banshee


Cardiff, United Kingdom

Einhänder wrote:Another method I find useful for fitting magnet is to get a much larger magnet to push against magnet you're fitting into the hole, using the opposite polarity to your advantage, Once the larger magnet is flush against the surface, you are safe to glue-in your magnet and have the perfect surface for your magnets to snap on to!


That's rather clever, that.

Didn't I link the magnets I used, btw?

   
Made in us
Road-Raging Blood Angel Biker


your basement

no need to necro i just wanted to put this amazing tut in my subscribed

great tut by the way has turned my ever project army flexible

Reconstruction WIP


Forum Index » Painting & Modeling Tutorials
Go to: