| Author |
Message |
 |
|
|
|
|
Advert
|
Forum adverts like this one are shown to any user who is not logged in. Join us by filling out a tiny 3 field form and you will get your own, free, dakka user account which gives a good range of benefits to you:
- No adverts like this in the forums anymore.
- Times and dates in your local timezone.
- Full tracking of what you have read so you can skip to your first unread post, easily see what has changed since you last logged in, and easily see what is new at a glance.
- Email notifications for threads you want to watch closely.
- Being a part of the oldest wargaming community on the net.
If you are already a member then feel free to login now. |
|
 |
2015/03/24 14:51:57
Subject: Learning Green Stuff and Plasticard
|
|

Screamin' Stormboy
|
I was looking to get into a conversion that would prove too difficult to do with strictly GW parts so I have to turn to other tools.
Because of this I was wondering what tutorials were available to me. I would appreciate it if you guys could link any tutorials, personal pictures or general advice on using green stuff and other tools like it, along with anything on plasticard.
Specifically the plasticard would be used to make large curved shoulder pads for an ork and other metal parts. The green stuff would be used to make leather straps, a harness, and metal rings to link said pieces together. Thanks for any info you can provide!
|
Ya Avarage Finkin Man-
"Boys before toys but all my boy's toys are boys holding toys so can the toys before the boys really be boys with toys?"
-raving lunatic
  |
|
|
 |
|
2015/03/24 18:09:51
Subject: Learning Green Stuff and Plasticard
|
|

Hissing Hybrid Metamorph
|
With plasticard, draw what you want first and then cut it.
While I don't have any, just youtube both those words and tutorial, there are heaps out there.
|
|
|
|
|
|
2015/03/24 20:21:06
Subject: Re:Learning Green Stuff and Plasticard
|
|

Posts with Authority
|
There are potentially helpful sticky topics for putty here and here. Less so with plasticard... have you checked out 'The Waaagh' forum? They have a lot of plasticard experience there, especially for orky stuff.
|
|
|
|
|
|
2015/03/24 20:27:41
Subject: Learning Green Stuff and Plasticard
|
|
Legendary Master of the Chapter
|
If you are lucky you can find a plastic wholesaler around. i love getting 2x4 feet sheets of thick plastic card for under 15 bucks.  As well these in a poly propaline syringe is one of the best plastic cement i have EVER used. edit But if you are making armor type bits for regular troops you might as well pick up some tubing from evergreen in the right size and cut it out. making flat sheets into round pieces can be difficult. A trick for straps is to roll out a green stuff sheet and let it cure slightly (timing needs to be recorded i honestly dont recall and it can be different all around) then try to mold with it. it will give you less headaches.
|
|
This message was edited 1 time. Last update was at 2015/03/24 20:30:00
 Unit1126PLL wrote: Unit1126PLL wrote: Scott-S6 wrote: Scott-S6 wrote:And yet another thread is hijacked for Unit to ask for the same advice, receive the same answers and make the same excuses.
Oh my god I'm becoming martel.
Send help!
|
|
|
|
|
2015/03/24 22:47:06
Subject: Re:Learning Green Stuff and Plasticard
|
|
Infiltrating Broodlord
|
I don't know of tutorials but making Ork armour with card is pretty easy; I simply hold it above a candle, or bend it against a heated rod or similar object. Hoping to do a huge number of jaw armour plate soon for my 'ard boys.
|
|
|
|
|
|
2015/03/25 00:35:22
Subject: Re:Learning Green Stuff and Plasticard
|
|
Screamin' Stormboy
|
To give you guys a little bit of a better idea I am doing a grimskull conversion. I already have most of the bits sorted out in my head here is a decent reference pic
I need to make pieces for the shoulders, parts for his power pack, alot of his left arm (the whole thing is cybernetics incase you didnt know), the riging on his legs and the leather straps around his chest.
Anything even remotely similar would be great. I have a degree of natural artistic talent but I haven't worked with green stuff or plasticard before.
BTW thanks for all the replies good stuff so far!
|
|
This message was edited 1 time. Last update was at 2015/03/25 00:39:52
Ya Avarage Finkin Man-
"Boys before toys but all my boy's toys are boys holding toys so can the toys before the boys really be boys with toys?"
-raving lunatic
|
|
|
|
|
2015/03/25 05:44:36
Subject: Re:Learning Green Stuff and Plasticard
|
|
Sinewy Scourge
|
 Yaavaragefinkinman wrote: Yaavaragefinkinman wrote:To give you guys a little bit of a better idea I am doing a grimskull conversion. I already have most of the bits sorted out in my head here is a decent reference pic
I need to make pieces for the shoulders, parts for his power pack, alot of his left arm (the whole thing is cybernetics incase you didnt know), the riging on his legs and the leather straps around his chest.
Anything even remotely similar would be great. I have a degree of natural artistic talent but I haven't worked with green stuff or plasticard before.
BTW thanks for all the replies good stuff so far!
Fine, but be ready to have him wrecked by a single space marine with no helmet.
More seriously, plasticard is pretty straight forward and easy to work with. Basically, draw what you want and cut it. It might take something bigger than an exacto though, cause in my experience exactos tend to bend and not cut straight.
As for the green stuff, thats a little trickier. The key is to be able to shape it without getting fingerprints all over it. I would suggest buying a set of dental tools, because they are perfect for the job. In addition, you can use Vaseline to some extend to stop the fingerprinting. Finally, GS wont really work for anything big, because it wont dry right and might continue to be malleable. In the case that you want to do something bigger than a small detail with GS, you might want to consider using a frame, such as a paper clip or something, to put the GS over.
Thats about all I got for you. Good Luck!
|
"Whoever said the pen is mightier than the sword obviously never encountered automatic weapons."
 |
|
|
|
|
2015/03/25 18:29:23
Subject: Re:Learning Green Stuff and Plasticard
|
|
Gangly Grot Rebel
|
Try to find shapes that are similar to ones you want to achieve. If you look for shoulder pads - why not to use tubes?
http://www.ebay.co.uk/itm/Styrene-Strip-Round-Tube-Section-for-Architecture-Model-Evergreen-Plastruct-/291352664327?pt=LH_DefaultDomain_3&var=&hash=item43d5f8d907
You can make other components straight from GS and apply them when said components are cured. just sculpt them on something curved. You can also make casts using Instamold - which is really good method of transferring textures, small elements and details.
Also - probably most important - practice. You will learn that material and how to work with it. Soon, I can bet you will give your advices out to people.
Few general tips for GS:
- Keep your tools and hands moist all the time.
- Create body posture scaffolding from wire and build GS up.
- These are the best tools for GS ...and GS dedicated xacto of course:
http://www.ebay.co.uk/itm/Pack-of-4-Ball-Stylus-Polymer-Clay-Pottery-Porcelain-Sculpting-Modeling-Tools-/400337621335?pt=LH_DefaultDomain_3&hash=item5d35fb5157
Oh, and by the way... I did something similar  Loads of fun when building it
(third time I post this pic - sorry...)
 http://imgur.com/a/XJ1wS
Good Luck!
|
|
|
|
|
|
2015/03/25 18:30:55
Subject: Learning Green Stuff and Plasticard
|
|
Legendary Master of the Chapter
|
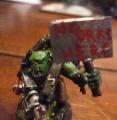
Holy Gak you made that?
|
Unit1126PLL wrote: Scott-S6 wrote:And yet another thread is hijacked for Unit to ask for the same advice, receive the same answers and make the same excuses.
Oh my god I'm becoming martel.
Send help!
|
|
|
|
|
2015/03/25 18:32:13
Subject: Learning Green Stuff and Plasticard
|
|
Gangly Grot Rebel
|
Yup. I never thought I can. Until I have my go at this.
White: Plasticard
Green: GS
Gray: GW bits.
|
|
|
|
|
|
2015/03/25 20:14:02
Subject: Re:Learning Green Stuff and Plasticard
|
|
Gargantuan Gargant
|
 Jollydevil wrote: Jollydevil wrote:More seriously, plasticard is pretty straight forward and easy to work with. Basically, draw what you want and cut it. It might take something bigger than an exacto though, cause in my experience exactos tend to bend and not cut straight.
While there's a bit of flex in the trusty old #11, there's not that much. Ease up on your pressure and make multiple passes, if necessary. The fixed (removable, but solidly clamped) blade of an X-acto type craft knife is, if anything, actually more stable than the chunkier Stanley-style retractable blade knives, even if their blades are larger and thicker. Remember, the more pressure you apply, the easier it is to accidentally force yourself out of line.
With styrene, it's not necessary - nor even advisable, in many cases - to cut all the way through. Thin stuff can be safely sheared with regular household scissors, but most of us adhere to the 'score and snap' method for the bulk of our plasticard cutting. It's as simple as it sounds: A gentle pass or two with a knife to score the surface (1/3 of the thickness is plenty), then flex the sheet and it will snap cleanly along your scored line. Unless you're shearing, scribing, or sawing through, snapping will actually give you the cleanest edge - it's better than cutting the whole thickness with a knife, which has to push material out of the way to work. We use the same technique in the frame shop to cut 1/8" thick acrylic glazing and it works right down to the paper-thin .010" stuff.
|
The Dreadnote wrote:But the Emperor already has a shrine, in the form of your local Games Workshop. You honour him by sacrificing your money to the plastic effigies of his warriors. In time, your devotion will be rewarded with the gift of having even more effigies to worship.
|
|
|
|
|
2015/03/25 20:38:53
Subject: Re:Learning Green Stuff and Plasticard
|
|
Posts with Authority
|
I like dental tools for most of my own sculpting - look for the top-quality smooth, fine-edged ones in ebay stores or dental retailers, with names like zahle, lecron, hylin or vehe. They're still pretty cheap, around a couple of pounds or dollars each. I'll also point out colour and clay shapers, which are 'paintbrushes' with silicon-rubber-tipped heads. These can be quite useful for smoothing out nicks and fingerprints on the surface of putty, near the end of a sculpting session. Black-tipped clay shapers are the firmest type. I like a size 0 'round cup' clay shaper for most smoothing, backed up by a size 0 'taper' and a size 2 'round cup' grey colour shaper.
Other useful tools are more general items: I also use a couple of different sizes and shapes of hobby knife blades and needles for odd jobs, and ball-headed paper embossers, similar to the tools Boredbeard pointed out.
On that note, Boredbeard: blimey! 
Jollydevil wrote:Finally, GS wont really work for anything big, because it wont dry right and might continue to be malleable.
Wait, what?
|
|
This message was edited 1 time. Last update was at 2015/03/25 20:39:28
|
|
|
|
|
2015/03/25 21:28:55
Subject: Re:Learning Green Stuff and Plasticard
|
|
Sinewy Scourge
|
 Vermis wrote: Vermis wrote:I like dental tools for most of my own sculpting - look for the top-quality smooth, fine-edged ones in ebay stores or dental retailers, with names like zahle, lecron, hylin or vehe. They're still pretty cheap, around a couple of pounds or dollars each. I'll also point out colour and clay shapers, which are 'paintbrushes' with silicon-rubber-tipped heads. These can be quite useful for smoothing out nicks and fingerprints on the surface of putty, near the end of a sculpting session. Black-tipped clay shapers are the firmest type. I like a size 0 'round cup' clay shaper for most smoothing, backed up by a size 0 'taper' and a size 2 'round cup' grey colour shaper.
Other useful tools are more general items: I also use a couple of different sizes and shapes of hobby knife blades and needles for odd jobs, and ball-headed paper embossers, similar to the tools Boredbeard pointed out.
On that note, Boredbeard: blimey!
Jollydevil wrote:Finally, GS wont really work for anything big, because it wont dry right and might continue to be malleable.
Wait, what?
Straight lumbs of GS? Ive always had problems with large portions of it drying weird and/or not drying at all.
|
"Whoever said the pen is mightier than the sword obviously never encountered automatic weapons."
|
|
|
|
|
2015/03/25 21:40:59
Subject: Re:Learning Green Stuff and Plasticard
|
|
Gangly Grot Rebel
|
Jollydevil wrote: Vermis wrote:I like dental tools for most of my own sculpting - look for the top-quality smooth, fine-edged ones in ebay stores or dental retailers, with names like zahle, lecron, hylin or vehe. They're still pretty cheap, around a couple of pounds or dollars each. I'll also point out colour and clay shapers, which are 'paintbrushes' with silicon-rubber-tipped heads. These can be quite useful for smoothing out nicks and fingerprints on the surface of putty, near the end of a sculpting session. Black-tipped clay shapers are the firmest type. I like a size 0 'round cup' clay shaper for most smoothing, backed up by a size 0 'taper' and a size 2 'round cup' grey colour shaper.
Other useful tools are more general items: I also use a couple of different sizes and shapes of hobby knife blades and needles for odd jobs, and ball-headed paper embossers, similar to the tools Boredbeard pointed out.
On that note, Boredbeard: blimey!
Jollydevil wrote:Finally, GS wont really work for anything big, because it wont dry right and might continue to be malleable.
Wait, what?
Straight lumbs of GS? Ive always had problems with large portions of it drying weird and/or not drying at all.
Layering is the key. ...and armature.
Small lumps for general definition. Flat flakes for adding to that definition - usually multiple layers (wait until it cures).
Last, thin layer that will allow texturing. And details.
You will not believe how large sculpts you can make 
|
|
|
|
|
|
2015/03/25 23:02:01
Subject: Learning Green Stuff and Plasticard
|
|
Posts with Authority
|
First I've heard of it. Might have something to do with insufficient mixing or old, stale putty. Large amounts apparently take a little longer to cure as well (more polymer chains to react) but aside from the problems I just mentioned, I don't think it should cause putty to fail to cure altogether.
|
|
|
|
|
|
2015/03/26 07:15:57
Subject: Learning Green Stuff and Plasticard
|
|
Grizzled Space Wolves Great Wolf
|
Vermis wrote:First I've heard of it. Might have something to do with insufficient mixing or old, stale putty. Large amounts apparently take a little longer to cure as well (more polymer chains to react) but aside from the problems I just mentioned, I don't think it should cause putty to fail to cure altogether.
If greenstuff cures slower in bulk it would have to be the only epoxy resin I've ever heard of to do that. Almost all epoxy resins cure faster when you have larger amounts. They don't cure from the outside in, so having "more polymer chains" is irrelevant, the number of molecules per unit volume is the same. The reason bulk resin almost always cures faster than small amounts of resin is because heat is released during the reaction and that heat in turn makes it react faster, which releases even more heat. The larger the bulk, the less heat is dissipated away from the resin, so the faster it reacts. I don't imagine GS would release significant heat because it does cure rather slowly anyway, but I'd be rather surprised if it cures slower the more you have. The only reason I can imagine Jollydevil had issues is if it wasn't mixed properly. I haven't made anything HUGE from GS, but the larger things I have made (a Treeman is probably the biggest) I didn't notice any sorts of problems with the larger blobs not curing quickly or not curing properly. Of course you'll still have to layer it to get good detail as boredbeard said, if you just have a giant blob of the stuff it's very hard to manipulate.
|
|
This message was edited 1 time. Last update was at 2015/03/26 07:17:02
|
|
|
|
|
2015/03/26 09:50:24
Subject: Re:Learning Green Stuff and Plasticard
|
|
Gangly Grot Rebel
|
Just one more thing: If I really want big chunk to be done quickly and in one piece - Milliput is my choice.
Recently I've made a spheroid (50mm x50mm 50mm, time 24h, almost whole portion of it) without any reinforcement inside and it is perfectly hard and ready for carving.

With minimal armature you can do any general shape, and it is much better to sand than GS.
Cheers.
|
|
|
|
|
|
2015/03/26 13:08:50
Subject: Learning Green Stuff and Plasticard
|
|
Posts with Authority
|
Apologies Skinky, I had a momentary lapse in thinken gude.  Got mixed up with the anecdotes I've heard of mass of putty affecting curing rates, though that should illustrate how few problems I've had with that kind of thing.
And I agree: most stories I've heard of putty not curing properly, including one a few days ago on this board, are somehow related to incomplete mixing. It is harder to do with a big wodge of green stuff, though it can be helped by warming up the two components just a little, especially by warming up your hands. Warmer GS is a lot softer and easier to mix, and it helps if your fingers aren't cold and stiff either. And of course, just mix it for longer.
I also agree about using milliput or other clay-like putties - or even oven-bake polymer clay - for at least bulking out larger sculpts. Partly because they're generally softer, which again helps with mixing and shaping large amounts, and partly because they're usually a lot cheaper than green stuff. 
|
|
This message was edited 4 times. Last update was at 2015/03/26 13:15:29
|
|
|
|
|
2015/04/28 01:14:04
Subject: Re:Learning Green Stuff and Plasticard
|
|
Screamin' Stormboy
|
Sorry for necro but does anyone have any guides they could link or tips for cutting circles (not lopsided crap nice circles) into plasticard both tubes and sheets?
|
Ya Avarage Finkin Man-
"Boys before toys but all my boy's toys are boys holding toys so can the toys before the boys really be boys with toys?"
-raving lunatic
|
|
|
|
|
2015/04/28 04:53:10
Subject: Learning Green Stuff and Plasticard
|
|
Incorporating Wet-Blending
|
|
|
|
|
|
|
|


