| Author |
Message |
 |
|
|
|
|
Advert
|
Forum adverts like this one are shown to any user who is not logged in. Join us by filling out a tiny 3 field form and you will get your own, free, dakka user account which gives a good range of benefits to you:
- No adverts like this in the forums anymore.
- Times and dates in your local timezone.
- Full tracking of what you have read so you can skip to your first unread post, easily see what has changed since you last logged in, and easily see what is new at a glance.
- Email notifications for threads you want to watch closely.
- Being a part of the oldest wargaming community on the net.
If you are already a member then feel free to login now. |
|
 |
2016/08/20 10:50:37
Subject: Fun with magnets - Imperial Knight
|
|

Focused Dark Angels Land Raider Pilot
The grim darkness of far Fenland
|
I've been messing about with magnets, so thought I'd share my experiences here!
I magnetised my Eldar Windriders a while ago and posted about it in my wordpress blog, so I'll start by putting that here. I'll shortly be following up with my Predator - currently about 25 magents on him!
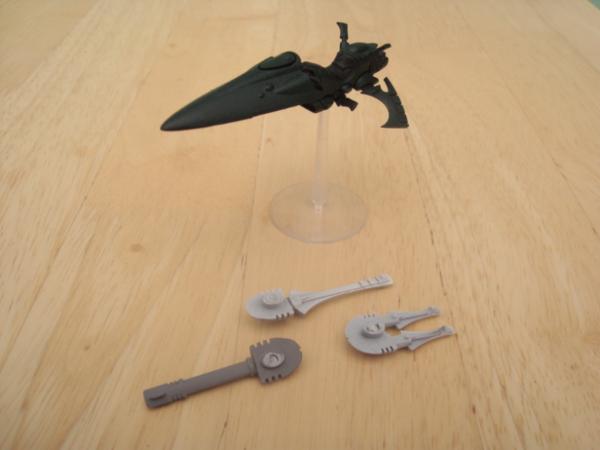
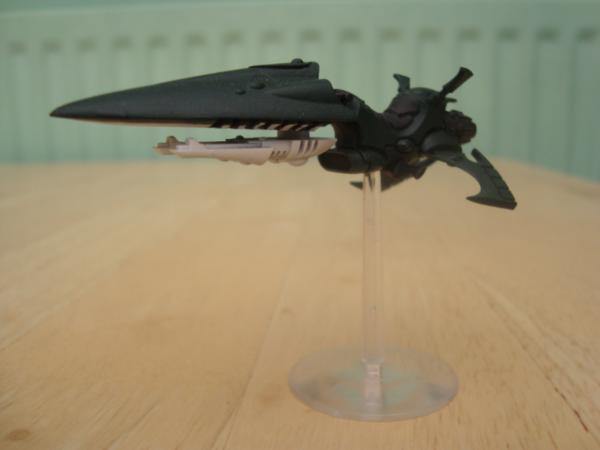
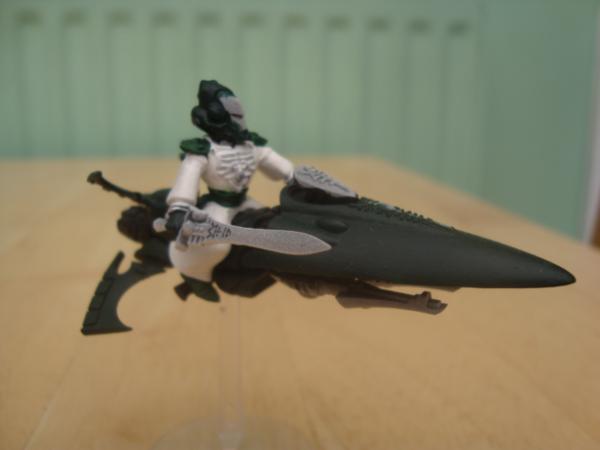
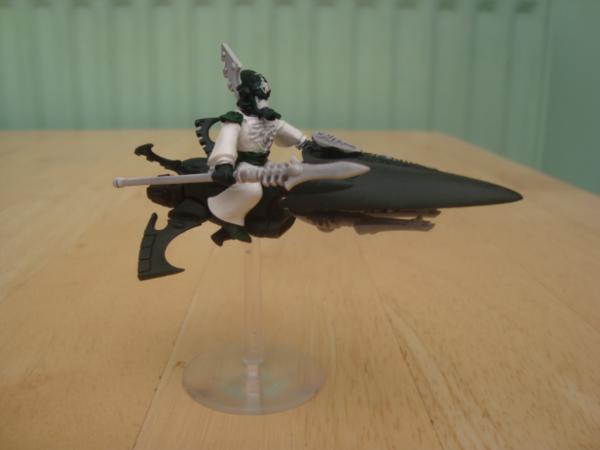
So I’ve got an old (2nd ed) Jetbike that I’ve stripped ready to re-paint. It previously had a shuriken cannon, but I now want to be able to swap the rider between a guardian/windrider and an Autarch, which means I need to be able to choose between the shuricannon and the twin-linked shuriken catapults (Autarch isn’t allowed the cannon).
I’ve also only got one pair of legs, but two bodies for the rider, so I’d like to be able to swap the body between windrider and Autarch.
Enter the magnets!
If I stick magnets in the top of the legs and the bottom of the bodies – where you’d glue them normally – I should be able to swap them over at will, and still have something that looks right and doesn’t fall apart mid-battle. I can also do the same with the top and bottom parts of the jetbike chassis, which between them hold the weapon of choice.
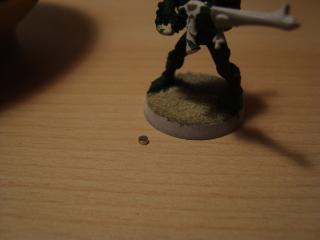
There’s not a lot of space, so I’ve got some 2mm x 1mm magnets. I got 50 for about £2 on eBay. This pic shows them next to a guardian to give some scale. They’re surprisingly strong magnets for the size!
This is the top and bottom of the jetbike chassis. I need a small hole in both, so I can stick a magnet in them both to hold them together.
It took some precise drilling, first with a slightly smaller bit (1.6mm I think), then a 2mm bit, to get the holes. Keep drilling a little and test fitting, because one of mine has gone a little bit too deep. Not too much of a problem, but better avoided if possible!
You can see where the magnets have gone.
I started by gluing in one of the magnets, then ‘test fitted’ the second magnet to the first. You don’t want to glue in both magnets only to find the polarities are the wrong way round! Whilst the second magnet was test fitted to the first I marked the visible side of the second magnet (spot of paint, marker pen etc). This marked side is the side I’ll be gluing into the other hole (not as easy as it sounds – too small for chubby fingers, but my tweezers are metal, so the magnet doesn’t want to let go!). So I glued in the second magnet and done – a magnetised model!
You can see here it's just a simple 2mm hole in the top of the legs and bottom of the torso. It's easy to swap them over now.
|
|
This message was edited 3 times. Last update was at 2018/10/13 18:59:19
|
|
|
 |
|
2016/08/20 11:15:26
Subject: Fun with magnets - Eldar Jetbikes
|
|

The Marine Standing Behind Marneus Calgar
|
Always god to see more how-to tutorials. Even if modding the old bikes is soon to be a lost art.
When I was putting cannons on my bikes, I never had the official ones, so I needed to chop and glue. When I was modding my second vyper, the new bikes were out, so I just made it so it could take those guns.
2mm magnets are my bread and butter. I use them for almost everything. I think they might be closer to 2mm thick as well, not 1mm. Plenty strong for the stuff they need to do.
|
|
|
|
|
|
2016/08/20 19:42:26
Subject: Fun with magnets - Eldar Jetbikes
|
|
Focused Dark Angels Land Raider Pilot
The grim darkness of far Fenland
|
 Nevelon wrote: Nevelon wrote:Always god to see more how-to tutorials. Even if modding the old bikes is soon to be a lost art.
When I was putting cannons on my bikes, I never had the official ones, so I needed to chop and glue. When I was modding my second vyper, the new bikes were out, so I just made it so it could take those guns.
2mm magnets are my bread and butter. I use them for almost everything. I think they might be closer to 2mm thick as well, not 1mm. Plenty strong for the stuff they need to do.
Yeah, I've recently bought another 250 2mm magnets, and 50 4mm ones for bigger things like tanks. Can never use too many magnets!!  Automatically Appended Next Post: Automatically Appended Next Post: After doing my old skool jetbike I got some more jetbikes - the current ones - and I wanted to be able to swap the guns around. They all come with twin-linked shuriken catapults, shuriken cannons and scatter lasers, so I want to be able to easily swap these depending on my army list. I’ve also got a warlock/farseer, so I want to be able to swap heads and their right arm (singing spear or witchblade).
This has been pretty easy. All the guns attach easily with a little nubbin that’s the perfect size for 2mm magnets. I just drilled out a hole on each gun and the jetbike’s chassis, and trimmed off a little of the nubbin and that’s it – swappable guns!

The farseer’s neck is also the perfect size for the magnets, so again just some simple drilling and I can easily swap between farseer and warlock.

The farseer’s arm was even easier – it’s such a snug fit that it doesn’t even need magnets. I can just swap them over without glue or magnets. Perfect!
Warlock with witchblade...
Or Farseer with singing spear...
|
|
This message was edited 1 time. Last update was at 2016/08/20 20:09:18
|
|
|
|
|
2016/08/28 08:53:02
Subject: Re:Fun with magnets - Eldar Jetbikes
|
|
Focused Dark Angels Land Raider Pilot
The grim darkness of far Fenland
|
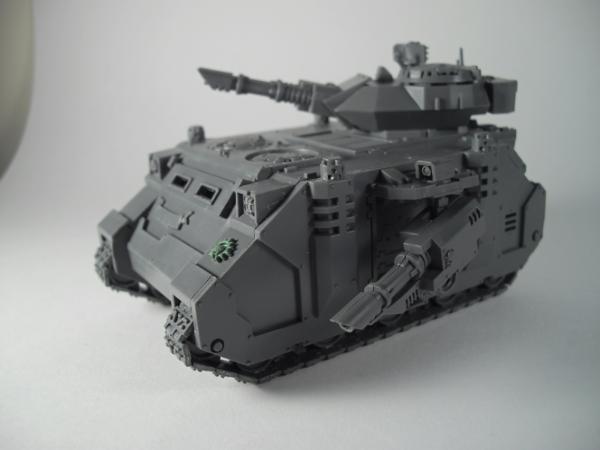
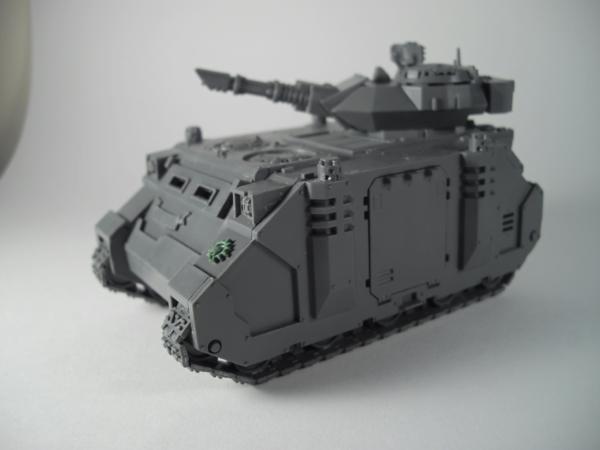
Next up, magnetising a predator.
This is the finished result, containing about 25 magnets.
Predator:
Razorback:
Rhino:
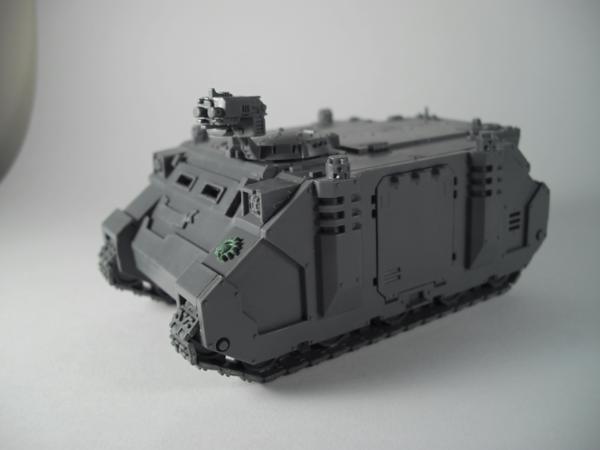
As you can see, I can add/remove sponsons and the turret, and switch which weapons are used. When I get a hunter/stalker kit, it comes with both turret weapons. So I should be able to use the predator for the spare one.
I started with the side sponsons. I needed to be able to swap out the predator sponsors, or the rhino side hatches, so needed a couple of magnets on the hull, and some matching ones on the sponsons and hatches.
Hull:
I added a few small pieces of plasticard on which to mount the mags. I needed to do this before fitting the inner side of the hull:
The side sponson is deep - it sits right in the hole in the side, but the hatch is quite thin so sits a long way off the inside where the mags are. So I had to mount the mags on the hatch on bits of sprue.

I was going to go with mags in each corner, but actually they're pretty strong and 2 is easily enough. Probably one in the centre would have done.
Pro tip: It's a pain getting the right amount of superglue on the mags. They're tiny and you don't want to get glue everywhere. I put superglue onto the tip of a small needle and just dab that onto the mag. That seems to give just the right amount of glue.
Next time on Fun with Magnets - swapping out the top hatch/turret mount.
|
|
|
|
|
|
2016/09/04 09:44:37
Subject: Re:Fun with magnets - Space Marine Predator
|
|
Focused Dark Angels Land Raider Pilot
The grim darkness of far Fenland
|
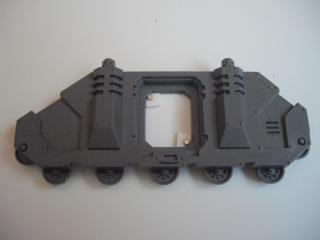
For the turret, I wanted to keep it so it can be rotated 360 degrees, but be able to swap the weapon between the twin-linked lascannon or the autocannon. I also wanted to be able to remove the turret completely and use the tank as a rhino.
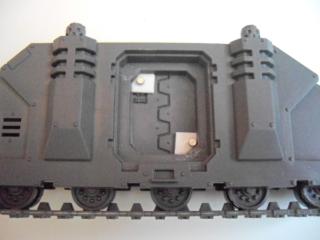
So the first step was to magnetise the rhino hatches/turret mount. There's not a lot of space on the little ridge the hatches sit on, so I've stuck 2 pieces of plasticard on the inside of the hull and stuck the magnets onto these.
This also means when the hatches/mount are put in place, the magnets are flush. If I'd stuck the magnets on the ridge I'd have needed to do some drilling.
Obviously, we also need magnets on the underside of the hatches/mount, so that required a little drilling. Not that clear on the hatches in this pic, but you can see it on the mount.
Pro tip: it's really, really irritating when you've carefully drilled out the holes, twice stuck the magnet to your thumb before eventually getting the magnet to glue in place - only to put the two magnetised pieces together to find they repel each other! So, once one is glued in place, test fit the second magnet to the first. Mark the side of the second magnet that you can see (marker pen, spot of paint etc) and this is where you should be gluing.
You can now happily swap between hatches and mount - although the hatches aren't quite as secure as I'd like, so maybe I'll pop a second magnet on each one towards the middle of the hull next time - so there are two magnets on each hatch, at opposite corners. I'm just going to leave this one - it's not like they're fighting gravity.
Eventually I want to also be able to use this as a hunter/stalker, but not sure if it uses a different turret mount. But it doesn't matter, I can now just swap as necessary.
So that allows us to swap between turret or rhino hatch. Now we need to consider the gun in the turret. The predator has a twin-linked lascannon, or an autocannon. I wanted to maintain the pivoting action of the weapon, which is done by just pinching the pivot points of the gun between the top and bottom half of the turret. So I needed to magnetise the turret halves.
The back was easy. I used 4mm magnets for a little more strength. The bottom one just went straight on, but the top one needed a small piece of sprue to raise it up to be close to the other magnet.
The front ones were more tricky. There wasn't really anywhere to place them, and the angled and small space prevented me from just sticking some sprue in. In the end I put some plasticard in to give two sides at right angles. The magnets then stick on their side only. It's not the most secure thing, and one side didn't work at all. Fortunately, it seems one pair of magnets at the front is sufficient. Maybe next time I'd just build up an area with green stuff to glue the magnets to.
So now I can just pull the two halves of the turret apart, swap the gun, and pop them back together.
One last thing I did with the turret was to make the little radar thing and the hunter killer missile swappable. Too small for mags, I just put a little pin in the turret. Then the radar and missile can just slide onto the pin. You can see them swapped over on the pics above. The pin below isn't that clear - it's pretty small! I just use a cut up paper clip for pins.
Next time on Fun with Magnets - the storm bolter.
|
|
|
|
|
|
2016/09/04 09:54:49
Subject: Fun with magnets - Space Marine Predator
|
|
Pious Palatine
|
Cool. Does the Stormbolter and flat panel just pop out for the switch between the Pred and Rhino.
I've magnetised the top of my Pred so the turrets just pull our rather than having the top bit open up, but's certainly effective magnetising the top section to open up.
EDC
|
|
|
|
|
2016/09/04 10:13:17
Subject: Fun with magnets - Space Marine Predator
|
|
Focused Dark Angels Land Raider Pilot
The grim darkness of far Fenland
|
 evildrcheese wrote: evildrcheese wrote:Cool. Does the Stormbolter and flat panel just pop out for the switch between the Pred and Rhino.
I've magnetised the top of my Pred so the turrets just pull our rather than having the top bit open up, but's certainly effective magnetising the top section to open up.
EDC
You'll just have to wait until next time to find out
(But yes, pretty much - the flat panel and storm bolter just swap over, with a mag to hold them in place)
|
|
|
|
|
|
2016/09/05 19:22:01
Subject: Re:Fun with magnets - Space Marine Predator
|
|
Focused Dark Angels Land Raider Pilot
The grim darkness of far Fenland
|
Next up is the pintle-mounted storm bolter - although pretty much spoilered by EDC 
It's a pretty simple one. I wanted to be able to add/remove the storm bolter - ideally two of them - so I could keep it WYSIWYG whether it's a rhino or predator. I tried test fitting two storm bolters, but the mounting for it is too wide to have 2 side by side. A bit odd when it's a valid option in the codex. But not to worry, I'll just stick with one on the model regardless.
I wanted it to be easy to swap over, and ideally for the storm bolter to be able to pivot round. This was done pretty easily by just sticking the magnet in the middle. A piece of plasticard on the underside of the hole in the hull holds a 4mm magnet.
Then the bottom of the flat panel has a nice little cross that's just the right size to ram a magnet into. I just needed to trim off a bit of protruding plastic as it was hitting the plasticard.
Pro tip: 2mm magnets are damned fiddly. It's really hard to hold one - even harder to hold it and keep it the right way up and apply glue. So I use a stack - about 10 or so - so I can put glue on the bottom one and put it in place by holding the stack. I just leave the stack there until the glue has dried, then pop them off.
(I don't know who I'm kidding with all this 'Pro tip' malarkey, I'm pretty much just making this up as I go, but hopefully someone will find it helpful!)
For the storm bolter I had to stick a piece of sprue into it, to get the magnet close enough to the one on the hull. But as they're both a bit bigger (both 4mm) they don't have to align perfectly to work. And the end result is that it spins perfectly!
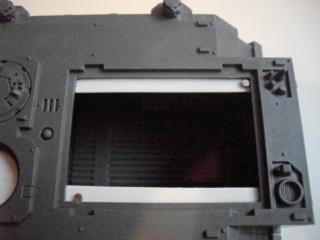
The only thing I've found a little difficult is that the flat panel is quite sunken, which makes it hard to get out. I need to use an Xacto to pop it out, which is no doubt going to damage the paint once painted up.
With storm bolter:
Without:
Next time on Fun with Magnets - swapping the guns on the side sponsons.
|
|
|
|
|
|
0002/09/05 20:18:08
Subject: Re:Fun with magnets - Space Marine Predator
|
|

Strategizing Grey Knight Chapter Master
|
Very solid build, regarding the sunken issues, you could look at gluing a small riser either on the bottom of the magnet or a gubbin on the top of the hatch which you can grab with your fingers?
|
IceAngel wrote:I must say Knightley, I am very envious of your squiggle ability. I mean, if squiggles were a tactical squad, you'd be the sergeant. If squiggles were an HQ, you'd be the special character. If squiggles were a way of life, you'd be Doctor Phil...
The Cleanest Painting blog ever!
Gitsplitta wrote:I am but a pretender... you are... the father of all squiggles. .
|
|
|
|
|
2016/09/06 06:02:55
Subject: Re:Fun with magnets - Space Marine Predator
|
|
Focused Dark Angels Land Raider Pilot
The grim darkness of far Fenland
|
 Knightley wrote: Knightley wrote:Very solid build, regarding the sunken issues, you could look at gluing a small riser either on the bottom of the magnet or a gubbin on the top of the hatch which you can grab with your fingers?
Yeah, I'd thought about putting something on the underside of the rim of the flat piece to raise it up, so the same kind of thing, I just haven't bothered yet! I'll see how often I want to change it and if it becomes a pain I can retro-fit something to change it. Not a problem doing later, so might as well wait and see if it's required (because I'm quite lazy!)
|
|
|
|
|
|
2016/09/24 19:46:42
Subject: Re:Fun with magnets - Space Marine Predator
|
|
Focused Dark Angels Land Raider Pilot
The grim darkness of far Fenland
|
Okay, so the Pred comes with either heavy bolters or lascannons on the side sponsons. I'll probably be running it with lascannons all the time, but it's good to have options!
The side hatches that house the sponsons are already magnetised to allow them to be swapped with the Rhino doors, but the kit only comes with one pair of them, and one pair of the little nubbins that the gun fits to (that allows it to pivot). So there's no choice for it, the gun halves need magnetising.
I've magnetised a bunch of stuff - this'll be easy! 
The guns are in two halves and need to be tight enough to grip the nubbin, yet still allow movement. So I figured I'd stick a mag at the front, and one at the back, and that'll do it.
But once I started looking at drilling holes for the magnets I saw that wouldn't really cut it. If the tip of the barrel isn't held together it'll splay out, but it's too small for a magnet on both sides. So I drilled smaller holes and just pinned them. But this didn't have the grip it needed to hold tight on the nubbin.
Pro tip: When drilling through something thin (like the side of a gun) with a tiny drill bit (for a pin) either stop before drilling all the way through, or don't support the back of what you're drilling with your index finger! A 0.7mm drill bit slides through the flesh of a finger no problem!! On the plus side, that's actually the worst modelling injury I've had in 25 years, which is pretty amazing.
So I ended up with a pin at the front and back to hold it together generally, then a magnet where I could fit one, to keep the two halves close together.

You can't really see the pins that well here, but can see the holes for them, and the magnet.
Looking at these photos, I've just realised both magnets are on one side! That's not right  The magnets must be stronger than the glue, so I'll have to re-stick them.
Overall, I'm not that pleased with these. It's just a little too hard to swap them over and when on they don't quite stay close up together like they would do if they were glued. But it was fun finding out 
I think that's all on the Predator.
Next time on Fun with Magnets - magnetising Vanguard Veterans. Lots and lots of weapon choices please!!
|
|
|
|
|
|
2016/09/24 20:00:44
Subject: Fun with magnets - Space Marine Predator
|
|
The Marine Standing Behind Marneus Calgar
|
When I magnetized my pred, I glued the guns together and just stuck a magnet on top. Cut the bar that goes into the guns off, and replace it with another magnet. Less fuss. Edit: Here’s a pic:
|
|
This message was edited 1 time. Last update was at 2017/01/15 12:26:29
|
|
|
|
|
2016/09/24 20:16:30
Subject: Fun with magnets - Space Marine Predator
|
|
Focused Dark Angels Land Raider Pilot
The grim darkness of far Fenland
|
Nevelon wrote:When I magnetized my pred, I glued the guns together and just stuck a magnet on top. Cut the bar that goes into the guns off, and replace it with another magnet.
Less fuss.
Oh that would have been much easier! Maybe next time...
|
|
|
|
|
|
2017/01/15 12:04:07
Subject: Re:Fun with magnets - Space Marine Predator
|
|
Focused Dark Angels Land Raider Pilot
The grim darkness of far Fenland
|
It's been a while, but here's how I magnetised my vanguard veterans. They can have loads of different weapons options, and because I've got 10 of them, I want to be able to run them as a squad of 10, or 2 squads of 5. Depending on what I'm up against, how I feel, what else is in my list etc, I might want them to have the option to shoot, or be totally close combat. Basically, I want lots of options available to me.
Enter the magnets...
Take this guy as an example, I could have him with a power fist and lightning claw:
Or with power sword and bolt pistol:
I've got a lot of models like this, where the arms detach at the shoulder. This is because the power fists and lightning claws are a single piece from shoulder to hand, whereas if you're just swapping weapon, say changing a bolt pistol for a plasma pistol, you can glue the arm and just detach at the wrist.
It's actually quite easy to do this. I generally drill a hole that's two magnets deep. One mag gets glued in the hole and the other on the shoulder. When you place the arm on, the magnet on the shoulder that sticks out disappears into the deep hole to find his magnettey friend.
As I've mentioned above, the other option is to magnetise at the wrist. This is good for swapping guns, power swords, storm shields etc. I've even magnetised at both the wrist and shoulder in some cases. This is my second serge - he's magnetised at the wrist so can have a power sword or storm shield:
He's also magnetised at the shoulder so he can have a lightning claw instead. I've also magnetised his head, so he can have a helmet and be a regular veteran, or be bare-headed as a sergeant:
This shows his arm magnetised at the wrist and shoulder. It shows the shoulder magnet a little clearer than the earlier pic too:
The technique with the wrist mags is the same - drill double depth into the arm, so one magnet is sunken and the other stands proud on the wrist of the weapon. When put together, the weapon's magnet disappears into the arm. Just watch out when drilling. I use 2mm magnets and the arms are about 2.5mm in diameter. You've got to drill very straight!
This is my serge with 4 different arm options - all glued at the shoulder and just swapable at the wrist:
I've really gone to town on these guys. I've got 10 men and I've used 59 magnets (so far - I could add more weapon swaps from my bits box!)
Next time on Fun with Magnets - Drop Pods!
|
|
|
|
|
|
2017/01/15 12:23:04
Subject: Fun with magnets - Space Marine Predator
|
|
The Marine Standing Behind Marneus Calgar
|
Did you mag the backpacks?
I’ve always found wrist mounts a massive pain to magnetize. I also use 2mm magnets, and there is very little clearance, as you said. So for the most part, I’ll just glue up whole sets of arms, gun/arm/shoulder pad and just keep everything at the shoulder. This does tend to burn through my CC arms and cool shoulderpads quickly, but I generally don’t need that many spares.
|
|
|
|
|
|
2017/01/15 19:14:39
Subject: Re:Fun with magnets - Space Marine Vanguard Veterans
|
|
Focused Dark Angels Land Raider Pilot
The grim darkness of far Fenland
|
I had no intention of using these guys without the jump packs so they're glued. Wouldn't have been too hard to mag them I wouldn't have thought.
I don't mind the wrist mags so much. Have the same thing with shoulder pads though due to the power fists and lightning claws. Fortunately you get loads in the Vanguard box!
|
|
|
|
|
|
2017/02/04 11:08:08
Subject: Re:Fun with magnets - Space Marine Vanguard Veterans
|
|

Fresh-Faced New User
|
Great work here, definitely saving this for reference later as I'm planning on magnetising a whole bunch of things in my Blood Angels 'Start Collecting' box.
Are you using the 2mmx1mm magnets in the shoulders of your vanguard as well? I didn't know if they would be strong enough to support the weight of the arm + weapon or if I'd have to go slightly bigger for this joint.
|
|
|
|
|
2017/02/04 15:03:25
Subject: Re:Fun with magnets - Space Marine Vanguard Veterans
|
|
Focused Dark Angels Land Raider Pilot
The grim darkness of far Fenland
|
Mcrat wrote:Great work here, definitely saving this for reference later as I'm planning on magnetising a whole bunch of things in my Blood Angels 'Start Collecting' box.
Are you using the 2mmx1mm magnets in the shoulders of your vanguard as well? I didn't know if they would be strong enough to support the weight of the arm + weapon or if I'd have to go slightly bigger for this joint.
Yes, it's the 2x1mm mags in the shoulders. I thought I might have to pin them to stop them just spinning on the mag and gravity forcing them to point/shoot at the floor, but actually they're okay.
|
|
|
|
|
|
2017/02/06 21:08:28
Subject: Fun with magnets - Space Marine Vanguard Veterans
|
|
Fresh-Faced New User
|
Good to know, thanks.
|
|
|
|
|
2017/02/06 21:18:34
Subject: Re:Fun with magnets - Space Marine Predator
|
|
Poxed Plague Monk
|
 Whittlesey40k wrote: Whittlesey40k wrote:
I've really gone to town on these guys. I've got 10 men and I've used 59 magnets (so far - I could add more weapon swaps from my bits box!)
59 Magnets...Dang.
I admire your dedication, sir.
I should come back and find this thread next time I'm feeling too lazy to magnetize a couple of weapon mounts.
|
|
|
|
|
2017/02/11 09:40:27
Subject: Re:Fun with magnets - Space Marine Predator
|
|
Focused Dark Angels Land Raider Pilot
The grim darkness of far Fenland
|
The Turnip Master wrote: Whittlesey40k wrote:
I've really gone to town on these guys. I've got 10 men and I've used 59 magnets (so far - I could add more weapon swaps from my bits box!)
59 Magnets...Dang.
I admire your dedication, sir.
I should come back and find this thread next time I'm feeling too lazy to magnetize a couple of weapon mounts.
Don't shy away from magnets. Magnetise everything! 
|
|
|
|
|
|
2018/10/13 18:59:01
Subject: Re:Fun with magnets - Imperial Knight
|
|
Focused Dark Angels Land Raider Pilot
The grim darkness of far Fenland
|
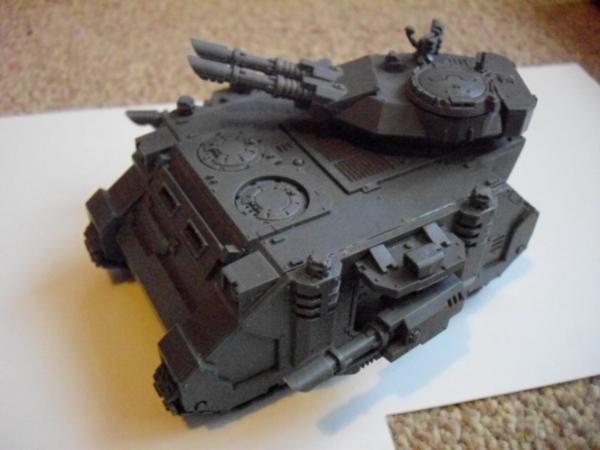
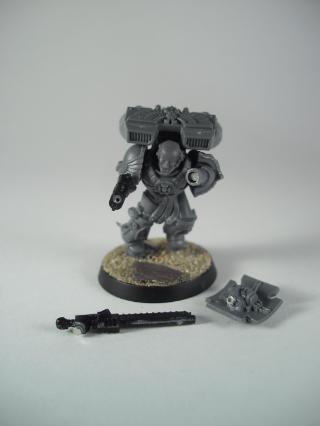
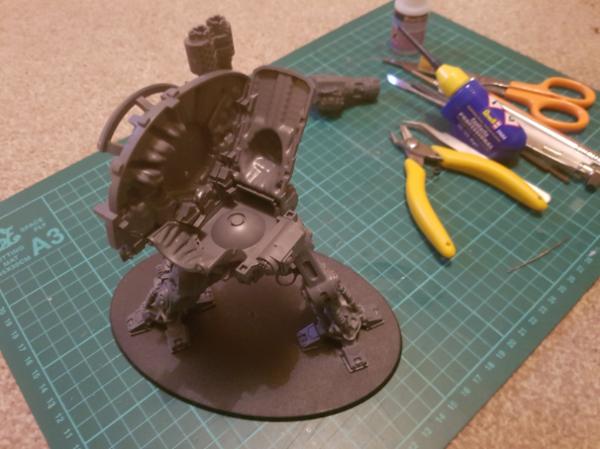
Well, I guess it's forever since I magnetised anything (or at least told anyone about it  )
I picked up Renegade and decided I'd magnetise the knight so I can have every weapon loadout - that won't take much, will it? Hey, and while I'm at it, why not light up the eyes. No problem!
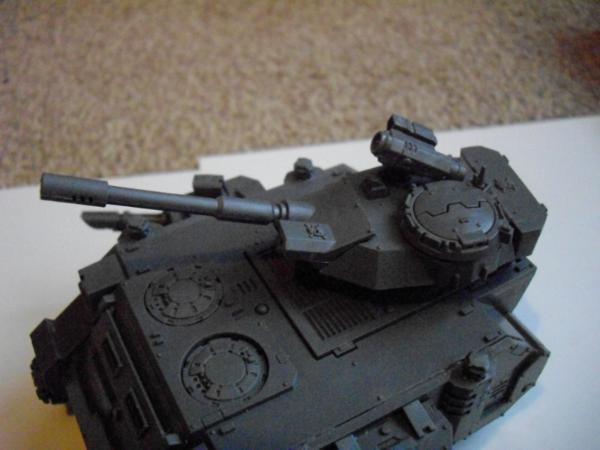
Weapon-wise you have the two arms, with a total of 5 different weapons, but two of them share the same weapon body. Then there's a choice of 2 guns for the hull-mounted weapon. And finally there's the carapace-mounted weapon - 2 choices, but one of them has two different fronts for the 2 missile types.
I actually ended up writing a spreadsheet to figure out what parts were needed more than once and what I needed to magnetise. In the end, it's not too bad. There are 2 shoulders that every weapon attaches to, so that's the main place to magnetise. Most of the weapons don't share parts, so can be assembled, but it's not all straight-forward!
My main references were: http://www.theindependentcharacters.com/forums/viewtopic.php?t=6858 and http://fromthefang.blogspot.com/2015/06/magnetising-imperial-knight-warden-kit_20.html. I took bits from both and some of my own ideas.
One of those websites also had a way of making the knight articulate at the waist. Well, I might as well go all in!
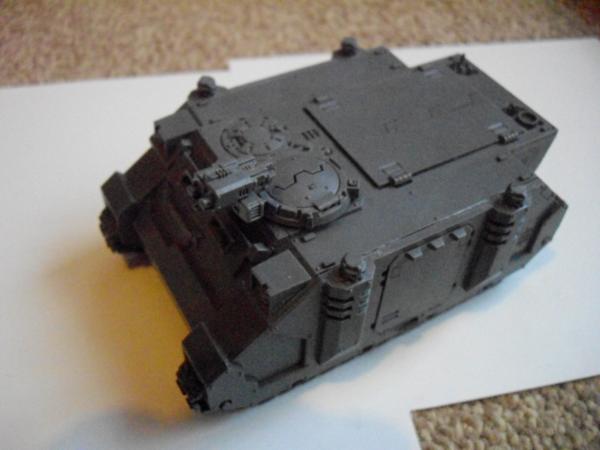
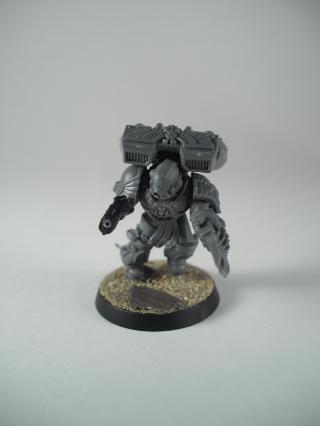
So this is where I'm at.
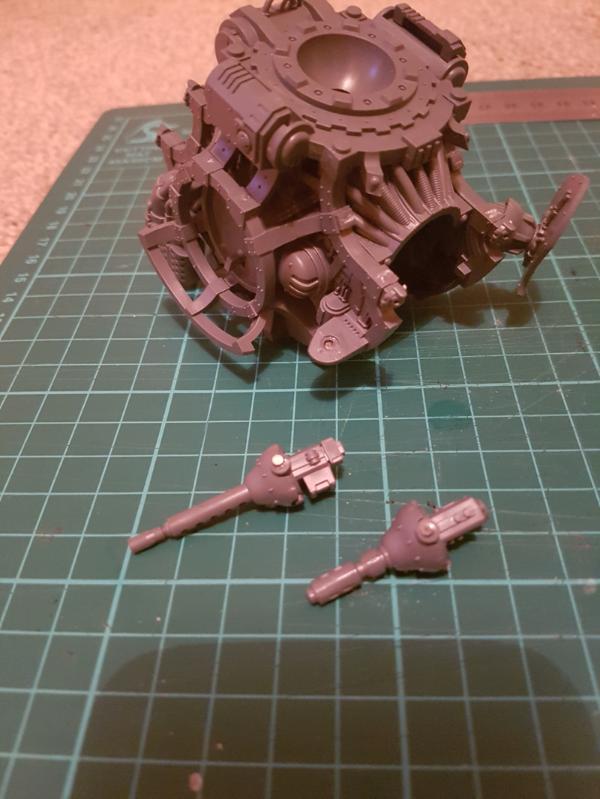
Legs and half the body assembled. I've not completed the body because I want to stick fibre optics in for the eyes. But I can't do that until after I've sprayed it. You can see right in the middle is the hole and peg that attach the legs and body together. This is where I'll stick a piece of sprue across to allow this to articulate. But again, only after spraying it.
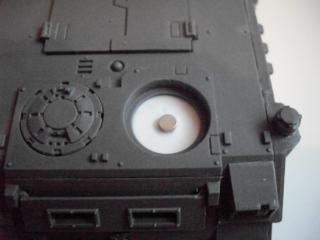
The eyes are drilled out for fibre optics. This is trialing it. As I said, it'll all get wired up once everything's sprayed.
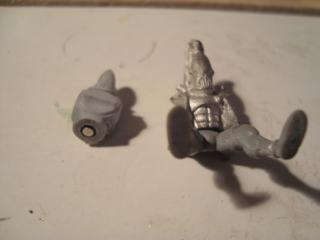
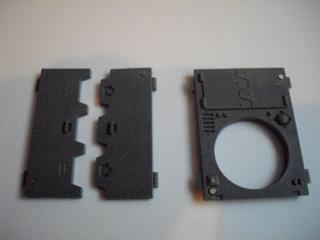
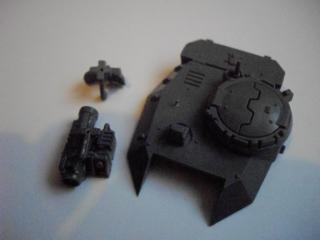
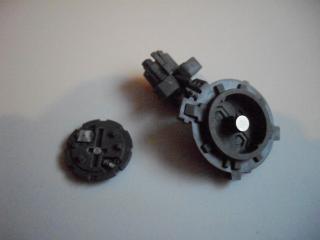
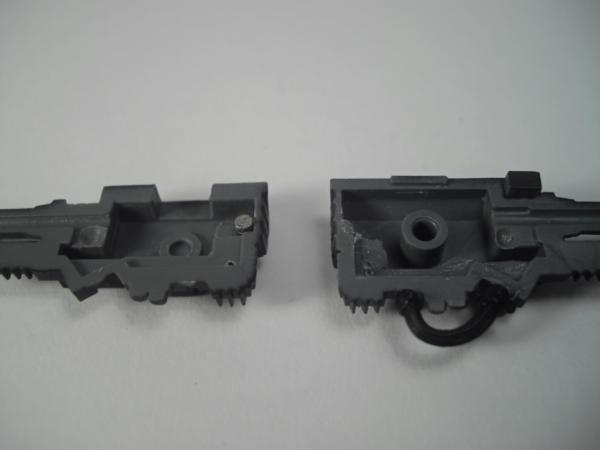
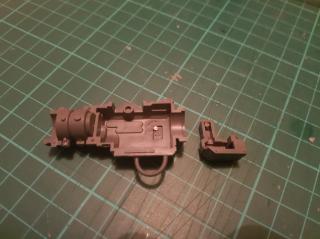
So I can get to the electronics for the eyes, change the battery and turn the switch on/off, I decided to magnetise the carapace too. It's a pretty decent fit, but a little rattly, so I've just stuck a magnet at the back to keep it in place.
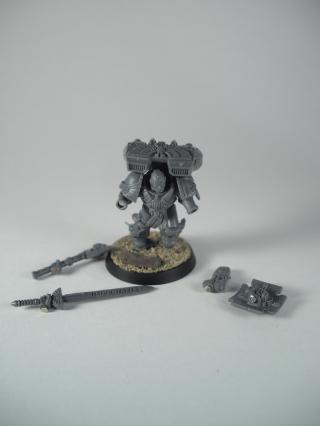
You can also see above a little sprue on the inside of the carapace top. This holds a magnet for the carapace weapon. Both carapace weapons have a nice little peg to go in a hole in the top, so it was easy to magnetise. The peg is exactly 2mm - the same size as my smallest mags! So both weapons have a mag on the peg, then the missile pod has two fronts, so they have mags too. This was tricky because there was nothing to really fix a magnet to on the inside. I ended up just sticking a blob of green stuff in there. Sort this out before assembling the missile pod or you'll never get the magnet sorted!
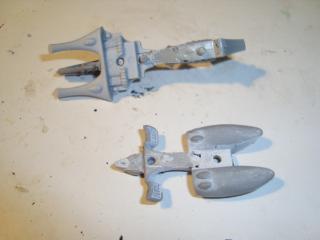
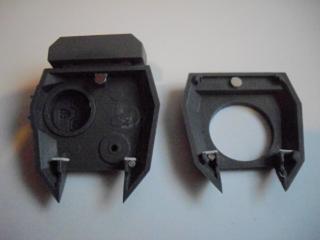
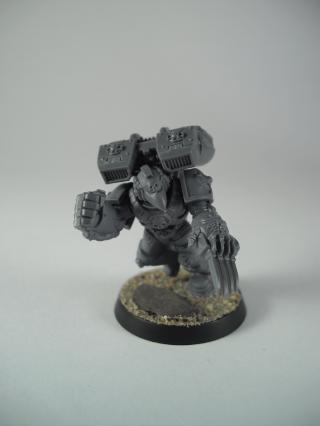
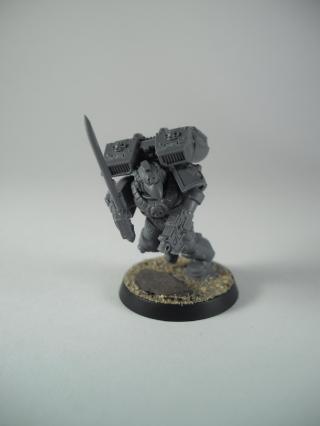
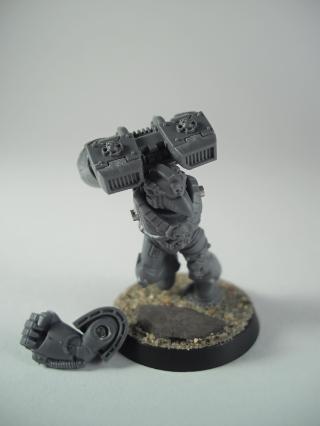
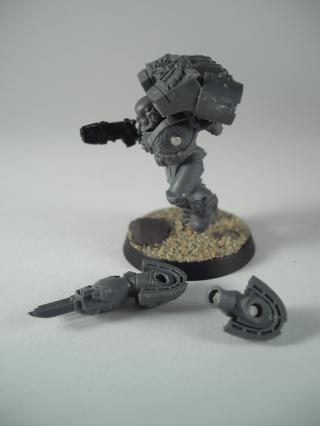
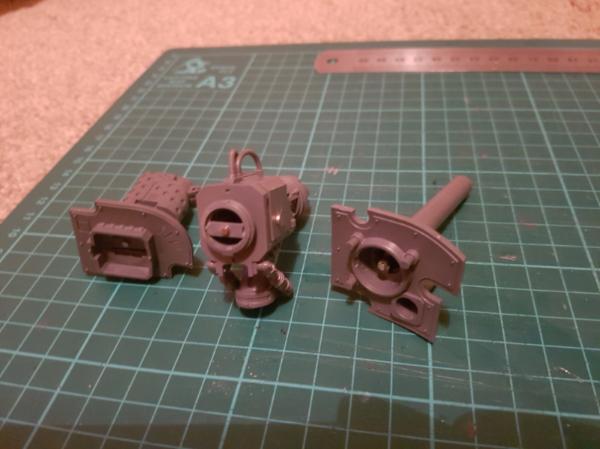
Next up are the main weapons. The two shoulders are top left. They've had the knobbley thing removed and replaced with larger (4mm) magnets. Then each of the 4 weapon bodies have mags in the holes where the shoulder fits. Bits of sprue and green stuff filled the hole before adding in the magnets. These bigger mags are fine for holding the weapons on, but they do tend to pivot themselves to end up pointing inwards - like they're a little crossed-eyed! So I might stick some small pins in to prevent that.
The thermal cannon and battle cannon share a body (top right in the pic above) and just have different barrels. Well, not just different barrels. The battle cannon also has a heavy stubber, so needs an ammo hopper that the thermal cannon doesn't want, and on the other side is the main hopper for the battle cannon or fuel canisters for the thermal cannon. So lots to change. There are also a few cables underneath that I got too lazy over and just cut them off!
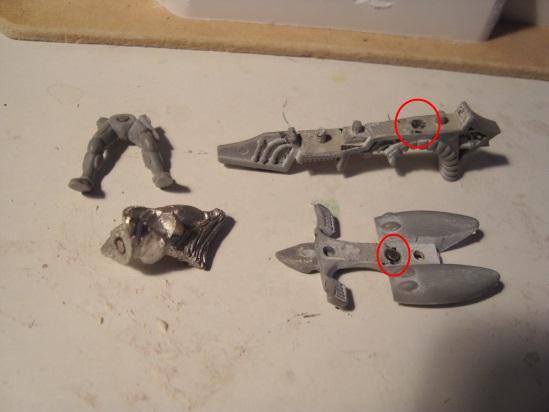
So this is the inside of the body of the weapon, with a hidden magnet so that stubber hopper can be removed without leaving an exposed magnet when using the thermal cannon.
The other side of the body has another mag, but this doesn't need to be hidden on the inside. There's either a hopper or canisters depending on which weapon barrel you're using.

Then the actual barrels need magnetising. The theory's easy, but it's a little tricky building up something to stick the mags to in order to get them in just the right place.
What's left? Oh yeah, the stubber and melta on the hull. Reasonably easy to pop mags where there should be a peg.
So all in I've got 25 magnets (I think), there'll be electronics for the fibre optics, and an articulated waist. Next step is spraying. Needs doing twice - I'm doing black then leadbelcher - but it's a bit too windy to be spraying at the moment. Might be a while before the next update!
|
|
|
|
|
|
|
|
 Dark Angels/Deathwing - just getting started!
 Space Marines -
 Eldar - Biel Tan 2000pts
 Ultramarines, 3rd Co. and friends, 16k+
  4k
4k  2k Points
 Competition Index