Hey everyone,
In our recent Kickstarter project we did some Updates showing how we sculpted stuff... I thought I'd post them here as well, for reference. So here goes...
We often get asked how our miniatures are made; so I thought I'd take this opportunity to show you all how I sculpted the badger for this project.
A lot of miniatures companies design their miniatures digitally using a computer program like Zbrush; but we're still very much old-school, and all our products are sculpted by hand. We just like messing about with putty, really! ;-)
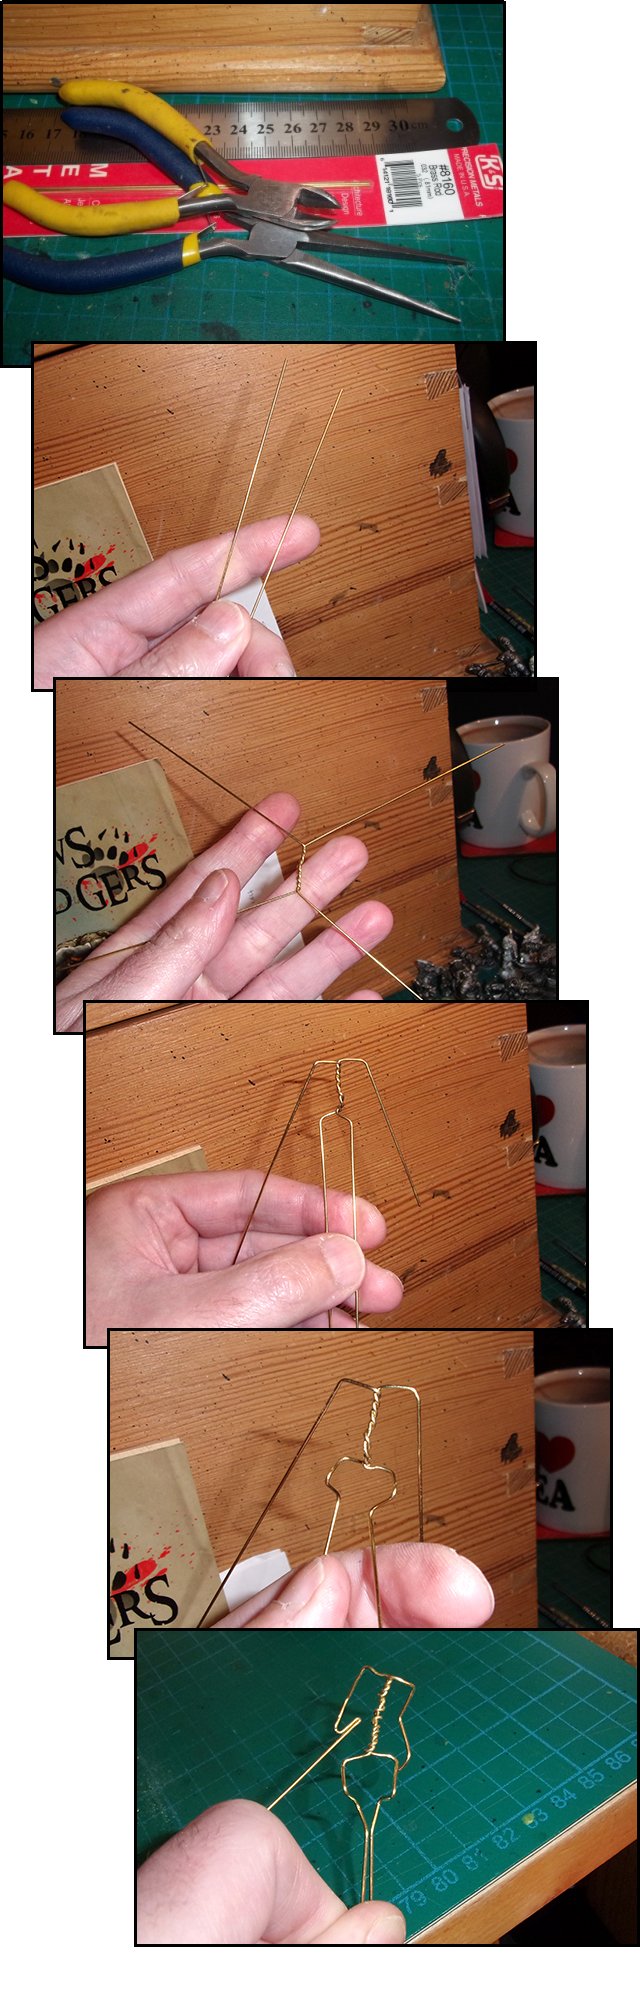
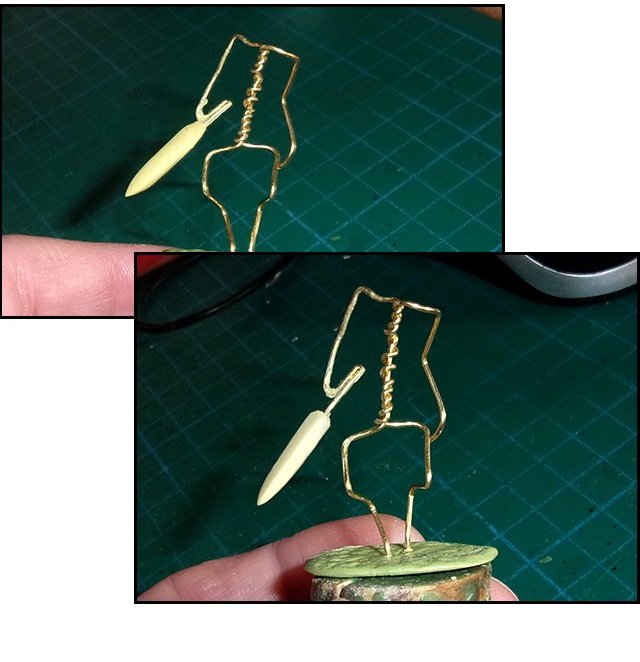
So… when you are sculpting with putty, you need something for the putty to stick to; otherwise it'll just flop about. I use an armature made from brass wire, which basically acts like a very simple skeleton for the miniature, providing support and stability for the putty. For small miniatures, I use .51mm wire, but for a larger sculpt like the badger, I use .81mm wire. It doesn't sound like much of a difference, but it is much stronger and stiffer.
I start off with some tools – the wire, a ruler, narrow pliers, and side cutters. I take two pieces of wire, both quite long, a twist them together. The twisted section will form the body of the miniature, and the rest is the limbs. Then it's just a matter of adding bends; firstly to form the shoulder and hip joints, then knee, ankle, elbow and wrist joints. Then I pose the armature; I have a rough idea in my head of the pose I want, but it often gets adjusted a bit at this point. Finally I trim the wires; leaving some extra length on one arm to become a weapon, and some extra length on the legs to hold the armature with.
 Automatically Appended Next Post:
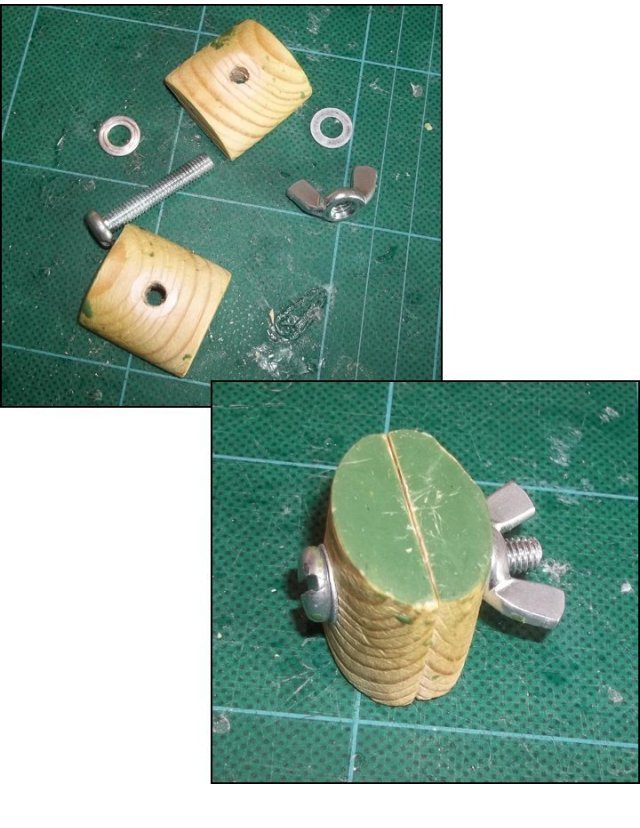
Generally armatures are stuck into a cork, to give the sculptor something to hold while they work. I've never been keen on using corks; they are very light, and I used to knock them over all the time, often damaging the sculpt. Also, I used to find it difficult to stick the armature wires into the cork without bending the armature.
So instead I made some custom armature holders. They're just two little bits of wood, sanded round, with a hole drill through. Then I use a nut and bolt to hold them together. They're ideal for sandwiching the armature wires snugly…
 Automatically Appended Next Post:
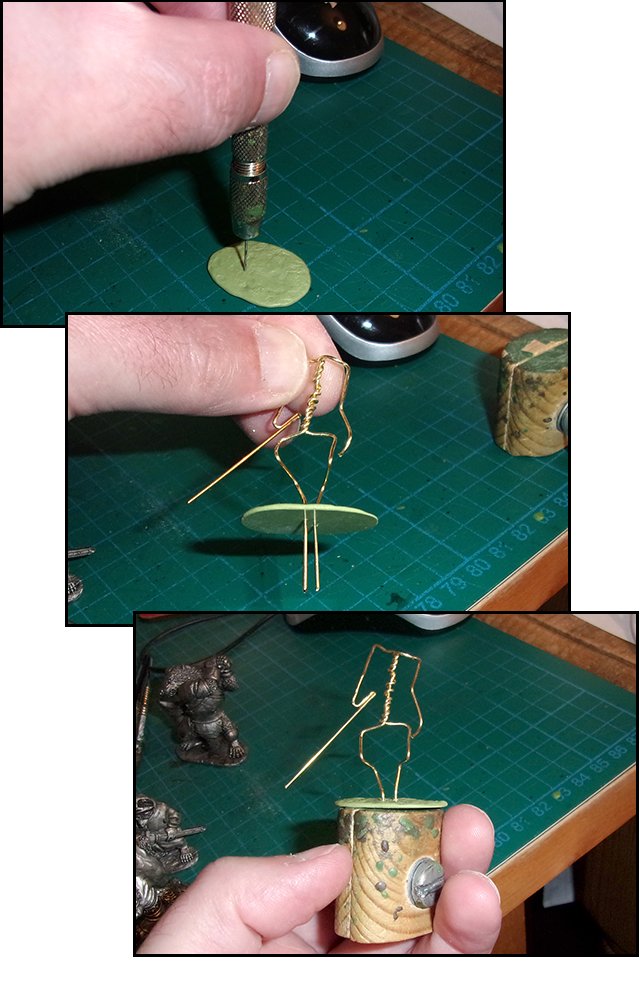
But first I added a base to the armature. The base is just a flattened piece of Milliput putty, which is a cheap epoxy putty; it's very tough, and ideal for terrain, bases, and anything that needs a sharp edge, such as weapons… more on that later!

I used a thin drill bit in a pin vise to make a couple of holes for the leg wire, then slotted the armature through. Finally I attached it to the holder.
 Automatically Appended Next Post:
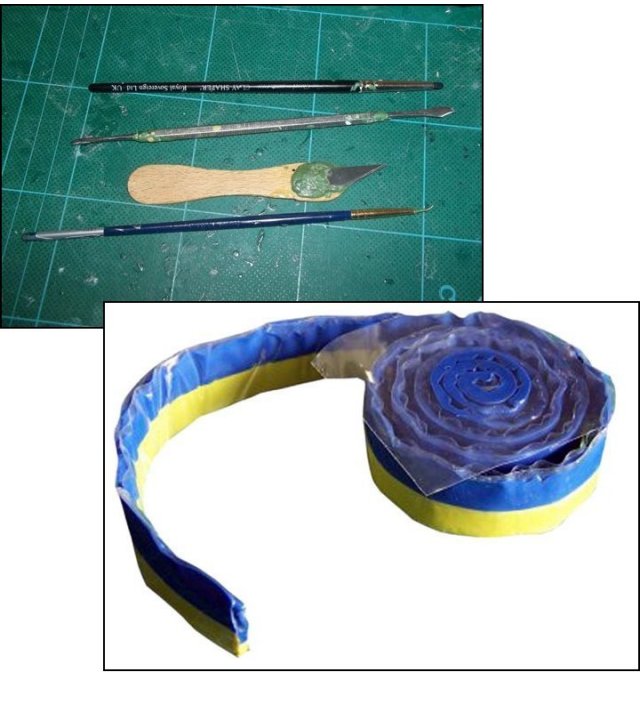
Next I sorted out my sculpting gear; a silicone-tipped Clay Shaper (I use a Royal Sovereign size 0 Chisel point mostly), a Wax carver no.5 (also called a Zahle dental tool, or an
SG dental tool), an old scalpel blade that I've dulled with sandpaper, and a bit of bent wire, filed to a point, stuck into an old paintbrush handle… all very high tech stuff! ;-)
And of course, some putty. I'll be using mostly Green Stuff (Polymeric Systems Kneadatite Yellow/Blue, to give it the full name!) but I'll also use Brown Stuff, which is very similar to be honest. I use it mostly just to make it easier to see different sections of the sculpt. I'll also be using a little more Millput (Standard Yellow-Grey) for the sword blade. (not pictured)
 Automatically Appended Next Post:
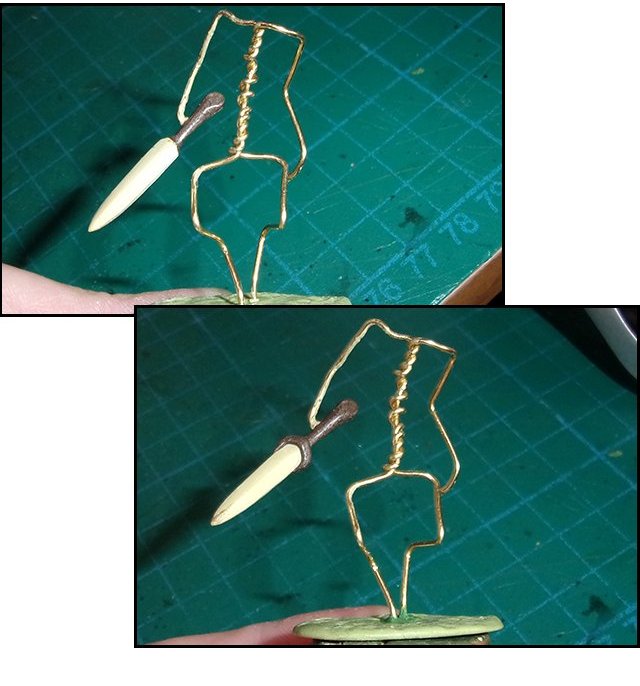
I roughly shaped some Milliput onto the wire to form a sword blade. I let this cure overnight, and the used a file to smooth and shape it.
 Automatically Appended Next Post:
Next I mixed up some Brown Stuff putty. It's supposed to be better at hard edges than Green Stuff, so is recommended for armour and weapons. I haven't really found it to be all that different to work with, but I do like being able to sculpt different parts in different colours, and it's useful for that.
I did the handle first, and smoothed it with the clay shaper. Then I added the guard to the blade. But I'd mixed up a lot more putty than I needed for the sword handle, so….
 Automatically Appended Next Post:
...I used the remaining Brown putty to make a shield, and to bulk out the head. For the shield, I have a rounded-off lump of old Milliput, and I press the Brown stuff onto it, and shape it into the shield shape. I let it cure on there, and popped it off once it was hard.
I then took a piece of bent wire, held in a pin vise, and added the left-over putty to rough in the basic shape of the badger's head, and left it to cure.
 Automatically Appended Next Post:
Once the shield was cured, I mixed up a little more Brown Stuff, and added a Fleur-
de-lys design to the front. I'm a big fan of the Fleur-
de-lys; they look quite impressive, but are actually really easy to sculpt. I'll be going into a bit more detail on sculpting them in a later Update… (I made a video! I'll post it later...)
 Automatically Appended Next Post:
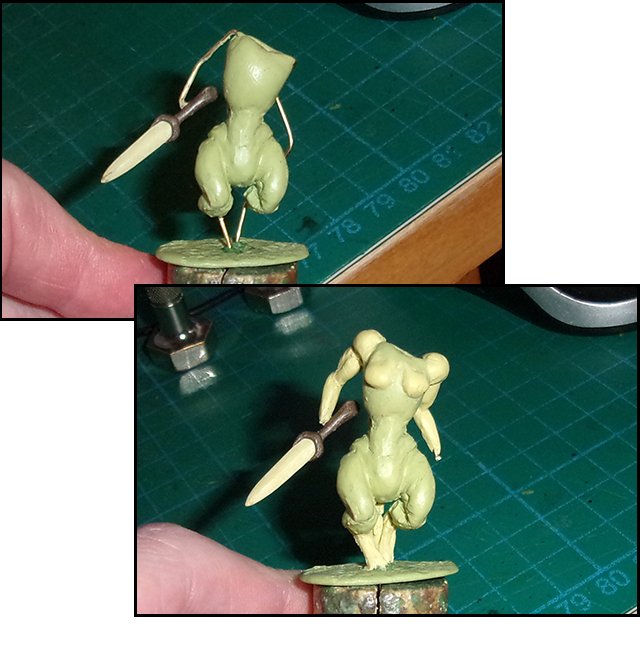
Next, I started bulking the armature out. Normally I'd use Green Stuff for this, but with a larger figure, I use Milliput – it's cheaper!
I started with the torso and legs, and let that cure for a few hours, before going back and adding arms, shoulders, breasts and feet, and let that cure too.
 Automatically Appended Next Post:
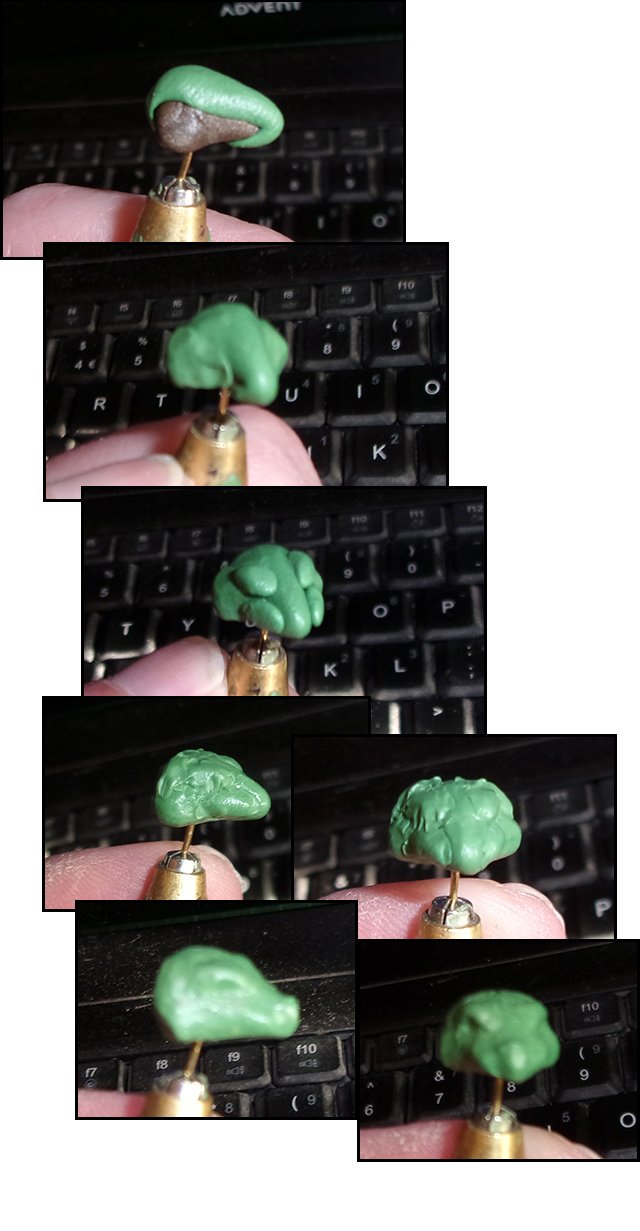
While the Milliput on the armature was curing, I got on with the head. I mixed up some Green stuff, and took the basic shape I'd made earlier, and added a long strip up the middle of the head. I added a couple of lumps of putty on each side near the back, then two smaller lumps for the cheeks and a couple for the eyebrow areas. These were then blended together, and smoothed. The idea here is to form the basic shape of the badger's head; I use a lot of reference pictures of real badgers to get this right. There's always some compromises though – I have to be able to get wider range of expression that an actual badger could manage when sculpting an anthropomorphic version.
 Automatically Appended Next Post:
I then added a couple of semi-circles for ears, and small ball shapes for eyes, and a blob for a nose. These were blended in, and I started tidying it all up, marking in the nostrils and mouth. Then I started working on the fur texture; using the blunt end of my Wax no.5, I marked the whole surface roughly, then used the sharp end of the tool to refine the surface, gradually tidying it up until I was happy with it. Then I left the head to cure fully.
 Automatically Appended Next Post:
Once the head was cured, I drilled a hole into the body, and fitted the head into it. I also test-fitted the shield at this point just to make sure it would work OK.
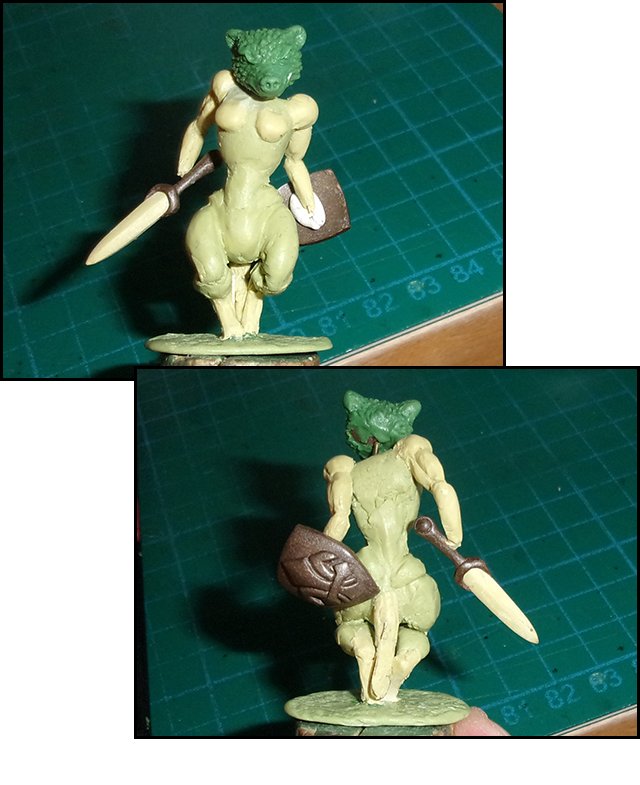 Automatically Appended Next Post:
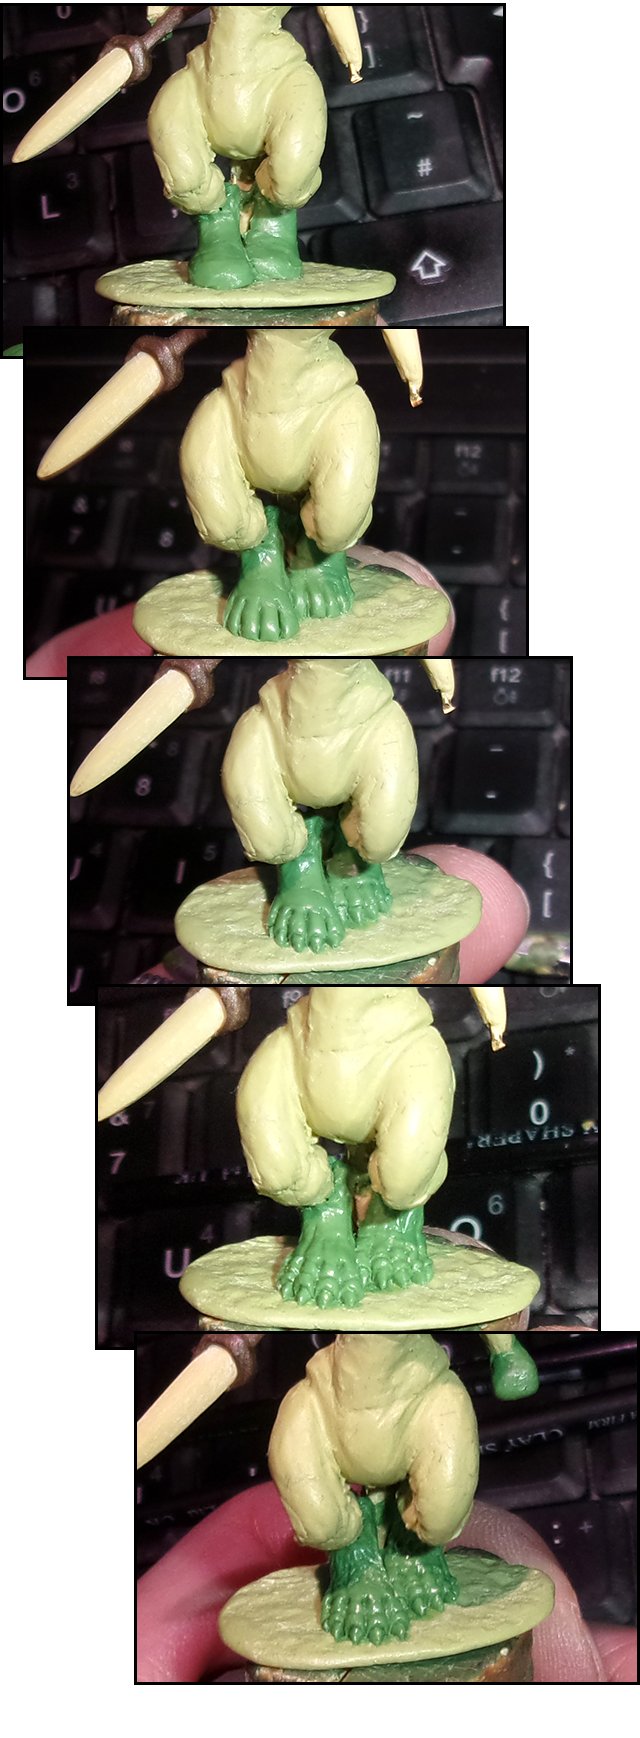
Then it was time to start the sculpting from the ground up… with the feet! I mixed up some fresh Green Stuff, and pushed it onto the armature, and smoothed it. Then I cut some lines in to mark the toes; I also cut a line across the front of the toes, and shaped then into claws.
Next I began working each individual toe, gently shaping them to show the joints as much as possible. Then I sculpted some fur texture on the foot. I had a small amount of putty let over, so I used it to form a core for sculpting the badger's left hand, as you can see in the bottom picture.
 Automatically Appended Next Post:
Next I started working up the legs; again, pressing fresh Green Stuff onto the model, smoothing it, adding rough texture with a blunt tool, and then slowly refining it with a sharp tool. I probably ought to do a video to show the process really… maybe for the next project!
 Automatically Appended Next Post:
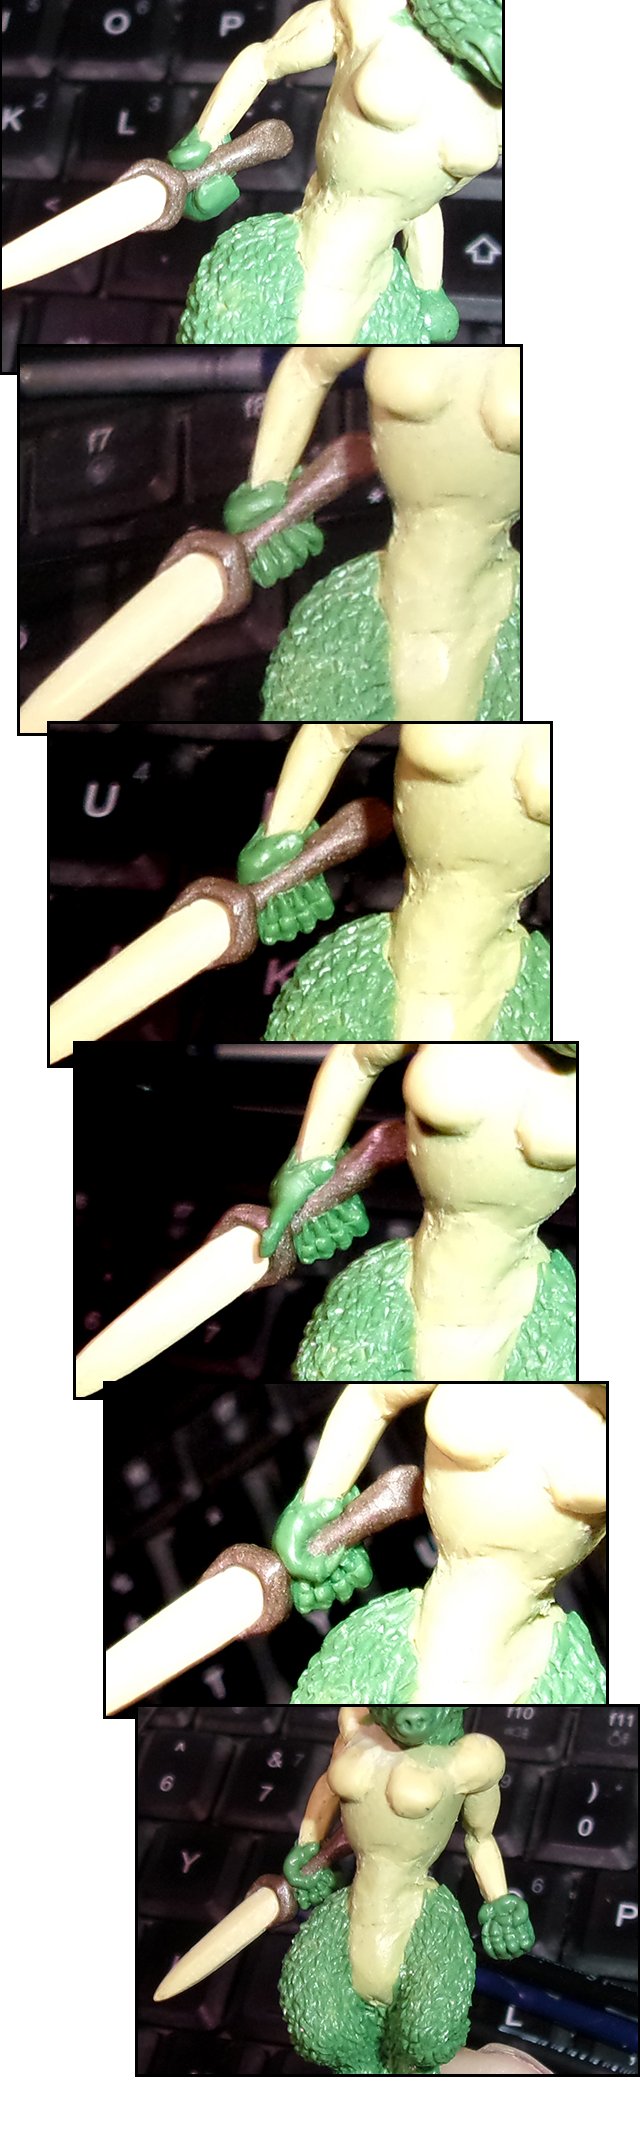
With the leg fur textured, I started on the hands. I mixed up some more Green Stuff, and rolled out a short length, which I wrapped around the sword handle and pressed into place, flattening the finger area. Then I cut in lines to separate the fingers, and followed with a shallow line cut across the fingertips, to show the claws. Then I spent a while tidying and refining the fingers. Next I rolled out a thin strip of putty to make the thumb; I pressed one end into place, then bent it around and marked in the claw. That was the hand done, but I spent another half hour or so generally fiddling and obsessing over smoothing and tidying it...
I did the left hand the same way.
 Automatically Appended Next Post:
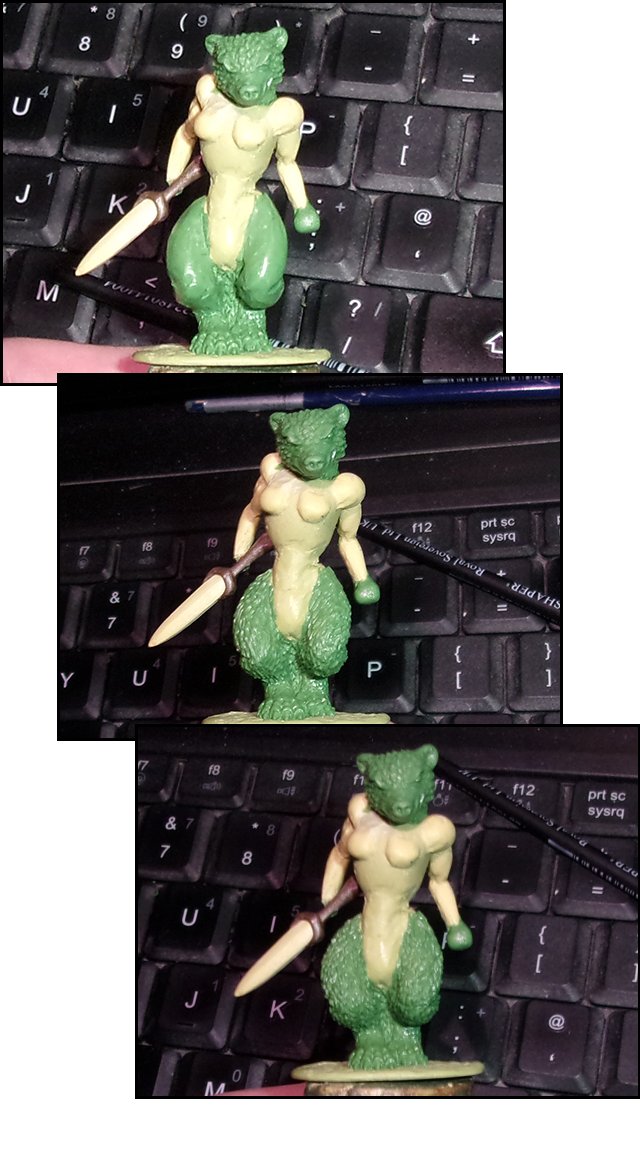
Then I returned to the body of the model. More fresh putty, and I rolled out a length, and wrapped it right around. Then I pressed it into place, and shaped it roughly with the metal sculpting tool, before gradually smoothing and shaping the folds of the cloth with the silicone Clay Shaper.
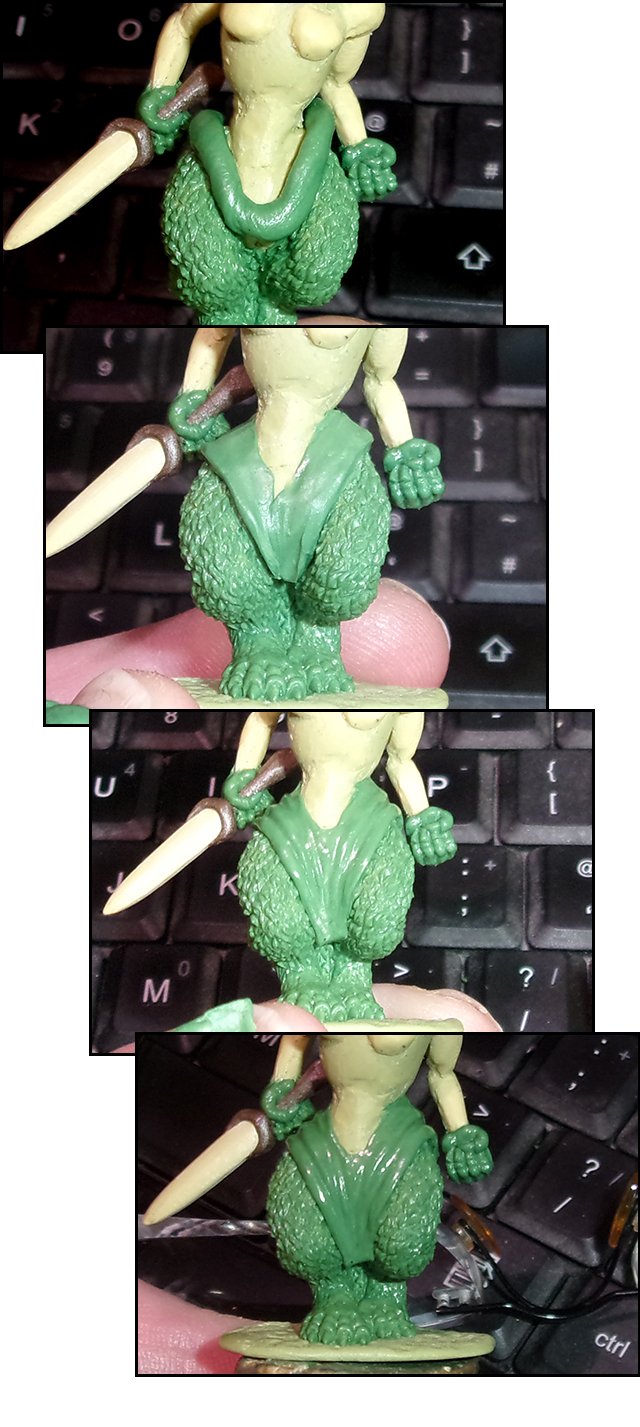 Automatically Appended Next Post:
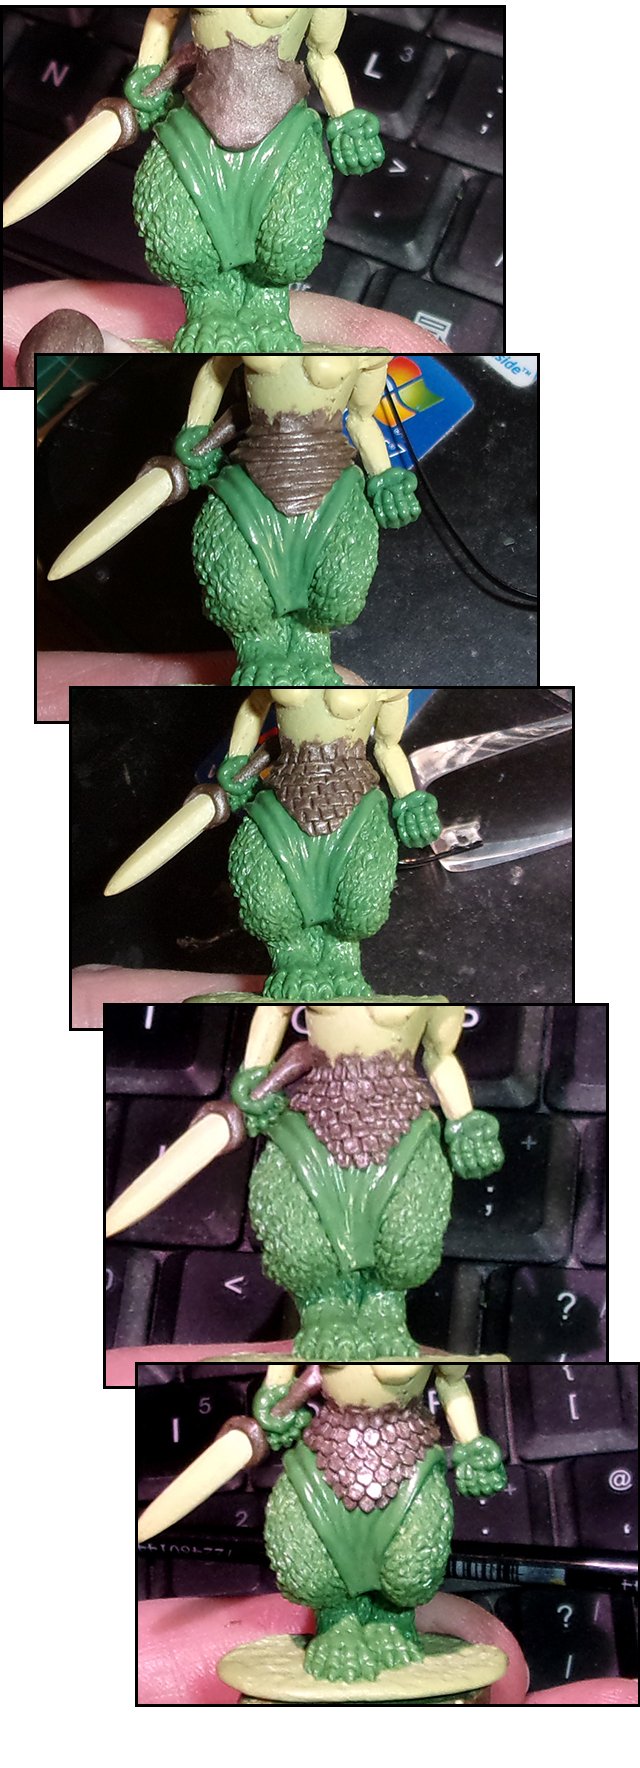
Next I switched back to Brown Stuff, to make some scale armour. I pressed it into place, shaped it, and smoothed the surface as well as possible. Then I cut in a series of horizontal lines, and then indented the putty at those lines, so they formed a series of ridges rather than a flat surface. Next I started cutting in small vertical lines across the ridges, forming a brick-wall style pattern. With that done, I carefully dragged each of the 'bricks' downwards, stretching and separating them slightly. Then it was just a process of gradually refining each scale individually. It's really very simple – it just takes a long time!
 Automatically Appended Next Post:
Then I went back to sculpting her clothing. Using more Green Stuff, I added clothing to the front of her arms. I didn't need to do the back, because that will be covered by armour. And because that armour will need straps to hold it on, I made indentations at various points on the arm clothing. Straps and belts tend to pull clothing in, and cause folds and the like. So to make a sculpt look realistic, you need to plan ahead and make sure you've accounted for that – straps just laid over flat clothing won't look right, unless the clothing is a very tight fit.
 Automatically Appended Next Post:
While the arms were curing, I added a quilted jack to the body. I applied a layer of Green Stuff, and smoothed the surface. Then I made a series of very light diagonal cuts, and spent a lot of time gradually softening and blending them with the Clay Shaper. I also made a small indentation at each point where the lines crossed to complete the 'quilted' look.
Then I made and indentation right around for her belt. Next I rolled out some very thin bits of putty, and pressed them into place to form the belt and armour straps. I had some putty left over, so I used it to add the lower part of her hood.
 Automatically Appended Next Post:
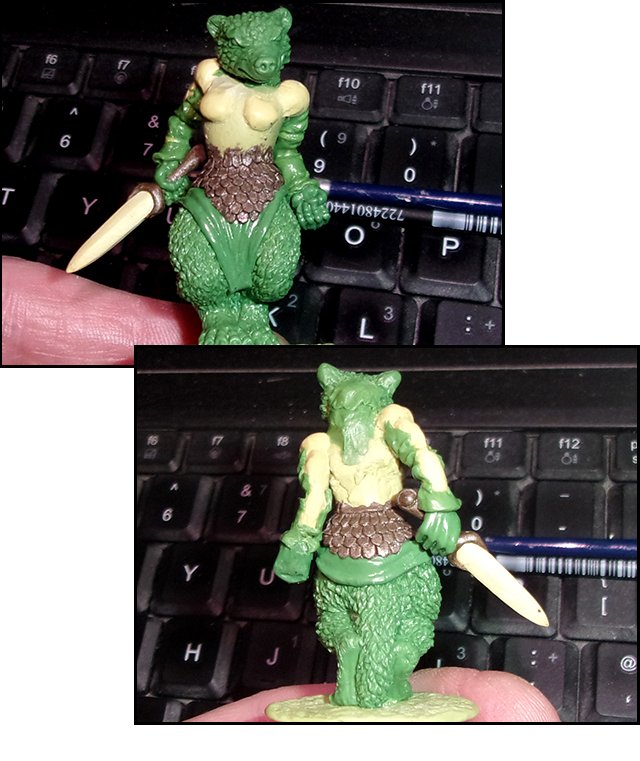
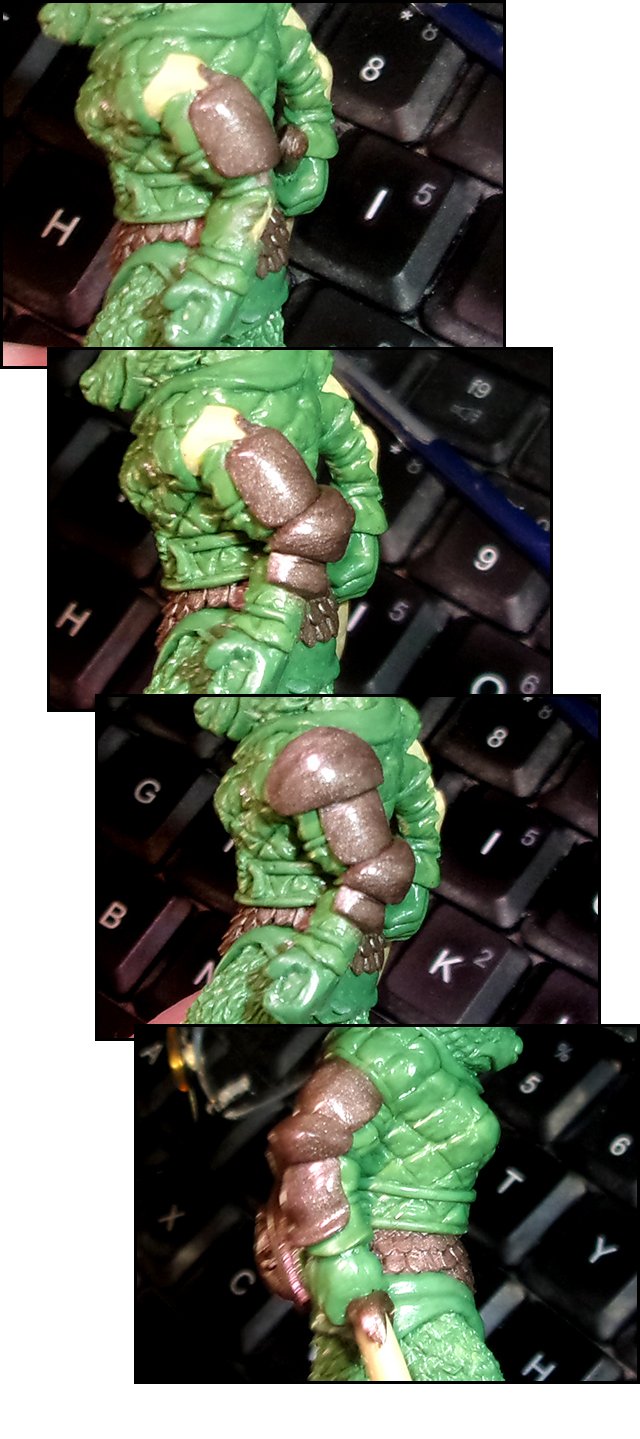
Then I moved onto the armour on her arms. I used more Brown Stuff for this; I used small blobs of putty to form individual sections of the armour, smoothing them carefully one at a time, before adding the next piece. I did this on both arms, and let it cure.
 Automatically Appended Next Post:
While that was curing I decided to add a cross belt to her body; thankfully the body hadn't fully cured, so I was able to make an indentation for it first! I also attached the shield. I'd already sculpted the inner side of the shield, but I forgot to take photos… sorry!
 Automatically Appended Next Post:
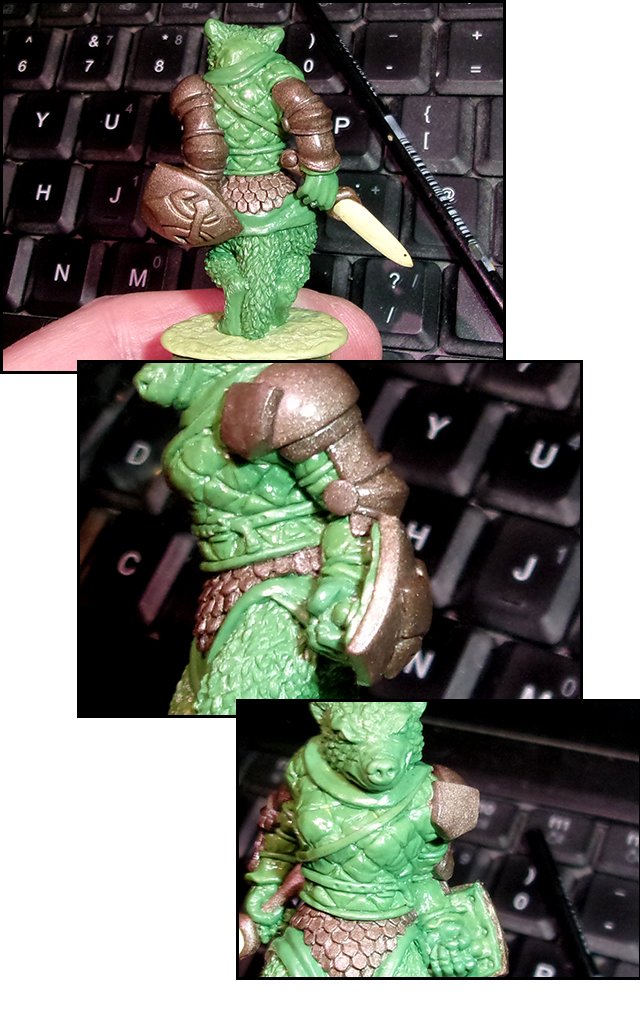
I then went back to the arms – the armour plates were cured, so I was able to use fresh putty to finish them off. I rolled out some long thin bits of putty, and used them to edge the elbow armour. I also added a couple of circular pieces to act as joint protection. I also added a small decorative shield shape to the shoulder plate.
 Automatically Appended Next Post:
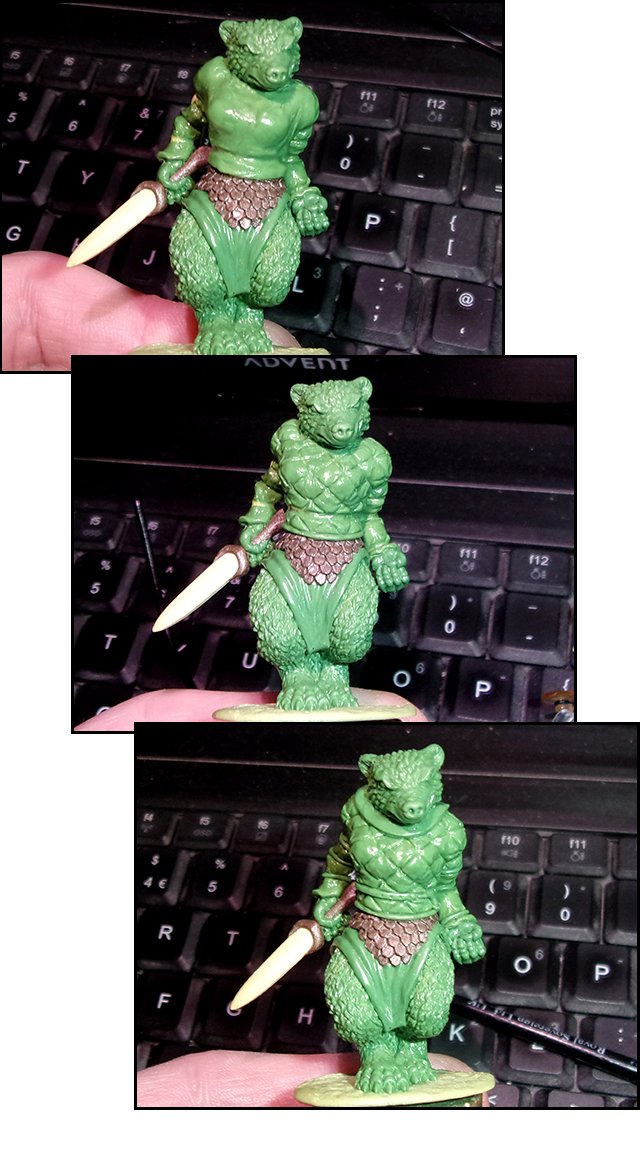
 While the armour was fully curing, I used more Green Stuff to add a hood to the back of the model. I also had to add a bit more fur to the back of the head/neck, to cover the join there.
 Automatically Appended Next Post:
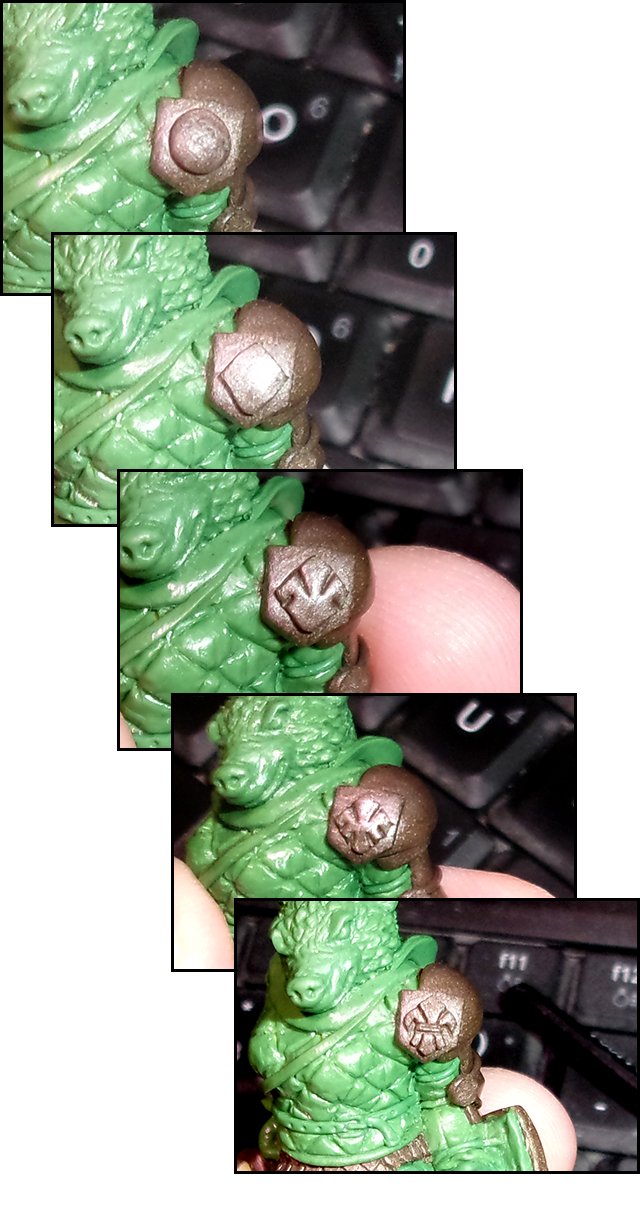
 Next I decided to add a Fleur-
de-Lys to the shoulder shield (they have a proper name, but I just can't remember what it is!) I took a ball of putty, pressed it on and flattened it. Then I cut away the sides to leave a diamond shape. Then I made four cuts with the blade. I made two more cuts near the bottom, and gently pulled the lowest part down slightly. Next I made two cuts across the middle to form a band, and began gradually teasing everything into shape, just poking and prodding, followed by lots of smoothing, then a bit more poking and prodding until it looked right….
 Automatically Appended Next Post:
 One of the things I like to do is make every miniature a single piece; I'm not a fan of multi-part metal models, mostly because I always seem to break them! So this badger needs to be a single piece.
The problem is, as she stands, that won't work. If we tried to mould her at this point, the mould would flow around the arms and lock her into place, making it impossible to get her out again. Solutions to this are – either cutting the arms off, and casting them separately, for a multi-part miniature, or filling in the gaps. Naturally I went for filling in the gaps!
The key to this though is making sure that the 'filling' looks like it's meant to be there; making it a useful part of the model. And that's where pouches, bags and other equipment come in! In this case, I added a bag and some pouches; just the basic shapes. But that left a gap behind the sword hand, which I decided to fill with a large blob of putty, that I would turn into a coil of rope.
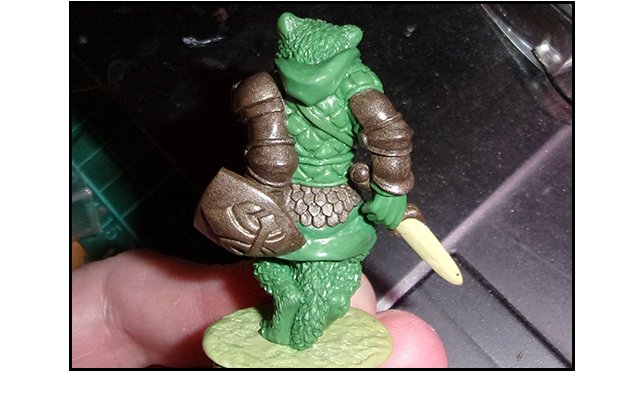
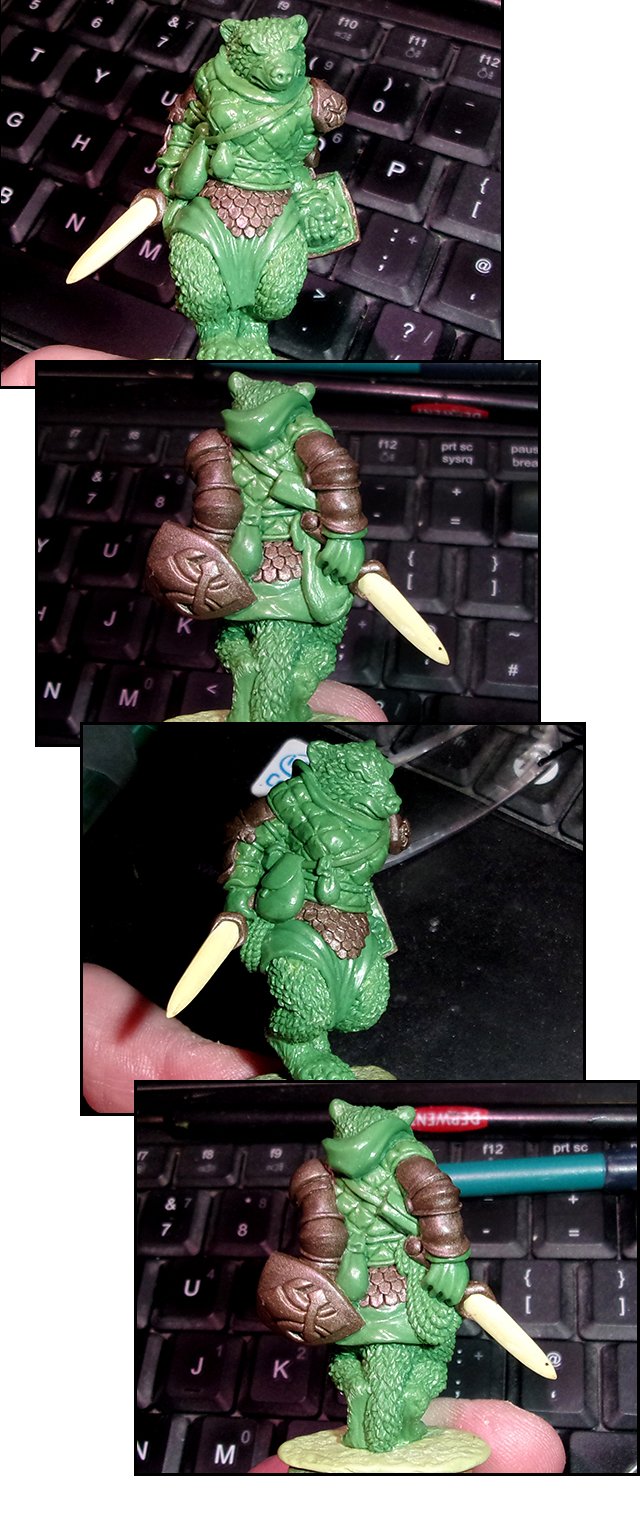
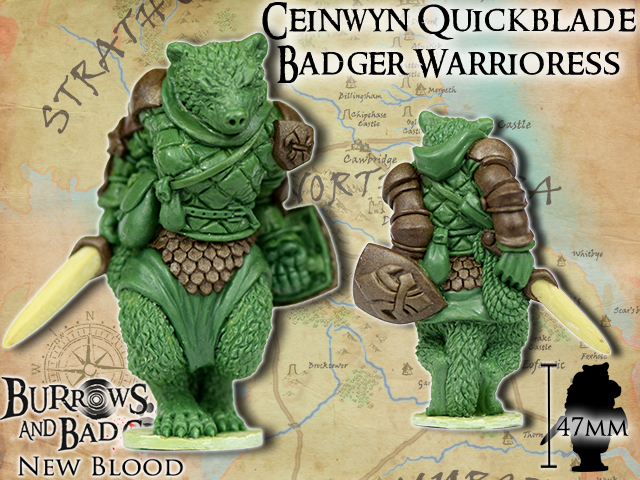
I added flaps to the pouches and bag, and simply cut a series of lines into the blob to look like coiled rope. And with that, Ceinwyn Quickblade, Badger Warrioress, was finished! :-)


 Death Guard 1.0: 8,500 points painted (Pics available in Gallery) P: 7 W: 1 D: 3 L: 3
 Thousand Sons: 3,750 points painted P:1 W:1 D:0 L:0
 Nurgle Daemons: 3,800 points painted P:2 W:1 D:1 L:0
 Tyranids: 2,000 points painted
 Primaris "Honoured Mastodons": 3,700 points painted
 Tau 6,750 points painted
 Nice badgeress too!

