Saturday December 6, 2008
by Felix Flauta
I invited myself over to John Humphrey's house to try a 2250 point game of Warhammer Fantasy. He was gracious enough to accept and host (again, at my request. Bad Felix!)
Lists
High Elves
- Level 4 Arch Mage w/ Book of Hoeth
- Mounted BSB w/ Banner of Battle, Dragon Armor, Lance, Shield, Barding
- 20- Spearmen/ FC
- 10- Archers w/ Muso
- 20- Phoenix Guard, FC, Banner of Arcane Protection
- 5 Ellyrian Reavers, Bows and Spears, Muso
- 5 Swordmasters, FC, Banner of Sorcery
- 14 White Lions, FC, Banner of the Lion
- 5 Dragon Princes FC., Banner of Ellyrion
- 2 Repeater Bolt Throwers.
- Eagle.
Empire
Empire List -
- General/ BSB/ Luthor Huss / Battle Wizard
- 28 Swordsmen/ FC, 9 Free Company Detachments x 2
- 10- Handgunners X 2.
- 5 Knights w/ musician
- 9 Knights /FC with Steel Standard
- Great Cannon x 2
- 5 Pistoliers
- 19 Greatswords FC/ w 9- Swordsmen Detachment
- Helblaster Volley Gun.
Terrain Setup
Nothing fancy. Two hills in deployment zones on either side. Two forest templates on my right flank, clear in the center and another hill and a forest template on the left flank. Funny that we don't use buildings on the day that I stop using Wood Elves. Not my intention! I just picked terrain that was already set on the table.
The table itself was 4'x8'.
Deployment
There were three distinct battles going on on the table, and we sort of set things up that way with our deployment.
Left Flank
When John put his Swordsmen block, Free Companies, Pistoliers and Greatswords on his right flank, I wasn't sure if I was relieved or dismayed. I was relieved because I figured that his main battle line of infantry would take all game to make contact; fighting a block of Swordsmen sitting pretty with both a Battle Standard Bearer and his general just made me shudder with all the shenanigans that could go on in there.
I was dismayed because I felt spread thin.
In response to this, I put a nominal force of Ellyrian Reavers on my left flank. Their only job was to thin the Pistoliers.
Center
This was going to be the gunlines. John's Cannons, Hellblaster Gun and Handgunners faced my Reaper Bolt Throwers across the table. Because his static combat blocks were so far on the flank, I felt comfortable putting my Spearmen next nearest to them, the Phoenix Guard in the middle with the White Lions running near my right flank. My bolt throwers stared across the field at the cannons and my minimal Swordmasters unit stood behind the Archer line near my left flank. My General, the Level 4 Archmage armed with the Book of Hoeth, cowered out of angled shot line of sight behind the White Lions.
Right Flank
The cavalry standoff. Except he invested more resources in this encounter than I did. He had no less than 14 knights on this flank. Five of them were a unit with Great Weapons, obviously designed for light duties such as flanking and marchblocking, etc. My cavalry was my Battle Standard Bearer and Dragon Princes followed by an Eagle.
The matchups were tight on both flanks, but I had the advantage in the center. I just needed my Left flank to hold out long enough for me to roll or redirect his two cavalry units so that I could get my main blocks across the table.
Battle
Left Flank
John's main infantry blocks of Swordsmen and Greatswords, together with their Great Companies, march towards my left flank. When I see this, I breathe a sigh of relief as I worried that he would try to match my Spearmen and Phoenix Guard in the Center, and without my Cavalry I'd be hard pressed to fend them off.
However, they advance inexorably and slowly. My Reavers use their bow range to get off a few shots on the Pistoliers, and manage to feign flight from one of the blocks, but they are inevitably shot by Pistoliers and forced to panic. The Pistoliers chase them down and shoot them off the table.
The left flank crumbles, but we both knew at the start that it would crumble. I simply needed time for my own forces to stop his guns.
Center
Initial volleys prove unlucky for John. His first cannon fails to damage a Reaper, and his second cannon misfires. Handgunner Marksmen pick off my Spearmen's champion.
One cannon picks off a Reaper Bolt Thrower and the other one overshoots. They rally the following turn and fall behind the Phoenix Guard and White Lions. The Helblaster and Handgunners can't break the Phoenix Guard due to their Ward save, but the Spearmen panic and lose a turn fleeing. Archers reduce one unit of Handgunners down to six, who panic, which gives me just enough time to move forward for a key charge.
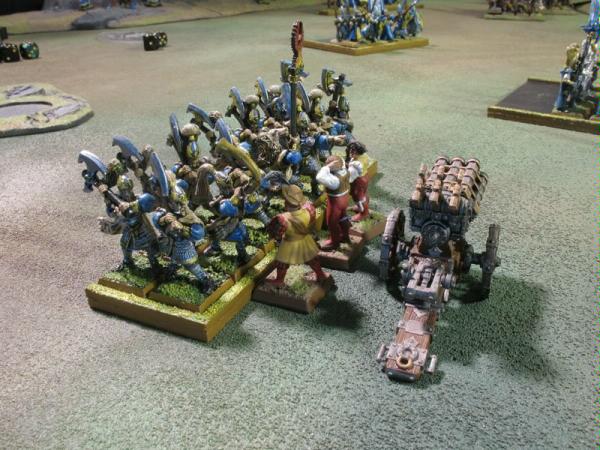
pic taken by John Humphrey
Here you can see the White Lions break through the woods, charging the Helblaster crew. The Phoenix Guard in the background reach the non panicked Handgunners, and the Spearmen even further back are recovering from the earlier panic.
The White Lions go through the Helblaster and into the Cannon crew. The Phoenix Guard destroy the Handgunners and take a Grape Shot from the second Cannon cannon. It isn't enough. Soon both Handgunners units and all of John's warmachines are destroyed and spiked by the elite High Elf warriors.
The Spearmen aren't completely lost. One of John's recovering Free Companies come to charge them. With Speed of Asuryan and two ranks to attack with, the Spearmen easily repel the Free Company. However, the lack of a unit champion may have blinded the unit to tactical thinking as I allowed the Spearmen to pursue the fleeing the Free Company.
This was near the end of the game. My Spearmen was my last unit capable of holding or contesting a table quarter on my right flank, and so that brought me down 100 essential points.
Near the left, the Empire Swordsman finally arrive and fail charge my Swordmasters. Greatswords come close and I start to fire bolts and arrows at them, reducing their ranks. Their wizard gets one fireball off before the unit finally reaches my Archers.
The Archers hold for one turn and manage to wound the Wizard, which is just long enough for the Swordmasters to take only one charge. They last two turns and then my Banner of Sorcery goes away.
Once freed from combat, the Wizard tries to Fireball something and takes a STR 8 Miscast.
John's forces were unable to touch the remaining bolt thrower.
Right Flank
Left looked bad from the start, so I gamble on being able to win a combat on the right. If this doesn't work, then my infantry advance at center would crumble to flanking knights.
The Level 4 Archmage had four spells at his disposal-- Ward of Saphery, Curse of Arrow Attraction, Fury of Khaine (a magic missile) and Vaul's Unmaking. Even with the Book of Hoeth and Banner of Sorcery on the Swordmasters, he's mostly unable to get any kind of spell off either due to low dice rolls, or key dispel scrolls. Perhaps the only thing that worked was that Vaul's Unmaking miscast and rolled a 12 on the table, making the spell go off and destroying the magic of his knight block's standard.
I put the Eagle forward to try to draw a charge as both knight units faced down my Dragon Princes with their Noble. The smaller flanking knight unit failed its charge and the Eagle fled, while his larger Knight unit held its ground and took a full charge from my Dragon Princes.
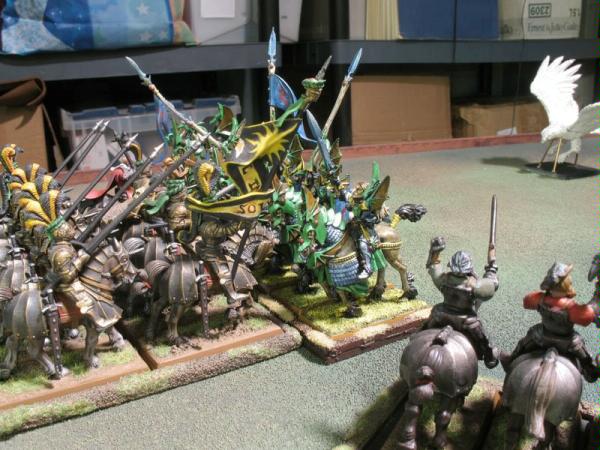
CHARGE!
Even with the Banner of Battle I can't break the unit on the charge, but at least my Dragon Prince manages to kill Luthor Huss. And that's when the knights flank my Dragon Princes with their Great Weapons.
I survive the initial counter charge, but in the prolonged combat that follows every Dragon Prince dies to an Elf, and my Noble is faced with a hideous combat resolution.
With all his kills, flank and standard bonuses, the Empire knights have a 6 combat resolution.
I roll for my Banner of Battle. 6. Plus 1 for having a standard. The lone Elven Noble wins by 1!
He routes the Knights, chases the large unit and runs it down. The remaining unit flees, but rallies, claiming the remaining table quarter, but hopelessly stuck in the middle of a wood.

Conclusions
Because I was able to keep both my characters alive and run down his main block of knights, I was up 190 points. That left us with a draw. If I'd been able to claim or contest one more table quarter, I'd either be up 290 points, which might still be a draw, or if I'd been able to claim one table quarter in its entirety I might have pulled a minor victory.
It was a good game that stretched my army out. If the Empire had been a bit faster, I would have been in trouble, but fast moving Elves really helped rescue what could have been a disastrous loss.
That and a single key dice roll. To be fair, however, he rolled really well when I could have broken the Empire knights on the initial charge and I only rolled a 1 for the Banner of Battle on that turn.
Links
- John posted a report on his plastic legions blog. http://plasticlegions.blogspot.com/2008/12/weekend-battle-recaps.html
