MarkCron's magnetising experiences - A quick quide for the complete Newbie!
Hi Dakka,
The purpose of this article is to share my experiences and some of the tips and tricks I picked up during my initial magnetising projects. Also, to encourage people who are wondering about whether they can do it to give magnetising a go. It is mostly simple and you'll wonder why you didn't do it from the start.
So far, I've magnetised three Rhino/Razorback conversions, a Landraider, a Ghost Ark/Doomsday Ark, a couple of Skaven Warp Lightning Cannons plus a couple of tac squads for one of my boys.
Couple of disclaimers. Firstly, I am not a magnetising expert by any stretch. Hopefully, this article will encourage you to have a go and save you some money. Equally hopefully, you'll forgive some of the shocking messes I have made and not repeat them yourself, which is the primary purpose of the article.
I'm writing the article because a couple of people asked me for tips (which was either kind or foolish - jury is out! ;)). Work permitting, I'll have this article done by next Sunday 18th May 2014
Why Magnetise?
For me, magnetising wasn't such a big thing with my Crons. I'd occasionally play the Ghost Ark as a Doomsday ark but mostly Crons don't have a lot of simple magnetisation options. (Ghost Ark/Doomsday Ark is, with hindsight, not simple). Then I started GK.....and that was a shock, with multiple weapon options, not to mention interceptors vs GKSS.
When I started my GK, I just glued everything up. I had no vehicles and in the house we routinely allow proxies, so it wasn't really a problem. However, we have as a rule that any proxies need to be specifically identified - well, that started getting tricky, particularly mixing non interceptors into a GKSS. Of course, all the normal GKSS got killed and I was trying to remember whether these lone guys were GKSS or Interceptors!
I also had no vehicles, but had my eyes on Rhino/Razorbacks, a LR and a Stormraven.
As I couldn't afford to have all these models in different varieties, magnetisation became a highly desirable thing!
Now that I've done them, I have to say it is much more satisfying to play with squads that are compliant and vehicles which have the correct guns. It is also easier for me to remember what is where (which, with my memory, is an important thing!!)
What I used
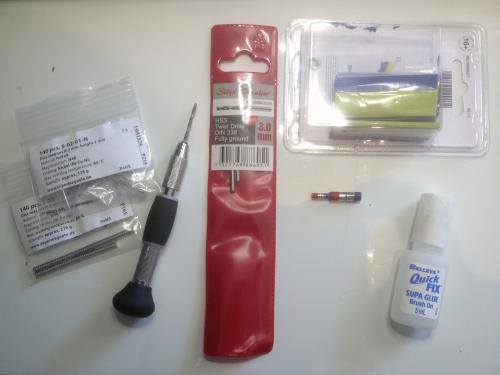
Ok, things that I used.
Magnets, obviously. I used 3mm, which was perfect for vehicle weapons and some larger infantry stuff (like backpacks), plus 2mm. I use either N48 or N52 neo magnets.
While I was in Europe, I used supermagnete.de, who are awesome (and sometimes give you free stuff!) and in Australia I just bought from Frenergy.
I use a Citadel hand drill for the 2mm, and just a normal 3mm drill (which I turn by hand). Others use dremels (didn't have one), a pin vice (also didn't have one - but this would probably help a lot).
Greenstuff (for filing gaps, making mounts - sprue is also handy for that)
And superglue.
And some magnet templates!![br /]
Polarity, Polarity, Polarity
Most of my spectacular failures were because of incorrect polarity. In simple terms, I glued the magnet in the wrong way and had to get it out. This is possible, but generally messy and requires greenstuff to fix the mess. Also, it is REALLY helpful if all your magnetised bits (eg Rhino heavy bolters, powerfists, backpacks) fit to any of your rhino mounts/bodies/arms.
So, you need a way to get your polarities correct. There were a lot of ideas I came across on the internet, including scoring one side of the magnet, painting one side etc. However, being thoroughly impatient, there was no way I was going to spend time on that. So after winging it for a while, I came up with the idea of magnet templates:

Ok, so I superglued a small stick of magnets together (they naturally want to stay together, so I just brushed superglue down one side of the stack). Then I painted one end red (my "Base" side) and the other Blue (the "attachment side")
The Base is the bit you are sticking to (so the Rhino body in this case) while the Attachment is the thing you are sticking to the Base.
So Now I attach the magnets I want to insert to the template....and away I go. Red end for base, Blue end for attachment.

The above image is the template with a stick of magnets attached to either end, ready to insert into holes. The easiest way to get magnets into place is just to take a stick of magnets, push one end into the hole and slide the rest of the stick off.

The above image is me getting ready to insert a magnet into a base.

and to an attachment.
Sometimes you have to drill completely through a part (eg LRC/R sponsor gun mounts, Rhino gun mounts) in which case Red is for Left, Blue for Right. However, you need to be REALLY careful when you have drilled through.
Whatever method you use.....always check, twice.
Key Tricks and Traps
The process of magnetising something is pretty simple really. Find a place where the attachment fixes to the base, drill a hole in each part, insert magnets, profit.
For the most part, the process really is as simple as that, particularly with something simple - say a spotlight to a Rhino, a single handed weapon to an arm, shoulder to a body. And, if you watch many of the videos, it looks really easy. What could possibly go wrong?
Well, lots of stuff really. I'm going to cover the stuff that happened to me and that I found difficult, but the key message I want to pass on is that it is really satisfying to magnetise stuff. For some reason the sound of the magnets clicking solidly together and the part just sitting there, perfectly.....hopefully you'll enjoy it as much as I do.
So, without further ado, on with the tips and tricks.
Where do I put the magnet?
Now this seems fairly obvious, you just put it where the bits are supposed to glue together, right? Sure, that will often work and is often the best thing. However, before you leap in and drill the hole, remember a couple of things.
- Magnets are frictionless. So, I had a couple of situations where I carefully trimmed off the tab, inserted magnets, attached the attachment.......and was deeply unhappy when the weight rotated it upside down or the gun/hand just drooped.
- Trick : if there are tabs, inserts etc which are there to help locate the attachment part properly, see whether you can leave it (or at least part of it) there. Put the magnet next to it. In a lot of cases this is possible. Having part of the original locator tab makes things a lot easier, because if slightly misplace one of the magnets (and this happens a lot!!!), the tab is enough friction to hold the part properly in place.
- Trick : The friction to stop magnetised parts from unwanted drooping can come from any contact point on the model. So, if you were magnetising a two handed special weapon, use one hand without magnets (and just rest the gun in it) and only magnetise one hand.
- Trick : paint the magnet. A layer of paint can provide the friction necessary to stop droop. I find that the paint wears off after a while, but a touch up solved the problem.
- Advanced trick : stick a very thin shaving of sprue somewhere where the attachment contacts the base part (and out of sight).
- Advanced trick : With the attachment in the position you want, look and see where it almost contacts the model (eg a gun crosses the chest). Then have a look and see whether you can put a magnet in the hidden side of the gun and on the chest. Note, the gap has to be really close for this to work effectively, or alternatively you need space to insert more than one magnet (to increase the pull).
- The objective is to be able to pull the attachment off and replace it with a different one. So, test fit all the attachments and look at where each one touches ANY part of the base model. The magnet does not HAVE to go into the glue mounting point (but most often, thats the only consistent place if the attachments are different shapes).
- Look CAREFULLY at how the parts fit together. Magnets are thick! Most are at least 1mm thick, but you can buy thicker ones.
- If one part slides into another, you either have to completely embed the magnet, or you have to trim 2 mm off one part so that it sits in the correct place. If you don't get this right it may look really weird.
- The thickness of magnets can be useful. For example, the razorback gun alternatives (HB, lascannon etc) have a perfect hole for the magnets to go into. Only problem is that it is too deep. Solution? push in two or three magnets. As long as you have the polarity right, it makes no difference (although if you go too overboard you might find metal things flying onto the board!)
- Magnets pull toward each other (duh, right?). More magnets pull harder (Really!). But if you think about that, you can drill a deeper hole and push 2 x 2mm magnets on one side (which is thicker) and 1 x 3 mm magnet on the other side). So carefully look at the parts you are joining. If you don't have neat 3mm spaces (or 2mm spaces) then don't be afraid to mix it up. Particularly, with the bottom of arms where hands/weapons attach, if you only have space for 1mm magnets, drill deeper and chuck 2 or 3 in there.
- Sometimes you need to build a mount (eg many videos use Sprue inside landraider door openings) or fill holes (the ghost ark needed a fair bit of greenstuff). Do what you are comfortable with. If you aren't a master sculptor, don't try to sculpt something complicated. Remember, magnets stick to metal too and you can buy flat sheets of magnetic material (hell you could even try magnetic paint!).
- Weight makes a difference. Long items like lascannons tend to droop more, so use more or bigger magnets.
Drilling the hole
Without doubt, drilling holes is by far part with the most risk (you aren't going to die or anything ;). Worst case if you REALLY stuff it up, chuck greenstuff in, smooth it off and have another go.)
A quick word about drills. Firstly the GW drill that I bought comes with 1 and 2mm drill bits. It won't take anything larger than that (unless you buy say a 3mm bit with a small shank). If you are only driling plastic (which is all I have done) then you don't actually need a drill body. For my 3mm drill, I just turn it with my fingers.
- Slow and Steady wins the race. In this case, let the tortoise win. Pick your spot and just turn slowly.
- Drill, don't Poke. The idea is to use the drill to shave off the plastic in ever deepening circles.....not drive the drill straight through with pressure alone. (It's a good thing Dakka is a family friendly place, because this point could go off track really fast!).
- Never drill on a round surface. The drill will slide off. If you need to, shave a bit off where the centre of the drill goes so it doesn't slip.
- If it is really important that a magnet goes "just there", drill a pilot hole first.
- If you are sticking a magnet onto a surface, drill down just a little bit first, just to create a rim to locate the magnet in.
- Remember that most drills are bowl shaped at the bottom...this can be handy as there will be a little space under the rim for superglue to pool in. But it does mean you have to drill a little deeper than 1mm to flush embed a 1mm magnet.
Pushing in the Magnet
The final step.....and the easiest.
All you need to do, is push a magnet in THE RIGHT WAY UP. Whatever you do, however you do it, find a way so you know which way up the magnet is supposed to go.
- DO check polarity before you test fit a magnet. You can bet that the one time you drill a perfect hole, you'll test the depth with a magnet, it will sit perfectly flush, you will jump for joy.....and then realise it is in the wrong way up.
- Superglue the SIDE of the hole. remember that little bowl at the bottom of the hole from the drill? That holds a lot of superglue and it will flood out!
- Don't stress if your magnet stick gets superglued together, cos you can just cut them apart.
- If you have a really narrow space to get a magnet into, use the bottom of an appropriately sized drill bit. Attach the magnet to that, use the drill to push the magnet into the hole, then rotate the drill while sliding it to the side.
AARGH - the magnet is the wrong way up
Firstly, don't beat yourself up about it. This is going to happen and the faster and cleaner you get it out, the quicker you can move on.
- Using a bigger magnet (or a longer stick of magnets) is not going to pull it out.
- Don't make a giant mess. The magnet will come out if you can get something down the side of it. So, pick ONE spot, cut,shave or poke a hole deep enough, and lever out the magnet. Jewellers screwdrivers worked for me. If you are going to have to cut, cut a triangle shape as it is easier to fill with greenstuff afterwards.
Specific Models
As most of this stuff is already built, I'll just take photos of my magnet positions and note anything particularly difficult.
Please remember that I am a tabletop gamer/painter so I'm sure there are more precise ways of doing this - there are many online videos with great results! Mine were done comparatively quickly and without too much complicated scultping/mods and work well for me (mostly!).
Rhino/Razorback
Overview
The humble Rhino/Razorback is a comparatively easy project. The trickiest part of the process is drilling the holes for the magnets in the right place and making the holes consistent on all the guns/cover etc.
My major pain points were:
- The Sponson - because of a poor decision on how to insert the magnet and even worse accuracy when it came to drilling the holes
- The cover for the guns, because it is really quite thin!
The Hull


As you can see, the hull is comparatively easy. All that I did was put magnets in the front to take the dozer blade, then a magnet on the surface of the hull for the spotlight. Everything else didn't seem to need a magnet following the test fit.
With the Storm bolter and the HK Missile, I stuck the stormbolter onto the hatch mount...then cut the mount off and glued it onto a spare hatch. I then built the HK launcher per the instructions and it just sits nicely in the hatch space. Done.
Many of the guides suggest that you need a bit of sprue under the gun hatch to keep the hatch in place. I found mine were a tight fit so didn't bother and it works fine.
The accessories

If you have the right size magnets then magnetising the guns is a piece of cake - just push a magnet into the mounting hole (mine were a tight fit!) so it is flush with the top - done. Note that I cut the ammo feeds off - with hindsight I'm not sure you need to do that.
On the top of the guns, it is a little trickier, because you need to put a couple of small magnets in to hold the cover in place. PRECISION here is important, because if the holes are drilled slightly off centre from each other the gun cover doesn't sit straight.
The dozer blade is easy, just trim off the back of the mounting points so it is flat, magnet, done.
The gun sponson
A LOT of unexpected grief here.
I trimmed the side tabs of the sponson and stuck some magnets on....only to discover that in order to get the guns to sit properly you need to embed the sponson magnets so they are flush.
Off the magnets came....and my next poor decision caused a world of grief. I decided it was a good idea to drill in from each side of the sponson and attach a Base polarity magnet in each side. :facepalm:
DON"T do that. Just drill a hole all the way through the sponson and fill the hole with magnets.
See the photos below for why.


Not getting the holes in line mean that the guns don't sit straight (either front to back or up and down). which makes the whole assembly look a bit weird.

If you don't get everything aligned, the above problems raise their head.
Conclusion
Overall, the magnetising process is not too bad, as long as you don't repeat my mistakes - Good luck!
LRC/R
Aahhhh, the Landraider redeemer Crusader. I haven't finished magnetising all the top bits yet (HK, Stormbolter, MM, Assault cannons) so I've just taken photos of the magnet positions for the sponsons and the doors for now.
I wanted the sponsons to be fitted to either the front or back doors, and I didn't really want to have to have bits of sprue running across the inside of the doors. That way, if it is wrecked, I can remove the doors and sponsons and say that they were blown off!!
I decided that three magnets should be enough to hold the sponsons, so just drilled them into the door frame. For the back of the doors and the sponsons I then drilled holes for flush mounting (on the doors) and surface stuck magnets (the sponsons, because they sit differently in the frames).

Trap I did the doors first, then tested against the shell of the LR. That's when I realised that the bottom magnets had to be in different places on different sides of the LR. Always, Always check to make sure everything is going to plan. In this case it wasn't a problem, because I hadn't drilled into the shell yet.
For the sponsons and guns, it was actually pretty easy working out where the magnets should go. For the gun mounts, just trim off the pegs that stick out, drill a hole all the way through, insert superglue and 3 or 4 magnets. Done.
NOTE : you will have left side and right side sponsons and guns. Double check the polarity before you glue magnets into the guns!!
The guns are straightforward, as the magnets I had fitted straight into the holes already there. The holes were a bit deep, so I just pushed a couple more magnets in. For clarity. I pushed the stick of magnets in, and just slid off when flush. I think there are 2 magnets in the guns, but it could be three.
The only trick bit was the external covers. For the covers, I embedded a magnet into the gun (to get the magnet in, take a single magnet of Base polarity, attach it to the bottom of the drill bit and push it in), then on the cover I drilled the centre of the tab and fitted a magnet. My 2mm magnets were a bees dick too wide, but you can just force it and it is fine.
Ghost Ark
Overview
The GA was my first attempt at magnetising a big complex vehicle. The result was ok, but there were a couple things I'd do differently if I was going to do it again.
The problems:
a) The warriors all incline at slightly different angles when in GA form.
b) The gauss array guns don't sit neatly, because of the way they were attached (I magnetised the gun to the mount - in hindsight, bad idea).
c) It was unnecessarily hard to get the various body bits to fit together.
d) I used 5mm cube magnets with a huge pull, because I got them free. Seemed like a good idea at the time, but I think in the end I would have ended up with a better job just using say 4mm wide magnets, but putting in more (say 3 or 4) - in the body bits there is plenty of depth to fit the magnets.

By the time you complete, you'll have magnetised most of the bits above.
Hull and Body
One of the problems I discovered was that all the different bits of the hull all had different depths. So the connector for the prow is a different length to the cap etc. You'll need to think carefully how you deal with this. I didn't find this out until after I had put magnets in the stern, and Prow....not helpful.
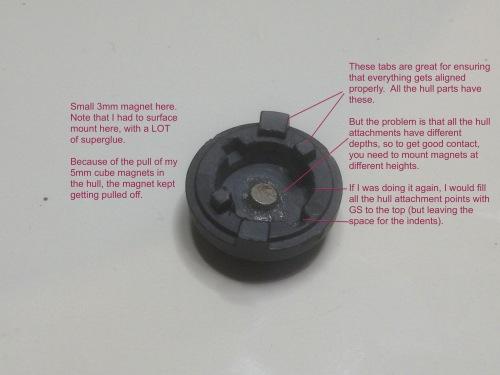


If I was doing this again, I'd just stuff greenstuff into all the hull attachment points until it was flush. Then drill out the GS to insert the necessary magnets. Just make sure you leave the locator tabs in place, that way if the magnets are slightly off-centre the hull will still hold firmly together.
Gauss Array
The Gauss Array was highly frustrating, mainly because I chose to leave the mounts unmagnetised where they join the ribs. I was following a vid I found on Youtube and this seemed like the thing to do. However, you really have to be careful to make sure you make perfectly level cuts and get the magnets placed exactly, otherwise they sit at different elevated angles.
If you are going to magnetise the gun to the mount, then you need to trim down the mount (keep this exactly flat) then trim out the top of the gun where the mount fits. Again if that isn't perfectly flat, the gun will point up or down once you attach it. You can fix that by adjusting the mount (it will swivel where it joins the ribs), but it is annoying.

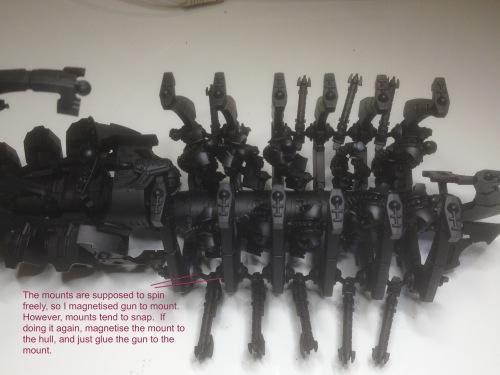
If I was doing this again, I'd glue the gun to the mount, then magnetise the mount where it sticks into the ribs. To do that, I'd trim off the insert which fits into the rib, then drill and embed a magnet. In the Rib, I'd greenstuff the hole and drill and embed a magnet. You'll need to do this BEFORE you stick the ribs together. And, for this, I'd use the magnet template in the base/attachment form (ie both sides of the rib have Base magnets).
Also be careful, because the ribs need to be fitted in a certain direction otherwise you get gaps between the ribs. (so, you can't just whack 2 ribs together - you'll find they fit better together if they both face "front")
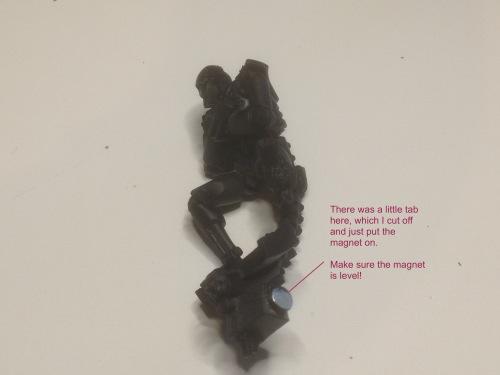
Warriors
I'll be honest, I was seriously tempted not to put the warriors in and just use the parts for kit bashing, but then decided to magnetise them. Leaving them out means you can actually put the unit riding the GA into it.
However, I didn't. :/
The process is comparatively simple, just drill a hole to widen the point in the hull to take a magnet, trim off the tab on the warrior and stick on a magnet.
However, note : drilling out the hull is a pita, because its rectangular to start with and the drill jumps a bit. So, you are better off filling the rectangle with GS, then drilling it.
You'll also need to fully embed the hull magnet, because the tab on the warrior isn't solid, so you can't easily embed there.

WarpLightning Cannon/Plague Claw
coming soon


