by xenite
Modeling scale armor with greenstuff
Note: This article was originally posted on my modeling and painting site. I really like the addition of the articles section to Dakka, so I am sharing the material here. Feel free to visit xenite's little green monsters for more information.
From time to time, as I am walking down the street, people come up to me and ask “Say Xenite, how do you model such wonderful looking scale armor on your small, but terrifying undead warriors?” The following is what I tell them…
This kind of sculpting is very easy once you get the hang of the properties of greenstuff. Generally speaking all of the below was done within several minutes of mixing the putty together. The longer the putty cures, while still being sculptable, the easier modeling in this method is.
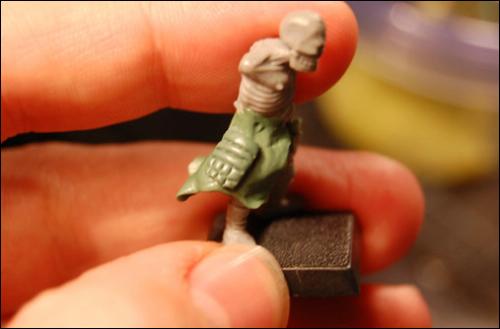
Here is what we are working with in this tutorial. This guy is a member of a 25 man undead unit for my Warhammer Fantasy Battle army. The little green ball beside him is the amount of mixed greenstuff that we need to do both areas of armor on this model.

This is my home-made sculpting tool. I have yet to find anything commercially available that works as well. I based this design on sculpting tools that were made by the very talented Gene VanHorne. Check out his work at www.reapermini.com. Also, if you get an opportunity to do one of his sculpting classes at Gencon, I highly recommend it!

my very favorite sculpting tool!
Below is a shot of the spoon tool.

Poker tool

Here I have applied the GS to the model’s thighs. I tend to use Vaseline to help keep my GS smooth when I am doing surfaces like the tunic that I am building the armor on top of. This can be a problem when it comes to adding more detail as new GS will want to stick to your fingers more than the cured GS. In this case, I rubbed the area down with a paper towel, and scored the surface slightly with my sculpting tool.

Shape the GS into the rough shape that the area of armor is. To do this I simple worked the GS gently with the spoon end of my sculpting tool. NOTE: it helps a ton if the surface that you are sculpting GS onto isn’t uncured GS. Every time you press in detail, the supporting GS will change shape. No good. That may be obvious, but I figured it was worth noting.

Adding the detail. Here I cut with the edge of my sculpting tool's spoon horizontal lines. With a little practice, this becomes very easy to do with consistent results.

Row by row, make vertical cuts until you get a grid pattern. With the ballooning that GS tends to do when you work with it, this will start looking a lot like a quilted surface. Well, using slightly less pressure when you make the cuts, that is exactly what you get. Bam! Two tutorials in one!

Once you have all of your rows cut, you need to pat and pull each square of GS. Pat: gently press on the square with your sculpting tool, and without raising it up again, pull it down slightly. Because of the sticky nature of GS, this will pull the GS down a little. Essentially one of the most annoying aspects of GS becomes a great property to work with. This is one of several reasons a lot of pro sculptors eschew the use of Vaseline. If your tool or the GS has a little lubrication, the pull technique won’t work very well. I still use the stuff because I am not as good as the pros are by a long shot. If you do, use it sparingly.

Close-up of the armor.

Here is an example of several skeleton warriors who have armor made this way. With a little practice this method is great for armor, quilting, and lizard/dragon scales as well.

If you have any questions at all about this tutorial, please feel free to PM me.