Written by
stgm
Introduction
Often I get compliments about the quality of the photos on my website, and am asked what equipment I use. The key to good photographs, however, is not in higher megapixel counts or image stabilization or laser 3D flash matrix (or whatever the latest fancy oooh-aaah technology is). It's all about light. Not surprising, given that the word photography literally means "study of light."
Everyday people post pictures of their latest work in progress or completed work, and there are indeed no shortage of breathtaking brush- or conversion work. A lot of the times, however, our appreciation of such work is lessened by pictures that are, well, simply put, not very good. The reason can be many -- handshake due to longer exposure, out of focus, distracting background, etc. -- but the biggest culprit is probably the reliance on, and usage of, the built-in flash that is ubiquitously present in just about every single camera, digital or film, costing under $3,000.
When you look at a miniature under a "normal" viewing circumstance -- most likely you are in a well-lit room, and you can view and appreciate the miniature as it is. The light or lights illuminating the room is most likely an overhead light or a torch-type that points up. Such light sources do a good job of diffusing light and providing level lighting that make it possible to read, paint, write, etc.
However, when you take a photograph of a miniature with the built-in flash, the light source is very small, is very close to the lens, and is very intensely focused. It does an OK job taking pictures of a group of friends at night from 5-10 ft., but it tends to overwhelm a miniaure, especially if the camera is positioned somewhat close to it.
Built-In Flashes
Take a look at this picture. It is a 28mm Space Marine figure (in progress), taken with the built-in flash:
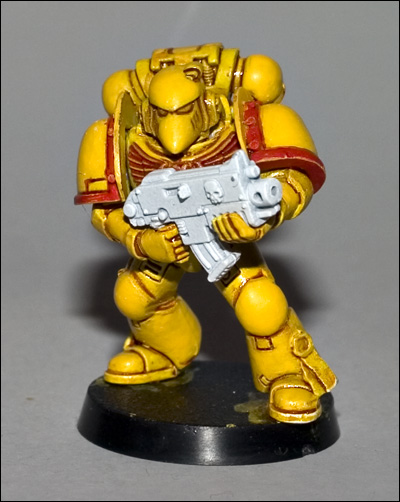
example of a built-in flash
At a glance, it looks OK -- right? Well, no, not really. The intense burst of light tends to "flatten" the subject matter, so any naturally occurring shadows under the chin or nose are lost (notice the "shadows" you see on the miniature are actually an ink wash kind!). Then there are other disadvantages: The dark, harsh shadow right behind the figure can be distracting; the flash will create glares from any kind of shiny surface; the color comes off very strong and stark. In all, it's not an ideal way to photograph!
External Flashes
This next picture is of the same miniature, but the light source used is an external flash, with a tilt-and-swivel head. That feature allows me to "bounce" the light off the ceiling or the wall behind me. It's helpful if the ceiling or the wall in question are painted in white; otherwise some post-processing work in an image editing software is necessary to correct the color tone.
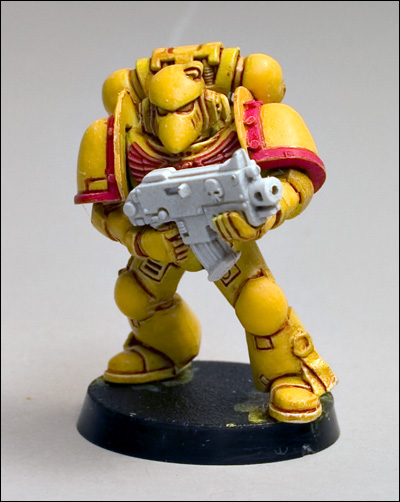
example of an external swivel-head flash
I hope you can tell the difference! For starters, the image is definitely "softer" without losing focus or detail. There's a pleasing overhead directional light, and that gives the Space Marine's figures more depth and feature.
However, it's not every camera that has a hotshoe to attach an external flash to. Typically most point-and-shoot digital cameras costing under $500 will not have a hotshoe; the more advanced "prosumer" cameras, as well as pretty much all digital SLRs, do have them. And even if your camera did, it's no small expenditure, as most digital flashes with tilt-and-swivel heads start at around $200, on top of the camera! (pardon the pun)
Ambient Lighting
So, what to do, what to do? Well, there is a third way that yields just as good results as using external flashes, but only costs a fraction of the price tag. It's called a tripod. Yes, those klunky, definitely pedestrian, unsexy tripods. But only to the uninitiated! In the photography field, tripods are revered and esteemed as a valuable part of any photographer's equipment, and it's not unusual to see people spending $300-600 on quality tripods.
But for our purposes, you only need to spend about $20. You can get a 5- or 6-ft. tripod for that amount, and that will do just fine. The only thing you need to pay attention to is how much weight the tripod can support. For most point-and-shoot digital cameras, this will not be an issue, as those cameras are far lighter than what even the cheapest tripods will bear. You can even get a mini-tripod, but I'd recommend you still get the regular tall one; as their legs are in sections, you can use them as a table-top tripod by not extending all leg sections. However, do avoid the super duper mini tripods, the ones with bendy legs; at the minimum, you want a tripod head that will swivel and tilt.
The key to achieving great results with a $20 tripod is to use ambient lighting. You know, the light that illuminates your room. For this to work, your camera must be able to allow shutter speeds longer than one second. I'd venture to guess that most digital cameras will let you take long exposures; if your camera has manual or aperture/shutter priority modes, then you're in luck. Most newer cameras should, except for the super ultra compact ones.
So set the camera on the tripod and point at the miniature. Use the LCD screen to frame and adjust exposure as needed. The length of exposure -- how long it is -- will depend on how well your room is lit. Don't use table lights or flash lights to illuminate the miniature; let your room's ambient lighting do the work. If your camera shows histogram, learn to use that -- it's invaluable in properly exposing a photograph. Use the timer function to take the picture; otherwise your act of pressing and releasing the shutter might introduce vibration to the picture (blurred picture).
Here's a picture of the Space Marine, using a tripod, timer, ambient lighting, and no flash (the shutter speed was 1.3 seconds; as a comparison, and as a general rule, you really can't take hand-held shots at speeds slower than 1/40th second):
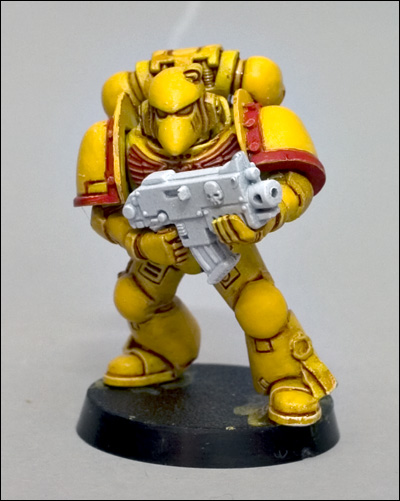
example of ambient lighting
If anything, the figure looks even better than the external flash photo! Actually, that's likely, as the external flash light -- bounced off ceiling as it were -- is still an intense, small source of light; for light diffusion and level illumination, it can't compete with a room light. You still have your natural shadows and a sense of depth.
Incidentally, the photo came out of the camera looking like this:
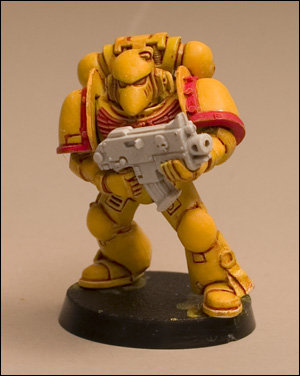
example of ambient lighting - not color corrected
Without getting too technical, this is due to the different light sources having different "temperature" and the camera's built-in white balance not being able to compensate adequately when left on "Auto White Balance." If I had set the camera to the proper white balance (in this case, tungsten light source), then the figure wouldn't have such a yellowish cast to it, but as I post-process all my images, it's no big deal to correct it afterwards for me.
Comparison Shots
Finally, here's a few comparison photos showing the same section of the miniature, with the three different light sources:
The Tyranid Biovore really illustrates the differences between different light sources because it has a glossy finish, which means the built-in flash really plays havoc with this one...
I hope you found this article useful!

