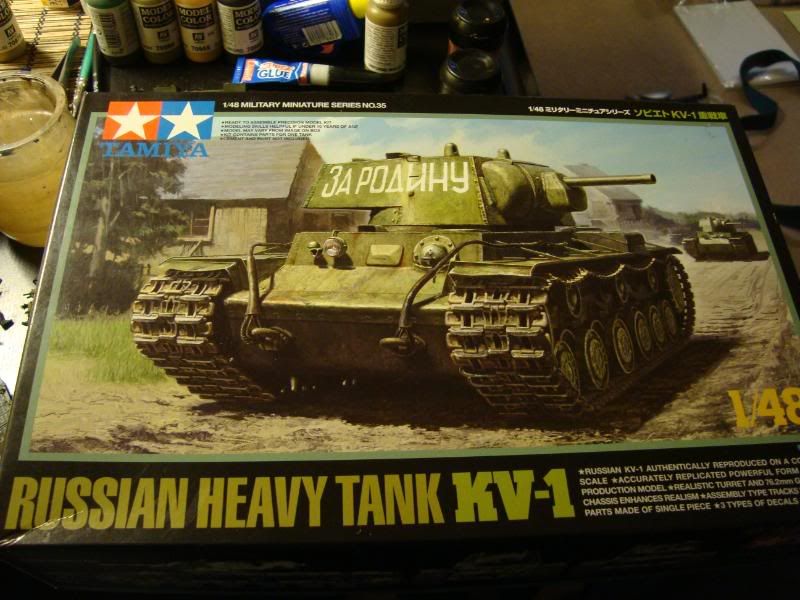
11330
Post by: Gundam-Mecha
As mentioned in my Thunderbolt Diorama, I'm also currently working on a WW2 1:48 Scale Diorama as a gift for a relative.
I decided on 1:48 scale for two reasons, firstly its the closest scale to what I'm used to working with on Citadel and Forgeworld items, and second it is compact and easier to transport (which is vital as the finished piece would have to travel overseas with me to Minsk to be delivered).
Having spent my new year celebrations in Minsk (Belarus), with my girlfriends family we spent sometime in the "Great Patriotic War Museum" which is what the former USSR countries and Russia refer to WW2 as. This term specifically relates to what we know as the Eastern front. Having seen the amazing exhibits at the museum I felt inspired to model a Red Army peice as I felt it only appropriate.
Incidently the displays in the museum were fantastic with a huge collection that focussed only on Partisan resistance groups, the Red Army, and Nazi Concentration camps in Belarus and Southern Russia. To see such a large collection focussed on just Russian and USSR WW2 History was very interesting as most museums I've visited in the UK and Europe have been wide ranging covering German and Allied forces, allowing little depth for each.
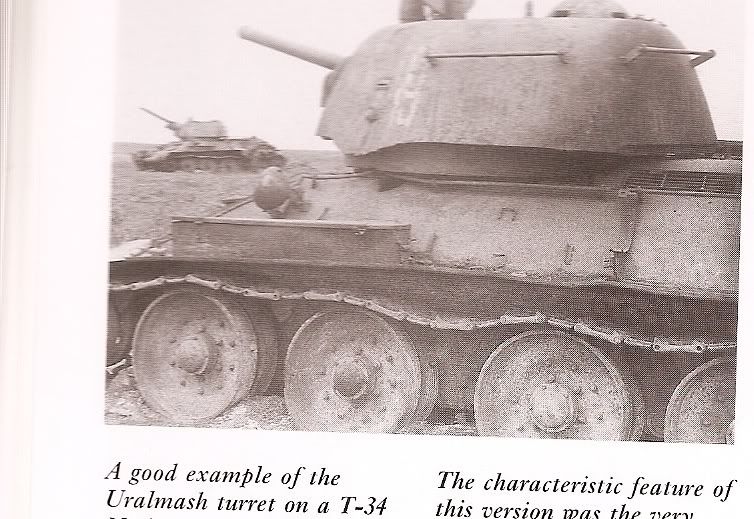
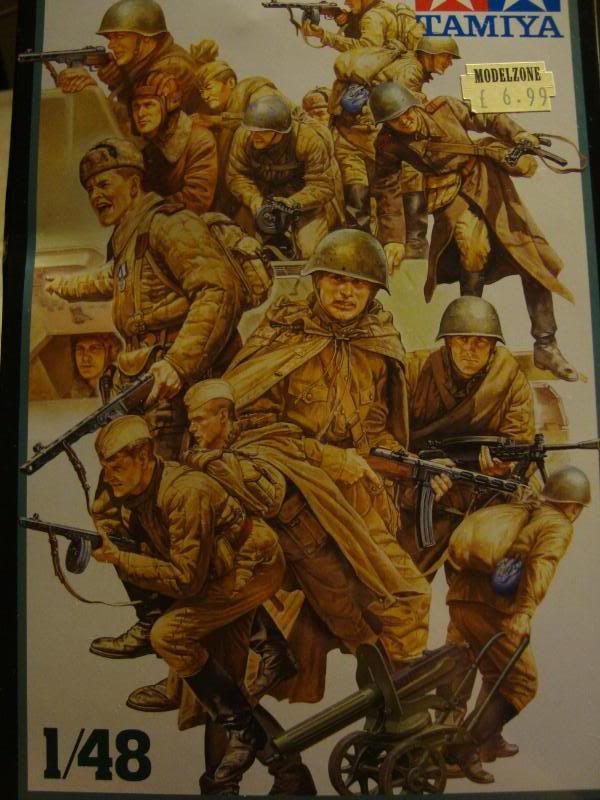
I decided to go with Tamiya 1:48 kits for this project as I was very impressed with the components I used in my Thunderbolt Diorama from Tamiya. As reference I'm working from the following two books by Osprey Publishing, In particular the work of Mig Jimenez of MIG Productions fame was a huge influence and inspiration. He really is a fantastic modeller and painter.
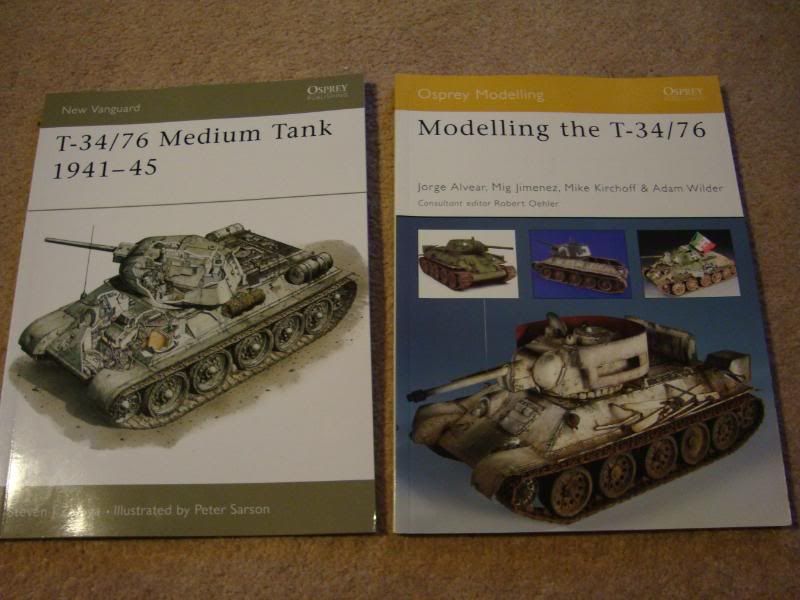
These really are great books, not only very interesting in terms of history and background, but also as modelling guides they are four star and easily on the level of the Forgeworld Masterclass Book (which obviously owes alot to books likes these and Mig's F.A.Q book). They also have lots of full colour plates and cross sections which is very interesting generally speaking in Tank design, where principles could be easily transfered over to 40K Imperial Guard Armour.
The Diorama plan:
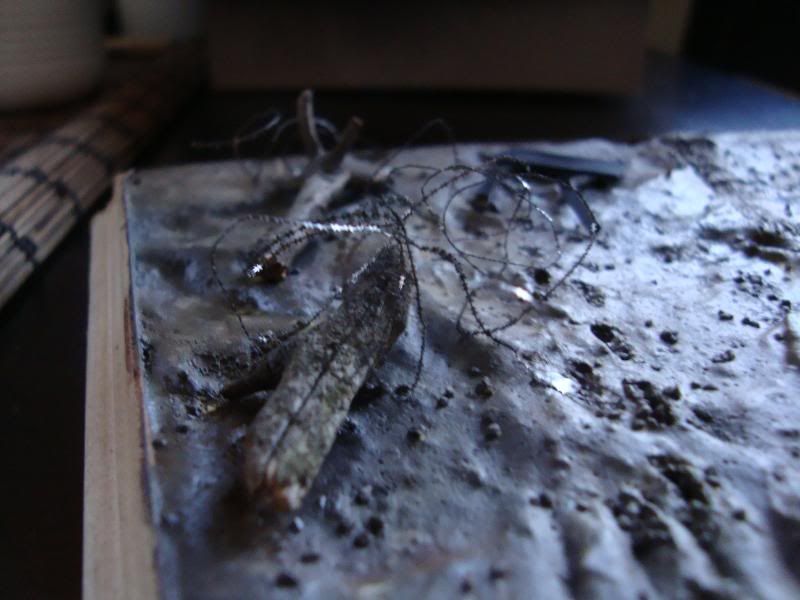
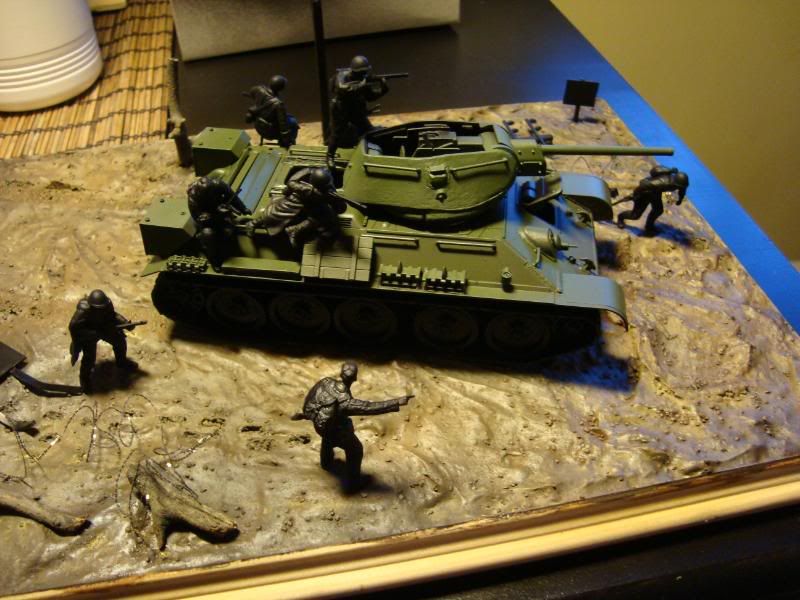
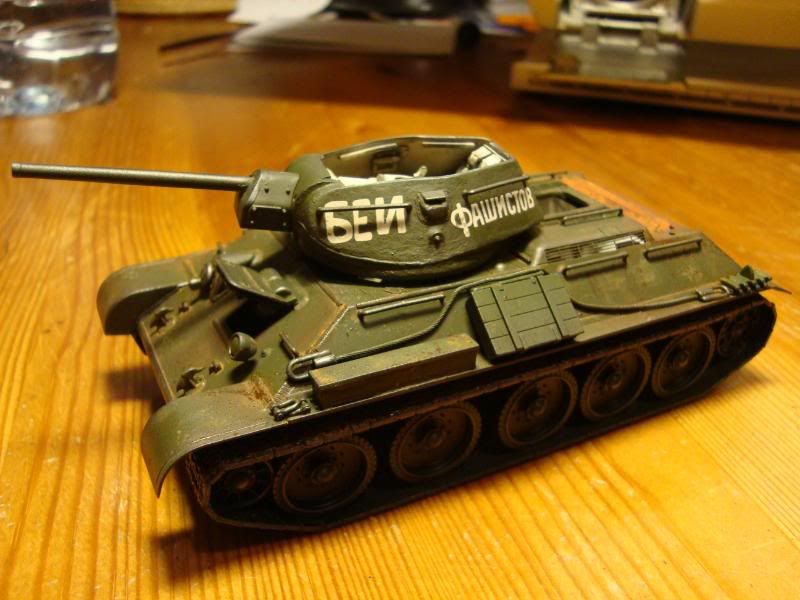
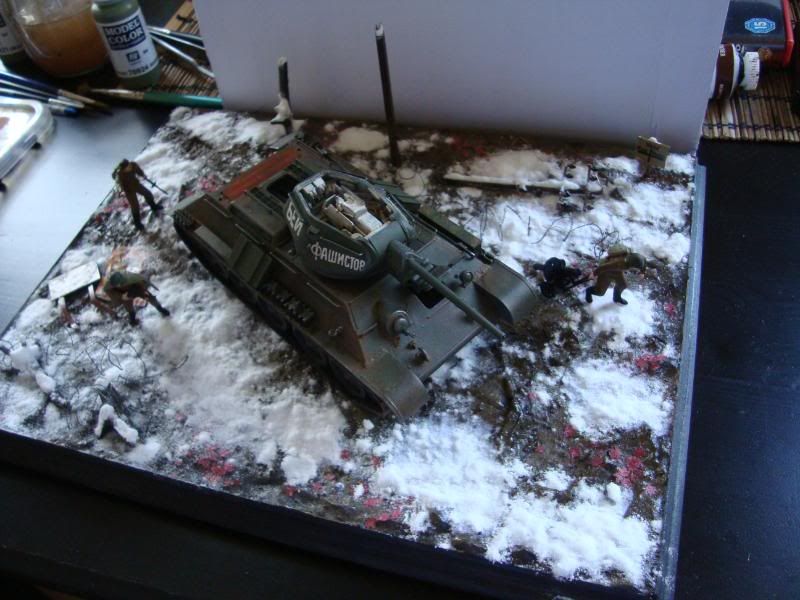
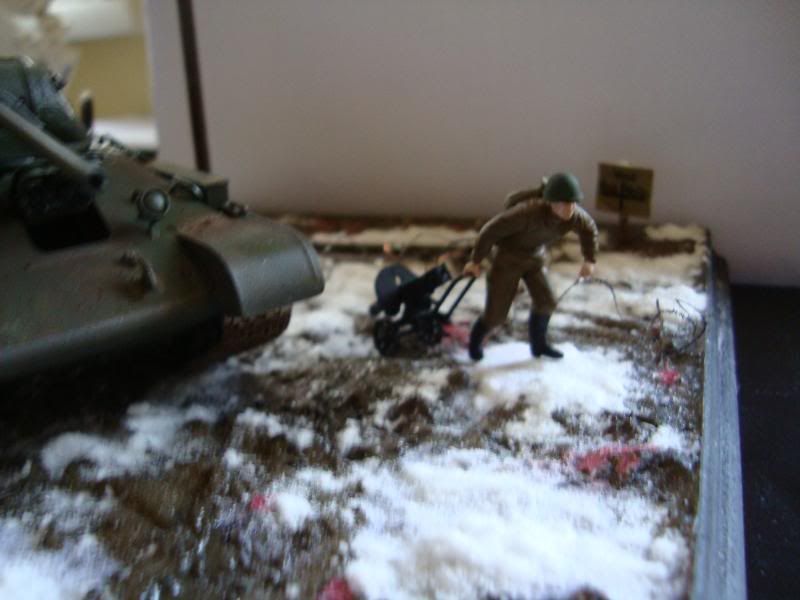
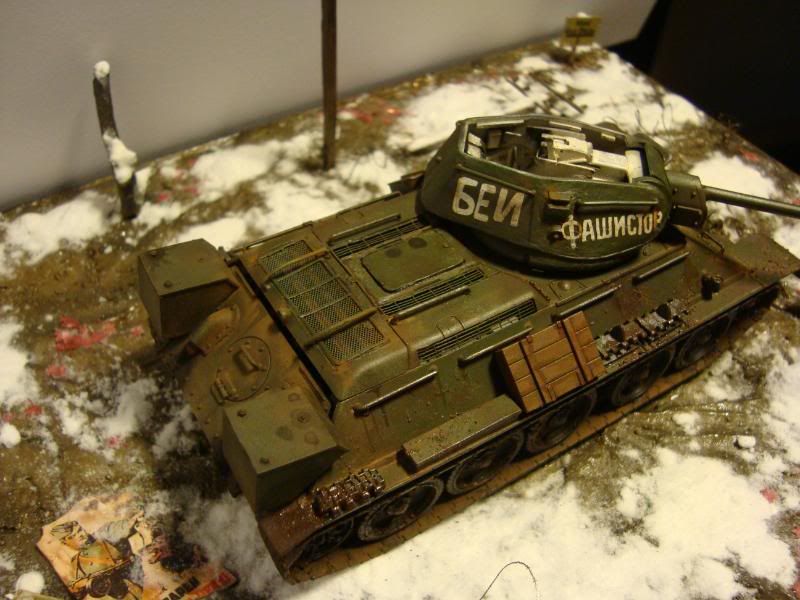
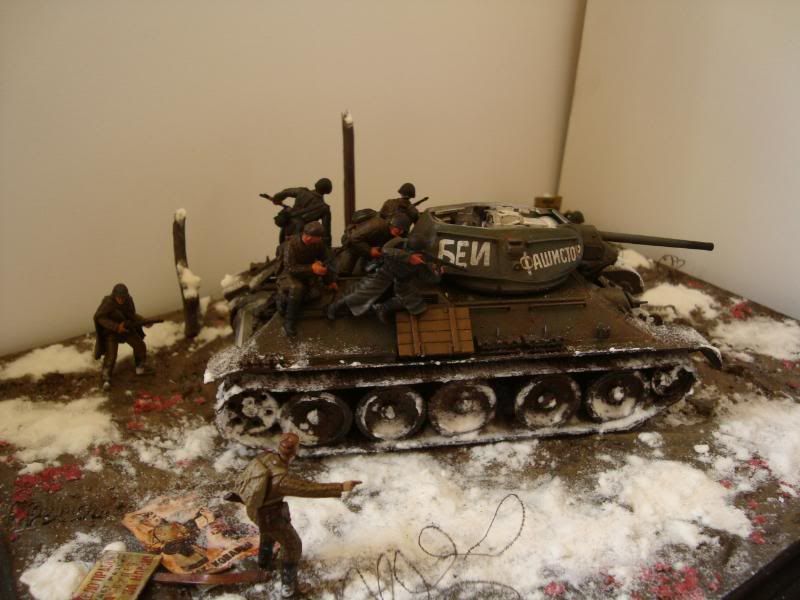
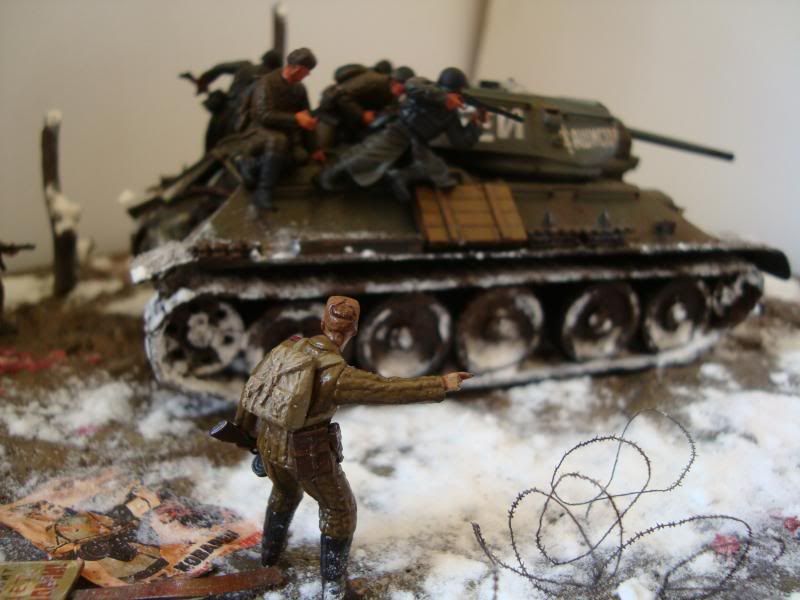
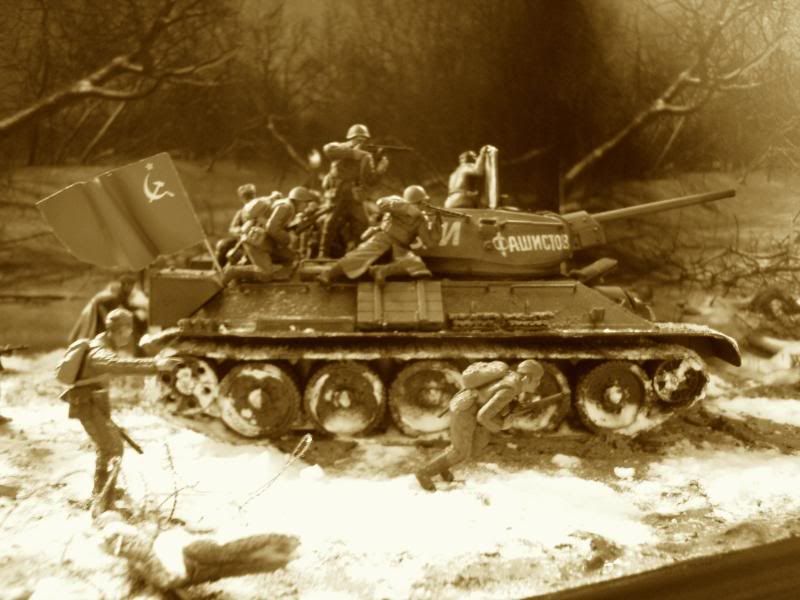
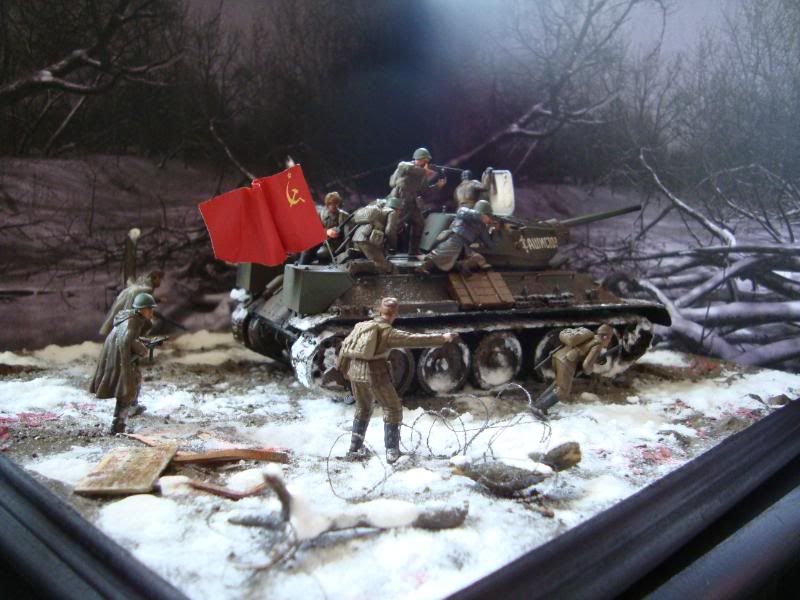
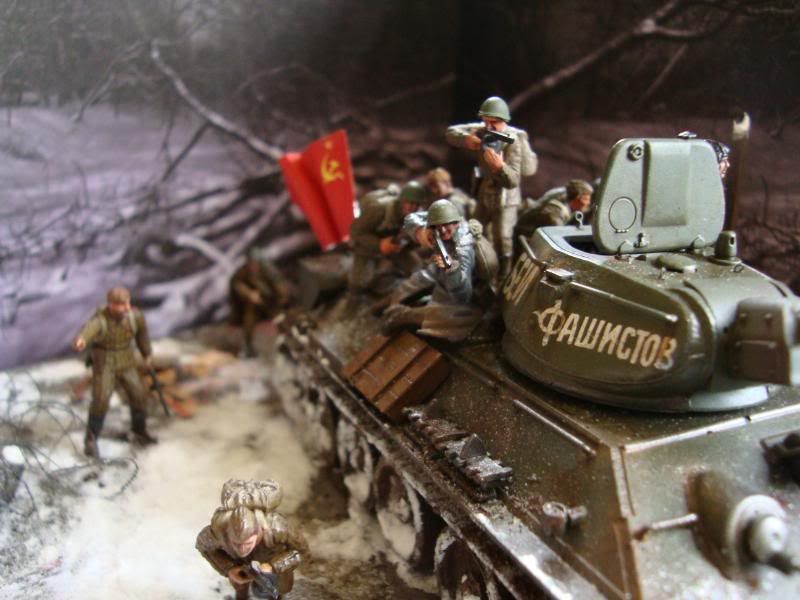
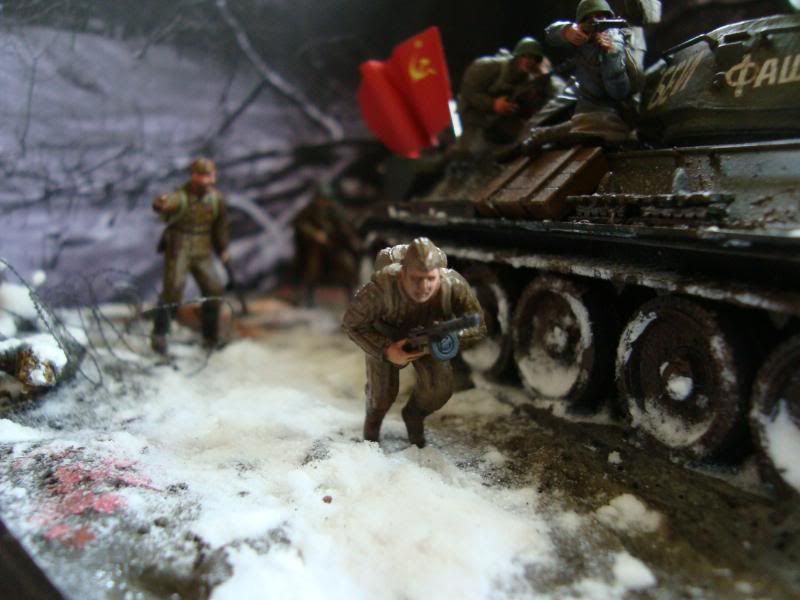
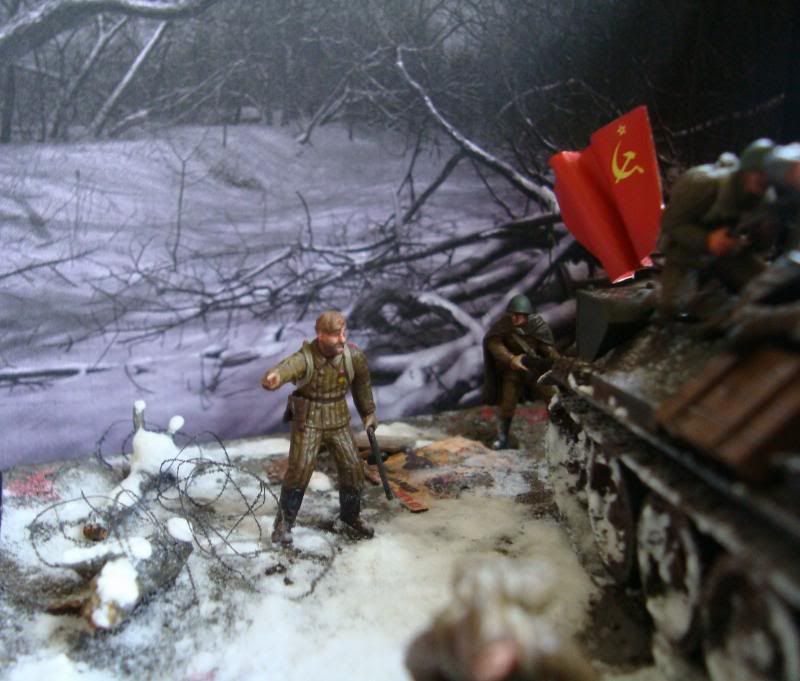
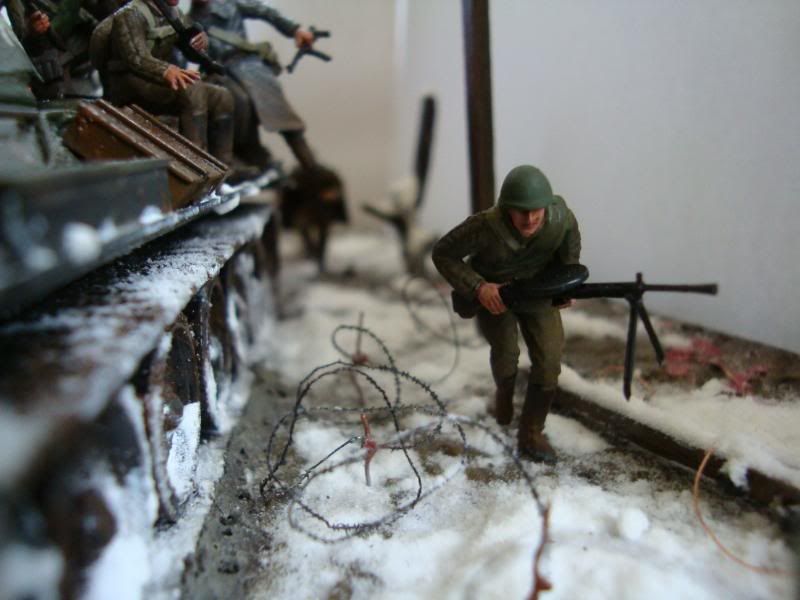
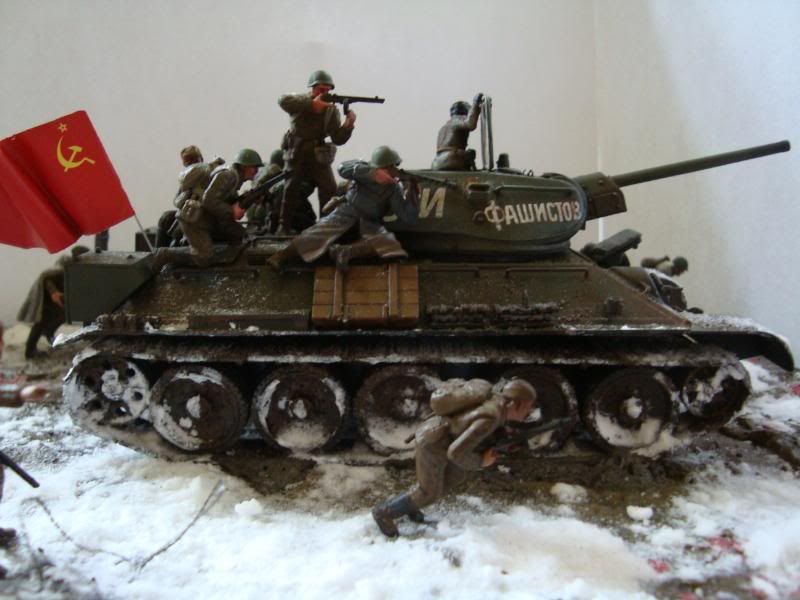
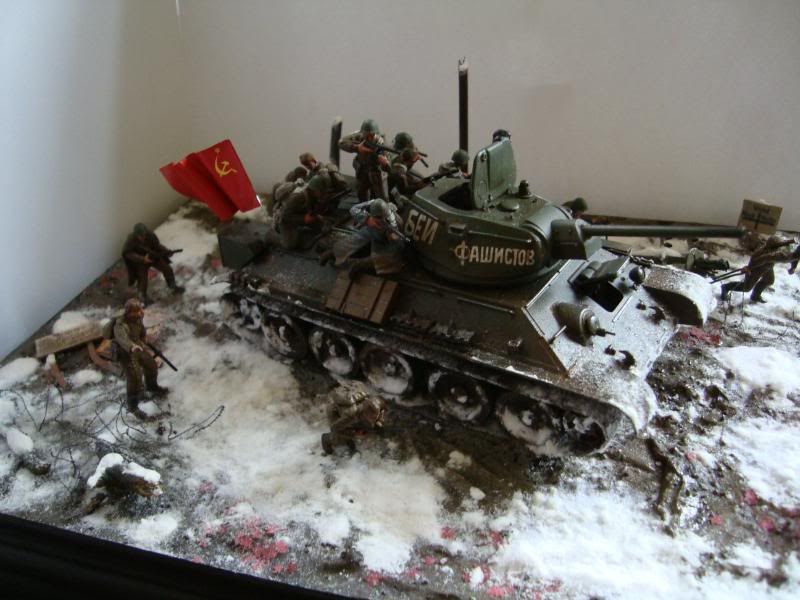
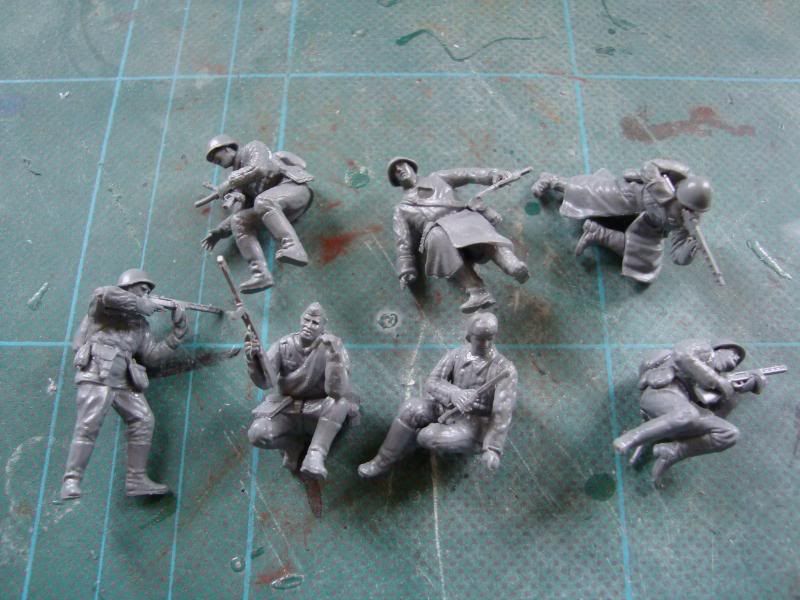
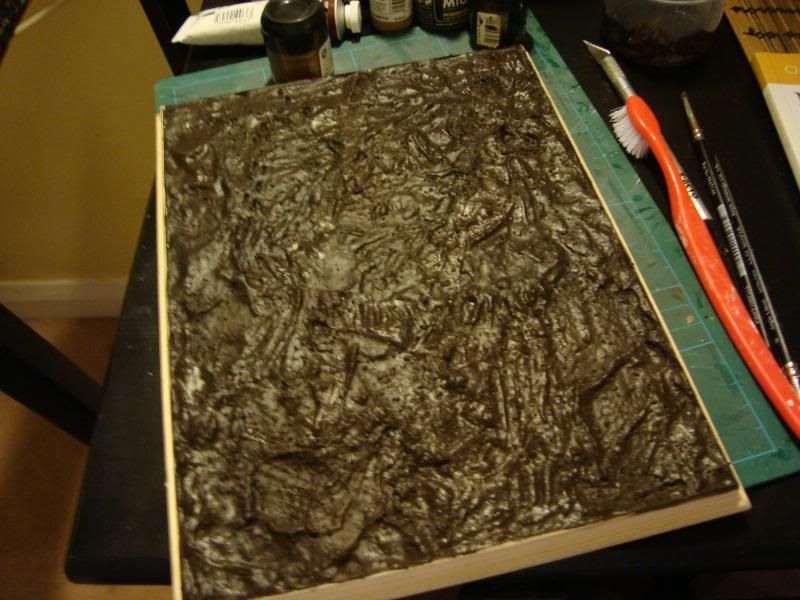
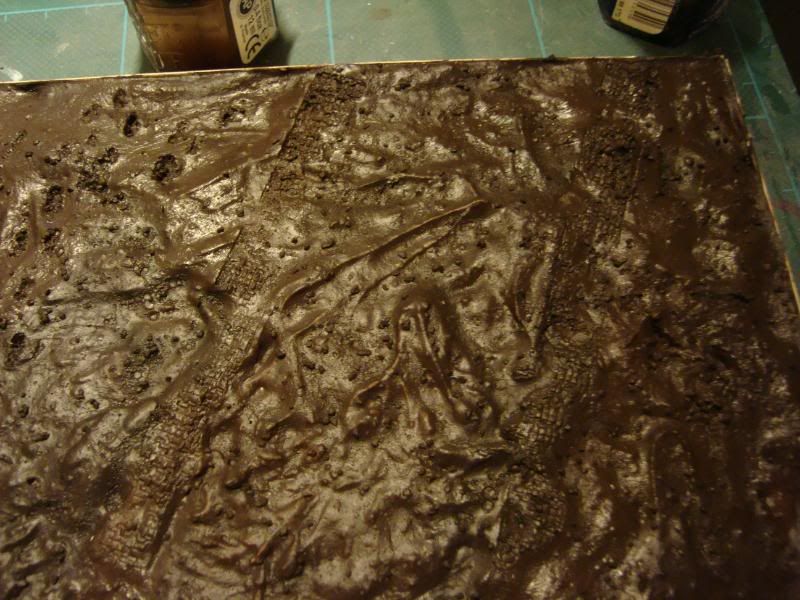
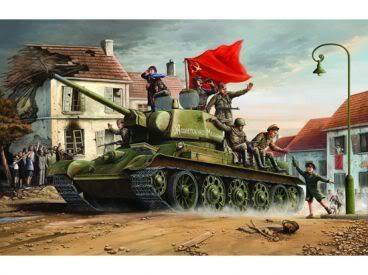
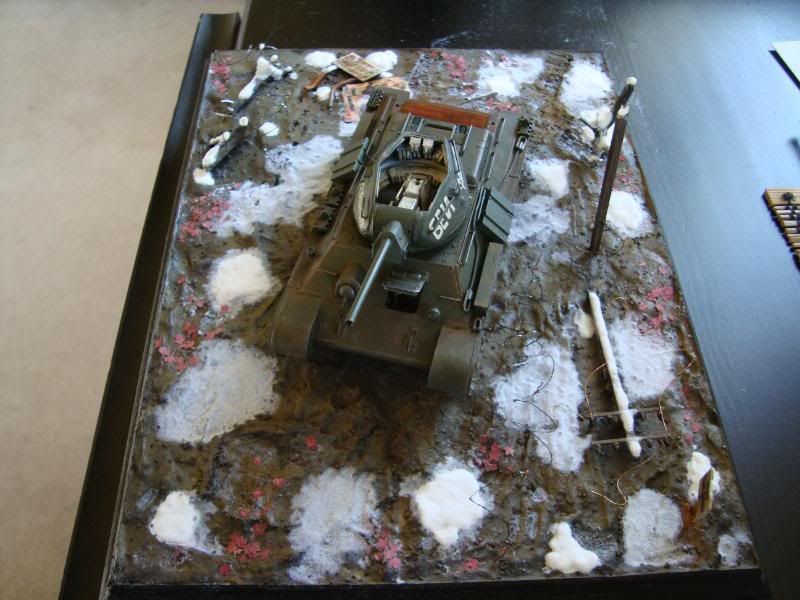
The diorama will be a small peice with a T34/76 Tank driving through a battlefield scene with Infantry riding the tank as well as running along side the vehicle. The idea is to have a muddy battlefield with effects such as tank tracks pressed into the ground, craters from shelling, as well as a great deal of water effects filling muddy puddles and craters etc. I want to try and give the piece a gritty realistic look whilst not going too over the top with the mud effects and weathering.
The Models:
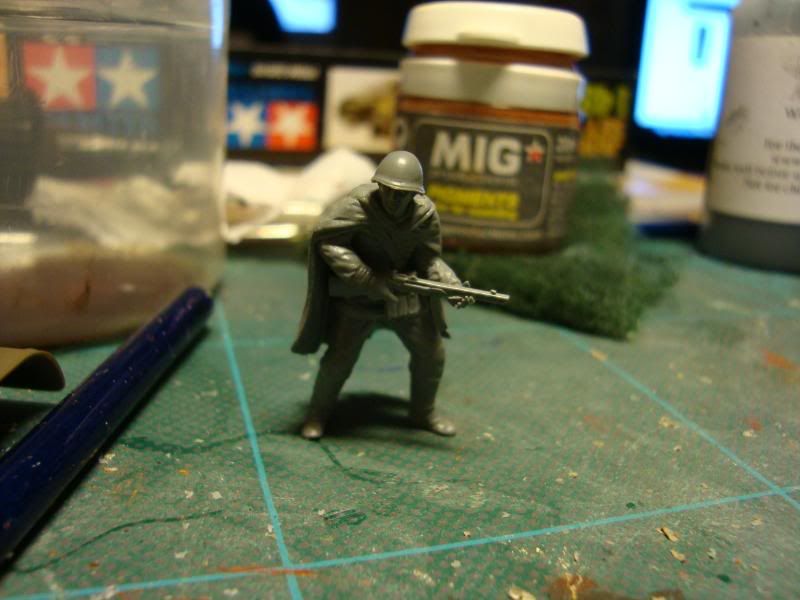
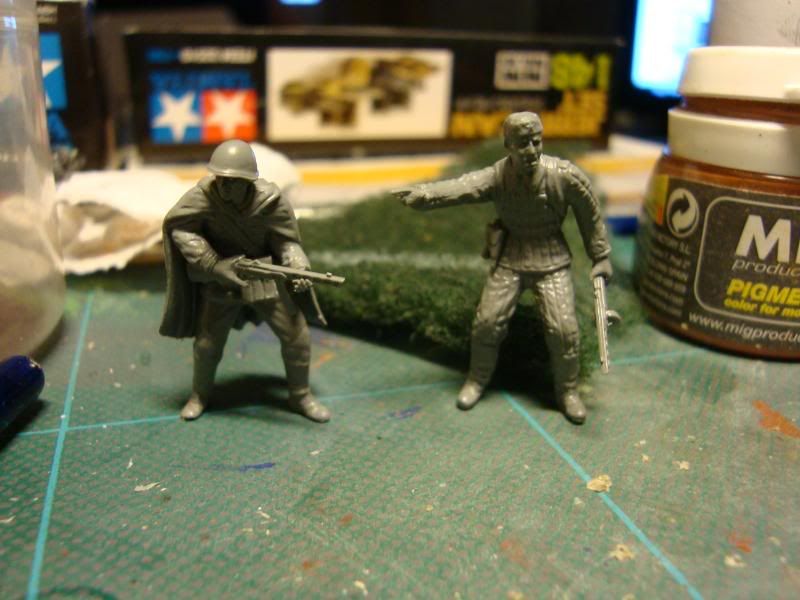
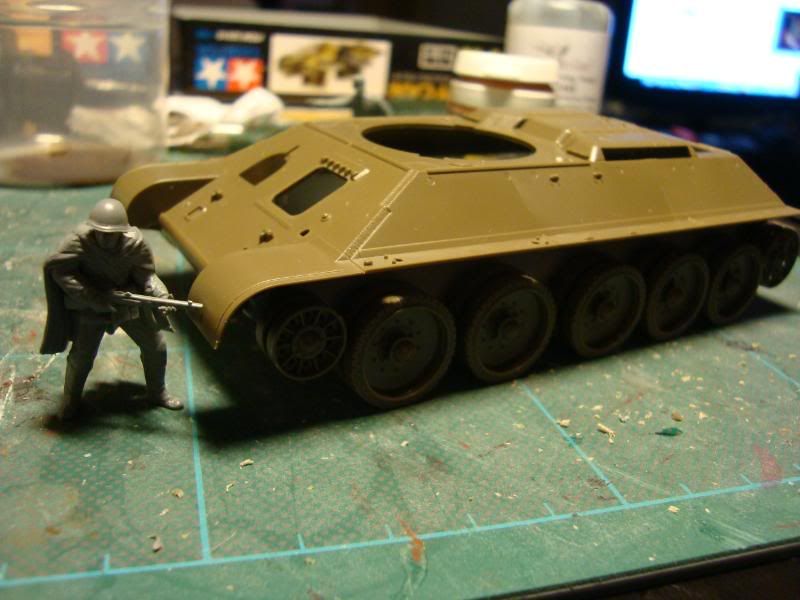
As you can see the detail on the Tamiya kits is fantastic for plastic models, and easily on par with forgeworlds resin infantry in terms of scale and detail. It was really nice to get away from "heroic" scale figues and work on something that was actually much more realistic in terms of proportion and sculpt.
Here's a scale comparision next to a forgeworld infantry sized miniature:
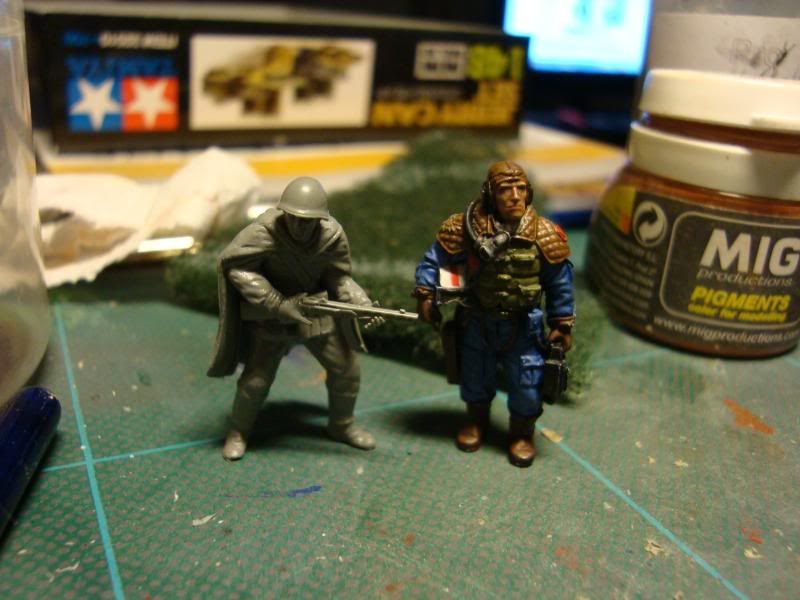
Scale wise they are a close match and as I found with my Thunderbolt ground crew the plastic Tamiya components fit very nicely with the forgeworld troops and really open up some interesting and exciting conversions opportunities.
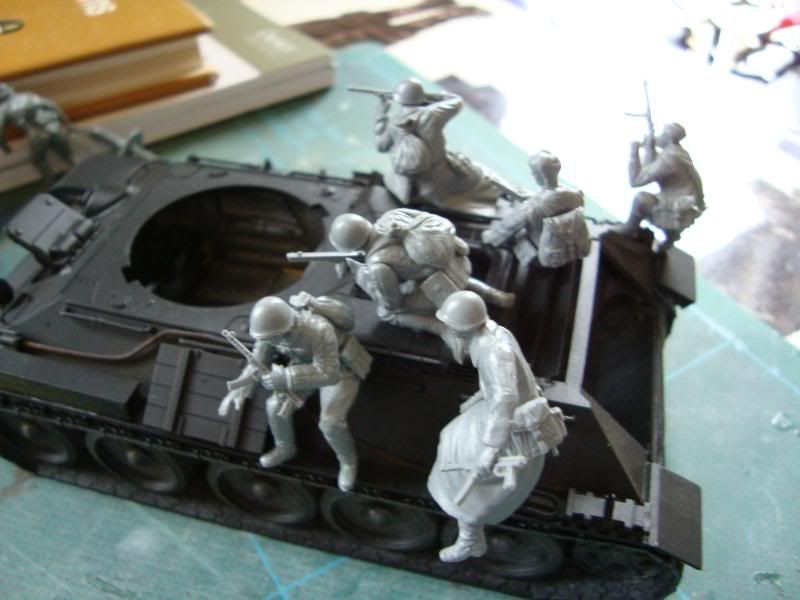
The Tank:
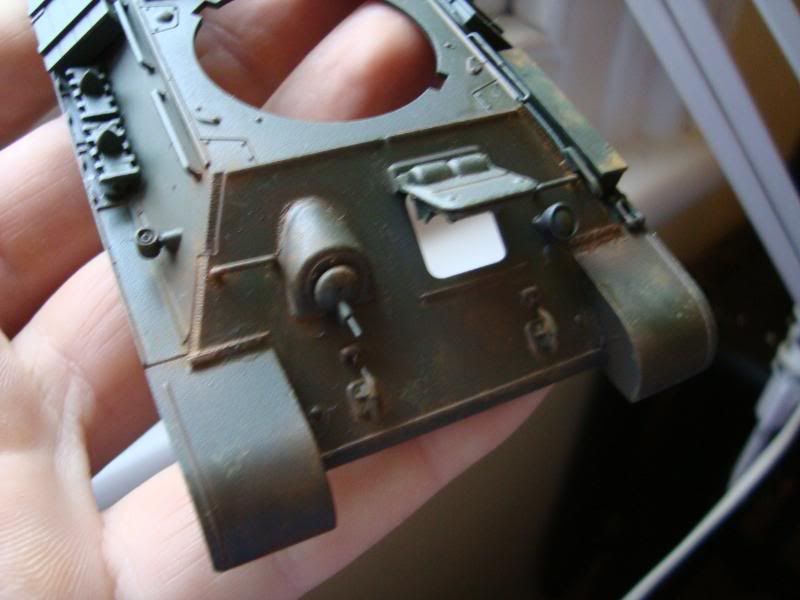
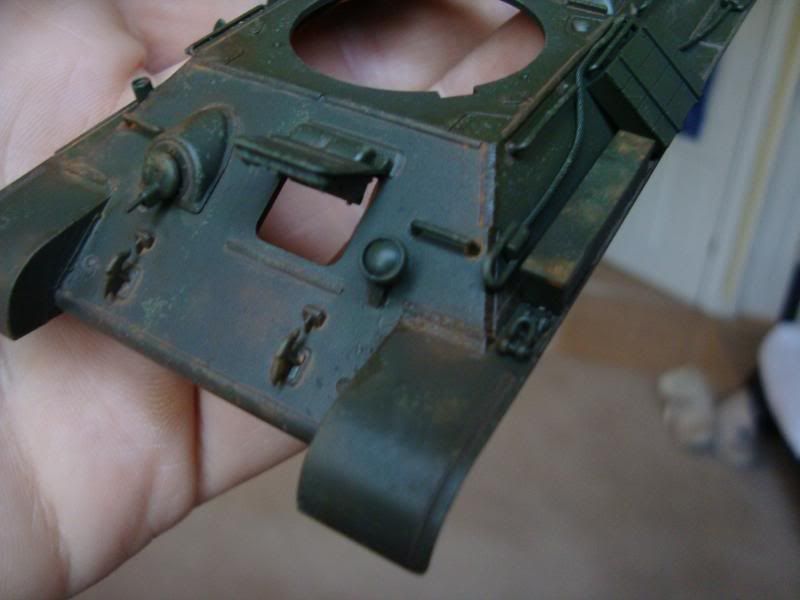
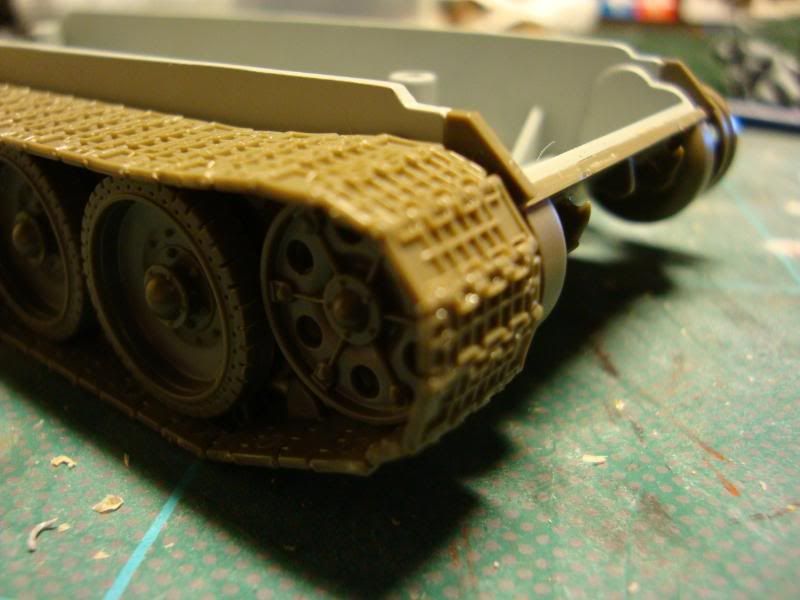
Scale wise the Tank is just right and looks great next to the Infantry. Also much like the troopers the level of detail is very high even at this small 1:48 scale. The wheels and Treads especially were very nicely done. I thought Imperial Guard Vehicles were tough treads to make... these ones were even more challenging! Lots of tiny little links that fitted together especially around the front wheels, however the effect is well worth it and even though these are the basic plastic parts that come with the kit they give a really nice finished effect.
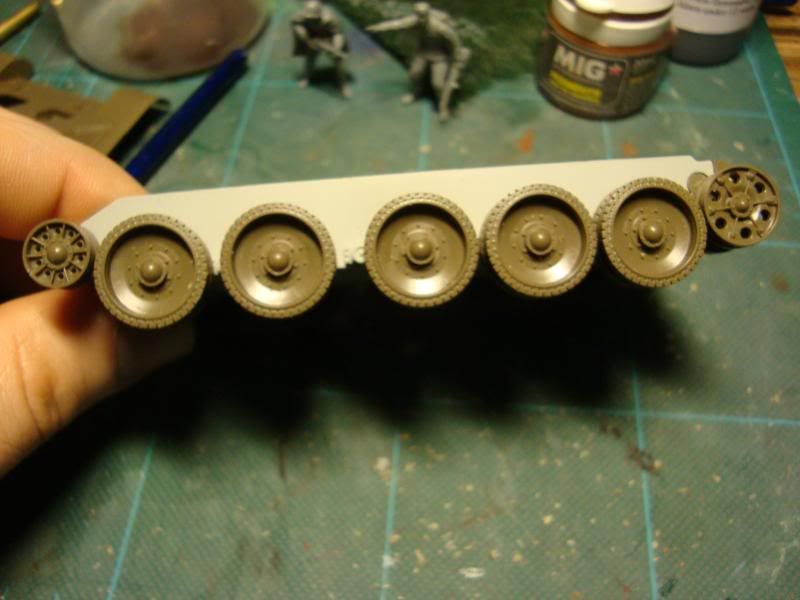
The Wheels and lower hull (the Hull is made from cast metal to give extra weight to the kit)
Scale comparision
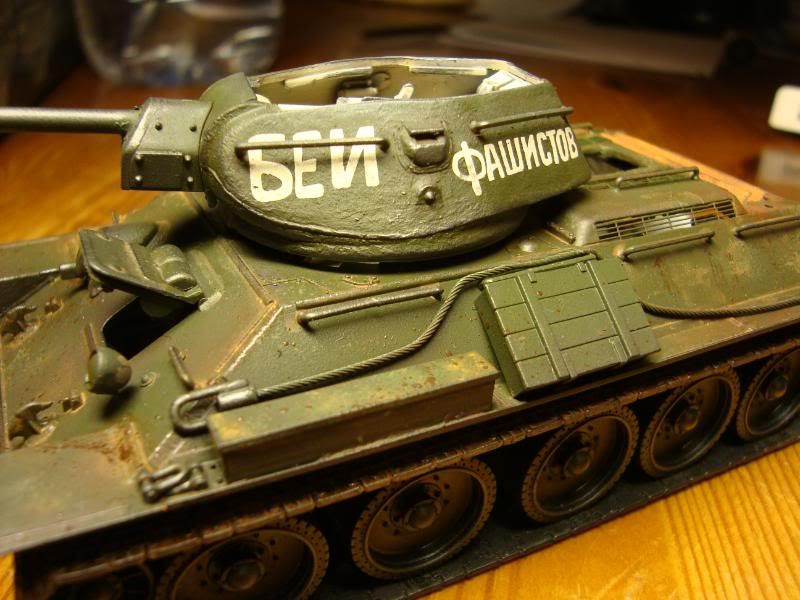
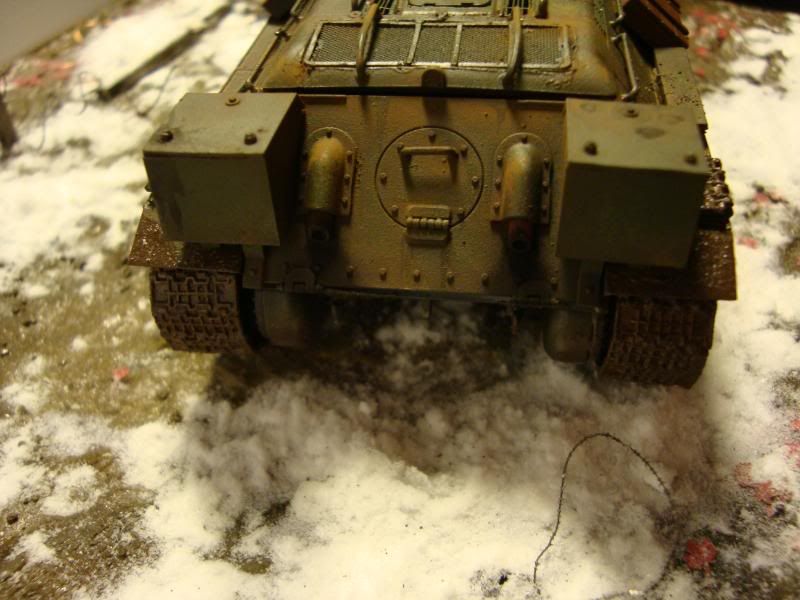
Assembelled Tank with upper hull and extra rivet details on the rear fuel tanks
10392
Post by: Paul Atreides
Very interesting. And double the amount of post increase I get for commenting on two different blogs... Niehehehehe....
471
Post by: davetaylor
Looking good Gundam, I'm excited to see the types of weathering you use on this project.
Cheers
Dave
7013
Post by: Ifurita
Always nice to see something historical every now and then. I used to paint 15mm Napeoleonics.
8551
Post by: captain.gordino
GW's never made a tank as attractive as the T-34.
EDIT: In my humble opinion.
9505
Post by: CaptainRavenclaw
I'm excited to see how you make the craters. I've always wanted to create some realistic looking ones but have never had the time or the technique.
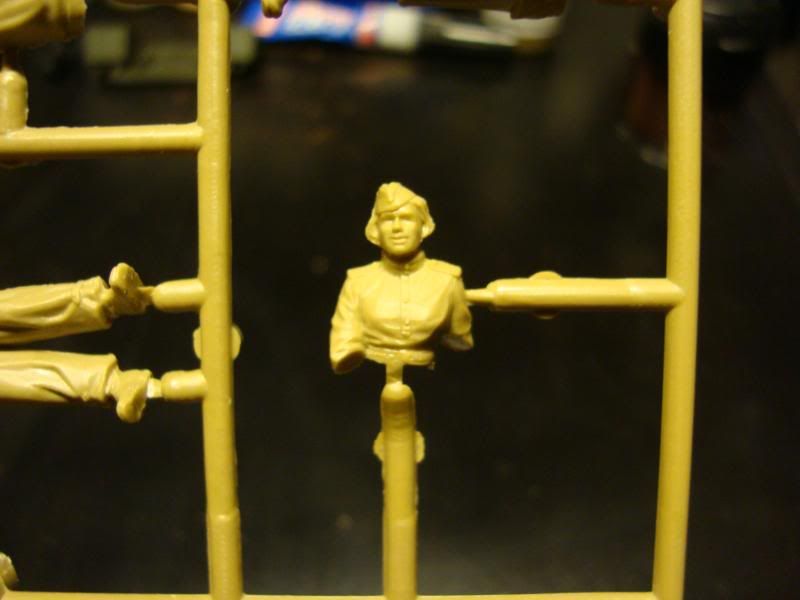
11330
Post by: Gundam-Mecha
Time for some more updates.
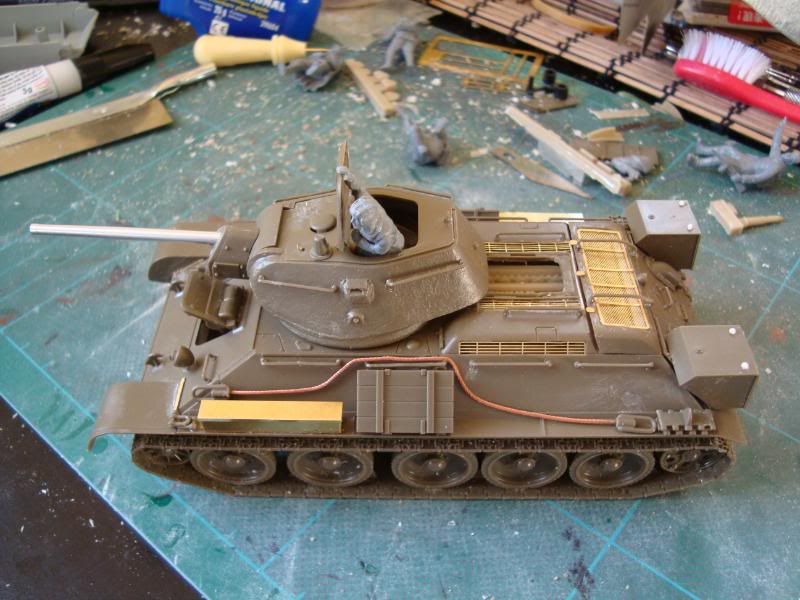
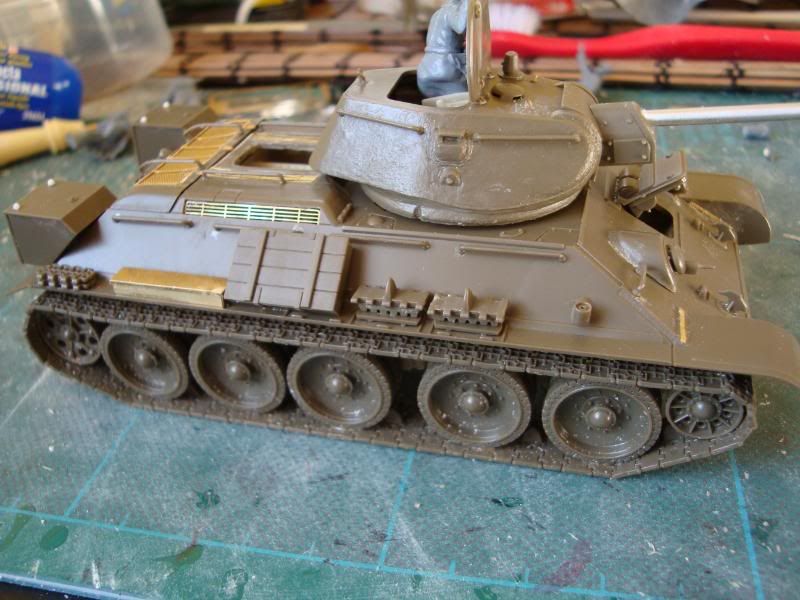
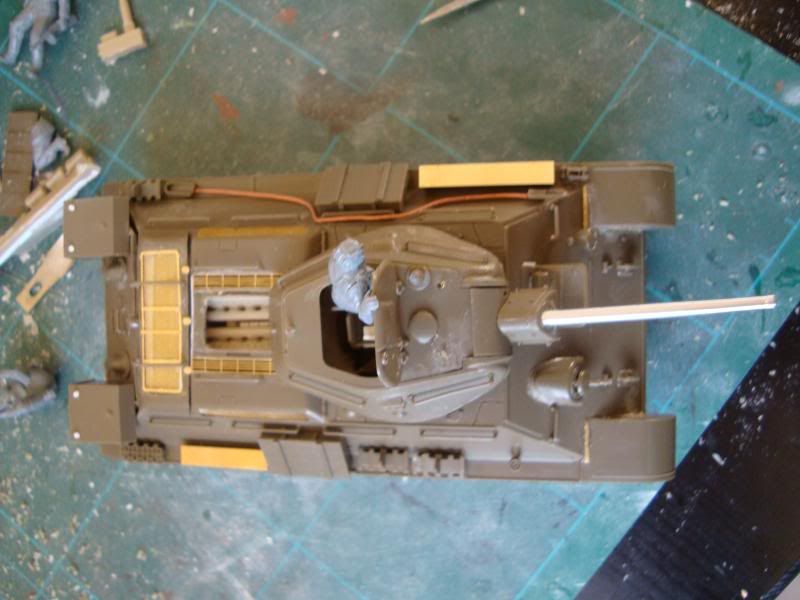
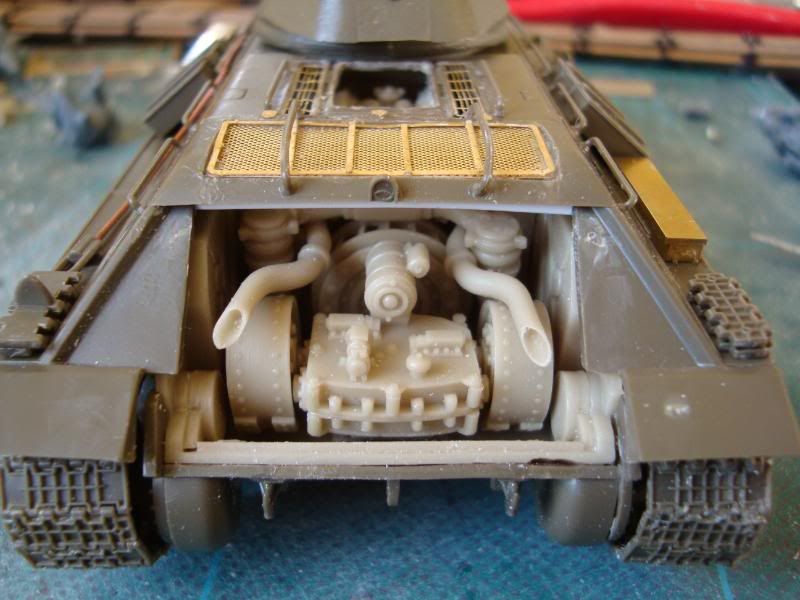
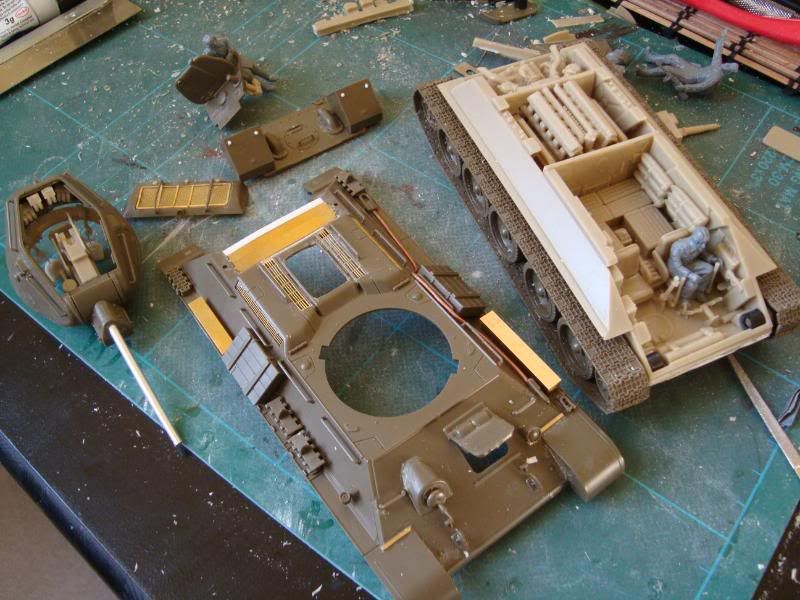
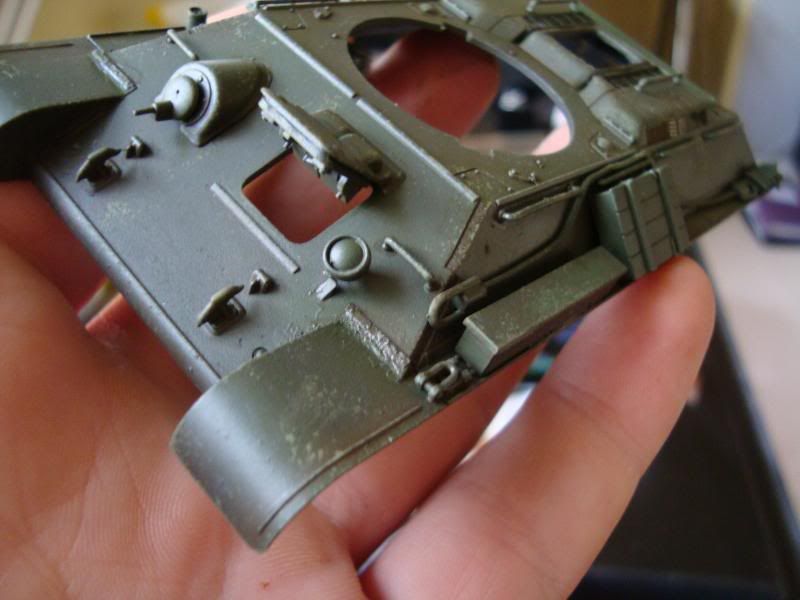
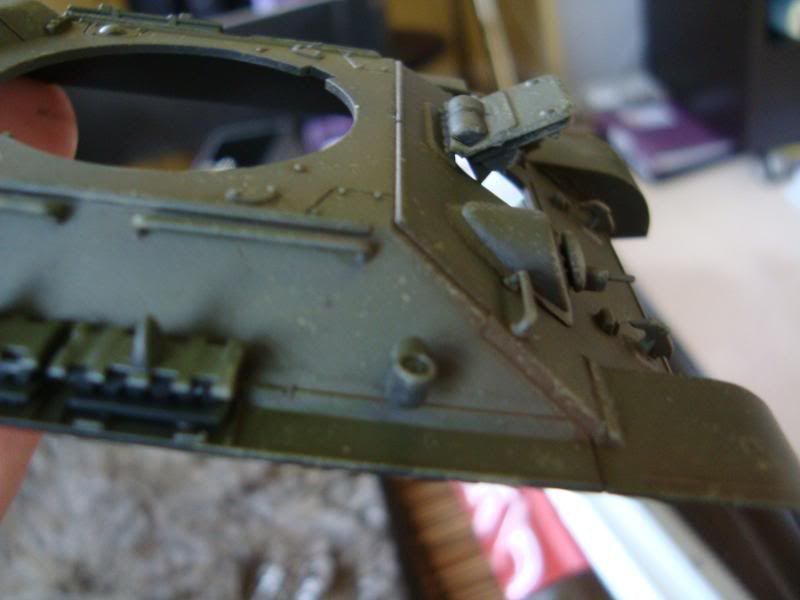
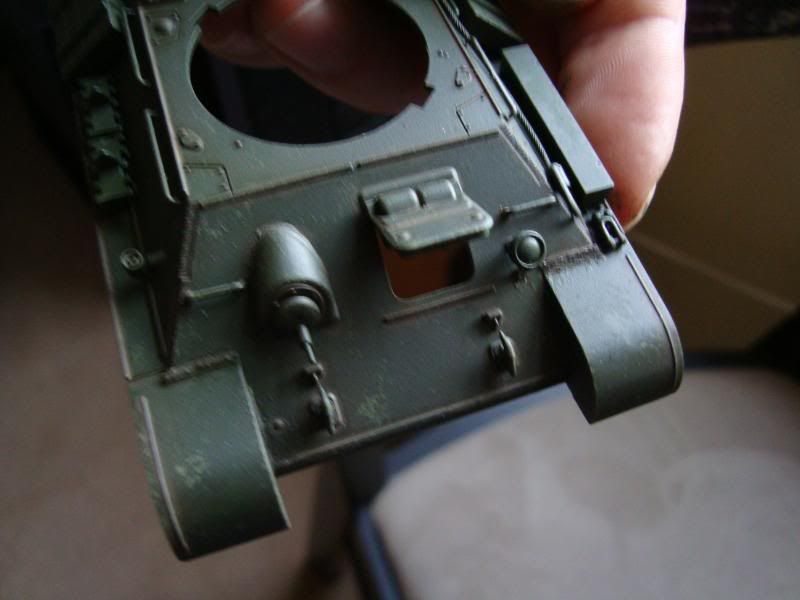
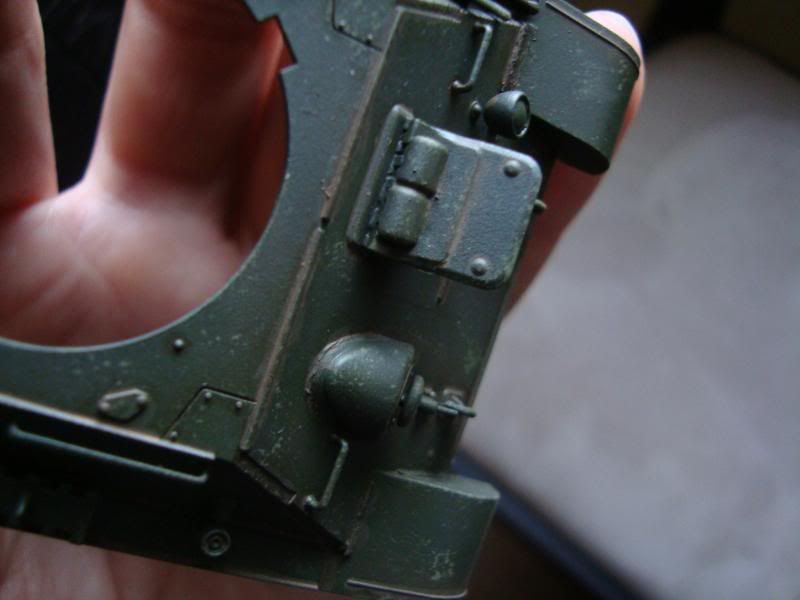
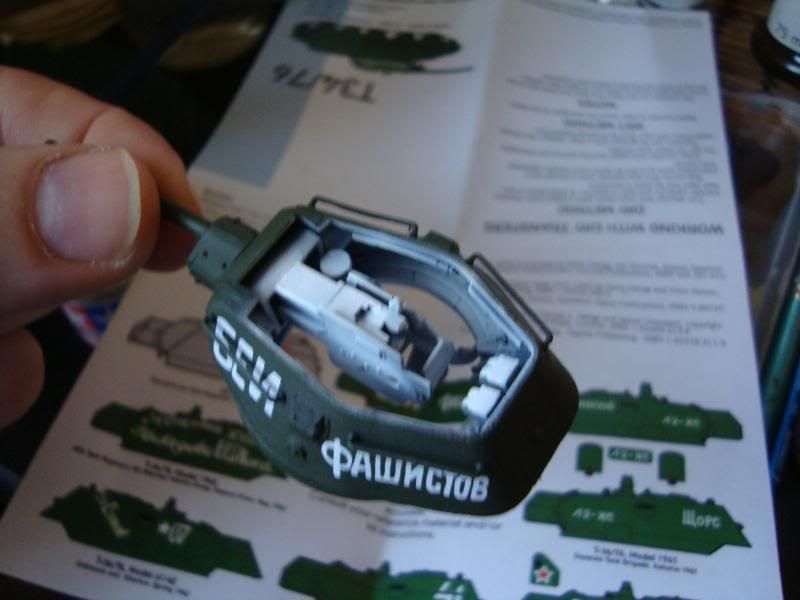
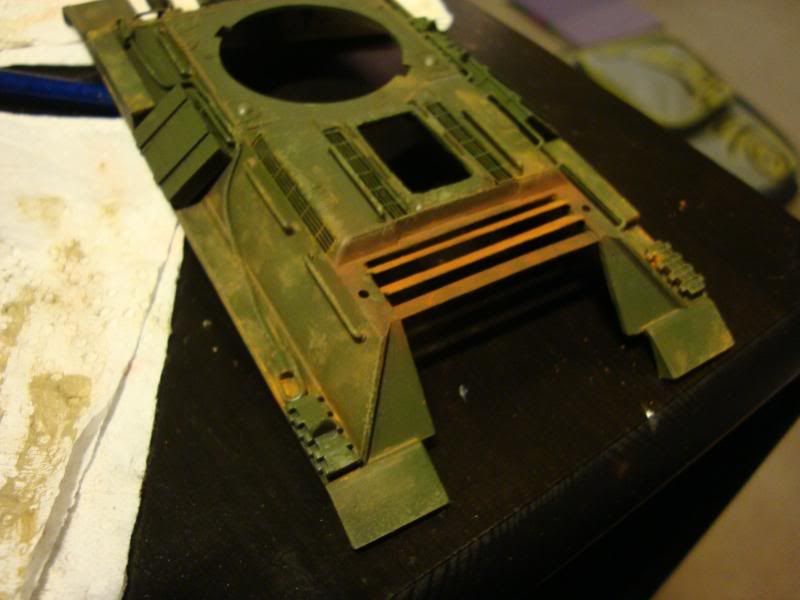
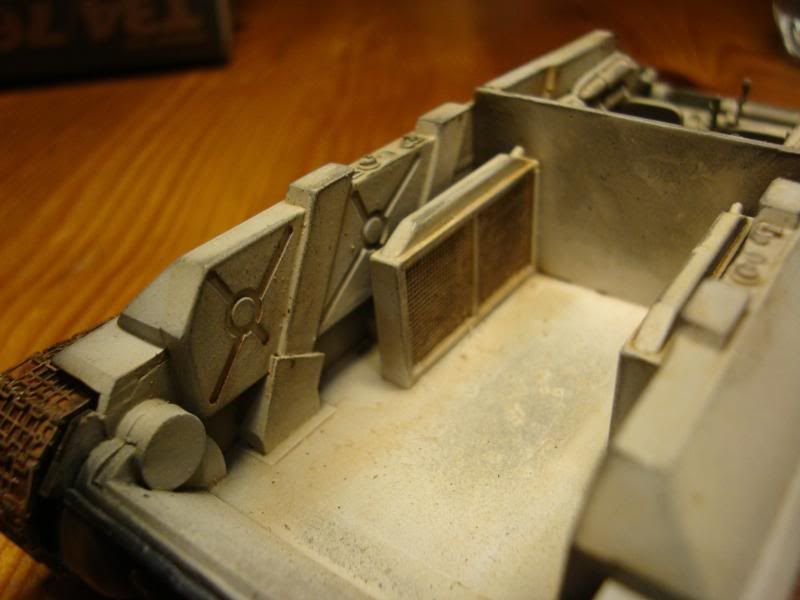
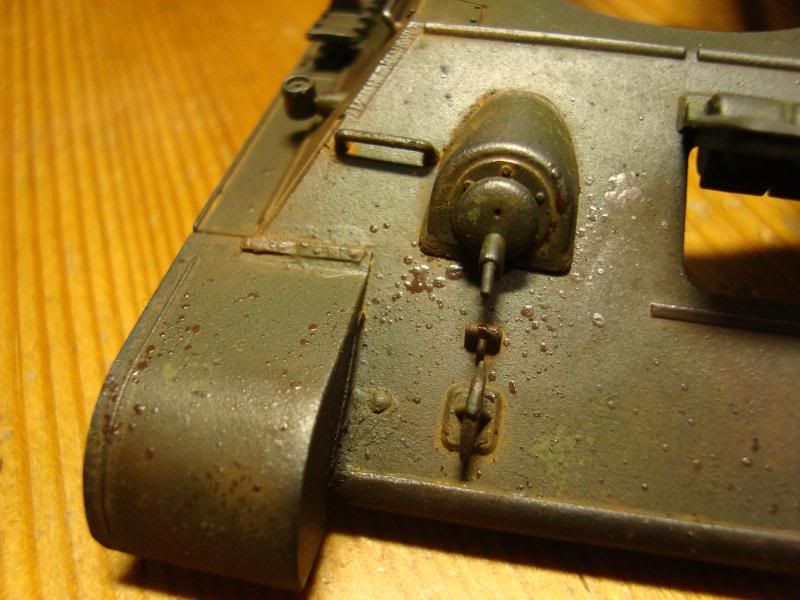
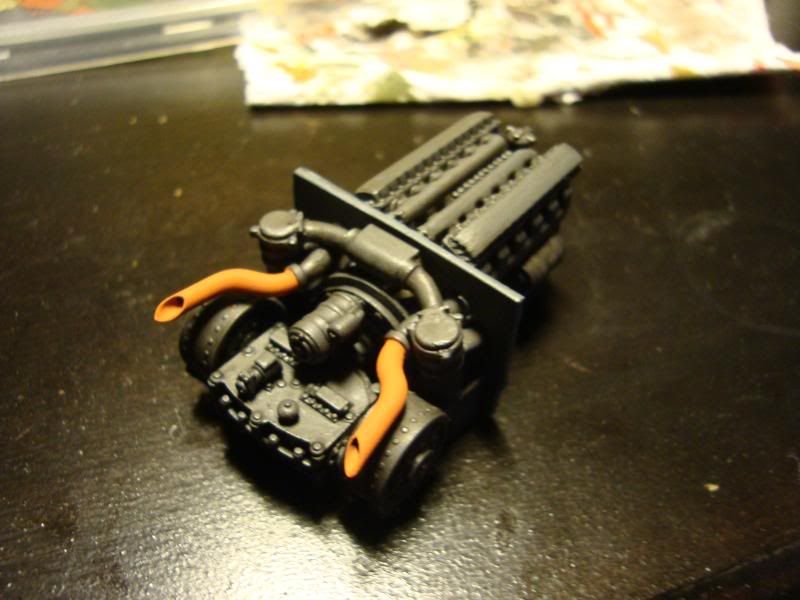
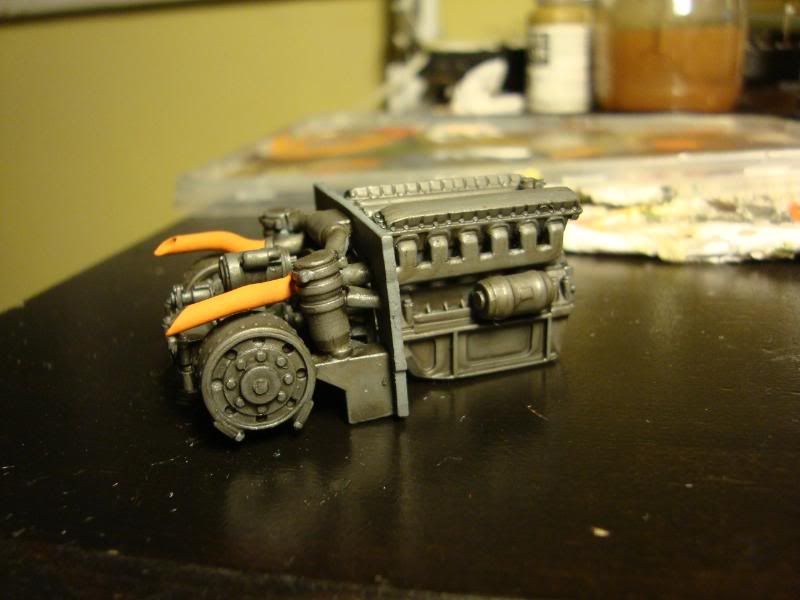
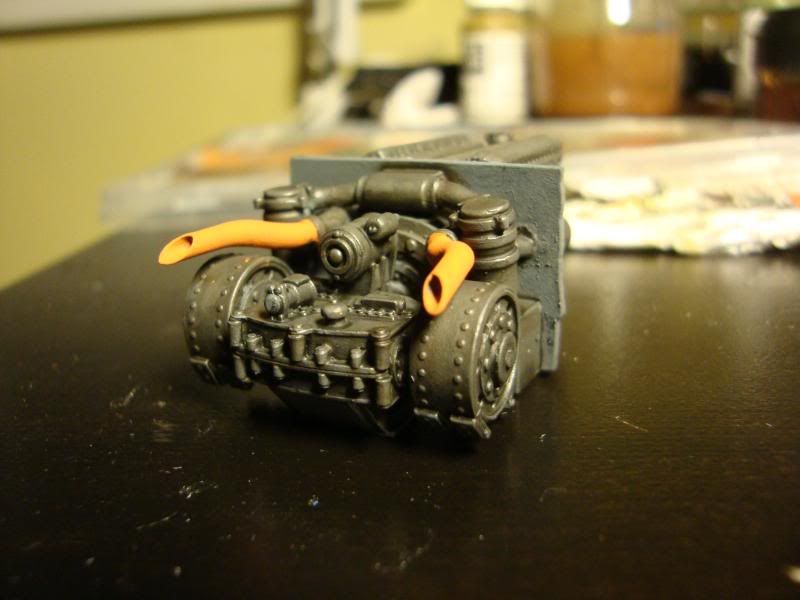
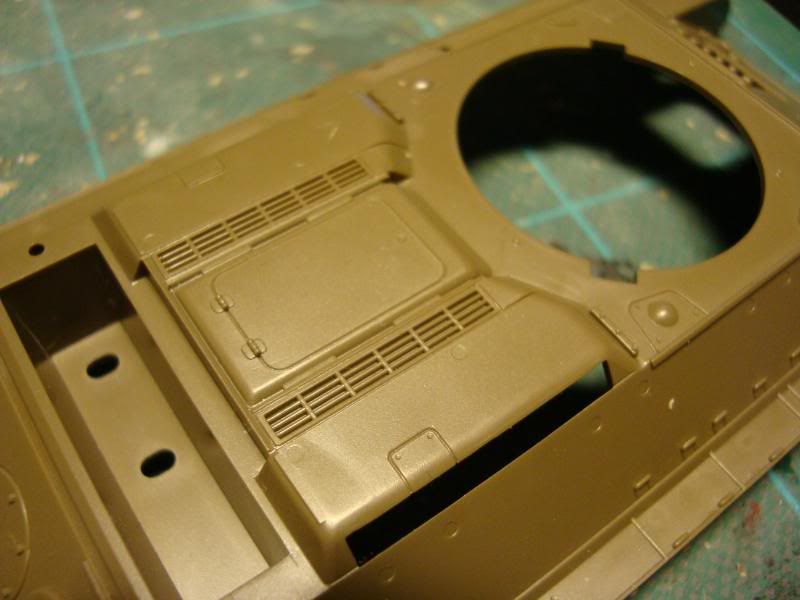
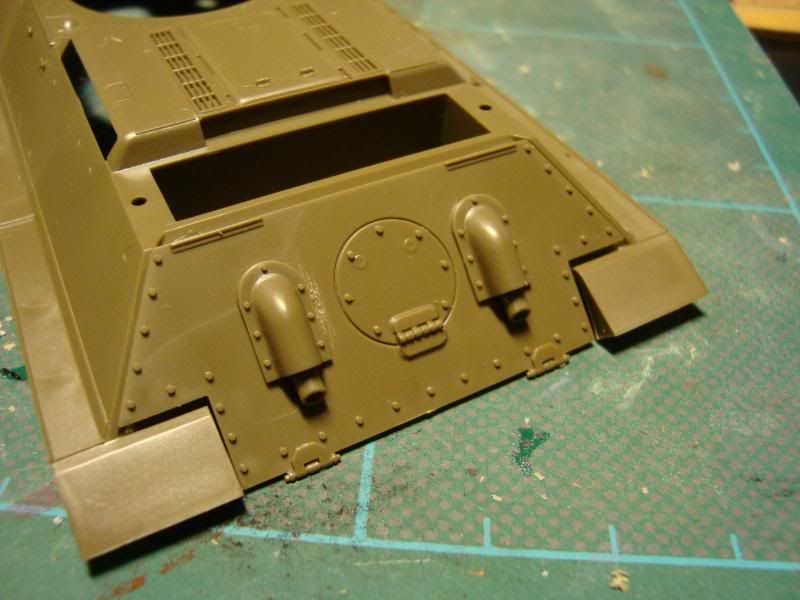
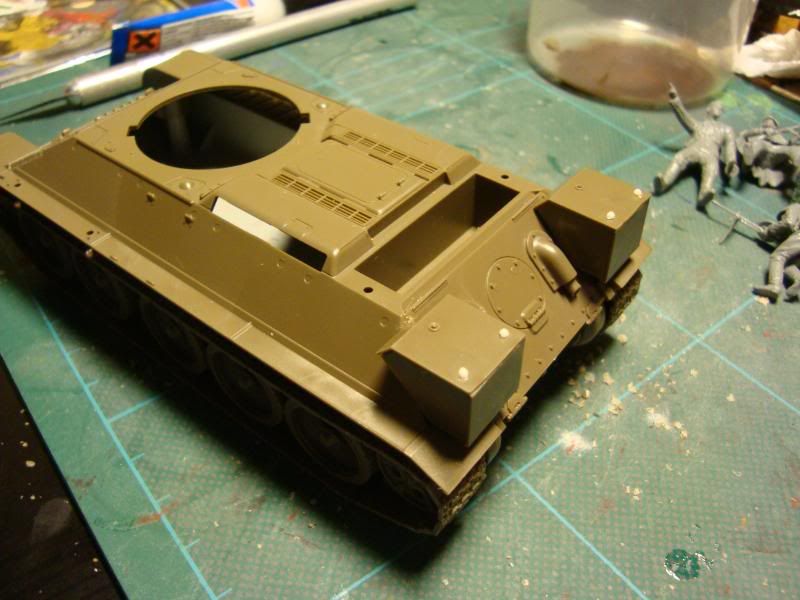
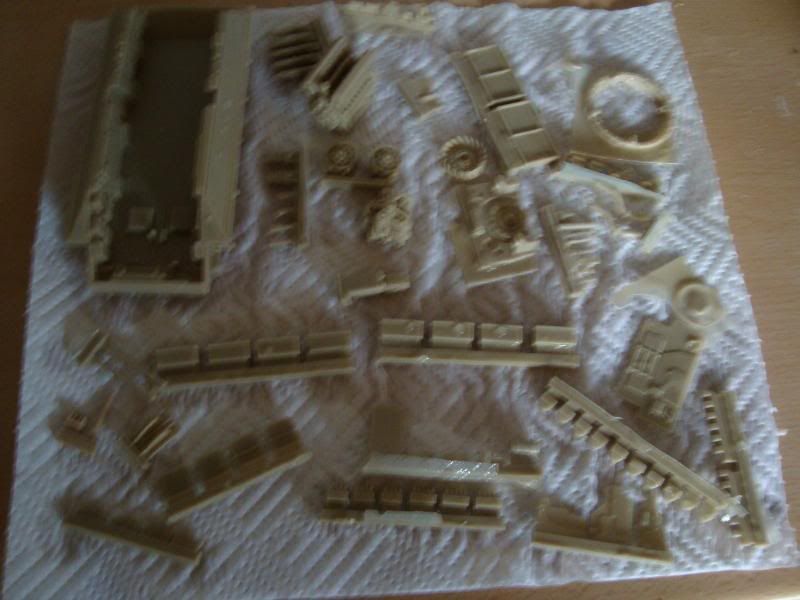
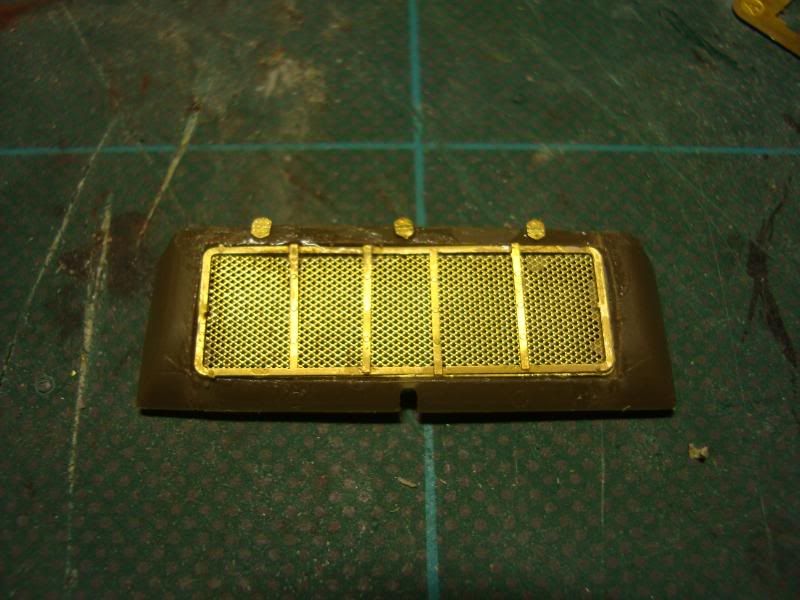
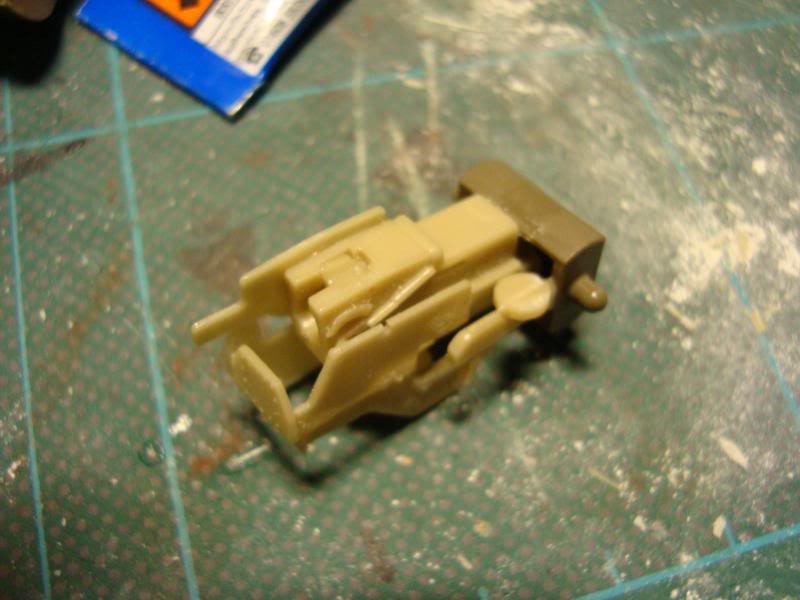
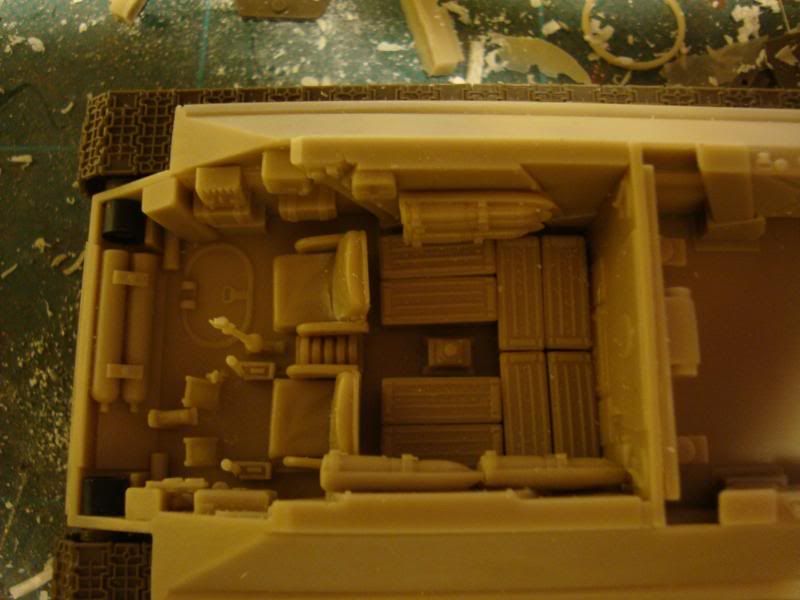
I finally received the photo etch and resin upgrade parts for the Tamiya kit that I've been waiting for. The bad news is I didn't realise that the resin interior detail set actually included not just interior detail sections but an entirely new resin lower hull... when I read the words "discard the Tamiya Cast Metal Hull..." my heart sank! It took a lot of work but I managed to remove all of the plastic components from the metal hull without any damage. Wheels, Treads, and hull sections. A modellers saw, a scalpel blade, and an improvised chisel and a whole lot of patience later and I was back good to go.
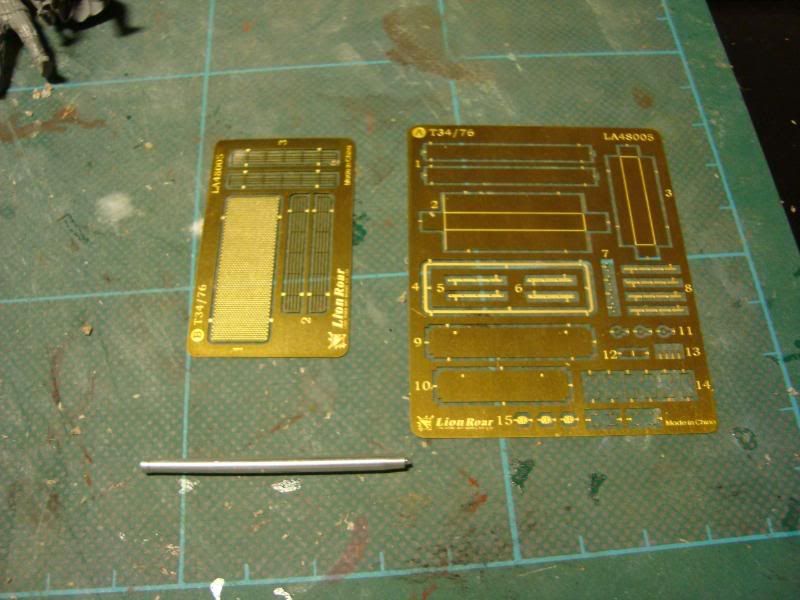
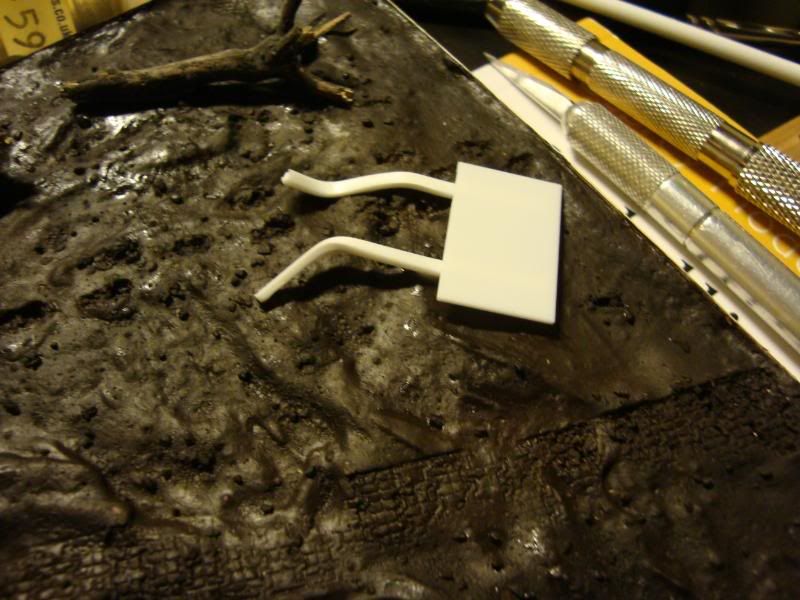
The Photo etch components and the metal main gun barrel:
The Resin detail parts:
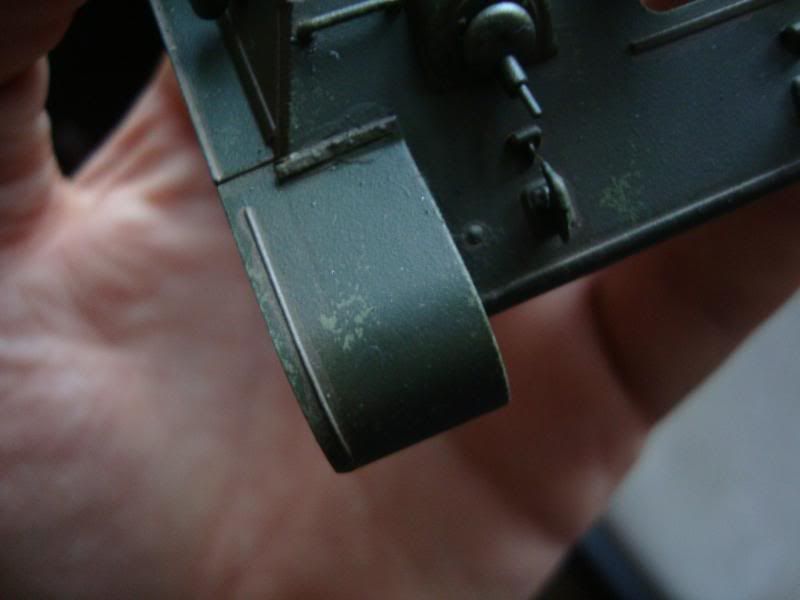
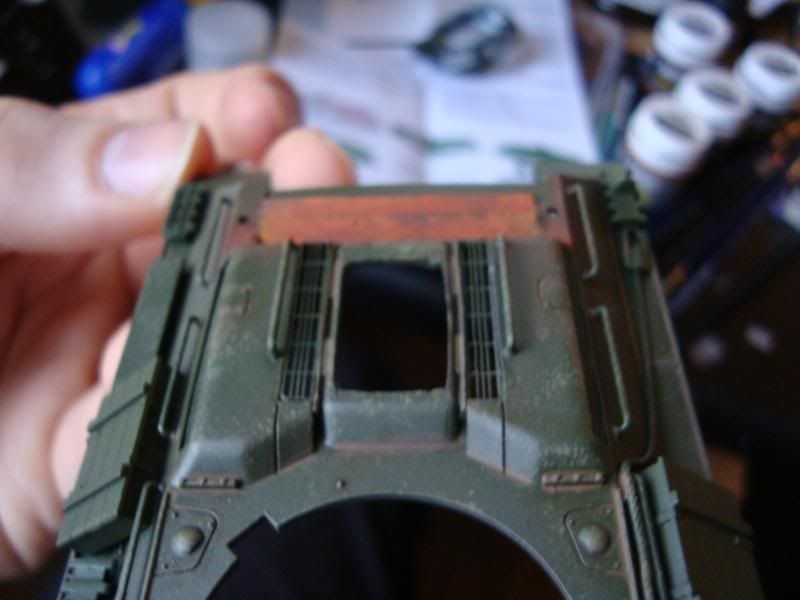
The Photo etch looks great but was a real challenge, it required me to chop up a lot of the plastic Tamiya upper hull. Very small sections that required a lot of very careful cutting and very precise work. One slip and a whole load of the kit would be ruined. It took some time but the results are really worth it.
I also had to rebuild some parts of the hull with plasticard to accommodate the new photo etch parts.
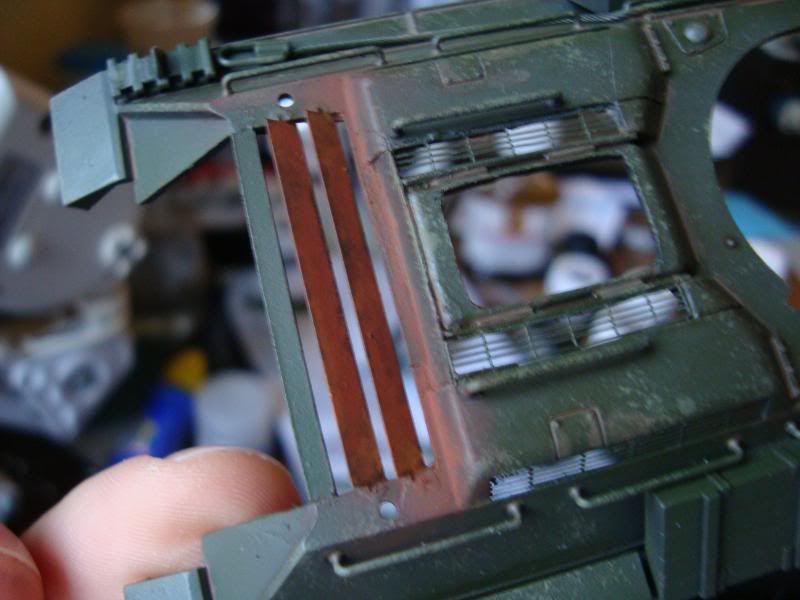
Step one, the grills:

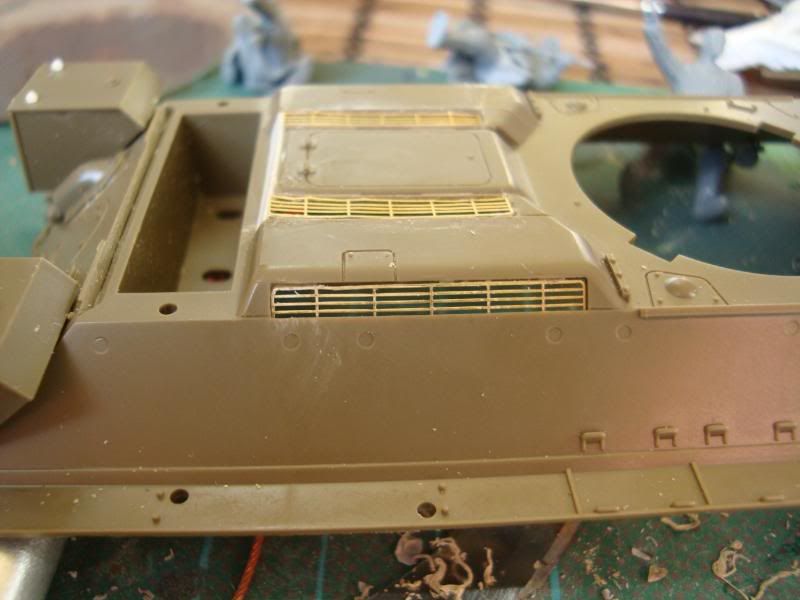
As you can see the original plastic detailed sections had to be carefully cut out and removed for the new etch parts to fit in.
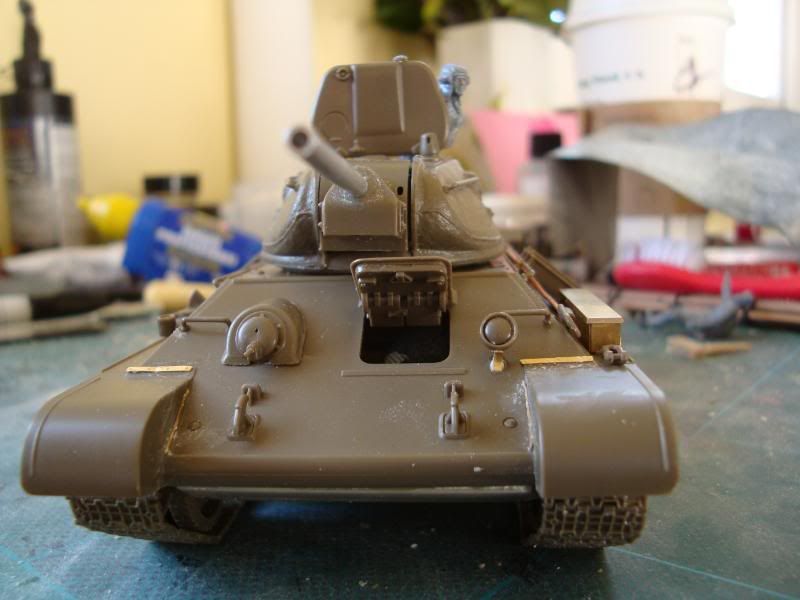
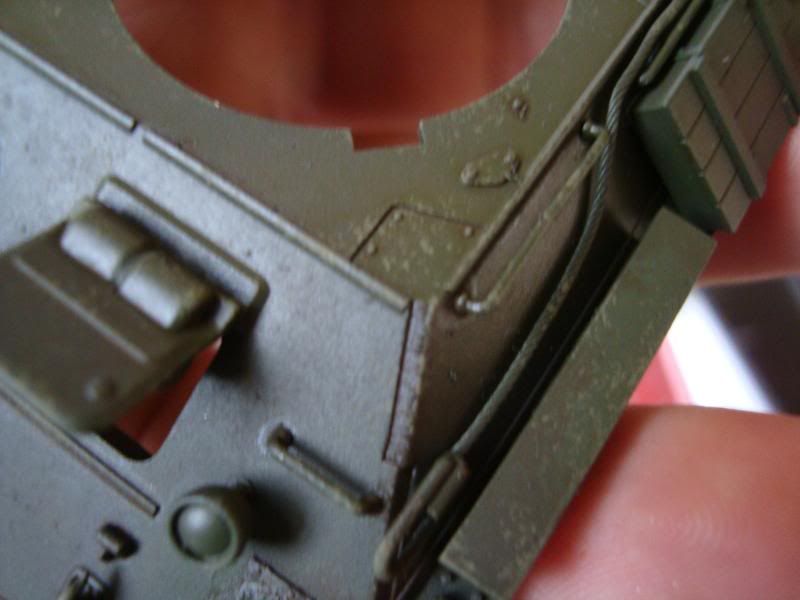
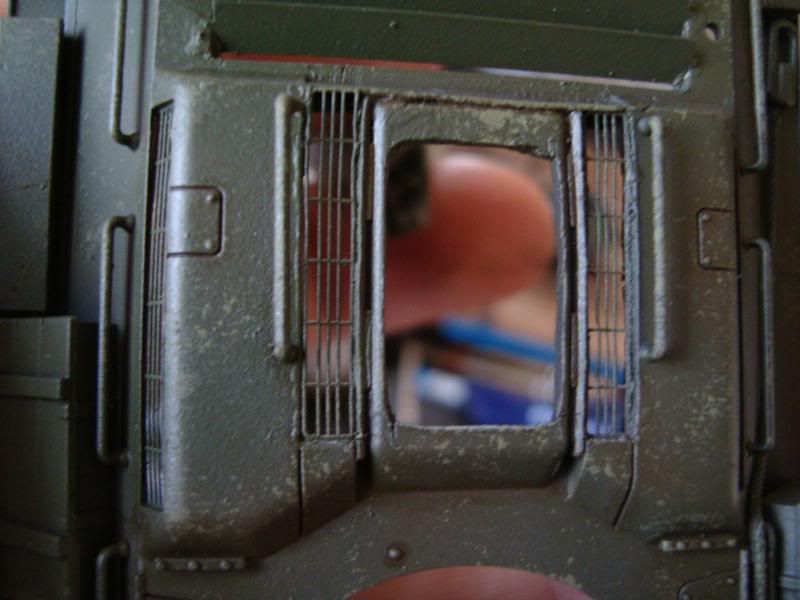
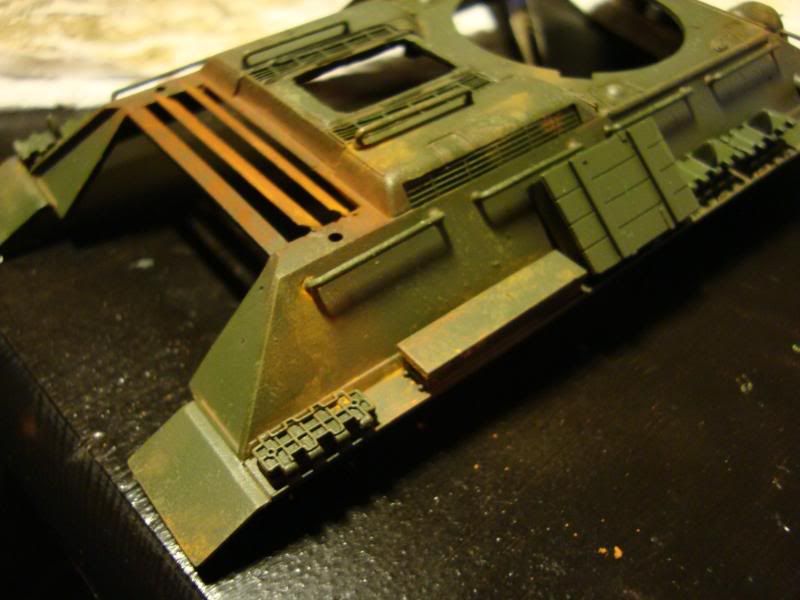
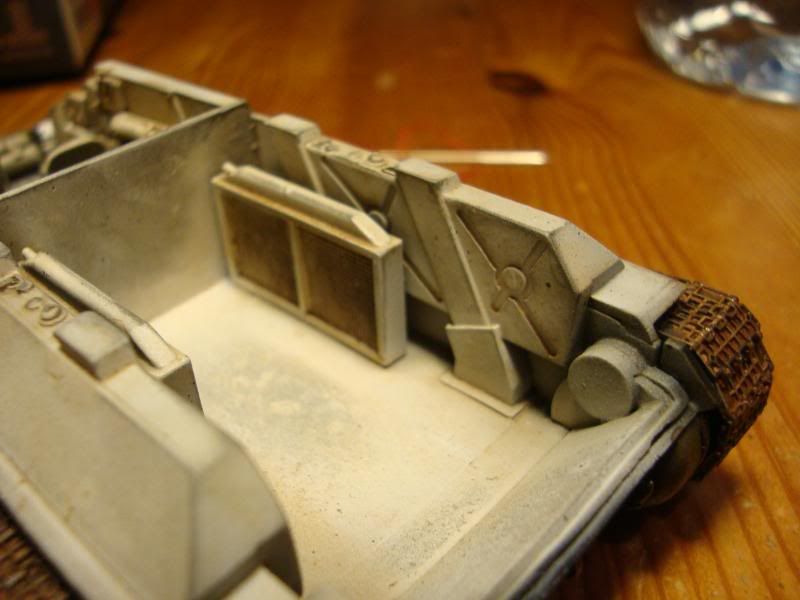
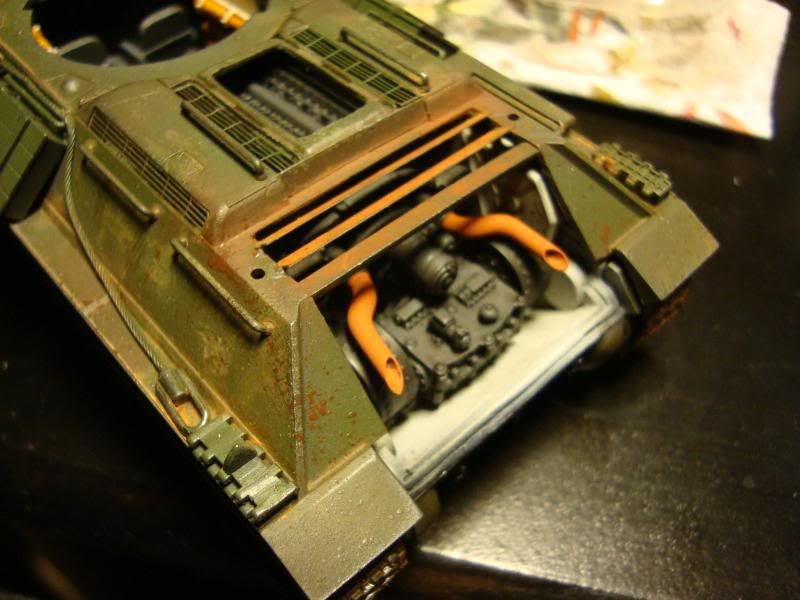
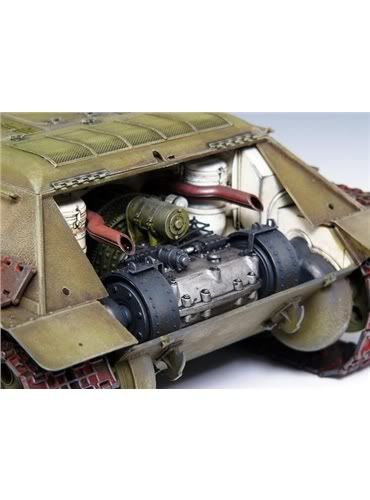
Step two, removing the plastic engine hatch and adding the engine vents:

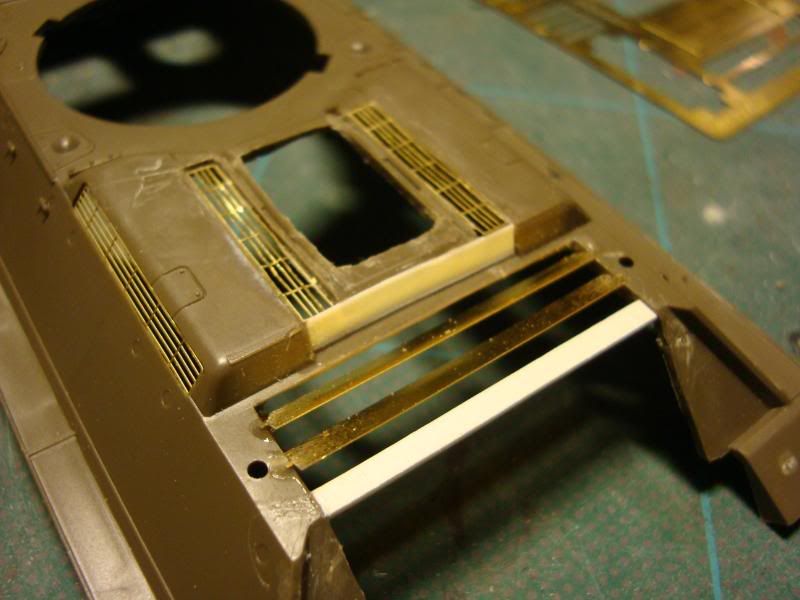
Again a large part of the rear of the upper hull had to be very carefully removed and the engine hatch between the grills was especially tricky to cut out. I also had to rebuild part of the new missing plastic areas with a beam of plasticard to fit the photo etch vents. These plastic areas had to be removed to accommodate the resin engine components.
Top engine hatch (before):
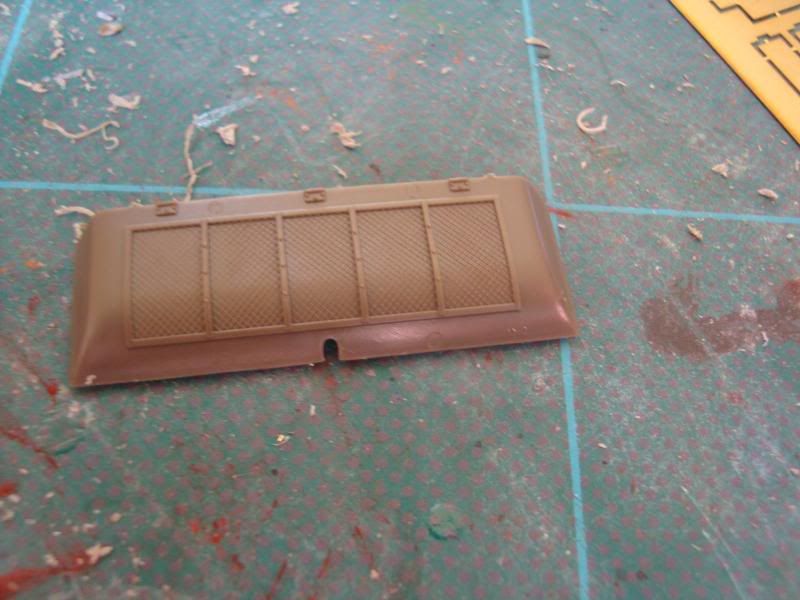
Top engine hatch (after):
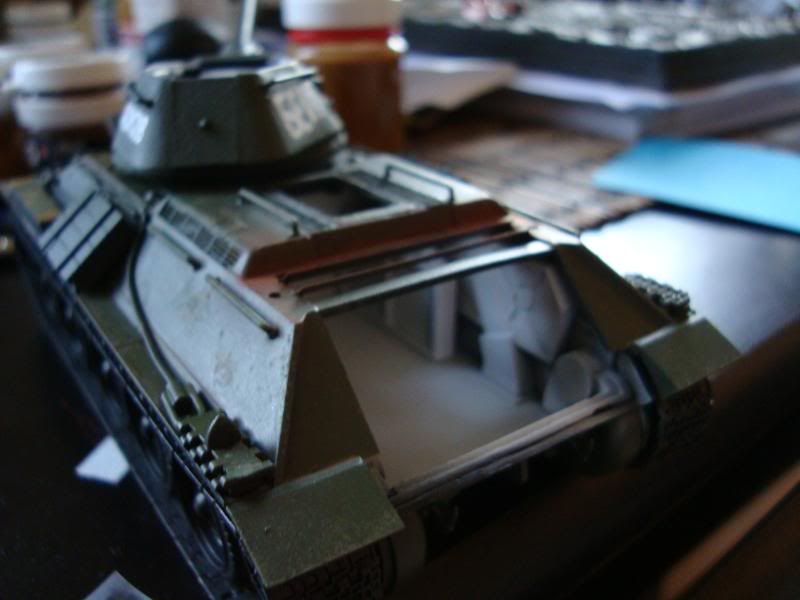
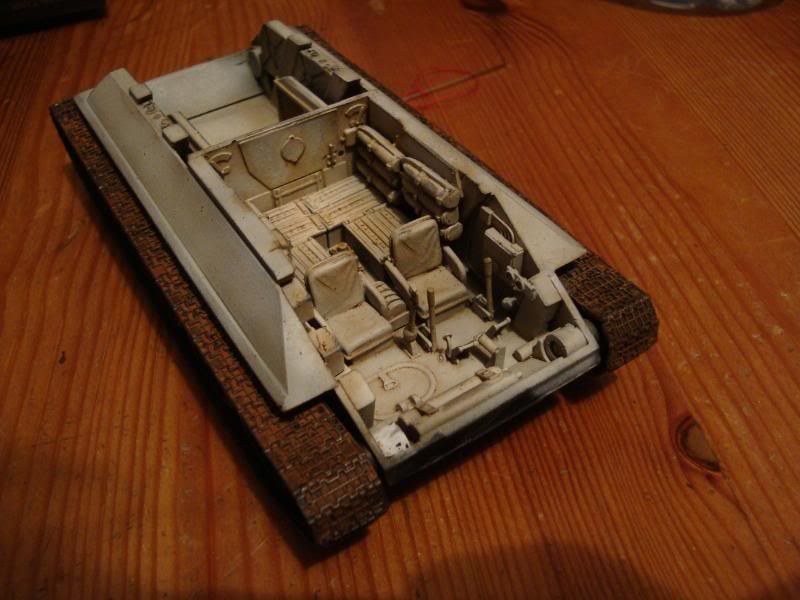
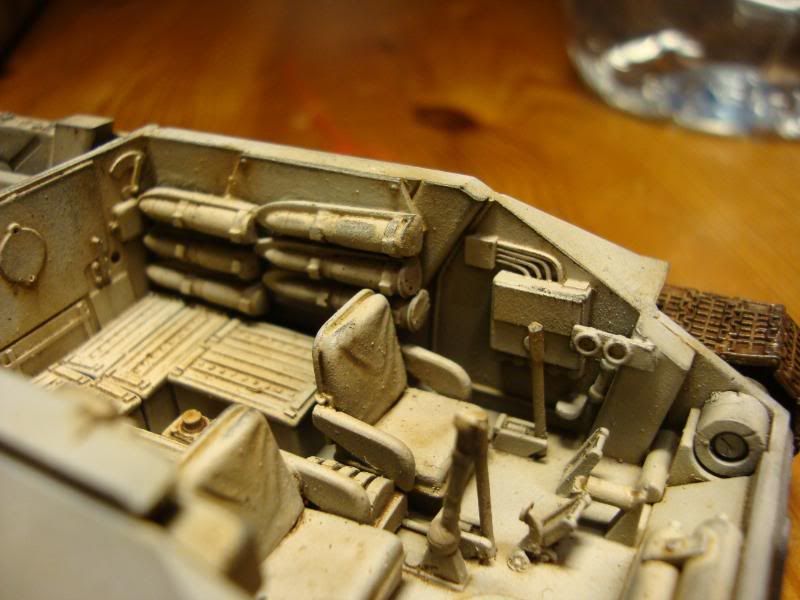
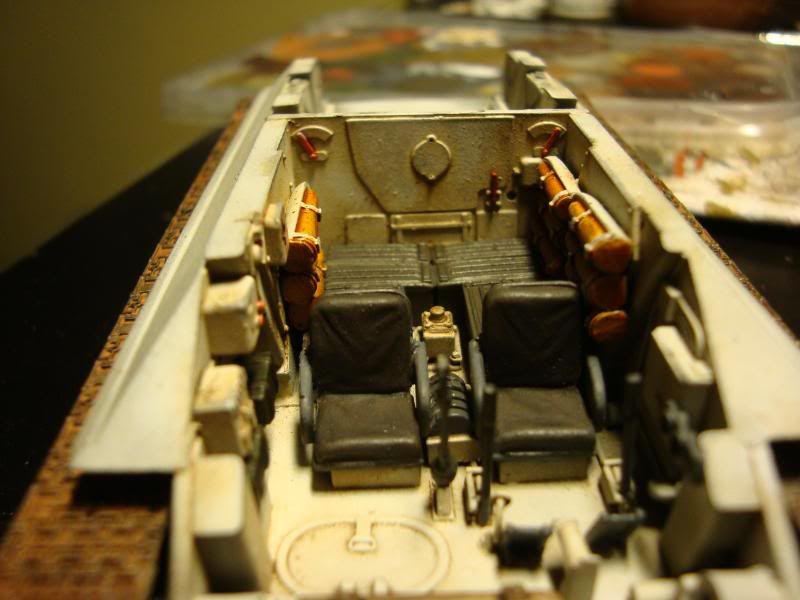
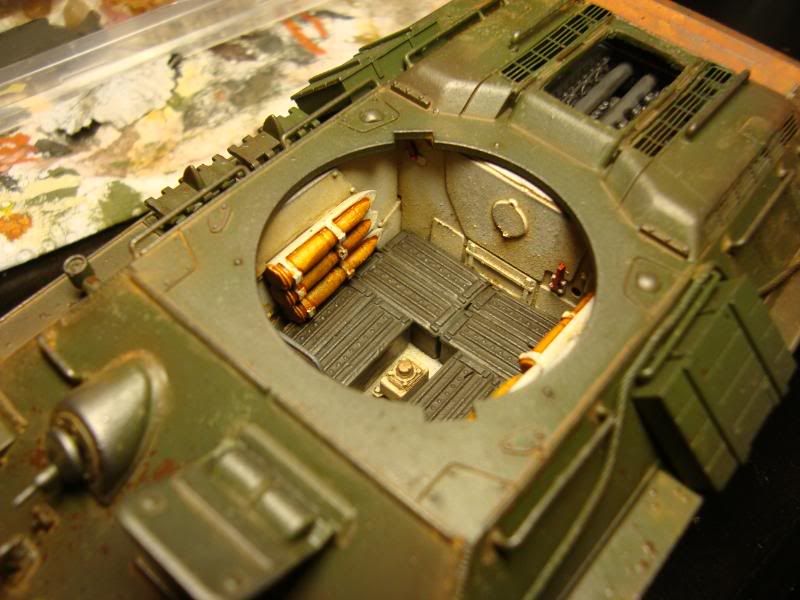
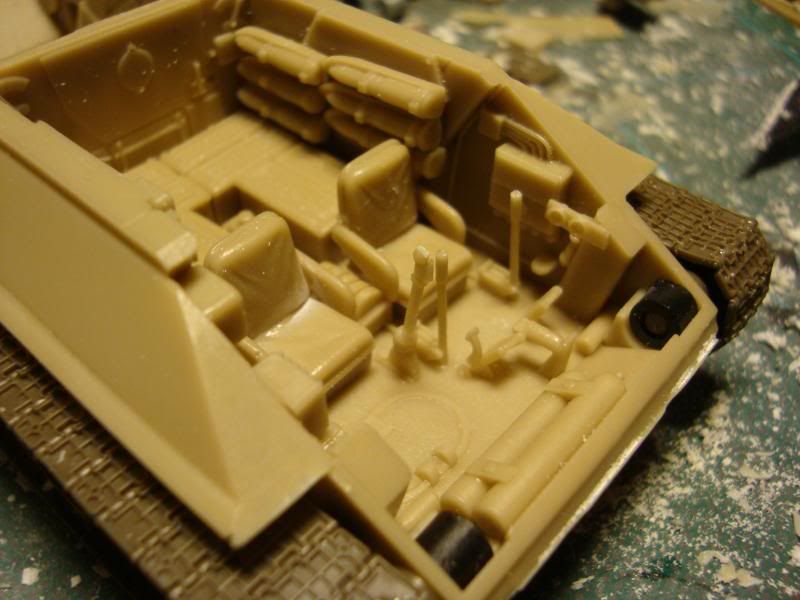
The resin lower hull:
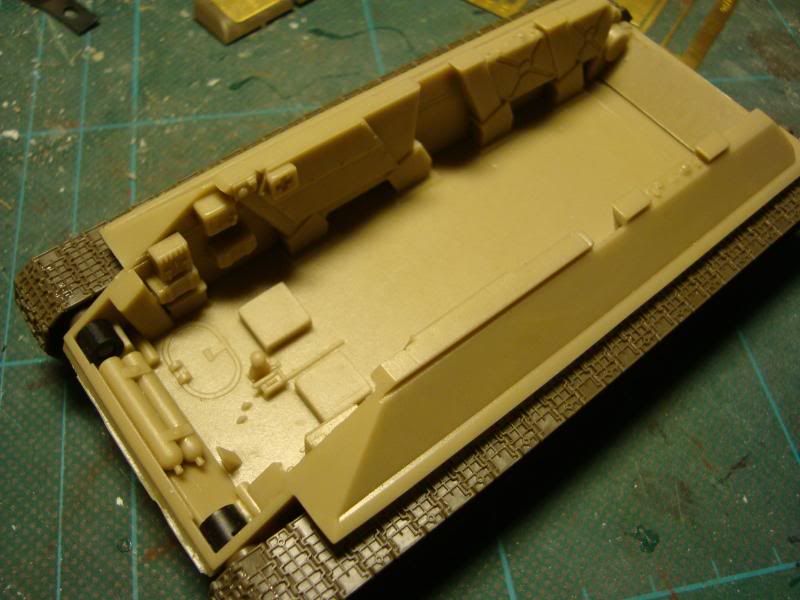
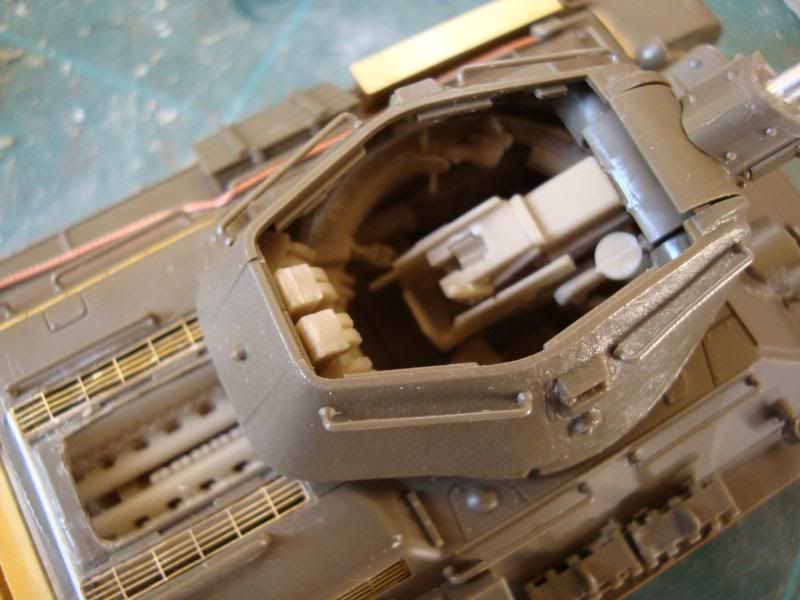
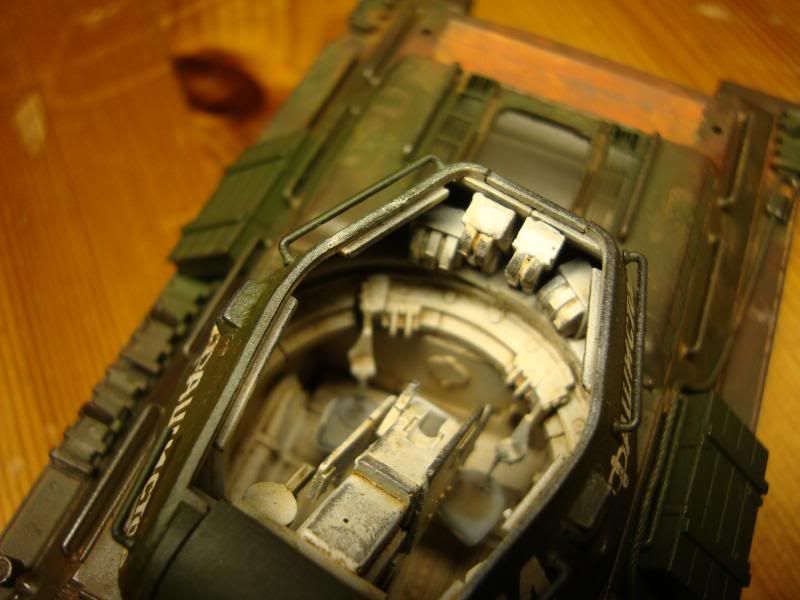
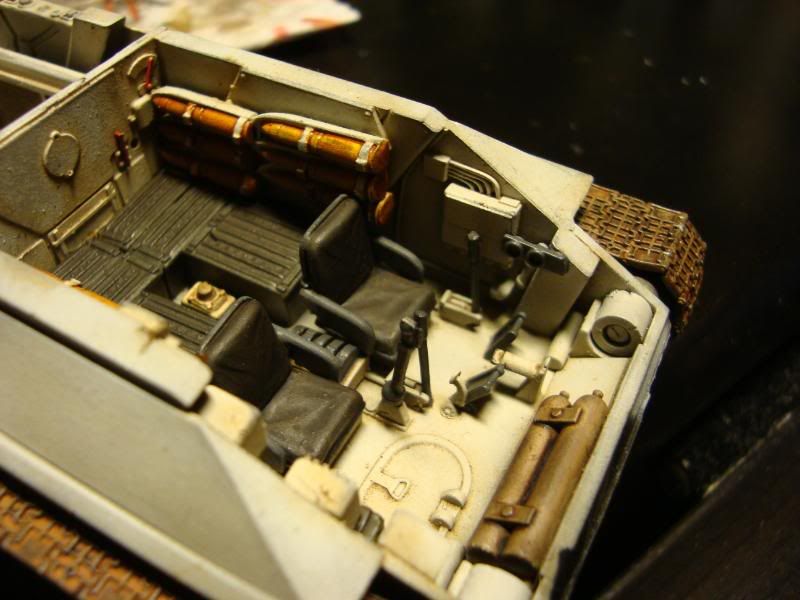
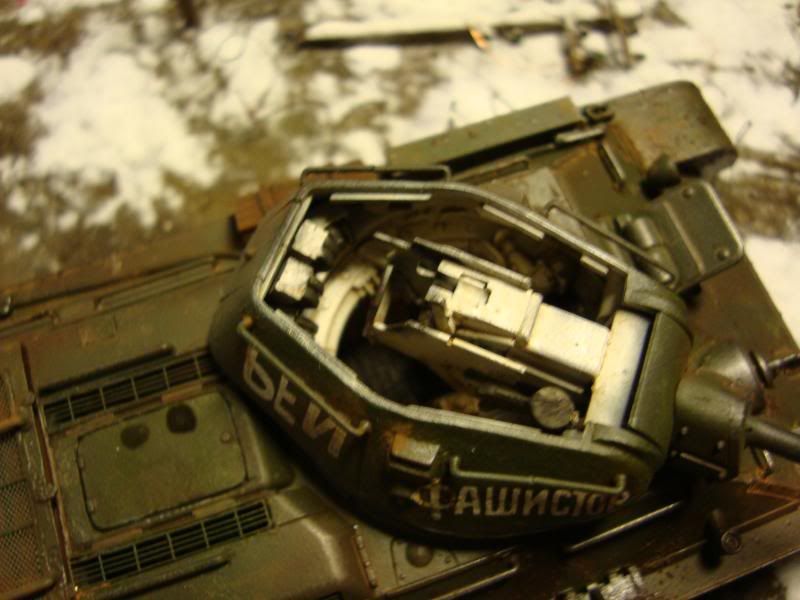
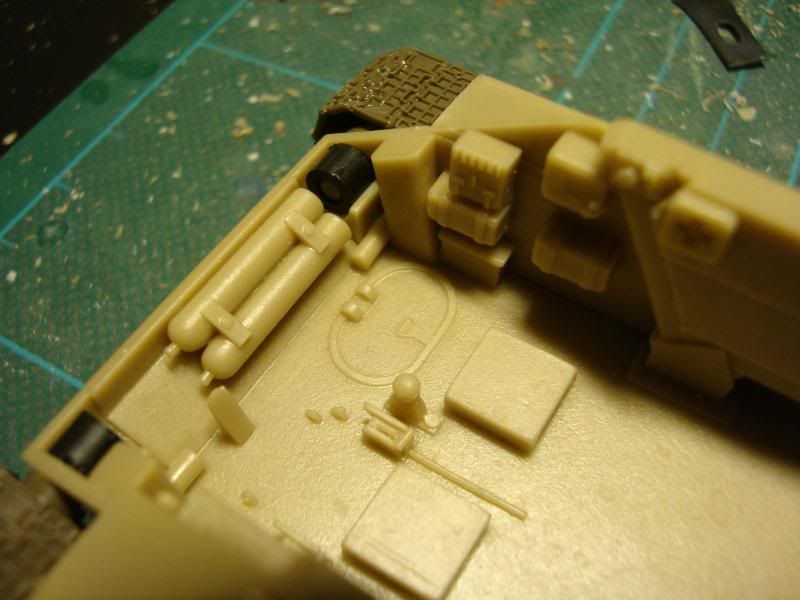
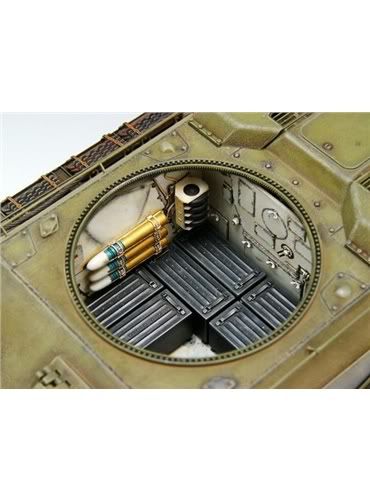
Crew cabin closeup ( WIP):
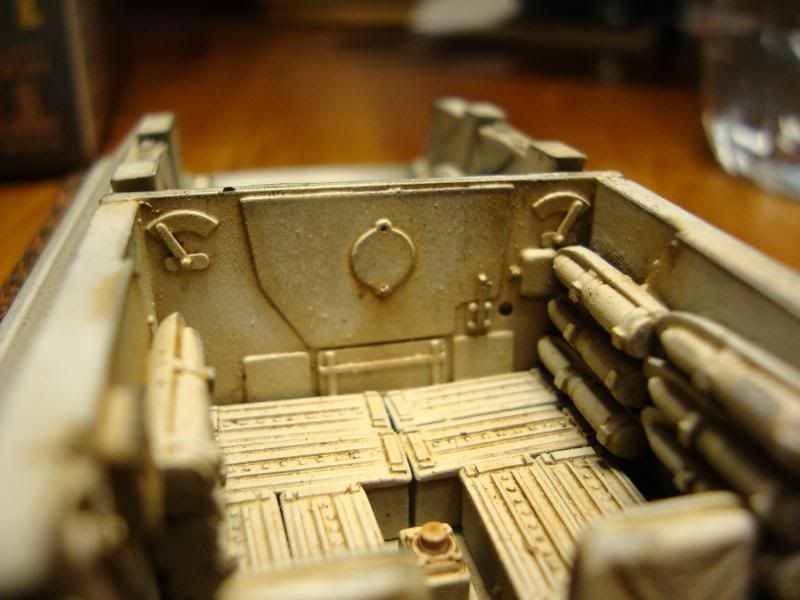
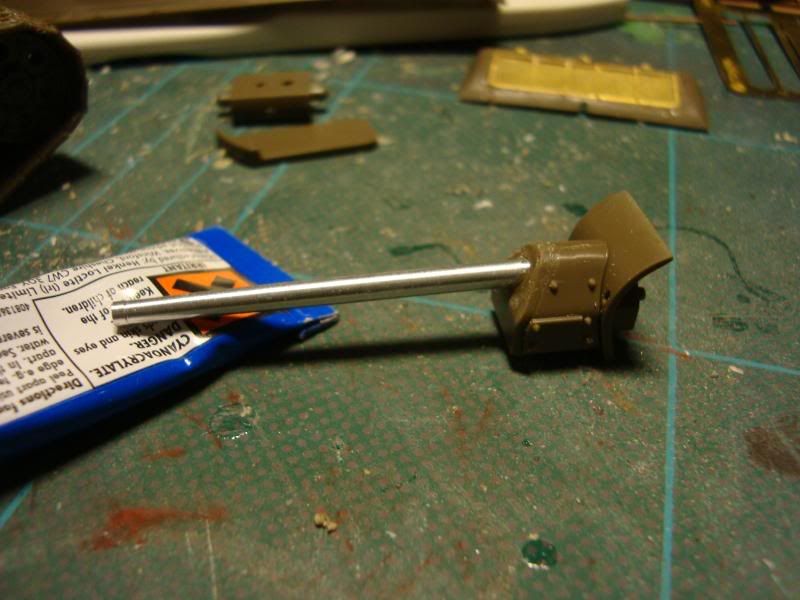
Next I moved onto the turret and the main gun:
Main gun with metal barrel:
The resin gun breach upgrade parts, these were a nightmare to put together and the instructions provided by the manufacturer were close to terrible. You needed a degree in engineering to make sense of them! In the end I had rely on the reference photos from my Osprey books!
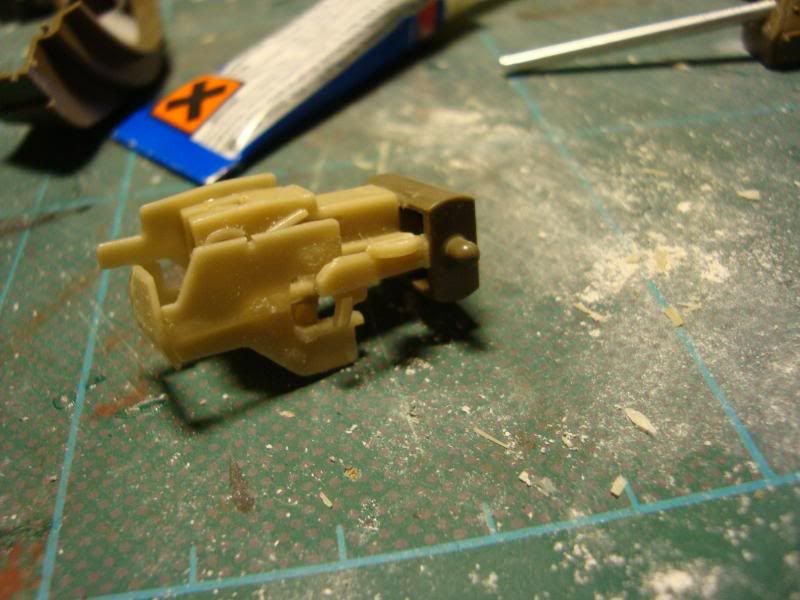
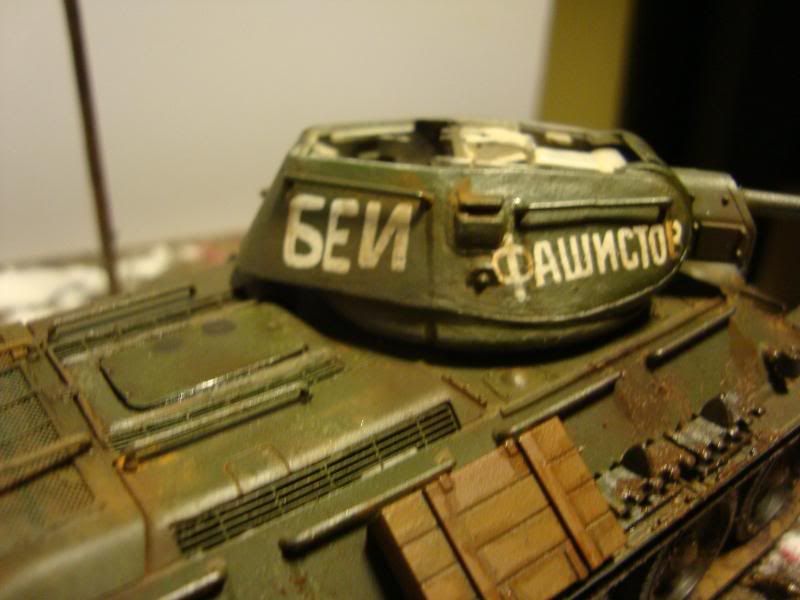
As you can see it has a co-axial machine gun.
10339
Post by: tallmantim
Wow
Impressive level of modeling.
Looks great.
11330
Post by: Gundam-Mecha
Thanks Tallmantim!
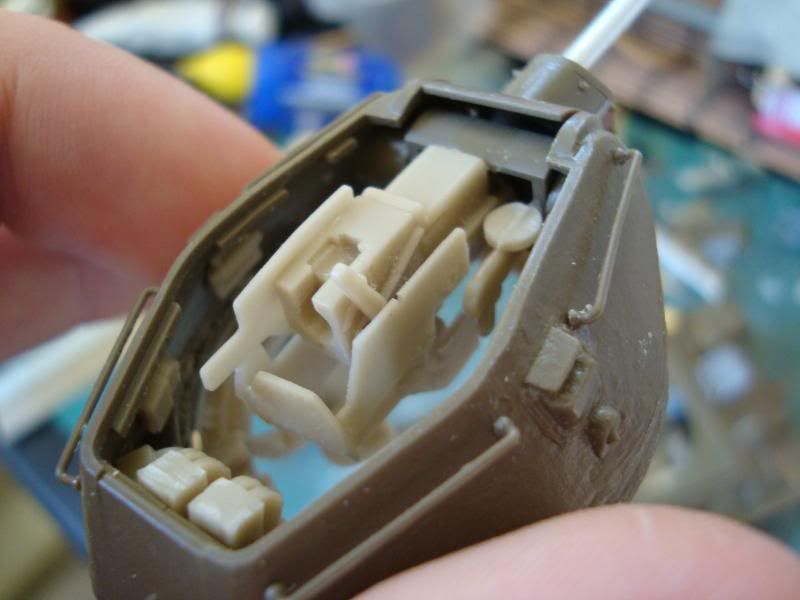
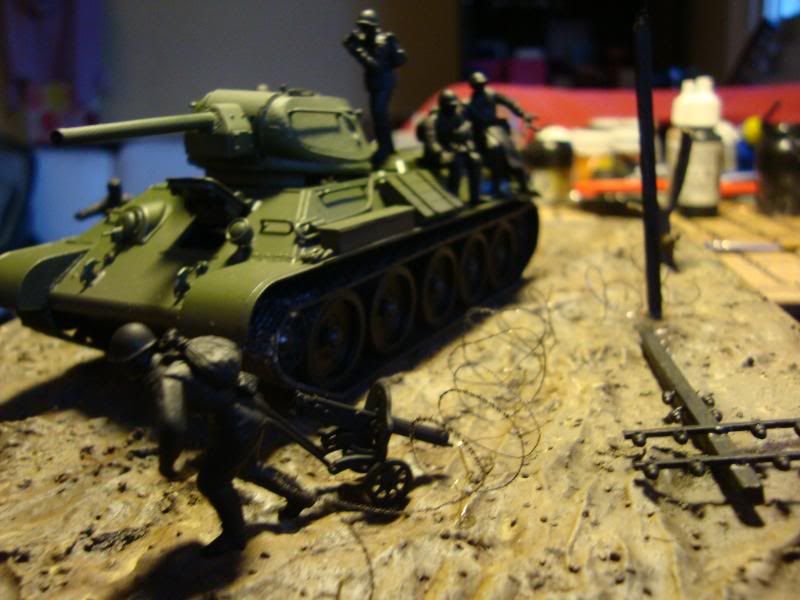
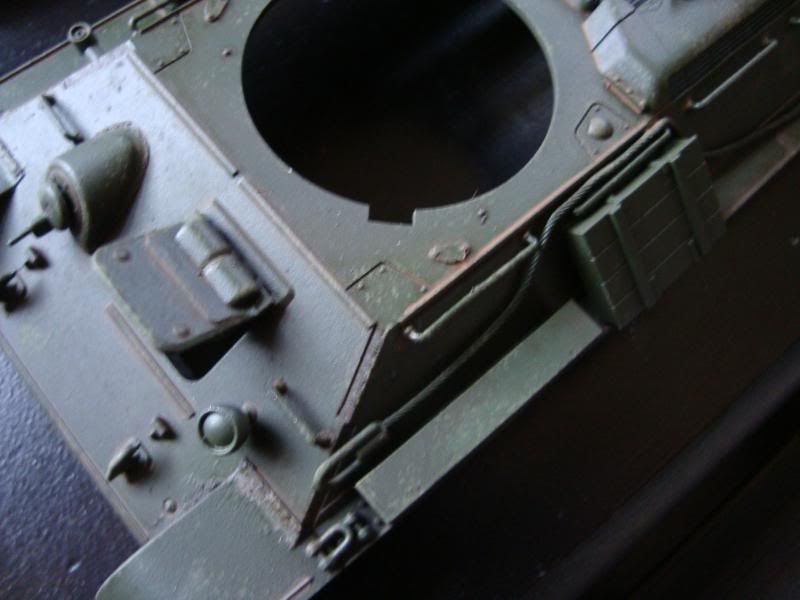
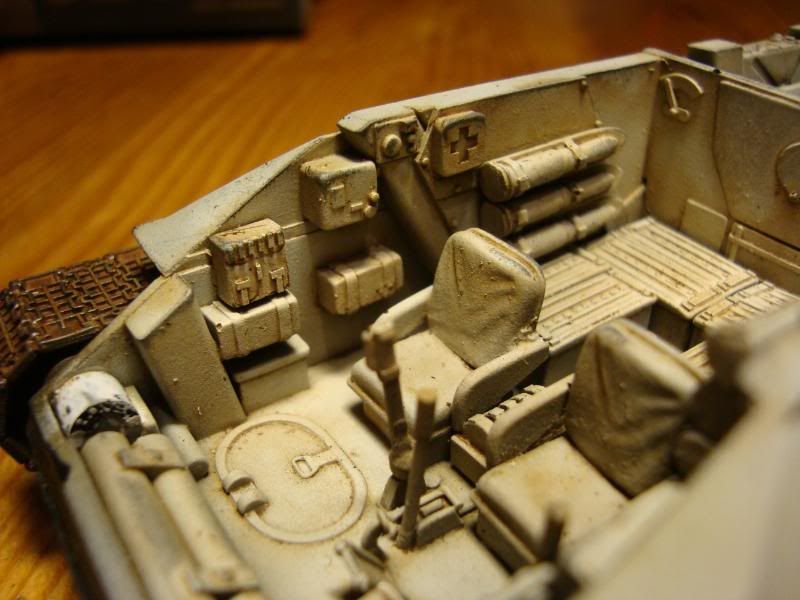
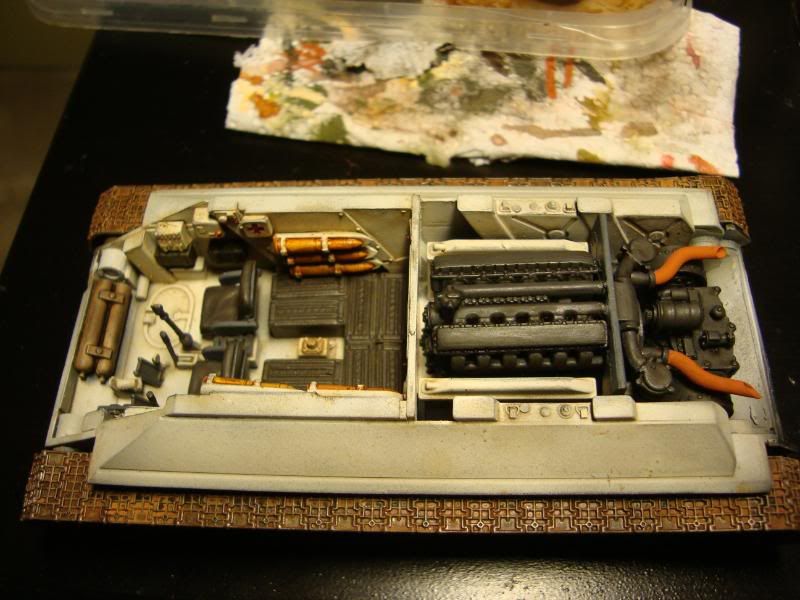
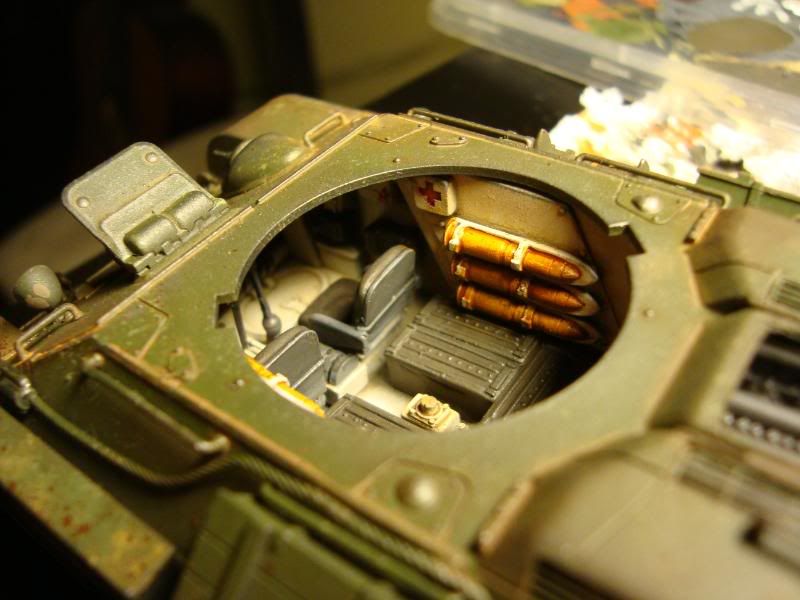
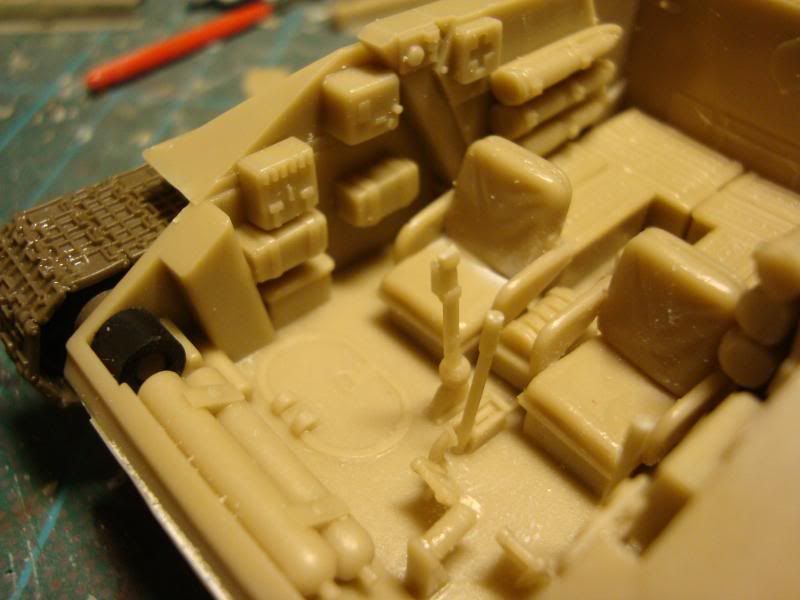
I did a whole load of new stuff last night. Mostly the interior details in the crew cabin and the detailing on the outer hull.
I also worked on a conversion of a tank driver to go inside. Tamiya give you a tank driver upper torso and arms but no legs. He has just a stump that is supposed to glue directly to the hull. So I had to kit bash together a lower body and some legs from various parts of an old Tamiya German tankers set. I've now gotten him to a pose I like the only problem is that at present he's a little too tall and the upper hull wont fit properly. So I'm working on shaving him down so I can fit him in without any problems.
I'll post some new update photos tonight.
10339
Post by: tallmantim
LOL
He's Russian, so a Vodka diet should see him shed a few pounds to fit into the tank!
;-)
11330
Post by: Gundam-Mecha
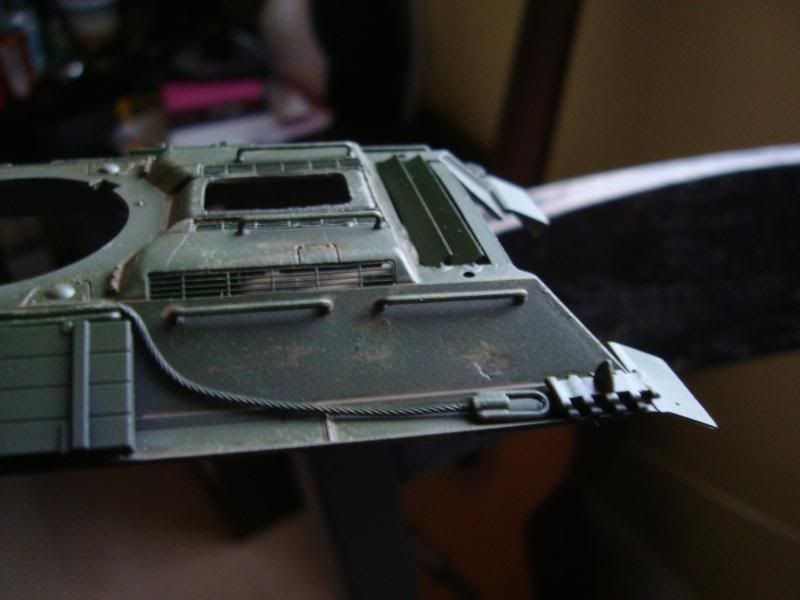
Some more updates:
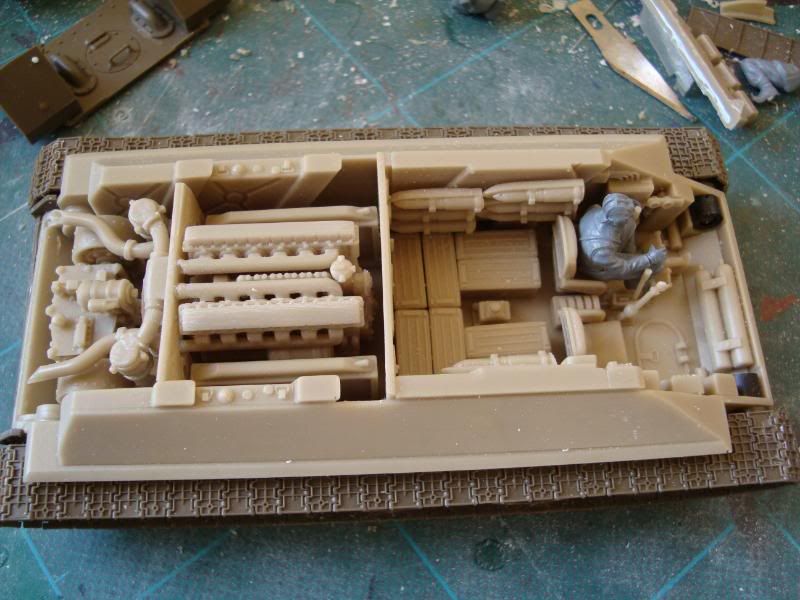
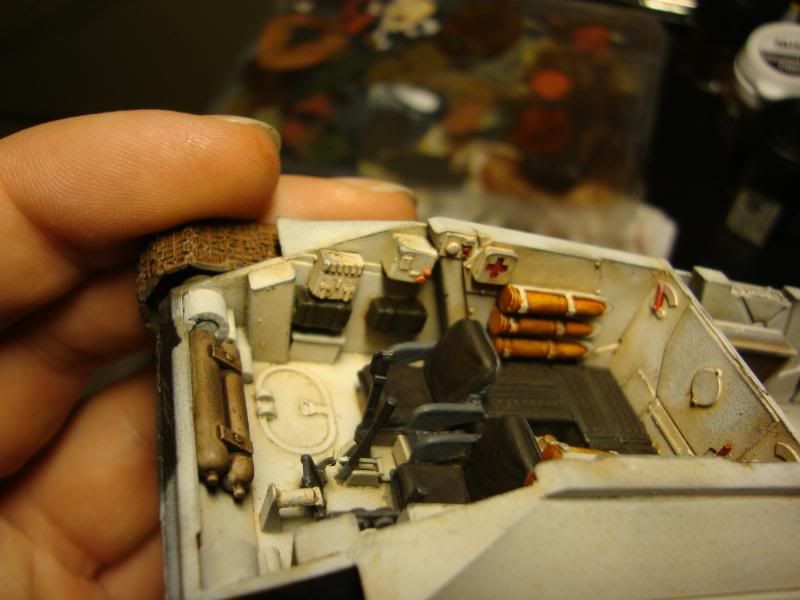
Crew Cabin:
The Tank Driver:
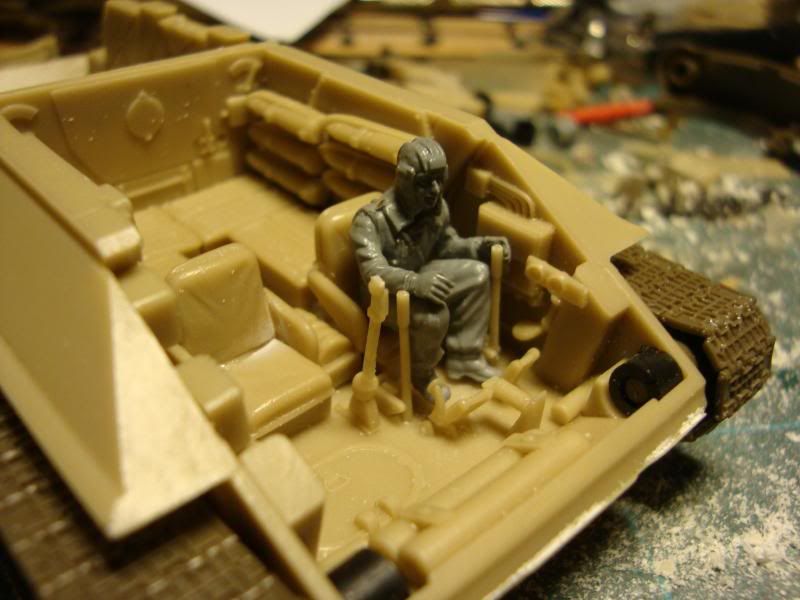
The Vodka and cigarette diet seemed to pay off, he finally fits into the tank! 
9505
Post by: CaptainRavenclaw
That's great detail. I wouldn't like to sit infront of all that live ammunition stacked up on the wall!!
4657
Post by: Metsuri
For the motherland some sacrifices like safety have to be made 
Great looking building, I'm waiting for you to get to the painting.
11330
Post by: Gundam-Mecha
Yes, occupational hazard I guess! 
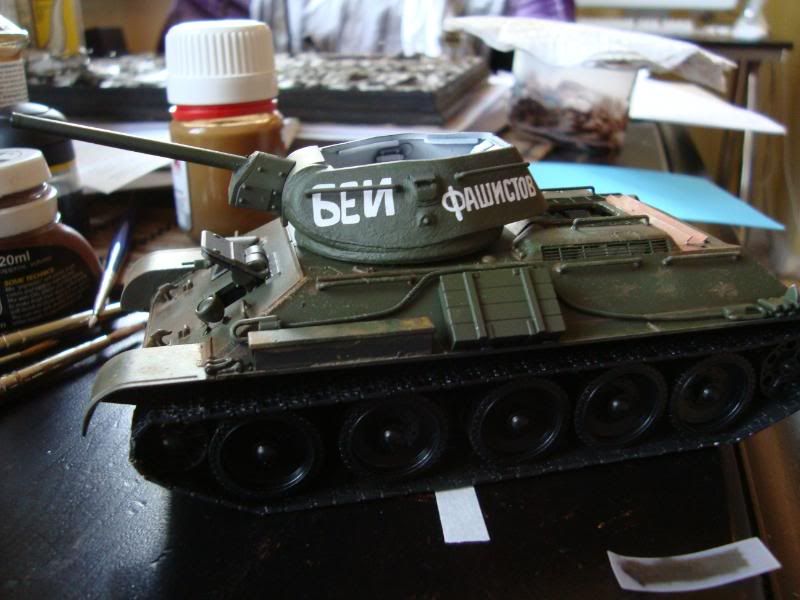
Thanks for the feedback guys, I will start painting the Tank soon, once all the interior in the turret is done. The engines I'll build and paint separately since it will be close to impossible to paint the detail once its in the lower hull.
9463
Post by: PanzerSmurf
Ahh, the good old T-34, the forefather of all russian deathtraps...
8745
Post by: Llamahead
Uhh compared to "The Ronson" or the "Tommy Cooker" the T34 was fairly safe. The Sherman was notorious for going up in flames at the first opportunity. That was also more due to the fuel exploding than ammunition cooking off though.
How much does the internal detailing kit cost and how does it compare to Forgeworld? What are you using with the etched brass? Can't wait to see more good work
6091
Post by: Apone
Looking good so far.
keep it up!
11330
Post by: Gundam-Mecha
Hi Llamahead
The internal detail set was from a scale model company called Verlinden. I ordered it from Historex Agents online, and it cost about £20 for the full kit.
In terms of resin quality, cast quality, and detail it surpasses forgeworld resin items. The resin was very clean, with very little flash, and the gates were well positioned and easy to remove (unlike FW gate that I've experienced being directly above an important detail area).
The quality of the actual items and the sculpts was also spot on, very very detailed and nicely done. They are also very true to the actual components of a real life T34, so you can tell that a good amount of research has gone into the kit to check for accuracy and authenticity.
The Photo etch is from a company called Lions Roar, they are based in China and make some great scale model upgrade parts. This one was specifically for the 1:48 Tamiya T34/76 kit.
Lion Roar work mainly in 1:35 scale, their 1:48 catalogue is smaller.
11330
Post by: Gundam-Mecha
Thanks Apone!
I'll be moving onto painting shortly, so I hope to have some better updates for you all soon.
10392
Post by: Paul Atreides
That must have cost more than forgeworld.
Brilliant work, by the way.
6747
Post by: silverdaemon
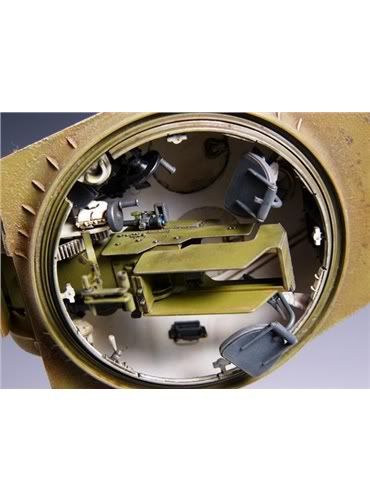
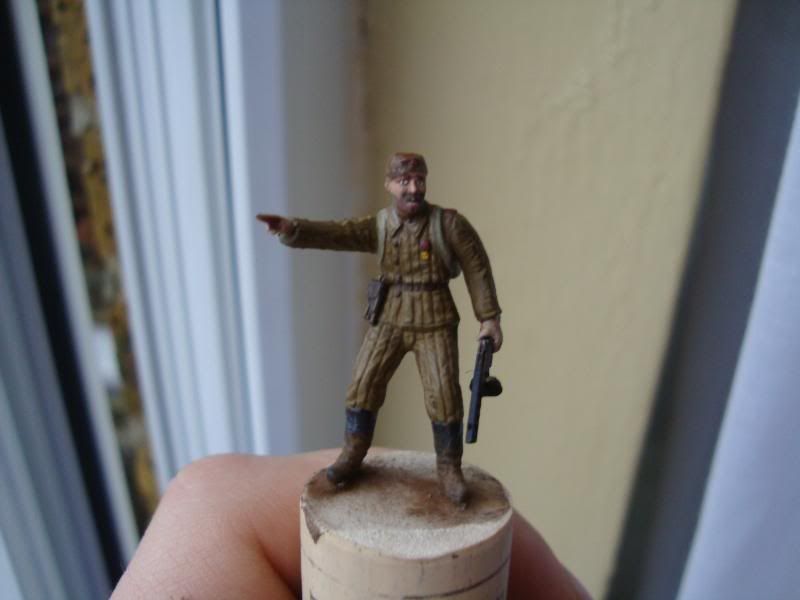
the guy in the third pic down looks like such a tattler. "mom! he took my helmet! waaaaaaahhhhh" Where is a Comissar when you need one?
5268
Post by: NO_SUCH_LUCK
Nice to see some good scale modelling on Dakka!
BTW, is this solely going to be a diorama piece or will it double as a gaming model?
5642
Post by: covenant84
Looks great, keep posting!
7632
Post by: Ghost in the Darkness
Work faster we wanna see the finished project cause it looks so cool right now.
9463
Post by: PanzerSmurf
@Lamahead: I did say RUSSIAN deathtraps
11330
Post by: Gundam-Mecha
@ Paul - actually no it was considerably cheaper than forgeworld kits.
The Tamiya plastic kit was only £13 and the Verlinden Resin upgrade kit was £20. When you consider how much you get in the resin kit thats pretty good value. A complete new lower hull with full details, all the components to make all the chairs, steering gears, controls, shells for the walls, ammo crates, full detailed engine, extra hatches, full gun breach, full turret interior detail, full upper hull interior detail (machine gunners station etc). Actually its a rather big bag of bits. Most of which are tiny little micro detail for the larger components such as gun breach and engine. The only bad thing about this kit was Verlindens awful assembly instructions, they used extremely vague exploded diagrams that were very hard to follow. For the most part I had to rely on the technical drawings and reference photos in my Osprey books!
@ Silverdaemon - you can never find a good political comissar when you need one!
@ No such luck, Covenant84, Ghost in the Darkness - Thanks guys I'm working as fast as I can on it at the moment. My Thunderbolt has taken a little step to the side right now. Got a lot more done last night on the turret and interior and engine. I also made another few infantry figures. I plan to start the base shortly. This will only be a diorama peice, as its going to be given to a relative as a gift for display in their house. Thats why I'm going to such lengths on the modelling and details. I plan to have the tank open (not completed closed) so you can remove lots of parts to see inside and get to all the detail.
@ Panzer Smurf, from what I've read on T34's especially during Barabossa, most of them eneded up in swamps and bogs! Nature was the biggest deathtrap to the tank its seems! 
9505
Post by: CaptainRavenclaw
I read that the battle of kursk was more of a anit-tank gun and air support battle than it was a tank on tank battle.
The T34 was so instrumental with its sloped armour sides that Hitler ordered a complete redesign on the panzer mk IV to have sloped fronts and added sloped armour plates onto existing panzers where they could be refitted!
What I want to know is what colour you're going to paint the armour!!!
10339
Post by: tallmantim
How about painting as part of the German army?
;-)

11330
Post by: Gundam-Mecha
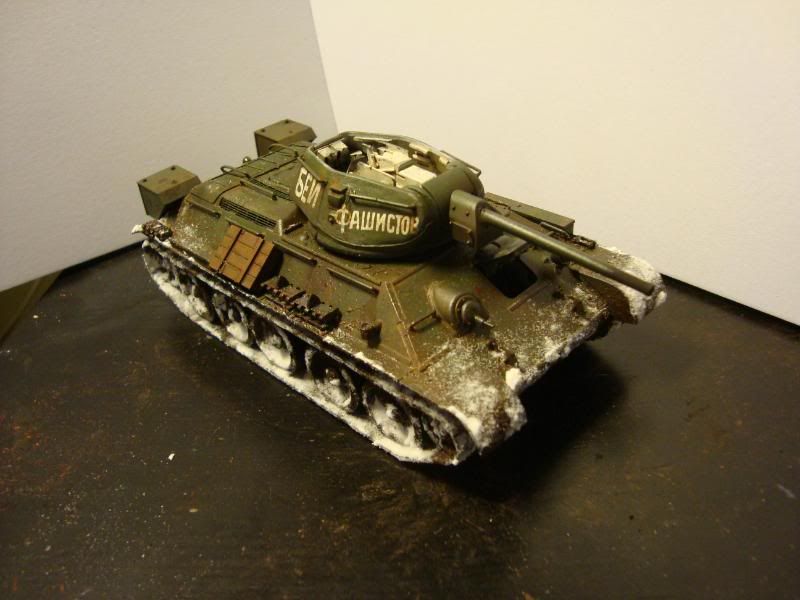
@ S.J - It's going to be the standard Russian dark green with a fading winter white wash coat over the top. I'm looking at trying lots of techniques on the tank, various kinds of weathering and rust, and some mud etc. I'm also looking at adding snow to the diorama and playing with that. There is a technique for ice in the Imperial Armour Masterclass book that I'm keen to try out. Mark Bedford did it on his Malcador Diorama and it looked really nice I think.
I also have a large selection of materials I ordered from Woodland scenics and other places that I'm keen to try out. Tread tracks in the fresh mud, troopers foot prints, lots of water effects. Stuff like that.
@ Tallmantim - Blasphemy! Actually one of my Osprey books covers T34's in service with Axis forces. They have an example of both an Italian T34 and a captured T34 used in German service. In fact Mig's T34 in the book is a German one. It was quite common for the German forces to recycle them. Although the Nazi's were unable to mass produce them back in Germany, a fact that horrified them at the time, that a Slav tank could (in the early parts of the war) out perform an Aryian Tank.
7361
Post by: Howard A Treesong
Gundam-Mecha wrote:@ Paul - actually no it was considerably cheaper than forgeworld kits.
The Tamiya plastic kit was only £13 and the Verlinden Resin upgrade kit was £20. When you consider how much you get in the resin kit thats pretty good value. A complete new lower hull with full details, all the components to make all the chairs, steering gears, controls, shells for the walls, ammo crates, full detailed engine, extra hatches, full gun breach, full turret interior detail, full upper hull interior detail (machine gunners station etc). Actually its a rather big bag of bits. Most of which are tiny little micro detail for the larger components such as gun breach and engine. The only bad thing about this kit was Verlindens awful assembly instructions, they used extremely vague exploded diagrams that were very hard to follow. For the most part I had to rely on the technical drawings and reference photos in my Osprey books!
Yup, forgeworld are inferior as resin manufacturers go, and expensive too. All resin is expensive, but it shows the domination GW has that people think that to get an even better product elsewhere you'd have to pay even more again, and you don't. More work goes into these than the forgeworld stuff, for a start they have to be scale accurate which isn't a straigtforward matter when you have to take into account mould shrinkage and the like.
Gundam-Mecha wrote:@ Tallmantim - Blasphemy! Actually one of my Osprey books covers T34's in service with Axis forces. They have an example of both an Italian T34 and a captured T34 used in German service. In fact Mig's T34 in the book is a German one. It was quite common for the German forces to recycle them. Although the Nazi's were unable to mass produce them back in Germany, a fact that horrified them at the time, that a Slav tank could (in the early parts of the war) out perform an Aryian Tank.
I've seen photos of captured T-34s where the gemans have built up and squared off the sides off the hull with wood. I'm guessing it was to change the profile of the tank to avoid friendly fire. Rather than simply do a T-34 with a german cupola and markings you could make it look very different indeed.
11330
Post by: Gundam-Mecha
4786
Post by: legoburner
That looks great! I wouldnt be surprised if the whole thing was fully functional and it drove off across your desk. Really looking forward to seeing this painted too.
11330
Post by: Gundam-Mecha
Thanks Legoburner! It certainly took a lot of work but the interior detailing really paid off.
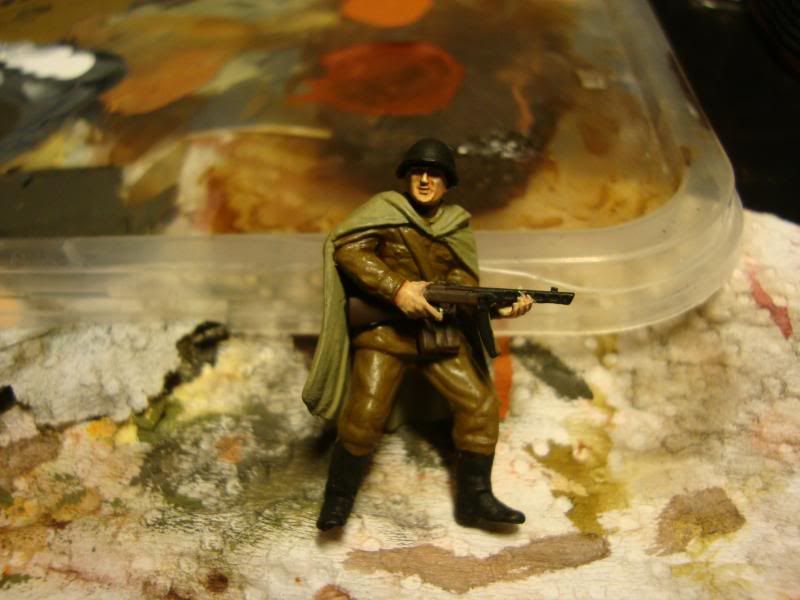
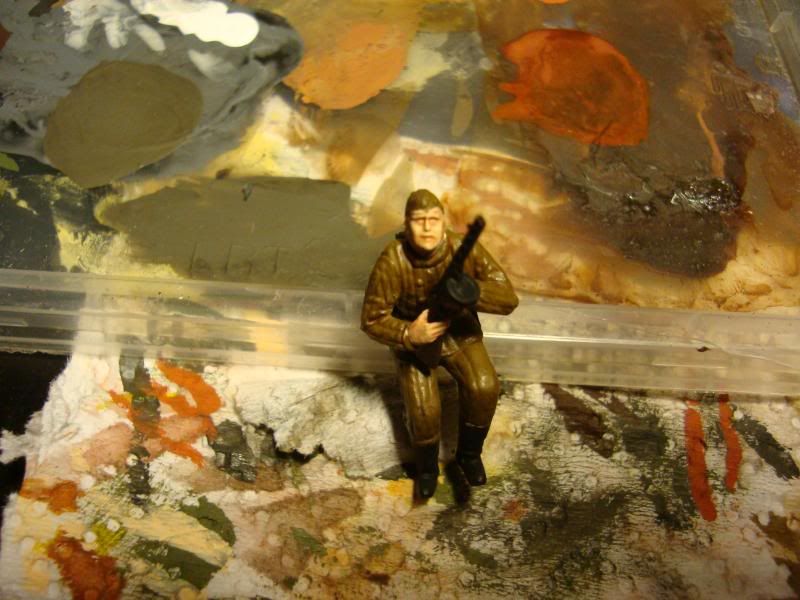
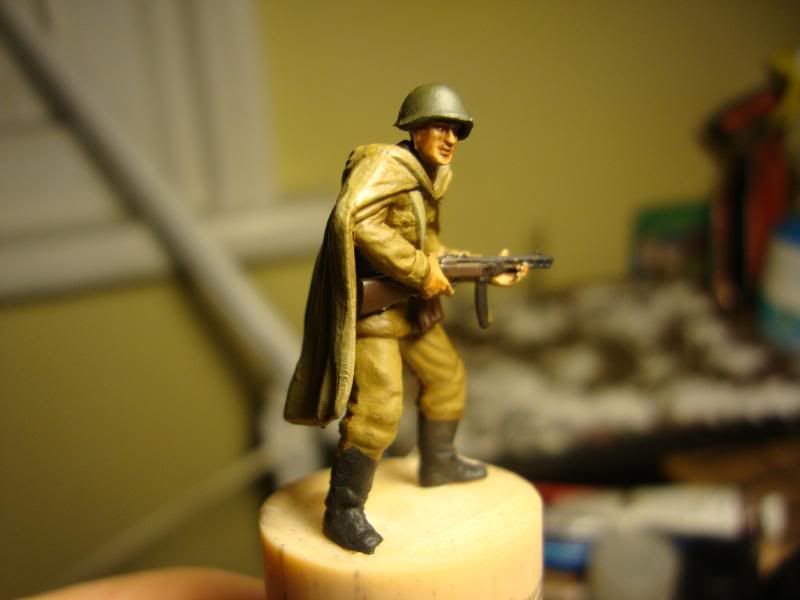
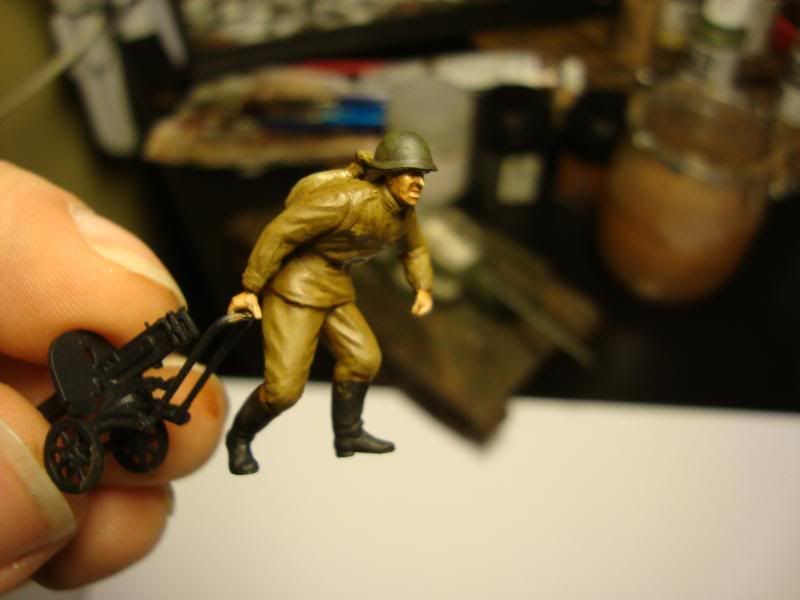
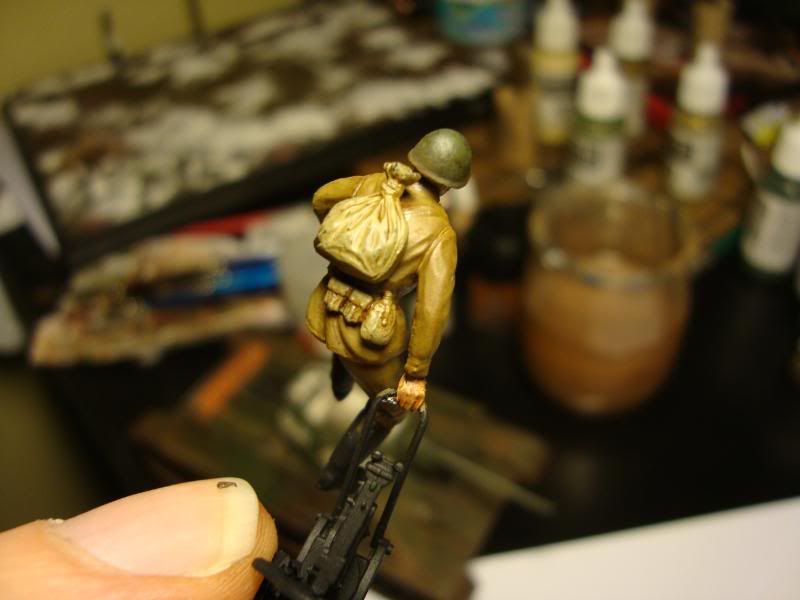
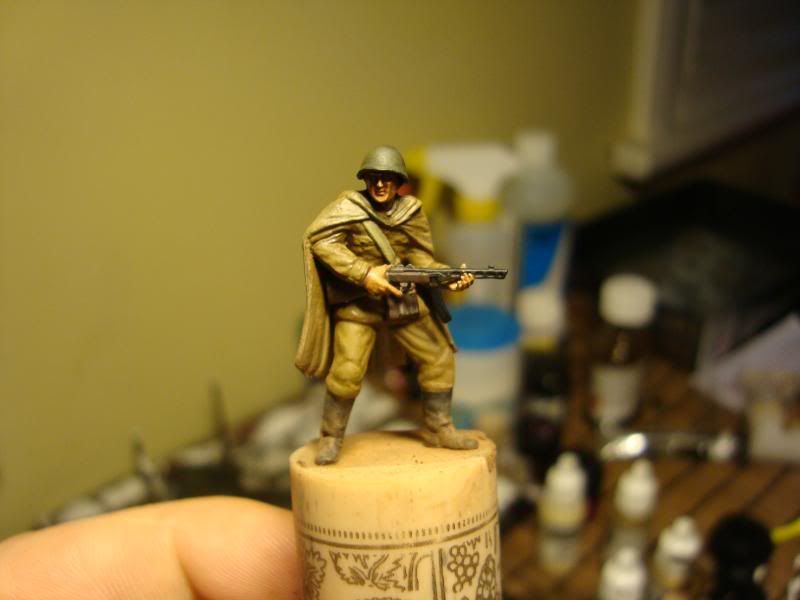
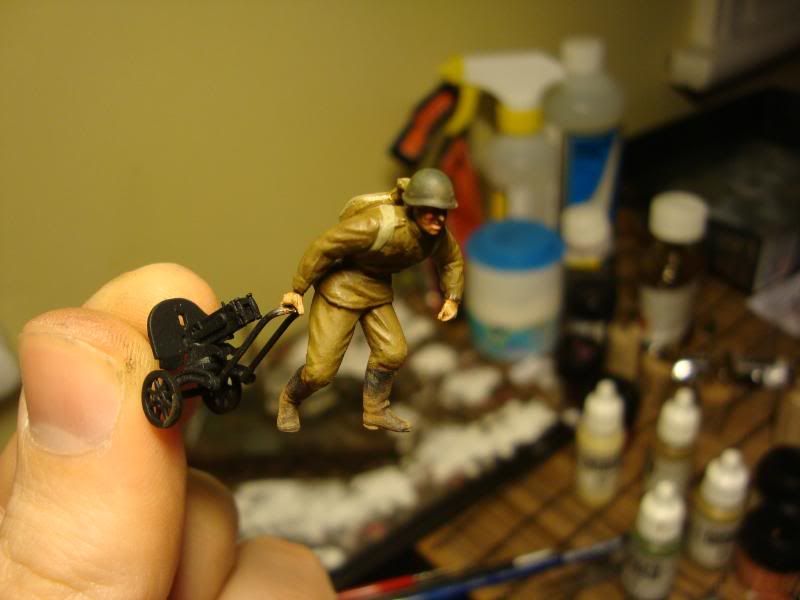
The Infantry are now finished and ready for the diorama and painting.
Infantry on foot:
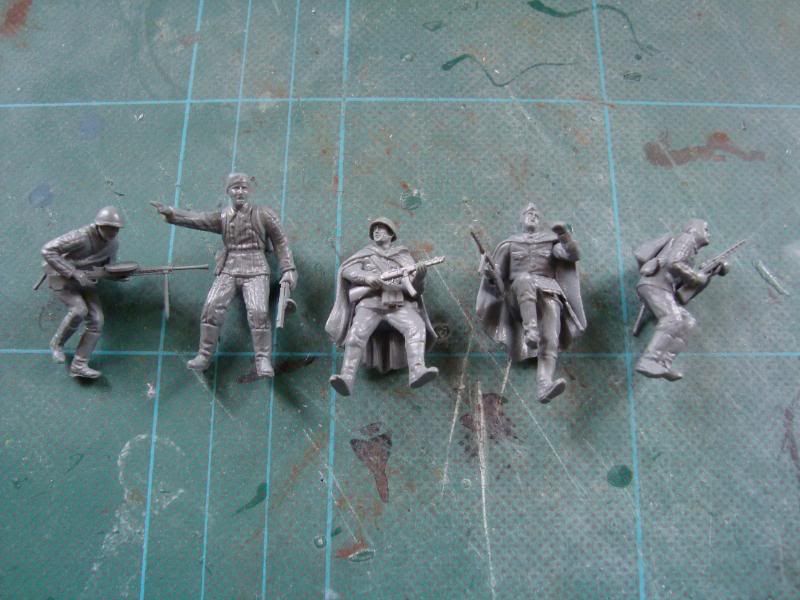
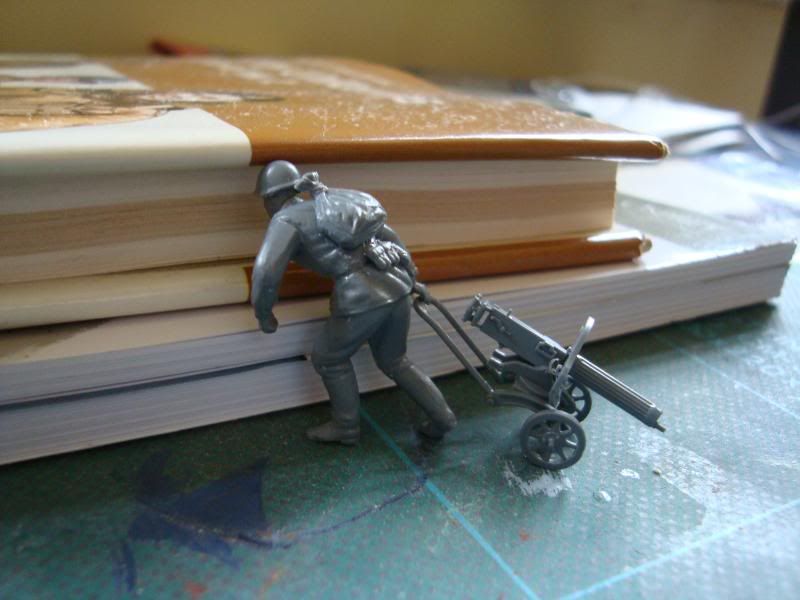
Infantry riding the tank:
Now that the troopers are all done I've moved onto making the scenic base for the diorama and started painting the Tank. More photos of the painting to follow shortly.
8745
Post by: Llamahead
Really nice work, good to see some really nice scale modelling can't wait to see the diorama. Love the guy with the traditional Gatling gun, As the posture looks right.
11330
Post by: Gundam-Mecha
Thanks Llama, I really love the Tamiya sculpts. They really managed to get some great dynamic movement into the minis.
You can really believe they are running for cover etc.
I'm working on the base right now and hope to have some more photos of that up soon.
11330
Post by: Gundam-Mecha
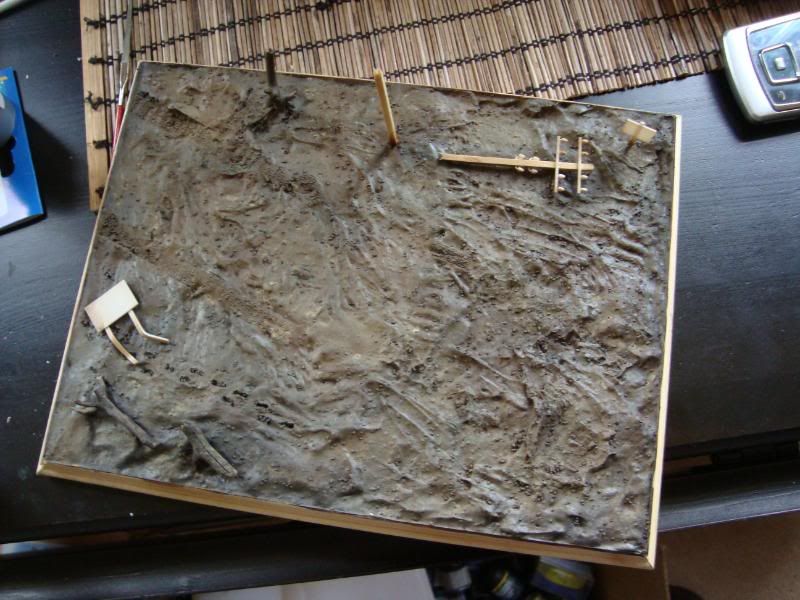
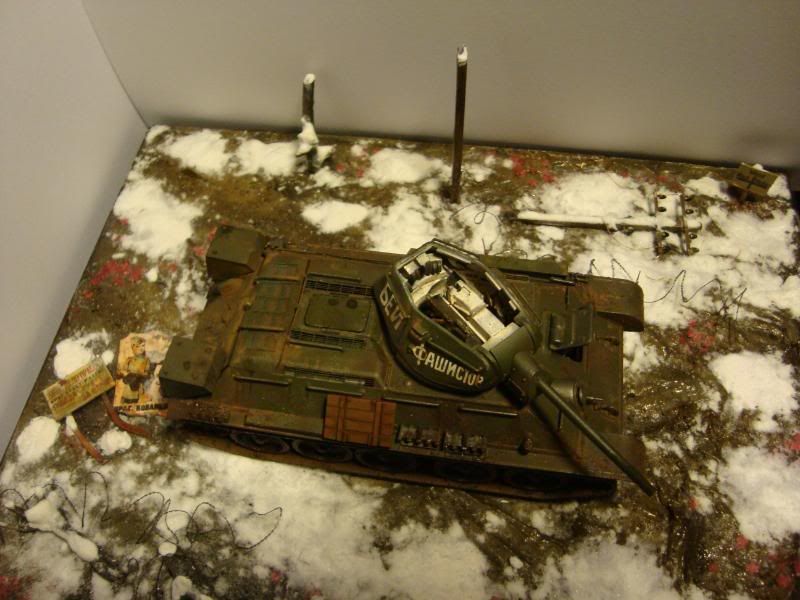
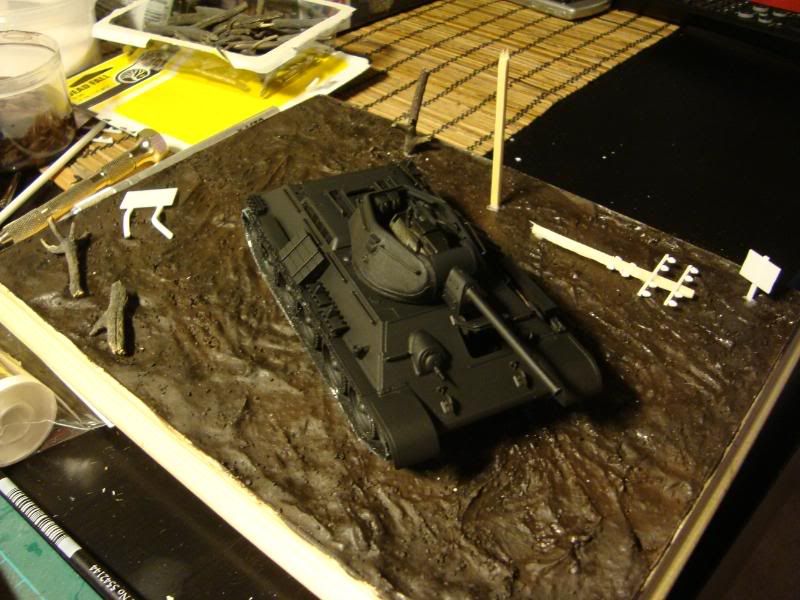
The base WIP:
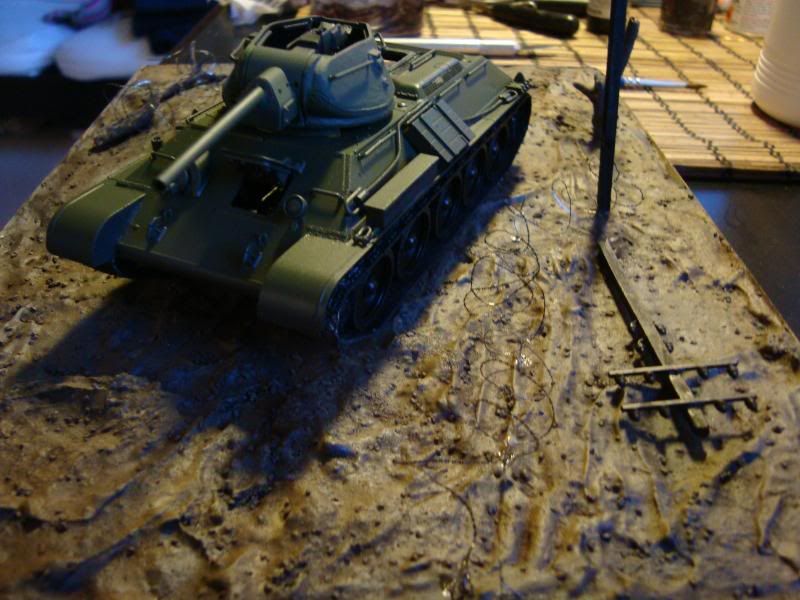
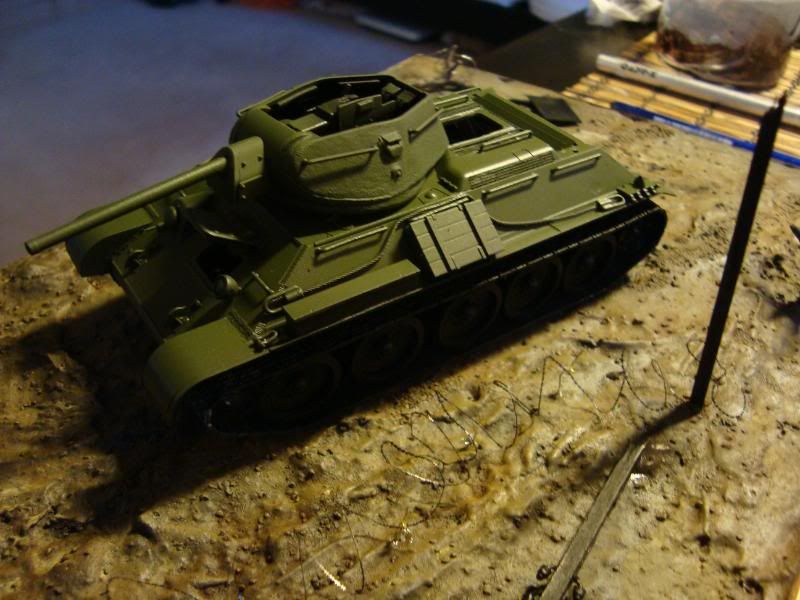
1st stage of painting:
Tank tracks (a little hard to make out in this photo):
4179
Post by: bubber
great work so far.
i'm starting to collect 1:48th WW2 too.
still not 100% confident of the etched brass bits though - some are soooo tiny.
your progress picts are great - better than most model magazines (but then they are limited on space i suppose!)
cant wait for the next lot.
will you airbrush this?
also could you do a pict of one of the men next to an IG mini?
11330
Post by: Gundam-Mecha
Hi Bubber, thanks for the comments! Yes Photo etch components are very fiddly! It takes a lot of work and patience especially when you have to remove very small areas from the original plastic parts to accomodate them. It's really worth it though and gives a great end result.
If you're not too sure about photo etch there are lots of different sets of different levels of detail you could try to start with. Lions Roar do varying levels from easy to experienced.
I'll be doing a mixture of airbrushing and brush painting on this set. The base and the tank will be airbrushed then worked on with brush techniques and washes, and the troopers will be brush painted.
I'll dig out an old plastic IG mini for you and get some comparison shots.
11833
Post by: Kagar
Great work here Gundam-Mecha. I recently returned to the hobby and your level of detail and dedication is really inspiring.
I hope I can keep up my motiviation as well, starting on a blog ( here and on blogspot ) soon to motivate me.
11330
Post by: Gundam-Mecha
Thanks Kagar!
What will you cover in your blog? I'll be sure to check it out!
11330
Post by: Gundam-Mecha
Today I visited a local model store and stocked up on some different materials, including lots of scenery bits and the Sin Industry Filters by Mig Productions.
I've seen quite a few articles on these filters and have been really keen to try them, today I got myself the Allied filters set for Soviet, US, and British Tanks.
Filters are very subtle washes that you apply to armour to pick out the details and give interesting shades and colouring.
I also ordered myself a new airbrush online that will arrive tomorrow, so it will be great to try that double action airbrush on the T34.
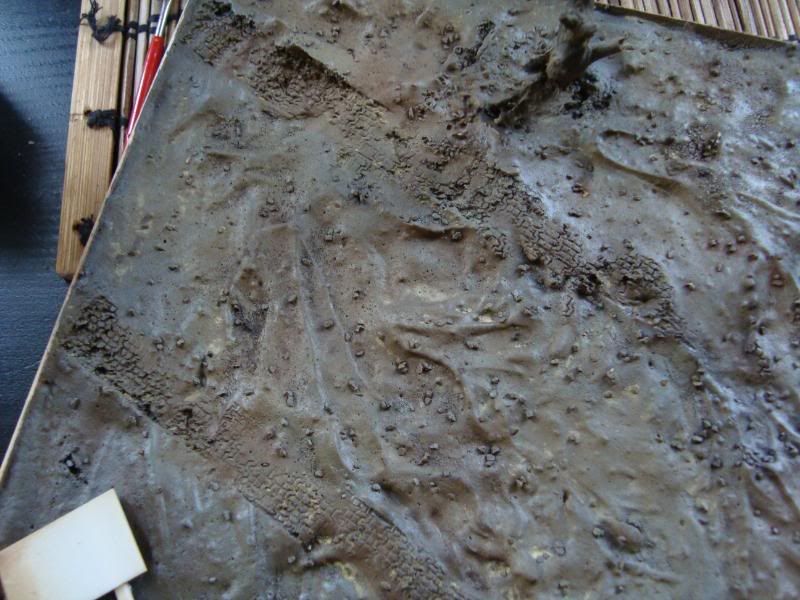
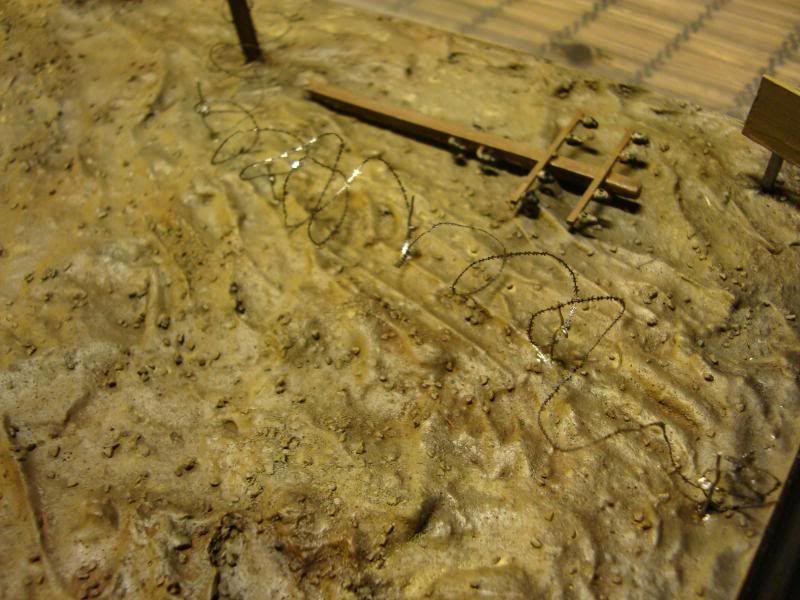
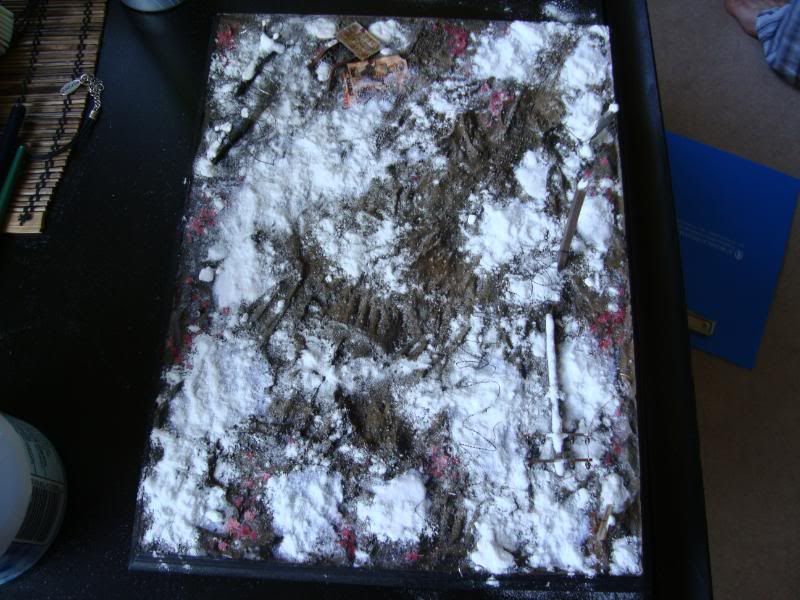
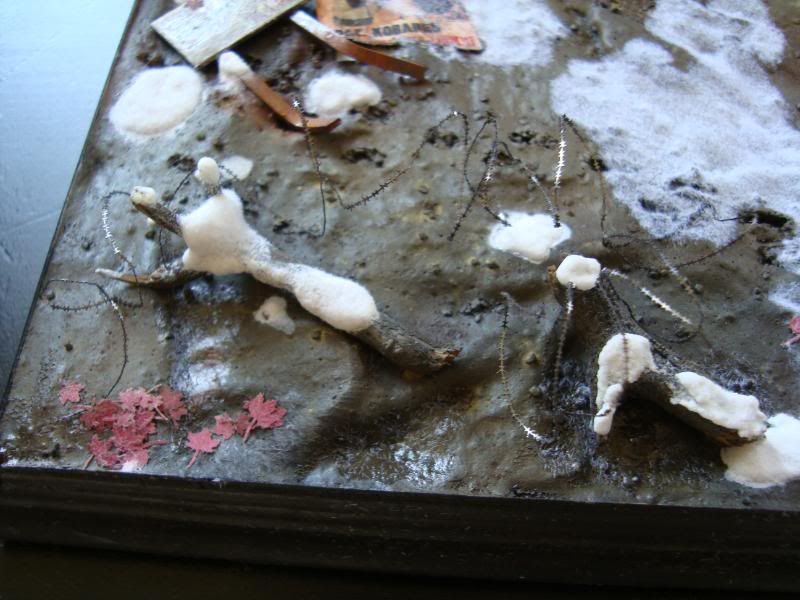
Here are some more WIP shots of the scenic base:
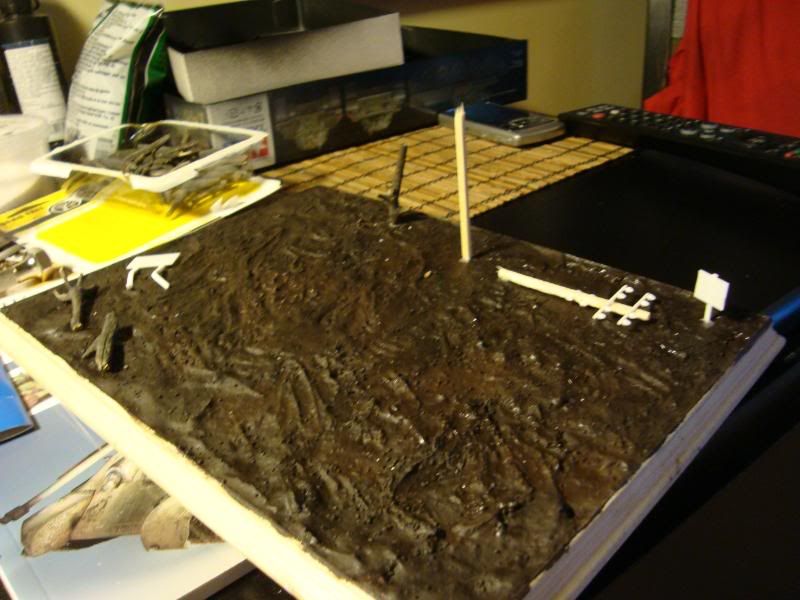
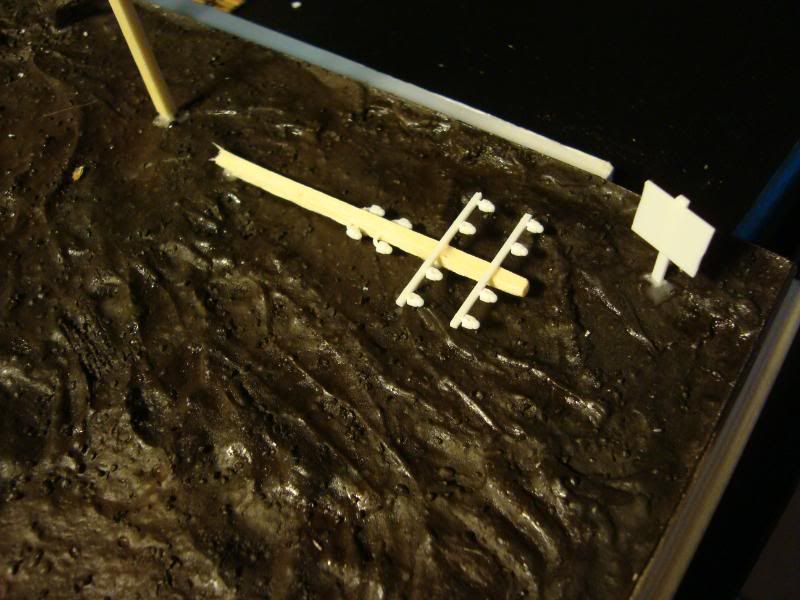
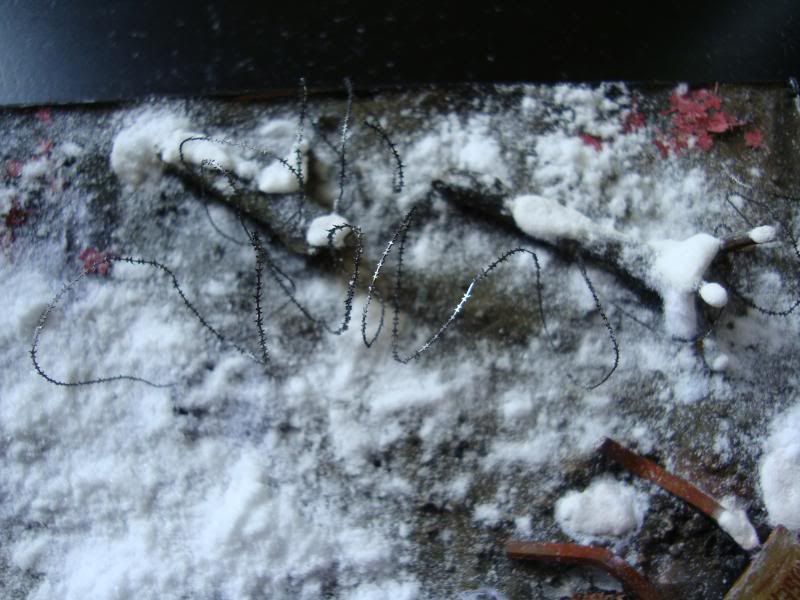
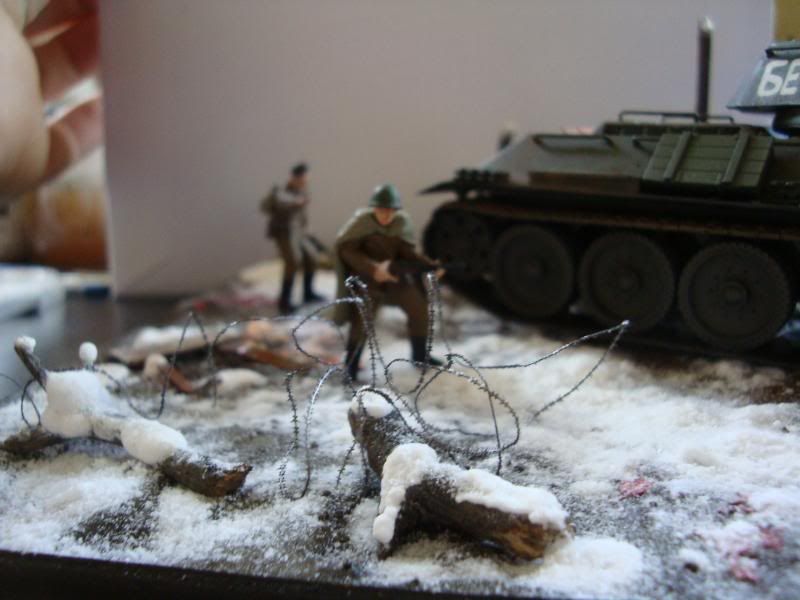
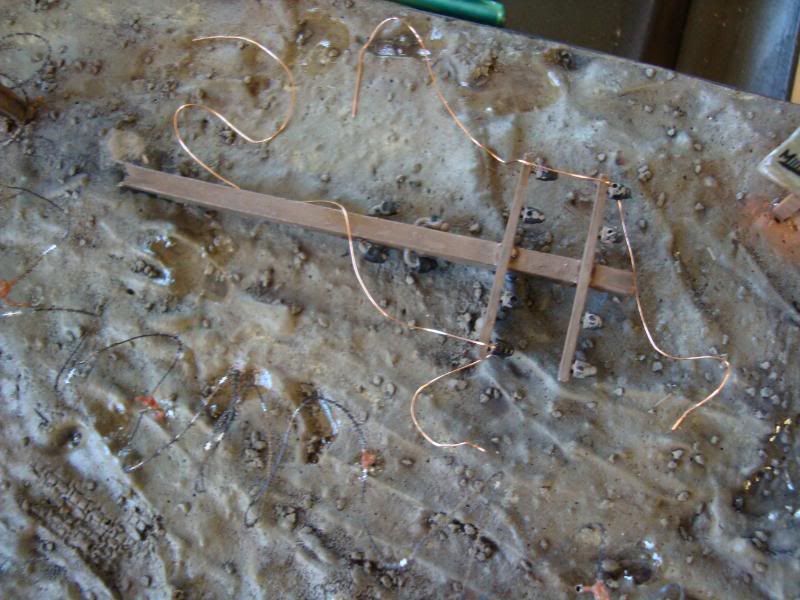
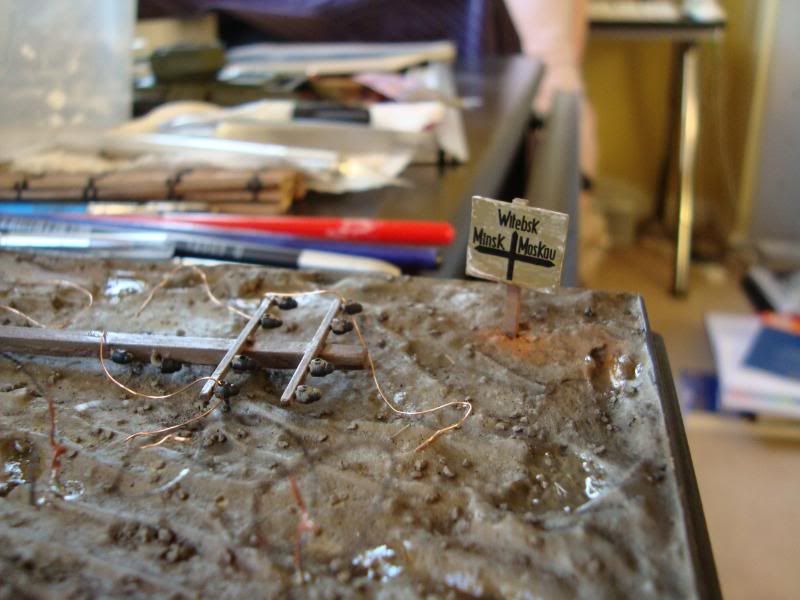
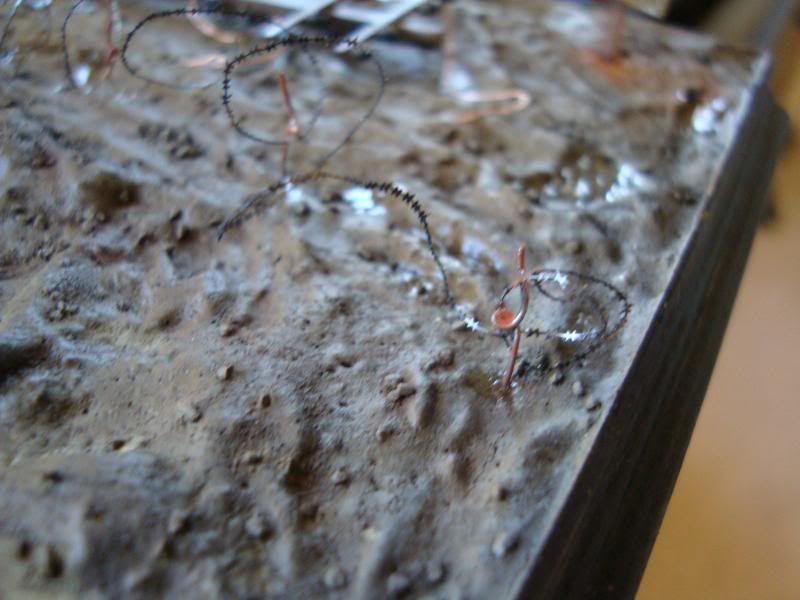
Theres still a lot more to do on the base. For example the telegraph poles will have copper wire through the holes I drilled out on the plastic parts. I plan to have these cables hanging from the pole and also strewn across the ground to make some interesting patterns. I'm also waiting on some brass etch barbed wire for the base.
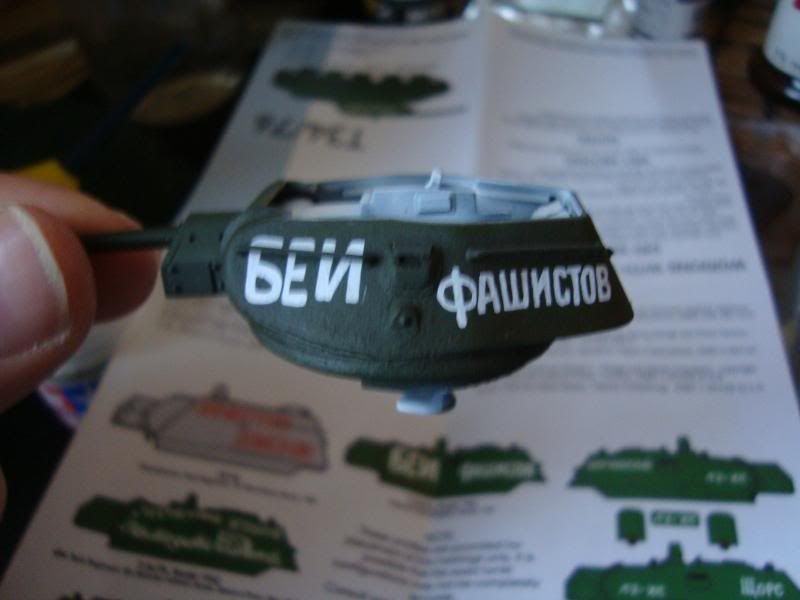
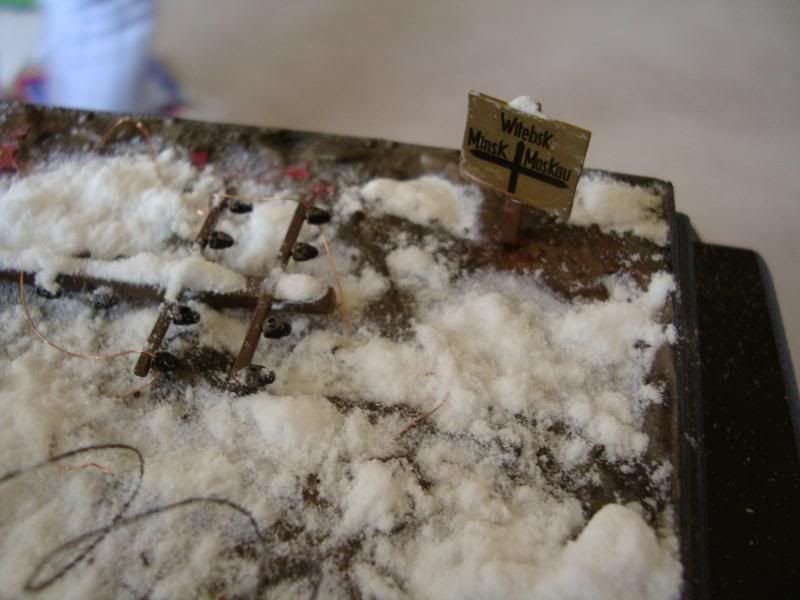
The signs will also be painted and finished with the Tamiya 1:48 road sign set, the sign standing will be in German reading "this way to Minsk, Moscow" and the damaged sign on the ground will be a Russian war slogan.
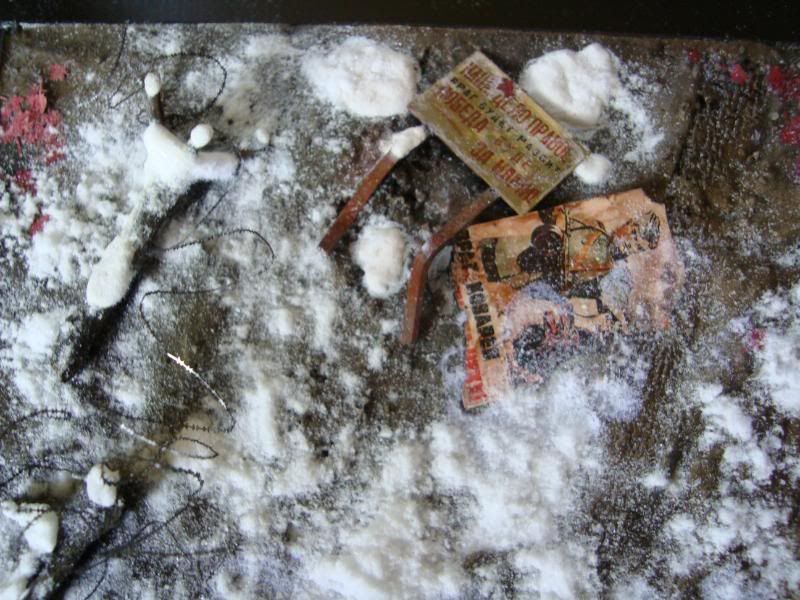
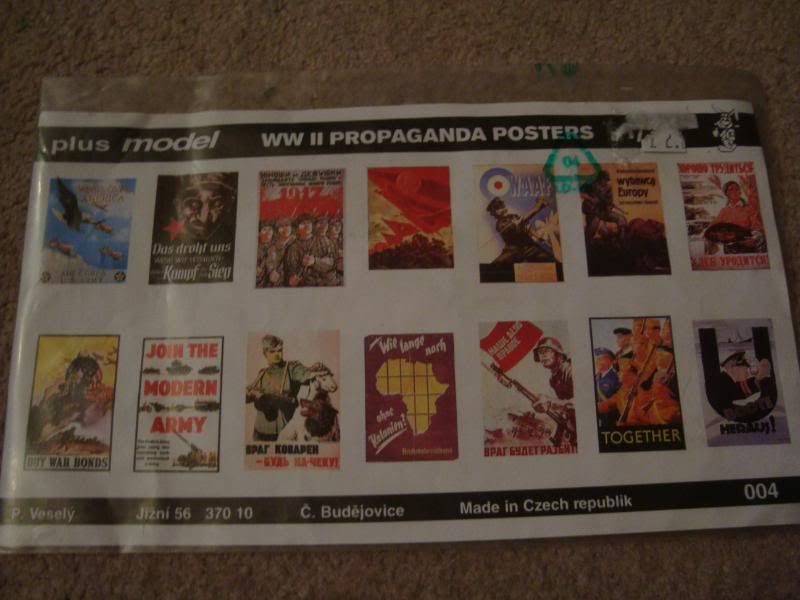
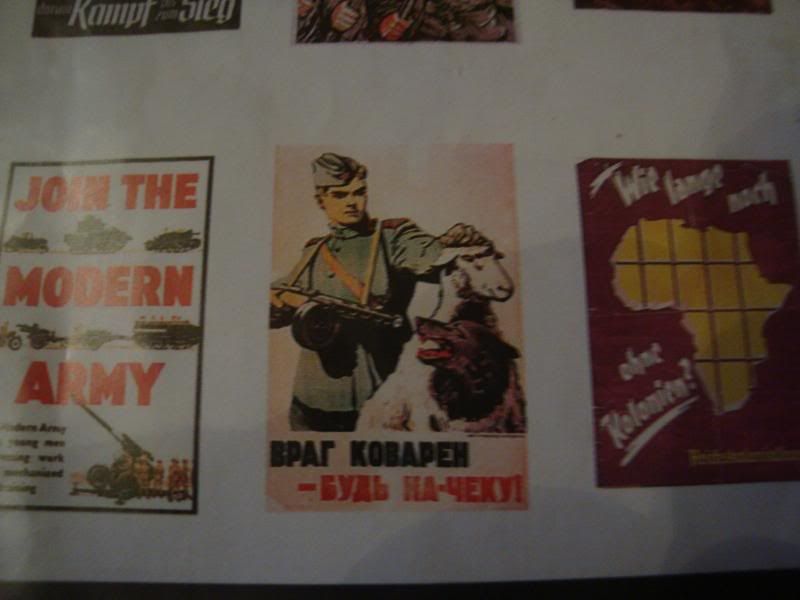
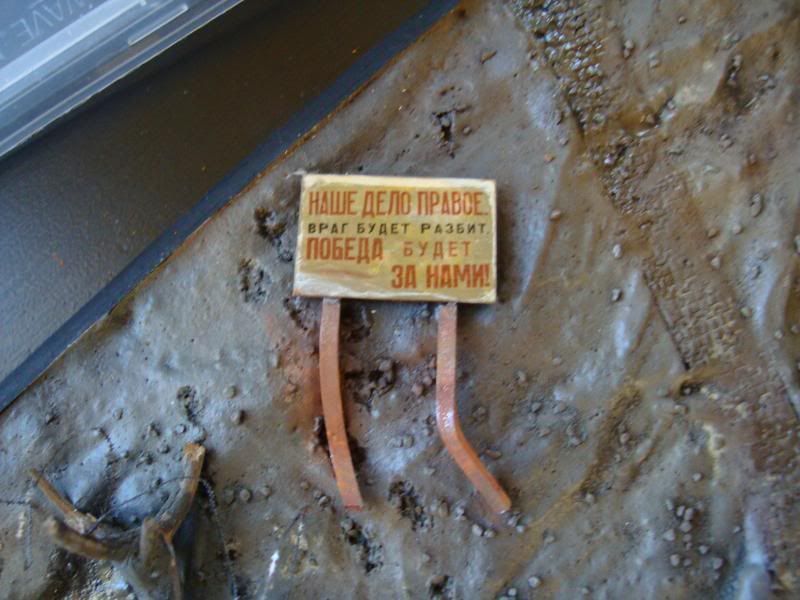
I'm also going to have some Soviet propaganda posters strewn across the floors:
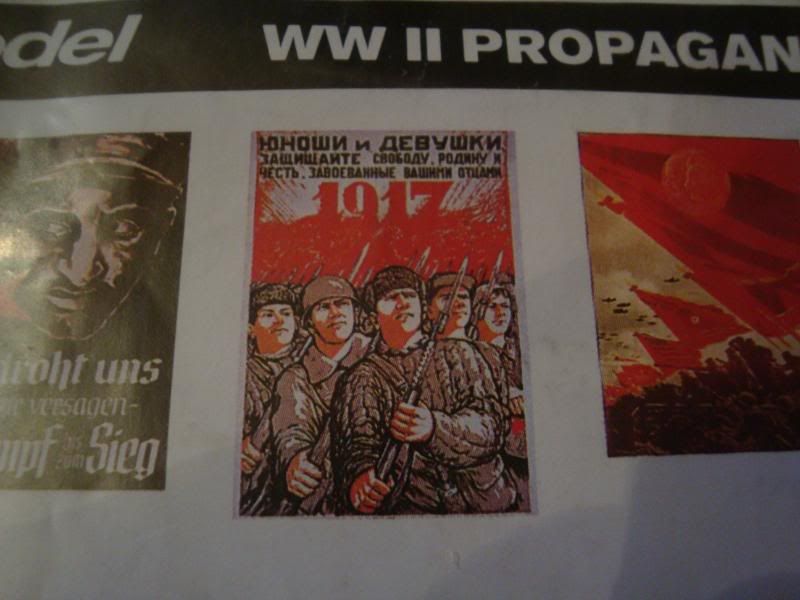
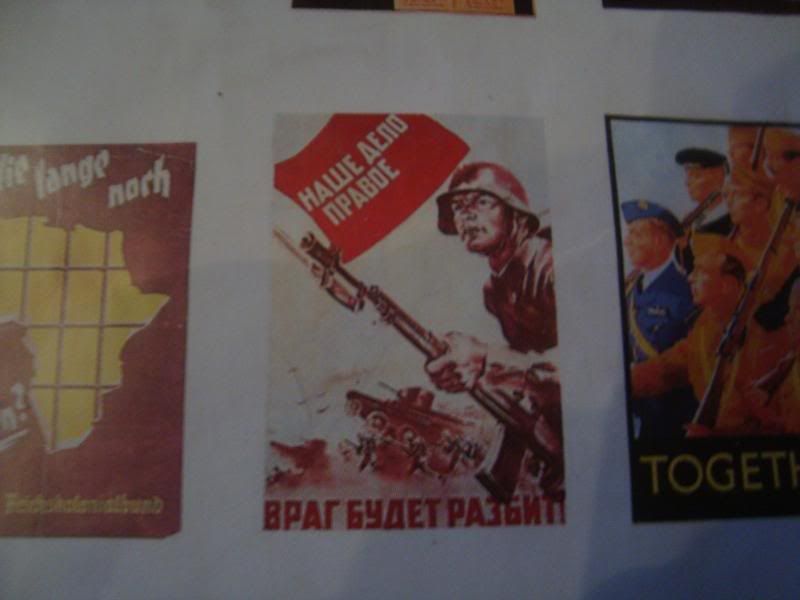
4657
Post by: Metsuri
Thats starting to shape up nicely.
The russian posters are great looking!
9505
Post by: CaptainRavenclaw
Wow, so much progress has been made! Maybe mother russia was right!
Seriously though, I love the base, it looks great. It gives a lot of space to the diorama and with the men running around it'll look complete. Did you use real pieces of wood for the trees? It looks like it. I always wondered why people spend loads of money to buy plastic trees, when you can get real ones for free!!
11330
Post by: Gundam-Mecha
Thanks guys!
I really love the posters and war slogans, it's going to be fun working with them.
As to the base it was important to allow enough room for all the infantry and the Tank since its actually quite a small area to work in (around 25cm x 18cm).
I wanted to try and get the subtle impression of a battlefield without filling up too much room as I wanted the minis themselves to be the real focal point. Theres still a lot more to come and it does look a bit bare now since there are no other effects such as foliage, flock, water effects, ice, snow, leaves etc. I'm hoping also that the barbed wire will really bring some more to the scene when it arrives in the mail tomorrow.
The trees are real wood yes, just some twigs snapped into the right length for modeling. I'm most likely going to end up weathering these and maybe adding a little paint, or I may leave the natural wood colour.
The Telegraph pole is made from a match stick.
11330
Post by: Gundam-Mecha
11330
Post by: Gundam-Mecha
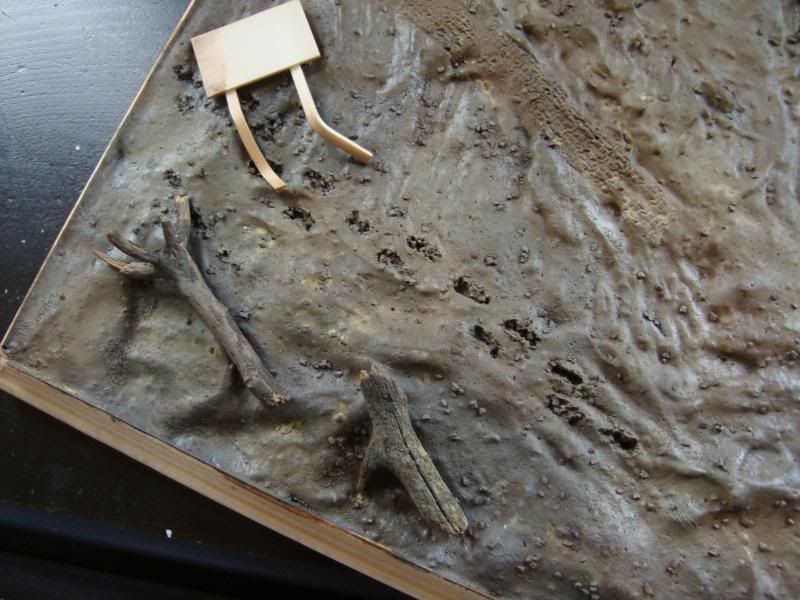
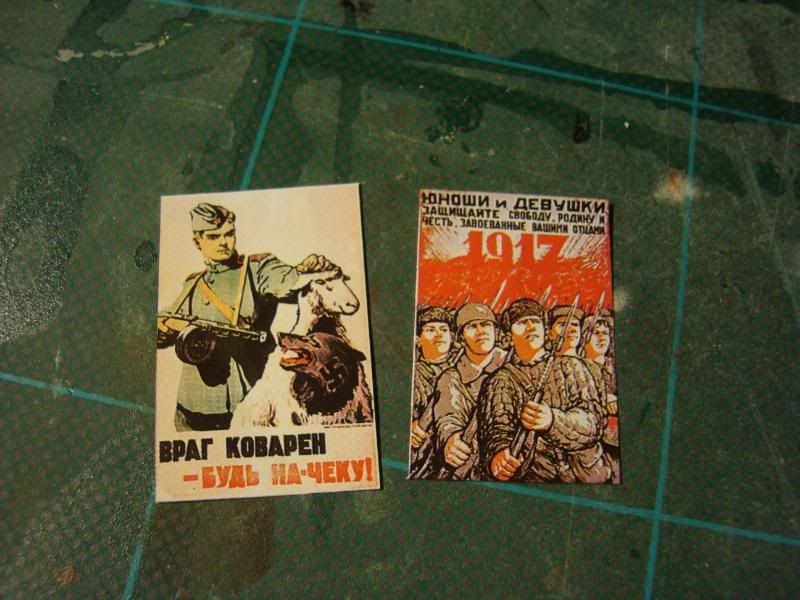
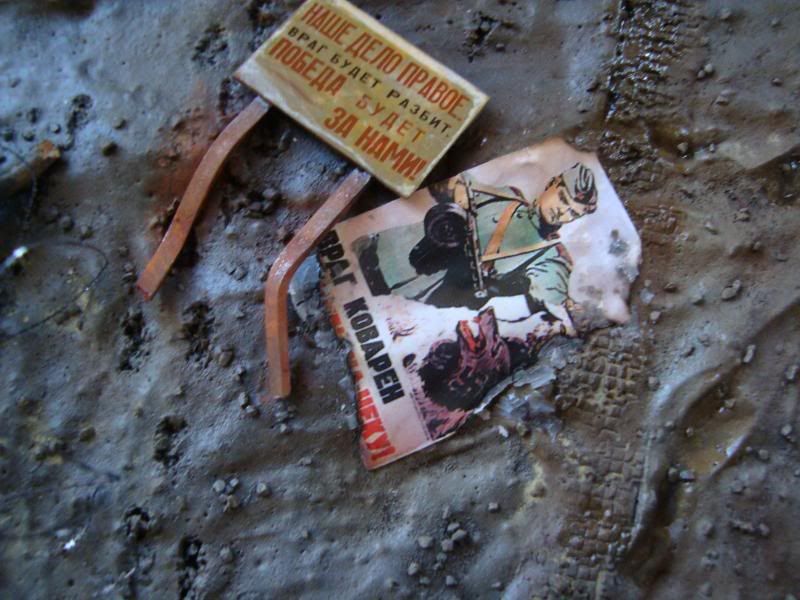
The Posters cut out:
Work on the Telegraph Poles:
The signs marked out with the Tamiya transfers:
Poster weathered and attached to base:
Weathering and rust on the barbed wire fence:
1748
Post by: Grandmaster
Its looking great! Do you read AFV magazine?
Its great for this sort of hobby.
Ive made a few 1:35 dioramas so i know the work involved!
Keep it up
9505
Post by: CaptainRavenclaw
Did you singe the edges of the poster with a flame? It looks great. Keep up the good work!
11330
Post by: Gundam-Mecha
Thanks guys,
Grandmaster - I read AIR modeler magazine which is the sister mag to AFV (started reading it for ideas for my FW Thunderbolt). I've never actually read an AFV mag though. I've flipped through them a few times though. It seems to be a great magazine and I'm actually considering getting a subscription as there are some wonderful models and painting inside!
I've never worked in 1:35 myself but I've been considering it recently. You can certainly get a much higher level of detail in armour at that scale and there are so many fantastic infantry and crew kits available at that scale. Acessories and after market kits are also much wider ranging at 1:35, it can be a challenge sometimes to find things at 1:48. It's a shame really I'd like to see more stuff at 1:48 I really like the more compact scale myself.
Yeah it is a lot of work, but it's really worth it. A lot of people have asked me on Warseer especially if I intend to game with these WW2 models or my Thunderbolt and all seem disapointed when I say no. I guess they find it hard to appreciate that people like to build models and paint them just for the art of it. It's really satisfying to spend the time on a diorama or a complex kit and just watch it grow and develop. Actually I never seemed to have time to finish whole armies when I played Fantasy and 40K in the past, I just ended up with large groups of semi finished minis. With one diorama though or a single kit, you can get a project finished and really work on all the cool elements of painting that come near the end of a project like weathering and highlighting etc. It's ironic that my painting now has imporved alot more now that I'm painting less compared to when I used to work for GW and was painting shedloads of minis everyday!
It's finishing a model to completion that really helps you hone and develop your skills I think.
S.J - yes the edges of the poster were burnt with a match, very carefully and then blown out pretty much as soon as they were lit. Since the posters were so small it was really important to move quickly and try to control the burning as much as possible. I then sealed the ash and burnt areas of the paper with some watered down PVA glue to stop them from crumbling and blowing away and gave the poster a wash of Chesnut brown ink mixed with Badab Black wash. Soaking it in watered down PVA and sealing the top afterwards really helped get the paper to fit the contours of the scenery nicely.
I also tried the Johnson's Klear trick for applying Transfers from the Imperial Armour Masterclass book and found it worked really well.
11833
Post by: Kagar
This looks better and better after every update you post, I espescialy like the pigtails that are holding up the barbed wire.
I've send you a pm regarding your prior question.
11330
Post by: Gundam-Mecha
Thanks Kagar!
Those "pig tails" were very tricky to bend. A thin bit of copper wire, some plyers, and a lot of patience!
I followed the example in the Modeling Masterclass book, they did a similar thing in the Krieg Earthshaker Diorama.
Checked out your blog, great to see some Mordheim stuff!
10890
Post by: Deff Dread red Edition
Nice,now get to work finishing it up I must see the end result!
11330
Post by: Gundam-Mecha
11330
Post by: Gundam-Mecha
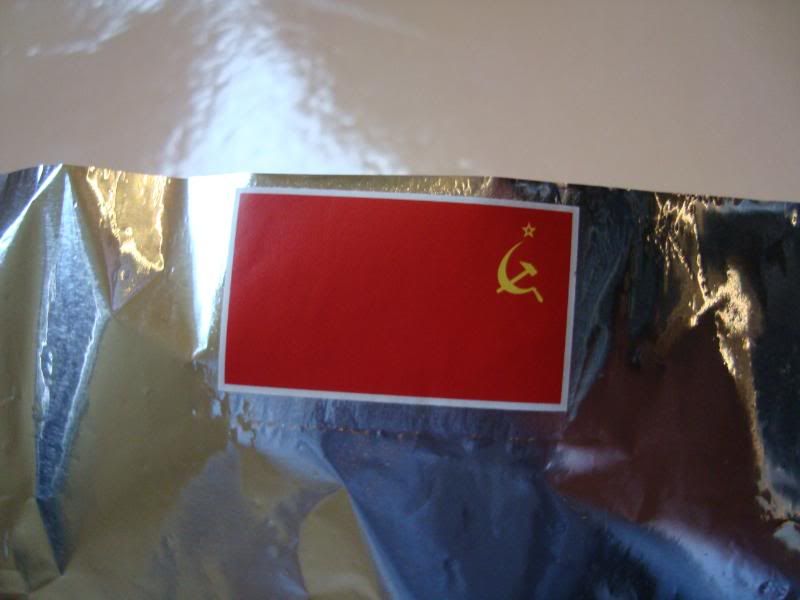
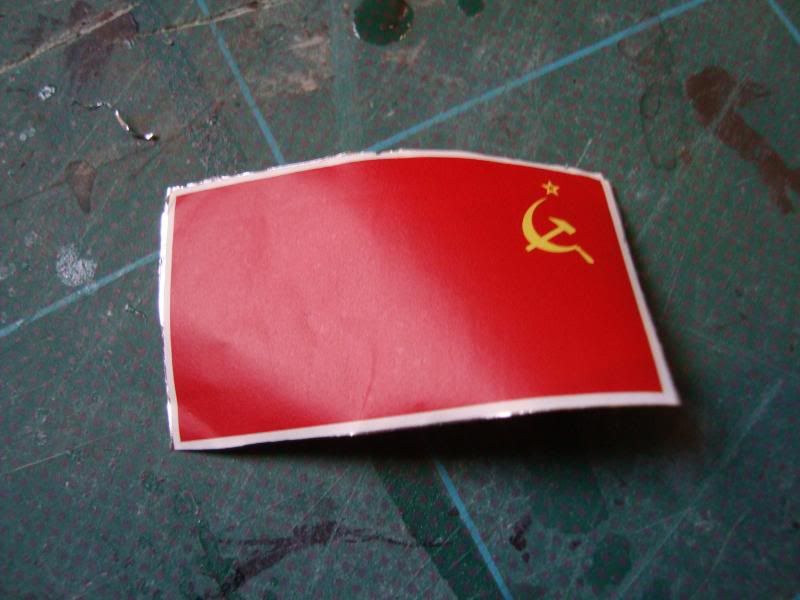
A small package arrived in the post today and contained these:
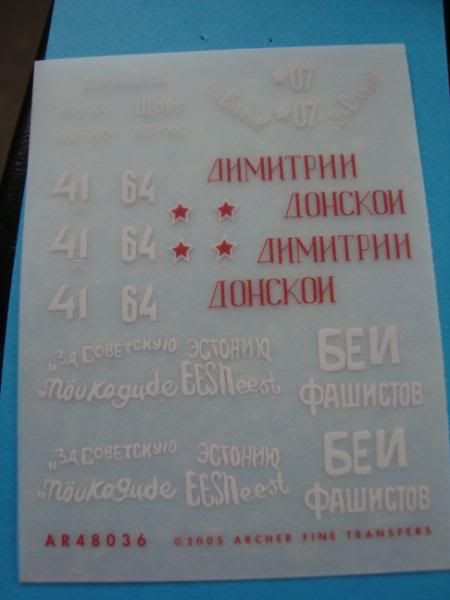
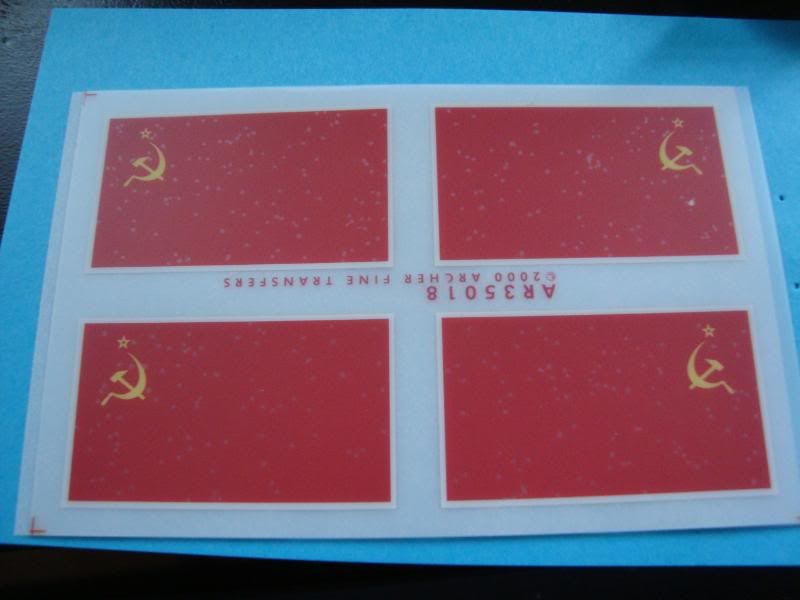
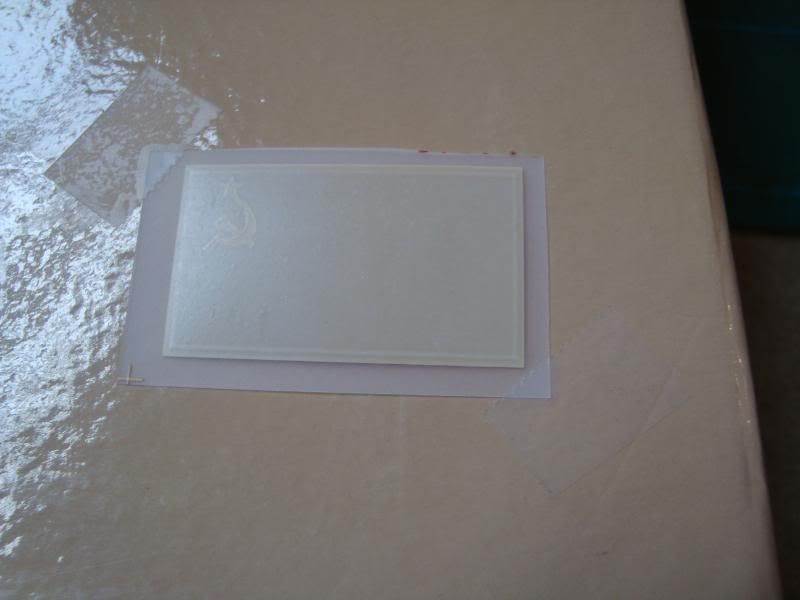
My transfers and banner from Archers. I've used Archers transfers before but this was the first time to use one of their flags. The Instructions provided were pretty clear and the quality of the transfers fantastic, they apply directly to tin foil. Heres a short how to guide:
Step 1:
Cut out one left and one right side of the flags, being careful not to cut the backing paper just the transfer sheet.
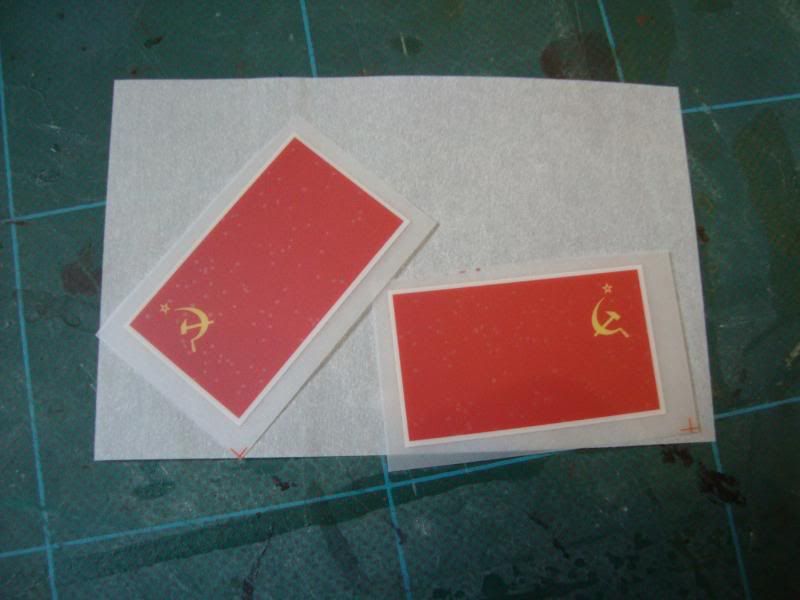
Step 2:
Stick one side down to a flat light surface with some tape. Making sure the image is facing down.
Step 3:
Place the other side on top sticking one side with tape to make a hinge so you can make a sandwich. Dont push down at this stage as the transfers will bond together and become useless.
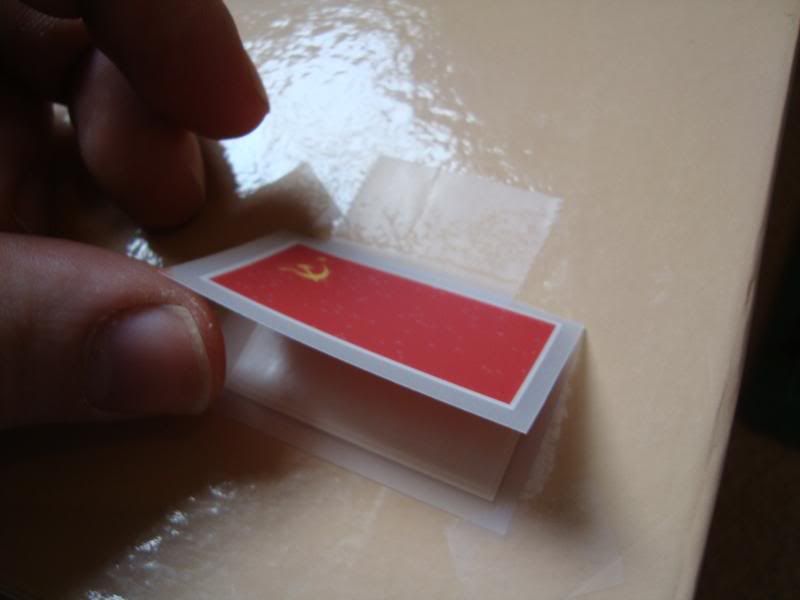
Step 4:
Place your tin foil in-between both halves and make a snadwich.
Step 5:
Use a dull pencil and some force to push the transfers onto the foil.
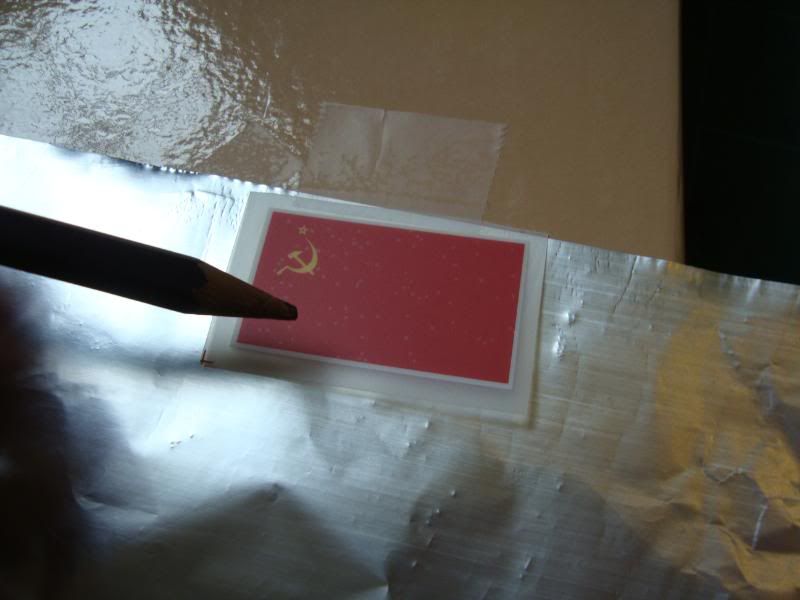
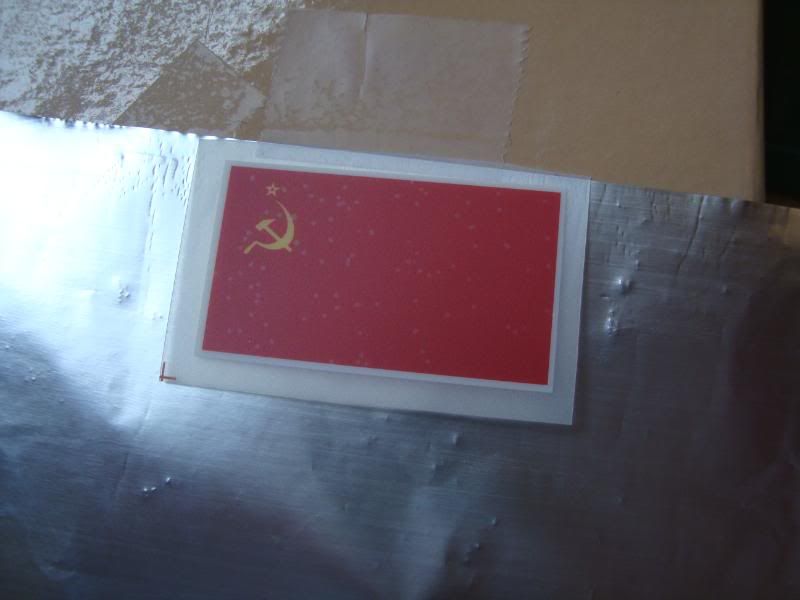
Step 6:
Carefully lift the transfer paper from the foil.
Step 7:
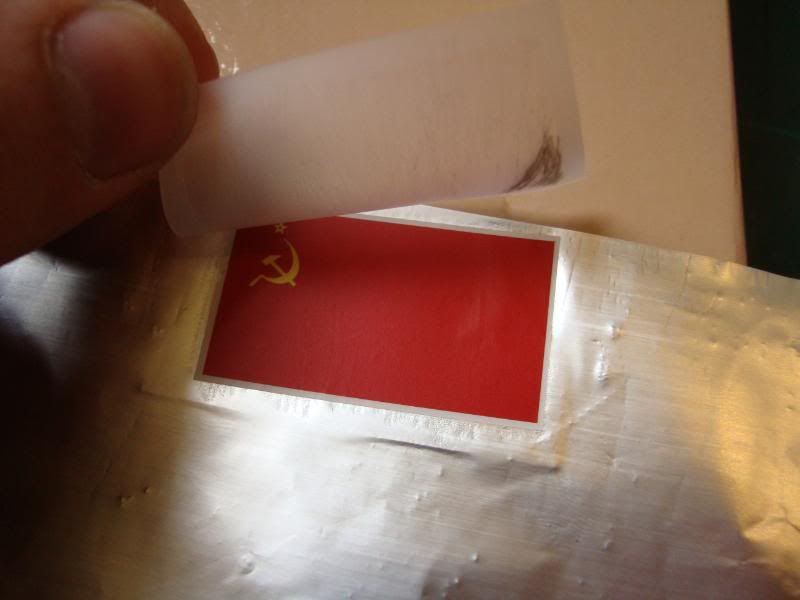
Place backing paper over the flag and burnish the transfer into the foil to seal it.
Step 8:
Remove the backing paper and carefully peel the foil from the transfer paper on the other side.
Step 9:
Carefully cut out your flag using a scalpel blade and very light cuts. The foil can easily tear or split at this stage.
Step 10:
Bend and crease the tin foil to the desired shape. The foil will hold any shape you want and the ink will never crack or peel. It's remarkably durable.
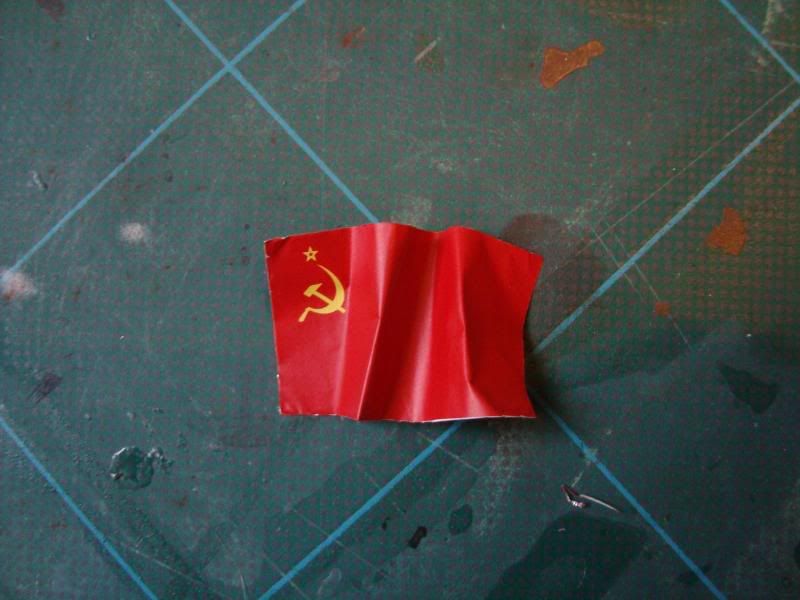
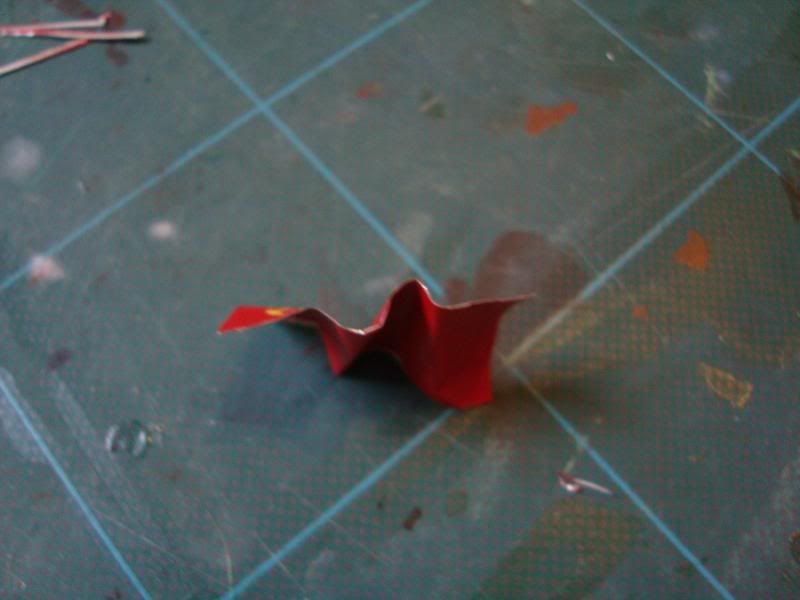
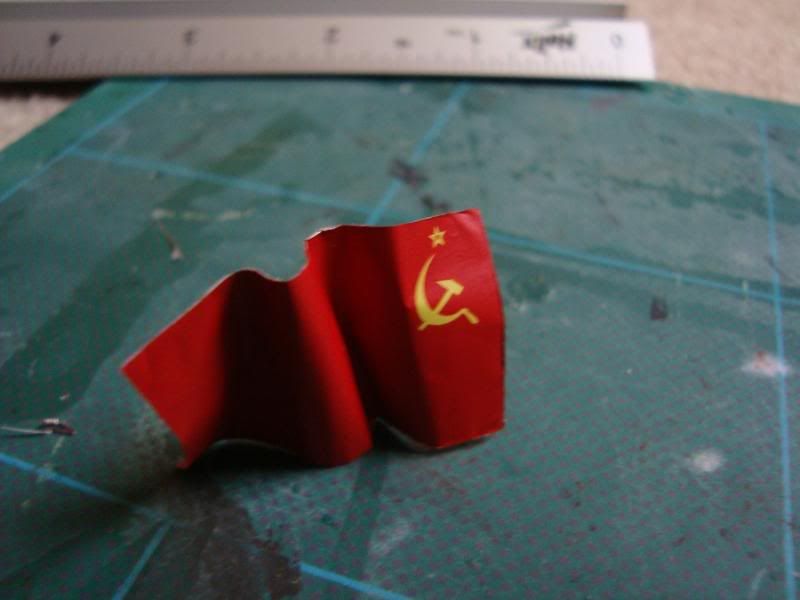
These flags are a great product and give some very diverse and realistic effects. I can't recommend them enough!
11330
Post by: Gundam-Mecha
11833
Post by: Kagar
Your booking a lot of progress, how long do you think is ahead of you to get this finished. Or don't you plan these things?
11330
Post by: Gundam-Mecha
Hi Kagar!
I hope not too long till the end now. The tank has some more stages of weathering and painting, but the base is mostly done. The next thing is of course the infantry.
My final deadline is the summer of this year as that is when i will be traveling to Minsk to deliver the finished diorama to my relative. So I have to get it done over the next few months for sure!
11833
Post by: Kagar
Well seeing the progress that your making I'll take it you've started work on another project by then. 
I've started work on my Tau army now, I've posted the last pictures of my Witchhunter warband yesterday.
10339
Post by: tallmantim
Looks awesome GM!
The paint with the weathering even looks like thick soviet paint that would go over these things.
4770
Post by: holden88
Amazing job overall. I used to model WWII armour in 1/35 scale before moving into 40k and I can certainly appreciate the amount of work that goes into a project like this.
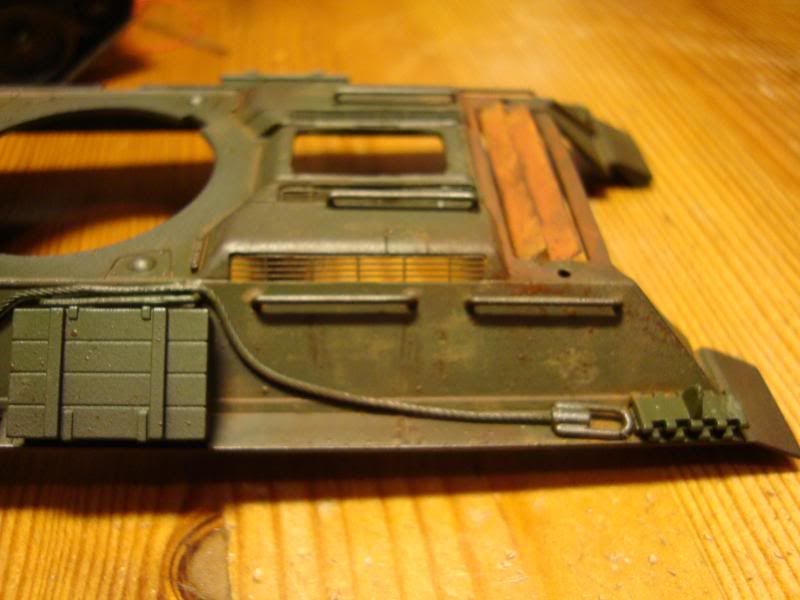
I have one comment. The external stowage (the crates, track links, tow cable, barrel cleaning kit) don't appear to be fastened to the hull in any manner. They just seemed to be sitting on the tank and look like they will fall off as soon as the tank drives away. Obviously as modellers we can glue parts on our vehicles anywhere we like, but real tankers have to ensure that their gear is secure.
For example: with T-34's it was very common for the crew stash the spare track links vertically into the long hand holds that adorn the tank.
11330
Post by: Gundam-Mecha
Thanks Tallmantim! More to come, I'm hoping to finish the interior this evening.
@ Holden, thanks for the feedback and the suggestions. I was following the Tamiya guide when I attached the components to the Hull. Come to think of it though you have a point. I had a look this morning at my reference photos this morning and on some cases there doesn't seem to be any visible straps holding down the spare track links. They are placed onto the flat areas that overlap the tracks. Similarly with the long crates they seem to be placed on the tank and held by their own weight or perhaps some subtle clips or something underneath.
I'll post up some of the photos of this later, it puzzled me too, so any suggestions you might have would be very welcome.
11330
Post by: Gundam-Mecha
7361
Post by: Howard A Treesong
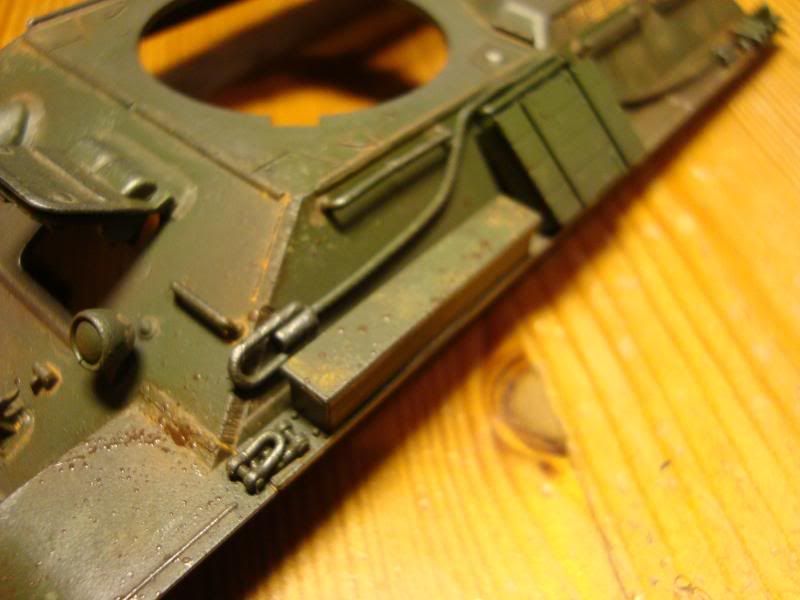
I think there are clips holding all the stuff on, they just aren't obvious. Although the rear end of the tank in your second picture appears to have bunches of track links with brackets around them.
11330
Post by: Gundam-Mecha
In the second example the tank in the front has treads that seem to be placed ontop the fenders without straps or clips...
In some they have small clips near the edges, but in others like the third picture they also seem to be laid directly onto the fenders again.
I can only guess that the track links are bolted onto the fenders insome way, or held in place by small brackets near the sides. At 1:48 Scale such small detail is a bit harder to represent than in 1:35 which gives you more scope due to the enlarged size. I may try to custom make some clips or something out of spare photoetch parts. Either that or perhaps some very thin straps from plasticard.
11330
Post by: Gundam-Mecha
I've been doing some reference research and giving the base and the tank a lot of though recently.
I'm pretty much settled now on what I'll do with the crates and track links, but I've been debating whether or not I should add a fading whitewash coat to the tank for winter operations. I've been planning to model some snow on the diorama base and the idea of winter camo on the tank lingers in the back of my mind.
I was looking at Mig's snow camo T34 in my Osprey Book and also saw this example today:
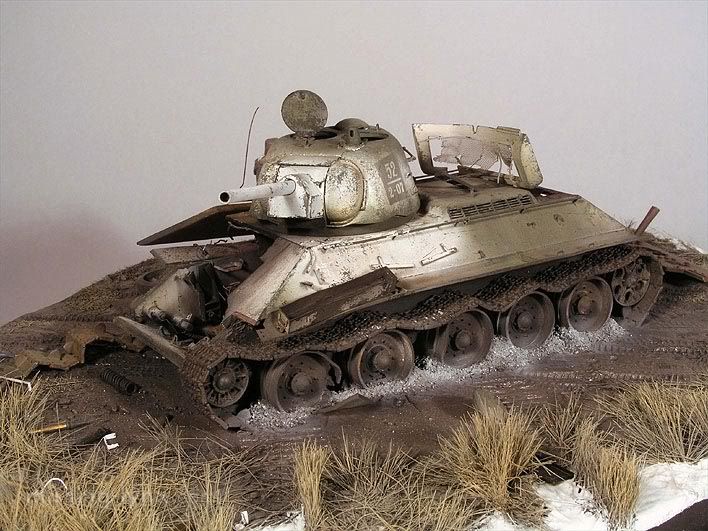
I was also quite interested in this unusual example also
I quite like the idea of patches of dull faded white, quick poor quality washes of white were often given to tanks during winter time and faded and wore off during operations. It would also give me a chance to try the hairspray technique mentioned in the Modeling Masterclass book thats really intrigued me.
What are peoples thoughts on this? It would be interesting to get some feedback and ideas from fellow modelers here at Dakka, keep the T34 Green and let the weathering speak for itself, or incorperate some subtle white wash patches?
I've also been working on the banner for the Tank, and based the idea from this picture:
I've also had problems sourcing colour images of the T34/76 interior. I have lots of black and white but not many colour and most of these are from other models. General consensus seems to be that the inside of the T34 was painted white, as to the controls and other fitting on the inside I'm not so sure. I will have to look into that. I'm using these images as a guide at present:
I'm not sure about the gun breech though, this example shows it as green but others I have seen have shown it as white or grey. Sadly I don't have a photo of the breech in my reference images.
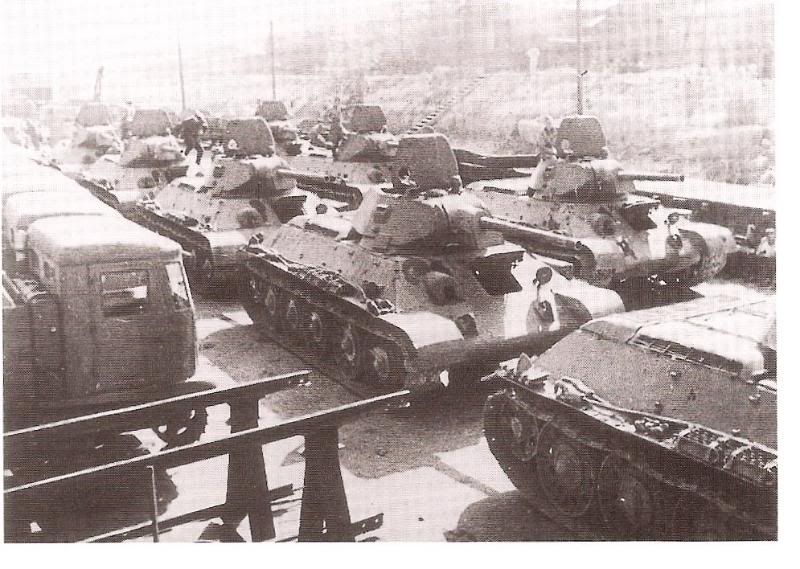
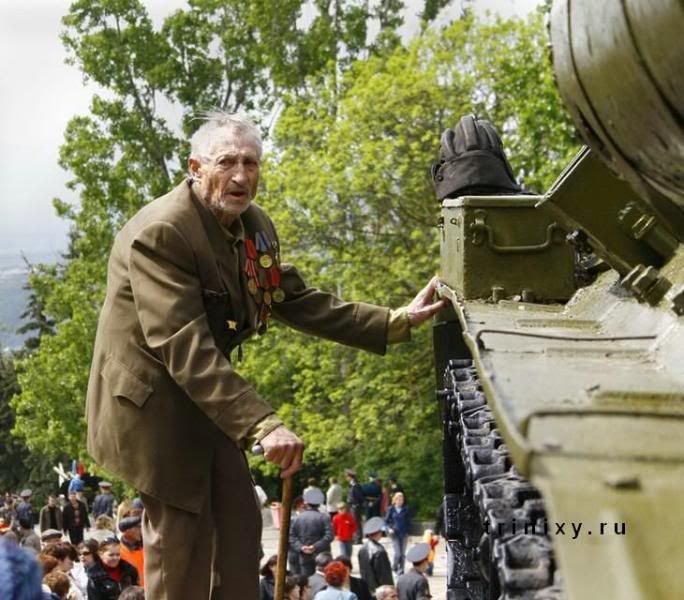
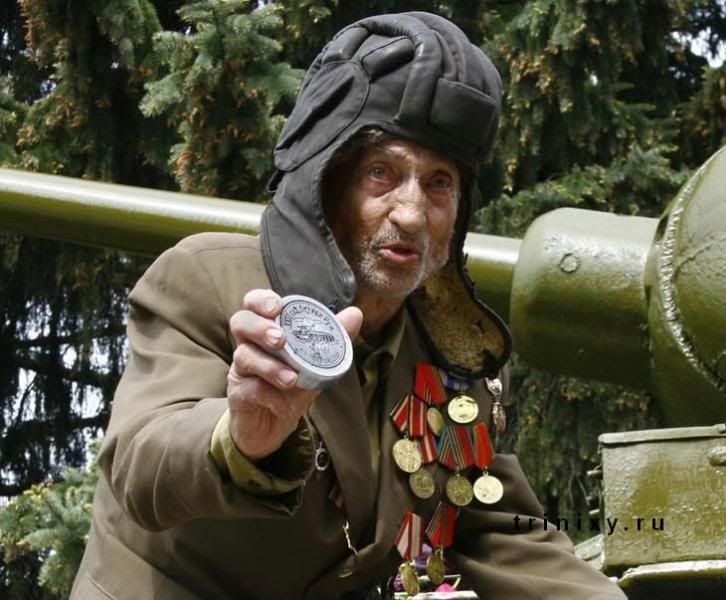
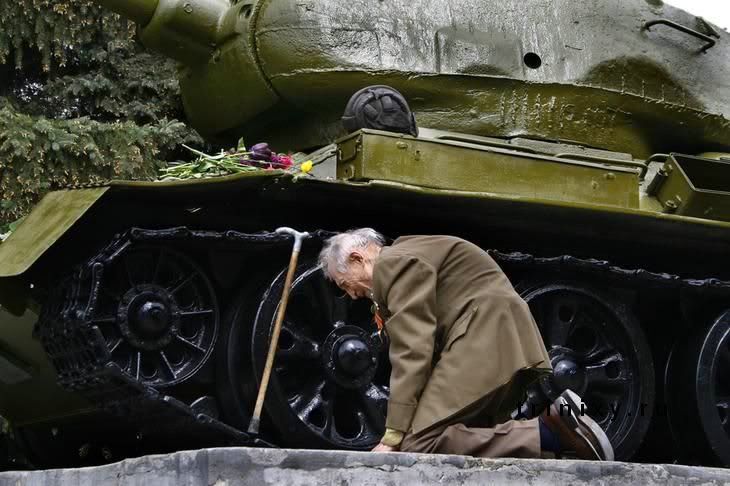
On a seperate note I found these remarkable images today while I was searching, they show a Veteran Russian Tankman being re-united with the AFV that he crewed throughout the entire length of the war. He came across the tank purely by accident finding it as a memorial in a small Russian Village. They really are very touching pictures and I'm sure it must have been a very emotional experience to see the vehicle that he served with again after so many years:
4770
Post by: holden88
After doing some research it appears that the track links and boxes are bolted onto the exterior of the tank. These bolts are sometimes hidden underneath the stowage which is why it looks like the objects are merely resting on the fenders. Let me assure you anything not secured to the tank would be lost when the tank starts moving. Here is a great website with some good colour close-up shots.
http://www.ipmslondon.ca/old%20site/ipmslondon.tripod.com/armourreferencearticles/id29.html
Keep up the great work.
8745
Post by: Llamahead
I think how you paint the tank should be based on three key factors;
What season do you see the model in?, If it's late autumn chances are the tank may well have not been painted yet if it has the weathering will be less pronounced. In late winter/ early spring chances are it will have been painted but will be more weathered.
How early in the war is it? The later in the war it is the greater the chance I think the tank will have been repainted as earlier in the war the Soviets would have had trouble removing the tank from the frontline for painting.
How fresh is the tank & crew? A veteran crew would probably have more leeway to paint the tank in winter camo unofficially, than a fresh unit. A fresh unit would also be less likely to realise the necessity as well.
At the end of the day it's whichever you prefer. Personally I'd probably go for the unofficial winter camo as it gives you more room to play with the model.
Brilliant work as ever I especially like the morass of the base. Reminds me of a lot of places I've worked where we've regularly had tracked vehicles about.
11330
Post by: Gundam-Mecha
Hi guys thanks for the comments
Holden - thanks for that link very useful. I figured that they may have done something like this with regard to bolting track links o or using clips. Although I imagine a much quicker and easier field method would be as you described to hold them in between the hand rails. Thats something I'll definitely keep in mind for my next build. I'd like to do a 1:35 scale T34 for myself, as I'll be giving this one away as a gift.
Llama - Thanks, great ideas and useful comments. I was thinking sometime around late autumn or early winter. Of course the issue s with that the the winter whitewash would be more pronounced and less weathered. The only issue I have for choosing that season was because the 1:48 scale leaves I have are brown, so I was thinking to use those. By late winter most leaves and ground fall would be not so pronounced, but I guess I could still get away with it. Leaves do stay on the ground through out winter after all.
I think I'll do some test runs with the hair spray technique on something and see what I think.
Next post will have some updates.
11330
Post by: Gundam-Mecha
11833
Post by: Kagar
Looking better and better, can these weathering effects also be accomplished with GW products or do you "need" mig pigments and filters etc. ?
11330
Post by: Gundam-Mecha
Kagar wrote:Looking better and better, can these weathering effects also be accomplished with GW products or do you "need" mig pigments and filters etc. ?
Filters are very helpful but not essential, they let you build up gradual subtle variations in colour and act as a surface for further weathering. You can get the same effect for weathering surfaces using GW purity seal, or any other spray varnish.
As far as the rust effects go I would say that pigments are very important. They don't have to be Mig ones, you can easily make your own pigment powder by grinding a artists colour pastel with a scalpel blade.
The metalic areas are graphite from pencil lead. Just grind some pencil lead with a scalpel and apply with your finger or a small cosmetics applicator (those little sticks with sponge tips).
A lot of the effects can be achieved on the "cheap" so to speak if specialist modelling supplies are hard to come by for you.
10339
Post by: tallmantim
GM - starting to look really realistic!
keep it up!
10890
Post by: Deff Dread red Edition
One word and one word alone sums up what I feel,brillant!
11330
Post by: Gundam-Mecha
Thanks guys!
@ Tallmantim, yesterday I worked some more on the base and added the snow effects and some other scienic materials. I used these great 1:48 scale leaves from plus model. They are tiny little cut paper leaves with embossed patterns. Really easy to apply and a brilliant finish.
@Deff Dread, thanks! In response to your PM here's some ideas on weathering. I'm no master at it as I've only been playing with the technique myself recently but these are my experiences and observations.
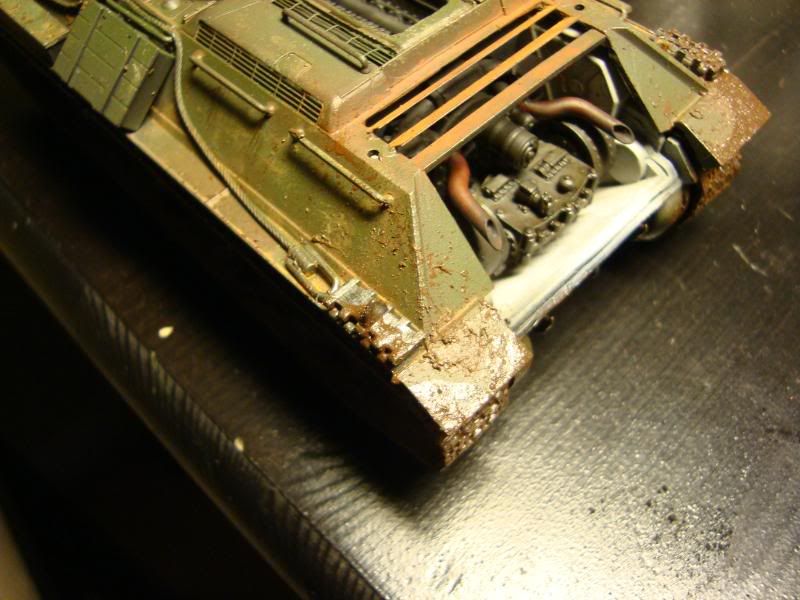
Mud:
This can be achieved through various ways depending on the kind of mud you are looking for. If you want very wet fresh mud you can mix pigments, water, and some gloss varnish. This will give you a thick mix thats shiny and "slick" looking. I find this method is best for splashes or splatters of mud. When using this method its best to just flick onto the model directly by flicking the brush against either a hard surface like a plasticard stick or your thumb.
If you want thick dry mud you can mix pigments, earth, and acrylic resin. Some people even like to add in things like household filler and sand to this mix as well. For natural looking results when applying this kind of mud use an airbrush, load you regular paint brush with the mix and then hold it in front of an empty airbrush using the air from the airbrush to splatter the mix onto the model. You can easily control the flow of the air going through the airbrush (depending on if you are using a double action airbrush of course) and the effect won't be too heavily loaded on.
Rust:
It can be tempting to go too far with rust. It looks great and is fun to do but a little goes a long way. Try to look at as many reference photos as you can and think about your tank and the conditions. Is it a wreck thats been abandoned on the field? If it a campaign hardened vehicle thats seen a great deal of action, or is it a newer vehicle in service with a fresh regiment? These are important things to consider as obviously working vehicles will have far less rust than wrecks.
Try to get some good quality pigments for this. and in various shades. I myself have Old Rust, Standard Rust, and light Rust. For example on the T34 the areas around the engine hatches have a mix of all three and show heavy weathering. Old rust around the edges near the engine block, and standard rust on the flaps by the hatches, with little bits of light rust on the top edges. This is because the engine hatch vents unlike the exterior armour are not painted and are a different kind of metal. Also the vent grille on the main outer hatch lets water and the elements through much more easily, increasing the weathering of these components.
On the outer hull I used only light rust to show the minor weathering, as this tank is a worn tank on campaign fighting during winter its more likely that snow, rain, and the elements would have taken their toll. However no tank crew would ever allow it to errode seriously as this would impeed the functioning of the tank. So rust on the exterior would only be mild.
When looking at reference photos remember that modern images of tanks that are outside as museum peices or monuments whilst in better condition that wrecks would have different weathering and rust than combat active vehicles. It is much more likely that a combat active tank even during the darkest days of the War would be repaired and maintained by the crew as much as supplies could afford.
Dirt/grease/soot:
Dirt, grime, soot, and grease are much more likely on a combat active tank than heavy rusting, so these effects give you a bit more realisitic leeway.
Dirt grime, dust, and grease gather on the edges of fenders, on areas of wear such as crew areas and handles, and near rivets and weld seems, panel lines. you can replicate dust and dirt by using washes of inks, Citadel washes, filters, washes of Oil paints, or pigments. The possibilities are very diverse all depending on what you are trying to represent.
For my T34 I used Filters first for natural shading, followed by burnt umber oil paint washes mixed with turpentine, and light earth pigment washes. I also dry brushed scorched brown paint around areas of wear such as crew hatches, fenders, and the top of the tank where the crew would be riding as this diorama is a mechanised rifle unit (the Soviets did not use universal carriers or APC's, they attached tanks to infantry units and troops rode the back of the AFV's).
Soot is important around the exhausts, engine areas, and gun barrels and breech. For soot effects I use Mig pigment black soot. I usually apply this by thinning with a little water.
Grease can be easily made by mixing black or brown inks with house hold cleaners like Johnson Klear. This wash gives a very slimy look. Make sure you apply to grease to areas of movement and motion, such as around the gun mantle, barrel, and road wheels etc. Don't just apply it anywhere, try to use reference photos as a guide.
Oil can be replicated by mixing black inks or oil paint with thinners, Mig Jimenez has a really great guide for realistic oil puddles in the Osprey modelling book on the T34/76 that I've been using as a reference.
worn paint/ visable metal:
There are two main ways to show these effects, either showing worn coats of paint or chipped paint, or showing totally chipped paint exposing the metal underneath. For worn or chipped paint use a shade of paint lighter than the base colour and apply using the sponge method. This is a great technique and is a little like dry brushing. Take a small peice of sponge soak in a little paint and wipe off the excess on tissue paper, then when there is hardly any paint left on the sponge dab the surfaces to make little areas of chipped or worn paint. Its great fun to do and easy to master, the trick is not to over do it. Too much sponging can ruin the model. Look for areas where you expect wear and chips and dab very lightly. The more confident you get with the technique then the firmer you can apply.
Visable metal is done best with graphite. Just grind up a pencil lead and apply carefully using your fingers or a small cosmetics applicator. Again here too a little goes a long way.
As far as general application of these techniques goes there are various methods. You can mix pigments with water to get a light semi transparent effect, this is often good for areas of rust or dirt or rain staining, or you can mix oil paints with turpentine or white spirit, this gives great options for blending naturally and fading colours. you can also coat an area with turpentine or thinner and then directly apply pigment powder, or apply powder in light dustings and then fix with turpentine or thinner.
The key I think is to keep experimenting and always have sometihng in mind, a reference photo of a real vehicle maybe or even just the rusty BBQ in your back garden! Don't just apply the weathering how you think it should look in your mind. Most importantly don't over do it, subtle and light applications are always best.
11330
Post by: Gundam-Mecha
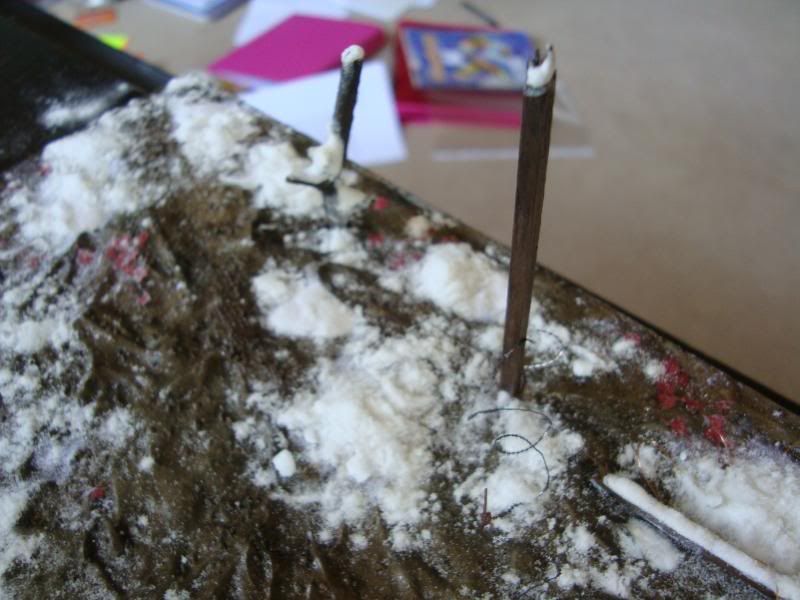
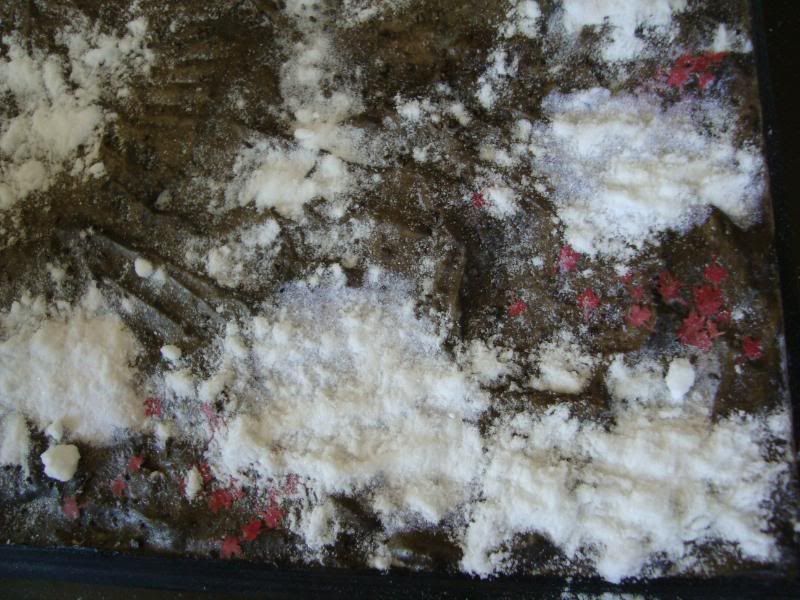
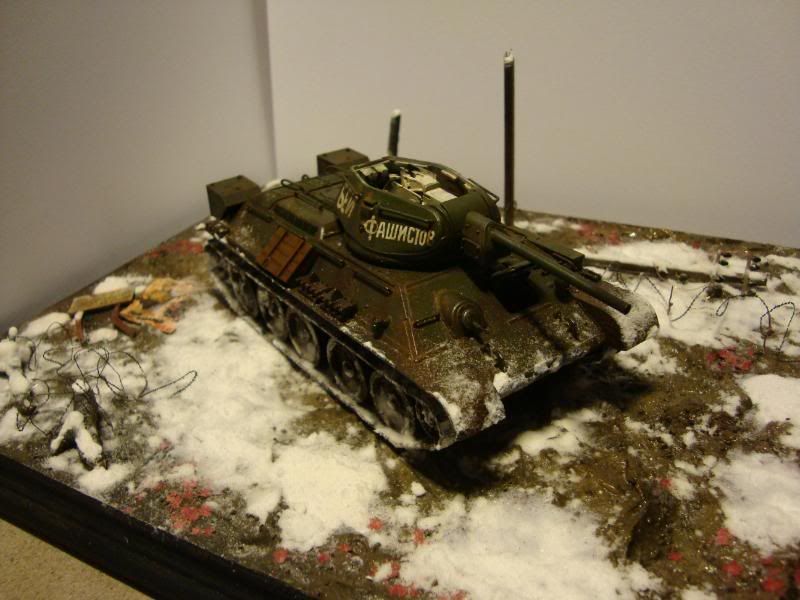
Quick update on the scenic base:
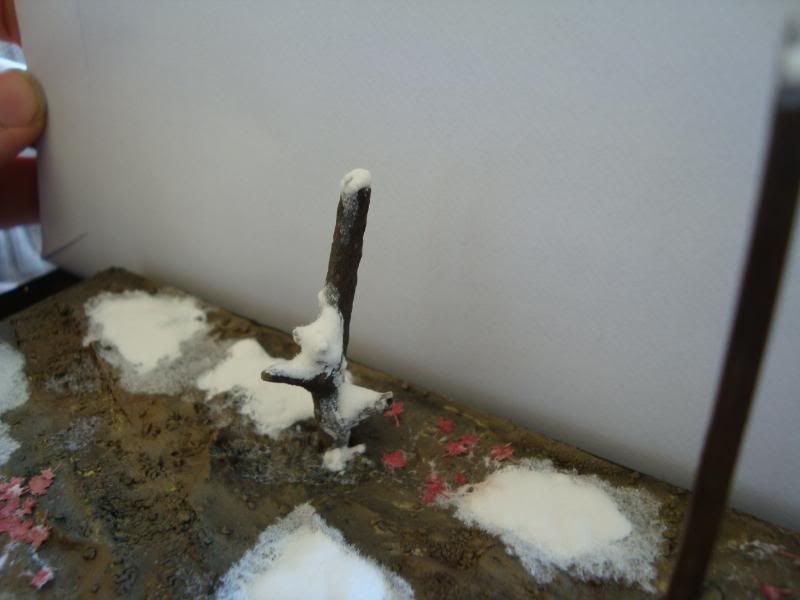
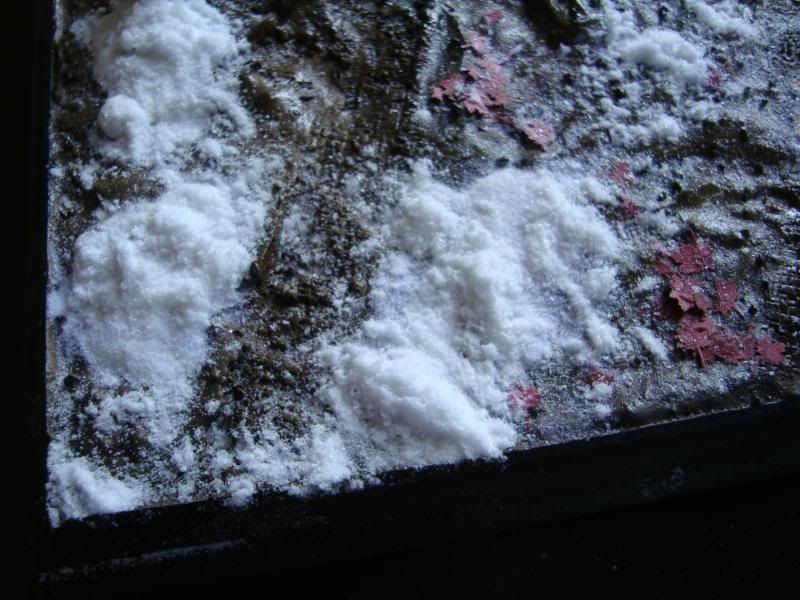
I used two different methods for the snow effects, my preferred method of bi-carbonate of soda, PVA, water, and paint mix and some woodland scenics snow scatter (the same product the GW package as their Citadel Modeling snow). I didn't really like the Citadel/woodland scenics snow, after it was applied it looked too furry, so I wasn't really satisfied with it. It's the first time I've used it before and followed the example from the Forgeworld Masterclass.
I decided afterwards to re-coat those areas with a thin watered down mix of bi-carbonate snow to dull down the fluffy effect and make it look more natural. I will probably do this later tonight.
471
Post by: davetaylor
Hi Gundam-Mecha
This project is coming along very nicely. I'm loving the weathering and your work on the internal detail is great. You have a ton of patience!
When I look at your latest post I agree with you on the result of the snow, a bit too furry. I think that material can work well on the base of lots of wargaming miniatures, but when it comes to a display piece of this scale it isn't working too well. I hope your solution works.
Two other things I noticed are that there is no snow under the tank (an area you'll be able to see, not very well mind you) and that the "patches" of snow are very regular (almost all a similar size and almost evenly spaced around the tank). I'm not sure how you feel about that, but in my humble opinion I'd be inclined to join up a couple of the areas of snow, making one or two large patches, a few medium size, and a couple of smaller ones. Just a thought.
As I said, however, looking great. Your relative will be very proud to receive this!
Cheers
Dave
11330
Post by: Gundam-Mecha
davetaylor wrote:Hi Gundam-Mecha
This project is coming along very nicely. I'm loving the weathering and your work on the internal detail is great. You have a ton of patience!
When I look at your latest post I agree with you on the result of the snow, a bit too furry. I think that material can work well on the base of lots of wargaming miniatures, but when it comes to a display piece of this scale it isn't working too well. I hope your solution works.
Two other things I noticed are that there is no snow under the tank (an area you'll be able to see, not very well mind you) and that the "patches" of snow are very regular (almost all a similar size and almost evenly spaced around the tank). I'm not sure how you feel about that, but in my humble opinion I'd be inclined to join up a couple of the areas of snow, making one or two large patches, a few medium size, and a couple of smaller ones. Just a thought.
As I said, however, looking great. Your relative will be very proud to receive this!
Cheers
Dave
Thanks Dave
I totally agree, what actually happened here is the result after I blew away all the loose snow flock.
I originally had soaked the surface in watered down PVA and scattered the flock from above much like you would with real snow. I then left this over night. When i shook off the excess however I noticed quite rightly as you say that the base had only formed small isolated patterns.
I think that the texture of the snow can be easily fixed by adding the bi-carbonate mixture.
I'll play around with it tonight.
11330
Post by: Gundam-Mecha
9505
Post by: CaptainRavenclaw
That looks cold. Good job.
11330
Post by: Gundam-Mecha
Thanks S.J, I'm also working on some little ice patches at the moment. The super glue trick in the Forgeworld Masterclass book is really great. I hope to try that out tonight.
Hopefully after that the base will be finished. The Tank is nearly there, so that just leaves me with the infantry now.
12808
Post by: daszer
Just stumbled on the thread and really glad I did due to your outstanding efforts - I've had a couple of military vehicles made up but unpainted and you've given me inspiration to dust them off and get them started. Particularly like the metallic feel and the excellent attention to detail such as the bubbling paint etc.
Good luck with the snow - I've had trouble myself in the past with it and know how tricky it can be to get the right distribution and texture. I can see you're not short of skills though and it is certainly improving with each picture.
10339
Post by: tallmantim
Looks good, but I'm not a fan of the red leaves. This looks like a winter scene and the red leaves remind me of Autumn.
The snow looks nice though.
11330
Post by: Gundam-Mecha
10890
Post by: Deff Dread red Edition
Nice work,hope your family member is happy with the diorama when presented with it.Now finish it quick!!!
11330
Post by: Gundam-Mecha
Thanks Deff, its for my (soon to be) father in law. He used to be a military man himself and the diorama is a late gift for the Russian version of all mens day (they have all womens day and all mens day there), it's called patriotic heroes day or something. Basically during the Soviet period it was celebrated as Heroes of the Soviet Union Day, but since the end of the USSR it was adapted and renamed.
I hope he likes it, and as Dave said I hope it's something he's proud of!
On a seperate note, I can't make up my mind about the new(ish) Citadel Washes. Some shades seem to work very well but others not so nicely. I think Devlan Mud, and Badab Black are good, but I can't make up my mind of Griphonne Sepia and Ogryn flesh. As for the other shades I don't have much of a reason to use them since my palate is normally more subtle natural colours.
They claim that the washes dry to a matt finish but I've found that with the lighter shades especially the Sepia that they don't. That one often dries to a shiny finish which I'm not too keen on at all. For example on the khaki fatigues once the Sepia had dried I just wasn't that into it. I'm thinking to go back to other methods such as acrylic washes and oils for figures, although I do think the darker shades work well on machinery and vehicles.
Has anyone else found that? I know lots of people love them, but personally I think I prefer the old inks for the most part.
9504
Post by: sonofruss
Don't forget mud on the tracks, wheels, and rear fenders.
11330
Post by: Gundam-Mecha
Thanks Russ, yes theres a lot more work to do on the wheels.
As for the tracks and fenders theres some light mud at the moment. I was thinking to move away from the very heavy mud weathering that I've seen on some examples. What I will most likely do is cover tracks and fenders with fresh snow, since alot of the mud will actually be pretty firm and solid in the cold. It's more likely that the treads will be picking up and throwing snow and some muddy water thats trapped beneath thin ice.
10339
Post by: tallmantim
Gundam-Mecha wrote:
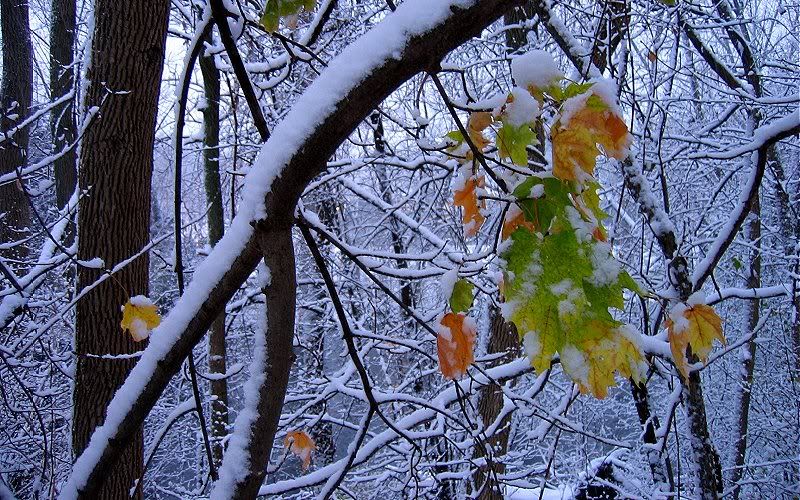
Thanks Tallmantim, the scene is set in early winter, which is why the snow fall in light (by Russian standards!), and also why the tank isn't in a full winter white wash coat yet. A lot of Autumn fall would still be on the ground at this time like in these pictures for example:
LOL - you can tell I come from a country without snow (and mostly with evergreens to boot!)
4657
Post by: Metsuri
Gundam-Mecha wrote:Has anyone else found that? I know lots of people love them, but personally I think I prefer the old inks for the most part.
I use ogryn and devlan washes as a shortcut to in metallics, but the sepia has been a disappointment so far. The old inks have much more uses as the washes are what the name says. Still I have found them both to have uses in my painting.
11330
Post by: Gundam-Mecha
Metsuri wrote:I use ogryn and devlan washes as a shortcut to in metallics, but the sepia has been a disappointment so far. The old inks have much more uses as the washes are what the name says. Still I have found them both to have uses in my painting.
Hi Metsuri, yeah I feel the same, I think they are useful (similarly I use them on metalic areas and vehicles), however I do really miss the old inks and I agree that they are much more versatile.
It's a shame that they didn't maintian both lines simultaniously like they did with Citadel Colour and Foundation Colour. I think there would have been a market for that. Its annoying though especially when the Forgeworld Masterclass book makes heavy use of inks. I have only a few pots left and not so many different colours, so its hard to replicate some of the techniques.
Does anyone know who produced these inks for Citadel? Is it possible to buy them via another company like with the old cote de arms(?) paints?
11330
Post by: Gundam-Mecha
Haha no worries Tallmantim! Actually its a very good point and it's always great to get feedback from people.
Sometimes it can really help you to notice a problem you didn't see before and correct it. It's also fantastic to share ideas and techniques with other painters and modelers!
10339
Post by: tallmantim
I believe Valejo have a duplicate of the Citadel inks in their Game Colour range...
11330
Post by: Gundam-Mecha
tallmantim wrote:I believe Valejo have a duplicate of the Citadel inks in their Game Colour range...
Really? Thats interesting, I've used Model Colour but never the Game Colour range before. I'm going to a model store tonight to pick up some more model colour shades so I will look into that and see what they have.
Thanks for the heads up.
11330
Post by: Gundam-Mecha
9505
Post by: CaptainRavenclaw
Wow. You never see mud as realistic like that on tanks in 40k. Great job. Whoever's getting this should really like it! Its top class work!
1798
Post by: AdrianG
This is absolutely stunning work, I've always admired those Military modellers that can obtain this much detail on a model.
Will be watching this Blog for certain.
11330
Post by: Gundam-Mecha
Thanks guys! I'm glad you like it, and I hope my father in law likes it too!
I can't recommend acrylic resin enough, it really is a fantastic medium that let's you achieve so much.
In this case it was mixed 30% acrylic resin, 30% plaster/household filler, 40% mix of pigments (Europe Dust, Dark Mud, Black Smoke). This gives you a nice thick dry mud, its important not to add any water, the resin will give all the moisture and liquid you need.
Load a brush with the mix and hold it in front of an empty airbrush, and then use the airbrush to "blow" the mud mix onto the model. It's rather tricky and takes some practice, too much air and huge blobs will shoot off and ruin the model. It's a good idea to test on some card or paper first till you can get a smooth control of the flow.
The airbrush will give you realistic spraying of mud across the wheels and tracks in some really organic shapes. Much more so than applying directly with a brush.
To add some wet mud into things mix some acrylic gloss varnish into your mud mixture. This wet mud can either be sprayed on or applied directly by brush.
It takes around 12 hours to dry fully so it's a good idea to decide on something that you know you won't want to go back on and put it to one side over night. In my case it gave me some time to work on the infantry.
With a bit of practice you can get some fantastic results.
4657
Post by: Metsuri
As said the mud look really great. Good to see you didn't go over the top with it, it seems now to have believable amount on it, especially as the ground is frozen.
Great job done again, waiting for the next installment.
11330
Post by: Gundam-Mecha
Thanks Metsuri.
It was a bit nerve racking. It's the first time I tried the airbrush technique so I was a little anxious that it would go horribly wrong! I was really pleased with the result in the end though.
I hoping to get the infantry on foot finished completely tonight and wrap up the left over on the tank. I still have to paint the wooden boxes on the outer hull and pick out a few little details.
After those its the Infantry who are riding the tank (which I haven't started yet) and the tankers, driver and the commander leaning out of the cuppola.
11330
Post by: Gundam-Mecha
6747
Post by: silverdaemon
Amazing work on that tank weathering. *applause*
11330
Post by: Gundam-Mecha
Thanks Silver much appreciated!
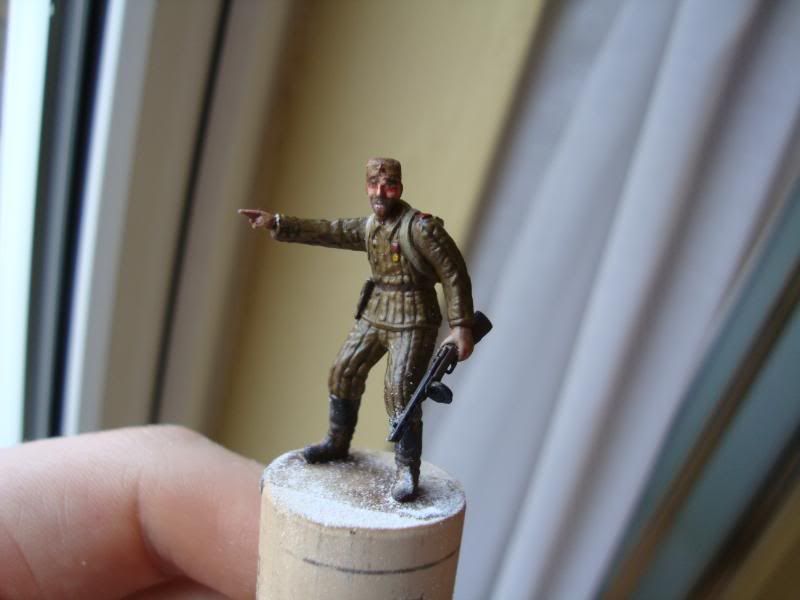
I must admit I found the Tamiya figures quite a challange to paint. Especially the faces, the quality of the casts between the different individual troopers varies alot. Some have rather crisp clean details that are easy to paint, others have rather flat and undetailed faces.
It's very annoying because these faces that lack detail are a nightmare to work with. Give them a wash to pick out the detail and nothing happens because there is little detial to pick out. Often in such cases the wash ends up just bleeding all over the face as the recesses and lines are not defined enough to hold the pigment.
I was reading an article in a military modeling magazine last night Xtreme Modeling, and a painter there was talking about similar problems he had with a Verlinden resin mini, that had very little surface detail. In 1:48 scale there aren't so many great quality figures like in 1:35, I don't know why. It's almost like an after thought for some companies in military scale modelling.
As a wargamer I guess I took for granted the quality of plastic sculpts on faces in Citadel minis and other brands. I think this though is down in a large part to the over sized and bulbous heads we have in heroic scale. They allow for more room and more detail.
Painting these Tamiya kits was a little like painting plastic Lord of the Rings basic figures. They had similar issues with featureless and basic face casts.
I'm still not happy with some of these faces... I repainted the sergeant figure more times than I'd like to remember and still can't get a result I'm pleased with. I think I may end up totally stripping the paint on the head and starting from scratch.
For my next 1:48 project I'm going to try some resin figures, I hope that will give me a better sculpt and cast to work with.
11833
Post by: Kagar
Your making good progress with this diorama Gundam. I'm really impressed with the weathered look of the tank.
10890
Post by: Deff Dread red Edition
Nice!Can't wait for this to be finished,like how the infantry is looking and the mud on the tank.Keep it comin' hope all goes well.
4657
Post by: Metsuri
Its a pain to work with blank faces, as the whole paint job is then compromised. As the focal point of the scene is the T-34 I think you are on the clear though, especially with many of the faces obscured by the poses.
The mud on the boots looks good. Can wait to see it coming together.
11330
Post by: Gundam-Mecha
Hi guys and thanks for the comments.
I bought myself some new kits last night, and I found some amazing plastic 1:48 WW2 figures. 100% better than the Tamiya ones. I will be using them for my next project.
They are produced by a Ukrainian Company called ICM. they are slighty larger than the Tamiya but the detail is astonishing, just as crisp and sharp as 1:35 figures and on a level similar to resin. They really are some of the finest detail plastics I have ever seen. Will post some pics tonight.
Deff and Kagar - Thanks guys, not much further to go now with the T34. I am toying with the idea of modelling some snow on the tracks or hull at the moment. I've seen some great examples in Xtreme Modelling recently and was thinking that some little bits of snow might break up the colour a little and make the tank more interesting to the eye while still keeping it realistic. For sure I won't use any white wash or winter camo, but maybe some fresh snow on the fenders and mud guards by the treads.
Metsuri, thanks I totally agree. It's a real shame when alot of thought has clearly gone into the posing and the detail of the equipment that Tamiya left some faces so featureless. The ones with the helmets (which you see less of the faces) are ironically better detailed than the men without the helmets (who you see the most of)! Also the inconsistency is odd, some are well detailed some less so, I can only assume that they had a different group of sculptors working on these at the greens stage. I'm not totally unhappy with things at present and I think with some creative shading and highlighting I can probably add a lot more detail to the dull ones, perhaps I am just being too much of a perfectionist, or perhaps I am just too used to high quality wargame figure minis (I often forget that in Scale modelling the important element to many is the actual vehicle, while in my GW background it's usually the reverse!).
10392
Post by: Paul Atreides
Boy is the level of detail on that thing amazing. It relly comes into a category of its own in the hands of such a skilled modeler as you.
11330
Post by: Gundam-Mecha
Thanks Paul! That's very kind but I still have a long way to go yet!
Heres a small update not a great photo as the lights not so good, the shadows are rather stark:

Yesterday I got myself these magazines:


Fantastic for reference and they have some amazing examples of some really great work.
The articles also have lots of helpful tips and hints with great step by step photos of techniques.
Some examples of my next project:
Some pictures of the new ICM figures:


These really are great casts and sculpts and the detail is amazing. I'm really looking forward to painting these.
471
Post by: davetaylor
Wow, some of the details on those faces are fantastic. I'm sure you'll have a lot of fun with them. I like the stubble on your updated trooper. I was just about to suggest that to add some depth to those faces that didn't have the depth you were looking for.
Cheers
Dave
11330
Post by: Gundam-Mecha
Thanks Dave, yeah the ICM figures have amazing faces. Much superior sculpts compared to the Tamiya ones.
The female NCO is also great
Not so clear on this photo its a bit out of focus, but its a very characterful set.
I think you were totally right about stubble, trying to find ways to add something to the faces to give extra depth and detail was tough. I was really limited to what I could do with them. Any other ideas or tips? Aside from stubble and picking out lips etc I'm a little out of ideas. I can't pick out eyes as there are none to speak of and I'm reluctant to just try and paint them in on a sculpt with little surface detail.
I've tried "flushing" the cheeks with a brighter pink to add depth and also represent the cold etc.
4657
Post by: Metsuri
So another soviet tank coming. Can't wait for that, even though you still have some work ahead with the current project.
The figure is looking good, there is only so much you can do without sculpting additional details.
11330
Post by: Gundam-Mecha
Don't worry I will be sure to finish this project first!
The KV-1 I'm going for alot of aftermarket extras to really bulk out the details. So I will have to wait for those to arrive before I can start also.
Yeah I think your right about the Tamiya figures. I'm happy enough now with them and to be honest given the large number of troopers that will be in the diorama and the poses I'm okay with it now.
The scene and the Tank will be the real focal points.
11330
Post by: Gundam-Mecha
Tried some more things on the Sergeant.
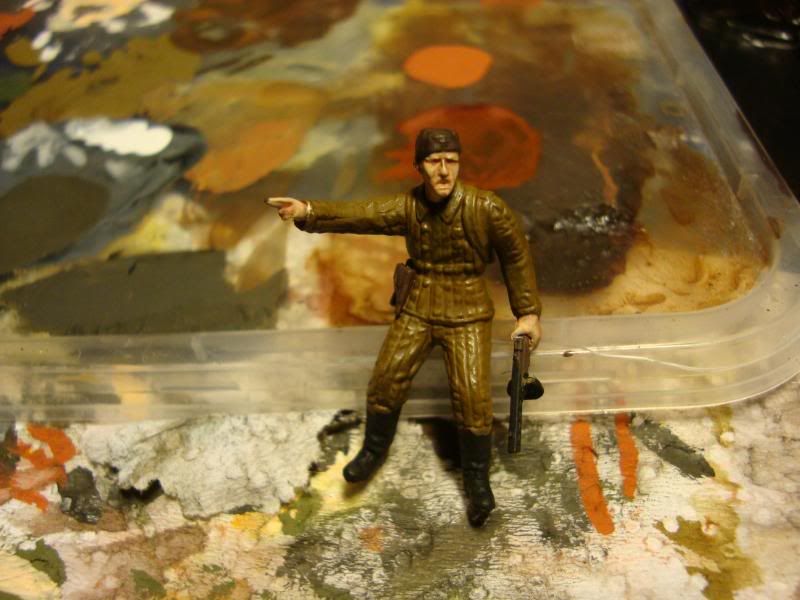
I don't usually paint eyes as I'm not much of a fan of them, but perhaps it gives something more to the figure than the sculpt provided?
I'm still not sure on it myself and may end up re-painting them. What do people think?


7899
Post by: The Dreadnote
I think that looks great, personally.
471
Post by: davetaylor
Hi G-M
To be honest I think the whites are too big and the pupil too small. At this scale too, the black outline looks a bit like eyeliner. Leaves them looking a bit cartoony. May sound a bit harsh, but it can all be solved relatively easily.
I'd recommend the following steps:
• enlarge the pupils by doubling the thickness of the line you've already done.
• reduce the size of the whites (and remove the black outline at the same time) by replacing the thin "eyeliner" with a slightly thicker line of the darkest flesh tone you've used on the face (giving the eyes a kind of sunken look, harrowed if you pull it off well).
I think it's really that same issue of the lack of detail in the models that isn't being your friend here, but I have faith you'll pull it off just fine!
I hope this helps.
Cheers
Dave
4936
Post by: VermGho5t
I'm not sure of the size comparison of the models here to heroic scale, but maybe as an easier alternative to painting the pupils you could try the Micron line of pens made by Sakura? I use the smallest (005) for the pupils on my guardsmen. I know it may sound like cheating, but if I can channel Wilde here, "bad painters borrow, good painters steal"?
4657
Post by: Metsuri
I'd have to go with davetaylor on this one G-M. He kind of looks straight out of cheap horror flick with a it came from there expression. Try to paint the eyes smaller with dark flesh as the liner.
Practice makes perfect also in this area. But already with those eyes there is much more life to the fig, so if you bare to try until succeeding I would say that paint the eyes at least on the most visible troopers. It gives another focus point on the face.
11330
Post by: Gundam-Mecha
Thanks guys for all the helpful feedback and the honest crit. It's been very helpful.
Going back to Migsula's recent thread about Dakka and Warseer, I think these last 3 posts are an excellent example of what I was refering to with regard to people here sharing ideas and tips. So far on my Warseer thread everytime I have asked a question to people or asked for crit or feedback I have had nothing. One person even said basically that the lack of detail in the casts wasn't the issue, but that I should essentially be a better painter!
I have to disagree with this though, his arguement was that detail in everyday faces in real life is inconsistent due to genetics ergo model companies have a right to produce inconsistent and poor quality casts. Whilst I agree that everyone is different and natural variation is of course common place I don't agree that there is ever an excuse for a model company to "skip" areas of a sculpt or take short cuts. Every ICM figure has a wonderfully casted and sculpted face with amazing detail, and the vast majority of Citadel miniatures also have very crisp and detailed faces.
From my own expeirence, the experience of painters here at Dakka, and the views of professional mini painters in magazine etc I still strongly believe that there are two distinct categories of figures:
1) those that aid painting
2) those that hinder it or make it more challenging
Dave - I think you hit it right on the head with your observations. I thought it was too cartoony and thats why I try to avoid it when I can. I too think that the whites of the eyes are too big and also perhaps a bit too bright? I was thinking of perhaps toning them down a bit either with a very light wash to darken the white slighty or by mixing an off white shade and repainting with a muddy or dark white. I'll definately try your suggestions and enlarge those pupils.
VermGho5t - size comparision wise the Tamiya 1:48 figures have much smaller heads than standard heroic scale. Heroic scale tend to have more bulbous heads that allow for more detail and more extreme expressions (shouting etc). I was pretty close to your suggestion myself last night! I actually only have one very fine detail brush and the tip is slightly curved, so I was finding it very difficult to get a nice point so I could do the pupils. Was a real nightmare! Wilde... what a genius he was!
Metsuri - Haha actually you know after you said that I totally saw it. He is even pointing! "Its behind you Comrade!" Thanks for the positive feedback though, and it's good to hear that people think its a worthwhile addition. I'll give things a crack again tonight and hopefully I can refine it some more.
Dreadnote - Thanks for the feedback, I'll try to make it even better though.
4657
Post by: Metsuri
Gundam-Mecha wrote:I too think that the whites of the eyes are too big and also perhaps a bit too bright? I was thinking of perhaps toning them down a bit
I use bone as the color for the whites in the eyes. The clean white as you said tends to come out as too bright. Especially when you think these guys have been lacking sleep and food for sometime in the of the war. Try it out if it works for you.
And good that you understood my poor attempt at humor, sometimes people can get a bit touchy on these forums. Best luck in painting the mirrors of soul.
471
Post by: davetaylor
"Best luck in painting the mirrors of soul"
No pressure there Metsuri ; )
7013
Post by: Ifurita
I like using a dark brown, like Scorched Brown to block out eye sockets, a thin line of white over that, and then some more Scorched Brown for the middle. It's not as stark as black, but give the shading I like.
11330
Post by: Gundam-Mecha
Thanks Ifurita, nice tips.
Did some more work on the eyes. The light was pretty bad so these photos aren't great, I will try to get some in natural light tomorrow.


I removed the dark eye lining and blended in some light red oil paint, I also toned down the whites of the eyes and the size of the whites and added some light grey to the pupils to give them some colour and bigger shape.
8745
Post by: Llamahead
That is literally a hundred times better I'm so surprised and impressed that such a small thing can make such a huge difference into how you perceive a model. It now looks great whereas before it looked o.k.
471
Post by: davetaylor
Much better. This guy looks like he hasn't slept in days, driving the fascist invader from the Motherland! Nice one.
Cheers
Dave
11330
Post by: Gundam-Mecha
Thanks guys, I was reading some really interesting articles on painting eyes on scale models recently. There is the school of thought that says paint the whites of the eyes and those that say only paint the pupils and leave the whites out.
The argument being that in actual real life you rarely see the whites from a distance. It's an interesting point, but I'm not sure how applicable this is to 1:48 (28mm) figures. I think the guys article was aimed at 1:35 and even 1:16 scale figures (scale was not mentioned directly) and some of the techniques for panting both the colour of the iris and the black dot of the pupil seem to be very difficult if not impossible at 1:48 scale.
It was interesting food for thought all the same.
Here are some photos taken in natural light, they are a little clearer than the ones I took last night, however even these aren't great and I've found photographing the faces rather tough, they just never seem to do the minis justice. For example in the photos the colours always end up coming out too stark and strong, in actuality they are more subtle.


6633
Post by: smiling Assassin
Wow, nice work. I like the stubble, and I recognize how you pulled off the weathering on the boots. It's often hard to work on more real scale models such as these after doing the Heroic scale for so long -- I can't imagine getting anywhere near that quality for a long time!
Stay safe,
sA
11330
Post by: Gundam-Mecha
11330
Post by: Gundam-Mecha
Thanks SA - I'm hoping once they are all laid out and together as a large group that these figures will have a much better impact on the scene.
As you say figure painting heroic scale opposed to historical scale (1:48) minis is actually alot more different than you'd think. It certainly took some getting used to, but I'v enjoyed it alot. I'm hoping that the improved quality of the ICM figures for my next project will give me some better results.
11330
Post by: Gundam-Mecha
On a side note I put together this little tutorial on the techniques used on the tracks for some guys over on Warseer. Thought I'd post it here if anyone is interested in the different stages of weathering:
Heres a little walkthrough on painting and weathering the treads and tracks.
First off you will need:
Mig pigments, I used Vietnam Earth, Europe Dust, and Dark Mud. However any earth colours are fine.

Acrylic Resin
Tamiya Acrylic Thinner X-20A
Gloss Acrylic varnish
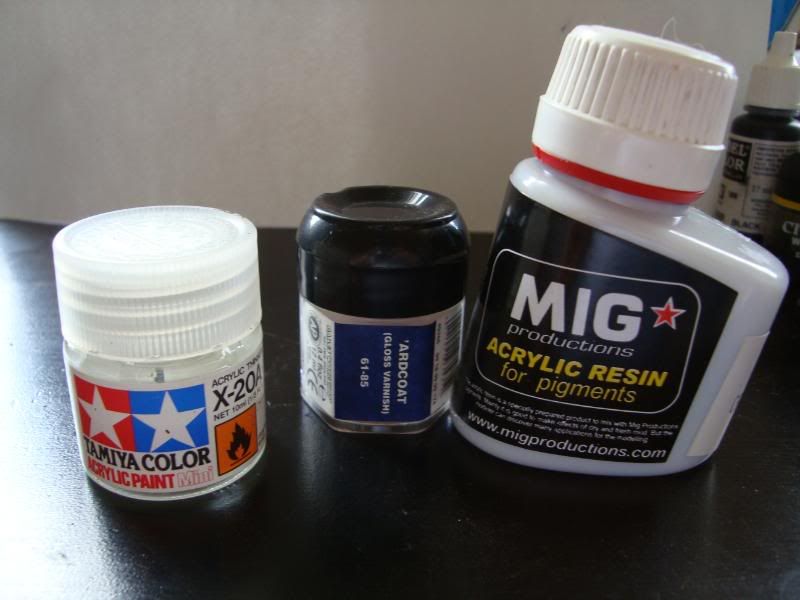
Kommando Khaki
Desert Yellow
A dry brush, standard brush, and an old Pencil.
The painting:
From a black undercoat/base lightly drybrush a layer of khaki and Desert Yellow:

Mix some vietnam earth pigment with water to make a wash


Next mix some thinner with some Kommando Khaki

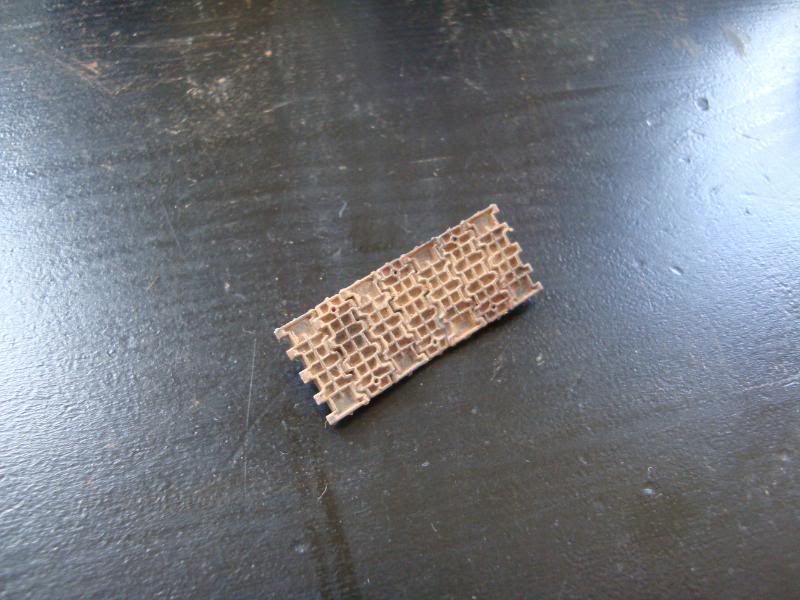
Then dust the tread with some europe dust pigment, this is a bit like dry brushing. Load your brush with some pigment powder and carefully apply directly to the tread dry.
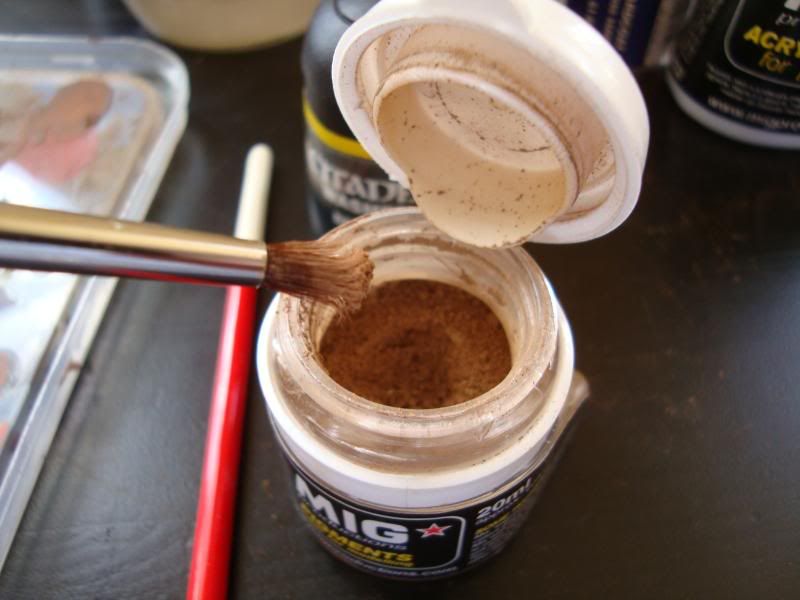

Mix some gloss varnish with some dark mud pigment to make the wet mud, and flick directly onto the tracks by flicking the drybrush with your finger.

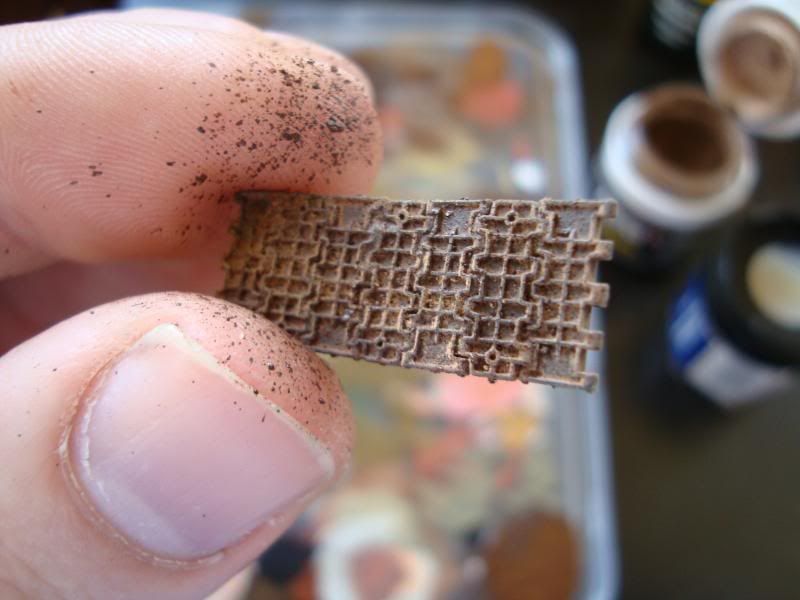
Next mix some acrylic resin with some dark mud pigment to make the thick mud and either apply via the blowing method using an empty airbrush (holding the loaded brush infront of the air stream) or brush directly to the model.

Next use a pencil to mark out metallic areas either by drawing directly or using graphite dust.

The end result:

4936
Post by: VermGho5t
Hey GM, one thing I have found out about taking photos so that you get clearer pictures is a bit of a same rule of thumb when doing actual paintings, specifically still lifes. If you can have 3 sources/types of light then it will bring out a higher range of color and make the color more 3 dimensional. Check out my gallery on my claws of lorek for examples of this. I essentially used flourescent, incandescant, and natural light with a white reflector on the opposite side to get well lit photos. Sometimes a gradient background will help too as it will be similar to differnt shades/hues of color.
6633
Post by: smiling Assassin
Thanks for the tut' on the rust/dust/must, it looks brilliant. The base for the taking is incredible too, as if the firing mechanism of the gun. Heck, the whole thing is great.
sA
4657
Post by: Metsuri
The eyes look great and thanks for the dust/ mud tutorial. The scene is starting looking really great. The tank is looking right at home in that field.
Have you thought about the snow on the tank, in real life it would stuck in to the tracks and lower hull, but the effect maybe too difficult to try on this scale.
Great work again!
10890
Post by: Deff Dread red Edition
Thanks for the tutorial on paiting rusted/dusty tracks,still lookin good can't wait to see the finished scene.I personally like the way you painted the eyes might give it a try in future.
11330
Post by: Gundam-Mecha
Thanks guys, it's great to hear feedback from other people. After a while of painting one thing for such a long time, you start to get paranoid! I actually think the mini is growing on me now, its not my favorite sculpt in the set, but it isn't the worst either. That dubious honour goes to another trooper who I'm also loathing painting at the moment.
VermGho5t - Thanks for the tips on photography. The light in my apartment is really terrible. My landlord didn't fit proper lighting and in my living room all I have is this silly wall mounted lighting on one side, the kind that funnels light directly up into the ceilling!
I use a lot of lamps but they have quite strong bulbs, so the difference in how you percieve colour when painting during the day and night is quite remarkable! I really want to get myself one of the artists lamps with the daylight bulbs.
I should also think about using background screens or a some card etc when takin the shots of the figures as well I guess, I think this would help alot.
SA, Metsuri, Deff - I'm glad you guys liked the tutorial. It came about from a Warseer user asking some tips on weathering, as I have found on Warseer people often ask for advice or tips and give little back. It's quite different in that respect to Dakka. I was also asked by a guy from Warseer for some tips on doing weld lines on armour, actually for my next project I plan to do alot of weld detailing on my KV-1 as it's a detail thats missing on the Tamiya kit. So I will most likely end up doing a little tutorial on that also at some point soon.
4657
Post by: Metsuri
Gundam-Mecha wrote:I should also think about using background screens or a some card etc when takin the shots of the figures as well I guess, I think this would help alot.
That helps a lot as the eye isn't distracted and camera also has easier time in guessing the right color. Get some light gray or blue card for the back ground. I shoot my minis using a light gray and for most of the time it works ok.
7632
Post by: Ghost in the Darkness
Wow that tank looks great. I have really no constructive comments other than that.
11330
Post by: Gundam-Mecha
Thanks guys, I'll try light grey or blue as a screen Metsuri. Think I have some coloured card lying around at home.
Cheers Ghost! I didn't get to do any painting yesterday like I had hoped, but I'm planning to get some more done tonight. Once the infantry are done (some already are) I move onto the next step, attaching and gluing them to the base and then blending htem into the diorama with mudd effects and snow etc.
On a similar vein I'm also considering adding some snow to the tracks and the tank hull or fenders...
11833
Post by: Kagar
The project is coming nicely together. Seeing that soon I'll start working on my battlesuits and tanks for my Tau army i'm getting more and more interested in the use of pgiments etc. for weathering effects. However I'm in doubt about the durabilty of the effect for tabletop use.
A far layers of matte varnish might solve this?
11330
Post by: Gundam-Mecha
Hi Kagar,
Pigments are durable if fixed correctly and protected by varnish.
You can fix with turpentine, thinner, or specially formulated "fixer". A few coats of varnish spray and you should be set to go.
11330
Post by: Gundam-Mecha
10339
Post by: tallmantim
Snow effects on the tank look awesome GM.
4657
Post by: Metsuri
Now that's impressive. I was a bit sceptical on the amount of snow when looking at the pics without the scene, but when the tank is put to the diorama it looks flawless.
How did you attach the snow to the tank, it looks really life like, especially on the front of the tank.
11330
Post by: Gundam-Mecha
Thanks guys. I had a look at a lot of different examples of snow modelling on armour in my scale magazines, it was very interesting to see the different approaches that people took towards it. Some people went for thick clumps of snow, others for light snow scatter, and some for ice and slushy snow.
In my case I modelled the snow in two seperate stages.
Firstly I mixed bi-carbonate of soda, PVA, water, and some Vallejo white paint to make the clumps of heavy settled snow that had been pulled up into the road wheels and treads and also throw up across the front of the hull. The white paint helps keep the mixed bi-carbonate white as without it it can get muddy and discoloured due to the glue and water etc.
This was applied very lighty with an old brush to areas on the roads wheels, treads, and the fenders and front hull. The trick is to be very subtle at this stage, too much snow and it looks like your vehicle has been sitting still in the elements without action. Getting the balance right to make it look like its been driving through the heavy snow and lifting and splashing snow is very important.
This was then left for a few hours to dry, and the second stage started.
Now we have our heavy clumps of snow we can work on blending in the lighter snow fall and the natural scatter that comes from the motions of the tank. Ever been driving with snow on your car? Even the settled snow on your hood will throw little streams of light snow particles over the car as you drive as soon as the wind hits it. Exactly the same principle here.
The tracks and road wheels were sprayed with hair spray, and when this was still wet pure bi-carbonate of soda powder was sprinkled over the areas from a height to replicate natural snow fall. You can also blow the powder in directions you want once its settled by blowing with your mouth or very carefully using an airbrush.
Once the excess powder that hasn't bonded is blown away the surface is given another light coat of hairspray to seal everything in.
This allows you to get a really nice gradual blend between the thicker areas and the natural weathering and also allows you to cover snow without completely obscuring the weathering and details underneath. Showing the various different layers of weathering the same as you'd see in real life.
11330
Post by: Gundam-Mecha
Talking about some of the techniques I've used on this Diorama, I have recently found this book that is published by the people who do Xtreme Modeller Magazine.
Its called Frozen Hell, and is part of their elements in combat series.
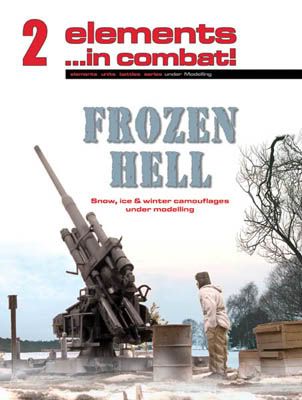
This really is a fantastic series of books and covers various different environments in diorama's and gives some first class tips and techniques. This particular one focuses completely on winter settings, how best to paint winter camo on armour, how to model snow, different ways of modelling ice and water etc.
They also have this one which is the first in the series that covers water features, rivers, oceans, ponds etc.

I can't recommend them enough, not only are they a very interesting read they also have some amazing examples of some fantastic artists and modellers.
11330
Post by: Gundam-Mecha
9505
Post by: CaptainRavenclaw
I love it!! The snow on the guys cloak is my favourite. Is there much left to do? It looks great.
11330
Post by: Gundam-Mecha
Thanks S.J, theres still a fair bit to do. The Tank riders need a lot more work, I also have to finish the Tank Commander and the Tank Driver. Some of the figures look a bit shiny right now in these pics but thats as the fixer I used to attach the snow looks glossy when wet.
Most of the things left to do are now mostly figures though. The Tank is pretty much done as is the base. I just need to add the Soviet Flag to the T34, but I've been waiting till the figures are all in place first.
The snow effects on the troopers were a bit tricky and I wasn't sure how it would pan out, so I'm glad you like them. I was quite pleased with the end result on the cape myself.
11330
Post by: Gundam-Mecha
Today I spent some more time on the Diorama and worked on both attaching the T34 to the base and painting the figures.
I came across some problems with the Tankers, I have conflicting and contradicting evidence about their uniforms.
Some books state that Russian Tankers wore black or Steel grey overalls, a one piece jumpsuit. Others show them as wearing khaki dress. One book even states in the main text that Russian Tankers following 1935 wore black or steel grey, then in the plates and plate notes depict them as wearing khaki overalls, saying that after the outbreak of war the black was replaced with khaki jumpsuits...
Russian uniforms are notoriously difficult, as Stalin changed the dress from Soviet patterns back to Tsarist style near the end of the war. Supplies were also a problem and fabric was often sourced from whatever was available, be it local materials or lend lease stock. This meant that regular infantry often had a huge variation in colours of uniform from light beige and khaki all through to light green!
A Soviet Tank Officer centre (according to Army Uniforms of WW2
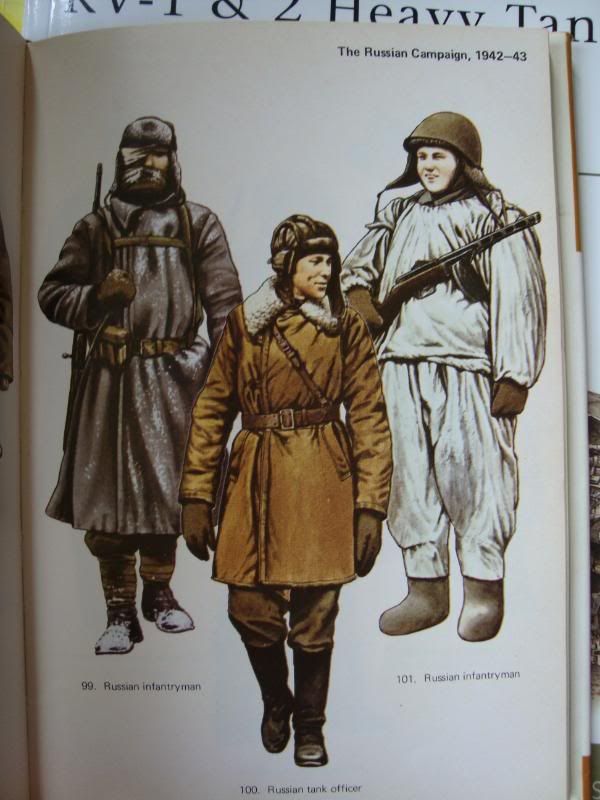
A Soviet Tanker circa battle of Kursk (1943 after the supposed change of uniform from black to khaki) according to Kursk by Osprey Publishing

A Soviet Tanker (first left) according to Army Uniforms of WW2 Circa 1941 (again after the apparent change showing khaki).

In the end I decided to settle with the Kursk example and go for Steel Grey/ Black overall using the brown leather and sheepskin jacket.

Attaching the Tank to the base:
 WIP
WIP of the infantry:


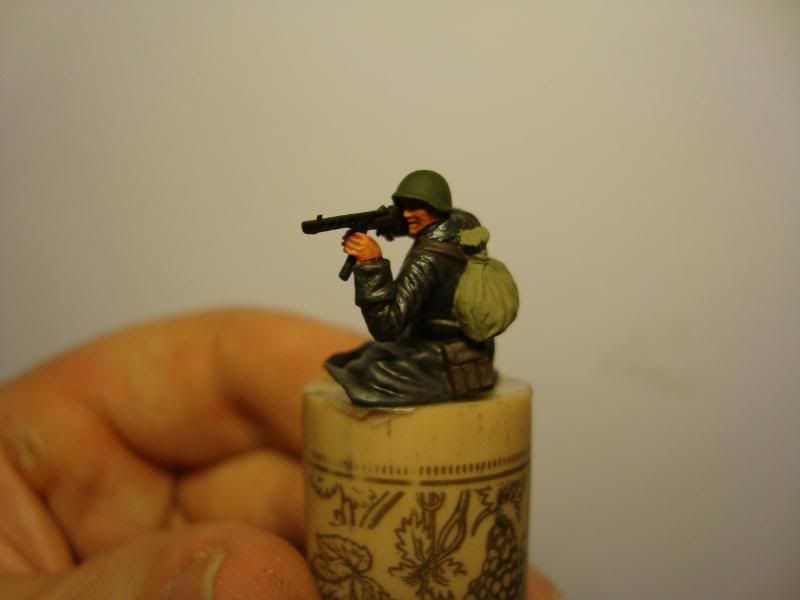
10890
Post by: Deff Dread red Edition
Really nice now get it done,LOL!!
6633
Post by: smiling Assassin
Awesome!
sA
11406
Post by: Disjointed Entity
Loving it!
11330
Post by: Gundam-Mecha
Thanks guys, I really want to try and wrap this diorama up by this week.
It just means sitting down and slogging through the infantry and tank crew.
I managed to get quite alot done last night on the infantry, most of it boring and unexciting parts like finishing off the basic colours etc. At least now however I can move onto the next stages like detailing and highlights etc, they are getting there slowly.
Fingers crossed this will be over soon and I'm already looking forward to the next project!
7899
Post by: The Dreadnote
Excellent work. Seems like there's always something worth seeing when I look in on this topic.
9505
Post by: CaptainRavenclaw
Its great to see all the pieces coming together. excellent.
8745
Post by: Llamahead
Great stuff can't wait to see the finished article what's next though?
11330
Post by: Gundam-Mecha
Thanks guys, Llama you'd be suprised. Aside from finishing the painting on the figures, It's all the little subtle things. For example I've just attached two figures to their final places on the base as well as the tank, there was blending them into the diorama using a wet mud mixture from acrylic resin, making little icy puddles in the ground, making sheets of broken ice (using the superglue method). All kinds of little finishing touches.
At the moment the main goal is finishing completely the painting on all the infantry and the two tankers, this is coming along now compared to the recent WIP shots. I painted in the eyes on them and some details yesterday.
Once thats done I need to decide on the final positions and places for all the infantry on the ground and attach and blend them into the base. Then attach the tank riders and driver to the Tank.
I've also got to add the Soviet Flag to the turret. Still it will be done very soon and is nearly finsihed!
4657
Post by: Metsuri
Can't wait for the finished product as the time and effort you've given to small details is great.
Give us a good coverage of the finished product, will you?
12513
Post by: ricekake87
Dude, the freaky thing is that Im still building my 1:35 scale model of the same tank!!!!! Thought about converting it for 40k, but the dam thing is just to good looking to harm!!!!
Oh and keep up the good work!!!
11330
Post by: Gundam-Mecha
Metsuri - Don't worry I will get lots of pictures from various angles, taken nicely as well I hope with a cool background image.
Ricekake87 - Thanks! My next project is another 1:48 diorama but I'd definately like to try a 1:35 project soon. Dragon do some great 1:35 T34 kits. Would love to see some photos of your work! 1:35 figures are fantastic, such a diverse range and much better than 1:48 figures.
11330
Post by: Gundam-Mecha
Well it's finally finished!
While I'm uploading all the finished pics heres a little taster of one of the finished Tank riders:

More to come very soon.
11330
Post by: Gundam-Mecha
11406
Post by: Disjointed Entity
I love it! All the models look quite naturally posed! Great work Gundam-Mecha! Great!!
12513
Post by: ricekake87
LOVE IT LOVE IT LOVE IT!!!!!!!!!!!!!!! keep up the great work
7899
Post by: The Dreadnote
Superb.
471
Post by: davetaylor
Fantastic stuff!
While looking through the finished pictures I really had a sense of the cold they must be feeling and a chill went down my spine.
Now that's some great modeling!
Cheers
Dave
10890
Post by: Deff Dread red Edition
Very nice.
7632
Post by: Ghost in the Darkness
OMG that looks great, good work.
11330
Post by: Gundam-Mecha
Thanks guys for all the comments, ideas, feedback, and constructive criticism you've all given me during this project. Getting a chance to share this project with you all and have your feedback shape and develop my ideas has been really fantastic and very much appreciated.
It certainly has been a labour of love, and the man hours put into the diorama really have been mind boggling! The effort really paid off though and I'm really pleased with the end result.
It really was worth it, and its been fantastic to see all the different elements come together.
At the start of the project I really wanted this Diorama to tell a story and set a powerful scene, and Dave from what you've just said it really did work out well. I'm really happy that the winter feeling has come across in these photos!
Now I can start my next WW2 Diorama, the Battle of Kursk 1943, a summer scene set before the start of one of the most decisive engagements on the Eastern Front...
Time to get the modelling saw out again!
P.S - I get to keep the next one for myself!
10890
Post by: Deff Dread red Edition
So have you presented the diorama to your relative yet?
11330
Post by: Gundam-Mecha
Not yet, I'll be handing this over when I visit Minsk in July.
It's a surprise present, so I'll be sure to take some photos when it's handed over to get the reaction!
11833
Post by: Kagar
Congratulations on this work of art Gundam, it looks great!
I hope you can make a picture of the smile on the face of your father in law when you hand it over.
1798
Post by: AdrianG
Bravo,bravo!
Really looks the part
11330
Post by: Gundam-Mecha
Thanks guys. Actually knowing that it will be a gift really made the whole project much more satisfying. I'll be sure Kagar to take a photo of his reaction, he was an Army man himself, so I'm sure he will appreciate it.
Thanks Adrian, if you like this be sure to check out my next blog.
10339
Post by: tallmantim
Lovely - the sepia pic looks good. When I first opened it I had to do a double take as I first thought it was a reference pic!
LOL - thinking "it's good that he's found a reference pic that's in a similar campaign to what he's shooting for!"
4657
Post by: Metsuri
Well the end result surely was worth the wait, it is simply stunning. The flag is great touch as it brings some warmth into the cold scene and looking at the troopers on wouldn't guess you had such difficulties with them. They blend into the whole seamlessly.
When I look at this I'm thinking about taking some time off the army painting to work on scene and turning it into a photo of lost time. Thanks for sharing G-M.
11330
Post by: Gundam-Mecha
Tall mantim - Thanks! I'm glad the photo gave a realistic effect! Haha
Metsuri - I'm glad you like the finished article, in the end I was quite happy with the figures. Some were a real pleasure to paint, while some were a bit of a challenge. I think in the end though they worked out very well and made me work harder at the face painting and really give the subject a lot more thought.
I ended up using alot of methods that I don't usually use which is definately a good thing.
I hope you decide to go for a scene and I'd love to see a blog on that!
14694
Post by: Lanky-feck
Wow thats an amazing project you have got me into planning and building one similar but i would do British tank because they are my fave.
11330
Post by: Gundam-Mecha
Thanks Lanky, theres more WW2 stuff to come on my Kursk Diorama that I'm working on currently.
British Tanks are great, I love the Cromwell and the Churchill Mk3 Heavy Tanks.
There are also some great resin 1:48 British figures out on the market too!
6825
Post by: The_Blackadder
I see you are quite the modeler in your own right. A marvelous diorama. I was hard pressed to determine that sepia image wasn't an actual combat photo.
Excellent work,
Blackadder
11330
Post by: Gundam-Mecha
Thanks Blackadder, I'm glad you liked the Dio.
I'm hoping to make my Kursk one even better and build up on the skills I started here. This was one of the first times I tried scale model techniques on a kit and it was a really fun and interesting learning experience.
14694
Post by: Lanky-feck
If i may propose a question where do buy your scenery, tanks and men also where do you get your ideas.
I had a go at making a 1/72 dio and it looks quite good ill post pics if anyones interested.
13159
Post by: inquisitor_lord_slade
Pure awesomenesstability... I love it!
11330
Post by: Gundam-Mecha
Thanks Slade, glad you liked it. I'm really excited to give it as a gift to my father in Law.
@ Lanky, the terrain and scenery in this dio are scratch built for the most part. The base was make with filler, PVA, and rock scatter. The telegraph pole is from a large matchstick, and the barbed wire fences are made from wire and Photo etch barbed wire. The trees are just twigs broken in small parts.
As to the kits themselves its from a very varied selection of sources. The Tamiya Tank kit and figures I got at a local model shop, the photo etch and resin parts are ordered directly from the manufacturers online. I also use a web shop called net merchants, as well as Historex.
For sure post your pics it would be great to see!
3998
Post by: king88mob
first off, thanks so much for sharing the build on dakka, in such great detail! This is a better writeup then many of the ones i see on armorama and the like, as they assume that many of the steps are old hat to the readers.
It looks great, as does all of your stuff.
one thing I wanted to ask was if you'd considered weathering the flag a bit? It's a big contrast (which might be intensional) and it's very very clean against the rest of the diorama, which doesn't seem likely if it was snowing and muddy.
14818
Post by: blood_pact
are these guys roughly the same scale to GW guardsmen?
Some of them would look great in someones IG army if they are
11330
Post by: Gundam-Mecha
Hi Guys thanks for the comments, I've been away on holiday for awhile so haven't had time to visit Dakka.
@ king88mob - Thanks very much for the compliments, I go to Armorama sometimes to browse and I have to agree, in terms of actual discussion and tutorials theres very little. There also seems to be a reserve or reluctance to share... perhaps people are worried that others may become better than them, or maybe they are concerned that projects will lose their sparkle if their secrets are revealed... I don't know.
As for the flag, I understand where you are coming from but there were a few reasons why I decided to leave it clean, ranging from practical to cosmetic. Firstly the nature of the banner (a special dry transfer over tin foil) makes it rather tricky to work with as a material. It's not like paper and not quite so easy to cut, distress, and make holes in etc. Also the transfer makes such work problematic as it can be prone to flake and peel off. It can be painted over though easily enough, and the main advantage of this banner method (in my eyes at least) is that the tin foil allows easy shaping of the flag in ripples or curls in the wind etc.
Secondly I had in my mind that the banner would be something that the Tank Crews would cherish and take a great deal of pride in. Only to be flow outside the vehicle while travelling through secured or liberated areas to boost morale and patriotism. When in active hot combat zones this would be stowed inside the tank. Perhaps kept in a protective case or some other kind of storage. Also in quiet periods when at rest effort would be made to wash and repair the banner to keep it in a good condition.
I guess also that the propagandist inside me also liked the idea of a nice shining red army banner proudly on display (much like in many of the Soviet propaganda photographs, a dirty and worn banner isn't as striking)
@ Blood-pact - they are roughly IG trooper size. They match FW troopers exactly. So for example they would be the same size as an Elysian or a Kreig Trooper. I have been meaning to put comparison photos up for ages and promise to do it soon!
On a side note next week I am heading to Minsk to finally hand over the diorama to my father in law, I'll be sure to take some photos of the presentation and post them here
11330
Post by: Gundam-Mecha
So the project is finally over and the gift handed to my father in-Law who loved it. He spent ages playing with all the parts and taking it apart! Of course in this photo he is doing his best to look serious!
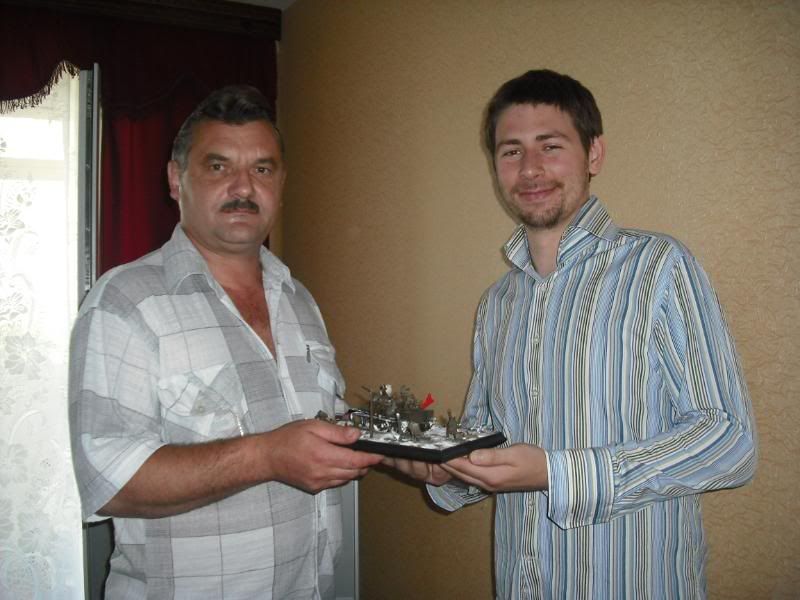
He had also gotten me a gift before I came, a Soviet hat!
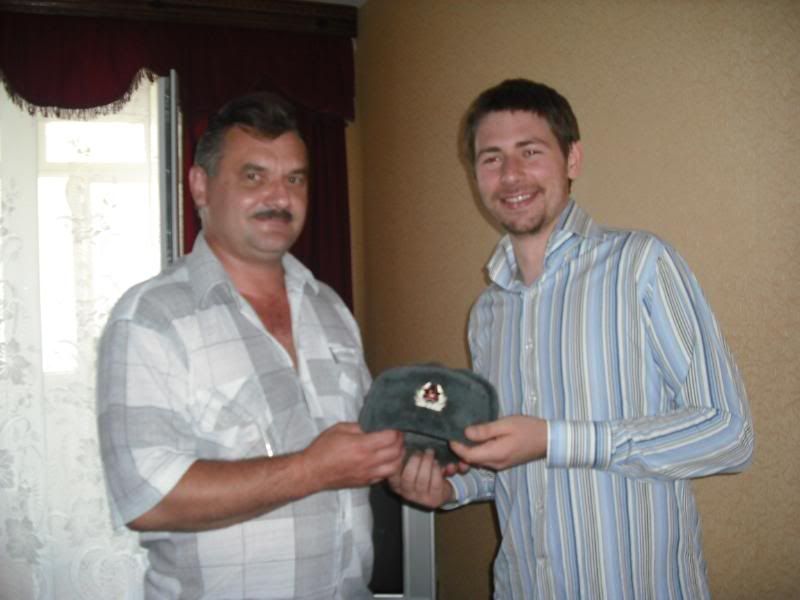

Us at a Soviet WW2 memorial outside of Minsk, standing with a T-10 tank

And the real thing, an actual T34!


Reference photos for details on the T34
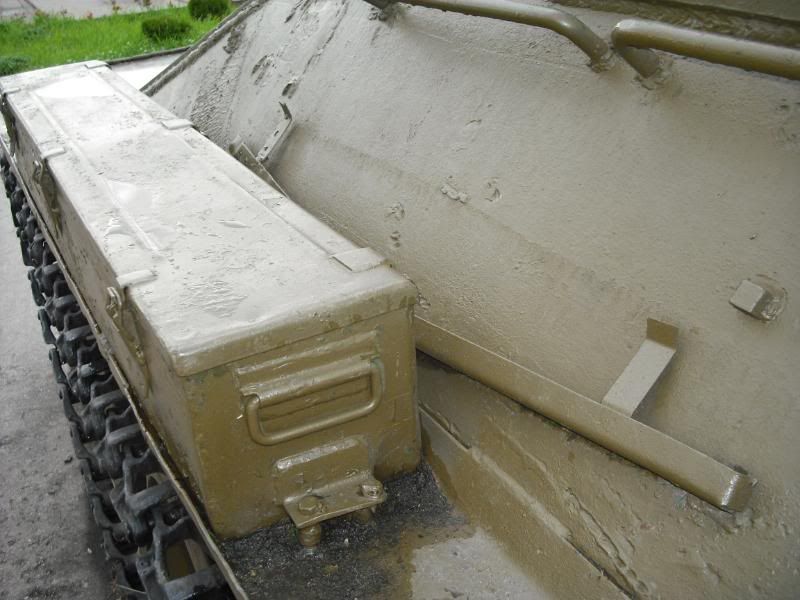
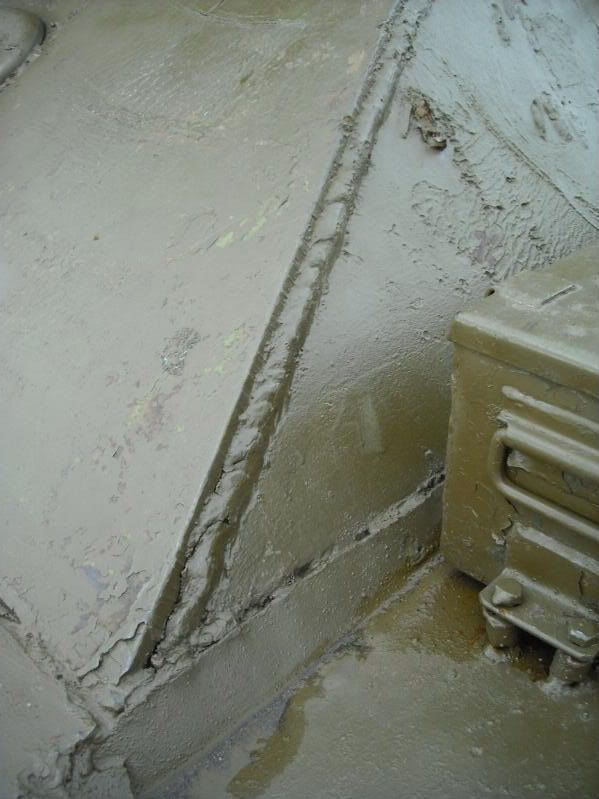
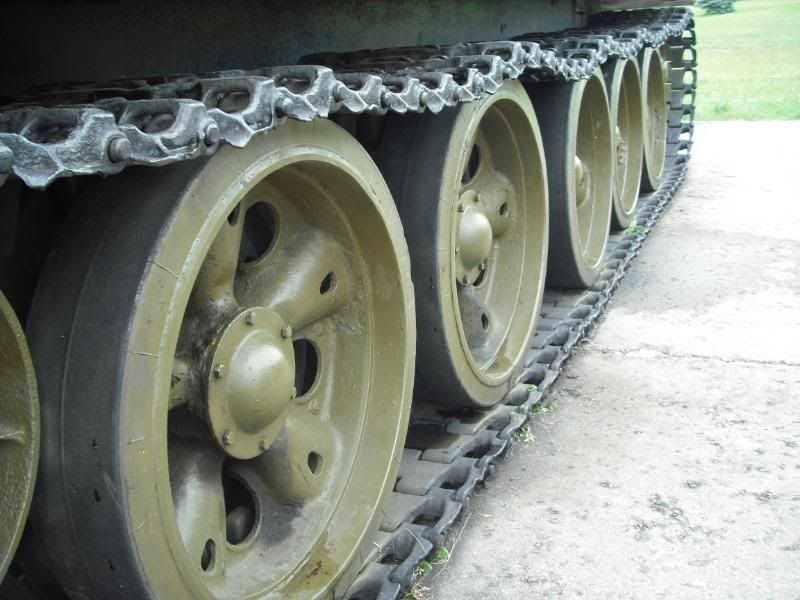


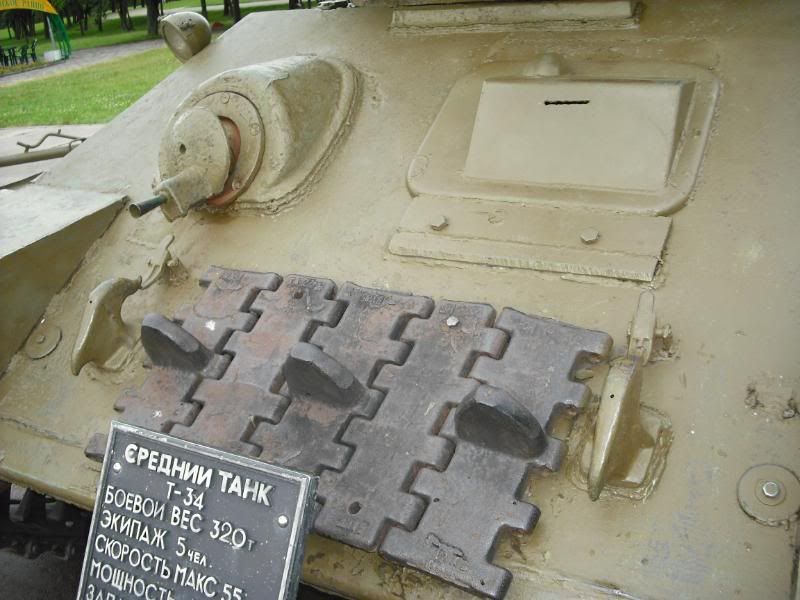

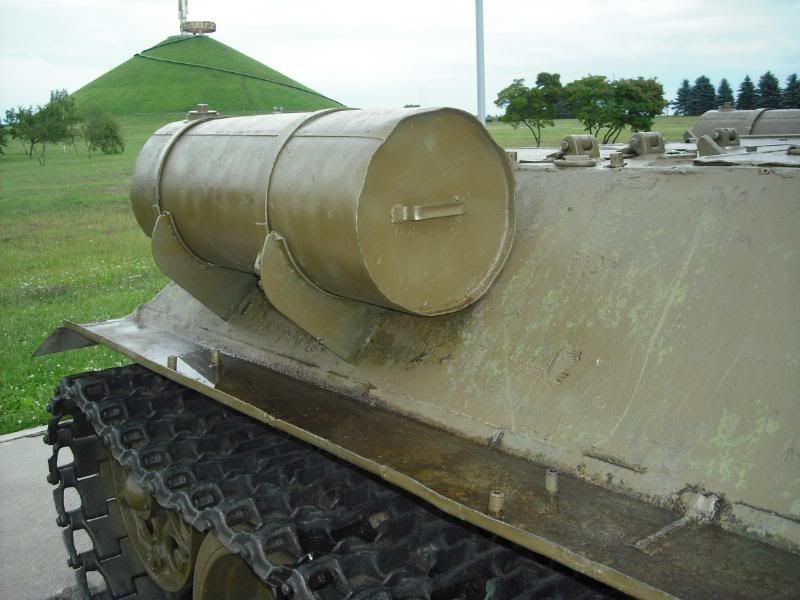
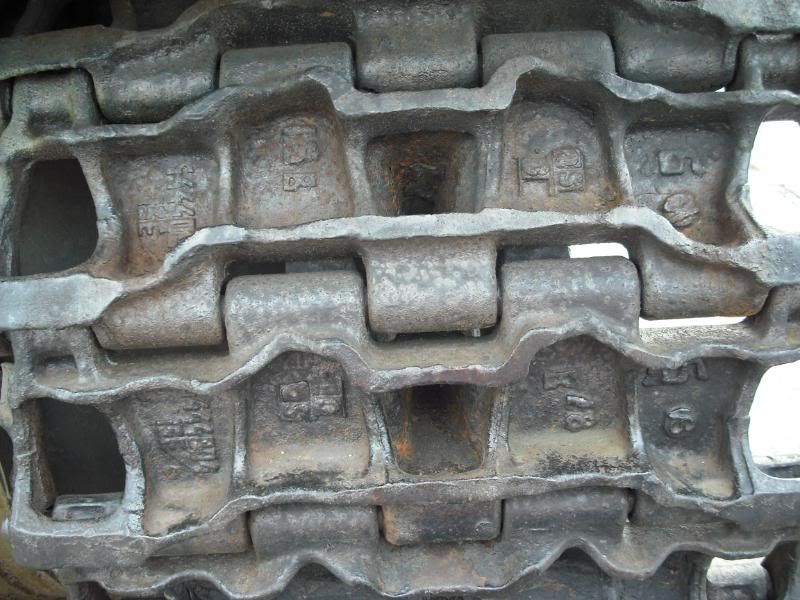
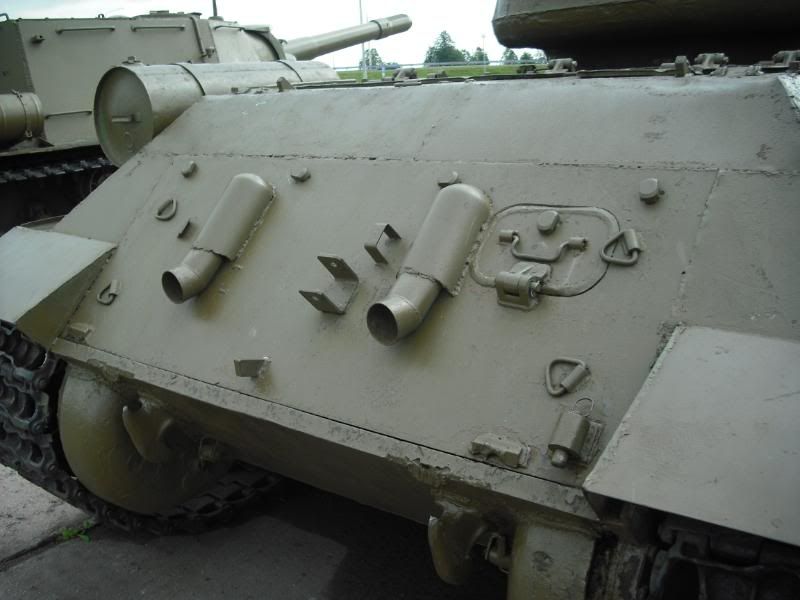
In front of the monument, next to the T34

And the lady who made it all happen, my fiancee
So now this blog is offically over and finished, research over, diorama built, gift presented, and real life T34's visited! It just leaves me to say thank you all for following my blog and for your great comments, observations and feedback.
Farewell comrades
4216
Post by: Darknight
Absolutely beautiful (and I am not just talking about your fiancee!) Really stunning work - I am not a huge fan of historical modelling, but this is a wonderful work of art.
I am also reading about your Kursk diorama, and that is looking very good also.
8266
Post by: Wolf
Ha! damn darknight you beat me to my pun ¬,¬. anyway this was a really nice job mate loved it !
11953
Post by: Shellfishguy
Glad to hear your father in law enjoyed the diorama! Excellent piece of work.
471
Post by: davetaylor
Once again, great and inspiring work!
Well done.
Cheers
Dave
10890
Post by: Deff Dread red Edition
Damnit darknight you stole the awkward and uncomfortable post for July from right out under me(DAMN)!
Anywho,looks like you had a good time.Lovely diorama and I am happy to hear that your father-in-law liked it.
6633
Post by: smiling Assassin
Congrats man. That's excellent work, tremendous pictures. Quite an acheivement!
Stay safe, looking forward to more from you.
sA
4216
Post by: Darknight
Cripes, it seems you can't even compliment a man on his fiancee or modelling skills any longer without people making a joke out of it ....
17913
Post by: Uberman7788
Armor like this will take us all the way to Berlin!
10345
Post by: LunaHound
Gundamecha wins on all levels !
11330
Post by: Gundam-Mecha
Thanks for the comments guys, and Darknight thanks for the compliments... on everything! :-)
I've just started work on my 1:35 T55A and will set up a new blog for that soon, I also got some painting done on my KV-1 last night and will update that blog too over the next few days.
|
|