13761
Post by: sallad101
1
13761
Post by: sallad101
I first started off making little odds and ends such as Flocking (from sawdust and paint) and tank traps (using pink-poly and a little mixture)....
3
13761
Post by: sallad101
then I started working on other odds and ends like sheet iron and pipes etc..... and barb wire made from the stuff used to fix holes in your walls which I just primed and painted painted.
3
13761
Post by: sallad101
Some more tank traps and then barrels (all scratch built  )... Oh Joy !! all homemade on the cheap....
13761
Post by: sallad101
Then I decided to tak it up a notch an make a little board (to no apparent secifications).... oh an a little fort which I then decided not to use with this board.... I still need to get some Milliput to do the sandbags on the other unfinish trench and then lay the ground works using cat littler etc...
9
5636
Post by: warpcrafter
That poster seems a little too tolerant for the Imperium. More like "Any citizen of the Imperium whomseoever has contact with mutants or xenos, knowingly or unknowingly shall be arrested, tortured for information and purified by flame of the Emperor's holy promethium. Praise the Emperor in all things. Ave Imperator."
13761
Post by: sallad101
After that (still have yet to finish the trenches etc...) I got started on a barraks things I once saw.... I used a large can cit in half... I should have primed it using some sort of mettle primers cuz the paint totally did not stick and thus I have to put like a million coats on... (for terrain I use nothing but the cheap stuff, acrylics from wallmart).
Sorry if I'm not that entertaining I'm really burnt and hung over from a late night... so my snappy wit ain't all that snappy...  
8266
Post by: Wolf
I'm liking the scenary there mate, the poster seems extremly harsh even for the emperor !
I look forward to seeing some of your IG men painted when the time comes
all the best
Wolf
13761
Post by: sallad101
I then went on to start (yet another) project which this time I'm actually almost done... though I have not pust a base on it for I don't know what its grander purpose shall be...
7
13761
Post by: sallad101
 PUBLIC SERVICE ANNOUNCEMENT
1
13761
Post by: sallad101
Some progress on that large building.....
9
10892
Post by: Emrab
Wow really great stuff. Could you please inform me about how you made the trenches in the board. It dose not seem to complicated. Also what is the board made out of?
13761
Post by: sallad101
ANOTHER PUBLIC SERVICE ANNOUNCEMENT: Brought to you by "The Imperium of Man"
1
10029
Post by: Fiendcrackar!
You should probably go watch the old donald duck cartoon, "spirit of '43" on youtube.
Its so bad.....
10809
Post by: insertnamehere
I am looking into building terrain for a local store that is now feeding my addiction. How difficult was it to cut out the foam? Did you use a razor or a hot wire?
13761
Post by: sallad101
Emrab wrote:Wow really great stuff. Could you please inform me about how you made the trenches in the board. It dose not seem to complicated. Also what is the board made out of?
Thanks... And sure thing, for the trenches I glued two 1" polystyrene boards together -but just go buy the 2" (I did'nt have any at the time...) then I drew on the board how I was thinking to cut them out... as shown on the attached picture. And seeing as I am new to this and do not have all the right tools I just cut using a box cutter then when I got close to my desired depth I started scraping an shaping using a wood rasp (kind of like a file but better at shaping refer to picture) then I sanded as much as I could... after that I based the board using paint mixed with sand and white glue (like elmers). Oh and look around on the internet for inspiration... I've attached some piks that I used.
Look up on youtube a guy by the name of the "Kamloopian" here is a link: http://www.youtube.com/watch?v=2zbfubGVRyE&NR=1
He's a pure stoner and seems totally disocombobulated but within his wierd rifts and rants he's got some really great tips....
7
1963
Post by: Aduro
I'm going to have to kidnap you, lock you in the back room of the FLGS and put you to work building new terrain for the store.
13761
Post by: sallad101
insertnamehere wrote:I am looking into building terrain for a local store that is now feeding my addiction. How difficult was it to cut out the foam? Did you use a razor or a hot wire?
FOAM IS EASY TO CUT ITS.... WELL FOAM. NO HOT WIRE, I FOLLOW THE ADVICE OF THE YOUTUBE GUY THE KAMLOOPIAN (LINK POSTED ABOVE) AND JUST USED PLAIN OLD BOX CUTTERS AND EXACTO KNIVES.... THEY ALLOW YOU MORE CONTROL OVER THE SMALLER DETAILS ( AS HE SAYS). FINALLY TO SHAPE I USE THE SAND PAPER BLOCKS FROM HOME DEPOT... AND WOOD RASPS (SEE PICTURE ABOVE). BUT MAKE SURE YOU'VE GOT A VACUUM CLOSE BUY TO CLEAN ALL THE STUFF UP... OH AND SAND SOMEWHERE WITH VENTILATION AND WITH A VACUUM AS WELL THE DUST IS TOXIC. OH AND IF YOU DO IT OUTSIDE  PLEASE REMEMBER IT’S NOT BIODEGRADABLE so TRY AND CLEAN AS MUCH AS POSSIBLE up before the wind takes it (MY LITTLE PLUG FOR SAVING OUR WORLD SO THAT WE MAY ONE DAY HAVE A WORLD TO BRANCH OUT FROM AND CONQUER OTHER GALAXIES
(Sorry for the caps  )
13761
Post by: sallad101
P.S. If any admins are watching please help me change the flag on my profile  ... I'm from Canada not the U.S. (please and thanks)
10809
Post by: insertnamehere
Thanks, HI HO HI HO it's off to Home Depot I go.
13761
Post by: sallad101
Oh..... and a rock.
3
13519
Post by: Napalm
I love that base! I've always wanted to build something like that but just never got to do it.
13761
Post by: sallad101
Napalm wrote:I love that base! I've always wanted to build something like that but just never got to do it.
Thanks... If you are reffering to the base of the rock I've just got one word for ya.....  :Honey Nut Cherios" paitned brown then white glue and some of my homemade flock.... but if you are reffering to the "base" on and around the trench system that's a whole-nother explanation 
13761
Post by: sallad101
ANOTHER PUBLIC SERVICE ANNOUNCEMENT: Brought to you by "The Imperium of Man"
 WHAT ARE YOU ! DOING TO HELP HUMANITY ? WHAT ARE YOU ! DOING TO HELP HUMANITY ?
1
12914
Post by: FoxPhoenix135
Great stuff. I especially like the building facade you have made there.
5559
Post by: Ratbarf
Where did you get all of the Service anouncments? Did you alter the original WW 2 posters or are they drawn from scratch with tehm as a refference?
13761
Post by: sallad101
Nahhh nothing like that.... and I take no credit in making the posters.... I just have about "10,000,0000,0000,000,000" Warhammer 40k related pictures on my computer... but I do have lots of those ww2 recuitment posters. And to answer you question some of the ones I have seem to be altered WW2 posters.... but many are made from scratch by people with such programs (and the time) to make them up. But hey do what I do, you can just print these/those or any other pic you like, really small... colour print it, then soak it in soya sauce or paint it or something to give it that weathered look (oh and dry brushing helps) and then attach it to your terrain.... you can also buy pack or pre-made little posters at hobby stores I imagine....
But it's best to just copy a pik from the net... resize it, then print them at your local print shop... and then BAM !  you've got propaganda....
Here are some piks of packs you can buy of the ww2 stuff...
  ( but these following 4 or so are not my works or piks they are just examples in response to "Ratbarf's" question )
13761
Post by: sallad101
ANOTHER PUBLIC SERVICE ANNOUNCEMENT: Brought to you by "The Imperium of Man"
1
13761
Post by: sallad101
1
4936
Post by: VermGho5t
It's nice to see a new face on Dakka. Generally most new users do not appropriate originals of other users here, claiming them as their own original work. I guess I should be flattered, you're own takes on creating new propganda posters are awesome, but for feths sake you could have at least given me and the others who created several of the these posters their goddamned credit due as we put in a lot of hard work to create them and then put them up to the community of Dakka.
I don't care if you use them, that is why they were made, but make for goddamn sure you give the people who put in the time and work their credit due for that at the very least.
If readers are too lazy to do a simple search or browse my gallery and see the dates in which the images were posted then here is a link to the DL of the pack. http://www.dakkadakka.com/dakkaforum/posts/list/214123.page
...and here is a link to my gallery.
6328
Post by: Hialmar
Excellent work on all of this. Like the trench system especially.
As a hint for all, if you go to a Pat Catans, Michaels or similar craft store you can pick up a "hot wire cutter" that runs on D batteries and cost about $3.00 and works great for cutting any type foam.
12340
Post by: Jonny_Lunchboz
Sweet terrain.
11452
Post by: willydstyle
VermGho5t wrote:It's nice to see a new face on Dakka. Generally most new users do not appropriate originals of other users here, claiming them as their own original work. I guess I should be flattered, you're own takes on creating new propganda posters are awesome, but for feths sake you could have at least given me and the others who created several of the these posters their goddamned credit due as we put in a lot of hard work to create them and then put them up to the community of Dakka.
I don't care if you use them, that is why they were made, but make for goddamn sure you give the people who put in the time and work their credit due for that at the very least.
If readers are too lazy to do a simple search or browse my gallery and see the dates in which the images were posted then here is a link to the DL of the pack. http://www.dakkadakka.com/dakkaforum/posts/list/214123.page
...and here is a link to my gallery.
Although he has provided no specific credits to those who did make the "posters" the creater of the thread has also been careful to say that he did not create them.
411
Post by: whitedragon
willydstyle wrote:VermGho5t wrote:It's nice to see a new face on Dakka. Generally most new users do not appropriate originals of other users here, claiming them as their own original work. I guess I should be flattered, you're own takes on creating new propganda posters are awesome, but for feths sake you could have at least given me and the others who created several of the these posters their goddamned credit due as we put in a lot of hard work to create them and then put them up to the community of Dakka.
I don't care if you use them, that is why they were made, but make for goddamn sure you give the people who put in the time and work their credit due for that at the very least.
If readers are too lazy to do a simple search or browse my gallery and see the dates in which the images were posted then here is a link to the DL of the pack. http://www.dakkadakka.com/dakkaforum/posts/list/214123.page
...and here is a link to my gallery.
Although he has provided no specific credits to those who did make the "posters" the creater of the thread has also been careful to say that he did not create them.
On the other hand, the posters he is using come from another member here on Dakka, and the gallery system is pretty easy to use. Since he found the stuff, and the creator is on the same site that the new member is joining, you'd think he'd give a brief shout out? Especially since the new member wants to make a good natured entry into the community? Just a little common courtesy is all.
13761
Post by: sallad101
whitedragon wrote:willydstyle wrote:VermGho5t wrote:It's nice to see a new face on Dakka. Generally most new users do not appropriate originals of other users here, claiming them as their own original work. I guess I should be flattered, you're own takes on creating new propganda posters are awesome, but for feths sake you could have at least given me and the others who created several of the these posters their goddamned credit due as we put in a lot of hard work to create them and then put them up to the community of Dakka.
I don't care if you use them, that is why they were made, but make for goddamn sure you give the people who put in the time and work their credit due for that at the very least.
If readers are too lazy to do a simple search or browse my gallery and see the dates in which the images were posted then here is a link to the DL of the pack. http://www.dakkadakka.com/dakkaforum/posts/list/214123.page
...and here is a link to my gallery.
Although he has provided no specific credits to those who did make the "posters" the creater of the thread has also been careful to say that he did not create them.
On the other hand, the posters he is using come from another member here on Dakka, and the gallery system is pretty easy to use. Since he found the stuff, and the creator is on the same site that the new member is joining, you'd think he'd give a brief shout out? Especially since the new member wants to make a good natured entry into the community? Just a little common courtesy is all.
My most humblest apologies “VermGho5t & whitedragon” and any others. At the time of appropriating most works of the afformentioned (some of whom I did not get directly from Dakka – this is the internet) I did not think to note down their original authors because I did not think of using them in this way nor did I even have a Dakka account or really think I was going to make one . So when I made the account and posted the pieces I was (seemingly) unable to “credit directly” certain authors of the pieces (also because as I said before I have like “10,0000,000,0000,000” Warhammer 40k images so they were really just lost in the pile). Thus I just blankly said that these were not my works.... I in no way intended to take any credit I was only trying to infuse my own first topic with a little flavour from the community. My apologies I intended in no way to neither offend nor infringe on the general interests in any way. And if you’d like I’ll take them down (just as soon as I figure out how).
1
13761
Post by: sallad101
Ratbarf wrote:Where did you get all of the Service anouncments? Did you alter the original WW 2 posters or are they drawn from scratch with tehm as a refference?
Hey here is another place with some of those ww2 posters but these are facist ones (and no I do not condone any sort of facism unless the benevolance of the great W40k Emporer of mankind... and that we just call tough love )
http://www.ilduce.net/manifesti.htm
411
Post by: whitedragon
Apology accepted.  Also, I was merely playing devil's advocate to Willydstyle.
13761
Post by: sallad101
.
10054
Post by: Death Gear
nice work
13761
Post by: sallad101
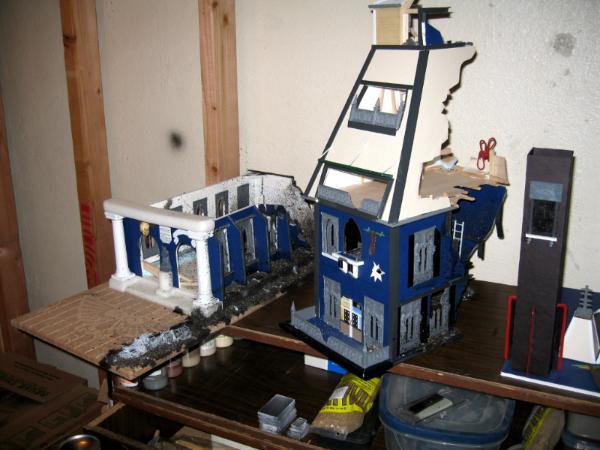
And are some more WIP (works in progress)... (must appologize in advance but I seem to start a lot of theings then get caught up in the all the wonders lie has to offer and that the terrain stuff on hold...). The first is a base sort of barrier thing I was going to use in conjunction with the barraks I am making.... sort of like a military outpost setup. Next should be a bunker I am working on (like the generic space marine bunker that GW promotes). and finally is the start of a factory I am working on... And a picture of the idea from where it came.
The picture of the finished factory is not mine it is just what inspired me to start my own
13761
Post by: sallad101
Finally, "yes" to answer the question who ever asked it.... the tiles are easy... and it is done the same way you do brick work... use an exacto knife or box cutter... draw on the polyfoam (pink stuff) the pattern of brick work or tiles you want, then trace over/inside the cuts with a pencil/or pen (not a sharp one because it is to thin.. unless you are doing finer details). This will deepen the grooves already made by the pencil, just push harder for deeper grooves etc... The styrofoam is very moldable and these indents will stay. And yes the mettle was made from card board that I just stripped one side off, as they say in those readily available tutorials floating around the internets And for the concrete texture... I use a mix of just sand and paint and white glue or if I need it thinker I use the liquid nail, white glue, paint, and a bit of clear caulking.
But all that and more can be learned from the terrain guru the Kamloopian on youtube... be patient he may be nutz... but he's got solid gold ideas.
Oh and most of the stuff I am doing is on totally the cheap...
4936
Post by: VermGho5t
Good on you dude. I accept your apology and also apologize for jumping down your back.
Your terrain is really great! Do you find it hard to split time between creating terrain and working on your models? (I do).
13761
Post by: sallad101
glad all is well.
Actually, I have yet to start buying/painting my models... I just recently started up again. I would like to begin collecting guard (cadian with a twist). the terrain I've just been doing to get a feel for the brush etc... but I'm sure that I'll have the same problem  . I have little time as it is to do the terrain (for it is only a side hobby thing). But I think many underestimate the importance of good terrain (if I may be so bold). For what is the game without the board ? They can also both be mutually related ie: building/painting armies (with specific camo/schemes) and the terrain to fight them on. But that is enough posting etc... for today I gotta go enjoy the scene and the sun (  and thanks to the anonimity of the internet, this remains my little secret ).
When I saw this pik I thought 'usual suspects' ( not my pik)
1
10892
Post by: Emrab
Thanks for the tip.
12212
Post by: Lord Kaesar II
Why i do say... The Necron warrior is standing taller than the rather not truescale space marine in that 'little' police lineup
11452
Post by: willydstyle
That Marine is standing a little more than half a head taller than the Cadian next to him... looks about right. So what's wrong with a tall Necron Warrior?
13519
Post by: Napalm
I want to game on that terrain. I don't care if I have to play alongside the commies, er Valhallans.
13761
Post by: sallad101
Napalm wrote:I want to game on that terrain. I don't care if I have to play alongside the commies, er Valhallans.
Checkout the rest of these tables.... (the russian one is close to the bottom).
http://www.gf9.com/terrain/gallery/gf9tables?page=1
13761
Post by: sallad101
ANOTHER PUBLIC SERVICE ANNOUNCEMENT: Brought to you by "The Imperium of Man"
(not my pik... but man, if someone could give this guy a lasgun)
1
13856
Post by: Topographic Oceans
That factory looks fantastic!
8881
Post by: Obscurum
Everything is awesome.... The combination of pieces, the ruggedness, and all of the extra miles you go to make this look more realistic. Awesome! Still- the trenches bother me, they feel a little too linear. Mayhaps some weathering and decay kind of thing? Like it's been around for a while, or like it was actually dug by lazy guardsmen?
13611
Post by: Stump
Great work!
I just started this game about 5 or so weeks ago. My brother and I ordered our starter armies and I made some terrain will waiting for it to come in. I made it all too big.  I got to start again.
If my new stuff is half as good as yours I will be happy.
11406
Post by: Disjointed Entity
The picture of the finished factory is not mine it is just what inspired me to start my own
Is that the factory from the Flames of War site? I remember there being something like that in a Stalingrad blog or something.
Still awesome though
And I'm loving your terrain! Home business here you go!
13761
Post by: sallad101
Disjointed Entity wrote: The picture of the finished factory is not mine it is just what inspired me to start my own
Is that the factory from the Flames of War site? I remember there being something like that in a Stalingrad blog or something.
Still awesome though
And I'm loving your terrain! Home business here you go!
Thanks but it remains just a small hobby (time permitting) The finished factory (not the one I have started) is from this site...
http://www.gf9.com/terrain/gallery/gf9tables?page=1 they have some kool ideas, however many of their boards have to much of a 'cleaness' to them and not enough war-torn grittness.
11752
Post by: Brother Captain Andrecus
Good terrain. It makes me smile. I've always loved the Russian-y look.
9388
Post by: Stretch
You have some pretty sweet terrain here. I think I might have to steal some of your ideas.
13761
Post by: sallad101
Hey Guys/Gals just a quick update... been busy as of late and have thus not had much time to work on the terrain. But the good news is I just got accepted to the 'Socio-Legal Studies' (Masters program) at my University and I am ecstatic
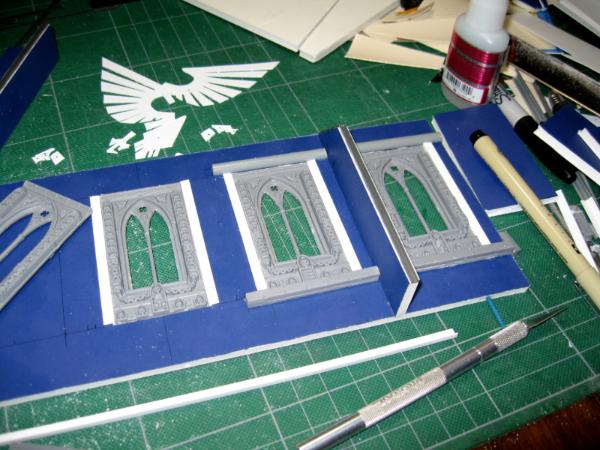
The updates posted are a little progress on my bunker (in terms of texturing - I still need to paint and dry brush it)... a finished and better pik of my (stand alone) fortification wall... better piks of the finished building with details such as paper laying about... and finaly, progress on the factory.
13761
Post by: sallad101
So I really hope the posting of these projects is not tiring you all out... I wanted to post a step-by-step update to show how I go about doing these... but if I'm over posting in terms of piks just let me know and I'll cut down on the number of uploads.
 (REFER TO EARLIER POST TO SEE WHAT I AM TRYING TO BUILD......) (REFER TO EARLIER POST TO SEE WHAT I AM TRYING TO BUILD......)
Here is what I've done so far towards completing my factory project....
Yet to do = brick work that frames the whole thing... make the ceiling sheets (with extra destructo damage  ) add in one or two platforms inside... and glue it all together....
13761
Post by: sallad101
Here is the finished stand alone fortification/barracade... I was thinking of cutting it in half and making it into a checkpoint or sorts to be placed within the city I am building (in my mind )
13761
Post by: sallad101
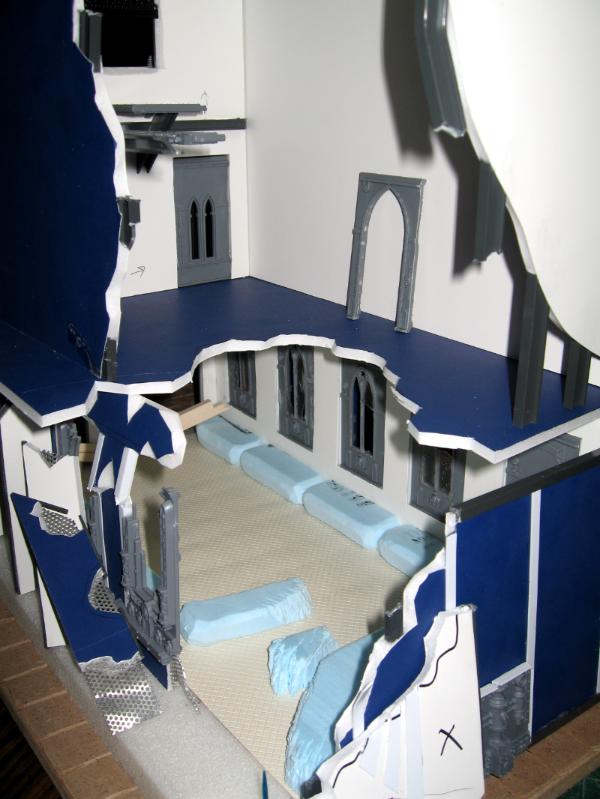
Finally, here is the repost of the finished building... with the addition of clear pictures of detailing (ie: paper, rubble, fire damage, bullet holes)...
7
13761
Post by: sallad101
1
7416
Post by: jabbakahut
Great work man, I like the simple use of easy stuff you employ, inspirational. The paper in the building is great, how did you do that?
3309
Post by: Flinty
That is ace work. My only criticism in your building work is that reinforced concrete buildings have an awful lot more reinforcing bars than you show. You could easily double the number of torn out bars without going overboard.
But thats probably just the engineer in me talking. Keep up the good work.
13761
Post by: sallad101
Flinty wrote:That is ace work. My only criticism in your building work is that reinforced concrete buildings have an awful lot more reinforcing bars than you show. You could easily double the number of torn out bars without going overboard.
But thats probably just the engineer in me talking. Keep up the good work.
Hey thanks for the input I will definately keep it in mind re: the reinforcing bars... again, I'm only getting back into it so I want any and all criticism/advice (but only if it's free). So please, by all means let me know... 
13761
Post by: sallad101
jabbakahut wrote:Great work man, I like the simple use of easy stuff you employ, inspirational. The paper in the building is great, how did you do that?
Are we talking about the little pieces of paper laying on the floor? If so... I cut little tiny pieces of paper... then soaked them in soya sauce.... (Didn’t give me the complete effect i wanted) so then I dry brushed them in brown... then dry brush in grey... before the dry brushing I took a lighter and carefully burnt the edges... I made a line using water so that the whole piece would not catch fire only, the edges.... I was thinking of taking a fine brush and trying to put some lines across to simulate writing but I'm not sure... what do guys/gals think?
As for the "simple use of easy stuff"... thanks for noticing...
Yeah, I much rather build my own things then buy them from GW..... I try and use some things/bits from GW to highlight/emphasize certain projects but sometimes it takes all the fun out of inventing ways to create what you want.... take the barrels I made for instance... sure I could go and buy them... but instead I took some plastic viles (used on the bottoms of roses to keep them fresh) then cut them to size... then wrapped thin tin wire around them to get those three rounded grooves that are on oil barrels... I crazy glued the wires to the plastic to hole it there as well as give it that smooth look. Then I cut some plastic from a coffee lid and glued that on... then primed and painted them... sure it took a while but it was late at night and I had the time.... and it cost me nothing..... (well a little bit of paint, but whose counting)...
Including than the price of paint... the foam board and glue I have spent under $50 for all the projects (give or take a bit on the cost of Walmart paints) I have listed (and this includes a 20 pound bag of sand). And for that $50 I am making/have made (1-board, 1-bunker, 1-large building, 1-fortification wall, 1-large factory, 1-munitions or storage depot, a whole lot of bits/barrels/2 different kinds of tank traps/home-made flocking/barrels/barbwire etc...) If you went to GW what could you get with a budget of $50 (<Canadian $) ?
>
13761
Post by: sallad101
P.S. if you live in North America (or Canada as I do) now is the best time to buy the pink foam board... winter is over and summer is a coming so all hardware stores (home depot in particular) are selling the stuff off madd cheap... at mine I am getting huge flats for $10 each..... and all the free sawdust I want
13761
Post by: sallad101
Bunker done..... 
7416
Post by: jabbakahut
With the scrap paper, did you then just pva a couple coats over it after putting it on the model?
13286
Post by: Mu
Great terrain, the WIP photos are excellent really inspiring/informative.
13761
Post by: sallad101
jabbakahut wrote:With the scrap paper, did you then just pva a couple coats over it after putting it on the model?
I did use the PVA glue but only on the side facing down... I was not sure that if I used it to harded the face side up it would't make it glossy/shiny.... so I only glued the bottom face.

13761
Post by: sallad101
3
13761
Post by: sallad101
NEED ADVICE Ok so I wanted to add some girders/roof beams within the factory... I'm just not sure what to use... popsicle sticks are too large and make it strange (off scale)... I only need to put thee so that you can still have room to move pieces within the factory... I just don't know what to use -I prefer plastics... but any advice would be great Oh, and emphasis is placed on hose hold items... I'm trying to do projects on the cheap (ie: not going out and buying plastic card).... Thanks Guys/Gals P.S. I also wanted to make a grated walkway behind the small window slats at the front of the factory (on the inside) I have a whole bunch of mettle and plastic mesh/screen... any suggestions on what/how to make the walk ways? (sorry I'm lazy today and am in deficit of the energy required to invent some way of doing so....)
3
7416
Post by: jabbakahut
I would use plastic strut.
For a cheaper alternative, I've been using the left over edging from those cheap plastic poster frames-lots of interesting uses for those if you're creative. I would stay away from popcicle sticks unless you plan on cutting one in half and gluing it to the top and bottom of another to create an I-beam.
13761
Post by: sallad101
Thanks
Hey I like that setup.... are you posting the finished product on Dakka ?
12914
Post by: FoxPhoenix135
Nice bunker! I'll have to try my hand at putting something like that together.
13761
Post by: sallad101
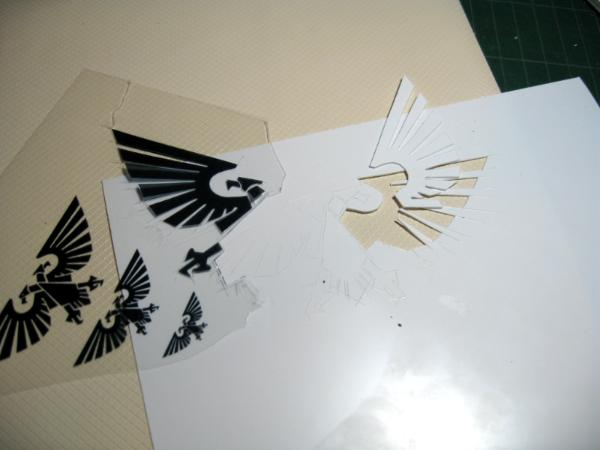
Hey Guys/Gals I was also wandering how to go about making an imperial aquila to put on my factory. I wanted to put one over each door and make it seem as though make from stone... I don't have the time/patience to carve it (unless its easy) plus the pink stuff seems too delicate.... I see them on a lot of other models (the finished product , so I am unable to see how they are made). thanks for any/all help.... you guys/gals are great.
1
12914
Post by: FoxPhoenix135
I suggest printing it out on paper, and gluing it to either cardstock or plasticard before cutting it out. Alternatively, you could print it onto thick cardstock, and cut out the black portions delicately with a hobby knife and use it for a template for some spraypaint and just shoot it on there.
10054
Post by: Death Gear
lets see what the table looks like
12212
Post by: Lord Kaesar II
You could simplify the wings into a more one piece thing and then cut it so that there are still distinct long feathers, like the stuff that comes with the imperial vehicles
7416
Post by: jabbakahut
You can follow my blog here http://www.dakkadakka.com/dakkaforum/posts/list/235980.page
And if you look in the corner of this pic from the same project, you'll see I cut the eagle from plastic card. This was somewhat complicated, I printed the eagle on clear projector paper, I then glued this to the plastic card. I then used an exacto to cut through the film and onto the plastic card, I didn't need to cut through both, just at least score the card so I knew where to cut. is there a simpler way to achieve the same result? Don't know.
7416
Post by: jabbakahut
Here we go, just up loaded a better image.
And don't forget that you can click on it and zoom in if you like.
13761
Post by: sallad101
Awesome thanks again jabbakahut, definately workable... I'm a try that. I found the best Girder type things too (I'll post piks later) they came from this large red plastic crate thing (not a milk crate, but similar plastic) which has the perfect grating... spent an hour cutting it though :( but I've got enough to do the factory and either make a bridge or some large construction crane.... or just more girders...
13761
Post by: sallad101
1
10054
Post by: Death Gear
Death to Chaos
13761
Post by: sallad101
Well I guess my topic is finally living upto its name ... I've been massively enjoying the summer weather and my (by proxy via my best friend) new cottage and all the lovely ladies in booty shorts that seem to have come with Still working onthe factory its mostely pieced together except the details etc... which will be added later. I'm thinking of using somthing else to texture my goop mix for I don't want all the buildings to have the gritness that comes with a sand based gooping. I was thinking 'plaster of paris' for a more cement type look? any suggestions? I usually use a mixture of white glue(PVA), 'no more nails', paint, a bit of clear silicone if needed and then sand (or in this case somthing else).
Oh and I solved that scafolding problem by using an old crate type thing which was already busted and could no be used... I really wanted to use somthing other than cardboard for the roofing because I wanted to use the cardboard to make industrial type doors that roll down... but keeping with my general theme of doing things or the cheap on free I had to give in
Oh and I don't think I'm going to put scafolding in the middle; although I already have one made up and painted it seems to get in the way when reaching... the roof I'm going to put on will be mostly detachable... I'm only trying to cut down on the clutter.
7416
Post by: jabbakahut
I love the use of the milk crate, I think I'll have to go steal one. For the texture effect you're looking for; try using the spray textures you get for drywall touch up, I just tried using it the other day. You can make it orange peal or go with the complete knock down texture, and it was safe for foam.
12030
Post by: Demogerg
I am definately stealing a few of your ideas.
great looking terrain, keep it up!
6633
Post by: smiling Assassin
That is awesome.
Perfect for a smeltery...
sA
13761
Post by: sallad101
Ok so by now I'm probably killing it with the micro updates but hey... I'm a glutton for any kind of exposure and all your imput and suggestions have really helped me get beyond my second guessing -so thanks. Here is the nearly almost finished factory... the only issue I have is what to do about the roof. I put the panels on and there just seems to be something missing? maybe some cros beams? I'm not sure... but whatever it is I don't want it to block or prevent players from sticking their hands in -all roof panels are detachable. I'm thinking of just putting a block of pinkstuff at one end and maybe making some sort of ventilation or fan system... of just sticking up some faux-grating/venting and just leaving the rest (I guess this would be the lazy approach. I am also not sure exactly about the colours yet (guess that's my problem) for I really don't want every single building I make to be a depressing grey . after painting it the long term goal will be to base it and add something like a large boiler, and two areas in just after the main door that have platforms for tanks to be raised up fr undercarriage inspection (one of which will be perminantly raised). the front bay door that is half open will be painted and have some sort of large intustrial numbering (I may even make it 'opperational'). I'm also going to add hand rails to the little raised area and thow some of my homemdae barrels in there. guess that's about all -thanks for the imput, patience etc...
7926
Post by: youbedead
A tip if you do another bunker. A bunkers Would never have straight flat walls. It is much more realistic to ave sloped walls on the bunker as this increases the amount of Armour that a shell must pass through.
13761
Post by: sallad101
Oh and here is that end piece that I'm still trying to decide on.... vent fans, grating ? not sure
14410
Post by: Havoc13
This is wonderful work...
I hate you.
joke
7416
Post by: jabbakahut
You're not glueing the pannels down?
I would gule the roof all together, put more paneling on the other side of the shark fins, cut the wall along the top brick area, use magnets so that the entire roof can be pulled off. That is what I've done on my cathedral I've been working on.

7116
Post by: Belphegor
Fan System, definitely.
It will help break up the general squareness,
and give the eye something to train too.
7416
Post by: jabbakahut
fans would look good
12914
Post by: FoxPhoenix135
Looking good! I get what you mean about the good weather and not wanting to stay indoors anymore. What part of Canada are you from, anyway? We are probably practically neighbors, as I live in South Central Alaska. We have been having some awesome sunny days the last week or so, totally making up for last summer's crummy weather. It's hard to stay inside after such a long winter!
On topic: square wooden dowels would be a cheap way to secure that roof a little better, perhaps.
13761
Post by: sallad101
So it's been a long, long while since I last posted, which is good for I have been crazy busy with school, traveling, social/love life and have had scant time to Hobby it up... But something about last remembrance day just got me a wondering. And so I just recently went back to work on some things that have been collecting dust - to this end I have had some success and have encountered some obstacles... but I now ope to share some things that I have picked up on. Trenches - seems it's most every wargamers fantasy  to build masterful trench systems lined with uber kool sandbags. Here [below] is my attempt....
Now my projects have been all about DIY as much as possible using the cheapest things either at hand or store bought and I think I have solved some issues [or at least have a suggestions or two] that many trenchers face.
The ever elusive Sandbag: I have searched far and wide looking for a reasonable method and have finally found one- it may not be the easiest, but it sure beats one gentleman’s attempt at filling Kleenex (tissue paper) with real sand etc... Unlike said individual I was not granted the gift of patience. There is also the ‘greenstuff’ method which works just fine but (according to some) can get expensive. There are other products and natural elements I have seen other attempt and many (with much time and effort) have produced wicked kool results. Now I am not the best (by far) modeller – it’s more of a time killer for me. Sorry getting off topic – Ok so what has my search resulted in? Crayola!!! Not the crayons... but the ‘Crayola Air-Dry Clay’ (5lb bucket from Wal-Mart should cost you between $5 -$10 [Canadian] – this is not to be confused with the foam/putty magic stuff). It is clay, that dries overnight (or less) and well... is clay, so imagine the results: hard, dry, not too brittle – but do exercise caution. I found it wonderful (considering the price and amount) to work with... try to work in a semi cool environment for the longer you play with it the softer it gets and the harder it is to keep the details formed. Now for the details, many use things like clothe, burlap, and a myriad of other inventive things to produce that sand bags texture... and one night after tearing through my clothes closet looking for some sort of material... I finally saw the answer staring right back at me – my very own modelling knife (pen knife, scalpel or whatever people call it). I used the grip of the modelling knife to make the texture and it looks great (as per my low expectations). Now I am not taking credit for this for I’m sure many others have come to the same conclusion... however I must caution, the detailing left is very delicate so use finger caution so as not to squish the details our when cutting your seams along the side. To get them to stick together I used a mixture of finger pressure back up with a small dap of generic white glue. So too when adhering to the surface of your board – finger pressure and some generic white glue. They have adhere beautifully... so much so, that I can turn the board upside down and bang the sand off after turning the board and not a one has fallen off. I then used $2 a bottle Wal-mart Acrylic paints to paint em up (and to paint the entire board). Caution: because it is clay you need to be careful when applying the paints.... to much paints and brush for too long can moisten already dry clay and lead to the removal of the texturing work you have done. So for the first X2 under coats of black just be careful. I have produce results I am completely happy with - the only issue I have seems to be the advanced detailing of both the board and the sandbags, but again, I am no master painter... The next task I had (and still have) is water affect; I really want to make the board like one of those haunting WW1 warscapes you see in old photos [see below] but I have yet to really look into water effects... and actually almost melted my board when I tried using some sort of clear hardening top coat nail polish stuff [pictured below] it worked for one creator but messed up others... so stay away from that stuff. I would appreciate any and all suggestions re: detailing, water effects etc.... I want this board looking as a muddy WW1 type landscape which I can then 40k-it-up etc... hope some of these suggestions have helped, for many of yours’ have been as the emperors guiding light through the dark eye of chaos. P.s. I am not completely satisfied with the colouring of the painted sandbags... but this is a painting issue.
13761
Post by: sallad101
10
13761
Post by: sallad101
Inspiration is key....
13761
Post by: sallad101
5
13761
Post by: sallad101
More dem piks
13761
Post by: sallad101
Last of dem piks (Remember don't use these products unless you know how to controll their masterful melting ability when in contact with the pink styra)
13761
Post by: sallad101
Sorry I just realized that I never posted this little guy... I was trying to do a hanger type thing and had just finished a can of Allen's apple juice. So I grabbe a pair of shears and got a cutting (careful sharp edges). Make sure to prime with some sort of metal primer - for (as I had to contend with) other primers just don't do it. I then just stuck it into some leftover pink styra, textured, then painted...
6
13761
Post by: sallad101
(hey how do you delete a single post?) I can't seem to remove this indiviual post at the end without the piks :( yes the one you are reading right now
12212
Post by: Lord Kaesar II
I'm liking this latest stuff. Trenched landscapes are always just such a look that you really have to make look destroyed and wasteland, which I think you have so far. And for water effects, though it may not be cheap, I've seen the GW stuff actually have a great look to it, when other people have made terrain involving it.
Anyway, just a suggestion, but it's good to see you're back in the game! Stay in it, and that's all I've to say. -Kaesar II
34119
Post by: neil101
Just found your work , very nice stuff. like your factory ,i a also building a manufactorum , ina similar vain , so i took notes , especially the crate for iron work. trenches are cool! and yours is one of the coolest i have seen. look forward to see what eles pops up on here
26139
Post by: Skalk Bloodaxe
Just found this thread tonight, subscribed. Very detailed with an intense focus on doing amazing things with low cost materials. The bread tray was the most stunning. I have to find some sort of access to some broken ones, will start checking around. Runner up was the air-dry clay.
I haven't been making any DIY 40K period terrain lately because I scored some of the GW CoD buildings on eBay for close to nothing and most of what I had been making was lacking that "tie in" to the new stuff I had, but I saw some other work here that tied it DIY and pre-manufactured together in a way that works well. This thread is going to make me revisit how I have been looking at terrain.
24297
Post by: Viktor von Domm
seeing all your terrain makes me again wish i had the time to do a trench system...
also never thought about giving sandbags a texture...very good idea.
very good work.
vik
|
|

 . Members like "VermGho5t" (and) "whitedragon" and others
  'midnight'