11330
Post by: Gundam-Mecha
Following on from my recent T34-76 Diorama, I decided to work on another Soviet Tank to keep for my own collection.
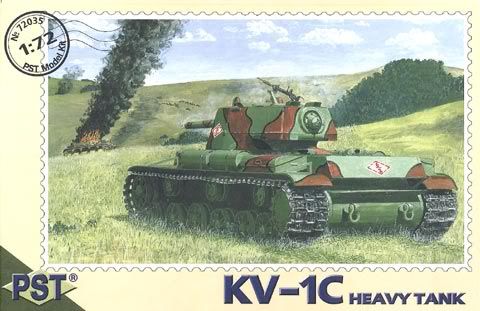
This time it will be a KV-1 Heavy Tank, set in a pre-battle scene before the Battle of Kursk. I decided to go with Kursk for a number of reasons. Firstly my last Diorama was great fun to make but only a generic scene, I wanted this one to have a solid historical setting to a specific engagement so I could really go into some depth and research the battle, terrain, and armour alot more.
Kursk also gives me a chance to try something different and model a summer setting, which brought a whole new load of options for terrain and environment.
The setting of Kursk was also the last time that massed numbers of KV-1's were used in the War, marking the swansong of the Tank. After this date KV-1's were used much less and in much smaller quantities as production by that time had already ended in favour of massed numbers of T34's, Kursk saw the destruction of a large number of the Red Armies KV-1 stock.
I also decided on a pre-battle scene on the front lines, as it gave some interesting modelling options, allowing me to show the Officers and troopers preparing and briefing for the battle ahead. A calm before the storm, and a chance to show a wide range of figures that you usually wouldn't get in a action battle scene (like my last diorama).
Here are the two main books that I'm using for my research and reference material:
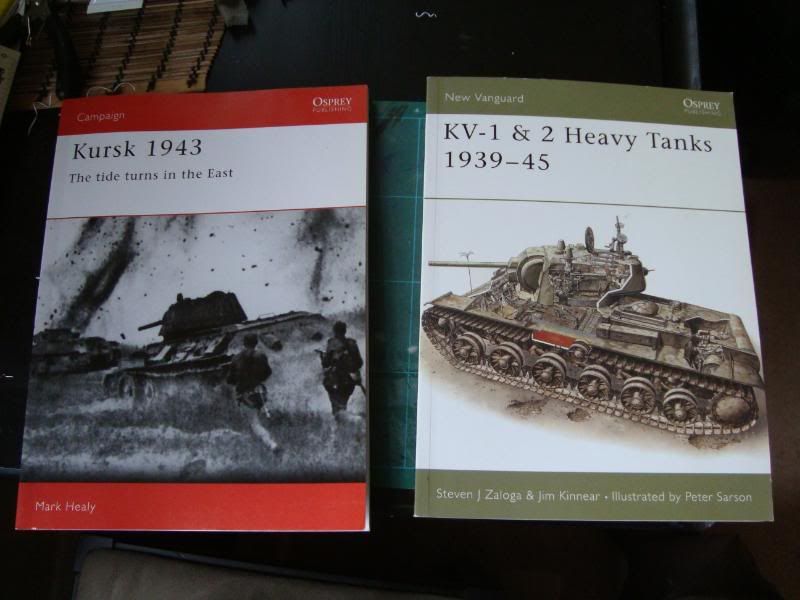
I'm also using a large number of modeling magazines and internet material.
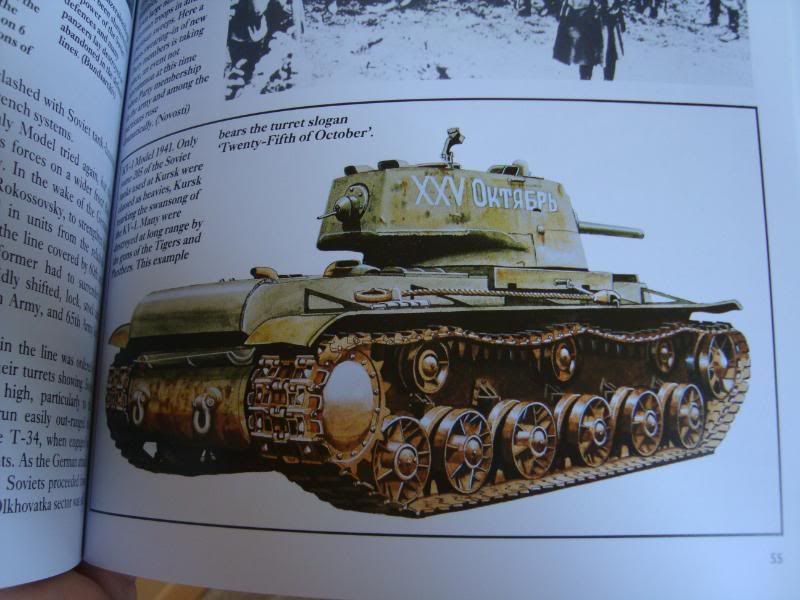
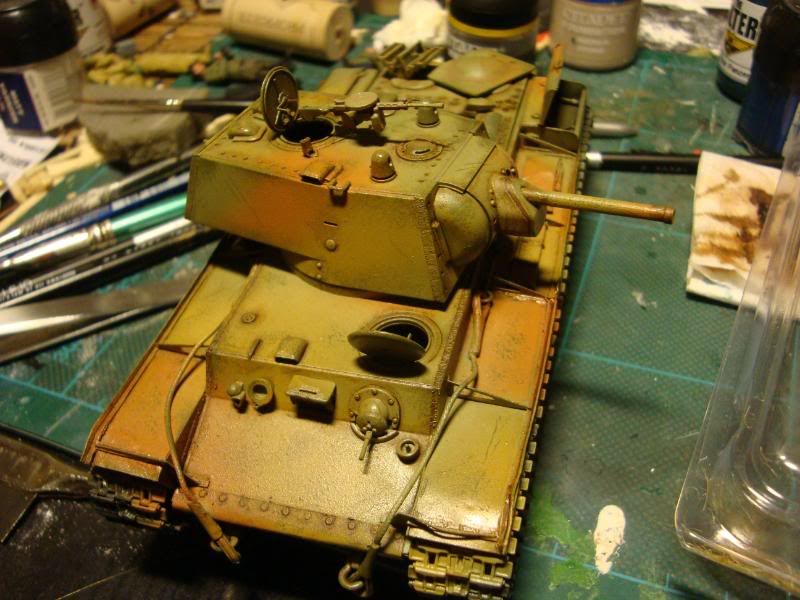
I spent alot of time thinking about how to paint and model the KV-1. I really wanted to model a specific tank this time based on reference material from Kursk, so that it would be historically acurate. I found a great example of a tank called the I.D Papanin, that fought in Kursk as well as numerous other engagements all throughout the War. Sadly it was a different model KV-1 to the example I had with the Tamiya kit. The Tamiya kit being a KV-1 1941 model and the I.D Papanin was a KV-1 S model that had a much different turret and chasis design, in the end I decided that the conversion work required to turn my KV-1 in a KV-1 S would have been to vast. I had already bought alot of photo-etch components that were KV-1 specific and those would have been lost if I had scratch built the turrent and remodelled the upper hull.
Perhaps I'll do this for my next project though as its a really interesting tank with some great history.
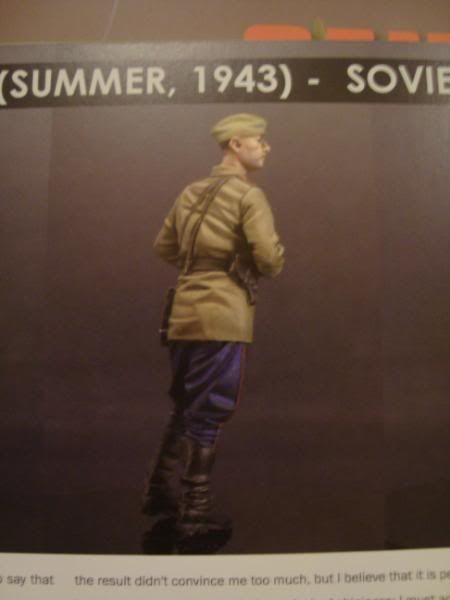
After a lot of research I decided on this example from Osprey's Kursk - The tide turns in the East. It's KV-1 1941 model with the Turret slogan "25th October" a reference to the revolution.
Here are the kits that I'll be using for this project:
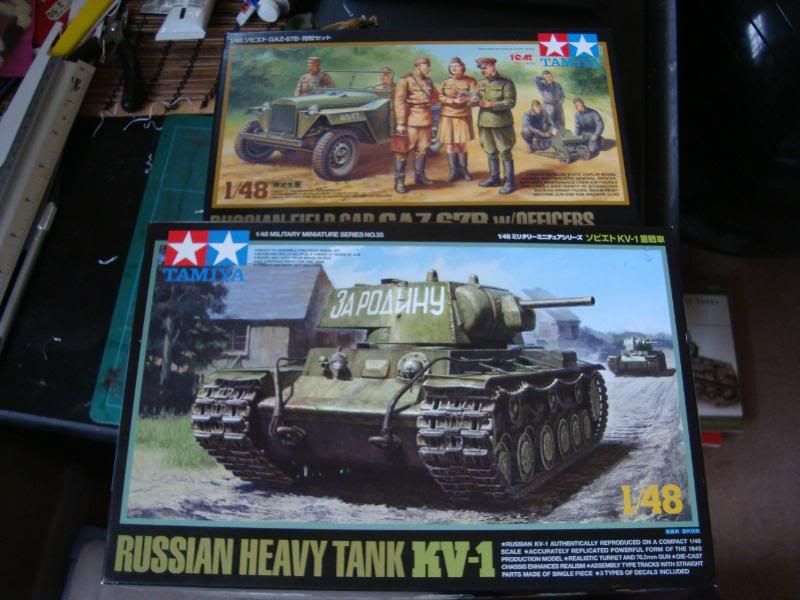
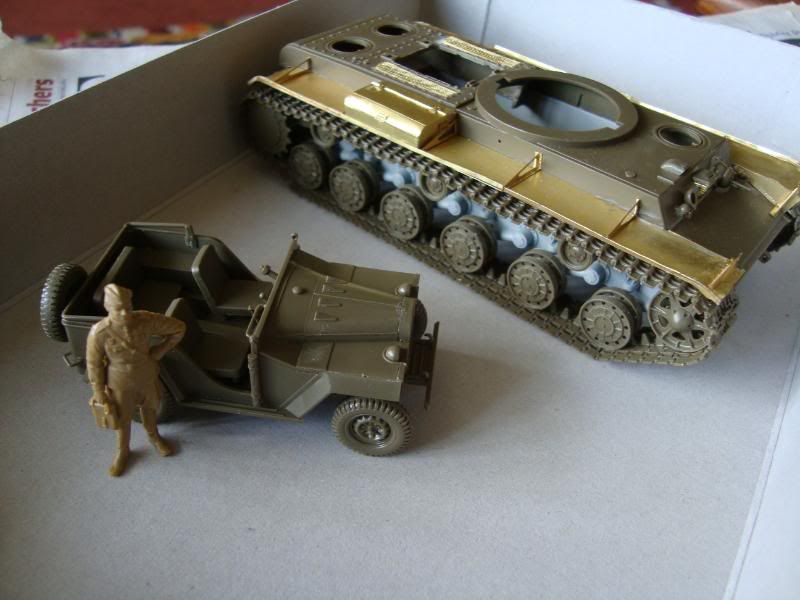
The Tamiya 1:48 KV-1 and the Tamiya GAZ67-B Jeep with the fantastic figures from ICM models Ukraine.
I'll also be using alot of Photo etch, much more than my last project. Since there is no complete internal detail set for the KV-1 in 1:48 scale I decided to seal the tank and super detail the exterior.
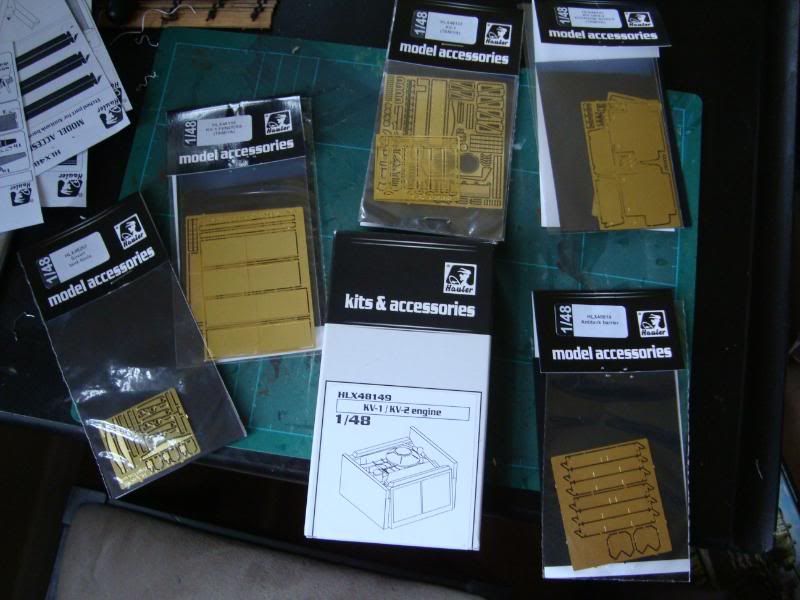
All these Photo etch parts are from Czech manufacturer Hauler, and include a Resin Engine, as well as new fenders, storage cases, grilles, and various other turret and hull details.
11330
Post by: Gundam-Mecha
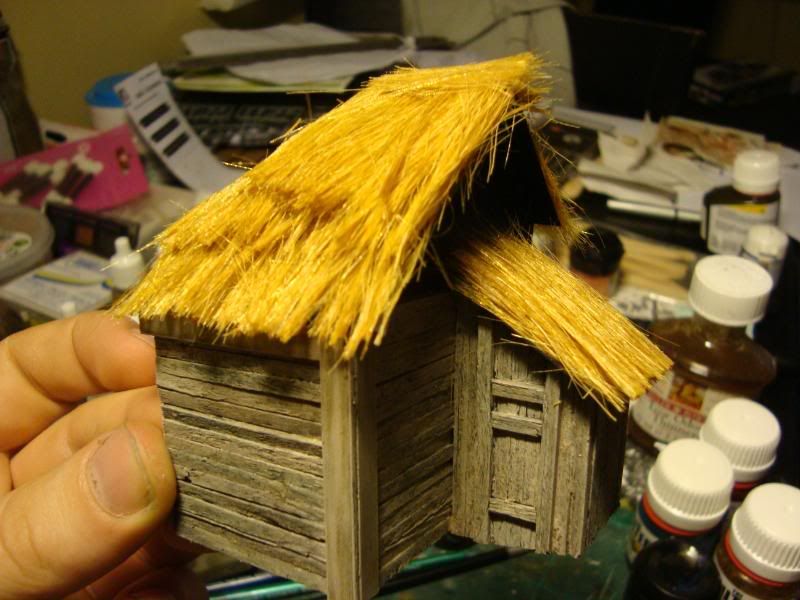
Time for some WIP shots:
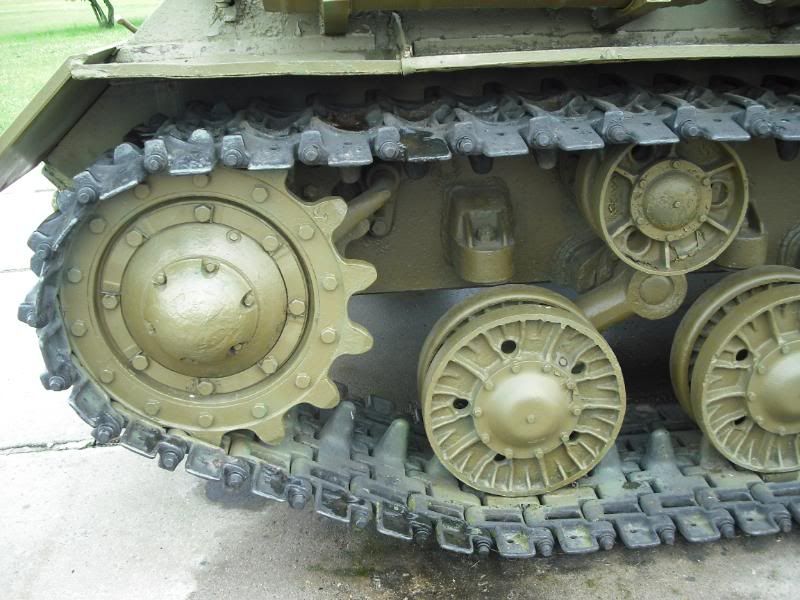
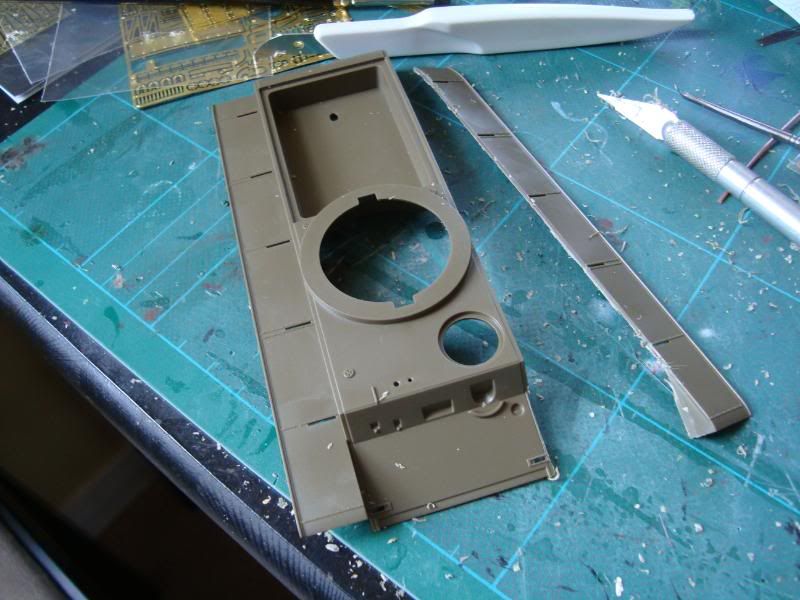
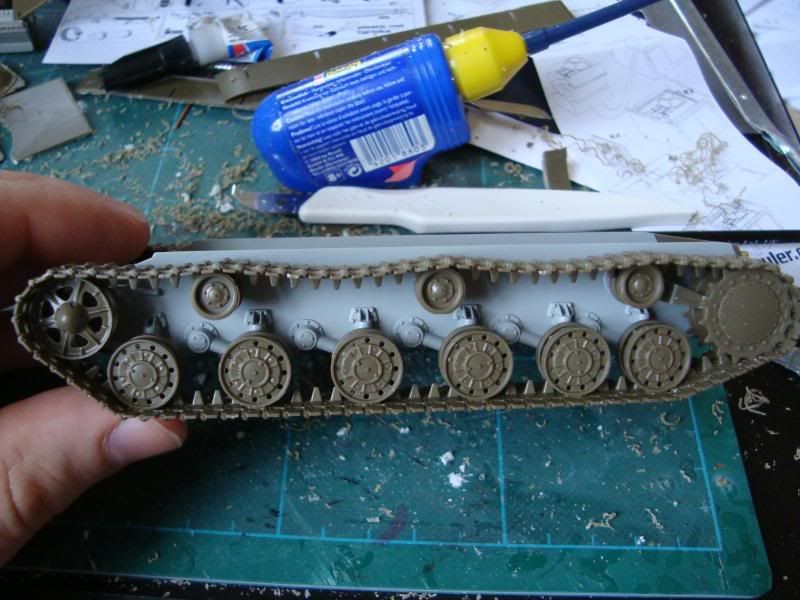
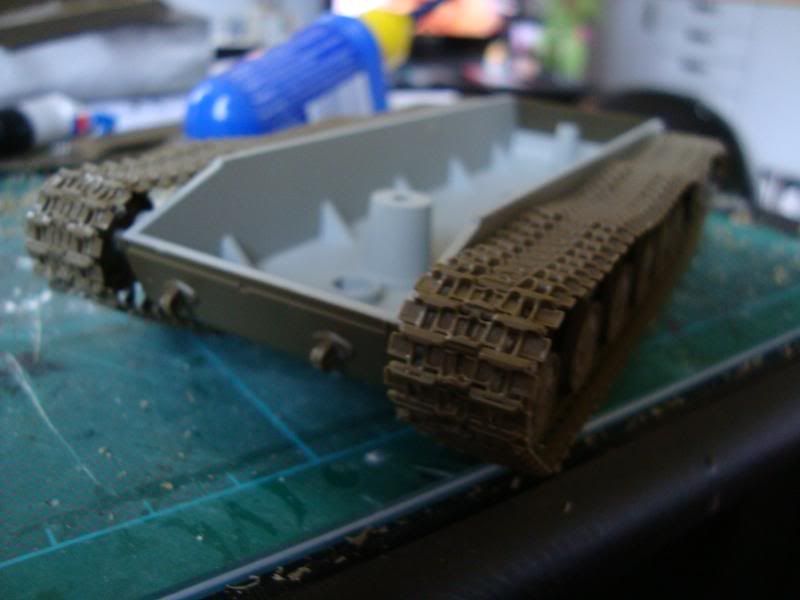
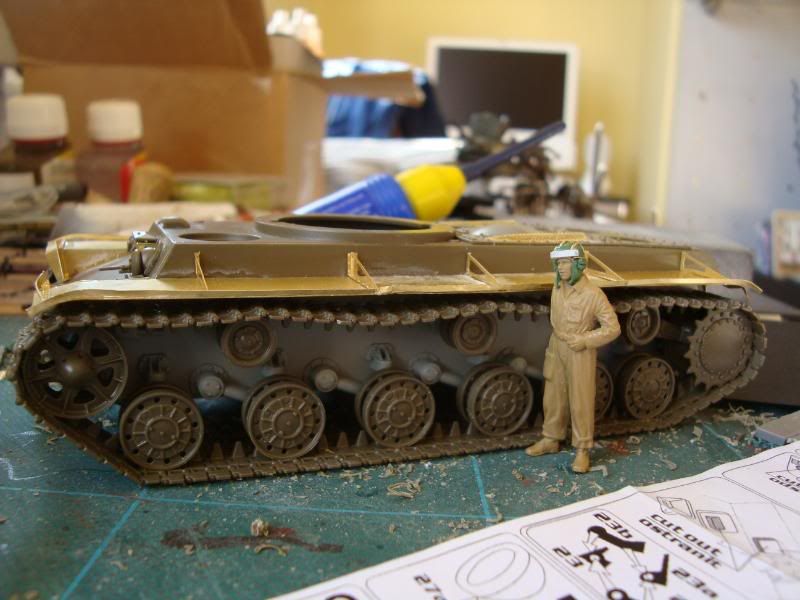
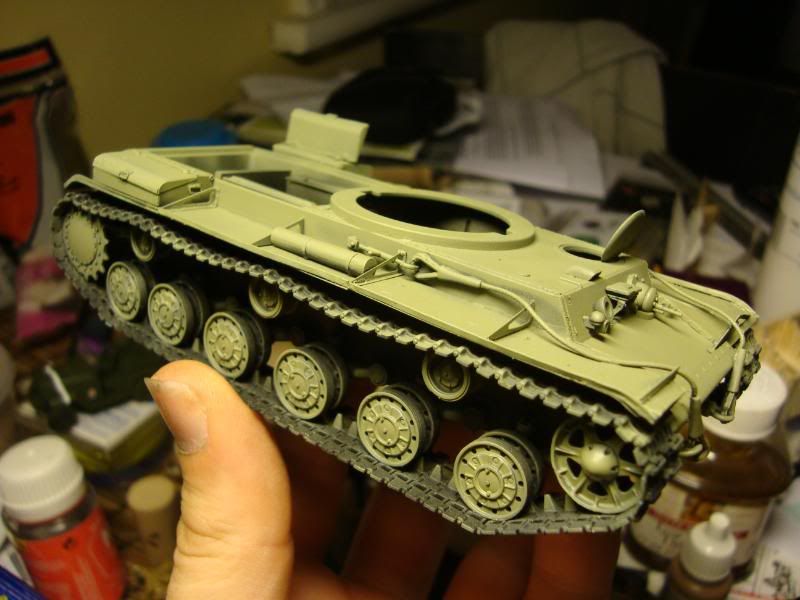
This kit much like the T34 also has a cast metal hull that adds considerable weight to the model and makes it feel really nice in the palm of the hand. Much more impressive than a all plastic or resin kit.
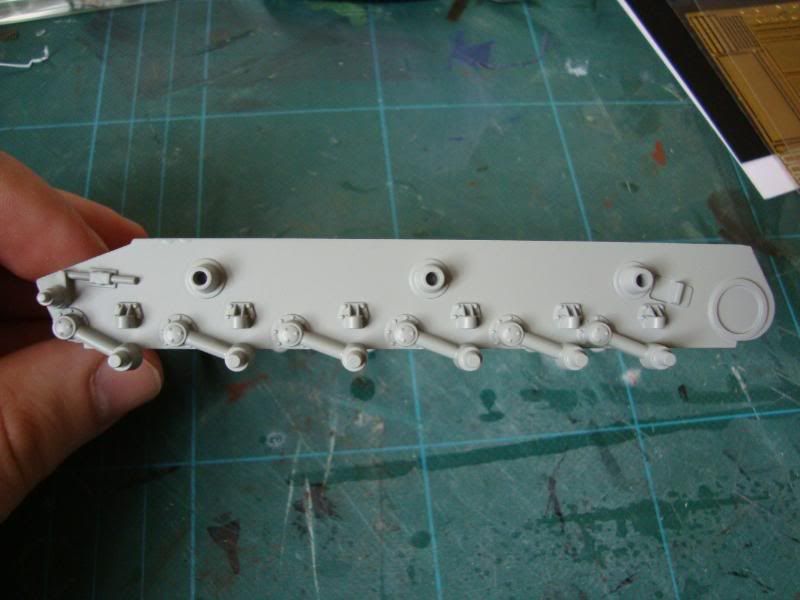
Detail on this is also quite good better than the detail in the Verlinden resin replacement hull I used for the T34/76, although it is less detailed than some other plastic lower hulls such as those produced by Hobby Boss.
The most time consuming part is often making up the road wheels and adding the tracks. The tracks on this kit though were much better than the tracks on the T34. They were modelled very well with a lot of detail and had a nice sag to them where they hung between the return rollers on the top of the wheels. I did consider getting a metal track set for this tank, but when I saw how nice the plastic treads were I decided against it.
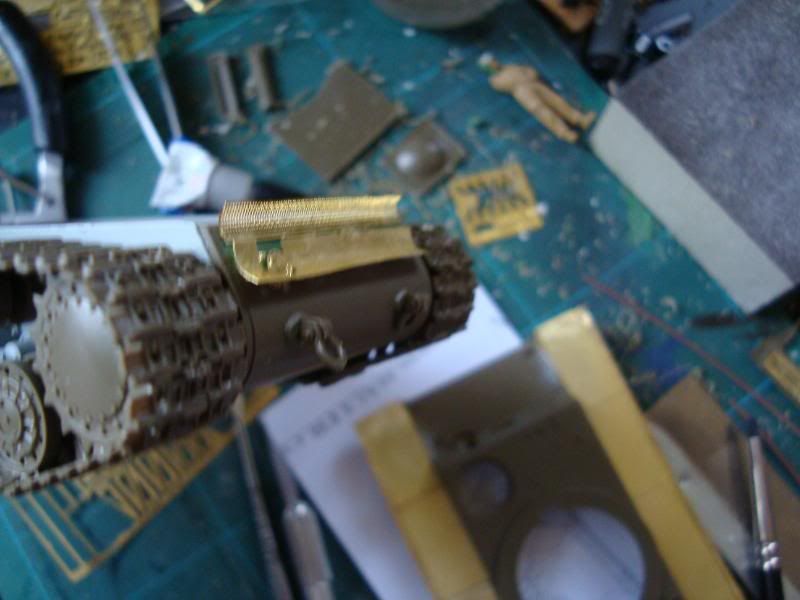
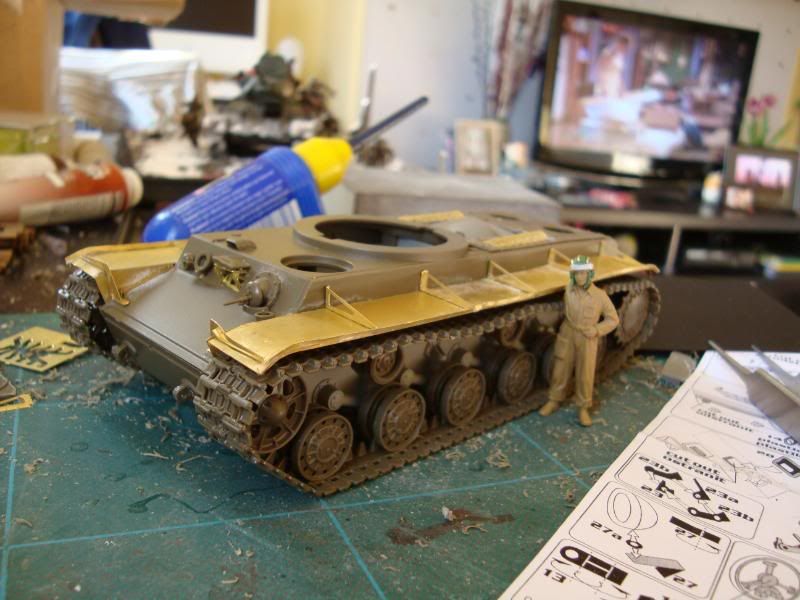
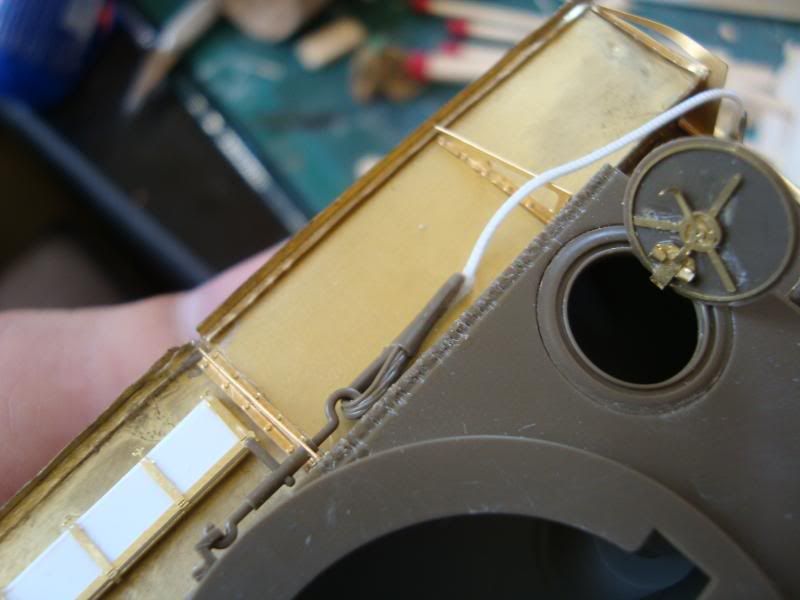
Even at this stage though preparing the wheels and lower hull I had to start straight away with the photo etch.
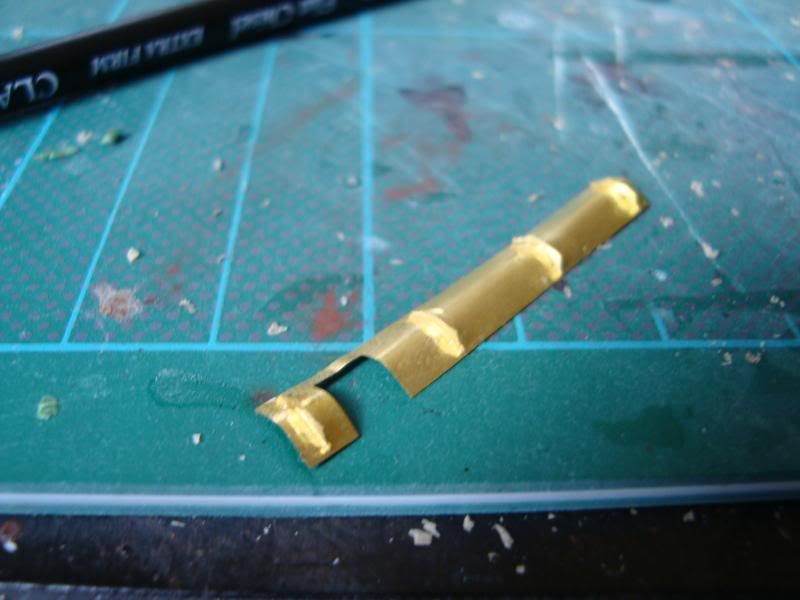
The photo etch parts in the Hauler set are a lot more intricate than those in the Lion Roar set that I used for the T34. This one required all the little struts to be glued into place before attaching to the lower hull. I also had to fill a large area that accomodates plastic detail part for this component with greenstuff and remove another part and replace with a photo etch alternative. Photos of this area and work to follow.
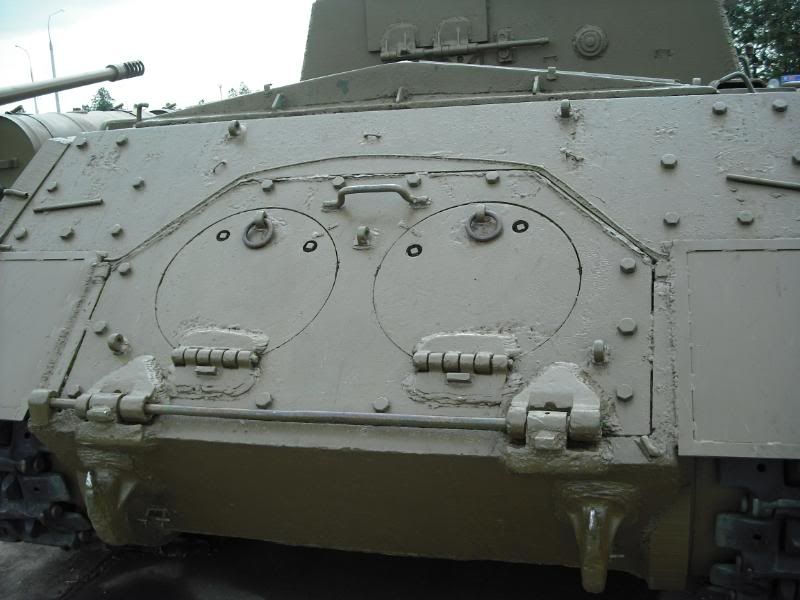
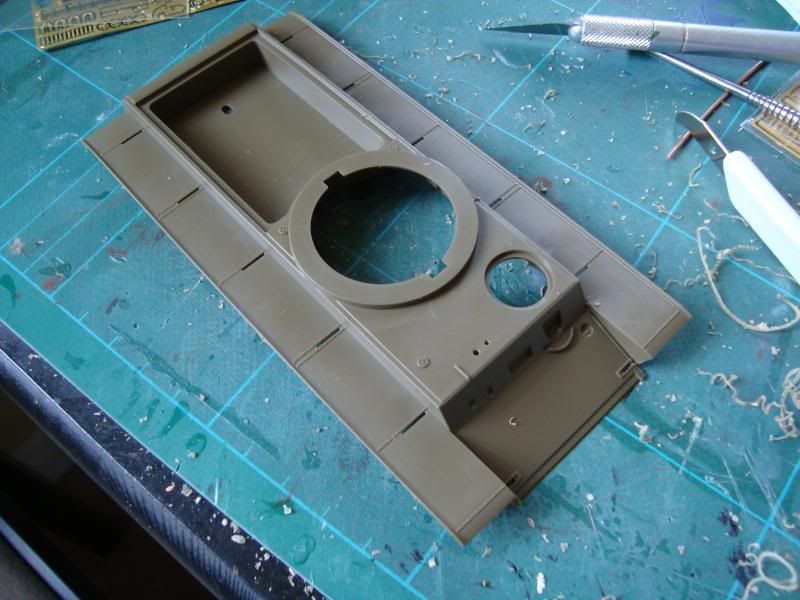
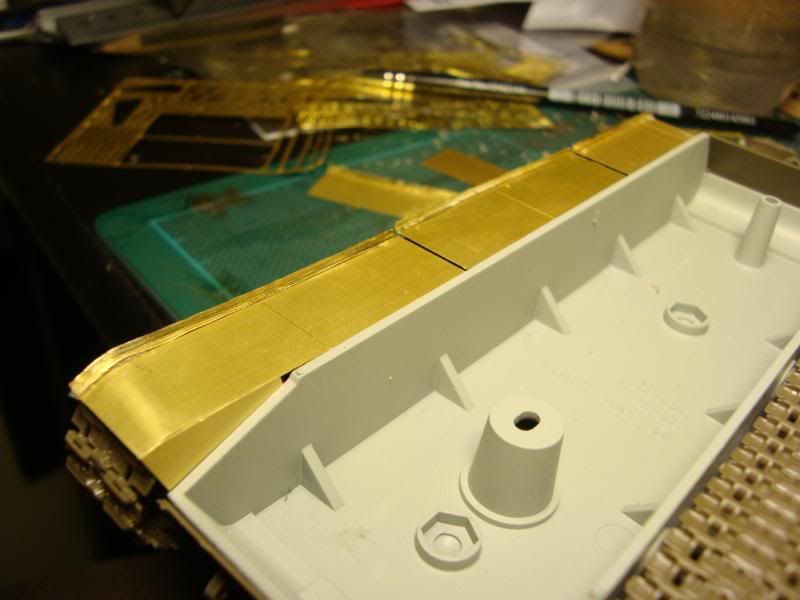
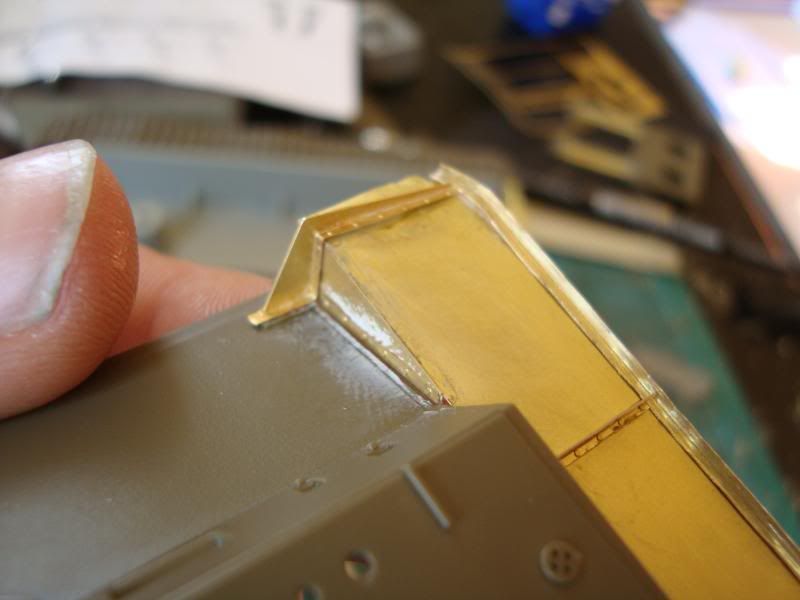
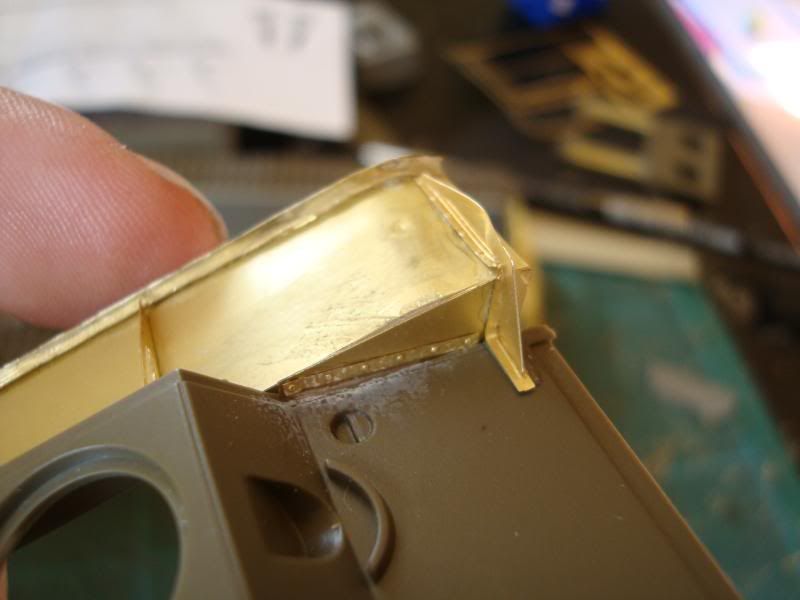
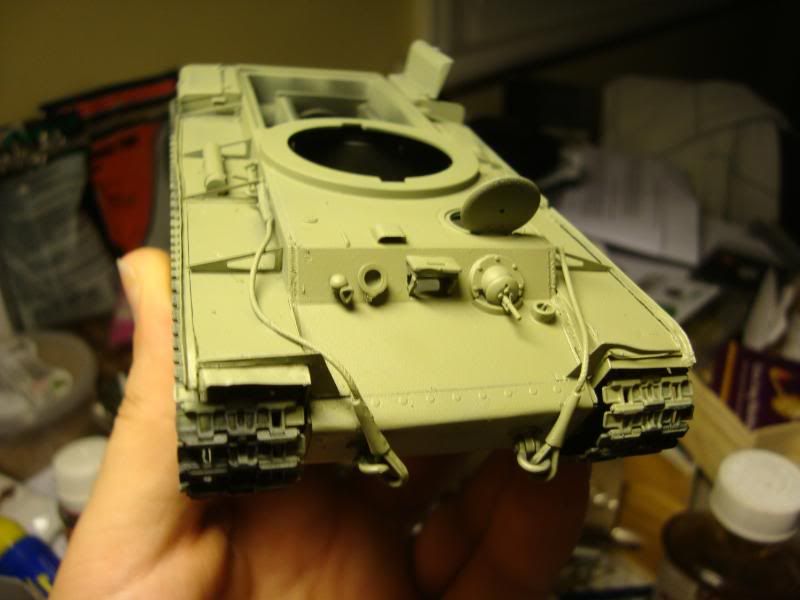
The Upper Hull would also need a great deal of work, both plastic fenders needed to be removed and weld seams need to be added as the Tamiya kit lacks weld seams and surface detail and looks a bit dull when compared to other kits.
The upper hull before:
Removing the Fenders:
The Upper Hull after:
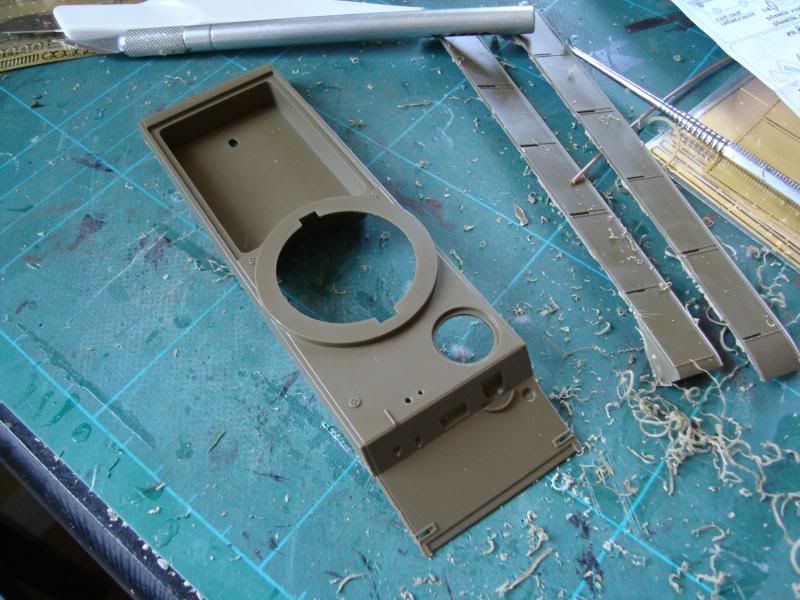
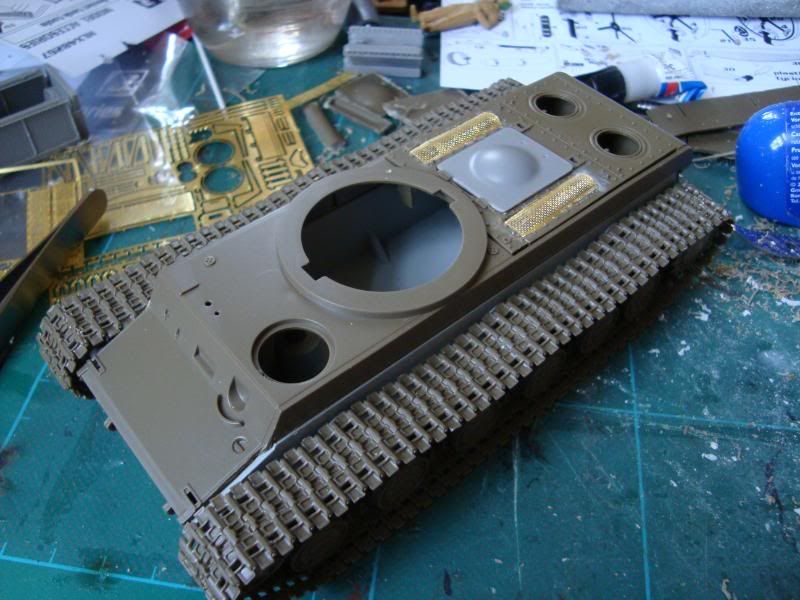
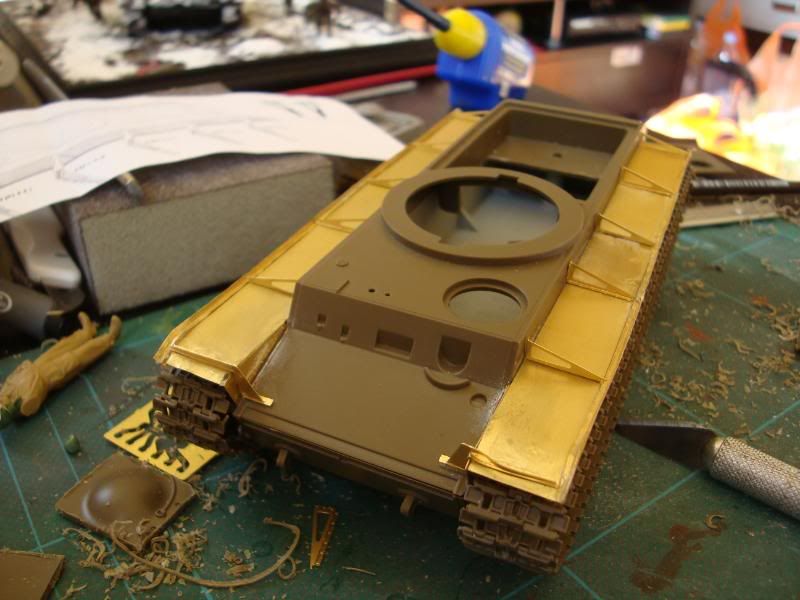
A large section of the hull was also cut away and removed to accomodate the Resin Engine deck:

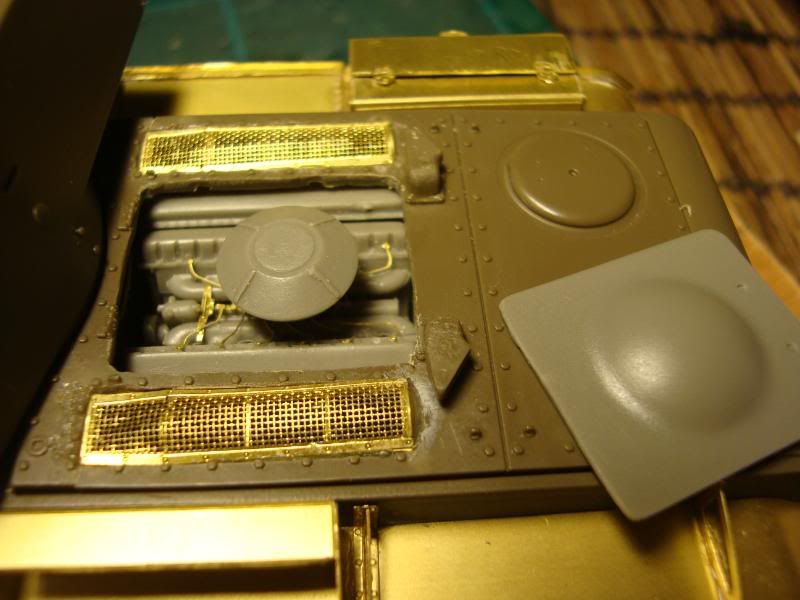
Work then started on the engine hatch, this area needed extensive work to remove the moulded plastic grilles and hatch much like my T34.
Removing the plastic engine hatch, and the new resin upgrade hatch:
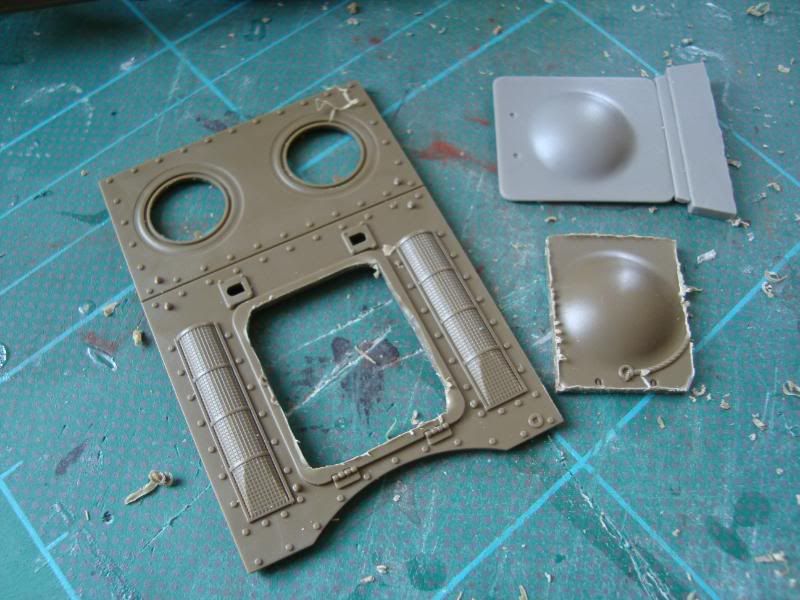
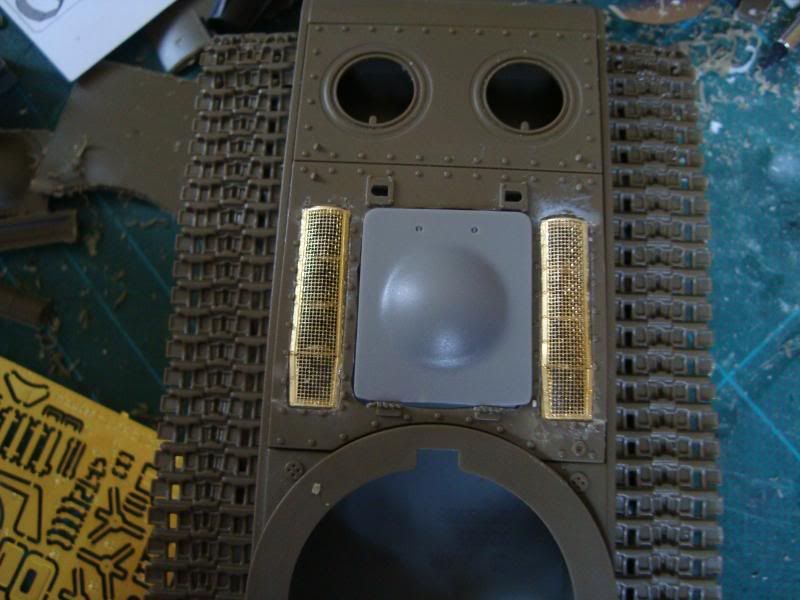
Adding the new raised photo etch grilles, comparison with the plastic moulded grilles:
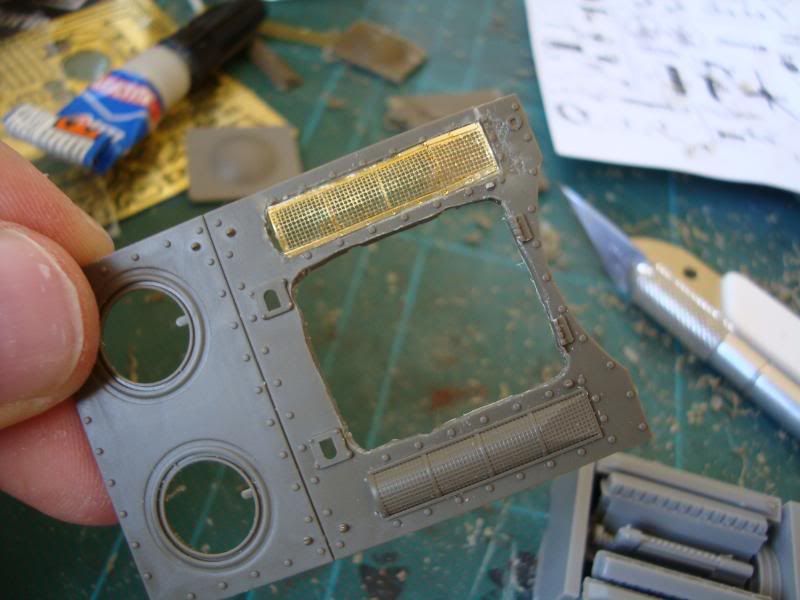
As you can see in this photo, unlike the flat grilles of the T34 the KV-1 Grilles give a nice raised detail. This was very tricky to model and required a flat grille mesh to be bent to shape and attached to a photo etch frame made up of 5 seperate tiny parts:
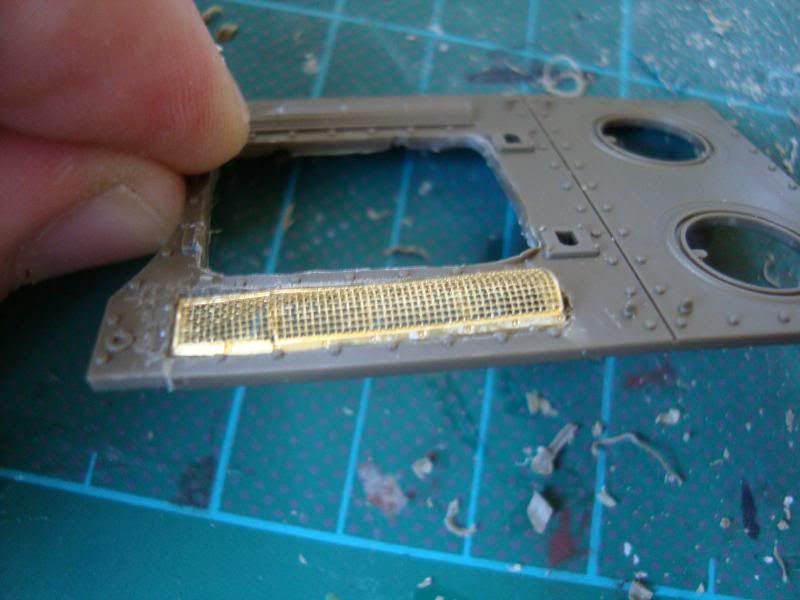
Both Grilles finally inplace:
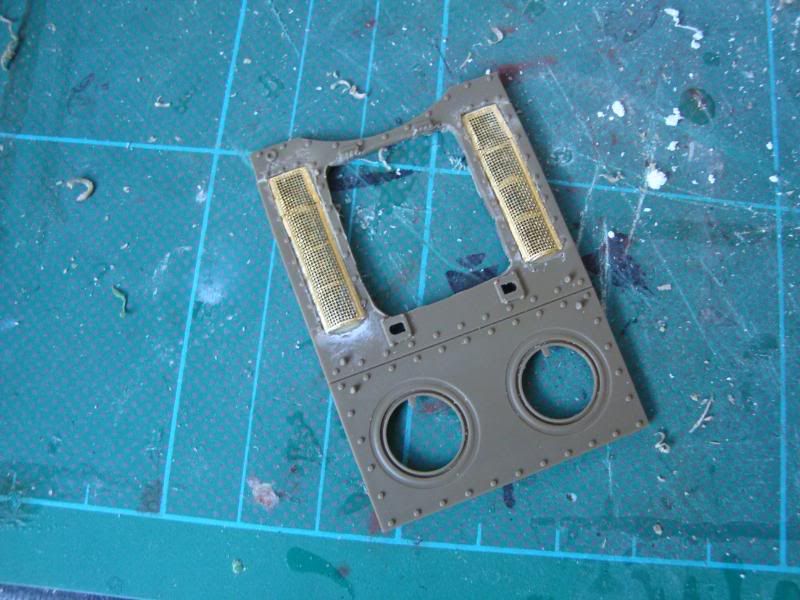
As with the T34 this was very tricky and time consuming, the hardest part being remvoing the original plactic areas without damaging the rest of the parts on the hatch area. However once cut out and the new Grilles placed in the effect is really worth it. Not only is it alot more detailed it is also transparent and allows you to see through the grilles into the engine area. Any messy areas or uneven cuts can then be filled and tidied up after the photo etch glue has dried.
11406
Post by: Disjointed Entity
Looking beautiful already! Can't wait to see the end result, maybe better than the T-34!
11330
Post by: Gundam-Mecha
Thanks disjointed, hopefully it will be a better end result. I actually prefer this tank kit to the T34 kit, theres a lot more to it. Especially with all this extra photo-etch.
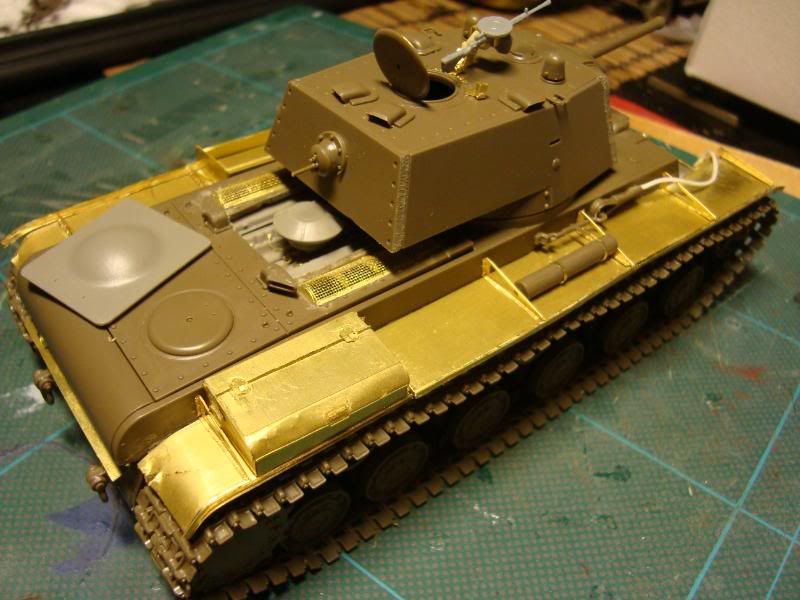
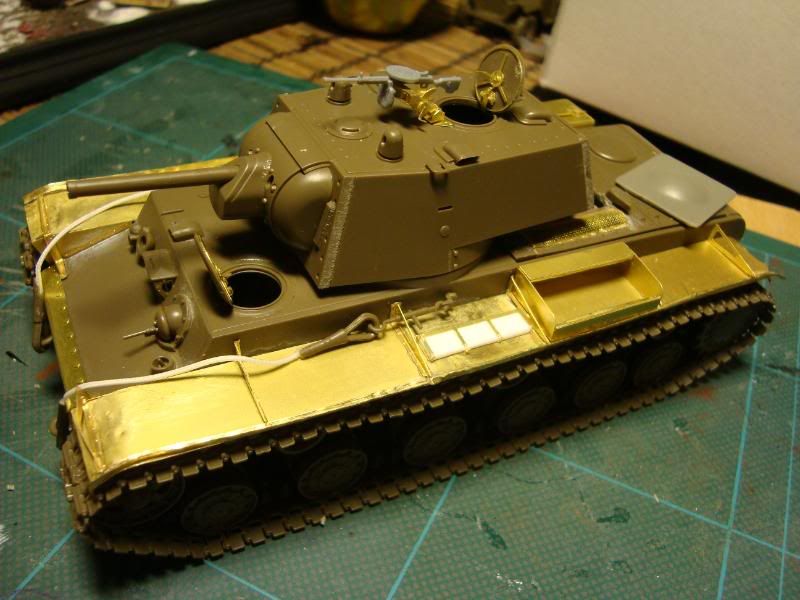
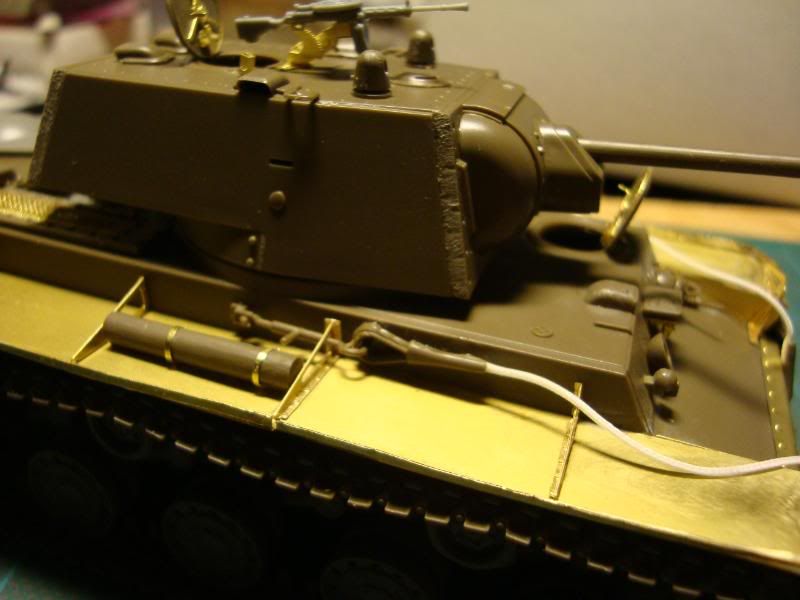
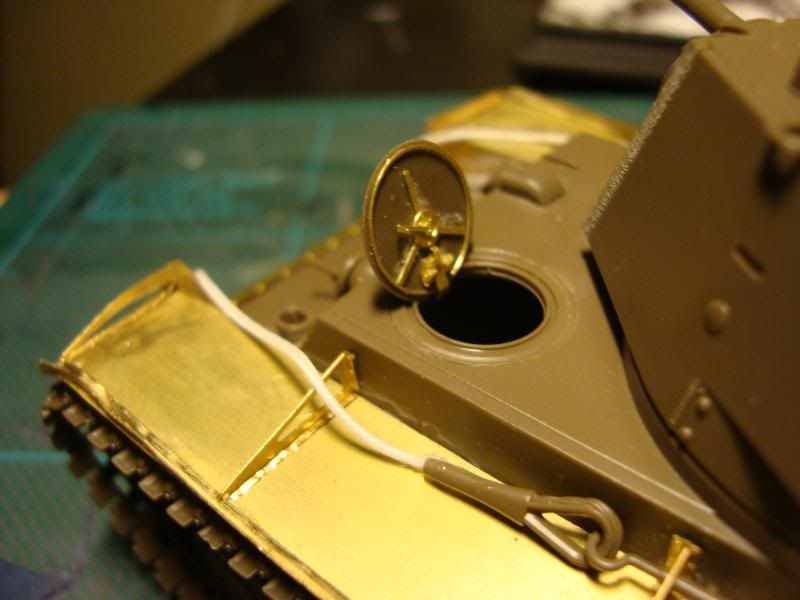
Heres some more developments, the photo etch added to the rear lower hull:
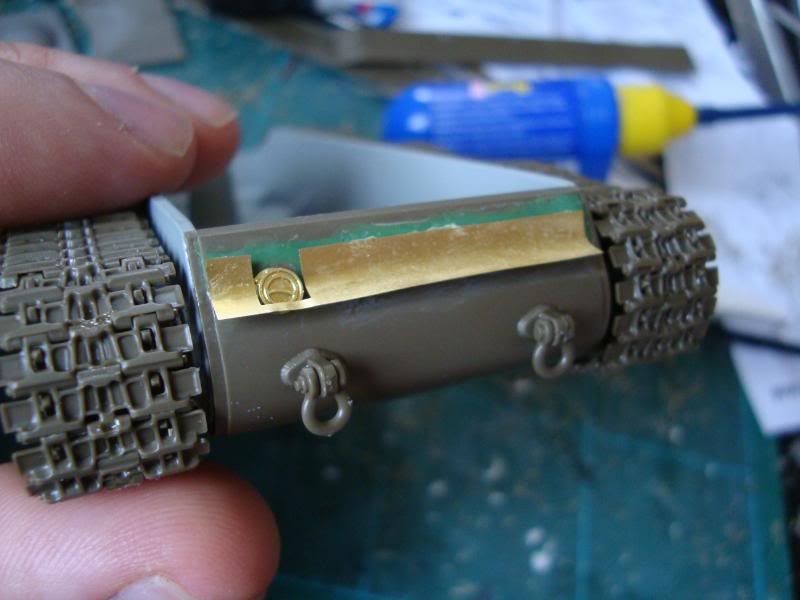
Tracks:
Dry run with the upper hull:
Grilles and Resin engine hatch:
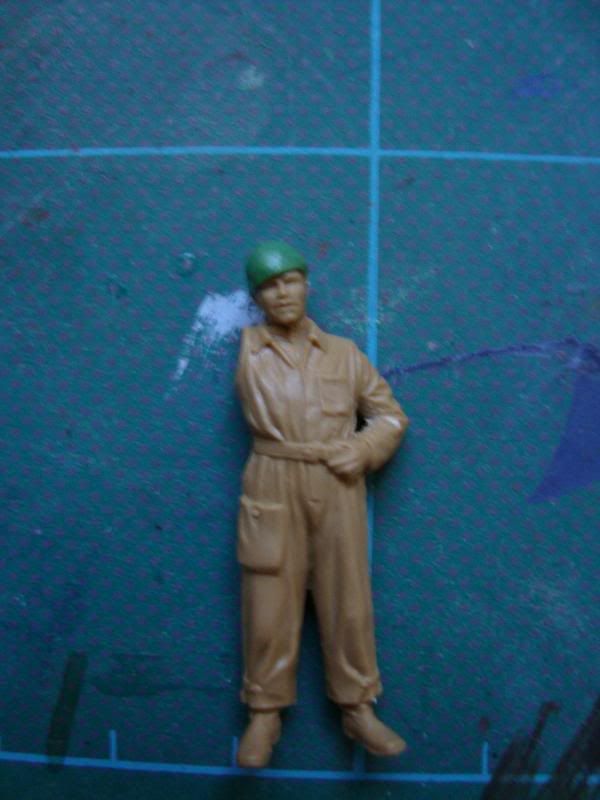
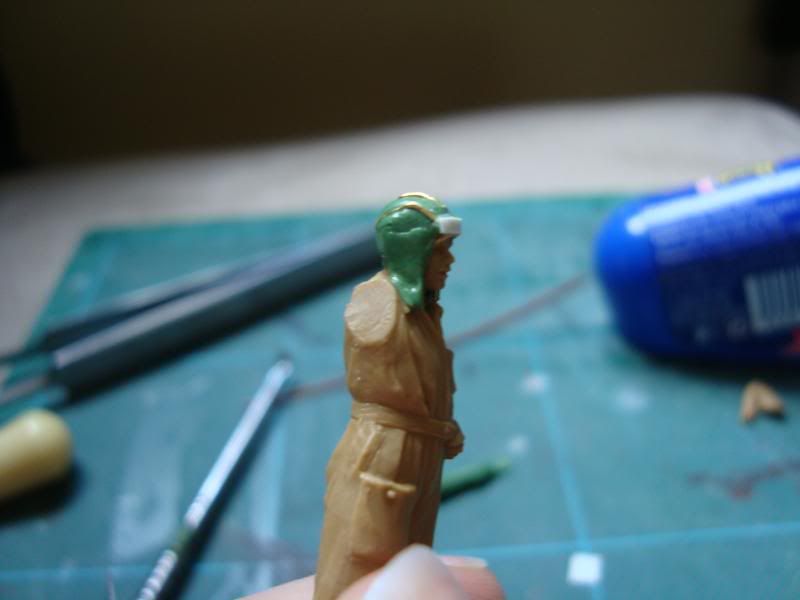
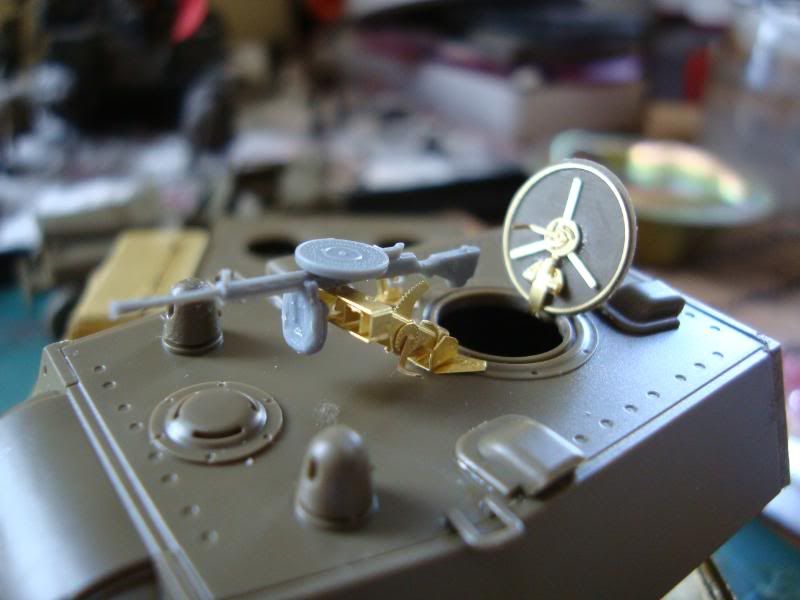
I also did some work on the figures. The ICM minis are based on generic Soviet airforce ground crew. For the officers this is no problem as Soviet army and airforce uniforms were identical. The engineers however need a little converting to make them into tankers, the overalls are spot on but they lack the tankers helmets, coming only with peaked caps.
Heads as in the kit:
Bodies in overalls

My reference photos of Russian Tankers helmets:
Building the tank helmets from scratch WIP:

11406
Post by: Disjointed Entity
Looking good! From what I've seen of actually tanker's helmets, thats a damn good representation!
11330
Post by: Gundam-Mecha
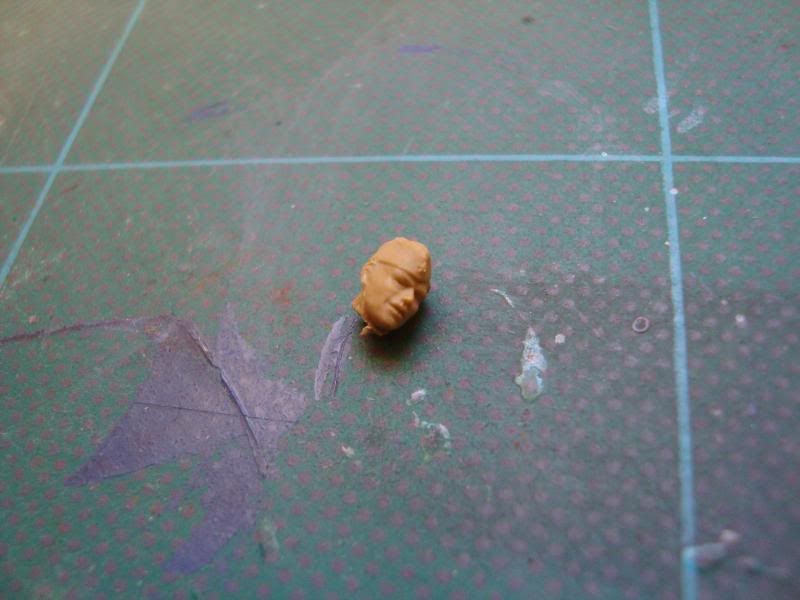
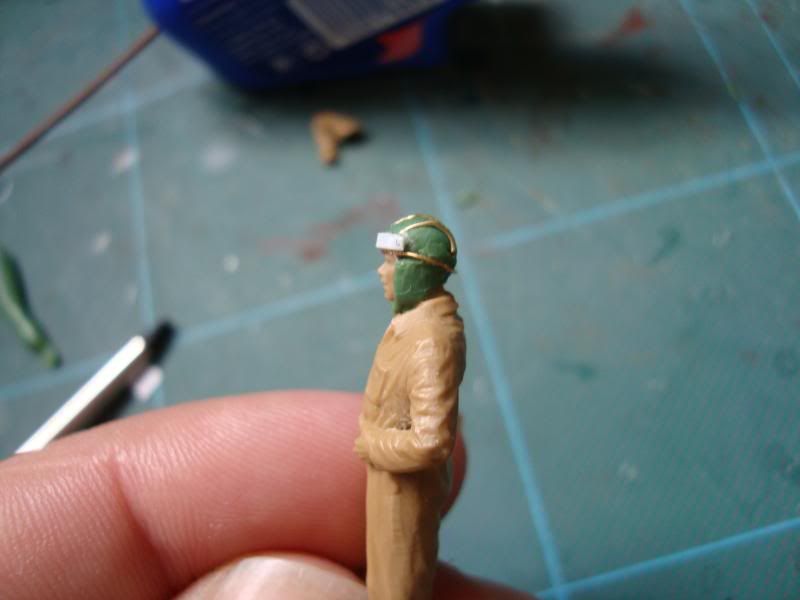
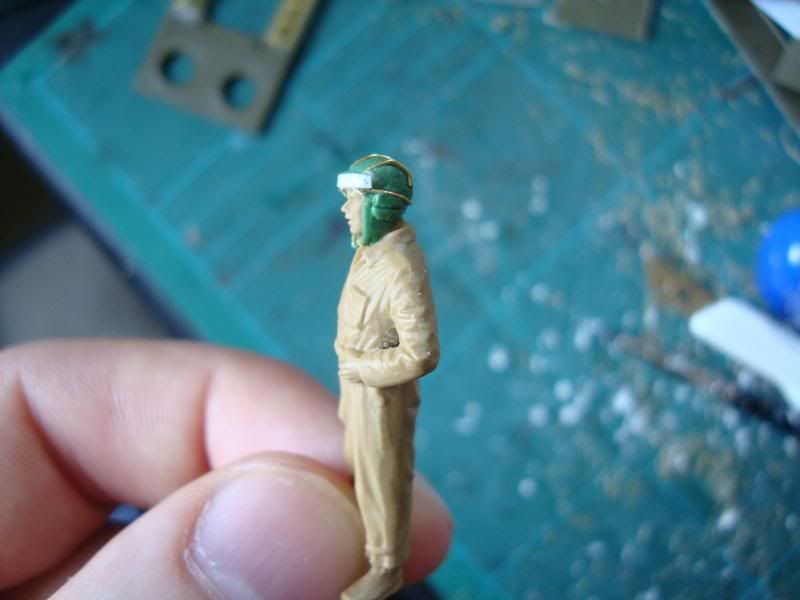
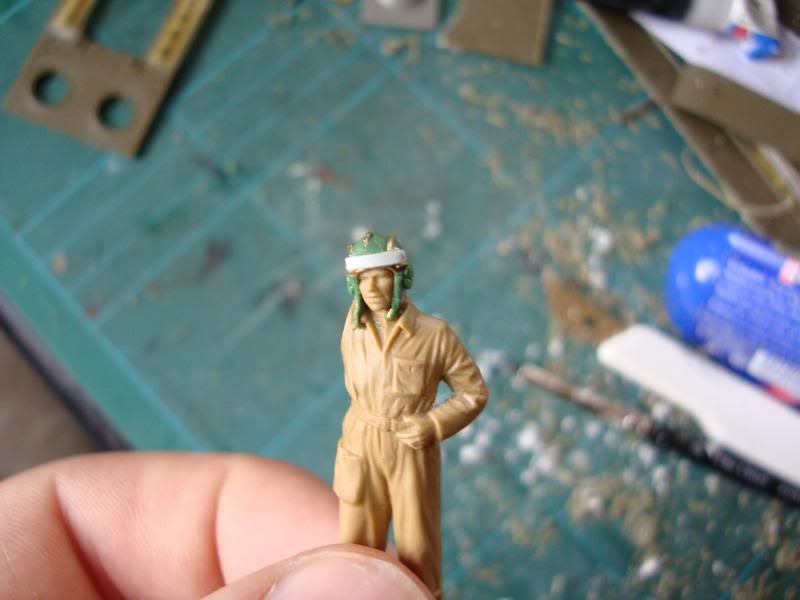
Thanks for the feedback! The trouble is you actually have to make the helmets look quite crude because the tech level during WW2 was quite basic. I was worried that the sculpting would suffer as a result and not look too good.
Sculpting figures isn't my strong point and I'm by no means an expert at all. I'm still quite pleased with how the helmets are going so far though. I found the wire frame really helped the shape, and the extra wire parts help the detail alot.
11406
Post by: Disjointed Entity
Yeah, they look really good! Are you going to cover them with thin cloth to give the entire "Slightly Padded" look or just go for the straight up leather cap?
11330
Post by: Gundam-Mecha
These ones will be leather caps, since the Soviet Tankers didn't use fabric padded caps often. The vast majority were padded leather.
11406
Post by: Disjointed Entity
True, true.
I just wondered if the tankers who crewed the tank you're basing this on wore padded or not.
11330
Post by: Gundam-Mecha
From what I can make out from the reference details and my research they wore brown padded leather helmets, although near the end of the war this changed to black canvas helmets.
So I have a bit of leeway on this.
With my T34 diorama I went with black helmets but these weren't sculpted by me they were on the kit as was and had no surface detail.
11406
Post by: Disjointed Entity
Fair doos,
best of luck with the diorama!
8745
Post by: Llamahead
Really nice stuff intrigued by the sculpting are those wires a former for the hat or will they show through on the finished model.
10912
Post by: BOSS_PIMPALOTZ
Superb the last WW2 themed Diorama you did was fantastic! I expect great things of this one!
11330
Post by: Gundam-Mecha
Thanks guys, Llama the wire parts of the helmet are going to be left visible as they will help make up the surface detail. I used a wire frame for the front of the helmet to aid sculpting the hanging chin straps, but the wire on the top of the helmet is going to be incorporated into the design.
BOSS - I'll try not to disappoint! 
11330
Post by: Gundam-Mecha
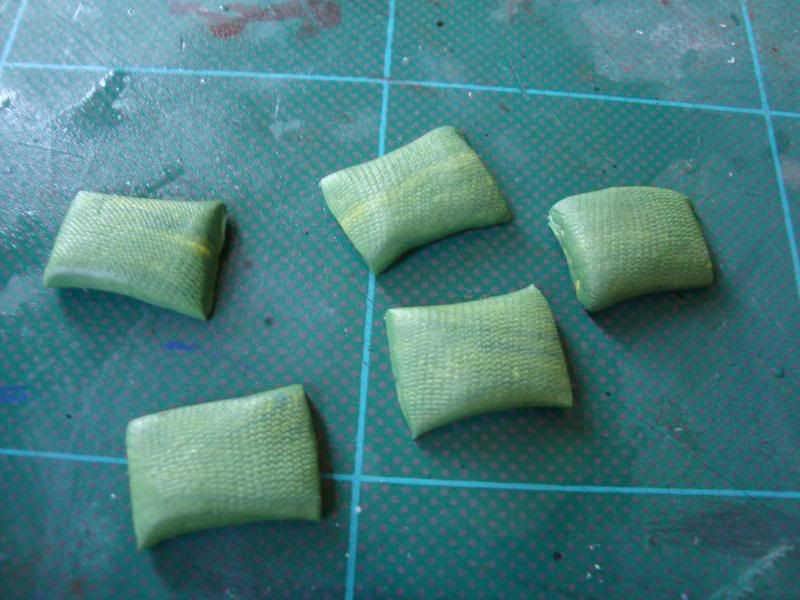
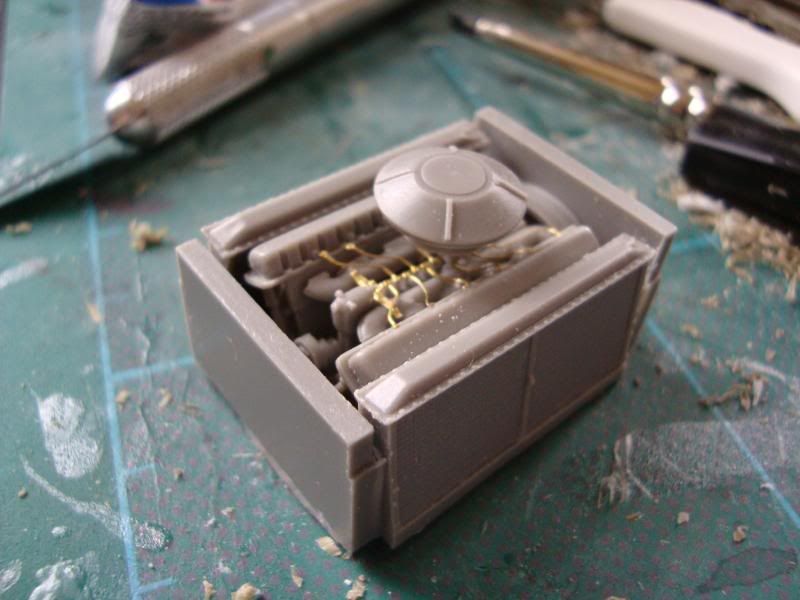
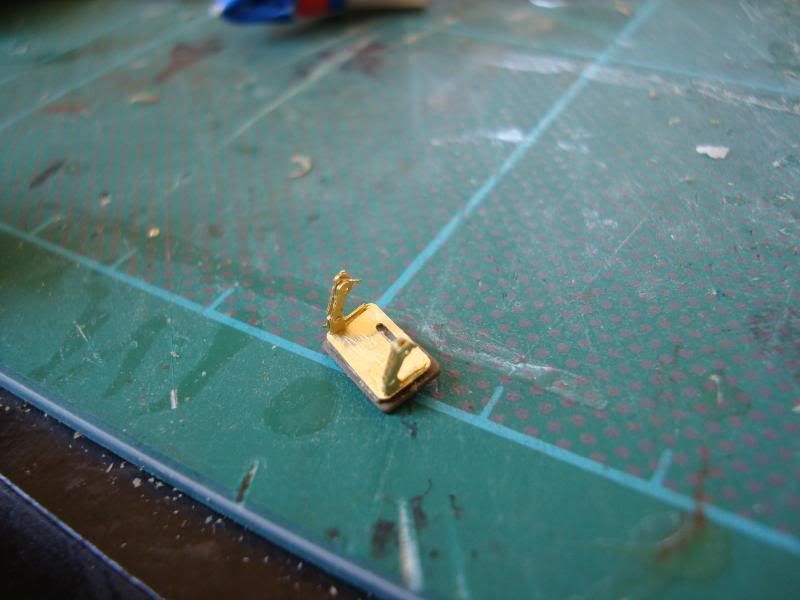
How do you add detail to resin one of the most detailed modelling mediums? Add photo etch, for super detail madness!
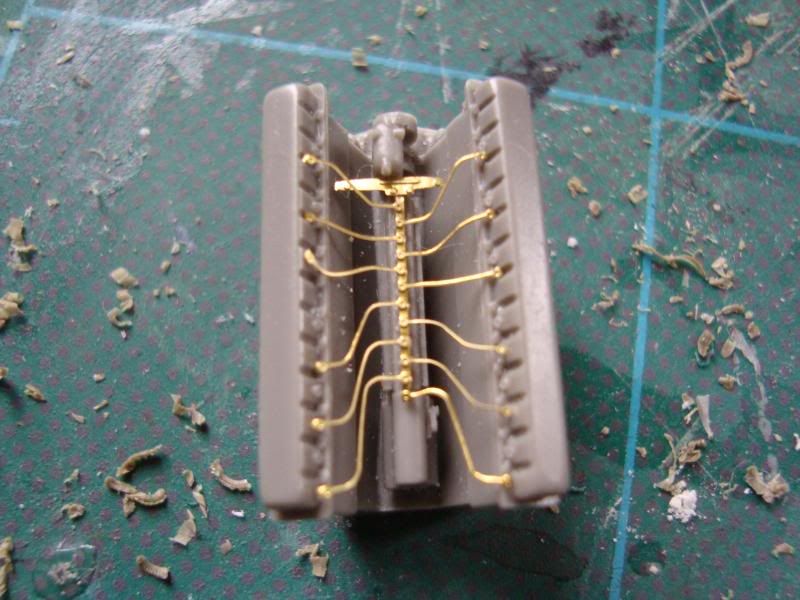
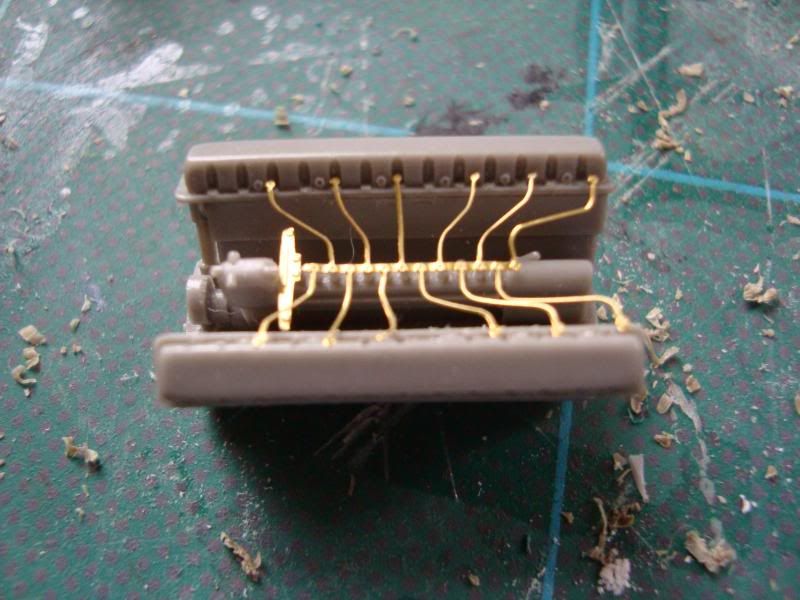
These photo etch wires are absolutely tiny! Getting them in place and lined up was a bit tricky! The ends will be super glued to the tiny little holes on the resin when finished to make them perfect.
Adding the other resin components to the Engine

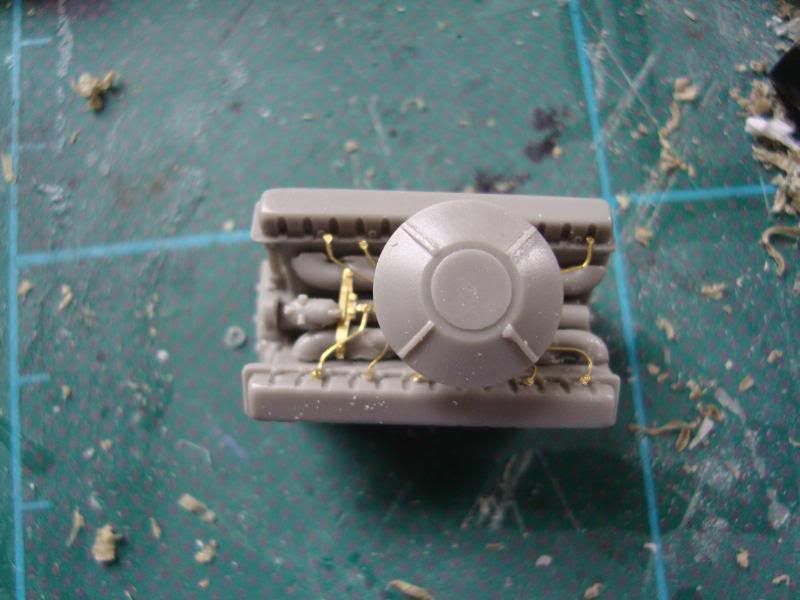
The Engine inside the Engine deck
My next stage this evening is working on the Photo etch fenders that will replace the plastic ones that I removed already.
13651
Post by: The Lost Hobbit
This looks great. The new grilles and hatch really improve the model. I'm looking forward to seeing how it progresses.
11330
Post by: Gundam-Mecha
Thanks Hobbit. Actually theres still a lot more to do with the grilles, I have to use some filler to tidy up the little gaps and clean up the messy areas around the outside of the photo etch.
Same goes for the area around the main hatch, I need to straighten up the edges with some filler and sand/file it down. The resin hatch will actually be modelled to be up and open so you can see the engine detail. I'm planning to have a tanker sitting on the top on the engine area conducting repairs whilst the Tank Commander is briefed by the officers on the ground.
9395
Post by: CMDante
Read through this log last night before bed and have to say, wonderful and very interesting stuff.
Always loved the level of detail miliatry model makers put into kits so will be watching this develop.
Cheers,
Dante
11330
Post by: Gundam-Mecha
Thanks Dante, I'm glad you've enjoyed the blog so far. I've certainly enjoyed researching and preparing it myself. Some of the stories of heroism that come out while you research these things are quite extra-ordinary and it really makes you stop and think what it must have been like to have lived during such a dramatic and harrowing period of history.
As I've said in my other blog these are my first steps into serious scale modelling and I'm far from an expert, but I've found it very interesting and I've enjoyed the challenge and the opportunity to test myself and build on my skills. Unfrotunately I'm lacking some of the specialist tools needed, for example I don't have a photo etch mate (this is like a kind of small vice that lets you shape photo etch sheets very easily) so I have to rely on cruder methods, which actually has been rather tough with some of these parts. Especially the photo etch fenders... my god those were a nightmare to shape!
I'm hoping though as my collection of tools builds up and as I develop my skills more I'll be able to get much better results. Perhaps after a few 1:48 kits I can also move up to some more ambitious 1:35 stuff.
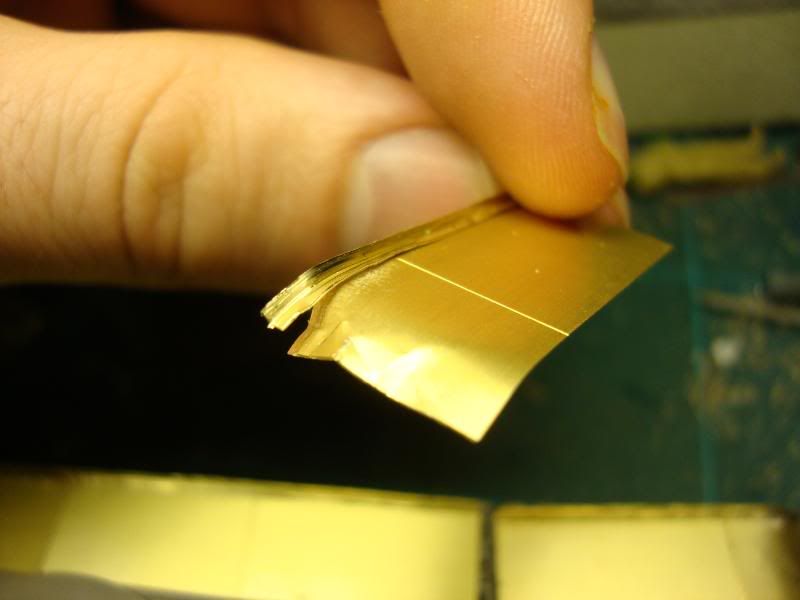
After many hours of laborious work I finally managed to make some progess with the fenders... It was seriously tough and bending and shaping such tiny components was a real challenge without the proper tools. Still I managed it in the end. The great thing about Photo etch is that the metal sheets are very easy to shape and bend, so you can recreate damage and wear very easily. Personally I think having such wear and tear on the parts really helps bring life to a model, and shows it in a much more realistic battlefield way.
It's important though not to go too over the top with this wear and damage. Subtle bending warping and tears/dents will look much more realisitic than a fender covered with huge blast holes and shreds (unless the tank is a burnt out wreck of course!).
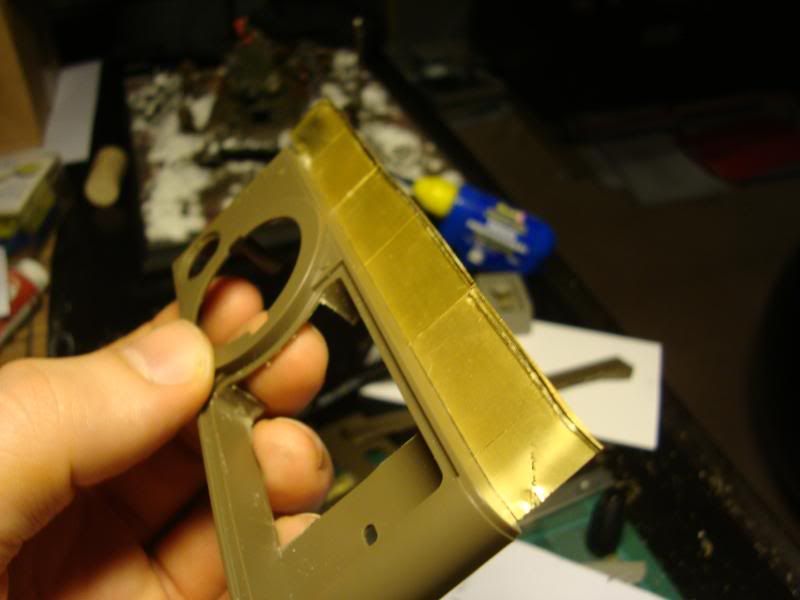
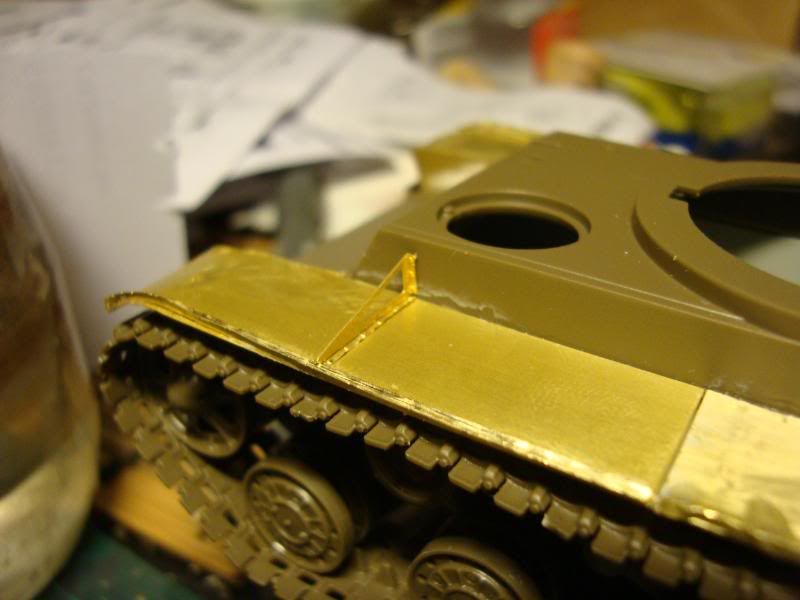
The Fenders are made up of three flat lengths of etch that need to be shaped at each end, as well as having rims added to the outside edge and struts and supports on top.
The first stage is bending the tiny rims and then attaching them to the main fender. Once they are attached (or before if you prefer) you can shape them into rough shapes to show wear and damage. On the central flat areas its best to show wear in this way by distressing the rims.
The front ends of the fenders as well as being shaped to a gradula curve also need to have extra panels added to the side.

When you get to the ends of the fenders that overlap the treads you have much more opportunity for damage on the fenders than on the flat parts. Dents, tears, and buckled components can all be recreated very easily with a small pair of pliers:
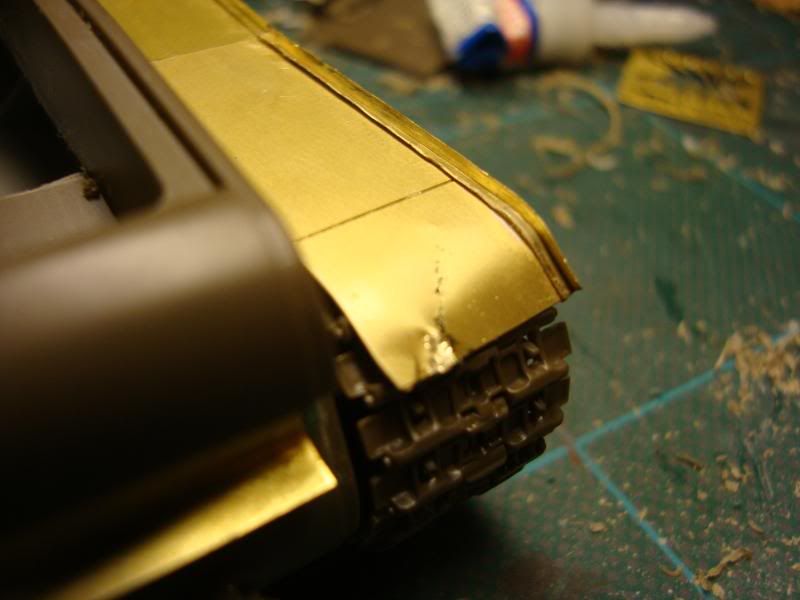
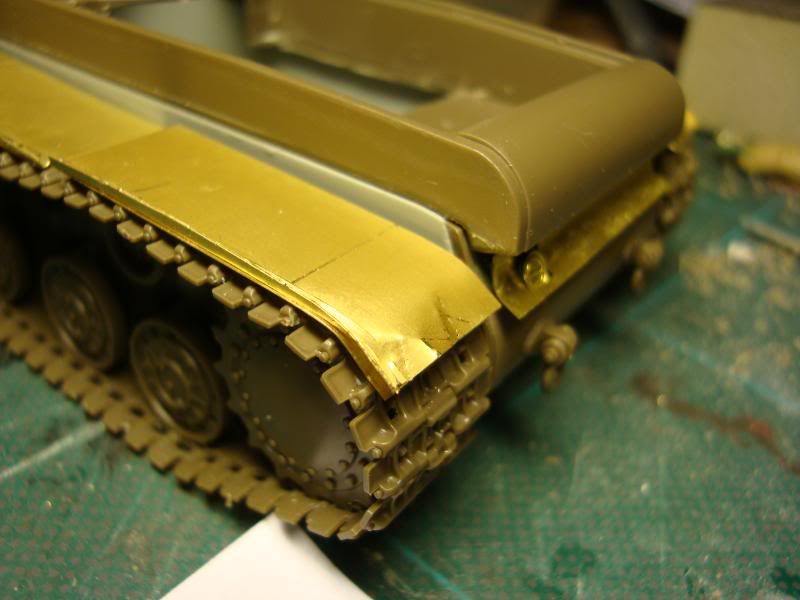

Whole fender dry run:
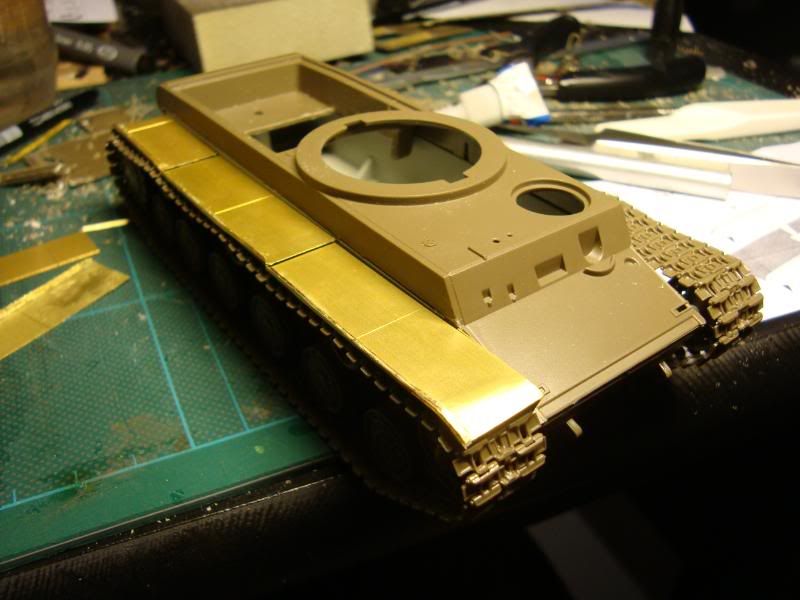
The fenders are then attached very carefully to the upper hull with superglue, making sure that enough space is left for the treads, so that they don't scrape the tracks.
Once these are in place and dry supports and struts are then carefully shaped out of photo etch and attached:
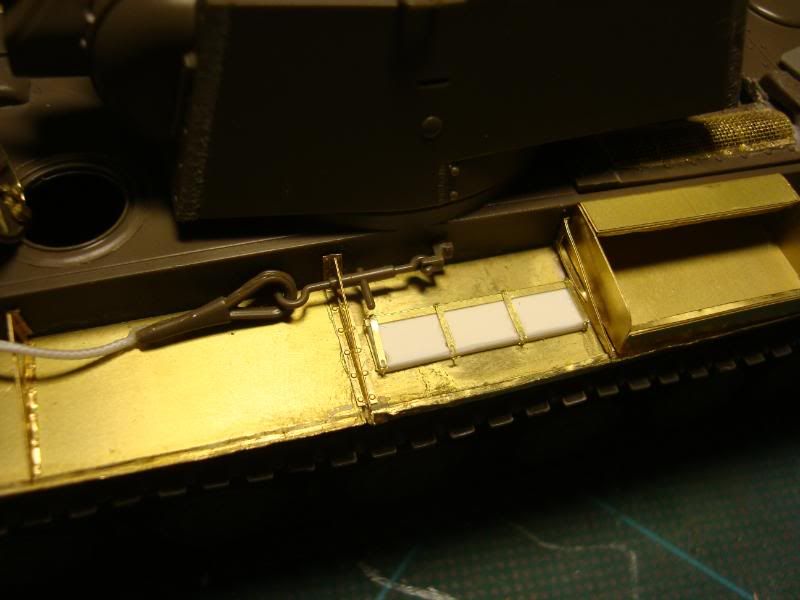
While I was waiting for the fenders to dry I also finished off the photo etch detailing on the rear lower hull adding the grille:
11833
Post by: Kagar
The amount of detail in those foto etch parts is amazing. I can't imagine how fidly it is to apply these parts to a plastic kit. Do you use an activator for the superglue to dry as fast as possible? Or do you end up with a lot of patience and glueing your fingers together on a regular basis.
Impressive to see you pickup such project so soon after completing the last one.
11330
Post by: Gundam-Mecha
Hi Kagar! I don't use an activator on the glue, just very fine lines of superglue applied with a scalpel blade, then usually I apply the parts by gently holding them in place or in the case of the smaller components by a very fine pair of modeling tweezers.
The first application of glue will hold the photo etch in place to get the position but it will need to be reinforced with a second layer to finally set it. Again I carefully apply some superglue with a scalpel from the back/underside of the fender or grille and run it along the line where the photo etch meets the plastic.
If you're careful you can also use the superglue as a filler at this stage to fill any tiny gaps, it has the advantage over modelling putty on delicate components like this as no pressure or touching is needed to apply it. Using modelling putty would make the photo etch parts bend or fall off.
9504
Post by: sonofruss
http://www.n344rb.com/plans/brakeplans.pdf
This is what you need but smaller and cheaper than a pro built one.
11330
Post by: Gundam-Mecha
Thanks Russ, but I was thinking something a little more like this:
http://misc.kitreview.com/tools/images/etchmatereviewbg_1.jpg
7899
Post by: The Dreadnote
This is an amazing project, man. Do you know where I might find a comparison picture between a model done with photo etch parts and one out of the box? It'd be good to be able to really appreciate the difference in quality!
11330
Post by: Gundam-Mecha
The Dreadnote wrote:This is an amazing project, man. Do you know where I might find a comparison picture between a model done with photo etch parts and one out of the box? It'd be good to be able to really appreciate the difference in quality!
Hi Dreadnote, sorry for the delay in answering your question.
I'll see if I can dig out some photos for you to show the comparison, its a lot more than you'd think. The etch parts really bring out a whole new level of detail to a kit.
11330
Post by: Gundam-Mecha
Some more updates, sadly last weekend I was very busy and away from home so I didn't have anytime to work on the project. However I'm now back and have progressed quite alot on the photo etch and detailing.
Adding the struts and supports to the fenders:

Battle damage:
Finished fenders:
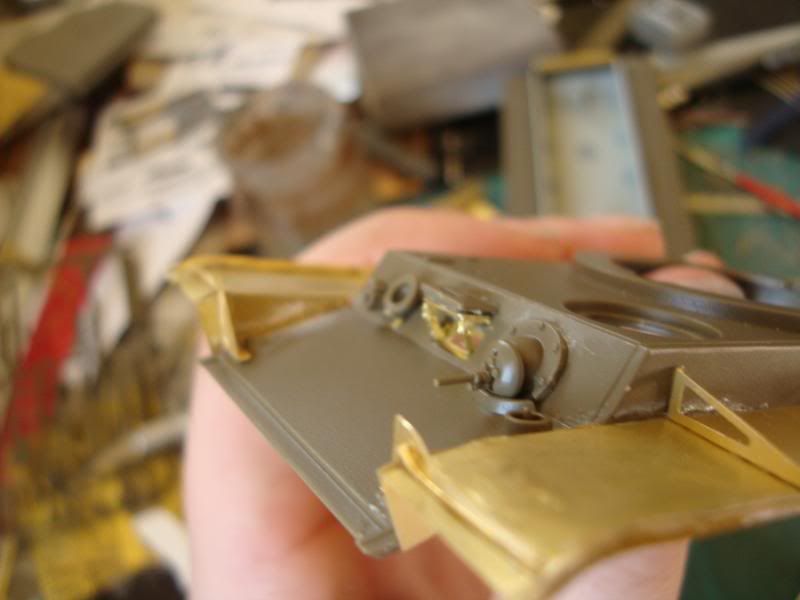
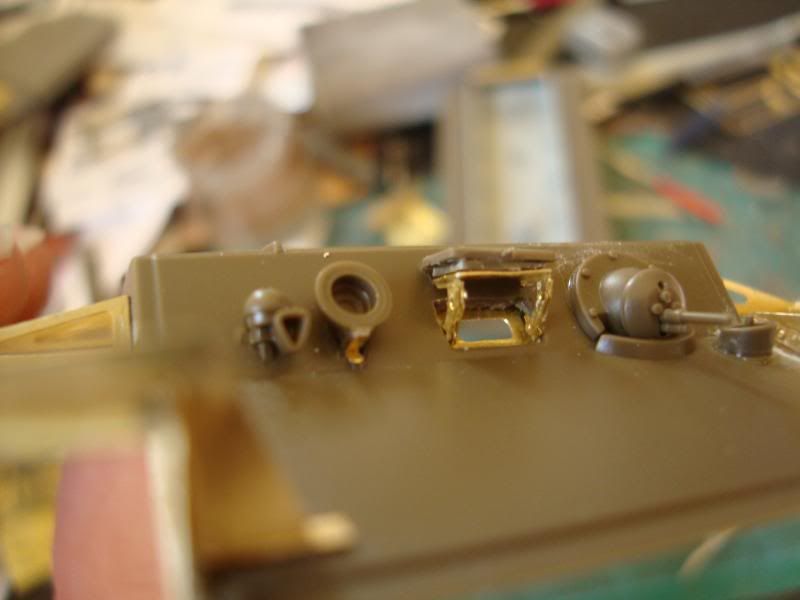
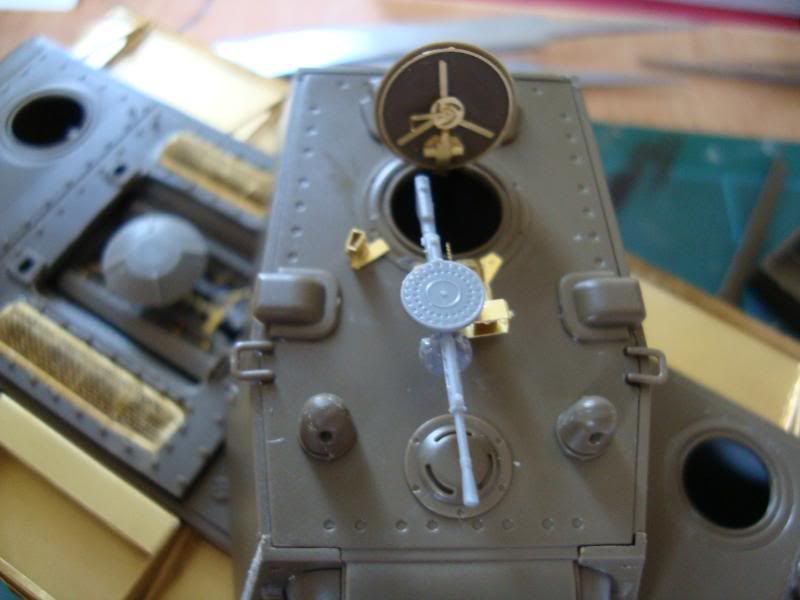
Once the fenders were done I moved onto the rest of the upper hull detailing. There were some extremely detailed and tiny parts that went into these acessories, the drivers hatch in particular was very tricky and needed me to cut a small hole out of the plastic hull before converting and reattaching the hatch.
This drivers hatch had 4 seperate parts for each support that holds the hatch, they were tiny and needed super fine tweezers and very sharp eyes to build:
Drivers hatch and machinegun:
Current progress dry fit:
Scale comparison with the Tank crewman:
10890
Post by: Deff Dread red Edition
Very nice,I love historical minis!!!
471
Post by: davetaylor
Hey GM, looking good!
When I first saw you cutting off the plastic fenders I thought "Oh no, he's crazy!" Now that I've seen the brass-etched fenders I know you're crazy. That's and awesome level of detail to go to. I also like the "one size fits all" tanker helmet. Nice work.
This diorama will eclipse your T-34, without a doubt.
Cheers
Dave
13152
Post by: Alazahr
Nice model thus far... Oh, look! Friends!
-J.
11330
Post by: Gundam-Mecha
Thanks guys, Dave - Yeah those fenders were tough work but I think they give a much more realistic finish than the plastic ones. You can bend, wear, and shape the photo etch parts into any kind of damage or weathering you want. Looks much more battle harderned.
Alazahr - Sharp eyes sir! Yes that is indeed freinds. I do most of my modelling in the late afternoon so all thats on TV is reruns of friends and scrubs!
10345
Post by: LunaHound
Wow, the amount of patience required to assemble those must be..... ( i mean i get frustrated from just GW kit!)
I was wondering, what kind of glue do you use ? any
specific brands?
11330
Post by: Gundam-Mecha
Hey Luna, I use superglue to attach the photo etch.
At 1:35 scale though people use a soldering iron! I've not moved onto soldering yet though and at 1:48 I can still get away with glue use.
The key is to just use the tiniest amount of glue you need apply with either a toothpick or a scalpel blade for really fine thin lines.
I just use regular superglue, Loctite is the name of the brand here in the UK, not sure if thats availalbe also overseas.
It's certainly a challenge to assemble, I made sure I invested in a good quality pair of very fine tweezers! It's really rewarding though when it all comes together.
13152
Post by: Alazahr
Gundam-Mecha wrote:Hey Luna, I use superglue to attach the photo etch.
At 1:35 scale though people use a soldering iron! I've not moved onto soldering yet though and at 1:48 I can still get away with glue use.
The key is to just use the tiniest amount of glue you need apply with either a toothpick or a scalpel blade for really fine thin lines.
I just use regular superglue, Loctite is the name of the brand here in the UK, not sure if thats availalbe also overseas.
It's certainly a challenge to assemble, I made sure I invested in a good quality pair of very fine tweezers! It's really rewarding though when it all comes together.
And next up Gundam-Mecha assembles an entire US Navy ship fleet in a bottle!
-J.
11141
Post by: perplexiti
Another great blog from ya Gundam-Mecha, I loved your T-34 one, so many great tips to "borrow"
11330
Post by: Gundam-Mecha
perplexiti wrote:Another great blog from ya Gundam-Mecha, I loved your T-34 one, so many great tips to "borrow"
Thanks Perplexiti, I'll have some new tips on this one as well, in particular doing weld seams on armour from modelling putty/material.
Alazahr - you know I may just do that one day!
11330
Post by: Gundam-Mecha
Hi guys, so I'm finally back after a little break from modelling the last few weeks.
Here are some more updates, I'll be posting a lot more regularly from now on that sports and work have calmed down a little.
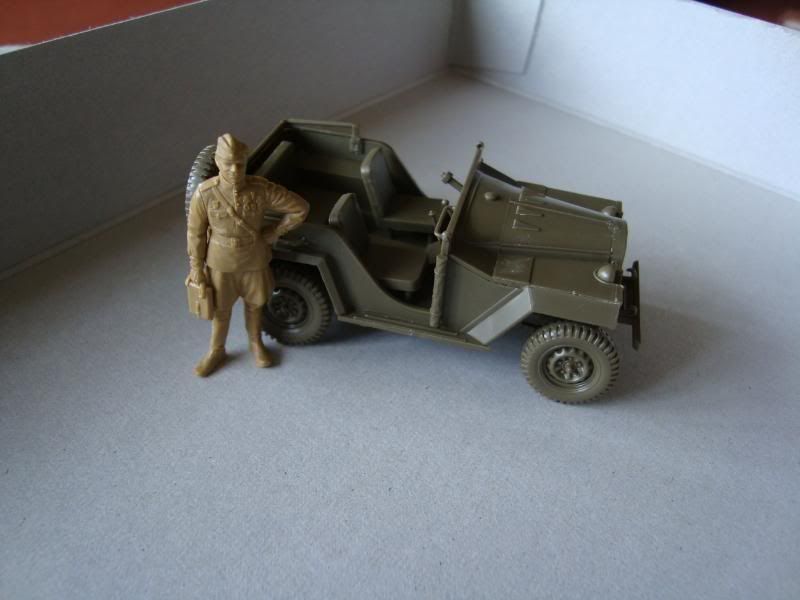
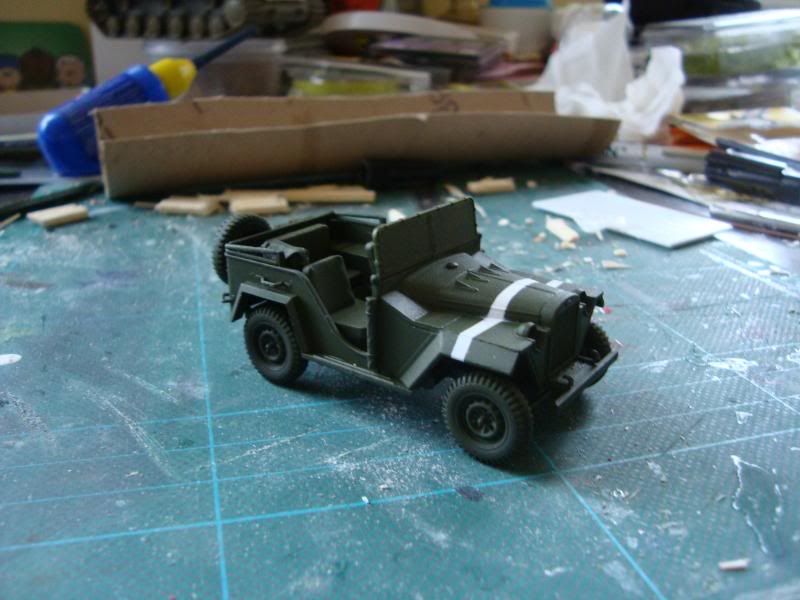
The GAZ 67B

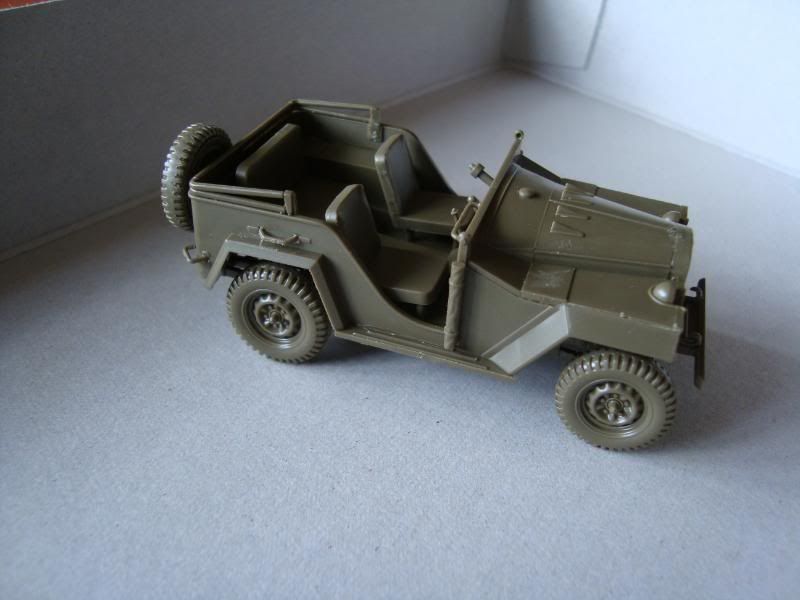
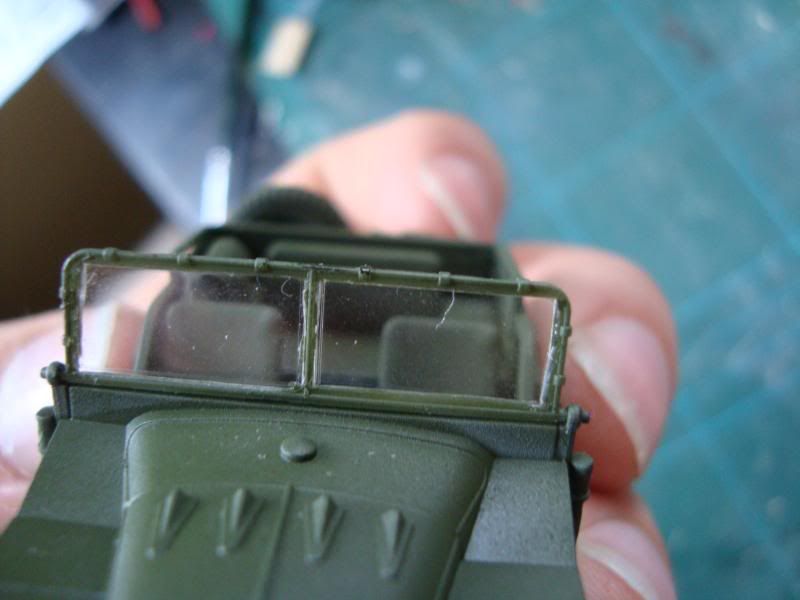
This was a really nice kit to make, it was something totally different as I've never done jeeps or trucks before and was a real joy to put together. There was a photo etch set for this kit but it contained minimal parts, only having 1 component of any real interest (an etch grille for the from of the car). In the end I decided not to bother as the kit parts out of the box do the job very well anyway. I may add a few left over etch parts on this anyway such as a few tools etc. or some tow cable but nothing too drastic. Theres a clear plastic windshield yet to be added.
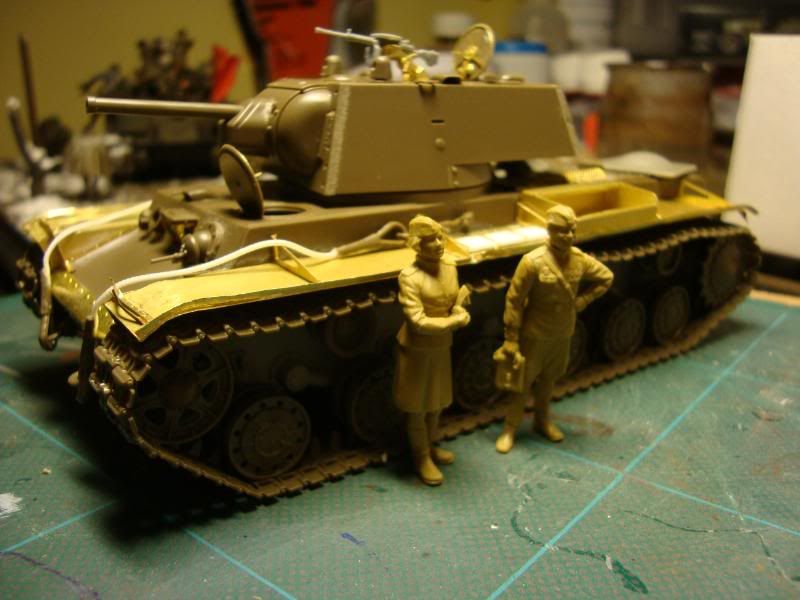
Scale comparison with one of the Officer figures:
Scale comparison with the figure and the KV-1:
Some more work on the KV-1
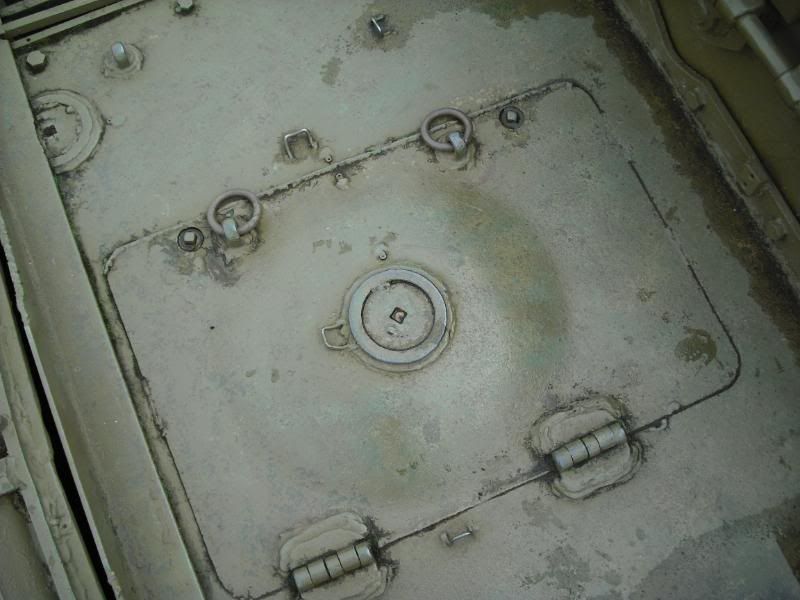
Photo etch replacement for the inside drivers hatch (KV-1):
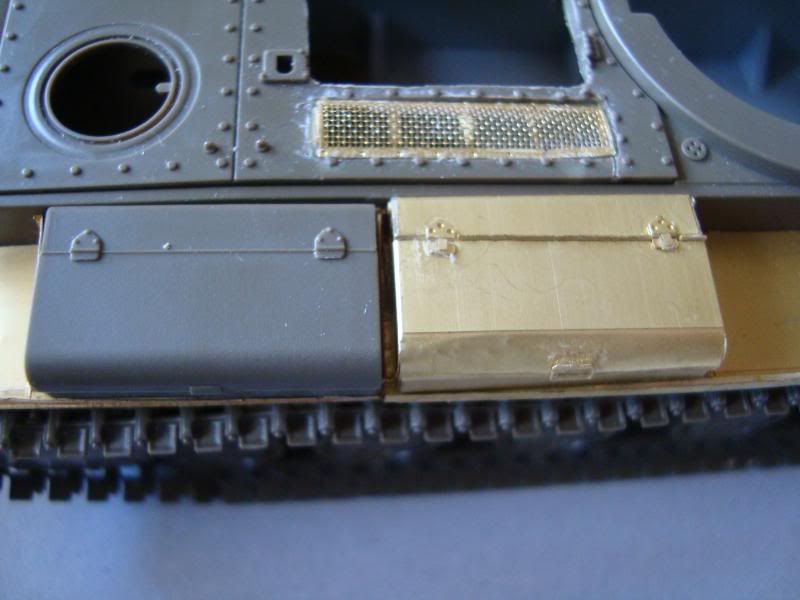
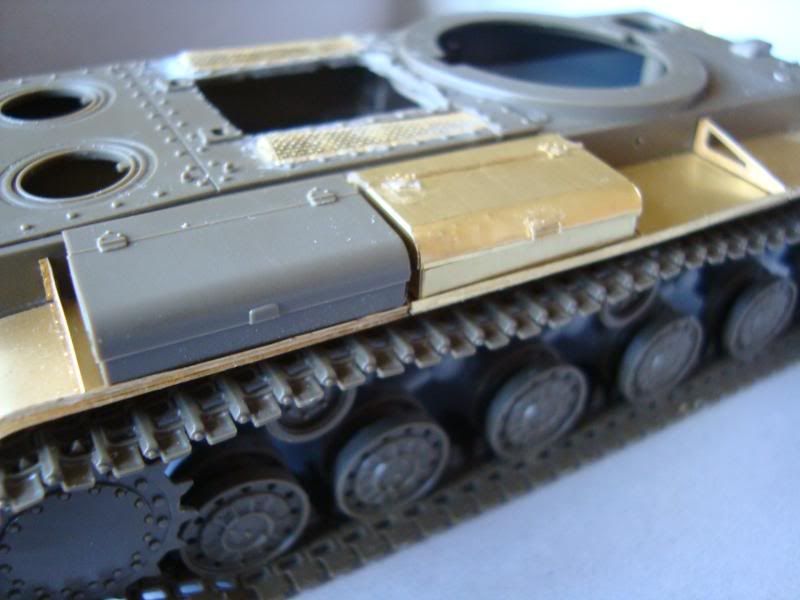
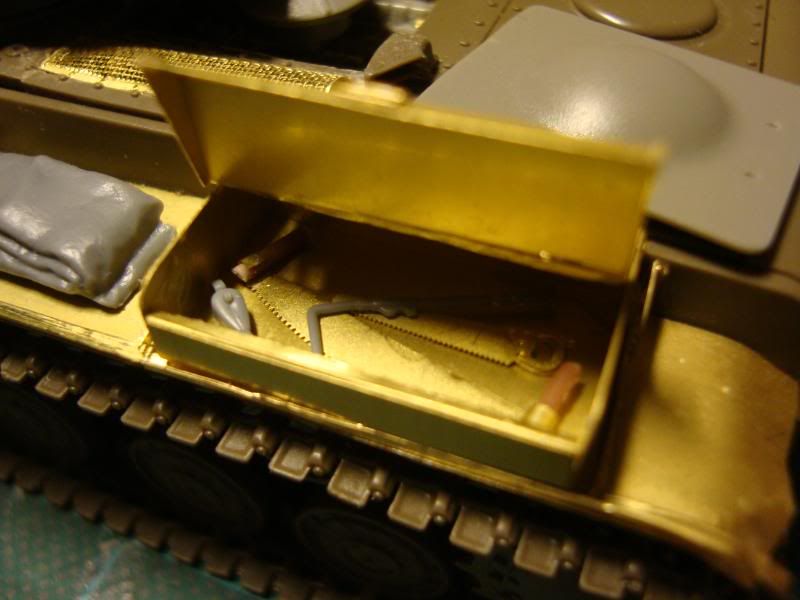
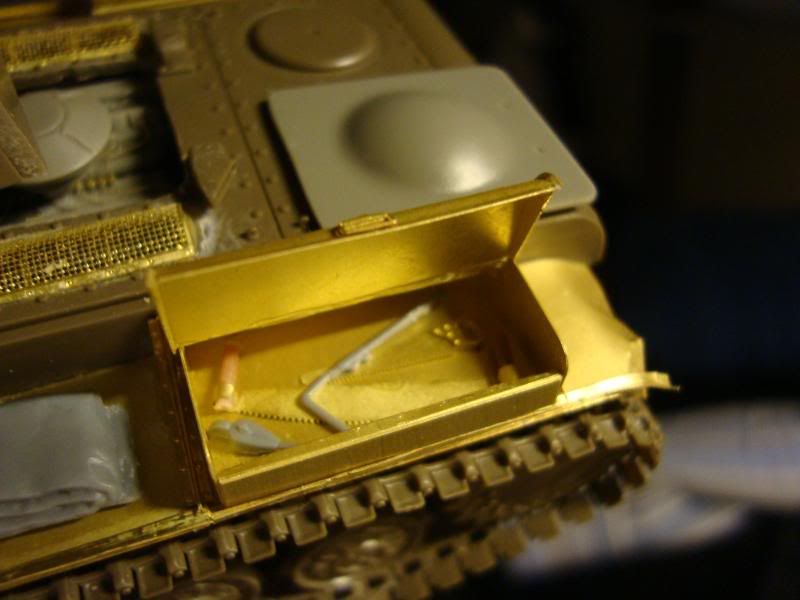
Photo etch storage boxes (KV-1):
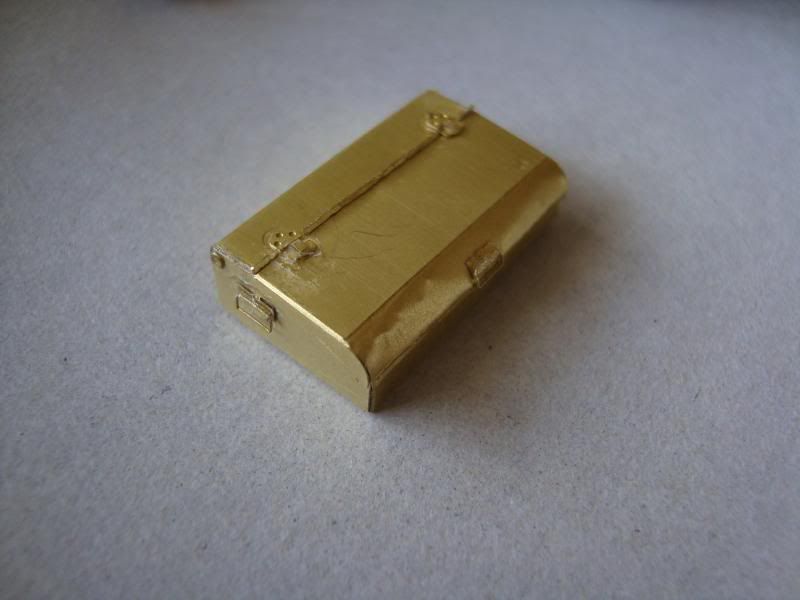
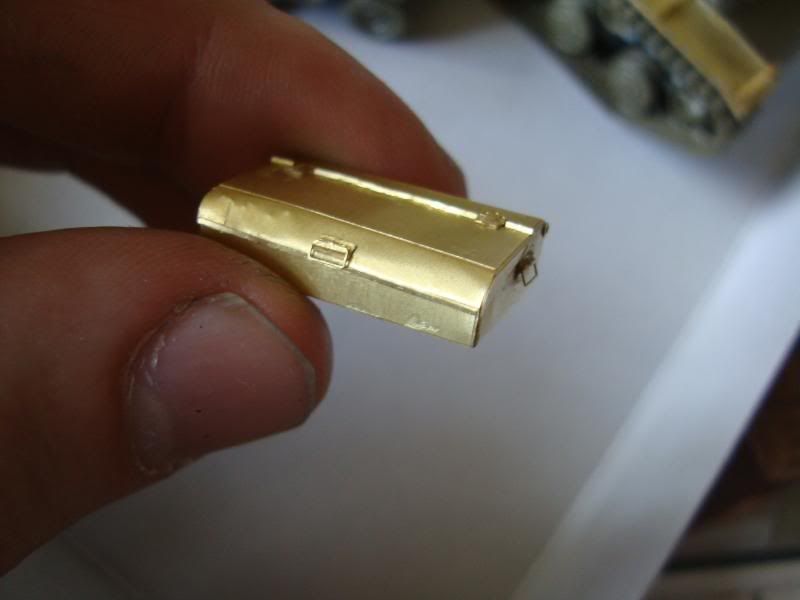
Comparison with the plastic kit storage boxes and the photo etch upgrades:
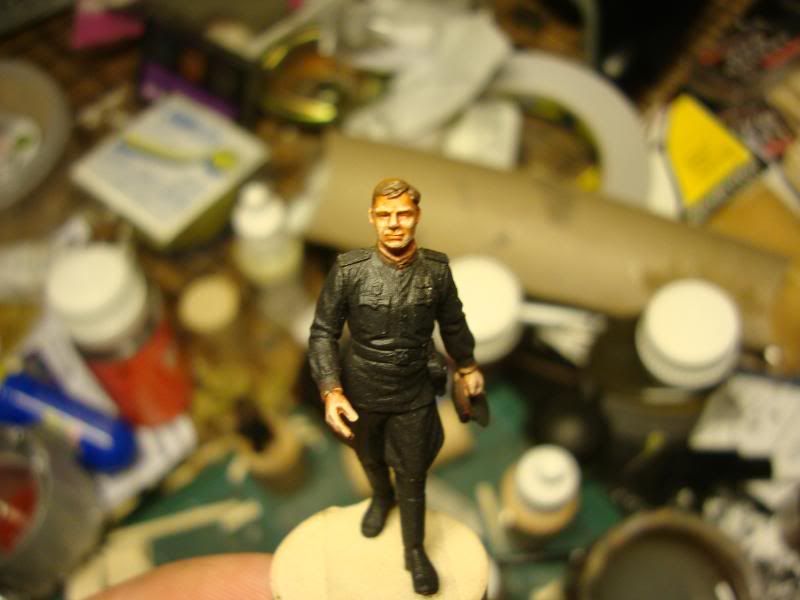
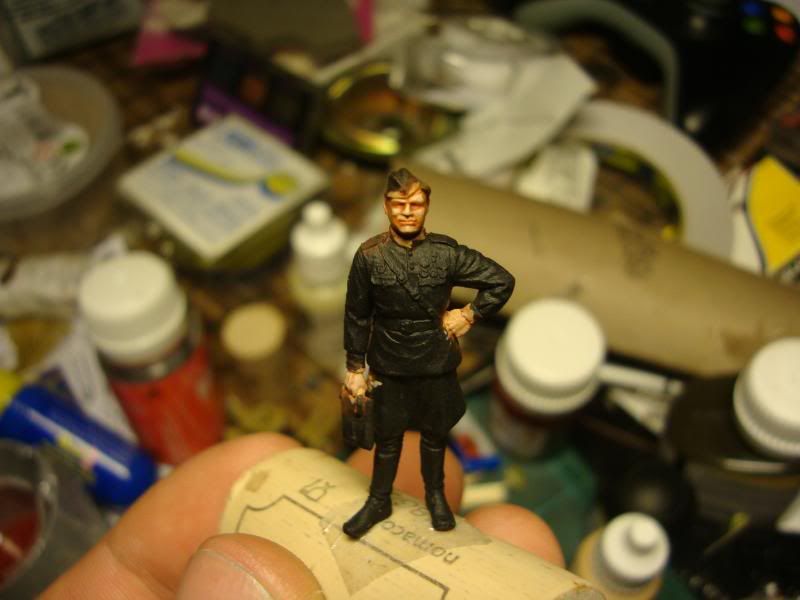
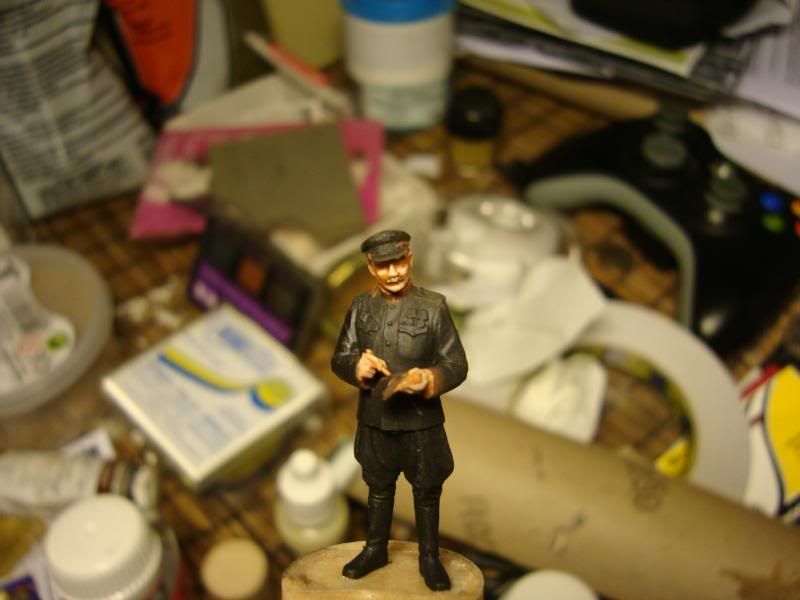
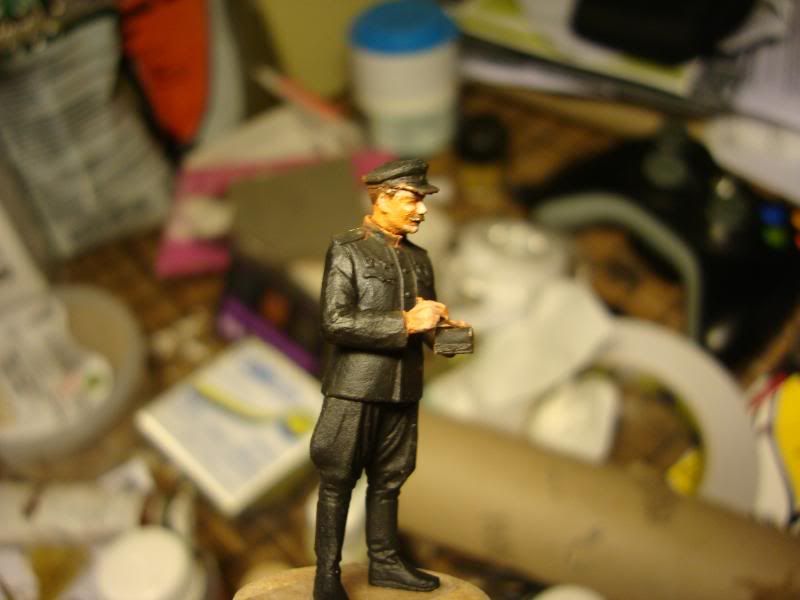
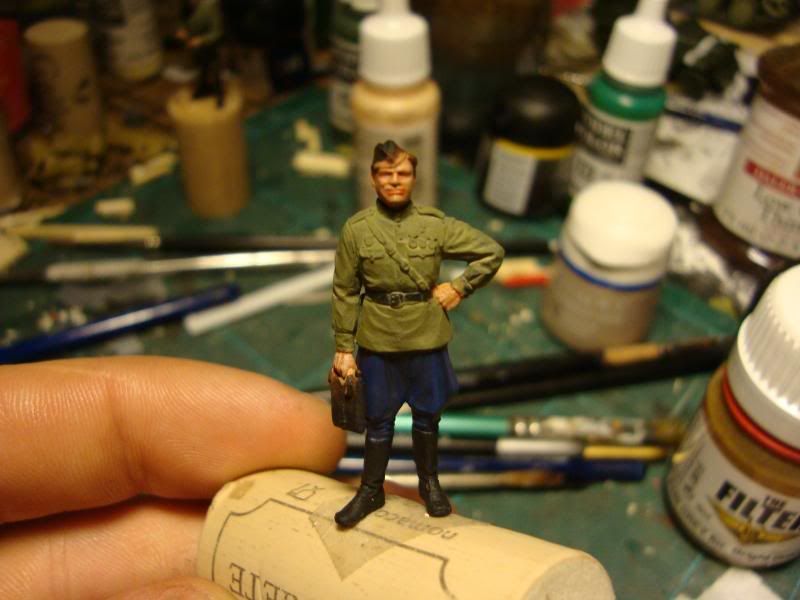
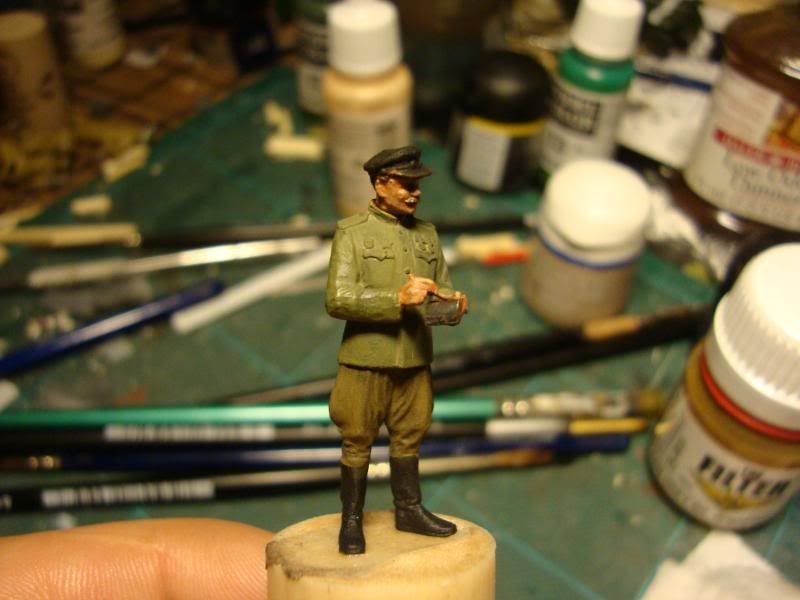
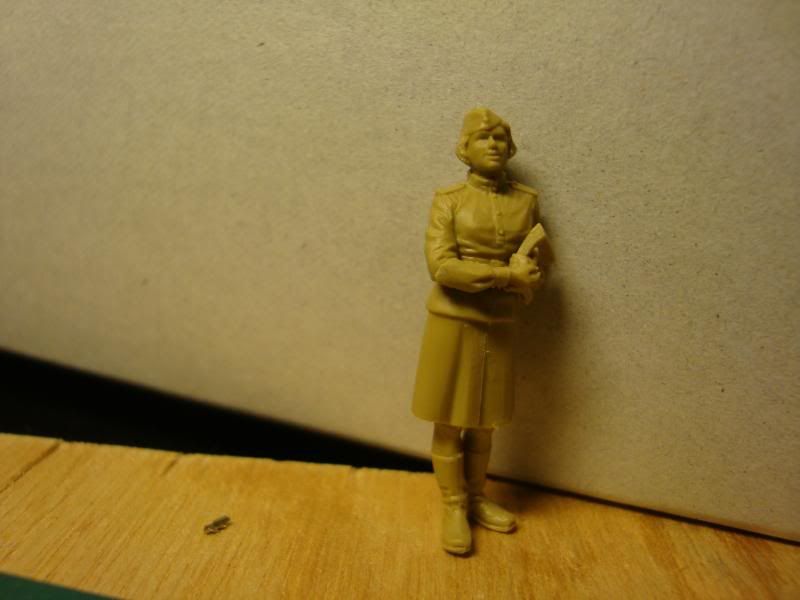
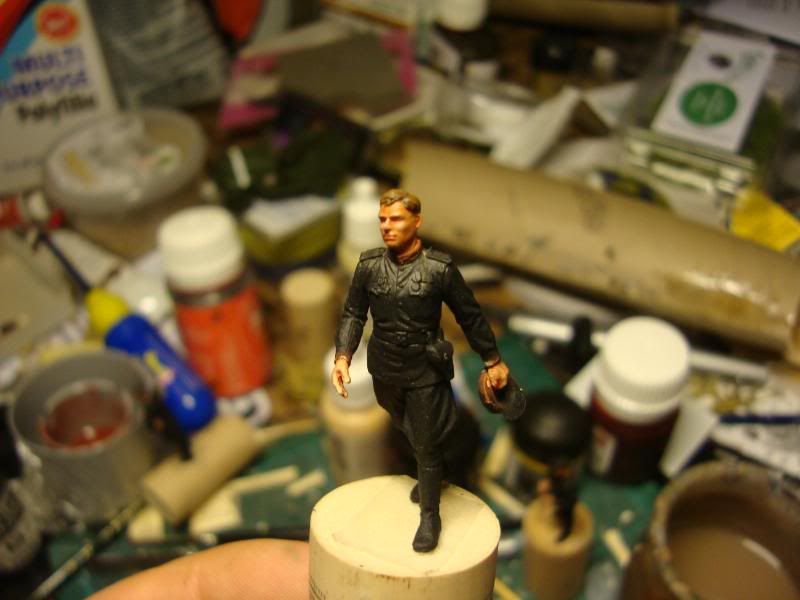
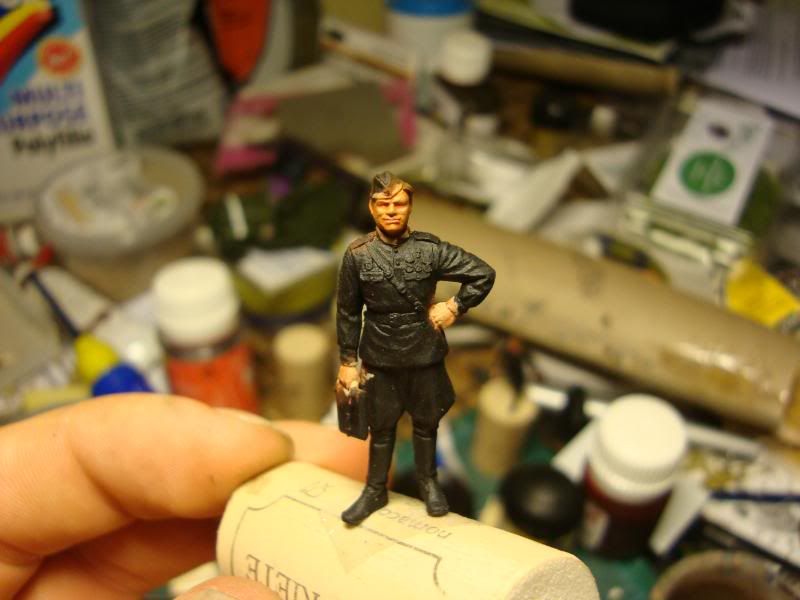
Two completed Officers:
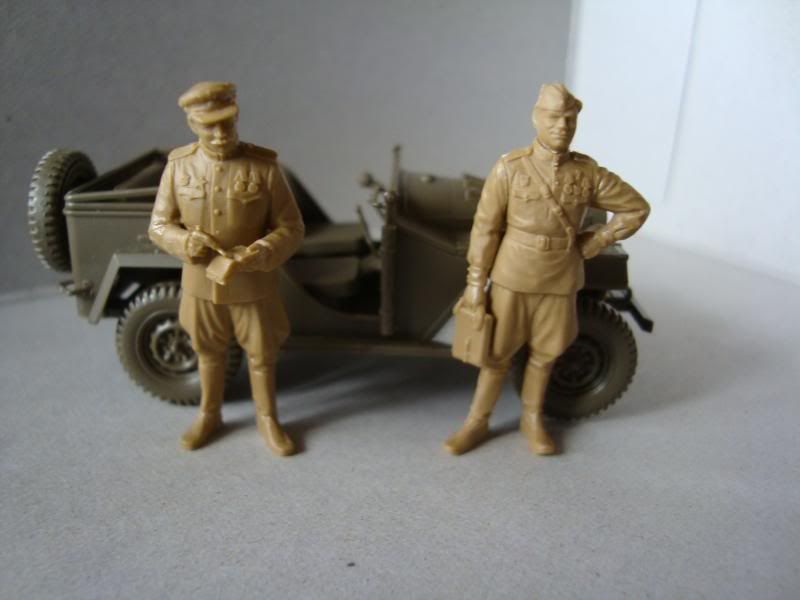
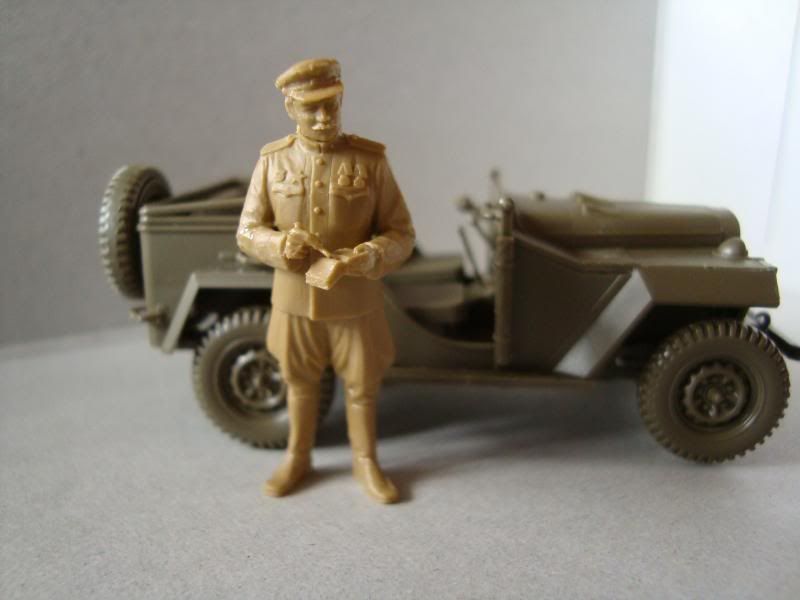
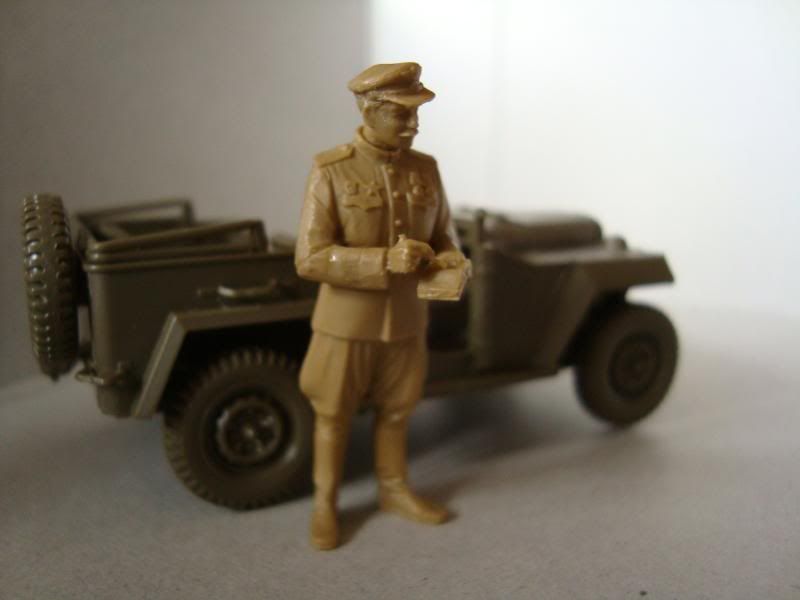
These figures are really fantastic, brilliant sculpts and fantastically detailed, they are some of the best plastics I've ever worked with. I'm really looking forward to painting them as they are such characterful minis.
10890
Post by: Deff Dread red Edition
The officer with the note book looks real nice,if you don't mind me asking how much did the tank kit cost.Can't wait to see this diorama done.
11330
Post by: Gundam-Mecha
Hi Deff, the actual plastic Tamiya kit was quite cheap, it was about £18.
The photo etch parts vary from £14 for the main upgrade set to £6 for the replacement storage containers etc.
On the whole scale model kits are cheaper than Citadel plastics and offer much finer quality, especially in terms of options for photo etch components and super detail upgrades.
10890
Post by: Deff Dread red Edition
Are the officers from the same kit or do they come in their own?
471
Post by: davetaylor
Great to see you back on this project! I hope the sports went well.
I think I'll be bugging you for weathering tips as I work on a Golden Demon diorama soon.
Cheers
Dave
12358
Post by: StubbyGB
Great stuff ! I loved your T34 and this one is shaping up to be even better. I wish GW / FW produced more photo etched parts, I'd live to 'super-detail' a Predator.
11330
Post by: Gundam-Mecha
@ Deff - The figures came in a limited edition Tamiya GAZ set, however they are also available seperately as they are produced by Ukrainian firm ICM. They are sold via them as Russian Aircrew set (Red army and Red Airforce wore the same uniforms during WW2).
@ Dave - sounds great! A dio for GD? Fire away I'm happy to share tips and advice anytime!
@ Stubby - I totally agree thats an area where FW really miss out, Decent photo etch upgrades would really bring their kits alive.
11330
Post by: Gundam-Mecha
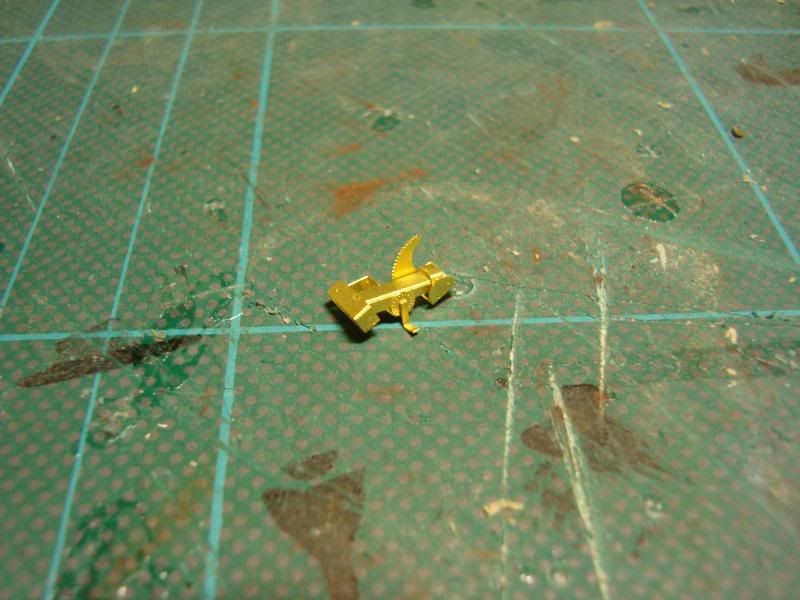
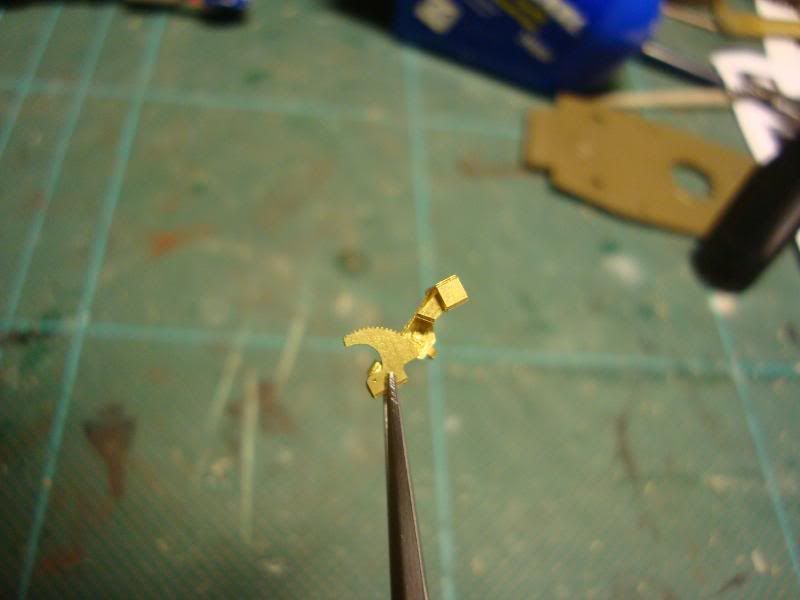
More work and more tiny photo etch... this one was made up of 6 different parts and was quite tricky! It's a bracket for the cuppola for the Heavy Machine Gun. (The cogs are also seperate components that had to be glued on as was the handle!)
Finished the main parts of the Turret and now it's starting to actually look like a tank!
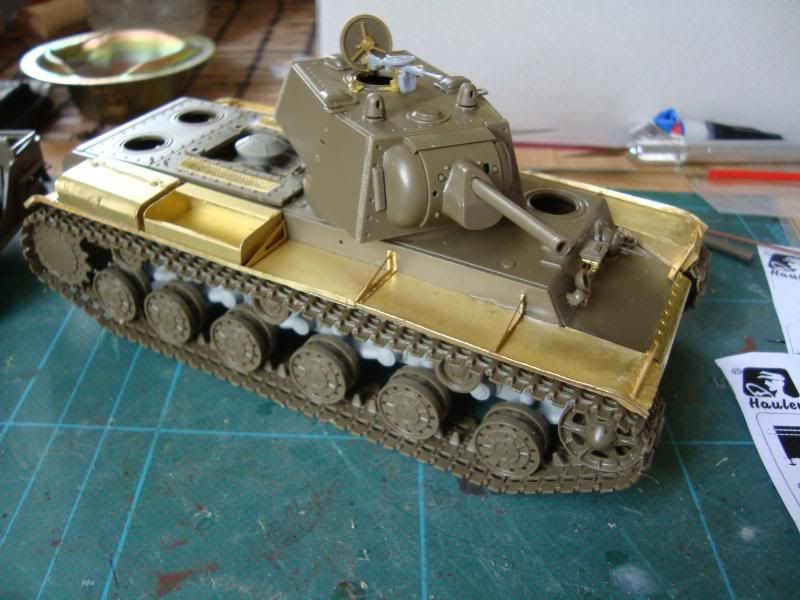
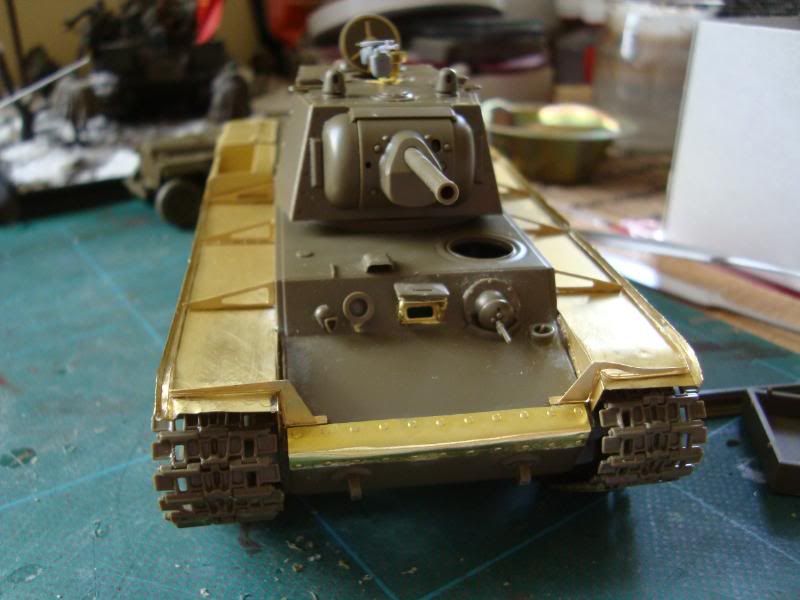
Photo etch Storage boxes (one will be modelled to be left open showing the tools inside while the tanker works on the engine) and the rear turret mounted Heavy MG.

Close ups of the turret mounted Heavy MG, this is based heavily from my reference photos and cross section diagrams of KV-1's for accuracy and detail, and is kit bashed from the Tamiya Infantry sprue and the photo etch components. I also added the bag pouch underneath the MG to catch the shell casings during use as with the actual version.

10345
Post by: LunaHound
Im still incredibly amazed with your patience , and also just realized... Your models dont have any of those super glue marks ! ( Even my super glue bottle have that weird white dusty things on its cap ) Your fingers also have no trace of super glue either!
11330
Post by: Gundam-Mecha
Hi Luna, thanks for the comments.
I try my best to be as careful as possible with applying the superglue. Your quite right if you use too much it can leave that nasty white dusty residue.
I find though that if you use tiny amounts it doesnt do this too much. Of course in some areas even on my KV-1 it has a little but this is easy to fix after the glue has dried. You can easily remove it by carefully sanding the area with some fine quality modelling sandpaper, I use Tamiya finishing paper myself as its great at removing glue spills and marks and also scratches and damage.
Alternatively if you find that you have a large blob of dried glue you can wait till it dries and just carefully shave it off with a scalpel blade.
I actually find working with plastic glue tougher than super glue. When super glue goes onto a surface it dries hard and is relatively easy to remove, however when plastic glue goes onto a surface it melts it, which is really tough to remove and tidy up! I've had to fix a few plastic glue spills as well and those take much more time.
I use the Revell plastic glue with the needle tip, however even with this it can sometimes get jammed and all of a sudden overflow during the middle of an application.
11330
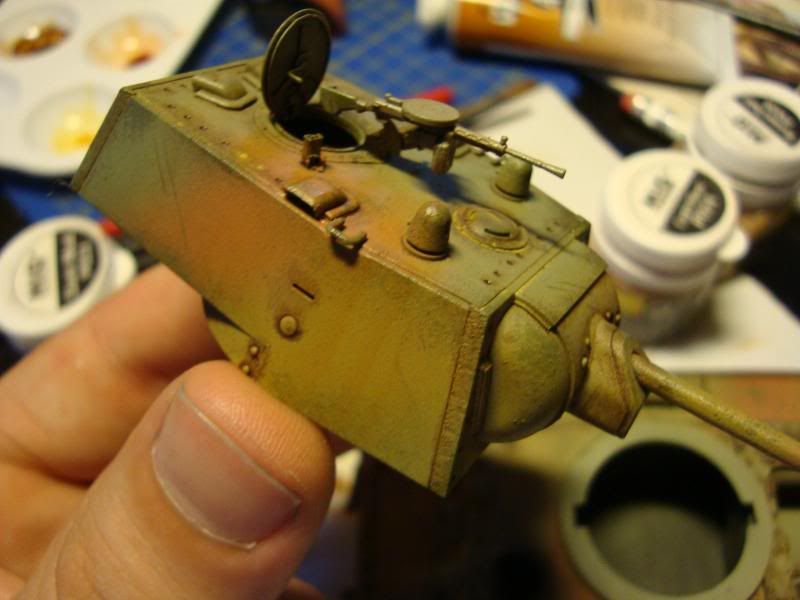
Post by: Gundam-Mecha
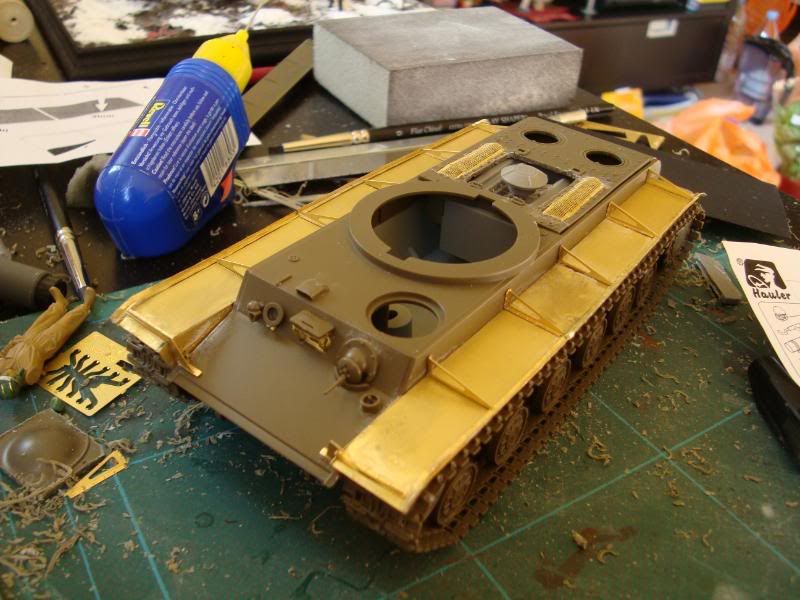
Some more updates, most of the external detailing is finished now, I still need to add some weld seams though that I will move onto next as well as a few tools etc. Once those are done though I will move onto painting
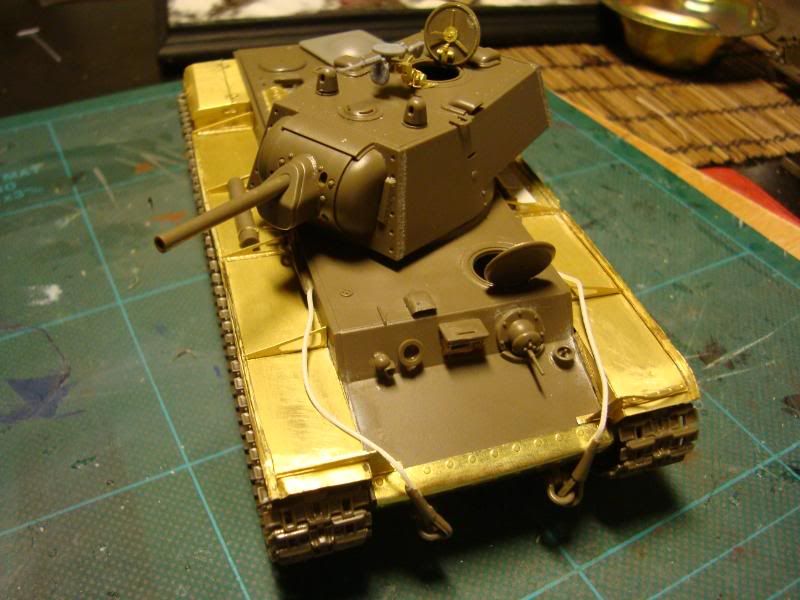
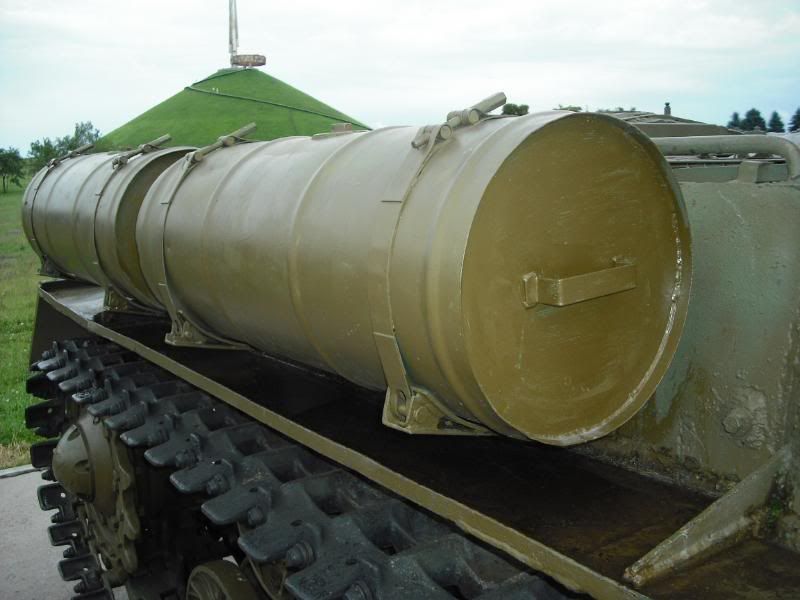
Tools and equipment:

Engine deck (this will have a kneeling tanker working on it with tools, hence the open hatch):
Drivers hatch:
The female NCO:
Scale comparison with the finished tank:
 Automatically Appended Next Post:
 Once I do the weld seams I plan to put a little guide up step by step like I did with painting tracks in my T34 blog.
Painting I hope will start tonight, The GAZ is built now, as is 90% finished on the KV-1, I just have a few more figures to finish then I can paint these also.
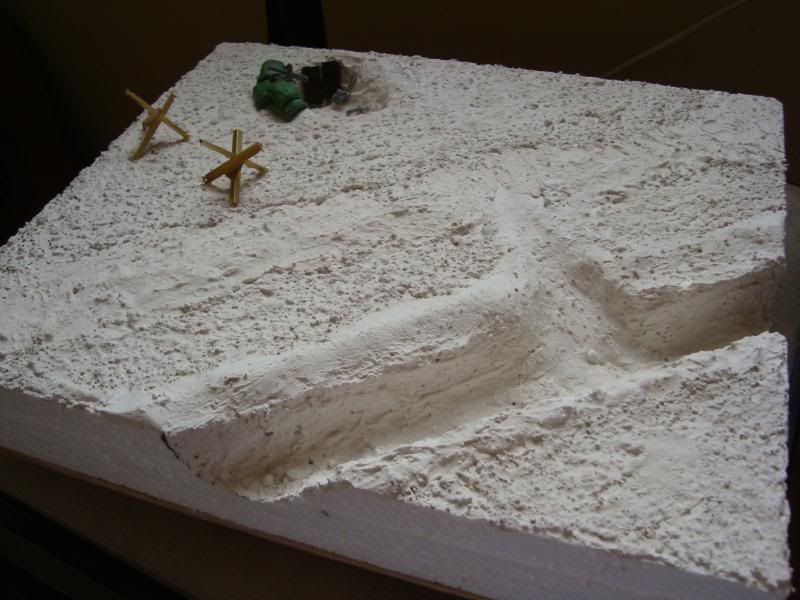
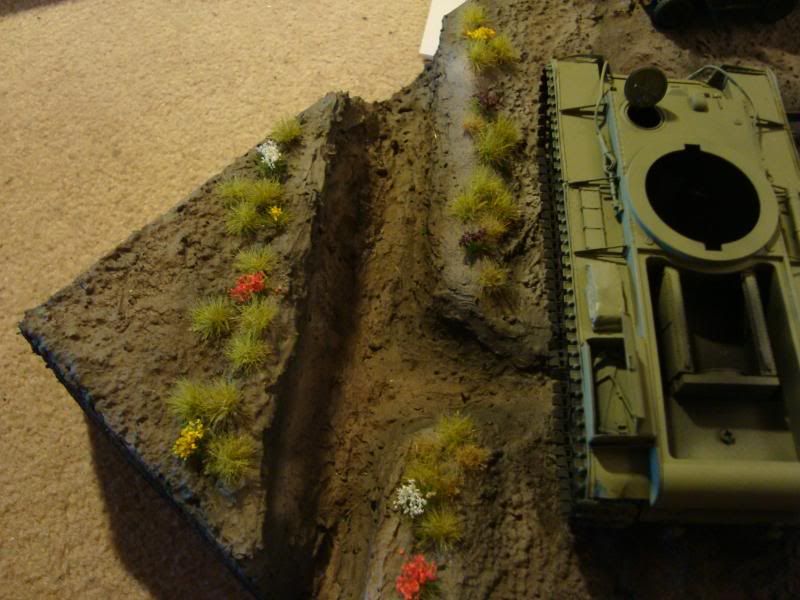
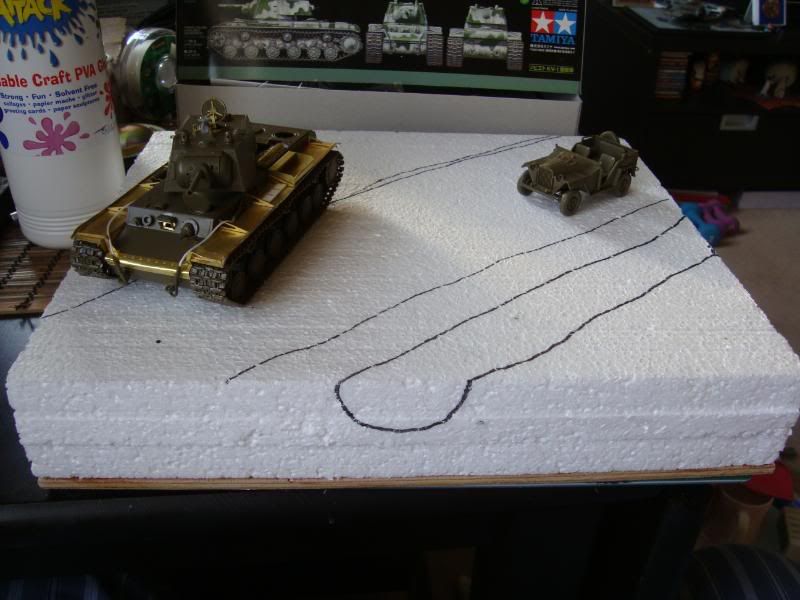
I've cut a piece of wood for the base and got myself some Das pronto modelling clay for that, I've also got some Crystal resin to use for the river and water features. all I need now is a stryofoam board for the main body of the base that I will attach to the wood and cut to the shapes needed.
This scene is going to have more features than the flat ground of the T34 Dio. I'm planning a river, trench works, and lots of surface features like grass and plants, barbed wire, and Tank traps.
so as far as the diorama scene itself goes, I'm going for something like this:

Lots of surface detail, vegetation, and contours in the ground.
11330
Post by: Gundam-Mecha
I've now glued the insulating board onto the wood base and have started work on carving the polystyrene sheet into the shapes needed for the scene.
I had to leave the base overnight with some heavy books ontop of it to hold it down while the PVA glue dried, so I'm hoping that by this afternoon it should have set fine and I can carry on.
I've also ordered some great scenic materials online yesterday that should arrive today or tomorrow from a company called fredericus Rex. They supply fantastic clumps of grass and other natural scenic scatters that are really natural and effective. Much better than scenic scatter or flock. I ordered these via a UK based company called SK miniatures and the service was first class. Can't reccomend them enough.


I got myself a mixture of these different flocks of various shades of green from strong green to dry grass. I also ordered some more 1:48 scale leaves for the base from Netmerchants. Netmerchants also gave great service and have a huge catalogue.
10890
Post by: Deff Dread red Edition
Those do look better than the flock GW makes.
I can't wait to see this diorama done already,I know I can trust you to turn out an excellent diorama.
(no pressure,lol.)
224
Post by: migsula
Nothing very constructive to add other than, thanks for sharing, it's very nice to follow these blogs
11330
Post by: Gundam-Mecha
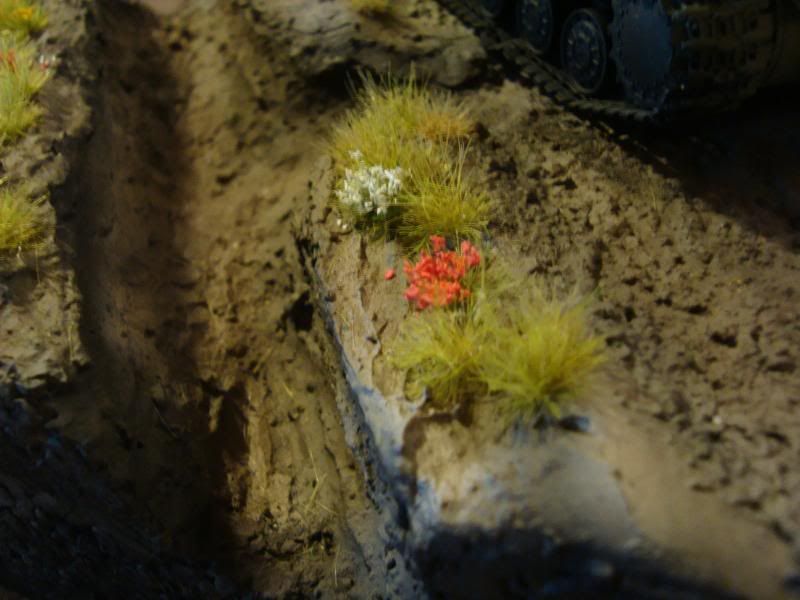
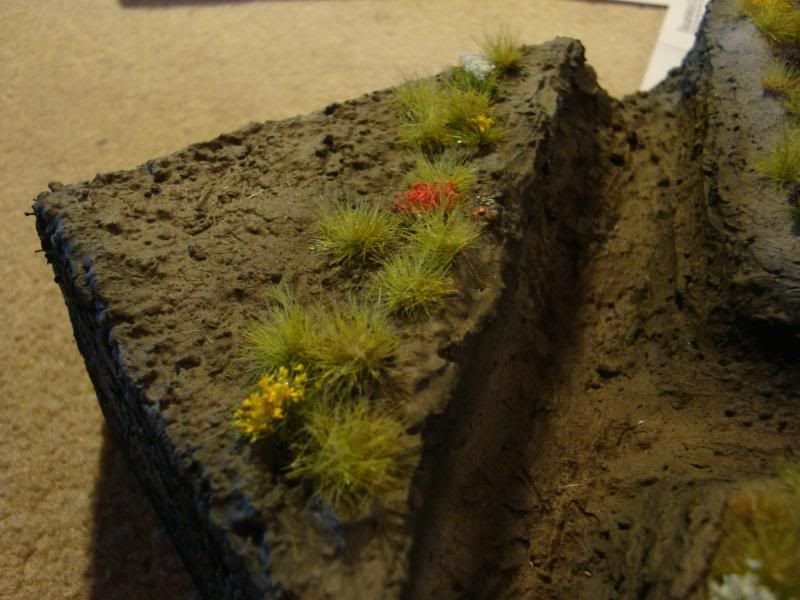
@ Deff - Yes and the best thing about these flocks is that they come in little clumps that are attached to a sticky sheet. Just pull them off and stick them directly to the scene and you get some great grass and plant formations.
I've used GW flock for years, and for basing figures it's fine, however scenic scatter isn't so useful for a large area like those you get on a diorama base.
@ Migsula - Thanks for the comments, I'm glad that your enjoying the blogs. I think its great that so many people are doing diorama projects (Connan, myself, and shortly Dave Taylor also), it's also great to see people doing scenery work, the various space hulk scenery boards that have been going about recently in the boarding party blogs have been awesome!
Once I finish some of the WW2 projects I'll be moving back to some 40K stuff hopefully. I have a Warhound Titan thats gathering dust and I need to finish off my Thunderbolt also.
Automatically Appended Next Post:
for those who are interested in the scenic materials Here are a few links to the suppliers I used.
The service from both was fantastic.
Grass and turf
http://www.skminiatures.co.uk/#/dryg...ump/4533213819
or for leaves
http://www.netmerchants.co.uk/product.php/14746/447/leaves_oak/5da77b2adca46422cc3de041309bd8d7
Automatically Appended Next Post:
The next problem to deal with as I mentioned before is the lack of weld seams on the Tamiya kit.
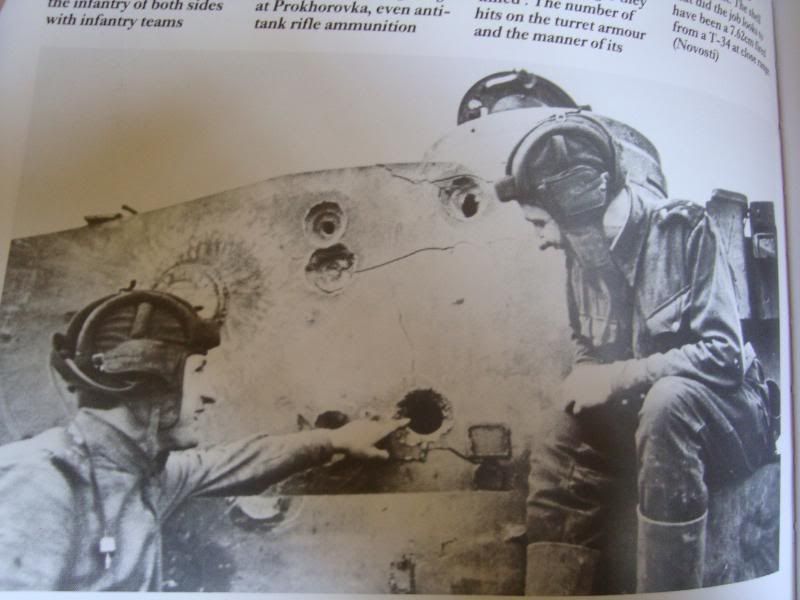
Here are a couple of comparisson photos from Perth Military Modelling with the Hobby Boss and Tamiya Kits that really highlight this, and show the areas that need extra detailing with modelling putty:
Upper Hull
The front area also needs some weld seams as per this example
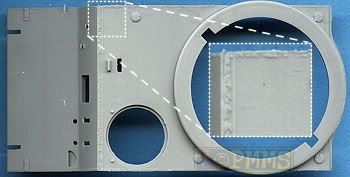
Turret comparisson


As you can see the Plastic Hobby Boss parts in Grey have more moulded detail in the kit, however personally I prefer to add such details myself with putty to get a better result. Also the Photo etch parts address a lot of this issues as well in terms of detail that even exceed the Hobby Boss parts.
Even though the Tamiya kit has a few downsides in terms of sprue detail I still think it's the better kit for the experienced modeller as it presents a blank canvas to build upon ourselves.
8266
Post by: Wolf
Uuh the photos didn't work for me in your last post man, but either way it is looking very good I should do one of these in my summer break, keep me busy.
11354
Post by: AirborneAnto
Wow thats really great stuff. I was inspired to try a similar project when i visited Normandy but never got around to it  but you have inspired me to try again 
1340
Post by: Northen
Great project going on here!
Keep up the good work.
11330
Post by: Gundam-Mecha
Thanks for the comments guys.
I've fixed the images, on my PC it was showing the photos but i noticed from an outside machine that linking to photos from that site was not allowed so I changed this.
Airborne a D Day dio would be really interesting to see, you should definitely try it! Automatically Appended Next Post: Just a small update on the progress of the scenic base.
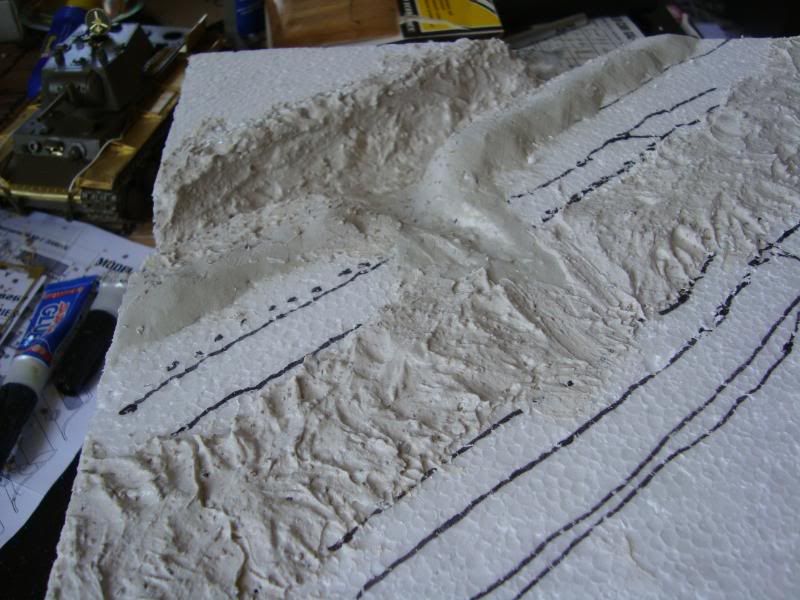
My grass clumps and leaves arrived yesterday! Brilliant service, ordered Wednesday and arrived Thursday!
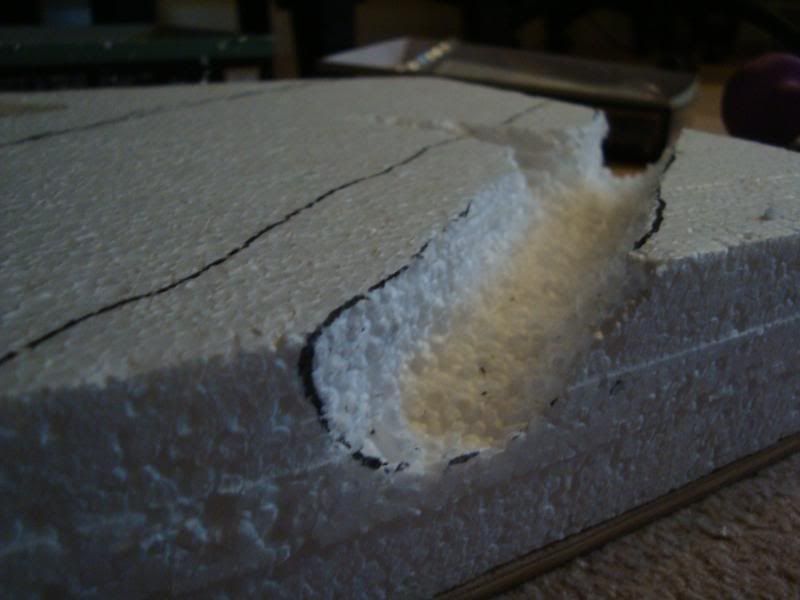
The Insulating board has finally dried and stuck to the plywood base. Last night I started marking out areas of the scenic features with a marker and began carving the shapes out of the polystyrene base.
Theres a lot more to do, and the base will be covered with Das Pronto Modeling clay, so these are just very rough initial stages.
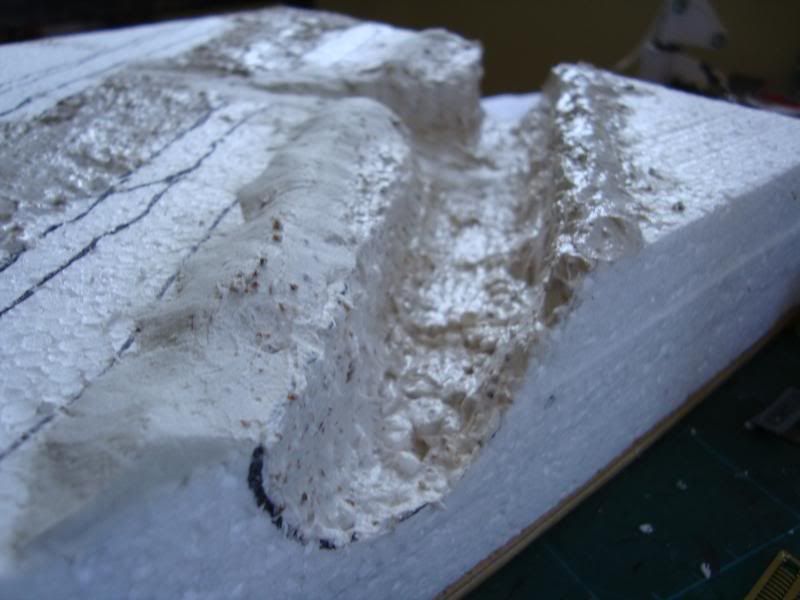
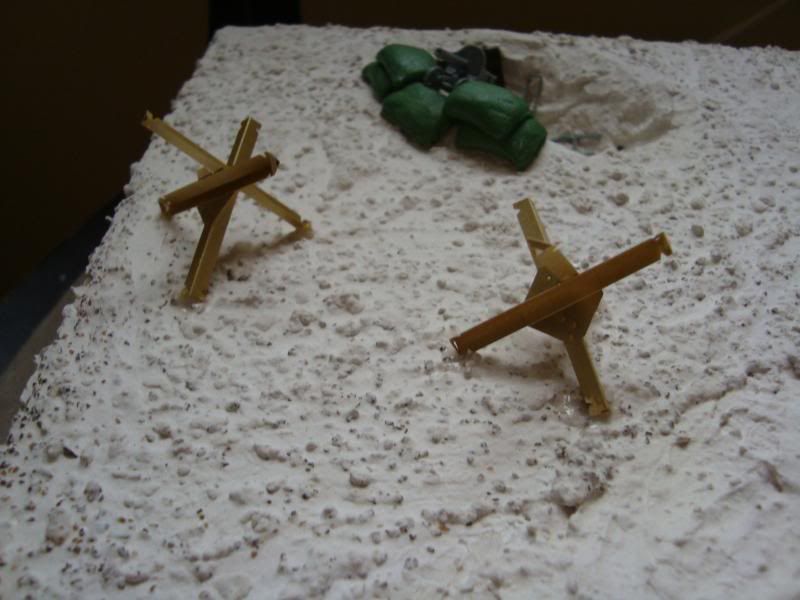
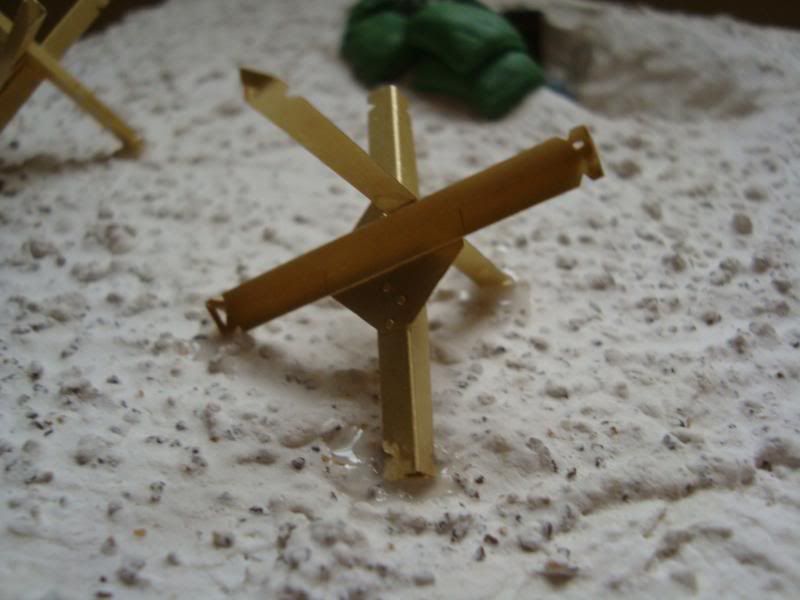
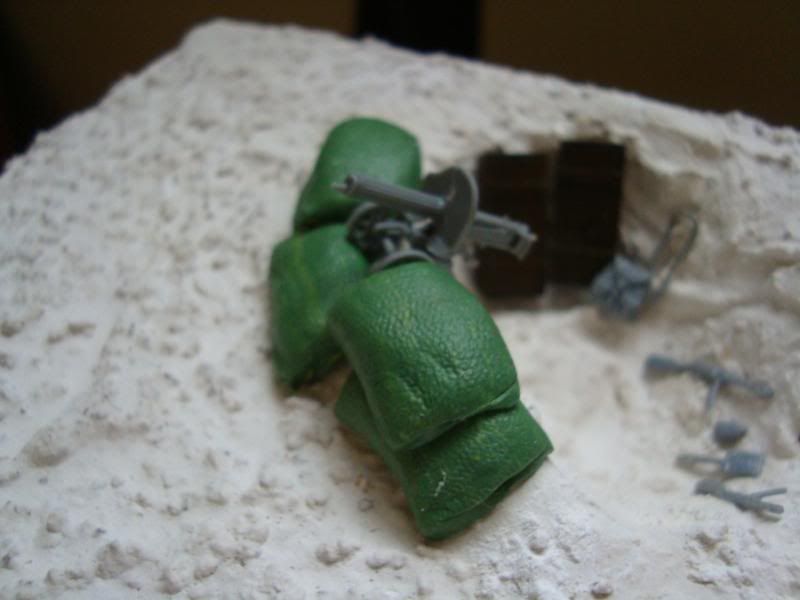
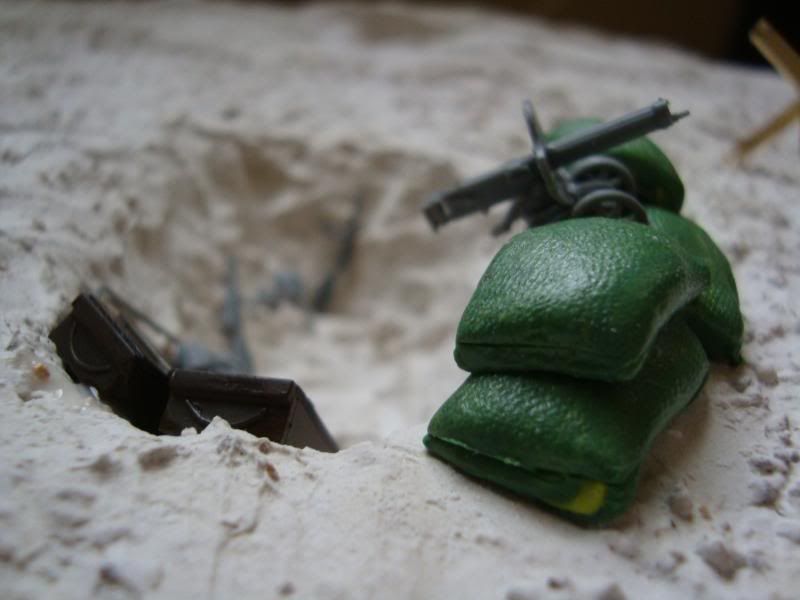
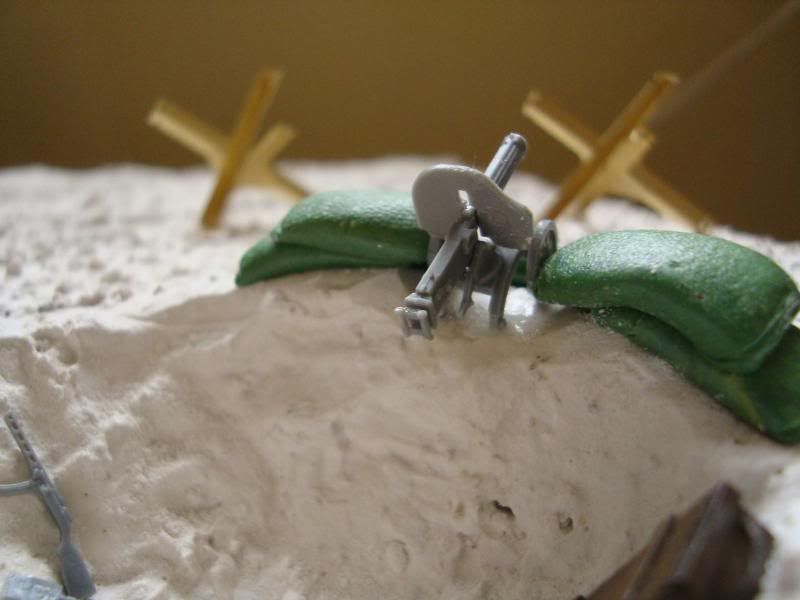
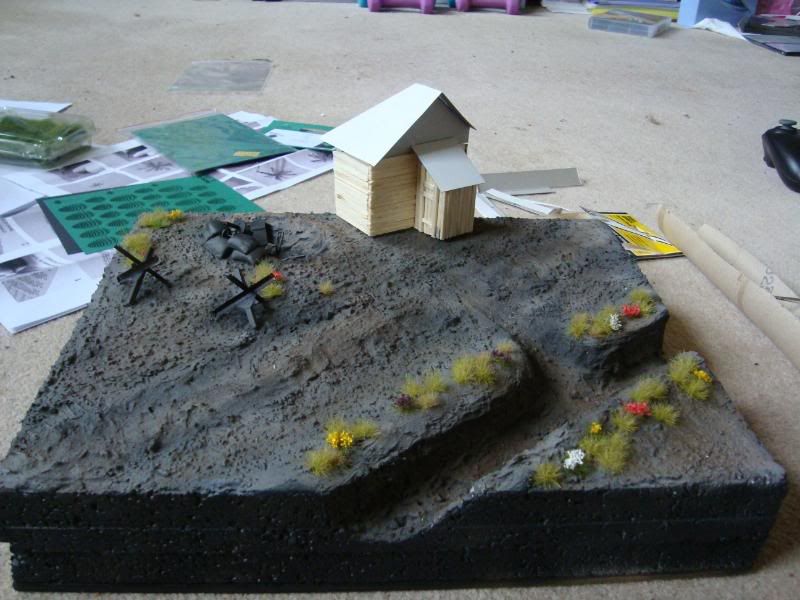
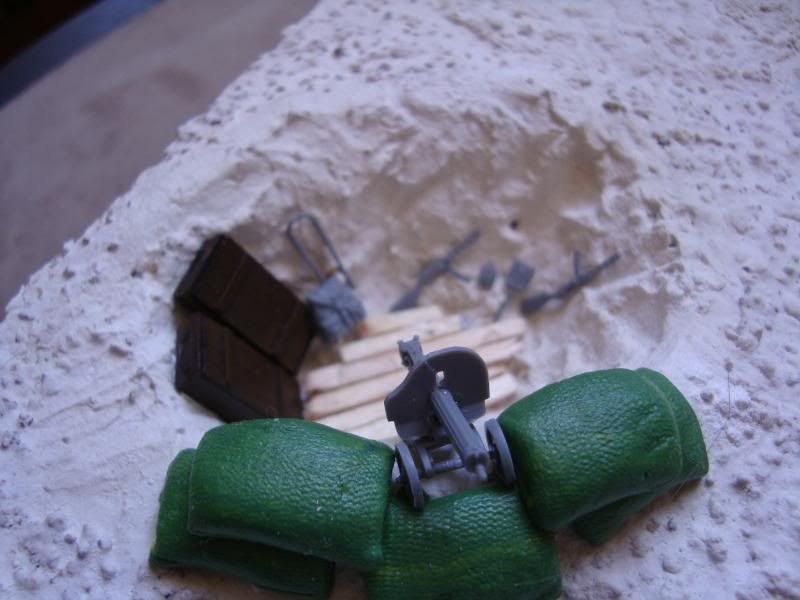
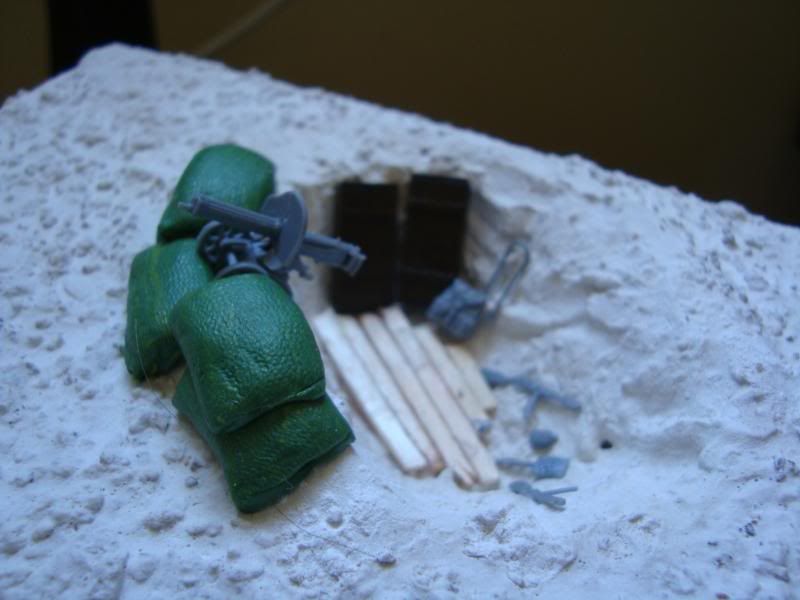
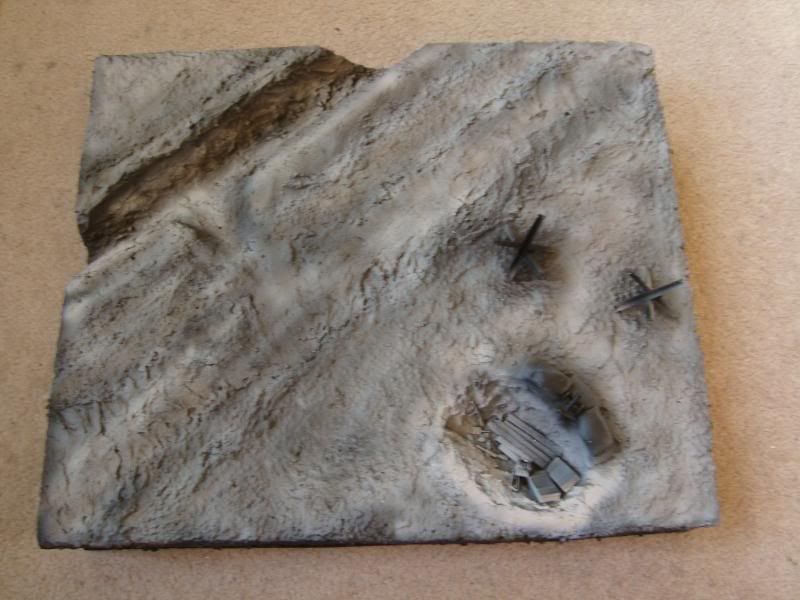
Marking out the river, dirt track road, and machine gun nest
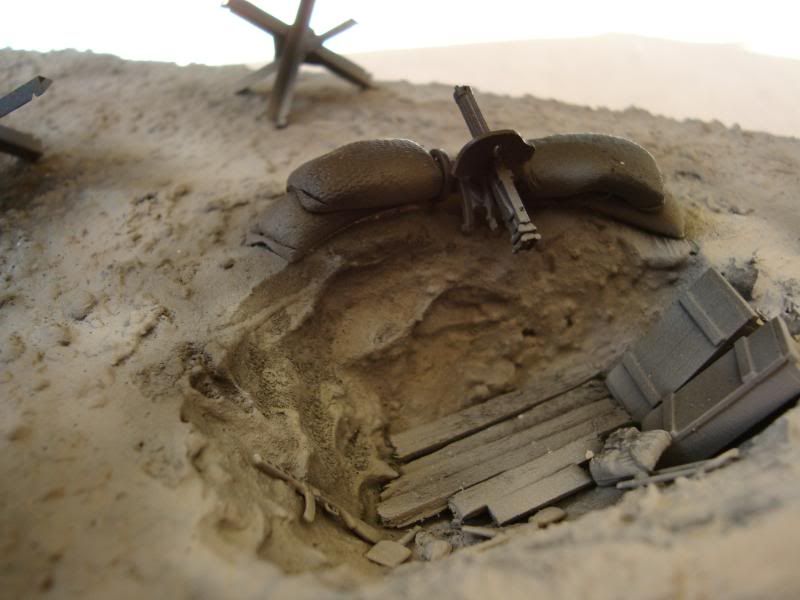
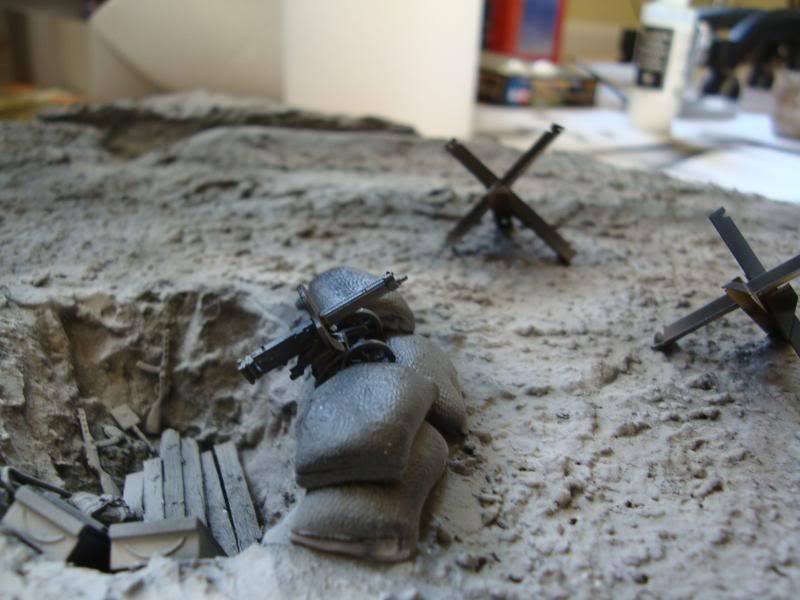
Carving out the river and ditch for the machine gun nest:
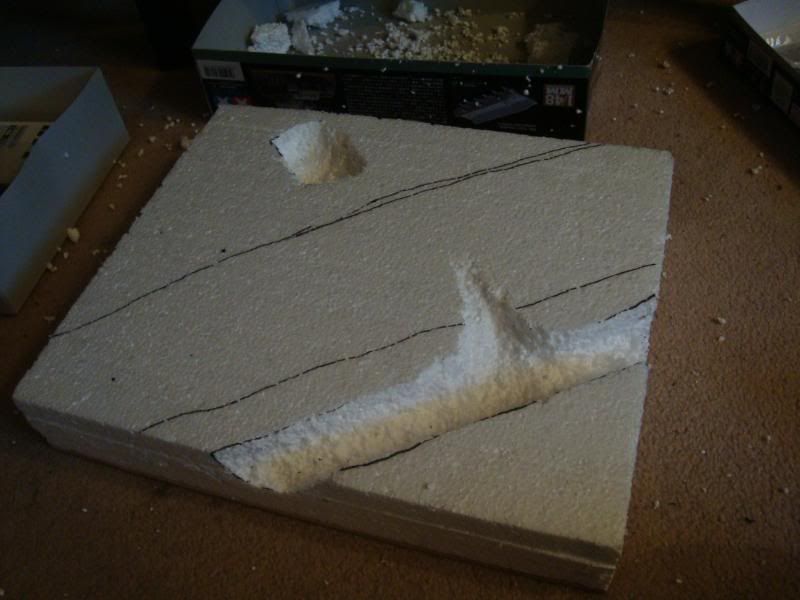
The river bed, this will be covered with modeling clay, sand, and filler and filled with crystal resin to make water.
Some updates on the KV-1
The open tool box and tank tools, as a Tanker will be sitting by the exposed engine working I will also have tools and equipment spread over the engine deck area.
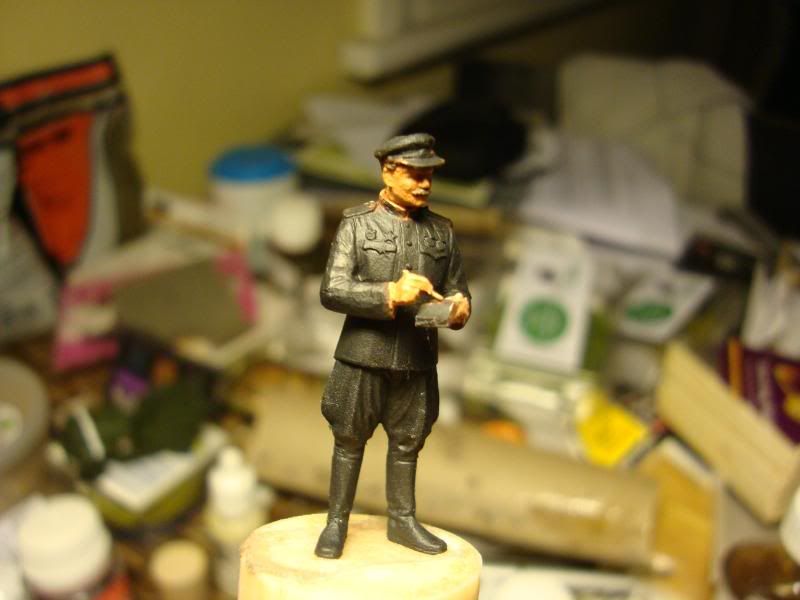
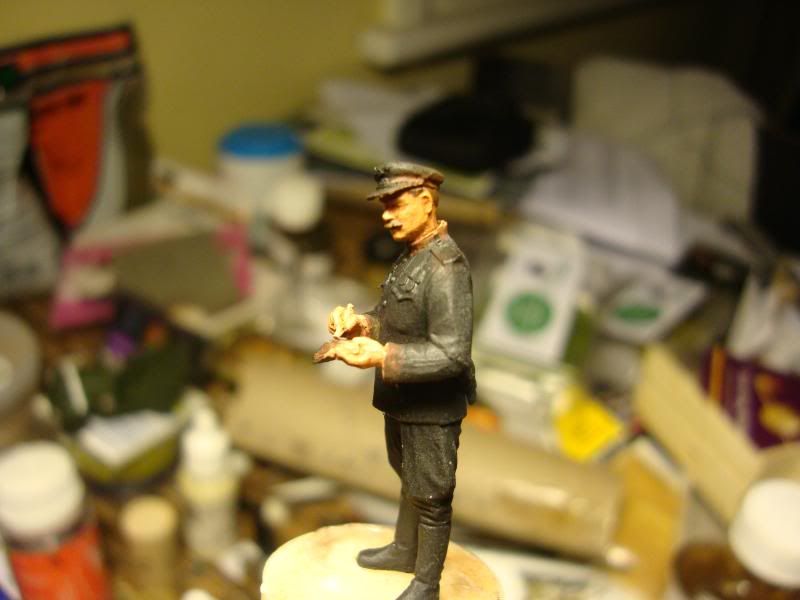
The final Officer figure:
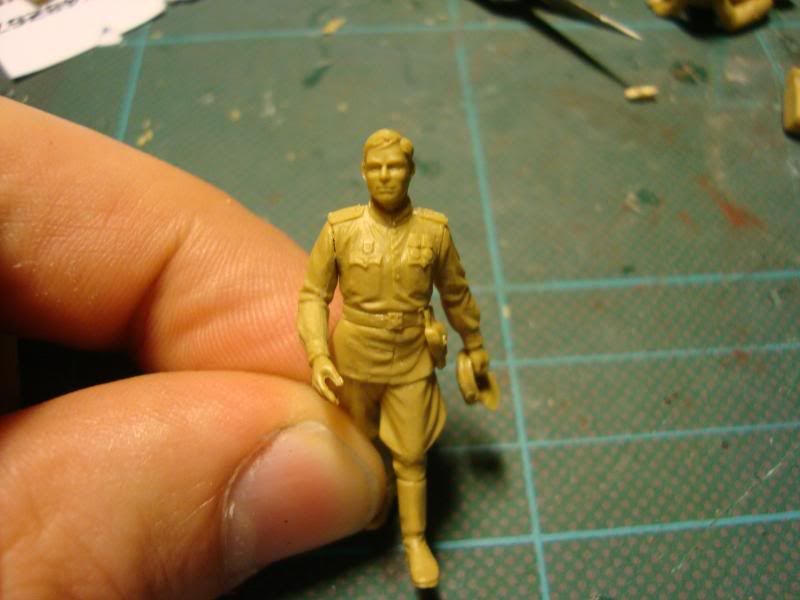
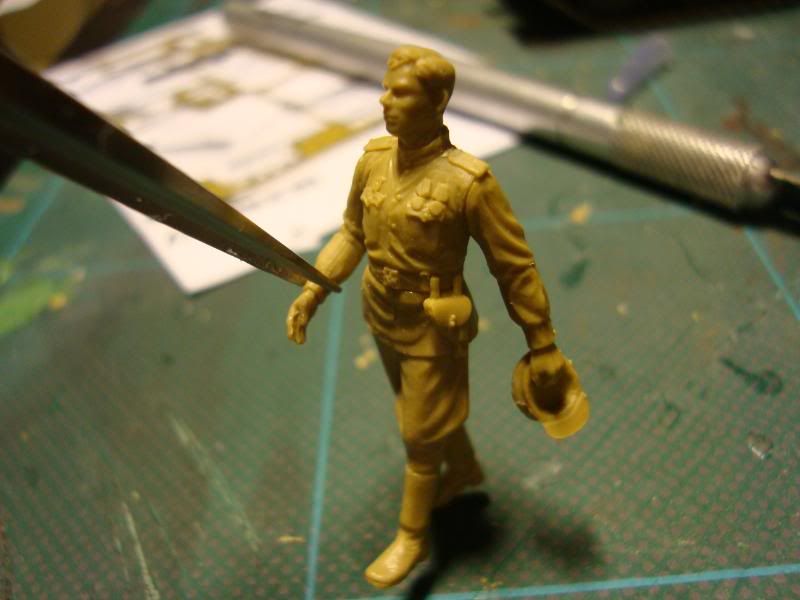
Another great sculpt and pose from ICM.
11330
Post by: Gundam-Mecha
10890
Post by: Deff Dread red Edition
The rough layout looks good,can't wait to see it all done.
Those figures have amazing detail,they look rather great without paint even IMHO.
11330
Post by: Gundam-Mecha
Thanks Deff, yeah I really was impressed with the ICM minis. They are going to be a real pleasure to paint and are so much more detailed and refined than the Tamiya figures.
I will probably start painting them this week.
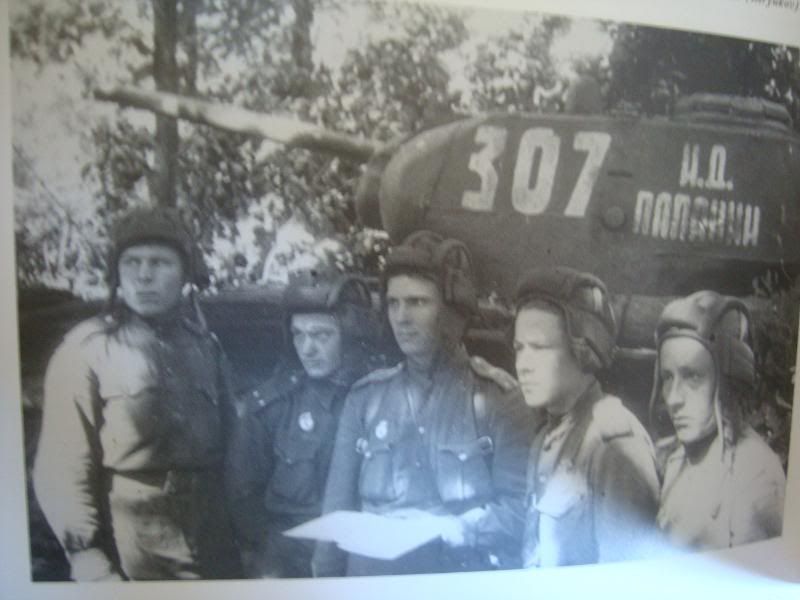
Here are some reference photos of Kursk that I've been working from.
The Machine Gun nest reference and inspiration, (and example of Maxim Machine guns used in dug out's)
Mixed Kursk battlefield images as terrain reference's

Russian Sapper's cutting wire fences, this was an interesting photo that outlined the types of barbed wire fences used in Kursk as I plan to include some of my own in the scene:
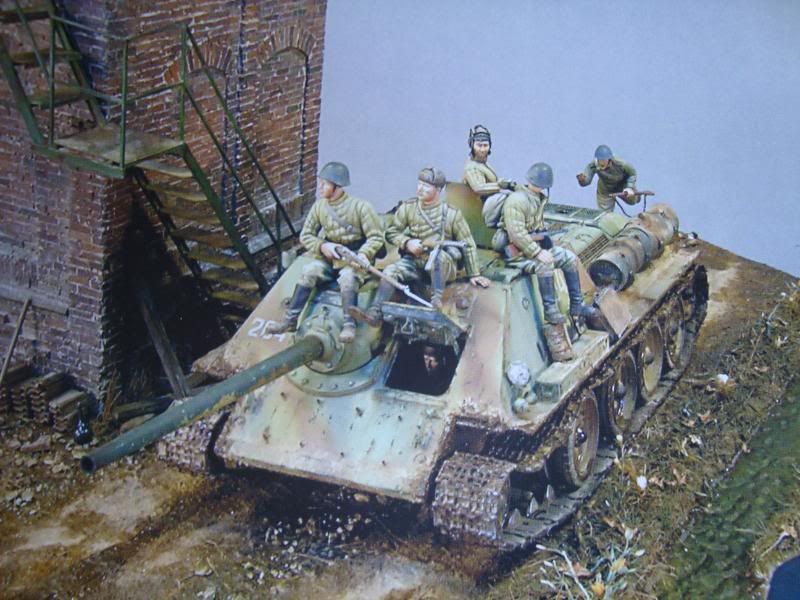
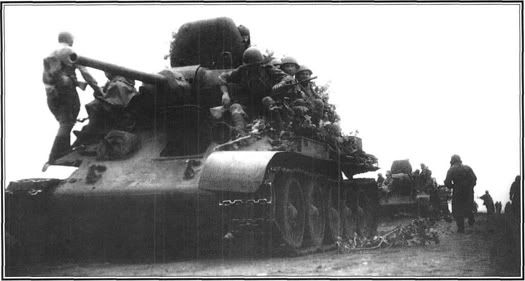
This one brings back memories of my last project! Russian Infantry riding a T34/76 in Kursk:
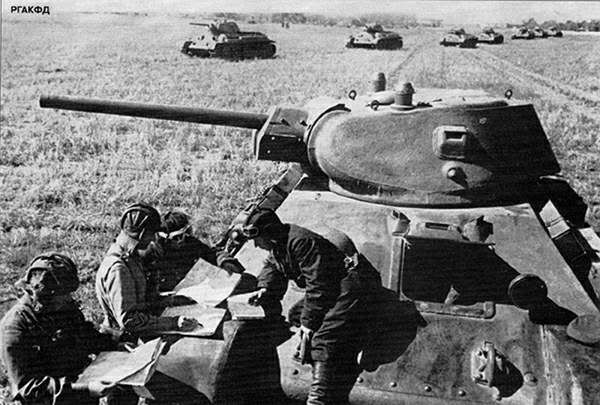
The next few images were also inspiration for the scene that I am doing and served as great reference material. They show Tank crews discussing orders and mission plans in Kursk pre battle (exactly what our Tankers and Officers will be doing in the Dio):
A T34/76 and Crew
An SU-122 and Crew

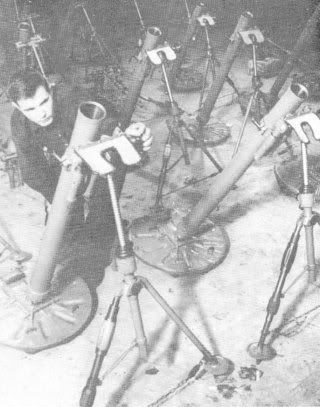
I also found this little gem today that is a great reference for Soviet Mortars. I was initially considering making the dug out a mortar position but didnt have any photos of Russian Mortars or any kits to represent them. I'm now considering scratch building a mortar using this photo as reference material and possibly changing the machine gun nest to a mortar emplacement.
As you can see from these reference photos the Kursk Landscape was rather bleak, mostly grassy plains and small isolated villages. This is a bit challenging for a modeller to represent without making the terrain look too boring. I've decided to focus my scene around a defensive position near one of the small villages, pre-assault. This allows me to include some small buildings in the scene to break things up and add more than just a flat field.
14066
Post by: Xanthos552
This is incredible. How many hours have you put into it so far, including research???
10890
Post by: Deff Dread red Edition
Can't wait for you to put it all together!!!
Where did you get all the reference photos from.
9003
Post by: AlfredTheStrange
I'm somewhat of a soviet union buff, and i love what your doing! I always wonder how genuine soviet war photos are as they tended to be staged, however for your purposes those are quite excellent.
I really like the officer with the mustache and im tempted to track him down for use as "Commissar Joe".
6633
Post by: smiling Assassin
I envy you incredibly.
I've never had the balls to get into Historic Modelling -- the risks of being shot down in shameful flames by being innacurate frighten me hugely. However after seeing the care, but constrained ambition you have shown, I might just give it a go.
My Tamiya Flak 88 is in the post, thanks to you.
Peace.
sA
11330
Post by: Gundam-Mecha
Thanks for the comments guys.
@ Xanthos552 - too many hours! :-) I've lost track to be honest but its a project thats spanned weeks so far (and not even a lick of paint yet). I've used lots of books and internet articles for the research as I wanted to get it as accurate as possible. Actually A great deal of time has been spent pouring over colour slides of KV-1's to pick a colour scheme that matches the area and the engagement... and when I've found something I really like I've worked hard via research to try and blag it in without being unfaithful to the period! haha most of the time its worked and I have been able to fit the things in that I like while being accurate. I've ruled out a lot of things that looked cool, because they werent justified for that engagement or season.
@ Deff - the photos are from numerous sources, alot of them from books, and some from the Internet. A great deal of the internet photos though I already had in books to be honest.
@ Alfred - What you mean like this one?
yes I know what you mean, progaganda and staged images are always a problem. But these photos seem to be more reliable in that the battle scenes are a lot less staged including actual combat engagements. Also for the purposes of knowing what kind of uniforms, equipment, and terrain features they are helpful, although as far as engagements go I wouldn't take them as gospel.
10890
Post by: Deff Dread red Edition
By the way did you present you're relative with that other diorama you did yet?(sorry if you mentioned this already I have the memory of a goldfish with short term/long term memory problems.)
Do you know where I can get a bit of information on the 8th SS Cavalry division?
11330
Post by: Gundam-Mecha
@ Assassin, glad to hear you've given it a shot!
You don't have to go too deep into things, you can always do a generic AFV or something similar. Thats what I did in my Winter T34/76 scene to a certain extent.
The most important thing is to just enjoy it, I got into it because I loved the modeling and painting. My interest in History was just a side note and an extra that I decided to pursue for myself. Doubtless if I posted on a scale model forum they would bash my stuff too! But for me it's about having fun, learning something cool, and enjoying all parts of the process, not about being a detail facist.
@ Deff - I'm going to Minsk in July to hand this over and present the T34/76 diorama. So just over a month to go till then. I will post updates to that blog once I've taken pictures of passing the gift on Automatically Appended Next Post: Umm as to the SS I'm not so sure. I don't model German stuff, but there are some good resources online.
I stumbled across a Historic modeling SS forum the other day by chance but didnt bookmark it. I will try to find it again for you.
10890
Post by: Deff Dread red Edition
Thanks I am really intrested in historical modelling thinking of buying a few kits from a company called "Dragon" I like their WW2 german stuff,not sure what quality it is but would like to try it.
11330
Post by: Gundam-Mecha
Deff go for the Dragon kits for sure. Dragon is a very well known company and they produce some excellent quality kits for good value as well.
Dragon kits are used often by professional scale modelers and experts.
10890
Post by: Deff Dread red Edition
Ok cool,I love WW2 German stuff and over here the kits are much cheaper than any GW make so I will be sure to try it out.One quick question,how is painting those photo etched parts different to plastic?(by this I mean do you prepare it in a special way,must it still get a basecoat and such)
11330
Post by: Gundam-Mecha
Exactly the same as painting plastic or white metal.
Just undercoat it the same time with a spray and you can paint over it with anything. Acrylic, inks, Foundation paint, oils, turpentine, or thinners.
10890
Post by: Deff Dread red Edition
Ok thanks,hope everything goes well and you get the diorama finished soon.
14066
Post by: Xanthos552
This looks so good, i may have to give it a go when i have a minute then.
Actually, in light of that reply post, many hours!!lol.
I know what you mean about finding the right parts that look good and are historically accurate.
Well, anyway I can't wait to see it finished and a big double thumbs up!!
8745
Post by: Llamahead
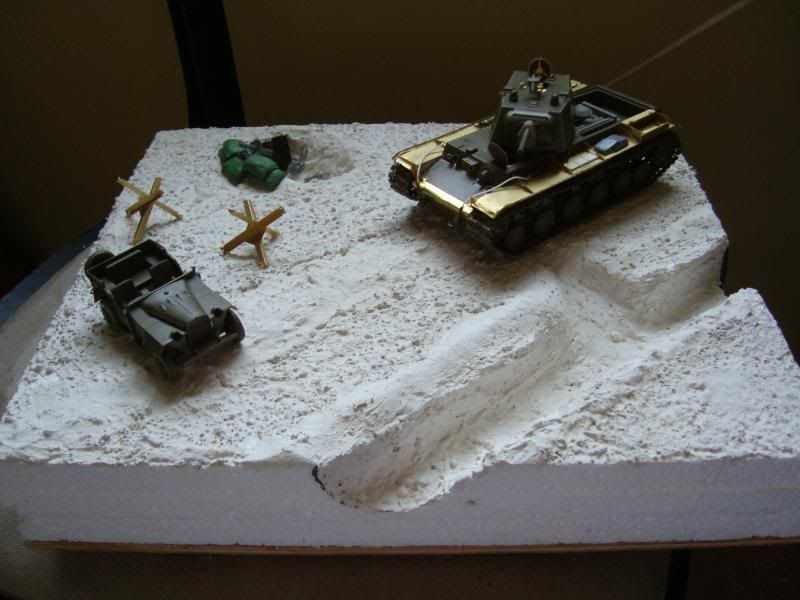
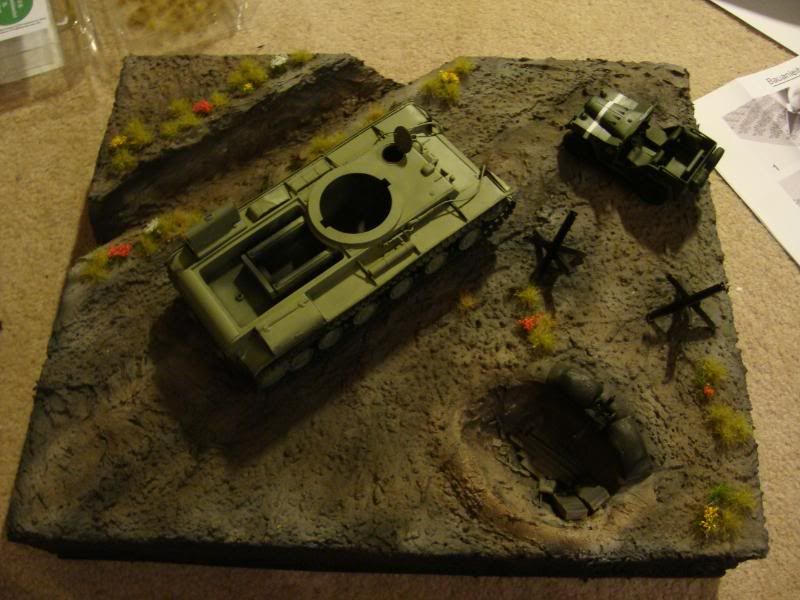
This is great stuff the scenics are looking good. Can't wait to see more of the figures. How big is the base by the way because I'm interested to know how your planning to fit buildings, a heavy tank, a machine gun nest, a staff car and a trench line all on one base?
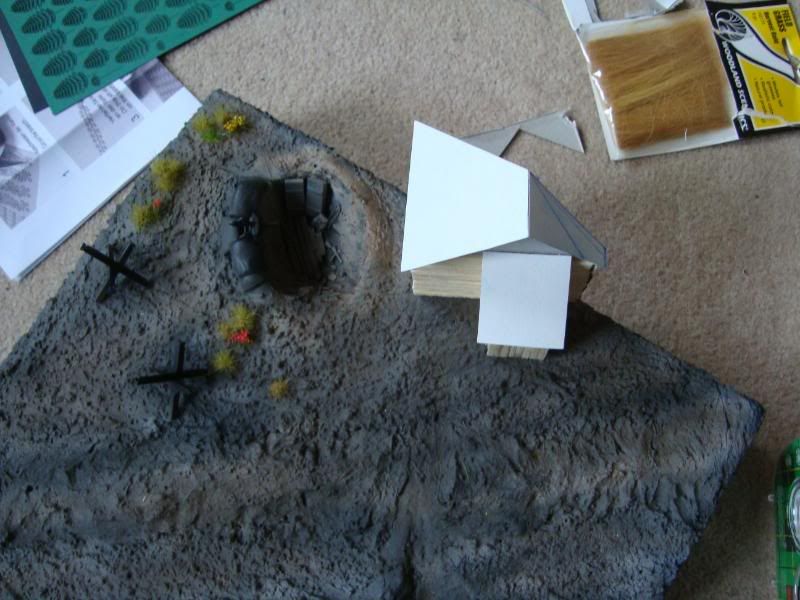
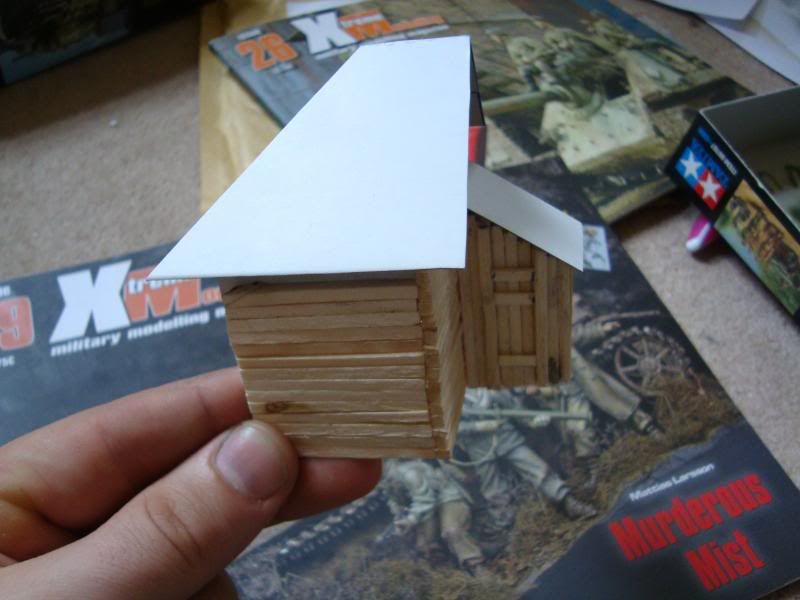
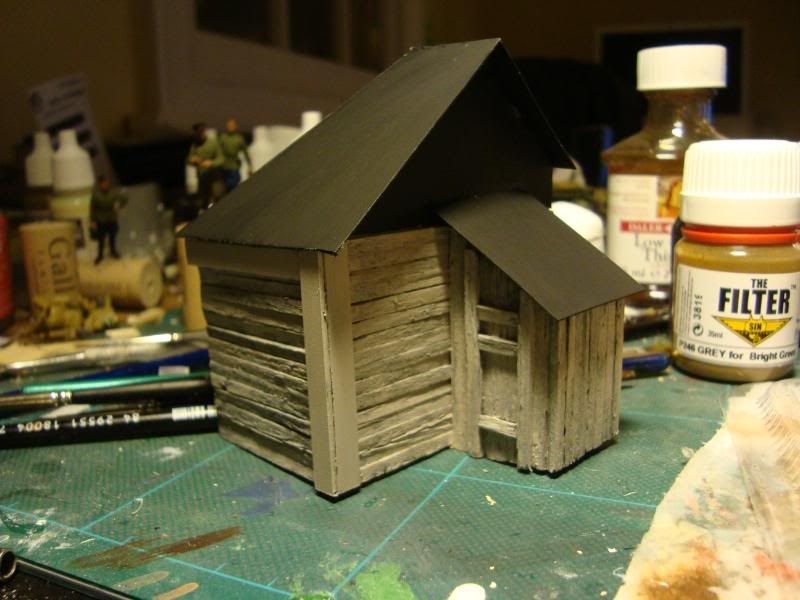
11330
Post by: Gundam-Mecha
Thanks for the comments guys. Llama, dont worry it will all fit, the base is actually rather big compared to the scale of the figures (Base is 12 inches by 11 inches). Also if you place things right you'd be suprised how much you can fit in. Heres some work on the Scratch built Farm house:  Based on this reference picture:  Some work on the other tankers, preparing the tank helmets, I plan to build these up and flesh them out some more tomorrow. 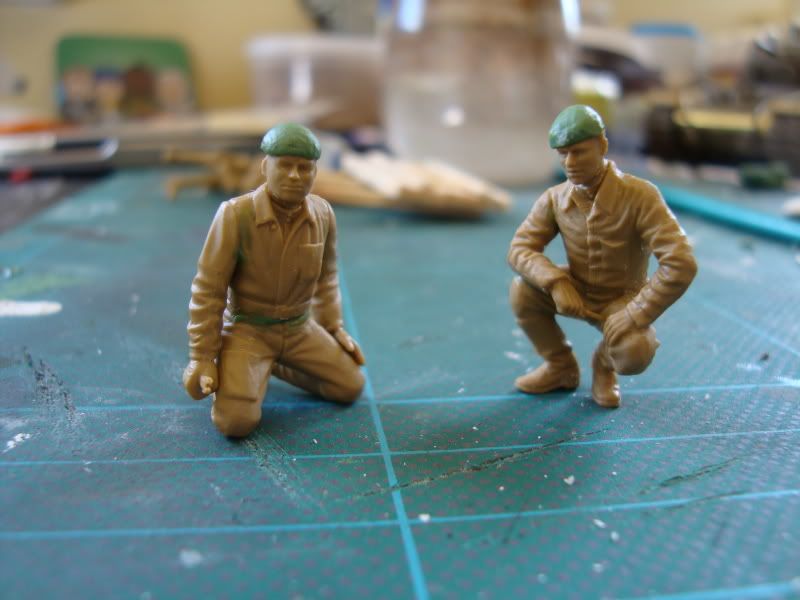
10890
Post by: Deff Dread red Edition
Whats that farmhouse made of?
Oh and maybe it is just my pc but the reference shot is not working.
11330
Post by: Gundam-Mecha
Thanks Deff, I've fixed the image of the reference picture now.
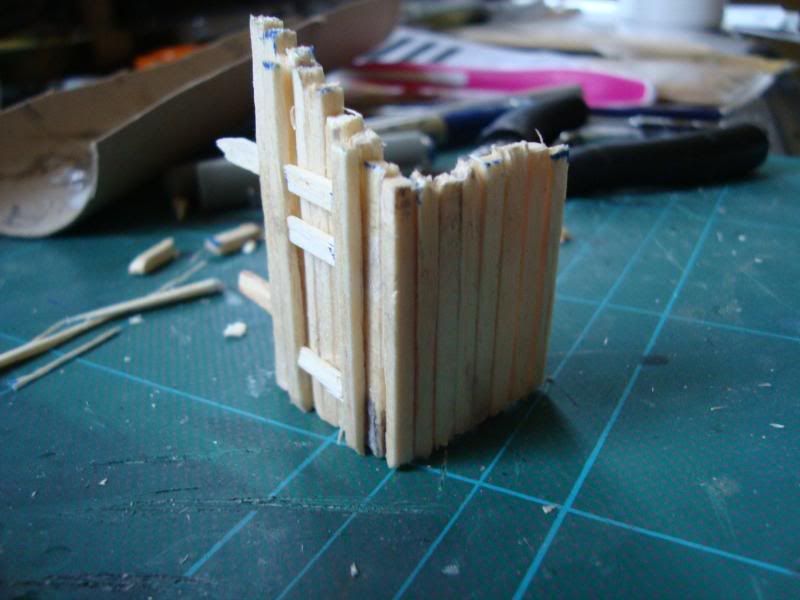
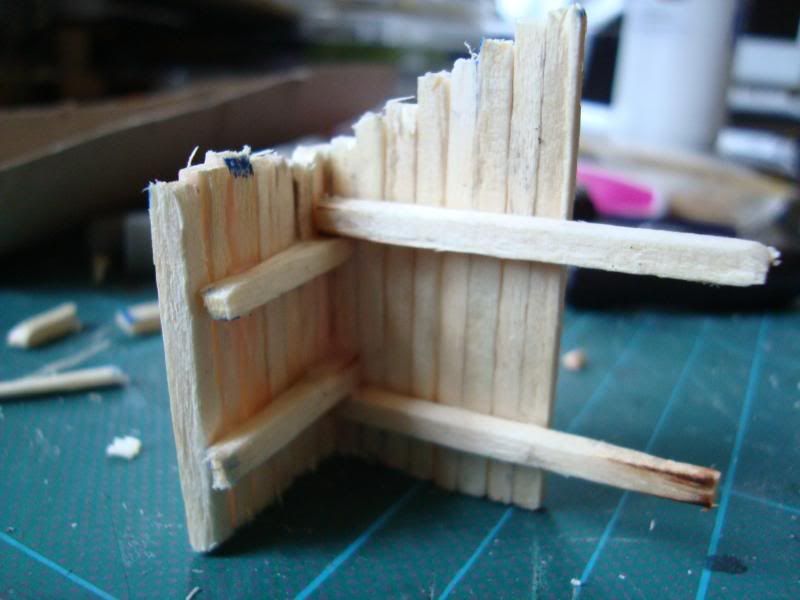
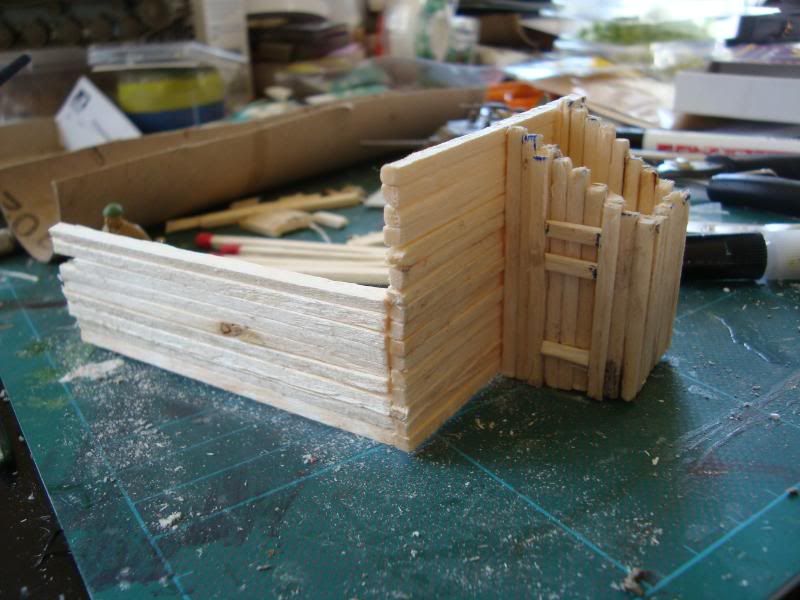
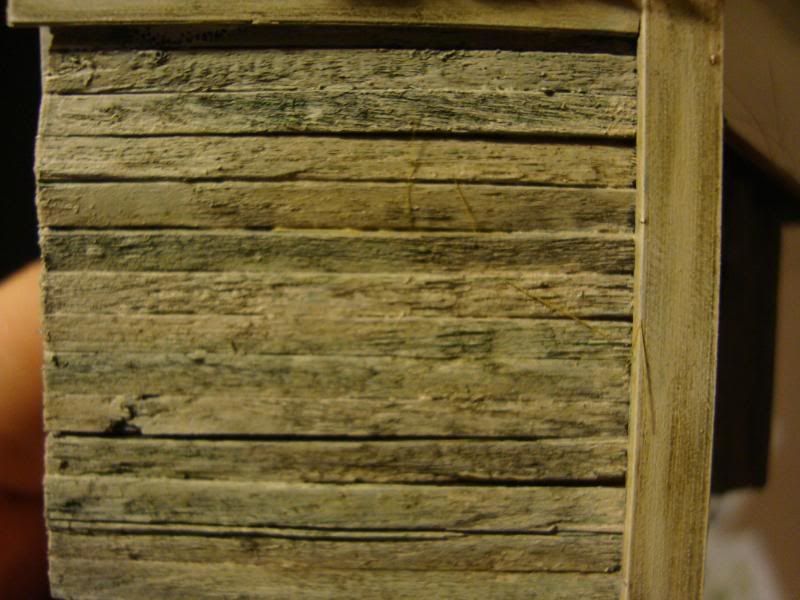
The farm house is being made out of match sticks. The extra long kind of cooking matches. They are thicker than normal matches and give a good length to work with. For the planks over the top of the wall this are match sticks cut in half to make thinner peices for external detail.
It won't be an entire Farm house but just a section cut at an angle near the edge of the board.
11330
Post by: Gundam-Mecha
Finally had time to get an update up.
I've been working on quite a lot of the diorama recently. The figures and GAZ 67B Staff Car are primed and undercoated and ready for painting.
I've also been working on painting the terrain and adding to the scenery.
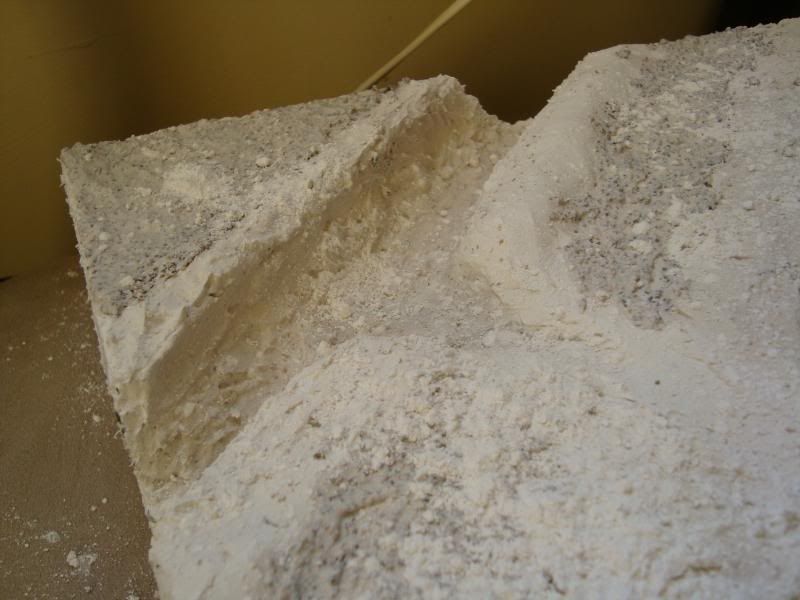
Following a really helpful point from a poster at Warseer I decided to change my machine gun nest. As the person rightly pointed out even though the dug out is shallower than the river bed, the water table would mean that the bottom of the machine gun nest would get very wet and have some standing water at the bottom. To remedy this I sealed the bottom of the dug out and put down some wood planks to help solidify the ground for the soldiers and soak up surface water (to a certain extent).
Not only did this allow me to deal with a logical and natural problem, but also let me add more detail and work to the machine gun nest to make it look a little more interesting.
Work on the scratch built farm house progressed steadily:
The scenic base:

I also tried various approaches to the weld seams on the front hull. I tried different kinds of epoxy putty, procreate and milliput but just wasnt happy with the result at 1:48 scale. It just didnt look as good as it does at the larger 1:35, so I decided in the end to just use the glue method, to apply an even bead of glue and let it settle and melt the plastic before making the weld marks with a scalpel blade.
In the end I decided that this gave the most subtle look and was the least invasive at 1:48.
10890
Post by: Deff Dread red Edition
Looking good.
One question(sorry if you mentioned this already),is the river bed going to be left empty?
And if not how are you going to make realistic looking water?
11330
Post by: Gundam-Mecha
Deff Dread red Edition wrote:Looking good.
One question(sorry if you mentioned this already),is the river bed going to be left empty?
And if not how are you going to make realistic looking water?
Hi Deff, the river bed is going to have water in it. I'll be using Crystal Resin to represent the water flow, it's fantastic stuff is completely transparent and sets hard. The only thing is that you have to add it at the very final stage once the ground work is done and all the painting finished, so there wont be any fishing in that stream for awhile!
10890
Post by: Deff Dread red Edition
I see hope to see it more soon,one more question.I see machine guns in the machine gun turret(the smaller ones I mean)so my question is more historical.What was Russia's standard troop issue weapon.
6633
Post by: smiling Assassin
If I'm not wrong it was the Mosin Nagant, then later the semi-automatic SVT-40? It didn't catch on during WW2, much like the G43 the Wehrmacht produced, came in too late for any measurable effect. The submachine gun was memorably the PPSH.
Mosin:

SVT-40:
PPSH:
 sA
sA
10890
Post by: Deff Dread red Edition
Thanks sA,bit of a history buff are we?
10086
Post by: Neconilis
Tada! http://en.wikipedia.org/wiki/SVT-40 http://en.wikipedia.org/wiki/Mosin-Nagant Those were the standard issue rifles of the Soviet forces by the time the War came to them. Edit: Someone hit enter faster than I... Though as a note the SVT-40 didn't come too late during the War, it was mostly production, cost and supply issues that kept it from fully replacing the Mosin-Nagant during the course of the War. It also had somewhat of a negative reputation early on which was carried over from issues with an earlier version, the SVT-38. These issues were fixed, but much like the M-16 in Vietnam they lingered and created negative opinions at times.
6633
Post by: smiling Assassin
 I like to think so.
I'm a bit better at heavy artillery than small arms, though.
sA
11406
Post by: Disjointed Entity
smiling Assassin wrote: I like to think so.
I'm a bit better at heavy artillery than small arms, though.
sA
General Eastern fron nut here. Not amazing in my knowledge but I can help out every now and then.
And you were bang on on the Small-arms sA
11330
Post by: Gundam-Mecha
Some interesting discussion here, and good points from Smiling Assassin and Neconilis.
It's also stated that Steel helmets were unpopular with Russian troops who saw them as a sign of cowardice. I've seen it argued that they preferred the soft peak cap, although I'm not sure how widely practiced this was. I would expect that lack of steel helmets would be down to supply issues, as red army troops often had a diverse and eclectic range of equipment that was heavily affected by lack of supplies and resources.
Don't forget the Maxim heavy MG, that was also very popular, as was the Degtyarev Pekhotniy light machine gun
10890
Post by: Deff Dread red Edition
Thanks for the replies,sorry if it is a little stupid of me I have never been one for researching the 2 great wars.(I don't mean great as in cool or good but in scale)I however as I am getting older find myself more "into" researching such things,but a bit more on the German side of things.
11330
Post by: Gundam-Mecha
No worries Deff, let us know if you ever have any questions.
One of the things that really made these projects fun for me was the research actually, one of the extra bonuses of military modelling!
If you are interested in the Wehrmacht there are plenty of great reference books by Osprey. From History of campaigns and engagements,, down to individual generals, and equipment.
10890
Post by: Deff Dread red Edition
I'll keep an eye out for them.
So how is the project coming along.
6854
Post by: InyokaMadoda
Just a stunning amount of skill, creativity and detail. Excellent work!
11330
Post by: Gundam-Mecha
@ Deff, I'm hoping to get base colours on the Staff Car and figures over the next few days, which will be really nice and give me a chance to get some actual models painted and on track. I've also finished the tank now and will prime and undercoat that this evening. I'm hoping now that the main part of the build is done that the other stages will shoot along quite quickly and that shortly you guys will all be able to see something that resembles an actual scene!
The only outstanding building stuff really are the tankers helmets on the remaining two crew men. I've done the base and the armature and need to bulk them out and finish them off with green stuff. The three Tankers are the only crew I haven't undercoated yet.
@ Inyoka - Thanks alot, I'm hoping that over the next few days progress will be quite quick and there will be alot more for you guys to see
10890
Post by: Deff Dread red Edition
Sounds good,I can't wait to see the officers painted uo.They really are very detailed minis and will look even more excellent with a good coat of paint.
11406
Post by: Disjointed Entity
Maybe you could add some of the Russian Combat Engineers?
(They're the ones with the single large metal plate on thier chests. I presume to deflect blasts when diffusing things, I'm not too sure)
Just thougt some of them as a diorama would be pretty cool next. Clearing mines or what-not.
Great work on the KV-1 so-far! And I really like the crew too.
11330
Post by: Gundam-Mecha
Disjointed Entity wrote:Maybe you could add some of the Russian Combat Engineers?
(They're the ones with the single large metal plate on thier chests. I presume to deflect blasts when diffusing things, I'm not too sure)
Just thougt some of them as a diorama would be pretty cool next. Clearing mines or what-not.
Great work on the KV-1 so-far! And I really like the crew too.
Those guys are cool, I've seen photos. I actually considered some Sappers but since this is set in Russian held defensive positions prior to the start of the main engagements at Kursk it wouldnt really fit.
Definately an idea for future projects though!
Thanks for the compliments on the KV-1 , I hoping to make the tankers better soon and have everything positioned how want it.
11406
Post by: Disjointed Entity
Can't wait for the final images!
11330
Post by: Gundam-Mecha
Managed to finally get some painting done on the GAZ.
Hitting the KV-1 shortly and hope to have some images up shortly.
Base colours and markings:
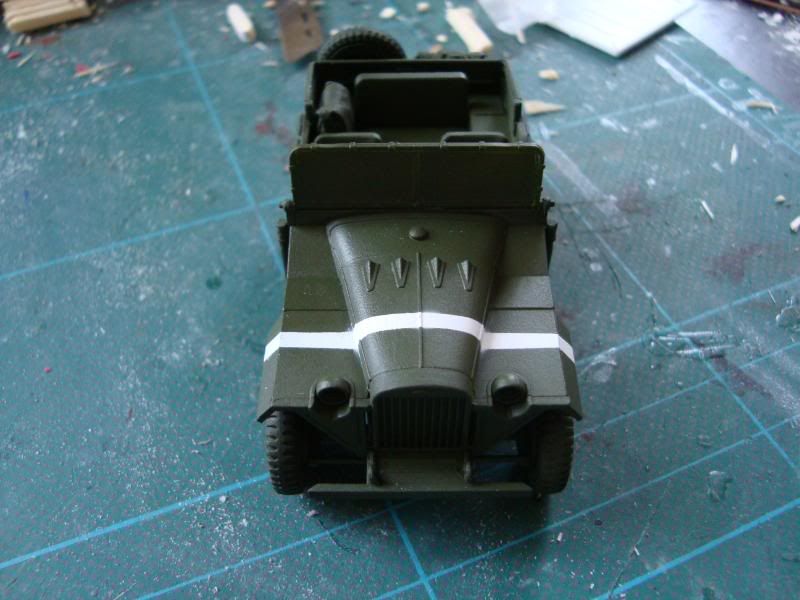
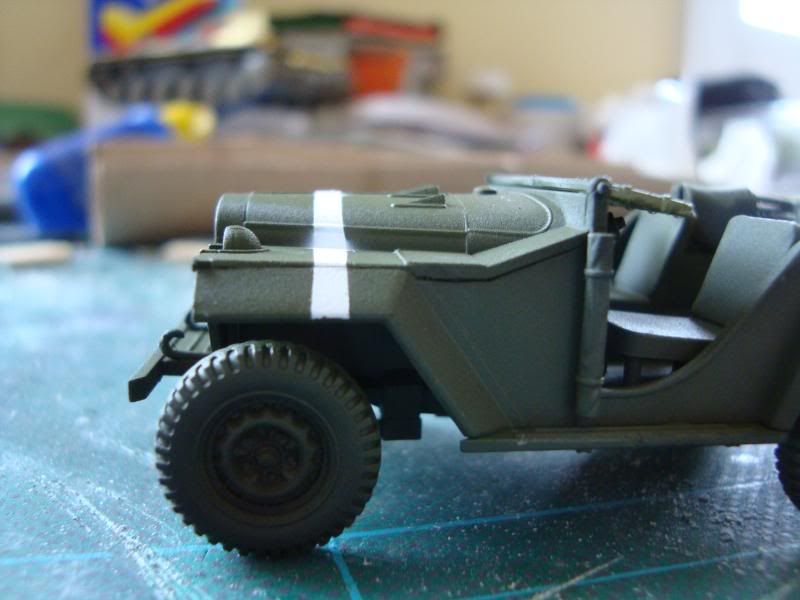
The masking tape worked really well for marking out the white stripe, theres a tiny bit of bleed on the curved edges but this can be tidied up later with very little effort. As you can see I also used it to protect the clear plastic windscreen. Leaving the edges exposed so that the paint would cover the frames. Using an airbrush to mark out the colour of the frames is much easier than trying to paint it by hand with a brush.
Windscreen:
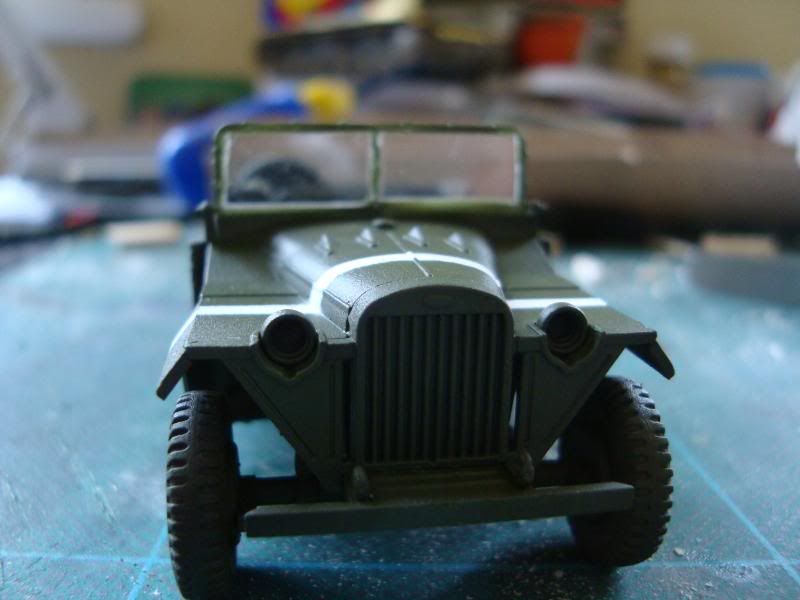
Once I had peeled the masking tape off it gave a nice clean finish.
Basic colours and decals:
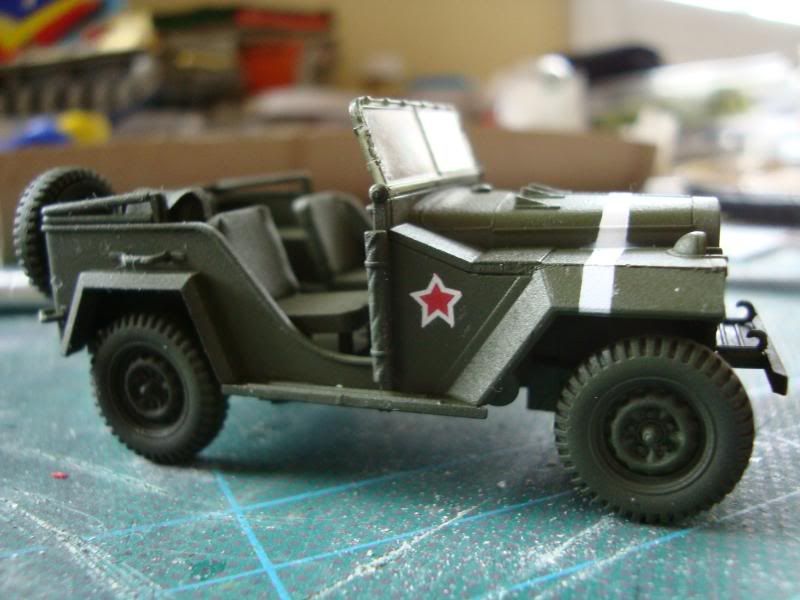
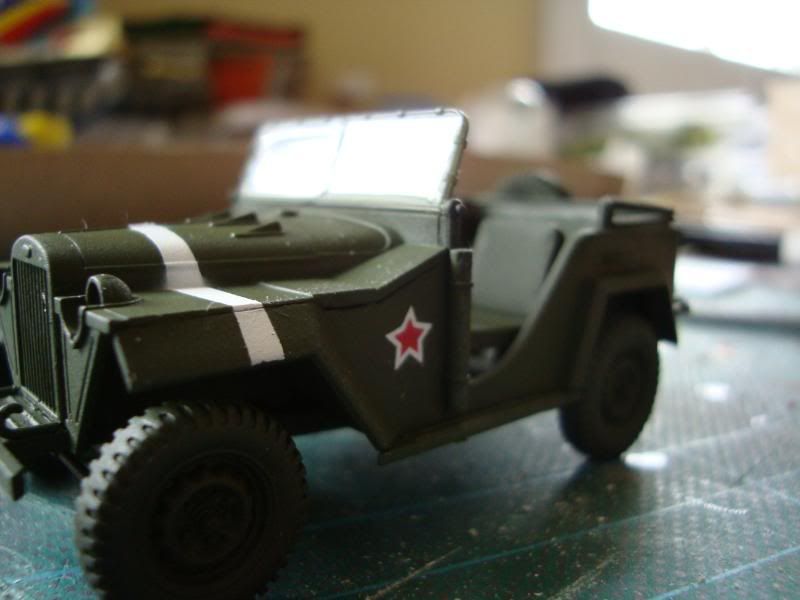
The Staff car is now ready for the next stages, filters.
10890
Post by: Deff Dread red Edition
Can't wait to see it finished.
On an off-topic note once more,I would really love to see a diorama of the presentation of the sword of Stalingrad(don't know if I spelled that wrong).
11330
Post by: Gundam-Mecha
Stalingrad would be a great battle to model, I've been considering either the defence of Stalingrad or the fall of Berlin as my next WW2 project.
A diorama of these battles would be great as it would allow me to model two factions (Red Army and German forces) as well as a ruined city scape.
Maybe when this project is finished
10890
Post by: Deff Dread red Edition
I am talking about when Stalin accepted the actual sword of stalingrad,maybe I have my history all screwed up though.
But yeah those two battles would be rather nice if kept to strict historical guidelines.
11330
Post by: Gundam-Mecha
You mean this story:
THE SWORD OF STALINGRAD
Ten months after the German surrender, Winston Churchill recognized the extraordinary suffering and heroism of the Stalingrad people. He presented the jeweled "Sword of Stalingrad" to the Soviet leader. It bears this engraving:
To the steelhearted citizens of Stalingrad, a gift from King George VI as a token of the homage of the British people.
Yeah that would be cool to see too! Tamiya do a famous generals box set but I'm not sure if it includes Churchill...
10890
Post by: Deff Dread red Edition
I just think it is a very nice moment in history to make a diorama out of.I saw in the last project you did that there was Russian writng,can you speak Russian?
6633
Post by: smiling Assassin
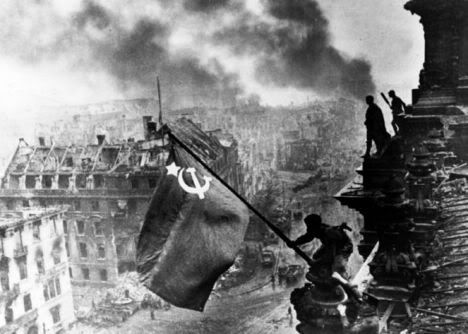
Fall of Berlin.
Dude.
If you do the Soviets hanging the flag from the Reichstag, I will be eternally indebted. The coolest thing EVER.
sA
11330
Post by: Gundam-Mecha
smiling Assassin wrote:Fall of Berlin.
Dude.
If you do the Soviets hanging the flag from the Reichstag, I will be eternally indebted. The coolest thing EVER.
sA
Haha thats sounds like a challenge Sir!
Automatically Appended Next Post:
I managed to get some more painting done this evening. It's rather late so the light is rather extreme, so apologies for the bad pictures.
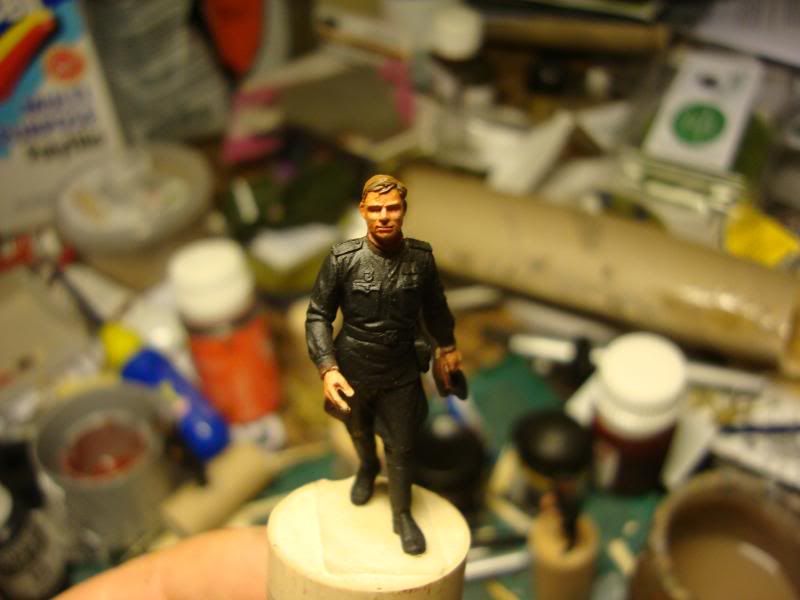
Officers: I decided to try painting the skin and faces first, i've seen this method used by other painters but had always worked in reverse before, starting with the uniforms and finishing with the faces. It made an interesting change and I think it's an approach that'll try again in the future.
I also managed to get some base coating done on the KV-1 but sadly had to stop before I could finish it completely.
 Automatically Appended Next Post:
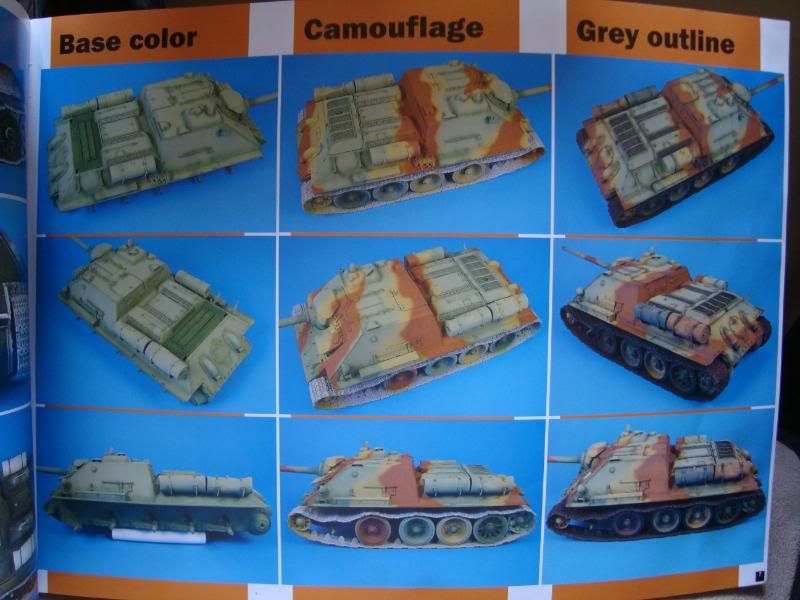
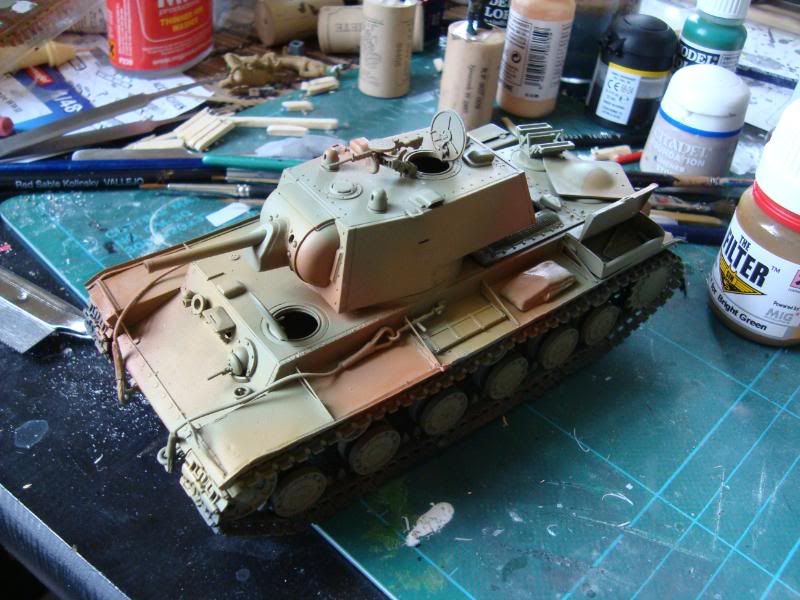
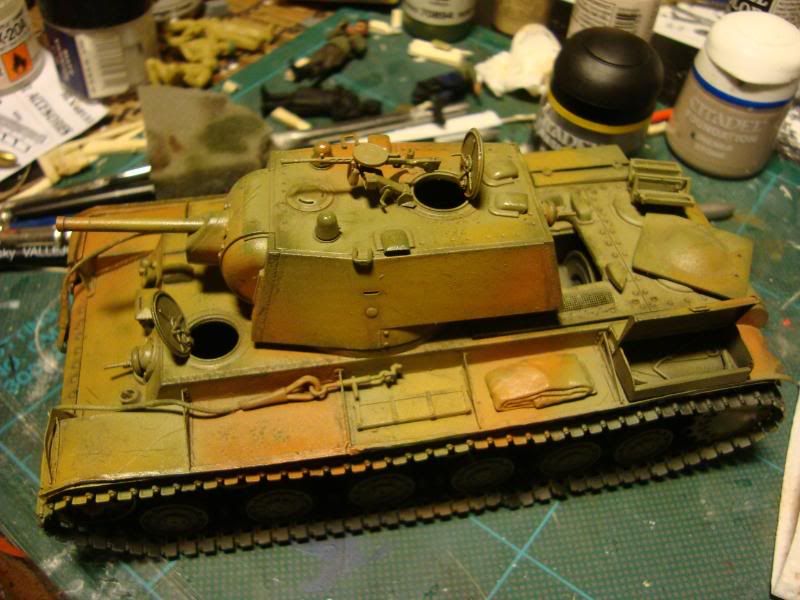
I've been thinking alot about the colour scheme for the KV-1 recently and did some more research. I didn't like the idea of just painting another plain dark green tank again, after all I just did this with the T34/76.
I also figured that something else a bit different with a more summer feel would be appropriate for the scene, and found a few different examples of camo schemes on KV-1's (hence the light base coat colour).
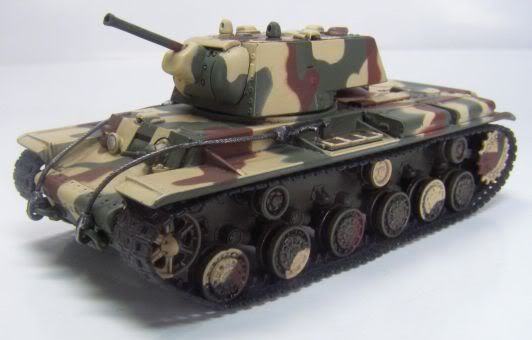
I especially like the three tone scheme, and saw a similar thing done on an SU-122 in Xtreme Modelling magazine.
11330
Post by: Gundam-Mecha
10890
Post by: Deff Dread red Edition
Looking good Gundam.I am liking the officers.Also the three tone scheme strikes me as the way to go with that tank.Those flowers are a nice little touch looks like you have got the whole base almost finished.
11330
Post by: Gundam-Mecha
Thanks Deff, yeah I've had a lot of positive feedback over on Warseer on the 3 tone scheme so I'm going to give that a shot. I like it because its different and interesting, totally unlike what I did on the T34, so it will be a chance to try some new techniques and effects.
Theres actually a whole shed load of work to go on the base! I wish I were nearly finished. To be honest I added the plants and clumps of grass last night quite late while I was watching TV just to get a feeling for how it will look and and to start off. I have to bulk it out a bit with more grass and shrubs, mostly along the river bank and in certain areas on the main field, as well as add loose leaves on the ground, ferns, and other bits.
I got some great paper plants from Frederus Rex yesterday and I'm planning to add those in near the water side and scattered across the main field. I can't really carry on with that until I have the farm house put down. Once I have all the features in place like the building and the vehicles I can decide where to place the rest of the plants and grass in a natural way.
The farm house is coming along well and I've finished the basic wooden structure, I just need to do the roof to finish it off and then paint it and attach it to the base. I plan to have some ivy growing up the walls of the farm house too.
After all thats done, and the MG nest and Tank barriers painted I can work on the crystal resin and fill the river.
10890
Post by: Deff Dread red Edition
Sounds good,get cracking!
11330
Post by: Gundam-Mecha
11953
Post by: Shellfishguy
Love what you did with the plants and wildflowers along the stream bank! Really enjoyed the previous diorama and this one seems to be shaping up even better. Its all those small details that really make the scene believable and a real joy to see. Keep up the great work!
11330
Post by: Gundam-Mecha
Thanks Shellfish! The Farm house is still quite WIP, but most else of the actual terrain is done now.
As I said to Deff there's still alot of filling out of the plants and vegetation to go, but edging closer all the time! I'm looking forward to getting to work with the Crystal Resin. I've never used it before so it will be fun.
10890
Post by: Deff Dread red Edition
I like the farmhouse thus far.Which kit are those flowers from?
11330
Post by: Gundam-Mecha
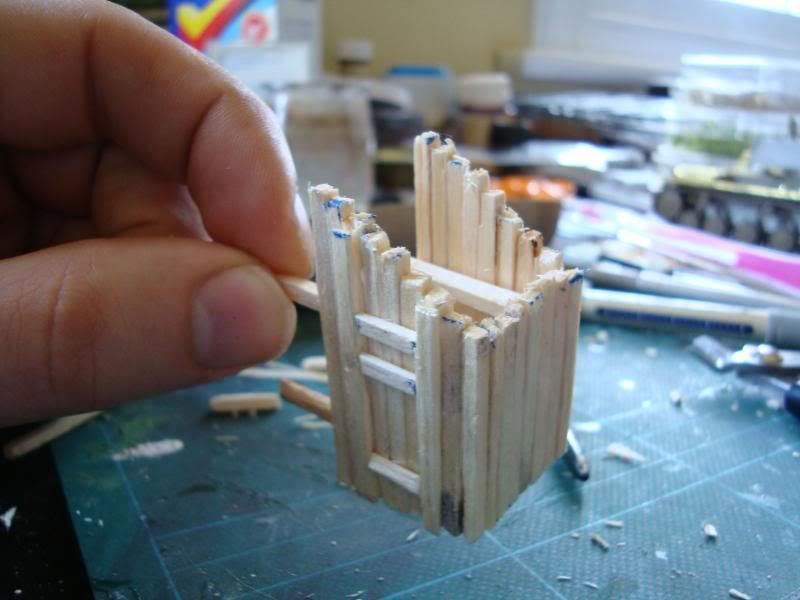
After some discussion with a poster on Warseer I decided that I wasn't happy with the corners of the farm house, so I added some planks to finish the edges with textured plasticard.
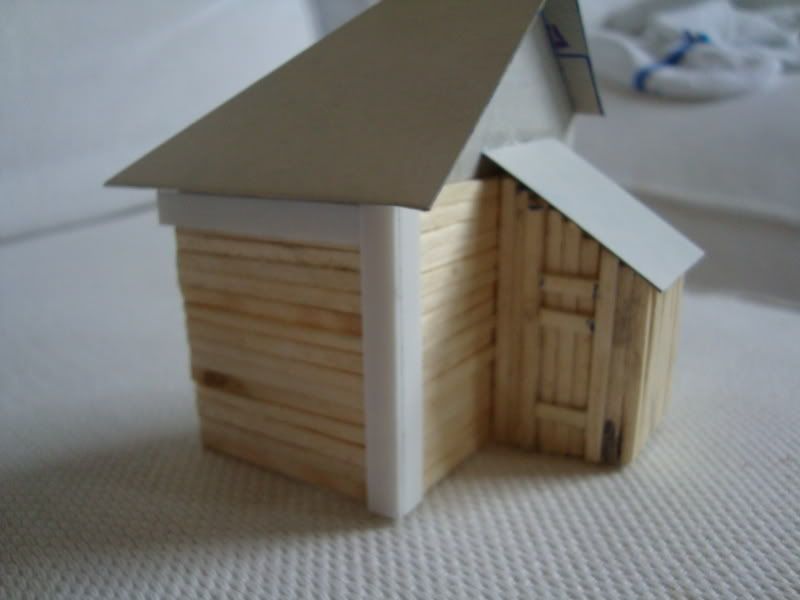
Looking at reference photos of wooden buildings I think it gives a better finish.
Deff - The flowers are from a German company called Fredericus-Rex. They have a brilliant range of scenic accessories.
1340
Post by: Northen
This blog is so cool. The whole project is coming along great, keep up the good work.
11330
Post by: Gundam-Mecha
10890
Post by: Deff Dread red Edition
Looking good.I am liking the farmhouse and the tank,keep up the good work.
11406
Post by: Disjointed Entity
Underneath the picture of the guy in blue Trousers, it said Russian General.
Just thought I'd point that one out to you Gundam.
looking great otherwise!
11141
Post by: perplexiti
Great camo man, looking really good.
1340
Post by: Northen
Great progress. I am shure that the camo will look ace once finished.
BTW, are the russian uniform pics from Osprey books? Have been thinking about getting some of them.
11330
Post by: Gundam-Mecha
Disjointed Entity wrote:Underneath the picture of the guy in blue Trousers, it said Russian General.
Just thought I'd point that one out to you Gundam.
looking great otherwise!
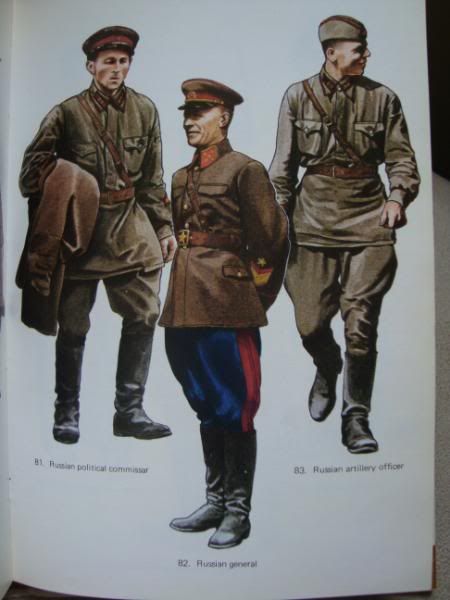
Your quite right, that picture is a Russian General, and if you look at the second example on the third picture your see that he is a Cossak Officer. Blue trousers with red stripes were very common in Soviet Uniforms, with various width and thickness of the stripe. For our purposes though I'll be using this example, of a Russian Tank Crew Officer from Kursk circa 1943:
His red stripe is a lot less pronounced than he General's uniform, being much thinner.
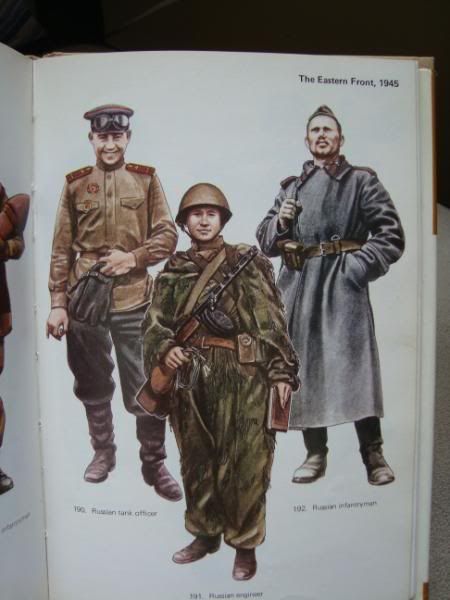
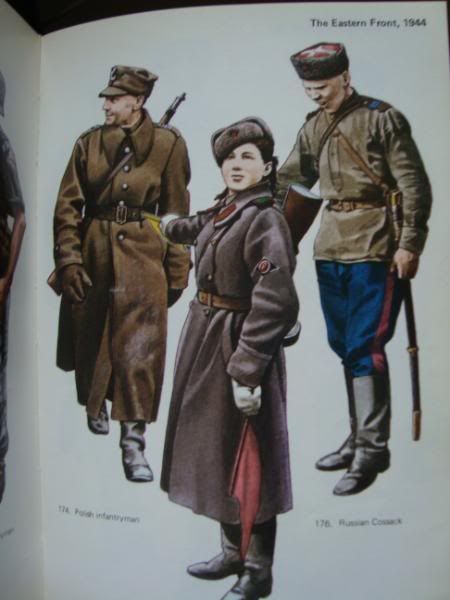
Northern as for the colour plates of uniforms these are from an old hardback book called "Army Uniforms of World War 2" part of the Blandford Colour Series published by Blandford. It's quite an old book, my edition was published 1973, I'm not sure if its still in press.
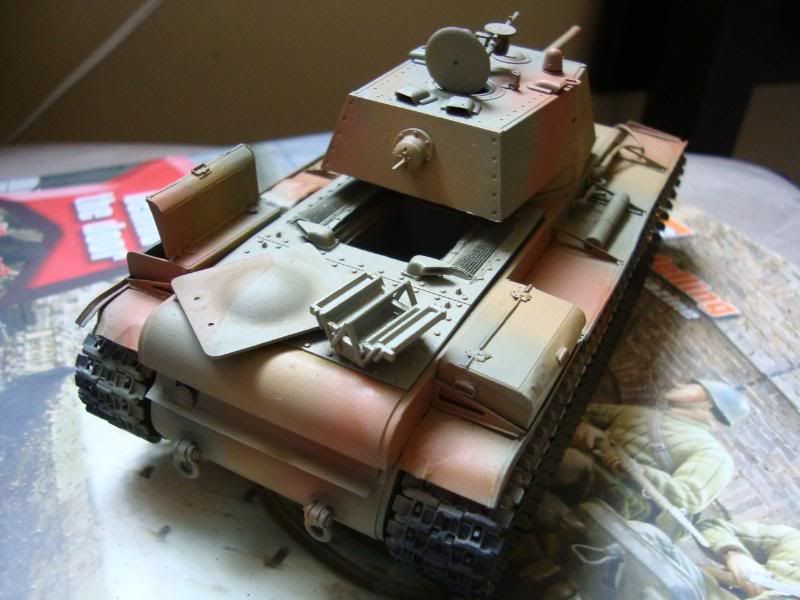
Thanks for the compliments on the Camo, I don't often do camo schemes on armour so it was very interesting for me to try. I'm quite pleased with the result so far, but I think it will look a lot better with weathering and paint chips etc. Right now its way too clean!
I also managed to do a lot more work on the KV-1 tonight, but the lighting is bad and doesn't show the detail nicely so I will take some more photos in natural daylight and post tomorrow.
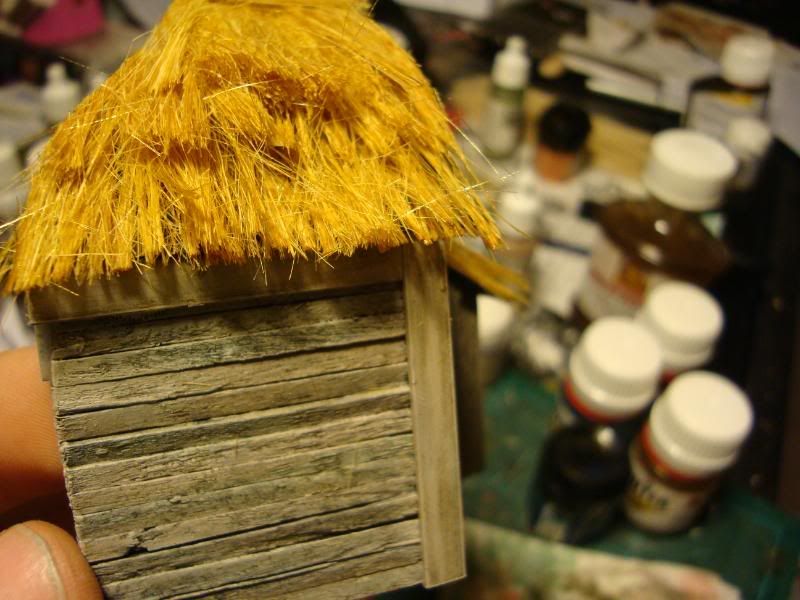
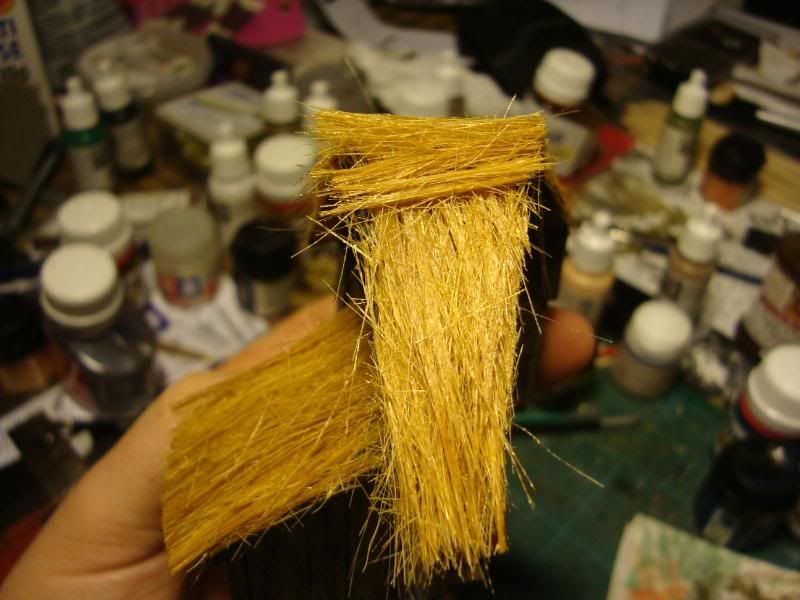
Did some more work on the farm house, distressing the wood and I also made a start layering the thatch roof. The Straw roof needs a
lot more work and is still very heavily WIP, but these images give an idea for the direction it will take.

471
Post by: davetaylor
That wood is looking great! Nice work GM. I think the thatch is going to look good too.
Cheers
Dave
10890
Post by: Deff Dread red Edition
Agreed,the wood is looking very nice.Also with a little more work the thatch will look very nice aswell.
11406
Post by: Disjointed Entity
Ahh, I stand corrected. I just didn't want your dioramam to be a bit messed up historically, seing as it's looking so good!
11330
Post by: Gundam-Mecha
Thanks guys, Deff this is just an underlay, I'll be adding layers cut shorter and layered over the top of each other to recreate the thatch look.
Thanks Disjointed, I know what you mean and actually soviet uniforms can be quite confusing! I'm glad your liking it so far. To be hoenst I havent been able to make the kind of progress I'd like. I only have little bits of time here and there at the moment. If I had a whole weekend free then I would get so much more done!
10890
Post by: Deff Dread red Edition
Sorry to hear you haven't had time to progress with the diorama.Hope to see some stuff soon. Automatically Appended Next Post: By the way heres just an intresting site,don't know how accurate it is but it is fun to look around on.
http://www.diggerhistory.info/00-pages-top-level/master-index.htm
11330
Post by: Gundam-Mecha
Cool, thanks for the Link Deff I'll check it out! Always good to see more resources!
10890
Post by: Deff Dread red Edition
Like I say I am not sure how accurate it is,but I do love there German WW2 Afrika Korps stuff.
11406
Post by: Disjointed Entity
I know what you mean Gundam, real life - the bane of us all!
11330
Post by: Gundam-Mecha
It's a nuisance isn't it?
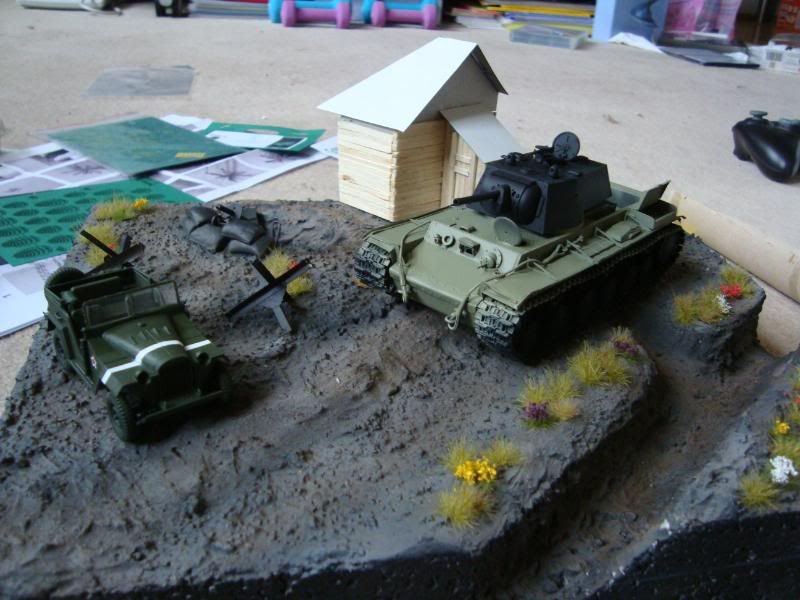
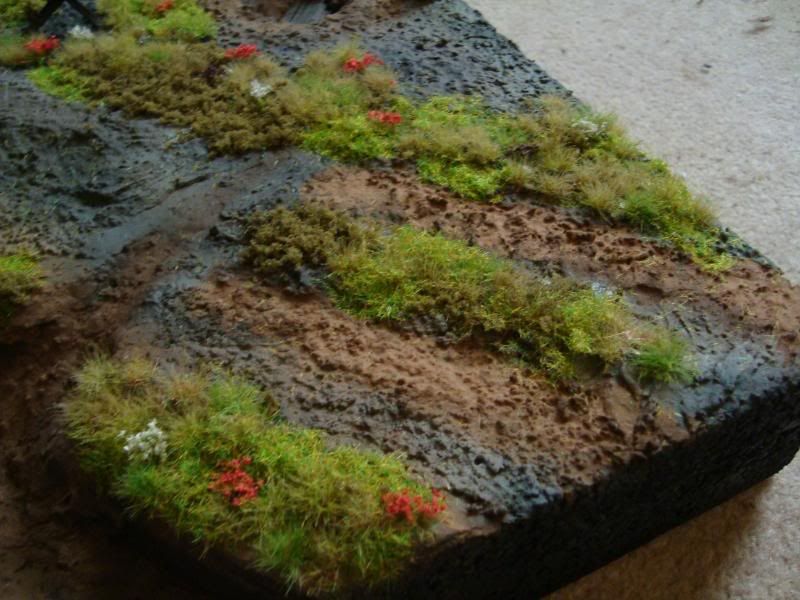
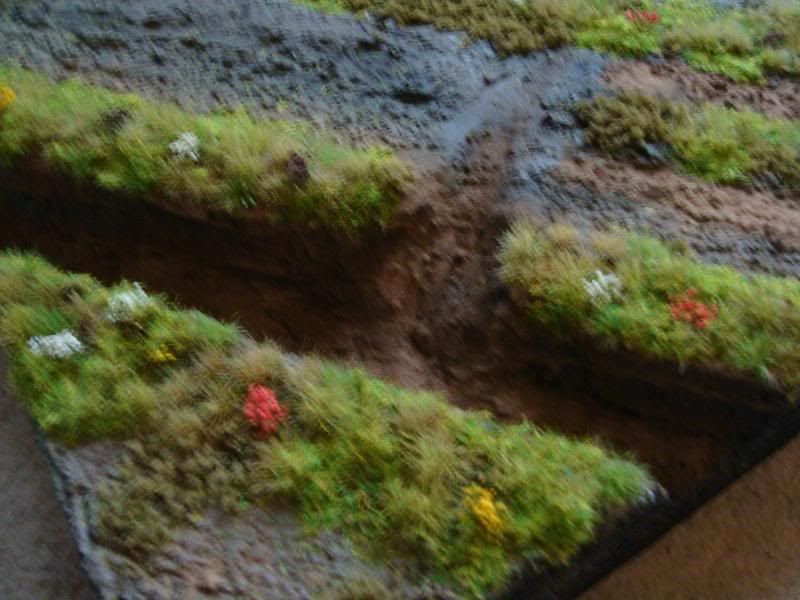
I managed to get some more work done on the dio.
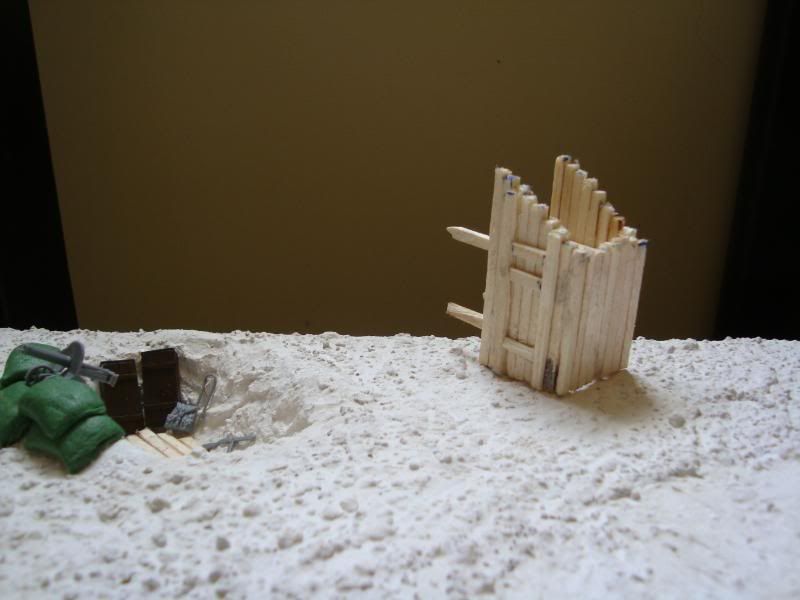
Worked alot on the base bulking out the grass and flowers to fill out the spaces a bit more and help landscape the scene, I'm not happy with the grass and plants, although I will be adding some loose leaves and ivy once the farm house is attached and blended into the base.
Heres a rough layout of where I am at present:
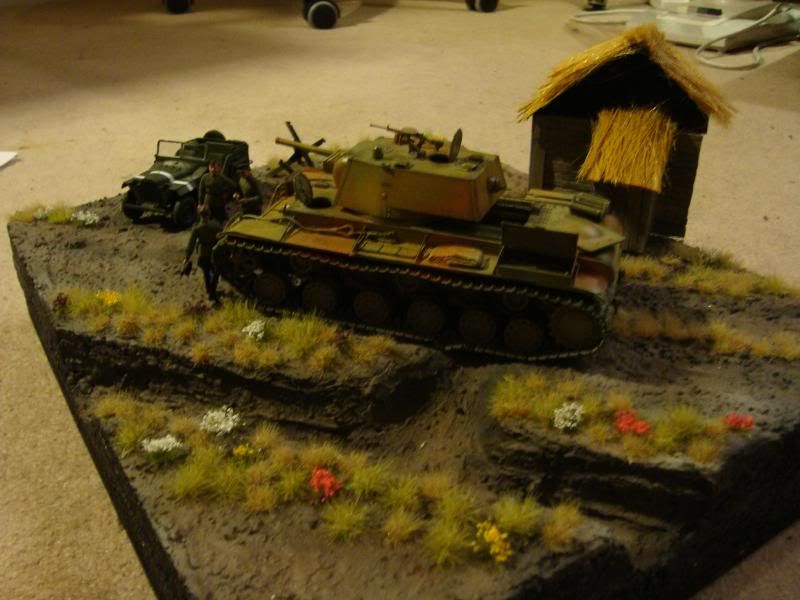
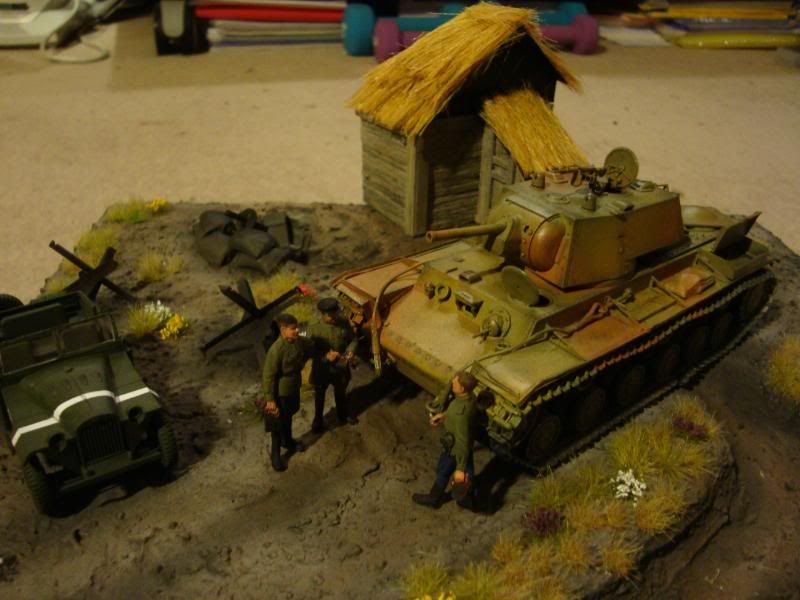
Scenic base Check list:
Finish off the farm house and attach/blend into the base
paint the machine gun nest
paint the tank barriers
model the river with crystal resin
add some paper ferns to the base and ivy t the farm house
Mount the edges with cut plasticard
I've also bulked up the farm house roof with some layers of thatch, strips of woodland scenics long brown grass were attached to strips of selotape and glued onto the roof, these were then covered with loose long brown grass cut to length and glued with watered down PVA. The whole roof was then sprayed with hair spray as a fixative. It's still a little scruffy and some edges need to be trimmed and tidied with scissors now that the roof is dry. I may also paint the roof, or at least weather it in some way.

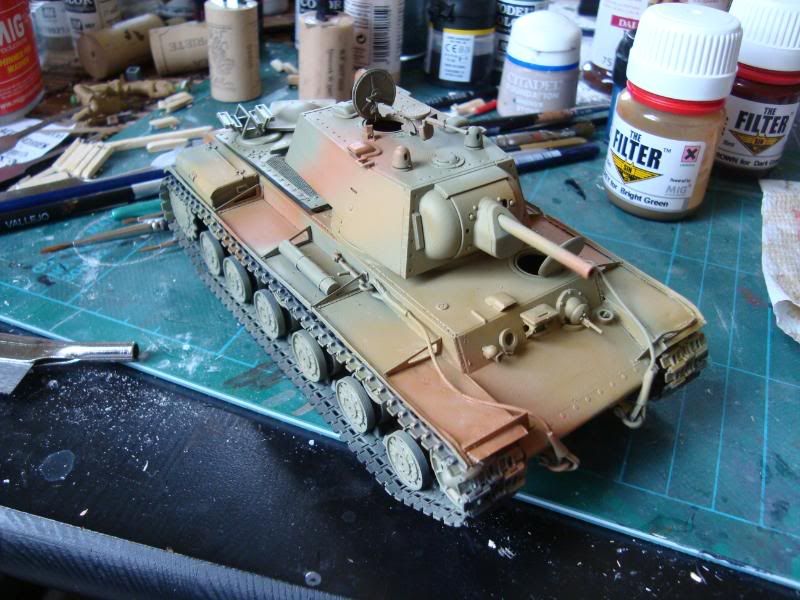
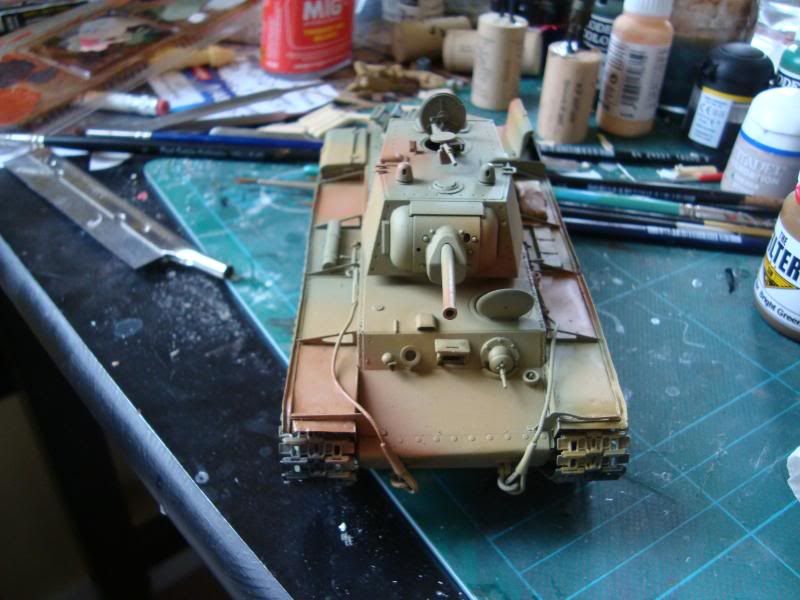
I also managed some work on the KV-1 adding paint chips and the first stages of weathering with some oil washes.
10890
Post by: Deff Dread red Edition
Looking nice,the scene is starting to come together.
11406
Post by: Disjointed Entity
How well do your crewmen size up against IG?
Cause I really want to get some Valhallans in Summer Dress, and they don't exist.
Also, looking really really good so far, I think the base and flowers etc, look good - not too busy, enough to be realistic.
11953
Post by: Shellfishguy
I think the thatch does need some weathering of some sort, the yellow is much to bright. The thatch I've seen seems to be a much more greyish-tan (if that makes sense).
The only thing that feels out of place to me is the farm house. The way its alone along the back of the diorama feels kind of odd. Maybe a tree or split rail fence along a section of the back to kind of enclose the scene some more? Probably just me, but with the one piece standing up like that, it accentuates how empty the rest of the back is.
11406
Post by: Disjointed Entity
Now you come to mention it, I kinda get the same feeling.
471
Post by: davetaylor
I agree, a fence would be a good solution.
Cheers
Dave
11330
Post by: Gundam-Mecha
Thanks for the feedback and the ideas guys.
I've actually been debating with myself if I should add some trees or shrubs of some kind near the far side. I've been playing with the idea of bulking the scene out, in fact the main reason I wanted to include a building was to give it something of a three dimensional aspect and give it depth.
I very nearly bought a tree last week...
Good news is though that I have some great fences and other components from my Tamiya diorama set. I've been thinking a lot about using these to add to the scene. The problem is that the limited size and space is a bit of an issue, and I wanted to keep the MG nest to make the scene more characterful and true to setting.
My concern is adding too much to make the scene look more aesthetically pleasing, while ignoring the realism of the buildings and fences and how they would be logically placed in a real life situation.
For example placing a fence along the back section takes a lot of thought and has to be done is a realistic way so that the line of the fence matches in realistically to the building (that is cut at a cross section).
After this weekend I'll try adding a few elements and shuffle things about. I agree with Dave though that a simple well placed fence would be the best bet to add to the "empty" space. Automatically Appended Next Post: I've also been thinking alot about the grass and vegetation and following some discussion with guys over at Warseer have decided to bulk this out a bit. I'm also going to blend in some brighter green colours for some variation between dry scorched grass and fresher grass.
I want to blend the clumps of grass with some static flock and also add some small vegetation from lumps of turf and foliage from Woodland Scenics. Like this:
Right now the grass sections are a little isolated and need blending in with some flat grass to give a more even effect.
I'm also considering adding a bale of hay somewhere in the scene, I saw it done on another KV-1 diorama (1:35 scale) and I really liked the effect.
11330
Post by: Gundam-Mecha
I'm finally back from Belorussia and have lots of great photos from there. Actually it ended up being a bit of a WW2 fest in the end. I spent most of my time visiting war memorials and monuments and museums with my relatives!
I'll be updating my T34 log with more photos later tonight, with pictures of me finally handing over the finished article, as well as plenty of photos of the real thing. Suffice to say he loved the present and spent ages playing with it taking the different parts apart. I don't think he expected it to be so detailed!
Now that I'm back I'll also be able to finally get back to work on this Kursk log. I also got plenty of great photos for info there. I didn't manage any photos of KV-1's but I did find an SU-152 thats basically a modification of the KV chassis. So alot of general images of the details were really great. It was also a fantastic opportunity to get lots of close up reference images of the finer details in person, such as the weld seams, the serial numbers stamped onto the hull, and various other bits and peices that arent clear on old reference images from the war.
10890
Post by: Deff Dread red Edition
Hey man long time no post,that link I sent you have any good reference material?
I also can't wait to see those pics,sounds like fun and I am glad to hear your relative liked the gift.
So anyway I can't wait for more updates.As for the idea of adding various types of flocking to indicate different types of grasses and such I think it sounds good.
OT:Would you happen to have any good reference material of the Afrika korps?I have been researching them lately.
8266
Post by: Wolf
This is looking really good ! I really really must do a diorama of some german stuff over my holidays this stuff has just inspired me !
11330
Post by: Gundam-Mecha
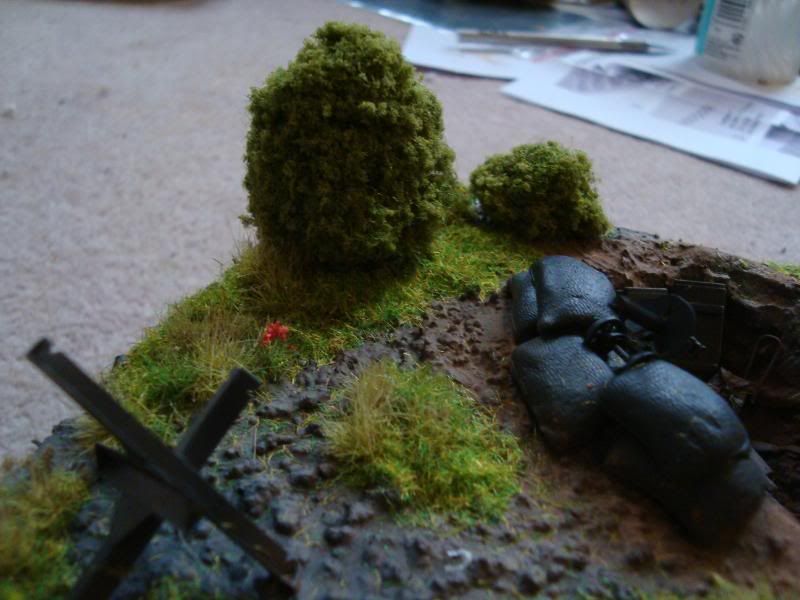
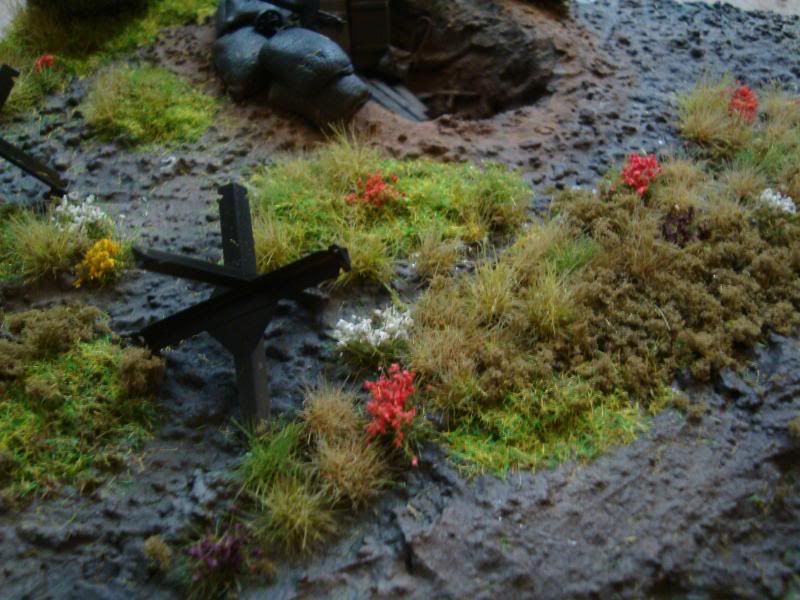
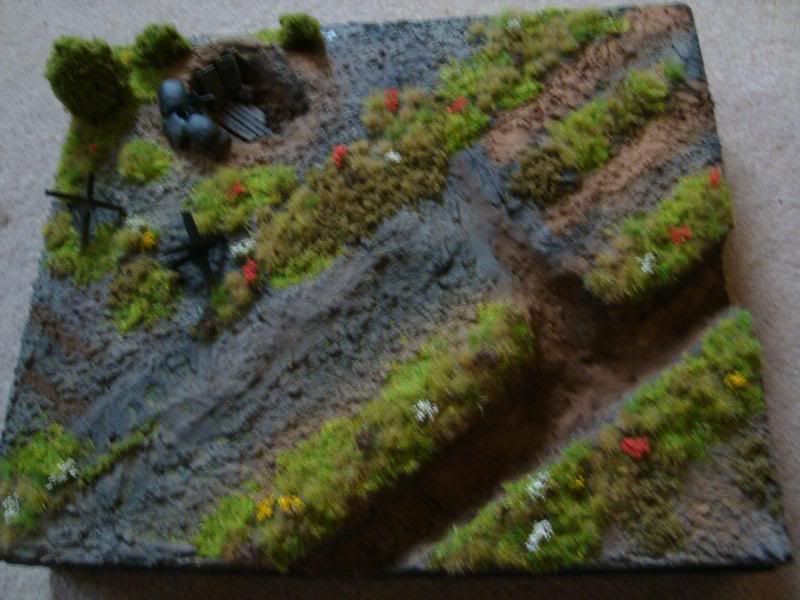
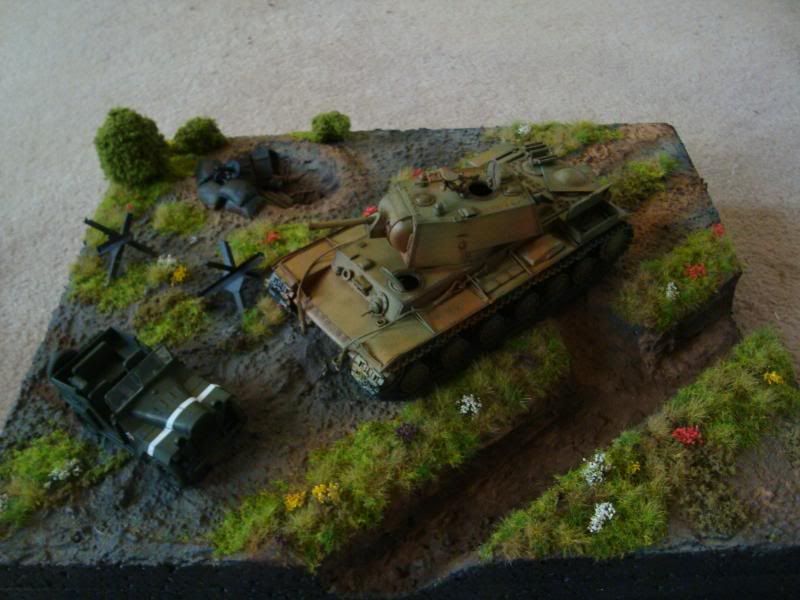
11330
Post by: Gundam-Mecha
8266
Post by: Wolf
Oooh That base is looovely very nicel done. It all has a nice, calm feeling to it, I likes this one alot.
11330
Post by: Gundam-Mecha
Thanks Wolf, thats the feeling I was tying to get across before the battle with the officers and tankers discussing the briefing.
A calm before the storm so to speak.
I've actually added the river water since this last photo, it now has crystal resin water in the river bed.
8266
Post by: Wolf
Niice  You know you are driving me close and closer to forgetting what debt is and making my own lol !
11953
Post by: Shellfishguy
Love what you did with the plants. The bushes in the corner look good and I think a tree off to the other side would be a good replacement for the cottage. I agree that the cottage felt a little out of place in this scene.
11330
Post by: Gundam-Mecha
Thanks guys!
Shellfish its funny you should say that, a guy on Warseer actually complained that the bush was not realistic enough. But to be honest at such a small scale theres very little you can do with a small bush or hedge, it's too compact to add branches etc. So I'm at a bit of a loss as to what I could add to make it look more "real"...
6633
Post by: smiling Assassin
Looks awesome as ever. I'm drooling a bit, still.
sA
11953
Post by: Shellfishguy
After all the detail you put into the base, people and especially the tank, he complains about the bush? Guess some people just need SOMETHING to bitch about lol. And you're right, at this scale, what could be done to the bush? It looks fine as it is, and really peoples attention wont be on the bush when viewing it.
|
|