11516
Post by: deadly chicken
Hey guys just realised im absolutely SH*T at painting so trying to turn that around. What i ask from you:
-Comment and crticism (try to make them as nice as posible)
-Links to tutorials or things that may help me ( I need them! )
-Posts about techniques or skills i should learn
-Anything else that may stop me sucking donkey ass.
thank you in advance,
DC
MODQUISITION NOTE: I HAVE ASKED HIM TO REPOST AS HE'S TRYING TO START AFRESH AND IS GENUINELY LOOKING FOR GENERAL TIPS ON HIS PAINTING AND I WOULD APPRECIATE SOME POLITE COMMENTARY. SOME DAKKA MODELING HELP WOULD BE APPRECIATED BY ME. deadly chicken could you posts some recent pics-this would be helpful in the furtherance of that-frazzled
11961
Post by: Ifalna
All you have to do is browse the forums themselves for everything you need 
Check through articles and painting and modelling tutorials, look through everything you think is relevent for yourself.
You can post images in any of the "rate this!" threads to get some good c&c, but asking us to go find the posts you need is a bit pointless, you can find them yourself and have them be more relative to what you are looking for.
14346
Post by: acullen626
Practice!!! o and buy some washes!!!! There great!
7013
Post by: Ifurita
I think you need to work on your brush control. I took a look at your Orc in progress and the first observation is that it's really hard to tell where one part stops and another starts. All of your colors overlap and blend in a bad way. The grimy look is fine, but it's based on some fundamental blocking and tackling.
11516
Post by: deadly chicken
??? I understood very little of that ifurita
7259
Post by: Deathmachine
he means you need more control in your brush strokes or maybe a smaller brush. your uruk hai was an improvement to the other models, it helps to slow down while painting making sure to paint in the lines so to speak. the less paint you use the easier it is but it does take a little longer but if you want better results its going to take a little time.
8021
Post by: JD21290
Chicken, what Ifurita is trying to say is that the colours tend to blend into eachother too much, there needs to be a solid break in the colours.
Post up some pics of a few different models and ill give some advice.
11516
Post by: deadly chicken
ah like lining in. only which colours should i use to define the areas?
8021
Post by: JD21290
It all depends on the colour of that area chicken.
For example: you would use shading on an orks skin to break away the colours between skin and clothing / weapons.
Its all dependant on the model and the colours you are using.
Washes and inks tend to do this job very well when it comes to higlighting.
hence why i rarely use any solid colours and instead paint in washes and inks.
12931
Post by: jackvolerich
I used to suck at painting but if you keep trying you will get good believe me it has taken a while of tryin and screwing up but it will pay off, but as that old saying goes practice make perfect.
11516
Post by: deadly chicken
indeed. now i have completed some test models please try to focus on the presented areas, as the rest is crud.
3
8021
Post by: JD21290
Heres a better way of explaining colour breaks:
space marine armour is a good model for playing about with.
There are a few ways to break colour, otherwise (blood angels for example) we would have a solid red model, which tends to cause loss of detail.
Base colour: Allways the best start 
just simply put on the colour to cover areas that will be red.
Shading / details: a red wash or ink (of a slightly darker red) will bring out all the details and areas to help break up the colours.
Details: highlighting is the best step, simply use a small amount of paint around edges of armour to pick out raised areas.
this will give the model alot moer detail and define the colours even more.
On black models: for models like legion of the damned or black templars you will need to pick out the armour to stop it looking like a lump of black paint.
you can either highlight the armour (dark grey on black) or, you can use a very light drybrush of grey to pick out the details and raised areas.
hope some of that helps, if not, take a peek in the tutorials section on here, plenty of great ones that im suer will help you.
11516
Post by: deadly chicken
already scoured the tutoril page
7766
Post by: Anti-Mag
Hmmm; Chicken, we are here to help, but this requires some initiative and effort on your part too. Don't get exasperated; it will take over a year for you to become better. Stay calm, because your excitement seems to affect your literary skills too; this is a forum, not a random text to a friend.
One of the first things I learned about painting a model was something I will call ''sequence of colour''. The most common mistake I see by newcomers to the hobby is them trying to paint every little detail seperately. For example:
Little Johhny buys his first Space Marine boxed set (another common mistake? I'll leave that for another thread). Wanting to paint them as Blood Angels, he does the following.
1. Paints most of the armour red, but stays away from details such as guns, eyes, shoulder pad lines.
2. Picks a different colour for each detail, and tries to paint them on seperately. So we get a wobbly yellow line on the shoulder pads, a bolter forged to the marines hand through use of boltgun metal, etc. Oh dear, what a mess.
Apart from the poor marine looking like he's been fighting on a volcanic paint world for a month, that's an expensive model down the drain; most likely beyond the Emperor's salvation. He has gone to the great pallete in the sky.
The most important lesson I learned in painting is that when you're new, your basecoat is paramount. For the Blood Angel example, the best thing to do would be to paint the whole thing red, guns, eyes, even the base if makes things more simple. Then gently work a wash into the recesses of the model, this will make your model twice as good in about 23 seconds.
There are so many techniques out there, and I can't be bothered to list them all here. Also, calling people nasty names is a sure fire way to get laughed off every topic that you create.
1.You do suck at painting.
2.You do need to stop being so sensitive about it.
3.You will get better if you are patient.
The first model I ever painted was a Space Marine in the most uninspiring pose imaginable. I painted him Goblin Green, with Sunburst Yellow shoulderpads and brown knee pads. This was not the point where I thought I could make money off of painting. It was where I thought this model looks as if it's Stevie Wonder's GD entry. I need to practice and revise.
11516
Post by: deadly chicken
lol. dont get the point of the story. I dont do that. I paint all of it grey then pick out details. which model are you talkin about and are you a rapist. LITTLE JOHNY?!?! WTF?!?!
11961
Post by: Ifalna
/facepalm
11516
Post by: deadly chicken
he he just me being an immature gimp! ^.^
7766
Post by: Anti-Mag
deadly chicken wrote:he he just me being an immature gimp! ^.^
Well, you're good at one thing.
I spent a good ten minutes writing that previous post in the hope of you finding it easy to read and useful. Needless to say I won't bother again. So far, in my Dakka history, you are the only person to have ever laughed at advice, and yet you need it more than anyone else on this forum. By a long, long way.
Good luck with the painting, and puberty in general.
14055
Post by: 31rls31
anti-mag is correct you cant treat those that are trying to help like dirt,or name calling,youve asked for help and we would all like to help.Use the advice your given and more of us will help,other wise anti-mag is correct in what he said so good luck
14070
Post by: SagesStone
I find that what helps best is to paint it so that you're happy with how the model looks yourself. Eventually trying to beat your best model. Everyone has their own technique of painting, eventually you'll find yours and will improve it overtime. Becoming good at painting requires three things really; patience, practice and experimentation.
10345
Post by: LunaHound
Best way imo DC, is to replicate a photo of what you want to paint.
80% of my painting messing up is when my mind blanks out when im doing my own color scheme ( i dont plan ahead for my own armies T-T )
I think it'll make BIG difference ( works for me )
10761
Post by: karmaiko
Ifalna wrote:/facepalm
qft Good luck kid, you obviously have a lot to learn about the world.
703
Post by: Dice Monkey
deadly chicken wrote:already scoured the tutoril page
Honestly I would pick up some of the reaper triad paints, they designed them specifically to work together in a paint by number fashion and you can simply apply it as shade, base highlight until you get a feel for painting. Then you can start experimenting with washes, mixing colors and all the other tools and tricks available. If all else fails pay Iörek large sums of money for lessons.
14949
Post by: thesoupdragon
DC,
Try not to get too downhearted and try not to take criticism like it's a personal attack. You've asked people to be as nice as possible when giving C&C, but unfortunately by its very nature, criticism can sometimes sound harsh and is sometimes hard to accept. It's only human to feel defensive about something that you've created, but poeple are genuinely trying to help you out.
My advice is to spread your net as wide as possible for help and advice. Try other forums, youtube and above all, local game stores, gaming groups or even friends who are experienced in painting. The latter is probably the best, because as much as you read about other peoples techniques, it cannot replace seeing how someone actaully does something on a model and having them there with you to show you the ropes in person.
I'm afraid that as many other people have pointed out, there is no quick fix when it comes to learning a skill like painting, it takes time, effort, and hours of frustration but if you stick with it, you will eventually reap the rewards. Take your time, paint, paint and paint some more, and you'll begin to find working methodologies that are right for you and give good results. When I started out I rushed to finish everything and made a pig's ear of my models so I took stock, slowed down and went at it stage by stage with help and advice from friends and forums.
We've all been there at the start, and we're all still learning - it's an ongoing process.
Now advice on your pictures above. I would say that painting robes and cloth is the most difficult thing I have tried to do as washing does not necessarily catch all the shadows. As pianstaking as it is, you need to layer and blend successively lighter tones out from a dark bascoat in the recesses. This is a pain, but spending the time to do it can really make the difference between a model that looks mediocre, and a model that looks dynamic and alive.
I quite liked what you had done with the marine. You seem to have picked out the detail on the helmet OK. The only thing I would suggest is you might need to clean up the white a bit afterwards to make it look nice and crisp. I asked advice on how to do just that in an earlier topic and time and again people suggested a wash followed by a white retouch.
My final advice though would be to concentrate on getting the basics right first and then concentrating on more advanced techniques/high level detail. It's amazing how good a model can look with a basic, but well executed paintjob.
Hope this helps and stick with it.
tsd
6609
Post by: Fresh
Anti-Mag wrote:deadly chicken wrote:he he just me being an immature gimp! ^.^
puberty in general.
epic.
I CANNOT STRESS ENOUGH HOW IMPORTANT UNDERCOATING IS.
well i guess i can show you a technique called highlighting, i do this to my marines metal by doing this technique, looks quite good (boltgun metal, badab black wash, highlight of chainmail.)
for example painting an Ultra Marines armour ( blue )
i would base coat black
then paint the armour blue
after it dries paint the armour the base colour with a slightly lighter blue colour (example regal blue 50.50 ultramarine blue) this gives the armour more depth into the model
you could leave it as that but you could continue on further continuously adding a light colour to the armour. this effect is called highlighting and can be extreme or very weak.
a good example of highlighting (other techniques) is shown by a great telion painted by GD
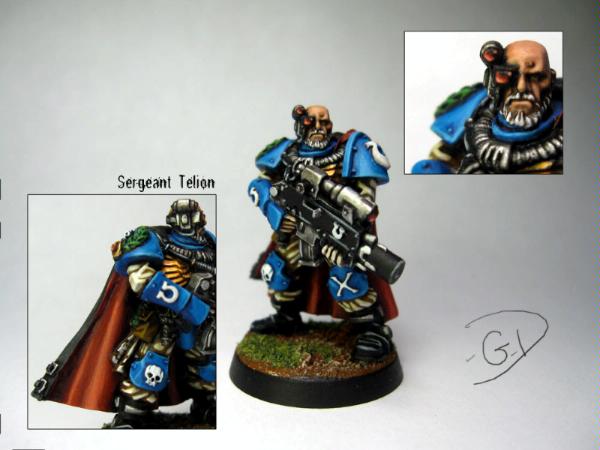
notice the gloves, neck guard and shoulder pads for the highlighting technique. good luck and i HOPE this makes any sense.
if anymore experienced painters then me could put this better, please edit
83
Post by: ZandrisIV
Sites I've found useful when I was learning to paint:
http://www.jenova.dk/
http://www.paintingclinic.com/
http://www.coolminiornot.com/
If there is one thing I can find to compliment you on, it is that relative to your painting skills, you have a decent ability to freehand. This would suggest that your brush control is actually pretty good, merely that you're having trouble deciding how to put to plastic rather than lacking the ability to paint at all.
Some general tips:
1. Always thin your paint, at least a 1:1 paint:water ratio.
2. Always undercoat, a black undercoat is actually easier to deal with than white, especially on 40k models.
3. Have a lot of patience. You need to take your time with painting. Very few of us have the ability to both paint fast and make it look good, and you should learn how to do the latter before you think about the former.
Now, for good practice:
1. Get a generic space marine model. The plainer the better.
2. Undercoat black.
3. Try to paint each individual armour segment a nice solid colour while you keep a really thin line of black undercoat between it and the next segment.
4. Observe carefully how your paint flows and layers, and how multiple layers of paint will build up to give you a good, solid colour, even on black.
5. Practise highlighting the edges. Mix up a lighter shade of your basecoat, and then paint a thin line on the edges of the armour plate, as well as the raised ridges.
6. Repeat until you're happy with it. This is basic "eavy Metal-style painting".
11516
Post by: deadly chicken
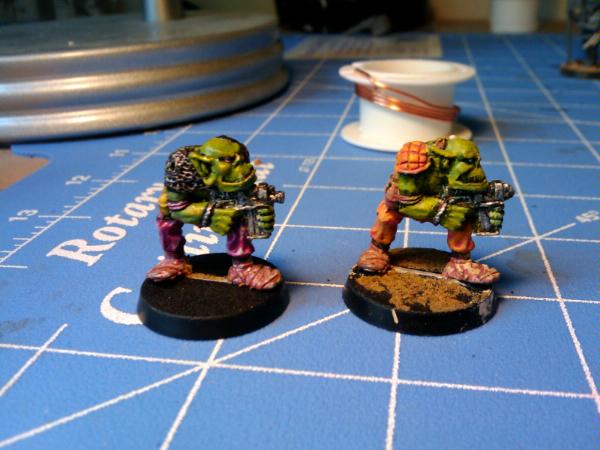
Thank you for all the advice and the websites.
Got some washes today. thought delvan badab and thraka were my best bet.
tried them out on a WHFB orc. here he is:
2
10345
Post by: LunaHound
Picture is way too dark , light source is from wrong spots.
DC one main thing to remember is , the light should be around where your eye is. If the lights are behind the mini and at the side of the mini , where do you think will be lit up? Behind and the side of mini right?
In other words the light source should always be behind you when you take pics.
14571
Post by: gretar
i must agree with a lot of things here 
You really are terrible at faking/being thankful
Your paintjobs are extremely bad
You arent paitient enough
And finaly , some of your pictures are too dark
But i would like too help im sending a PM now about some techs and tips you might whant too use
14346
Post by: acullen626
Form what i see that looks like an improvement! from those other things!Reminds me i still got some black orcs to finish up.Think you need to photograph in a better lit area though! Apart from that looks good!
11807
Post by: freaky angel
Take your time. That's the most important thing I reckon. Remember my skulltaker? That took me TWO WEEKS, using every second of my spare time-I don't even remember sleeping...
Another thing is to remember that washes darken the whole model, while highlights brighten it. So if you're doing an orc(k), or other dark model, washes are the way to go, but equally, if you're doing something like an eldar, try and leave the washes alone.
One last tip to finish off-if you get white dwarf, read all the masterclasses til you know them back to front and upside down. They come in really handy. Sorry to go on about it, but the aforementioned skulltaker has techniques and colours from about four different masterclasses.
That's all I can think of off the top of my head. Good luck!
11516
Post by: deadly chicken
Thank you everyone! (this is not a fake) Sorry about the ultra-terrible ork pics. I have some better ones. Enjoy:
3
8021
Post by: JD21290
Now that looks 1,000,000,000 times better than your other models, the simple use of washes helps improve painting very quickly.
once you have washes a model then its allways good to finish it by highlighting the model.
for example on the banner:
skulls - highlight the most raised areas with bleached bone, that will help add to the overall look of it.
the sun glyph - a quick highlight of blood red around the raised sections (eyebrows, lip etc etc) will help loads more, could allways pick out the teeth in the same was as the skulls have been done.
but this is a vast improvement.
12931
Post by: jackvolerich
See practice makes perfect. Washes really are a great way
to improve a bleak model. good job on the Black Ork.
11516
Post by: deadly chicken
^.^
I've got a rider of rohan, a dark angel aaaaaaaand a high elf on the way!
221
Post by: Frazzled
That indeed looks better.
11516
Post by: deadly chicken
OMFG eyes are so tired!
first day of contacts. 3 hours of painting does not help.
12996
Post by: gil gerard
The orc you did looks muuch better than your earlier stuff. Just keep trying different things till you find an approach that works for you. The tutorials in WD are pretty good, but the Dakka tutorials are generally much better. I don't know how long it takes you to paint a figure, but try takeing your time and not rushing. When I first started (many years ago), I would paint 60 or more figures in an evening; of course they looked like sh*t when I was done. I try not to do more than five in one sitting now, or sometimes just one,if it's a character model. I'm nowhere near as good as a lot of the painters on this site, and I have years of experience on you. So try not to expect too much from yourself too fast. If you pressure yourself, you aren't going to enjoy painting and you will wind up frustrated and quitting. Remember, this is something you do for fun, try and make each figure look better than the last one and above all, have fun doing it.
6209
Post by: odinsgrandson
deadly chicken wrote:Thank you for all the advice and the websites.
Got some washes today. thought delvan badab and thraka were my best bet.
tried them out on a WHFB orc. here he is:
This is an improvement over your previous paintjobs.
I teach people to paint usually by sitting down with them in the game store and walking them through a mini- the techniques get a little more advanced as the mini progresses. Now, I can't really walk you through a whole mini and give you criticism as you go, but I can give you a good idea as to what I teach.
Step 0- Choosing paints- My pupils can often just use my paints for their first mini, but you're going to have to use your own. Each color you want to use on your mini should be represented by two paint bottles, and possibly an ink pot. The two paints should be a darker paint and a lighter version of the same color, or some other color to mix with your first paint. Also, whenever you are using a color, you should mix just a little water into it. This watering down of your paints helps keep them from covering up the details on the mini.
Step 1- Undercoat. I always have my pupils undercoat in black, it is far more forgiving to a new painter, and overall I prefer the black to anything else. Undercoating is simply spraying the mini down with black primer- I suggest Duplicolor's Sandable Black Primer- you can get it at automotive shops like Checkers (note, get the Duplicolor sandable primer, the other stuff doesn't work as well).
Step 2- Coloring within the lines. At this stage, you can lay down your base coats. Paint the whole mini in colors darker than what you want the mini to end up looking like. The objective here is to have each of the areas show distinctly from one another, and not to get the paints to bleed into one another. One of the best ways to do this is to leave a little of your black undercoat between the different areas (this is a type of "Blacklining" and it helps keep colors distinct, and helps the mini "pop").
Step 3- Inking or washing for shading. You don't have to use an ink on every color that you use, but it is often very helpful. Ink washing is necessary with most metallic colors, but other colors can also benefit. Remember to water down your inks. The purpose of ink washing here is to shade areas that should be darker, so you can pay special attention to darker areas.
Step 4- Highlighting- Start with your base color, and mix in a little of your highlight color, and start highlighting up. Pick the areas that are closer to the top of the mini, and make those areas lighter. You can do this in many stages, and it works best that way. Highlight up with one color, then add a little more of your highlight color and do another layer.
- a simpler version of this is to get two colors that compliment each other well, and just paint the uppermost tips of each area in a highlight color. Space Marines are often painted this way.
Beyond these steps, you start to get into more advanced techniques (old style washing and effects for example) but these are the core techniques that you can use to make your minis look great. I suggest that you master these techniques before drybrushing also, because drybrushing works quite well when combined with these other techniques, but falls to pieces when used as a crutch.
Note- you can check out some of the beginner tutorials at Coolminiornot.com, though they have so many writers that it is hard to tell which will be good. Another option you have is to check out Brushthralls.com and use their "Battlebox in 10 days" articles to get an idea as to how to use these techniques.
14694
Post by: Lanky-feck
I find if you think positive that the end result is usually one you'll be very proud of. The ork dude looks ace compared to the orks i did i gave them to my brother as he collects them but still think positive and think that its not brilliant as that will put you down and make you ruin the model as your trying harder oh and good luck for future models. Lanky-feck out 
14418
Post by: Vipera
I think that its looking a whole lot better than the other ones, I think the shoulder pads look good. lighting is difficult I think that sunlight helps the most.
14949
Post by: thesoupdragon
The ork looks like its a massive improvement already, well done.
Make sure you take note of what a lot of people, inluding me, have been saying though, take your time and don't try to do too much all at once:
deadly chicken wrote:^.^
I've got a rider of rohan, a dark angel aaaaaaaand a high elf on the way!
It's good to be painting a variety of models and to be doing so regularly to improve your skills, but make sure you don't overdo it. Trying to take too much on at once might leave you feeling frustrated and like you're taking one step forward and two steps back. Focus on carefully applying the techniques people have advised you about one model at a time.
Good luck!
tsd
11516
Post by: deadly chicken
thesoupdragon wrote:
deadly chicken wrote:^.^
I've got a rider of rohan, a dark angel aaaaaaaand a high elf on the way!
It's good to be painting a variety of models and to be doing so regularly to improve your skills, but make sure you don't overdo it. Trying to take too much on at once might leave you feeling frustrated and like you're taking one step forward and two steps back.
not at all. I find that i was using a paricularly slow technique on the DA and needed something to fill the time waiting for ink to dry and plus it stops me ggetting bored off painting 1 modelnon-stop and lets me show off a variety of colours.
here is the cloak from the high elf which i am very proud of:
1
8021
Post by: JD21290
the cloak looks great
i think we have a whole new chicken when it comes to painting.
11516
Post by: deadly chicken
^.^
7766
Post by: Anti-Mag
But a complete turkey when it comes to gratitude and etiquette.
14571
Post by: gretar
Anti-Mag wrote:But a complete turkey when it comes to gratitude and etiquette.
Agreed
9804
Post by: Ultrafool
Cloak looks great man, your painting skills have improved.
2050
Post by: Anung Un Rama
12996
Post by: gil gerard
these babies have been lurking in my bitz box since the late 1980s, they are probably some of the very first models I ever painted. As you can see, your recent models are quite a bit better than my meager first attempts. Incidently, I was probably about your age when I painted them. Though I like to think I have improved over the years, I am still not on par with some of the painters lurking around here. Just keep trying out new stuff and try to listen to criticisms constructively and you will improve.
14055
Post by: 31rls31
your improveing great job
11516
Post by: deadly chicken
@ everyone thank you for your kindness and support. 1 completely unrelated question. any ideas how to turn a boletr into a stormbolter.
@gil those are good, if not a bit creepy.
11807
Post by: freaky angel
Glue 2 bolters together and trim them down(or trim them down and then glue them together, I can't really remember)
DC's learnt to say thankyou! It's a miracle!
11516
Post by: deadly chicken
umm im sorry no image.
11807
Post by: freaky angel
I know my internet's broken.
1 more try:
2
11516
Post by: deadly chicken
omfg!. o well better than mine (the gobbo) and my dads aint the best either (this is his first ever mini ((the assault marine))):
3
14070
Post by: SagesStone
Congrats on your painting improving DC. The Orc with the banner looks good.
To the guy with the blue space marine, try to use tooth picks to paint the lenses. A tooth pick can also be used for the trim on the shoulders.
10890
Post by: Deff Dread red Edition
Good to see you improving and growing in the hobby,hope to see some more stuff soon.
11516
Post by: deadly chicken
and you will be but now i have to take out my contacts. ARGHHHHHHHHHHHHHH ITS SOOOOO HARD!
14070
Post by: SagesStone
If I could paint with only one eye because there were shards of glass in the other, you can paint just fine. You just need more patience than normal. I think that Master of the Forge and servitors came out alright though XD. But if your eyes start hurting, it means its time to rest and try again later.
This is a picture of it
Yeah I had to use flash, and I always use the auto-adjusted form of the image so they always end up a bit brighter.
11516
Post by: deadly chicken
firstly you have a shard of glass in 1 eye?
second not what i meant when i said eyes hurting.
14070
Post by: SagesStone
Yeah I know that irritation and pain are two different things, I don't really know where I was going with it now. Might be with how it would become irritated if I would try to focus on some details with the other eye and it would be best to take long breaks.. Anyway I knew what my point was then but I don't remember it now XD
Yeah, I had some small shards of glass in one eye, but they're gone now and the eye has healed enough so that I can at least see out of it a little bit and no longer require a patch over it. At the time of painting that Master of the Forge I had to though. Luckily there is not going to be any perminant damage to vision
11516
Post by: deadly chicken
lol (not laughing at the fact you had glass in your eye)
anyway today's my last day off school and I hope to do some more painting but after today i will be a bit slower.
14070
Post by: SagesStone
Any extra time to paint in is good, I managed to get the bases done on everything in a few hours today.
14869
Post by: Wrexasaur
I am still pretty new to painting models. I can say that brush control is probably one of the most important part. One way to make this easier is to put your models in blue tac so you don't have to awkwardly hold the model up to your eye. Placing the blue tac on the end of a normal wine cork will give you a comfortable grip of sorts; make sure you warm the blue tac by kneading it for a few minutes to make sure the glue can stick to the cork.
The next thing I would advise is to avoid being so critical of your work. It is important to give yourself room to learn.
An easy way to improve your overall skills would be to use thinned down paints applied in multiple layers. As well as minimizing the effects of your mistakes, your colors will be more bold and smooth.
14471
Post by: 1xx700007117
i love the da chest
11516
Post by: deadly chicken
thank you for the tip's wrex lxx70007117 your name is really hard to type but thank you.
earlier on i was described as immature (by myself!). got a story to show how mature i am compared to my friends. We were in math(s) at school today when my best mate started chuckling. he passed his textbook over to his (and my) friend and he laughed too. The textbook was then passed back to the girl who sits next to me. she laughed as well. I asked what was so funny. she passed me the textbook and said "look at 2d." I read it, "will y = 1 - x go through point (-8,-7)" hmmmm. I asked what was so funny. she pointed at the first bit "WILL Y." then i look at her quizically and she say's very loudly WILLY! and she's 12. not 3. 12.
10761
Post by: karmaiko
What brushes are you using chicken? Also, how do you take care of them? Brush size makes a huge difference in how you paint, if you're using too big of a brush it will cause a lot of mistakes, however too small of a brush will also lead to wasting time when trying to paint lots of models. Try using some different sized brushes; good quality art stores will be able to help you make some wise purchases, and may even be able to give you painting tips too! Secondly, once you've actually made the financial investment you need to keep them in working condition or you will be buying new brushes after a few models as the bristles get frayed. Some general notes about brush care -Always dip the brush in a (relatively) clean pot and gently wipe the brush sideways along a cloth or papertowl to remove paint. Repeat this process until paint no longer comes out. - Never smash the bristles into the side of your cleaning water to try and get extra paint out, this will simply destroy them. - Never use hot water on horsehair brushes (non-silicon) as it removes the oils, always use cold water. - Try and keep the plastic tip covering the brush comes with when you buy it; it prevents freak accidents from mashing a brush tip. - To keep your brush moist try and use a ceramic plate with a bit of water in it to dip your brush in rather than using a stock pot that will sooner or later become polluted with paint. Ceramic is both cleanable with hot water, and the separate plate of water can be changed frequently if it's getting dirty. Only dilute your paint until the consistency you want - too much water and it will run everywhere on the model. (ALWAYS water down your paint for two reasons: firstly it makes it easier to work with and applies in a more controllable manner, second it keeps it moist in the brush and prevents it from drying on the bristles making it much easier to clean). - It may sound disgusting, but licking the tip of your brush helps preserve the tip. Only do this after you've cleaned it so that no more paint is coming out! The paint is non-toxic, but DDT was also thought to be non-toxic to humans (durrr...) so better safe than sorry . Hope this helps Karm
11516
Post by: deadly chicken
I do half of those things.
10761
Post by: karmaiko
Wow, not even a thank you. Maybe you should do the other half and improve yourself?
Just like before in a previous thread, someone goes out of their way to write up thoughtful input, and you are completely rude to them (perhaps you forget calling one poster a rapist?).
Until you're painting at a quality that doesn't make eyes bleed, you should be a little more appreciative of people going out of their way to help you - this isn't the 'help deadly chicken paint better forum.'
If it wasn't for the mods expiclity stating to be nice to you and give constructive criticism (why they would do this for an ungrateful brat is beyond me) I don't think you would have half the responses you do. I know this isn't the first time people have given you flak over your attitude. To think I actually supported you originally, but just like that character on So You Think You Can Dance you've talked yourself into a 'no'.
11516
Post by: deadly chicken
:( every time i try to be nice and thankful it backfire's. I am thankful I just don't type it out every time i get a post. I am however sad i lost your support as i think your a real nice guy and give good advice. THank you and I'm sorry
DC
14949
Post by: thesoupdragon
I would disagree with that DC. Every time you're nice and thankful people DO appreciate it as they know that the ten minutes (or more) that they spent composing what they thought was a helpful and informative post has been worth it.
I understand what you're saying about not physically writing 'thank you' every time and I do believe that you are generally appreciative of advice on here but the best way to ensure that everyone will continue to offer their help is to take the time to thank them.
For example, your post above reads:
"I do half of those things."
This comes across as arrogant and dismissive as if all the advice were meaningless nonsense which it evidently was not. Your response gives me the impression that you feel like his post was an attack on your skills or that it is 'teaching you to suck eggs' and that you're being defensive about how much you already know. A better way to have responded would be:
"Thanks for the advice karmaiko, I already do some of those things but I hadn't thought of trying *insert technique here*. I'll give it a go and see if it helps."
That way, it allows him/her to understand that you have taken their advice on board while showing that you already have some experience of what they are talking about. It only takes a minute longer to write a post in a more gracious manner and I'm willing to bet my mortgage on the fact that you'll get better responses and more help by just taking the time to say a brief thank you.
This is in no means a rant DC, please understand that. I'm just trying to help advise you on how to deal courteously with folks so that you continue to get the help and advice you need in the future and don't get left out in the cold.
tsd
8044
Post by: Arctik_Firangi
You've seen a lot of improvement in a short time, with resources and assistance many of us could only have dreamed of when we started this gak in the 80s and early 90s. 90s for me... but let's see a uniform squad of at least five miniatures. The ork was very good, and I can see you spent a good bit of time on it, but there's also a painful difference between painting quickly and painting well. I tend to spend too long on single minis myself, a habit I find hard to break from my days of owning very few miniatures indeed. I painted the first 750 or so points of my first army (Space Wolves 2nd ed, much smaller game) a single mini at a time, but it looked garbage because they weren't really uniform.
14070
Post by: SagesStone
karmaiko wrote:-Always dip the brush in a (relatively) clean pot and gently wipe the brush sideways along a cloth or papertowl to remove paint. Repeat this process until paint no longer comes out.
- Never smash the bristles into the side of your cleaning water to try and get extra paint out, this will simply destroy them.
- Never use hot water on horsehair brushes (non-silicon) as it removes the oils, always use cold water.
- Try and keep the plastic tip covering the brush comes with when you buy it; it prevents freak accidents from mashing a brush tip.
- To keep your brush moist try and use a ceramic plate with a bit of water in it to dip your brush in rather than using a stock pot that will sooner or later become polluted with paint. Ceramic is both cleanable with hot water, and the separate plate of water can be changed frequently if it's getting dirty. Only dilute your paint until the consistency you want - too much water and it will run everywhere on the model. (ALWAYS water down your paint for two reasons: firstly it makes it easier to work with and applies in a more controllable manner, second it keeps it moist in the brush and prevents it from drying on the bristles making it much easier to clean).
- It may sound disgusting, but licking the tip of your brush helps preserve the tip. Only do this after you've cleaned it so that no more paint is coming out! The paint is non-toxic, but DDT was also thought to be non-toxic to humans (durrr...) so better safe than sorry .
Hope this helps
Karm
Helped me, thanks. I did the first, second, fourth and fifth things already. But I didn't know about the hot water thing with the brushes. Lost a couple that way, I thought they just might have been a crappy company or something >_>
11516
Post by: deadly chicken
lol! thank you every one for the support. I've almost finished the elf (needs a proper base) but here he is now:
2
14346
Post by: acullen626
hmm the highlighting on the cape on the backs looks quite good. I think you need to put someting on that base though to get a better view. For me that helps
11516
Post by: deadly chicken
yep i know it needs a base. may get around to it tonight. thanks!
13611
Post by: Stump
I have been keeping track of this thread since it opened (actually several threads ago ) and I just wanted to comment on the patients that the Dakka Dakka community has.
Great job to those that gave advice and kept your cool.
Good advice all and it seems that ole DC is starting to listen and has improved greatly and I do not mean in just the painting department.
Keep up the good work DC in your painting and attitude DC.
11516
Post by: deadly chicken
yay! thank you! ^.^
8141
Post by: SonsOfLoki
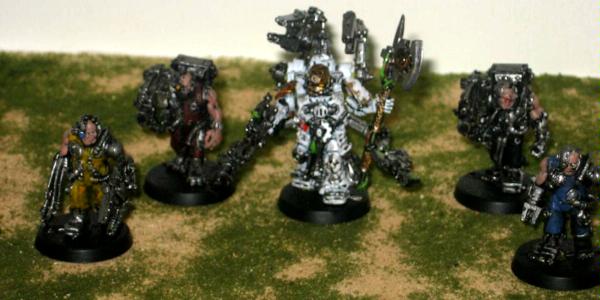
May i show you my improvement with before & after washes?
Also note that i spent copious amounts of time on the Small Details! 5 hours on the warboss!
2
14346
Post by: acullen626
Wish i had that one in my collection^^^^ !!!!
10869
Post by: thedarkside69
thats not half bad at all. Try to get a better picture though..
14418
Post by: Vipera
The elfs cloak looks really good.
9217
Post by: KingCracker
SonofLoki - you must be a friggin master! Ive never seen washes turn a chaos termy into a warboss. That trick, I gotta learn!
DC - I have to hand it to you, your skills are only getting better and better. Specially on that black orc. WOW. Keep it up
15833
Post by: dirkthe1
Wow, the improvement is massive-but i guess that is the effect of a bit of effort and concentration.
However, I did stop reading when you told the story about a quadratic equation.
do you do those at 12?!
15359
Post by: Lextheimpaler
Hmmm i must ask if your 12, if so PPL leave the poor bloke alone about his attitute his 12 for christ sake his suppost to be a smart ass brat who wasnt at 12. and lasty im 23 and i laughed at the willy thing ( giggled like a lil girl actually) and as for your painting just comes with time i guess patience is the key and that develops as you get older. also less painting more chasing girls
10345
Post by: LunaHound
SonsOfLoki wrote:May i show you my improvement with before & after washes?
Also note that i spent copious amounts of time on the Small Details! 5 hours on the warboss!
You must be champion of Tzeentch o_o
11516
Post by: deadly chicken
yay thank you for the complements.
and thank you sons of loki for that before and after picture.
but most of all thank you for bringing this thriead back into my immediate memory
ummmmm this will sound really stupid and begginery but how do you highlight? I can highlight objects with large dips quite well and also drybrush but i cant for the life of me simply highlight a space marine. can you help me please?
2
11516
Post by: deadly chicken
yay thank you for the complements.
and thank you sons of loki for that before and after picture.
but most of all thank you for bringing this thriead back into my immediate memory
ummmmm this will sound really stupid and begginery but how do you highlight? I can highlight objects with large dips quite well and also drybrush but i cant for the life of me simply highlight a space marine. can you help me please?
10842
Post by: djphranq
Looking good DC
10689
Post by: Granesh
The key thing with highlighting is to just take the highest points on the model and make the base colour brighter.
For example, it looks like your Galadrhim's cloak is Mordian Blue. Take that colour and mix in a little white, then pick out the highest areas on it.
Don't go overboard, and actually, overbrushing usually does it well and actually blends the colours together. One other suggestion. Go easier on the
chainmail, next time drybrush it, the chainmail will stick out and give it more depth. You're definitely getting better, keep it up!
9504
Post by: sonofruss
KingCracker wrote:SonofLoki - you must be a friggin master! Ive never seen washes turn a chaos termy into a warboss. That trick, I gotta learn!
DC - I have to hand it to you, your skills are only getting better and better. Specially on that black orc. WOW. Keep it up
You got to it before me dang about the termy to warboss KC.
Highlighting armor is hard and easy. the easy way is to use a flat tipped brush and follow the hard edges of the armor plates with a lighter color.
The hard way is to layer dark to light. Lets say a ultramarine you start with a dark blue then lighten it in layers leaving a line of the next darker color till you get to ultra blue
This is not a ultra bit the skin has 4 layers of green paint for the skin with a green wash the higher up the muscle the lighter the green.
Edit to add picy
8141
Post by: SonsOfLoki
KingCracker wrote:SonofLoki - you must be a friggin master! Ive never seen washes turn a chaos termy into a warboss. That trick, I gotta learn!
Its all in the wrist
11516
Post by: deadly chicken
wow thanks guys. I have some examples of attempts of highlighting but they are stored on my other pc so maybe not tonight.
11516
Post by: deadly chicken
I seem to have lost my pics. as soon as i can take some more i will post them to you.
11516
Post by: deadly chicken
THIS THREAD SHALL NOT DIE!!!!!!!!!!!!
11516
Post by: deadly chicken
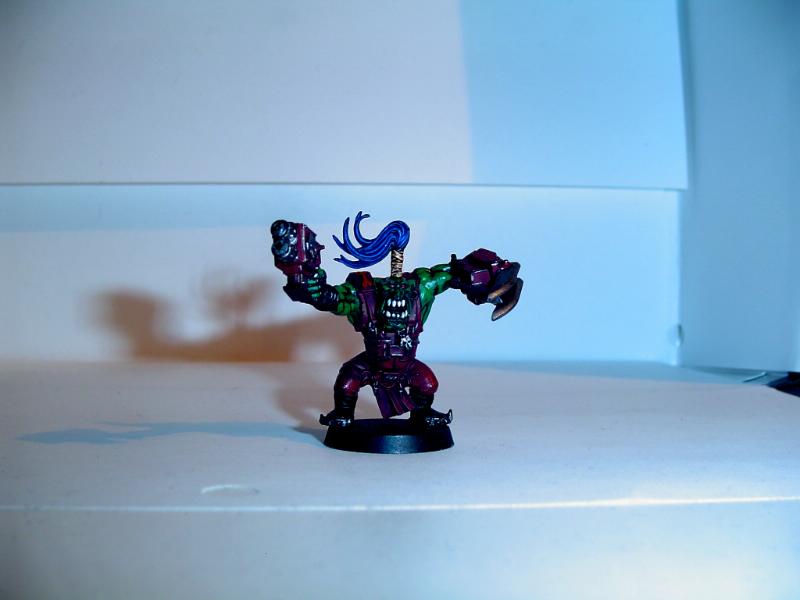
picture time!
I have been working hard and have done a few WIP's. enjoy!
DC
10
15726
Post by: SgtSixkilla
Looks great DC! Keep up the good work.
I especially like the red hair in the last pic. Good highlights and wash effects. Looking forward to seeing more.
(Tip on taking pics without a lightbox: Open a paper pad, set the models on it and then hold the back up while taking a pic. Should remove the orange tint you (or at least I) get when taking pics inside. Just make sure you have decent lighting so you can avoid using flash, but with bleached white paper as background it shouldn't be too much of an issue in any case. I think it's pretty easy to see how I did it in my Ork galleries, because there I used a spiral note pad.)
11516
Post by: deadly chicken
ITS NOT HAIR ITS FIRE!!!!!!!!!!!!!!!!!!!!!!!!!!!!!!!!!!!!!!!
thanks for the tip though. first i need a paper pad, lol.
also thank you for the compliment.
DC
15726
Post by: SgtSixkilla
Oop. Sorry. I just looked at the pics. Sorry if you mentioned it already. :p
9217
Post by: KingCracker
Fire, hair, whatever! It looks like its flowing and thats a good thing lol.
Nice job DC. Im really digging the light effects you gave on some of those SM good work
7653
Post by: Corpsesarefun
SonsOfLoki wrote:KingCracker wrote:SonofLoki - you must be a friggin master!
Its all in the wrist
i LOL'd
11516
Post by: deadly chicken
YAY!!!!! ^.^ !!!!!! thank you for the kind comments.
i will try to post more tonight or tommorow.
a happy DC
11516
Post by: deadly chicken
well it looks like i didn't
i just wanted to do a bit of THREADROMANCY on this fine sunday afternoon.
but really, this acctually HAS A PURPOSE!!!!!!!!!!!!!!!
if you are still subscribe to this thread then are a truly nice person and i wish to call upon your truly niceness to answer a few painting questions.
i am having alot of trouble blending, can you help?
does anyone have any brush control exercises?
thanks a tonne,
DC
17260
Post by: Grim.Badger
deadly chicken wrote:does anyone have any brush control exercises?
I've not got a steady hand but I find leaning on the couch arm helps a lot! I basically lean my arm so that only my wrist can move about, that limits the amount of brush shake you get
9388
Post by: Stretch
I think it was LBursley that had a great couple of posts on brush control exercises, but I can't find the ones right now. Check out his threads. As for advice on blending, lots of thin coats. Blending well is a skill that takes a long time to build up(I currently still suck) What i can offer is take your time and keep the color you are using slightly watered down so you can build up to the desired effect slowly. Hope this helps, and keep up the good work, your stuff is looking a lot better!
11516
Post by: deadly chicken
thanks guys.
[joke] i think i'll just get out my restraints from went my dad went insane and tried too shoot himself and strap my arm in. that should keep my arm steady. [/joke]
but seriously thanks. i'll just use the chair i am sitting on now.
do you have any tips for watering down paint????
i always get it too thin. or maybe that's not thin enough........
please help.......
DC
7653
Post by: Corpsesarefun
Aim for a milk consistency and opacity, any more watery you have a wash but any thicker its hard to blend.
10345
Post by: LunaHound
For some reason i have never watered down my paint ,
but people doesnt tell me to thin my paint either 0.o
maybe they have no hope or expectations for me to tell me lol
11516
Post by: deadly chicken
thanks corpses
i dont know luna.........
you may use better quality paint.
I am currently using crappy GW paints in which 1/2 of the solvent has evaporated in several of them anyway.
but mine are like from 3 years ago...............
EDIT: ^.^ THANKS A DOODLE!!!! ^.^
7653
Post by: Corpsesarefun
Higher quality paints often are thinner for easier blending
what pains do you use luna?
11516
Post by: deadly chicken
do you know any good brands that are stocked around the cheshire area?
14070
Post by: SagesStone
Yeah, I never thin any paints either and that's using the crappy GW ones
The other day I found one of those old twist top ones of blood red and when I opened it it was perfectly fine as if it was brand new. When did they switch over to the current lids anyway?
11516
Post by: deadly chicken
no idea.......... i just cleaned out a dead chaos black pot and used it to hold my mix of pure awesomeness.............
|
|


