Hi everyone, I've received a lot of feedback on my Genestealer Cult (article here), and I appreciate all the kind comments. But as I said in the article, the GT army was really only the beginning. Since my critical mass of Hybrids (Boyz) are done, I can now have fun exploring some different looks and army builds.
So here's my blog for phase two. The main push of this second phase is to mechanize the army. A vehicle-borne militia army was what I originally envisioned for my GCult, and in playtesting I've found I really enjoy how the army plays mounted up.
I haven't done a huge amount of work on the army since last winter, but I've moved ahead on some projects I needed to complete with the mech build in mind. BTW, I apologize in advance for so-so pics. I need to get some better lighting and do some camera tweaks.
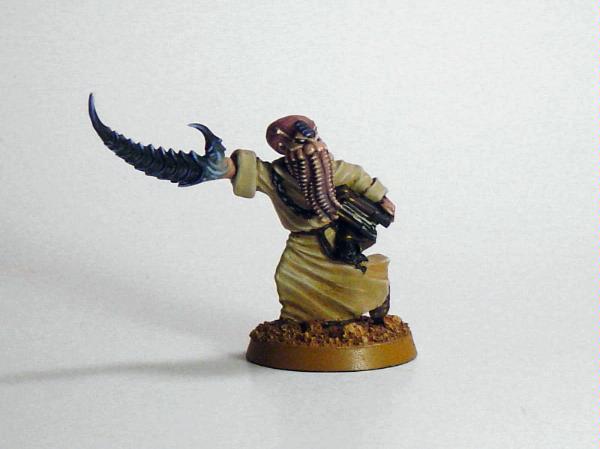
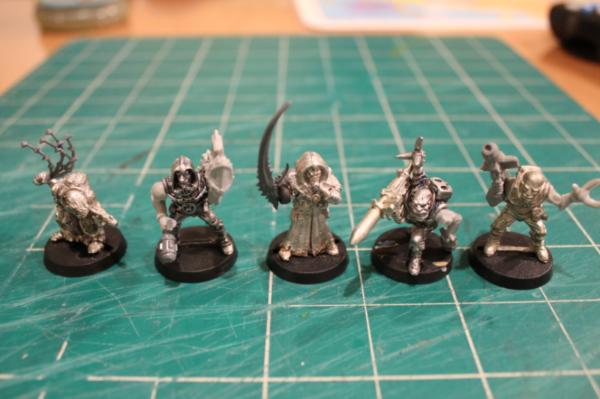
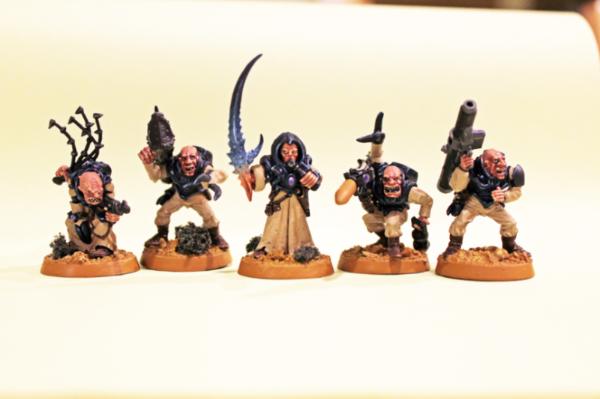
First up is a pic of a new Acolyte (Nob). Since I'm splitting up my footslogging sluggas into smaller units to be truck-mounted, I need some additional unit leaders.
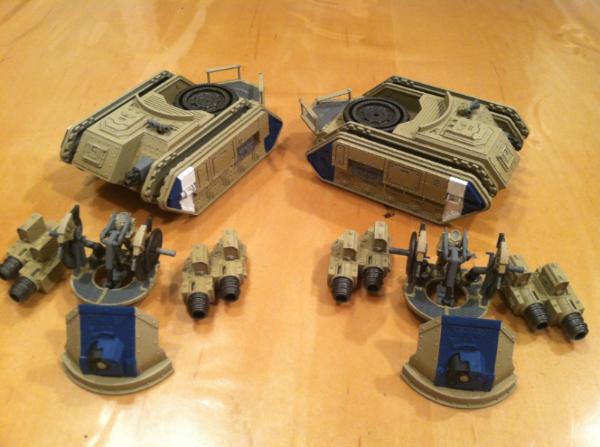
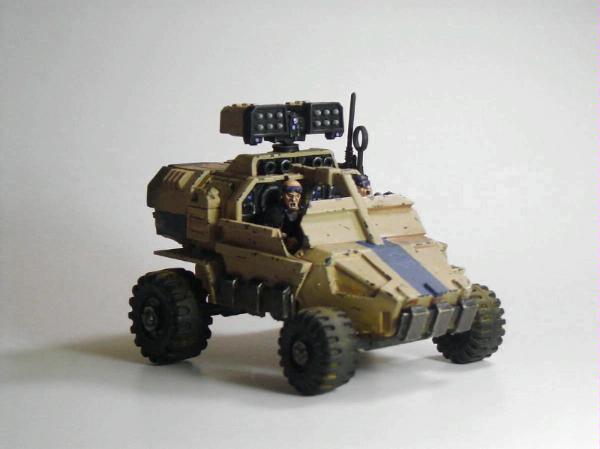
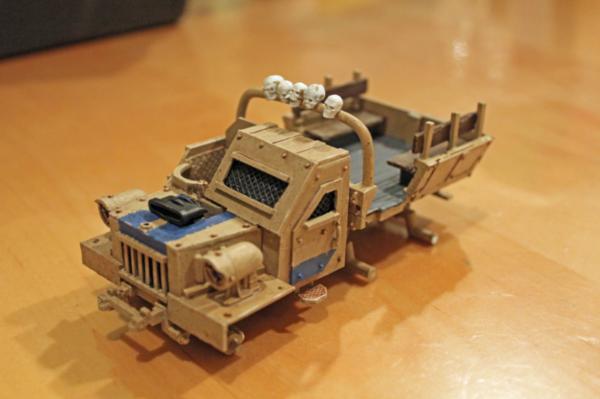
Here's an example of the new rokkit turrets for my existing buggies. It's just a simple repurposing of a Terminator cyclone missile launcher.
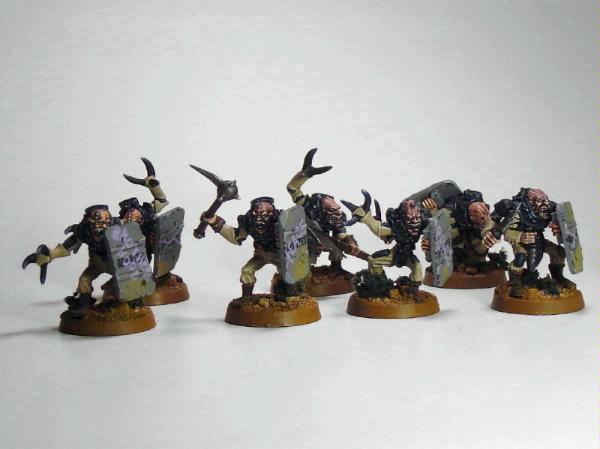
I also did some work on my existing Hybrids. I'm going to field some of my formerly footslogging slugga Hybrids as 'Ard Boyz. To model the extra armor, I added riot shields stolen from the local Arbites and decorated with various friendly slogans like "brotherhood," "peace," etc. They were an easy plasticard build.
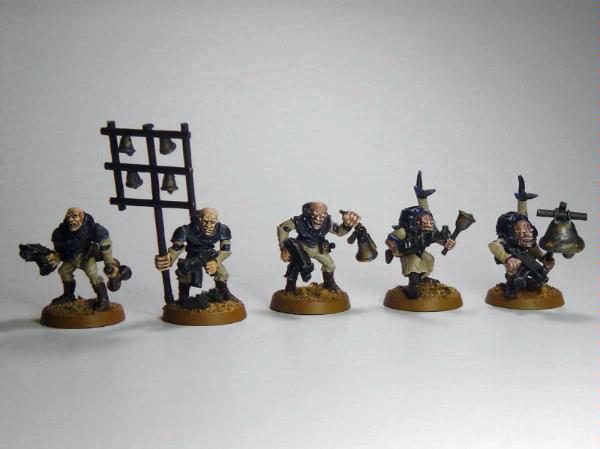
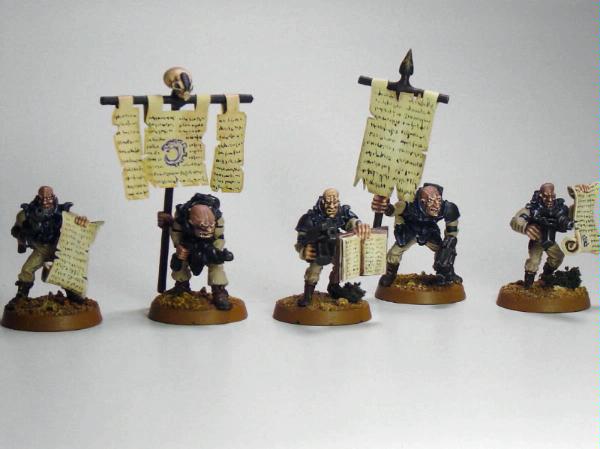
I've gotten some comments that my shoota Boyz could use some differentiation on the tabletop. I don't think traditional unit markings would really work for these guys, so I decided to take a different approach. My idea was to theme each of my shoota Hybrids/Boyz units. I settled on two quasi-religious images -- bells and books.
The first pic shows the bells theme. I think of them as heralds of the new order. The second pic shows the books theme. I imagine them as apostles reading from their holy scriptures even as they cut down unbelievers.
I'll continue theming these units as time allows, but I think this is a good start.
I love what you did with the army before, I can't wait to see where you go from here! And I really like the theme squads- it is a striking way to seperate out units. You continue to raise the bar for all us wannabe genestealer cult converters.
gorgon wrote:
First up is a pic of a new Acolyte (Nob). Since I'm splitting up my footslogging sluggas into smaller units to be truck-mounted, I need some additional unit leaders.
I think this guy is brilliant. I really like the amount of detail that you painted on his "face" and tentacles. He's like Dr. Zoidberg's delightfully creepy cousin.
I'm loving the new additions for the army! Pity there'll be no Baltimore GT for you to take 'em to this year! I love the bell theme as well. A great unifying concept for the army and a nice break from the "usual".
Great stuff as always!!
Oh, and if you're thinking "trucks", I'd definitely swing by Dave Taylor's blog. He's done some freakin' amazing scratch-build Adeptus Munitorum trucks with Thomas Wynn. Very, very nice stuff IMNSHO.
@Boss: Nope, all the Hybrids in my army are metal. I got most of them at a pretty good price, all things considered, but my wallet still aches.
@Cygnnus: Yeah, I'm keeping an eye on Dave's stuff. What I'm shooting for with my trucks is something in between his and the base Ork model. I want mine a bit ramshackle, just not quite as ramshackle as the base kit. I didn't know Tom was involved with those trucks.
And yeah, I probably won't be fielding these guys for a while at any major tournies. :( The Mechanicon tourney is nearby and should be a good one, but since my clubmates are running it, it looks like I'll be paint judging and not playing, lol. I might play in the Friday event, though, once that's finalized.
@Savnock: Yep, I'll convert Ork Trukks. And there will be Battlewagons. I'll get into that in my next entry later today.
Automatically Appended Next Post: So now it's vehicle time. The mechanized army I've planned will require the following new items:
The Trucks will be converted from the Ork Trukk kit, while the Battlewagons will be converted from the IG Chimera kit. As much as I love them, my existing GCult Leman Russes (which I formerly ran as gun platform Battlewagons) won't be part of this new army composition, and will probably be designated for Looted Wagon duty when I get the urge to field them.
I plan to do prototypes for the Trukks and Battlewagons, then go back and build the remaining vehicles after I've presumably learned a few lessons the hard way.
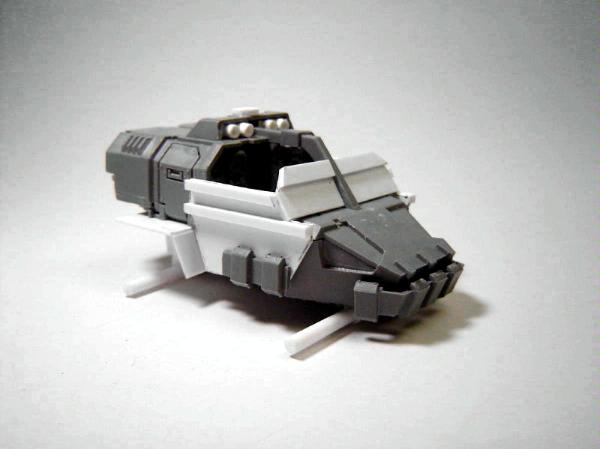
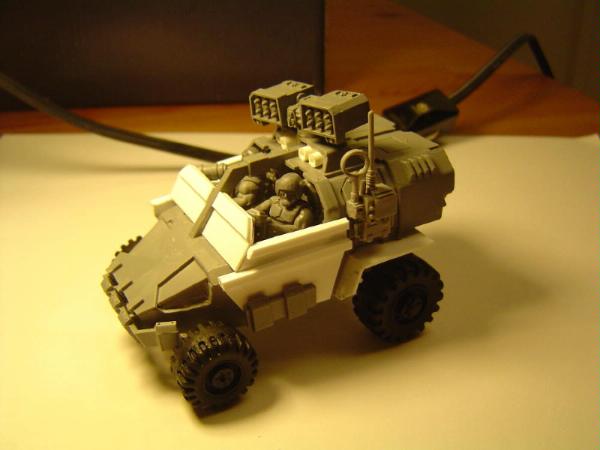
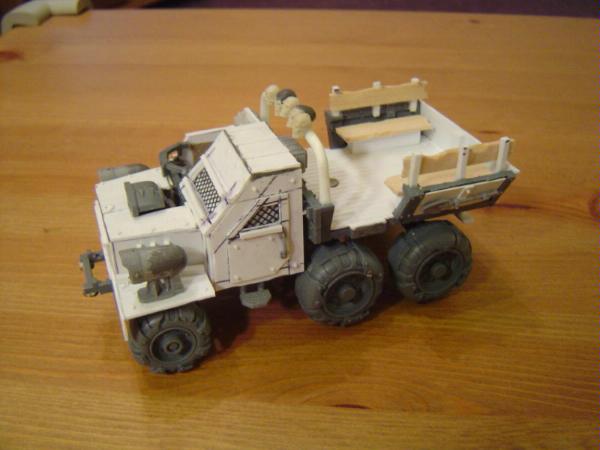
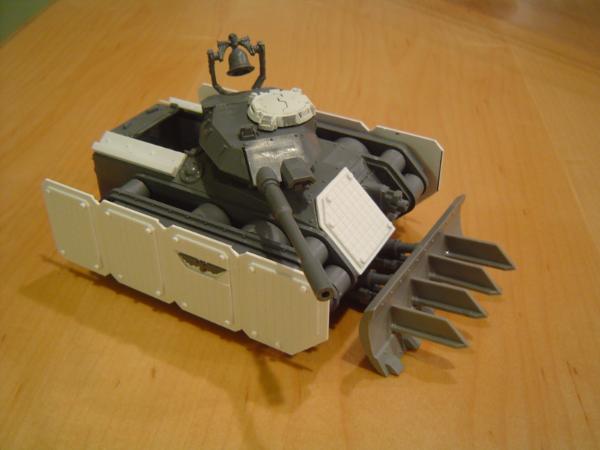
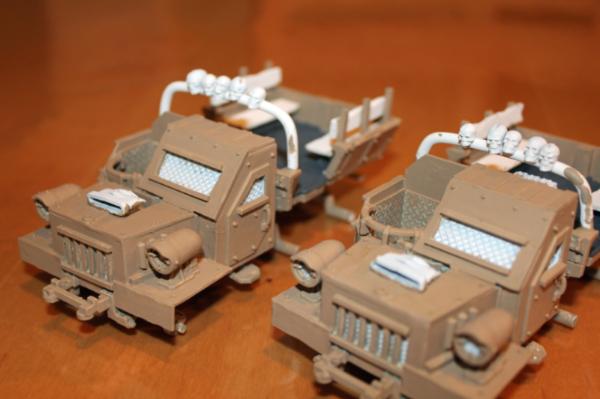
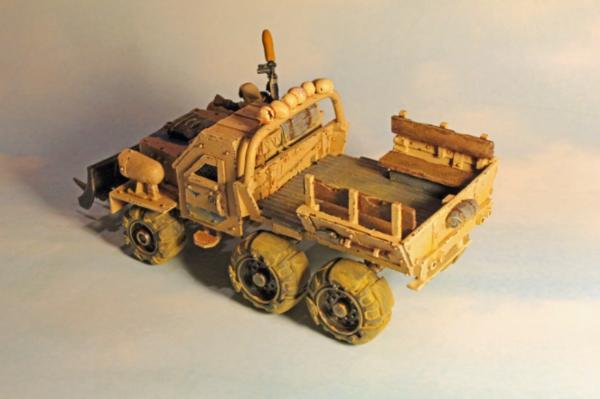
But first up is a new Buggy to complete my squadron of three. My Buggies are built from Space Marine Land Speeders. The first step after doing the usual prep work on the two hull sections is to trim off the wings and any Imperial iconography. I also shortened the bumper to give it more of a land vehicle look, and added plasticard covering the vents over the cockpit (this will become more apparent after the top and bottom are glued together).
The driver and gunner will be painted separately and added later after the Buggy is painted. Note that I don't do any major work on the riders' legs, other than some trimming down of the knee area. That's because the legs won't be visible after I build the rest of the cockpit and add the torsos and arms with controls and targeting mechanisms.
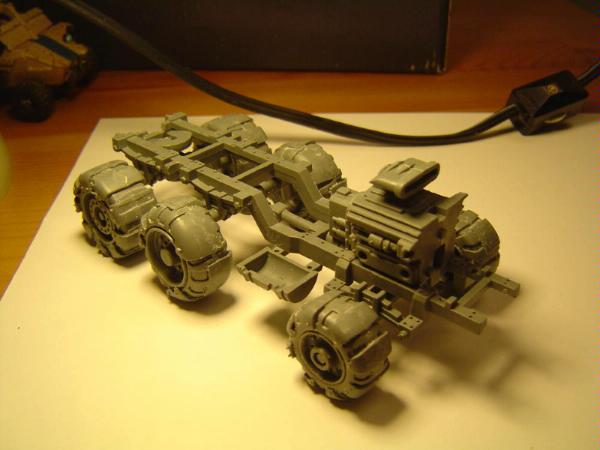
The next step is to add the chassis stuff underneath. I just build up some support structure using square plastic rod and plasticard. For now, I won't add much in terms of realistic detail like fuel tanks, etc., although I have an itch to go back and add some of that stuff to all three buggies later.
I'm definitely just a ham-and-egger when it comes to plasticard work, but hopefully will illustrate that you don't have to be a plastics expert or do anything complicated to get a good result in your converting. The nice thing about this army is that if something looks a little crude, it kind of fits the theme.
The Buggy is starting to shape up now. I added the side panels, which serve two purposes. First, they help enclose the cockpit area. Second, they cover the seam where the two hull sections meet.
The axles were built from plastic rod and plastic tube (rod fitting snugly inside the tube). I kept them extra-long for now. IMO, it's better do that and trim them down carefully than to measure for a precise fit now and risk accidentally making them too short and discovering it when you're ready to mount the wheels. Ripping off welded plastic parts is a PITA.
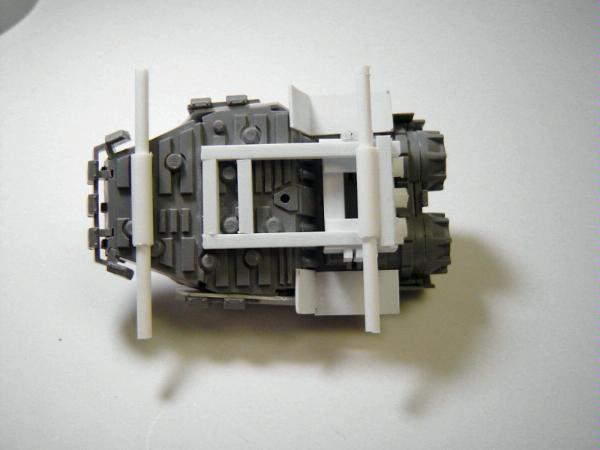
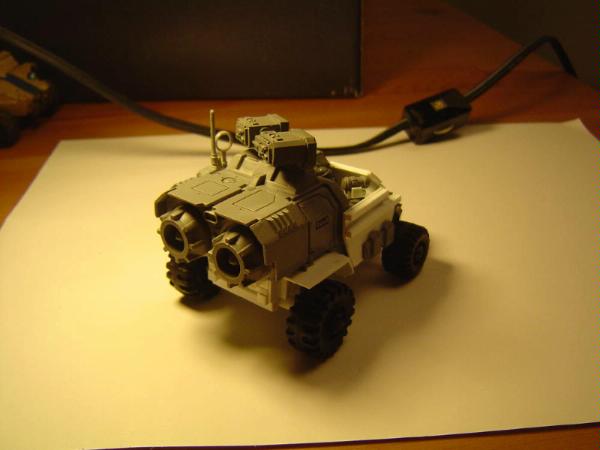
I also added the turret mount, rear wheel guards and "lights" above the cockpit where the vent was.
Usually my projects move painfully slowly due to my sometimes difficult schedule. But this one is moving along nicely. It doesn't hurt that I'm getting some modeling time in while watching the Stanley Cup finals. Go Pens!
I still need to add the communications array and tires, and model up the turret and riders. After that, I'll do some cleanup and it should be ready to go.
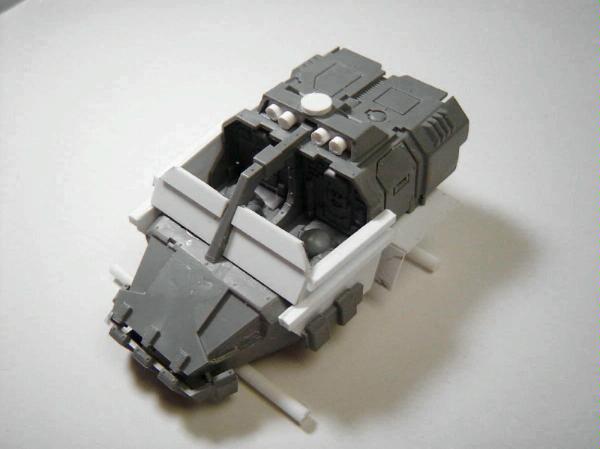
Okay, after a vacation and some time basking in the glow of the Pittsburgh Penguins' Stanley Cup victory, I'm back to blogging. Since I last posted, I put the finishing touches on the buggy.
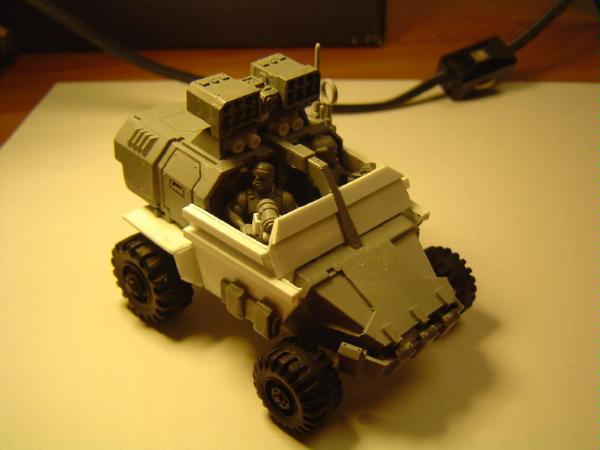
As you can see, I added the rokkit pods and tires. I also modeled up the driver and gunner. They're just blu-tacked in place for now, as they'll be painted separately then glued in place. I used Sentinel control bits for the driver's steering mechanism, and cobbled together a targeting mechanism for the gunner out of a speeder bit and some plastic.
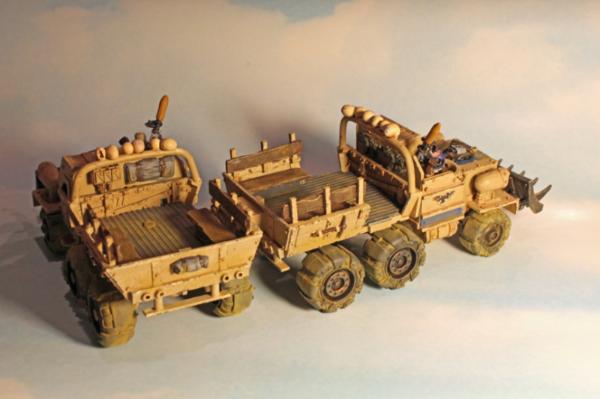
So now I have a full squadron of three buggies. I know people probably want to see it painted up, but I'm planning on modeling all my needed vehicles first and then use an airbrush to paint the base coat on all of them in one fell swoop. Plus that way I can use my vehicles in games in the meantime instead of having to do proxies.
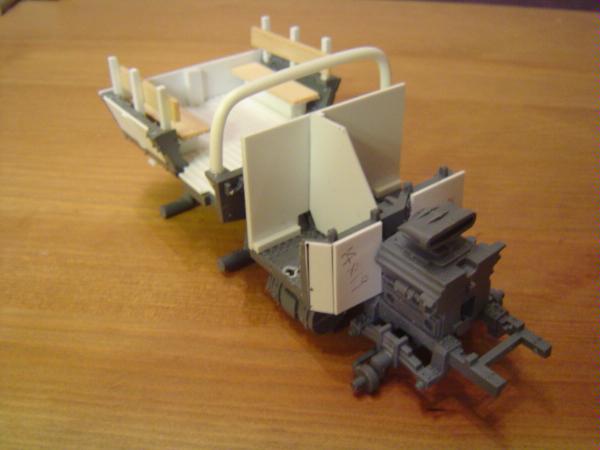
With that project out of the way, now it's on to the truck prototype.
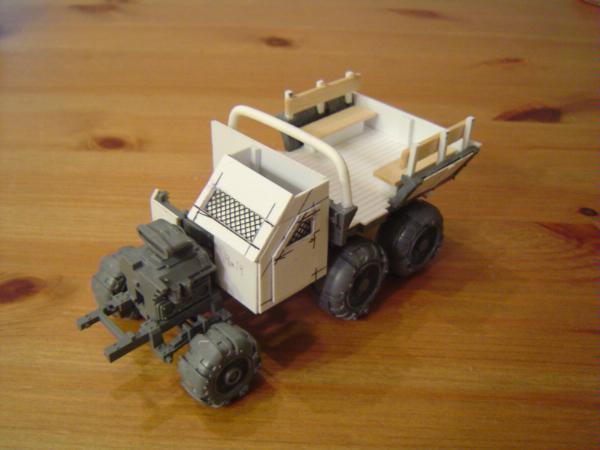
I'd already been planning to modify Ork Trukks to make my transports when I came across Dave Taylor's and Thomas Wynn's awesome Imperial truck conversion. There are definitely ideas there I'm going to borrow. However, to fit my army's look, I'm shooting for something more civilized than the Ork Trukk but more ramshackle than the Imperial conversion. I have a pretty clear idea what I want to do with the truck bed, but the cab section will likely take some thinking and some work to get right.
Here's the assembled truck chassis. So far, it looks like your basic Ork Trukk. I'll get into how I'm changing the truck bed in the next update.
Okay, it's been a loooong time since my last update. But I've been working on the trucks (albeit slowly). Over the next day or so, I'll bring everything up to date. Which brings us to the bed section.
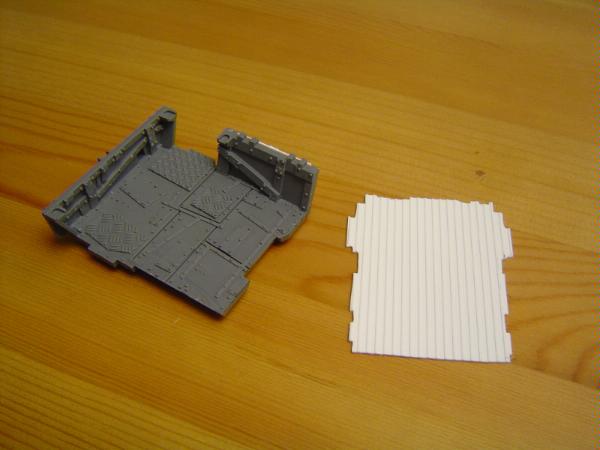
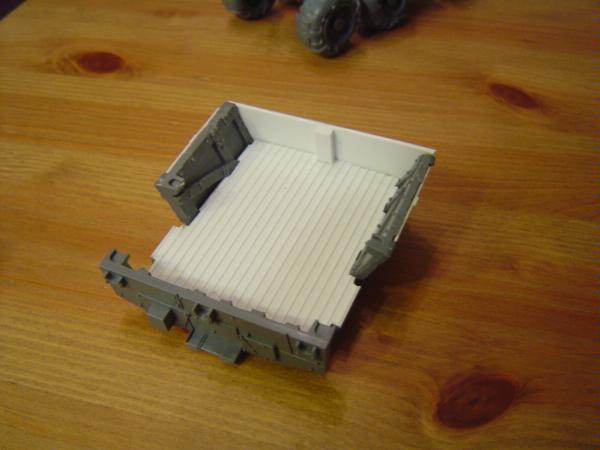
As I said, I want this truck to be a little less ramshackle than the Orky version. Rather than build a new bed from scratch, I decided to alter the existing one since there were elements I really liked. The first step was to create a new bed liner from some ridged plasticard. Fitting it involved a lot of trial and error and was a pain in the butt, but I like the final result.
Next, I added plasticard on the outside bed walls (again, to de-ramshackle things), and created a back wall. The second pic below shows the bed resting on the chassis and some of the detail I added to the rear.
The next steps included adding sideboards and benches using square plastic rod and wood strips. I also added a (yet again, less ramshackle) roll bar to the bed. To create the roll bar, I just took some plastic rod and bent it after heating. Be careful if you're doing this over a candle or something. Styrene will melt very quickly. I used hot water, which is slower but less likely to drip plastic on something valuable.
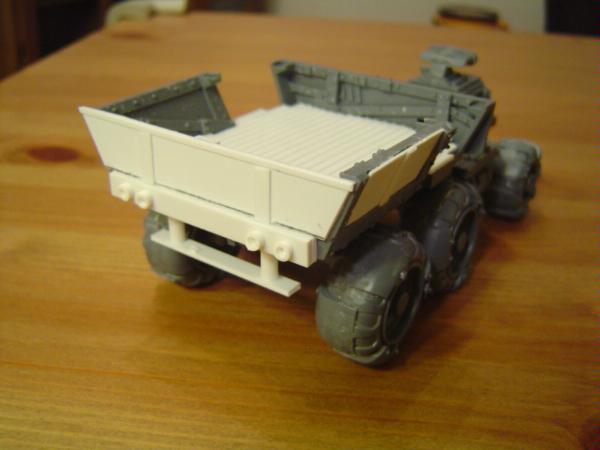
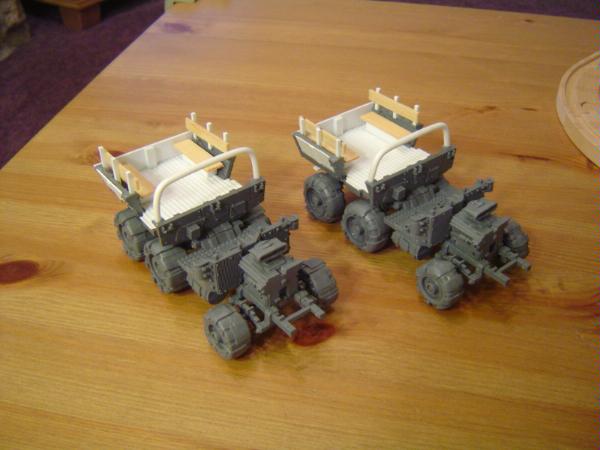
Here's the two WIP trucks. I'm actually doing two of them simultaneously in an attempt to save time (that didn't really work).
With the bed finished, now I had to ponder how to do the cab section. After a lot of pondering, I decided to duplicate elements of Dave Taylor's and Thomas Wynn's awesome Imperial Truck conversion, but add some different touches of my own, particularly in the engine area. I wanted to do more of an angled front with heavy duty headlights sitting on the front fenders. Also, the gunner will have a shoulder-mounted weapon (that RPG-style Steel Legion missile launcher serving as a rokkit) instead of a fixed emplacement to give it more of a militia feel.
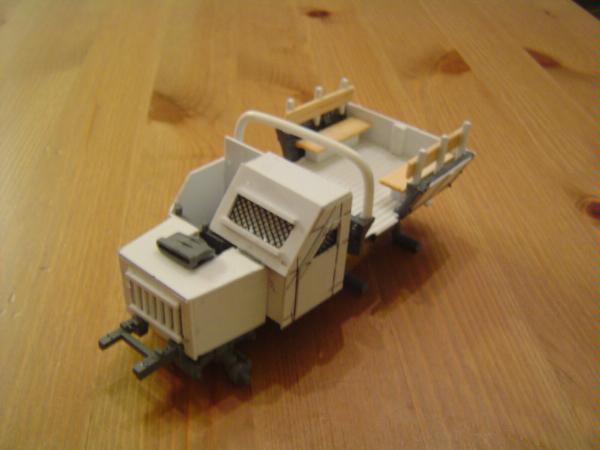
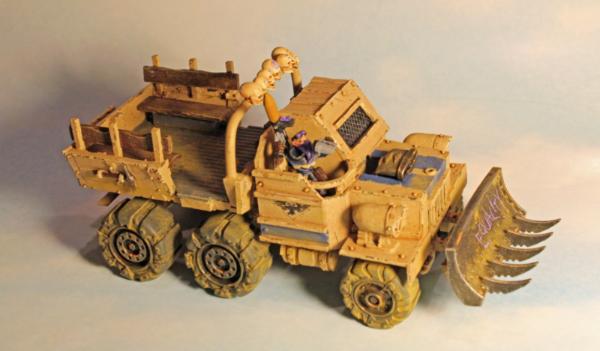
Here you can see the installed rear cab wall, the wall separating the driver and gunner, and some of the engine wall sections.
In this pic you can see the enclosed driver's section, the door and windshield all taking shape.
I'm loving this phase 2 work! By far the standout for me is the "de-ramshackling" of the ork trukk kit. Really great stuff there, I know I'll be following this log closely. Kudos!
An important point I should add is that I made patterns as I went along for a number of the plasticard pieces. That way, when I build another truck (which I will likely need to do) it shouldn't be as big of a hassle with fitting, etc.
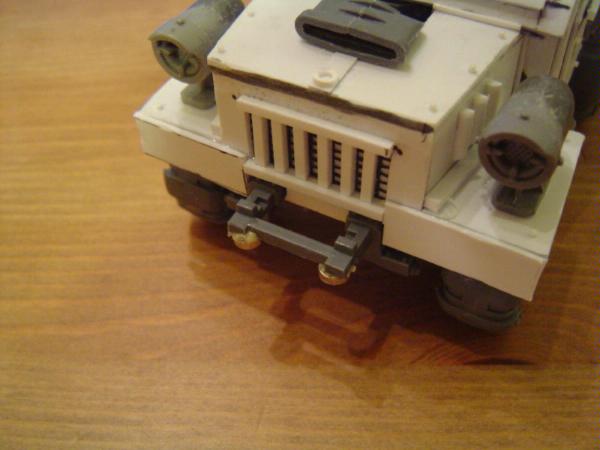
So here's the boxed-in front end. You can see I left the big blower exposed...I just like that look. The hood has an angle to it, in contrast with the Taylor-Wynn Durango. The front grill is also in place.
I seem to lack more build pics, so I'll show pics of the finished product and talk through them.
The pic below shows the finished front end, with headlights installed. The headlights are the old conical Imperial searchlights, with the pointy part chopped off and Procreate added to create a rounded back.
You can also see the magents mounted under that frame section protruding from the bumper. That's where the ram will mount.
Here's the ram with magnets in place. I find the reroll in difficult terrain to be invaluable, so my army never leaves cult HQ without the rams. Still, rules or my mind may change in the future, so I wanted to have the flexibility to remove them.
The ram bitz are the old Imperial version. They're a little smaller and thus a better fit for my trucks.
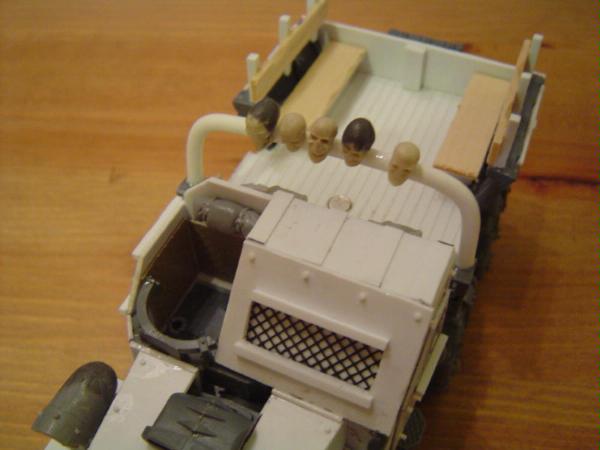
Here you can see a closeup of the cab area and the roll bar. What's that on the roll bar? Skulls?!? In the 41st millenium?!? Poppycock!!!
Actually, part of the fluff for my army is that the cult venerates the skulls of previous generations -- human, hybrid and purestrain. So they like to mount skulls of fallen cultists on their vehicles and have their ancestors accompany them into battle. I used Procreate to lengthen and "hybridize" some of the skulls, as you can see.
Getting back to the cab area, I added diamond plate plasticard (extra armoring for the gunner) and bitz to the gunner's cupola. The gunner models will be on magnetized bases so that they stay snugly in the cupola. You can also see some of the rivets I added. Those were done the hard way, with me cutting tiny pieces off extremely small plastic rod. With a pair of good tweezers,it's actually not all that hard or time-consuming.
In case anyone is wondering, the meshy windshield is just some replacement window screen backed by some thin plasticard.
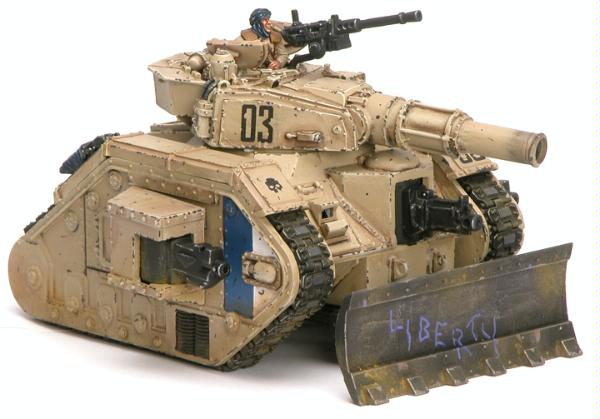
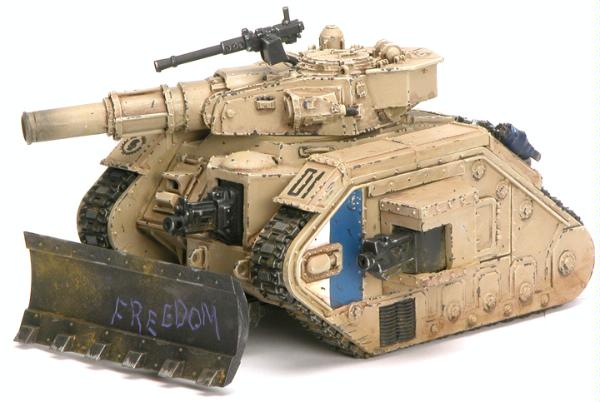
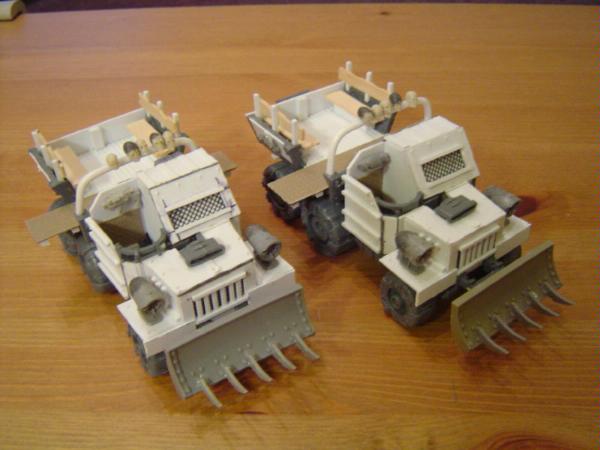
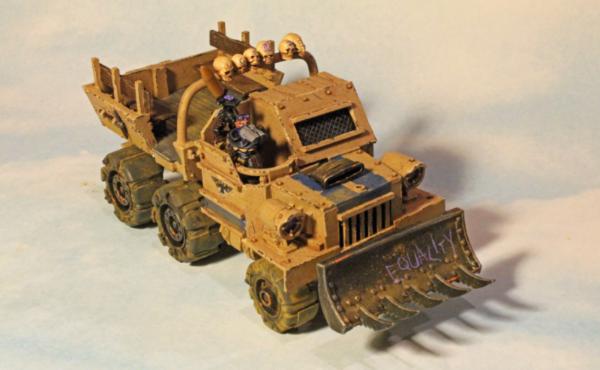
And ta-da! Here are the finished trucks (except for the gunners) with rams and boarding planks in place. I'm pretty happy with the overall result, even if they took a lot longer than I expected. I think they fit my vision of something in between the base Ork kit and the Taylor F-150.
Some of the joins might look a little sloppy in the pics. Hey, not all of us have access to a laser cutter (*cough, cough*). But I did lots of filing and filling, and rest assured the trucks should "clean up" very nicely when they're primed. They just don't look pretty right now.
The trucks will receive plenty of weathering to demonstrate how hard they've been run and used. But I'm saving the painting for later, when I can basecoat all my new vehicles in one go. (Sorry folks, I know that's not very exciting, but it's going to be the easiest path forward.)
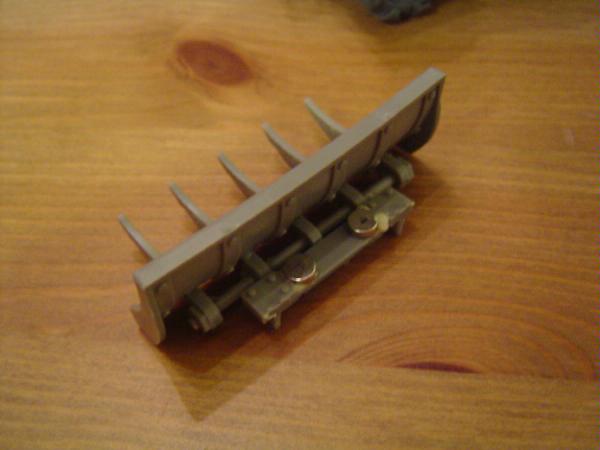
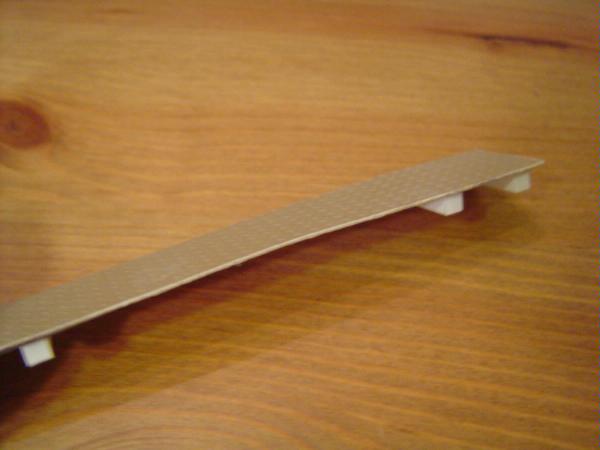
In case anyone's interested, here's the boarding plank. It's a simple strip of metal, with a strip of diamond plate plasticard glued on top. The inside bars help stablize the plank when mounted.
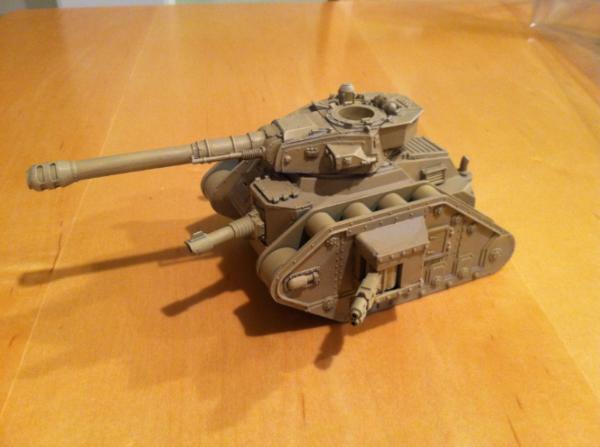
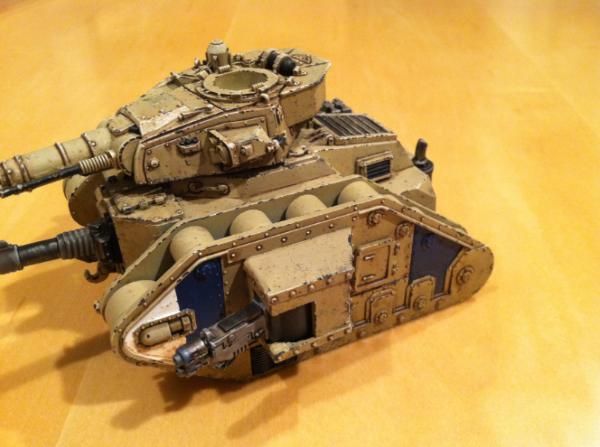
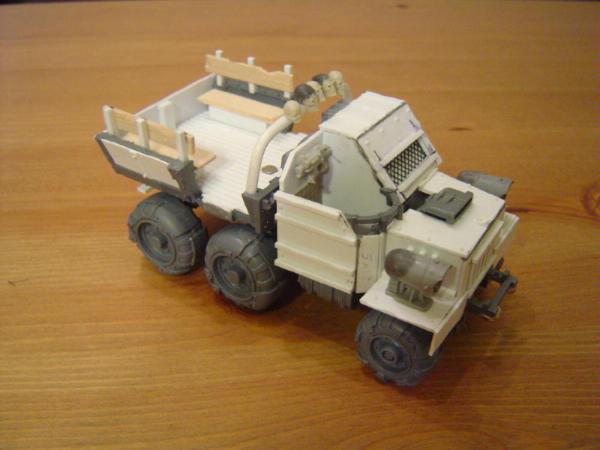
Finished right side (sans planks and ram):
Finished right side (sans planks and ram):
Because I need and deserve a break from vehicles and plasticard, I'm going to switch things up. When armybuilding I recommend a change of pace whenever you think you need one. You want to be able to keep your enthusiasm level up and not get burnt out.
Anyway, as I've played and tested the army more, I've fallen in love with the performance of Nobz squads. Who wouldn't, right...they're the Scarlett Johanssen of the codex. The best counts-as fit for Nobz are probably Purestrain Genestealers. Previously, I fielded a bunch of Purestrains as Kommandos, which worked well. But with some some work, I think I can alter some existing models to give them more of a Nobz feel and be 100% WYSIWYG.
Unfortunately, I'm having camera problems, and it'll probably be a week or two until I get them sorted out. So there'll be a short delay until my next posting. By then, I may have the Nobz completed, so I'll just show pics of the finished models and talk you through what I did.
Well...another delay. Much of my hobby time in October went into helping launch The Mechanicon GT (www.themechanicon.com), which was a worthy distraction. Things came off well, especially with it being the inaugural event, and our club hopes to make it bigger and better next year.
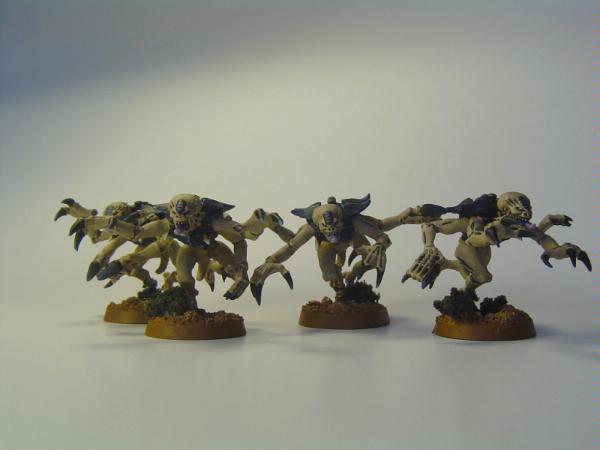
I did get some personal work done, however. Below are some pics of my new Purestrains, which count as Nobz. My pics are still coming out puzzlingly dark, which is strange because I'd set up more than enough lighting for these. All signs point to a new camera for Christmas, methinks.
Anyway, to keep these WYSIWYG, I made some minor alterations to the regular Purestrain models. First, they received shoulder plates to represent the 'eavy armor. Next, the addition of spinefists took care of the sluggas. And finally, some flesh hooks (they're a little hard to see in the pics but they're there) reps their stikkbombz. These four look identical because I gave them the same equipment. I'm not playing a lot of wound allocation tricks with this unit because it starts to become a real counts-as stretch for some of the equipment.
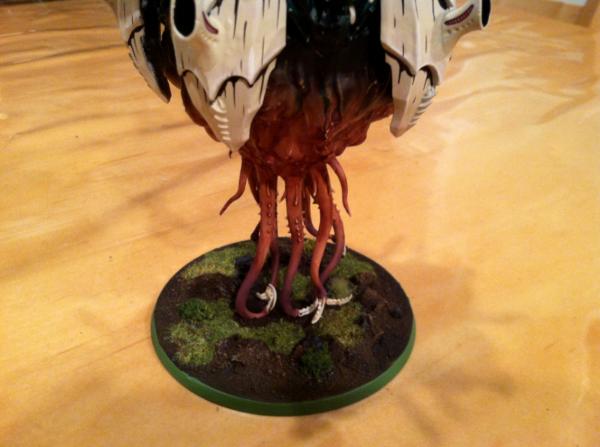
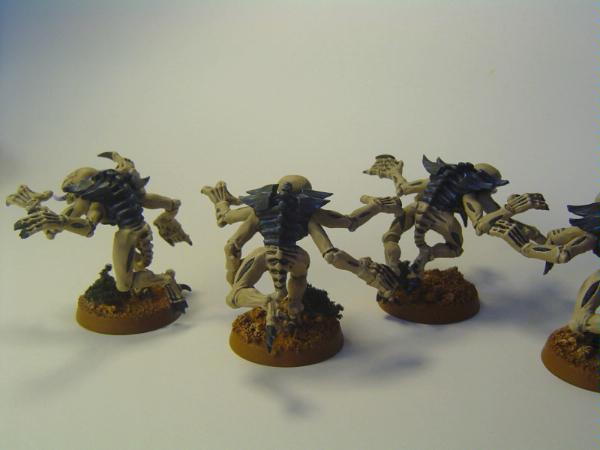
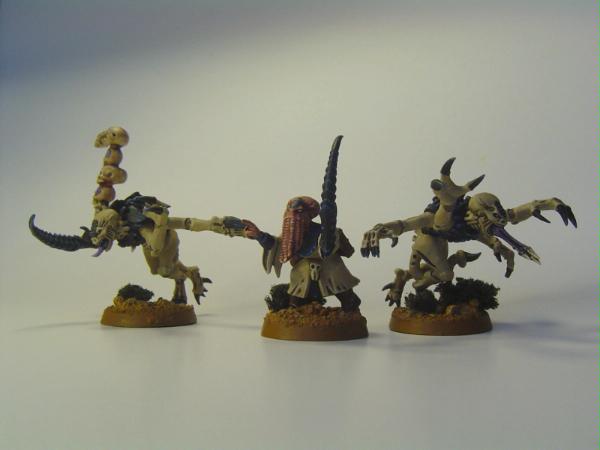
I made slightly more significant alterations to the three more unique Nobz in the unit. Going from left to right in the pic below, the first Purestrain received a power klaw and a Waaagh banner, which I repped with a skull juju stick thing in his lower right hand. I'll have to take another pic of that one at some point, because I like how the stick came out. I stacked human skulls, Genestealer skulls and Hybrid skulls (built from human skulls elongated with Procreate). After finishing all the bone work, I added painted decorations to the skulls, in line with the fluff that my cult venerates the skulls of their ancestors. You'll see more of this when I paint my Trukks.
The middle model is one of the Acolytes that seem to be one of the more popular parts of my army with other hobbyists. Unlike my previous Acolytes, I built this one from plastic parts. The basic body is a Plague Monk. I gave it some boots and an arm from a Cadian trooper, a klaw from the Daemonette kit, and of course the tendril head from the Genestealer kit. You can barely see the tome he's carrying on his back. The tomes, scrolls and other holy scriptures carried by the Acolytes are what counts as bosspoles in my army. It was a simple build, and it's good to know I can spam these guys out of plastic if I need to down the road.
The third Purestrain counts as the Painboy. I used the implant attack head to represent his dok's tools, with the idea being that's how it injects Tyranid phage cells, proteins, etc. into wounded cult members. I also added a barbed, poisoned tail (it's kind of curled underneath) to represent his 'urty syringe.
Pretty basic stuff overall, but I think it achieved my goal of making the unit WYSIWYG (in a counts-as sense) while staying within the Genestealer look and feel. So now that they're kosher, my clubmates can no longer complain as they cut a bloody swathe through their armies. HA HA!
I've already started work on my Battlewagon prototype. I'll have some in-progress pics up in a day or two.
Bramnero wrote:Looks really awesome, but can i just ask: what the hell? since when do priests have Genestealer heads?
It's because they're Hybrids. Hybrid Acolytes are canon...the tendril heads aren't. Still, I wanted to do something to make them stand out. I think I talked about it the article I made for the army.
And thanks everyone. The pic quality is bothering me...I feel like they really aren't doing any justice to the minis. My camera used to take good mini pics, but lately...bleh. Not sure what's going on, but I think a new camera should see some improvement.
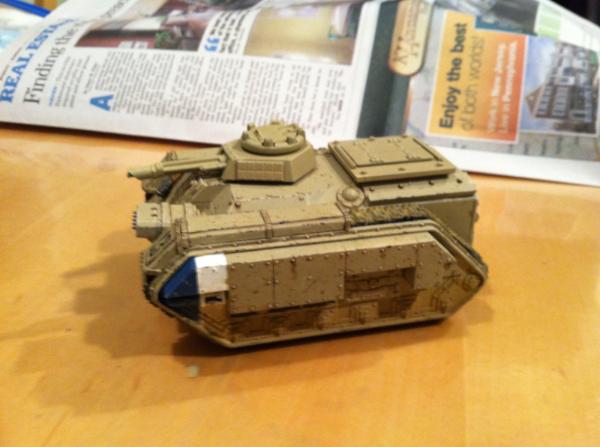
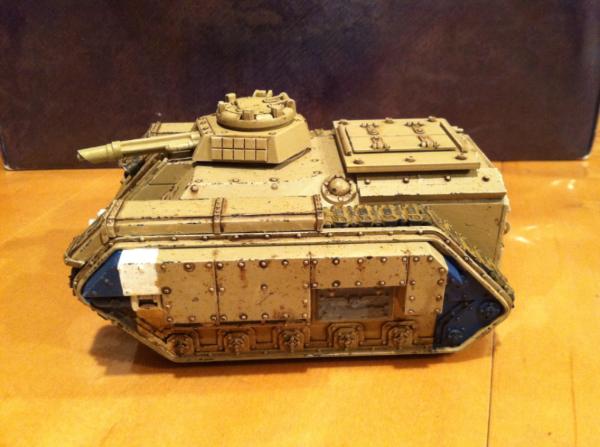
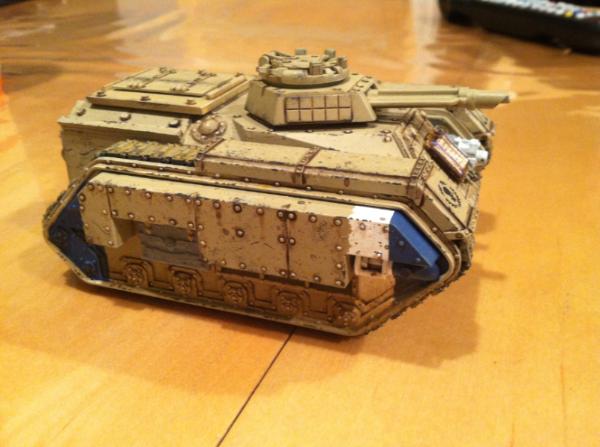
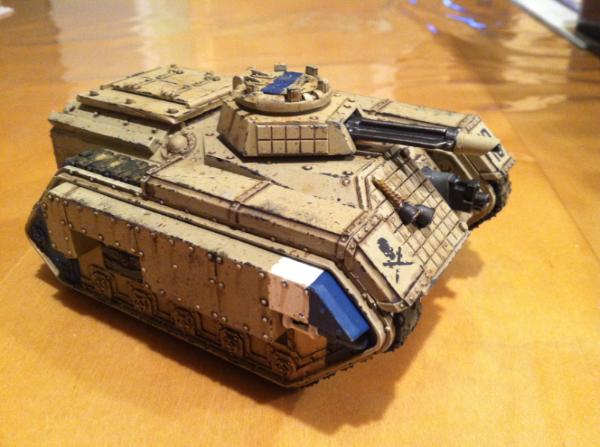
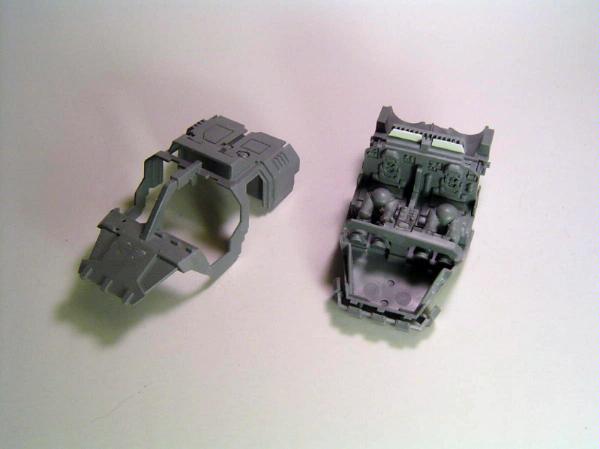
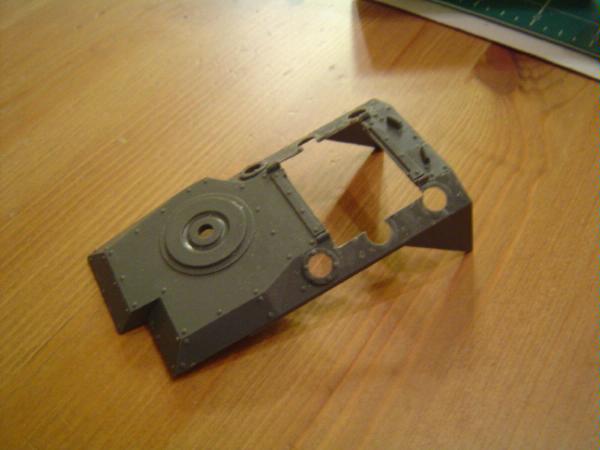
So anyway, we're moving on to the Battlewagon prototype. The plan is to use a Chimera as the base. I'll add a Predator turret to give it a little more size and bulk, and armor up the hull and track sections. In fact, I'm going to try using plasticard to build track armor similar to the FW kit. Also, I'm going to open up the top a little more (to represent it being opentopped, imagine that).
So here's the upper hull in progress. I've widened the opening. You might be able to see that I've shaved down the lips around the rear two gun ports on each side. That's because I'm going to cover those holes with plasticard and other detailing.
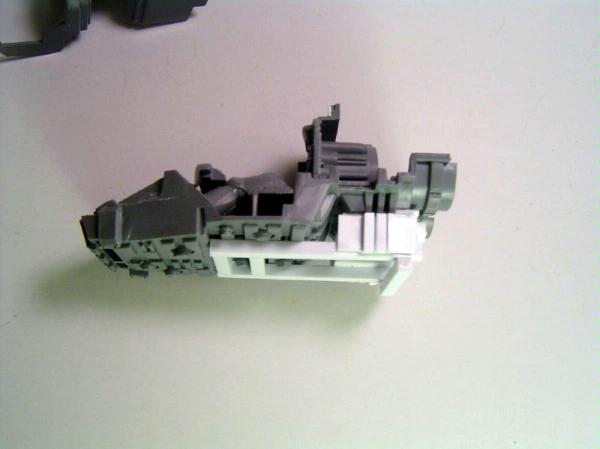
Since the top will open and wider, I'm going to add interior detail. And although it ain't cheap, the FW Chimera interior is probably the easiest and best way to do that. Here's the interior resting on the lower hull so you can see what I'm talking about. The interior bench seating isn't built yet, in case you were wondering.
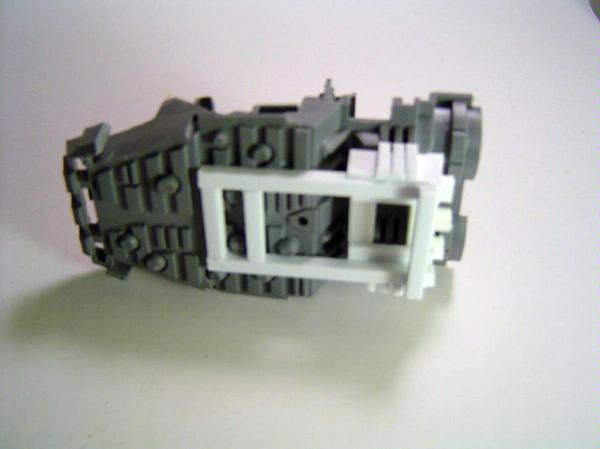
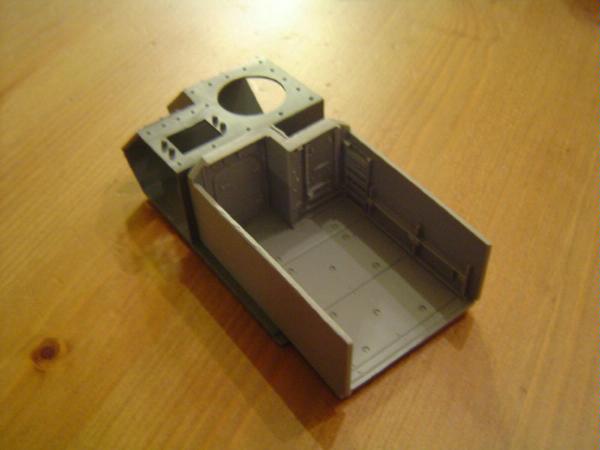
Okay, back to work. So here's the Chimera body with the open top cleaned up with some plasticard. I'll add details (rivets, etc.) to those side strips later.
And here you can see the FW interior now fixed in place.
So with the body starting to come together, it was time to work on the turret. As I said, I'm going to use a Predator turret to bulk out the vehicle and give it a meaner look. Having never done this conversion before, I spent a lot of time dry fitting parts. And what was immediately apparent was that the Predator turret *almost* fits the turret ring on the Chimera shell. So I took my hobby knife and ran it around the interior of the turret mount a couple times, and that was all I needed to get a nice fit! That was a lot easier than I anticipated.
I also added a post to fit the hole in the Chimera turret ring. I just added some plastic rod and reinforced the join with some greenstuff. Voila...a swiveling Chimera turret on a Chimera body that stays in place.
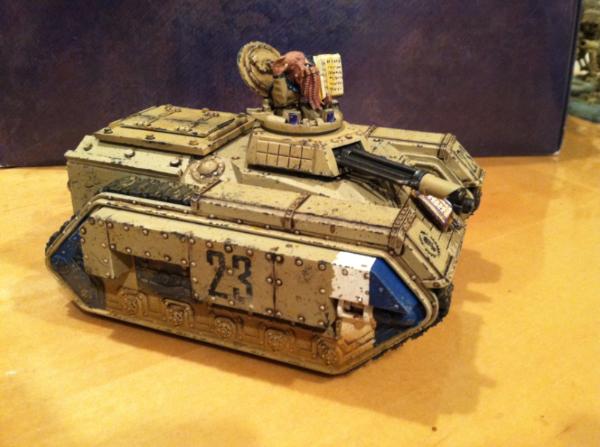
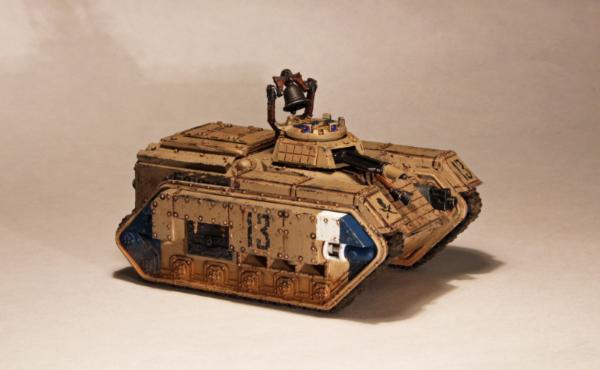
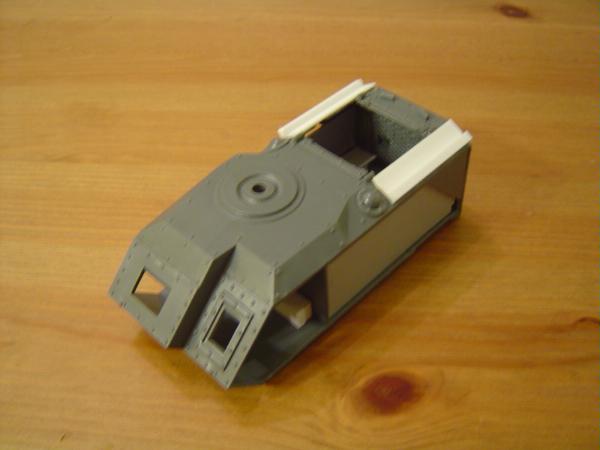
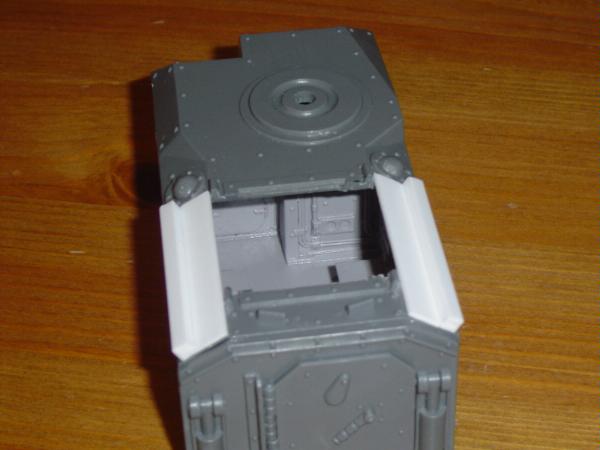
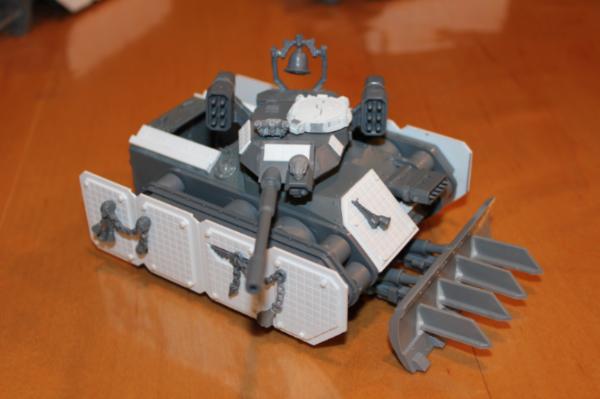
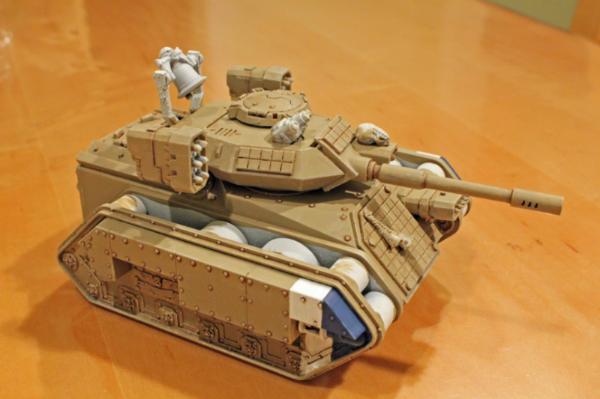
Alright. I'm starting to make some progress now. The next steps are adding details to the basic body and turret frames. So I added a cupola hatch, a new front armor plate (more work to come there), and a bell.
Why a bell? Well, if you remember waaaay back earlier in the thread, I explained that I'm theming my Hybrid/Boyz units to add some differentiation. Since this is the Battlewagon that's going to cart around the bell-themed unit, it's going to get the same bell theme. IIRC, the bell I used on the turret is from the VC Corpse Cart.
Now I'd like to track down some miniature bells to use elsewhere on the vehicle. I have some GW bitz I can use...the issue there is that they're plastic bitz lacking undercuts and therefore aren't hollow. They'll still do in a pinch, but I'd like to find an alternative. If anyone has any ideas, shoot me a PM.
In the meantime, I'm going to start work on the ram.
Amazing models! Im really impressed with the concept and have always liked the GS Cults you could always try to make the bells out of greenstuff or look out in craft shops this time of year for reduced price christmas decorations, or try and rob some plauge monks!
Beautiful stuff. Have to admit that when I wanted better Civilian style trucks I used Ramshackle Games a far easier far less cool version than your works of Plasticard art. For the bells I'd have to reiterate the recommendation of the Zombie and Plague Monk regiments especially the Plague Monks. Also for a Warlord Wagon how about using the Screaming Bell/Plague Furnace kit?
I'm a big fan of speeder/buggy conversions, and just wanted to say "Thanks!" for including your descriptions and shots of the undercarriage you built. I have some speeder/buggy conversions of my own that are built on ork fenders merged with the speeder frame, but I'm not thrilled with the back end. Your addition of the suspension frame really makes a big difference. I may have to borrow some of that thought for a future one, and if it comes out well, make a mold of it so I can produce dupes easily. Thanks again for sharing the work!
Keith
gorgon wrote:
Automatically Appended Next Post: So now it's vehicle time. The mechanized army I've planned will require the following new items:
Rocket (Rokkit) Buggy
But first up is a new Buggy to complete my squadron of three. My Buggies are built from Space Marine Land Speeders. The first step after doing the usual prep work on the two hull sections is to trim off the wings and any Imperial iconography. I also shortened the bumper to give it more of a land vehicle look, and added plasticard covering the vents over the cockpit (this will become more apparent after the top and bottom are glued together).
The driver and gunner will be painted separately and added later after the Buggy is painted. Note that I don't do any major work on the riders' legs, other than some trimming down of the knee area. That's because the legs won't be visible after I build the rest of the cockpit and add the torsos and arms with controls and targeting mechanisms.
The next step is to add the chassis stuff underneath. I just build up some support structure using square plastic rod and plasticard. For now, I won't add much in terms of realistic detail like fuel tanks, etc., although I have an itch to go back and add some of that stuff to all three buggies later.
I'm definitely just a ham-and-egger when it comes to plasticard work, but hopefully will illustrate that you don't have to be a plastics expert or do anything complicated to get a good result in your converting. The nice thing about this army is that if something looks a little crude, it kind of fits the theme.
*Rubbing eyes* What the heck? I lie down for a short nap and I wake up looking like Grizzly Adams. How long have I been out?
ALMOST TWO YEARS? Great googly-moogly. I had this weird, long dream about green Tyranids and gourds, but I didn't think I was out that long. Oh well. Since I'm up now, I might as well get back to work on my GCult and this blog. As soon as I shake off 20+ months of muscle atrophy, that is.
Here's where I left off. I'll have more soon.
Automatically Appended Next Post: *Stretching* Well, I'm getting gross motor functions back, and have made quite a bit of progress on my battlewagons. I took pics along the way, but they're not quite as step-by-step as my previous entries. So I'll try to talk things through a little.
My goal with the ram was to have something that looks nasty enough to count as a Deffrolla in a pinch. I started with the standard dozer blade and added metal beams to the blade from one of the old plastic tank trap pieces. I think the end result looks dangerous enough.
To mount the ram-rolla, I added three magnets to the dozer blade frame and flush-mounted three more magnets under the Chimera hull. Obviously it's best to do this before you glue the track sections to the hull.
On a side note, notice that I added more front armor in the form of some grid plasticard on top of the plain plasticard. As you'll soon see, I used grid stuff in various places...including homemade side armor.
*Thanks, folks. I'm hoping blogging -- even if a bit erratically -- helps keep me on schedule.
So I dunno why anyone should pay FW rates for their side armor when it's so easy to make from plasticard. To wit:
Okay, so this idea was technically borrowed from a Warseer poster. Still, there's no rocket (rokkit?) science at work here. You need two sheets of plasticard -- one heavier and plain, one with the grid pattern -- some small round plastic rod for rivets, large square "rod" for the mount on the back side, and a logo from the Chimera kit.
It's just measuring, cutting and gluing from there...I really don't have any great insights about the assembly of the outward faces. My main advice is to figure out a size that works for your vehicle and create a pattern for the main armor piece. Then thanks to the gridlines, it's easy keeping the top pieces a consistent size...just cut them to be 7 squares by 10 squares or whatever works for you. Note that the three grooves separating each armor section are just that...grooves I cut using a straightedge saw. One or two gentle passes is all it takes.
I should address the mount on the back side, though. First I placed two magnets underneath the bumped-out section on the Chimera tracks (for the prototype these were glued to the hull...for the later versions I wised up and flush-mounted them).
Next, I added the large square plastic rod to the back of the side armor piece. This piece will fit under the track bumpout and also add some strength and rigidity down the armor piece. I drilled out holes to flush-mount two magnets and voila...snugly-fitting, detachable side armor for a fraction of the FW price.
I built three sets of side armor from the plasticard I purchased and still have enough to make more. Now that's stretching your dollar in a weak economy!
Hmm...side armor would also be good for that Vostroyan project I have percolating... *slaps self* Darn it gorgon, I need some focus outta you! Listen to Gold Five and STAY ON TARGET!
Okay, fine. So the Chimera is finally starting to look like it has something approaching Battlewagon-level armor. Which is good, I'm getting there.
Thanks Tom. It's nice to be back to work on this army.
Here's where my step-by-step pics peter out. So let's skip ahead to the final product.
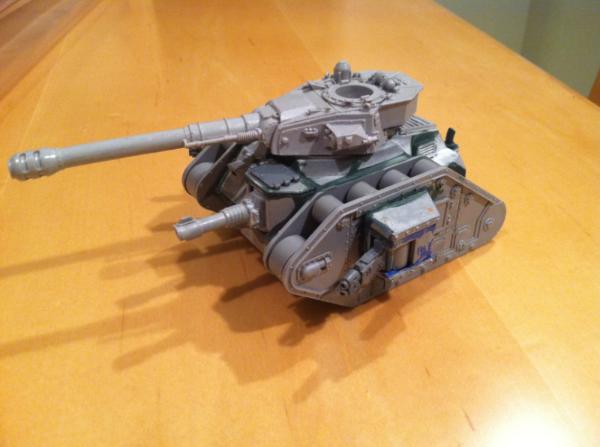
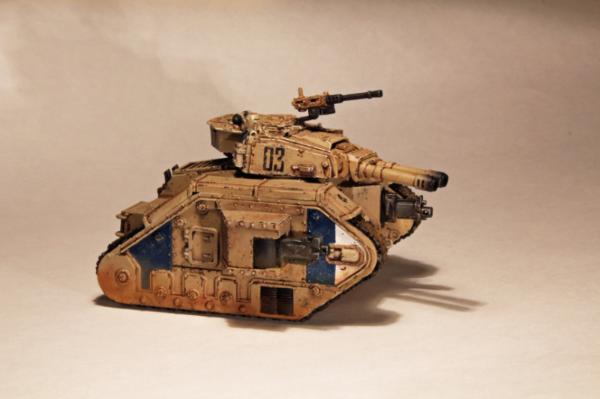
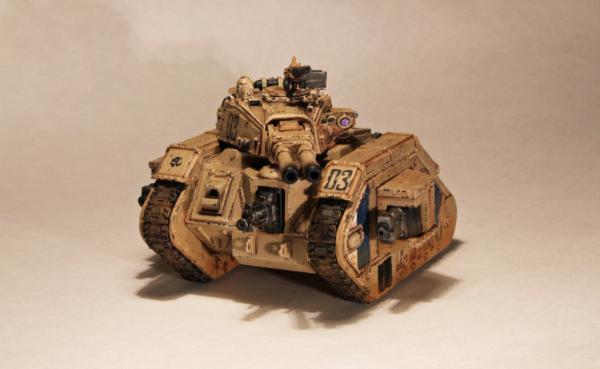
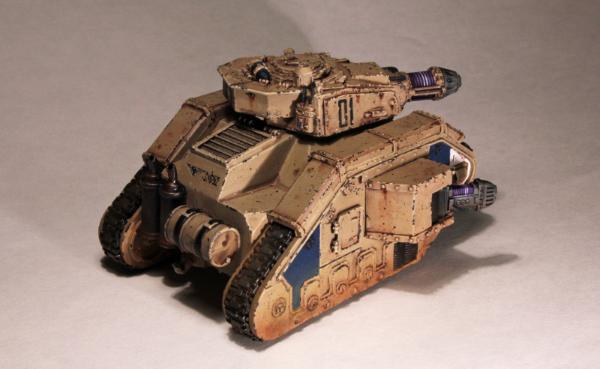
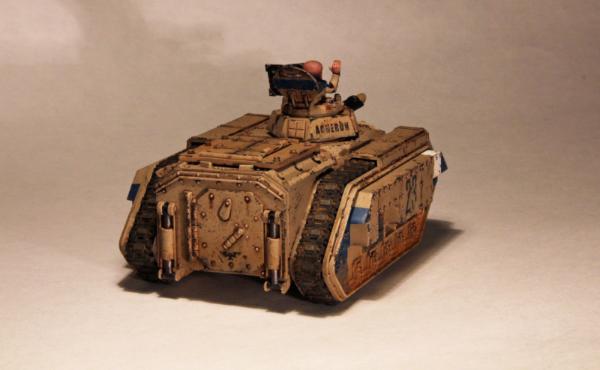
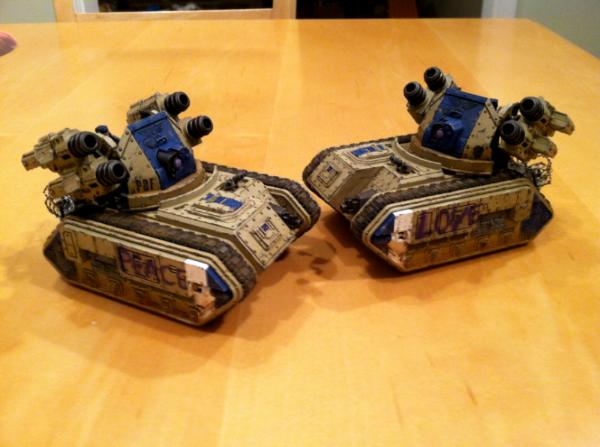
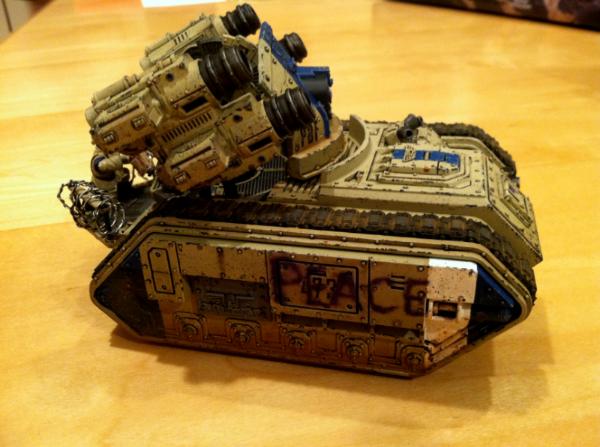
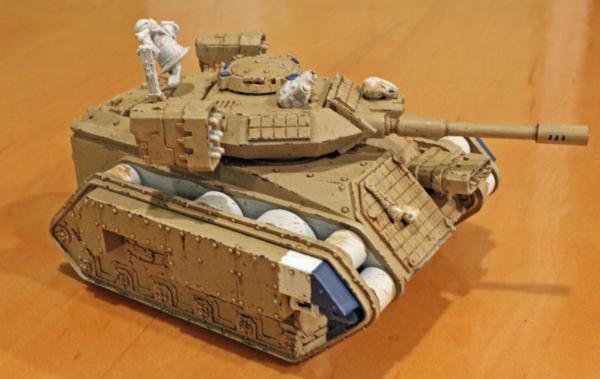
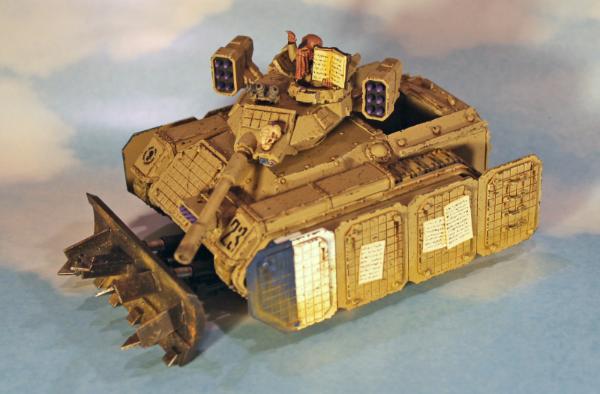
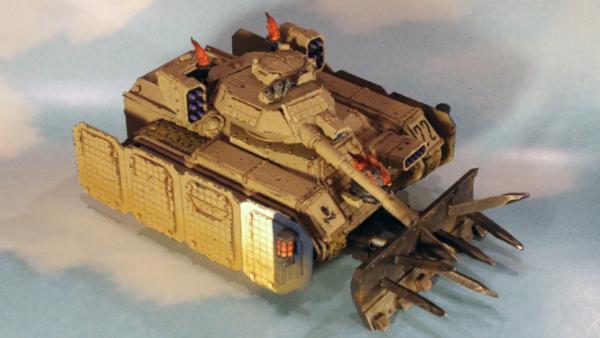
That looks a bit different, huh? I added Typhoon missile pods to the turret to represent two rokkits. A bit of a bold move, but I think they make the tank unique and break up the Predator/Chimera profile. I also added a third, hull-mounted rokkit (Sentinel missile pod bit) in place of the hull heavy bolter/flamer. Various areas got more of the grid plasticard to represent added armor and to tie things in visually with the side armor.
Speaking of side armor, I added chains from the CSM vehicle sprue and hung various bell bits from them. I bent the chains to help give a sense of forward motion.
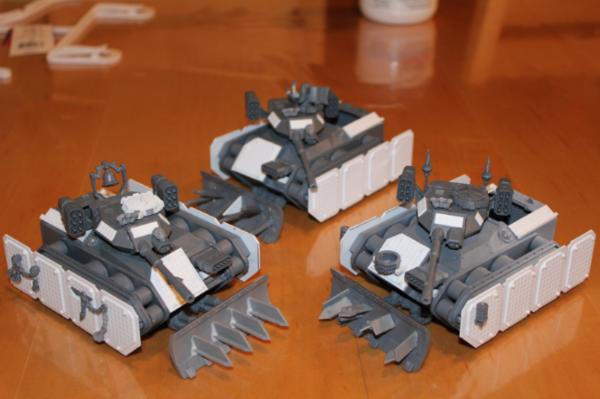
Oh, and I also finished two other Battlewagons. Here's a look at the final results of assembly. Overall, I'm pretty pleased.
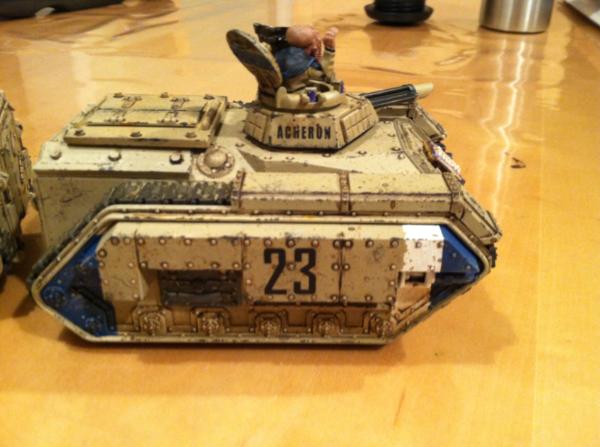
You can see that I changed the formula on the ram-rollas to differentiate them a little. To refresh everyone's memory, the wagon with the bells will transport the bell-themed Hybrid/Boyz unit. Another battlewagon (the one in the rear) will transport the scroll/parchment-themed unit, and the third will transport a unit of Tankbustas (replacing Burnas for now). The parchment wagon looks a little bare at the moment since paper, writing, etc. will be added to the hull post-painting. The commander of the parchment wagon is one of my patented Acolytes. It isn't glued in place yet. I'll paint it separately, then mount him in the finished wagon.
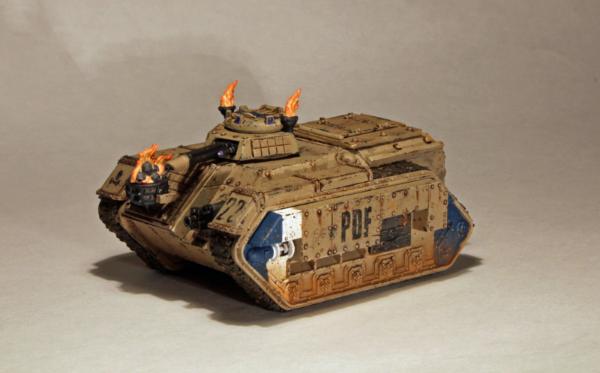
For the third Battlewagon, I stuck with a "fire" theme even with the change from Burnas to Tankbustas. I think fire has a nice, culty, primal edge that will fit the army regardless. Besides, Tankbustas "bring the fire", right? The brazier bits are from the VC Corpse Cart (boy, that really is a great kit for bits). I'll add "fire" to the large brazier mounted on the front hull later, probably after painting.
I'll basecoat these at the same time as the trucks and third buggy, using an airbrush. I find painting already-mounted tracks to be a bit of a PITA, so I'll paint the tracks and track guards separately and glue them on to the finished wagon. While the finished vehicles may look radically different from the base Chimera kit, remember that the ram, turret and side armor are removable. So if at some point down the road I decide to make this army count as IG, I just need some turrets to swap out and voila, I'll have IG Chimeras. Assuming people will overlook the hole in the roof. And the hull rokkit is an issue that'll need a fix...I glued it down to keep things moving. Still, those aren't big hurdles and would beat buying, building and painting new kits.
These look brilliant for a start. The rams are great the weapons fit brilliantly and the extra armour works wonderfully. Personally I'm slightly worried that they are a bit small for Battlewagons and need something to make them bigger, large enough to carry twenty boyz.
Thanks for the comments. I was a little concerned about the size myself. Note that I originally started these back before the Battlewagon kit was released. But the addition of the Predator turret, missile pods and side armor bulk them out more than you'd think...it's not nearly as low as the Chimera profile now. Still, it's obviously not the same, so in tournament situations, I just plan to be very generous with my opponents' LOS to them. Regarding scale and fitting models inside, 40K vehicles aren't to scale in most instances and can't realistically carry their listed passenger max. And since this is open-topped, I imagine Hybrids crawling all over the thing and not strictly huddling in the passenger bay.
So that does it for the battlewagons for now. I'm hoping to have the army completely revamped for next year's tournament season (targeting the Colonial GT in particular). In addition to all the vehicle painting, other stuff I have to do includes:
-Build and paint Tankbustas
-Build and paint new Magus with claw
-Build and paint extra Brood Brother/Grot and another Runtherd
-Build and paint a display board "enhancement"
I'm gonna stay mum on that last one for now. Heh.
Overall, that's not too bad of a workload, but the six vehicles will take a lot of time to do right. Plus I need to get my GCult technique down again for my infantry after painting Tyranids for the past 18 months or so. Especially with faces and flesh tones. FYI, we have a nice DSLR camera now, so pic quality should be better from here on out...at least after I get the hang of the thing. They shouldn't be as dark and muddy as the ones earlier in this blog, at least.
Next step will be building infantry. After that I'll start painting vehicles.
I'm gonna use three bits for "rokkits" -- the RPG-style Steel Legion missile launcher, Cadian IG bazooka-style missile launchers, and the old-school hard-to-find GCult/Chaos missile launcher. And of course, they'll be borne by more metal Hybrids. Bet you're wondering when I'm gonna run outta those, huh? Well, not yet. Perhaps soon though, lol.
You might remember that I used those RPG bits in my original army as part as the motley mix of weapons representing deffguns for my "Lootas". Going forward, this will be better sorted out. The RPGs will be strictly rokkits, while the more dakka-looking guns become strictly deffguns. So while I already have some of the RPGs painted up, I need to paint more since this army formulation uses a lot more rokkits.
Here are some Hybrids with holes already drilled for pinning arms. I always pin when affixing plastic to metal.
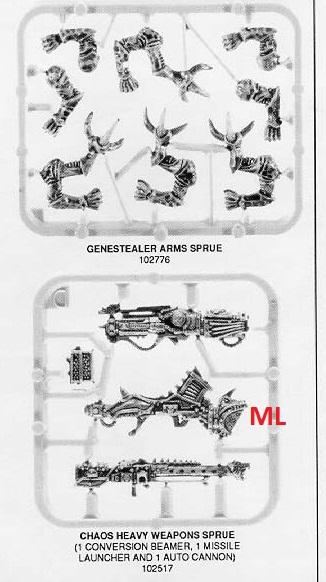
And here's a look at the aforementioned old-school ML...doesn't it have a weird, archaic look? Love those things. You can also see the plastic genestealer arms, which I'll talk about in a later post.
Oh, and of course Tankbustas need some proper Tankbusta bombs, so I'll add some plastic meltabomb bitz.
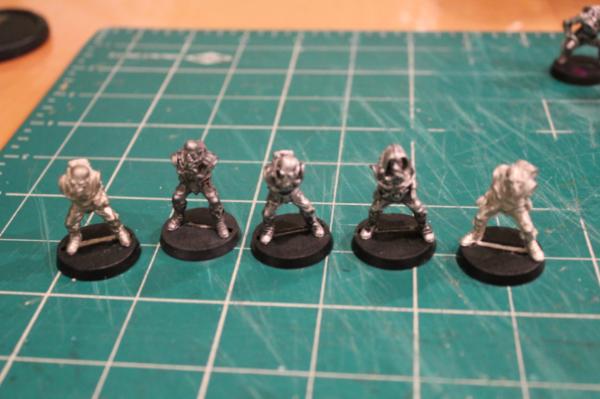
Got all the infantry assembled...here are some examples.
Might be good to take a moment to discuss little plastic arms and some GW model history.
*dons smoking jacket, leans back in a big plush chair by the fireplace, and pulls out a pipe*
The old Genestealer Cult arm sprue (pic in the previous post) is an interesting case. If you bought armless Genestealer Hybrids after the mid-90s or so, you probably got the GCult arm sprue with them. But those arms fit the metal Hybrids poorly because they were intended to be used with the larger, *plastic* Hybrid models, which had a much larger shoulder join area. The metal Hybrid models were designed to use the RT-era IG plastic arms, which I believe they discontinued at about the time the old RTIG models were discontinued (so 1994 or 1995?). You can see one of the old IG arms on the second hybrid from the right in the pic above, and how it fits the model nicely.
My solution is to use a straightedged saw to cut some of the GCult arms just below the shoulder. You can see an example of this on the first hybrid on the right. The angle of my cut determines the angle at which the arm is raised when mounted. A side benefit of this approach is that I can squeeze more arms out of a sprue.
Looks like I'm in good shape with infantry. Everything I need for the army sans the special project is now assembled and playable. I'm gonna take a short break -- not two years, I promise -- to work on a few other projects. After that, I'll get to work painting the wagons trying some new approaches, including filters, oil weathering and the use of an airbrush.
I'm back! Told you it wouldn't be another two years, but you were all skeptical, weren't you?
Here's a pic of some of the infantry I painted up in the time since my last post. I picked some of the same models as in the earlier post so you can see the before and after. I'm starting to get a better hang of the new camera and Photoshop, so hopefully the pic quality will be a little better going forward. Anyhoo, these models aren't Golden Daemon quality, but then this is an army project and not a GD entry.
And with my target date fast approaching, I've moved on to the vehicles. Remember these guys? Painting has begun! The khaki basecoat is being applied...next steps will be drybrushing, filters and washes.
Well how did I miss all this? You darn sneaky genestealers.. *grumble grumble*
Very good conversions all around and those trucks look great. Aah genestealer cults are so much fun.. you my good man are in dire need of converting yourself a Limousine transport for your Magus! =)
Here's a WIP shot. A lot has changed since you last saw them. The trucks received a light drybrush (mix of the basecoat and VGC Bonewhite), followed by a filter, a pin wash and some splattering. What are filters, you ask?
Well, filters are kinda sorta like washes, but with the goal of changing the underlying color instead of just supplying shading, etc. You might notice that the khaki seems exceptionally flat and monotone in the basecoat pics in the earlier post. Well, that's because it is...it's a straight-out-of-the-bottle basecoat.
In this case, I felt that the VGC khaki was a bit too warm. I'll have a rant on that that later. So I applied a light grey-blue acrylic filter to "cool" it down a bit. Note that when making a filter, you want the paint to affect the flat areas and NOT just run into the cracks. Military modelers seem to prefer filters made of oil paint. But in this case I thought an acrylic would work fine and in fact it did. I majorly thinned down some Vallejo Model Color to a watery consistency and applied it all over, taking care to keep it from pooling.
If you do it right, the end result should be extremely subtle, and in fact I think it's too subtle to see in these pics. I think it made a difference though, and that's what's important. I'm still very much a novice with filters, and look forward to doing a lot more with them in the future.
The next step was a pin wash, which just means a wash applied along some of the lines and details instead of being applied all over. Ogryn Flesh and Devlan Mud worked fine for this. I still wanted to give oils a try though, so I thinned down some burnt sienna oil paint with odorless mineral spirits and applied it around the rivets to add additional weathering. Been a long, long time since I used oil paint for any application, but I really liked how it behaved. I might use them more extensively on my battlewagons.
Even with all this weathering, the flat areas still looked too pristine. So I thinned down some paint, loaded it m(sparingly) onto a brush and kinda flicked the bristles to throw splatter. If you zoom in on the pic above, you'll see it more easily. Be careful if you attempt this, though...it's very easy to overdo it. I read something once about weathering that I think is very wise -- basically you weather to the point at which you find yourself saying "just a little more" and then STOP. That "little more" tends to be the exact point at which you overdo it.
Oh, obviously I also added the blue stripes to add some color and tie it in with the rest of my army. I used VMC Prussian Blue. Next up...more weathering of the base coat. Yay! After that I'll get to some of the obviously unpainted details.
As you can see in my previous pic, the paint still looked a little pristine even after all that weathering. So I added some chipping.
There's no big technique secret at work here. I just mixed up a dark grey color and lightly touched my brush along the sharp edges. My main tip is to vary the size of your chips. Make them too uniform-looking and they'll look overly fake. I also added a few scratches on the panels using a small brush and the same dark grey color.
If you want to try this yourself, remember that a little can go a long way. As I said in my previous post, when you think you're almost there, it's probably time to stop. I didn't hold back *too* much on these, since I want them to look well-used and scratched up. But I think the chipping is reasonable and not too OTT. I'll still use some weathering powders in places, but otherwise I'm done with weathering on the body.
I stuck a gunner in his spot so you can see how that's going to look. My next task is to paint some of the unfinished details, such as the engine blower, skulls and some of the gear that's strapped on. Oh, I may also add some decals if I find some that I like for these.
Very nice work. Fortunately I had time to go through your article as I was more or less lost on the entire project. Now I am glad that I have. Congratulations on all the hard work and perseverance thus far.
So obviously I finished all the details and added a few small decals. A while back I purchased a decal kit from MicroMark...came with setting solution, softening solution, different varnishes, etc. And I have to say that my decal work has gotten much, much better ever since. They really look like part of the model now. If you have issues with getting decals to look right, I highly recommend investing a little moolah into those decal solutions. They definitely worked for me.
So back to the models. I used weathering powders (dry) in spots on the truck body. The effect is subtle since the base color is khaki. But since the planet in question is mostly arid, I wanted to stick with a dustier look rather than one of great gobs of dark, wet mud. I particularly liked how the blue stripes weathered with the addition of the powders. Note that added powders *after* sealing with a matte varnish (Testors' Dullcote). If you try to seal on top of powders, the powders can fade in a major way. So you just kinda haveta accept that you may need to touch up the powders later on down the road. On the tires, I used a different approach. I applied the powders after having mixed them with rubbing alcohol to serve as a binding agent. That allowed more powder to stick, creating a more caked-on look.
I'm actually fairly happy with these. That doesn't always happen that way, as I can be my own worst critic. Anyway, it was fun trying some different techniques, and I think the end result was better than my previous vehicles for this army. Thanks for all the comments.
But I'm definitely not feeling like my work is "done". My next assignment is painting up all three battlewagons. Yikes. I've alloted seven weeks for this. Will be a bit of a grind, but I have a definite plan now thanks to my work on the trucks.
Edit: Had some depth of field issues with the previous final pics, so I swapped them out.
These are fantastic! Big fan of your weathering effects, and thanks for the tips as you go - impressed with the oil effects! I've had a few tries myself and never managed the subtlety you have here. The rubbing alcohol looks great - you've really nailed the 'caked on' look.
Thanks also for posting your WiPs earlier - I've used a fair few of your details / techniques trying to do a truck of my own. Hope you don't mind - I credited you for the design!
Not sure why this blog isn't getting more of the attention it deserves - I'm sure people are watching, even if it seems quiet. Keep it up!
Sorry I didn't respond earlier! These trucks are amazing! I am scratch building a Battlewagon (been in the works for almost 2 years now.), and want it to resemble a large tanker truck (either fuel or sewage! ), and I too will be using some of your techniques! I know mine won't be painted anywhere near as good as yours, but hopefully it comes out ok.
@Scarper: I'm probably a little light on watchers just because I'm so darn slow! The pace is probably boring people into comas. And feel free to borrow...sharing tips and tricks is what we're all here for. Regarding oils, filters, etc., I just usually try to err on the thin side. You can always adjust or reapply if things go on too thin.
@RSJake: I feel your pain. I started "phase 2" like 3 years ago, LOL. I got distracted there for a year or two with my Tyranids after the new Tyranid codex hit. But I've given myself a deadline (the Colonial GT tourney in late March) to "finish" this stage of the army. I say "finish" because I'm sure 6th edition will have me wanting to start "phase 3" soon.
Regarding techniques, most of them aren't hard to pull off. In fact, I feel confident in saying that even if someone isn't the best single mini painter, they can still paint up some really nice-looking vehicles with the right approach. My advice would be to practice them a little on some old models or whatever. You'll learn a few things and then be ready to roll when you're working on the real things.
My personal opinion is that patience is also a huge factor in achieving the results you want. When I mess up a model, it's usually because I lost my patience and tried to cut one too many corners. I mean, I'm still cutting corners with this army in the sense that I'm not painting every single model like it's a Golden Daemon entry. But I have a certain minimum standard for these in mind and I try to stop myself and refocus if I start falling short of that.
I actually started to lose my patience late in the process for these trucks. But fortunately I was able to rescue the thing I goofed up. I have a feeling my battlewagons are going to test my patience quite a bit, since there's three of them and the models are more complicated (interior details, turrets, side armor, etc.).
Look into AK interactive DAK weathering kit
They sell em on the main site or ebay.
3 bottles filter,wash,and streaking grime,top stuff
They also sell the bottles separtely and also for other paint scemes( panzer grey,OD green,Nato Camo)
For a proper DIY filter use enamel paint,not acrylic.
Thin it down with odorless spirts over a matt varnish 8 parts thinner to 2 parts paint.
Enamel and its thinner will not harm acrlyic in any way.
Filter work best over matt,washes and streaking grime over statin finish.
Once finished protect with matt or satin varnish.
Amazing work! Really big fan of the idea that you just pull other things apart and go from there to create something completely new and unique looking.
Hey gorgon,
Ive come to check out your nid blog! I really am liking the scrach buliding man! The battlewagons and chaimers are exallent! I love the plastercard work! You sir have a good moddler in you, I'm looking forwad for the new addtions of hibryeds to be painted up! I love the ise of the grechen which is show on your article! Hey how about you check out my blog too? (Link is in signutre). Can't wait for these guys to be painted!
Okay, so that was unnecessary. But if I don't keep it a little weird, there's no way I'm gonna finish these things. So on to the wagons and the final major mini painting project of phase 2.
I'm curtailing some of the early-stage pics, since you've already seen me apply the same techniques on the trucks. The pic below shows one of the wagons with a completed basecoat, a filter, and a pin wash. For these, I used strictly oil paint for pin washing, and I'm very happy with how it turned out. Oils (thinned down with mineral spirits) just flow and behave so nicely for this purpose. In case you're wondering, I removed the side armor for now and will get to it later.
As a reminder, the wagons will each be themed. One will have a bells theme to match its Hybrid unit, another will have a parchment/scroll/holy tome theme, and the last one will have a fire/brazier theme and will carry Tankbustas and someday maybe Burnas.
Below is a pic of the same wagon a little farther along. I did splattering all over like I did with the trucks. I also used some oil paint to create some drips and rain marks. I didn't go overboard with this though, since the planet in question is supposed to be on the arid side. Finally, I added some dark grey chipping along edges, like with the trucks.
The weathering is now mostly done except for powders, which will come later. So it's time to move on to painting some of the details like bells, skulls, weapons, etc. After that will come tracks and track guard assembly.
I really love your buggies & wagons. But they remind me of how terrible I am at playing with plasticard...
You had said in the article that you wanted to use these guys as Lost & The Damned originally. Were you talking about the one from the old Codex: Eye Of Terror? If so, you are 3 different colours of insane blended into awesomeness.
Ha! Yeah, they were gonna be beautiful as LatD! Hybrids make great Mutants, Brood Brothers work as Traitors, Purestrains as Daemonettes, etc. Woulda been a been a more compact army also. Since the switch to Orks, I can't believe how many models I've had to paint (and acquire $$$). I'm looking at getting a Battlefoam PACK AIR bag, but my GCult almost fills it already!
Phase 3 isn't even out of the question...I'd still like to do some Burnas and a unique take on Killa Kans. Then I have another army idea percolating that's only around 80 models, but would require kitbashing every single model. I wanna punch myself in the face for even thinking about that one. But it is a good idea.
I think I probably am insane. Dunno about the awesome part, but insane...yeah.
Love your work with the oils! I'm trying my hand at oil weathering myself at the mo and you're pretty much solving my problemsbefore I get a chance to ask about them The tank looks fantastic - I'm a big fan of your unit markings.
And there is nothing insane about customised armies - this is clearly a labour of love, and ought to get you nothing but respect. And hopefully some donations for upkeep
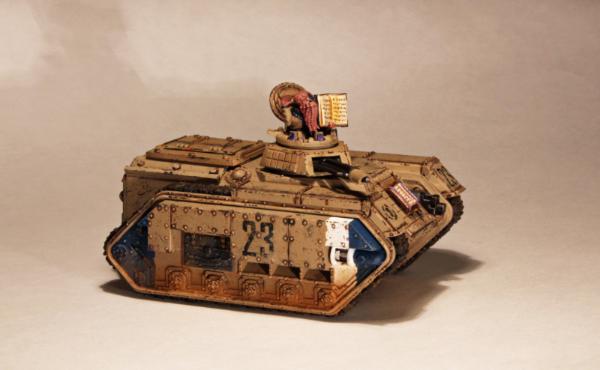
No, I didn't forget about this blog. Really! Okay, so maybe I did for a little while there. But here's my final update on the wagons. Voila. How do you like the background? Look out...FLYING TANKS!!!
As you can see, the tracks are on, powder's been applied, the side armor is on, and details have been added and painted. Regarding powders, on the tracks I used a binding agent (alcohol) so that they stuck better. It'll still rub off to some degree, but the binding agent helps out a lot and allows them to be applied more heavily. On the lower part of the tanks and side armor I applied the powder dry for more of a dusty look. Again, the imaginary planet in question is a fairly dry place and so a lot of caked-on mud wouldn't make sense. At some point I'll probably tweak a few things. I'd like to add some more parchments to the wagon with the Acolyte, and would like to add another brazier to the fire-themed wagon. Maybe scrawl a few more slogans on them. But these are definitely in a good enough spot to call them done for now.
Which is to say that I made my deadline (the Colonial GT). And while there I won a Best Painted trophy and some good loot for my efforts! Yay me! Thanks for all the support, folks.
I know some of you are thinking "what's next?" Sheesh, give a guy a break, wouldja? Well, other than the detail tweaks I mentioned earlier, I have a third buggy that's primed and needs painting. I also have the stuff to build a third truck. I plan to make a few design tweaks on that one whenever I finally get around to it. And I need to fill out a few units, etc. Long-range plans include Kans and Koptas...definitely have some ideas in mind for those. But first, I'm gonna take a little break from the GCult and work on stuff that I've let sit for too long. Right now I'm assembling some IG stuff for a Vostroyan army. I'm probably not going to paint it anytime soon...mostly I'm just trying to get the army playable at 1500 pts.
I also need to work on my game table. I have some old, old forest/jungle terrain, but I want to do a ruined city set. I already have two large ruined buildings done. Next steps include painting a Zuzzy mat, some barracades and a FW terrain piece. Then I'll build a few more buildings.
After that...I have a new army project tentatively planned. Let's call it Project X. Project X is pretty ambitious. I have it fairly well concepted out, but I'm still working through a few things. It'll be a quite a while until you see it...might take me two years to finish even after I start on it. In the meantime, I'll post some pics of my terrain, etc as I get it done. Oh, and I also have a new Tervigon kit that I'll probably paint up later this summer. I'll share that too.
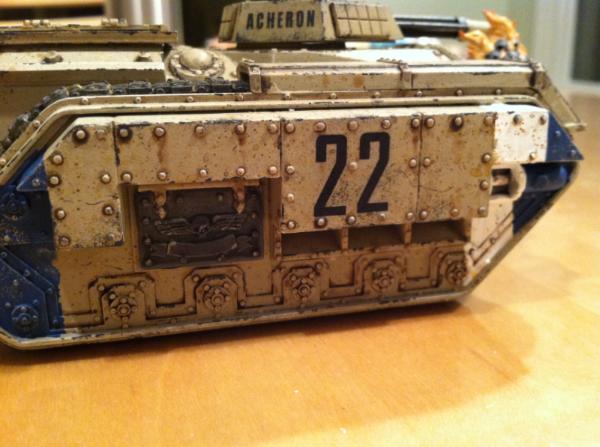
I haven't updated this blog in a looooong time, mainly because my GCult was in semi-retirement. However, the winds of change are blowin' across the dusty wastes of Acheron VI. Namely -- rumormonger extraordinaire Hastings has indicated that a Genestealer Cult codex may be on the way in the next year or so. WOW!
The funny thing is that I had already decided to ditch the Ork codex for my counts-as and roll with Astra Militarum going forward. I had army lists figured out and everything. Now lots of things are in flux. If this is true, how will GCults be structured?
-Will they get a detachment we can run alongside AM and/or Tyranids?
-Will the codex include Cult units only, or will kits from other armies be included (Chimeras, for instance)?
-Will Brood Brothers be a choice in the codex, or will we have to rep them as AM infantry?
-Will Hybrids be in the codex, or will I have the option of using those models as AM infantry?
There's too much confusion...I can't get no relief!
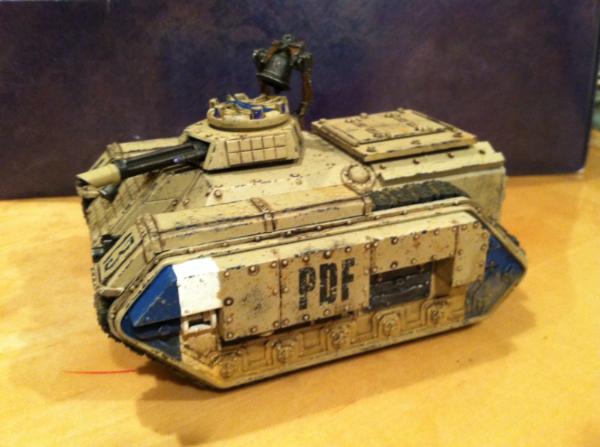
Ultimately, it's a damn good dilemma...there's just some short-term uncertainty about which models I should be painting. Realistically, I'm going to have to put infantry changes on hold for now. It should be safer to work on vehicles, though. GCults almost have to be able to get some commandeered PDF tanks somehow, someway in a battleforged army, right? Well, that's what I'm going to tell myself, since I've already started on the vehicles.
So it's full steam ahead on the AM vehicles! Here's a list of things to do until the codex becomes clearer.
1) Paint new Vanquisher Russ
2) Update old Russ turrets and paintjobs
2) Transform the "Battlewagons" back into Chimeras and update the painting
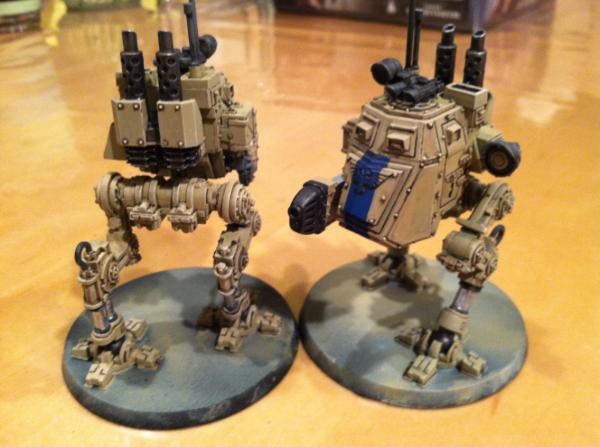
3) Paint new Sentinels
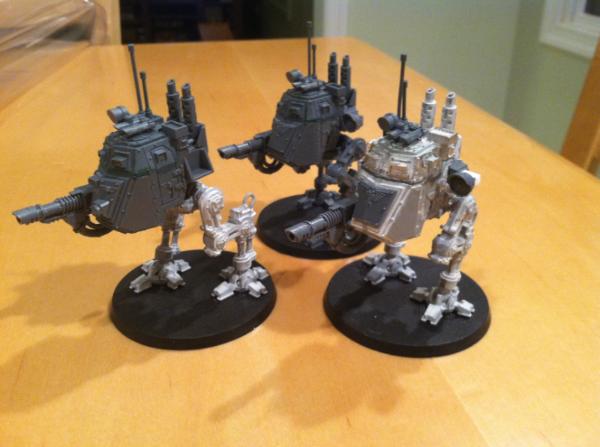
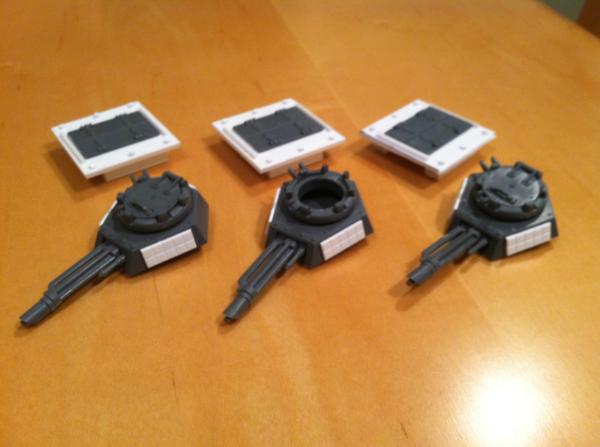
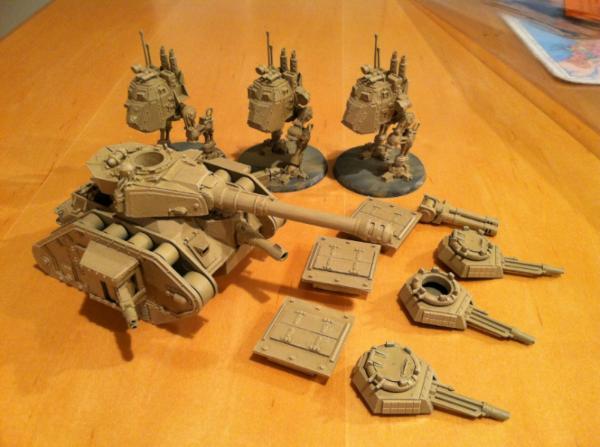
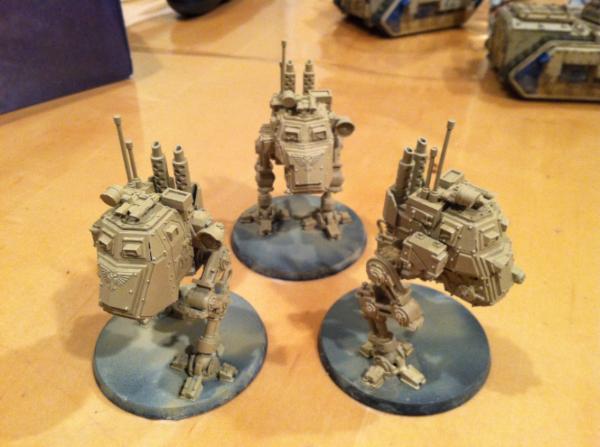
And here are the new Russ, the Sentinels, and the new turrets and hatches for the Chimeras, all ready for priming and painting.
Can I start by saying that I love the new Vallejo Game Air paint? It comes in khaki! So instead of spending who-knows-how-long slathering VGC on these vehicles with a traditional brush and trying to get an even coat, I can get a nice thin coat in minutes (with dry time in between coats) with my airbrush, AND be guaranteed a close match to the regular VGC Khaki that I use on my stuff. Vallejo...you guys are awesome.
FYI, I primed these with white Vallejo surface primer, which also works great. Laying down multiple thin coats is the key.
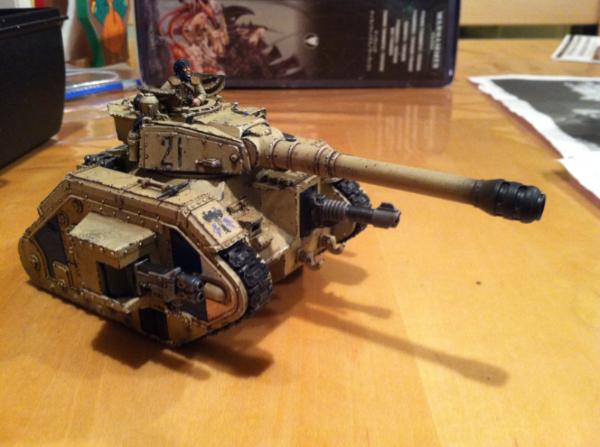
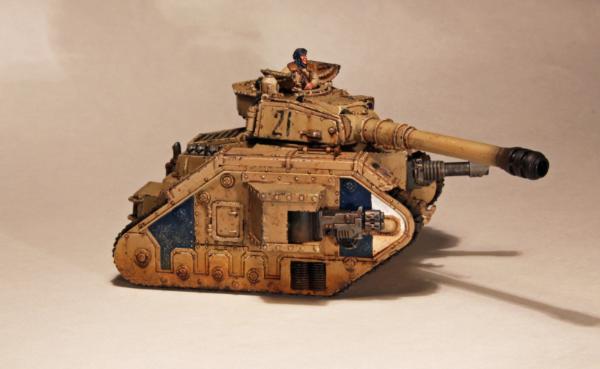
First up is the Vanquisher, but I'm also going to work on the older Russes concurrently while I'm in "Russ mode." The biggest change on the old Russes is swapping out the battlecannons for an executioner cannon and exterminator cannons. Here are the old Russes:
They look pretty good, but there are definitely things that I can improve, including the weathering. I've also grown dissatisfied with my oil pin washes on my vehicles. I used a burnt umber, but I don't think it provides quite enough contrast in the seams and around rivets. I'll improve that on the Vanquisher and these older Russes.
So, I popped the battlecannons off the turrets and added magnets and posts. From now on the main guns will be swappable, depending on what type of Russ I want to field. I can't explain why I didn't do this in the first place.
I'll purchase a new FW Ryza Executioner turret kit to get the Executioner bit for one Russ. I can always use the turret piece on another Russ down the road. I want to make the other Russ into an Exterminator, but I don't like the weedy look of the Ryza pattern Exterminator guns. So I took the beefier plastic Exterminator bits and combined them with some plastic strip to make my own.
Oh, also note that I've pulled out the Tallarn commander guy and closed the top hatch. The commander will go into the Vanquisher turret to represent "Pask".
Very nice stuff!
I'd love to see what kind of Astra Mil lists you're trying out.
I'm using that codex for the cult I'm building, too. Right now, I'm trying out an AM/Inquisition build that I think looks fun (though, perhaps not that competitive LOL).
Awesome to see that you're back. Wow... a GS Cult codex? As if I didn't have enough stuff to paint... I love the look of your tanks, but I think that they could use a bit of work to better suit the GS look. Maybe give Pask a tentacle arm or something? You don't need to get too OTT with it, just enough to make it recognizably alien.
A tentacle arm would be mutant, really, more than Genestealer.
If he's going to convert an arm, making one reminiscent of the old Hybrid arms would be more appropriate.
MagickalMemories wrote: Very nice stuff!
I'd love to see what kind of Astra Mil lists you're trying out.
I'm using that codex for the cult I'm building, too. Right now, I'm trying out an AM/Inquisition build that I think looks fun (though, perhaps not that competitive LOL).
Thanks! I too had plans for an AM/=I= build. It was a good way of getting the Purestrains into the army (Purestrains were easily the weakest part of the counts-as when I was running them as Orks). Now I'm not quite sure what to think. I'm guessing that the tanks are a fairly safe bet, though.
I'm not too worried about being competitive. My tourney results with "Orks" were pretty embarrassing. Some of it was definitely the counts-as/model constraints...the rest of it was that I might be the world's worst Ork player. I dunno what it is. With my Tyranids I feel like I can make a respectable showing at an event. I guess the Ork playstyle doesn't mesh well with me. *shrug* It wasn't a hard decision to change the counts-as, ultimately.
Automatically Appended Next Post:
youidiotkid wrote: Awesome to see that you're back. Wow... a GS Cult codex? As if I didn't have enough stuff to paint... I love the look of your tanks, but I think that they could use a bit of work to better suit the GS look. Maybe give Pask a tentacle arm or something? You don't need to get too OTT with it, just enough to make it recognizably alien.
Thanks, it's good to be back on this stuff!
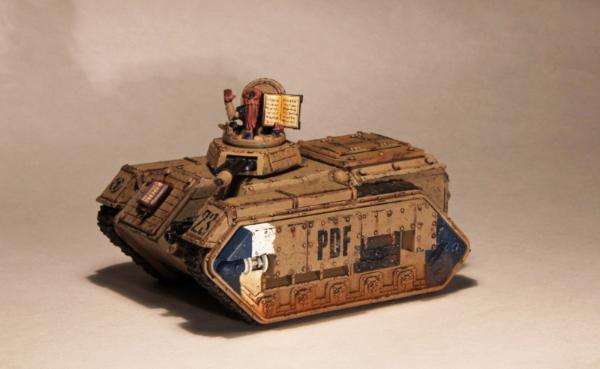
And that's a completely fair comment. Honestly, with this round I still won't be going too crazy with Culting-up the tanks. The focus is going to be on getting paint on the new stuff and getting the weapons changed and basic paintjob updated on the old stuff. The next project (the Chimeras) -- being built on those strange conversions earlier in the thread -- will have a *little* more ornamentation, including that tentacle-faced 'Acolyte' commander transplanted to a regular Chimera turret.
I'm also waiting to see what may come with a new GCult codex. Lots of new bits and ideas may come from that, especially if we get a ground transport (limo) kit. I think you're going to like the new paint jobs, though.
Regarding the tank commander, it's probably important to note that Brood Brethren aren't mutated, at least not visibly. When they're implanted, their DNA gets some re-writing and they become enslaved to the Cult, but visible mutations only show up with their Hybrid children. Which kinda makes sense. The parents would have a hard time blending into society and protecting their Hybrid children if they all grew third arms and such.
Anyway, I have some ideas for a new command squad, if that's possible post-codex. They'll still be Brood Bros, but I have some interesting visual cues in mind. And since the infantry in my army are mostly Hybrids, I don't think my army will look too much like straight-up AM/IG. (I have around 120 metal Hybrids -- almost all painted -- which is probably a sign of some kind of mental disease.)
Future ideas include a GCult Knight. I have the basics of that one mostly planned out. I just have to decide whether to base it on the plastic kit or on one of the FW kits. Oh...and find the time. That one's probably a longer-range project.
So next up on the Vanquisher is a filter. I could spend a lot of time talking about filters, but there are other places you can get better explanations. The short version -- a filter is an extremely thin layer of paint (usually oil paint thinned by white spirits) applied evenly over a model in order to very subtly change the underlying paint color.
This is actually a bit of an experiment for me with the GCult. You often see darker filters applied to lighter colors, but in this case I'm hoping to use the filter to "cool" down the khaki a teeny bit, to simulate some color changes from its factory paint job.
After protecting the basecoat with a layer of Testor's Dullcote (you want matte and not gloss so that you get even coverage and not a wash effect), I applied a light blue-grey filter. Here's the end effect. It's subtle, and given that I took the pic with my phone and didn't do any color correction, etc., you probably won't even notice much difference. You can see a tiny bit of the color collected around some edges.
Eh. It's okay, I guess. I think next time I'll play around with some color modulation instead.
Anyhoo...so I thought I took a number of pics of the next few steps, but I sure as heck can't find them on any of my drives.
But maybe it all works out anyway. You guys probably want me to skip ahead and show some sexier pics anyway, right? So how's this?
Alright, here's another pic of the Vanquisher at this stage.
At this point, I've done some airbrushing of the ground color on the lower part of the track section and on the bottom of the hull. You can't see it well in these photos because of the shadows, but it's clearly visible in real life. Next I did a drybrush highlight with VGC Bonewhite.
That set me up to start addressing details on the model, starting with a pin wash. On the older vehicles I did pin washes with straight burnt umber oil paint. But it came out too light and I was never satisfied with it. So this time I used a mix of burnt umber and black to make the details "pop" better. I also did more pin washing with the brown-black mix on the older Russes.
You can see that I also did some weathering. This included some sponge application of a dark grey, some splattering with oil paint/pigment mixes (again, protecting the paint with a layer of Dullcote first), and then some edge chipping with dark grey.
It's funny how vehicles come together with this stuff. When you start working on them, they'll look plain for a while, but once the effects start getting layered on top of each other, there's that moment where it seems to suddenly round into shape.
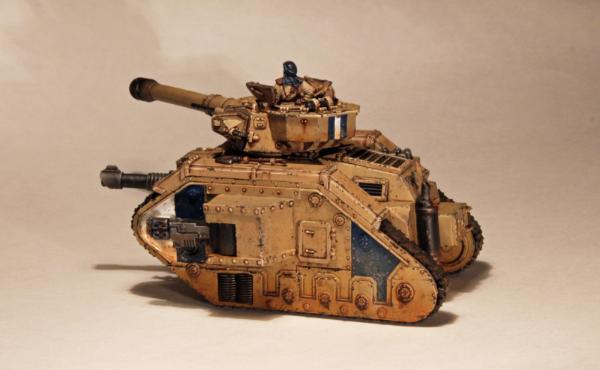
Oh...I almost forgot. I decided that the back half of the Russes needed a little color, so I made the back panel of the track sections blue (VMC Prussian Blue, IIRC). I duplicated this on the older Russes too.
Like I said, I think you guys can see things coming together now.
Almost done with the Vanquisher now. I installed the tracks and track guards, added the tank commander to the cupola, and added decals. I'd like to go on a little bit of a tangent here about applying decals, but I think I'll save that for the Chimeras.
Next steps include sealing it with Dullcote and adding weathering powders.
In case someone's curious, I still have the dozer blades for these. Later on down the road, I'll magnetize them so that I can swap them on and off (this is another why-didn't-I-do-this-the-first-time-around thing).
Next time I'll have some "glamour pics" of this and the other Russes with my good camera.
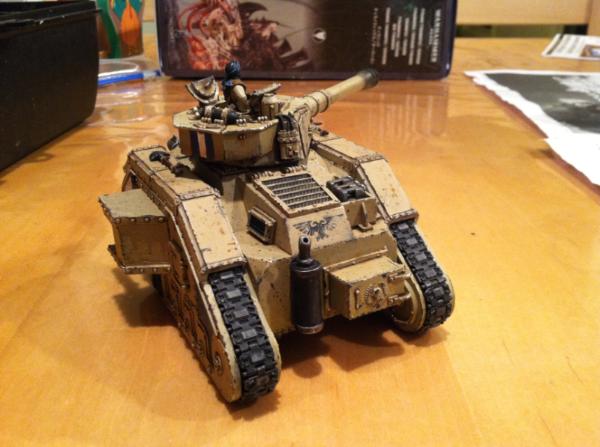
As promised, here are some quality pics of the Russes with the DSLR.
"Compensating? Who's compensating?"
Here's the Exterminator...
...and here's the Executioner.
I decided against doing OSL on the plasma weaponry, since then I'd want to go back and add it to the glowy bits throughout the army. I don't need more projects right now, so I kept it basic and consistent.
Overall, I'm pretty happy with how they turned out. I think the darker pin wash and the extra weathering were successful. And while the updated older Russes might not be quite to the standard of the new Vanquisher, they're close enough and blend well. I'm a big believer in revisiting previously painted models, provided that you left them in a state where you can cleanly make revisions without needing to strip the model and start over.
If the GCult codex happens (and we get a limo/transport with some sexy bits), I'll probably take a little time to 'cult up' these tanks a little more. But I'm good to move on for now.
To refresh your memory, I'm planning to take those crazy Battlewagon conversions I did a while back and transform them back into regular Chimeras. The two main steps involved are replacing the turret, and closing up the hatch area. Like so.
The hatch fix isn't perfect, but there isn't going to be a perfect solution given all the cutting and sawing I did to the model. I do like the idea that I can pop the roof off to display the interior details. And it'll blend in better when I'm done with it. Note that I'll also have to replace the front rocket launcher with conventional Chimera weaponry, which is easy enough.
Some other general, rambling thoughts...right now I feel like there's a definite lack of contrast in the model. Without the side armor pieces, it's kind of a big mass of khaki, and the oil pin wash I did doesn't pop the way that it does on the new Russ (again, due to my use of a pure burnt umber instead of burnt umber + black). So I'll give the body another pin wash when I work on the turrets and roofs. I also think I'll add some blue to the back half of the model like I did with the Russes, to spread some color around the piece. And I definitely cut a few corners to get these done the first time around, so I'll do more detail work on certain parts of the hull, especially in the rear.
Been really busy and have fallen a little behind with this blog. I'll try to catch up here over the next few days.
So I'm going to skip the filter on the Chimeras, since we're well past that stage on the hulls already. The first steps are a drybrush highlight on the new bits, and the pin washing with oil paint on everything. Which gives you something that looks like this.
Even though one of the beauties of oil paint is how you can manipulate it after it's been applied to the model, you can still end up with some cleanup work. But that's no biggie. Already, I like how the details are popping much more with the brown/black mix.
After a little cleanup, I did some sponge work, which gets me to this.
So here's one of the chimeras with edge chipping added to the sponge weathering. I also felt like there was too much khaki from a top-down view, so I added the stripe of color across the hatch.
And here you can see some of my work around the back hatch, which was admittedly not finished properly the first time around. Oh...you might notice (or not) that the treads have lost a lot of their dirt. That was intentional...I felt like I applied it too heavily the first time. A light spray with matte sealer did the trick and got the dirt back to the level I'm looking for. (Matte sealer tends to make weathering powder disappear.)
Here's one of the chimera with the Acolyte turret guy added. Also, you can see that I've started to apply decals. More about that next time.
I see a lot of people using them, and more often than not they don't use them well. You see bubbles, wrinkles, or edges of the decal. You even see it on stuff featured in GW publications!
Now, that might be because they avoid using varnish on their models for photography reasons. At least, that's what I've heard. But there's no reason more hobbyists can't get better results and decals that look painted on.
If you think I'm going to say that technique is everything...you're wrong. Or at least partially wrong. What you need most is stuff. Namely, a good decal setting solution, a good decal softening solution, and some good flat and gloss varnishes. Micromark has a good kit with all the above that costs about $20. If you're doing a bunch of vehicles, it's well worth it.
My basic process is that I brush on some gloss varnish where I'm going to apply the decal. I loosen the decal as usual in water, then apply it to the spot, moistened with setting solution. I use a brush to maneuver it in place and let it dry. When dry, I carefully apply a little more setting solution. Then I let that dry. Next, I carefully apply softening solution, let it dry, then repeat. At this point, the decal usually looks pretty good but not quite painted on. That's where the flat varnish comes in. Two coats will do the trick. I often find that my final seal with Testors Dullcote works fine as the second coat.
I know this sounds like a lot of steps, but it really goes quickly, and if you handle your decals all at once it really isn't a big deal. Up your games with your decals, folks!
Here are some shots of the Chimeras after I've gone back and done some sponge work over the decals to make them look weathered and flaky.
I'll get some final, sexier shots of the Chimeras up shortly.
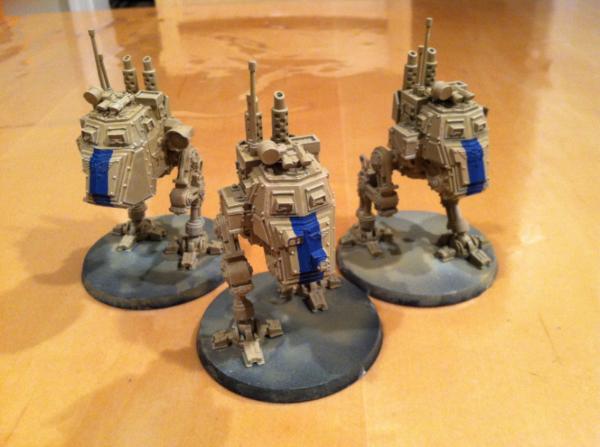
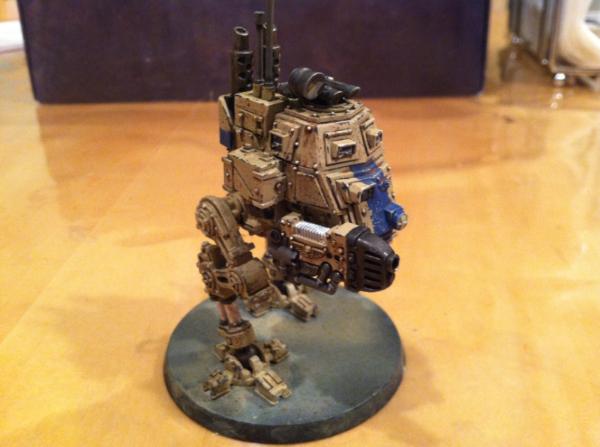
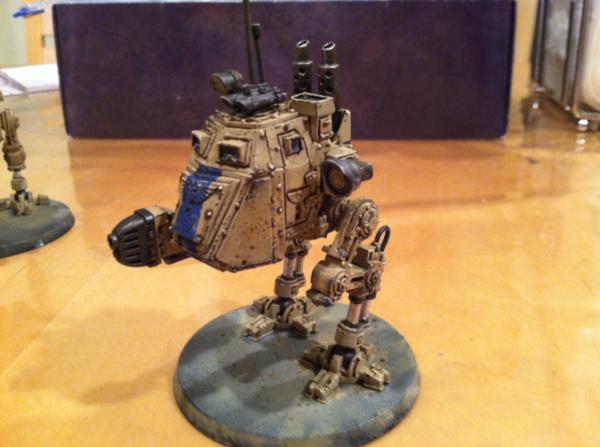
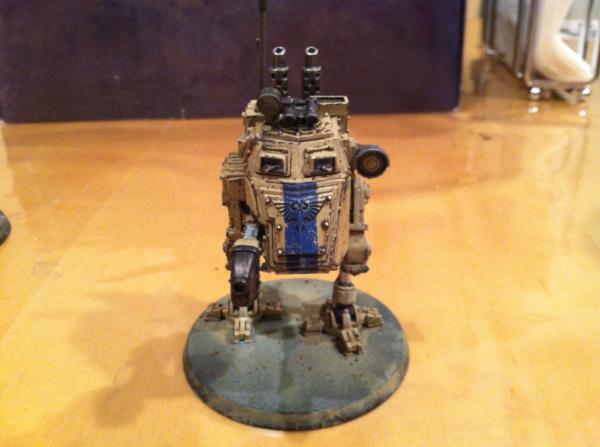
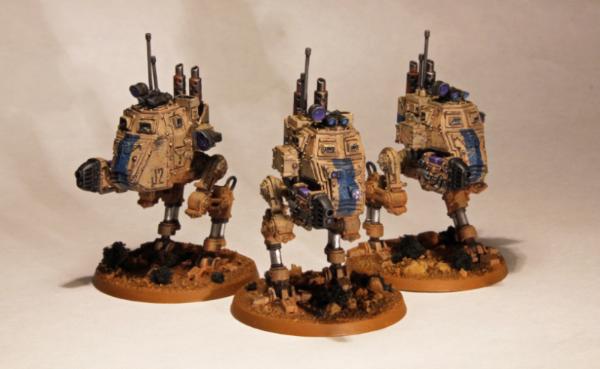
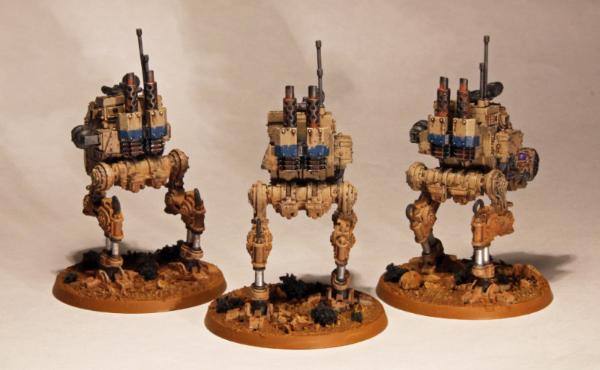
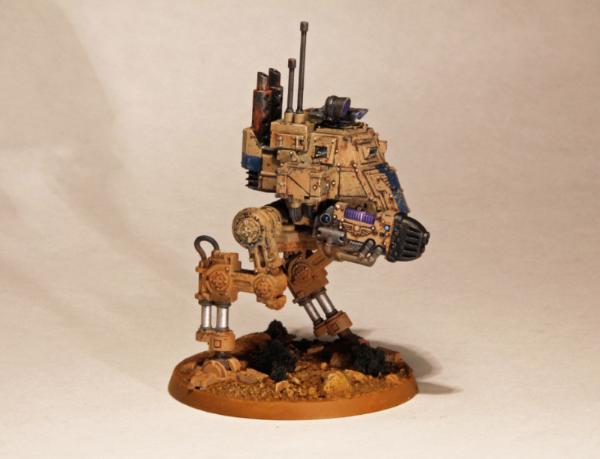
The first pic shows the Sentinels with filter and drybrushing. The second two pics show the oil pin wash and the start of some work on various details.
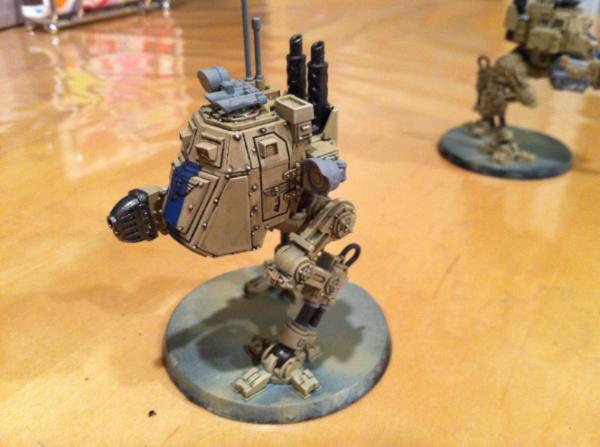
So here are some higher-quality pics of the Sentinels -- all detailing, basing and weathering completed.
Hope you guys liked this most recent batch of minis. I've been working on my regular Tyranid army (Hive Fleet Gorgon) recently...maybe I'll show off a few pics of that stuff before getting back to the GCult.
I agree. These look absolutely awesome. One question, though: why are the leg pistons so shiny? You'd think that they'd have more weathering on them, considering the condition of the rest of the vehicle.
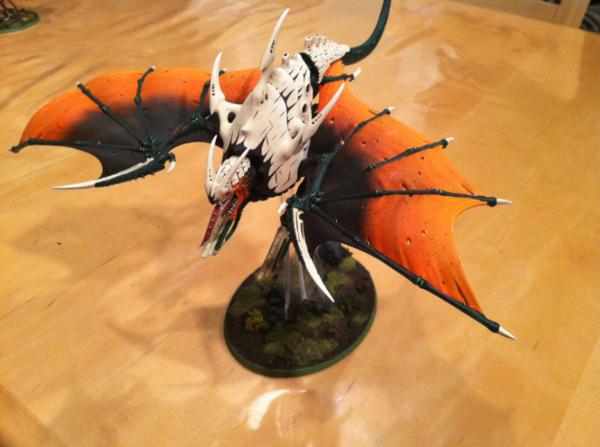
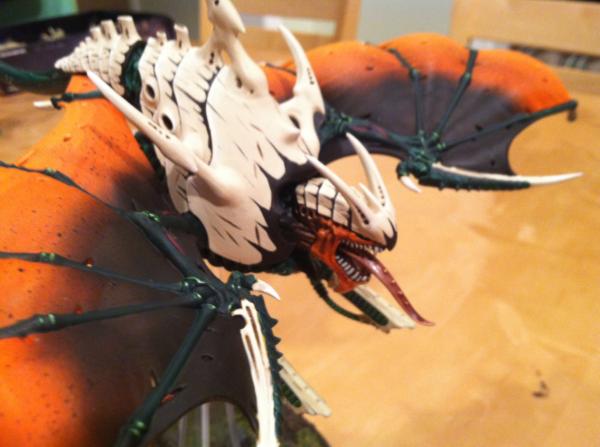
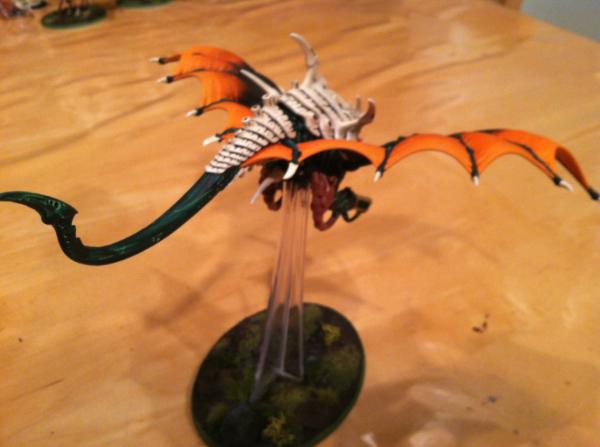
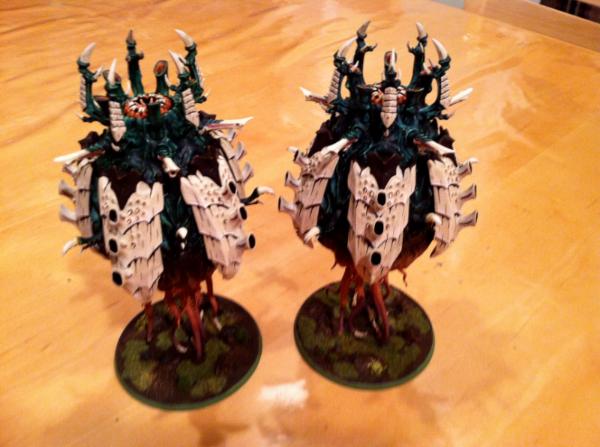
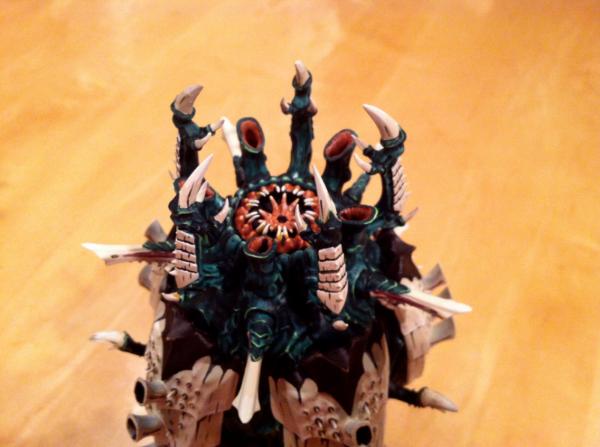
I've been a little delayed in getting to the next batch of GCult stuff, so in the meantime I'll share some (off-topic) pics of stuff I've done recently for my regular Tyranid army. Hive Fleet Gorgon has been with me since the late '90s. You'd think I'd be done painting minis for that army at some point, but GW won't stop making stuff.
Here are some quick phone pics. It's an old army...more of a simple, high-contrast scheme than the subtle stuff I do with the GCult.
Looks fantastic. I'm not quite sure how I like the green base rims, but now that I think about it, they complement the orange and khaki nicely. Do you have any shots of the GS alongside the rest of your Tyranids?
youidiotkid wrote: Looks fantastic. I'm not quite sure how I like the green base rims, but now that I think about it, they complement the orange and khaki nicely. Do you have any shots of the GS alongside the rest of your Tyranids?
Ha! The green edges are the telltale sign that this army started in the '90s...when all bases were green. And honestly, the overall color scheme shows its '90s roots. Bright was in back then...now you tend to see more muted colors on Tyranids. But like an old tie, you just have to wait for it to come back into style.
I don't have shots of my armies alongside each other. The schemes don't really complement each other, but that's intentional. When I started the GCult, I was really sick of painting the green and bone scheme (so imagine how sick of it I am now!) and wanted to do something different. And more muted. The old blue and purple scheme is classic, but it can come out really garish-looking if you aren't careful. So I ended up going with a neutral primary color, with blue as a secondary color and purple as a spot color.
And thanks!
Automatically Appended Next Post:
Brother-Captain Scotti wrote: Some absolutely wonderful stuff here. Your bit on decals is a big help, thank you for sharing
Thanks to you too!
There are plenty of techniques that are hard in this hobby, but decals shouldn't be one of them, especially when you're working with flat surfaces. I hazard to guess that if GW had decal softening and setting solutions to sell us, we'd have articles about decals in WD and more educated hobbyists everywhere.
I actually bought several pots of Cote D'Arms Goblin Green to match the paint I used when I started this army. The most recent iteration of Goblin Green was a little brighter than the original, which had more brownish tones.
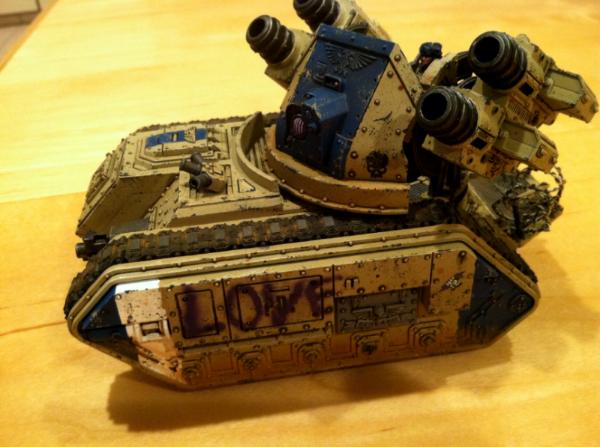
Here are the Wyverns, primed and ready to paint. The assembly (and lack thereof) you see in the pics seemed the best balance between "getting as much assembled as possible" and "being able to paint it." I left off the extra rings for the mortars so that I can just insert the autocannons anytime I want to run them as Hydras.
I was actually surprised a little by the kit. It's not a hard kit to build by any stretch, but it's more fiddly than I expected based on my assembly of the current Chimera kit a while back.
Anyway, here are the Wyverns with the basic colors blocked out. (Insert still more praise for Vallejo Game Air paint here. ) It's not very visible in the pics, but I did a little color modulation by spraying a khaki/bonewhite mix from above, to simulate the fading that takes place on surfaces that get the most sun exposure.
So now that I finished the Wyverns, I...what? I haven't shown them yet? Really? I know it's been a while with the vacation in August and getting slammed at work now and...
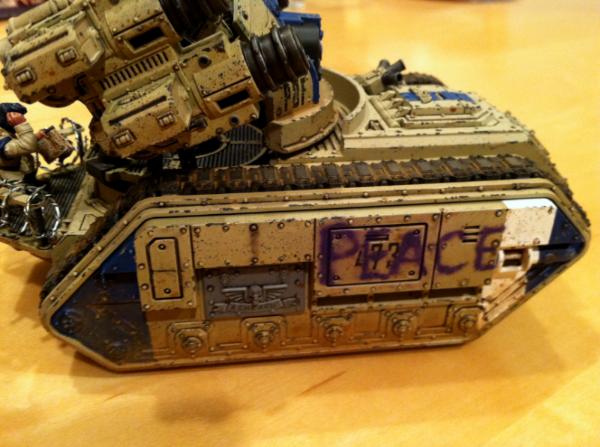
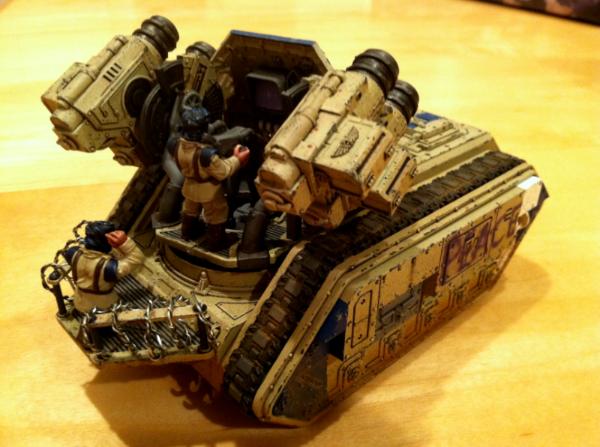
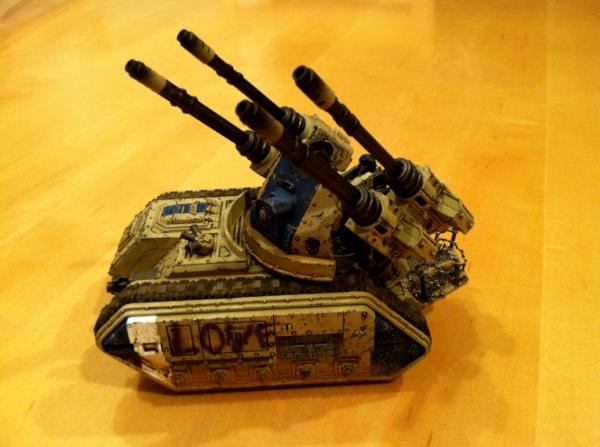
Okay, here they are. Meet the PEACE and LOVE.
I got away from the slogans in the last batch of stuff, so I thought I'd get back to basics. And what says "peace and love" better than a stormshard mortar round perforating your body like Swiss cheese?
I also finished the Hydra barrels, which I can insert into the mortars for a quick unit change.
Those were quick cam phone pics. At some point I'll do some high-quality ones with the good camera.
The next item for the transition to AM/IG is some infantry. But I'm just starting a new project..."code-named" XII. I'm not sure if I'll share that stuff here or start a new thread.


 I'll get into that in my next entry later today.
 So there'll be a short delay until my next posting. By then, I may have the Nobz completed, so I'll just show pics of the finished models and talk you through what I did.
 All signs point to a new camera for Christmas, methinks.

 Hybrid Acolytes are canon...the tendril heads aren't. Still, I wanted to do something to make them stand out. I think I talked about it the article I made for the army.


 I wanna punch myself in the face for even thinking about that one. But it is a good idea.
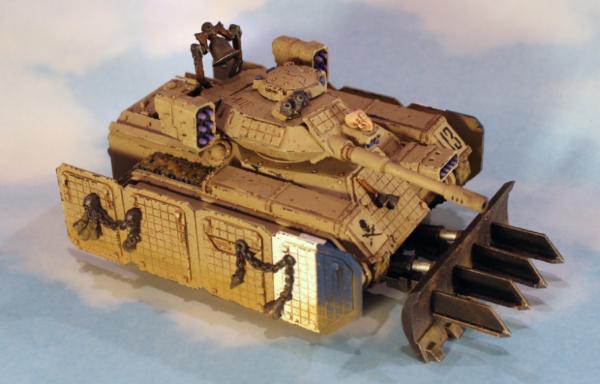
 Project X is pretty ambitious. I have it fairly well concepted out, but I'm still working through a few things. It'll be a quite a while until you see it...might take me two years to finish even after I start on it. In the meantime, I'll post some pics of my terrain, etc as I get it done. Oh, and I also have a new Tervigon kit that I'll probably paint up later this summer. I'll share that too.