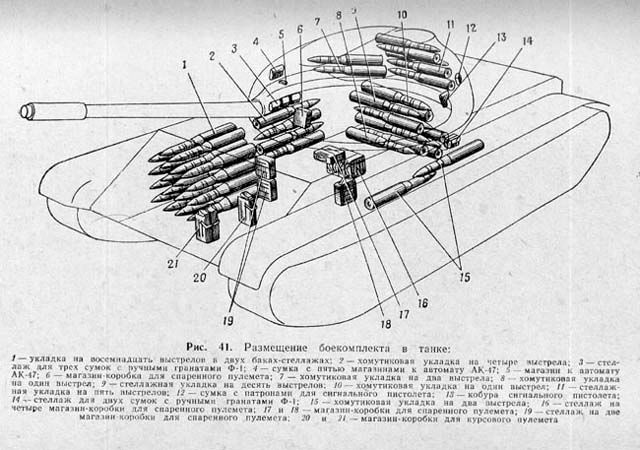
11330
Post by: Gundam-Mecha
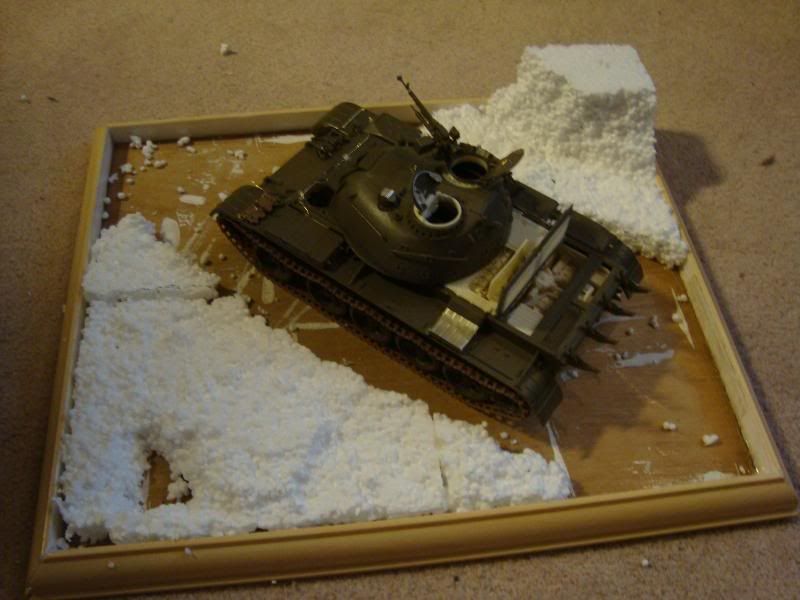
After feeling inspired looking at IS-2's and T-10's in Minsk, I decided to branch out and start a project on a modern Soviet armour project. Working on a cold war project was a really nice change and allowed me to try modelling totally new styles of armour and wargear. I also decided to scale up and try a 1:35 scale project.
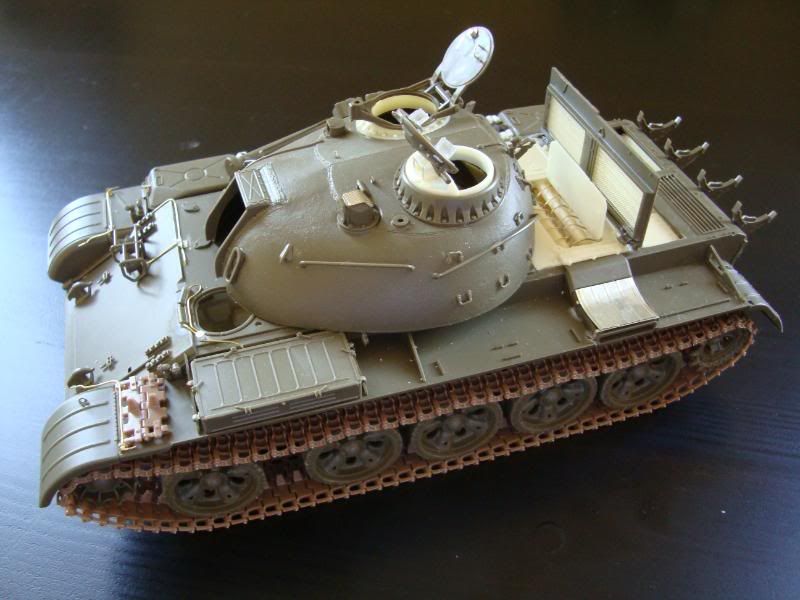
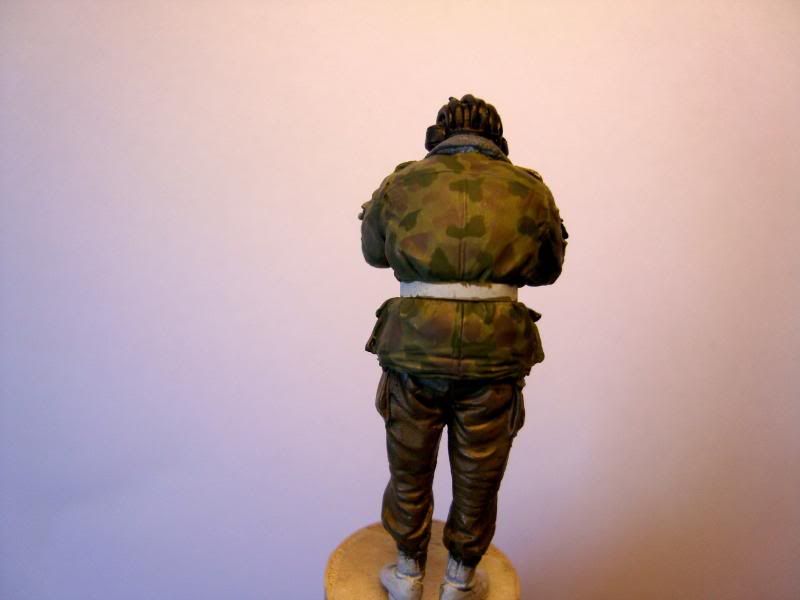
The scene will show a T-55A and Soviet Motor Rifle Troops on patrol, the main part of the scene will be the excellent Tamiya 1:35 scale T-55A:
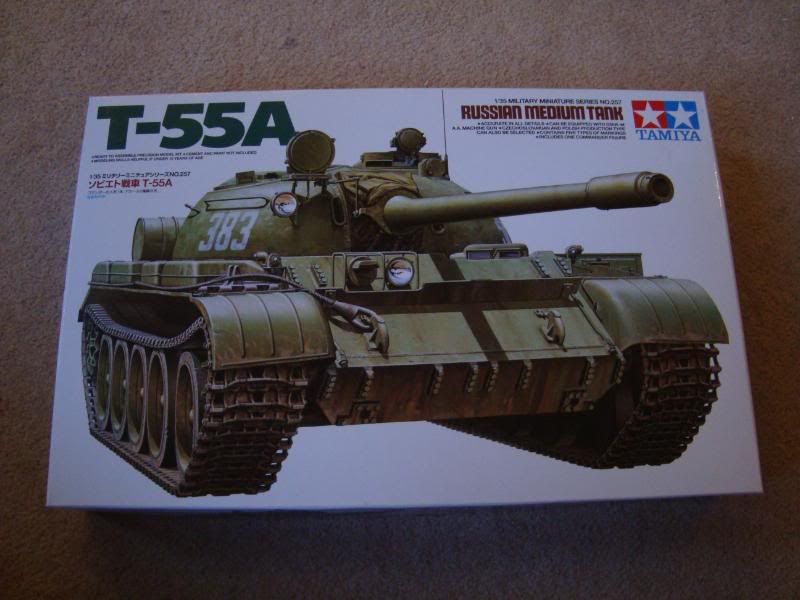
This really is a fantastic kit and a real joy to put together. Tamiya out did themselves with this kit, the level of detail is fantastic and the build goes together like a dream.
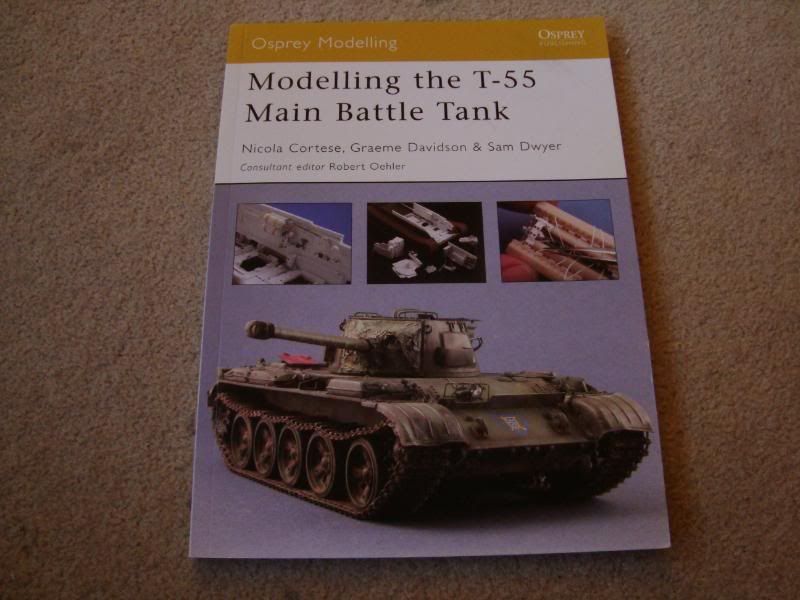
Once again I'll be using Osprey's excellent modelling guides, as reference:
As well as numerous magazine articles and web sources.
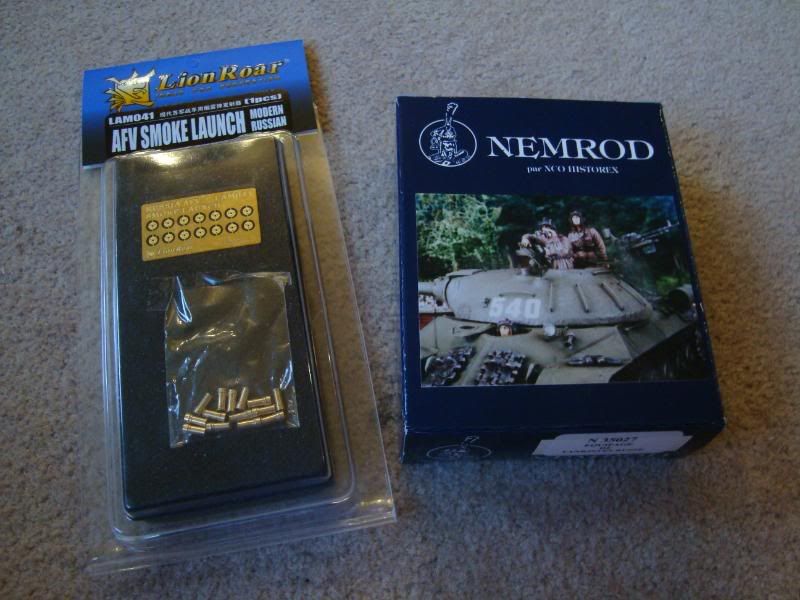
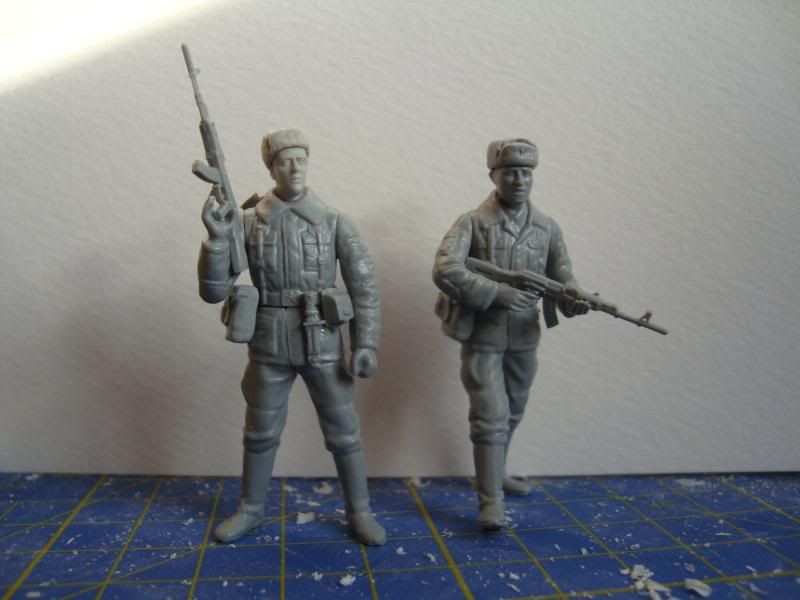
I'll also be using photo etch and some resin crew figures from nemrod:
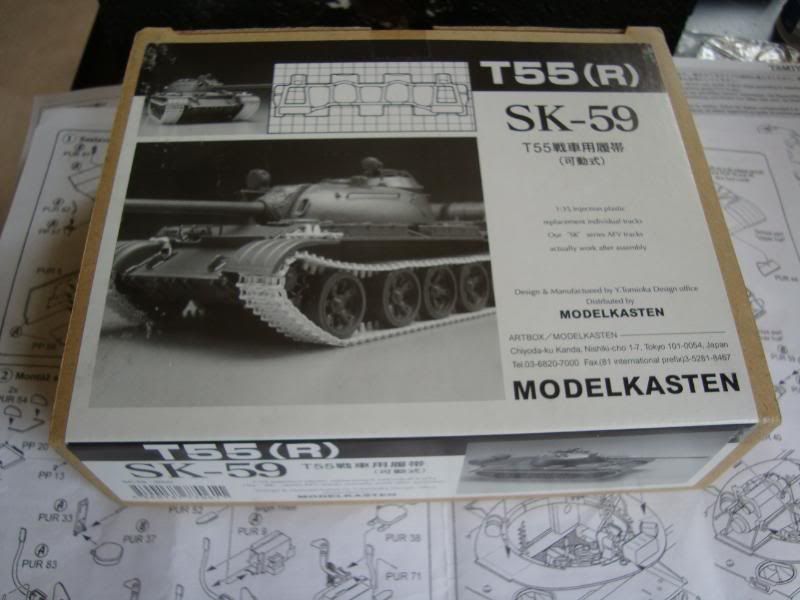
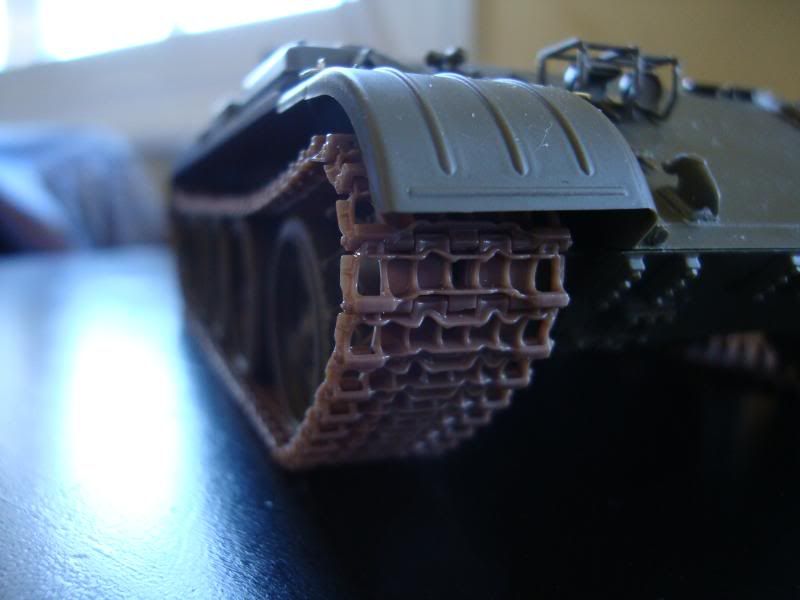
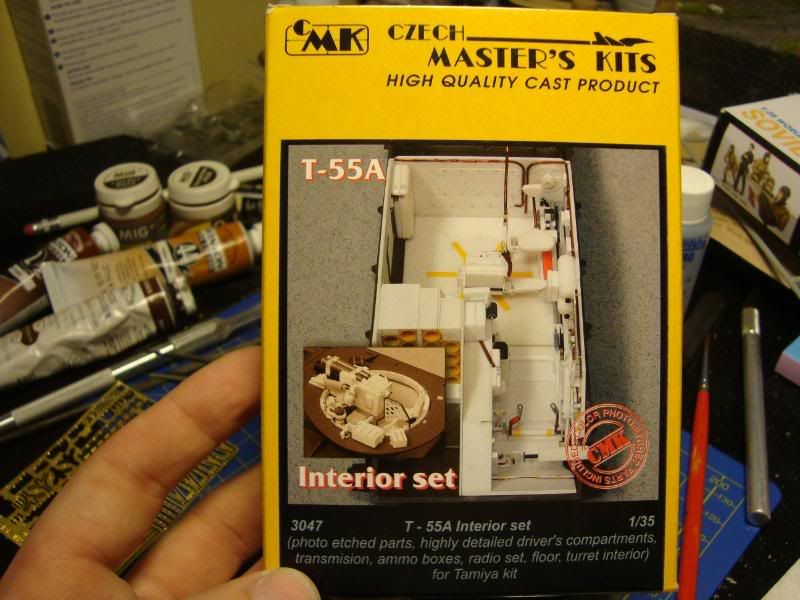
I'm also waiting on some tracks from Japanese firm Modelkasten, and some resin full interior detail kits from CMK (Czech Masters Kits). Since these are all on mail order from Sprue Brothers in the USA I'll be starting what parts of the build I can without them for now. Luckily CMK provide full instructions for their kits online so I have been able to read these and see what areas of the Tamiya kit that don't require surgery or modification.
Starting the build:
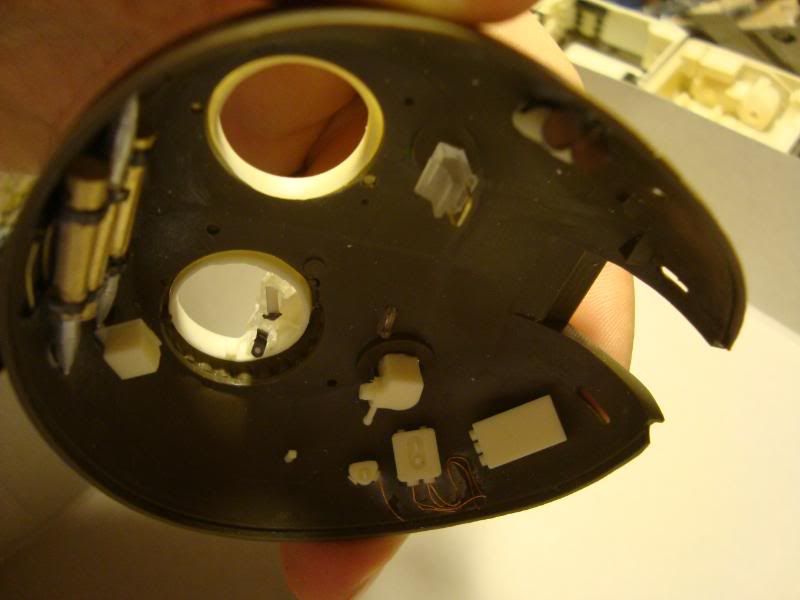
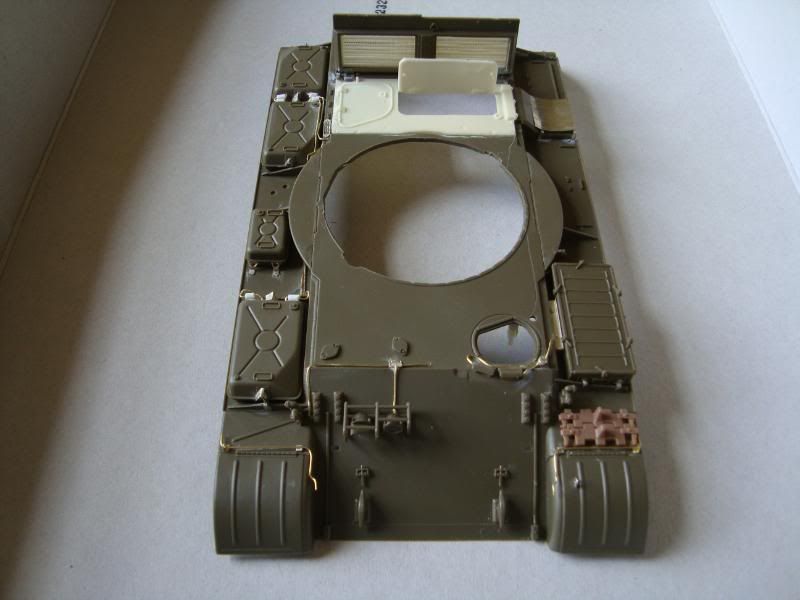
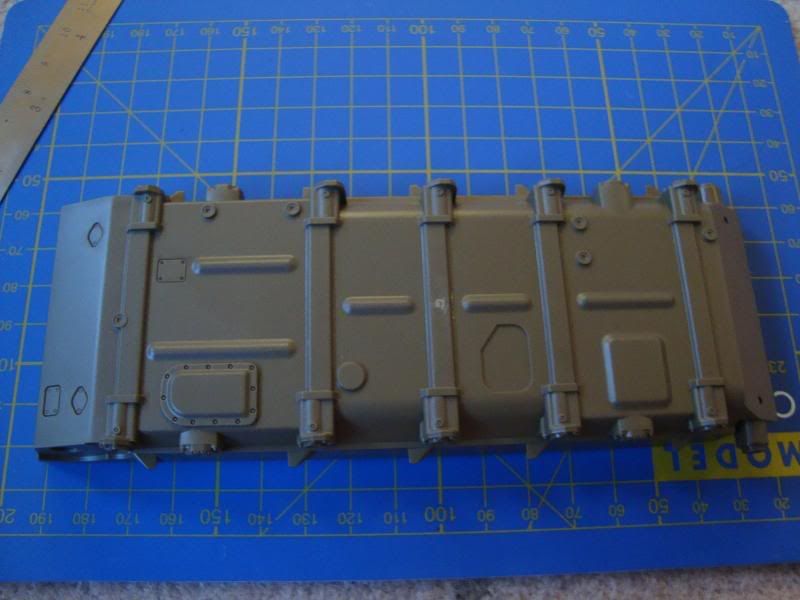
The CMK instructions told me that it was safe to start work on the lower hull and wheels without the resin upgrade parts.
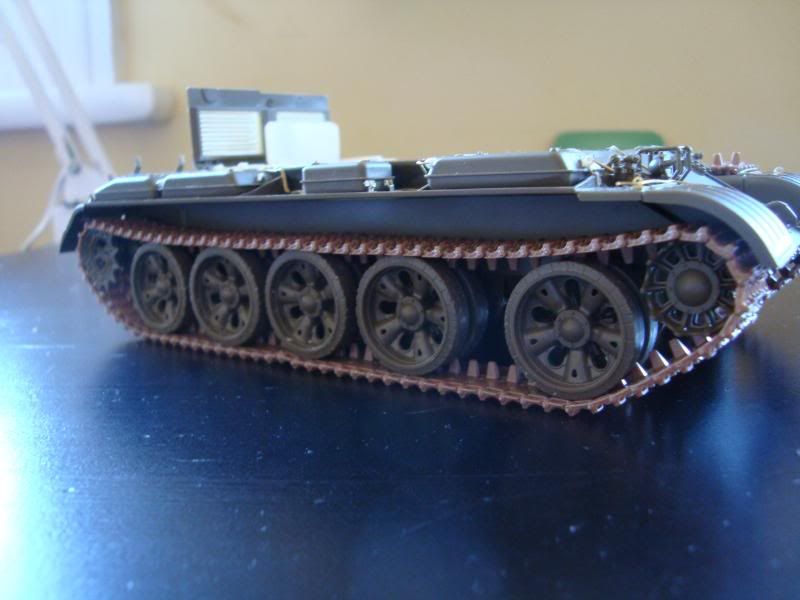
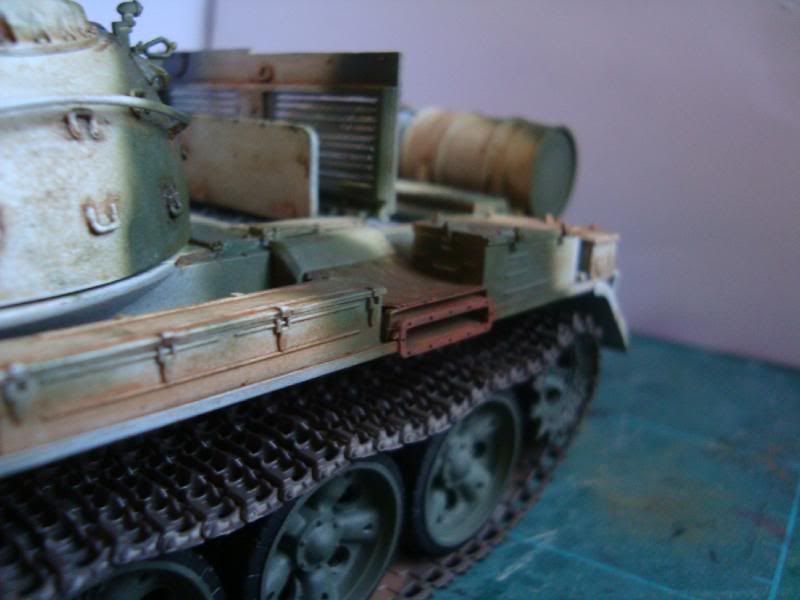
The lower Hull - the detail on the part is great. It's a shame that the underside won't be visible!
Since the road wheels on a T55 are rubber they are prone to chipping and little blocks wearing away. You can easily replicate this with a triangular modelling file, by filing away small chunks:

When building the suspension its a good idea to align the parts with a small metal rule to get a perfect fit:

The wheels and gears use small polycaps so the can be easily removed from the suspension and can actually move. Some track kits such as the Modelkasten kits are also workable which allow complete movement forwards and backwards.


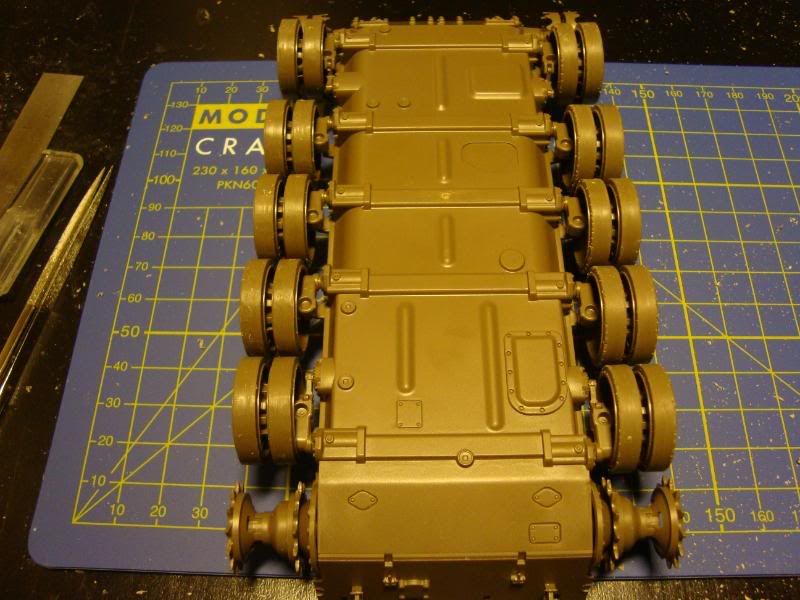
This really is a great little touch that not only makes building and painting much easier but gives the finished kit an extra dimension.
Quick mock up with the upper hull, now it actually looks a little more like a tank!
6633
Post by: smiling Assassin
Can't wait for it dude. What will this one consist of?
You're making quite the habit of doing awesome stuff.
sA
14569
Post by: Blightdrone
Assuming that this will be to the same standard as before.. would it be safe that we go get our jaw-locks now? Or foam tables?
I seriously can't wait to see how this turns out.
Cheers,
Jack.
10890
Post by: Deff Dread red Edition
Still in the early stages but so far it's looking good.Tamiya really make good stuff.Hope to see more soon.
11330
Post by: Gundam-Mecha
Thanks for the comments guys, I'm hoping to make this project even better than my others. The increase in scale will let me go into a lot more detail and get much more in. For example the full interior detail, turret detail, and engine compartment will be a lot of fun and will be even better than the interior kit that I used from Verlinden for my T34/76.
Actually the T-55 is a direct descendant of the T34 so theres a running theme between these blogs!
Deff your right its early stages but theres still a lot of detailing to do at these levels, I need to crack into the hull next and add washer cables, electriacal wiring, nuts and bolts and rivets etc.
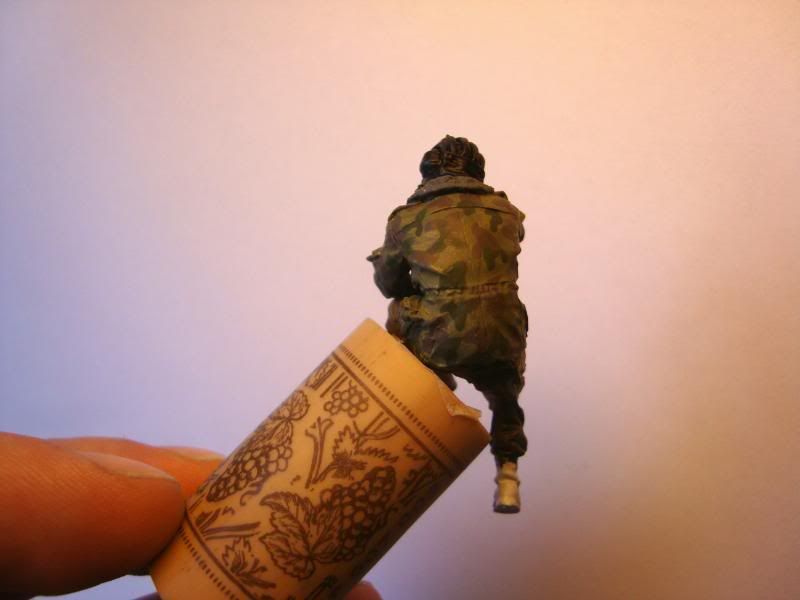
Assassin, this dio will be made up of the tank, three tankers, and four motor rifle infantrymen, set in a winter scene. I'm thinking to do a winter camo for the armour.
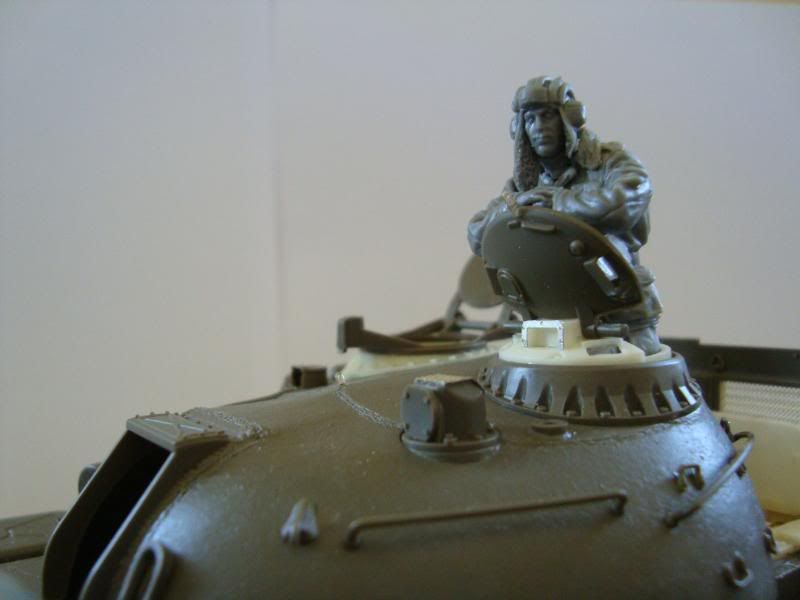
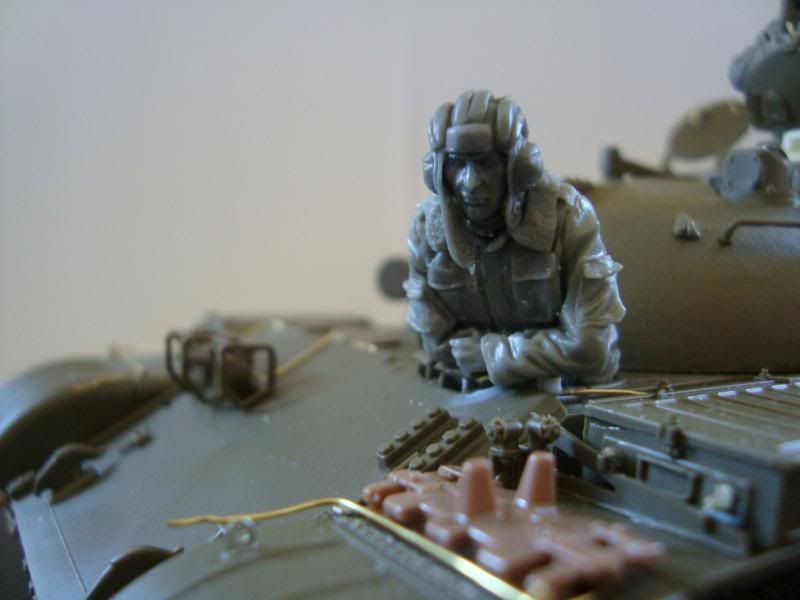
Heres some photos of the figures.
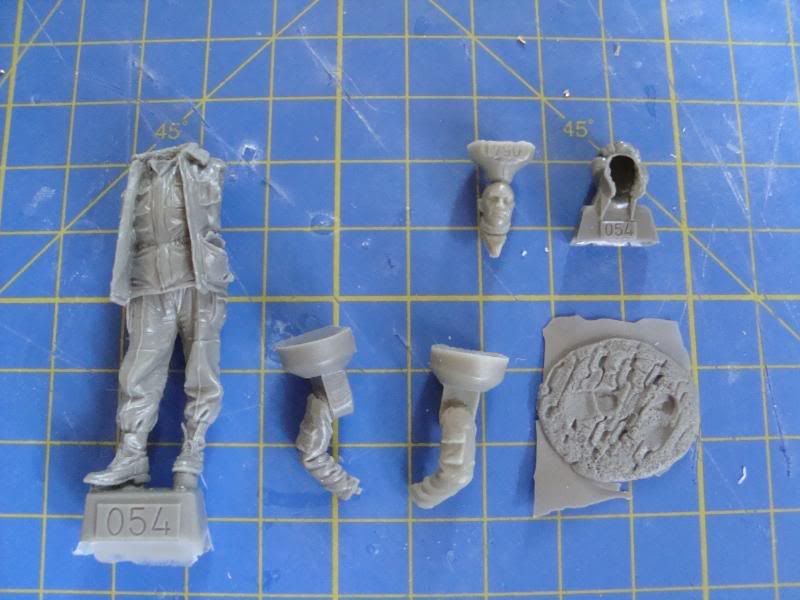
Nemrod box art:
This set comes with a driver, gunner, and commander. One is in a seated position inside the tank (upper body only), one is seated on the turret (full body), and one standing (full body). I plan to convert the driver with the spares from the plastic Tamiya crew figure that comes with the T-55 to convert him into a fully seated figure to go into the CMK drivers chair.

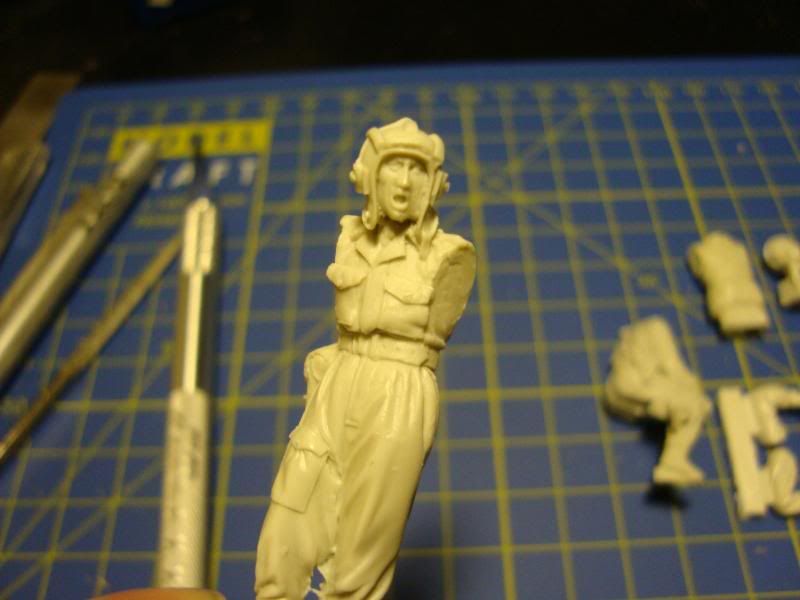

They need some cleaning up but overall the quality of the resin casts are very good with some nice surface details. Also the faces are very nicely done. The detail doesn't show to well in these images, but theres plenty there. I've recently gotten myself some modellers oil paints for skin tones, so I'm really looking forward to working on the skin tones in that medium instead of using acrylic colours.
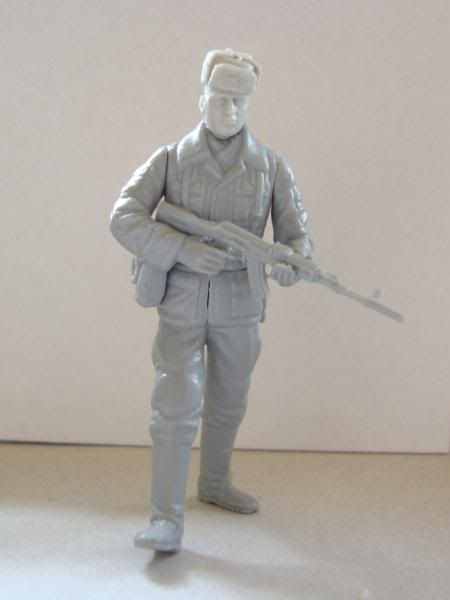
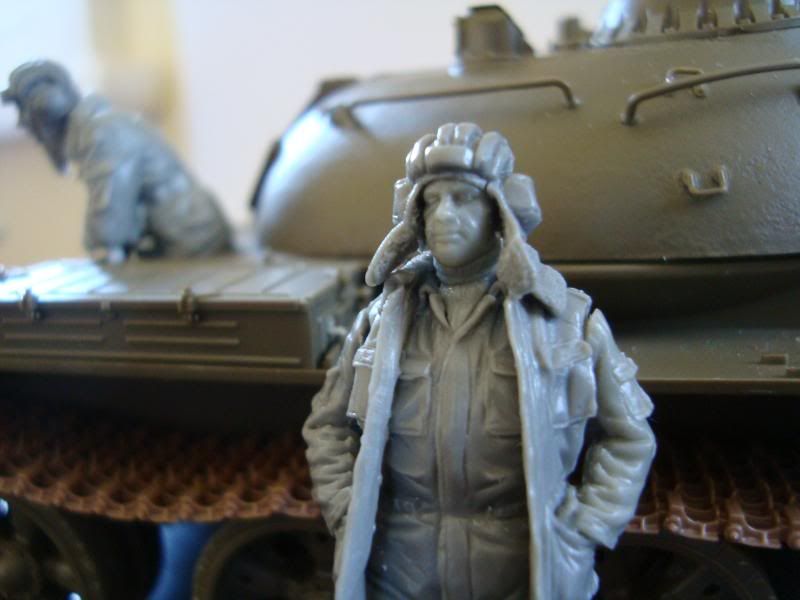
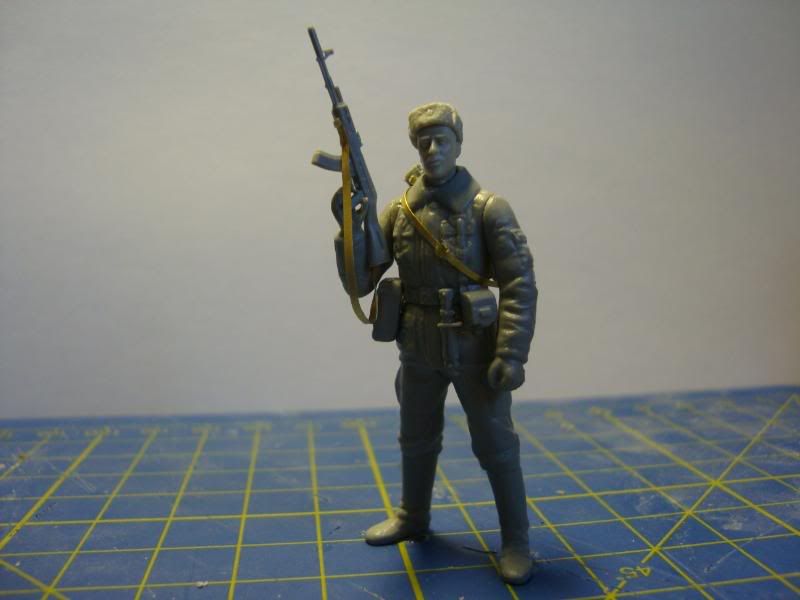
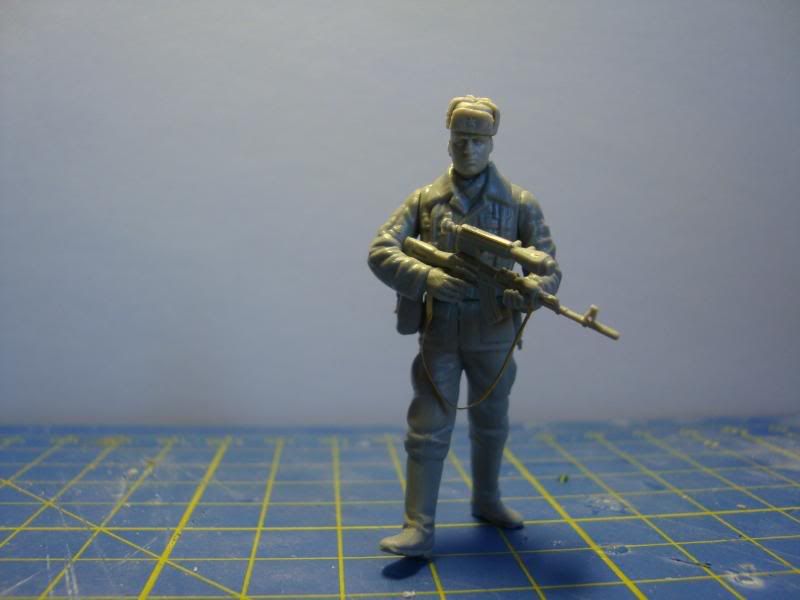
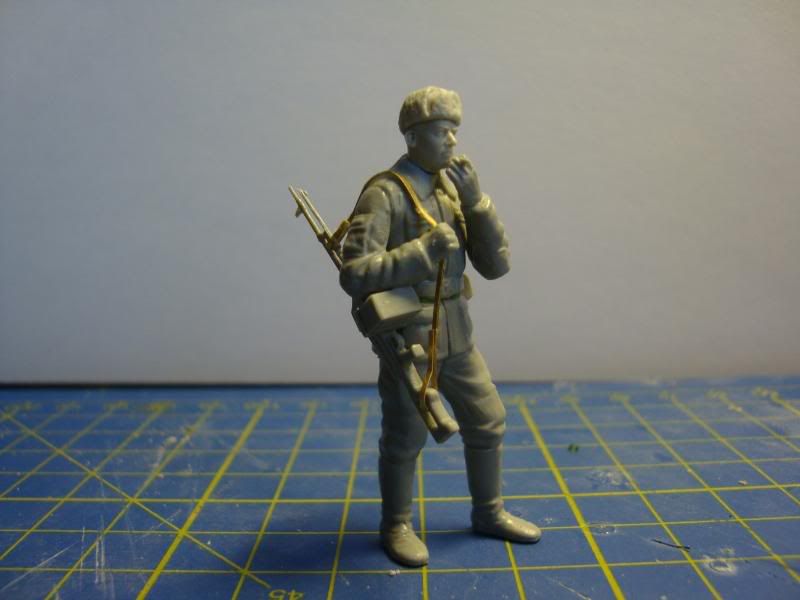
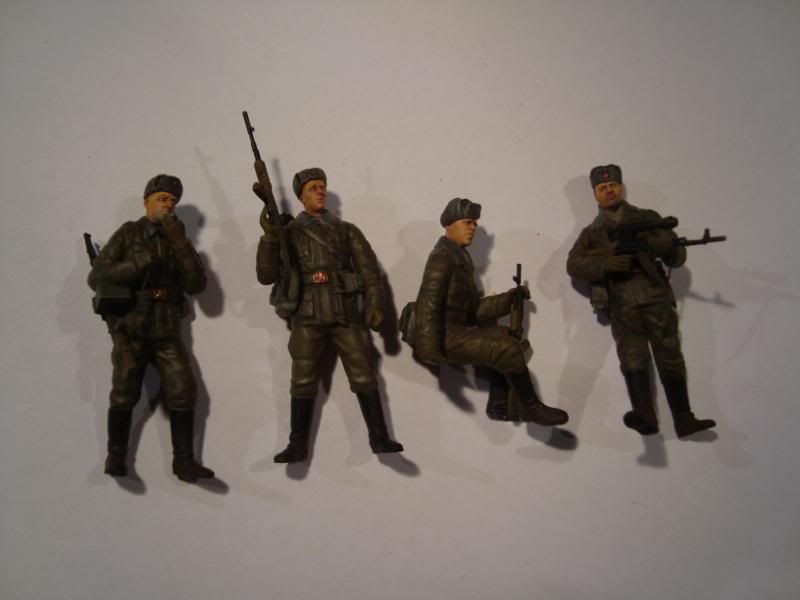
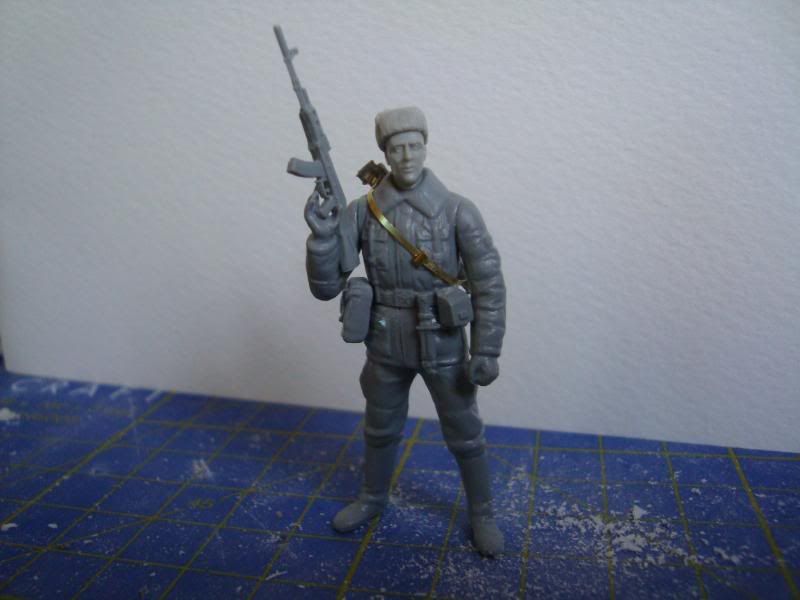
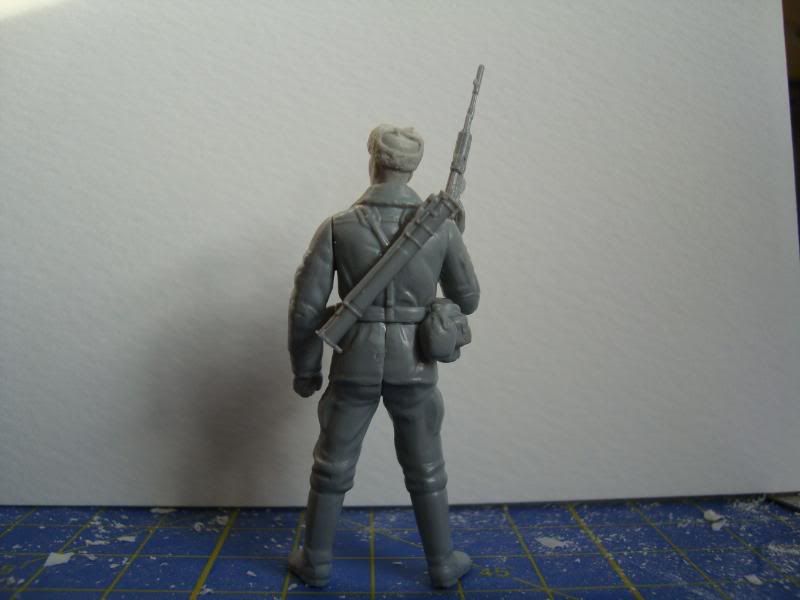
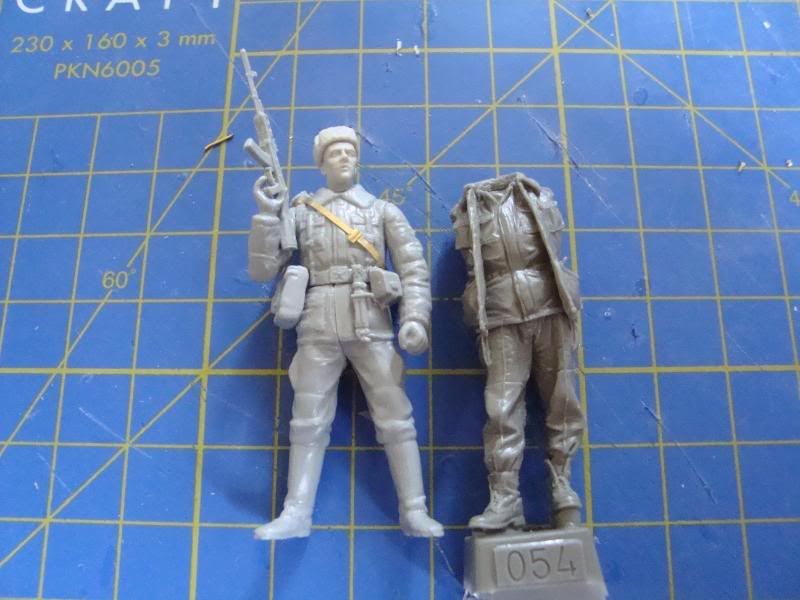
Next up is the Infantry, a great 1:35 plastic kit from Dragon:
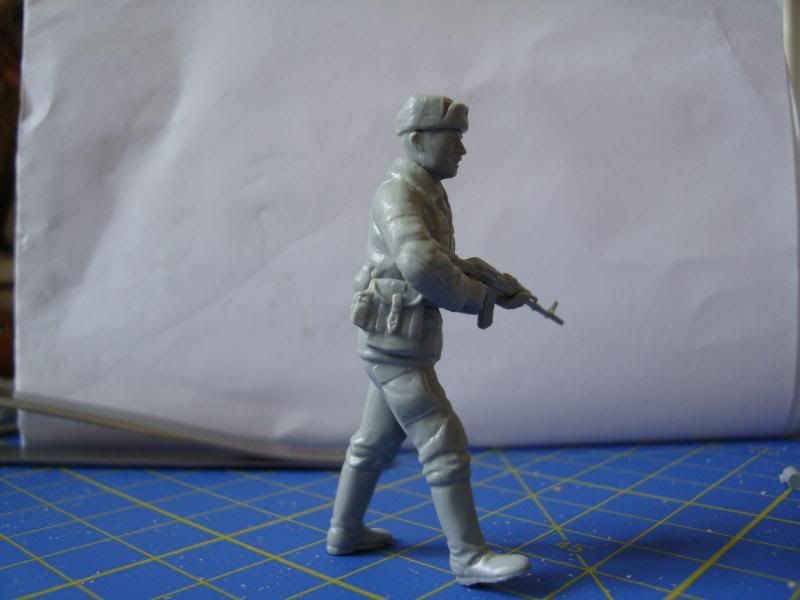
This figure is very early stages of build, the gaps need to be filled with filler and extra details added such as a rifle strap on the AK-74 for example. However this gives an idea of the figure straight from the box. I really love the Russian winter hats in this kit! These sculpts really have character.
10890
Post by: Deff Dread red Edition
Wow,dragons stuff looks amazing.I want to buy their AfrikaKorps stuff,but research is going slow.Just as a matter of intrest how much did the motor rifle box set cost?
6609
Post by: Fresh
Always been a fan of your dioramas, keep it up!
10890
Post by: Deff Dread red Edition
Well anyway I hope all goes well.
Now forward for the Motherland!

11330
Post by: Gundam-Mecha
The Dragon kits are great value. This Soviet set was about £5, it comes with four figures and numerous acessories. Quite a fair price really.
Great photo Chris! Thanks! 
10890
Post by: Deff Dread red Edition
Sounds a reasonable price,I hope to pick up some of their stuff in future and now seeing how beautifully detailed they are I will be sure to.
Oh and at first I though I had the wrong era of war,but decided to post it anyway. Automatically Appended Next Post: And just for further refrence:

I am lonely had nothing better to do  .
11330
Post by: Gundam-Mecha
Thanks for the reference pic! I actually have been working off this example myself. This site has some great reference photos:
http://www.wargearweb.org/impressions/smr/soviet_motor_rifles.htm
Motor Rifle Troops riding a T-55

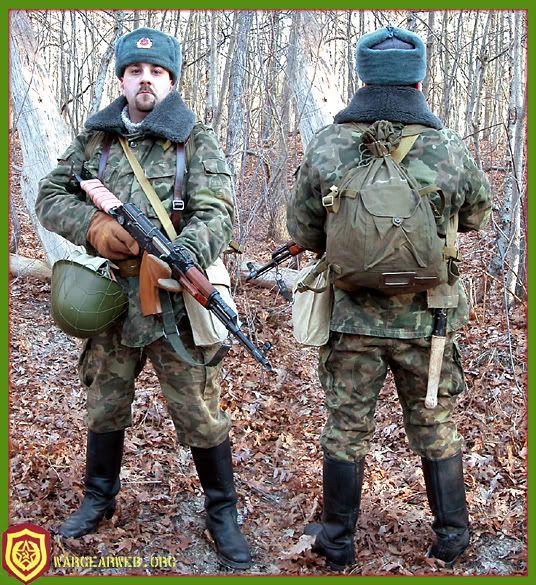

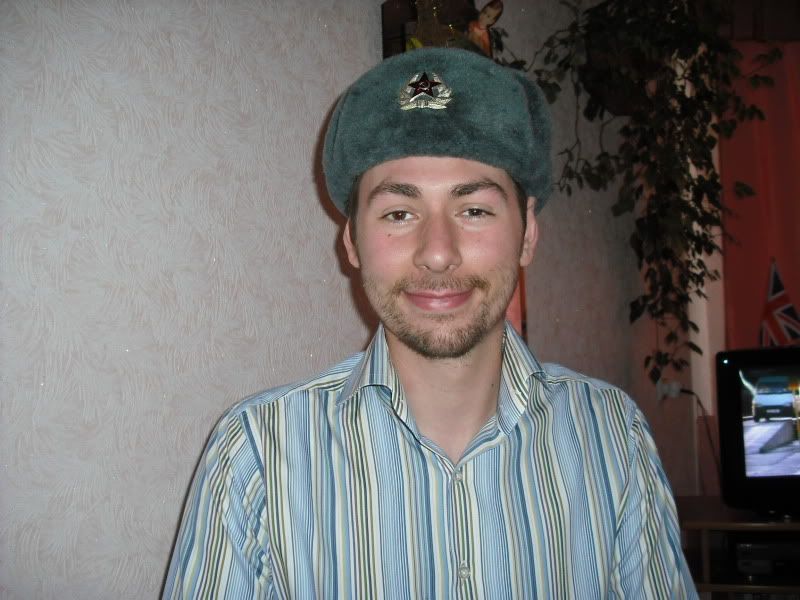
I actually have one of these hats myself!
10890
Post by: Deff Dread red Edition
Hehe,well I guess it is great refrence material(the hat I mean).Espically since you own it and can browse over it's finer details.
11330
Post by: Gundam-Mecha
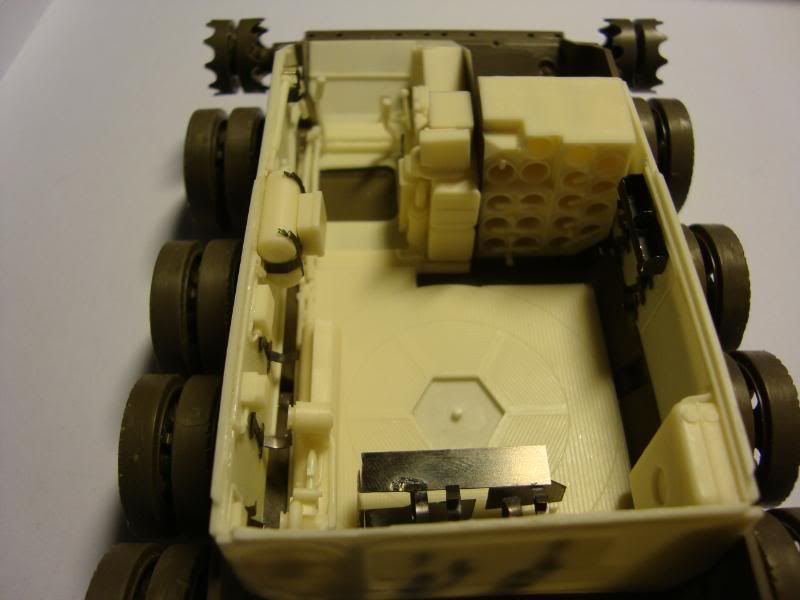
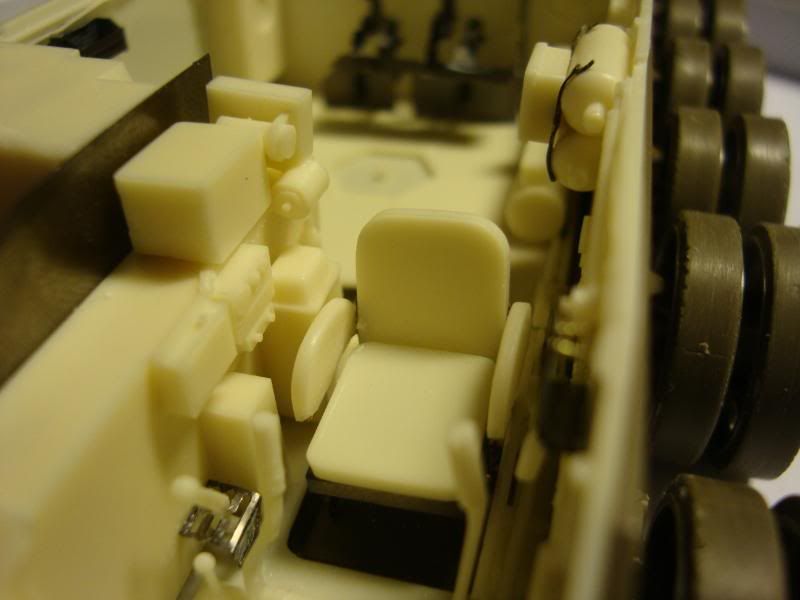
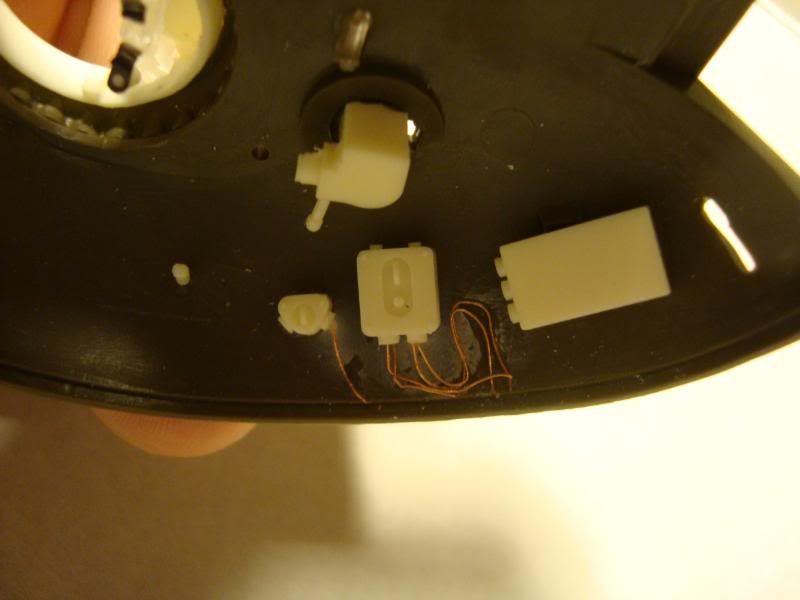
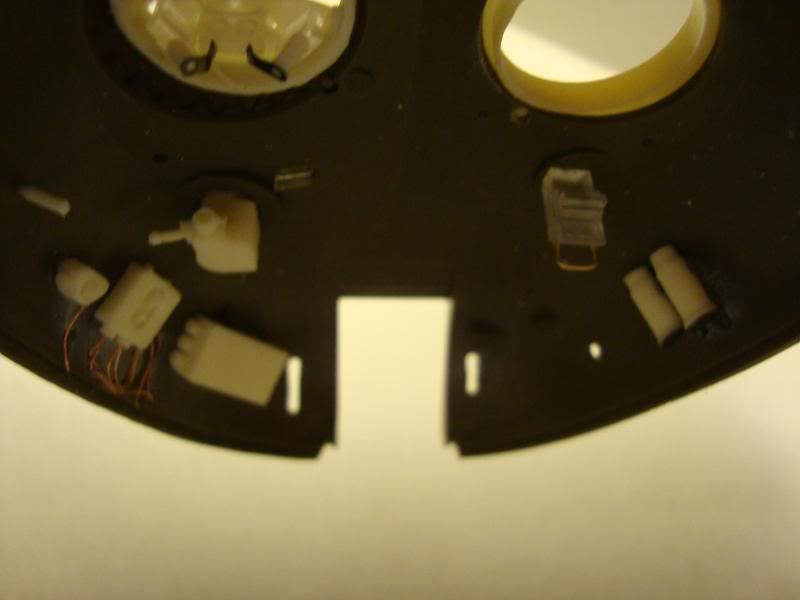
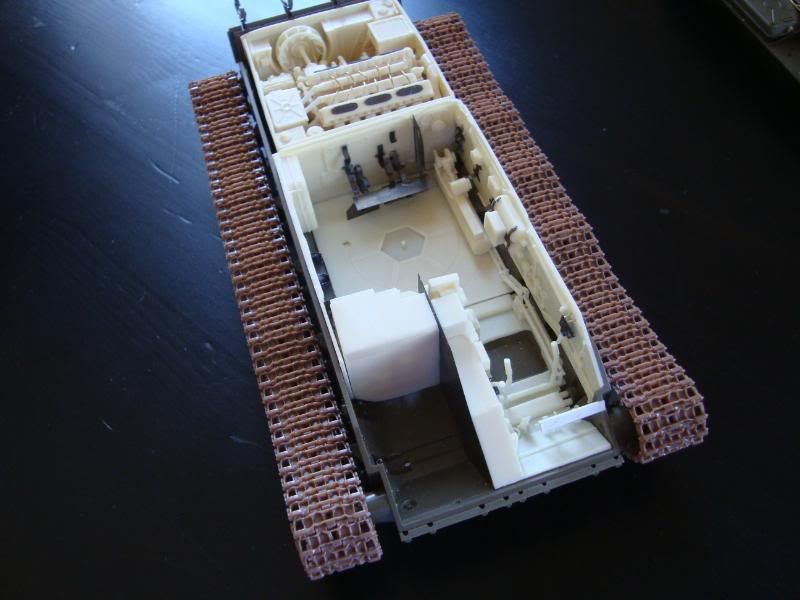
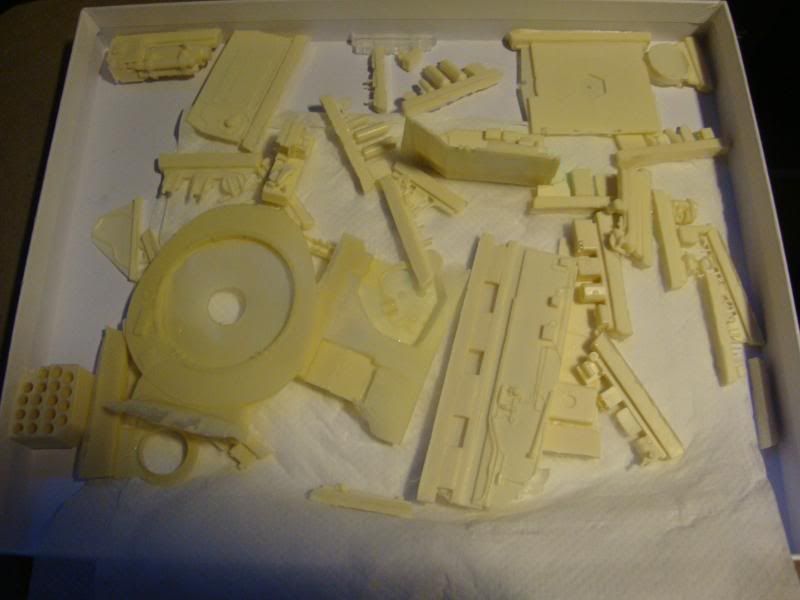
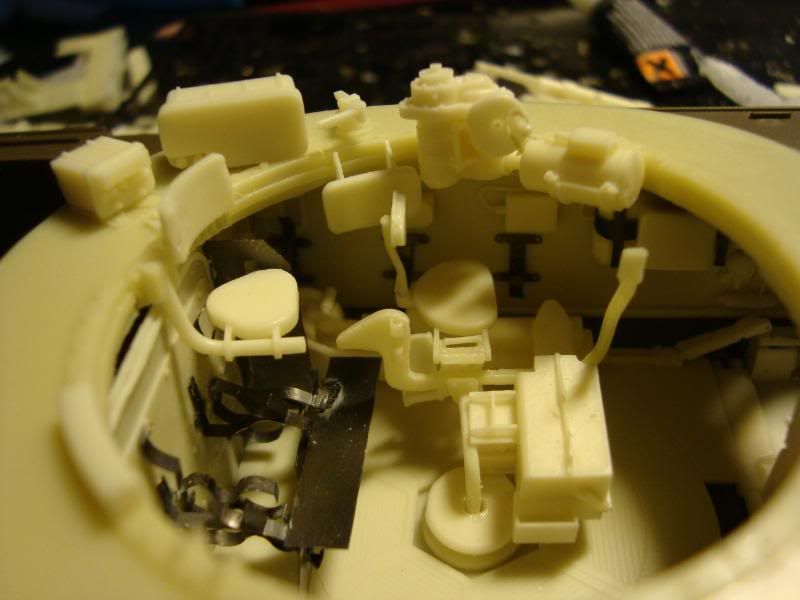
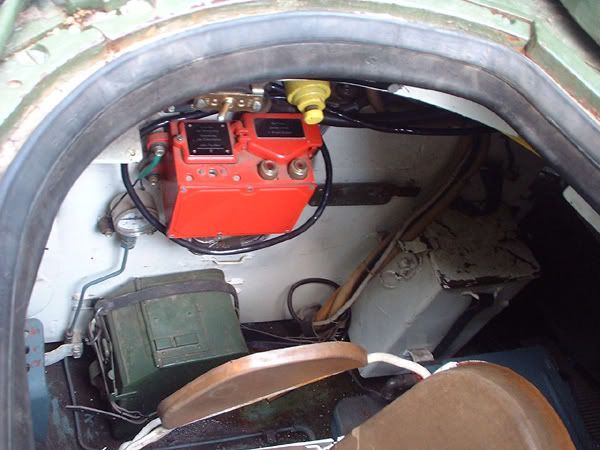
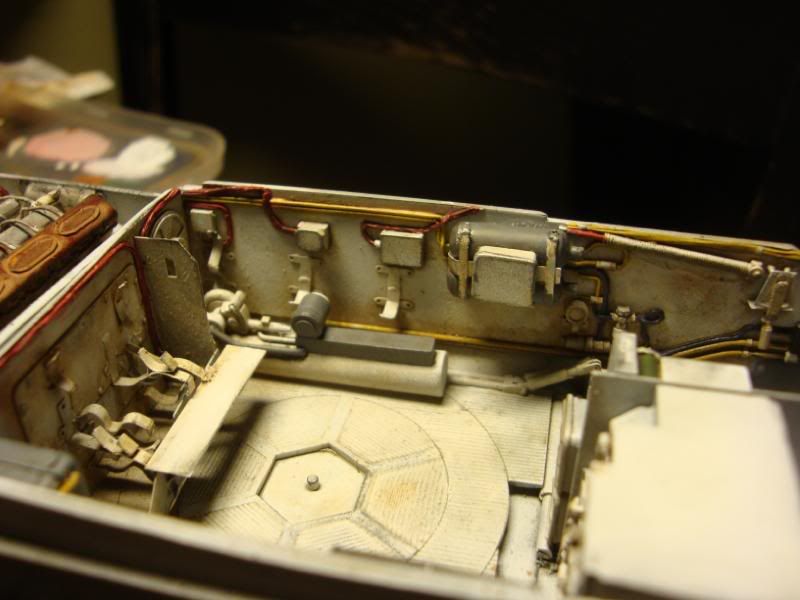
Started work on the CMK interior this evening.
After washing the resin components I quickly came to realise how complex and time consuming putting it together would be.
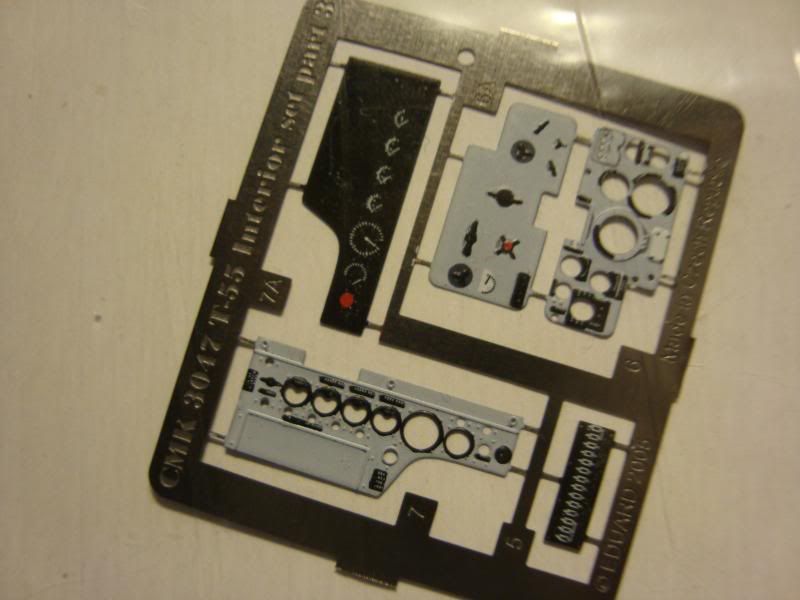
Heres the CMK kit, its a fantastic mix of resin, clear resin, painted etch, and photo etch components:

The start of the Drivers cabin:
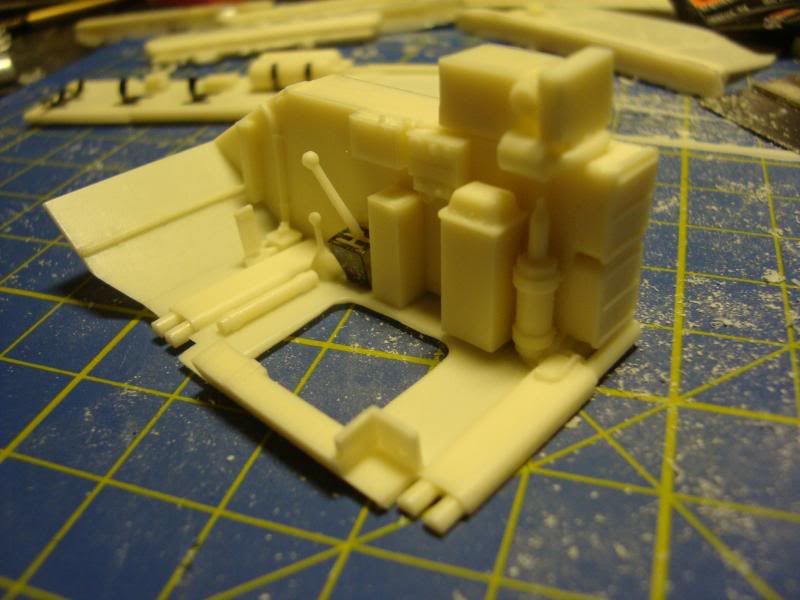
Position in the hull:

A wall section:

17114
Post by: firebat
SO stoked for yet another masterpiece from you.
I love watching your progession on these pieces, its amazing!
12358
Post by: StubbyGB
Fantastic G-M is making a new diorama !  It must be a bit lonely here for you amongst all us crazy sci-fi / fantasy modelers with our made-up tanks and made-up wars. Its great to have you here though, your work is always fantastic and a great inspiration.
That interior kit is amazing, it sure puts forgeworld to shame with their interior kit for the chimera.
Keep up the good work mate.
10054
Post by: Death Gear
Nice job so far.
10890
Post by: Deff Dread red Edition
Thats a nice little kit,how difficult is something like that to paint?
11330
Post by: Gundam-Mecha
Thanks for the comments guys! Very much appreciated!
The interiors will take a long time and the current Drivers Cabin is very much WIP.
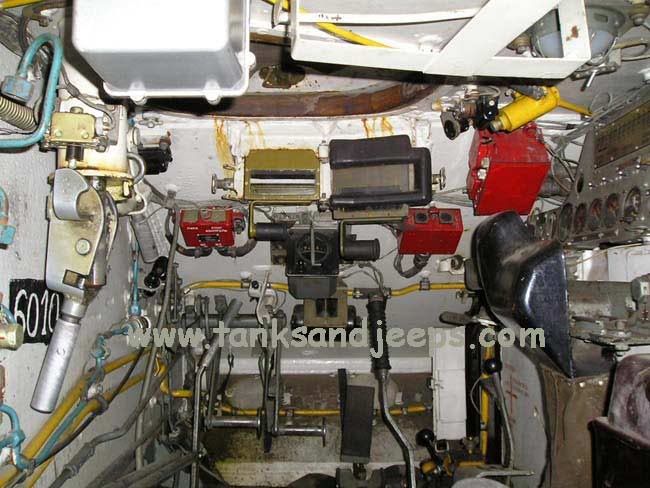
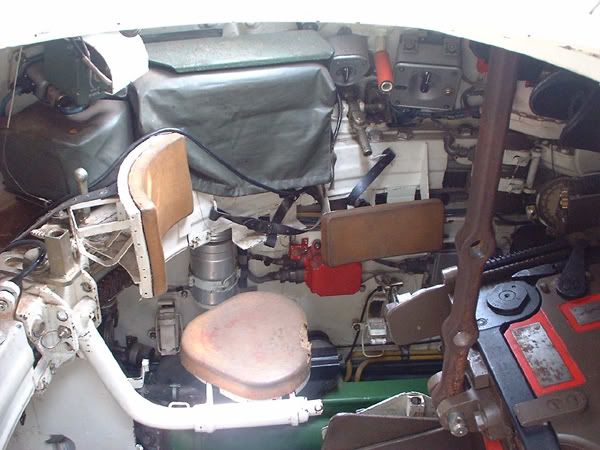
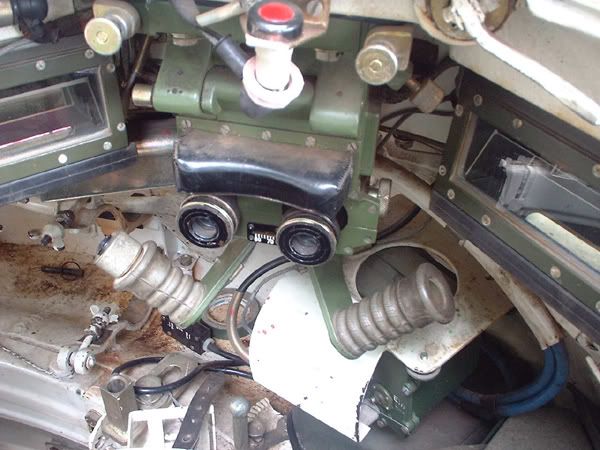
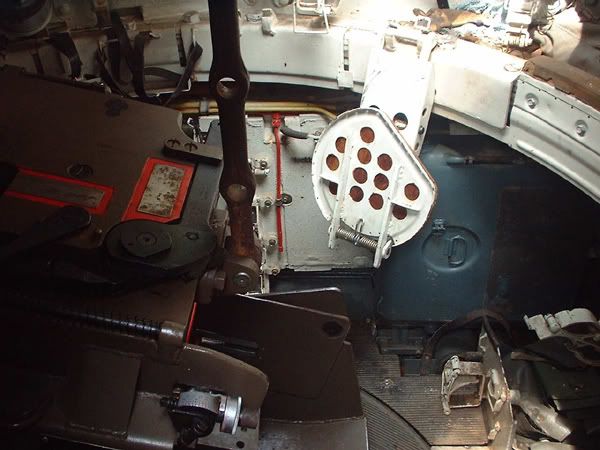
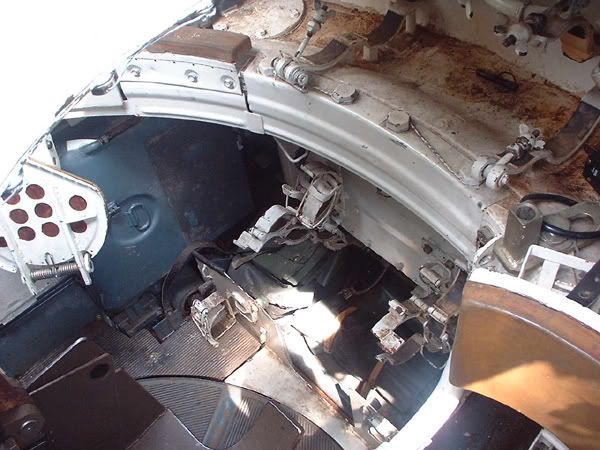
Here are some reference photos of the real interior of a T-55 to give you an idea of how it will end up when finished:
Drivers Cabin
Turret


I'll be trying my best to get it as accurate and detailed as the real thing. 
@ StubbyGB - I totally agree that while FW offer some internal kits and very minor etch they really miss out. I think there would be a huge demand for further expansion in this area. Some of their tank designs are great and theres so much room for super detailing. You really learn a lot more about resin working with other companies, it isn't until you use competitors stuff (even in Sci-fi and Fantasy) and Scale model resins that you realise just how bad the quality of some FW resin kits are.
In this kit for example I have loads of absolutely tiny elements and there was not a single break or damage. It also was shipped from the USA to England! Ultra fine detail, clean casts, excellent quality resin. I have lost count of how many FW kits have arrived broken.
I love made up tanks too! I have plenty of 40K stuff, it's just taken a back seat at the moment sadly
@ firebat and Death Gear - Thanks guys I will try not to disapoint!
@ Deff - painting these kits is tricky somtimes but no more so than your average complex Citadel kit. The parts are all washed in warm water with a mild abrasive cleaner and a tooth brush first. I find that scale model resins do not have a huge amount of mould release agent on them so they wash quite nicely. I then prime the parts with Mr Resin primer from Gunze Sangyo. Its a specialist primer for resins that bounds really nicely to the resin and can also be used to fill surface inperfections and air bubbles etc. I then just paint as normal with airbrushes, oils, acrylics, and pigments etc. A fine detail brush and some patience are all you need really, and plenty of good reference photos!
10890
Post by: Deff Dread red Edition
Aaah...I see.Well anywho,goodluck with it.
11330
Post by: Gundam-Mecha
Here's a catalogue photo of the Hornet Resin upgrade heads for the Motor Rifle Troops that I will be using. They should be arriving in the post over the next few days

These are great sculpts and I'm really looking forward to working with them on the remaining troopers. I might end up swapping the head on the current trooper I've built as well if I decide they don't match up well.
10890
Post by: Deff Dread red Edition
Here is a shot for futher refrence,it's a tanker uniform:

(Forgive me for posting all these pics if they are in no way helpful.)
11330
Post by: Gundam-Mecha
Thanks for the pics, it's always cool to share reference photos!
Feel free anytime you find something cool!
10890
Post by: Deff Dread red Edition
I think you'll find you have just opened up the flood gates to hell,prepare for spam(lol no).
I will be sure to.So what colour will the motor riflemen be done in,like shown on the box or in some form of winter camo?
4216
Post by: Darknight
Winter Camo always looks great - would that be historically accurate? Could you perhaps have a bit of a mix; maybe some people with some non-winter camo pants or something?
(And by "pants", I am using the American term, not the one from the land of my birth. I don't believe they do interior detailing for human figures.)
11330
Post by: Gundam-Mecha
Thanks guys.
As to winter camo for the Motor Rifle Troops I don't think they used a set winter colour scheme. Given the fact that the coats are obviously for winter operations (fur collar and padded) and that all the reference photos I have show them as green, khaki, or green/brown camo. I know that historically speaking (WW2) Soviet troops used winter overalls that were white during heavy winter fighting, I'm not sure however if this practice was continued into the 1970's - 1990's.
I do know that Soviet armour was either white washed or painted in a green and white winter camo.
Perhaps the troops continued the white overall tradition? I've seen reference photos of troops in green and brown camo fighting in snow so maybe they didn't bother?
10890
Post by: Deff Dread red Edition
Accually I think they wore something like this:

Soldier of 1978. Automatically Appended Next Post: Here is the site link if you would likle to read up:
http://www.russianwarrior.com/STMMain.htm?1969_uni_Arc.htm&1
seems to me it was worn by armoured companies/troops.Yet I might some how have read it wrong(this happens alot).
11330
Post by: Gundam-Mecha
Yeah that looks about right. I found these examples of Russian troops (post USSR) that follow the same practice:
Heres some example of the kind of winter camo used on tanks, in this case its an APC.

I also found these cool exmaples of Russian camo on what looks like T-55's or maybe a T-55 variant.

 Automatically Appended Next Post: Automatically Appended Next Post: Deff Dread red Edition wrote:
seems to me it was worn by armoured companies/troops.Yet I might some how have read it wrong(this happens alot).
No your spot on the page actually refers directly to Soviet Motor Rifle Troops.
Sadly though there are no figures in these extra overalls and I don't fancy sculpting them! So I will stick with standard winter dress without the ZMK Overalls.
6633
Post by: smiling Assassin
I'm actually drooling a bit looking at the interior details. Jesus, man. This is going to be (to quote Snoop) "off the hizzle, dizzle."
sA
11330
Post by: Gundam-Mecha
Thanks!
I hope to be able to get a bit more of the interior cracked out tonight. I just heard that my CMK Engine set arrived in the post today, so I'm looking forward to getting my hands on that too!
10890
Post by: Deff Dread red Edition
smiling Assassin wrote:I'm actually drooling a bit looking at the interior details. Jesus, man. This is going to be (to quote Snoop) "off the hizzle, dizzle."
sA
Agreed!
Anywho winter camo or not I can't wait to see them!
11330
Post by: Gundam-Mecha
Some more goodies arrived in the post yesterday and today before I went to work... sadly I had to leave the parcel on my coffee table... urgh!
Today I got my Hornet resin heads and also the Aber photo etch upgrade set for the T-55A. I also got a great back issue of Tamiya modelling magazine in the post that has a really indepth article on the Tamiya T-55 kit. Pletny of construction shots and step by step painting guides.
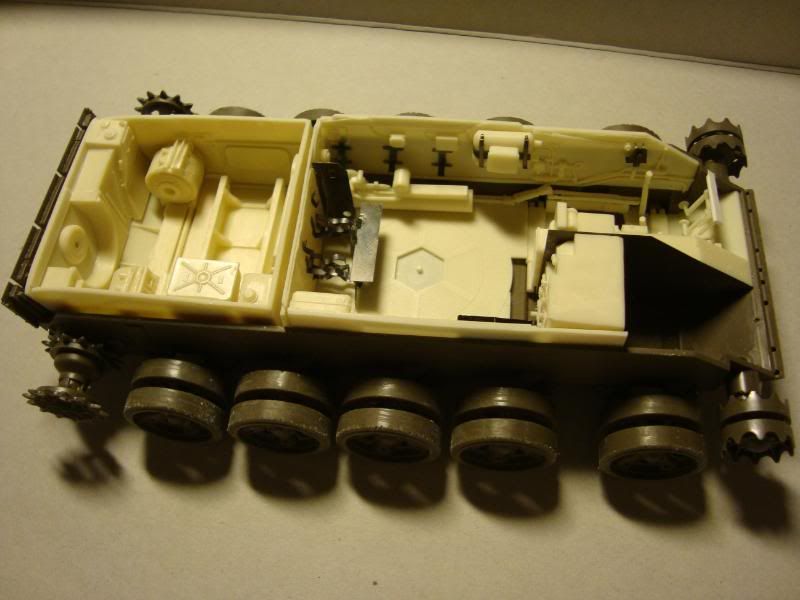
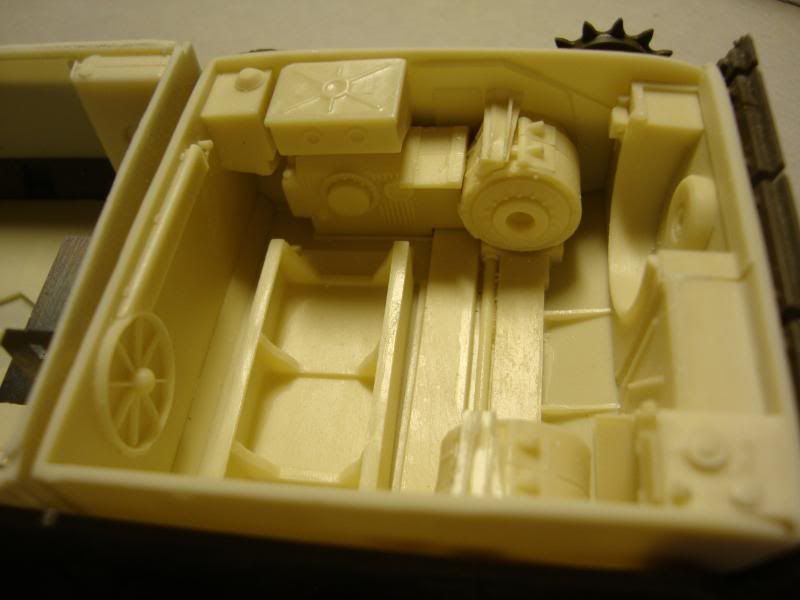
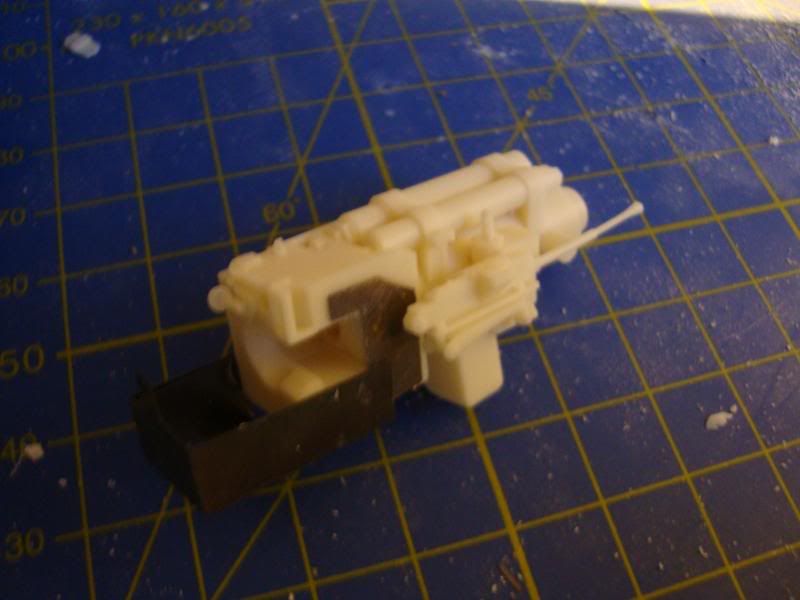
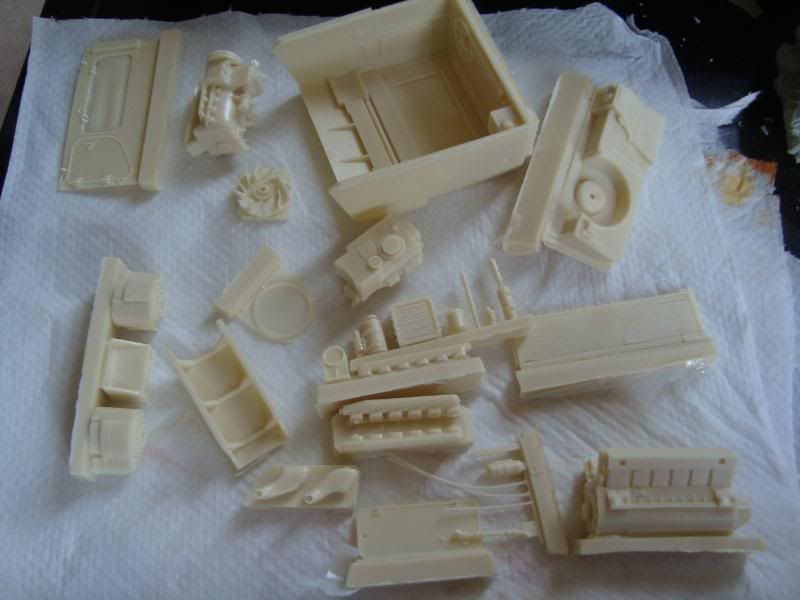
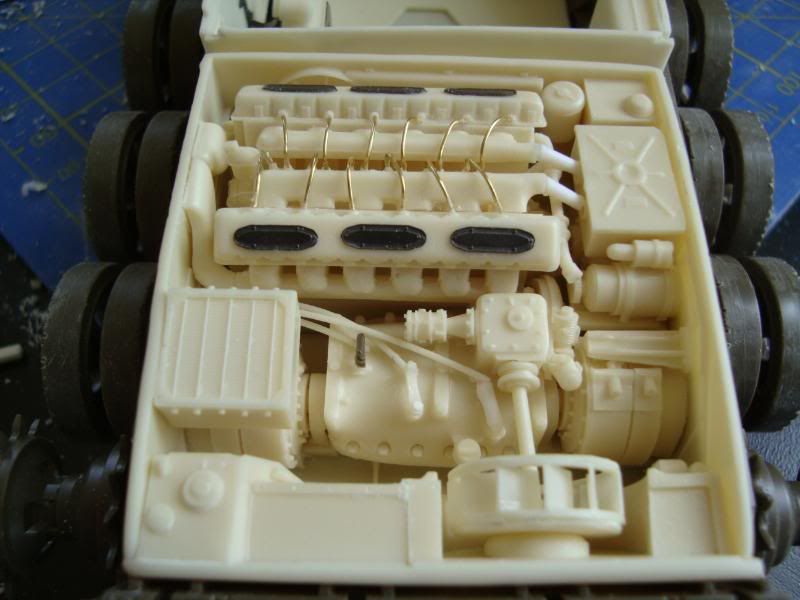
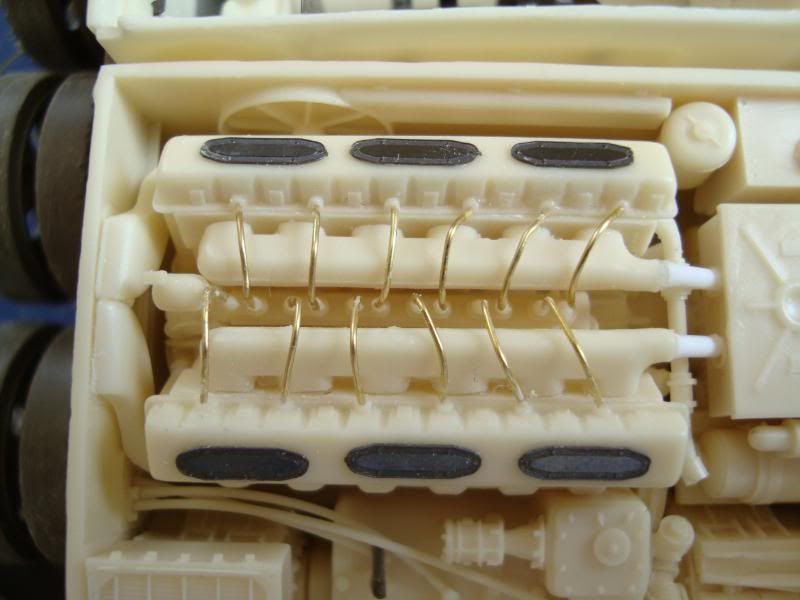
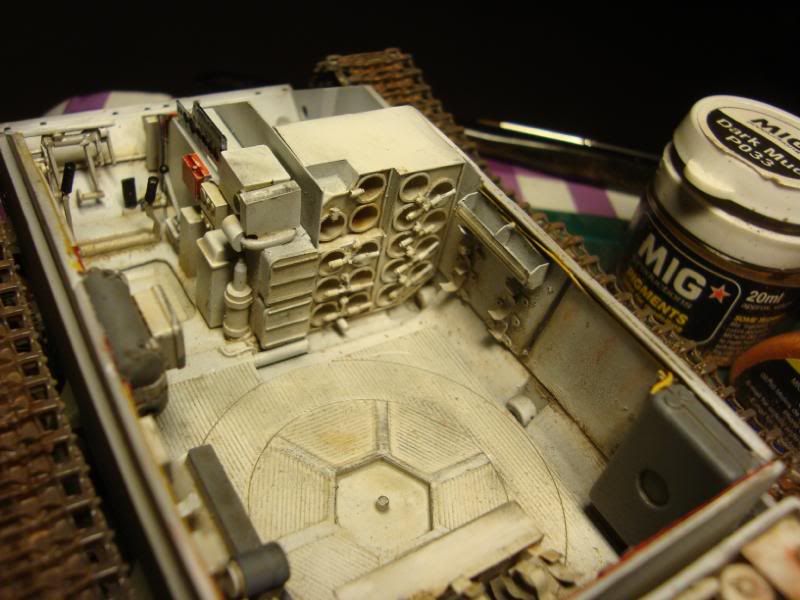
Heres yesterdays purchase, the CMK Resin engine set. This set is fantastic and fits into the Tamiya Hull like a dream. It also fits together flawlessly with the CMK Interior set and gives a very comprehensive model.
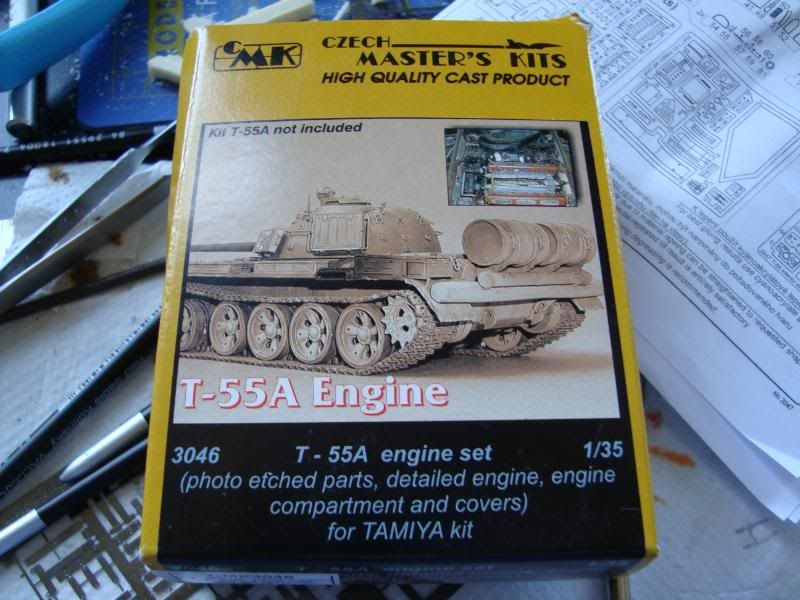
It comes with plenty of resin parts, some photo etch, and just needs some Brass wire and plastic rod to finish (not supplied).
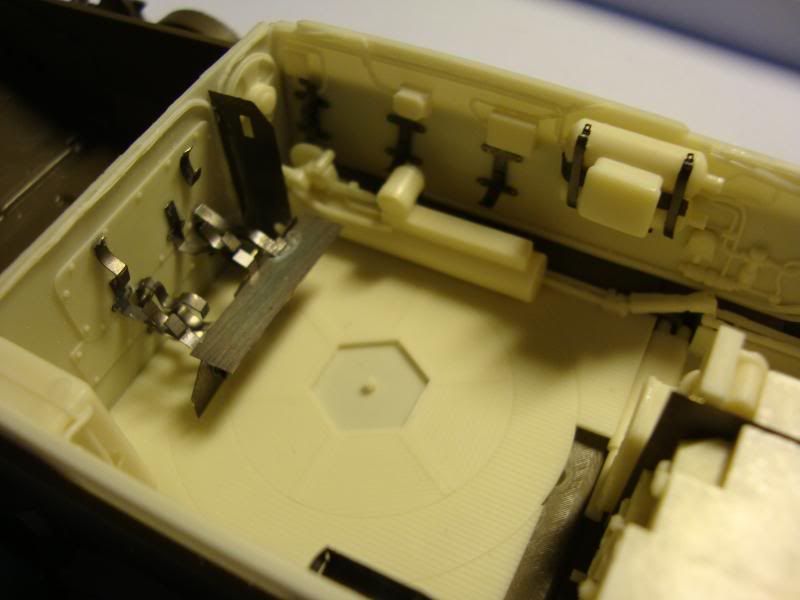
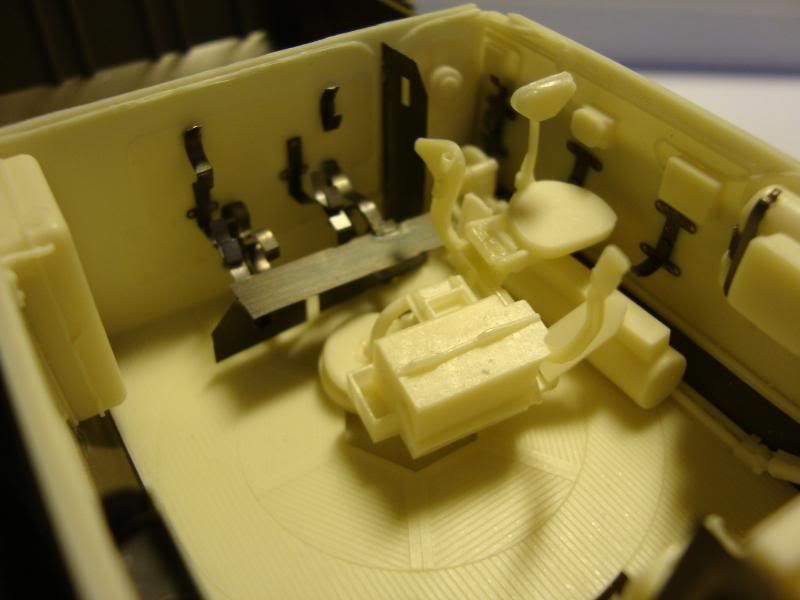
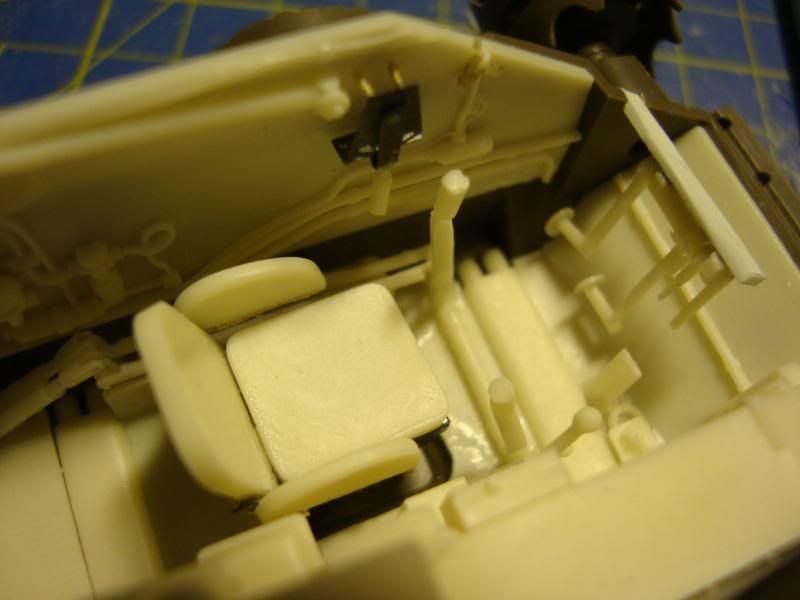
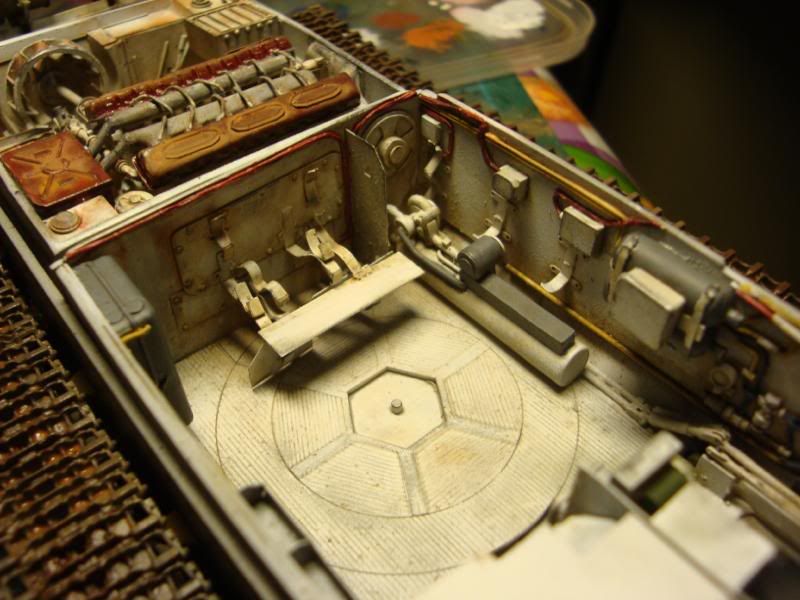
I also managed to get some more of the interior set built last night. Not as much as I would have liked as I had a busy evening and only had a little modelling time.
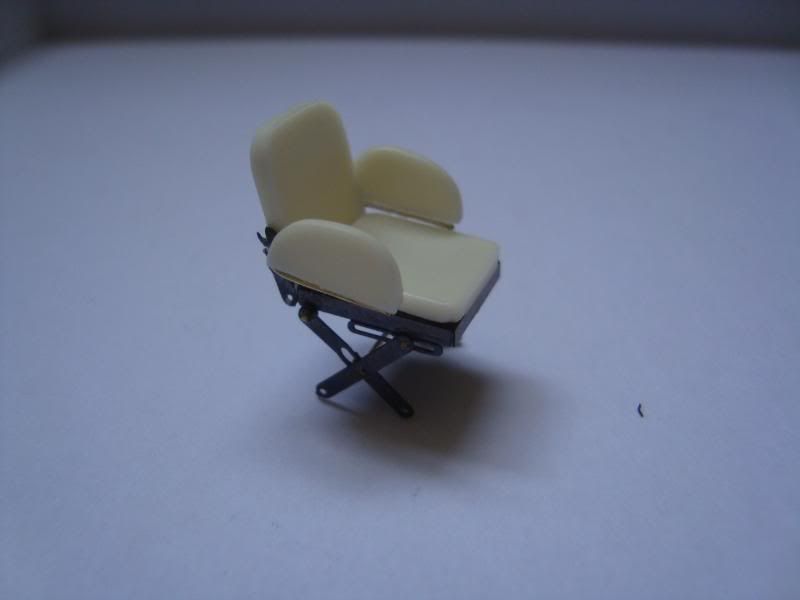
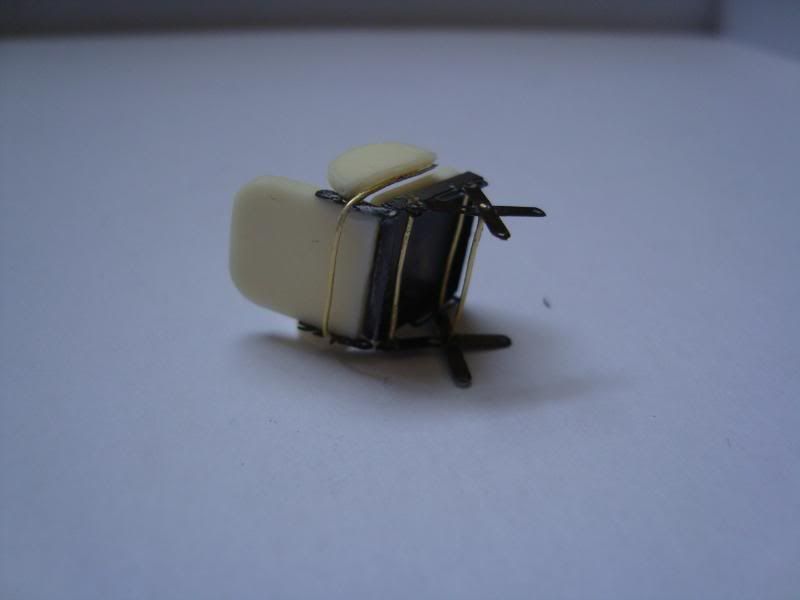
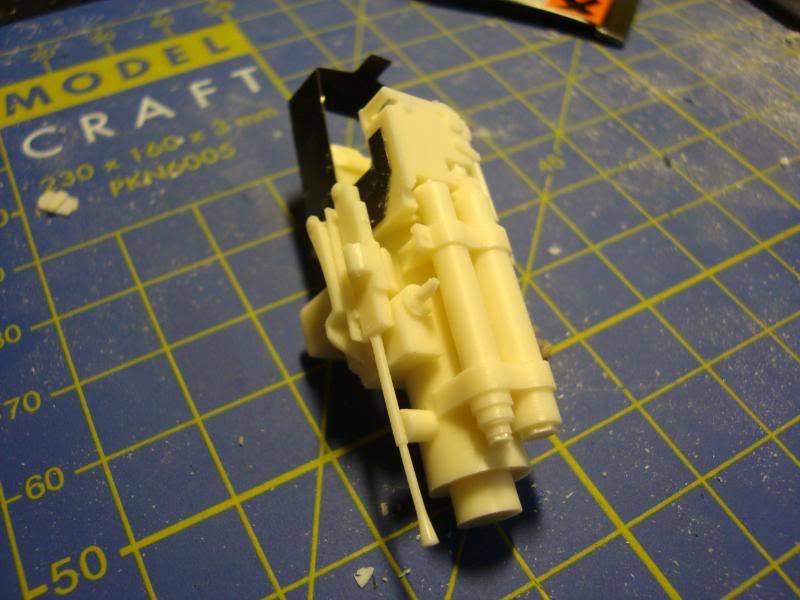
First up the Drivers chair, a nightmare of photo etch, brass wire, and resin. This was extremely fiddly to make and required building up the chair in stages from photo etch, and threading the brass wire through the holes in the chair legs and base. The end result though is a pretty detailed and nice looking drivers chair and I think was well worth the effort. Much more detailed than the drivers chair in my 1:48 Verlinden interior set for the T34.
The interior set requires a lot of sub assembly and building of parts before they fit together. It's quite complex and often components make little sense till you see them put together. I've often been building something and thinking "what on earth is this supposed to be?" however when it fits into another part of the kit you start to realise and think "ahhh so thats what it is." You also find that the instructions in these kits whilst generally good can be rather vague and a little confusing so it's always a good idea to have reference photos nearby to double check where parts go. Sometimes the exploding diagrams can be tricky to follow.
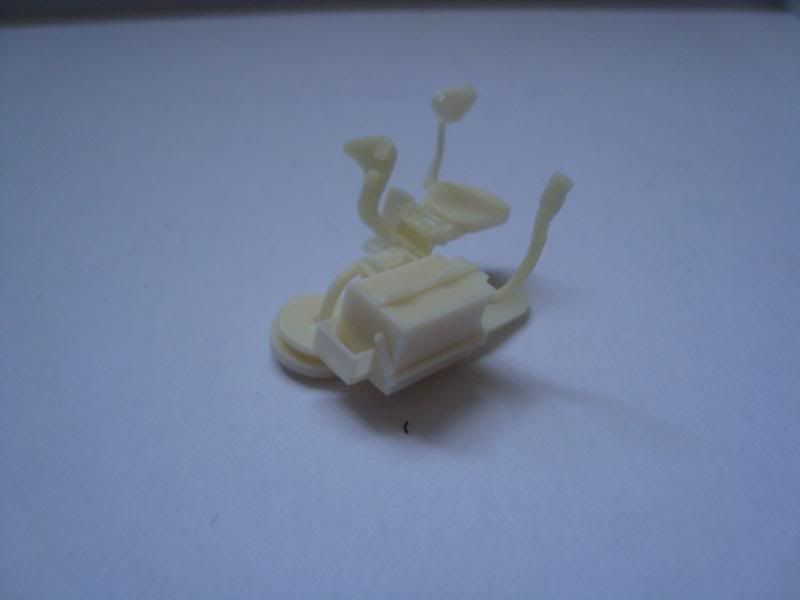
Heres the gunners station (or at least part of it)... The chair and foot rest are very detailed with nice surface texture (not really clear in these photos).
Suspended, as it would be in the hull
7899
Post by: The Dreadnote

That is insane.
15805
Post by: abhorsen950
Im Loving it!
Where do you get these kits from?
Cheers
ABH
8266
Post by: Wolf
Lol that pic is immense, and I gree, it's already looking great !
Where dooo you get these amazing kits from !?
10890
Post by: Deff Dread red Edition
Oh sweet heavens man!
That looks tiny and smal,Deff's ole' and shaky will never be able to do that!
Keep up the awesome work,hope to see more.
What are you thinking of for the paint scheme of the tanK?
11330
Post by: Gundam-Mecha
Thanks guys
A good pair of fine tweezers, and some patience are essential for these parts. I've lost count of the number of times I've glued chairs to my fingers! 
As to sourcing the kits... thats actually very difficult. I normally find out from things from scale model magazines, and books. I also use Perth Military Modelling reviews page alot as well to get the inside opinon on new releases etc.
The CMK stuff was really hard to track down. CMK are based in the Czech Republic and you'd think that in Europe they wouldn't be too hard to find, but actually I had to order mine from the USA and even then it was tough. I got the last two CMK kits in stock! I used Sprue Brothers online store and I must say it was great service.
I also order photo etch and resin parts from Historex Agents based here in the UK, as well as directly from manufacturers in Eastern Europe (Poland, Ukraine, Russia). For the metal shells that I'm using for the T-55 I have had to order these from Hussar Productions in Canada via the webstore Air Connections based in Ontario! I'm also waiting on some Japanese Modelkasten Tracks that I've ordered from a small store in the US, I couldn't order them from Japan direct.
Alot of the things take a lot of tracking down and investigation! Still you usually find eventually that someone somewhere will have it.
Deff as for paint scheme for the tank I definately want to avoid the basic dark green scheme, and will be doing camo. It's either going to be a winter camo (dark green and white) or a camo scheme like the example photo I posted earlier from a Russian military website (various shades of greens and some black).
12393
Post by: BEASTSOFWAR
do you display your stuff on www.missing-lynx.com ? you seem to have a fantastic eye for detail and that site has some of the best in your field.
BoW- John
11330
Post by: Gundam-Mecha
BEASTSOFWAR wrote:do you display your stuff on www.missing-lynx.com ? you seem to have a fantastic eye for detail and that site has some of the best in your field.
BoW- John
I've never posted anything on missing-lynx actually. Since I'm quite new to "serious" scale modelling I had always avoided places like that and armorama. As you say it has fantastic work on it and i enjoy visiting, really mind blowing stuff and I guess I always figured that my work wasn't really at that level yet.
Maybe after a few more builds I might try it one day.
15805
Post by: abhorsen950
Some Cracking stuff, I cant beleive you go to all that trouble for the models, but it certainly pays off.
Youve inspired me to find something of the WW2 WW1 era and im going to start work on some ww2 1/72 scale Airfix models
thanks for the inspiration
Keep up the good work
ABH
11330
Post by: Gundam-Mecha
10345
Post by: LunaHound
Oh Gundam-Mecha , you are scary! surely this type of things are as intricate as open heart surgery!
15805
Post by: abhorsen950
Fabulous work on the interior
Keep it up
Cheers
ABH
11330
Post by: Gundam-Mecha
Thanks guys I'm glad you like it! Sure takes a lot of work but its worth it. Next up is the turret interior and gun breach! :s
173
Post by: Shaman
This is quite awesome... Winter warfare and claustrophofbic tanks makes me glad im a civie..
looing forward to next update .. also love the chair
18457
Post by: xhequimunqui
By Odin's hairy knuttsack this is good stuff. I've worked my way through all three of your blog projects over the last few days and it's absolutely fabulous stuff.
11330
Post by: Gundam-Mecha
Thanks for the compliments guys! I really appreciate it and its great to be able to share these projects with other modellers.
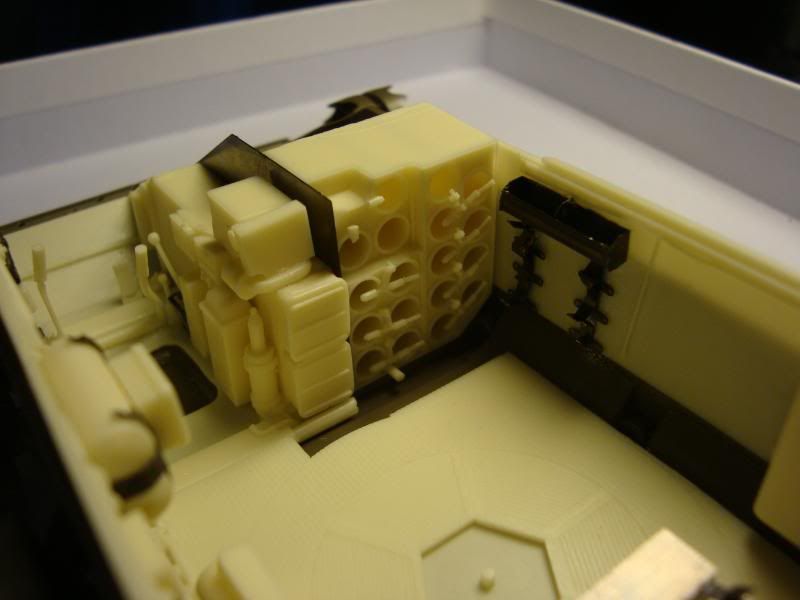
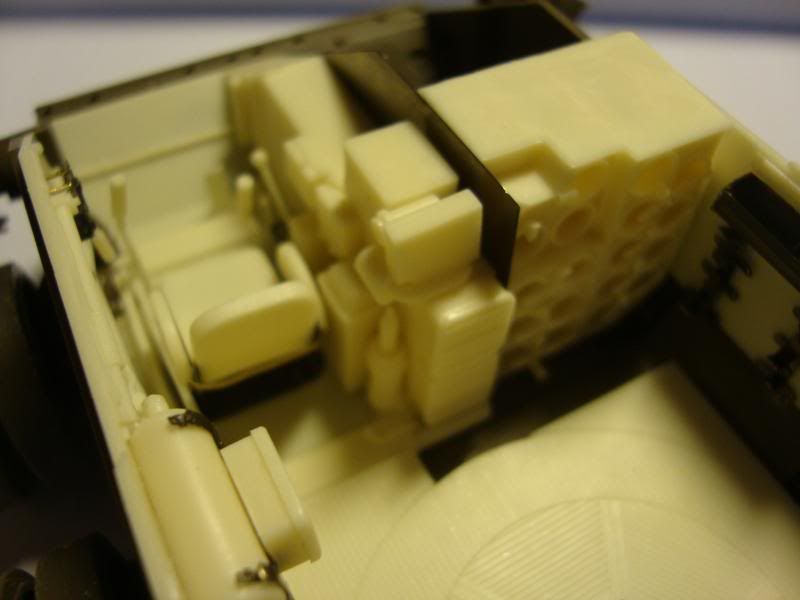
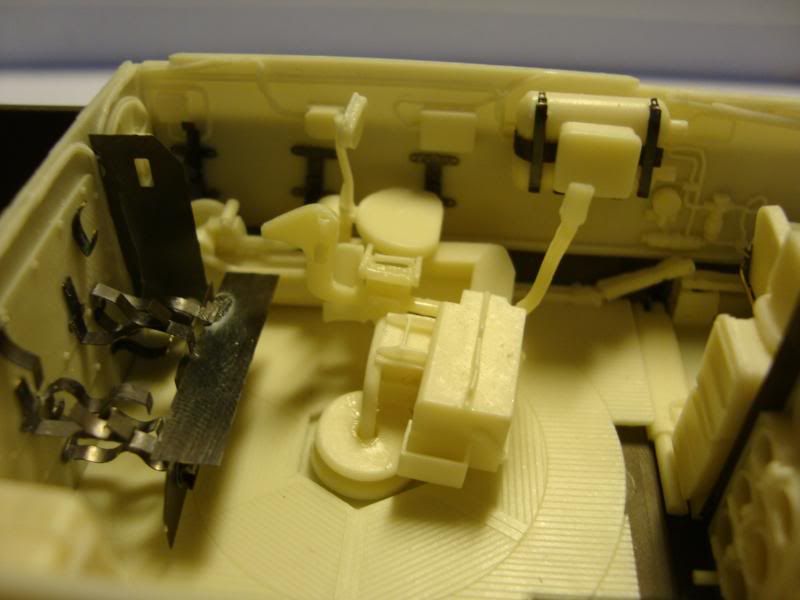
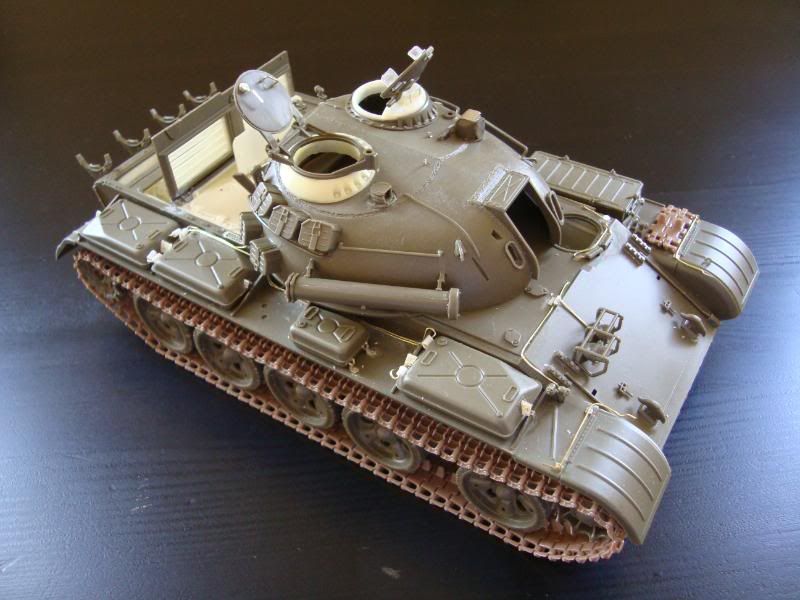
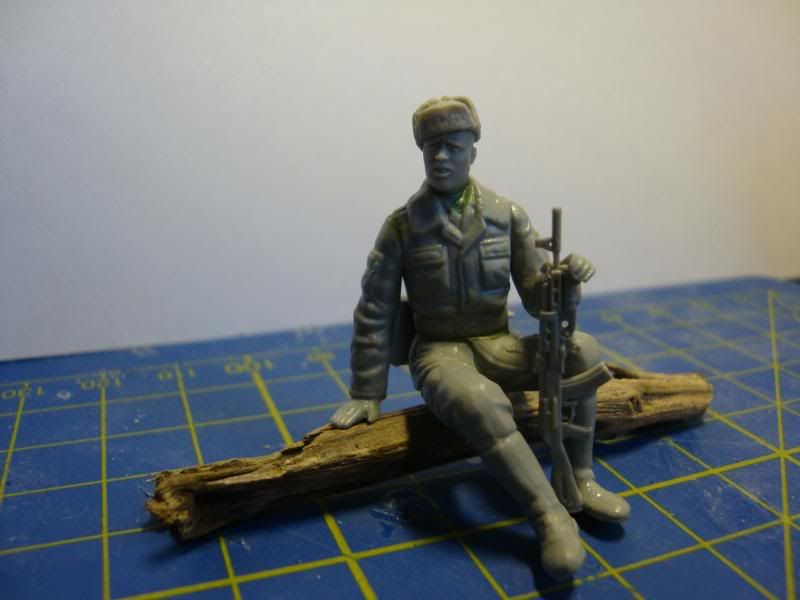
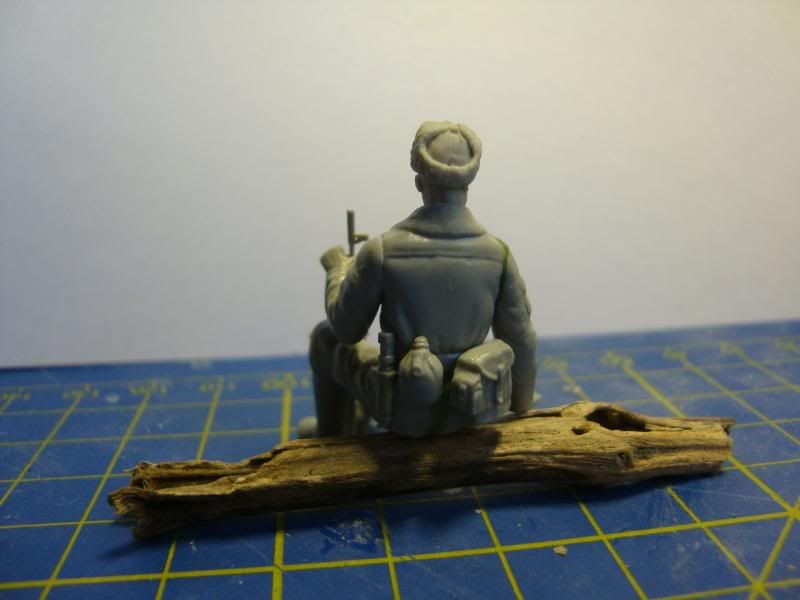
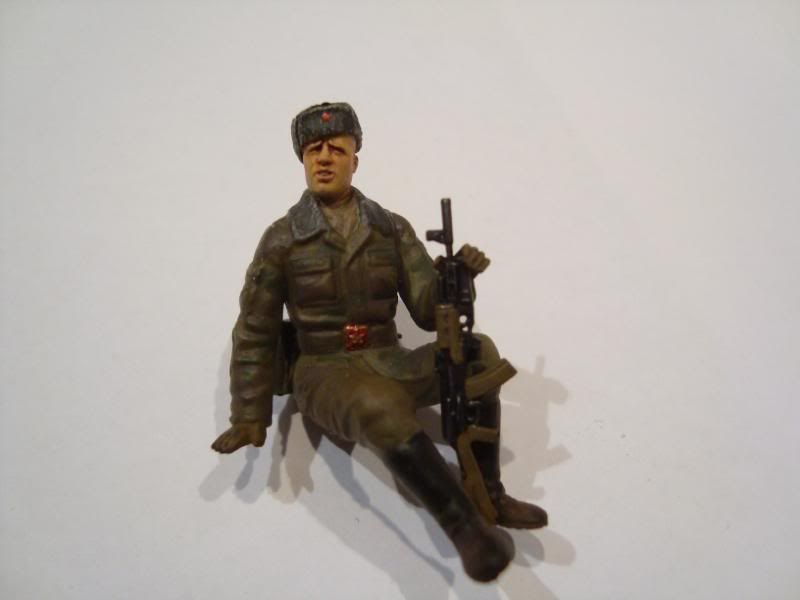
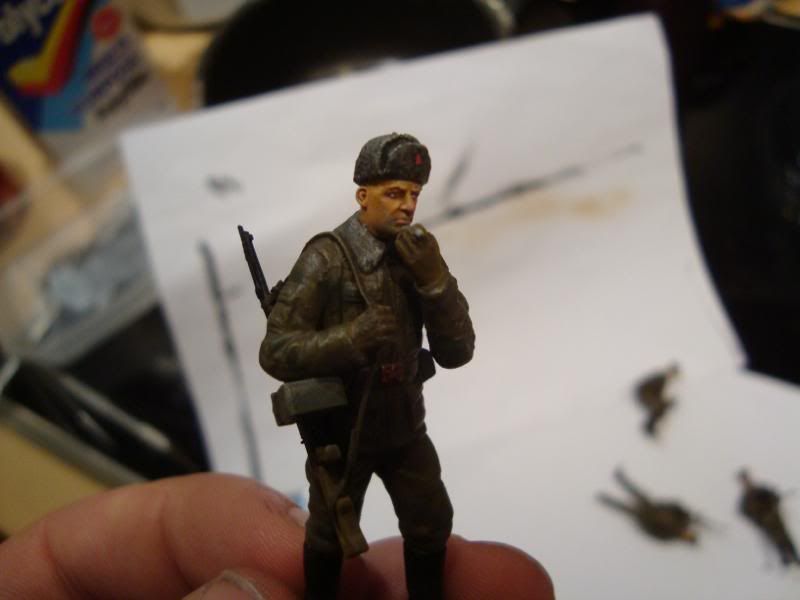
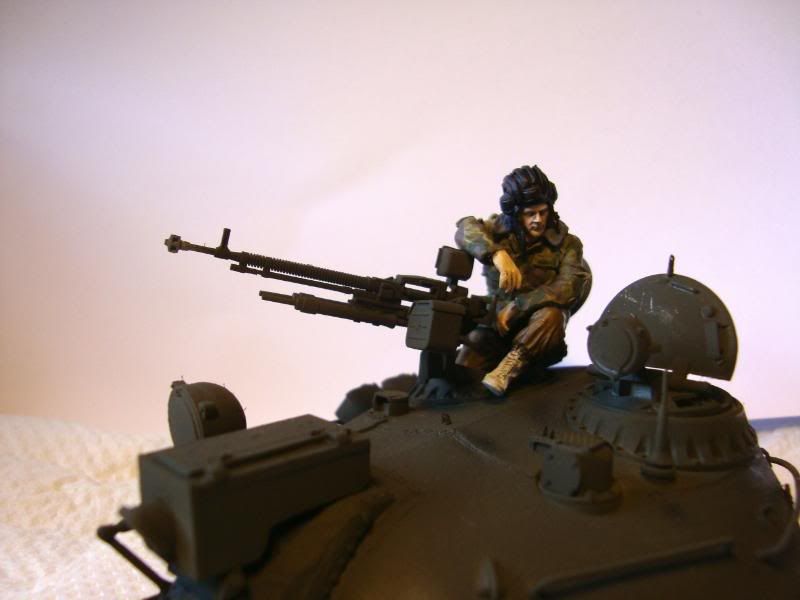
Had a busy weekend and managed to get some more done on the interior as well as some of the Soviet Motor Rifle Troops:
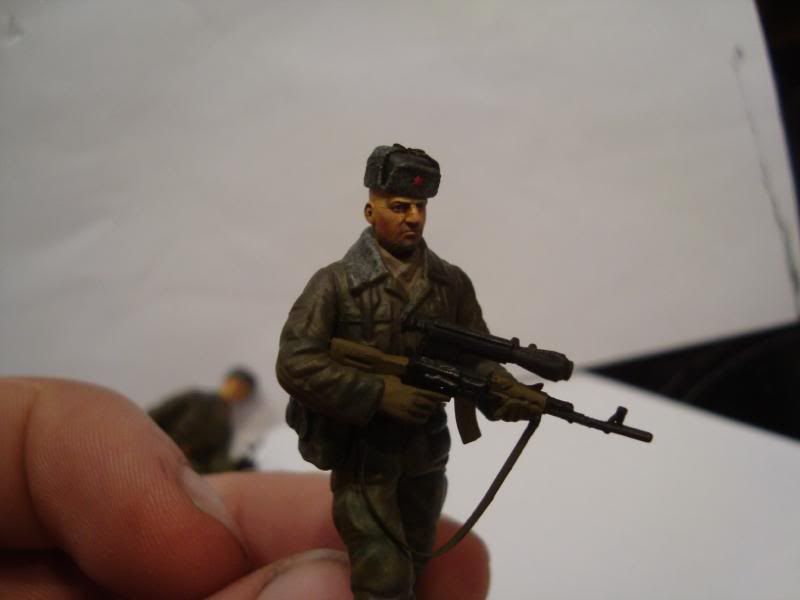
Motor Rifle Troopers comparison with the plastic figure head and the Hornet resin upgrade head
Upgraded trooper with scratch built etch strap:
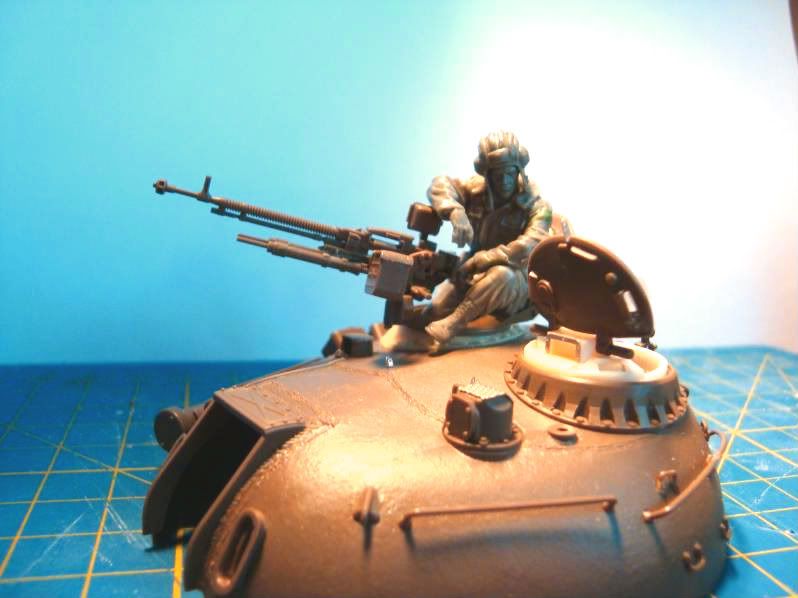
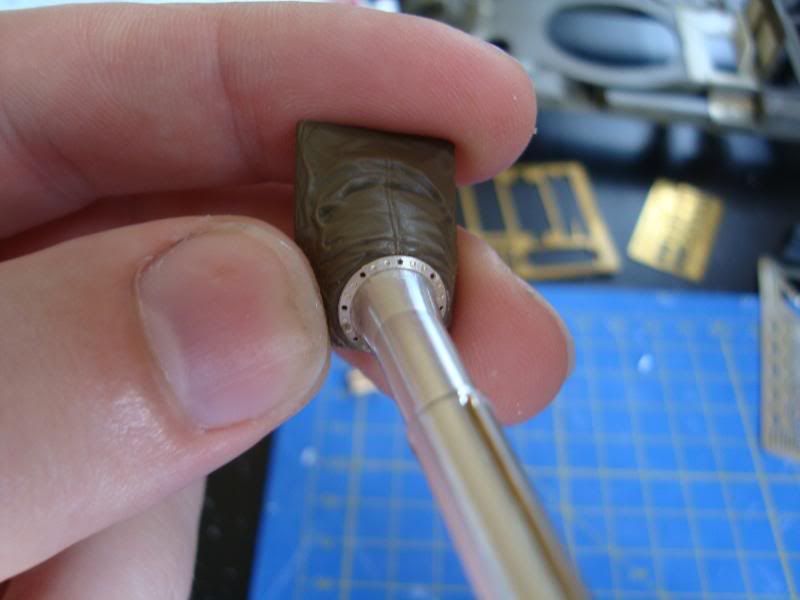
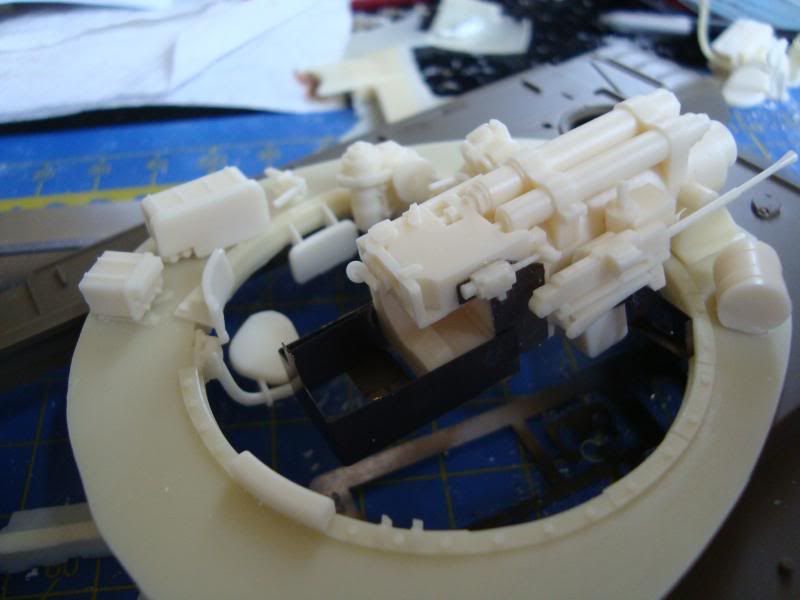
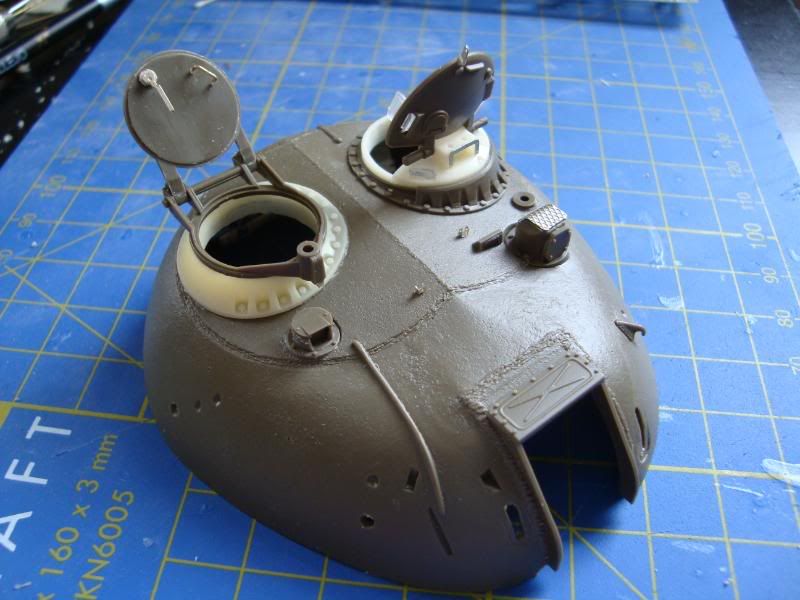
Gun breach detail with coaxial machine gun:
Turret ring detail:
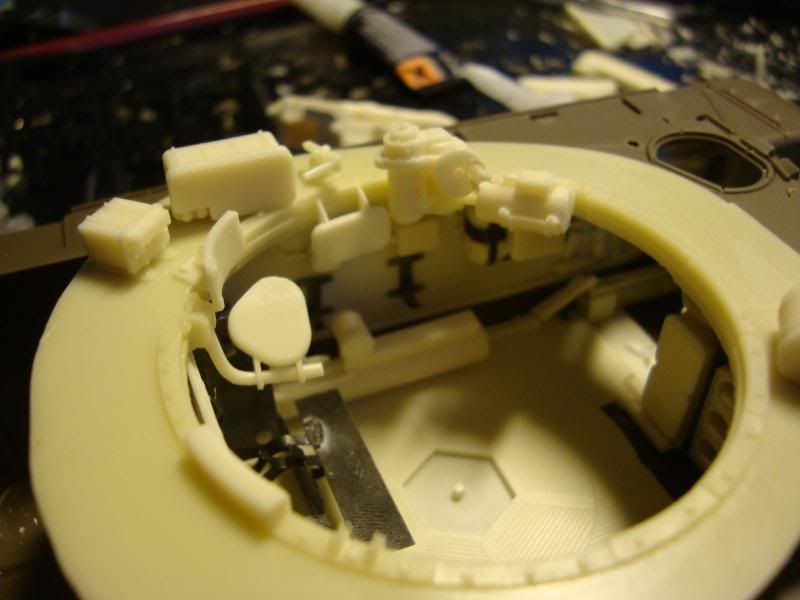
Drivers station with foot pedals
10890
Post by: Deff Dread red Edition
Good fething grief!
That detail is insane,you sir have just made me feel like less of a man using only tiny plastic bits,this is a sign of great awesomeness.Now get more up and be right quick about it!
Just one question man,doesn't that Hornet head look a little small?Perhaps it's just my tired eyes,oh well I guess that's the price I pay for almost 8 hours of Call of Duty.
11330
Post by: Gundam-Mecha
The Hornet heads are a little smaller than the plastic Dragon ones, both are described as 1:35 scale however there is always a little scale creep between brands even in historical modelling.
However whilst its a little smaller its not out of proportion in terms of the rest of the body, hands etc. It just looks like he's a little gaunt or skinny compared to the other guy. Actually I quite like natural variation in size and shape of figures. Not everyone is the same in real life, so why so in models?
10890
Post by: Deff Dread red Edition
I see what you mean.Well anywho hope your week isn't to hectic so that you can get more stuff done.
15805
Post by: abhorsen950
What Scale are those troopers btw? is it 1/72 or 1/32?
Cheers
ABH
10890
Post by: Deff Dread red Edition
They are 1:35 scale I belive.
6633
Post by: smiling Assassin
Mate this is insane. I do not envy you, though, because painting this is going to be such a bitch.
I recommend a whole load of shading washes.
sA
11330
Post by: Gundam-Mecha
ABH - Deff is right these are 1:35 scale figures. Slighty larger than 1:48 figures, but not far off heroic scale larger figures. For a rough size comparison they are roughly the same size as a Space Marine Terminator or one of the ever popular "true" scale Marines in Power Armour.
1:48 scale figures are actually slighty smaller than regular 28mm heroic scale figures as the proportions are not exagerated. 1:35 figures slighty larger than regular heroic infantry.
sA - painting sure is going to be a challenge, but it will be a lot of fun. I just got my metal 100mm shells from airconnections in Canada today. They are fantastic turned metal shells that have really nice detail, much better than resin detail shells you can get from companies like Verlinden or Forgeworld.
I'll be doing a lot of the painting by airbrush, as well as numerous washes, oil filters, and brush painting with acrylics. Definately for the micro details I think your right, shading washes will be essential Automatically Appended Next Post: Finally got my shells for the interior, these arrived today:
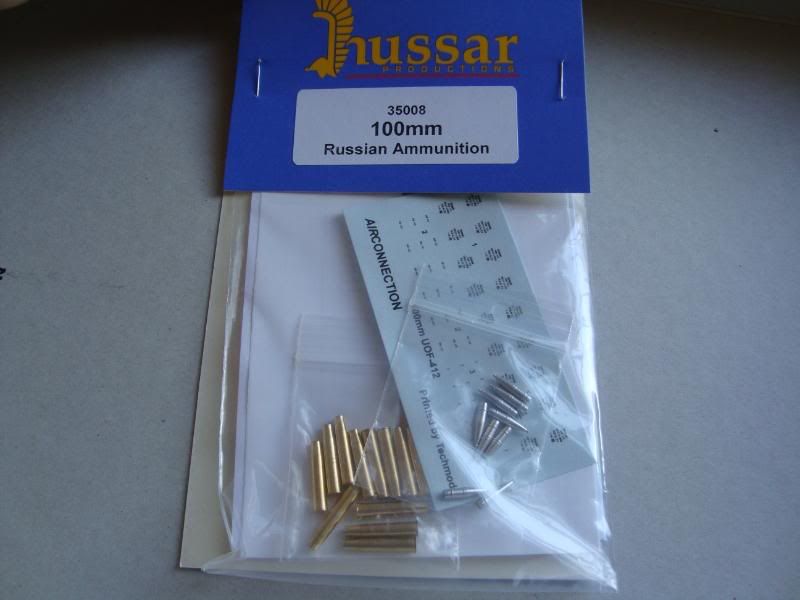
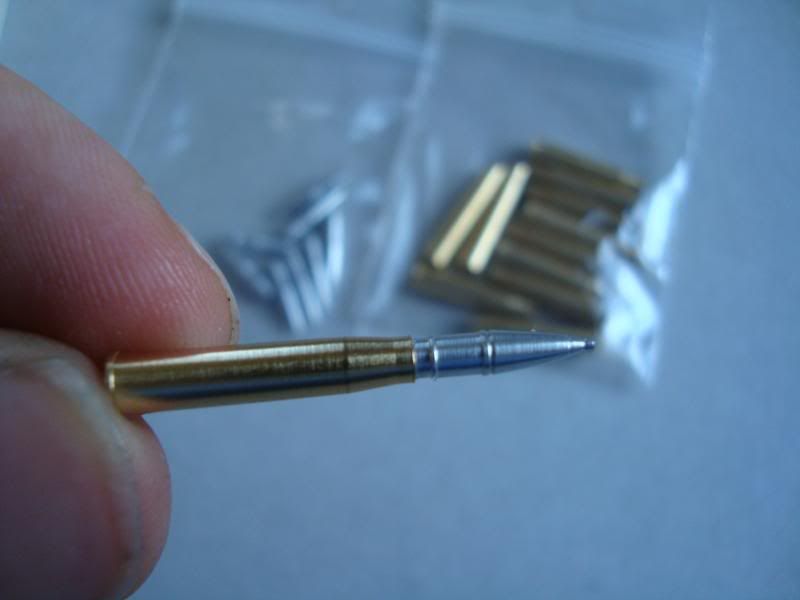
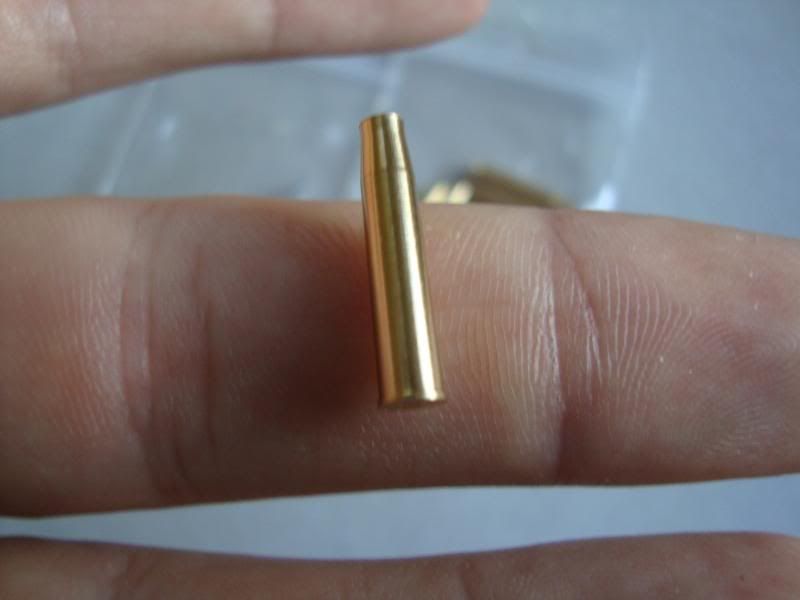
These really are great items and the mini transfers for the shells are amazing, also all in authentic Russian!
9504
Post by: sonofruss
 This is just not fair G-M showing us gamers up with your hoity toity model kits and fancy resin and brass etch extra doodads now you go and throw in some turned shells.
I guess I will need some really fancy stuff when I build my 40K scale mek Gargant. 
15805
Post by: abhorsen950
:O:O:O:O
Cracking
also thankyou for that 1:35 and i saw some of the kits by the same company the other day only tanks.
Lovely stuff
keep it coming
Cheers
ABH
8745
Post by: Llamahead
Those shells look great I might have to find a way to use them. How difficult do you reckon it would be to "adapt" one of those kits for a Russ?
11330
Post by: Gundam-Mecha
@ Sonofruss / ABH - thanks guys! Actually Russ theres loads of cool gubbins you could throw onto a mek gargant. If you want cool engines, servos and stuff like that plane kits have loads of accessories and parts you could try, mix those with some household junk like Jamiesson's Stompa and you're in business 
@ Llamahead - you could easily use these shells for a Russ scale wise they'd fit really nicely. Also since this is a fantasy Sci-fi setting you have a much wider choice of what shells to use. You can just choose any shell that looks cool to you! Hussar have a wide range of different shells, check out this review on Perth Military modelling for an otherview and pictures of all the different options.
http://www.perthmilitarymodelling.com/reviews/vehicles/hussar/hussar35005-10.htm
The 152 mm shell set might suit a Russ better since they are big beefy looking shells, and a Russ has a huge battle cannon!
Here are some more updates from what I managed last night:
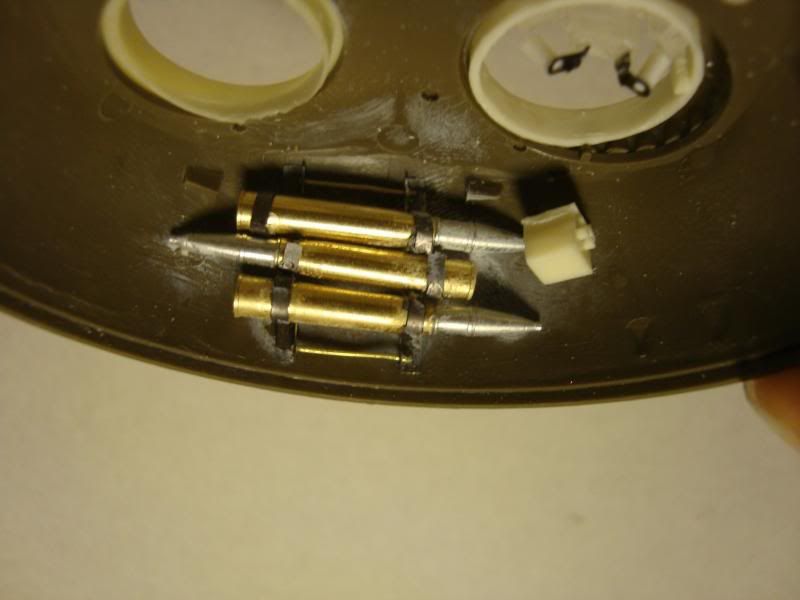
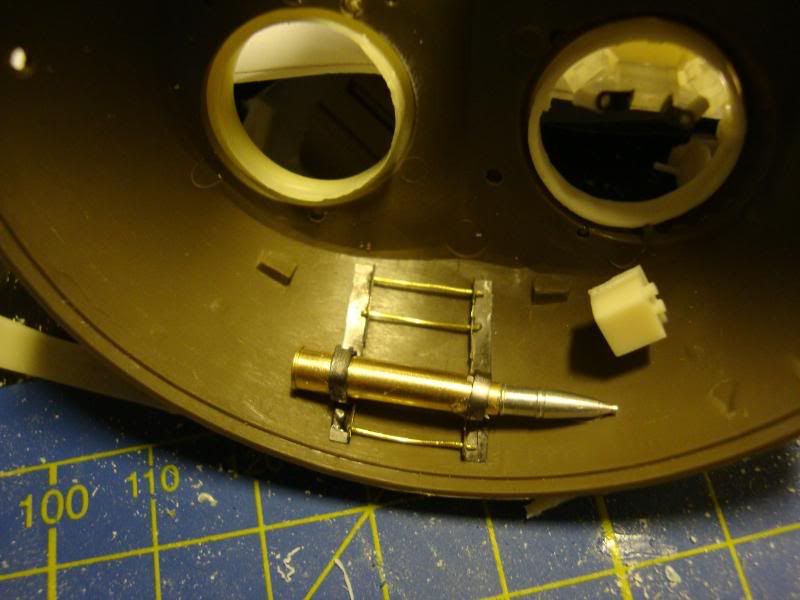
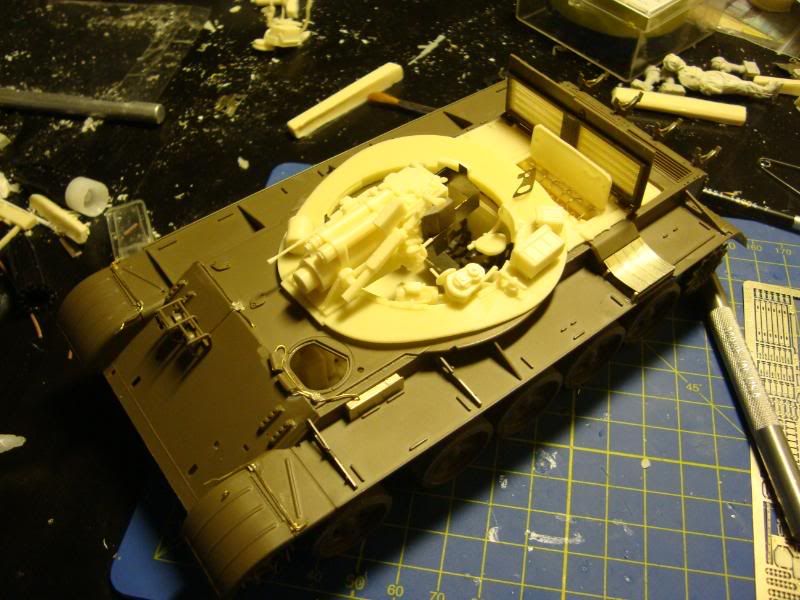
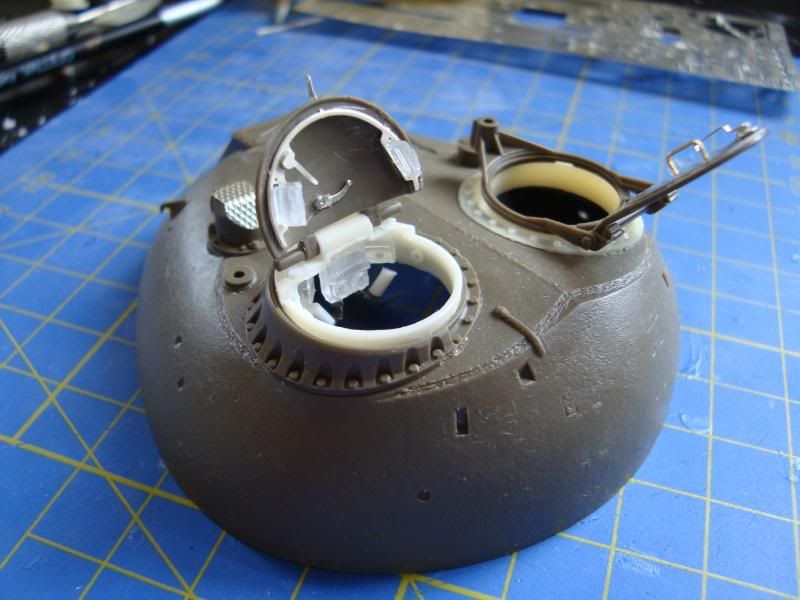
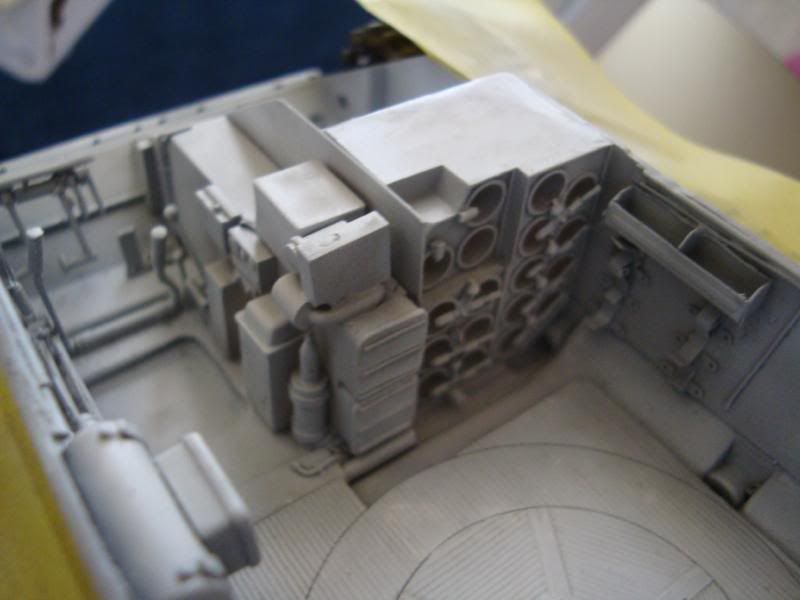
Making the Turret ammo rack and Shells. The rack is made from photo etch and Brass wire and the shells are attached with photo etch brackets.
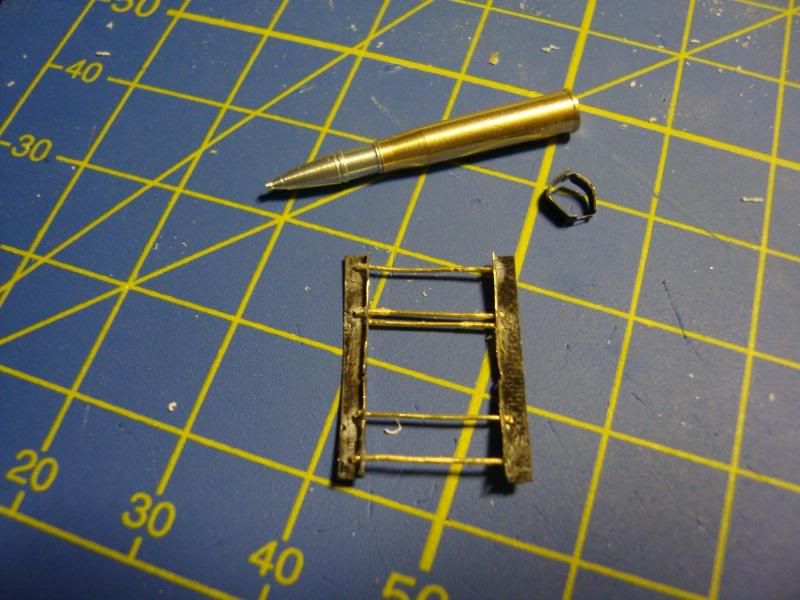
Attaching the ammo rack and shell to the turret interior, this is just the first shell, there will be four layered on this rack.
Turret ring detail and gun breach:
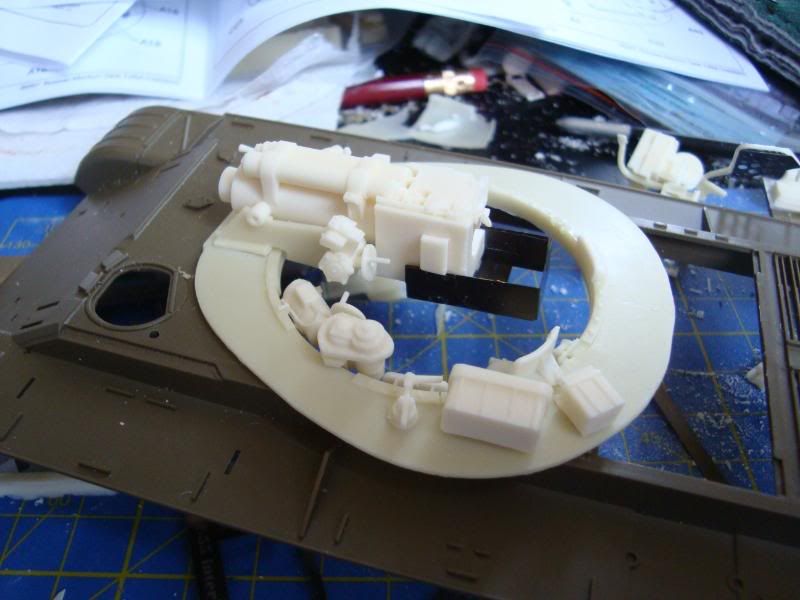
Parts for the next stage of the project, the fully detailed engine and engine bay. Most of the main interior of the Crew cabin and the Turret is nearly done now, so I will be cracking into this part soon.
8266
Post by: Wolf
WOW! These detailing packs are simply amazing, they have so much detail in them its's great.
If I can ever find anything similar for german tanks, I would make one of these without a second thought!
Great work so far mate, really is starting to take shape.
10890
Post by: Deff Dread red Edition
Coming along well.One quick question,jow often with these resin kits(like the interior kit)do you encounter warping in the resin?
Automatically Appended Next Post:
I am sure that you could find something like that for German tanks wolf.Also Dragon makes a rather nice Panzer kit IIRC.
10912
Post by: BOSS_PIMPALOTZ
Loving this keep up the good work
What enviroment is the final Diorama going to be set in Snow? Temperate?
11330
Post by: Gundam-Mecha
@ Wolf - there are plenty of German sets out there, don't worry you can super detail to your hearts content! Any specific vehicle in mind? I can help you locate some and send you links to pictures if you have anything planned.
@ Deff - generally speaking I've found that these resin sets have actually been of very high quality with very little warping, and little excessive flash. Also the resin gates (the large chunks of resin from the pouring channels in the mould) as also in sensible places and not difficult to remove. The only warping I've found has been very minor and only on the very very thin sheets and panels. This was easily fixed by running under warm water and pushing flat to the required shape.
10890
Post by: Deff Dread red Edition
Well atleast they are of good quality.Can't wait for more.
11330
Post by: Gundam-Mecha
Thanks Boss-Pimpalotz, the final setting of the diorama will most likely be in snow. I'm not sure how heavy the snow will be at this stage. Maybe light fall or maybe heavy .
I recently got an amazing book called "Frozen Hell" by the Xtreme Modelling magazine people, it covers various techniques for recreating snow and ice in dioramas and really was a fantastic read. I'd recommend it to anyone interested in dioramas regardless of the setting (historical, Fantasy, Sci-fi).
8266
Post by: Wolf
Probably Tiger tanks mainly , God I lovee those machines.
I've always wanted to do a German Diorama,
HAs there been any advancements on the terrain at all ?
10890
Post by: Deff Dread red Edition
Dunno if this is the kind of scale you would like to work in wolf,but here's a little review just to give you a general idea of Dragon's kit:
http://www.missing-lynx.com/reviews/small/dml7370reviewgp_1.html
11330
Post by: Gundam-Mecha
Hi Wolf
Funny you should say that CMK do interior, drivers cabin, and engine sets for the Tiger.


Verlinden also do Resin interior set for Tigers:


Haven't started on the Terrain yet, I'll probably start it soon though so I can try the layout of figures and the tank.
15805
Post by: abhorsen950
Its Really coming alive great job!
Found some of the soldiers kits last night online theyre going to be purchased in the future
Cheers
ABH
11330
Post by: Gundam-Mecha
abhorsen950 wrote:Its Really coming alive great job!
Found some of the soldiers kits last night online theyre going to be purchased in the future
Cheers
ABH
Thanks! What figures did you go for? Sounds interesting, please put up a blog on what ever you find
8266
Post by: Wolf
Those interior kits are fantastic cheers !
11330
Post by: Gundam-Mecha
No worries, happy to help. You can order them online directly from the manufacturers. Just google Czech Masters Kits or Verlinden for the webstores.
4746
Post by: Flachzange
While I really like what youve done so far, Id love to see you build a tiger diorama one of these days.
11330
Post by: Gundam-Mecha
Flachzange wrote:While I really like what youve done so far, Id love to see you build a tiger diorama one of these days.
Thanks but if I do that it will leave nothing for Wolf to do!
Seriously though I've considered trying other nations armour, but have never gotten round to it. Maybe one day I will!
4216
Post by: Darknight
Have you ever considered taking a Leman Russ or other GW kit and building internals in it? I have seen that done a few times, but I think with your skills and knowledge you could do a really good job of it. Most of us GW-only painters have a very "cartoony" style which is ideal for 40K and Fantasy, but your hyper-realism and attention to detail could create something quite wonderful.
Perhaps a Sisters of Battle vehicle, with shrines and seals on the engine, and censers, and candles, and this and that and the other?
15805
Post by: abhorsen950
Thanks! What figures did you go for? Sounds interesting, please put up a blog on what ever you find I found only german infantery at the scale you are using and a smashing hanomag with three figs aswell for only £10
but i found Germany infantry, the afrika corps 1/48
not a lot of selection but ive ffound a smashing collection of 1/72 which i think im going to go for
Keep up the good work
ABH
8266
Post by: Wolf
Hah cheers, Gundam for that thought of saving me the pleasures of posting a blog of my tiger diorama
15805
Post by: abhorsen950
Wolf cant wait to see yours posted on here too
keep up the good work Gundam
Cheers
ABH
Automatically Appended Next Post:
I just want to ask.
Does missing-lynx.com only show 1:35 models in there gallerys?
Or do they show all scales?
Cheers
ABH
11330
Post by: Gundam-Mecha
8266
Post by: Wolf
Looking good ! I like the wires coming out of that little box thing under the turret, looks really nice
What kinda of colours are we going for this tank then ?
11330
Post by: Gundam-Mecha
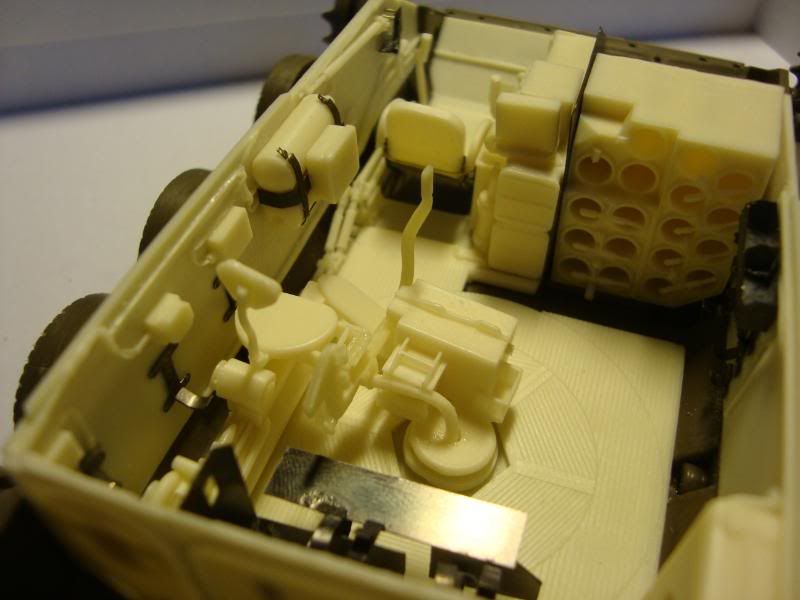
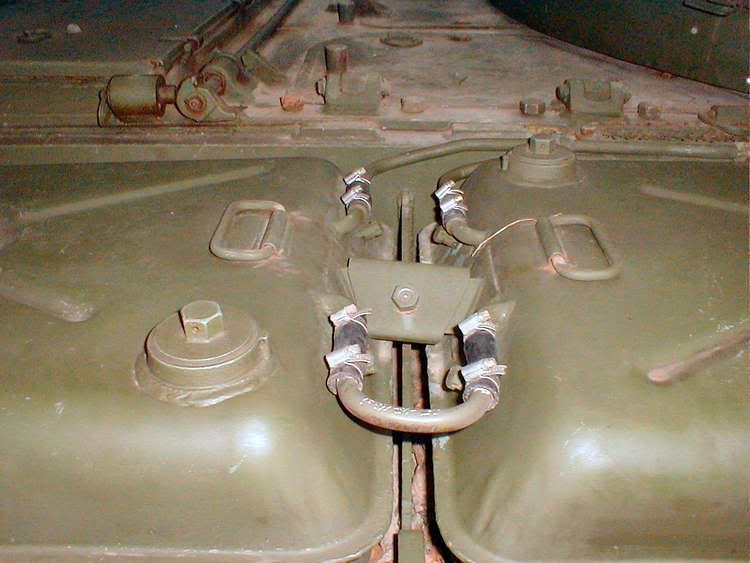
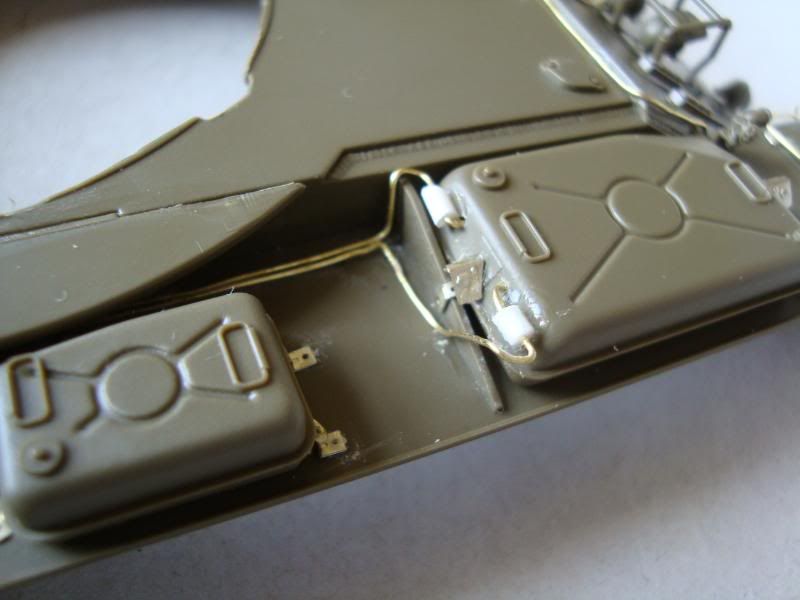
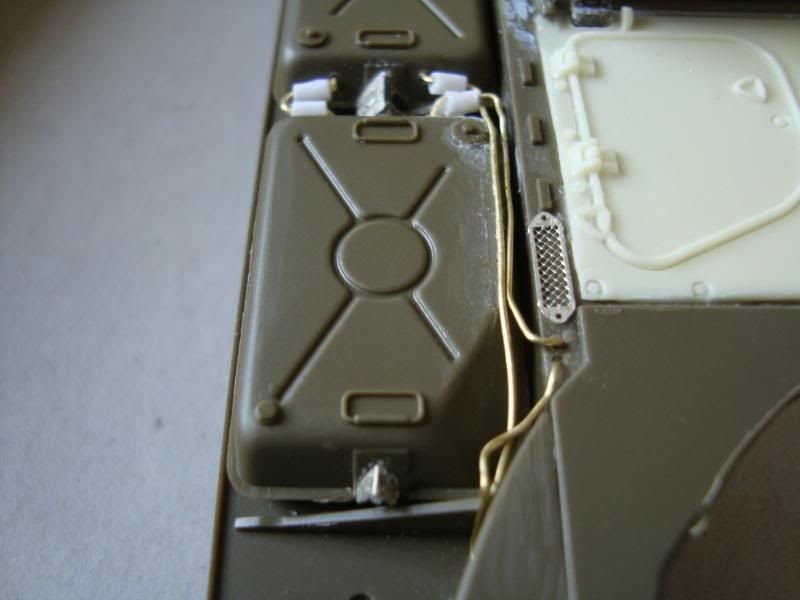
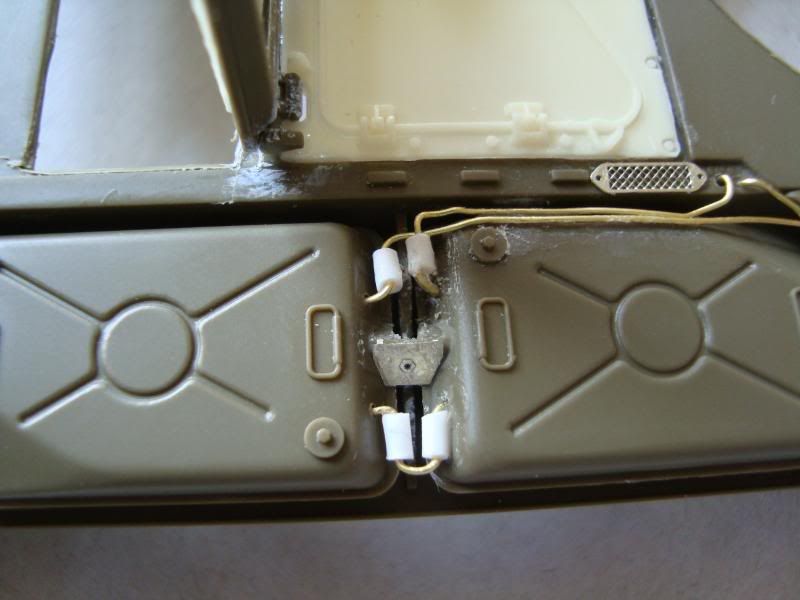
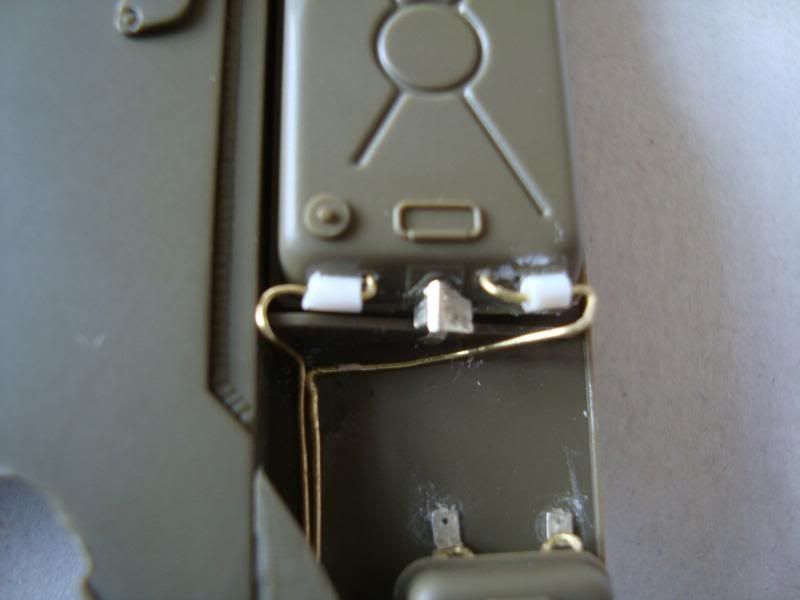
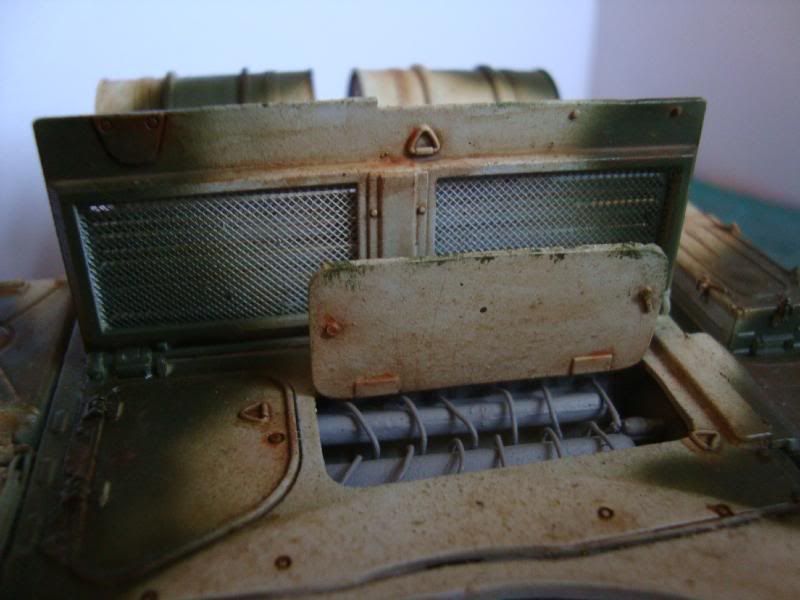
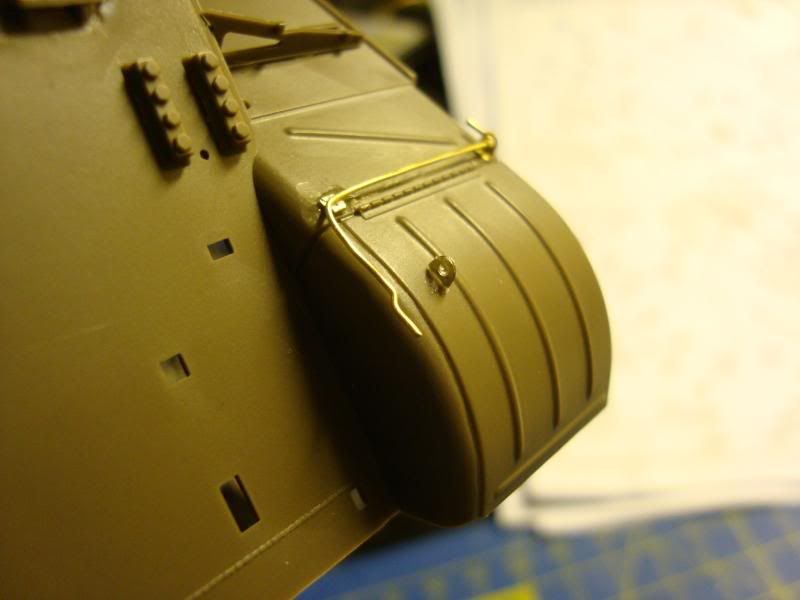
Thanks Wolf, the wiring and cabling was done from reference pictures in the CMK instruction sheet and certainly was quite tricky! Needed just tiny bits of superglue run along the length of the brass wire and then carefully positioned with tweezers. I think the end result is worth it though as it adds a little extra depth and makes the parts look much more like working electrical components.
As you can see from these reference photos the interior of the T55 was a maze of instruments, wires, and cabling! I don't know how the crew made sense of it all!
As you can also see with so many various different parts in different colours painting the interior is certainly going to keep me busy!
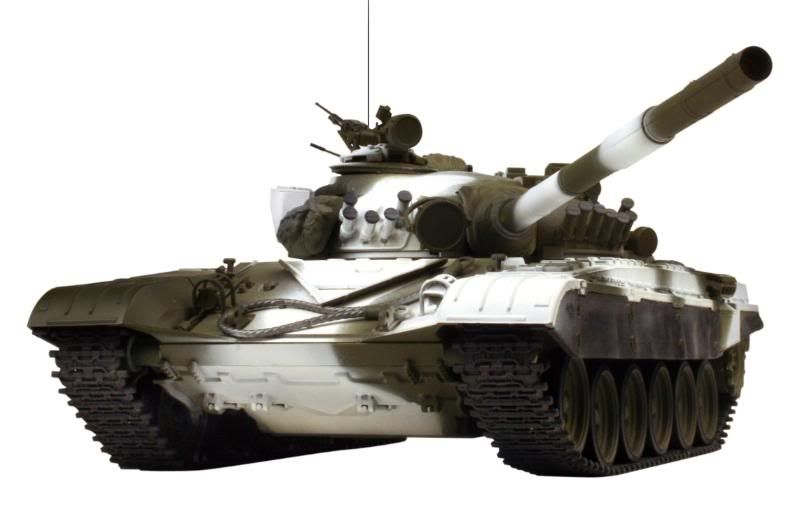
As to the colour scheme for the armour of the Tank I've been doing a lot of research into this. Soviet Tanks were mostly painted Dark Green but during winter operations they were either white washed or painted a Green and White disruptive camo pattern. I was reading a Forum post on Armorama and Mig's Jimenez (Of Mig's Productions) confirmed that the two tone camo was continued through to this period. It will look like this example (in this case a T-72) but with weathering etc.
14569
Post by: Blightdrone
Brilliant model! It looks so realistic!
I feel sorry for you though, because YOU have to paint it
Great work as always.
Cheers,
Jack.
8266
Post by: Wolf
Ha you're right it is a mess in there I hope your noy going into that much detail
I'm liking that cammo scheme as well, should looke really nice when weathered and so on.
11330
Post by: Gundam-Mecha
Thanks guys! Maybe I am mad but I'm certainly going to try and paint the interior as faithfully and accurately to the reference photos as possible!
I'm sure it will be great fun once I crack into it, which will be fairly soon! I'll keep telling myself that the ends will justify the means!
15805
Post by: abhorsen950
Wowzas keeps getting better and better
why dont you post your dioramas on www.militarymodelling.com the stuff on theres smashing and your work will fight right in
cant wait to see more
ABH
11330
Post by: Gundam-Mecha
Thanks ABH. The main reason I haven't posted in miltary forums really is that I was very much a Fantasy/Sci-Fi wargamer with a Fantasy 28mm background, and I've only just recently started branching out into Scale Modelling. It was a natural progression for me really from Forgeworld kits and the techniques used in the Modelling Masterclass book.
I probably will try posting on Armorama and places like that though. It would be interesting to see what the scale model specialists make of my builds as well.
11953
Post by: Shellfishguy
Looking awesome as usual GM! Did you ever finish up the KV-1 diorama?
11330
Post by: Gundam-Mecha
Thanks Shellfish!
The KV-1 diorama is still ongoing. I've done some more work to it recently and plan to update the blog soon.
I added the Crystal Resin river and also worked on the terrain a little. It's not forgotten about yet!
I just couldn't resist starting this one!
9997
Post by: Rahveel
Dear Gundam-Mecha,
I traditionally do not care at all for historical or modern miniatures, as I typically find them to be boring and lifeless. After reading your blog, my opinion has changed 100%. The level of detail applied by both yourself, and the kit-makers is astounding, and I never would have guessed that so many conversion opportunities would present themselves (and be exploited so fully).
Thanks for sharing your incredible work!
-Rahveel
10890
Post by: Deff Dread red Edition
Hehe liking the new avi.Anywho as always nice work,keep it coming.
11330
Post by: Gundam-Mecha
Well it's been a while since my last post but I'm finally back!
I've been quite busy posting on Scale model Forums recently and my work has gone down pretty well there actually!
Which was a suprise and it was nice to talk rivets etc with other historical armour geeks!
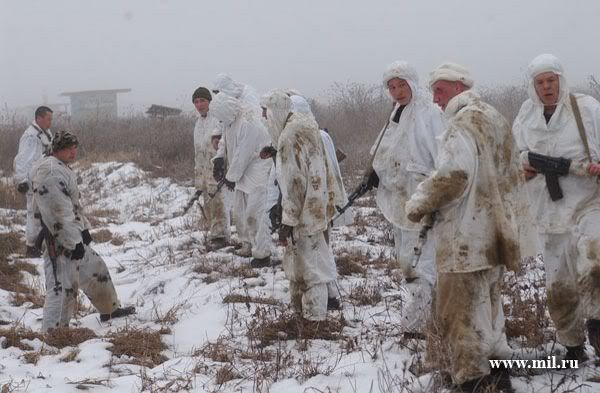
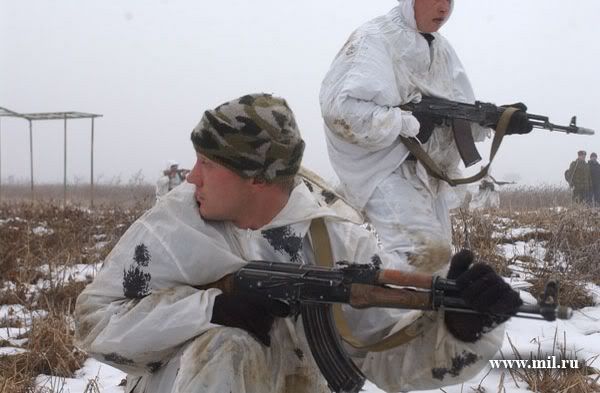
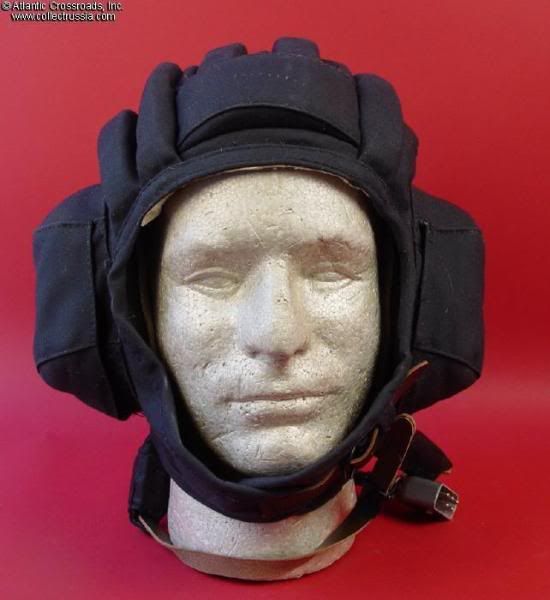
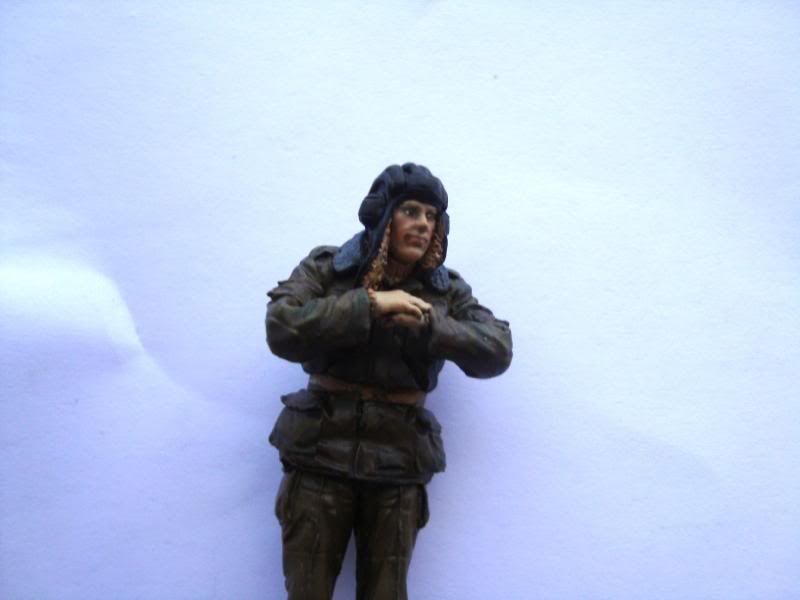
After some discussions on scale model forums and some further research I discovered that the Tank crew I was planning to use was out of period. I looked for reference details of Soviet Tank Crew and Infantry Uniforms and I found some great reference images of the Soviet Afghanka (which saw service from 80's to early 90's) and also various Tankers helmets used in the 1980's in Afghanistan. I decided to swap the tankers with a modern Russian Tank Crew from Checnya 1992 in my diorama, as even though they are post Soviet the Afghanka matches their uniforms very closely and also let me choose figures in winter dress which suited the scene much better. Here are some reference images:
padded winter Afghanka
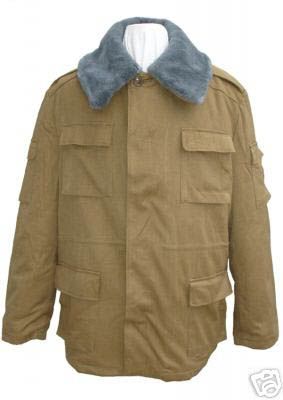
Summer Afghanka

1980's - 1990's Soviet/Post Soviet Tankers helmet
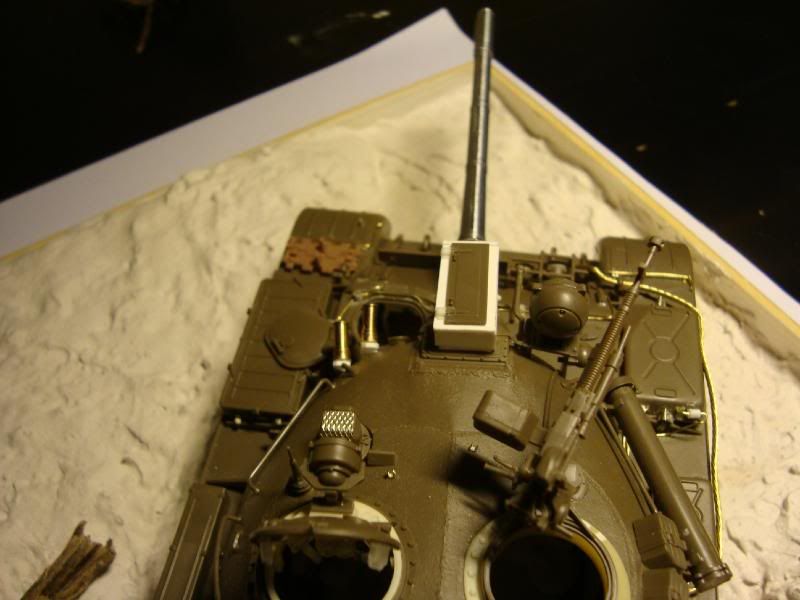
I've also been doing alot of research into ways to upgrade the T-55 to a T-55M or T-55AM to make it match the 1980's setting a little better. This will include a scratch built KTD-2 Laser Range Finder make from plasticard, and an upgraded thermal barrel on the main gun.
KTD-2 Laser system (the big box ontop of the barrel)
Build updates:
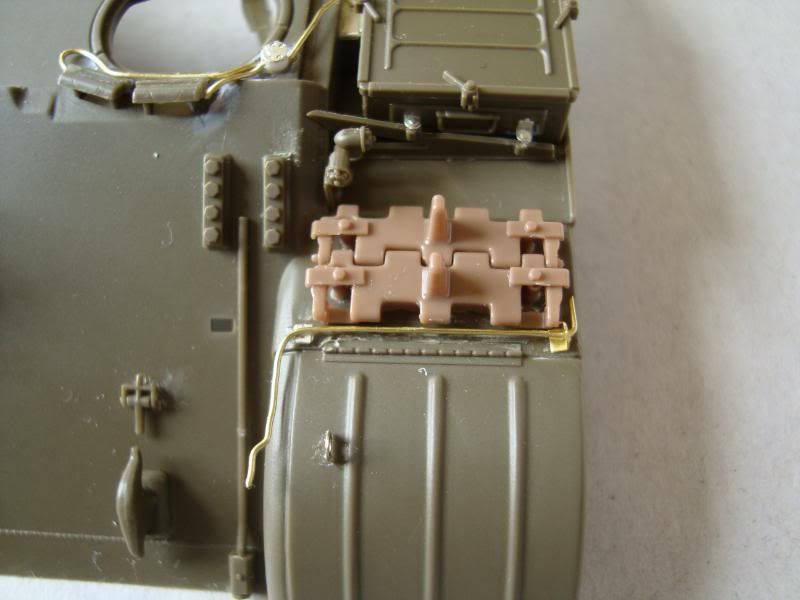
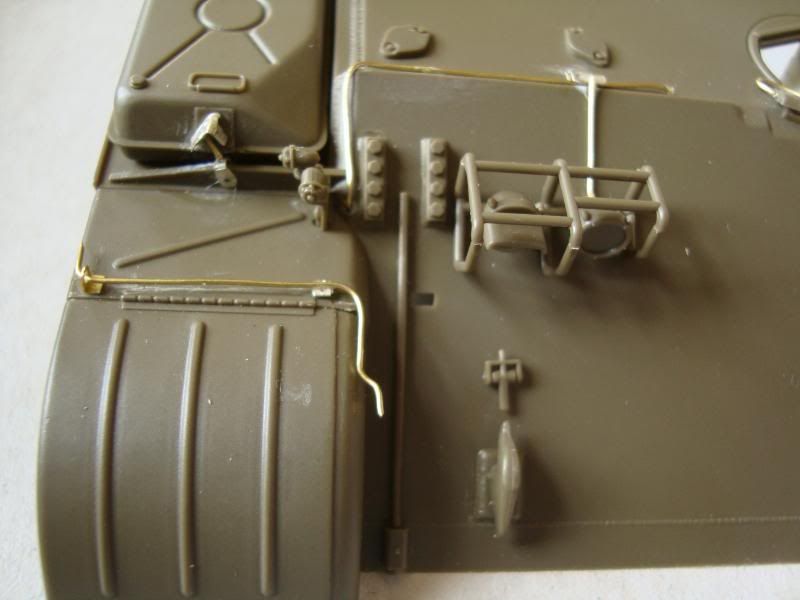
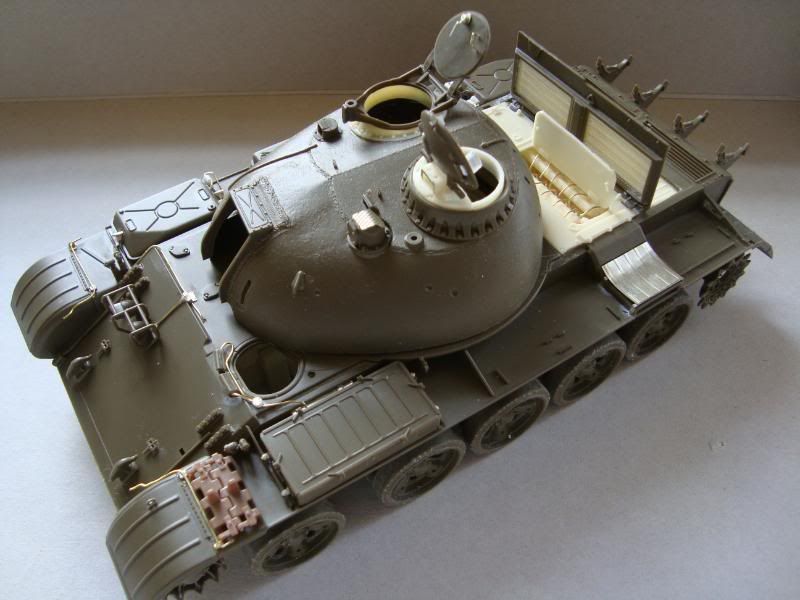
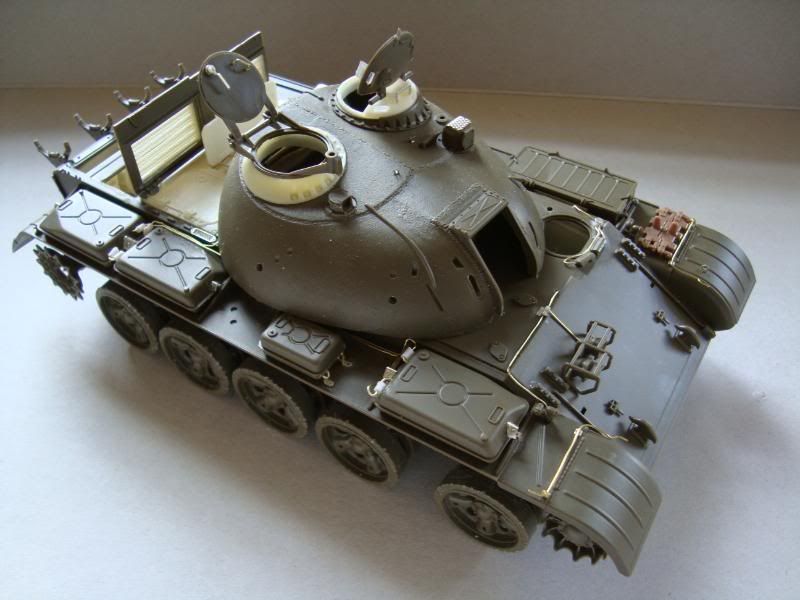
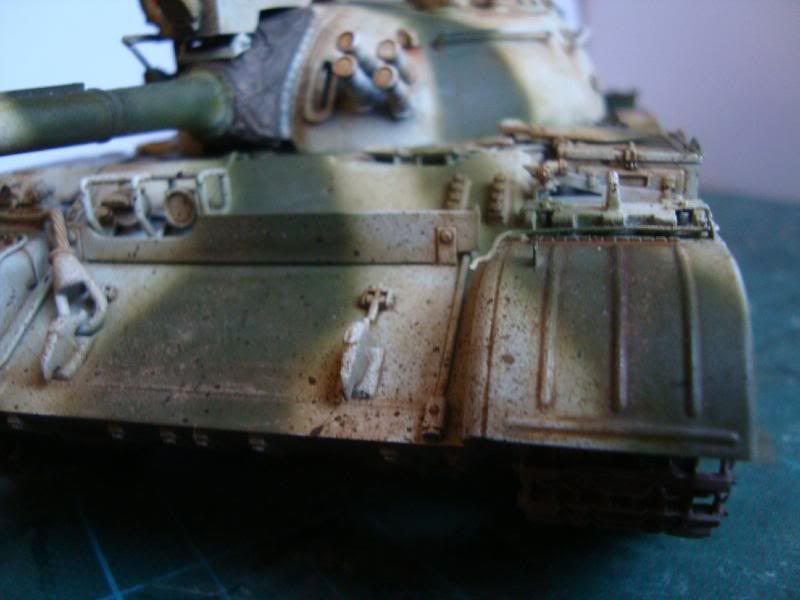
Finally finished the Engine bay although it wasn't without problems. I found once built many of the CMK parts just simply didn't fit together at all correctly. It took some work to jiggle it around but I'm happy with the end result.
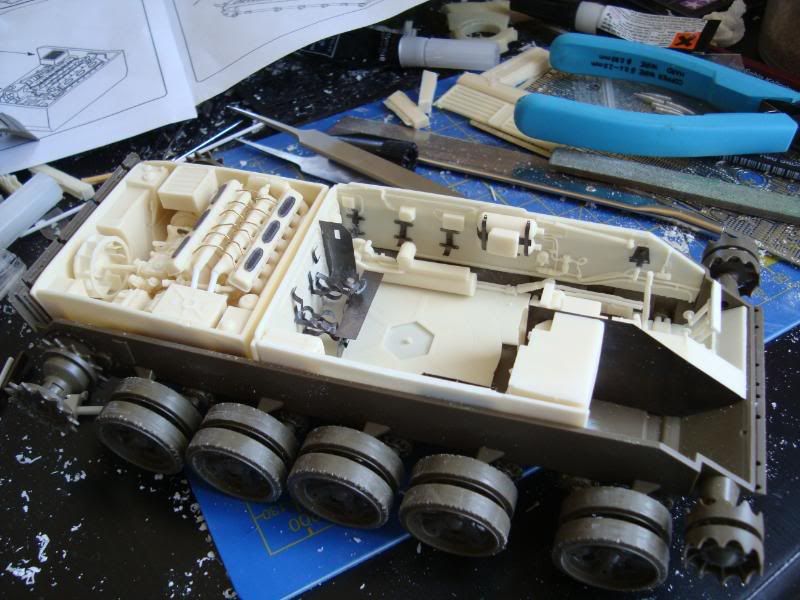
With the upper hull:
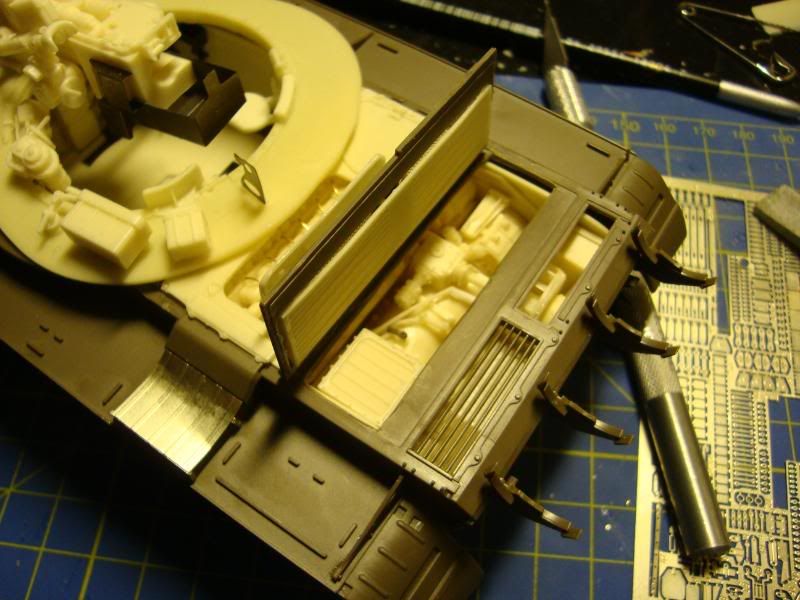
Some of the detailing on the cables and washer hoses, and fenders:
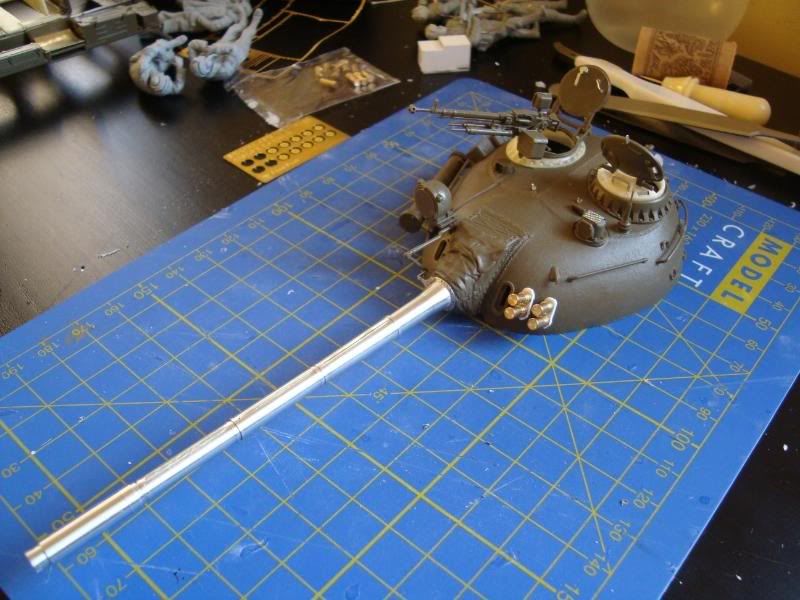
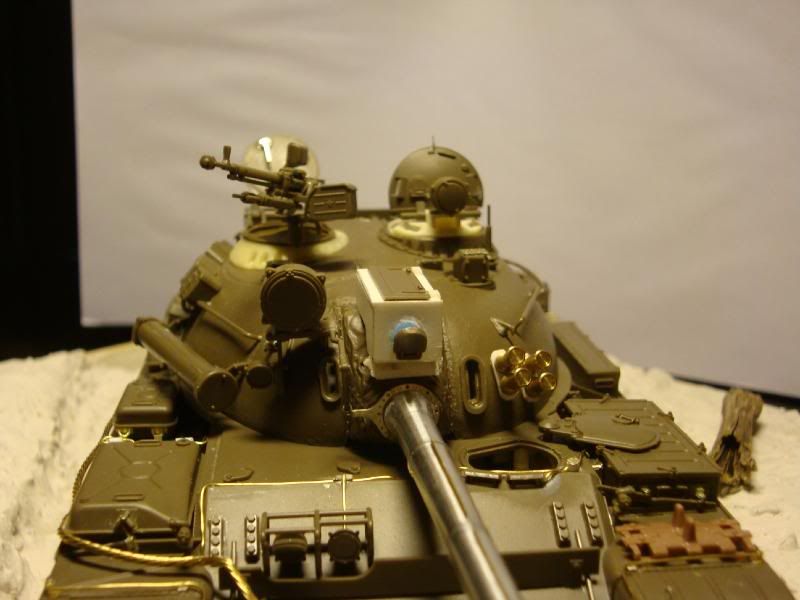
Turret exterior
 Automatically Appended Next Post:
Rahveel - thanks for the kind comments! I'm glad your enjoying the blog. Just wait till the terrain and all the figures are factored in, It will have a lot more life
10890
Post by: Deff Dread red Edition
Wow really coming along well and in very nice detail.Get more up soon.
11330
Post by: Gundam-Mecha
Thanks Deff!
Heres a picture of the Tank Crew in Winter Gear that I will be using instead

11953
Post by: Shellfishguy
Glad to hear your work is going over well on the modeling forums too, I had little doubt they would! But dont forget your roots! Make sure to keep Dakka up on your projects
4216
Post by: Darknight
Gundam, this is a great build and I am simply flabbergasted by the level of detail - were I to build something consisting of so many parts of such magnificent smallness it would be a mass of glue and layers of epidermis.
11330
Post by: Gundam-Mecha
2889
Post by: Jin
Sir, I applaud you on your attention to detail. Lord knows I wouldn't be able to do something to this level of detail myself.
Can't wait to see this finished up!
11330
Post by: Gundam-Mecha
Thanks Jin! I did the fuel lines last night started around 9:30pm and when i finished it ended up being around 1am!
Certainly was tough and at times I felt like gouging my eyes out with brass wire!
I'm pleased with the end result though Soon I can start painting it!
10890
Post by: Deff Dread red Edition
The Hornet heads do give it a nice touch.Agreed with all others that the level of detail is amazing.This is what awesome looks like in human form!
11330
Post by: Gundam-Mecha
Thanks Deff!
I will be able to start painting soon!
I read a really interesting article recently about painting faces on 1:35 figures with oil paints. Very educational, I'm looking forward to trying the techniques on these guys!
8266
Post by: Wolf
Looking might fiine ! The detail is superb as usual Looking forward to seeing a rough layout of the models on the board.
11330
Post by: Gundam-Mecha
Opened up my Tank Models figures last night and I was certainly impressed with them. The quality of the sculpts and casts was spot on. Wonderful detail and clever placement of gates make it easy to tidy them up and prepare them with little hassle.
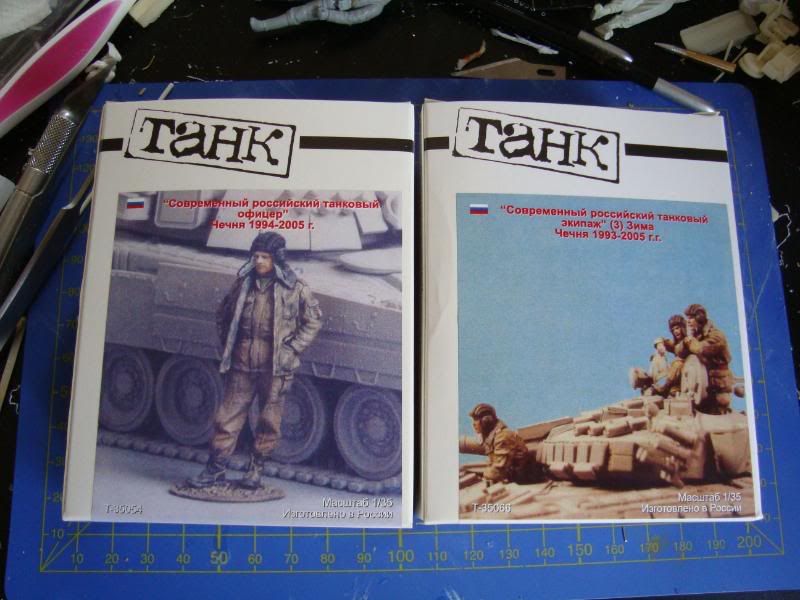
Scale wise they are also a great match to the Plastic Dragon figures. The Nemrod figures were quite noticably smaller than the Dragon ones, but these Tank ones are great. Once again though the Driver's legs stop at the knee, so some conversion work will be needed to finish his legs if I choose too.
This is the Tank Commander, he even comes with a great little resin base, which is a nice little touch.
I can't wait to paint these!
10890
Post by: Deff Dread red Edition
Those are very nice sculpts.I myself cannot wait to see them painted.
6633
Post by: smiling Assassin
Damn, I particularly like the one on the right. The creases are a lot sharper etc. Wow.
sA
11953
Post by: Shellfishguy
Strikes me as odd that they have the fuel tanks on the outside of the tank, seems like a dangerous design. But you're right, adding the extra fuel line detail was really worth it, looks amazing. I'll add my "can't wait to see this painted" comment to the stack hehe.
11330
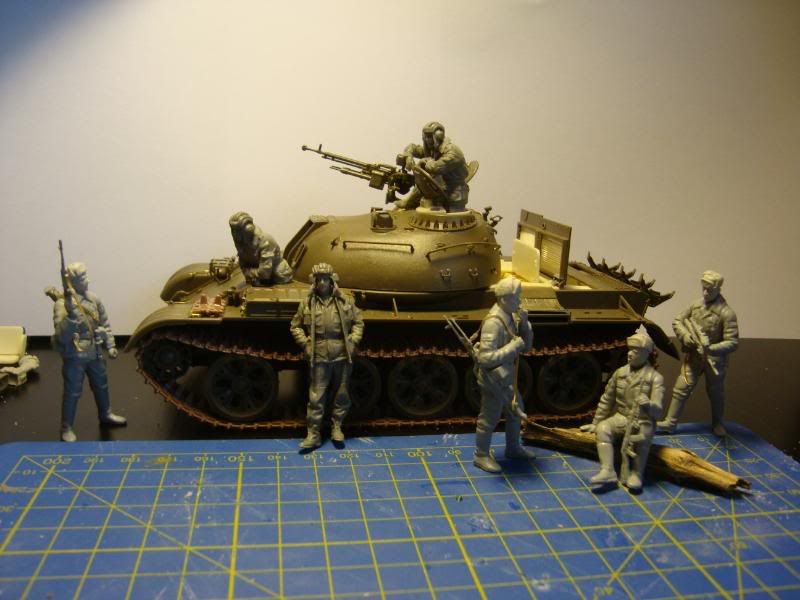
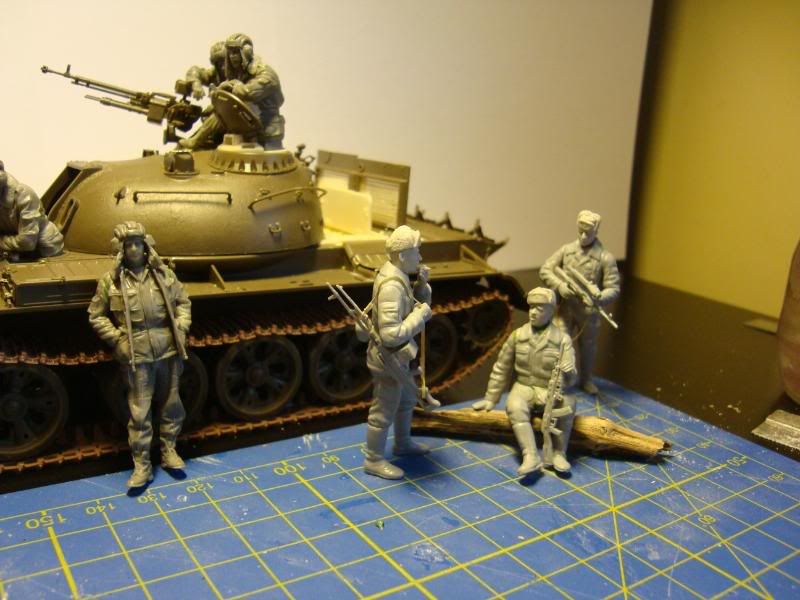
Post by: Gundam-Mecha
Thanks SA, the resin Tank Crew really are impressive. I finished building them today and will post photos later. I've also started the terrain as well
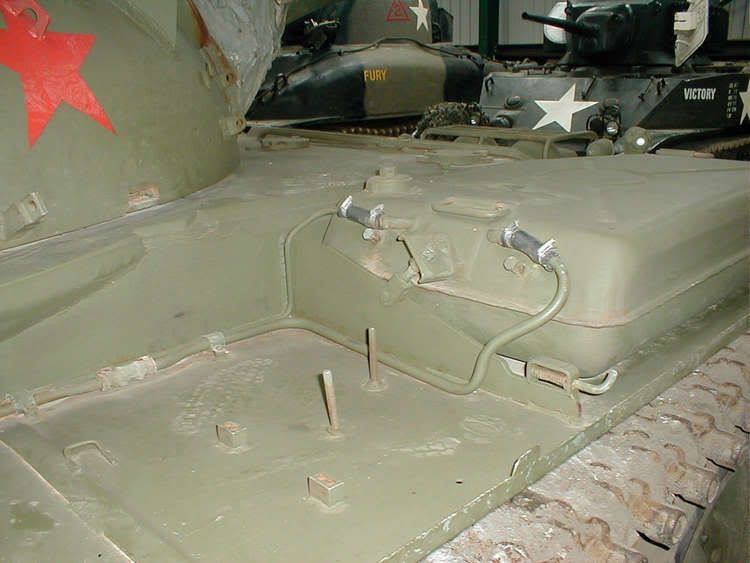
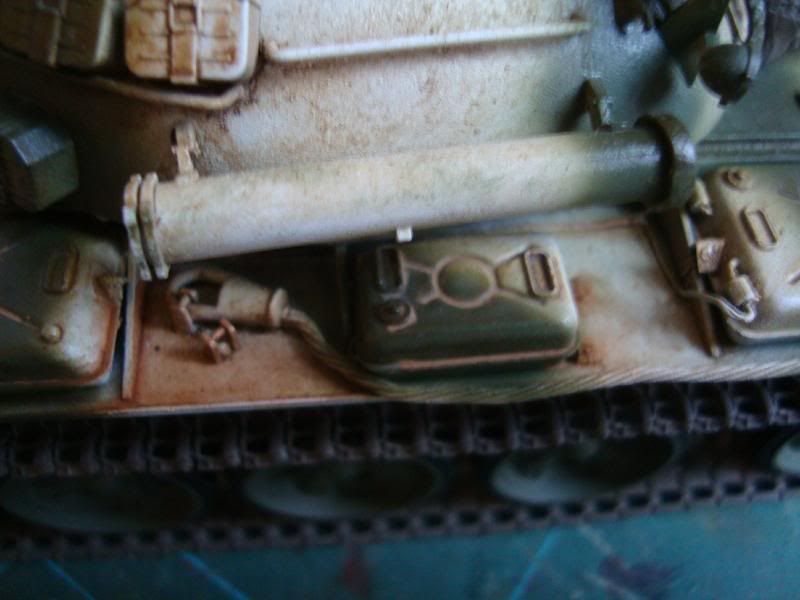
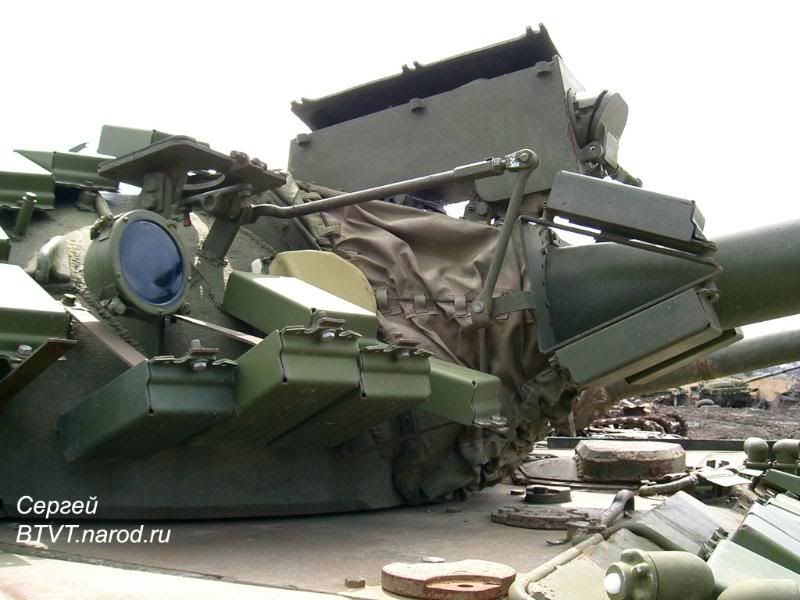
Shellfish If you think the external fuel cells are bad wait till you hear this, the Russians put additional fuel cells in the same storage that holds the 100mm shells...
Placement of the additional fuel cells
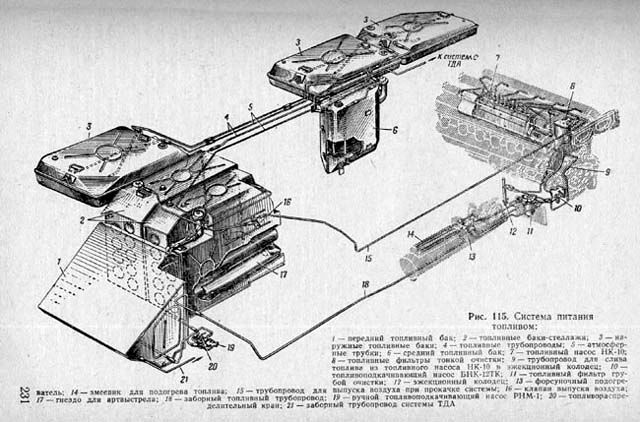
Placement of the 100mm shells (same place!)
Tank Shells and Tank Fuel together.... sounds safe!
10054
Post by: Death Gear
Nice!
4786
Post by: legoburner
Great stuff, enjoying it so far and continuing to enjoy it too! You've really been tempting me to try some larger scale military modeling, but not enough to overpower the FoW stuff I've got on the go at the moment so far...
4657
Post by: Metsuri
Shellfishguy wrote:Strikes me as odd that they have the fuel tanks on the outside of the tank, seems like a dangerous design.
The same design is found in WW2 era T-34, which was ok because the fuel they used was not easily ignitable.
Edit:
And the tank looks as brilliant as we are used to get from you.
11330
Post by: Gundam-Mecha
11330
Post by: Gundam-Mecha
10890
Post by: Deff Dread red Edition
Wow the scene is really coming together well.I like the posing.Now get painting!
11330
Post by: Gundam-Mecha
Thanks Deff. I primed the Tank crew last night and will start painting them this afternoon! I can't wait actually to finally get some paint on!
10345
Post by: LunaHound
I think my eye balls just rolled out while staring at the instruction booklet...
9997
Post by: Rahveel
Such an amazing amount of detail. Good show sir!
11330
Post by: Gundam-Mecha
10890
Post by: Deff Dread red Edition
Wow the level of detail it burns....lol.
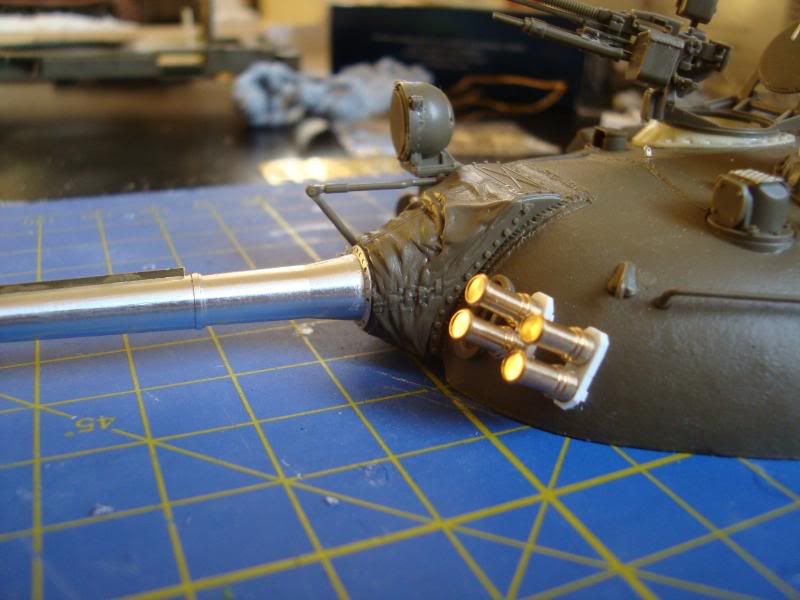
That is a lovely gun barrel,and the smoke launchers are a nice touch.
As said before can't wait to see this painted.
7899
Post by: The Dreadnote
Wow, man. Fastastic job!
11953
Post by: Shellfishguy
Love the barrel and the smoke launchers! With all the various custom parts you buy for your tanks, does it really drive up the price, or are the parts a reasonable cost?
11330
Post by: Gundam-Mecha
Shellfishguy wrote:Love the barrel and the smoke launchers! With all the various custom parts you buy for your tanks, does it really drive up the price, or are the parts a reasonable cost?
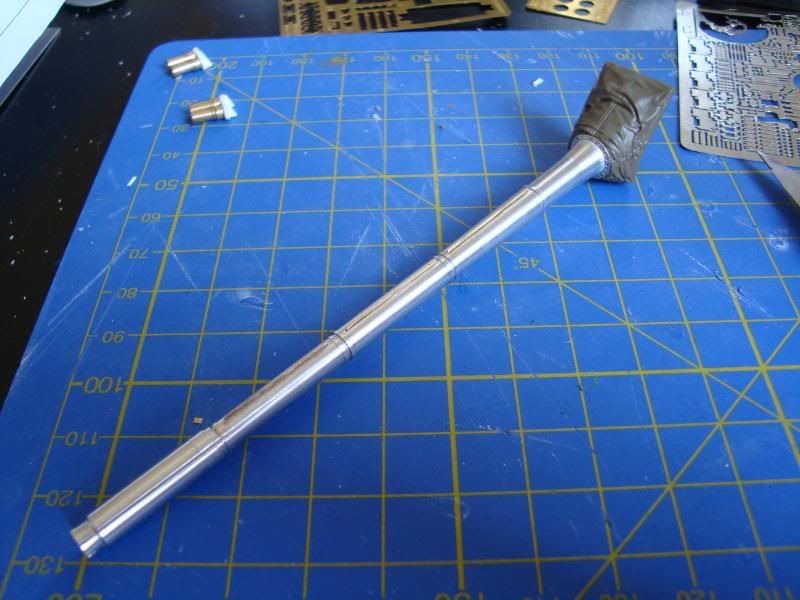
It varies really, some parts are quite cheap. The barrel was $9 from a store on ebay and the smoke launchers were about $4 I think.
The larger Resin interior sets are the most expensive at around $25-30 each.
10135
Post by: Zzzzzz
It's been over six hours, where's our update ?!?!?!
11330
Post by: Gundam-Mecha
Sorry for lack of updates zzzz!
Heres a quick one till later today.
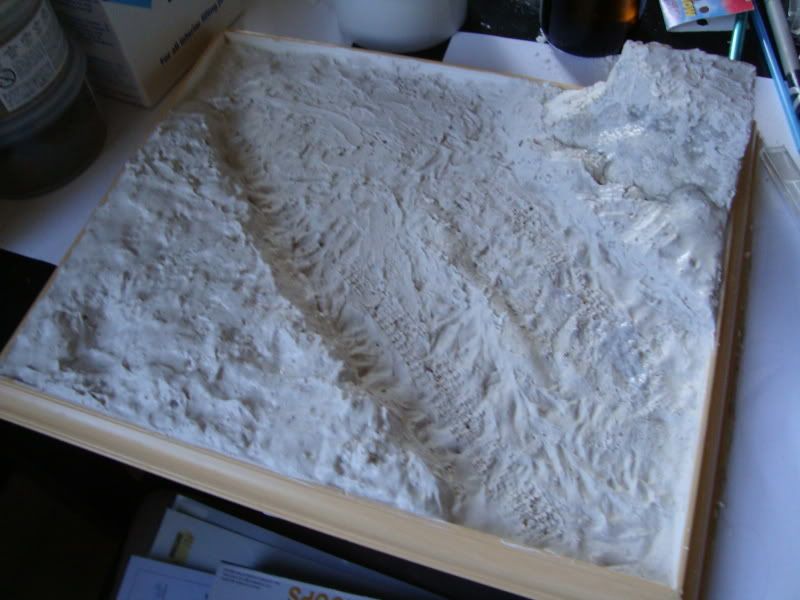
Some more work on the scenic base, blending the Das Pronto Modelling clay with a ground mixture made of household filler, sand, flock.
7375
Post by: BrookM
Holy crap.
A bit of a silly question though; why go all the way and build a kickass interior when you can't see it?
11330
Post by: Gundam-Mecha
Because the upper hull and turret will be removable
11330
Post by: Gundam-Mecha
15805
Post by: abhorsen950
Finish it i dare you
Noo really its fabulous and the figures are astounding.
On Friday im buying about 3 4 kits of soldiers from tamiya and dragon lol.
Steve
8745
Post by: Llamahead
Utterly awesome. I want one of those barrels for a Vanquisher!
Automatically Appended Next Post:
Slightly off topic when you use weathering powders how do you seal them to the model?
11330
Post by: Gundam-Mecha
Thanks guys!
I've been away on holiday last week, but am hoping to crack into this now i'm home. It will be finished! I have a deadline of September 10th! So it'll be a busy week for me!
Llama - as to pigments and sealing/fixing, there are numerous methods.
You can use thinners, water, or fixer. Mig productions make a pigment fixer that works very well and gives different effects to a thinner, it also makes the pigment permanent and once applied you won't be able to blend or weather it any further.
I have both Mig products and hope to do a brief Tutorial shortly that covers and explains their uses along with the pros and cons of each.
11953
Post by: Shellfishguy
Looking awesome as usual GM, cant wait to see the burst of work as you approach the finish line!
8745
Post by: Llamahead
Cheers Gundam-Mecha looking forward to it!
11330
Post by: Gundam-Mecha
Well i've been away for awhile but i'm finally back with some updates. A few things happened, firstly as I said before I went on holiday to Brazil which kept me busy, and also my airbrush broke! While cleaning my Premi Air G35 the nozzle snapped in the airbrush and the thread of the nut broke off inside. It was while I was re-attaching the nozzle and using the small spanner in the set to tighten the nozzle in place. This was a bummer as it left me without a brush for a day, however it was a good thing as it also prompted me to go and buy myself another better brush. In the end I got myself an Iwata High Performance C Plus Airbrush which is just fantastic. I'm loving the HP-C+ and have found it a really lovely airbrush to use.
The Premi Air isn't totally out of action though as I ordered myself some new nozzles which arrived today. A little TLC and the G35 will be up and running too, the question is whether or not I will want to use it anymore!
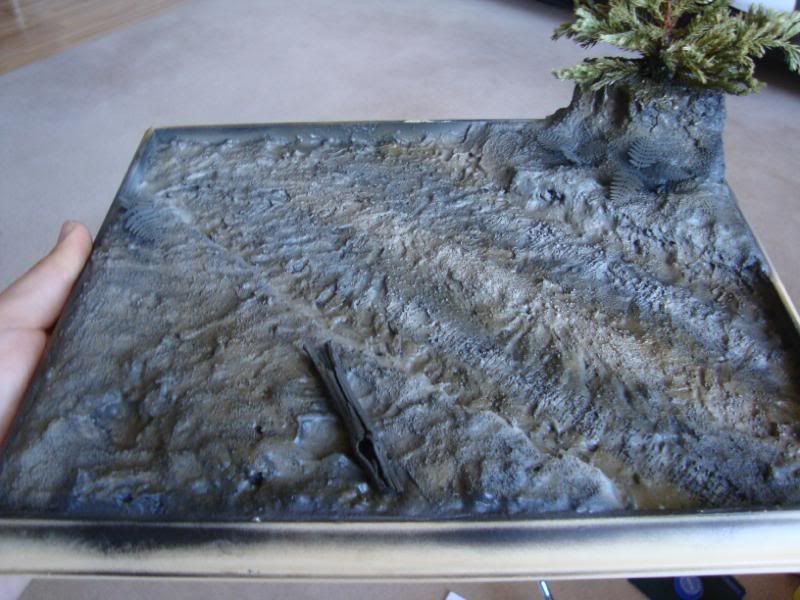
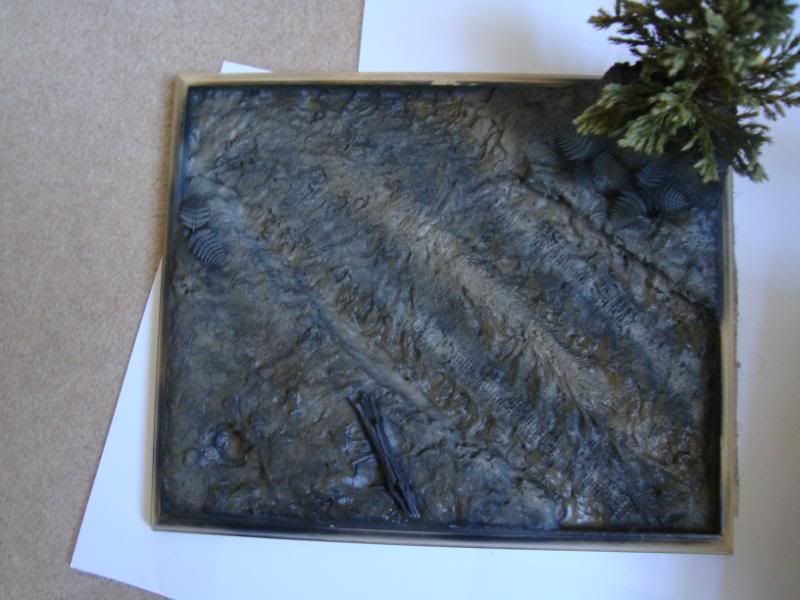
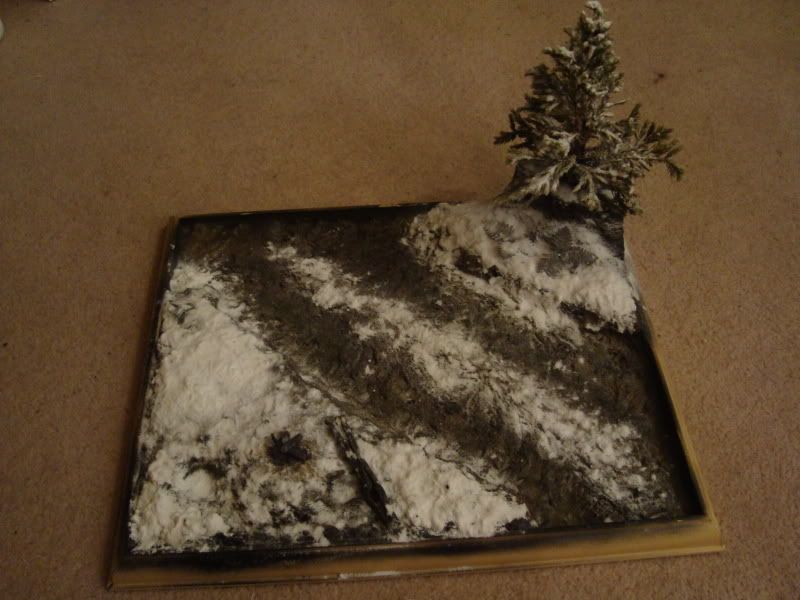
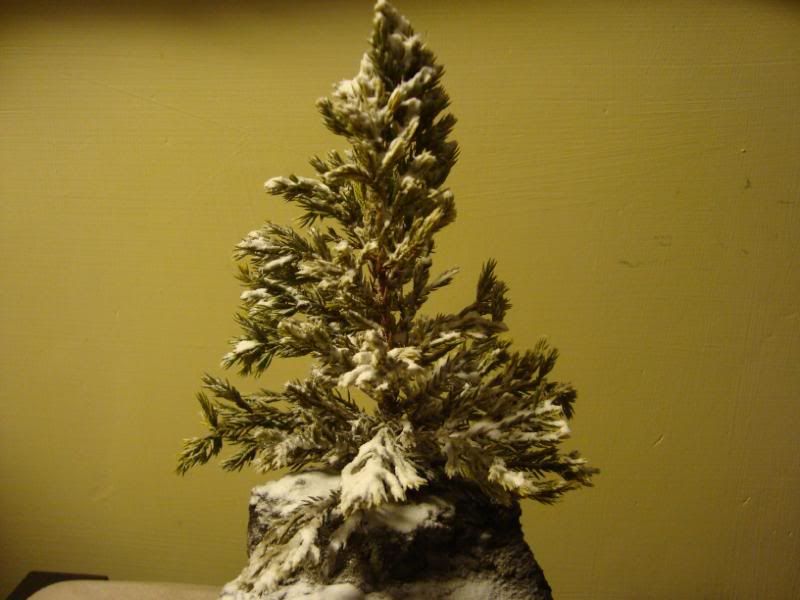
Heres some progress on the terrain build. More texture to the ground and some vegetation added pre-painting stage (fir tree, log, and ferns). Flock and algae etc I will most likely add after the base is painted.


The fir tree will be weathered and covered with snow.
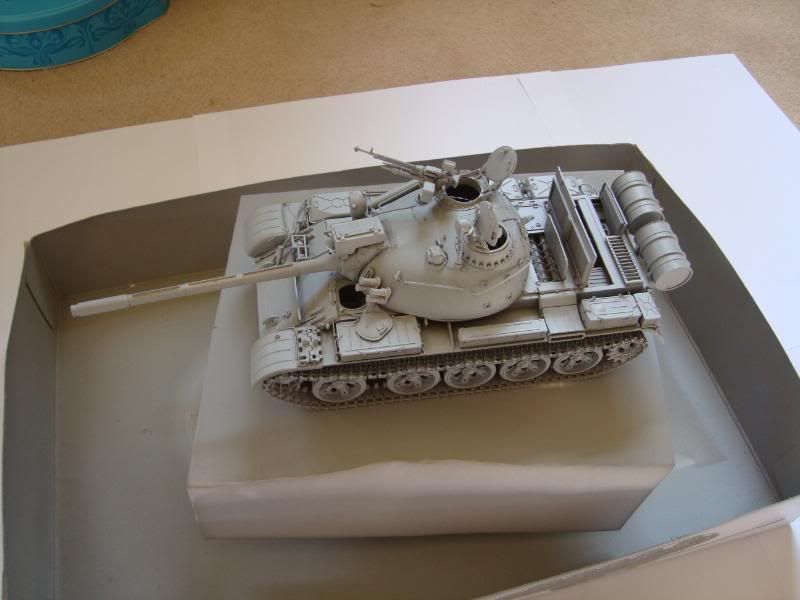
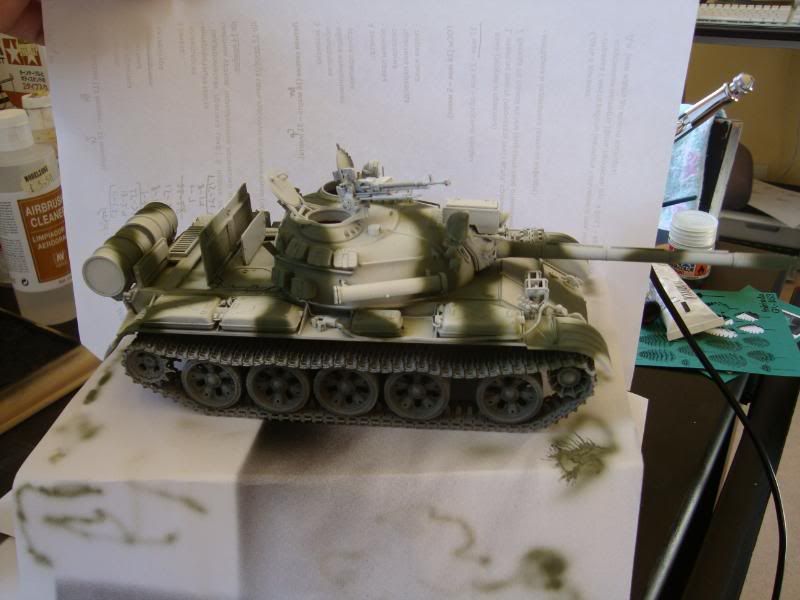
I also cracked into painting the T-55 which I primed first with Tamiya Primer then Tamiya Dark Green. I also made sure to mask and protect the interior at this stage.


I also got some work done on the tankers, which are heavily WIP at the moment:

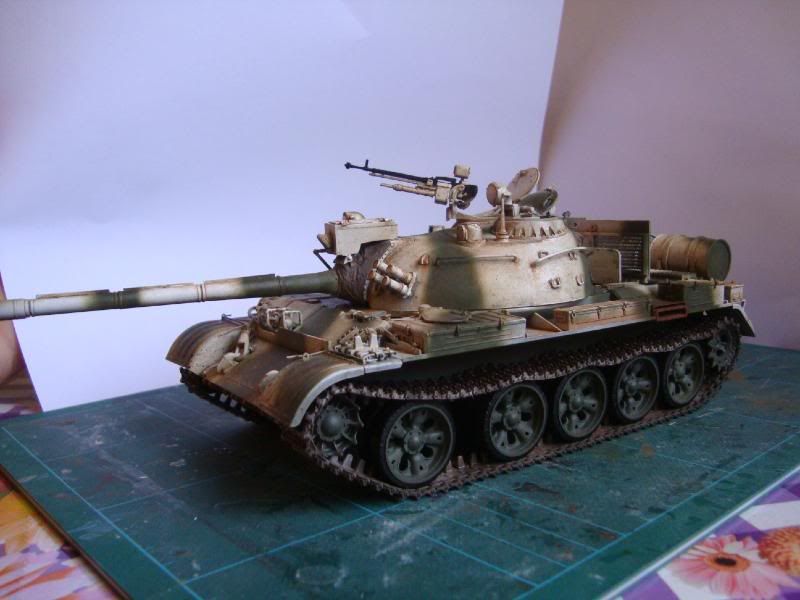
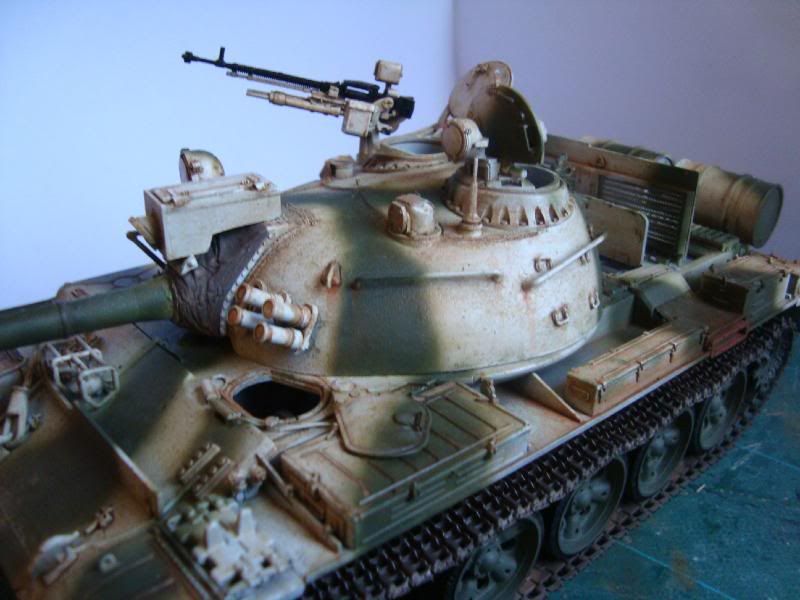
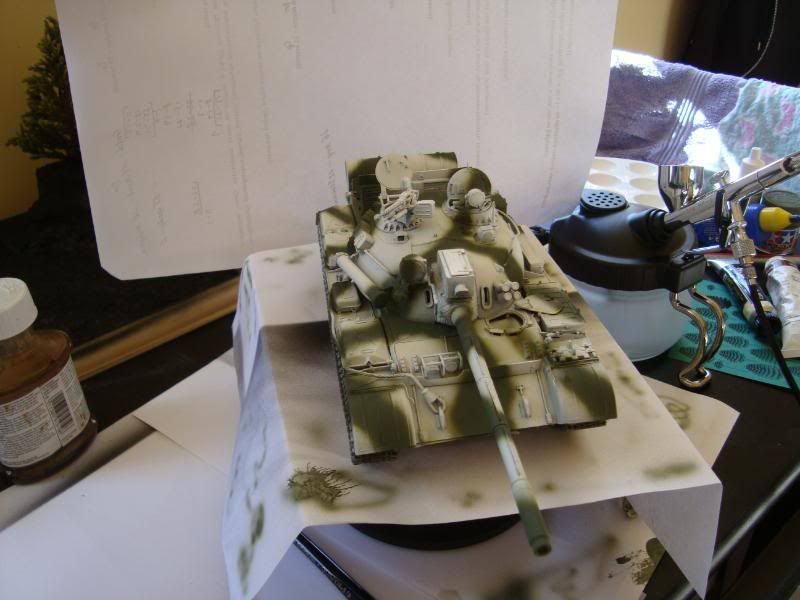
Next stage on the T-55 was laying down a coat of Tamiya Flat White, built up in gradual layers, I then added a coat of Tamiya Clear mixed with Thinner to give a semi gloss and help with the oils and later wash stages, and then adding the Camo scheme using Tamiya Field Grey.

10890
Post by: Deff Dread red Edition
Wow,just wow.The landscape is coming along well,it looks very nice as do the crew and tank.The camo on the crew looks really good,damn now I want to fork out cash for a tank(ouch my poor wallet).
4746
Post by: Flachzange
The more I see of airbrushing, the more Im tempted to get into it. The results people are getting with adequate practice are stunning!!
9720
Post by: tcraigen
The base looks great, I really like the crew, they seem to really make everything come alive. They look very nice and their clothes look very life like/ natural
16335
Post by: Witzkatz
This thread is an inspiration! I'm now thinking seriously about an airbrush, too, that tank looks fabulous. I once built a IS-2 tank and used my very first (and only) airbrush back then and liked it...it was nowhere your standard, but as I said, your blog here makes me want to try again.
I guess the boxes and tread parts and the other stuff on the tank hull that does not directly belong to the tank will be repainted? I just got the thought that maybe there are tank crews who camo-paint their tank with all the usual equipment on, would probably increase camo effect.
8266
Post by: Wolf
This is really looking up ! The painting is fantastic and the detail as usual is looking fandabadosey, well done.
I'm looking forward to seeing more paint cleverly slapped on there
11330
Post by: Gundam-Mecha
Thanks for all the kind comments guys! It's really nice to hear such positive feedback form people and is veyr much appreciated!
I'm glad that people are enjyoing this and that it's encouraged others to try new things. The great thing about it is that all of these methods and techniques can be used on any armour in any game setting or model companies products. Tau, Guard, Pig Iron Productions... whatever your poison you can add so much to your vehicle kits and miniatures with airbrushes and weathering techniques. I think its greta that these more advnaced techniques are now moving out of the scale modeller elite into wider spread modelling communities and circles.
With a bit of practice you can get wonderful results that really add grittiness or realism.
Witzkatz - You would be suprised at how cheap a good quality double action airbrush actually is. A lot of people are put off by the price but my first airbrush a Premi Air G35 was only £25 and gave wonderful results. You can get some great budget brushes and I can't recommend the G35 enough for a starters brush. As to stowage, a lot of it was painted in the camo pattern also. Things such as Fuel cells, fuel drums, storage cases and boxes were often painted in the camo scheme to increase the effect. Spare Track links were also painted at times. Usually jsut the tow cables weren't and any tarps or other canvas stowage. There certainly is alot of scope though for artistic licence in this area.
I love the IS-2! Actually I'm planning to make my next build a 1:35 IS-2 in a city scape setting
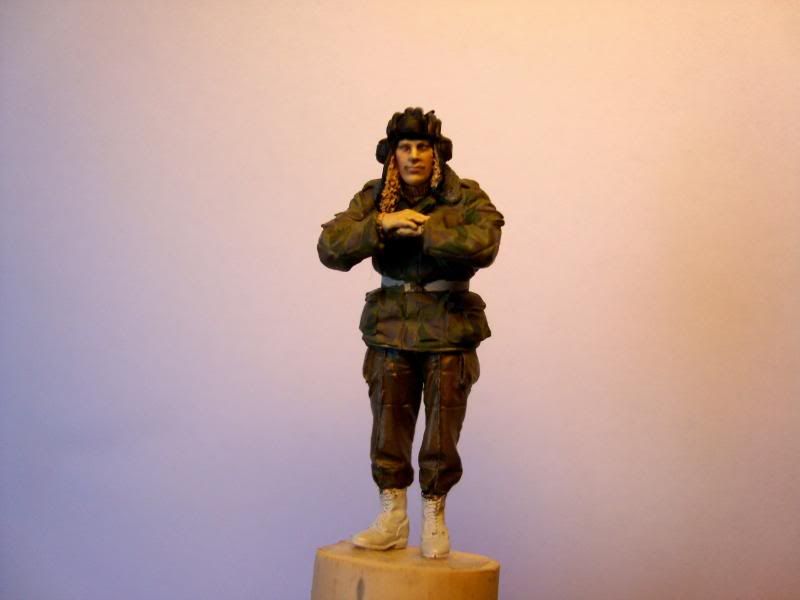
Tcraigen - Thanks, theres still alot more to do and the camera doesn't really do them justice. The skin especially didn't photograph well, you can just about make out the flushed redish cheeks but the overall skintone on these pictures came out quite light. Alot of the subtlies of colours are lost in these photos. I also have to do the eyes etc. I used oils for painting these faces and skin areas, it really was a new challenge from usually working with acrylics, but I found that it gave me much better scope for blending the colours and shading. The fatigues have also been shaded now with oil washes over the Vallejo acrylics.
Deff - Thanks, painting the camo was great fun and really rewarding actually. The patterns and colours are taken directly from my reference images and photos and I referred to them alot to get a realistic look. It's important to follow an example of camo patterns, we can often go overboard when imagining our own!
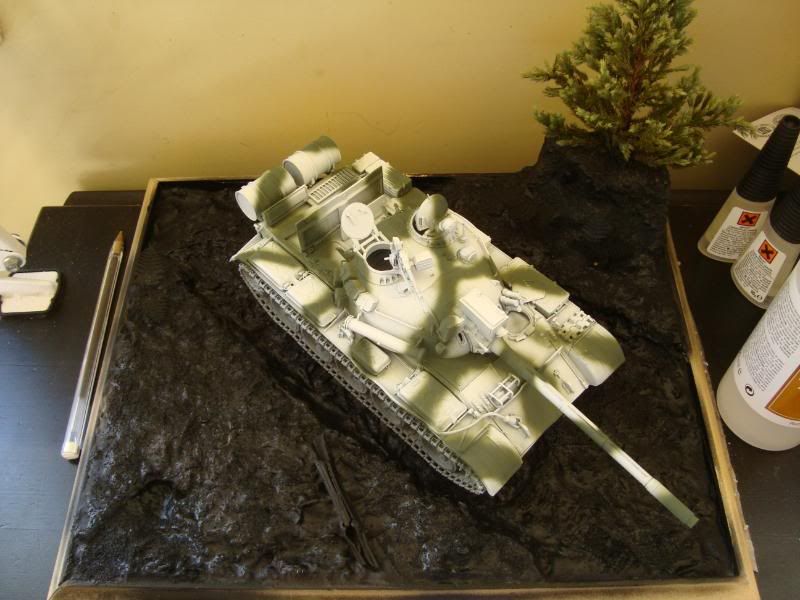
I've now had a chance to paint some of the base with some muted mud tones, and I've also started painting the infantry and given the T-55 some filters to change the look of the white and also blend in the camo patterns a little better. This evening I will start weathering by working on the paintchips and dust and mud.
16335
Post by: Witzkatz
Aye, the IS-2 was a nice model to built and paint! Was my best piece for a long time, until some kid from Australia (no clue where that came from, me being here in Germany after all) walked into my room and dropped it on the floor. 
Well, on a more related topic: Thanks for your tip about the Premi-Air G35! Will definitely get one of those now. The only dual-action I found in stores around here were around 109 €, which is a bit too much for a first airbrush in a long time for my taste.
I will keep watching your great diorama threads! It's a shame I have ordered a bunch of Catachans a while ago, this tank is making me wanting to start a winter-themed army.
11953
Post by: Shellfishguy
Loving it GM. I'm glad you posted the pic of the tank on the base, finally have a better feel for the scale of the diorama. Cant wait to see more!
8745
Post by: Llamahead
Sorry about the Necromancy but a while back you were asking about sourcing inks, Privateer Press now supply inks as part of their range of painting stuff don't know about the quality though. I'm guessing it'll be pretty good though.
13519
Post by: Napalm
I love the camo on that thing, it really looks cool.
11330
Post by: Gundam-Mecha
Thanks for the tip Llama! I'll certainly look into it.
Napalm - thanks! I had great fun painting the camo. I've done some more work on it since these photos by adding filters and an oil wash. Updates tomorrow.
Sorry for the lack of updates but I got married on Friday so this week has been rather busy!
12358
Post by: StubbyGB
Hey Grats man !
11330
Post by: Gundam-Mecha
StubbyGB wrote:Hey Grats man !
Thanks dude! Now all the toys can come back out of the cupboard since the in-laws have gone! bwahaha
11330
Post by: Gundam-Mecha
11953
Post by: Shellfishguy
Congrats on the wedding GM! Love the weathering you've done so far, especially around the engine compartment and fuel cell. How are you planning on doing the snow?
11330
Post by: Gundam-Mecha
Thanks Shellfish!
The snow will be in a way thats similar to the snow I did on my T-34. Bi-cabonate of soda mixed with PVA, and white paint.

4657
Post by: Metsuri
That T-55 is coming along nicely. Love the look of the camo, the yellowed white is beautiful.
16367
Post by: Slain'e
Really nice work man, detailing is great, looking forward to seeing this build completed.
Spent 3 hours last night building 8 sets of Aber 1\48 scale German tool clamps for my IG armour project.... 
Just wondering GM, have you ever entered the Euro Militaire ?
11330
Post by: Gundam-Mecha
Thanks for the comments guys! Last night and Today I've been cracking on into the tank interior and have also been doing some extra work on the figures.
I got Mark Bannermans Excellent book Modelling Panzer Crewman from Osprey today. Whilst the minis in question are German figures the techniques are applicable to any figure of faction the skin tones and faces section is especially good. It has some excellent step by step guides for painting figures with oils also.
Slain'e that Aber IG build sounds cool is it up as a blog here?
As for Euro Militaire I've never entered. Actually I've never entered any painting competition. I'd like to give it a shot one day just for fun. I've gotten some nice feedback recently from scale modellers over at Armorama, but it would be nice to get a view from a judge as well as see how my painting makes the grade. Would certainly be interesting.
15805
Post by: abhorsen950
Very very very nice stuff
11330
Post by: Gundam-Mecha
Thanks abhorsen!
Just a quick update with a few pics. Spent some time working on the interior of the tank, layers of white and some filters only at the moment. It takes 2 hours between each filter coat...
I also did some work on the scenic base and the figures, quick example below. I'm finding it tricky to photograph the figures so will try to see if I can get some better shots later this evening.

Next up is blending the colours on the scenic base and giving it some light oil washes. Once the mud and earth there is done I can move onto pigments and adding scenic flock and snow effects.
8745
Post by: Llamahead
Working with a bloke who served in a Chieftain during the Cold War and he mentioned they always went on exercise a round or two light because the ammo store was nice and cool and kept the food fresh! Great stuff on the crew and the outsides of the tank are looking brilliant!
11330
Post by: Gundam-Mecha
Thats cool, I may have to model that some day, an interior with a kitchen!
Thanks for the kind comments too Llama
18627
Post by: get to the chopper!
Wow that crewman is almost frightening realistic looking. Great job, this is looking amazing .
You said you were layering filters on - could you explain what exactly filters do and why you apply them? I've seen them mentioned a lot but I've never really known what they're for and how they help. Cheers!
8044
Post by: Arctik_Firangi
Gundam-Mecha wrote:
#2 looks like he just farted in the tank... #1 looks like he just noticed.
Seriously, though, these are all very nice models. Are these 28mm scale? I have about a hundred 28mm Soviets from Bolt Action minis I'm yet to work with...
18627
Post by: get to the chopper!
Nah, they're larger scale ones - I remember I looked at the site he got them from when I was looking for altenative heads for my imperial guard.
18570
Post by: Oshunai
This blog is staggeringly awesome, from the level of detail involved to the excellent paintjob/weathering techniques used. Keep it up!
Can you explain exactly what ratio of Bicarb/white paint/PVA you use to make the snow please?
8745
Post by: Llamahead
No trouble mate its exceedingly easy to be nice about such a great model!
11330
Post by: Gundam-Mecha
Thanks for all the kind comments guys, and apologies for not being able to reply over the weekend, I was in Milan Italy.
Chopper - A filter is basically a very heavily diluted wash, it has the consistency of tinted thinner mixed usually from oil or enamel paint and turpentine or artists thinner. The ratio is usually 95% carrier to paint and retains a high transparency. The idea with a filter is use it to subtly change the colour and qualities of a surface colour very gradually. Filter coats are usually built up in layers of three to five upwards, and each layer is left to dry for two hours in between. Since a filter aims to change the base colour and add chromatic richness it is only applied to the large or exposed surface areas and not applied into details such as weld seams, panel lines, or rivets. Washes are best used for picking out details.
You can buy filters that are ready mixed to use out of the bottle such as the excellent sets from Sin Industries (a subsidiary company of Mig Productions, like citadel colour and citadel miniatures), or alternatively you can mix your own. It's important to remember that the brush should not be too heavily loaded, first wipe it on a piece of kitchen towel to remove the excess. It's important that the filter coat is light, and controlled and a lightly loaded brush helps with this. go over the area that needs to be "filtered" once (no more than twice) with a large soft brush and then leave to dry for two hours. I'll post later on some comparison shots of a surface without a filter and one with filters and nothing else, as well as a brief tutorial. As they build up in layers the effect becomes much more noticeable and helps to break up the monotony of a strong base colour.
Arctik -These are 1:35 scale with works out around 32mm I think and sadly not 28mm. If you want heads for GW sized figures you could try 1:48 scale sets as theyare much closer in size to heroic scale. Hornet are well known for their head sets and the quality of sculpting is great, they are all resin sets also which adds to the detail.
Oshunai - As for the snow mix it depends on the effect i want, heavy snow, fresh snow, melting or wet snow. Usually though I'd say somewhere in the region of three parts bicarbonate, 1 part PVA, 1 part white acrylic. I then add a little water as I'm stirring the mix, the consistency should be wet enough to be able to apply by brush but still retain a thickness to hold in place. You can always add more bicarb into the mix when you make it to thicken it up if you want. For melting snow add more water to give it runny texture, once it's dry you can also give it a coat with some gloss varnish by brush to give it a shiny look. For heavy or fresh snow more bicarb than water and PVA, you can also sprinkle bicarb powder over the surface directly while it is still wet to add further texture.
Llama - Cheers!
18627
Post by: get to the chopper!
Gundam-Mecha wrote:Thanks for all the kind comments guys, and apologies for not being able to reply over the weekend, I was in Milan Italy.
Chopper - A filter is basically a very heavily diluted wash, it has the consistency of tinted thinner mixed usually from oil or enamel paint and turpentine or artists thinner. The ratio is usually 95% carrier to paint and retains a high transparency. The idea with a filter is use it to subtly change the colour and qualities of a surface colour very gradually. Filter coats are usually built up in layers of three to five upwards, and each layer is left to dry for two hours in between. Since a filter aims to change the base colour and add chromatic richness it is only applied to the large or exposed surface areas and not applied into details such as weld seams, panel lines, or rivets. Washes are best used for picking out details.
You can buy filters that are ready mixed to use out of the bottle such as the excellent sets from Sin Industries (a subsidiary company of Mig Productions, like citadel colour and citadel miniatures), or alternatively you can mix your own. It's important to remember that the brush should not be too heavily loaded, first wipe it on a piece of kitchen towel to remove the excess. It's important that the filter coat is light, and controlled and a lightly loaded brush helps with this. go over the area that needs to be "filtered" once (no more than twice) with a large soft brush and then leave to dry for two hours. I'll post later on some comparison shots of a surface without a filter and one with filters and nothing else, as well as a brief tutorial. As they build up in layers the effect becomes much more noticeable and helps to break up the monotony of a strong base colour.
Ah awesome, cheers for that. I actually ordered the complete mig set over the weekend in anticipation for doing my tanks - looks like a made a good choice. Am I right in thinking that they are effectively a tinted varnish (ie a wash that colours rather than runs into cracks and creases)? Would they be useable on things like leather jackets which would need a sheen to them?
18570
Post by: Oshunai
Gundam-Mecha wrote:
Oshunai - As for the snow mix it depends on the effect i want, heavy snow, fresh snow, melting or wet snow. Usually though I'd say somewhere in the region of three parts bicarbonate, 1 part PVA, 1 part white acrylic. I then add a little water as I'm stirring the mix, the consistency should be wet enough to be able to apply by brush but still retain a thickness to hold in place. You can always add more bicarb into the mix when you make it to thicken it up if you want. For melting snow add more water to give it runny texture, once it's dry you can also give it a coat with some gloss varnish by brush to give it a shiny look. For heavy or fresh snow more bicarb than water and PVA, you can also sprinkle bicarb powder over the surface directly while it is still wet to add further texture.
You sir are a wonderful human being. Thanks for that, just solved a load of problems I was having.
11953
Post by: Shellfishguy
Wow GM, the face on that crew member is amazing! Almost creepily lifelike. Mind explaining what you did there?
11330
Post by: Gundam-Mecha
get to the chopper! wrote:
Ah awesome, cheers for that. I actually ordered the complete mig set over the weekend in anticipation for doing my tanks - looks like a made a good choice. Am I right in thinking that they are effectively a tinted varnish (ie a wash that colours rather than runs into cracks and creases)? Would they be useable on things like leather jackets which would need a sheen to them?
Exactly, thats the idea, glazes of colour to change the base shade, although they are matt and won't dry shiny. You can use filters on figures also, you can also use them as a light wash to pick out details as well if you only want something subtle. However the main use is for changing the characteristics of the base coat. If you want to add shine to a leather jacket for example your best bet is a gloss varnish applied by brush directly over your painted surface of high lights and shadows etc.
Oshunai - no worries happy to help anytime. It's not an exact science really. The best way is to just play around with some mixes and see what you like best. As with everything in modelling do whats best for you personally as a modeler.
Shellfish - thanks! The skin tones and faces are my first attempt at painting faces with oils instead of acrylics. I've found it rather a hard lesson and it's certainly been a challenge but I'm really glad I took the leap to try another technique. I've got a lot to learn on this but I hope with practice I can improve things. The hardest thing about painting with oils is the long dry times inbetween coats or during blending. 1-2 hours from base coats to blended highlights etc. You also have to be real real subtle. A tiny dot of white is enough to highlight a whole cheek, and once blended will work really well. Too much though and your figure ends up looking like a snowman! Also with oils they are very translucent when wet, you won't really see the highlight effect till it drys, so it really is a leap of faith following the tips in guides and hoping that the effect will be what you want in a few hours time. If you try to over compensate to make it immediately visable while wet the results will dry very heavily. I think this is the biggest difference between blending with acrylics. Pretty much how an acrylic looks on the brush and immediately on the surface when wet is how it will look dry. With oil blending its another story, you really have to be restrained. For a good guide on painting faces with oils you should check out Mark Bannerman's excellent Osprey book "Modelling Panzer crewmen of the Heer" it has some fantastic step by step photos.
11330
Post by: Gundam-Mecha
Time for a quick update.
The scenic base with blending and oil washes and filters:
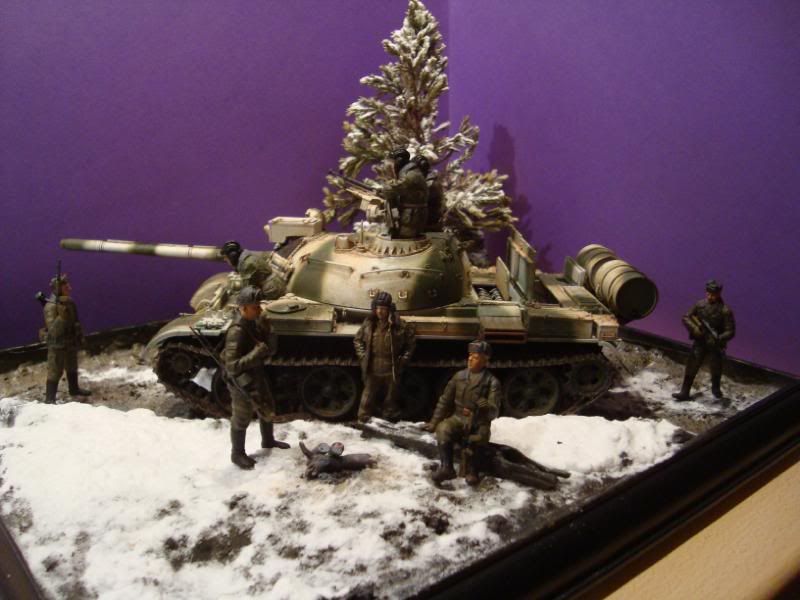
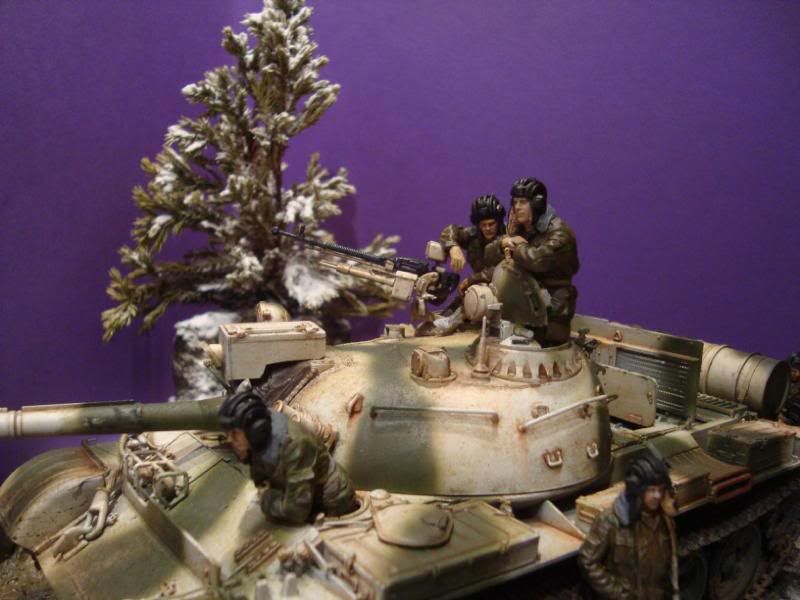
Snow effects:
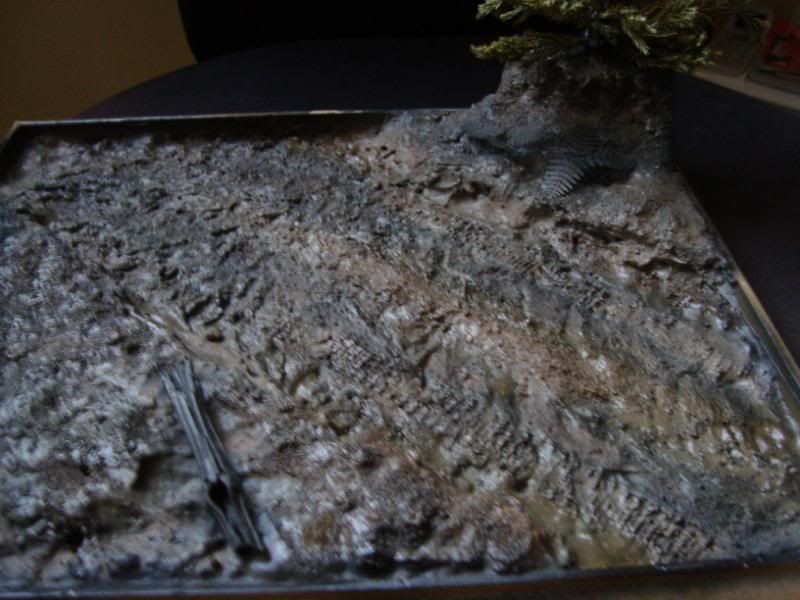
The reference inspiration
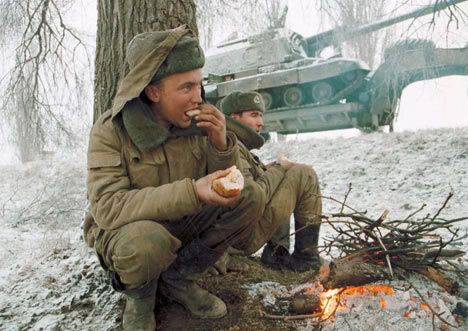
The actual dio
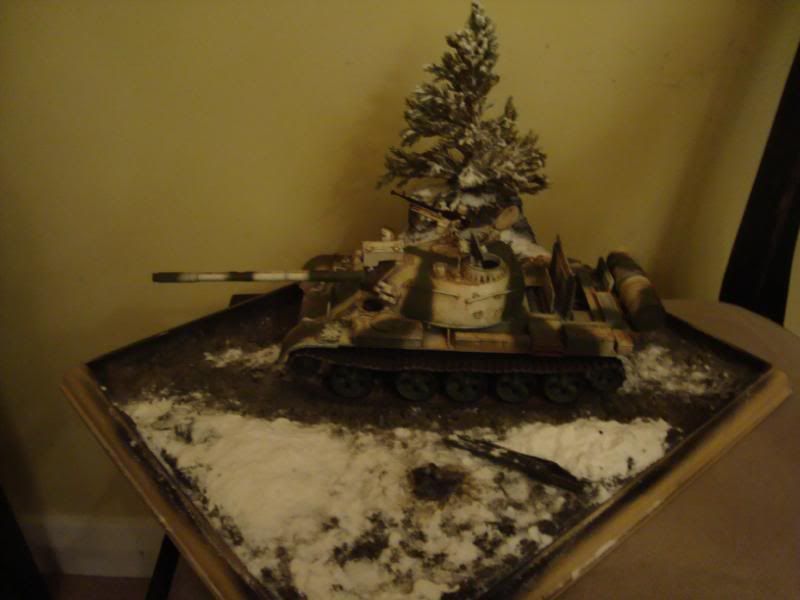
As you can see in the last image I built a small campfire of burning embers that the figures will be sitting and standing around, much like in the photo.
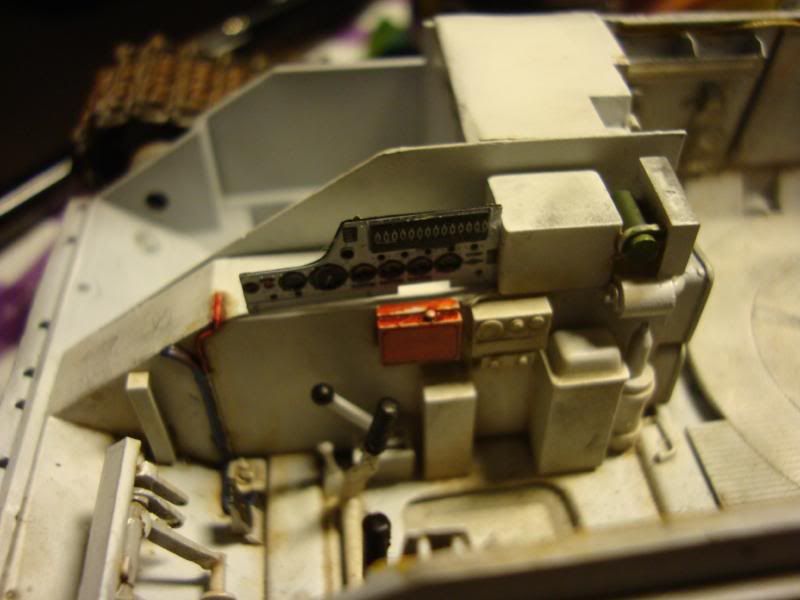
T-55 interior, still a lot to do here and very much a WIP:
18627
Post by: get to the chopper!
Looks awesome man, great job. I love that tree on the base - how did you make it?
11330
Post by: Gundam-Mecha
Thanks Chopper.
The tree is made up of various cuttings of a small evergreen tree that my parents had in their garden. These were soaked in Glycerin to preserve them and then glued together and attached to the base. To add the snow I used the hairspray technique and then sprinkled bi carbonate of soda directly onto the tree.
18627
Post by: get to the chopper!
Ah thats a great idea - I may do that myself, cheers.
10890
Post by: Deff Dread red Edition
Yeah sounds like a cool idea, might be useful in making terrain. Thanks for the tip.
The diorama itself is coming along well, can't wait to see it all put together. Keep up the good work!
11330
Post by: Gundam-Mecha
Thanks for the feedback guys!
Actually I'm not too pleased with the interior, I had very a specific idea in mind when I was doing this and was following lots of reference photos from the Osprey T-55 guide, in the end though the finished result didn't really come out how I had hoped.
I also found weathering the interior very tricky as theres so much small photo etch that really is very delicate. I had to hold back a bit on the graphite weathering because I was worried that the parts would break off. Another issue was the fluff and lint that I found had gathered in corners and stuck to things during the oil washes and filters... plucking all that out with a pair of tweezers was a pain too especially on the deleicate photo etch parts.
So I guess I have a love hate relationship with this interior, I'm not entirely satisfied with it, so it's interesting to hear what others think.
Particularly I'm not very happy with the engine, I think I will work on that some more tonight.
On a positive note I've been painting the Motor Rifle Troops and they are coming along well. Although I still need to finish off the Tank Crew. I plan to weather the tank some more with the snow and mud effects
18627
Post by: get to the chopper!
I know what you mean about the interior. TBH when I saw it I though it was only half finished. It kind of looks like its missing something. Maybe its in a stage where its too weathered to look like a nice new tank, but not weathered enough to look like a beaten up old one.
In terms of graphite weathering, how do you personally do it GM? Do you rub some on your finger and then rub it on; do you rub straight from the stick; or do you use some sort of tool to get rubbed on with more detail?
11330
Post by: Gundam-Mecha
7899
Post by: The Dreadnote
Bloody hell! Your infantry look incredible!
514
Post by: Orlanth
Just noticed this thread, I was reading in some aprehension because the uniforms were initially very wrong for what you wanted. This was fixed but you were threatening to do thick snow, nice that you did thin snow.
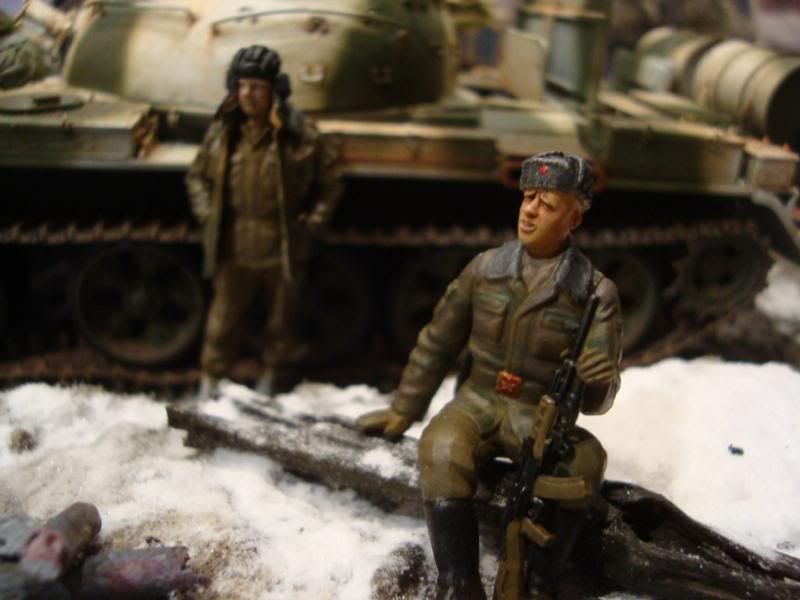
its been a rollercoaster read of nooooo, but it came out 100% in the end/so far.
Thick snow true Russian winter would have been bad not for the uniforms (though gloves are noticably missing) but for the poses. they are too relaxed and 'open' for deep cold.
The tank commanders jacket open is not a problem, it can actually get hot in tanks
My one remaining niggle is about the seated infantryman, he is sitting on a bare log which is not a good idea. You need to make it look like he had brushed the log first, sitting on snow gives you a wet seat, lying on snow is not so bad but sitting is a lot of pressure from a hot part of the body, the soldier will get damp and cold wet is a thousand times worse than cold dry. Most winter troops without modern equipment, and even with, learn to sit on something.
Thus the log needs to look like he has swept his hands over the seat.
Also think about footprints.
Normally i wouldnt be anything like this picky, but its a sign of where I think you are at with your modelling.
|
|