465
Post by: Redbeard
I think I'm going to try and log this next army project from start to finish. I'm usually really bad at doing WIP photos, so this is going to be a bit of an effort on my part.
Step one: buy needed stuff. Did that over the last few days. Stopped by the Chicago Bunker, and ordered some of the FW nurgle upgrade kits for marines and terminators, and fancy rhino/LR doors. Got in on the Warstore's post-christmas sale to order most of the GW stuff I needed, and ordered a few direct-order-only items from the GW website. Picked up some more Fens resin bases, that match my Nurgle Daemon bases, from ironhalo.
Here's what's coming, should make for a 3500 point Nurgle force:
1 FW Nurgle Sorceror
3 FW Nurgle Marine upgrade kits
2 FW Terminator upgrade kits
5 sets of Deathguard rhino doors
1 set of Deathguard Land Raider doors
1 set of chaos landraider tracks (I cannot stand the idea of a chaos landraider driving around with Imperial Eagles on the tracks)
1 each of the FW Nurgle Dreadnoughts, plus arms to go with these.
3 boxes of chaos marines
2 boxes of chaos havoks
8 chaos bikers
2 boxes of chaos termies
1 chaos termie lord
4 chaos rhinos
1 chaos predator
1 chaos vindicator
1 chaos land raider
2 boxes of plague marines
3 obliterators
1 Typhus
2 bitz boxes of death guard shoulder pads
2 bitz boxes of extra meltaguns
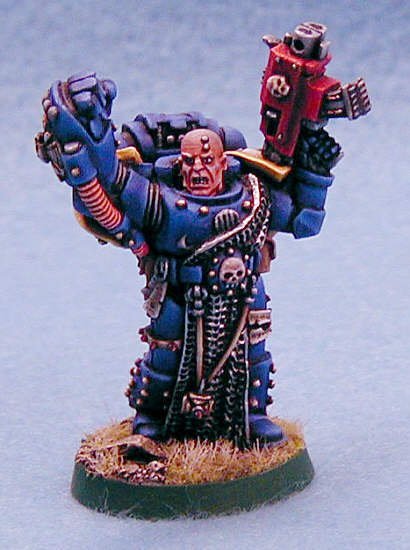
Trying to decide how to paint them. I'm leaning towards The Cleaved, from the C:SM codex. Looks like a fairly simple scheme with Dheneb Stone armour, and oozing blood/oil from gaps in the armour, which will be interesting to paint.
Next update will be when the boxes all arrive.
22426
Post by: Munch Munch!
This is interesting. I hae never seen a forge world nurg. marine painted as the cleaved. I will keep watch.
20867
Post by: Just Dave
Looks like a really nice idea (although massive) and I look forward to seeing if you do paint the Cleaved, which personally I hope you do!
Anyways, Ill be watching this one...
8709
Post by: OnTheEdge
Ooo, makes me tingle! Sounds awesome and a it would be so cool to see a project log with wip pictures start to
finish.
//Edge
465
Post by: Redbeard
Today was the first day of the NFL playoffs. What better way to dedicate six+ hours to working on a project, sitting in front of the TV.
During the week, I received the bulk of my orders. I'm still waiting on a couple of things, including the Forgeworld parts, but I've certainly got enough to start working on:

First things first, I got the bases for the army. These are the same bases, from Iron Halo, that I used for my Nurgle Daemons, which will make it easy for the daemons to stand-in when needed as Daemon Princes, Greater or Lesser Daemons.


These will all get painted in one big batch, to match what I've already got.

Scabeiathrax supervises the process. It's important the channel the right spirits into a new army.

Following this, the boxes all get opened, and sorted into buckets of parts that I'll use, and parts that I won't.

This means that I won't spend any extra time filing or trimming parts I won't use, and also sets the first seeds of what I want to do in mind.

Specifically, this time around, I'm doing all the Rhinos with closed hatches. My Emperor's Children are an open-hatched army, these guys will be different. So I don't need any of those parts. I'm going to replace smokestacks with the small chaos heads, so I'll need those, but I don't think I'll need the larger heads. As for the troops, I'm going to skip the holsters and combat knives, and I don't need any of the non-Nurgle specific parts, so they can be put aside. I'm not a big fan of marines with horns or top-knots, and I want everyone who can to have a helmet, so a bunch of heads are being put aside, while others (the top-knot helmets) are having their hair removed. In spite of worshiping the Chaos Gods, these guys are still an elite military operation, and they're going to dress like it, wearing their helmets into battle.
At the end of the day, I've got everything cut off the sprues and sorted. The metal and resin parts have been washed (I'll do this again when the FW parts come in - do you want pictures of this step?) During today's games, I'll be filing off mold lines, and if I have enough time, drilling bolter barrels.
20867
Post by: Just Dave
Looks good man, and yeah, I also like to work on my Warhammer during say, football or darts (obviously different in the UK!).
I really like the sounds of this army: the bases look good, I much prefer closed top rhinos, I love the sounds of you keeping a coherent theme with the helmets and I like the minimalist approach for the wargear too - very Death Guard esc...
Have you decided which army your aiming for?
465
Post by: Redbeard
I'm going to do it as The Cleaved. Most Nurgle armies I've seen are done as Deathguard, and The Purge have some interesting painting possibilities. I'm going to use the Deathguard iconography though, as it's really just a Nurgle symbol. This also means I can run a squad or two as plain Chaos marines, whereas that's not really true with pure Deathguard.
Anyhow, I watched more games today, Packers lost, which is always good, and I cleaned the mold lines off of all the vehicle parts (land raider, 4 rhinos, vindicator, predator, and a defiler top that will be usable with the bottom of a Nurglish soulgrinder)
Total time spent so far: 14 hours
edit: got correct chapter name
9092
Post by: Blackbone
Looking forward to see what you do with that paint scheme. It will be fun to see some of your WIP.
- Blackbone
465
Post by: Redbeard
Spent the last two nights filing mold lines while watching 'The Wire' (which I highly recommend, great show so far).
As I go through these parts, I tend to start thinking about overall aesthetics of the army. Marines, even chaos marines, are professional soldiers, and, as such, need some level of standardization in their equipment, and especially their vehicles. (Unlike, say, orks, where each vehicle should look different).
I'm not a big fan of chaos rhinos, especially nurgle ones, that look like something is bursting out of it. If it's not daemonically possessed, why would it need a tentacle monster inside it? I'm thinking that I'm going to do some decay as large pits in the surface of the hull. I'm also thinking about using the salt method of weathering to make them look nice and rusted up, although I'm wondering if the dripping blood/oil described in The Purge's section of the codex would look too busy on top of a heavily rusted vehicle. I'll have to consider that too.
Time so far: 20 hours
22426
Post by: Munch Munch!
I thought the cleaved had the black drippy-drip.
465
Post by: Redbeard
Oh, maybe you're right. What's in a name. They're going to be light armour with drippy-drip.
22426
Post by: Munch Munch!
Taken from lexicanum
The Cleaved is a warband of Chaos Space Marines. Oil-like blood constantly oozes from the joints in their power armour. These marines are known to have a high threshold for pain.
465
Post by: Redbeard
Yup, those are the ones.
17244
Post by: The Good Green
This looks like a massive project. I like the sound of it, oily drippy-drip all over. I'm looking forward to seeing it come to fruition.
465
Post by: Redbeard
Two more weekends of NFL games, and I'm finished filing, scraping and drilling out bolter barrels. Still waiting for my Forgeworld order before I can start assembly.
Total time so far: 45 hours.
I've also planned out what exactly is being built:
2 units of metal plague marines, seven men each.
Champion w/ magnetized arms. 2 Special Weapon troopers with magnetized arms for plasma/melta/flamer options, rhinos for each.
2 units of 10 marines w/ FW nurgle torsos. Each unit will have two men w/ magnetized arms for special weapon options or a heavy weapon, one magnetized champion. These squads will serve as either plague marines or CSM w/ Mark of Nurgle, as needed. Rhinos for each.
1 unit of 10 men, all with the chainmail torso parts. Squad will have four men with magnetic arms for heavy weapons (Havoks), magneto-champion
1 unit of 7 men, 2 specials & champ.
1 unit of chosen (using DA Robed dudes), magnetic champ, 3x magnetic specials/PWs.
1 unit of 7 bikers, magnets for champ and special weapon options. FW torsos here.
1 biker lord/sorcerer model
1 unit of 7 terminators, magnetic arms, FW torsos
1 unit of 5 terminators, magnetic arms
1 terminator lord/sorcerer
1 Typhus
1 FW sorcerer.
2 extra 25mm bases and bodies, to use as needed.
Land Raider
Vindicator
Predator
Defiler
3 Obliterators
2 Dreadnoughts
Any Daemon Princes or summoned daemons to be used in this army will be seconded from my Nurgle daemon army.
17916
Post by: Miss Dee
Sounds very cool. Cant waite to see more.
465
Post by: Redbeard
Some more work tonight, with pics.
First, here's me washing the resin bases. Exciting, I know, but it's an important step.

Here's the filed parts of the infantry, all laid out and organized:

Okay, those were fun. On to the neat stuff, Dremel sculpting. Sometimes, you get a really cool model, but there are parts of it that you don't like. Here's one:
That's the Games Day marine from a few years ago. What I like: The torso, with the chainmail. The slight twist to the body. What I don't like for this army: 1) He's stinking loyalist scum. 2) He's dumb and not wearing a helmet in battle.
This is an all pewter model though. In order to get it ready to be part of my army, I need to remove his head, and his loyalist powerfist arm, as well as remove the purity seal, and the crux symbol on a string. That's a decent amount of work. And, it only takes a few minutes with a Dremel (and a jewelers saw).
First, a look at the setup, and tools.

This is a standard Dremel rotary tool, with a flex shaft attachment, and a hanging mount. For the detail work, both of these are necessary. The shaft attachment means that you're really working with a pencil-style tool, rather than supporting the weight of the Dremel in the hand that you're working with. The hanging support means that you're not supporting the weight of the shaft attachment either, nor fighting its natural tendency to straighten out. Dremels are pretty light, but the work involved here requires precision, and the more control and balance you can get out of your tool, the better. Notice, also, the safety glasses on the desk. You're going to be shredding through metal, and shavings do fly off. Wear safety glasses, or don't do this. Your eyes are too valuable.

These are the three bits I use for this sort of work. From top to bottom, there's a really fine engraving bit. There's a straight cutting bit below that. I use it for smoothing surfaces, as the long flat blade works like a file. Finally, there's a large engraving bit, which is used for speedy removal of material. (The red spot is not blood, it's paint on my desk).
Doing this requires a light, but firm touch. The first thing you want to do is use your desk as a stabilizing surface, and anchor your hands together, just like when you're painting.

Go slowly, don't press the bit into the metal and let the tool do the work. If you push the bit into the metal with too much pressure, it can catch and the torque will drag the bit across surfaces of the piece that you don't want, ruining it. This is a subtractive sculpting method, and you can't easily add back stuff that you accidentally removed.
Here's the finished marine:


There's a hole for any plastic marine head, which will fit inside the thinned out neck guard. His right arm is gone, replaced with a nice flat surface to attach a plsatic arm to, and the chainmail has even been re-holed beneath where the crux used to hang. Another loyalist has seen the truth and joined the forces of chaos.
This method can be used on plastic, but it's trickier, as the dremel really heats up, and the plastic can end up melting around the bit. You may have to stop periodically and clean the bit off with a hobby knife. It is, still, a really fast method for removing unwanted detail though. I removed the Dark Angels Iconography from some terminator legs and a robed body, replacing them with Nurgle's tri-circle design:


22426
Post by: Munch Munch!
Thanks for the tips. Don't use that toothbrush!
465
Post by: Redbeard
I got my FW order, finally, and spent some time cleaning and prepping those parts. Added to the mix:
Infantry Upgrade packs (30 power armour, 10 terminator armour)

Two dreads

Five rhino, and one landraider door sets, plus LR chaos tracks.

After prepping that, I set to painting the bases. These are The Fens bases from Ironhalo. Step-by-step follows:
Step One, prime black, and then use one of the old Dark Angel Green spray cans to spray the bases Dark Angels Green:

Paint the ground Calthan Brown

Pick out the larger stones with Charadon Granite

Wash the whole ground area with Devlin Mud
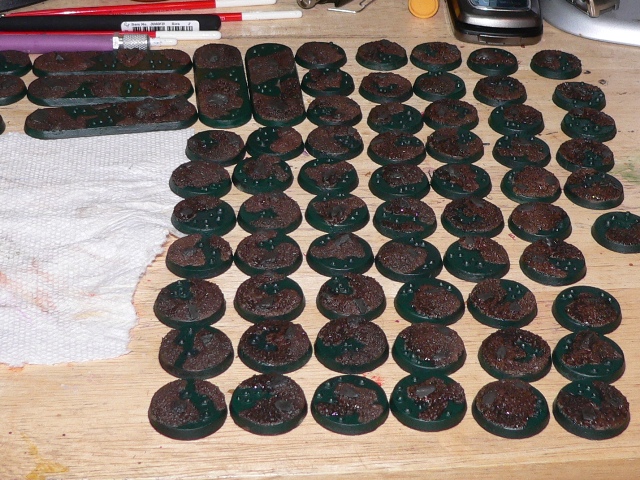
Drybrush the larger stones with Codex Grey

Pick out the bubbles with Knarloc Green

These are then given a coat of Matte Varnish, and left for the final steps when they've got models on them. The final steps are giving a gloss finish to the water, and adding some yellow static grass clumps to the ground.
Time logged so far: 55 hours
20867
Post by: Just Dave
Wow! those bases look amazing! My only suggestion is to make the water seem like it has more of a surface... Through, I dunno, drybrushing a lighter green?!
Even so, how can you manage to motivate yourself with that much to do?!
Looking good.
465
Post by: Redbeard
There's no real texture on the water to drybrush against, and drybrushed water would look odd. It's meant to be a very still water, like in a swamp, where there aren't any currents really anyway. When the gloss coat is added (after the guys are added, so that they can be matte sealed on the base), the overall effect looks better.
As for motivation - I dunno, it's just a process. You want an army, you have to put the time in 
22426
Post by: Munch Munch!
Wow, I just wan't to say, god help you Redbeard. How much money was that?
465
Post by: Redbeard
I dunno. Less than I make in a week, so I'm not too concerned. I guess you could figure it out if it really matters
22426
Post by: Munch Munch!
whoa.
11422
Post by: Iron_Chaos_Brute
Very nice stuff.
10345
Post by: LunaHound
Redbeard i have always wondered, how do you and others manage to glue the minis on a sceneic base ? Mine can barely stay on a flat surface , not to mention the bumpy surface a scenic base has!
8745
Post by: Llamahead
Good grief now thats what I call an assembly line Mr Ford would be proud!
4746
Post by: Flachzange
Now THIS is an exciting blog. Very ecxciting to see it all gathered together before you actually start out, rather than adding stuff slowly. Every of your army that I have seen so far is pretty dang awesome and very well done, so this one wont be any different. Good choice on the purge too.
Very much looking forward to updates!
5503
Post by: SPARKEYG
LunaHound wrote:Redbeard i have always wondered, how do you and others manage to glue the minis on a sceneic base ? Mine can barely stay on a flat surface , not to mention the bumpy surface a scenic base has!
Pin the model to the resin base and secure w/ a touch of super glue.
465
Post by: Redbeard
Exactly what SparkeyG said. You put a pin into the model's bases, and they'll never come off
10345
Post by: LunaHound
Redbeard wrote:Exactly what SparkeyG said. You put a pin into the model's bases, and they'll never come off
Where does the pin stick to though? the hole 's depth is only as thick as the base's material isnt it?
465
Post by: Redbeard
I'll take some pics and show you when I get to that point. But, it goes into one of the model's feet, and into the base, where ever seems most appropriate.
17916
Post by: Miss Dee
Me likes...
22426
Post by: Munch Munch!
Oh man, the anticipation of painted models is killing me!
465
Post by: Redbeard
It's going to be a while before they're painted. I'm working on assembling them all at the moment. Take a while because I'm magnetizing all the options for all the heavy & special weapon troopers, and the champions.
22426
Post by: Munch Munch!
Ah well, if it has to be done, it has to be done.
465
Post by: Redbeard
So, I spent the last week or so working on assembling the marines. (terminators are next, including typhus & obliterators).
One thing I did with this army is set it up so that my weapon options can be changed from game to game, with magnets. For the most part, I'm using 1/8th inch round magnets from KJ Magnetics. It's a good size for doing arm swaps with, as they fit easily in the shoulders of men, and it's easy enough to get holes drilled to the right size.
One thing to note, if you decide to do this, is that you don't want to just drill a 1/8th" hole in your part, you want to work up to that size, which gives you a lot more control. I run through five different drill bits before I get to the final size.

Also, when drilling the bodies of marines (where you have a different front and back plate), you're better off gluing the heads and torsos on before you drill, because the drill can separate the two halves of the body if you're not careful. Using the legs and head for additional stability goes a long way to preventing this.
Here are some of my Havocs in the drilling stage:

And some of the multiple arms that will end up connected:

Anyhow, I've just about finished the power armoured men now. I ran out of my Death Guard shoulder pads, so I'm waiting for a new shipment of those. I'm also going to go back through, after I finish the terminators, and add random bits of fluffyness to models that look like they need it.
Here are the (nearly) finished units:
Seven Chosen:

Three of these guys are set to take flamers, meltas, plasmaguns, or power swords. The champion can swap out a plasma pistol or boltpistol, and a powerfist. power weapon, or chainsword.
Seven Bikers:

The two special weapon guys can have flamers or meltas, and the champ can have a powerfist, power weapon, or chainsword.
Ten Havocs:

I've got four heavy bolters, four missile launchers, two lascannons and two autocannons to play with. These work with the Chaos Space Marine squad as well.
Ten Chaos Space Marines:

Special weapon man, heavy weapon man (can also use specials), and champ can swap weapons.
Plague Marine units:


Each squad can run two of any special weapon option. The ten man squad can pretend to be Chaos Space Marines and take one of the heavy options too, if they so choose.
One neat thing is that the whole army is magnetized with the same polarity, so arms from any model can be used on any of the other magnetized men. I could set up a unit running around with all plasma pistols if I wanted to (but why?)
23389
Post by: cosmic pixie
You, my friend are truly awesome. I love The Cleaved and when done properly, they are amazing.
17916
Post by: Miss Dee
WOW.. very coolness.
4746
Post by: Flachzange
Great progress! Looking forward to more!
17916
Post by: Miss Dee
Same here.
23428
Post by: Qualude
WTB Nurgled Bane Wolf x 3
465
Post by: Redbeard
I worked on my Land Raider last night and tonight. I took a bunch of photos, because I want to describe the thought process that goes into this.
First, a couple of pictures of tools.
This is a miniature side cutting bit for a rotary tool. It is invaluable for removing emblems, as the next few pictures will show.

This is my newest addition to my workshop. It's a simple footswitch that can be used with any powertool. You plug it into the wall, then plug the tool into it, and it works by shutting the power to the tool off unless you're pressing the footswitch down. Really simple. I got this over the weekend, and it's already been worth the money. I use it with my dremel. When working on plastic, the dremel can spin fast enough to melt the plastic. This not only lets me stop the bit to clean it off faster, but helps prevent the heat build up by working in short bursts. I know that turning a tool on or off is not the hardest thing in the world to do, but it's hard to explain how useful being able to do that with a footswitch is. Perhaps mentioning that dentists, who use these sorts of rotary tools for working on people's teeth, use them with these footswitches, will help convey it. It just adds an extra degree of control.

On to the actual work on the Land Raider.
I started by cutting the tips off the heavy bolter barrels and lascannons, so I could replace them with the chaos head bits:

While I was working on this, I decided that I wanted to lower the profile on the heavy bolters too. I took out the center pivot, and used a razor saw to cut off the bottom of the heavy bolter bodies, and the ammo feed, and glued this directly to the mounting disc.

This lets it sit in the gun housing position with the top shield below the Land Raider's hull, rather than jutting out over it. It's a small thing, but I like it.

And, don't forget to drill out the newly attached chaos barrel tips.

Next, it was time to remove Imperial details. This is done primarily with the dremel bit pictured above, and then smoothed over by scraping with the back of a hobby knife.
No Crux Terminatuses on the side:

No Mechanicus skull on the engine block:

While doing this, I considered the look of the Forgeworld doors that I'd bought. They come with buboes and pustules on them. I'm okay with that look on daemons, and on plague marines - they're living creatures, and so it makes sense to get diseased like that. I'm even okay with that look on defilers and dreadnoughts. But not so much on tanks. Nurgle is the god of decay and rot and disease, but metal doesn't catch diseases, it rots by rusting. I'm not a fan of the tentatcles-and-slime Nurgle aesthetic on non-possessed vehicles, and I intend to rust and rot out all my tanks pretty good instead. Not only that, but it doesn't make sense to have pustules on the doors, and no where else on the vehicle. So, that said, I set to work removing them. I saved as many of the larger ones as I could for using on some dreadnought arms.
Here are the doors, without pustules:


I then set to magnetizing the side lascannons. I did this by putting 1/8th" magnets into the top and bottom sponson plates, and then putting 1/16th" magnet into the mounting pillar. This serves three purposes. First, it allows me to remove the guns for storage, so the model will take less space in the foam. Second, it allows me to remove the guns to paint the hull behind them, and to paint the guns separately. Finally, on the off chance that some future chaos codex will allow chaos marines the intelligence to stick flamers on the sides of their land raiders, I'll be all set to buy a bitz sprue and use it. Unlikely, but if it happens, great.

Next up, I decided that the exhaust stacks for the engine looked too clean, and so I went and replaced them with yet another set of the chaos head bits:

Once the engines were replaced, it was time to attach the sides.

I then went in and added some of the chaos accessories. I'm not really a big fan of the iron-wrought fencing look on chaos tanks, but adding a couple of rows next to the front door hides the ugly top door post. I also figured that a set of spikes around the pintle-mounted gun would make some sense.

I went with the Chaos tracks from Forgeworld too. I'm pretty OCD about not having Imperial Eagles on my chaos tanks.

A few chaos stars and Nurgle icons here and there, with some skulls too, just to prove it's a GW model. Also, it's a little hard to tell from that picture, but the smokestack head's mouths have been drilled out. Important to have a way for the smoke to get out.

I topped the sponsons with the last of the chaos head bits, figuring they'll serve as smoke launchers. I went with the lascannons in the forward position, because this just makes more sense to me. If the guys want to get out the front, they use the assault ramp. If they want to get out the side, they don't want a couple of big lascannons pointing at their heads. This is the configuration on the pre-heresy model too.

So, this is where it's at now. I'm going to finish building all the tanks, and then go back through and add some combat damage and weathering before priming them, but I want to do that all at the same time, so for now, it's on to the rhinos.
465
Post by: Redbeard
I finished the base construction of all the vehicles in the army today. I need to go back over all the vehicles and add weathering and damage effect, but the construction (and magnetizing) is all done. Like the Land Raider, many small touches went into all of these, from the removal of all Imperial designs (Eagles and the like), replacement of smokestacks with chaos heads, and the like...
Predator:

Configurable with either sponson or turret option.

Vindicator:

Rhinos. These all have magnets installed next to the hatch, to allow the inclusion of upgrade weapons (Havok launchers, or combi-weapons). I took the time to trim all the pustules off the doors, saving as many as possible for fixing up other things. Also went with the spiky bits to protect the hatch here as well:

The Dreadnoughts, one of each Forgeworld Nurgle variant:


I also wanted to be able to run them with 2x CCW, but Forgeworld doesn't sell a right-handed nurgle option, so this is where the pustules that I removed from the rhino door got used. I carved out some places and glued the pustules on in others so that this matched the rest of the dread.

Finally, I had a nurgle soul grinder with a magnetized top half, and the parts to make it a defiler too, so I did that. All the weapon options are supported:

Time spent to this point: 100 hours
3564
Post by: Brother Bartius
Wow. Loving your work.
I'm a sucker for FW too.
16865
Post by: Nightwatch
Enough win ?
11228
Post by: Holy~Heretic
Its amazing how organized you are. Its a good thing for a newcomer to the hobby like me to see.
Cant wait to see some painted stuff and no doubt this army will be done before I even finish the rest of tactical marines!
Oh and I'll let you off for having a traitor scumbag army because you watch the Wire!!!!
All in the game
4746
Post by: Flachzange
Excellent work on the vehicles! Very cohesive look, even without any paint on them. I especially like the spike-rings you used for cupola/hatch protection. Great addition.
17916
Post by: Miss Dee
Better make rules for Blight Shells for the Vindacator
9504
Post by: sonofruss
You know that the razor back lascannons work better and they fit the Defilers gun platform
465
Post by: Redbeard
Didn't have any of those. I did have a spare set of Land Raider lascannons, so that's what I used...
Sometimes, you just work with what you've got.
17916
Post by: Miss Dee
Im gonna have to wait a very long time to see some paint on them .......
10855
Post by: nyyman
Very nice start!
465
Post by: Redbeard
Okay, question...
What do people think about the idea of stowage on Chaos Space Marine tanks?
A lot of people add stowage details to IG tanks, but it's something rarely seen on Marine or Chaos vehicles.
Perhaps it's because Marines are generally considered to act more like a strike force than a campaigning army, but if you're out in the world for more than a few days, you run the risk of running out of ammo or fuel.
I've got a few boxes, barrels, and other stowage pieces from various sources and I'm considering adding them all in here. Any opinions on that?
10345
Post by: LunaHound
Stowage as fuel tank, i dont like that idea , as it could be powered by chaos demons if fuel runs out.
However , if you make the stowage piece like toxic or radioactive , then very yes . Nurgle would welcome them right away! 
21946
Post by: ZacktheChaosChild
:O
Wow. I'm excited. I'll be watching this one.
17916
Post by: Miss Dee
Im with Lunahound on this one.
Automatically Appended Next Post:
Howabout making a resuply tanker and ammo carrier?
4746
Post by: Flachzange
I say go for it.
Theyre still a military force like any other. They need ammo and other supplies as well. Maybe not food or anything, but yanno, spare parts and stuff.
That, or like Luna said, toxic canisters to spread disease 
465
Post by: Redbeard
Here are some pictures of the tanks, with stowage added, and some battle damage added (not the easiest to always make out on all-grey plastic).
For the stowage, I used some IG pieces, plus some WWII stuff, and some plasticard to make restraining bolts, with pins for bolts. I've got some spare tracks on some of the vehicles, some extra ammo for the pred, fuel and ammo boxes on the rhinos. It's nice to think that you could get the daemons of the warp to fuel your vehicle, but the warp is a fickle place, and I think a prepared military force would make sure they weren't stranded without petrol just in case the daemons didn't show...


17916
Post by: Miss Dee
nice, very nice
20956
Post by: Empchild
As my old Squad leader always said "strap it down strap it down strap it down!" Great work btw.
17349
Post by: SilverMK2
I think the extra equipment is something that you just don't see enough of.
I have to say this is amazing work so far. The only thing I am not sure of is the colours on the bases, but I imagine that the painted models will tie in and make it all look pretty 
8745
Post by: Llamahead
Impressive stowage. I like the idea myself. Especially as I can imagine a daemon powered tank refusing to work at the most unopportune chaotic moment!
17916
Post by: Miss Dee
Empchild wrote:As my old Squad leader always said "strap it down strap it down strap it down!" Great work btw.
Marine or Army?
11422
Post by: Iron_Chaos_Brute
Off Topic: He's Army.
On Topic: Redbeard, great as usual. No construcive criticism b/c I don't have any criticism
21331
Post by: TempusCorvus
How exactly did you magnetize the Defiler's various weapon options?
465
Post by: Redbeard
With a drill
Okay, since you asked:
On the right side (from the model's perspective), you have the big ring connector. The ring that comes with the defiler is the same size as the heavy bolter mounting ring on a land raider. The biggest difference is how much space there is between the mounting posts.
I happen to have an extra land-raider disc, probably from an ork conversion years ago, so I used that instead of the defiler one, because I had more support posts that fit the Land Raider disc than the defiler disc.
You drill a 1/8th inch hole midway between the connecting hole. You will also note that I trimmed off some of the rear detail on the disc - that's so that the lowered heavy bolter conversion will sit flat. I also used my drill to slightly widen the mounting holes, so that the pegs on the supports for other weapons can slide in and out easily, but will still provide stabilizing support for the weapon.

This disc is then glued to the defiler body.
To do the autocannon, you very carefully drill a hole between the mounting pegs, and put a magnet in there. The gun mounting pegs on the Land Raider mounting piece are larger than the holes on the autocannon too, so you have to carefully enlarge the holes on the autocannon. I also trimmed down the ammo feed belts, so that just a little bit was left. When the autocannon sits in position, you can't see anymore of the ammo feed belt than this anyway, and it just gets in the way.

The lascannons are done with extra land-raider lascannons (with proper chaosy gun tips). They're simply attached to the heavy bolter mounting plate, and again, a hole is carefully drilled between the connecting posts to put a magnet in there.

The Heavy Bolter is lowered, like I did for the Land Raider itself. A little square magnet fits nicely between the bolters.

On the other side, rather than using the small mounting disc, I used the plate that's meant for use with a havok launcher. Simply drill the middle out, and drop a magnet in:

The Havok launcher is equally as easy to do - just stick a magnet in the base:

The Heavy Flamers involved a couple of plasticard pieces to fill in the gap between the flamers, where the small connecting post would normally go:

Finally, for the CCW, I used the small connecting post, removing the connecting posts entirely, and drilling a couple of holes that fit with the raised bumps on the havok launcher mounting disc. (Again, this provides support, so that you don't get a saggy CCW).

There is a bit of an art to getting your magnets in just the right place. Different people have different techniques for this, do what works for you. I've used over 250 magnets on this army, so I have a pretty good feel for that sort of thing - it comes with time.
24262
Post by: Mr-_-Flidd
Loving your work Redbeard!
The magnetising for the defiler has just answered about 10 Questions I was gonna post in the P&M Forum!
Keep on truckin'
24182
Post by: Ultra mortalitas
Damn Redbeard Nice work. Been waiting for someone to start an CSM army of the cleaved.
Good that you decided on putting the helmets on because i pretty sure in the codex it said that no one has seen their faces and they always clad in armor. I love the drippy-drip thing they have with the armor. 
Anyways back on topic: Your work so far is kicking major  . Good luck and keeping it up. 
14062
Post by: darkkt
Wow, impressive! I wish I had seen this when I started, I wouldnt have so many redundant models. Will keep an eye on this one!
16814
Post by: physcosamatic
i like it, want to see some painted mareehns
465
Post by: Redbeard
Sometimes, things don't go as planned, but you learn a bit.
I primed everything on Saturday, and airbrushed all the tanks, and three test marines with Dark Flesh. This is going to be the undercolour for the army.


I put a coat of matte finish on them too, to protect this colour for the next step.
Then I dunked the test marines in water, and sprinked salt on them. I'm not sure this is the best way to do it. One of the guys, I dipped into a bowl of salt instead of sprinkling, but that got really big clumps of salt on him.

I then airbrushed them with dheneb stone, which should be the main colour for this army:

It is at this stage that I realized there was a problem... I hadn't given them enough time to dry, and there was still water in the recesses. This meant that quite a bit of the airbrushing didn't stick :(
After it dried, I brushed them with a toothbrush (an old one, not one I still use for my teeth) to get the salt off and see how it looked.

The big patchy areas are where the water ruined the aribrushing as it came out of the cracks when the air hit it. You can kind of make out some smaller rust chips.
All-in-all, I'm not too happy with the result. I'm going to go and see if I can find more tutorials on this and see what I did wrong.
21331
Post by: TempusCorvus
After looking through this entire blog, you make me wish that I had magnetized my entire army. I really can't wait to see how all this looks once it's completed
20956
Post by: Empchild
WOOT the painting begins
18322
Post by: belial
Really like what you're doing with this army. Dont know if your interested or not but Forge world do a really good painting masterclass book, with tips you might find usefull in getting the armour effect you're after. Using hairspray instead of salt for example. Anyway good luck with this.
465
Post by: Redbeard
I've got that book, but the salt is a different look than the hairspray, which is why i'm not going that route.
18474
Post by: Darth Bob
Always wanted to see The Cleaved in a full-fledged army. I love the idea that there armor leaks pustulent slime.
Look forward to more updates .
11422
Post by: Iron_Chaos_Brute
I like the salt effect on the first two, I just think you need to make sure to get finer grains like on the legs where the effect is best (IMO). Another try with correct airbrushing couldn't hurt.
17916
Post by: Miss Dee
One night when I could not sleep I wrote down some notes on Blight Shells.... (Trust me to leave it in the bedroom)......
Blight Shells:
Can be used by a Vindicator or a Defiler, any who has been wounded but has not been removed from play must pass a toughness test or they have been infected by the toxins and other nasty things that the followers of Nurgle have placed inside the shells.
Use the stats of the weapon that is being used to deliver the shells.
In the shooting players next turn the minis that failed the toughness test turn on thier bretheren and join the renagades.
22426
Post by: Munch Munch!
Nice! THat would be great for datasheet.
17916
Post by: Miss Dee
Miss Dee wrote:One night when I could not sleep I wrote down some notes on Blight Shells.... (Trust me to leave it in the bedroom)......
Blight Shells:
Can be used by a Vindicator or a Defiler, any who has been wounded but has not been removed from play must pass a toughness test or they have been infected by the toxins and other nasty things that the followers of Nurgle have placed inside the shells.
Use the stats of the weapon that is being used to deliver the shells.
In the shooting players next turn the minis that failed the toughness test turn on thier bretheren and join the renagades.
Im thinking that Havoc Launchers should be able to have Blight Rockets
22426
Post by: Munch Munch!
That would make sense. Would it have it's own profile?
17916
Post by: Miss Dee
I think so but Im hijacking this thead aint i?
465
Post by: Redbeard
Just a bit...
I have to put aside working on this for a few weeks, as I need to get some models done for Adepticon, but I'll resume updates as there is more to update.
17916
Post by: Miss Dee
I thought that the Blight Shells might be a good addition to your force.
9407
Post by: Lint
Great job so far, I love the magnetizing work. Would you consider doing an article for each of the various vehicles you've magnetized? Specifically the Predator? I'm having a hell of a time getting the side sponson weapons to magnetize to the doors...
465
Post by: Redbeard
Hey, I didn't forget about these guys...
After a short detour, painting ork models for Adepticon and then painting more ork models because they'd been sitting there yelling at me to paint them, I'm back to this project.
Last weekend, I put down the undercoat. I used Dark Flesh, because it's a nice dark colour, and should look good as rust under where the paint is chipped off.

After that, I used my airbrush with water in it to spray a layer of water over all the models, and then sprinkled salt onto them from about 12 inches above.
Men watered:

Men salted:

I then left them alone, to allow the water to completely evaporate. That lets the salt stick in place, and means that I won't get the same nasty behaviour that the test models had from rushing too much.
Today, I went through 5 bottles of Dheneb stone, laying down the basecoat that will be the primary colour for the army.


I'm going to let this sit for a bit, and then I'll take a toothbrush to them and see what they look like with the salt brushed off. Stay tuned...
22426
Post by: Munch Munch!
I'm glad this thread wasn't abanoned. I really like it. Can't wait for more.
21664
Post by: poipo32
I wish you best of luck with the results, because if it failed, it did on your whole army.
4746
Post by: Flachzange
Yup, I hope this turns out as youd like as well. Looking good so far though!
465
Post by: Redbeard
No pics - but comments;
I started trying to remove the salt, and it's not as easy to remove as I'd hoped. It seems stuck on pretty good, and while it comes off okay with a hobby knife, it doesn't come off well at all with a toothbrush, which is what I was hoping for. The hobby knife requires a lot more care, as you can remove more than you're trying to remove. I spent at least a half-hour last night working to remove the salt from one of the rhinos, and I don't think I got it all yet. I'll get some pics of examples up soon, but this next step might take a while before it is all done...
22657
Post by: Frodo
Any news on how the slow salt removal has been going? I'm really keen to see if this is a viable way of weathering for my vehicles as it sounds great!
465
Post by: Redbeard
Hey Frodo, how's your finger?
Actually, I've been doing some experimentation with different processes. I think it is best to establish what I'm going to do across the whole army up-front.
That said, I'm kind of moving towards the following:
Take the dheneb stone guys, and paint on some of the detail work. I'm using Adeptus Battle gray for much of this. I'm also going to get the exposed guts and nastyness with some oranges and purples.
After that, wash the whole model with devlan mud. Then I'm going to go back over the large surface area plates with a 50/50 mix of kommando khaki and white - it's a good off-white colour that doesn't have the same yellowing tint that bleached bone mixes have.
And then, after all that, I'll remove the rest of the salt, so that I don't lose the chipping/cracking when I build back up the off-white colour.
31591
Post by: crazy650
I just joined this site cause of you and had dream like a year a go of making this have not finished mine would like to do something like this. Im going to get back into mine again (=
22150
Post by: blood reaper
This is relly nice work , the best ive ever seen , cant wait to see more.
32019
Post by: lol wut
Now THIS is the way all Nurgle Marines should have been done!
24247
Post by: Ambull
Wow, this thread is really tight, this work is awesome and I respect how organized and methodical everything is!
The pics are very specific and give a good view into your methods. I look forward to more updates, this project is destined for greatness!
|
|
