monkeytroll wrote:For your sake I'm sorry we couldn't do anything to stop you in your wonderful madness.....for our sake I'm happy
Bell tower concept looks great....will it be a completely enclosed space, or will there be ropes/chains ging down to the lower floors?
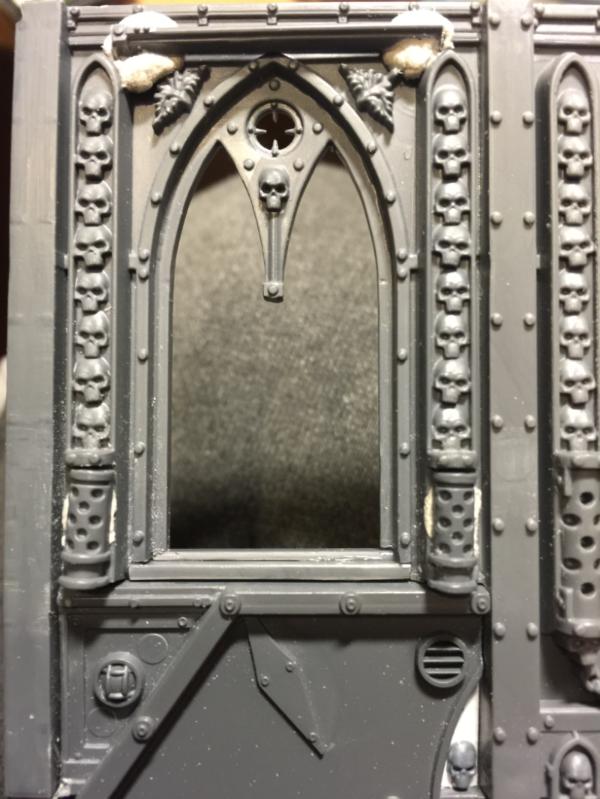
Glad I can be of assistance MT Plan for the bell tower will be the Manufactorum windows forming the walls - a) because you can then see in un obstructed unlike the basilica windows and b) because I figure the vents on them kinda look like speakers, used to amplify the bells tolling for all to hear.. I think I'll 'glaze' the triangulate sections of the roof, with the actual bell suspended from the central square roof - tat way you'll be able to see into the space and see it, rather than it being suspended above the roof. Then I can mount the comm unit on top, again as some sort if transmission device for various purposes. We'll see how it evolves once I get all the necessary pieces in okay and see how they might fit....
Oh, yes, for got to say - the plan also is to have some sort of cable descending from the bell to the ground, probably via a hollowed out 'vent' COD floor/ceiling tile. That should be fun...!
Rhich wrote:Your doing a great job, I built one similar a few years back, I feel your pain..... however, seeing grown men getting excited to play on it is totally worth it in the end...
Indeed - saw your blog a few days ago and colour me impressed - if only I had the space for such a huge display board! Looking forward to seeing how it comes along Rhich - your building also looks pretty epic
inmygravenimage wrote:Mmm... cloisters! Really impressive level of lunacy. Are you using skaven stuff for the bell tower?
Yep IMGI, good old Skaven screaming bell (or whatever it's called) - I'm looking forward to shaving all the Skaven details off that, along with the ton of plastic I've now got to get rid of in te form if MORE bloody mould lines.. Sigh....
MagosBiff90 wrote:Unbelievable!! ..... just a mammoth amount of work going on here! not sure i have anything to add but admoration!
More like a whole herd of mammoths I think Magos....
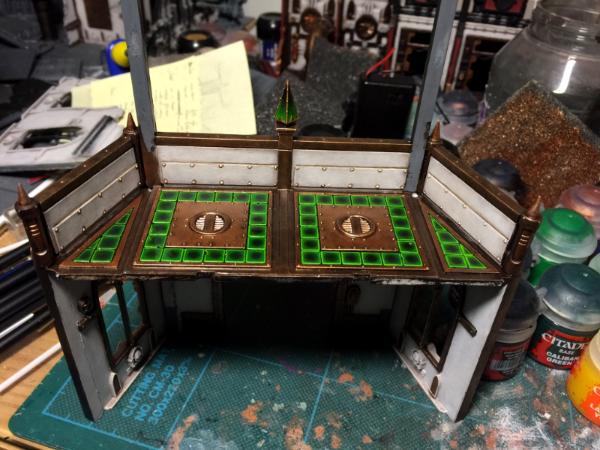
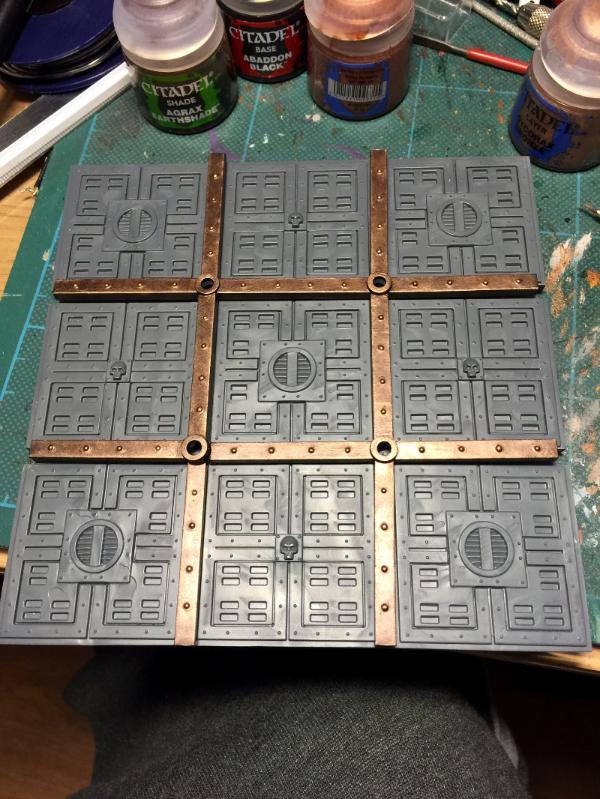
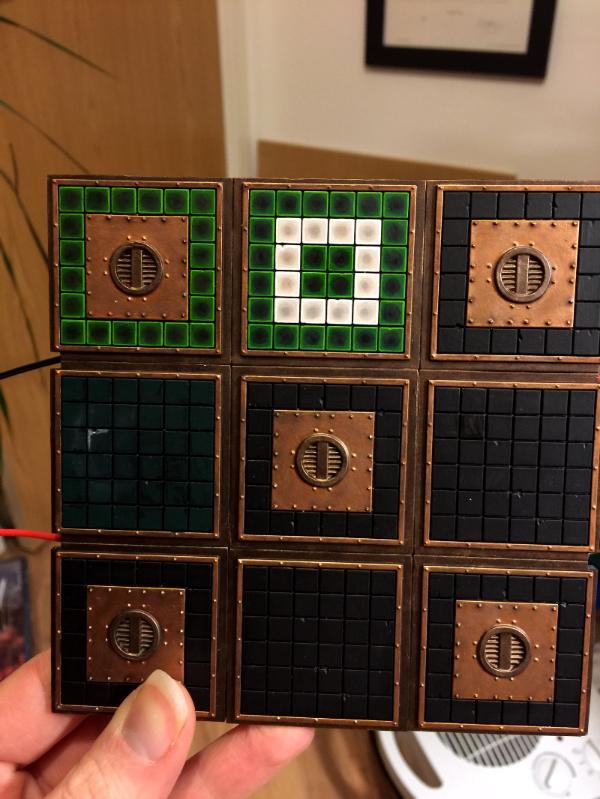
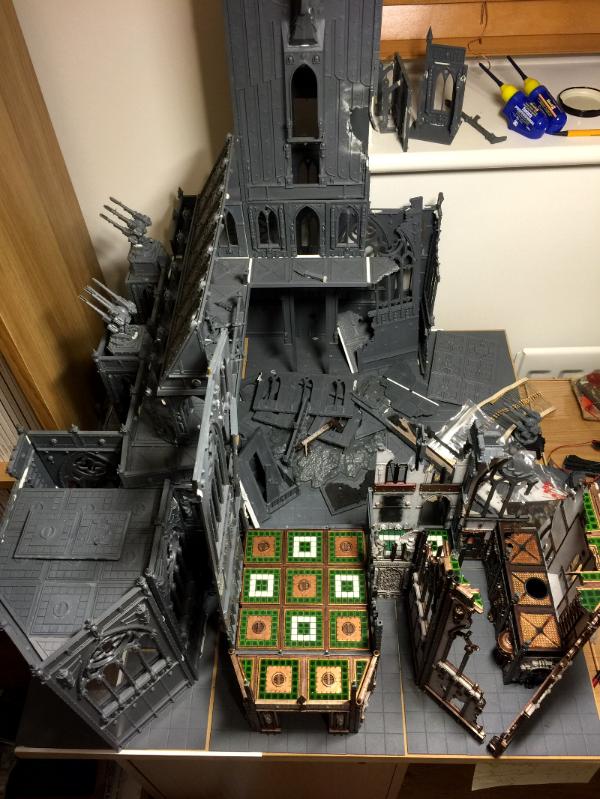
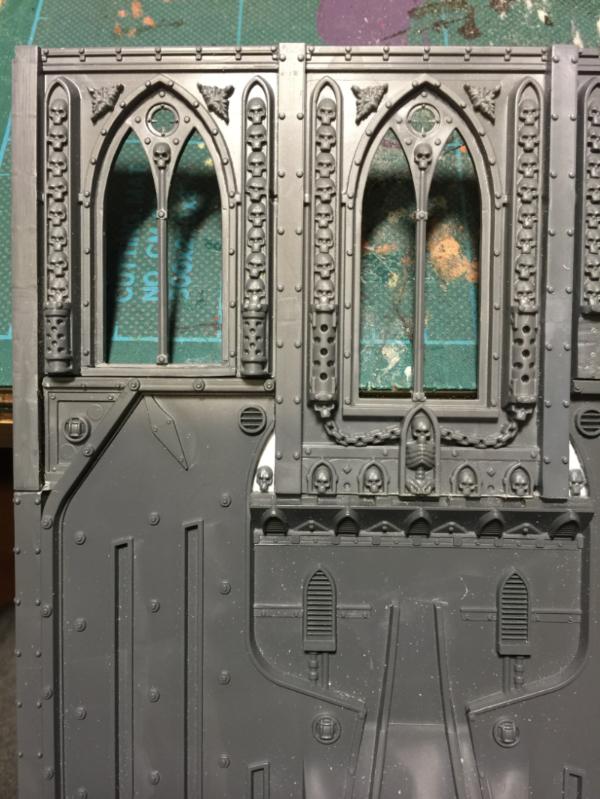
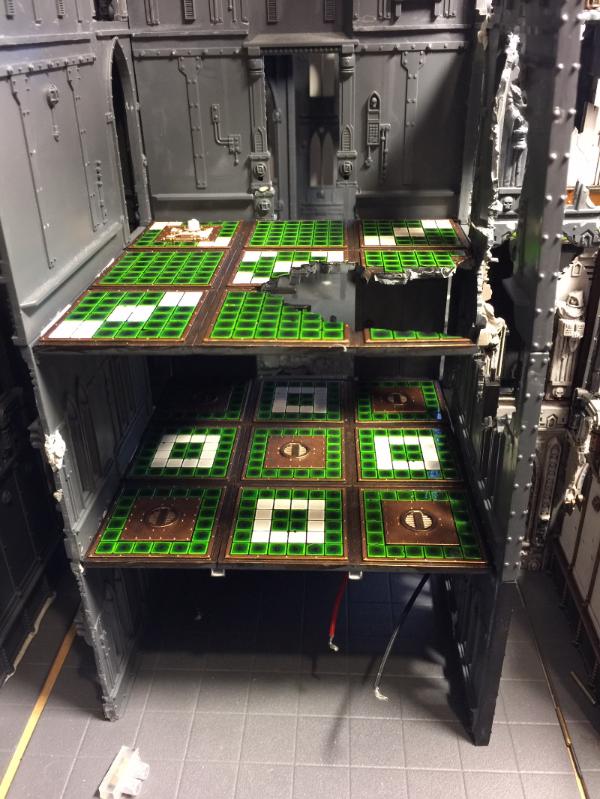
Right then, here we go.. First a pic of what I think will be the final layout for the cloisters and Chapter House (or rather Chapter mansion, the size of the thing!)
I need to decide whether I have the Mausoleum's inside the cloister or outside the back gate, as it were, but I'll decide that later once more actual construction is completed.
Moved to a second (handily spare ) board. Although I'm now severely running out of space in my new cave - can barely see the floor for boxes now, but needed to find room on the work desk to actually do some work! Speaking of which, my bell tower bell arrived today:
Before:
And after:
I'll find a skull to mount on the warpstone 'stump' at some point - goodness knows I should have a few to choose from!
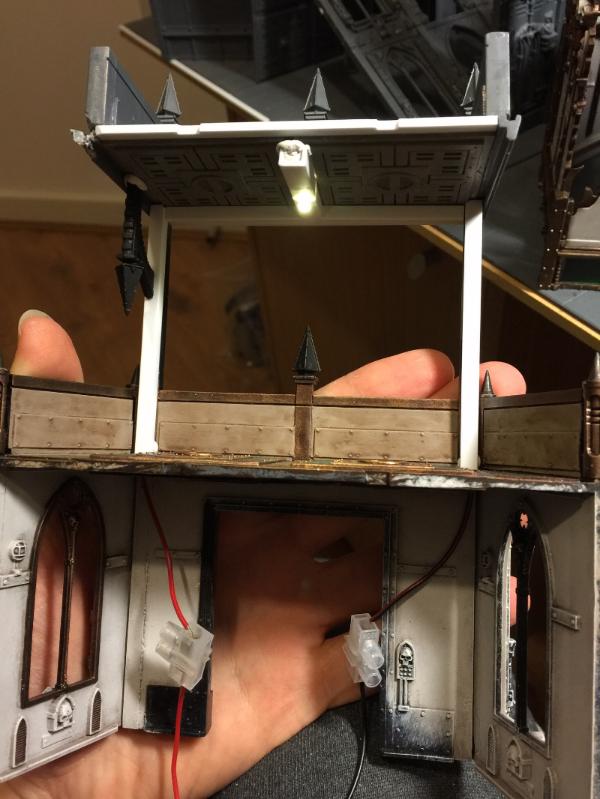
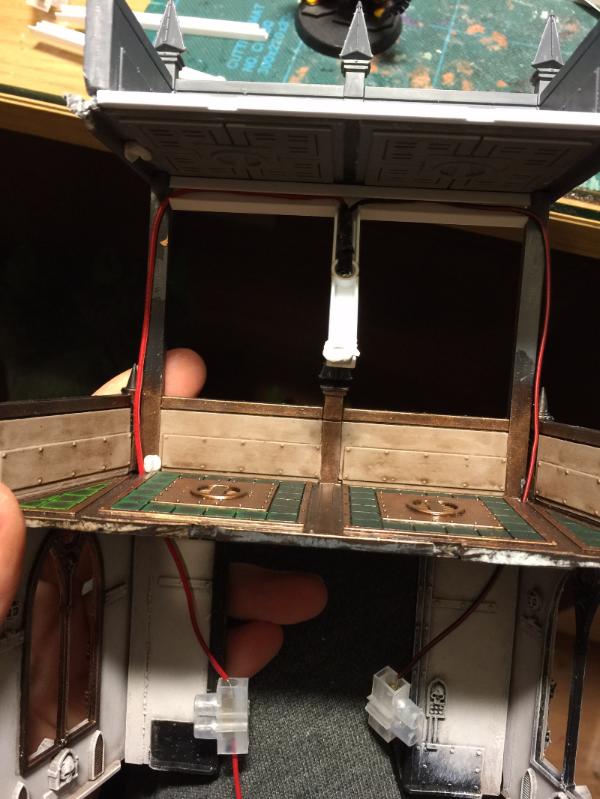
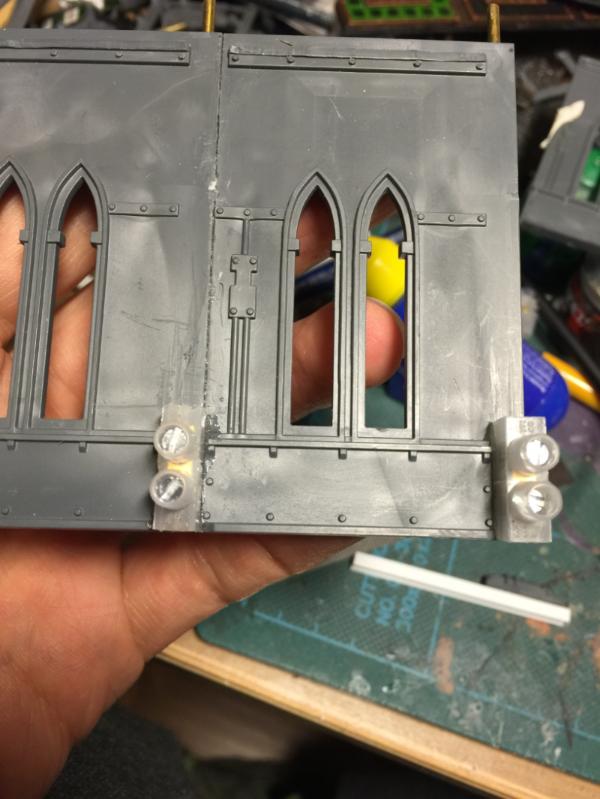
Also started to flesh out the form of the bell tower itself:
The main issue with this is as I'm planning on using the standard COD floor:roof tiles, there are sizeable gaps between the walls even if additional girders are used - luckily, my favourite movement tray edges look like they will come to the rescue once again - mounted between it looks like they'll fit the gaps perfectly, give or take due to the vagaries of white tac as a fixing agent!! Mind you, I've not yet worked out what I'll be doing with the diagonal floor plates. Yet....
I'd say the mausoleums should be 'outside' to have a nice open quad there, but as you say, there's plenty of time for that decision yet. Perhaps a removable mausoleum piece that could be utilised in both positions?
I take it that's the Pratchett Wing you're currently working on? Was going to comment on the lone Baxter in there, and then realised that it's The Long Earth.....and three copies of Good Omens?
I have little doubt you will find a suitable skull to adorn the bell
Time will tell on the graveyard MT - depending on space might well investigate your idea for a removable piece - may hap interchangeable with some additional craterage... Hmmm.... The possibilities....
As for the Pratchett wing - whatever gave you that idea?!
Spoiler:
What's that you say? Multiple copies of the same book you say? Damn you obsessive tendencies....
Without wanting to get too sidetracked (as per forum rules ) yes, optometris, yes they are. Well, one set of them. Got another kicking around in some boxes somewhere, waiting to find a good home...
of course, I now realise that the spoiler is somewhat redundant given the pic appears on the main Dakka page - lol - will try and do some more Catherdral shots this evening...
Just wanted to say you were one of my inspirations to start my own terrain project, a cathedral as well......but mine might become a bit more...corrupted
Thank you foto69man... I'm actually kind of humbled by that, to be honest especially when I'm in the company of Lord_Mortis and his fabulous board. Well, I shall look forward to seeing more of your work and progress on the cathedral
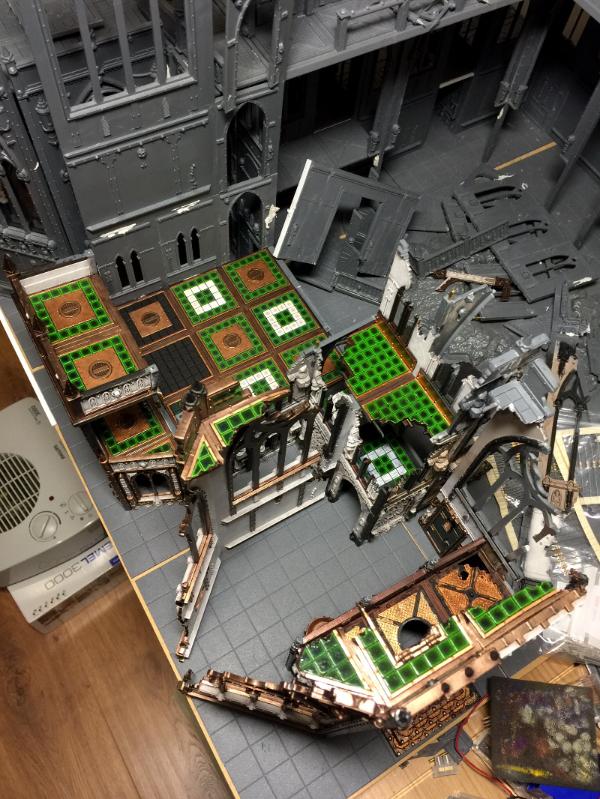
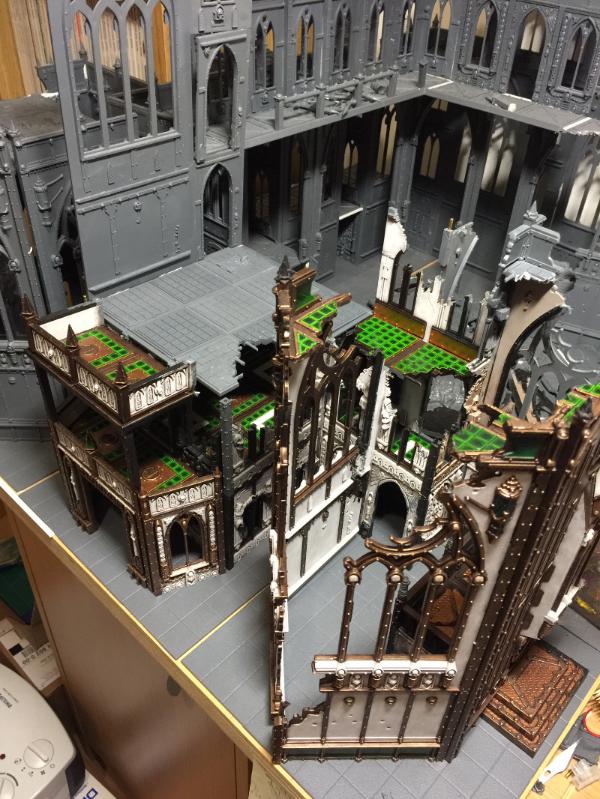
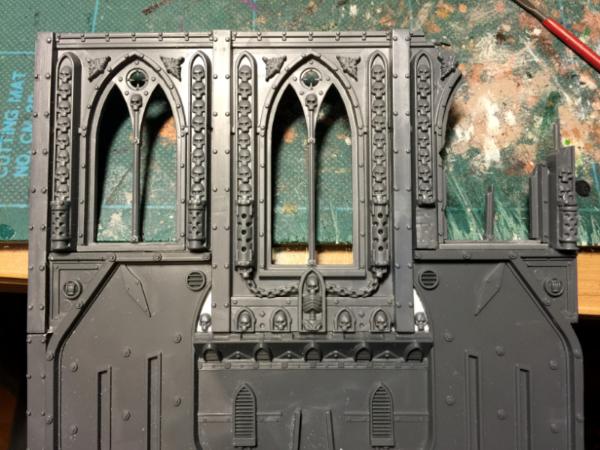
Speaking of which, while I was once again bored at work, was struck by another bout of insan... Ahem, inspiration.... So I might have said earlier that I'd hit on the final layout... Well, as per normal that didn't last long. So, here without further explanation (other than having learnt a lot from the build so far that I think I could pull this off, is the next stage of development:
(He he - spoilers! )
Spoiler:
Ignore the random wall selections for the time being, as I'll need to work out what to put where if I do this (who am I kidding, it's gonna happen ) - the biggest challenge will be sorting out the floor plates I reckon.... But this way I solve fiddly problem of joining a cloister end to the Eagle door opening, plus means I don't have to run an internal walkway inside the Chapter House, meaning that I can do more interesting things inside. Maybe.
So - although I know what you're going to say anyway - should I do it?
Interesting....certainly lot of potential with that build
I kind of feel that it's a bit sacreligious towards the eagle door as is though, I'm thinking the chapter house should be raised one storey, so the current base is level with the cloister roof?
I did consider that MT, but think I've decided agains raising the building for a couple of reasons:
A) practicality - raising it would involve 'underpinning' it - which either means a load more pieces or a block of polystyrene or something, but given that the lower 'skirt' is likely to be windowed wall pieces you'd be able to see what was down there and you know me by now - the interior needs to look just as good as the exterior... And then
B) I don't want the Chapter house to detract attention too much from the Cathedral - after all, that's the main focus of the project! Also, I kind of like the 'squat' feel of the building, as if it's hunkering down into the ground - sort of a cross between a Martello tower and the Bodleian library..
Have also decided to move the cemetery out of the cloister and to the back of the board - the garden of Morr walls will only need a small amount of work to fit the space nicely, which gives that side of the board an older feel, as if it was there first and the rest of the buildings have grown alongside it...
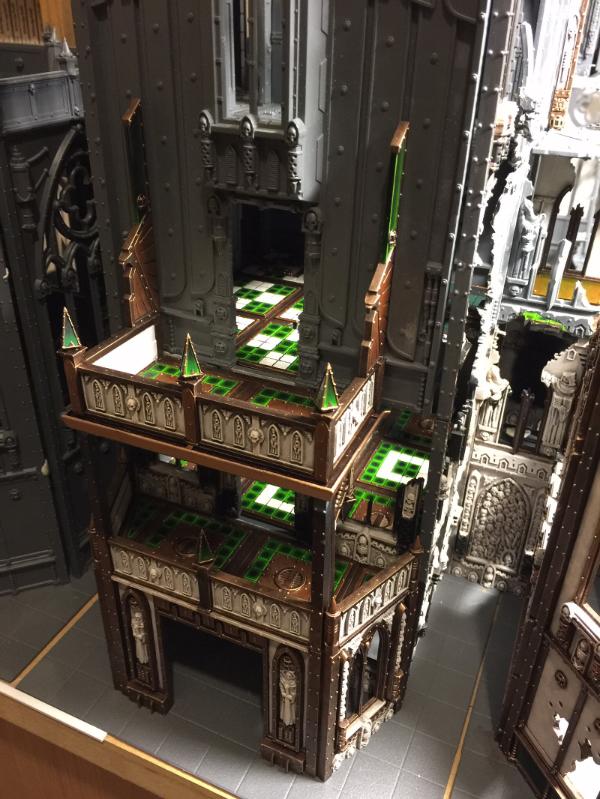
Can't be arsed with spoilers any more so one final revision pic (at least for today). I'm also less convinced now by the bell tower, but maybe that's just early day jitters.. Thoughts anyone?
Phutarf wrote: Without wanting to get too sidetracked (as per forum rules ) yes, optometris, yes they are. Well, one set of them. Got another kicking around in some boxes somewhere, waiting to find a good home...
of course, I now realise that the spoiler is somewhat redundant given the pic appears on the main Dakka page - lol - will try and do some more Catherdral shots this evening...
sorry ill keep on topic lol (i've got almost all the books in the discworld collection, one day ill get the unseen library set though)
This board would be so much fun to play kill teams on!!!!
I thought you would have already considered it, but thought it worth a mention anyway
I was thinking just wall sections as support, with the current floor f the house covering it entirely, so no access to it, but you could see the walls through the cloisters - wel aware you wouldn't stand for a block of styrene under there Good point about not wanting it to overshadow the cathedral though, makes perfect sense.
Having said that ( ), I think your issue with the bell tower might be one of height, maybe you're associating bell tower with the 'tower' part and expect it to look a little higher? Try tacking the bell in place inside it to see how that scales to your eye.
Funny isn't it MT - I say one thing and then not 24 hours later decide to do the exact opposite. Having worked out some logistics, I probably now WILL raise the central section of the chapter house - another (sigh) Imperial Sector and some floor tiles purchased off eBay and I'll just about have all the bits I need. Having put the two boards back together, I don't think even this will detract from the actual Cathedral.
As for the bell tower - was having a play with some other ideas this evening, but not yet 100% convinced with thing yet - I'll procrastinate some more before sharing what I come up with....
Really impressed with the clean up job on that bell, Phutarf. I leave for a few days and your cathedral starts growing extra wings. Craziness. keep it up.
Perhaps the problem with the bell tower is that the bell holder (if that's what it's called) looks kind of lost because its sitting on top of a larger tower section. If it was raised higher it might look better.
Warboss_Waaazag wrote:Really impressed with the clean up job on that bell, Phutarf. I leave for a few days and your cathedral starts growing extra wings. Craziness. keep it up.
Meh. Nothing more than an hour or so with hobby knife and files to take care of the bell WW - no dremel here, all done lovingly by hand. Although...
cheiflibrarian wrote:Perhaps the problem with the bell tower is that the bell holder (if that's what it's called) looks kind of lost because its sitting on top of a larger tower section. If it was raised higher it might look better.
You know I'm definitely having second thoughts about the bell tower. It was a great idea in my head but in practice and in situ I'm just not happy with it... I've got another idea in mind that I'll try out before coming to a decision (HA!!) - after all, having bought and spent the time on the bell I'm going to bloody well use the damn thing
Apologies to all those in the UK for my somewhat late night postings of late, but I'm working on this late into the evenings - should keep my American followers happy though Anyway, having taken on board Monkeytrolls thoughts, purchased yet another imperial sector this afternoon to give me enough parts to round out the build, including enough wall sections to underpin the central Chapter House building to raise it up. Just to underline my OCDish tendencies, here's the planning document:
However, just because you can figure it out on paper, doesn't mean reality will actually work. I was planning on using the Manufactorum walls to do the underpinning, thinking that this was some sort of secret power house for the building or something. Anyway, as it turns out, you pretty much can't see any of the walls used through the Sanctum 'skirt':
so it'll be a complete waste to use them like that. As such, I'll be investing in some more thick plasticard and constructing my own wall sections, minimal detailing but enough that if you look closely they won't look out of place, and then use the Manufactorum parts on another new building - although not one part of this project!
That aside, pretty happy with the new dry fix of the Chapter House is coming along (although am running out of white tac like crazy!). The general shape and dimensions seem to be working - the proof will be in the actual construction - but for now I'm liking the raised central section. I think I'm probably going to leave it now as a flat roof, given my misgivings about the bell tower - this keeps the overall height the same as before (minus comms relay) so complements rather than detracts from the cathedral:
Mind you I'm now getting a 'mountain from Close Encounters of the Third Kind' vibe from it... Plus it's actually a pretty big building...
Definitely going to use the Eagle wall supports around the base on this bit though, as having looked at a number of Chapter Houses online they seem to favour chunky supports like this to buttresses - those will stay on the Cathedral and inner cloister wall - but helps give the Chapter House a distinctive feel.
Right, getting late (or early depending on how you look a it) - more at some point...
I did have to do a double take at your post tryanotherone cos I was thinking 'what have I done to upset anyone?'. And then read the rest and realised you were joking. I hope (NB - mods - don't you dare lock and or delete this blog!!!)
It will - eventually - be painted, but not part of a table as such, as I don't game - just doing this for "fun".....
And fear not, Construction (of a sort) has commenced Brother Payne
So, I was contemplating overnight (rather than sleeping like most sane people do) just what to do with the supporting walls under the Chapter House. As I'm essentially a lazy bugger, I didn't really want to go all the way to my nearest craft shop just to get some more thick plasticard, and then inspiration hit me....
Mortuary freezers.
As you do. Bear with me.
You know, these jobbies:
Now I've always like dreadnoughts, I own a lot of them (and might assemble and paint them one day, but I digress...) but always figured that given the rate of casualties Space Marines accrue, surely there must be a supply and demand pressure on the availability of dreadnoughts. Therefore, what to do with all those injured marines that need entombing in one? Well, now I know - they get stored in special stasis chambers, under Chapter Houses!
Still with me? Good. Now, my favourite colour is green. (Bit of a segue there, but go with it). And if you've ever been to Regents Park underground station, or a really well preserved Victorian public loo, you might have seen tiles a bit like this:
Great aren't they? Well, I think so. So what's that got to do with mortuary freezers or Chapter Houses I hear you thinking? Keep with me...
Now as a result of having loads of COD kits, I've got lots of spare floor/roof tiles hanging about. And as I've already used some on the sloping parts of the Cathedral roof, I know that two put together are a similar size to the height of a wall section. And I've got loads of the hatch ones (which previously I hated and could never find a use for). See where I'm going with all the above now? No? Well, here's where:
Spoiler:
Ta da! After some rigorous cutting down and gluing, meet my new Chapter House wall supports and 40k-ified Stasis Chambers, which, in the fullness of time, will be painted a lovely green
As you can see, the completed piece on the left is almost the same size as a standard couple of wall pieces/one Shrine Window in width - it's a smidgen taller, even after cutting down but I'm not too worried about that. The bits on the right (under an unsullied tile) show how I've had to cut down the 4 to get them into the right configuration, along with a girder that was previously cut off a wall piece - always recycle children!)
So, that's what I've been up to this morning - need to glue the second one together now, complete a third one, and then work out what to do with the ones that will go under the two large eagle pieces, as it's a slightly different build I'll need to do on those.
Sorry for the long post but I figure those of you still looking in might find some of this useful inspiration. The tiles reversed also would work well as oven doors btw,!
Pity it's not epic as in epic scale GiraffeX - would be a lot quicker lol.
Minis-wise, I'm leaning towards a 30K heresy army (simply CID I love Forgeworlds stuff more than the standard GW marines - time will tell. Although I love my personal colour scheme, the more Death Guard stuff FW produce, the more I'm thinking of doing them - I recon Mortarion on top of the Chapter House would look rather nifty!
Which is also better than what my cave looks like at the moment:
Plastic shards and dust everywhere, transplanted to my makeshift alternative work area due to both boards being on my actual desk...
Have had to stop now as after a days worth of sawing and filing, my hand started to go numb. But pretty pleaded with the fruits of my labours:
Spoiler:
There will be at least 20 drawers once all sides are complete - only another (or 6) to go...
YourIntestines wrote:Absolutely amazing work. I wonder if you could make one for fantasy...
Actually YourIntestines (love the handle btw! ) the cathedral itself, if you don't look too closely at some of the 40k detailing could easily be passed off as WFB - guess that's the joy of having Gothic style architectural cues.
hk1x1 wrote:Last time I checked in on this you were just building the cathedral,
now it looks like you've started constructing your own city .
Amazing work, cant wait to see what comes next.
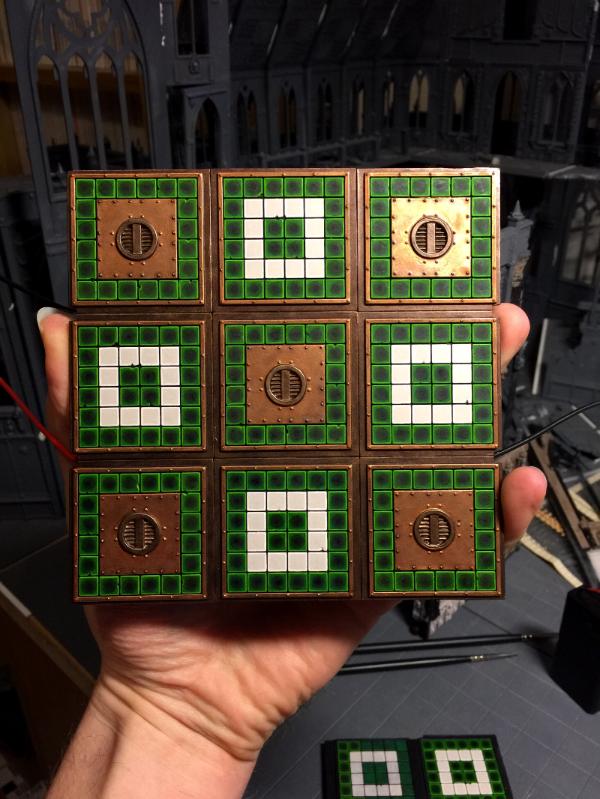
Lol thanks - what came next, as I'm impatient, is a smidgen more test paint:
If you want to know what this is and you've not opened the spoilers in my last couple of posts - WHY NOT??!! - Lol - otherwise, feedback please. Both sides of the tiles have been painted in exactly the same way, just the left with a white recess, the right with black. But which is better? There's only one way to find out - FIG.... *ahem* (don't worry - all non UK followers, you won't understand that last bit.. )
But seriously, which do you prefer? I know which I prefer to paint.... But I also know which I prefer the look of. Sigh.
(NB - this is purely a test piece - the actual finish on the real pieces will be a lot better!)
Since there was a page flip. Can't really qualify my decision... just prefer the black. It's grimdark... the white is too new and shiny looking? Dunno.
Nope I prefer the white but the reason for that is it is true to the reference material, however due to the setting I would agree the black is more suited to the environment.
But both look great and you have captured the characteristic of victorian tiles well
Thanks for the feedback everyone. Having looked at it in daylight rather than 11:30 at night, I too prefer the black background - makes it easier to see the light 'ting' in the corners than on the white. And like I said it's a damn sight easier to paint too!
So I'll probably end up doing them all on a white background, knowing me.....
So, in between creating half a ton more plastic dust and shavings creating another wall, have finished up my rough draft of the piece - hope you like it, I'm pretty please with how it's turned out:
Which is just as well, as I'm going to have 24 of them to do on the chapter house, and given the result, am now thinking that ALL the floor tiles like this might end up green.... Also adding weight to my thoughts about adopting the a death guard as my new army....
Well I think it depends where they are on the building in relation to the light from outside. The right is much darker so good for under the cloisters while the left would be nice for any parts that light would shine through too.
Thanks OneManNoodles - I like to think my book collection reflects my sophistication... Who am I kidding?! Lol
MT - awesome but will take forever...
GiraffeX - true, but given they are predominantly under the ChapterHouse walkway and will be all but invisible, it doesn't really matter all that much... Sigh....
Nothing wrong with being a cathedral building Pratchett junky ... or so my psychiatrist says.
Shame you are not going to paint all the tiles like that. You could cut the painting down to 3 shades with a glaze over the top if you're going to keep it, either way it's going to be a lot of tiles!
Lol - the painting on the tiles currently IS just three shades and a glaze - ork hide base, then dark angels green, snot green and scorpion green. Ok and a final white edge highlight, all washed down with a thraka green wash, and some gloss varnish on top. Trouble is this was knocked up pretty quickly, simply to test (as it's been a VERY long time since I've painted green) - I'll be taking far more care over the actual paint - and therefore more time.. Sigh
I think the side with the black recess works better, as the white makes them look a bit like bathroom tiles .
Nice work on the actual tiles though, they really stand out.
Phutarf wrote: Thank you foto69man... I'm actually kind of humbled by that, to be honest especially when I'm in the company of Lord_Mortis and his fabulous board. Well, I shall look forward to seeing more of your work and progress on the cathedral
Speaking of which, while I was once again bored at work, was struck by another bout of insan... Ahem, inspiration.... So I might have said earlier that I'd hit on the final layout... Well, as per normal that didn't last long. So, here without further explanation (other than having learnt a lot from the build so far that I think I could pull this off, is the next stage of development:
(He he - spoilers! )
Spoiler:
Ignore the random wall selections for the time being, as I'll need to work out what to put where if I do this (who am I kidding, it's gonna happen ) - the biggest challenge will be sorting out the floor plates I reckon.... But this way I solve fiddly problem of joining a cloister end to the Eagle door opening, plus means I don't have to run an internal walkway inside the Chapter House, meaning that I can do more interesting things inside. Maybe.
So - although I know what you're going to say anyway - should I do it?
More kits came in and on the next story. I'll be doing interior catwalks and then planning a roof(removable of course )
Spoiler:
Keep up the good work and keep inspiring me! One day My cathedral will catch up to yours!
Daaaaamn! I was thinking it looked pretty small and then I noticed the Tyranids...
Good to see things coming along foto69man - although are you sure you want to catch up with my level of madness/obsessiveness??
Anyway, only a minor update today folks - real life has been getting in the way of progress sadly, that and a pair of busted sprue cutters - I mean, it's not like they've had much work recently!
Just thought I'd share a couple of pics of the (almost) completed stasis chamber walls - and the very subtle differences between the construction of the 2 and 3 panel walls as they aren't quite the same:
Went for one of the Manufactorum "boiler" walls as the Gubbins that powers the stasis chambers - could have used a "fan" piece instead, to give the impression of freezing ventilation, but somehow that didn't look quite right. Anyway, too late to change now as both are glued now!
You'll also note (obviously!) that each has an additional girder on the right hand edge - in order to make the Chapter House fit the floor/roof, I need some additional width - damn you angles! Here's an early production pic of the CH floor with the stasis walls in place (ish) - they just about fit, although I'm going to have some serious 'fun' cutting down the triangular pieces. Not.
Brother Payne wrote: Daaaaamn! I was thinking it looked pretty small and then I noticed the Tyranids...
See spoiler for more...'scale' photos lol
Phutarf wrote: Good to see things coming along foto69man - although are you sure you want to catch up with my level of madness/obsessiveness??
I do believe I would like to catch up to your level. I have been watching your build closely and my next step is inner walkways for snipers/scouts/infiltrators ;-)
Was thinking of stained glass on some of the windows too, not sure yet.
This happened today...
Spoiler:
Tyranids(Me) and Blood Angels vs Orks and Grey Knights 1850pts per person
Nice work. I agree the 'boiler' plates work better than the 'fan' plates would have, doesn't seem quite the right feel for the stasis chambers. Handy how those trianglur spaces have turned out just the right shape for.....err, nothing.
foto - Another impressively sized cathedral....woohoo
Re the triangular gaps, I'm torn between cutting down some full squares (lots of hard work) or trying to fashion my own (similarly lots of hard work). The former would mean I'm using proper bits and whatever's left would (hopefully) look good, but the latter would mean more tiles left to use elsewhere... But might not look as good.... Decisions decisions......
Only a brief update tonight, and I'm breaking one of my self imposed stupid rules for this stupid project, and that's by painting something - but I couldn't resist given what it is... So without further ado, after some fun crafting it this evening, I give you the first triangular Chapter House floor plate:
Now, I know the paint job isn't quite as good as the previous test piece, but I'm figuring this is (probably) just another test piece to see if I could get the shape right more than the paint - what do you think? Will it do?
(NB - it's rather daunting to think that the CH floor plate will eventually have over 500 tiny tiles that need painting... Each by hand... )
Oh my! Just back-tracked from a post of yours to find this thread. And... wow! I admire the breadth of vision, the scale here. And the way you take by now familiar building blocks (GW terrain) and bend them to your purposes.
I'll be following this, looking to pick up as many ideas as I can pillage along the way!
GiraffeX wrote:That corner piece looks very cool. This is going to be so amazing when its all painted up
Yeah, but at the rate I paint, the words Sistine Chapel spring to mind...!
GrimDork wrote:Yeah that piece is pretty slick boss, keep it up
Will do, will do...
tinfoil wrote:Oh my! Just back-tracked from a post of yours to find this thread. And... wow! I admire the breadth of vision, the scale here. And the way you take by now familiar building blocks (GW terrain) and bend them to your purposes.
I'll be following this, looking to pick up as many ideas as I can pillage along the way!
High praise indeed, coming from the master of greenstuff! If I had a fraction of the skill you do tinfoil.... Constantly amazed by what you are achieving!
Right, mutual admiration over, and now I'm awake again (damn you sun and dawn chorus), the reason I painted the piece last night was because I wanted to see if I could pull this off without anyone noticing:
As you can hopefully see, it's actually a scratch built bit out of plasticard - ok, aside from the rivets that were incredibly carefully harvested from a spare tile. If you look closely at the "finished" piece the tiny tiles are in no way as crisp a the 'real' tiles, but painted and from a distance I recon I can get away with it. Although it took a damn age to construct, I think it'll be easier to do another 3 (or 7....) off these than butcher proper tiles, which I can use elsewhere - after all plasticard and time are cheap, COD floor tiles are expensive!
Here it is in situ:
Can you spot the join? Lol....
Next update (probably) - stasis controls / holo projector.....
Great work on the triangular sections, making them from scratch seems the way forward - although time-consuming, I'm guessing that it's not that much slower than chopping, cleaning and filing standard bits to shape, and certainly cheaper.
I'm not sure I'd go that far YourIntestines - will be getting some different thickness plasticard at the weekend to see if I can make one betterer... And yes, I tend to agree MT - although as I need to make 8, it's still going to be painful. Even more so when you start to really see the true size of the Chapter House now I've glued together the main floor plate:
And worked out that it's 572 individual full tiles, plus all the odd shaped ones that need painting.....
Awesome as usual Phutarf. Have you any step by step photos of those angled floors? Layer by layer? "Action" shots? Anyway, still following this close like a hawk who is flying too low to the ground.
Hey Warboss - glad you're enjoying the build - cos I'm not. It's giving me nothing but grief ATM and as a consequence my motivation is waning somewhat. Wish I'd never started the second board now tbh, or that I'd chosen to do something with more straightforward bloody angles....
Anyway; the custom build floor paste was done in pretty much the same way as the one I did waaaaaaaay back as part of the balcony on the cathedral - I've got some more, slightly thicker plasticard today so doubtless I'll bore the arse off anyone following next time I cut some up with new pics. Also bought a new pair of sprue cutters as my old ones gave up the ghost last week - can't think why.... It's been a pain trying to remove components without them, I can tell you..
So basically this week in my spare time I've been cleaning up mould lines (such fun) and gluing a few walls together - nothing very exciting in afraid, nor photogenic. The only real update is, after much prevaricating and changing my mind about half a million times, my revised idea for a bell tower:
I'm thinking it's a nod to a minaret. May as well nick ideas from more than just one religion huh?! Lol.... Also with a hefty dose of acknowledgment to Lord_Mortis for stealing his take on the actual bell positioning itself, all be it that my end result will be slightly different - still, credit where credits due and all
Mind you, depending on how you interpret the rules for Armies on Parade, the positioning of the tower could well invalidate the second board, given that the balcony over hangs the rear of the board by a tiles width. Now, I've not seen any formal rule that prevents this, and I'm sure I've seen previous entries with overhangs, but you can beat your life if I did ever enter this it'd be disqualified. I did try offsetting the tower to comply, but just didn't look right and meant using extra wall pieces I can I'll afford (literally) to do so - but who even knows if Games Day or AOP will even still exist at the point either board will ever be finished???
Sigh
So to cheer myself up a bit I gave in and ordered one if these:
Revised bell tower looks cool. Giant projects are always difficult to maintain momentum on. I try to break up projects like these with a bunch of really small, quick pieces. They help me stay focused and keep me from feeling like I'll never get anything done. Discipline is a bitch.
So, this evening I have been focusing on the bell tower once again, mostly on the basis that it's a much more straightforward build than the Chapter House (well - as straightforward as I can let myself get away with, at any rate!)
Now, the main thrust has been on the bell housing itself, as I really didn't like the previous version - it just seemed a bit too... unfurnished. So with that in mind and after looking at various interpretations of bell towers through history, came up with the following. It's not 100% realised yet, but turning out well I think:
Here's the inevitable how to guide... Firstly cut down four basilica buttresses:
(Remember to save the cut offs - will always come in useful elsewhere!)
Then mount thesis onto a square of wall parts (minus spiky bits):
Then add a further (complete) square on top where the Sulla used to be:
So the main issue now to resolve will be how to mount the actual bell, as a ball of white-tac won't cut it - but as this will mostly be hidden, I'll worry about that later.
So that should be it. But after a late night of pondering, felt that the inverted buttresses supporting the balcony didn't quite cut it, looked a bit weedy. So I'm contemplating doubling them up for a really ornate look - what do you think? :
GrimDork wrote: Yeah the new bell housing looks better. Go for the elaborate supports if they aren't a deal breaker. Seems appropriate for imperial Gothic.
After a couple of days away with work, your wish is my command Grim... So herewith I provide for your approval the fruits of this evenings labours: elaborate imperial gothic double inverted support version 1:
Hope you like it
(After all - only another 7 of the bloody things to build!!)
The emperor gave his body, heart, and soul for the imperium architect, you must do your utmost to uphold this honor. Etc etc, a few more pages of imperial doctrine, anyway... it looks quite nice good work
GrimDork wrote: Yeah the new bell housing looks better. Go for the elaborate supports if they aren't a deal breaker. Seems appropriate for imperial Gothic.
After a couple of days away with work, your wish is my command Grim... So herewith I provide for your approval the fruits of this evenings labours: elaborate imperial gothic double inverted support version 1:
Hope you like it
(After all - only another 7 of the bloody things to build!!)
Looks good - I'm a fan of the fancy supports Just a little nitpick though - is it just me or do the two beams not quite look parallel? How it doesn't turn out to be a problem...
Brother Payne wrote:Looks good - I'm a fan of the fancy supports Just a little nitpick though - is it just me or do the two beams not quite look parallel? How it doesn't turn out to be a problem...
yeah, they are very slightly out of alignment, but thankfully there's enough flexibility in them that once glued in place (whenever that might be,,,) they'll straighten up nicely....
Phutarf wrote: yeah, they are very slightly out of alignment, but thankfully there's enough flexibility in them that once glued in place (whenever that might be,,,) they'll straighten up nicely....
GrimDork wrote: That looks great, the damaged portion with the broken railing is excellent especially.
cheers Grim, glad you like it
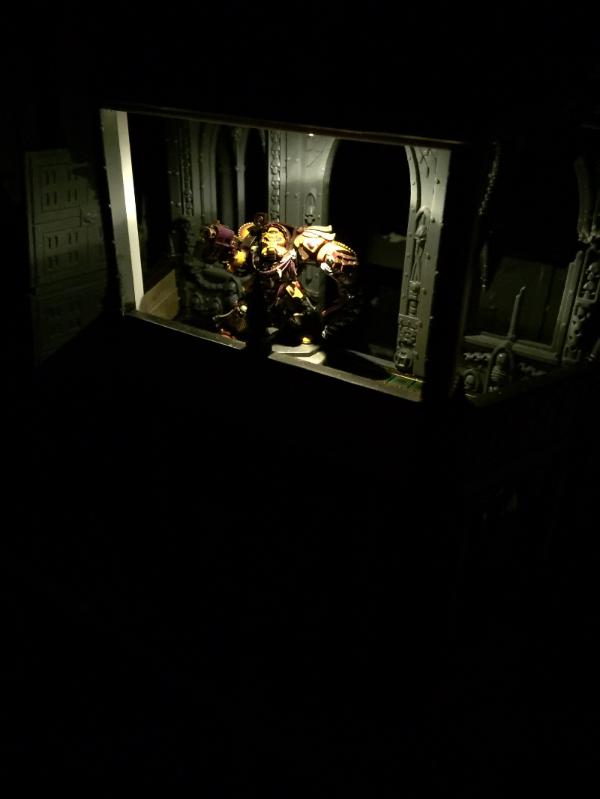
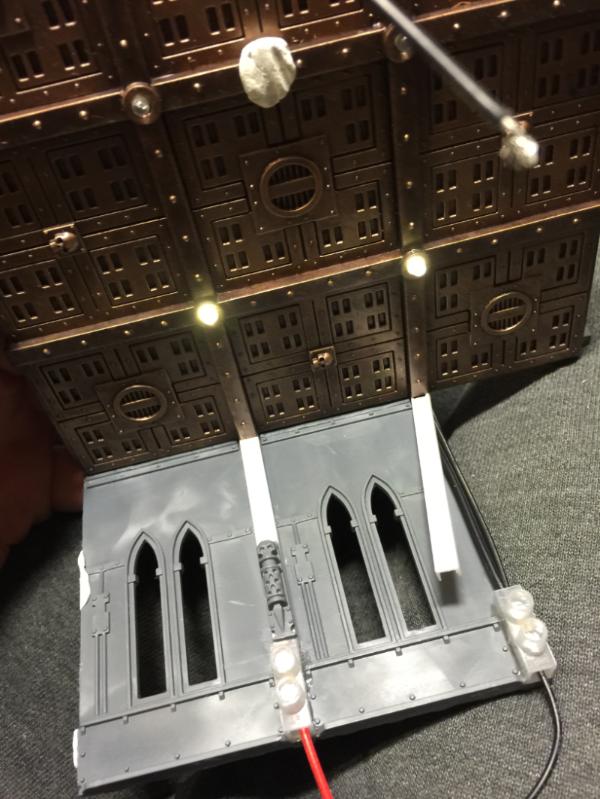
So today's efforts have been on the bell mount itself, and I think I've come up with a solution I can live with. So in reverse order for a change, here's the (nearly) finished item, to be followed by explanations:
Here goes...
The initial solution came from some left over bits I had from the Imperial Bastion Icarus defence laser, namely the 'mobile base':
Inverted, this actually fits reasonably well on top of the buttresses I'd already cut down previously:
Now, I'd been wondering how to accomplish the swing on the bell to show a bit of movement. Initially I'd planned on using the bell mechanism that comes with the Scaven Screaming bell, but by using the piece above a further idea struck me: rather than have a manual bell pull, why not have an automated bell striker? Thus, with a bit of modification of one of the mobile base 'feet' and a COD light, I came up with this:
Trouble is, that sticks out a bit at the back which then blocked the upper rampart sitting neatly on the modified buttresses. Sigh. So I initially tried cutting out a hole in the rear wall, but that looked crap... So what yo do? Well, obviously raising up the section was the solution, but what to use?? A quick rummage about in my bits box, and found the answer - a cut down part from the 'gargoyles' in the COD kits:
These raised things up just the right height to allow the bell stricken mechanism to fit. Only problem THEN was that it rather exposed the bottom of the buttress supports, which are just that little bit too big to fit neatly on the rim of the mobile base.
So I needed to find a solution, which either meant constructing something from scratch, or find a suitable round 'bit' - easier said than found. But then... it's amazing how an empty old Brazen Brass paint point has parts JUST the right diameter to do the job, after a bit of cutting and filing:
The black part of the lid also turns out to fit neatly as the point where the bell can be mounted, once attached to the upper rampart. This was just a cut down floor plate, which I had to re-bulk out in order to get the fit just right:
So that's where I've got to:
Still have 4 more double buttresses to construct, the balcony opening to finish etc etcetc... But it's coming along!
GrimDork wrote: You have lost me in your words, but Boo thinks you are just ducky. That... is amazing. Beautiful, keep going this is excellent work.
oooooooooooook..... Not quite sure what that meant Grim but thanks anyway!
Tower was looking a bit lonely stuck on its own, so work has now begun on the corner of the cloister where it'll be situated:
(cathedral lurking in the background for a scale comparison.....)
Typically, the way I've constructed the actual tower means I'm going to do a heck of a lot of modifications to the floor plates to get them to fit... And just broke my much beloved pin vice drill bit drilling pin holes for all the tower walls
(And woo! Broken through the 20,000 views barrier! Roll on 40klol )
Rogue Wolves wrote:Quite arguably the coolest thing ever built with those kits.
in the words of the late Ian Richardson/Francis Urquhart - "you might say that, I couldn't possibly comment!" But cheers anyway
YourIntestines wrote:I notice that your glue is growing nicely in the background.
What are the pink things in the jar?
lol don't get too excited YI - the glue's been there for ages. As for the pink things - thankfully not my as a result of plastic shards and dust - it's just a label from a jar of black peppercorns I use as a water container used for cleaning brushes (on the rare occasions I paint!)
Later this afternoon I've been working out the floor tile layout for the cloister/chapter house walkways
just enough tiles to finish it without buying any more (aside from the bespoke triangular ones I'll need to make....)
GrimDork wrote:Heh, it was a quote from a Baldur's gate character in the second game.
More or less, i don't have the skills or inclinations to make use of your detailed explanations, however i can still like, very much, what i see
ah... I'm afraid I don't partake of such electronic forms of entertainment, hence the confusion . As for not having the skills - rubbish - anyone can do what I'm doing - just needs time and patience ( something which I am sorely testing of myself ATM....). As for inclination, well, people can make use of my 'handy how-to' guides if they want or not - I'm not precious, otherwise I wouldn't post 'em!
monkeytroll wrote:New version of the bell tower is excellent, and those double butress supports are awesome
Thanks MT. I like them too, just wish I'd settled on something a bit simpler!
Right, having bought yet another Administratum kit (honest, I tell myself, the last one. Really.. Lol) I need some help. I've been trying to find some diamond pattern tread plate to match (or at least as closely as possible) that of the Shrine of the Aquila floor plates, but from what I've seen on various forums (fora?) there's no consensus over which of O, H or HO scale is the best fit. So, anyone got Amy views? My local model centre doesn't appear to carry any (unless I've missed it somewhere) so without a visual I can't really judge...
Ok, so haven't updated in a while, partly because I've been busy with RL, mostly because what I have been doing has been dull behind the scenes stuff - mostly cleaning up mould lines (the bane of my life) and gluing wall panels together - all necessary stuff but hardly blog worthy. Mind you, I'm going to have to clean up soon or else I'm in danger of losing things in the plastic dust and detritus:
That aside, picked up from eBay some 1:50 scale plastic tread plate, which turns out to be slightly bigger than the GW stuff, but you know what, on the basis that the bits I need it for are quite small and can't be seen that easily, I'll run with it. So here's my rough test version of the corner plate needed for the walk way round the Chapter House exterior:
Once everything is painted up and the walls are on, I figure no one will notice the difference in scale - personally I think it looks quite nifty. C&C's always welcome.
Heading into the madness that is August in uni admissions, which means Clearing - so probably a while till the next posting. Hopefully that will cover the fun ideas I've got in mind for joining the two boards together - while still allowing for then to be displayed separately as well....
Well, I know from the views that there are still some of you out there following progress, so thanks for keeping with me: I know this project is dragging it's feet and there hasn't been much by way of interesting progress of late, but trust me, there IS progress going on behind the scenes...
So over the last couple of days I've been working out the logistics of how to have two Independant boards (should I ever actually decide to enter two in Armies on Parade in two stores - I don't think there's any rule that says you can't ) while also being able to join them together into one bigger display as well. Well, here's the solution - at least the work in progress solution at any rate:
Figure 1: Two boards joined together with linking Cloister:
Note, in order to get things lined up I had to dismantle the whole bloody Cathedral again in order to move it 2.5mm nearer the edge of the board. Yes, I am that sad...
Figure 2: boards separated to show linking pieces:
These pieces will, obviously, NOT be glued in place, as they will need to be removable...
Figure 3: insertable wall sections to close off Cathedral:
These will allow the Cathedral to be "sealed" back up - no point leaving dirty great holes in the walls! Also, means I now have a couple off access points should I decide to put any models into that part of the building...
Figure 4: separated Chapter House board:
By adding additional wall sections in I can complete the Cloister (all be it they are pretty ruined - partly aesthetically to help tell a story of a bombed out board, but mostly on the basis I simply don't have enough treadplate tiles to do a complete walkway!). Also with internal crater which I'm not sure I'd use on the combined boards - will need to ensure this can be added/removed as needs be..
As ever, still a HUGE amount to do, even on just this - lots still to consider, such as how exactly to carve up the base plates/movement trays so that I can paint internal/external floors as required (after all, will look odd on the separated Cathedral board if the internal flooring extends out under the wall... Also need to finalise how the top of the walls will work with the "crenalations", what roofing pieces need to be fixed and which removable, lining everything up etc etc etc.... But working these things out is half the fun of this project (these projects??)
Again, thanks for sticking with me. More to come - at some point....
Nifty looking solution to the two boards/one board problem
Could you not have cut 2.5mm off the board?
For the cathedral section, could you have doors to 'seal' it off, with a dirtier version of the internal floor acting as a path? Probably not, thinking about it, but hey-ho I guess a separate piece that fits over the floor with ground cover on is the only real way to go, perhaps attached to the wall sections that fill the gaps? Then again, considering the flagstones around the cathedral, maybe not.
@monkeytroll - I did chuckle when I saw your suggestion about cutting down the board.. Problem however wasn't the size of the board, just where the cathedral was positioned on it - originally dead centre, so there was a 2.5mm gap all the way round - in order to marry up, I needed to shift it (and more importantly the base plates it sits on) to fit flush with the side of the board, otherwise it just doesn't work with the adjacent board. Sigh...
As for the gaps - I did consider doors, but felt that would spoil the aesthetic somehow, hence the removable walls. Just been to my local GW (Cribbs, Bristol - hi guys if you're following ) for some MORE movement trays - hopefully if I get a chance tomorrow I'll be carving these up as I think I'll need to do some interesting 'slotting' in order to have the right painted floor/paving slab arrangements depending on the connected-ness of the boards. (The logistics of this project give me headaches... )
@ Brother Payne - well, they are a good idea - practically, as you can see, they're a pain in the bum!!
Right, must off to the gym now - between that, work (stupidly busy ATM), real life family issues and the need to occasionally sleep, I'm amazed I EVER get any time for this...
That angled hallway in the second piece I'm guessing is way WIP yet? It looks a little wonky as it. That's my only criticism on once again just an absurdly impressive build. Your patience is profound. I would have glued all of this together by now and then regretted it when I realized I needed to go back in to modify something.
This Cathedral project would be great to do an Ascension of Balthasar diorama. Though I suspect it'd take a while to fill the cathedral with dead bodies like it is in the audio book lol.
Just found it today and spent literally my entire work shift reading this blog. I felt your pain about the house move, as my wife and I are about to embark on that adventure in the next month or so and I am dreading packing up all of my Dark Angels and the terrain I have currently. Certainly what I have done doesn't even begin to hold a flame to this testament of gaming love that you have decided to build.
Keep up the amazing work, I know I will continue to follow this and hopefully be able to pull my jaw off the floor soon.
@YourIntestines - I do drop in every so often to the Bristol store, but as I'm up in Stoke Gifford Cribbs is way more convenient when you just have to buy one more COD kit.. Still, if you see a middle aged bloke with stupid beard and moustache in there eying up a landing pad or imperial bastion (or three) it's probably me mulling over yet another terrain idea....
@ Warboss_Waaazag - the angled hallway is soooooo a work in progress that I'm still in the changing-my-mind-constantly phase of pre(ish) construction - the build on both boards has definitely been a case of try things and then change them until I'm finally happy - and them change them again.... So yes, still VERY wonky ATM. But I just love how when things finally get glued it all seems to come together and the obsessive planning and detailing becomes all worth it but don't get me wrong, there are bits I've glued that I've now had to rip apart and start all over - which can be painful both physically and on the wallet....
@ angelofvengeance - I'm afraid I'm not familiar with the source quoted - but the length of time it's all taking me it's entirely possible MY corpse will end up slumped over the damned thing!
@ Lucazi - thanks! Good to have you along for the ride, just be prepared to be in it for the long haul at the current rate of progression. Not sure I can condone the reading of the blog while at work, but I'll not tell if you don't re the house move - urge, horrible experience, but I'm sure you'll get up to speed in no time - just make sure you've put your foot down about dedicated hobby space in the new house! now go put your jaw back on and do some work
Well, after a 2 1/2 hour work out, I undid all the hard work by following it up with a take out Indian, crisps and chocolate binge while slumped in front of the TV all evening... So much for dedication, both to reducing my waistline and the build...hopefully I'll have some more progress to share tomorrow... (About the build that is, not my efforts to get thin!)
@angelof vengeance - ok, I'll try and get hold of a copy and give it a go
@Warboss - haha thanks - I wish I liked them - anything that isn't a standard right angle on this build is a right pain in the arse....
Anyway, onto today's promised progress, namely how to get the boards to marry up, or not, as the situation dictates. And, if I do say so myself, I'm pretty chuffed with the results
So here goes:
Step 1: cut some seemingly weird shaped pieces out of a couple of movement trays:
And add them to the bottom of the cathedral, along the edge facing the second board:
Step 2: add the wall 'plugs' to the removed pieces:
Step 3: for a separate, single board Cathedral, slide said pieces into the gaps:
Et voila! Once all the surrounding bits of the cathedral are glued solid (and ok, with a small amount of white tak to the base of each piece ) the walls will be sealed and you shouldn't really be able to see that they are separate pieces at all...
Step 4: for a combined board, repeating the cut movement tray pieces, add the 'bridging' piece wall sections (just the one photographed but you get the idea):
Step 5: slide the piece in place, along with board no.2 and voila! One integrated cloister!
(yes, I know, I've got to sort out the ceilings and holes etc etc but one step at a time please - there are only so many hours in the day )
Step 6: for a separated second board, simply add additional wall pieces to the side of the board as required:
So there you have it, loyal followers, my solution to my insanely stupid idea of having a two-in-one idea for the boards. Now both floors can be painted appropriately as internal floors or external flagstones without ruining the general affect of each separate board or the double board
I'm off now to have a lie down - hope you've enjoyed the latest instalment of a middle aged mans descent into total OCD madness
Just realised that it's been over two months since I last updated this blog.. And bloody ios8 has killed my update, once agin! Grrrrr
Anyway, this project isn't dead - just resting while I concentrate on my side project, from which I'm learning a lot about how to - or rather how not to - paint buildings. This will be invaluable once I actually tackle painting the cathedral!
Have set myself a deadline of 2017 to get both boards and armies completed, on the basis that if I don't have them done by the time I'm 40 I'll never finish the dratted things...
Enthusiasm is creeping back in again... Had fun this evening doing another test panel for the Cathedral incorporating some of the 'techniques' employed on the Manufactorum project - have decided that I quite like the idea and look of 'enameled' sections:
(Only the bottom left panel is finished)
Not sure I've got the process totally correct yet but I'm getting there with it...
hk1x1 wrote: That is a very nicely painted piece, don't be surprised if i start asking you for painting tips some time next year .
Well, I don't think my 'skills' are such that I'll be doing that, but thanks anyway :p
So, I've done some more work on the test piece - think I've got the glass/enamel process sorted now - the secret is the application of the gloss varnish at the end - however, taking decent photos is proving difficult:
That aside, I've decided to stop with the manufactorum for the time being and actually start painting the cathedral. Yes really. The first piece will be part of the ruined section housing the energy plant/mechanicum shrine, which I've finally finished modelling this afternoon - the plan being that I can make more mistakes on a ruined part thsn starting the paint job on an I damaged bit!
(Photo of section to follow in edits as I can't get more than one pic on a post atm without losing all text)
It's great fun inspiring others Coldwill, although I would suggest no one else embarks on such a scale of lunacy unless they are declared clinically insane...
As for the verdigris Warboss - I caved in and bought the GW specialised paint on a whim - turns out to be quite good actually! Still learning the best way to apply it but it'll definitely come in handy on the project
Automatically Appended Next Post: Blimey... This painting malarkey is going to take me a while...
Quick update on today's progress - after undercoating black and base coating last night, applied a VERY liberal wash of Agrax Earthshade:
(Manufactorum forlorn in the background....)
Then after waiting an eternity to dry, proceeded to 'wetbrush' (like dry rushing, but wetter ) the base coat back on top ( rykarth flesh or whatever it's called)
Followed them by Palid Witch Flesh and a final white on top of that (mainly on edges but a bit on the walls too)
Obviously only half done on the final stages ATM, and still have to do the interiors.
Then I'll need to reapply some shading to recesses and general dirt/grim, although I'm now eyeing up some Forgeworld weathering powders. Then I'll start on the metallics, and finally the interesting green bits!
Thanks Physh - although at the rate in painting it'll take even longer than the build (which still ain't finished!). But yes, this isn't going to be your standard, grey, drybrushed boring building - this is going to be blinged to the max lol
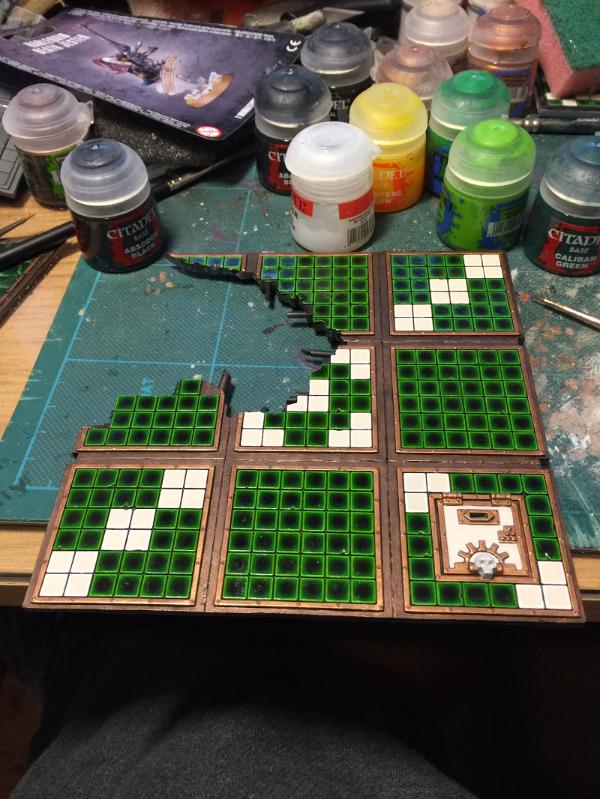
On that note, I've been experimenting with floorings:
While I could stick with a straightforward black and White checkerboard floor, I'm quite taken with doing a green glass type effect to complement the wall panels - but it's tough to get a consistent look, and the texture on the movement trays doesn't help. What do you think? (Nb - it's only the bottom middle two tiles that are done, just in case you didn't realise!!)
The glass effect looks spot on my nan had some old victorian tiles that looked just like but the cheque tiles look great I might have to borrow that approach
Glad to hear you are taking a different approach to the colour scheme, it would be a shame not make that no wait an insult to go a standard scheme approach to this
Liking the green tiling, as you say it ties it in nicely with the wall panels. A little bit of inconsistency in the tiles isn't an issue - there would be minor differences in the tiles anyway, and wear and tear as it's a floor would only add to that.
Are you planning for them to be all green, or maybe some kind of checkerboard effect utilising the green?
Thanks guys. I'll persist for the moment with the tiles then, although I do need to get some of the new paint range as I only have one pot of dark Angels green left, and that's not going to last if I do ALL the floors like this!
The effect is (in theory) quite simple- black undercoat, orchids flesh base, dark angels green layer. Then blend a tiny bit of black ink into the centre, and wet blend goblin and snot green towards the edges. Once dry, a couple of coats of gloss varnish, and hey presto.
The problem I have is making sure the dark centre is balanced by the highlights so that neither is too prominent - but then I'm a fussy bugger...
At work today (on lunch break) so need to get a job lot of new greens and try and replicate afterwards - more updates to follow....
Oh, and still haven't decided exactly what tiles will get done like this (if I do) - will probably be a mix of black/white and then a 'feature' bit in green glass. Probably
This will look amazing when it's done! Caliban Green is the new Dark Angels green if you didn't know already. Or if you wanna do lots of it you could try and get your mitts on the Caliban Green spray can (not available now at GW but I'm sure if you do some digging on eBay or independent retailers you should find some)
hk1x1 wrote: That is a very nicely painted piece, don't be surprised if i start asking you for painting tips some time next year .
Well, I don't think my 'skills' are such that I'll be doing that, but thanks anyway :p
So, I've done some more work on the test piece - think I've got the glass/enamel process sorted now - the secret is the application of the gloss varnish at the end - however, taking decent photos is proving difficult:
That aside, I've decided to stop with the manufactorum for the time being and actually start painting the cathedral. Yes really. The first piece will be part of the ruined section housing the energy plant/mechanicum shrine, which I've finally finished modelling this afternoon - the plan being that I can make more mistakes on a ruined part thsn starting the paint job on an I damaged bit!
(Photo of section to follow in edits as I can't get more than one pic on a post atm without losing all text)
OK I have to ask as this is bugging me everytime I look at this picture why is some of the plastic showing ?
The thing is are you painting directly on to plastic or is it a undercoat that is just very close to the original plastic colour ?
Could also be using primer by hand or that gesso stuff. It's starting to get cold where I am, could very well be keeping indoors for all of the painting now
Alfndrate wrote: It appears that phutarf is painting directly on to the plastic. Honestly with how everything looks, I wouldn't bat an eyelash at this.
It's not that it annoys me or I think it's wrong I am just amazed the paint is staying on the plastic without any issues, I have found directly applying paint without undercoat has some irregular or unsightly effects however this is doing the opposite.
More a case of envy on my part
I did chortle a bit at the discussion going on here... Just to clear up any misunderstandings, the piece you were referring to lone dirty dog is simply a test piece, and as such the bits that look like raw plastic are just that - they didn't gey under coated. Everything else with paint on starts with an Abaddon Black coat or two (although being a Luddite, this is ALL done by hand/brush - no spray paints or airbrushes here thank you!)
That said, the new GW Base paints do appear to work quite readily straight onto the plastic I find - but I'm old school, so even the White bits get a black undercoat - I find it gives the finished effort more depth.
As for envy - well, I don't think I'll be winning any Golden Demons any time soon, so I guess it's all in the eye of the beholder
Thanks for clearing that up I just could not work it out as I figured that you had under coated other parts with black, so seeing the grey made me wonder if it was grey undercoat or just plastic.
Any way that's that resolved so thanks for clearing that one up, and you should realise you have talent and yes I am envious of it
Well, another weeks gone by with seemingly little progress...
Ok, that's not entirely true. I have made SOME, just not a lot that's visable or pic worthy. Here's the WPI shot for you - Metallica are coming on nicely after a bit of trial and error on the window 'bling':
The original gold was too yellow for the rest of the colour scheme, so had to tone it down a bit - I think this muted tone works well.
Have also been doing some additional modelling/gluing/undercoating to keep things ticking over while I try to get the greens right. Turns out the Caliban green is a very poor substitute for Dark Angels green, so had to wait until I could get back to my local GW store today to try out some alternatives - more experimentation will now occur using Lamenters yellow glaze - I hope to have some results for you later this week!
Dear god man, if you ever get this done all the way it's going to be one of the most stunning pieces of scenery ever. I mean even in sprue grey it's impressive, but your colors are really nice.
Of course, I know exactly what's going to happen once it's finished - I'll cart it off to a store for Armies on Parade and trip over or some such and break it into a zillion pieces. Years worth of work gone in seconds and a grown man reduced to a pitiful sobbing wreak...
So I don't understand how "blog view" works, as I went through it and came here to comment yet there is stuff here that isn't in the blog view?...
Anyway, looks awesome, I really dig the paint scheme you are using. At first I thought this was going to be one ugly grimdark building of same GW parts, but that paint job looks so good and unique. I can't wait to see it done.
GrimDork wrote: Dear god man, if you ever get this done all the way it's going to be one of the most stunning pieces of scenery ever. I mean even in sprue grey it's impressive, but your colors are really nice.
I second that!
and if anyone would ever ask me to show them something "awesome" or "epic", i would link them this thread..
jabbakahut wrote:So I don't understand how "blog view" works, as I went through it and came here to comment yet there is stuff here that isn't in the blog view?...
Anyway, looks awesome, I really dig the paint scheme you are using. At first I thought this was going to be one ugly grimdark building of same GW parts, but that paint job looks so good and unique. I can't wait to see it done.
Yeah, I've never quite worked the blog view out either jabbakahut, so stick with the standard view... As for the paint scheme - I could have gone for the same industrial grey dull dull dull that everyone else does, but.... no. While it would have been quicker (soooooo much quicker!) it wouldn't do the building justice - so like you, I can't wait to see it done either!
DiDDe wrote:
GrimDork wrote: Dear god man, if you ever get this done all the way it's going to be one of the most stunning pieces of scenery ever. I mean even in sprue grey it's impressive, but your colors are really nice.
I second that!
and if anyone would ever ask me to show them something "awesome" or "epic", i would link them this thread..
Thanks DiDDe. You can also file it under "insane"....
Sadly, back at work - how did it get to be monday again already? - I'll attempt to get some more wip pics this evening for you all. Chow for now...
So glad you took a different direction to the traditional Grim Dark scheme as your pallet choice has breathed life into this magnificent structure, I also like to think that due to the status of this architectural brilliance the colour reflects that.
Like it was designed to stand out amongst the rest of the cities dwellings and to have a sense of importance and grandeur, either way its bloody marvelous in every way and you will need an entourage if you ever leave the house with it
Ok then... Here's today's update - not much in terms of volume but plenty in terms of process refinement:
Turns out that the Lamenters glaze works a treat in making the Caliban green greener
The biggest problem I now have is that it's going to take FOREVER to paint all the tiles like this...
lol - thanks LOne dirty dog, GrimDork & OneMAnNoodles. I can now state with some certainty two things:
1) painting this thing is going to take as long, if not longer, than its taken to build it (and considering it's not finished, that might be longer than anyone imagines!)
2) in order to get time to paint it, I'm going to get fat again, as I've been missing gym sessions like crazy now :(
Anyway, here are a few more wips from tonight's efforts:
Made some progress on "whitewashing" interior walls:
Started to re-coat the details, but that get REALLY tedious. Will need to do the Manufactorum walls at some point, obviously...
Exterior white work completed on the lower front piece - difficult to get it all in shot due to the angles though:
And the reverse - interior whites done (as you'll be able to see some of it from the exterior - great - twice the amount of painting...) and a start on the metallics and tiles:
And an over head to show the contrast between the base colour of the tiles and the finished ones - amazing what three paints, one glaze, a load of varnish and a lot of time can do.. Although it's really frustrating that I have to do everything else BEFORE the 'fun' green parts...
So, as with the build previously, do you lot want to see more WIP pics or more 'final' pics?
Hell Yeah !!!!!! We want to continue on with your pain and grief to complete this project ........................ if only in a supportive role at least LOL
If I took a break from the project Grim, I'll never finish the bloody thing... And thanks Stormwall - I'm loving the green to be honest, it's my favourite part to do. Trouble is its often the LAST part I get to do..
Anyway, sorry for the outburst previously: after a long a boring week of work, what happens? I come down with a cold at the weekend of course. So have felt like crap all day, and in order to get any painting done, have had to shove wads of bog roll up my nose to prevent leakage.. Leading to blocked sinuses and a stinking headache...
Of course, my mood hasn't been helped by the painfully slow progress I'm making on the project - everything I do seems to take about a zillion steps, with drying times making things even longer. Oh, that and my stupid, crippling attention to detail.
So here's today's pics as I can't do any more today or I'll go insane(r).
Firstly - interior metallics, now finished, all bar any corrosion. Do you lot have any idea how long it takes to pic out all the details and dry brush things WITHOUT getting anything on a previously whitewashed wall??
Mind you, when I say attention to detail, what I really mean is OCD - because if parts of the walls are torn apart, you ain't going to see whitewash are you? No, you'll see the base material:
So in between doing that I've managed to whitewash the exterior walls (destroying yet another medium dry brush in the process - it's going to cost me a small fortune to keep replacing them) and some more of the green roof tiles:
And the rest of the green glass panels on this piece:
The good news is that I have now successfully replicated the process using new GW paints - the test piece using the old ones on top of the new paints bit below. Spot the difference? No? Good!
On a slightly more positive note, my latest FW order has apparently been dispatched, so assuming I've not succumbed to man flu, I'll have something to look forward to picking up from work on Monday
Right, I'm off to mope for the rest of the evening. You might get more tomorrow, if I'm feeling up to it....
Is that all you got done ........................ Only kidding I could not even begin to take on a project of this size so i take my hat off to you sir for that alone
The paint really does look amazing and the detail you have picked out is really crisp and well lined, on top of that the glass tiles replicate life extremely well must borrow that technique for the future
Well take a rest and let Nurgle do its worst hope it only a short stay mind, and I can't tell any difference between the old and new paints
Thanks for the compliment LDD - you know, I think it might be a result of deciding to do a pre-heresy Death Guard army that Papa Nurgle has struck me down..
As for people borrowing techniques, both you and Stormwall are more than welcome to do so, as is anyone else for that matter. It really quite simple in theory, just the execution than needs a bit of patience:
1) black undercoat
2) base of Caliban green
3) wet bend black ink (but thin black paint would work just as well I guess) to shade
4) wet blend Warpstone Glow to highlight
5) very thin line of moot green to edge highlight
6) cover entire surface with a wash of Lamenters yellow glaze (may require two coats got desired level of 'greenness')
7) the tricky bit (lol) - cover with gloss varnish. The tricky bit is ensuring that you've put enough on so that the finish is smooth (drying horizontal is a must) while not putting so much on that it goes lumpy and ends up looking terrible. Generally I find that I do two coats - the first invariably is too thin and ends up with brush marks in it, but a second one to even things out has (so far) gone ok.
With the wet blending - I'm afraid it takes a while to do and also usually a great deal of saliva/paint eating due to the need to clean brushes between paints quickly... Don't do this at home kids (wait until your old and past it like me lol )
Thanks hk1x1. Sadly there's a price to pay for the detail/standard, and that's time. Maybe if I break a leg or something I can get some extended time off work....
Anyway, feeling a bit more human so made a bit more progress this evening. Because I like to flit from one bit to the next, have started in the ruined Eagle. For those that have been following for a while, you may recall my original test eagle was a coppery/gold affair:
Well, having stated painting in earnest, I was struck after having doing the whole thing with an undercoat of Warplock Bronze and then putting the test beak back on that it reminded me of something... Cue a quick google search, and yep, something that should keep my American followers happy:
Consequently, a quick repainted of part of the test eagle later, I now have a new, darker, Eagle, which, after another comma, lol, I think works better with the rest of the scheme - the contrast with the white walls weally..... *ahem* really looks good I think, plus means the green spot colour will really stand out. Well, I think so anyway...
Obviously there is (as always) a heck of a lot still to do - the real beak needs painting for starters - but it's coming along. I'm particularly happy with how the blast door has come out:
Again, lots of detailing still to be done, and I wish now I'd just completed the over head light fitting in the same metallics rather than having to do that separately, but hindsight is a wonderful thing - will come in useful on the remaining 5 I have to do on the rest of the building....
That aside, now that painting has commenced, something else I touched on further back in the thread has become much more apparent. As such, I've made a couple of tentative purchases off eBay today, which I'll update you about in due course, but for now, here's a teaser spoiler...
Spoiler:
Right, time for a quick catch up on other projects and then bed...
@LDD - don't worry, the race/beak will get a proper paint job in due course.
@Stormwall - thanks - I'm sure he would. Wish I could get him to paint them tho!
Anyway, just a quick update today - and please bear in mind that this is my first foray into this territory - but now I've started, welcome to yet another can of OCDISH worms...
Well, it may seem slow to you, but having missed a handful of updates I can see definite progress here. The green tiles are looking fantastic in situ, this thing is going to be gorgeous when done.
And if you're starting with lights, does that mean you need to go back and start pulling things apart to do some re-wiring?
He was secretly plotting in y'know, secret to make his builds better in the holiday season of winter, as he counted on us getting lazy and fat with holiday food and winter related injuries. Oh cruel fate!
God, this thread is awesome. I'd love to do this kinda of thing but, my girlfriend would kill me due to the money involved. Phu is a good kind of crazy.
By which, as my long suffering partner will tell you, I am now in the full grip of an obsession. Which will not be quelled until I have managed to placate the urge to take it to its fullest extent. This normally manifests itself with wanting to buy shiny things - hence the magpie (and what could be more appropriate in this instance) and my now expanding collection of FW kits that steadfastly refuse to get built but. I.. Must... Have..... (Am also desperately fighting a losing battle against the current FW Knights bundles. Despite having a Reaver, Phantom and Warhound that I've not got anywhere near finishing. Sigh. Thank god for having no money ATM)
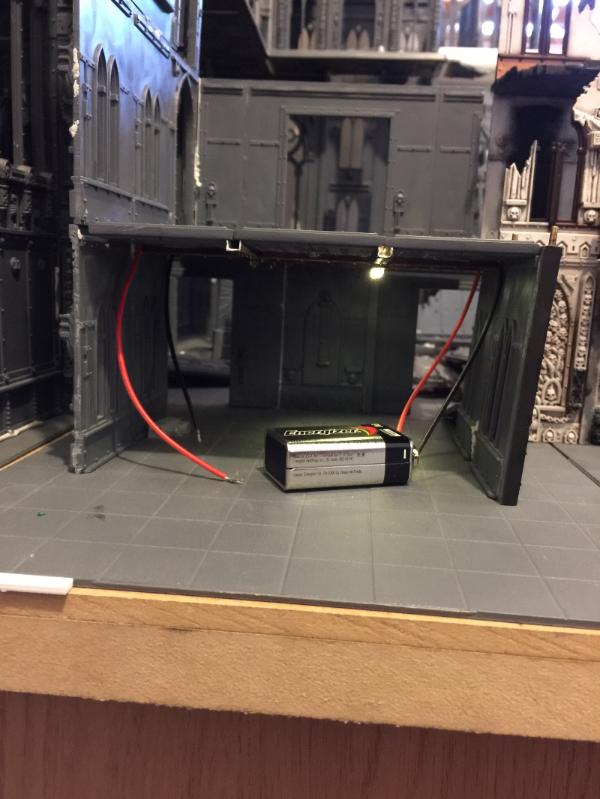
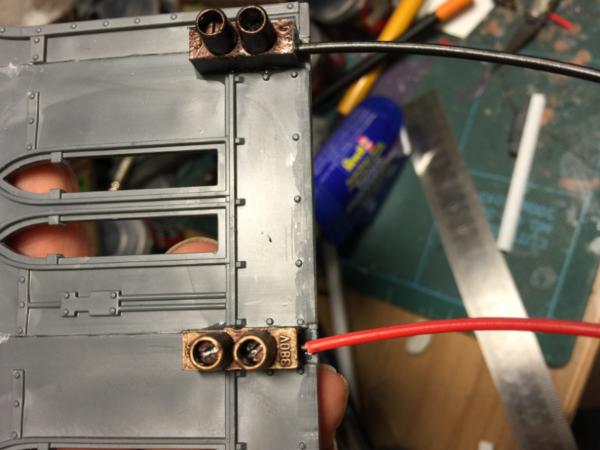
So now I'm going to HAVE to explore the wonderful world of model lighting. The current kit I got off eBay dirt cheap is nice and all, but to do the build justice I'll have to do things myself - God knows how long and what cost this is going to take
So a bit more playing around:
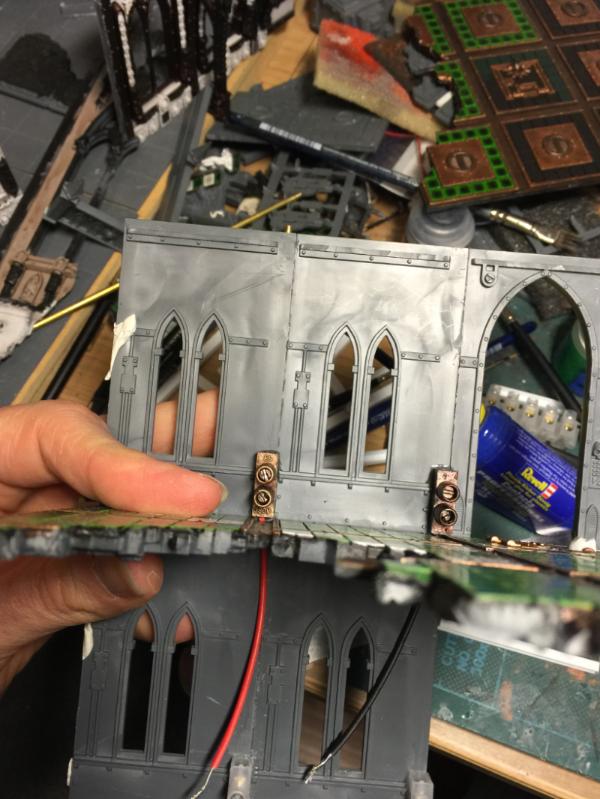
(Nb - this is a far more realistic representation of the actual light ATM - went for a 3mm warm white assembly - I think I'll need to up that to bright white, experiment with different size LEDs etc)
And the reverse:
Of course, NOW I need to figure out where to mount lights. Which can't be in places easily visible from the exterior, but provide good illumination. And where and how to hide the wiring. And how to feed everything from the battery store in the Manufactorum. And the whole voltage/resistance/ohms stuff - and I hate maths and physics. And the merits of soldering verses not soldering.
Thankfully Monkeytroll the build hasn't really progressed any in terms of its glued togetherness, so it should be fairly easy (HA!) to accommodate everything....
Dremel a groove into the joins to slot the wiring into is what I would do, since its just a butt joint, if you are careful you can pull it off.
Try Rapid Electronics, they'll (LEDs, resistors and a spool of wire) be cheaper than whatever you are paying to someone on ebay. If that helps to feed the magpie ...
The only option that I had was half round rod lay the wiring under it and make it part of the scenery itself, maybe inlaid piping or some kind of electrical cable it could represent.
There's a variety of conductive tapes that are used in wiring doll houses as well, they could be useful. No link at the moment as I'm on my phone, butyou could try Hobby's - they have a lot of doll house electrics on their site.
JoeRugby wrote:Good luck with the magpie Phutarf. I suck at wiring so can't be of help sorry
thanks JR - I'm resisting the urge to splurge the cash - so far... But it's only a matter of time...
OneManNoodles wrote:Dremel a groove into the joins to slot the wiring into is what I would do, since its just a butt joint, if you are careful you can pull it off.
Try Rapid Electronics, they'll (LEDs, resistors and a spool of wire) be cheaper than whatever you are paying to someone on ebay. If that helps to feed the magpie ...
The magpie needs no encouragement at all OMN - but thanks for the suggestions. I don't actually own a dremal ATM, and while it'd be one solution I'm not sure I want to be cutting more plastic out of the structure ATM - although I'll inevitably have to make some modifications.
leopard wrote:Model railway tip, you can get conductive paint to use in place of wiring, then paint over it - good for small LEDs in awkward places. By the way this whole project is jaw dropping
monkeytroll wrote:There's a variety of conductive tapes that are used in wiring doll houses as well, they could be useful. No link at the moment as I'm on my phone, butyou could try Hobby's - they have a lot of doll house electrics on their site.
Cheers both to Leopard and monkeytroll - I've done some investigations into the conductive paint ideas but tbh, I think I need to go the old fashioned wires route - just seems a bit more 40k somehow! Oh, and as for jaw dropping.. Well, glad you think so. It's becoming a right pain in the arse to tell the truth!!
Miniature13 wrote:Nice project, i love seeing stuff like this come together Will keep an eye on this!
glad to have you along for the ride Miniature13
lone dirty dog wrote:The only option that I had was half round rod lay the wiring under it and make it part of the scenery itself, maybe inlaid piping or some kind of electrical cable it could represent.
Funny you should say that LDD - I was thinking along the same lines, to the extent of visiting my local hobby store and purchasing some plasticard tubing yesterday. The results are as follows:
For this bit of the Chapel area, I've decided to have a totally separate, integrated power/lighting rig, as I'm going to leave this free of the rest of the building, so that I can get access to the interior (this, rather than the roof, as the way that fits means it'd be virtually impossible to take off/on.) this way I don't have to run wiring throughout or under the WHOLE cathedral to get to the current battery store area, plus can get to the Gubbins easier should anything need dealing with... Well, that's the plan.
Obviously, as always, lots and lots to do, but I'm pleased with the overall direction of travel. The pre wired LEDs fit (with a little persuasion) neatly into the tubes, and I've found that the plastic guards you get with GW brushes are great at fitting over the exposed LED itself, focusing the light into a more confined and therefore brighter 'light fitting'. Only problem with this is that the length of the wire the LEDs are connected to isn't quite long enough really to be able to hide everything easily - so I need to decide whether to buy individual components and fit them together myself or do some bodging... Need to mull this one over a bit more..
Quite pleased though with the way I'm going to 'box in' the battery - still a few things to work out but should look nice once everything is hidden!
Where does the time go... Two weeks since last posting, but the December is a busy time of year...
Anyway, haven't made any progress on the lighting side of things as I've not had the time to get supplies or really work out logistics, but have been doing sone more painting:
Walls completed, metallics picked out, base coated Warplock Bronze and washed with Agrax Earthshade:
Highlighted with Hushut Copper and then Sycorax Bronze:
Copper details picked out with Hushut Copper, washed with Agrax and re highlighted as above - and each rivet individually highlighted:
Green sections (inc lights & display panels) & pressure valve faces base coated:
Although no one will be able to see any of the damned thing anyway once it's in place:
The next question is whether to try and do green glass effects on the internal sections or just leave them as a painted green - I'll have to think about that.
Also been working on the external door and steps:
A bit further on and with more of the green glass panels completed (also virtually finished the white bits between the wings and the damaged wing itself):
Epic... Yes, As in scale Master... I think Grim had it right!
As for odd, Noodles - in what way? I kind of think it's fitting for a mechanicum bit of the build - after all, it's probably maintained by some weird arsed shaped servitor...
Lol no worries mate. And to be fair, it was the only doorway bit I had! Thank goodness for 40k fluff.. (That and its not painted regulation mechanicum Red)
Amazing work on the eagle's wings, and the green yet again. As for the dremel, I am quite surprised you weren't using one this whole time. My dremel costed maybe 12$ usd, was worth every penny when it came down to sanding down Sanctum Imperialis doors.
The rate at which you progress astounds me. Oh and I stole your green process for my Space Marine chapter, so thank you.
Cheers both GiraffeX & Stormwall - although I'm assuming that you're astounded by the incredibly SLOW rate of progress - honestly, if I can't find ways to make the painting faster, or not care so much about the finish, I don't know if I'll ever get this finished. And I've got a ton of FW stuff just sitting waiting...
(As for the green technique - glad you find it useful: make sure you post some examples, I'd love to see them )
Looking very swish with a bit more paint on it. Love the shot of the door where you can see the steps reflected in the tile-work, the high gloss really sells the 'glass tile' effect.
Yeah, I'm liking that effect too MT - the Chapel roof on the other side of the building (assuming I don't have an aneurism doing it) will hopefully look spectacular. Watch this space. Although it's a long time in the future, I expect.....
whalemusic360 wrote:Hot dang, that's an impressive haul! I'm more then a little green with envy.
and that's only part of it... I keep telling myself that one day I'll build and paint ALL the FW stuff I've accumulated. One day...
monkeytroll wrote:Ahah....they must be for when you turn the manufactorum into a hangar, right? Good plan
hahaha monkeytroll - NO.
Anyway - after a hiatus for Xmas (how I loath that particular holiday - don't ask) I'm back - and very nearly at 30k views! I'd never have thought that was likely at the start of all this, believe me...
So, as I STILL haven't gotten round to doing anything more with lighting, I've been doing some painting work on the rear section of the ruined side, as this will only need one LED and I think I know how to do that one with minimal effort/damage to paintwork, so rather than delay/procrastinate I've cracked on. So here, for those that don't recall, is a shot of the area in question:
Unlike the green tile floor plates, the walkway/roof on this section will be all metallic, so first job was to decide how to do this. To keep things reasonably simple, went for a straightforward three shade base (Warplock bronze, Hashut Copper & Sycorax bronze:
The whole lot was given two heavy washes of Agrax Earthshade, allowing for variation of pooling in the copper areas:
And finally highlighted:
Overall, I'm pretty happy with the final effect - just need to weather the broken edges and bullet holes with verdigris effect, but that'll most likely happen once things are finally glued in place.
Over the last couple of days I've been doing some of the walls and the broken 'sticky out' bit. While the painting of theses isn't hugely difficult, as it's just the same process as for the other white areas I've done, by god it's bloody fiddly, and is taking AGES. While I love the detail on the kits, if you do anything more than a standard one colour dry brush picking the details out is a nightmare... Anyway, here's a couple of sequences of the exterior and interiors - base/shade, white fully completed, and detail re-primed:
Exterior:
Interior:
Put together with the rest of the area:
Today I've been starting to pick out the details:
[url=http://www.dakkadakka.com/gallery/674375-.html]
[/url]
Eventually the windows will look like this:
So much still to do! More progress tomorrow with any luck. Thanks for stopping by....
Bufo bufo wrote: Awesome to see this still evolving. I almost hope you never finish it and it keeps growing and growing.
I bloody hope not! I want to get on with some minus at some point in the next decade!!
Anyway, a brief update of this mornings work before I quit for the day in favour of a Game of Thrones-a-thon - a before and after shot of the metallics (ok, after and before):
The one on the right is just a base of warlock bronze washed with agrax - the joy of all this is to try and avoid getting the White too messed up by the drybrushing of Hashut and sycorax. I'll need to do a spot of tidying up but generally it's not been too bad... I'm just rueing the day I decided to do this - the stages take so damned long!
The interior:
Not sure if you can see very well, but another bit of madness is to try and preserve the white between the interior frame and the skull decorations bit either side... Goodness only knows why!
Now I'm wondering whether to pick out the cables etc between the skulls...
Incredible.... The modelling and composition of the whole piece was great.. and then came the paint.... and it has raised it right up to the top level! Really inspiring work!
SisterSydney wrote:What amazing work. Exalted. Now just put the cathedral on tank tracks...
thanks for the feedback SisterSydney (although tbh I've never worked out what exalting actually does... As for tracks, I think that'd be a step too far, even for me!!
wolfmerc wrote:Now reading this thread Is certainly a good reason to not go to bed until after reading it at three in the morning!
lol - the rate at which things are progressing wolfmerc you'll gave plenty of time for sleep before I'm even a quarter finished :(
MagosBiff90 wrote: Incredible.... The modelling and composition of the whole piece was great.. and then came the paint.... and it has raised it right up to the top level! Really inspiring work!
cheers MagosBiff90, although, while ok my painting skills are reasonable, compared with lots of others out there they aren't what I'd call top level - more a case of quantity over top quality!
Kelly502 wrote:Really great work!!! Would love to see the table it will adorn!
thankfully Kelly502 there is no table as its a display piece only really. Maybe if I quit my job I could think about a table... I have plenty of other building ideas bubbling away, but the 2 and a bit builds already on the go are waaaaaay more than enough to be going on with!
Anyhoo, enough preamble. Although it's been a while since my last post I've been busy behind the scenes, mostly working away on little details. Details details details, so many ruddy details!! Although I have made a start on the ruined roof:
In order not to make the post too long in one go I'll spoiler the next bits:
1) the (almost completed) rear ruin:
Spoiler:
"Just" need to do the green scroll bit, and then work on the exterior wall metals. And interior wall. Etc etc etc!
2: the evolution of "'Sam' the American Eagle" from test piece through to pride of place:
Spoiler:
The original test head
Basic whites completed as per previous descriptions
Metallics re-undercoated
Base metals
agraxed
Highlights stage one
Highlights stage two
In place
And started work on the weathering...
While I STILL have to finish painting the Manufactorum bits below, I've also finished putting together the 'chimney' that leads to Sam:
Debating whether to look into getting a smoke generator to actually blow smoke out his eyes though!! Oh, and btw, it took bloody AGES to paint/highlight the dratted ladder too...
Finally for today, this little lot turned up in the post yesterday:
Just waiting for some wire to turn up from a different source and then I can really get going on lighting things up!!
I think that'll do for now - there'll be more when I get the chance....!
Oh great. Now I have LED's, wire, bits for mounting them - and the resistors I've got won't let me do more than two in series. I'm going to have to do Maths!! and then wait for new ones to turn up, once I source them!
angelofvengeance wrote:Really liking how this Cathedral is coming! The green tiles have come up really nicely!
thanks angel - they do, don't they?
Well, following on from my outburst earlier... Just frustrating when I thought I had everything in place to sort out the lighting that I'm back to logistics again - that comes from being an electrical novice. Still, I've done some work on how I'm planning on mounting the LED's in the main tower - basically there will be four LEDs in a series in the 'crosshairs' of the roof tiles:
Hopefully this will provide more than enough light to see the interior detail plus any minis therein. The actual custom mounts consist of a couple of concentric plasticard tubes, cut (very carefully) to size:
The inner ring fits pretty snugly round the neck of the 3mm LED:
And the inner ring is a perfect fit for the outer ring, with groves cut for the plastic covering for the wires:
Although I've not yet quite worked out how I'm going to solder the LEDs to the wire and cover it - but I'll work on that once I've got the right resistors and figured out the whole wiring logistics.... Oh, the 'error' was a quick doodle I'm thinking of using on the small display screen on the ruined section at the rear of the building - see previous pics for details
Although I want to get the wiring sorted out so I can then get cracking on painting more of the main body of the build, thee are still plenty of bits left to finish on the ruined section. So a progress shot of the roof/doorway I've been working on:
I'll obviously need to paint at least part of the actual door to be used as debris too - what fun....
... and the sun will have swollen into a red giant, consuming the Earth? Yeah, I have projects that feel like that too -- mostly stuff my wife wants me to do, though.
Urgh. Maths aside (and I'm now tepmpted to try and run everything in parallel rather than series just to make my life easier) the logistics of physically wiring up the lighting rig for this model is becoming a real headache. Unlike most LED's in models that I've seen, virtually evey mounting/wire will be visable - i.e. I can't just hide away the wiring loose "behind the scenes". This is making the placing of the wires, not to mention how to actually solder them up in situ, difficult to say the least....
Parallel would be better anyway because then when an LED burns out you can just replace it instead of checking every single one to see which is out, right?
In theory yeah - however,in practice I doubt I'll ever be able to replace anything as I'll pretty much have to glue holders etc in situ - I'd have to break the building apart to get to anything.... Parallel means I won't have to worry about whole circuits failing if one LED goes, but does mean having to snake additional wires, and find ways to hide them... Argh!!
Honestly though, having seen the wires you're using, they're quite thin.
In my mind it's not something to necessarily hide- it's actually adding more detail and more realism to the model!
(A bit more annoying to paint though )
Lol there'll only be a bright side if I can get the damned LEDs to work!
(And I bet Blackadder would laugh in the face of my lighting woes.... Just look at his freaking awesome projects!!!)
Automatically Appended Next Post: Ok, minor update - more background detail painting this evening, so won't bore you with that, but have finished my first proper buttress piece (please excuse the poor pics):
I don't even want to think about how many more of these I need to clean up and paint...
Well, it's a slow day at work (don't tell the boss!) so I've been allowing my brain some work resource to think about my lighting issues. Turns out my voltage isn't high enough to run 4 LEDs in series, but having done additional research looks like parallel would be better anyway, at least for this project. But that would mean additional wires... Where to house them...? Well, here's what I've come up with: I can run two LEDs off one of the current resistors, so that means only two circuits on the basis of 4 LEDs per 9 tile ceiling in the main tower. As I need to do three floors, that's just 6 circuits - which I think I could, with some judicious hole making and boxing in, work like this:
(excuse the not to scale scribble..)
"All" I'd need to do then is run the wires to the battery store - I'm thinking that will be under the floor plates in dedicated grooves in the base.
This element of the project is turning out to me more time consuming thsn I'd like. Anyone see any issues with this 'solution'?
Well, I think I'm finally figuring out this whole electrics thing:
Obviously this is just a test mock up (dur) but at least it works in principle. Also below is a revised plan of the tower wiring loom, on the basis that my inital concept sketch just doesn't work, as hiding the wiring under that idea was impossile, due to the physical layout of the build - ill go more into that at a later stage once construction of the rig has actually begun.
In the meantime, a couple of other WIPs (nb - please let me know if I'm boring you with all these):
Rear doors on the ruined section (still need to finish the green bits, obviously):
and a bit more progres on the main ruined section:
Thanks Angel. Maybe, one day, if I ever get it finished, I might let people use it. Yeah, right!
Anyway, another quick update - prototype of the ceiling for each of the floors - thank goodness for Plastruct! Although it does take ages to cut all the pieces to size... and needs additional rivets glued on...
and a really bad angle shot, to try and show what it looks like in situ:
The main issue (aside from actual construction) that I'm facing is that I want, as much as possible, to be able to take the whole of the front off the main tower so that I can get mini's inside (and secondarily so that I can try and connect all the wiring together, eventually). However, because I've destroyed half of the side, which looks really cool and all, it has buggered up where I can run cabling - so getting the circuits I want/need in place is proving an absolute logistical headache
Pegs / plugs? or just metal contacts would do the job, if you could incorperate it into corners or something might help make it moveable... or am I completely miss-understanding?
the underside looks good, adding the plastistruct pieces makes a bit improvment over the stock look actually.
OneManNoodles wrote: Pegs / plugs? or just metal contacts would do the job, if you could incorperate it into corners or something might help make it moveable... or am I completely miss-understanding?
the underside looks good, adding the plastistruct pieces makes a bit improvment over the stock look actually.
Nope, you're not misunderstanding OneManNoodles. It's really all down to where I can incorporate the trunking, that is accessible in order to put the building together AND allow me complete the lighting circuits I need. I may have mentioned boards line (it would seem) OCD once or twice... Maybe the following will help:
The latest version of the circuit "map" - I THINK, having done some mock ups, this will work:
As for the connections between floors, here was my initial idea - using terminal blocks to connect wires BETWEEN floors, so I won't have to solder, as actually fitting and soldering in such confined spaces would be virtually impossible:
And what it would look like after painting:
Which, given mostly it won't be visible anyway, doesn't look all that bad...anyhow, this particular configuration won't work as a) its on the wrong wall and b) the block needs to be at the bottom of the floor rather than the top. Will look worse, but it will be easier to build.
And then I need to decide - stark white light, as on the left, or warm white light, as on the right?
The left makes the interior slightly brighter, but the right feels more 'right' for a cathedral...
Or alternatively I can the whole bloody lot and just NOT light the damned thing.
Liking what you're coming up with for the lighting so far The terminal idea for connections is a good one, once painted they fit right in. For removability I think OMN has the right idea with metal contacts between pieces, seems like the 'easiest' solution.
The warm light does look more fitting for a cathedral look
Oh...and, no, WIP shots are never boring, I'm always interested in seeing the process, plus it shows progress, and that's a big thing in a project of this scope
monkeytroll wrote:Liking what you're coming up with for the lighting so far The terminal idea for connections is a good one, once painted they fit right in. For removability I think OMN has the right idea with metal contacts between pieces, seems like the 'easiest' solution.
The warm light does look more fitting for a cathedral look Oh...and, no, WIP shots are never boring, I'm always interested in seeing the process, plus it shows progress, and that's a big thing in a project of this scope
Cheers both - on the subject of the light, I'm torn: I think it'll come down to having to paint the full interior and then try it with both before making a final decision: once I've settled on the design, construction of the ceiling housing will be quite easy (ha) - the wiring beneath, not quite so
The idea will be that the floor/ceiling plates will be glued in place so as to give structural stability to the tower, but I might leave the trunking on the walls removable so that I can more easily connect up the wires to the ceiling lights and up into the next floor - again, more experimentation will need to be done before I draw any firm conclusions.
And while I'm grateful for the encouraging feedback MT, I do still wonder whether the updates are of interest to most. It always seems to me that progress is so bloody slow that you're all bored rigid by seeing not very much, but I want to try and document the process as much as I can a) to remind me how to do it all in case everything goes up in flames b) so that others can (if you want) use some of what I'm doing for your own projects and c) so I can get useful feedback...
Mind you, I also wish I could turn my brain off - as it just came up with this possible idea for more internal lighting:
Quiet how I could pull this off is a totally different matter...
I think the lighting is coming along very well. We need updates so we can see what your doing, its nice makes the blog more interactive so people can leave ideas/help.
I thought you was mad when you started this project now I am convinced
Well how you are going to match all this in is beyond me but i take my hat off to you for your persistence, can you not add some kind of decorative covers to the connectors ?
Boring never mind boggling totally all though I dont always post I always intrigued by your updates, plus all information helps someone so its all good
Since your cathedral is battle-damaged, maybe just leaving exposed wires dangling in certain places would actually add to the effect instead of take away from it? Maybe add a broken pipe or two sticking to from the wall to add to the "guts of the building are hanging out" effect.
Sorry for the late replies but finding time to work on the build and update the log is a bugger at the moment. Roll on two weeks time when I've got a week off, and can throw myself at it 100%! In the meantime...
@master of asgard: thanks, and ok I won't!
@ Jehan-reznor: I could try different wattage, or voltage, or stuff, but frankly my poor non-mathematical or physics liking brain can nearly cope with what I've got at the moment, so I think I'll just stick with making do... :(
@GiraffeX: glad you think so. Feedback, positive or critical is always welcome (although I do cry a little inside at anything negative lol)
@lone dirty dog: I've been convinced a lot longer than before starting all this! As for the decorative covers, see more boggling below...
@SisterSydney: I may go the exposed route, but it'll have to look good otherwise it'll just jar with me. Once I get to that part of the build I'll see - maybe put some pics up for comment. I'm also itching to get on with the crater area of the broken side, as I gave some ideas about how I can incorporate more 'realism' to the damage there - but I'll need thicker boards first...
defo the way I'm now thinking of going, especially for removable areas. Yesterday went out and bought some brass rod that fits the size of the terminal blocks snuggly, so what I'll eventually do is get thicker base boards, then lay the wires into it, cover them with the movement tray vase plates but leave contacts sticking out that will then fit neatly into the terminal blocks on the lower floor. Then just wire up everything above....
So anyway, here's what I was working in yesterday: lighting the front balcony section:
Obviously the final result won't be in total darkness, but it's a cool look
What's more fiddly is the cover up job to hid everything:
(Again, I still need to install and finish covering up the lower light, but hopefully you get the idea!
With a few bits removed you can see how everything links together:
And a close up of the main housing. Frankly it's ridiculous the amount of tiny, fiddly little pieces that needed to be cut up and glued to get to this stage, and I've not even riveted it yet!
The whole frontage will now be removable, but with the terminal plug idea from OneManNoodles above should mean I can get this lit!
When it comes to electrics for models try model railways books for help I have a couple from the old man which are full of info, they seem to have a long history behind them so have either had or dealt with issues and offer some great ideas and answers.
The top picture is very atmospheric by the way even without the finished paint job, also have you tried to find smaller connectors ?
Are you going to try and use conducting plugs to complete the wiring circuits and hold the pieces together? I personally don't think that would be a good idea, unless it is really secure, like screwed on secure.
Of course then you have to worry about lining things up properly too which can be frustrating if you are not paying attention.
I'll also point out that screwing in wire in confined places is also a huge pain.
Depending on just what you want to do; try Rapid and Maplin, both sites are easy to get around though the range is limited you may find what you are after,
There is also RS and Farnell but it depends on how much you know what you are after and how much time you are willing to spend searching.
Make sure your brass pegs & holes are perfectly aligned.
Have you thought about copper strip on the top & bottom of levels to act as a contact?
Yes the updates are interesting and useful. and not just for the "I'm glad I'm not making that" reason
And do continue to wire it up, if you plan it properly it'll work fine, it's a hell of a lot easier to fix something at the start and while planning than when you are half way through.
@ jabbakahut - Thanks jabba - there's plenty more that'll need hiding by the time I'm done!
@lone dirty dog - Yeah, I've been scouring the interweb for info, lots on trains etc - my main issue is that I'm really, really REALLY not good when it comes to maffs 'n stuff - so I'm trying as much as possible to keep things 'simple'. As for smaller connectors - these are pretty much the smallest I've found, and as I now have half a gazillion of them, there the ones I'm using!!
@ OneManNoodles - the plan is to only use conducting plugs at the very base of the walls - I'll be running wire up from them into the floor above's connector, and then repeating each level. Hopefully the way I'm designing the circuits, and where the connectors are, I'll be able to get things screwed in... Fingers crossed... The number of design plans I've worked through it better bloody work at the end of it! I'll check out the sites you mentioned too, cheers for those.
Hopefully by the end of the evening I'll have completed the housing for the lower light...
Automatically Appended Next Post: Done, for a given value of doneness... Just need to paint it all and glue it together.. And do the pins in the base to power it...
Soooo.... It's been a while since my last post, so better update you on where I'm at. I'm sure many of you will have seen on various Facebook groups that I've been updating there recently, so some of the below will be a little repatious, so apologies in advance if you've seen these pics before. For anyone that hasn't - am now very close to finishing the entrance/balcony:
Should have he rest done and all glued up by the end of the week. Alongside that I've finally gotten round to constructing the first of the main tower lighting rigs:
Along with my first foray into the world of soldering for over 20 years - could be neater, but it does the job...
In order to prevent getting paint on the LEDs chose to paint the rig separately first:
And then finish the rest once it was (carefully) glued in place:
Which is all rather pointless given that once it's in place no one will ever be able to see any of it... (Obviously I still need to trim the training cables once I've sorted out the connectors to the floor - there'll be another update at some point detailing that, I'm sure...)
So that's that side done - now need to get cracking on the top:
This will be fun. Not. By my calculations, that's a total of 244 individual tiles, or 976 sides that need edge highlighting....
Looking really awesome man. The wire coverings were definitely worth it. I hope you'll be doing lots of battle reports and photo shoots with this thing once it's finished!
That looks really cool. Have you considered that if you put some little resistors in to your circuits, you can make the lights flicker. Capacitors will make them blink. Both can allow you to add some additional dramatics to your lighting.
@Master of asgard - sorry, no battle reports - I don't game - just the Armies on parade display (assuming it's still going by the time I ever finish) - maybe I might sell it after that. Wonder how much I could ask/get for it?
@aka_mythos - yep, it's a possibility. I have a controller that woukd allow me to flicker some lights in circuit, but that does the same 'pulse' for all lights in the circuit - I've got my eye on some individually flickering LEDs on eBay though - I might get them and put them in the more damaged areas...
@monkeytroll - NO!! no more changes! I've still hit a load still to finish/build anyway
@JoeRugby - sorry mate - for what it's worth, unless you REALLY want to, don't bother, it's a hassle I could do without, I can tell you!
anyway, today I've been working on a few bits n bobs, but mostly the top of the floor plate - firstly the metals:
And this evening the tiles. I've decided to add more complication to my life, and to do something a bit more interesting that JUST green - each floor will now have a different white sub design as well - this floor, echoing the vent plates:
Hopefully looks ok - I can't tell anymore, as I'm going boss-eyed painting these stupid little tiles... Honestly, it's exhausting!
Like the new tile detail that is looking great, although it does remind me of the multi storey car park near me where it has tiles in this format for floor numbers all be it blue and scuzzy white
Excellent tile work, reminds of the public toilets at old train stations and down by the coast ... (And no, I do not regularly frequent public toilets or am I acquainted with George Michael )
Ruglud wrote: Excellent tile work, reminds of the public toilets at old train stations and down by the coast ... (And no, I do not regularly frequent public toilets or am I acquainted with George Michael )
Ruglud wrote: Excellent tile work, reminds of the public toilets at old train stations and down by the coast ... (And no, I do not regularly frequent public toilets or am I acquainted with George Michael )
I think he protest too much
Now now you two..
Anyway, this is all taking a ridiculous amount of time... Best part of 8 hours to get to this point:
And here's where I've got to in terms of the tiles so far:
I'm beginning to think my new deadline of 2017 might be a bit tight...
Adding the pattern in the tiles was a smart move, breaks up the colour nicely, and once (!) it's all done (we have faith that will happen ) it'll prevent the tiles from taking on a Tron-like appearance from a distance.
Thanks MT. If I'm honest, the White was more to do with being bored of doing the same old green time after time - but as its jst as time consuming, it's not much more fun to do! Still, as you say it breaks things up a bit
I would continue with it as it does bring another aspect to the tiles, you could try alternative patterns for each floor kind of like the car park with its numbers
Well, it's almost complete, 'just' need to add a couple or three coats of gloss varnish to each tile now:
As the eagle eyed among you will spot, I went back and revised the White tiles, as the previous look just wasn't doing it for me - so now it's a simple solid block of pallid Wych flesh and a white scar edge highlight - looks better I think, and thankfully is much simpler to execute!
In the end I did three different methods of getting the green tiles, all of which had advantages/disadvantages. The last tile I really made a hash of (kudos to you if you can spot which one it is) But by that point I was willing to overlook the errors just to get it done. I think I'll go back to my original method in the future - it might take a bit longer, but the end result looks better imho. Sigh.
What it looks like in place:
Mind you, unless you get in close, three solid days worth of effort will largely go unseen...
I've learnt a lot doing this over the last few days: principally that I should stick to a tried and tested method of painting, that I need to do more trial pieces for painting methods rather than experimenting on a actual build piece, but most importantly to paint the full plate first and THEN glue the lighting in place - frustratingly one of the wires has broken off so will need to be re-soldered - which probably means ripping the dratted lighting 'girders' off to get to the gubbins and doing it over. Sigh. Hindsight is a wonderful thing....
The reality is that you have something that already dwarfs anything most other people have done. And, frankly, kicks the arse of even the largest GW 'displays', which are created by teams of people.
LOVE!!!! subbed! btw I suggest you paint the broken glowing green tiles in black with a greyish highlight. That way it looks like all the tiles are screens and that the broken ones no longer have power...
Welcome on board this incredibly slow train Sneshy - strap in for the slowest, most dull ride of your life...
Anyway, glad to have you along for the ride. An interesting idea for the floor there, but sadly all I can think of now is a '70s disco floor - maybe if I fit a glitter ball it might work!
Still though... This is a fully functional Cathedral of the Eccelriarchy and such splendors within. Boy! that chandelier could illuminate the entire structure.
angelofvengeance wrote:great stuff as usual Phutarf :-) keep it going man!
Thanks AOV - it's going, it's going. Slowly, but still going....
Sneshy wrote:Still though... This is a fully functional Cathedral of the Eccelriarchy and such splendors within. Boy! that chandelier could illuminate the entire structure.
Lol yes, it could Sneshy, but somehow I doubt it will...
master of asgard wrote:I think you should install incense burners with working smoke machines, and mini speakers which chant litanies in the Emperor's name.
Funny you should say that MOA, I did actually obtain a model train smoke generator for the Manufactorum bit, but sadly it's not going to work - the movement of a train is sufficient to 'agitate' the bit that makes the smoke, but static as would need to be in the Manufactorum chimney stack means virtually nothing happens. Ah well, does make the build a bit easier.... As for mini speakers - don't go giving me more ideas!
Anyhoo, tonight has been a build night rather than pain, but only on the basis that I need to finish doing some construction BEFORE I can paint some bits. So, for anyone that's been with me for a long time, you may recall ages ago I started the main tower upper storey windows:
Well, in order to paint the frontage, I needed to finish them. So... Firstly I had to cut some grooves into the existing frame:
Which then meant I could add a new frame and sill using some suitable off cuts I had in my bits box:
Before finally cutting down to size and mounting the central strut.
You might also spot that there are a couple of additional white bits with tiny skulls on nestling between the girders of the "full" window in the centre. Believe me, those were an absolute pain to get in place, as shaping the plasticard bits was a right faff...
All I then needed to do was cut various 'broken' bits up and repeat after a fashion on the other side:
While obviously I still need to file down and glue in one replacement incense burner bit, there's a lot of gaps that'll need greenstuffing as the fits aren't as tight as I would have liked, but overall I'm pleased with the result so far. Once I've done that, I should be able to get in painting it
I'll have to echo lone dirty dog on this one, phutarf. Always stunning, but you're going to need a replacement robot body before you finally finish this thing. Although when you do, it will enter the annals of legend of ridiculously incredible builds.
jabbakahut wrote:That is a good looking kit-merge. I like the little details, GW pieces blend really well together.
They can do - it's all a matter of putting the right bit in the right context. Or failing that, shoe-horsing the wrong bit into place anyway!
lone dirty dog wrote:Every time I drop in you continue to astound me although I wonder how old you actually be by the time this ever gets completed
lol... I wonder myself LDD - that and the ever growing stack of unfinished (or started) models I've got growing behind the scenes...
Warboss_Waaazag wrote:I'll have to echo lone dirty dog on this one, phutarf. Always stunning, but you're going to need a replacement robot body before you finally finish this thing. Although when you do, it will enter the annals of legend of ridiculously incredible builds.
thanks Warboss. I know it's taking a stupidly long time to get anywhere, but I want to do the project justice, so no half measures!
Have mostly been doing a few behind the scenes things this last week, such as constructing lighting frameworks for the upper floors, so no massive pic updates to show. However, I did (virtually) compete the second flor last weekend, so for anyone that hasn't seen the pics on various Facebook forums (fora??) I've been using recently, here it is:
Sorry for the long gap between updates, but to be honest I've been doing more updates on various facebook forums regards painting this thing as it's quicker to update than the blog, so apologies for anyone left bereft of updates. If you're not already a member, I strongly suggest asking to join the "'eavier metal" group, there's tons of great painters out there...
Anyway, here I am with a bit of a long post to make up for things. Well, I couldn't put it off any longer: today I bit the bullet and started on putting together the connector blocks for the lighting system in the main tower. TBH I've been putting this off for ages because it scares the out of me - the more that gets glued in the more difficult things become to change/fix at a later date, but it's got to the stage that to pain the internal walls I needed to get this done...
So the first thing to do was to position the terminal connectors I the walls. You'd think this was straightforward, but it involved removing very small amounts of the lower kickback plates to be able to slide the terminal blocks between them, not to mention actually tidying up the blocks themselves. Also had to break out the 2 part epoxy resin to glue the damned things on a super glue wasn't doing the job:
Of course, the blocks on the second floor have to be positioned slightly higher, as they need to sit proud of the raised surface of the tiled floor:
(You'll have to excuse the odd angle of the pic I'm afraid!)
I'll probably end up painting the wires even though it'll be virtually impossible to see the small gap underneath the block:
The eagle eyed of you will probably have noticed the small gaps that appeared on the sides of the floor plates - obviously I needed to cut these in order to run the wires between floors:
As you can see, the roof 'girders' don't meet the edge of the plate, as otherwise there wouldn't be any room to run the wiring down the wall:
So there will be two wires running from the floor block up the wall: one to the upper floor, one to the lights:
But that looks ugly, so there will be custom covers for each set of wires, cunningly crafted to resemble girders:
Note that these fit up inside the gap between the roof girder and the wall - the plan is to insert these only once the floor plate is put in position as I'll need to be able to access and flex the wires in order to get them into the terminal blocks - once this is done, I'll have to slide the covers up and in place. Given the limited space I'll have to manoeuvre at that point, I'm not looking forward to that...
And one last pic to show things still do work:
Just need to do this 5 times now..... And on with the painting....
I really like the internal structural beams. With or without the lighting effects it looks awesome. May have to half borrow that for some of my own buildings.
Warboss_Waaazag wrote:I really like the internal structural beams. With or without the lighting effects it looks awesome. May have to half borrow that for some of my own buildings.
Borrow away Warboss - I'm not precious
Sneshy wrote:Awesome!! you'll have a fully operational cathedral yet.
well, there aren't any flushing toilets. Yet...
jabbakahut wrote:Great integration of the terminal connectors!
ta. I was a bit wirried about how they'd look, but I don't think they'll stand out too badly in the end. Mind you, you'll be hard pressed to see them anyway...
Young_Logan wrote:
lone dirty dog wrote:
Next month he will be adding running water
Don't tempt him or we will never see it finished
On another note this project gets better every time I come back to it
Young Logan
Thanks both - maybe I'll investigate the water feature when I get to the crater...


 ..... just a mammoth amount of work going on here! not sure i have anything to add but admoration!
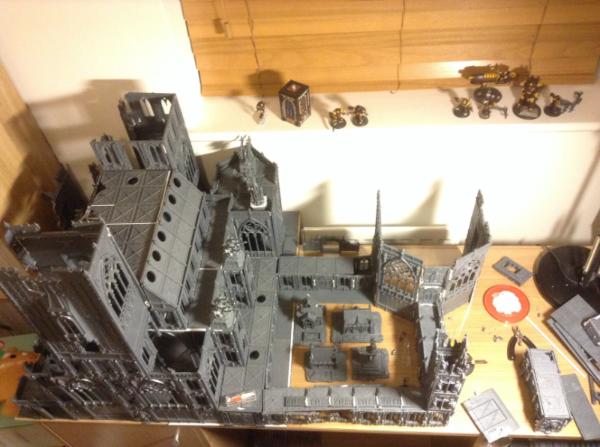
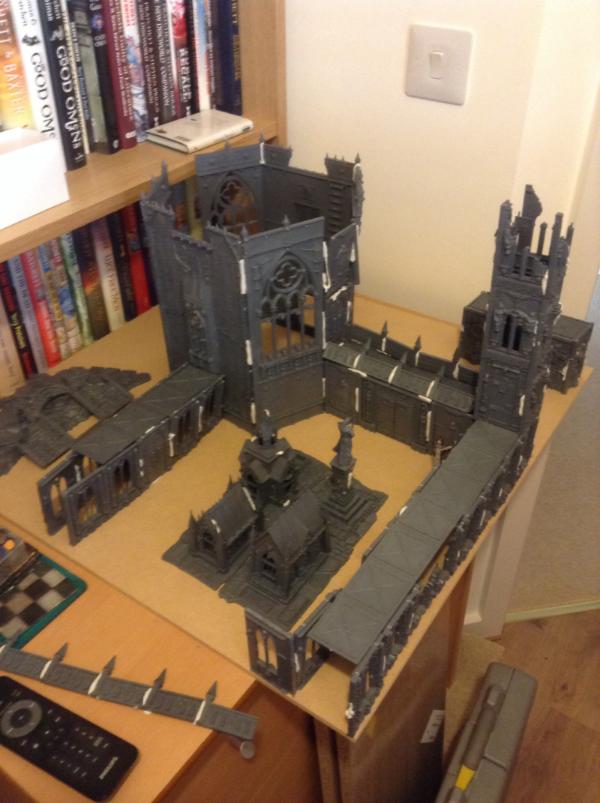
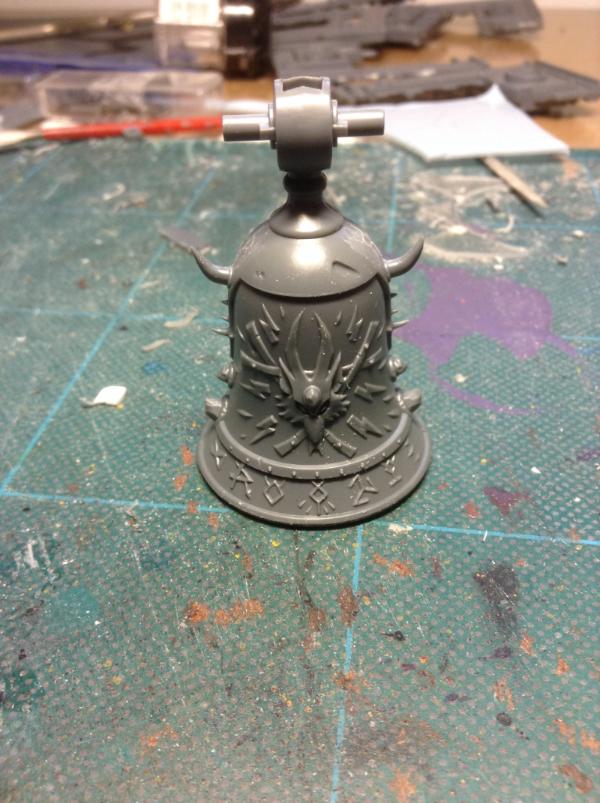

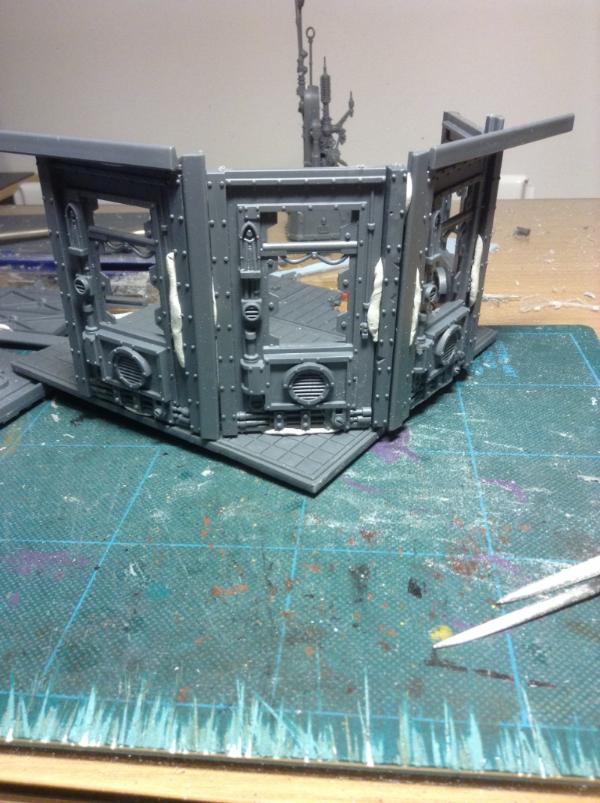


 ) yes, optometris, yes they are. Well, one set of them. Got another kicking around in some boxes somewhere, waiting to find a good home...


 especially when I'm in the company of Lord_Mortis and his fabulous board. Well, I shall look forward to seeing more of your work and progress on the cathedral
  )
)
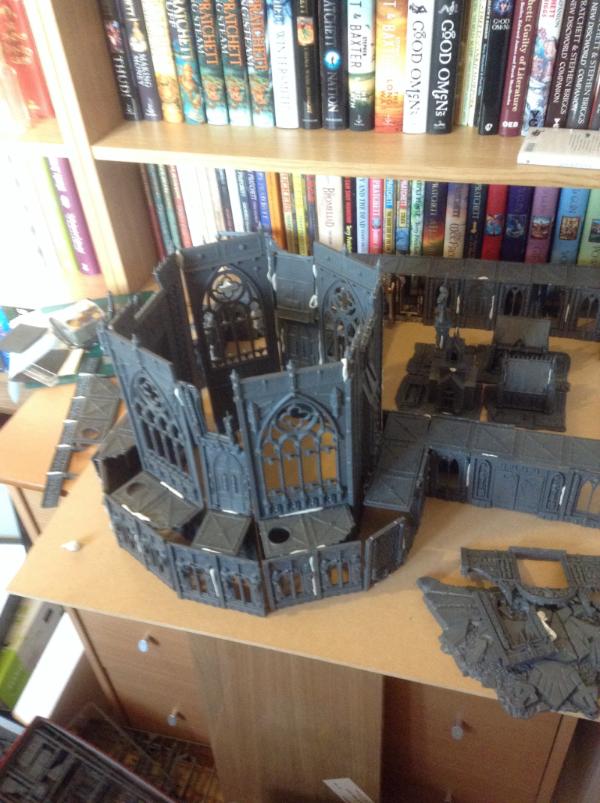
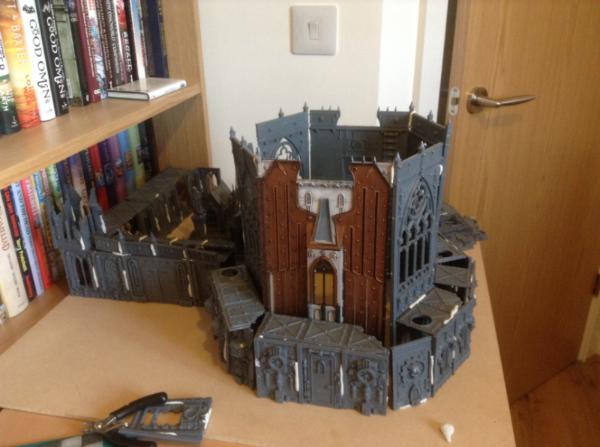
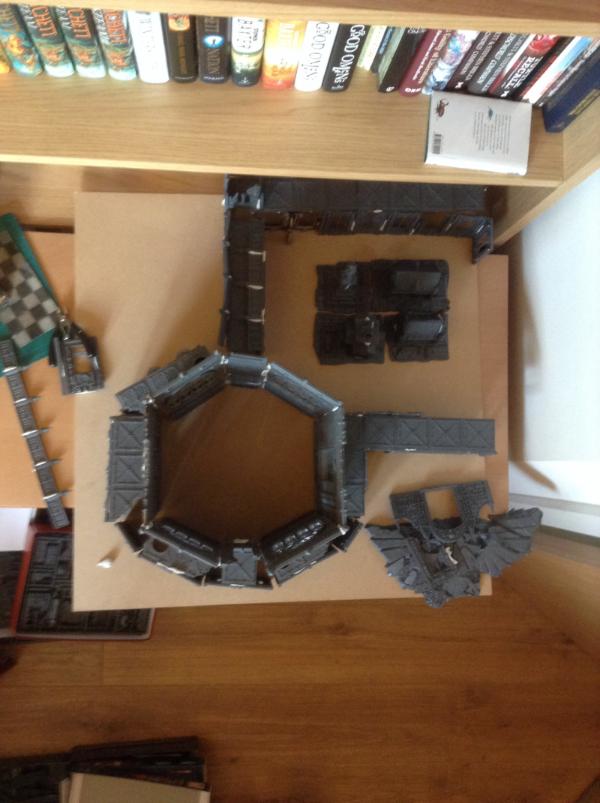
 ) - the biggest challenge will be sorting out the floor plates I reckon.... But this way I solve fiddly problem of joining a cloister end to the Eagle door opening, plus means I don't have to run an internal walkway inside the Chapter House, meaning that I can do more interesting things inside. Maybe.
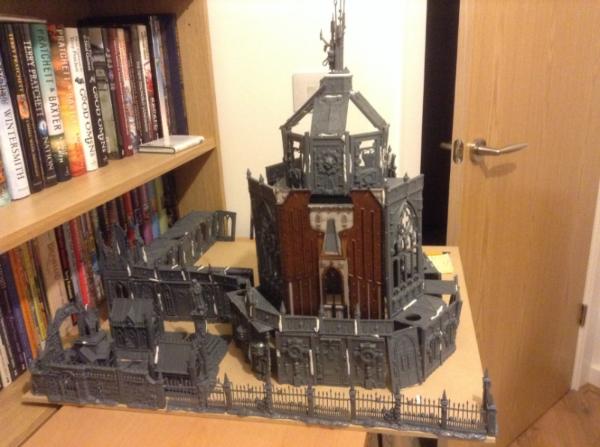
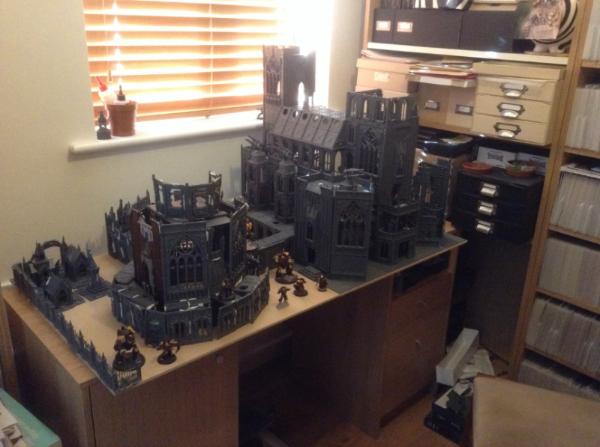

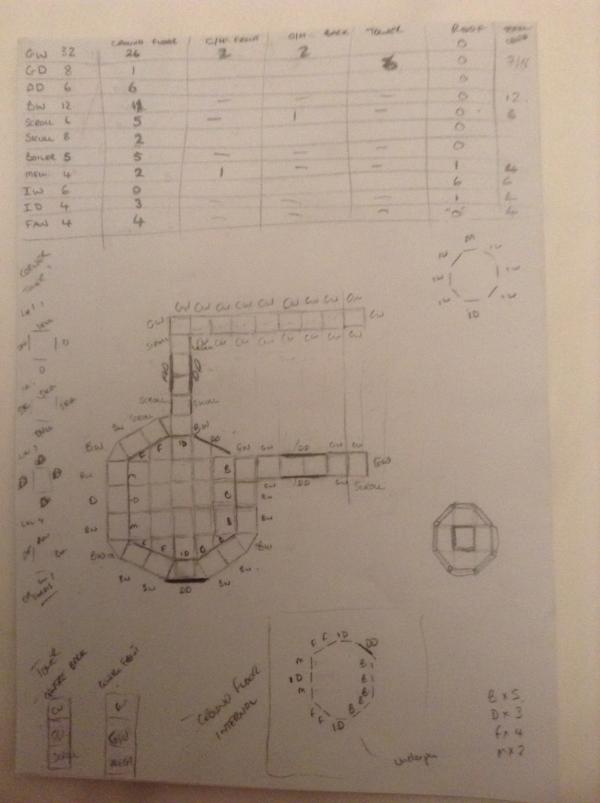
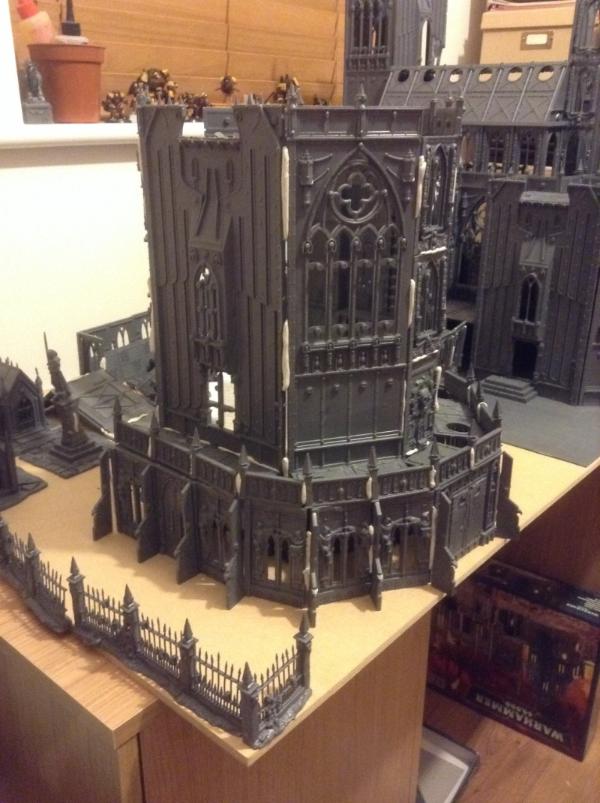
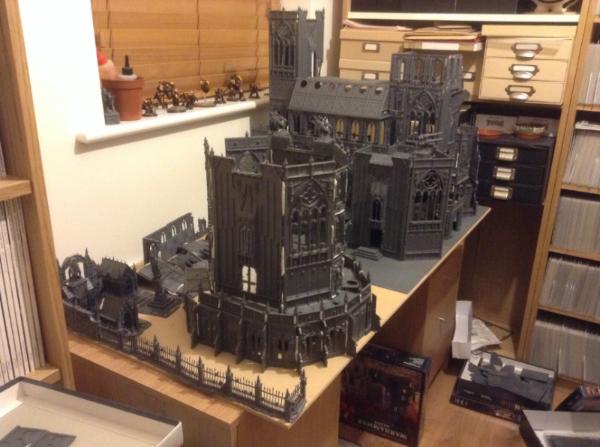


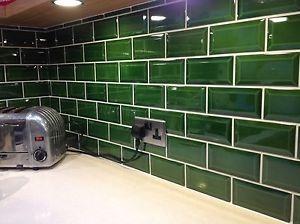
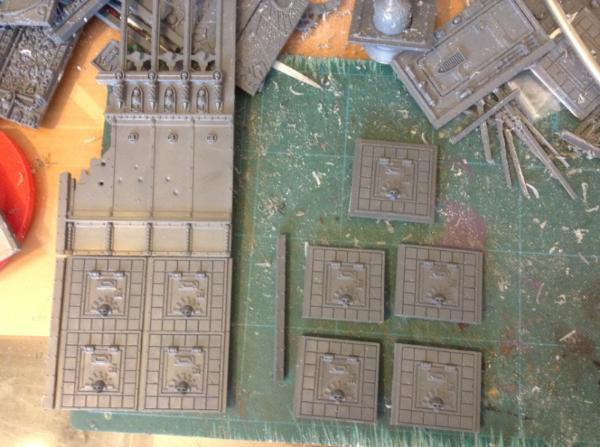
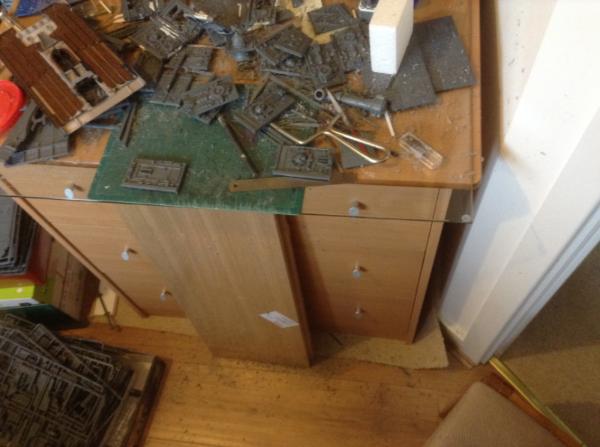
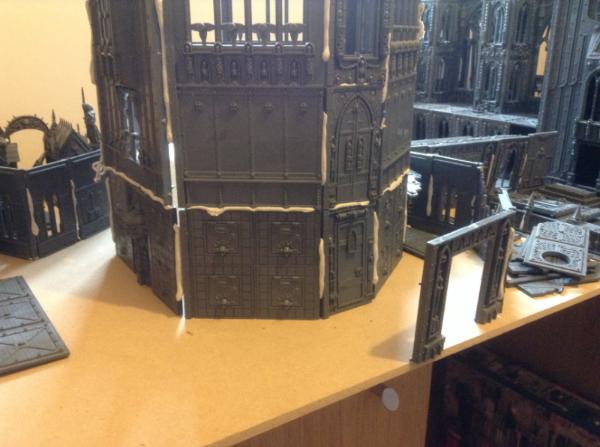
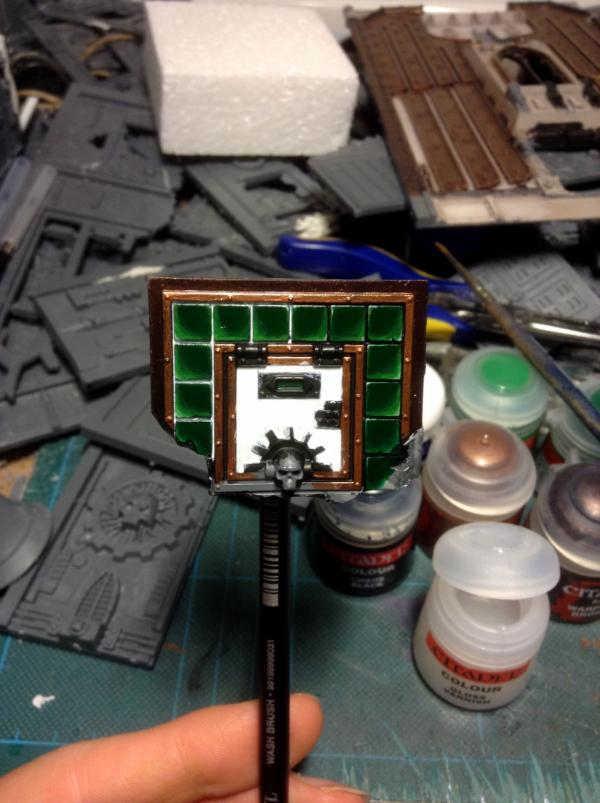

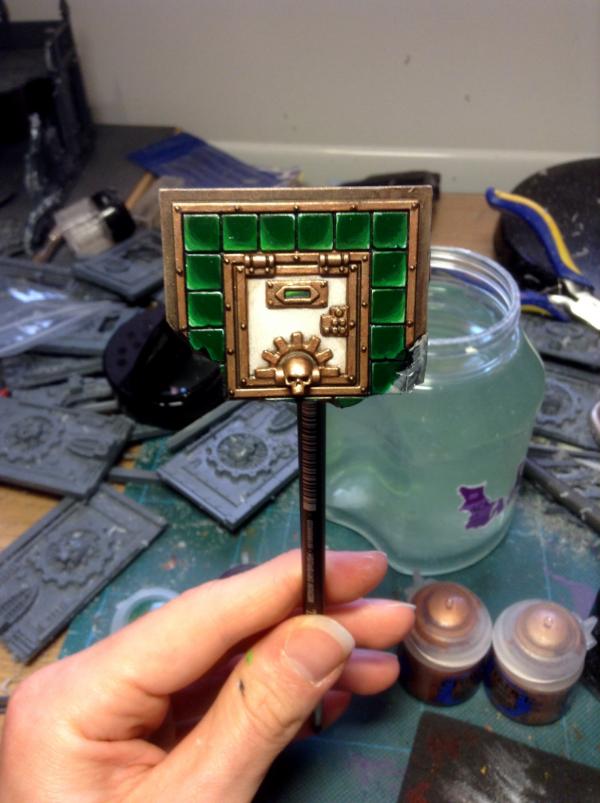
 they look perfect.
 )
)


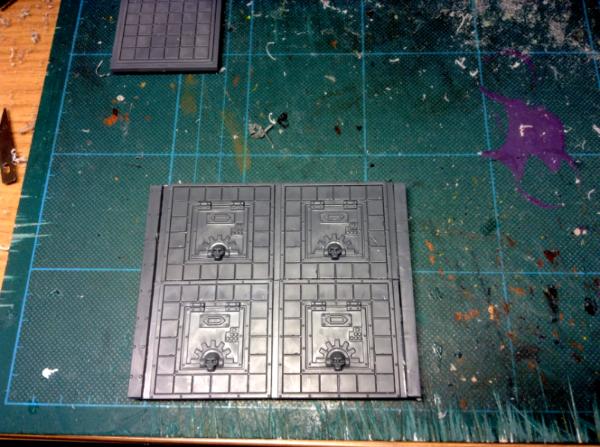
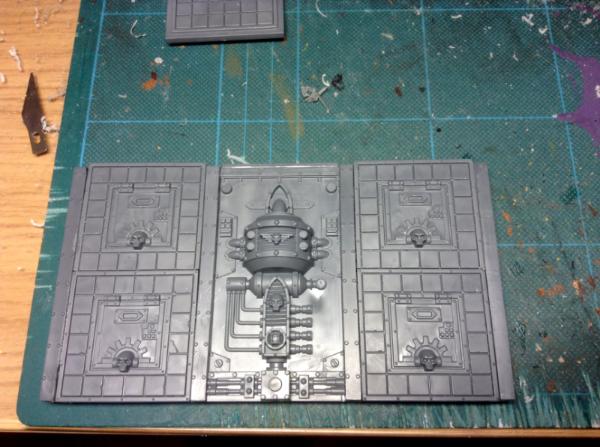
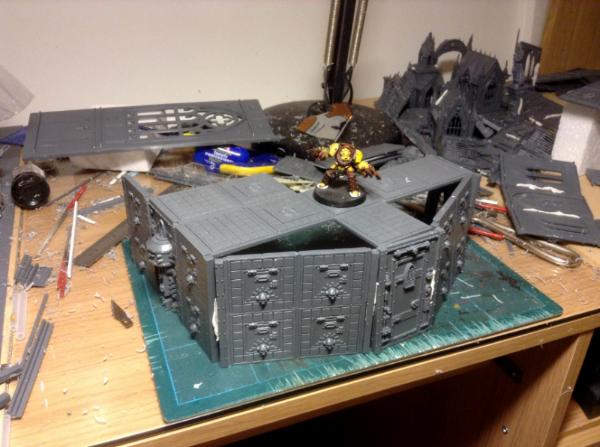


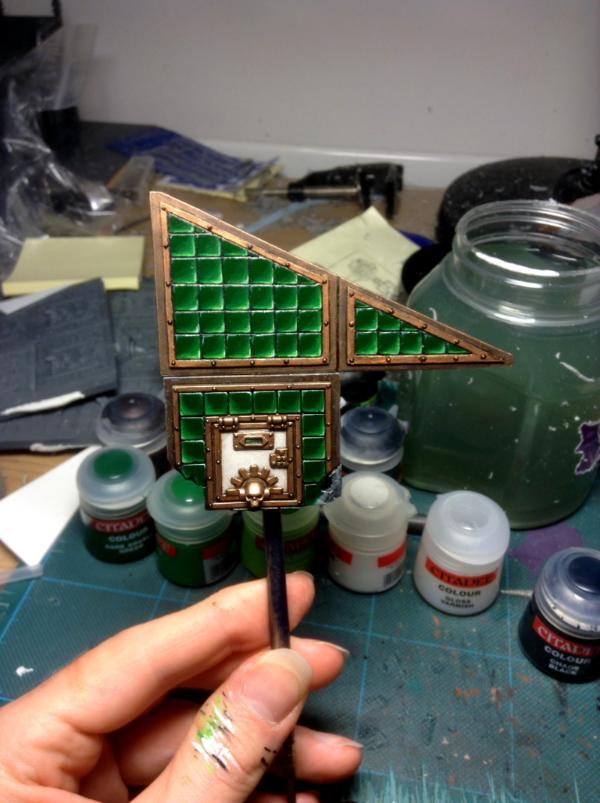

 expensive!
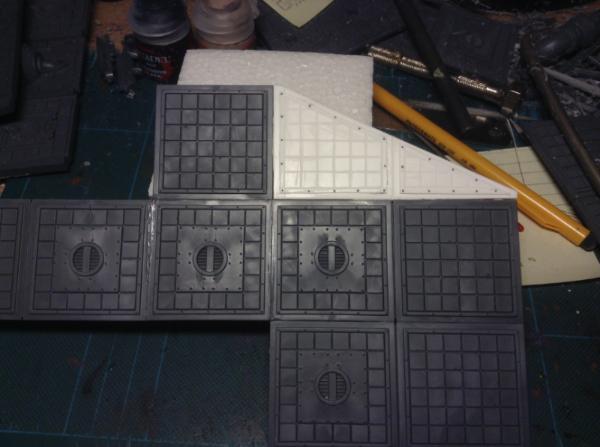
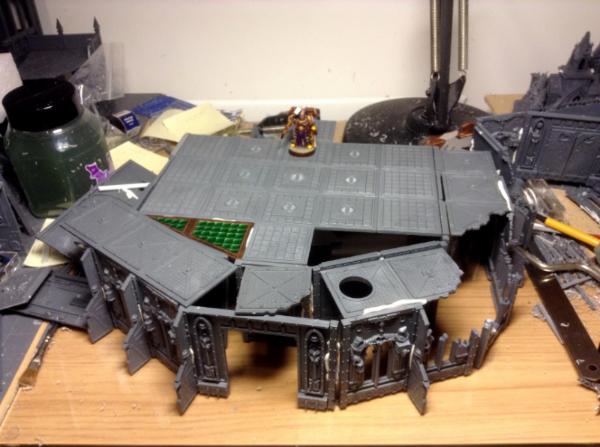
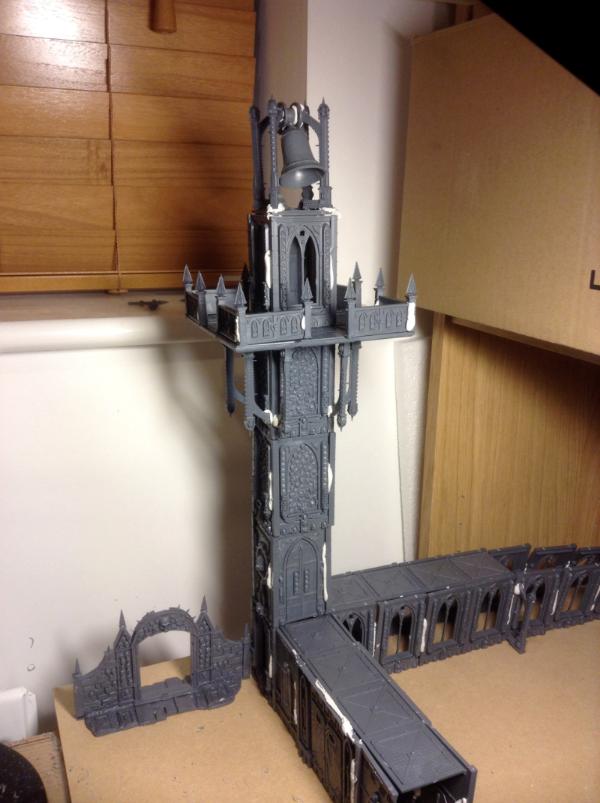
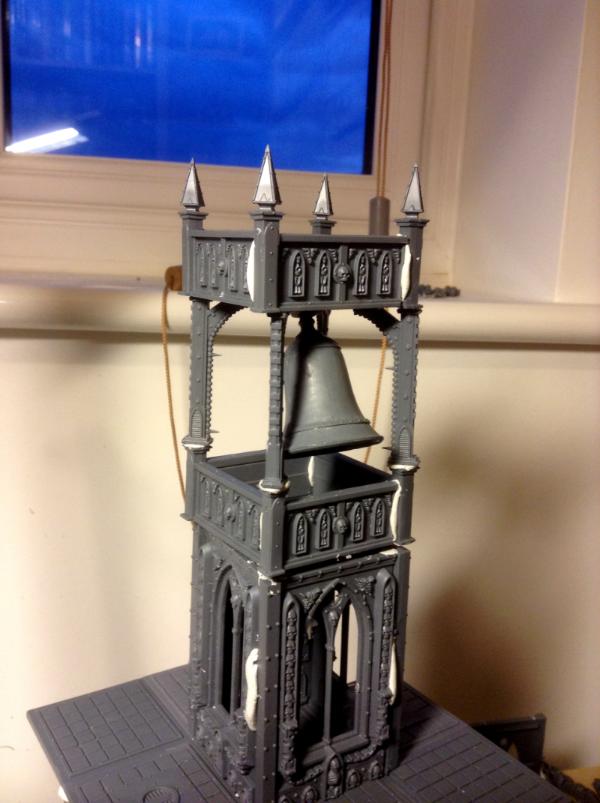
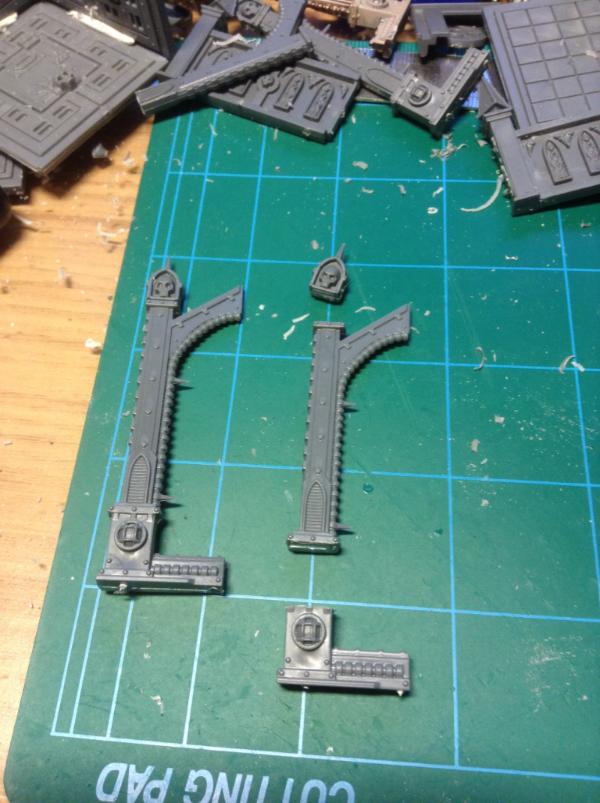
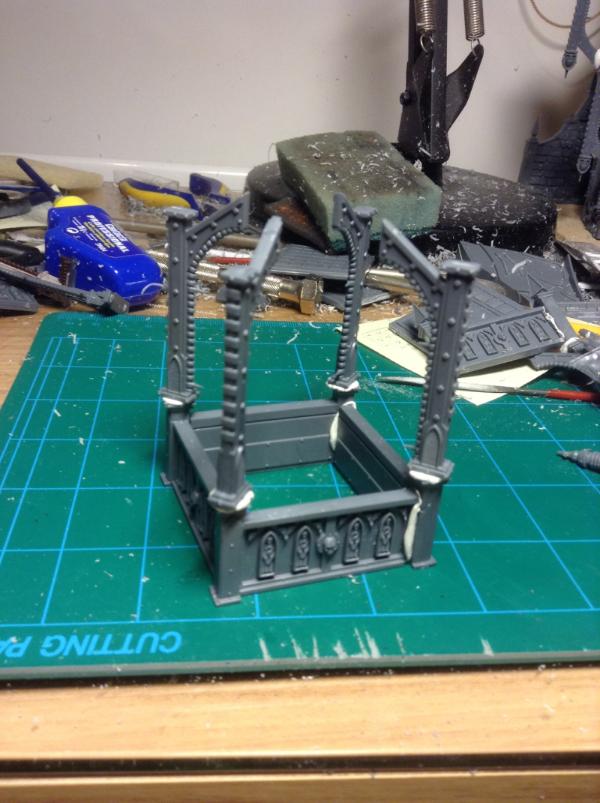
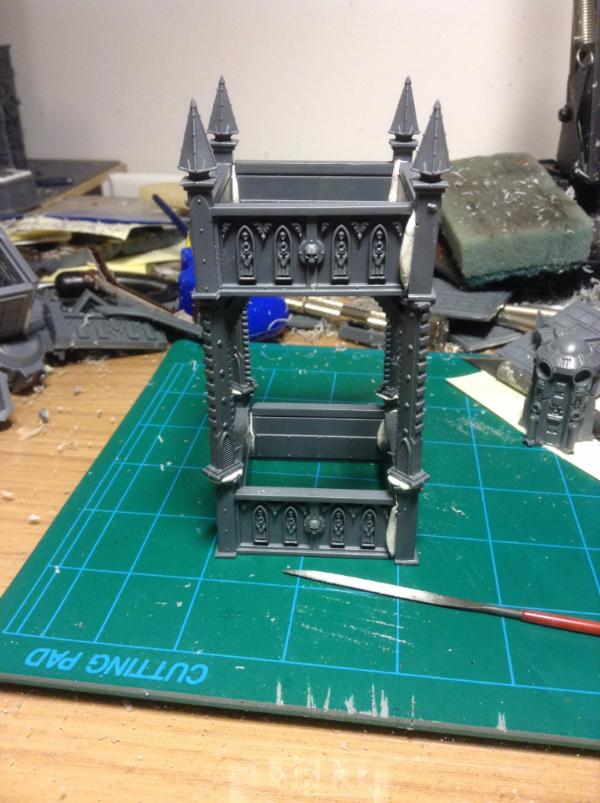

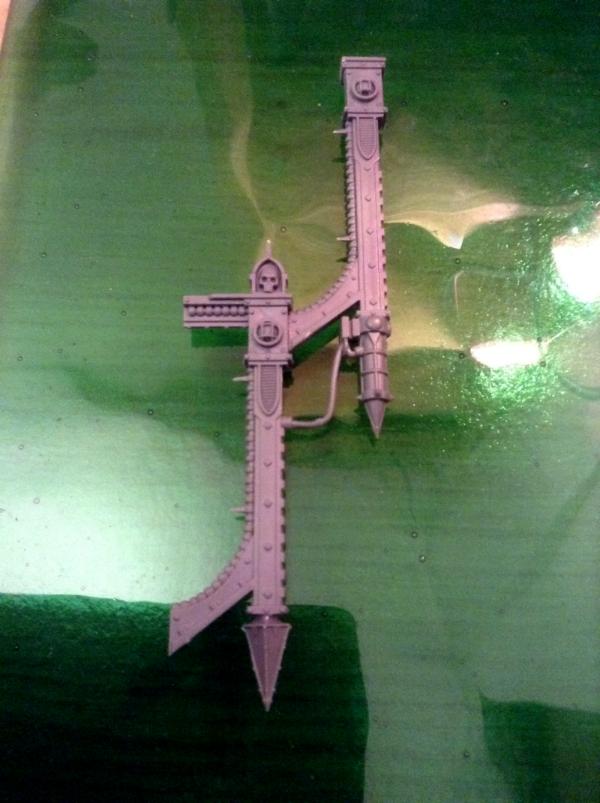
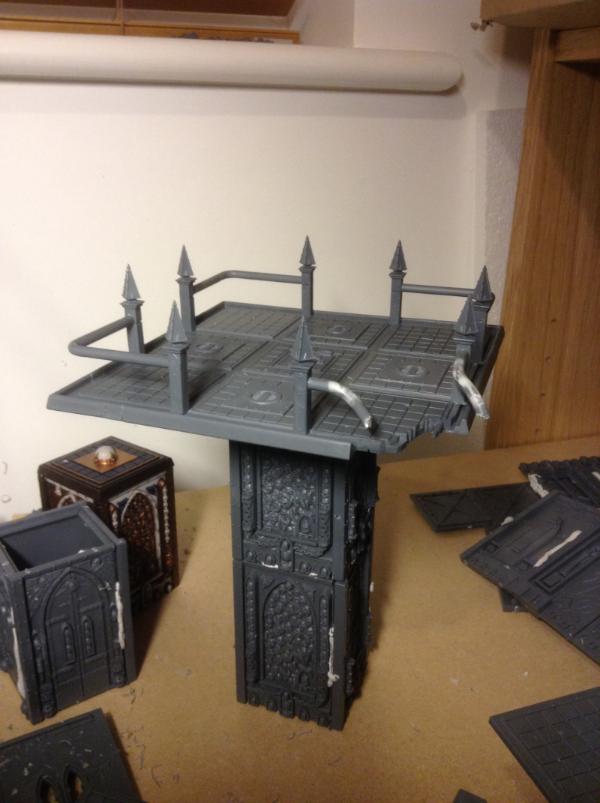
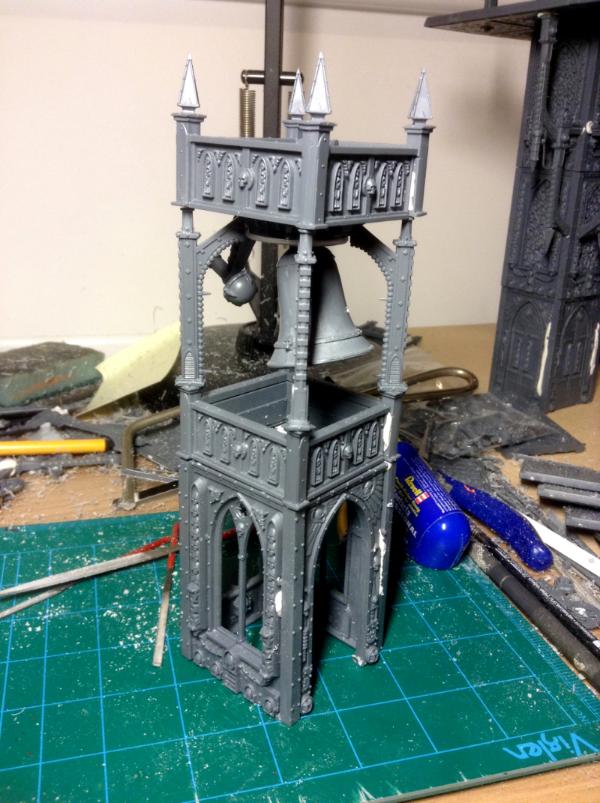
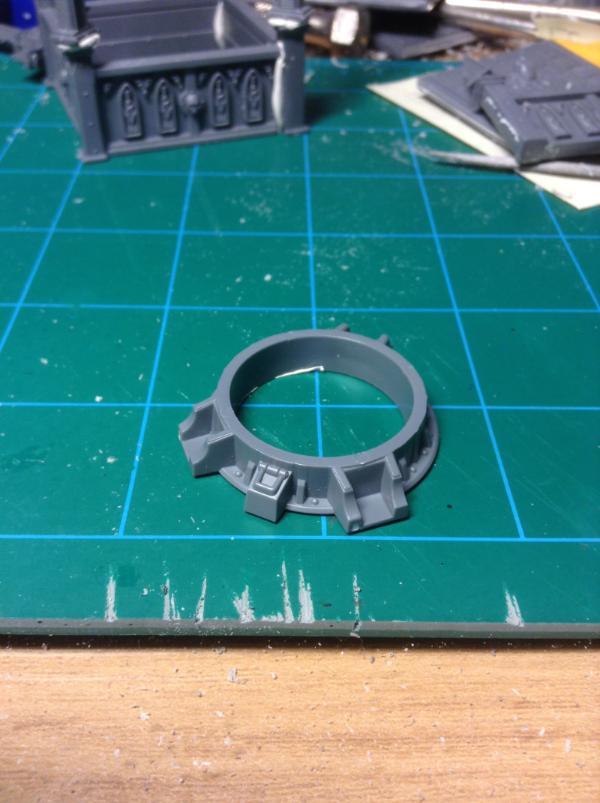
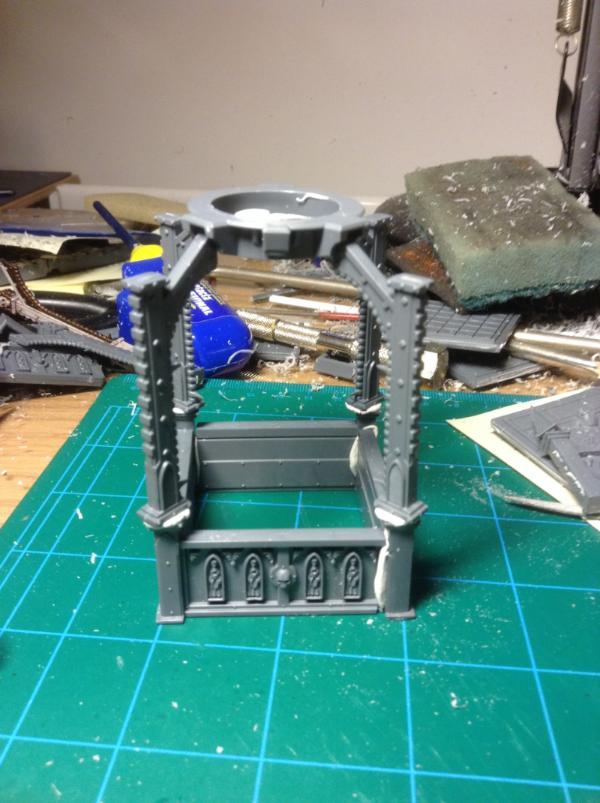
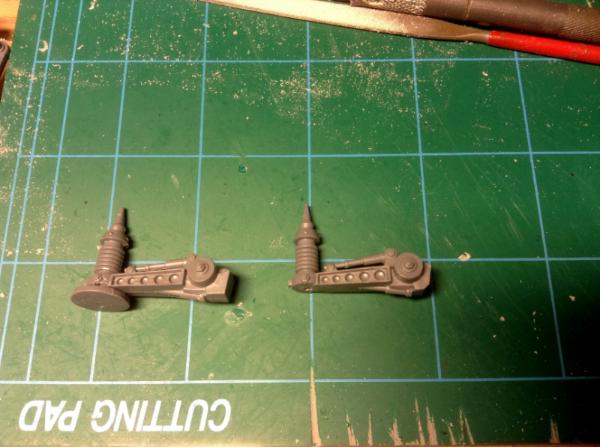
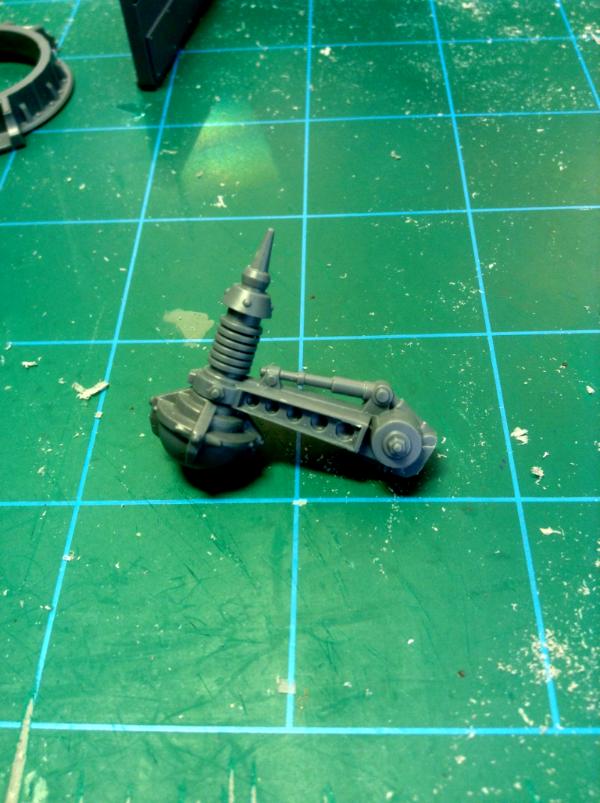
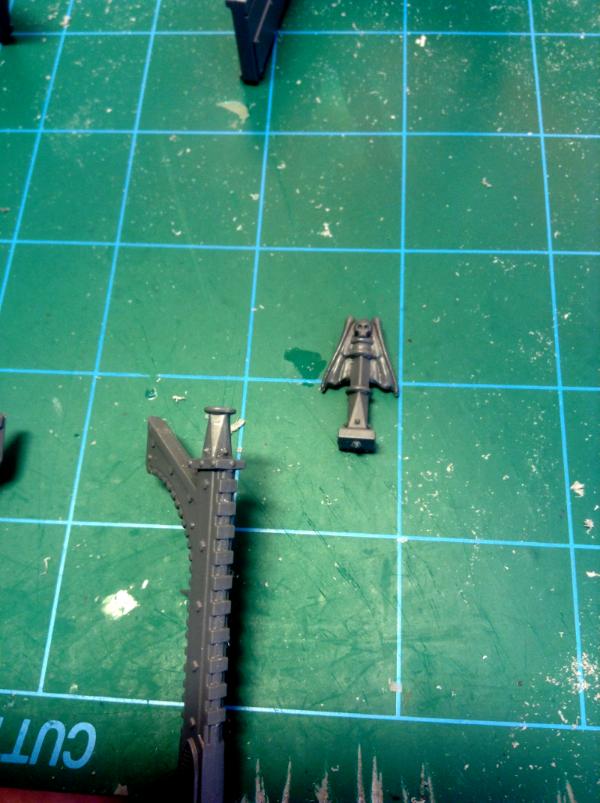
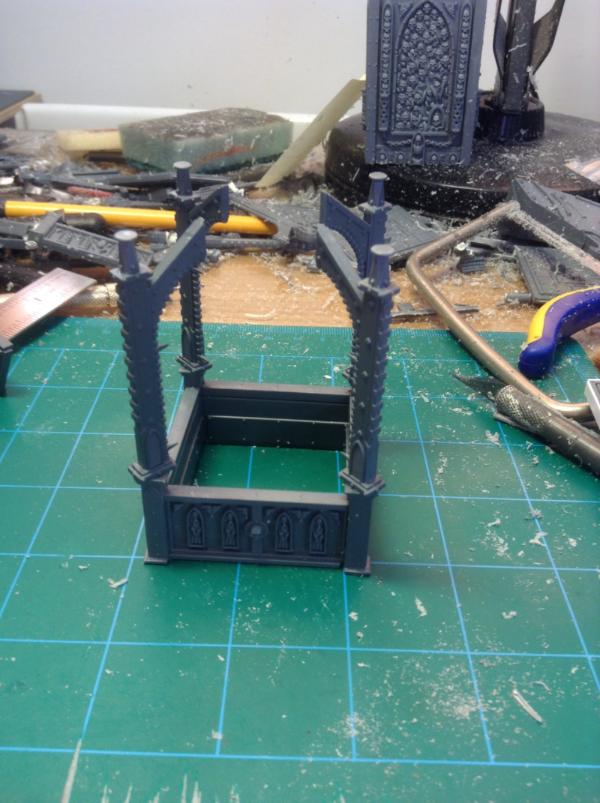

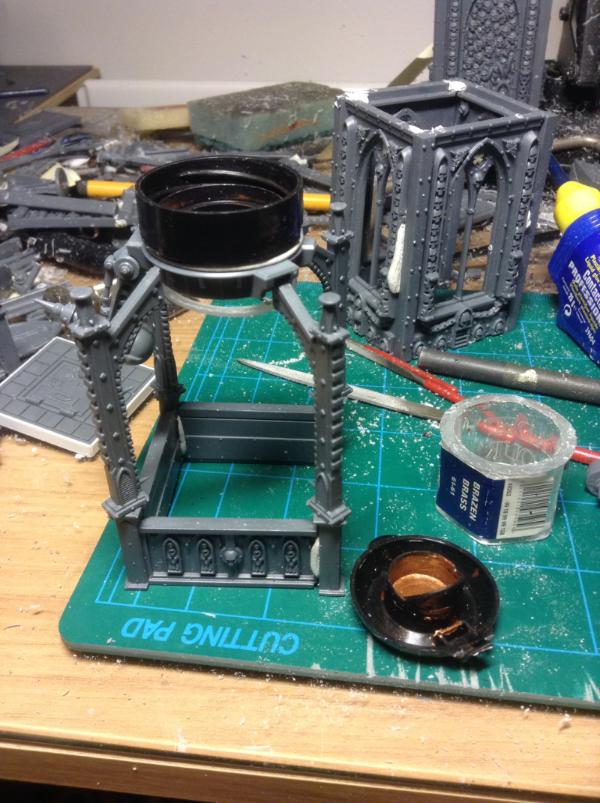
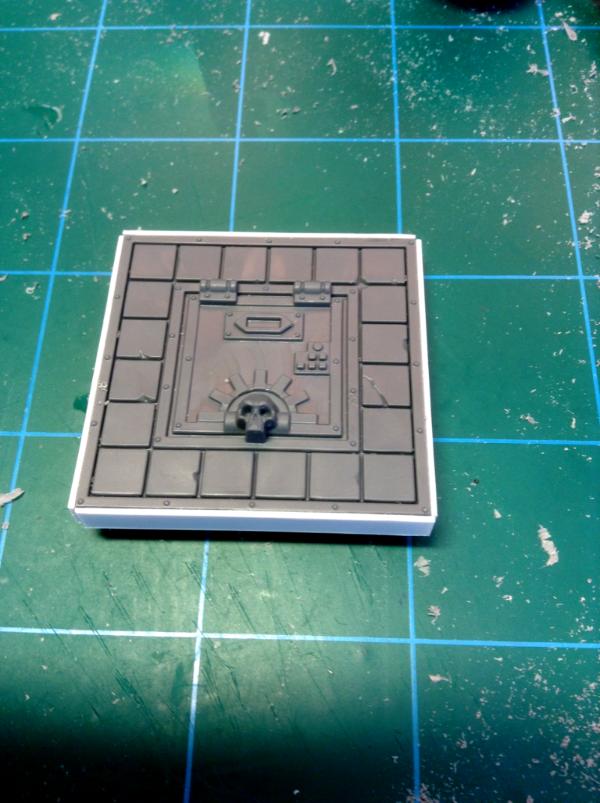
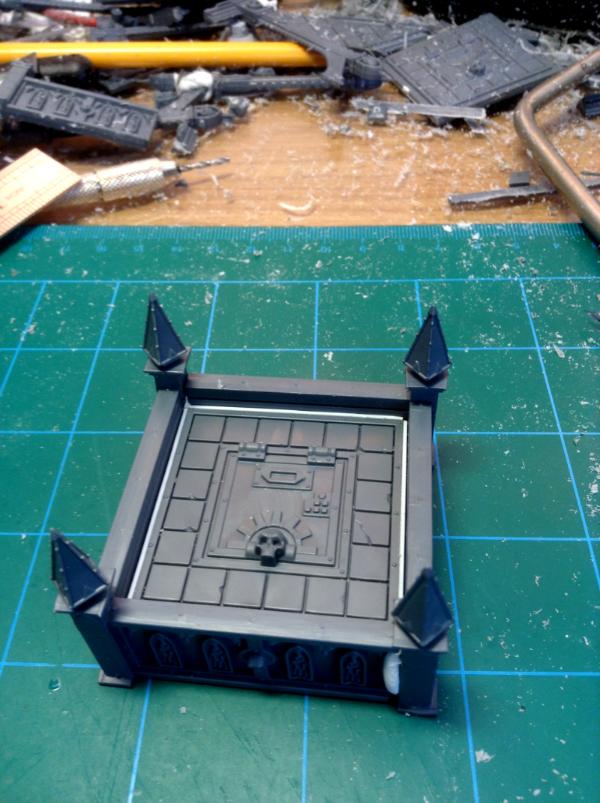
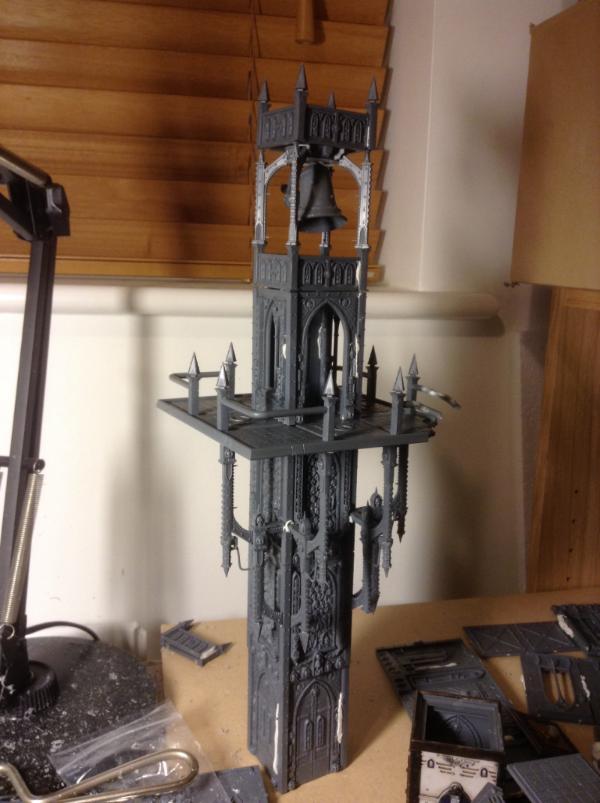
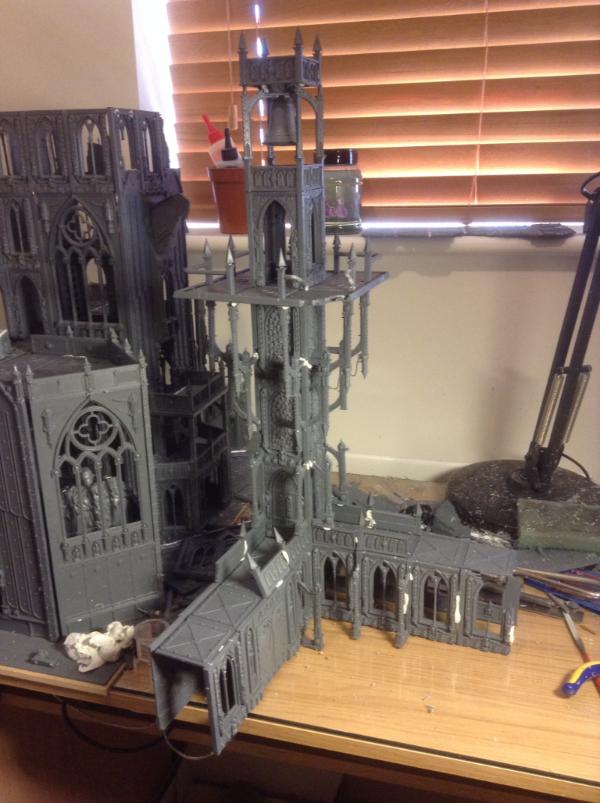
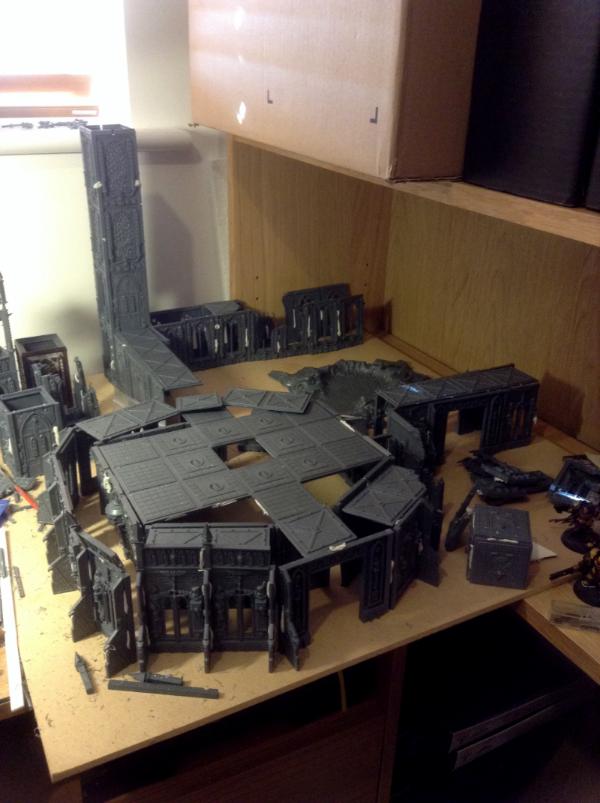
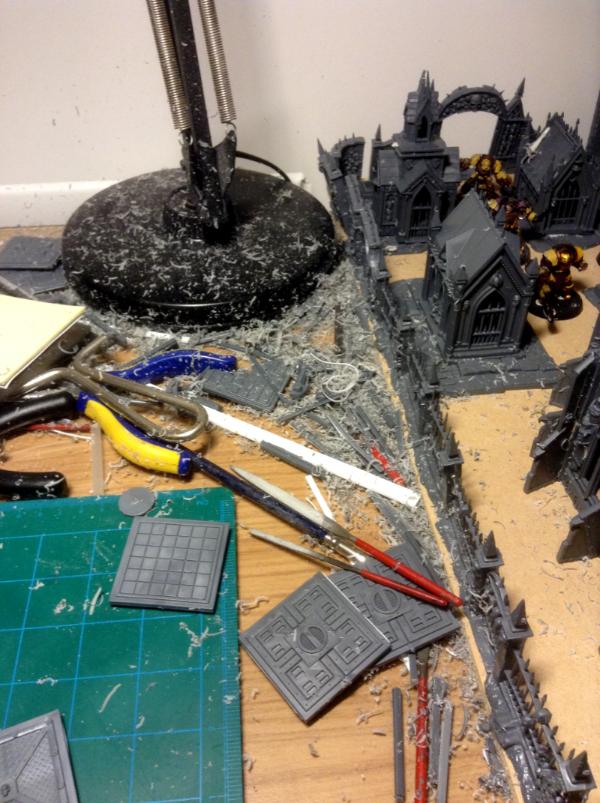

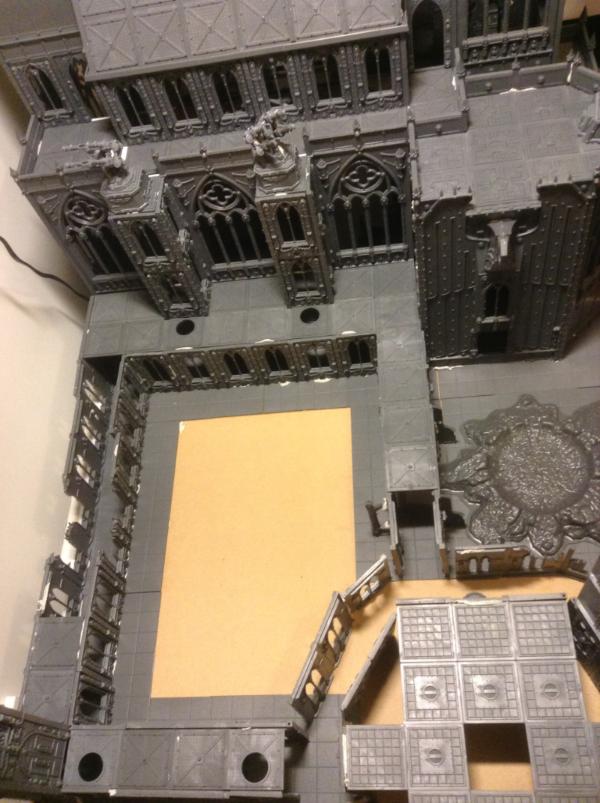
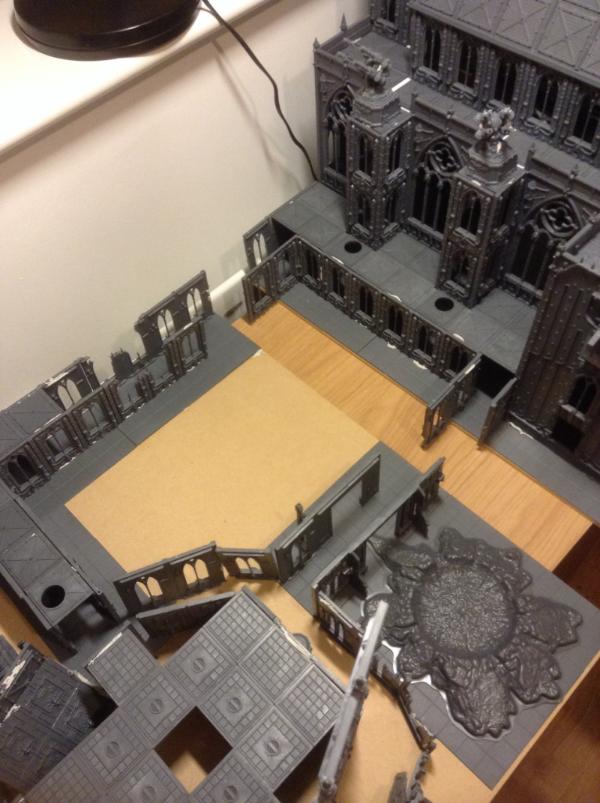
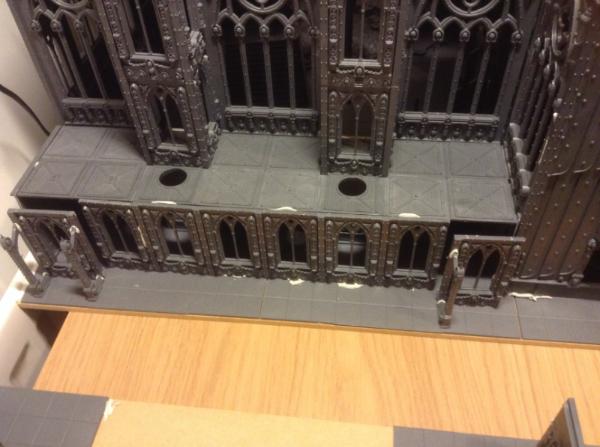
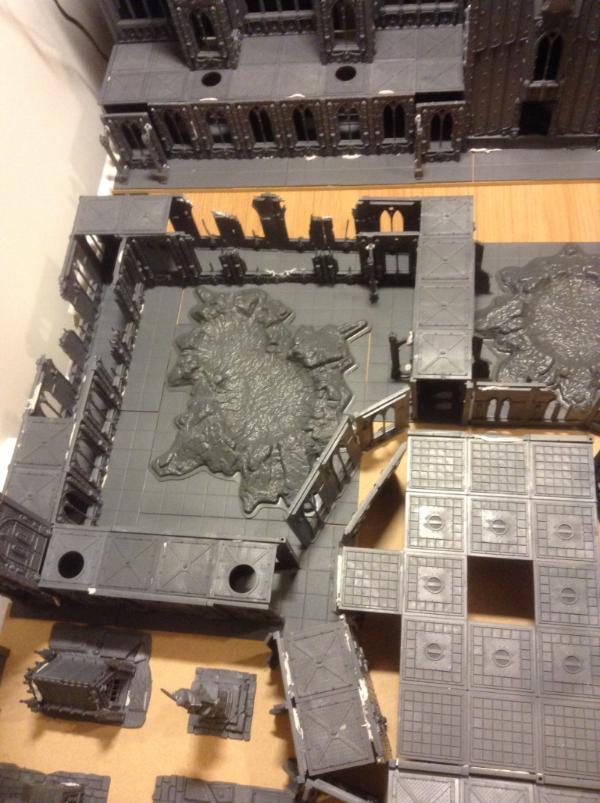
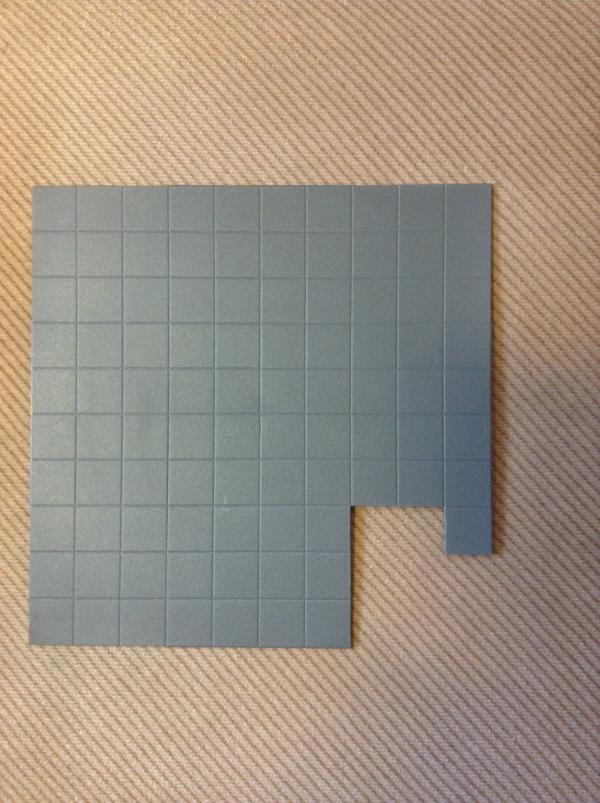
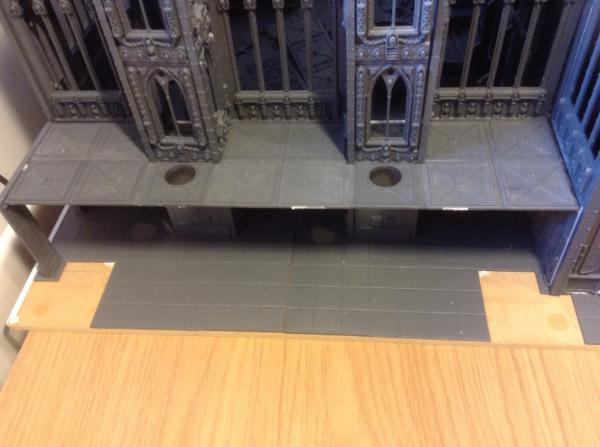
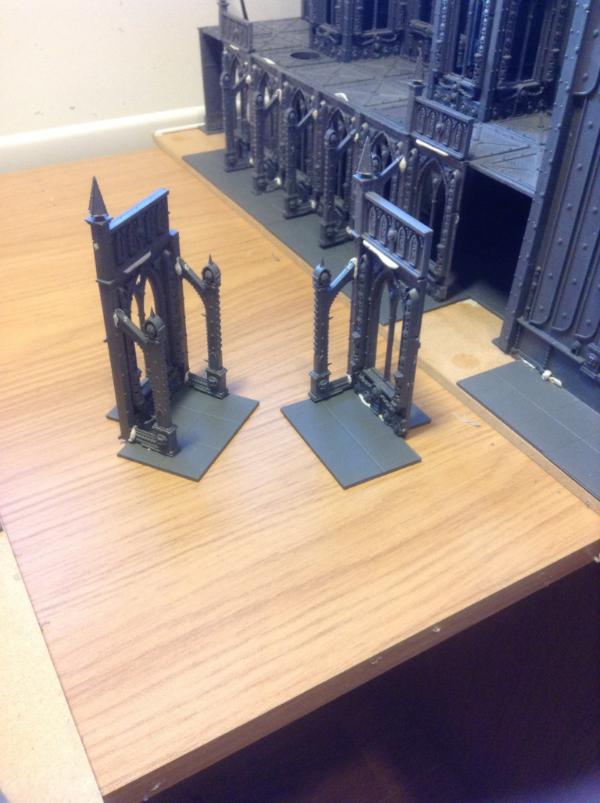
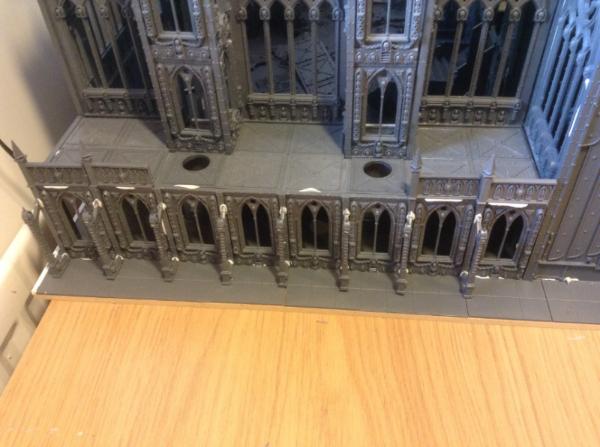
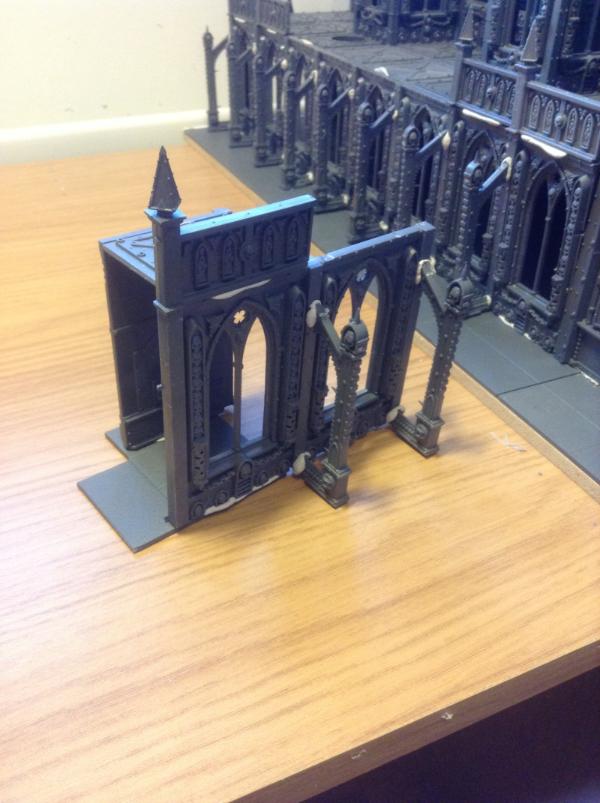
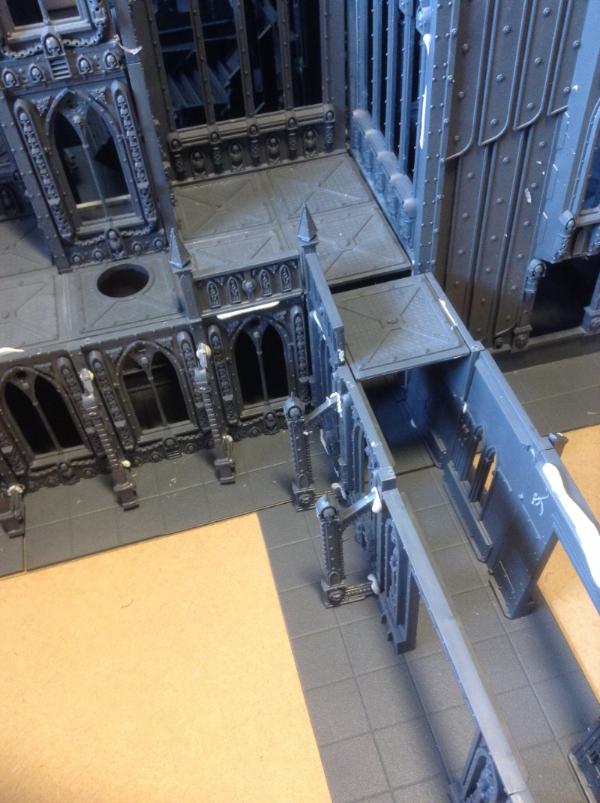
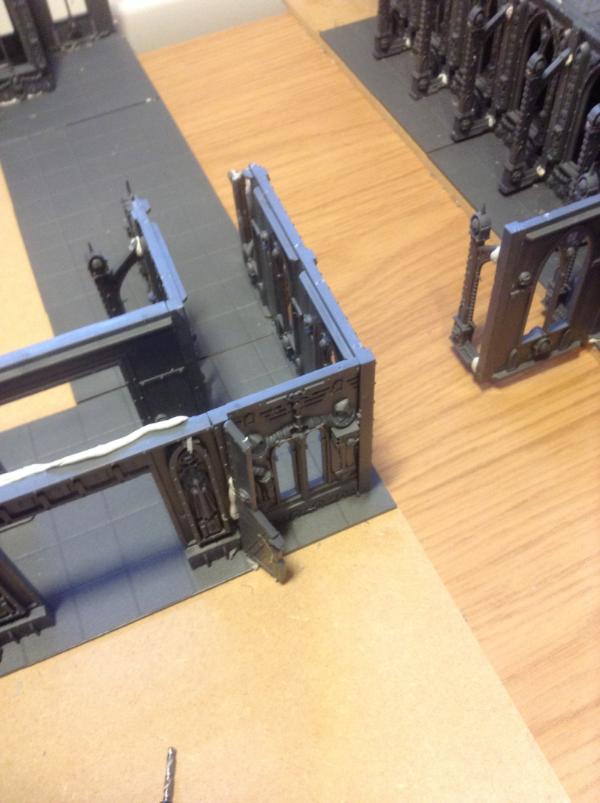

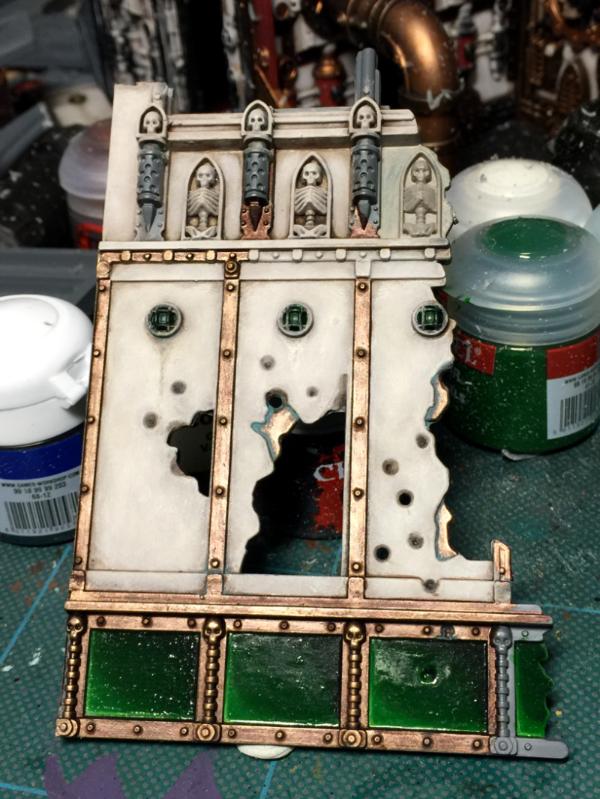
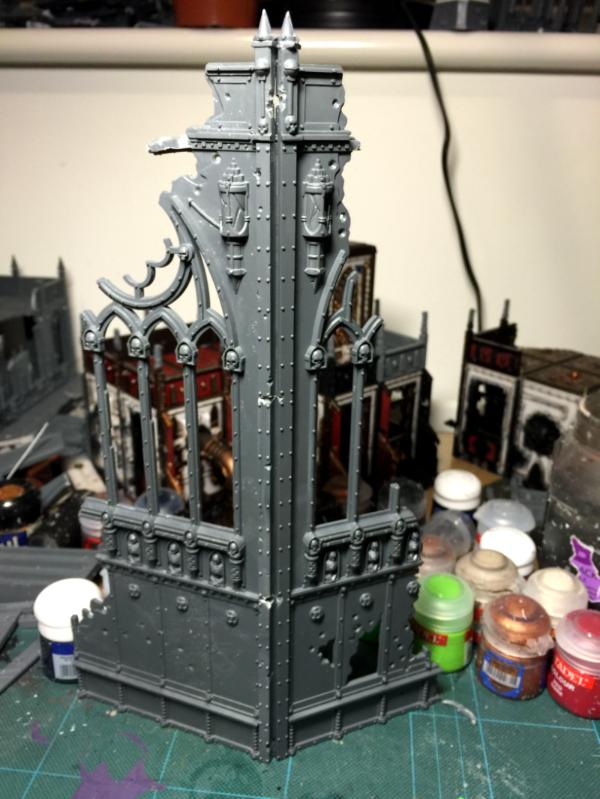
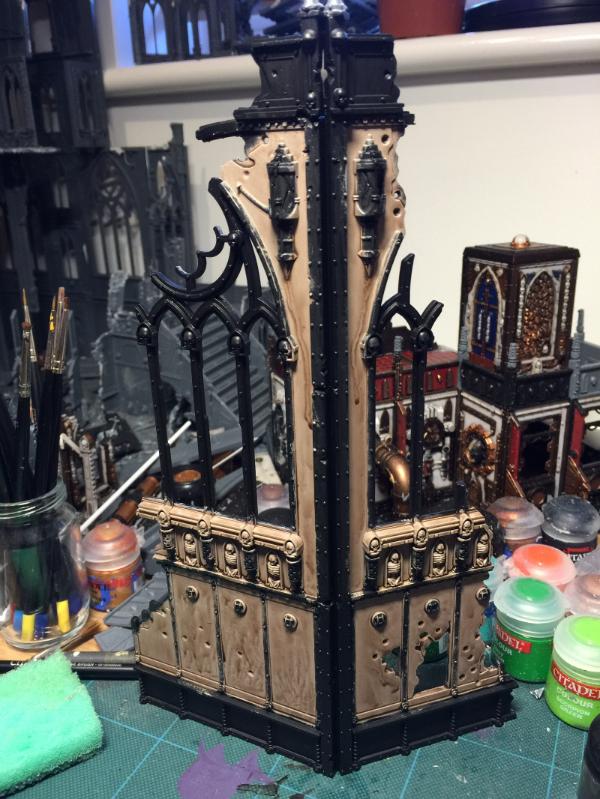
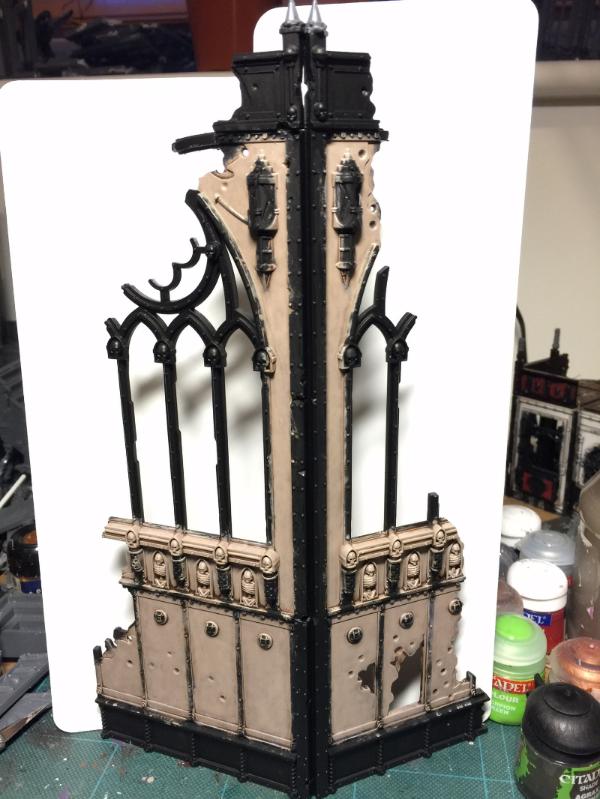
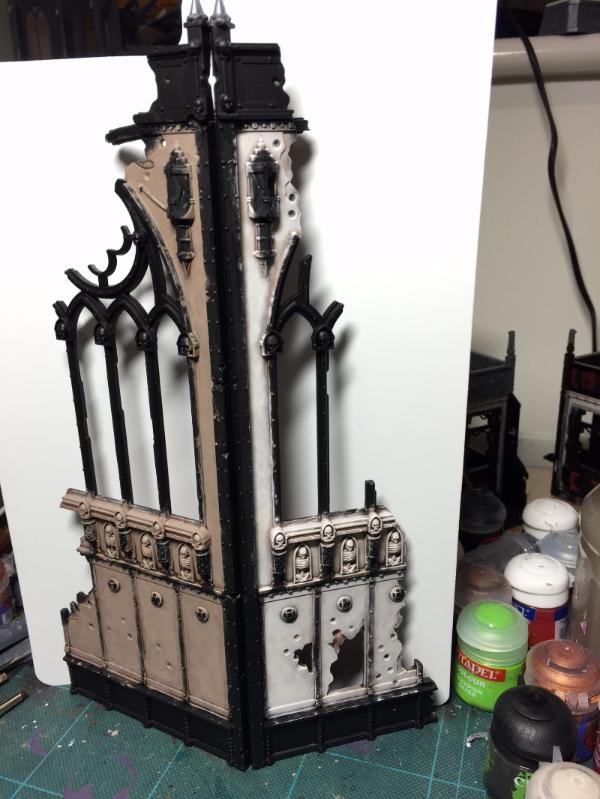
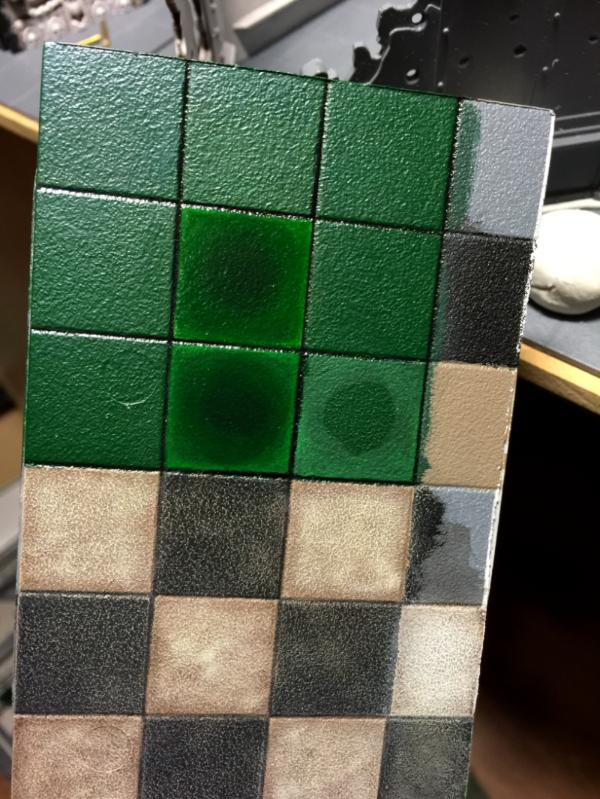
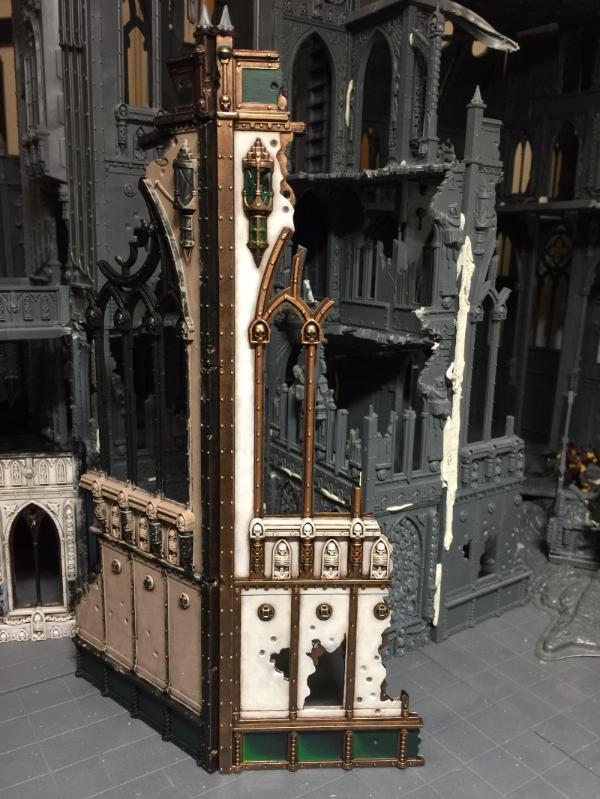
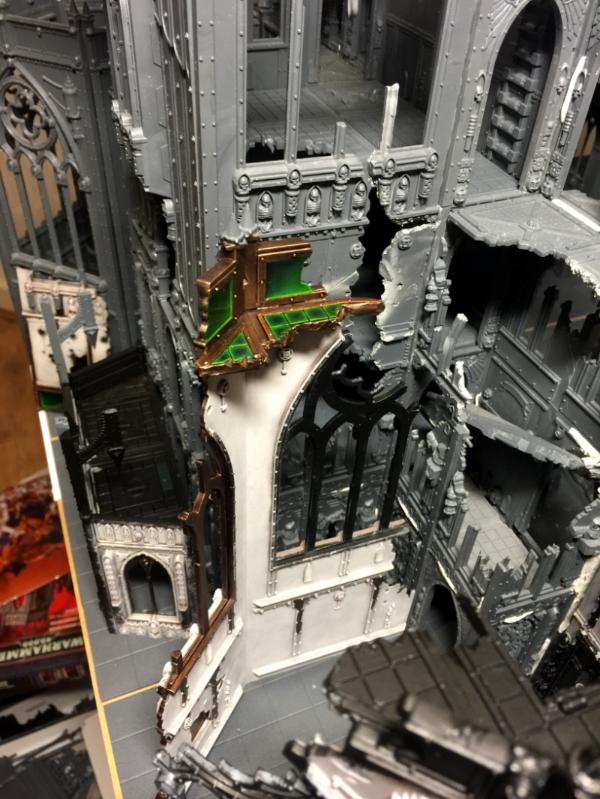
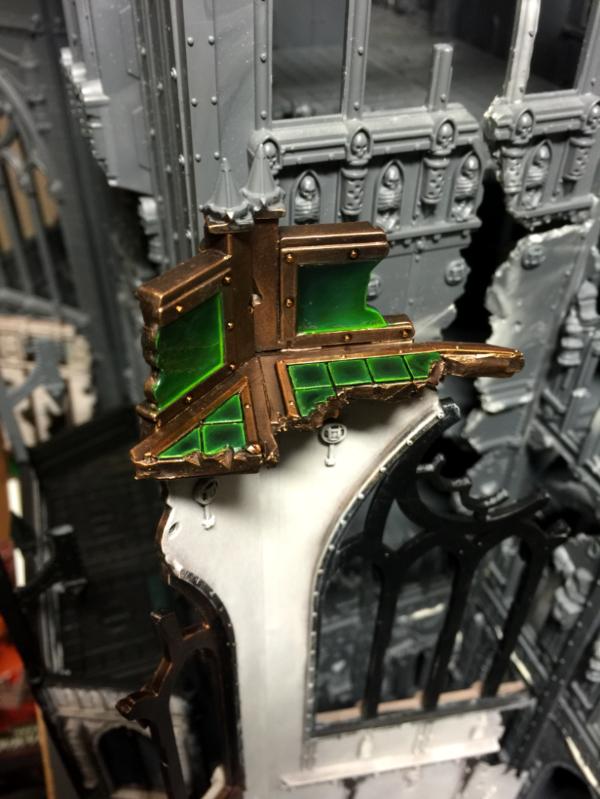
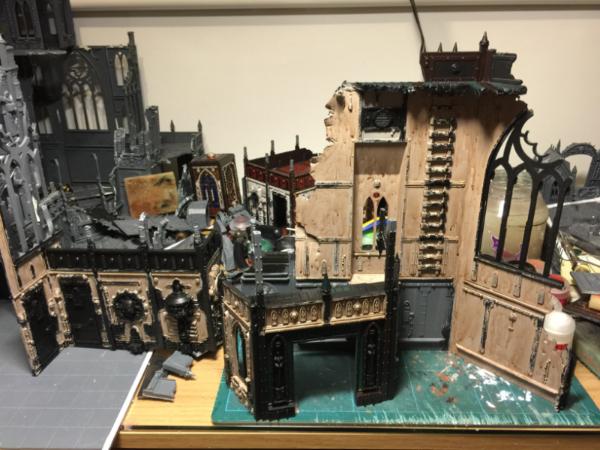
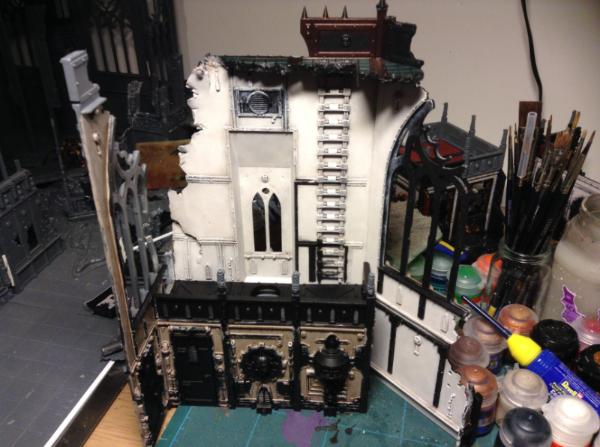
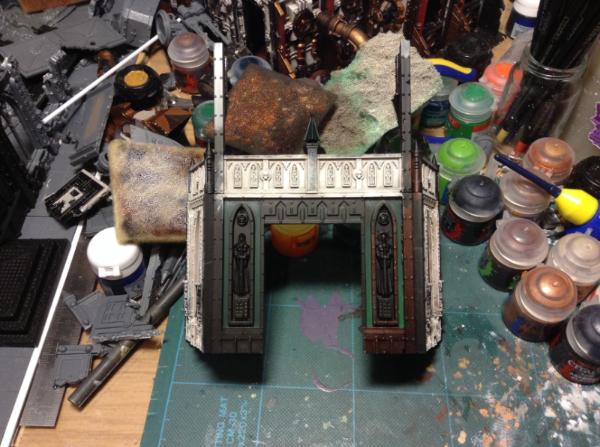
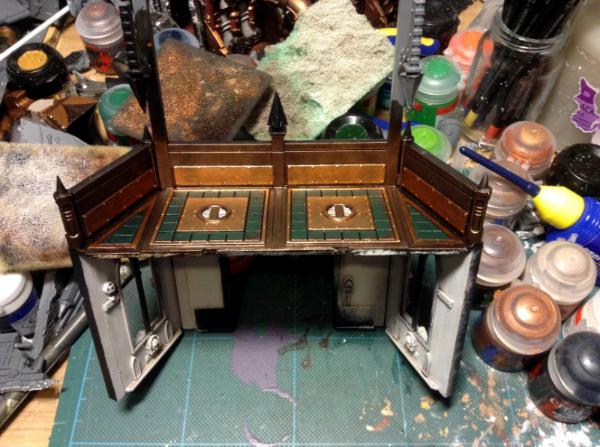
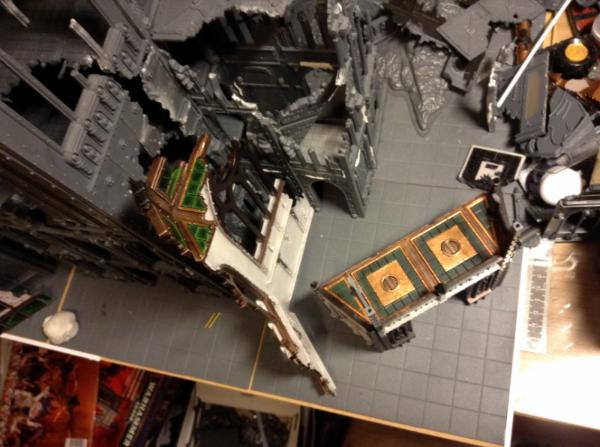
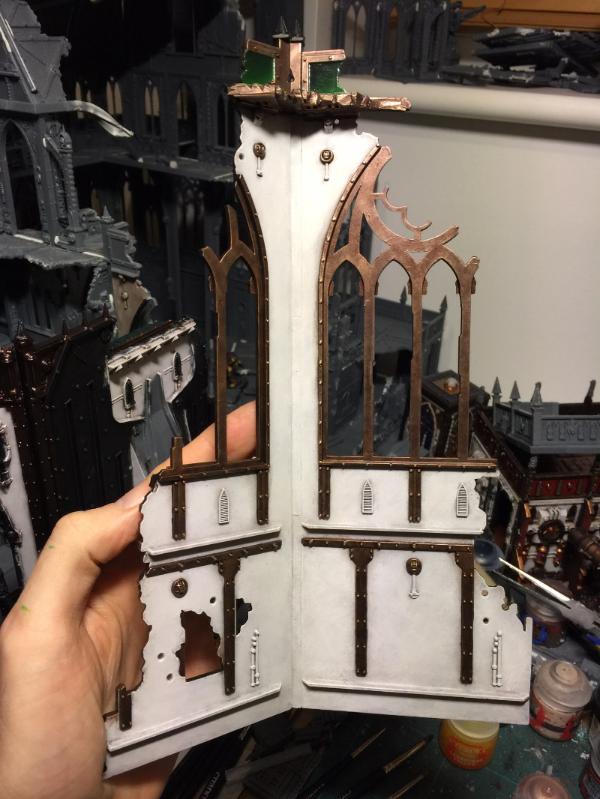
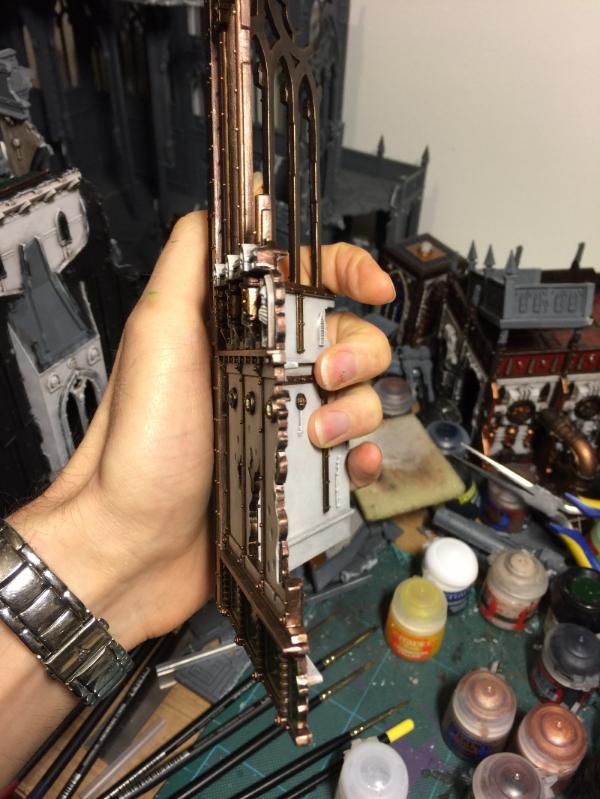
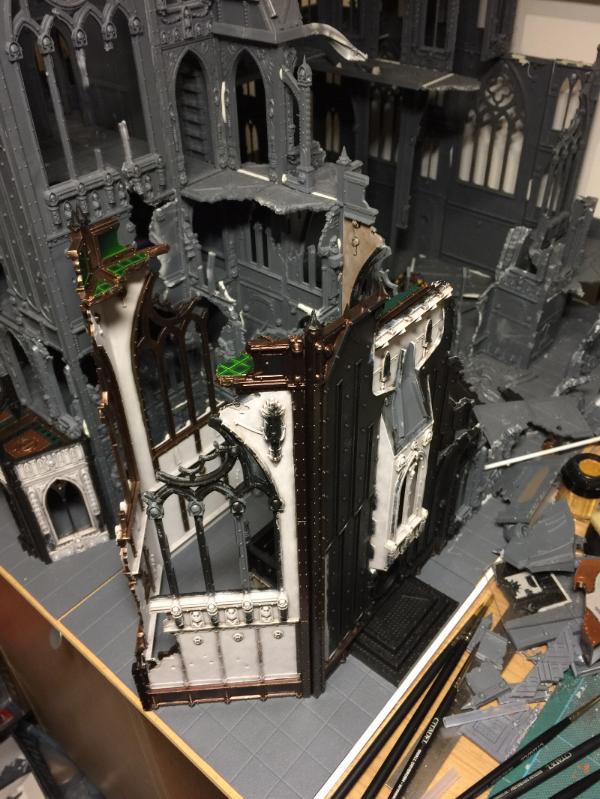
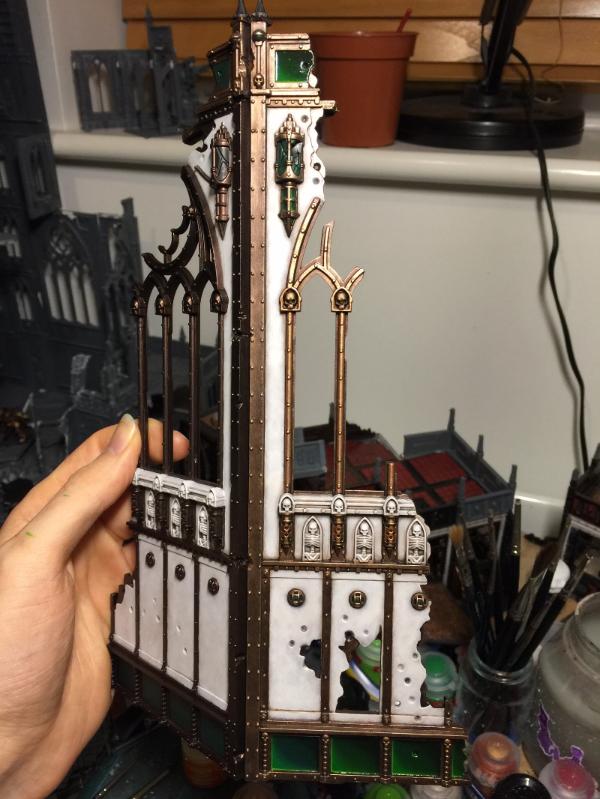
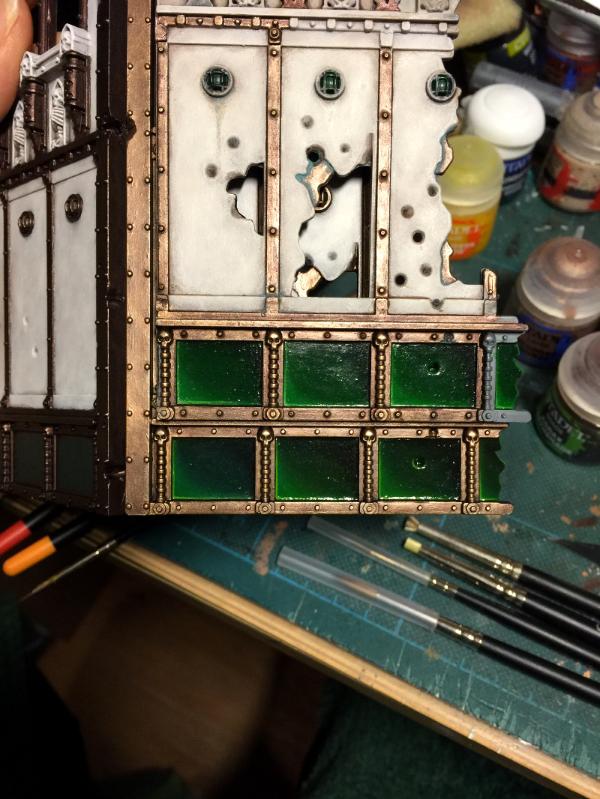


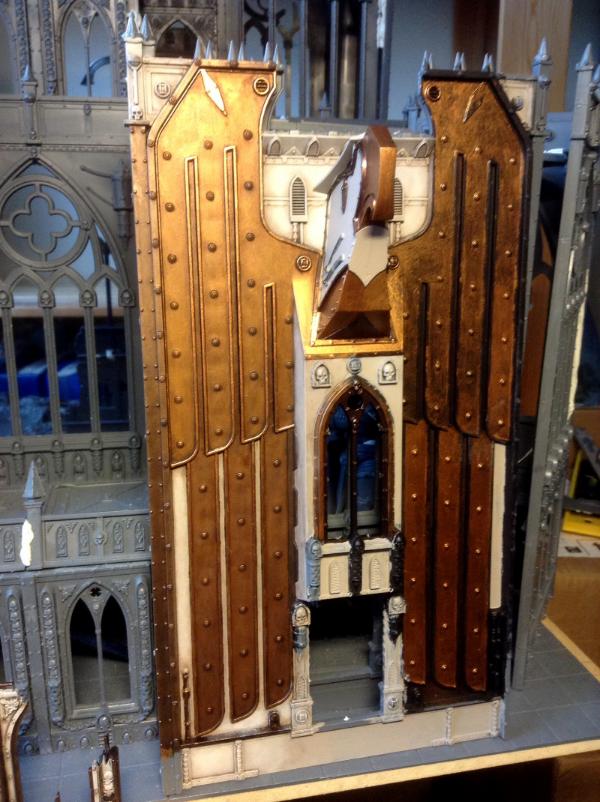

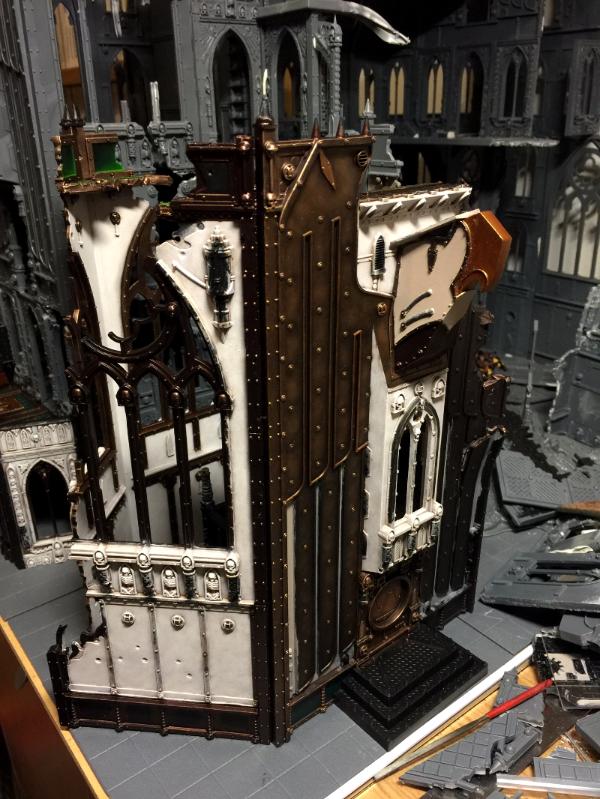
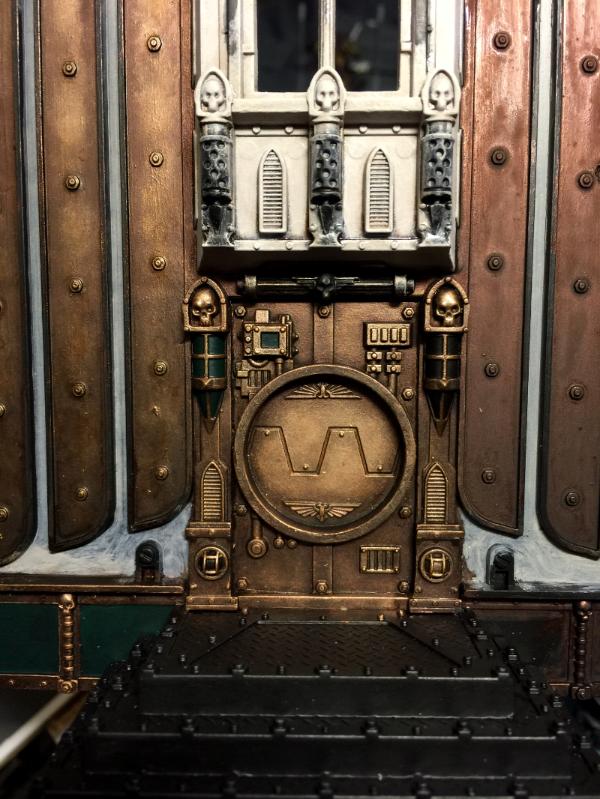
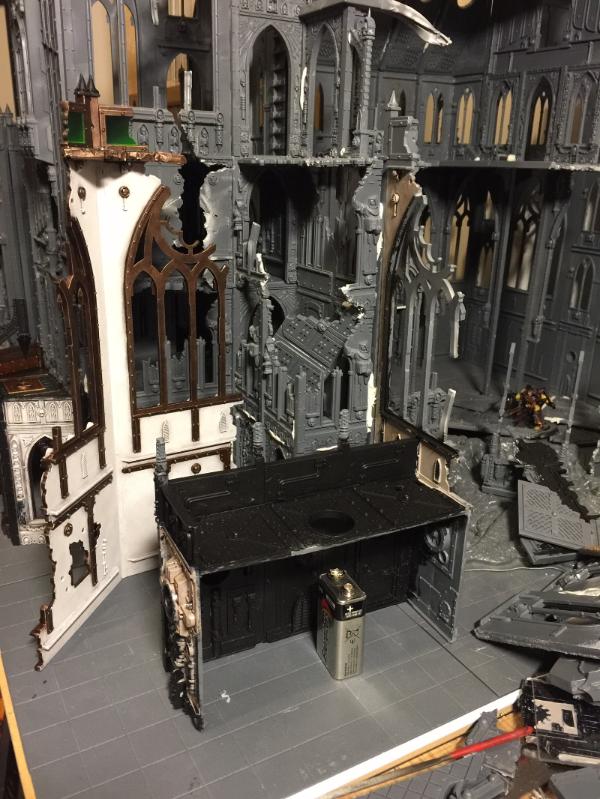

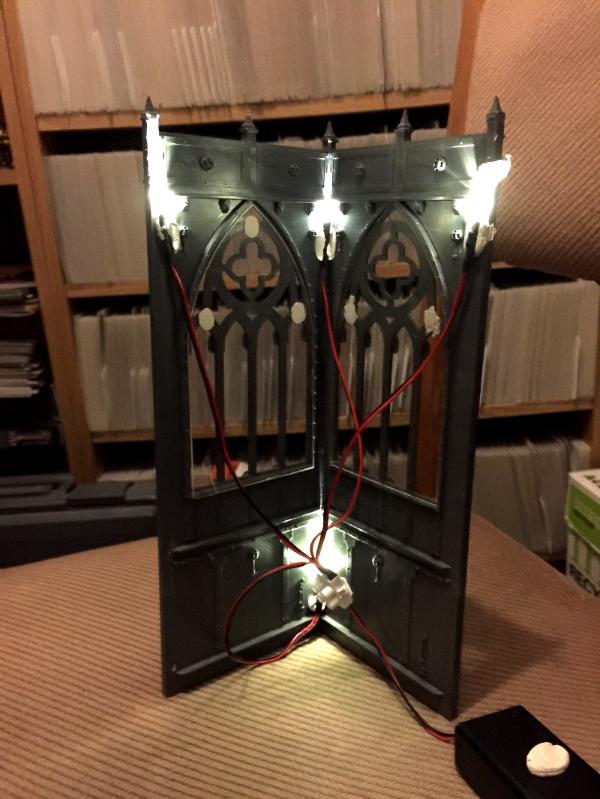
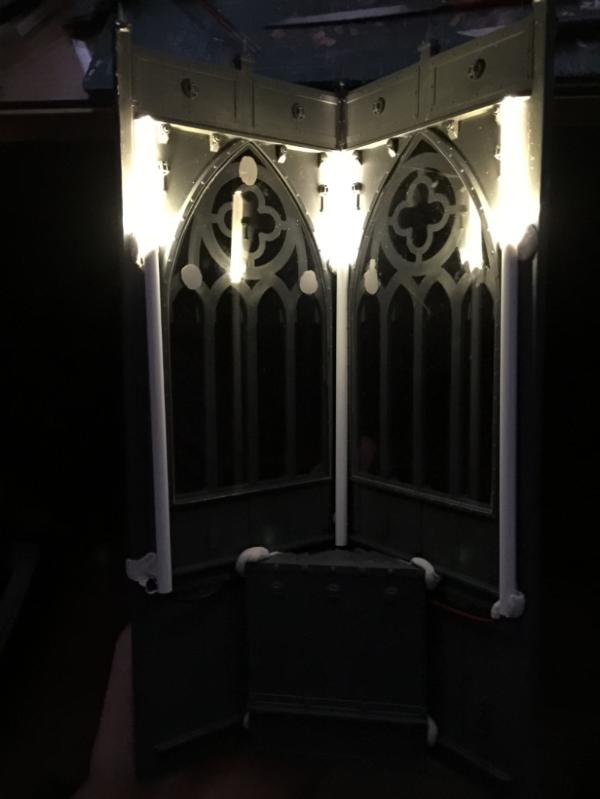
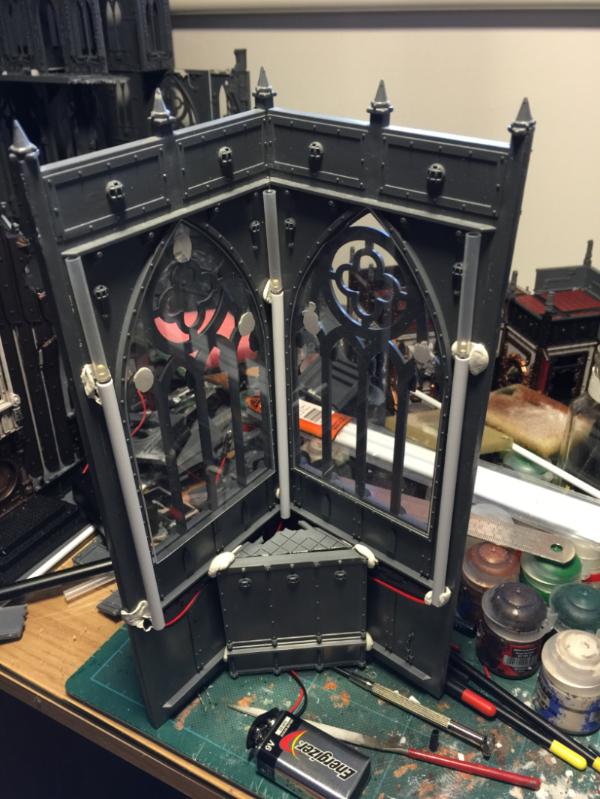
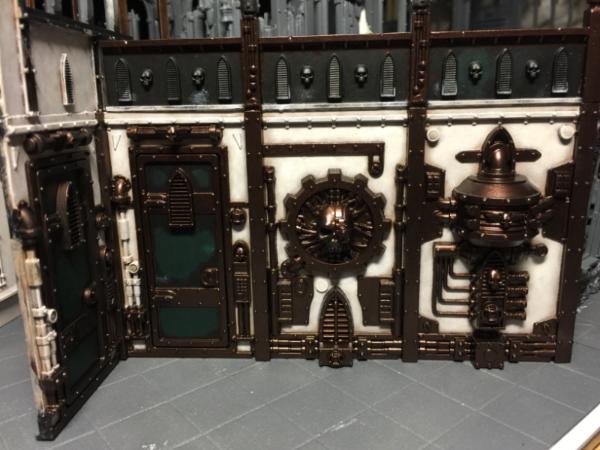
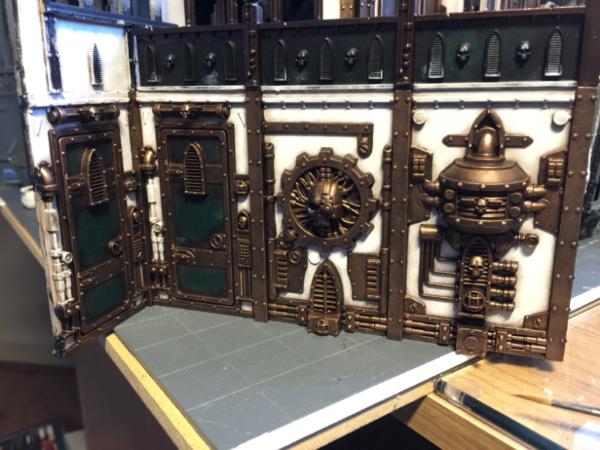
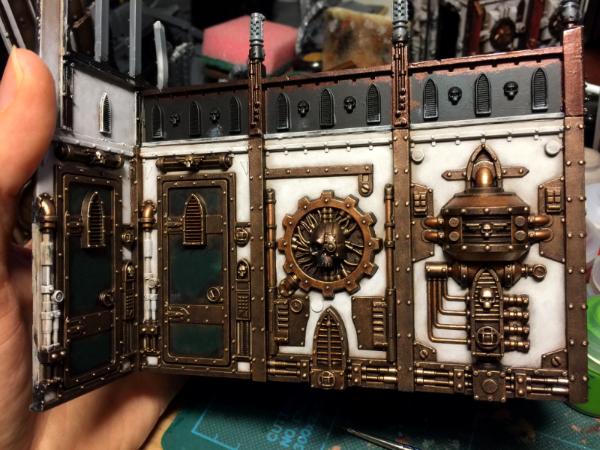
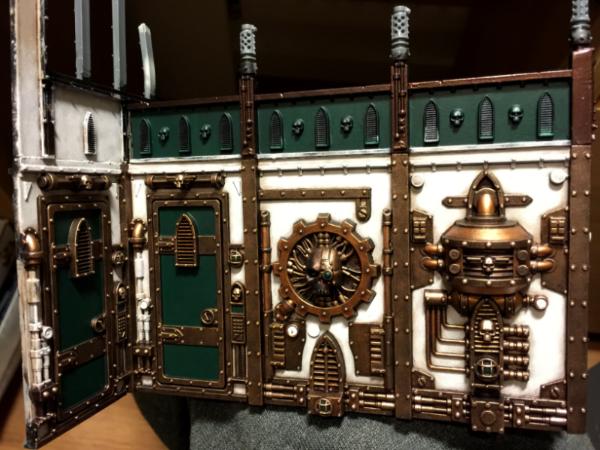
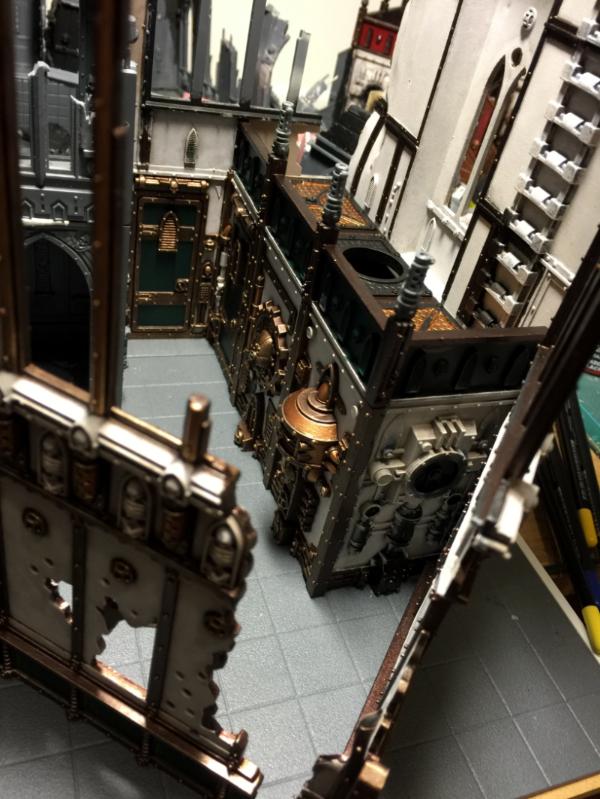
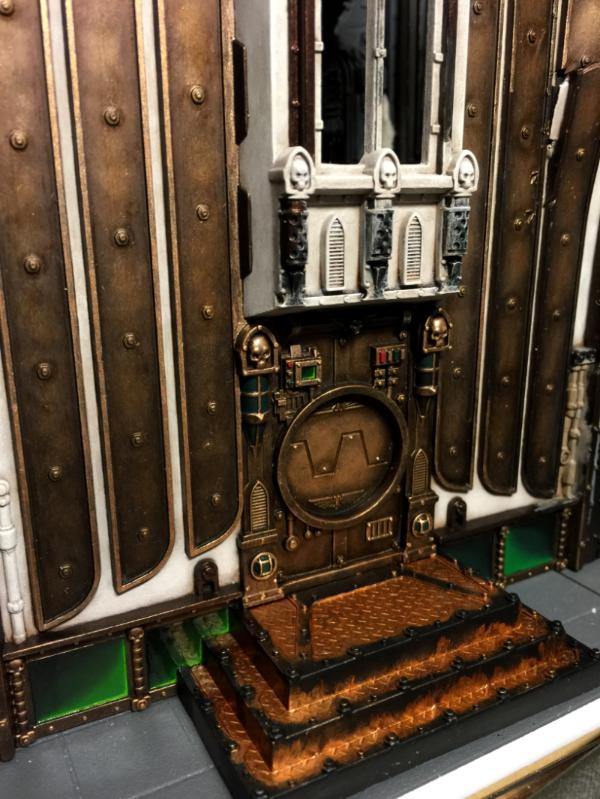
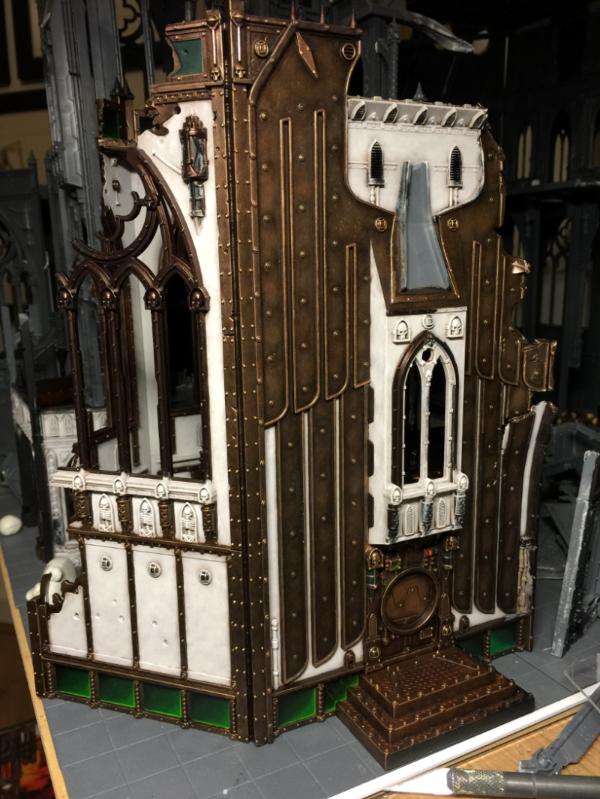
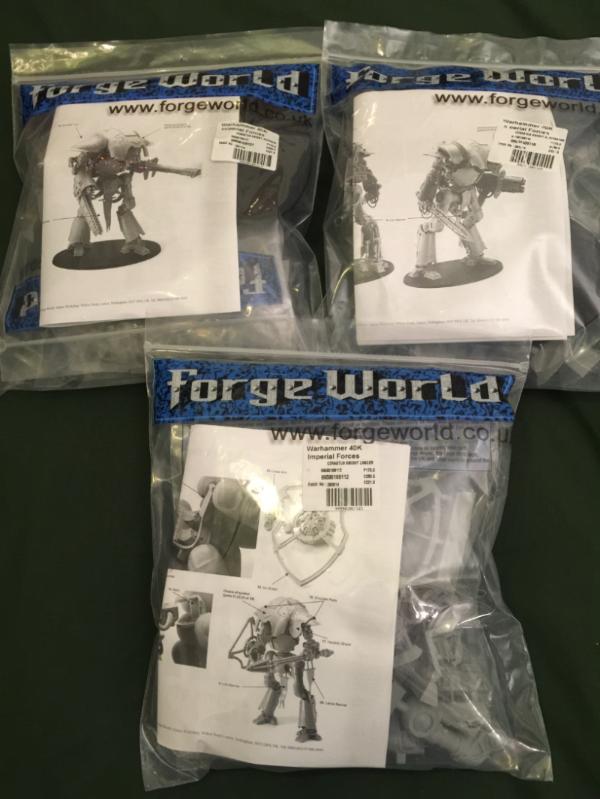
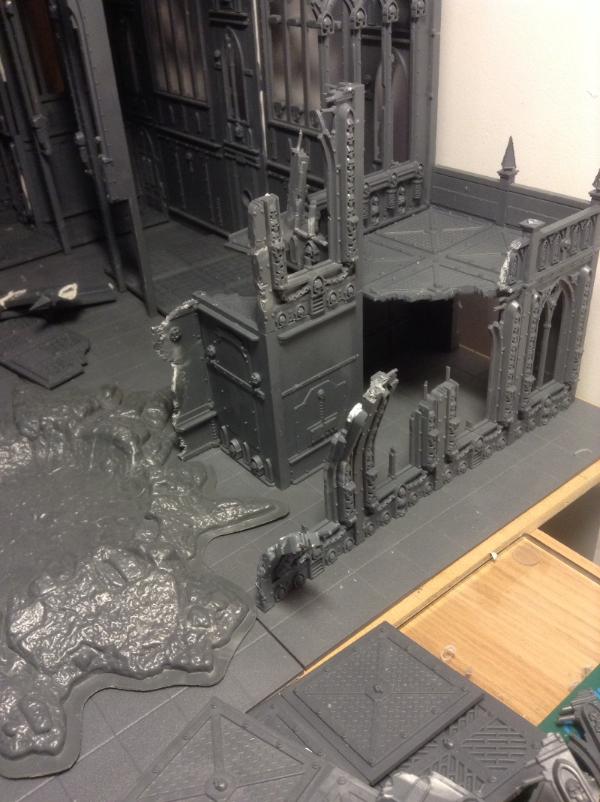
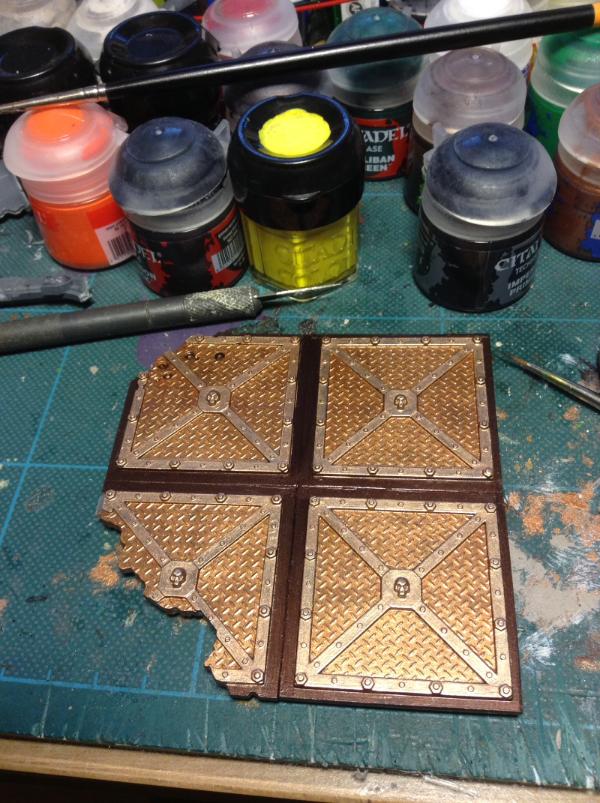

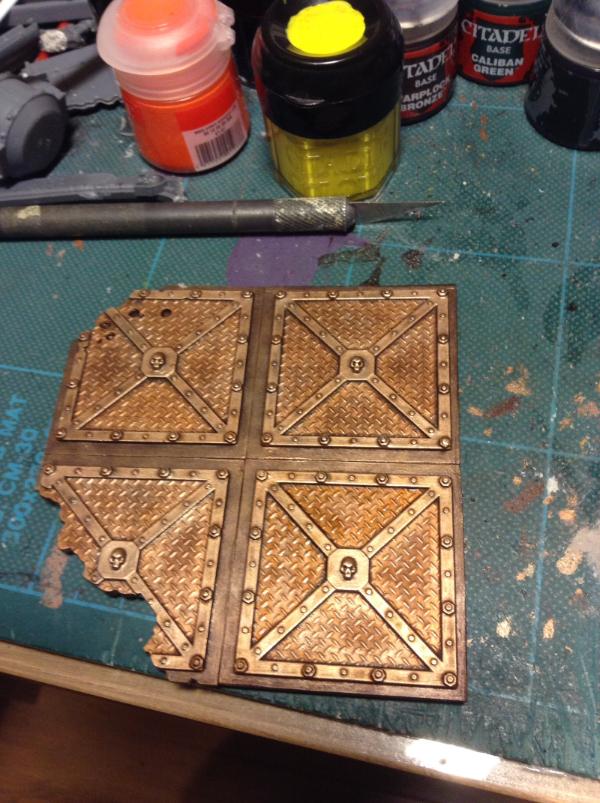
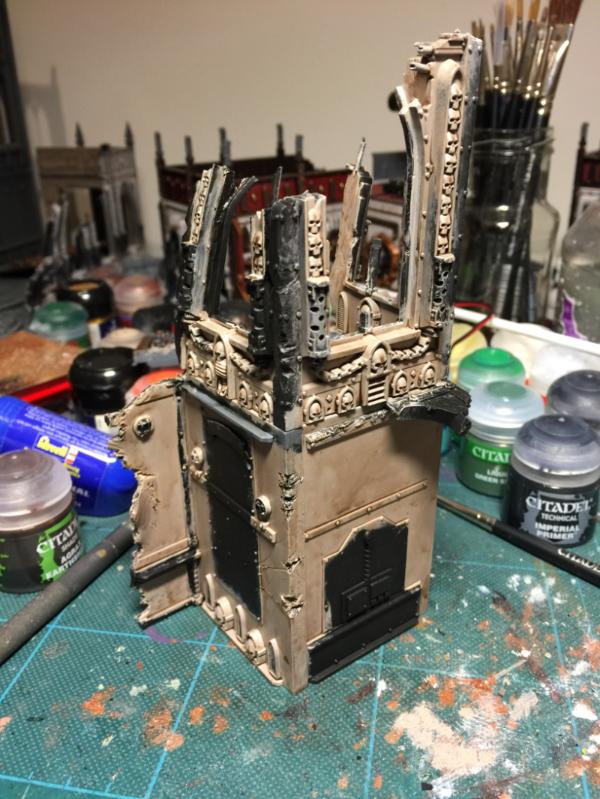
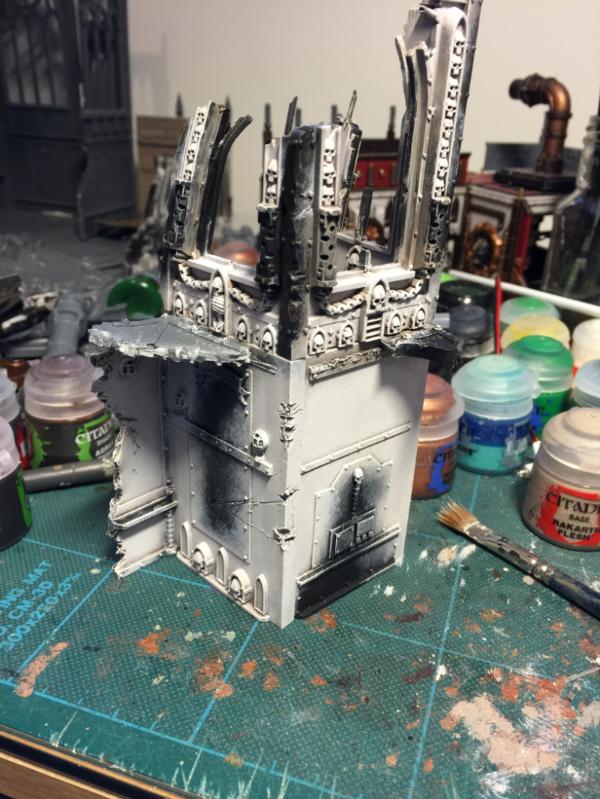

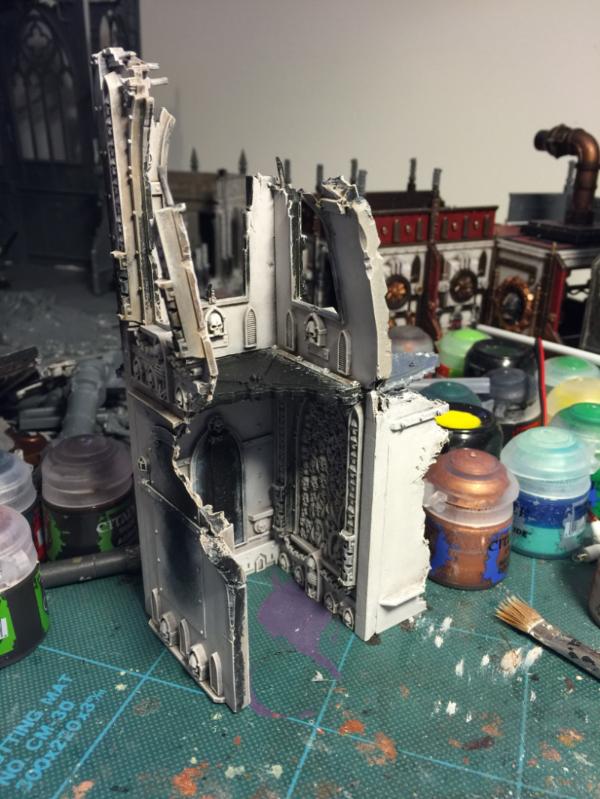
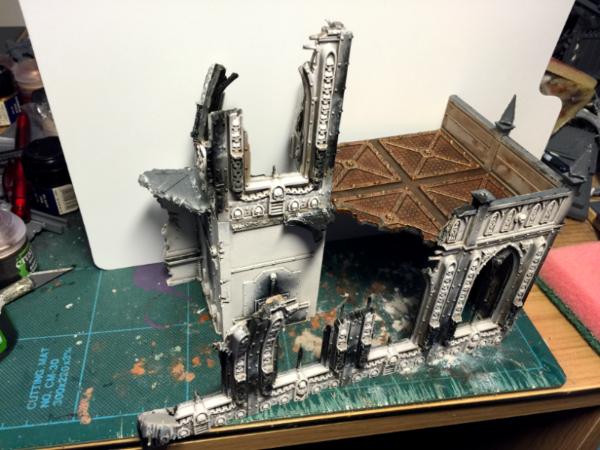
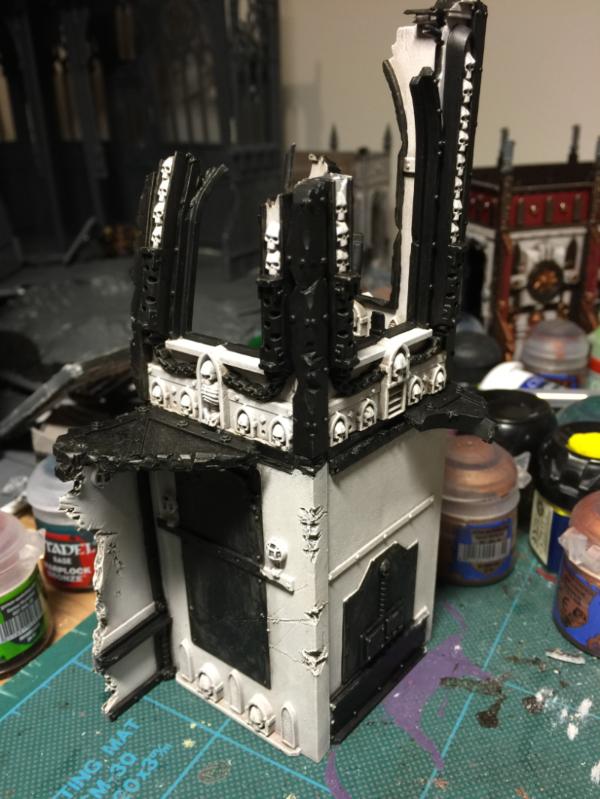 [/url]

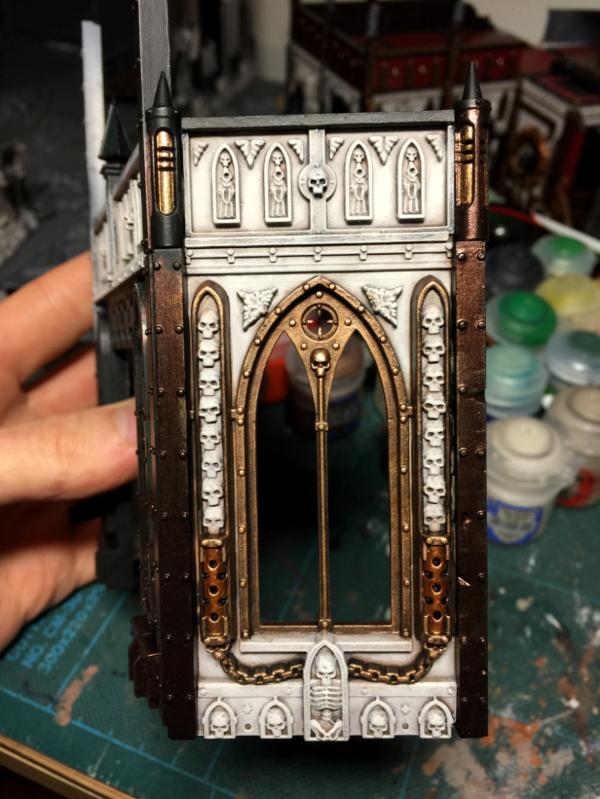
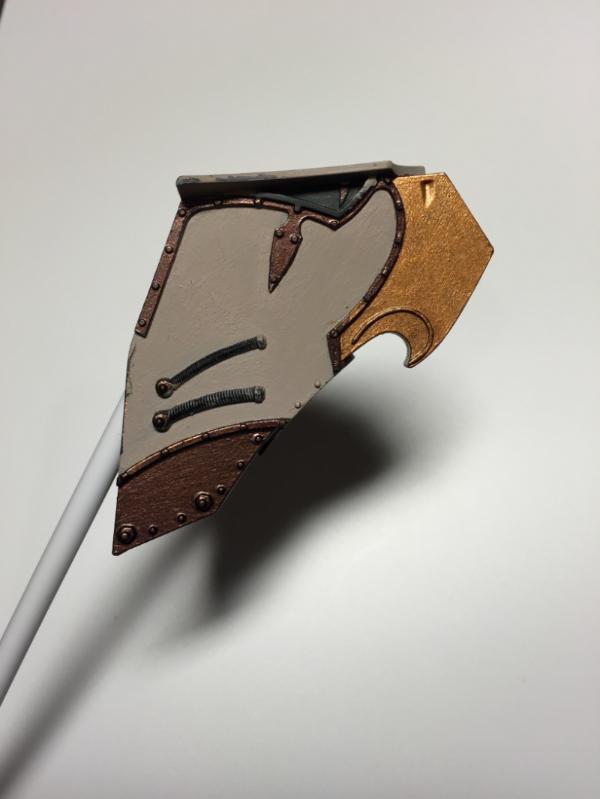
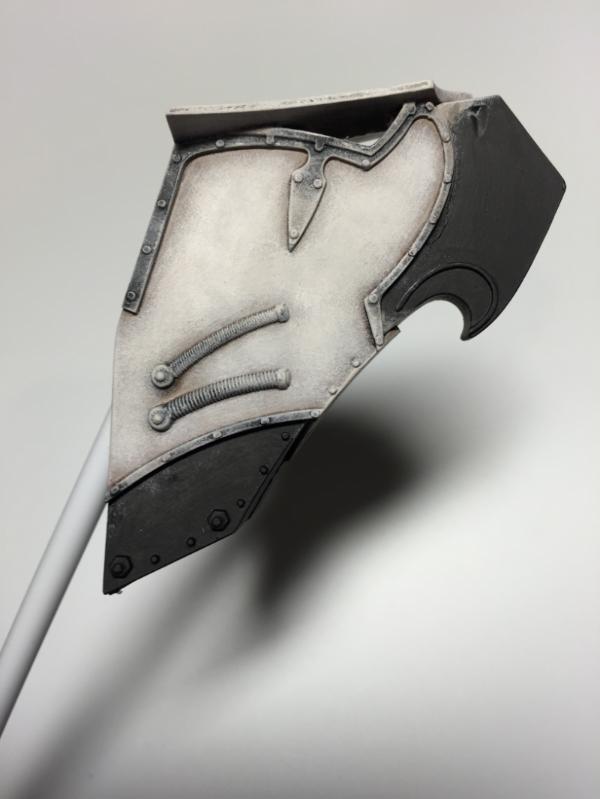
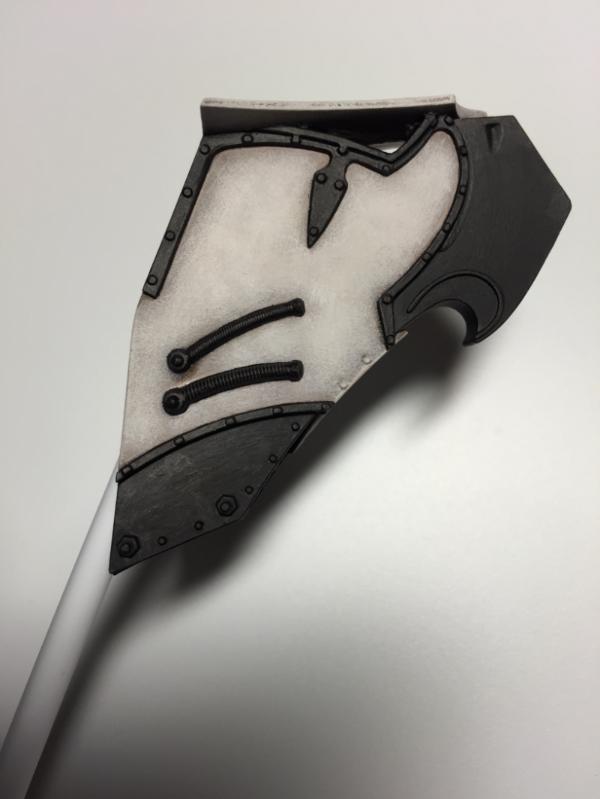

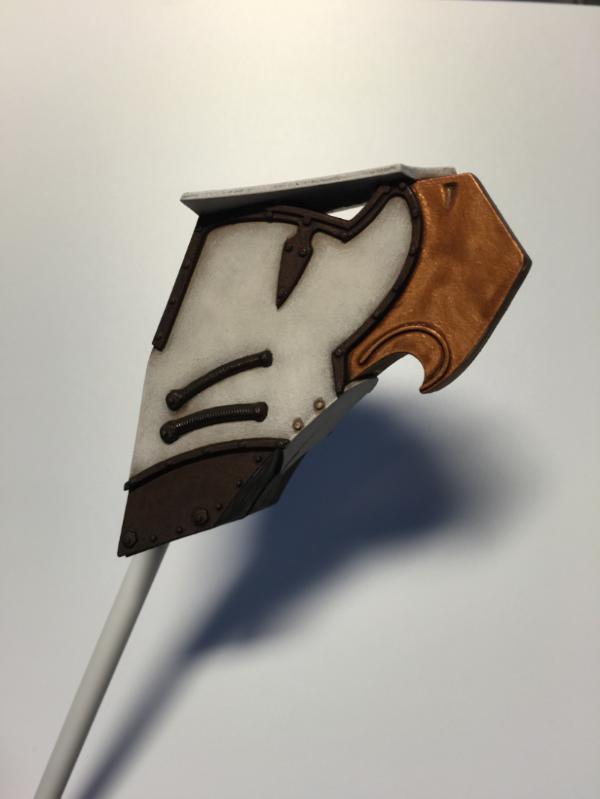
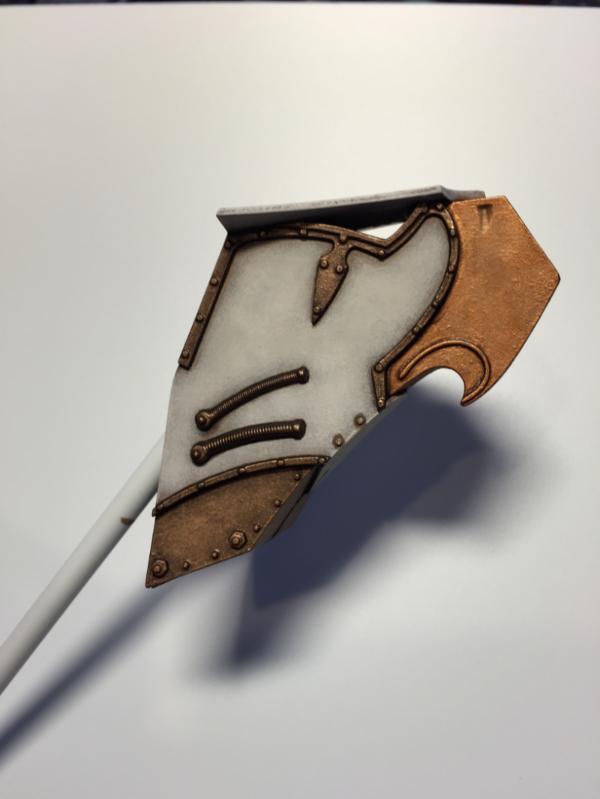
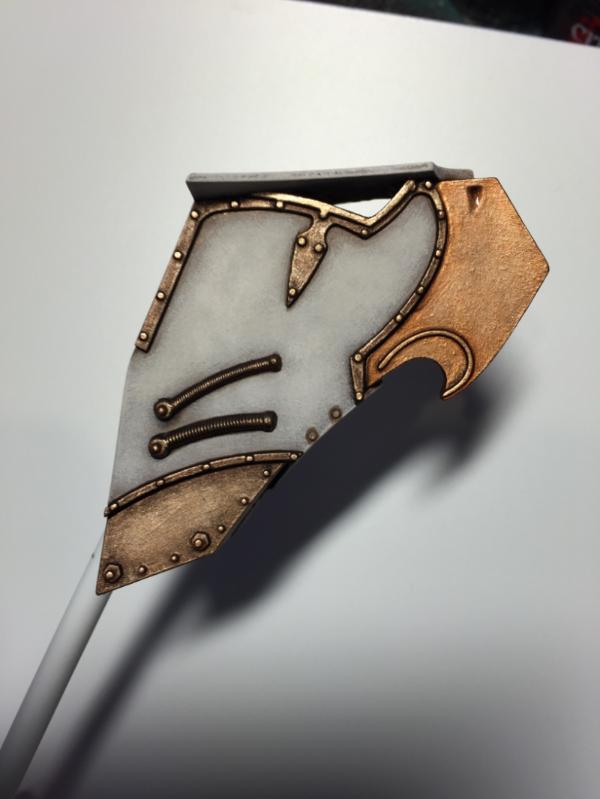
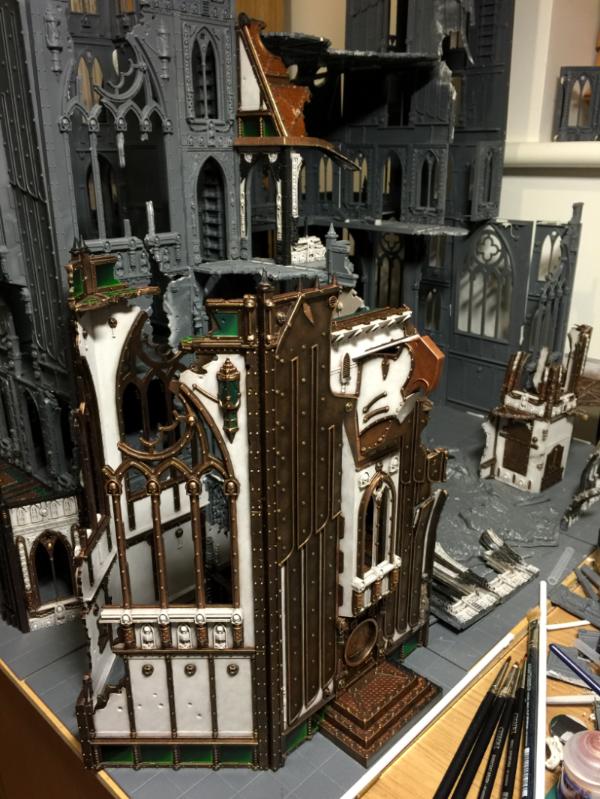
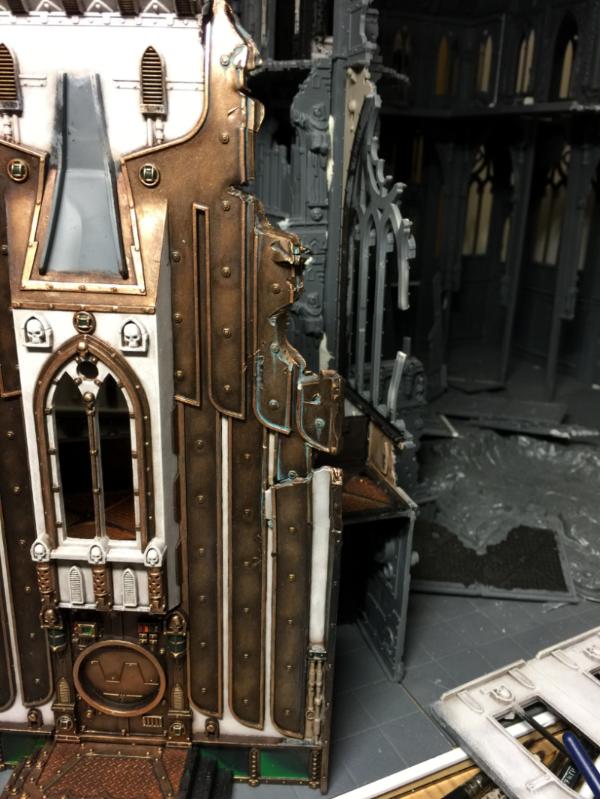
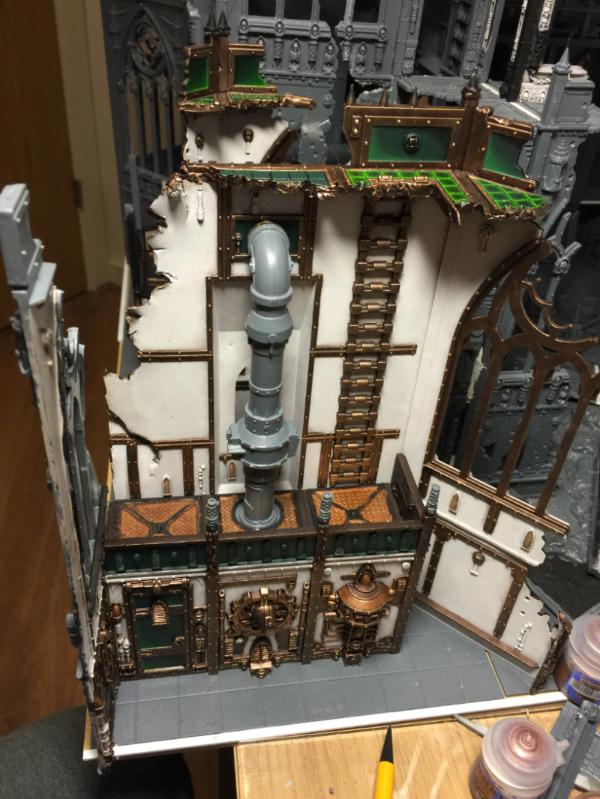
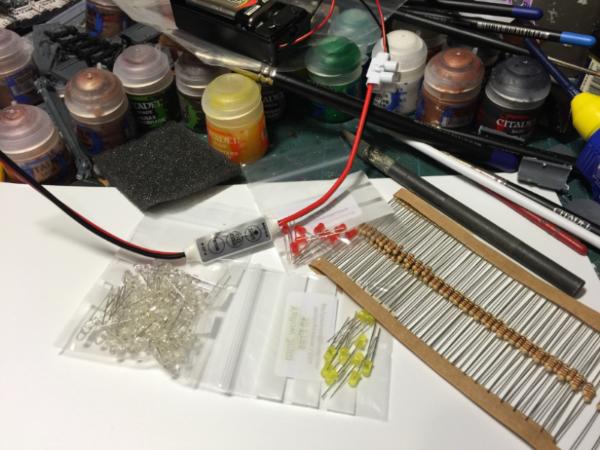
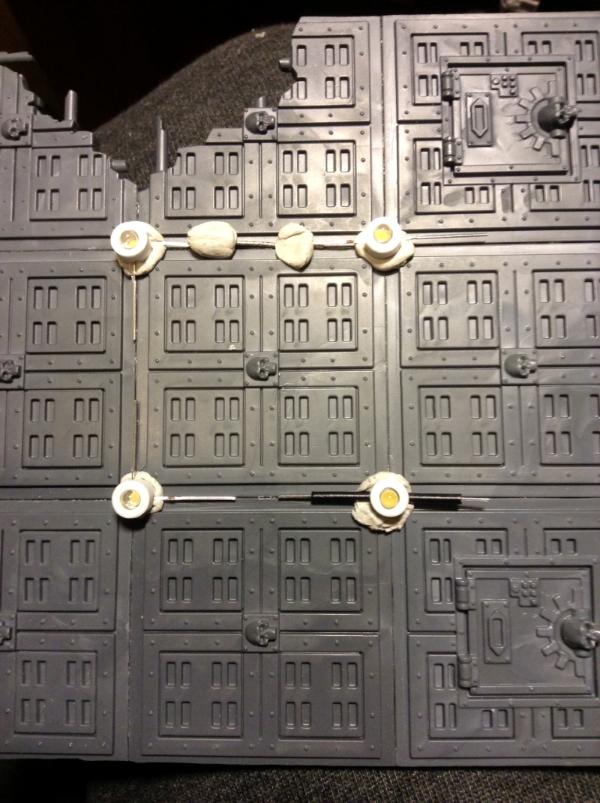

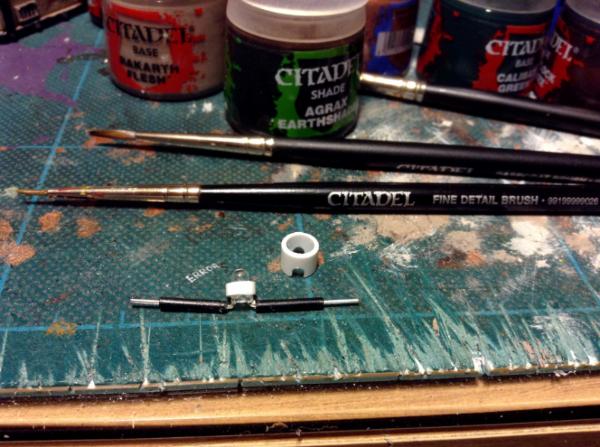
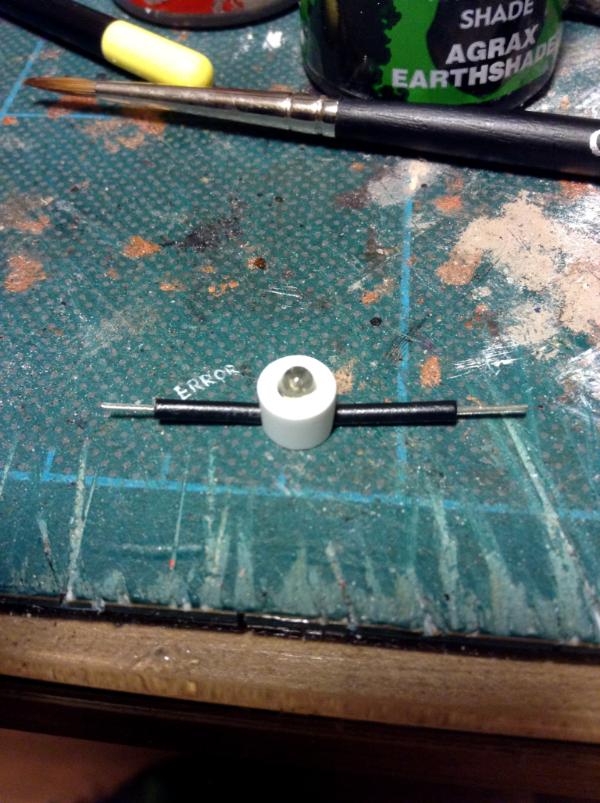
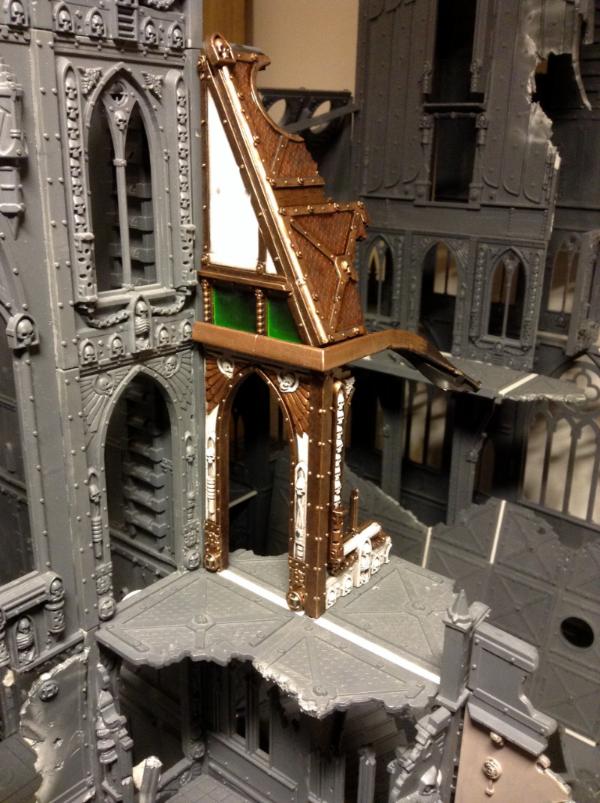
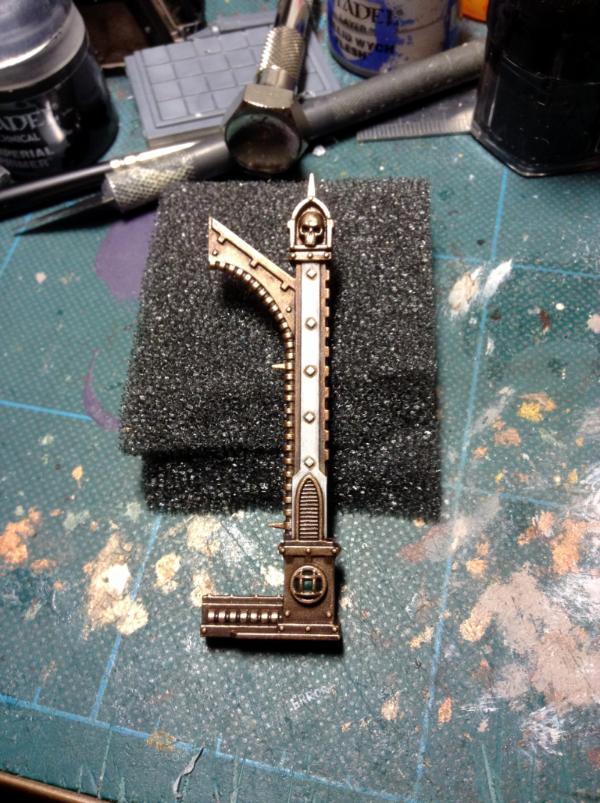
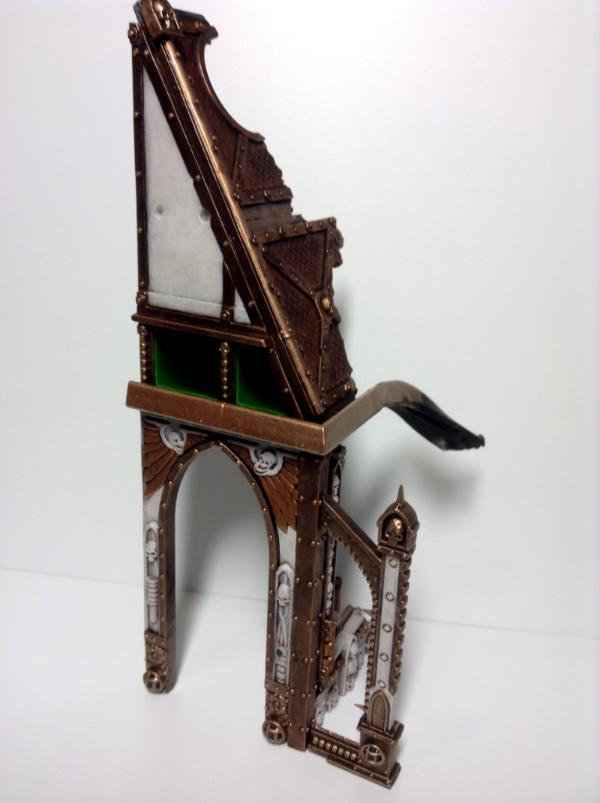
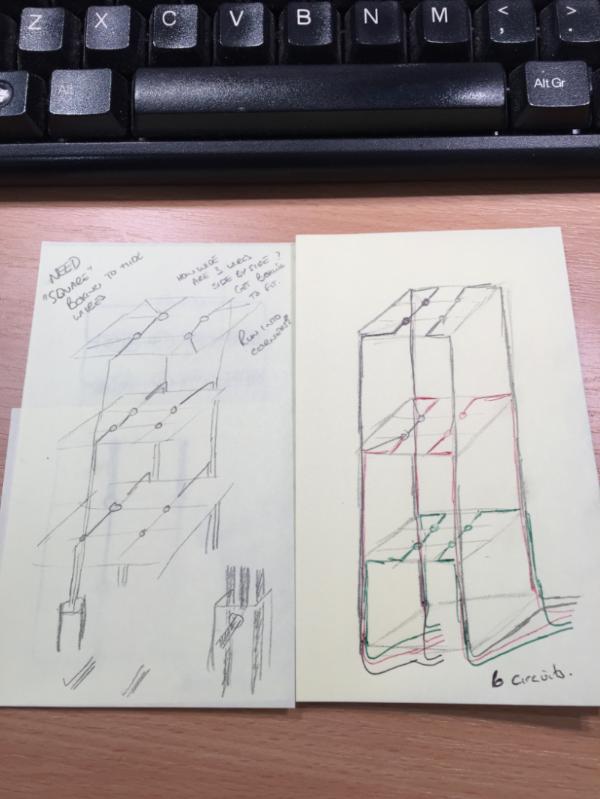
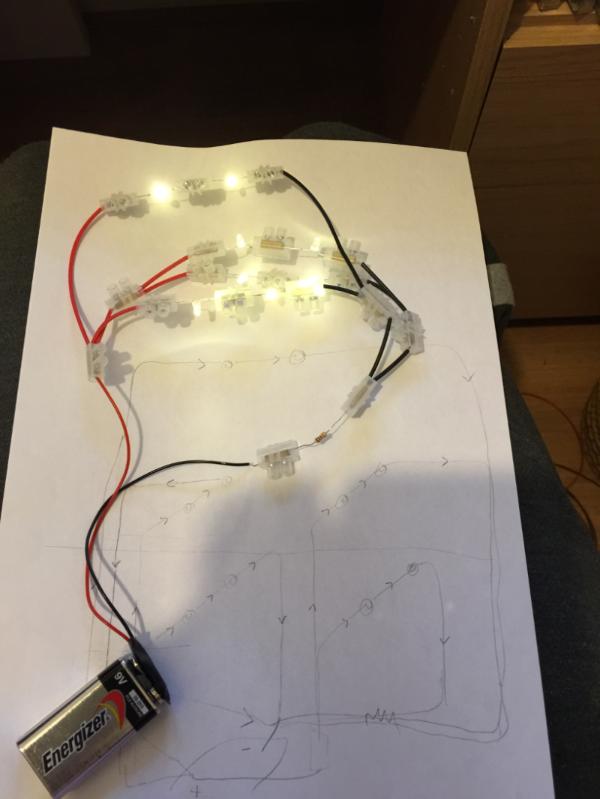
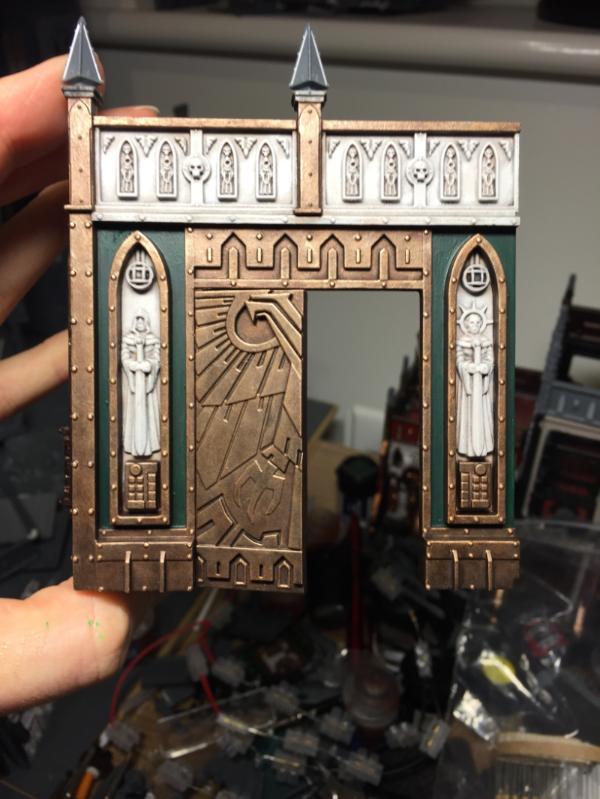
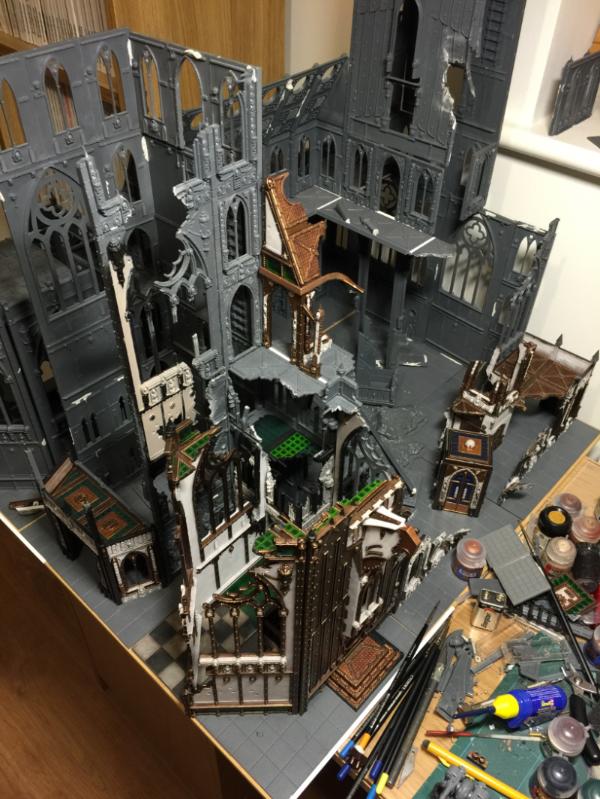
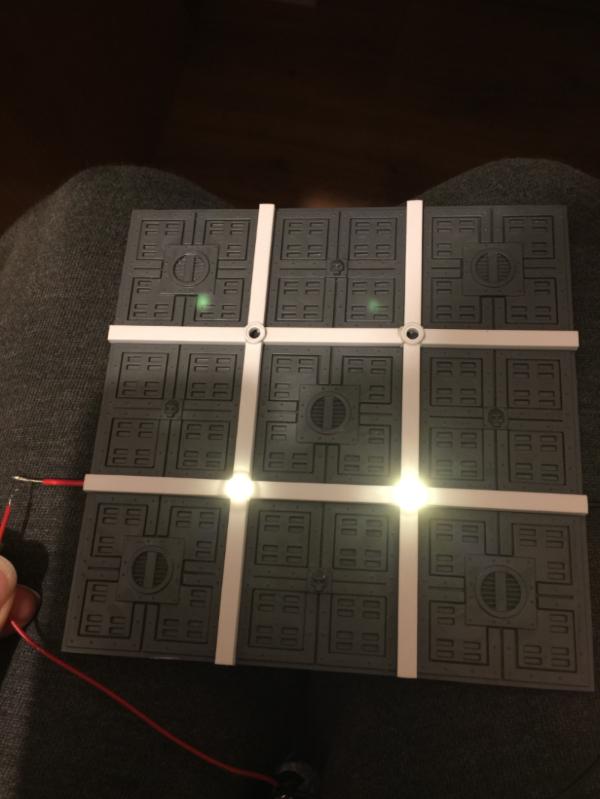
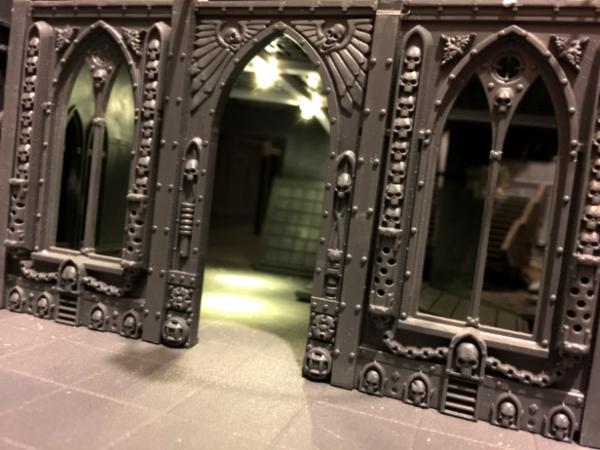
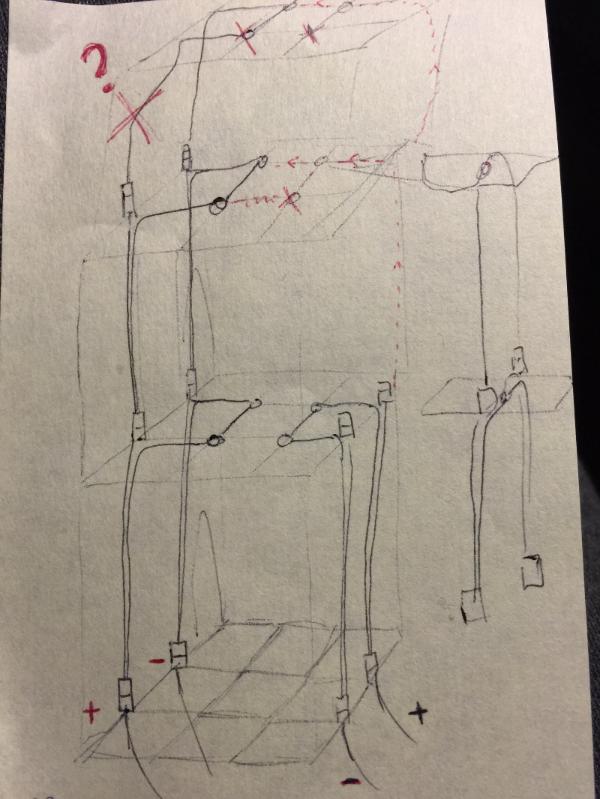
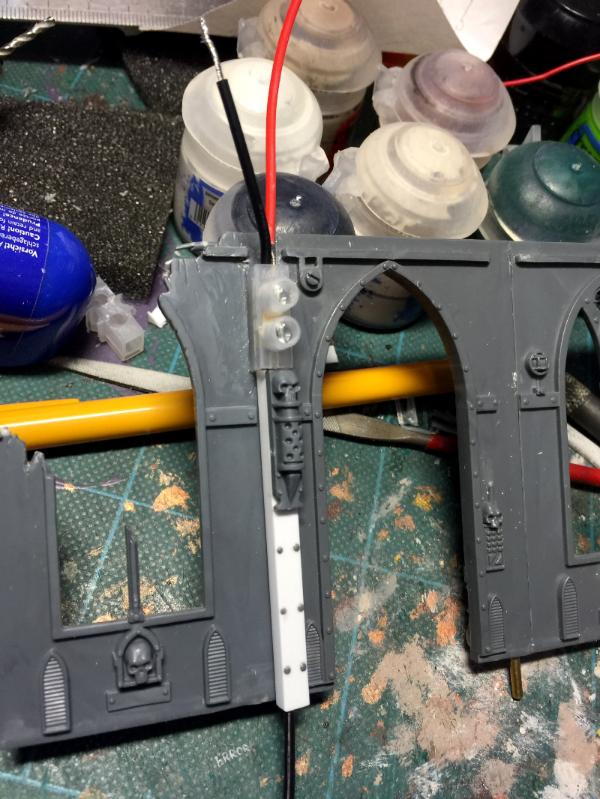
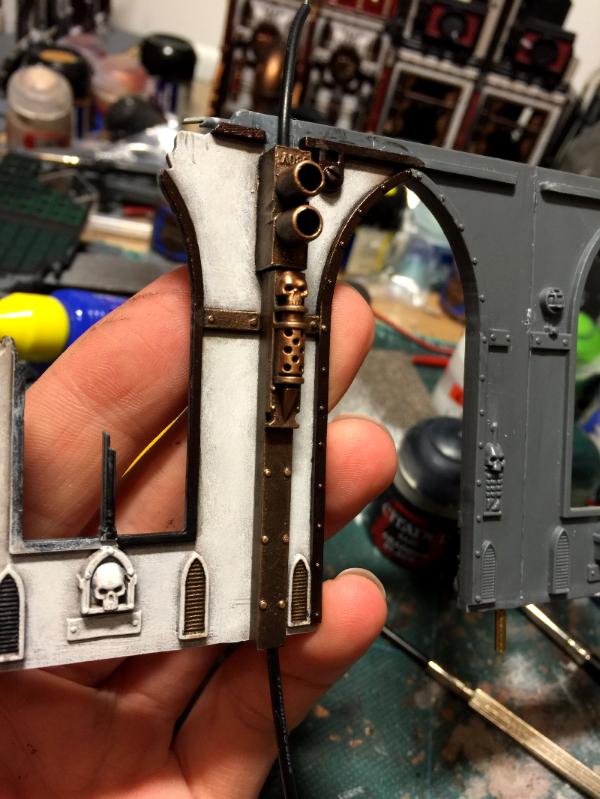
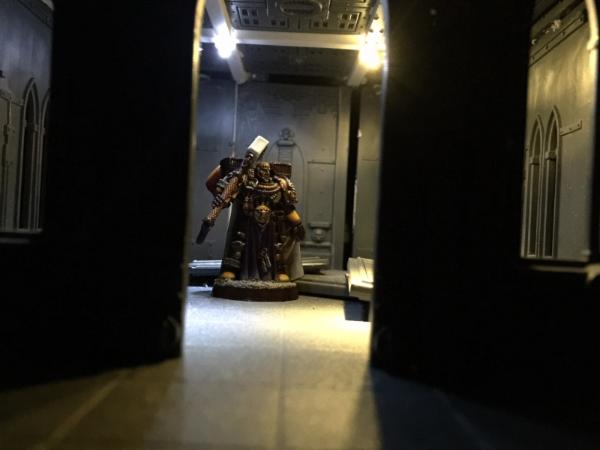
 b) so that others can (if you want) use some of what I'm doing for your own projects and c) so I can get useful feedback...