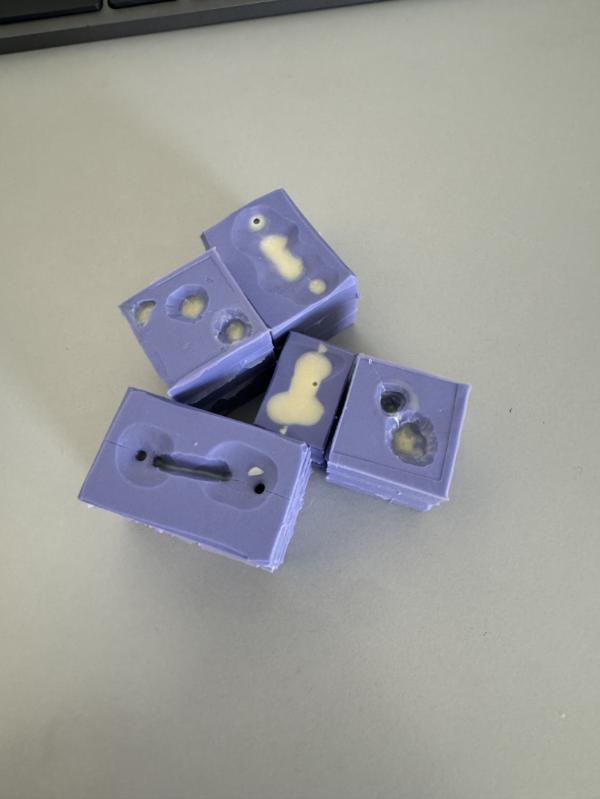
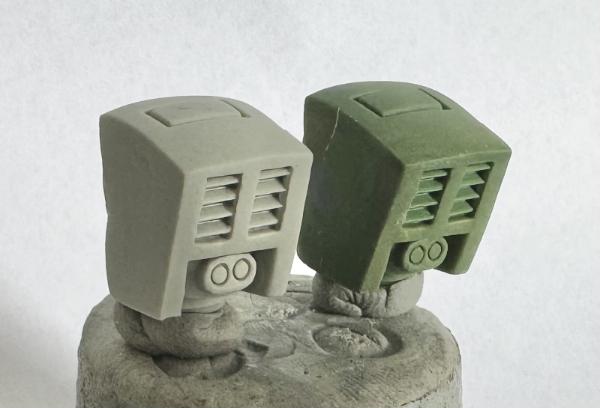
Got the molds out of the pressure pot this morning and they looked good so far. I've used UV resin to stick the parts to the bottom and unfortunately the silicone did not like that. Maybe the UV resin was not 100% cured yet, so there were some sticky parts. Luckily I only used it at the top and not to attach the vents to the parts.
Everything cleaned up nicely and I got the parts out of the molds, so now the next step is casting and seeing if everything went well
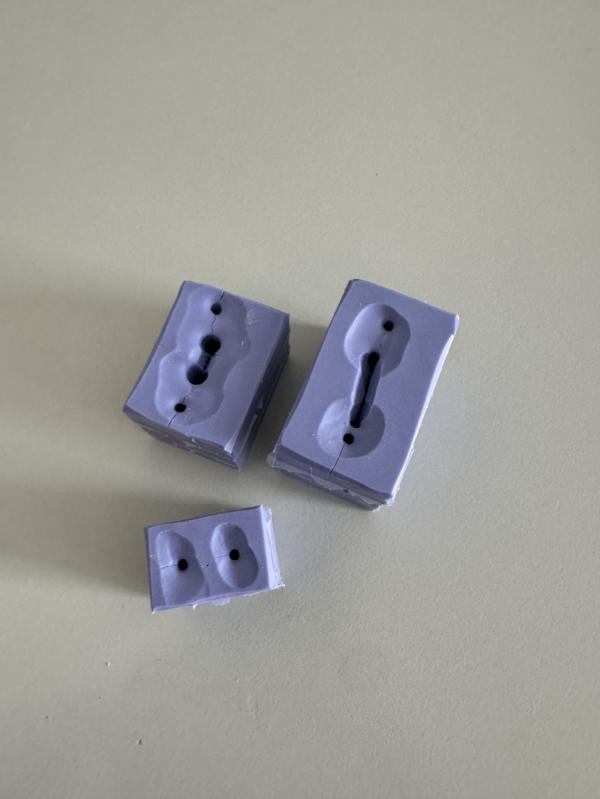
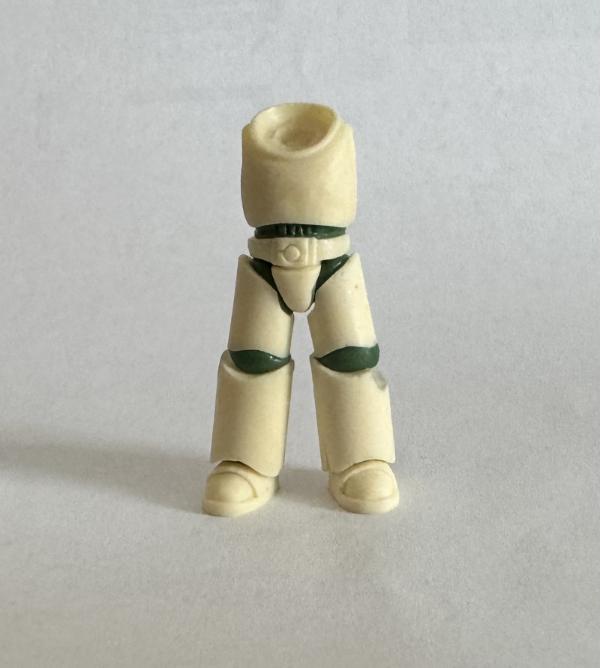
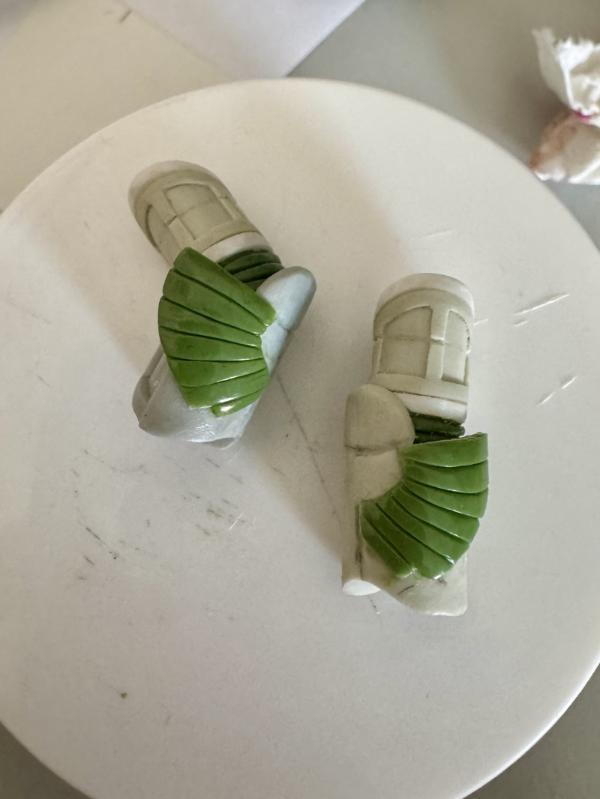
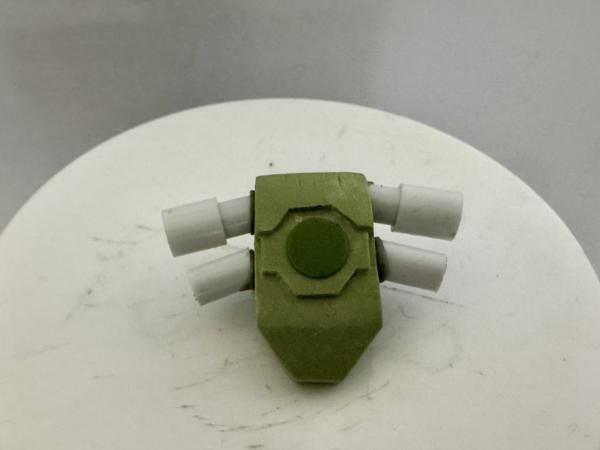
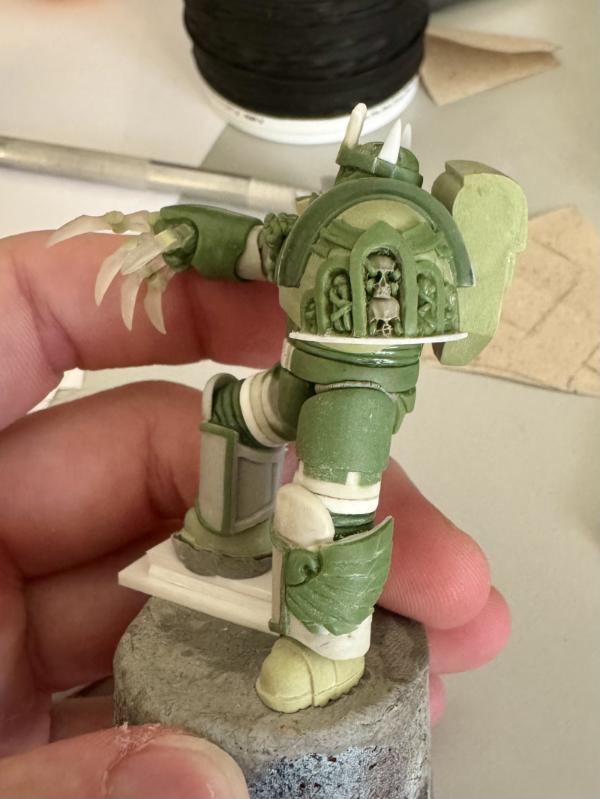
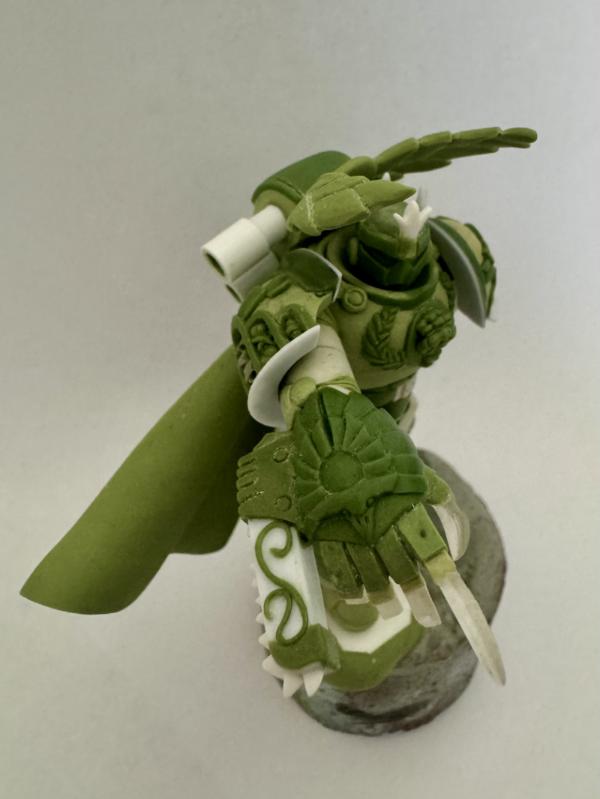
Groin and chest still need their silicone mold, but I will need to think of something else for attaching the vents properly. Legs, arms, foot and shoulder are now ready for casting
Last note, while the Lego box did work well, quite a bit of silicone worked it's way under the lowest brick row and partially filled those up. Not world ending, but still a bit of wasted silicone. I have used tape to seal up the bottom of each individual brick in the lowest row for the next two sets of molds. Let's see if that works, otherwise I might just fill up a couple of bricks with resin and only use them for the bottom row.
When you get to the point of finding out, “Hang on, I can just make this stuff myself! I can make anything I want” At that point you’re either Master Yoda or Darth Vader.
These are awesome space marines, Darth. Very cool.
@theCrowe: To quote in that spirit: „200.000 units are ready, with a million more well on the way.“
Once the final molds are ready with all parts I can print these out in a 30minute rhythm And yes, making anything I want was pretty much the main reason I’m doing it this way. Although I suppose with the current GW prices it is also a bit cheaper
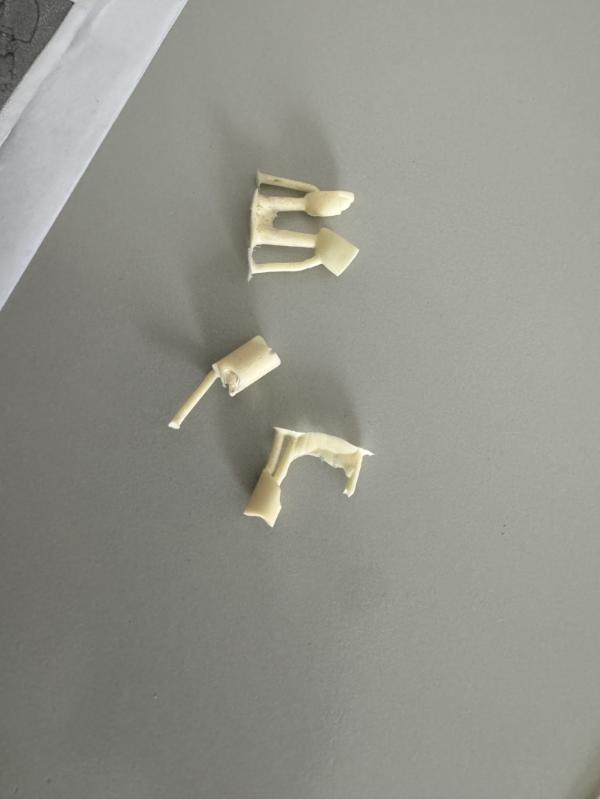
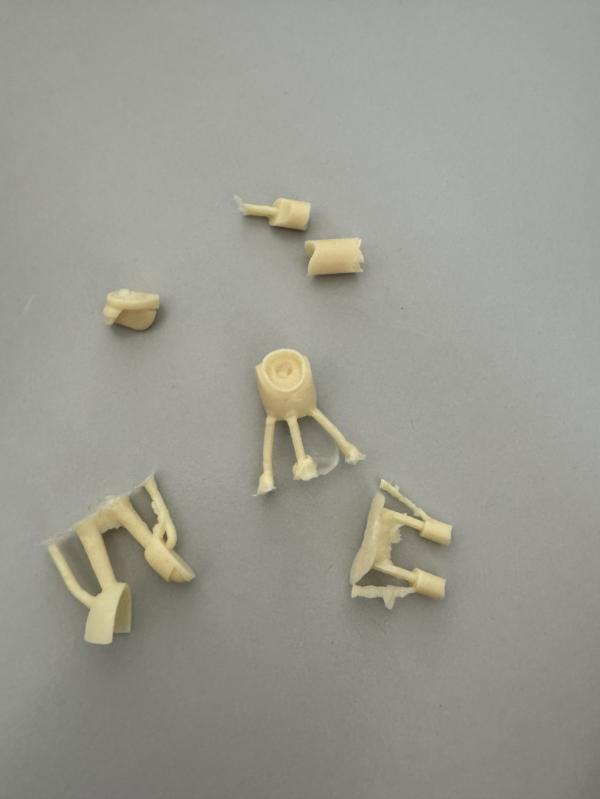
Got the first casts out of the molds, these were done without the pressure pot to try it out. Most parts came out fine but the lower leg has some major bubbles. Remains to be seen if it is a one off issue.
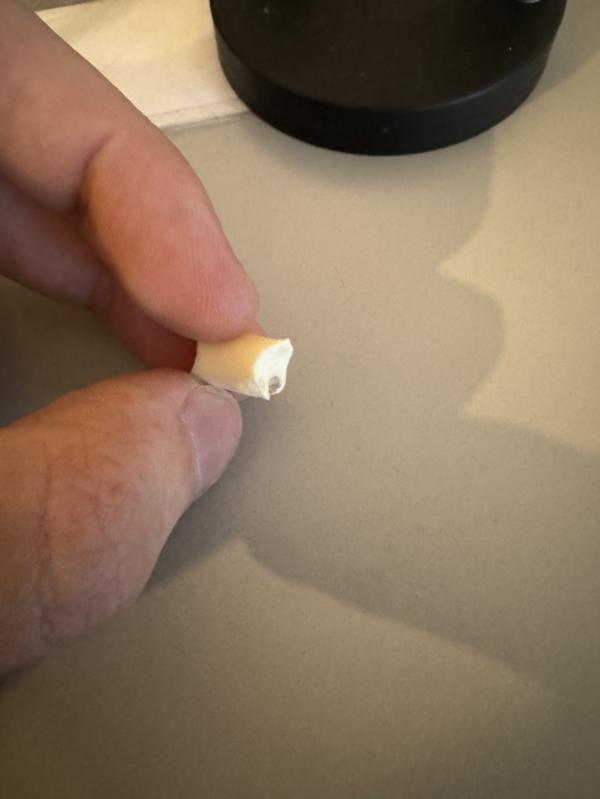
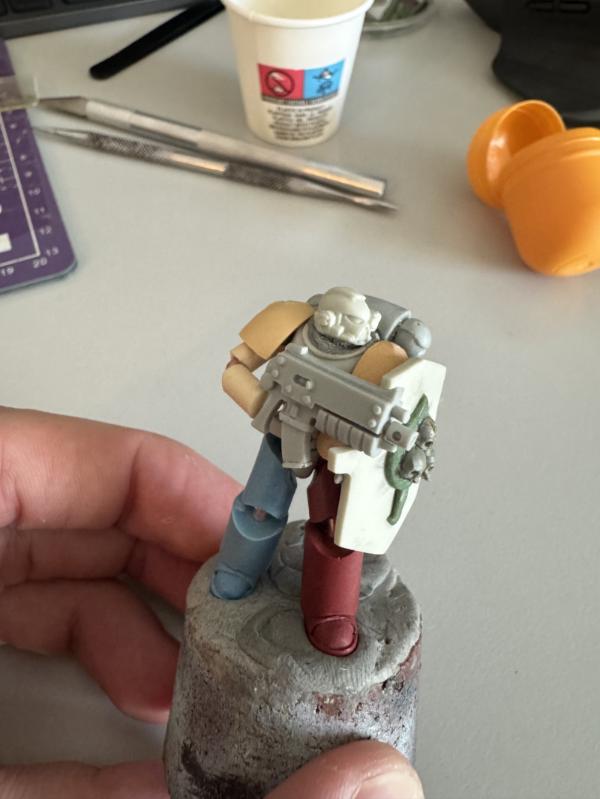
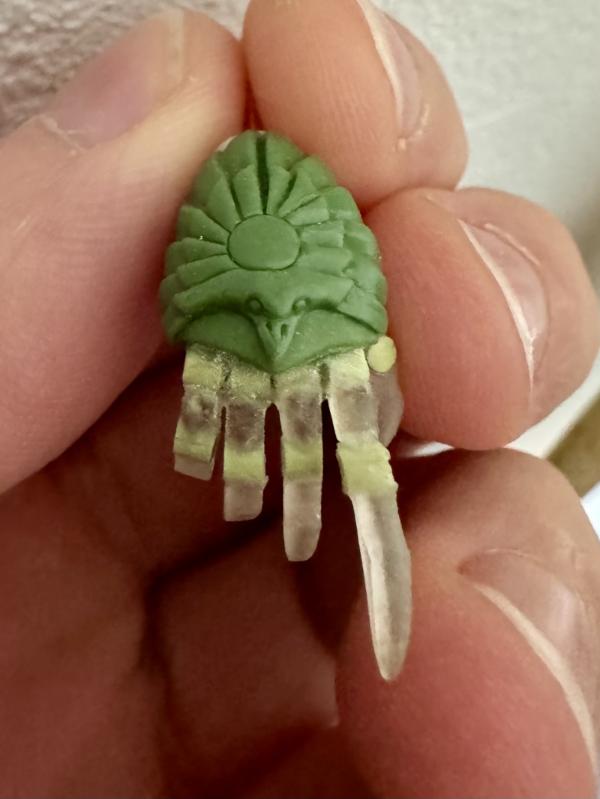
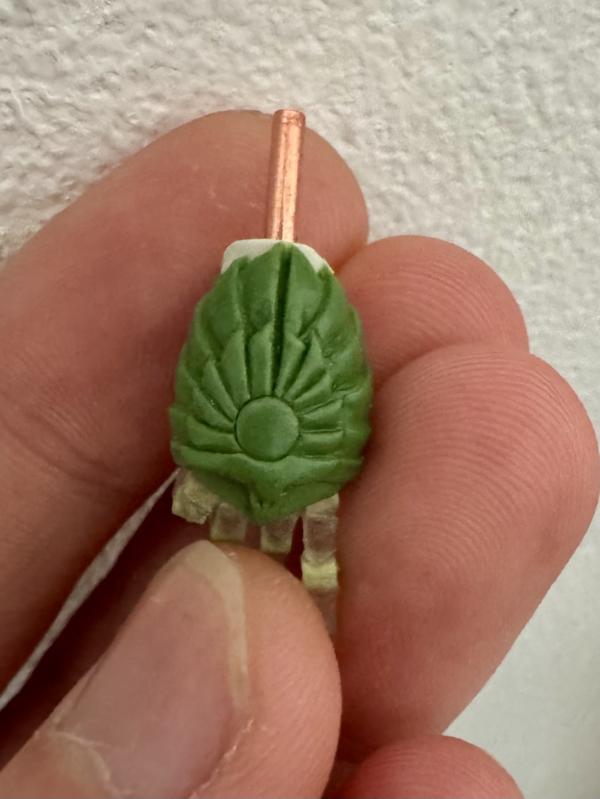
The arms unfortunately did not cast and need an air vent added, I’ll try to cut it into the silicone but if that does not work then I will have to remold it.
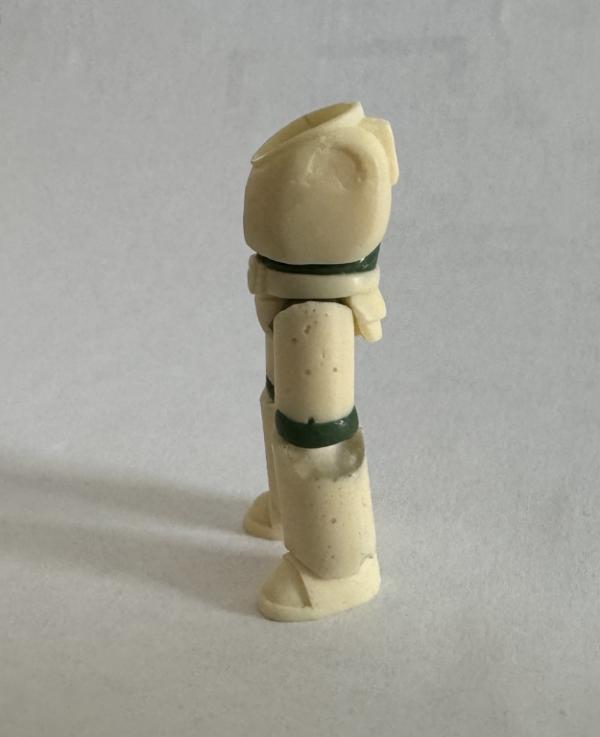
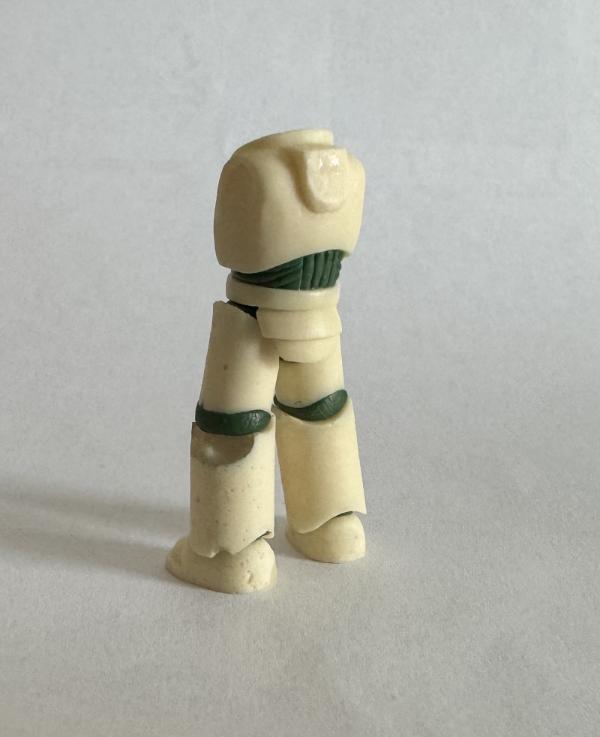
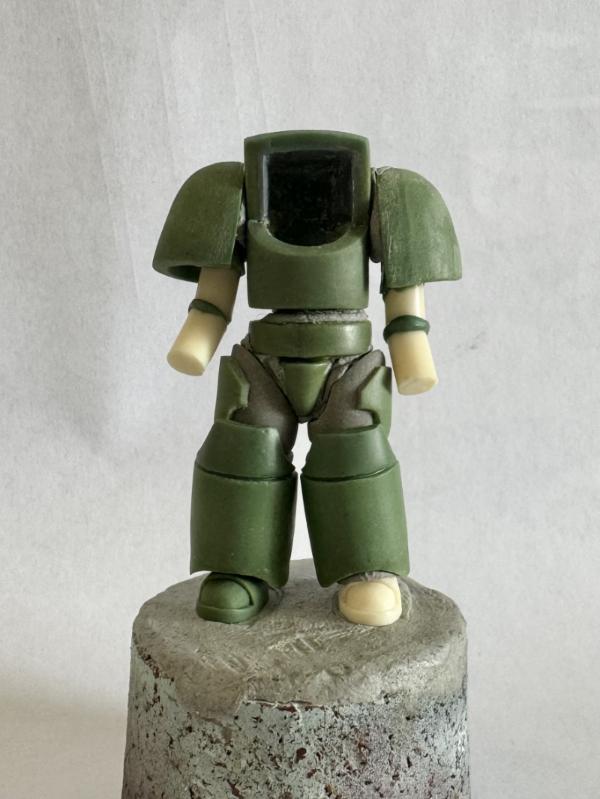
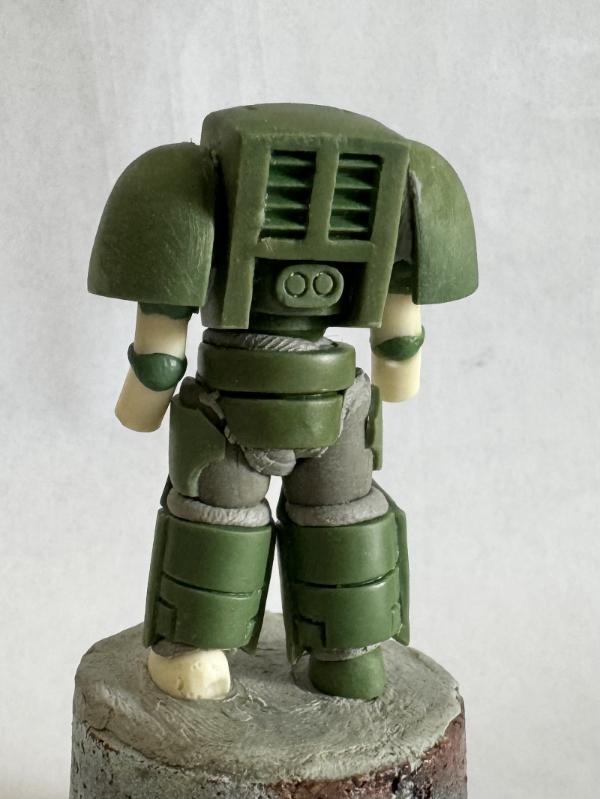
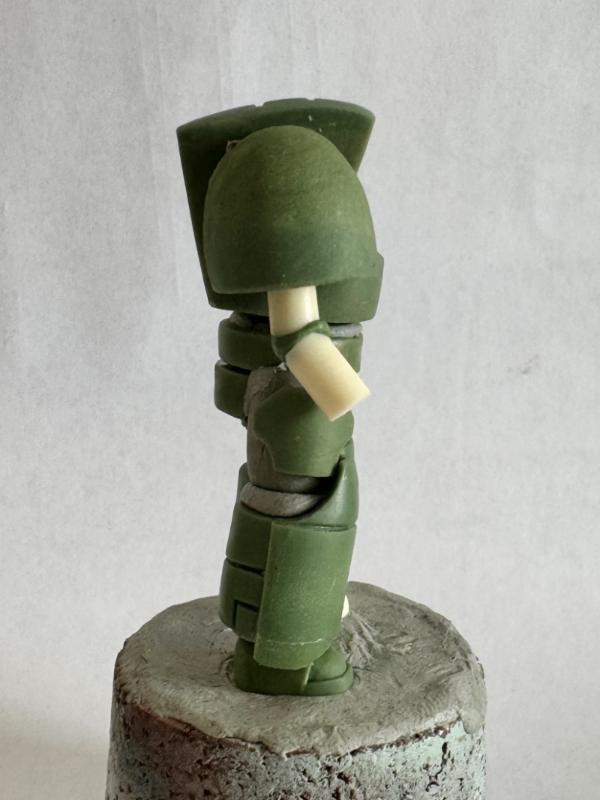
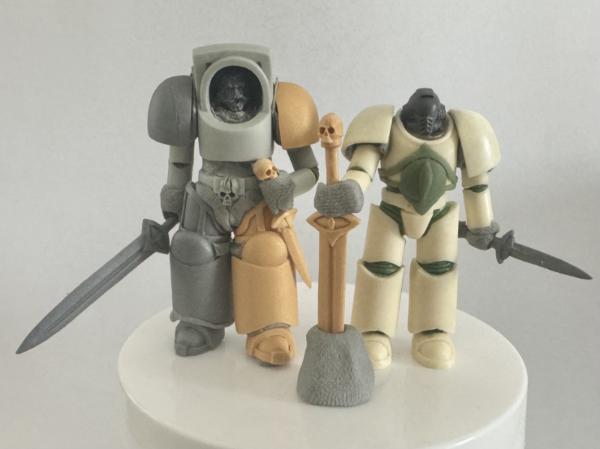
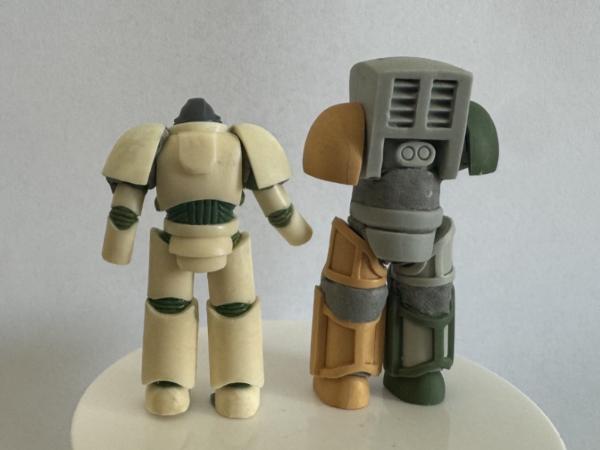
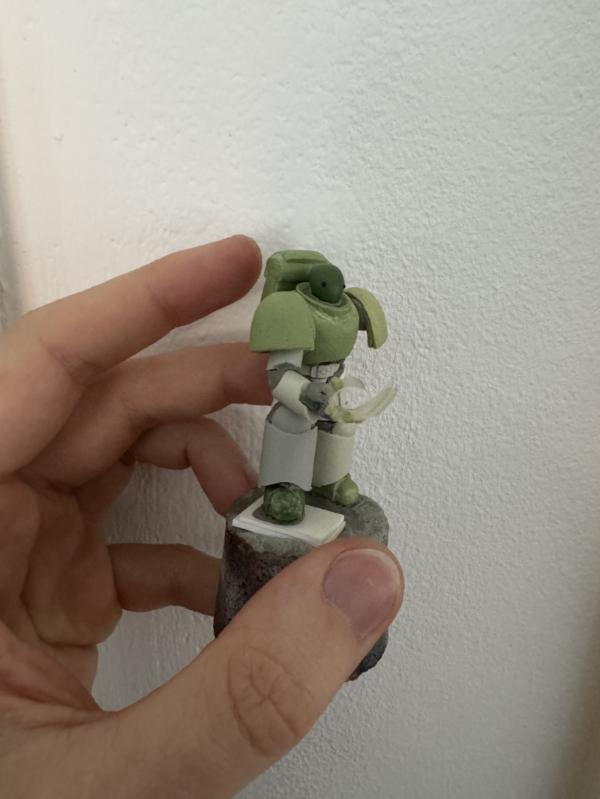
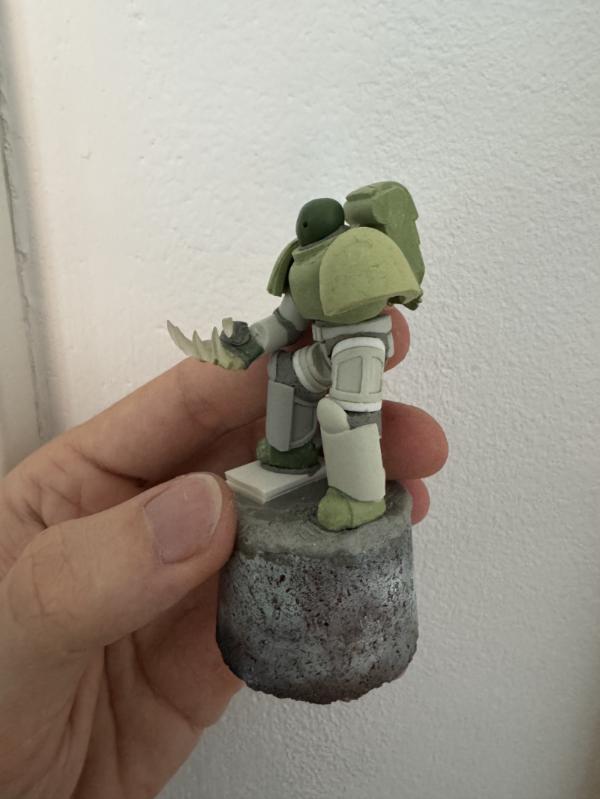
And here is the current progress of my custom marines
I've done the next set of molds as well as a new set of casts. The casts were put into the pressure pot and had no issues with bubbles. At least not with small ones. I did have two big bubbles. The top of the groin area, but not relevant as it was only the spacer and once again the lower leg. Both issues stem from the same problem, while pouring the resin, the resin went into both the air vent and the pouring hole. This has trapped some bubbles inside.
For the groin I think this was just me not being careful, for the lower leg I might need to try switching the two holes and/ or cutting another vent. On the topic of cutting vents, the new vents that I cut into the arm mold worked perfect.
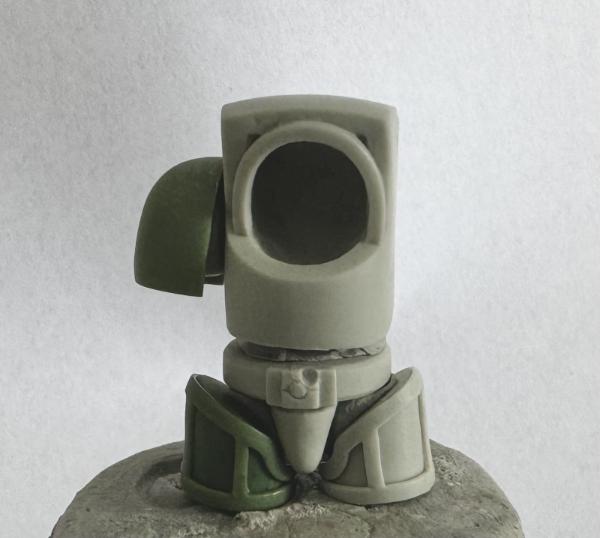
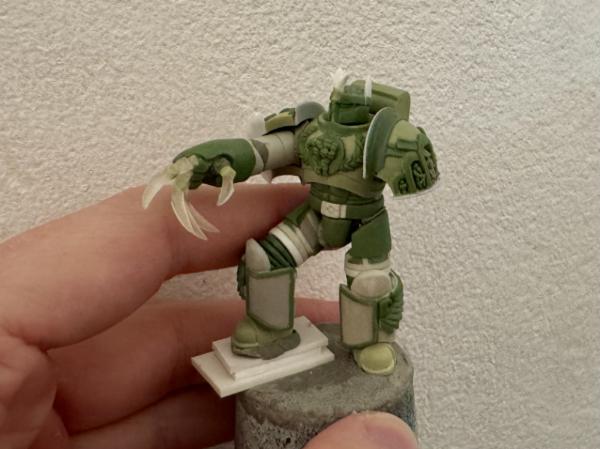
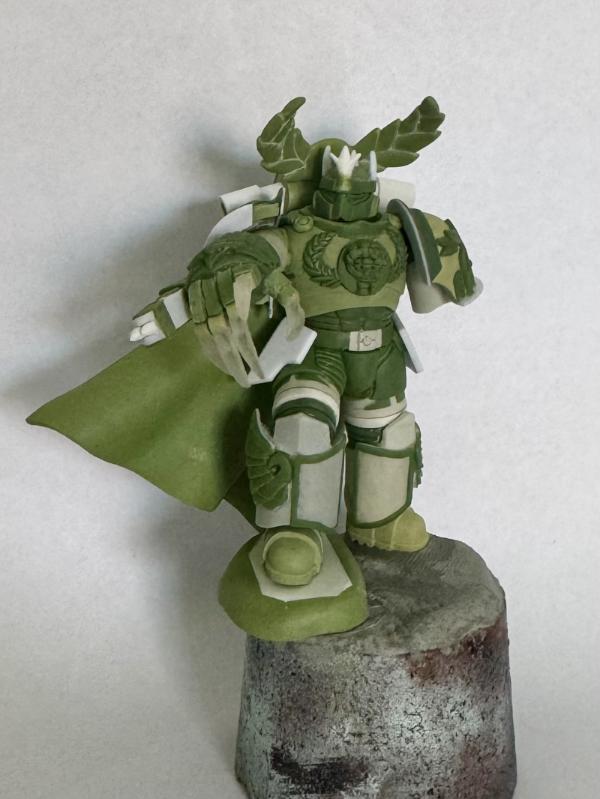
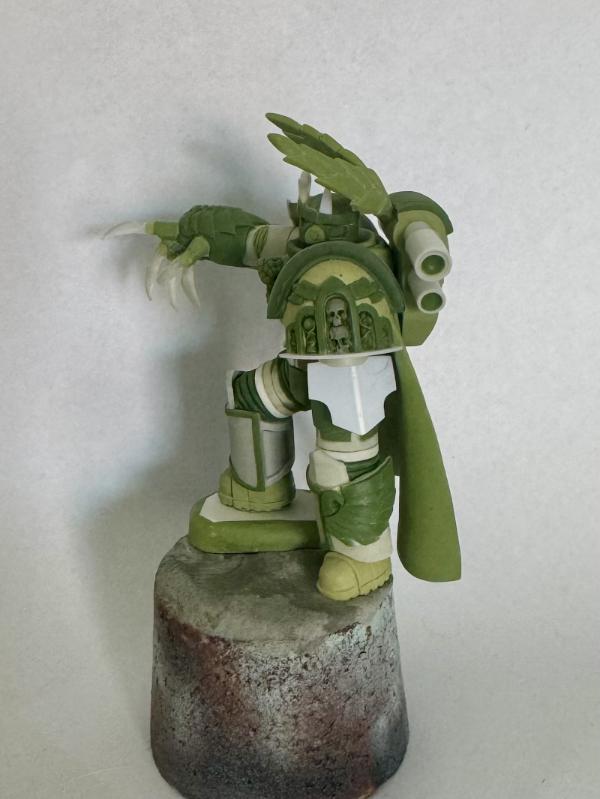
And here he is, missing only the arms and "backpack". I've filled the major air bubbles up with UV resin and then used green stuff for all the gaps/ joints. All joints will get some work done with cutting and resculpting the under armor but this should be a good final prototype mini.
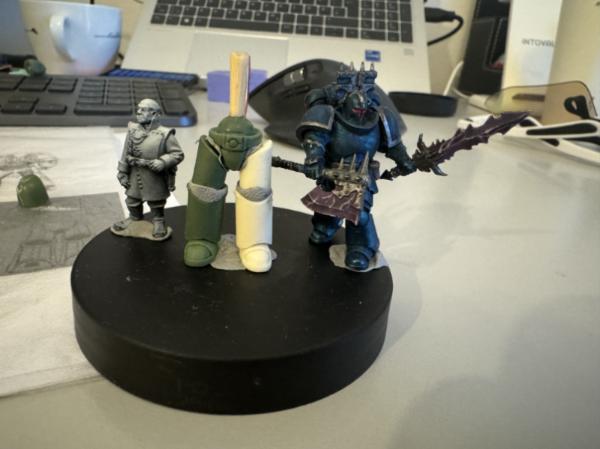
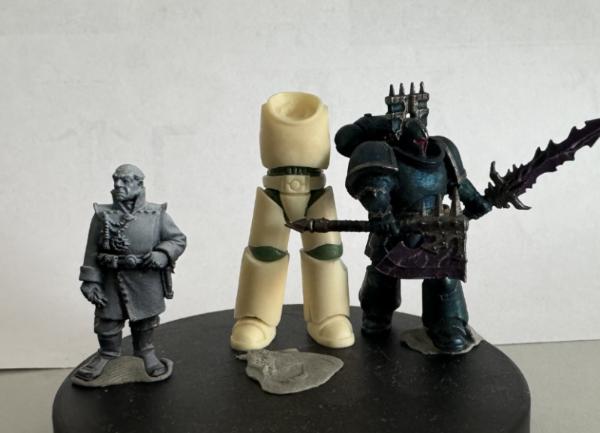
And once again a scale shot
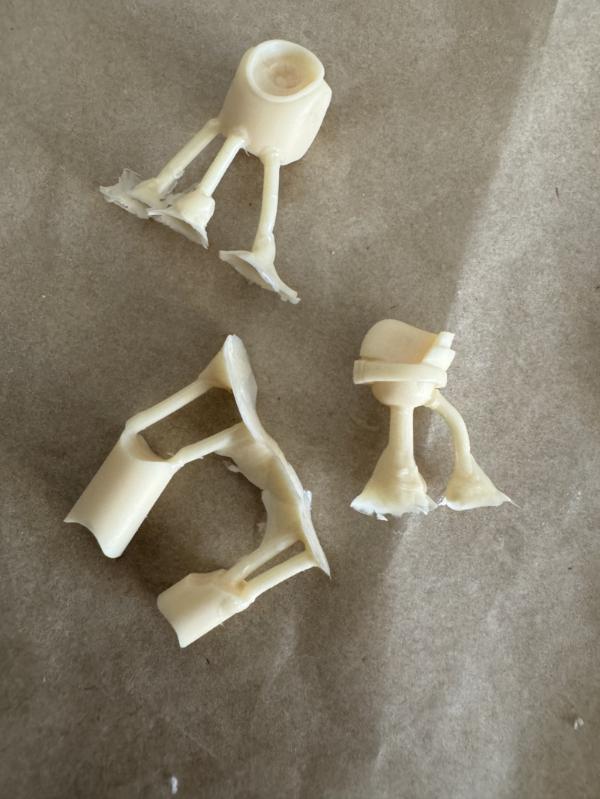
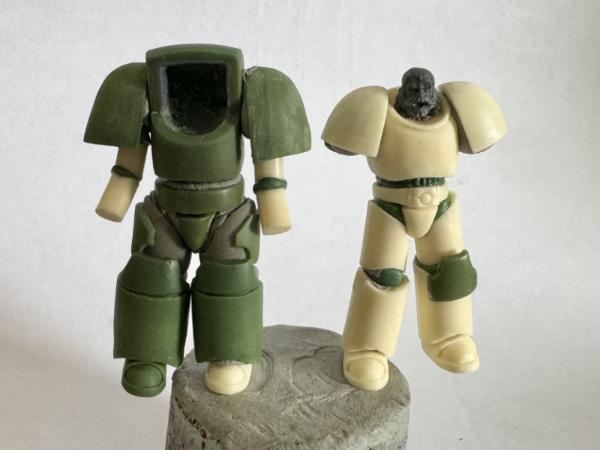
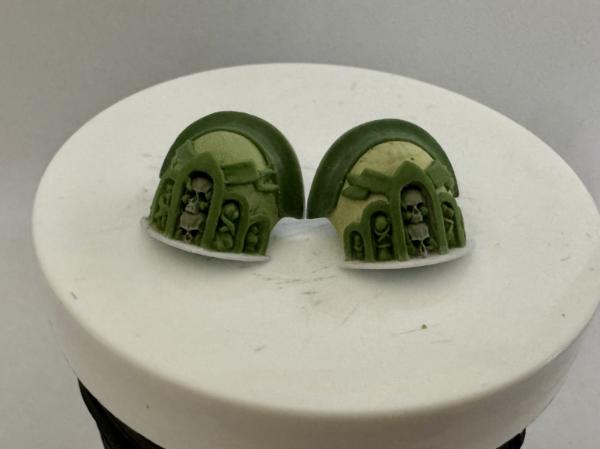
Here you can see the difference between casting without a pressure pot (left leg) and using the pressure pot (everything else). Without the pressure pot I had a ton of tiny bubbles in the cast.
Since I will use this mini as a prototype I'm not to worried about it. For future ones obviously all will be cast with the pressure pot.
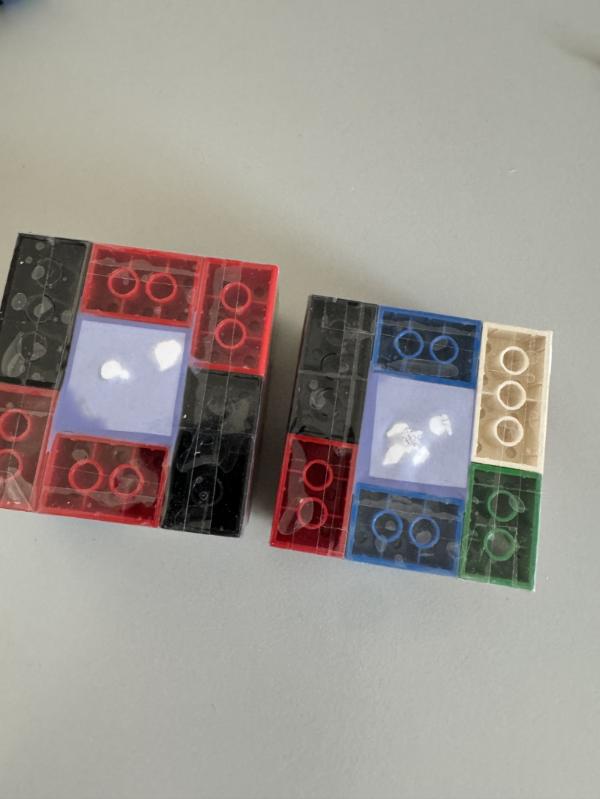
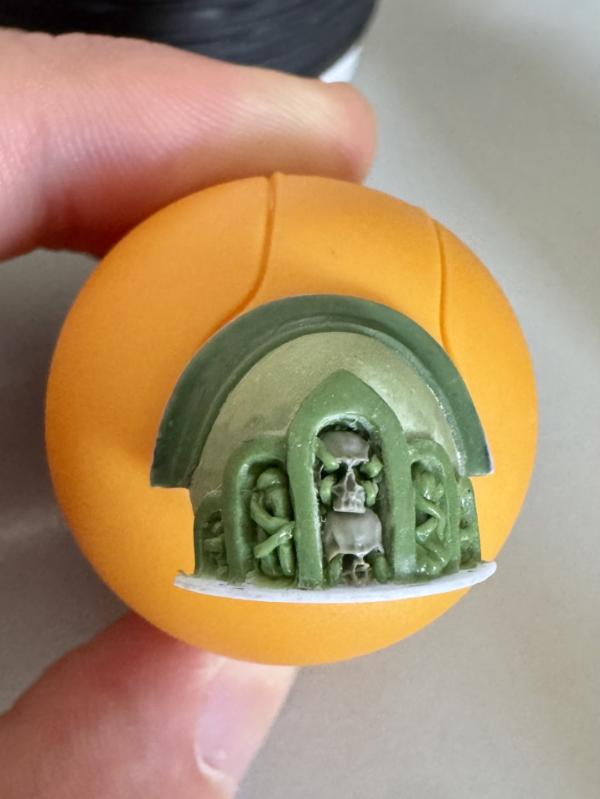
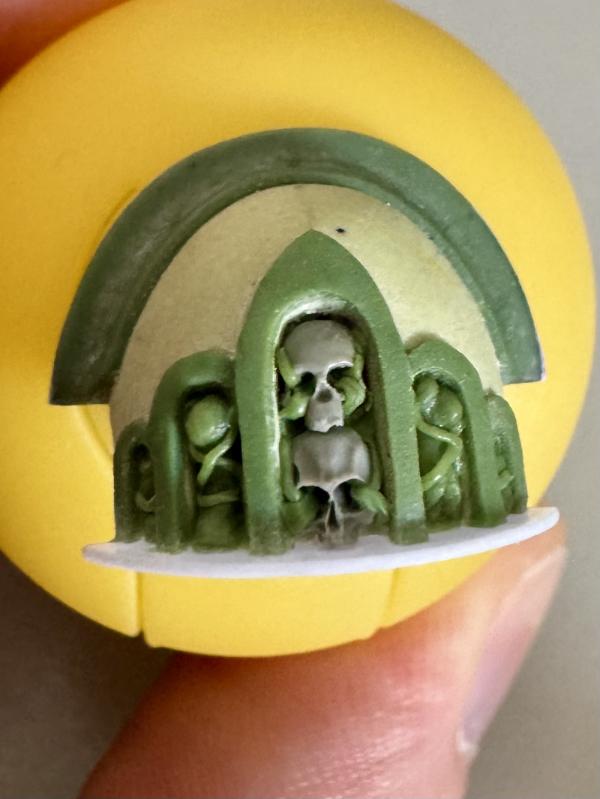
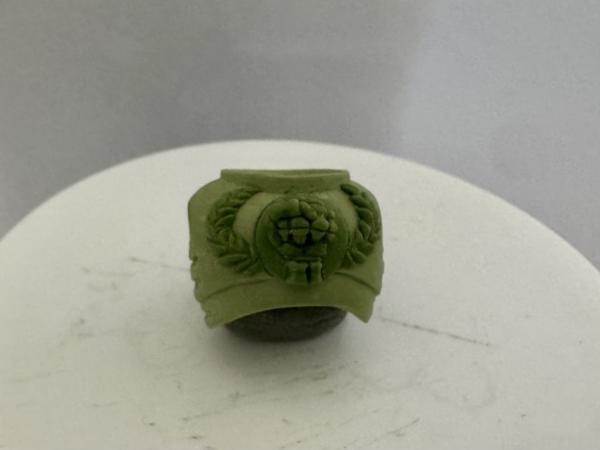
Chest and groin molds with taped off bottom. Held together nicely
All molds ready for casting, put them back in their brick enclosures to ensure minimal parting lines.
Quick update from my side. I‘ve made the pouring hole of some vents larger and concentrated on the pouring a bit more.
And now we have no issues at all with the casts
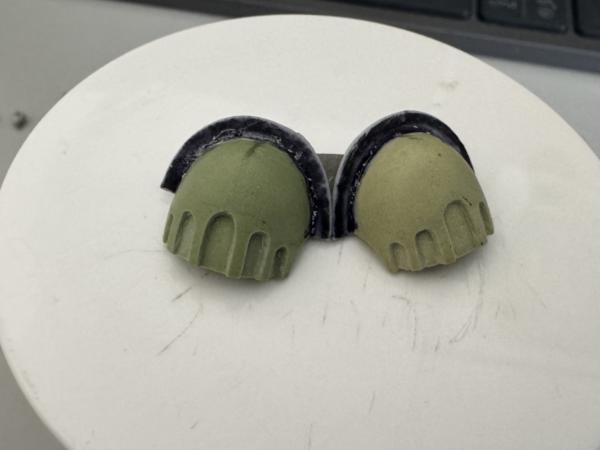
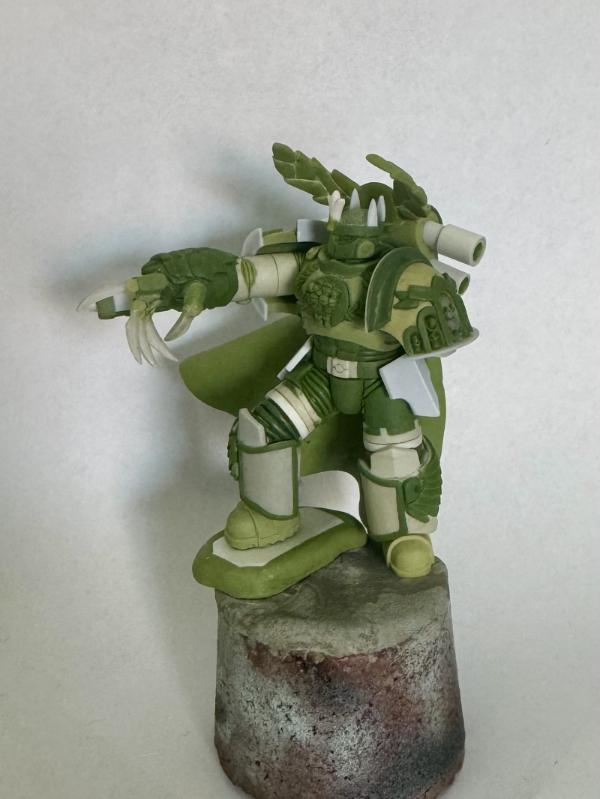
Sculpting on the marine is going slow now as it is mostly adding a lot of details. I've sculpted a mark IV style knee pad and will probably turn the test marine into a 30k Sons of Horus character.
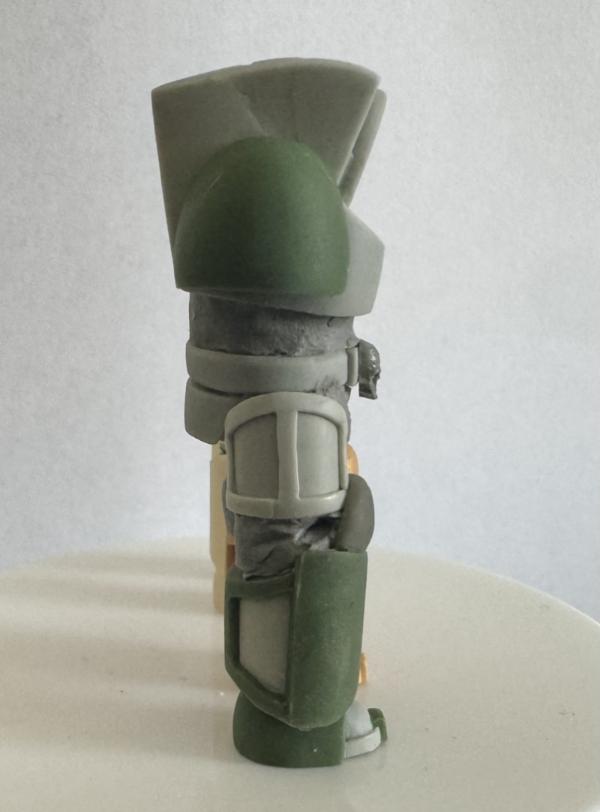
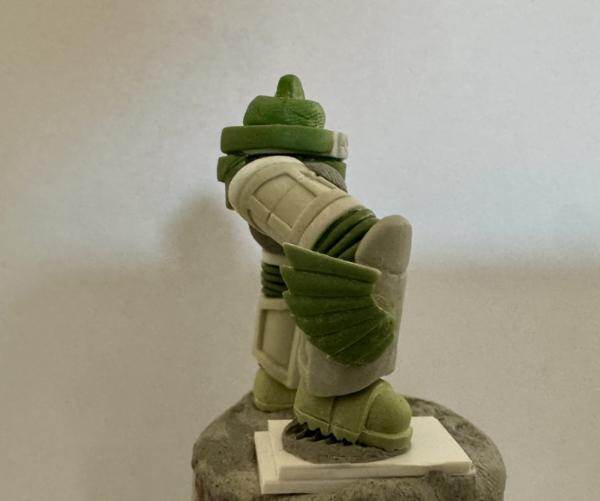
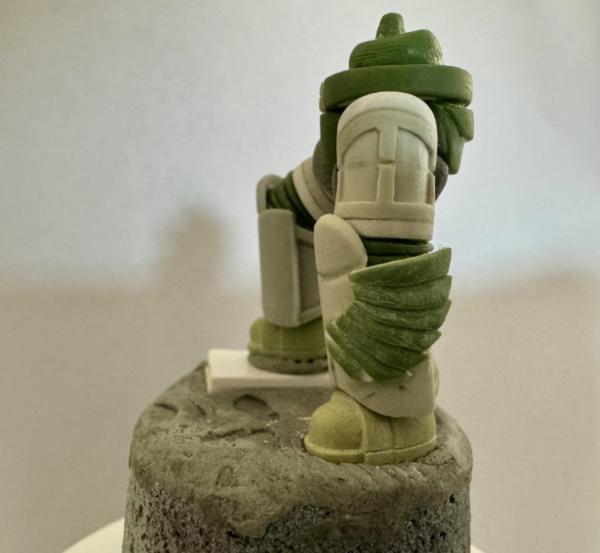
While the sculpting on the marine is slow, I'm making steady progress on the Terminator. Below is a scale mock up with the primarch legs and shoulders. I like the bulk of it but everything is just a tiny bit too large.
In terms of scale the terminator is just a tiny bit taller than the marine, but considerably more bulky. The head will actually sit on pretty much the same level for both minis. The torso for the terminator is 99% done, I just need to glue in the little arch in the front and maybe smooth out the internal section where the head sits. Then a once over sanding with some fine grit to hide a few transitions from sculpting.
The groin are was sculped over a cast from the marine, basically bulked out the two armor sections, back armor is now a single plate and then put a wider and thicker belt over the existing one. Pretty much ready for casting.
The thigh (can be seen in previous posts) is also done and already sits in a dedicated lego box ready for casting.
Things left to do:
- sculpt the final lower leg over a cast of the marine leg
- sculpt over a marine boot to make it bulkier and more suited for a terminator
- sculpt or bulk up the arms as these are too small
- probably need a new set of shoulder pads as well
Once I have a first complete mini of each I will probably sculpt some heads as well, but I'm currently pushing that to the back as it is the most difficult part
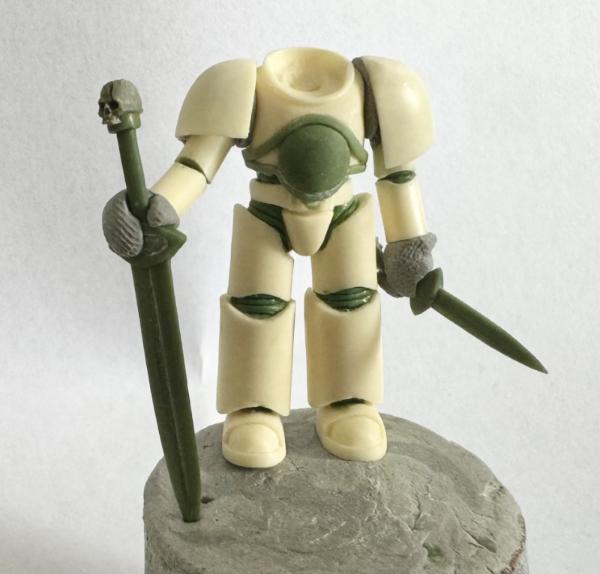
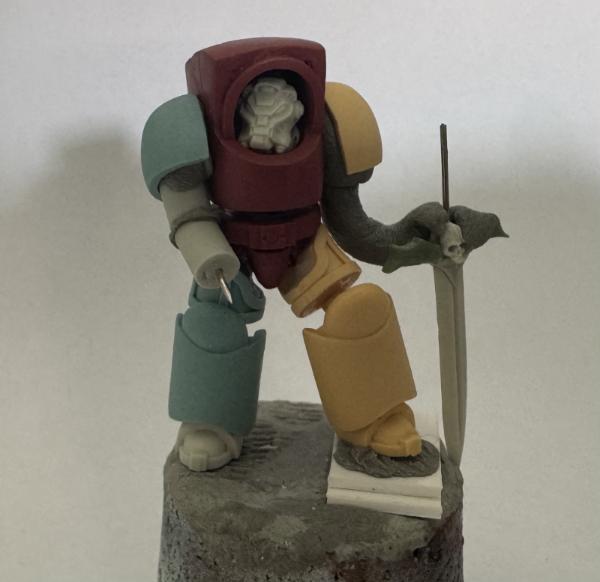
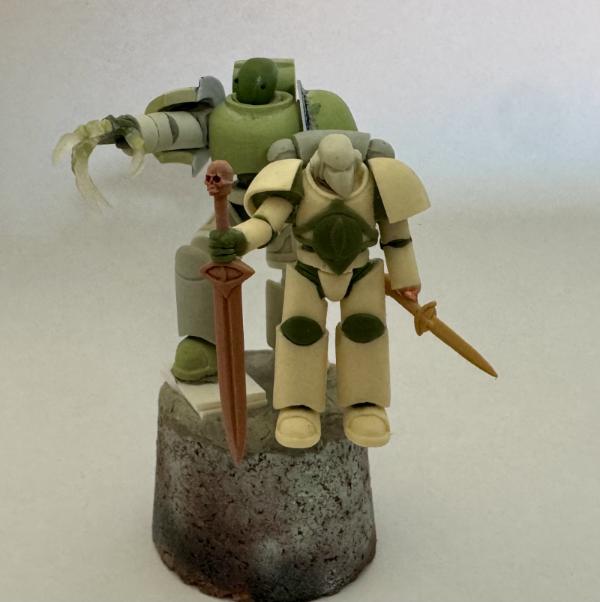
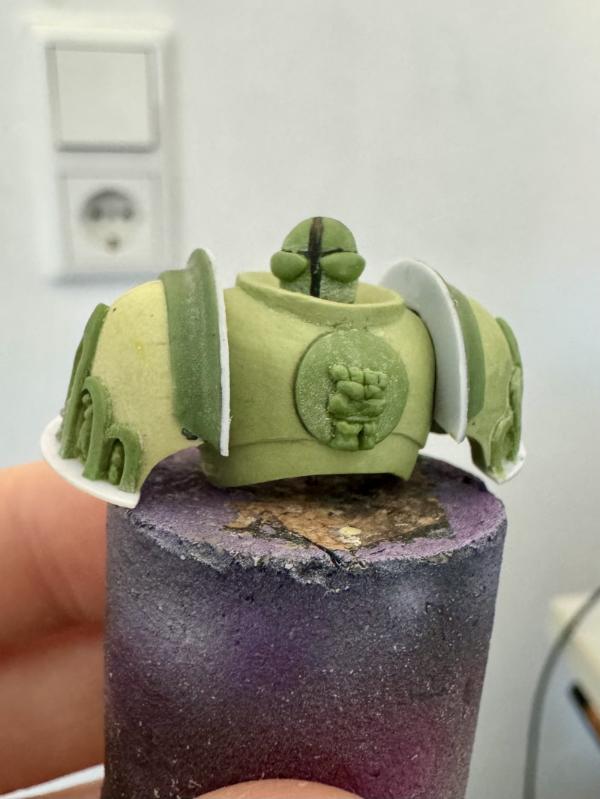
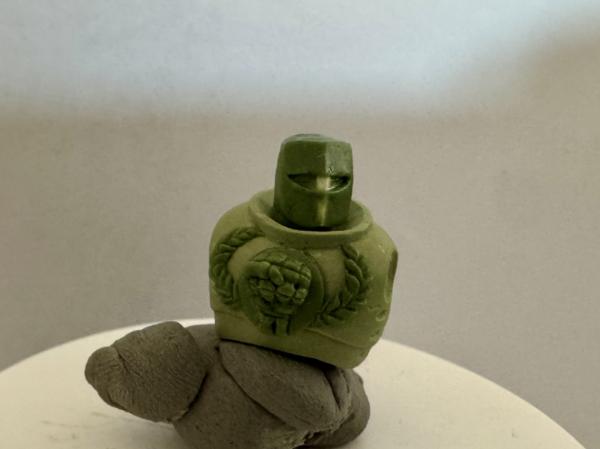
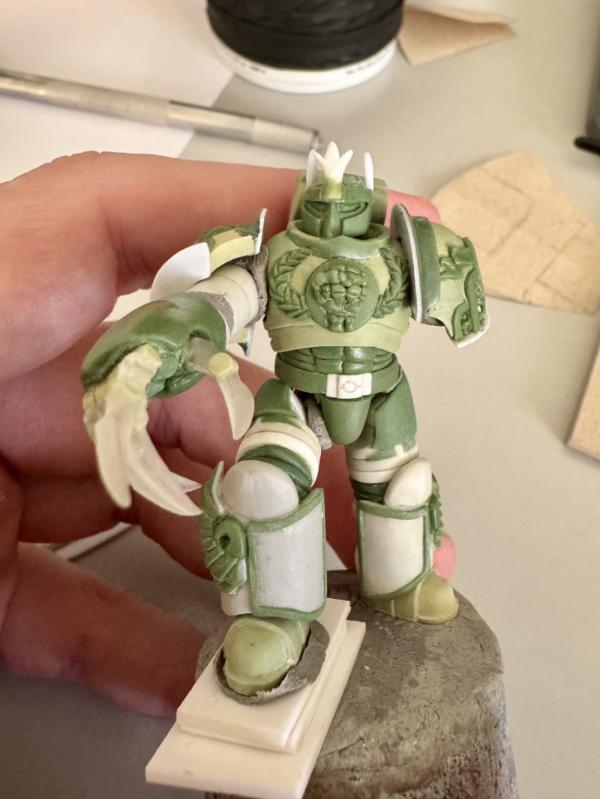
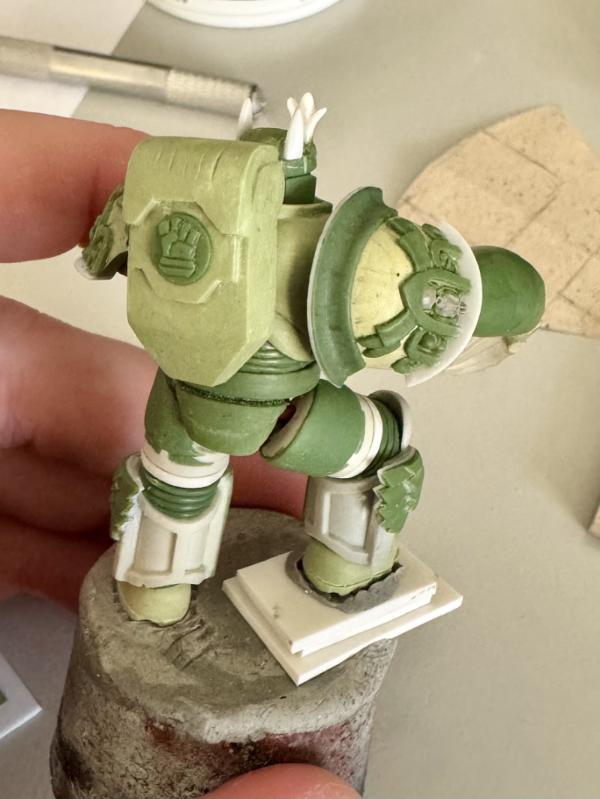
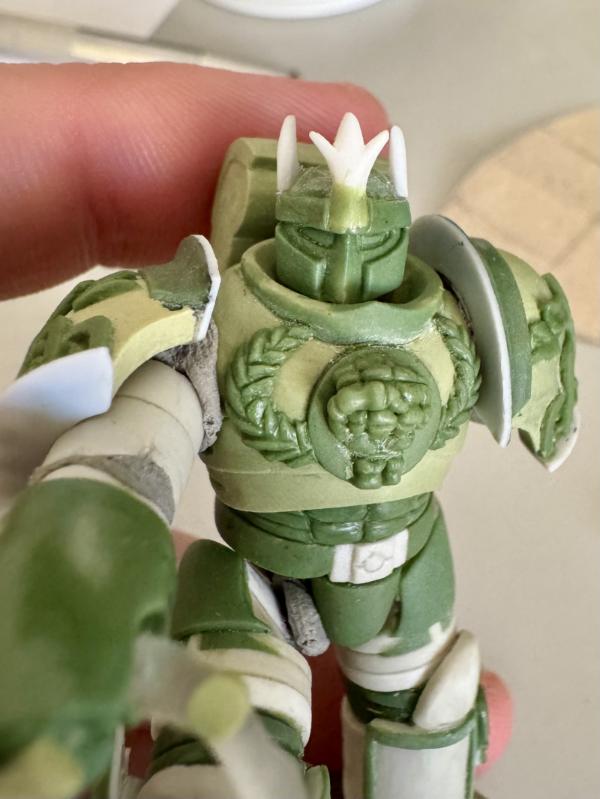
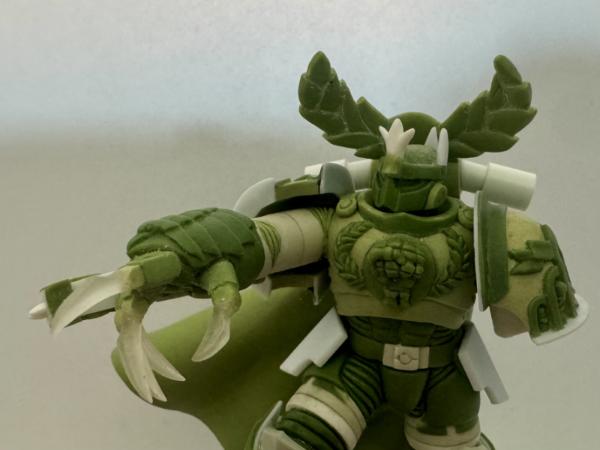
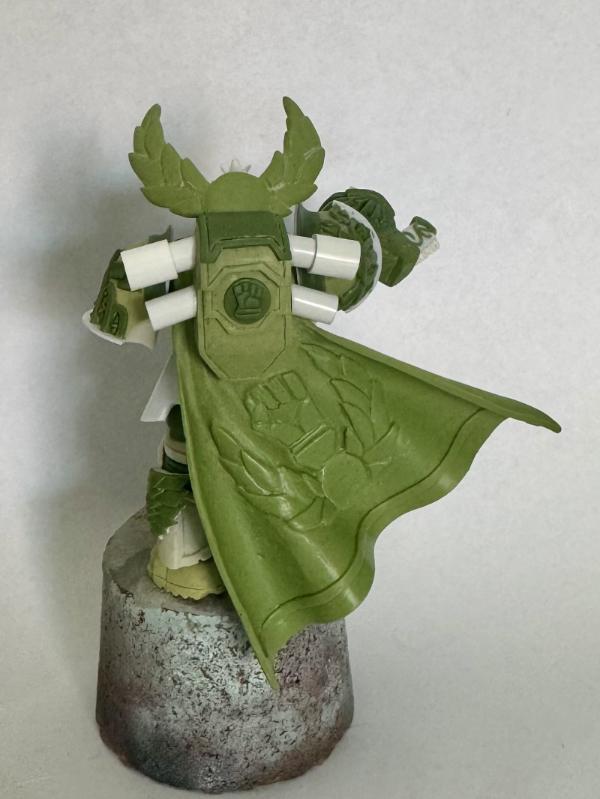
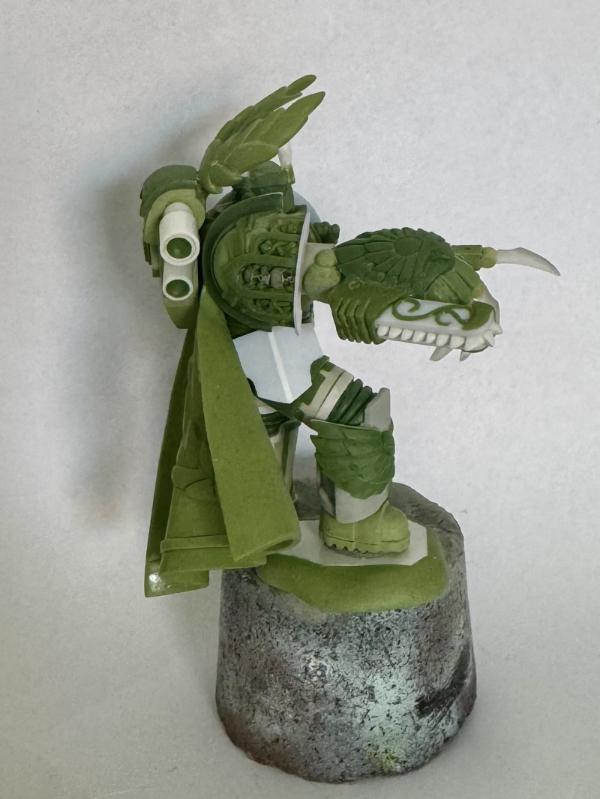
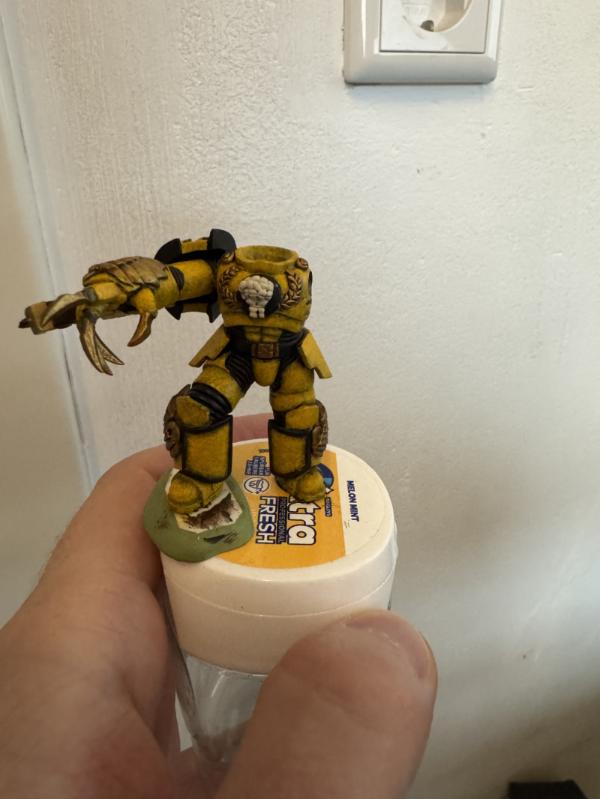
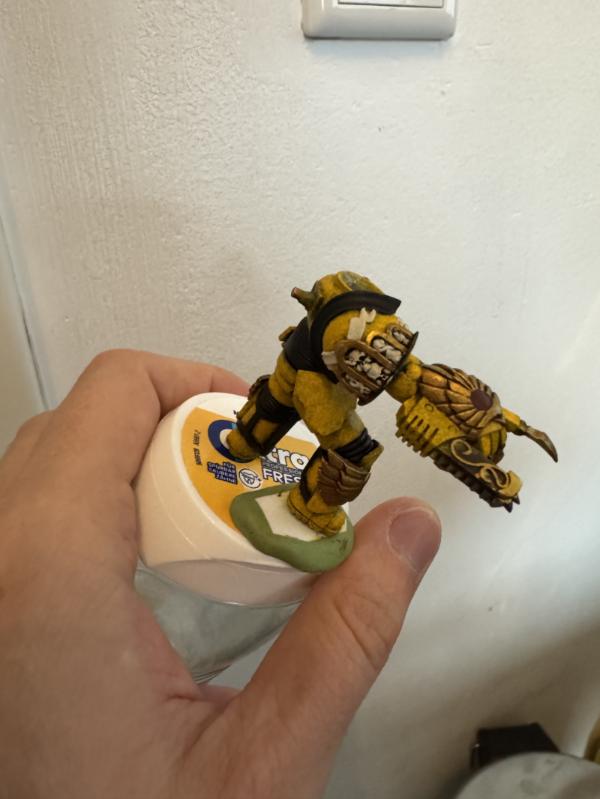
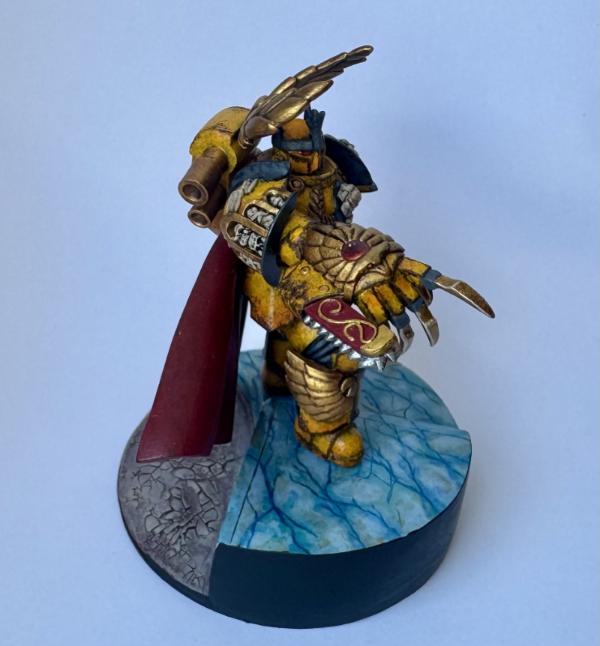
And here is the current progress on my first casted marine. Did some sons of Horus style chest armor, will still add a bit more details to it. All joints on the model have also been filled in with the "proper" ribbed joints.
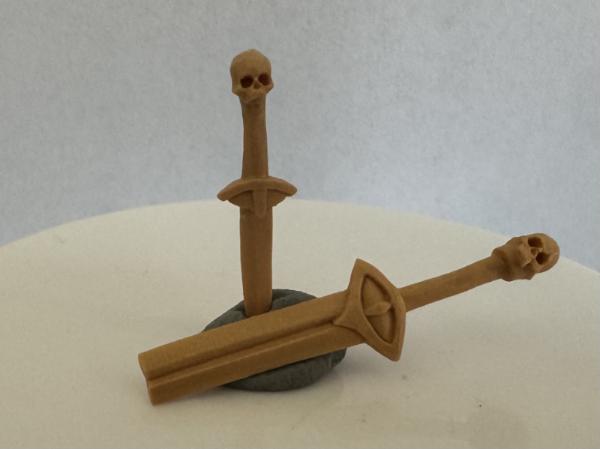
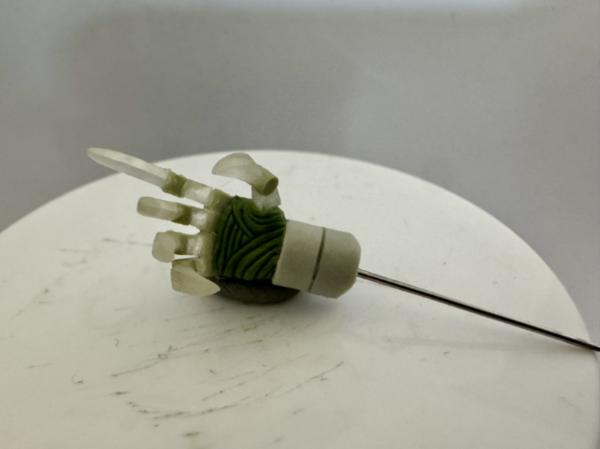
I've decided to hive him a sword and knife, althoug I am debating on just leaving the left hand empty and open. Still a bit of time until I get to sculpting hands though
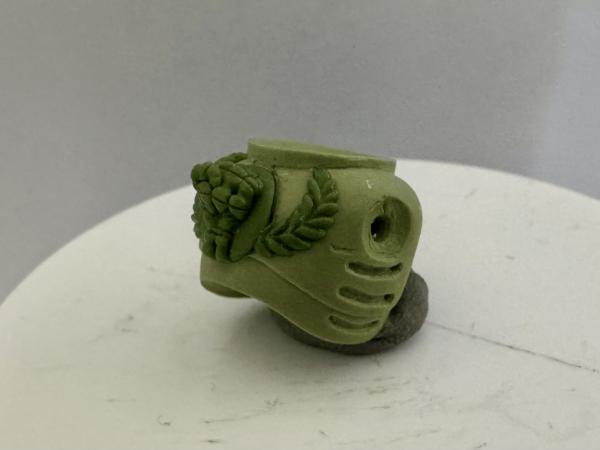
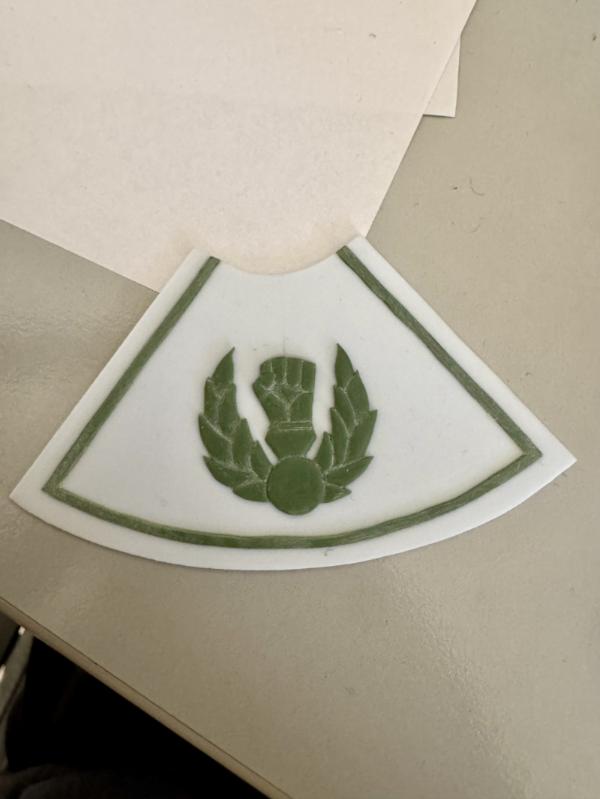
I've also started on a second sons of horus chest piece.
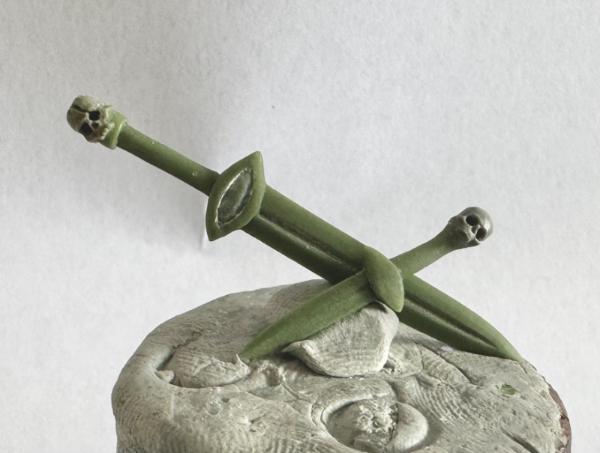
And a bit of close up of the sword and knife. Both still need a bit of work on the guard area before I can call them done. I might even cast them up as well if I like how they turn out
The Terminator has also seen a lot of progress. I've completed the chest and groin. Yesterday I poured the molds for all three pieces (with the thigh) and this morning I got to open them up.
There are a few tiny bubbles in the chest piece (hard to see on the pictures but one is at the bottom corner of the back) but these might just be because pouring the resin turned messy...
You know when you pour something from one glass to another and it just all runs down on the side of the glass and spills everywhere? That's pretty much what happened while pouring the resin I'll do another cast later today and see how they will turn out. The grey color of the cast is due to some black ink I added, just wanted to see how well it works and it also helps in making the details easier to see.
Overall it seems to be a pretty much perfect mold again.
The Groin turned out mostly fine but has a smal bubble at the belt buckle, I've cut in an extra vent for this one.
The thigh also had a fairly large bubble at the bottom, but I think this is again due to the mess.
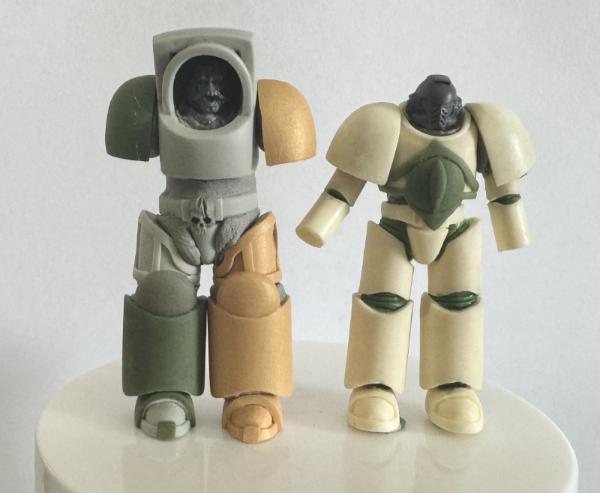
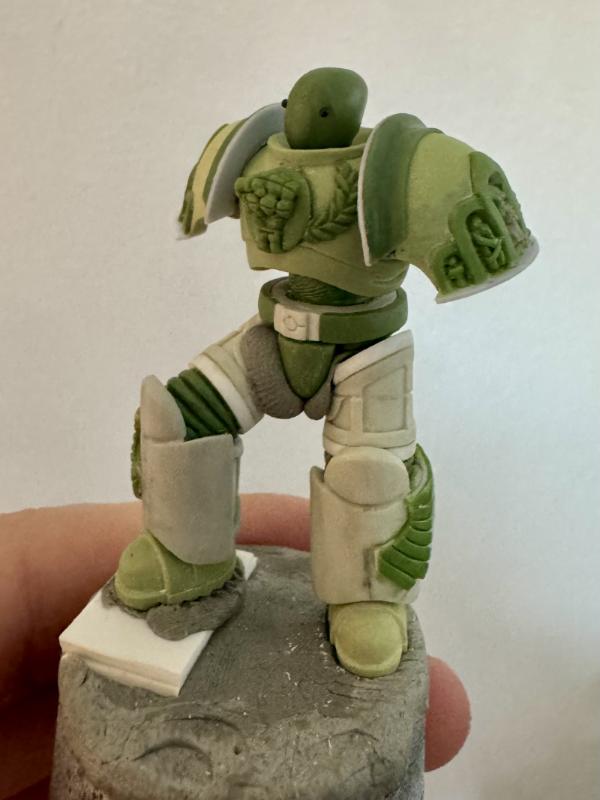
And this is what the current mock up looks like. Still need to finish the lower legs, boots and arms. I think the shoulder looks good in terms of size and I only need to cast it.
Still lots to do but I am happy with what I got so far. Looking forward to workin on the different power armor Marks and creating a few cool minis
That's nice progress on your sculpted, molded, and cast marines. Very nice Pneumo Those joints must have been a pian. I'm curious why you are choosing to go with all blades on your marine, rather than a gun as well? Is this marine a champion?
Thanks a lot! Honestly for this marine I just wanted to have some that is standing up perfectly straight. Mainly for scale and reference with other models. The pose of the arms just developed afterwards with one arm down (again for scale) and the other resting on the sword.
Plus I want to use only parts sculpted by me and I haven't gotten around to doing a bolter yet The joints honestly are super easy to do, just squish greenstuff into all the areas, everything was glued up beforehand with little spacers) and then cut/ press in the lines with a scalpel. If you wait a bit for the green stuff to cure, roughly 30 min, then it will be harder to make accidential marks on it. So I just squish it in, smooth it out with a silicon tool and then wait 30 min and do the lines.
I've also done another cast of the new parts and everything came out perfect, so no issues with bubbles or anything else Now I'm working on the legs and feet for the terminator.
And the terminator is almost done, only missing the slightly thicker arms now. I've been using different inks and powders for the resin to experiment and work on some side project unrelated to minis. Super fun to have the different colors and parts.
I like how the marine turned out, but I absolutely love the terminator. I always had a soft spot for these guys anyway Super happy with the legs and the knee guard that I did. I'll now do the mockup of the first terminator pose.
For the terminator leg I've done an improved joint by adding a 4mm ball to it and shaving it down a bit more to allow full range of motion. This makes it super easy to pose and to keep the correct spacing when making new models. I'm tempted to do the same for the marine leg, but it is not currently a high priority.
Made a mold of the sword and knife as well, first cast the sword did not fill up completely but this is already fixed now.
And some scale shots and views from all angles
Starting next week I will be on vacation for three weeks, so no more progress for a while.
Back from my vacation where I kind of forgot I had the space marines and terminators waiting for me. I was super thrilled to find them waiting on my desk
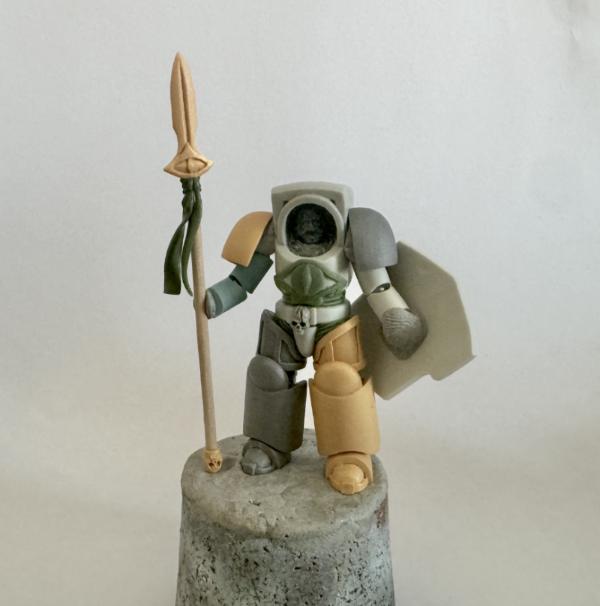
I pretty much fixed the test terminator with all his joints, the only parts missing are the joints for the arms and attaching his shoulders. Afterwards I only need to sculpt the hands for both the spear and the shield. Unfortunately the mold for the arms still has massive troubles with air bubbles so I have to fix it with UV resin for now. Hopefully the new vents I cut will fix it but it remains to be seen.
Super happy with how the terminator turned out and am looking forward to making more of these guys. As I go along I will most likely make more molds of different weapons as I am sculpting them for different characters.
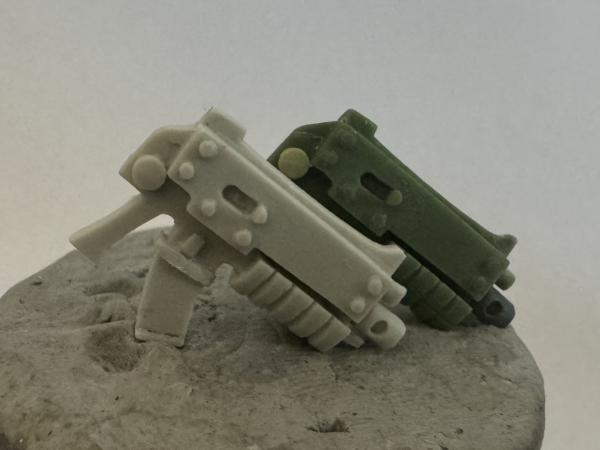
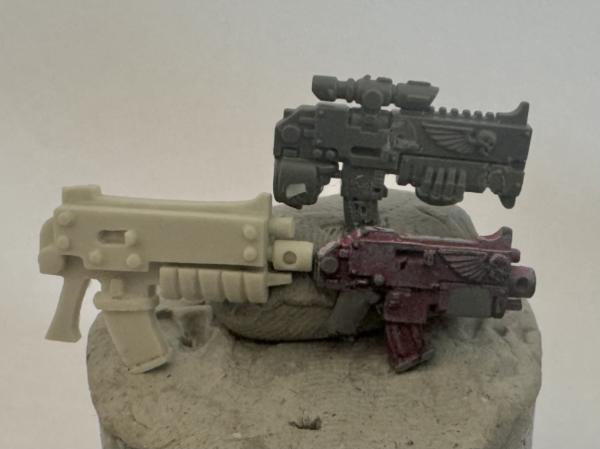
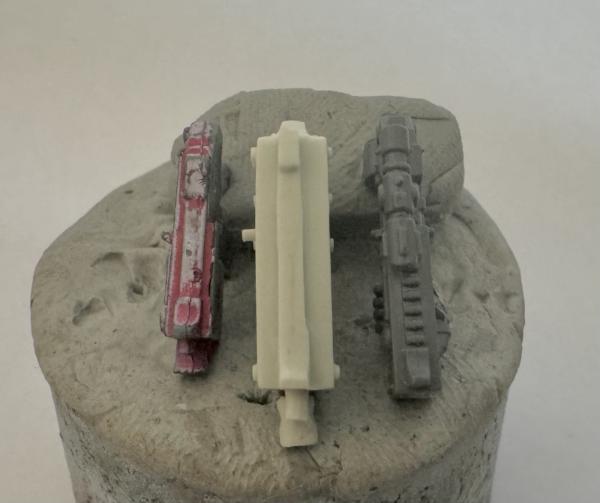
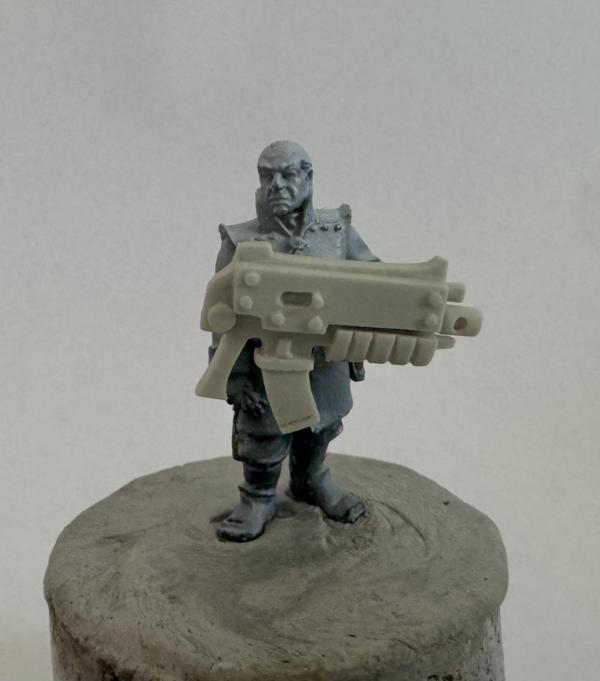
In regards to the space marine I have sculpted a custom bolter rifle that is more suited to the size of the marines. Lots of fiddly small work, especially with all the rivets. The firstborn and primaris bolter still could be used by normal humans in terms of size, the new bolter on the other hand is absolutely massive I've also pretty much completed the power pack and only need to add the rivets to it before making a mold.
The next marine will be equipped with a bolter, pictures will follow soon
Haven‘t really given the fluff a lot of thought to be honest. I mainly wanted to do a custom posable marine, the larger bolster just made sense scale wise.
I might do some fluff if I settle on a custom chapter and/ or chaos warband.
For now it’s still concept marines
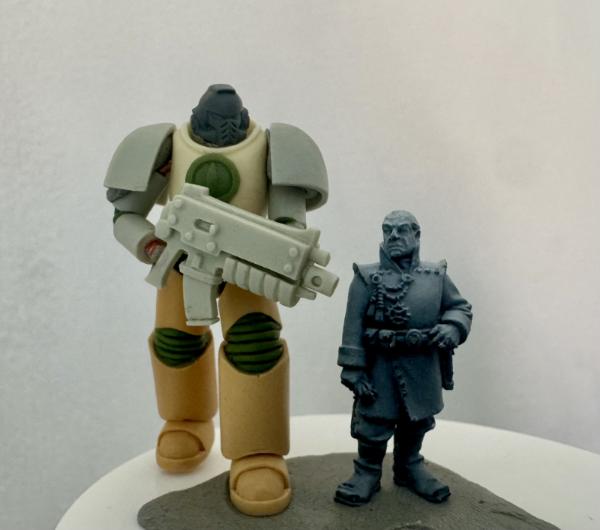
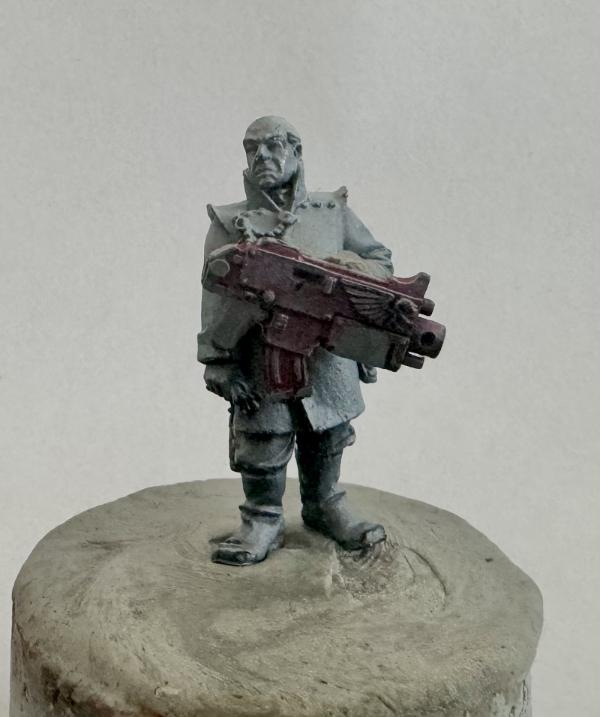
Below some scale shots with a normal human and a walking bolter marine. The other marine and terminator are only waiting for their hands now.
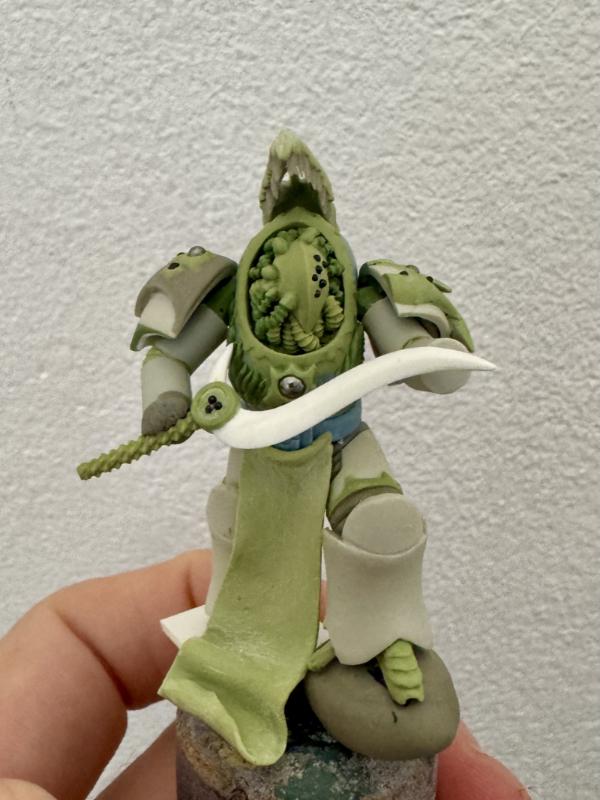
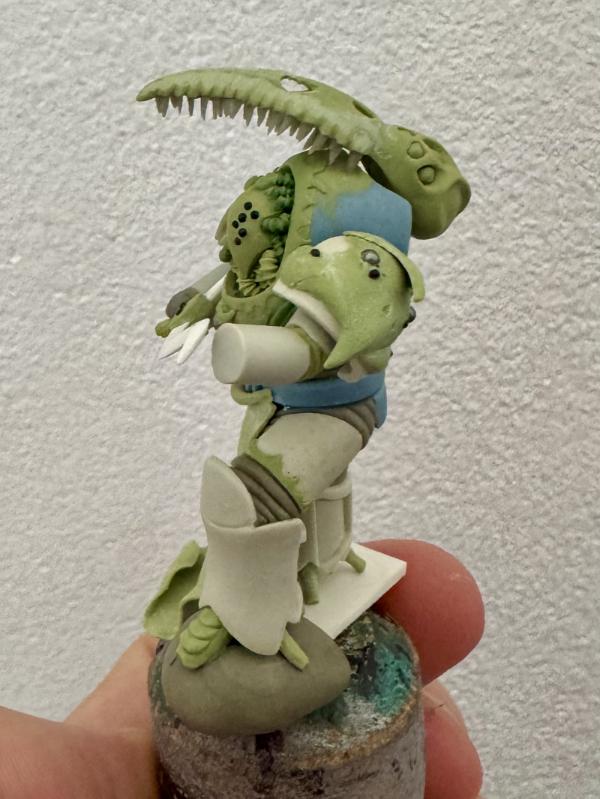
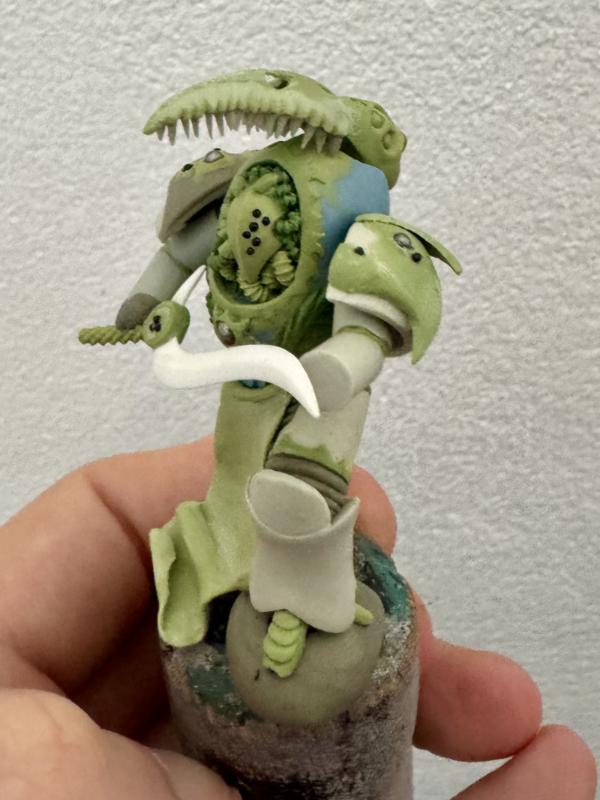
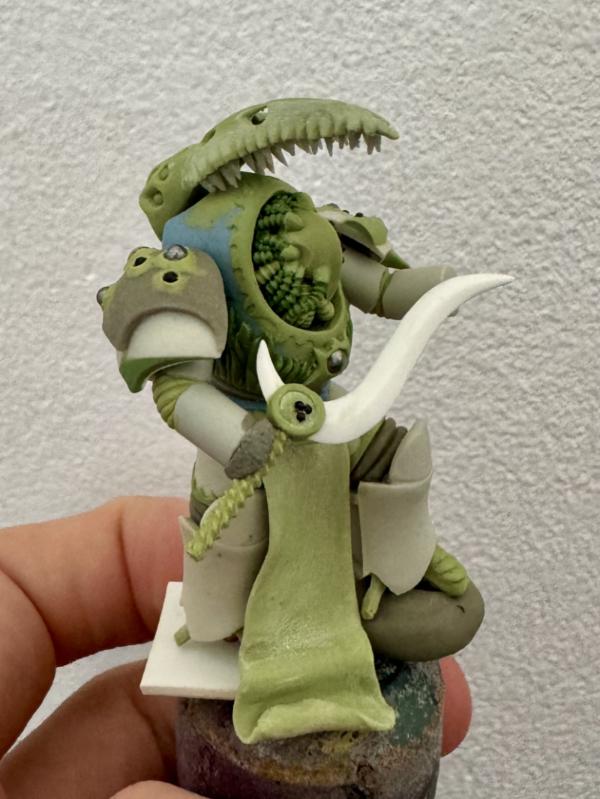
While I'm still working on the last parts for my custom marines, I now have enough parts to start using them for custom characters.
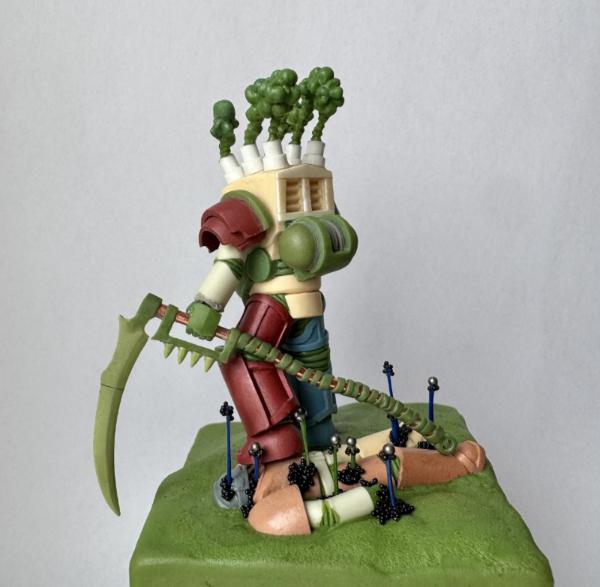
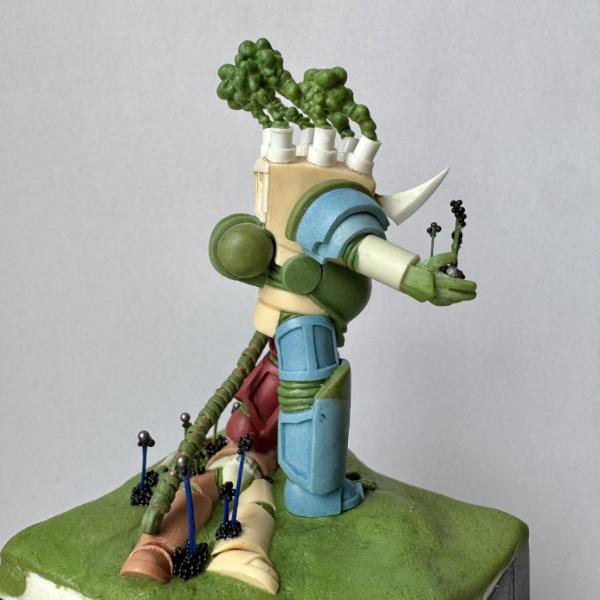
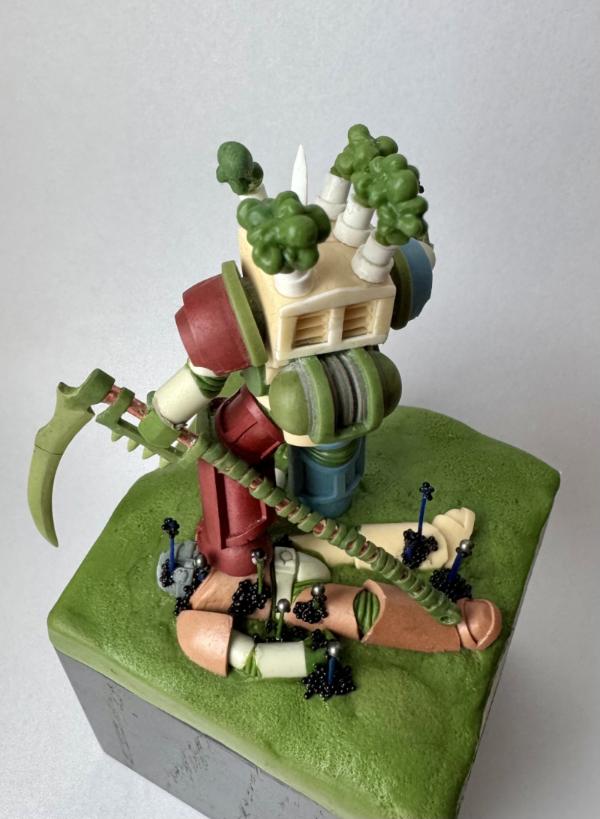
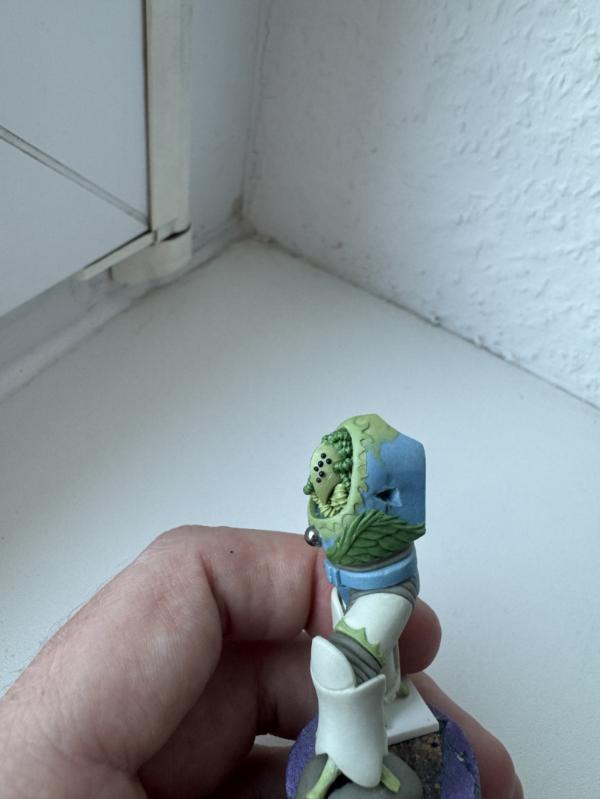
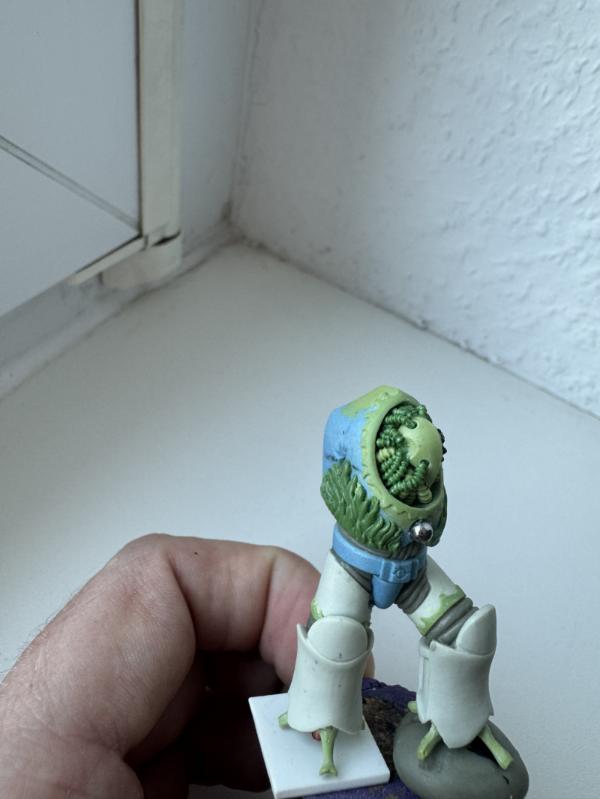
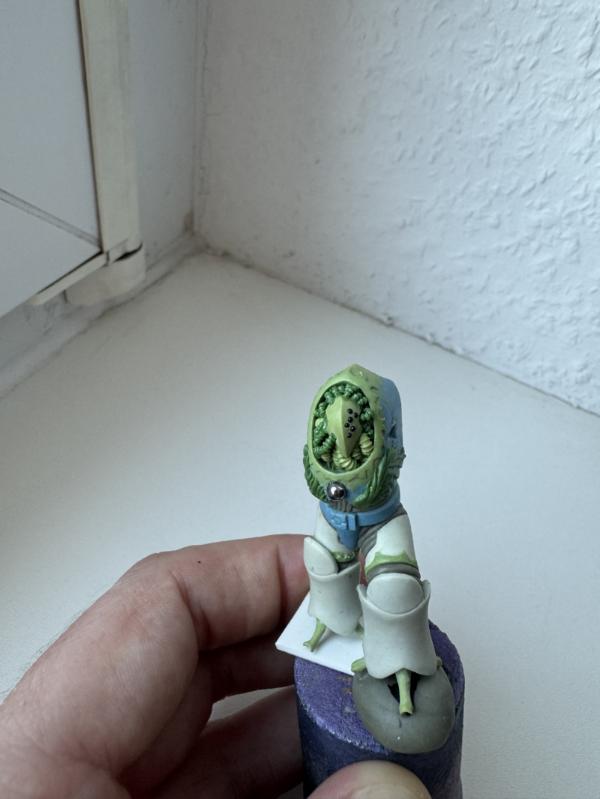
And since I am a sucker for terminators and Nurgle there is only one obvious choice (again, for the third time now )
I had this black block of wood lying around (originally for a candle) that I will use to create a scenic base for him. Right now everything is just stuck on and can still be moved around.
I figured since I can make unlimited parts, might as well throw a dead marine on the base. I shaved down the back and will create a mud like base in the end, so that he can sink into it a bit.
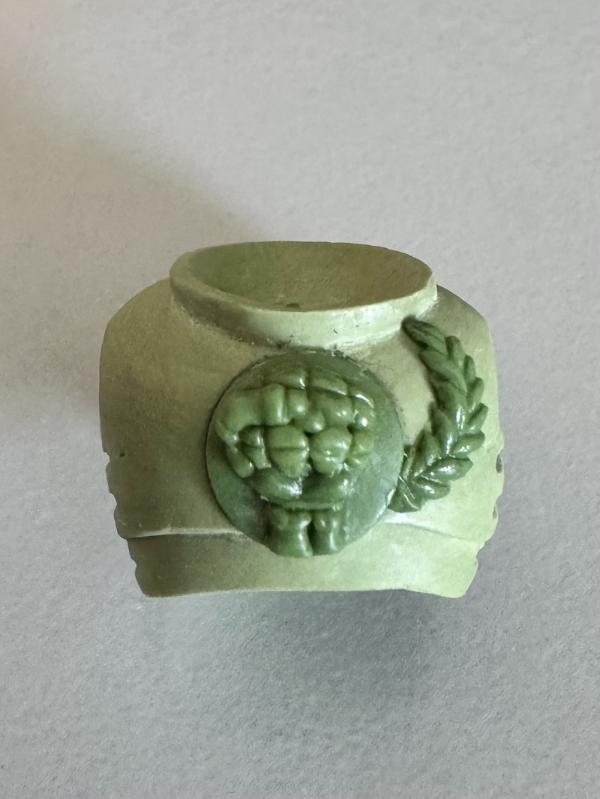
Right now Typhus is still pretty much using only the standard parts that I cast up. I did change his legs a bit to be a solid piece with no knee guards. The other big change was the Cataphractii shoulder pads. I just turned the normal pads sideways and cut off the end. For the smaller inner one I used a normal marine shoulder pad.
The stomach itself was just a quick mock up with bluetack, but I like the way it looks and will soon sculpt it with greenstuff. The other big open part would then only be his back and the vents on top. The rest will then be "just" a bit of detailing and corruption. I think in the end I want to aim for a model that would fit in between 30k and 40k. I might also do some flies/ nurgle magic effects in the end.
The major question I have right now is what pose to choose for him.
Originally I had this one in mind. Scythe in the left hand and right hand either pointing or casting magic forward.
Pose two would be scythe in the right hand pointing forward and then the left hand for magic. The left hand could "grab" a swarm of flies from the fallen marine or hold the head of it.
And for those who are curious, here are my two old Typhus versions:
Spoiler:
Version 1: Never got arms or anything else done, but the spirit was there
Version 2: Upscaled over a GW terminator, unfortunately still needs to be painted properly
Took a while to get there, lots of other stuff going on, but finally found some time to finish up my new Typhus. Looking at the last post, I kinda forgot that I did a mockup with bluetack
I've tried to keep this version fairly simply with minimal Nurgle corruption, I'll paint him up in a heavily weathered 30k paint scheme. I hope the smoke and magic effects turn out as good as I picture them in my head Super happy with how he turned out and especially with the fact that he is 100% hand sculpted, with the main body parts being easily replicated for many more models.
Now that I see the pictures, I noticed that he is still missing his elbow guards, so I will add those before painting as well.
@Tommygun1918: Thanks! I really hope the magic effects will turn out nice and creepy
@Nozeminer: I was reluctant at first as well but I think for good casts it is necessary. Keep in mind I’m in Germany, so the links/ products may not be the same in the states. I got the pressure pot below and got a few extra bits for it in a local hardware store. Happy to take a few pictures if they would help. But basically the bike valve allows it to be pressurized with a normal bike pump, takes about 2-3 minutes of pumping but it will save you the cost of a compressor. For occasional casts like I did I’m happy with it, if I’d do a ton of casting I’d probably get a compressor.
Thanks for the links . I had to go onto my account since it wouldn't ship to the States from that link. It's $81US or 78EU. I've already got a couple of compressors, one for tools and one for my airbrush so that won't be a problem. I hope this solves it. I really want to complete my Def Korps army.
Definitely solved it for me. Did both minis and dice with it and had absolutely no issues with bubbles from the resin. Just takes a bit of time to get all the vents set up.
I remember seeing your def Kops, absolutely stunning work on those
!
And once again the sculpting and conversion side of the hobby pulls me back in. I’ve dusted off my tools and molds and decided to go for another primarch (as well as some side project marines and terminators)
This time it will be a returned Rogal Dorn, mainly because I made a claw too big for another model I’ve used the mold from my previous primarch project for the chest, shoulders and back. The legs are slightly scaled up from the terminator sculpts and the arms are the thighs from the normal marines. Groin is also from the terminator set but will be bulked up.
As the temporary head we have the return of derpy face
Not 100% sure or the pose yet, but he will keep only one arm. There’s a lot of great art out there for a one armed Dorn.
I like the leaning pose, but the pointing one might be more regal and commanding. Especially with a large flowing cape.
Side project 1 is a terminator (that was supposed to get the claw, but the claw was too large)
@Karak Norn Clansman: Thanks! Having a lot of fun with them too
@Syro: Good to be back and sculpting again You're correct, Dorn does not originally have a claw. But a lot of the returned Dorn art that I found online for inspiration depicts him with the Emperors Claw, seeing as Rowboat got the Sword and the Lion the Shield of the Emperor. I've posted one of the images below that is one of the main inspirations.
Progress today was rather slow. I've mainly decided on a pose for Dorn, going with the pointing one after all. I think it looks more commanding and fit for a primarch, especially once I add the flowing cloak to it. I've changed the position of the fingers a bit to have a better pointing hand. Now that I have the final pose I can start working on filling in the gaps and detailling the armor.
Here's a couple of scale shots to get an idea how big he is.
Spoiler:
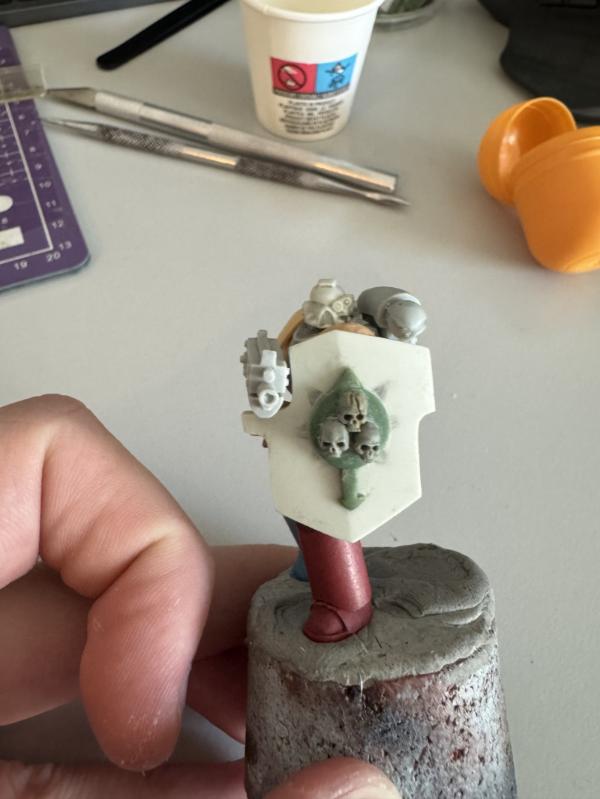
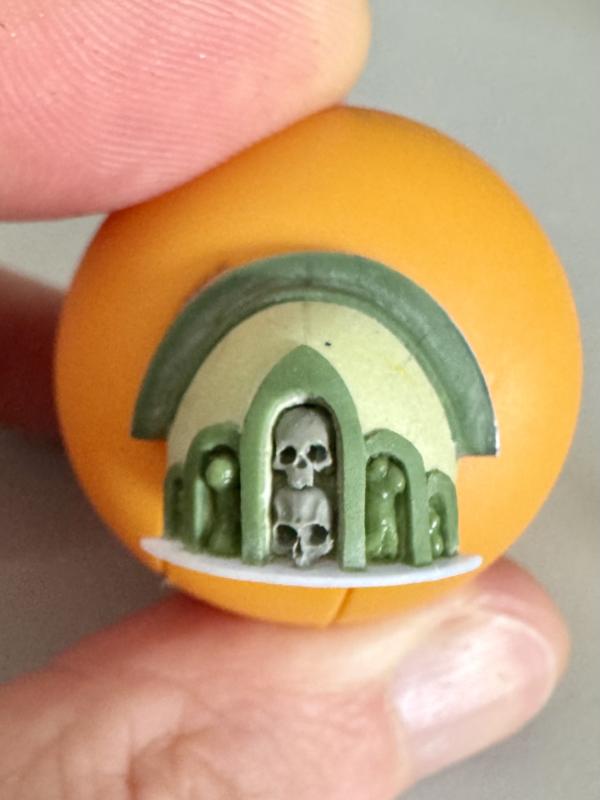
And last but not least, a lot of work went into the shoulder pads. I've used a pencil to draw on the sections and then slowly carved them out with a scalpel. In the final version they will be housing skulls and other bones, kind of like little reliquaries.
And now we have some more progess on my Dorn mini.
Current status overall. I have described the steps that I have taken below.
Legs currently only have a rough sketch/ idea of what they should be. I did fill in the padding for the knee joint, so that's a good start. The upper legs still need more plating and the lower legs will get half an eagle each and then some detailing on the inside.
Kneepads to be decided
For the chest I did some carving away to give it a bit more detail and then sculpted the Imperial fist icon on it. Since the shoulders already feature skulls and bones in reliquaries, I thought it would be fun for Dorn to carry his own fist on his chest. All new chapter masters can come to him personally to engrave their name from now on
The shoulders are more or less finished now, I've added some trims and some bones as well as little strings that keep everything in place. Maybe I will do some rivets or other small details before they are fully done.
@Karak Norn Clansman: Thanks! Definetely going wild with the details for this one
@Warboss_Waaazag: Thanks! Super happy with how they turned out. I did add a scroll for text to each of them as well. Only thing left now I thing is studs.
I had to redo the funky looking head, the new one looks more promising now. I've also finished the chest on both sides now. I don't think there is much room to add anything else, so it is probably done.
Shoulder pads are also done, except for maybe some studs.
The wings on the legs have been refined into better feathers and the thighs are currently curing with the gaps filled in. Still lots of work to be done here.
Powerpack did not get a lot of love for now, but I did create some vents out of plasticard. I think they are currently still too long, but the angle is fine.
Last but not least I started on the claw and did some ribbing on the inside.
Next steps are finishing the legs, arm and back. I have some nice ideas for the cloak as well to make sure it will fit in with the rest.
Dorn is coming along pretty well, although I notice that the steps I take are smaller and smaller as the details cover less area and are often overlapping.
Dorn in all his current glory. Not 100% sold on the helmet yet but for now it will stay. I build up the neck guard a little bit to give the chest more character, but that will be finally the last step Shoulders are still the same, currently just stuck in place with bluetack. The eagles on the legs and the lower legs in general are 99% finished. The knee pads will still get some love.
Upper legs were filled in to bulk them out and then another armor layer was added on top. I will probably do some hip plates over them as well to roung out the legs.
Close up of the chest and helmet. The belt will probably receive a different belt buckle before everything is done.
Current state of the cape. I will use silicone putty to make a mold of this and then fill the mold with green stuff for the final cape. This will allow me to have some sculpted detail on it while having the freedom for lots of movement and folds
And last but not least the current state of the claw. I like the way it is turning out, but I am questioning whether or not it is still a little bit too large. Maybe I need to shorten the lower arm a bit to make it fit and look nicer.
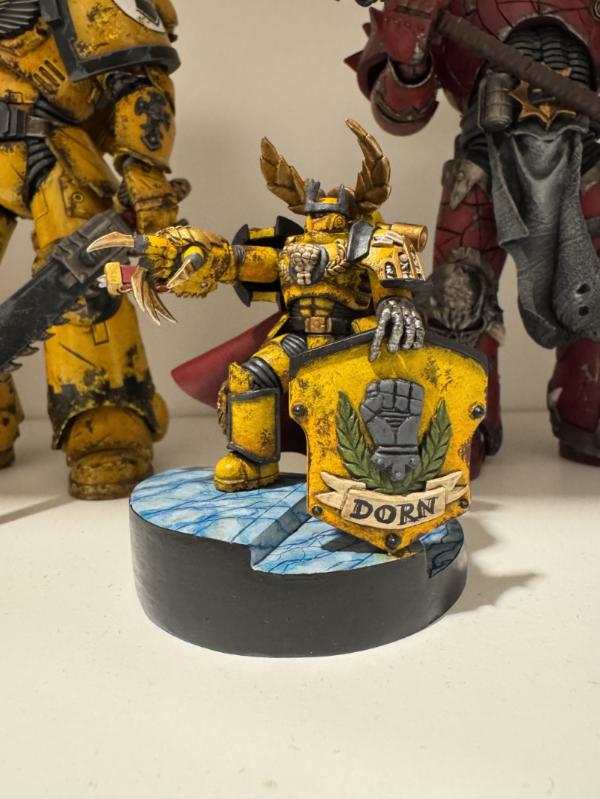
And finally Dorn is finished in all his glory. The only thing left to do is create a nice base for him, other than that he is completely done. I'm quite happy with how he turned out! I'm looking forward to painting him which makes it more likely that he will be one of the sculpts that actually get to see paint in the end
The head, backpack, cloak and left arm are all still detachable so that should make painting quite a bit easier.
Pictures below and as always let me know what you think
Thanks for the kind words SarpedonofSotha! I think for now this is probably the best model I did He’s already primed and ready to see some paint. To be honest I am still not 100% sure if the one armed look is the right one. Bionic arm would definitely be the option to go for and I have given it plenty of thought
Pneumo wrote: Thanks for the kind words SarpedonofSotha! I think for now this is probably the best model I did He’s already primed and ready to see some paint. To be honest I am still not 100% sure if the one armed look is the right one. Bionic arm would definitely be the option to go for and I have given it plenty of thought
Amazing job nonetheless! I'm in complete awe of how smooth your sculpting is so feel pride in your work !
Being the pragmatic that he is you could always have different arm attachment magnetized for different purpose as well like a breacher shield, a wrist mounted/gauntlet mounted bolter etc
Thanks, definintely am super proud of him Magnetized arm is actually something that would be fairly easy to still do. Might be something I look into
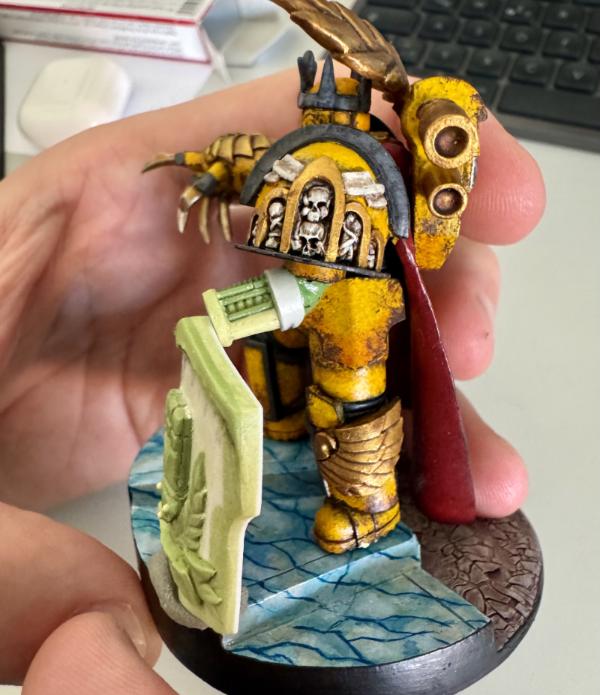
For now I am starting on the paintjob, super happy with how the yellow turned out. I will probably do a little bit of battle damage and then maybe some freehands on the larger open spaces. For now the rest is mostly blocking in paints to see what works best.
Thanks! Originally I wanted to have a one armed Dorn as he lost it and I thought it might be a cool mini to just have one arm. But the majority of responses I got both on here and in person were always variations of “Why just one arm?”
Sooooo he went and ordered himself a bionic arm and grabbed a big ass shield to carry around Still WIP but you get where it is going
Magic bird termi (name pending) is also coming along well, but still tons of detail work left.
Shield and hand are finished. I only need to attach a handle to the inside and sculpt the ribbing on the elbow plus the elbow guard.
The hand and arm were mostly just glueing various sizes of cured rolled putty together. Hope it looks good painted up
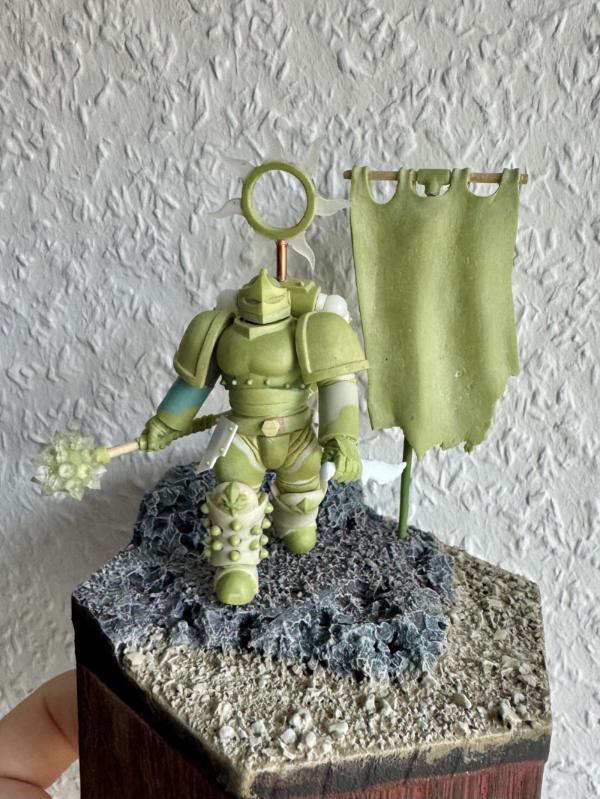
Bird termi has been put on the back burner for a little while. The unlikely event happened that my girlfriend showed interest in painting a mini So naturally I dropped everything and started on a custom female primarch mini for her. Not really lore accurate, but if your significant other shows interest in your hobby then lore should not be an issue
And this is where we currently are. Started with a similar base to Dorn, but shaved down the lower legs to be a bit thinner and form fitting. The thighs got a bit wider, groin and belt are pretty much the same.
The chest started out a bit smaller and then got some boob armor sculpted on in multiple layers until it got final approval.
Some are not to cover the stomach similar to some of my other minis.
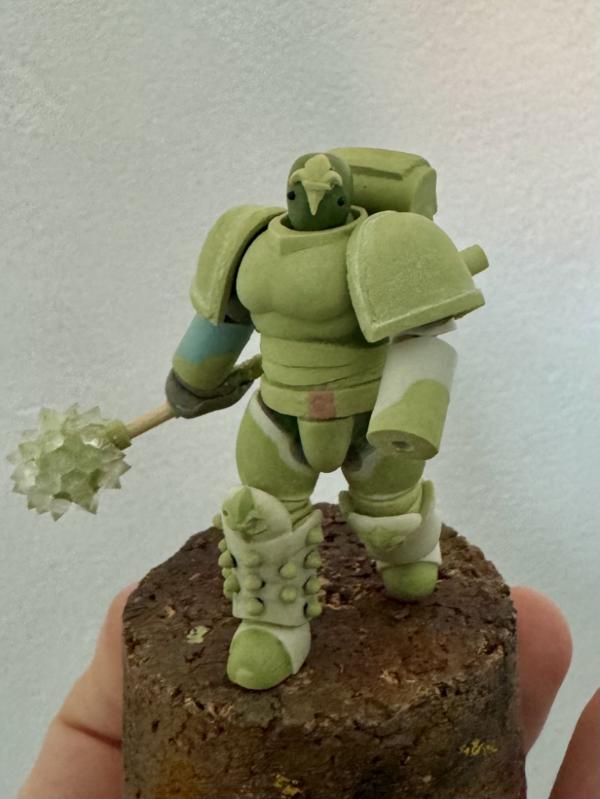
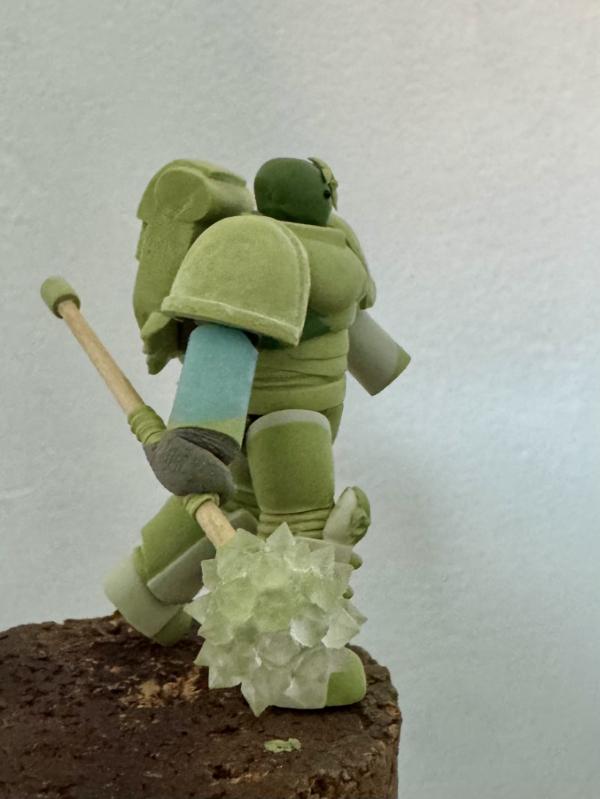
Now I only have the always dreaded head as well as the arms, backpack and detailing. For the weapon I did a sort of crystal mace where I glued on all the studs individually
Thanks tzurk! It was quite fiddly indeed. With a lot of risk to superglue my fingers together I do see the resemblance to Helga
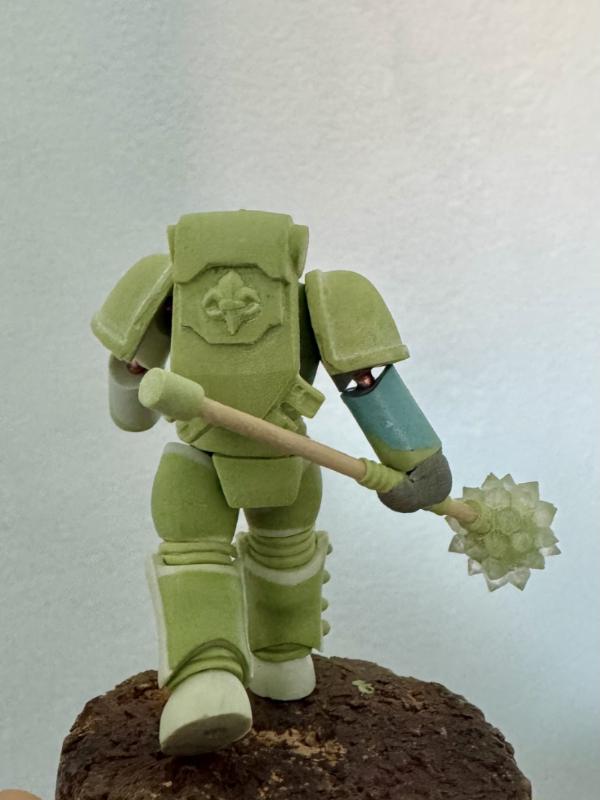
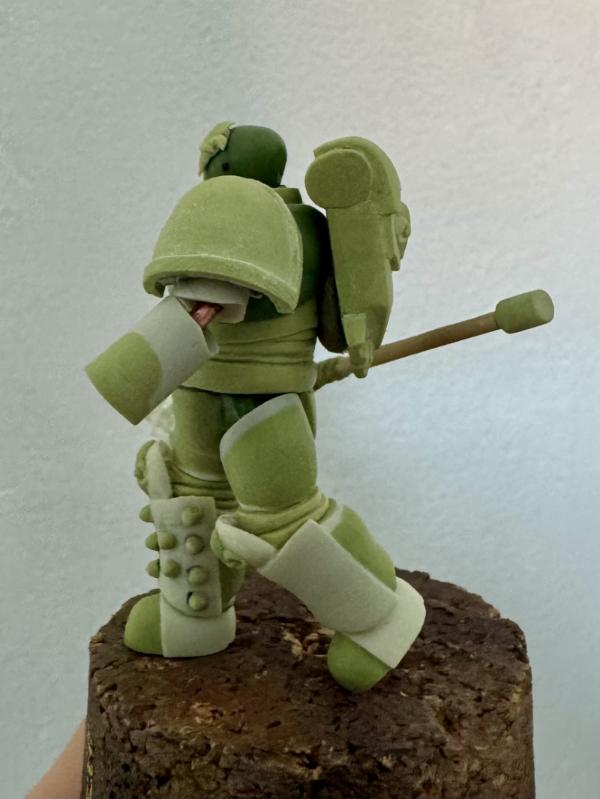
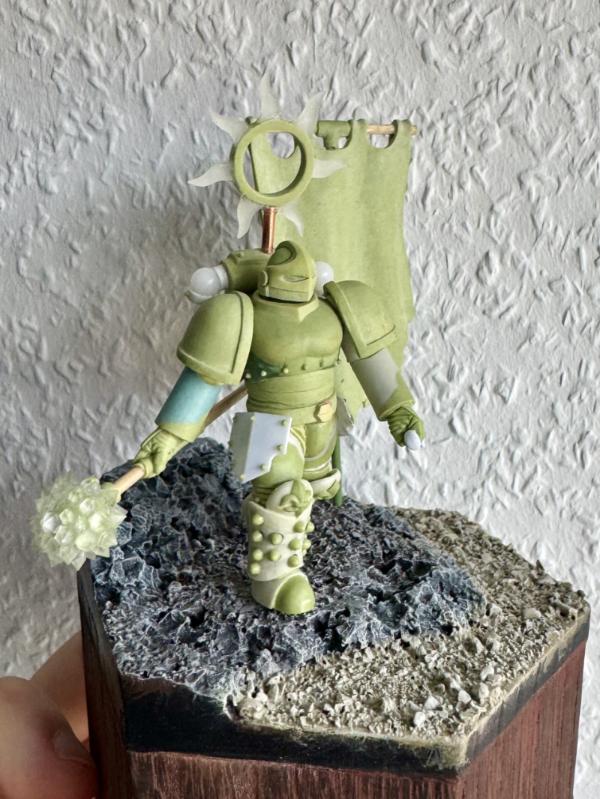
We're entering the final stretches for the female primarch. Since the last post I've added a ton of rivets, hip plates (with rivets ), fixed the arms in place with their elbow joint ribbing, carved some kind of obsidian dagger for the left hand and sculpted both hands, finished the back and also sculpted the head. Lots of work condesed in one sentence, but overall the only steps left in terms of sculpting are now some vambraces for both arms and some better plating for the top of the hands. If all goes well then she will be ready for priming and painting this weekend
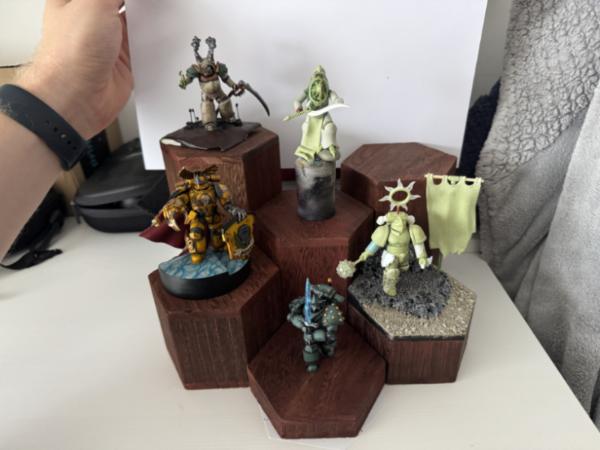
I've also done quite a bit of work on the base. I ordered a pack of 6 Hexagon stands of different height on amazon that can be placed together, they look quite nice for some display corner. She will be the first model to receive one of the hexagons, but Dorn and my Witch King will follow as well.
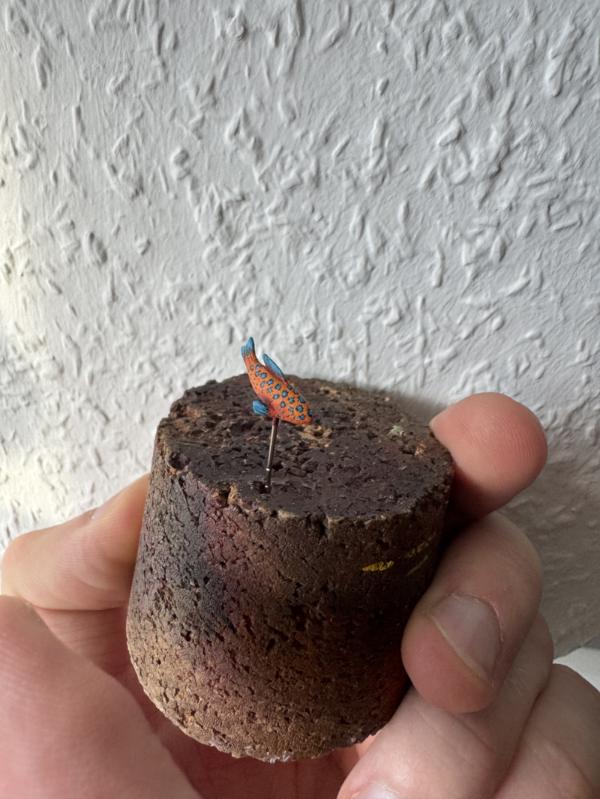
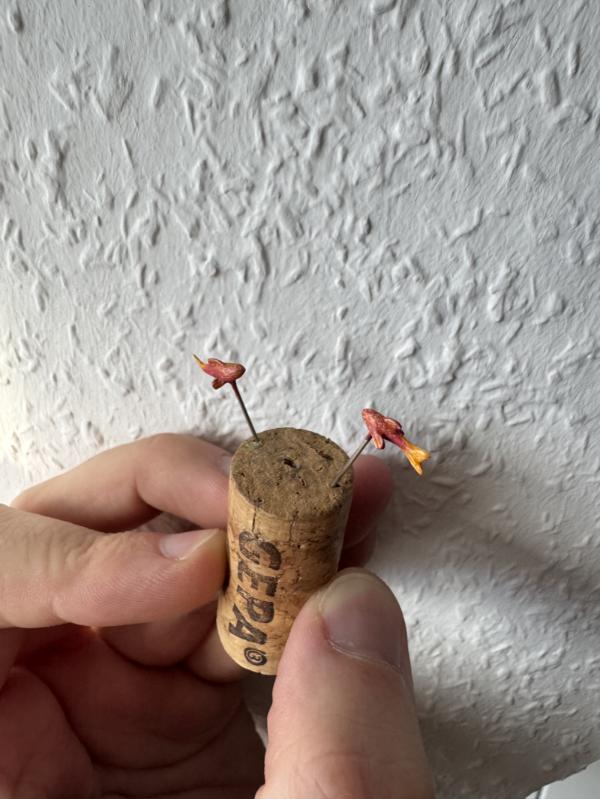
The overall idea for her is a forest base with some rocks and a bit of sandy lake. I've sculpted three tropical fishes that can swim in it as well as some sea rose leaves. The water area will be filled up with resin for a water effect.
That's great to hear that your girlfriend is interested in painting a mini. The female primarch looks good, I like that she has a sister of battle looking helmet. Dorn looks amazing, by the way.
Got some more sculpting work coming along. I’ve ordered some Horus Heresy marines and noticed that the scale difference to my sculpts is bigger than expected. I think almost primarch scale if you take the FW primarchs.
Also got a light box for my birthday and it does a ton for nicer pictures
Managed to get a bit of progress in. I think I’m happy with the final pose now.
Other than that I carved some runes into the legs, added some studs and started on the demonic power fist.
Thanks SarpedonofSotha, the bionic arm was a great idea Super happy with how it turned out and I think it fits really well.
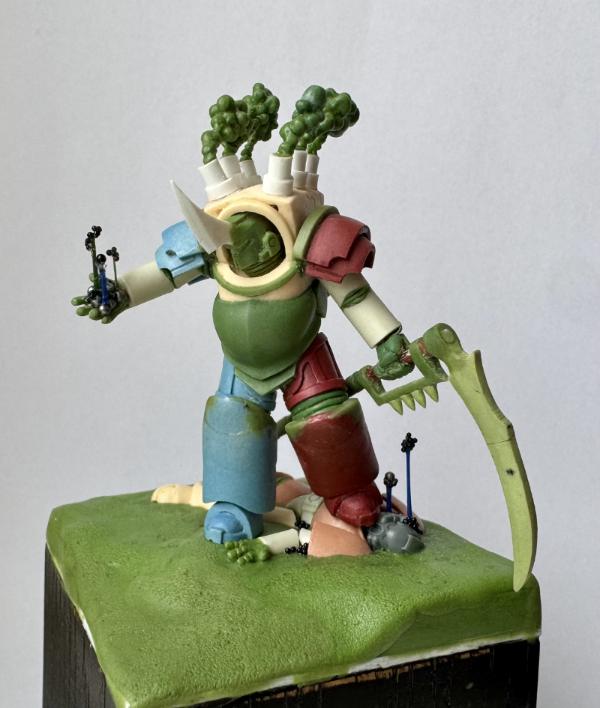
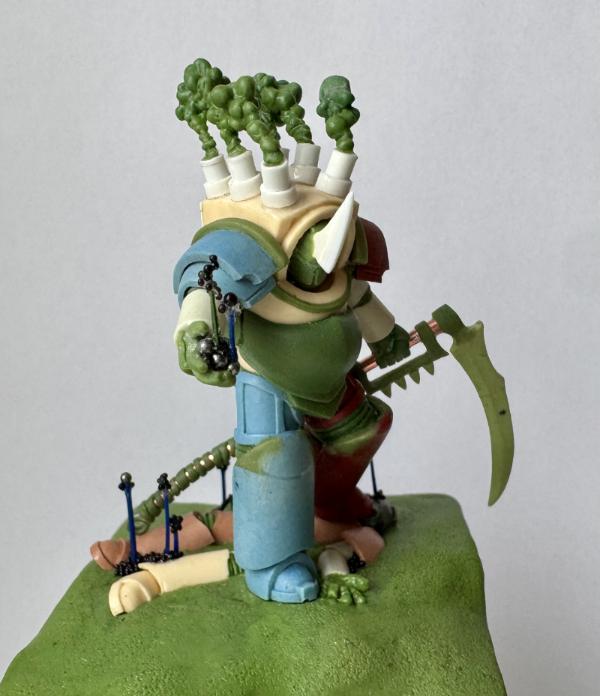
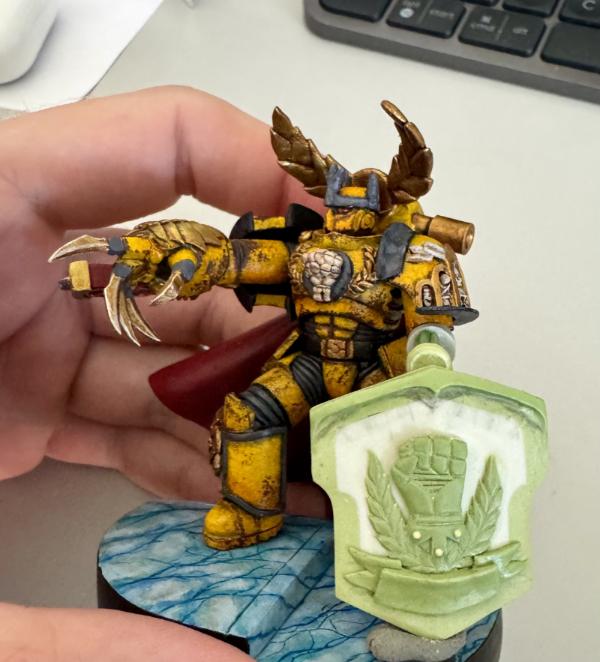
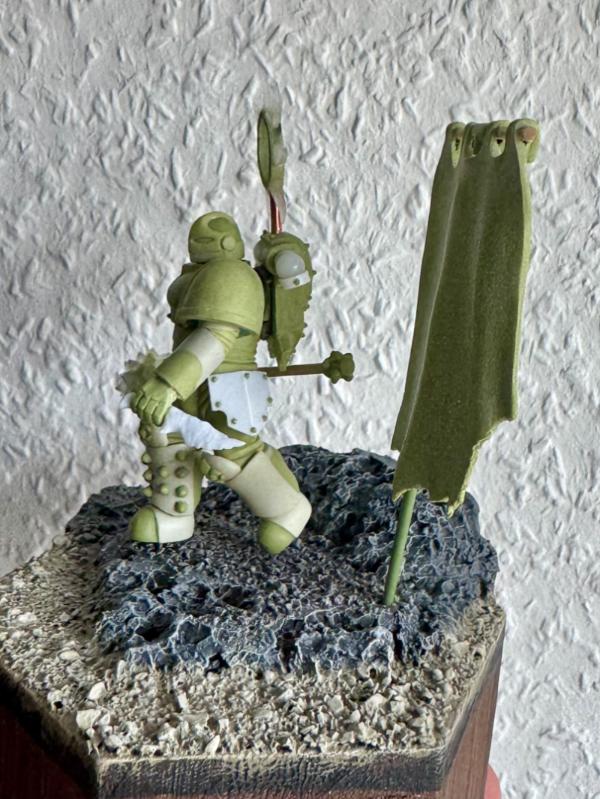
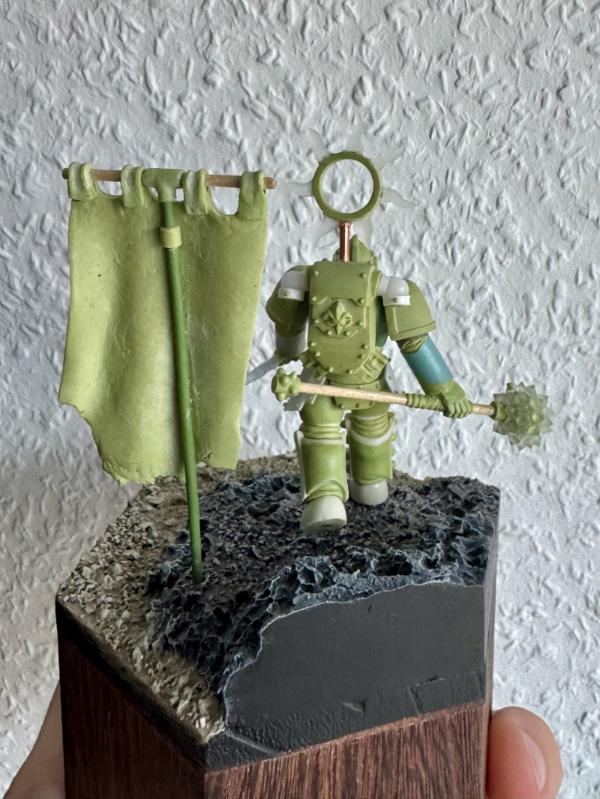
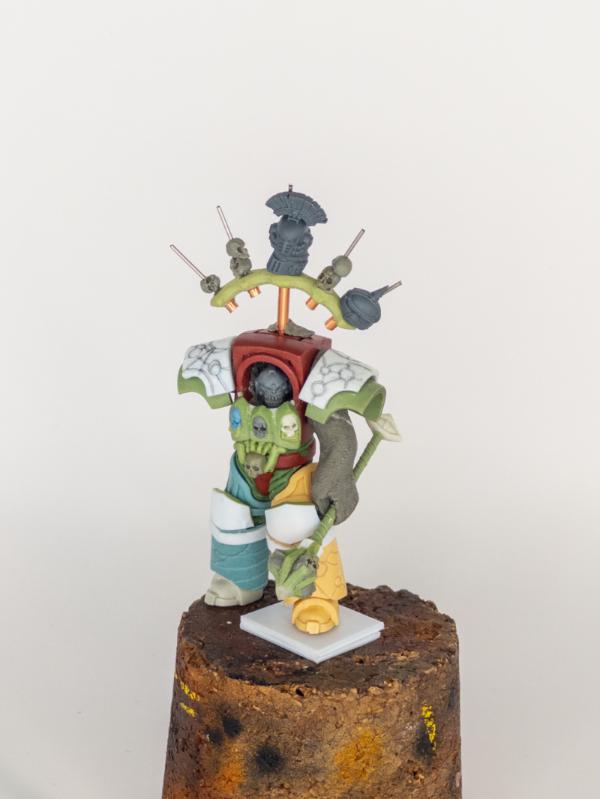
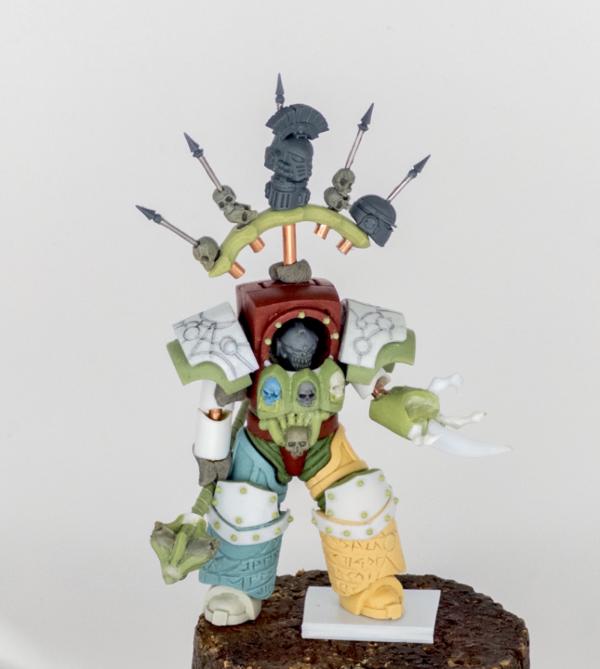
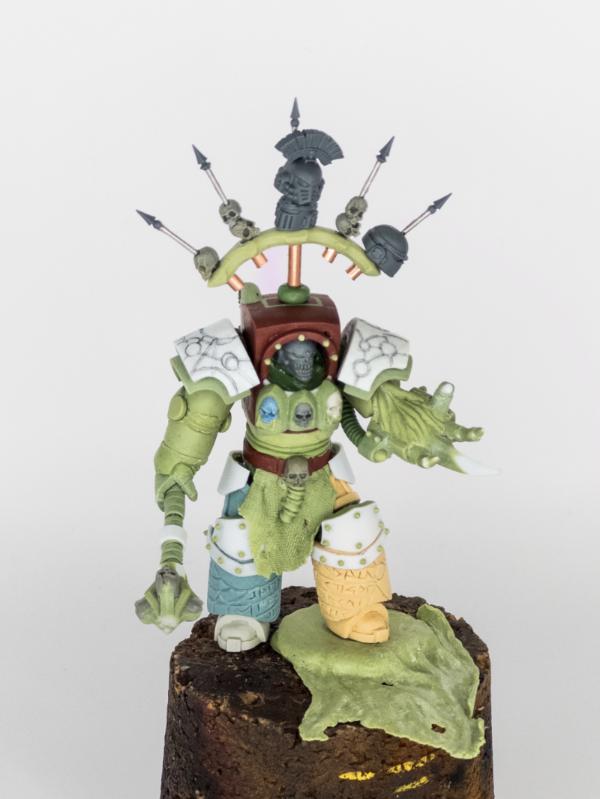
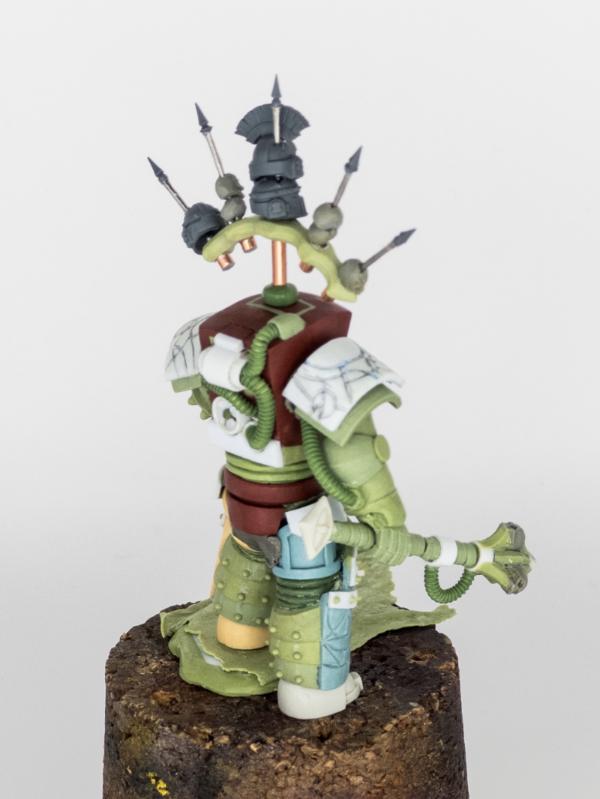
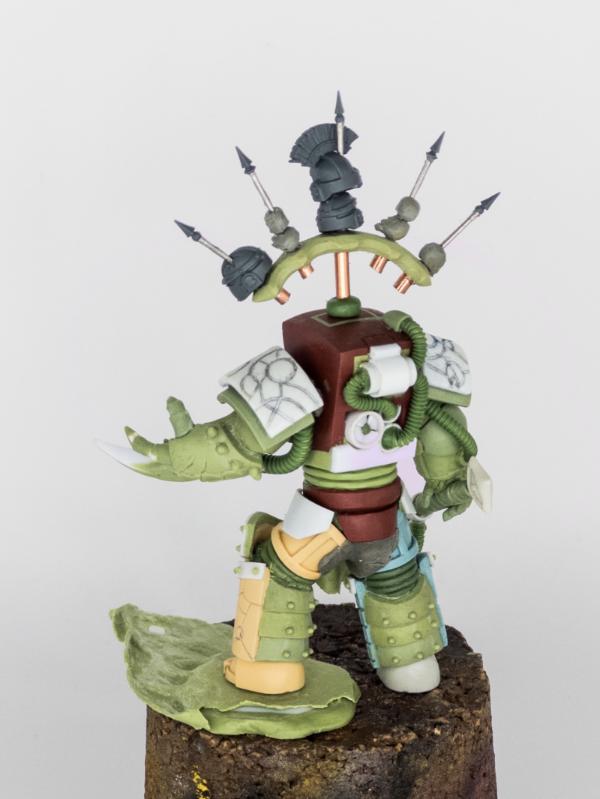
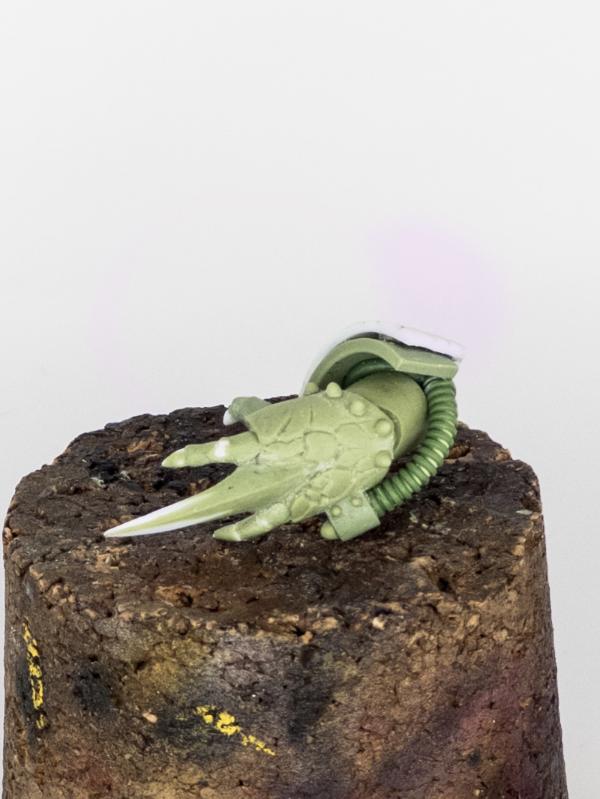
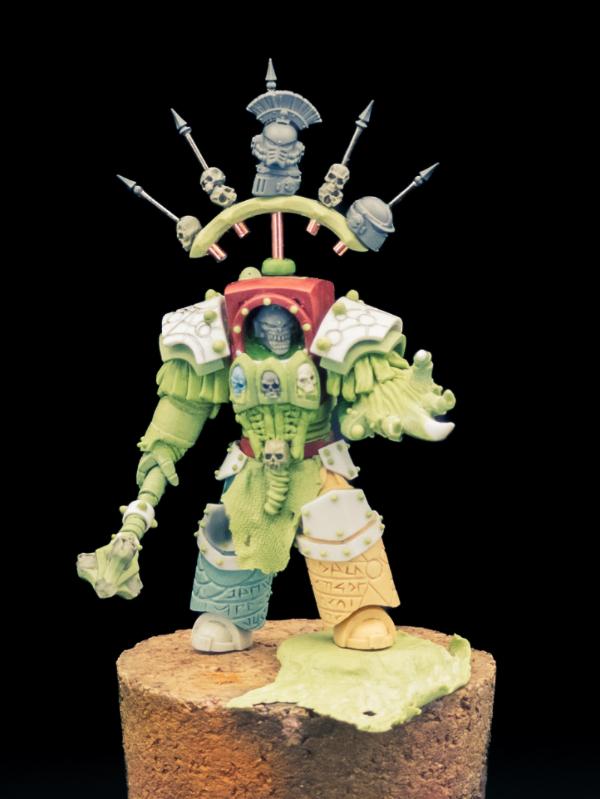
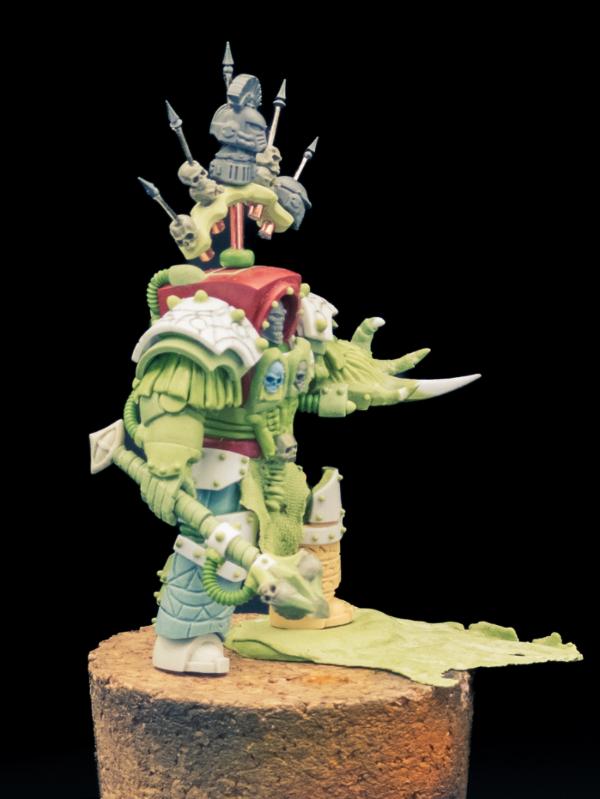
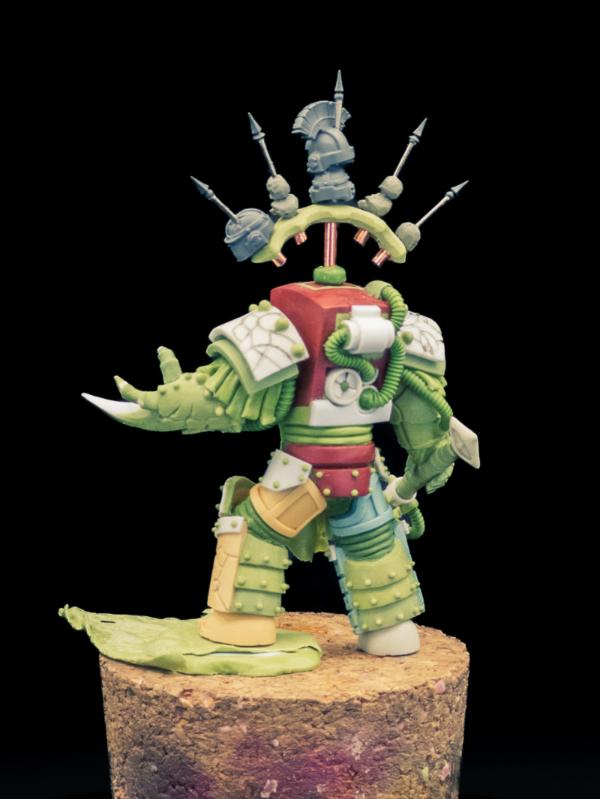
My word bearer is now almost complete. I've bulked out the arms and added some cables as well as the elbow for the right arm. Once the arms were bulked out I sculpted the right hand for the power maul for the final pose. Hands are always tricky The power fist was sculpted with a cracked back to show the large spike (I imagine it to be the two middle fingers growing together to form the large spike) growing out. Super happy with how it turned out! It was inspired by one of the old possessed arms I found in my bits box.
I've also started on his base, decided that he will stand on a ripped off Ultramarine banner
The biggest change compared to the last version is that I have cut him in half again and added roughly 5mm additional height to his torso. When comparing the last update picture and the new ones it is quite visible. Originally I did see his height as much of an issue but once the right arm and hand were ready and attached I noticed that the hand extends well below the knee I then re-checked the scale with his head and his torso from belt to neck was the same height as his head... Now it is about two heads which looks way better. Unfortunately this also meant sculpting an extension on his torso and resculpting the armor ribbing.
All that is left to do now is add some final details, probably more rivets and maybe some more carved runes, as well as resculpting the bones that sit below his chest.
And now he is finally done! I’ve added a lot of rivers to the “naked” armor sections as well as some tassels to the shoulders. The midsection got the bones back, in a slightly different style.
Happy with how he turned out and I will start painting him pretty soon. I’ve also started working on a base for him so he can join the rest of the models on their display hexagons