23050
Post by: Terraformer
At the time of posting this, this project is finished, but I'm still posting this project log from my regular blog to give the Dakka regulars a chance to see how this huge project came about without navigating off-site.
The good news about this is, is you won't end up stranded halfway through a WIP log, you can be assured this project was and will be completed in this thread 
This project started when we were contacted by a client about a potential project to convert a whole set of GW "Realm Of Battle" modular battleboards to a chaos-themed wasteland. After agreeing on the particulars, and being given some amount of artistic license to let our imagination run wild.
I took this project on almost by myself, but eventually had to enlist the help of one of our lead artists, MisMuse, who is a miniatures master in her own right, although her background comes from dollhouse miniatures and miniature food jewelry. Really.
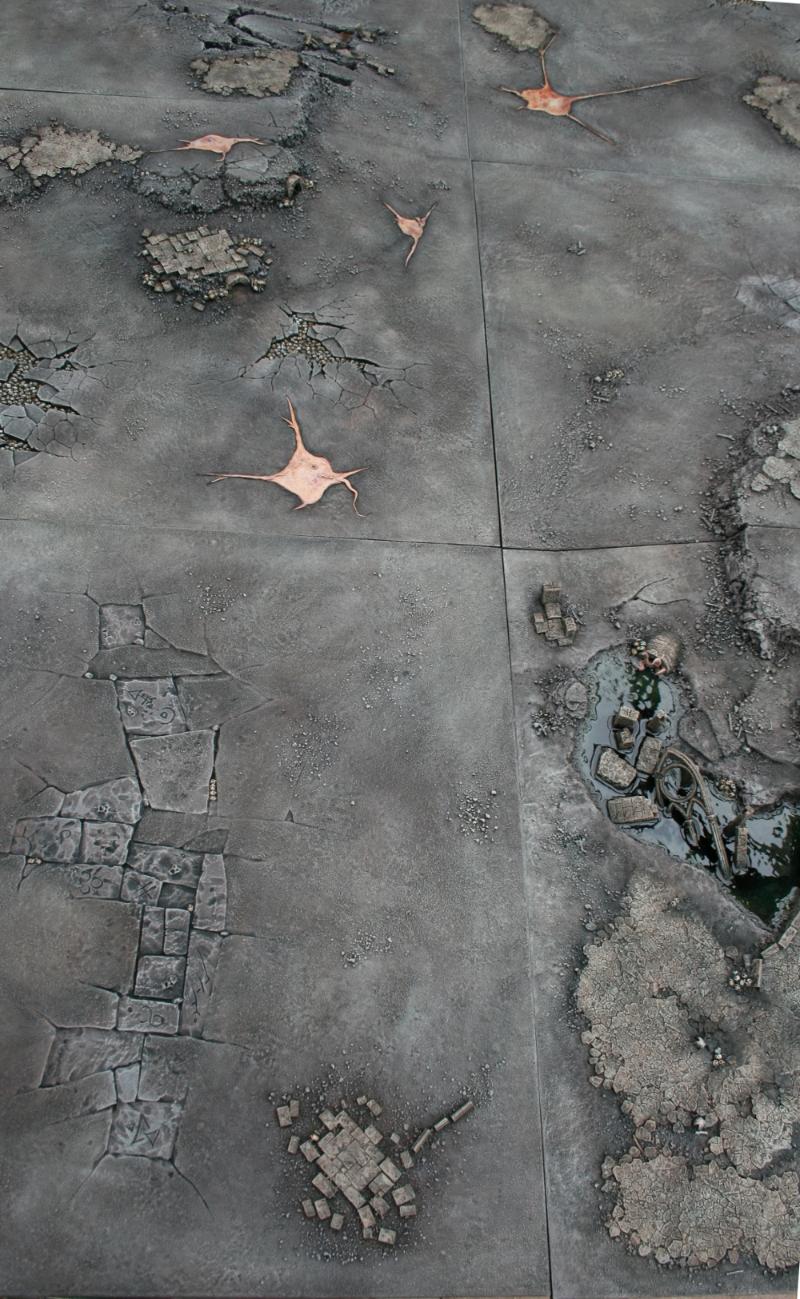
If you're not familiar, the Realm Of Battle is a set of 2' x 2' plastic boards with landscape molded into them, designed to fit together in various configurations and then stack together in a carrying case. Details can be had here. The usual technique for these boards is to prime, paint, add flock and play. We already decided that we wanted to do something different based on our client's request for something different from the usual "golf courses" that most gaming tables look like.
Our client had purchased a setof these boards and had GW deliver it right to our workshop. We had planned on this being a simple job finished within a month or so, but when I pulled out these huge tiles, I knew already that it might end up a bigger project than I had anticipated.
Before we could really start anything, we needed to do some preparation. First of all, some factory plastics contain residue from their demolding agents, which can keep even primer from adhering well. We make a habit of cleaning plastic parts before use.
Warm soapy water works best, since most demolding agents are some form of paraffin or other petroleum based wax.
We had a fair bit of planning to do even as the boards were being prepped. One of the first things we noticed was that even though the Realm Of Battle board has some skulls molded into it, we would need a lot more for a proper chaos-scape.
We accelerated one of planned projects just for this occasion, a project which we nicknamed: “Skulls skulls skulls.”
I sculpted sets of skulls, bones and piles of bones, rib cages and other nastiness out of green stuff. All of our added accessories were to be cast from resin. I wanted to be sure that anything we attach to the boards will be strong enough to withstand years of play and shuffling around in their case.
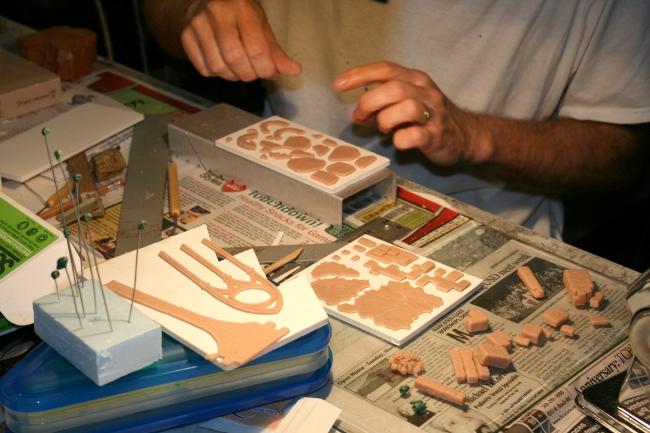
I also needed a lot of rubble and pieces of ruins, such as pavers, cobblestones and ruined gothic architecture to represent the crumbling and destruction wrought by chaos. These pieces were generally sculpted in Super Sculpy and textured realistically with natural stones and pebbles from out in the desert. Higher detail pieces like skulls and bones were done in Green Stuff. Everything gets glued down to foamcore before casting begins.
Many days later…
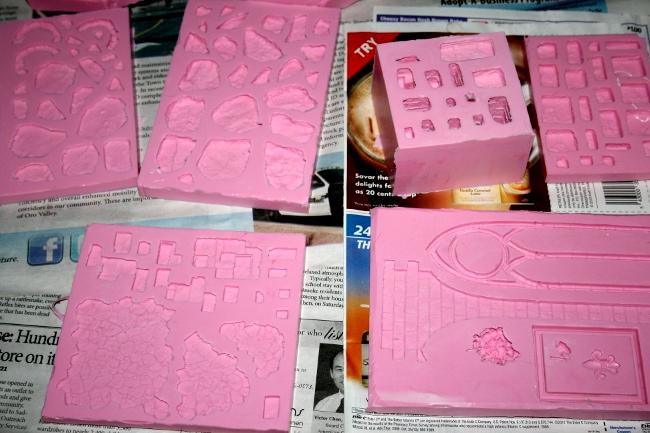
We started casting pieces immediately, and were almost constantly casting all the way through the process. We use tons of mold release all over everything, so every piece has to be washed by hand to get the grease off.
There are plenty of guides out there for how silicone molding and casting is done, so I’ll spare all the tedious details. Imagine this is like one of those cooking shows where the host finishes mixing ingredients and says “I prepared one earlier!” and whips a finished pie out from under the counter.
Instead of pie, we cook with 2-part liquid polymers, and after several days we had a HEAP of pieces that needed to be cleaned and trimmed carefully.
Hard to tell right now, but this is a pile of skulls. And yes, we all have band-aids all the time.
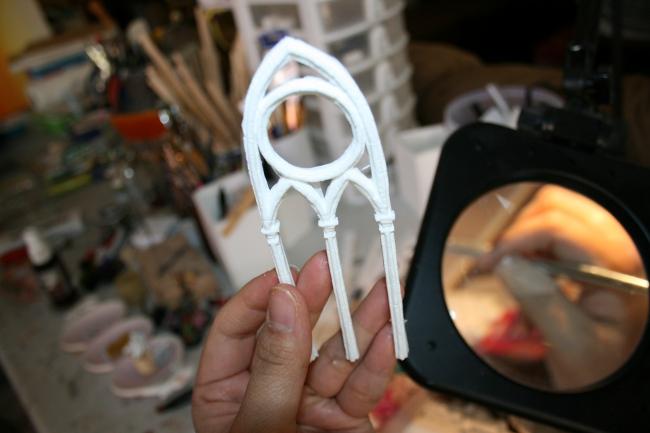
This is a gothic style arch that MisMuse had designed for another project she’s focusing on, but it also fit with some of my plans for the battleboards, so we were able to kill two birds with one stone.
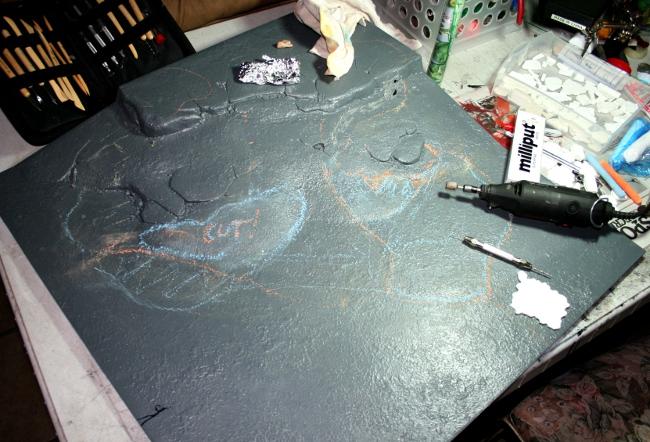
My plan going into this was simple, and by simple I mean insane and somewhat complicated. Most of these board will have at least some kind of minor modification or two carved into the plastic in addition to the details we’ll be adding, and for the most part we’re leaving the basic structure of the boards intact for playability and storage. However on one of the “mountain” boards, I wanted do something special.
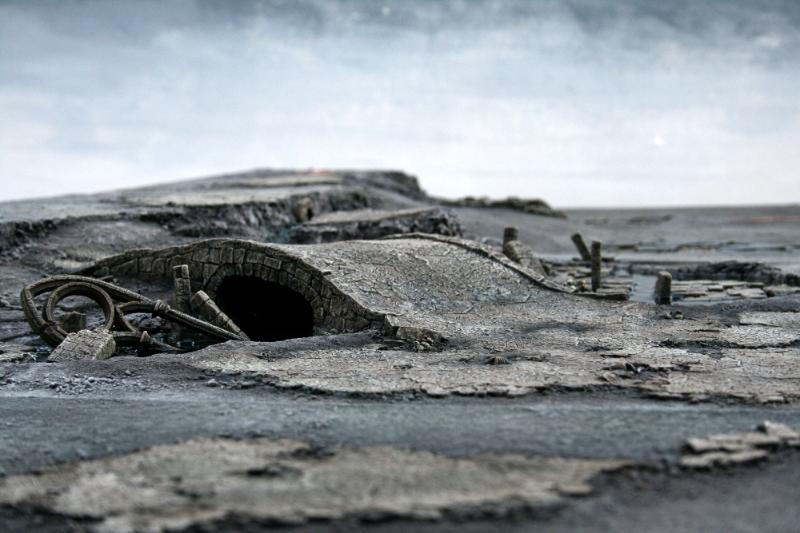
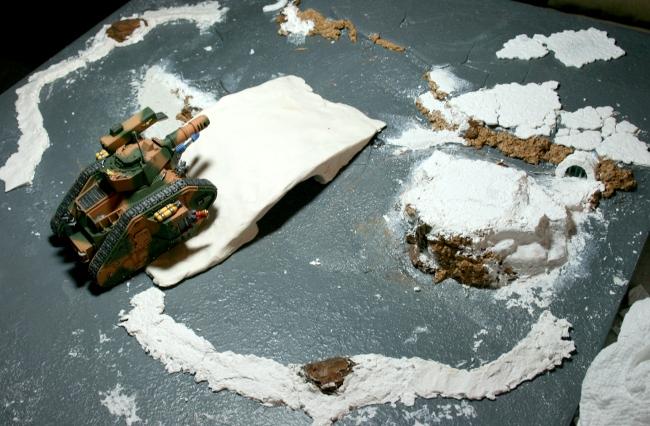
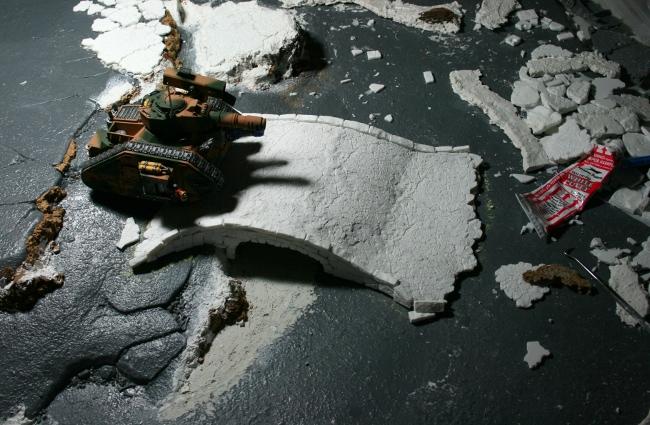
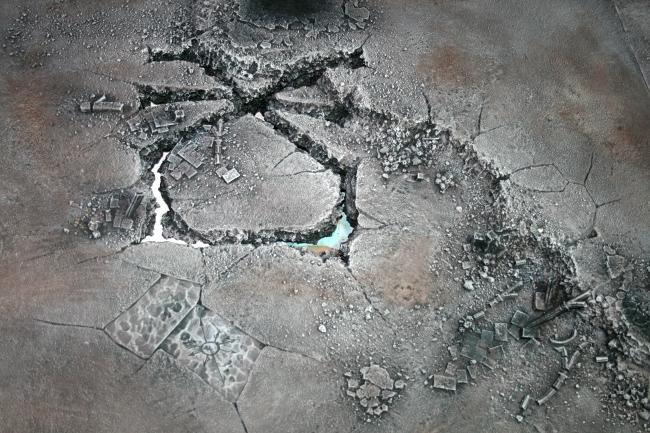
The basics of the plan involve pools of “liquid” flowing from a couple of culverts near the top of the hill, and a handful of ruins crumbling into (or rising out of?) the pools. In order to keep accessibility for troops, I would be making a bridge where the slope is currently, and that would mean making a few changes.
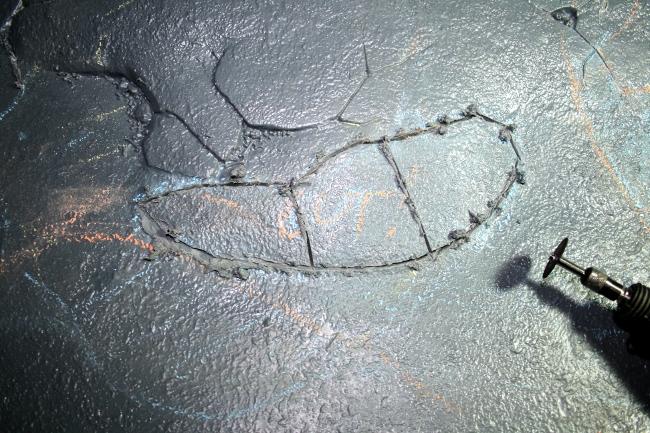
I used chalk to mark where I would be cutting, and where certain details would be, and once I was finally confident with my layout, I fired up Mr. Dremel and got to work.
 GW
GW makes these things tough. I made a nice, deep cut and the plastic didn’t even budge. So I made a few cross cuts and pried at it a little. Still nothing.

Seriously, what the heck is under this thing? A few more cuts, and some muscle, and finally I started to get it open…
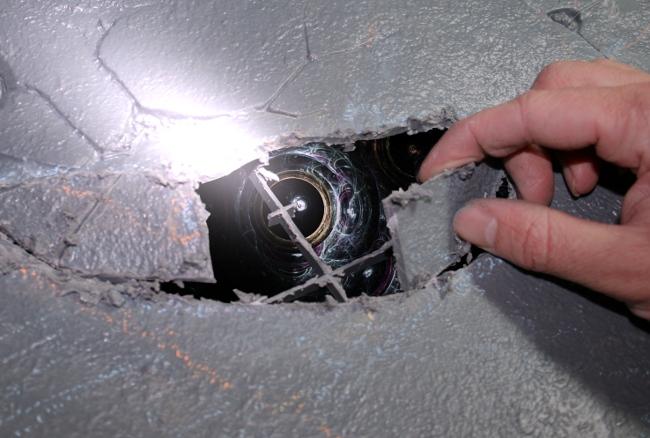
FFFFFFFFFFFFFFFFFF-
Okay so that’s their secret. I figured it would be best to get this thing covered back up as fast as possible, since the howling cacophony of madness emanating from the rift was rattling our shelves and made Mikey jump out a window clawing the flesh from his face. I proceeded to shape a few sheets of plasticard and wedged them into the opening with a combination of epoxy, plastic glue and holy water.
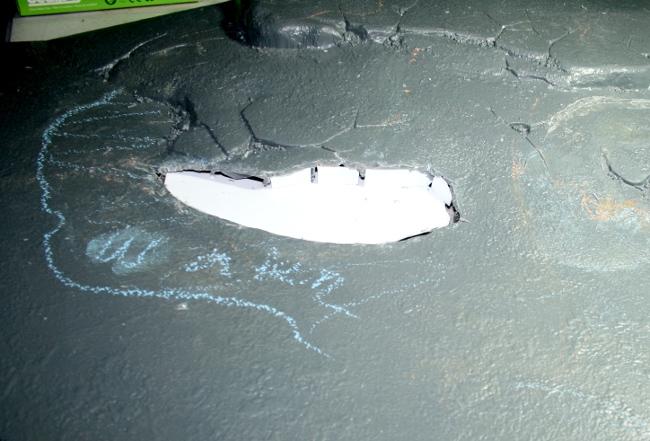
With the basic patch nice and secure, it was time to make it look natural, and for that I use Milliput.
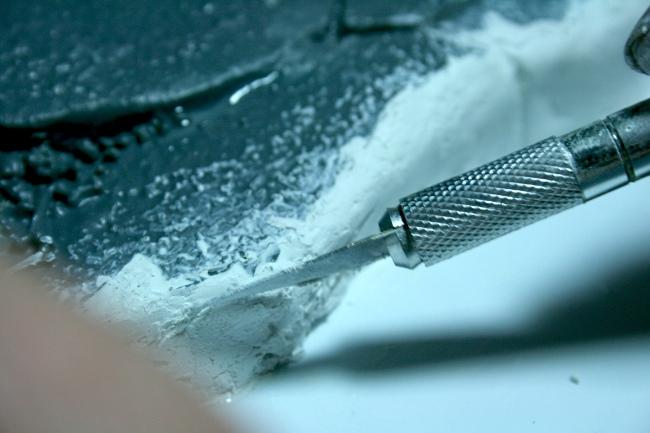
Milliput is great stuff. It’s gummy and and can be sculpted, it smooths easily with water, can be textured to look like stone or brick, and sets extremely hard.
I finished blending the edges smooth and then filled the bottom with Squadron white putty. I didn’t try to blend the bottom perfectly, since it would all be textured and then painted and submerged under “liquid”. While this area set up solid I started working on building up the other areas of the board.
Some of the slope needed to be built up a little to accommodate the bridge and the look of the ruins and to provide some unique dimension. This was done with a combination of Sculpy, Milliput and resin accessories.
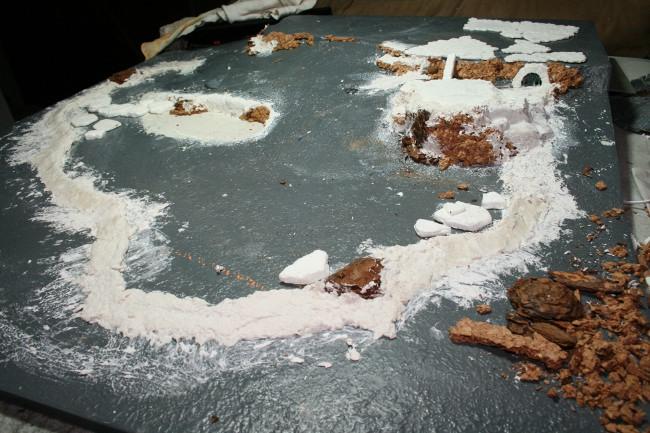
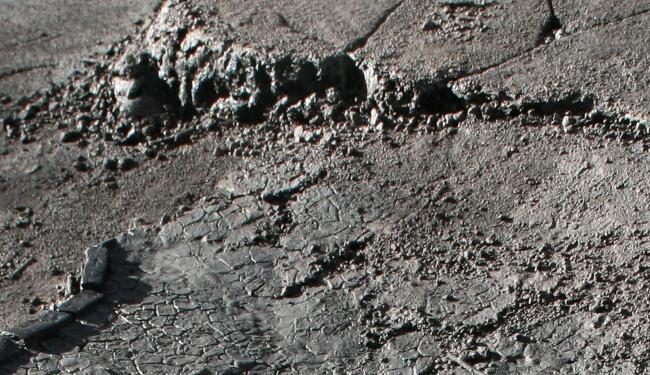
Another feature we’re adding to all of these boards is the rocky cliff faces. Don’t get me wrong, the GW boards are very nicely detailed, but the cliff faces are smooth enough that if they were real you could slide on them. In order to stand apart and look suitably dangerous for a chaos-scape, I wanted to make the exposed rock look sharp, detailed and realistic. Cork and bark bits together look exactly like sharply weathered, and perhaps earthquake shattered strata. This is a look I’ll make as a theme across the boards.
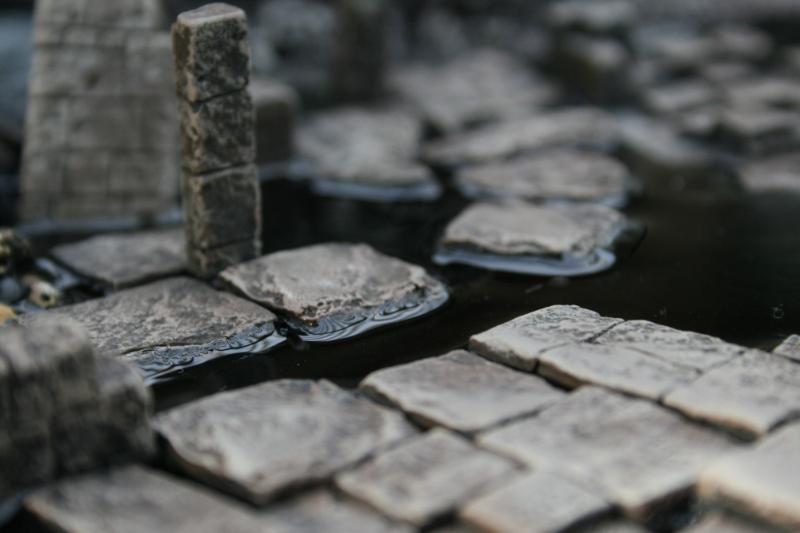
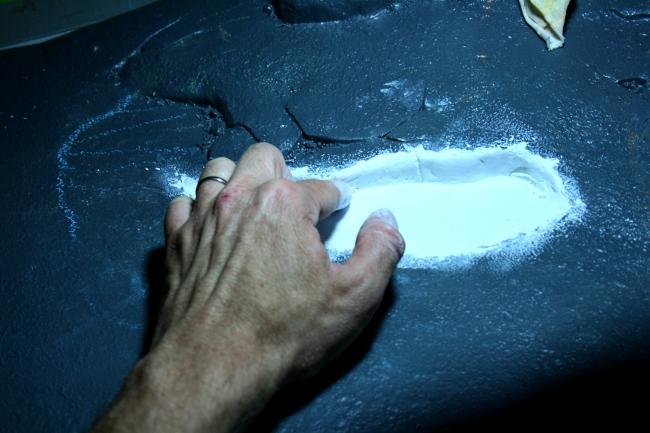
Next I wanted to define the “shore” of the pool, which has to have raised edges to contain the resin liquid we’ll be pouring at the end.
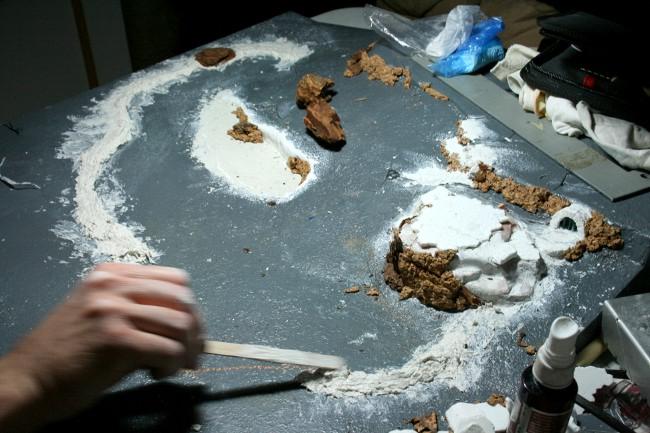
This is basically plaster powder and paper-pulp that you just add water to, I won't mention the brand, because honestly the label wore off the bag. I have a ton of it and have been looking for good applications for the stuff.
I shaped the edges and added a few chunks of bark to look like boulders and keep it from looking so much like a crater. Now, some of you might be wincing and shaking your head still at the prospect of using plaster.
This would be a good time to mention issues of material compatibility. I’ve been involved in some heated debates around here when I notice one of the other artists trying to use materials that don’t bond or react badly together, such as PVA glue and plasticard, or spray paint on styrofoam, or nylon with just about anything else. I speak from a lot of experience and melted heaps of plastic on this matter.
So that being said, the plaster I slathered onto these boards will not stick to the styrene. Plaster has great compression strength but zero flexibility, and as a result, when the board is picked up and bent even slightly, all the dry plaster pieces release from the slick plastic like an egg off a Teflon skillet.
See? comes right off. Fortunately, I knew this ahead of time, and counted on it. I wanted to make the shore hard, lightweight and not have to use 4 boxes of milliput on this single board. I broke the larger pieces up after they had dried fully and pushed them aside, to be securely glued down with epoxy later. On to the next step.
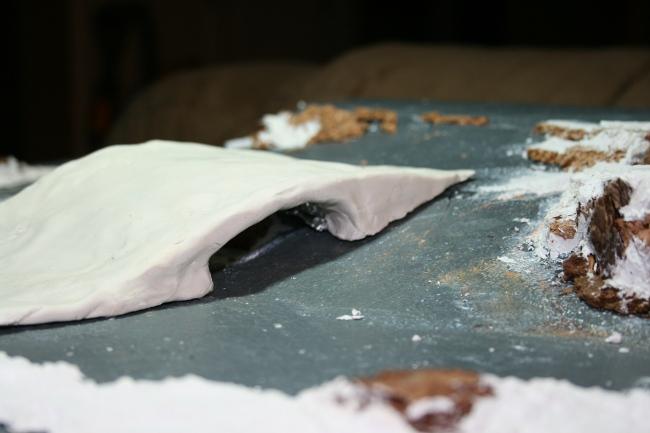
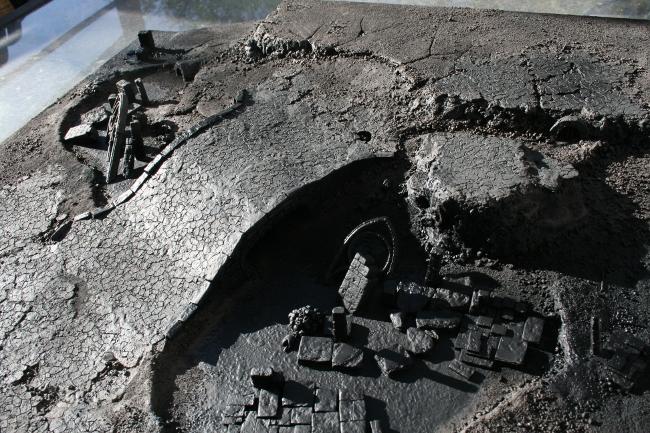
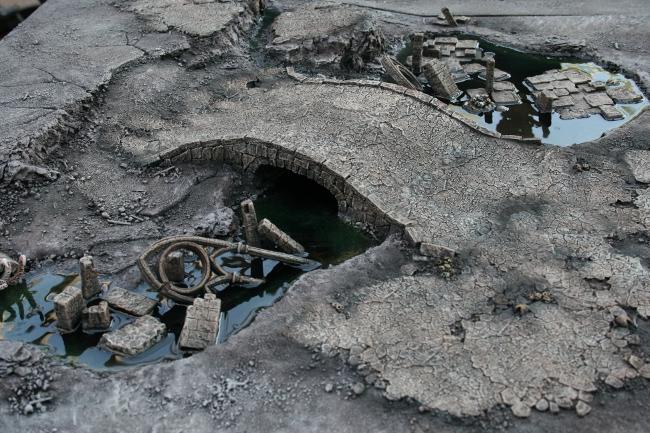
This board had a big ol’ pool planned, but I wanted to maintain accessibility while adding something really eye-catching, so I started work on the stone bridge. I shaped the basic form out of a thick layer of Polymer clay over a framework made from aluminum foil and chopped up soda cans. At this point I spent a lot of time on the logistics of placement, paying special attention to the position of the other battleboards when stacked. I didn’t want the weight of the other pieces resting squarely on the bridge arch.
I also wanted to make sure this bridge would be wide enough to move squads and vehicles over, so extended the sides a couple times until a Leman Russ could pass over comfortably. I still haven’t glued the plaster shore pieces down yet, only placed them loosely to check the overall layout.
I made sure it was wide enough to move vehicles over. After deciding on the position, I carefully lifted the bridge and baked it hard, using another aluminum scaffold to help it maintain shape while cooking.
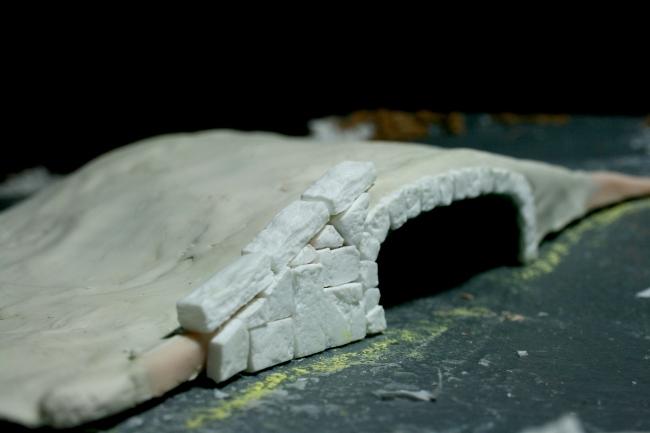
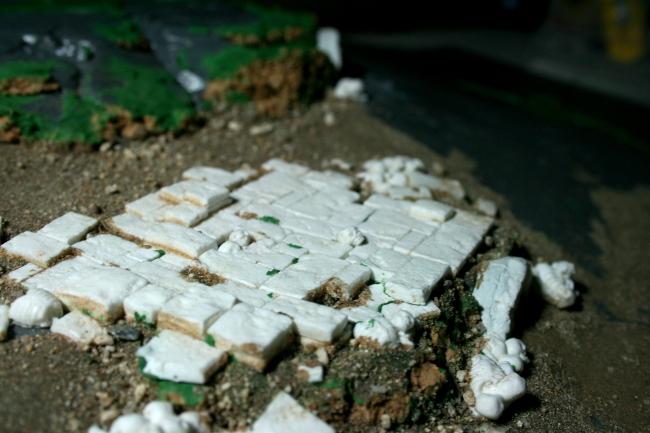
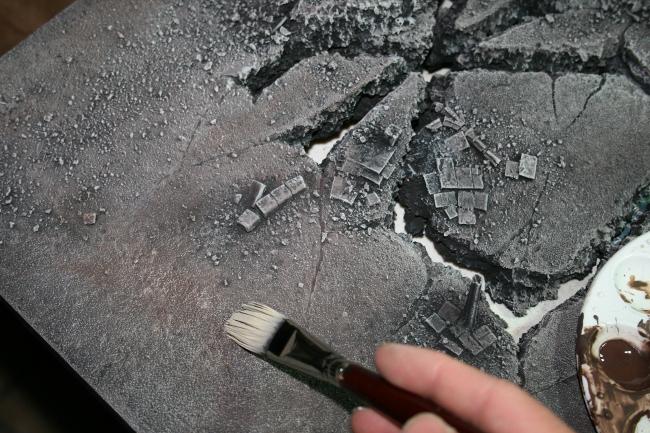
I couldn’t glue the bridge down yet either, because I knew what a hassle it would be to try to texture and paint beneath it later. I just settled it into position and got to work trimming, clipping and fitting resin cast pavers and bricks to glue over the bridge.
Lots of bricks.
Lots and lots of bricks.
clipping, cutting, trimming.
Chewing, gnashing, growling.
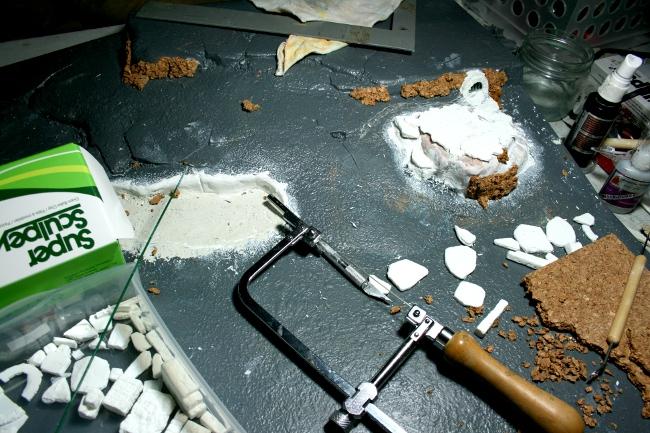
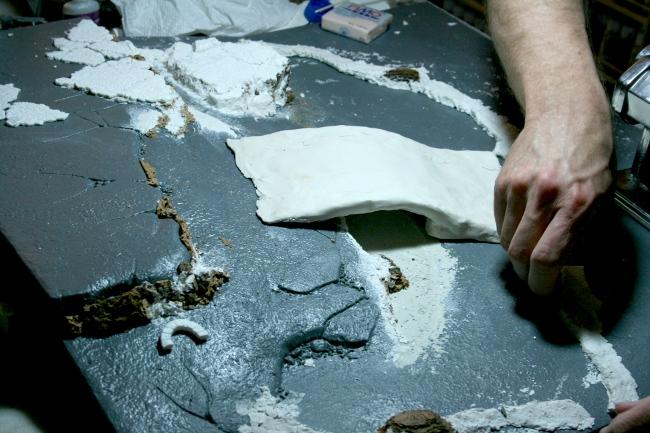
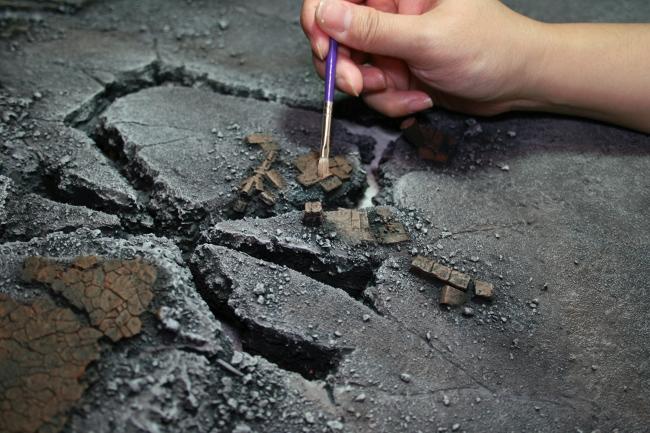
Well, that was tedious, but at least I had made some of the paver sheets interlocking for the top of the bridge. Next I had to mortar the gaps with milliput, smoothing over the seams between pavers and then sculpting in details to keep the pattern continuous.
By the time the bridge was finished, it had a layers of squadron putty, followed by a layer of hard resin cast cobblestones, followed by milliput epoxy putty gluing everything together. The underside of the arch was sculpted entirely in Green Stuff epoxy putty. I could probably stand on this thing.
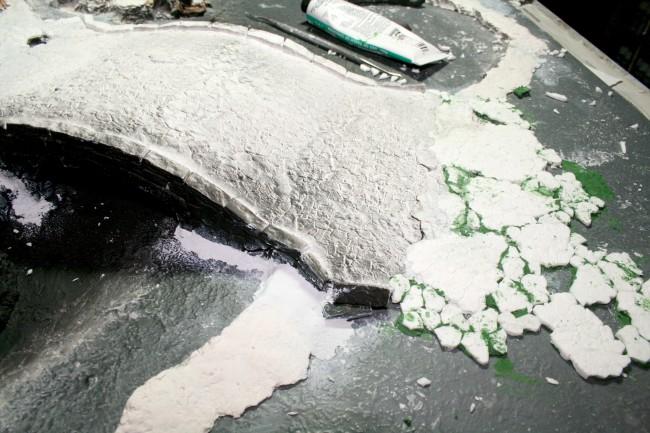
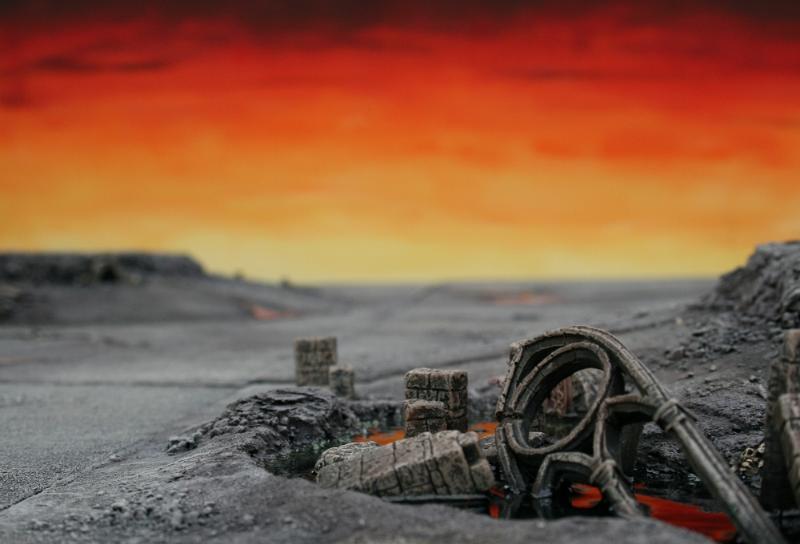
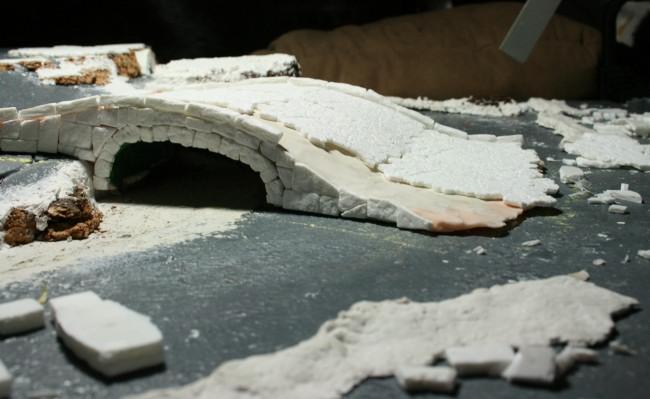
Now I finally glued down the shoreline, glued sand texture under the bridge where the water will flow, primed the inside areas of the arch black and started using filler and pieces of cobblestone sections to blend the bridge into the surrounding landscape. I used milliput extensively to fill gaps and bond the pieces to the board securely. I ran out of white squadron putty and opened up a case of green. Squadron green has a finer grain, but since all the board will be textured and made to look like dirt, foliage and horrible little chaos details, it wouldn’t make any noticeable difference.
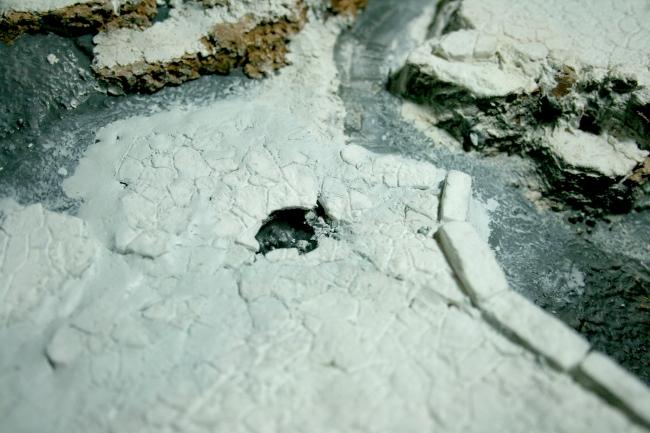
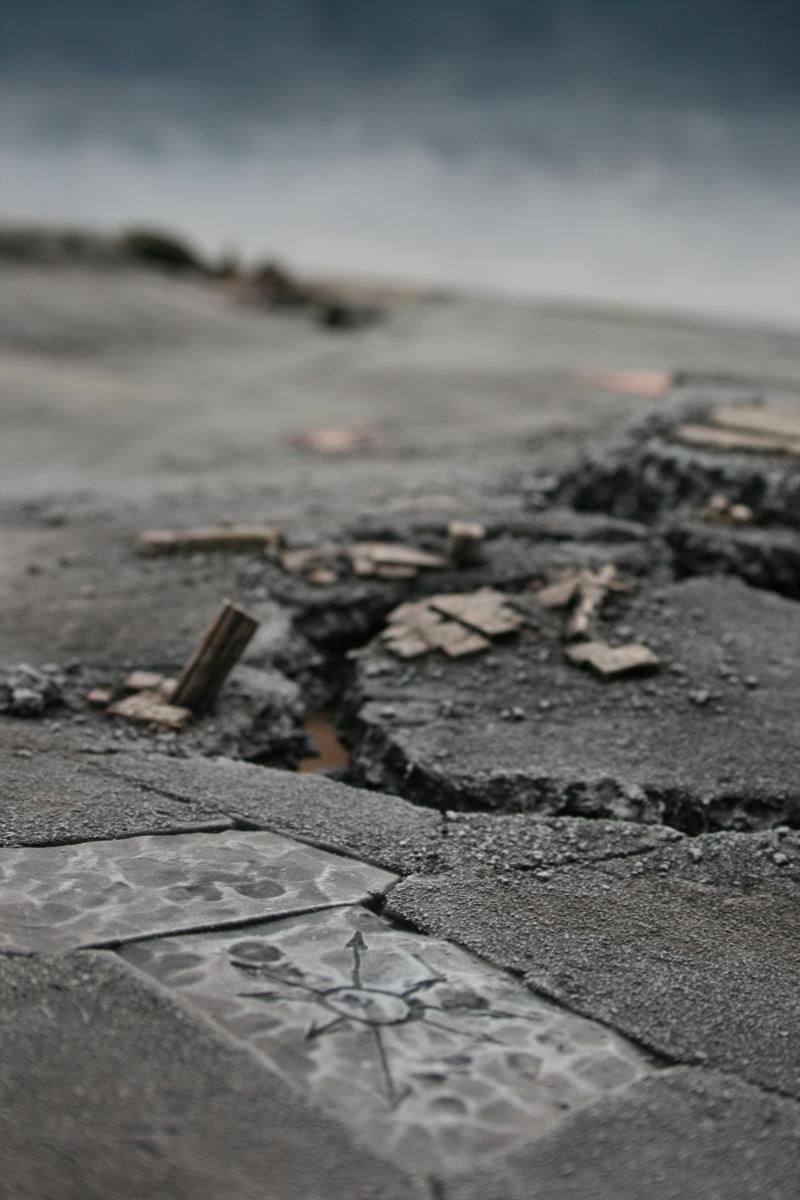
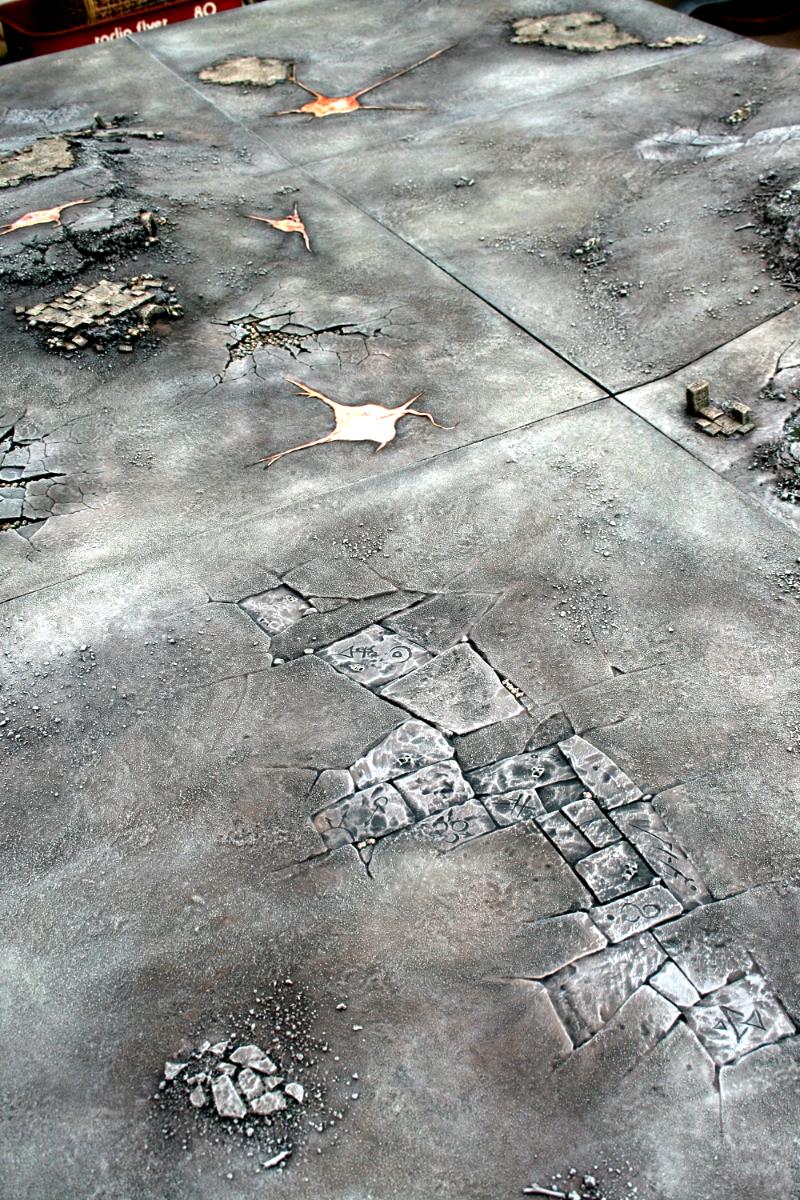
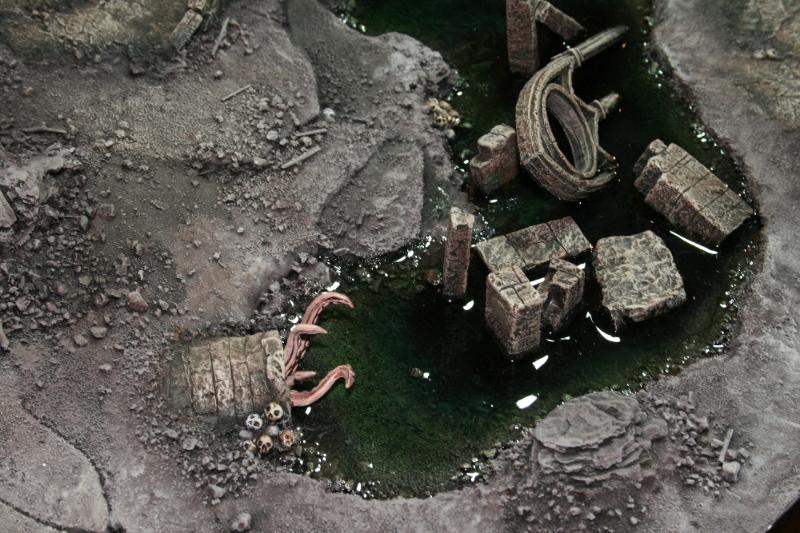
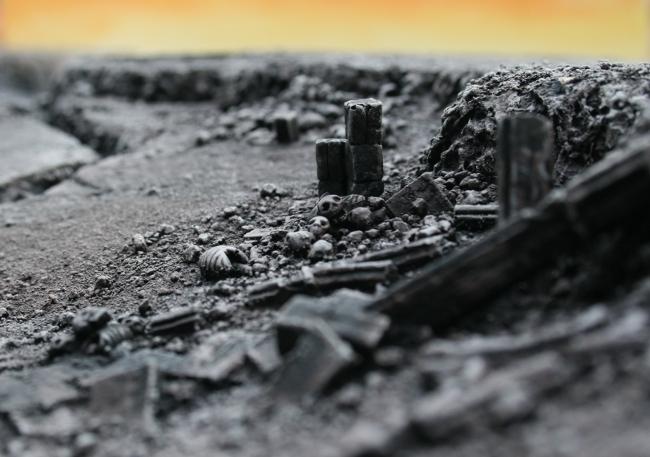
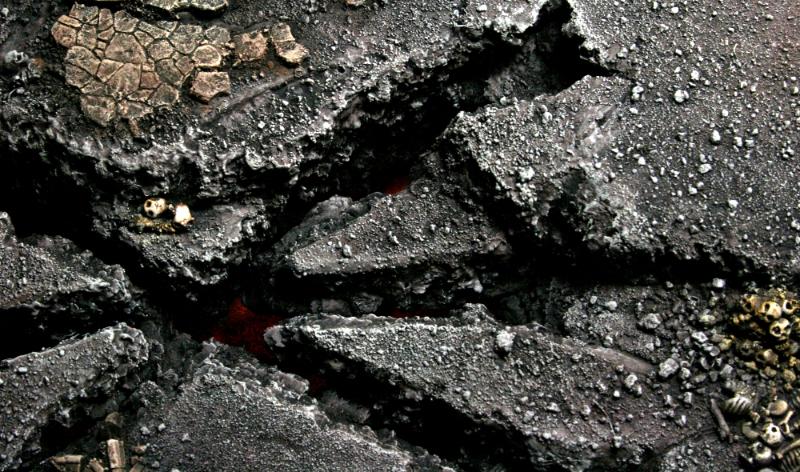
I left a little gap in the upper area of the cobblestones, keeping some of the board-sculpted details intact. The end product will look like a pothole with skulls inside. This is the kind of detail that will carry through all the boards in this project.
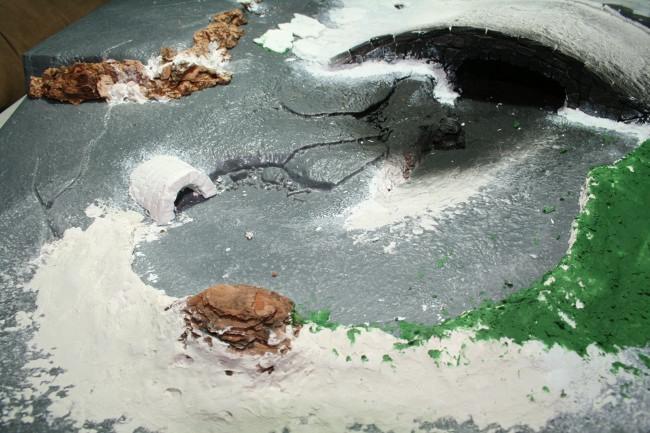
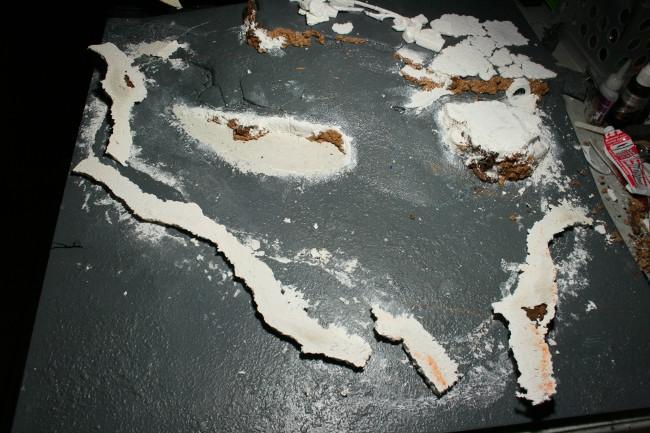
I sanded down the plaster shoreline and then used the same combination of milliput/squadron putty to smooth the edges. While that set, I started working on the second culvert. I didn’t put the bars in this culvert, because I plan on this one being “occupied”. More on that later.
With the shoreline smoothed and finished, the bridge glued down and the cliff-faces textured and detailed, I was just about done with the major portions of this board.
I added more cobblestones around the bridge, bringing the ground area up almost level with the shoreline in places, which would help the effect a lot. I added resin cast skulls and bones everywhere I could, tucked into cracks, beside culverts, at the shore edge, Etc.
I use a 30 minute, 2-part epoxy glue as the base for my texturing process. Nothing else would really have the hold between the plastic and the sand that I’ll be using. I cover the board in small areas at a time so that I can work the epoxy into all of the board’s pre-cast textures and other gaps.
I work in small areas, laying down glue, followed by areas of loose rocks and “boulders” represented by coarse gravel, and then followed an even layer of fine grit, sifted sand. I work in small areas also because 30 minutes is not enough time to get even a 10th of the board textured at a time.
After a few areas of glue and sand, the board is starting to look less like a threatening chaos-scape and more like a soft, sandy beach. I have to explain frequently to dubious passer-by’s that what I’m doing is the textural equivalent of a coat of primer. After this layer is glued down with epoxy, I can use PVA glue and cyno glues to further texture and detail everything up.
When I make scenery, I follow the same principles that I would for figure painting, and I don’t feel that just because a project is supposed to be a large area of dirt, debris or foliage, that it should be an excuse to take shortcuts and not treat every square inch like it’s a real, living part of an over-all model. You start with a clean, even base coat or coat of "primer" to work on. Make sure that all gaps are filled, and that there’s nothing running outside the lines. Once your base tones are complete you begin to highlight, shade and detail.
In the case of this model, my pallet of highlights consists of different grades of sifted sand, from small pebbles all the way down to sand that’s been sifted through cheesecloth. Essentially fine dust. These go on in patches and in amorphous areas to look like outcroppings of crumbled stones, piles of debris that collect into corners and gaps in pavers, kicked by countless boots or blown by wind and rain, and areas of hardened mud. I also scatter a few tiny branches here and there, making sure any piece I use has girth and knots of proportionate scale of real fallen logs for 28mm miniatures.

I continued to work on textures, using watered down PVA glue to make sure everything was solidly attached to the epoxy sub-strata. After drying I shook off the loose excess and then brushed it with a toothbrush to make sure anything that was going to come off, came off now.
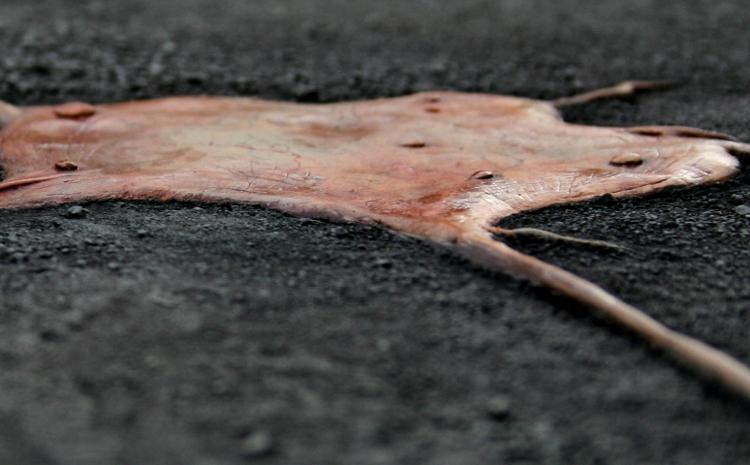
While those coats were drying, I used my time to work on the “occupant” for the lower culvert that I had mentioned earlier. For this I broke out the handy ol’ Green Stuff, some wire, cork and sculpting tools.
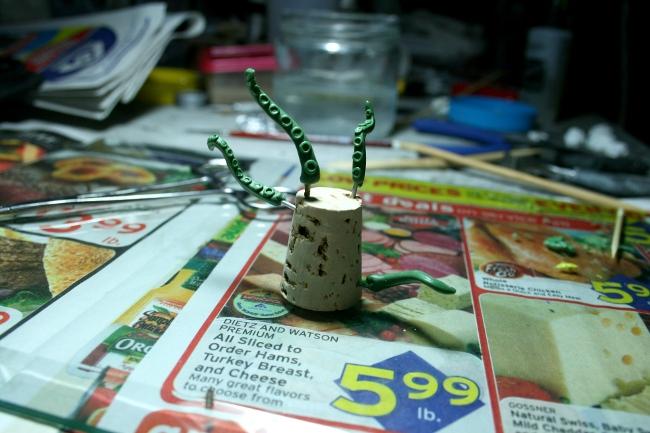
I shaped and smoothed the basic forms, using multiple passes from wooden tools with a lot of water lubrication, and let it harden for about about an hour then added the suckers.
Hey, that’s still too expensive for sliced ham. I get it for half that price at my deli.
Back to the board. From here I had a couple of final decisions to make. I had a few various ideas for what I wanted inside the liquid pools, some ideas were scrapped for being too bland (simple stepping stones to get across) to being too impractical (massive clockwork fortress rising from the depths) but in the end I decided to find a nice balance and make the feeling of some sunken ruins that would still allow figure access and playability.

I glued a few resin ruins and part of a gothic arch into place. All the time, I continue to pay careful attention to how the boards will stack together when stored. So far this whole board fits neatly even after all these modifications.
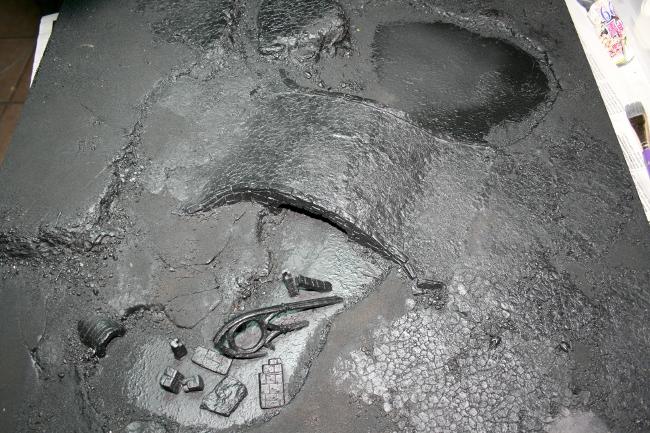
Since there was no reason not to, and I was getting a little excited, I went ahead and primed the whole thing flat black. I had a few more ruins to add, but I wanted to make sure everything was looking how I had planned it. I wanted to see how the textures and shapes looked before I got any deeper into this project.
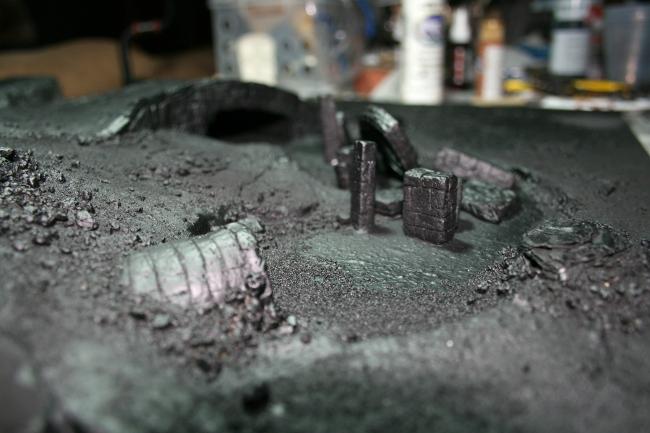
The verdict was in: Perfect. I ran a little ahead of myself and even started base-coating the ground a little, already trying to imagine what colors I’ll use together.
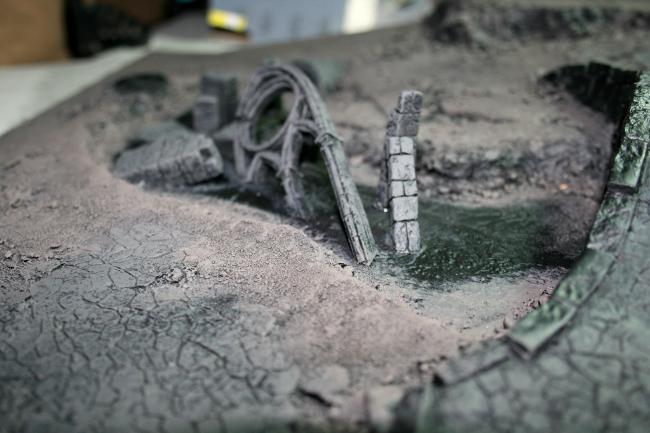
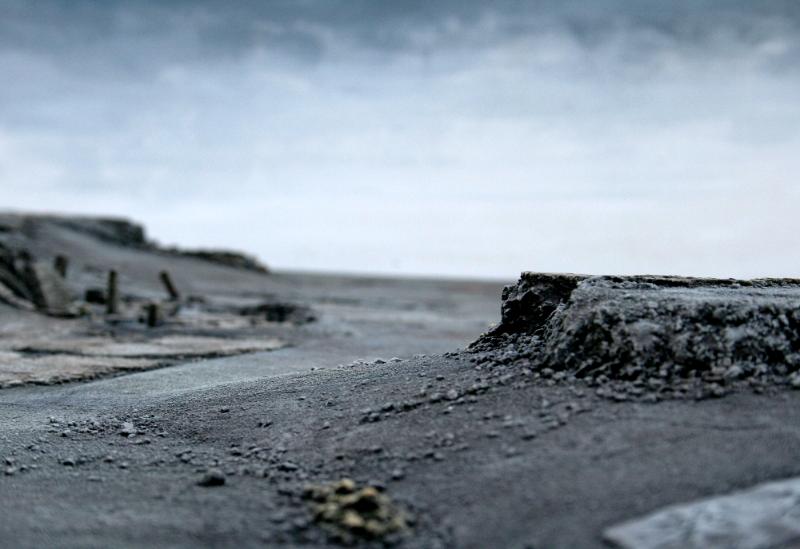
The textures picked up color perfectly, so now I was going to glue in the final pieces of ruins, both in the pools and some outside of the pools. A few more blasts of primer and this piece was nearly finished except for paints and resin. With the sun setting after another quick round of spray primer, I snapped a couple pictures of the details and rocks in natural light.
You can almost hear the wind howling and feel the glaring heat baking down on your skin. Wait, I really am out in the desert, those sensations are real.
Looking pretty good and it’s not even painted yet.
I held off painting any further though, because I wanted to paint them together so that the colors would match between them. So now it was time to set this guy aside and start another piece. That’s it for now, tune in for the next part where we’ll get another board or two finished up.
17349
Post by: SilverMK2
That is ass-kickingly cool.
Though I could have done without seeing you take a bath with the boards (it was still entertaining  )
24691
Post by: MasterDRD
Um... wow. Still trying to find words... Nice work. I'll come back when my brain isn't as fried...
24411
Post by: -=Scar=-
:O Makes me want to join your group... Come to australia
7107
Post by: Tek
What a log! This is looking sweet man, can't wait for updates
6806
Post by: Gavin Thorne
Just read this with the morning coffee after seeing it on the dakka homepage and have to say that besides waking up to my beautiful wife, it's a great way to start the day! Words cannot express how impressed I am with what you've done to the (IMO) rather plain RoB boards...
Kudos to you and your team!
4514
Post by: Myrthe
That is beautiful !! What a great blog of the process and the techniques (cork and bark ... whooda thunk it ?!) !!
Just one detail you left out ... what is the best scented bubbly bath to clean demolding agents from plastic ?
21170
Post by: Klawz
Amazing! Your client sure is getting their money's worth (I think, I don't know how much you charged)
23050
Post by: Terraformer
Myrthe wrote:
Just one detail you left out ... what is the best scented bubbly bath to clean demolding agents from plastic ?
Lavender.
20079
Post by: Gorechild
Wow, that looks awesome!
Really looking forward to the next update 
19122
Post by: kanelom
so much talent. Looks straight out of a movie scene.
14392
Post by: nerdfest09
GAH! this stuff is AMAZING! I just choked on my own spit in excitement!
25926
Post by: Cutthroatcure
Can we have some more Bath and Boards shots please...JK JK
But no man this stuff is really really professional grade and I commend you for your awesome work..Congrats!
17710
Post by: Yggdrasil
Terraformer wrote:
Well, that was tedious, but at least I had made some of the paver sheets interlocking for the top of the bridge. Next I had to mortar the gaps with milliput, smoothing over the seams between pavers and then sculpting in details to keep the pattern continuous.
Erh... Let me see... What did I read at first  ???
Terraformer wrote:Well, that was tedious
THAT WAS... TEDIOUS?!? I guess that the strongest understatement ever. Full stop.
Astonishing, at the very least!!!
Terraformer wrote:
You can almost hear the wind howling and feel the glaring heat baking down on your skin.
It almost looks like a REAL landscape, no wonder you can hear the wind....
These two minor comments to say that's truly awesome!!!
30050
Post by: indiana1000
Wow!!!!!!! This board ive seen Ever! Ever!
17353
Post by: Cosmic
Thanks a lot, Terraformer. Now I've got to search around for the pieces of my skull after my mind just exploded...
But seriously, the one word which describes this best is immense. Immensely insane, or immensely cool? Can't wait for the next parts!
BTW, did you spray prime all of that? How many cans of paint/aerosol paint did you get through?
16064
Post by: Tauzor
Holy monkey nuts Terraformer , so thats how you make an entry to dakka..
Myword !
Excellent work !
30636
Post by: MRMUMMBLES
Thats amazing you mentalist!
30019
Post by: YmeLocSquirrel256
Yggdrasil wrote:Terraformer wrote:
Well, that was tedious, but at least I had made some of the paver sheets interlocking for the top of the bridge. Next I had to mortar the gaps with milliput, smoothing over the seams between pavers and then sculpting in details to keep the pattern continuous.
Erh... Let me see... What did I read at first ???
Terraformer wrote:Well, that was tedious
THAT WAS... TEDIOUS?!? I guess that the strongest understatement ever. Full stop.
He meant the chewing to make the paving on the bridge, not the result!
imho, your board, and modelling skills are excellent!
5386
Post by: sennacherib
You are doing a great job. I have to ask why you didnt just build the whole thing from scratch instead of just using th Hyper expensive GW board as a base.
16217
Post by: Scrazza
this is gonna be an amazing board after this is ready
31707
Post by: Captain Damian
This is insane! Can't wait to see it finished!  Keep it up!
17808
Post by: oadie
Oh. Mah. Gawd.
Beautiful. I don't think I could put that much effort and detail into a diorama the size of a paper plate, and you're doing it to an entire 6'x4' gaming board?
This is in the running for most impressive plog I've ever seen. Subscribed faster than a really quick thing finishes a very short task.
25081
Post by: Lysenis
My god man! You have my heart racing in excitement over the details put into this project. Simply amazing!
I may have to get a Tyranid version done from you. . .
963
Post by: Mannahnin
Great stuff! Making me want to finally work on the RoB board I won more than a year ago...
23050
Post by: Terraformer
Cosmic wrote: BTW, did you spray prime all of that? How many cans of paint/aerosol paint did you get through?
I estimate I actually went through about 6 - 8 cans of primer, counting a couple of incidents of using the wrong brand with poor coverage, as well as having to strip and re-prime some resin areas and other minor setbacks.
sennacherib wrote:You are doing a great job. I have to ask why you didnt just build the whole thing from scratch instead of just using th Hyper expensive GW board as a base.
My client had these boards shipped to us to work on. It did save me a little bit of time to already have a solid foundation to work on and not have to devise my own modular scheme.
oadie wrote: Beautiful. I don't think I could put that much effort and detail into a diorama the size of a paper plate, and you're doing it to an entire 6'x4' gaming board?
It really was a lot of area to work on, more than I even anticipated, but we never back down from a challenge, and I did have help. If I had been working on it alone it would have been at least a year long project instead of the 5 - 6 months that it took.
I'm posting the next chapter now, and I'm happy to answer any questions!
25081
Post by: Lysenis
I asked a random collegue if the second to the last picture of Chapter 1 ( the one that has the feeling if the wind was howling) was real and she agreed.
That is how well done the 3T work is IMHO.
23050
Post by: Terraformer
Well, we're one board down, 5 to go!
It looked like a daunting effort, I was already sore from the last piece.
The good news is I had a pretty solid plan, and we weren’t building any more bridges or other really complicated concepts. Well, one more but we’ll get to that later.
I grabbed the next board and got to work.
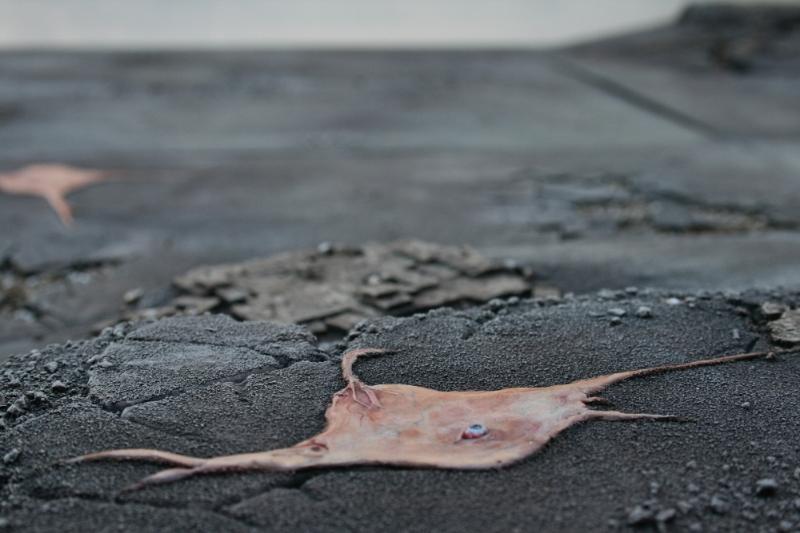
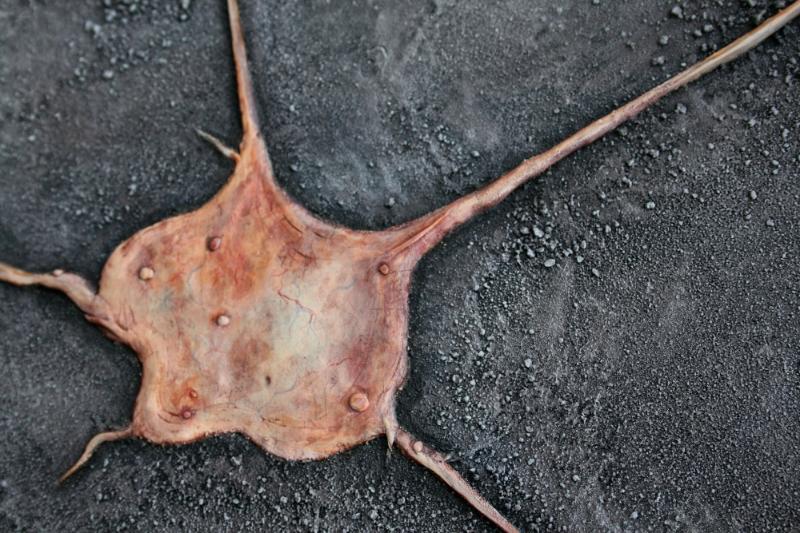
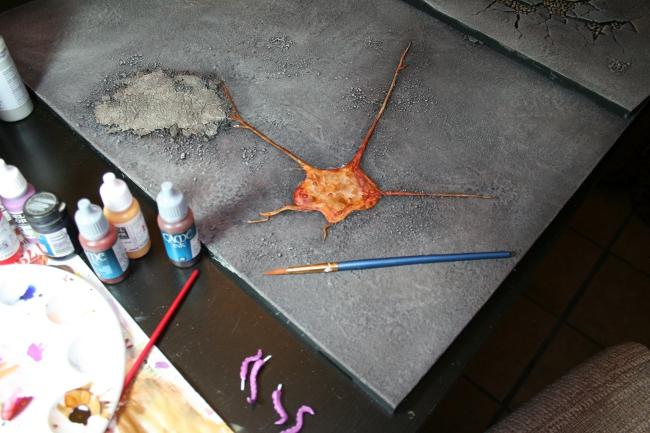
This was a flat piece, so it would go relatively smoothly. I didn’t want to make each piece elaborate, or there would be no place to put modular terrain, and it would take years to finish, but I did need to use some common elements to tie everything together, and for this one I needed a hint of ruins and skin. Skin? Yep, this was supposed to represent a world that was being overtaken by chaos, so there would likely be some disturbing elements laying around. I imagined Nurgle-ish infections in the ground might slowly start to develop and grow like fleshy blobs, so I wanted to sculpt a flat feature that looked as if it were spreading, and had the look of real skin.
My plan was to use Greenstuff and make a reverse impression by mushing a piece into real flesh to make something like a flesh-textured tool-tip. Now, who’s skin do I use? I approached MisMuse, my lead artist and designer, but for some reason she didn’t react well when I asked if I could rub my green stuff on her skin, so I just settled for the back of my own hand.
After curing for a few hours, I had a good sample of what my pores looked like for future archeologists.
The skin texturizer was just part of the process, I also sculpted deeper and more detailed creases and lines myself before rolling over it with my skin sample, well lubricated with water. An excellent tutorial for sculpting skin can be found here.
After smoothing everything out with some wooden tools dipped in water and adding a few blisters, warts, veins and tentacles, I had this lovely thing stuck to the board.
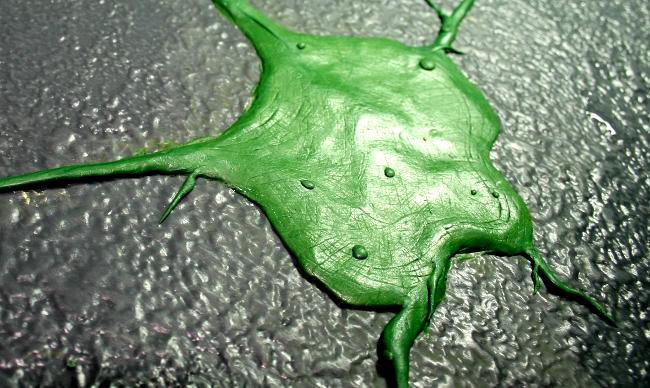
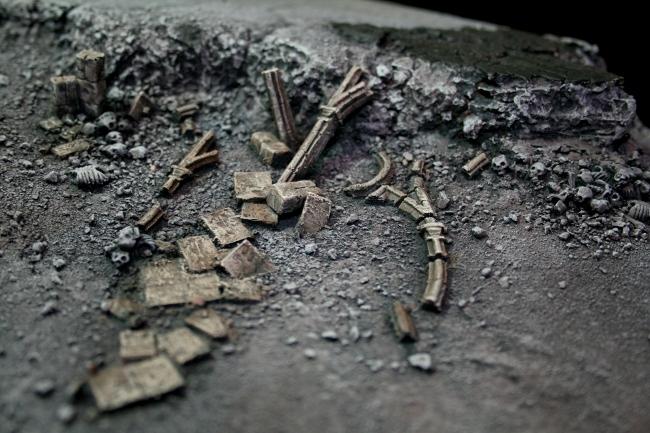
During this step, I made a very short pile of ruins and rubble nearby, so the fleshy thing could be grabbing onto something with one long “arm.” I cast more of the cobblestones from the previous board, along with some square pieces scattered around.
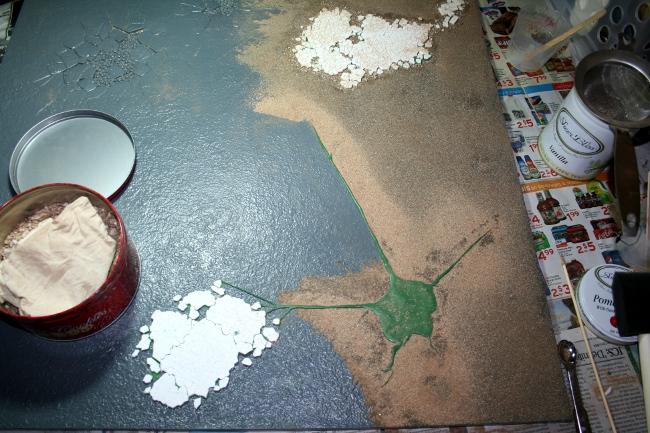
Again, restraining myself from creating the elaborate, complicated piece that told an epic story in my head, I added nothing else and began the texture work. The skulls in the pits worked fine as they were, no need to mess with a good thing, I just carefully applied epoxy around the cracks before sprinkling on my multi-step texture process. I used the same technique as before- first dropping a few clumps here and there of plain old yard gravel and dirt of various sizes and grit and plant fibers and roots and sticks, this is followed by an even coating of sifted riverbed sand, and then after the epoxy sets, scattered areas of super-fine dust with watered down PVA glue. After drying thoroughly, I sprayed black primer over the whole thing, but masked off the Fleshie, because I didn’t want to lose the detail under the heavy-duty primer I was using for the rest of the board. Later, I used Tamya brush-on primer and finished the base coats on the Fleshie.
Vallejo flat red mixed with purple and saddle brown went into the base color, I expected this would give it a warm tone, like irritated, rashy skin around the visible parts of the underside. I touched up the areas of the board that were masked off by hand, then set the whole board aside. That was as much as could be done at this point.
I grabbed the next piece and started the same way.
This piece would tie in with the previous one in the same way, with ruins and Fleshies (that term evolved pretty fast.) This was basically a repeat of the previous board, but with more of everything. I’ll fast-forward through all the tedious detail right to where things start to come together.
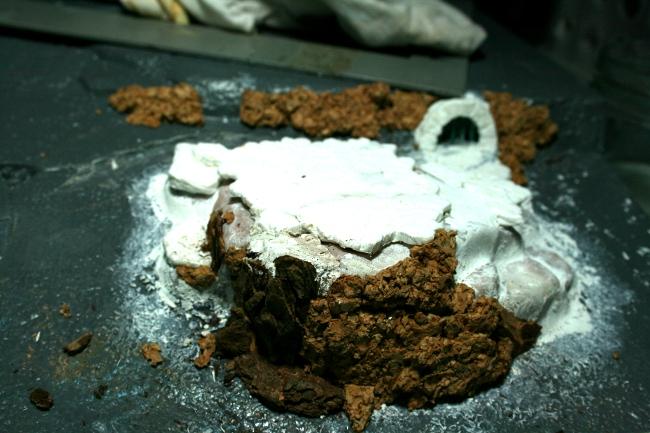
Using the same technique from the first board, I glued cork over the cliff-faces, and blended it in with green Squadron putty and a little milliput in places where it needed more adhesion. This would continue the jagged, destroyed-by-the-elements theme.
There was a small projected hill on this board which I glued pieces of square pavers over to look like the foundations of a structure. After the addition of a couple “dry” culverts, 3 more Fleshies. and a few piles of scattered skulls and bones, I textured the board like before. It should be noted that I discovered by this time that you can thin 2-part epoxy with Acetone. Not wimpy nail polish remover either, but the kind you get in a hardware store in a metal can. In slows the curing time dramatically, which helps when you’re working a large area, but best of all, allows you to spread the epoxy with a brush into all the corners and crevices, just like if you were using watered down PVA glue.
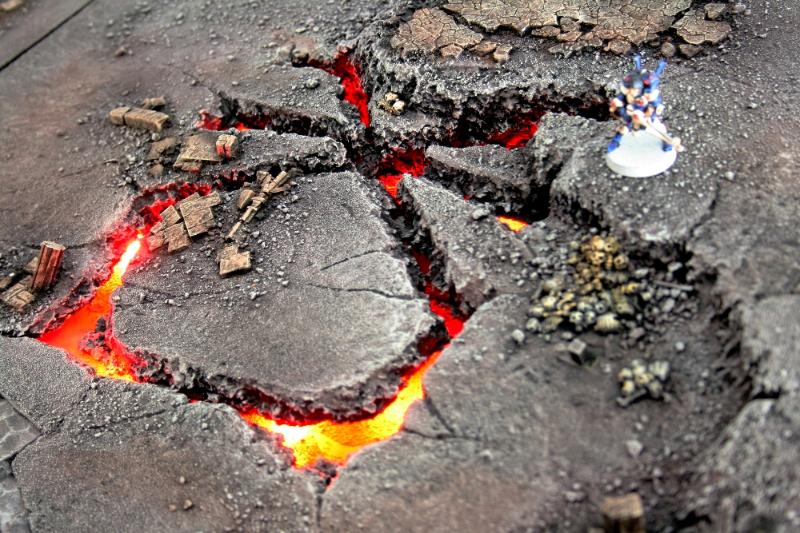
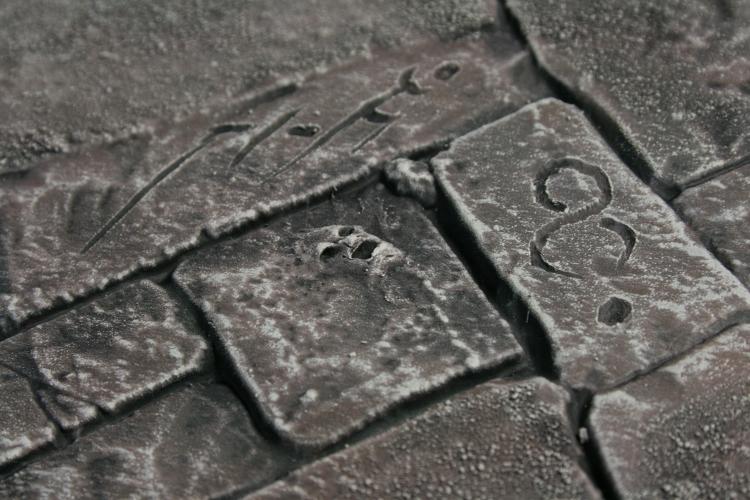
The next piece, which I failed to get a "before" picture of, was another mountain board. The distinguishing characteristic of this one was the odd, squarish blocky rocks embedded in the ground leading up the path to the plateau area. I wanted to incorporate as much of the board features as possible. so I decided to use these blocks as cursed, rune etched representations of the chaos that was infecting the very ground and splitting the world apart. Basically it was time to carve some creepy stuff.
I did a few Internet searches for arcane looking runes, and found inspiration in this set of alchemy symbols I found on a strange website about Native American Aliens and eagles from outer space.
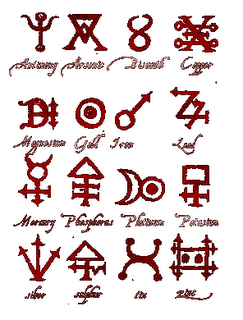
Using some of these patterns as a rough base, I sketched some symbols on the plastic and broke out Mr Dremel again.
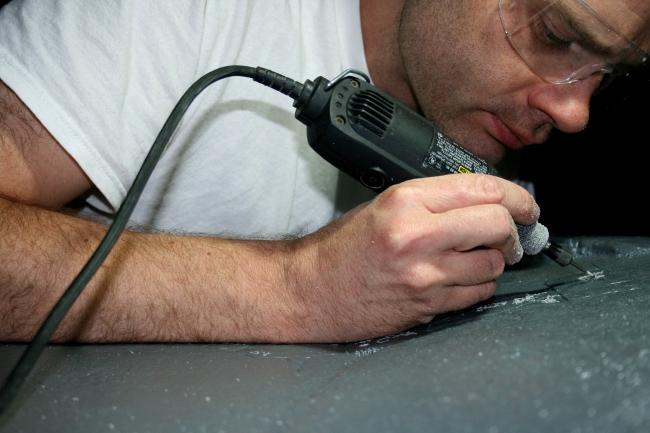
Using a VERY light touch, I used the edge of a routing bit to carve the symbols. Always wear safety glasses when using power tools. Look both ways before crossing the street. Call your mom once in a while.
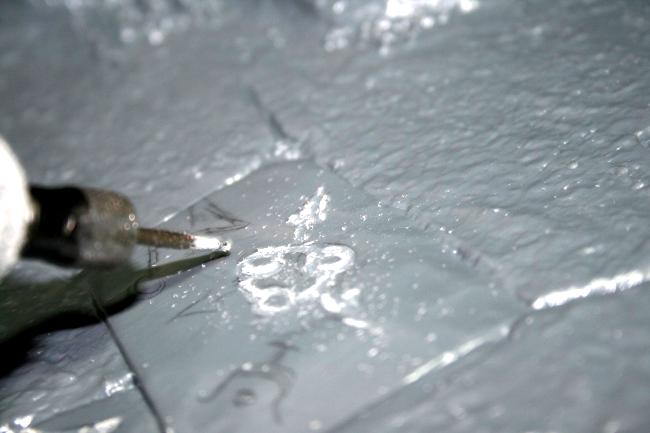
Some icons were slightly stylized versions of more well known evil lords of the Warp. Others were imagined, and I did wonder if they actually meant anything. I would hate to put some kind of curse on the board by accident. Dear Client, if players tend to get bad rolls on this board, you know why. The dremel tends to leave melted plastic shavings stuck to the edges, so after carving each rune had to be carefully trimmed with a hobby knife.
After carving the runes, I added cobblestones, skulls and applied cork and ground texture. In this picture you can see where it’s still damp from adding areas of super fine dust with PVA glue over the first layers of grit. After drying, I poured diluted PVA glue over everything one last time as well, to give strength to all the little stuck-on rocks, pebbles, plant parts, Etc.

Something seemed strange about the finished result and the runes that I couldn’t put my finger on. The more I stared at them, the more they seemed to be trying to show something… Maybe it was just my imagination.
I guess I was just getting closer to at least the halfway point and I was anxious to see this project finished. I was 4 boards down now and 2 to go. I had one flat board left, and one more mountain piece. I’ll break this update here and continue with the final push in the next chapter.
21353
Post by: aromasin
Dude... you scared the !*£$BED £(U"£$ out of me!!!
So instead of praising your, might I say ammazing working, you get an angry comment!
Hmph...
23400
Post by: Ma55ter_fett
I read the whole thing imagining that "The professor" from futurama was saying it, made it an even better read... if that is even possible.
23050
Post by: Terraformer
Ma55ter_fett wrote:I read the whole thing imagining that "The professor" from futurama was saying it, made it an even better read... if that is even possible.
I think this is wonderful.
17244
Post by: The Good Green
An amazing table of epic win! You put an inspirational amount of detail in all your work.
27220
Post by: NoToTheMan

and by lollipop i mean personal modeling lessons
19122
Post by: kanelom
yeah that flash/gif made me think i was crazy for a sec.. Staring at the screen forrr wayyy too long.
2776
Post by: Reecius
Holy gak, that is an amazing conversion you are cooking up there. Truly impressive. Keep the pictures and updates coming, please.
25617
Post by: Atode
Reiterating everyone who previously posted, very impressive work.
7107
Post by: Tek
I started thinking to myself "hang on a sec, how come this last image has really poor colour bandingOMG WTF IS THAT!!??"
Bastard. Loving the terrain layers idea. I started doing something similar, but nowhere near as nice as yours. I will be using this blog as a bit of inspiration for my own work going forwards.
30050
Post by: indiana1000
JEEEZ!!!!!!!!Y-yyou scared the life out of me! Especially the Gorilla!
15680
Post by: Ediin
Poor client, he will probably take that board without knowing the powers contained within...
And one night he will wake up to the sound of Space Eagles and Spaghetti Gods erupting out of the Warp Gate
created by his Realm of Battle Gameboard. And the World will be conquered and ruled for millenia by Sea otters and Dolphins!
Lo and Behold, Armageddon hath come!!
....
....
Sorry.
Seriously though, that board is ace.
19398
Post by: Tim the Biovore
Nice gif. I didn't think I was the only one who has demons living in his scenery...
23050
Post by: Terraformer
Ediin wrote:Poor client, he will probably take that board without knowing the powers contained within...
Knowing our good friend "Mr X" he is probably well aware of the dangers, and has some mad scheme to harness it for some nefarious plan.
Did I mention he sent us a package while we were working on his project?
Wavy-line dissolve into a flashback....

One day after returning from my daily rounds, I found something on our doorstep.
Odd, I wasn't expecting a delivery.

A quick shake and I determined that it was not in fact legos. I always shake a box to confirm or eliminate that possibility right away.
I quickly brought it inside and went to work. I noticed that the postage label said it was from “somewhere in the pacific”. Could this be a token of goodwill from the mysterious Mr X?

Yes! Oh glorious day! The box was packed to the brim with delectable treats, exotic chocolates, and most beautiful of all, that sweet, delicious nectar of the Gods, COFFEE! The chocolate macadamia nuts began to vaporize the moment they were brought inside, within minutes the first layer was decimated. But I had my eye on that lovely Kona. We’ve been out of real coffee for weeks, and productivity was suffering for it!

Yes, this would truly be a treat.

I took the first mug to my office and sat back, tasting that lovely, rich blend, and prepared to write a thank you note to Mr X. Truly I felt grateful to receive such a rare gesture of… hmn, that is an odd after-taste. No matter, I won’t comp- URK! GHHAAACK! grjshghggjrrr……….././…..

17349
Post by: SilverMK2
Love your sense of humour, Terraformer.
20079
Post by: Gorechild
The board is looking amazing! that gif scared the hell out of me =P
looking forward to part 3
15680
Post by: Ediin
Terraformer wrote:Knowing our good friend "Mr X" he is probably well aware of the dangers, and has some mad scheme to harness it for some nefarious plan.
Emperor Damn it! He's allied with the Space Eagles!!
God help us. God help us all.
Blasphemy aside, that coffee sure looks tasty. Chocolate Macadamia Nuts.....
'' NOT Poison!!!! Definitely not!''
This thread is full of win.
One thing bothers me though: the spilled coffee in the last picture is white. Which probably means that the powder was white too.
And what did mommy tell us about white powder that has the word ''Poison'' written on the box?
19122
Post by: kanelom
Mommy said check the address to make sure it isn't from a country we're at war with cause it could be anthrax, everyone's favorite suspicious white powder.
25081
Post by: Lysenis
Macadamia nut coffee from Konna Coffee has a tendancy to be much lighter then normal versions of coffee. As well as tasing about 100 times better as well. Ahhh sweet times from Kona. . . .
10254
Post by: Golden Eyed Scout
The humor is what keeps me coming back to this thread. Keep it up.
30050
Post by: indiana1000
I like you sense of humour!
24060
Post by: PukeNut
Great stuff! Can't wait to see the finished boards.
25983
Post by: Jackal
The board its self is pure win.
Its well worth whatever price your going to charge for it.
The level of detail on it is something else.
I wouldnt have the heart to put a model on it unless it was something painted by vicky lamb.
To make this even better, your sense of humor is along the same level as your skill.
Great thread and im going to have to keep an eye on this.
Also, a MOD needs to sticky this thread to the top of the forums, that way everyone gets to admire it.
5723
Post by: Dez
AWESOME!
That's it. My feedback for the whole thread. Awesome. Except I mean it in it's truest essence, not 80's Radical way. Awesome.
17738
Post by: Briancj
Uhm, folks? He's DEAD. There will be no more updates!
Sad.
I hope MisMuse can carry on the project.
--B.
PS: Seriously? Poor tactical decision on the part of the client, killing the creator before their commission is complete. Maybe it wasn't the client, but someone jealous. Maybe it was sent by a Farseer, intent on stopping such a terrifying vision of a WARP SPAWNED HELL from reaching completion.
Will we ever know?
25081
Post by: Lysenis
All I have to say to the badassery in this thred is "Tears for the Tear Goddess!"
22192
Post by: whalemusic360
Awsome boards, sorry to see you have passed so young.
26416
Post by: Young_Logan
Awsome board!
4670
Post by: Wehrkind
Very nice work so far, so much so that the very idea of packing this up in anything other than a mega sized foam army transport bag sends tiny shivers of horror down my spine. I have to admit I am almost more curious to see how that could possibly resullt in anything other than heart break as I am to see the completed work of beauty.
15297
Post by: Ramos Asura
Absolutely legendary....
Teraformersurely a GOD of terrain building.
Pity that he was poisoned...
Hmm.... perhaps the sigils of the Warp he so painstakingly carved hold some power yet.
We need a Chaos sorcerer in here stat! Or at least some sort of Necromancer.
The spice must flowTHE CHAOS BOARD MUST FINISH!
7375
Post by: BrookM
Cor blimey colour me impressed. Not to mention amused.
13060
Post by: Sarrazon
You, sir, live up to your name. I commend your terrain building efforts, and cannot wait to see more. Also, keep up the humor, it gives this more life than just a simple blog.
23050
Post by: Terraformer

Good news everyone! I have another chapter to share with you!
In our last update, we finished detailing and applying texture to all but two boards, which we’ll now be finishing up. Of the two remaining pieces, one is a “mountain” style piece with no ramp access, and one is a simple flat board, with more of those block-like shapes stuck in the ground.
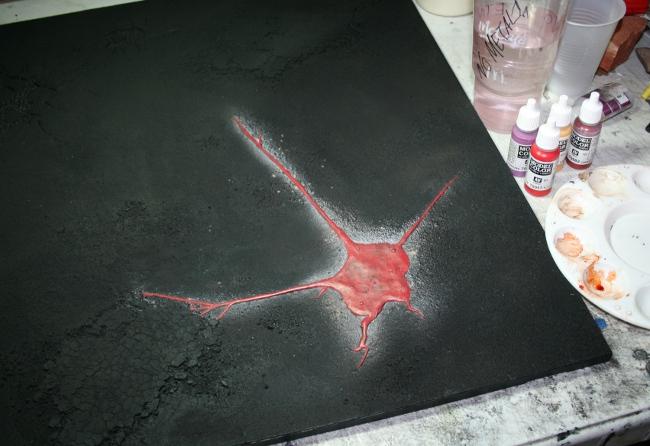
Our client discussed the possibility of adding a large Khorne icon to one board, and even mentioned the possibility of seeing it glow. Sounded like a good idea to me! I’ve done a handful of pieces with lights already, and it didn’t seem like a major problem, however there were some unique challenges to overcome. First of all, the flat areas of the boards wouldn't work because they have no room to carve out a rune and light it from underneath. I chose to make the rune on the slope of the mountain board, that way it would have room for lights, texture and of course a power supply underneath.
I looked up a few different versions of the Khorne icon then chose the one that could best be translated into glowing fissures. Then chose a spot that overlapped the cliff edge, in a way that would appear as if the rune dropped out from underneath the crust, with no regard for what the surface of the planet looked like. I drew the outline with chalk, making sure to keep the form just a little natural, with cracks spreading from the points.
Just to really make sure I was ready, I re-watched The Gate.

I realized a couple of things right away. 1. This movie is a lot scarier when you’re eleven and home alone at night out in the desert. 2. It didn’t really help with this project at all. But look at that cover! isn’t that awesome?
Getting back to work, I once more unsheathed Buzzweaver, my trusty dremel that adds +1 to all Eye Injury rolls.
The cutting job on this board was very difficult, much more than the other board. complicated by the fact that I had the center portion of the icon “floating” and was forced to keep some of the cross pieces intact to support it, while allowing a channel for the light to shine through, while still preserving enough of the lattice underneath to keep the board stable.
I put a plastic backing against the far end of the rune, which I glued with good ol’ melty melty style plastic model glue, held in place with clothespins while it set, making an effective weld between the board and the curved plastic sheets. Then I began to layer cork from the underside of the rune, tying the texture in with the cliff faces, and hopefully providing a deep texture for the light source to reflect off of.
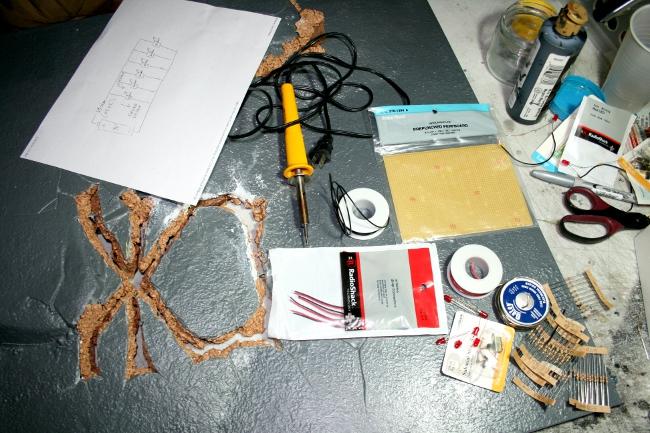
After a ludicrously long time placing bits of cork, sometimes with tweezers, I was ready to start with the actual lights. I got a pack of basic 1.7 volt red LEDs, a simple on/off switch, some assorted resistors and a 9v battery clip. Wiring LEDs is not terribly complicated, but there is a need for a resistor to keep the LEDs from burning out, and a great site that helps you put together a diagram is here.
As much as I wanted to make the lights pulse on and off slowly, I couldn’t find a cheap or simple alternative to using a micro-controller, which would have been time and cost prohibitive.
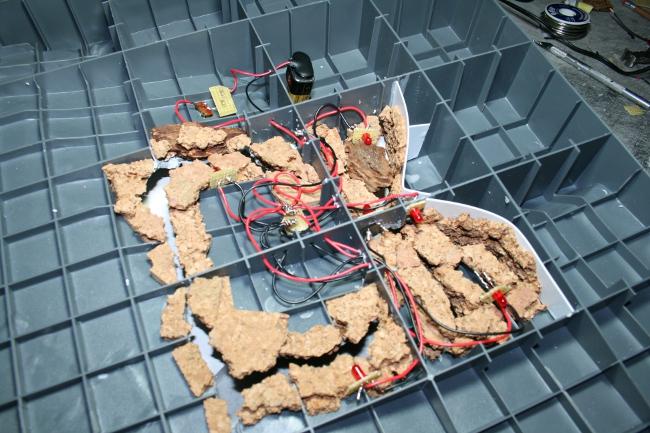
The underside wasn’t pretty, and steadily got less pretty as I added more wires and LEDs in parallel. I tucked the LEDs just out of sight from above, my plan was to illuminate the symbol with reflected light for a more eerie, baleful glow. My original plan called for 6 LEDS, and after a couple test, I quickly decided that I needed at least 9 for an even background illumination.The switch was attached through a hole off to the side of the symbol, and screwed into place. I thought about various things I could do to disguise the switch, but in the end, just a little putty around the edges and some drybrushing worked better than anything.

Job’s a good ‘un. Nothing smoking, no sparks. I did end up re-wiring the central junctions to be more secure, and covering the huge gobs of solder with electrical tape to prevent an accidental short. Now how does it look from the viewing side?
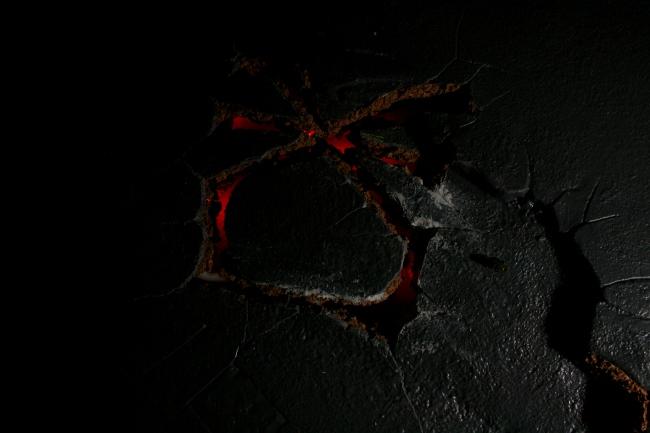
woohoo!
It was dark even with 9 LEDs because the background work-table was dark and absorbing much of the light. I planned on making a special lava-colored backing board later on that would reflect the light much better.
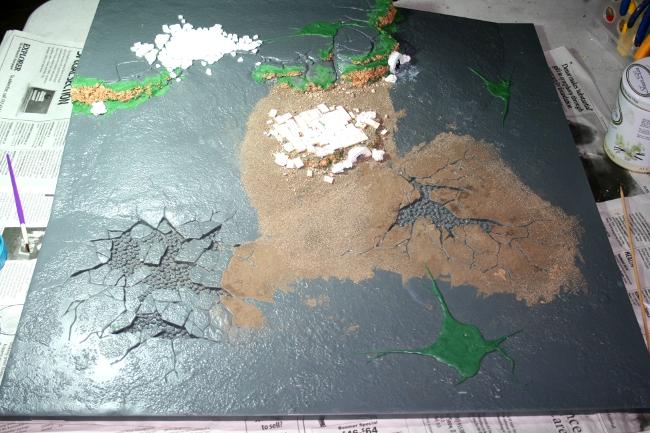
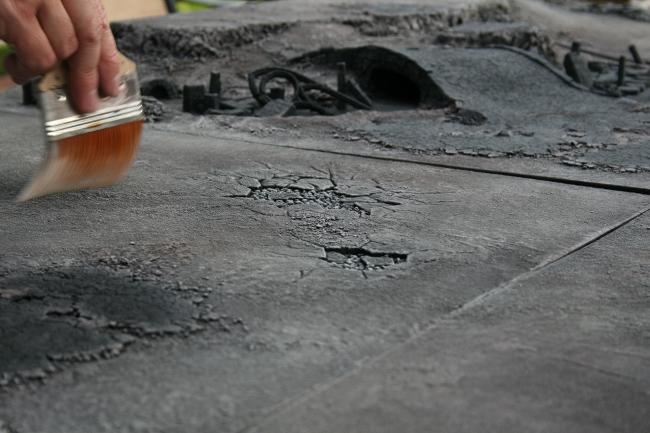
Now there were a few steps after this point that I ended up glossing over, because it was really just a lot more of what I did in the previous boards, hours upon hours of of blending with squadron putty, milliput, adding cork texture, crumbling ruins and the very last of my cobblestones before the mold became inexplicably brittle and gave out. Then texture and prime. The semi-finished product is up ahead.
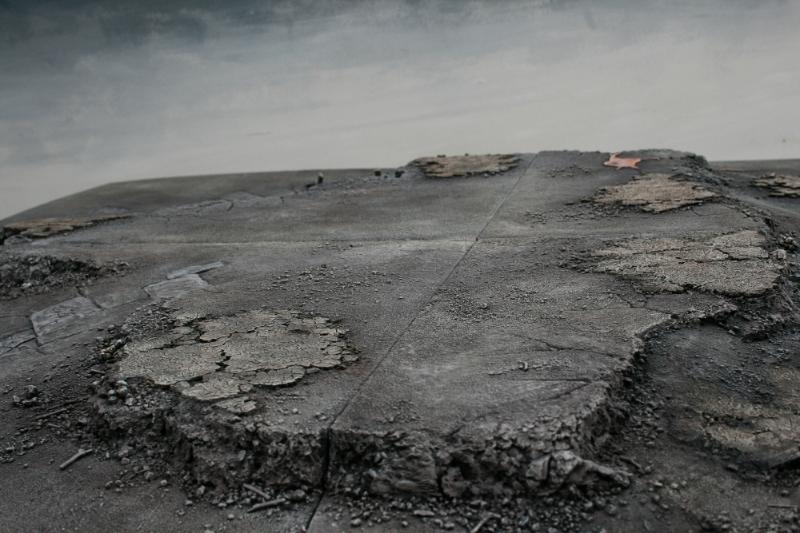
The end of the road was in sight, I just had one more, and thank God, no cliffs to cork over. This was a flat board with squarish rocks, so in the interest of keeping it simple but part of the theme, I sketched more enigmatic runes, and then using Green Stuff, sculpted a handful of ugly faces glaring from the rocks.
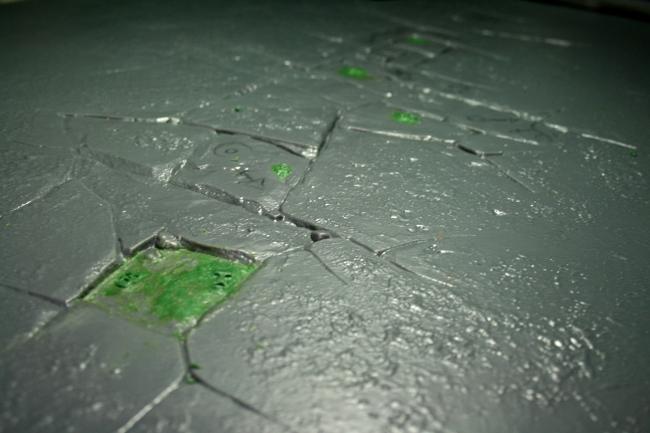
I blended the faces as smooth as possible with the background “rock” so that the finished effect would look like souls trapped in stone.
I etched out the runes again with a dremel, added pavers and fallen rubble, then epoxy, texture and DONE!!
Before the epoxy had even set, I placed it with the other boards to see how they look together, and promptly ran into a new obstacle. We didn’t have an indoor table clear enough or large enough to hold all 6 pieces! I went out the the patio! It was raining!
A spotty monsoon season became the next unexpected dilemma, and for the reset of the project we often ended up waiting out short storms before we could do any further work. (Later, we would also need to do painting outside while the boards were assembled together to make sure the colors were even in natural light.)
You can see the last board, still setting up before I can prime it. The other boards are primed, with some blotchy looking areas where I double and triple primed piles of rubble and resin bits and other parts that may become loose or scraped often while handled.
After months and months of slogging through these grey monsters, we were really about to start painting!
Astounding!

17349
Post by: SilverMK2
That is pretty damn epic. If I am ever so fortunate as to get a RoB board, I will be stealing pretty much everything in this blog - utterly awesome. As it is, I have plenty of inspiration to add things to my own home made board now Excellent work Edit: Just realised that I keep posting directly after your updates - I'm not stalking you, honest
26416
Post by: Young_Logan
Looking good, we going to get painted pictures now?
23050
Post by: Terraformer
SilverMK2 wrote:That is pretty damn epic.
If I am ever so fortunate as to get a RoB board, I will be stealing pretty much everything in this blog - utterly awesome.
As it is, I have plenty of inspiration to add things to my own home made board now
Excellent work
Edit: Just realised that I keep posting directly after your updates - I'm not stalking you, honest
I think it would be awesome to see more boards done in this style or even more fantastic designs, I really wish you the best and feel free to come to our blog and discuss your progress And it's okay about stalking, I have a saying that goes "stalkers can't stalk you if you're the stalkers stalking you."
Young_Logan wrote:Looking good, we going to get painted pictures now?
Soon, the board is done and I'm just re-posting these logs as I get a chance between working on current projects.
17349
Post by: SilverMK2
Terraformer wrote:I think it would be awesome to see more boards done in this style or even more fantastic designs, I really wish you the best and feel free to come to our blog and discuss your progress And it's okay about stalking, I have a saying that goes "stalkers can't stalk you if you're the stalkers stalking you."
Unless the stalker stalker is in turn just the stalkee in a stalker stalker stalker triple play
I have a WWI agri-world style board that I have been working on off and on for a while - currently in storage at the moment as I don't have room. I'm tempted to dig it out now and work on it, but my wife would probably shout at me if I did that... plus I already have way too many projects on the go 
Cna't wait to see the conclusion of your work (I'm resisting going in the gallery to have a look at the finished thing).
30050
Post by: indiana1000
Wow this board gets better and better! Can't wait to see more!
19445
Post by: Warboss Gutrip
This is beautiful.
In a scary, evil sort of way...
19122
Post by: kanelom
a really interesting approach i've never heard of ANYONE taking would be to do a cities of death board of Commoragh! The Dark Elf city in the webway. That would have some crazy conversion opportunities and be completely original.
27220
Post by: NoToTheMan
23050
Post by: Terraformer
Here we go, last push to completion. At this point all six boards are fully constructed, primed flat black, and lined up waiting to be brought to life. Er, barren un-life.
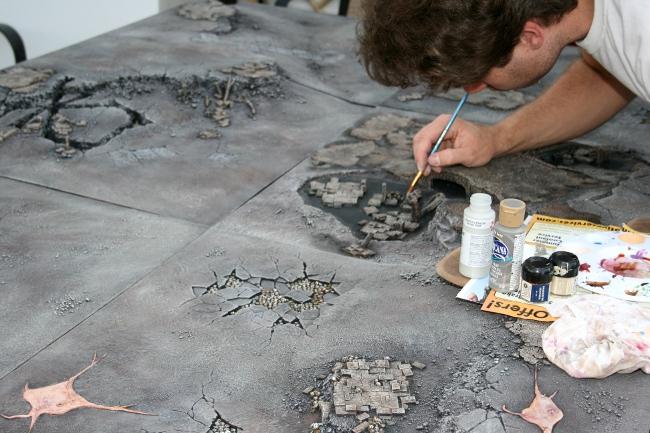
I started with the soil. I wanted the ground to have a warmth, even though it was essentially an ash-waste, so I started by applying liberal coatings and washes of burnt umber mixed with medium grey to all the ground and gravel areas with a 3″ golden nylon brush, the same exact brush I paint my figures with. ( ) I was really messy with this first coat, because it would be touched up later, and messy was good for a natural uniformity of color.
After some drying time, I added a lighter steel grey to the mix and brushed that on in circular motions to reduce streaks. This color was not as heavy as the first, but I still used a lot of paint. You can start to see the textures of the soils popping to life.
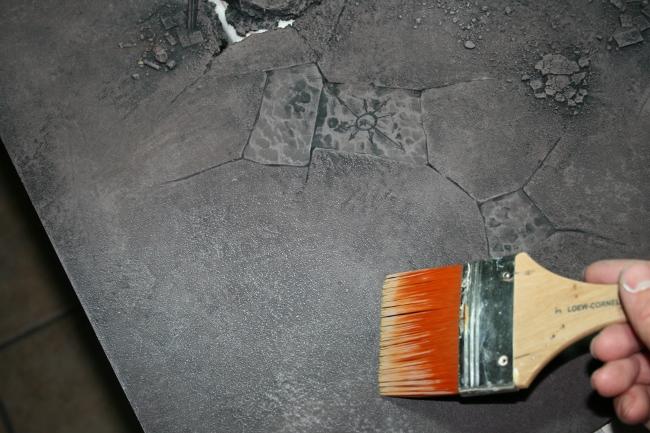
Again, working in a circular pattern, with a much dryer brush, I work in pure steel grey over all of the soil areas and rocks.
This makes a very uniform and rather unrealistic landscape, so in order to break up the large areas of unchanging color, I went back to burnt umber and applied washes in random, blotchy patterns across the boards, sometimes mixed with a little black, or grey.
After the burnt umber washes dried thoroughly, I then changed over to a pallet of warmer toned highlights, mudstone and sandstone, sometimes mixed with steel grey, applying these last highlights more carefully with a smaller, 1″ brush, again creating a varied, mottled feel to the landscape. I carefully highlighted the square stones, cliff faces and rubble piles the same way, sometimes with a much smaller brush for tighter control.
Between monsoon showers, I lined up all the boards outside under pure, natural light and made sure the “connecting” tones were even between the boards. This process was quite time consuming. (On some boards I had to re-wash or even totally re-blacken areas and repaint because somehow the colors grew too light and wouldn't fit with any other boards, on others, the base tones were too dark and had to be brought up, Etc.)
That’s it for the ground cover drybrushing, the overall effect was rather bleak, barren, scorched and blighted. Perfect really. Some people would call it done at this point and start lining up their armies. Not us. We had a lot of work to do still. Ruins to highlight in contrasting tones, skulls to paint individually, fleshy monsters to paint, toxic gunk pit to paint and pour.
Using all these multiple levels of drybrushing prevents the finished product from looking… well, drybrushed. If you do it right, you can achieve an effect that closely resembles airbrushing on some textures. But enough of how awesome I am. Lets turn it over to MisMuse's work. She was tag-teaming this with me, or I would still be working on it.
First we recolored all the ruin elements in pure black. This would give definition and clean colors.
We tried a handful of different color schemes for the ruins, blocks and cobblestones, but finally settled on a contrasting, warm toned, dirty sandstone look, which MisMuse achieved by bringing these elements up through asphaltum, light cinnamon and finally sandstone shades. While she wore her wrist out on the ruins, I started on the fleshies.
This was a crazy process I don’t fully remember, because skin tones are very subtle and complicated, and I was working a large area of different subtleties. Essentially it started with Vallejo dark flesh mixed with GW elf flesh over the whole thing, then shaded with flesh wash and sepia ink, then highlighted with flesh tones again, then mottled patches of purple ink/saddle brown to flow into the skin texture, then painting on veins and arteries visible through the skin. Lot of work, but the finished effect was rather creepy. Also I painted those tentacles from way back, light skin with purple washes, then highlighted and flesh washed.
The runes were looking great. Thank you MisMuse, for helping so much with this monstrous task, and thank you for taking pictures along the way and all that fantastic photography that you did so early in the morning even though “the light and shadows were all wrong, wrong!” And thank you for telling me that the first colors I chose for the ruins looked like “boring crap”. Yes, your opinion matters.
Skulls…. wow there were a lot. Most were base coated snakebite leather, and highlighted with snakebite/bleached bone, then some were washed with black ink, some were washed with sepia ink, then re-highlighted in shades of bone and/or grey. Some final highlights were added with bleached bone or grey mixed with white. This produces the effect of skulls in various states of decay or age. What, you didn’t think I was just going to drybrush them all white, did you?
Note that this is the only time in the whole project did I open a bottle of white paint, and it was still mixed with other colors and used only to highlight the cheekbones and foreheads of skulls. White is a very powerful "color" and should be handled with care. Every time someone drybrushes white paint on a model or terrain piece, somewhere a little bunny dies.
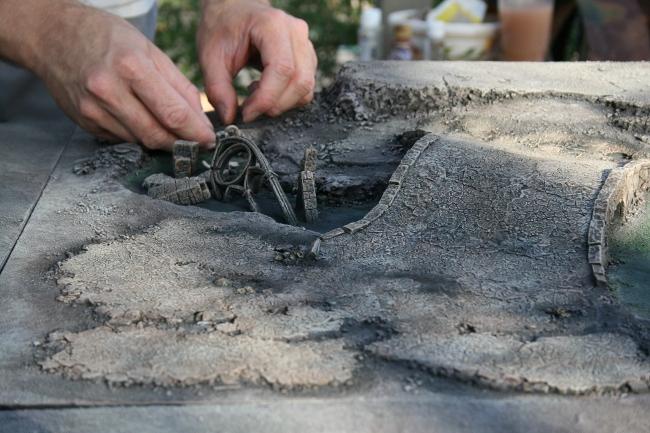
I painted the goo-pit in shades of green, fading to black to simulate depth, then attached the tentacles into the culvert with a little cyno glue. I didn't need anything too strong, since the resin would hold them in place once poured.
The resin is a 2-part polyester clear resin, with a little bit of dye added to further enhance the color of the pit. I used a disposable syringe to inject it into hard-to-reach-areas and up the slope to the culvert. This is the only stuff we use that gives off chemical fumes, so apologies to anyone knocked over when Mr X opened the box for the first time. Please note that the fumes disappear with time, and the brain damage is often reversible.
The resin is supposed to be done at the very end, but I must have spent another full day just fussing over details, l like missed skulls, repainting the edges of the boards, re-spraying matt sealant over the ruins and rubble, (with the resin carefully masked off.) And of course, making the lava background board and electronics cover for the wiring.
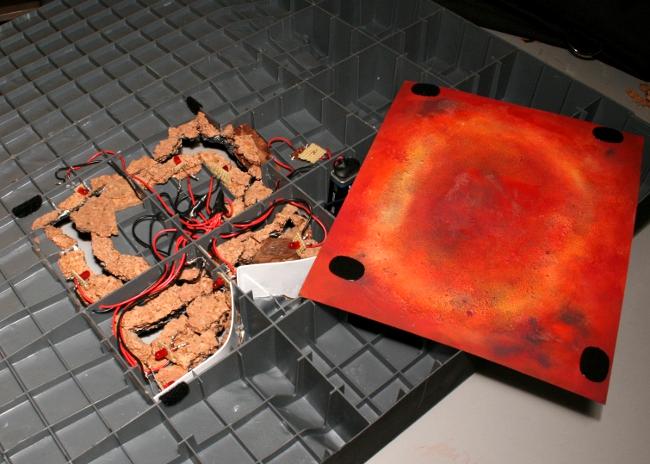
Just a piece of plasticard, textured lightly, primed white then painted with yellows fading into dark red, then a little black drybrushed around the red edges to look like cooling pieces of lava. It was attached with velcro tabs.
Then, our next step was to…. uhm, next we….
What?
What do you mean that’s it?
We’re done?

Oh. Okay.
22560
Post by: kaneka
Good god!
Any pictures of the thing as a whole?
23050
Post by: Terraformer
17349
Post by: SilverMK2
Looking extremely epic Shame I mist being the first poster again (damn sending an email and generally being at work! ). This is looking fantastic - really jumps off the screen. Edit: Woo, missed the first post to your last update, but get the next And holy god - that looks like you have visited the wastes of Birmingham ( UK) and taken some pictures - very realistic and utterly amazing. If I wore (or indeed owned) a hat, it would be well and truely off to you.
27220
Post by: NoToTheMan
let's see how much trouble i get in for this but...

>.<
you are a god!
or at least a demi-god...
22560
Post by: kaneka
I couldn't imagine playing models on this thing. Instead it should be displayed, like a pristine work of art.
Amazing work!
18410
Post by: filbert
Fantastic!
This was a commission project I think I recall you saying? Do you mind telling us what the price the client paid for this?
Thanks!
23050
Post by: Terraformer
filbert wrote:Fantastic!
This was a commission project I think I recall you saying? Do you mind telling us what the price the client paid for this?
Thanks!
Sorry, we have an artist/client confidentiality policy. 
17349
Post by: SilverMK2
And also how long it took and the man (and woman) hours involved? Also, I didn't see mention of you sealing the boards - did you use anything like that, or did you just leave it with the paint as the top layer? Edit: Never mind - just re-read it and you used matt sealant [doh]
20079
Post by: Gorechild
Wow, just wow You sure do know how to make a guy feel like his RoB board looks bad When I see the end product I'm going to have to steal some of your ideas Well that ^^^ reply got ninja'd by a whole lot of posts somehow. That looks uterly fantastic. One of the best boards I've ever seen, you deserve several medals. you can barely tell its the GW board under all that awesomnuss
18039
Post by: CrashUSAR
As soon as I have the funds (or any funds really) I want a board like this. I'll hold you at gunpoint if I have to!
17349
Post by: SilverMK2
Gorechild wrote:you can barely tell its the GW board under all that awesomnuss
That is probably why it is so good
23050
Post by: Terraformer
SilverMK2 wrote:And also how long it took and the man (and woman) hours involved?
We quickly lost track of actual hours involved since it was our first RoB set and we proceeded cautiously into the new territory and challenges that came with them, but I can say that the entire project was in our workshop for approximately 6 months from start to finish. Automatically Appended Next Post: CrashUSAR wrote:As soon as I have the funds (or any funds really) I want a board like this. I'll hold you at gunpoint if I have to!
Nice threat/avatar combo
17349
Post by: SilverMK2
6 months? Not too bad - mine is taking much longer than that and it is hardly even 1/6 done
306
Post by: Boss Salvage
Truly impressive work on that board, bravo (and this thread too). Now I've got a serious itch to make some eevil (if not as awesome) terrain of my own
- Salvage
20079
Post by: Gorechild
Every time I see the last pic of the board I can't stop thinking "I want to play on it :( "
30050
Post by: indiana1000
Wow that looks much better than the measly board i started today!
123
Post by: Alpharius
Wow!
I came to this party late, but I'm glad I took a look!
It would be great fun to battle on boards of this quality - congrats on a job VERY well done!
10667
Post by: Fifty
Is there a particular reason you and the client decided on a RoB board? Was it just portability, or was it a stylistic choice? Now that it is finished, how well does it go in the carrying case? Have you ever done anything similar on, say, an mdf base?
15680
Post by: Ediin
Awesome Board!
Although I still believe Flying Spaghetti Monster and Space Eagles will use it to rule the Earth...
25090
Post by: ~UnDeAd~
This project is amazing , love your work .
17353
Post by: Cosmic
I'd hate to think just what kind of troll might live under that bridge *shudder*...
Fantastic work - outstanding! This board isn't meant for putting models on it... It's meant to be put on top of the models!
Congrats!
26767
Post by: Kevin949
I'm with everyone else here, damn fine work.
Wish I could get a necron board like this but I'm sure I don't have near the funds required for this epic amount of work (nor do I have the skill to do it myself).
23050
Post by: Terraformer
Fifty wrote:Is there a particular reason you and the client decided on a RoB board? Was it just portability, or was it a stylistic choice? Now that it is finished, how well does it go in the carrying case? Have you ever done anything similar on, say, an mdf base?
The RoB boards were the client's choice, but we wouldn't hesitate to use them. The RoB boards are actually a really good choice for a modular table, because they're already made! While we could make our own set using MDF or plywood and some kind of filler materials for depth/height, then engineering some features that can be reconfigured like the hills, that would have been a lot of extra work adding onto time and cost considerably. (Imagine it's like having a custom piece of 6' x 4' furniture built.)
At about $12.00 per square foot, the RoB boards are already built, sculpted, cast and formed out of a very sturdy polystyrene, and yes they fit perfectly into their heavy-duty case with shoulder-strap, even after all the work we did on them. My only real critique about the boards is the overall detail level is slightly "smooth" with no real sharp edges. Also, despite being plastic and reinforced, they still tend to suffer from some minor warping/deformation at times. The clips included seem to help with that, but I would have liked to have seen a sturdier clipping system, or if I were to use them myself I may opt to add some kind of grommit/thumbscrew hardware to the edges.
We like the boards and rate them highly, and they do make an excellent basis to do conversions on.
7161
Post by: Necroagogo
As everyone else has said, the board looks gobsmacking. I'd like to offer kudos for the photography, too - some of the shots of the finished pieces are beautifully-composed and extremely atmospheric.
Awesome work, folks.
28104
Post by: vignor
one word excellent
28774
Post by: Brunius
Wow....just....wow......
14392
Post by: nerdfest09
Terraformer if you'd like tips for building a quicker board my best mate wanted you to try getting a piece of board then using spray paint to make it green! I don't know if this idea has occurred to anyone? but thinking aside, his idea sucks and i shall also be following your lead and spending hours and days and nights and most of my money and all of my girls money to build a board like this one! well done with the blog the board and the way you convey how you did it, it's like we're all standing there jostling for room while we warch you build magic!
23050
Post by: Terraformer
17349
Post by: SilverMK2
Pretty :O
27078
Post by: HadoukenAvenger
Would we be able to get a shot of the glowing symbol minus the eldar dude? I need a new wallpaper.
23050
Post by: Terraformer
HadoukenAvenger wrote:Would we be able to get a shot of the glowing symbol minus the eldar dude? I need a new wallpaper.
 Automatically Appended Next Post: Automatically Appended Next Post: Oh, but while I was looking through our photos, I did find a close-up of the Khorne symbol details, unlit though.
24691
Post by: MasterDRD
Terraformer wrote:HadoukenAvenger wrote:Would we be able to get a shot of the glowing symbol minus the eldar dude? I need a new wallpaper.
...nice one...
Ah screw it, might as well wallpaper it anyway. It's like having an autographed copy!
26416
Post by: Young_Logan
Legend board, i wish i owned it
Brilliant work mate
8272
Post by: FlammingGaunt
Terraformer wrote:filbert wrote:Fantastic!
This was a commission project I think I recall you saying? Do you mind telling us what the price the client paid for this?
Thanks!
Sorry, we have an artist/client confidentiality policy.
What if we promised to not break into their house and steal it deffinately not
27078
Post by: HadoukenAvenger
Awesome, now it comes with an inset pic of khorne himself! EDIT: Love the fleshie with the eyeball, it looks disgusting. Also, if one were to buy something like this project from you guys, could you give a very rough estimate of what it would cost? (eg: 'Over $1000', 'less than $500' and so on.)
23050
Post by: Terraformer
HadoukenAvenger wrote:Awesome, now it comes with an inset pic of khorne himself!
EDIT: Love the fleshie with the eyeball, it looks disgusting.
Also, if one were to buy something like this project from you guys, could you give a very rough estimate of what it would cost? (eg: 'Over $1000', 'less than $500' and so on.)
Without taking into consideration all the possible variables (we treat every commission as it's own project) we could do something similar to this for less than $1000.00
If you have any specific questions or requests, please drop us a line at projects@3t-studios and we can help you out
25081
Post by: Lysenis
They have some amazing things on their site. From custom made purity seals to just about anything terrain wise.
15805
Post by: abhorsen950
Your work is superb, I thank you for sharing it!
9466
Post by: Anadaroo
Absolutely breath taking !
Brings a tear to my eye..
Would LOVE to to take my brave Deffskulls across those blasted wastes to fill some deamons with dakka !
31495
Post by: waaaghpwnage
this makes me want to go outside in the midday heat and start work on a table i have leaning against the wall! this is absolutely brilliant in every sense of the word! this thing radiates realism. i literally feel i could walk on the surface of the board (well, technically, i could, but your client might get slightly mad at me... as would you and your colleagues) the glowing sigil is a great touch, as is, well, all the details put into this! and your sense of humor is great too! are you a champion of chaos sent to this world to tempt us to the ruinous powers with promises of awesome terrain boards with colorful sprinkles of comedic ability??? where do i sign???
10054
Post by: Death Gear
Wow this is awesome!!!!
23050
Post by: Terraformer
waaaghpwnage wrote:are you a champion of chaos sent to this world to tempt us to the ruinous powers with promises of awesome terrain boards with colorful sprinkles of comedic ability??? where do i sign???
Ah, another convert, excellent.
Please take your standard issue robes and report to the front desk for head shaving, tattooing and your special flask of "coffee."
17738
Post by: Briancj
Terraformer wrote:Please take your standard issue robes and report to the front desk for head shaving, tattooing and your special flask of "coffee."
Don't do it! It's Poison! Don't believe the box!
31495
Post by: waaaghpwnage
bah, how bad can it be? (famous last words) maybe ill find out whos in my head saying "bloooood, bloooood, bloooood, blooooood, bloooood" over, over, and over again in creepy voice. what? dont you guys have that? im sure its not just me... BWUAHAHAHAHAH! sorry, i was possessed there for a minute
18867
Post by: madmartykmf
I have a quick question about the water effects, Did you tint them or just paint the surface below or perhaps both??
Amazing job to you and your team
14062
Post by: darkkt
Awesome! Looking at this is much better than studying. Oh well, back to it!
23050
Post by: Terraformer
madmartykmf wrote:I have a quick question about the water effects, Did you tint them or just paint the surface below or perhaps both??
Amazing job to you and your team
Thank you, and yes it's a combination tinting and painting the surface before pouring resin, I fade from lighter colors into darker then black towards the center to give the illusion of real depth past the 1/4 inch or so of resin. The resin is then tinted a little before pouring, together the effect makes it look deep and menacing without being opaque.
18867
Post by: madmartykmf
Terraformer wrote:madmartykmf wrote:I have a quick question about the water effects, Did you tint them or just paint the surface below or perhaps both??
Amazing job to you and your team
Thank you, and yes it's a combination tinting and painting the surface before pouring resin, I fade from lighter colors into darker then black towards the center to give the illusion of real depth past the 1/4 inch or so of resin. The resin is then tinted a little before pouring, together the effect makes it look deep and menacing without being opaque.
Thank you for unveiling your secrets. That is what I thought and what I am using for my water effects piece. What a labor of love water effects is!! There is no fast or easy way to have deep water. Anyway keep up the great work and thanks again!!
Mike
30723
Post by: iheartlargeblasttemplates
Wow... just wow. this make the table i play on look stupid.
21738
Post by: superscenic
Who do I pester for action shots of well painted armies battling across this surface? And well photographed.
29052
Post by: Xenon
Best.. gaming board.. ever..
6854
Post by: InyokaMadoda
Absolutely wonderful work! Thank you very much for showing it all to us!
Now go and complete the other 10 RoB boards so that we can fight an Apoc battle on your terrain.
25081
Post by: Lysenis
Oh god. . . having them do an Apoc sized board for 20,000points or more would take at LEAST a year!
23050
Post by: Terraformer
I shudder to imagine. Really, if you're playing Apoc games you need to have a landscaper work on your yard, not a miniature terrain builder.
A very confused landscaper.
"No no! I need the shrubs smaller, can you plant bonsai trees everywhere? and tiny hills there, and a two inch wide riverbed across the yard..."
17738
Post by: Briancj
Terraformer wrote:"No no! I need the shrubs smaller, can you plant bonsai trees everywhere? and tiny hills there, and a two inch wide riverbed across the yard..."
There's a service, here. Somewhere, out there, is someone insane enough to turn his backyard into a 40K playspace.
I mean, there's already Garden Railways/Railroads.
--B.
181
Post by: gorgon
Y'know, I once theorized about what it would take to do a living game table. The basic idea was to use bentgrass (commonly used on putting greens because it can be trimmed very short) for the green parts. Trees would be bonsai, with their humidity trays serving as the area terrain bases (there'd be holes in the table into which the trays would fit). I thought about having running water, too.
Of course, even if you got this thing set up and looking good, the maintenance involved would be horrendous. Can you imagine trimming the table before each game? lol.
21738
Post by: superscenic
living gameboard? Garden train scapes? These are certainly space savers.
What I would like to see now that I've seen those fleshy splotches from this game board...Is a Tzimisce-like (World of Darkness Vampire Role-playing books) flesh cathedral or even better yet an entire battle-board made of fleshy things, bones tentacles etc. As if the battle was taking place in a planet entirely taken over by Tzeentch or Slaanesh and is actually growing, changing, corrupting into many Cthulu-like horrors.
4963
Post by: Nerf
Wow Gorgon, I thought I was the only one thinking of that idea, though I was thinking of using some sort of moss as grass. Figure you need a nice sized window to keep it next to as well. If I ever win the lottery and have too much time and money on my hands, that's what I'll be doing.
20572
Post by: Advent
WOW. I must play a game on this table. It looks so realistic. It reminds of ashl ands after a volcano erupts with a touch of the dark gods thrown into the mix.
4362
Post by: Ozymandias
This board is epically awesome, but I have to ask, with all the conversion you did, wouldn't it have been easier and certainly cheaper to just start with a wood/foam board?
15884
Post by: ghosty
Whoa. I hate being the bloke who finds these threads at the last possible moment. Truly amazing stuff, i wish i could afford a board like that.
3197
Post by: MagickalMemories
OKay... First of all...
Gimme my robe & coffee. I'm in!
Secondly...
DAMN!
Any chance of you asking the client for some pics of a game in progress on this board?
Eric
25081
Post by: Lysenis
They have my Xboard from Battlefoam I can not wait to see what awesomsauce they come up over it!
23050
Post by: Terraformer
Ozymandias wrote:This board is epically awesome, but I have to ask, with all the conversion you did, wouldn't it have been easier and certainly cheaper to just start with a wood/foam board?
That's a good question, the reality of it is to make a new set of of battleboards would have taken a huge amount of time on our part, since the pieces would have to be cut, sanded, treated, smoothed and of course engineered to make the built-in terrain contiguous in different configurations, not to mention we would need to do some kind of edge and corner covering because in my opinion, when you put this much into a project, you should get the highest quality result at the end, and bare foam just doesn't hold up so well over the years.
The RoB saved us that work, and as a result saved our client time and money. Also, you get a nifty awesome carrying case with the RoB
MagickalMemories wrote:Any chance of you asking the client for some pics of a game in progress on this board?
Yes! We're going to be posting an actual battle report by our client and his first victim on our website very soon, with lots of pictures. I'll update this thread when available, or you can just subscribe to our blog
I should also mention that this project is not actually completely over yet! While I won't give anything away yet, it's called "Phase II" and we're starting very soon. I'll be making a new project log to cover this new venture into madness.
17349
Post by: SilverMK2
Terraformer wrote:I should also mention that this project is not actually completely over yet! While I won't give anything away yet, it's called "Phase II" and we're starting very soon. I'll be making a new project log to cover this new venture into madness.
*stalks you*
3197
Post by: MagickalMemories
Don't get a lot of time online from home, and blogs are blocked from work.
Sadly, if it's not here, I will not likely see it.
I DO look forward to it, though.
Eric
6854
Post by: InyokaMadoda
Phase 2? Count me in!
21738
Post by: superscenic
There are some cool things happening over at 3t studios ATM. Lysenis said something about Tyranid terrain. My favourite!
Then there is some new look architecture for a SM chapter headquarters which I am eager to see develop.
And then above mentioned phase two.
25081
Post by: Lysenis
Oh yes. I bought an Xboard from Battlefoam. So far the amazing minds of 3T say that it is a stable peice that they will enjoy working on. I will not say more then that for fear of being poisoned. . .
33380
Post by: joker8911
Fantastic post enjoyed reading this and got some good tips, and the finished product is awesome
25129
Post by: Trilobite
Some really excellent ideas here, would love to try somthing like this out myself.
Looking forward to phase 2!
25081
Post by: Lysenis
Trilobite wrote:Some really excellent ideas here, would love to try somthing like this out myself.
Looking forward to phase 2!
Everyone is it is a sad thing when people cna keep you guessing at every turn. . .
35556
Post by: nickick
ghosty wrote:Whoa. I hate being the bloke who finds these threads at the last possible moment. Truly amazing stuff, i wish i could afford a board like that.
Yea, I know. I feel the same way...
5394
Post by: reds8n
Please don't dig up old and resting in peace threads like this. Thanks.
|
|