Its a waaagh in slow motion. I hope this blog will encourage me to hurry up and paint because I am soooo sllooooow! No seriously I am, a year ago I got back into the hobby after a very long break (15 years), in that time I have painted eleven Space Marines, one Rhino (almost) and two Nobs.
I haven't played since the 2nd edition but I am a firm believer in playing with painted army's. The down side to that is that I might never get to play! After painting those Marines and re-basing my old SM army I remembered how very very boring they were. I could go and play with them but bullocks to that, I want Orks!
Now I realise Orks probably aren't the best choice for a slow painter but I'm going for a Kan wall /Dread list, at 1500 points its not going to be very competitive being as it only has 40 boys but I have 11 walkers and with the Meks and Nobs the model count will only be 60 models. Still at my current rate thats going to take 5 years, so I've got to try something to speed me up. In an ideal world I want it finished by June/July.
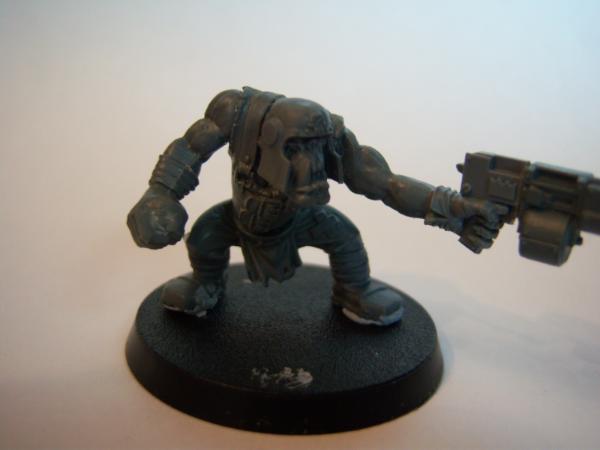
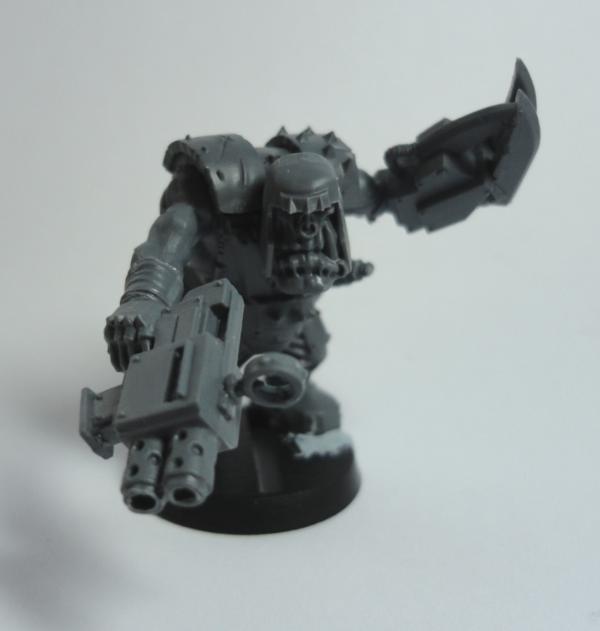
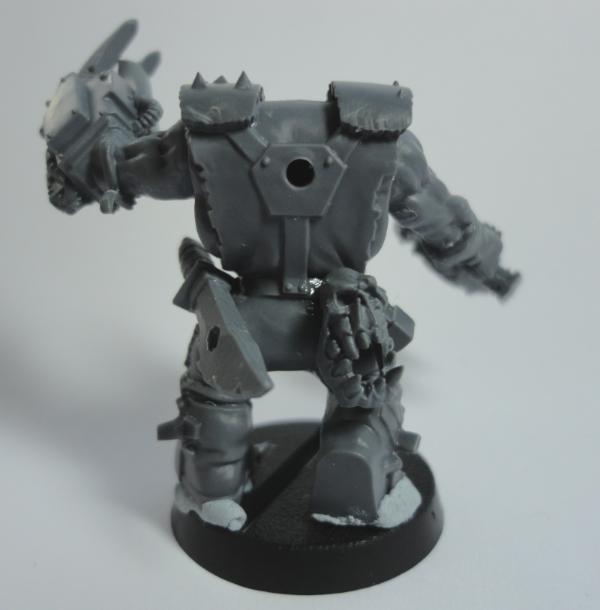
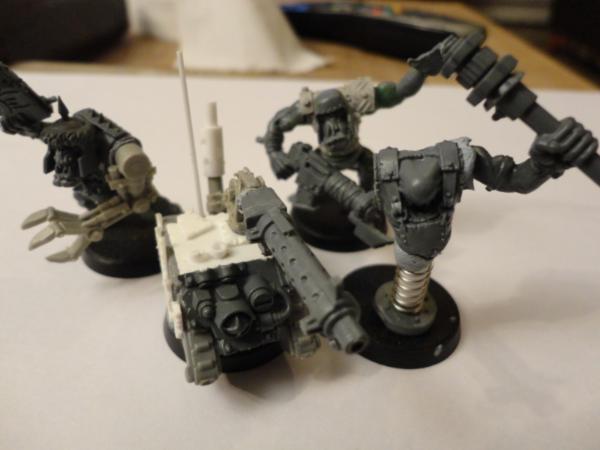
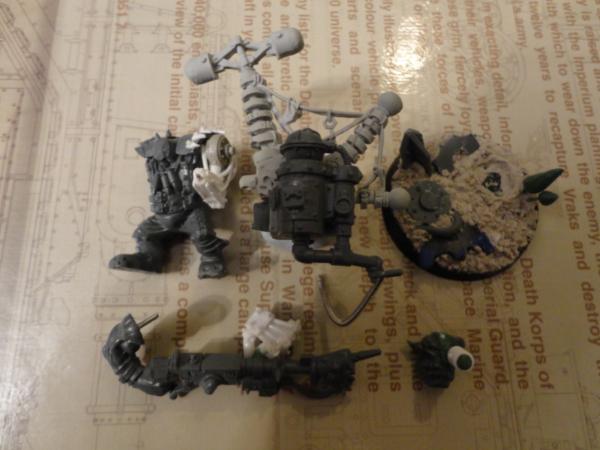
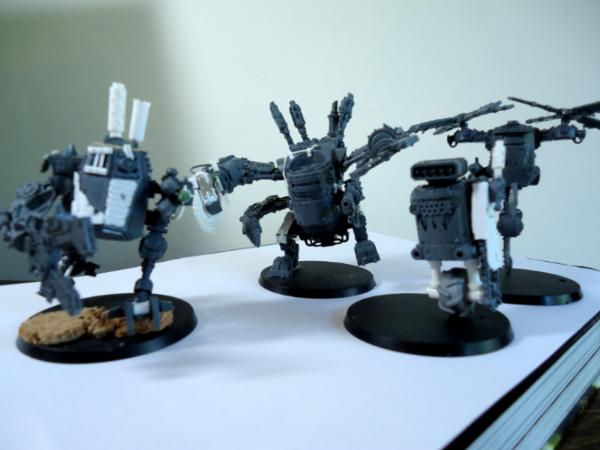
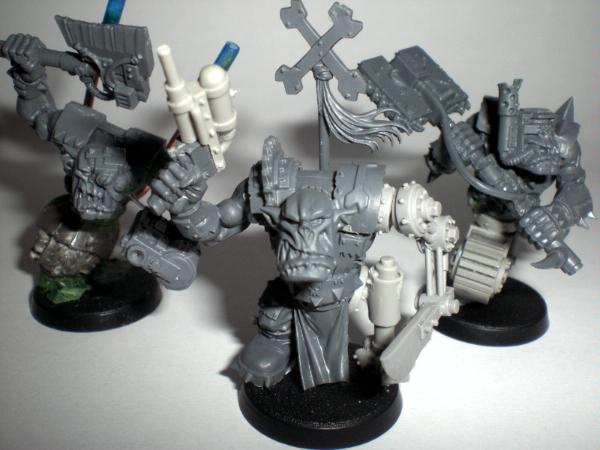
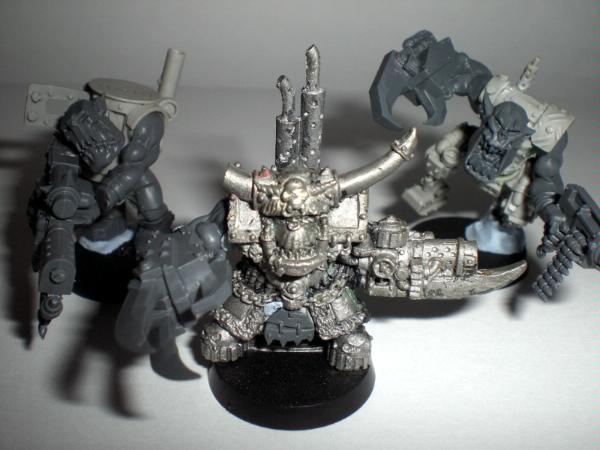
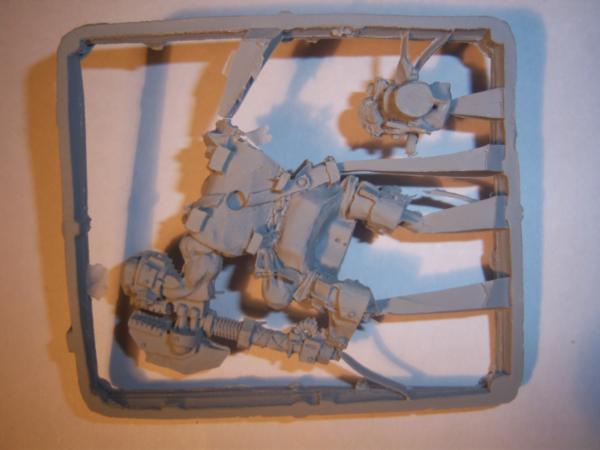
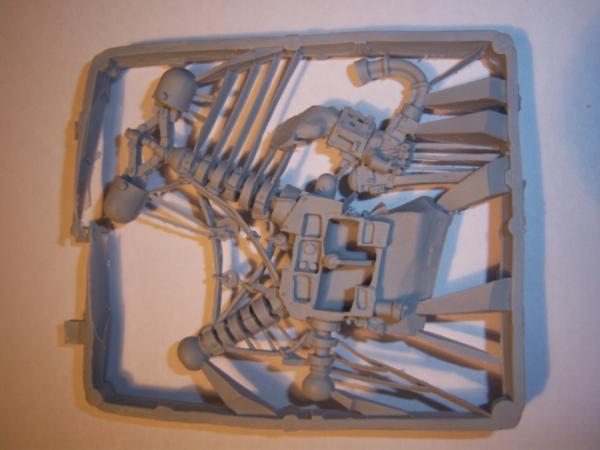
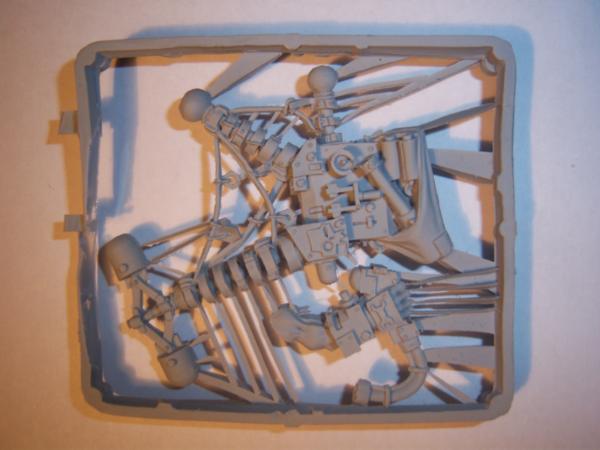
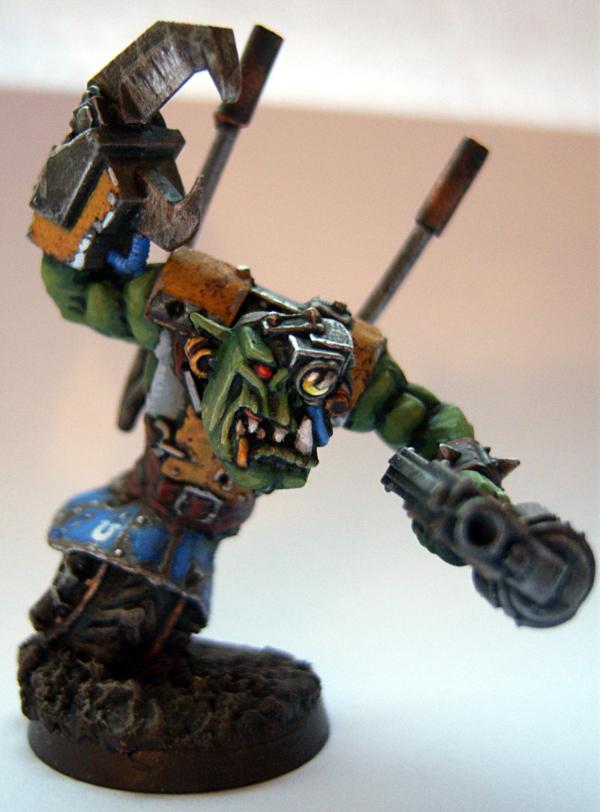
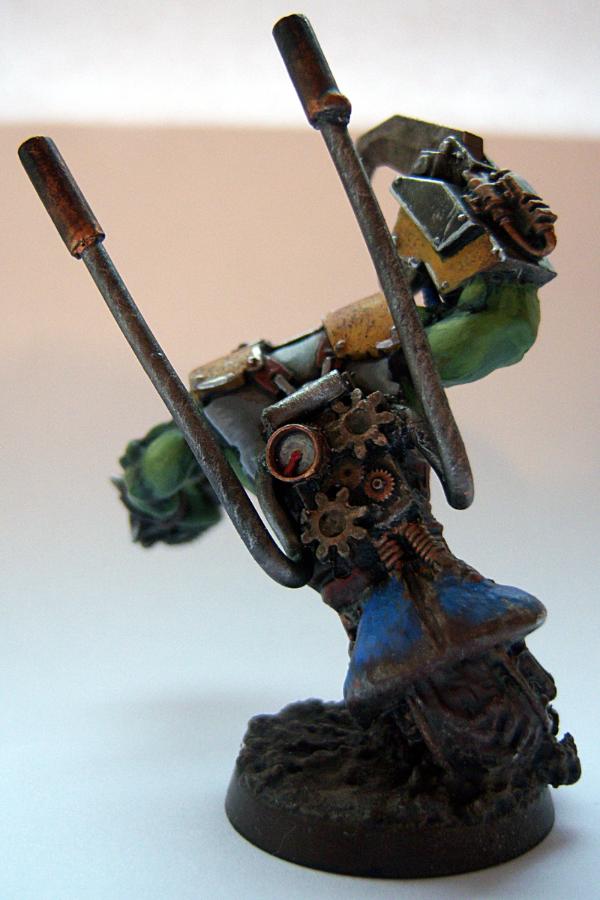
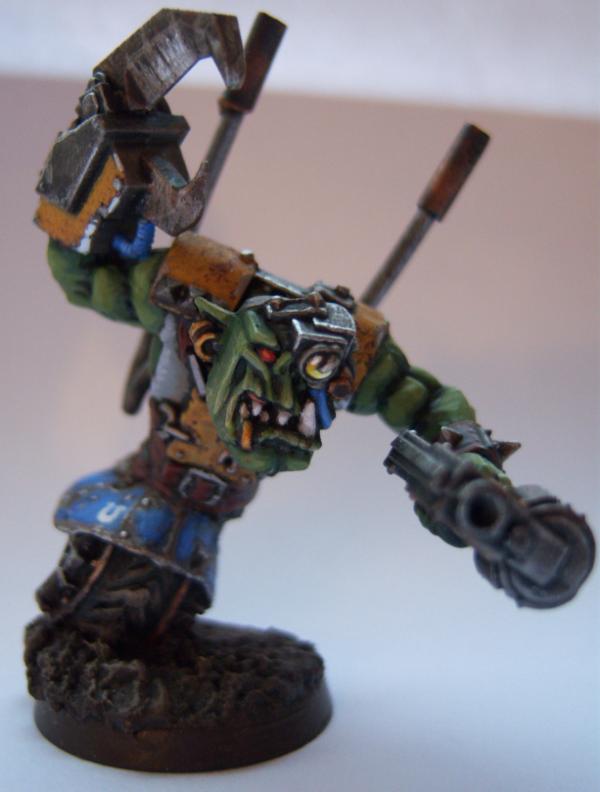
So on to some models. These are built using parts from the Nob box and some of the Kromlech parts that Maxmini sell.
Thats all for the moment though folks. I have a boys squad assembled and waiting for priming but I'm sure no one wants to see photos of grey, and a AOBR Dread that is half way to being orkified, the rest of the army is in boxes. Hopefully the wind will die down tomorrow and I an get some priming done.
Comments, criticism and help always welcome. Oh and ork skin recipes, I want my orks to have a variety of skin tones, so if you have any give them out.
nice work so far. I paint my orks with a base coat of orkhide shade over chaos black under coat followed by orkhide mixed with dheneb stone(not shure if i spelled that right also bleach bone works) then ork hide and dheneb stone with even more stone in it. you drybrush that over and then a final drybrush of straight dheneb stone
LiveforFun666; Yeah the darkness might be a Dark Angels hangover, I was always trying to go darker. I've still got the odd bit of highlighting to do on them here and there but I think that will have to wait until the army is starting to take shape a bit more. I'm going to try to make the Boyz a bit brighter, especially the skin.
Big Mek Dattrukk & bunnygurl; Slow won't get me a fieldable army though will it , tbh its not so much that I paint slowly but more of a case that I don't often sit down to paint at all. I enjoy it but life keeps interrupting (and I'm lazy). Having people expecting/wanting to see more should, with a little luck, encourage me to do more painting.
risewiththefallen; I would love to see an example, why not put some of your Boyz up in your gallery.
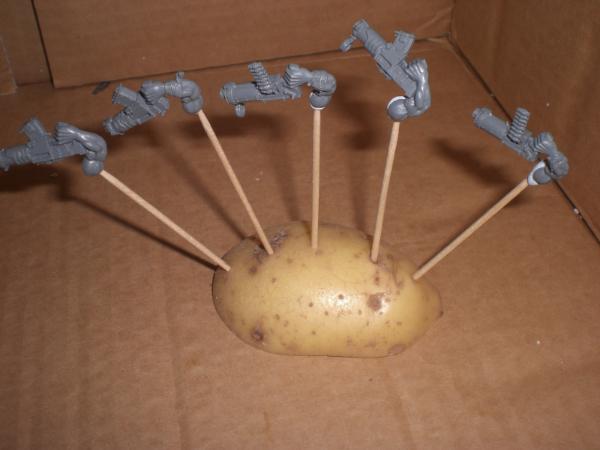
Anyway the wind didn't die down but I decided to try and get some priming done anyway. I grabbed a large box from my loft and found the least windy corner of the garden and got to spaying. I only got 5 done as I had to head out for my sisters birthday, still its a start and gives me something else to paint other then the Nobs. Whilst building the Boyz I decided that the best way to paint them would be to do the arms separate from the rest of the miniature as I didn't fancy trying to paint behind the Shoota. Unfortunately I hadn't thought about how I was going to spray the arms. Scratching my head I came up with this great painting aid.
Yes that is half a potato . Still I hate to waste food, I think I may need to have a rethink.
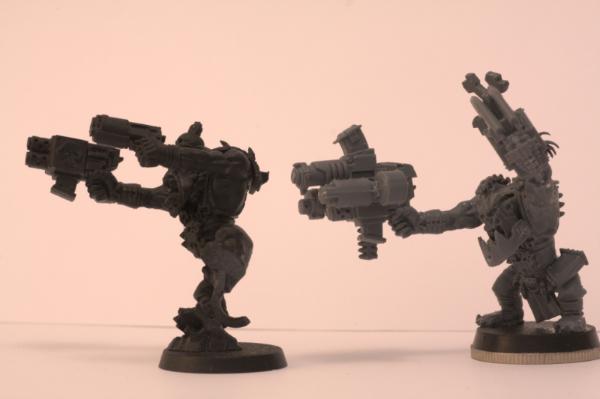
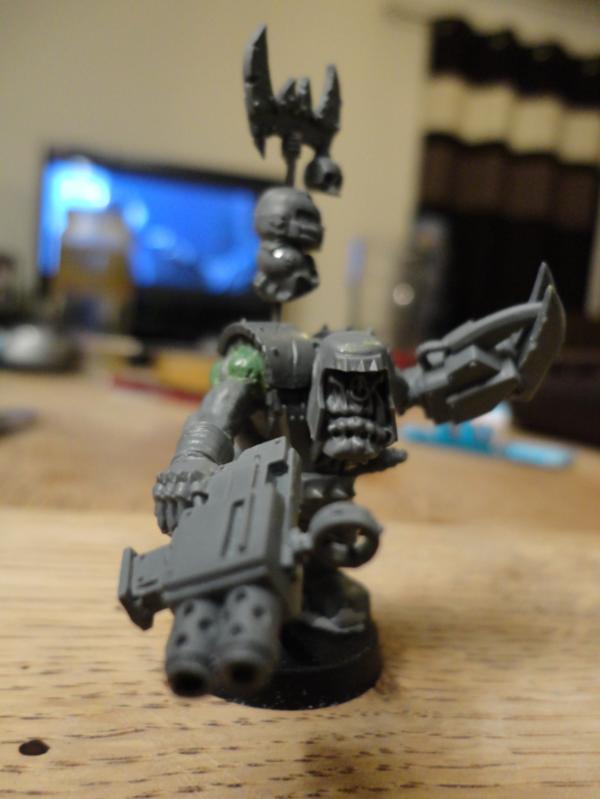
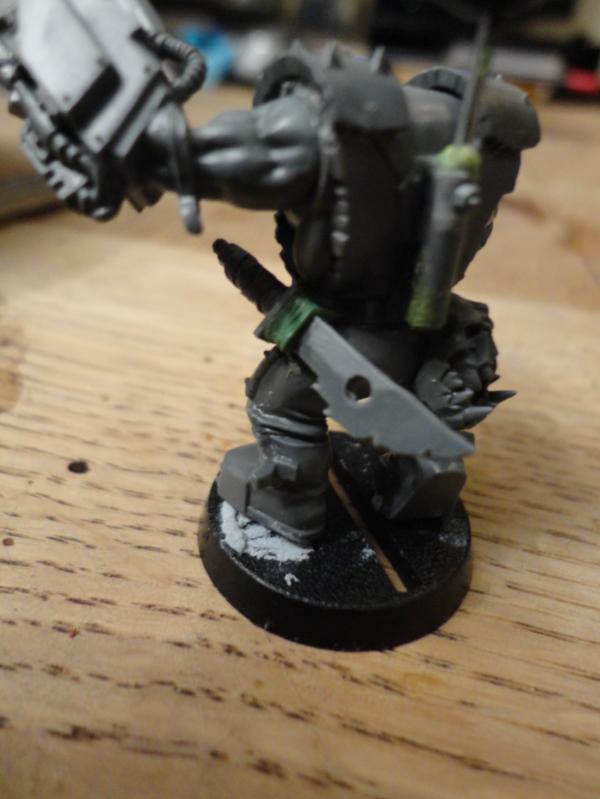
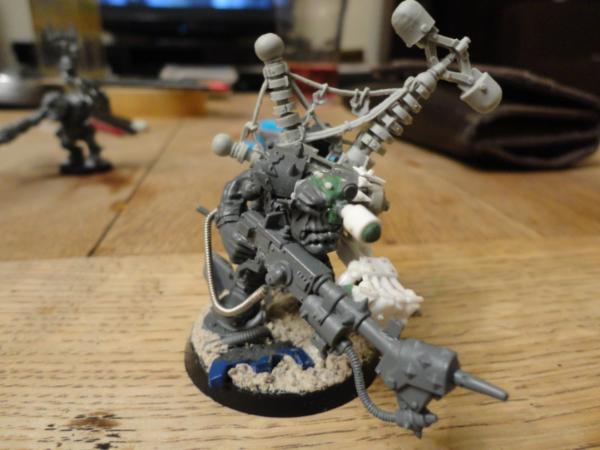
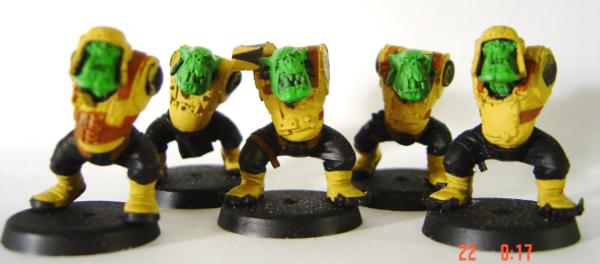
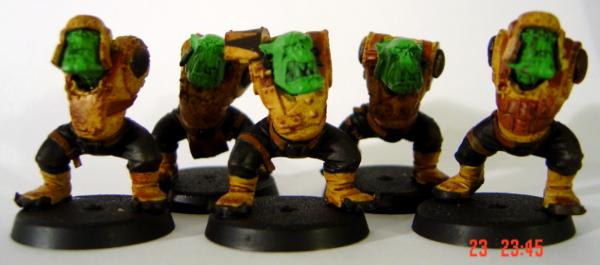
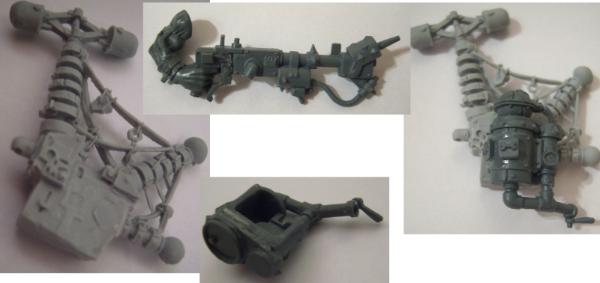
Oh and for those that are intrested heres some WIP shots of the Nobs before any paint. There have had been changers from these photos and all but the old Ghaz (which still needs work) have been primed now. So fingures crossed I will get some more paint slapped about this week.
I agree slow doesn't field an army in a short time. You've got the same problem I do. So much life to do, so little time and help.
Nifty idea you had with the potato, but they're so much better when mashed up with some onion and milk. I spray mine on the sprue (which I do believe is a no-no) then snip 'em out and paint 'em as is, them glue 'em on. Not the most efficient way, but it works for me for getting to all the lil' details. Lately though I've just been gluing everything together fully and going from there.
Good luck finding some time to paint and those Nobs above are awesome!
Again thanks for the positive comments, I'm finding them very encouraging.
iior - I appear to be starting a slow painters club . I checked out your wolfs they look great, now pick up that paint brush they won't paint themselves you know.
Wazzdig Dagga - Believe it or not the above aren't much more then a basecoat and wash.
bunnygurl - Yum mash, but personal I like to add . On a side note, how do you deal with the mold lines and sprue scars if primming on the sprue? Seems to be complicating things tbh.
So I started on a new nob today, no pictures you just have to take my word on it. I might have taken thinning my paints a little to far. I took two coats of Bleached Bone and three or four coats of Orkhide Shade to get a decent coat on the skin. Going to try out risewiththefallen's skin recipe on it but with layers instead of drybrushing. I seem to have lost my Dheneb Stone though which is a little odd.
Anyway will try to put some pics up by the end of the week, thanks for reading.
It's more time comsuming. Prime 'em, clip 'em out, then use a knife to shave everything down. Then hand paint on where paint was scraped off. Sounds stupid, but personally I find it better than spending a chunk of time trying to find something to stick annoying bits onto. Although most of my stuff lately seems to conveniently glue together in a way where painting details isn't an issue.
About the Dheneb Stone, paint pots grow legs dontcha know?
Always happy to make others look better monkeytroll .
Lol bunnygurl that sounds like a right pain in the ass, I think I will stick with the fruit and veg approach.
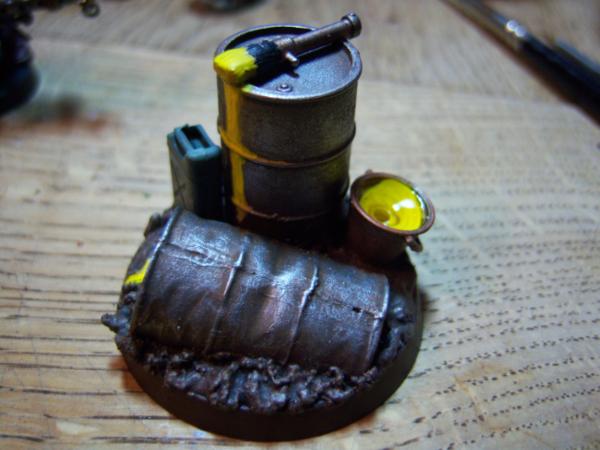
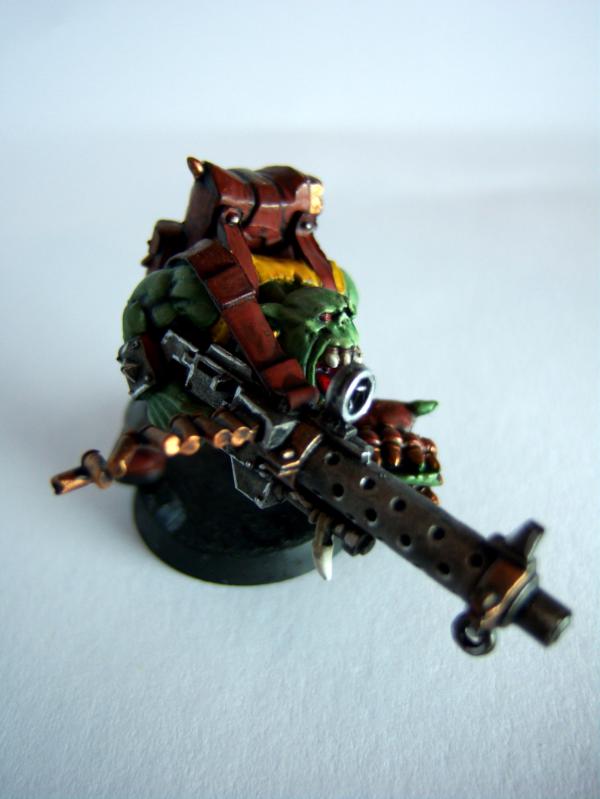
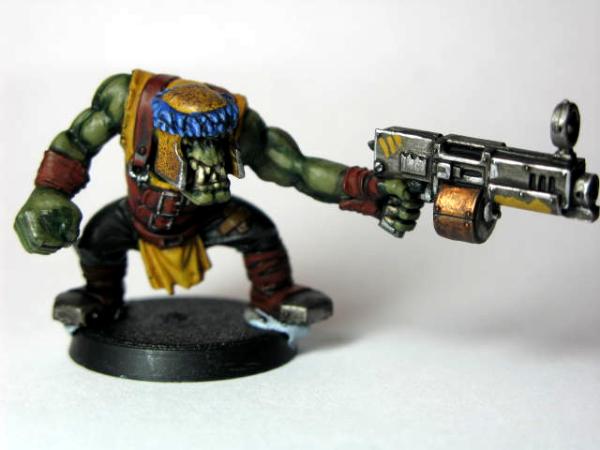
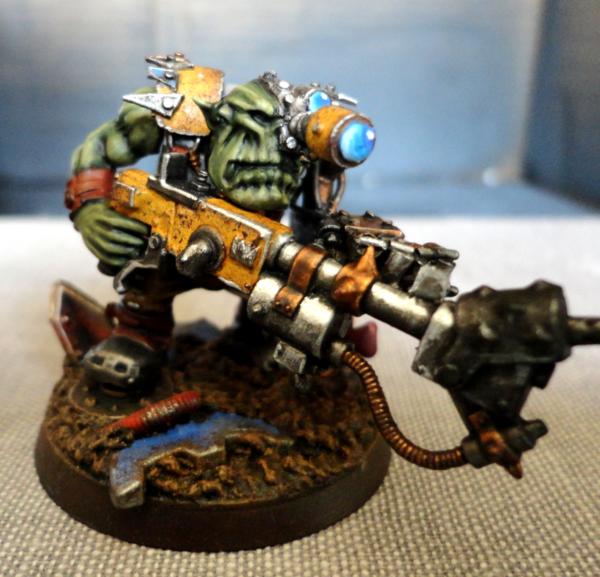
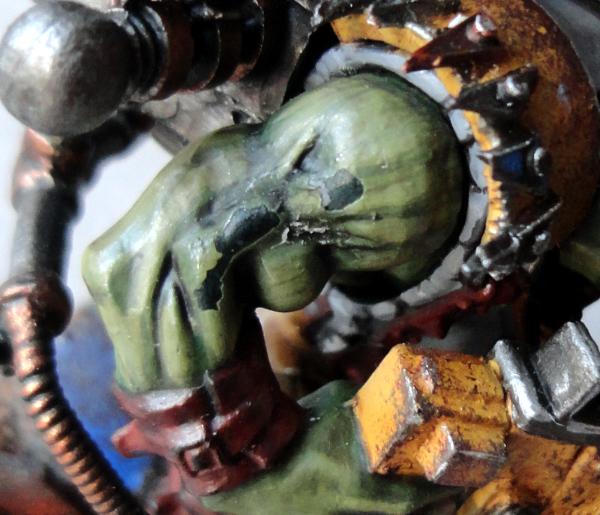
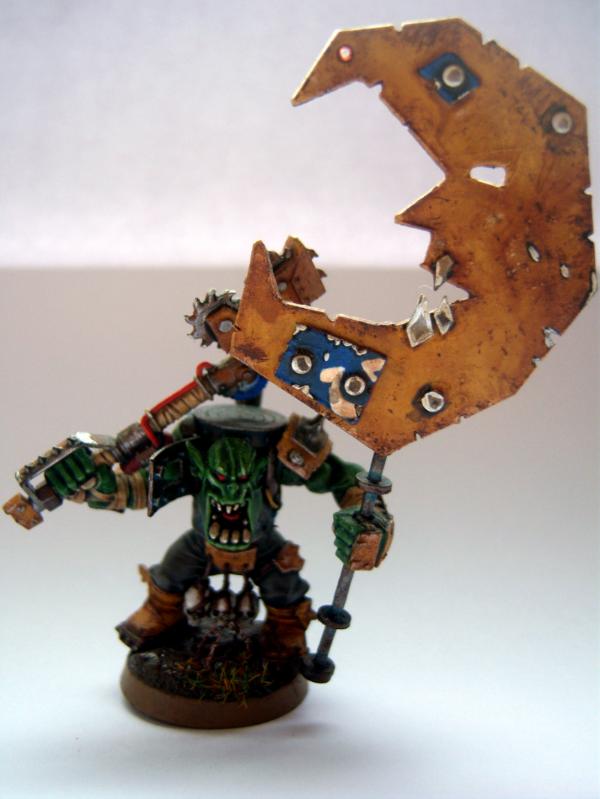
I can't make up my mind what to paint yellow on the Ork I am currently working on, this is the figure
The gun will have a bunch of yellow on it, thats a given. What I can't decided is whether to paint the can or the trousers yellow? The trousers will be a lot easier but that will mean I paint the can in some kind of metal and I already have one with a metal can. A yellow can will look better if I can get it right but all the weathering that will be required is likely to go wrong, and when things go wrong I down tools and it can be months before I pick them up again. What do you guys think, take the risk or play it safe?
Automatically Appended Next Post: I just dropped the bloody thing and the gun arm came off, and the resin chimney snapped
Anyway, I got married which was nice, but not a lot of time to get work done.
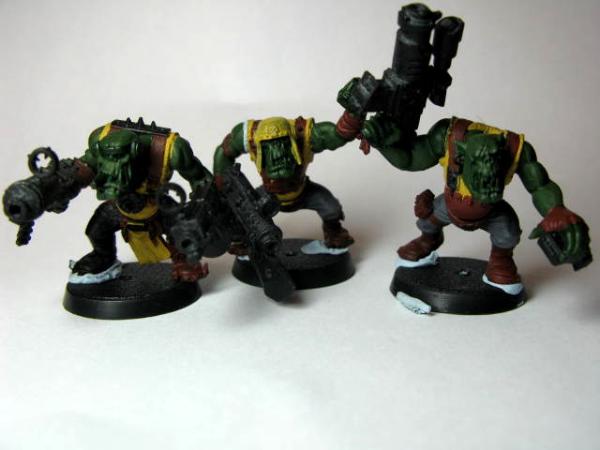
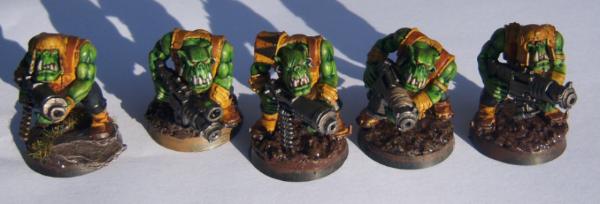
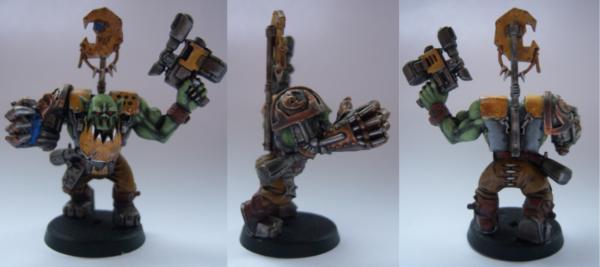
I repaired this guy and almost finished painting him.
Still some details to do and all the Tin Bitz. But thats three Nobz done, I have my first ork unit.
I painted up some Boyz this weekend as well, base coated anyway. Still lots of work to do obviously. I hope to get them finished by next weekend so I can start on some kanz, but it probably won't work out that way.
A few things I learnt this last month
1. Women take weddings very seriously.
2. Wet palettes are great.
Congratulations on getting married. That Nob looks great! The weathering is just superb!
Things you learned:
1. Are you really surprised?
2. I'm dying to get my hands on one of those. Went to buy one a little while ago but ended up getting a basing kit instead.
Cheers bunnygurl, why dont you just make a wet palette? All you need is a Tupperware pot, a sponge and some baking paper. I was always finding that at my slow pace my paint would dry on my palette/kitchen tile, now it doesn't. And yes I was a little surprised.
joshoftheforest; Knock yourself out.
The Kromlech parts are nice Ronin but I found Maxmini's service was a little lacking. Still they do nice bits and I know I will use them again.
Thanks Micromegas.
So not much done, I've finished base coating the straps and the done a very simplified version of the weathering on the yellow. Next its metals and trousers, then stick the arms on.
Sorry about the recent photos, been using a borrowed camera at night with poor lighting, the end result is that I think I've brightened them maybe a little to much.
I've thought about making my own, but I'm much too lazy. I'd rather drive for a half hour and spend $12 on one. I don't make much sense, do I? But that's how I roll.
So its been what a month, six weeks something like that anyway.
I haven't had the best luck lately, my camera broke so I couldn't take any pics. Then my oven gave up, and apparently to the better half thats a great excuse to completely gut and redo the kitchen, who would have thought . Plus we have had some excellent weather here in the UK so I've spent most of spare time outside playing ball.
But thats enough excuses thats take a look a what I have done.
I finished my first group of Boyz. Well almost I still have the base rims to finish but I don't know what to do with them. I've decided that I don't particularly like the Graveyard Earth, Scorched brown doesn't give any colour change between the top and the rim and black is a bit dark.
I also decided that five Boyz at a time are to many at once for me. Everything just seems like it will take to long so I put of doing it, going to try three at once instead.
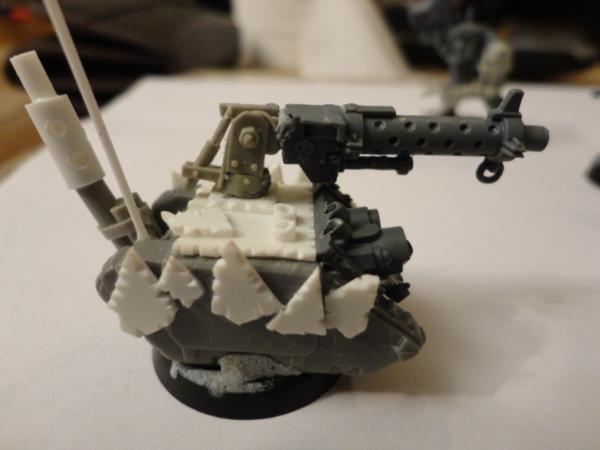
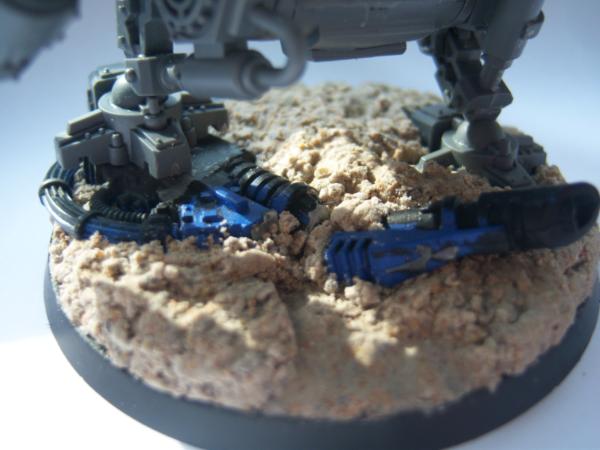
I also got some Kans which I have started building. The first is a fairly standard pose. The second was a pain in the ass, I tried to give it a running pose which I think worked ok. You can't see it in the photo but its stepping on a old rubble wall that I think came from and old starter set and I am experimenting with trying to model a dead SM leaning against it at the rear. Thats not going so well though.
Oh and a looted Dreadnought that still needs a lot of work.
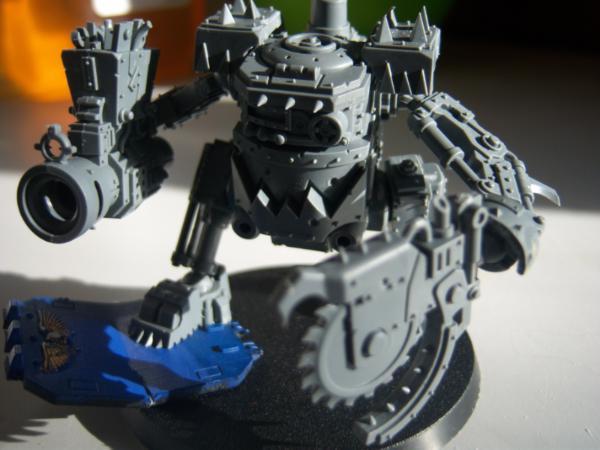
So thats about it, I picked up a Big Mek with a Kustom force field. I wanted a metal one before the switch to resin but it needs a ton of work removing mold lines and the little stringy metal bits. In fact I was surprised at how bad the cast was.
I need to try to update a little more often I think, but I am of to Mexico on Saturday so I expect it's going to be a month until I have something else to show, and that damn Kitchen still needs to be finished.
Oh one more thing. I borrowed a bunch of camera's from work over the last month to try to find one I liked at the right price (read cheap) one of the fancier cameras I tried was a 3D camera, I thought it would be cool. Don't bother! they don't have macro (at least the one I tried) and if you want to show of the pics online you can't as web browsers can't display the image files (as far as I could tell)
Hey, not going to get any complaints at your slow progress from me Especially when you consider that even with all the motivation Dakka provides I've managed to actually, completely, absolutely finish about a dozen pieces foer my orks since last June And no-one can blame you for going out in the sun, this is Britain, for all we know It may be snowing next week.
Anyway, boys look good, that's a nice skin tone you've got going there Dread looks cool too.
The Orks are looking good, I really like the weathering on the Nobz.
I tried batch painting in fives and found it nearly put me off painting so I've gone back to two models at a time now, I'm a really slow painter as well.
Not much to update I have been doing some painting, hopefully I will get some pics up this week, but in the meantime...
Finecast
I decided I would see for myself what they were like. As I want both Meks in my army to have a KFF and burner I figured I would get a Finecast Big Mek and picked one up today. Best case scenario; its perfect and I have an easy figure to cut up and convert. Worst case scenario; its crap, I complain to GW, get a free figure (or two half price figures depending how you look at it) and have two figures to cut up and convert.
As a hint to how it turned out... I will be ringing customer service this week. Sorry about the pics the light wasn't great.
So to start of, yes the detail is finer. I compared to the unpainted, unassembled, half prepped metal version I have and you can really tell on areas such as the trouser stitches and the wrap on the axe/wrench thing. The plastic/resin stuff is very easy to cut as well.
But thats about it for the good points, on to the bad;
I have a air bubble hole on the end of the chin.
What looks like a mold line (but its a weird place to have one so maybe its not) on the left hand side of the face, going over the eye. It might be difficult to remove without damaging the eye, I will find out this week.
The whole left hand side of the face/helmet has thick (2/3mm) piece of resin that will have to be very carefully carved off.
The left of the head is just a general mess.
Both feet have messy lumps that will need caving off, I guess someone has that piece of the mould.
The left hand is a bit messy and figures/thumb under defined.
The pouch/bag on his left has a hole that runs all the way though close to the body.
The place on the body where the right arm joins is very very messy and has bits of the mould stuck in it.
The circular thing next to the lever thing on the KFF is missing part of the bottom just above the stick bomb handle. The position of this makes it unfixable.
Thats about it really, I will admit I had to look quite closely to find some of these problems but still. On the plus side the lever on the KFF is straight on the Finecast whilst on my metal it is bent like this )( so thats an improvement, ish
Overall I am not very impressed, as much as the metal one is a pain in the ass to clean up, I think this one may take longer. I will post further comments as I get it prepped and cleaned.
Thanks guys, I still haven't thought of a better solution to priming other then using veg.
The Finecast is causing me all sorts of problems, and I'm only on the head! The sprue joins in some very daft places, it looks like I might have to try and green stuff an ear.
The quality is appalling, its all little stuff but the quantity of little problems is just unbelievable.
I phoned GW and they are sending a replace miniature, In the meantime I have started work on my first Bigmek.
I shaved down most of the details on the back of the KFF, shaved down a burner gas tank and stuck the two together. I also grafted a Burner onto one of the Nob the combi rokkit guns. It was all fairly easy, the Finecast stuff cuts with zero effort, which is a plus. I also quickly blue tacked everything together to check it all looked alright.
Cheers guys, yeah the gas tank fits very well. The arm is from kromlech bigfish but to be honest I'm not going to use it as it doesn't fit very well, this guys going to require a scratch built arm.
So what have I been up to? My replacement Mek turned up from GW, cast is just as bad, different problems this time and you can tell that they have tried to rearrange the mold because the sprue is laid out differently. Maybe in time they will get it right (maybe not). I primed some more Boyz but I'm sure no one is that bothered about seeing them at the moment, I've really got to pick up the pace on them though. My first KillaKan is still WIP as well, once the yellow is finished the rest of it shouldn't take to long.
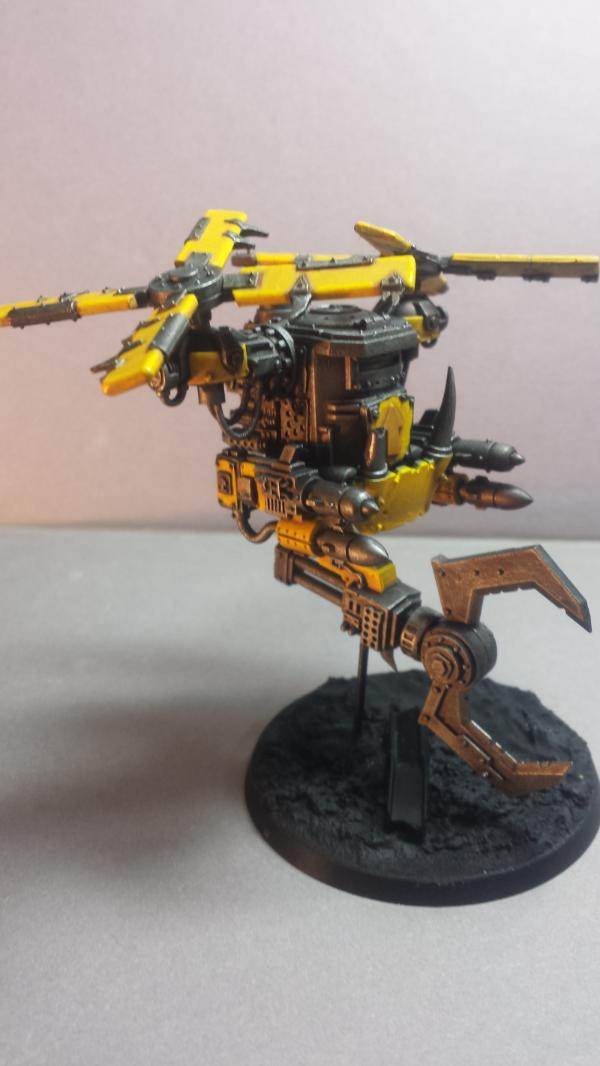
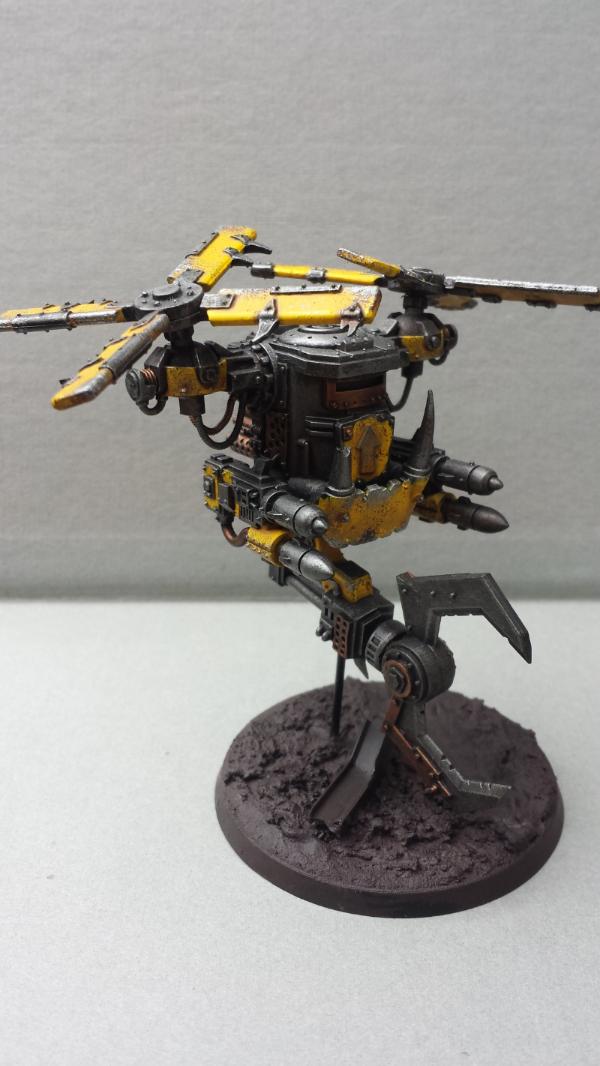
Cheers moonshine, I've got a couple of small areas on the engine to pick out in yellow then I can start the weathering process. After that a few details and the base and it's done. Unfortunately for me thats at least a weeks work.
The metal is easy; Tin Bitz > Mud > dry brush Boltgun > Mud > Dry brush Boltgun > more Mud! > dry brush Mithril Silver > and surprise surprise Devlan Mud again.
I tried that schank23, I wanted a dead Ultramarine, but I couldn't get it to work. Ended up with just the shoulder pad left behind.
Anyway the yellow is weathered and plasticard tubes/rods for the Mek arm are ordered (should be here for the weekend). Anyone got some good reference photos for bionic arms?
Looking good. That's some lovely weathering on the yellow
If you've got some of the kromlech limbs take a good look at them. It's easy to see how they've put them together as a springboard for your own versions.
So that took longer then I wanted, I have my excuses but no one wants to hear them. On the plus side after a two week long fight with the misses I am going to get to turn one of the spare bedrooms into my very own man cave. But first I have to finish the kitchen and sell the massive pile of crap that I collected to sell on eBay.
Anyway thanks monkeytroll the yellow is actually very easy but does come out a little dark. I was thinking of trying to do it a bit lighter on later models but the then the army might not tie together, so I probably wont.
The Kan is kind of finished, I tried to paint checks on one of the rokkits but that didn't go to well so got scrubbed, I might try again in the future. Other then that I got a bit lazy, there where plenty of little details I wanted to try to pick out but I figured all I was going to do was mess up what I had already done. So maybe when I get a little better.
I've been working on a rokkit arm as you only get one In the box, but no photos at the mo, I will try to get some up this week. And of course I'm still painting Boyz.
I have now completely given up on the date I want to finish by. But I am now hoping to get a 500 point army finished by the end of July.
Big Mek
2 units of 10 Boyz
1 unit of 3 Nobz
2 Rokkit Kans.
Yeay Badmoonz The Mek is looking really good were do you get the bionic armes and other bodyparts? I have seen them somewere but I can't remember The Kanz are simply good
They're Kromlech parts Damien you can pick them up at Maxmini or directly from Kromlech on eBay. I checked out your blog you should finish the fighta bomba it should look awesome with all those grots hanging over it.
You know what schank23 I thought about a Shark face but an old skool acid house smiley face would look great. Thanks for the idea, once I sober up I'm going to sort that out.
Oops, thought I'd commented when I dropped by earlier. The kan looks great, and love the look of the base. I wouldn't worry too much about getting different shades of yellow throughout the army, these are orks, they didn't come off a precision assembly line all together
Well thanks for coming back monkeytroll. I suppose your right about the yellow, I must try to get out of that imperial mindset of uniform. On the plus side I have been trying to mix up the colour placement on my recent boyz so they don't end up all looking the same.
Wow so much win on that ebay page you bet Imma get some stuff there I'll finish the fighta bomba probably after the AT-AT and I'm not gonna start on that again untill after the 25th
Been working on the rokkit arm today, I think its done. Going to finish at least 10 boyz before I start painting the Kan though. And I still need to finish my Mek
lol, i just noticed the stolen ultramarine plate on the banner. i shall be looting that please .
as for the rokits on the kan arm, very nice plasticard work there
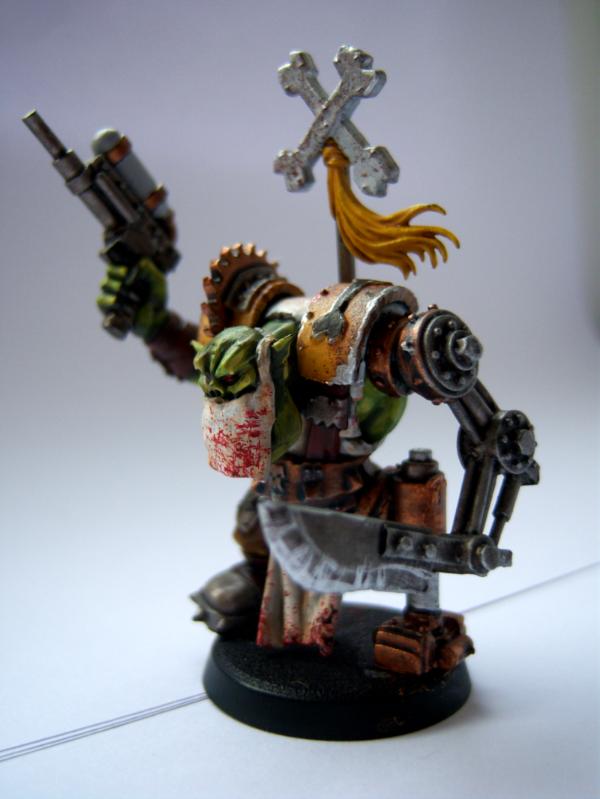
Loot away, I plan on putting bits of looted/battle damaged Ultramarines all over the army. Its a throw back to when I remember Badmoonz being yellow and blue.
Good job saving the finecast big mek. Before you open the next one, check the batch number if you have the old box still, if the batch numbers match you might have a similar problem.
I went through multiple replacements and still only have .99 of a Urien Rackarth.
My thoughts exactly monkeytroll. I hope to use more as my conversation skills and confidence grows.
And finally, I didn't save anything btemple, both Meks had problems that are going to require more effort then I can be bothered to put in at the moment, I'm just going to use them for parts. I hope they (GW) improve things in the coming months, personally I believe they will.
Anyway no real updates to show shh don' tell anyone.
Thanks a big bunch BangBang.
I wanted to use the picture to make a WAAAAAAAAAGH Banner but you were to late sadly I thought it up myself. It looks like yours nevertheless The gun arm is sick I think it'll be hard to tell the difference between Gw and yours.
I'm back, hardly any work done but I figured I might as well show it anyway.
Thanks Ralin, its not to hard to do though, I find painting the base coat harder. I'm fairly sure I posted the tutorial I use on one of these pages if you want take a look at it.
You finished your Waaagh banner yet Damien, I would love to have a look.
So I've finished 3 more Boyz, still took me an age to do but I think something clicked whilst doing them and with luck I should be able to turn them around a bit quicker now.
Put together another Kan, this one has the rokkit arm I built and smashed lascannon on the base. Other then that its fairly standard, I carved off a few of the spikes.
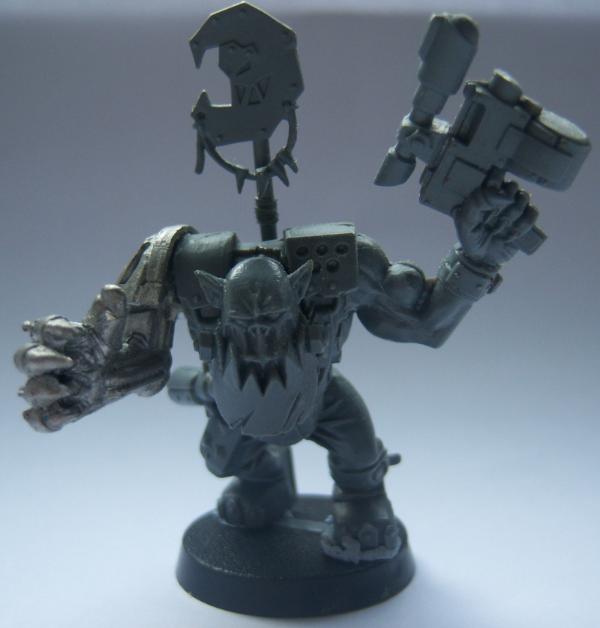
And a Nob to lead my first Boyz mob. Anyone know what the arm's from? I think its quite cool. Puts the model way of balance though, going to have to try and sort that out.
So this week I hope to get 3 more Boyz done and make a start on painting the Nob and Kan. Wish me luck
Looking good, I think that arm's from one of the old tin boyz, I'm guessing the marine one, but can't be sure without looking it up, and can't be bothered opening other tabs on my laptop, it's slower than my painting as is
Thanks Monkeytroll I had a look at the Tinboyz and I don't think thats it (also I don't think I ever owned any). I was thinking maybe its from old style Mega armour? I can't find any photos though.
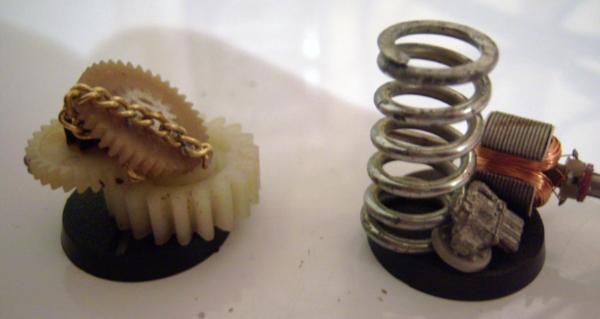
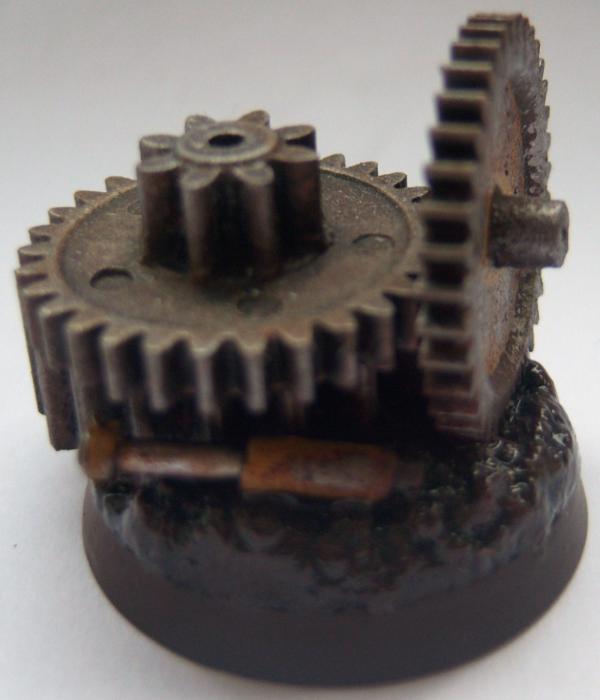
I finished of (well almost) an objective, one of my piles of gears. (Edit; jesus thats a big picture of such as small item)
And my new group of boyz made some progress last night. My new approach is;
base coat the skin
paint everything else in a thin coat of grey or two
fill in the areas I want grey with more coats
base coat the yellow
base coat the brown
base coat the silver
weather the yellow
sepia wash all over
highlights etc on everything but the skin
attach arms
highlight the skin
details and base
This is where I am at at the moment, and I hope to have all the base coating done by the time I hit the sack tomorrow.
Things are on schedule to finish on Monday, a week after I started. Which will be the quickest I have ever painted anything. With this approach I should be able to start batch painting five at a time (if not more later). Finding a grey primer instead of black would speed things up even more. Anyone know of a decent grey primer you can get in the UK?
Oh and I change my base rim colour from graveyard to scorched brown. What do you think looks better guys?
I've still got to do the bases but I was up to about 2am last night finishing them off and I wasn't staying up longer to do the bases. Painting 3 Boyz in one week might not seem like a big deal to most of you but I'm quite proud. I managed to paint (half, its big and split) my kitchen this week as well, two colours 3 coats each. I figure without having to normally do that, 3 Boyz a week should be easy.
Grey primer would definitely speed things up, anyone know what the Army Painter primers are like? I read the coloured ones are quite powdery, whats the grey like?
Come on someone answer me
I also started the Tinbitz base coat on my Kan yesterday so thats my mission this week. No photos because the blurry all browny metal coloured photo seemed a bit pointless to upload.
Boyz look good, and I understand where you're coming from with the time thing, well done. Can't help you with the primer thing though as I've not got around to finding one myself yet
edit: Yeah, not tinboyz. Think you're on the money with mega-armour though, found a few variations on a bad moon boss in mega armour, not seen that particular arm, but there were obviously a few variants doing the rounds.
Cheers guys. Yep time's a bitch, most nights I don't get to sit down to paint till 11 at the moment, its all that damn womens fault! Think I might try and get down to the store next week to pick up the AP primer, I guess the only way I'm going to find out what its like is to try it.
DeathGod wrote:Where did you get the gears for your objective markers? I've been looking for some and keep not finding any for a price that's worth it.
Old printer, old tape deck, old toy? To be honest I don't remember but I get plenty of old electronic items come though my work and the items that are no good I take a hammer to. They would have come from one of those items.
Heres a tip. Don't knock your newly purchased trukk of a 2.5 meter tall shelf.
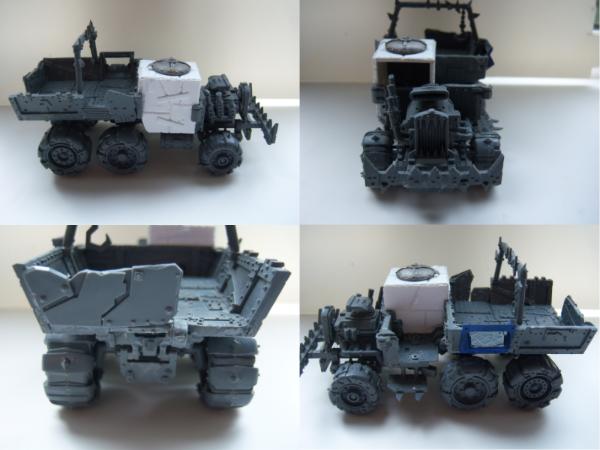
I completed a trade with The Great Wolf for a Megaforce today (well almost still got to send my stuff). All on the sprue except for the trukk which he had built. Five minutes after I had received it this happened.
So anyway my army is growing but most of it is still on sprue.
What have I been up to since finishing the Boyz? A new Kan. Unlike the first one I haven't glued the arms yet as I want to try and hit more details this time. He took a little longer to base coat then I wanted (days ) mainly because I was a little stingy with the primer so the Tinbitz didn't cover very well. With a little luck and a bit of elbow grease I should get him finished by the end of the weekend. With even more luck I will get the Nob for the Boyz finished as well, then I can get a group shot.
Back to painting then I suppose, damn distractions.
Thanks for the complements guys, they do help to encourage me. Your right of course MrH I shouldn't care but I really really want to get this Kan wall detachment done so I can play a game. Things don't stop there though, I've also got most of a 1500p speed freaks list sitting on sprue to build afterwards and far to many Orky army plans bouncing about my head.
But back to the first army, another Kan "almost" finished. Still got lens to do and I think I might add some more stuff to the base. To be honest I'm not all that happy with it but meh, time to move on, got a whole army to paint after all.
Well thats it. Weather has been great here so no time for painting, and this weekend the better half has me going to Epsom for a wedding so no time for painting. Damn all these demands on my time, I need time for painting.
I did pick up a kan of Army Painter Primer though so I hope to at least get some more Boyz primed. Don't know what the quality is like but the price is much better then GW
Cheers again monkey, when it comes to the Bad Moon colours I defiantly prefer the look of yellow and blue to yellow and black.
I forgot to mention although I've had no time for painting I have found time for destruction. Figuring the the truck would be easier to paint in pieces and it was already half demolished, I went to town. It's going to be painted in the traditional red in the end but first I'm going to spend the next few weeks piecing it all back together to see what I can come up with.
Slow?!? You don't know the meaning of the word slow! (for a more accurate definition - go check out my blog! ***shameless plug***)
Surprised I hadn't seen this earlier - it's right up my alley! Great conversions and painting - I'll be watching!
(Might have to try that Burna/KFF combo myself if/when I get around to another Big Mek... oh that's right - still need to finish painting my current one - and I started, what 18 months ago???)
Oh I've seen your blog Arakasi, it was one of the first blogs I started reading when I found Dakka, before I had even signed up (excellent conversions, painting and combining the two army's I collected as a kid) In fact I think it may of been the first few pages of your blog; the trukks, Mek with servo harness and Kopter you use as your avatar, that inspired me to dump the reboot of my Dark Angels and pick up my Orks again.
And 18 months thats disgraceful, you should be ashamed
Been working on my trukk this week, a little break from painting. After breaking it into even more parts then the fall, I discovered a few things. First was that a few parts were missing, maybe they had never been included in the original build or maybe they are still under the shelf in the stock room I will probably never know. Some like the drive shaft were easily replaced, others were not, the steering wheel for example presented me with a problem. Second was that the construction of the crew wasn't quite to a standard I was happy with.
So my solution, build a metal box to protect the hidden driver, it's still very much WIP. Oh and number plates why don't more GW vehicles have number plates.
They must be cheating schank, I refuse to believe claims to the contrary.
Finished the basic build of my cab/cockpit/metalbox (?) and started on the rivets, I am quickly coming to realise that I hate cutting rivets. I am sure that there was a UK web store selling them but I can't remember who. Anyone have any ideas?
Thanks monkeytroll I might give them a whirl. Although I actually started to enjoy riveting after doing it for a few evenings , now I've finished I'm looking around for more stuff to add rivets to. Thats it for the Trukk for now, going to put it back in the cupboard. I still need to sort out a gunner but I will do that later it was just a distraction from painting after all.
So on to my experiments with primer. I pick up some Army Painter Grey Uniform a few weeks ago and finally got a chance to use it today. This it what it looks like encase you don't know (Yeah to using up bandwidth for pointless photos)
The first thing I primed was the Boyz bodies, and I was quite unhappy with the results. Very course and powdery finish, I have no idea how its going to take paint but I figured I would chip on.
So I then primed the arms, these came out a lot better. I think it was due to the distance I sprayed at, The Boyz were done at about 12" whilst the arms were more along the lines of 6". So now I have a dilemma, do I try to strip the the bodies and re-prime? or leave as is and see how they take paint?
Oh yeah it's worth mentioning that I abandoned the potato, I've found sticking to a sprue much better.
Hmm, I'd say strip 'em. Powdery/grainy primer just leads to dodgy looking paint-jobs, and it's not like you're losing hours (or even days/months/years/decades) of hard work if you do it now.
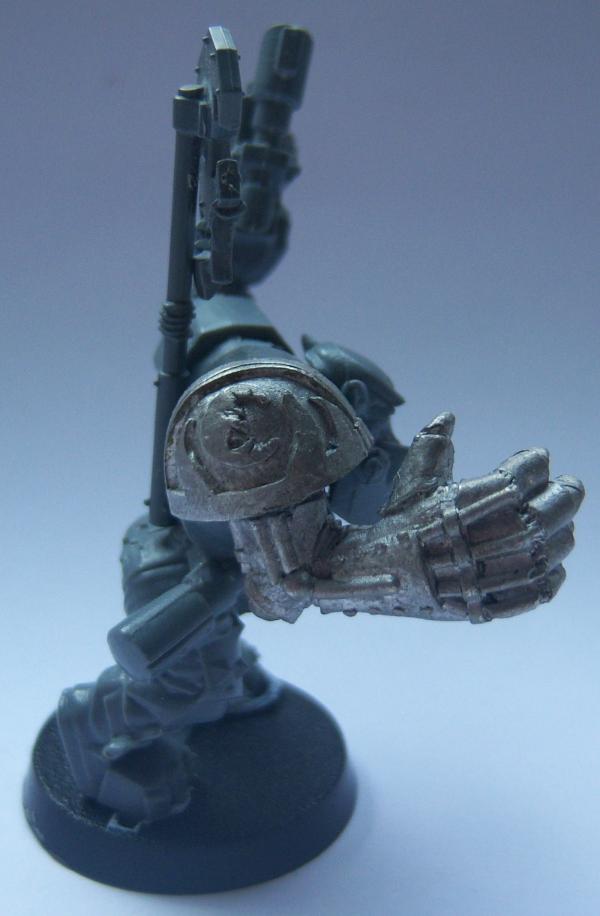
Nob for my Boyz almost done, just the lens and the base to go. I'm actually quite happy with how he turned out, a few things here and there I wish I had done differently but its the first paint job that is close to the the image I had in my head when I started.
When I finish going to take a squad shot, might try to knock some terrain together for that though.
Wow just seen your thread from your sig when you posted in my thread and I have to say your orks are fantastic your yellow is Killer !!!
Keep up the good work
So my life has been a bit hectic this last month. Works been busy and my laptop blew up (well HDD failed). Checked in on here a few times on my phone but its not the same you know. I still found time to do some painting a little bit of modelling and fixed the laptop so its not all that bad.
Anyway photos, I downloaded Gimp to see what it was like. As a general rule I don't like doing anything other then cropping my photos because I don't have a clue what any of those fancy options do. On these I just tried auto adjusting the white balance and sharpening the image up. The original image is at the bottom, which one do you prefer?
Thats one of my Cybork Nobs from the start of the blog. I hadn't planed on painting him as the Nob squad isn't going to see action until I get to 1500p and well, I'm still trying to get the first 500p painted. But he was primed and I just haven't had the chance to prime anything lately so I figured what the hell. Going to use him to lead a boyz squad in the 500p list for the meantime.
And talking about Boyz
Yeah I know blurry isn't it, I just couldn't get the camera to focus properly. My first 15 Boyz, all based and everything. Didn't get any terrain done to take a photo on though, just not enough time.
So what else have I been working on I hear you ask, what you didn't, tough gonna tell you anyway. I got no photos though so you will just have to take my word on it.
I actually got around to starting the arm on my Big Mek, need some more supplies because none of my rod is the right size for fingers. Got a new Kan on the go with a looted rokkit launcher which is looking good. Oh and my Mega gargant for comp, thats coming on, ish, kinda, well slowly, very slowly. I have a funny feeling it won't be finished on time
Anyway will try to get some photos up of those bits later in the week. Now I'm of to see how many blogs I can catch up on before BF3 beta starts calling again.
killer nob. Looks like something monkeytroll would come up with. And I'm a huge fan of his work. Those boyz are very well done. Loce your yellow. Not sure if that gear base is an objective marker but really like that also. Nice to have ya back.
Got a bit of work done, don't worry though it wasn't to much. Third Kan is basically finished, the base needs something still, but its painted.
I've painted a hand full of Boyz and I got around to painting my pain boy. He still needs his Hurty Syringe finished but first I need to find out how to get that liquid in a syringe look, any ideas? And basing of-course, I've got a few bits of basing to do but I am waiting to do a batch.
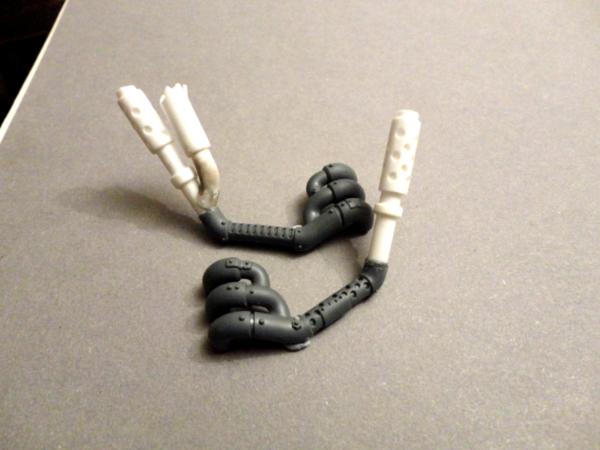
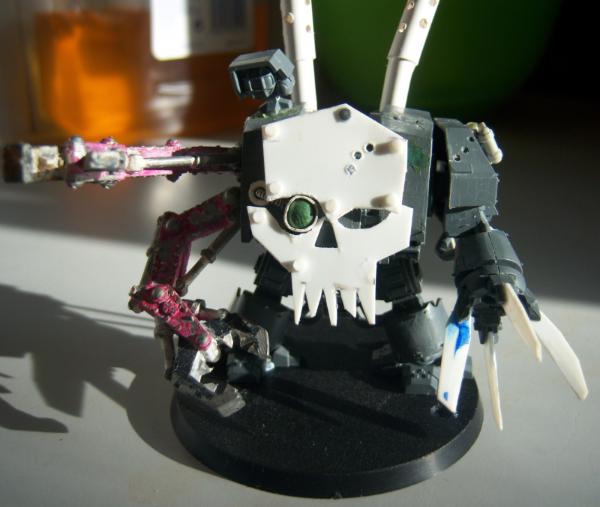
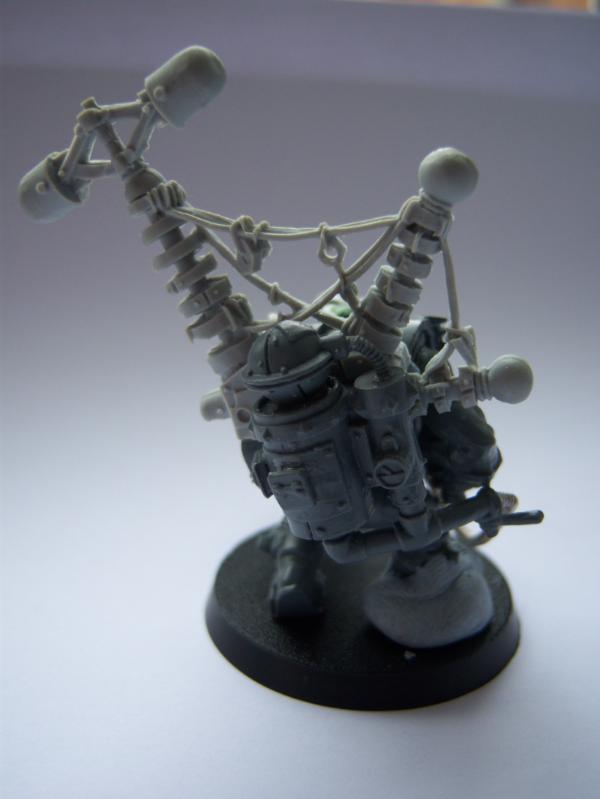
I finally got round to building the arm on my Mek and I decided to go with a different head, I hope you like it. The build is more or less finished, I plan on trying the hot salt technique to reposition a leg, and the base will need a raised bit for his other foot, other then that I think he is done.
Nice Painboy. I used the technique in the 'Eavy Metal Masterclass book (for Urien Rakarth) for mine - I can give you the steps if you want. How did you do the blood? I still have to do that on mine...
The front of your Big Mek reminds me of mine (so obviously cool!) - though obviously different from the side and back - nice.
Thanks Monkey, was nothing major, just a trukk load of little things compounded by Christmas. All sorted now though, and I've got a new laptop
Its one of my fav's as well TaWaaagh, thanks for dropping by.
It's ok Arakasi, I found it online just what I was looking for. The blood was done with a sponge (most of my painting is it seems) I mixed a red with a brown in to two shades one dark one light. Sponged on the dark first then the light. With hindsight I wish I had done more dark and less light.
Hows your Mek going, have you painted him yet? I've got some serious plogage to catch up on but they've got so big its a bit daunting. Think I will spend Monday catching up and see if I can fill the whole front page with Ork plogs Hehe.
All welcome Swordwind, hopefully the paint job on my Mek will do him justice... when I get around to it.
Anyway my water effect problem. I tried to mix paint with water effects to create a wet paint in a bucket look. For some reason it pulled away to the side leaving a hole in the middle? Any idea what I done wrong? how to fix it? Pics below
Started to slap paint on some Boyz with big shootas as well, just to proof I've started working on my Waaagh! again.
Yeah I tried that Arakasi, twice I don't know where the water effects go but each time it drys I am left with that hole, very strange. I suppose the best thing to do is fill it with GS and try again.
I tried the salt technique for bending plastic tonight in an attempt to reposition the legs on my Mek . I have photos if anyone wants to see them but they aren't very good.
In summary its a bit rubbish. The process might work for bending thin things like tails and whips, anything thicker though and the plastic on the outside deforms before the middle is flexible enough to bend. I almost got the feet into the position I wanted and I should be able to fix/cover up the damage done. In the long run I think I would be better of attempting to learn how to sculpt legs though.
Finished the AOBR big shoota. Base still needs doing of course, should be doing a batch of them soon. I tried highlighting the muscles with a sinewy look, it defiantly needs improving but that's what practice is for. Tried some highlights on the fabric as well, something I don't normally try (normally just wash) that had mixed results I feel. Overall I am happy with the results.
Going to practice a few more things and then I think I will tackle my Mek, getting quite excited because once the HQ is done I will actually have a legal and painted army, a small army yes but these Waaagh!s have a habit of growing so I am told.
Going to wait for 6th to drop before I learn the game though. No point learning 5th ed rules now is there.
Anyway some slightly out of focus pics;
Happy painting
No actually he isn't finished just noticed the stitchers on the back
Ha, these Orks are really awesome! I love your conversions and painting! Your yellow and the weatheringa re suberp, I will DEFINETLY be following this!
edit - Cheers Mr Merlin, you snuck in there whilst I was composing this post, all are welcome - /edit
edit II - today was a bad day - /edit
"One boy at a time, your get there in the end." That's what I keep telling myself, but secretly I feel that I am lying.
Another boy finished(ish) last night. Found the head a little tricky on this one, couldn't get the mouth the way I wanted and that damned missing eye. I missed loads of mould lines and he has a weird lump on a tooth, don't know what happened.
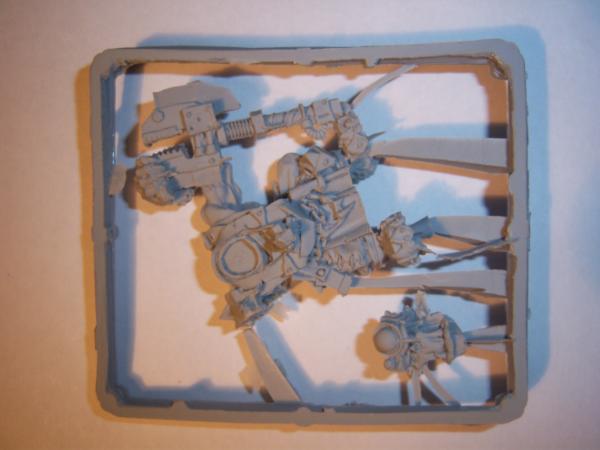
Also had a little luck on eBay and this turned up today. My first Forgeworld model and boy is it bad.
I was expecting a little bit of work but whilst trying to dry-fit I discovered that nothing fits, NOTHING. Just as a quick example; the wheels dont fit on the rear subframe and will need the holes made bigger, the rear subframe is warped and will need straightening, the socket it attaches to the main frame with is also warped and will require removing to get a tight fit, the part by the springs will need resculpting as well as it has been removed from the sprue to close to the model, the pins on the main frame dont line up with the jet engine etc etc thats just the back end. Oh and you get no instructions, just a list of parts and a few photos of the finished model.
Because of this I am going to put up stage by stage updates as I do them. It might help someone else.
No rush though
Seriously no rush, I want to get this Badmoon army finished in time to learn the game when sixth drops. Thats what four months? time to pick it up a gear.
Not tonight though, today was a bad day. Staff sickness, six or seven separate visits from the police, shoplifters, scumbags and arseholes. So if I sound like I'm in a bad mood I apologise.
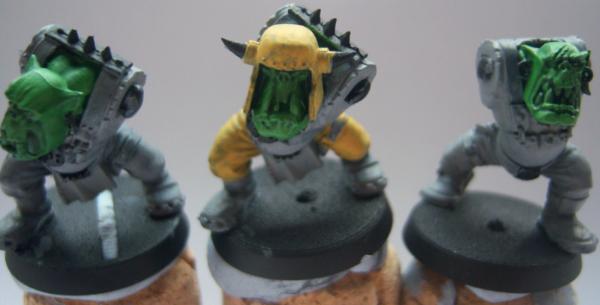
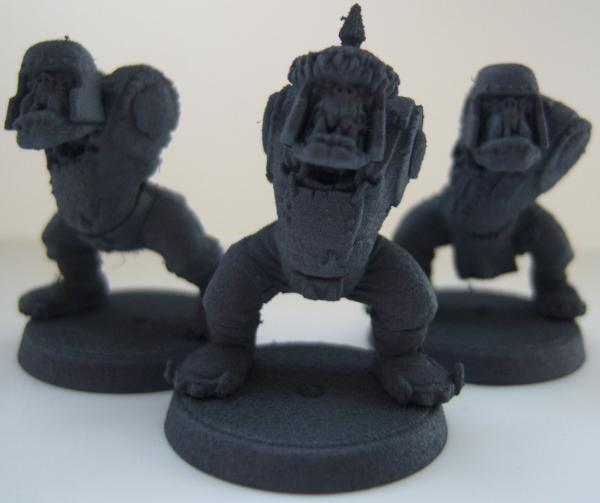
I spent the day building some Boyz, I wanted to achieve two things; Make them look more bad moony and add some variety to the pose. The Boyz are meant to be wealthy so to try to represent this I spruced up the shootas a bit and add pouches where I could, its not a lot but I think it helps. One of them is so wealthy he can afford two shootas
The poses where a little more tricky. As I'm sure most of you know there isn't a lot of variety you can get with the shoota arms, my Google-fu wasn't working, I literately couldn't find anything on converting the shootas. I did find lots on turning AOBR boyz into Shoota Boyz though. Anyway you can see the photos below, I've got a bit of greenstuffing to do to finish them and some heads will be swapped but the basic pose is done. Only got four of them done because I'm a slow arse modeller as well as painter.
I hope to get them finished and primed by Thursday, then with a bit of luck I will see if I can start and more importantly finish the painting in one day.
And if anyone can point me in the direction of more poses that would be great.
You call that slow? Some nice poses there. For some reason I particularly like the last boy - can't put my finger on why though....
A lot of the advice on AOBR can be brought across to the Shoota boyz - changing the angles of the arm, cutting at the bands, gloves, etc to rotate to new angles etc etc
Sorry Arakasi will try to lower my productivity a bit. Don't want to get a reputation.
Thanks for the pics MrMerlin Iove the angry(ier) boy
Things didn't go to plan last week the damn weather did not lend itself to priming, which slowed things down. I did try though, honest. I even gave using gesso a go which did not work. I read you can use it without thinning but my experience differs quite a bit. Luckily all I ruined was an old and broken 2nd ed boy so no harm done. I think I will try again, thinning it a little and adding some paint in the future, but if anyone has experience using it as a primer then I am all ears.
In the end I did get some priming done and even started painting.
I HATE BATCH PAINTING.
There I said it, I don't know why I still even try painting like it. I find it boring so end up trying to "rush" it. This leads to a sloppy base coat X(number of models). The biggest problem is that looking at this is the most unmotivating thing ever.
A bunch of half basecoated boyz, which have been sitting on my table for almost a week now. I did manage to push on and get one more or less finished though.
Cross fingers for a burst of productivity and an update at the weekend, I might get another boy finished .
All my skin is done in the same basic way. Choose a random green as a basecoat. Mix in a random beige/cream colour with a little random yellow for the highlight. Keeping lightening the colour though the highlights, normally in about five layers. I follow this with green and brown washes to smooth the transitions and darken if necessary.
I don't have hard and fast skin recipes that I stick to. Because of this I tend to paint all the Ork flesh on a model at the same time, and I don't worry about it matching the other Orks. They are Orks after all and variety is target.
The Ork in question was painted like this...Maybe?
DA Green
DA Green/Catachan (maybe 30/70 or 40/60)
Catachan
Catachan / kommando khaki / darksun
add a little more kommando khaki to that mix
and then a little more
wash thraka green thinned a lot at least 50/50
wash devlan mud thinned.
Hope that helps.
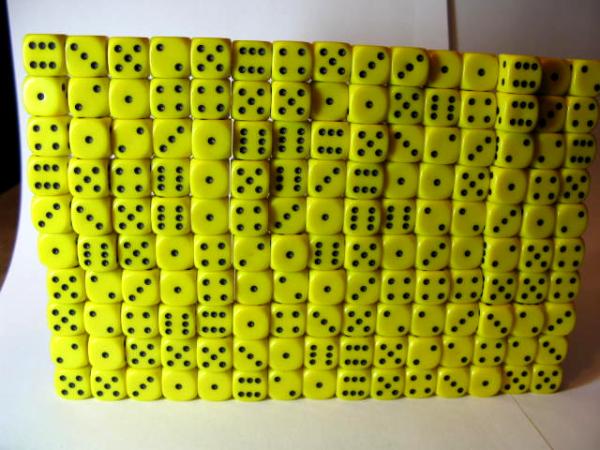
Oh I forgot to included this last night. I had 150 yellow dice arrive yesterday, I don't think I have ever had so many dice so decided to take a photo
Thanks SelvaggioSaky should be doing some more soon.
I've had camera problems again, I think I'm on my 5th now in the last 12 months anyway finished work early today so got to take some photos in some OK light (not great, just OK). BST starts this weekend though so longer evenings and easier photos
A few things to do to these boyz before they are finished but they are 95% done.
A Nob for my second boyz squad, fairly standard to be honest. The only real conversion was to reposition the slugga hand in a more gangsta pose. The body is from the Nobz box, the arms and accessories are from the Nob in the Boyz box. Surprisingly I found the bits from the Boyz nob were a little smaller then the bits from the Nobz box. This is him built minus boss pole, some bits are still blue tacked though.
So right now I'm basing the last 10 Orks I painted. My hope is that by the end of the weekend to have them done. I also want to get some greenstuffing done to bulk out the Nob's arms and my Mek needs a little GS. With a little luck I should be able to get them primed this weekend as well.
Thanks MrMerlin it's something I'm still trying to get to look right but practice makes perfect.
So here is my converted Landraider. What you weren't expecting 40k scale were you? Its my Orky EOD bot
That's a lie, no explosive disposal going on here.
I was digging though my bits box looking for things to decorate bases with (which are all done now) and he just came together. It will count as a boy with big shoota in my 3rd boyz squad. Which is going to have more of a cyborg feel even though they will be played as plain boyz. The plan is to make an ork with a remote to control it. Anyway a few more boyz started to come together as well but the 3rd squad is well down on the priority list, it's just a little teaser.
Been trying to bulk out the arms with green stuff on the Nob but that's not going well. Truth be told I hate the stuff.
Loads of work to go. I'm trying to work on each muscle group one at a time as I tend to mash previous work with my fat fingers. I did get a strap on his knife though and his boss pole is done.
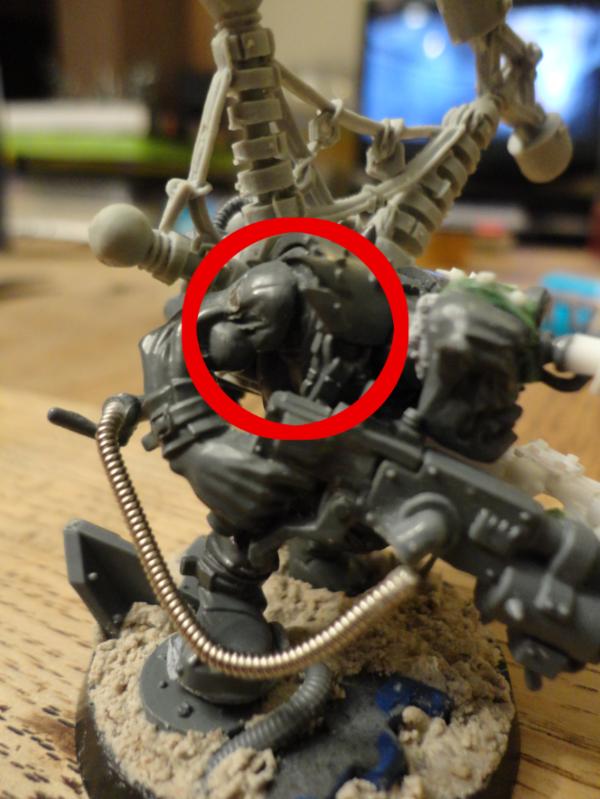
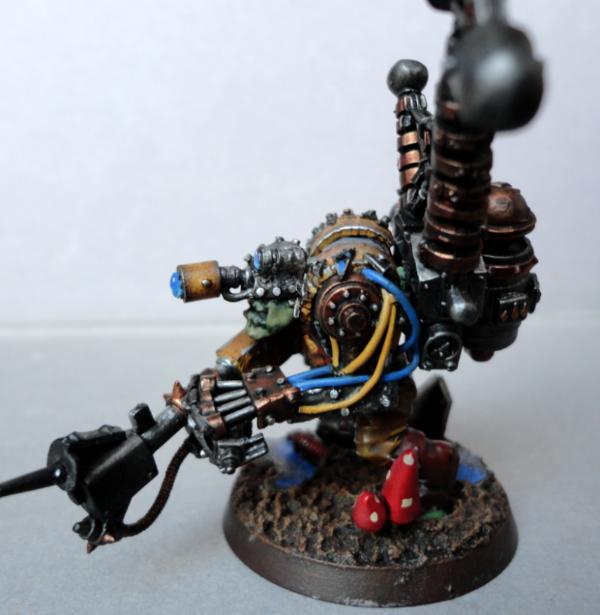
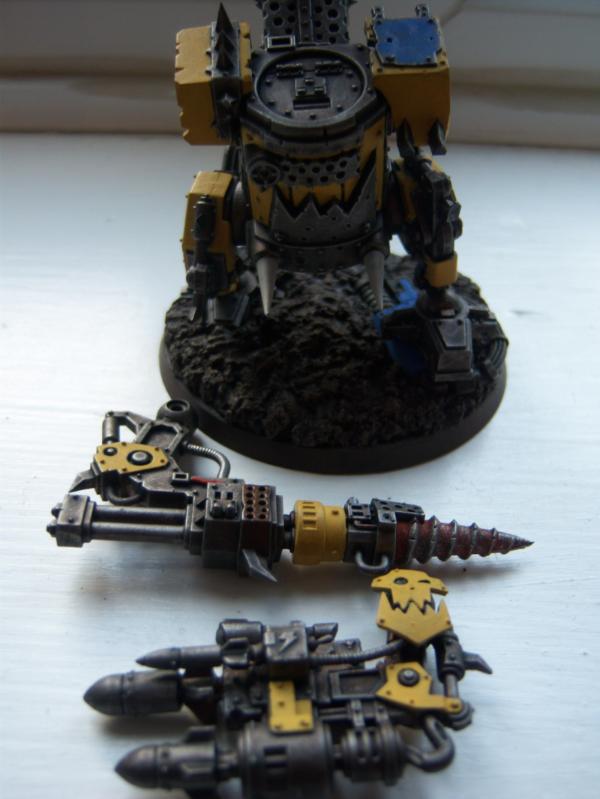
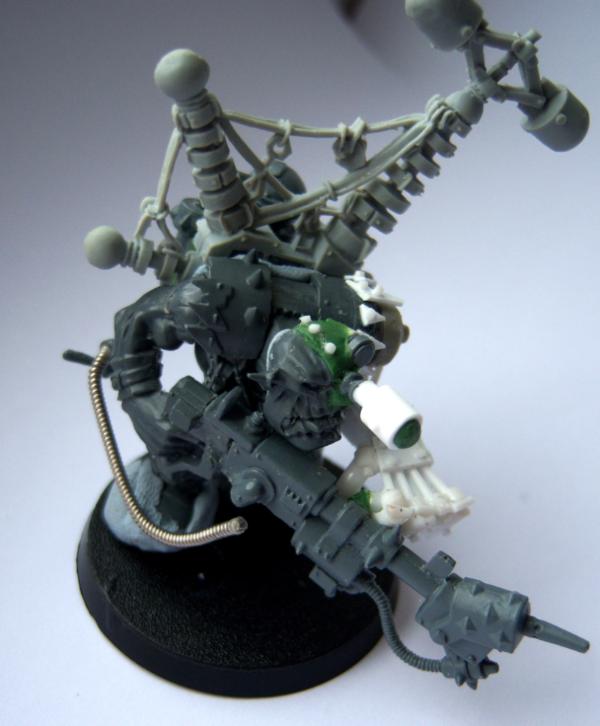
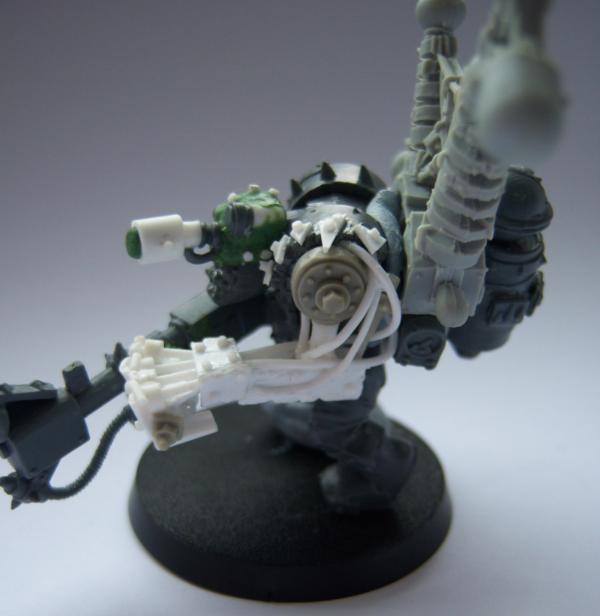
Lastly I am having a problem with my Mek. Here he is
I built him so that I could paint in parts and then construct
But I have this big gap
So I have two choices
1/ Sculpt the shoulder and make it big enough to fill the gap
2/ Build and paint, then fill the gap and repaint area.
Personally I am leaning towards option 2 but I am looking for opinions on the best way to tackle it.
The cybork boys are looking really cool, mate! get The Mad dok, then you can use them as cyborgs as well! Though its not very competitive......
Also, I think I have said that before: I love that big mek, great looking conversion!
I'd advice you to do it the second way, the model will look cooler in the end cause the painting will be easier!
Thanks guys, I figured I should post an update on what I've been up to.
I spent a few days trying to fit a shoulder pad in a way that I liked the look of, a real simple idea Arakasi I can't believe I hadn't thought of it. Unfortunately I couldn't find anything that would fit in a position I was happy with and still do the job. In the end I bulked out the joint by putting two small squares of plasticard over the pin, clipping them to size then smoothing it with green stuff.
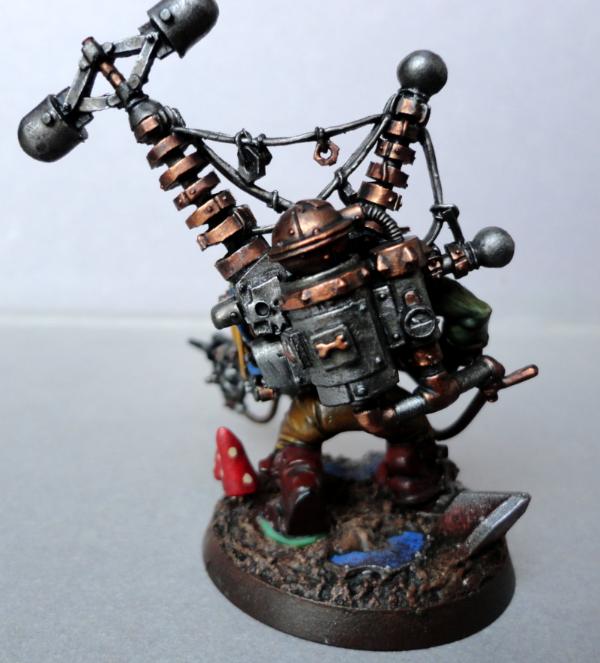
Anyway here is where I'm at with the paint job. I still need to start the actual KFF but the Mek himself is almost finished. A few details and touch ups then I will glue him together.
Hope to get my next update up a little quicker then this one.
Thanks guys, I was a little worried the blue was to light and was thinking of doing it again, but as everyone seams to like it I will leave as is.
No photos tonight I didn't feel like tackling some of the finer details so started on the KFF instead. Just two coats of Boltgun and I don't feel thats photo worthy. So many nooks and crannies on it, its going to be fun to paint but a little tricky I think, I wish I had spent more time cleaning it up though.
Dakka is a great place and if your looking for some more inspiration check out some of the links in the signatures of some of my other commenters (is that even a word, spell check is flagging it) commentorscommenties followers
They have some great work and are well worth looking at.
Over the weekend I finished of some details on the base and the metal on the KFF. I couldn't figure out exactly where I wanted colour on the KFF so decided to construct the Mek to get a feel of what the model would look like as a whole, that is where things started to go wrong.
First the gun arm. I used a pin, not so much because of the weight but to get and keep position, this pin was tight but I didn't think anything of it. I put some super glue on the joint and pin and went to insert it. All of a sudden it didn't fit flat against the body any more. I guess the glue added a little to much thickness to the pin. It is just a guess though, to be honest I don't know, this is the first time I have pinned anything and it did fit before the glue so it must be the glue right?
So now I'm pissed.
With some not carefully enough applied strength I manage to pull the arm back of. Breaking one of the spiky bits on the should pads in the process.
Now I'm getting stressed. I don't deal with stress to well, I tend to start reacting in a rushed manner without thinking. I should have stopped and taken a break, but I didn't.
So I repaired the shoulder pad and then went to work on making my pin hole bigger, to big. Try and glue it again and cant get the position, pull it back off. By now everything has a thick layer of super glue on it and I have to start scraping it off. I've also noticed that I am starting to ware paint off and the anger in raising. But result the arm fits and is looking good but...
I CAN'T PUT THE MODEL DOWN IT IS STUCK TO ME!
I must have got some glue on my fingers and now as I prise my finger free the paint is pulling away from the model and staying on my fingers.
I manage to stop myself from tossing the thing across the room, and finished attaching the KFF determined to get this bloody model together.
Unfortunately though by now the wife is getting an earful, some how by this point it had all become her fault, an accusation I later had to apologise for.
I wanted to try and fix the paint but by now I realised I was doing more harm then good, both to my model and my marriage, so I went to the pub.
Anyway photos, damage first.
And then more WIP shots.
So I'm going to try and touch up the damage, maybe just cover it with an armour plate. I might have to repaint the whole arm if I can't get the touch up to match, something that will be more difficult now I have finished construction.
What have I learnt?
When things are going wrong take a step back don't keep pushing on, you will make it worse.
£1 shop super glue comes in crap tubes, pay more for a better pot in the future.
Don't blame the wife
Anyway I think I'm going to take a break from the Mek, come back to it in a week or two.
That would have stressed me as well, but You can work It out I think.
Your Mek is already half cybork, why don't You try to fit a little cable on the harm to cover up the damage, like out and in the skin in the places where the paint came off?
It might work...
Anyway, is coming out awesome!
Hey Bangbang - I've felt your pain in pinning in the past. Biggest issue for final fit that I've had is getting the two holes to line up. If they don't line up, the fit will be off right from the start.
Not sure how you handled that, but here's how I've learned to deal with it. Before drilling any holes I put a small dot of red paint one side of the joint. Then, while it's still wet just touch the other side where it should fit. This give me two sides with small red dots that match. Drill the holes on the red dot and the two parts should mate well. It's not a perfect solution, but it makes it much more likely to get a good fit.
That Mek looks great though. I really like the skin tones you've got on there and the weathering on the yellow is great.
So my plan to get a 1000p army painted in time for sixth went to gak when my wife became ill. She's on the mend now and I can spend a little more time on myself, I might even update this blog semi regularly . I've set myself a new deadline of the end of August, that gives me what six weeks, yeah "plan on success but expect to fail" is my current personal motto.
No progress made on previous projects at all but I will finish that Mek soon promise, thanks for the encouragement, with hindsight the damage isn't to bad and should be easy to fix.
Spent the last two months mainly conducting myself in the practice of retail therapy. No real aim just buying bits from 3rd parties and loads of plasticard but I did get a airbrush that I haven't had the chance to bust out yet. I have plans to practice using it on some terrain and then to paint a bike/truck army. Oh and I got sixth rule book of course.
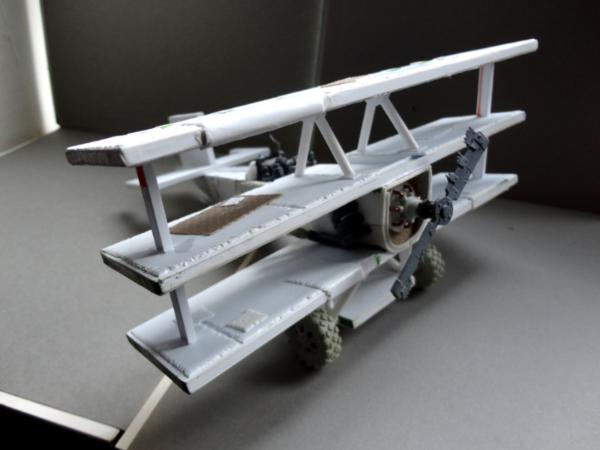
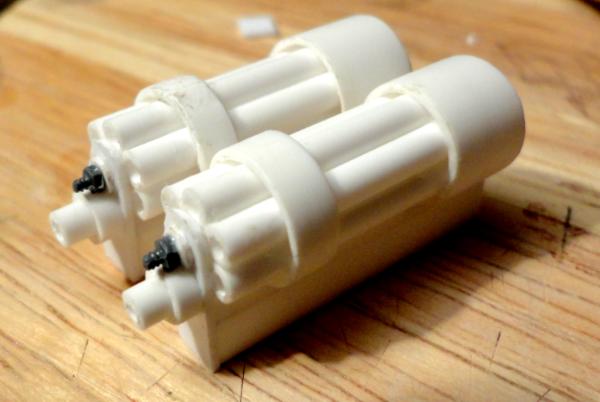
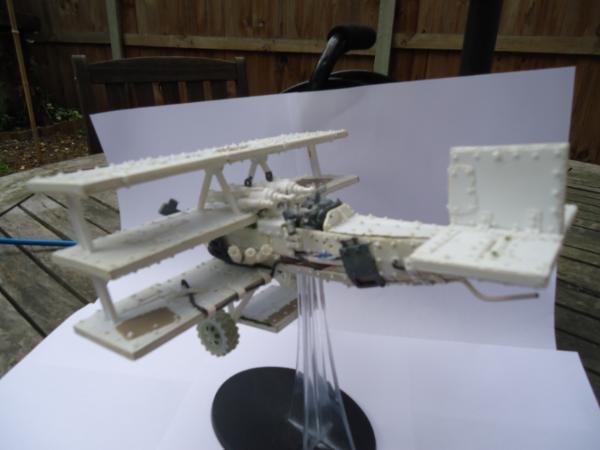
Anyway you didn't click the link to hear me ramble on, so the Dakkajet. I did buy a real one but although I don't think the model is bad I just didn't get excited about it. So decided to build my own. Still some plating to go and hundreds (if not thousands) of damn rivets before I even think of paint.
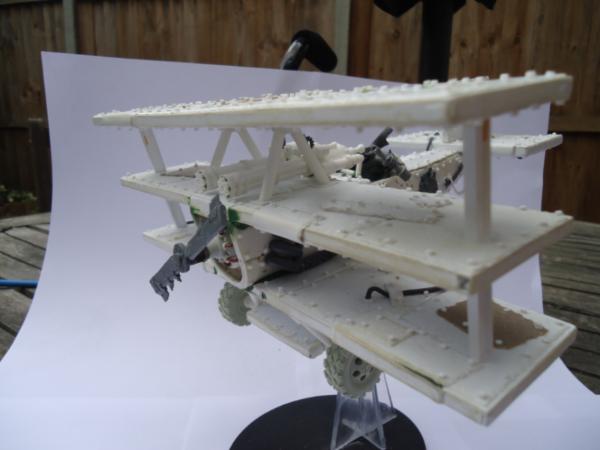
So what do you think? Its obviously based on the Fokker Dr.I triplane as made famous by Manfred von Richthofen (the red baron). What should I do about the six super shootas? I did think of putting one on each wing but I think that may look naff. My current plan is one of two big ass mini guns in the middle. Not strictly WYSIWYG but it will have 6/12 barrels so that should be ok right? Right!?
welcome back!
The Red (go fasta) Baron looks awesome, nice job man. I would put as You said two minigun together just above the rotors, It would look more balanced.
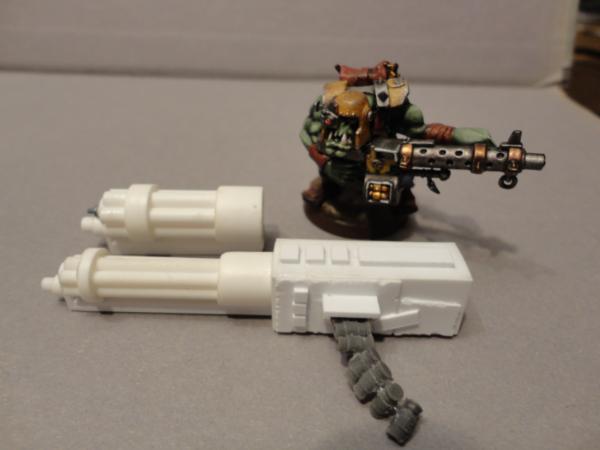
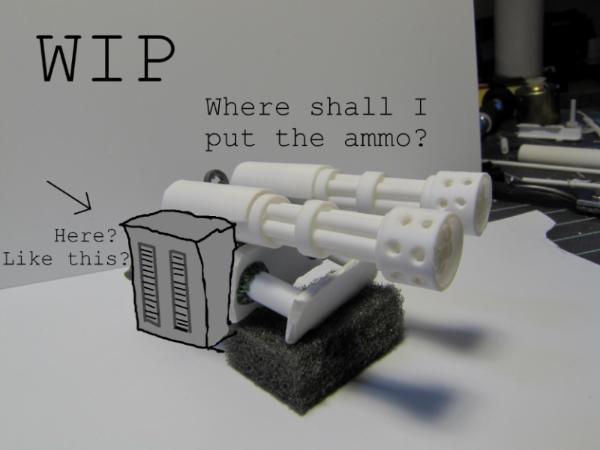
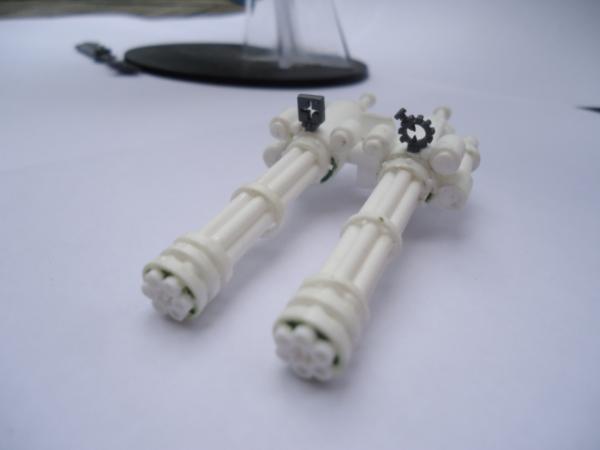
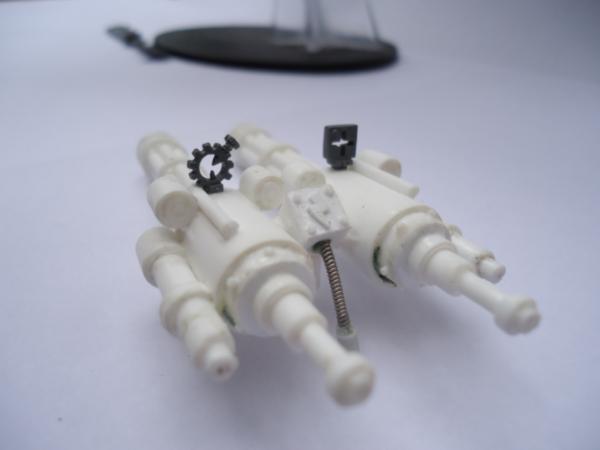
Super Mega shoota (got to call it something ) v2 is still to big. I have some scale shots comparing v1 and v2 for your viewing pleasure but I am going to try again. Got some ideas on how to add some interest to the erm body? of the gun, make it less of a box. I did take some photos to do a mini tut as I went, will see if I can put them together. Here's a scale shoot of the shootas
And I found the gun originally used on the Fokker was a Vickers MG and although this isn't exactly a faithful reproduction by any measure I figure its worth keeping a pic for reference.
Really liking the look of the new guns and the exhausts, you just need to put more rivets on them. Especially ork things need plenty of rivets!
As for the miniguns, bigger is better!
Have a look at this WIP of my trike for ideas.... Maybe do a half-round body to make it look less blocky?
Still a bit stuck on the gun problem, mainly because I have put very little effort into solving it. I have continued to work on the plane though, adding details and rivets, lots and lots of rivets.
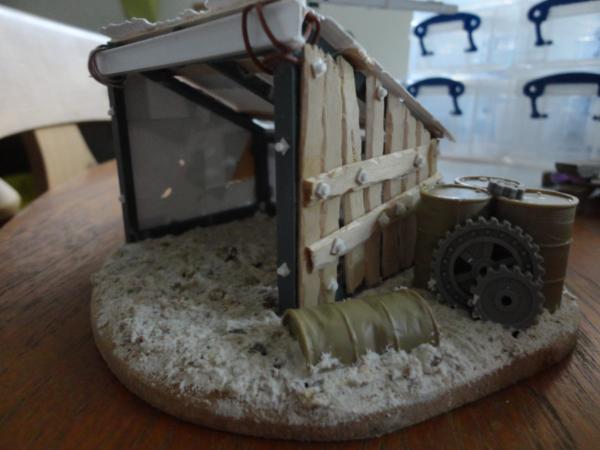
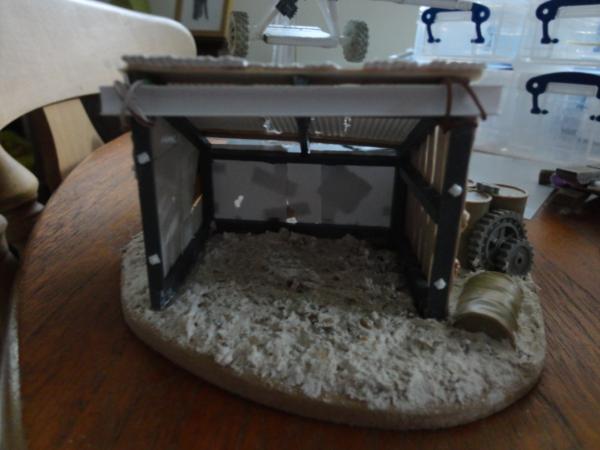
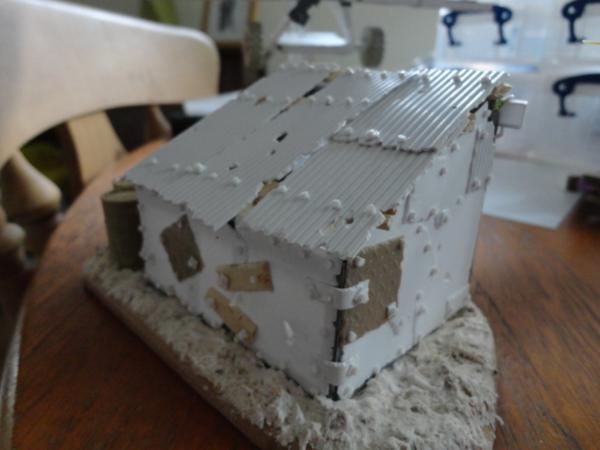
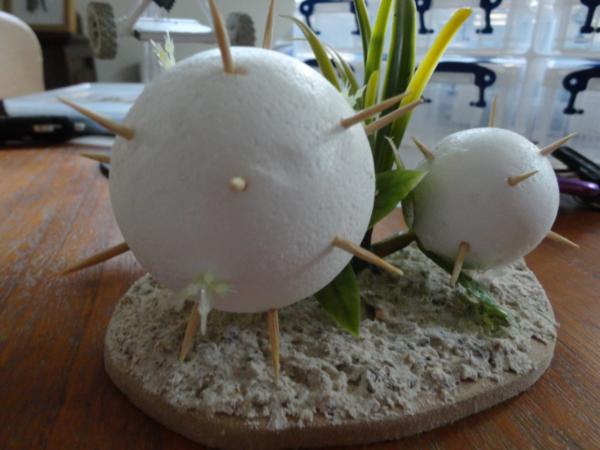
In other news I bought a airbrush and compressor about four months ago, but I'm one of these guys that puts of doing new things, especially when there is a risk of trashing expensive models. So I decided to build some small scenery pieces to test the airbrush out on. I've built a small scrap shack/shed to store gubbins in, and a spiked plant thing inspired by the old GW cocktail stick cactus.
So watch this space you never know this might be the month I pull my finger out!
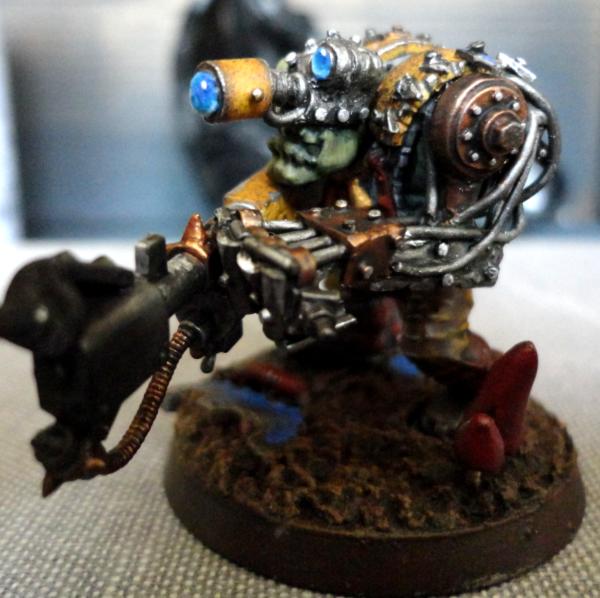
Also, what colors are you using to do your brass on the Big Mek arm and KFF? I like the effect, and I'm not quite getting there with the new GW metallics.
Maybe I've been a little neglectful, but time being the most valuable of resources has been spent elsewhere. Fear not though, for I once again I have time to waste direct towards valuable hobby. projects.
My Dakkajet has been safely stored on top of my fridge, where it successfully managed to collect a layer of bacon grease. Months of procrastinating went by, should I clean it? Should I finish it? I really should clean it but in the end though I figured screw it, carry on with the model and clean it afterwards.
And that is where I'm at. Model finished, time to give it a bath in hot soapy water and store it somewhere better until such a glorious time comes that I feel comfortable to throw some paint on it.
The gun has been reworked, hopefully if I get to field it it will pass the rule of cool and people wont mind counting it as three twin linked Supershootas. The pilot can't see a damn but... Waaaagh!!!
Oh and rivets so many rivets, over 800 I think.
So pics, I grabbed these outside today, it looked like rain so they were taken in a hurry and look a bit shaky but I'm sure you get the idea
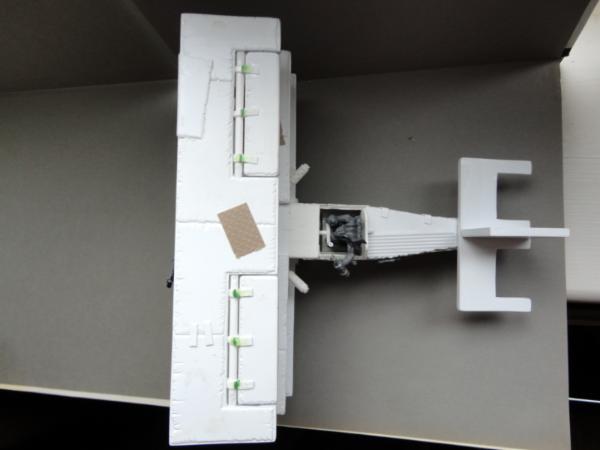
I've also been working on some Kans and a Dread. I should be able to grab some photos of these next week but I want to dig out my tripod first.
A quick question though. I have some off-road resin wheels, imagine you are looking at them from above, driving up the page, should the tread go like this.
/\
/\
/\
or like this?
\/
\/
\/
I feel less manly for having to ask but you know what they say, There are no stupid questions, just idiots.
I know I just couldn't fit them in without making the guns far to small. any ideas?
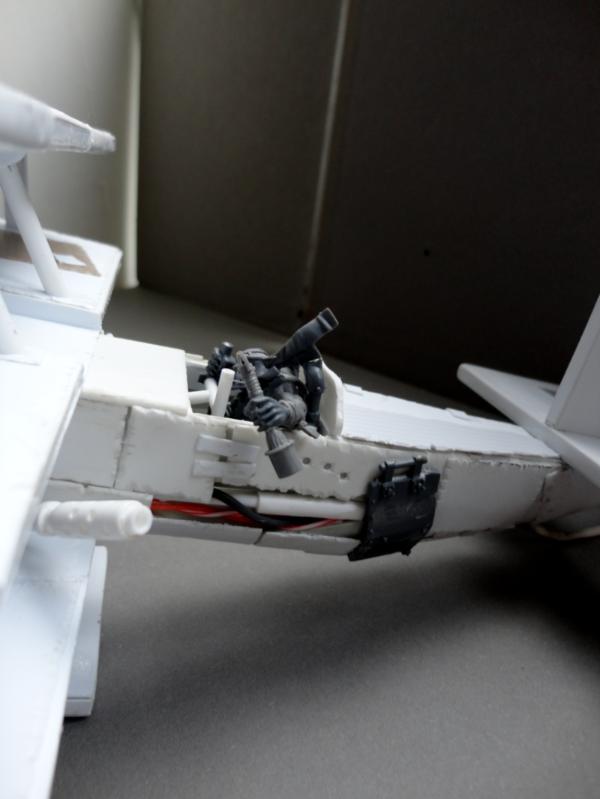
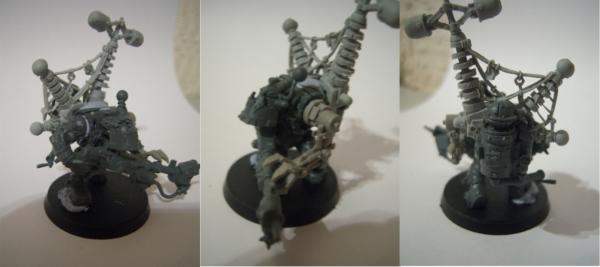
Automatically Appended Next Post: So these are the kans and dread i've been working on. Still some doohickeys to add and a few weapons. Will get individual pics as each gets its build finished.
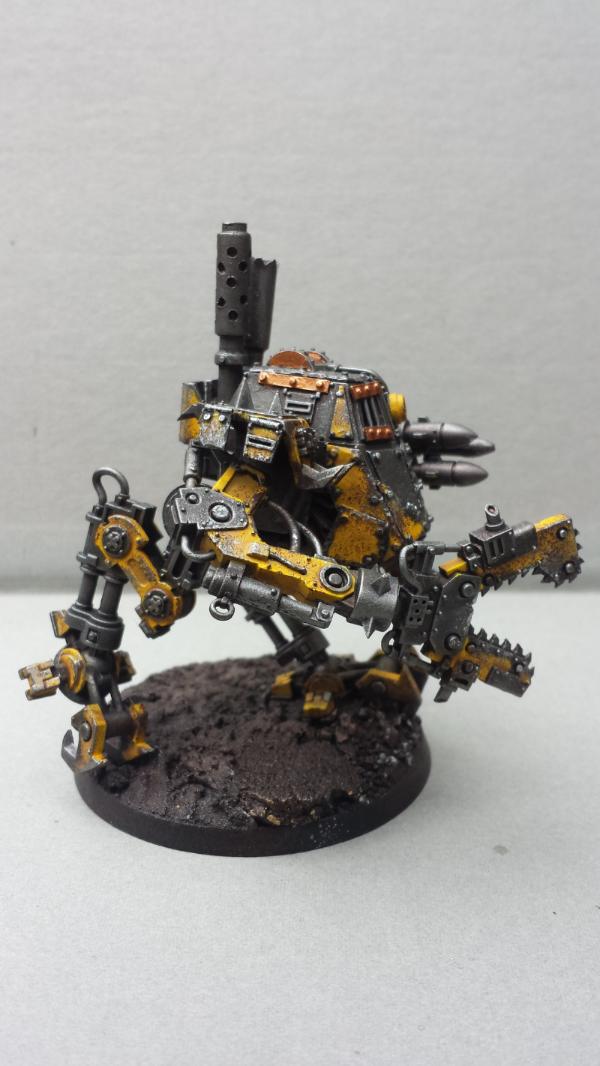
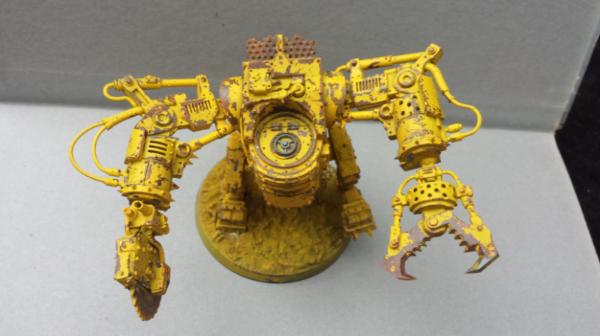
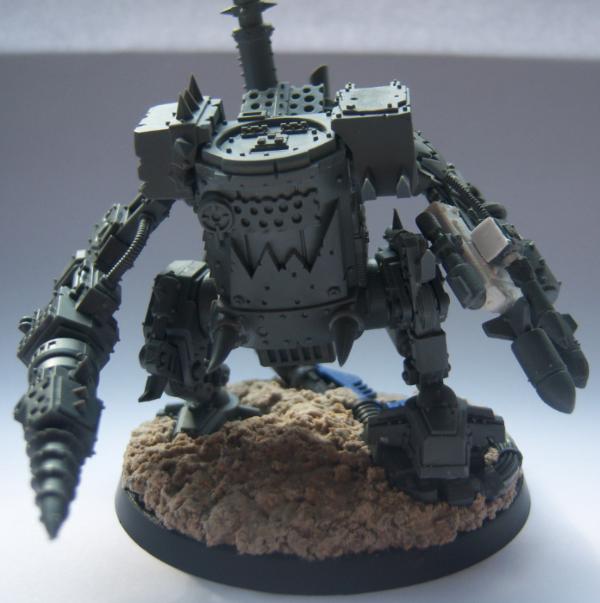
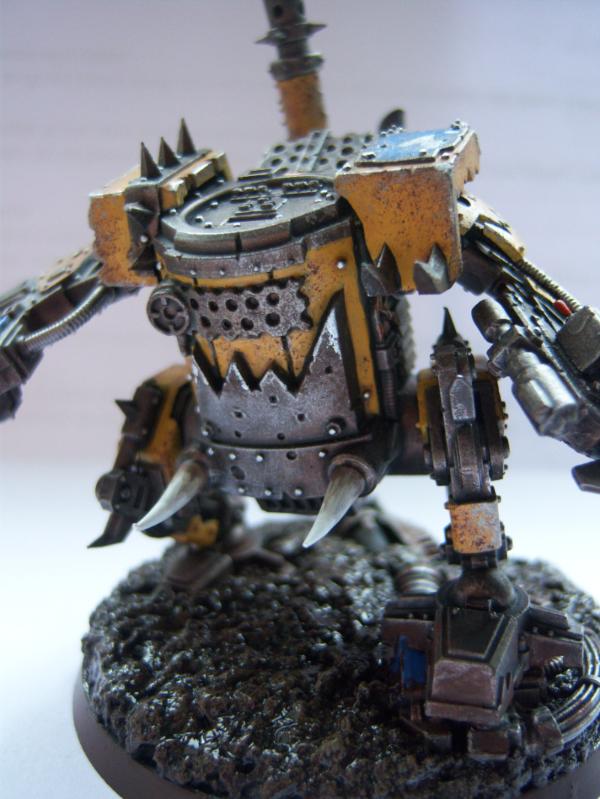
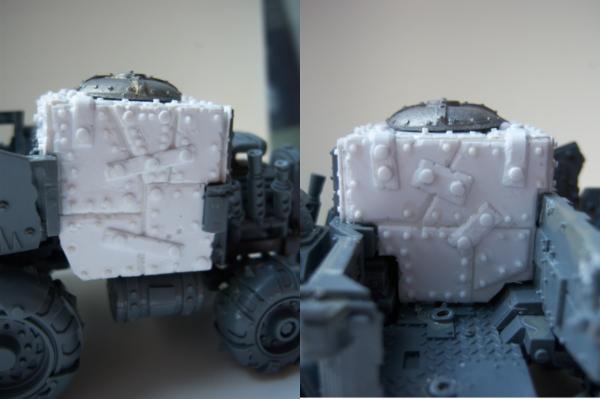
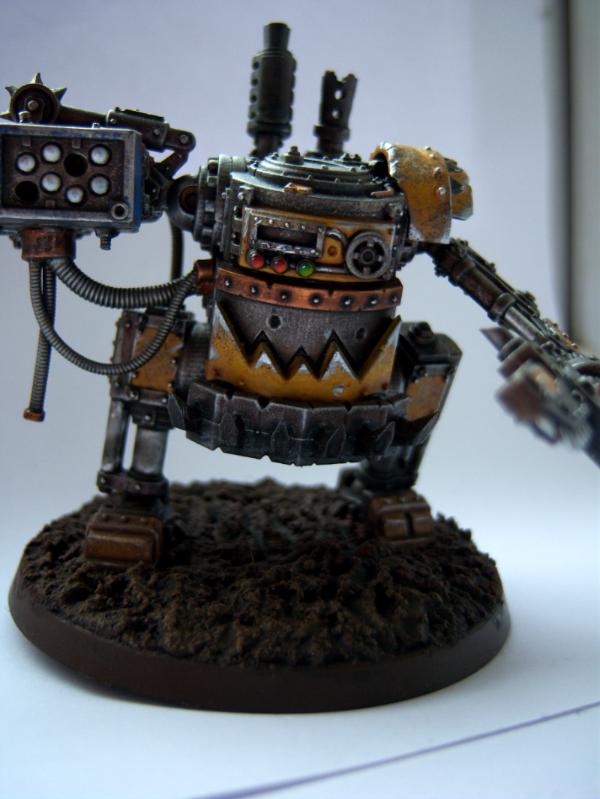
No way has it been a year. Slowly plodding on, to think I was naive enough to believe I was going to have a 1500 point army by summer 2011. I've been though 3 editions and still haven't played the game. But the end is in sight, well a 1000 point army anyway. After these walkers are done all I have is a Nob, some touch ups and then basing.
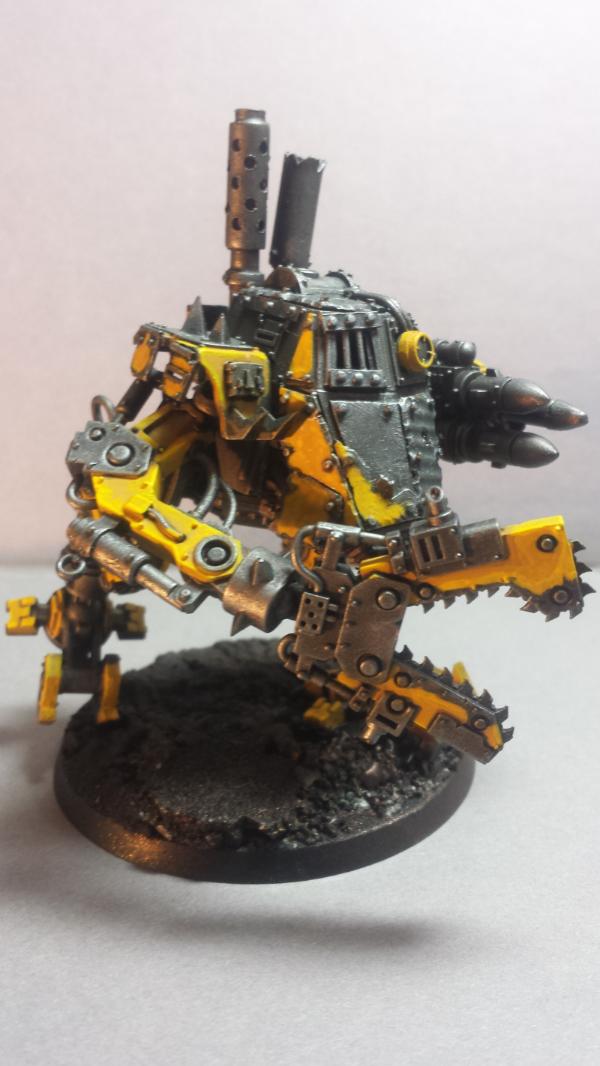
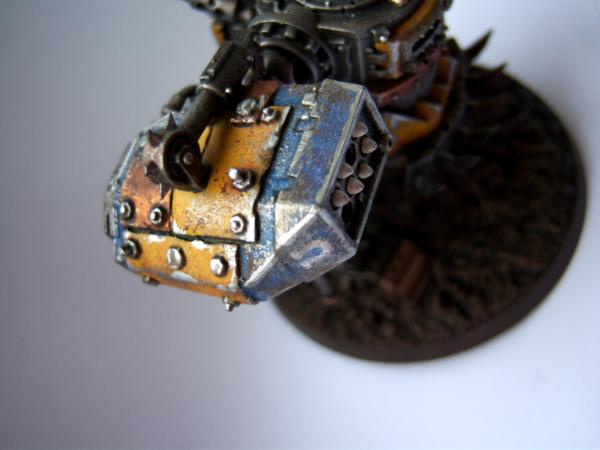
I decided to try and change my yellow. My old method was quite dark and I wanted to brighten it up. It was far to clean though so after some weathering and making a start on some of the other metals this is where I'm at with the Kans.
Still a fair amount to do but they are at a stage now where I can progress in small sections and its much easier to find the time for that.
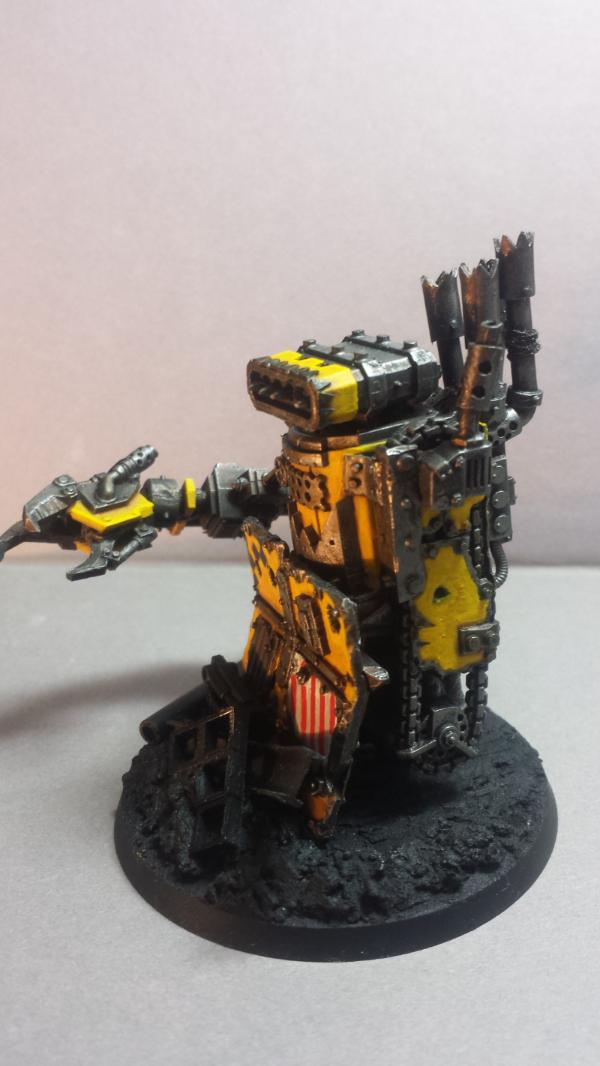
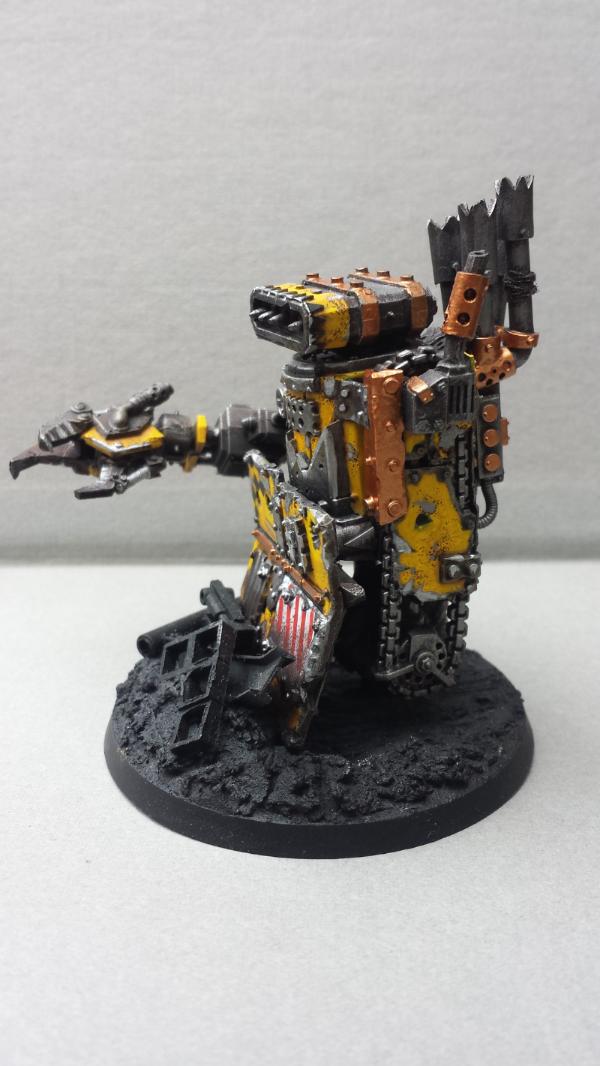
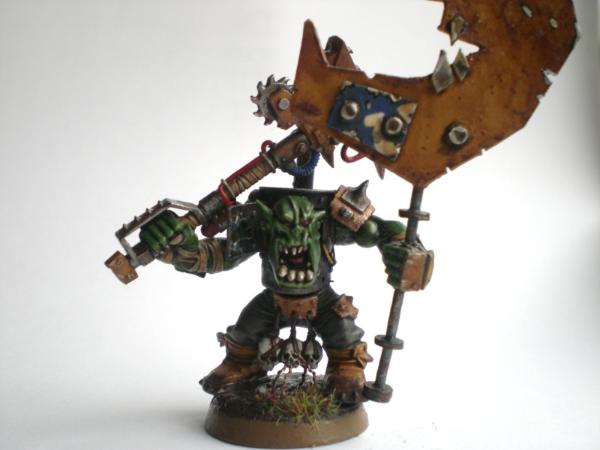
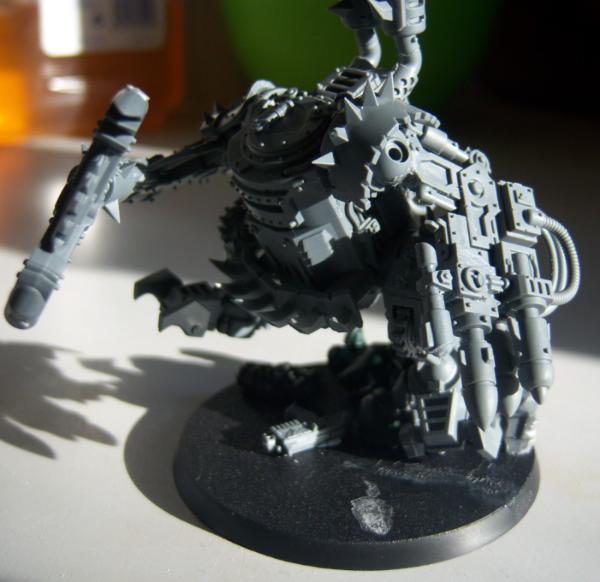
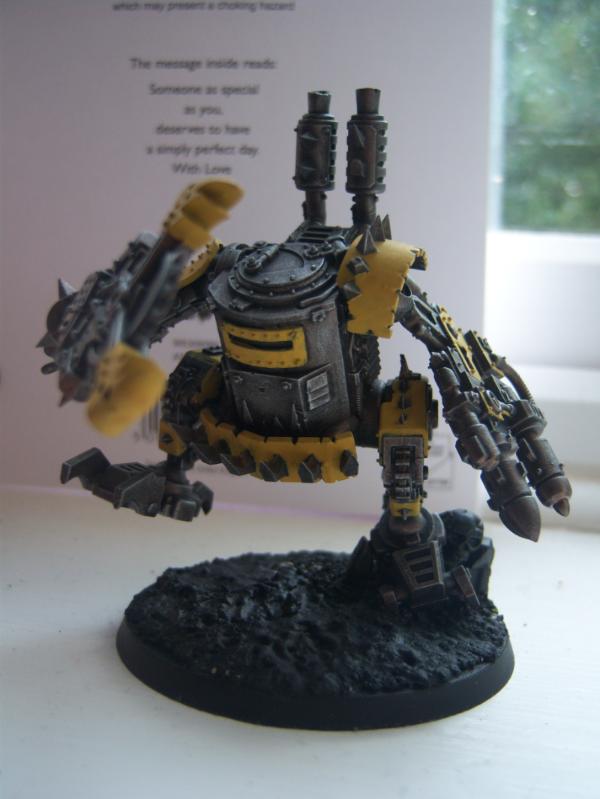
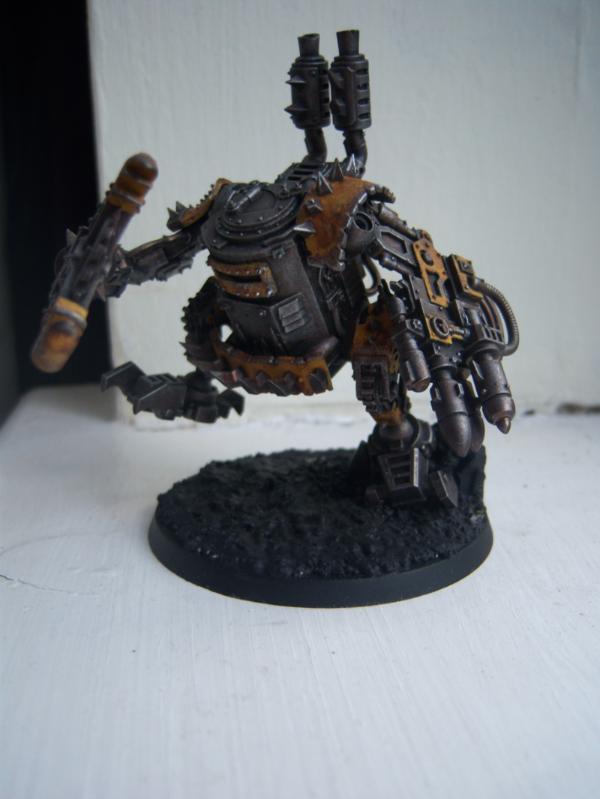
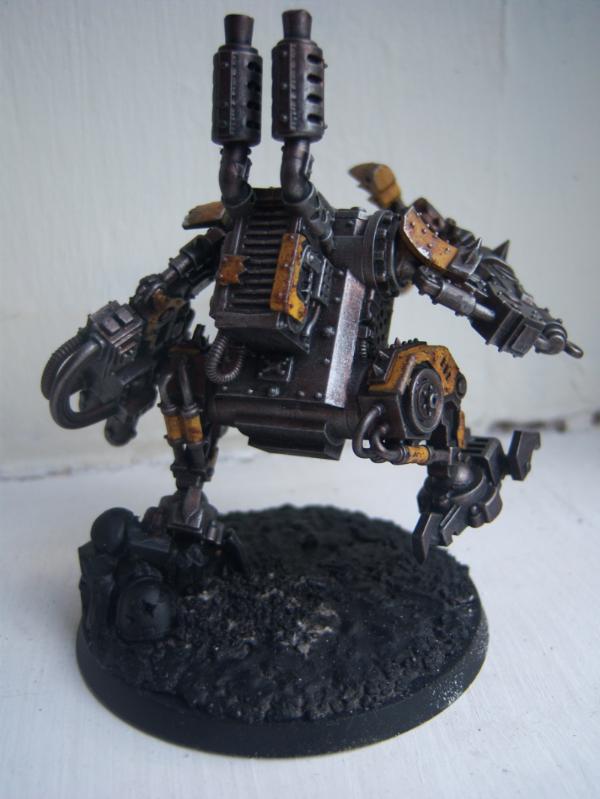
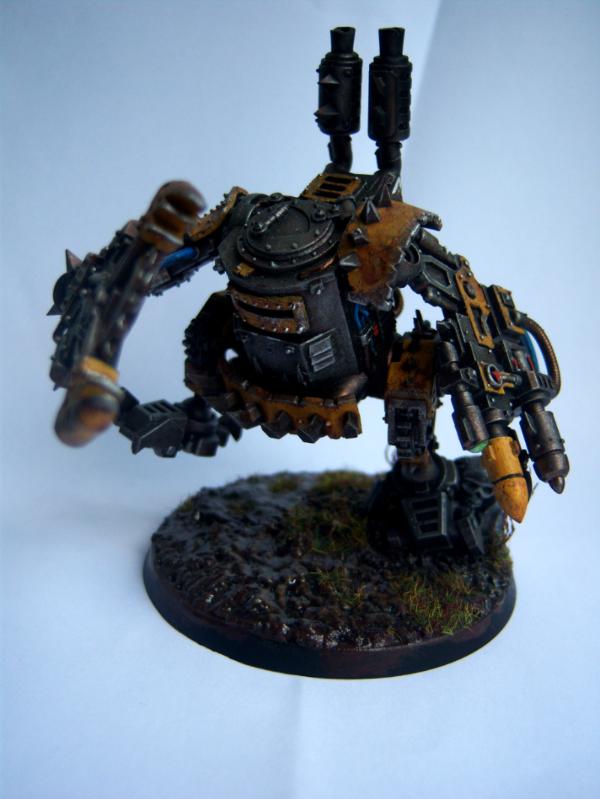
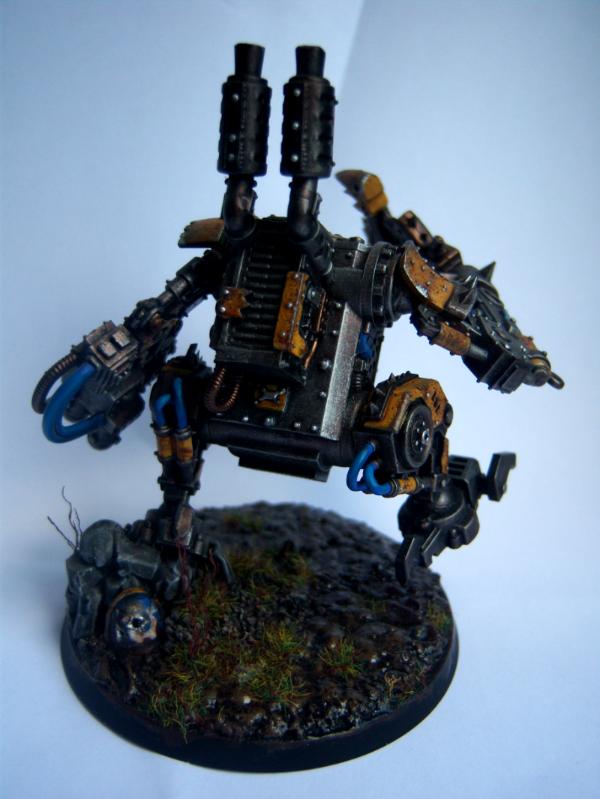
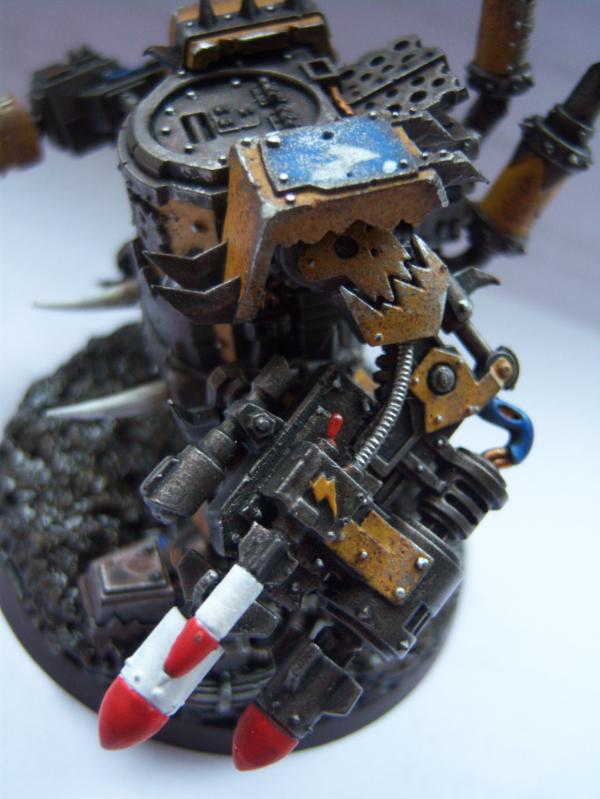
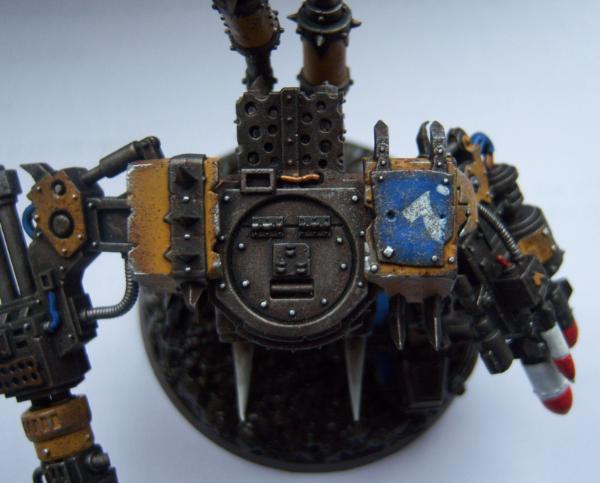
And my Deff Dread, This is my first go at using the hair spray technique. Overall I like the technique, its fairly quick and looks good, definitely something I'm going to be using on my vehicles in the future. I scratched a bit deep in some places, more layers of varnish before using the hairspray should help with that. The yellows very bright when compared to the rest of the army but after finishing the details I plan on using weathering powders to bring it down a bit.

 ,
, 
 . Still I hate to waste food, I think I may need to have a rethink.


 . I checked out your wolfs they look great, now pick up that paint brush they won't paint themselves you know.
 . On a side note, how do you deal with the mold lines and sprue scars if primming on the sprue? Seems to be complicating things
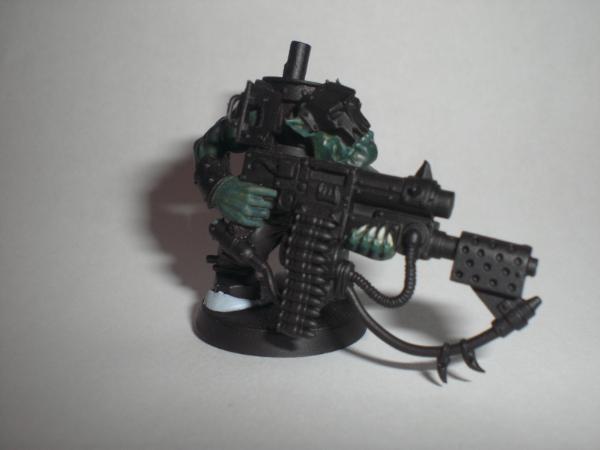

 I just dropped the bloody thing and the gun arm came off, and the resin chimney snapped
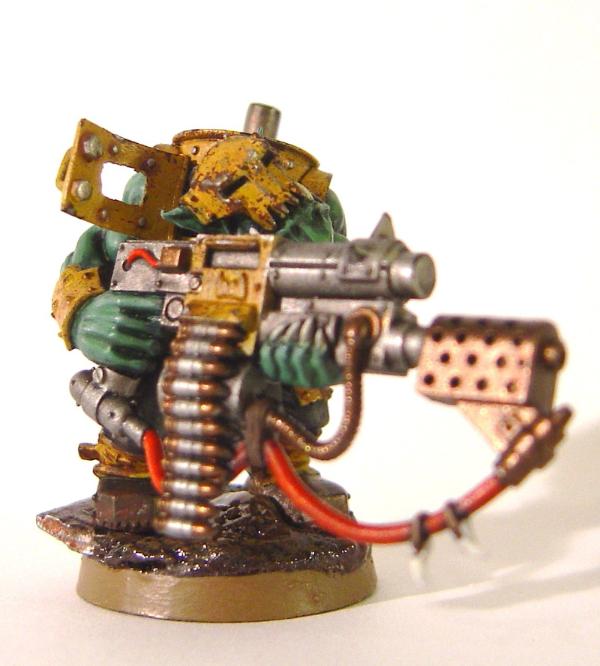
 something like that anyway.


 ) mainly because I was a little stingy with the primer so the Tinbitz didn't cover very well. With a little luck and a bit of elbow grease I should get him finished by the end of the weekend. With even more luck I will get the Nob for the Boyz finished as well, then I can get a group shot.


 just what I was looking for. The blood was done with a sponge (most of my painting is it seems) I mixed a red with a brown in to two shades one dark one light. Sponged on the dark first then the light. With hindsight I wish I had done more dark and less light.