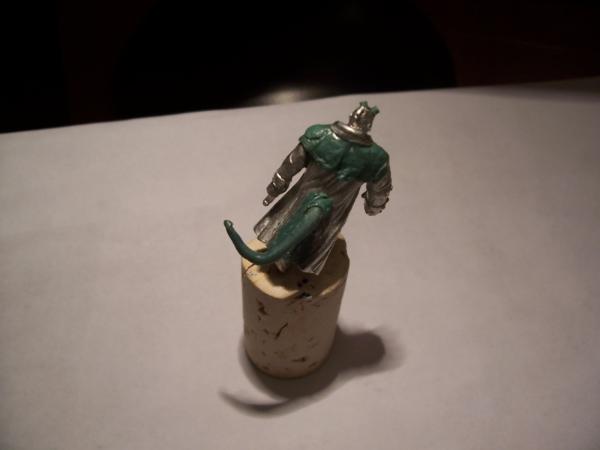
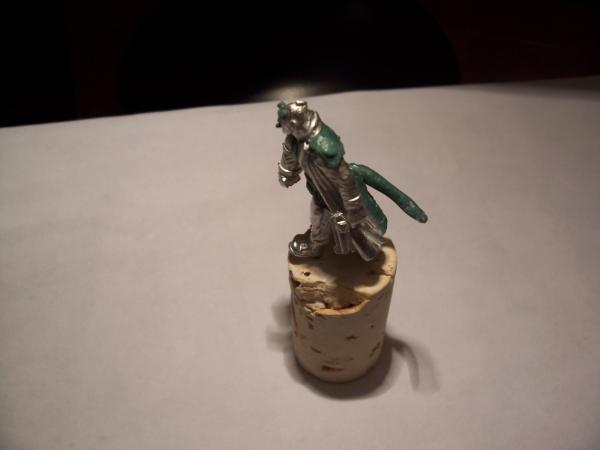
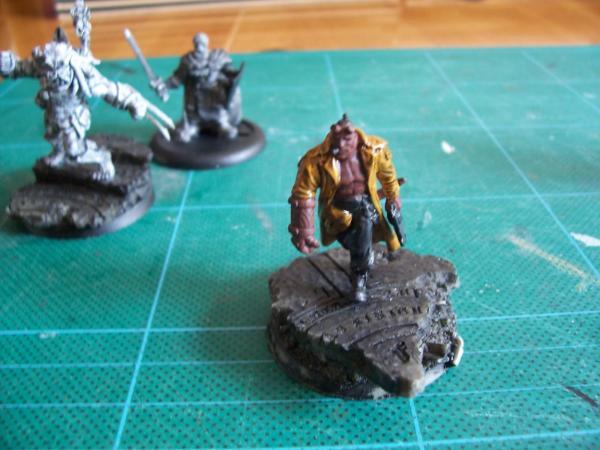
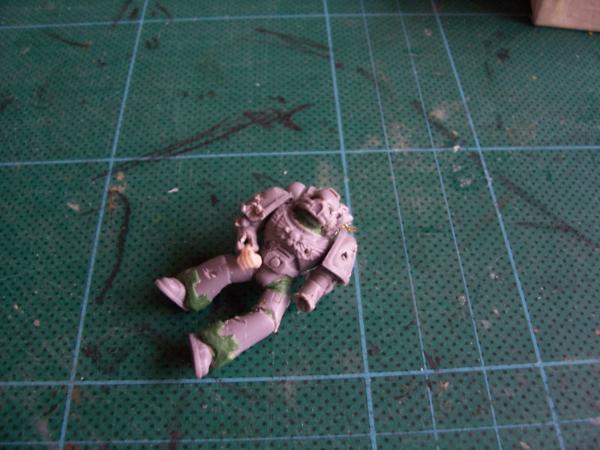
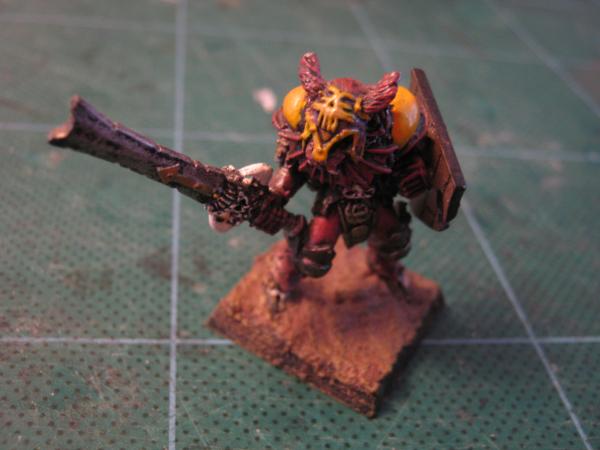
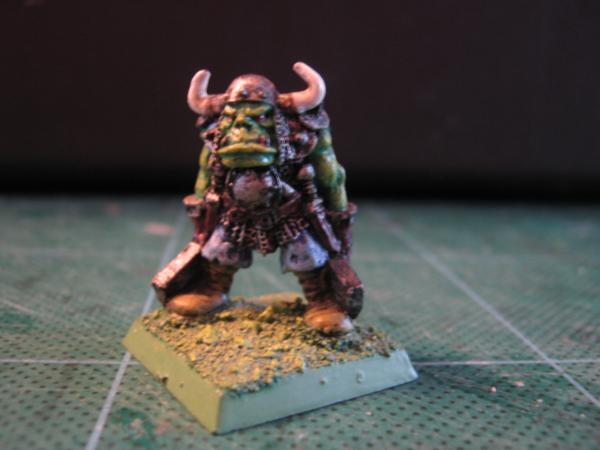
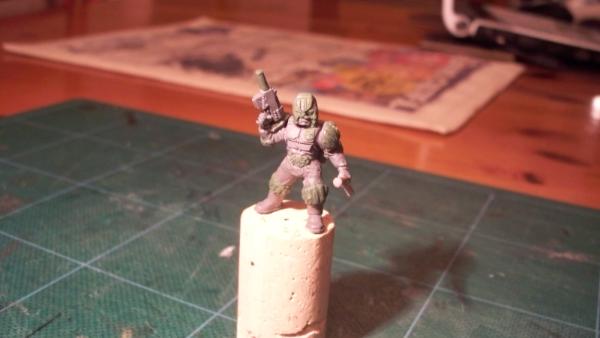
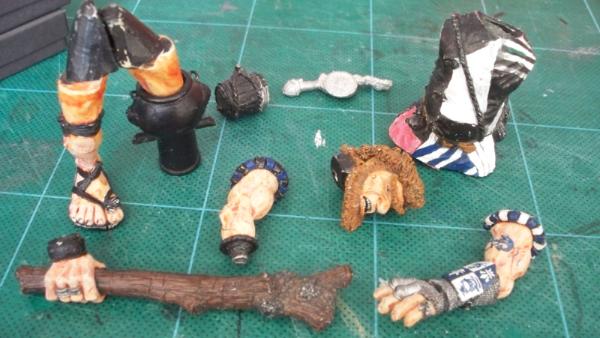
First phase is to construct the figure, luckily comes with a Helboy type fist and head option that is similar in looks albeit without horn stumps
Have pinned each arm, the leg and head, also filed down the t-shirt so that I can sculpt a muscular torso for this dude. Tail willl be sculpted around a piece of wire, will also resculpt the back of his jacket to accomodate said tail.
Up next...
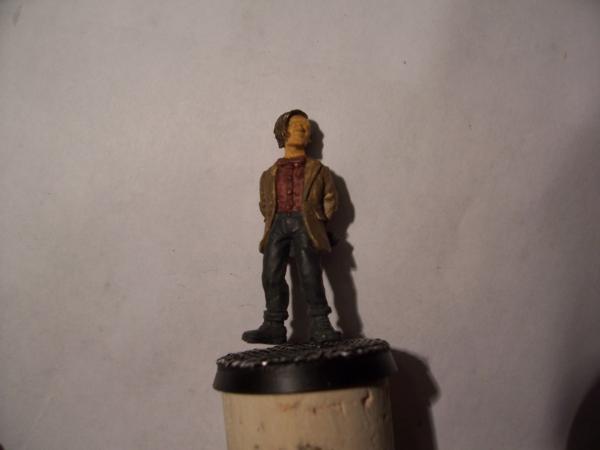
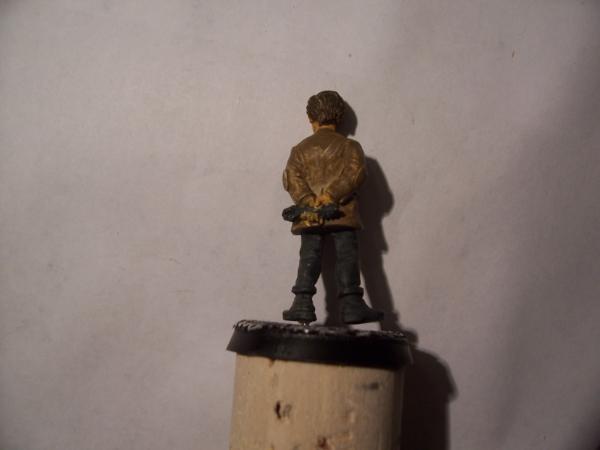
Dr Who -The 11th Doctor - better known as the one with the odd face and silly hair...
It's a WIP, no converting, just a paint job and so far have only basecoated and quick wash. The shirt will be white with dark red pin stripes. Will also get a more suitable base for him at some stage - most likely next month when I go to SALUTE '11
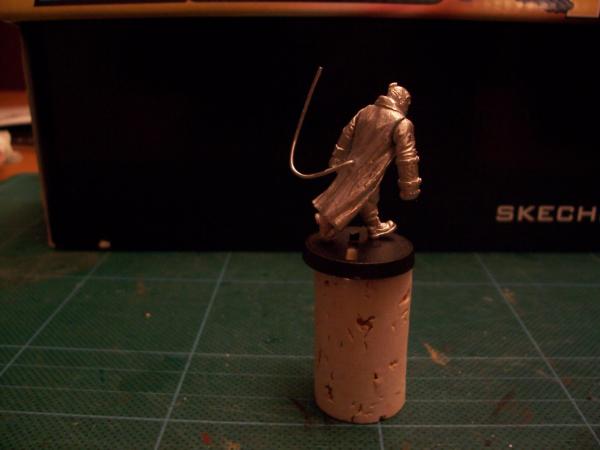
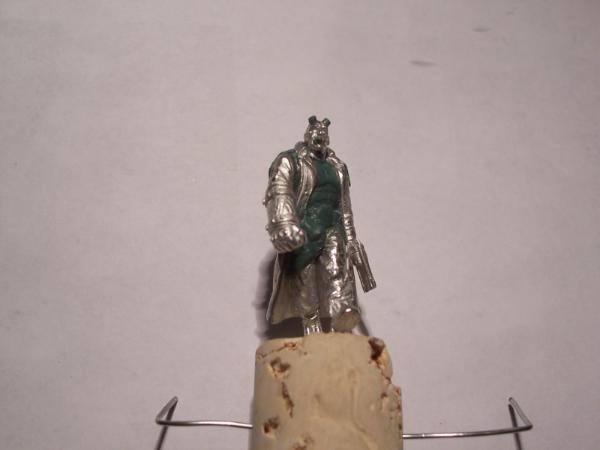
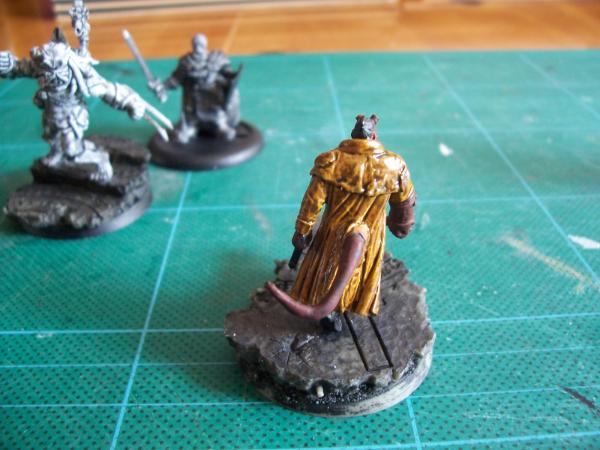
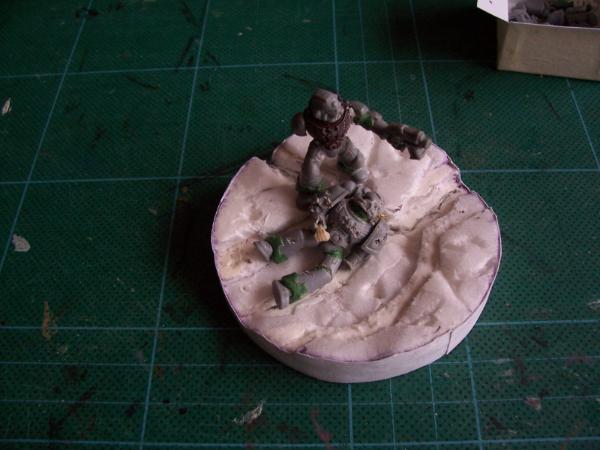
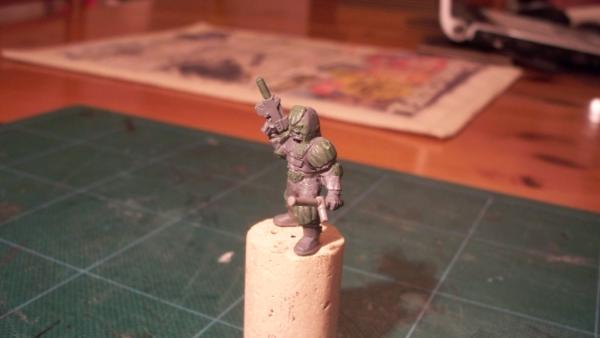
Back to Randomness #1 - Have now 'greenstuffed' Hellboy - Muscular chest, tail, jacket, horns, cigar, belt, holster - I'm learning as I go with this and relatively satisfied with the results. Picked up some great tips right here on Dakka Dakka on how to use the stuff...
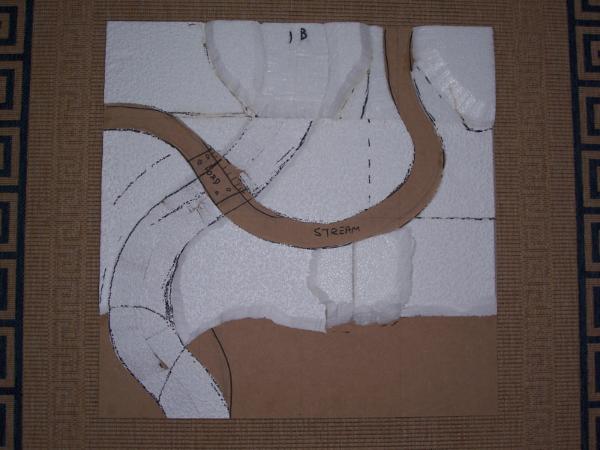
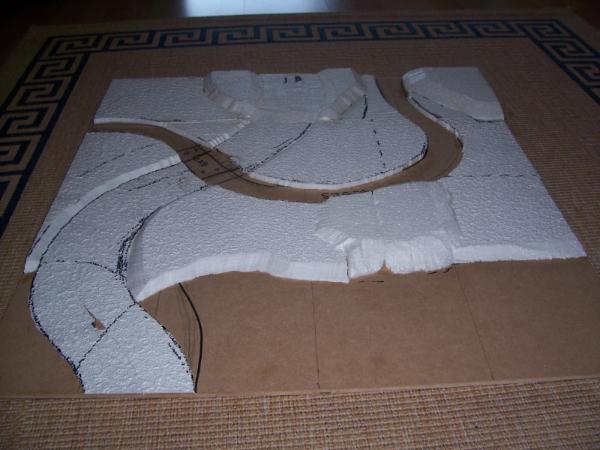
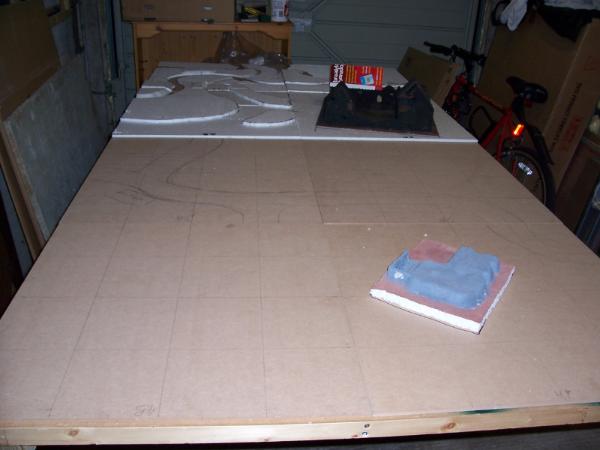
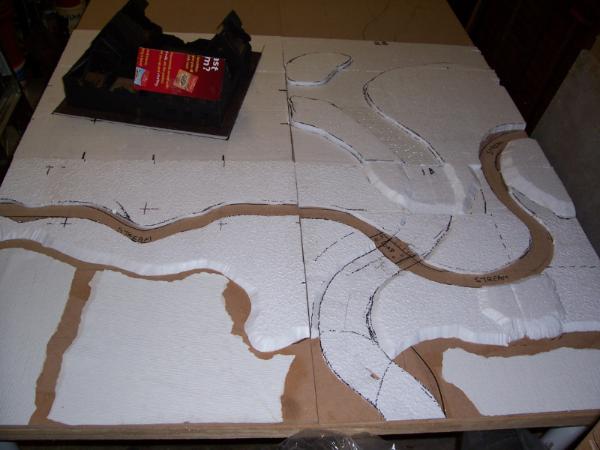
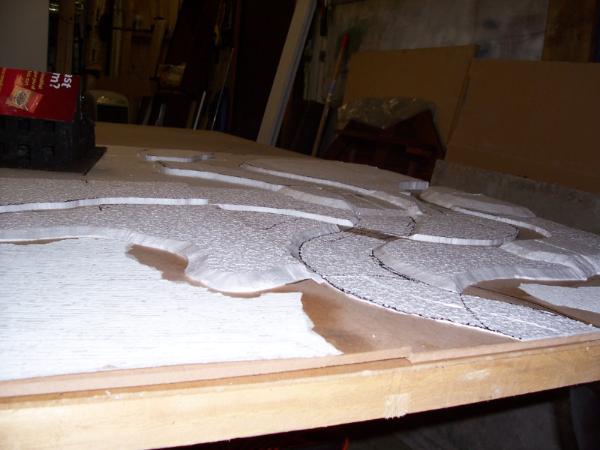
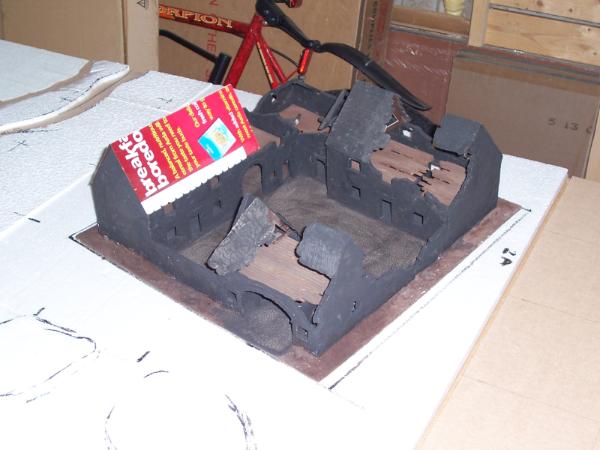
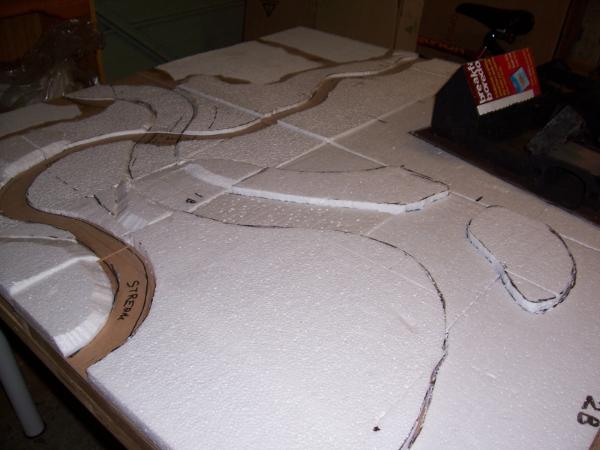
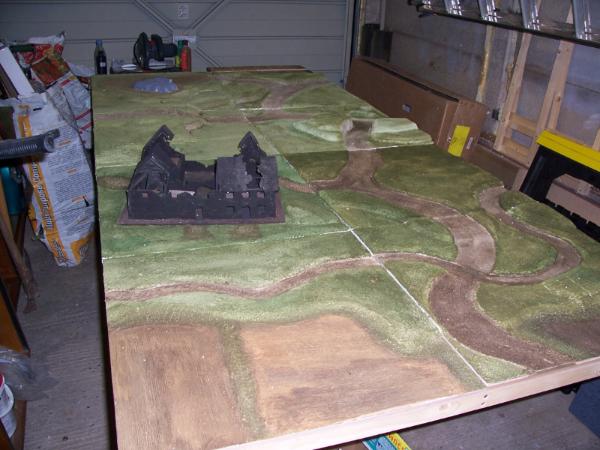
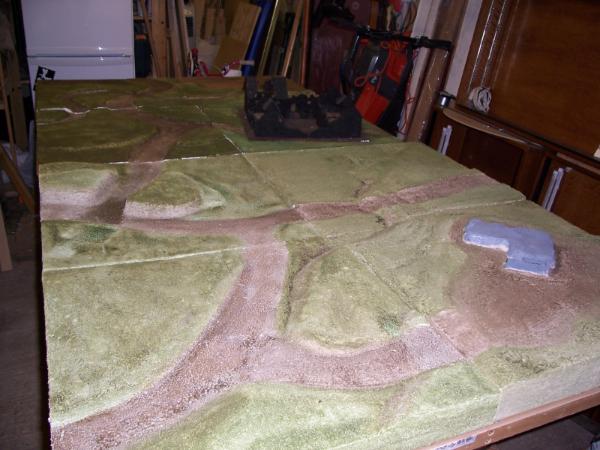
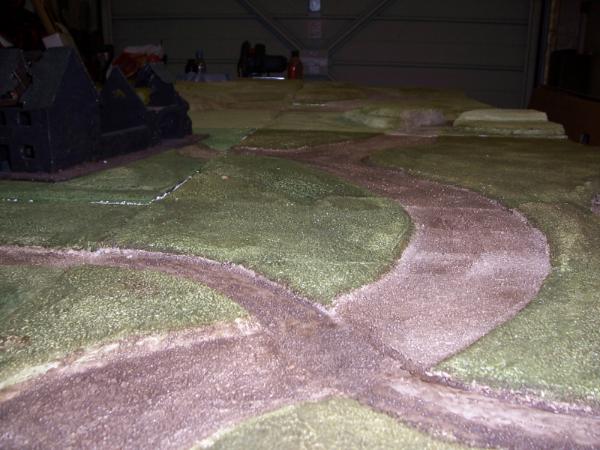
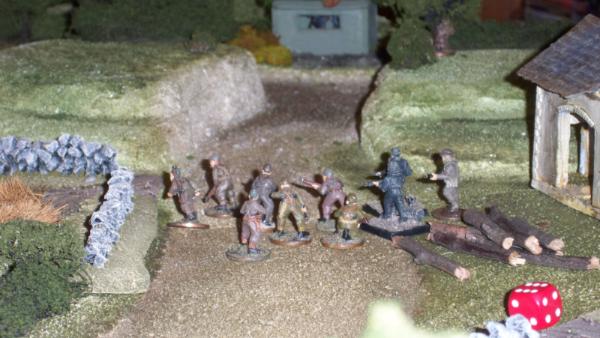
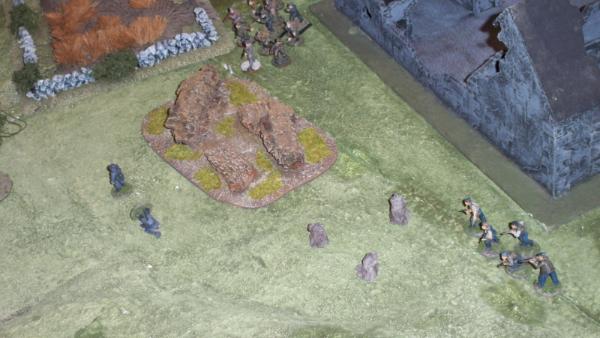
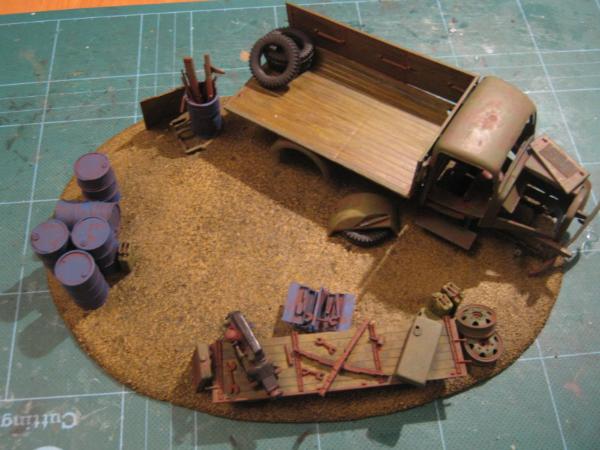
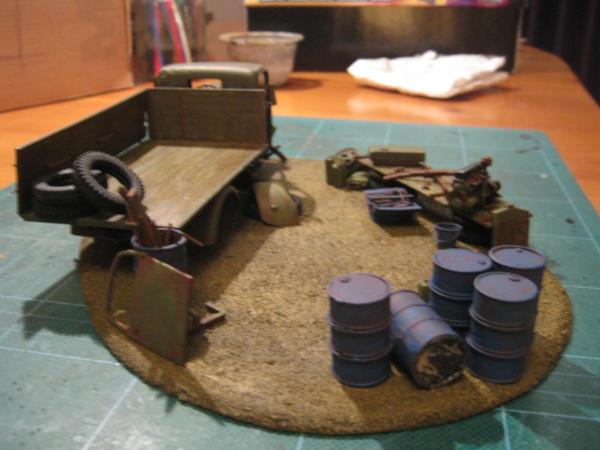
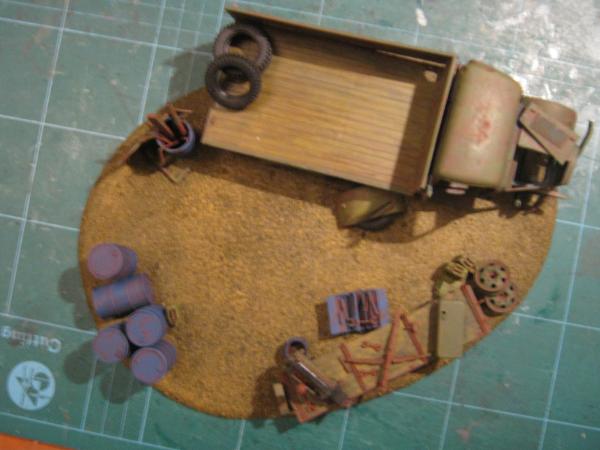
Some 24"x24" terrain tiles that I made for a WW2 skirmish game - the tiles where made to cover my 8'x4' gaming table out of MDF (for the base) and polystyrene.
Will post some more photos once I've located them on my hard drives...
@Paranoia_Agent - thanks, I've applied a base coat so will move on to painting him up soonish
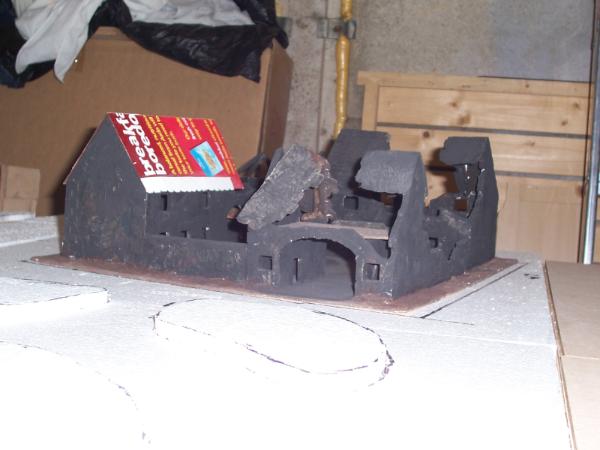
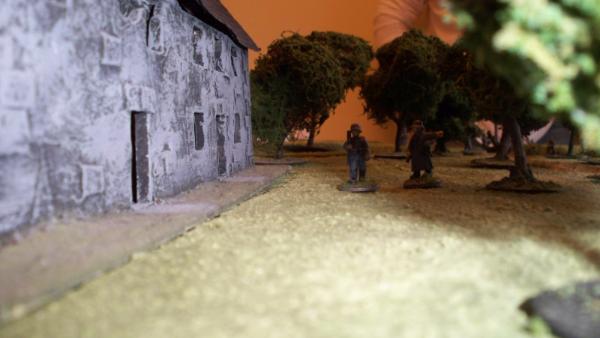
The ruined farmhouse is one of my favourite terrain pieces, unfortunatley my 7 yr old has stolen it and now drives his Hot Wheels around it - it's a bit worse for wear, but a perfect excuse to build another !!
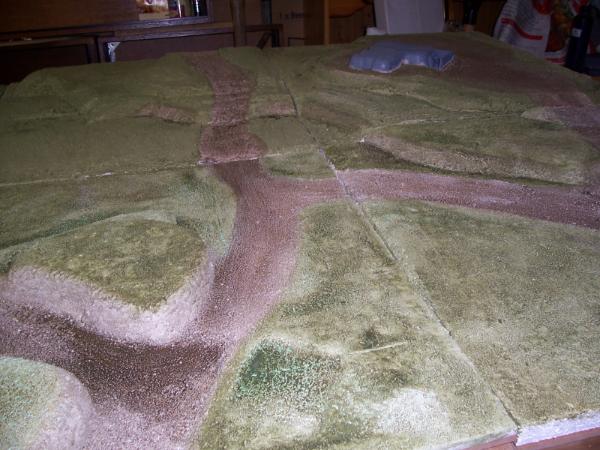
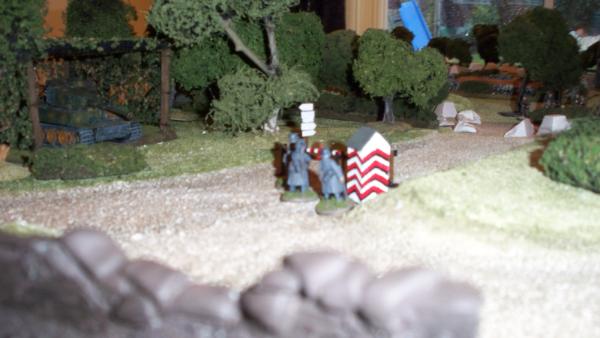
And I found more pics of the completed terrain boards, also with some shots of the WW2 skirmish game played on it - Commandos with French Partizans attacking a fortified German Bunker in a pre-D-day raid...
Warhammer World eat your heart out, my latest piece of terain is a 1:1 scale 6 sided tower...
This should explain why I've neglected my blogs lately - as soon as the rainy weather returns I'll move back inside and get on with some 28mm scale work
Whew, been a while since I last updated (or even did any work on my minis...)
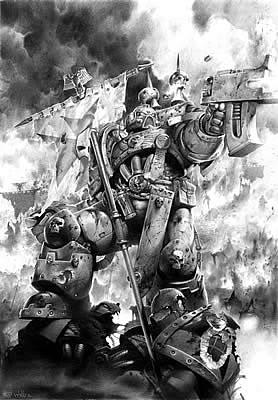
Was flicking through an old WD (286 to be exact) and came across this piece of art,
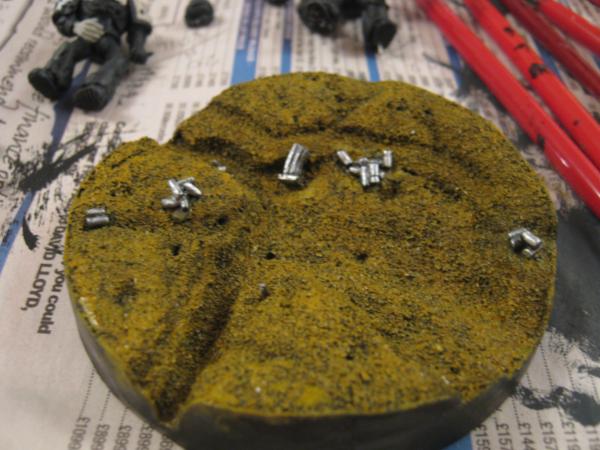
always loved it so decided to take the bull by the horns and have a go at creating it... and here are my initial efforts including a scenic base created by me out of layered cardboard and filler
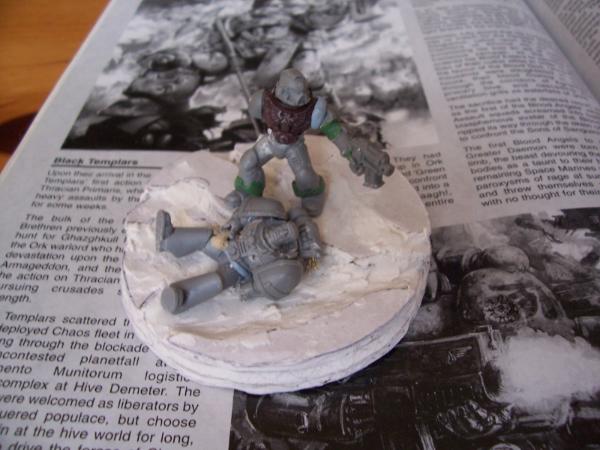
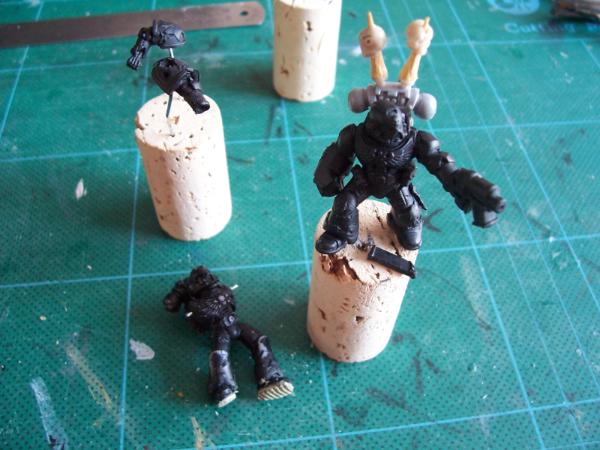
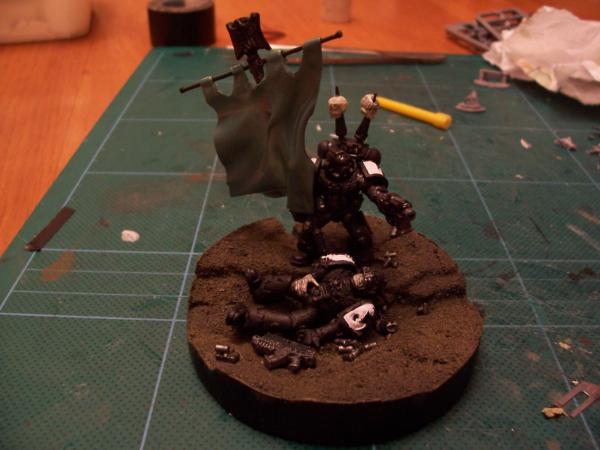
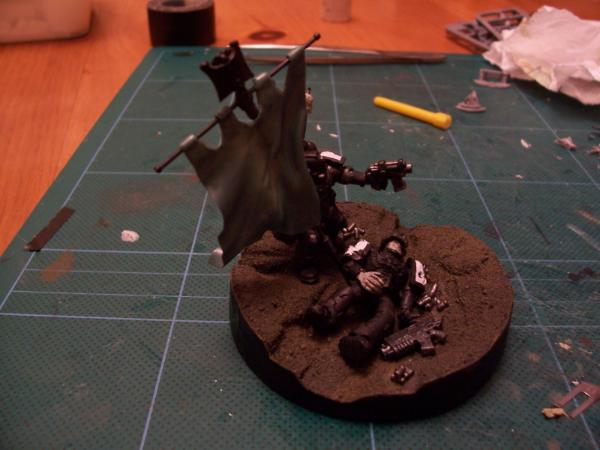
Gotta work on the standing marines final pose and power fist (having to scrathbuild this as the only one I can find to buy is gak). Dead marine has a hollowed out helmet to add, need to repose his feet and legs, plus some other bits and pieces to add lying about. He's currently missing his left hand which I'll either remodel or leave off as one of his many wounds...
Remodelled the dead templars left leg so that it's a more natural pose, also added some greenstuff to the ankle / shin armour similar to the standing templar and modelled a neck cover to give the hollowed out helmet a better look and fit. The helmet has the lenses cut out and some big gouges so that the head can be seen through - going to give him a deathly paint job, kind of like he's been lying there for a while
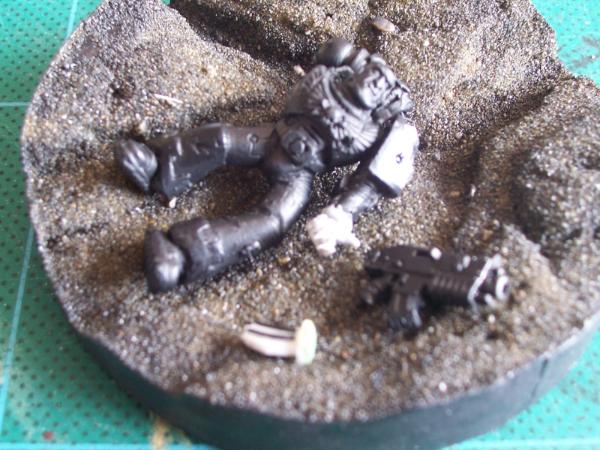
Have remade the base as well - scrapped the original as it just didn't work for me - this one is made out of layers of foamcore and chopped up to give a broken wasteland feel - just need to decide how I'm goig to cover it before painting - probably go with a sand layer rather than wall filler / tile grout which I normally use
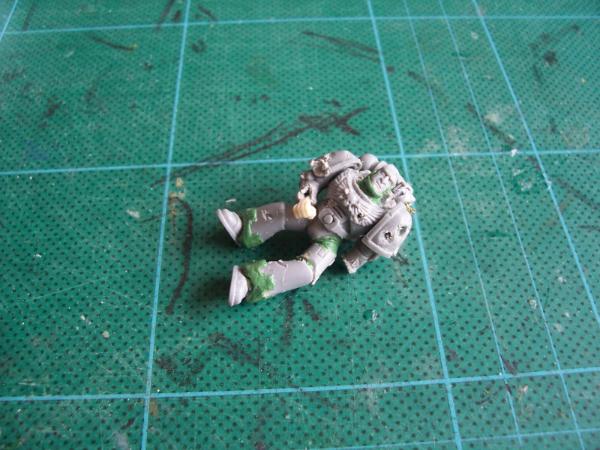
Textured the base - pva and sand, nice and simple yet effective, will paint up in a wasteland type of style and add some battle debris...
Got lazy and bought a power fist - it's the Death Company Power Fist, with some of the iconography removed to make it more generic. Have also added a quick black base coat to most of the pieces - back pack has had the spikes and skulls added, looks a bit chaos now, but guess it'll work out when painted ??
Next up is to scratch build the banner which will be fun as I have no idea how I'm going to do this. If anyone has a good tutorial for this, please do share :-)
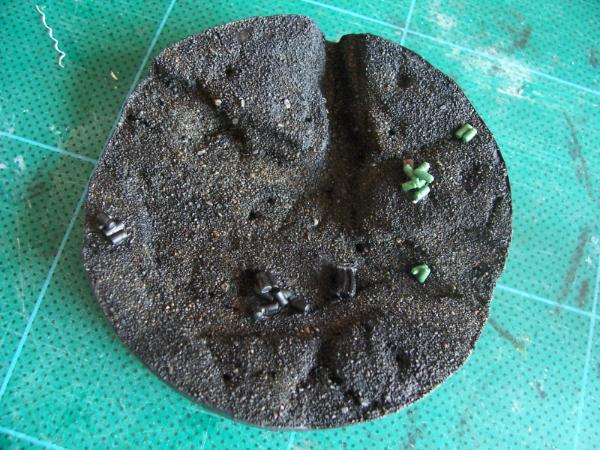
still need to do the banner, but quickly created spare / used boltgun magazine out of plasticard and wire. This will be on the base with the dead marines boltgun plus spent ammo cases.
Here's what it looks like in it's base state
have also put a new hand on the dead marines left arm - used a normal marines hand, repositioned the thumb and cut between the fingers so that they could be repositioned in a more natural pose (not the greatest pic though, sorry...)
I also have a new right hand on order - from the 'hanging zombie' plastic kit which will look much better than the current skele one I have on the model
Changed the dead Templars right hand for the hanging zombie, is a touch on the large ide, but hopefully nothing a quick scalpel job can't fix. To go with the spent ammo magazine I knocked out some quick greenstuff spent cartridges. Just now making up some smaller cartidges for the boltpistol.
Still need to attempt the banner...
Automatically Appended Next Post: Have now added the smaller cartridges and base coated the others...
Some paint splashed on the BT piece - still plenty to do though...
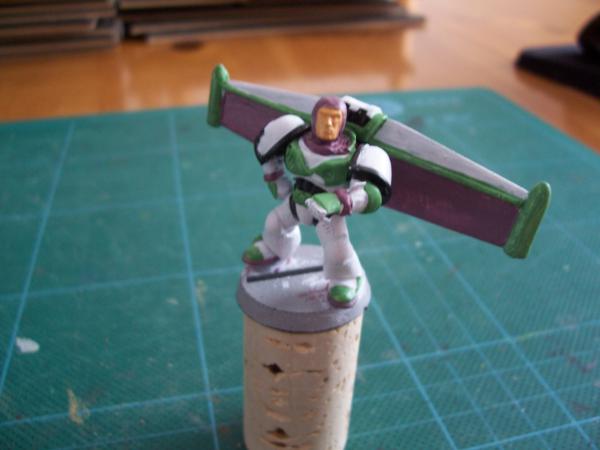
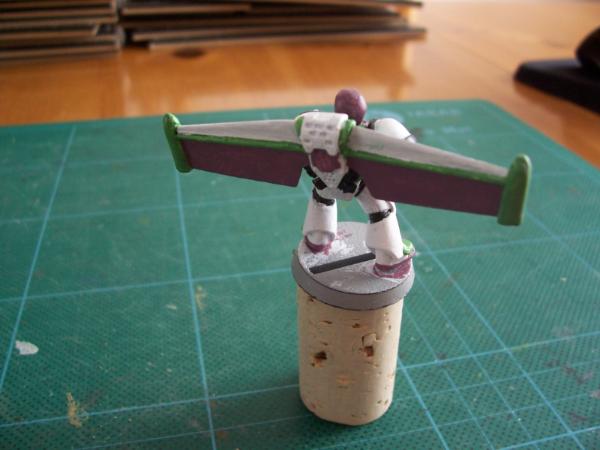
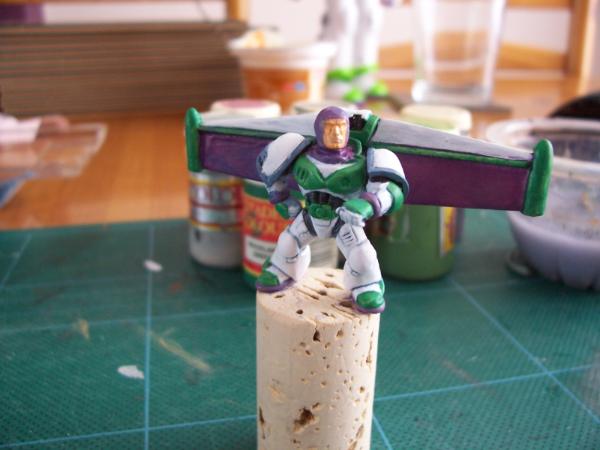
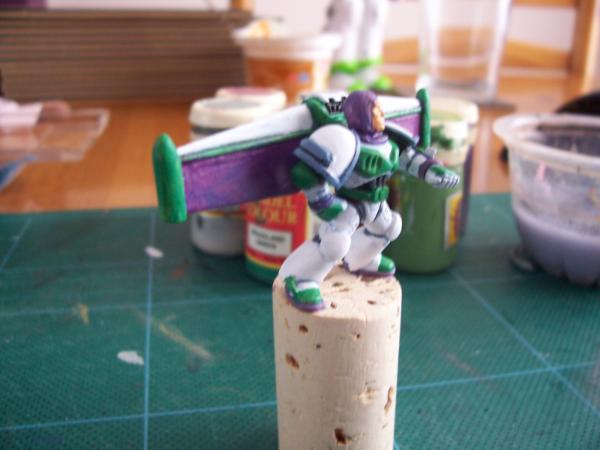
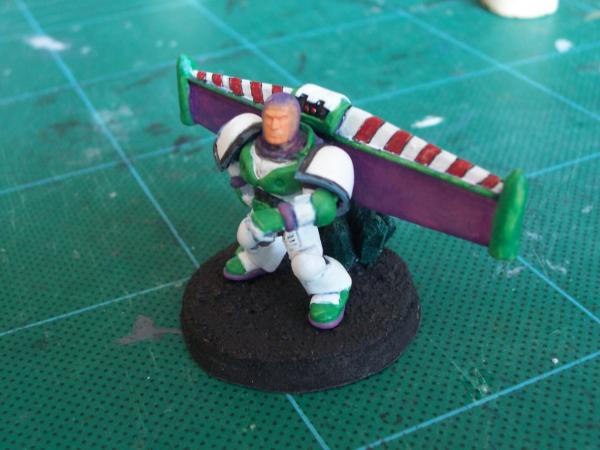
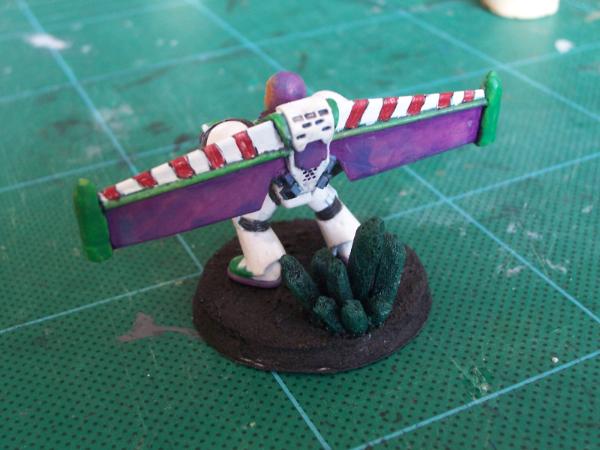
Took the opportunity to base my Buzz (who is still a WIP) - gone for an alien planet look with crystaline rocks, probably give the base a purple drybrush to give it a more alien feel...
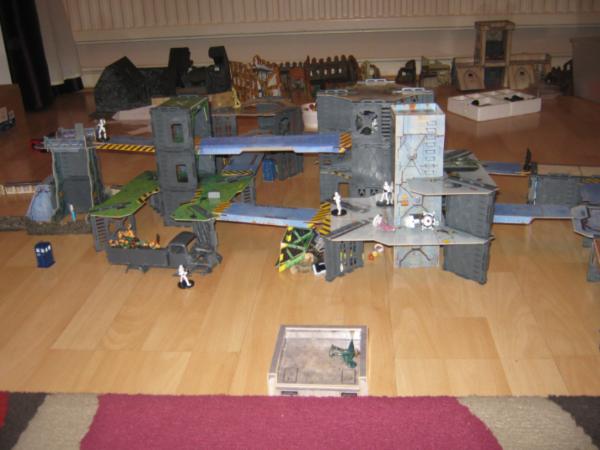
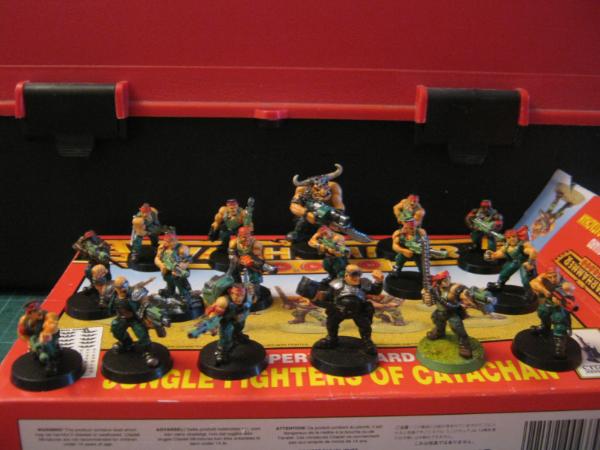
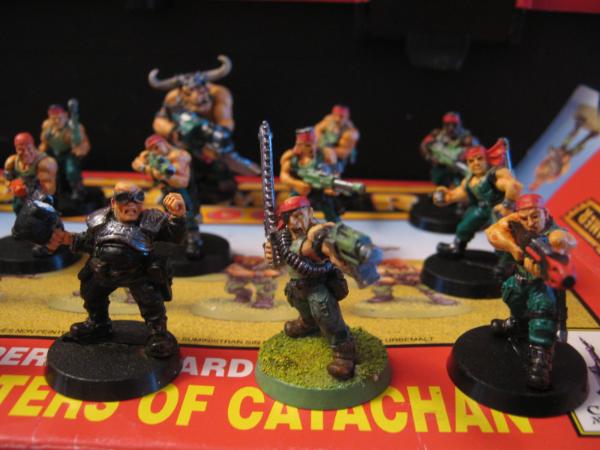
So, the kids decided to break out my old Necromunda stuff - there was some Catachans, Star Wars Stormtroopers and Dr Who minis to name a few, roaming around the walkways and towers...
progreen10 wrote: Nice work on the diorama.
About the castle,
I would be right in presuming that you have kids?
and it's not for yourself...
Yep, 2 young 'uns (Sorry for the long wait to reply...)
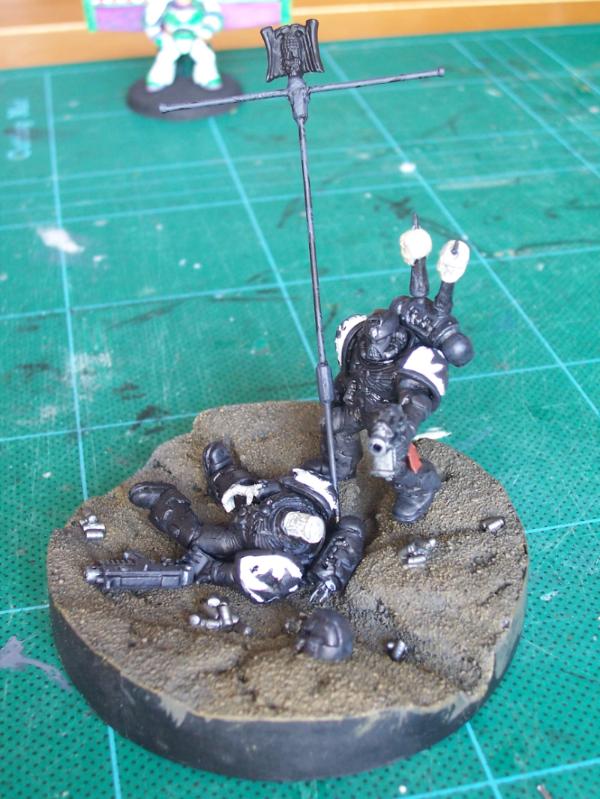
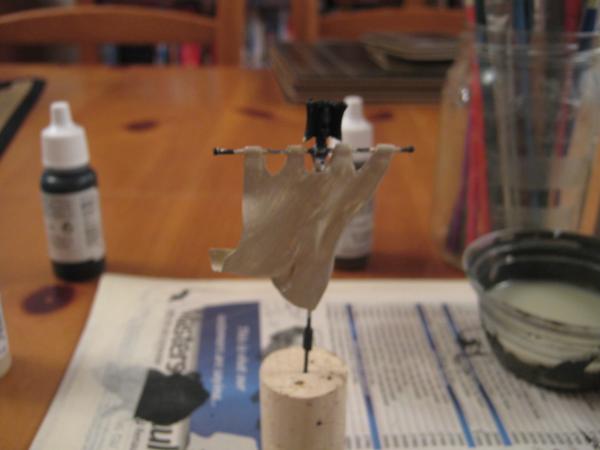
While waiting for glue to dry on the Thunderhawk in my Space Marine blog (check out my sig), I had a play with some greenstuff to make a banner. Used a piece of clear plastic with some regular cooking oil smeared over to stop the GS sticking, then rolled out a rectangle nice and thin. Cut the loops for the top, attached to the banner and shaped to looked like it's blowing in the wind. Just waiting for it to dry, then will give it some suitable battle damage...
Had a clear out of the garage and some of my old minis resurfaced from the dust and cobwebs... Might give a few of them some touch-ups when I get some time.
Still have more to uncover, including a 28mm Viking Longship...
I know, it's always great finding old forgotten minis... I went through a phase of selling off my old stuff a few years back. Sold off a load of unpainted and nib Empire figures, all my Chaos Dwarves, Chaos warriors and Dwarves, as well as a metal Epic Gargant but luckily missed this little lot. Made a load of cash and glad they went to new owners who will hopefully get to use them.
Still have the remants of my Empire army, including a load of archers, some heavy cavalry and some other bits...
Also got my Necromunda gangs that need some TLC - Cawdors and a homedrew gang based on the old metal Catachan box set - The Catachan Trading Co. - I'll admit, i had no idea of the fluff behind the Catachans when I created the gang, just liked the figures a lot more than the Goliaths.
And here they are... Just need to find the gang roster sheet for them now
The leader of the Gang - Don Corleone is the fat dude with beer in hand...
Also found this fella - was one of the original Confrontation figures - pre-Necromunda game featured in WD
Automatically Appended Next Post: And a WIP on the Black Templars diorama - which is also being intered into Papa and Panda's Competition: The Hero Round. Check out the details here... http://www.dakkadakka.com/dakkaforum/posts/list/498307.page ...
Watched Dredd on Saturday night and really enjoyed it - totally exorcised the demons from Sly's version (the visuals in Sly's JD are obvioulsy truer to the comic but the rest of the movie is poor - plus Urban kept his helmet on the whole way and could speak properly. "I AM THE LAW" (BTW, I do like Sly, just not his Judge Dredd...) Thought the judge's uniform was pretty damn cool and made me think if it was possible to create it in miniature form...
Need to refine the helmet a little but I think it's looking quite cool. I've also got one of the original Wargames Foundry Dredds still in it's blister, so will have to break it out, paint it and compare them...
Really enjoying this blog, it has to be one of the most varied on Dakka! Love seeing some of those old minis, and the Dredd looks great. Now you need to come up with some rules for him for Necromunda
So bit of a photo dump coming up - this is basically my project 'to do' list for the year, although doesn't include the Vehicle comp entry, Thunderhawk Gunship scratchbuild or IG trench diorama...
Plus I'l be attending Salute again this year so no doubt more will be added...
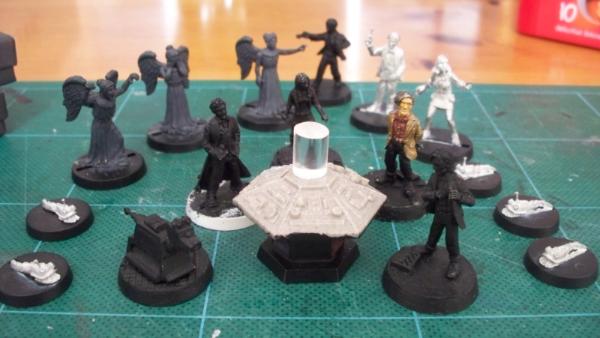
Let's start with my collection of Doctor Who minis - from Heresy and Crooked Dice - the Tardis console is Fenris I think... There's also a couple of Tardis models that my boy has squirreled away somewhere to be painted...
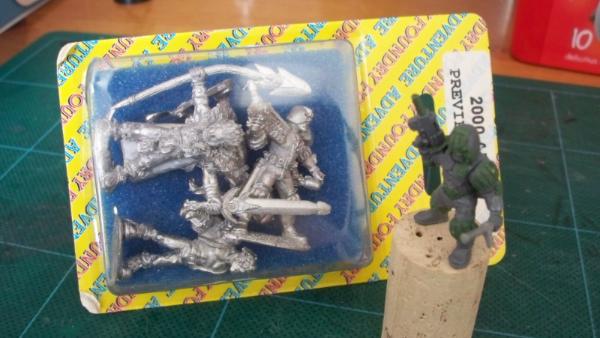
As already seen in this thread, here's Dredd, based on the recent movie, also my unopened Wargames Foundry 2000AD preview pack from a few years back...
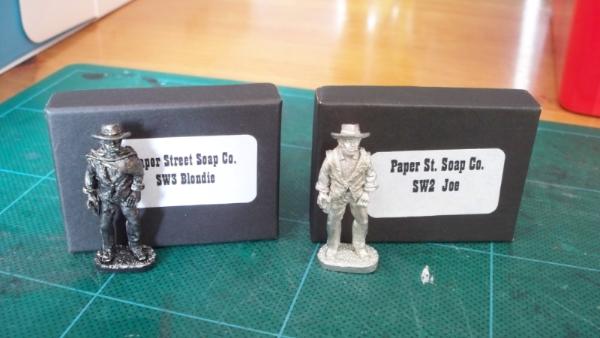
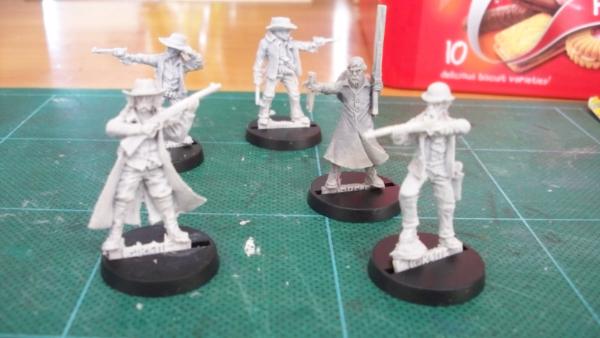
Some gunfighters - these are larger than 28mm scale from Paper Street Soap Company - got them at Salute about 6 or so years ago IIRC, nice sculpts, obviously based on a pretty well known actor and series of western movies...
Some Copplestone minis - ignore the paint jobs, was experimenting with base colours...
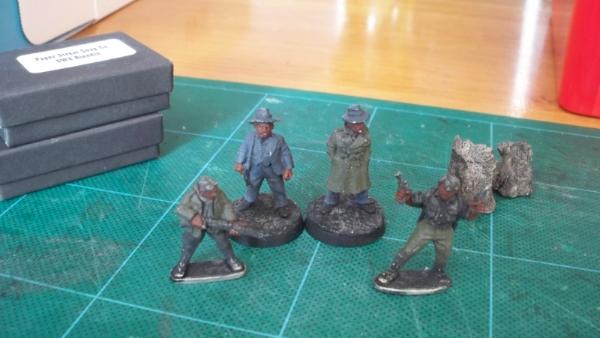
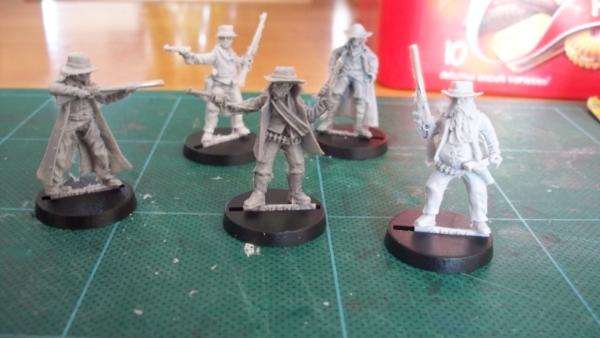
More Western goodies - this time from Black Scorpion - some of the nicest sculpts I've seen
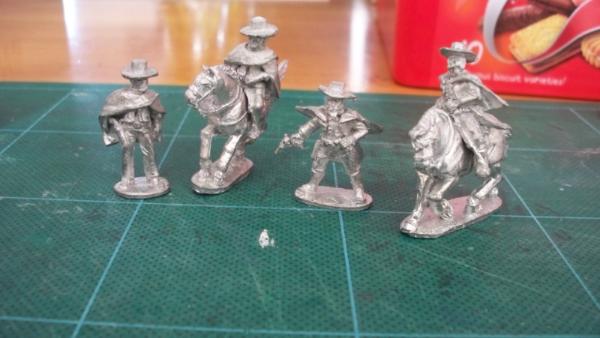
Westwind wild west gunfighters - another 'not' Clint here
More Black Scorpion - bit disappointed with the quality of these - a plastic/resin figures, tons of flash... and they have a wire dolly running through them and some you can actually see the wire... Still, I love the sculpts...
As above... Look closely at the guy centre front, the wire is showing through his outstetched arm !
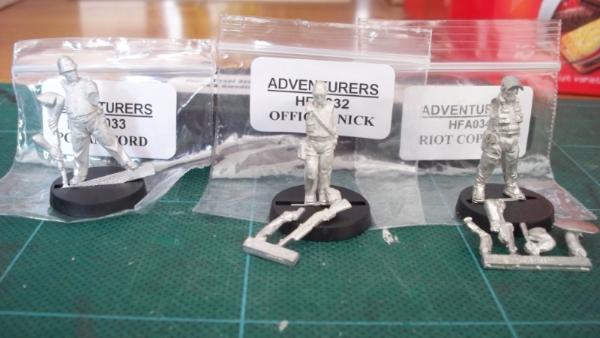
Hasslefree goodies - 'Not Hot Fuzz' figures
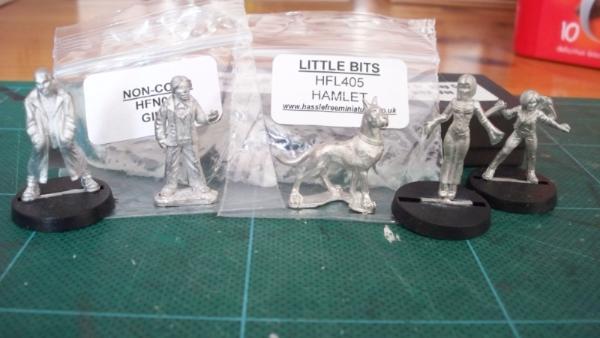
More Hasslefree 'Not Buffy and gang' plus 'not Scooby Doo', think I've got a 'not Shaggy' somewhere as well to go with him...
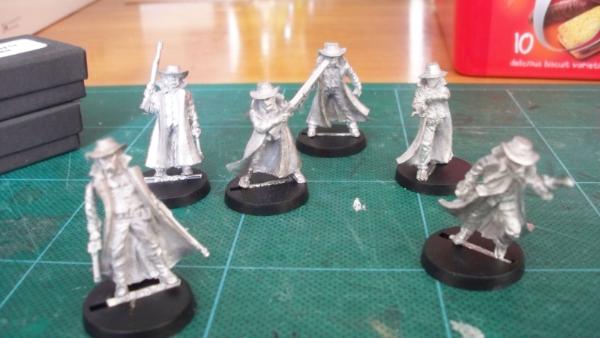
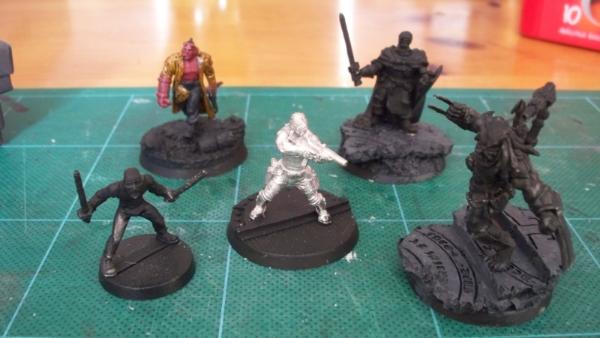
Mix of Hasslefree and Heresy - Left to right - 'Not Kick-Ass'; 'Not Hellboy (conversion)'; 'Not Snake Plissken (Esape from NY)'; Templar - will be paintedas per Indy Jones and Last Crusade; 'Not Predator' - Hurn I think they're branded as...
Lastly, my Marauder Giant - when I got him he had two right legs, so I had to sculpt a new left one - made it so that he had a false leg constructed from a cannon and a cauldron ! His story is that he comes from the coast and used old ship bits and sails for colthing / armour... Was going to change his club to appear like a ships mast with crows nest and ropes Pretty keen to get him completed...
Feth it, am I annoyed... I was making the toolbox at the family dining table as I usually do, then just after the last photo I tidied up so that we could sit down to eat. Went to look in my hobby cupboard today for it so that I could finish the detailing ans start working on some tools but I can't find it anywhere... Simply disappeared from the face of the Earth... Now I'm gonna have to make a replacement. :(
Yeah it was a real fiddly little bugger, but with the knolwedge in hand of the first build, any subsequent attempts will be easier and quicker (I hope...) BTW, I still can't find it, so am giving it up for lost... can only presume it went into the recycling bin and I'm damned if I'm looking through that lot for it...
Yep, random figures... That's what happens when you go to Salute with too much cash in your wallet... I'm sure I'll come back with another horde of minis this year and they'll go straight into the 'to do' list
Thanks mate, base has been touched up as was too yellow, have also added some dead grass and leaf litter. Will get some photos up before the weeks out...
didn´t knew you´ve put so much self made details into that terrain bit... the tool box is a gem of beauty... maybe one day you will find the original one again...
by the way... the wrecked dio totally made me miss the whole suply drop on that huge load of minis!!! why so many western minis? what are you up to mister???
Viktor von Domm wrote:didn´t knew you´ve put so much self made details into that terrain bit... the tool box is a gem of beauty... maybe one day you will find the original one again...
but for now you did an awesome job mister!
Thks Vik, got a funny feeling that the original went in the bin by mistake!
dsteingass wrote:What Vik said! Out-fething-standing man!
What thickness plastic did you use on the toolbox?
Cheers Dave, the plasticard is a mix of 0.5mm for the sides & 0.75mm on the base of each section. The cantilever and handle are also 0.5mm. Tools made out of the offcuts from my plasticard bitz box... Theres a club hammer, several wrenches, couple of screwdrivers, a crowbar and a stanley knife
Viktor von Domm wrote:by the way... the wrecked dio totally made me miss the whole suply drop on that huge load of minis!!! why so many western minis? what are you up to mister???
Always been keen to get a wild west game up and running. These figures have been in my collection for a while now, just never found the time to get them painted up... This may be the year though and if I do, expect to see a scratchbuil western town
Automatically Appended Next Post: Good news - I got my rebuilt Laptop (Dell XPS) back today. Been down for the last week and I've been having to steal the wifes Tab or the kids homework laptop to get online, hence why I haven't posted much!
Problem now though is, as the HDD died, I haven't been able to recover much of the data - luckily I have a back-up external HDD with all the photos, music and most documents so not lost too much, but... I've lost all my weblinks which I'd amassed over the last 15 years or so. Going to have spend a lot of time now finding them again...
Love the Black Templars diorama, it really looks like the artwork which I have always liked. Your modelling and painting skills are great, and I might try something similar to your diorama if you don't mind.
man... i don´t know why the last comment had to be anounced to me through the other thread of yours... after all i am subbed to this one too...i think...???
but it was cool to look through the pics of yours again! man you have quite some nasty talent mister!
Only downside is it's much more expensive than turf, but I never have to mow it, so worth it, plus I don't have a big grassy area - about 56 sq meters is all - used to have double that but the rest of the garden is now taken up by decking and a big extension on the back of the house...
No no no, wont be getting any friction burns on this stuff, it's really quite comfy under foot and much more realistic than the old Astroturf pitches - has several shades of green and even brown strands woven in. It's good stuff
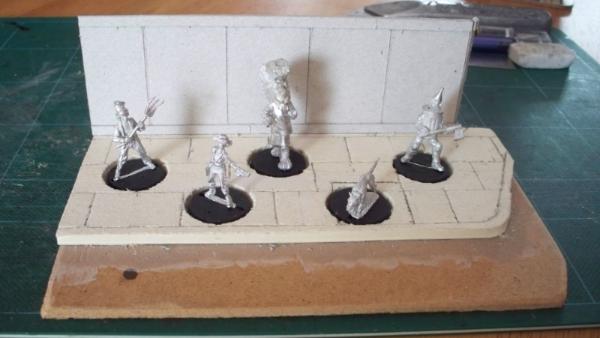
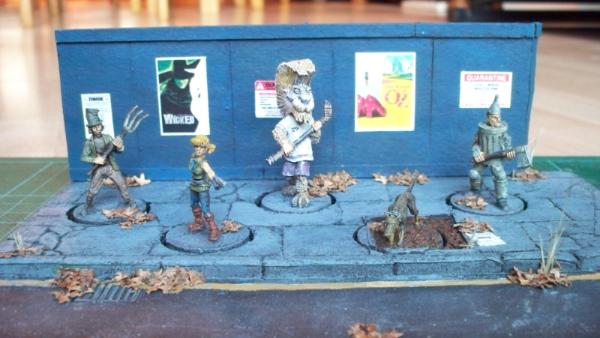
New update - this is the start for the next competition run by Panda and Papa Nid... The Brotherhood round. Really struggled to find inspiration for this one but flicking through the Hasslefree website I came across this little motley crew - in case you can't tell from the poor picture it's the Studio Miniatures Dorothy and Gang zombie survivors. Very much a WIP at the moment...
Viktor von Domm wrote:full marks for that classy literature meets anti zombi infestation reaction gang!
i want to see this done so badly! (i mean i really want to see this finished... and finished good not the other way ´round)
and with lots of grafitti on those walls too!!!!!!!!!
display board looks spiffing!
Cheers Vik, yeah, I want to do this justice so will take my time. Graffiti, posters and blood stains are planned for the back wall... plenty of litter also for the road / pavement...
dsteingass wrote:Wow! That's awesome! Such lucky kids!
Can you get onto the roof?
I had to make do with a fort out of a woodpile
Best we used to have was a pile of cardboard boxes to make into forts and tunnels. The kids of today don't know how good they got it !
There's a ladder and hatch that leads up to the turret, and plenty of room, in fact it's a real sun-trap. I've ad a few summer evenings sitting up there with a beer in hand Here's an old photo back in the construction period of my kids, swords in hand, protecting the tower...
Update time (of sorts). RL is really getting in the way of hobby fun. The sun is shining and I've been banished into the garden to get it finished. Managed to get a sneaky bit of hobby time though so worked on the bases for Dotty and her mates. Cracked paving is the order of the day...
[picture to follow - forgot to upload to the Dakka gallery!]
and here it is...
BTW, still have no laptop of my own Hopefully that will be resolved soon though...
ha! your kids are as crazy as mine... if i would let them play with fire my head would be getting bald even quicker^^... they can kick their dad even now as good and hard as any mule^^
Camelot? Did someone mention Camelot? Well seek no more, here it is in all it's (slightly ruined) glory...
Actually it's Bodiam Castle in East Sussex. It's a Bank Holiday today in the UK so we took advantage of the strange ball of fire in the sky surrounded by a blue ocean(?) still trying to work out why the sky wasn't grey... Bodiam Castle is amazingly picturesque, a classic ruined castle and made for an awesome day out with the family...
If memory serves, which it usually doesn't, is that the castle that Monty python used for holy grail. I've got Toget a new copy of the movie, my old copy was on laser disc. Yes I'm that old. It was great, it was in English on track 1, track two was English translated to Japanese with a running commentary throughout the whole movie by some of the pythons, and track 3 was English translated to Japanese and the. Back to English. You got great lines like "your mother was a small woodland rodent, and your father smelled kind of ...off." It also mentions all the castles were the same one shot from different angles, and they had a person who had all their limbs amputated due to an accident who was going to play the black knight, but because they drank their production budget they had to cancel the amputee, and could only afford to shoot at the one castle.
@ Theophony - It was the location for Swamp Castle
"All the kings said it was daft to build a castle on a swamp, but I built it all the same! Just to show 'em! That sank into the swamp; so I built a second one, that sank into the swamp; so I built a third one, that burned down, fell over and then sank into the swamp; but the fourth one... stayed up!"
Not sure about the rest, but knowing Monty Python, nothing would surprise me
@ Randy McStab - A tutorial? That would entail building another, which I neither have room nor money for - plus I built it on the fly and not sure I can remember all the stages !!
Next time a do something like this I'll document it ... My son wants me to build him a TARDIS next - now to persuade the wife that a big blue box would look good in the garden - did tell her that it would be perfect for garden furniture storage given the impressive interior dimensions She didn't fall for that one...
if we had visited that castle with my kids... they would have wielded their wooden swords and worn their full camo suits... and beheaded all the other visitors...in memorandum to lancelot´s great storm to the castle^^
Haha, yep, the Castle of AAARGH was just the same castle shot from the waterfront LOL, the DVD special edition has all of those extras, including the famous LEGO rendition of the song.
this again raised a question... would i model cheaper all things concerned when i would work with lego instead of GW and plasticcard??? now that is a tough one...^^...cool find ruglud!
At the outdoor theatre in forest park they are doing the musical version of "Monty pythons holy grail" my wife asked me if I wanted to go, but I don't think it would be nothing close to the original. Besides its a formal affair because the music is performed by the saint Louis symphony.
Not Spamalot then? Heard that is pretty good, one of these days I'll go and see it... Can't really imagine a formal rendition of Holy Grail though... It could unintentionally be hilarious
I guess it could have been spamalot, didn't really check into it. I can't get dressed p for Monty python, at least not in a suit, as. Peasant or a knight yes, as a stick in the mud....Ni.
I need motivation !! I'm lacking hobby mojo at the moment
So been seeing people's amazing workspaces and thought I'd share mine - a couple shelves in a cupboard plus the top of said cupboard... All moved back and forth to the family dining table... One day I will have a man cave, one day
I see the thunderhawk located a reading of "Polly Pockets" and took a nosedive, seems the marines either still have the drive if not the equipment, or they went to purge the unclean.
Haha, yeah... Marines like Polly - especially the magnetised ones
Oh and just noticed the 'Hawk is getting jiggy with the Play-Doh ... Nice
Automatically Appended Next Post: While sorting the 'hobby space' I found part of my 25/28mm WW2 collection safety stored inn the Wii box - it has two perfectly sized trays for figures, the second tray holds my Wild West figures (previously shown in this thread). The WW2 collection is mostly Wargames Foundry and Bolt Action (pre Warlords buyout). Might also be some Westwind 'Berlin or Bust' in there somewhere.
The Panzerschrek cases are metal, but the rest is resin.
The large walls were from BAM, not sure if they still have them now though under the Warlords banner. Not sure about the rest - there's a mix of 20mm scale terrain in there, but it still works with the larger scale.
Still got loads of US marines in a box somewhere as well...
oh.... I couldn´t live lest work in such confined places... I admit I am a rather messy artist here... and forgetful too... sometimes I really crawl through my bitzboxes...to have it all just in one tiny place... the horror... hope my wife never sees how other peeps make do with so little...
Well, I will admit to having boxes in the garage full of models and my WD collection, as well as my 8'x4' games table, terrain boards, scenery and games like Necromunda is stored out there. Also have another cupboard in the kitchen with more figures and terrain making stuff and we have a box room, which is home to Space Hulk (2009 edition), AoBR, various rulebooks, most of my surviving Wargames Illustrated collection and WW2 reference books. So I'm spread out, just don't have a place to call home yet... Maybe I need to build an annex on the castle !
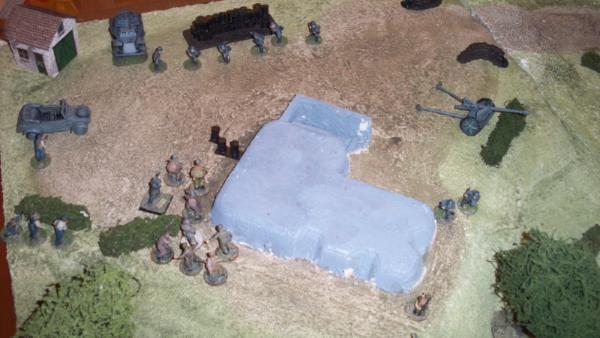
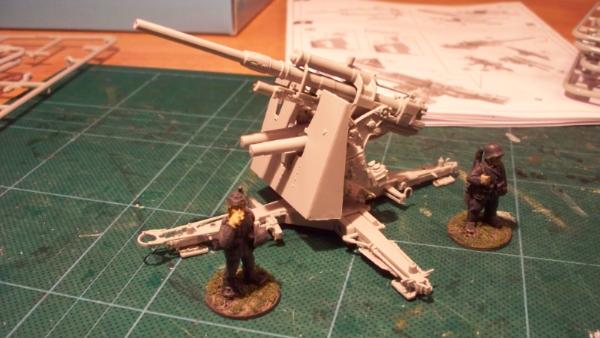
Those Wehrmacht are good lads, seen off several raids by those damn pesky British Commandos...
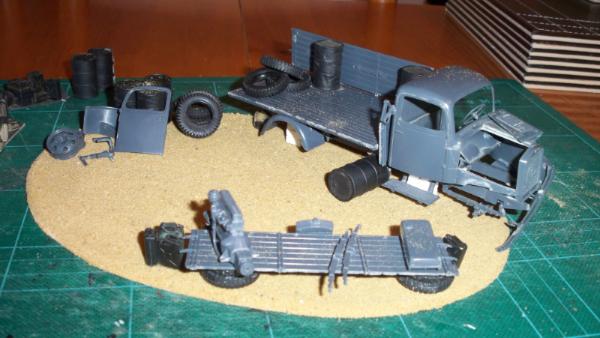
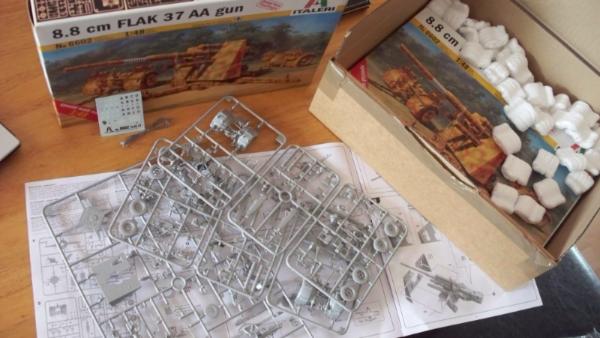
Bought myself a couple of German 8.8cm Flak 37 guns on Friday morning, they arrived in the post this morning
Plan is to use these for a WW2 game involving a British commado raid on German wehrmacht bunkers. Was tempted by the Bolt Action 88mm but at £25 a pop it was too pricey considering I needed to get two of them, then found this 1:48 kit on ebay for £8 each... Going to enjoy making these as haven't done a historical kit for quite a while...
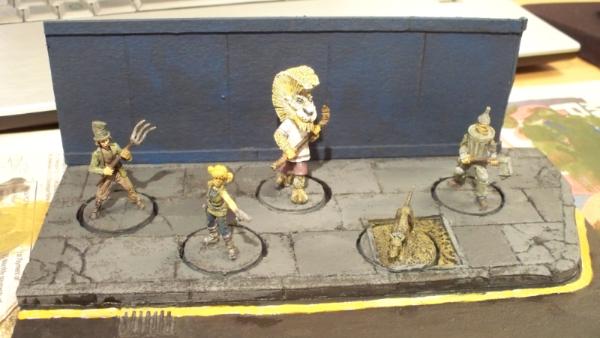
Managed to get some time in on 'Comrade and Papa's Round 4 :The Brotherhood round' competition. Threw some paint over the figures and also some on the display base.
can´t really say much about the FOW stuff... too small and too historical for my taste... but I can say the model of that haubitze looks quite good... with all that detail!
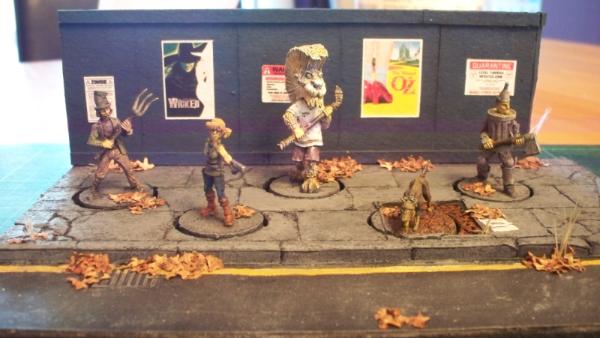
Automatically Appended Next Post: My competition entry is almost done. Some weathering on the posters and signs in the background and a few finishing touches on the figures. Should be done in a coule of days (hopefully)
For now I have this washed out image... Will get better shots when finished with my light box
as i said before.... i like the darker version better....,ore fitting to the general theme...
as for the lego... i need to show these to my son... he loves using bricks in many twisted ways... he uses them mainly for their shape and comes up with some awesome ideas... all these "scratch built" models will give him plenty of ideas!.
i think it is a mix of jabbas barge and a steam tank... the classic imperial cobbled with da vincies tank design...
and i agree...most awesome indeed!...
but i have to ask... the pieces often get used in a very twisted way... like the wedges... do these converters cheat and use glue? i think quite often otherwise nothing that cool looking would be possible...?
Still trying to find my Lego baseplates to start my legomunda campaign. I've looked everywhere for them, and have a great idea for the setup, but I refuse to purchase more o them at the prices they have now.
Ha ha, yeah and the beauty of Legomunda is you don't have to base the figures, they are fully posable, weapon swaps are as easy as pie and buildings can be shot to pieces as the game progresses !
The Legoland shots taken outdoors are all courtesy of my 9 year old son - the proud owner of the Palace Theatre... He's quite nifty with a camera, only had a couple of shots that we deleted due to the camera strap hanging over the lense...
Might try and stop by the Lego store that opened in a mall near my parents house today while we are out. It's supposed to be one of the largest stores in the company, so I'm excited. If we don't o it okay it's definitely on the list for the coming week.
It certainly is Plastic - no more mowing, just have to vacuum the lawn now
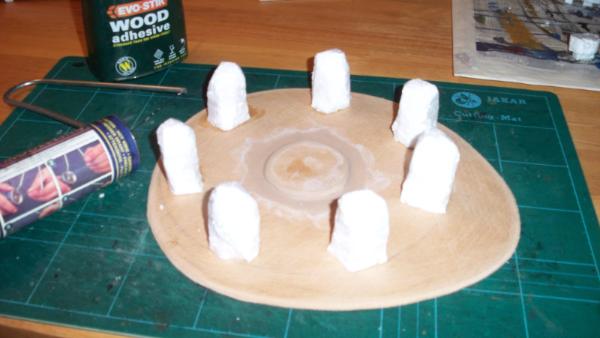
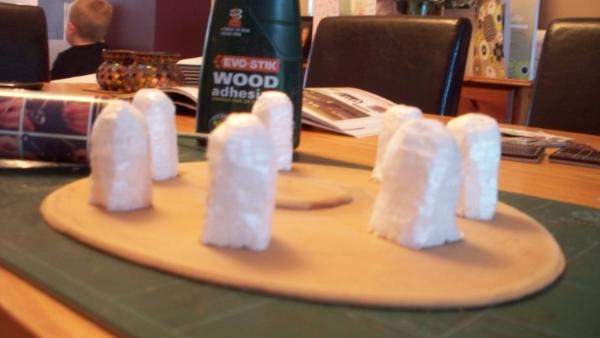
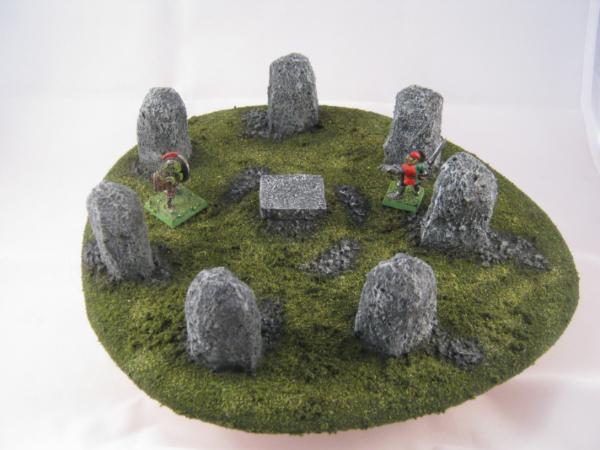
Procastination finally over on my entry for The -=]_=- Terrain Competition... I ws going to go with a war memorial with lots of statues but I just don't have the time or miniatures to get it done (it can instead go on my 'to do' list...) So, I've been struggling to come up with something else, then inspiration struck when I was flicking through some old WDs. Time to go old skool and make a Stone Circle
Initial work - base is hardboard, approx 25cm / 10' diameter. Standing stones are made from polystyrene chunks, shaped with my old hot wire cutter.
Next step is to put filler over the whole piece to get some surface texture, also need to decide what's going in the middle - choice is from firepit, sacrificial alter, stone table, dead tree or a larger standing stone.
Camkierhi wrote:Chaotic glyph, ala Oblivion, glowing runic circular symbol, then you can do tons of osl on the other rocks.
Oh and about time sir.
I did consider doing something along these lines, but I want to keep the piece generic so it can be used in fantasy, sci-fi and historical games.
dsteingass wrote:That is FANTASTIC!!
Automatically Appended Next Post: Have you thought about using cheap plastic "army guys" for statues?
Thanks Dave. Yeah, the 'green army men' could be an option... Maybe a later competition will be 'Statues'...
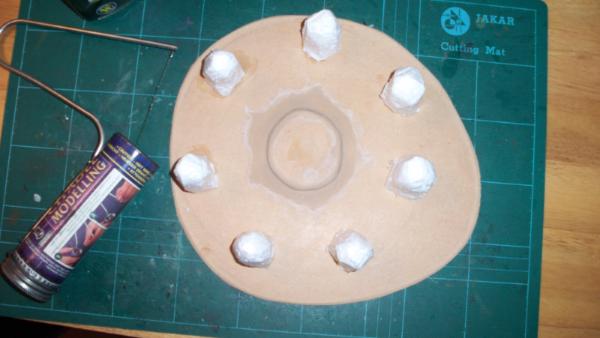
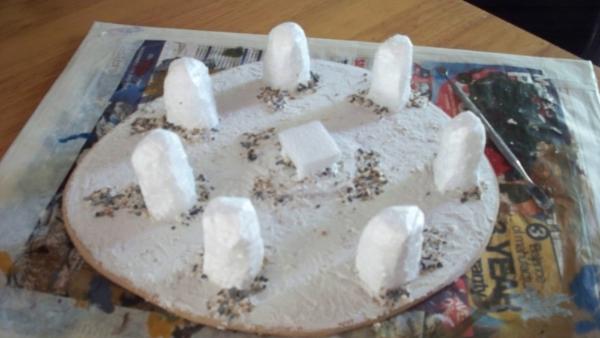
So, I've now added filler to the whole base and painted the stones with a PVA / sand mix to give them a rougher feel. Also decided that I'll have a stone table in the central, similar to the one in The lion, the witch and the wardrobe - could either be a simple altar or a sacrificial stone...
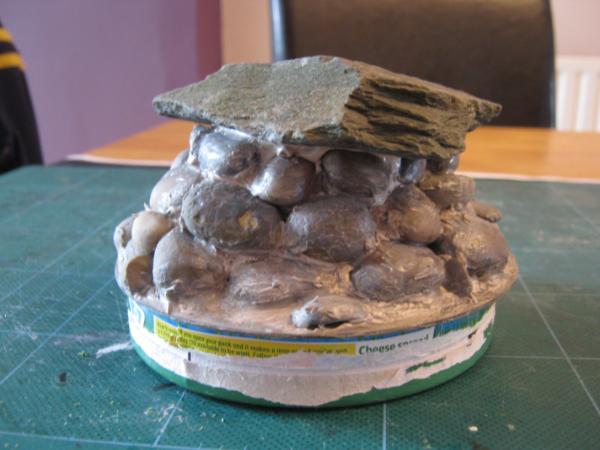
My daughter also wanted to get involved so she made a start on this stone cairn. Has an expanded foam core surrounded with pebbles from the garden and a pice of slate stuck on top. All based on an old CD... Once the glue is dry she'll be painting it up. (ignore the round box underneath - that's just to make moving the piece easier...)
And that's me done. Got to get some shut eye as up at 5am (UK time), then off to the airport and flying to Poland... Back on Friday evening...
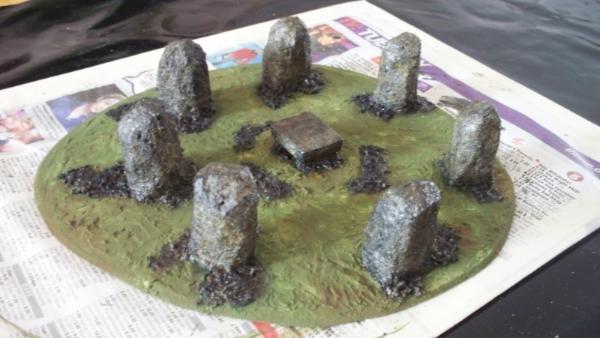
stone circle looks excellent and shows no mishaps at all... you fishing for compliments here
as for your daughters work... very inspiring! is it supposed to be something like a grave? like some peoples used to burry their fallen kings in? or will it have a statue on top?... the round box I think would support that idea quite well!
Your daughter has an eye for epic. Your work that is nice. More daughter. Plastic lawn is a sad lawn. Mowing is good for the soul vacuuming is self explanitory.
dsteingass wrote:That's a beautiful stone paint job ruglud!
Thanks Dave
Viktor von Domm wrote:stone circle looks excellent and shows no mishaps at all... you fishing for compliments here
as for your daughters work... very inspiring! is it supposed to be something like a grave? like some peoples used to burry their fallen kings in? or will it have a statue on top?... the round box I think would support that idea quite well!
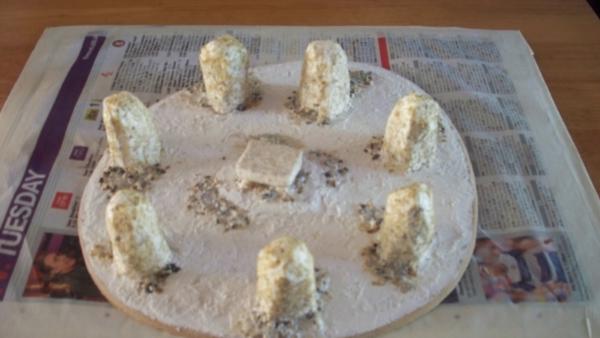
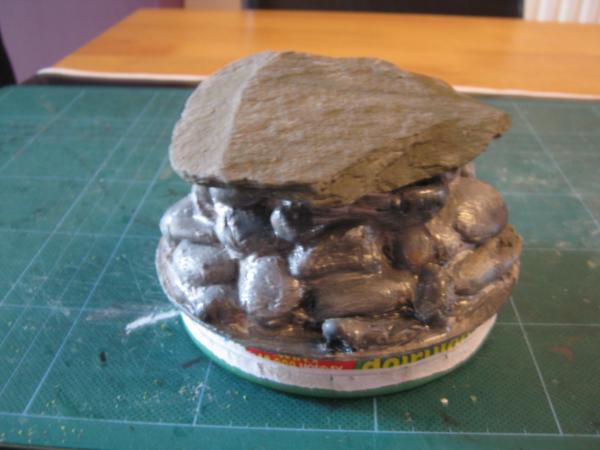
Well, the flocking went a bit pear shaped at the start, but I was able to save it without having to redo...
Yes, it's a burial mound and is just a pile of stones placed over the body of whoever it was that died - most likely a Celtic king . Not planning on keeping the box underneath - was just using it so that the base didn't stick to the table...
cormadepanda wrote:Your daughter has an eye for epic. Your work that is nice. More daughter. Plastic lawn is a sad lawn. Mowing is good for the soul vacuuming is self explanitory.
Thanks Panda, she just read your comment and is very happy Plastic lawn is awesome - my neighbours are out every sunny weekend mowing, raking and mulching. Me, I just go out and vacuum up some leaves or walk round picking the odd one up, then I can relax back in a reclining garden chair with beer in hand while the mowers are still buzzing away
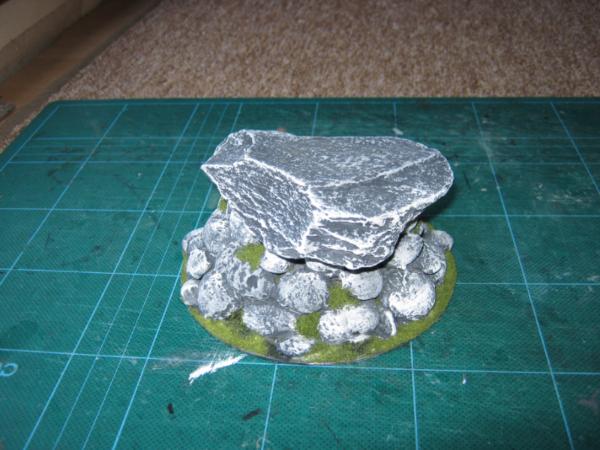
So... my daughter (13) finished the stone cairn and here it is...
and rightly so! the whole thing looks very good... the grass is looking very naturally and doesn´t look overdone in any way... and the drybrushing looks very professional... you can almost feel the rough surfaces!
i hope we see some more work of hers soon!... give her more work
So not an update - have had precious little time to do anything except lurk on Dakka over the past week and a bit - what with work going crazy busy and a stupid summer cold knocking me down over the weekend - but my Black Templar mini vignette made the Dakka Dakka front page That makes me very happy And it pushes up the views and votes - there's even a nice comment in there
Camkierhi wrote:I am very impressed, that's beautiful, well done girl.
Thanks Cam, I showed her your comment and she was beaming from ear to ear all day...
Viktor von Domm wrote:
I'm suitably impressed with her skills
and rightly so! the whole thing looks very good... the grass is looking very naturally and doesn´t look overdone in any way... and the drybrushing looks very professional... you can almost feel the rough surfaces!
i hope we see some more work of hers soon!... give her more work
Same for you Vik, you made her day with your positive critique. She's keen to try her hand at some more testing terrain work so watch this space...
tell you what... why not let her try herself out with some foam cutting to make some brick work? i bet that due to her drybrushing qualities she could do some very good looking small ruins
Vik & Panda, I'll see what else she can whip up for us all, she's pretty keen to make more terrain for her old man's 'sad hobby' as she calls it Kids !
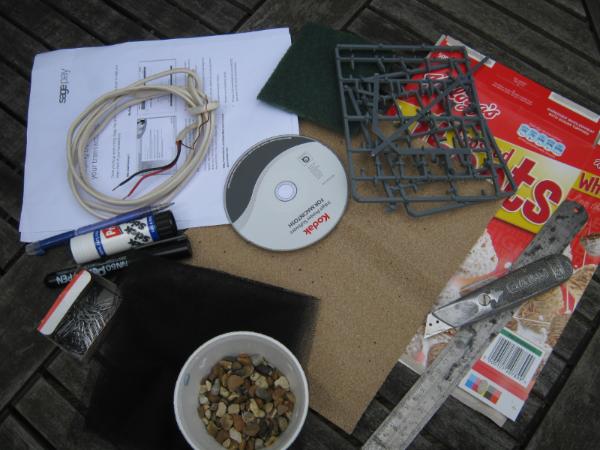
It has a recycling theme to create a piece of terrain - visit the thread for more info...
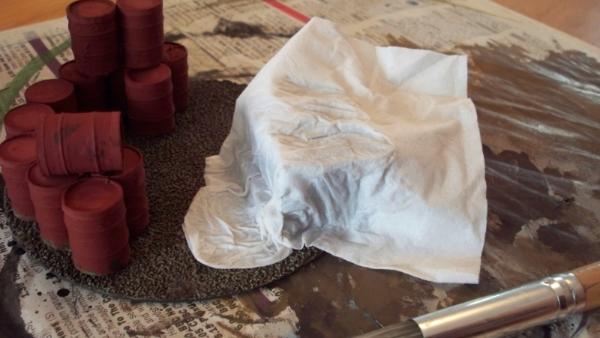
Here's my ingredients: CD (for the base size); scrap pieces of 80gsm paper; cereal box card; coarse grit sandpaper; wire; paperclips; scouring pad (not sure if I'm going to use this); fine netting material (left over from a homemade kids halloween costume); leftover plastic sprue; small stones from the garden; tissue / kitchen towel (not shown)
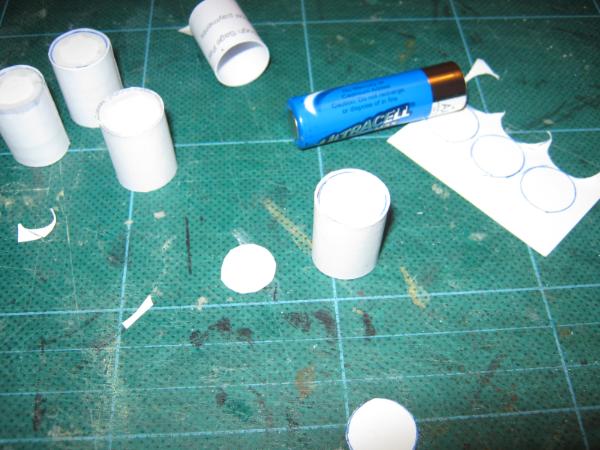
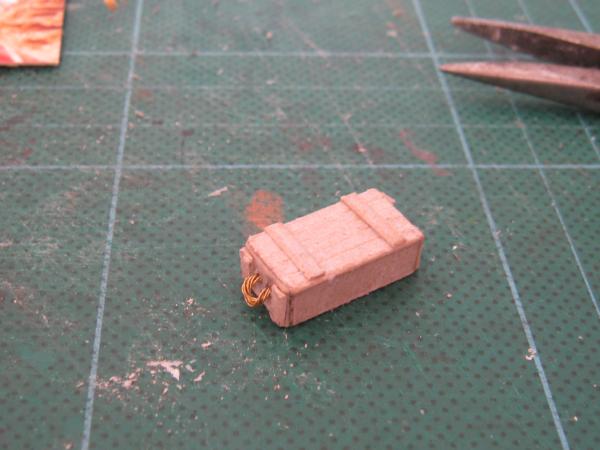
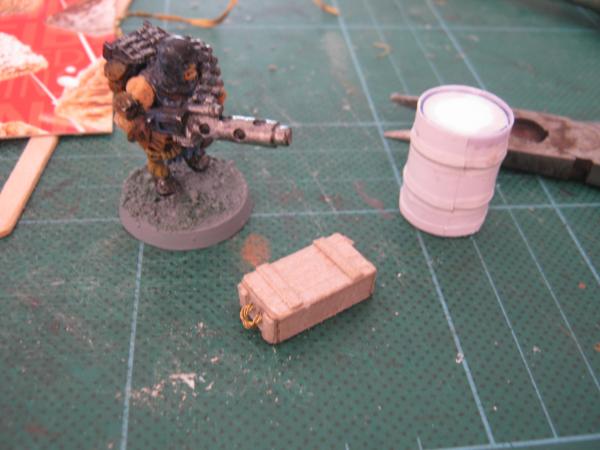
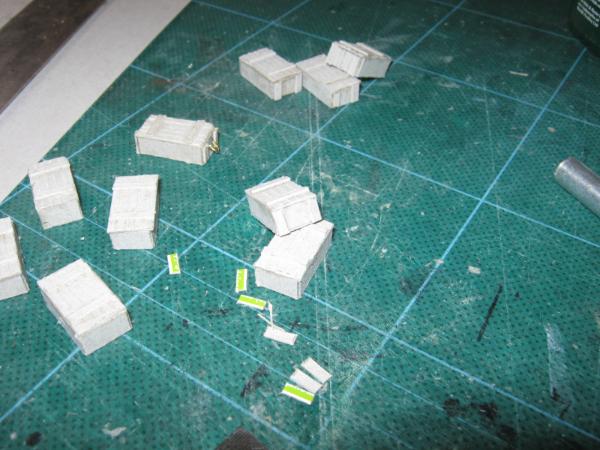
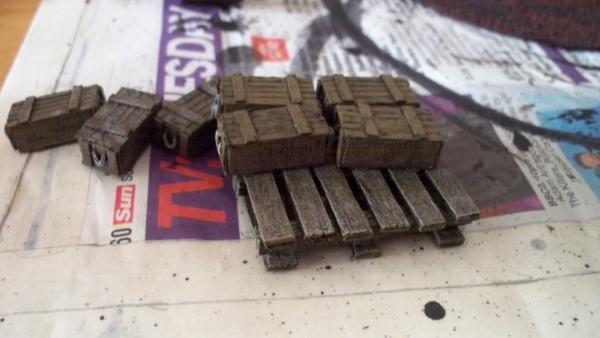
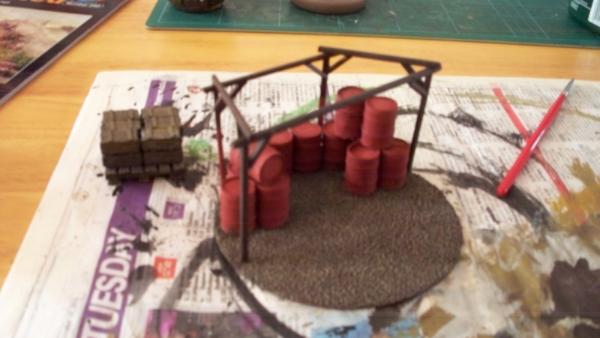
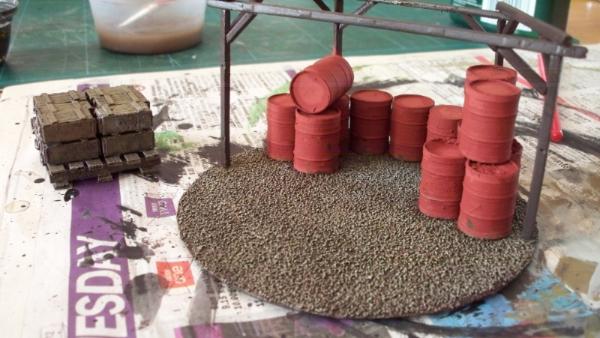
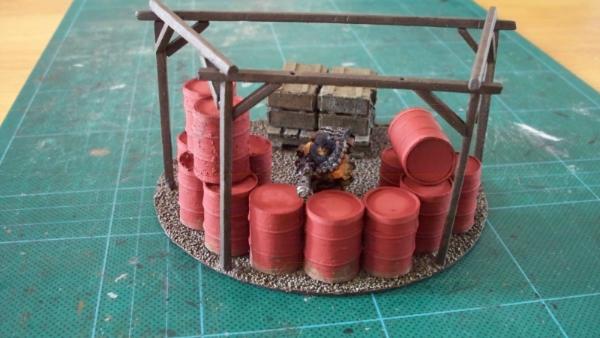
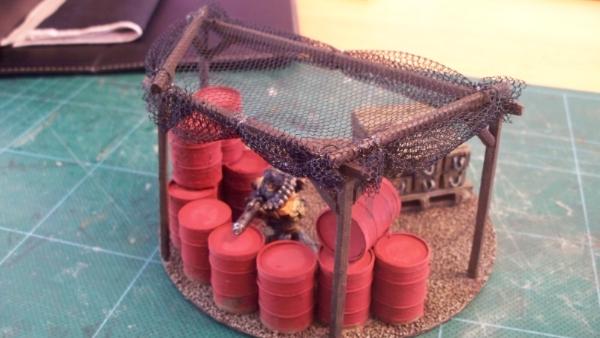
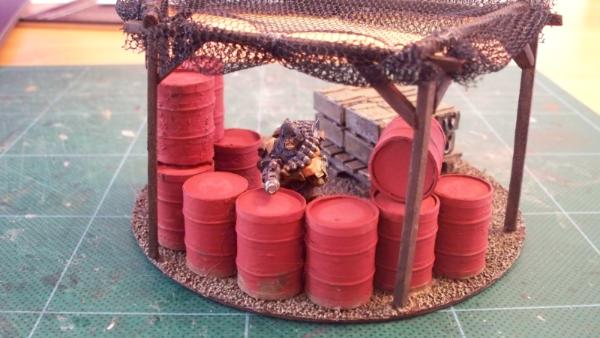
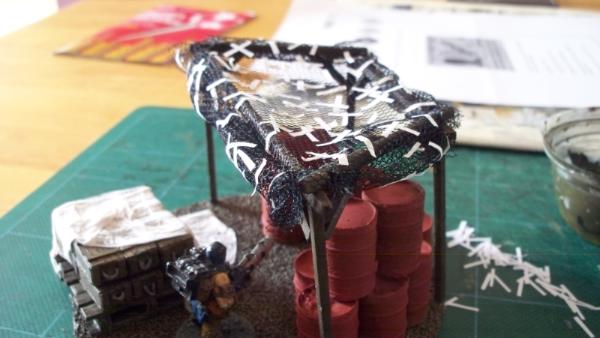
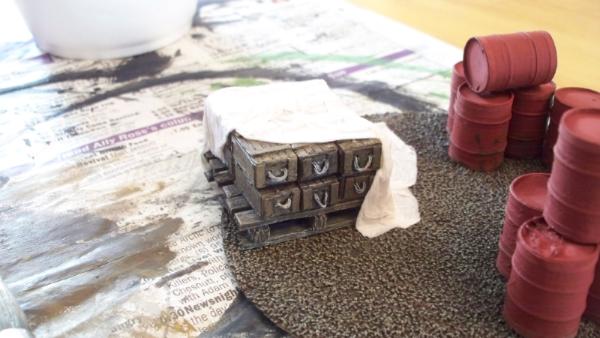
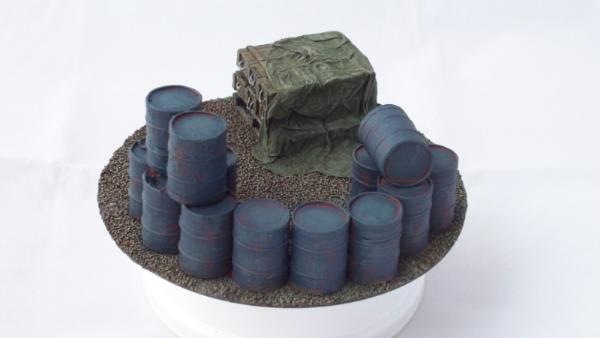
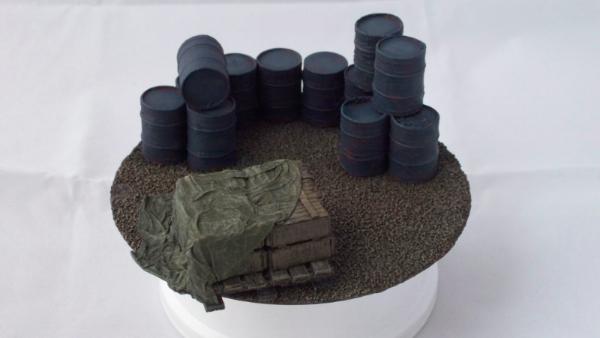
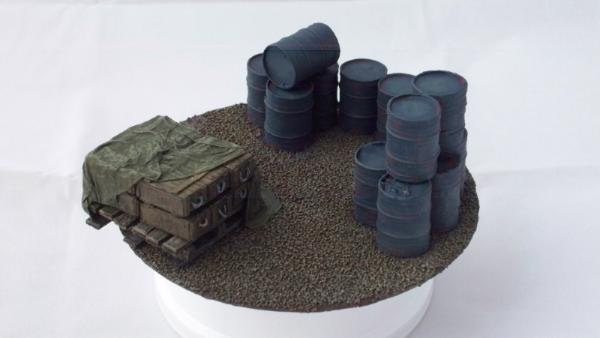
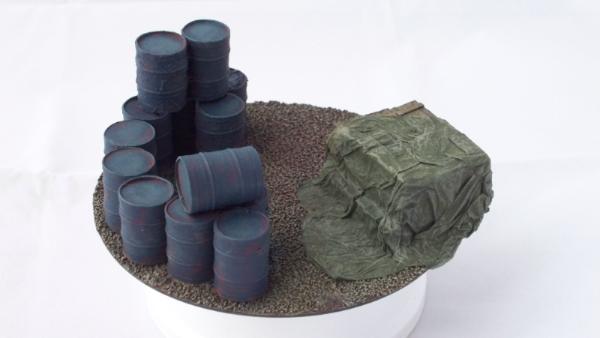
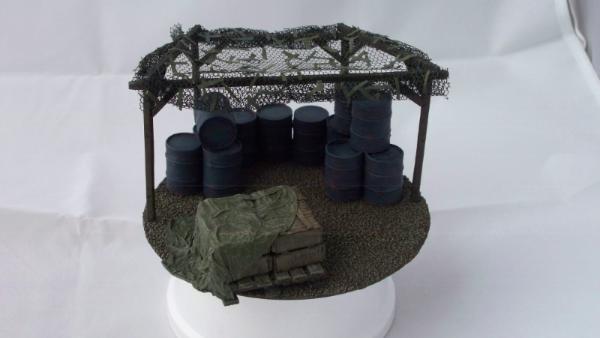
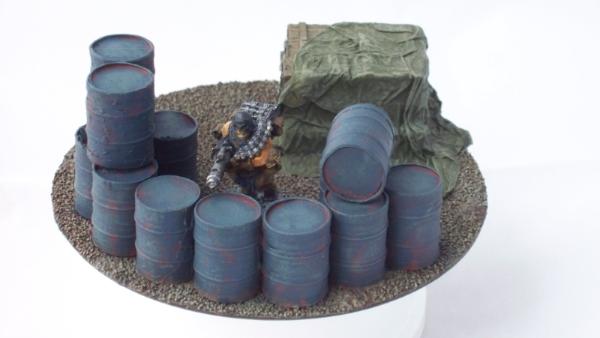
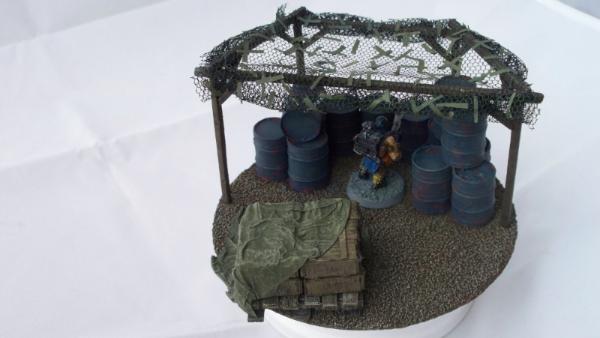
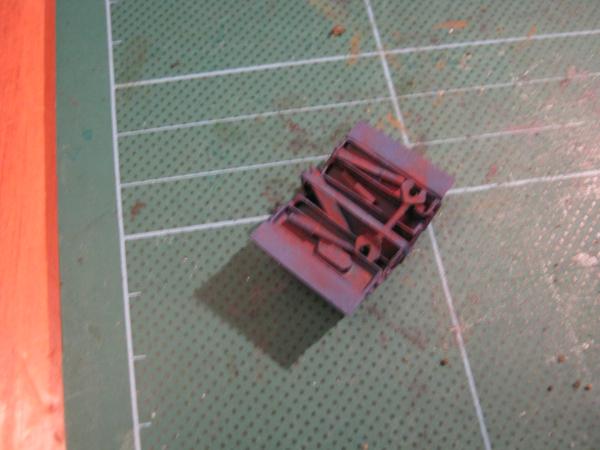
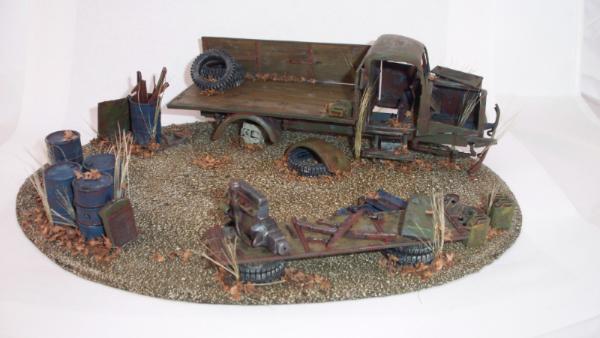
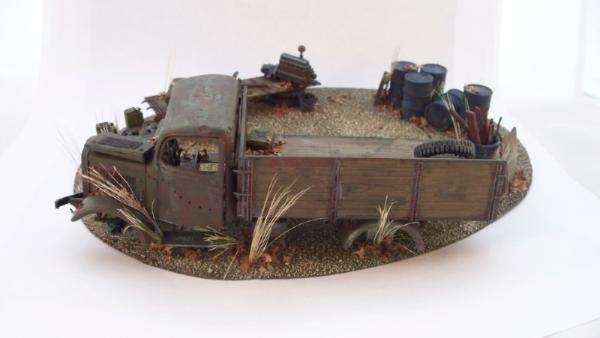
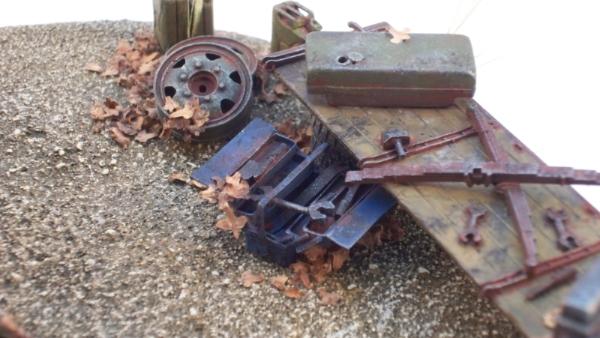
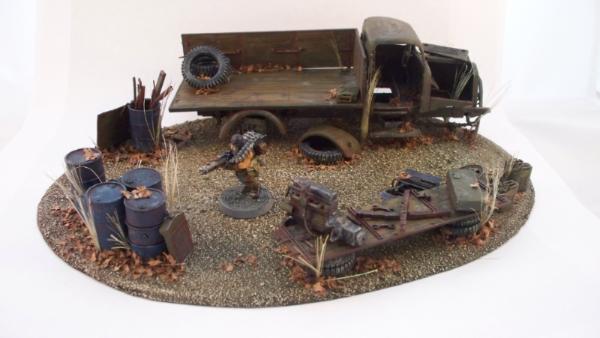
I'm going to build a supply dump - oil/ fuel barrels and ammo crates - will be usuable for 40k, necromunda, and various other sci-fi and 20th century wargames
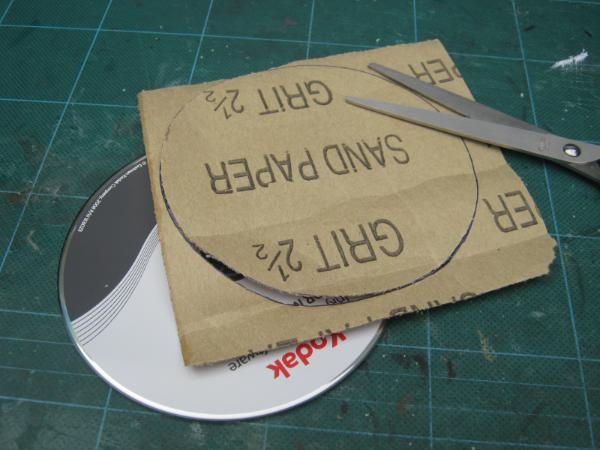
So first up, the sandpaper is cut to sizeand glued to the CD
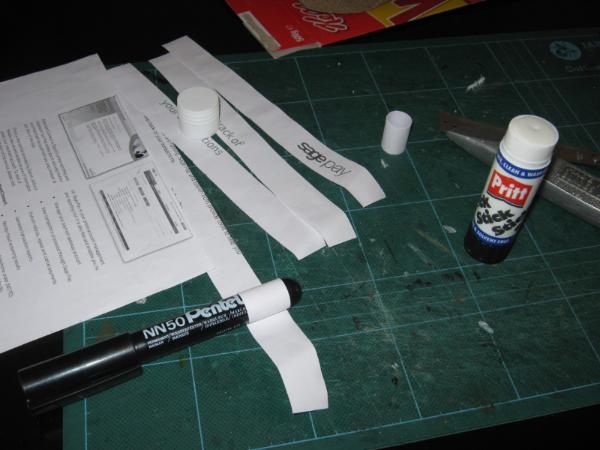
While the glue is drying on the base, we move on to creating the barrels. Cut strips approx 20mm wide from the short width of the paper (ie 210mm long for A4). Simply using pritt stik type glue, a strip of paper is wrapped around a marker pen and glued (note: don't glue to the marker pen...). Repeat process until you have loads of paper tubes...
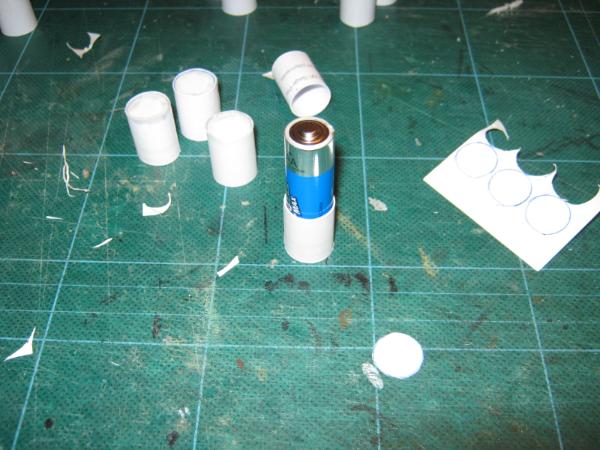
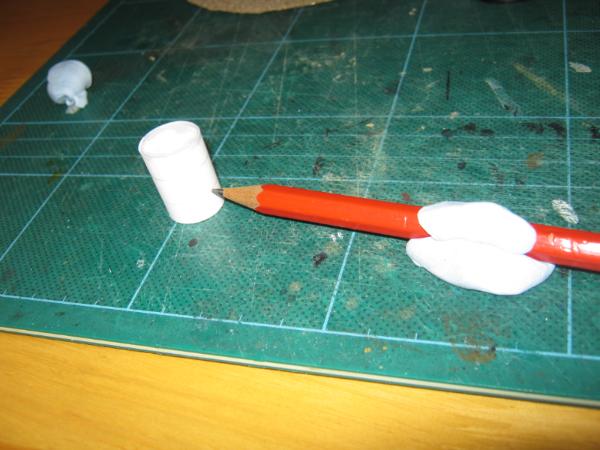
Update from last post. Oil barrels dry, now to add the end caps - created a small spacer out of card and put the basic tube over this. Put a pre-sized end cap in, a bit of glue (superglue or wood / pva glue is effective), then using an AA battery (which is slightly smaller than the tube) pushed the cap down onto the spacer and allow the glue to do it's thing... For majority of barrels I'm only doing one end as they will be standing up right.
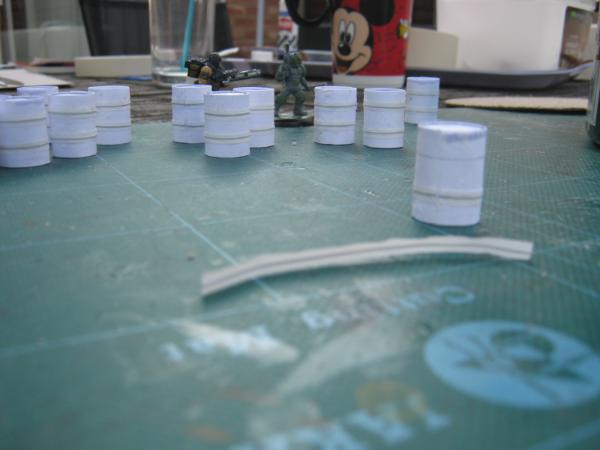
Next task is to add the mid rings on the barrels - a pencil and some blu-tack used to create guide lines at the same height of each barrel
Now, slight deviation from original plan - the wire I had to create the rings was too big, instead I found that sandwich bag ties was perfect, so glued these round each barrel. Damn fiddly though.
Last step, thin paper strip glued top and bottom...
Et voila, lots of barrels...
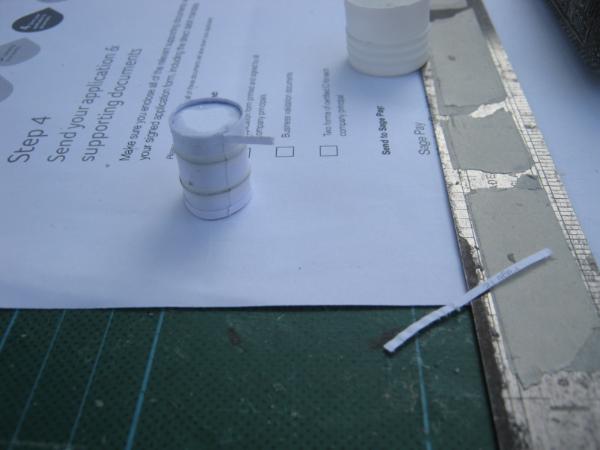
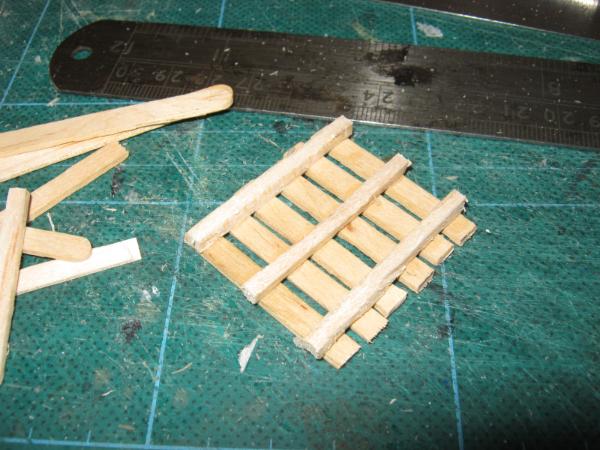
Next, making a pallet for ammo crates.
Cut equal lengths of scrap sprue
Double up some cereal box card to make thicker card, cut into strips and glue to sprue...
Ta da... One pallet
Nate that the last picture here shows ammo crates on the pallet, I need to make more of these and will document the steps in the next update (forgot to photo the build for these ones)... Also need to work some on the pallet to make it look more wood, less cardboard...
those barrels are really good looking... and to use those sandwich bag ties is a really nice way to use household items! we all have these in abundace!
the pallete looks good too... tho a bit thicker card wouldn´t have hurt either
as for the amo crates... that is something very interesting!
Cheers guys. Vik, I'll take a look at the pallet tomorrow and see if it needs more work or not
So... Some more kidz work, this time by my lad (9yr old)
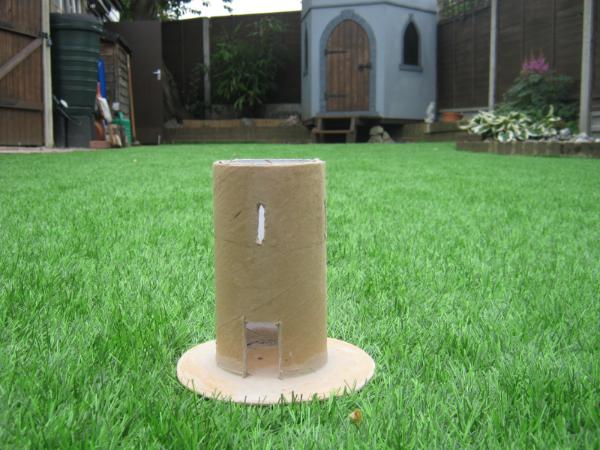
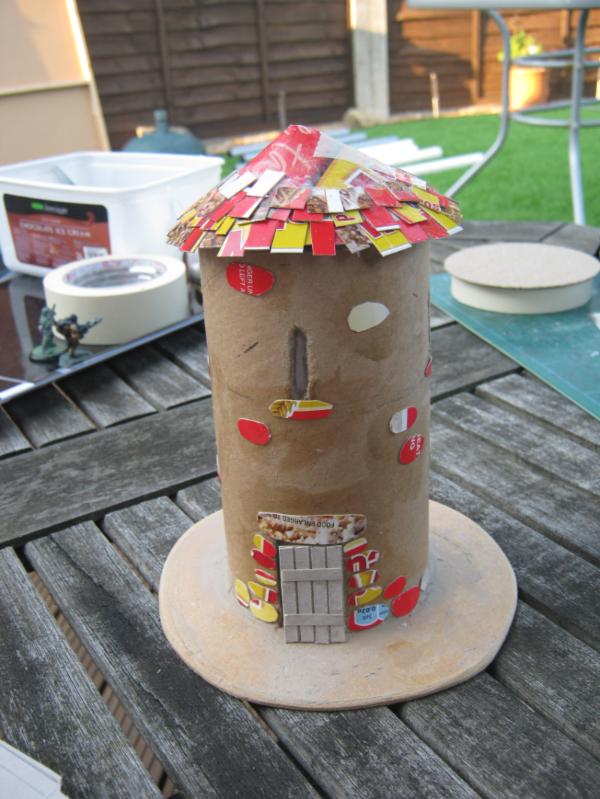
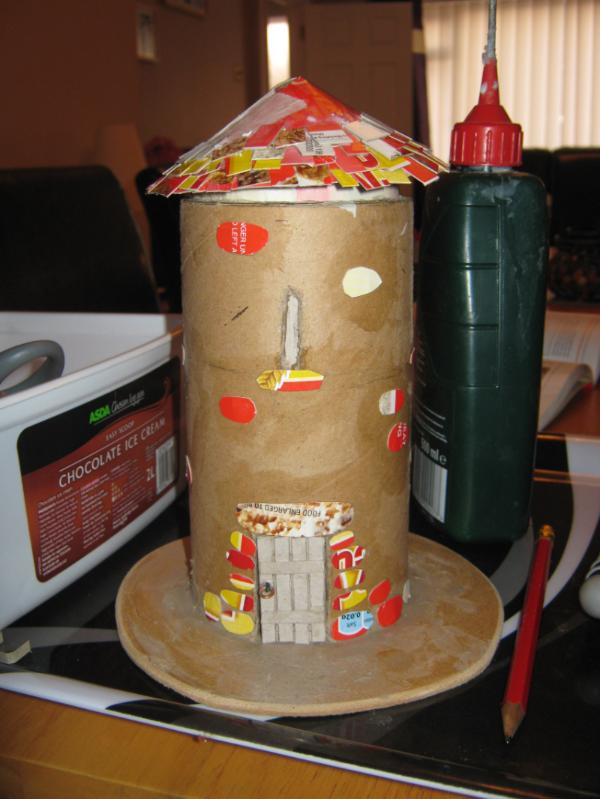
He's building a stone tower, WFB style. The roof will be romovable as he wants to use it as a pencil holder. BTW, he took all the pics as well...
Basic tower is a thick cardboard tube, approx 10" high. It's stuck to a shaped hardboard base. Door and windows cut out by me, but rest is all his own work
Worse part of the build is always roof tiles - he got a little bored so gave up and worked on the front door instead
Summer hols are nearly upon us so expect updates soon on this piece...
our summer holidays are almost over... ok... to be fair we have still two weks of ´em... but still... the end is nigh^^
the tower looks very cool... i know of the frustration the young ones so easily have to face... i wish my kids would be a bit more of a longer breath when trying to introduce them to the fun world of hobby work... (well they´re still only 7 and 5 years old... )
i think this will be a great looking tower... be sure to tell him that i too have way back then started with such projects... i once made a tower with PVA and small pebbles and actually stonewalled them pebble on pebble...that took literally ages...well it felt like that^^
i hope he wont loose interest in this... as i think the potential of a nice item is right there... and the best part is he will have fun with that even while doing his homework...
maybe add a note pad holder as some sort of wall with battlements ... i bet he would like a complete set of castel associated desktop utilities^^
Well, summer hols start end of July here, then 6 weeks of kid entertaining before I go to work (evening shifts for me). Hopefully I can peak his interest with some Necromunda builds - he likes the game anyway so you never know...
Ah yes, those heady days of youth and our crazy plans for awesome terrain. I once built a cardboard castle that looked like the old GW foam one, didn't totally finish it and it got destroyed in a house move
house moves are a totaly disaster zone... i can´t count how many cubboards or mirrors or cabinets got killed during these... once we lost all our christmas decoration stuff... later on... around two years later... our mother in law told us she had it stored in her garage´s attic... go figure... we already got us new stuff by then...
and necromunda is cool...and i like the campaign modus of it... skirmish games i think are also better than great scale wars...
Thanks Dave, now I feel pressure to deliver... Got to admit though, these particular ammo crates aren't working for me. I'm putting them to one side and going to create some new ones shortly. Will update soonish with the new look crates
Chelnov wrote:Those barrels look sweet. Thanks for the tutorial on making those...just what i needed
Thanks Chelnov - it's a really simple and cheap way to create good looking barrels... Plus if you want they can be easily wrecked / squashed to look properly battle damaged...
dsteingass wrote:why not? they look great in the pic?
See below for the new version - these were just too basic looking for me, might come in handy thogh for other projects so going into my bitz box for now
cormadepanda wrote:Really epic! This terrain is smashing.
Thanks Panda
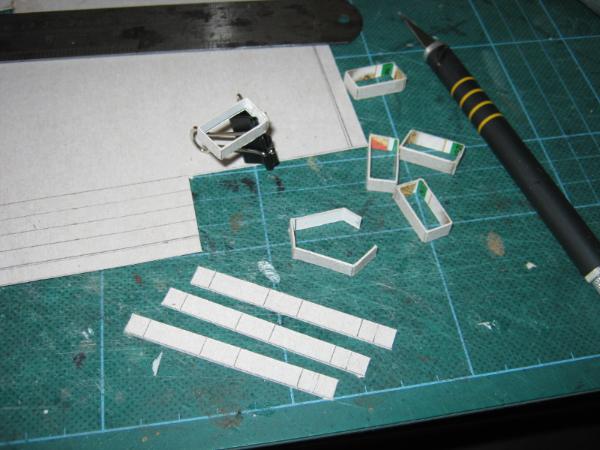
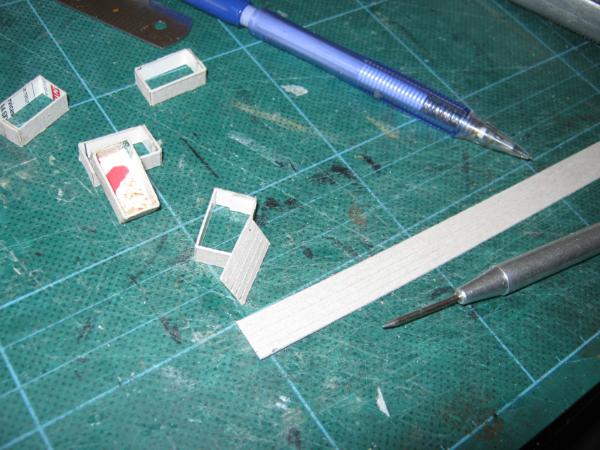
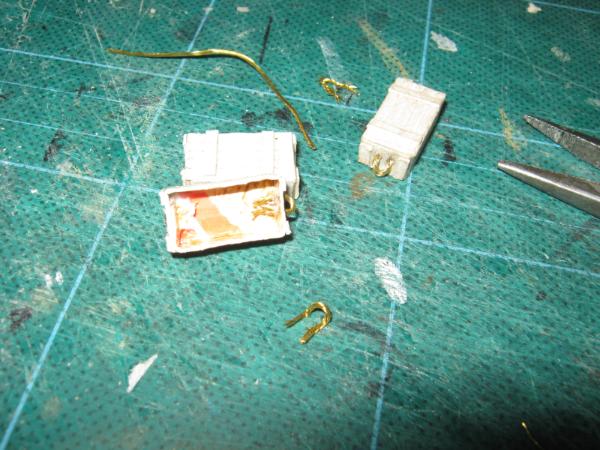
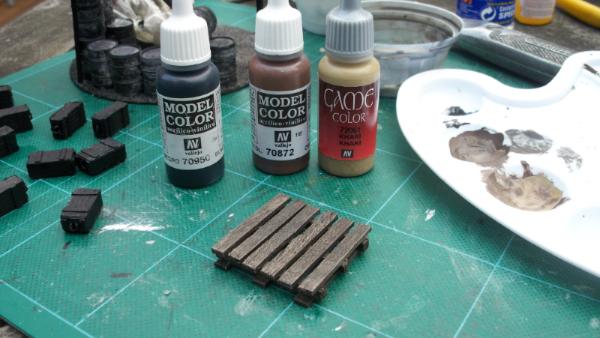
Update time... new ammo box test build. Made from cereal box card, glued together with PVA and piece of picture hanging wire 'borrowed' from my toolbox, glued in place with superglue
i would like to see tho a WIP or better a step by step on that build... is it layeers to the width of the crate or is it hollow? if the later... i am even more amazed as this is totally flimsy to build on that scale with cardboard!!!
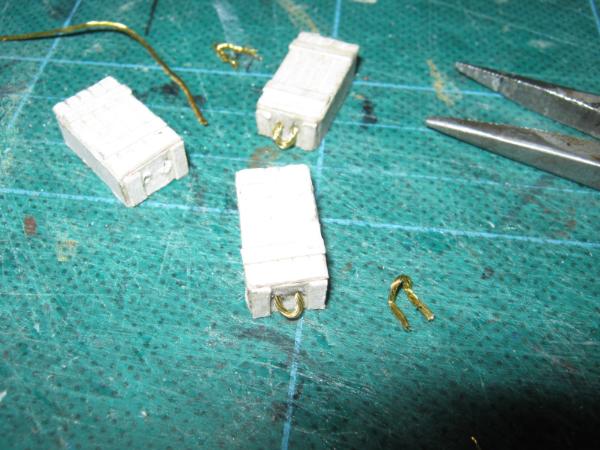
As promised, step-by-step to make ammo boxes out of cereal box card and twisted wire.
Cut some cereal box card to size, aiming for a box shape of 6mm high, 10mm wide, 18mm long - make sure there is a small tab at one end to stick the piece together. Score the fold lines, fold and glue with PVA.
Make the lid - cut a long strip of card the width of the boxes (10mm), then score lines every 2mm - do not cut right through though. After scoring them, run a sharp pointed tool along the line to open it up and create an individual wooden plank look on the card. Stick the box and top together with PVA.
Cut 2mm strips and stick across the planked top.
With more 2mm strip, cut small pieces to fit on each end of the box (approx 6mm tall). Glue two to each end.
When all the glue is dry, drill two small holes in each end (these may need to be opened up slightly depending on the drill bit and wire you have). Cut small lengths of wire - I used brass picture hanging wire - and pass through the holes to create a loop on the end of the box. Add a drop of superglue inside the box where the wire passes through. Bend the wire down to look like rope handles
Hey presto... Wooden ammo crates...
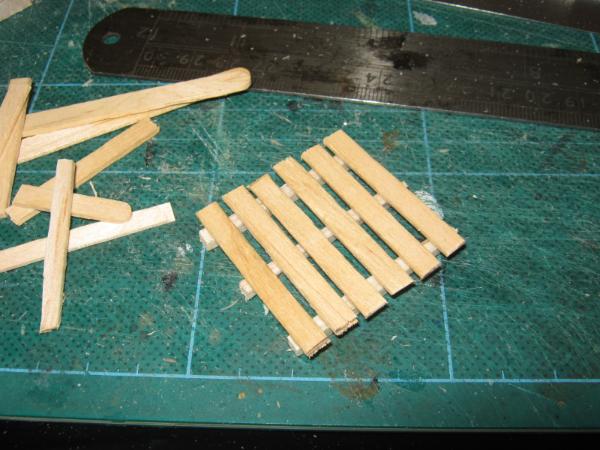
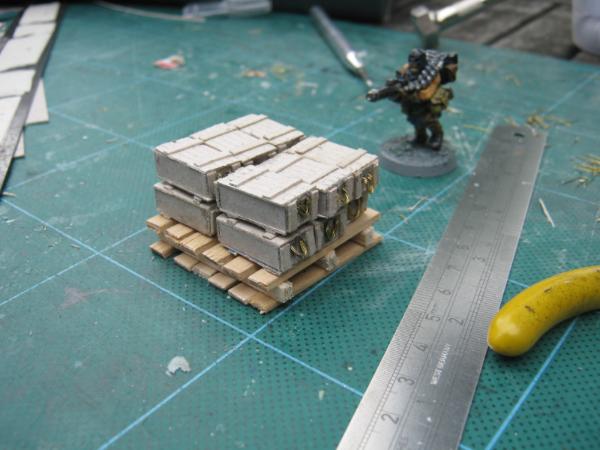
I also re-worked the wooden pallet - found a load of wooden coffee stirrers and liked the look of them more than using card, so with some small bits of balsa wood I found lurking around in my bitz box.
the new wooden pallete looks way more convincing.... the carboard one lok good but the boards were too thin... you solved that quite nicely!
and thanks for the step by step...i will try (tire?) my hand with this in the fullness of time too... these i think one could easily create in stock for any upcoming purposes in the future!
dsteingass wrote:Absolutely fantastic tutorials! I want to try them myself now!
You should, they would great with you IG and Necromunda stuff
Dr H wrote:Nice tutorial. Saved that for future use.
Thanks dude
Camkierhi wrote:Perfect tutorial.
By the time you paint them they will look amazing.
And than-you as well, hopefully I can do them justice with a good paint job
Viktor von Domm wrote:the new wooden pallete looks way more convincing.... the carboard one lok good but the boards were too thin... you solved that quite nicely!
and thanks for the step by step...i will try (tire?) my hand with this in the fullness of time too... these i think one could easily create in stock for any upcoming purposes in the future!
I agree Vik, thanks for calling me to task on that. You can never have too many ammo crates
Dr H wrote:
Viktor von Domm wrote: these i think one could easily create in stock for any upcoming purposes in the future!
and you could store them on the pallets for ease of storage and transportation...
Too true
Final build photo - I added a base to each of the boxes - exactly same build as the top, okay you can't see them, but I know that they are complete
So, moving on swiftly, I decided that even though I still need to finsh my entry in Briancj's comp... What the hell I thought, let's have too many projects on the go at once, why change the habit of a lifetime...
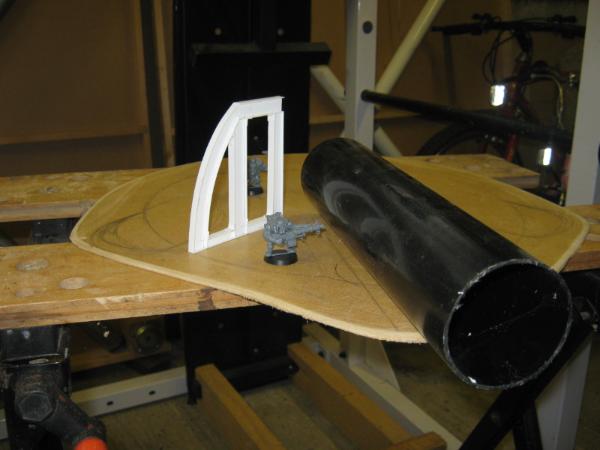
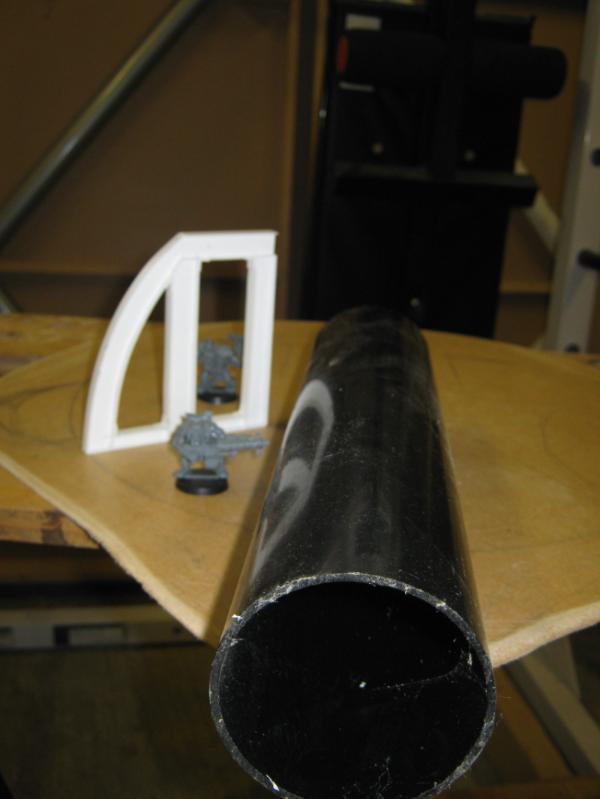
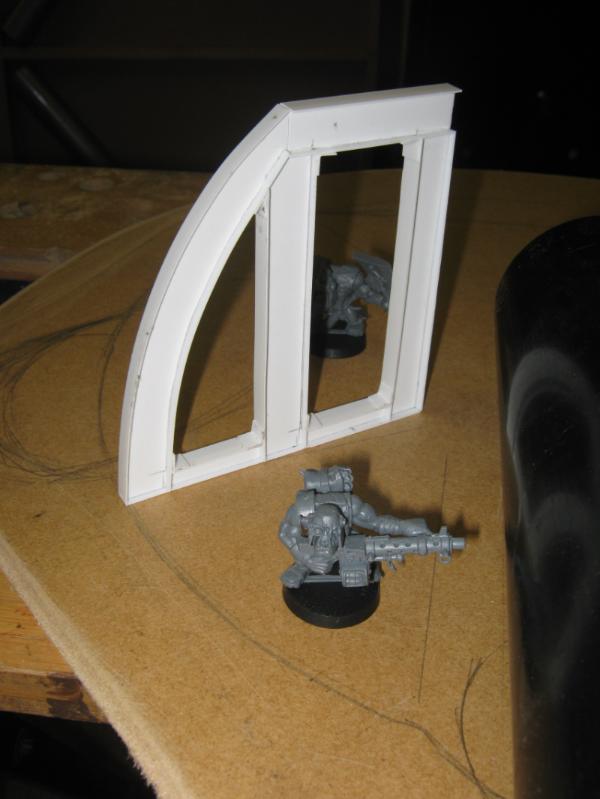
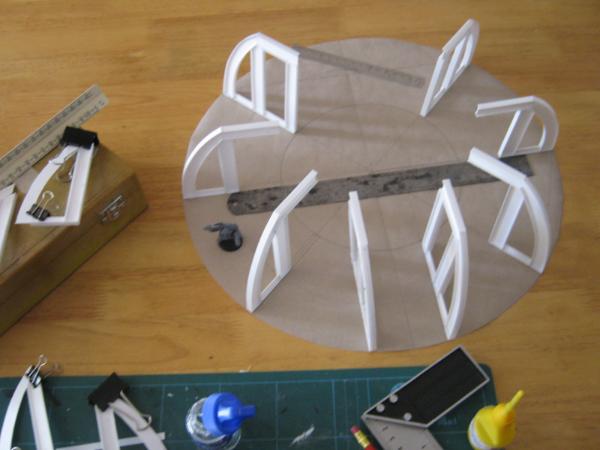
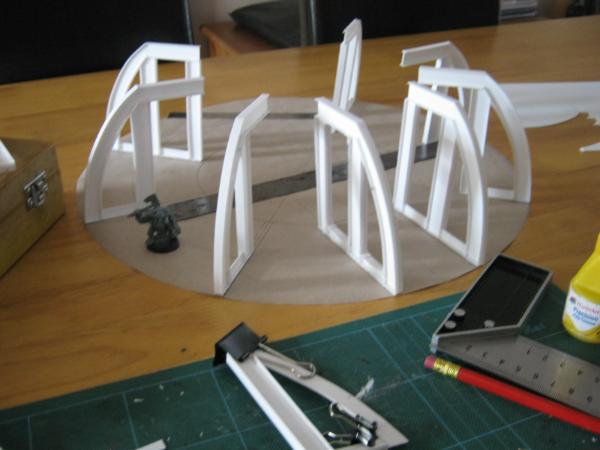
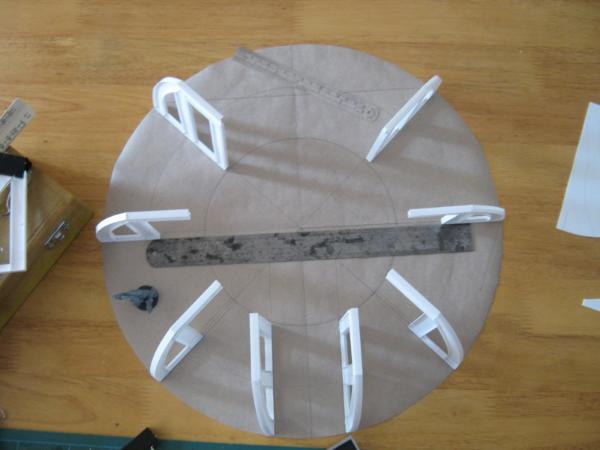
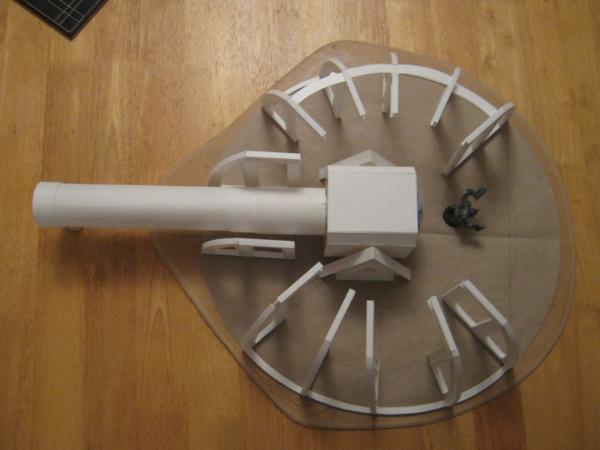
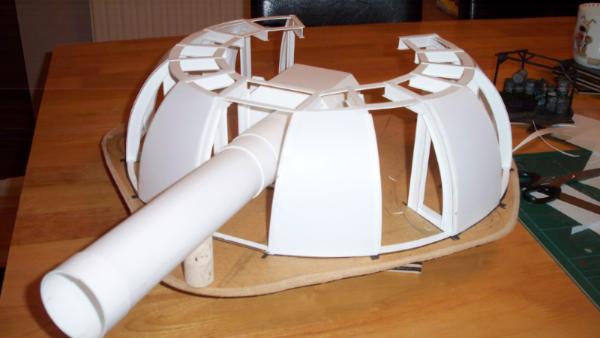
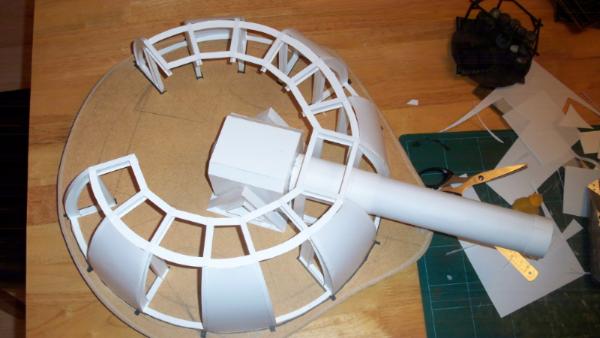
Sneaky peaky of the concept - and yes, it's Orky and the piece will be called 'Big Berfa'- that's all i'm saying right now
One thing I will mention though, I have made eight of those white plastic piece's - idea is they are internal steel girders and will include rivets ...
Further updates to follow at some stage, but do need to get back to my entry for Briancj's compo.
And your entry for Brian's competition looks brilliant. I have been puzzling on many occasions how to make more scenic clutter, like barrels and crates, I have in the past touched on paper tanks and have thought I could make them this way, but was unsure. Now you have shown me the way. Yours look excellent.
Camkierhi wrote:Is that 3" downpipe I see before me?
Now that is a barrel.
OOOh!!! you could do internal rifling!!!
And your entry for Brian's competition looks brilliant. I have been puzzling on many occasions how to make more scenic clutter, like barrels and crates, I have in the past touched on paper tanks and have thought I could make them this way, but was unsure. Now you have shown me the way. Yours look excellent.
Yes indeed, downpipe (with cobwebs included...), it's possibly on the big side, but then again this is ORK...
Thanks, the barrels and ammo boxes were fun to make, been a while since I did anything with card or paper. Just like the good old days again
Dr H wrote:The white supports look good. Nice work. Interested to see where this goes.
Cheers Dr H, the turned out quite well if I do say so myself - but now I've put them on the base it all looks too small... Some minor alterations may occur, but i need to get back to the concept and see what can be done...
I assume that's too small compared to the gun? Maybe they could be holding the above ground cover and the rest of the gun is underground... Not sure how you'd model that though.
Or make it like one of those telescope buildings with the (I assume) dome on top of a cylindrical (maybe) building?
Dr H wrote: I assume that's too small compared to the gun? Maybe they could be holding the above ground cover and the rest of the gun is underground... Not sure how you'd model that though.
Or make it like one of those telescope buildings with the (I assume) dome on top of a cylindrical (maybe) building?
Yep, the barrel is too big and I don't really want to make the model any bigger! I found a cardboard tube though that is slightly smaller so probably go with that.
And yes, the fnal piece will basically be circular in shape
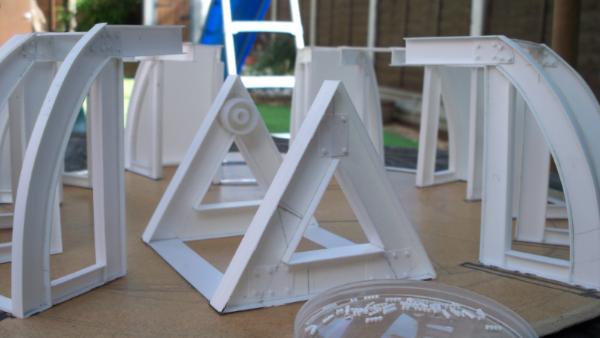
New update, made a paper template for the base so that I don't have to work in the garage all the time as it's too damn hot at the moment. Also cut some of the support girders down a little, then used the off-cuts as part of a few more girderss, I'll have 12 of them when done
Whaaaa! those barrels are simply epicly awesomely done! really clever Rug.....really clever, nearly as clever as the ammo crates and the palettes (which I think the coffee stirrer looks best) this is gonna be another one to watch closely!
Camkierhi wrote:Excellent. Looking great. BTW you can get 2" waste pipe.! Not sure if you want the expense of buying a length. But you should get it at a Plumbcentre.
I did toy with the idea of buying premade, but decided tomake my own with two layers of 0.025mm plasticard wrapped round a cardboard tube... (see below for pics)
Dr H wrote:Yeah, that's probably big enough...
It's not the size but what you do with it that counts...
nerdfest09 wrote:Whaaaa! those barrels are simply epicly awesomely done! really clever Rug.....really clever, nearly as clever as the ammo crates and the palettes (which I think the coffee stirrer looks best) this is gonna be another one to watch closely!
Cheers Nerd - I need to get back to this piece, glad Brian has extended the deadline though
Viktor von Domm wrote:
What the hell I thought, let's have too many projects on the go at once, why change the habit of a lifetime...
i imagine this would really read well on a tombstone
and that looks amazing... i love such round looking structures... sort of a riveted stonehedge!!!
Ha ha, yeah, that is a good qoute A riveted Stonehenge, hmm Interesting. There will be rivets, plenty of them (once I've bought some more plastic rod that is...
dsteingass wrote:Yes, I want my tombstone to be a bunch of different kinds of stones, mostly unfinished..like my projects
Viktor von Domm wrote:lol... that would look like the most epic site of a cargo cult then
Too true Vik
Casey's Law wrote:Nice blog, mate. Loads of fun stuff in here!
Cheers Casey
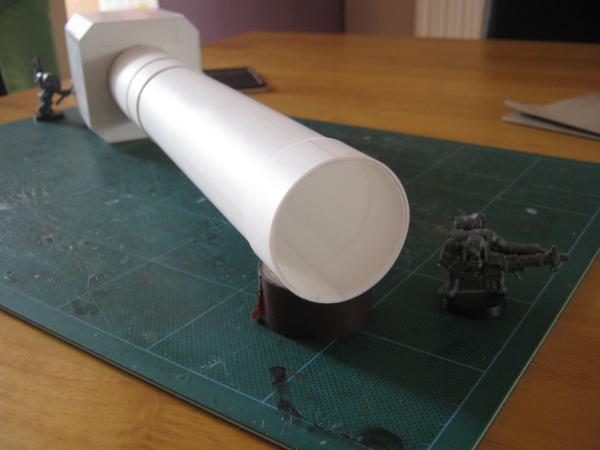
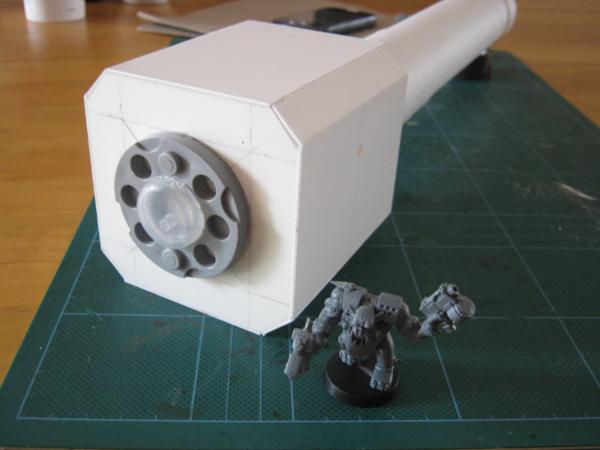
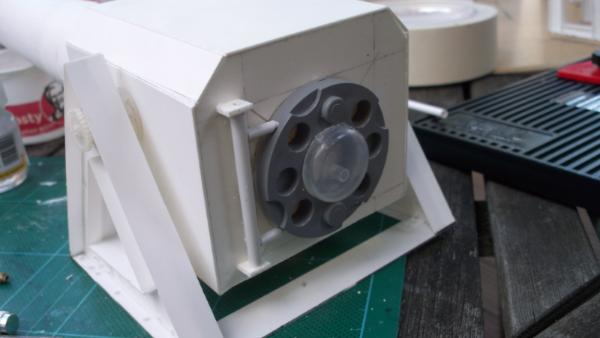
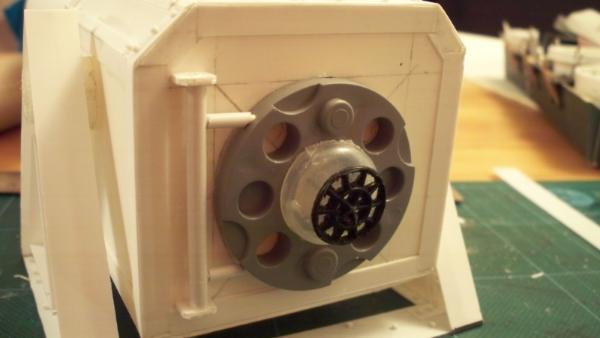
So, finally an update... working on the gun. As mentioned above, I've made my own from scratch. The barrel is approx 30cm (12") long and is 5cm (2.5") diameter. decided to reduce the size as I was struggling to find anything suitable to make the shells it fires. With this tube size I can easily scratch some out of card tube and plasticard...
Have also started to make the gun housing / chamber thing. Simple box idea that will be dressed up in a suitably orky fashion
The round doodah on the back is going to be a hinged door for loading the shells in to the firing chamber - that's made out of a spare spacer from an old flymo mower and a flip top bottle cap
That is right Orky there I almost feel sorry for he grots that have to help load it. Especially the ones in front of the shell who drag it in with ropes. But I guess their labor isn't in vane.
For the shells, you can also make them from wooden dowels, They come in different sizes. Find one that fits the opening and sand round the front. For shells that size, you will also have to make a wheeled cradle to move the shells to position. You may have to use a loota vehicle with a scratch built crane to hoist the shells into position. The grots are strong, but they do have their strength limits. Another option, if the opening is the right size, you can also use 12gauge shotshells (without the charge).
Thanks for stopping by Silver, I did consider the wooden dowel and may go that route, just undecided at the moment. I'm also planning a crane of some desription to move the huge shells about, but like the idea of an ork truk for this so thanks for that suggestion...
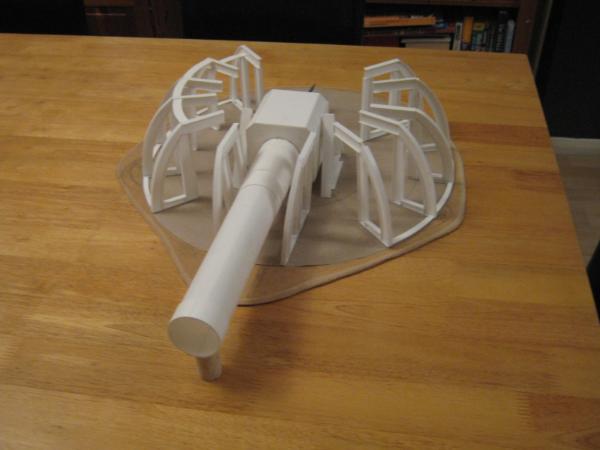
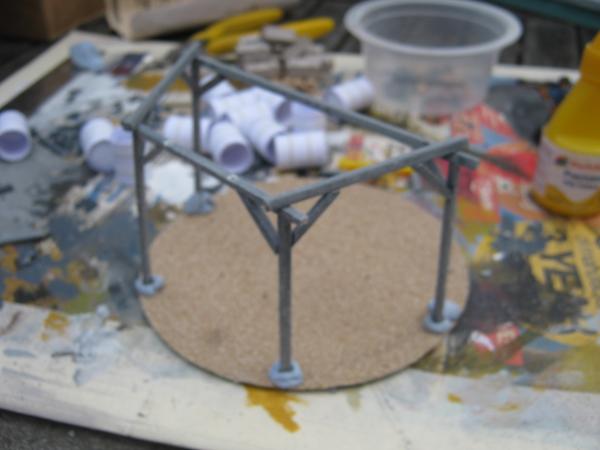
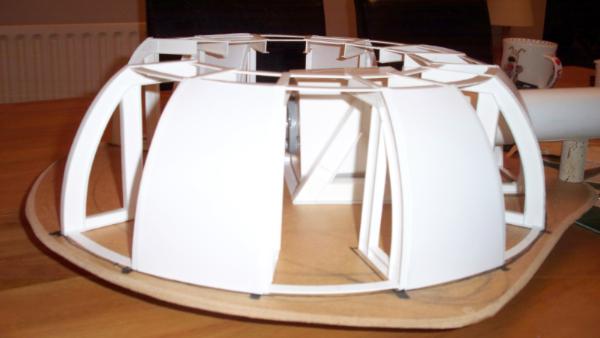
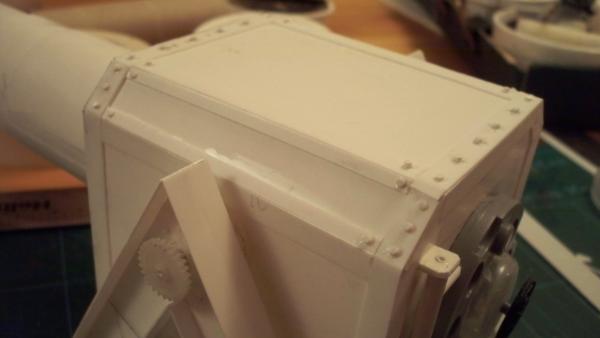
Update time. The actual structure is coming along and also the support for the gun...
Oh and I just got back from seeing Iron Maiden rock the O2 arena tonight - awesome band, awesome show. UP THE IRONS...
And that gun looks brilliant. Are you going to elevate the barrel at all? It looks perfect as is, just asking.
Dr H wrote:Looking like it's going to be epic when complete. Very Nice.
and I agree with Cam's sentiments towards your excursion...
Cheers guys and yeah, the Maiden were amazing - been a fan for a long time but first time seeing them live and it lived up to my own hype of them... Bruce is showman without peer. I got the tickets through work via a charity lottery draw - we have a corporate box in the O2and they had spare tickets up for grabs with a nominal charitable donation...
Viktor von Domm wrote:it now reminds me of a giant spider...
i really like that look... looks suitable old tech... lots of steel... very manly!!!
Ha ha, giant spider, does kind of resemble that at moment with the 'legs'
Very manly ?? No, no, no - very ORKY... or atleast it will be when the rivets and add-on metal plates are added
or atleast it will be when the rivets and add-on metal plates are added
that is what i await the most and fear for the most with this build... will this be a sphere? or will it stay as a steely skeleton?... if the latter... i think these structures are way too good looking to cover them all up!... a bit like steel lingery
Righty, change of pace - back to my entry for Briancj's comp. Given that it's turned into the sprue contest I thought I'd better have a go as well
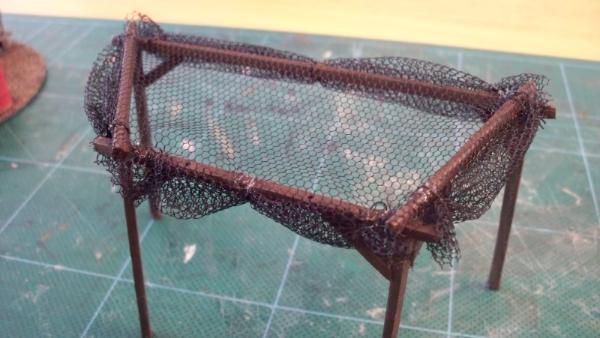
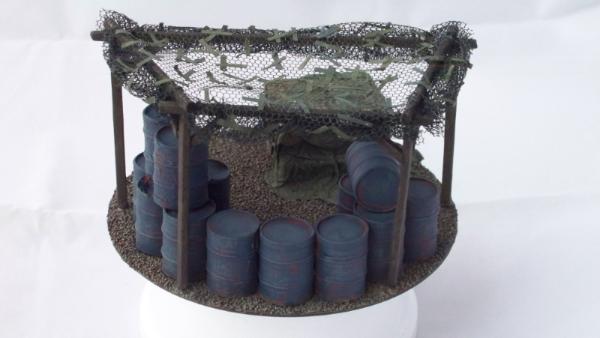
I took some old sprue and cut long lengths, then chopped of the 'sprouty' bits. To get a basic woodgrain I used a low grit sandpaper to roughen it up and round off the edges. Then cut the sprue to the desired lengths and stick together with plastic glue. The frame is going be holding up a camo net which i'll add after the frame is painted...
Note: If you have well manicured finger nails, then a) you're probably in the wrong hobby and b) don't use this process as it can scratch your nails up to hell...
Dr H wrote: It's nice to see the sprue use is catching on. Soon everyone will be using sprue for their models.
Looking good.
i challennge you.... make me a sprue horse... a robotic one...and i will name my third born after you (curently not planning on any additional family members tho)
Vik: I'll add it to my ever-growing list of things to do. Although I don't currently know where I'd start on a horse... will have to wait for inspiration.
Ruglud: That does indeed look like wood.
Although a little added/exaggerated variation wouldn't go amiss, dry-brushing a lighter colour and/or washing with a darker colour in patches. Or leave it as is, if you're happy with it. There's nothing wrong with it, that's what I've discovered with wood; it can be any combination of colours and everything is right.
Yeah, I did consider doing some more colour variation but then remembered that the palette will be mostly covered by wooden (cardboard) ammo boxes so will only see the edges, plus there may also be a tarpaulin thrown over the top... So really only going to see the edges, although i'll revisit this when i get to that stage and see if some more colour is needed
To fit in with the competition theme, it's a 'recycled' palette Vik, hence it's 'used' appearance. Well, that's my excuse and I'm sticking to it
I did consider painting it blue as I used to see lot's of palettes in this colour when I worked in the stockroom (also an ex-retail employee), but went for wood as it fits the colour scheme for the terrain piece...
I always recall then being heavier, much much heavier than the standard plain wood palettes - seemed to be made of thicker wooden slats... Much fun was to be had though with the palette trucks (non-motorised versions) - scooting round the stockroom and loading bay ramps
Sorry, anyways yes, the blue pallets are impregnated timbers used to try and lengthen the life of the pallet. One major side effect, is that they burn very well and very long. So around here they are snapped up by all those with wood burners. (be warned the pallet companies are looking for thieves.)
Love the work sir, pallet looks very natural, and recycled.
My Dad worked at a stamping plant, and would bring home pallets made of hard, exotic foreign woods that big rolls of steel came on. As punishment/chores, my job was to hammer them apart and cut them into firewood. They had long staples that were a bitch to get out...It seemed I was always in trouble for something and always breaking apart pallets
hmmm... that sounds at first glance a bit crule... but a young man needs every oportunity to get himself some muscles... without them you just get tossed around in school... and i´ve heard the ladies like a good proportiened fella more too ... so a cruel treatment that might have it´s benefits
Pallet looks great ruglud, I saw your idea and that's what inspired the forklift I made and the servo skull Jenna game , I will definitely be watching more of this for ideas. yes I'm a thief
And Dave, it sounds totally character forming if you ask me... Many parents today let their kids get away with far to much, time we revisited strict but fair parenting if you ask me, it's how we raise our kids tbh.
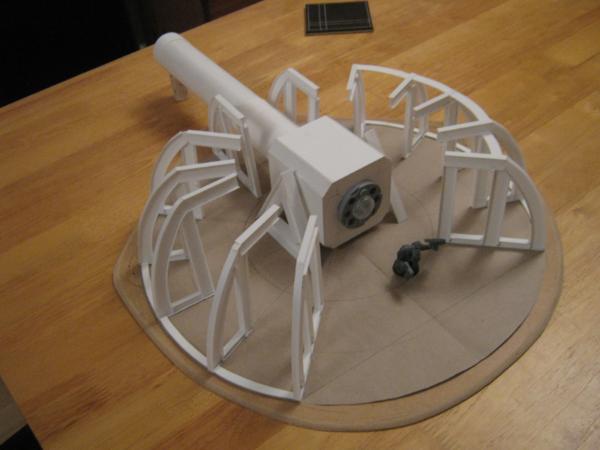
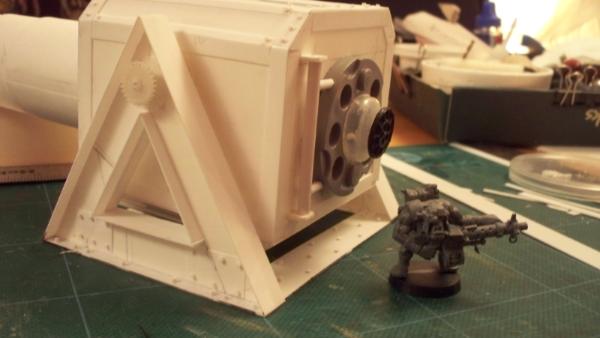
UPDATE TIME
I'm starting to get scared of this build - it's way bigger than anything I've ever attempted before and I hope that I can keep at it. So progress update time, made another couple of girder sections, stuck them all together and started to apply the outside 'skin'. Major problem is my poly cement and plasticard supplies are seriously dwindling so need to get an order in. Luckily it's my b'day next weekend and I'll nbe aksing my good lady and my ma to fund my plastic crack habit accordingly...
Theophony wrote:Looks fantastic ruglud, he should light up a big stogie and celebrate finding such a great defensible position.
Ha ha, yeah, I think the Ripper would enjoy a good stogie
Dr H wrote:Looking good. Crates are cool.
Cheers Spruemeister General
dsteingass wrote:OOoh! Nice tool! You'll have to cut some rivets and show us ow well it does!! Nice Crate&Barrell store too
Spoiler:
Yeah, rivet production should now increase 100 fold... well that is when I get some more styrene rod...
I'm particularily please with how the ammo crates turned out, may have to open my own Crate&Barrel franchise in the UK as will be making many more for the Orky ordinance I'm working on as well
Casey's Law wrote:Awesome work mate! That silly ganger has forgotten that the red barrels explode!
Yeah, that's always the problem with barrels - those muscle bound heavy stubbers never consider that they could be full of highly flammable liquids. Brain power in the underhive is sorely lacking I fear...
Camkierhi wrote:I got that exact cutter. It is great but a little flexible on tougher cuts. Screw it down to the bench for best results.
Crates looking awesome dude, really great. At last someone to give the Dr a run for his money.
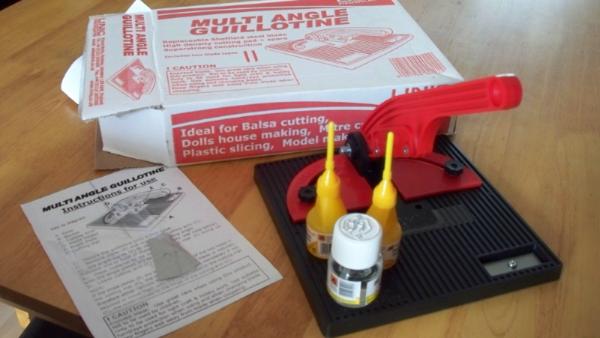
Cheers Cam, good advice, although not sure the wife will be happy if I screw it to the dinner table (my 'work' bench) I'll have to see how it goes, but mainly got it for cutting thin styrene rod and strips... Did consider getting the 'Chopper II' but it was slightly on the pricey side.
I think the good Dr is streets ahead, but it's been a fun build this far...
Viktor von Domm wrote:now that setting looks very cool... and i thought you had already your hands full with that big gun of yours
It's all about multi-tasking Vik, not something we chaps are supposed to be good at, but who said we have to stick with stereotypes...
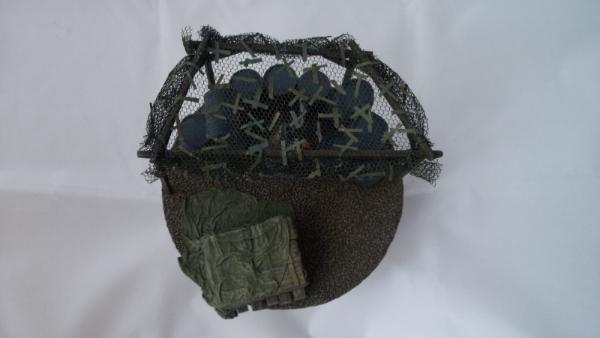
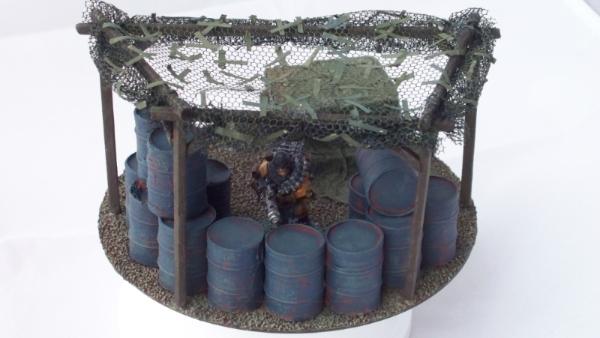
Time for the camo net to be added - this is some left over netting purchased for a halloween costume, but you can also use medical gauze, fishing net or those little net bags that Babybel cheese comes in...
Lay the net over the piece and cut roughly to size, ensuring you get plenty of overhang on all sides Start to secure the net to the frame with cotton - this can be fiddly, but perservere and just cut off and start again if you're not satisfied with the results Once all secure on the top, cut the overhang so that you have a flap on each side. At this stage you need to decide how you want the finished net to look, i.e. all sides down, sides rolled up, or a combination... I'm going for all sides rolled up... To do this, roll the net as tightly as you can then secure with cotton thread to the frame. When satisfied with the look, drop a spot of superglue on all the threads to secure them in place and cut any surplus off. You can also trim the netting at this stage if there's any stray edges...
Here's the camo net and frame completed and on the model (not stuck down to the base yet though)
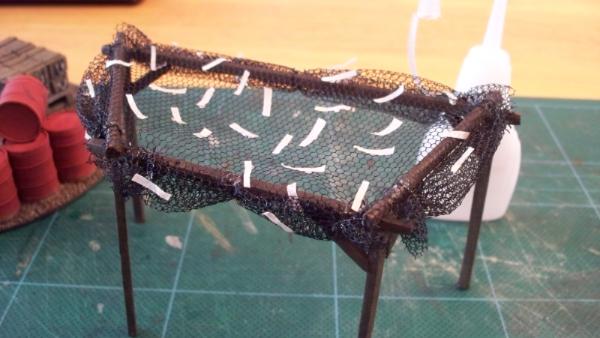
Now for the camo strips - simply cut thin strips of paper or, in this case, masking tape and stick to the net with either superglue or PVA (Elmers for our colonial cousins?)
Another super easy idea for the tiny strips is the paper/plastic Easter egg grass for egg baskets. It's also stuff they use in gift wrapping, forget the name of it. But it's cut thin an you can get it flat or crinkled.
Love the camouflage netting, will be stealing that idea at a later date
I think I know what you mean - it's like shredded tissue paper (craft tissue not facial / toilet tissue). That's a good idea if people have some of that...
Another alternative that came to mind is something I have lots of - artificial lawn. The plastic grass strands would be ideal for actually threading through the netting... And after putting the stuff down in my garden this year I have quite a few off-cuts sitting idly in the garage... Ooh, and you could also use the fake Xmas tree foliage, that's a similar stuff to the grass although coarser - I actually have a spare one of these in the garage as well that I was going to use to make small conifer trees from. Phew, all this thinking has tired me out...
I also have another update - that's right, two in one day
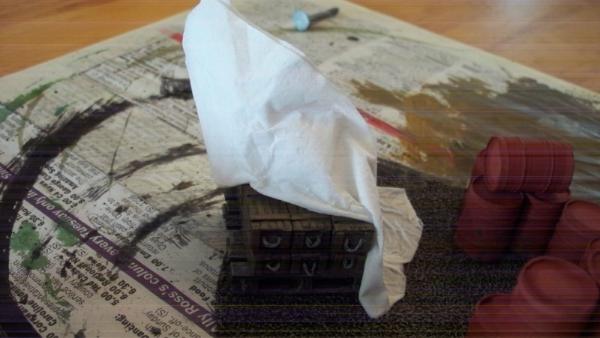
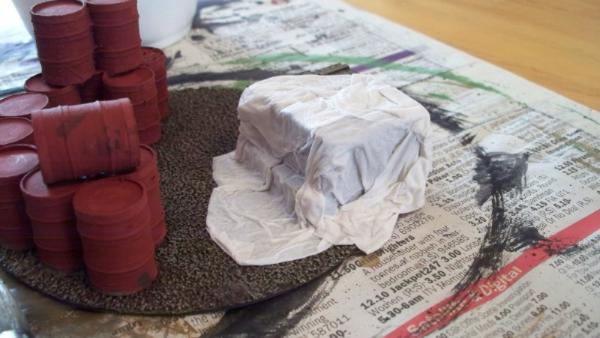
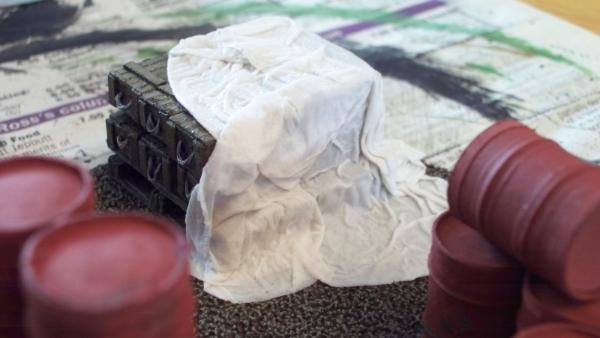
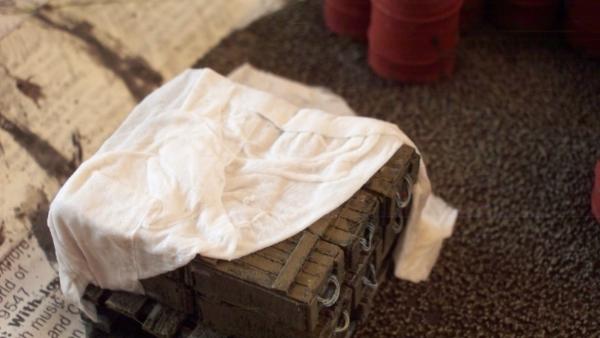
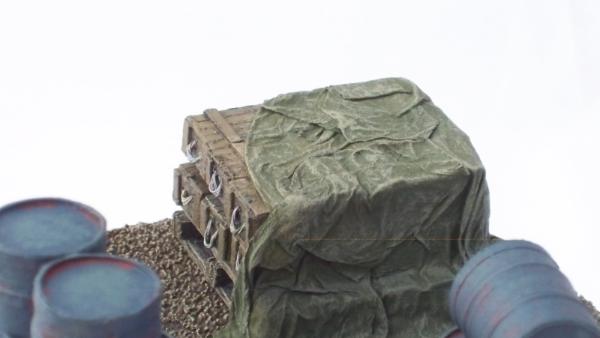
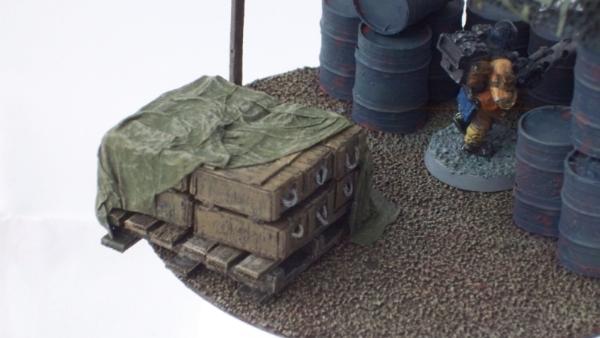
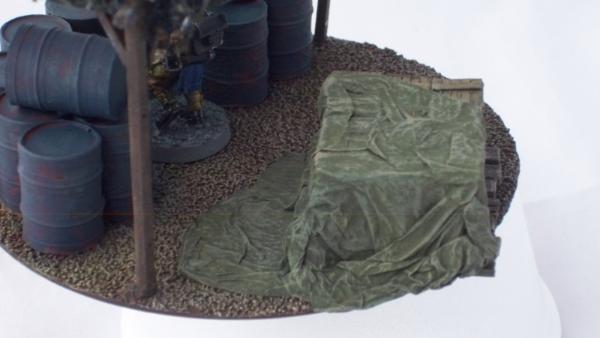
I decided to have a go at the tarpaulin and gotta say that I'm mighty happy with the result so far...
Ingredients: 1x facial tissue (doesn't matter what ply), mix of 1 part water to one part PVA (Elmers), 1x old soft paint brush.
Fold the tissue in half and loose fit over the piece to be covered, then trim any major excess off as as you see sit fit...
(Forgot to take a photo of this stage)
Start to brush on the PVA and shape the tissue as you do it to get nice looking folds, making it look like the tarpaulin has some weight to it. I've shaped it so the tarp is folded back on itself showing off the wooden card ammo crates.
Leave to dry...
I may add a bit of old rope or two, but for now, jobs a good un
well THIS is the living proof that dakka and everything that´s going on here really improves our work... that is probably the best to date work of yours too... if I may say so...
and that camo netting idea (with the addition of theo) is something I need to remember!
Cheers, guys, hopefully my next build will eclipse this one...
So, back to Big Berfa for the league terrain comp...
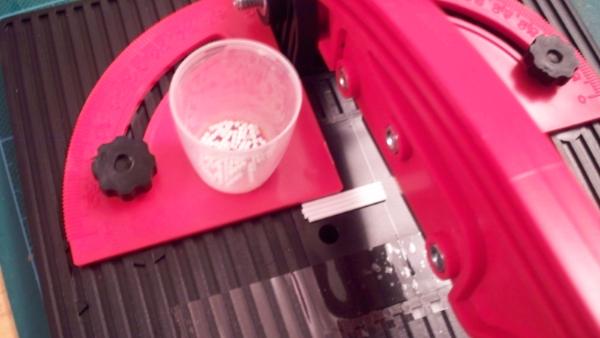
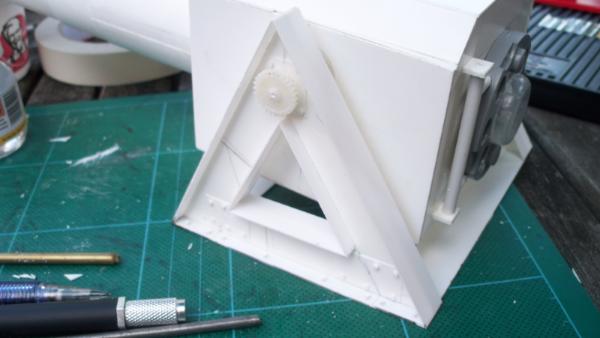
Rivet production in progress with 4x 1.2mm styrene rods glued together and chopped to size (technique borrowed from Dave - dsteingass, thanks )
R|ivets in action on Big Berfas gun mount and encircling girders - many, many more to be added, well this is a league competition after all
Heavy duty hinge added to Big Berfa's shell chamber door
Mechanism for raising and lowering the gun started with one cog so far...
I'm on holiday now until end of the week, riding rollercoasters at Alton Towers and visiting Warwick Castle amongst other things, so no further updates until the weekend at the earliest...
as I have often looked at the caps of bottles...(only softdrinks of course....) I have the fondest respect for someone that is up to cutting out that wheel structure from a cap... that was one hell of a work to get through for sure!
also... I know it will probably be not needed to say... but have you considered using a holepunch for the rivetmaking process? they get way cheaper thus and quicker too... just saying...
Dr H wrote:Looking good. Like the locking wheel idea.
Thanks good Dr - you'll also be pleased to know that there's a piece of sprue between the locking wheel and the door
Viktor von Domm wrote:as I have often looked at the caps of bottles...(only softdrinks of course....) I have the fondest respect for someone that is up to cutting out that wheel structure from a cap... that was one hell of a work to get through for sure!
Yeah, it was a bugger to cut out to tell the truth... the plastic is supper soft, but also supper thick - i did cut through the wheel in a few places so a drop or two of superglue came into play.
also... I know it will probably be not needed to say... but have you considered using a holepunch for the rivetmaking process? they get way cheaper thus and quicker too... just saying...
A hole punch is on my 'tools to buy' list, feel free to recommend one though as I have some cash burning a hole in my pocket which I've earmarked for hobby supplies (mainly plasticard / styrene...)
You never know Dr, maybe carving is on my horizon...
Thanks Casey, good see you back
Unfortunately updates have been put on hold, we had torrential rain last night and found water running down the walls in my daughters bedroom. Above her room is our loft conversion but it looks like there is a leak somewhere on the flashing or roof tiles where the conversion meets the exisitng roof line... Got a ladder out and gingerly made my way up the tiles looking for obvious signs of leaking but to no avail. I'm starting to do some repairs in the room now and cut out a load of damp ceiling plasterboard, now to let it all dry out and hope we don't get any more heavy downpours before I can call out a professional roofer...
Oh mate that's terrible. I had a huge flood in my house a couple of years back, make sure you get anti mould stuff up on the affected areas. I failed to do so and I think my bedroom has developed a bit of a sharpness in the air, nothing bad but not quite right. Having to strip back to the plasterboard to treat it.
Ha ha, yeah, we have horrible artex ceilings throughout the house - when the loft conversion was done several of them were flattened and look so much better 1970s artex is the bane of many UK householders
This is the one of the last rooms that needs to be redecorated - including replastering the walls so it's a bit of a spur to get on with it finally... Think I might go the drylining route once it's dried out properly as I don't have the money for a pro plasterer and can do this myself quite easily...
ouch... that would throw me into despair if something like that would happen in our appartment...we had a kitchen sink fail last christmas... and i was absolutly over the edge back then...hopefully you get this sorted out with the minimum of fuss and money!
as for holepunches... two folded answer... either one of these:
if sizes of 2mm upwards are still your thing...depends on what you are up to... also... wothwhile note... the pressure you put on these for punching PC is rather strong... so i recommend a good one... don´t fall for the cheap stuff here!
or
you want those art stuff hole punches...in 1mm or slightly bigger 1.5mm diameter...
also... i just saw this on the site i found that pic....
Thanks Vik, I'll take a look into those and see what's out there - I like my rivets between 1.0 to 1.5 mm. As for the hole in the ceiling - i bite the bullet and started the redecoration, beginning with chiseling off the old wall plaster ready to dry line with plasterboard... After a few hours of dusty work I have one wall almost un-plastered, much of it just falling off without any real effort !!
well.... that sounds most productive... but also as i something truly rotten is in your house...i hope for you everything turn back to normal soon enough!
The plaster is most likely the original 1960s finish when the house was built looking at the state of it. The downstairs rooms were redone in the late 80s when the previous owners had the kitchen and dining room extended, but they didn't bother with upstairs. Our sons room was a smilar state when we redecorated it a few years ago and I've been looking at this room ever since... I'm beginning to wish I hadn't started it though, I hate decorating, especially on a bank holiday weekend
I'd love to finish decorating I just don't have the budget. It'd probably be a good idea for me to 'dry line' the bedroom, any idea where there is a good tutorial on that I could have a gander at?
I found this one earlier today on dry lining using the dab and dot method - most likely the way I'll go rather than fixing batons to the wall as it means there's no fixing holes to cover up on the plasterboard - just jointing tape - make sure though that you get tapered edge plasterboard
at ruglud... I think this was is how professionals do the wallsealing these days... if you have redecorating tv shows... have a look there that's how even wet rooms like the bathroom gets redone these days...before the tiles get glued to the walls...
Well, three sheets of feather-edge plasterboard later and we have a healthier looking room - although there is still a whacking hole in the ceiling... Still a fair amount of work to be done and it's destroyed my ability asnd desire to do any hobby work . Hopefully I'll get back on track this week?
Finally finished the redecoration job - daughters room is back in use with some minor retouches left - but I'm waiting on another downpour first to check if I've sorted the leaking roof problem...
Back to hobby matters, tonight I've ordered 30 A4 sheets of plain plasticard (10 each of 1mm, 0.5mm & 0.25mm) also have 2 sheets of treadplate embossed plasticard (1/50 scale) and a revolving leather hole punch (as recommended by Vik). Just got to wait for the postman now... The anticipation makes it feel like Christmas come early
The leather hole punch turned up today and some riveting action took place (no pics though as the camera needs charging) Just waiting on all the plasticard goodies now.
I am also planning on actually doing some model work in the morning, watch this space...


 Hopefully that will be resolved soon though...


 And it pushes up the views and votes - there's even a nice comment in there