23950
Post by: rwzimmerman
29878
Post by: Chowderhead
Thats... That's killy as all hell. I love it!
I hope your son appreciates it as much as I do. I hope to see more great work.
26800
Post by: Commander Cain
What a creative piece of work! The detail and paint job ties the whole thing together perfectly!
33159
Post by: tipios
Nice one Bob.
33919
Post by: Moltar
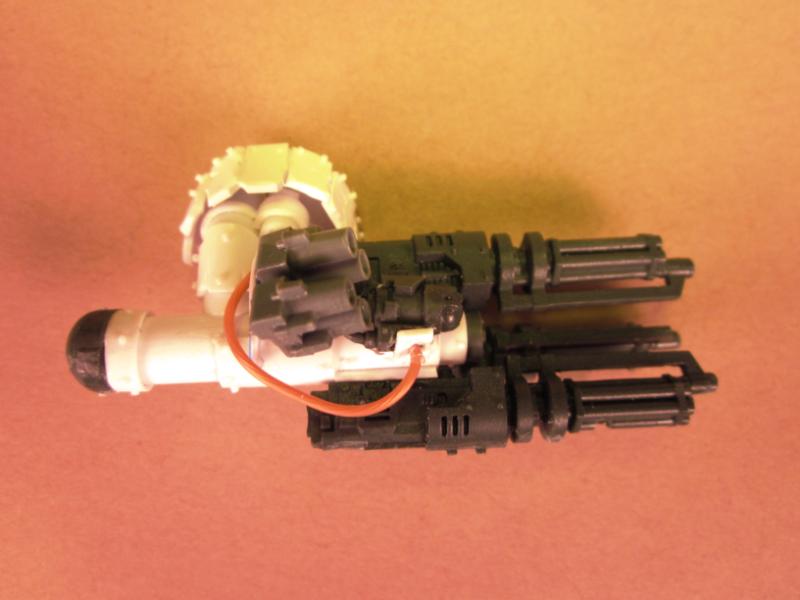
That is awesome! Great work, Bob. I love the tri-linked assault cannons!
23950
Post by: rwzimmerman
39109
Post by: Enzephalon
You're not happy with it?
I think these swamp bases are pure win!
22192
Post by: whalemusic360
Looks great! Maybe a bit of brown mixed with the green of the water?
23950
Post by: rwzimmerman
whalemusic360 wrote:Looks great! Maybe a bit of brown mixed with the green of the water?
I agree. I added just a touch of red to the mix, it looked murkier before it set up. I'm thinking about putting a light coat of ard coat with a little brown swirled in on the top and sides.
22192
Post by: whalemusic360
Not sure on if it would fit what your going for, but maybe a few flecks of crushed up dead leaf. Or oregano  Would give it some floating detritus throughout the mix.
The dread and termis are very nice btw.
23950
Post by: rwzimmerman
whalemusic360 wrote:Not sure on if it would fit what your going for, but maybe a few flecks of crushed up dead leaf. Or oregano Would give it some floating detritus throughout the mix.
The dread and termis are very nice btw.
You're like a mind reader. I was planning on adding a single leaf floating on the surface of the water on the last base pictured and maybe doing a multi layered pour next time with some leaves floating in the water.
22192
Post by: whalemusic360
Lol. any other good ideas I should have that you already have?
23950
Post by: rwzimmerman
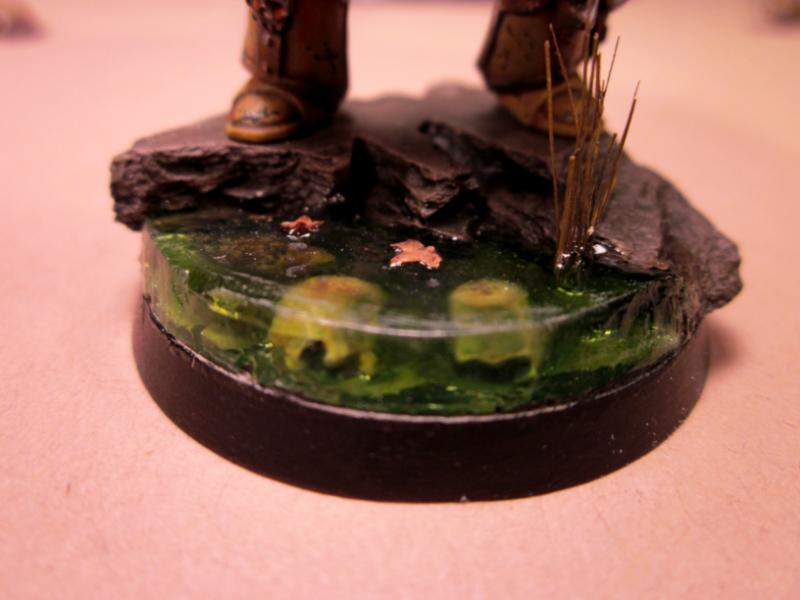
I took some of whalemusic360's suggestions and added some ard coat with brown swirls to the top and a couple of leaves floating on the surface. I like it better. CC welcome.
22192
Post by: whalemusic360
I like it, looks more sickly and desolate. Looks a bit like lime jello in to first ones.
29878
Post by: Chowderhead
Looks much better now.
Although I would put some wildlife into the water next time, make it even more grimdark.
33159
Post by: tipios
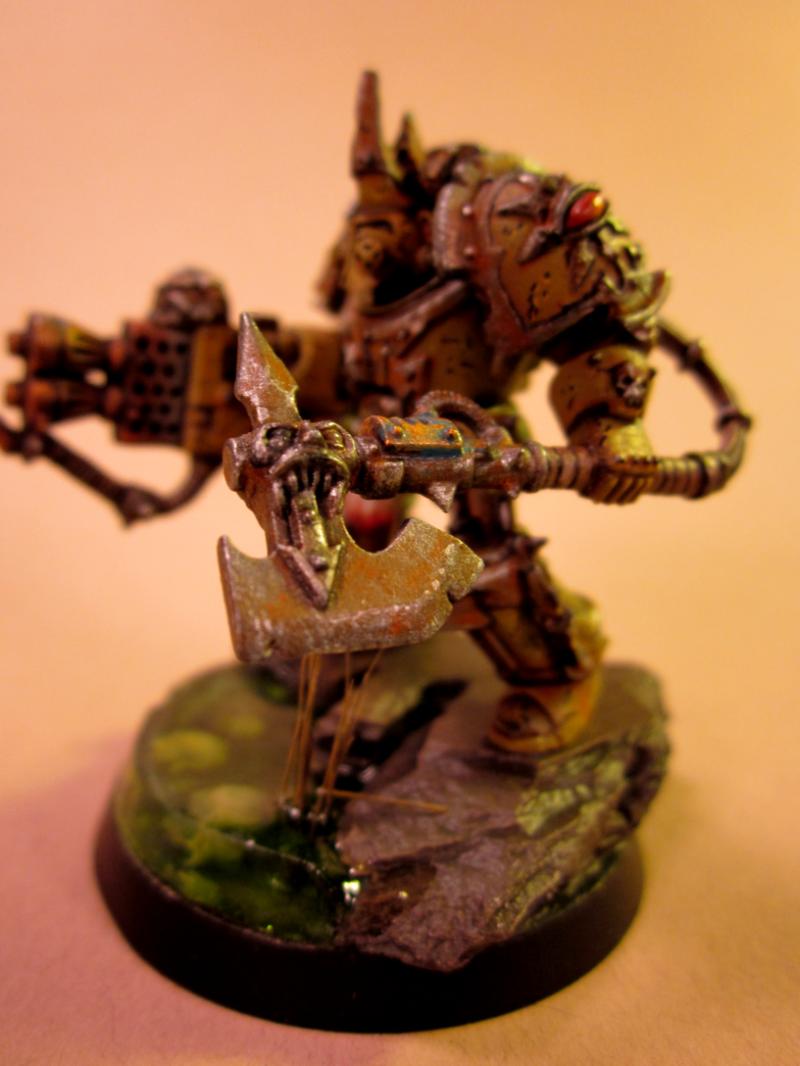
The termis look really good, I liked the water effect before, but after is even better  andalso the rust effect is really nice.
23950
Post by: rwzimmerman
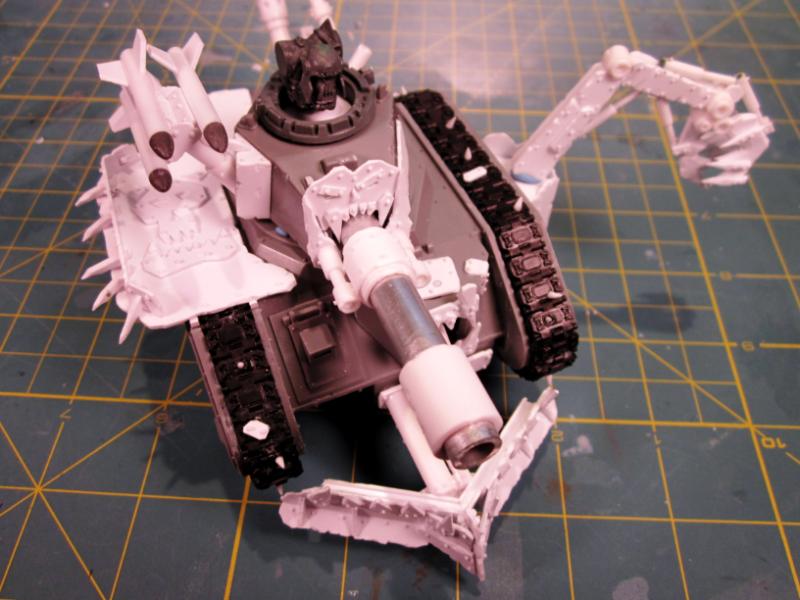
First obliterator
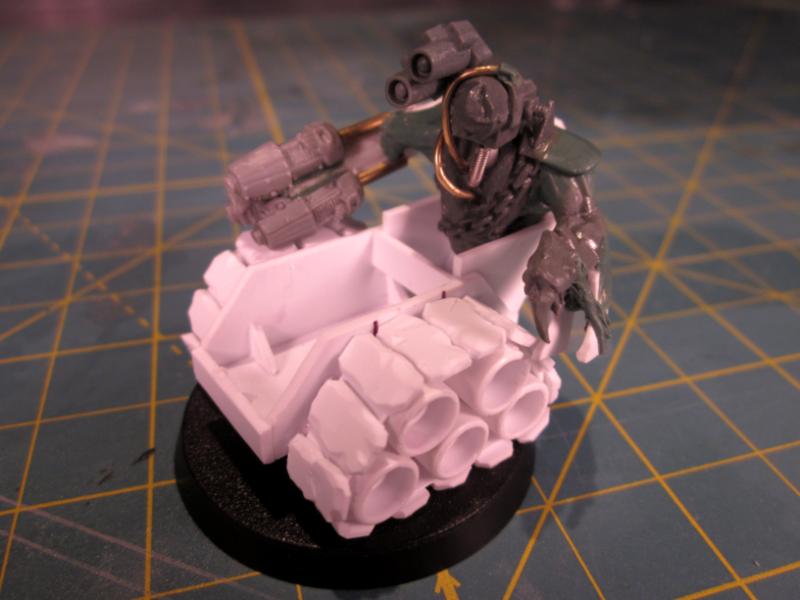
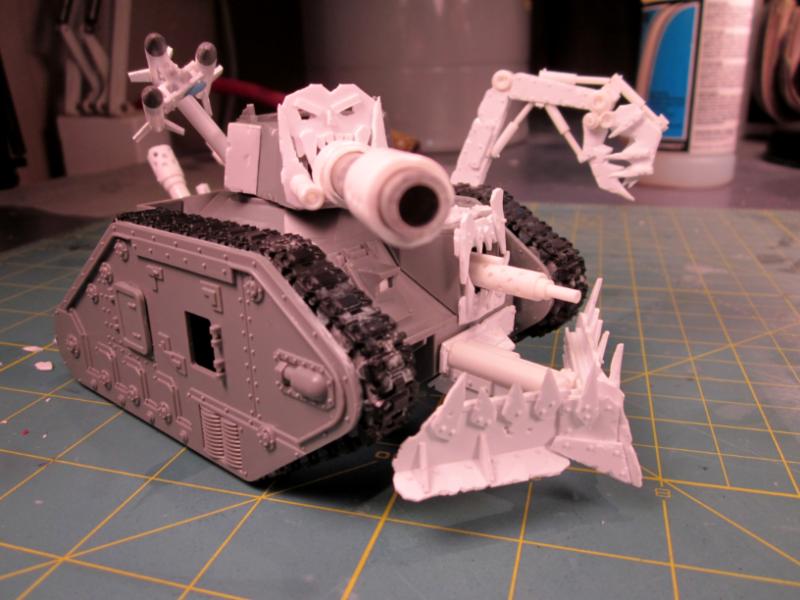
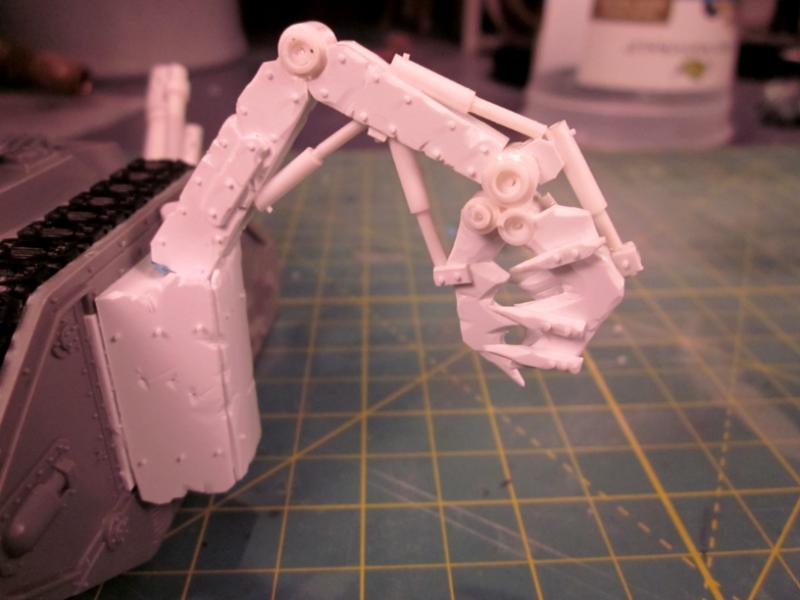
I want to make some obliterators. I hate the GW models for them. I built this "tank" bottom tonight. There's still a lot of detailing to go and I don't really know where I'm headed with it.
I might do something like this, but I'm not sure yet.
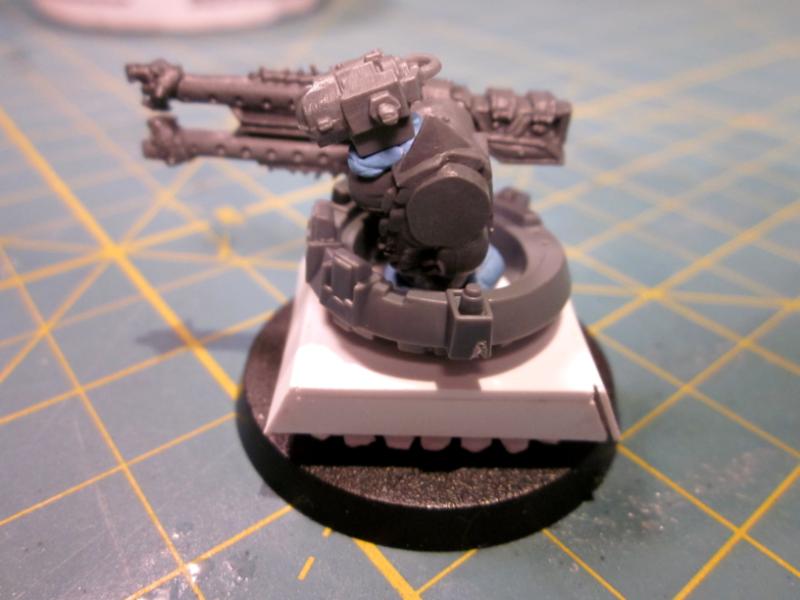
I'm thinking of a havoc missile launcher/spider for the next one.
23950
Post by: rwzimmerman
29878
Post by: Chowderhead
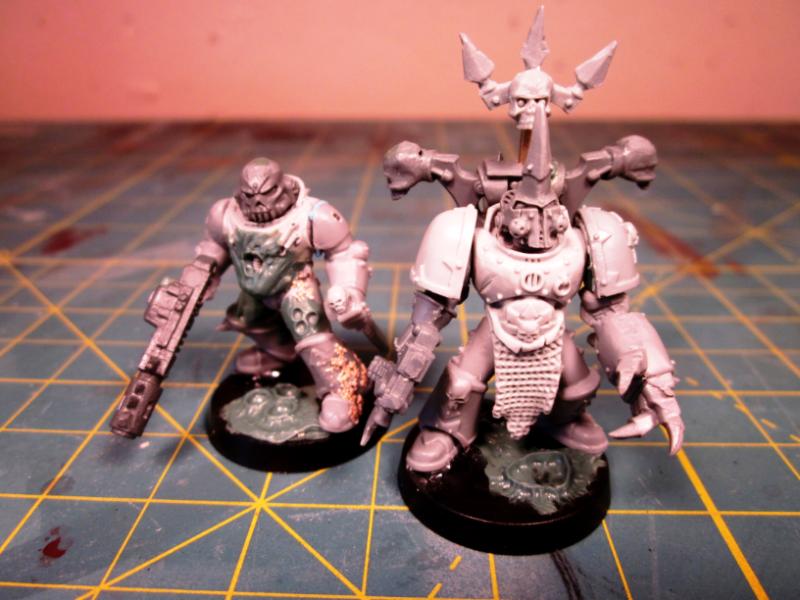
I really prefer the Khorne Deamon head to the beastman head. It just looks... Wrong, you know?
26800
Post by: Commander Cain
I am constantly amazed by your work Bob! Not only are your models full of incredible conversions, your painting skill is excellent.
Great work!
Cain
36934
Post by: logg_frogg
The beastman head on that terminator doesn;t really turn my crank but the possessed conversions are wicked sauce!
Keep up the creative work man! *subscribed*
23950
Post by: rwzimmerman
Thanks, everyone. I really appreciate the compliments and constructive criticism. The theme of the army (except the obliterators) is khorne-beastmen CSM, so I'm guessing when its done folk will love it or hate it. Hence the possessed using bloodletter parts and all the beastmen heads. The initial concept was to come up with something that will take a lot of converting to practice my skills. I don't play so the effectiveness of the configurations is of little concern, but I do make sure everything is legal. The first squad is almost fully painted, I'll have to post some pics soon.
19650
Post by: shingouki
lovely looking mini's mate,the water effects are top drawer.
22192
Post by: whalemusic360
I am lovin the beast-terminator, looks perfect.
23950
Post by: rwzimmerman
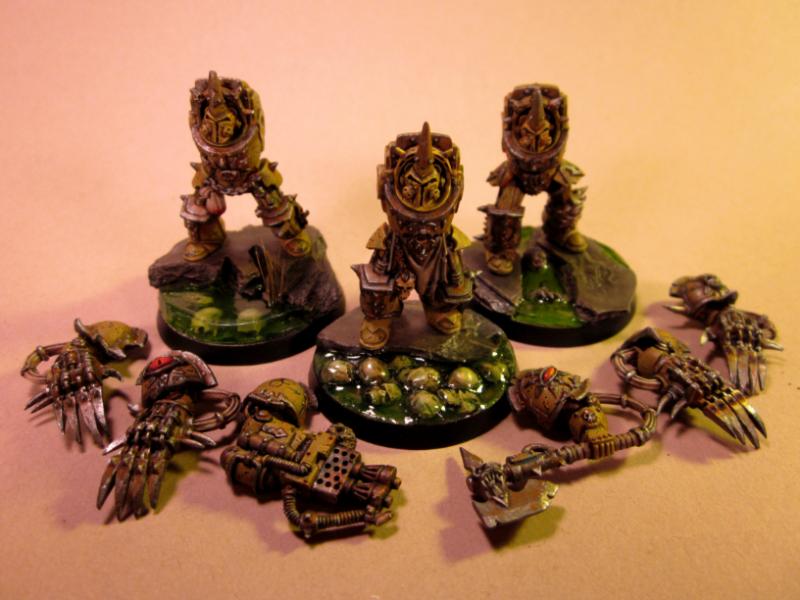
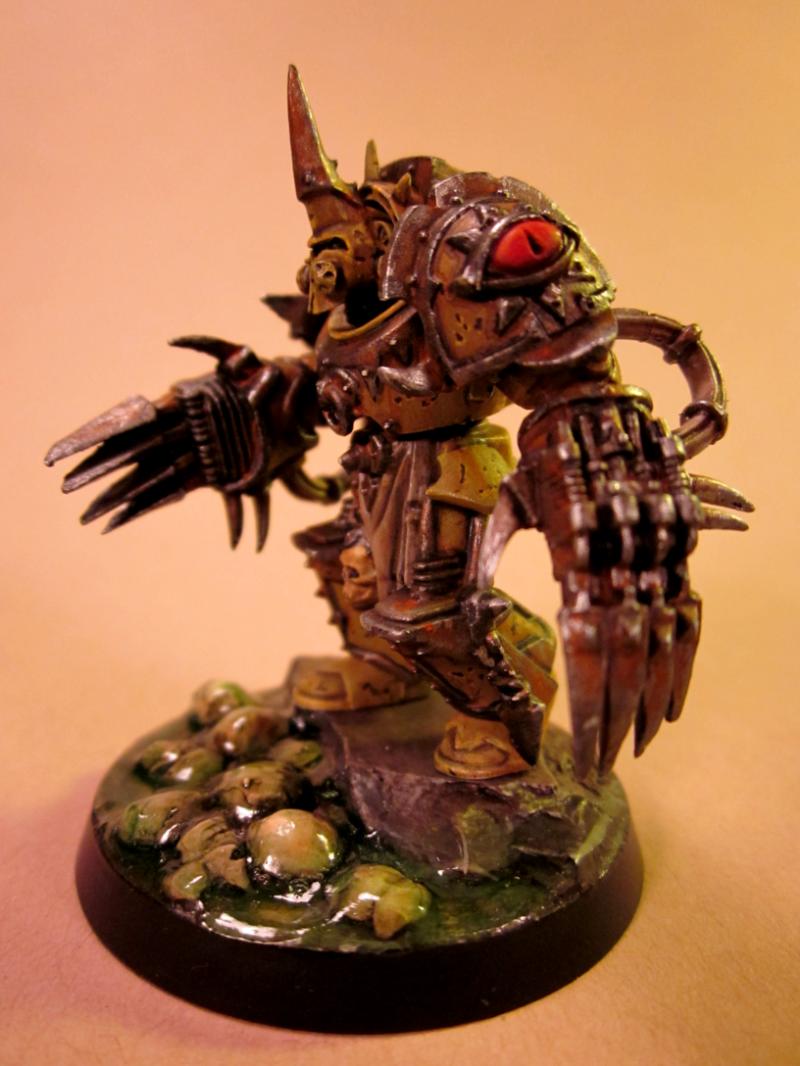
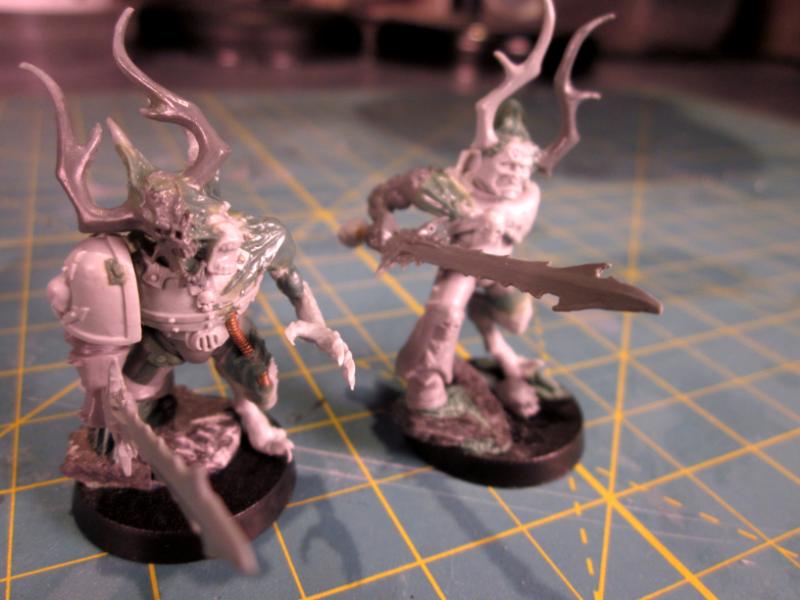
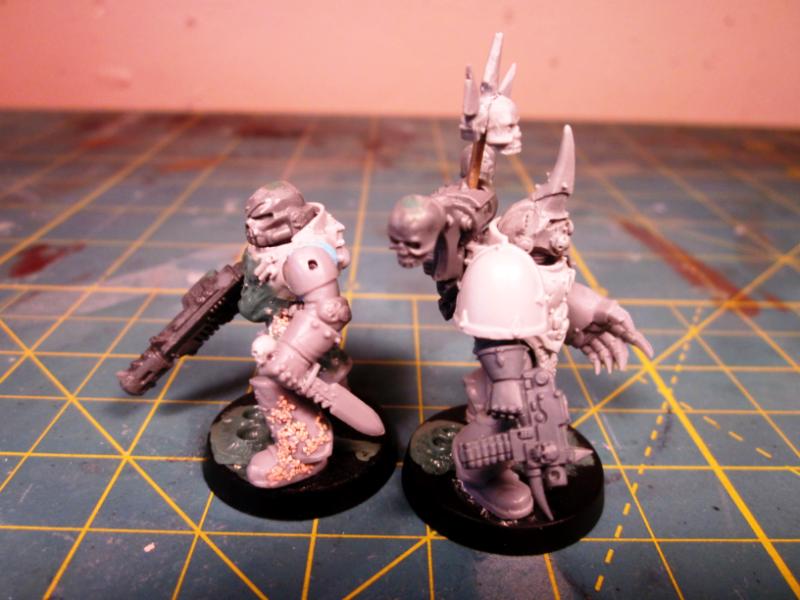
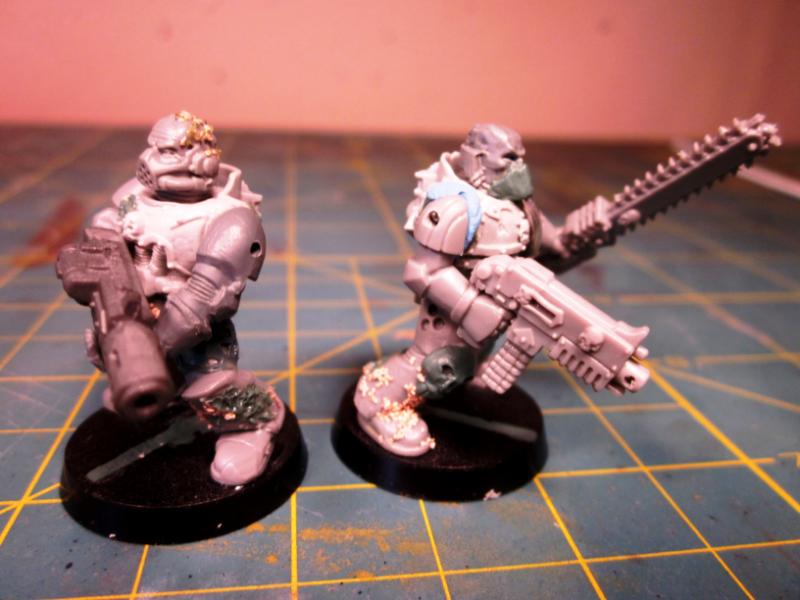
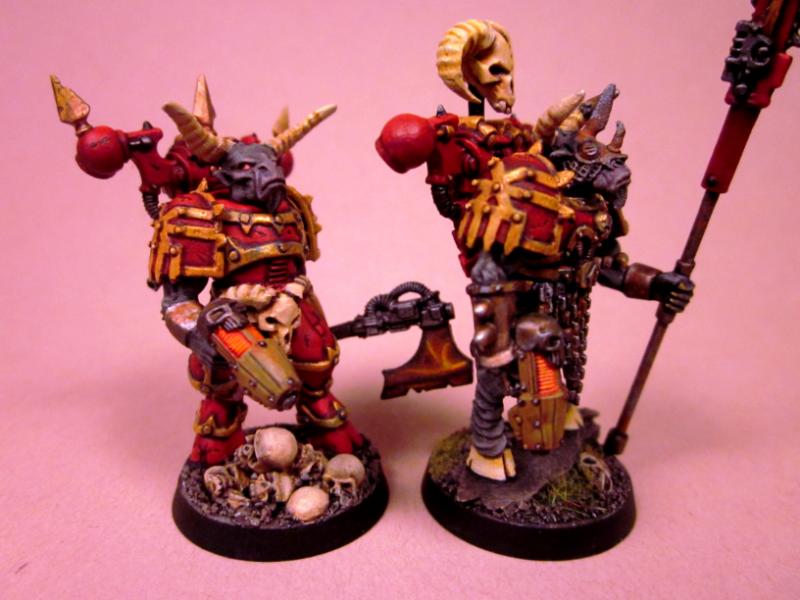
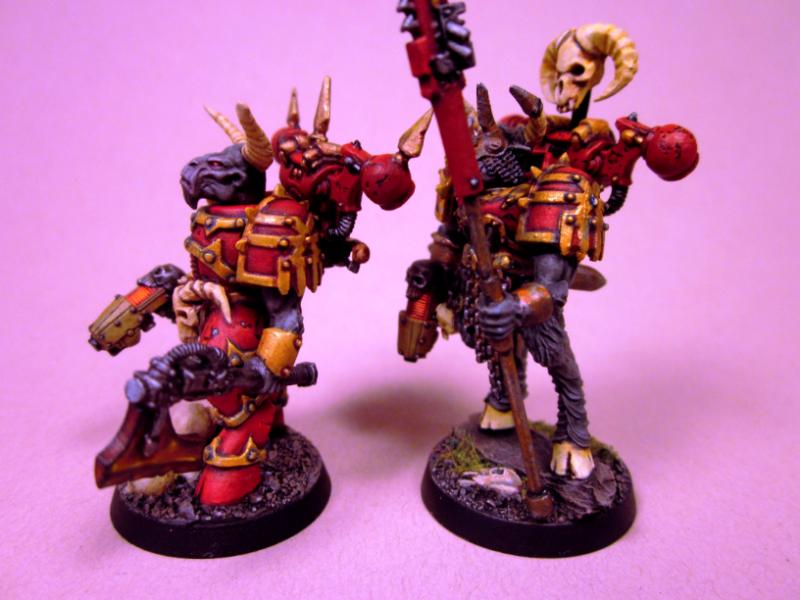
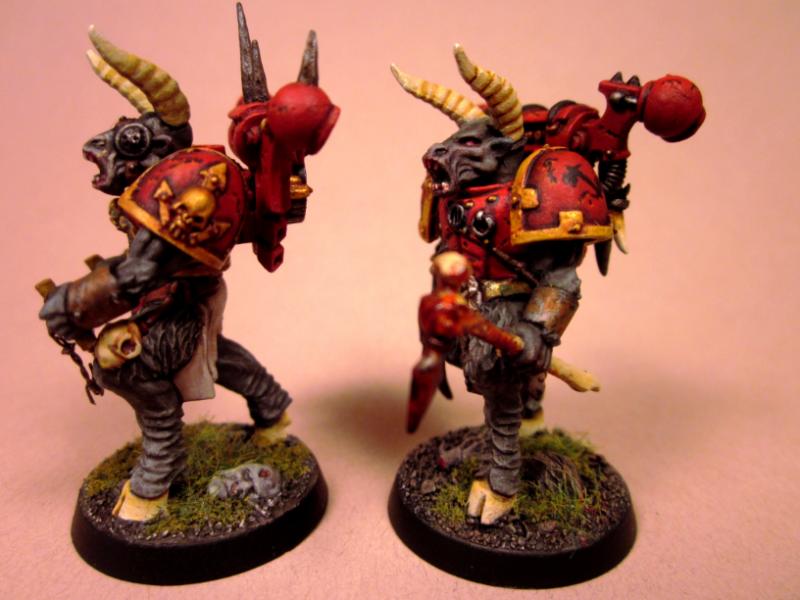
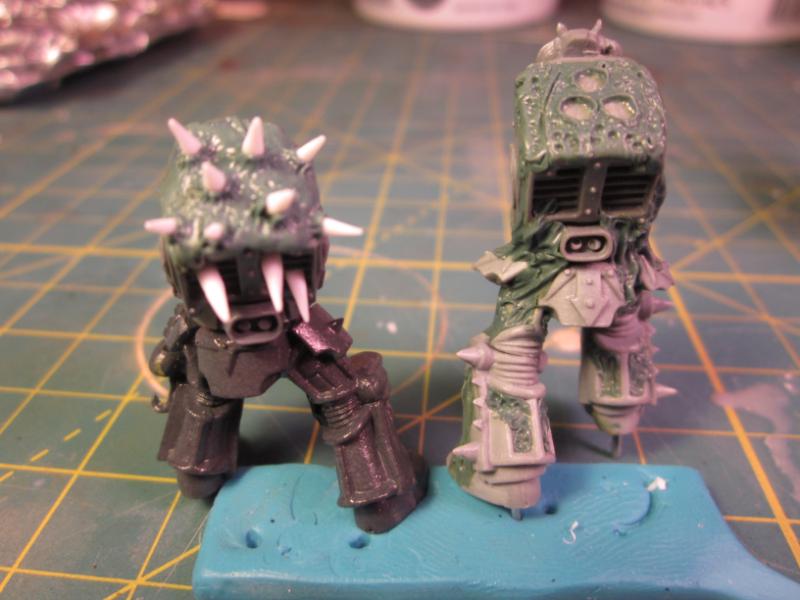
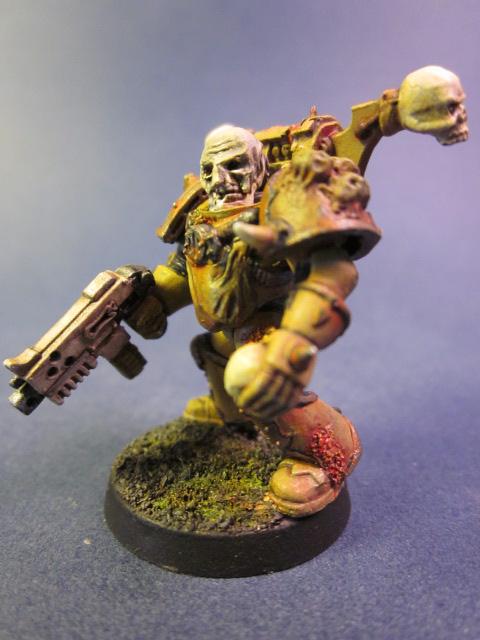
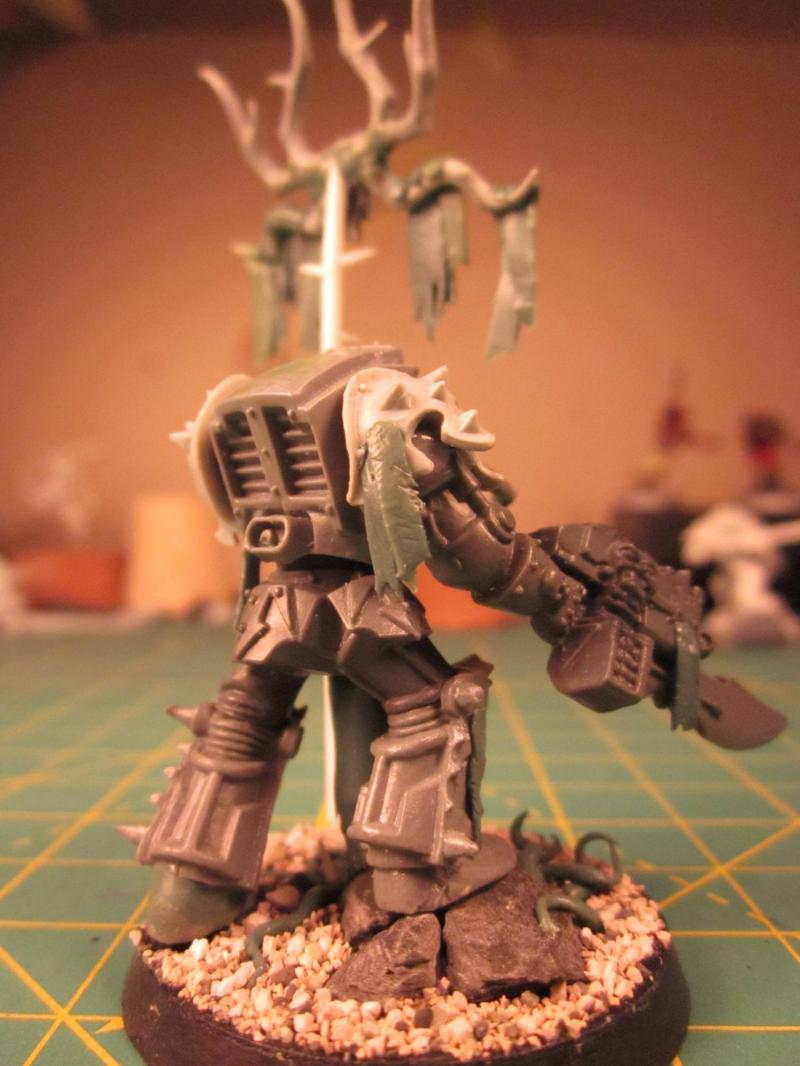
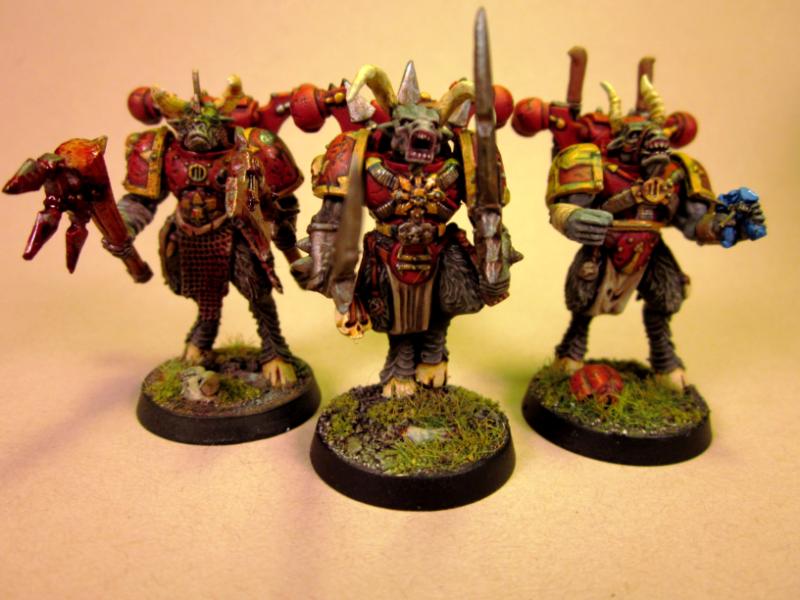
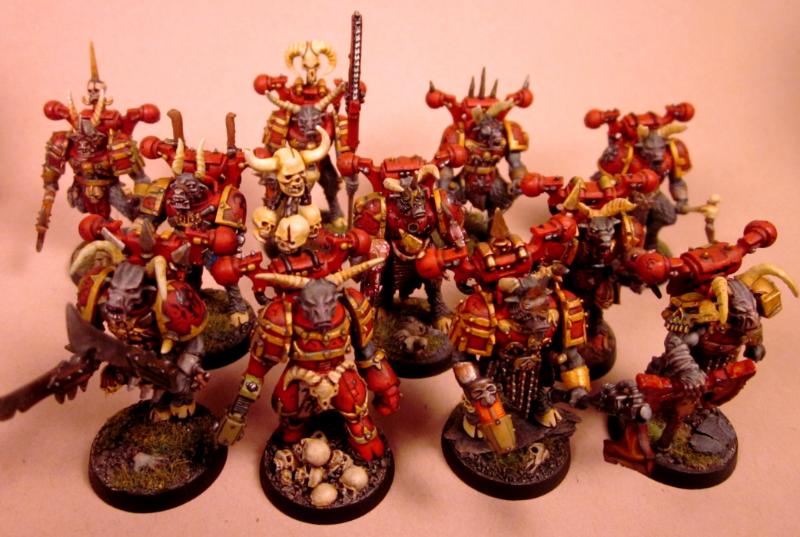
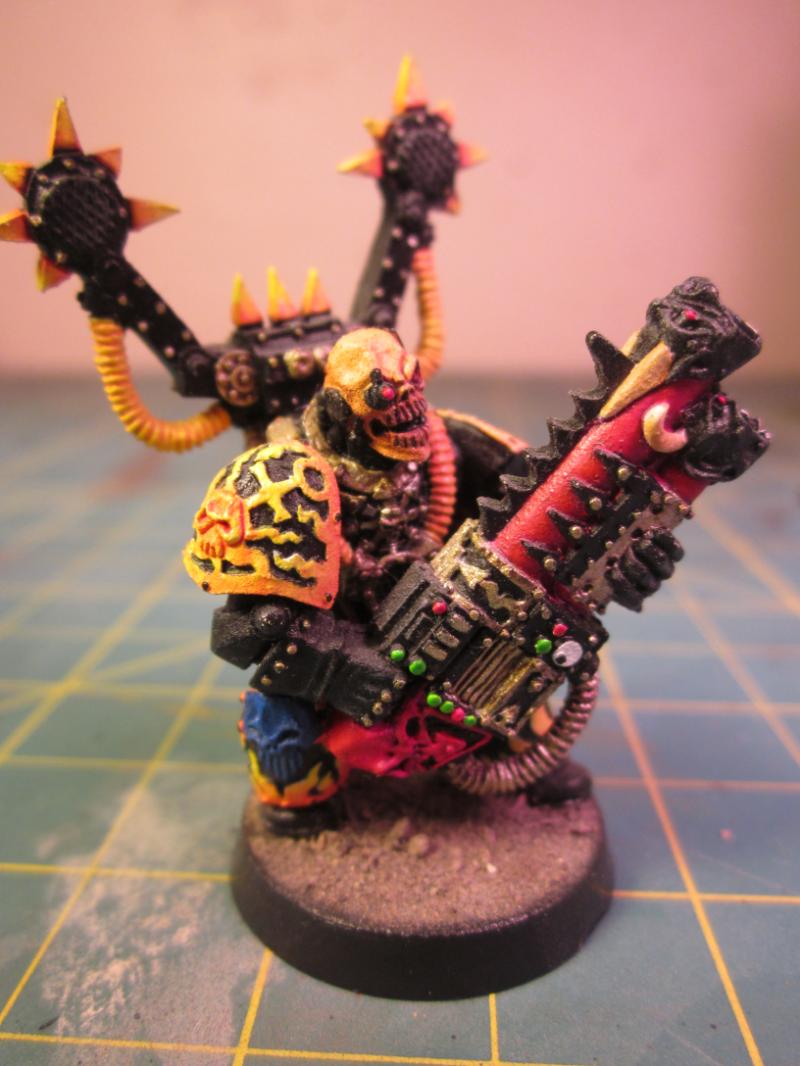
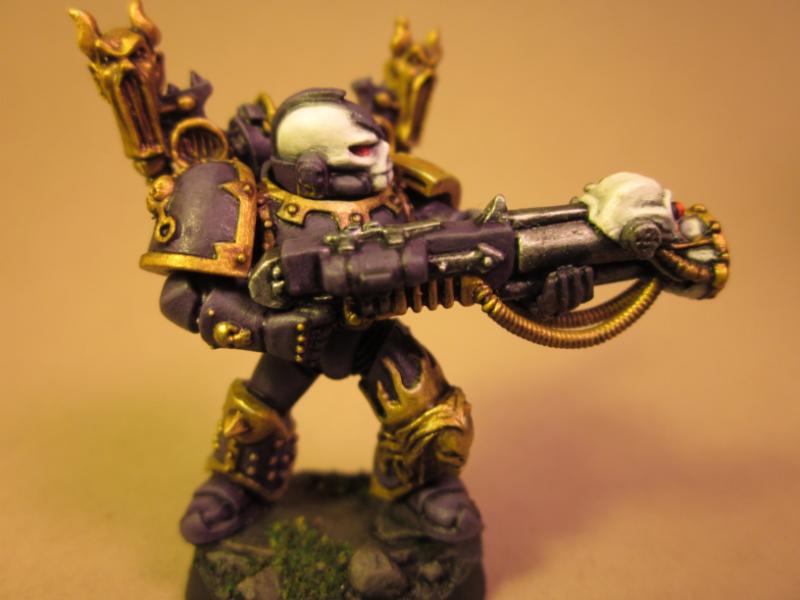
Here are the original members of the army - Khorne berserker beastmen. They are the only completed members of the army so far, though I still need to figure out how I want to do the eyes; I'm thinking yellow with a black pupil. I have four more that have been converted, but not fully painted. I hope to have rest of the squad painted soon.
As of now I'm planning on the army having squads of Khorne Berserkers (w/ rhino), possessed and terminators, and a demon prince; all with the a khorne beastman theme. My original plan for the demon price was to use a monitor as a base, but I don't like the news very much. I still might go that route and redo the parts I hate most like the lower legs; I have no idea what is going on with the muscles in the monitors shins.
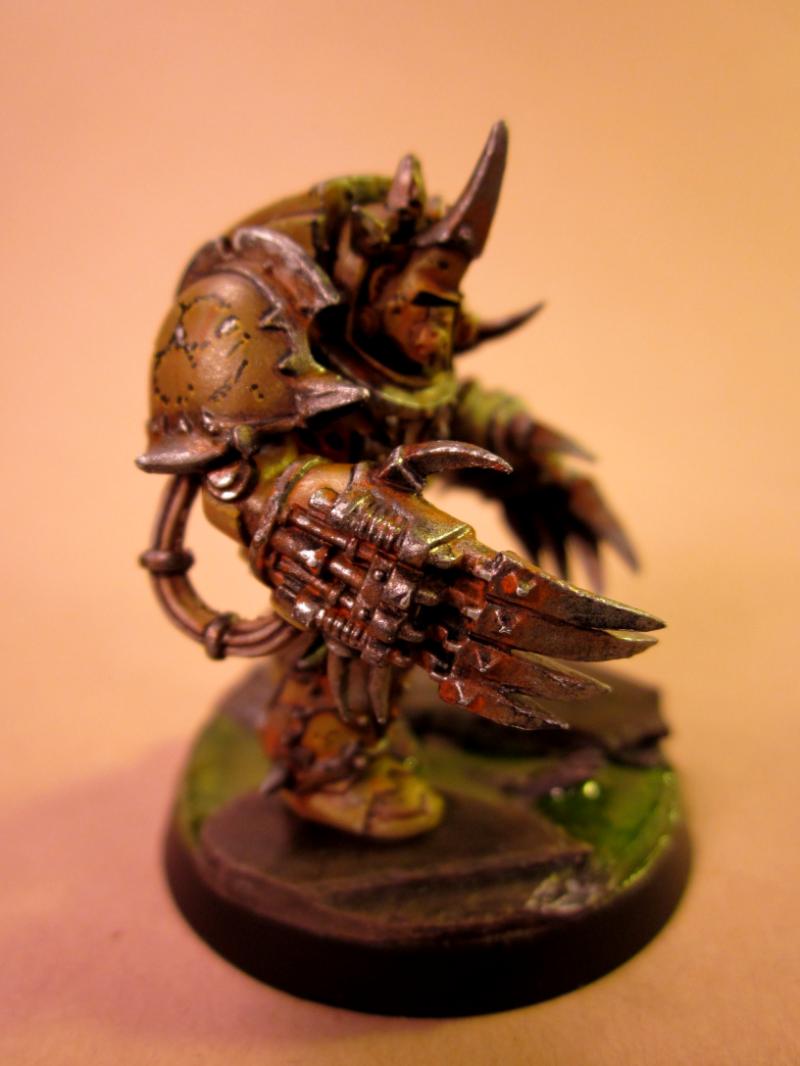
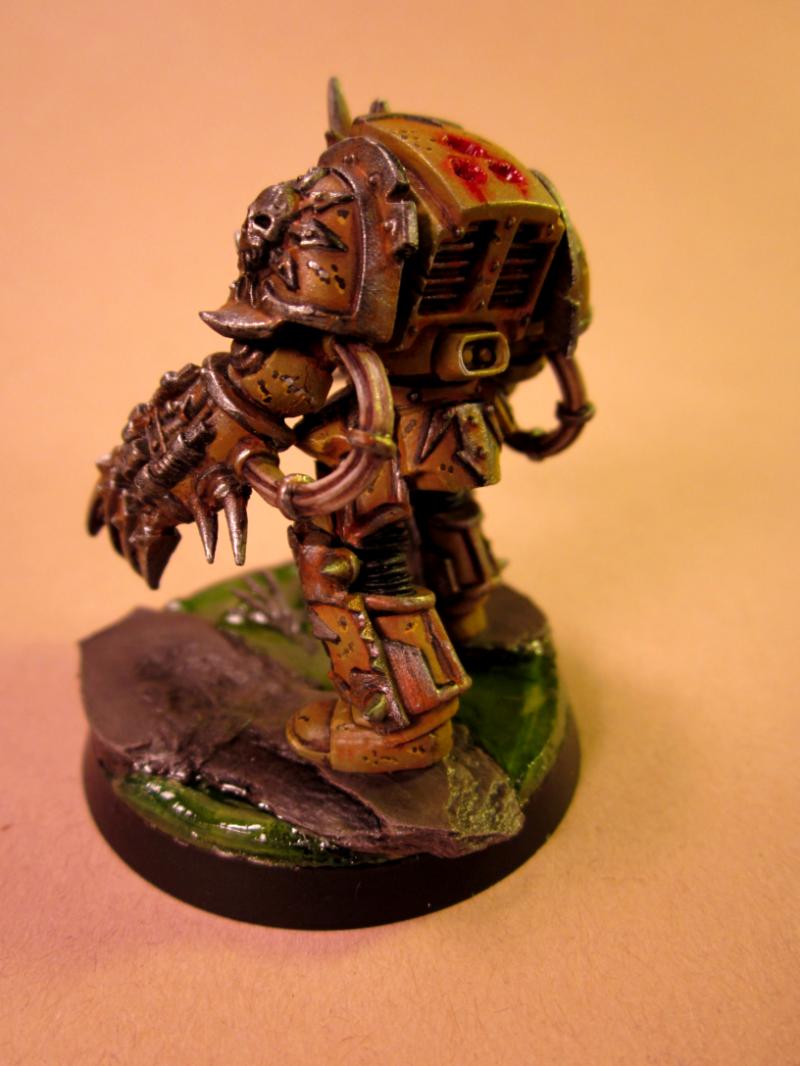
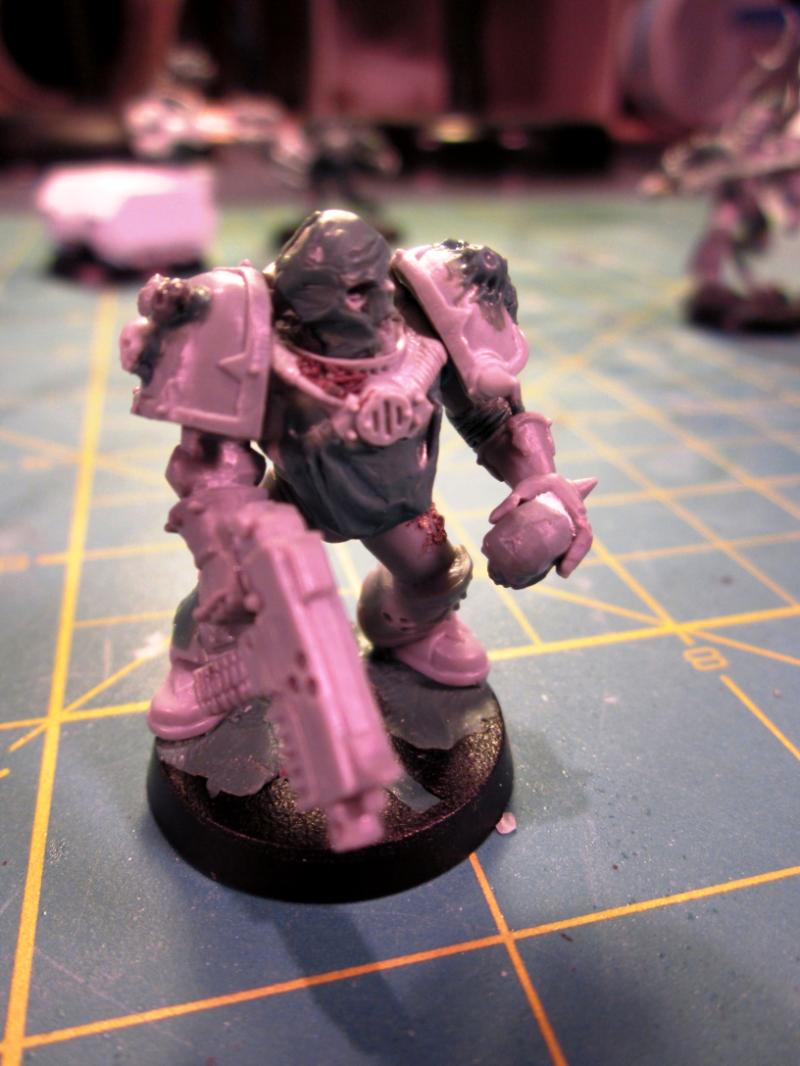
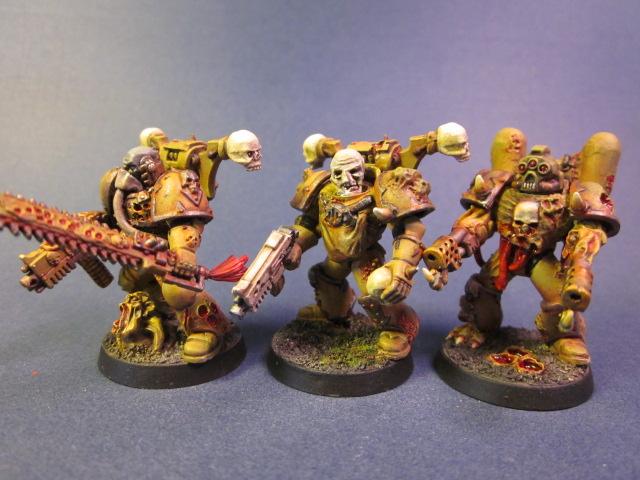
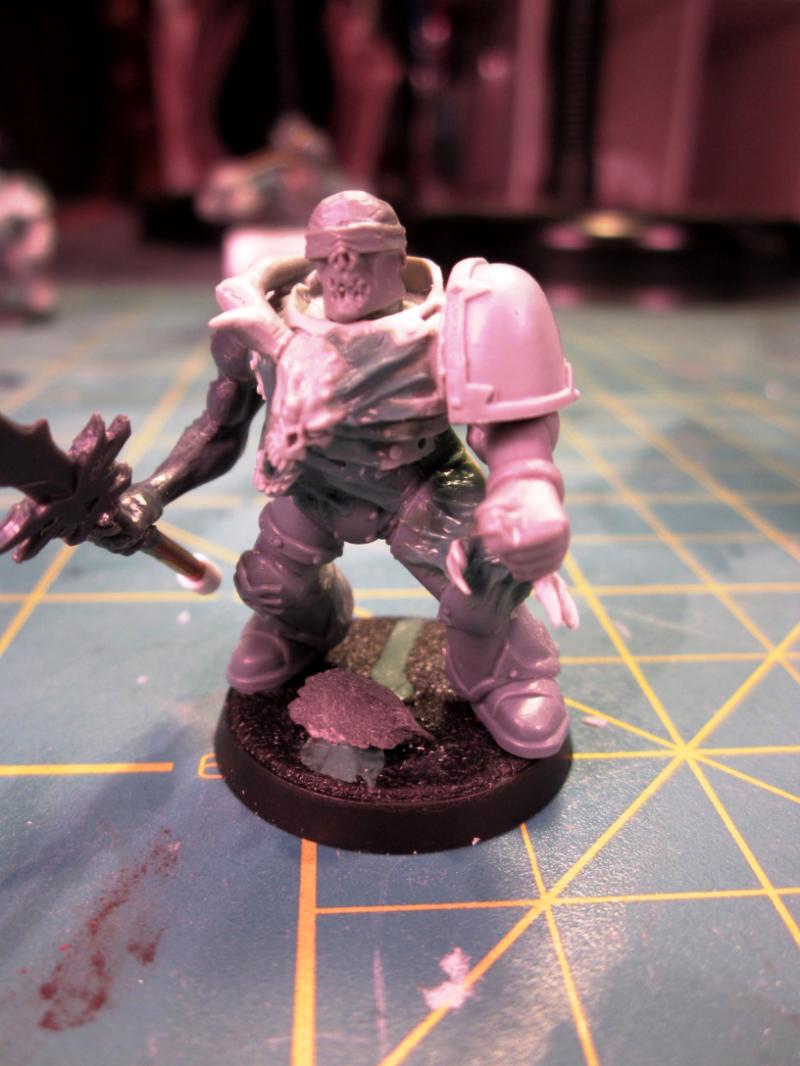
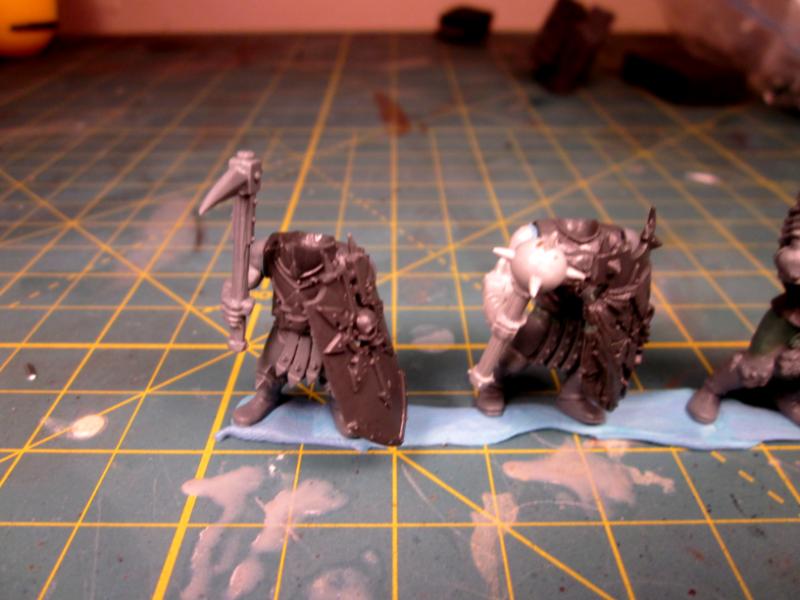
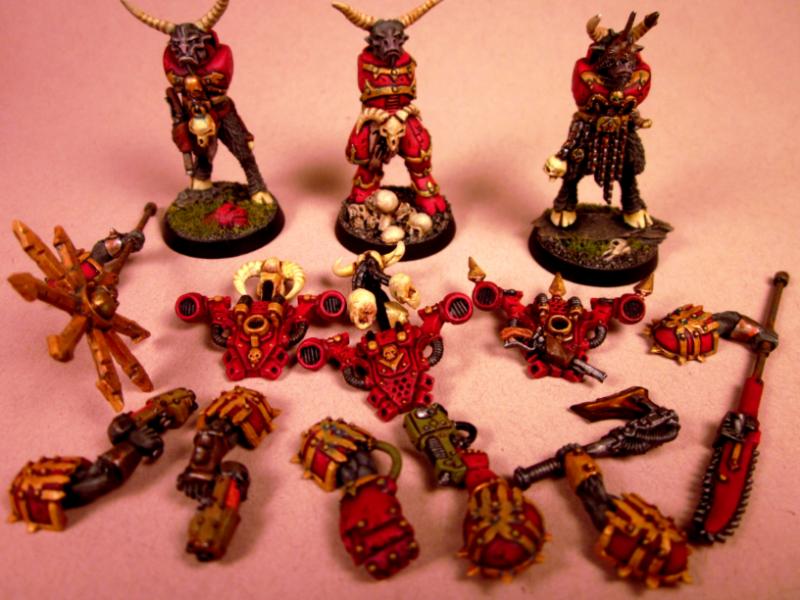
The first three. I've very happy with how the SM voodoo doll came out. It's doesn't fit the khorne theme very well, but it works with the the beastman theme.
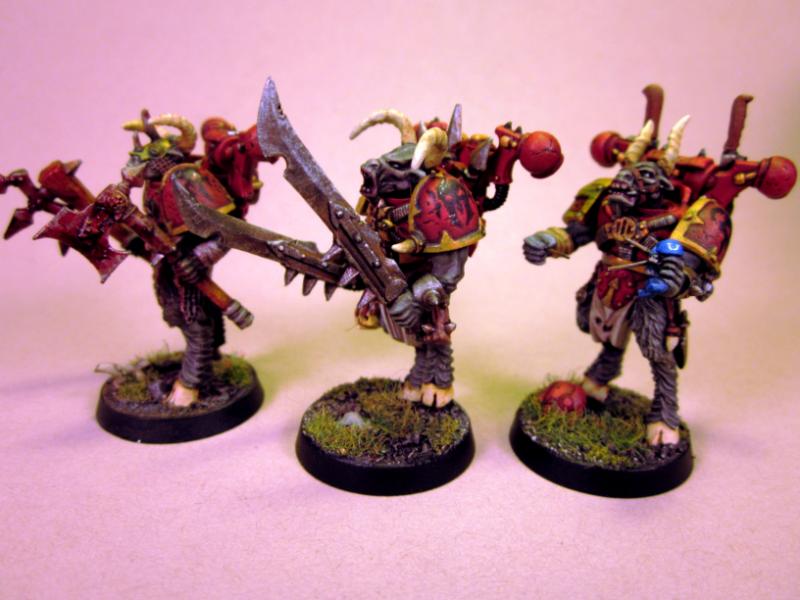
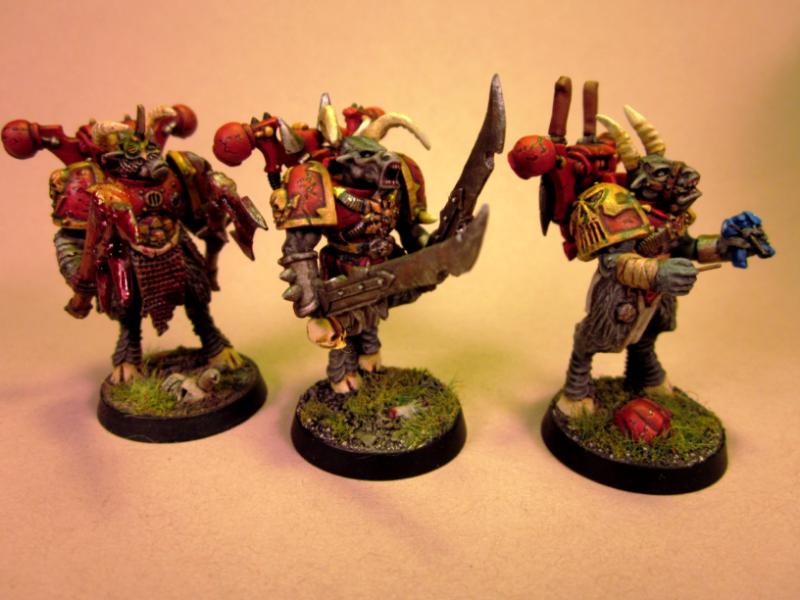
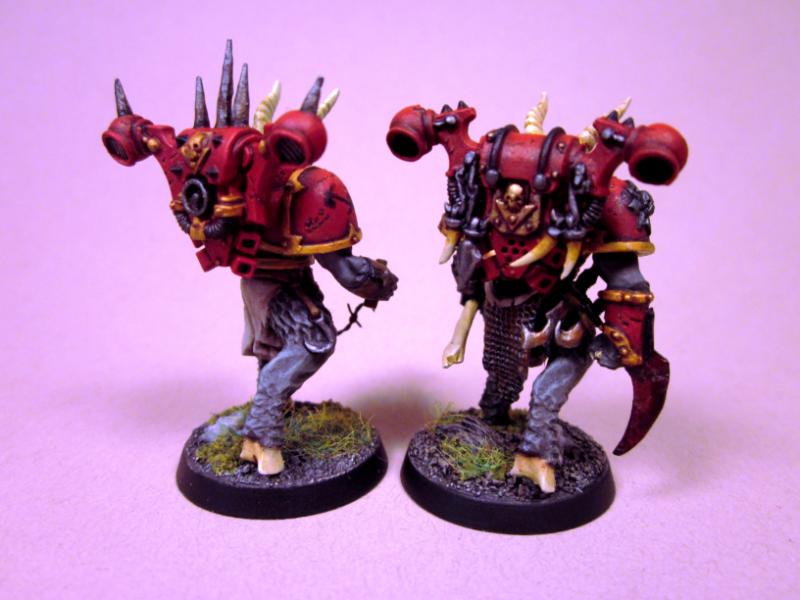
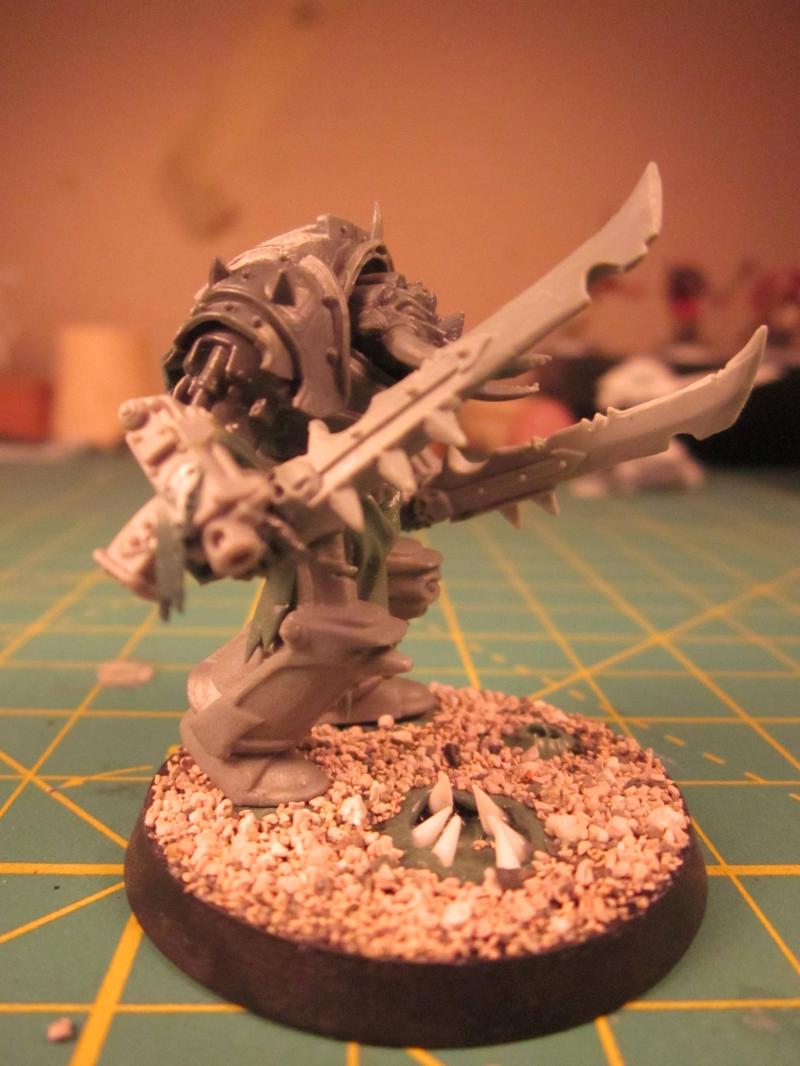
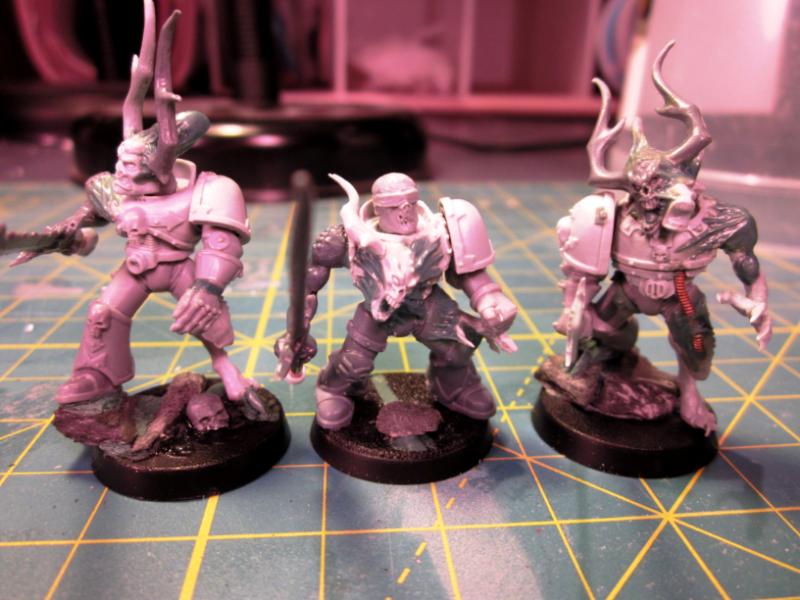
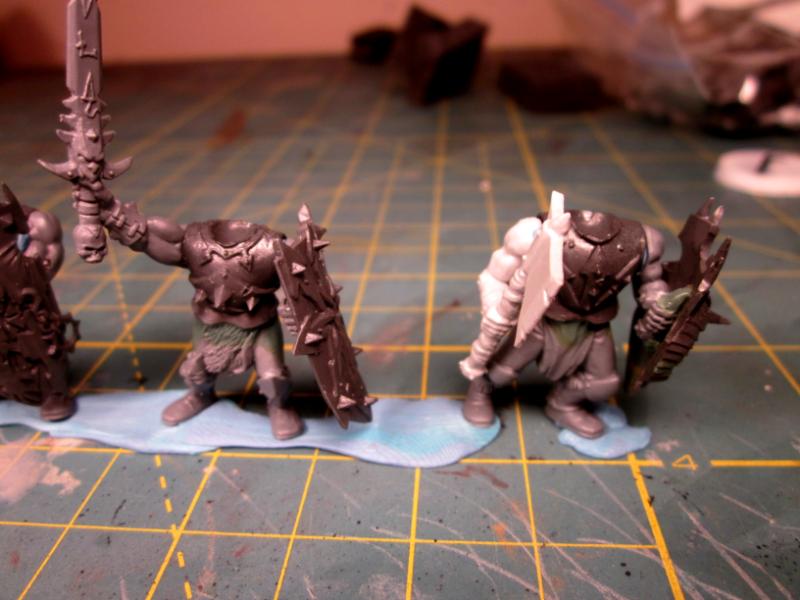
The next three: The two on the side were the prototypes. The on in the middle I think is my favorite member of the squad so far; not sure exactly why, he just seems to work.
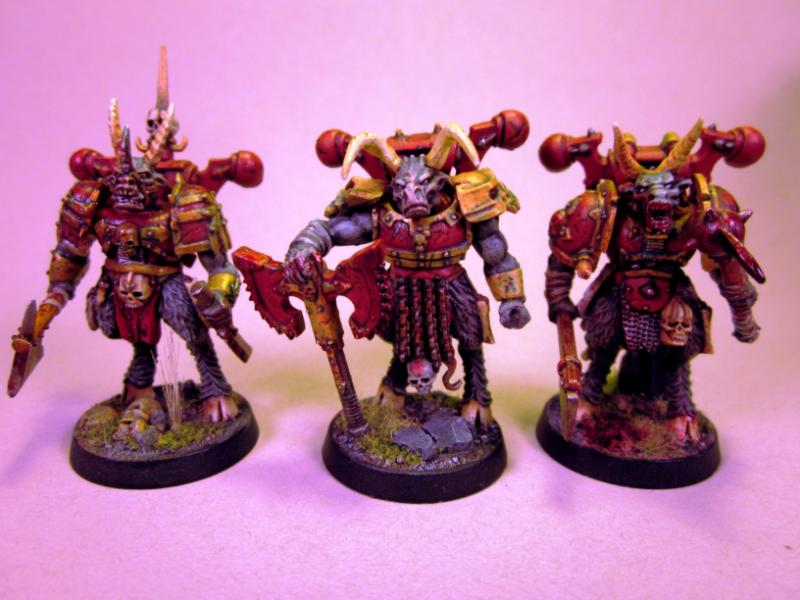
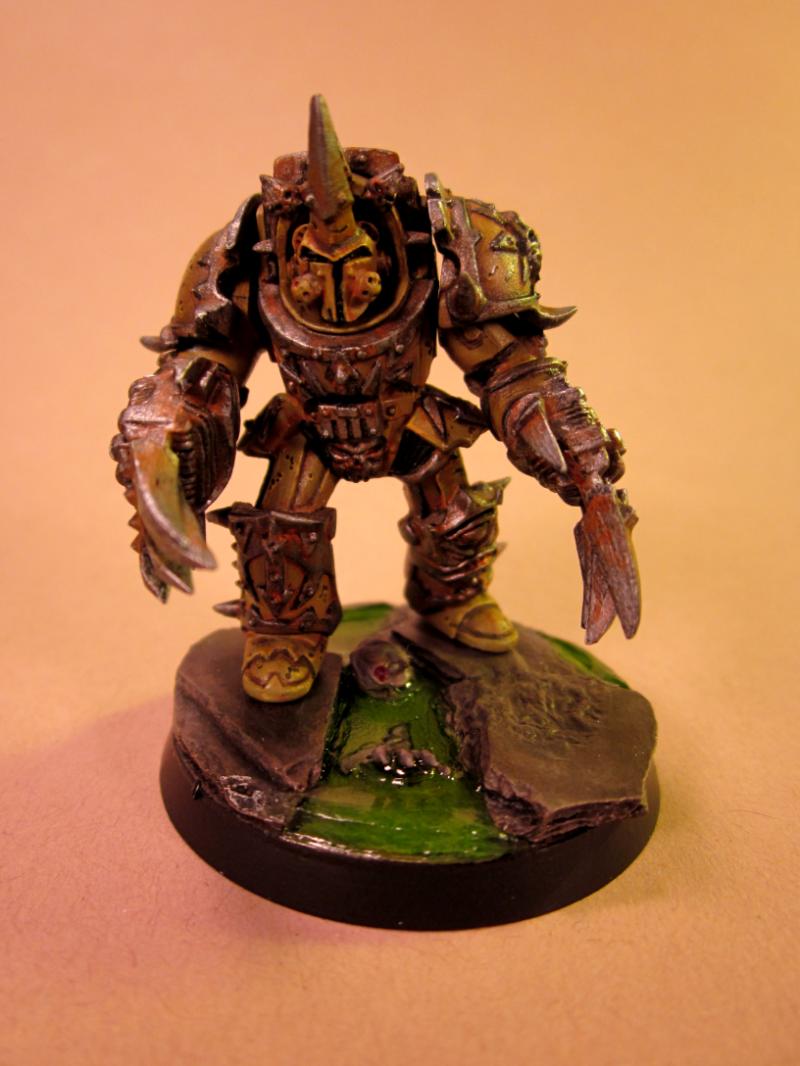
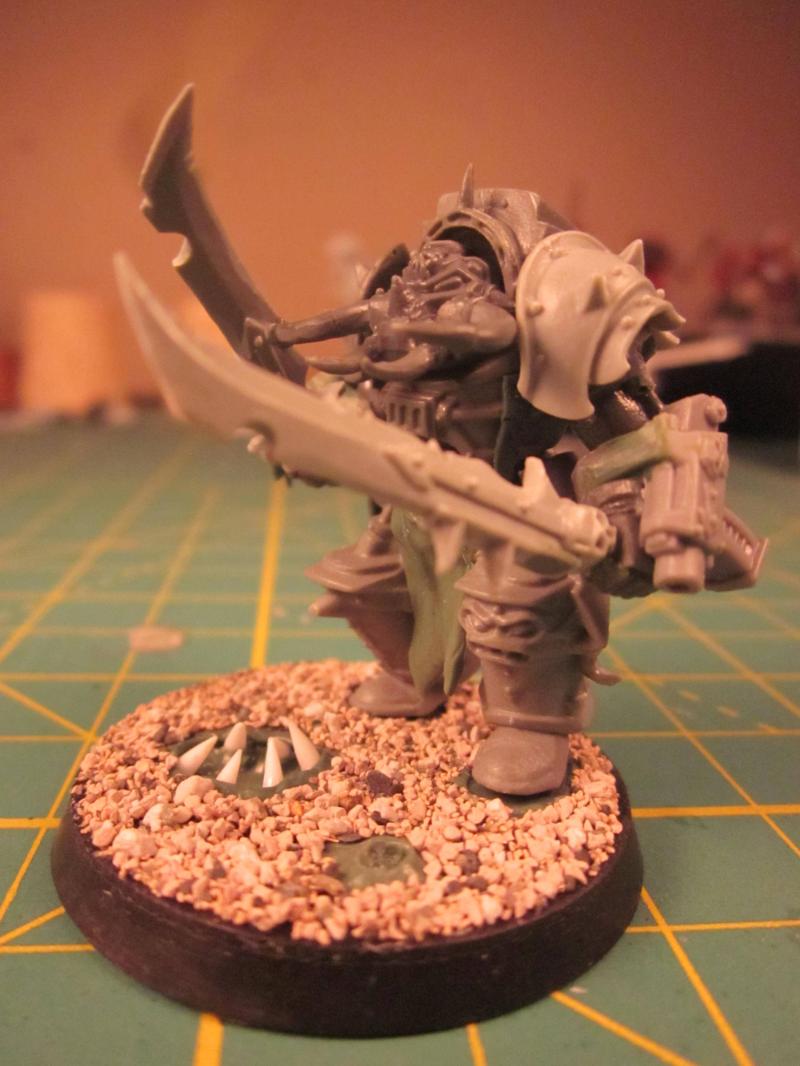
Another contender for favorite. He's the only one with a non- CC weapon so far. I love the look of the old powerfist; its from a really old set of space marines back when they are all beakies. Since they are berserkers I decided not to show any firearms on any of them unless it was an upgrade. This guy breaks the rule with the old fashioned pistol (I think its from the kroot), but I really like how it looks. I don't think the rest of the squad having two CC weapons breaks the WYSIWYG rules since berserkers come a CC weapon and a bolt pistol (which counts as an extra CC weapon).
24896
Post by: hivefleetmonolith
cant even tell you how badass those are
23950
Post by: rwzimmerman
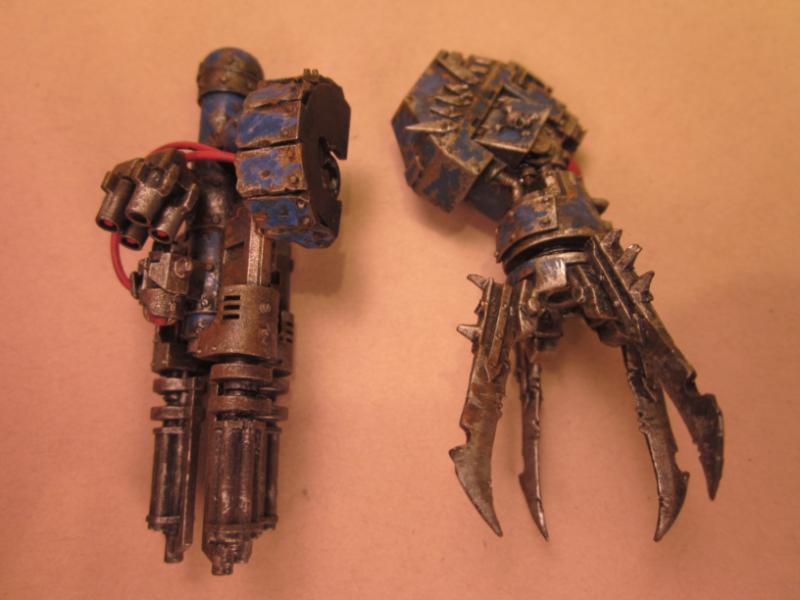
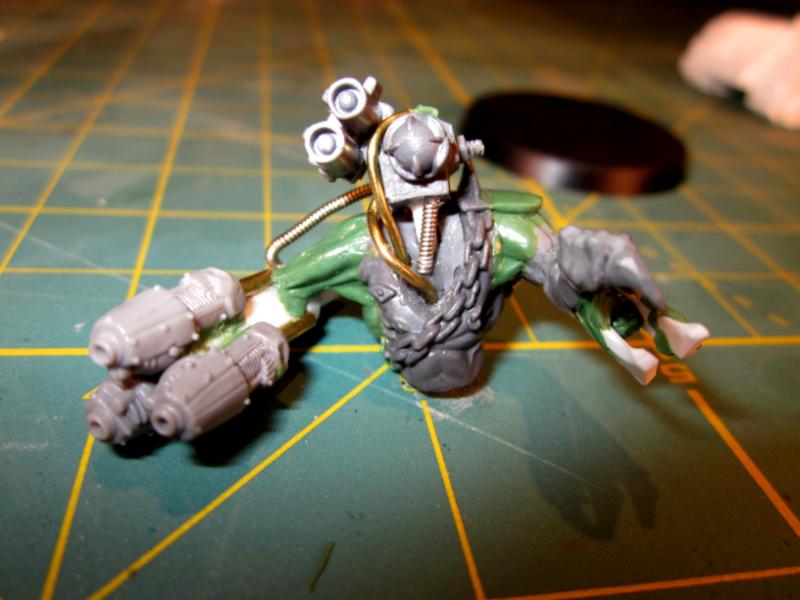
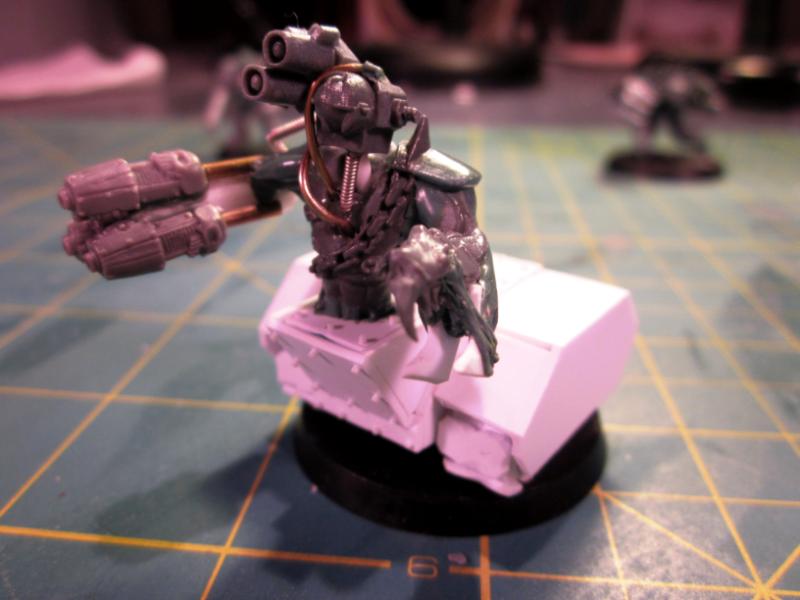
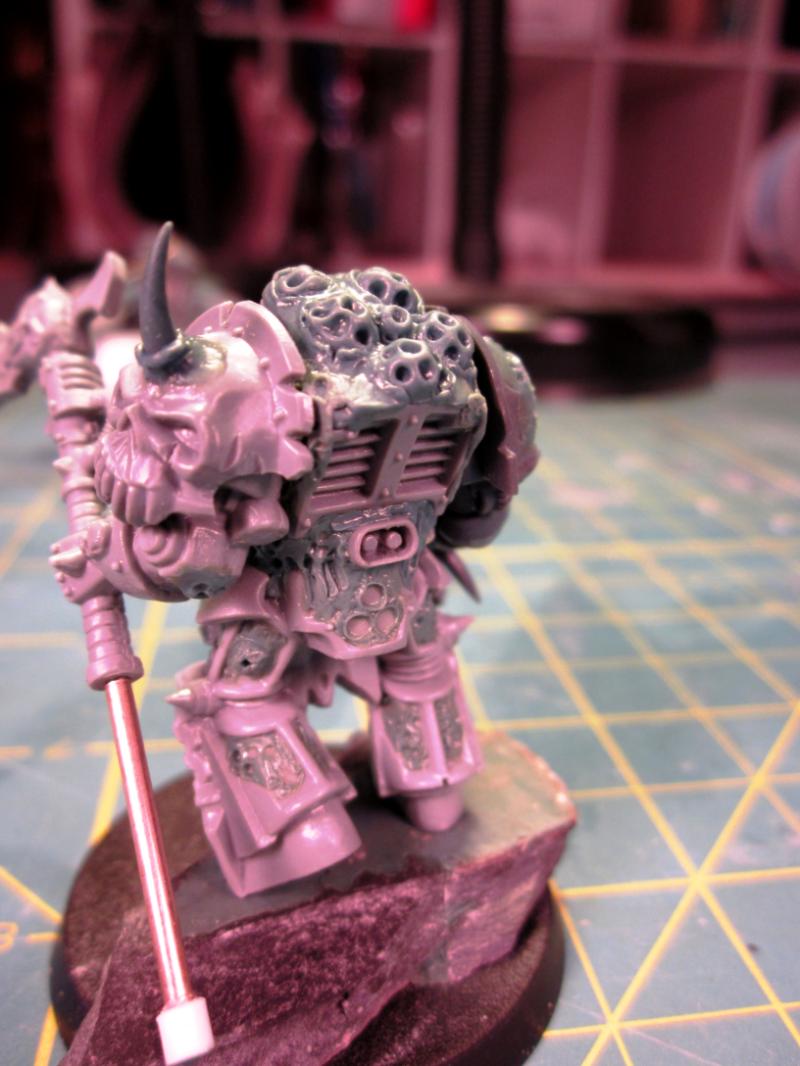
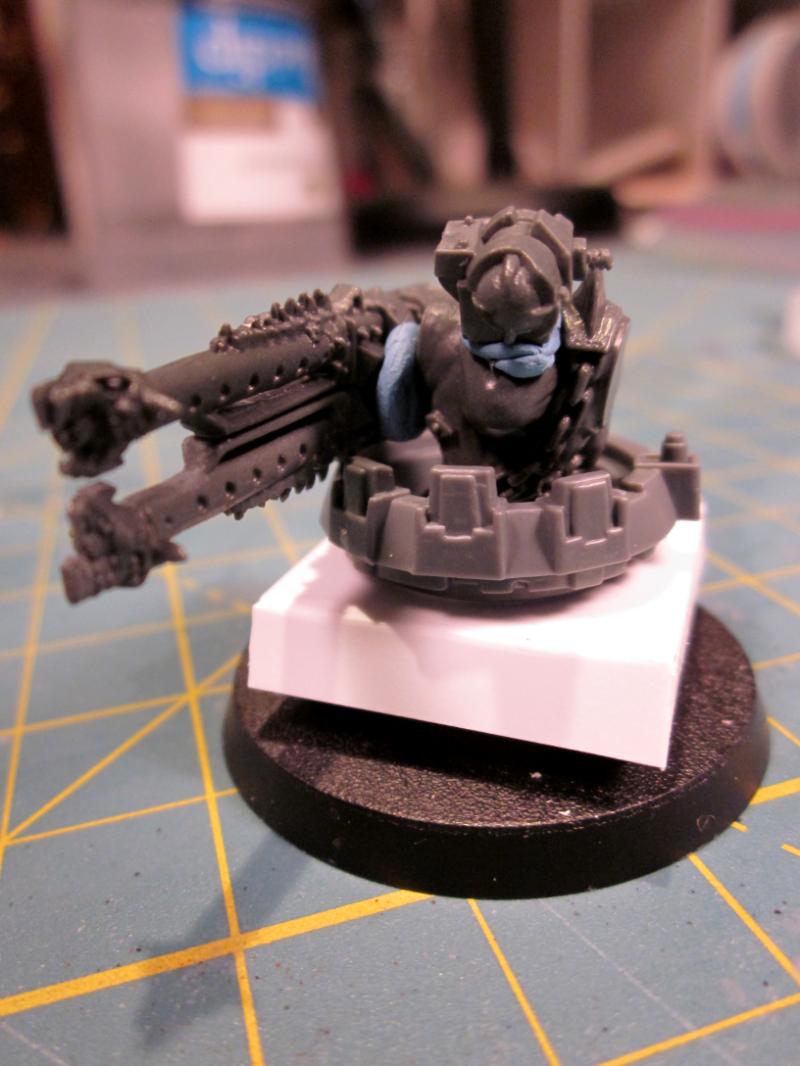
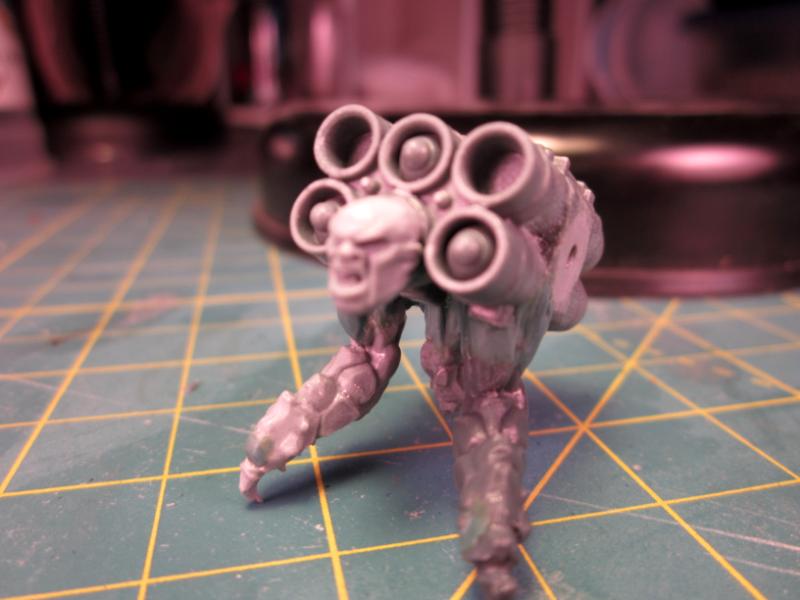
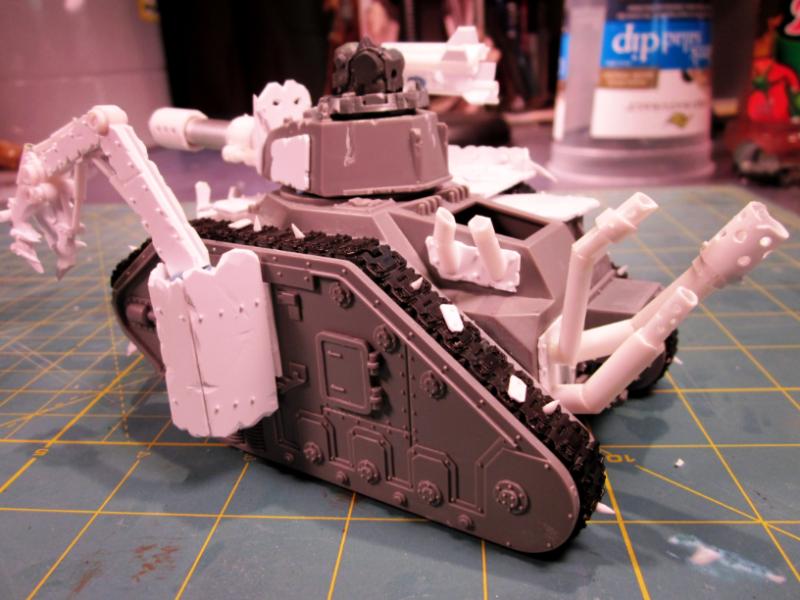
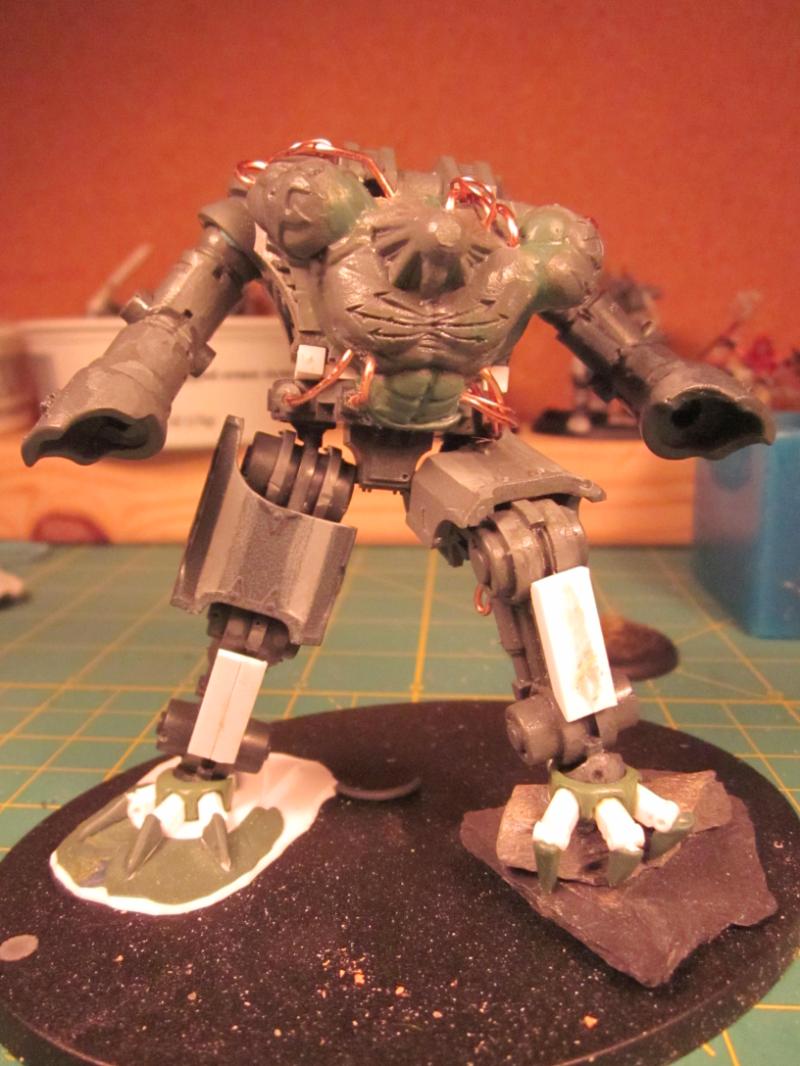
Oblit #2 is comming along nicely (sorry about the focus on the head). I'm looking for input on the arms. At first I was thinking of using terminator arms and adding green stuff to make it look like an organic arm with struts and joints sticking through, but I think they will be to big. Another option is no arms and stick some plates or something there. I'm leaning towards very skinny mechanical arms with engergy weapons at the ends like flamers or meltas. Opintions? other ideas?
23950
Post by: rwzimmerman
23950
Post by: rwzimmerman
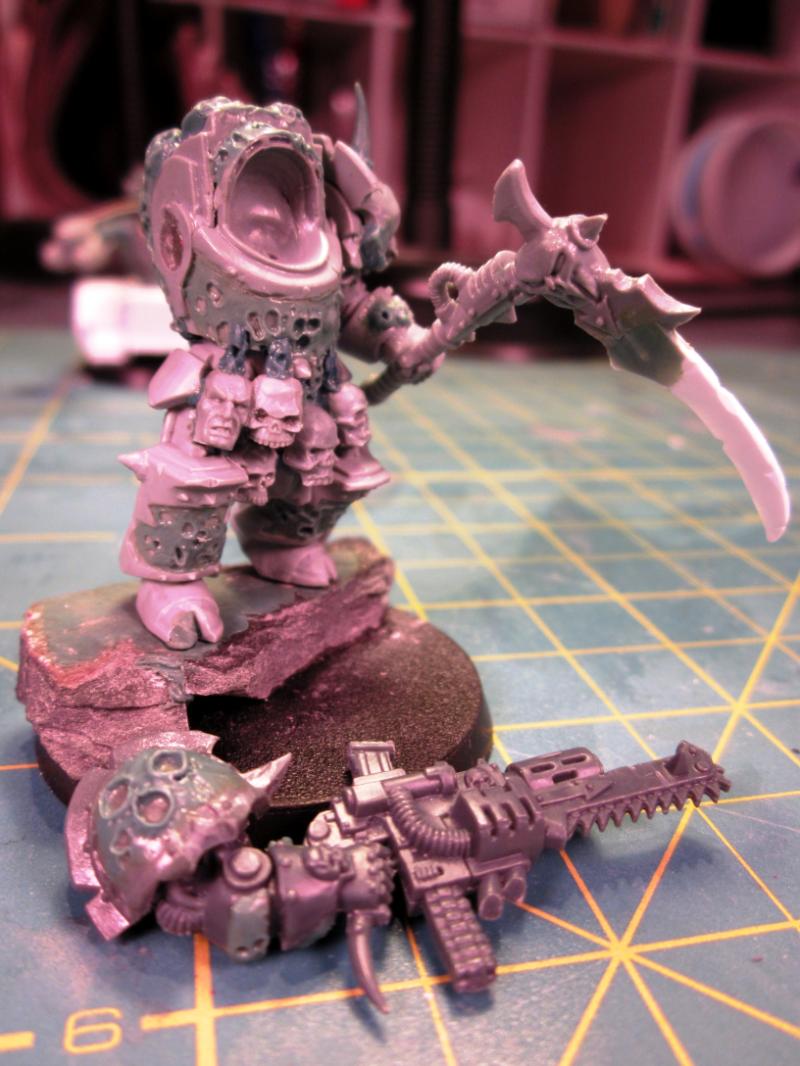
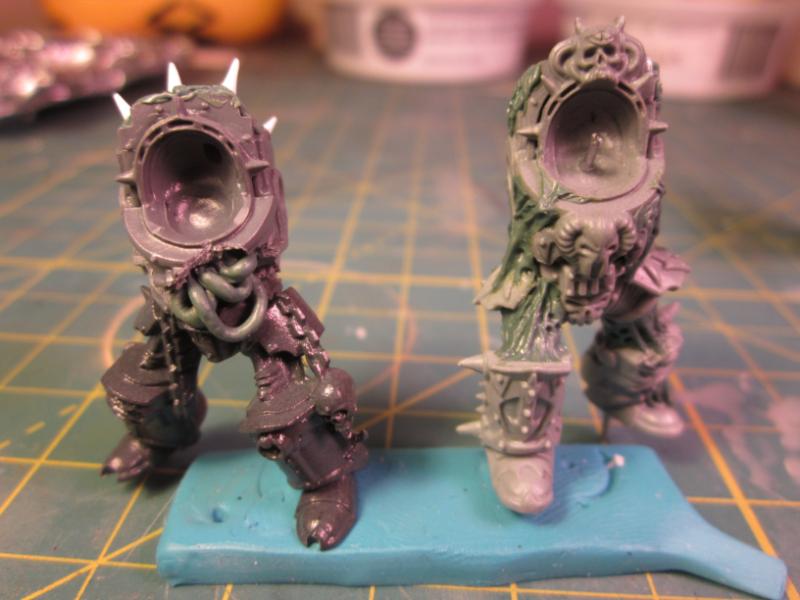
Possessed #3 done and ready to paint.

Three built. I just need to be inspired for the next two so I can get up to minimum squad size. I'm thinking of a blood letter emerging from the mouth of a CSM.
24247
Post by: Ambull
This thread is full of awesome concepts. Subscribed without hesitation.
17101
Post by: TheChronoTrigger
this is real incredible work here, i agree about the tank treads, they are a bit unproportional
40831
Post by: NeonHate
this thread has inspired me to make my own obliterators! sub'd!
23950
Post by: rwzimmerman
Thanks guys. I appreciate it, I'd love to see what you come up with for obliterators. I'm pondering my next conversion. I'm thinking of using demonettes and gargolye wings to make raptors, but I think they need more armor and haven't come up with a good way to do it yet. I could give them shoulder armor like the masque or add a few more bits to their arms and legs like they have on their torsos, but I'm not sold on either idea at this point. Suggestions welcome.
23950
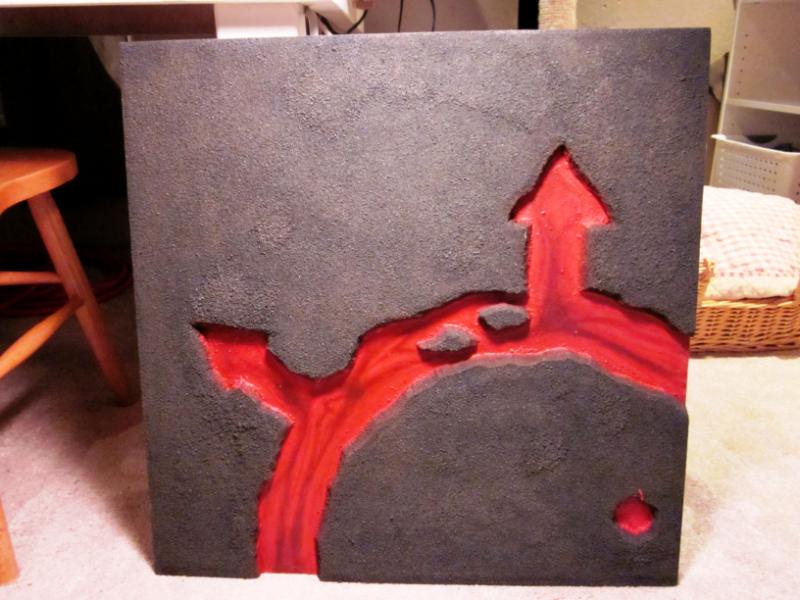
Post by: rwzimmerman
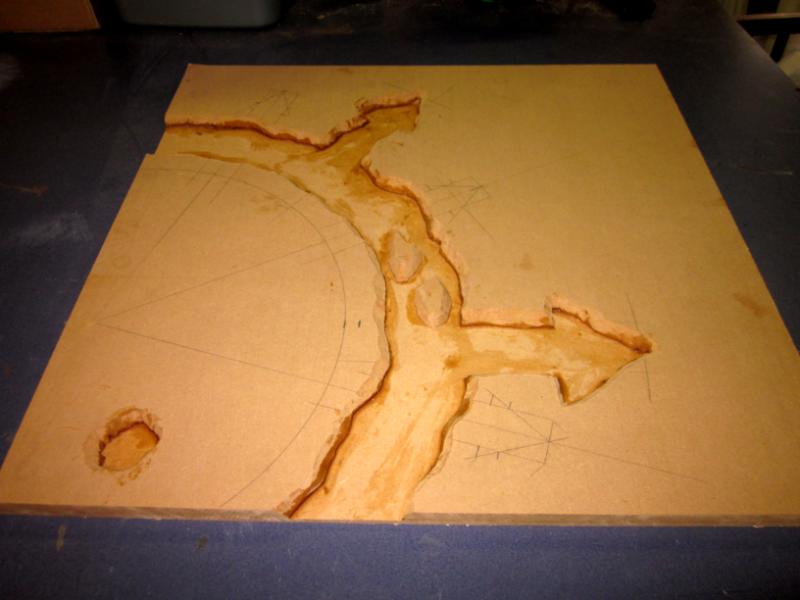
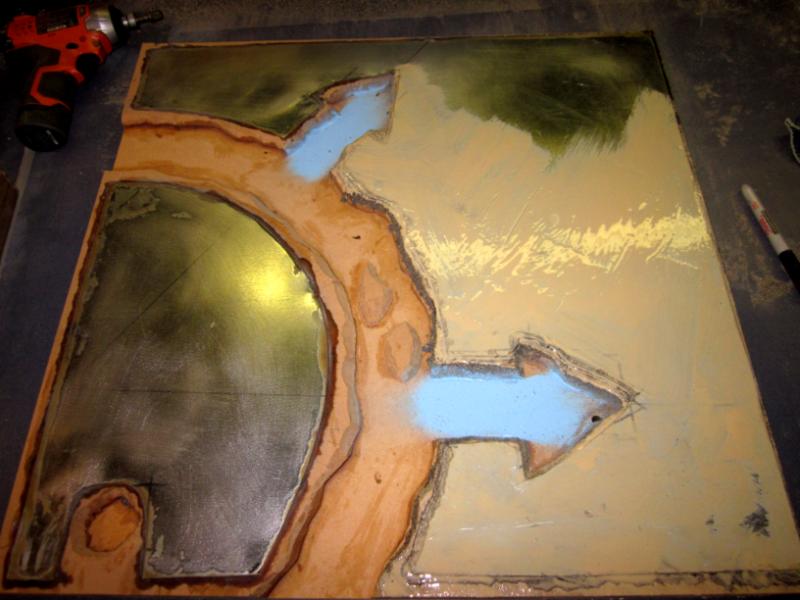
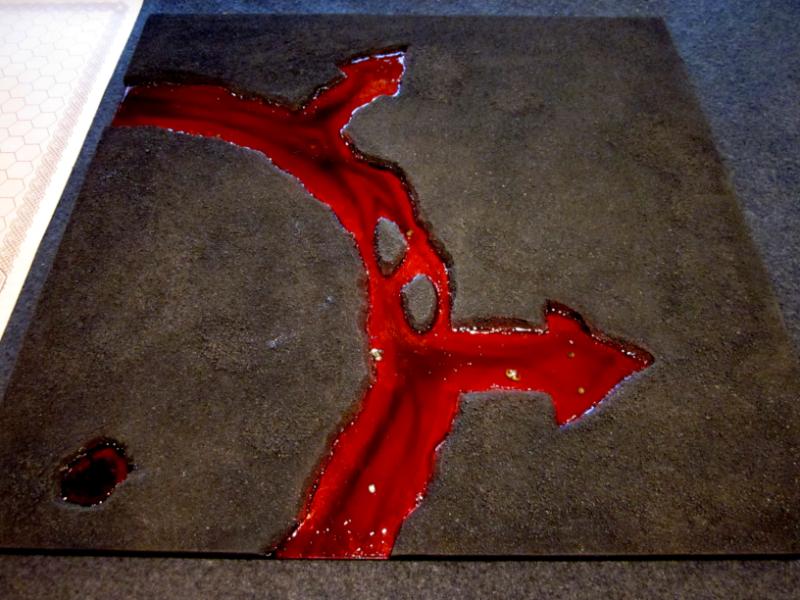
I started work on a display board yesterday. The glue was all set today. Not sure what I'm going to put in the "ditch" yet; probably blood, but could be lava.
22192
Post by: whalemusic360
Is that going to be for the Nurge, or the beast deamons? Or both, some swappable spots maybe?
14062
Post by: darkkt
...I... I dont think i can subscribe to this quickly enough.
Seriously, awesome stuff.
5654
Post by: Corey85
That board is awesome looking.
23950
Post by: rwzimmerman
whalemusic360 wrote:Is that going to be for the Nurge, or the beast deamons? Or both, some swappable spots maybe?
This is going to be a generic board for any chaos army. That's why I'm keeping the fluid in the giant icon generic like blood or lava. I may make some themed board later. This is my first attempt so I'm keeping it simple and generic.
No recessed spots for specific bases. I'm thinking I'm going to put sheet metal over the spots the army will stand on since I put magnets in the bases of most of my figures. I had planned on tracing the second layer onto the sheet metal befor gluing it down, but totally forgot the sheet metal till just now.
21162
Post by: 1-i
Well river of blood with chunks of victim/sacrifies/BBQ always makes for chaos.
The tracks, too big for that model yes but well done. Somehow i doubt you have the design plans you used, because that would be awesome info to share.
23950
Post by: rwzimmerman
1-i wrote:The tracks, too big for that model yes but well done. Somehow i doubt you have the design plans you used, because that would be awesome info to share.
I would share them if I had them, but the whole thing was free form, just making it up as I went. They are pretty easy to build, I copied Kanvass1's technique. http://www.youtube.com/watch?v=nu25qmf99Po
23950
Post by: rwzimmerman
Display board moving along. The sheet metal is glued in place and half covered in glue (forgot to take a picture sooner). Ignore the blue; once I got the rough shape of the sheet metal cut out I put it in place and tried using spray paint in the gap to paint the shape of the arrows onto the under side of the metal. It worked okay.
22192
Post by: whalemusic360
Looking really good. Consider the sheet metal idea stolen. I think I'll even do it on my next game board.
23950
Post by: rwzimmerman
whalemusic360 wrote:Looking really good. Consider the sheet metal idea stolen. I think I'll even do it on my next game board.
Glad you like it. Here's a tip; I went to the hardware store and the sheet metal in the "sheet metal" area was for welding and such and was somewhat expensive (~$30 or so for a 2'x3'), but in the "duct work" section they had 2'x3' sections of sheet metal for ~$7. I'm sure its not as high a quality, but its still steel and more than adequate for our purposes.
You might like this stuff as well. This transport tray is pretty easy to make. I used a table saw to cut a groove in a long strip of wood. Then cut the wood into the proper lengths for the sides. Then nailed the wood in the rectangular shape with the sheet metal in the groove. I know that's not very clear. If anyone needs I can draw some sketches an post them.
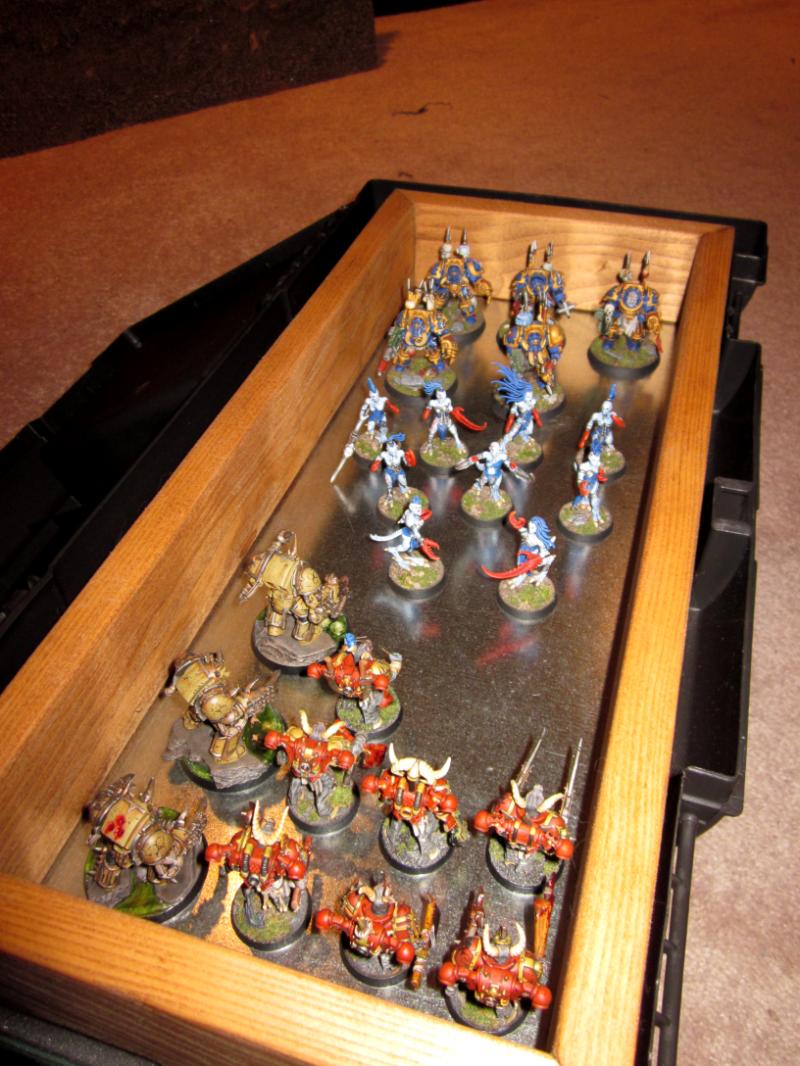
And Upside down. I glue 1/8th inch by 1/4 inch diameter rare earth magnets on the bottom of the bases. It keeps a good hold on plastic figures, but isn't strong enough to hold metal figs. I put two of the same magnets on the bottom of Queek Headtaker and he was not very stable. These guys are stable enough that if you accidentally drop your case a few feet you should be okay, but if you tossed it you'd have a mess.
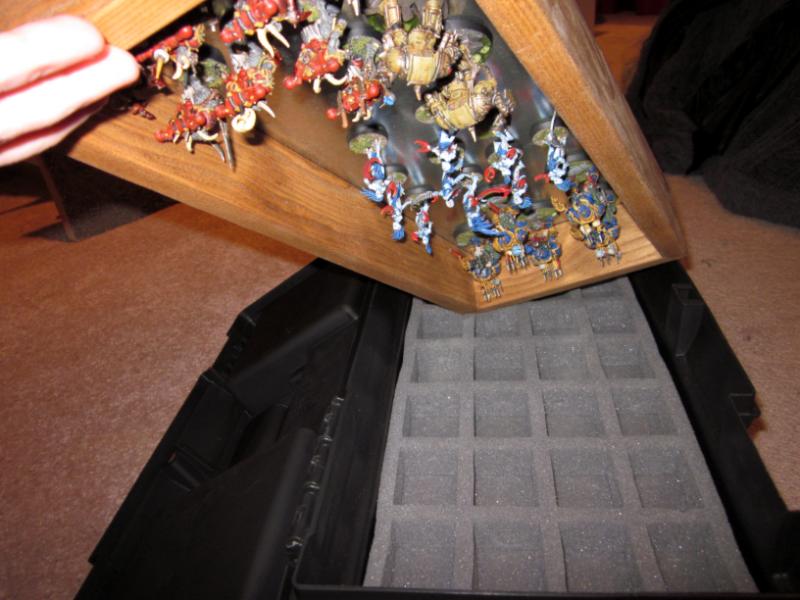
I glued a couple of pieces of scrap in a small cardboard box with a hinged top to carry my just a few around for like when going to the game store to paint. I use a few extra magnets in the lid to hold the extra arms and backpack up so they don't rub against the metal.
38535
Post by: Njal the Weatherman
That is awesome, i really like the termies, if you dont mind how did you do swamp, i get the skulls but the clear "water" material got me wondering how
22192
Post by: whalemusic360
I've got a friend that owns a steel siding (for houses) business, Im betting I can get some scrap sheets for free.
23950
Post by: rwzimmerman
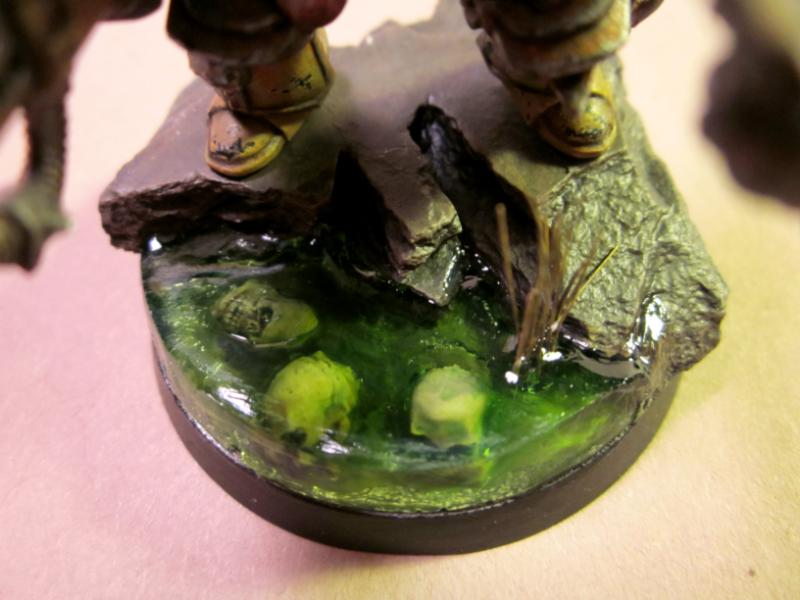
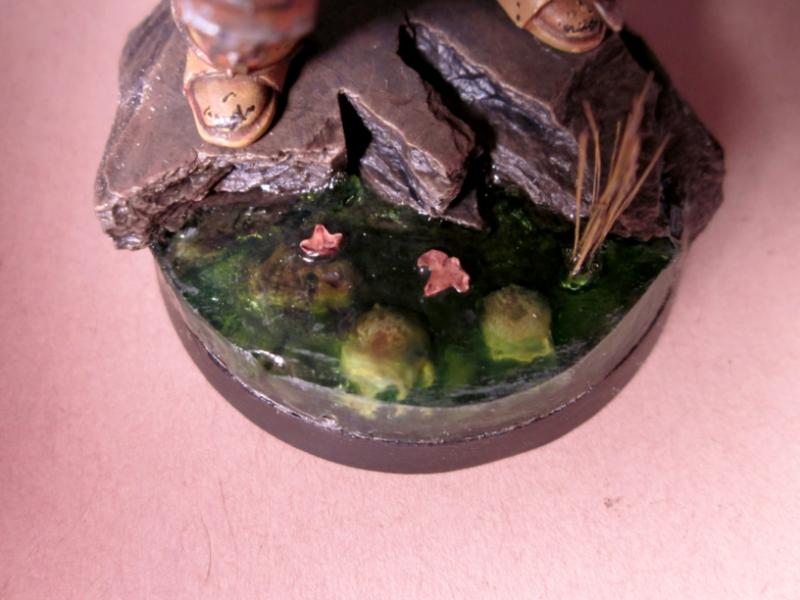
Njal the Weatherman wrote:That is awesome, i really like the termies, if you dont mind how did you do swamp, i get the skulls but the clear "water" material got me wondering how
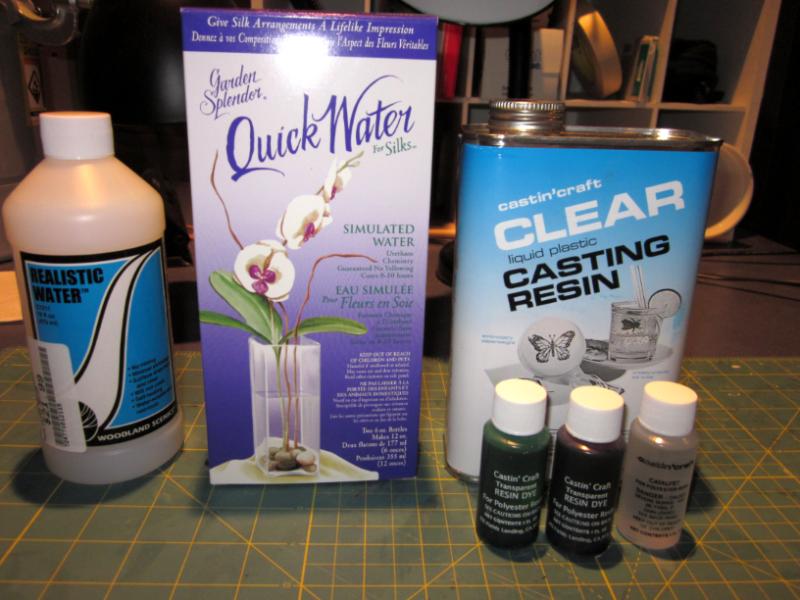
Short Answer: I used masking tape to create walls round the edge of the base and used castin'craft's Clear Liquid Plastic Resin with some of their Green dye.
Long Answer: I've tried three different product each cost between $20 and $30.
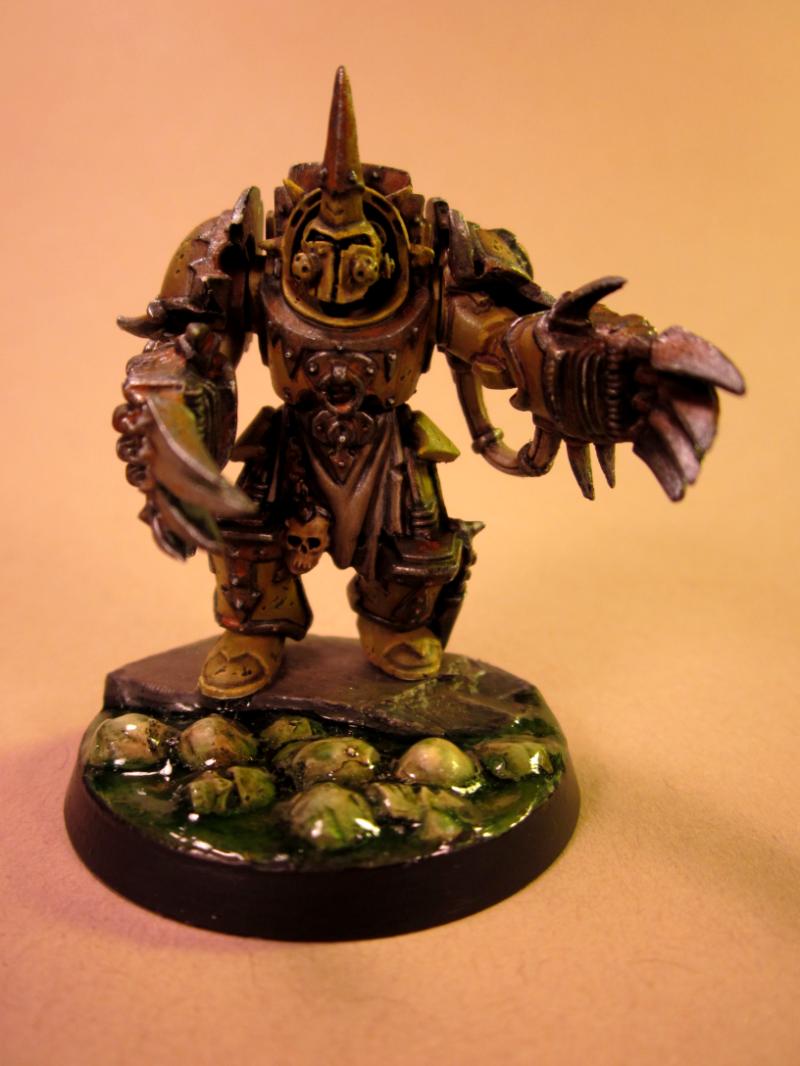
For my first attempt I created a wall of masking tape around the edges of the base where the liquid would pour out and used Woodland Scenics Realistic Water with a little green wash mixed in. The problem I had (and some google searches turned up lots of other folks with the same issue, but no solutions) was the surface tension was so great as it dried is climbed up the walls of tape and the rocks on the figure so I ended up with what looked like a glass bowl. I trimmed off the "bowl edges" along the front of the figure and tried again this time I painted a layer of silicon on the tape, but had pretty much the same result. The stuff is pretty thick next instead of pouring in a layer of the stuff I put globs on let them dry over night then added some more globs the next night and so on for several nights.
This is what I ended up with. Over all I'm happy with it, but it's not the edge of a pool I wanted like in the next two terminators. All-in-all if it wasn't for the crawling issue I'd be very happy with this product. I'll do some more experimenting with it and if any has any tips I'd love to hear them.
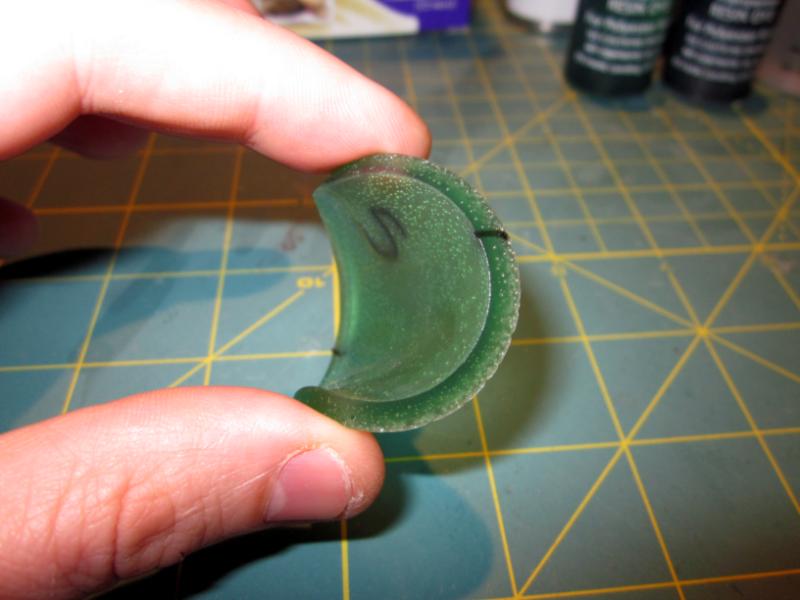
The next thing I tried was Garden Splendor's Quick Water. I picked it up at a craft store and don't recommend it. It took a LONG time to dry. I'd say somewhere between 1 and 2 weeks. I'm not sure because it never set up the way I expected so I'm guessing some of the time I was waiting it was already done and I didn't know it. As you can see in this pic it stays flexible, has lots of bubbles and if I press my finger into it it leaves finger prints. I three test pours in dixie cups and never tried it on a model.
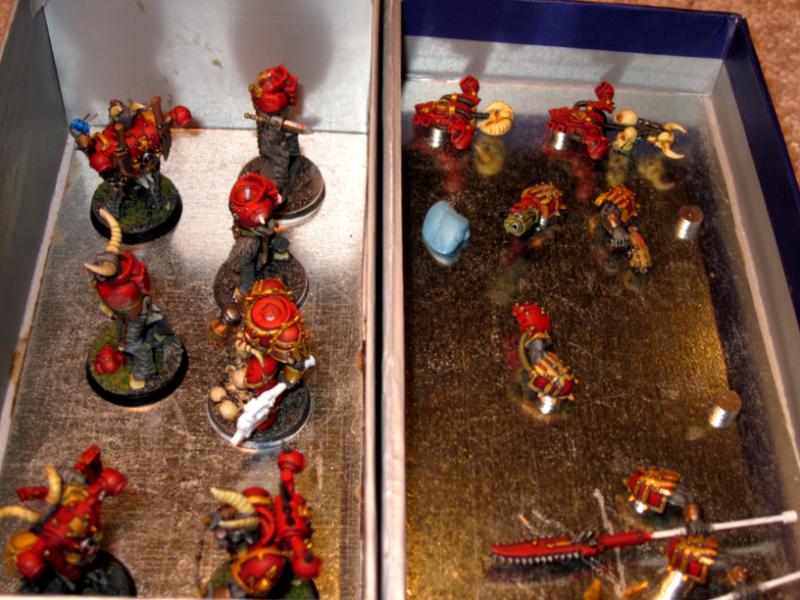
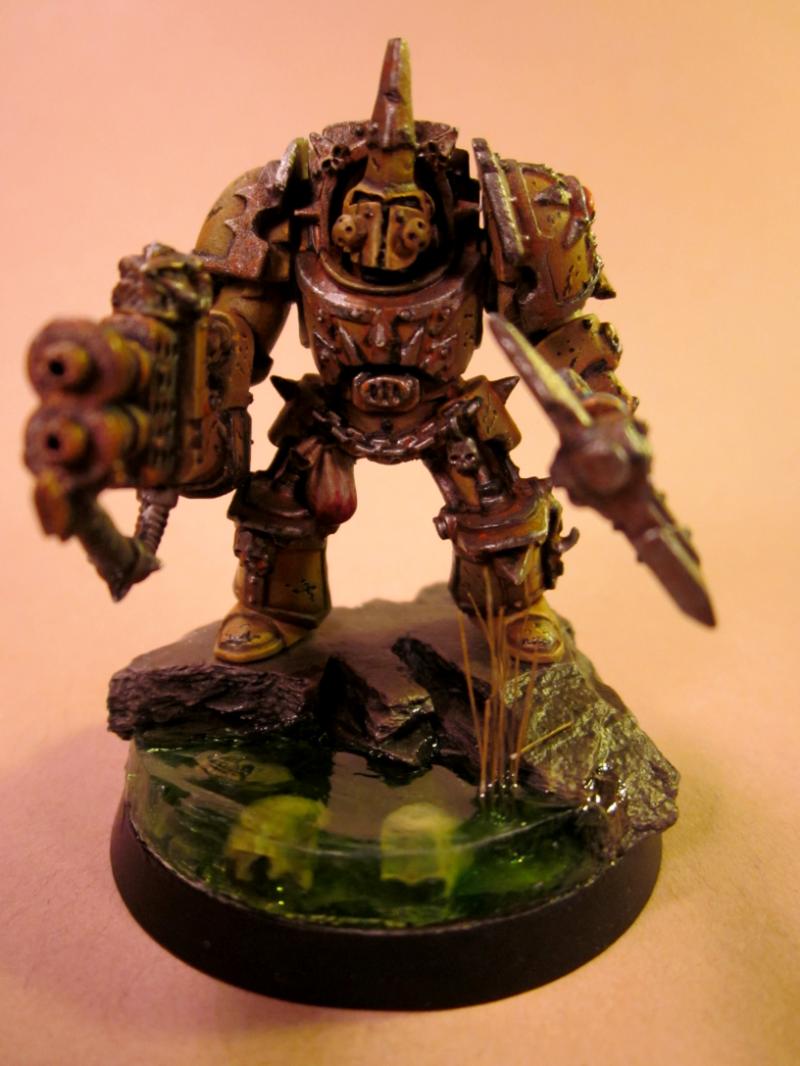
The last product I tried was castin'craft's Clear Liquid Plastic Resin. It's a two part epoxy so you need the big can of resin and the small bottle of catalyst (sold separately). I also bought their green and red dye's. I used the same process with the tape wall (no silicon) as with the Realistic Water. I added some of their green dye to the resin, then added some red to give it a murkier look. It worked beautifully, the liquid in the cup was a murky, swampy green, but as you can see from the pic below when cured it looked like green jello. Later I covered it with hard coat poorly mixed with Devlin Mud to murk it up a bit (pics earlier in the thread). Once I had the resin on the base I put a desk lamp about 8 inches over to provide extra heat and speed curing. I left it over night and it was done in the morning. There were also a couple of gaps next to the rocks where it didn't fill in as smooth as I'd like so I filled those with a few layers of 'Ard Coat.
It came out pretty good. Still not 100% happy with it. There was a little bit of a tension issue, but you will have that with any liquid. While measuring out the resin and catalyst aren't hard I'd rather just pore it out of a bottle like Realistic Water. The resin is pretty nasty stuff too. While researching products on the interweb I saw warning after warning about using it only outside or in a we ventilated area.
Something interesting about heat cure resins. The warmer it is the faster it cures and as it cures it generates its own heat. This means it "dries" counter intuitively; imaging spiked ball of resin. The big ball will generate the most heat, which will accelerate the curing process, which will generate more heat accelerating the curing process, and on and on. The spikes will generate less heat, and dissipate heat faster so will cure slower. So the center of the big ball will be the first part cured and the tips of the spikes the last. This also means a thin disk a few mm thick can take a long time to cure. Using a bit more catalyst will speed it up, but can cause it to crack if you use too much, so check the directions carefully.
All in all I have two products that I think will give me pretty good results with some practice. If anyone out there has any advice or another product they recommend please share.
23950
Post by: rwzimmerman
23950
Post by: rwzimmerman
41001
Post by: TheH2Oelement
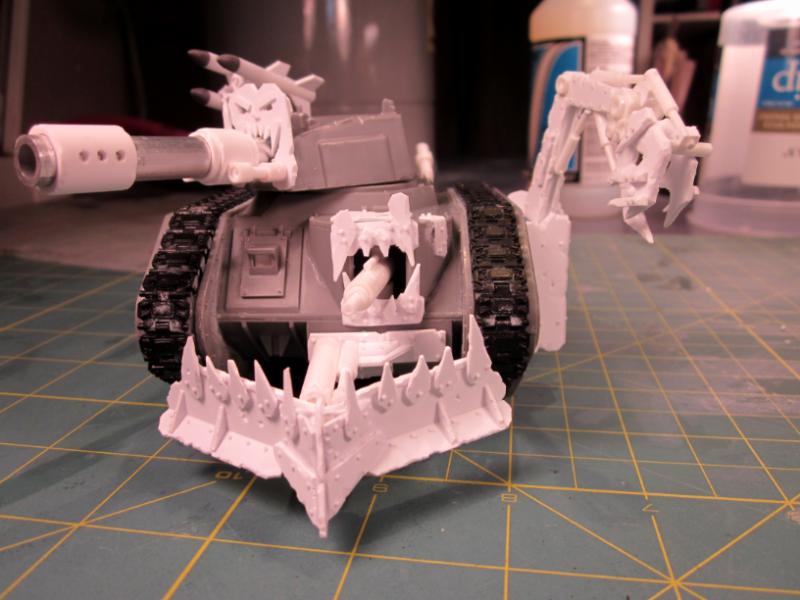
Looks very orky. the tracks could use some orkifying though.
16007
Post by: the damned artificer
Great stuff you got here, I've been wanting to do bases with high water for some time, and I think I'll have a go at it now
I have some water effect from zitardes which is essentially just a to part epoxy (resin and hardener) gives great results for my other projects.
Now I have a question, I noticed on one picture of the beastmen bezerker that the torso didn't have a seam from where the two halves was glued, and then I noticed that two of these guys have Iron Warriors torso's and they're not in metal as usual. Sooo this leads me to my question, do you cast your own in resin from a mould of the original metal ones sold by GW??
I'm toying with the idea of doing that myself, for personal use of course.
rwzimmerman wrote:
23950
Post by: rwzimmerman
the damned artificer wrote:Great stuff you got here, I've been wanting to do bases with high water for some time, and I think I'll have a go at it now
I have some water effect from zitardes which is essentially just a to part epoxy (resin and hardener) gives great results for my other projects.
Now I have a question, I noticed on one picture of the beastmen bezerker that the torso didn't have a seam from where the two halves was glued, and then I noticed that two of these guys have Iron Warriors torso's and they're not in metal as usual. Sooo this leads me to my question, do you cast your own in resin from a mould of the original metal ones sold by GW??
I'm toying with the idea of doing that myself, for personal use of course.
I'll have to check out zitardes; see how it measures up.
Good eye. Yes, I do make my own molds and cast from them. I started trying so I could make more of the OOP stuff I have (like the old metal noise marines) and bits that I use extensively (skulls) or are very expensive (like Typhus's head). I started casting the SM torso as well since I hate filling the seem between the two halves. I made molds of a few after filling all the gaps and cast them as a single piece (no filling!).
Here's a few things I would tell anyone thinking about casting.
1) It is not cheep. To get good results you need to have an air compressor, a pressure pot, mold making material, casting resin or plastic, plus all the other misc stuff (air hoses, mold releases, stir sticks, digital scale, etc). I don't think I've spent less money by doing it. For example; I have no use for chaos knights, but they have wicked cool weapons and shoulder pads, so knowing I could cast them I bought them ($45 IIRC) and made molds of their shoulder pads and some of their weapons (this probably cost about $10 in materials to make the molds; casting the parts after that costs pennies apiece). I've used four of one of their halberds to make the power claw on the dreadnaught. So you can look at it as I've spent $55 (disregarding setup costs) than I would have or I've saved $135 (since that's what it would have cost to buy three more boxes of chaos knights. But I'd never spend that sort of cash for bits for single model). In the end I've spent way more money on casting materials and GW figures than I would have if I did not cast, but I've saved a bundle (that I never would have spent) if you go by the retail cost of the bits I've used. If you were building a hoard army and were going to make the same view figs over and over I'm sure you could save a bundle.
2) Getting good results is not easy (but not hard either). It will take some practice to make molds that are not prone to bubbles. You will need to use pressure or there will be lots of bubbles and any long slender parts like a horn will not "fill out" leaving you with a head with only half a horn. Getting usable results takes a bit of time and effort. I try to stick to "spherical" objects (skull, SM torso) or object with large "channels" (an melta gun). That gives plenty of space for the resin/plastic to get in and the air to get out. Long skinning things like the chaos knight halberds are much harder since the resin/plastic traps air in the slender parts.
For me it is worth it since I can do conversions that would have been too expensive to do otherwise.
Automatically Appended Next Post:
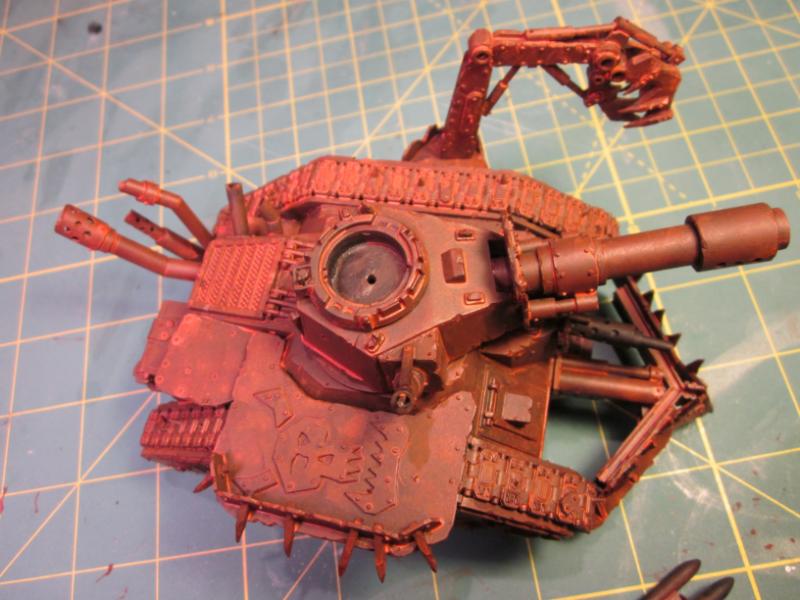
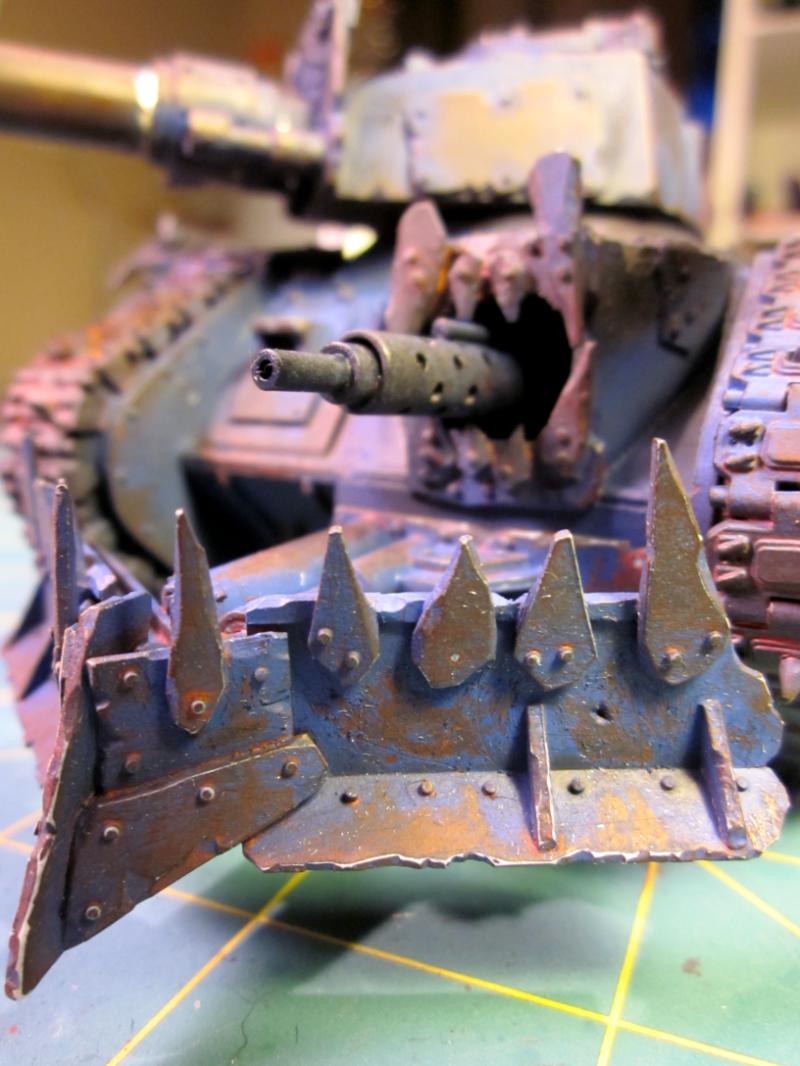
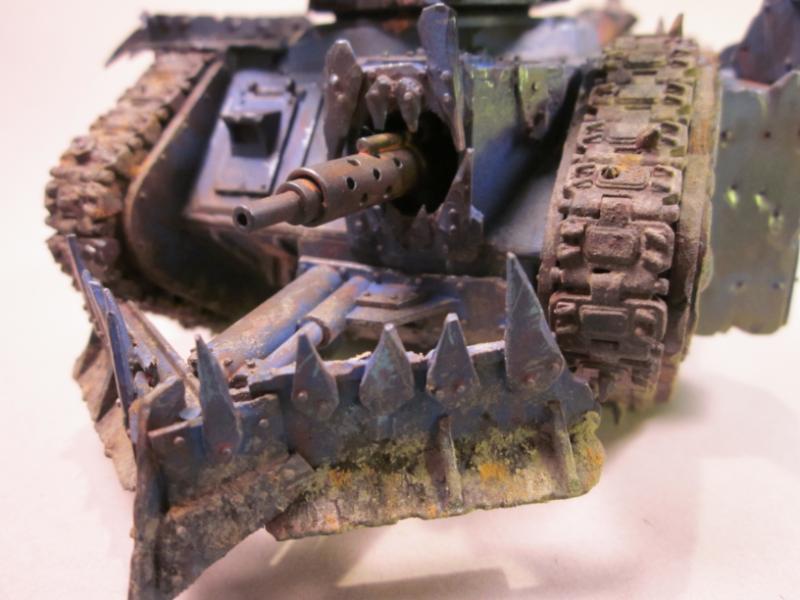
TheH2Oelement wrote:Looks very orky. the tracks could use some orkifying though.
Agreed. Are you talking about the black parts or the gray sections near the tracks (basically the sides)? I plan on adding some spikes an small tacked on plates to the black parts, the gray will get some plates, rivets and probably some glyphs as well. Any suggestions? I'd love to hear them.
16007
Post by: the damned artificer
Thanks a lot, I've been researching on the matter in over a year and I think it's finally time now. As you said, it is expensive, but compared to buying all the stuff I need for my armies (Iron wariors and my admech force with a few titans) I think I'll come out with more money and cooler armies in the end
23950
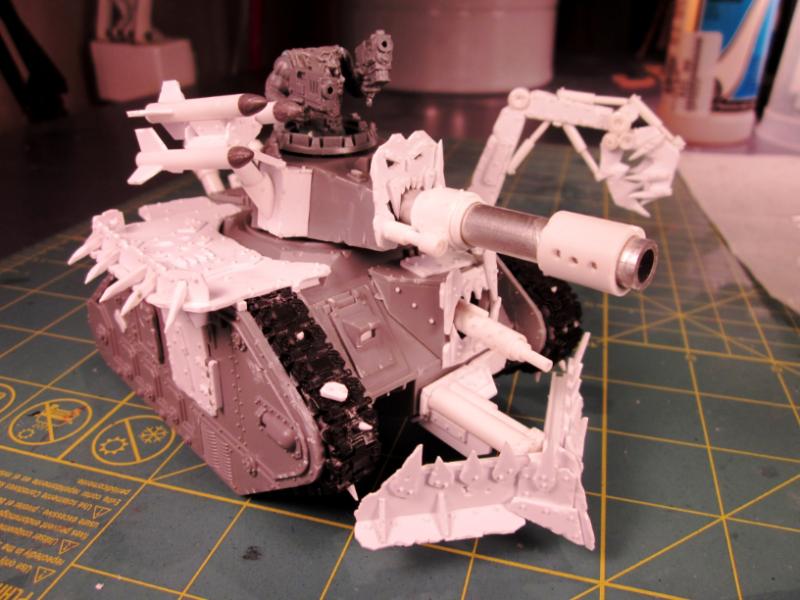
Post by: rwzimmerman
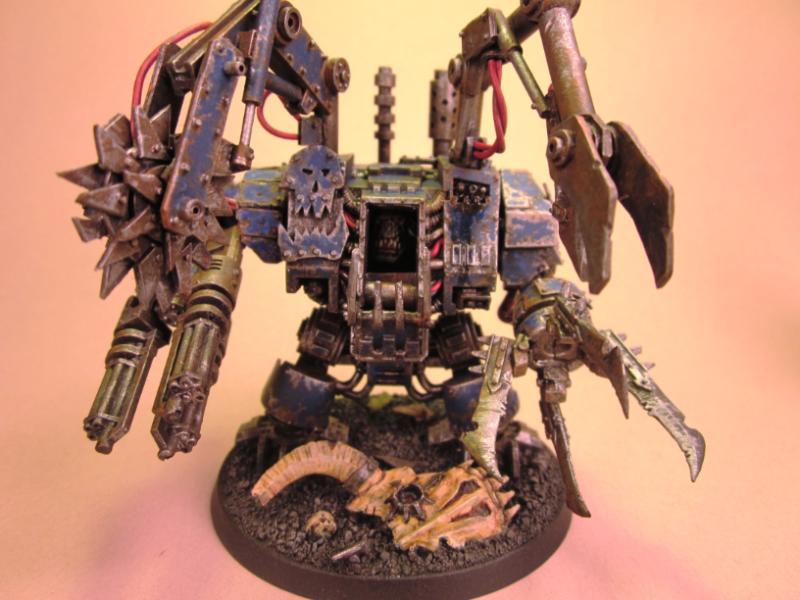
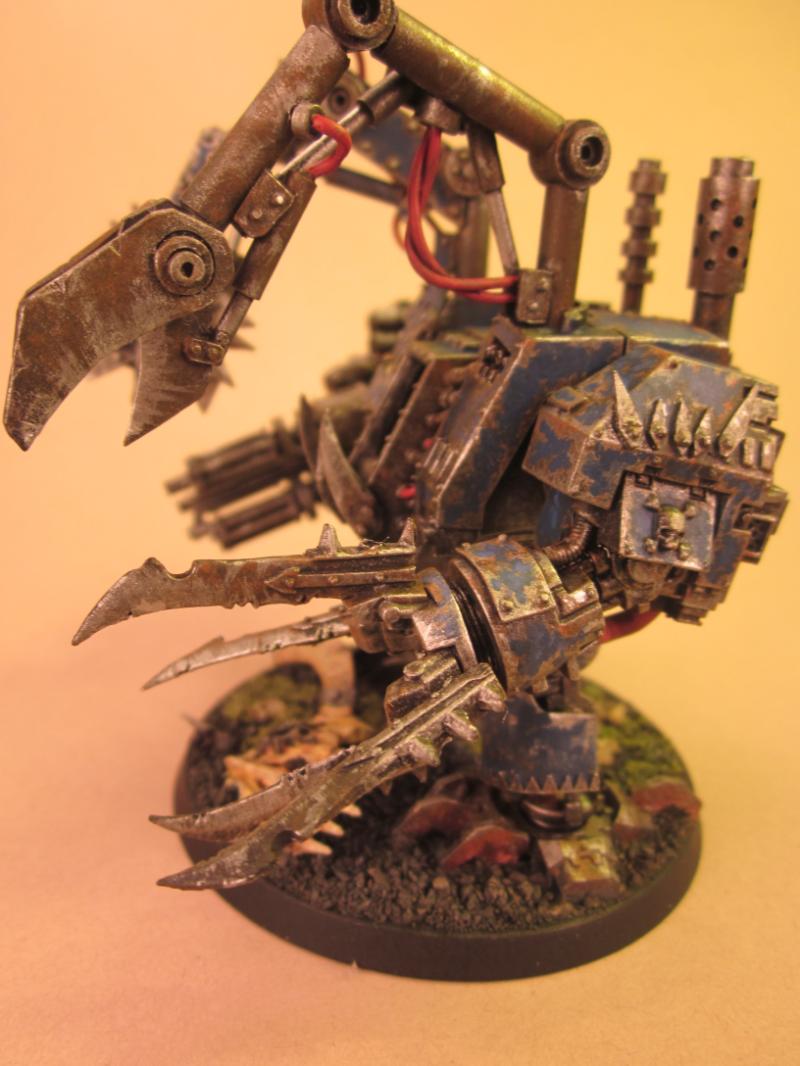
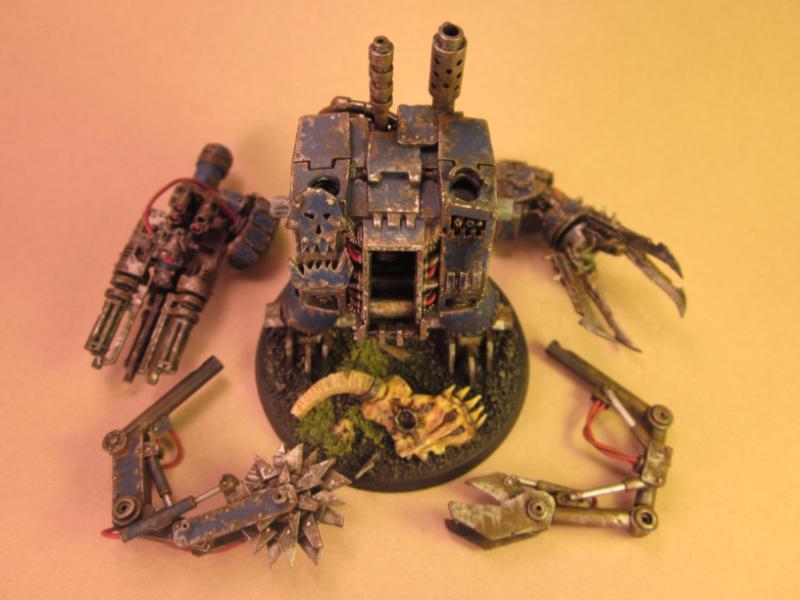
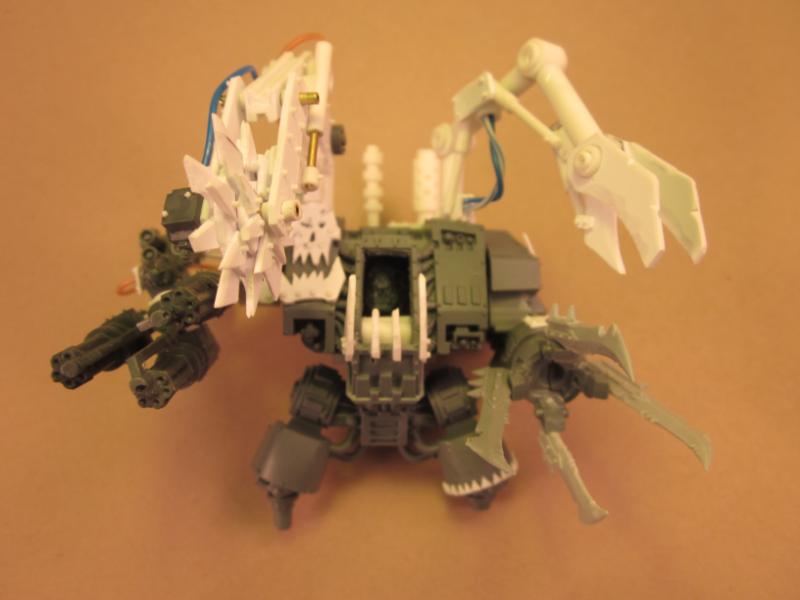
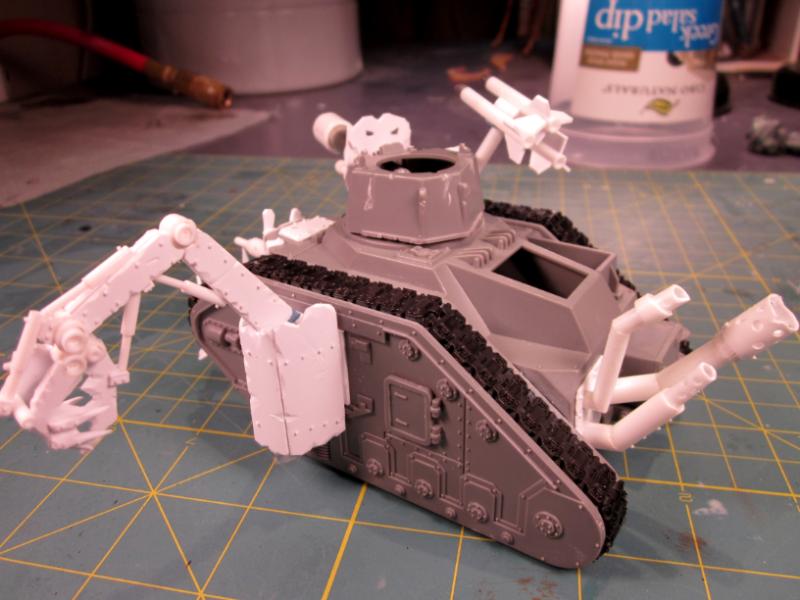
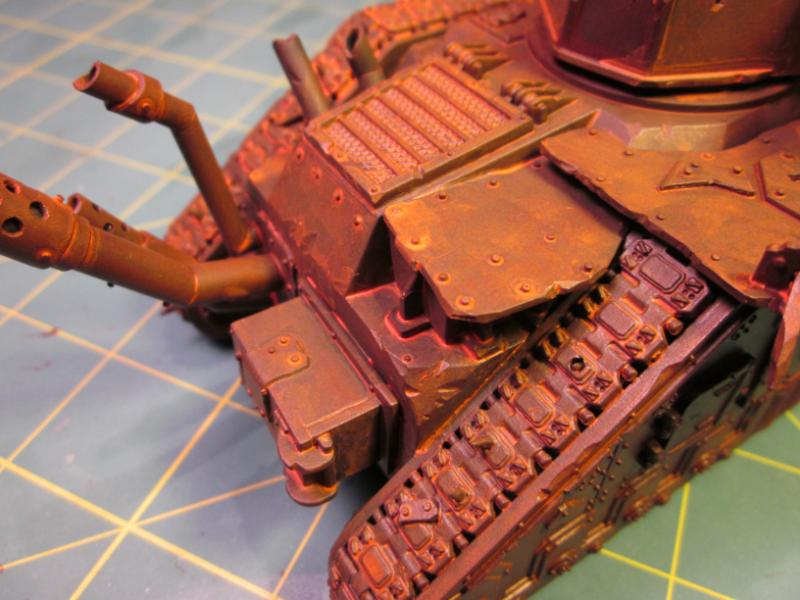
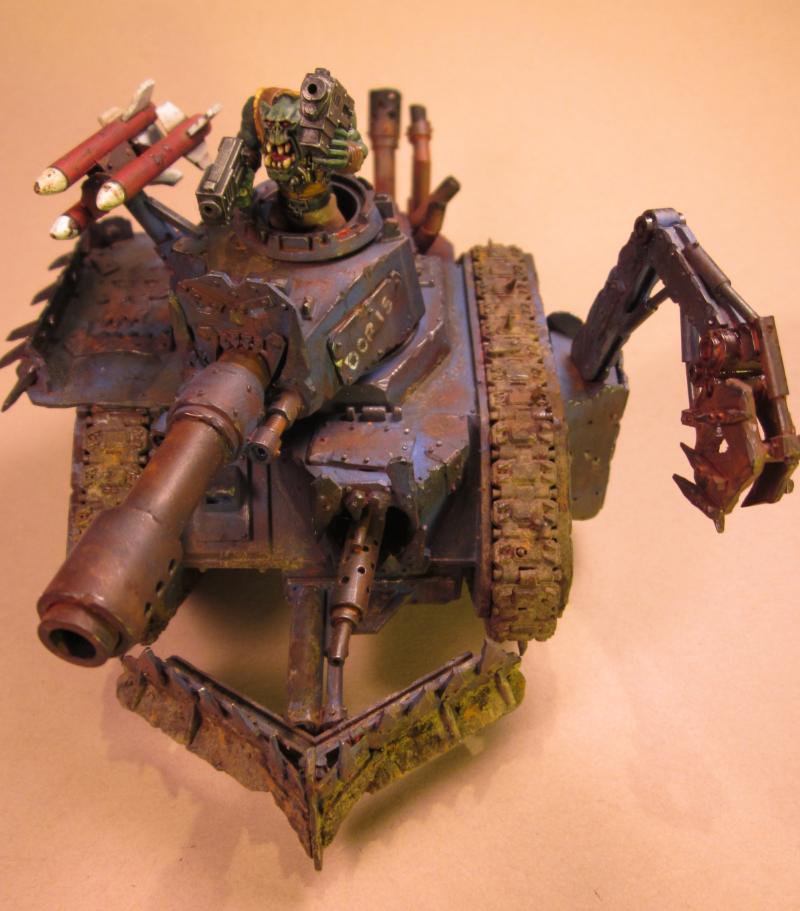
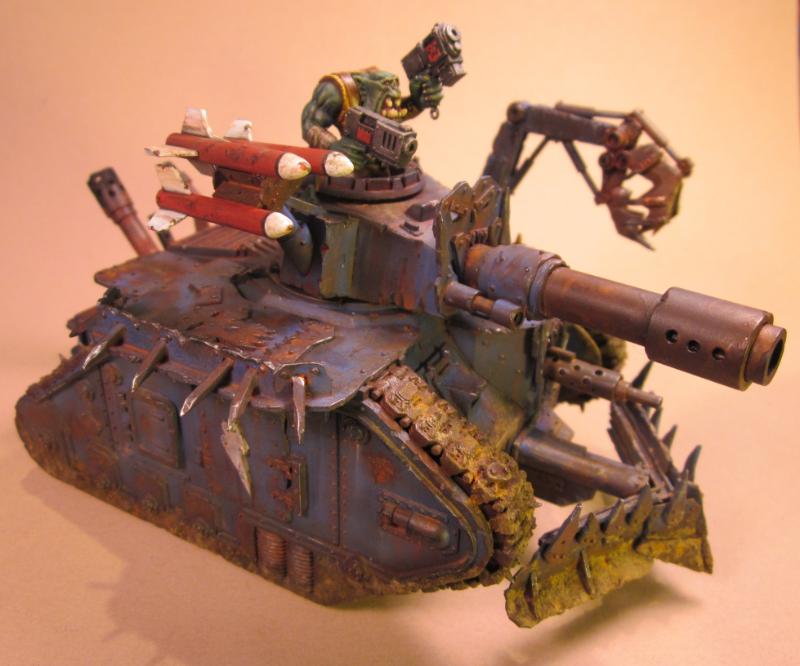
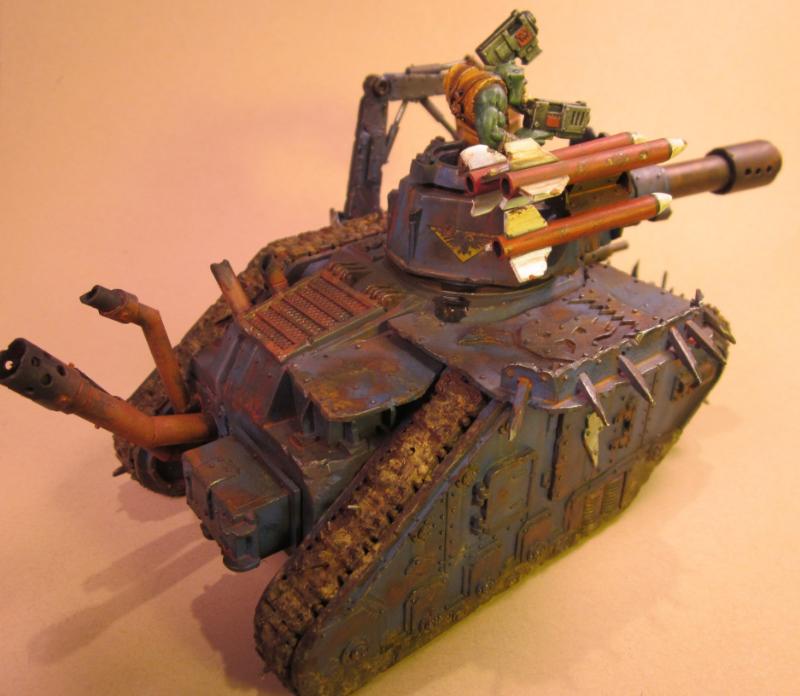
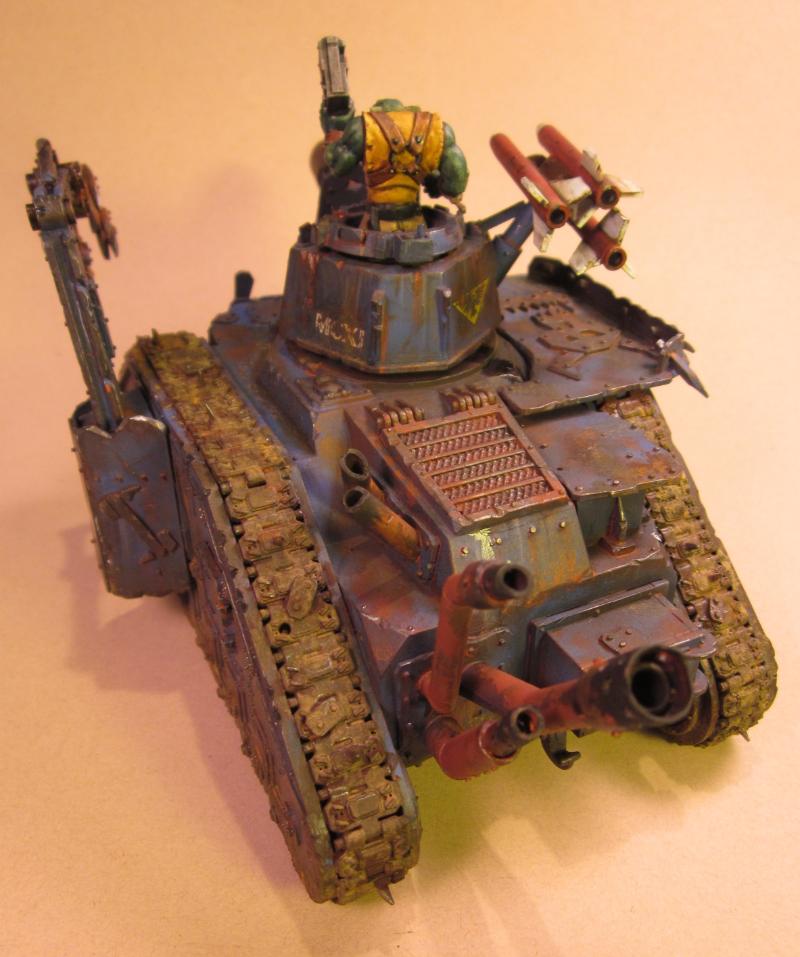
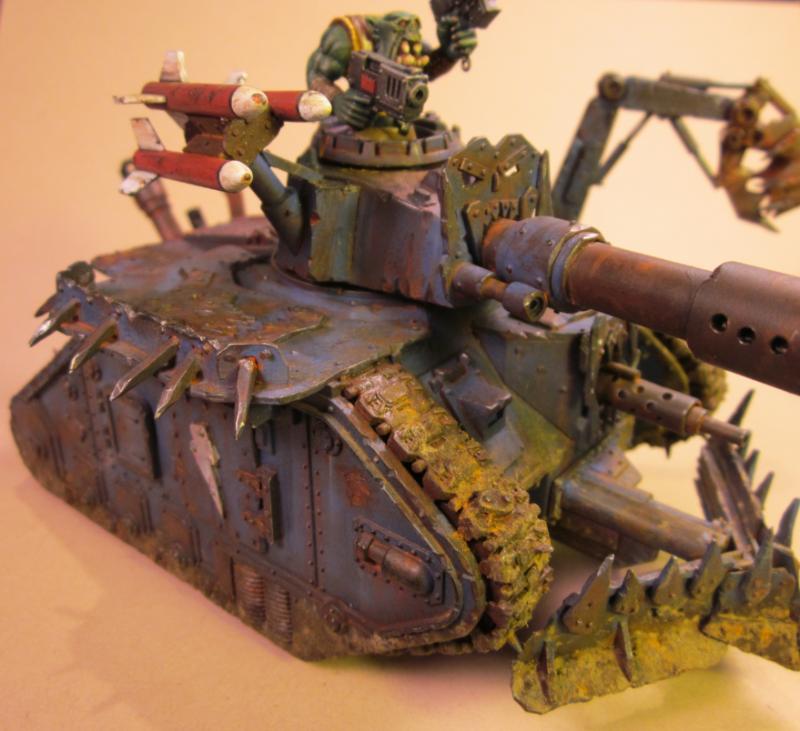
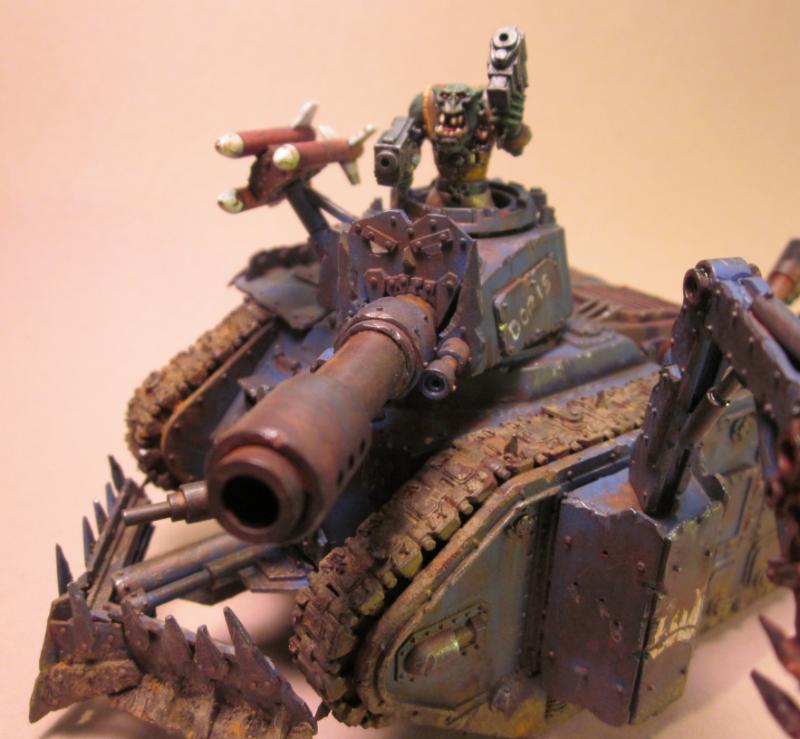
Progress.... Almost done with the build.
33919
Post by: Moltar
That looks awesome, bob. I really like the added exhaust pipes.
41001
Post by: TheH2Oelement
37519
Post by: bigfish
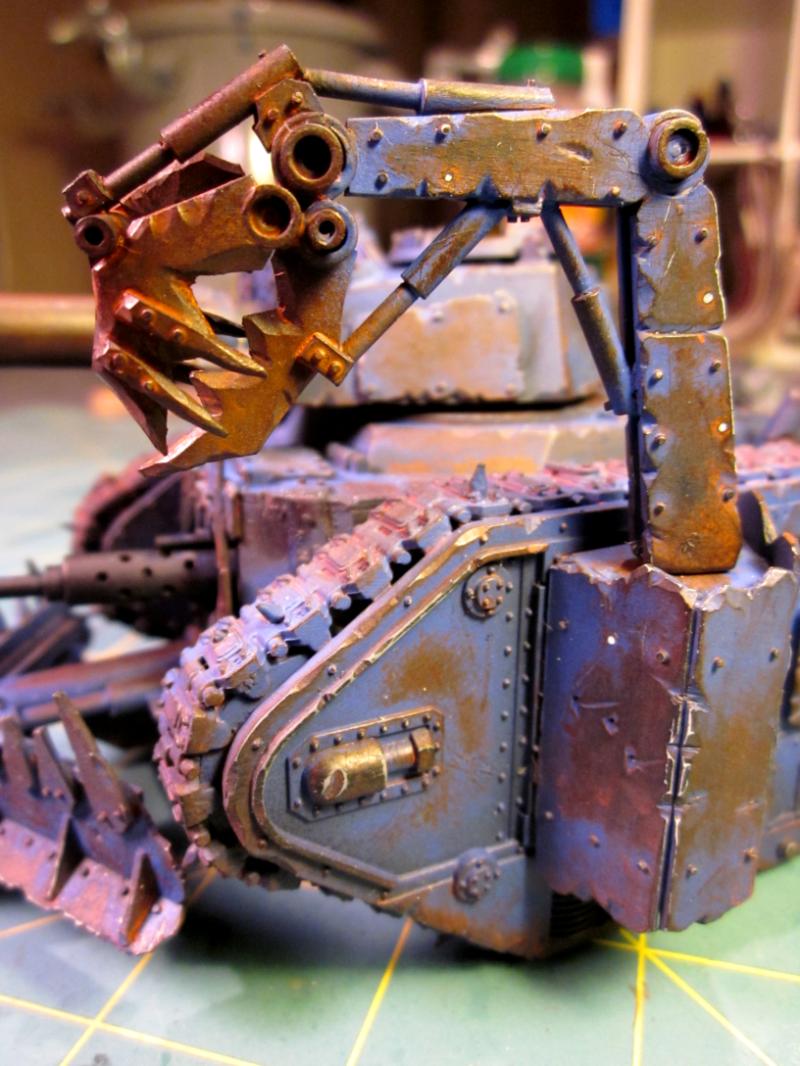
DAM your looted wagon is good. i need to get my self some plasticard. EPIC sunscribed
31470
Post by: sum1thtdiesalot
I think that is the coolest looted wagon I have ever seen. And the sheet metal idea for the display board, Genius. Cant wait to see more
14062
Post by: darkkt
This is all epic. Love the display board - how much weight does the sheet metal add?
43714
Post by: Begel Dverl
Good work on the Looted Wagon! The claw looks nice and orky!
43308
Post by: Wulfen Andy
Fantastic jobs there! Really love the ork dread!!!! 
23950
Post by: rwzimmerman
First off, thanks for the compliments and interest everyone!
darkkt wrote:This is all epic. Love the display board - how much weight does the sheet metal add?
The sheet metal is not heavy at all. I'm not a good judge of weight, but id guess a quarter pound or so. The added weight from the sheet metal is not even noticeable against the weight of the 1/2 inch partial board the base is made out of.
Since it has some interest I figured I post a pic of how the display board is coming along.
40279
Post by: prototype_X
lookin good!
23950
Post by: rwzimmerman
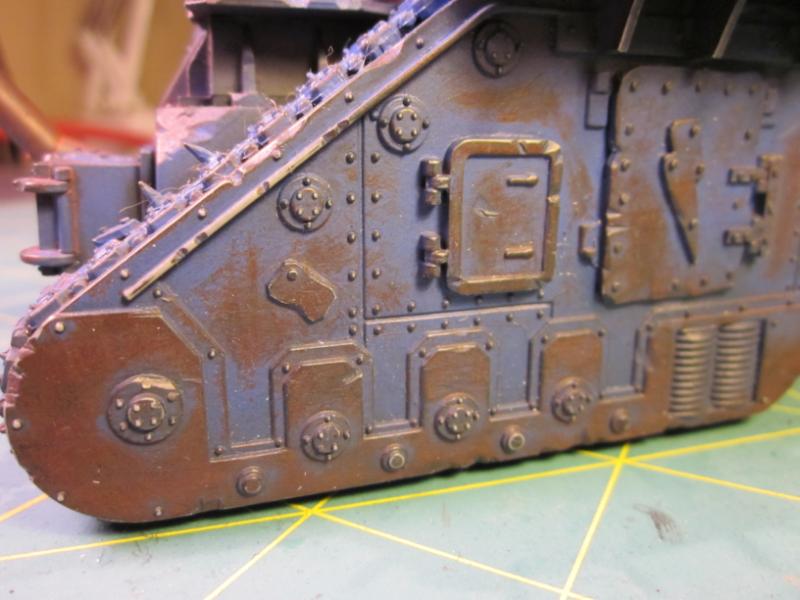
Not a lot of changes here, but the build is complete. Just got to wait for some green stuff to cure, glue the orks arms on and it time to prime.
40279
Post by: prototype_X
wowowowowowowowowowowowow thats incredible
also
DAKKA DAKKA BOOM!!!!!!!!!!!
23950
Post by: rwzimmerman
31470
Post by: sum1thtdiesalot
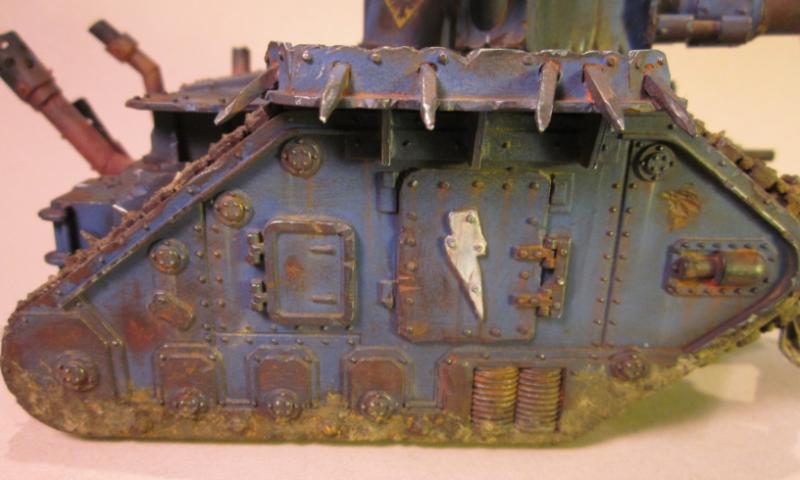
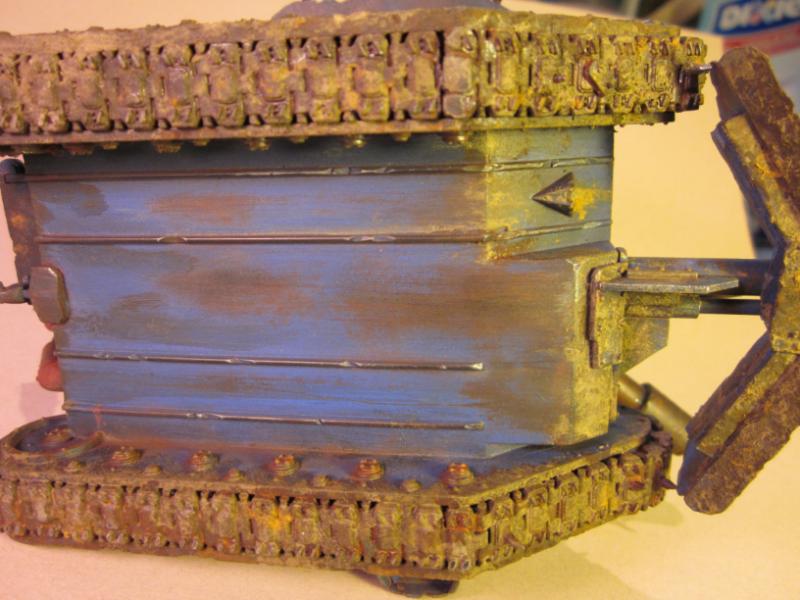
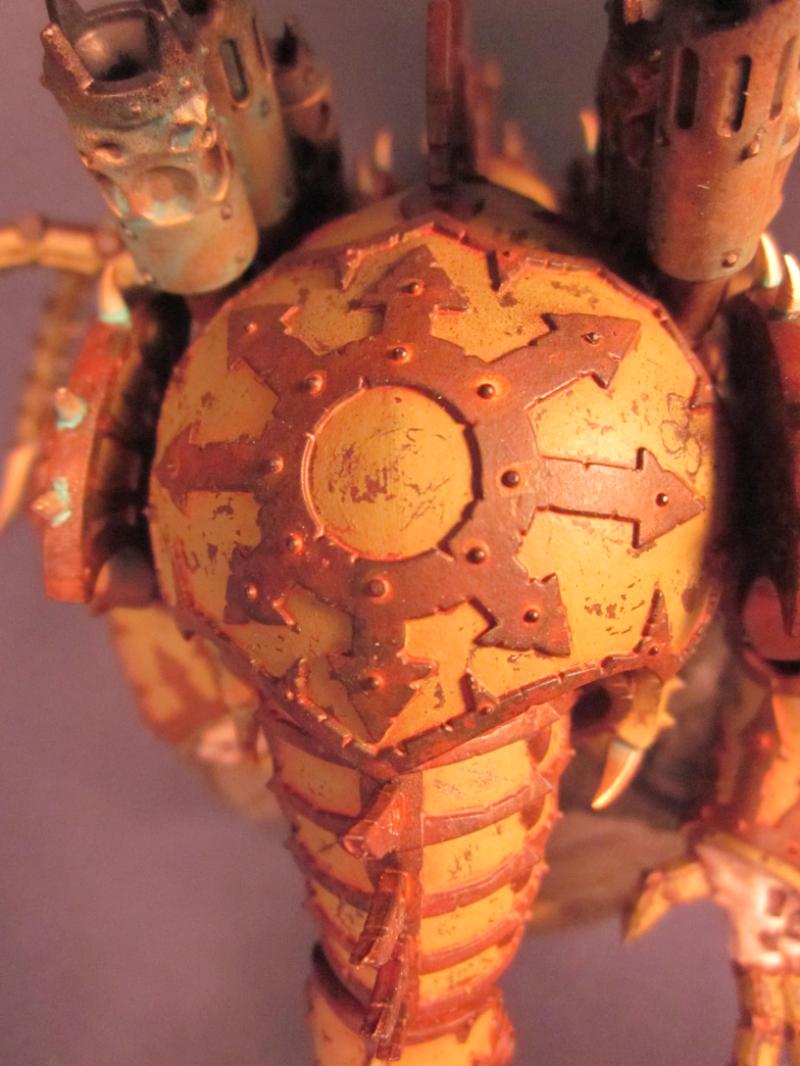
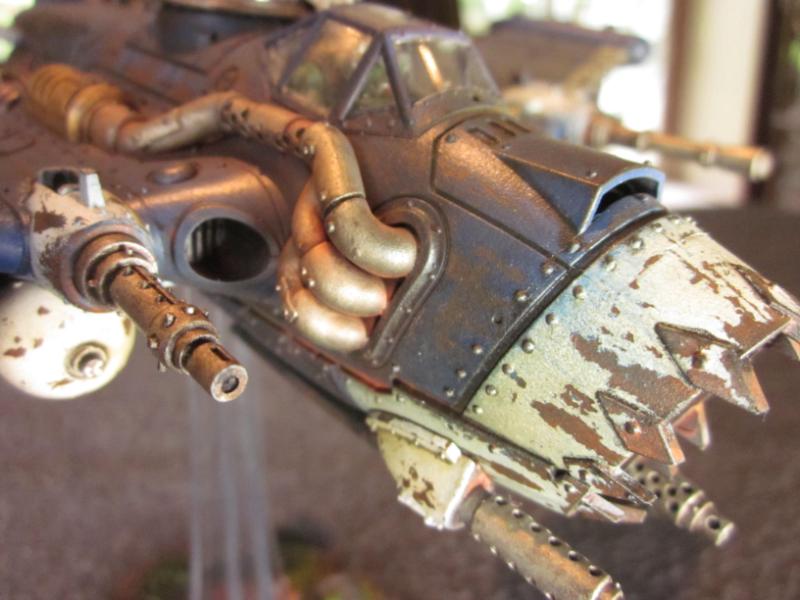
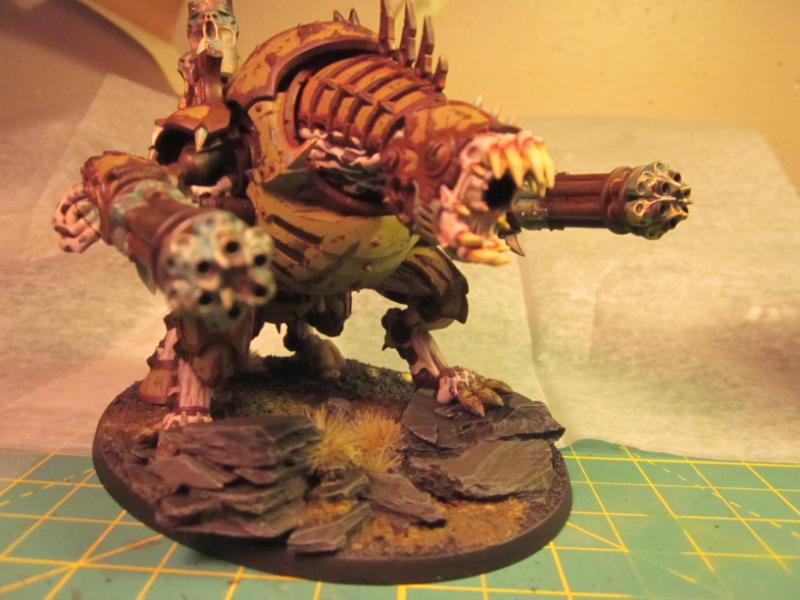
Looking great so far. Those rust effects are top notch! Any chance at sharing your secret?
23950
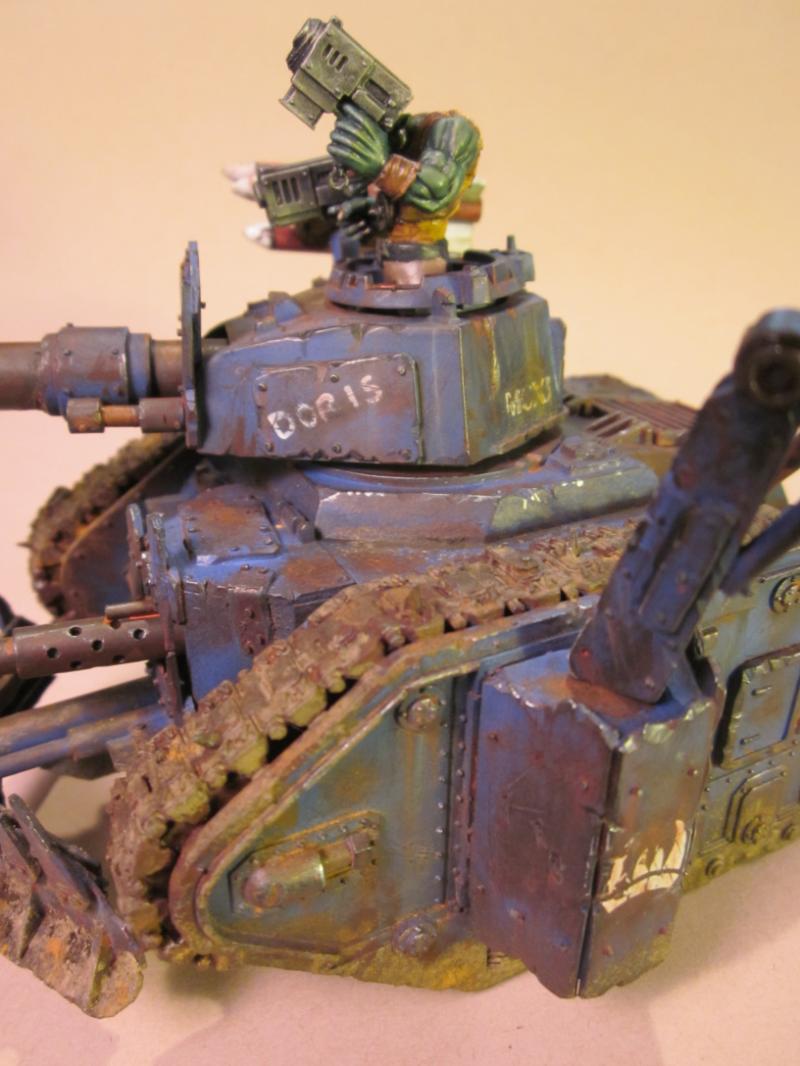
Post by: rwzimmerman
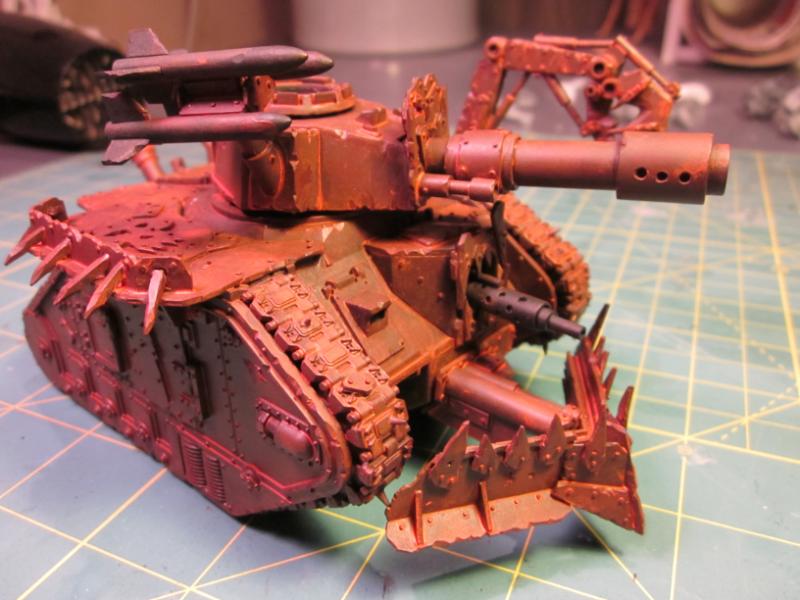
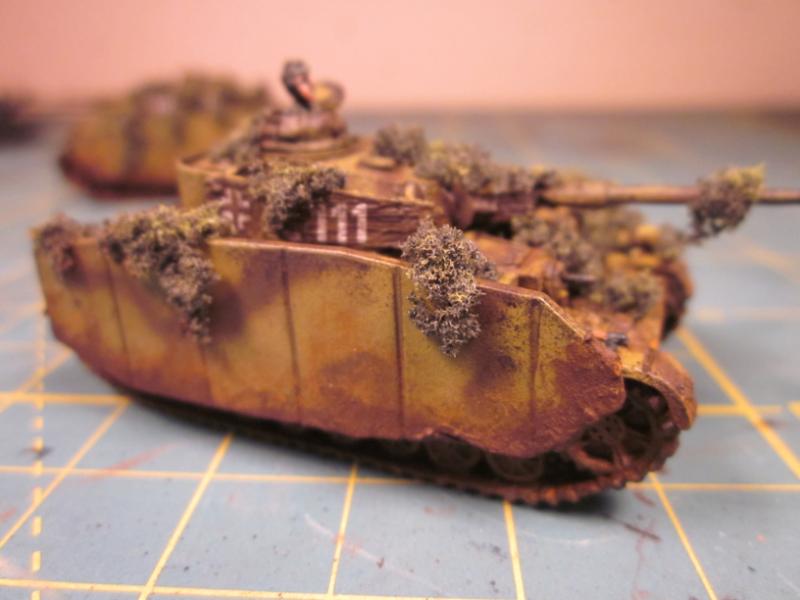
sum1thtdiesalot wrote:Looking great so far. Those rust effects are top notch! Any chance at sharing your secret?
Sure.
1. Primed the model black.
2. Dabbed on GW Scorched Brown heavily with a large junky brush; The goal here was to leave black in the deepest recesses and cover the tank with an uneven coat of scorched brown. It looked like it was covered with mud at this point.
3. A heavy wash of Tamaya Hull Red and water (1:2) with a drop of Future Floor Polish to break the surface tension.
4. Repeat step 3. The number of washes will vary I'm sure with what you think looks good. Again I tried to keep the wash uneven and random.
5. Repeated the wash process but this time I used GW iery Orange in place of Tamaya Hull Red.
6. Matte coated the model. This is to protect the rust layer and keep it from rubbing off to easily in the next few steps.
7. I airbrused the "painted" areas with GW Ultramarines Blue.
8. Shaded the darkest areas of the blue parts with a 1:1 mix of GW Ultramarines Blue and Black. I didn't spend much time on this, the real shading will come later, so I don't know if this was really necessary, but this is an experiment.
9. I sprayed the model with stainless steal cleaner (any sort of nasty caustic cleaner would work like oven cleaner, grout cleaner, etc). This softened up the paint.
10. I used a variety of tools (needles, wire brushes, steel wool, etc) to scrub off the blue exposing the rust. This is a VERY messy process. There was cleaner and bits of steel wool all over my cutting mat.
11. Rinsed the model in lots of warm running water.
This is my first attempt at this technique, I'm pretty happy with the results.
Automatically Appended Next Post: P.S. Like I said this is my first attempt at this technique so if anyone has any tips or ideas to made it easier or better, I'd love to hear them.
31470
Post by: sum1thtdiesalot
Well that is certainly different than what i was expecting. Lol. If I ever get to actually painting my orks i will give that a try. Thanks!
41001
Post by: TheH2Oelement
Looking really nice. Cant wait to see it finished
23950
Post by: rwzimmerman
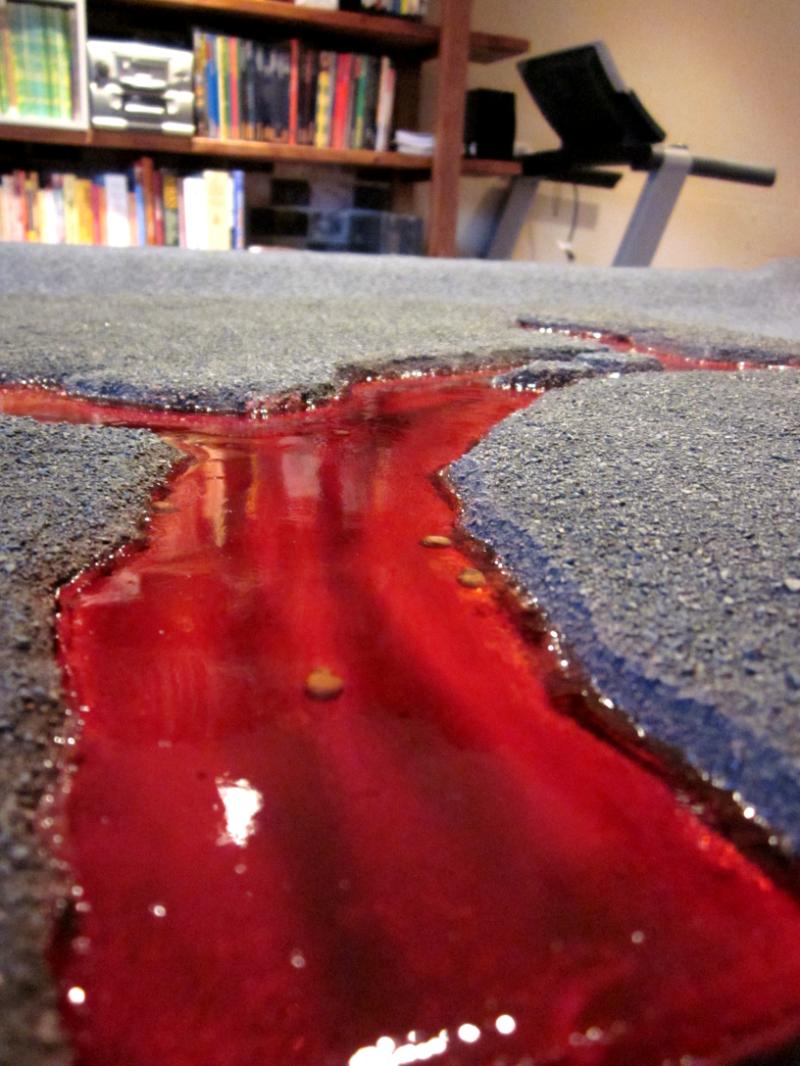
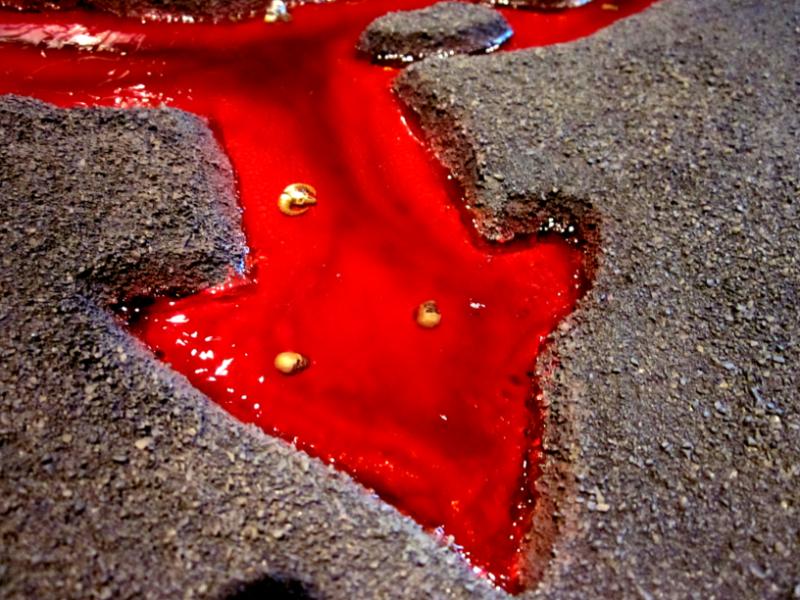
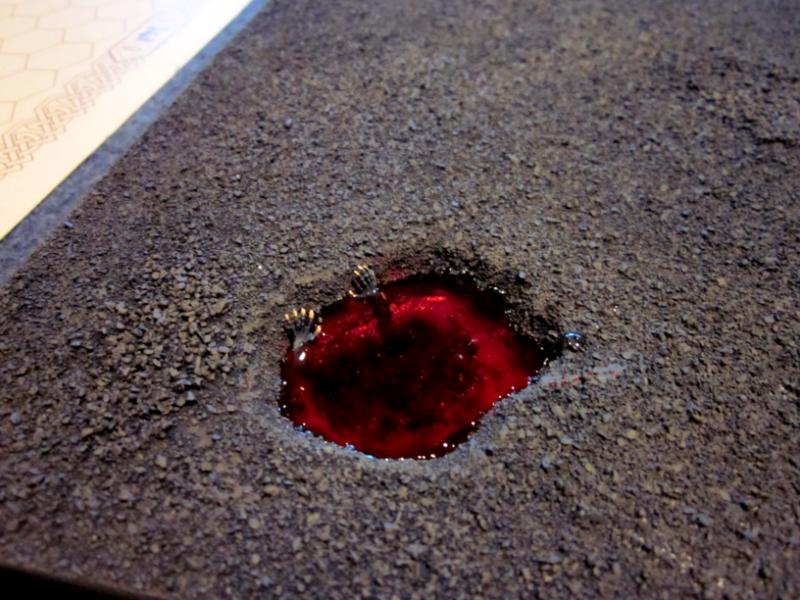
The display board is finished. I originally wanted to makes something grand with multiple levels, piles of skulls, spikes, bodies, etc... They I though I don't want to store that! So I settles on a very flat design. The "water" came out a bit more like jello than I'd like, but I'm leaving it for now, since I need it next weekend. After that I may experiment with covering water with a congealed blood effect.
This pick is a little darker than real life.
The yellowish bits are skulls.
More skulls.
Ghoul Arms
37519
Post by: bigfish
very very nice indeed (nice in a chaosy way)
and tbh the blood looks thick and gloopy which i like.
19650
Post by: shingouki
Mate you rock.
23950
Post by: rwzimmerman
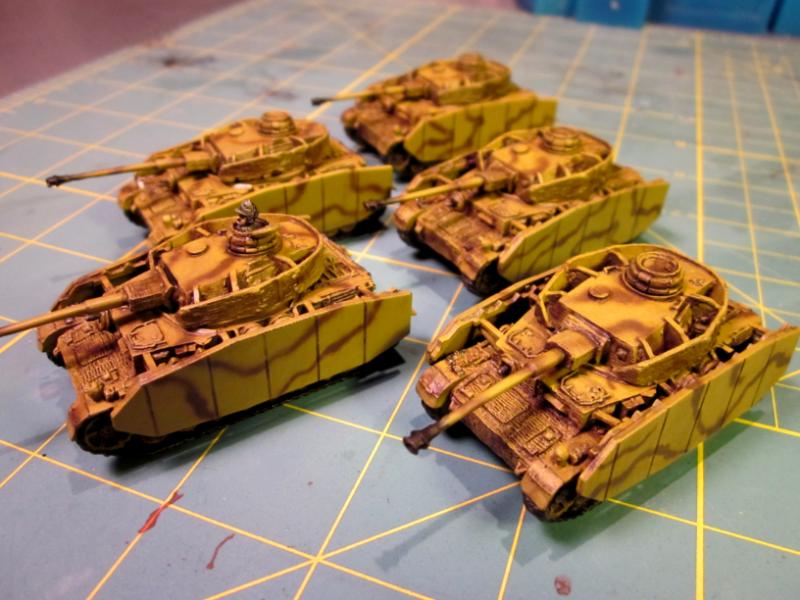
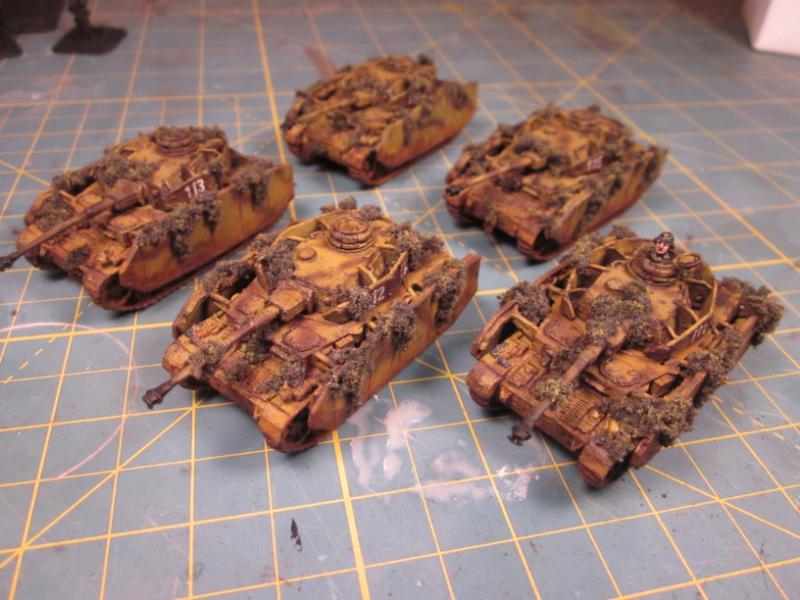
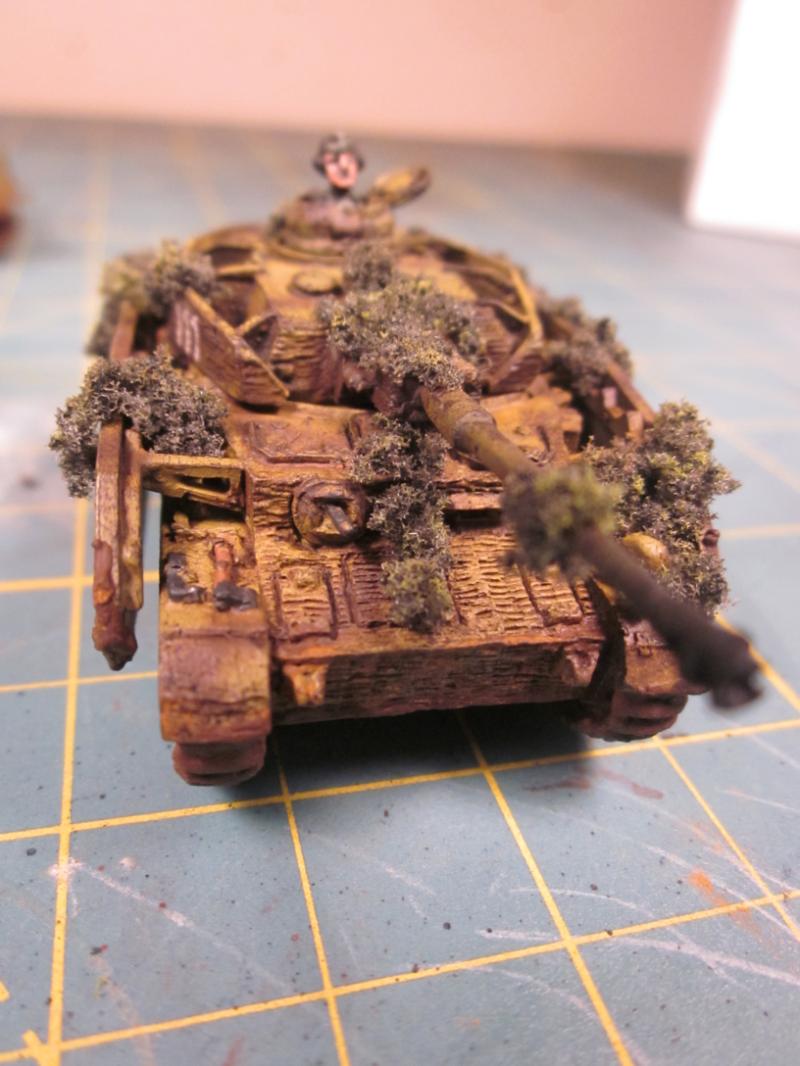
My latest project: some Flames of War German Panzer IV H tanks. I've got 9 done now. Three more and I'll have 1 command platoon and 2 combat platoons.

45385
Post by: Tim 121RVC
I love the swamp bases and the chaos display board!
23950
Post by: rwzimmerman
37519
Post by: bigfish
puts my looted wagon to shame mate, very nice
31470
Post by: sum1thtdiesalot
bigfish wrote:puts my looted wagon to shame mate
Mine too. Lol. Looks great all painted up. You should join the ork vehicle buildin contest. You have certainly got the skills to make one sweet vehicle
http://www.dakkadakka.com/dakkaforum/posts/list/381018.page
23950
Post by: rwzimmerman
Thanks to both of you, and I'll check out the contest.
26139
Post by: Skalk Bloodaxe
That Looted Wagon is right up there w/ some of the better ones I have seen. It's the attention to detail that really caught me, like the spikes and rivited patches on the treads, the minor chips in the original paint here and there... very well done.
I need to go back through and check out the rest of your thread, I saw the river of blood and have to check that out but had to post this first. Stunning work, very well done.
23950
Post by: rwzimmerman
33919
Post by: Moltar
Glad to see you back, Bob! Those plaguemarines are looking good, dude. Now slap some paint on them.
23950
Post by: rwzimmerman
33159
Post by: tipios
Nice!! Where's the head from??
23950
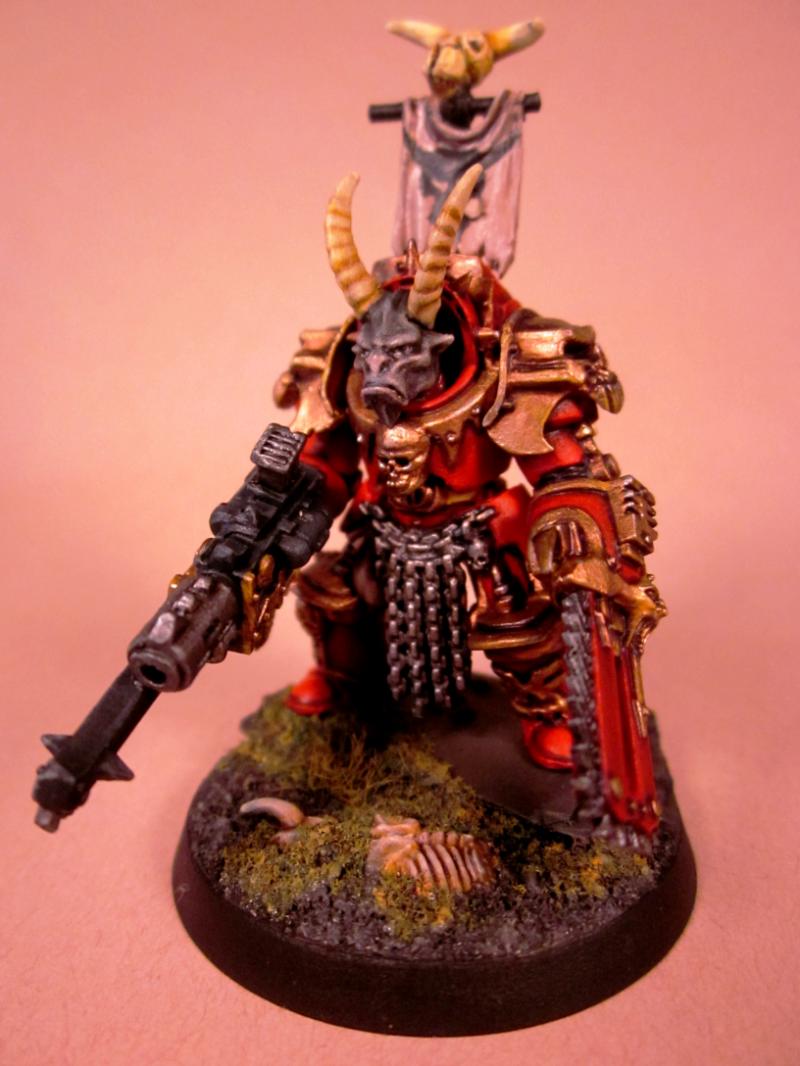
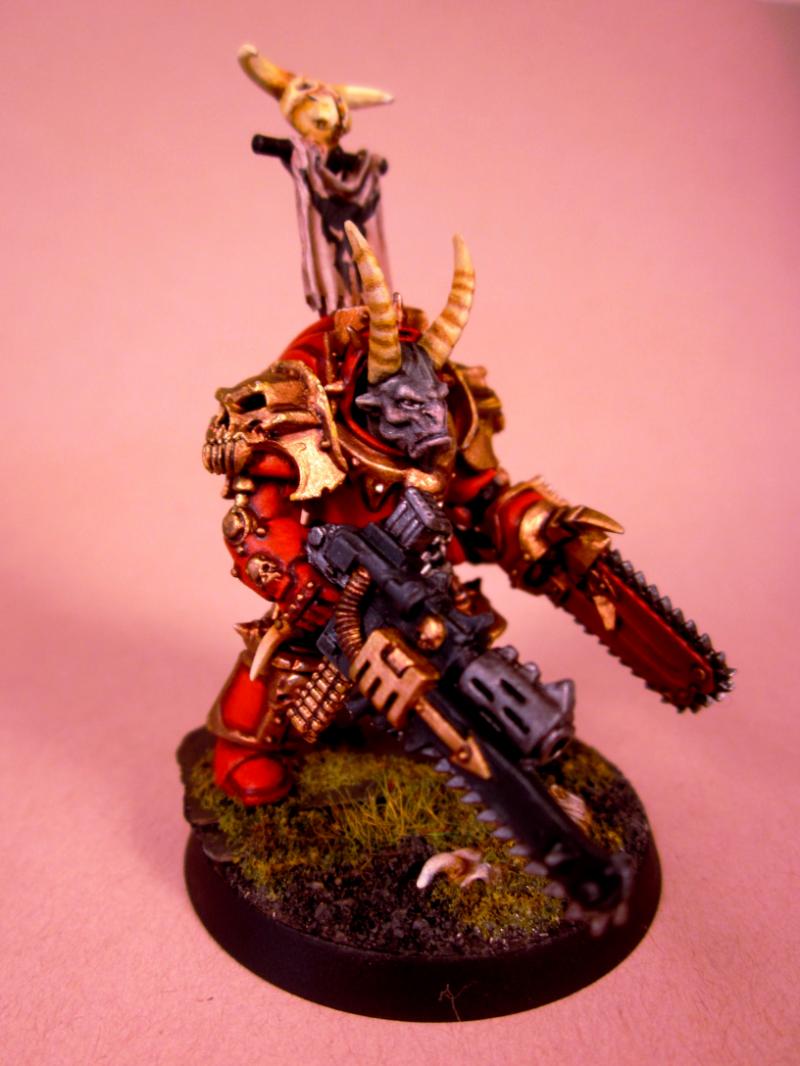
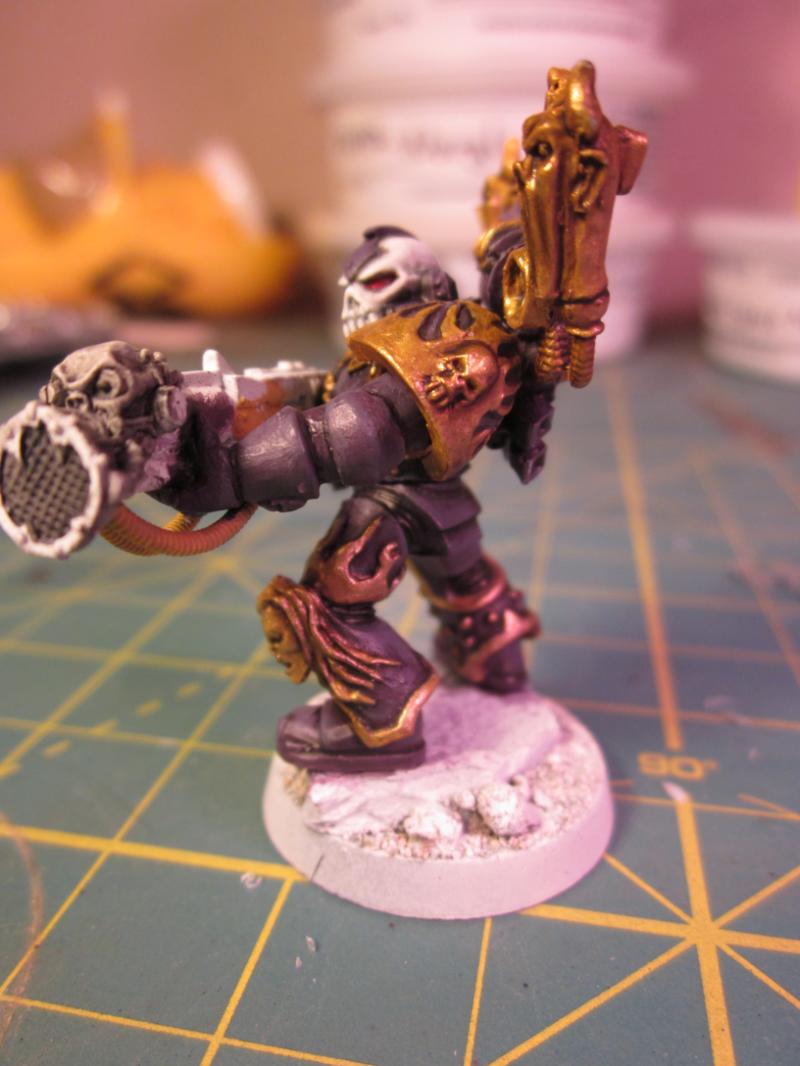
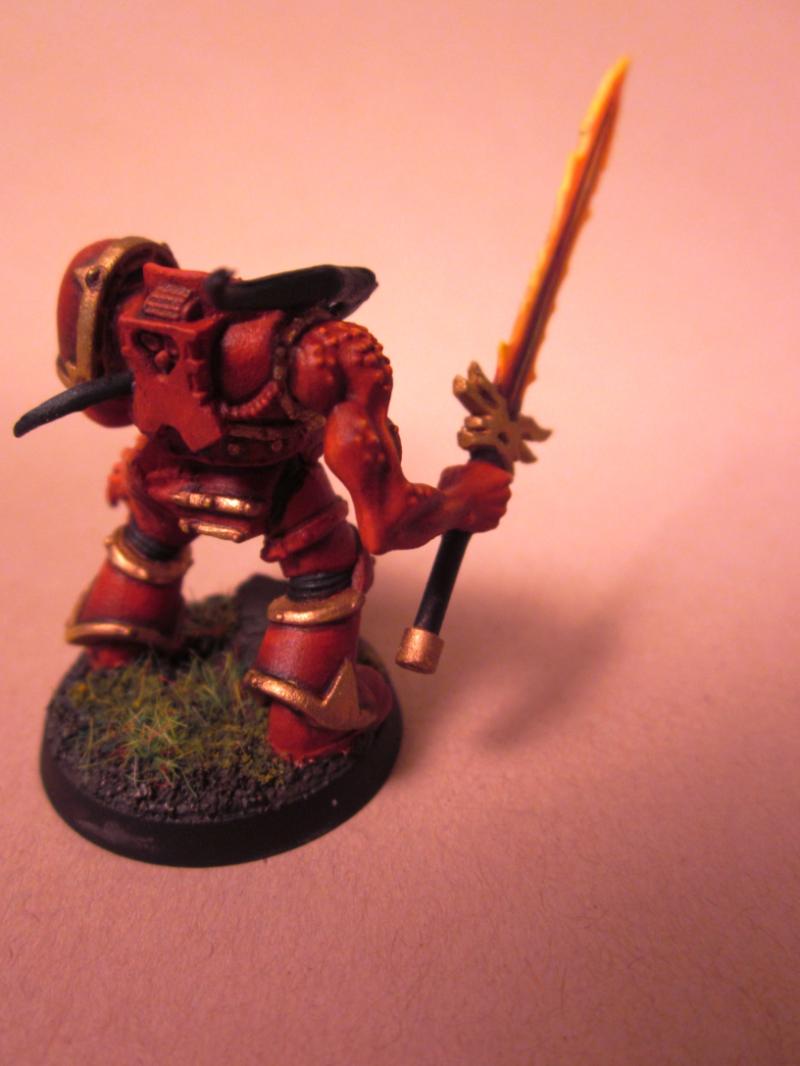
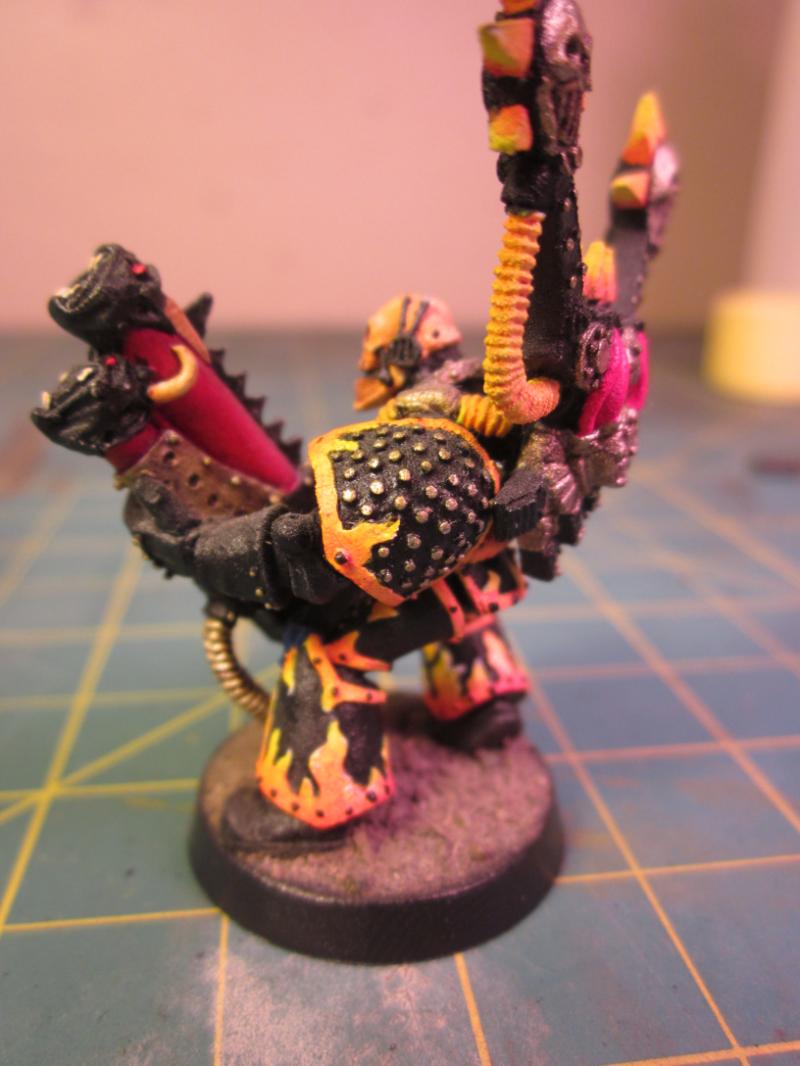
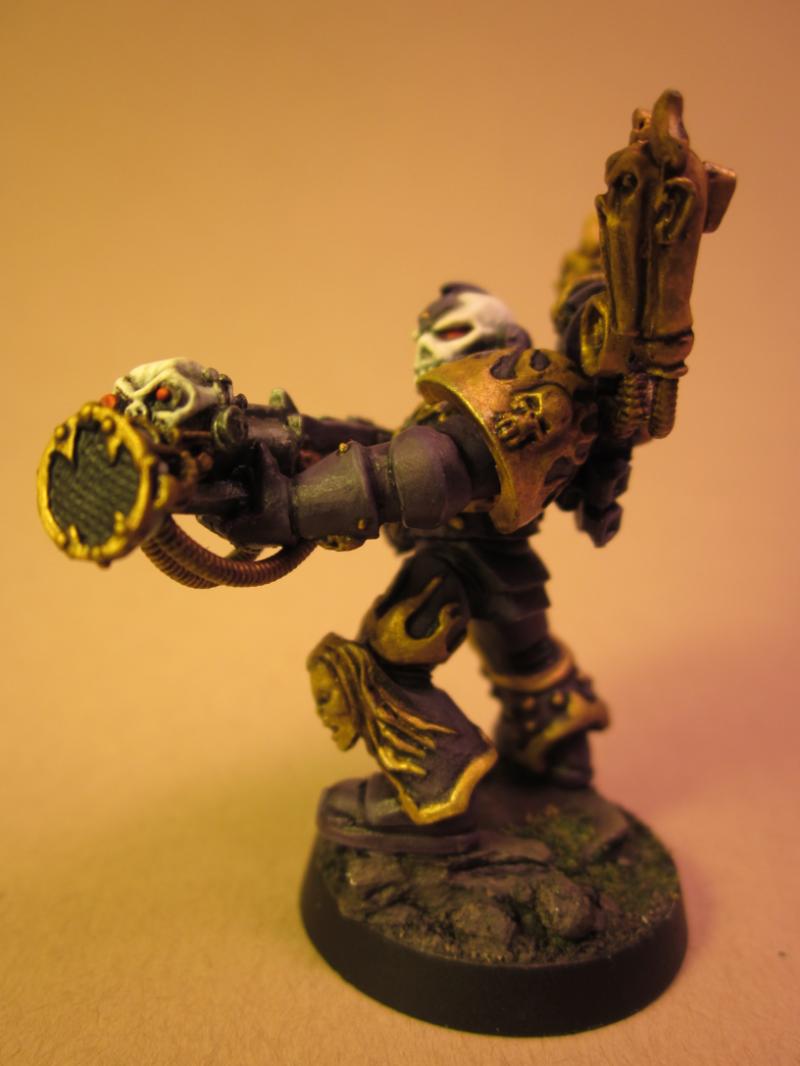
Post by: rwzimmerman
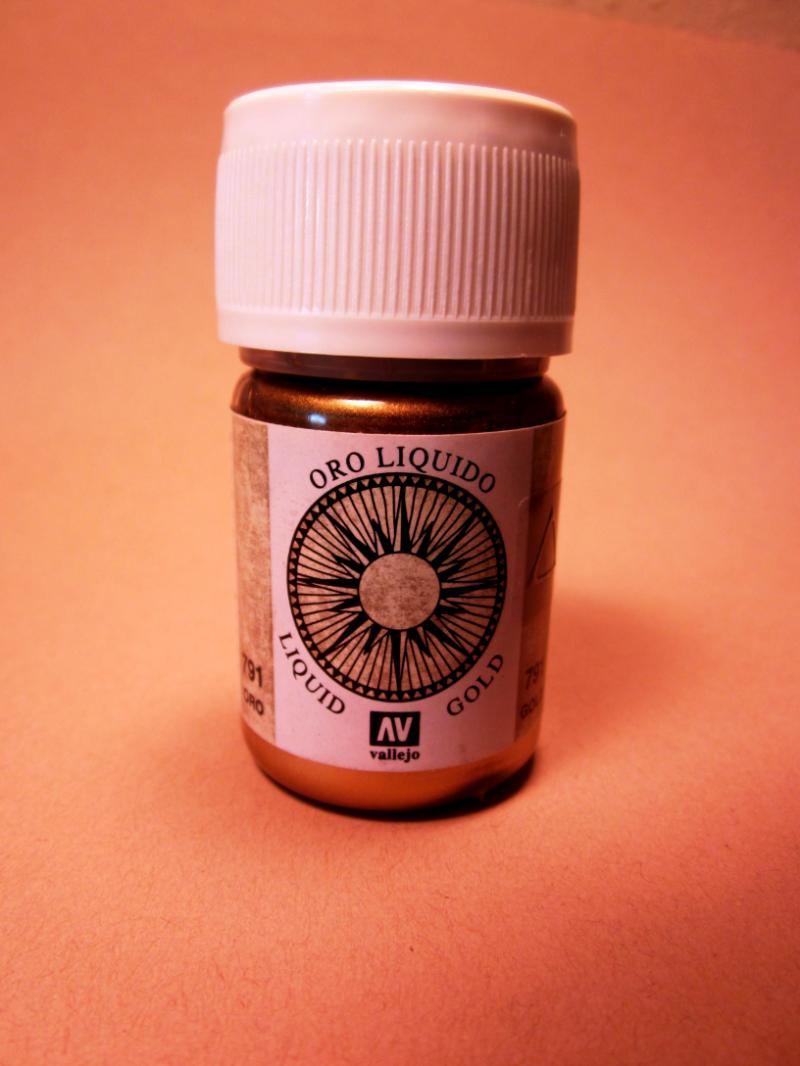
I tried a new paint on the Khorne Berserker above, from the Vallejo - Liquid Gold series. The grain size is extremely small, giving a very smooth look on the metallic parts. I don't know if I'd recommend it though. I've found it difficult to work with. It's alcohol based so it dries out very fast and the pigment doesn't stay suspend very long, you can watch it settle. To keep it from drying so fast I started keeping a jar of water in the fridge. When I'm ready to paint I add some ice, flip it over and use the depression in the bottom of the jar as a pallet. It helps, but still dries out a lot faster than acrylic paint. I also need to load my brush from the bottom of the "pallet" so it will pick up pigment. The brush gets crusty as well since the paint dries so fast. Sometimes I think the finish is worth all the hassle other times... I've only used the paint in the last month or so, so all of my experience with it is in the summer. I might do much better in a few months. I'm curious if anyone else has tried this paint and what they think of it or have any tips.
 Automatically Appended Next Post: Automatically Appended Next Post: tipios wrote:Nice!! Where's the head from??
That is a Fantasy Gor head with the horns modified to point up instead of back.
17244
Post by: The Good Green
Oh geez! THose chaos conversions and dark mechanicus style conversions are painfully awesome. The demon heads morphing out of the other heads and armour are fantastic and the GS work is magic, even without paint. Great work!
I think the Oblit. #2 is my favorite our of the lot, but those appearing demon heads are epic in their own right.
23950
Post by: rwzimmerman
The Good Green wrote:Oh geez! THose chaos conversions and dark mechanicus style conversions are painfully awesome. The demon heads morphing out of the other heads and armour are fantastic and the GS work is magic, even without paint. Great work!
I think the Oblit. #2 is my favorite our of the lot, but those appearing demon heads are epic in their own right.
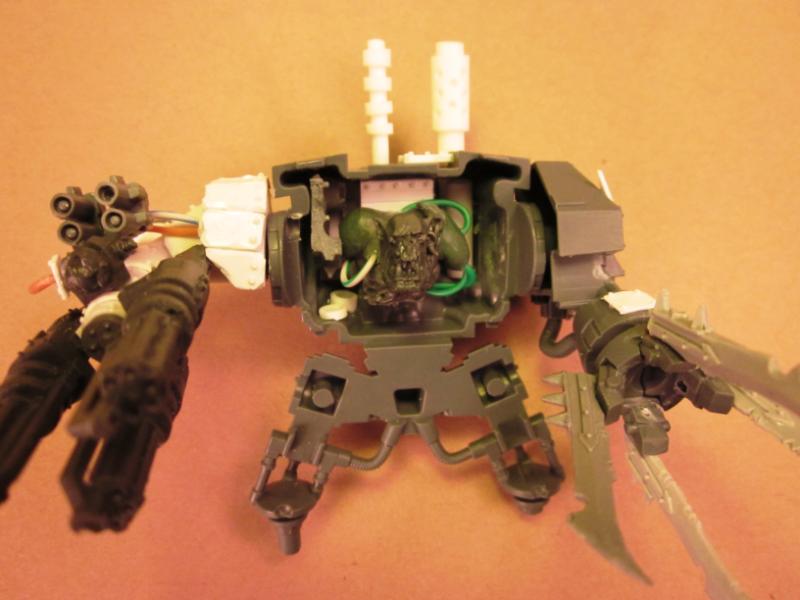
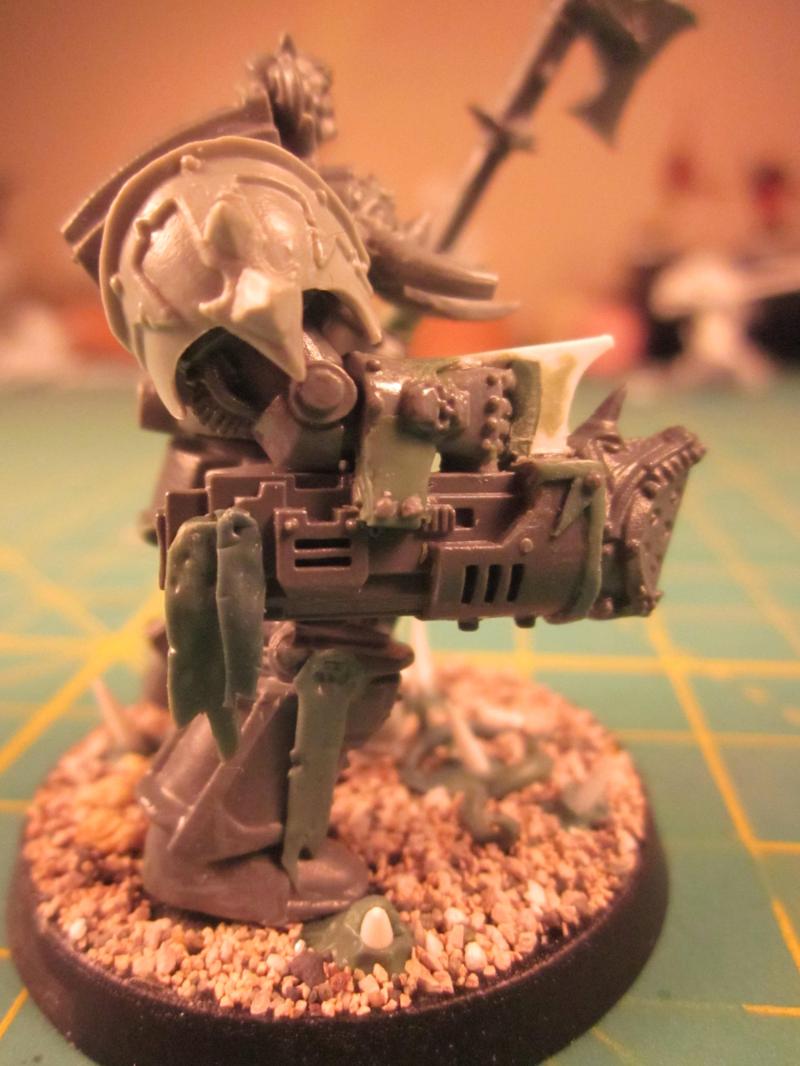
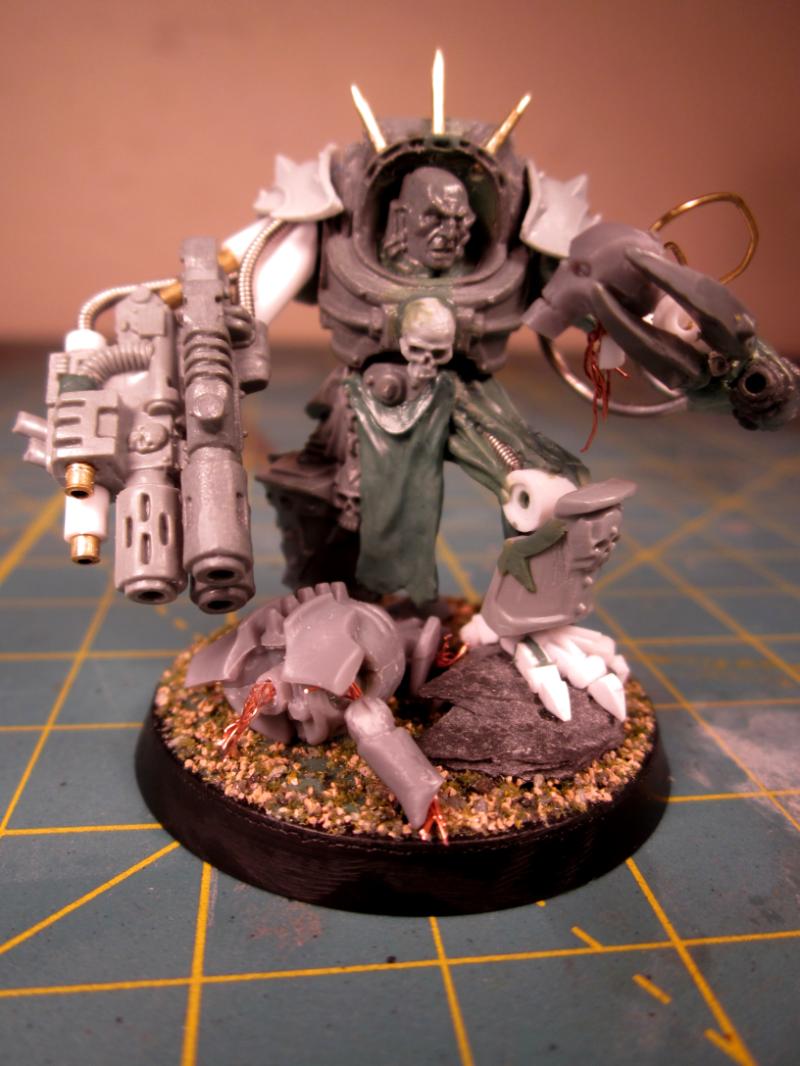
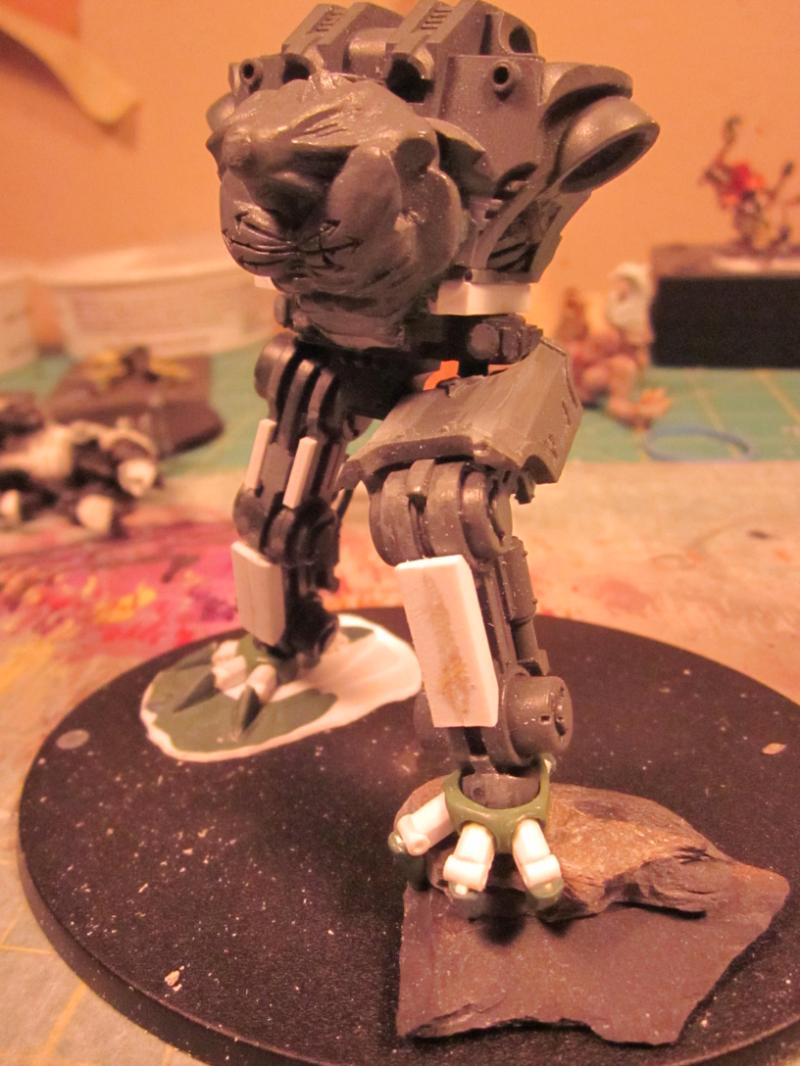
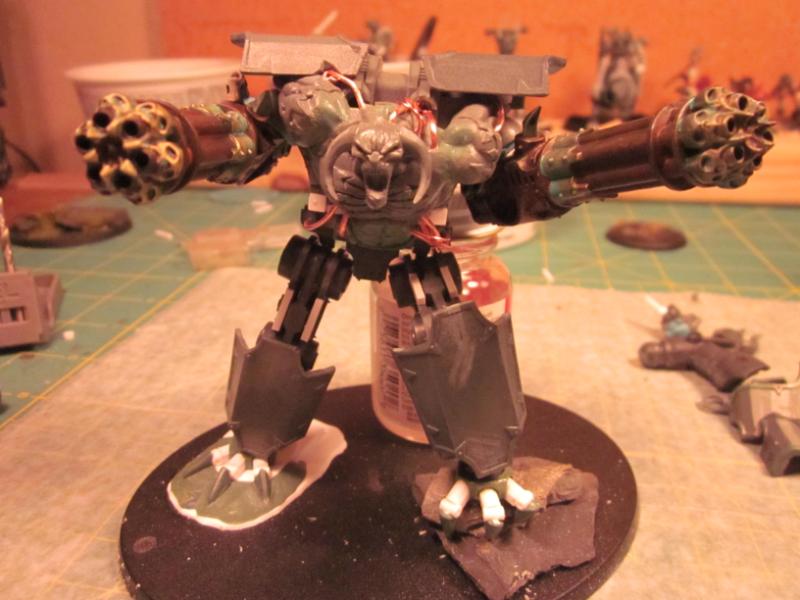
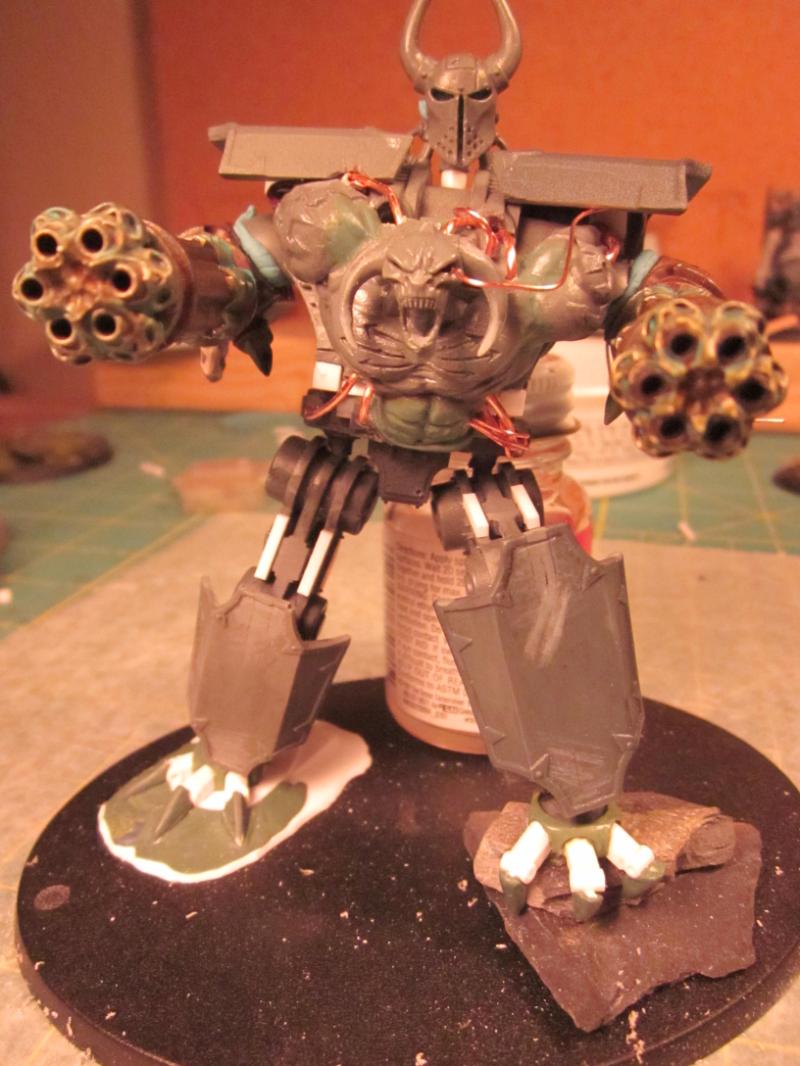
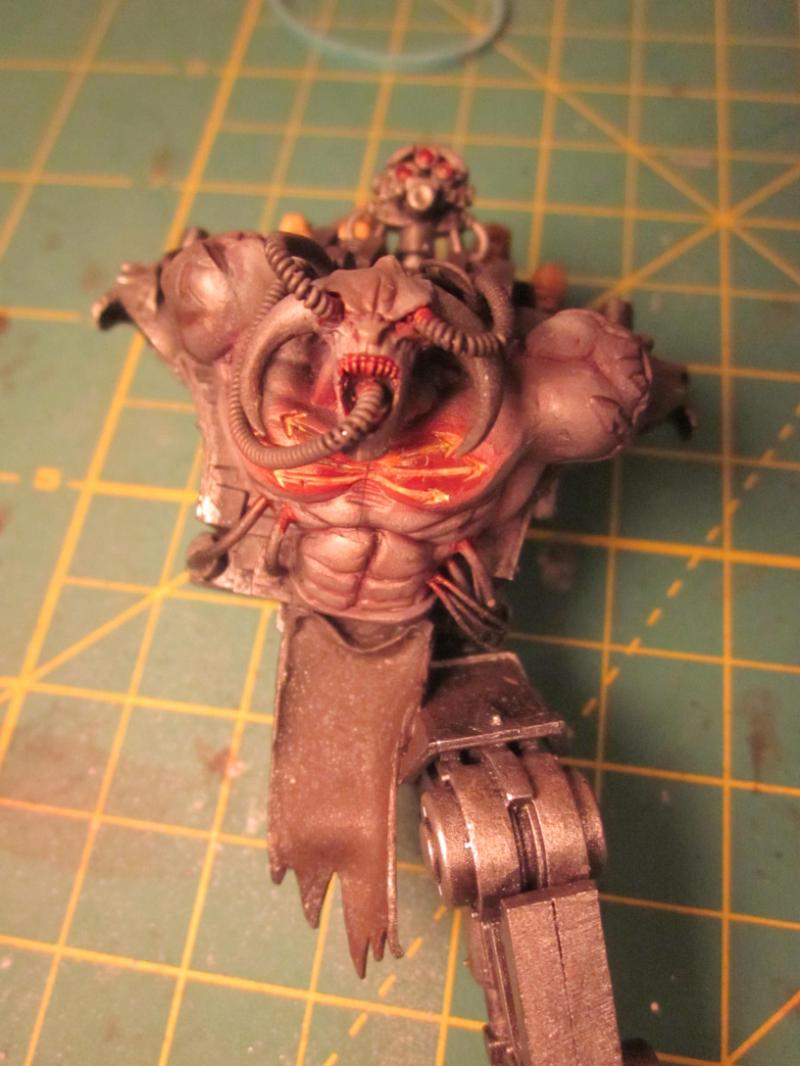
Thanks. Here's another Oblit WIP.
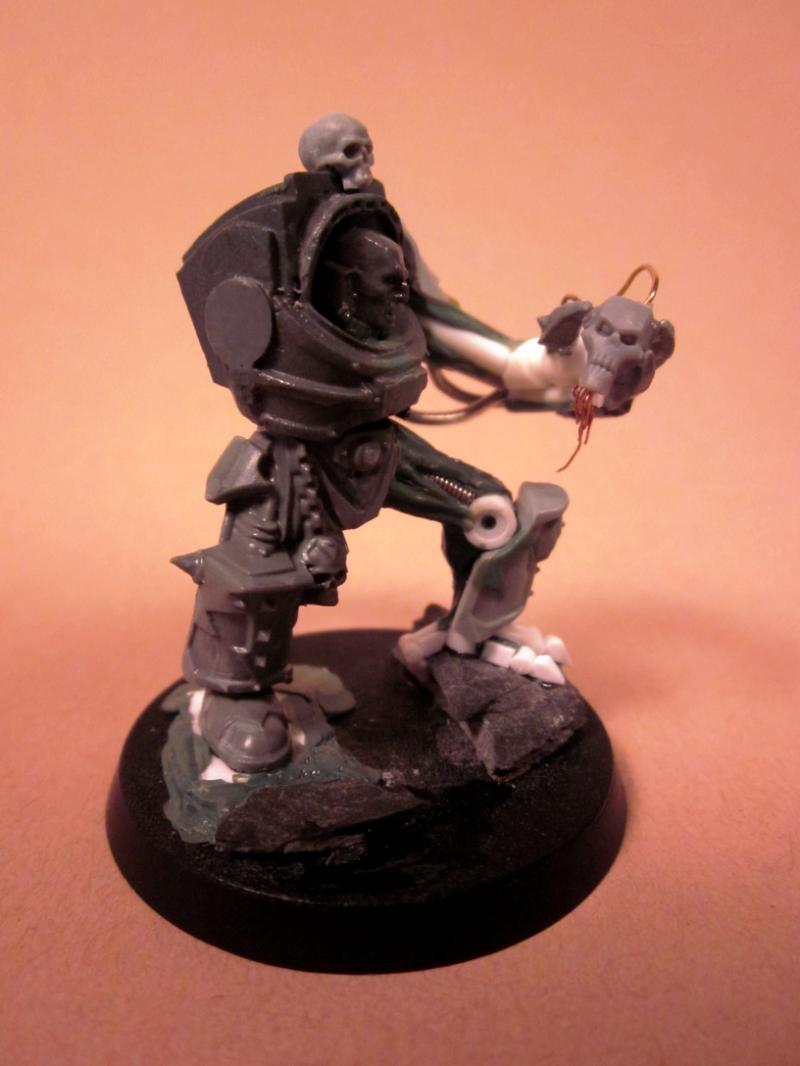
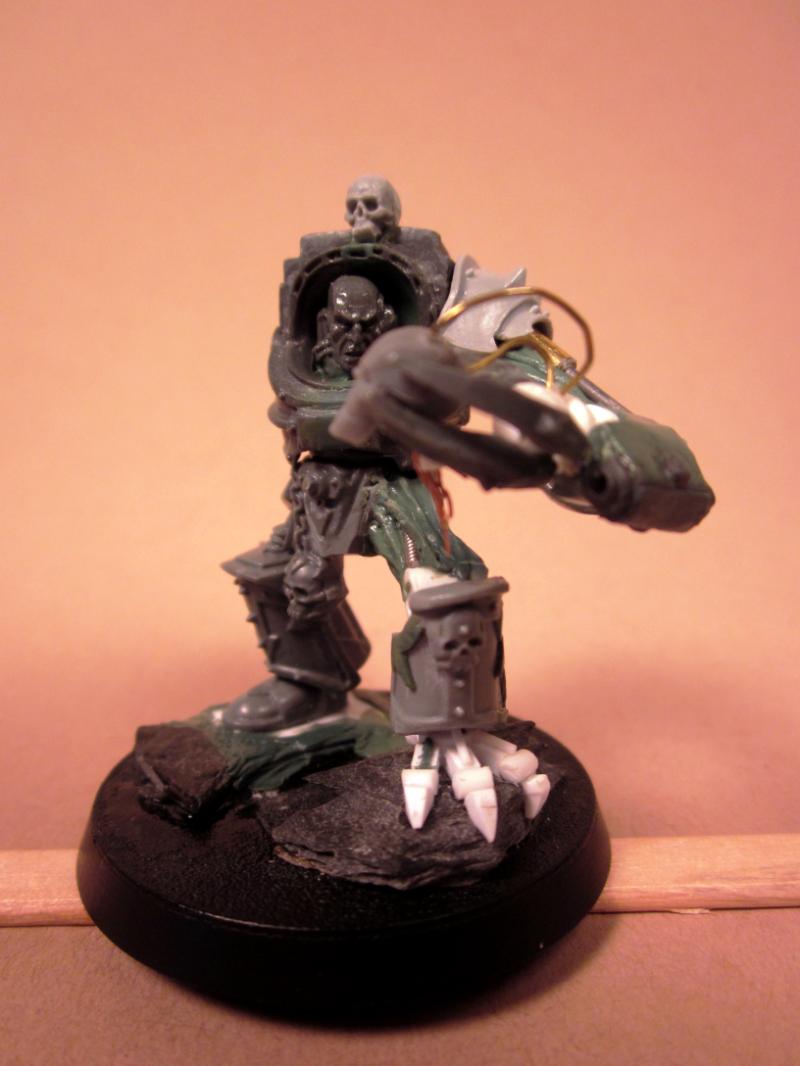
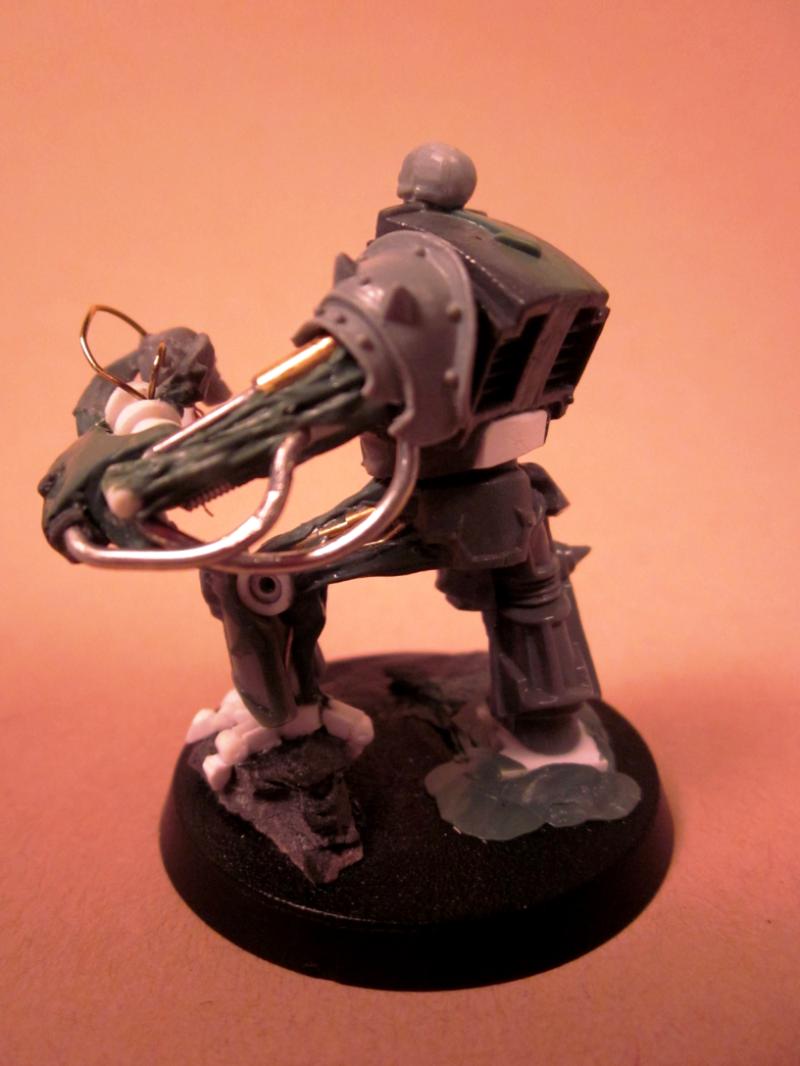
The idea is he's just killed a necron is and is studying/assimilating the technology. I hope that comes across.
I like how it looks like he's staring right at the head, I like how the custom leg looks, especially how the foot wraps around the rock he's standing on.
There are also a few things I'm not happy with. First off is the skull on the "hunch" over his head. I just sticks out like a sore thumb. Not sure what I'm going going to do about that yet. I may add two or four more skulls so it's a whole row. Or I might take it off and put a small trophy rack up there. I also think the upper arm looks a little thin.
The missing arm will be more of a heavy weapon arm mostly guns with another hand part way down that will be holding the necorn torso and assorted limbs. I'll probably put a few necron bits on the base as well.
Suggestions appreciated.
22192
Post by: whalemusic360
I think it looks freaking amazing!
44290
Post by: LoneLictor
Great Obilterator! The artificial leg and arm are done well. Also, I like how the Obliterator is examining the Necron head; it seems like something an Obilterator would do, considering their obsession with technology.
37519
Post by: bigfish
LOOK AT THAT LEG :O that is awesome
23950
Post by: rwzimmerman
33919
Post by: Moltar
Those beserkers are totally sweet, Bob! The year was worth the wait.
37519
Post by: bigfish
very very cool
23950
Post by: rwzimmerman
Thanks. I'll try to get a group shot up soon.
23950
Post by: rwzimmerman
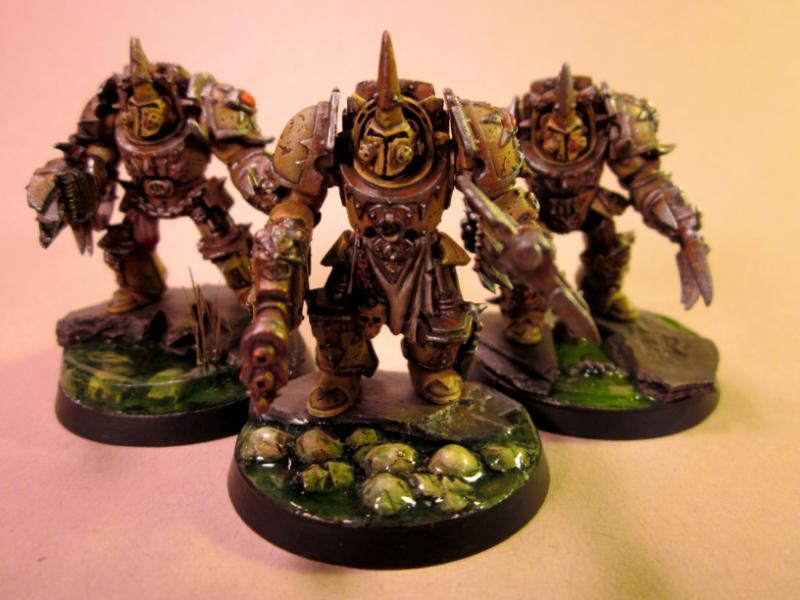
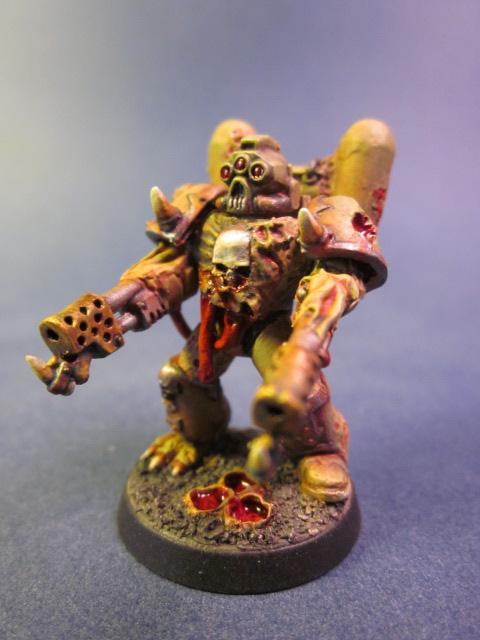
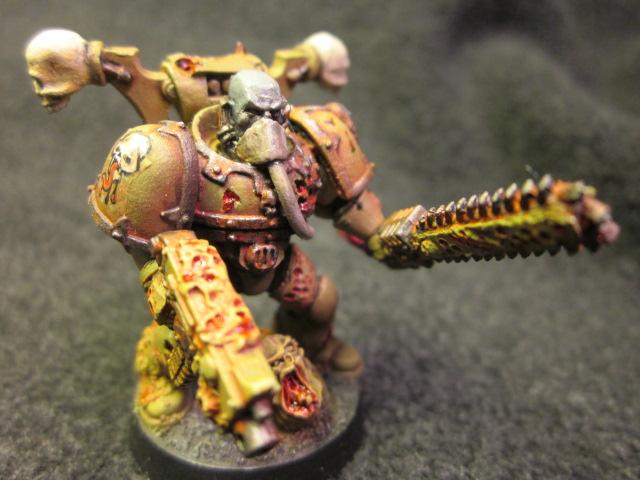
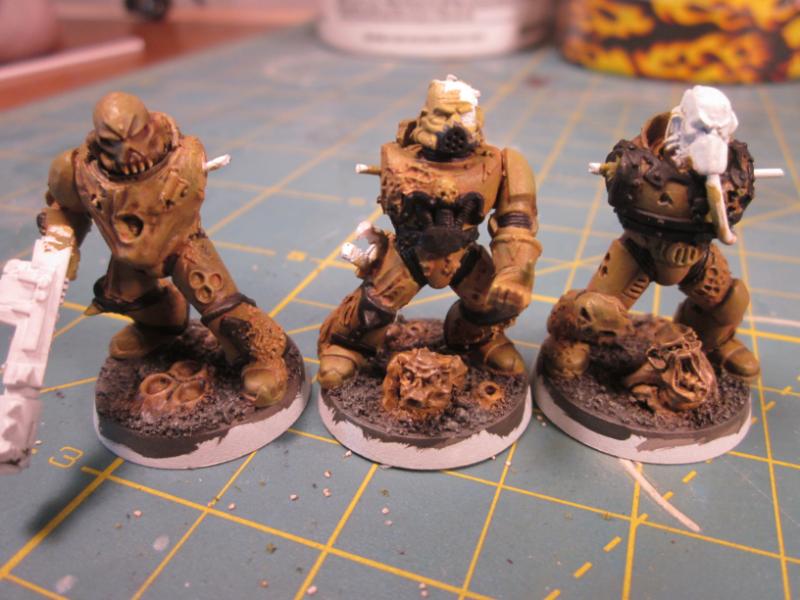
Death Guard flamer guy I started building tonight. I have the "skeleton done". No for green stuff and details.
23950
Post by: rwzimmerman
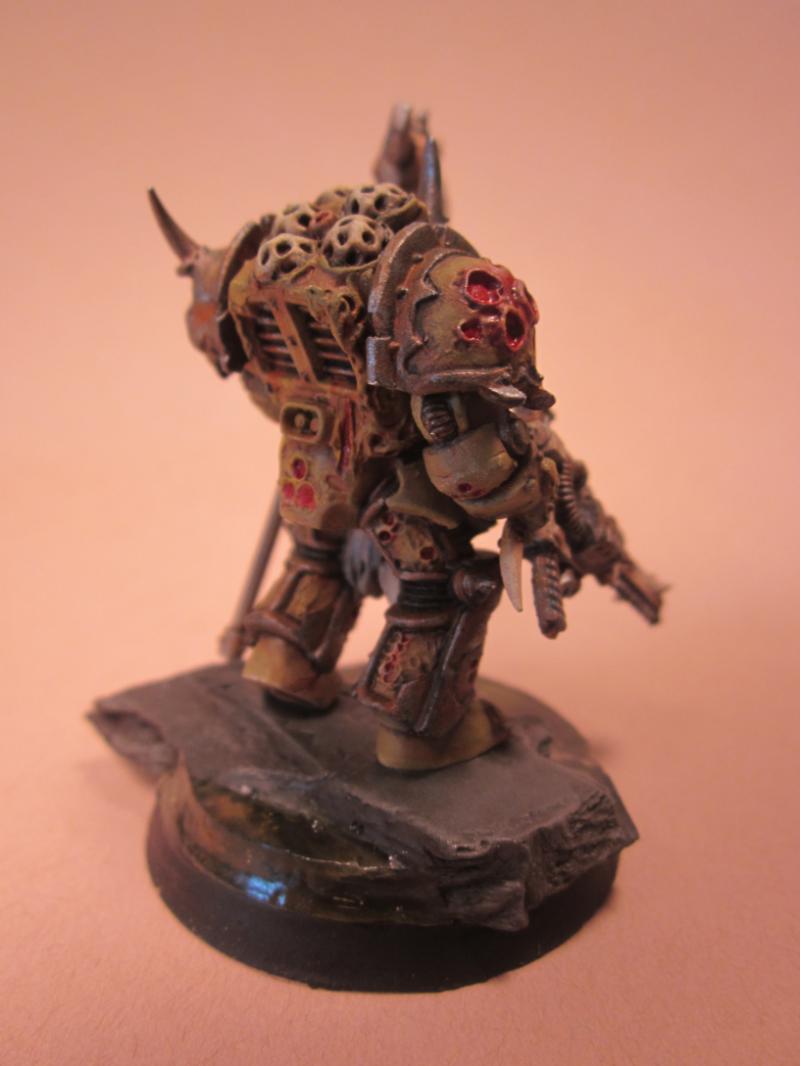
Nurgle marines moving along...

48594
Post by: dsteingass
I just read the entire thread.
1. Bob is a very talented artist
2. Now i want lime JELL-O and BBQ...yumm
48439
Post by: Rurik
your work is quite amazing!
i really like the ork dread, i can notice you put love on it's construction.
all your works are very good. those demons... oh... i fear of them.
greets
23950
Post by: rwzimmerman
Thanks guys.
========================================
The last couple of days I've been finishing off oblieterator #3. Now I just need to finish Oblit #2...

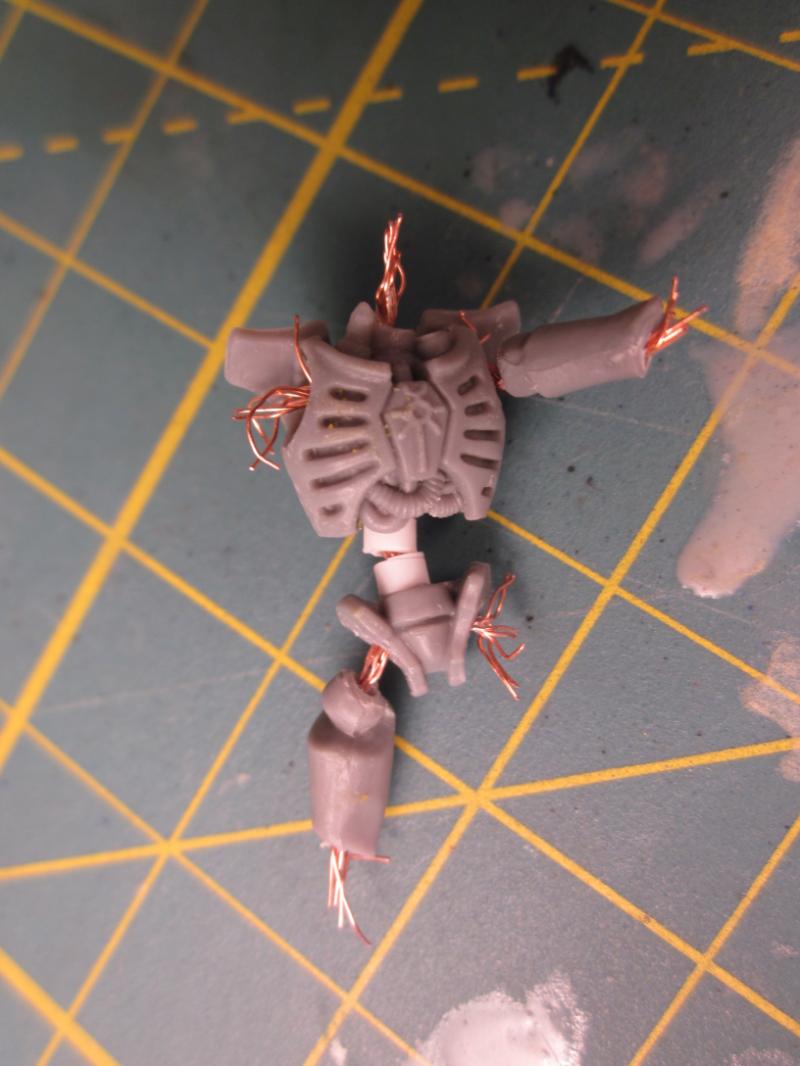
The Necron body. I'll glue it onto the base after it's been painted.
48594
Post by: dsteingass
WHOA! dood, that is amazing! Did you scratchbuild the claw just with strip styrene?
23950
Post by: rwzimmerman
dsteingass wrote:WHOA! dood, that is amazing! Did you scratchbuild the claw just with strip styrene?
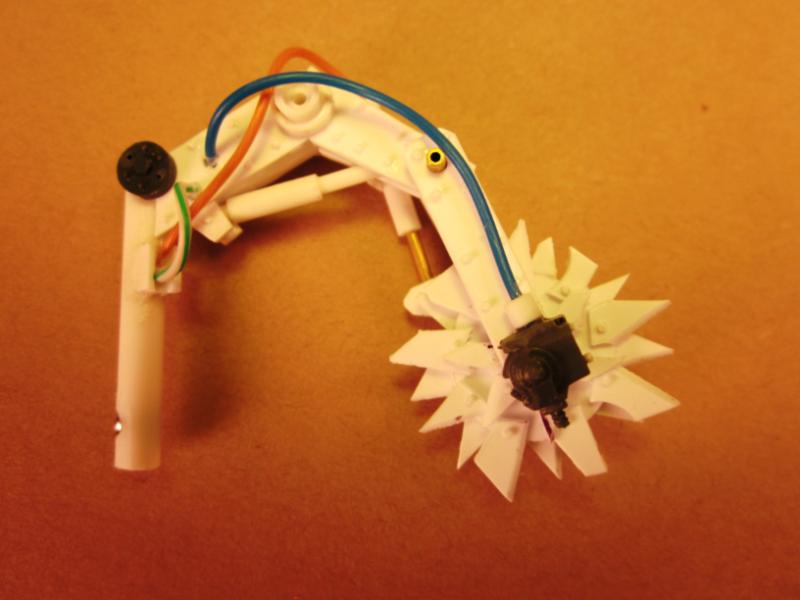
Thanks, but I don't know if you mean the "foot claw", or the hand holding the head. But this should answer you question. Anything white is styrene (tubes, rods, sheets, etc), anything gray (various shades) is a GW bit, anything green is sculpted from green stuff, then there are a few bits of copper wire and brass tubing with some slate on the base. Automatically Appended Next Post: P.S. if you were asking about the hand holding the head the fingers are the tips of a chaos terminator lightning claw.
48594
Post by: dsteingass
The foot claw specifically, very impressive! that takes skill and talent!
26800
Post by: Commander Cain
Dang, love that oblit! I can see all the time and effort you put into it, well worth it I say!
32289
Post by: juicaj1
That is probably the greatest obliterator I've ever seen. That is how GW should have designed them to look.
48594
Post by: dsteingass
It's the Boboblitinator!
23950
Post by: rwzimmerman
Thanks guys! I do think Oblit #3 is my best work yet.
26139
Post by: Skalk Bloodaxe
That Obliterator is ... (looking up Thesaurus online) ...
*head explodes*
Just wow. Your modeling skills are par with the top of the "best of" list I have running in my head w/ modelers and converters. The scrath-build bits are technical and quite possibly drove you mad. In the best way.
The Berzerkers are amazing. I really enjoy the beastial feel about them w/ the Beastmen heads. Reminds me of the RT fluff where Khorne followers had the heads of animals as a Chaos Gift.
Will be back again!
23950
Post by: rwzimmerman
Thanks everyone, I appreciate the feedback.
I’ve started working on a Grey Knights counts as army. I don’t know if it will ever get to playable size, but the idea is to make a Word Bearers force using the Grey Knights codex focusing on Inquisitorial Warbands.
I’ve started converting a few figures but these four crusaders are furthest along. I need to add some bits to make the weapons “power weapons” and decide on heads. So far I’m thinking either chaos knight heads or chaos marauder heads. Any input welcome.
23950
Post by: rwzimmerman
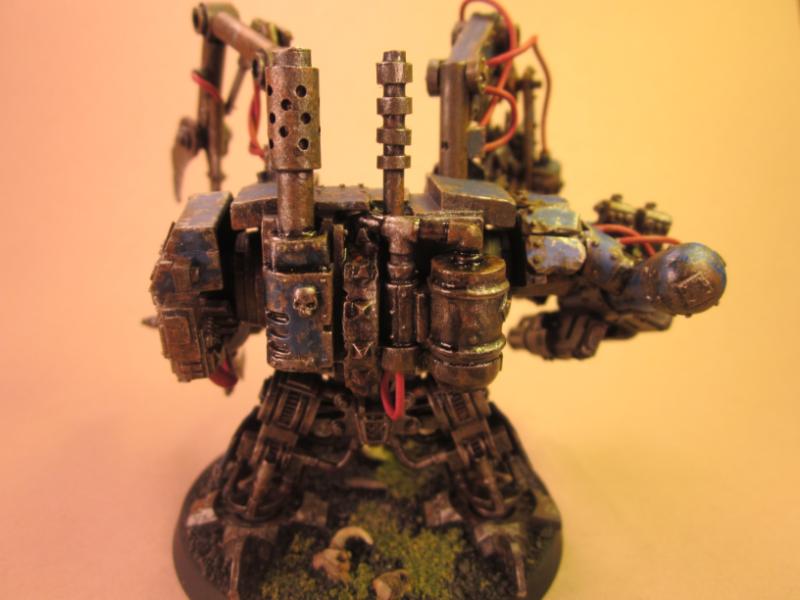
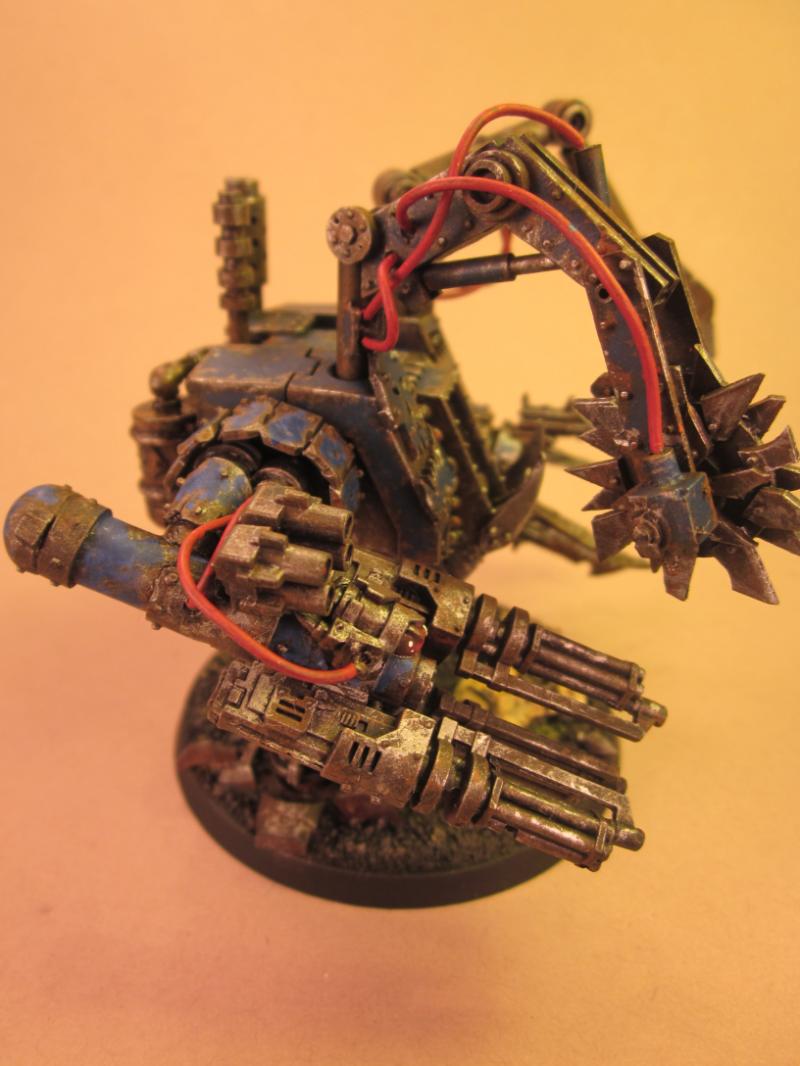
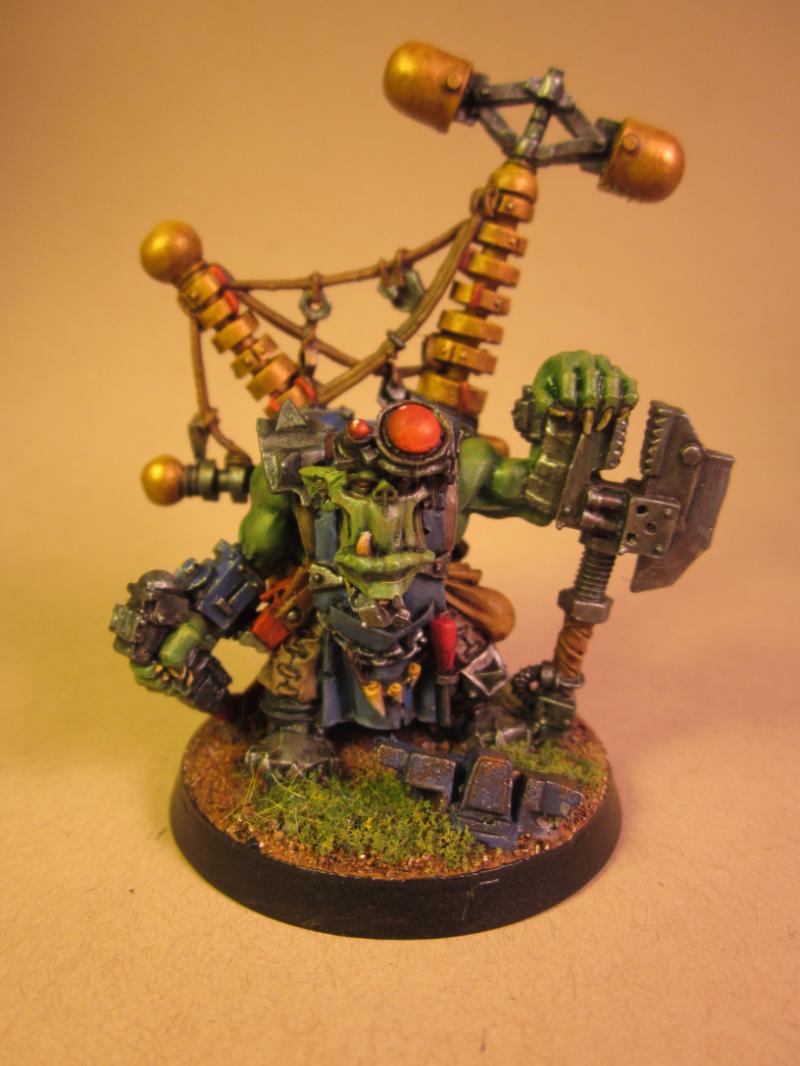
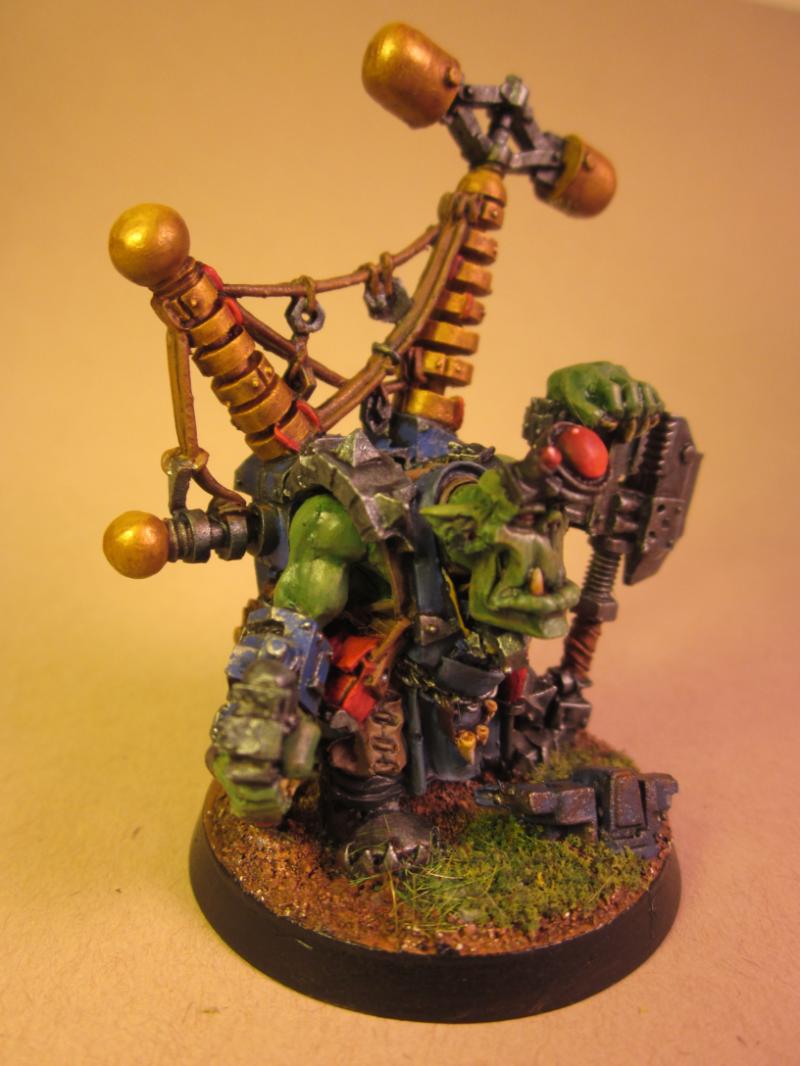
Just finished a Big Mek, I might touch it up ust a bit more, but I'm calling it "done". Don't remember the last time I painted an unconverted model.
26139
Post by: Skalk Bloodaxe
That is fantastic. I really like the "wear and tear" effect you've accomplished.
48594
Post by: dsteingass
Some models are great just as they are! This is definately one of them! You've given hin an appropriate inquisitive look like a Mek would have! Awesome!
51001
Post by: tarar2d2
rwzimmerman wrote:
The last couple of days I've been finishing off oblieterator #3. Now I just need to finish Oblit #2...
THIS IS DEFINITALY THE BEST MODEL EVER! 
21162
Post by: 1-i
Above this post is an uderstatment.
51001
Post by: tarar2d2
 BEST. MODEL EVER.
(happy? )
26139
Post by: Skalk Bloodaxe
Now I know what I want my Nurgle Obliterators to look like!
*edit- except more bloated and icky*
23950
Post by: rwzimmerman
Thanks everyone.
Bunch of misc pics....
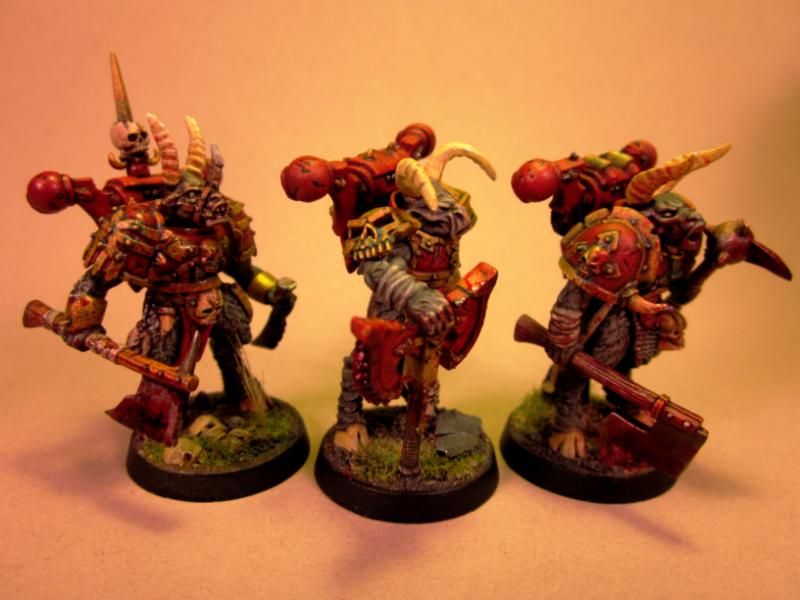
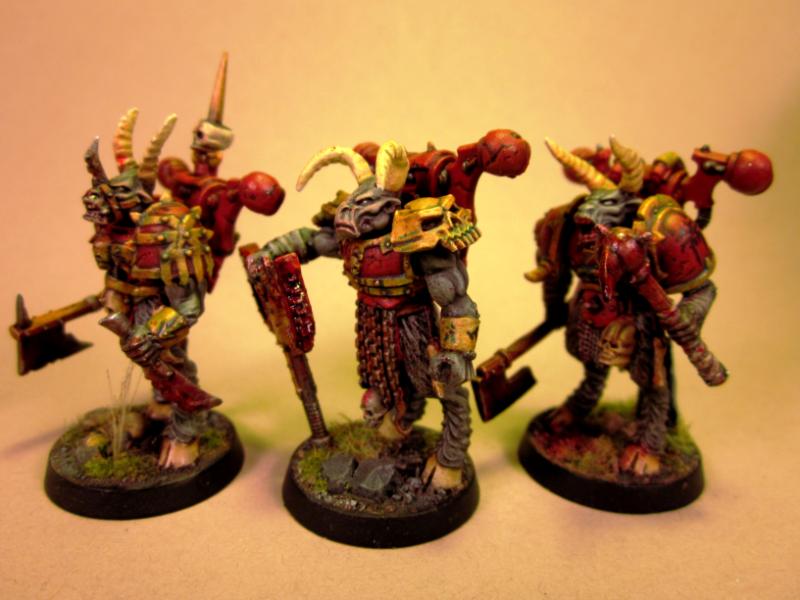
Group shot of all the berserkers Makes me want to paint up a few more.
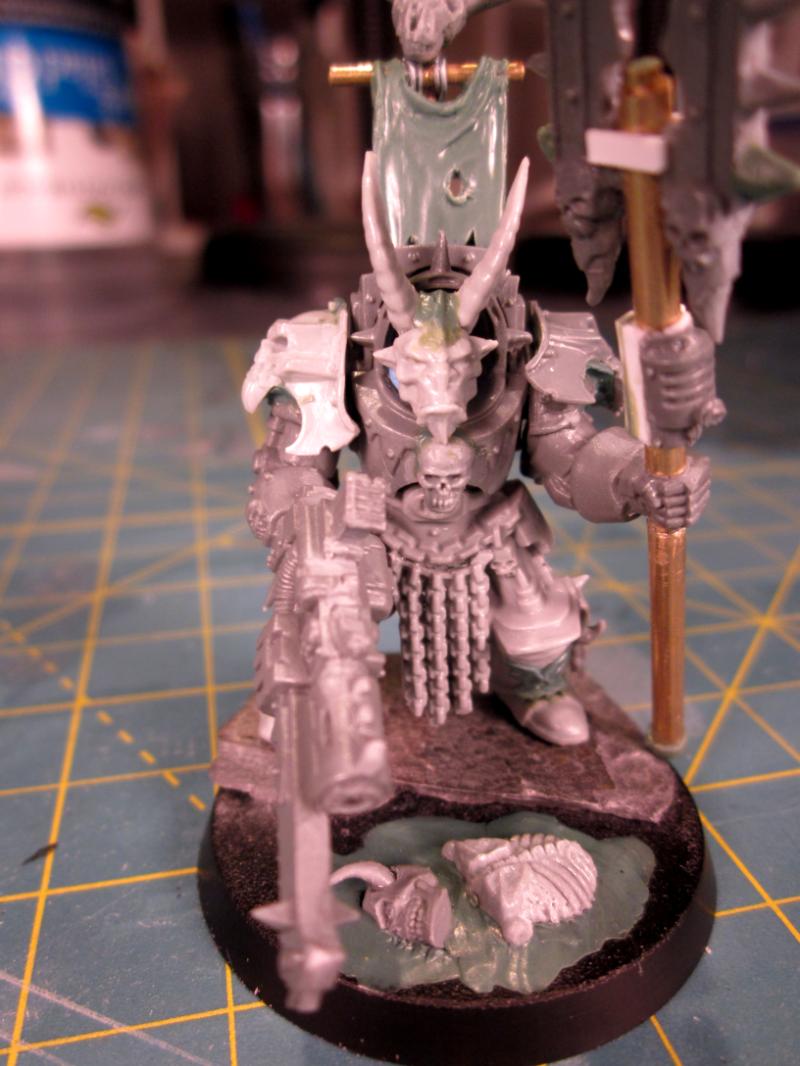
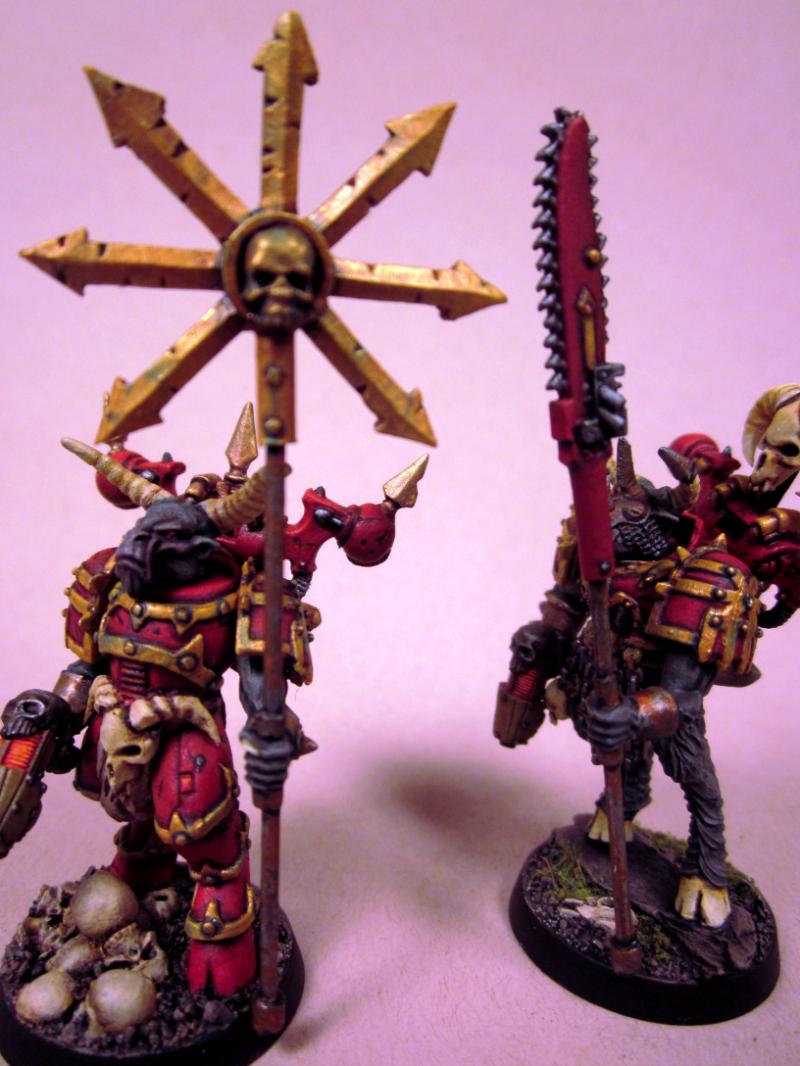
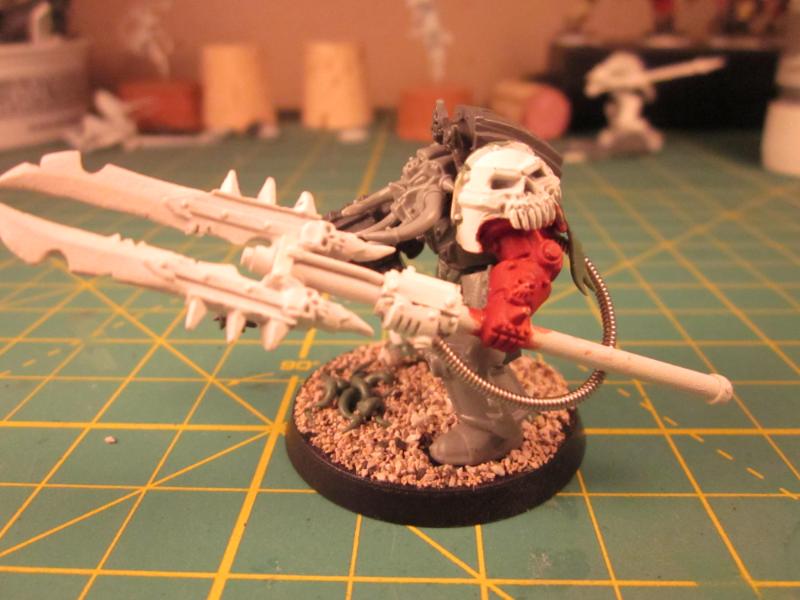
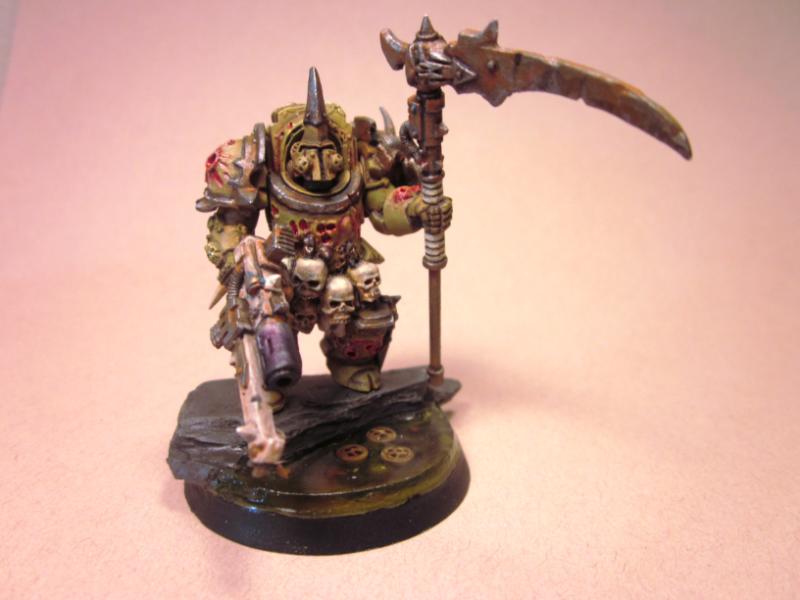
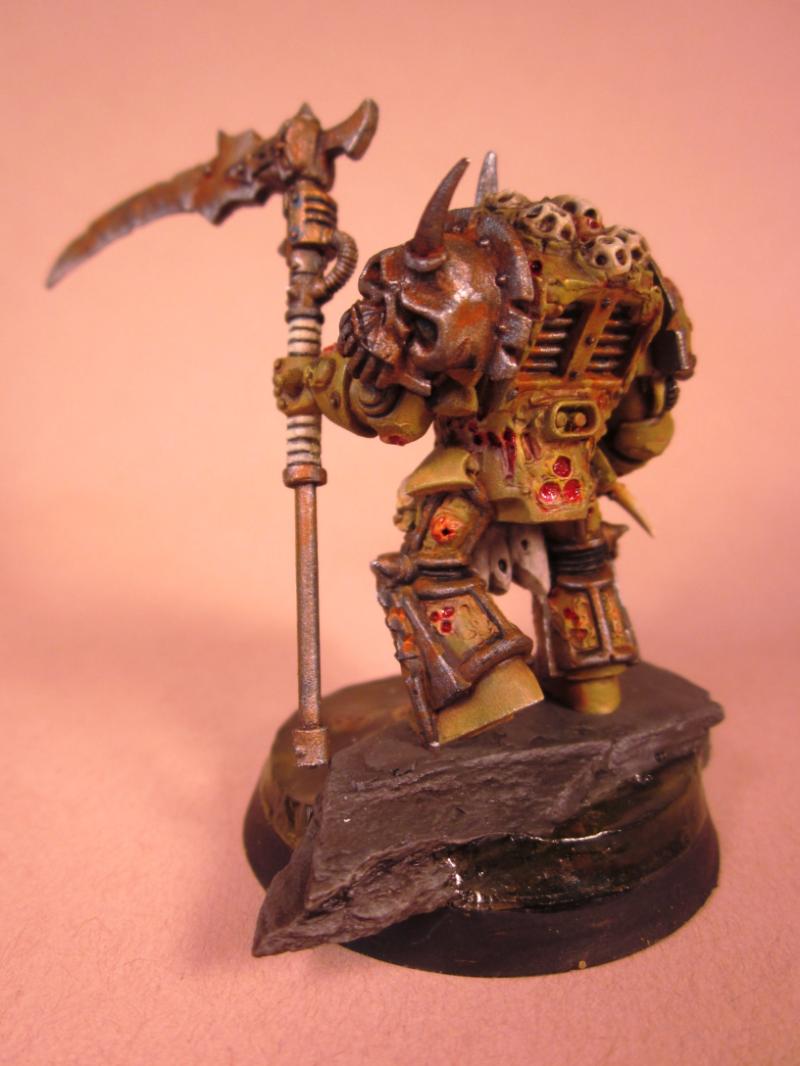
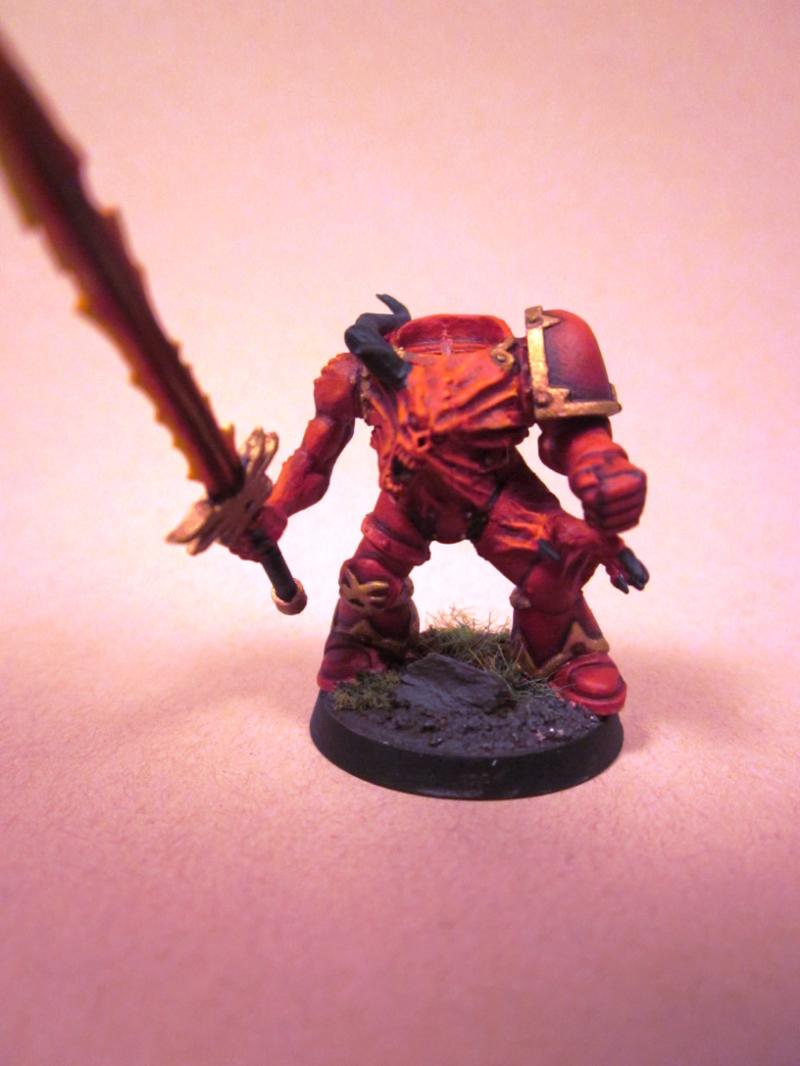
This is my poor man's Typhus knock-off. Ironically I have a real Typhus I haven't painted yet that I won in a GW painting contest.
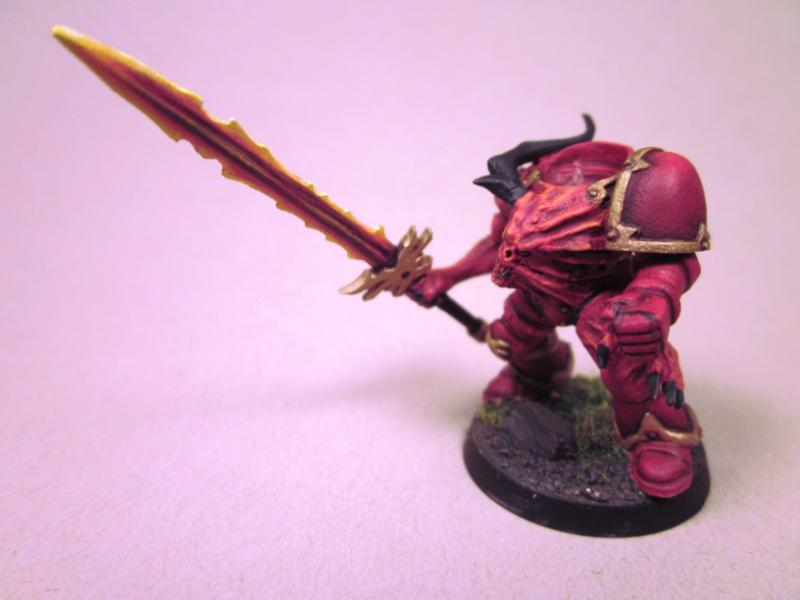
The only possessed I've painted so far, and even he's not complete. I haven't decided on his head yet, I think I want something that will look like the marine is completely comatose, just a drooling idiot at this point. A few other details are still missing too, like shoulder emblems, etc... I'm not completely happy with the sword either, but I doubt I'll be revisiting it.
And finally a squad of Panzer IV H's ready to go.
31627
Post by: FantasyBob
rwzimmerman wrote:Thanks guys.
========================================
The last couple of days I've been finishing off oblieterator #3. Now I just need to finish Oblit #2...
The Necron body. I'll glue it onto the base after it's been painted.
Amazing work! can you post more shoot and detil!?
47327
Post by: whigwam
Really amazing work here. At the risk of stating the obvious: you are a very talented convertor and painter. Subscribed!
23950
Post by: rwzimmerman
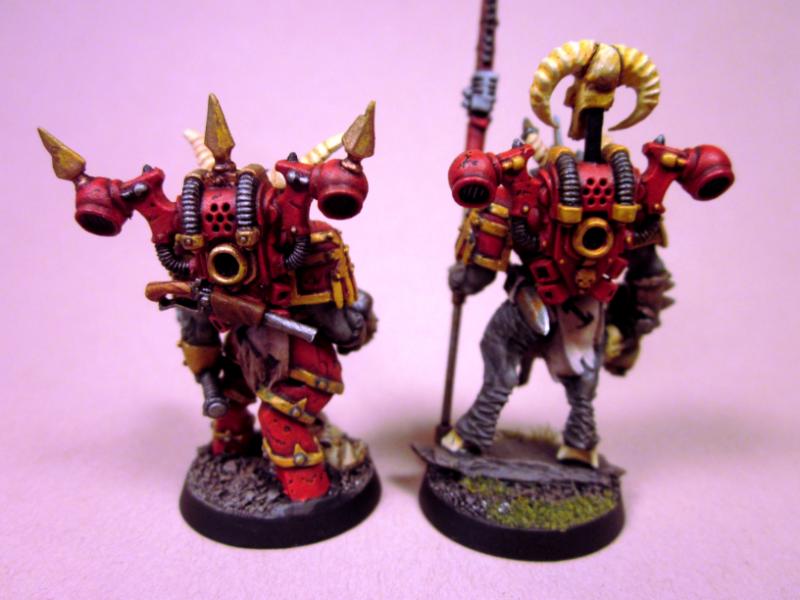
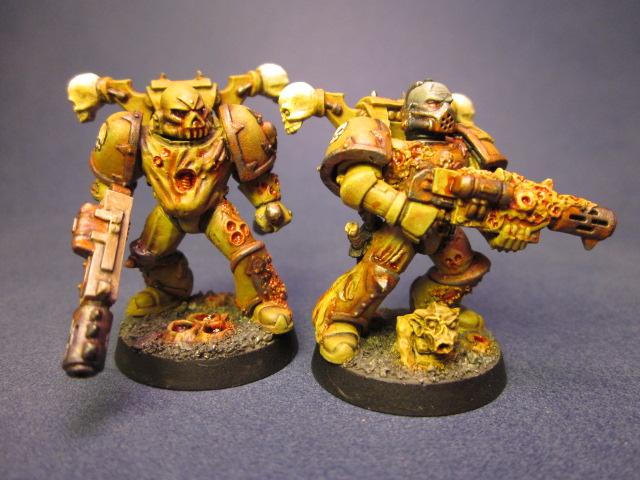
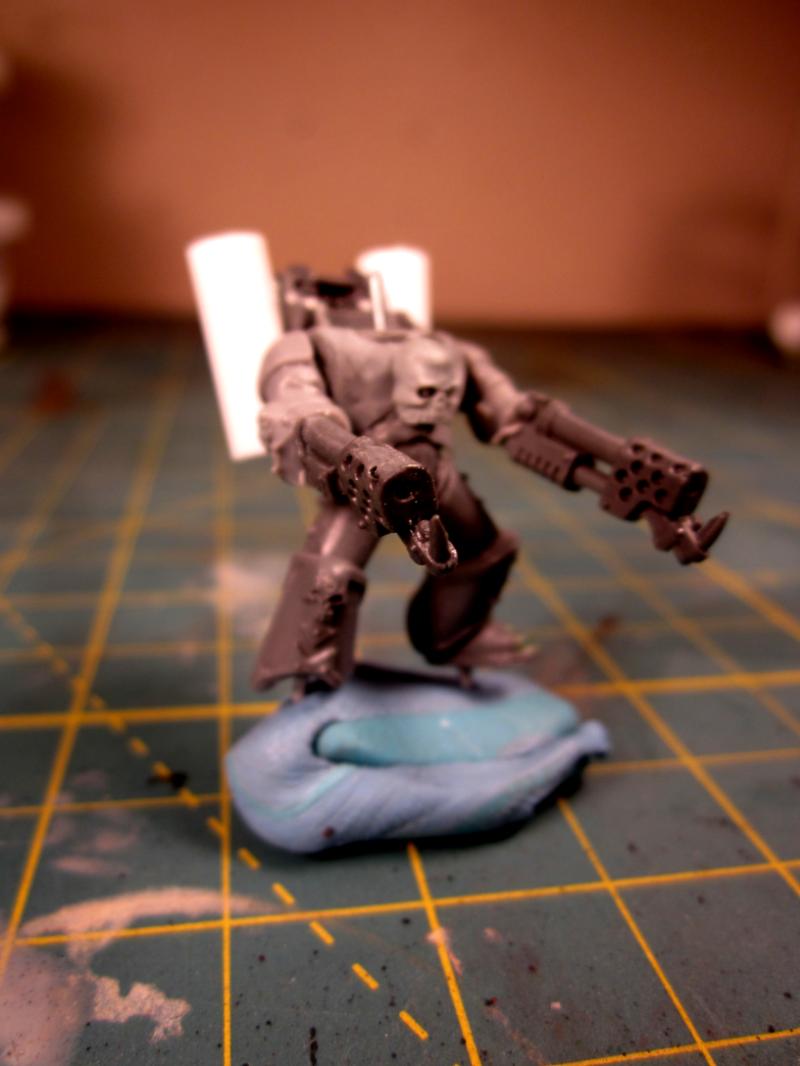
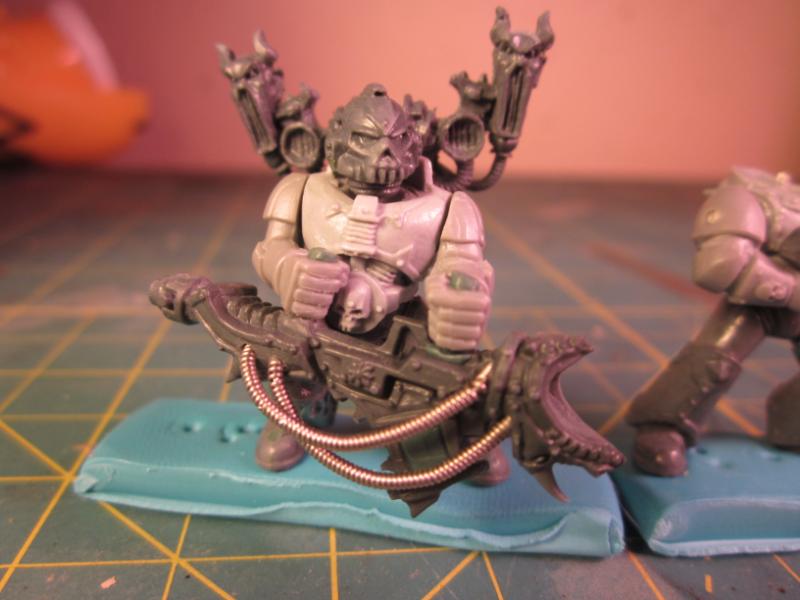
What I've been working on for the last week or so. Noise Marines!
This is my inspiration. For any of you not familiar these first two shots are of 2nd Edition noise marines, back when their models weren't just standard CSM with a couple of head and weapon swaps in the box. This one is armed with a blast master, but the sonic blaster was very similar just with one barrel.
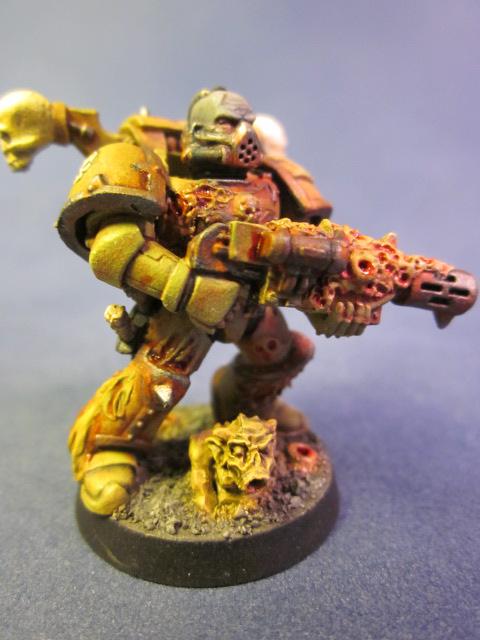
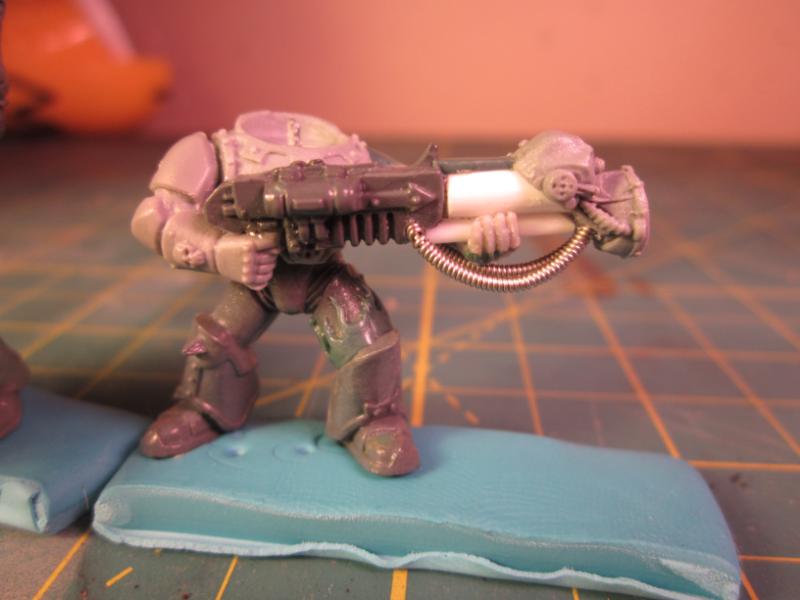
I think this will be a blast master. An old chaos missile launcher with the mouth hollowed out and a "speaker grill" green stuffed in the hole (sorry, no shots of that on this post). His back pack is a doom siren, I'm not sure if its from the current noise marine models or the ones before this. Either way I'm giving all of them this backpack and calling it just a normal backpack. I'll use the other version of the doom siren, the backpack on that looks more like a pipe organ to represent doom sirens in the game. That's assuming these guys ever see the tabletop.
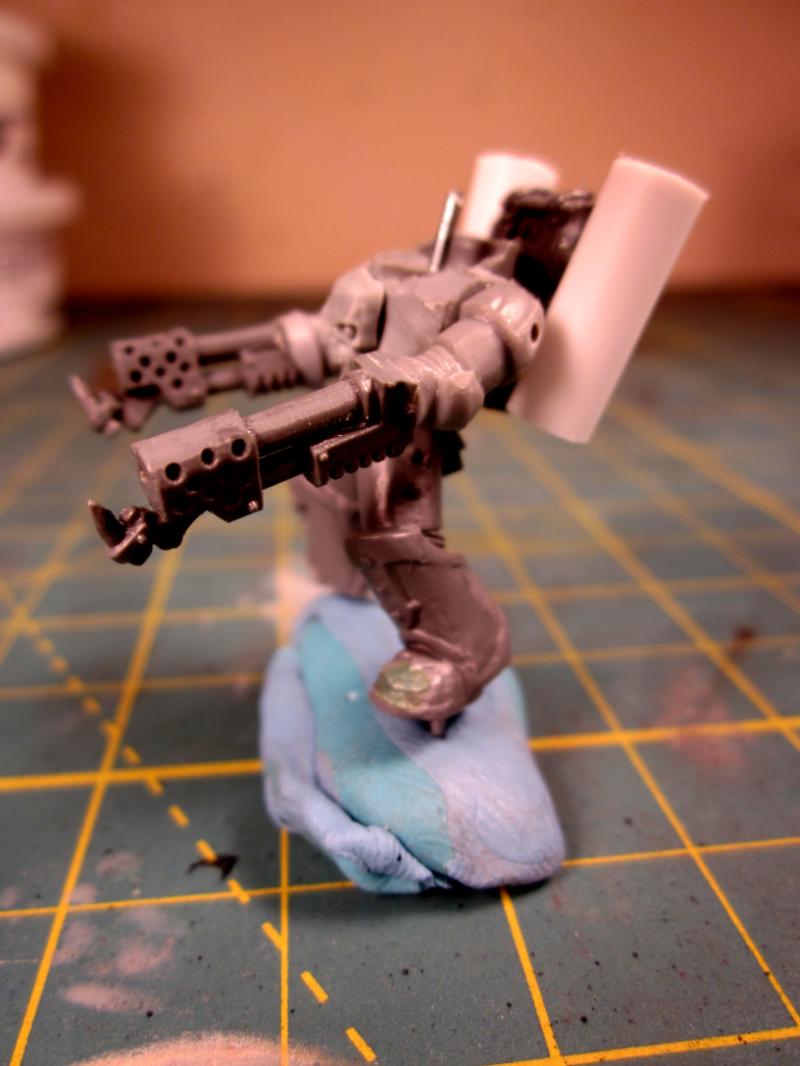
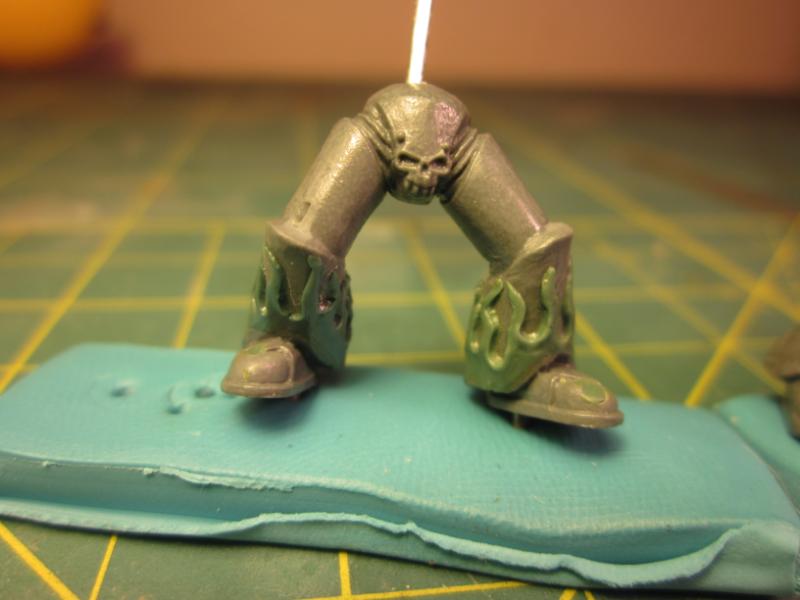
These are the legs of the blast master guy above. You can see here I have the flames on the legs. I'll add some rivets to the thighs, I think. I'll give the shoulder pads similar treatment. I'm thinking I may need to do some Legion of the Damned marines as well.
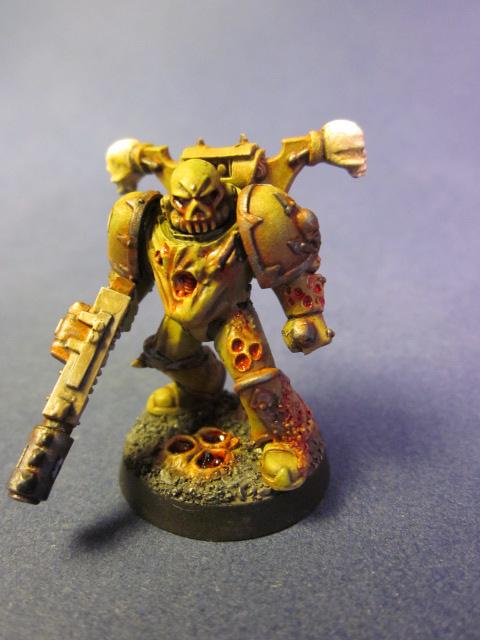
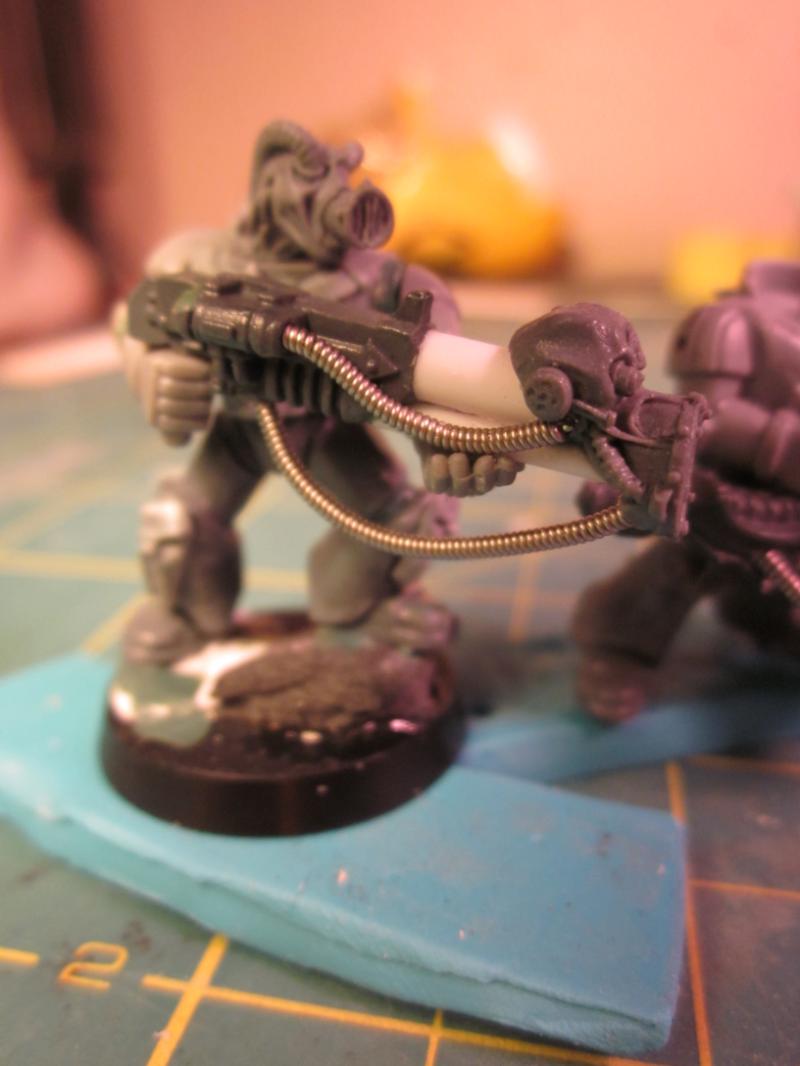
Here's a meltagun, guitar wire and a 2nd ed. noise marine head converted into a sonic blaster. In second edition this was the head you used for a noise marine with a doom siren. You can also see I've added flames to his left thigh.
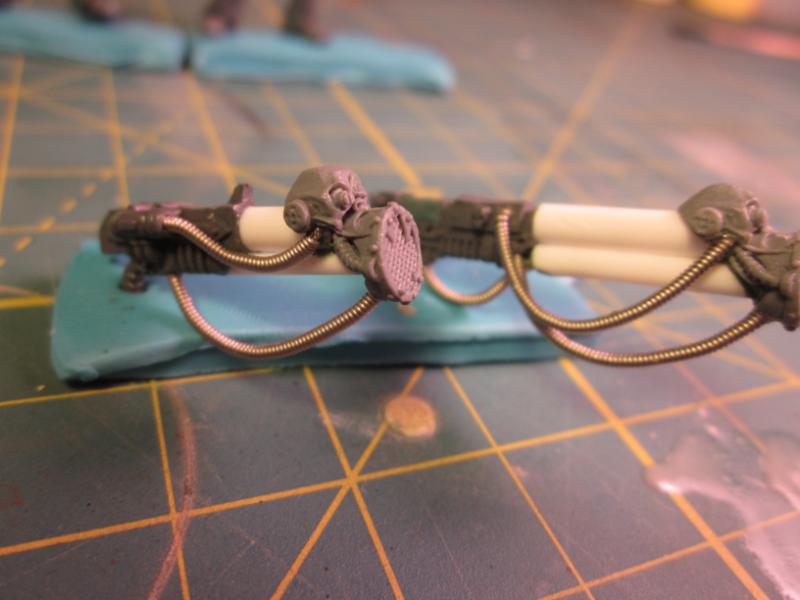
Two more sonic blasters ready to go. The longer one was going to be a blast master before I made the missile launcher version. I haven't decided if I'm going to shorten it or not. Probably not an can use it to represent an asp. champ I guess.
37519
Post by: bigfish
Looking very very cool indeed
26139
Post by: Skalk Bloodaxe
The Typhus proxy is excellent and I especially enjoy the dynamic base. It's impressive that you used water effects on such a small surface, and so cleanly.
The conversion of the Possessed is the best model I've seen for that from anyone yet, and that's saying something because I intentionally look for converting ideas.
The work here is amazing. You have a genuine talent for this.
23950
Post by: rwzimmerman
23950
Post by: rwzimmerman
The basic build is done on this one, now for the green stuff.
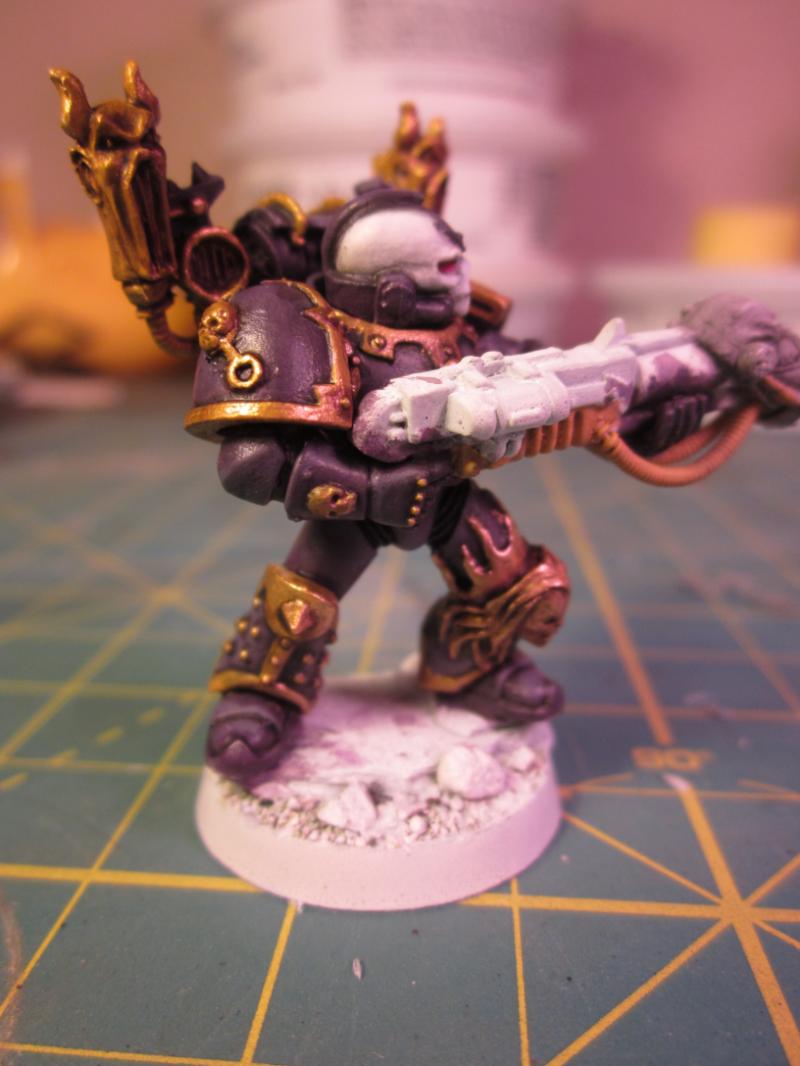
I wasn't so sure about the purple, but I'm happy with how the prototype came out.
26139
Post by: Skalk Bloodaxe
Excellent work! I missed the last update, not sure how that happened? Current work is great! The conversion is excellent, and the prototype looks sharp and has very clean / distinct lines. The Terminators are what have my eye though... looking forward to seeing what comes next there.
40761
Post by: Bongfu
I really love these conversions. You have a talent that surpasses even some of the best hobbyist.
47327
Post by: whigwam
That Noise Marine turned out so well. Better than the official model by far. As always, great work.
23950
Post by: rwzimmerman
Thanks everyone. I have an idea for one of the nurgle termi's I think I'll work on it a bit tonight.
And sorry for the blurry pic of the new noise marine. I thought it was a little blurry last night, but now I realize it is a LOT blurry. :(
23950
Post by: rwzimmerman
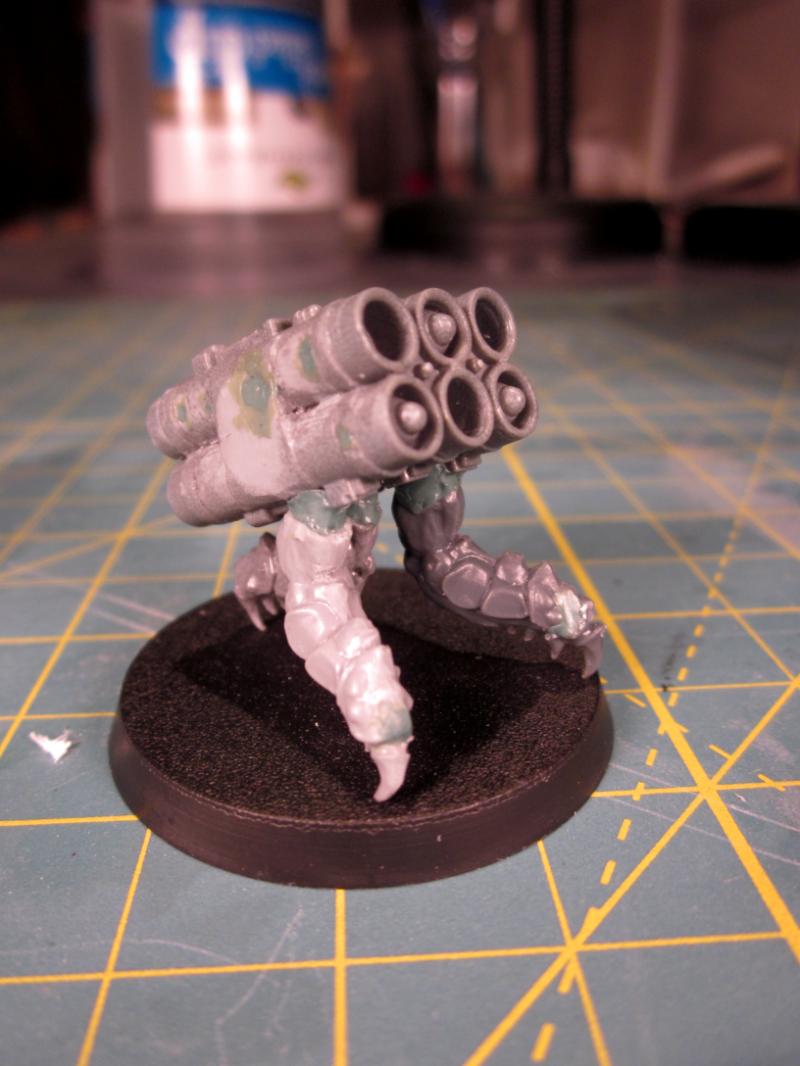
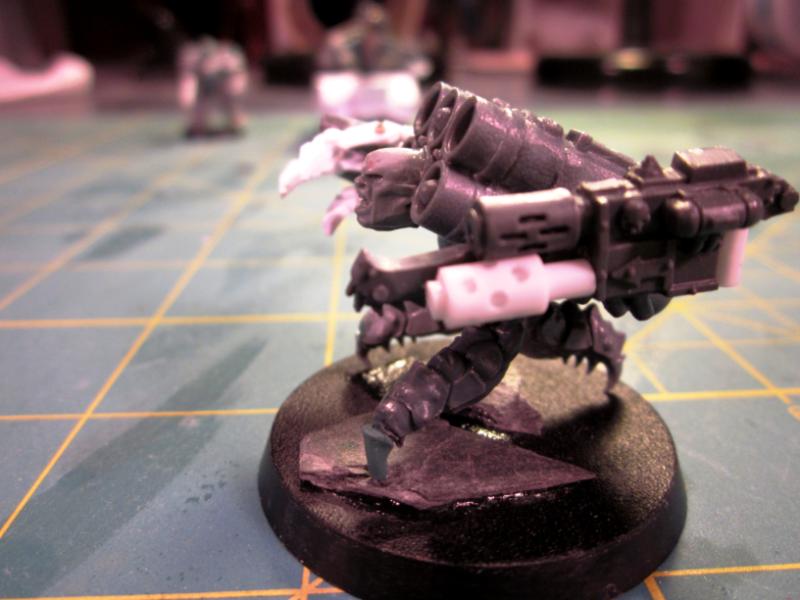
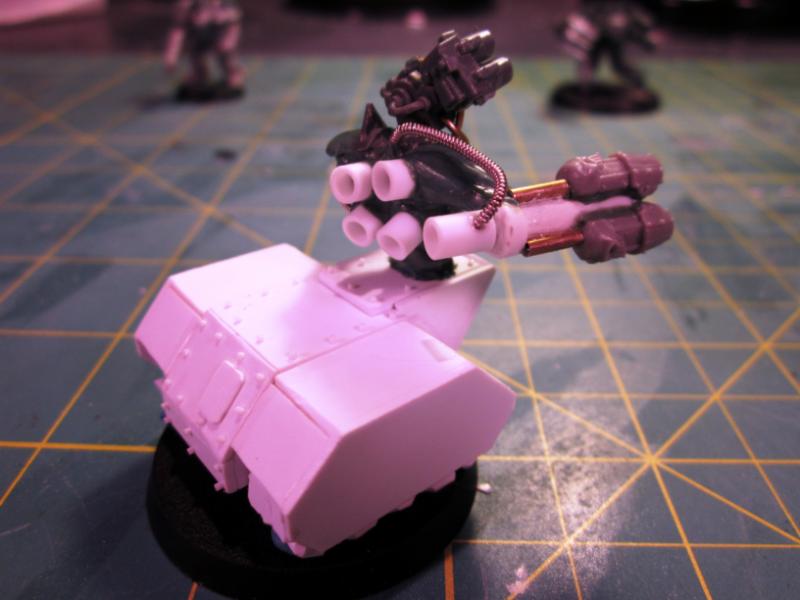
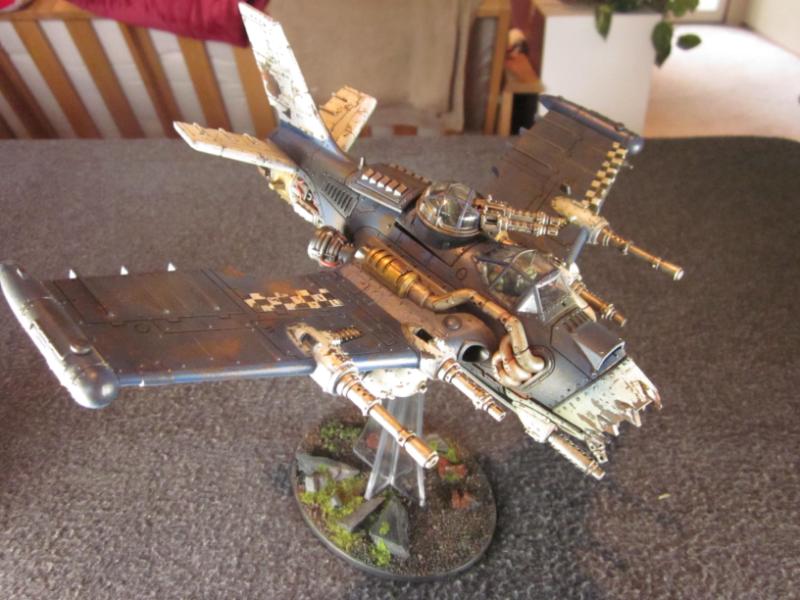
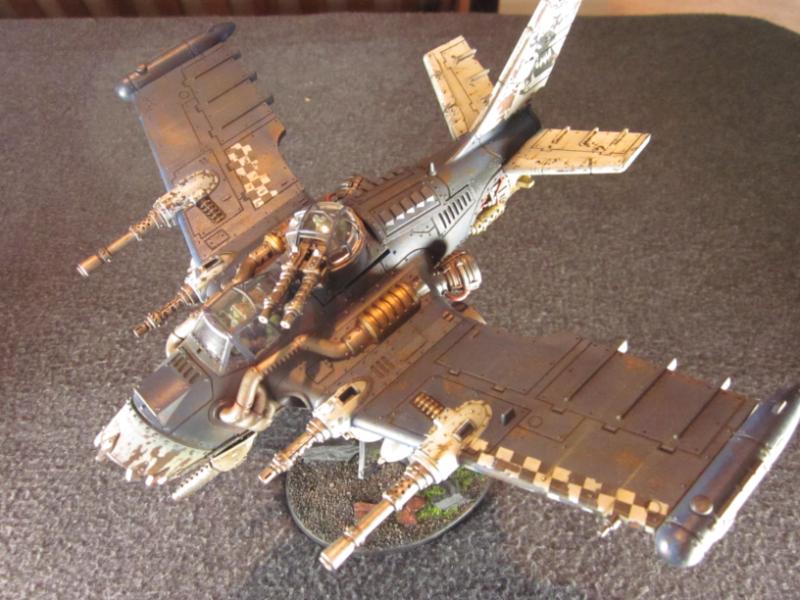
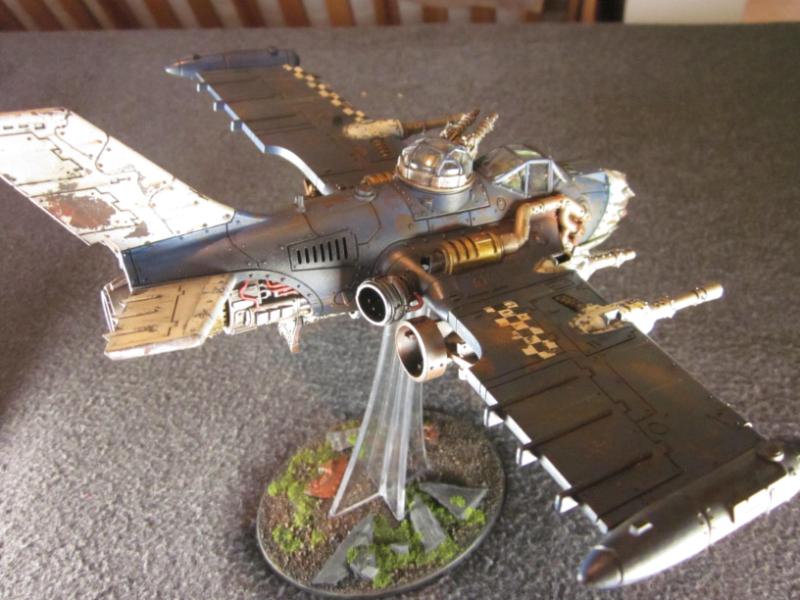
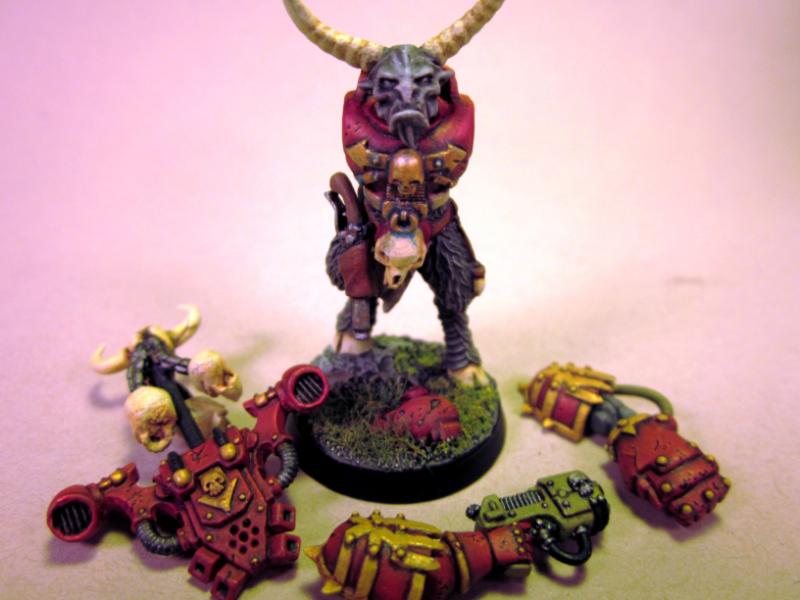
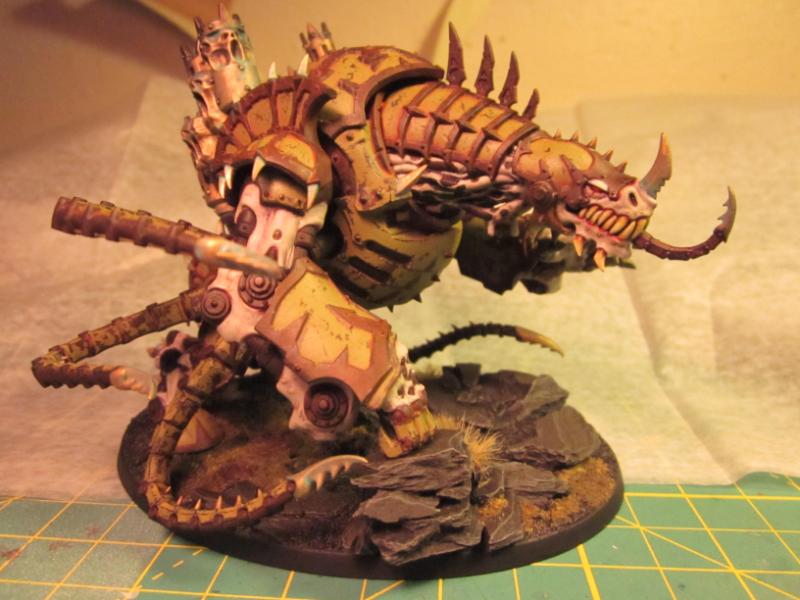
It has been far too long since I've updated this blog. I decided not to post anymore pics until I improved my non-existent photography. Here we are a year later and no improvement. Anyway hope you like my latest. No conversion work at all! Haven't do that in a while. It is fully magnetized though. All the pics below are from a single model fiend who can sport any configuration.
Here's my favorite build. Not legal or effective. Four legs, one gun.

More options:

48594
Post by: dsteingass
That is a gorgeous model! Paintjob is fantastic!
23950
Post by: rwzimmerman
23950
Post by: rwzimmerman
23950
Post by: rwzimmerman
My WIP bench. And this doesn't doesn't include the four rhinos I've been messing with. 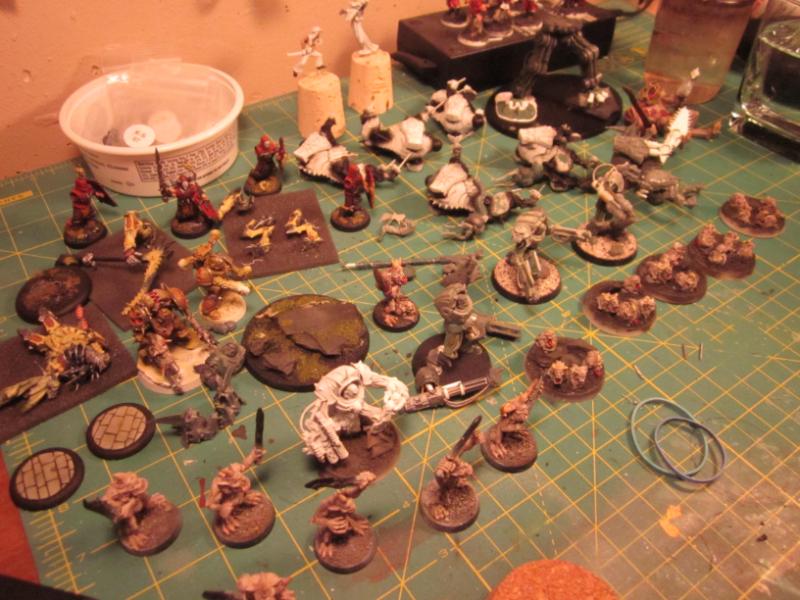 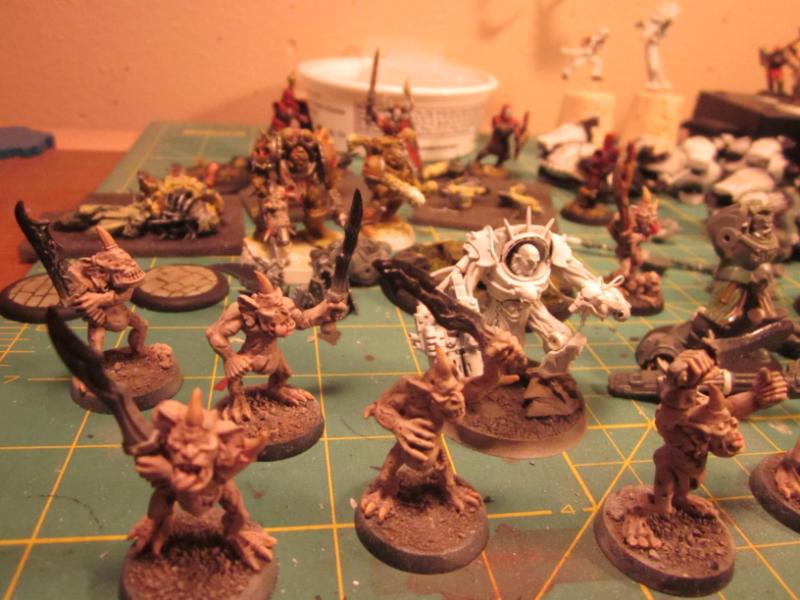 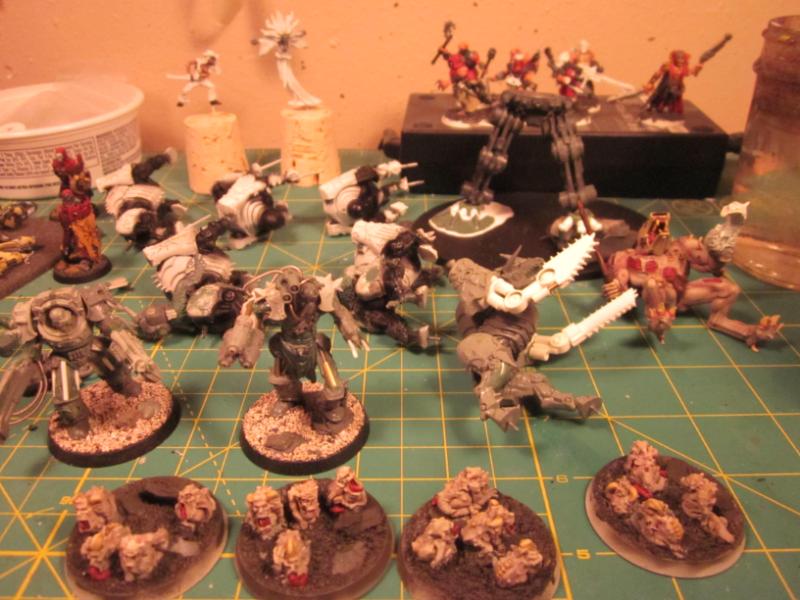
23950
Post by: rwzimmerman
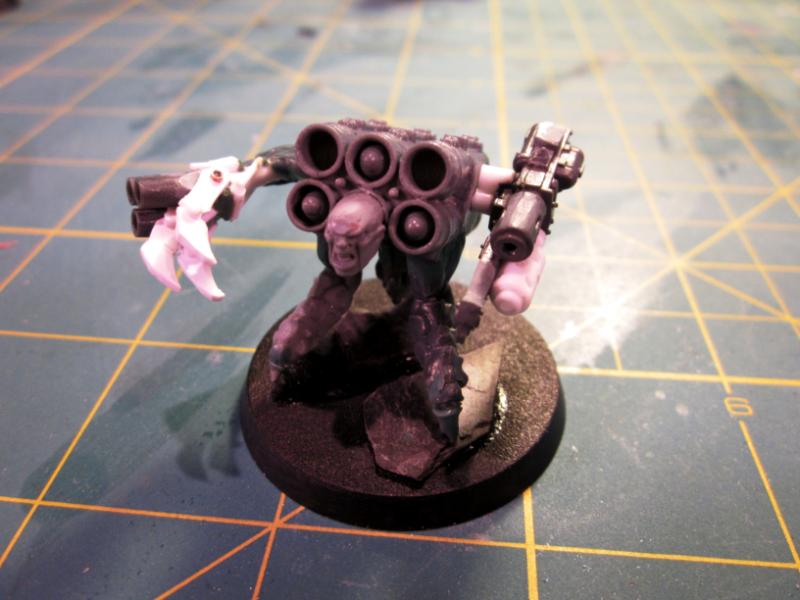
This is one of the projects I'm putting the most time into right now.
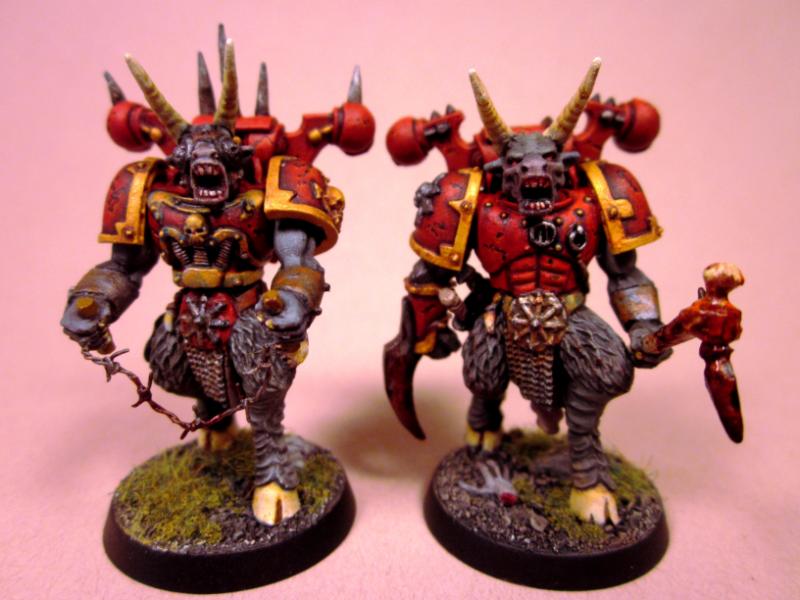
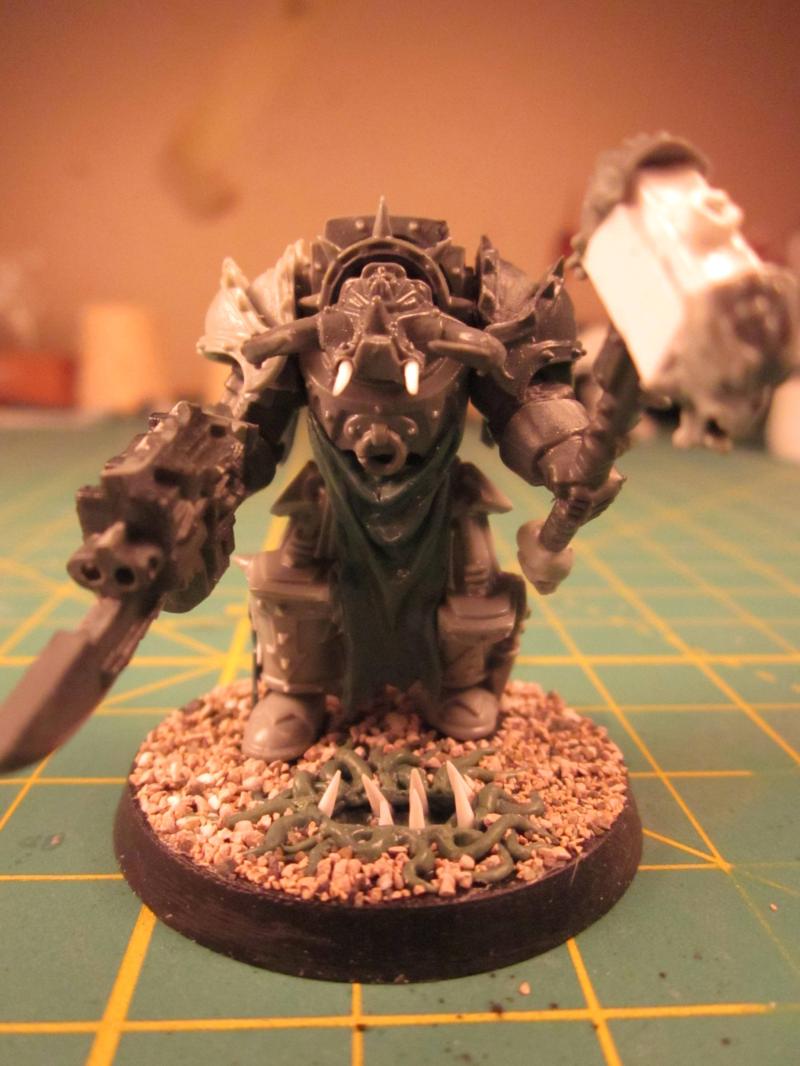
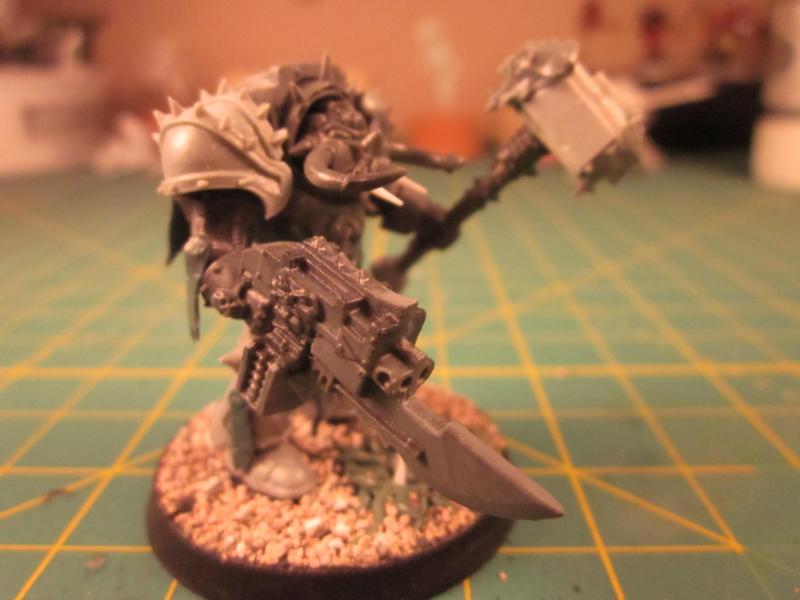
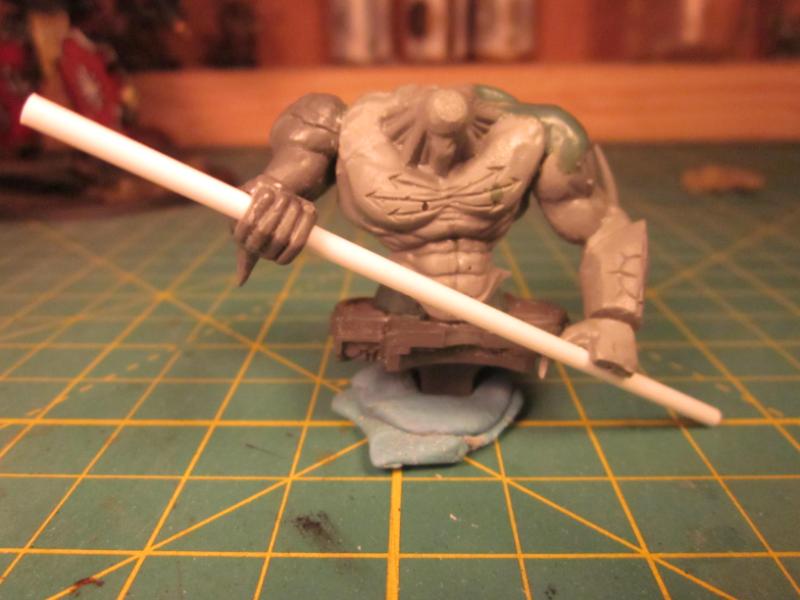
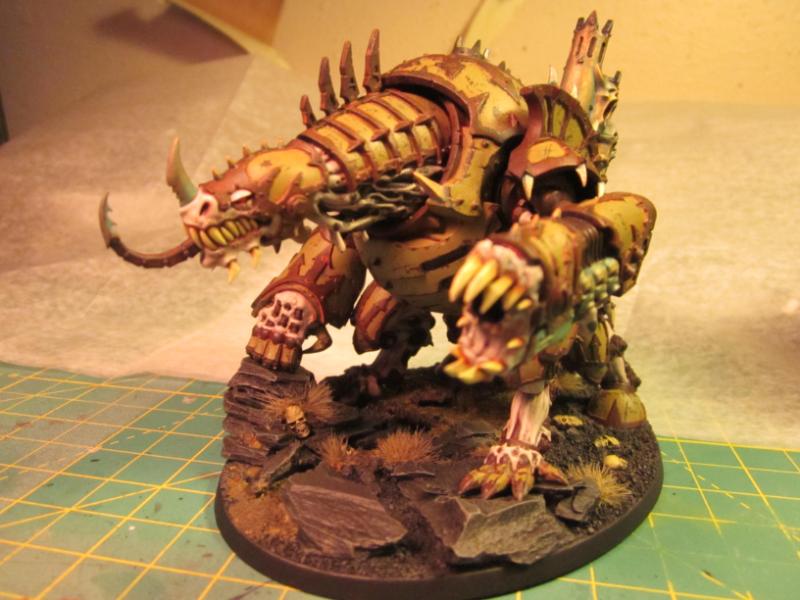
The first two 40k "skull crushers" for my beastman Khorne army. I plan on making 5 or so of these guys eventually. No real piratical use for that many, but I think they will look cool.
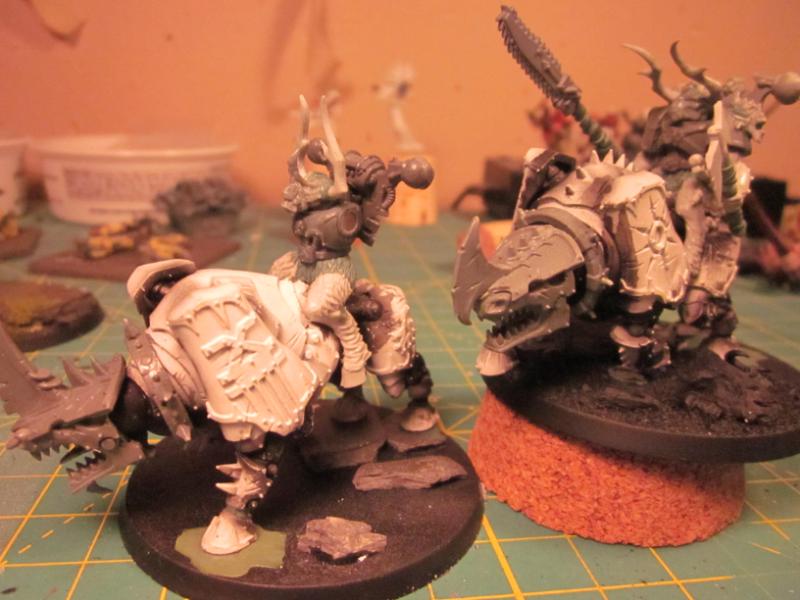

I like this guy so far. I need to do more detailing though. Add some skulls or runestones or something.
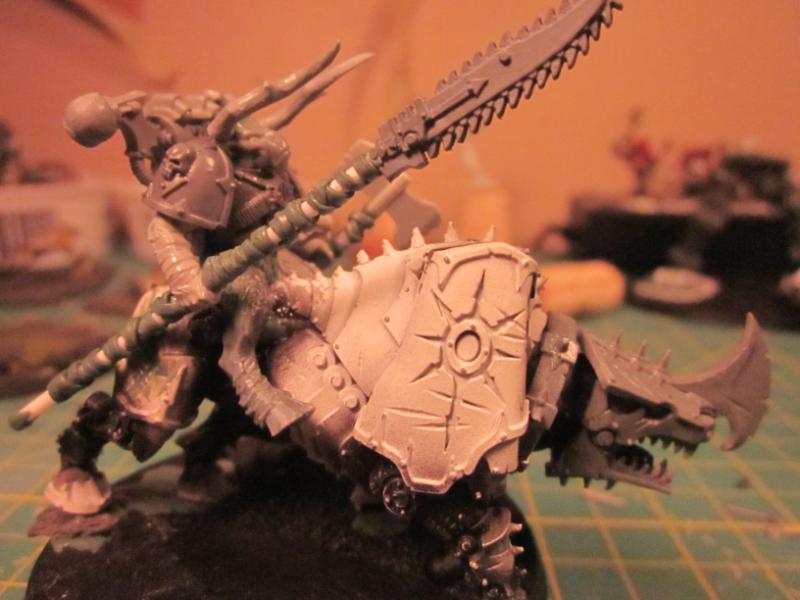
I repositioned one of the feet to give it a more plodding look rather than the sprinting look of the default poses. It was a lot less work than I thought it would be.
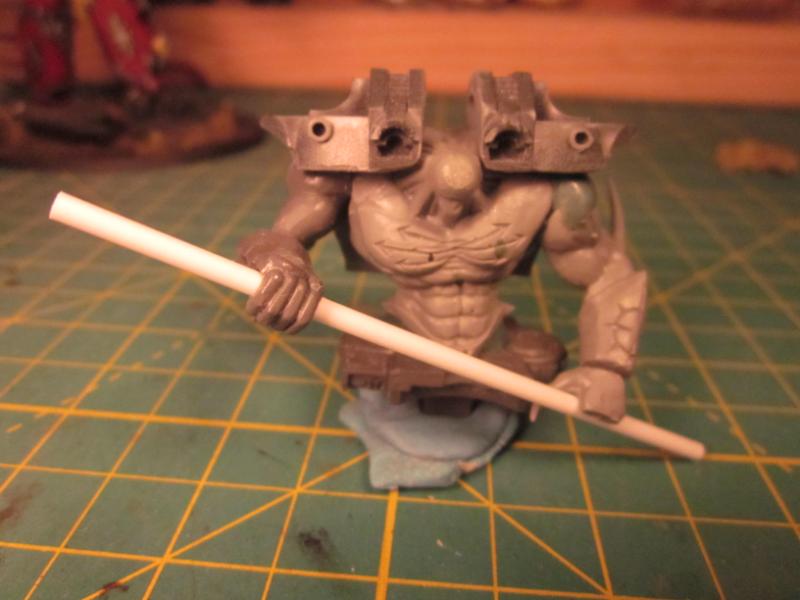
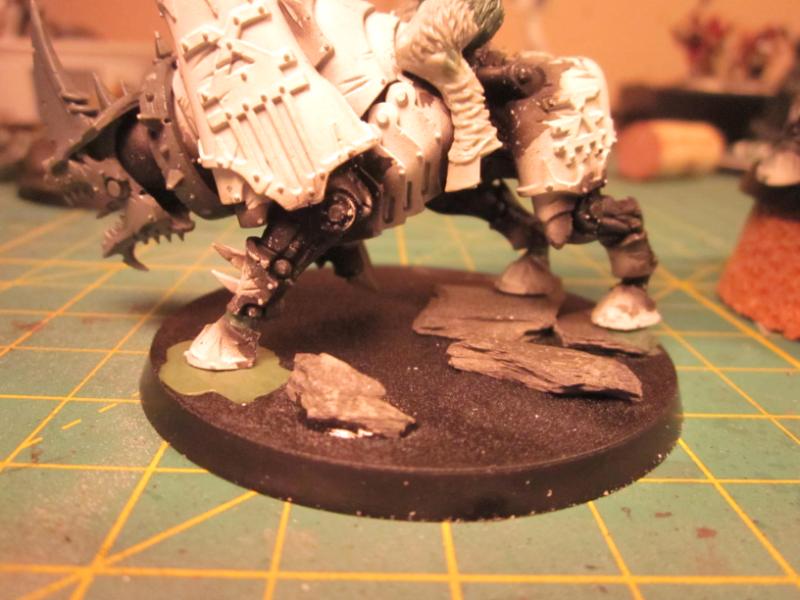
Not so many picks of this guy. Not nearly as interesting without any arms.

Repositioned feet again
47898
Post by: A Kvlt Ghost
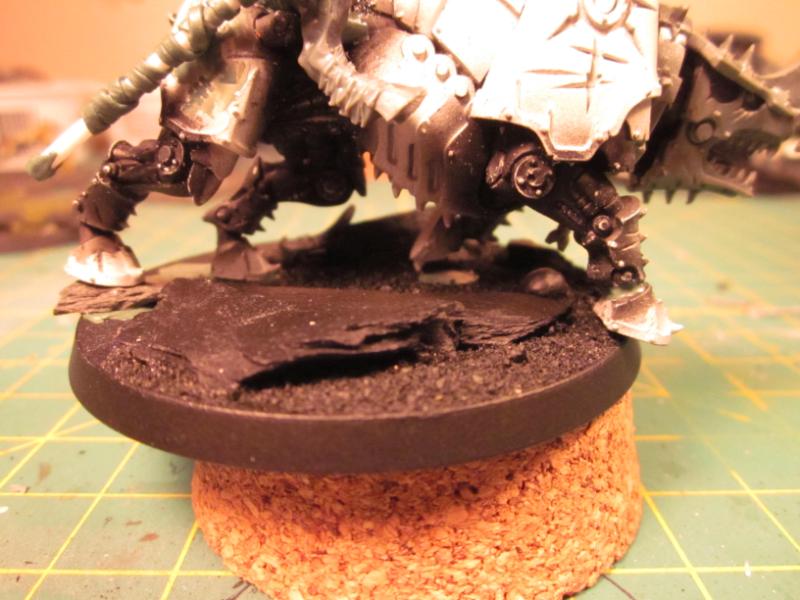
Amazing forgefiend. How did you base it up, is that stacked slate? Must have been awkward getting it the right height for the maulerfiend leg. Very nice work.
e; I just looked back and read the whole thread and feth me the plasticard work on your looted wagon is amazing
23950
Post by: rwzimmerman
 A Kvlt Ghost wrote: A Kvlt Ghost wrote:Amazing forgefiend. How did you base it up, is that stacked slate? Must have been awkward getting it the right height for the maulerfiend leg. Very nice work.
e; I just looked back and read the whole thread and feth me the plasticard work on your looted wagon is amazing
Thanks. You are very perceptive. It is stacked slate and it took a couple hours of fidgeting and adjusting to get everything exactly right so the feet and one arm seemed to rest naturally one them no matter which set of legs I added.
Automatically Appended Next Post:
==============================================================================================================
This will be a dreadknight for my Word Bearers counts as Grey Knight army. The mystical nature of the Word Bearers seems like a perfect match for the Grey Knights psyic powers. I figure I'll mix in some Dark Mechanicum stuff as well. The army will be heavily slanted toward the Inquisitorial henchmen.
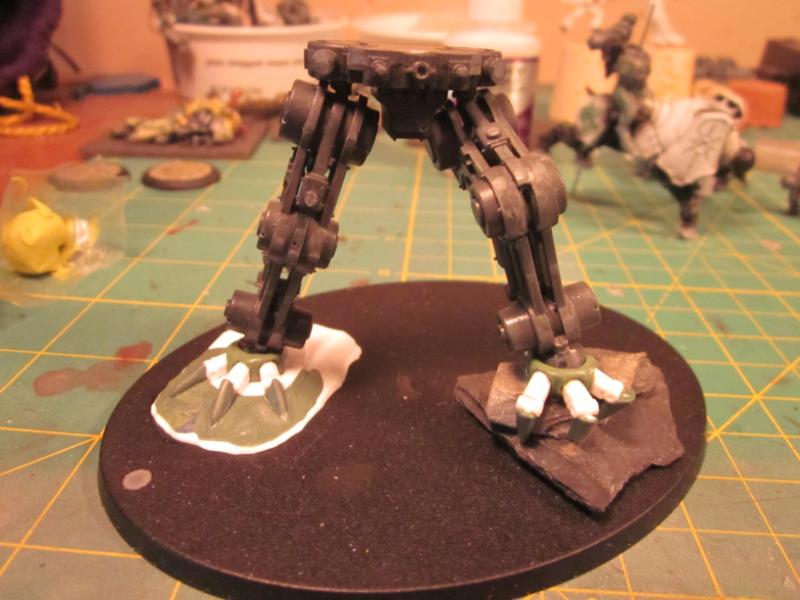
First the feet. They still need a little work.
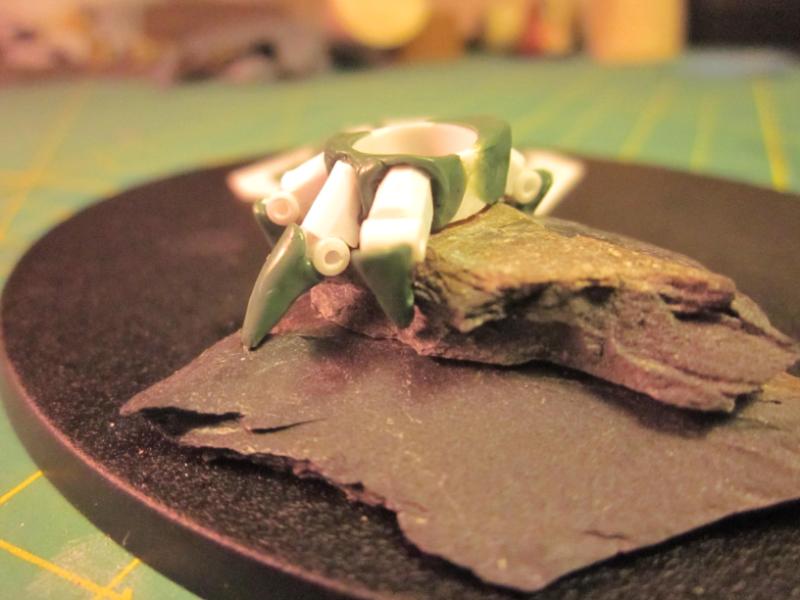
D'ho! I glued the legs into the torso backwards. It's a conversion so I'm sure it will be easier to work with it rather than dig them out and start over. I thought I would have to do a lot of reconstruction on the knee after cutting it apart and gluing it back to bend it, but simply cutting as close to possible to the knee with a sharp exacto and gluing it back worked fine.
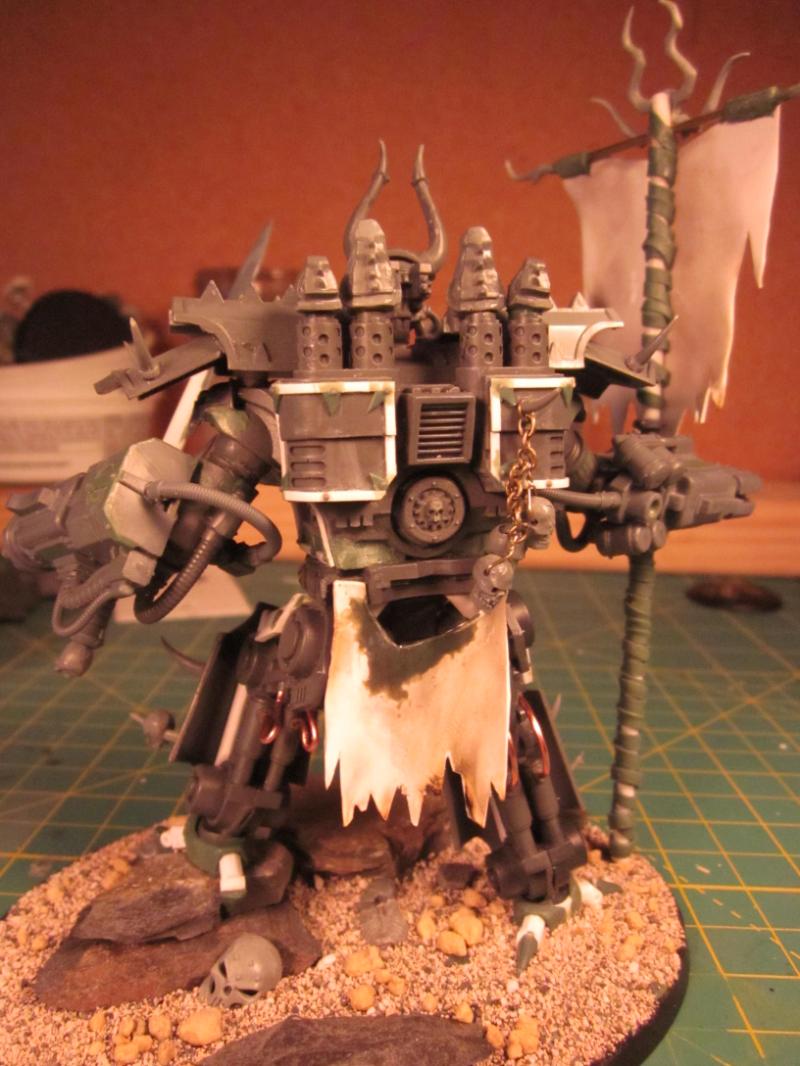
Now, to figure out how to merge the demon price with the torso and how the armor plates will go.
23950
Post by: rwzimmerman
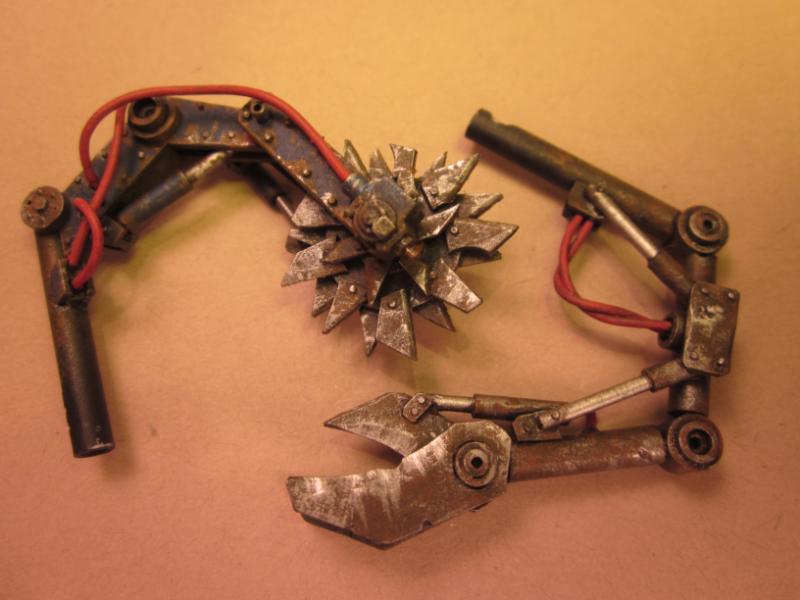
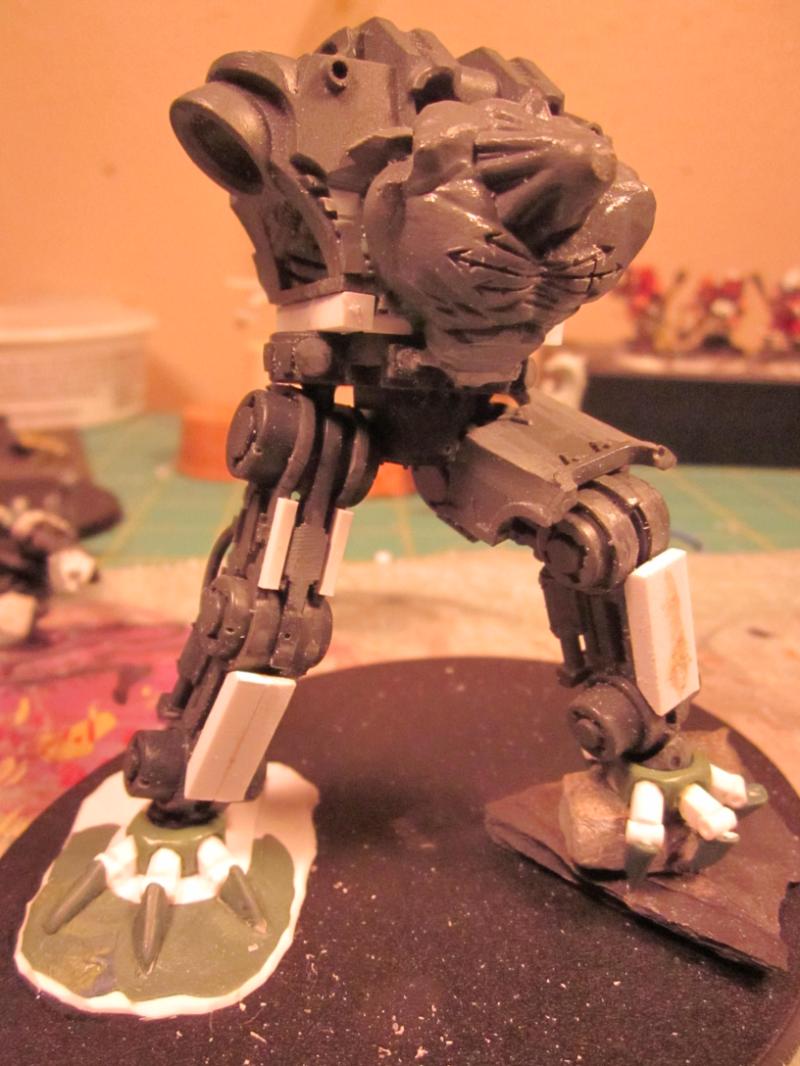
Got a bit more work done over the weekend. Still not sure what I want to do with the arms. They definitely need some beefing out. I may just replace one of them with a weapon of some type. Probably a from a forgefiend.
23950
Post by: rwzimmerman
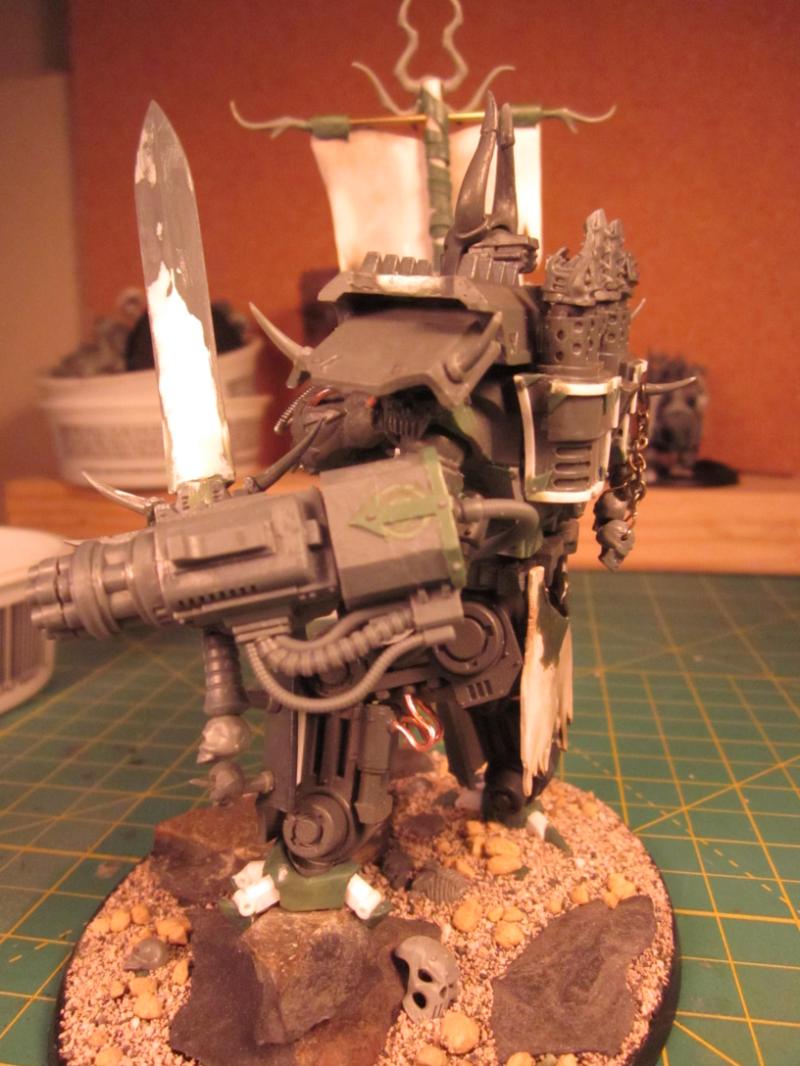
I'm not liking this. The thigh plates make him look too blocky or something.
This I like better, but still not sure.
No head, no arms and no thighs really make it look a lot smaller. I know you really cant tell in the pics, but it seems way smaller.
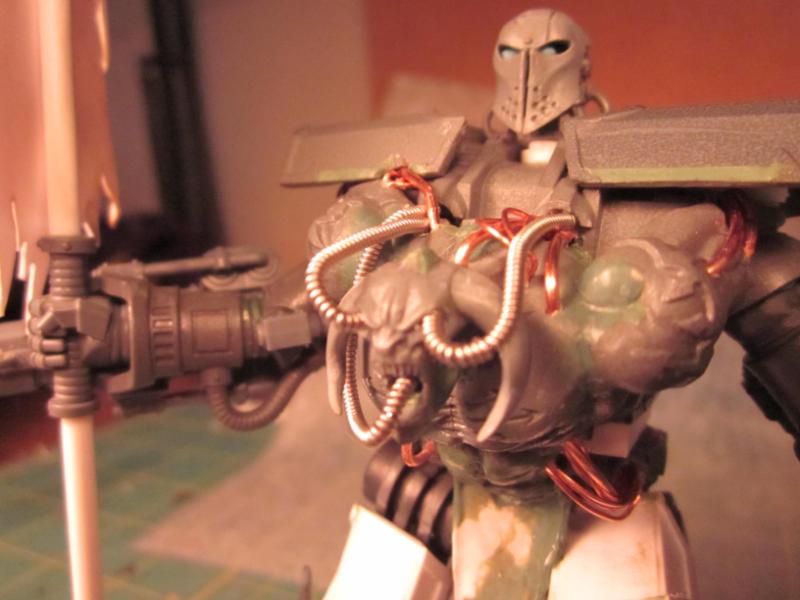
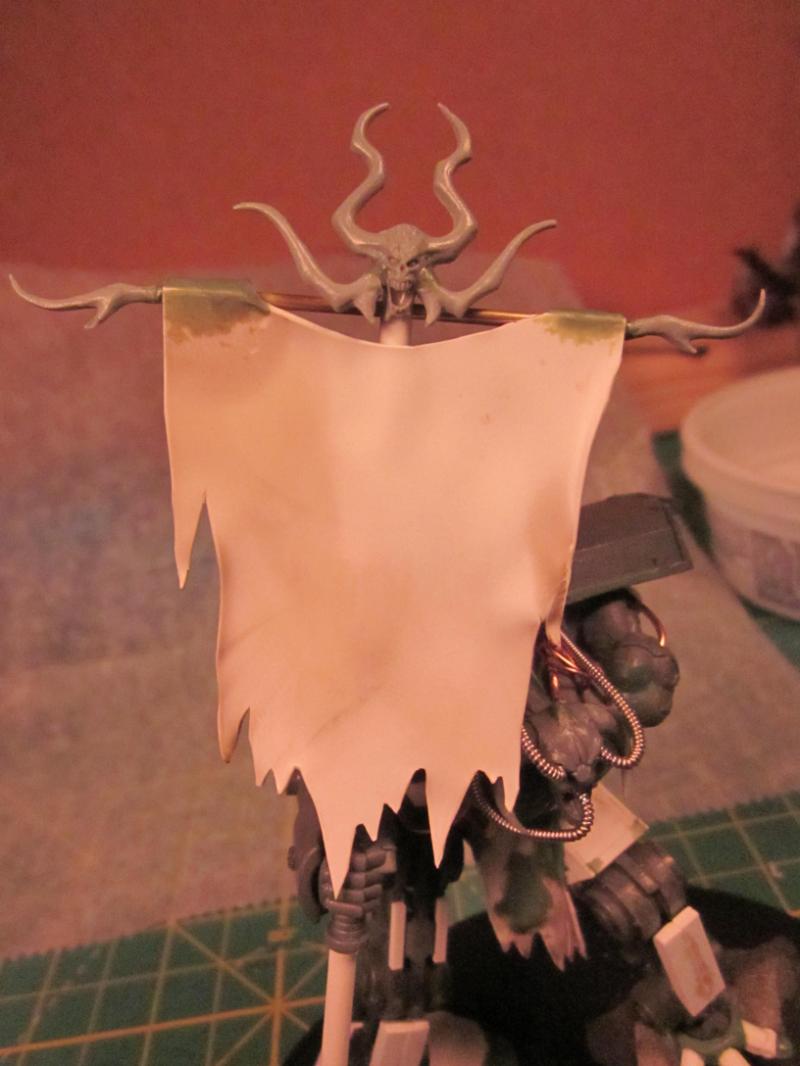
I really like the head, but not two heads. So I'm thinking I'll put tubes coming out of the DP's eye's and possibly mouth to make it "dormant".
23950
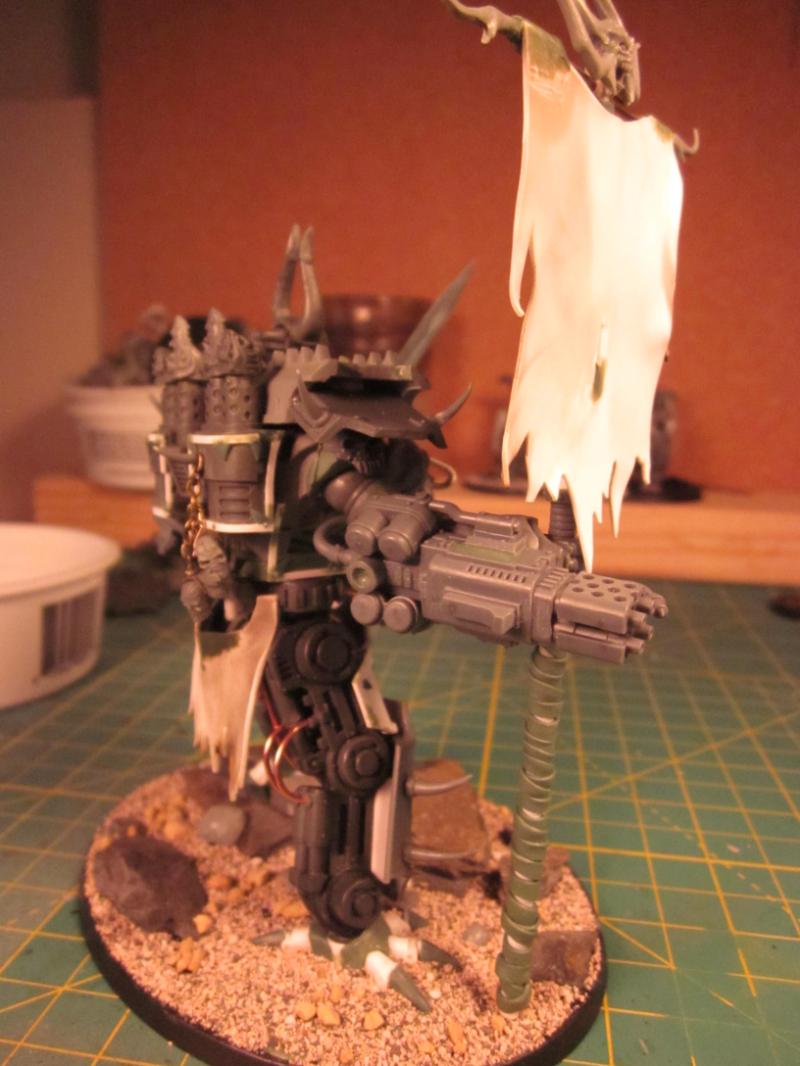
Post by: rwzimmerman
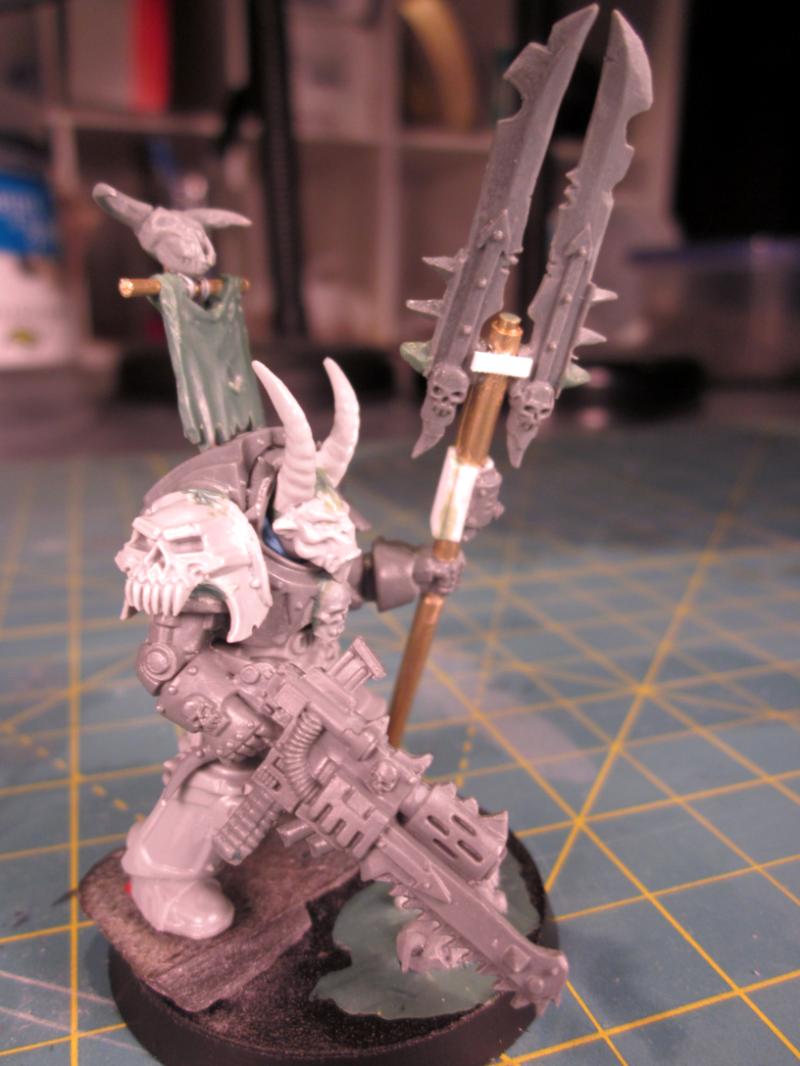
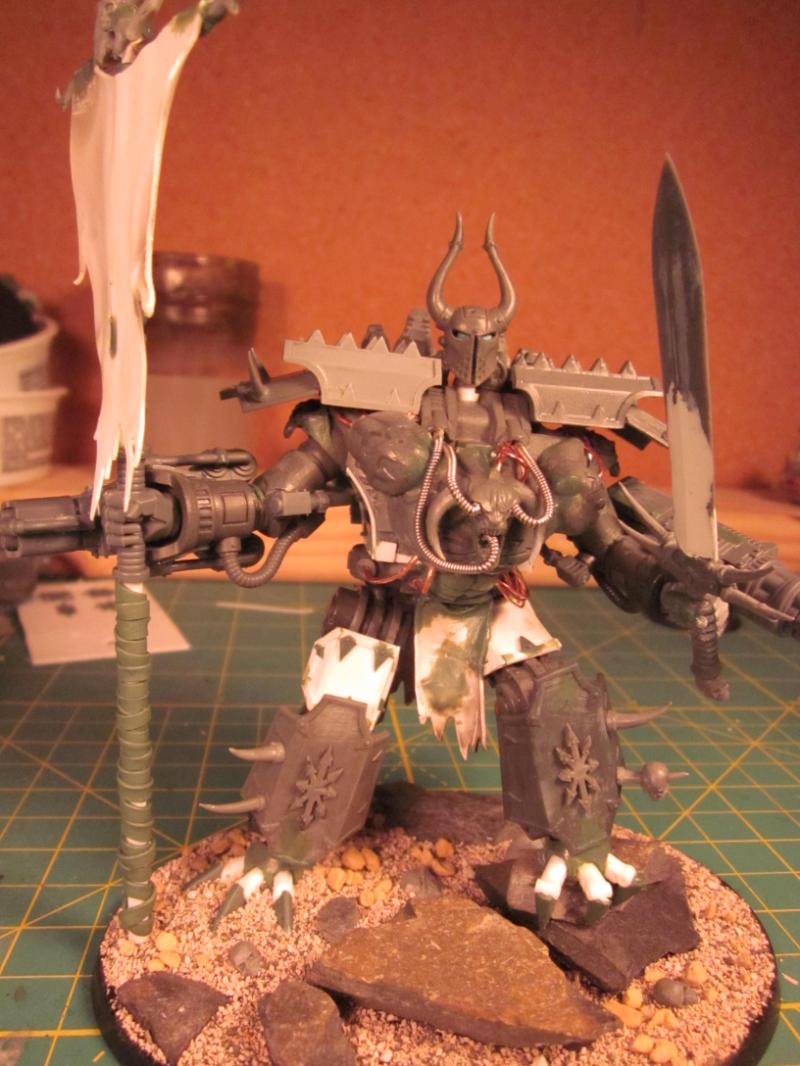
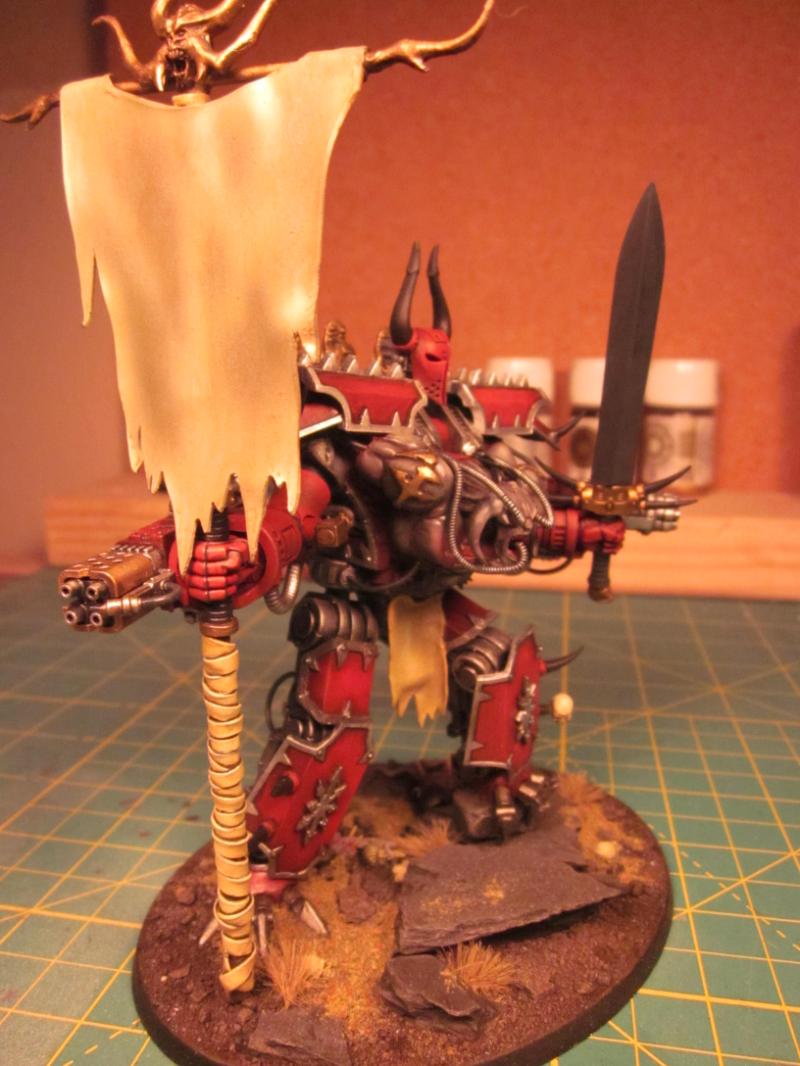
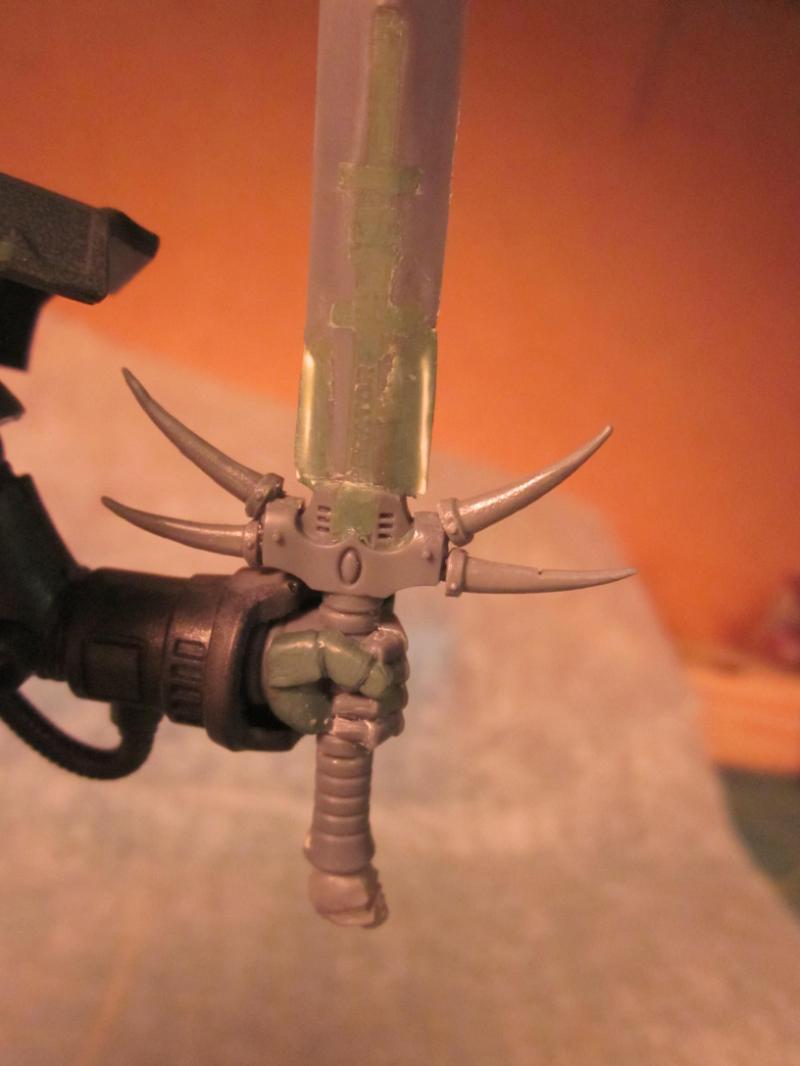
This is where I'm at now. The stance is a little "wobbly" since there is still a lot of blue tack at this point. Not sure if I'm going with or without horns on this head. I really like skull like head with the defiler, but it is a tad to small. IMHO
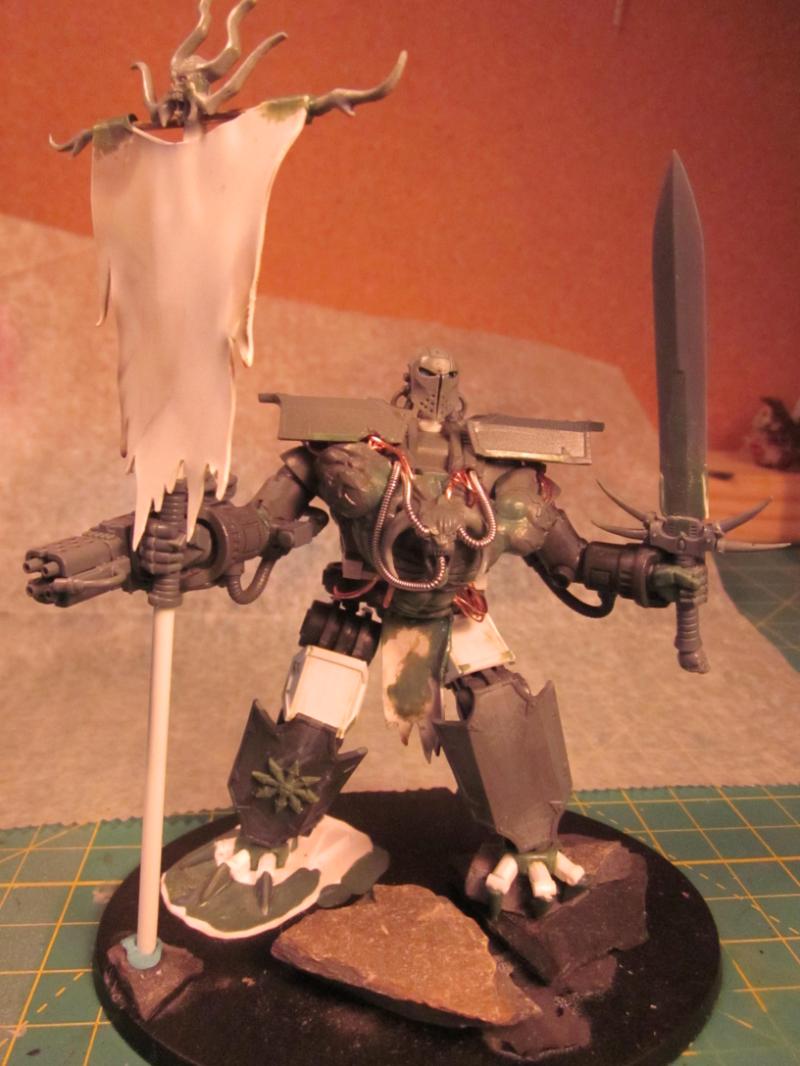
I'm very happy with the spikey hilt, though I'm sure it would do more damage to the wielder than any foe.
Very happy with the banner so far as well.
23950
Post by: rwzimmerman
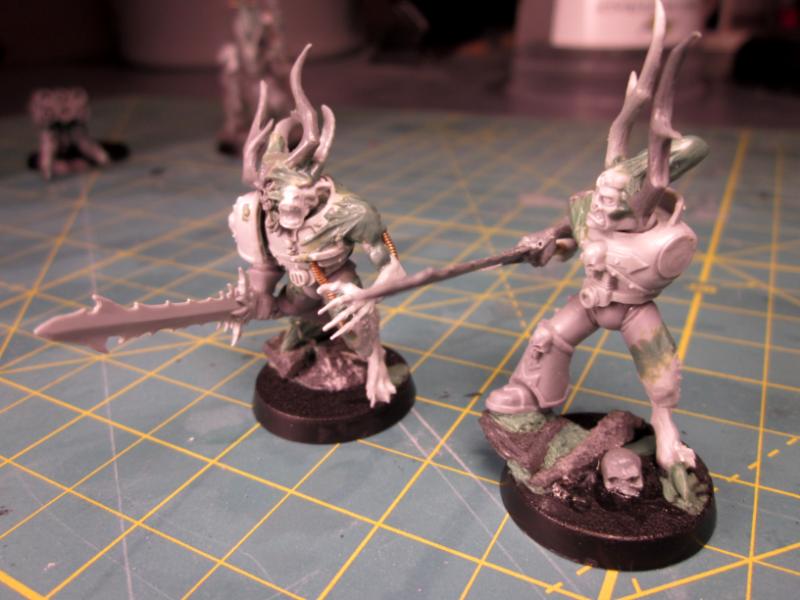
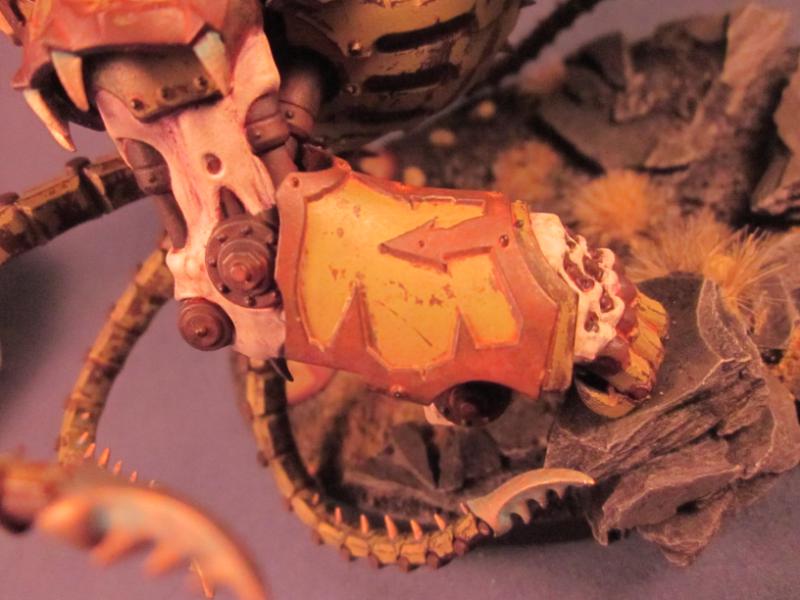
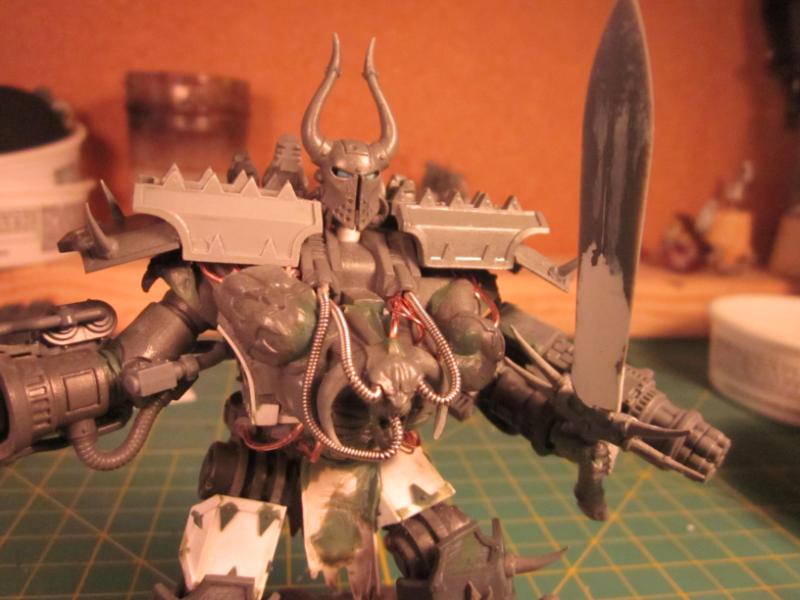
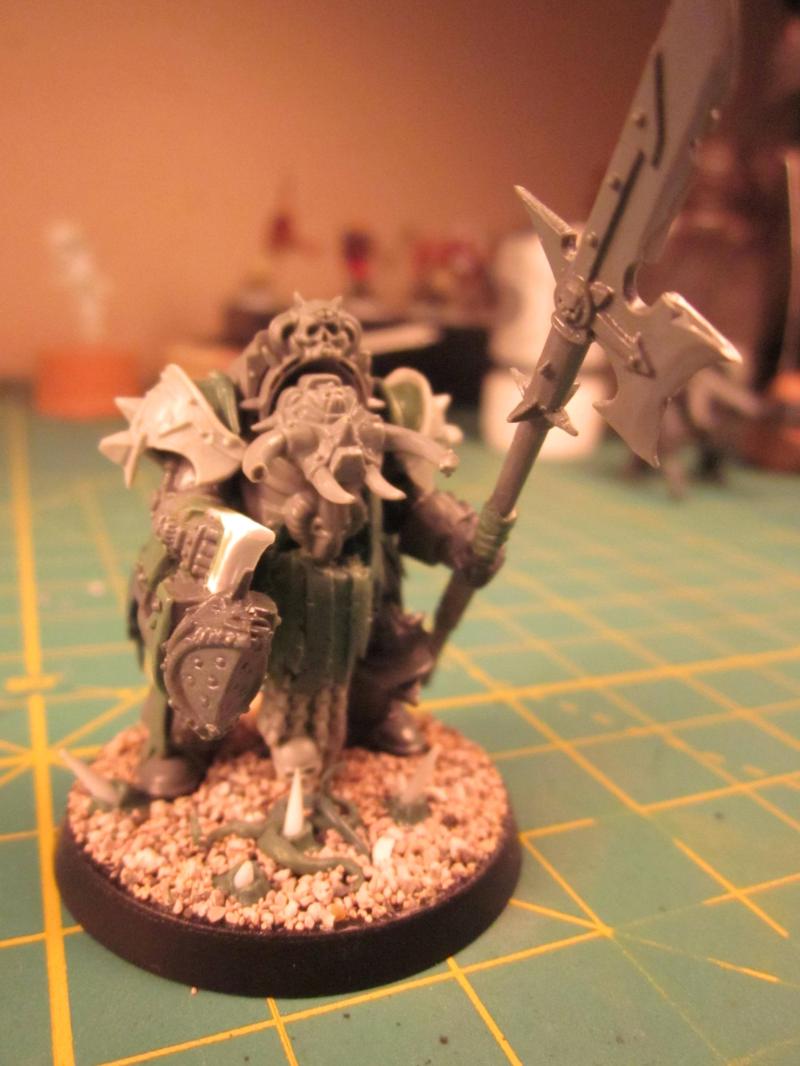
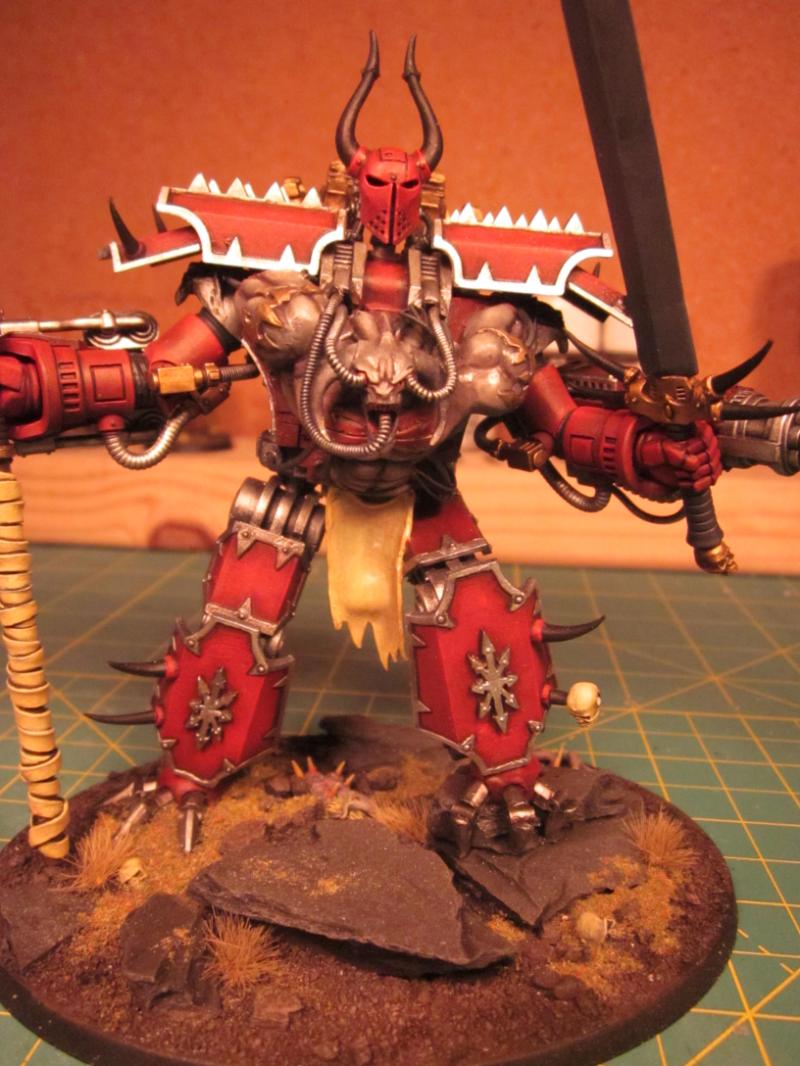
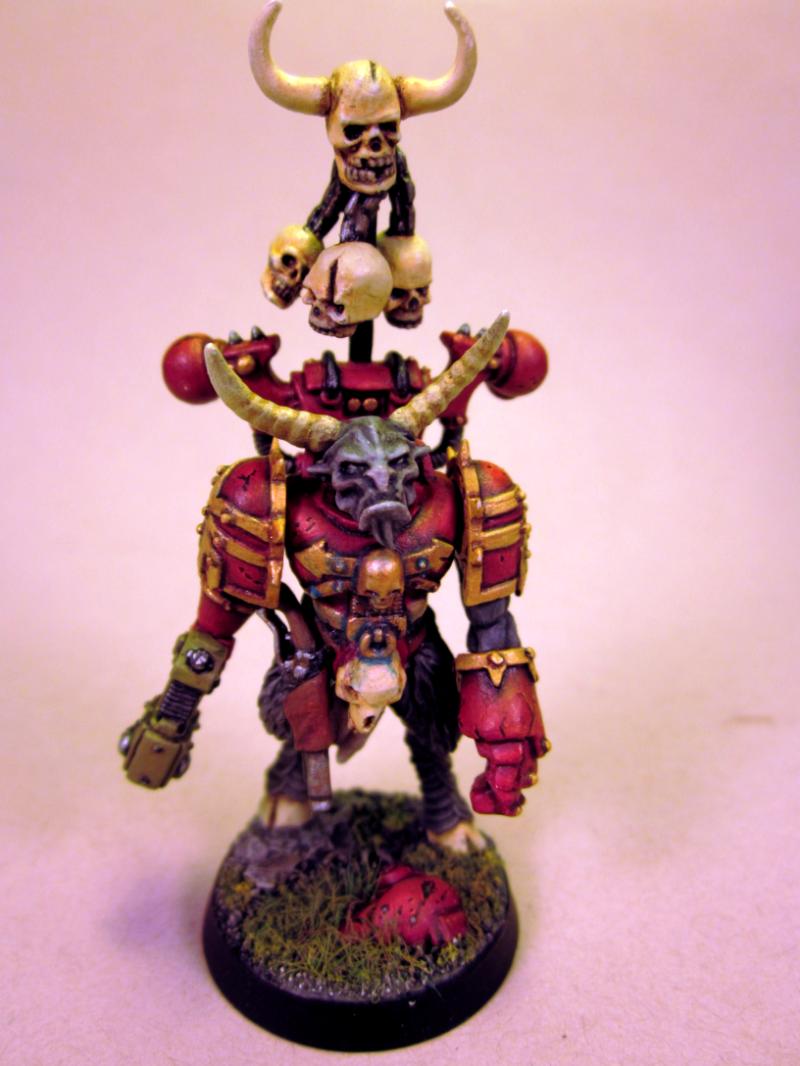
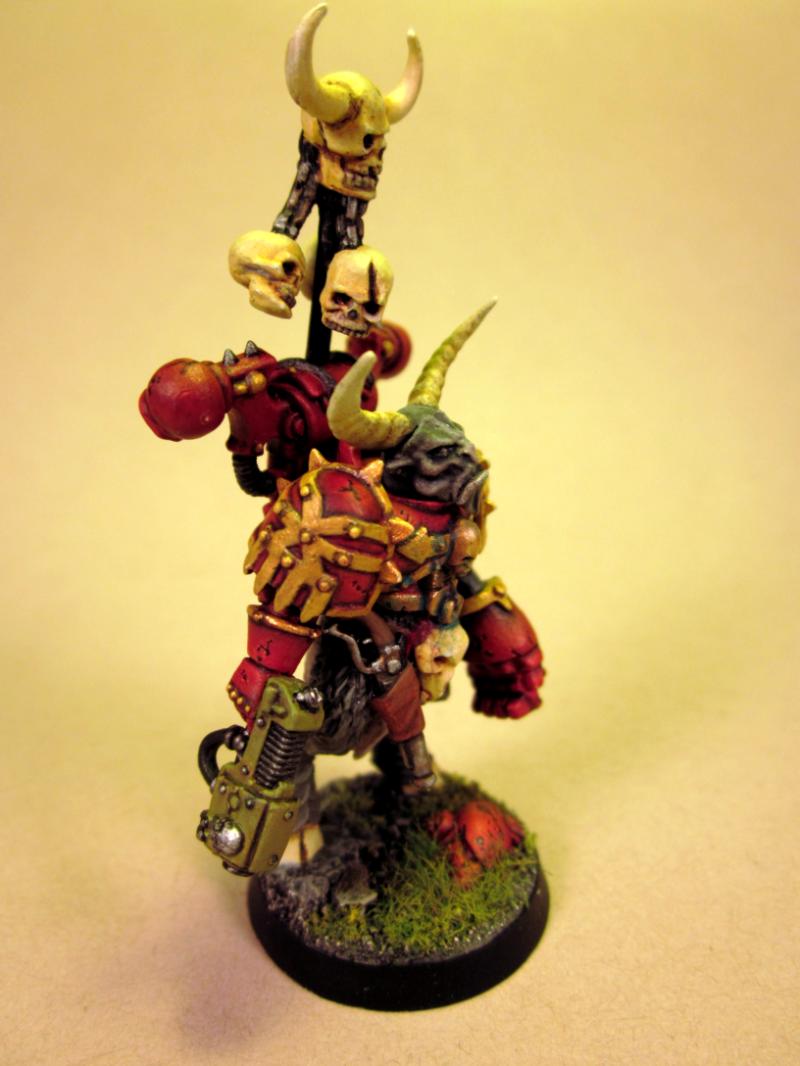
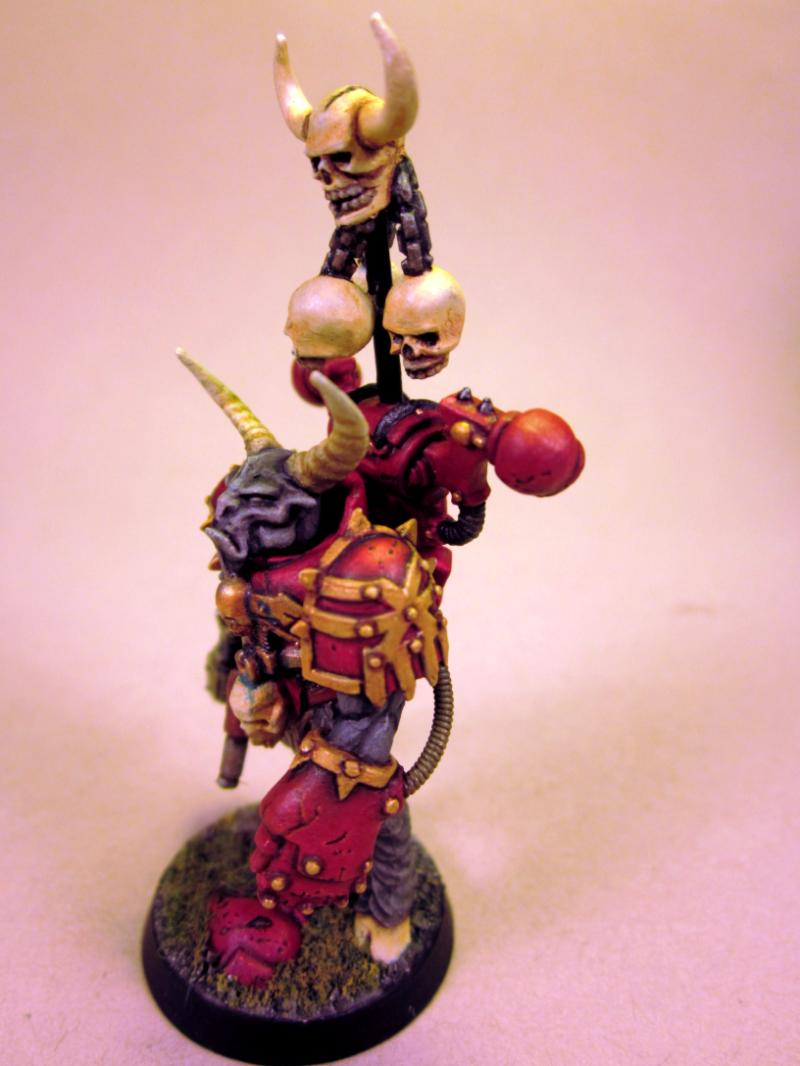
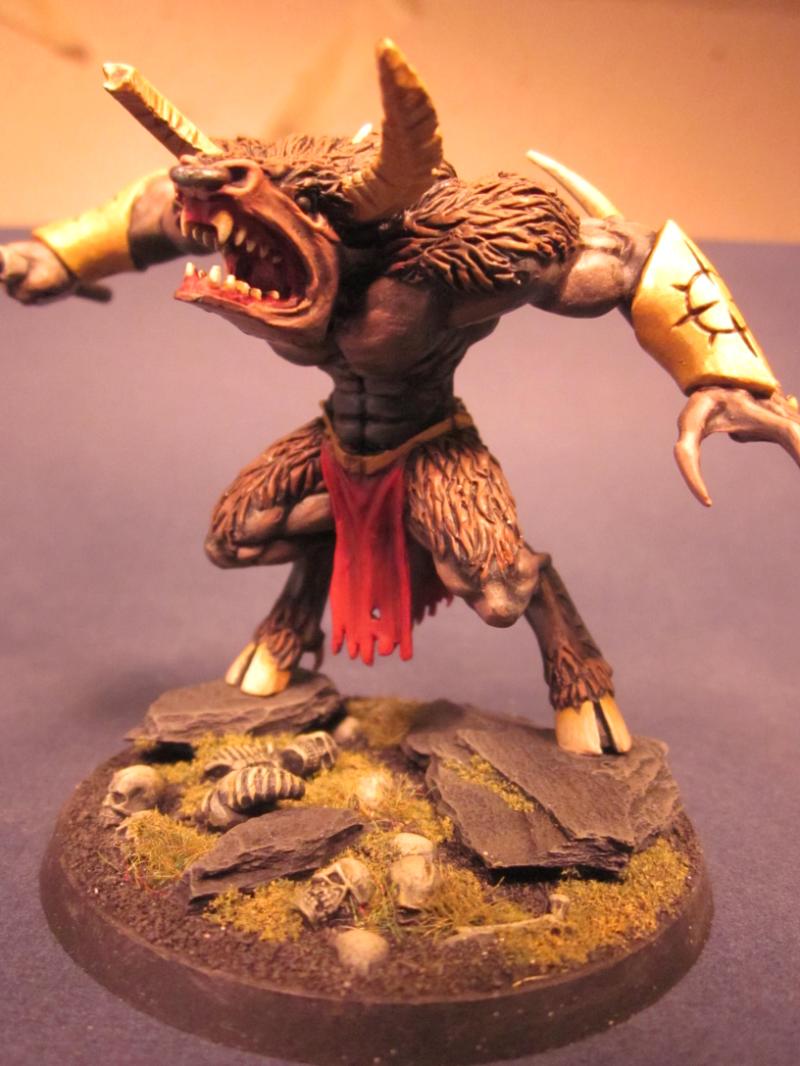
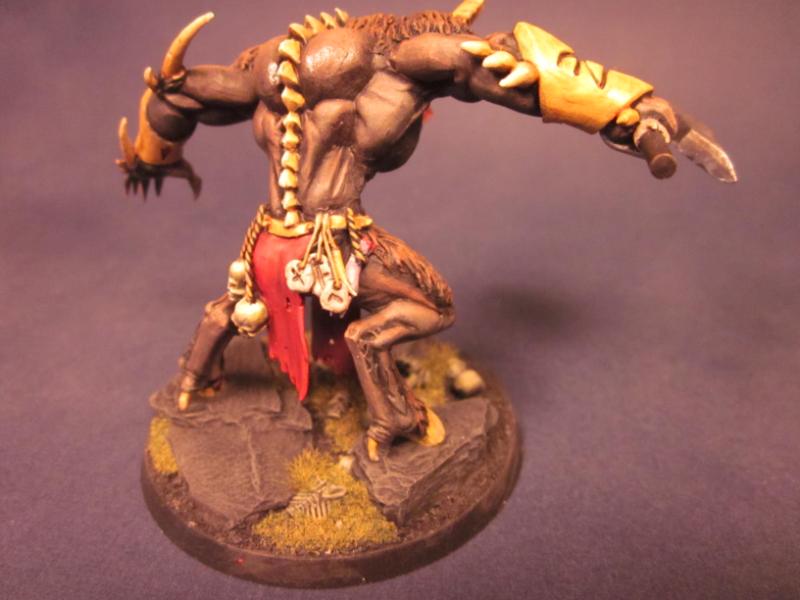
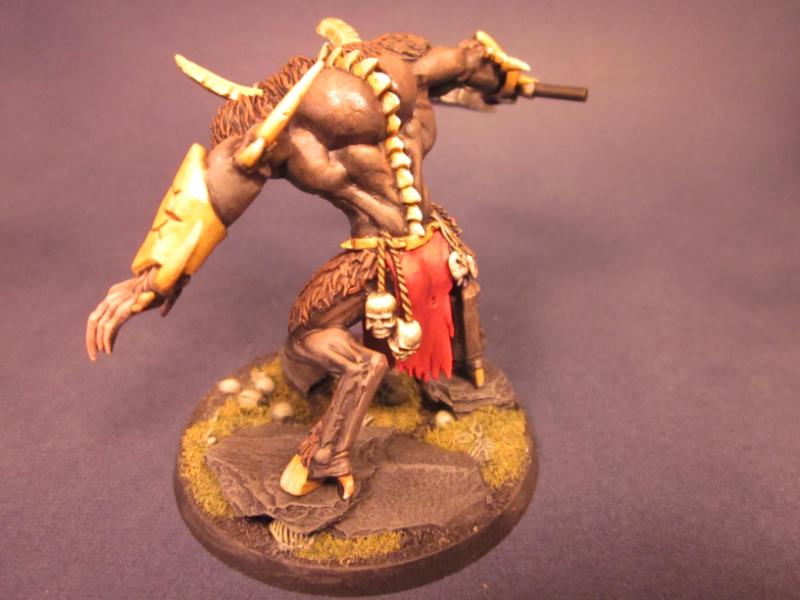
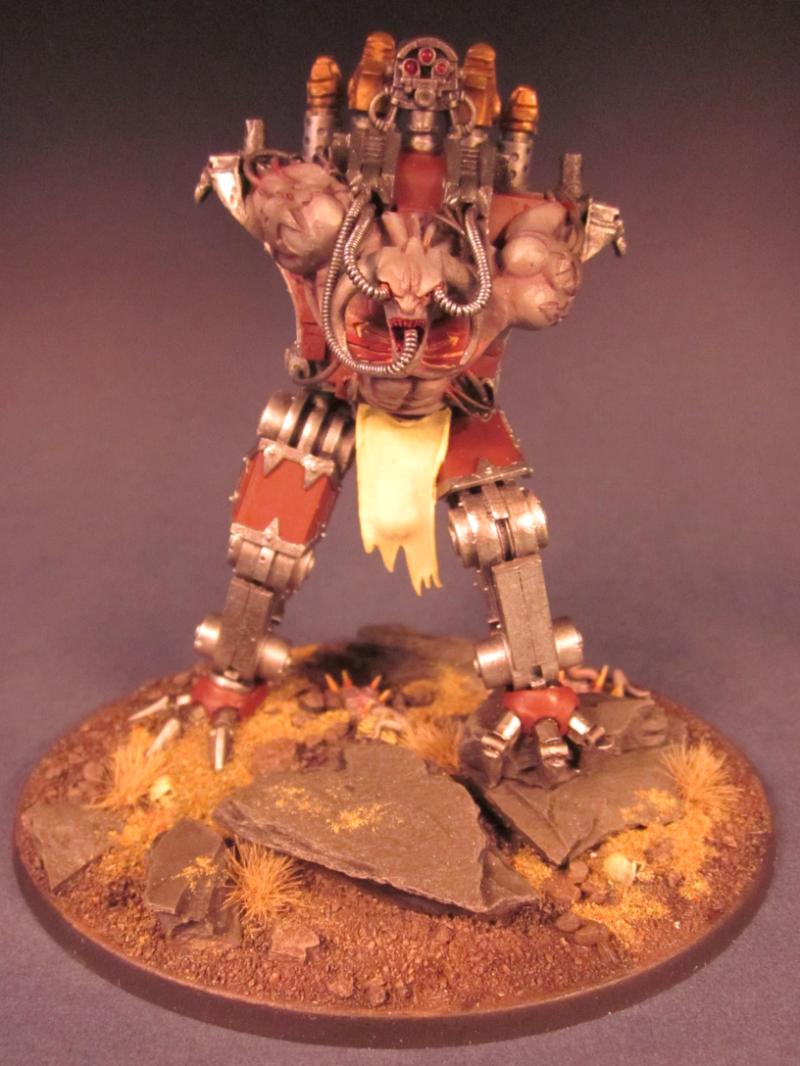
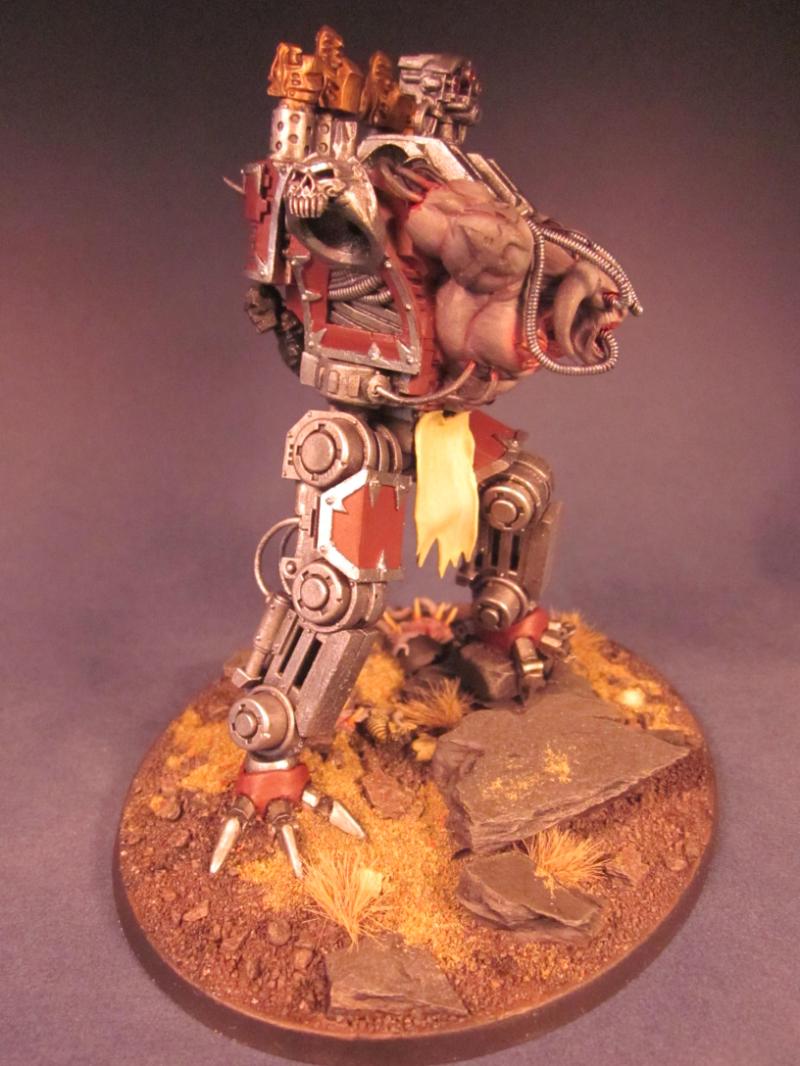
This is my Khorne Beastmen themed Demon Prince. My original plan was to take one of the GW minotaur’s and convert it to be a demon prince, but I hate those models especially the muscles in the legs. They go all kinds of random directions, drives me nuts looking at the knee. So I decided to make a demon prince look more like a minotaur and beastman. I’m happy with how it turned out. My one gripe is that it looks too much like a minotaur and not enough like a demon prince. I should have left it a bit more chaosy.
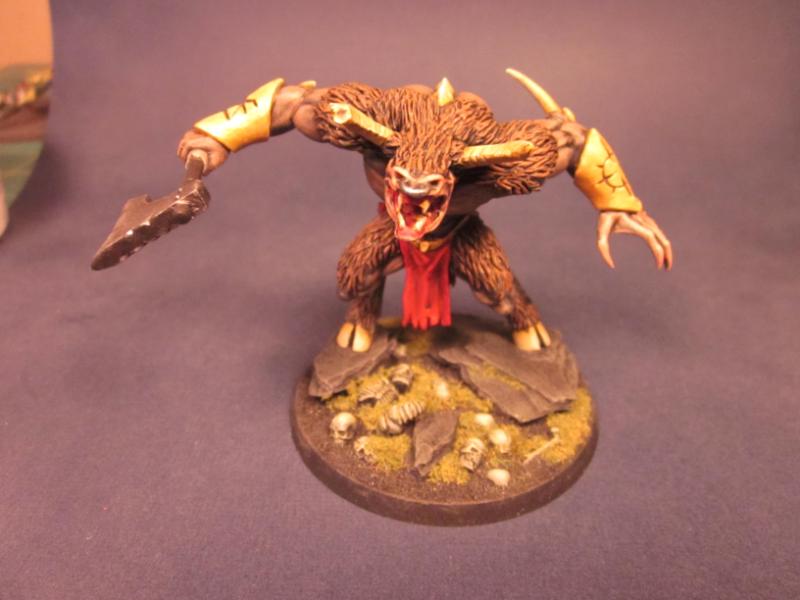
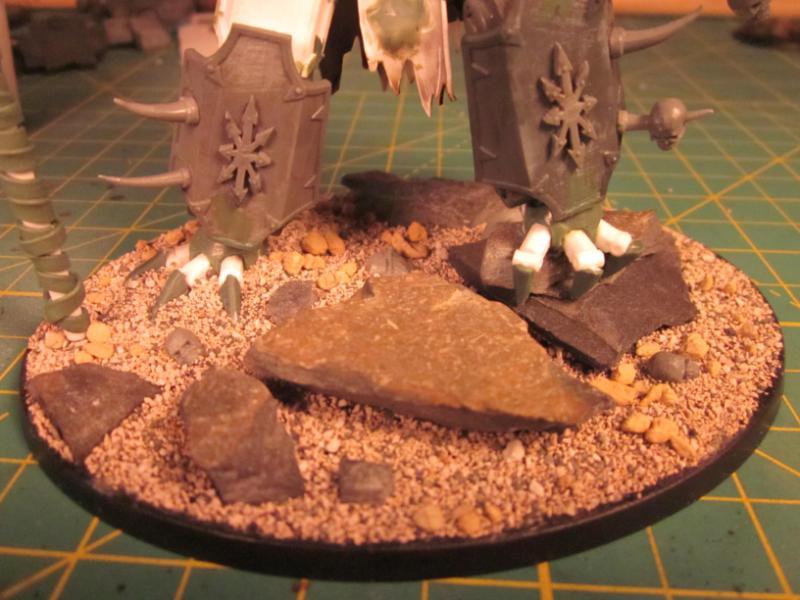
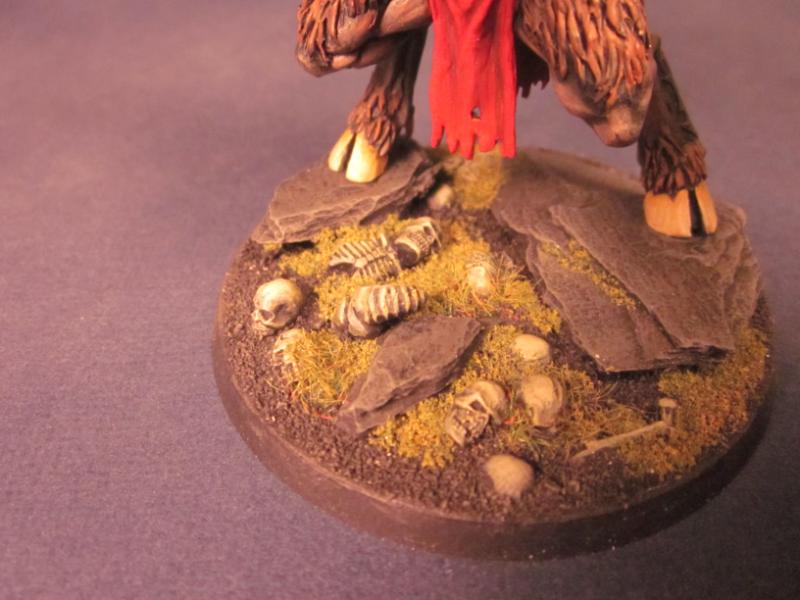
I really should add some sort of beastman glyph to the loin cloth. …and touch up those bone on the base.
…and clean up the edge of the base.
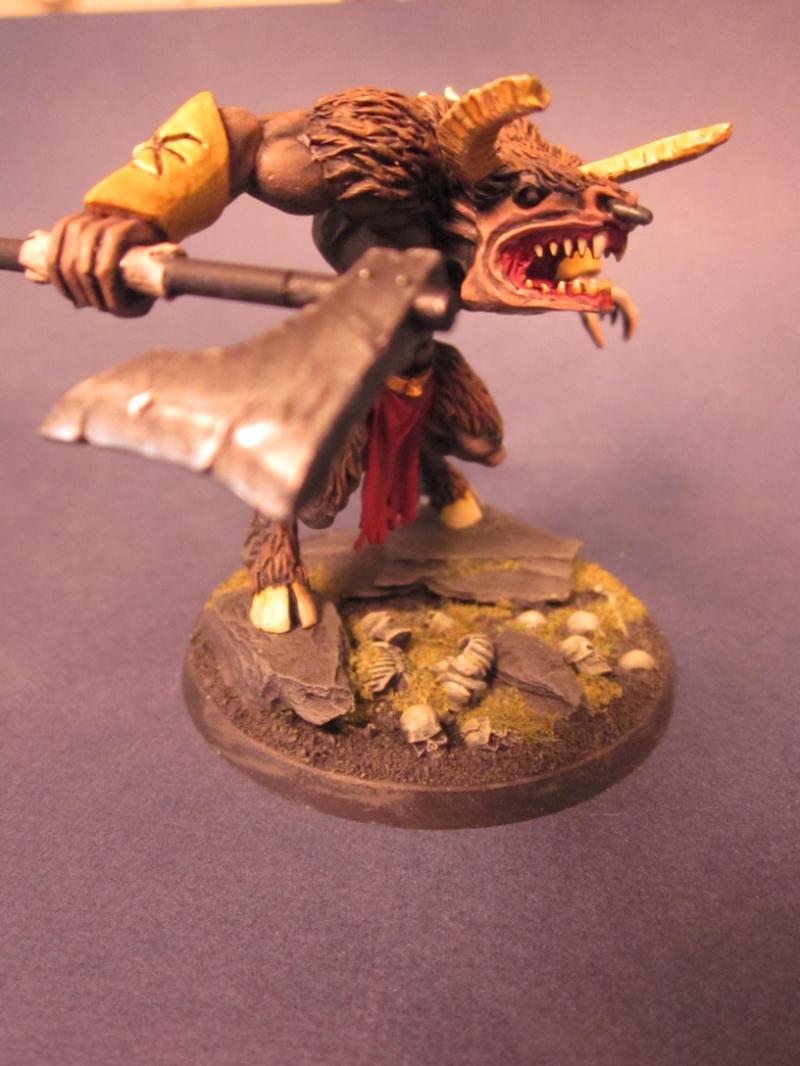
I’m happy with the runes for the most part. They don’t hang from the belt quite naturally, but aside from that I like them.
11892
Post by: Shadowbrand
Now -That- is an Obliterator.
23950
Post by: rwzimmerman
23950
Post by: rwzimmerman
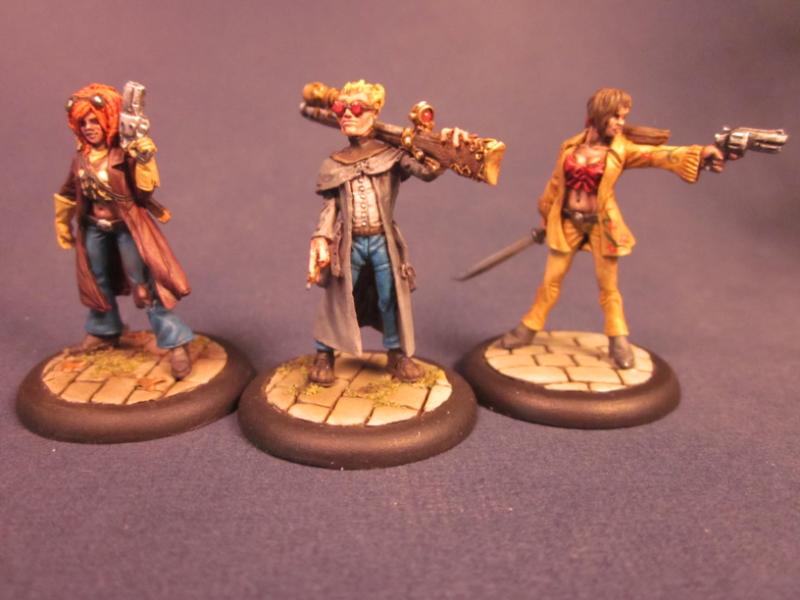
I painted up some Malifaux guys recently.
The 10 thunders are my main focus. Misaki's boxed set is the only one I've finished so far.
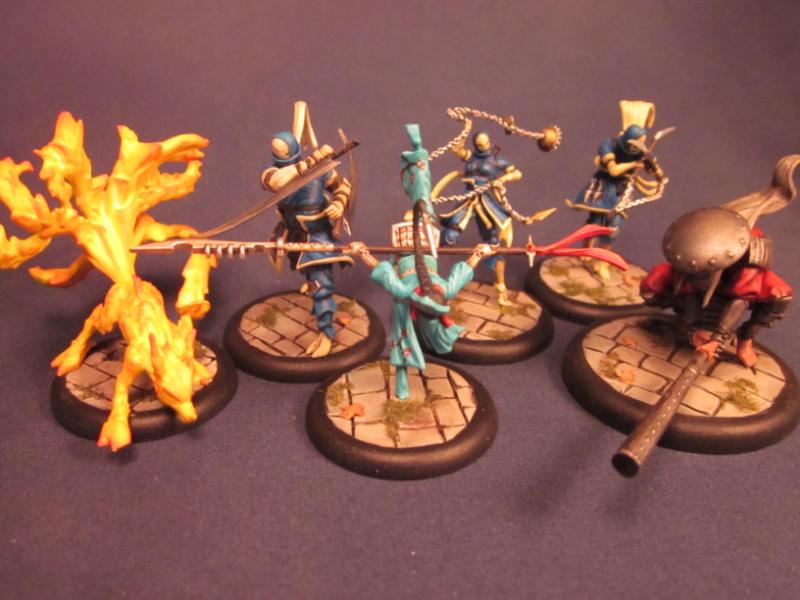
Here are some outcasts Misaki used to be able to take as allies. Two ronin and Hans (middle). I have one ronin half way done to go.
I started work on the spirits of vengeance boxed set.
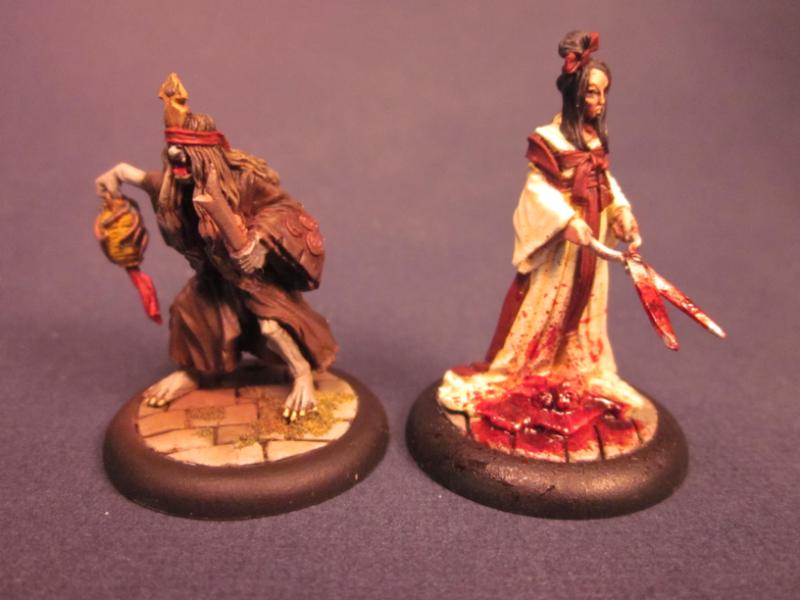
I may go back and add some fancy scroll work to some of these guys (like the flowers on ronin on the right), I just haven't figured out what to do yet.
23950
Post by: rwzimmerman
Started painting the dreadknight. The color is definitely off it's bit more purplish in RL. This is my fist real attempt to use an airbrush. I'm pretty happy with it.
23950
Post by: rwzimmerman
Making progress on the DK
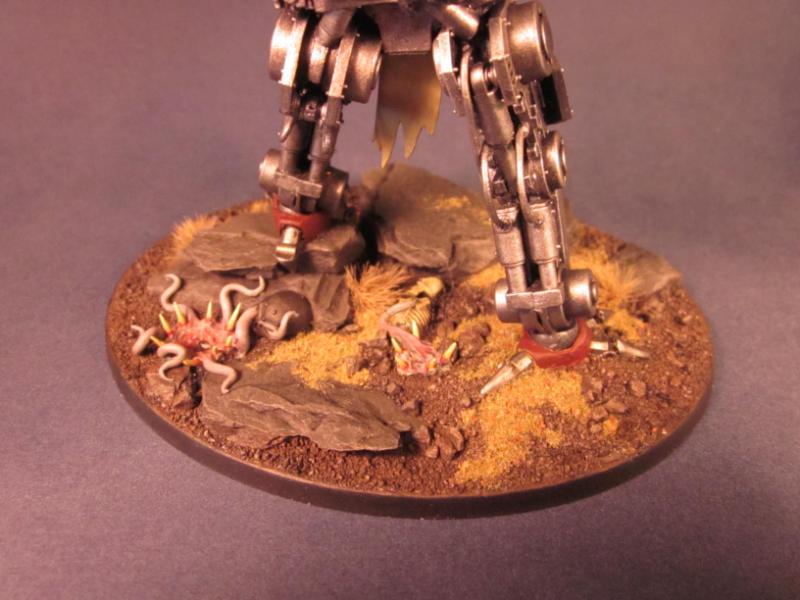
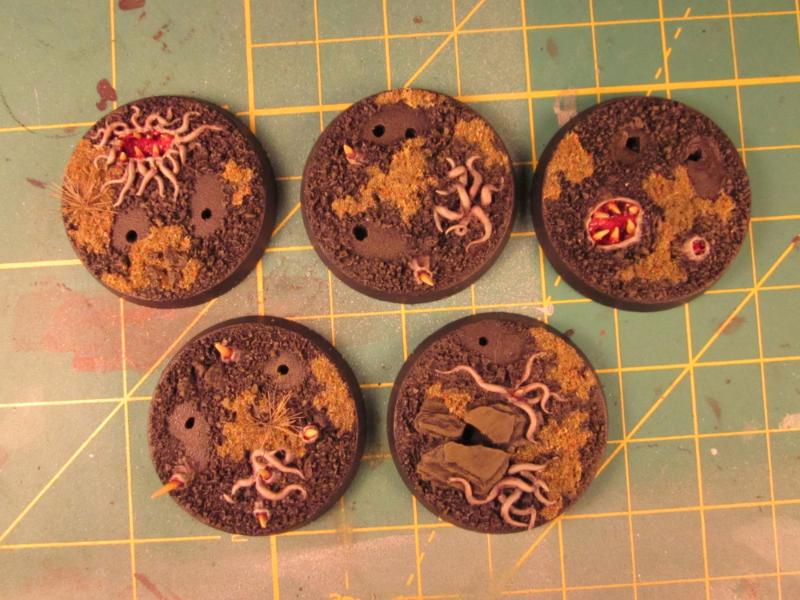
I'm putting little demon like spots of corruption on all my Word Bearer bases since they like demons so much. Forgot that on this base and had to go back and retro in a couple spots.
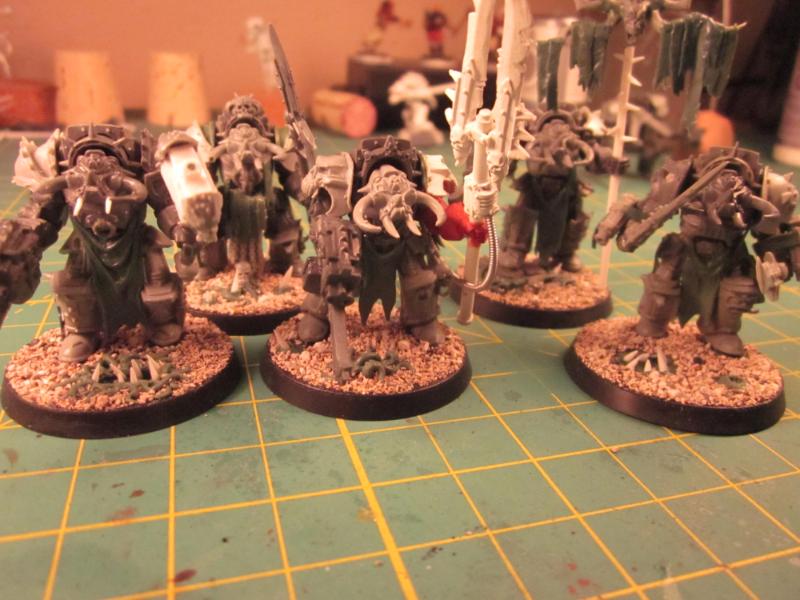
Here are the corrupted bases for my first 5 terminators ready to go.
Crusaders! The first of the henchmen portion of the army. Not all that happy with how these guys came out. I'll need to do another batch and put some more effort into them. Next I thing will be some arco-flagilates. It's hard to tell from this shot, but all of the weapons aside from the swords have "power-bits" added.

23950
Post by: rwzimmerman
23950
Post by: rwzimmerman
37519
Post by: bigfish
Daaaam, those gk counts as models are looking awesome!
im particually found of the one with the duel swords and tbh all of them are really cool. Also the dreadknight is looking sweet painted up
keep up the awesome
48594
Post by: dsteingass
Wow! That's your first Airbrushing!?! Amazing!
23950
Post by: rwzimmerman
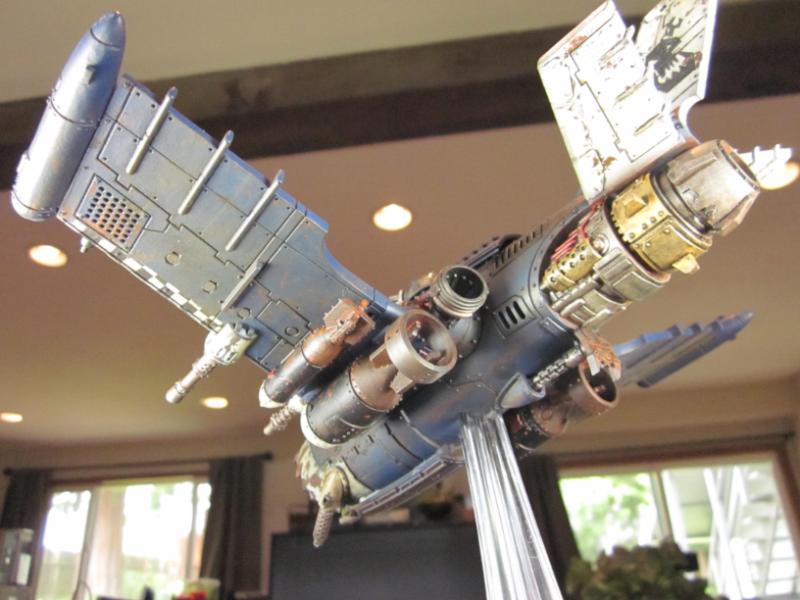
33919
Post by: Moltar
Sweet flyer, Bob!
48594
Post by: dsteingass
Some excellent work man! I especially love the paint scrapes!
|
|