18892
Post by: Bar
Hey guys.
Newbie alert, lol.
I am not a gamer at all, but i like the vehicle designs of the warhammer universe.
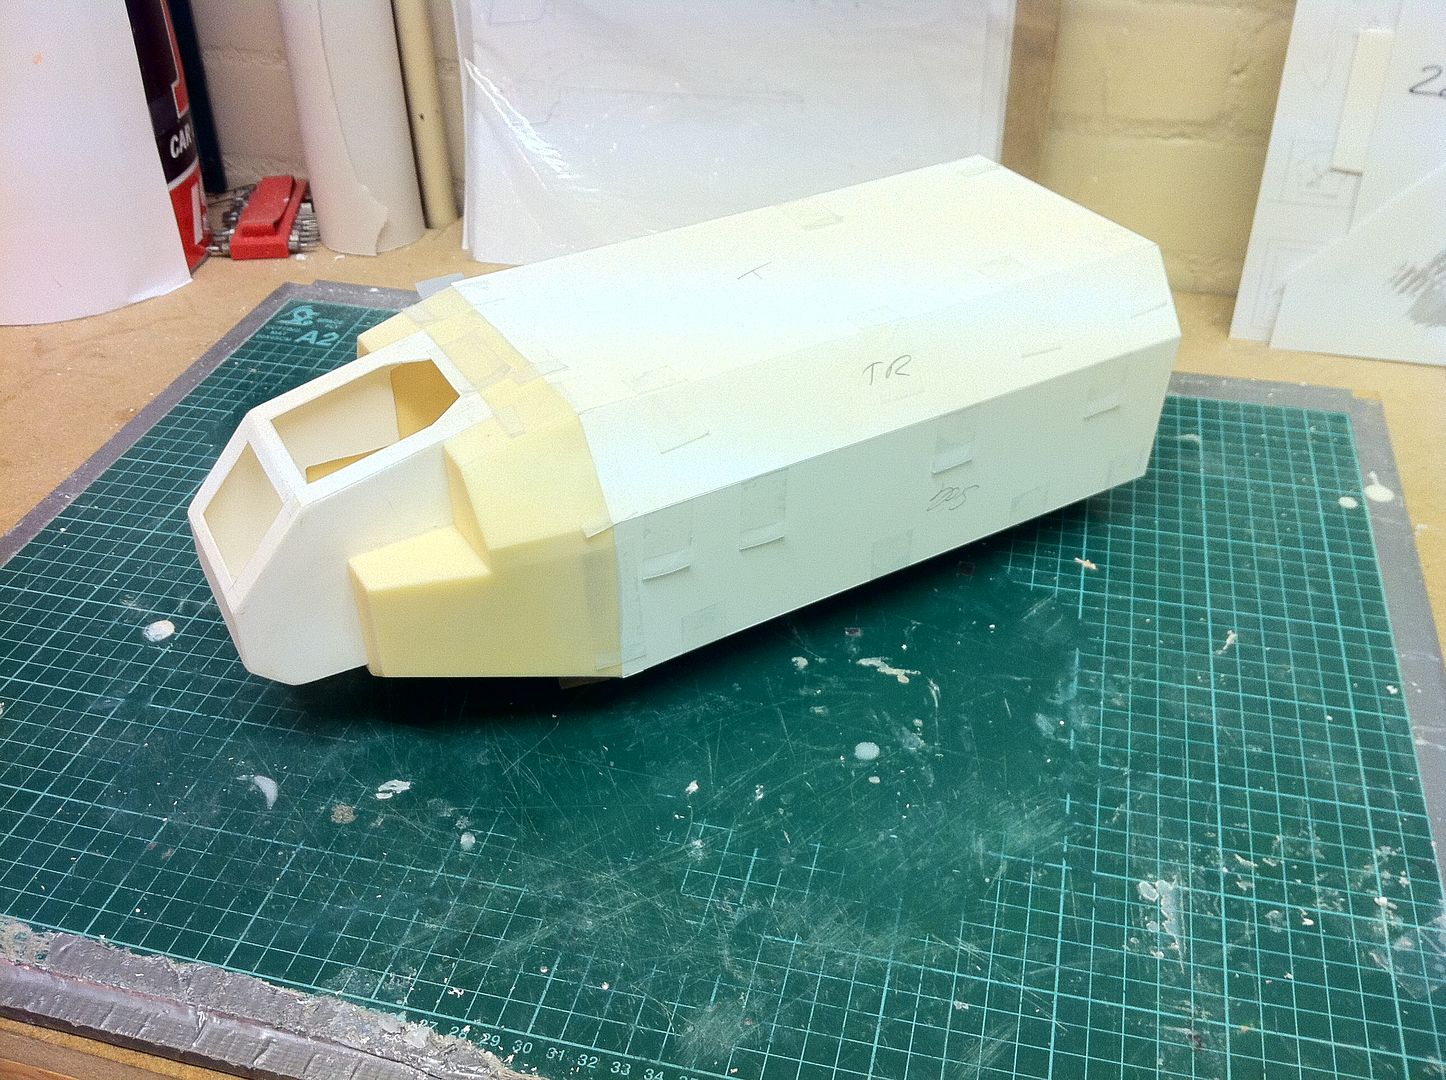
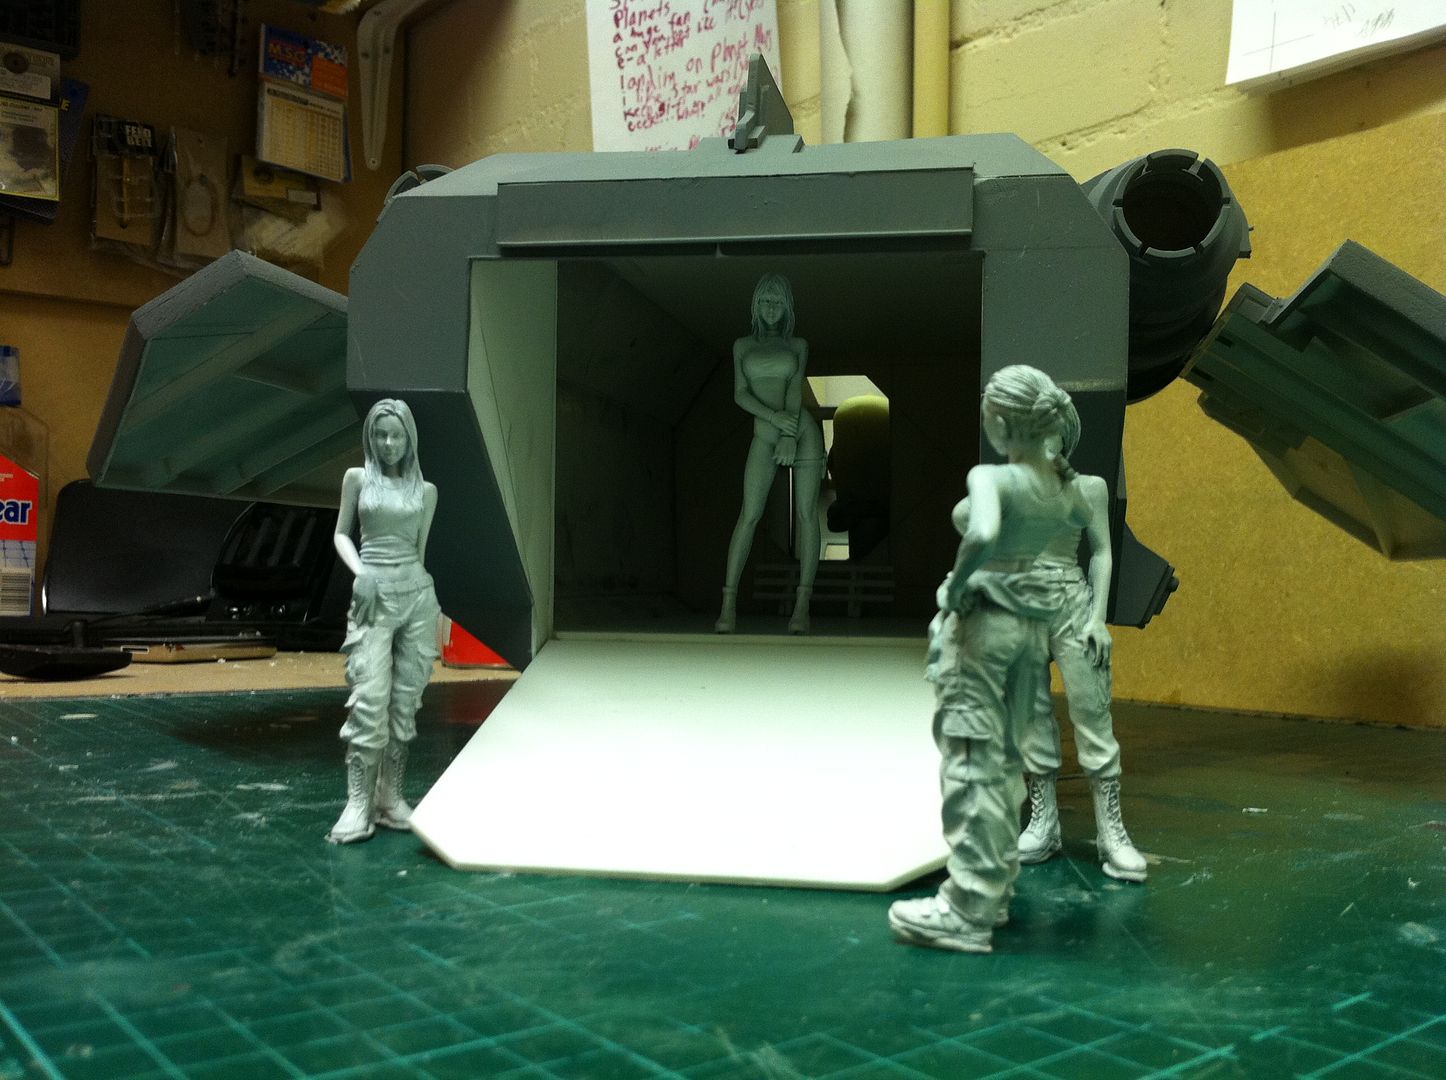
I wanted to buy an Arvus, but the kit is so tiny, so i decided to make one of my own in a scale that does the design a bit more justice. I normally work in 1/20 so that's the size i aimed for.
I also wanted there to be a bit more room in the cockpit(And in the back), than there is in the kit, so i streched the scale a little larger for that too.
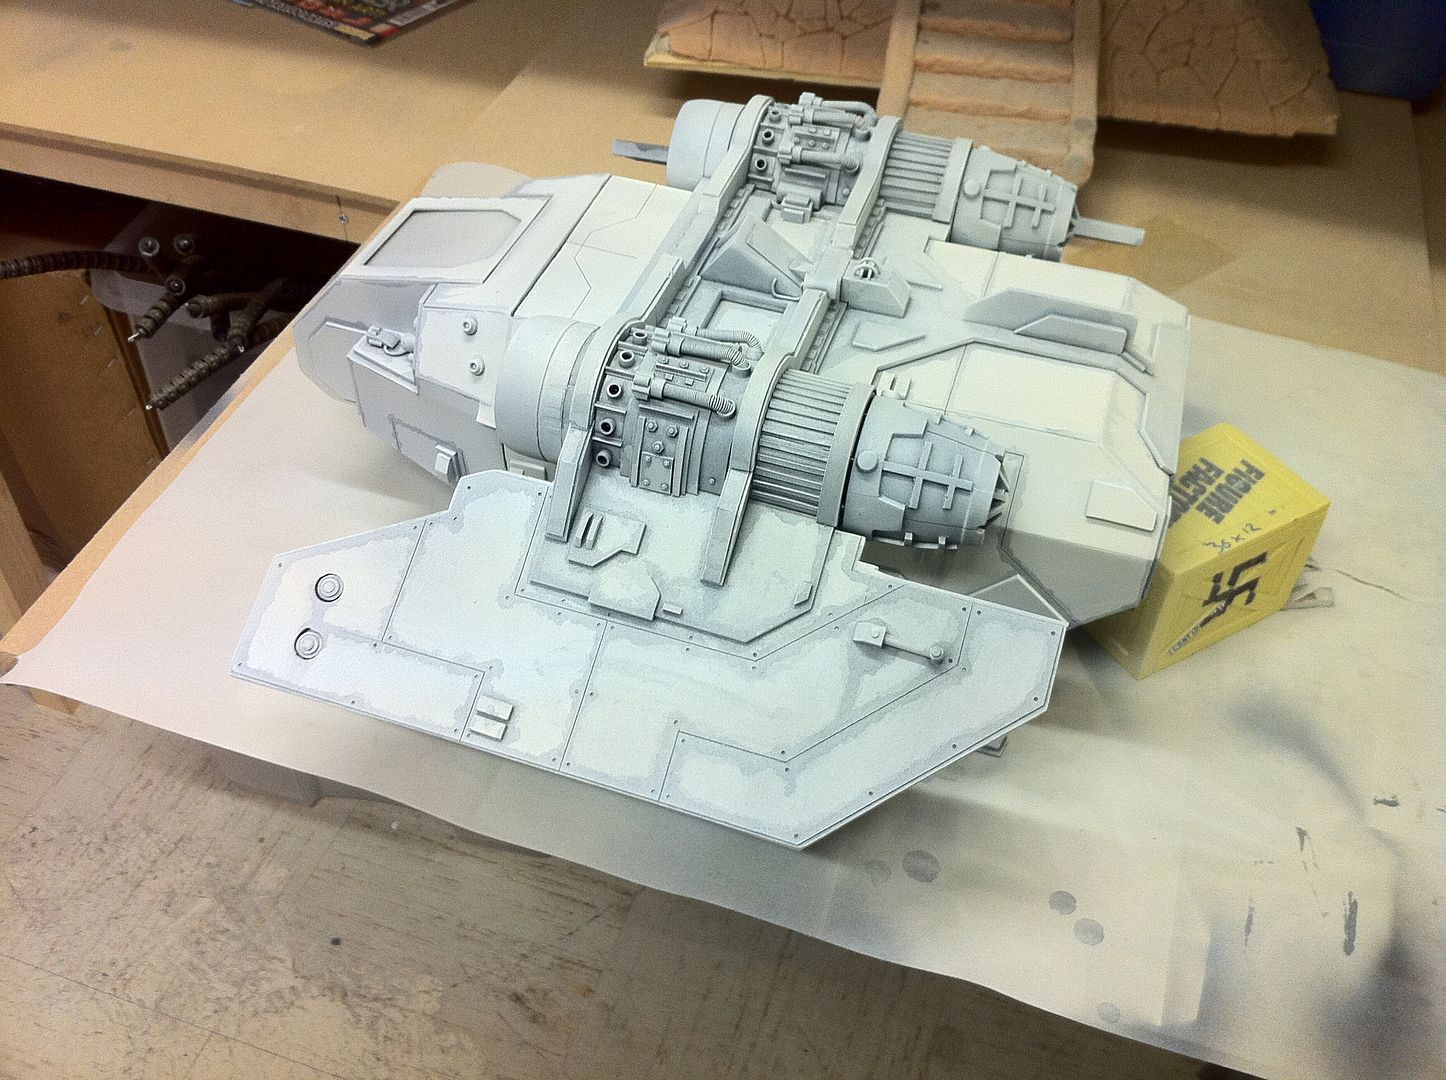
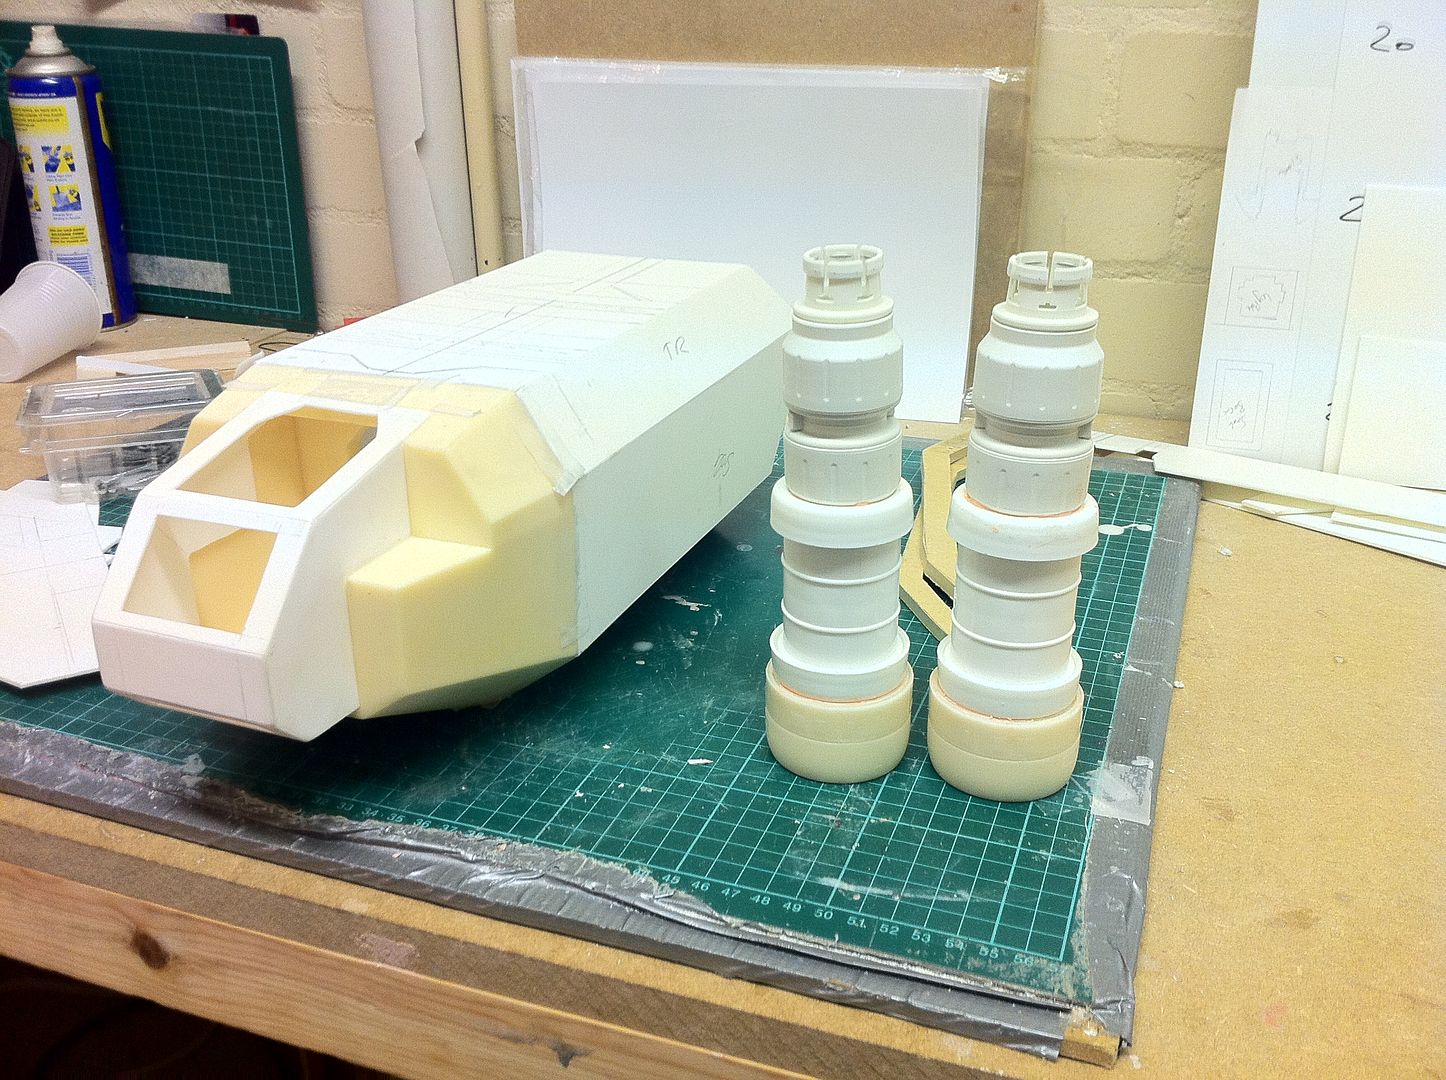
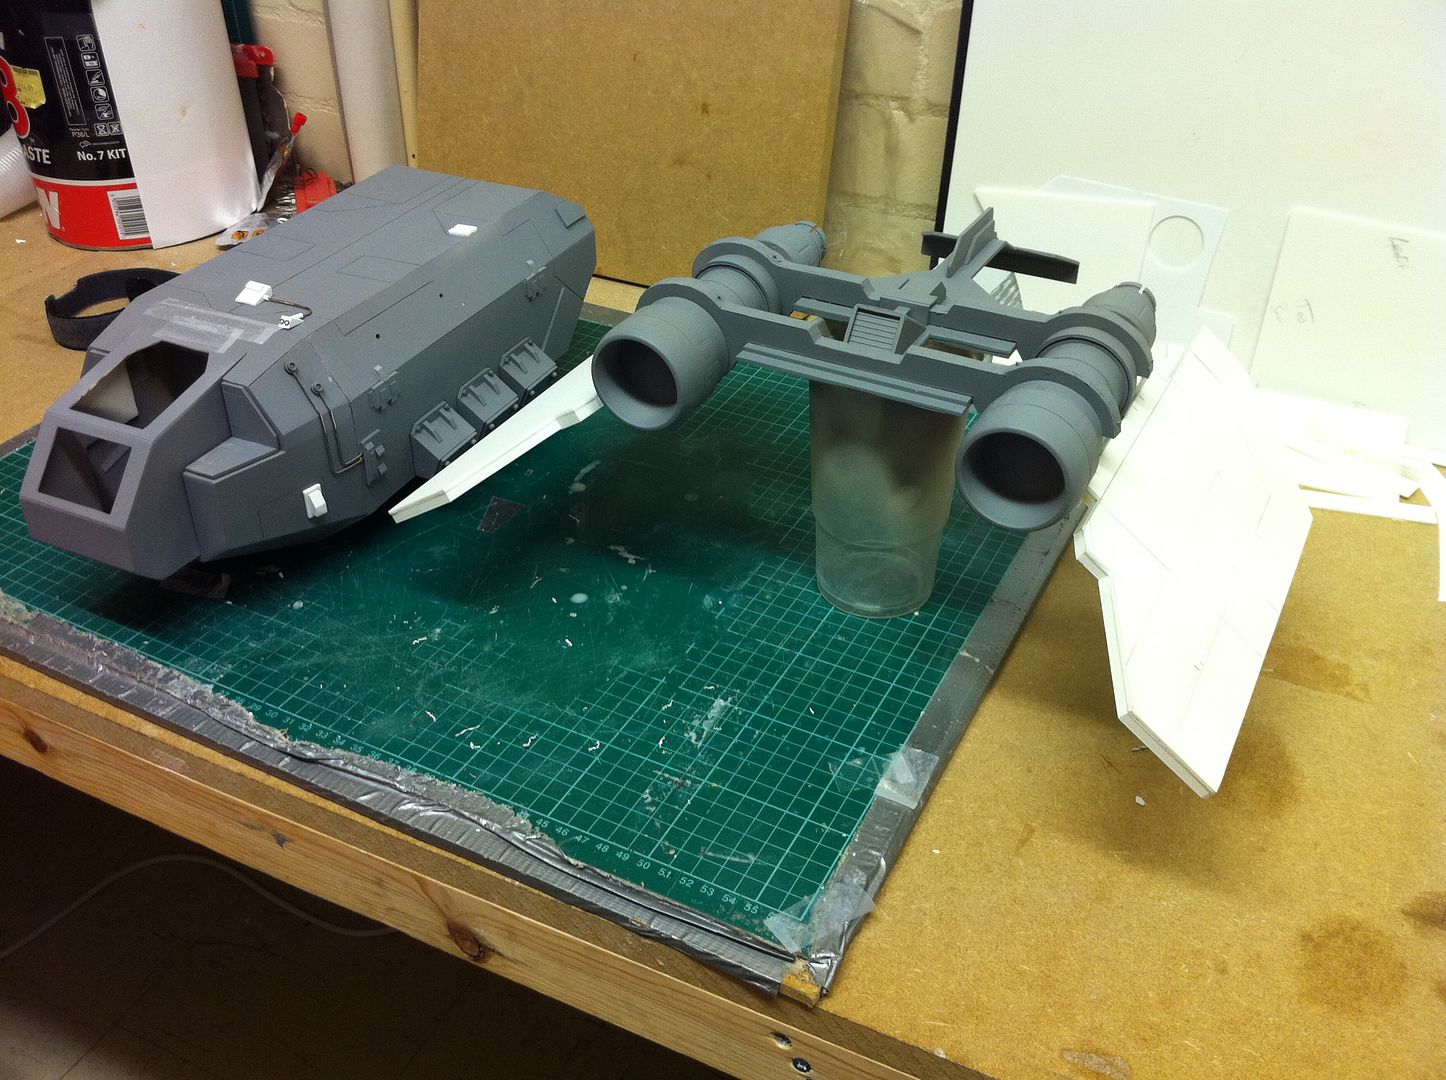
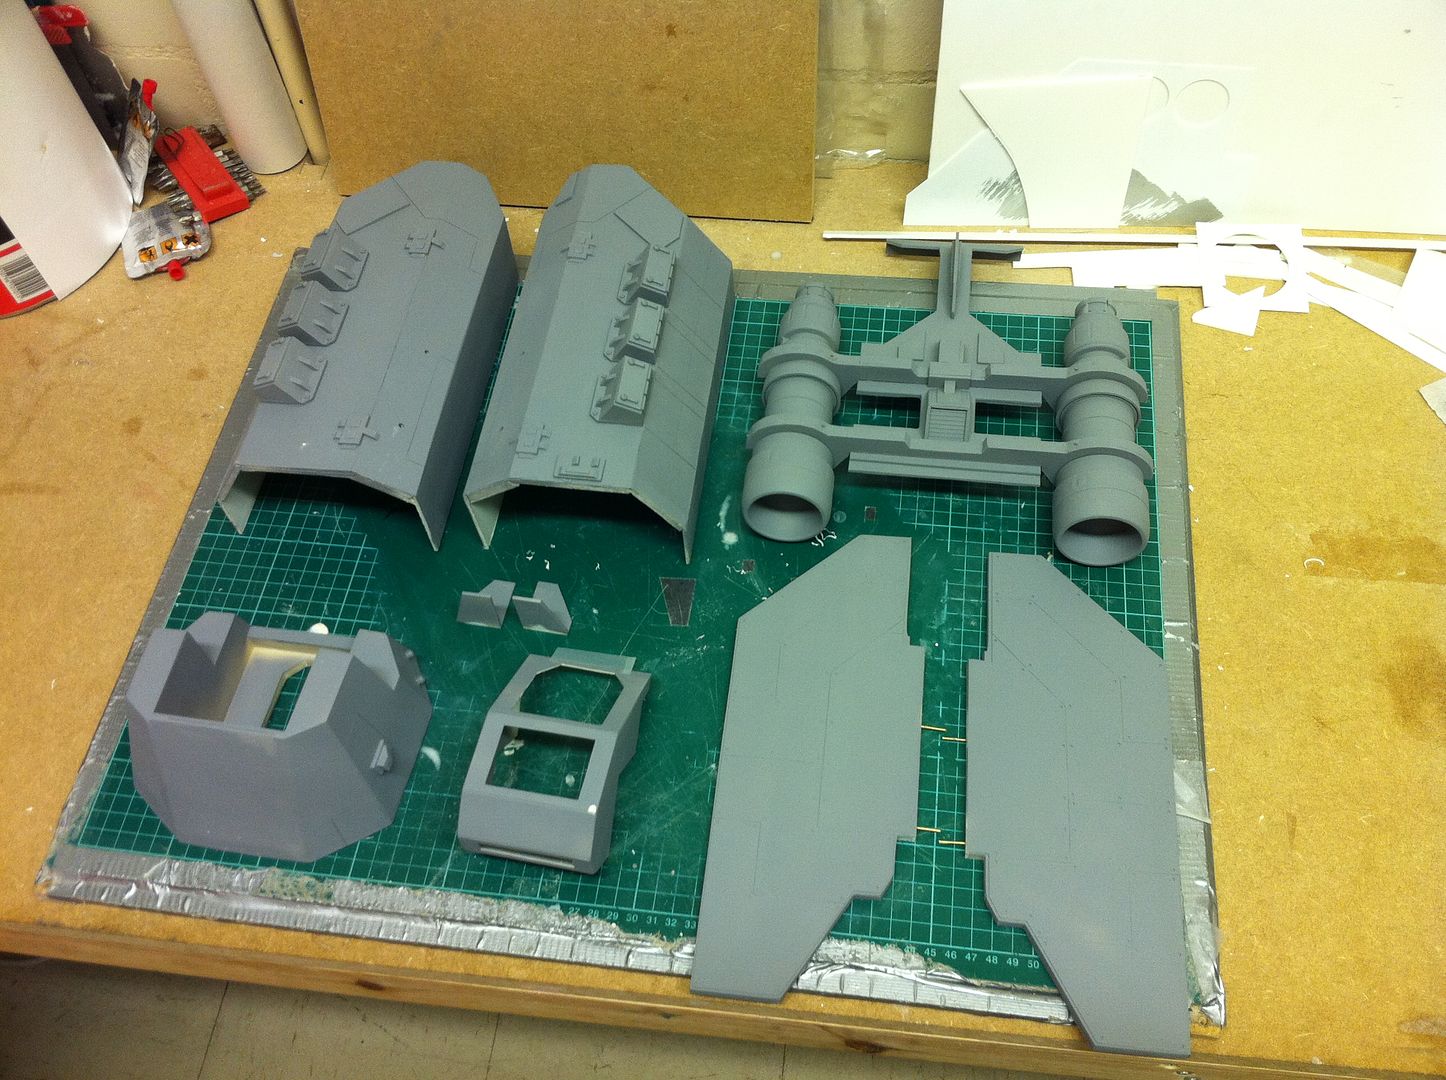
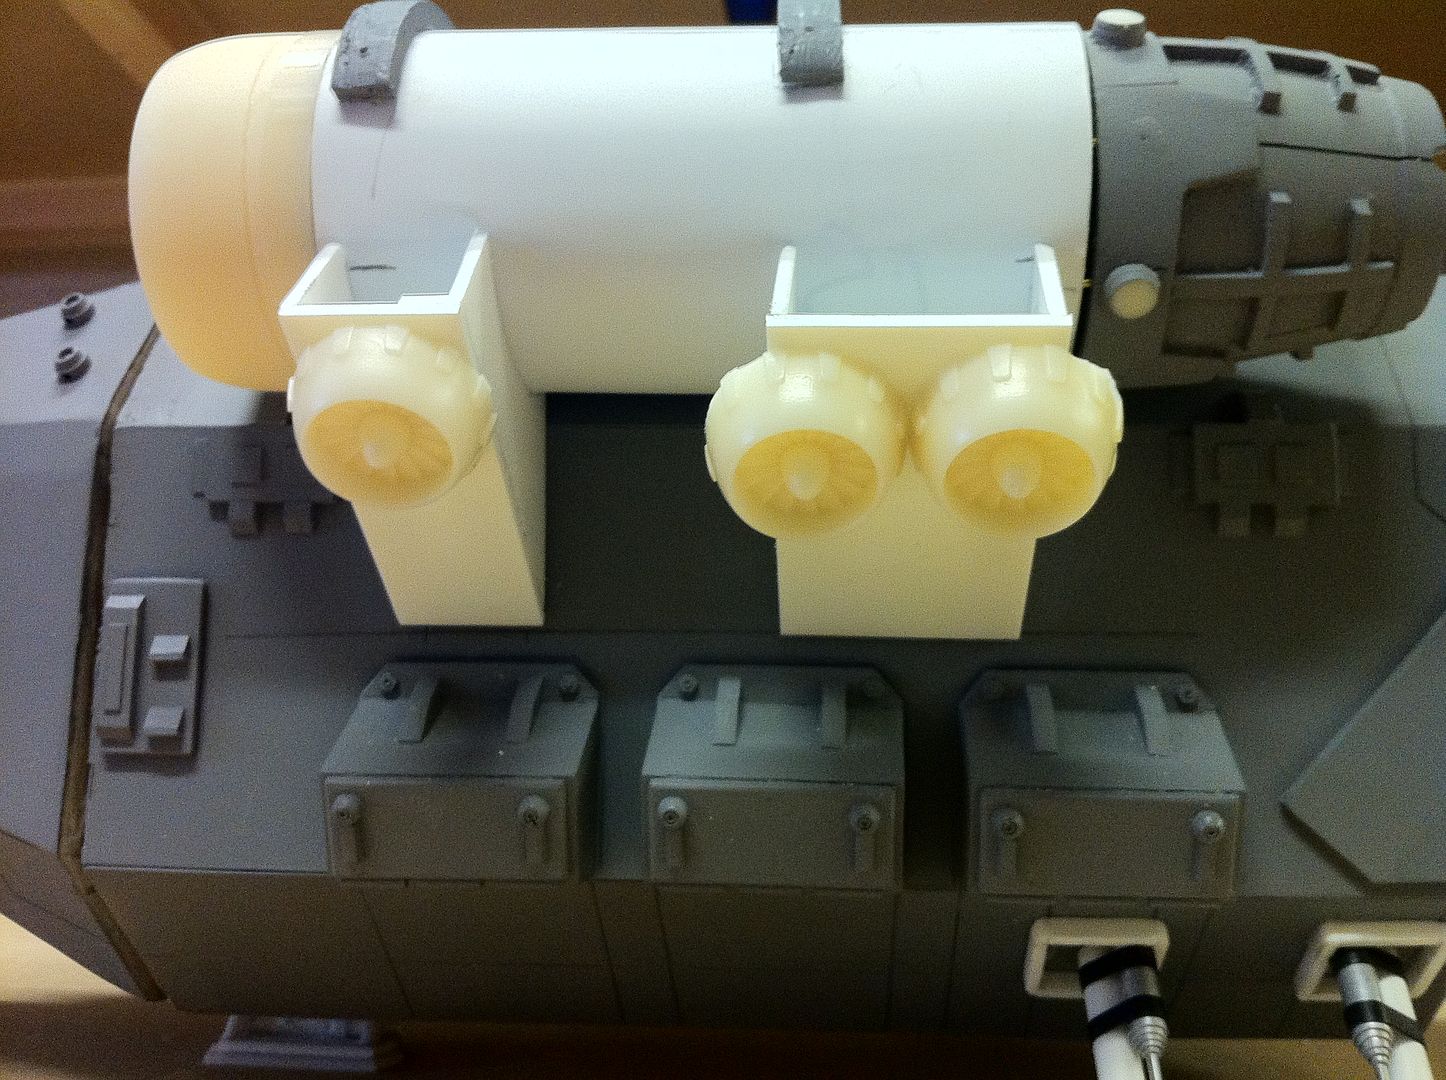
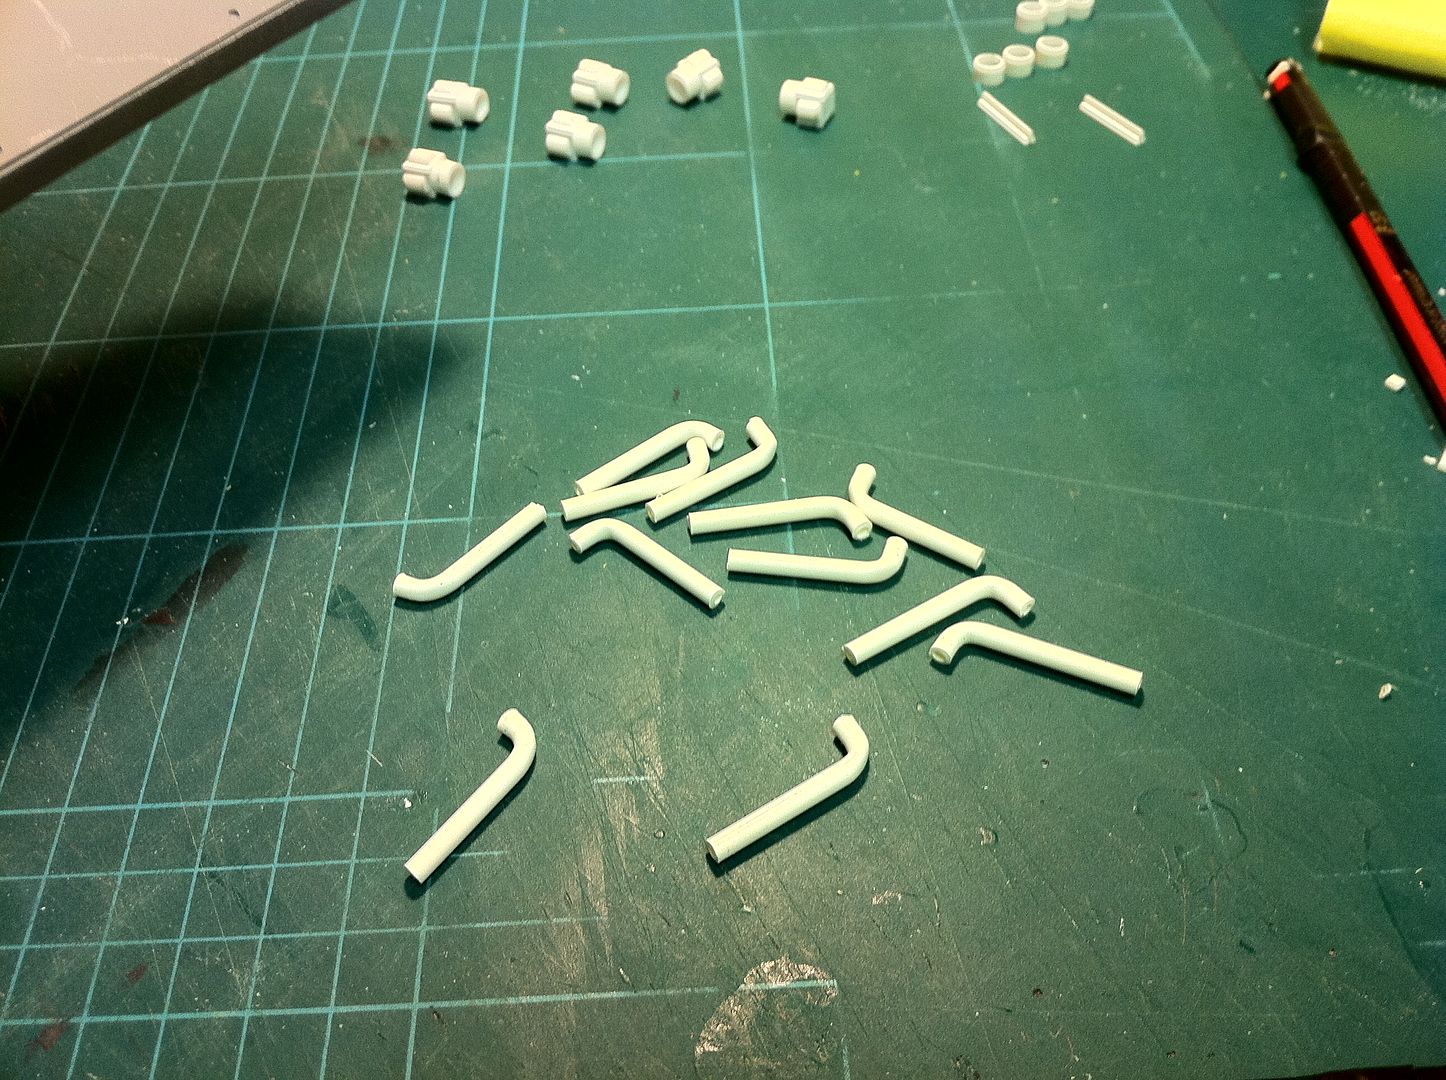
In any case, the engines are sourced from easily available plumbing supplies, but the rest is just scratchbuilt from styrene sheet and evergreen styrene stock.
If anyone sees any detail i have left off(I am relying on web-sourced images for the build as i didn't buy the original kit), let me know(And keep in mind the engine intakes were found items from another craft, so i am aware they don't match with the Forgeworld kit).
Comments and criticisms welcomed(I've been working in it for a week now. It will probably take at least another week to get the rest done).
I'll post just a handful of the images below. The rest(In the order in which they were taken) are in my Photobucket build gallery here.
Enjoy!


43629
Post by: mikeb2817
Thats is cool, would love to see it and the crew painted
14732
Post by: Lord Scythican
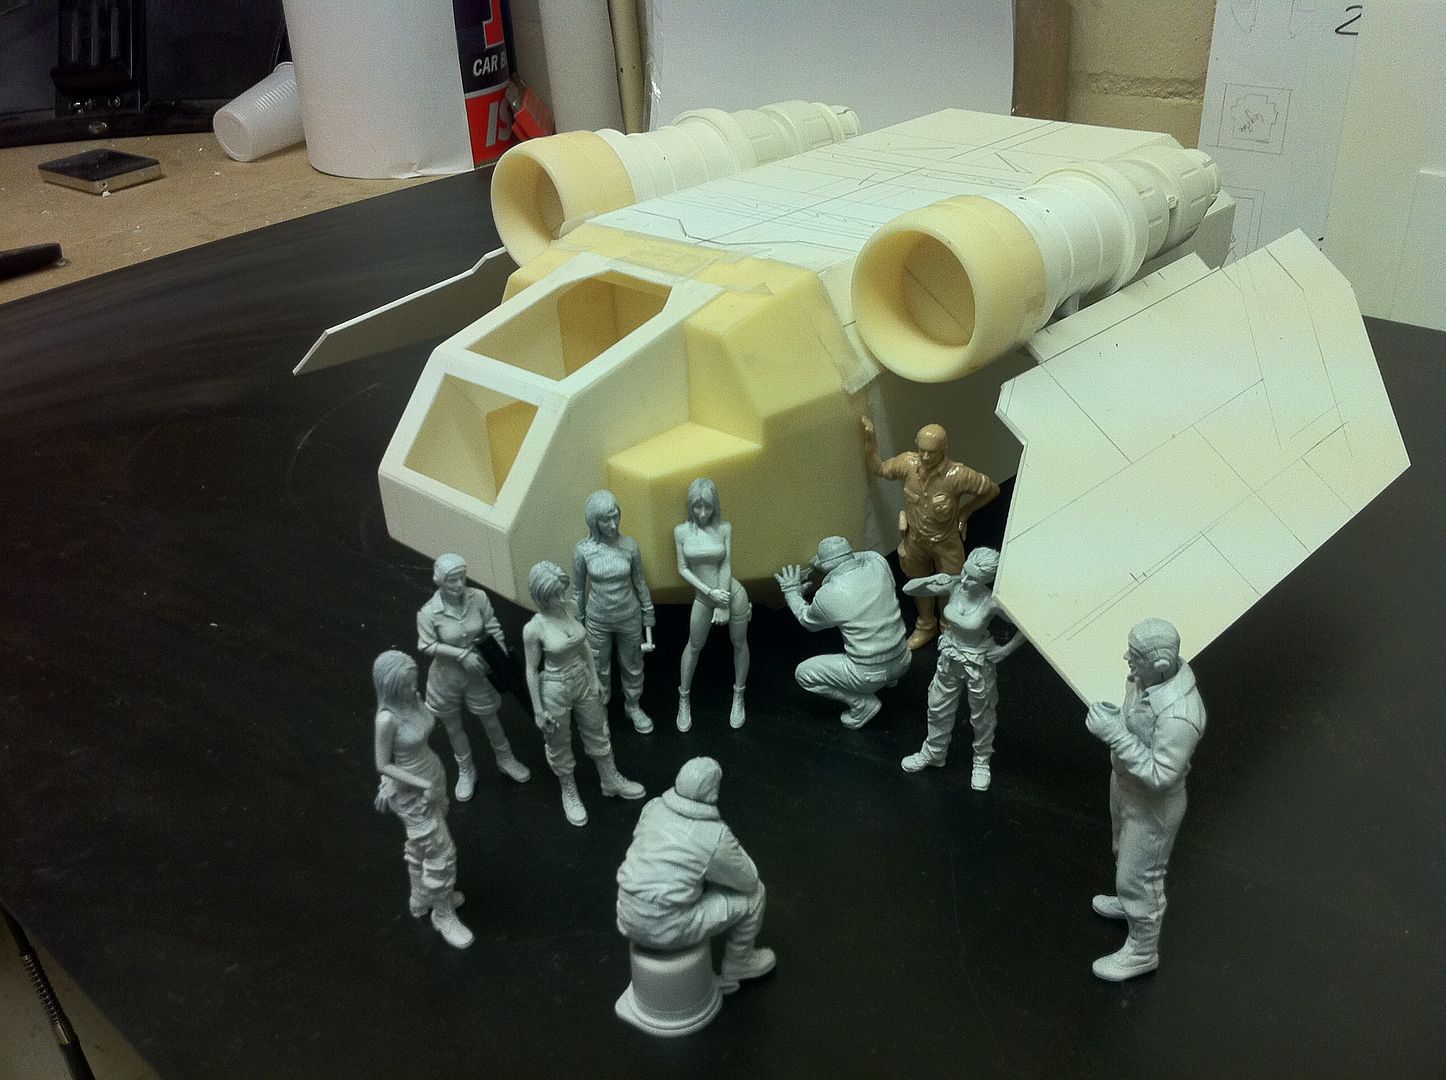
Okay the ship looks great so far, however the minis you added into the shots is just plain awesome. They look like your little helpers!
Where are the from?
18892
Post by: Bar
mikeb2817 wrote:Thats is cool, would love to see it and the crew painted
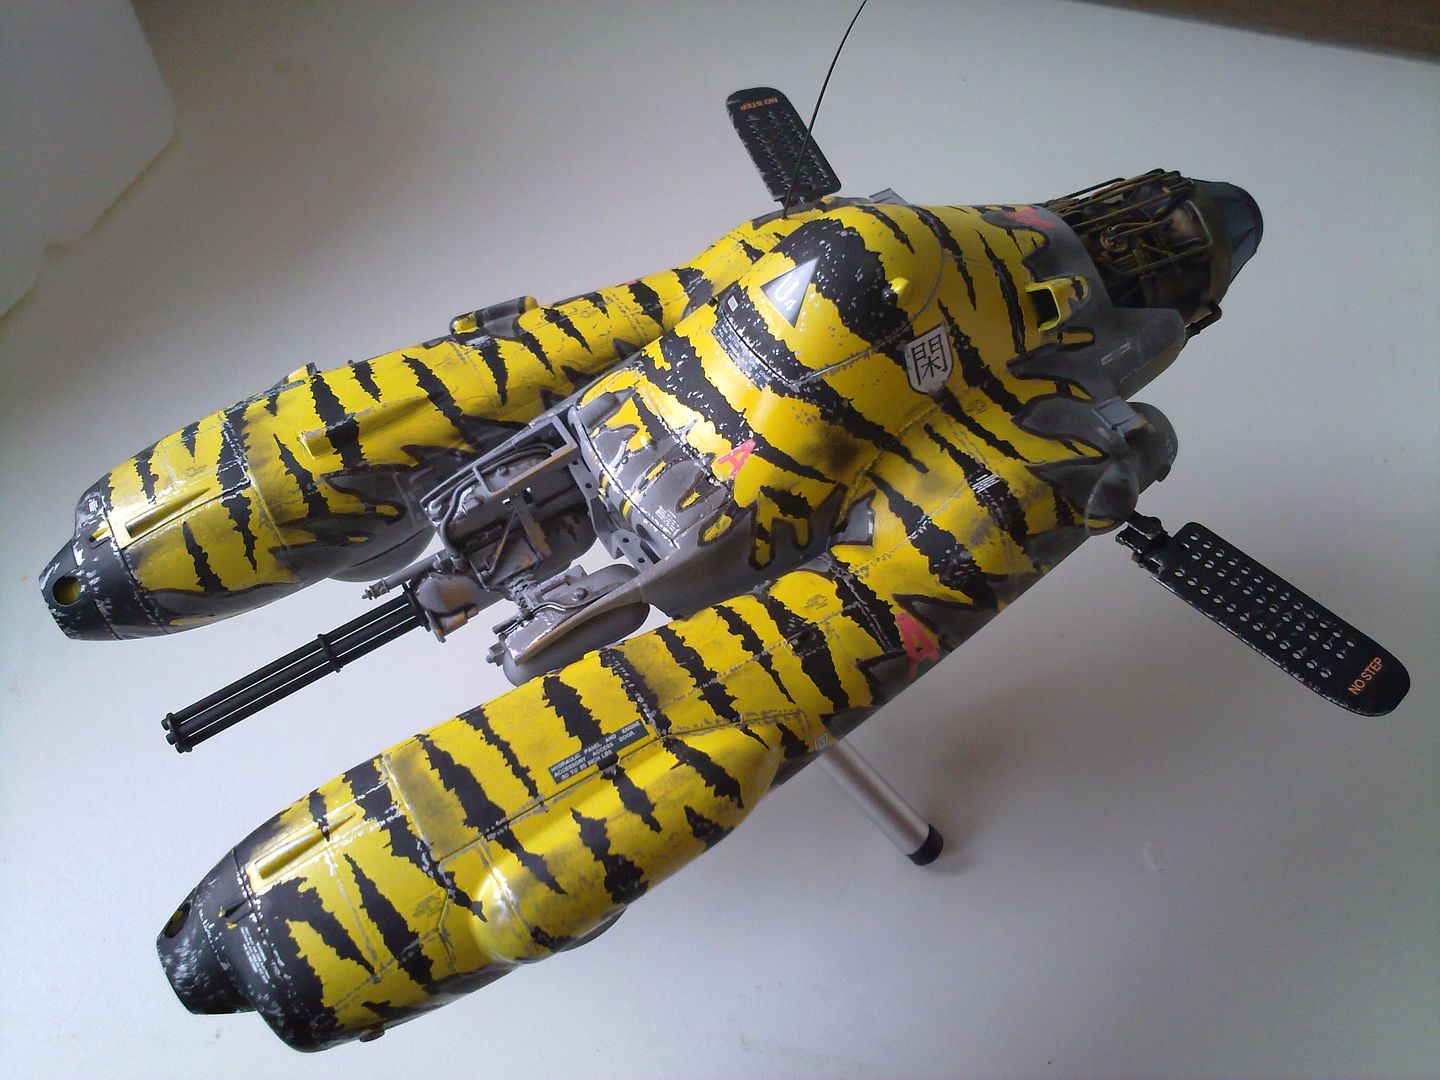
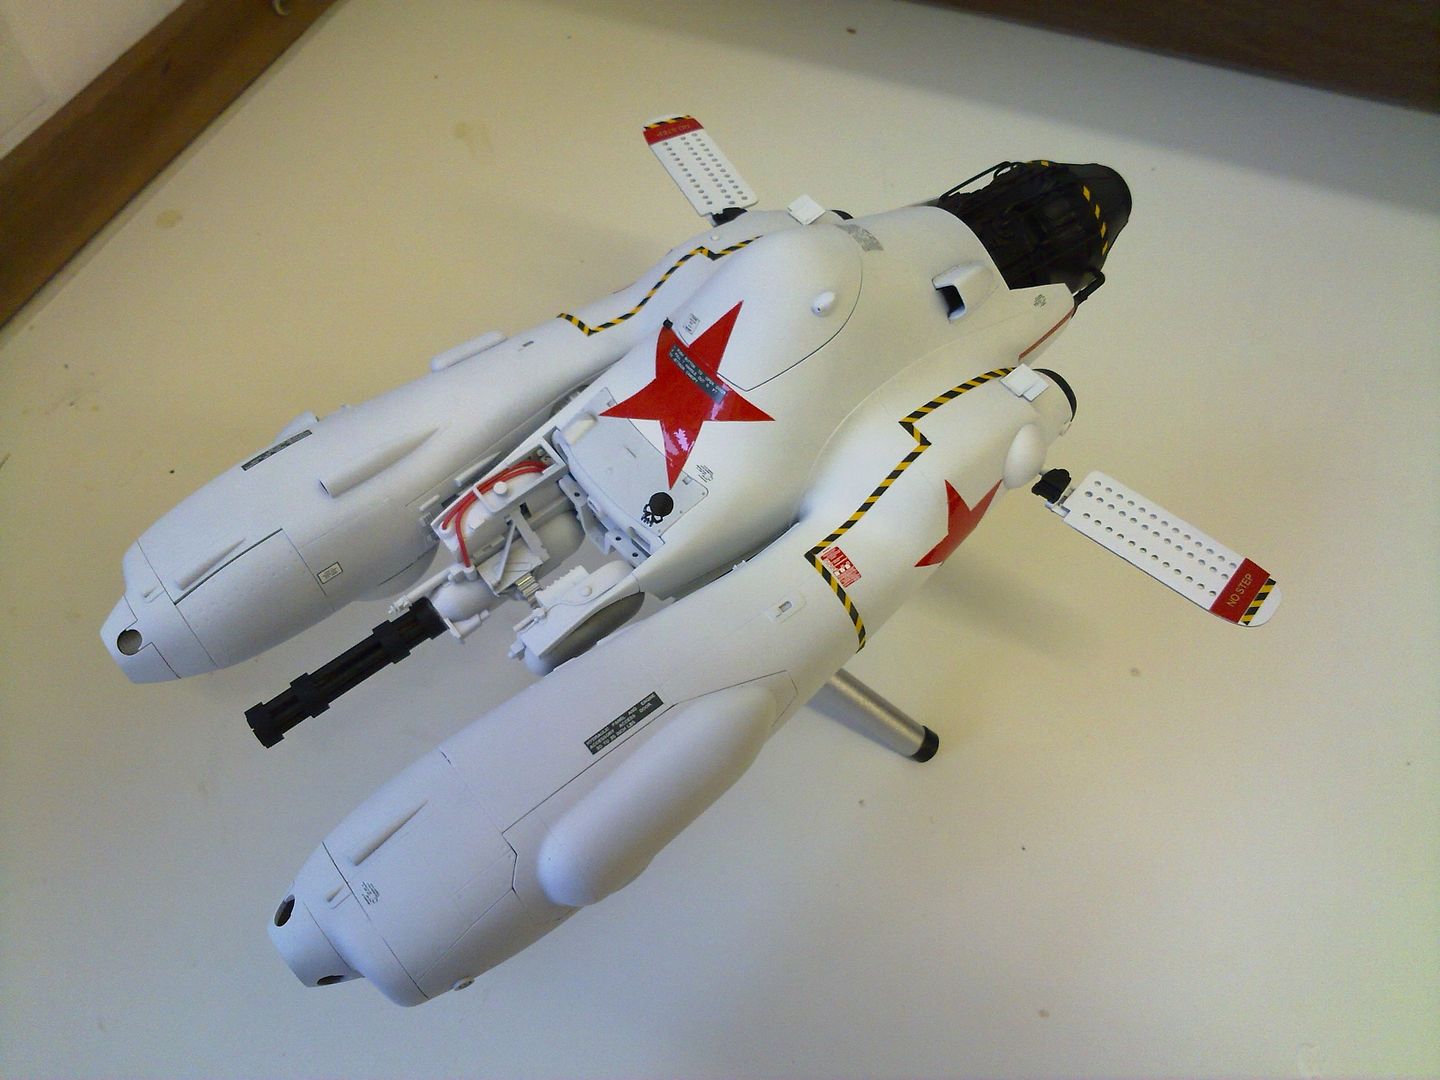
Thanks. I'm not sure what scheme i will use on this one. I have seen one painted in a heavily weathered off-white with red detail stripes. I like that one.
But i am always on the lookout for a cool colourscheme. If anyone has access to pics of an Arvus in a cool set of colours, feel free to post them in ths thread.
Lord Scythican wrote:Okay the ship looks great so far, however the minis you added into the shots is just plain awesome. They look like your little helpers!
Where are the from?
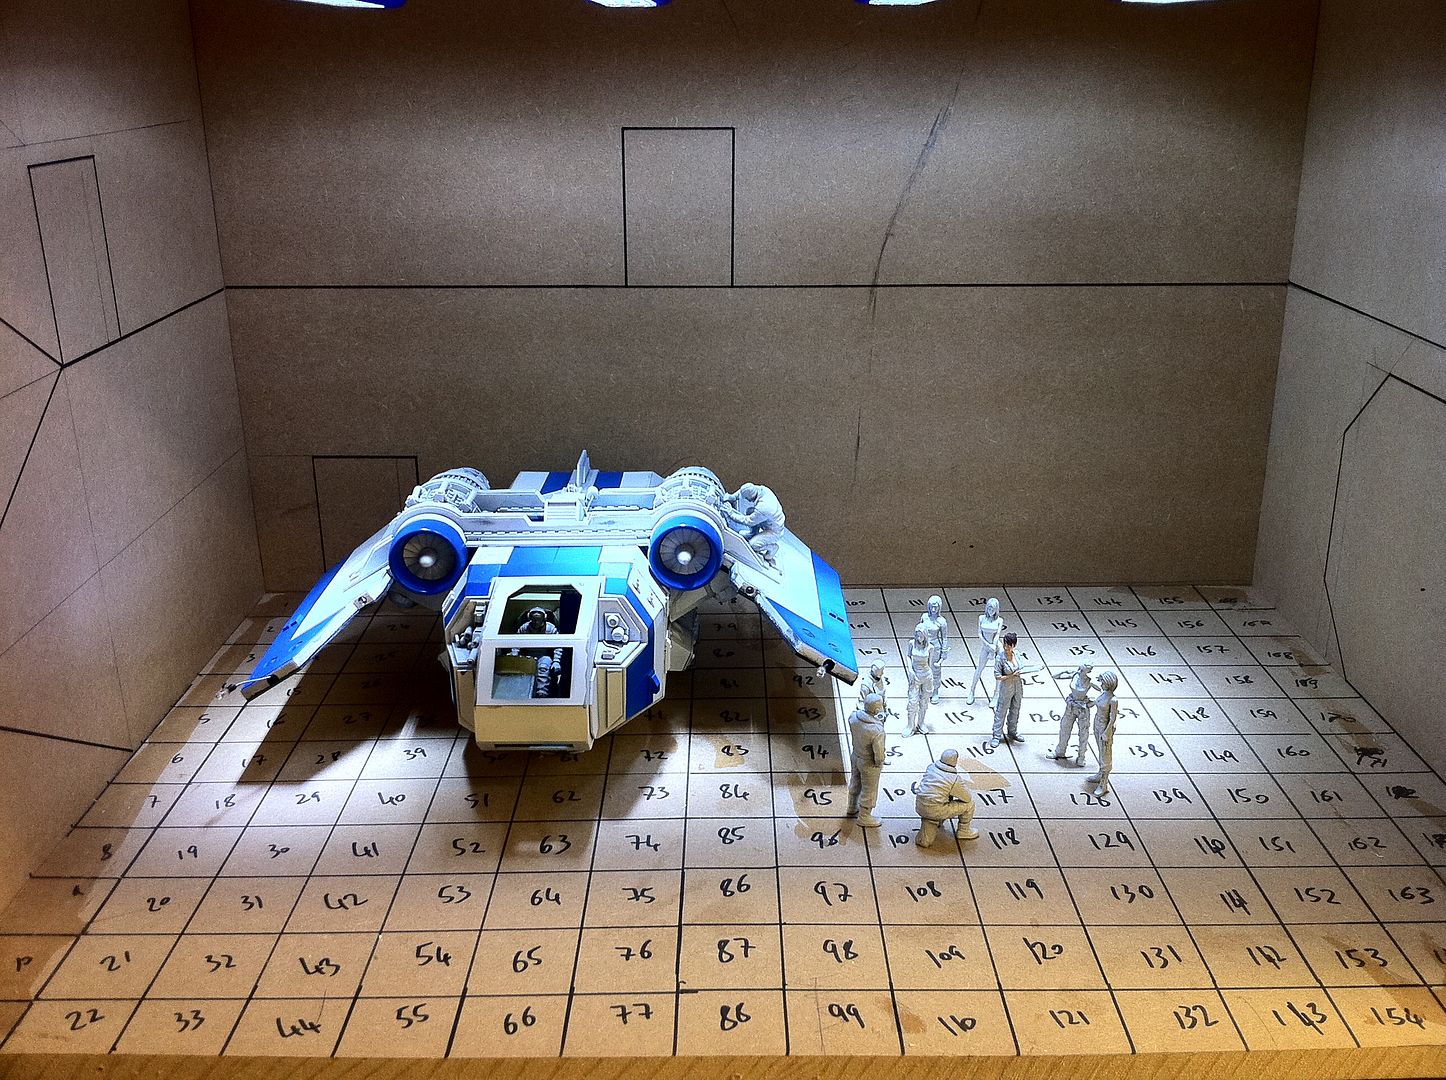
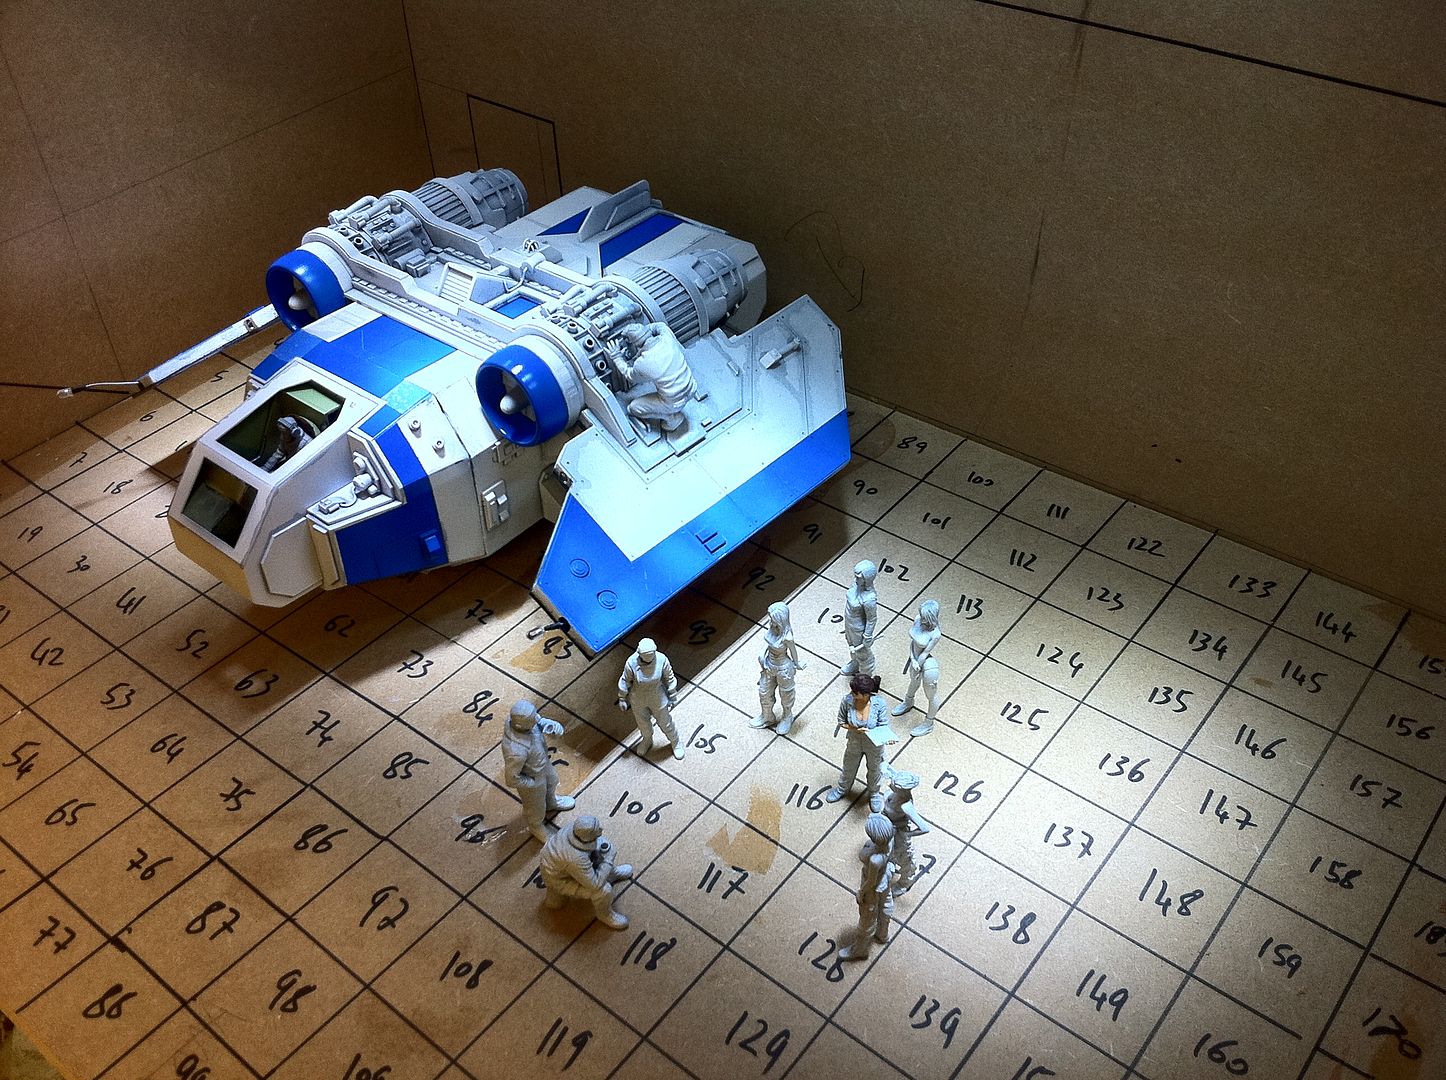
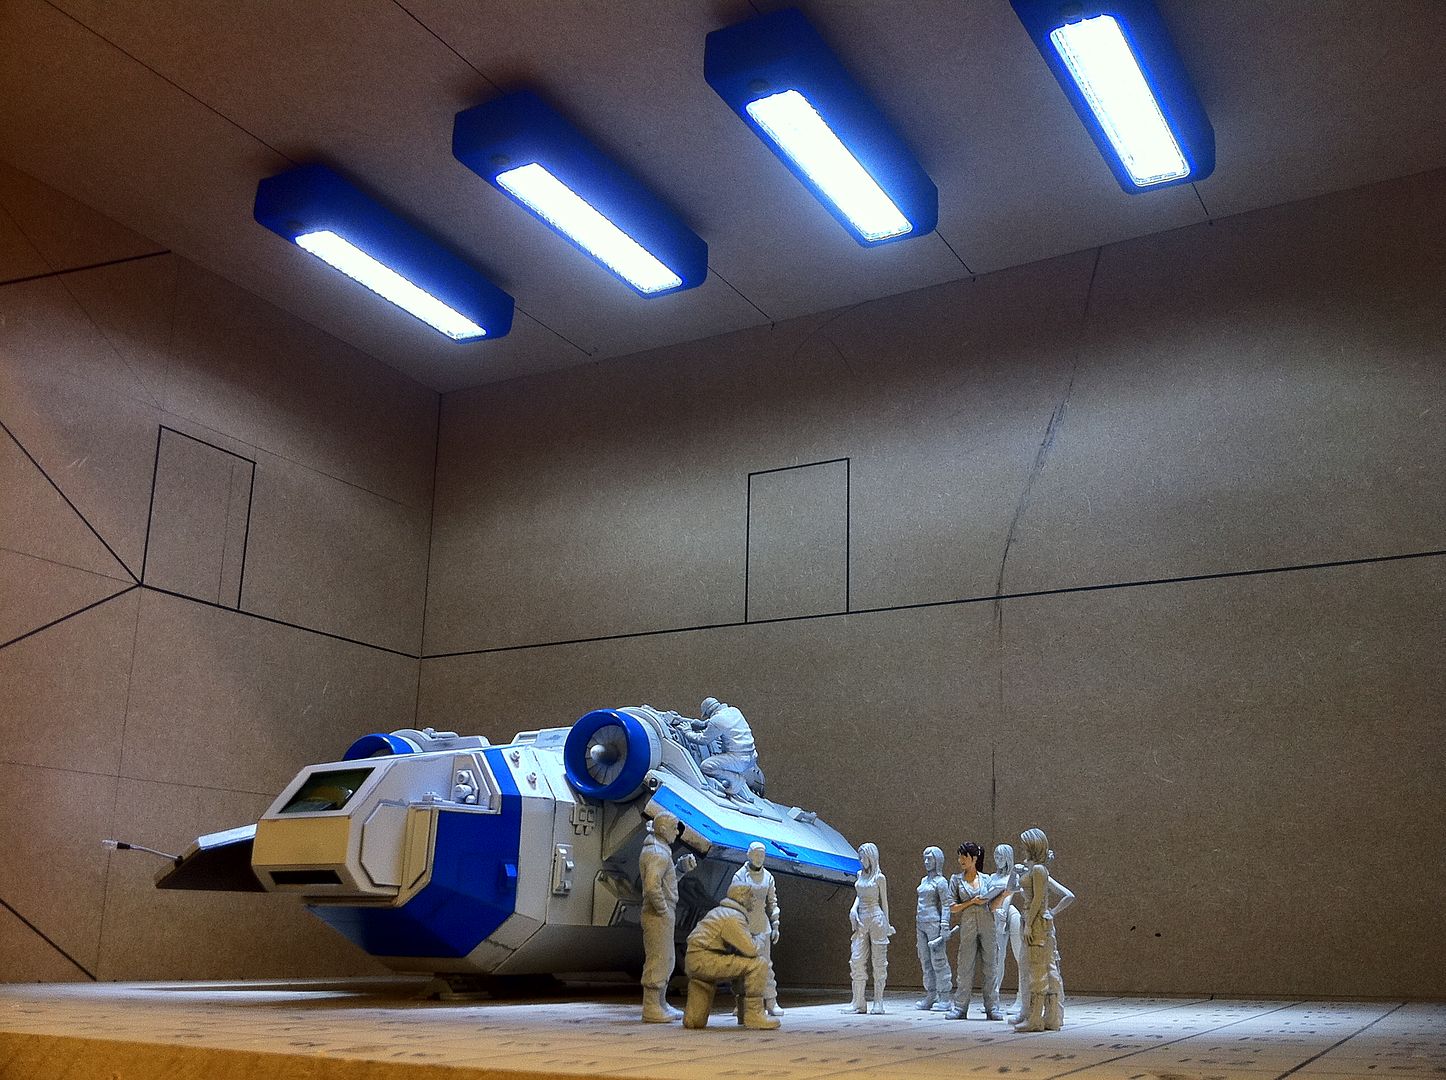
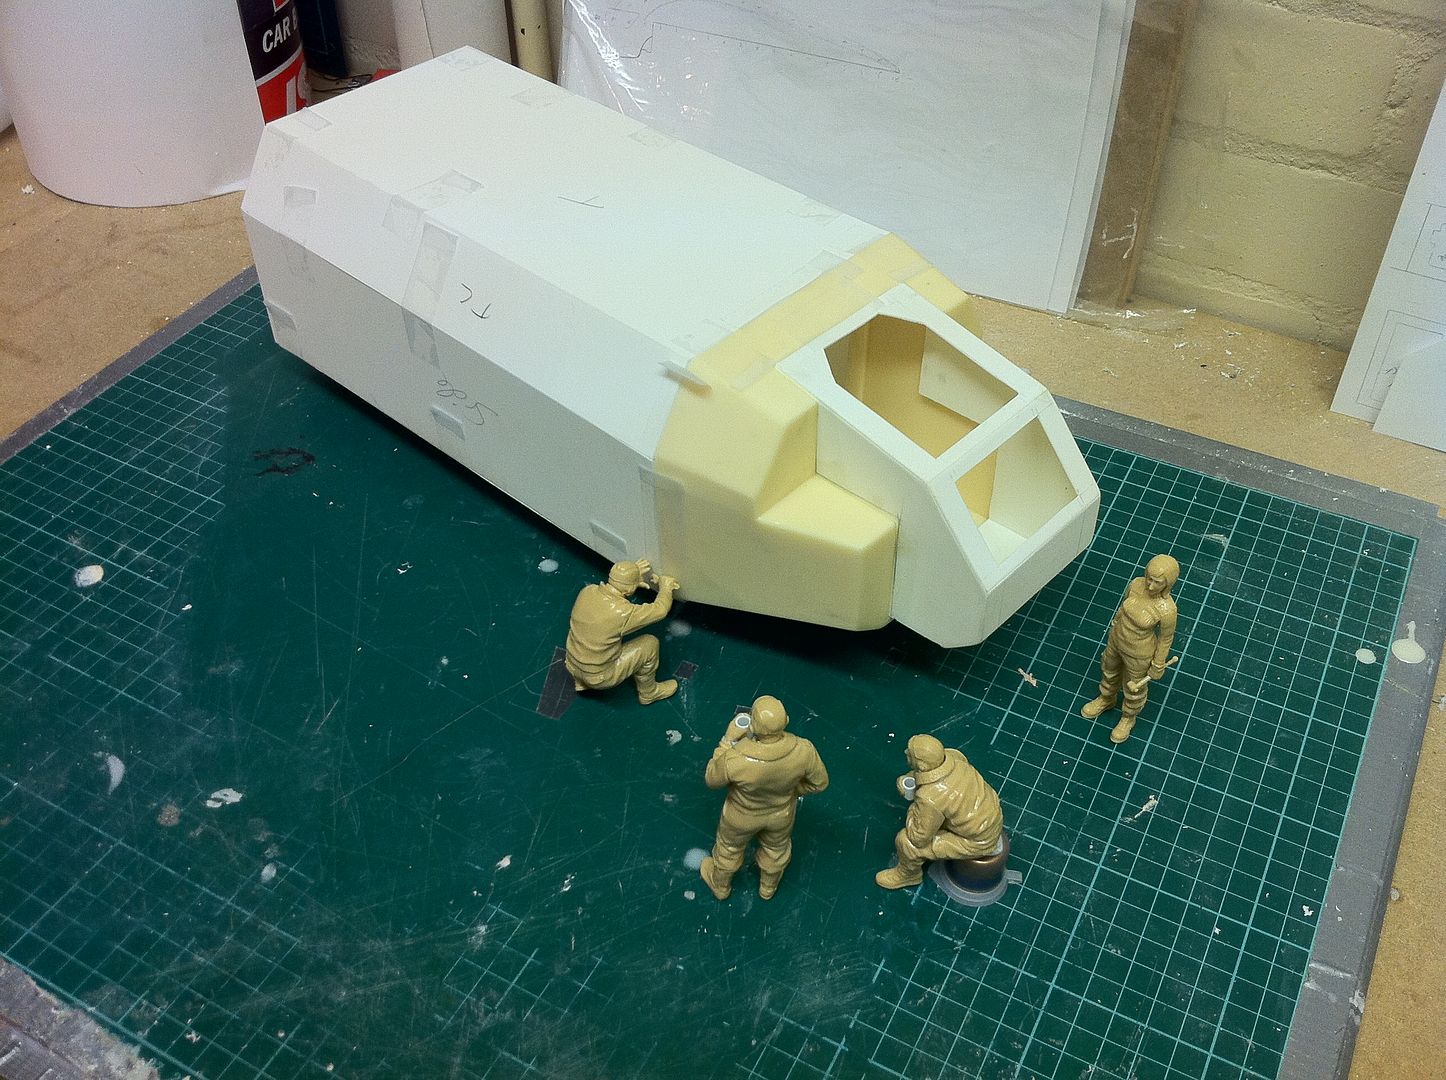
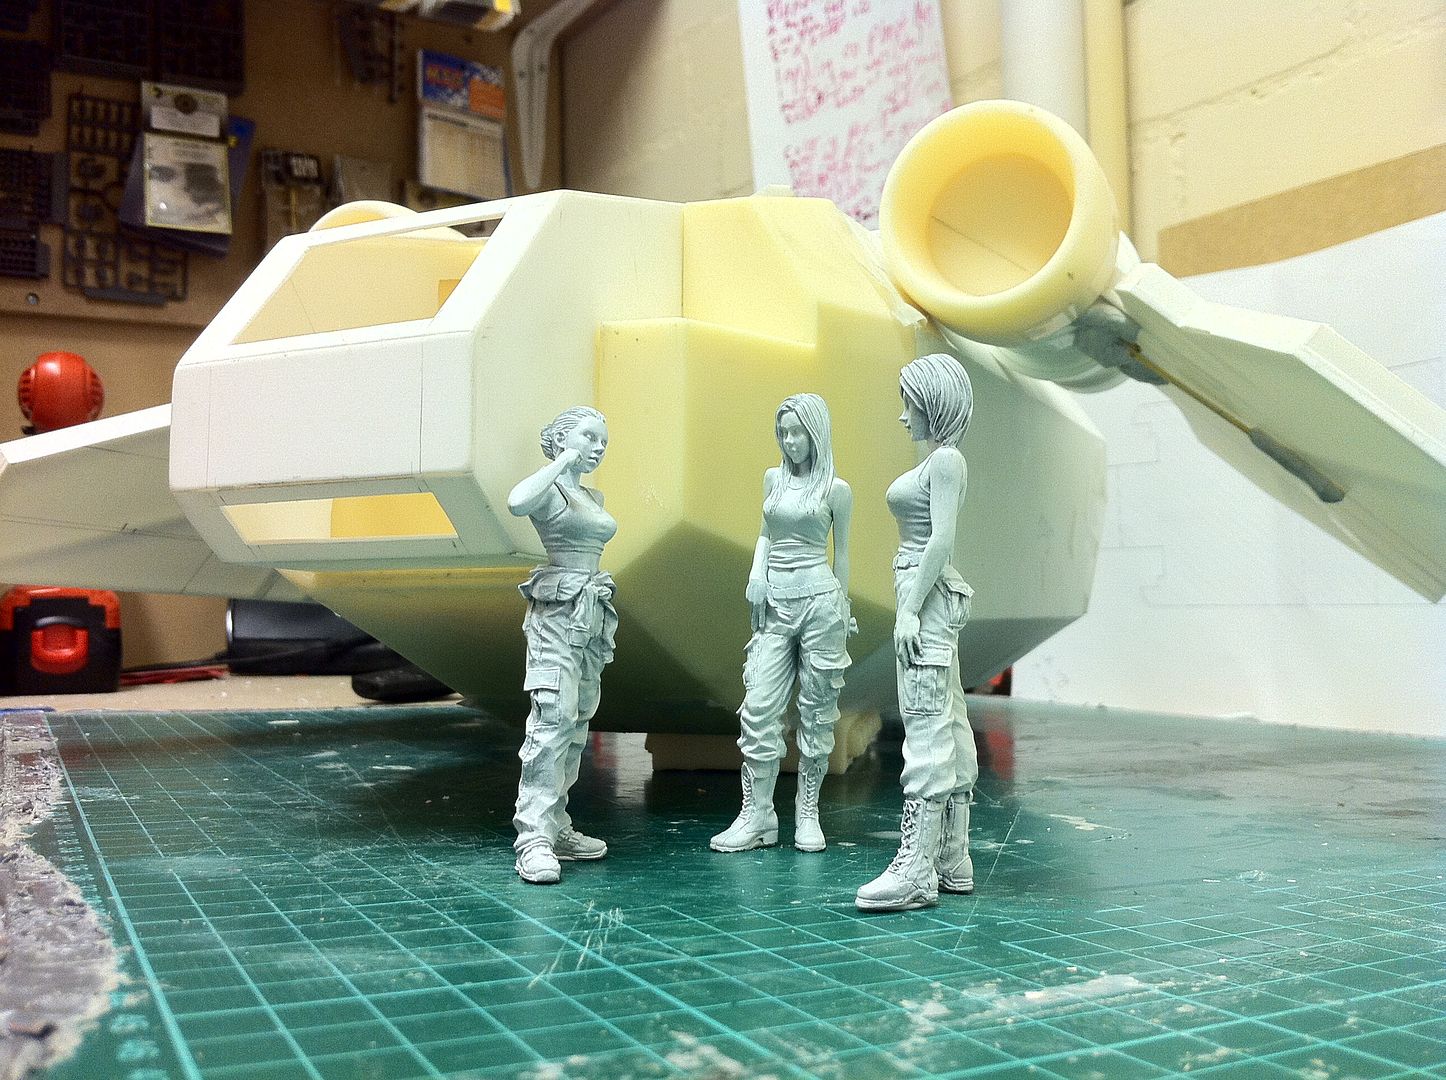
Thanks. The figures in the last image are a Hasegawa 1/20 Ma.K Cold Weather Set. The female figures in the earlier images are 1/20 resin figures. If you want links, i can show you where they can be aquired.
Thanks for the comments guys!
I really appreciate you taking the time to post comments.
7885
Post by: rexscarlet
Looks better than the original!
I like the engines made from "stuff" you had around...
A link for all those cool figs would be nice, and maybe a size comparison standing next to an IG if you have one?
33868
Post by: winnertakesall
A quick question, how to you get such clean joins?
18892
Post by: Bar
winnertakesall wrote:A quick question, how to you get such clean joins?
On the styrene parts?
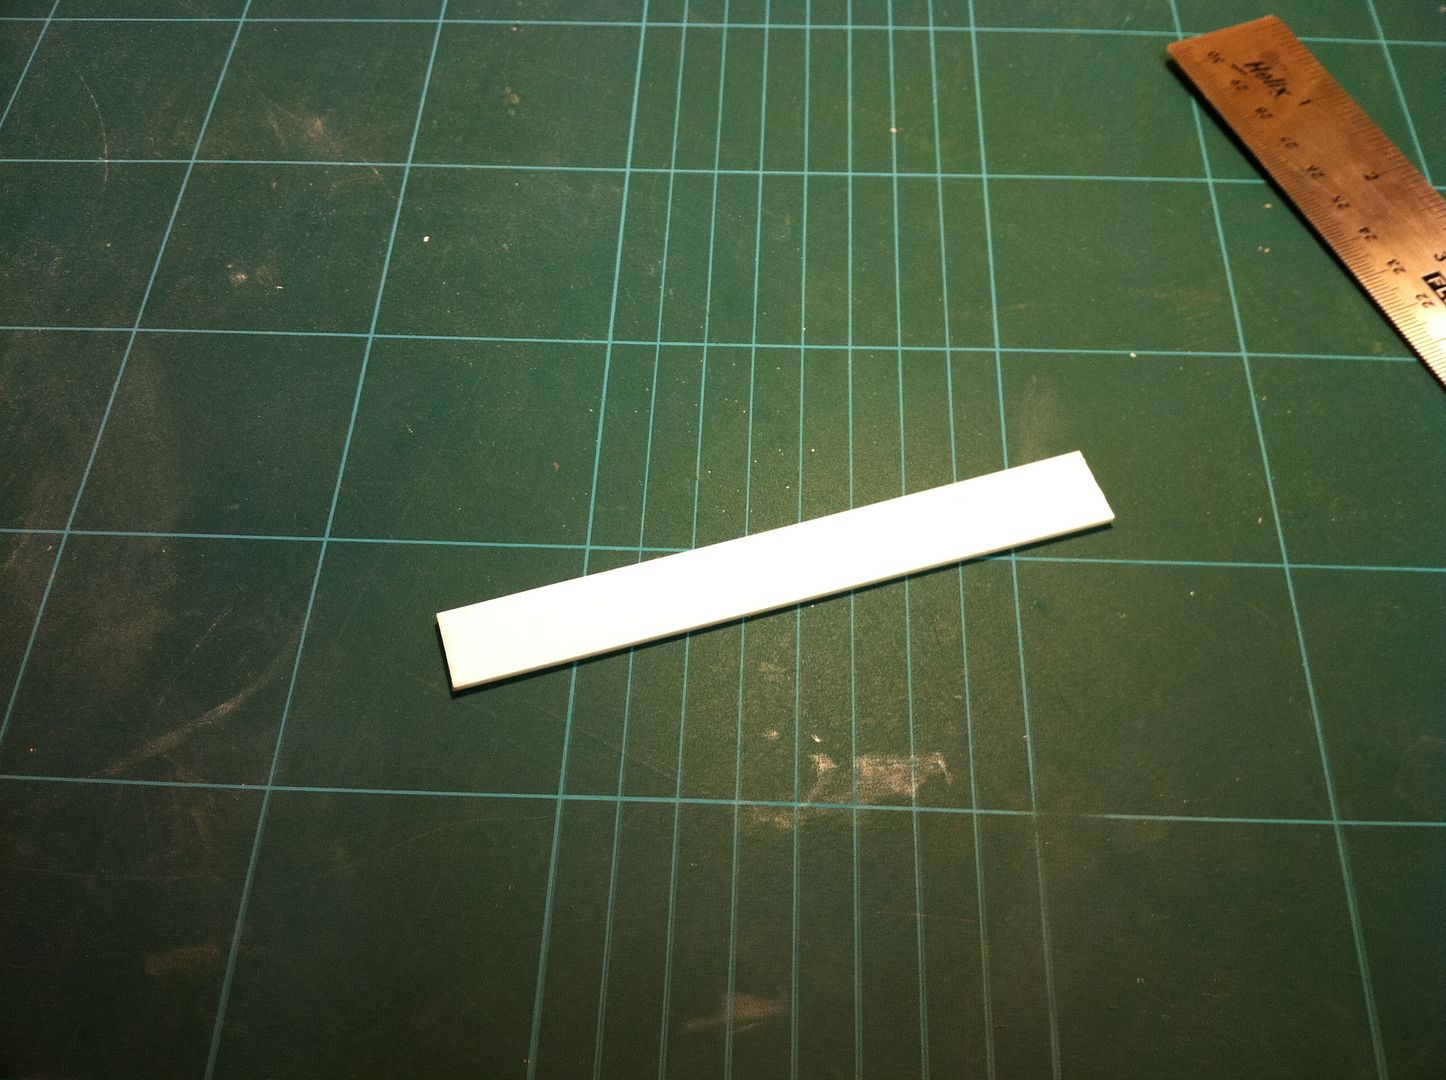
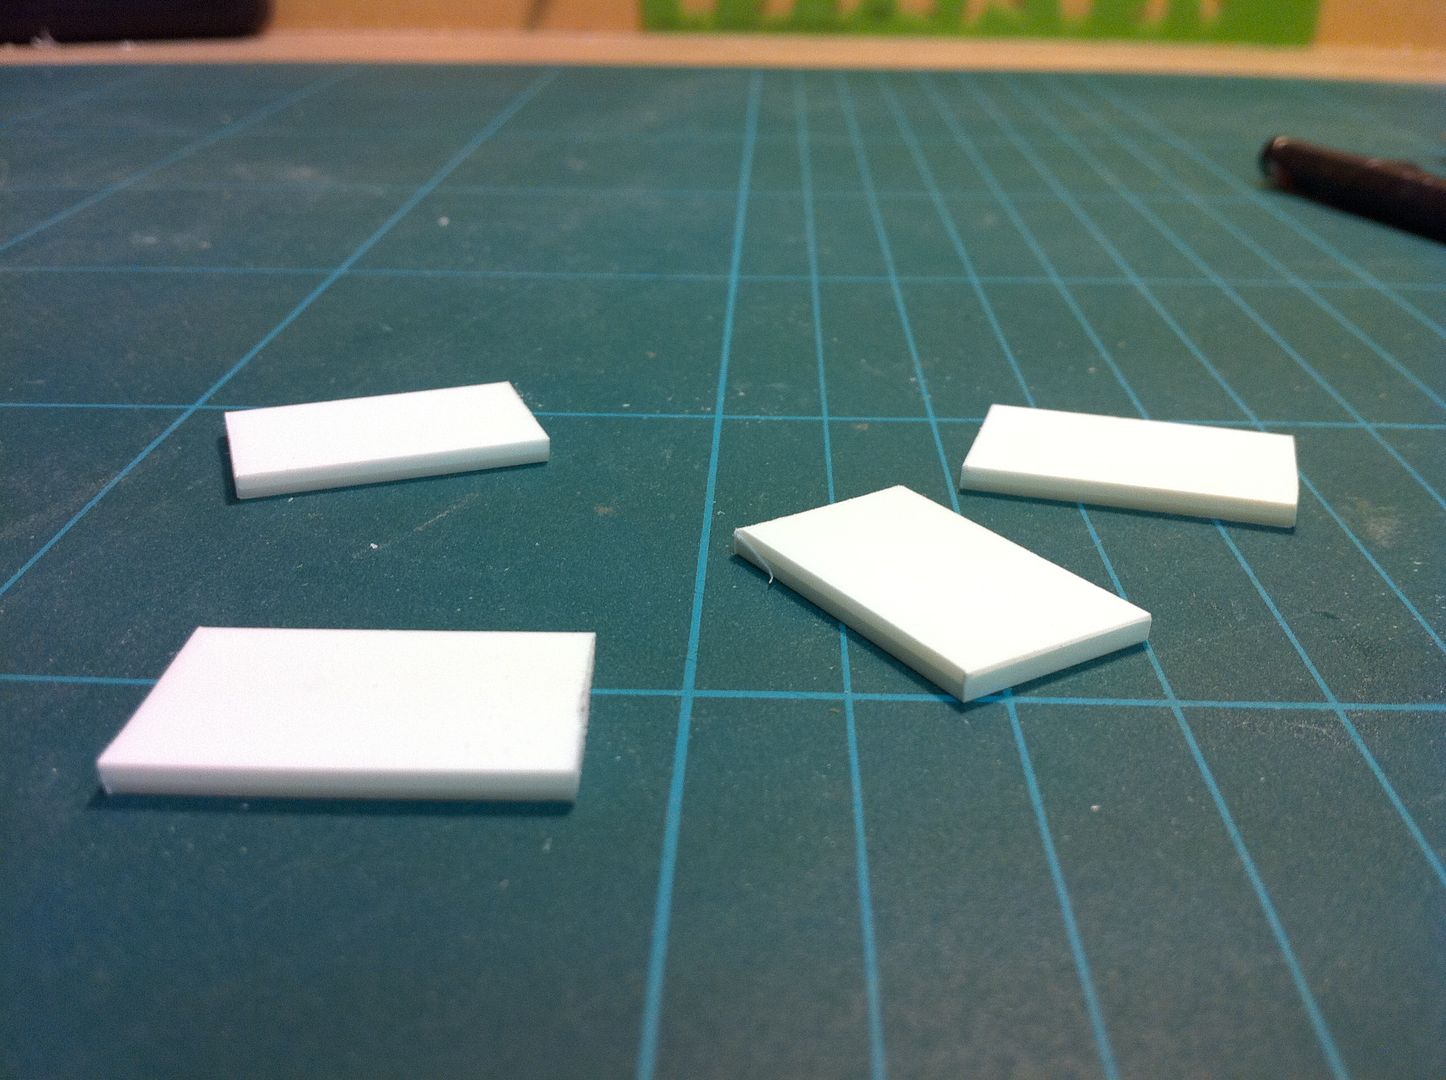
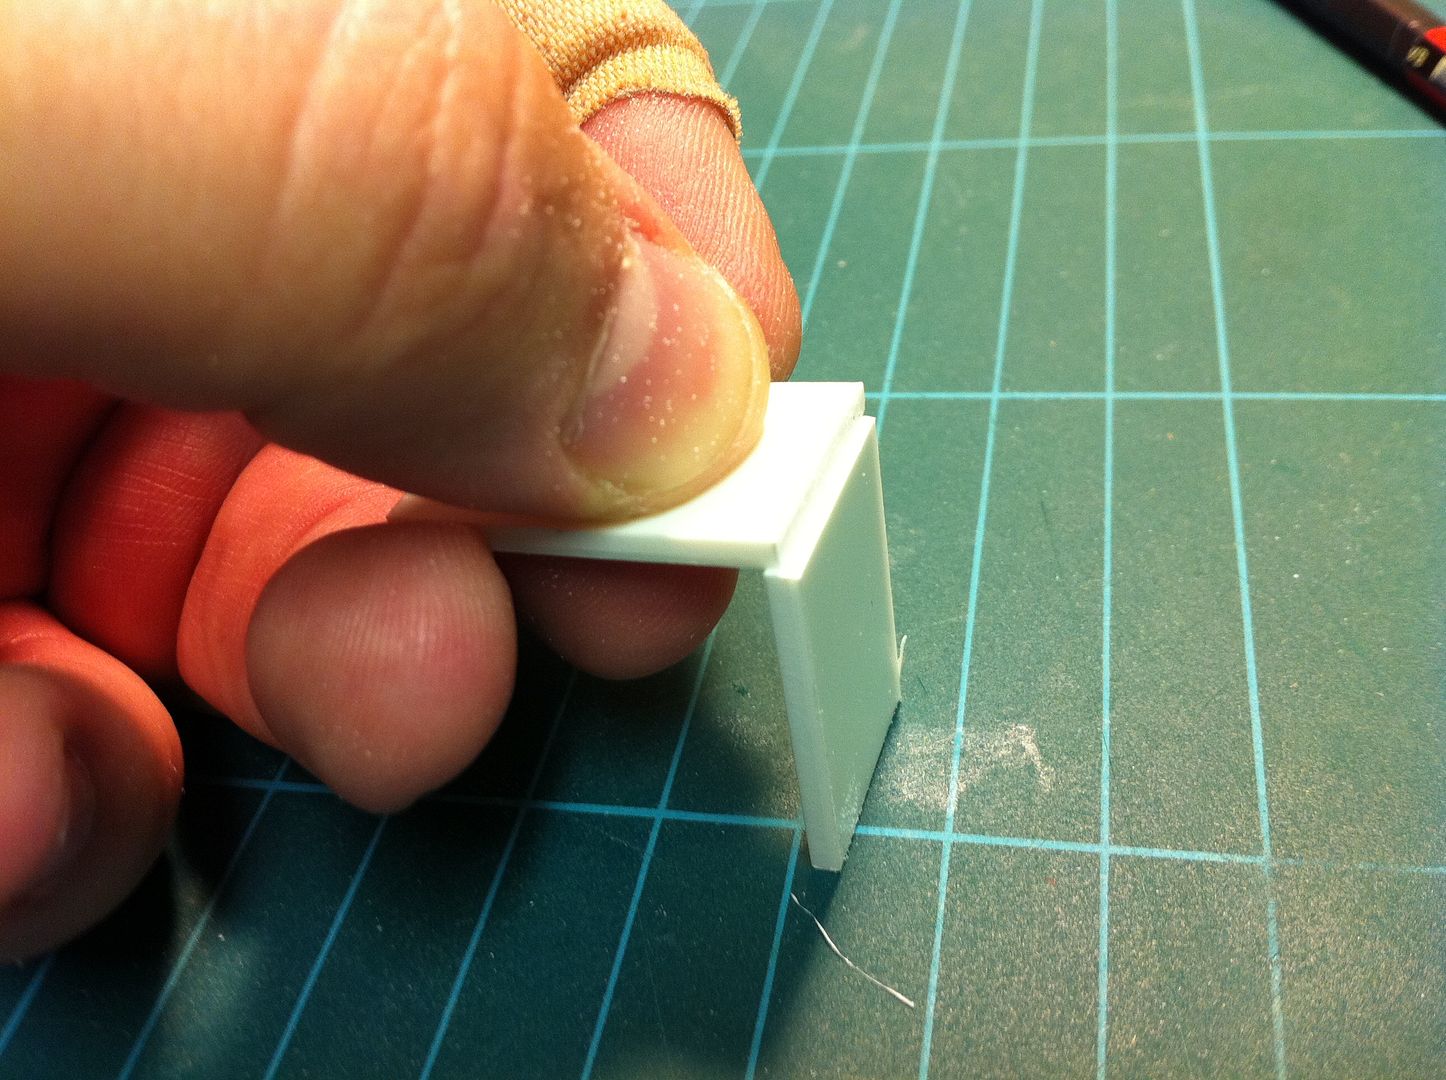
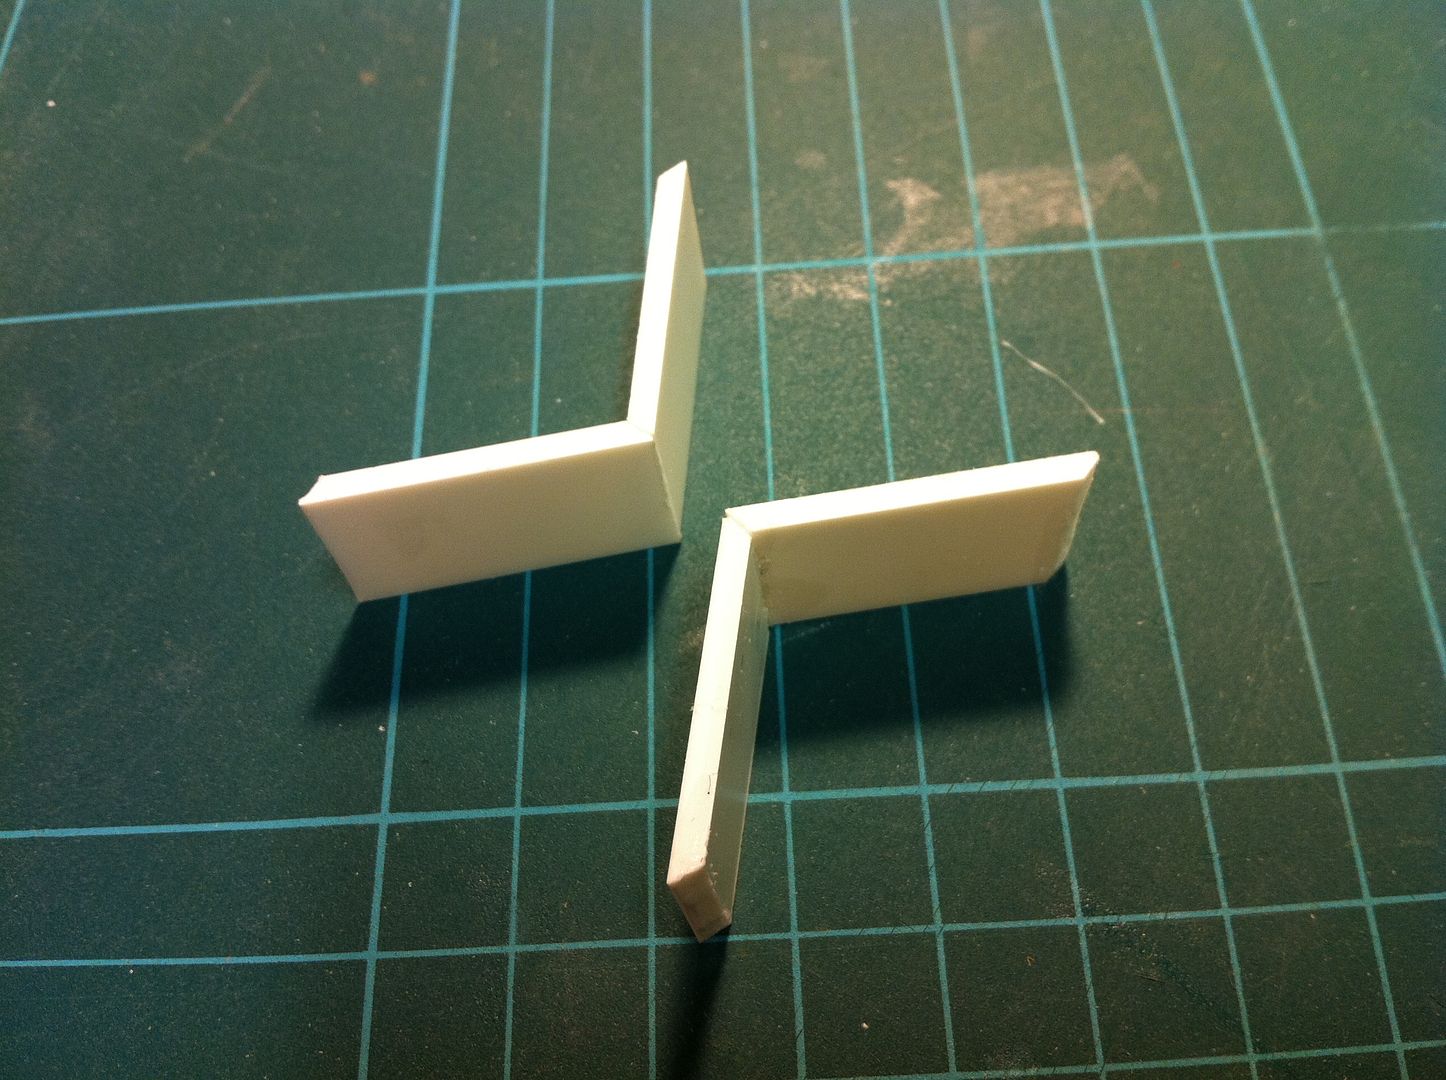
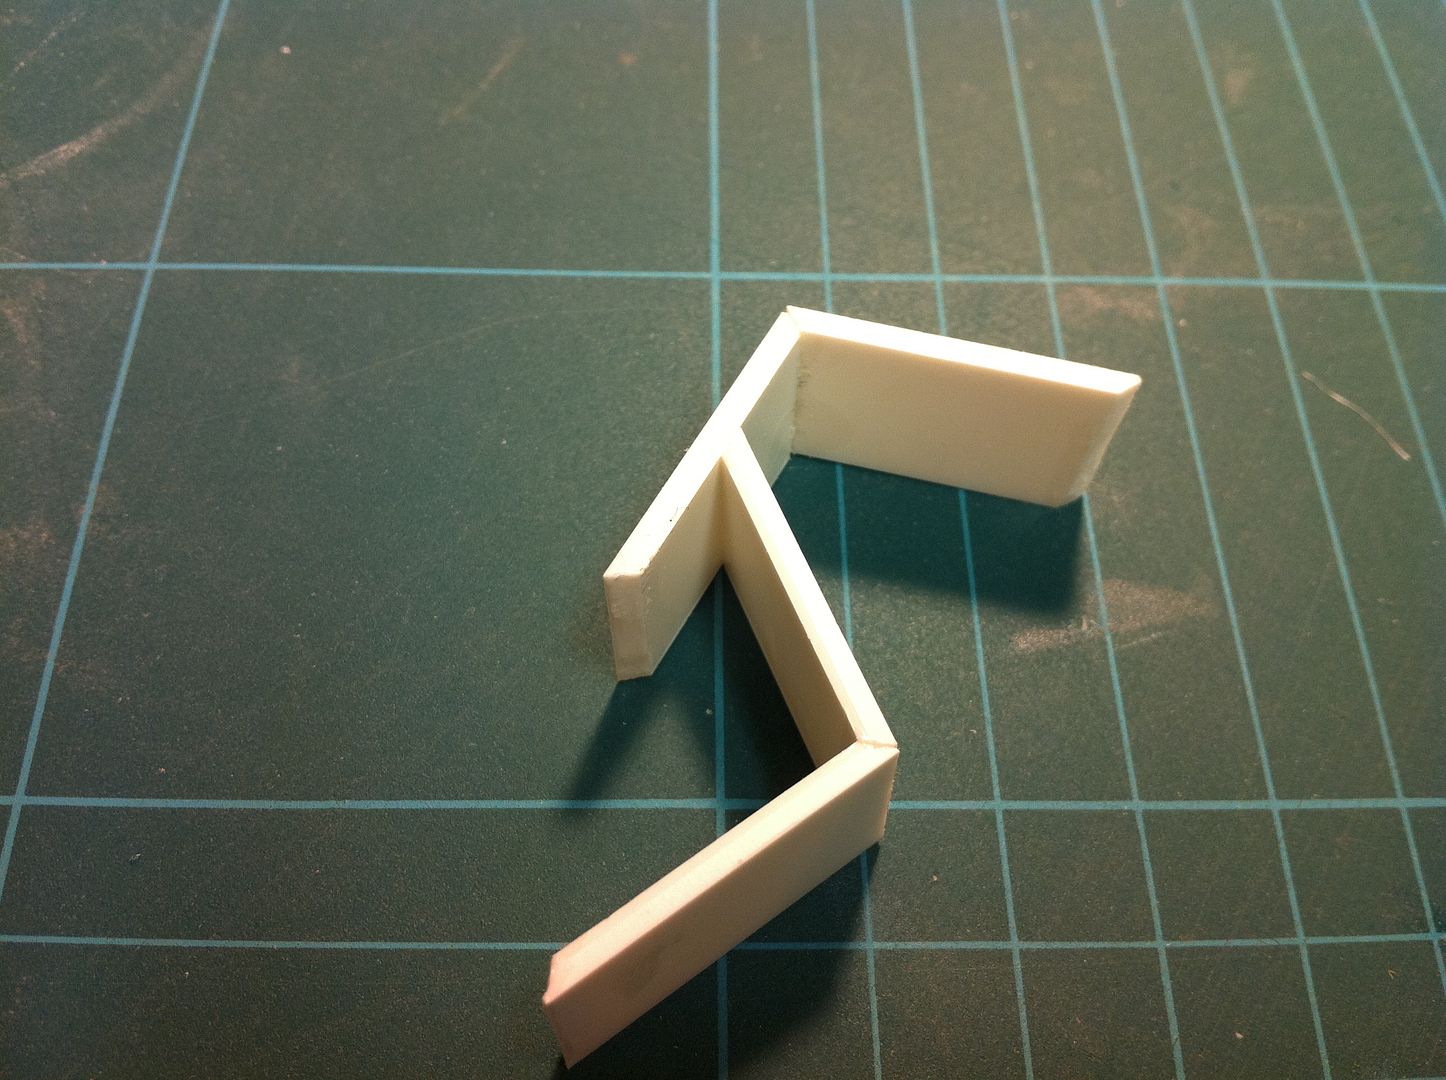
I use my dremel to chamfer the edges so the joined edge is just a tight seam. I can take pics to further illustrate that if you like.
rexscarlet wrote:Looks better than the original!
I like the engines made from "stuff" you had around...
A link for all those cool figs would be nice, and maybe a size comparison standing next to an IG if you have one?
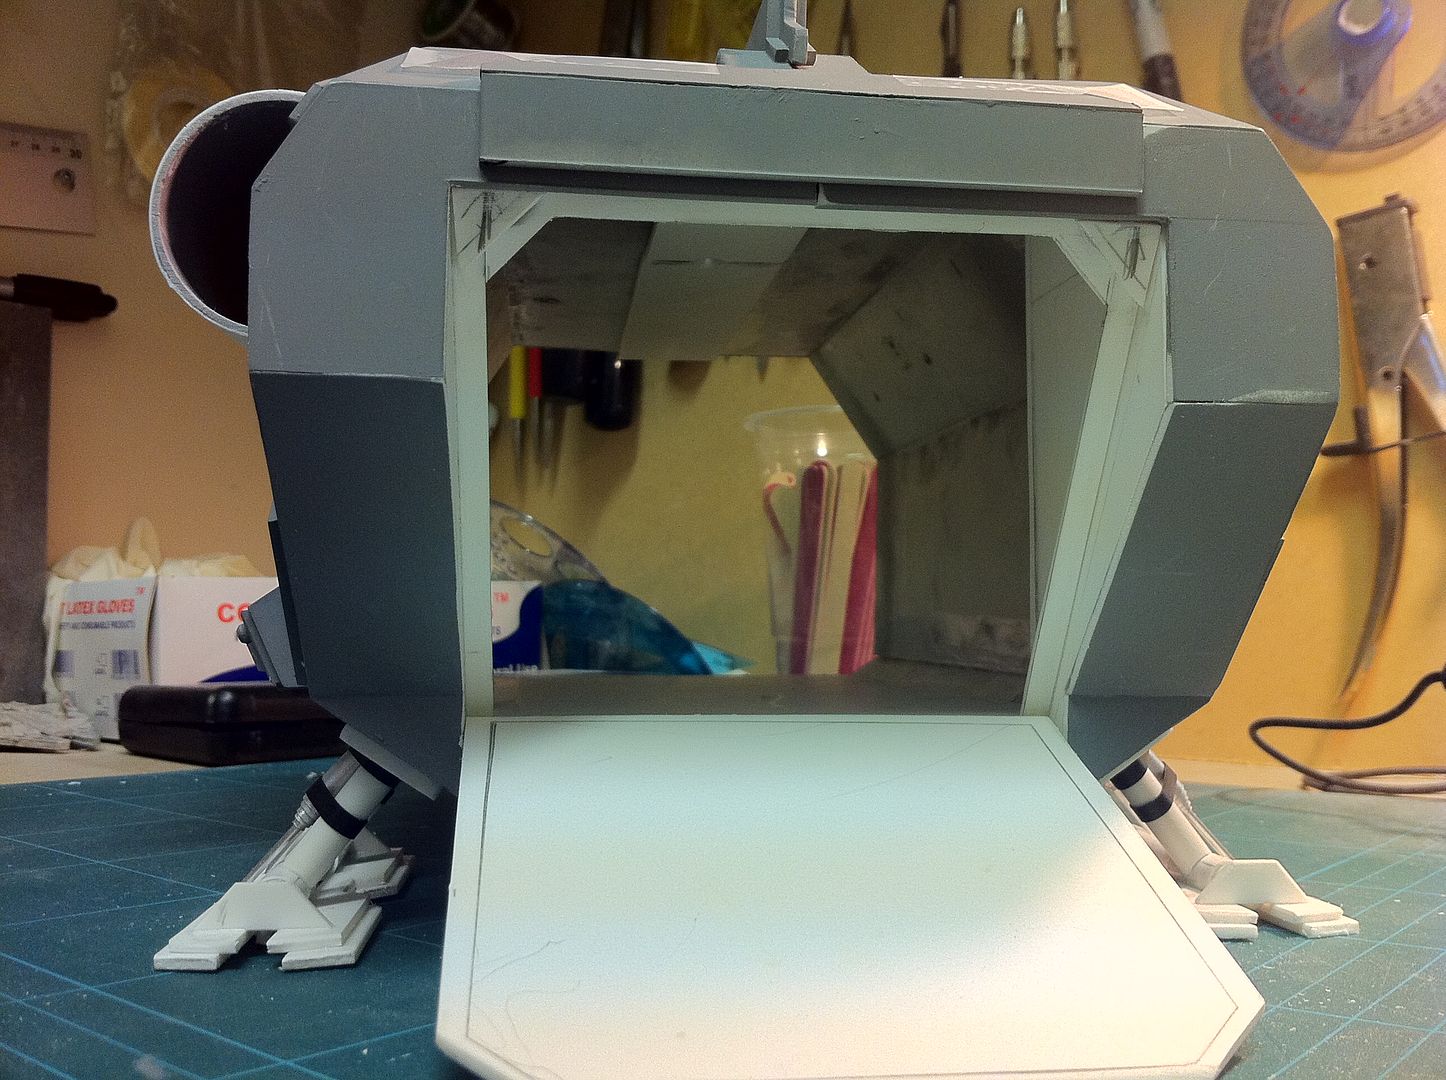
Thanks for your kind words. I have scribed the main hull nearly apart today(I had to build it all in one piece to ensure a proper fit, but it will need split so i can detail/paint the interior, and all the lighting system).
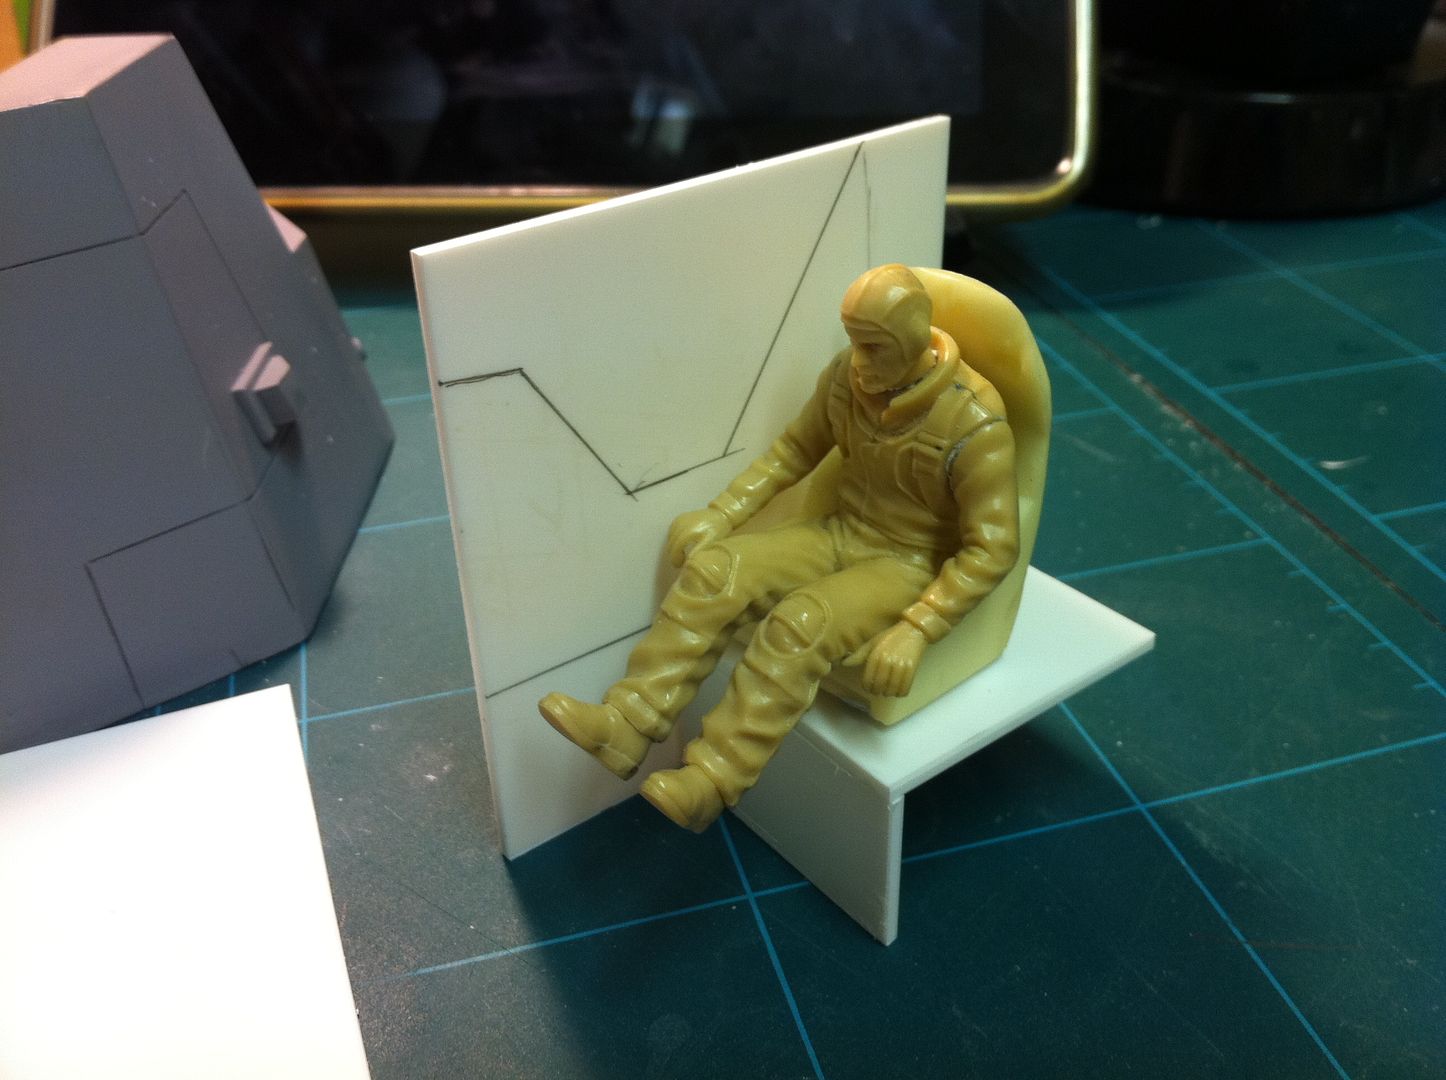
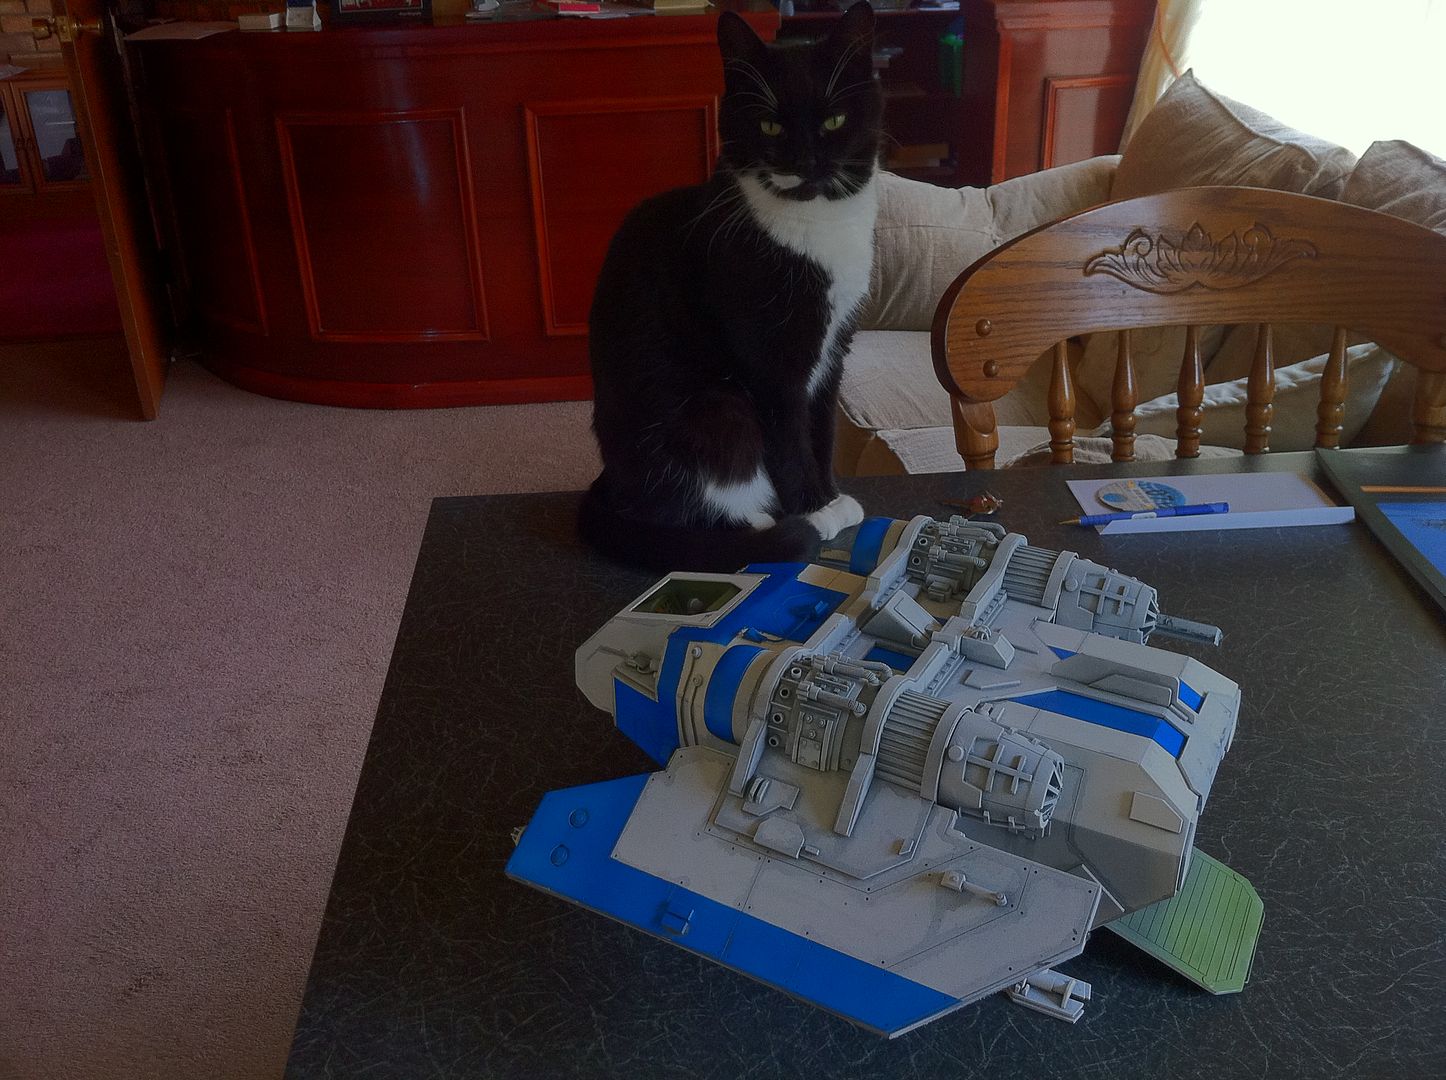
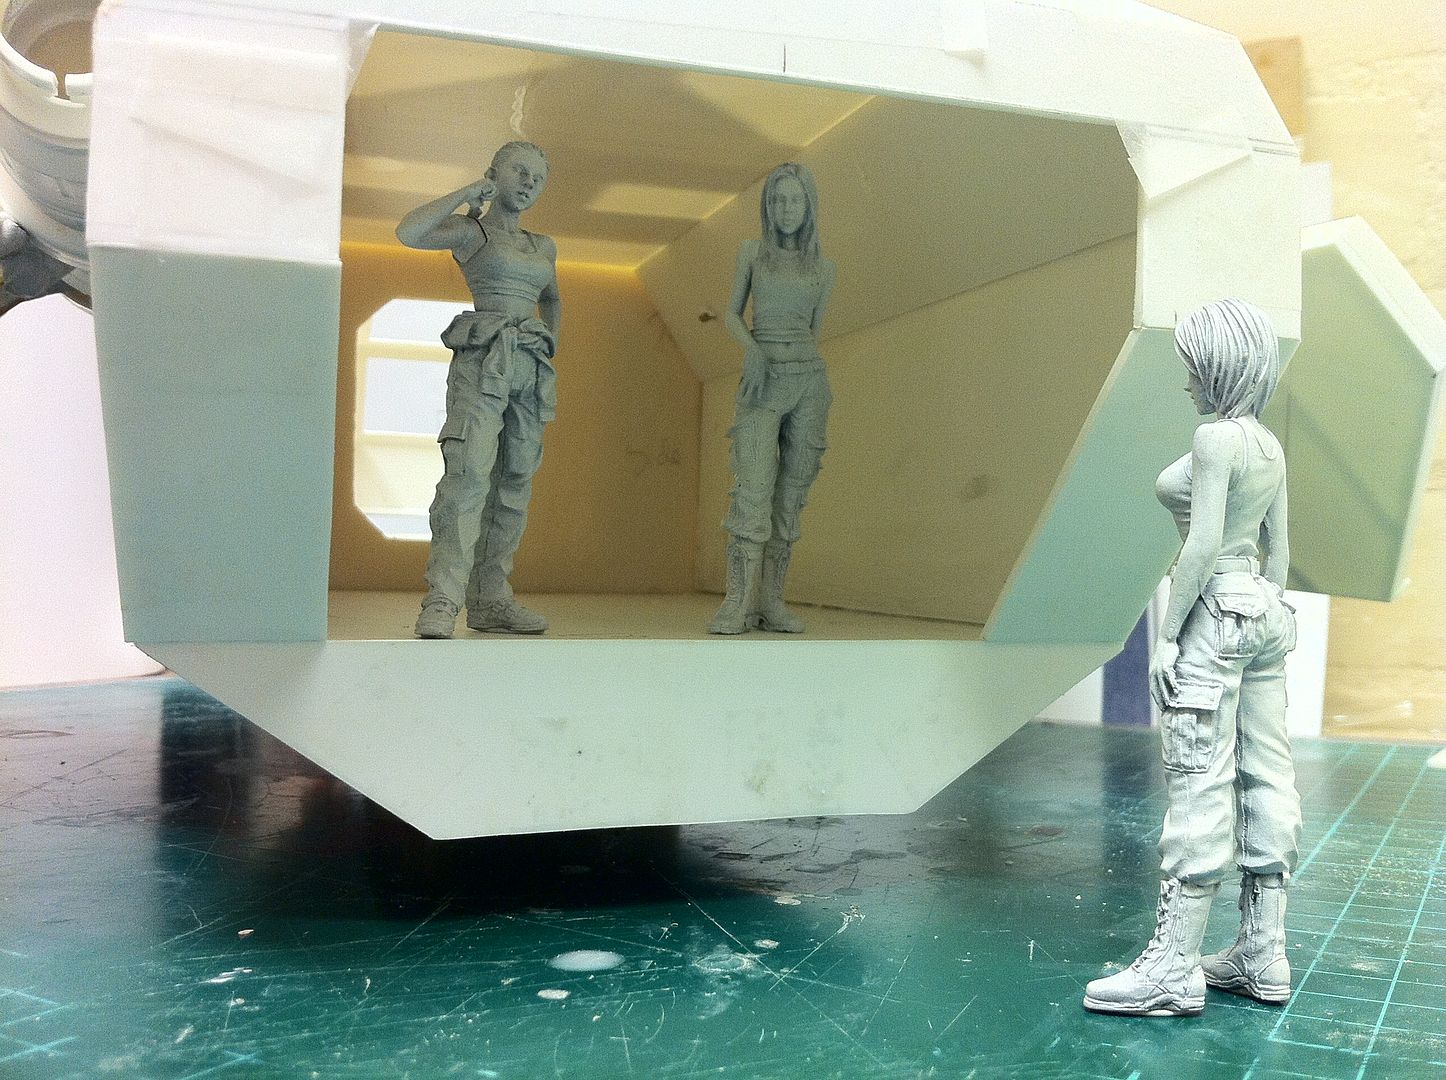
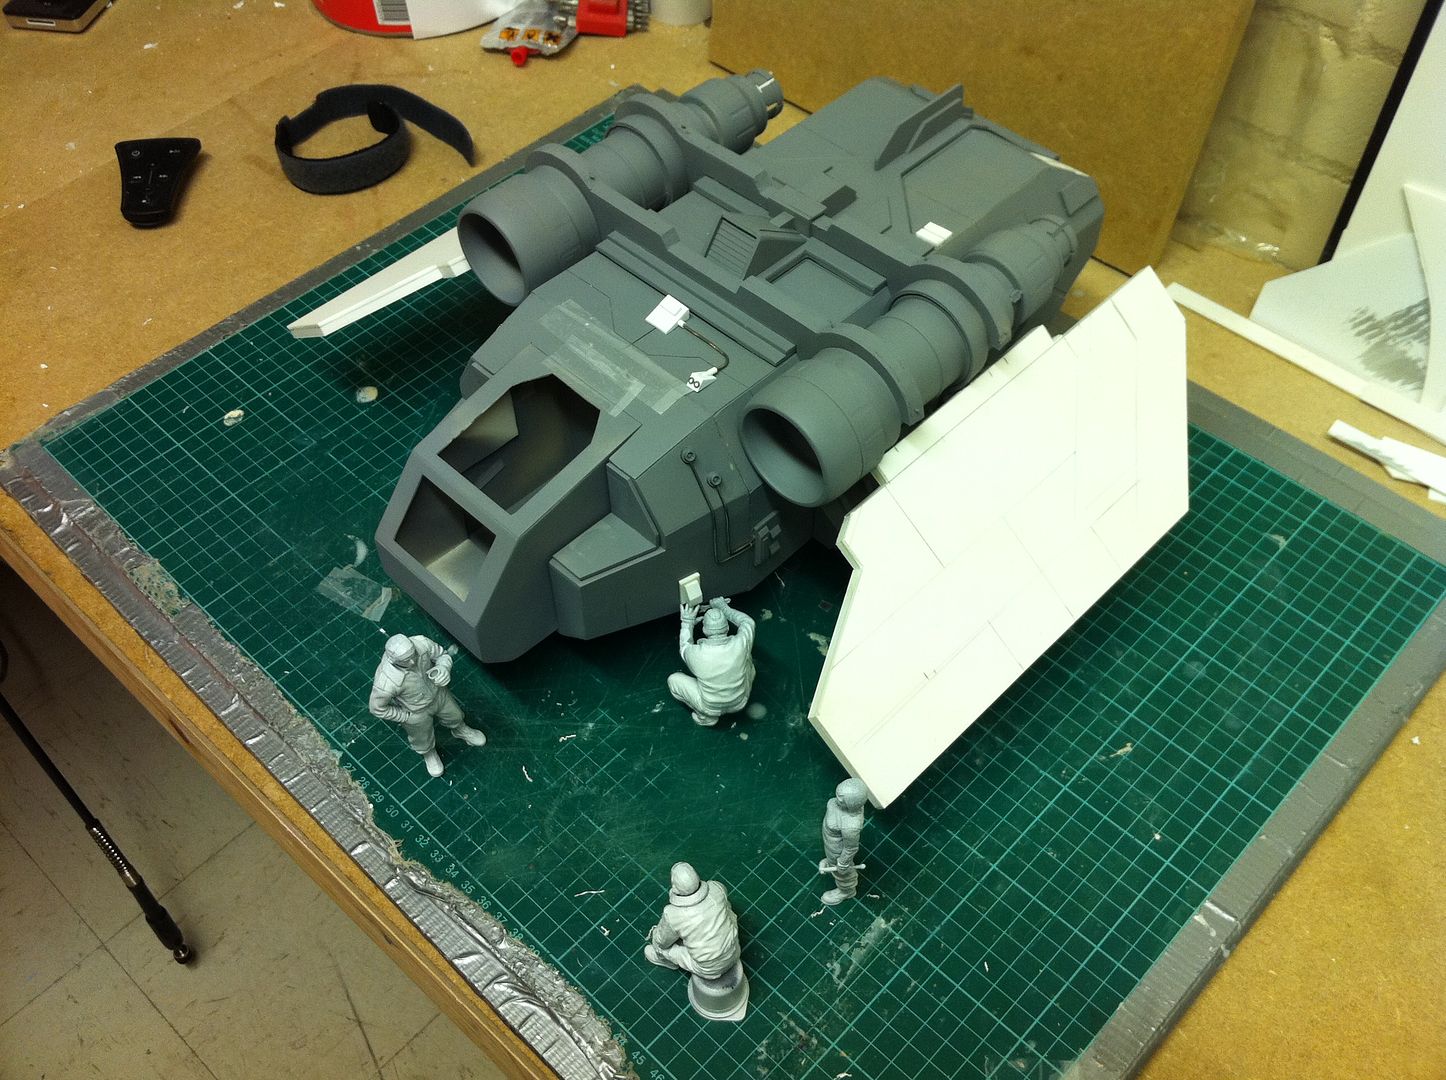
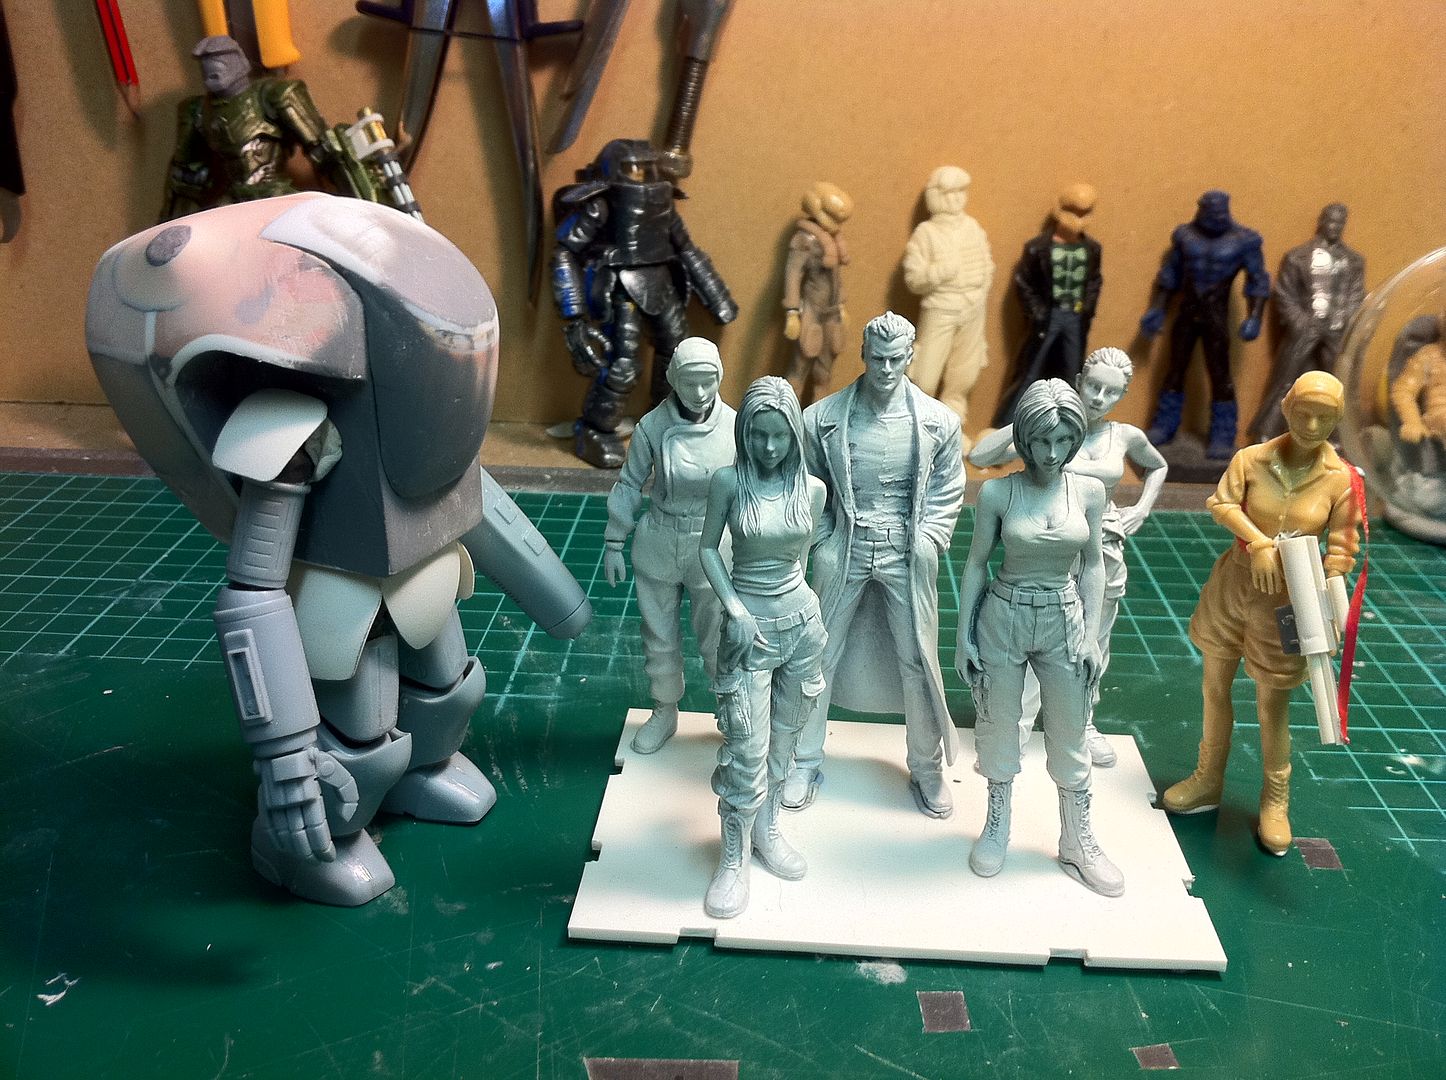
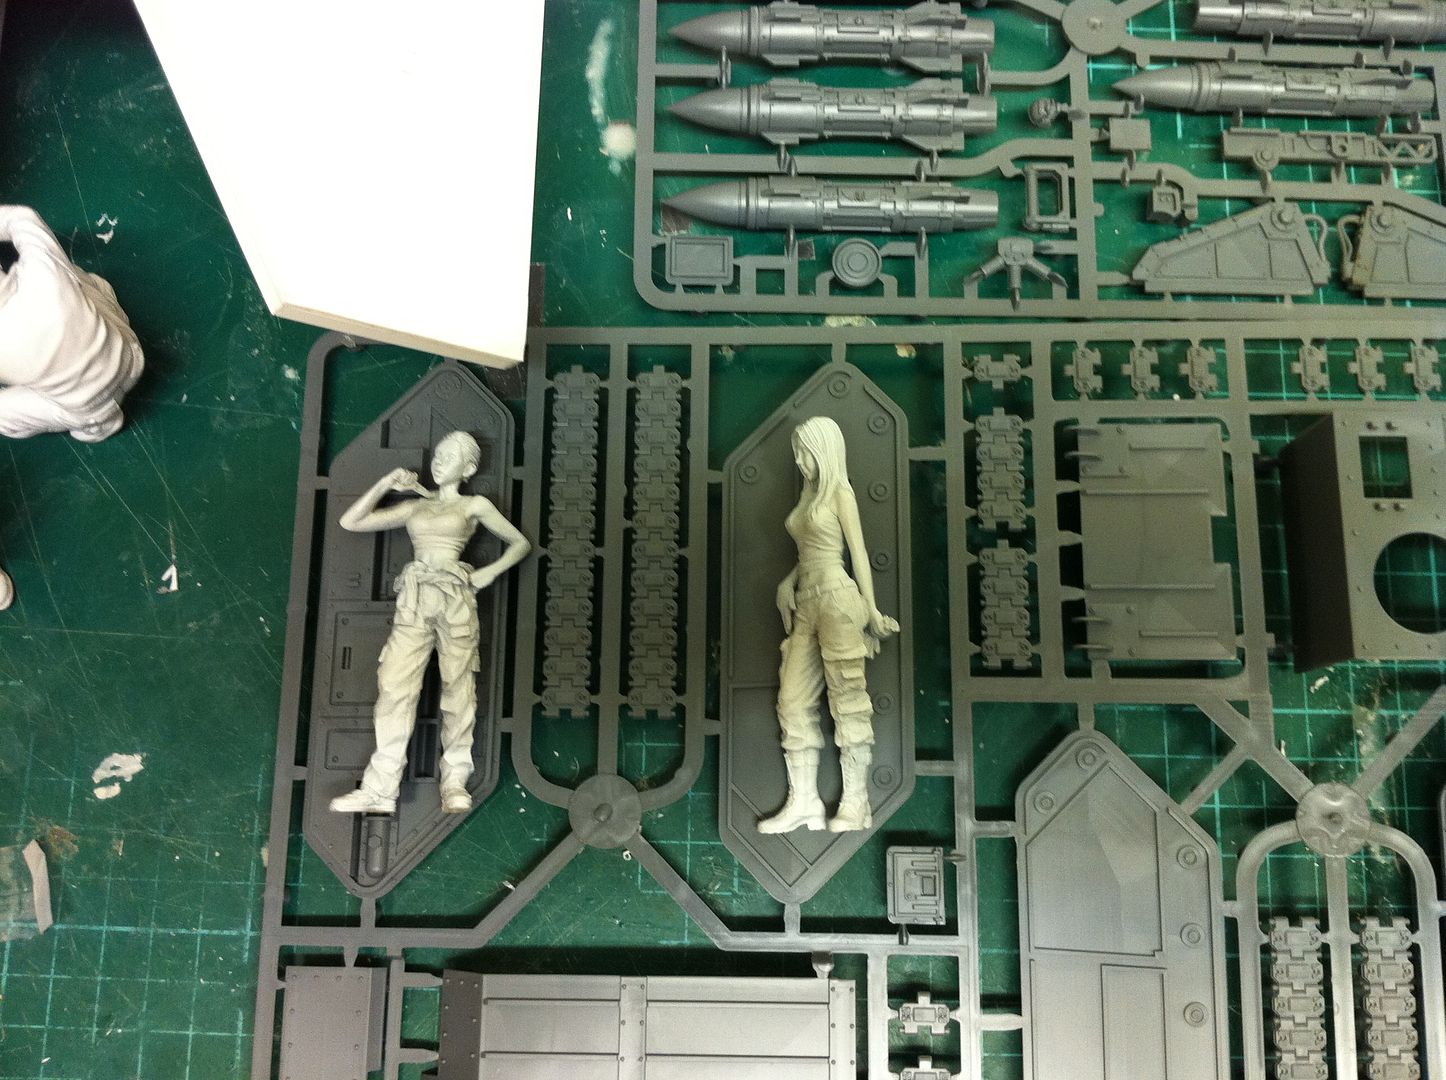
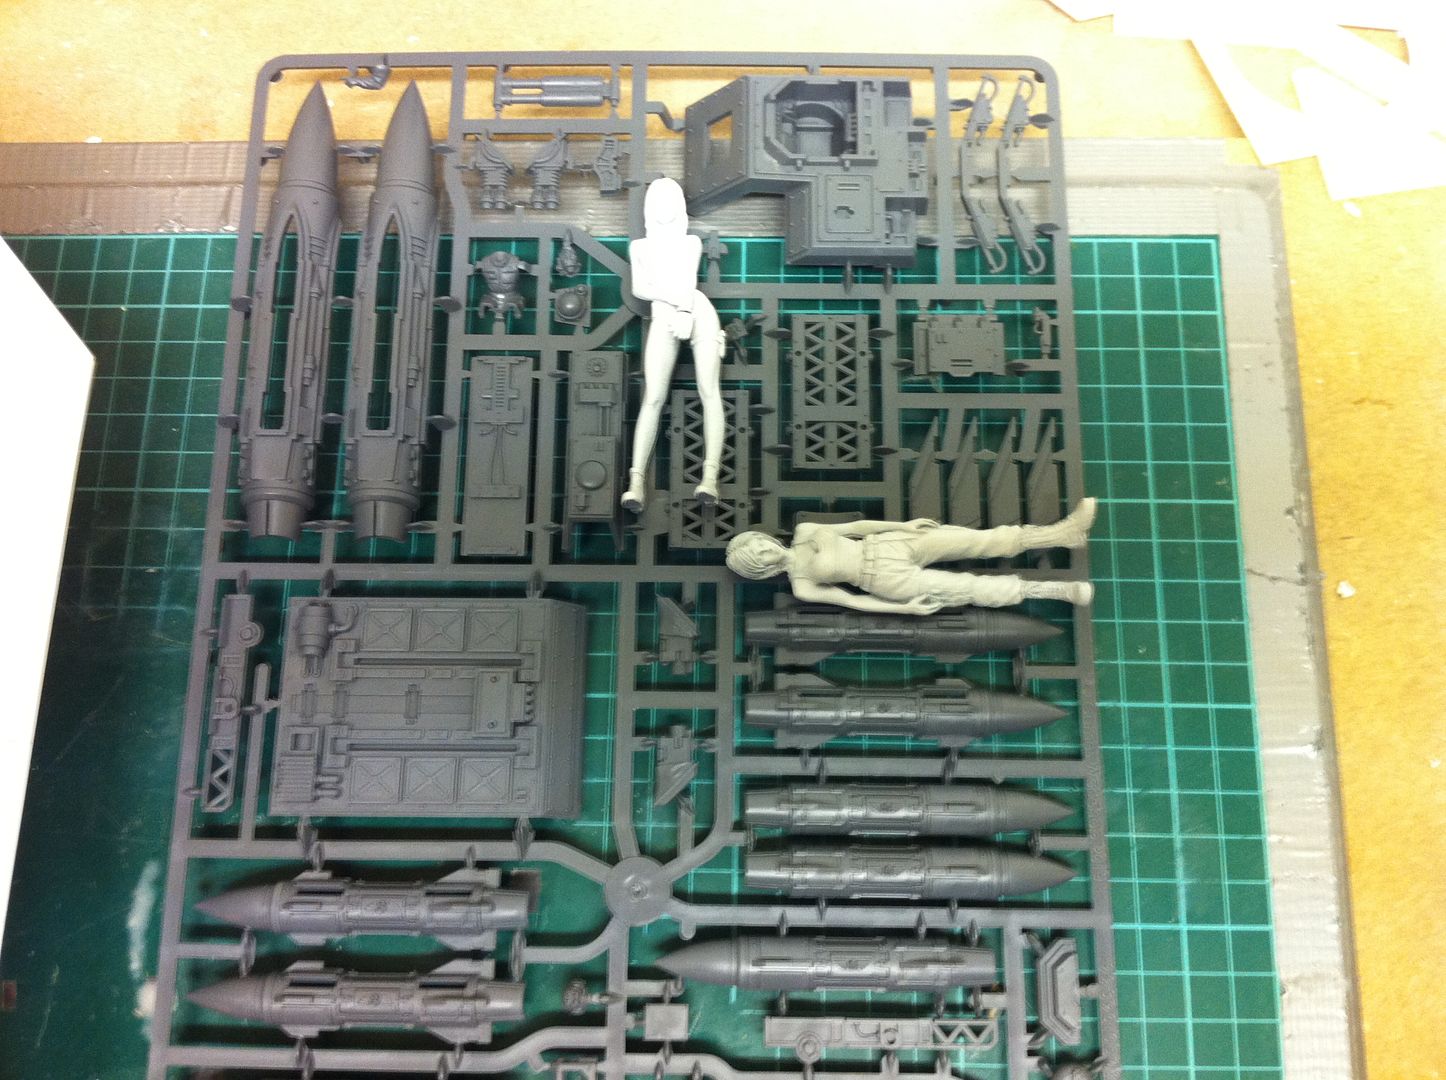
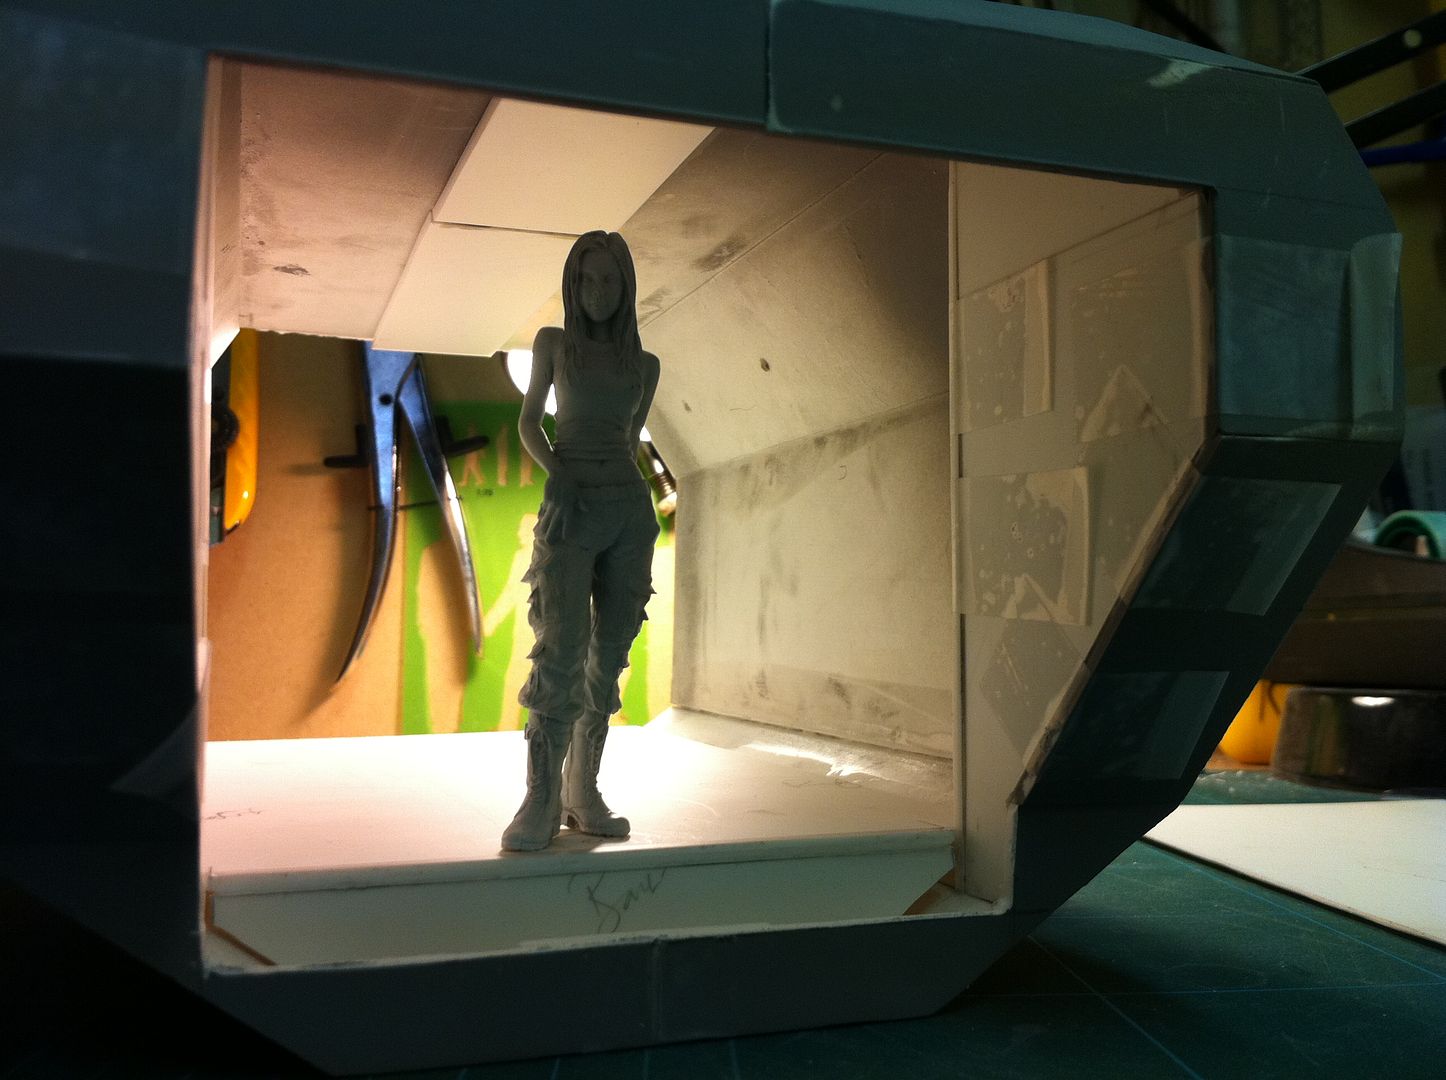
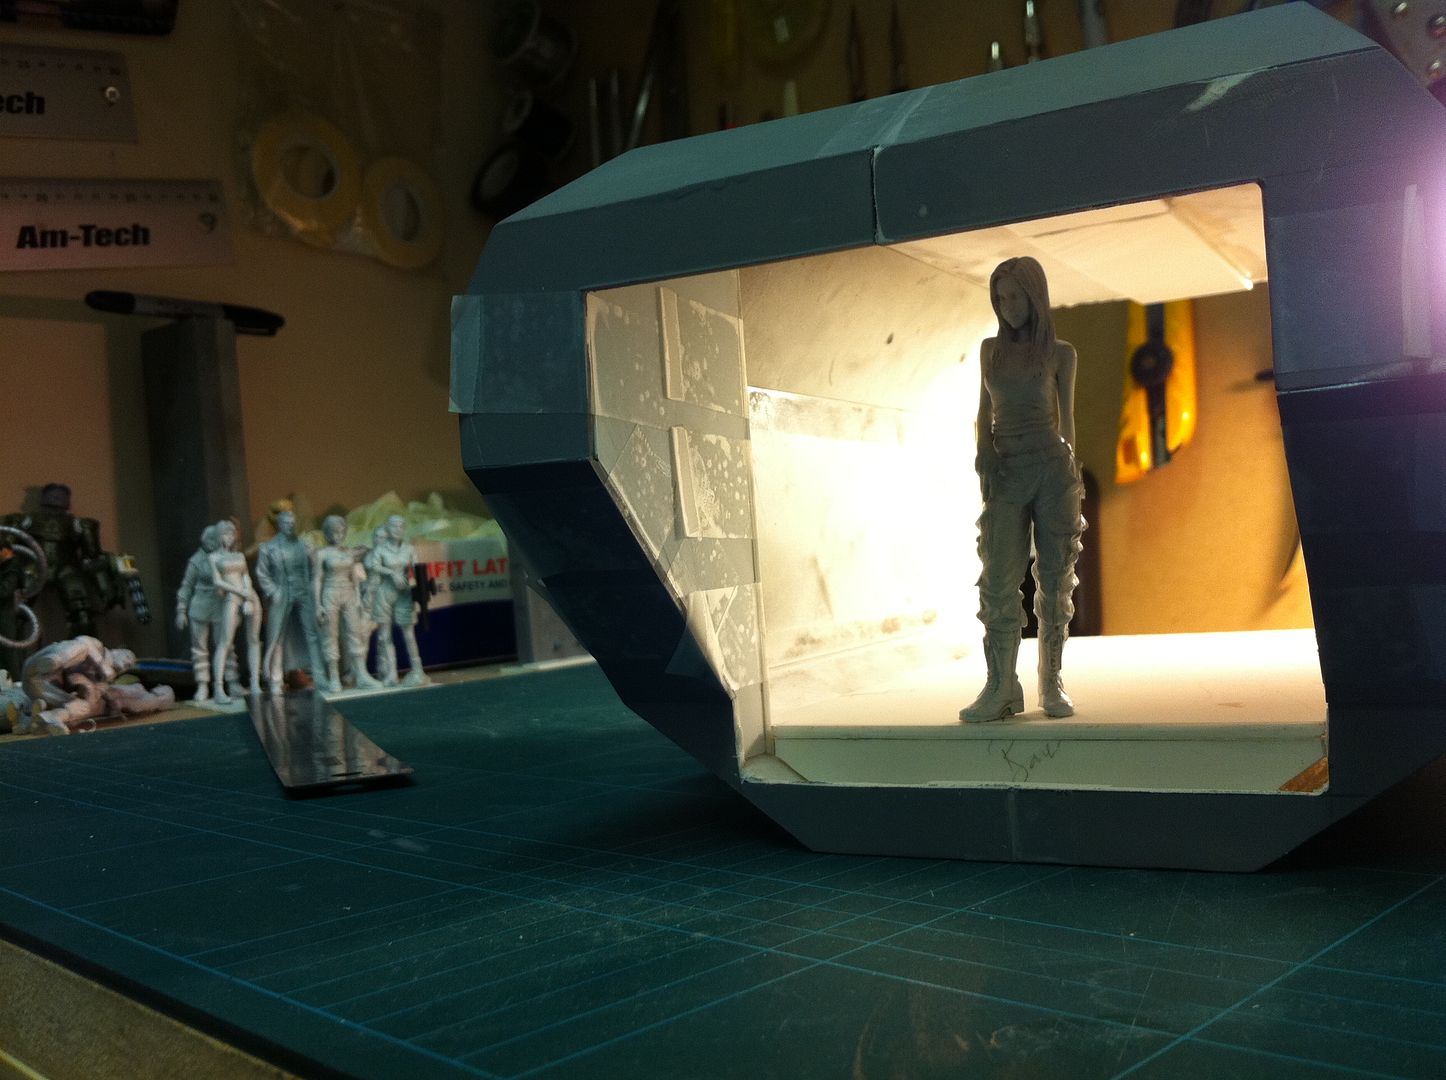
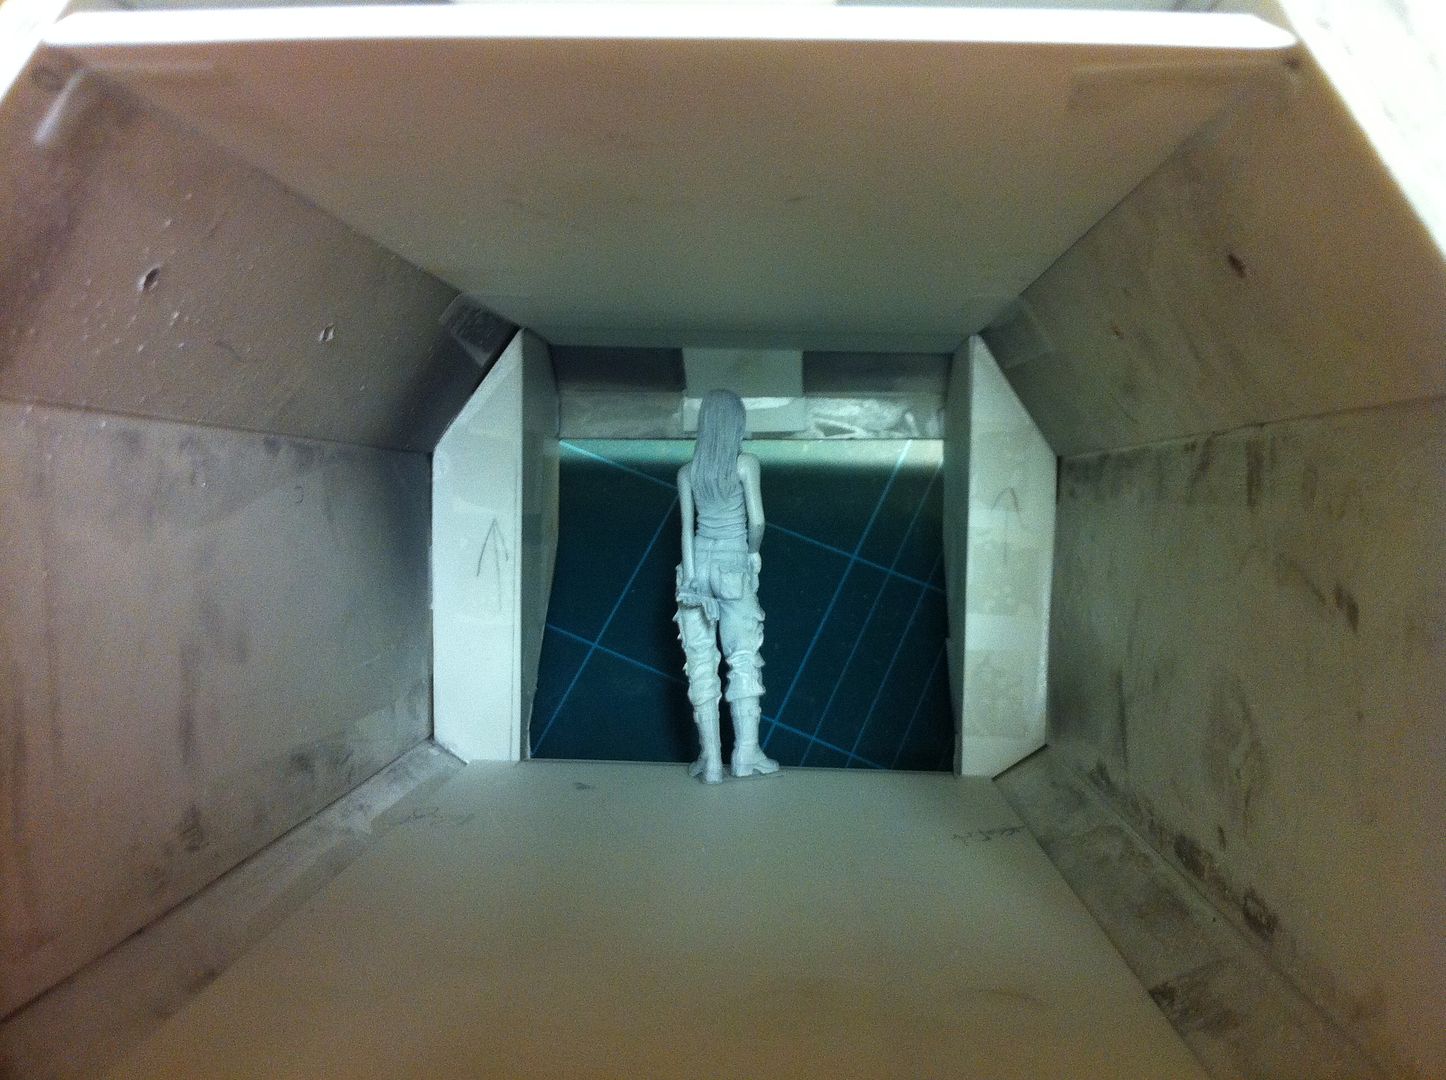
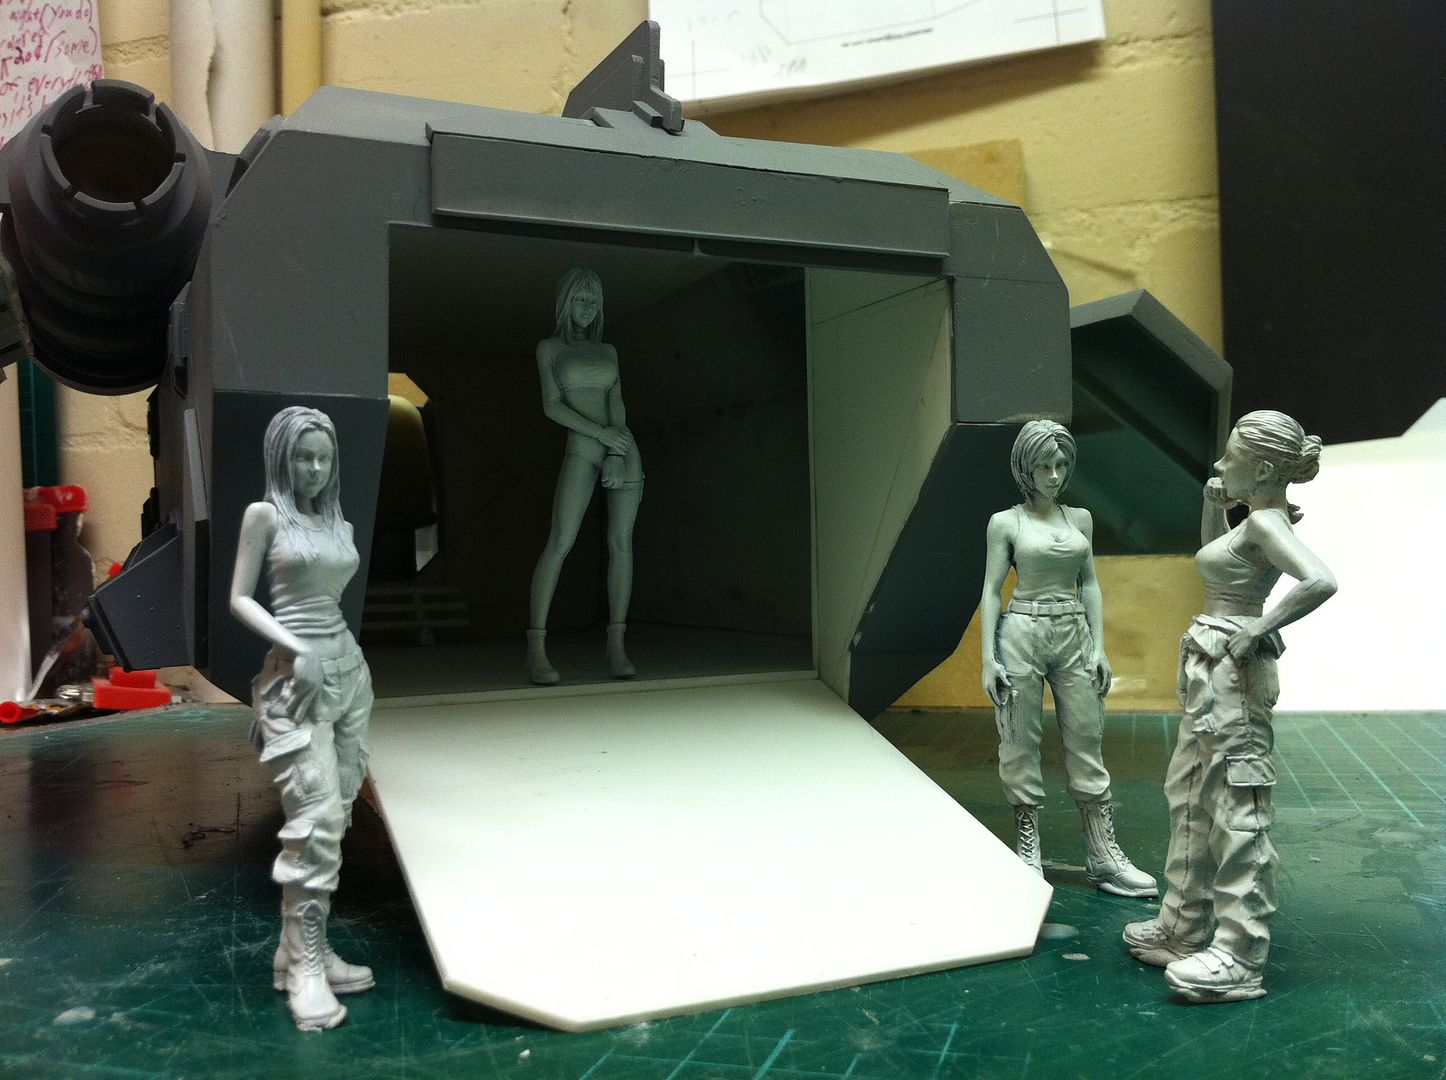
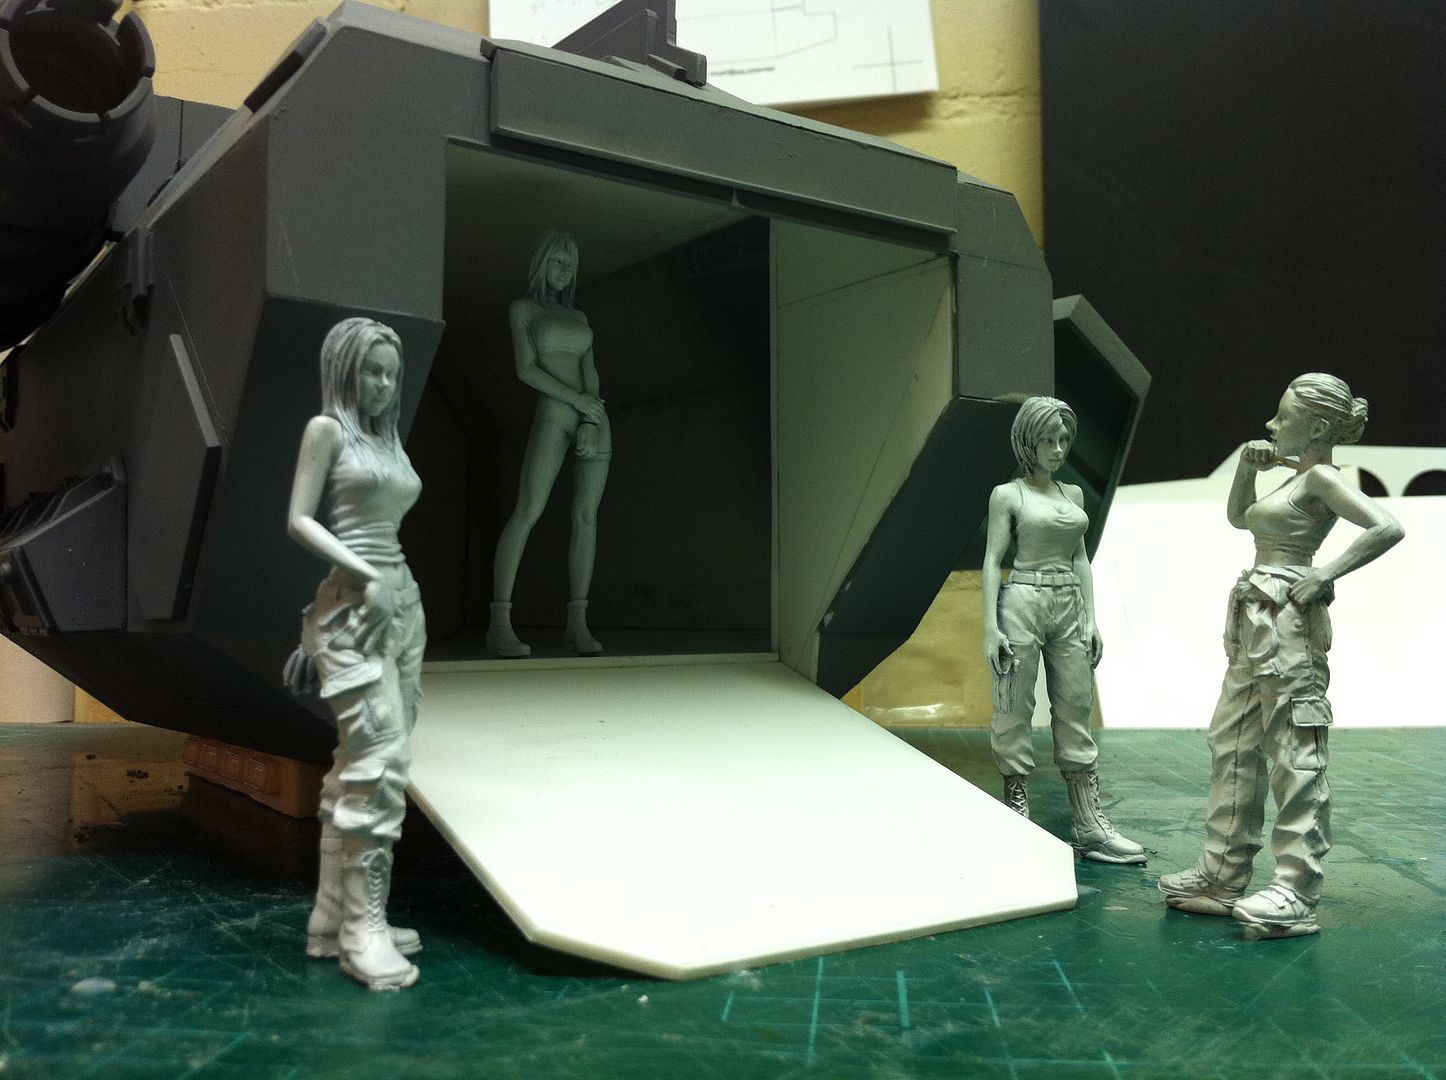
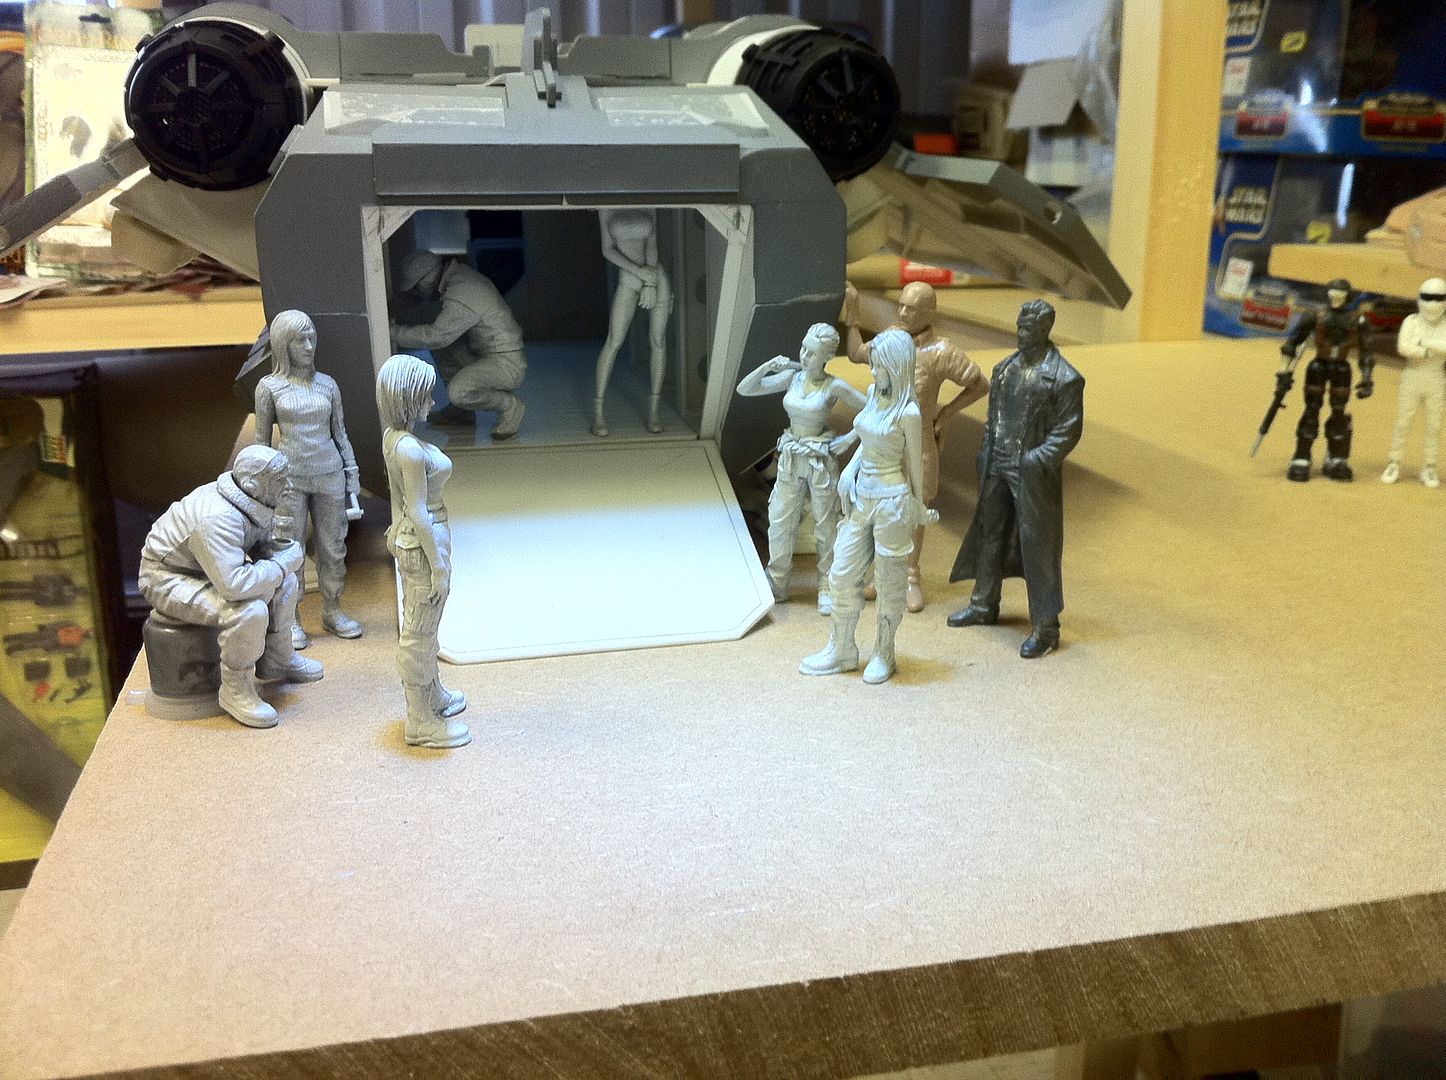
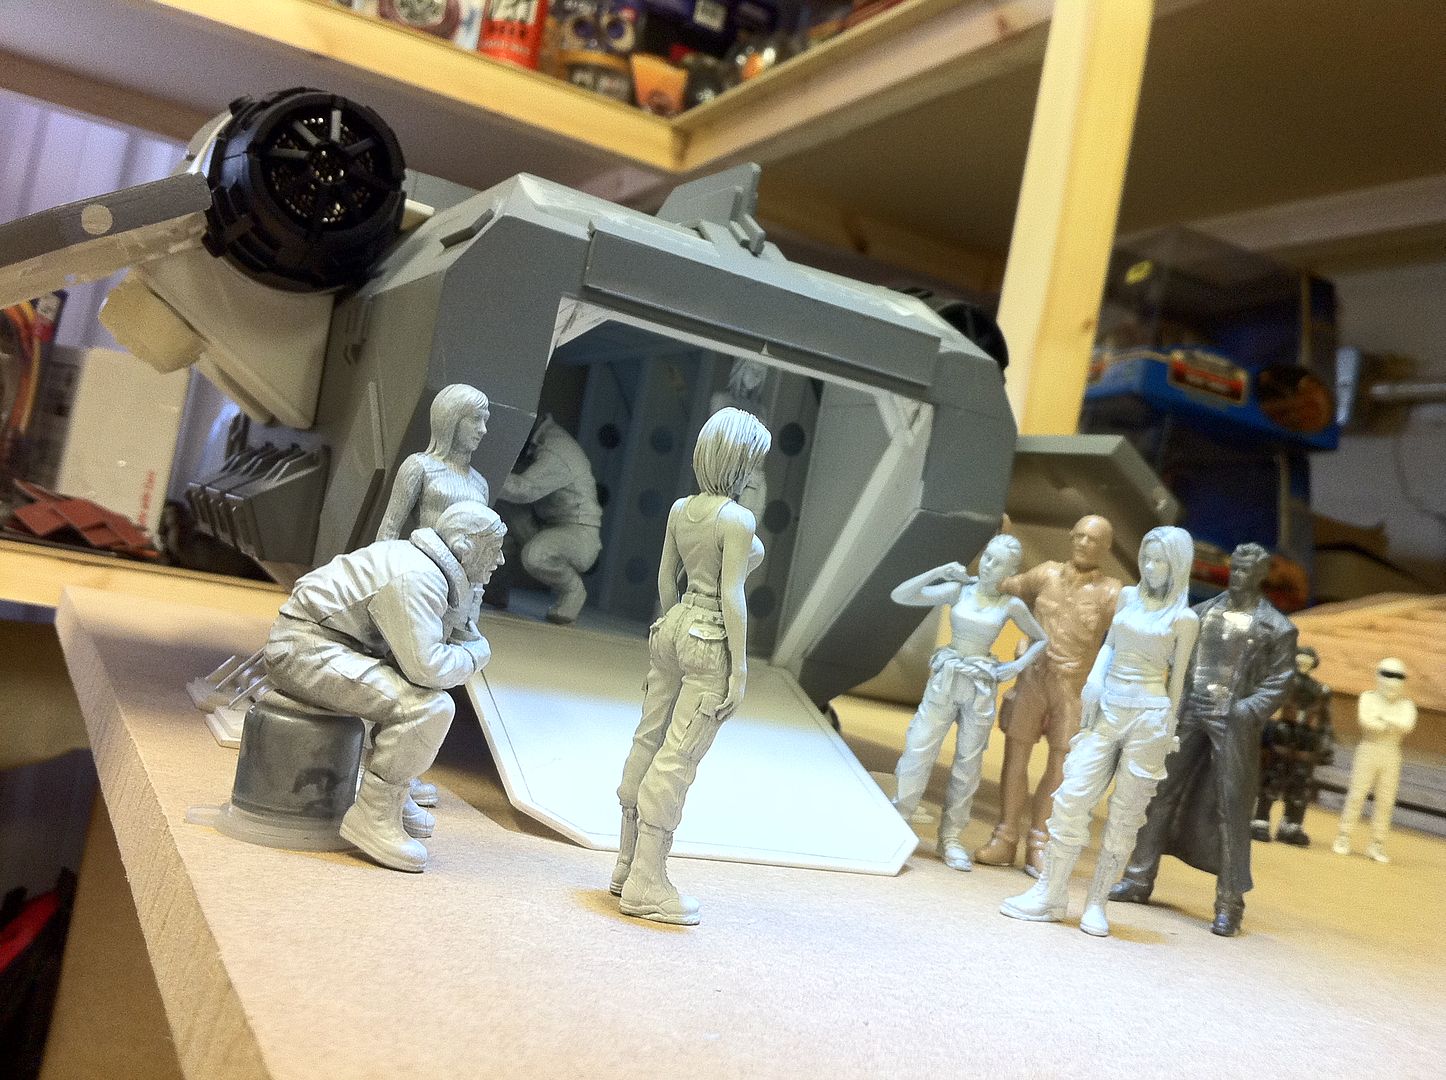
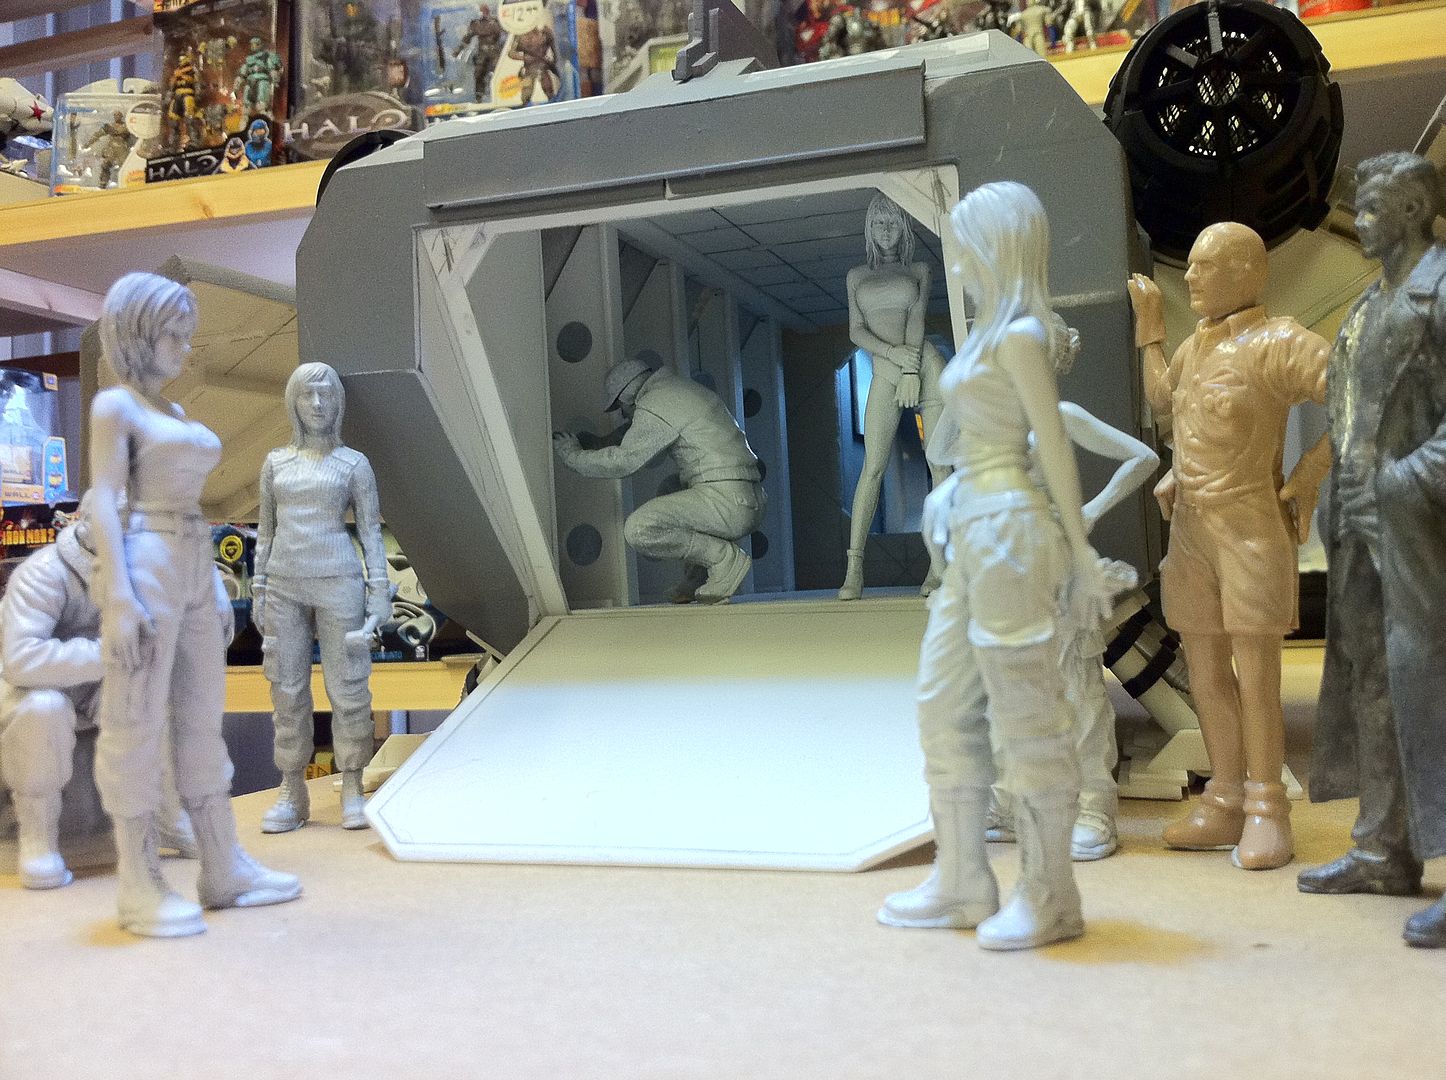
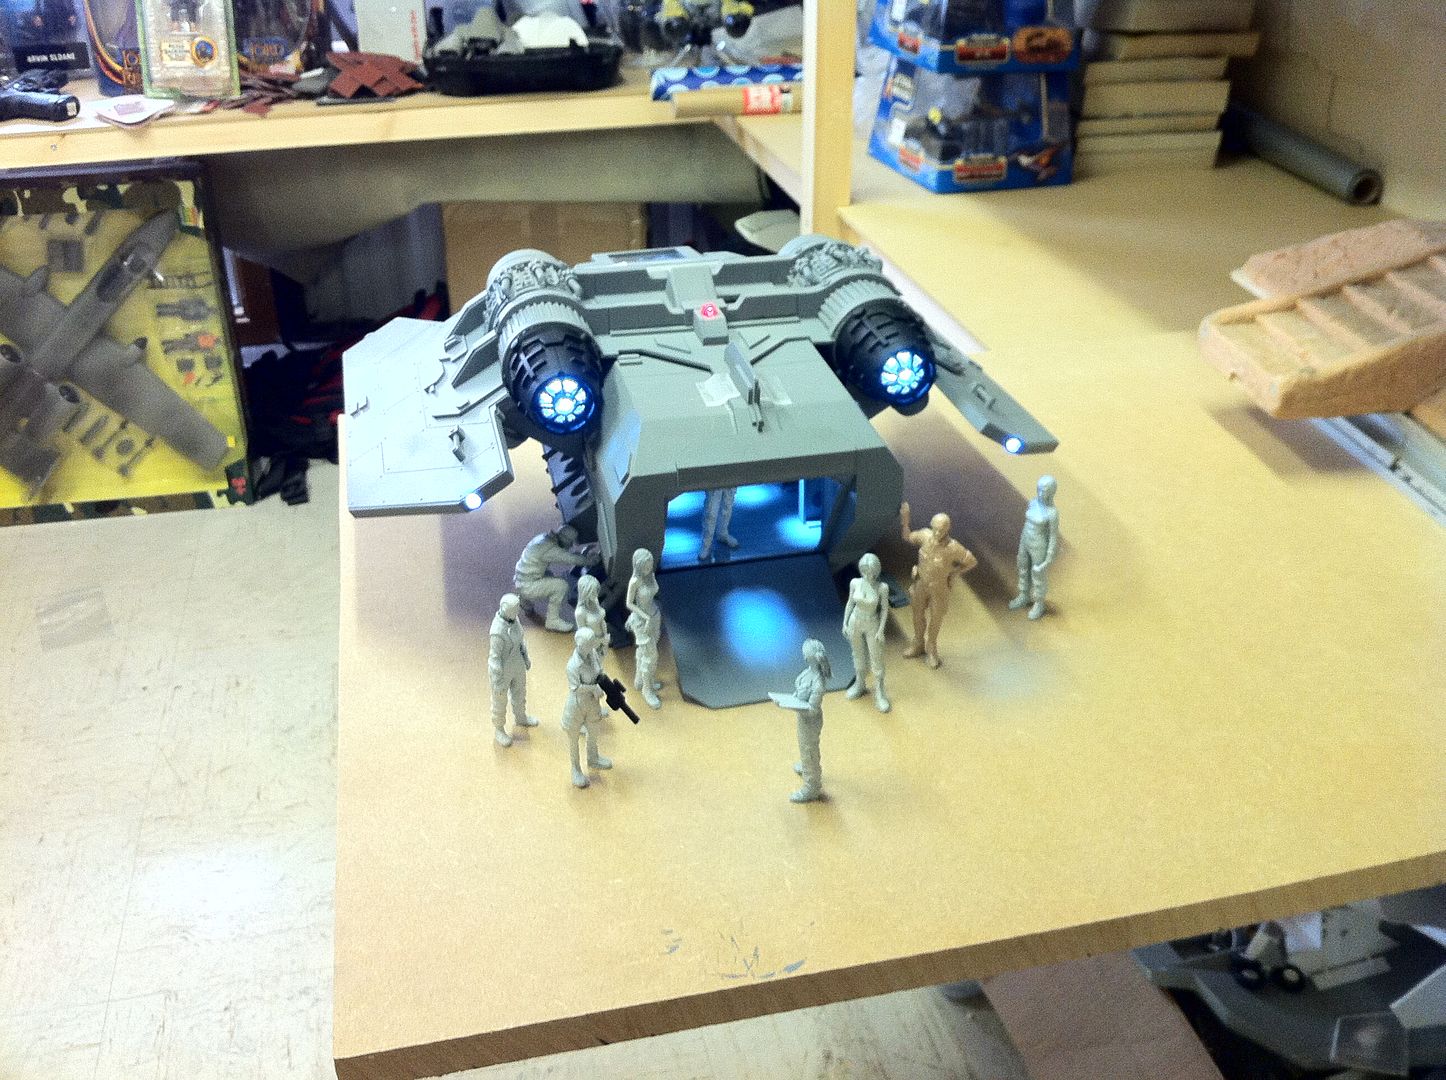
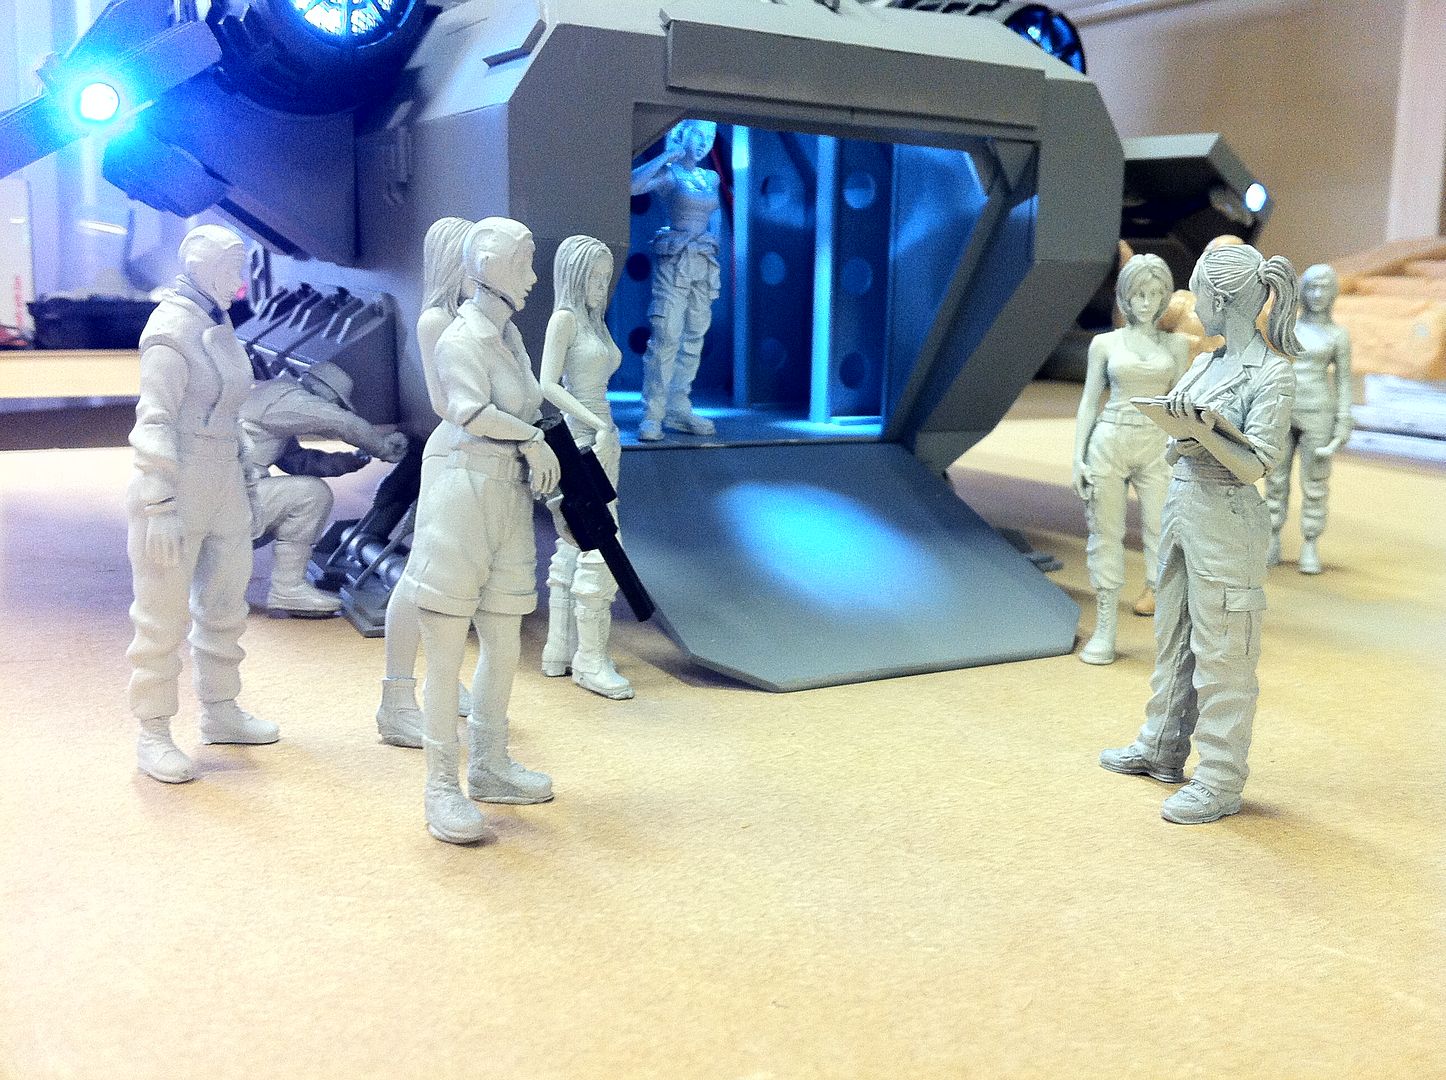
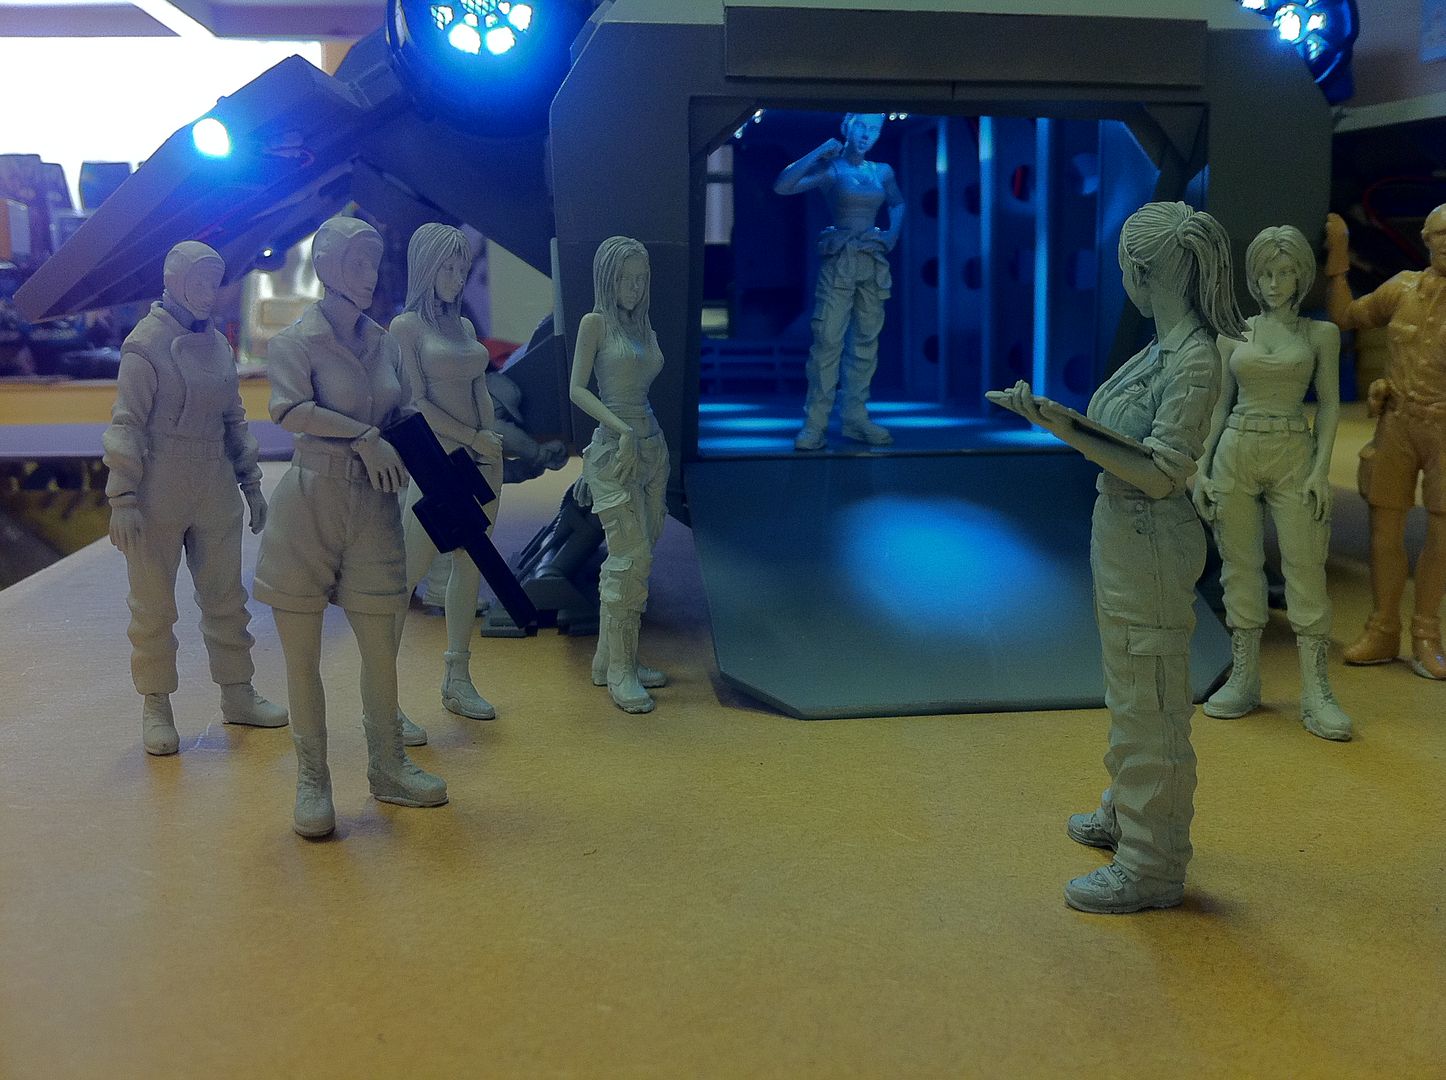
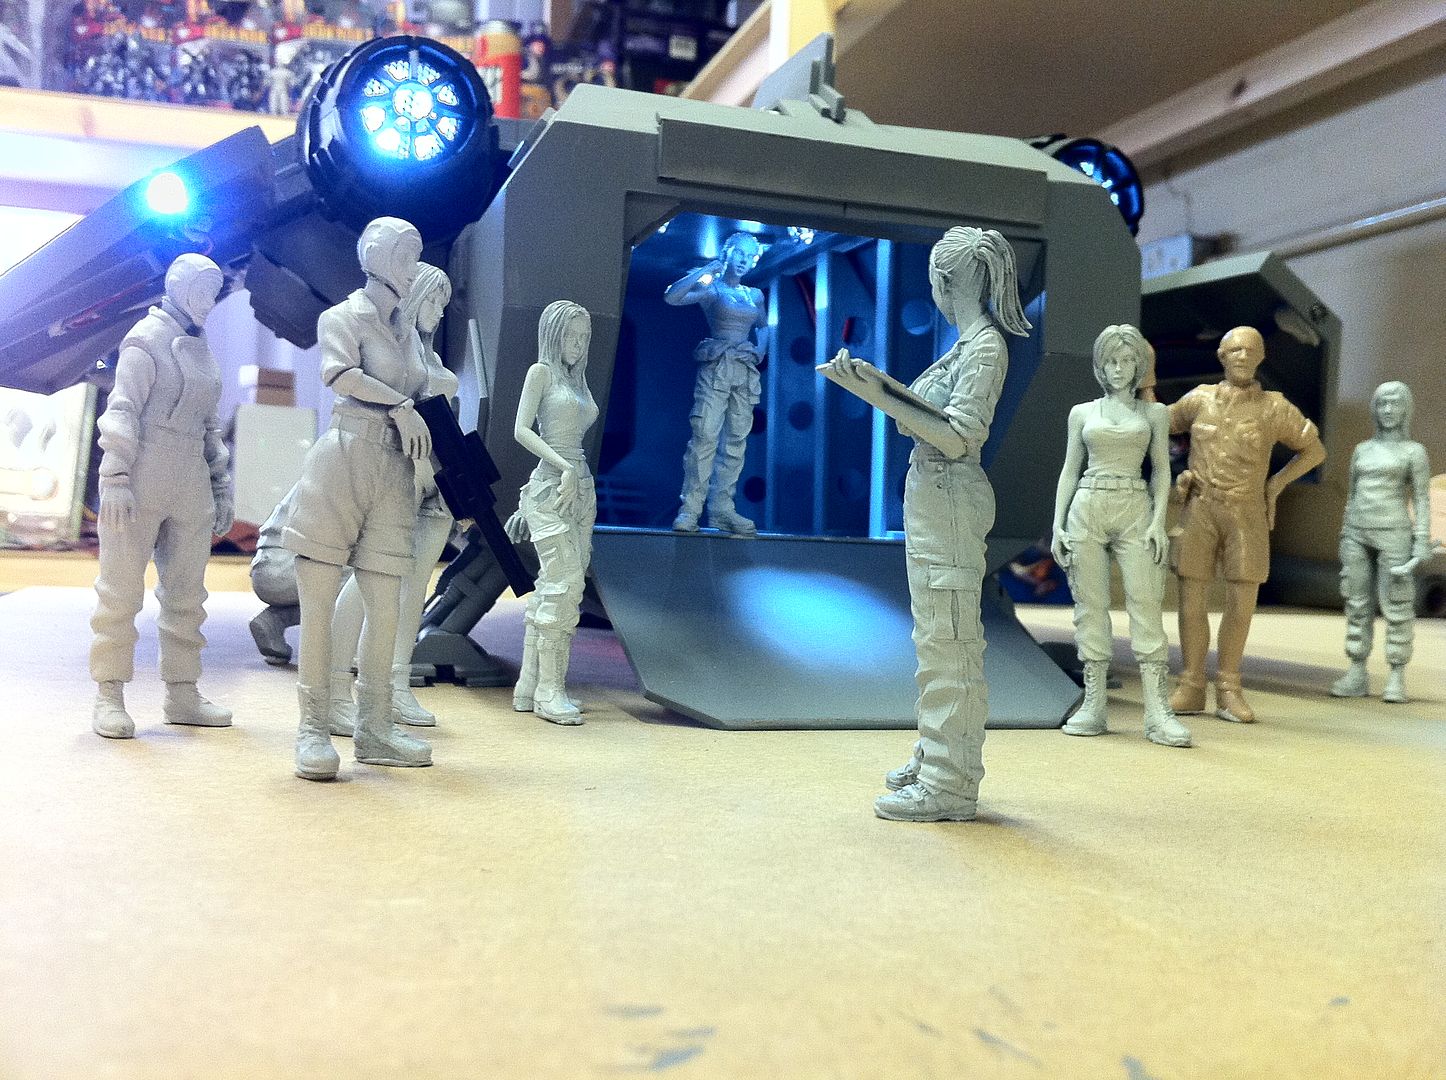
The figures are approximately 80mm high. Some are slightly larger, but all the girls are in the 80mm range. They are advertised as 1/20 scale. Sorry. As i don't game, i don't have any IG figures. If you see in the pics below, there are 10mm graded lines on the cutting mat i use. Let me know if you want pics of the figures next to a ruler.
Below are links to be able to buy the figures. They are fairly expensive. Also, see a couple of pics below of just the figures together.
http://www.starshipmodeler.biz/shop/index.cfm/product/1253_165/120-mercenaries-woman-maintenance-crew.cfm
http://www.starshipmodeler.biz/shop/index.cfm/product/1665_165/120-mercenary-woman-space-pilot-a-inner-suit-ver.cfm
http://www.starshipmodeler.biz/shop/index.cfm/product/1917_165/120-takako-lopez-maschinen-krieger-profile-1.cfm
http://www.starshipmodeler.biz/shop/index.cfm/product/1147_165/120-mercenaries-woman-pilot-figure.cfm
And now the pics showing more of the figures:


33868
Post by: winnertakesall
That would be greatly appreciated, as I struggle when it comes to that.
31627
Post by: FantasyBob
Man, your work is amazing and that girl are soooo cute! who own them!?
sorry for my english
18892
Post by: Bar
Okay guys.
Thanks for all the replies.
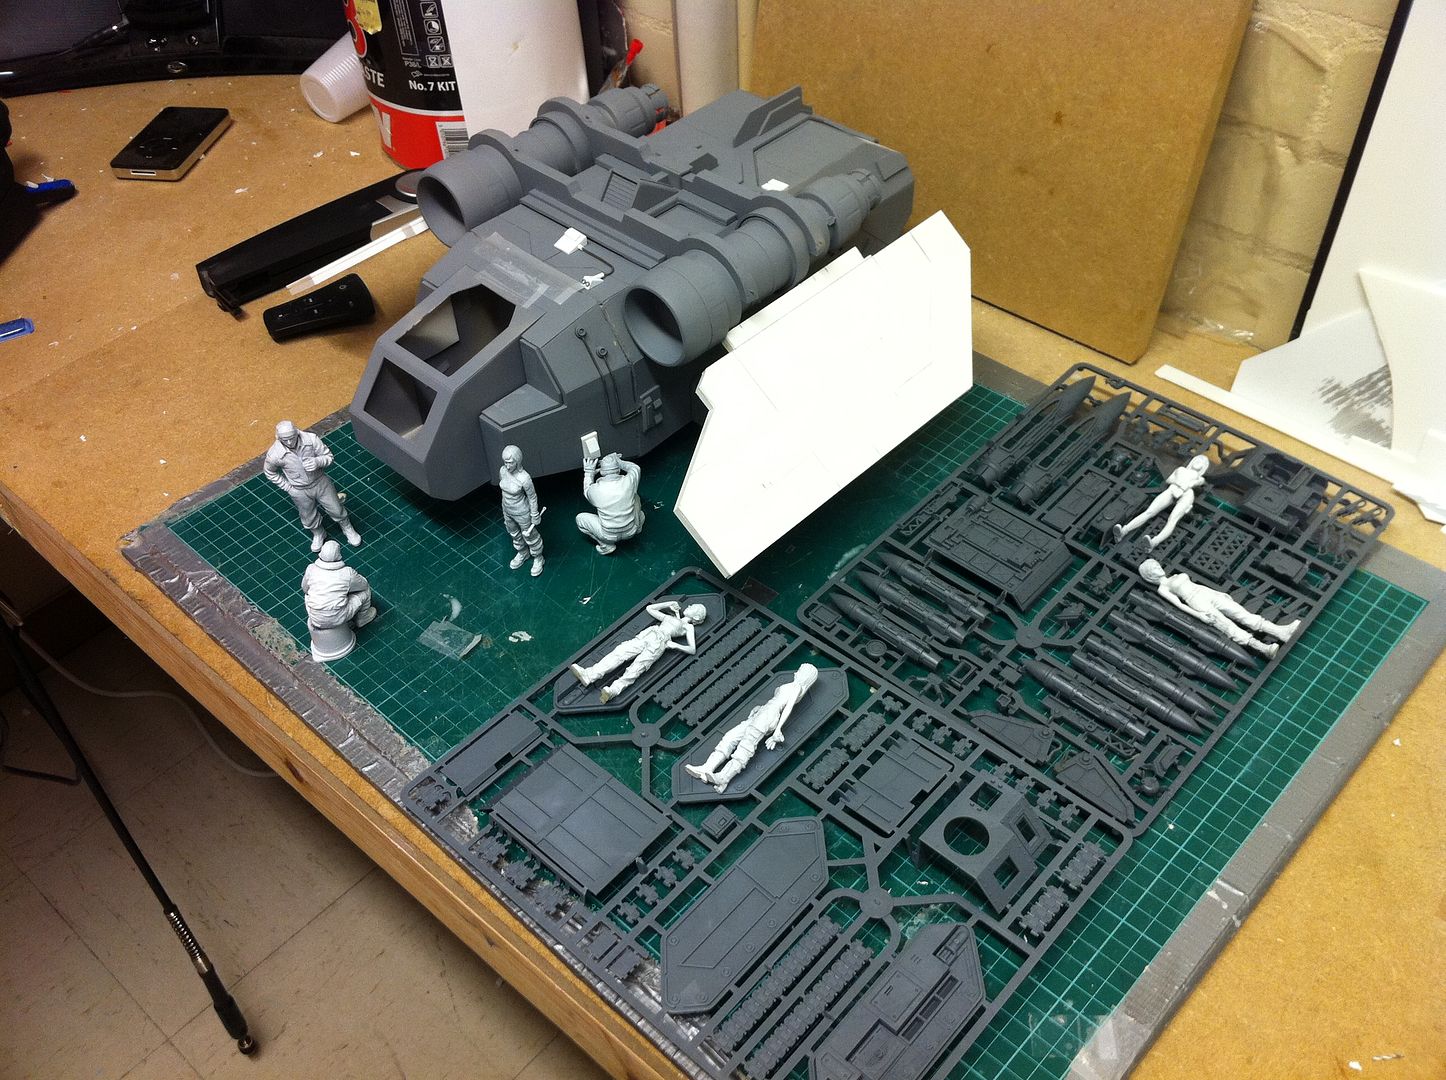
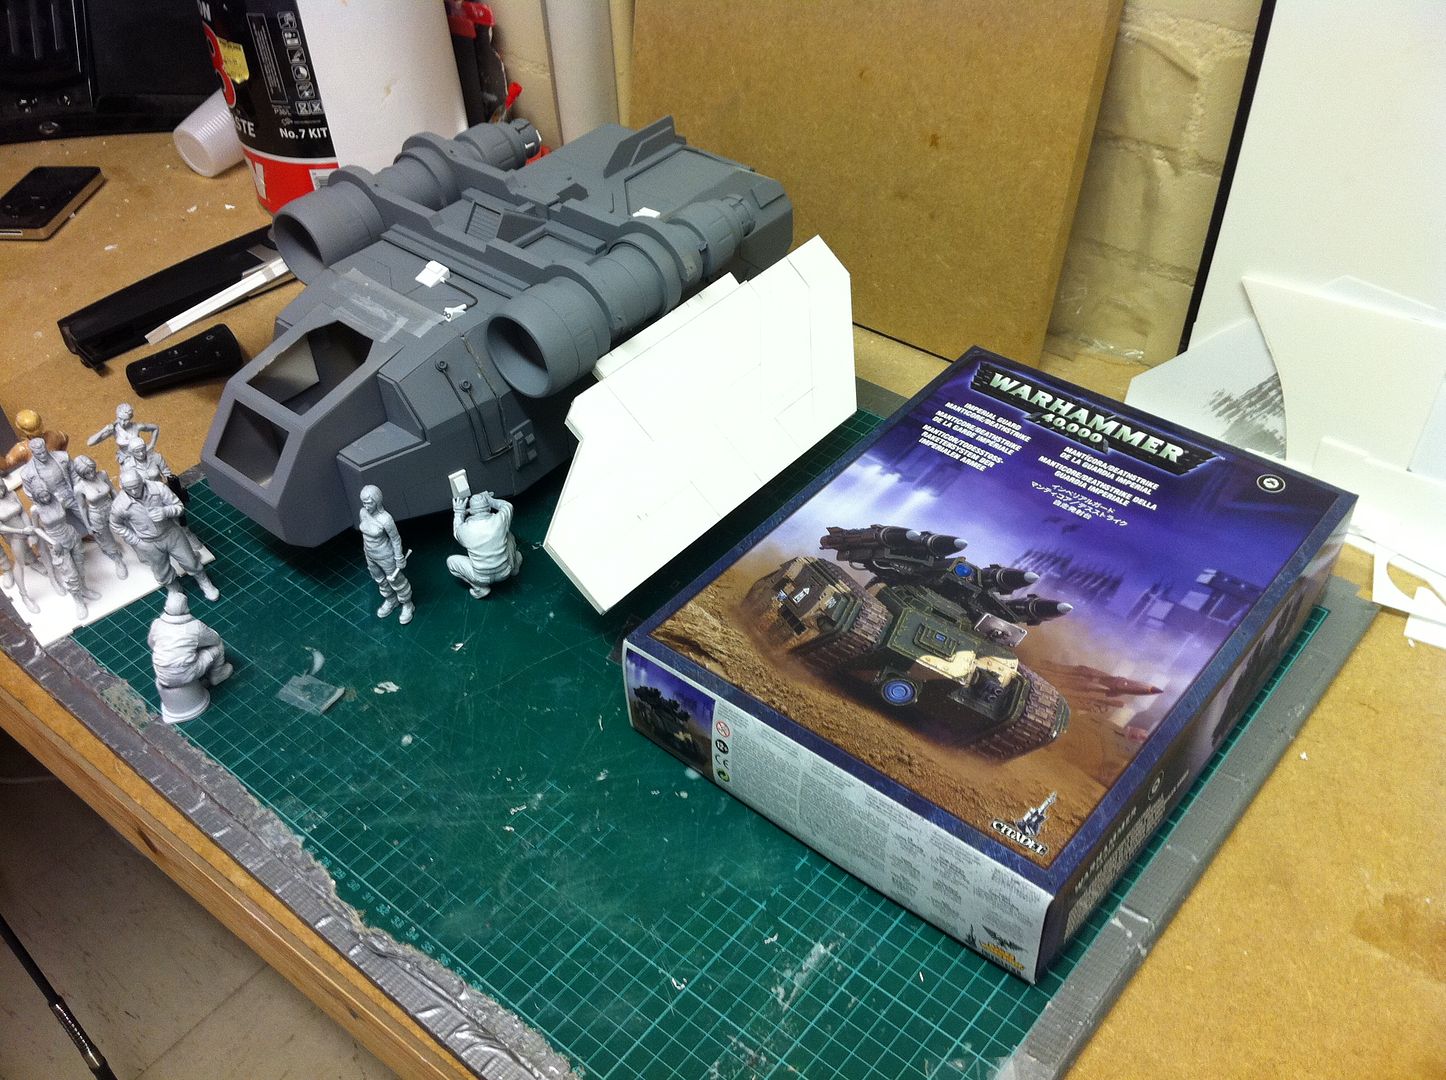
It occurred to me that i DO have some Warhammer kits in my model kit repository. None built, but still there on the shelves nonetheless. So i took a Manticore/Deathstrike and took pictures of the figures and the Arvus next to the sprues. I hope it will show how large the Arvus truly is!
winnertakesall wrote:That would be greatly appreciated, as I struggle when it comes to that.
No worries. I went round by work after the gym tonight to do a little cutting with a view to explaining how to get tight tolerances and neat edges.
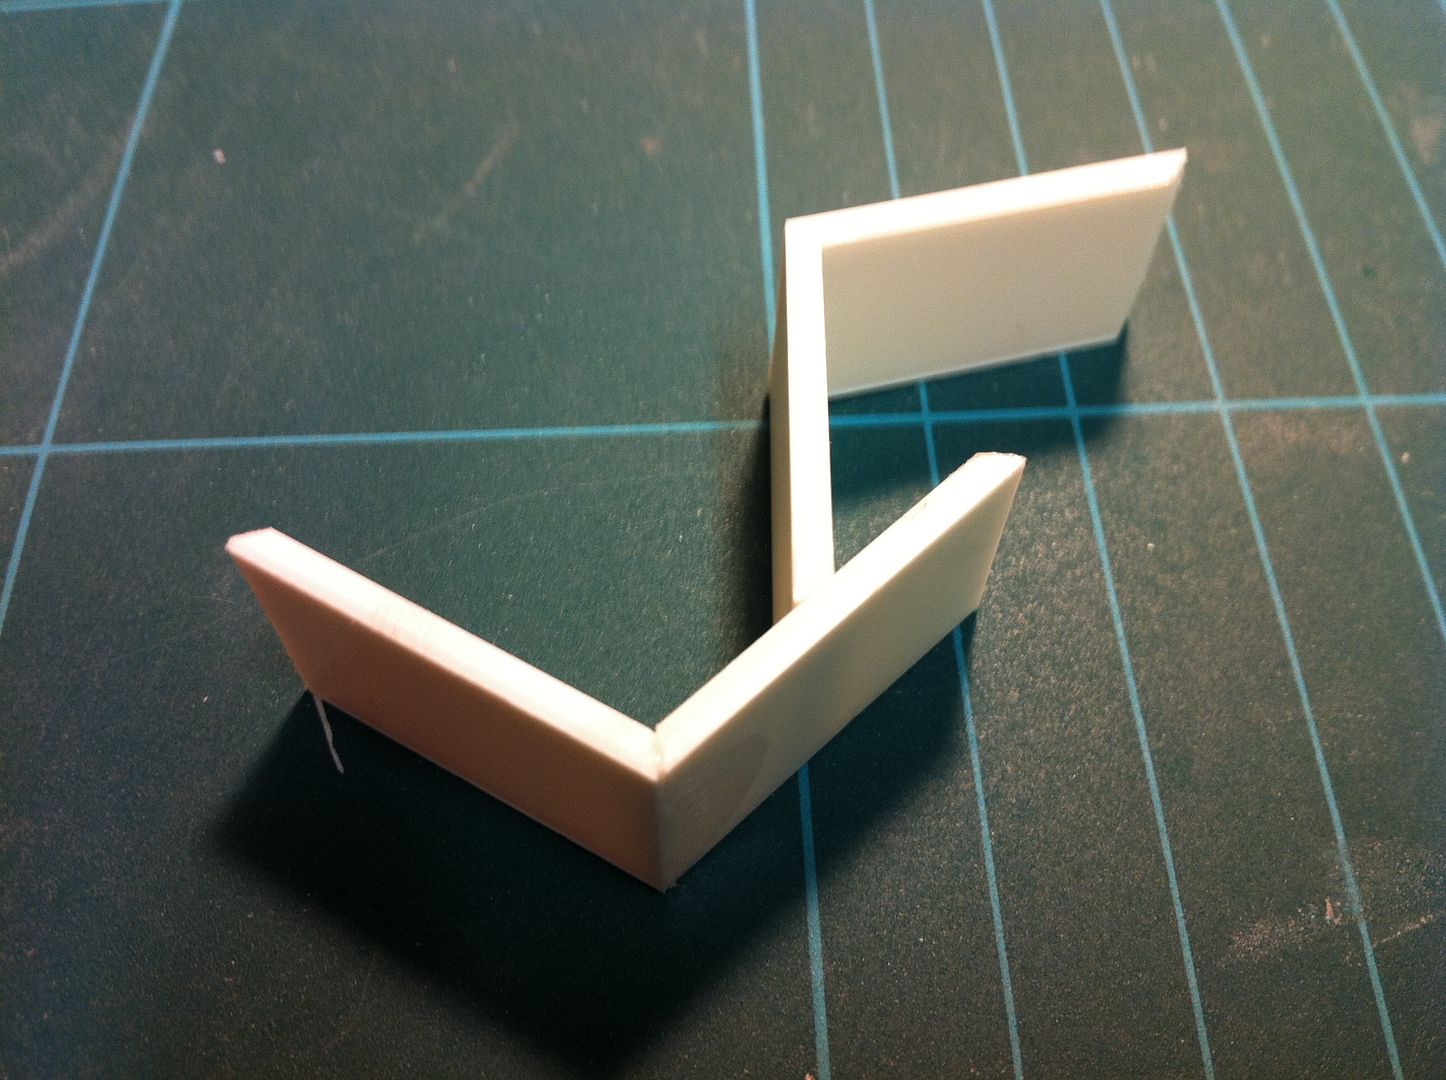
You just need to work out(Very roughly), the angles involved. It's not a problem if you make the angle too acute. As long as the edges line up. You can strengthen the joint from behind afterwards.
See the pics below(I also included a couple of pics of a same-scale Rebel Snowspeeder i made using the same techniques). I hope they illustrate what i am trying to say... If not let me know and i'll try again!
FantasyBob wrote:Man, your work is amazing and that girl are soooo cute! who own them!?
sorry for my english
No worries. Your english is not too bad. The figures are available at the links i posted in my previous message. They are the "Starshipmodeler" links. They can also be found on Ebay. Search for "Ma.K figure" or "SF3D figure" on Ebat and you will find most of them there.
Here are the pics.
"styrene tutorial" first. Then the sprue shots with the figures.


33661
Post by: Mad4Minis
You are a top notch scratch builder. I havent seen stuff like that since the last time I picked up an issue of Finescale Modeler.
18892
Post by: Bar
Mad4Minis wrote:You are a top notch scratch builder. I havent seen stuff like that since the last time I picked up an issue of Finescale Modeler.
Thanks for your kind words.
I think of myself as merely an average scratchbuilder. I can build just about anything, it has to be said, but i am far from the best.
But thanks for the compliment!

39828
Post by: mekbadzappa
This stuff is amazing, you should build a warhound titan, i would love to see how that would turn out.
11914
Post by: Nephilem
Quite frankly, your work is awesome. Was that a BSG Viper I saw up there, or do my eyes deceive me?
Looking forward to seeing the finished result for this one.
39117
Post by: lesboss
awesome mate 
27025
Post by: lunarman
Where do you get the girls from?
I'm not weird..... they're a good representation of artistic sculpting..... yeah
33868
Post by: winnertakesall
Thanks! That was very helpful. That is probably the best scratchbuilt thing I have seen, and the quality succeeds that of forgeworld
18892
Post by: Bar
mekbadzappa wrote:This stuff is amazing, you should build a warhound titan, i would love to see how that would turn out.
Thanks. I am not too enamoured with all the in-universe designs. Usually just flying craft. I plan on doing a Thunderbolt next in the same scale. And then maybe a Valkyrie(Or the similar one with a giant turbine behind the cockpit).
Nephilem wrote:Quite frankly, your work is awesome. Was that a BSG Viper I saw up there, or do my eyes deceive me?
Looking forward to seeing the finished result for this one.
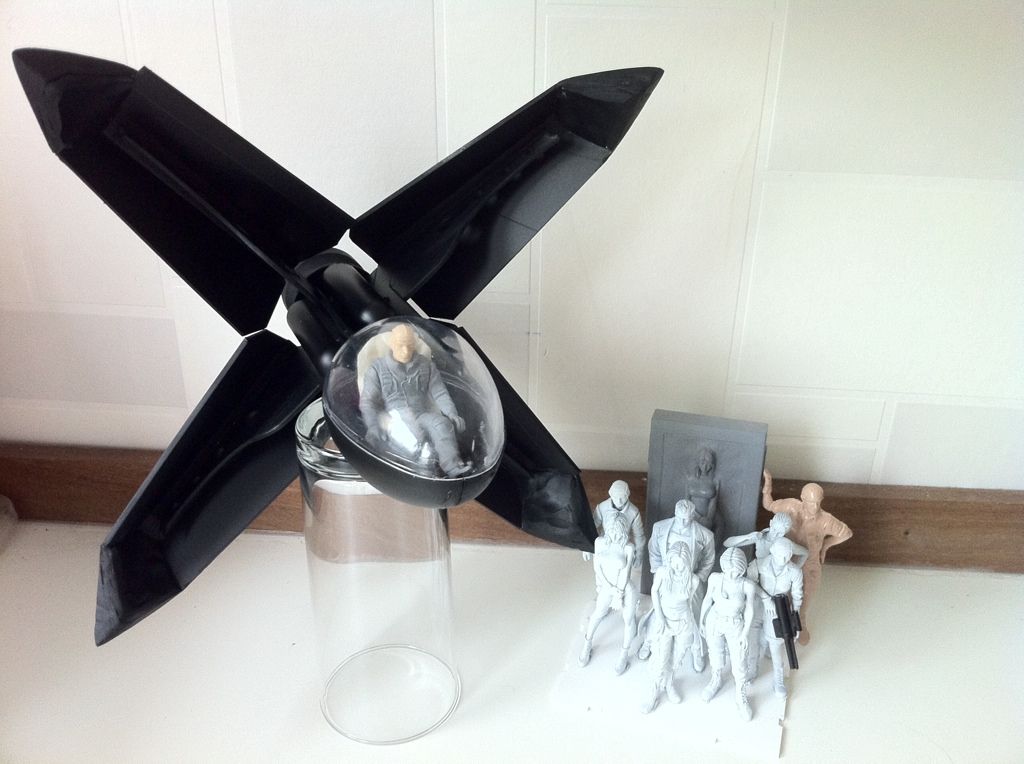
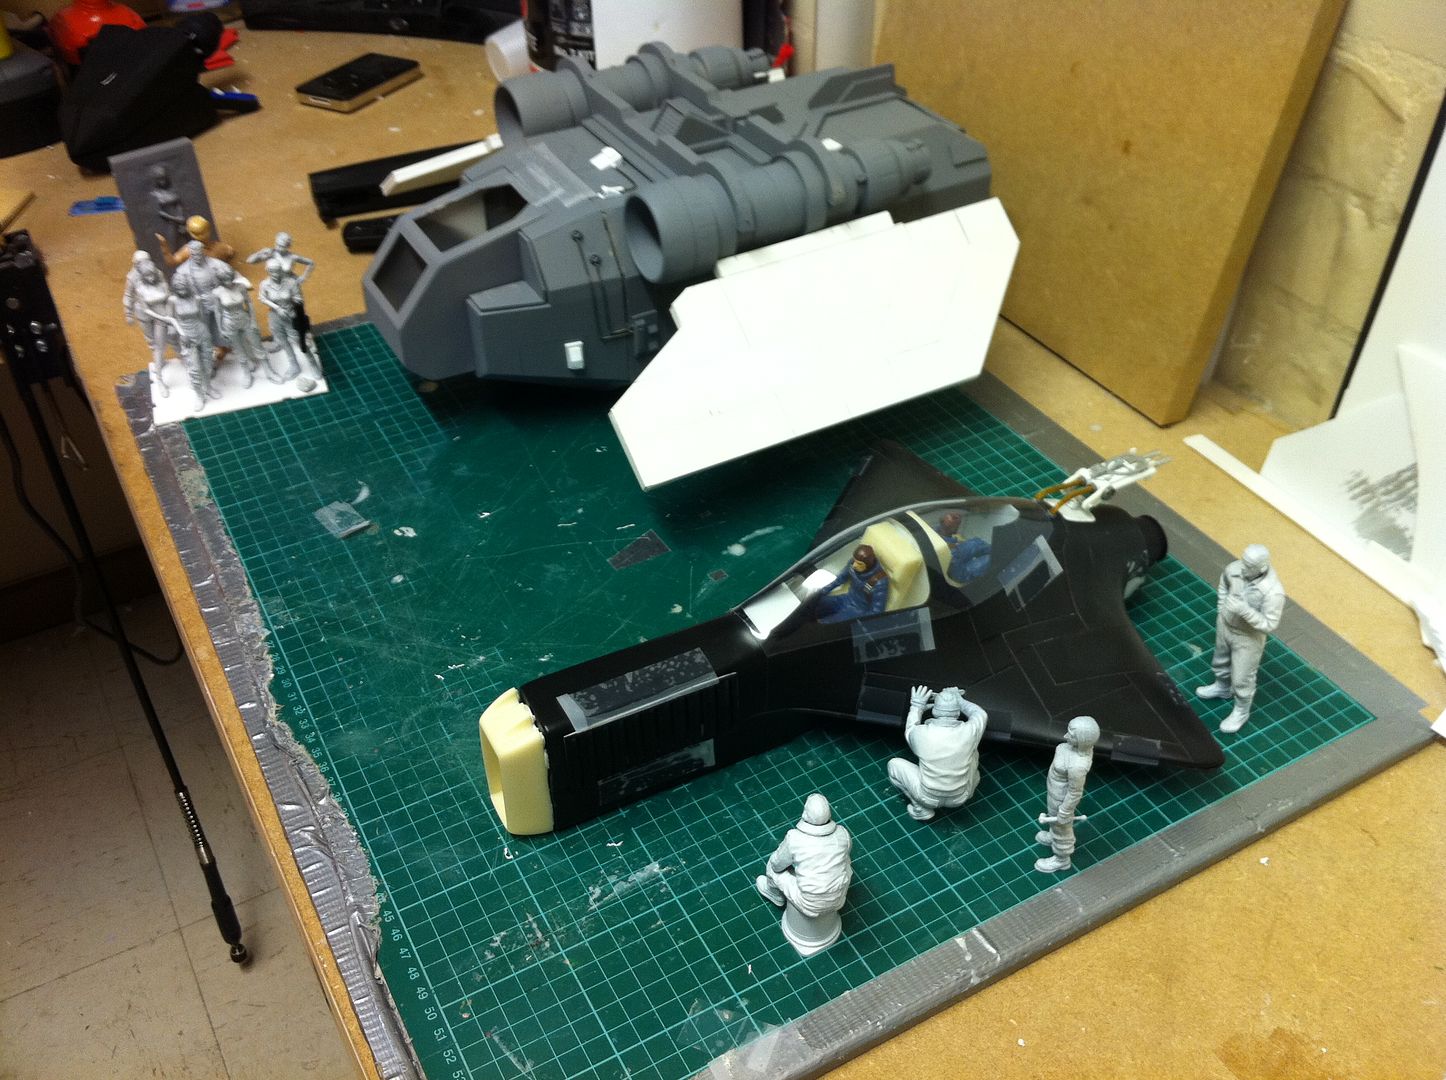
Thanks. The Viper was made from epoxy filler and styrene sheet. I can PM you the WIP gallery images if you like. I'll gather the entire WIP stack of images and PM you after i post this message.
lesboss wrote:awesome mate
Thanks! I love the Arvus design, but the Forgeworld kit is far too small for my tastes. This has probably cost me about £15 in materials so far. So i think i am ahead of the game.
lunarman wrote:Where do you get the girls from?
I'm not weird..... they're a good representation of artistic sculpting..... yeah
I posted this above, but here are links to the figures. And as i also said if you search Ebay for "Ma.K figure" or " SF3D figure" you will also find them.
http://www.starshipmodeler.biz/shop/index.cfm/product/1253_165/120-mercenaries-woman-maintenance-crew.cfm
http://www.starshipmodeler.biz/shop/index.cfm/product/1665_165/120-mercenary-woman-space-pilot-a-inner-suit-ver.cfm
http://www.starshipmodeler.biz/shop/index.cfm/product/1917_165/120-takako-lopez-maschinen-krieger-profile-1.cfm
http://www.starshipmodeler.biz/shop/index.cfm/product/1147_165/120-mercenaries-woman-pilot-figure.cfm
winnertakesall wrote:Thanks! That was very helpful. That is probably the best scratchbuilt thing I have seen, and the quality succeeds that of forgeworld
You are too kind. I do make master patterns, but i doubt if anyone could afford a kit this size...
That's why it's easier to just make one yourself. I do have molds for the engine intakes, side storage lockers and the front end. Just in case i ever fancy making another one...
18892
Post by: Bar
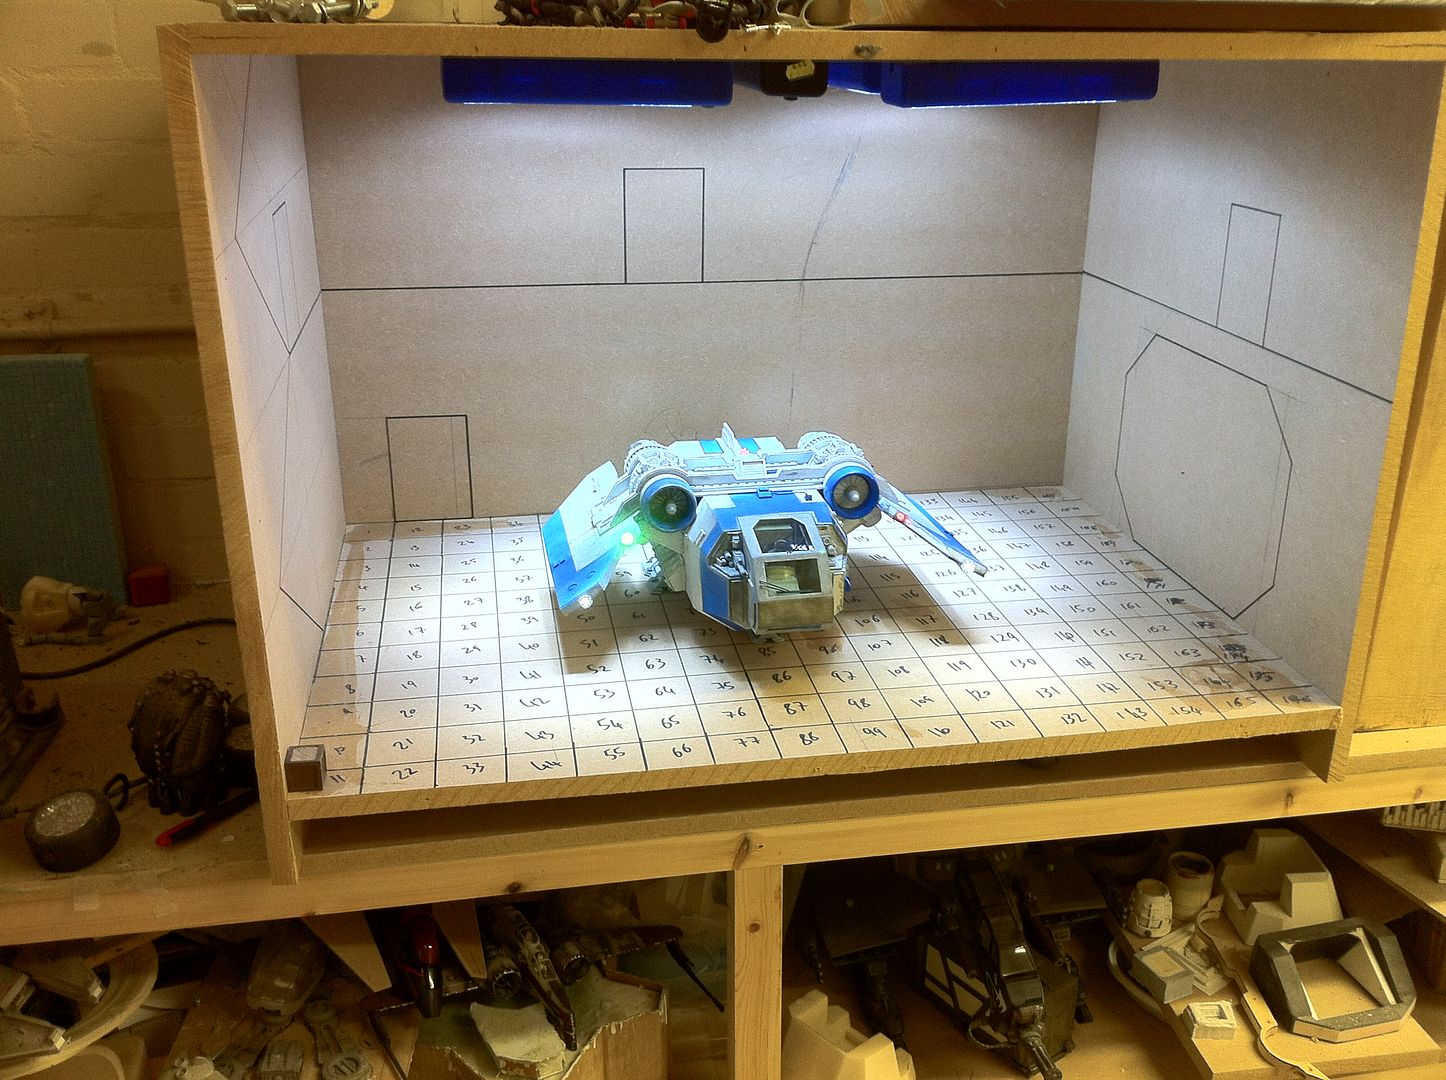
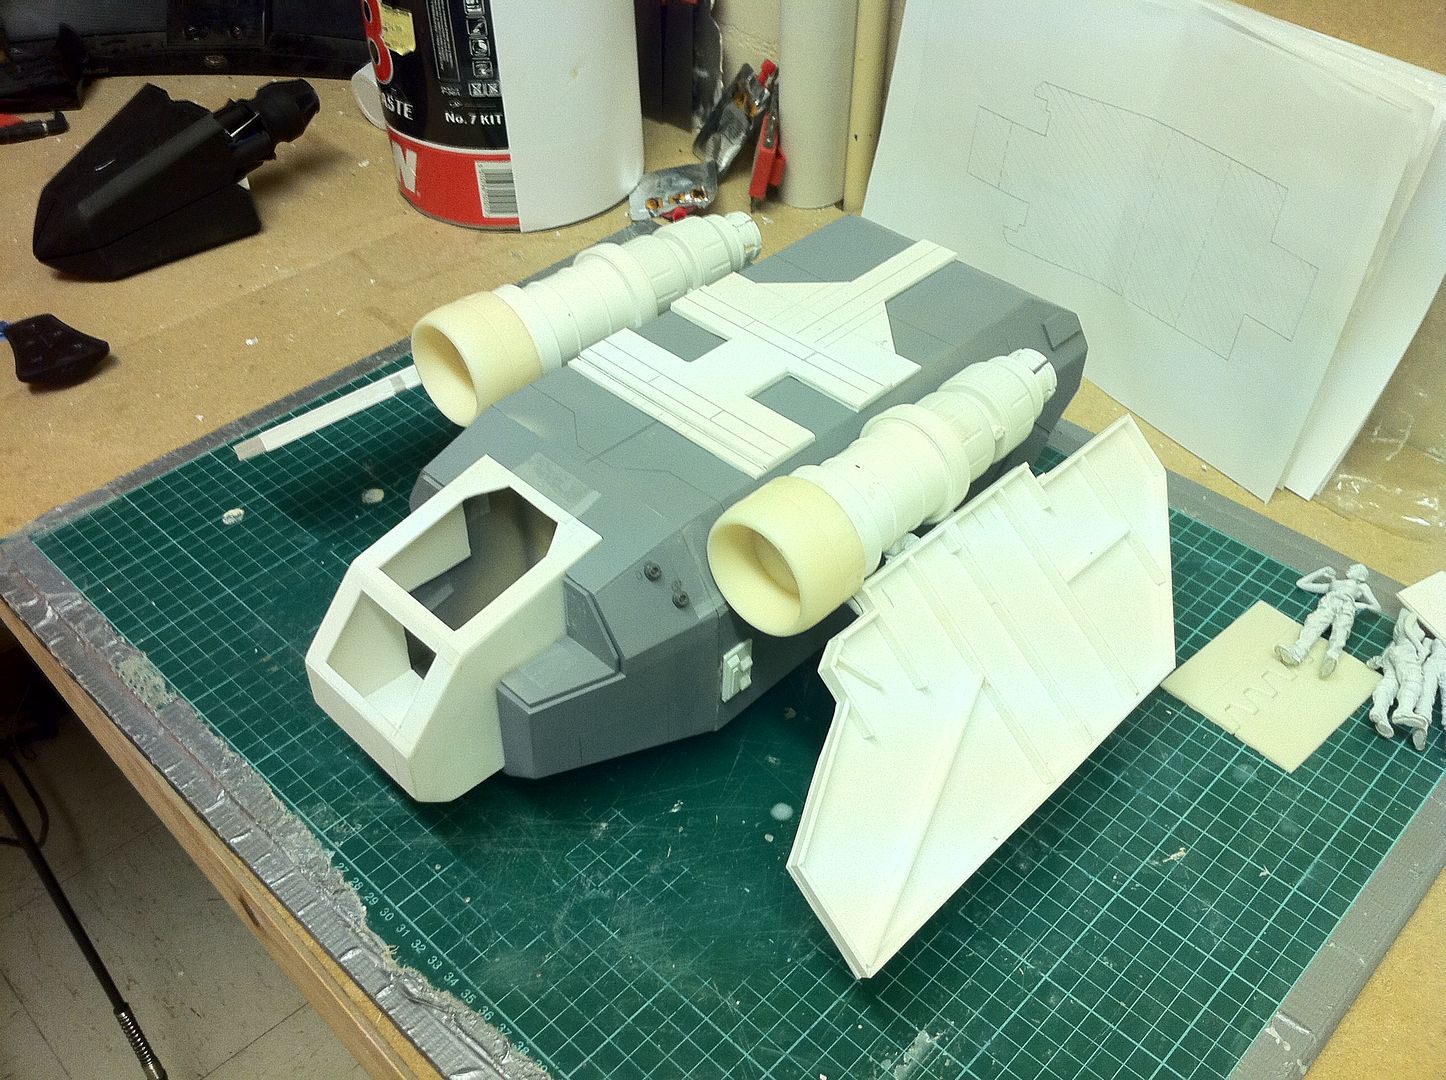
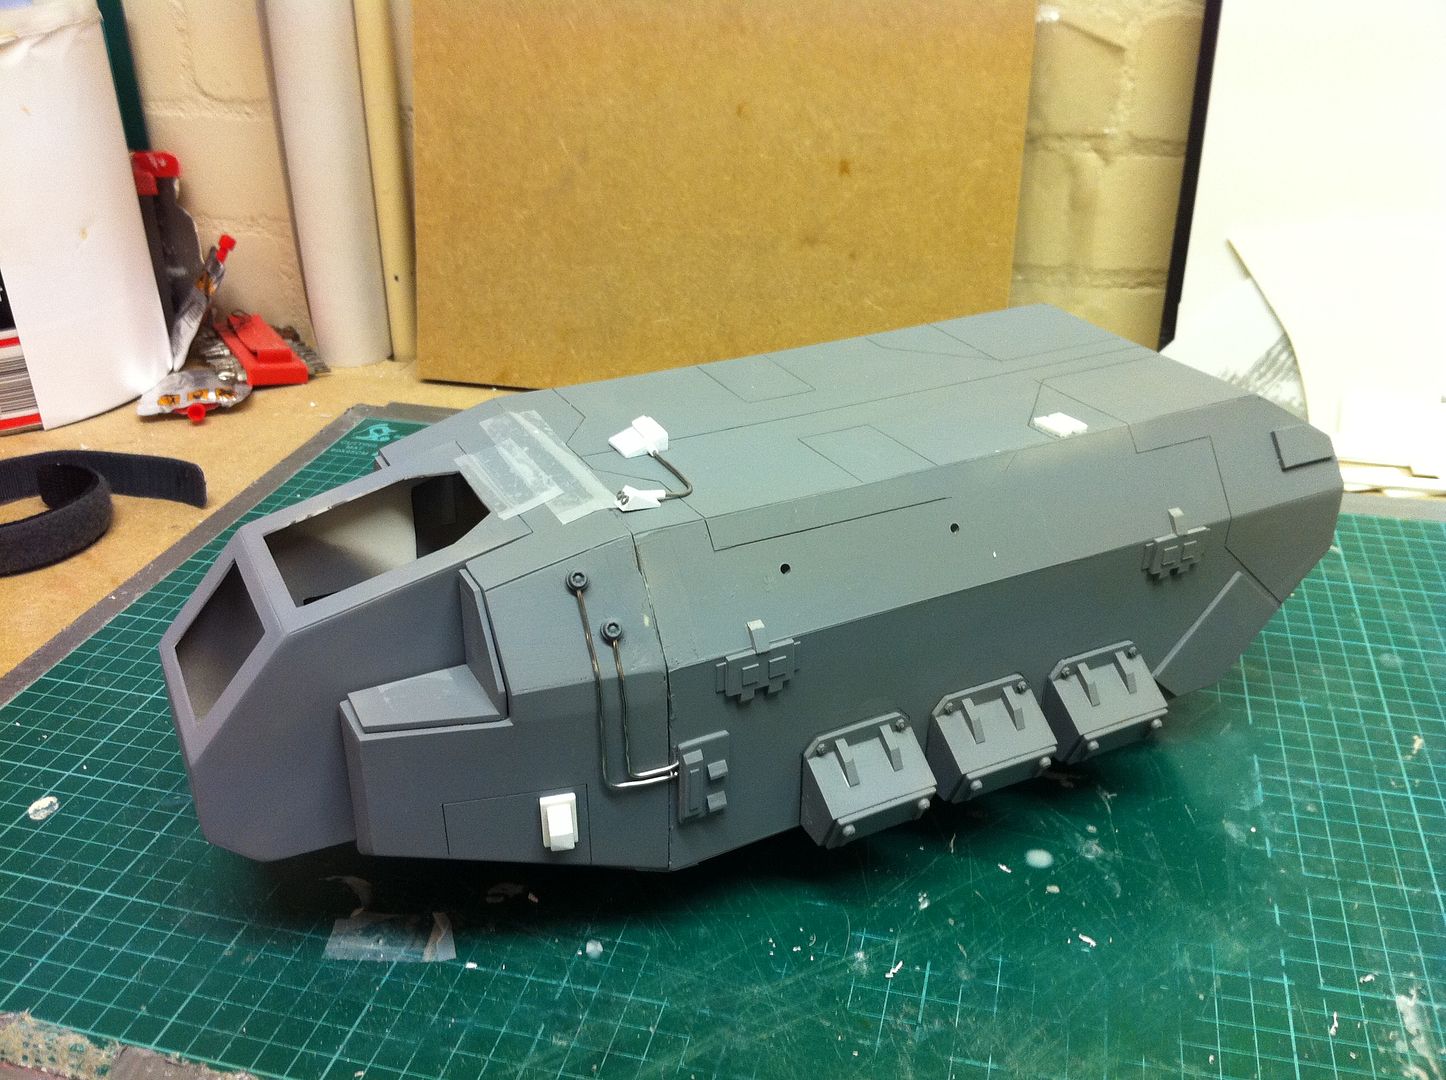
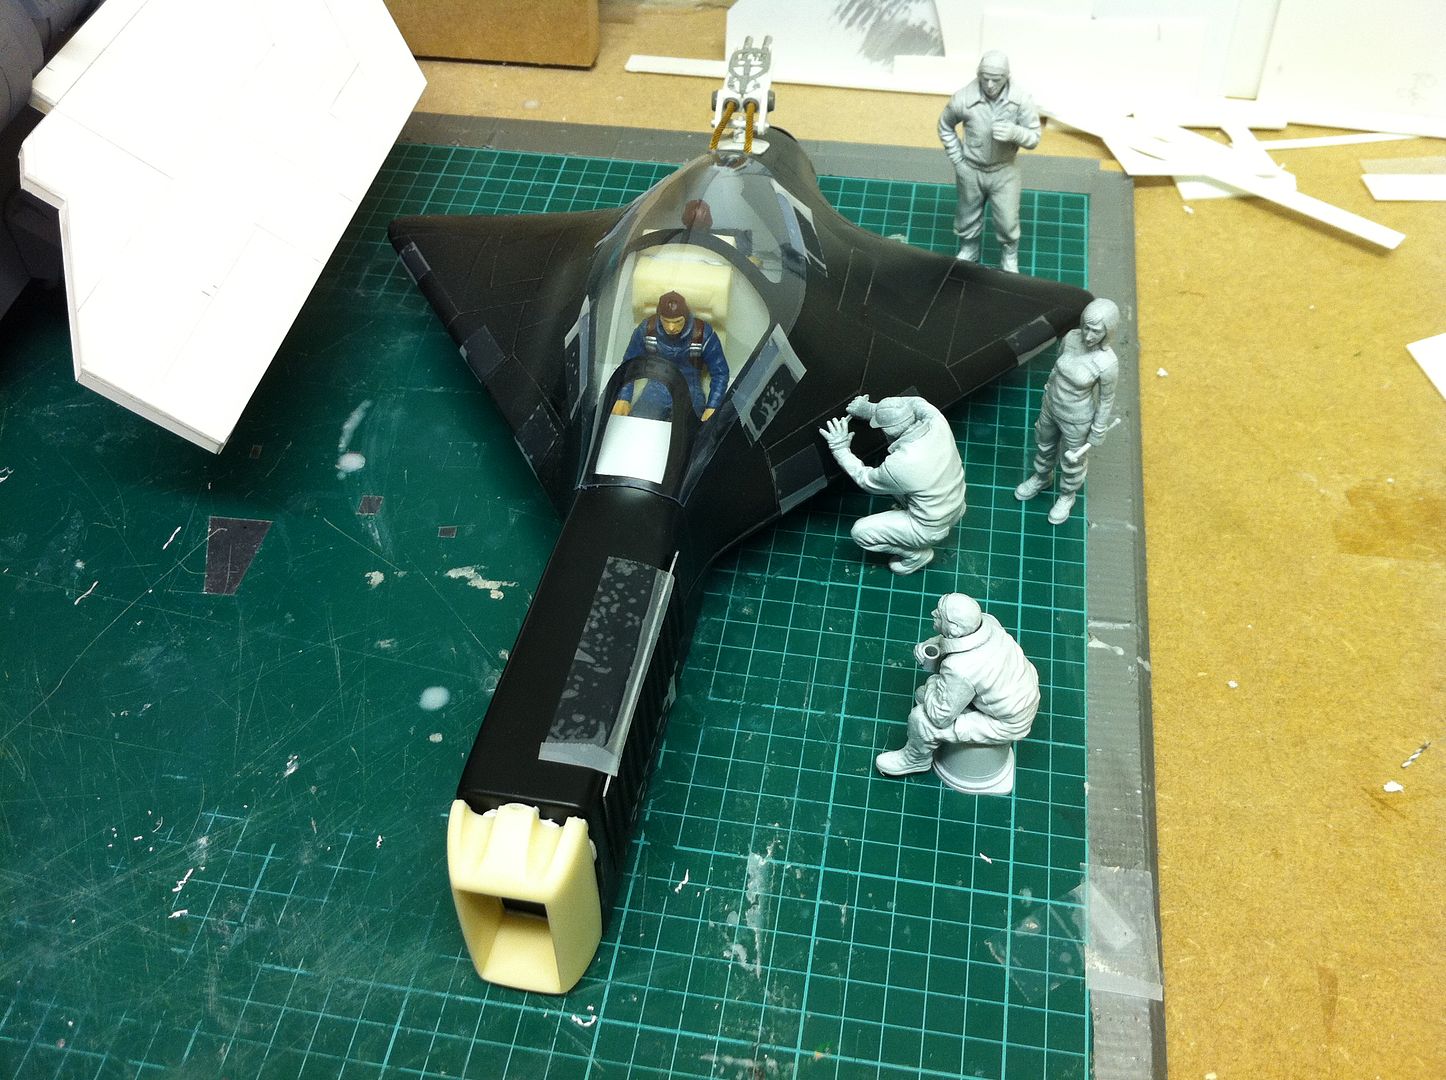
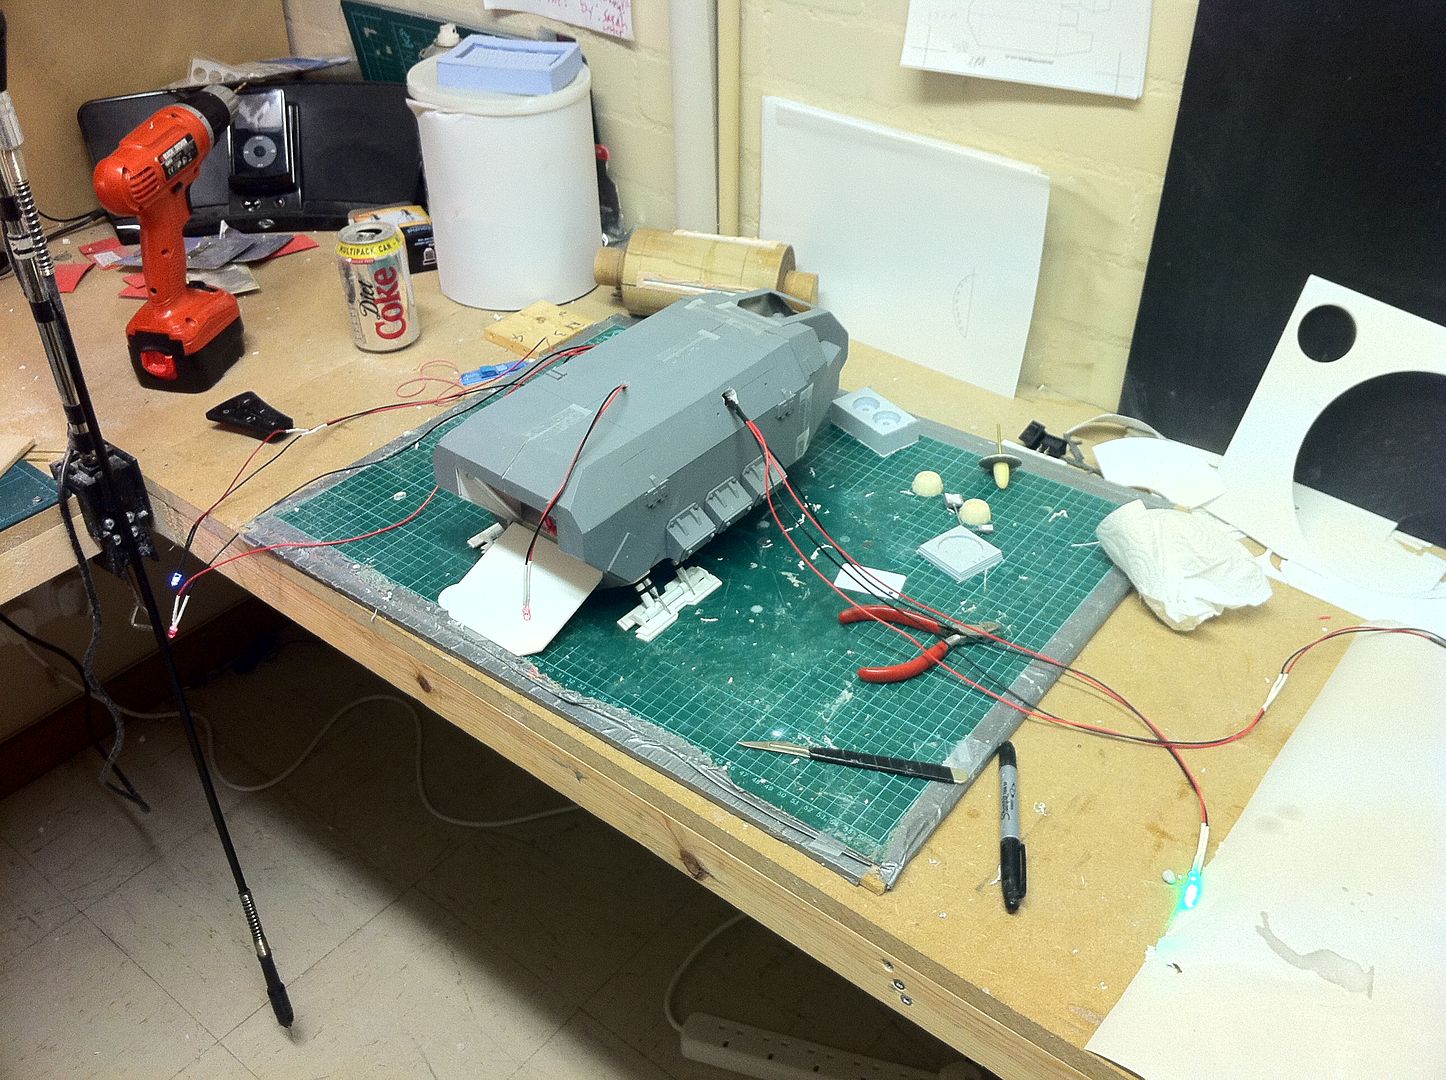
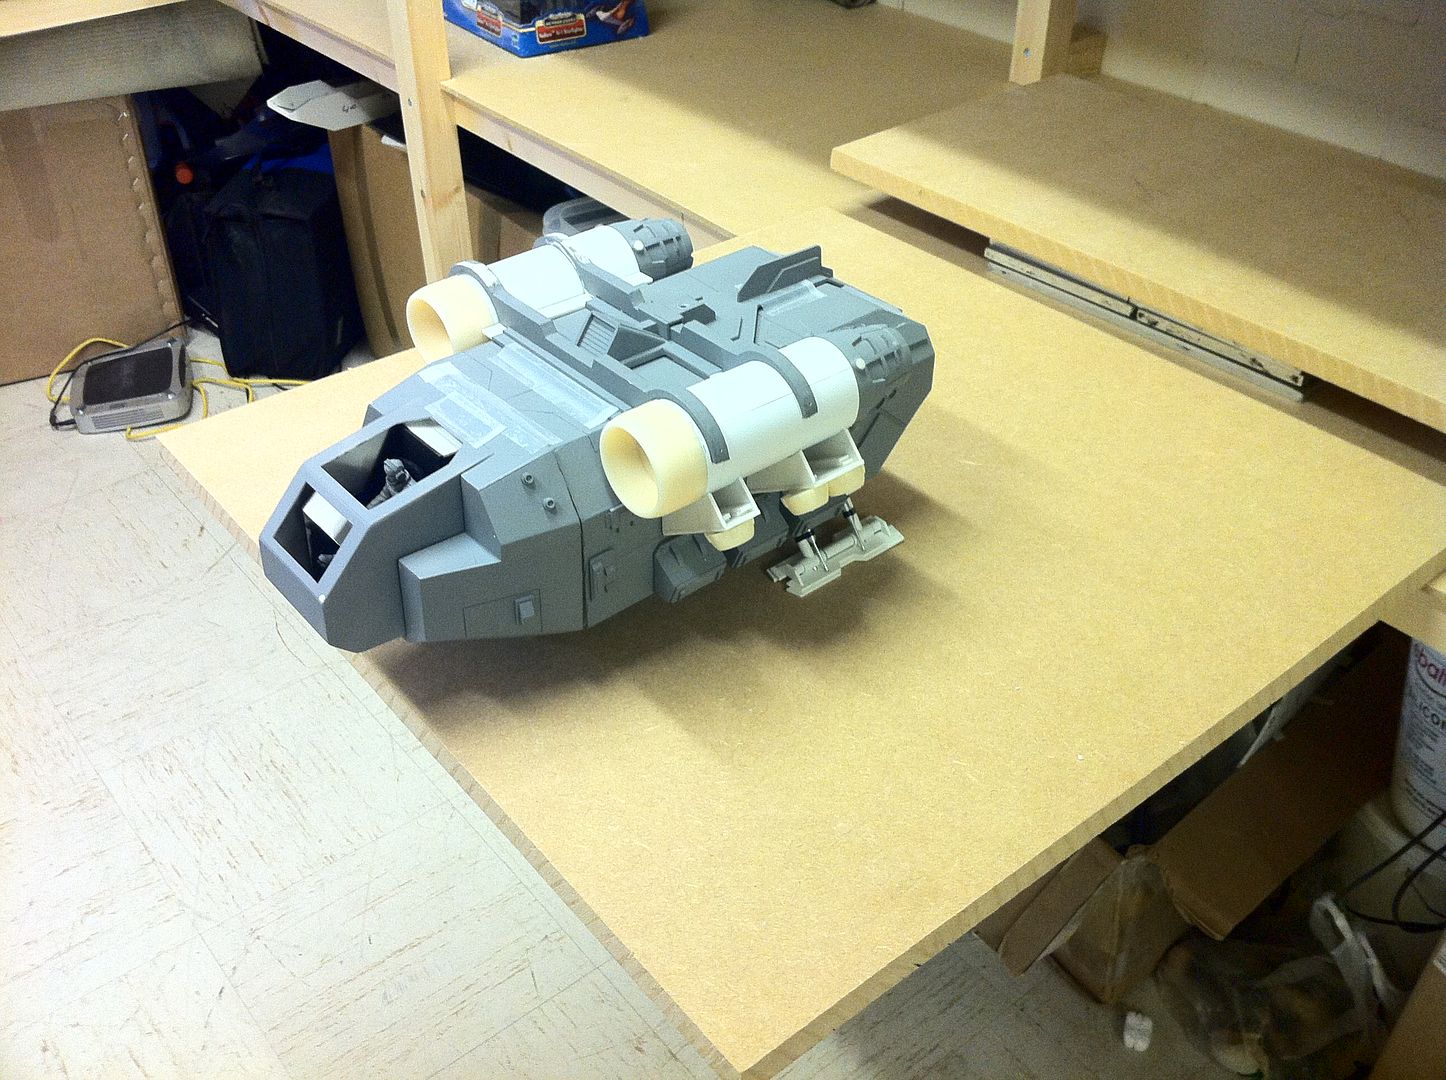
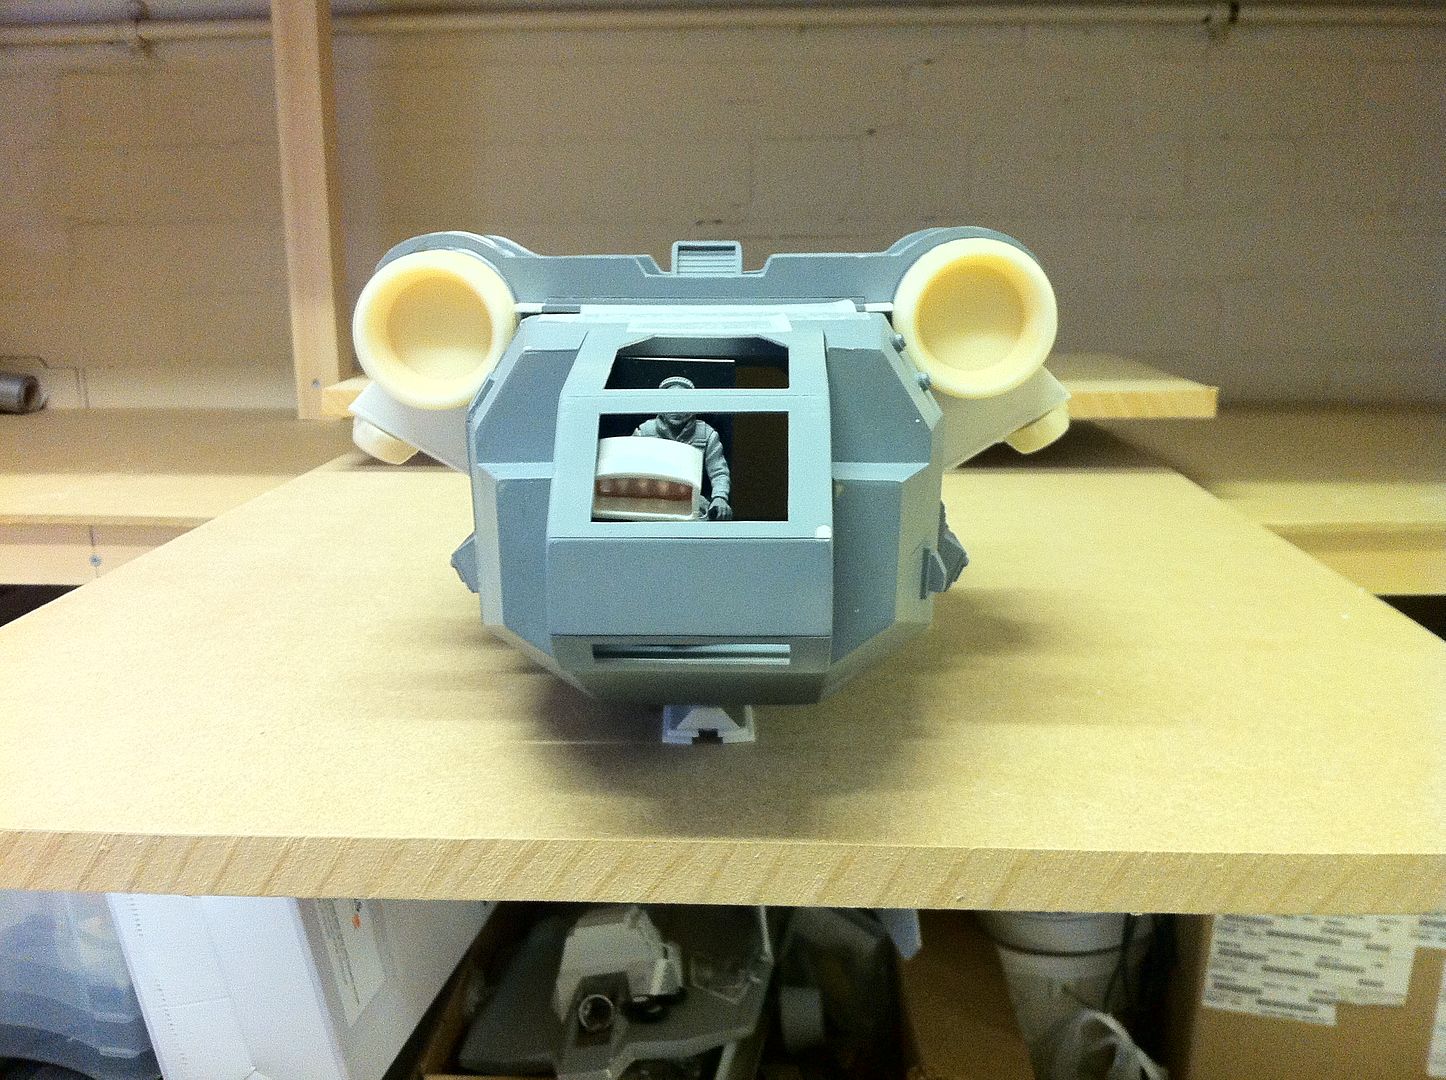
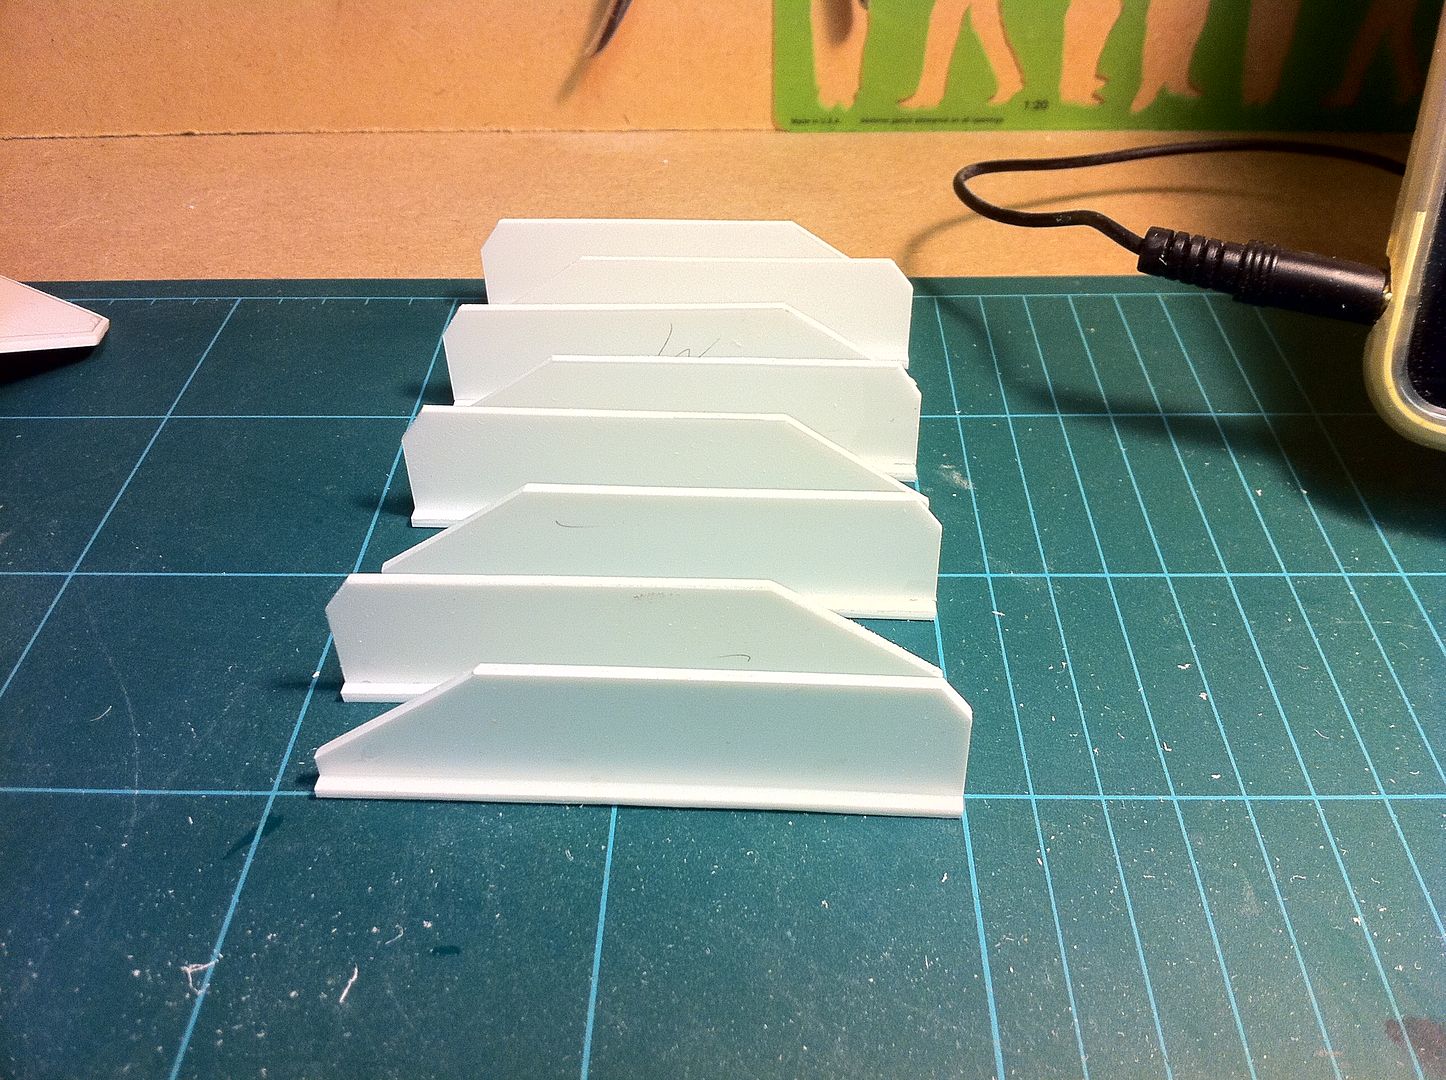
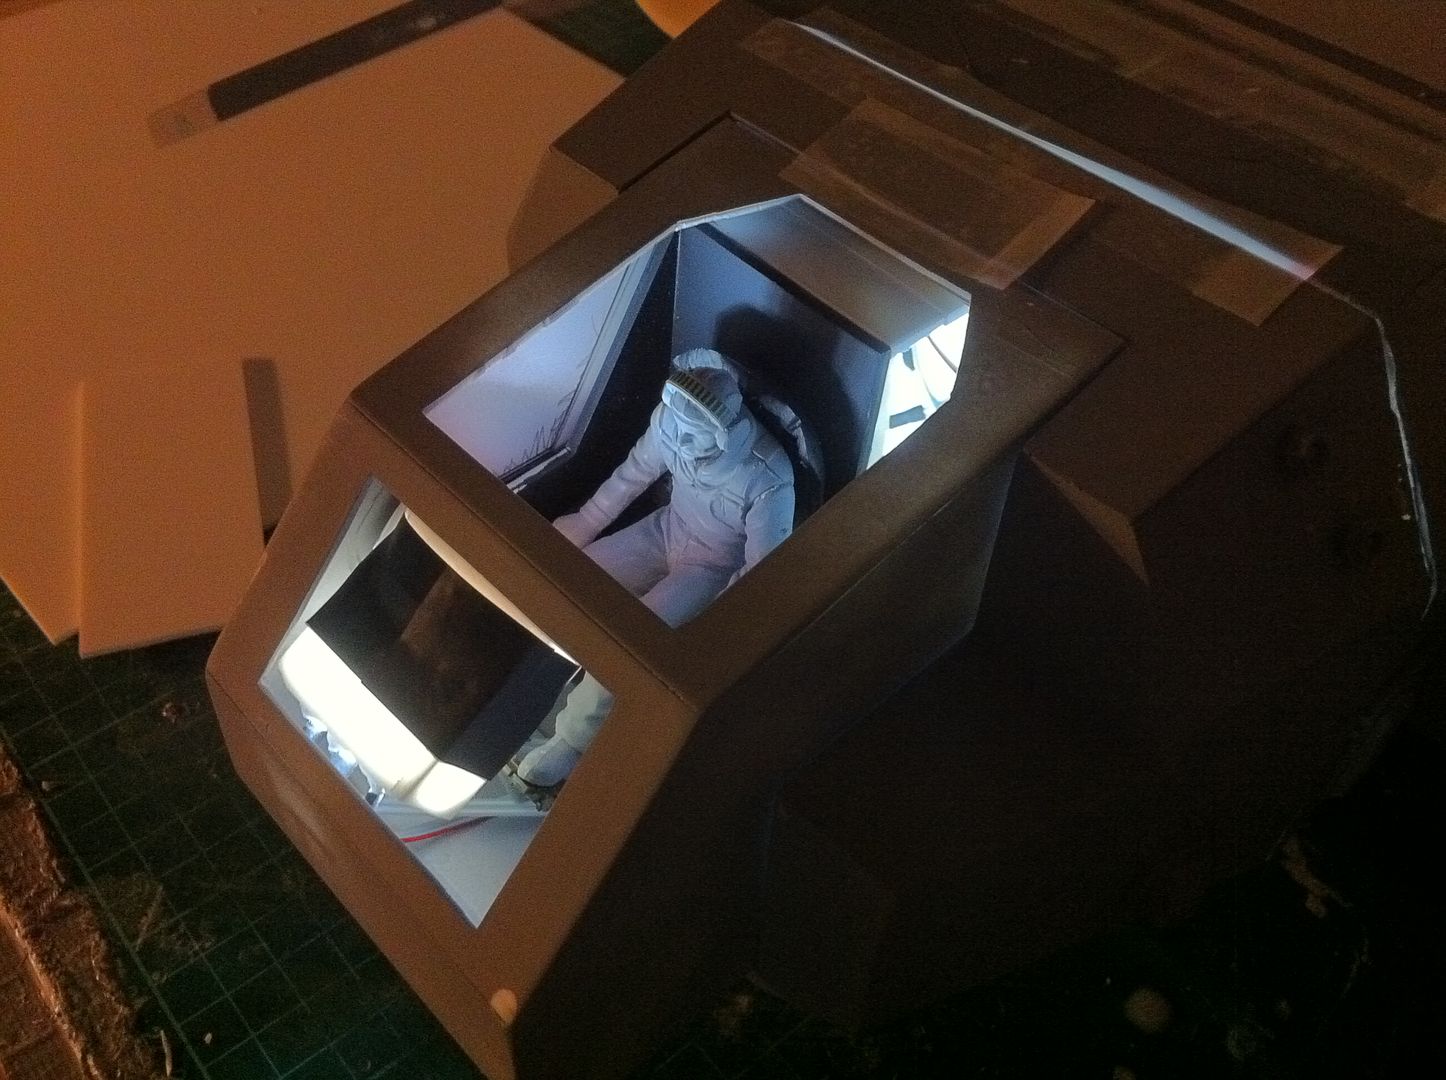
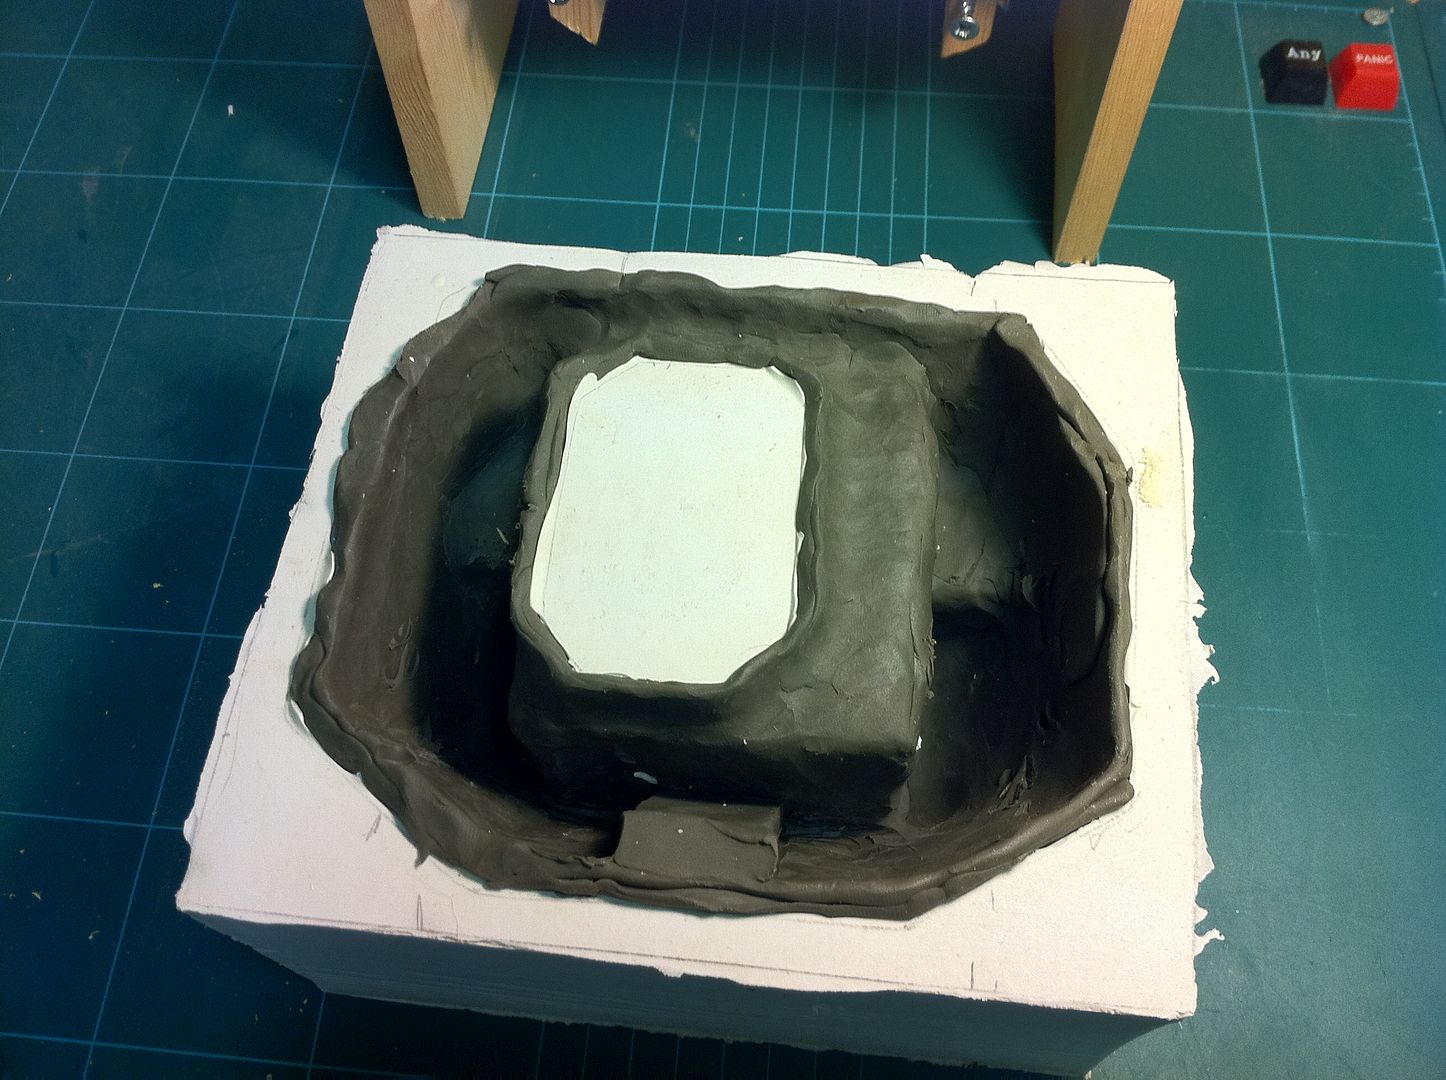
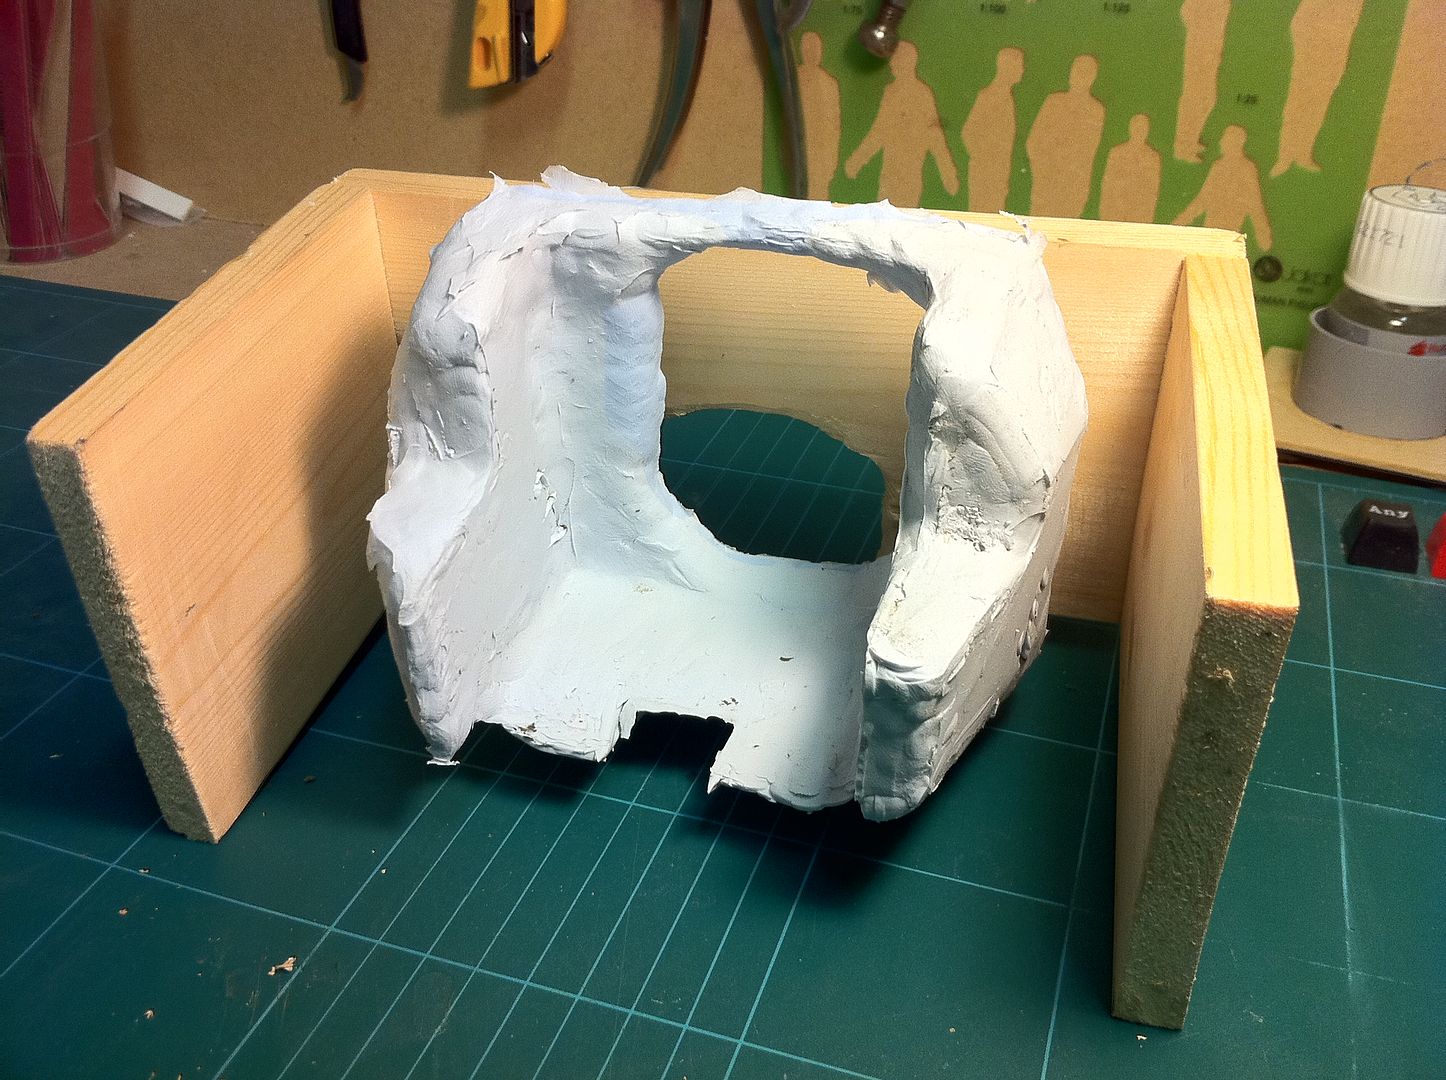
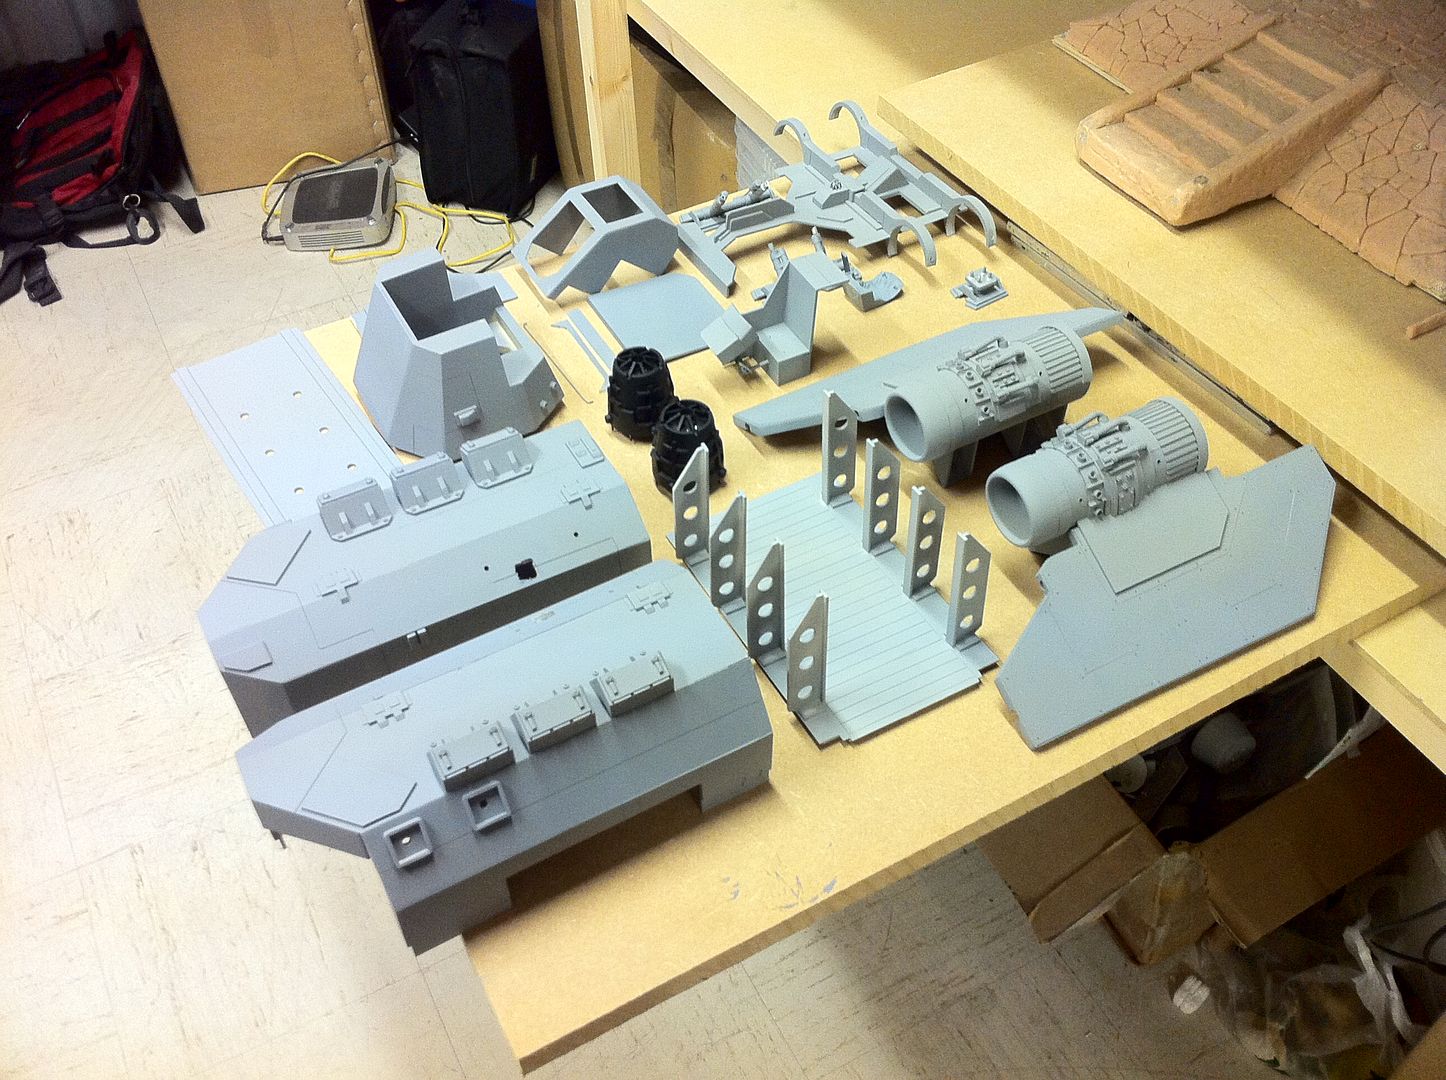
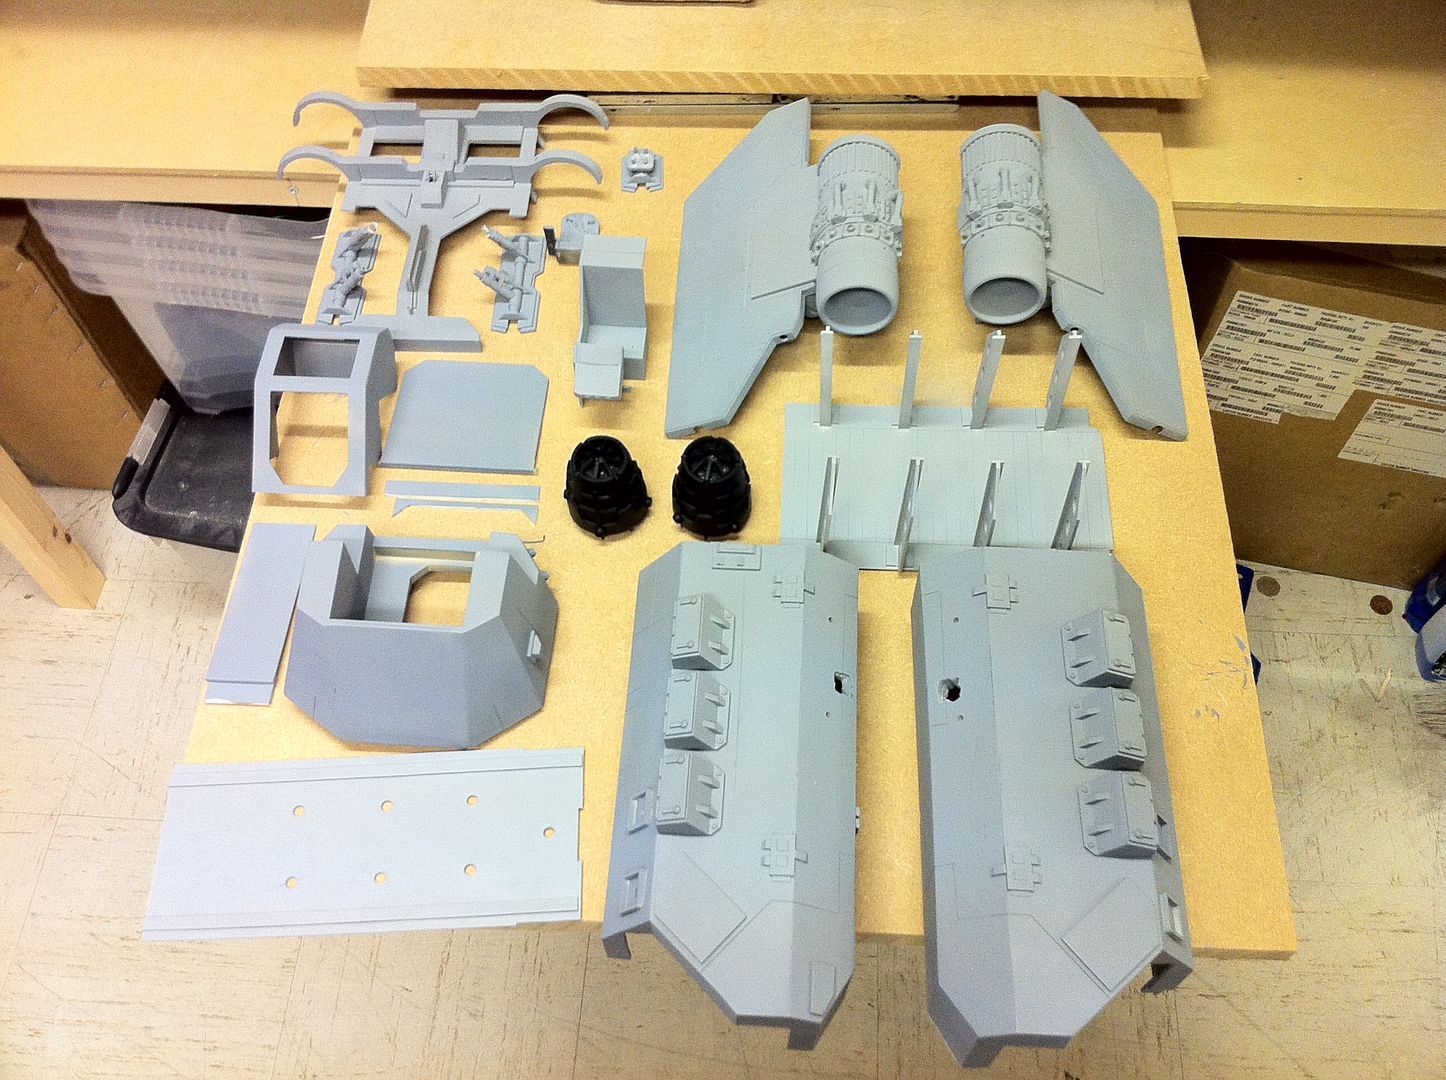
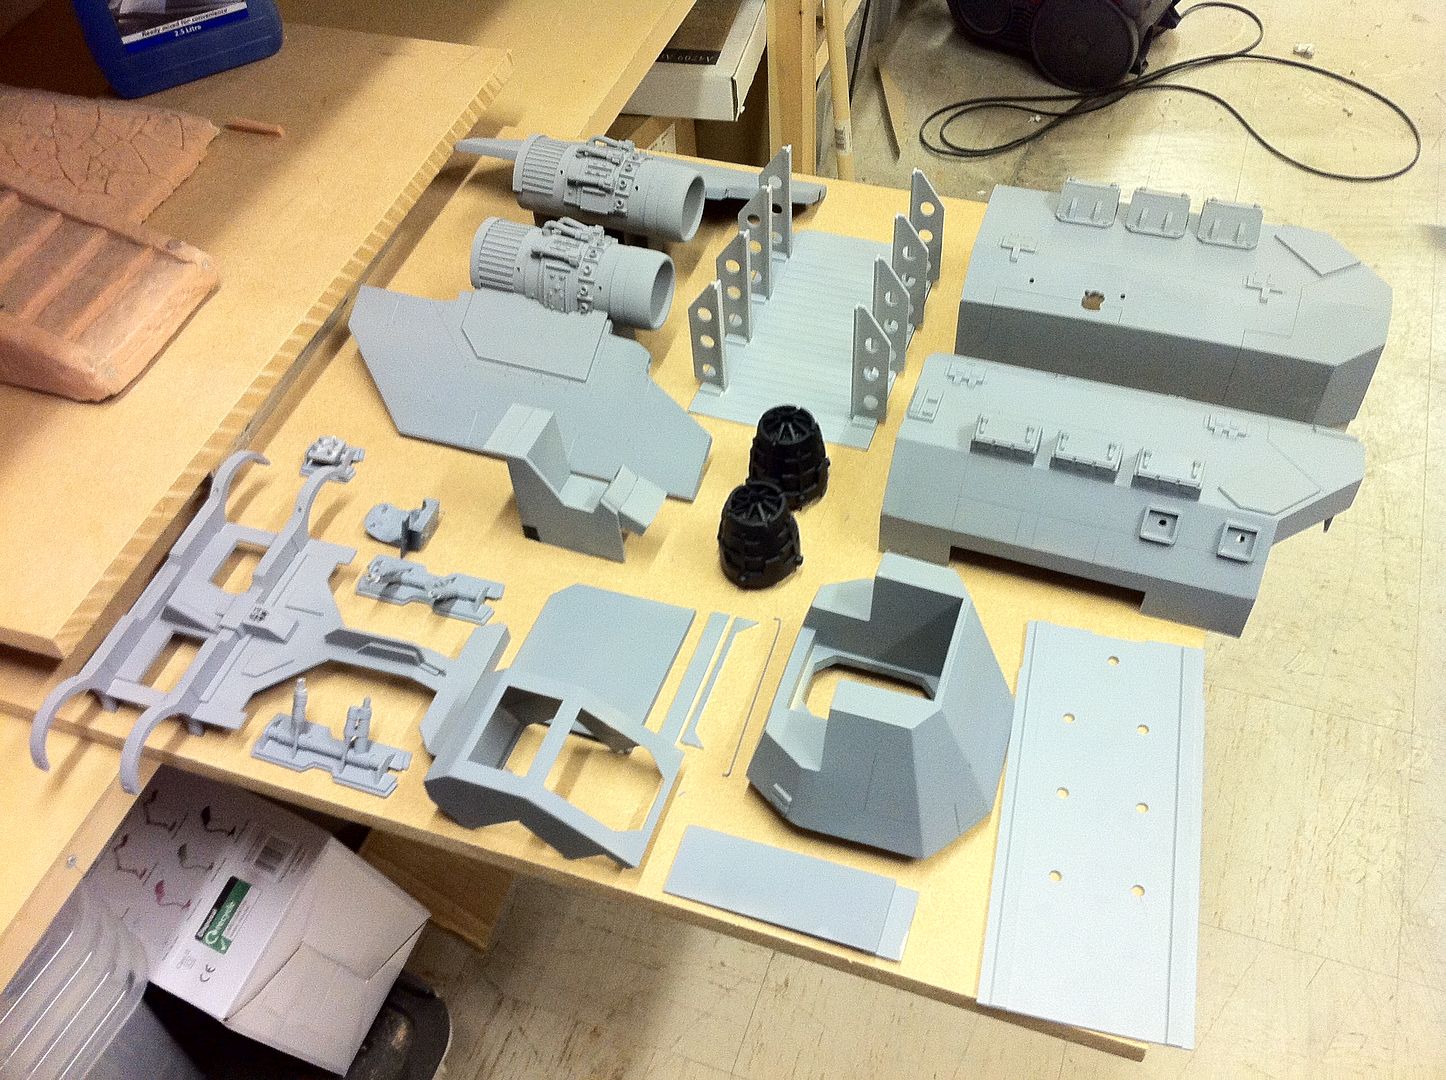
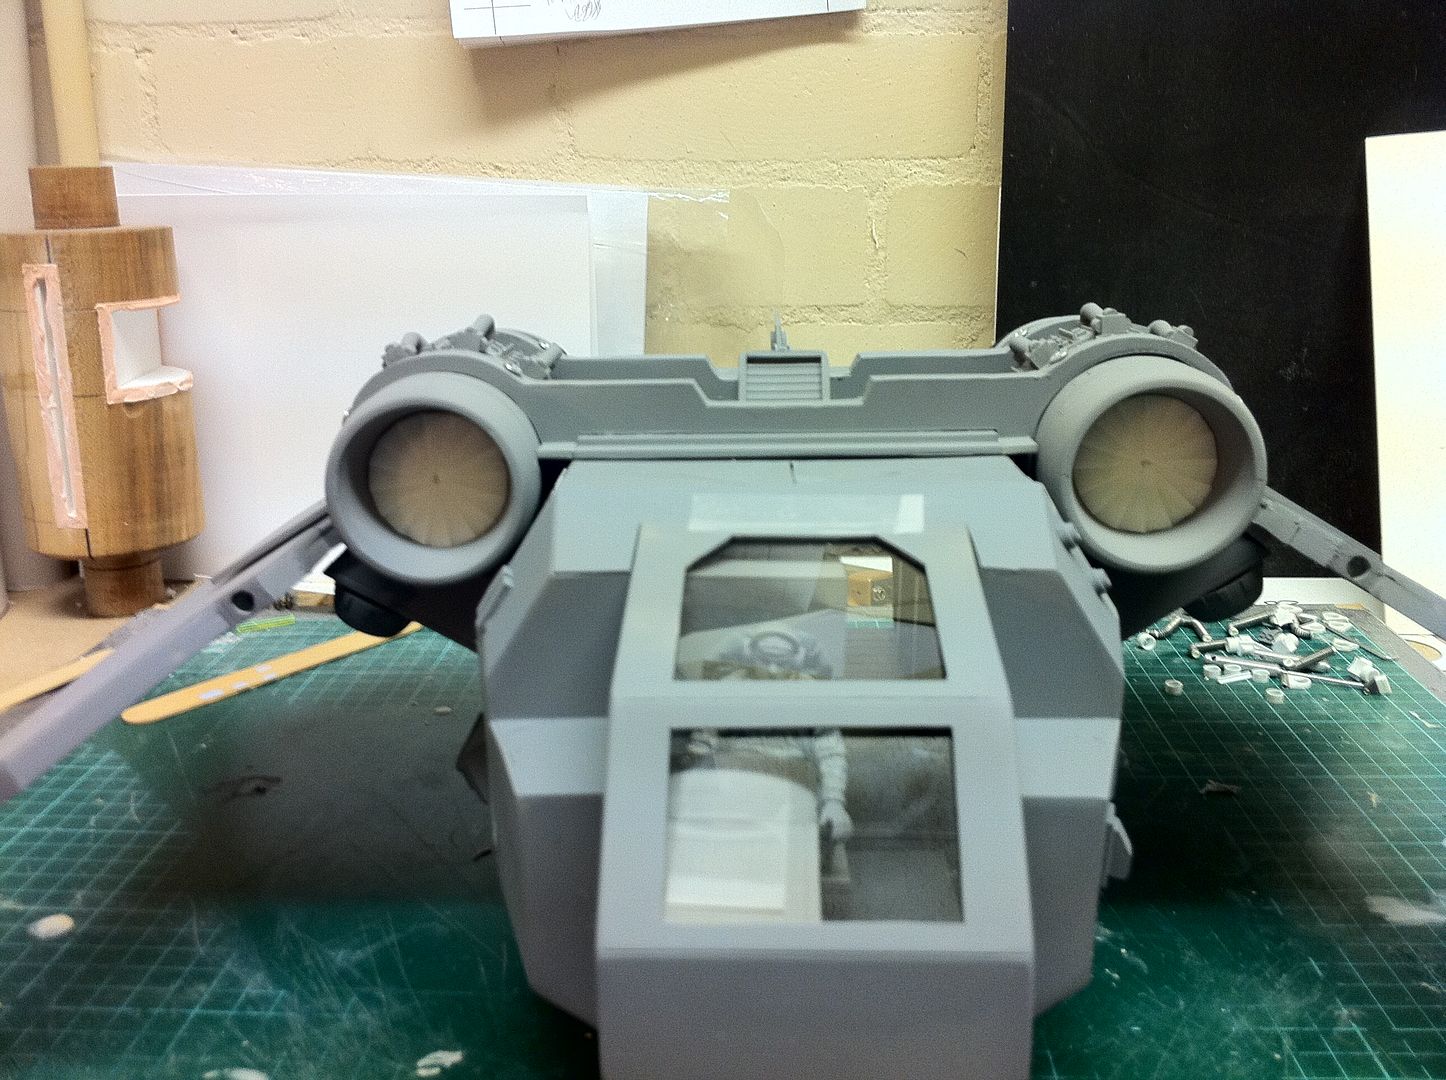
Hey guys. I was pottering away at this today at work.
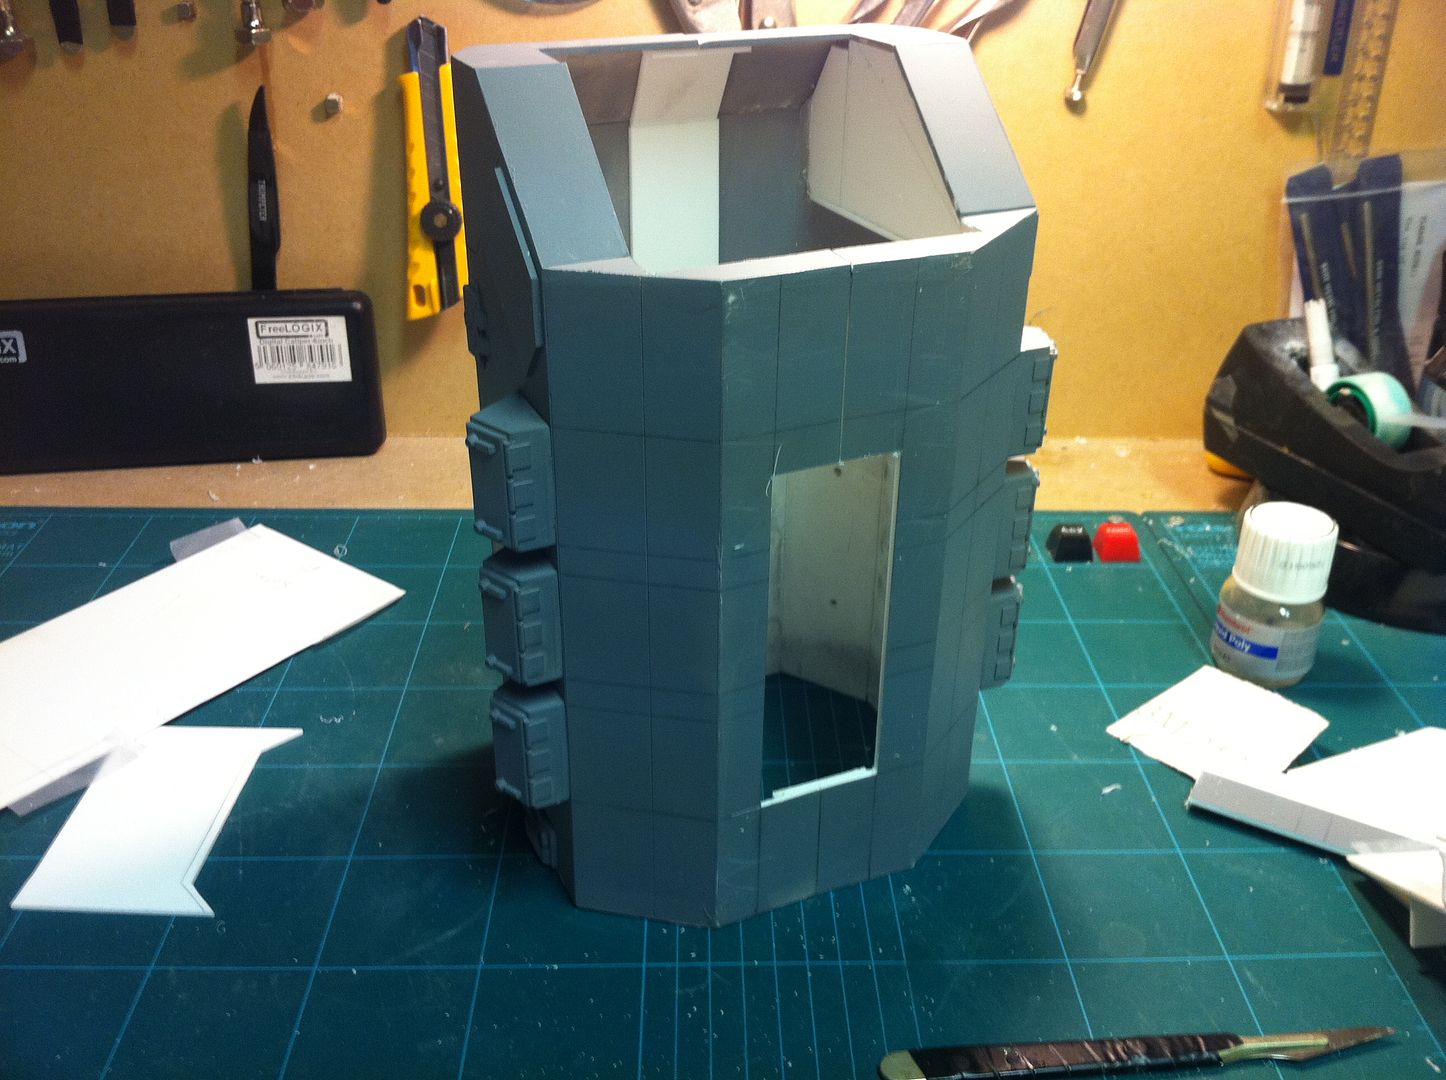
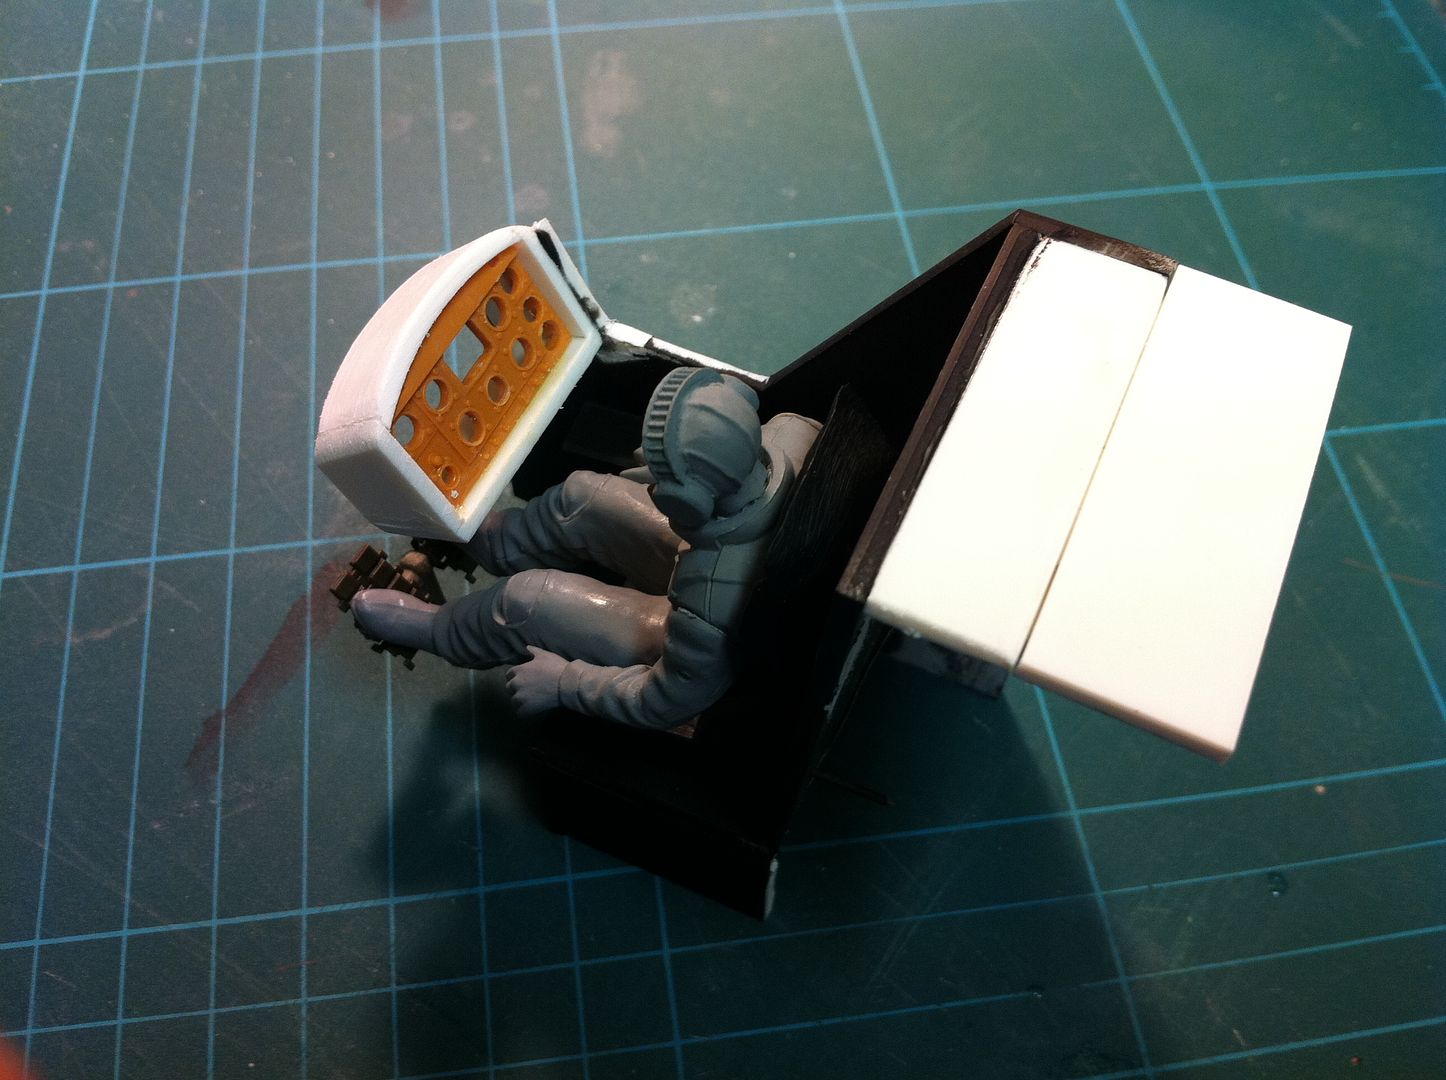
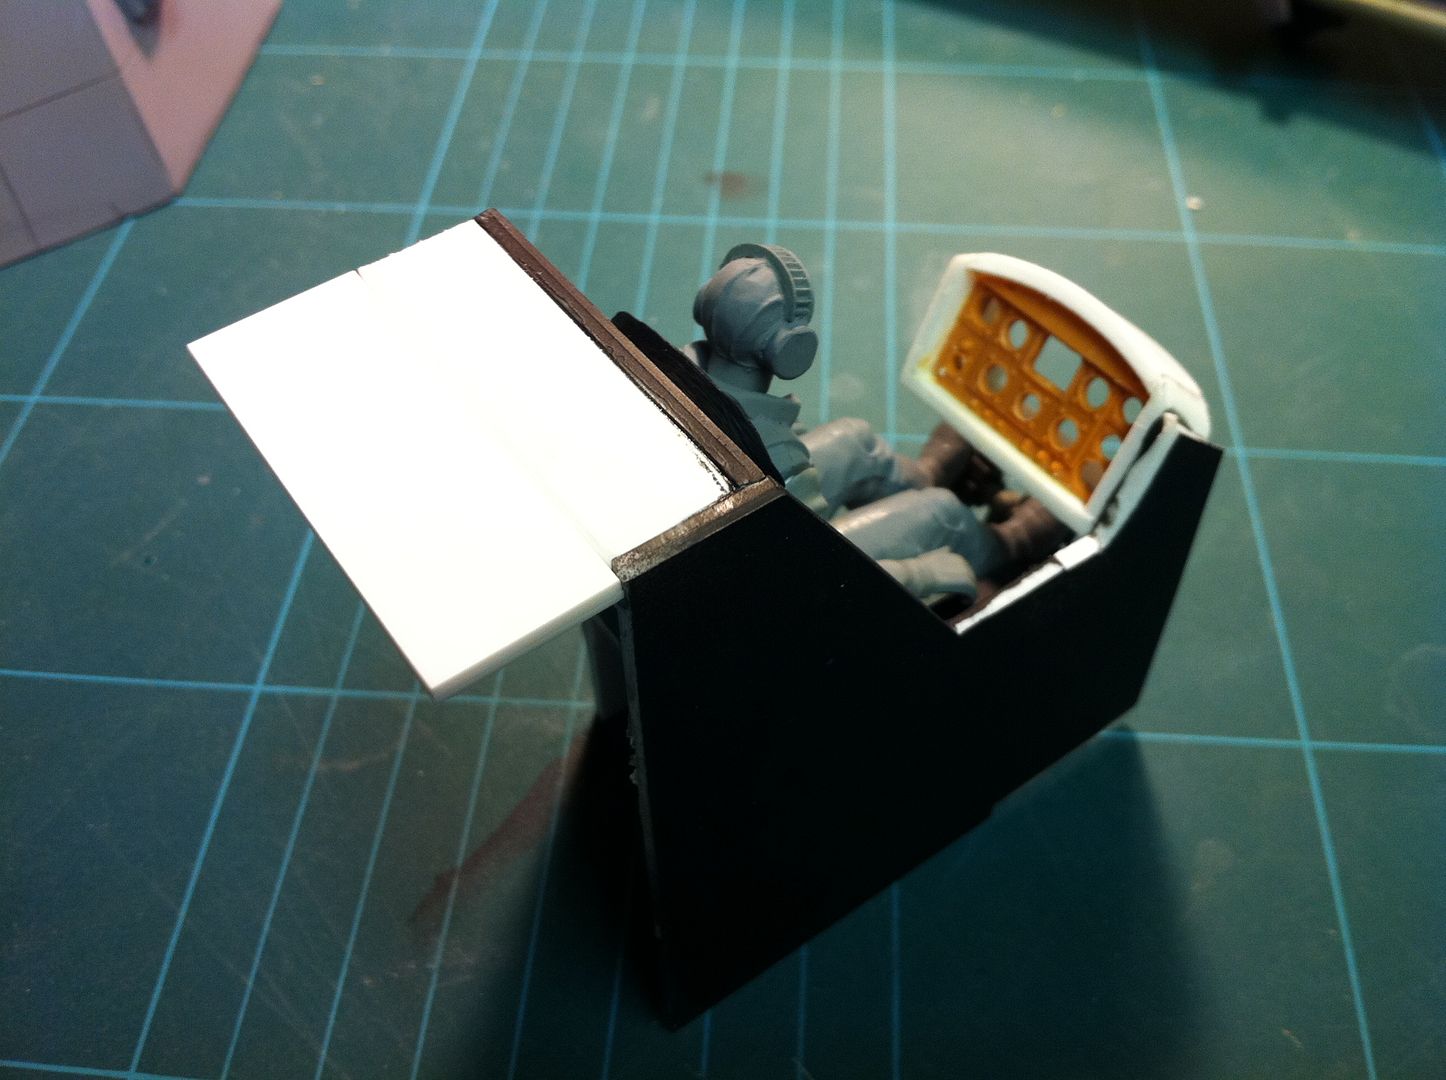
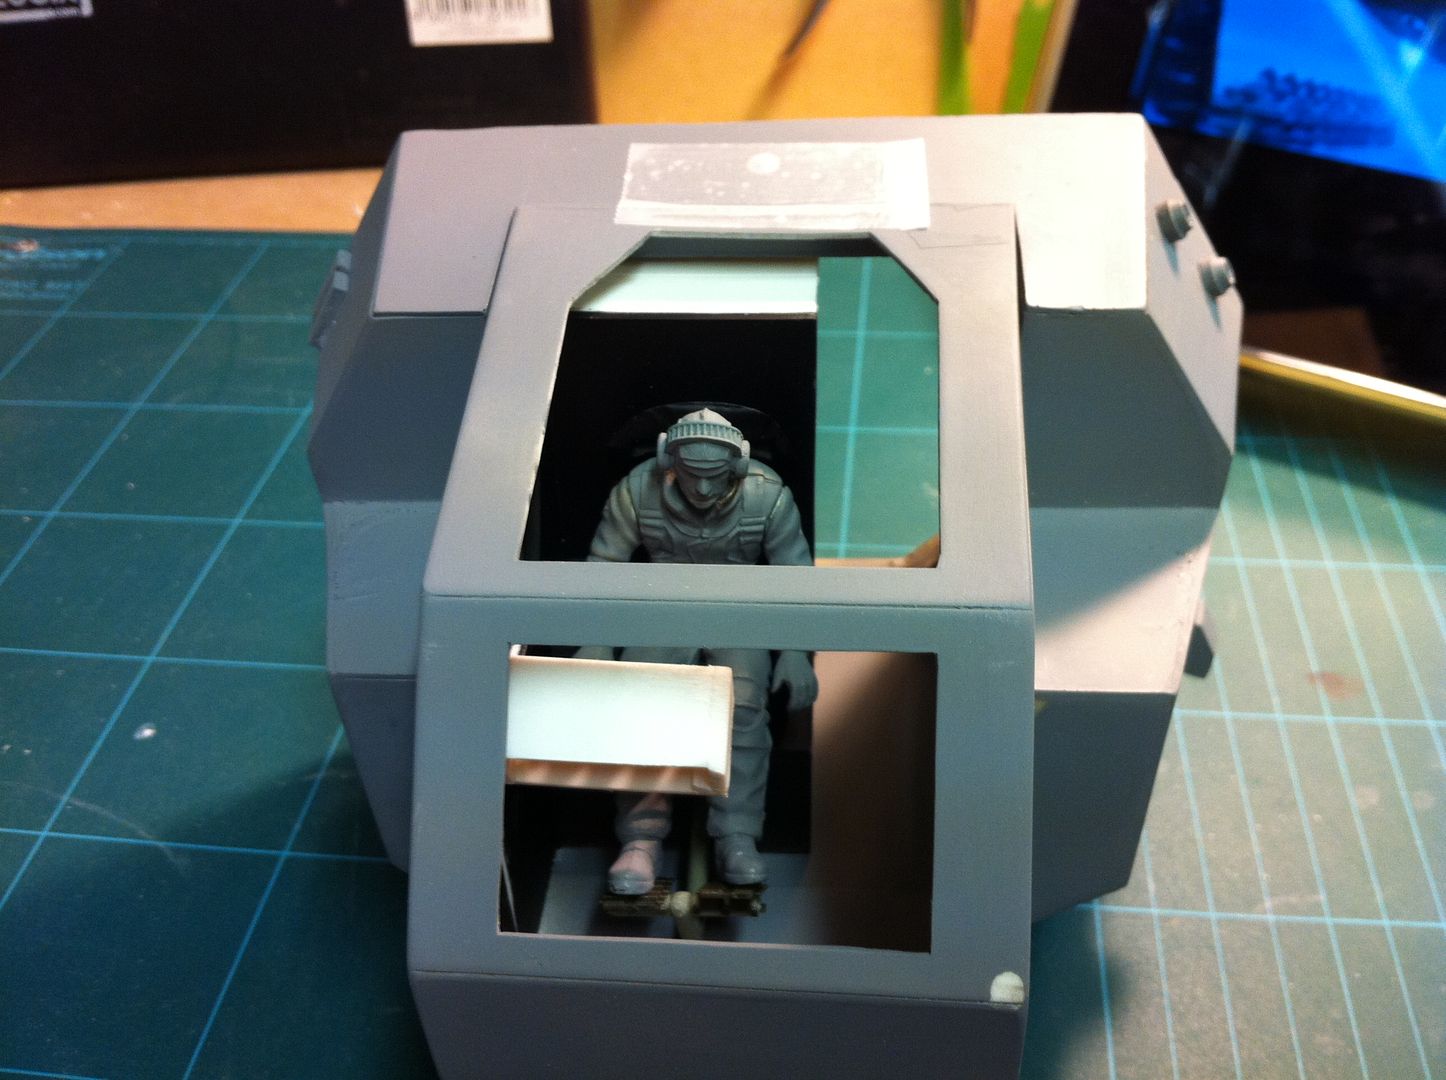
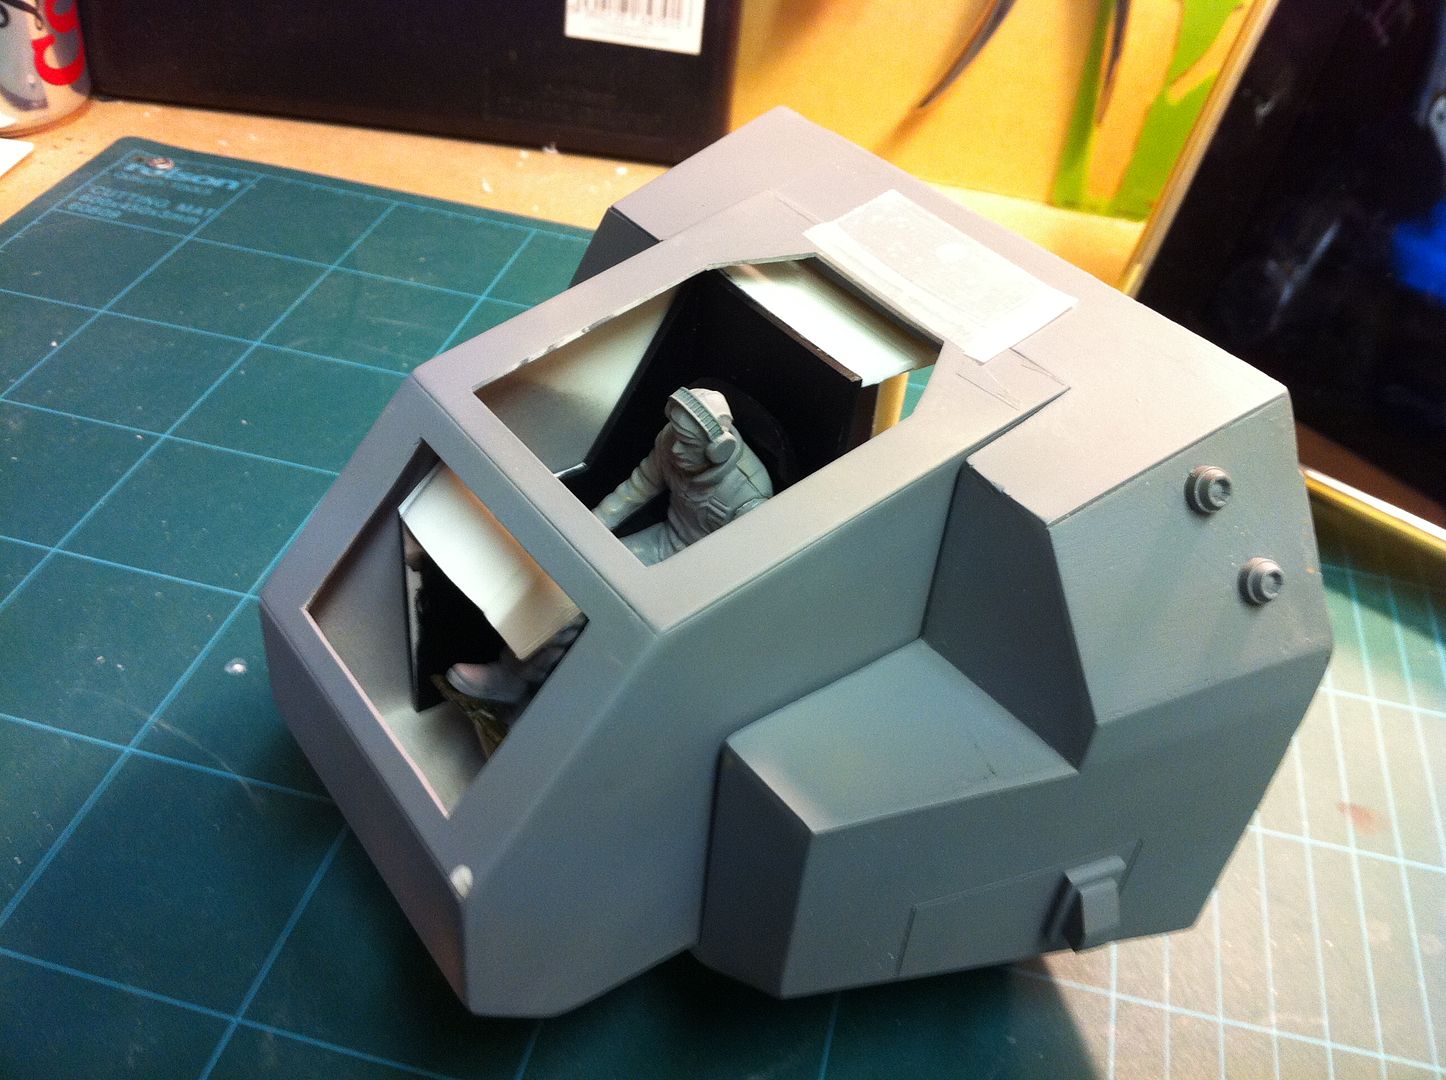
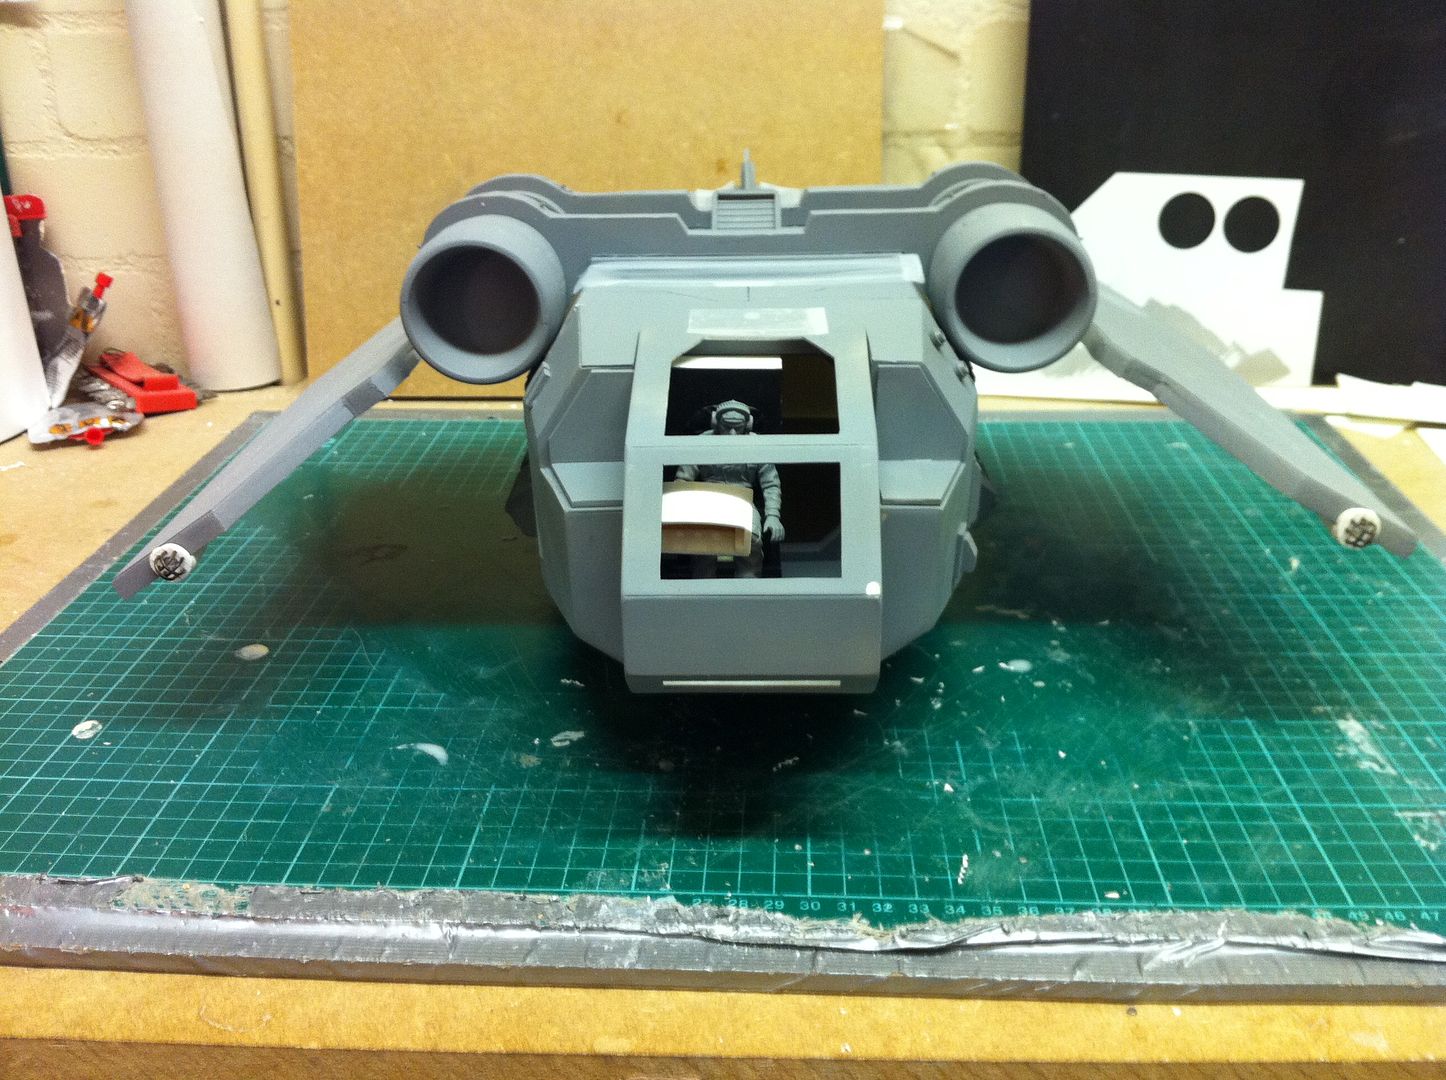
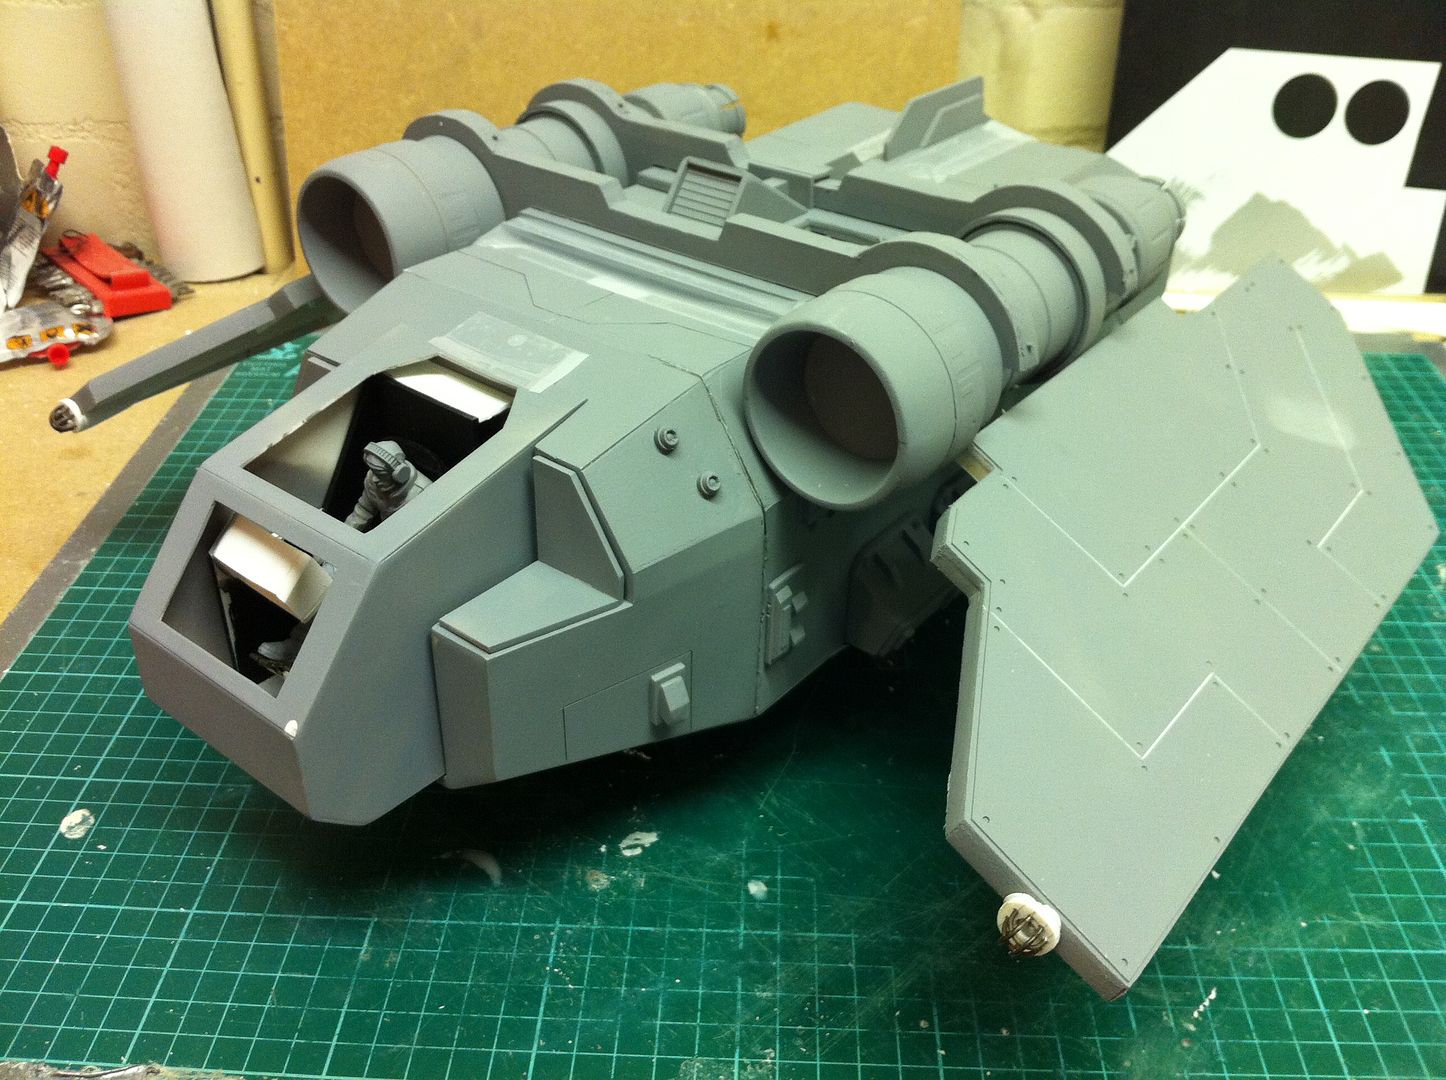
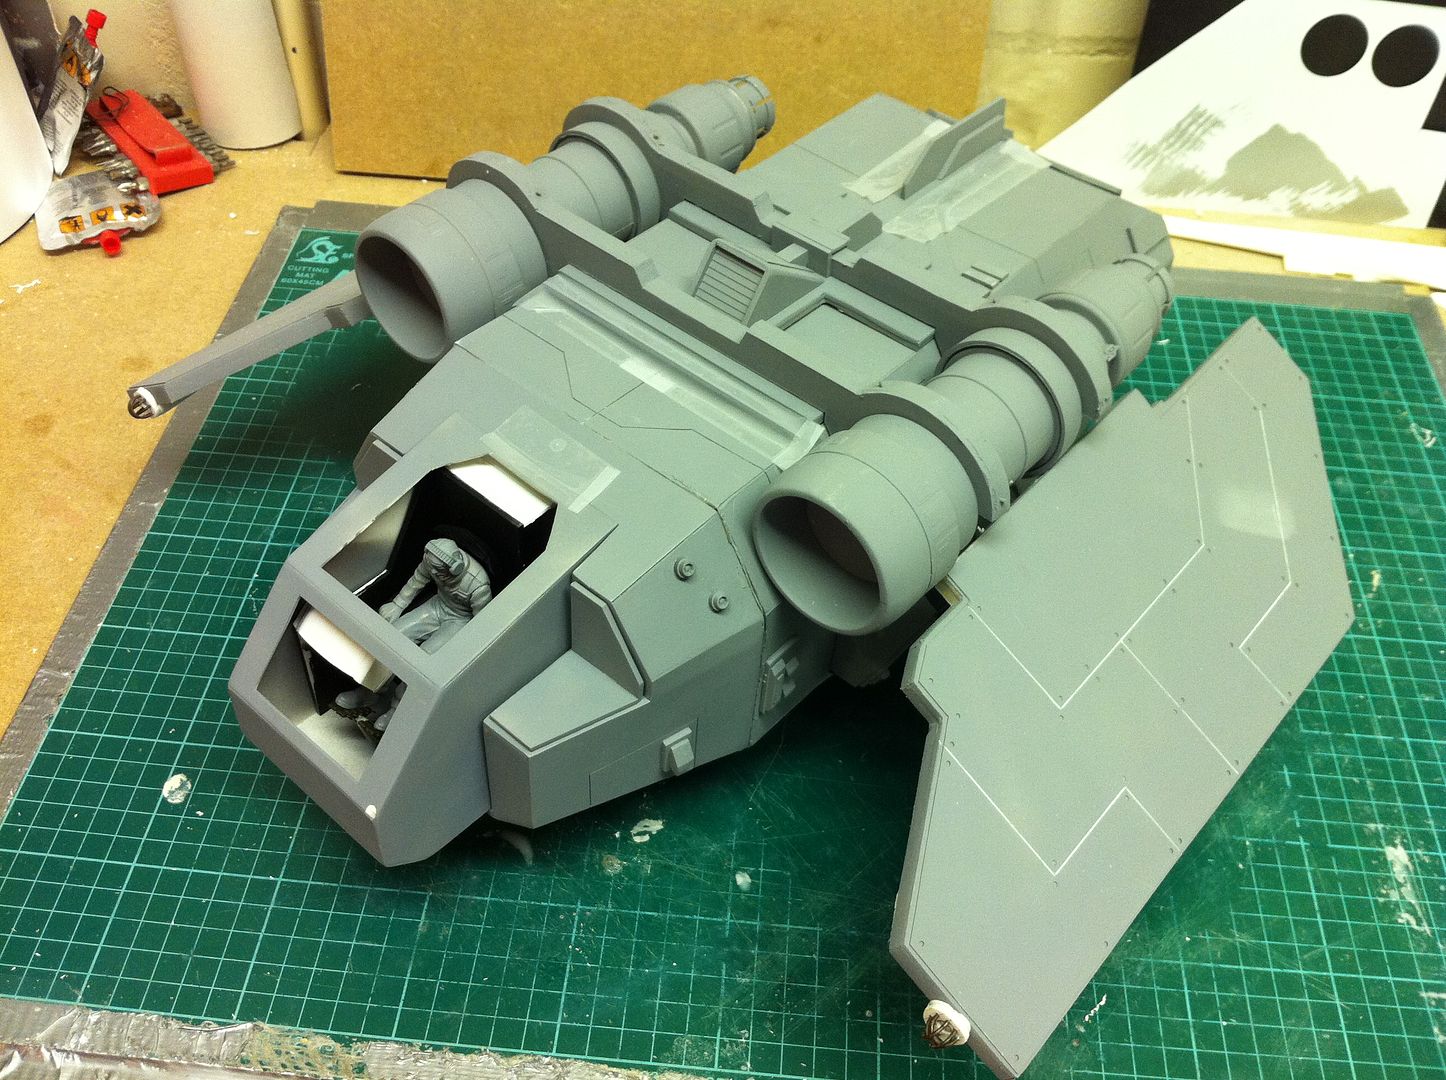
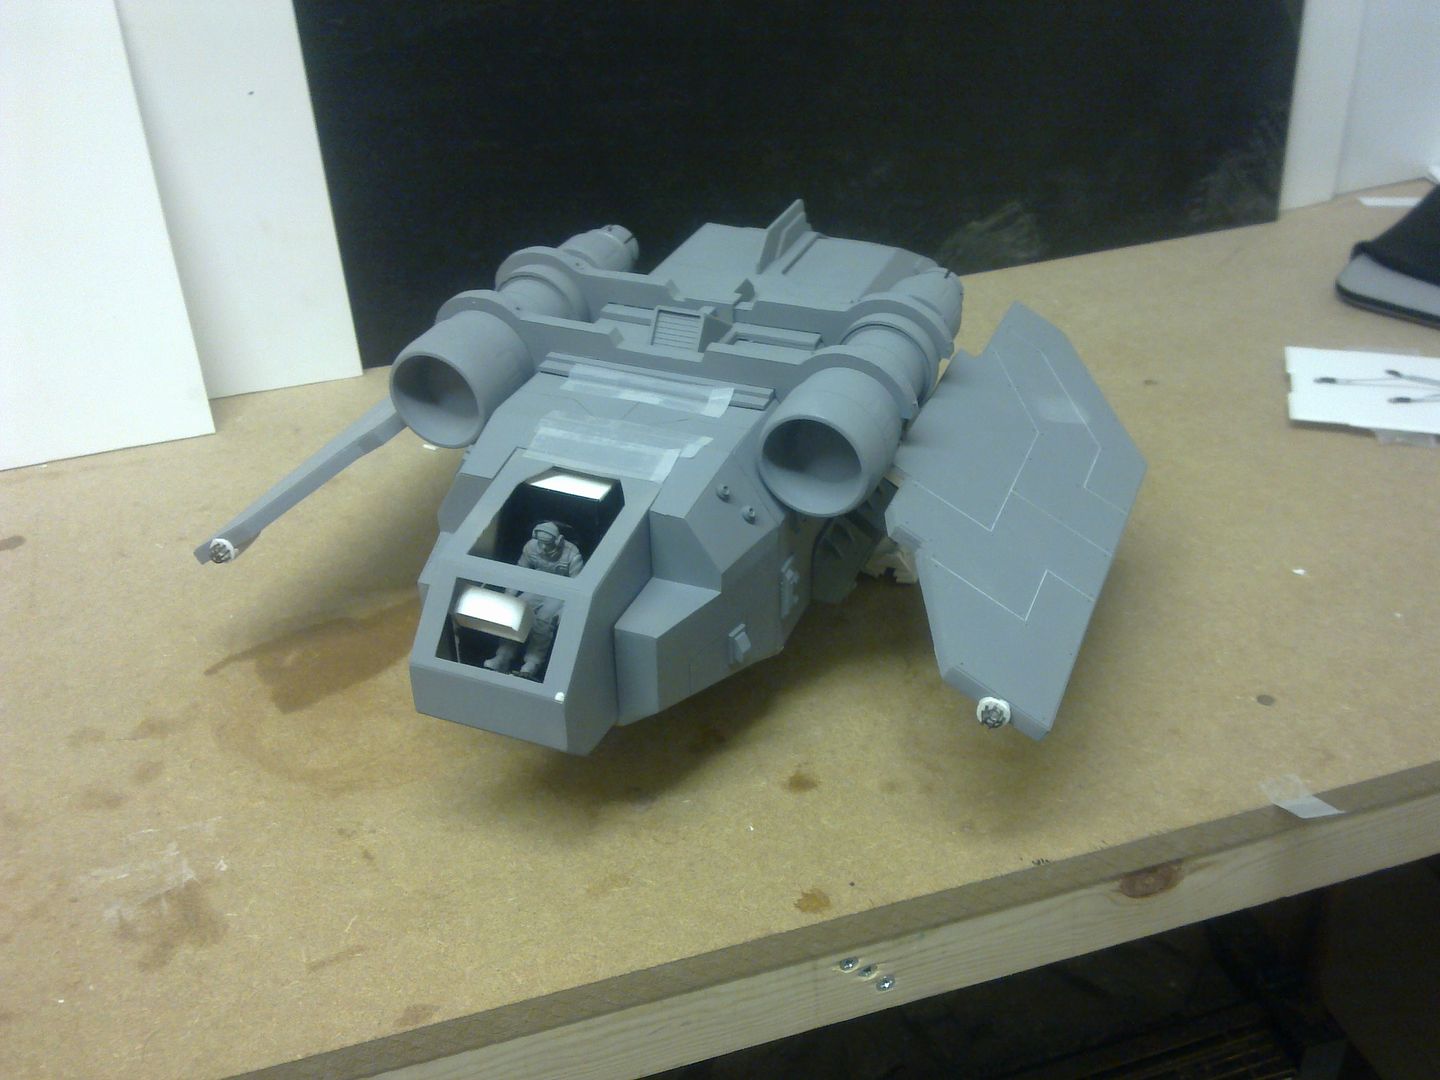
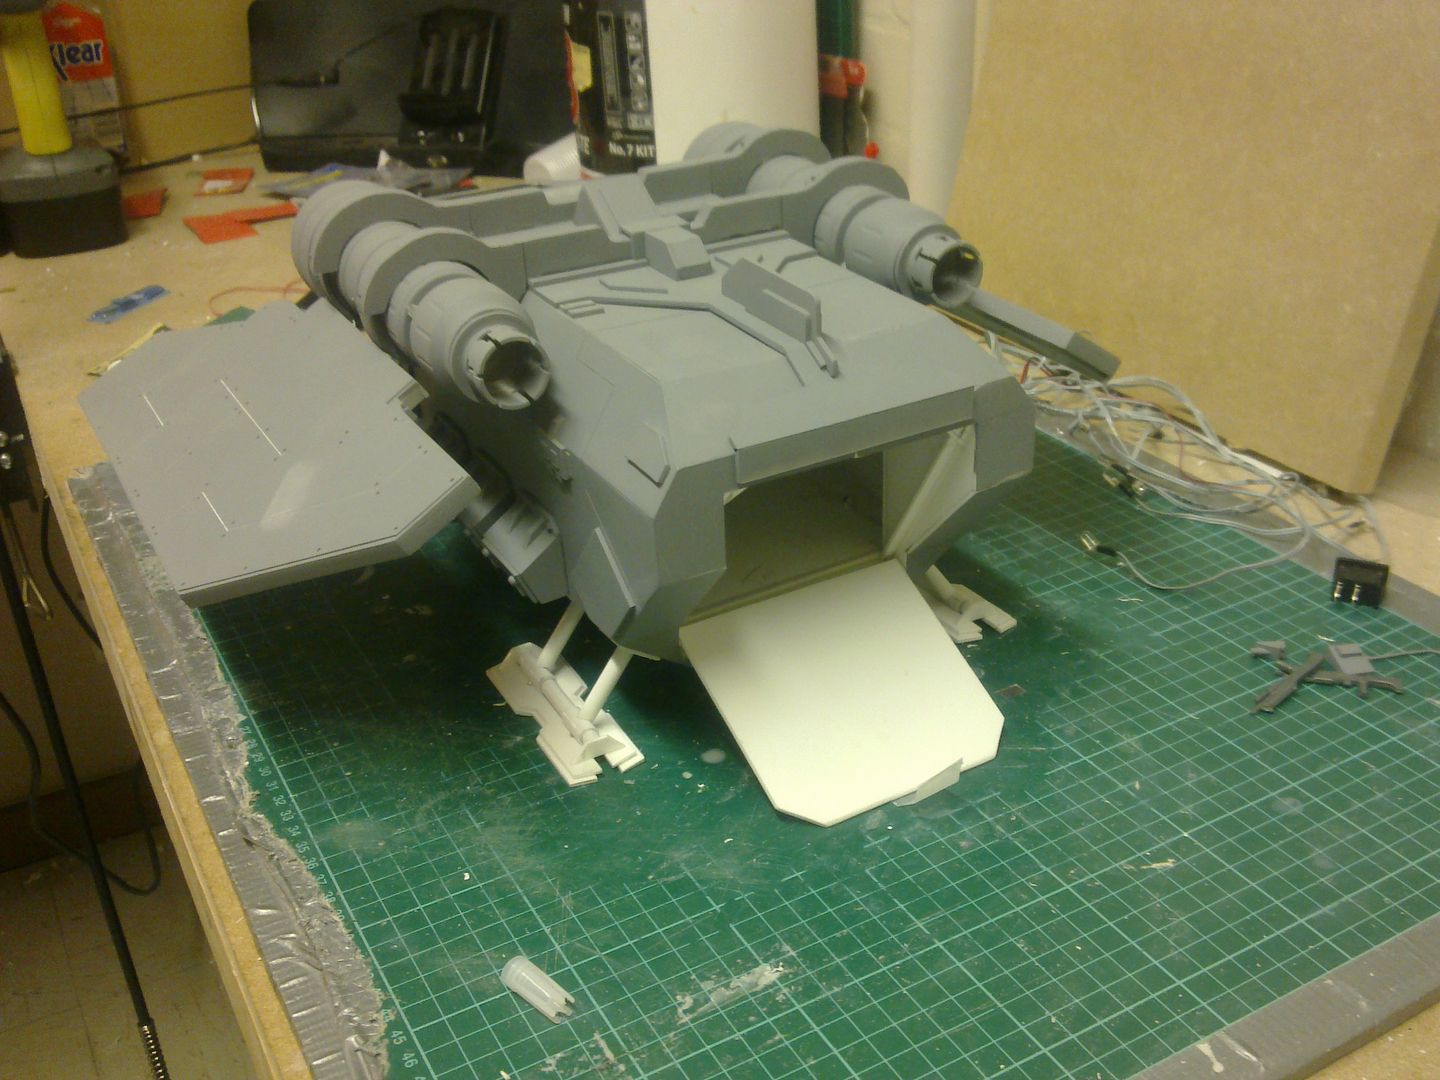
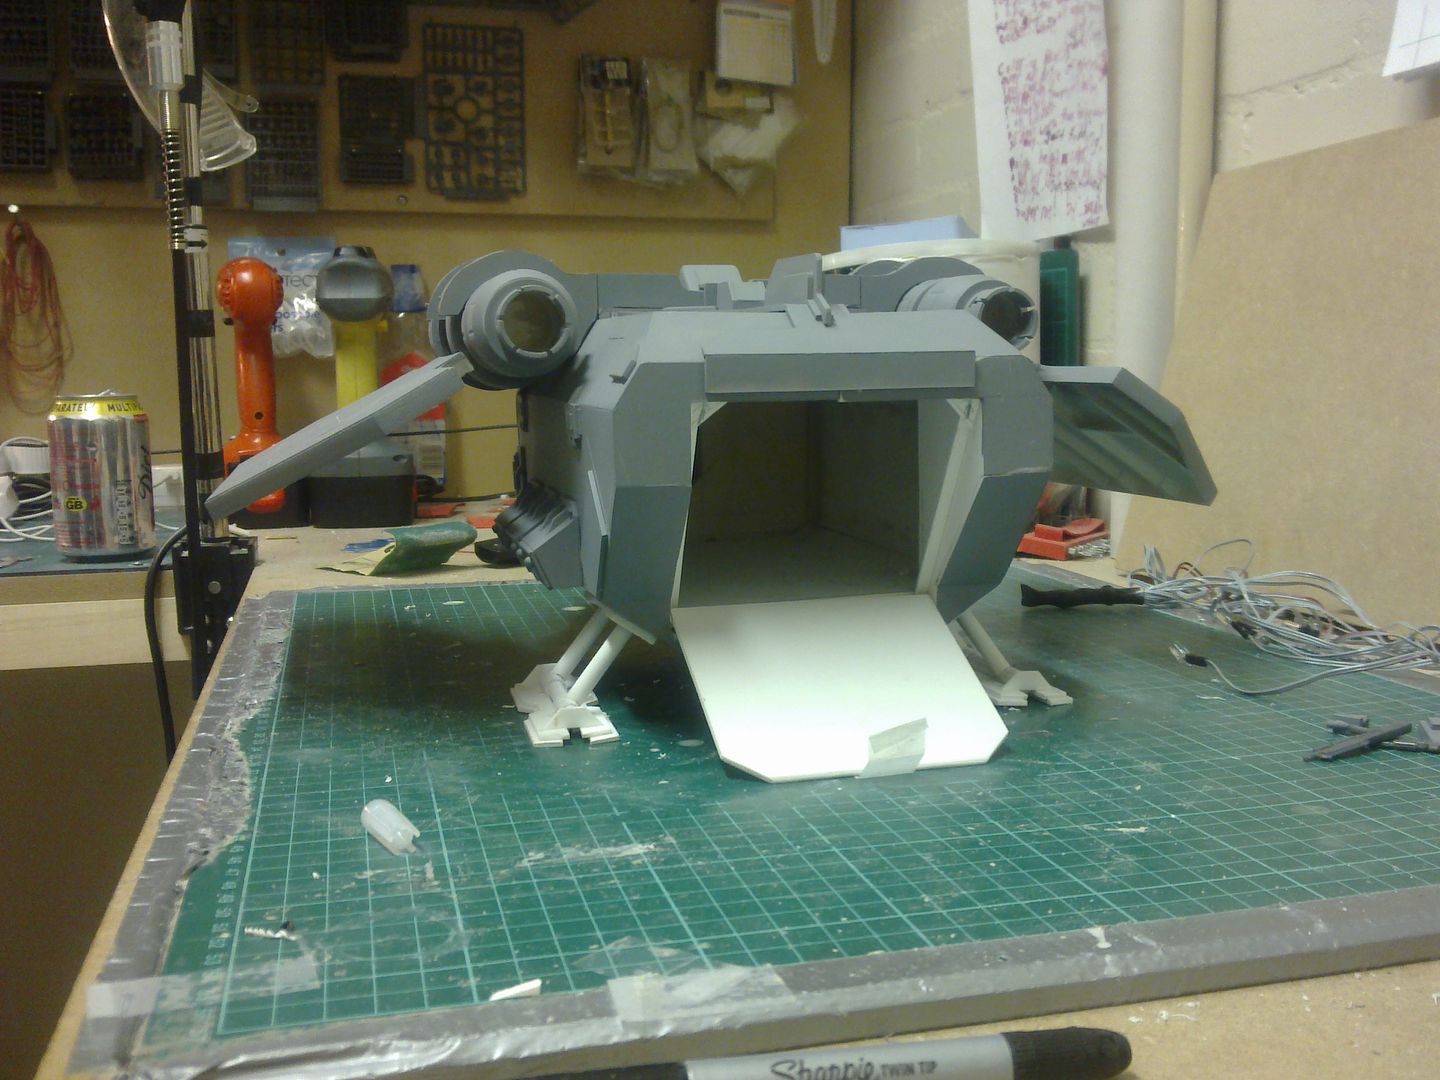
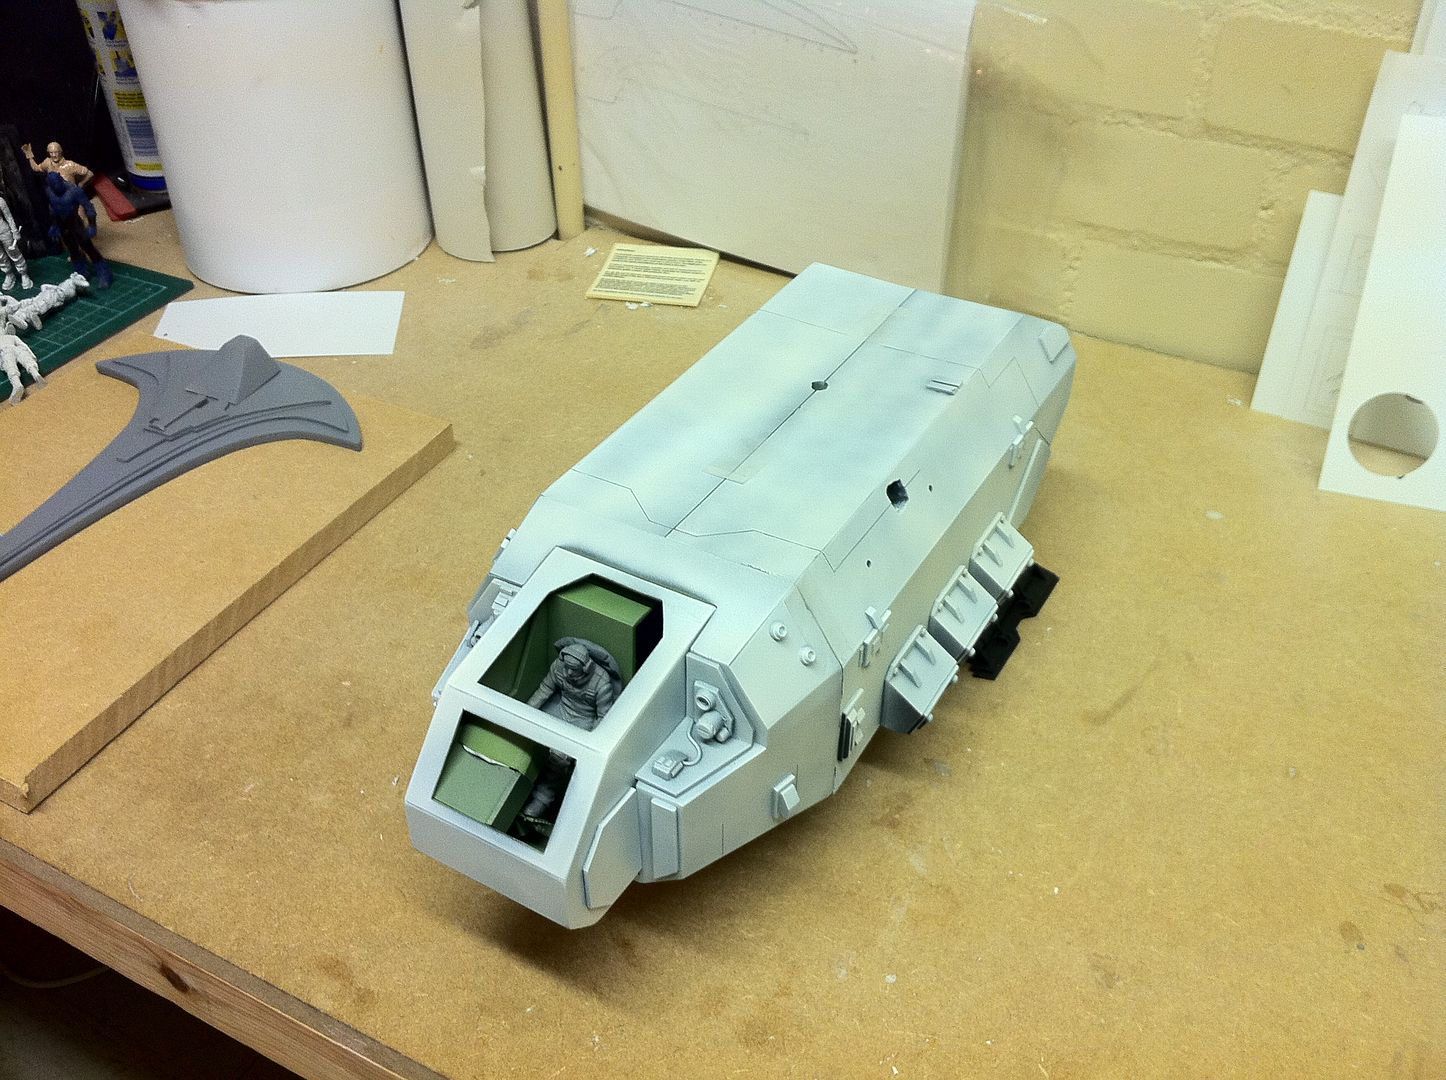
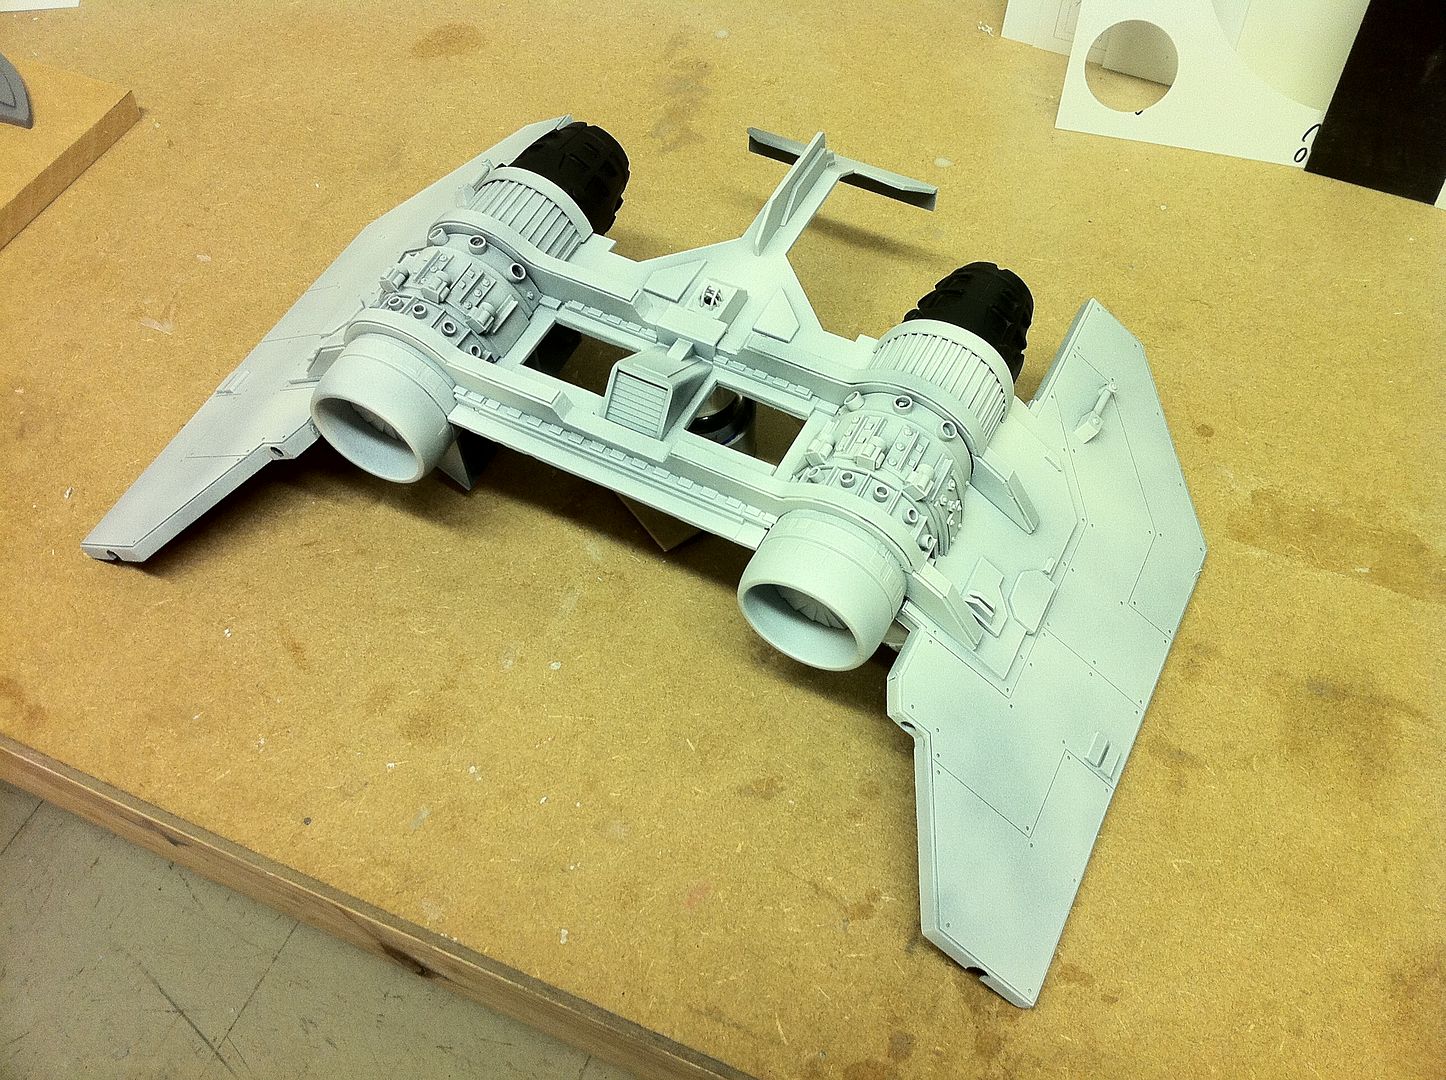
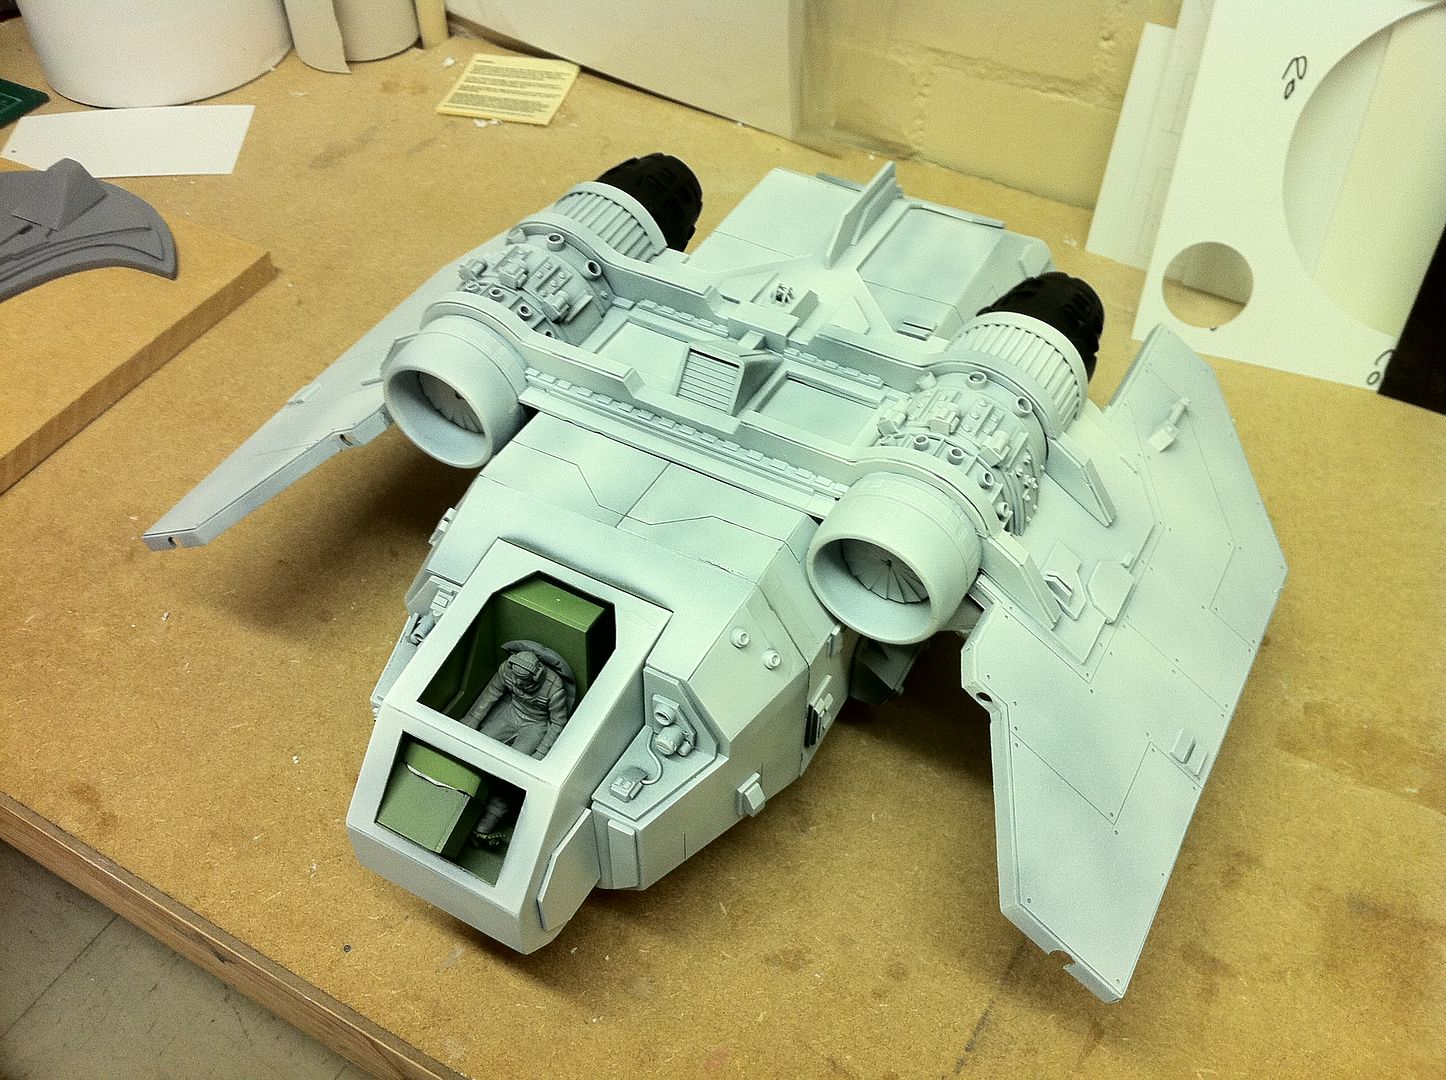
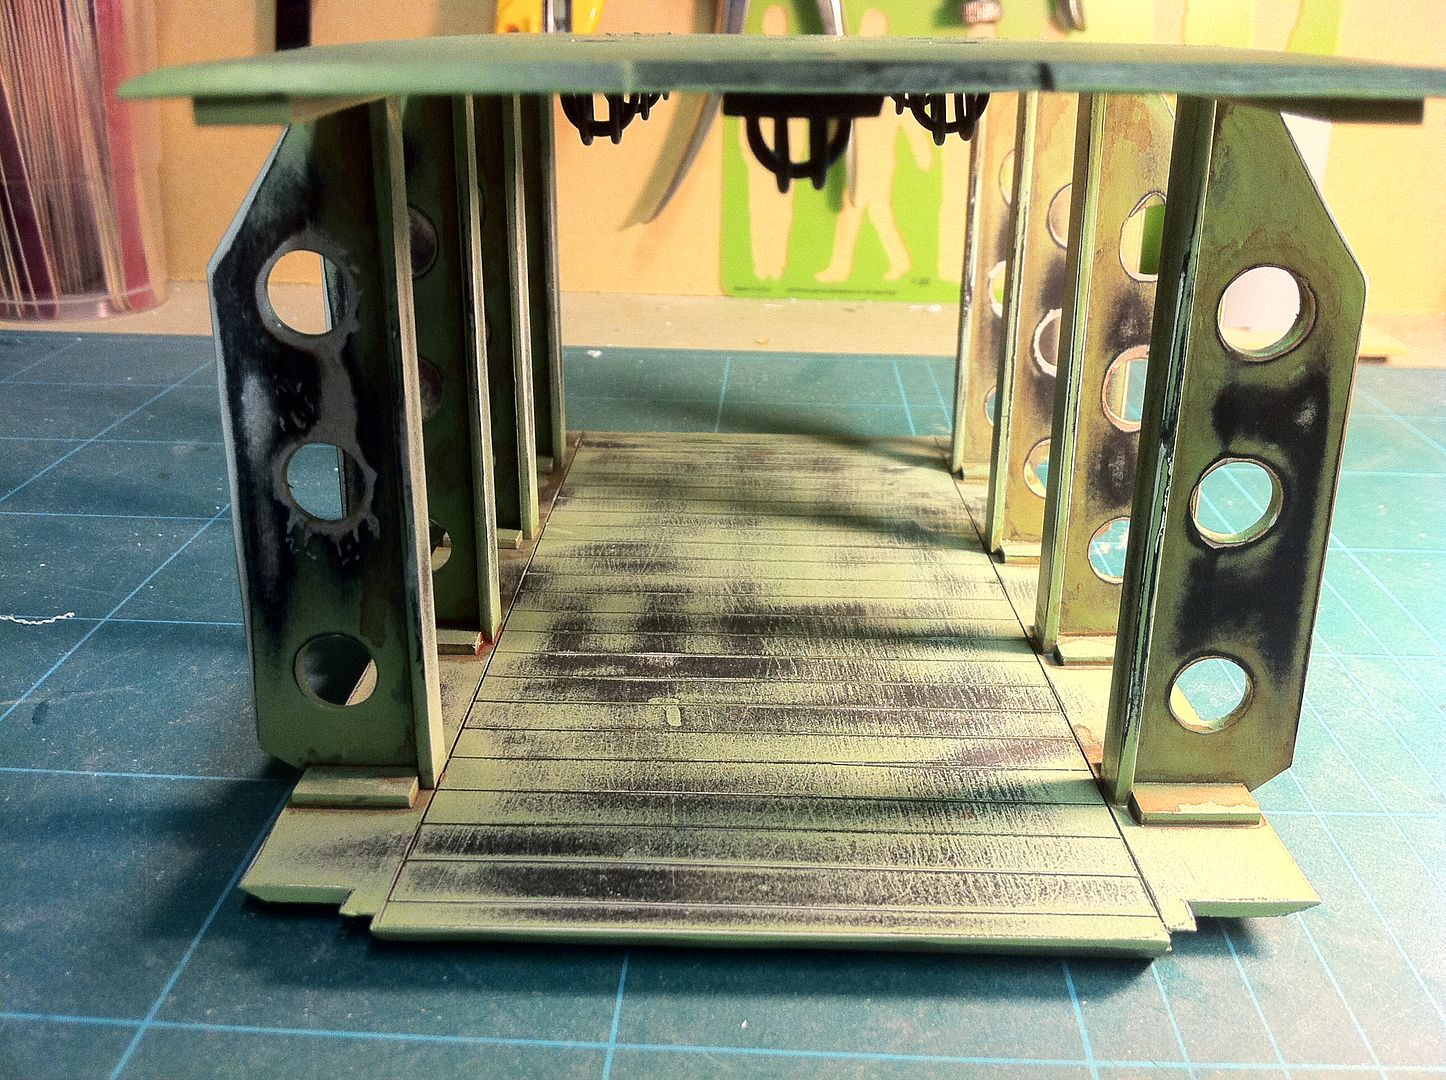
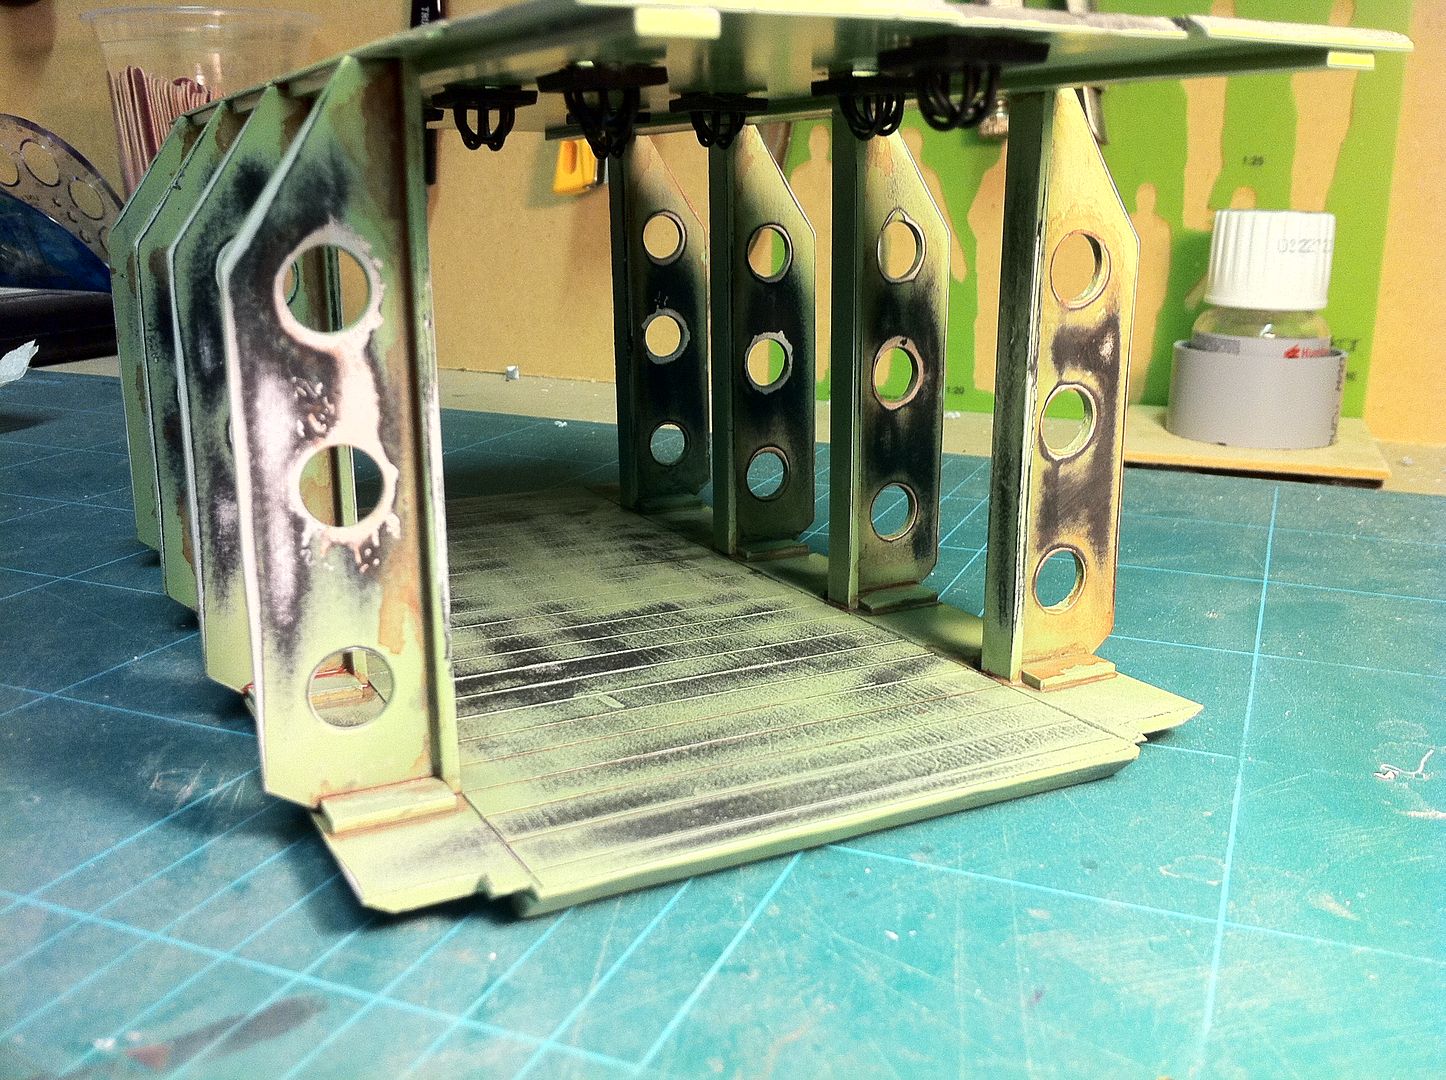
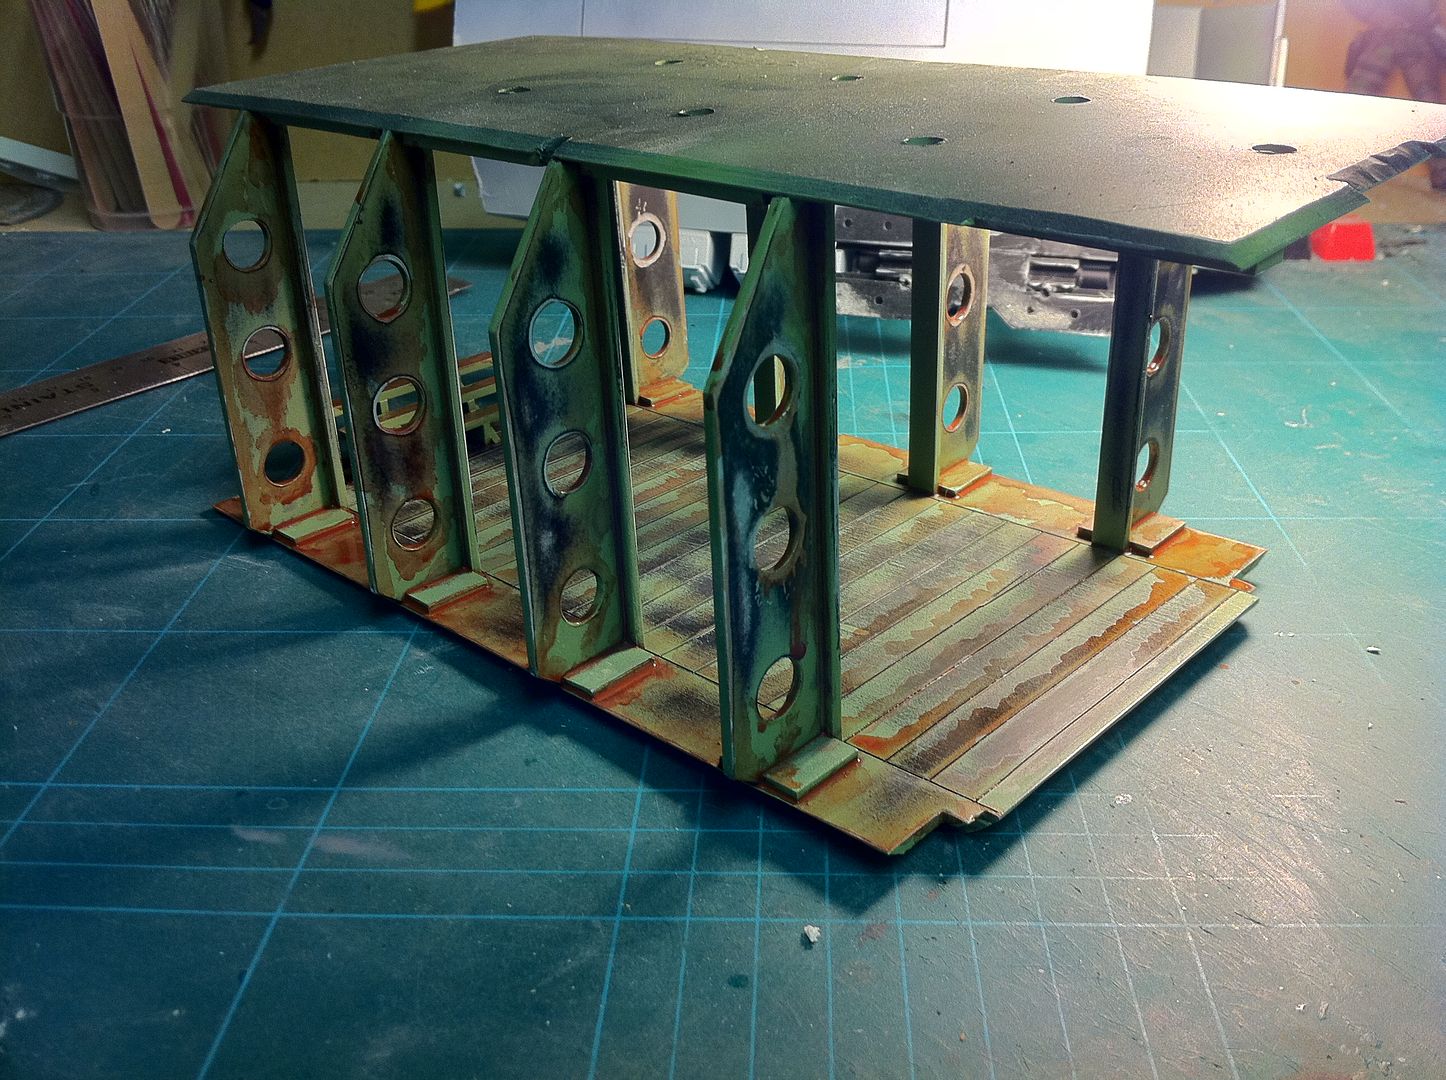
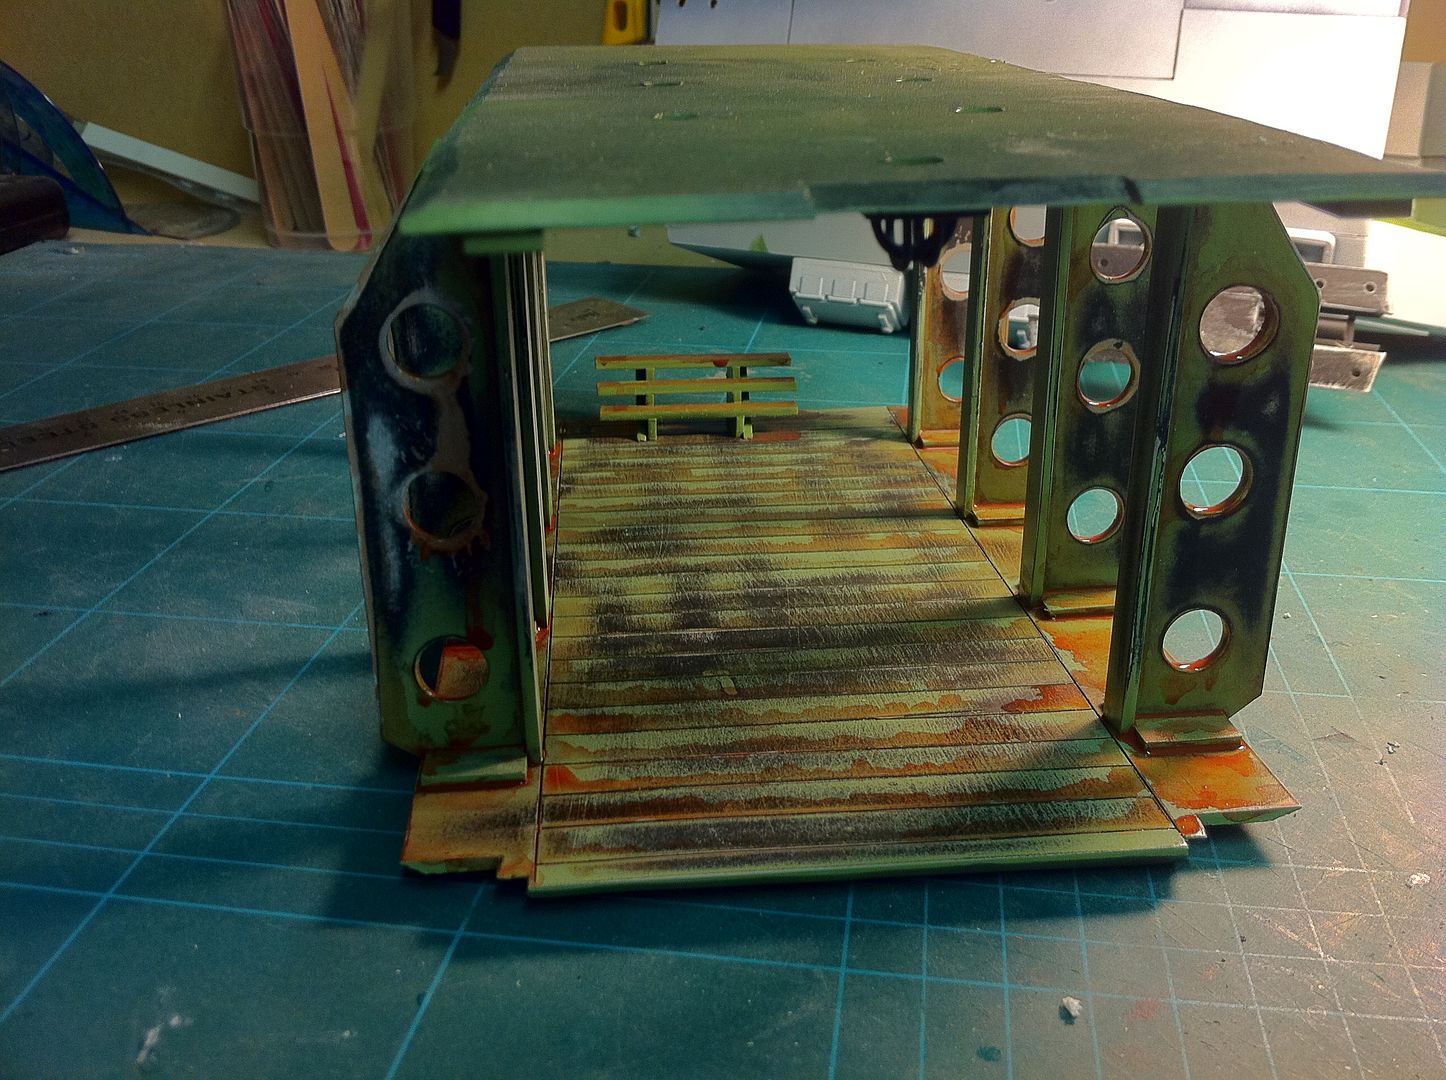
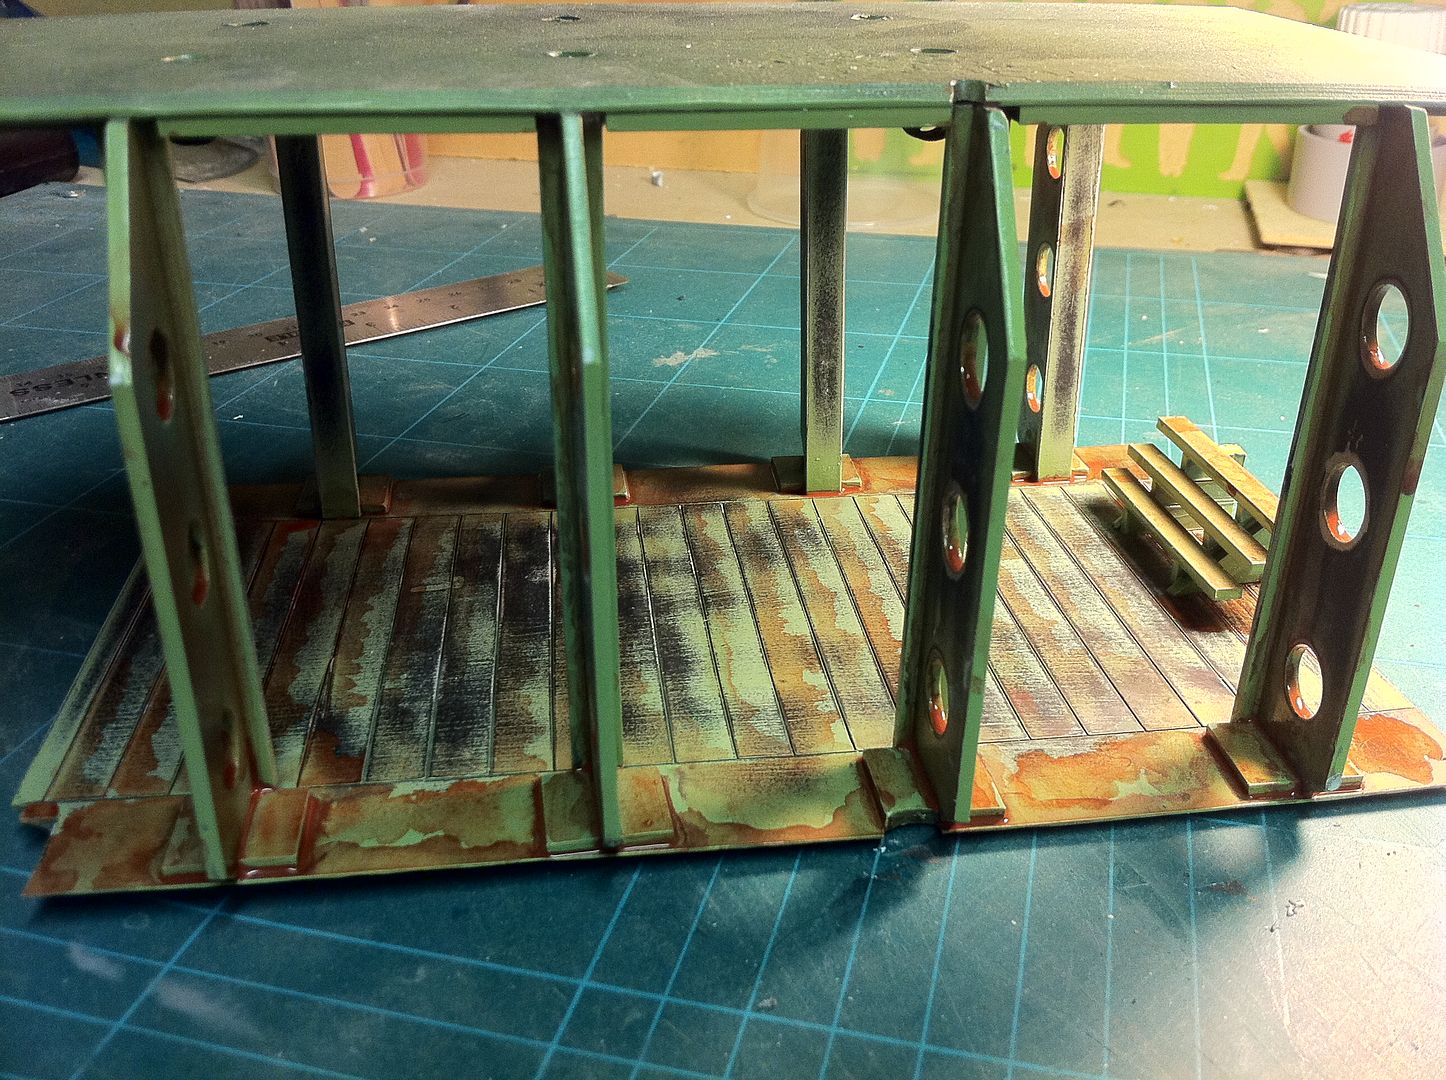
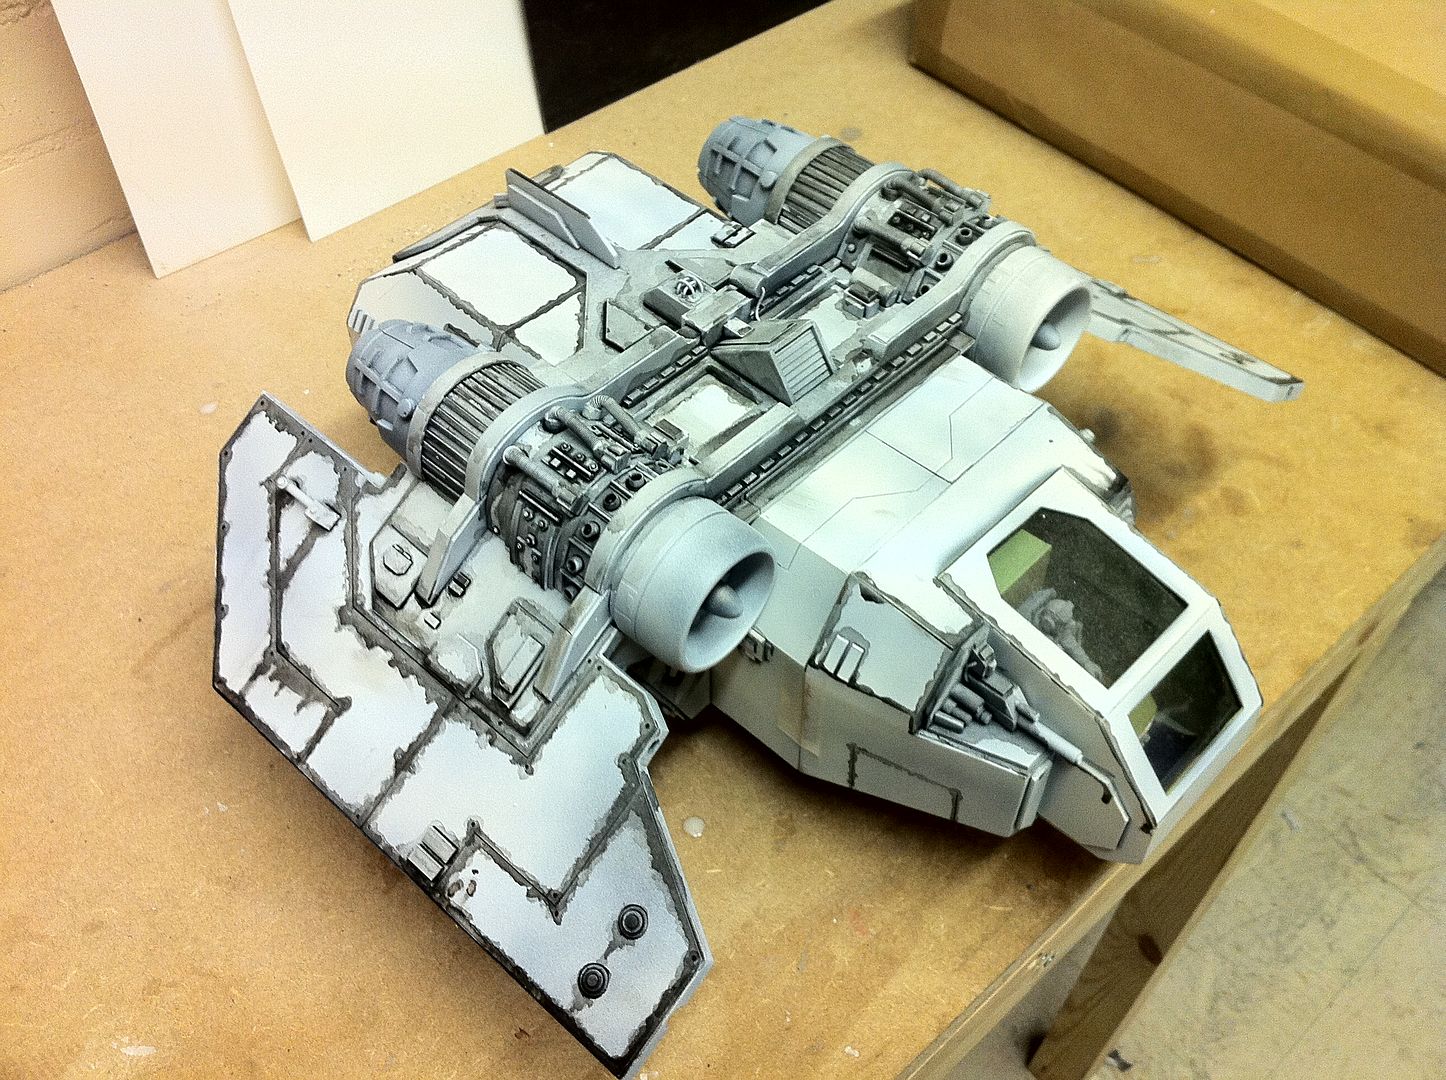
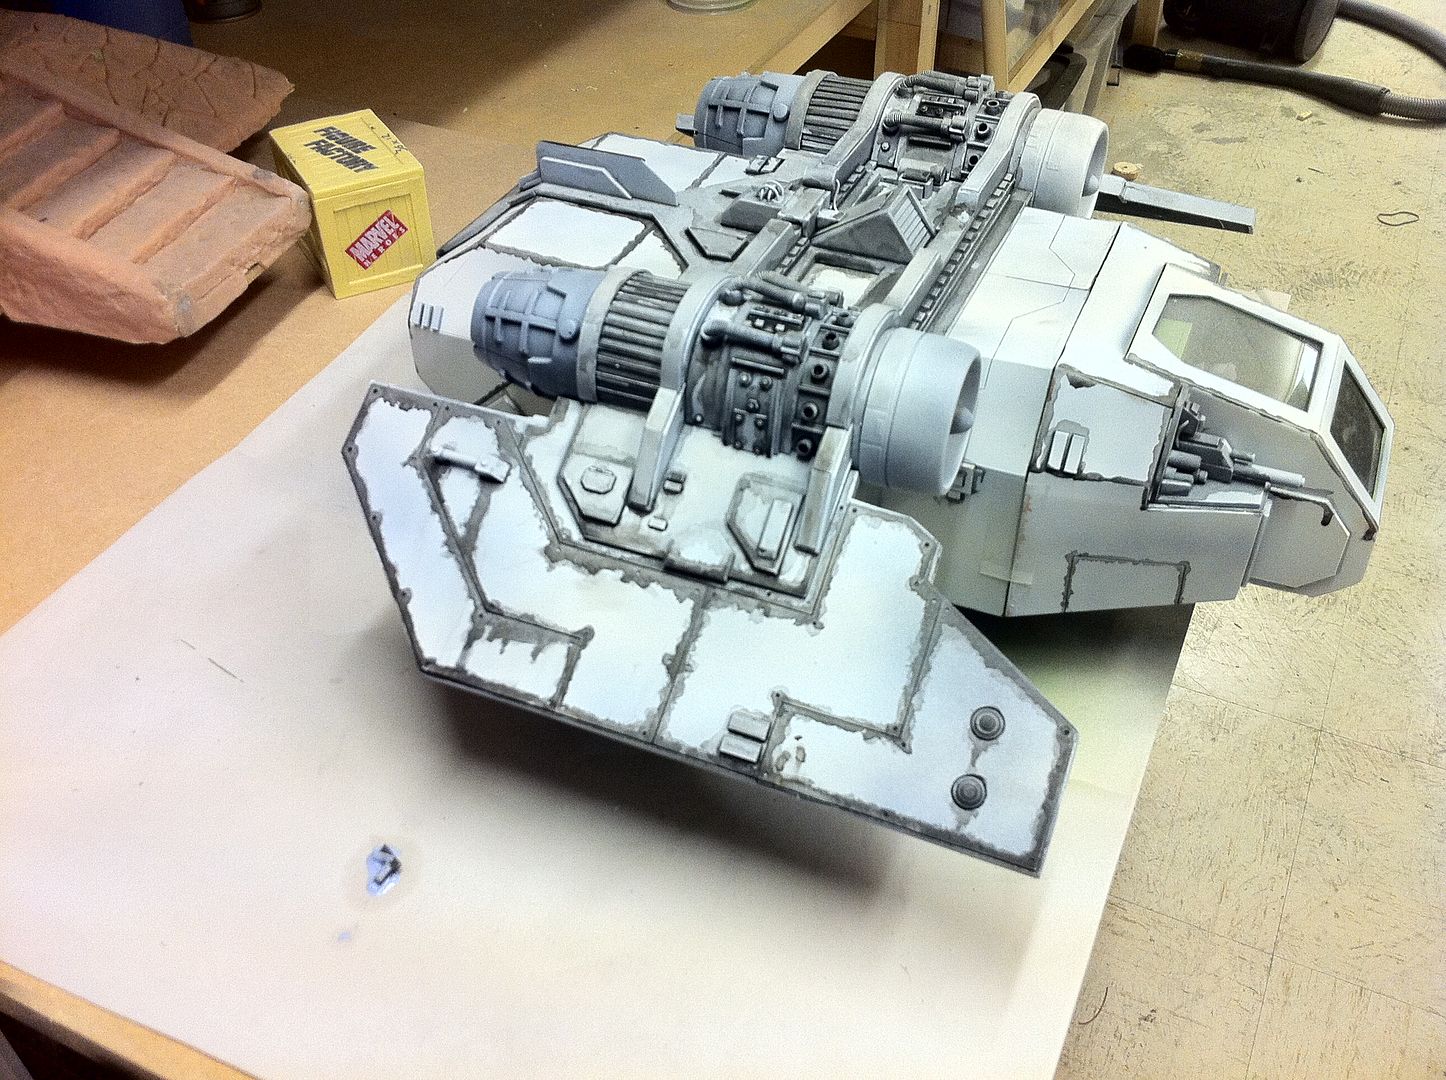
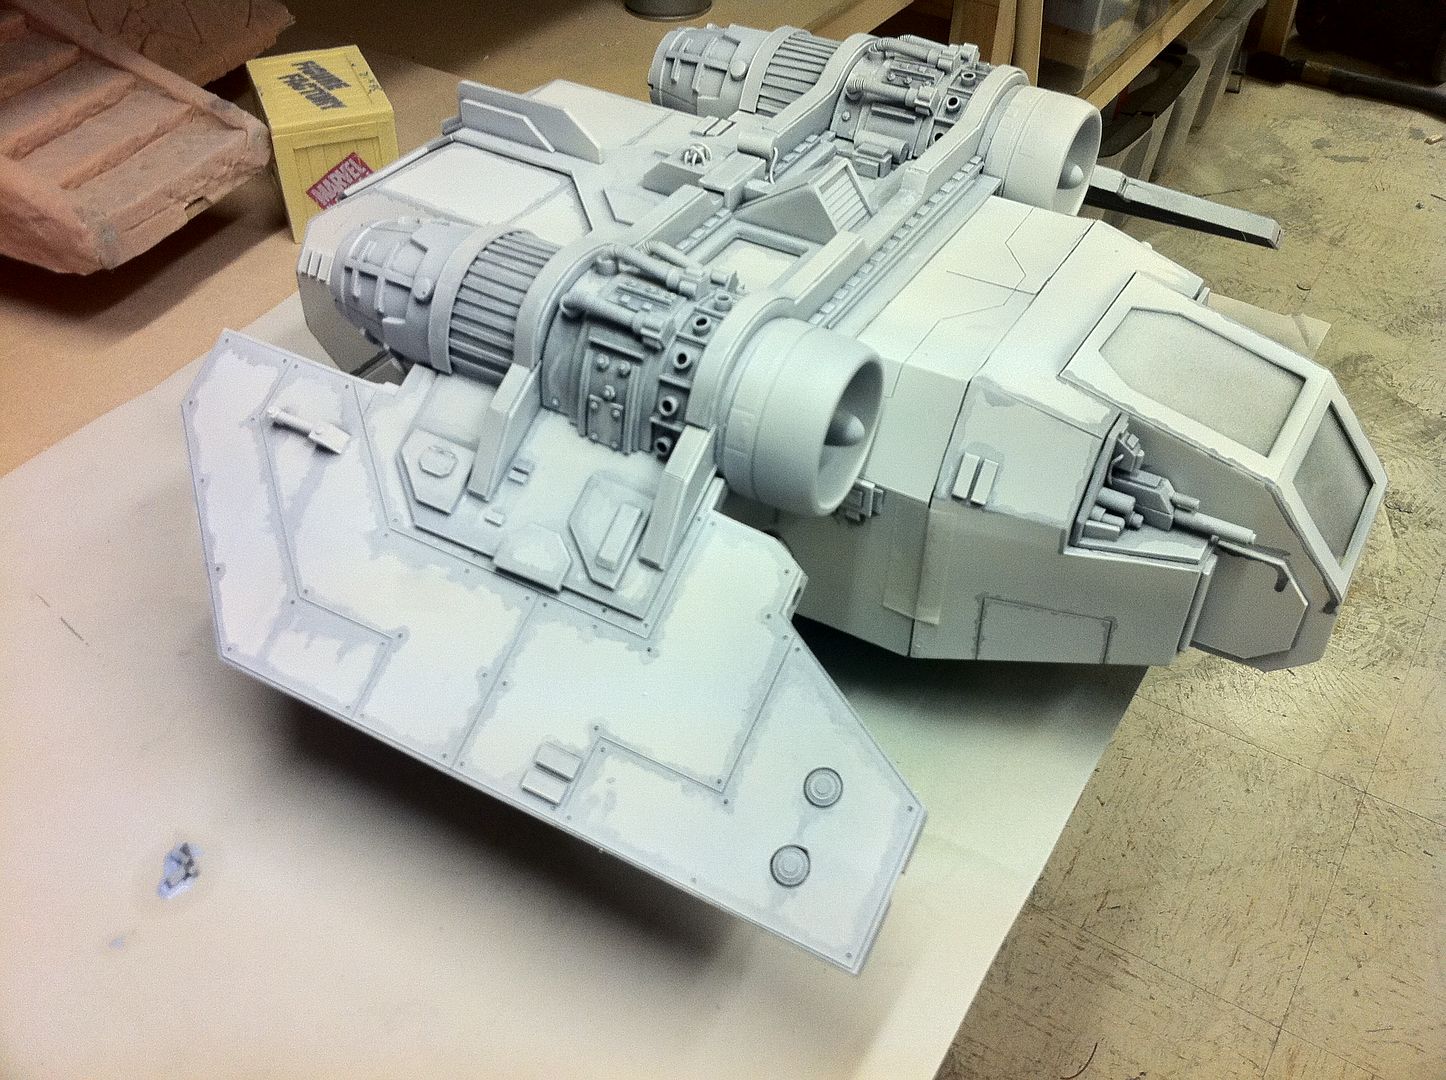
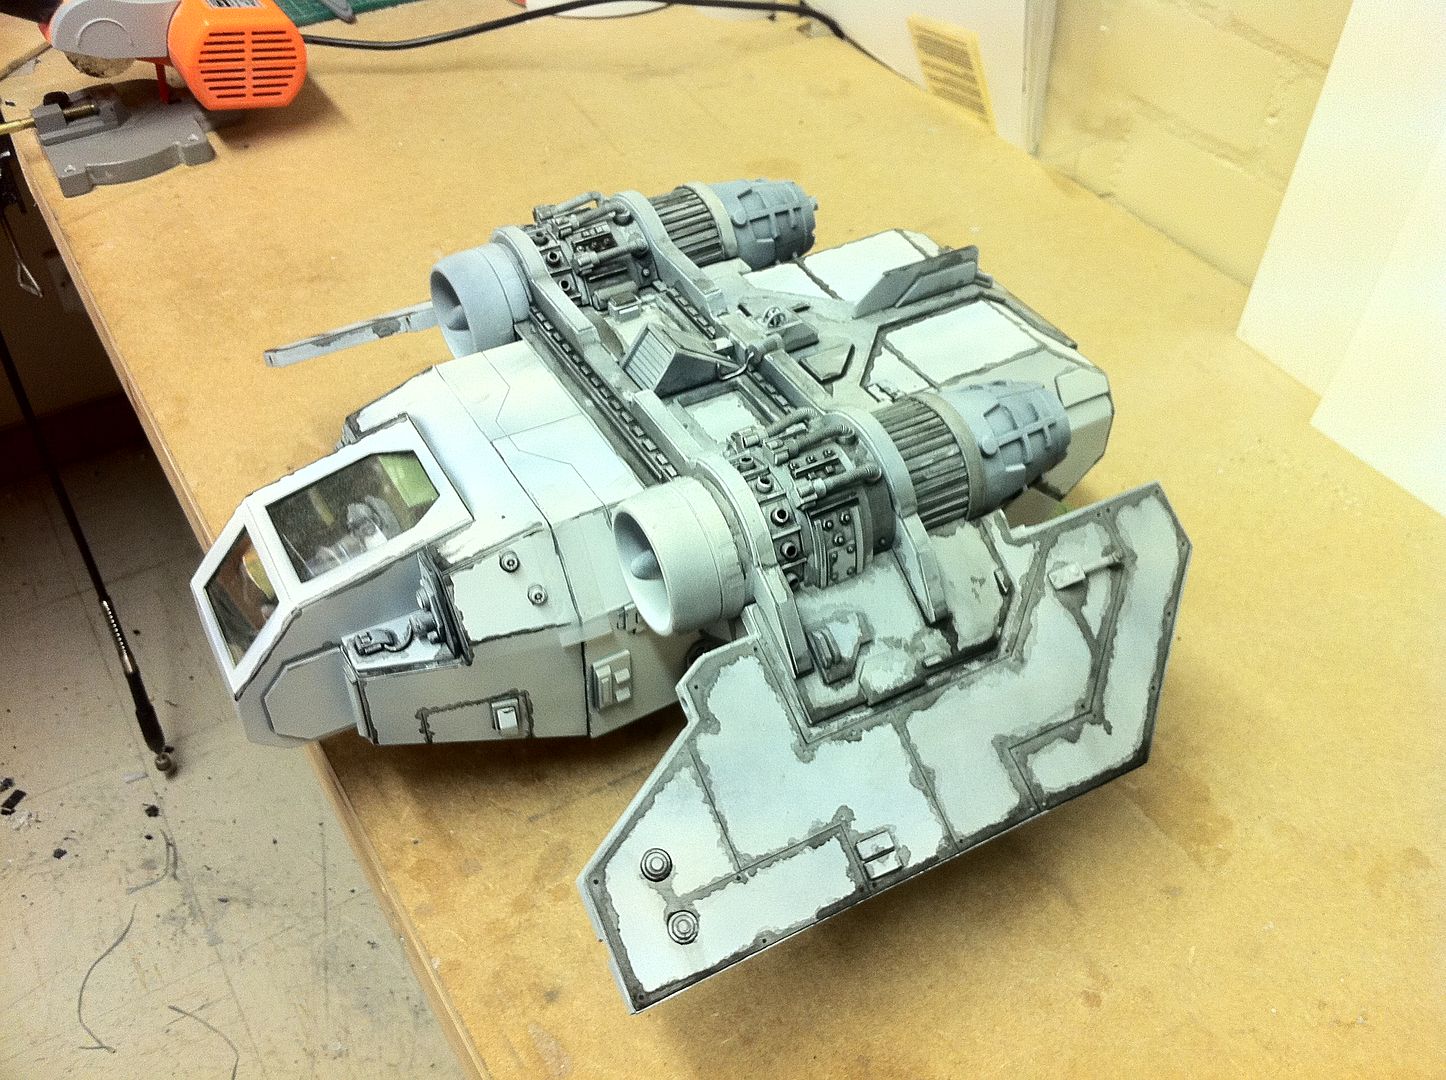
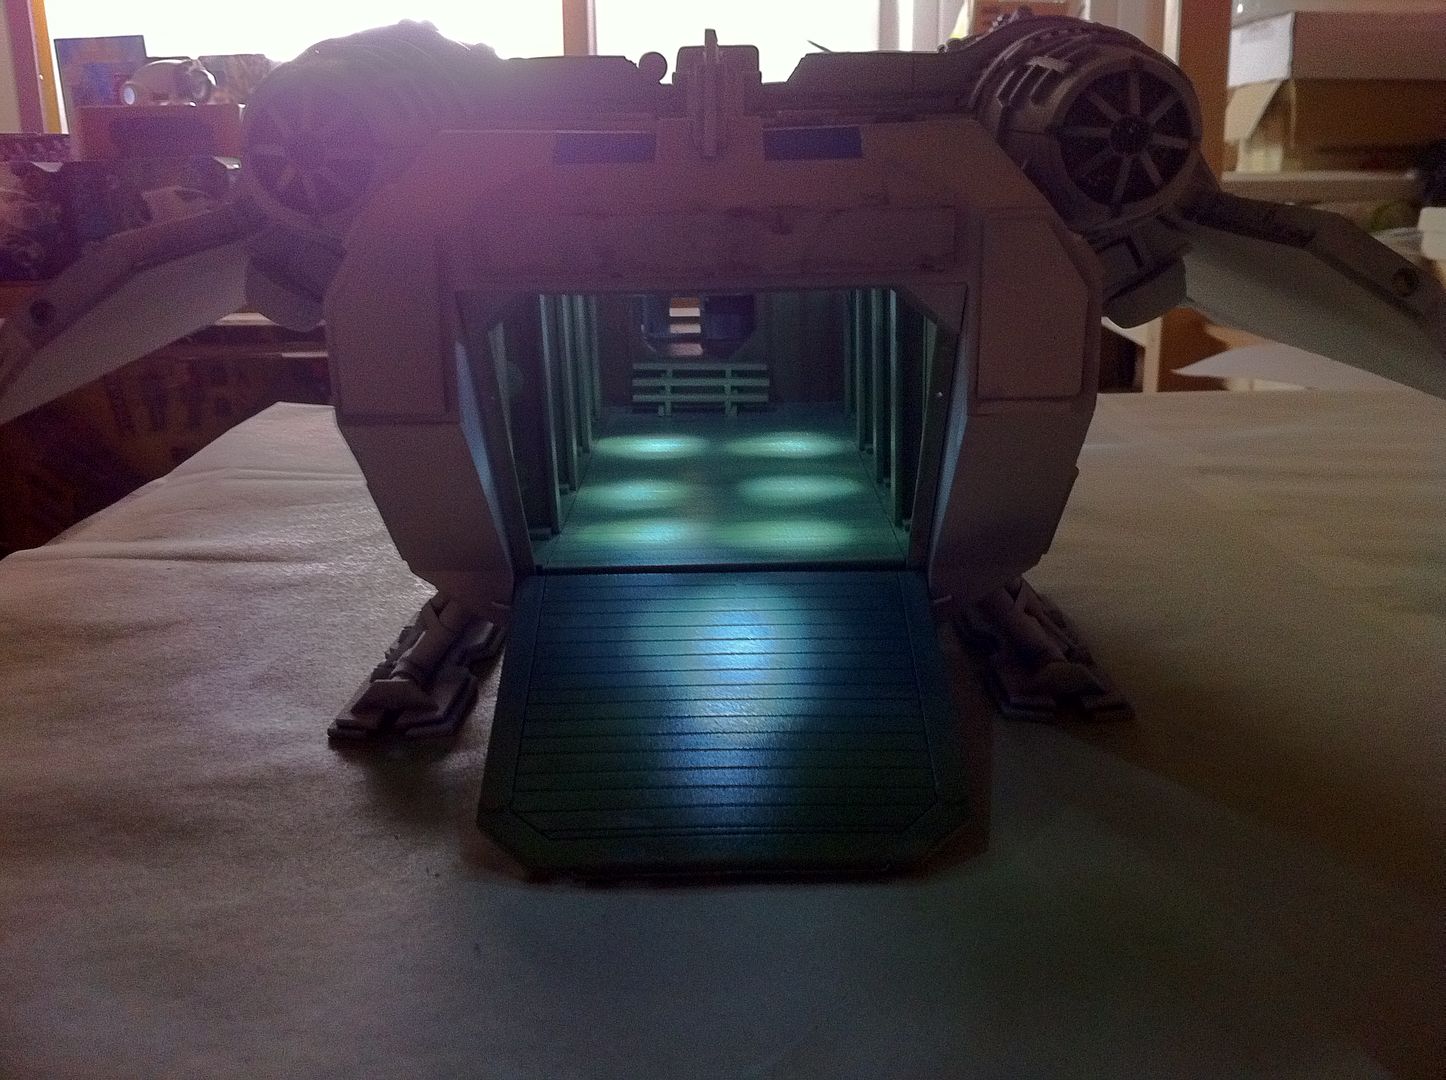
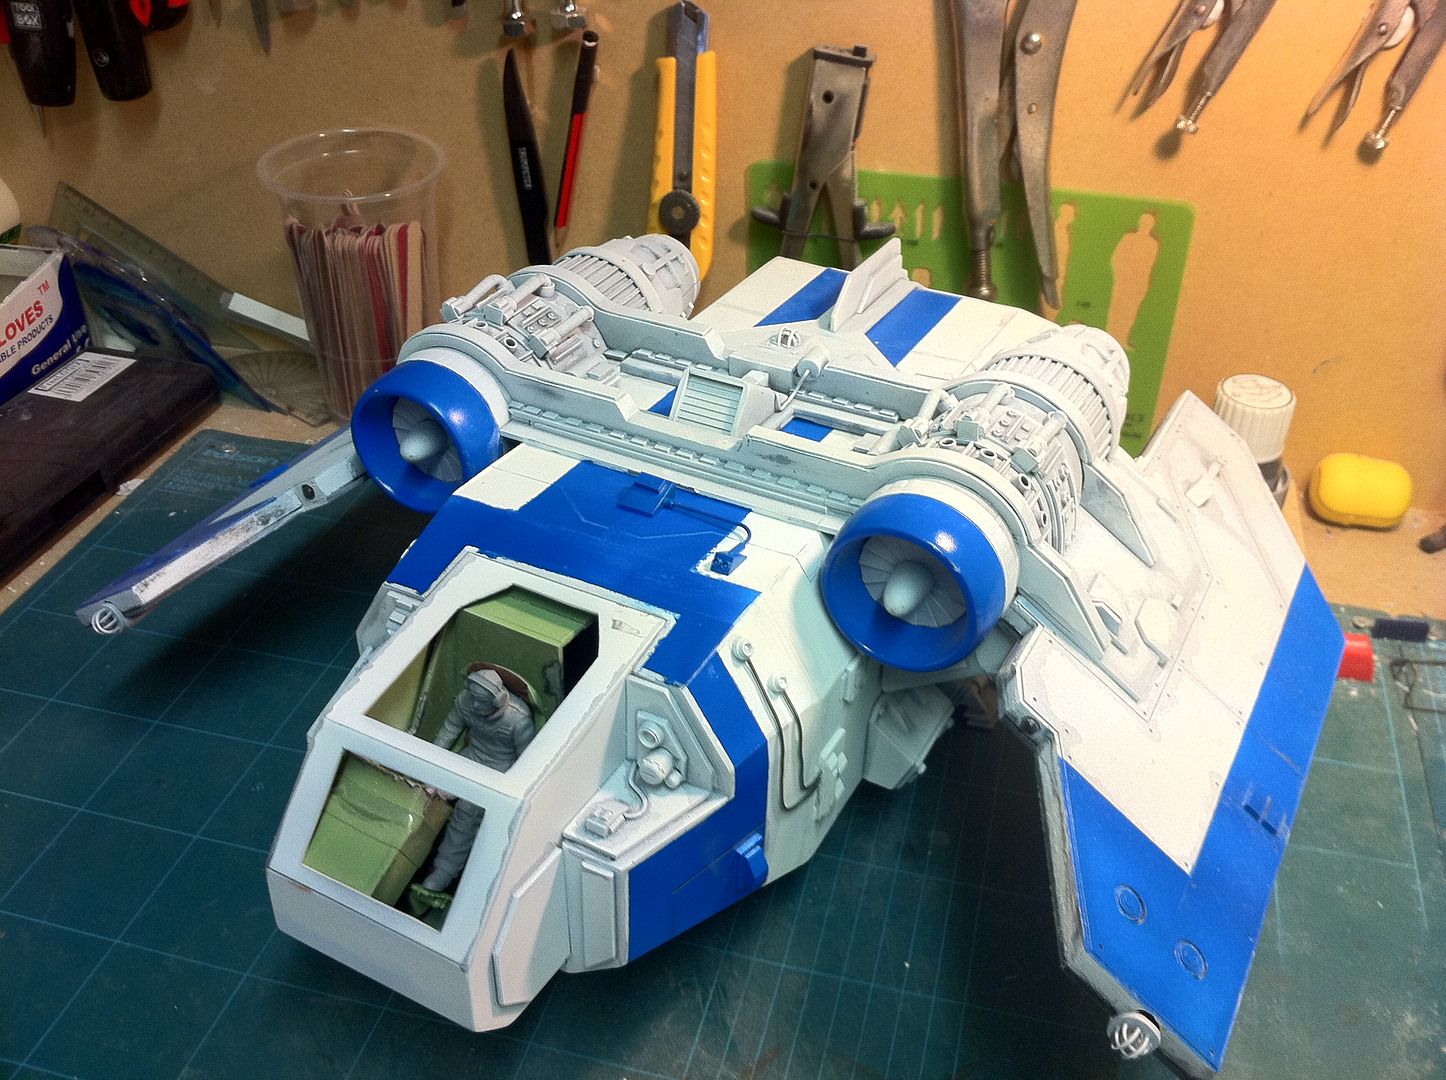
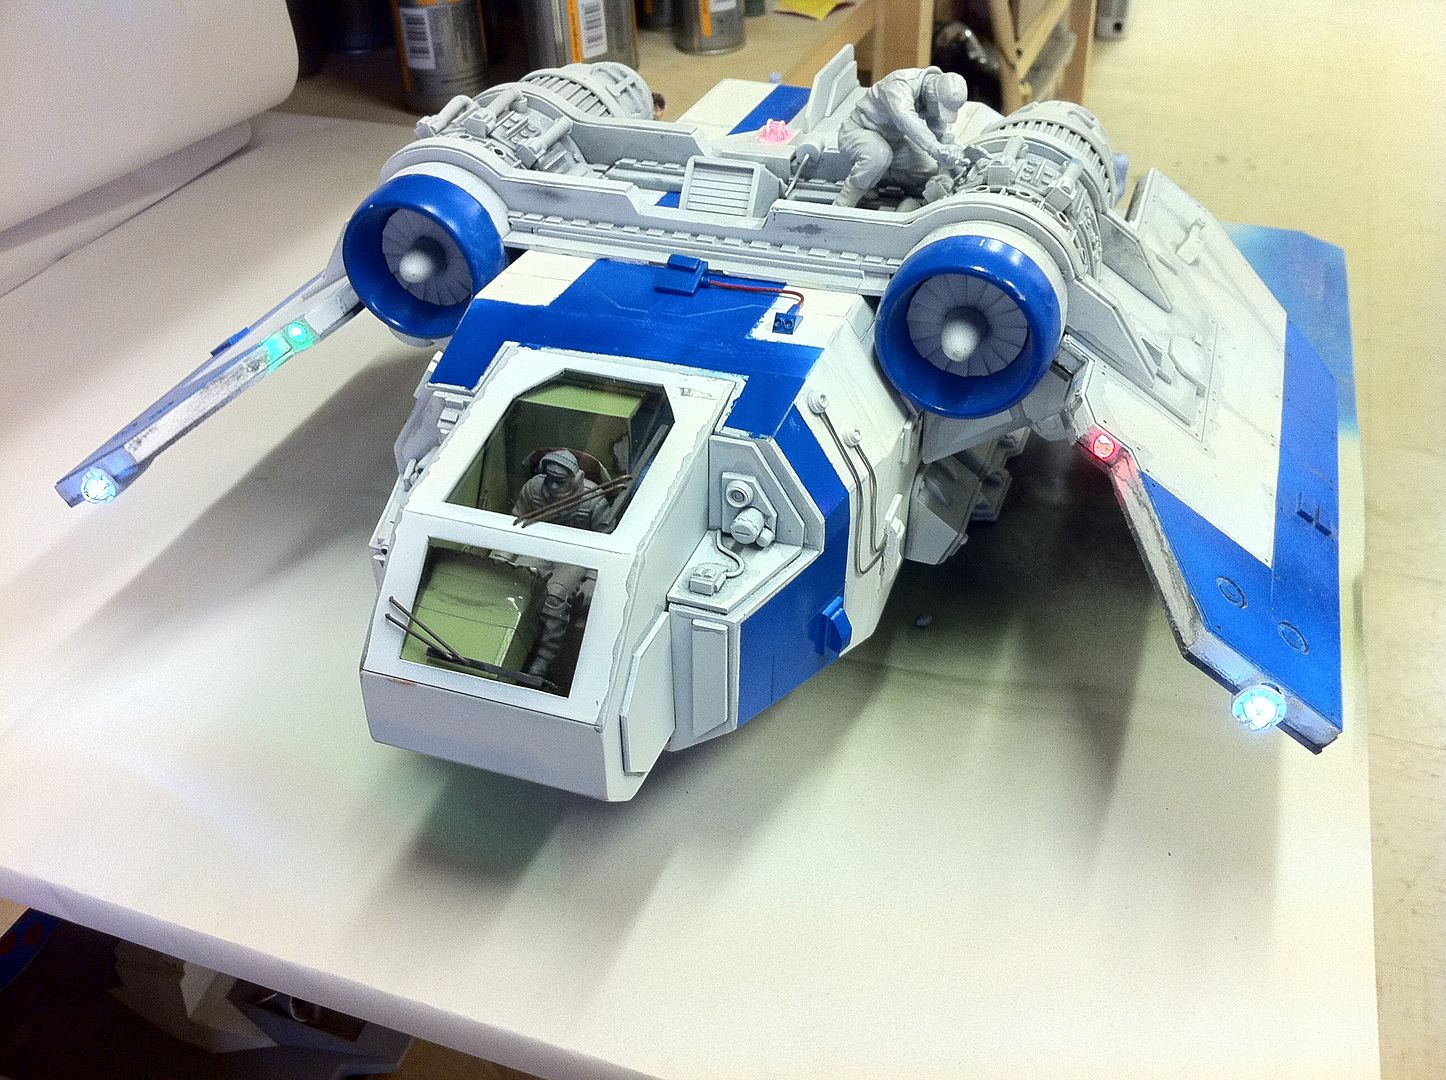
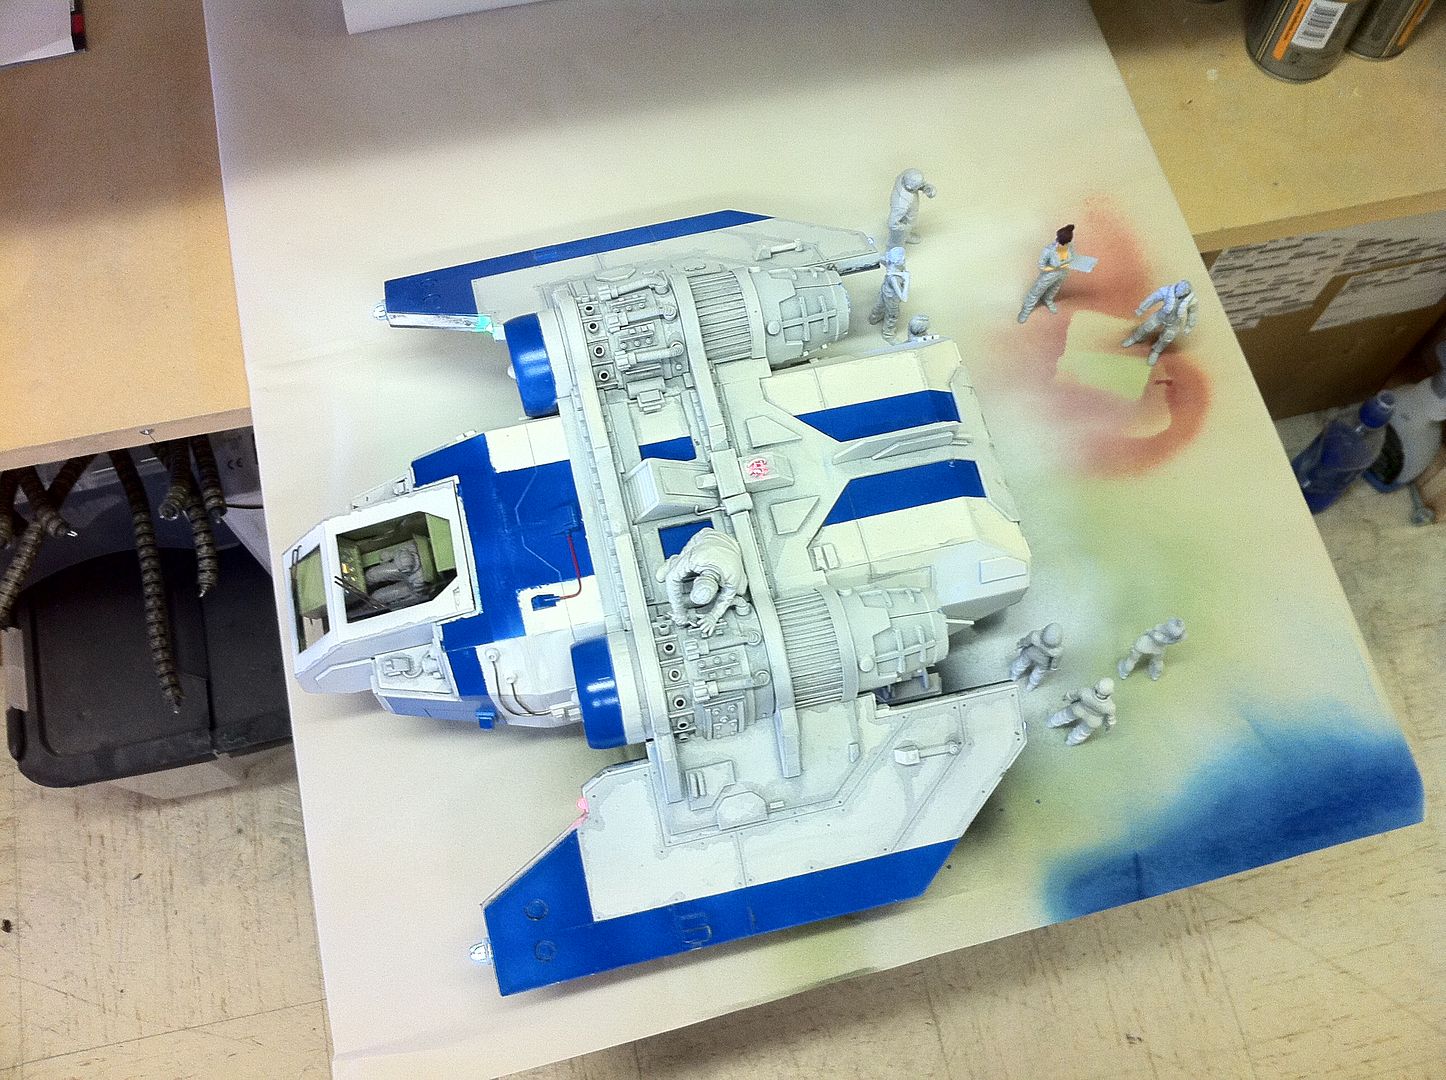
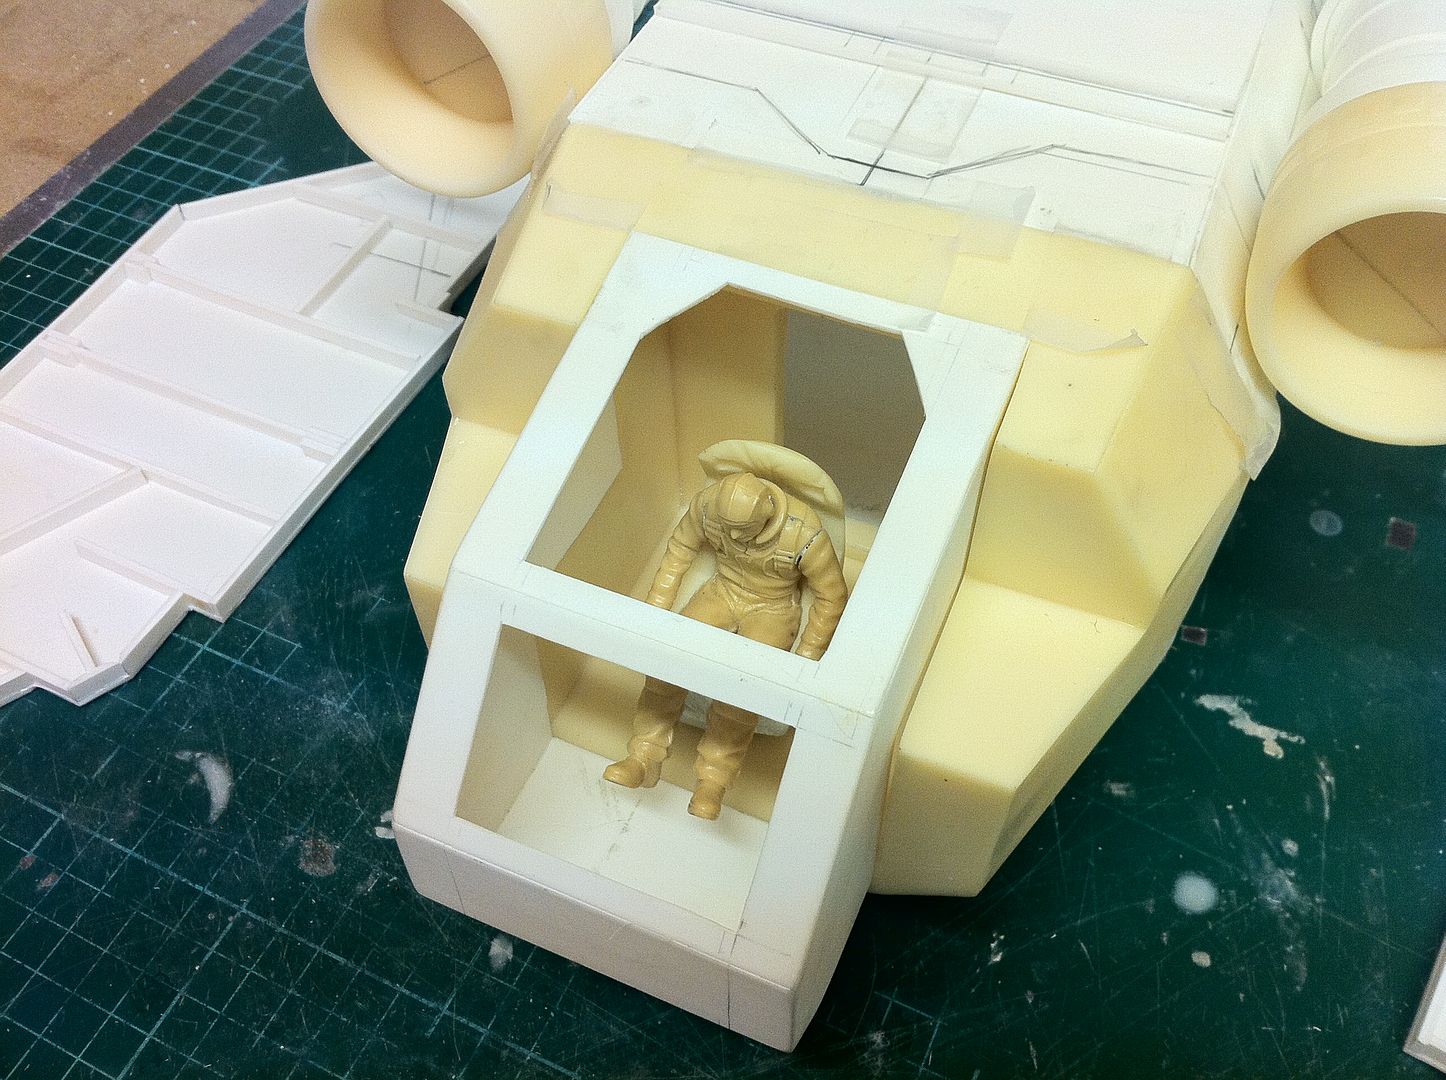
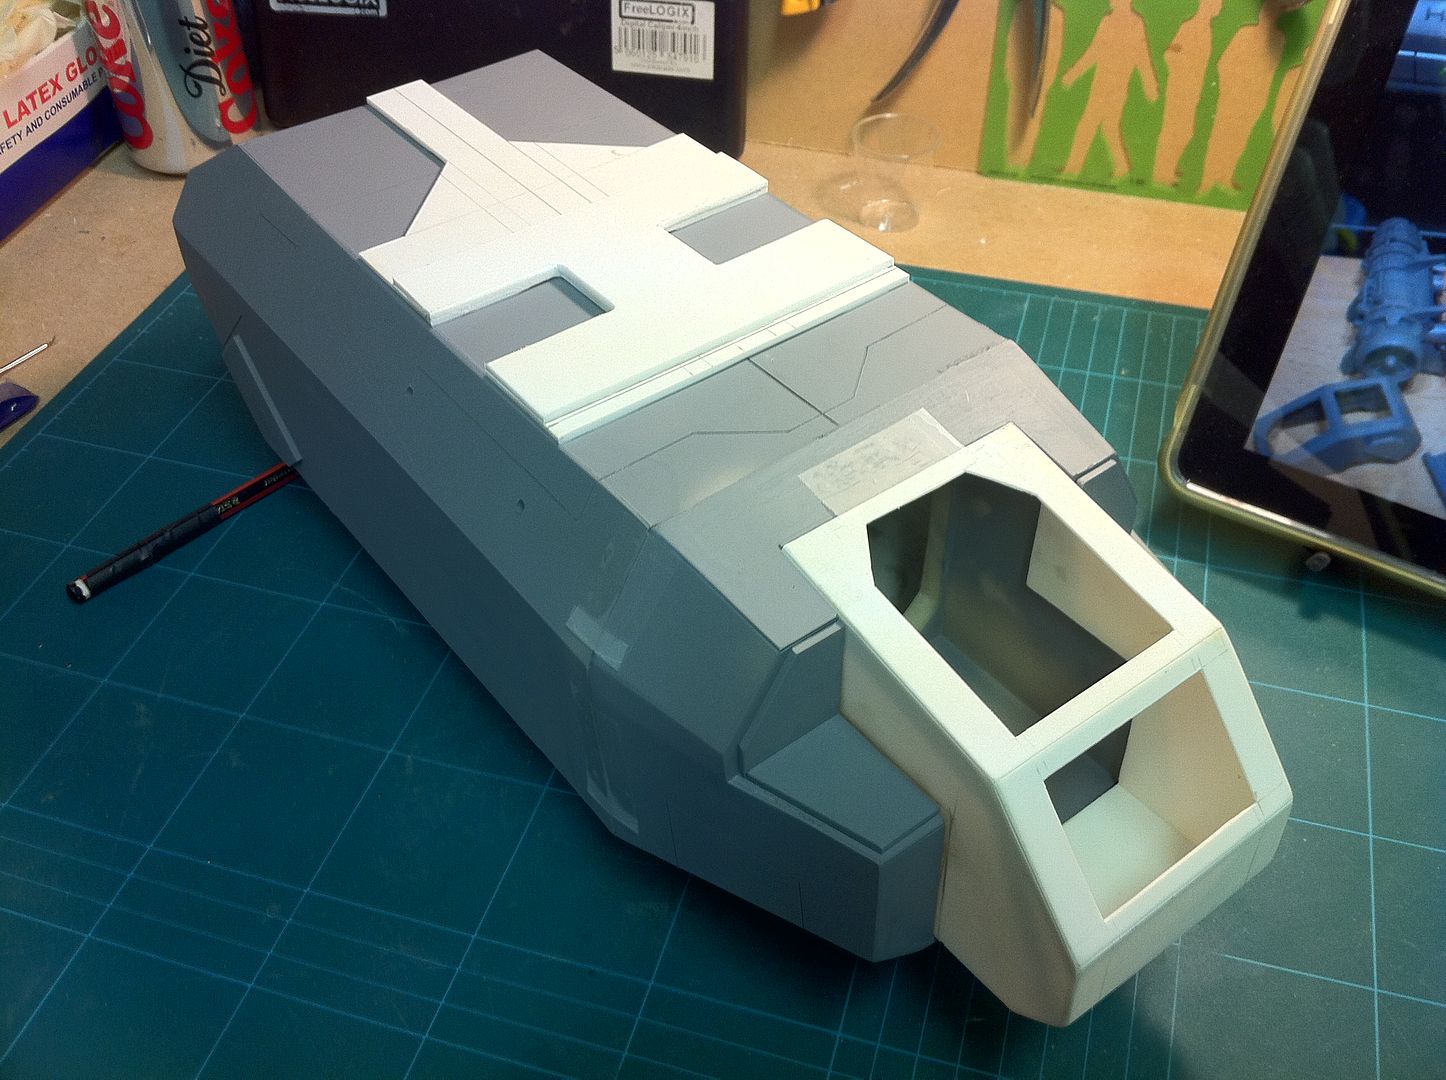
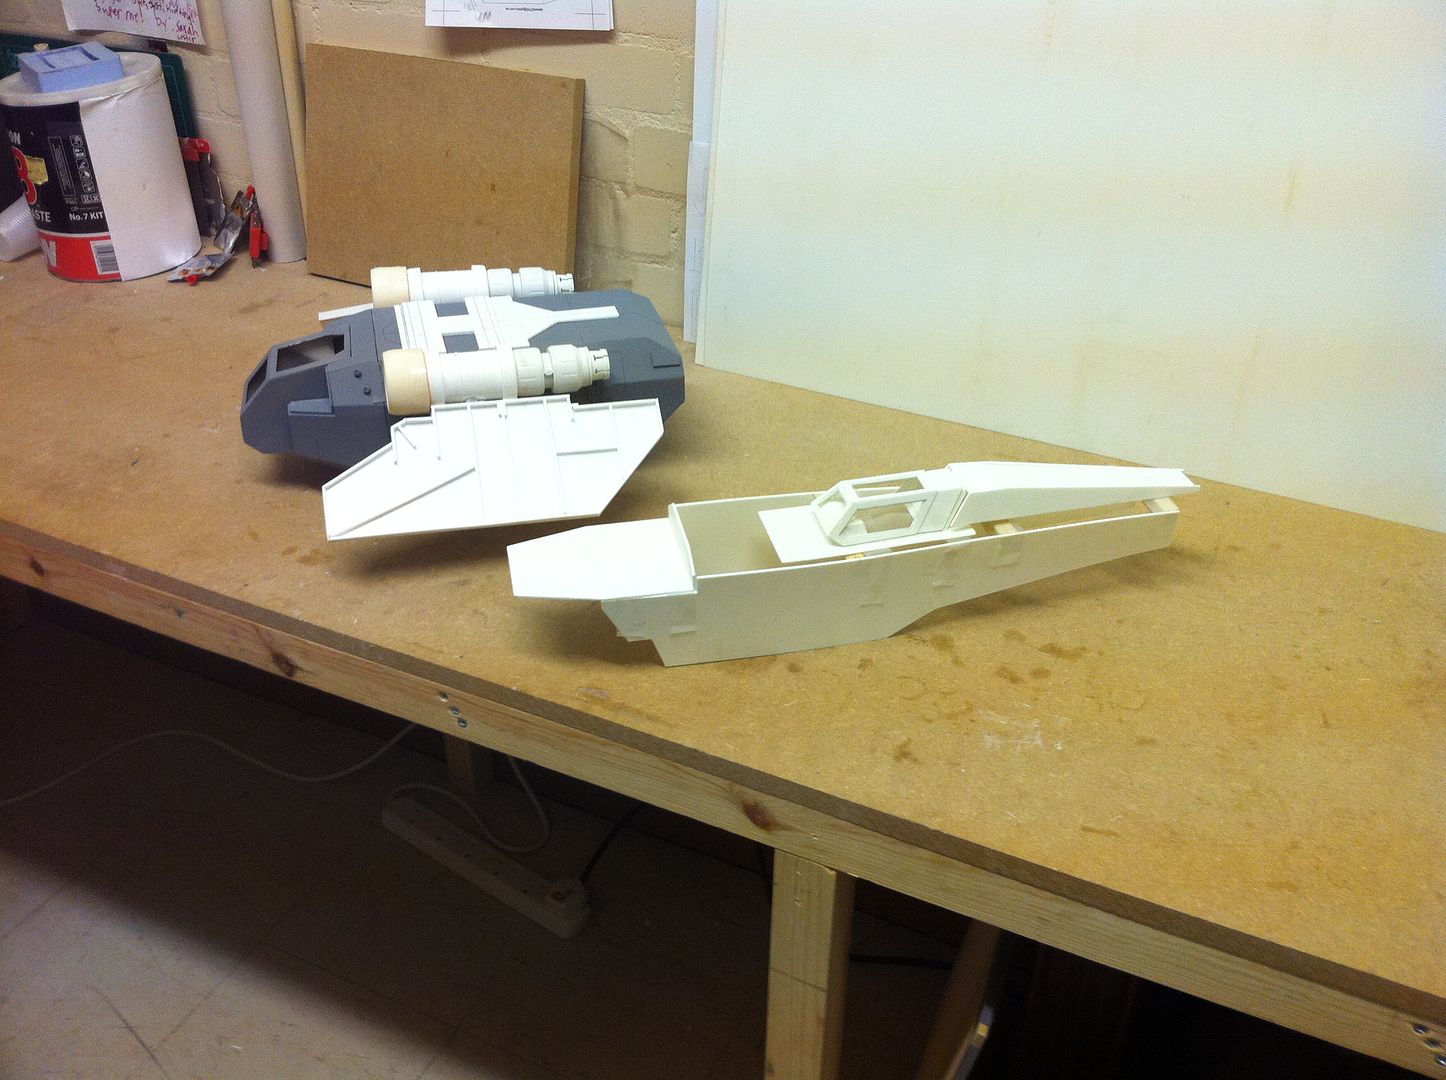
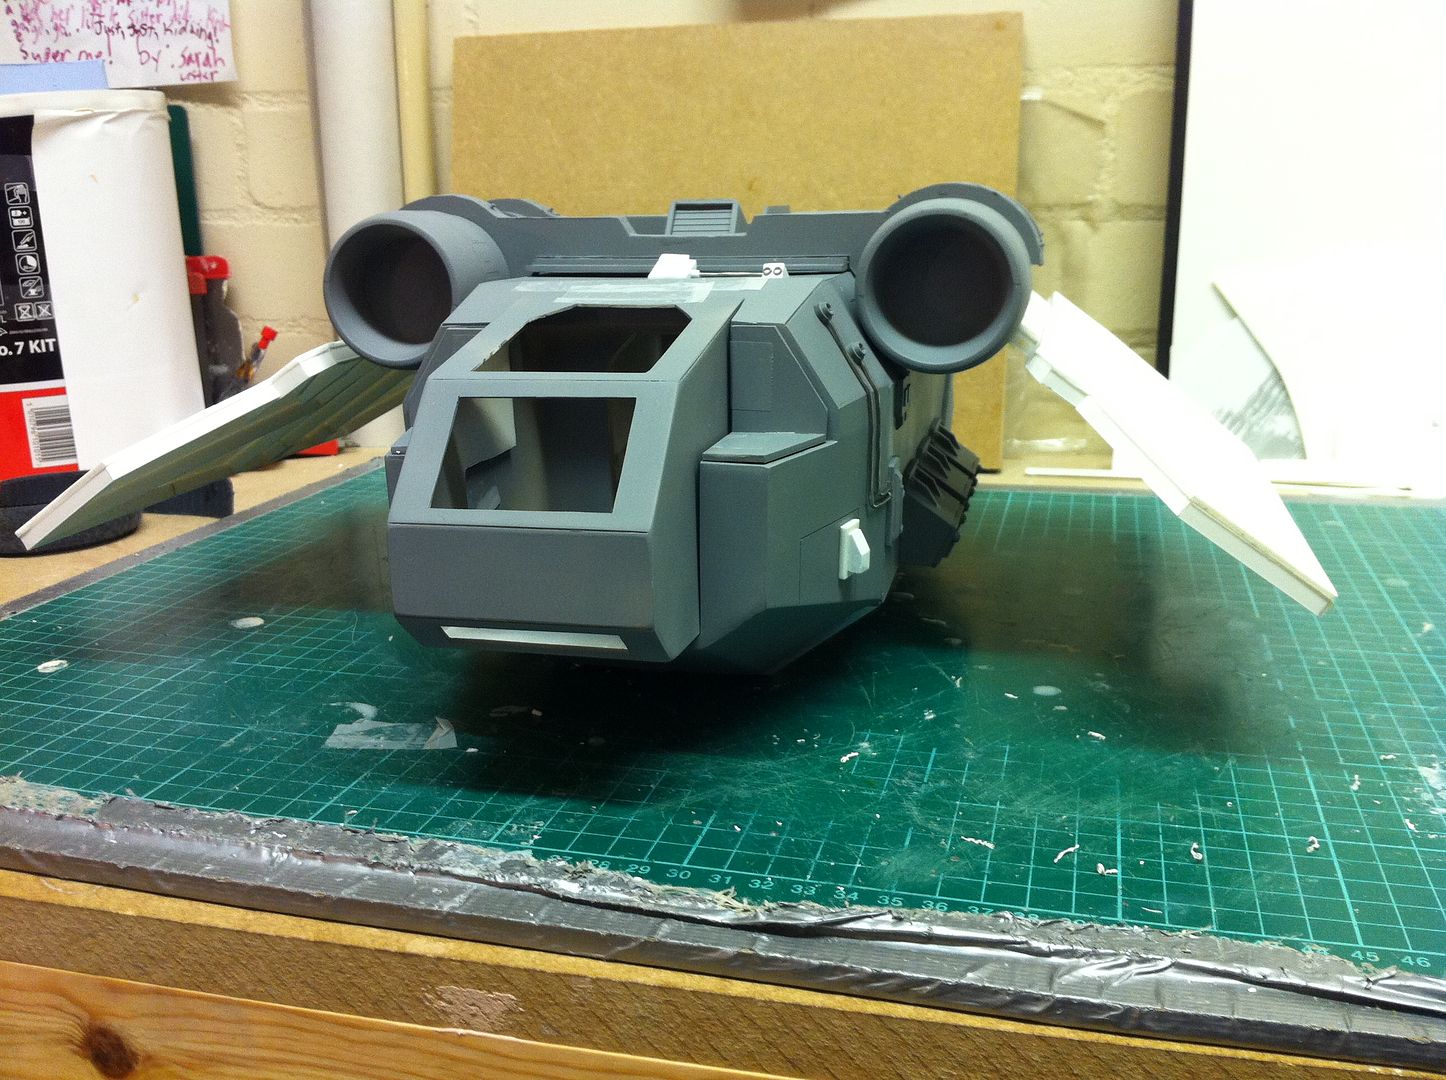
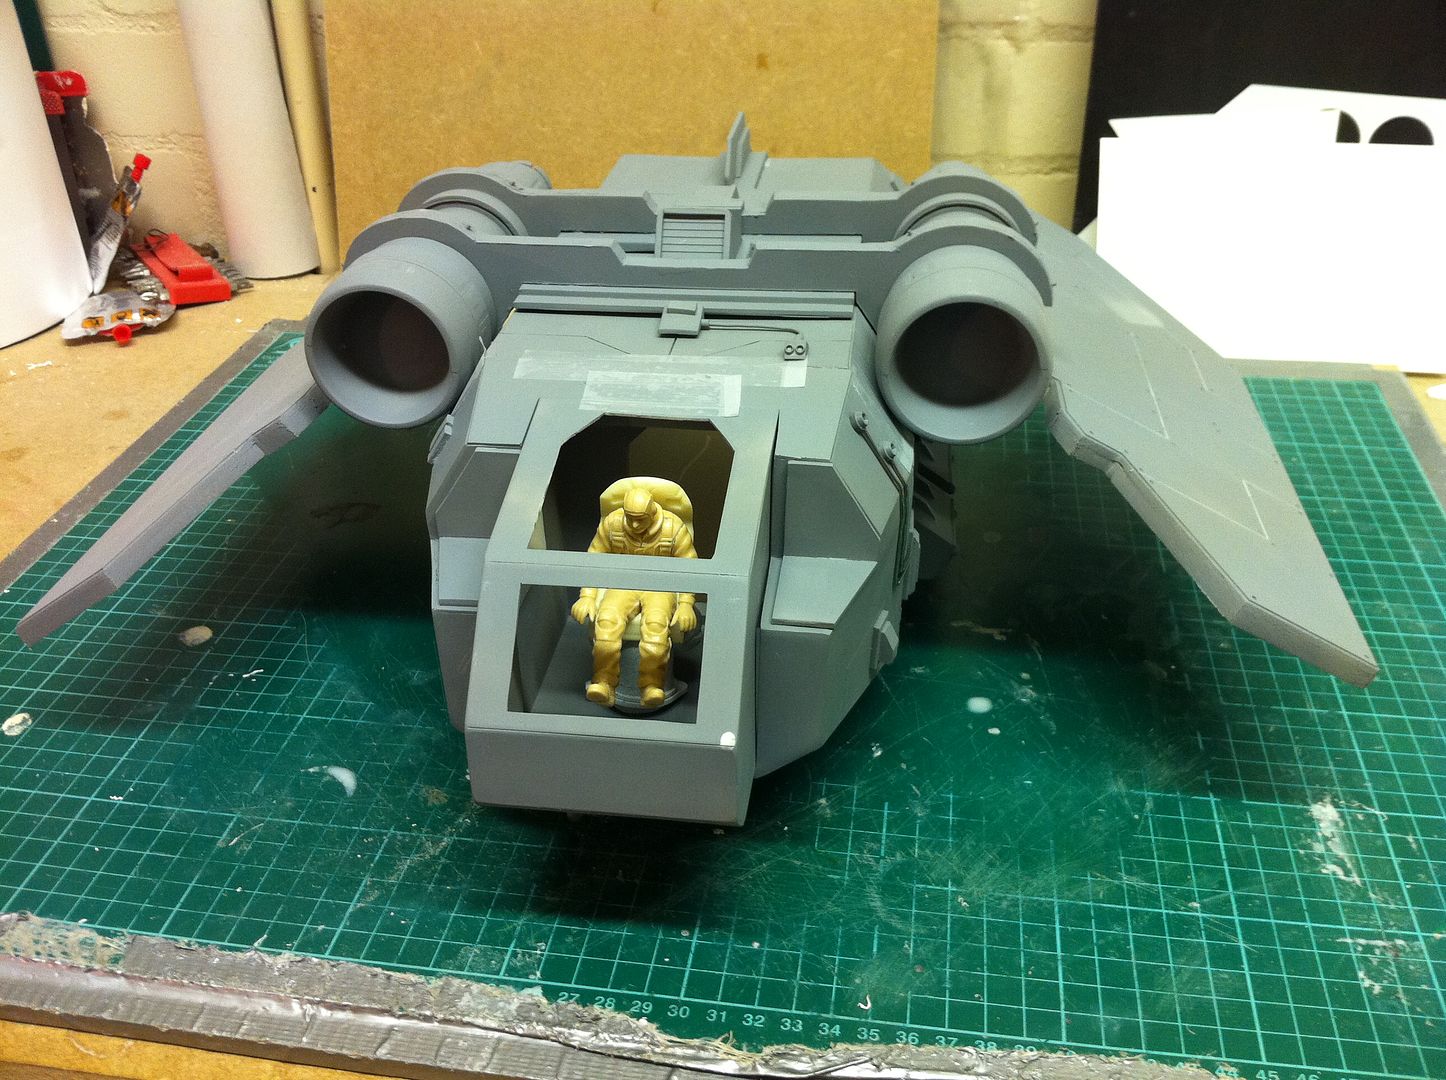
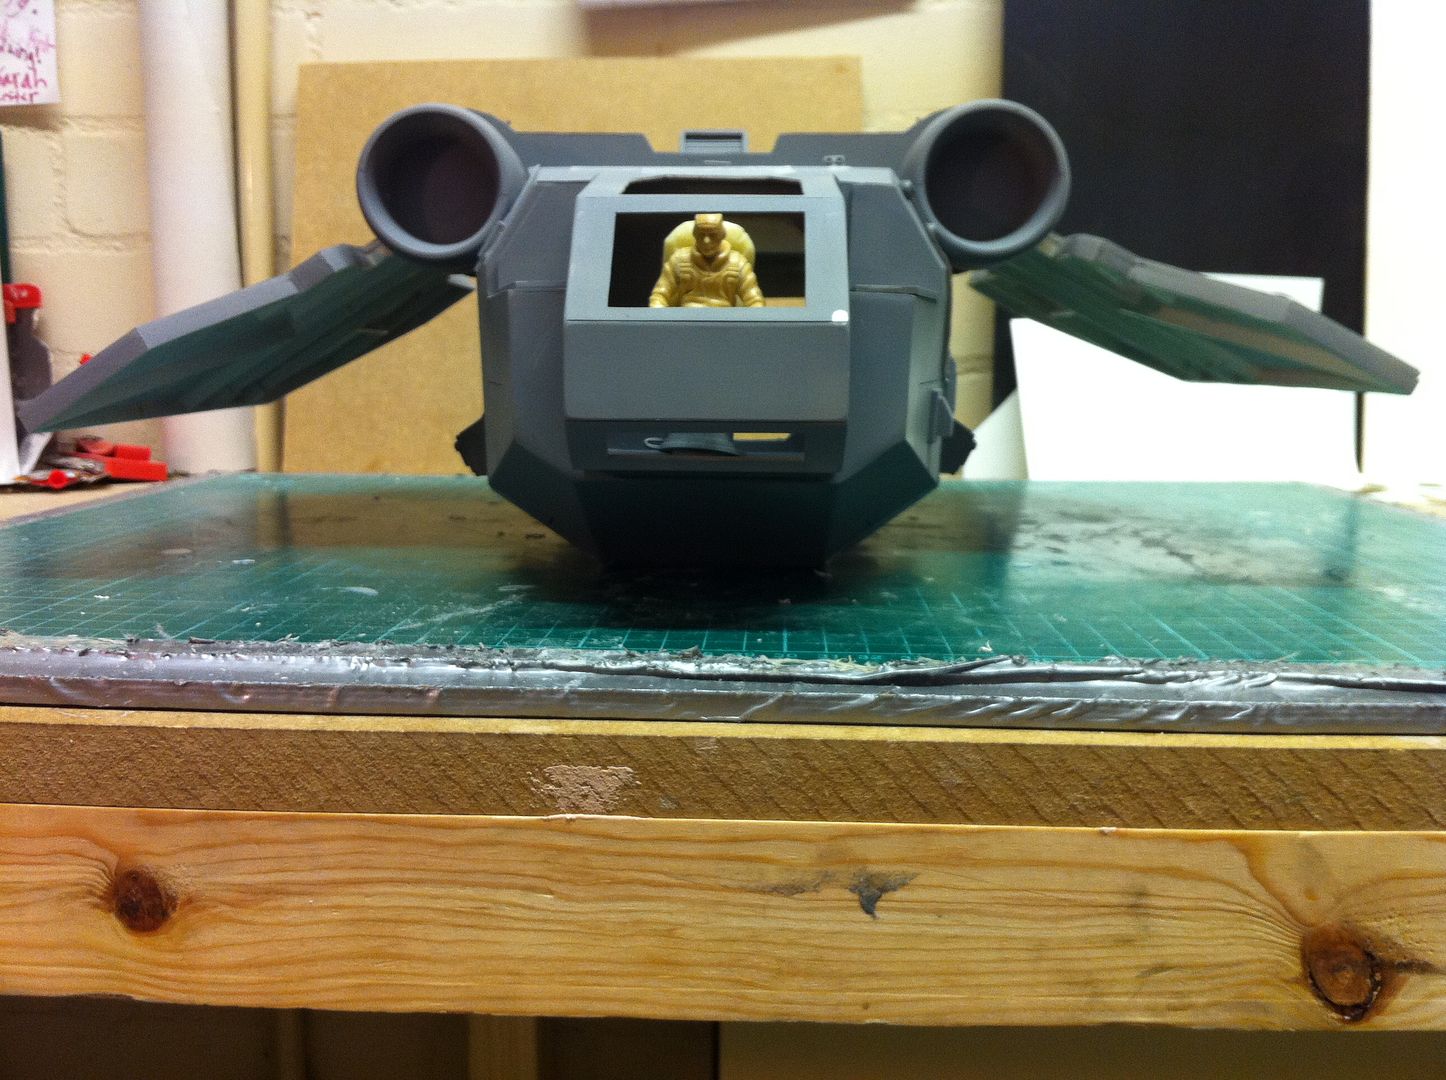
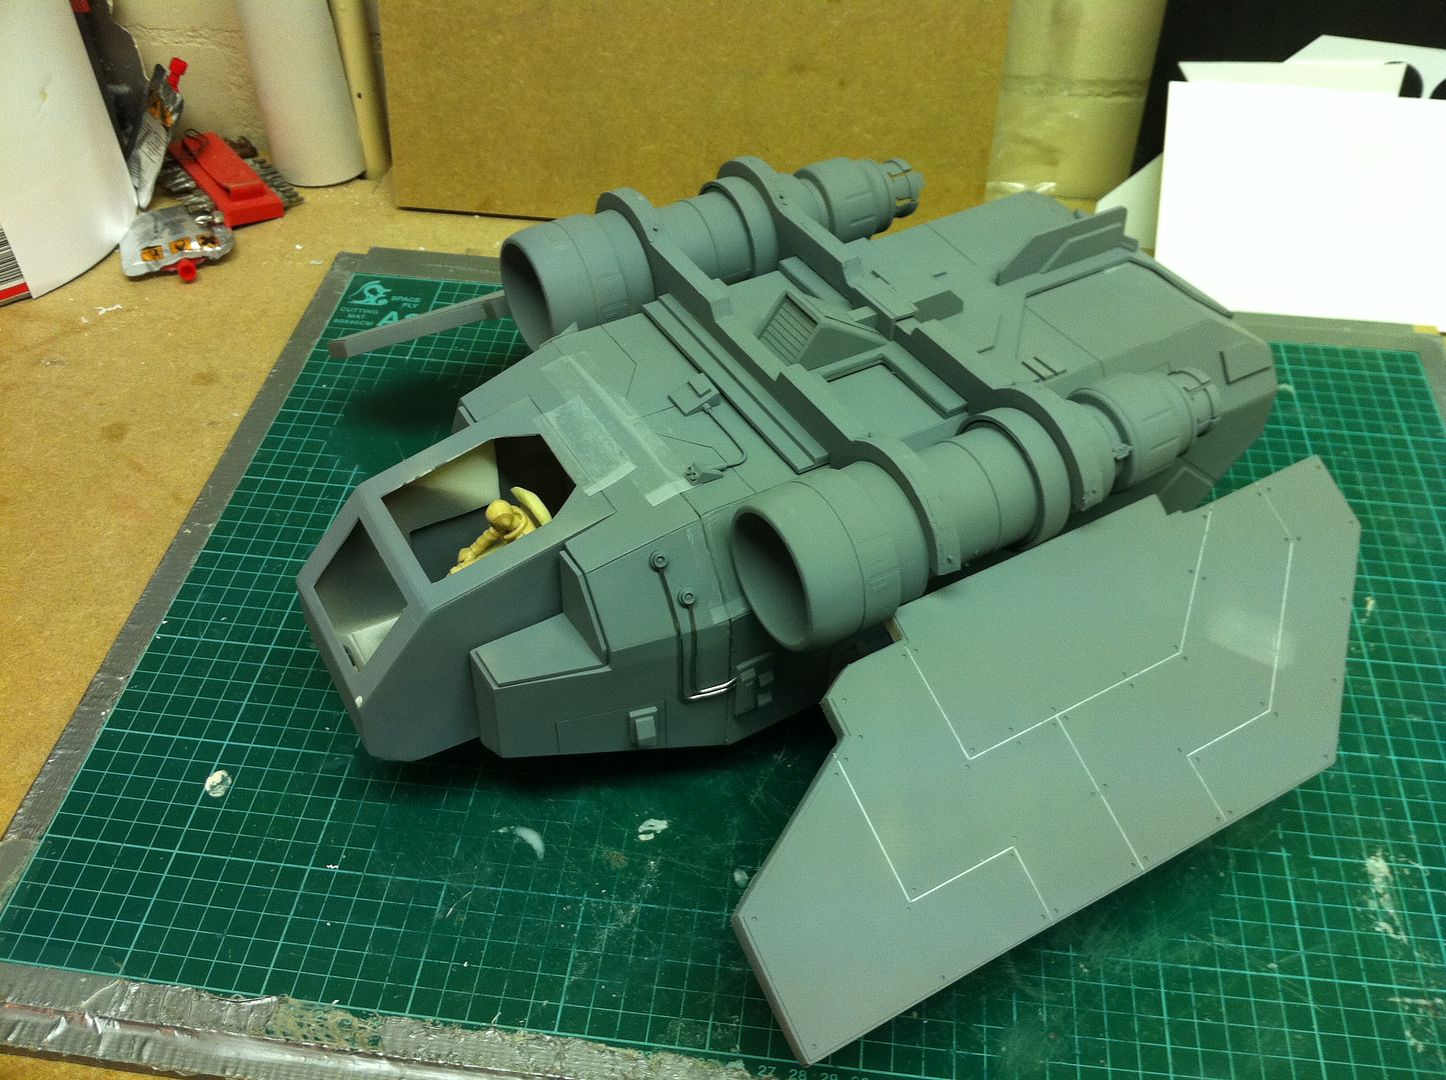
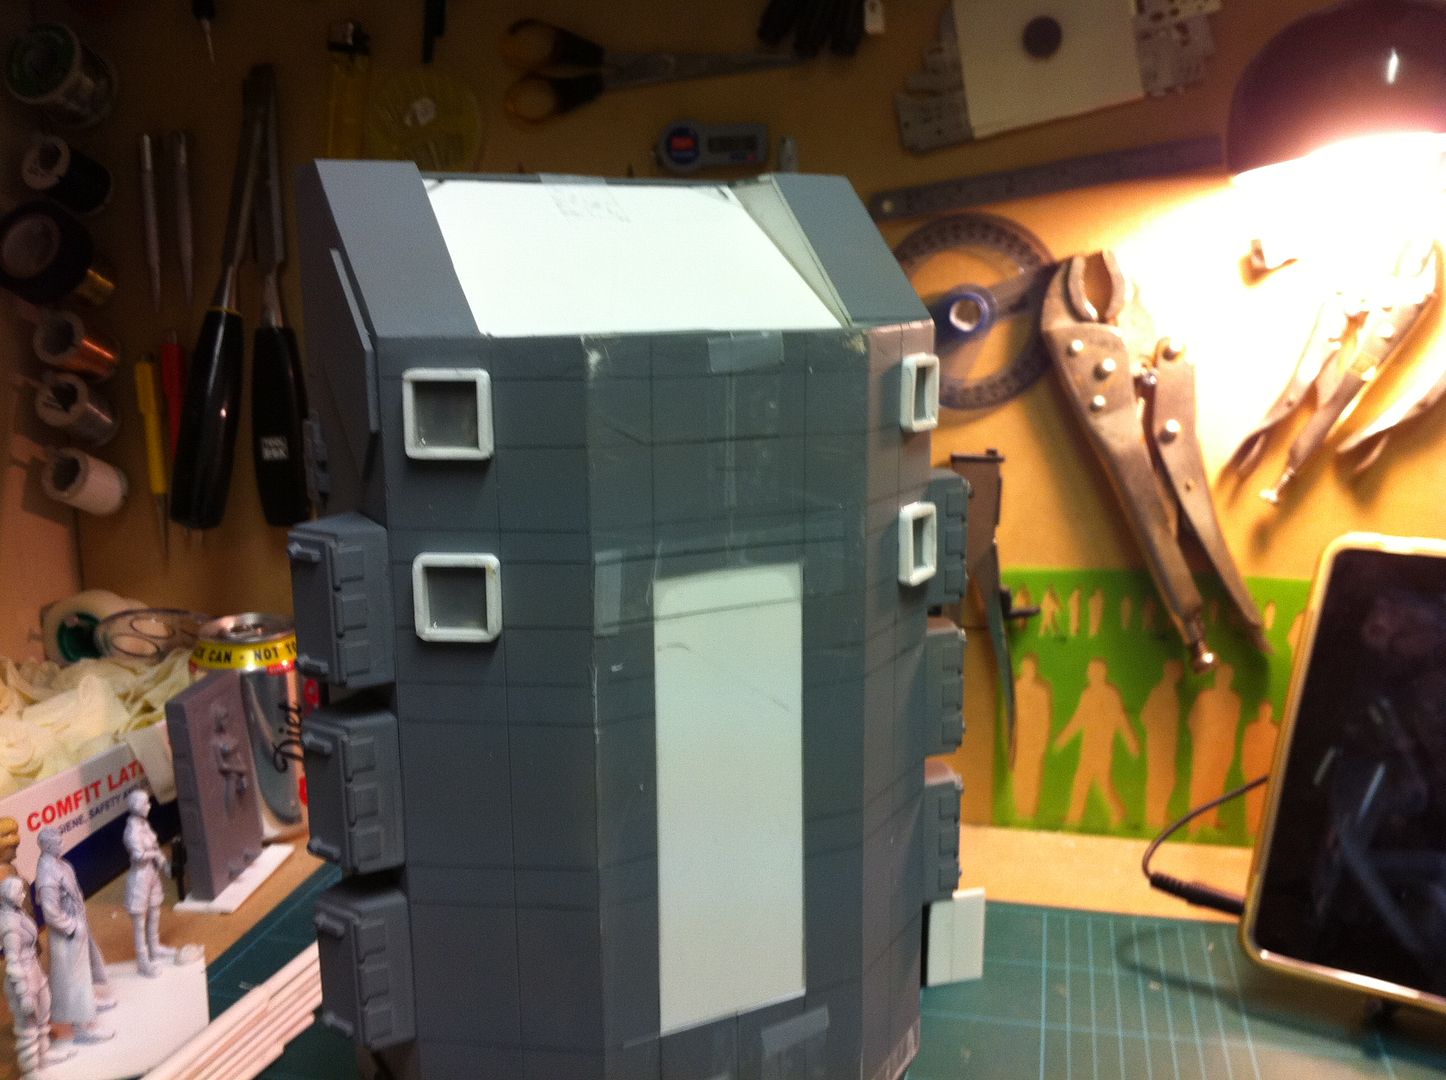
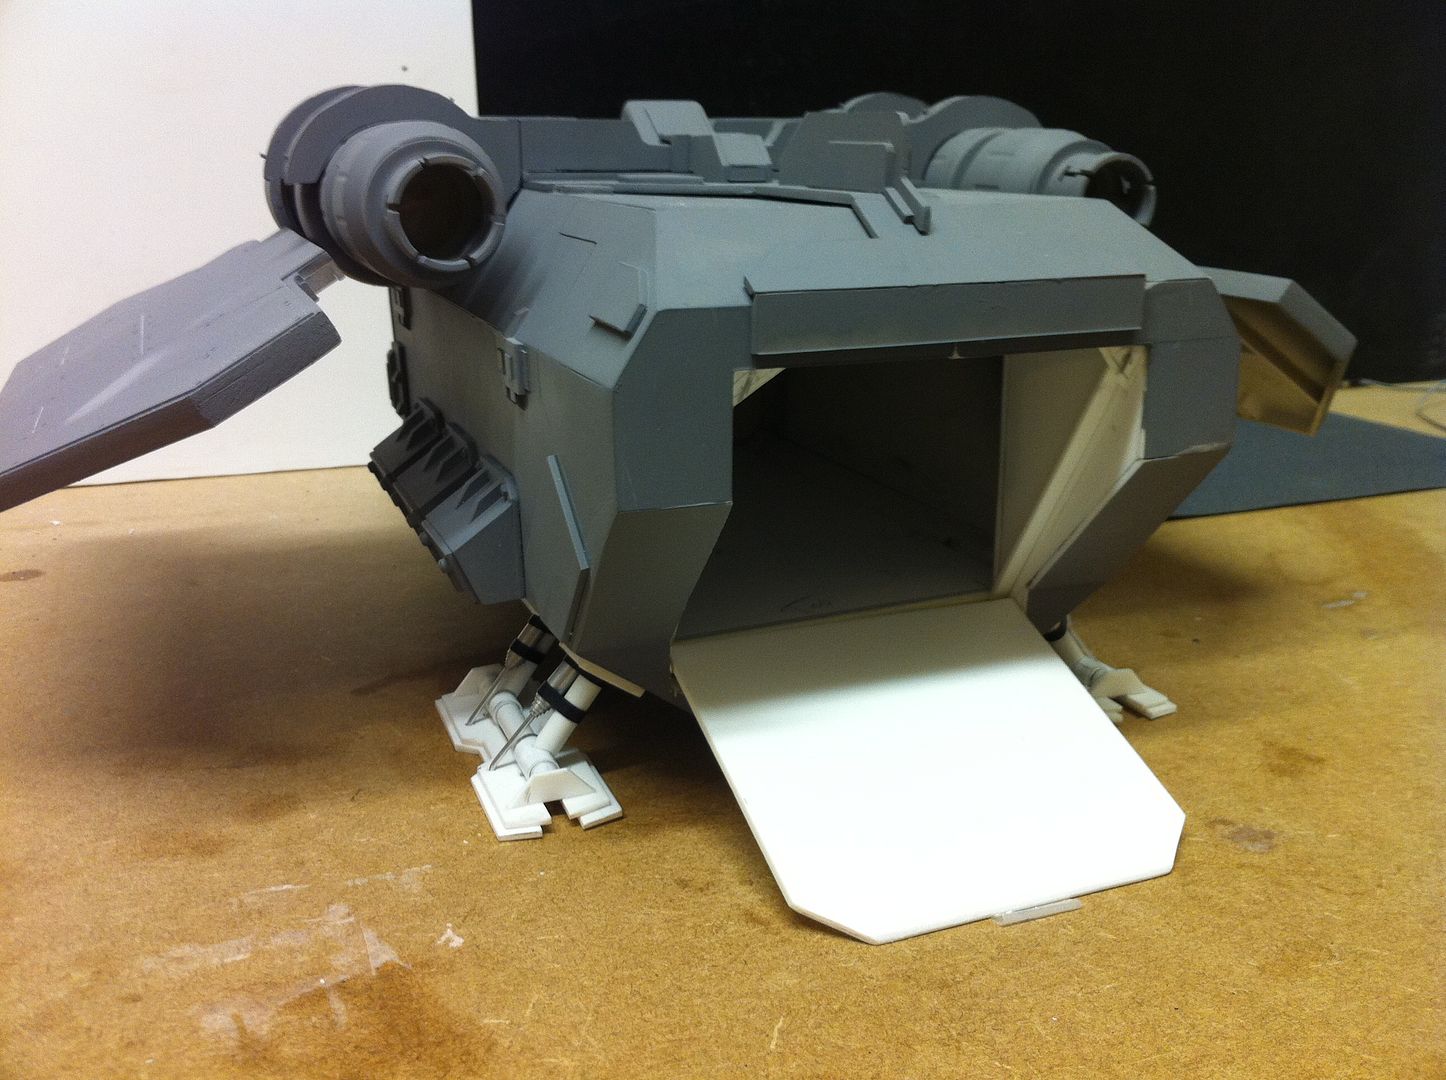
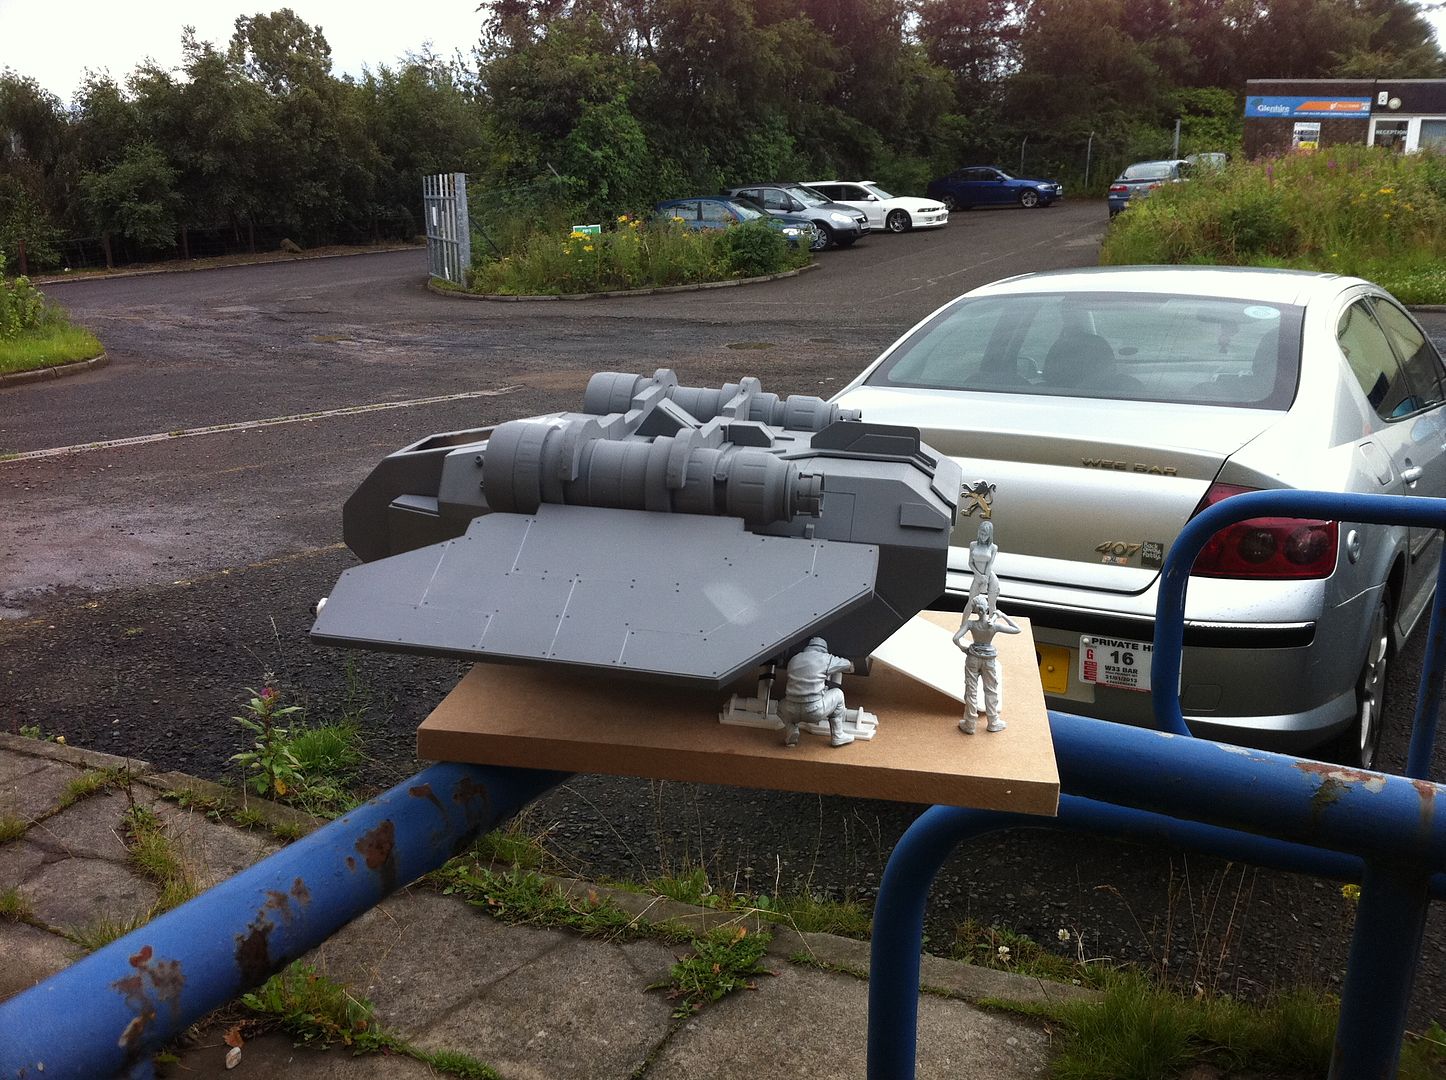
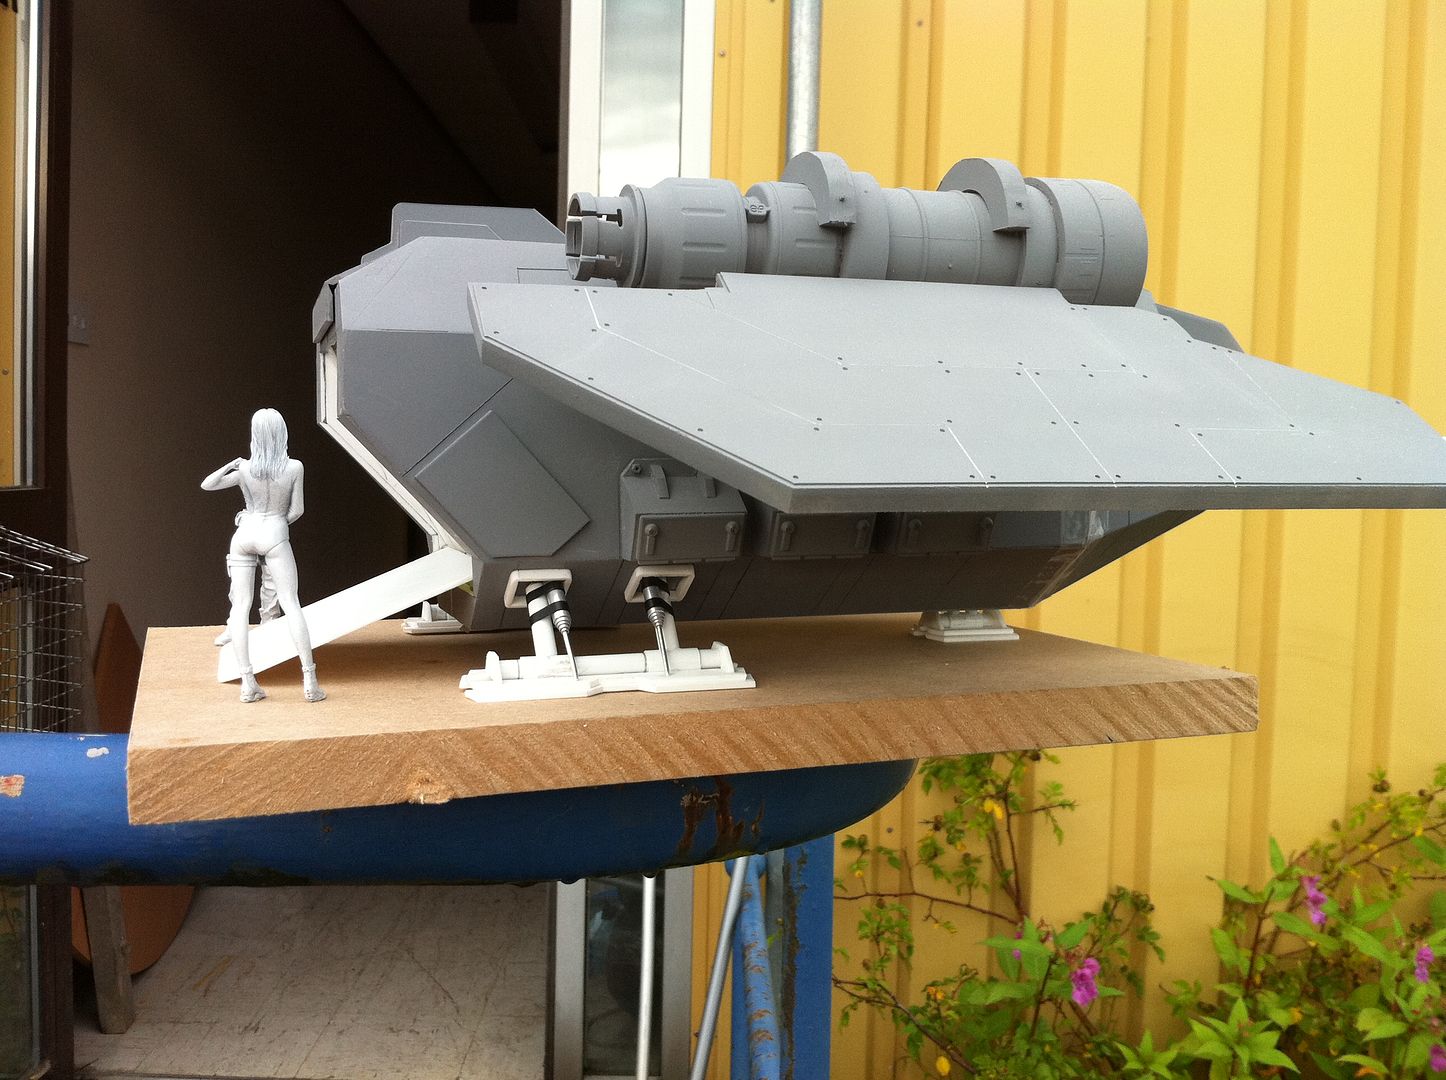
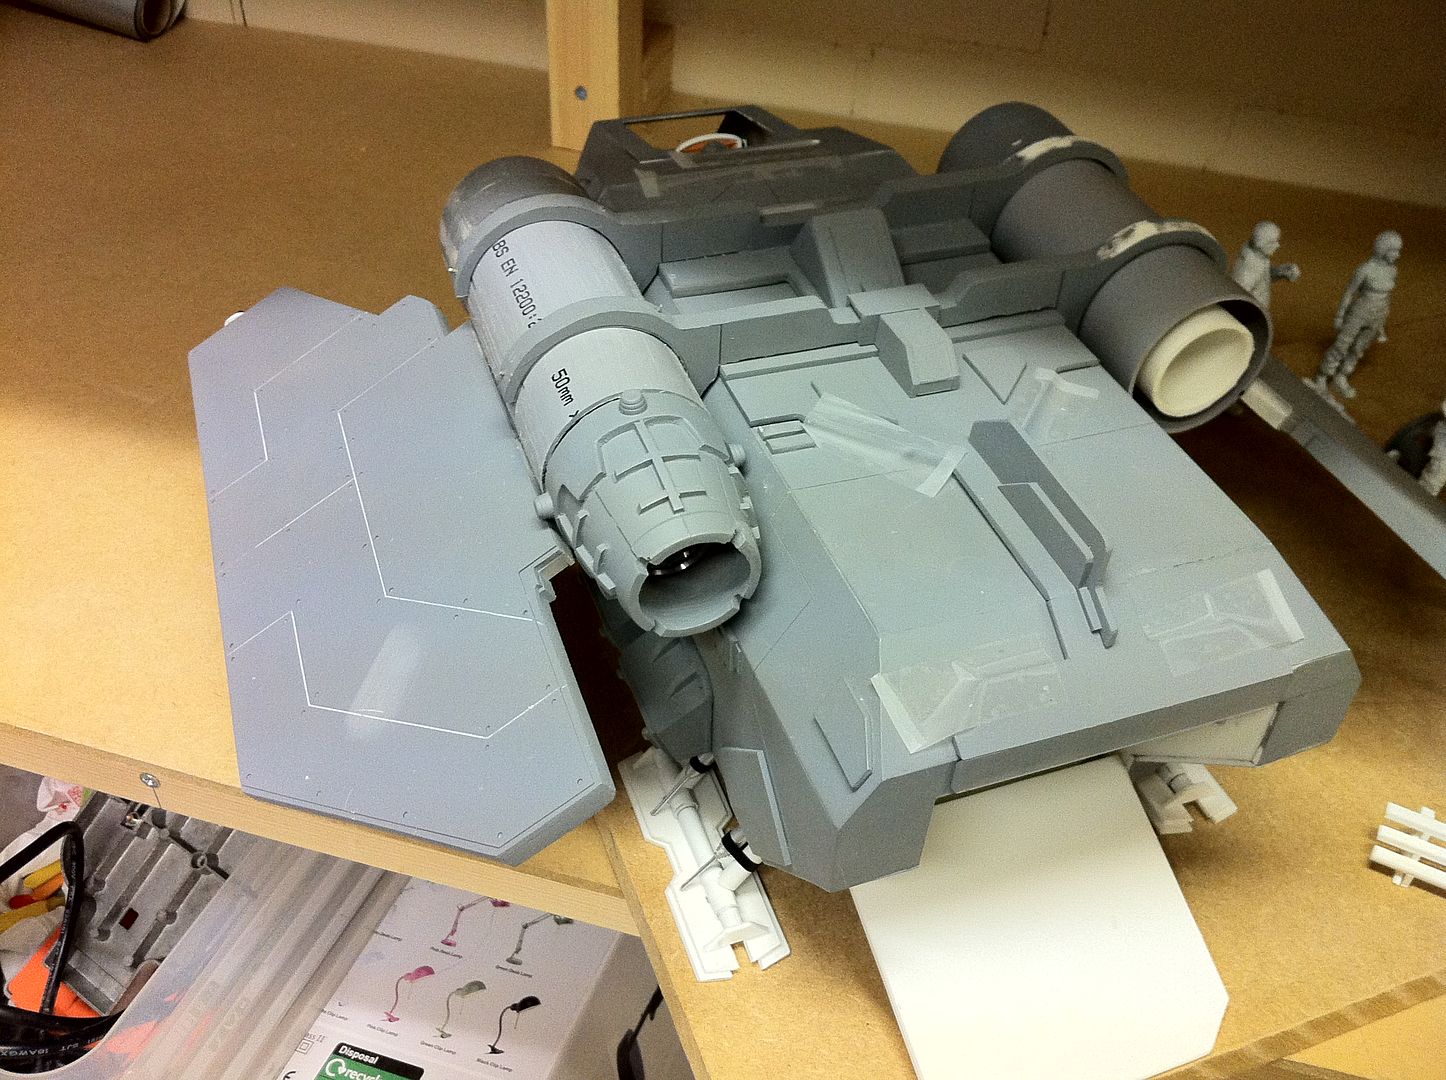
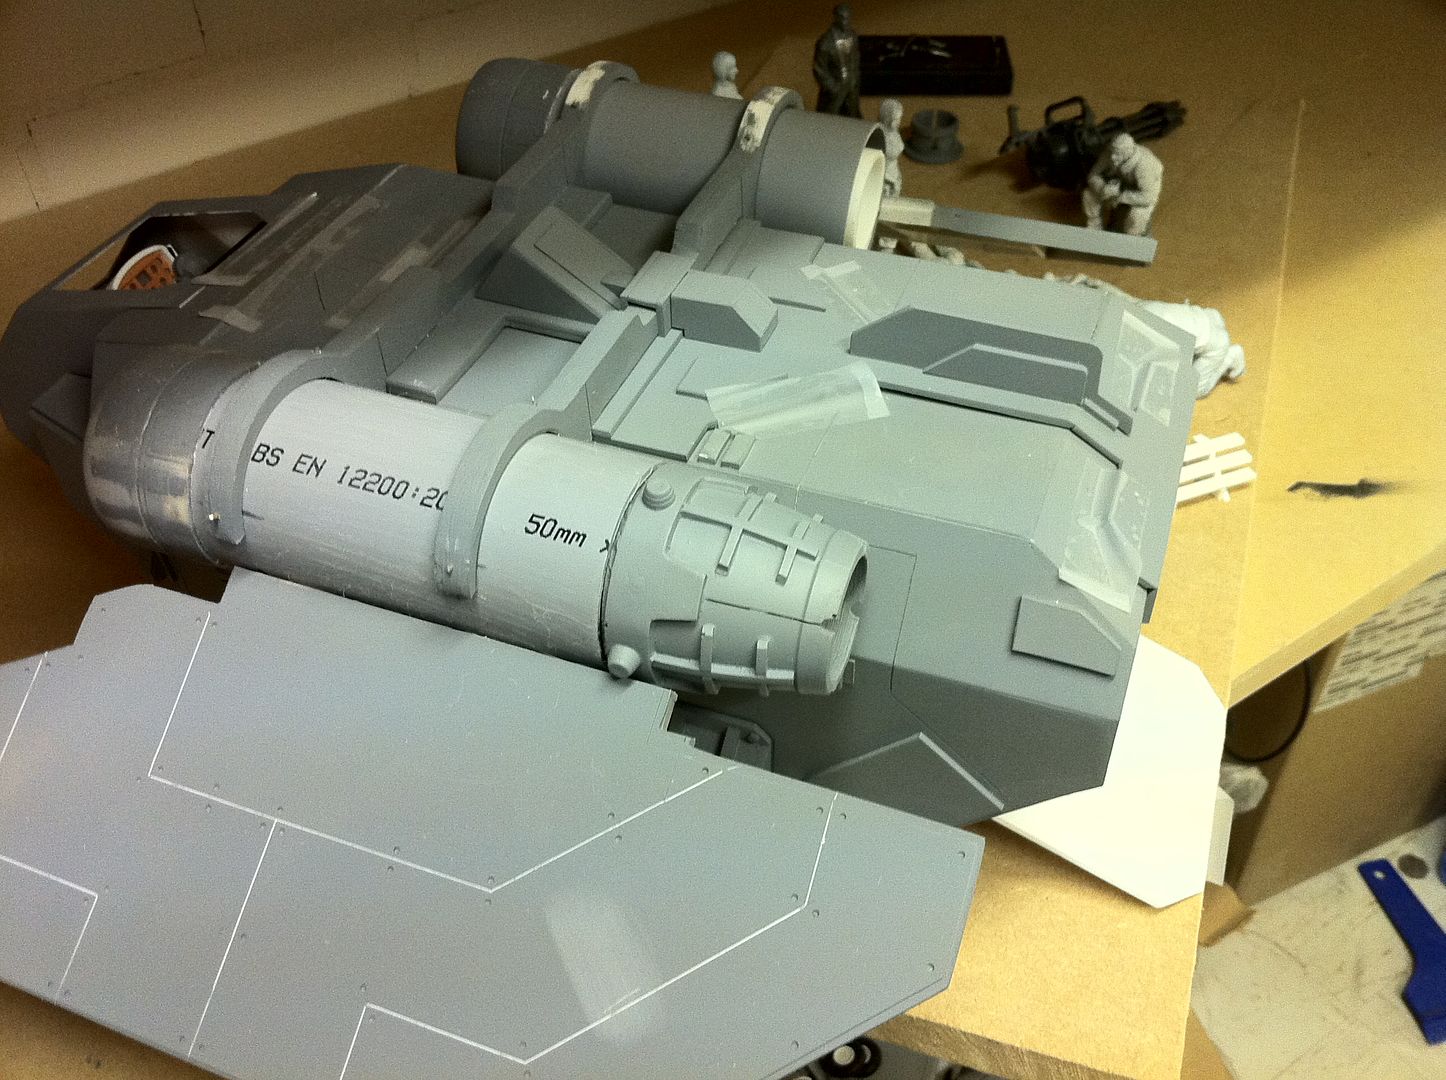
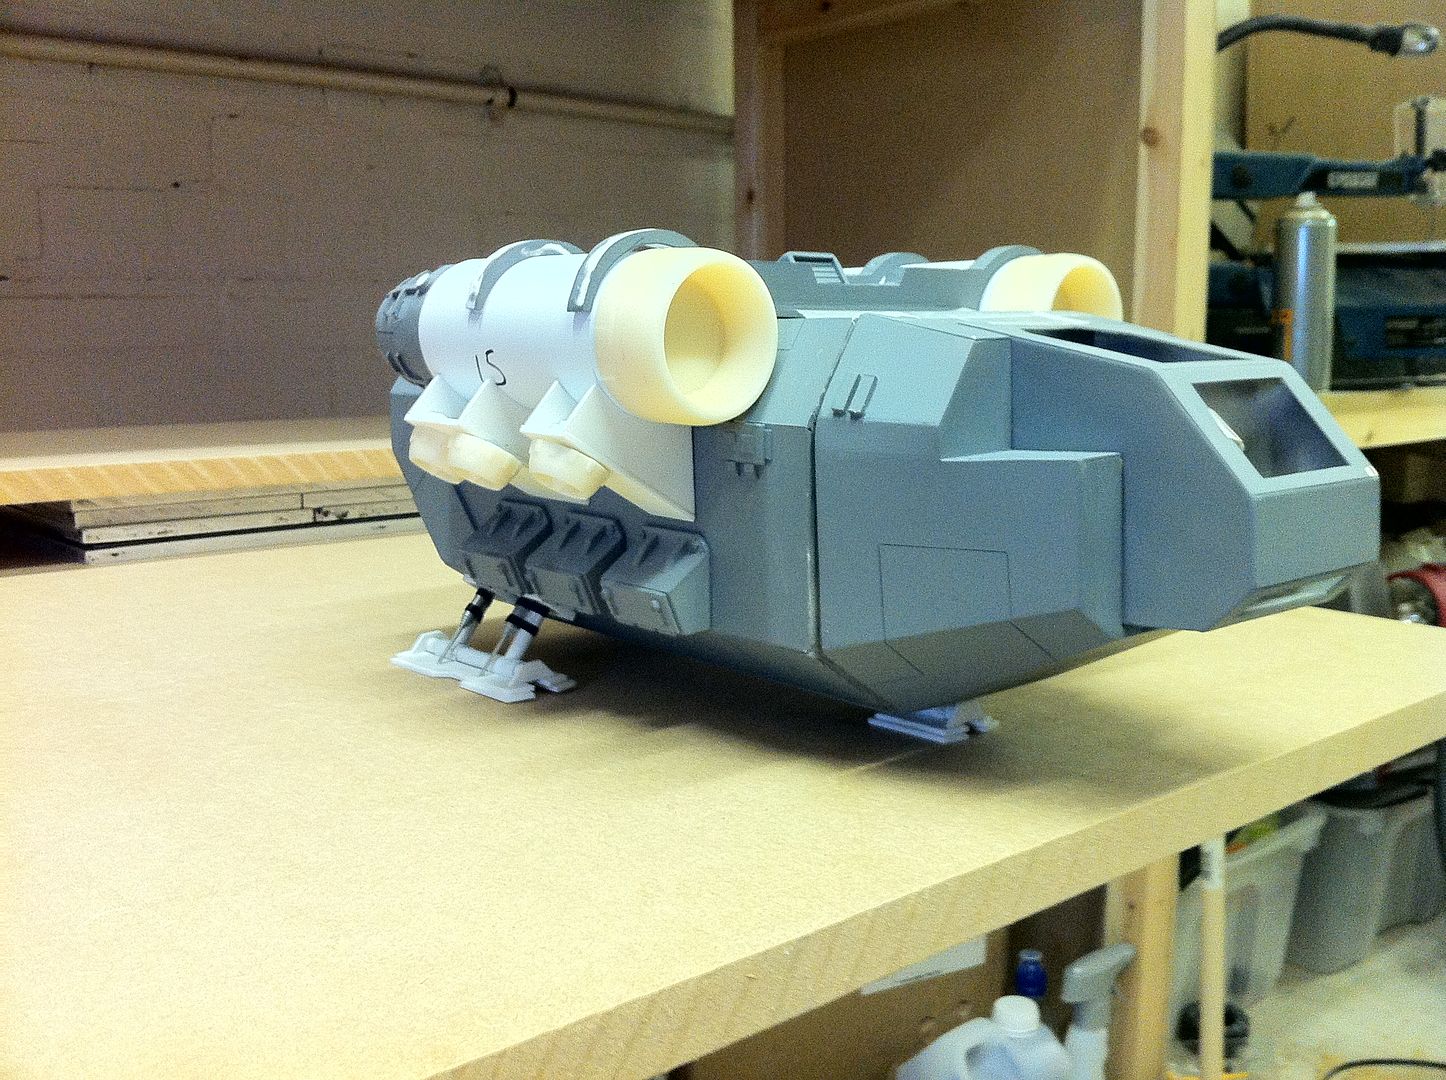
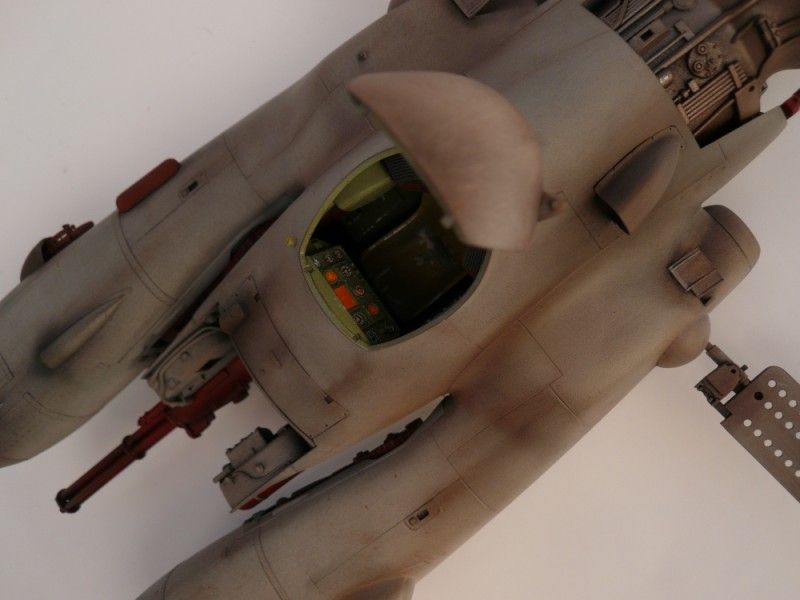
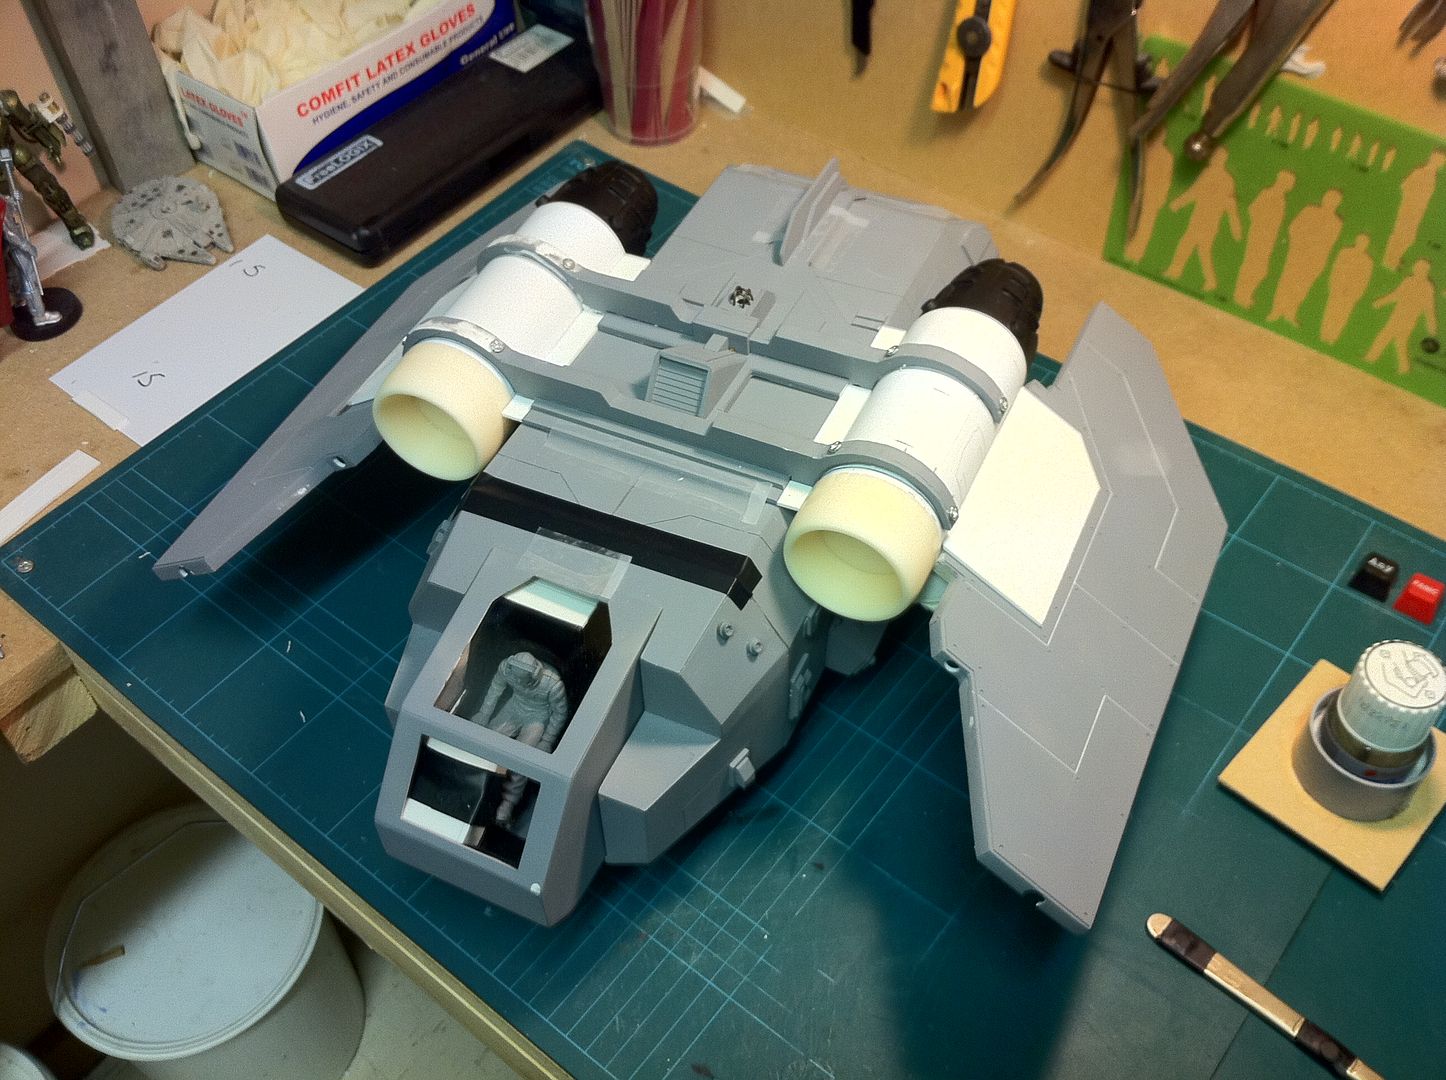
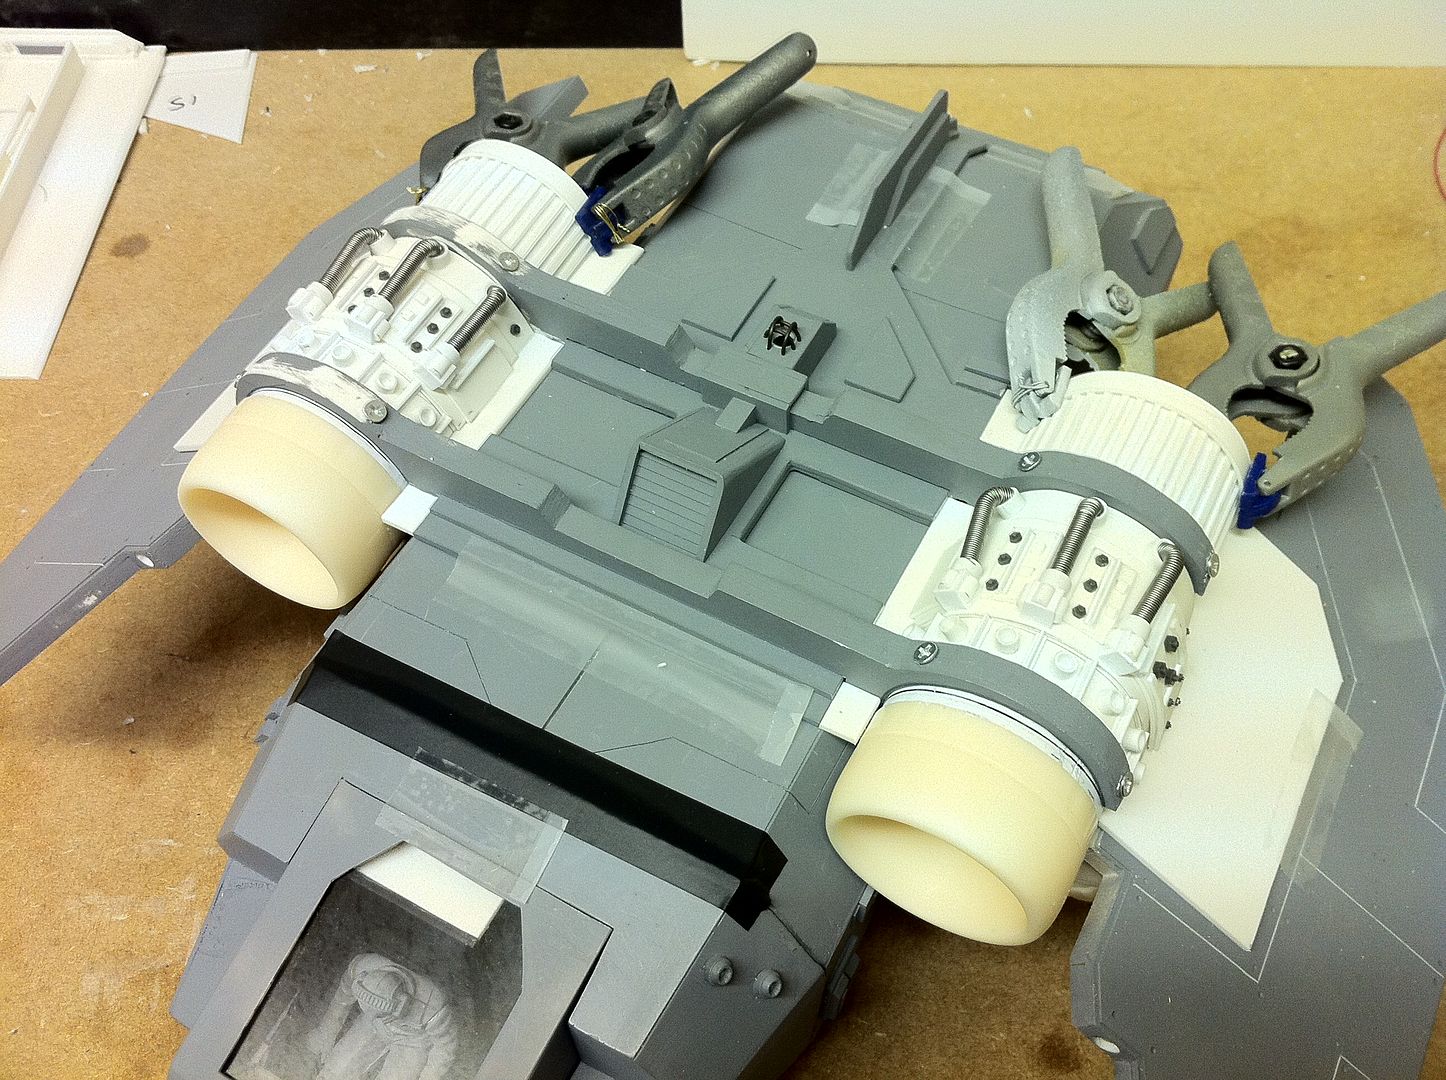
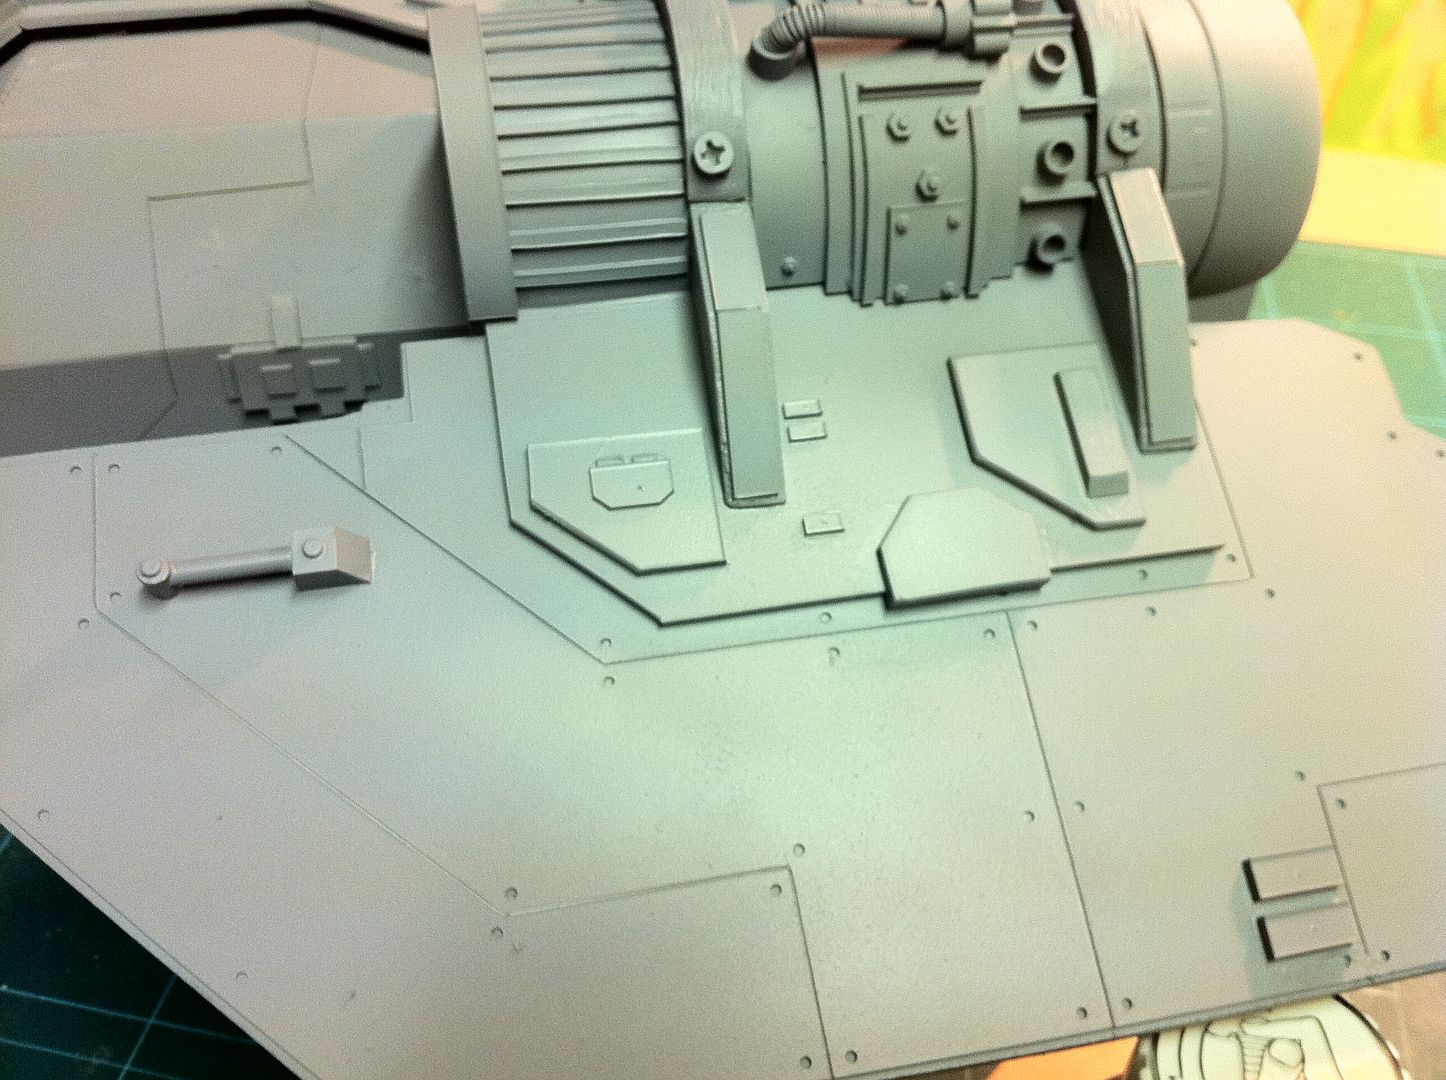
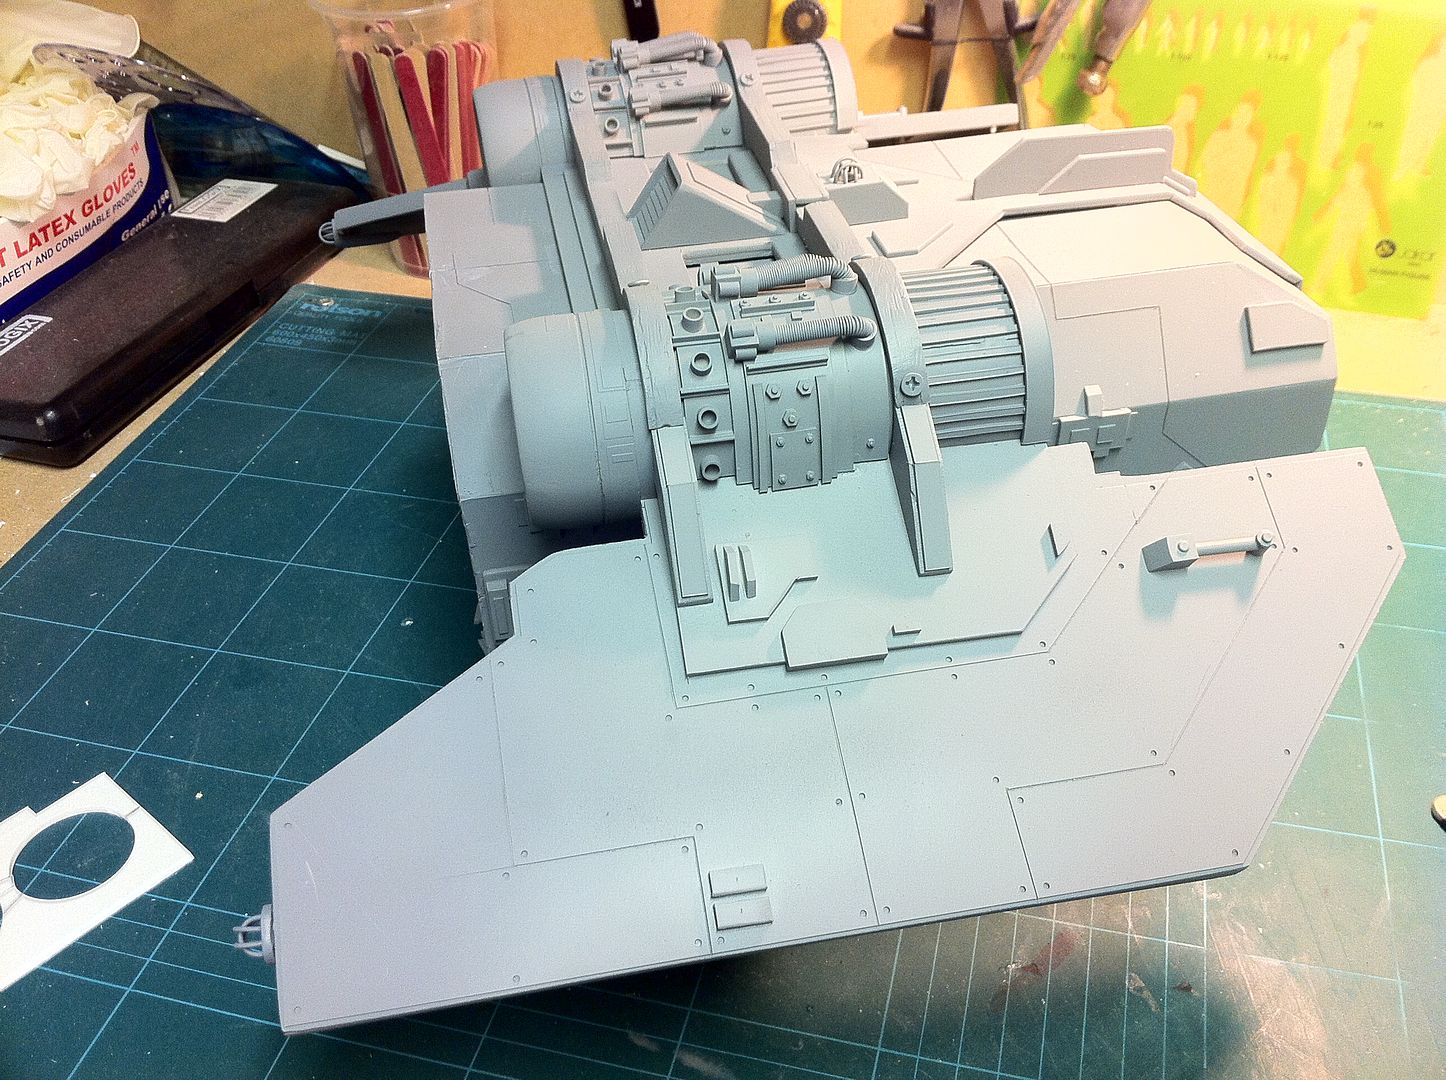
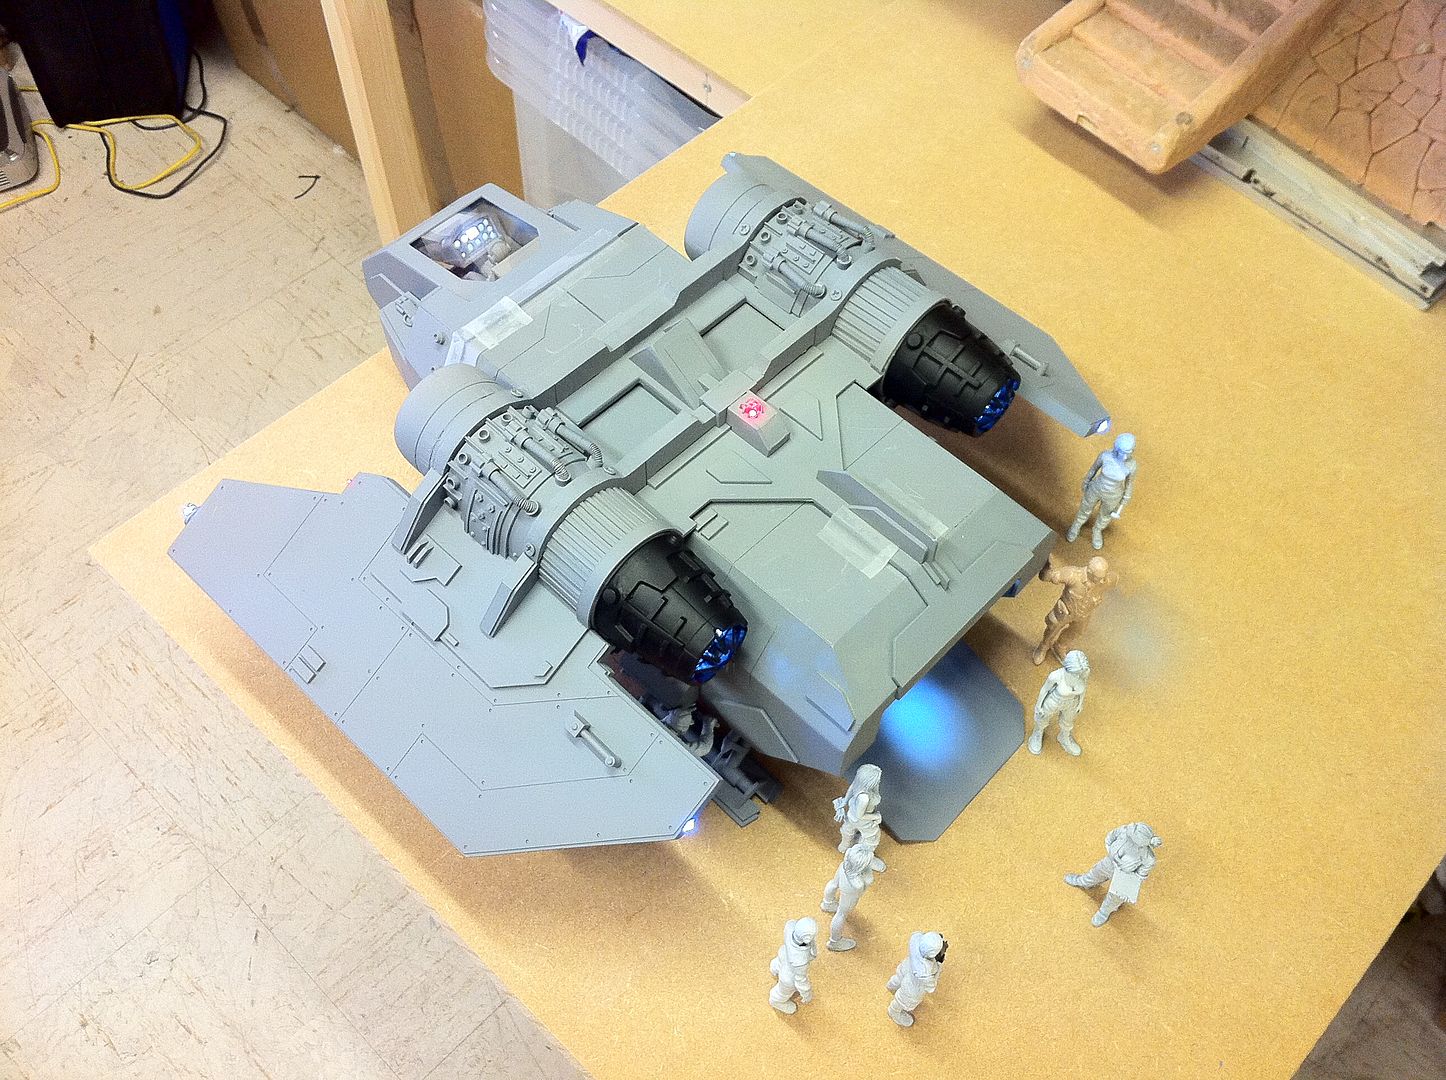
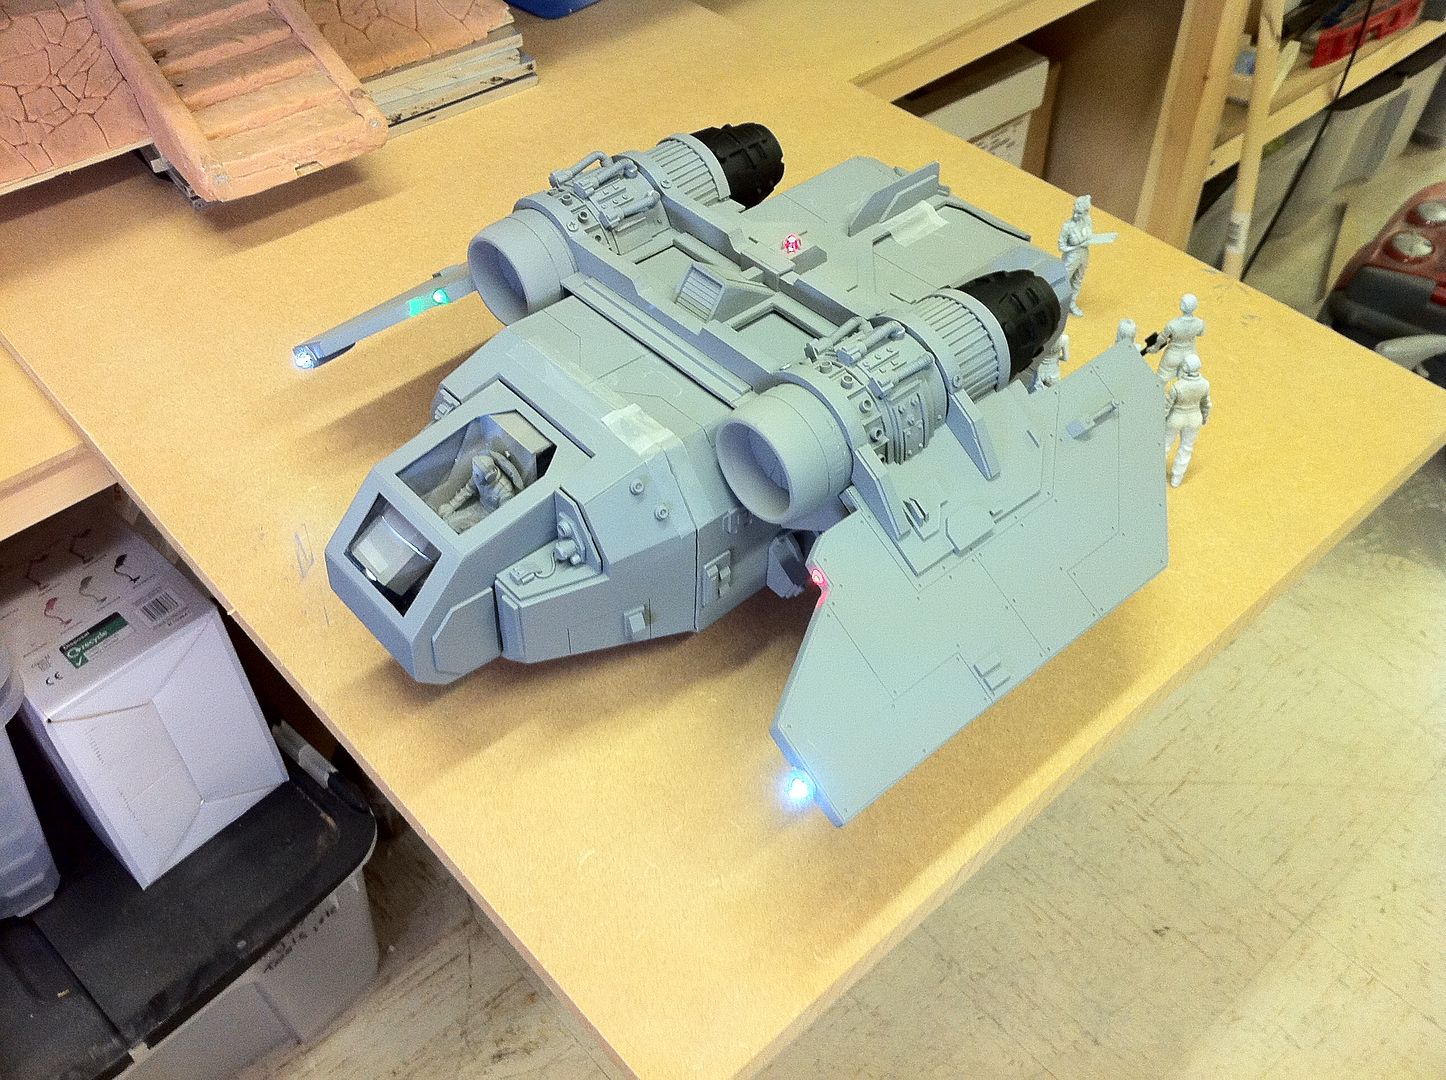
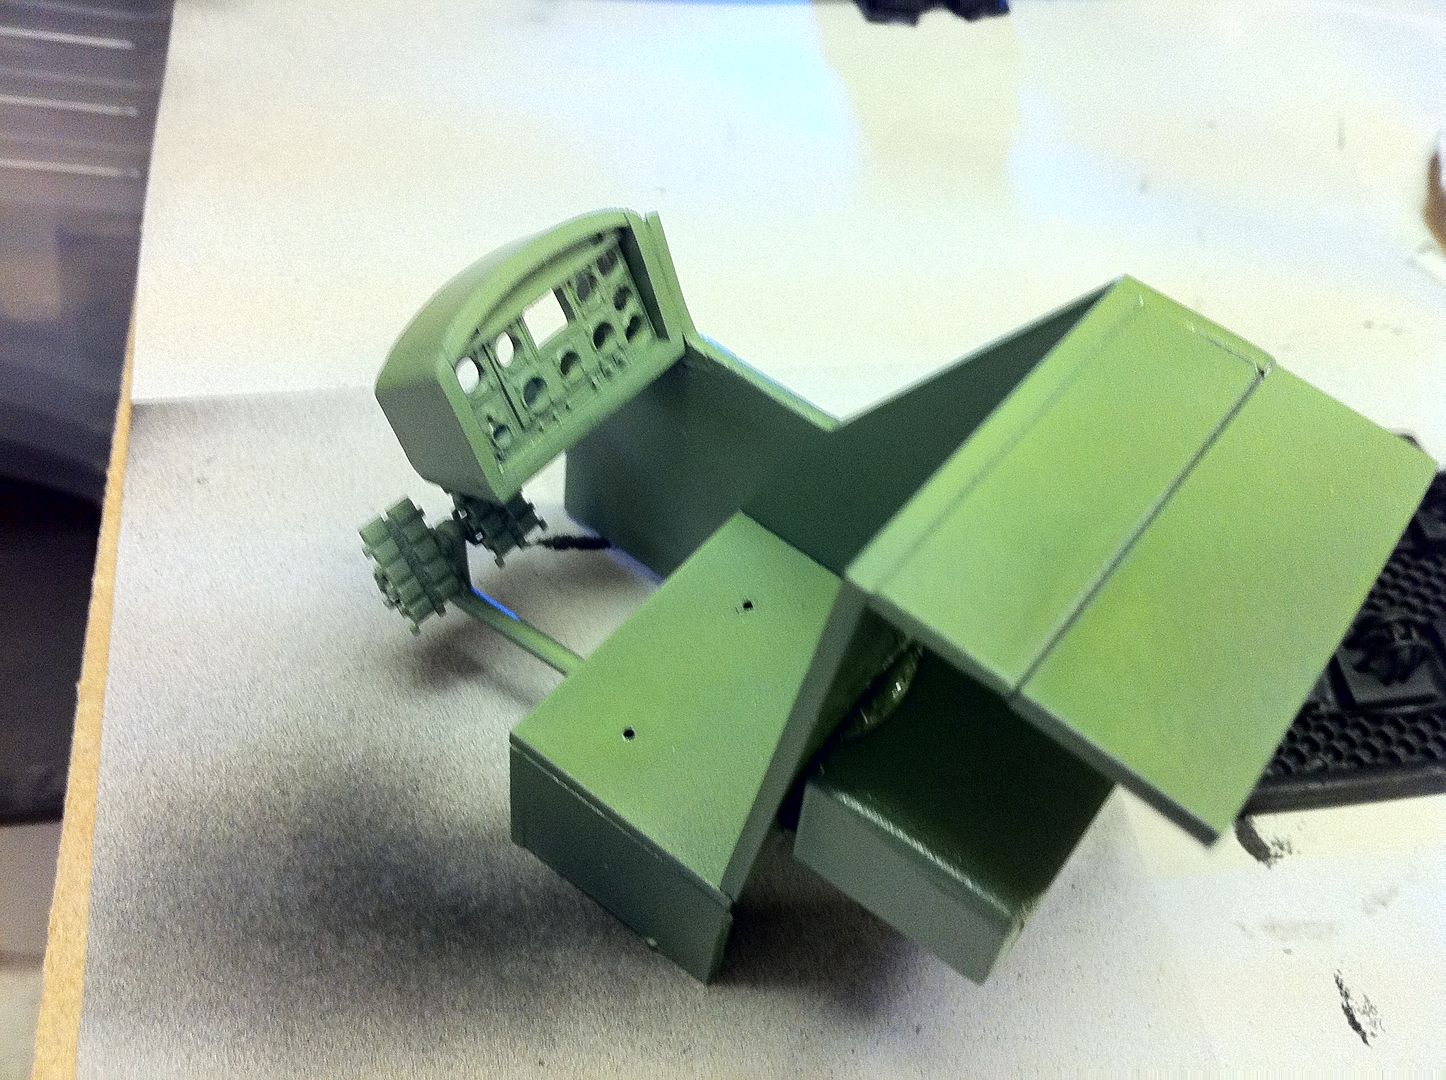
First off, mostly done with the exterior detailing, i split the main hull into halves and built up the inside rear bulkheads that the ramp will attach to. After that, i added the panelling/armour onto the upper wings. With this in place, there is only a small amount needing done to the upper wing area. Just a couple of greeblies and the flat panel armour that holds the wings to the engines. I have to say i am REALLY enjoying this build... This is one of the coolest designs i have ever come across, and the sheer scale of the size of the Arvus never came across to me till i started this.
If you ever thought the Arvus looked crappy, check this out...(This image is also attached inline further down this post).
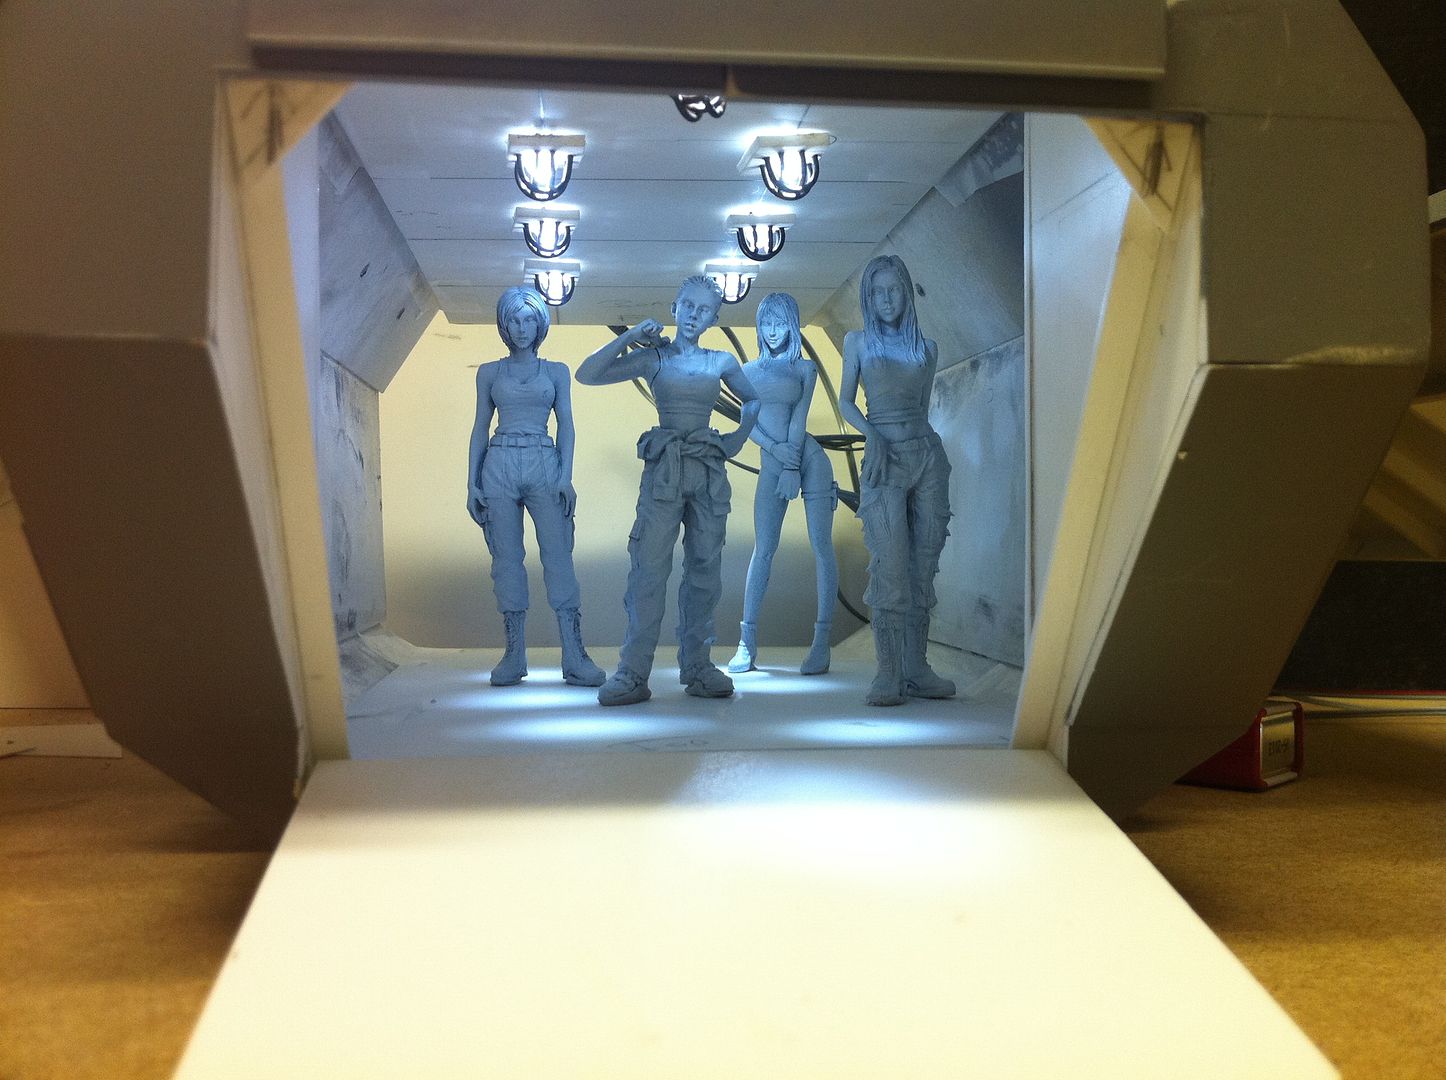
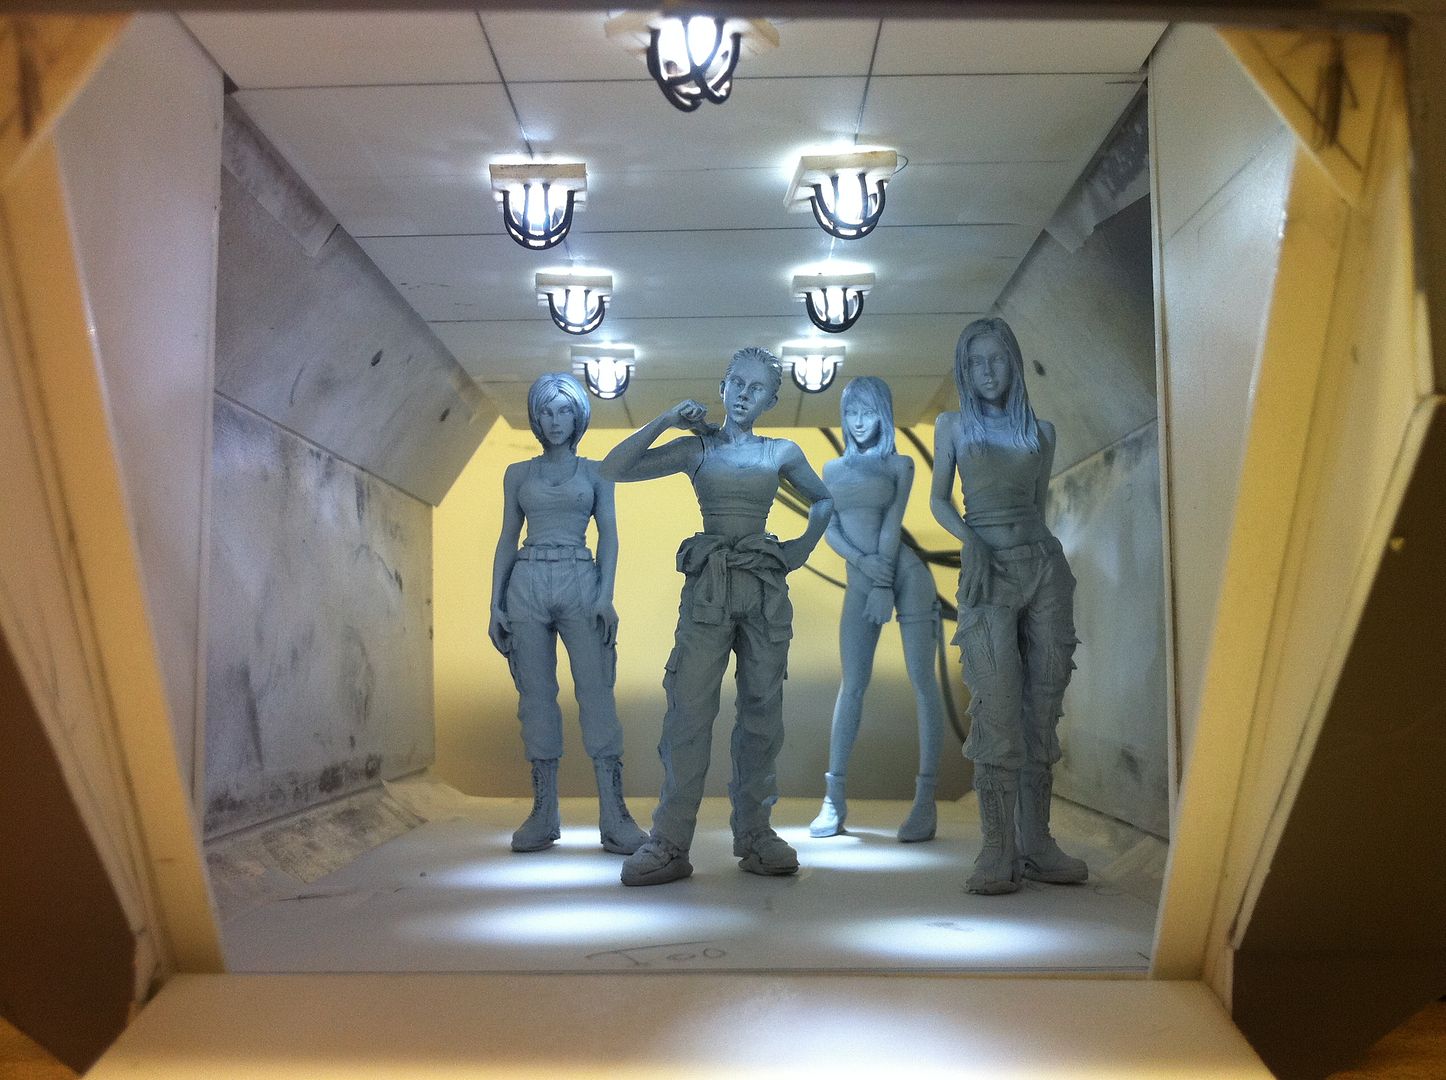
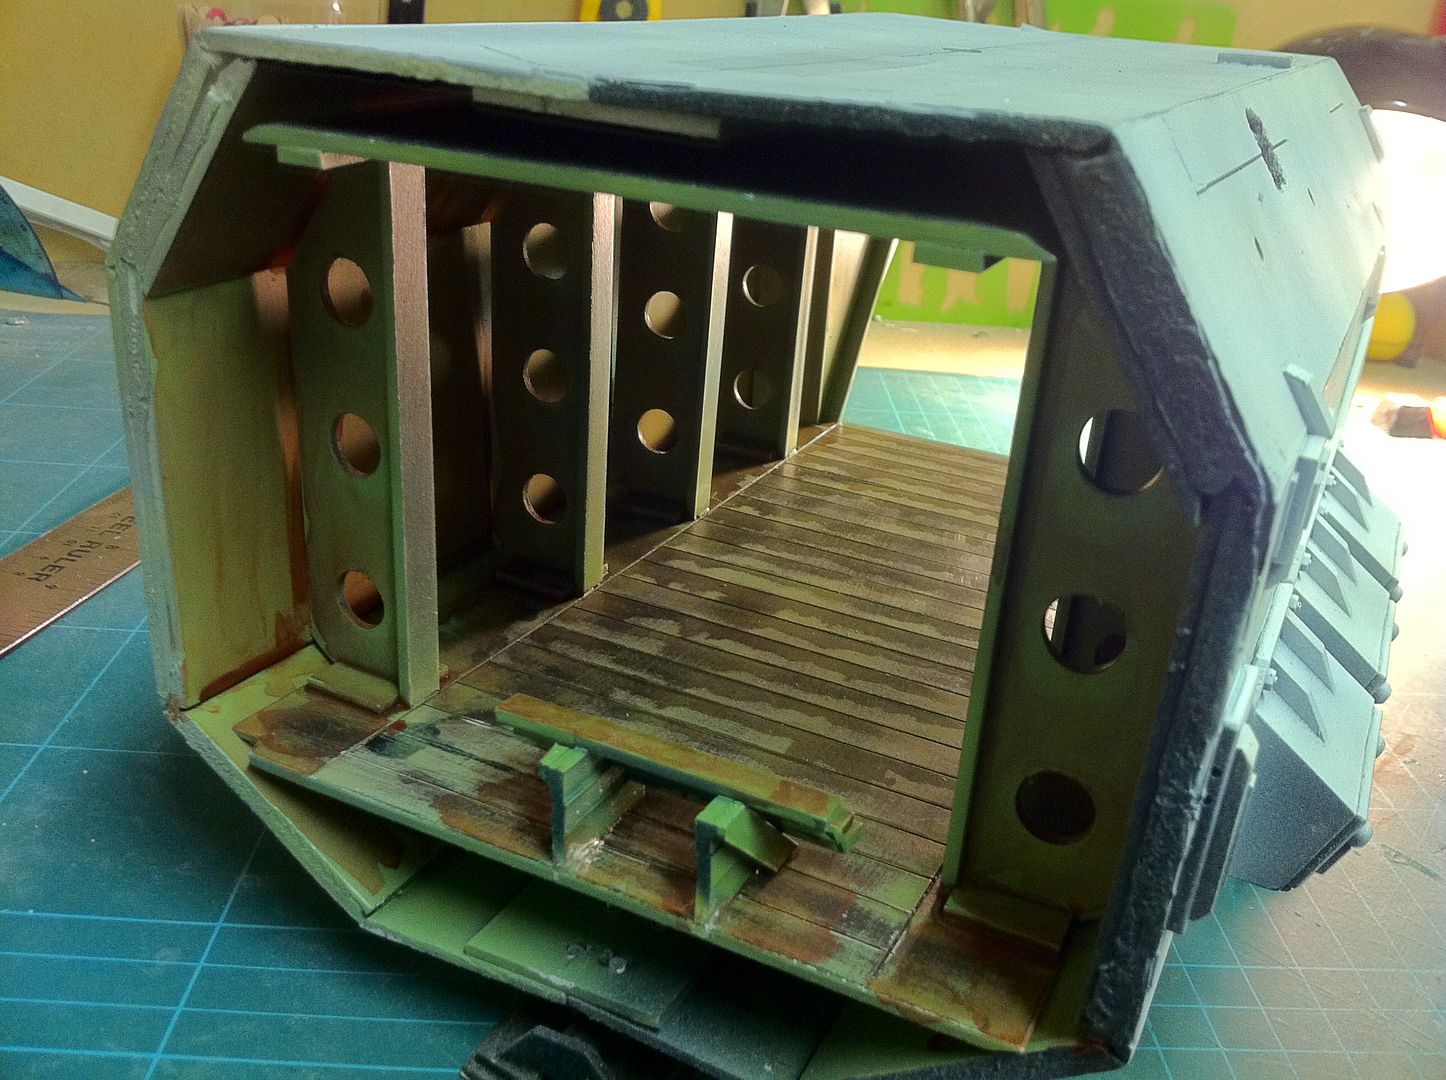
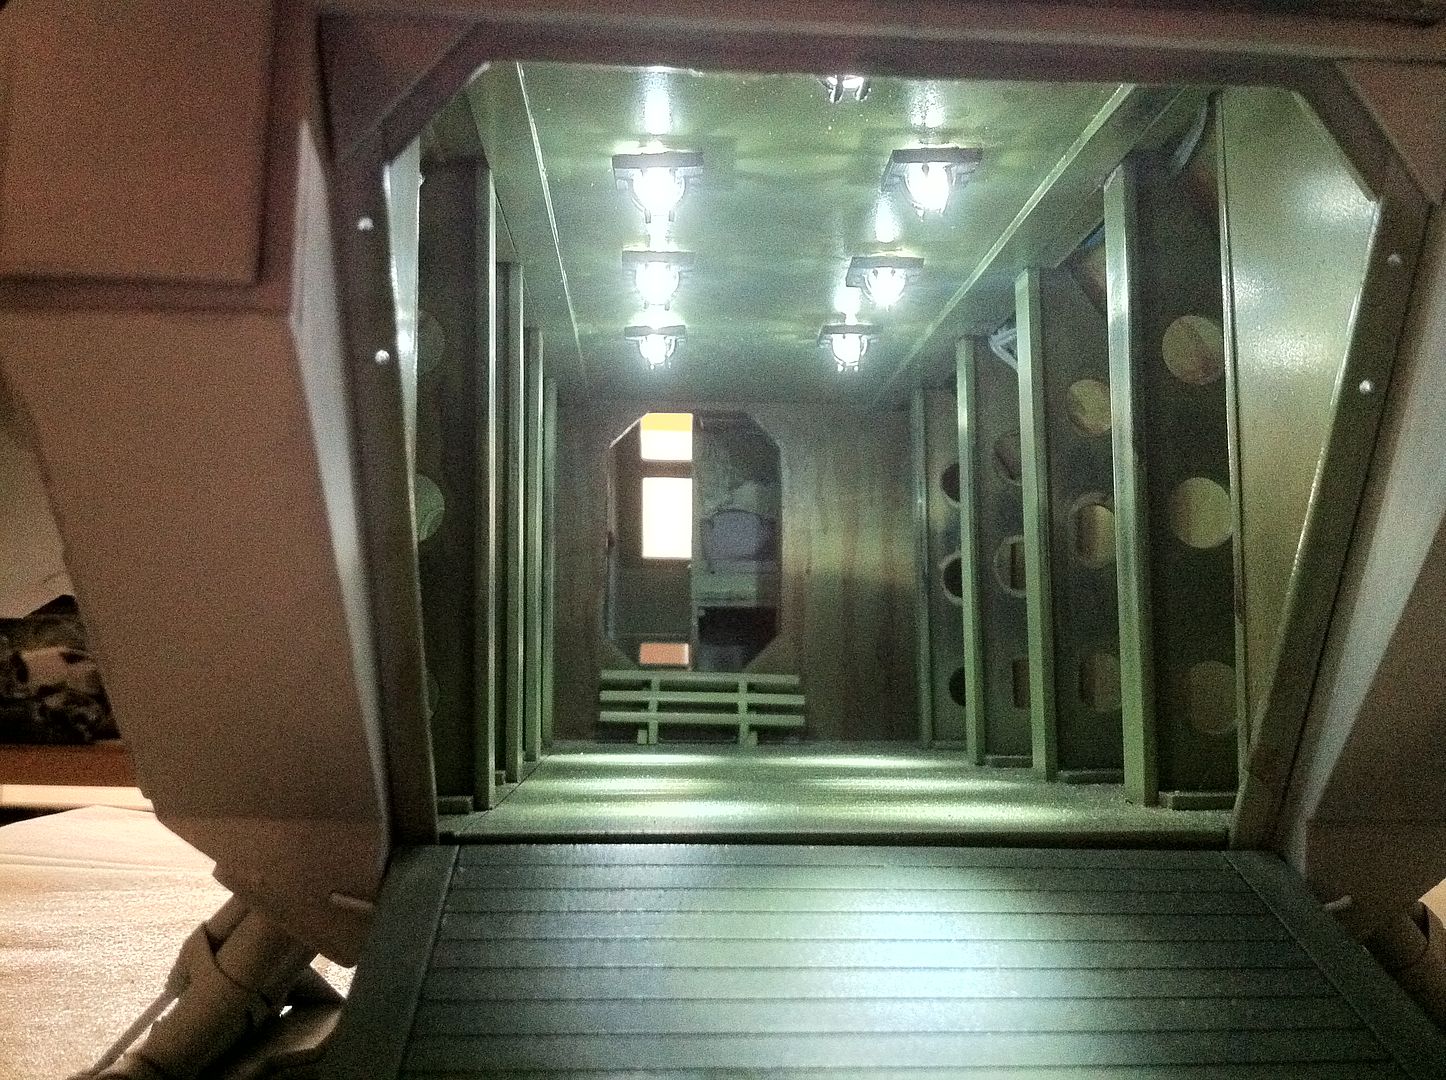
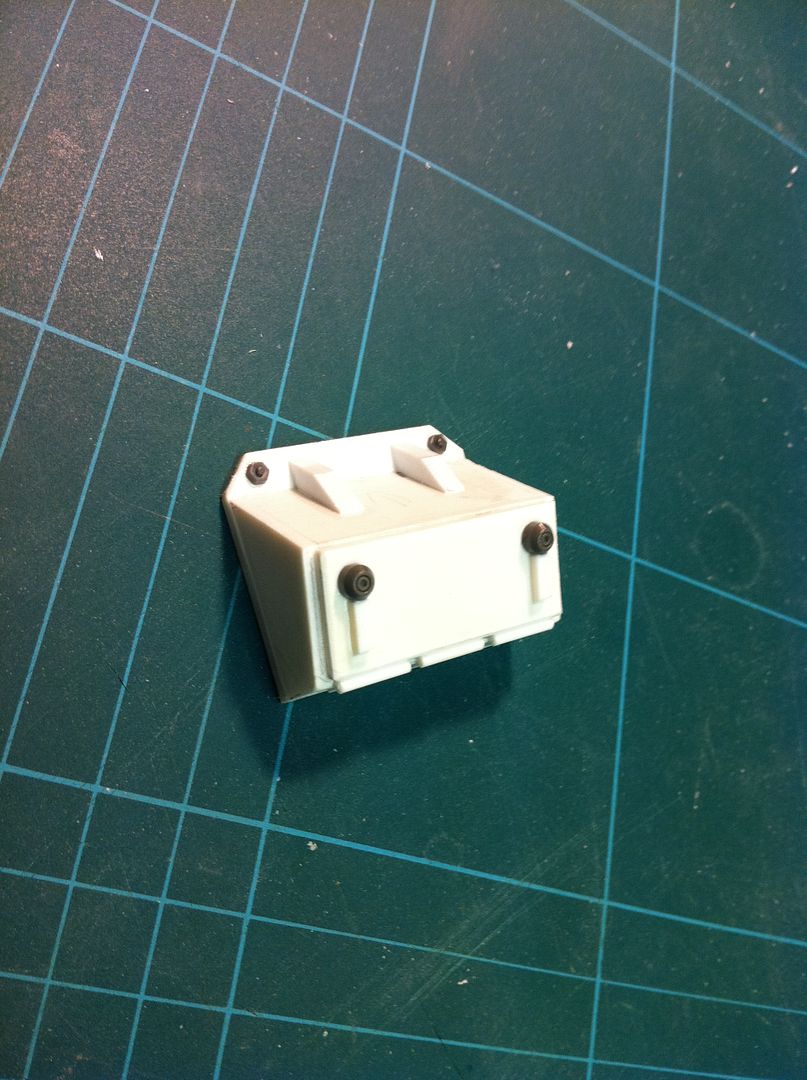
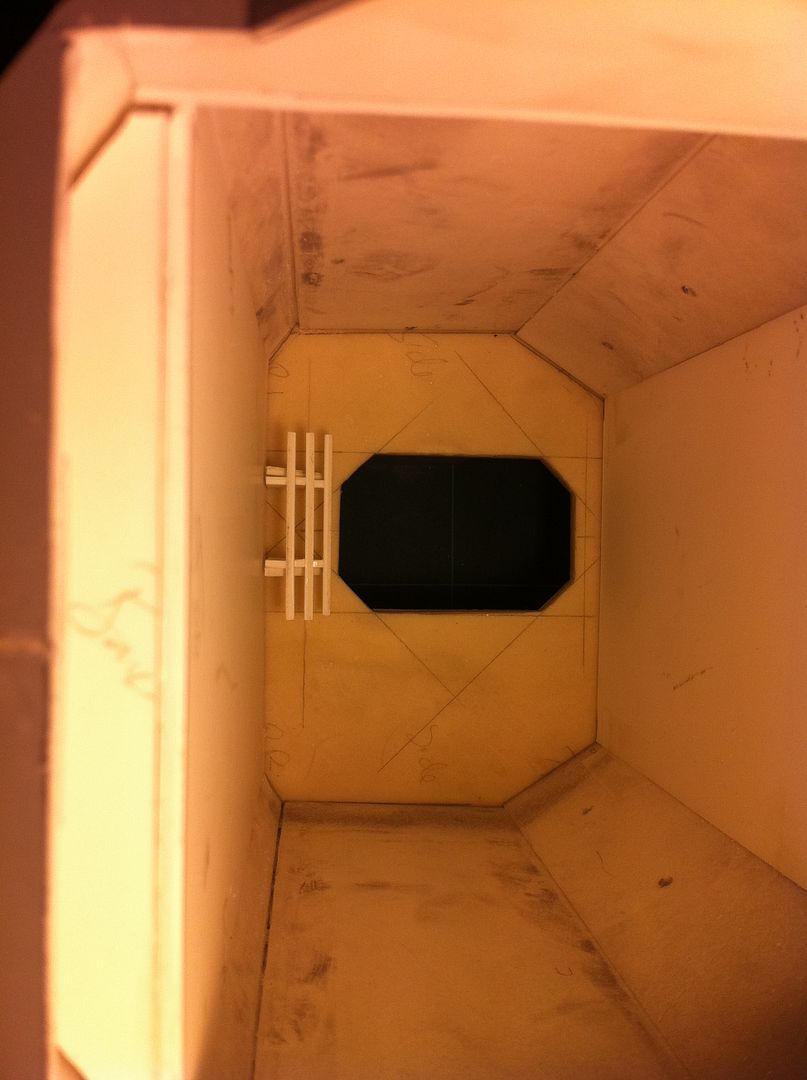
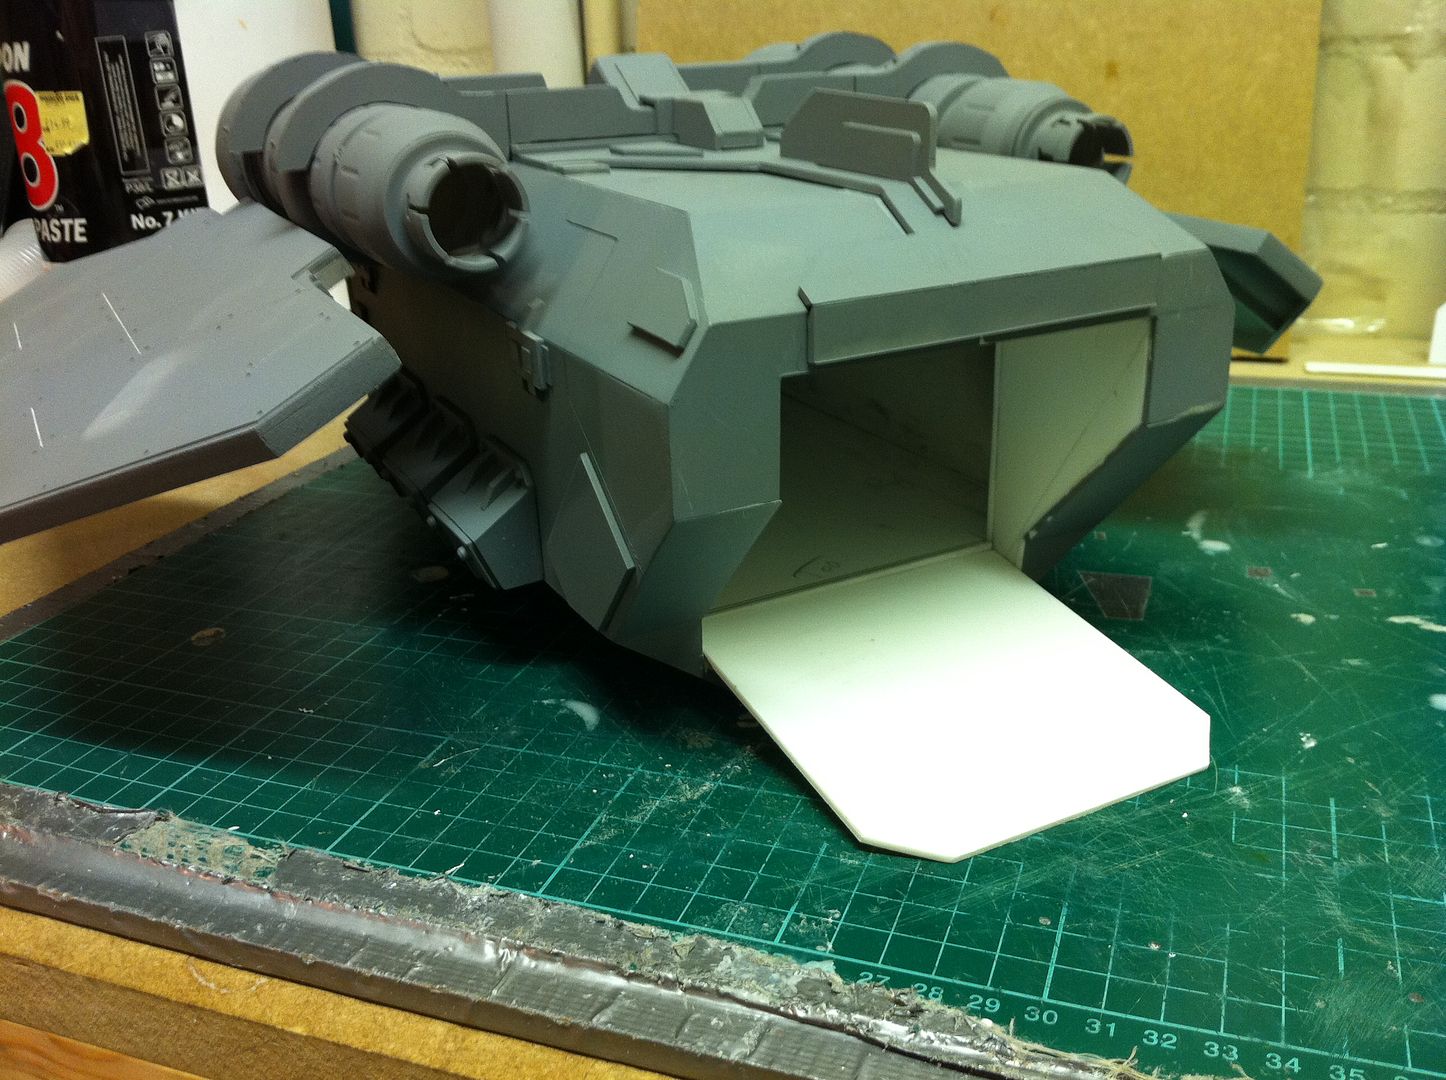
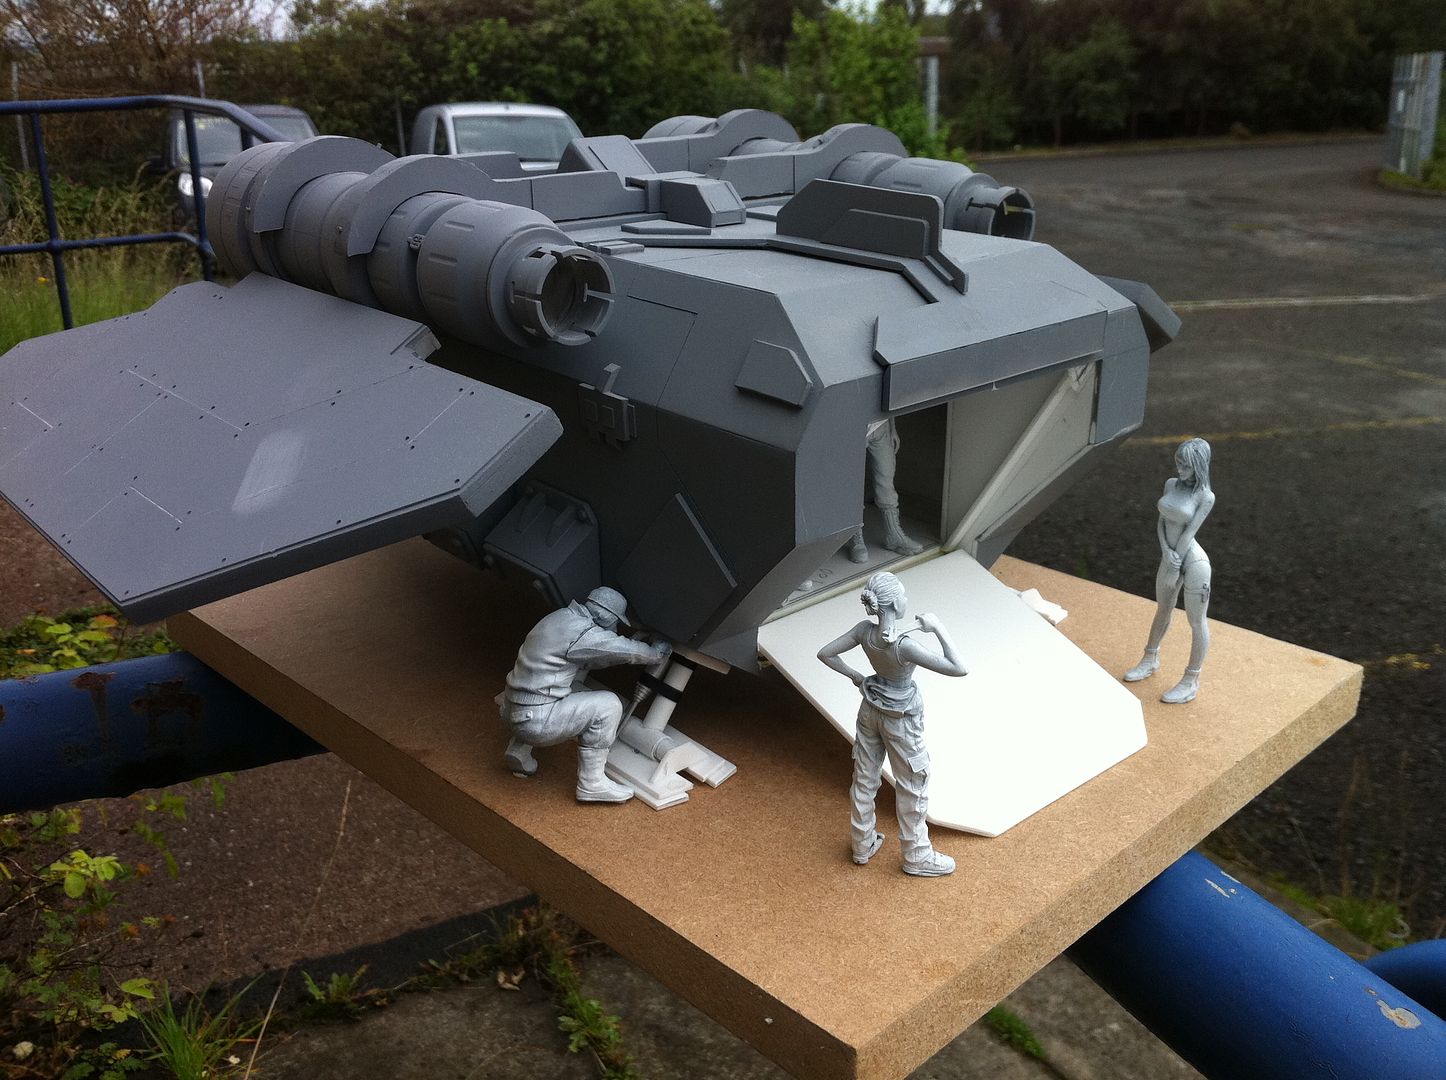
I also added the cargo/troop bay floor in place. It's wild at the moment, but will be attached soon. The roof is also roughed up and added in place. I needed to make sure there was enough room for it. I will be running lighting around the roof for interior lighting of the Arvus. Nothing too bold. Just enough to give a bit of atmosphere when you are looking into the craft.
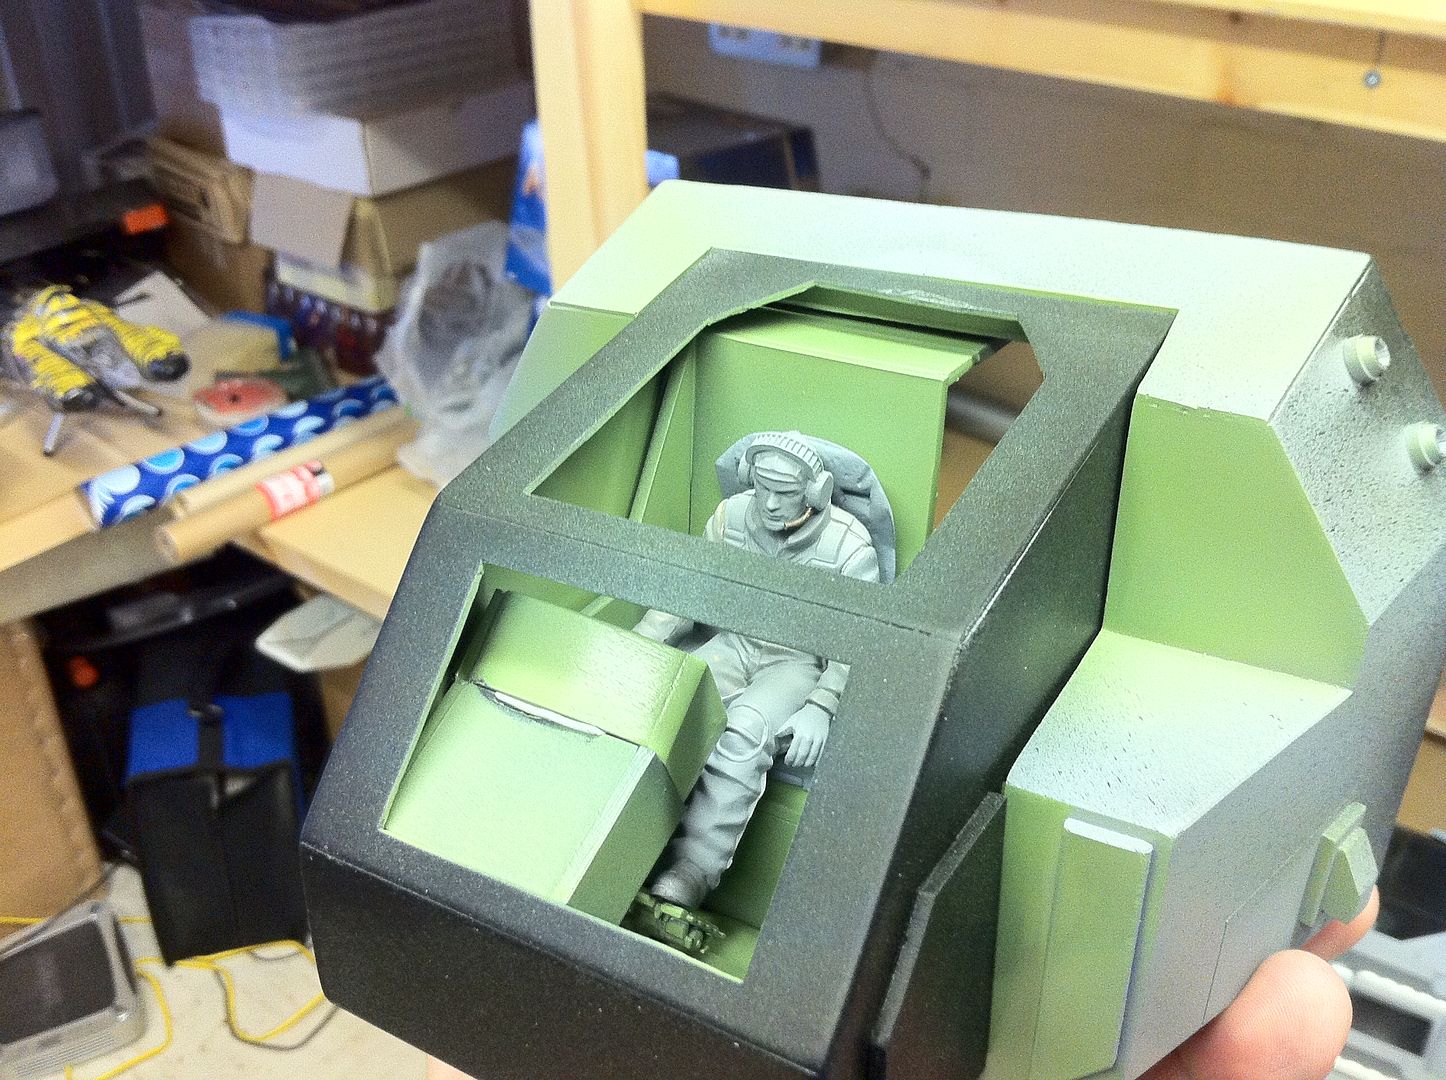
I mocked up a set of small steps to lead up to the cockpit. These may be discarded later if i make something cooler. For the interior, i need to make the bulkheads that line the bay. These will serve a dual purpose. I will have them attached to floor and roof(So the floor and roof can be inserted in one piece), and they will act as a conduit to run the lighting from under the floor to the roof area.
Anyway. Enough talk. Here are the pics. Enjoy!
And if anyone has any questions on the build, don't hesitate to ask.
23944
Post by: Hits_the_spot
Seriously great looking stuff in here. The mini is looking so incredible clean and accurate. Keep it up, cant wait to see more.
18892
Post by: Bar
Hits_the_spot wrote:Seriously great looking stuff in here. The mini is looking so incredible clean and accurate. Keep it up, cant wait to see more.
Thanks.
I am trying my best!
But this is a labour of love. I liked the design before i started, but now i really love it!
17349
Post by: SilverMK2
Extremely nice build. Also love the crew girls
Just a shame they are not 40mm
18892
Post by: Bar
SilverMK2 wrote:Extremely nice build. Also love the crew girls
Just a shame they are not 40mm
It wouldn't be too hard to make them 40mm.
Not hard at all.
4514
Post by: Myrthe
That is FANTASTIC !!!!
I wanted to get the Arvus myself but realized it was too small for what I wanted. Do you have templates for yours that you'd consider sharing ?
34420
Post by: PraetorDave
Ok so this is probably a silly question...but whats are Arvus? Where does this come from?
Looks really stellar, where ever it comes from
7433
Post by: plastictrees
PraetorDave wrote:Ok so this is probably a silly question...but whats are Arvus? Where does this come from?
Looks really stellar, where ever it comes from
http://www.forgeworld.co.uk/Warhammer-40000/Imperial_Navy/ARVUS-LIGHTER.html
18892
Post by: Bar
Myrthe wrote:That is FANTASTIC !!!!
I wanted to get the Arvus myself but realized it was too small for what I wanted. Do you have templates for yours that you'd consider sharing ?
Sure. I had a paper model i used as a starter(It's not totally accurate), but it was good enough to get the angles together. The rest was just Mark One Eyeball from pics i have of the Arvus i have found on the net. When approaching a build like this, if you don't have the original kit in your hands to take measurements from, you have to accept you might be off ever so slightly from the exact sizes. In the real world, military craft get constantly updated, so you may find that an F-22 built in 2005 might differ significantly in equipment and software from one made in 2006, even though externally it might look the same. I am applying this rationale to my Arvus.
It might be from a different construction block to the Forgeworld version...
Here is a download link from Rapidshare for all my Arvus reference in a RAR folder(Password is bar and the folder is just over 16mb in size).
PraetorDave wrote:Ok so this is probably a silly question...but whats are Arvus? Where does this come from?
Looks really stellar, where ever it comes from
Lol. I think we have a spy among us guys...
Seriously, though, if you download the file i posted above, you will find all my Arvus reference images and the PDF paper model file. Of course, you'll have to scale that up to build one like mine.
Thanks for the kind words everyone.
This is one of those great projects that just snowballs as soon as you start.
I am really enjoying it.
I am glad everyone here also enjoys it.
Thanks for posting replies guys. I like reading all your comments. If anyone here has an Arvus and spots detail i have missed, don't hesitate to post and let me know.
25141
Post by: Chibi Bodge-Battle
Super modelling
Did you crash mould the bubble canopy please?
18892
Post by: Bar
Chibi Bodge-Battle wrote:Super modelling
Did you crash mould the bubble canopy please?
Hey. I am not sure what you are asking here. I haven't got a mold for the canopy if that's your question.
25141
Post by: Chibi Bodge-Battle
That'll be a no then!
Was referring to the black two seater thing. Assume it was a kit rather than scratched?
Sorry if missed the relevant text 
18892
Post by: Bar
Chibi Bodge-Battle wrote:That'll be a no then!
Was referring to the black two seater thing. Assume it was a kit rather than scratched?
Sorry if missed the relevant text
Ahhhh. Sorry. My fault. I thought you were talking about the Arvus...
That build is my "Bentley AR-8 Arrowhead". It was based on another builder's design, but i made it as a vacuum form master.
If you want to see the entire build, here is the gallery for that. Enjoy!
29190
Post by: CURNOW
Outstanding love it !
18892
Post by: Bar
CURNOW wrote:Outstanding love it !
Thanks.
From message i am getting about this build, most folks like the design of the Arvus, but dislike the size of the Forgeworld kit.
From a google images search, i think i may be the first crazy person to attempt making one almost three times the size of the original...
31627
Post by: FantasyBob
Well, in general i think the dimension of the GW (and FW, maybe) vehicle don't fit the 28 mm scale.........this is gonna be this way because if they fit the scale, they are gonna be too big for a war game
18892
Post by: Bar
FantasyBob wrote:Well, in general i think the dimension of the GW (and FW, maybe) vehicle don't fit the 28 mm scale.........this is gonna be this way because if they fit the scale, they are gonna be too big for a war game
Of course. It would be way too big in this scale. It would take up the whole table...
I like big models though. I want to try my hand at a Valkyrie.
29190
Post by: CURNOW
Lol love it are you gona make that end single light red ? Or maybe all of them red ? Cos I've got the helly sceen from predator in my head now . Also you have to convert one of those girls into a load master !
38744
Post by: Brushfire
Brilliant work. I am in awe of your craftsmanship. With deft hands like those, you missed your calling as a brain surgeon or a concert pianist.
Forgeworld should hire you!
30532
Post by: Zefig
That's an awesome way of doing cages for lights, turned out really well. The whole build is looking fantastic!
18892
Post by: Bar
CURNOW wrote:Lol love it are you gona make that end single light red ? Or maybe all of them red ? Cos I've got the helly sceen from predator in my head now . Also you have to convert one of those girls into a load master !
Well, i was thinking of leaving them all white to be honest(So if it were on show, people could get a good view inside). But i will think about tinting the back one red.
There are still two to get fitted into the front headlamps of the wings, and one to light up the pilot's console.
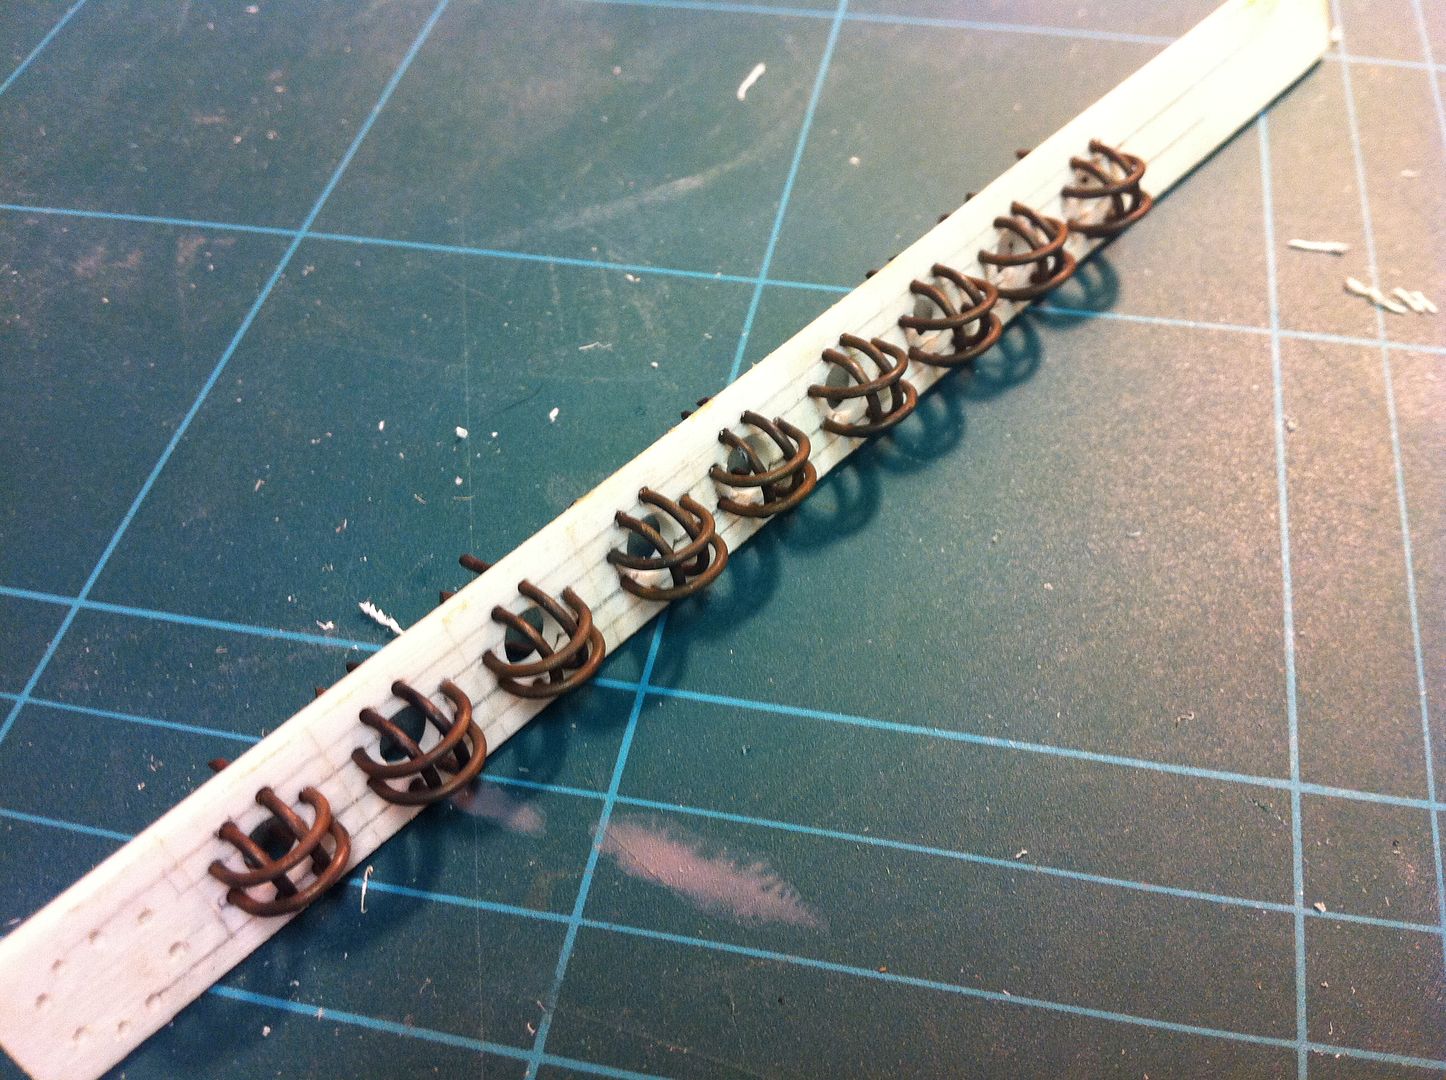
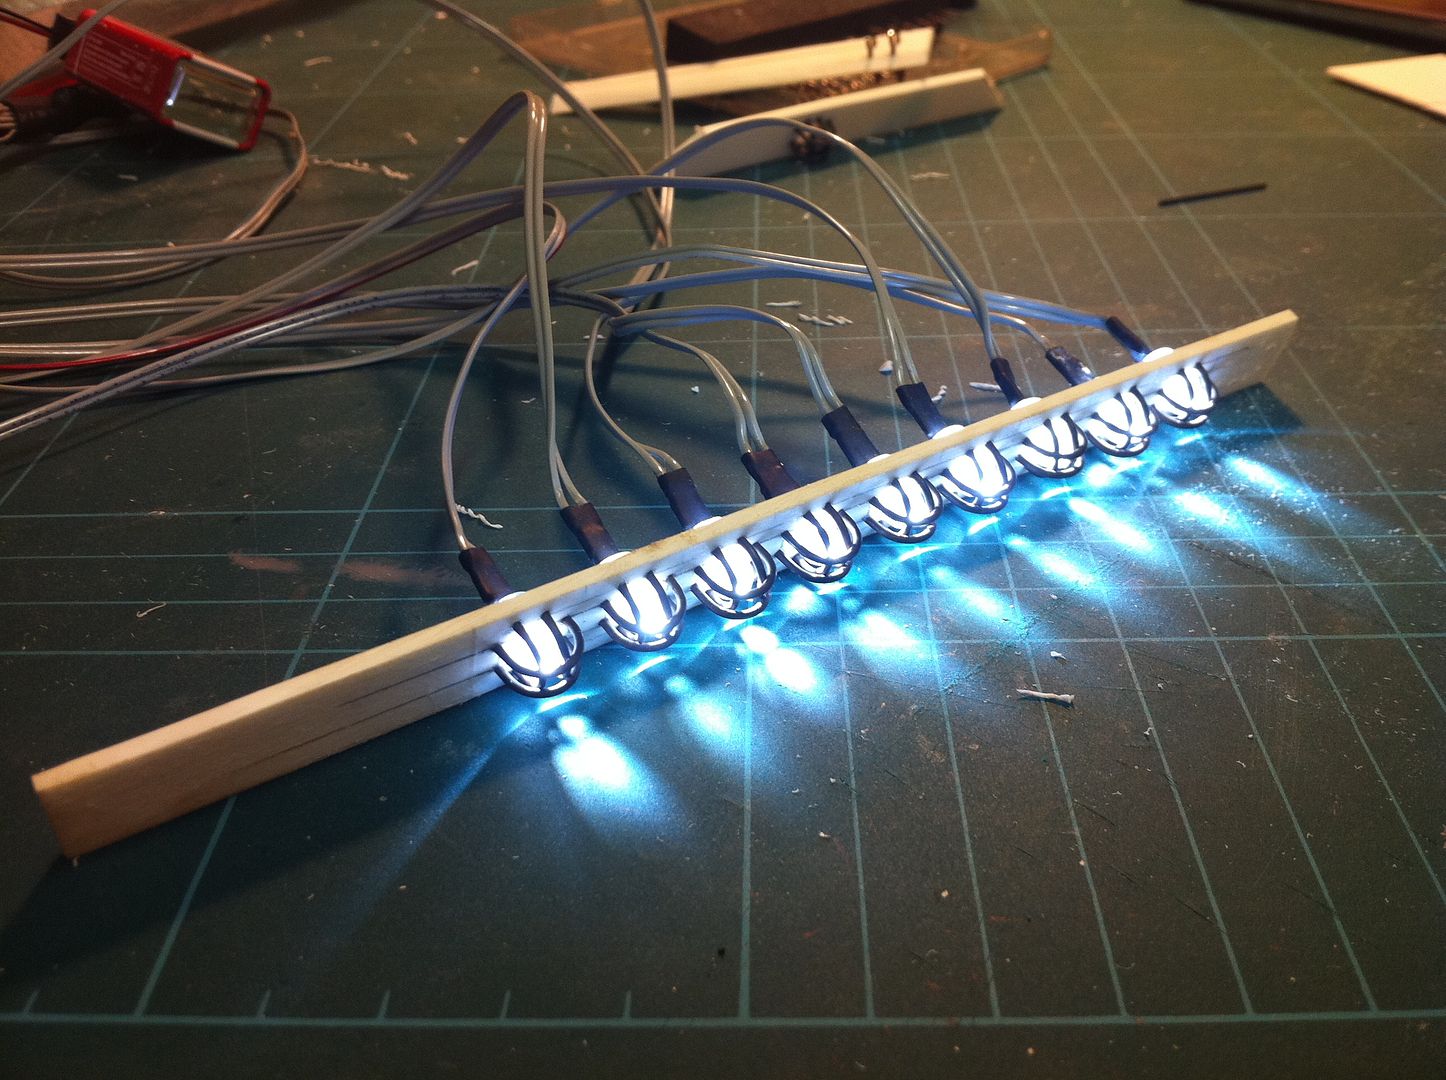
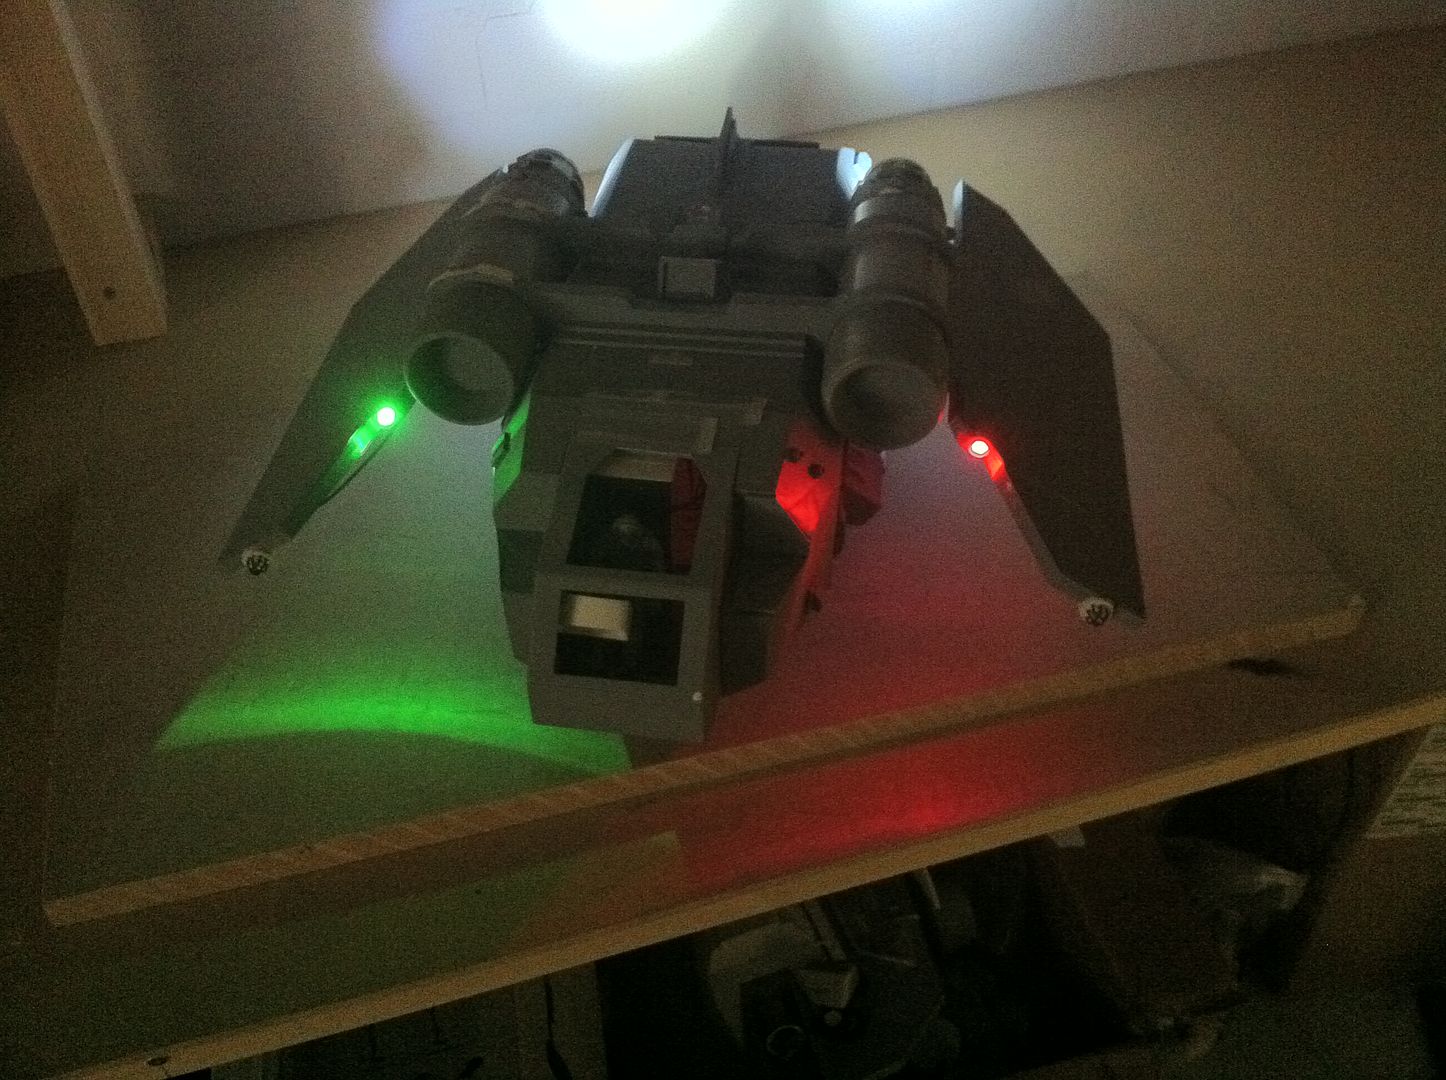
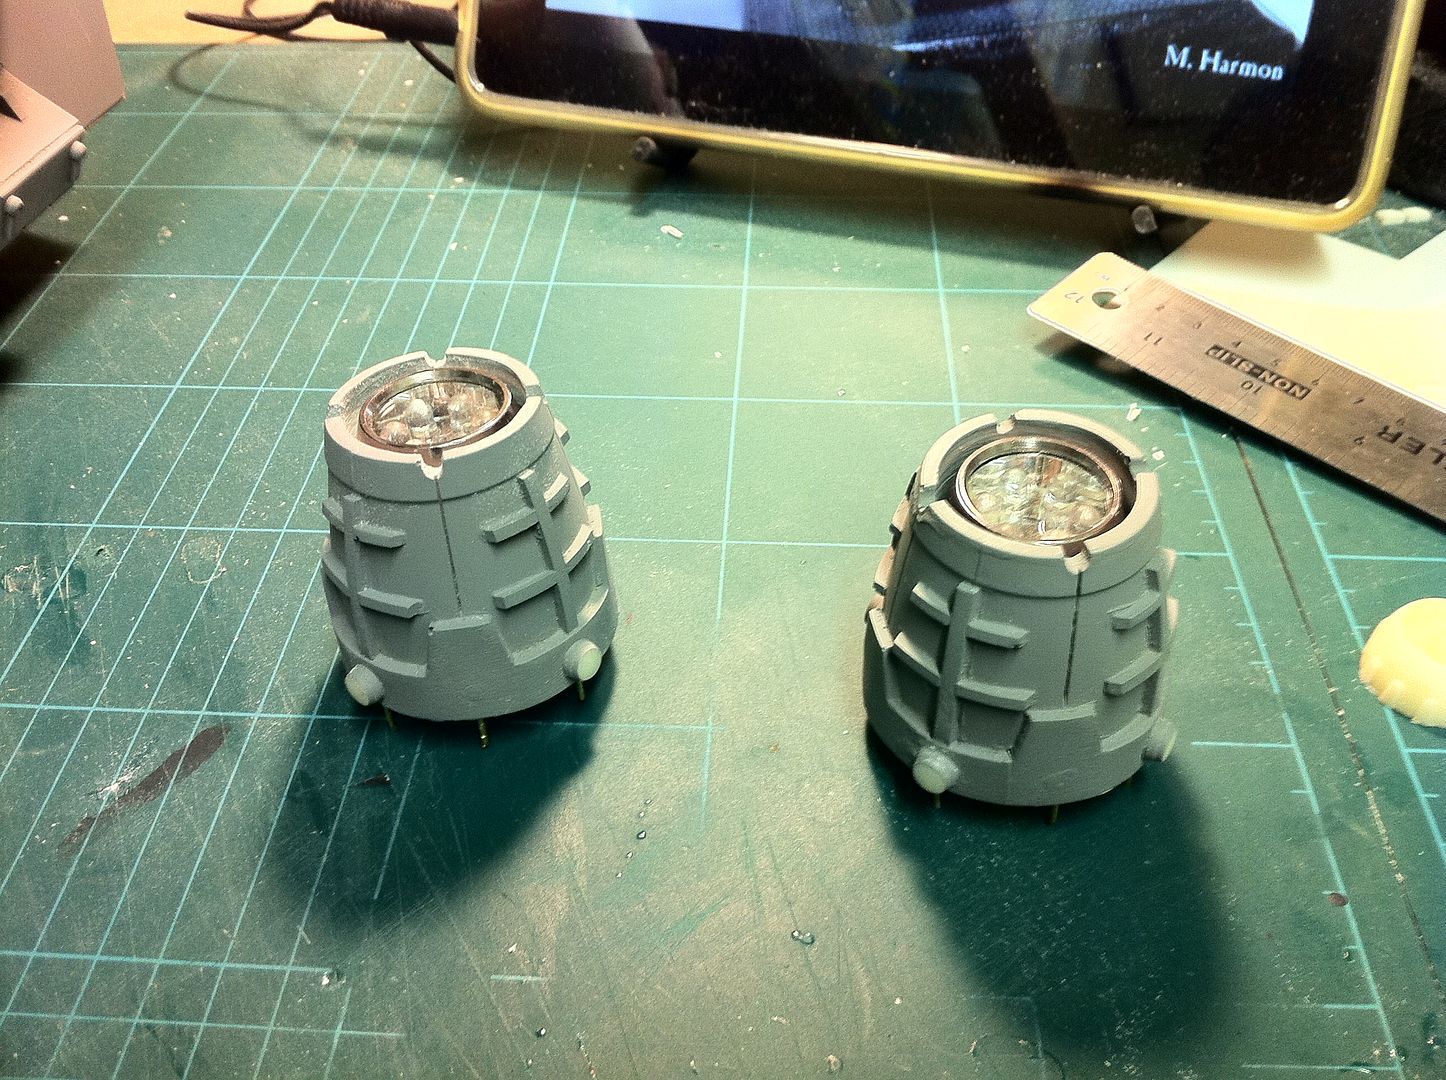
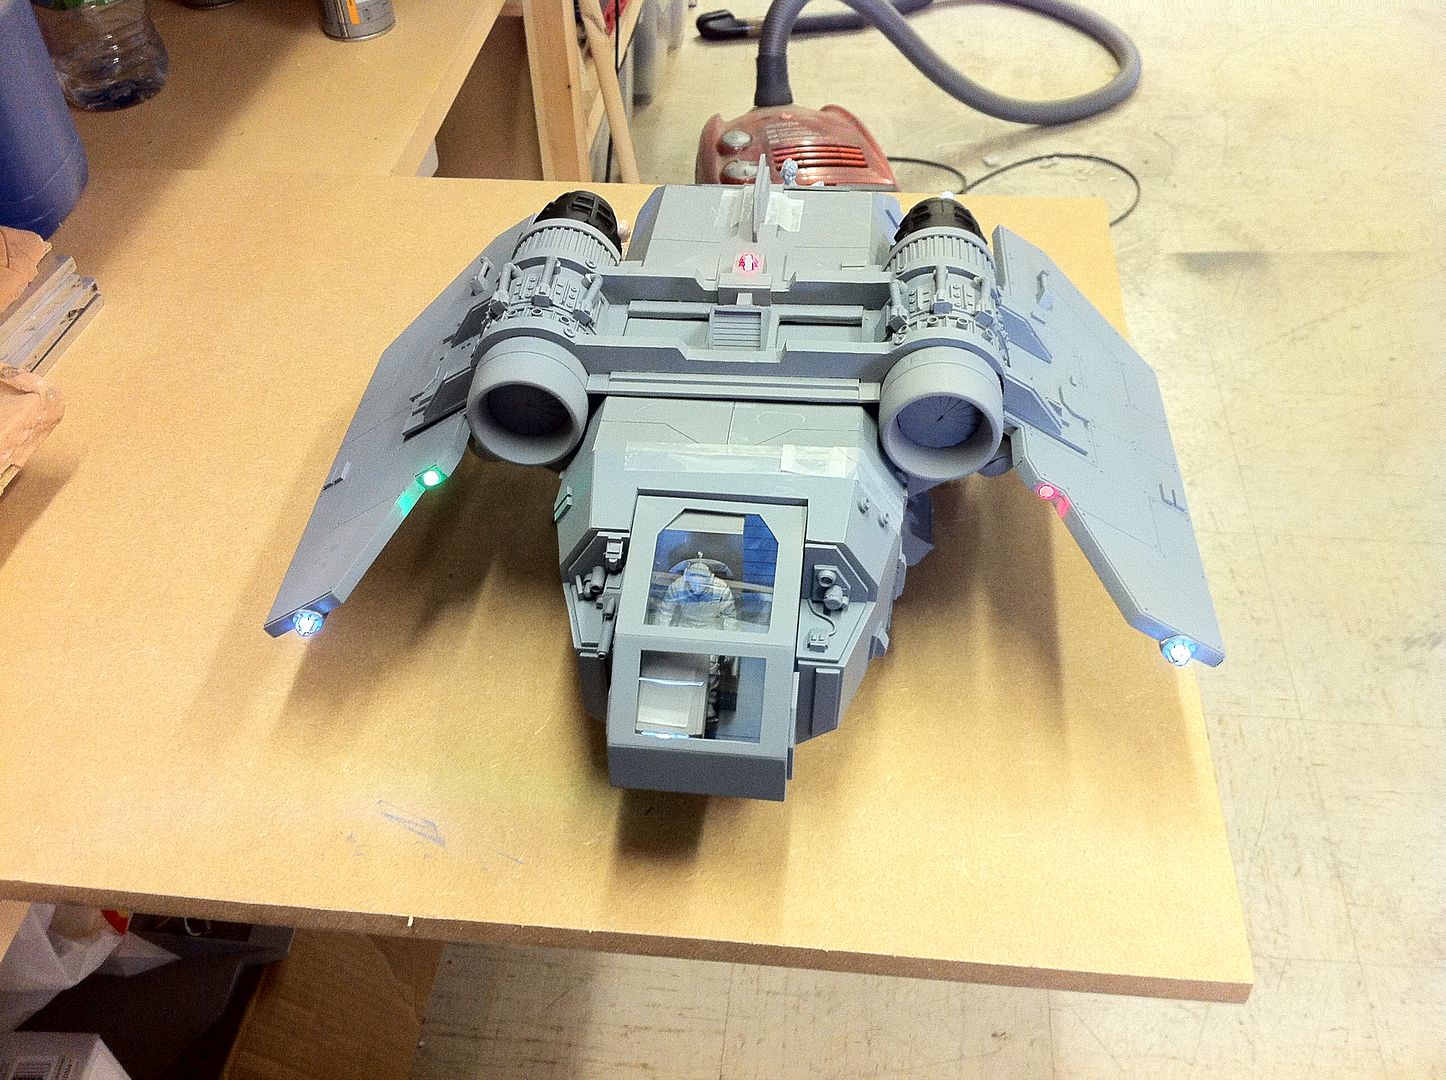
Add to that, the 8-LED system for the nav lights. Two white strobes, two red strobes, two red nav lights, and two green nav lights.
When i get those, i will be able to start buttoning this one up.
I still need to get the internal bulkheads done(Those will hide the LED cables).
Brushfire wrote:Brilliant work. I am in awe of your craftsmanship. With deft hands like those, you missed your calling as a brain surgeon or a concert pianist.
Forgeworld should hire you!
Thanks a lot. I appreciate that comment. I prefer to make big subjects...
I suppose they have plenty of talent as it is over at Forgeworld.
Zefig wrote:That's an awesome way of doing cages for lights, turned out really well. The whole build is looking fantastic!
Thanks again!
I knew i had to make the light cages for the wing landing lights. But i thought: "Why not just make them for all the lights?"
It looks cooler that way(And makes the LEDS look less like LEDs...).
30532
Post by: Zefig
Bar wrote:
Zefig wrote:That's an awesome way of doing cages for lights, turned out really well. The whole build is looking fantastic!
Thanks again!
I knew i had to make the light cages for the wing landing lights. But i thought: "Why not just make them for all the lights?"
It looks cooler that way(And makes the LEDS look less like LEDs...).
Very much so, they look pretty convincingly like industrial lamps now.
18892
Post by: Bar
Zefig wrote:
Very much so, they look pretty convincingly like industrial lamps now.
Cheers.
I have a technique that i use when trying to come up with clever solutions to problems.
I try to imagine a fella smarter than myself. Then I try to think, "what would he do?"
30532
Post by: Zefig
Haha, I like that. Seems to be working out so far, I'll have to try it for myself
25141
Post by: Chibi Bodge-Battle
Tip top
nice work on the lighting! 
39358
Post by: Paranoia_Agent
Wow amazing the arvis lighter has always been one of my favourite models and your scale for it is great it really does it justice, and those models you have in the photos really add character to the whole thing, as for your scratch building skills they are truly epic it leaves me speechless !
Keep up the great work
18892
Post by: Bar
Chibi Bodge-Battle wrote:Tip top
nice work on the lighting!
Thanks a lot. I will accept full judgement if i can pull the lighting off in the end!!!
Paranoia_Agent wrote:Wow amazing the arvis lighter has always been one of my favourite models and your scale for it is great it really does it justice, and those models you have in the photos really add character to the whole thing, as for your scratch building skills they are truly epic it leaves me speechless !
Keep up the great work
Thanks for your kind words. I really like the design too.
It's so cool looking. I should really have a landing pad full of them!!!
17349
Post by: SilverMK2
*shakes fist at the brilliance*
Very nice work on the light cages - they look great
7632
Post by: Ghost in the Darkness
Awesome sauce!
12313
Post by: Ouze
Subbed. Great work. I also love the lady soldiers.
46261
Post by: nemotgr
  It's like a diorama, well done! Btw what materials you used for the ship?
31627
Post by: FantasyBob
the controll panell looks good! and the pilot seat too.....anyway, it's coming out an amazing project!
18892
Post by: Bar
nemotgr wrote: It's like a diorama, well done! Btw what materials you used for the ship?
Thanks a lot.
The cockpit master was made in styrene, and the cast in resin(In case i decide to make more).
The shell and the wings are styrene sheet, with plumbing connectors for the engines.
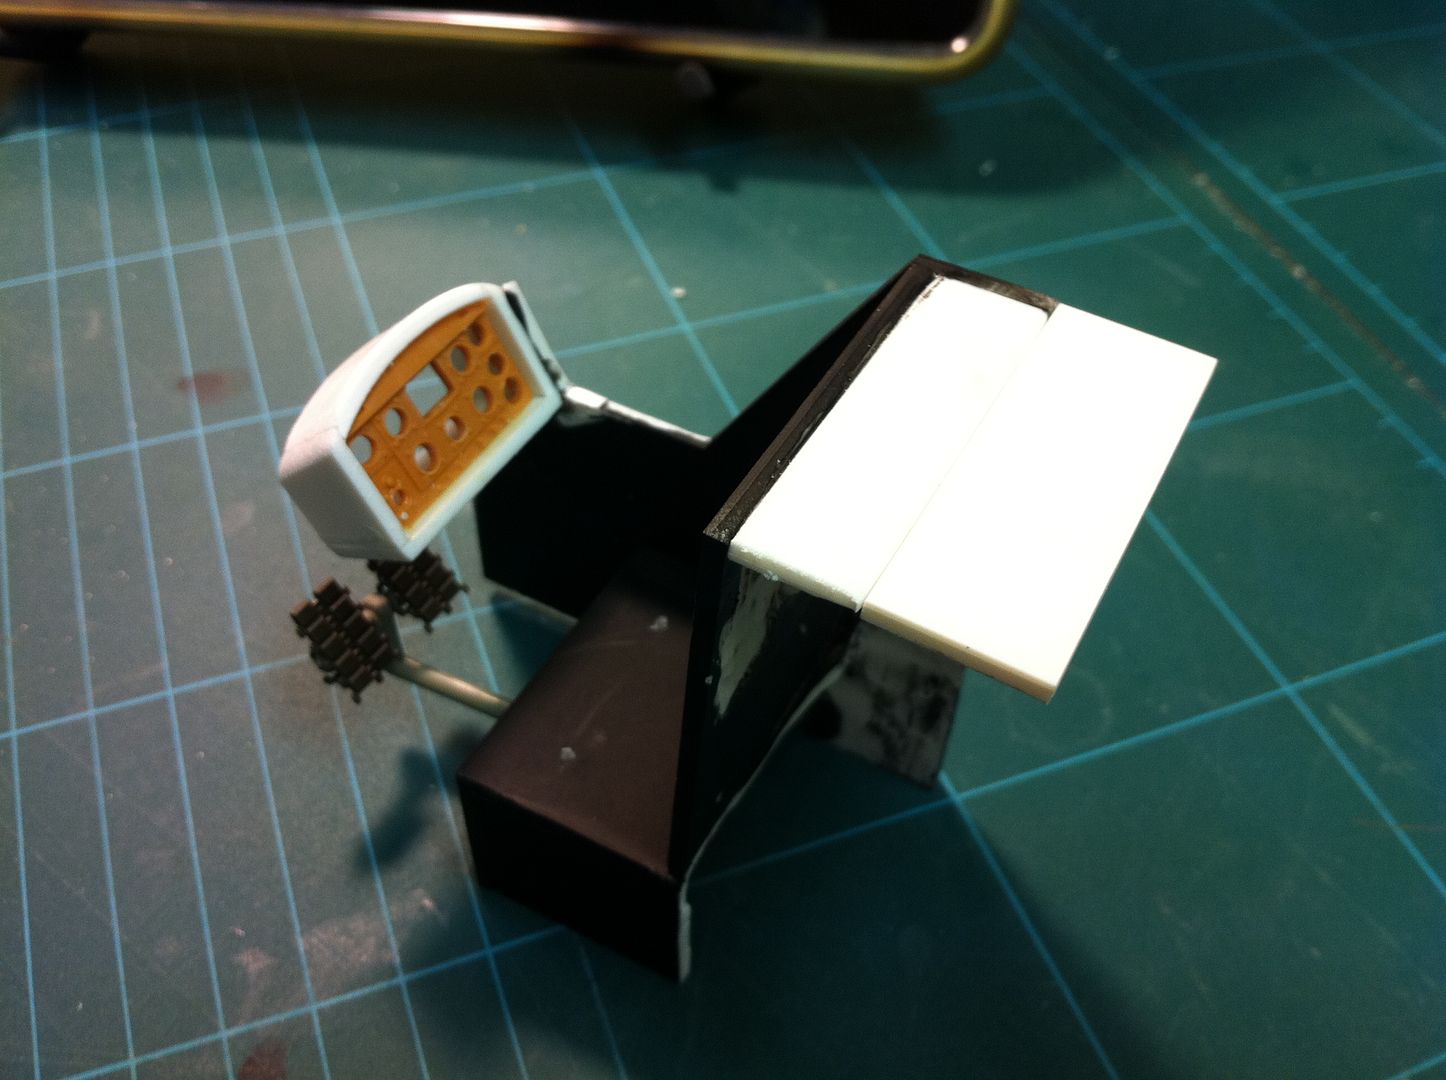
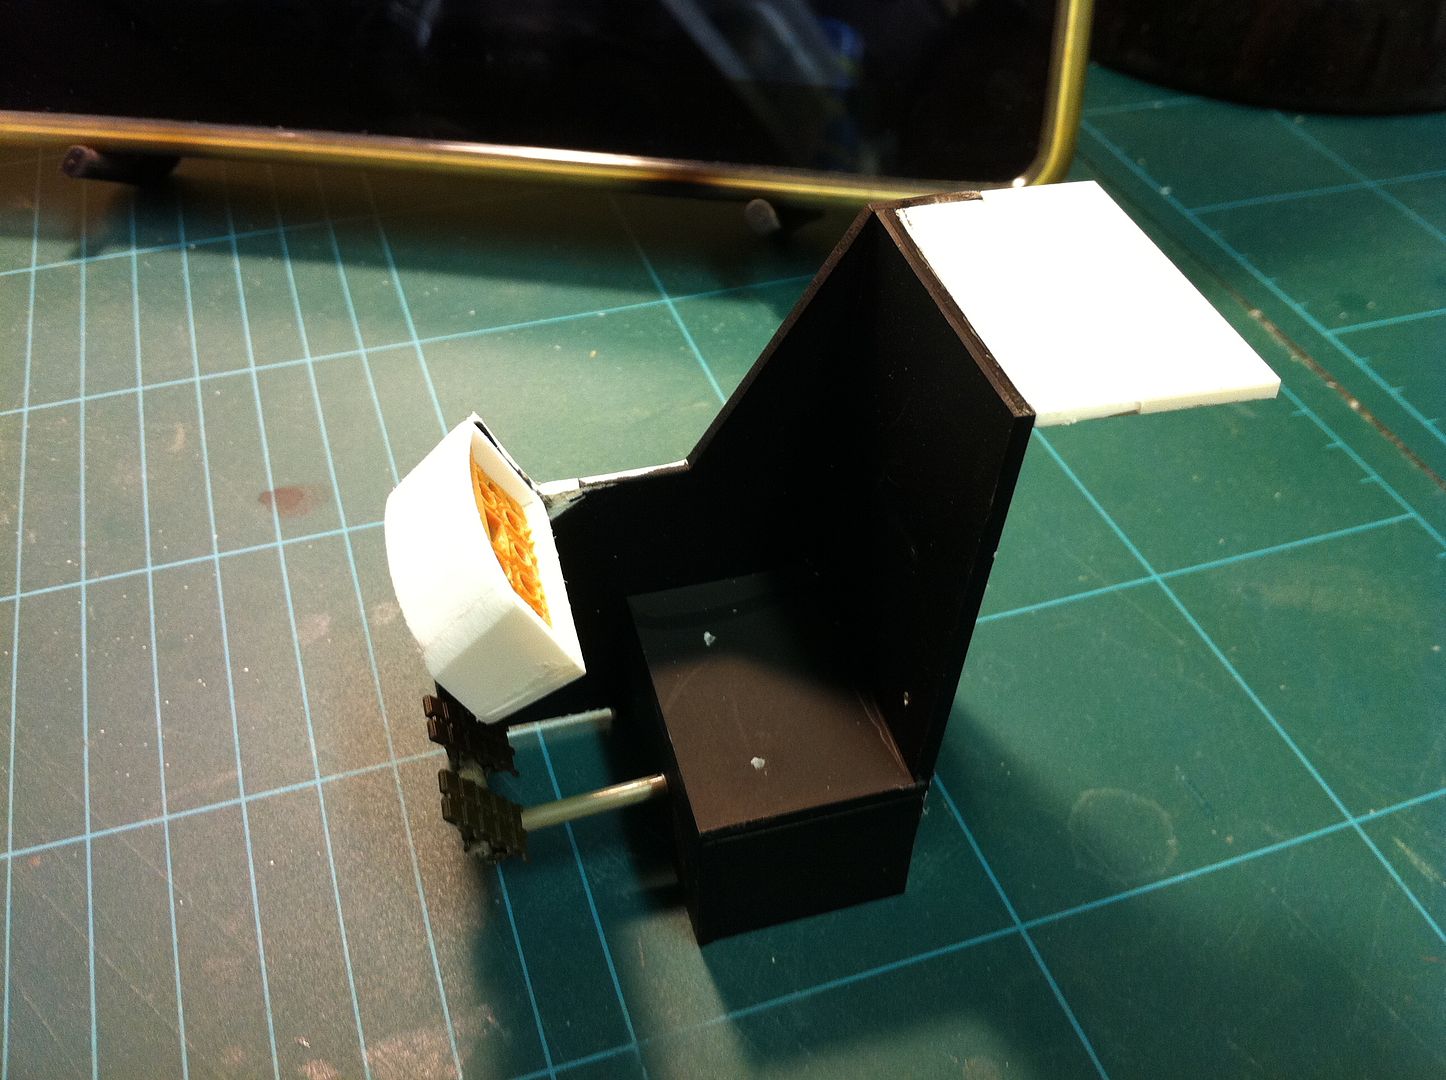
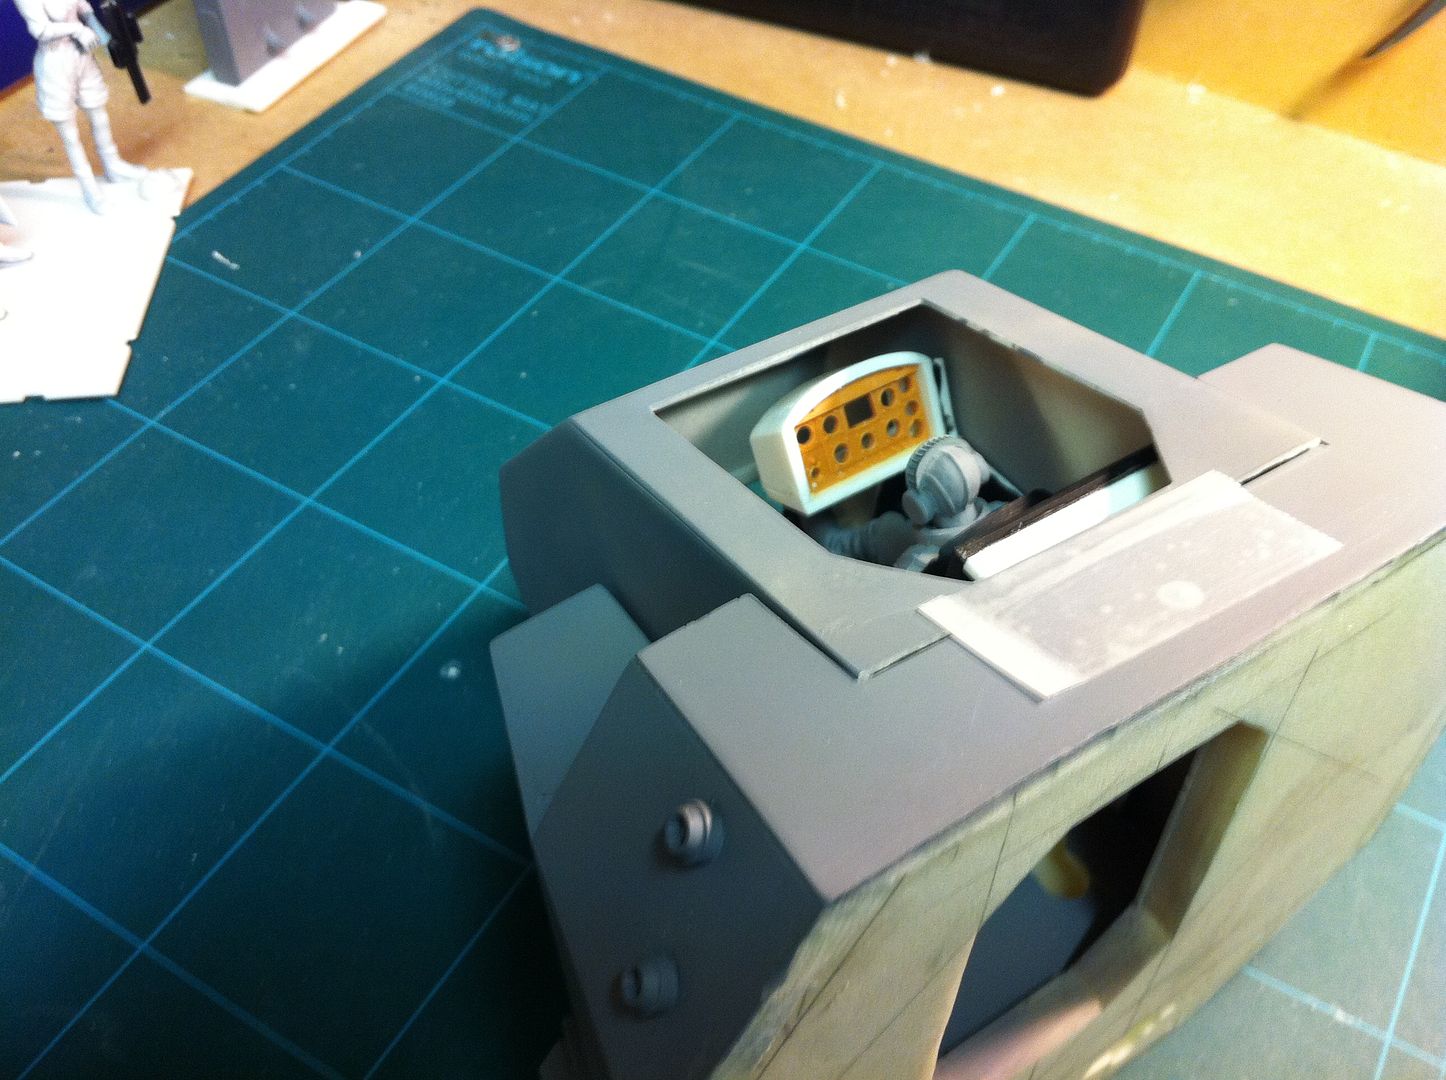
FantasyBob wrote:the controll panell looks good! and the pilot seat too.....anyway, it's coming out an amazing project!
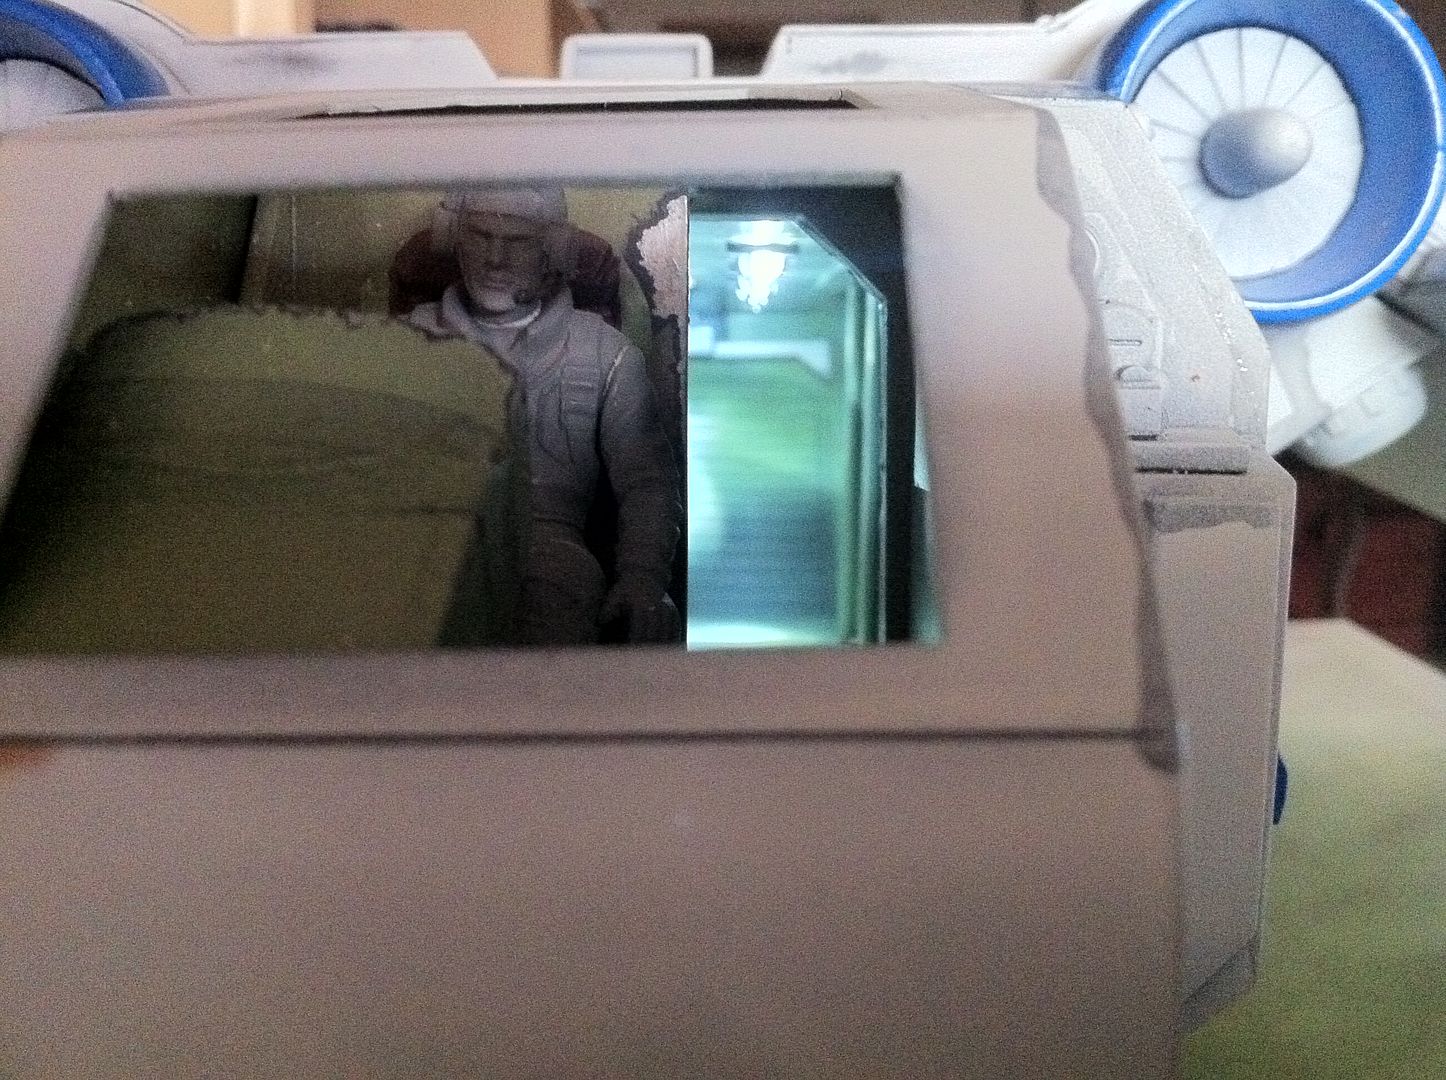
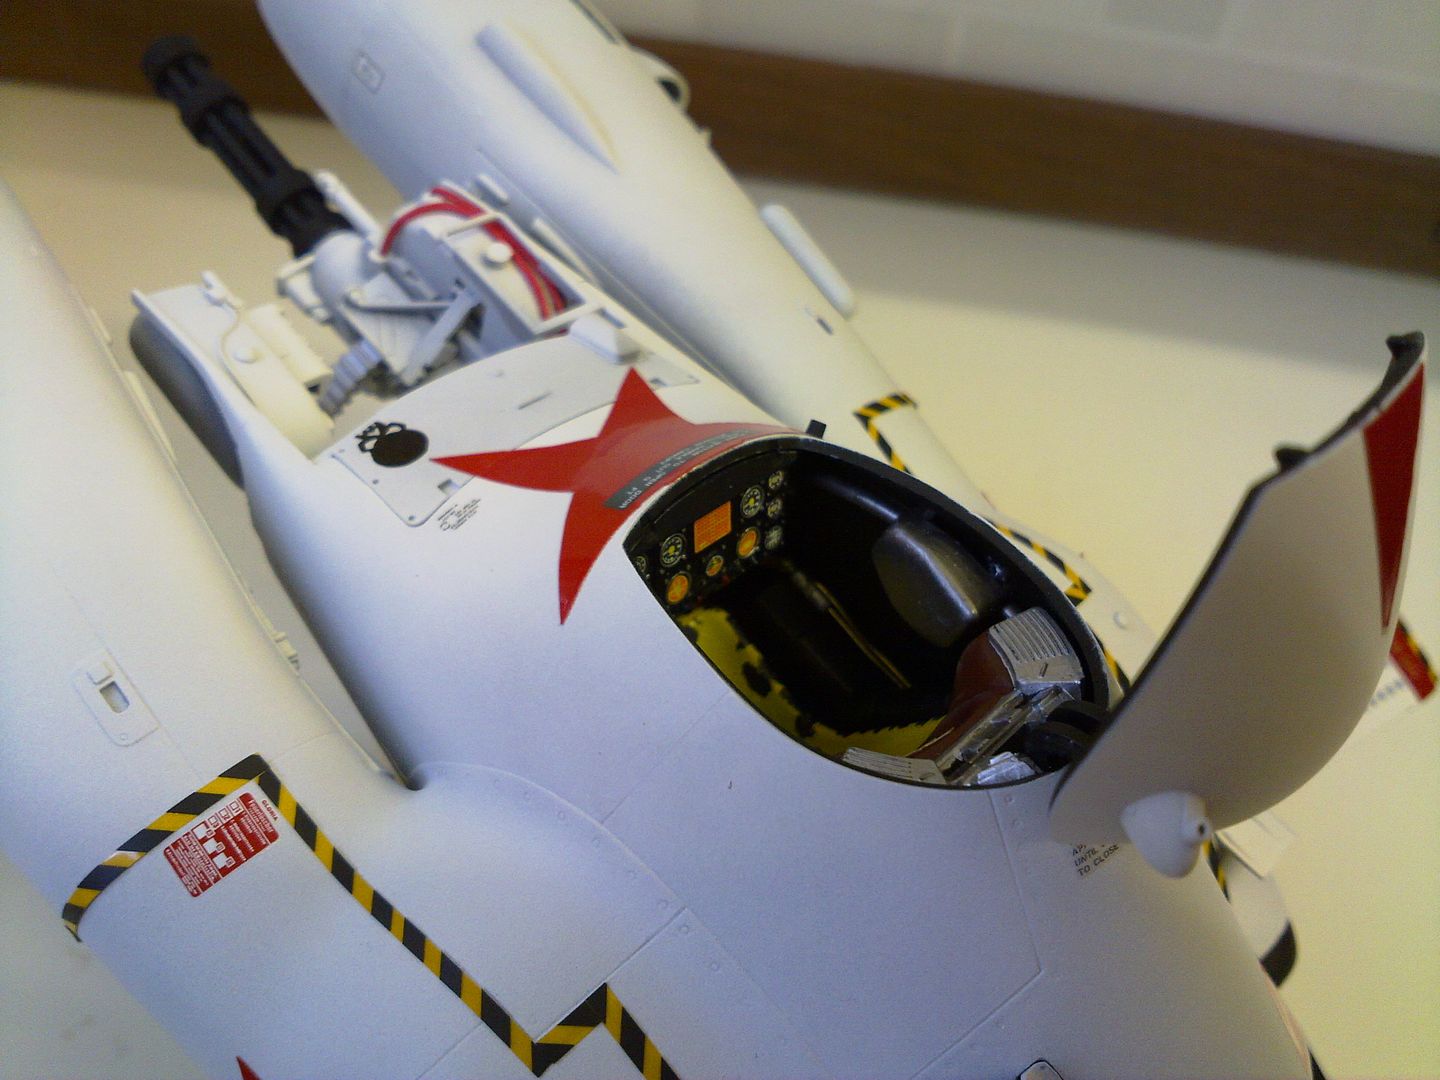
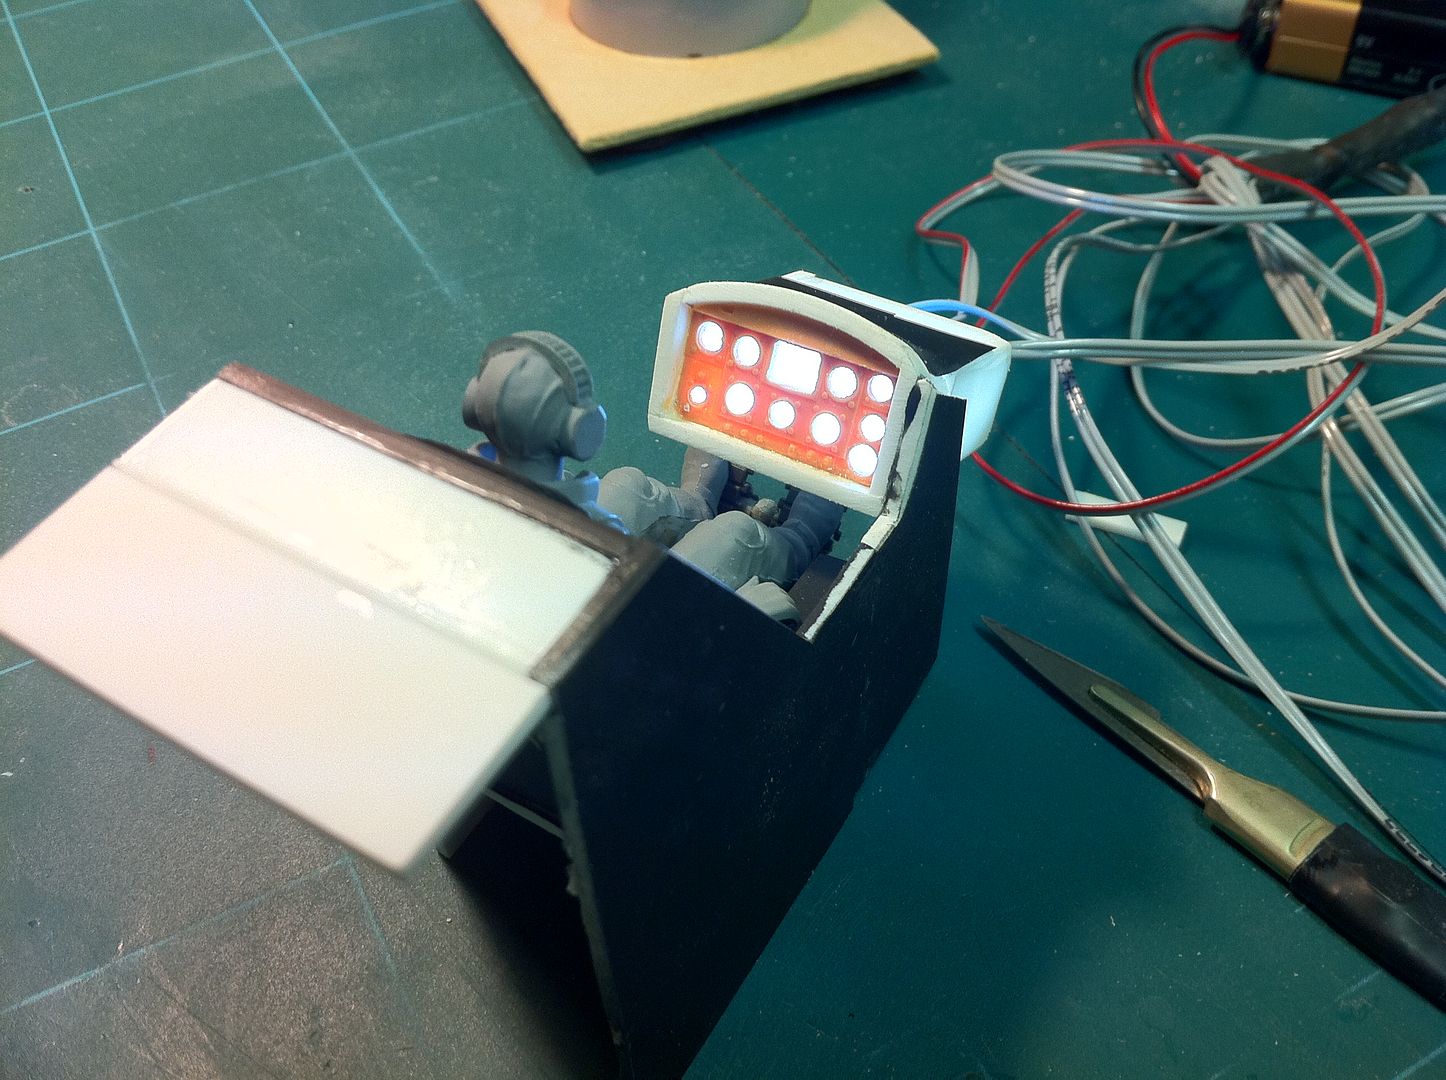
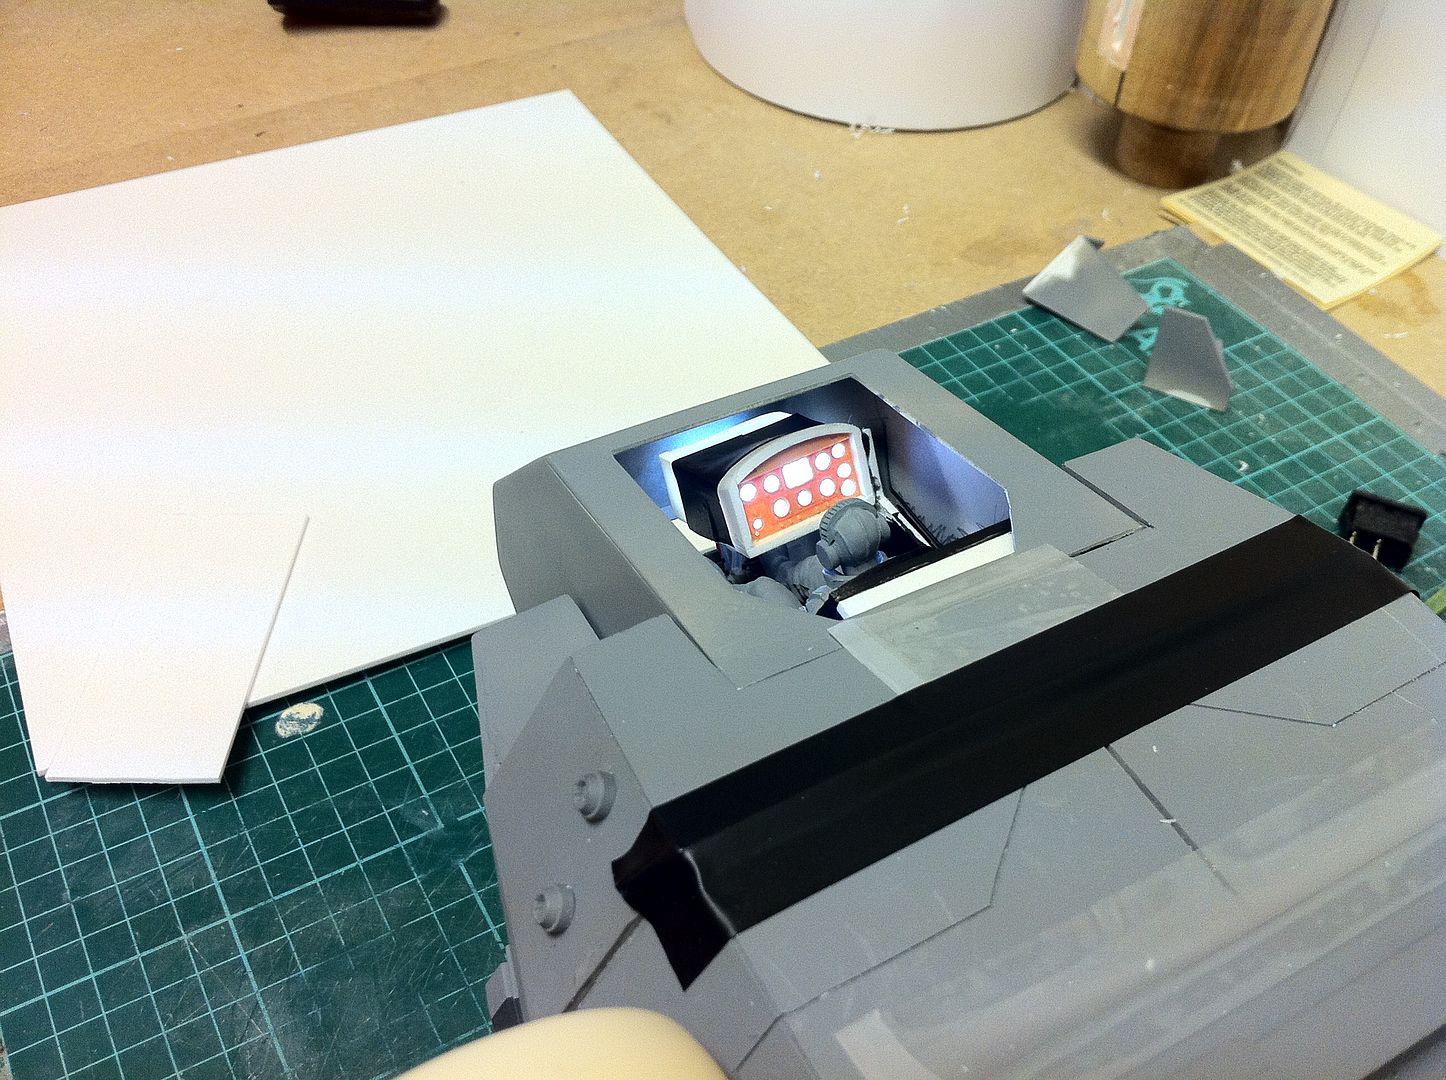
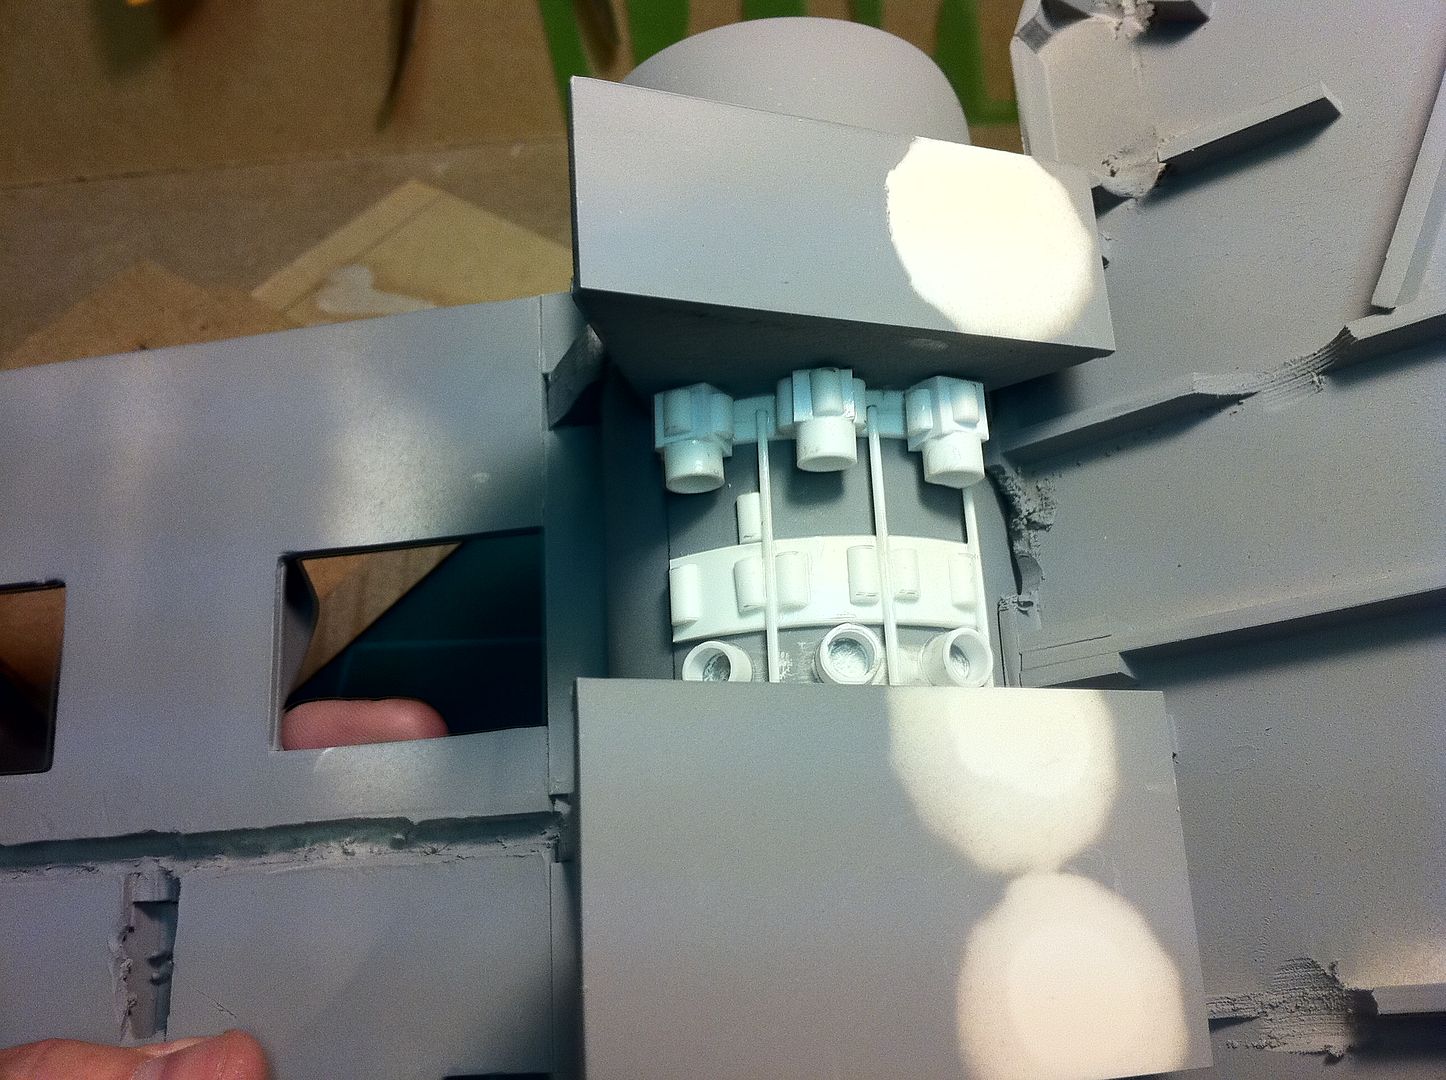
Thanks. I will get the light collector box made tomorrow for the lighting on the dash panel. I will also get all the pilot's controls done.
The only reason i deviated from the canon design by adding the dash was that in a craft like this with almost zero window visibility, the pilot would need the basic instrumentation...
18892
Post by: Bar
I went in a totally different direction tonight than what i thought i would.
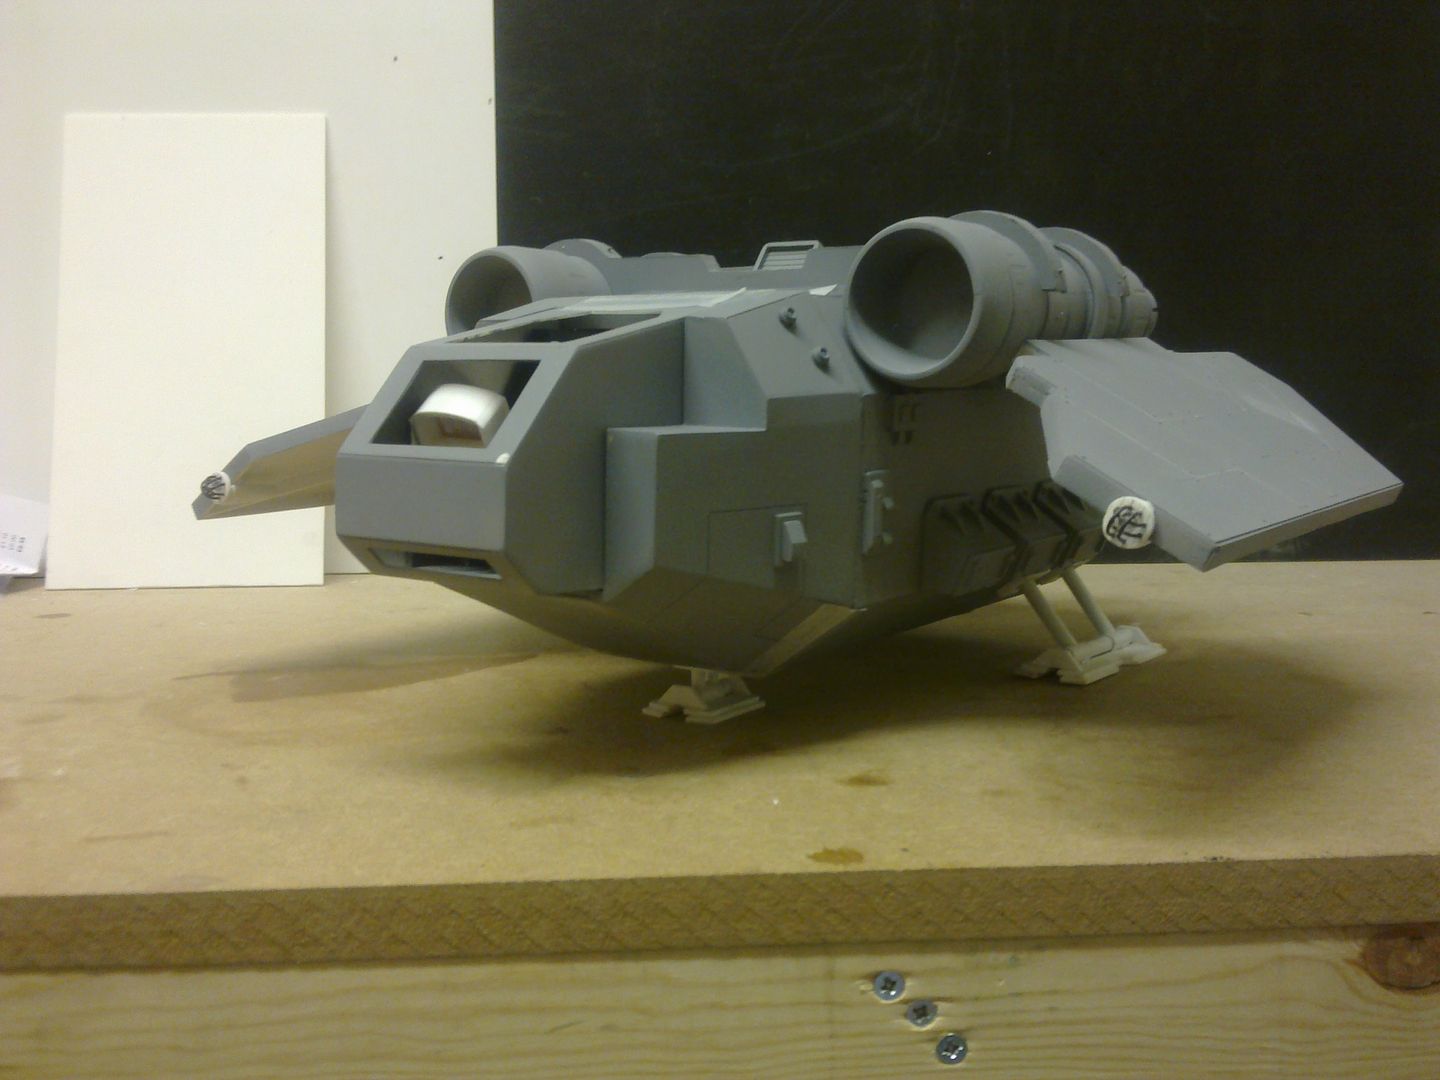
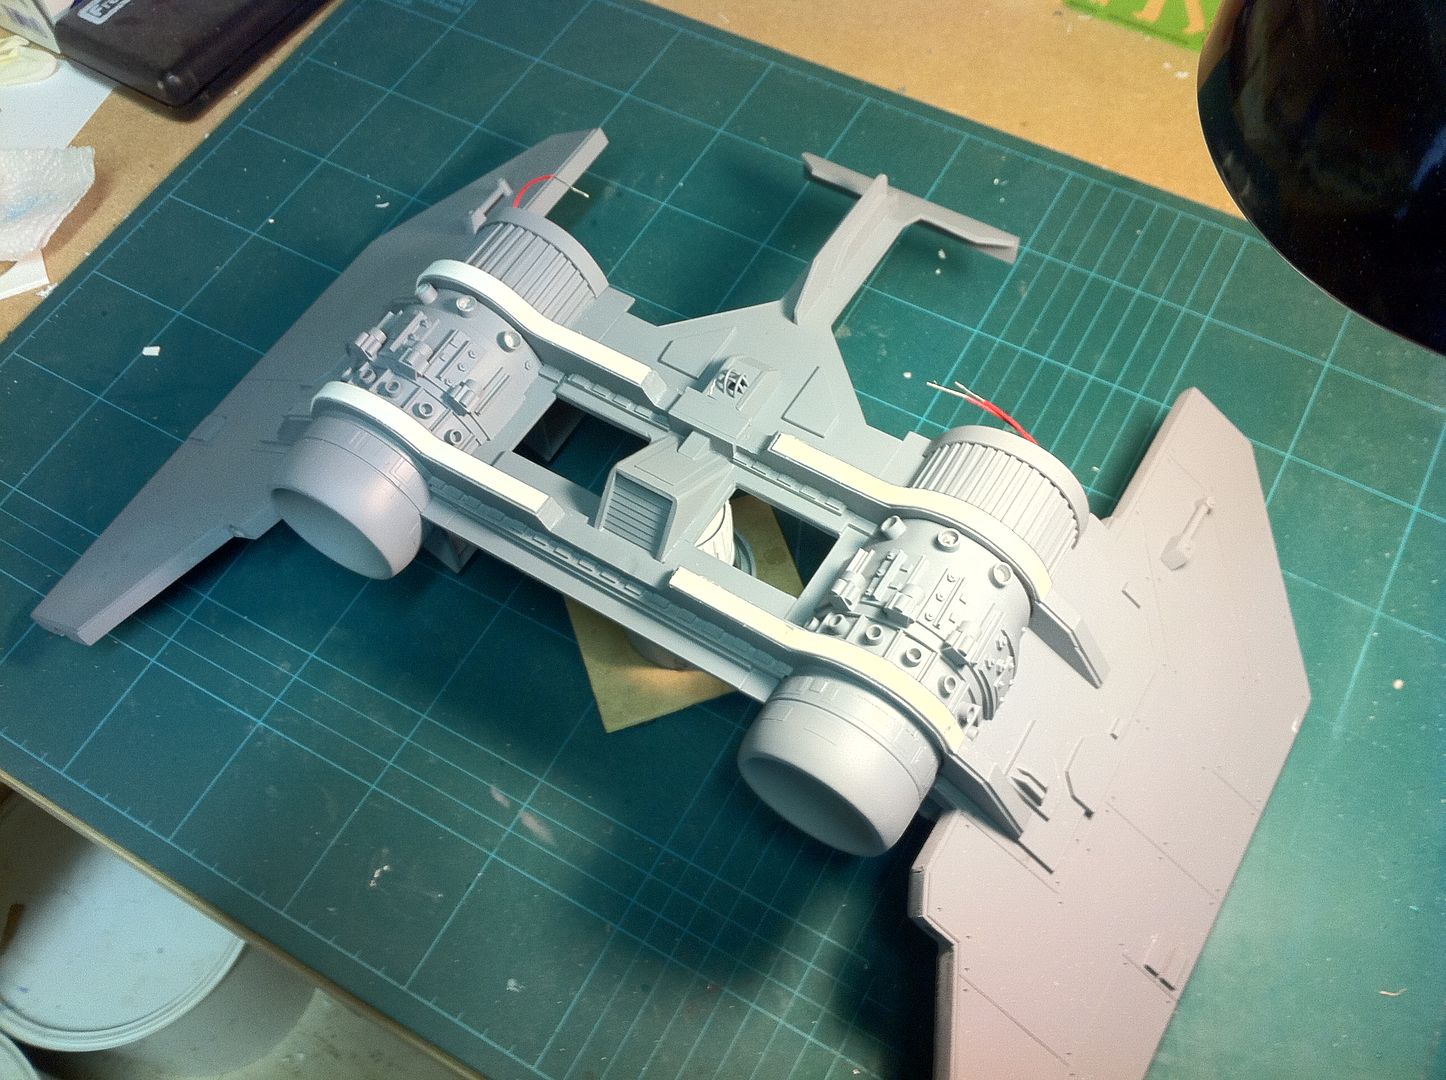
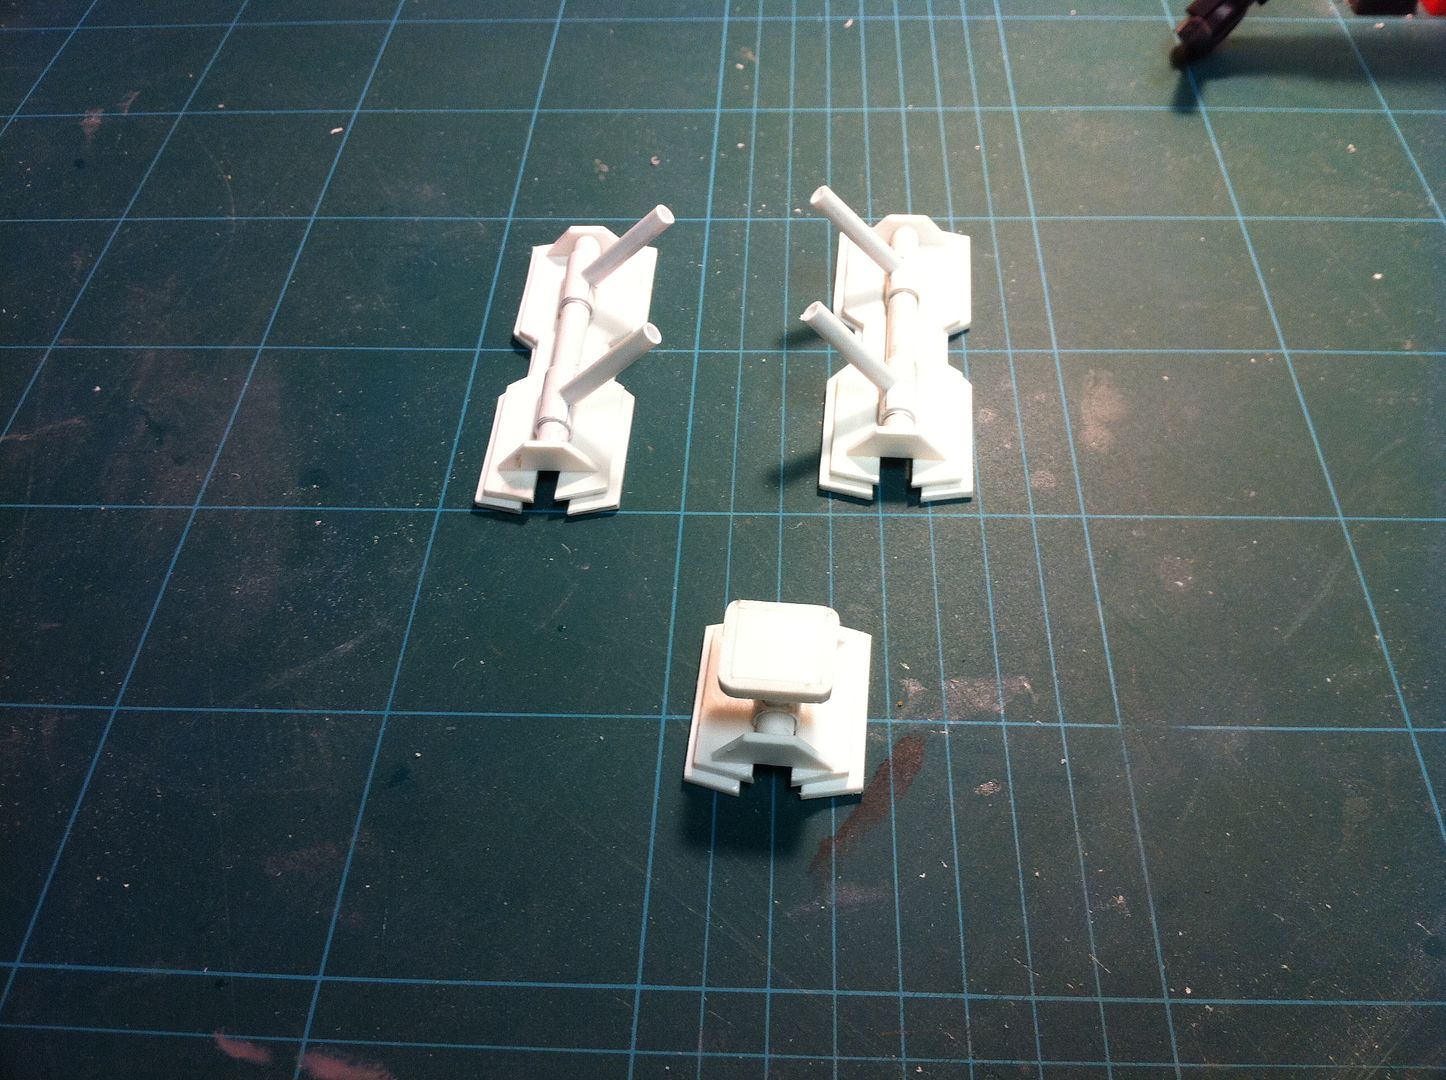
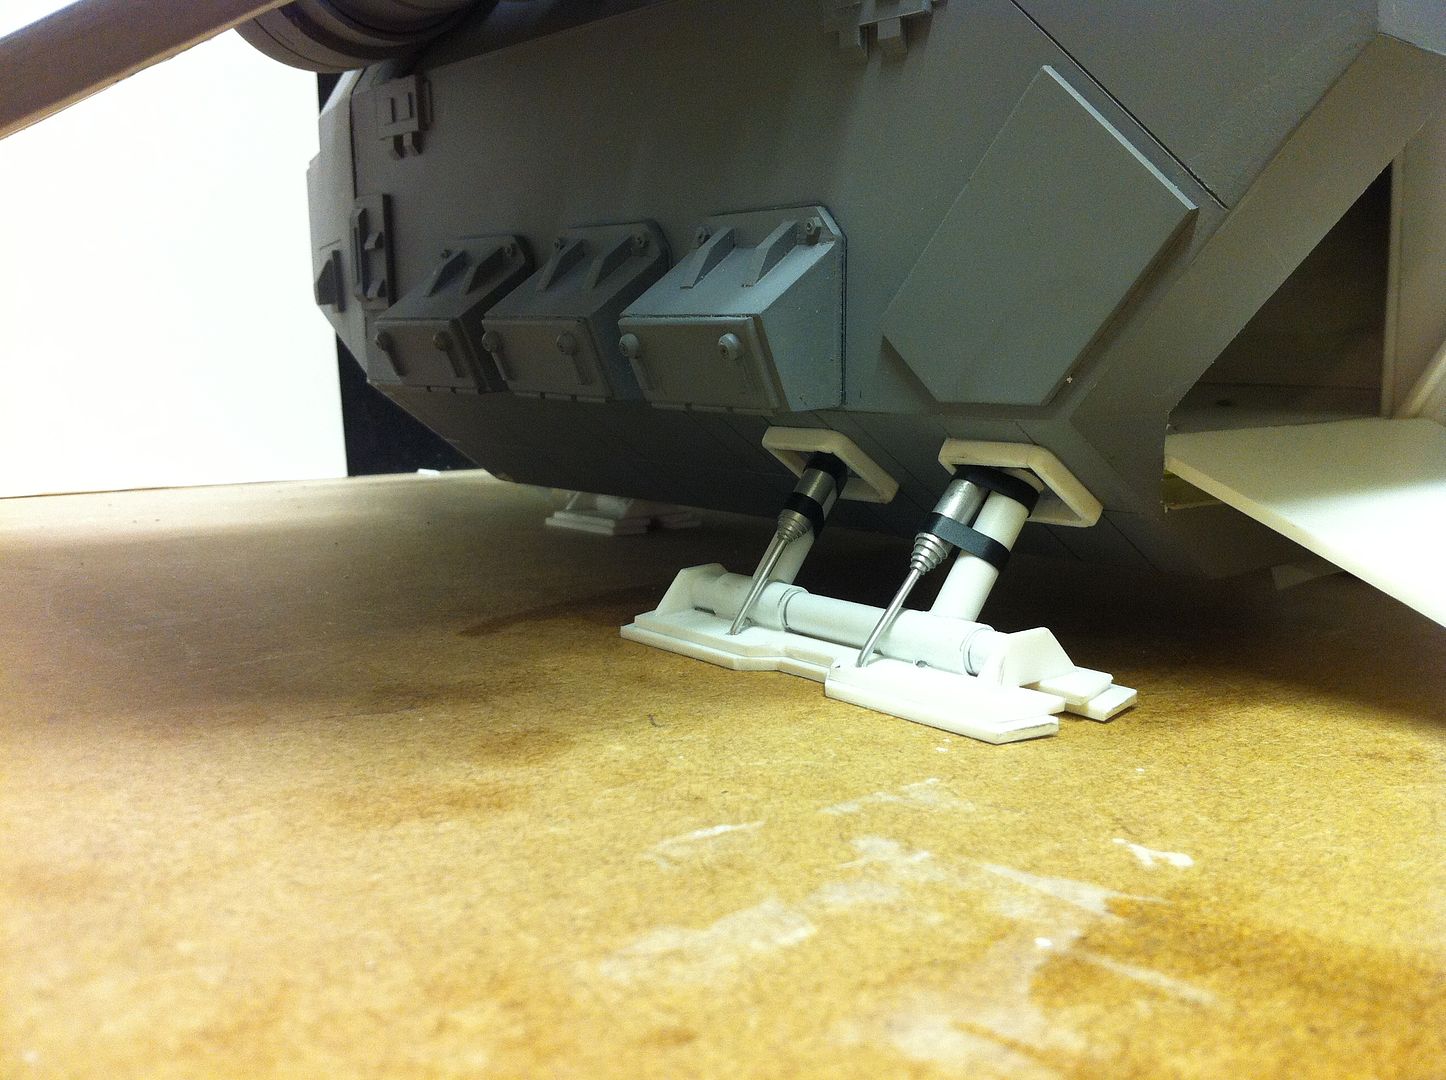
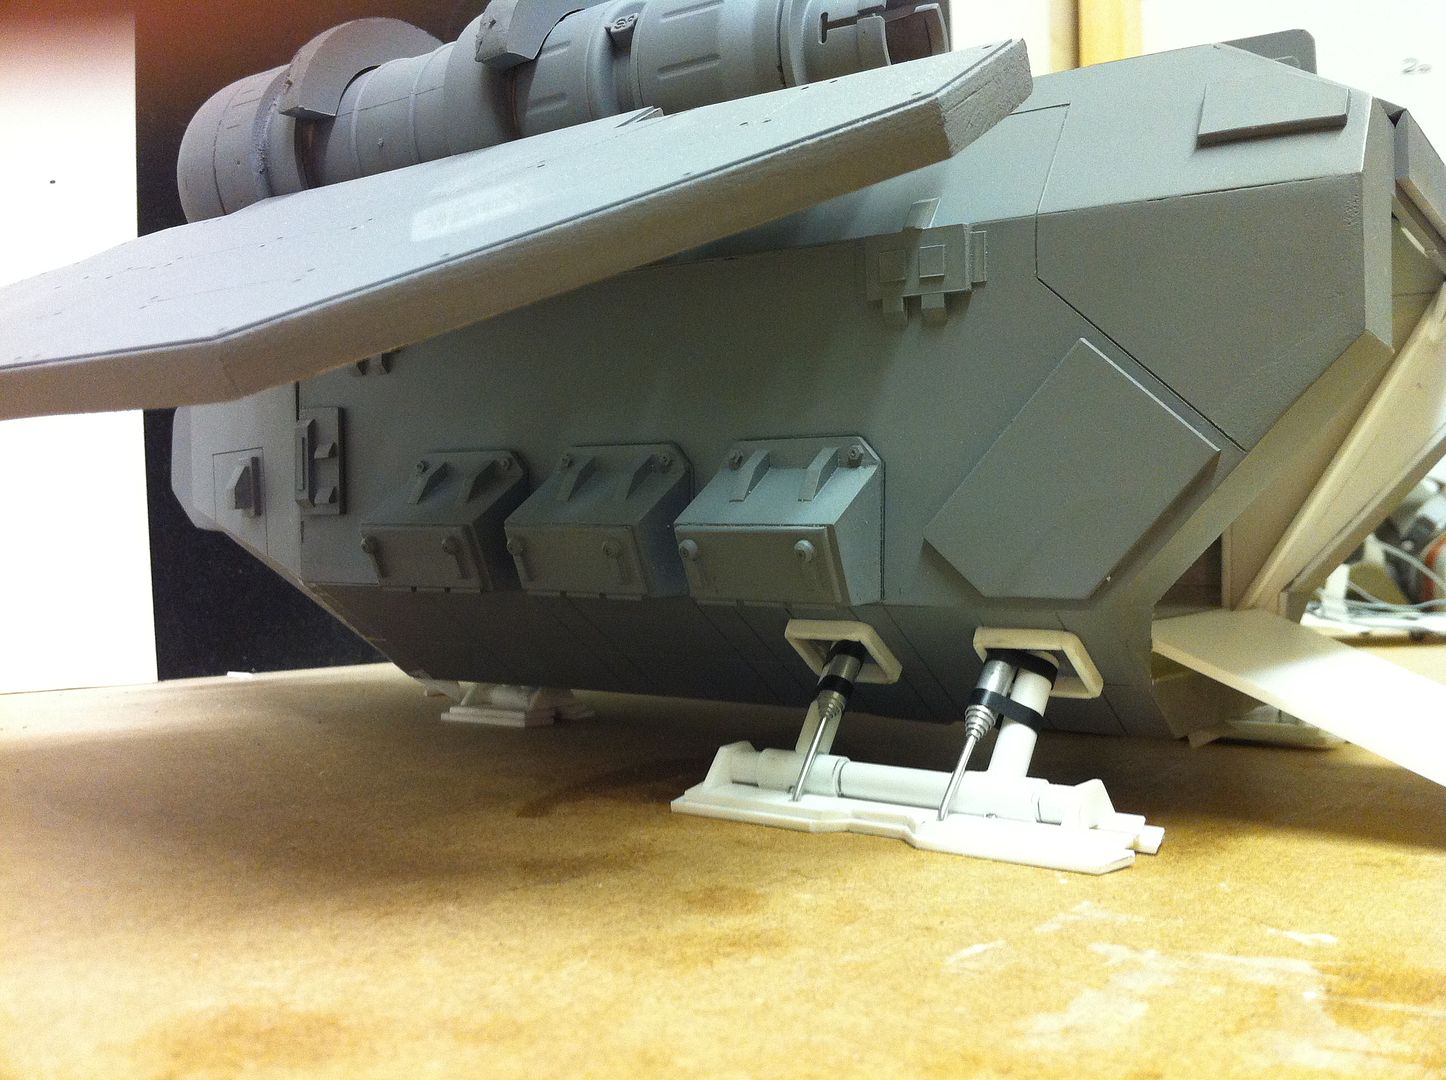
I spent a few hours on it tonight, getting the landing gear done, and the mounting plates for the aforementioned gear.
As the front gear is position over what is currently a split in the hull, i have made it a separate piece till the hull is glued together.
I should have pics of it sitting on it's gear tomorrow when the legs are all set.
11914
Post by: Nephilem
The gear looks a little gawky, but I figure that'll change if it gets some gribblies/detail in there, but I'd say the height is about right judging by the front gear at least. Otherwise you'd have rear gear and a landing skid or something for the front.
The only issue I see is that it makes the ramp look a little steep, but that might just be the angles involved.
18892
Post by: Bar
Nephilem wrote:The gear looks a little gawky, but I figure that'll change if it gets some gribblies/detail in there, but I'd say the height is about right judging by the front gear at least. Otherwise you'd have rear gear and a landing skid or something for the front.
The only issue I see is that it makes the ramp look a little steep, but that might just be the angles involved.
I have taken the criticism on board and have lowered the gear by 10mm. I should have pics tomorrow.
It looks a lot better now.
12028
Post by: Sarpedon_702
youz gotz skillz I must say!
18892
Post by: Bar
Sarpedon_702 wrote:youz gotz skillz I must say!
Thanks a lot. I appreciate your kind words.
24297
Post by: Viktor von Domm
i am normally not in a position to be in a lack of words....you sir done that now...and that was before you installed the lights... then i was only sitting at my desk with wide open eyes....same size as if in terror...but i am (still and will be...) amazed!!! and to even top all that you showed us your workspace...are you stockpiling for the zombycalypse and still being able to scratchbuilt and collect like hell? i can´t surpress my envy! only leaves me asking why someone would want to own so many exemplars of one single model...your shelf is totally off the scale for even a shop^^
did i tell you how much i am amazed by your work?
well i am a bit dazzled even now but i remeber doing so^^
cheers...for whatever reason that you needed my karma^^ you must have plenty of that by yourself^^
oh and i liked (loled more^^) to your photomontage of your car park^^
one thing so... what on earth are you working as to uphold such a hobbystyle?
i know i am nosy^^
cheers again, vik
18892
Post by: Bar
Viktor von Domm wrote: i am normally not in a position to be in a lack of words....you sir done that now...and that was before you installed the lights... then i was only sitting at my desk with wide open eyes....same size as if in terror...but i am (still and will be...) amazed!!! and to even top all that you showed us your workspace...are you stockpiling for the zombycalypse and still being able to scratchbuilt and collect like hell? i can´t surpress my envy! only leaves me asking why someone would want to own so many exemplars of one single model...your shelf is totally off the scale for even a shop^^
Lol. I DO have a lot of models. They ARE all for sale though. If i have anything anyone wants, i am always open to partring with it.
Thanks for your kind words. I try my hardest. And when that doesn't work, i try harder...
Viktor von Domm wrote:did i tell you how much i am amazed by your work?
well i am a bit dazzled even now but i remember doing so^^
Thanks again. I am not doing anything you couldn't do given enough time.
I once read somewhere that the difference between an apprentice and a master, is a very large pile of very small tricks.
My pile of small tricks grows ever larger.
Viktor von Domm wrote:cheers...for whatever reason that you needed my karma^^ you must have plenty of that by yourself^^
oh and i liked (loled more^^) to your photomontage of your car park^^
one thing so... what on earth are you working as to uphold such a hobbystyle?
i know i am nosy^^
cheers again, vik
Lol. No worries. I am a taxi driver ffor the family business. The place i have my workshop and my stash shelves is the company offices. I work there most days, making models if work is slow.
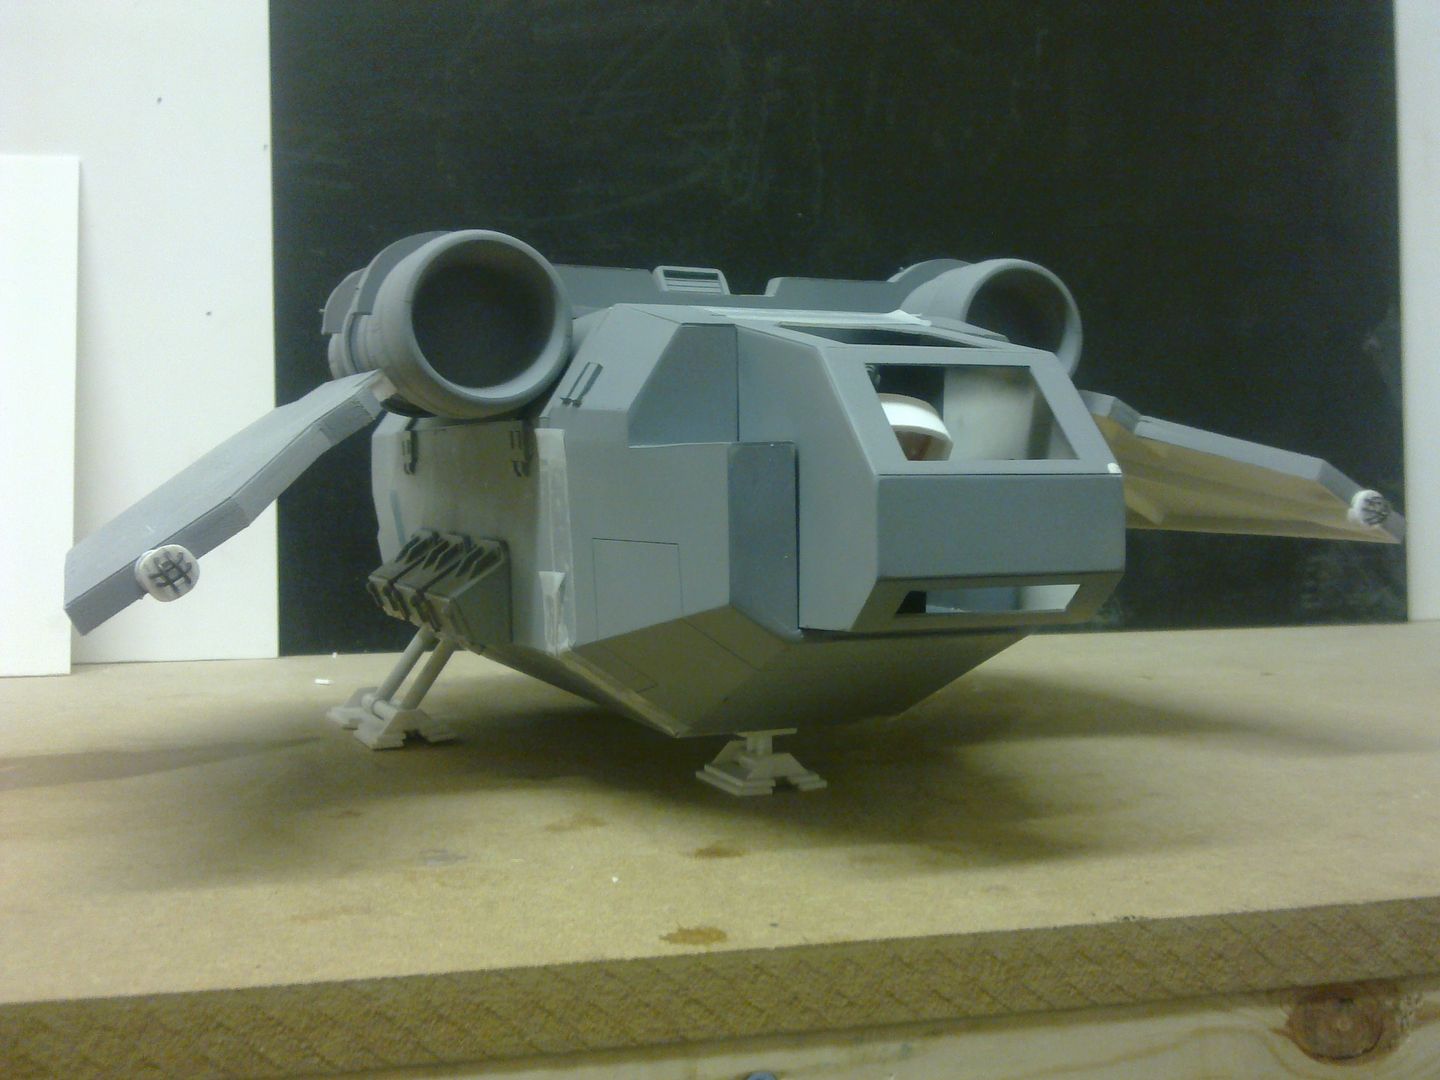
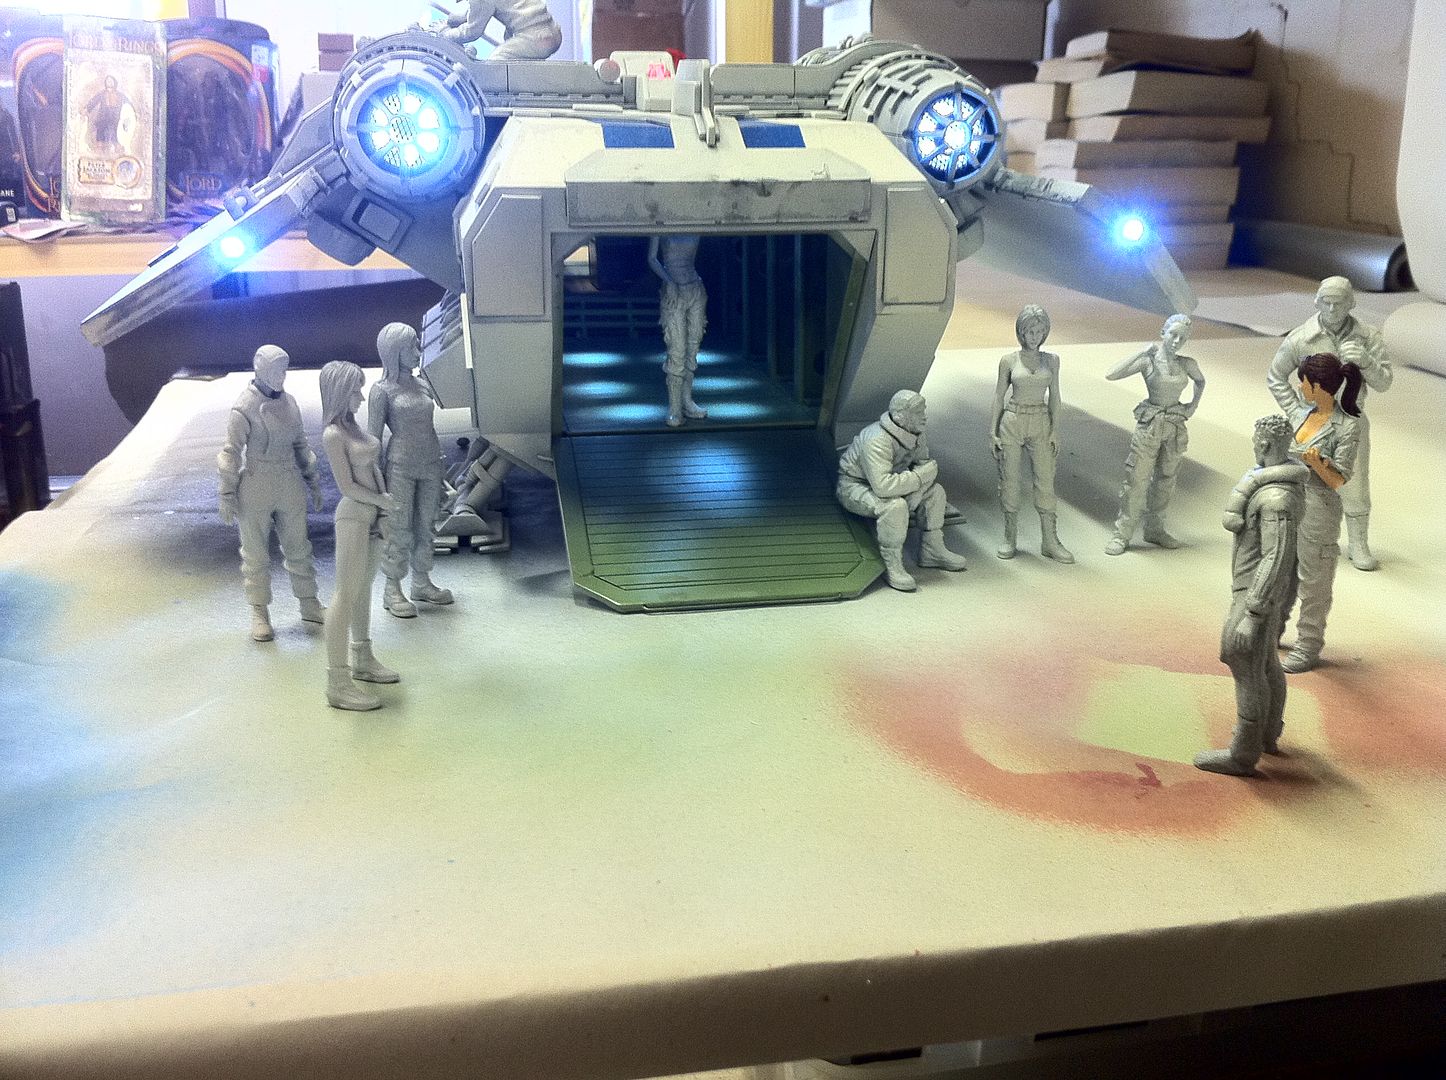
And i have a small update on the Arvus. The gear is pretty much set now. I added a couple of hydraulic rams to the legs just to make it look like there is more going on there than there actually is.
I will add cabling on as well. I am still waiting for the nav lights, so i am just tidyin up other little things in the meantime. I also took some pics in the daylight outside the office.
Enjoy the pics.
25141
Post by: Chibi Bodge-Battle
Those workers are hopeless.
Typical work scene that I thought was purely British* but appears to be universal.
One guy does the work while three or four others stand around and watch.
Get the others to pull their weight Bar, it'll get build quicker!
* Do I see Glenrothes on that bus?
My bro used to live near in Pitcoudie, now in Burntisland
Just seen the Saltaire though your Dakkaflag is the stars and bars
It is just a British phenomena after all!
Geography and working practices aside, looking grand
32775
Post by: Tortured-Robot
Well, that was fantastic!, awesome work.
26531
Post by: VikingScott
You sir have skills I am envious of.
Bloody brilliant work. I love it. And the figurines making mini dioramas for the pictures are awesome especially the chicks.
22192
Post by: whalemusic360
Wow, this is remarkable. I usually skip the scratch builds because they are normally meh, but if you can paint like you model, GD stuff for sure. Looking forward to more.
18892
Post by: Bar
Chibi Bodge-Battle wrote: Those workers are hopeless.
Typical work scene that I thought was purely British* but appears to be universal.
The women do all the gabbing, while the lone man gets the thing ready to fly, lol/
Chibi Bodge-Battle wrote:* Do I see Glenrothes on that bus?
My bro used to live near in Pitcoudie, now in Burntisland
Just seen the Saltaire though your Dakkaflag is the stars and bars
I don't know how that happened. I am very much in Glenrothes... How do you go about changing the flag???
Your Brother used to stay in Pitcoudie? It's a small world. I am half a mile away from there...
Tortured-Robot wrote:Well, that was fantastic!, awesome work.
Thanks a lot.
This is a very fun build.
VikingScott wrote: You sir have skills I am envious of.
Thanks. It's actually a very simple shape when you deconstruct it. This build has been quite easy.
VikingScott wrote:Bloody brilliant work. I love it. And the figurines making mini dioramas for the pictures are awesome especially the chicks.
Yeah. Those really help to sell the images. Well worth the investment of the initial purchase.
whalemusic360 wrote:Wow, this is remarkable. I usually skip the scratch builds because they are normally meh, but if you can paint like you model, GD stuff for sure. Looking forward to more.
Lol. I really struggle with painting. I CAN do it if i have to. But usually i leave the painting to others(I will post a few images below of things i have painted, but it's amateurish at best). I always say, play to your strengths. I am good at building. But i suck at painting.
When i see the magic that you guys do with a paintbrush on 28mm figures... It takes my breath away. That's a skill i don't understand, and could never attain.
But this build is big enough. I might give the painting a go...
Here are "examples" of my paintwork...(Don't laugh... You'll make me cry... )


24297
Post by: Viktor von Domm
i think you don´t have to be so humble about your painting ...looks very good to me and you use certain techniques that i think i will try out one day myself too... that grey stuff you "put" on as a masking for the tigerstriped "thingy" looks like i should investigate for...
about the: I once read somewhere that the difference between an apprentice and a master, is a very large pile of very small tricks.
My pile of small tricks grows ever larger.
thats a very sound thought pattern...butb the road to that pile is sweaty and holds many brusies and cuts... i´ve read somewhere that in martial art before there wasn´t the concept of coloured belts...masters used their belts for such a long timje that a balck belt happend due long wearing...so newcommers would have cleaner and brighter belts...and when they mature then these get darkend by use...
the new hydraulics i haven´t seen done in that way before but look very working nonetheless!
oh and one more thing... those repainted Star Wars models...why didn´t you too change the figures too?
besides the destroyer turned flyer is a very cool idea^^
cheers, vik
2326
Post by: shasolenzabi
Amazing.
22192
Post by: whalemusic360
I think your shorting yourself on painting as well. While probably not GD levels, you have strong, sharp colors, and great weathering. I particularly like the Viper in NASA paint. Maybe you could team up with someone like Sons of Orar, who has started painting larger scale tanks with amazing detail.
11914
Post by: Nephilem
You're doing some awesome work here... no wait, sorry. You're doing a LOT, of awesome work here. I agree with whalemusic360 too, you sell yourself short on your paint work.
The NASA Viper got a chuckle out of me too (and the WIP shots of that I forgot to say were really informative!)
Any further plans for detailing the gear at this stage (I've a fascination with gribblies.. what can I say)? Really enjoying watching this project evolve!
18892
Post by: Bar
whalemusic360 wrote:I think your shorting yourself on painting as well. While probably not GD levels, you have strong, sharp colors, and great weathering. I particularly like the Viper in NASA paint. Maybe you could team up with someone like Sons of Orar, who has started painting larger scale tanks with amazing detail.
Thanks. While i am not totally inept, as you say, it's not any kind of award winning skill i have with painting. I leave that to those who excel in painting. I have no need or desire to be great at everything. I accept that i have strengths and weaknesses. And a real weakness i have is for painting. But it's not a problem for me. I leave that to the experts.
shasolenzabi wrote:Amazing.
Thanks a lot.
I appreciate that.
Viktor von Domm wrote: i think you don´t have to be so humble about your painting ...looks very good to me and you use certain techniques that i think i will try out one day myself too... that grey stuff you "put" on as a masking for the tigerstriped "thingy" looks like i should investigate for...
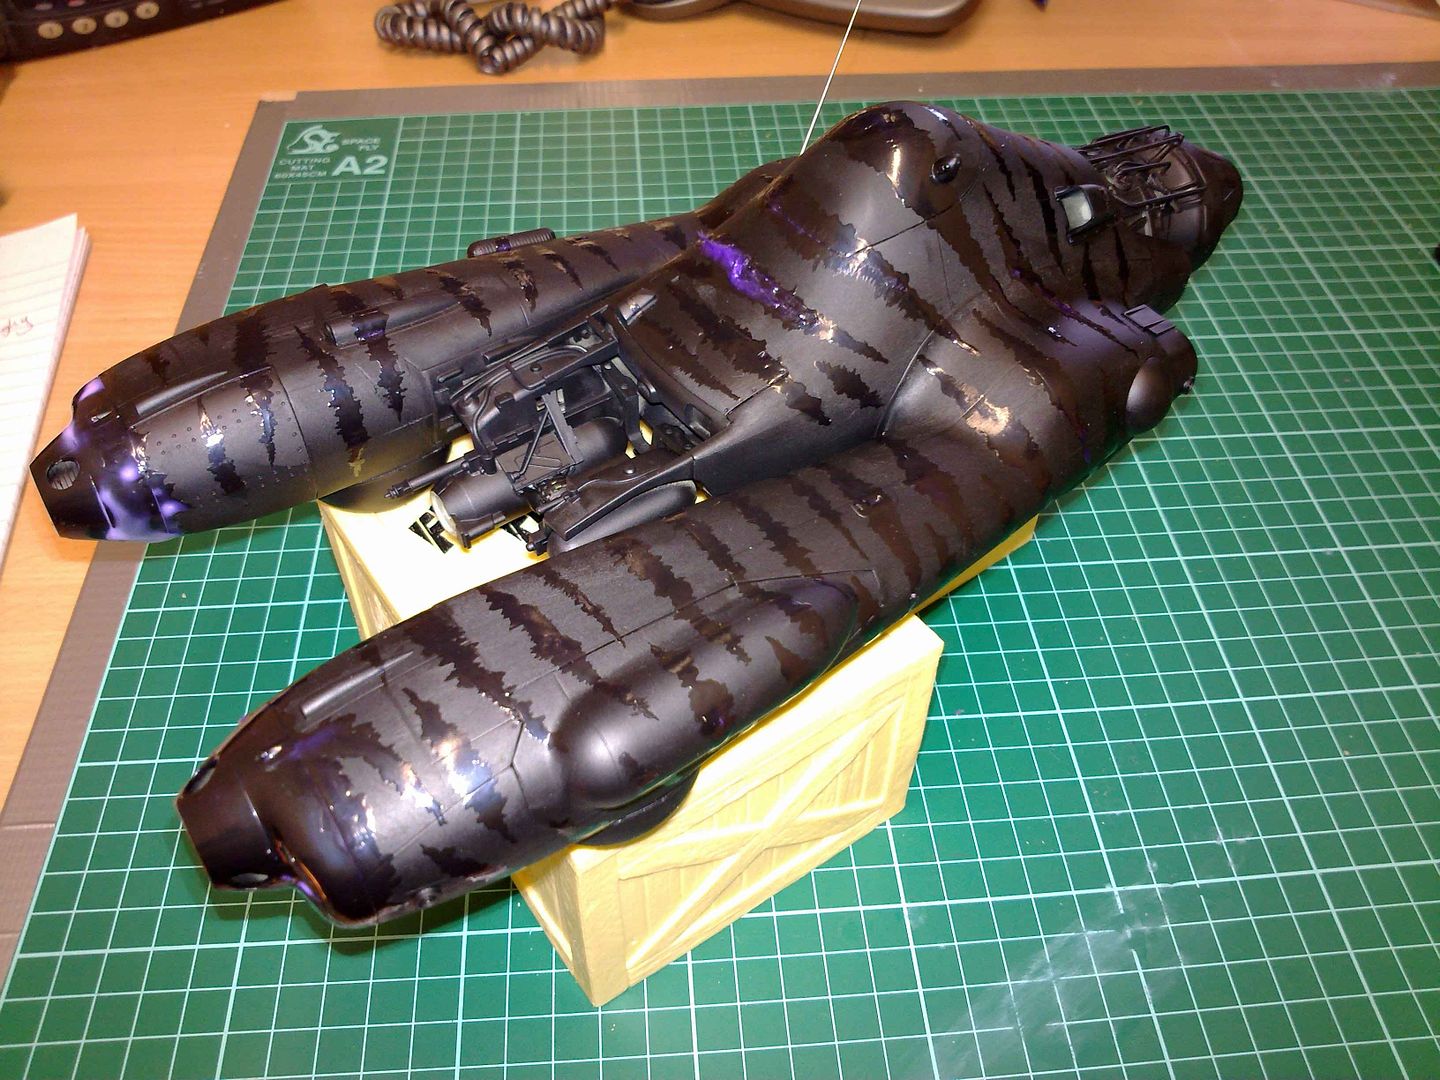
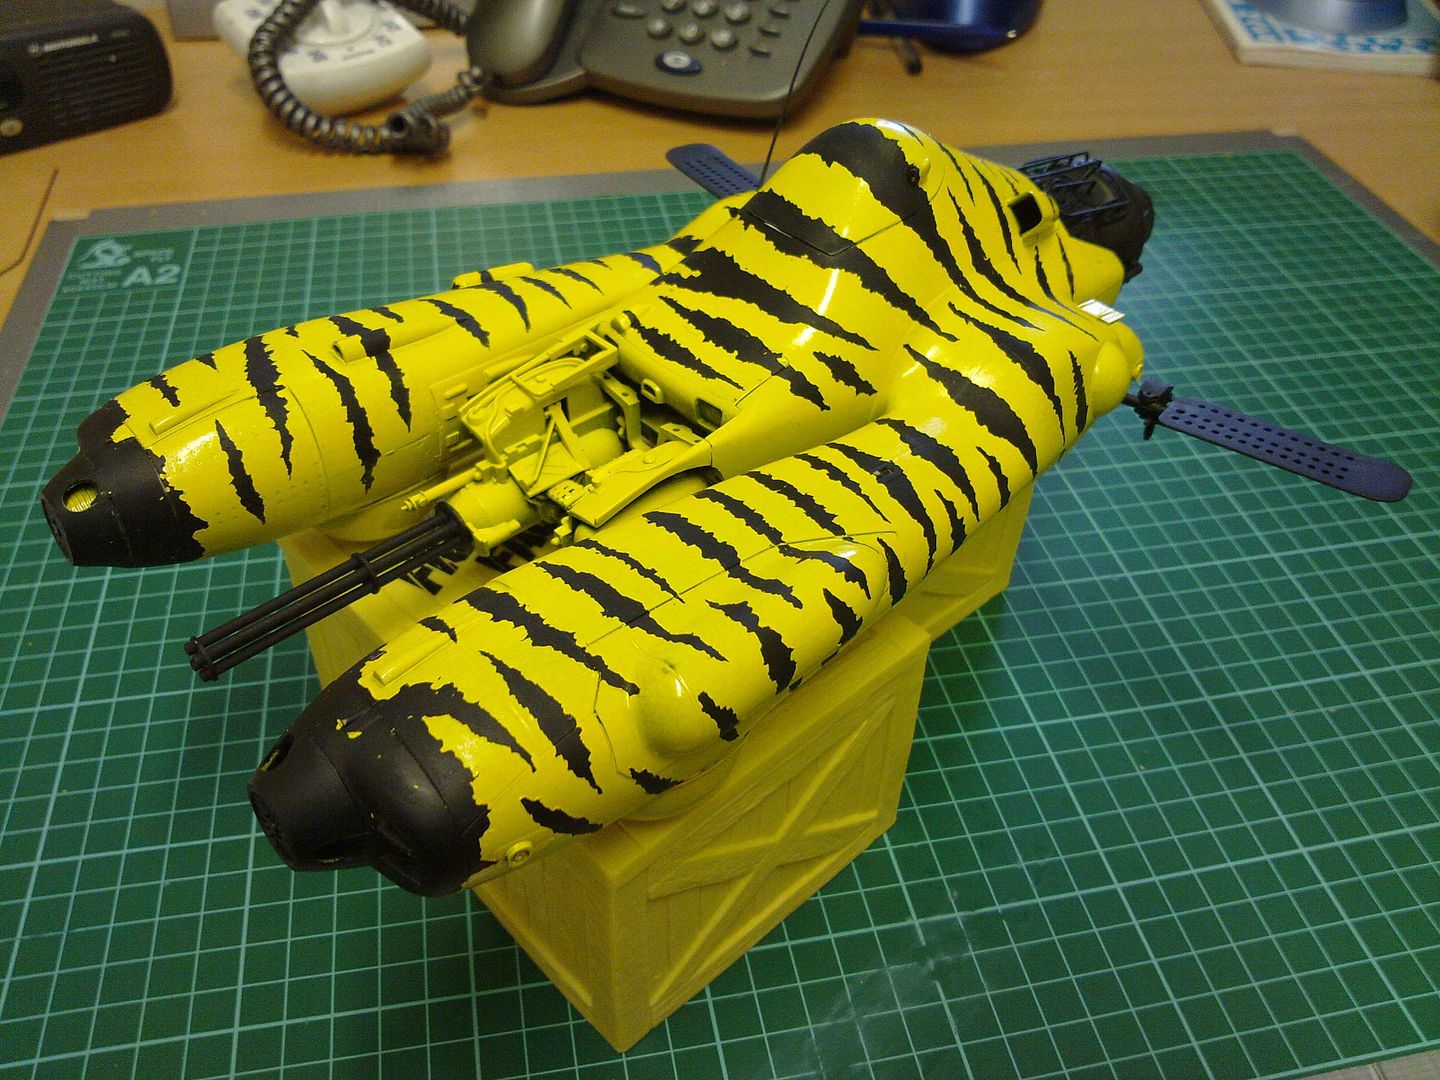
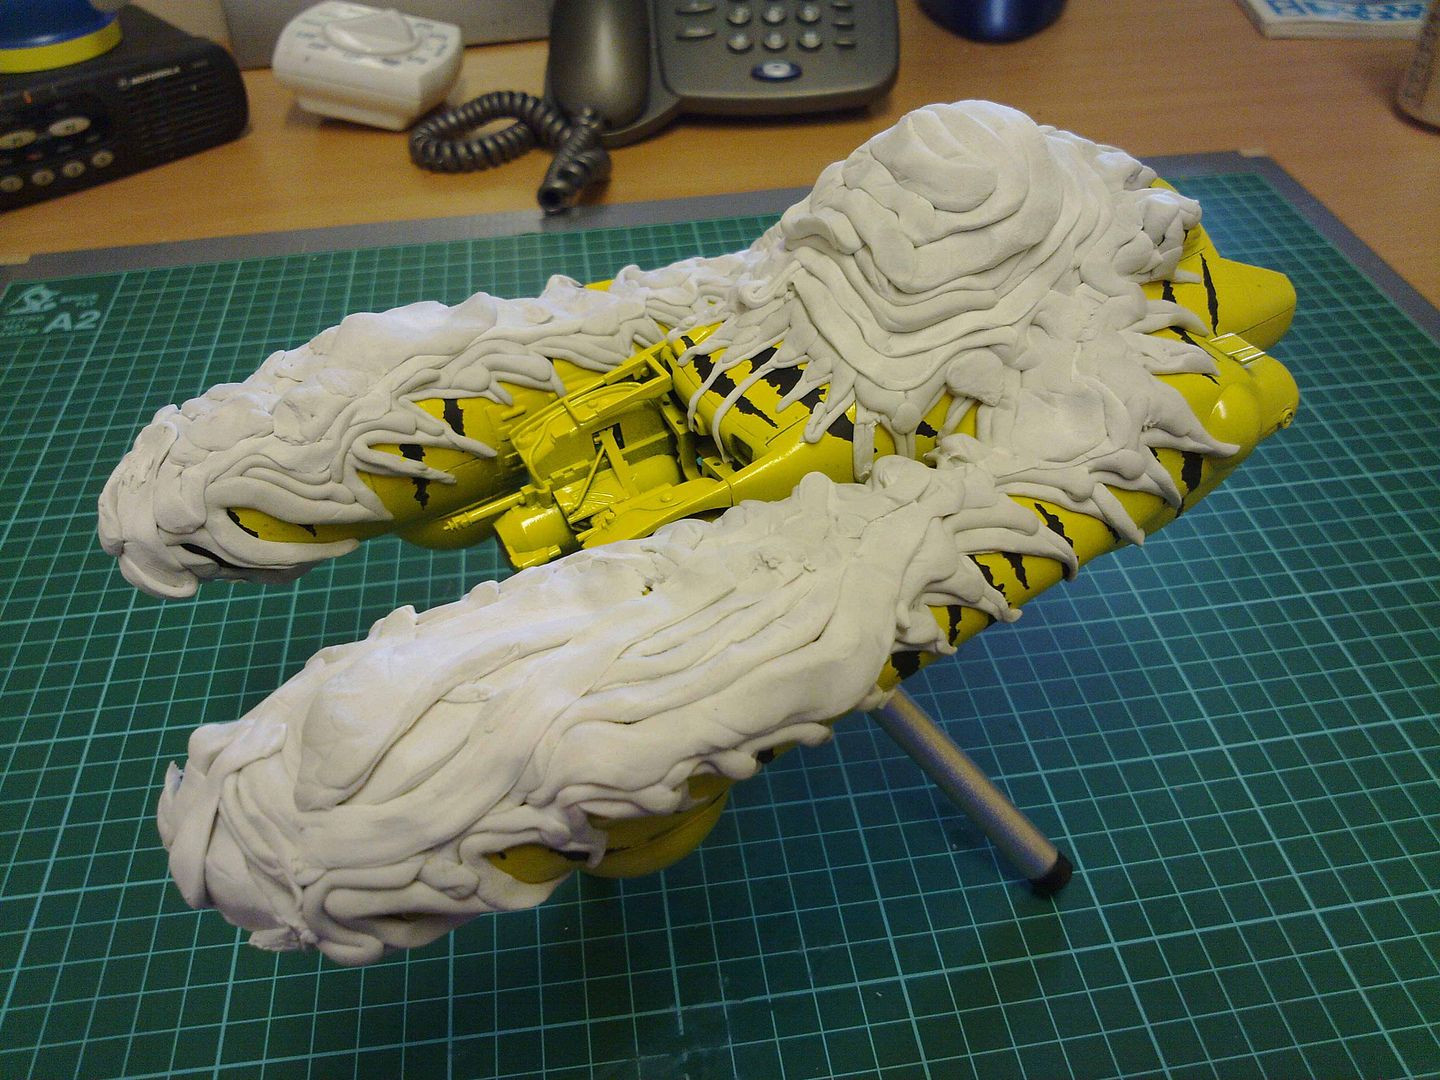
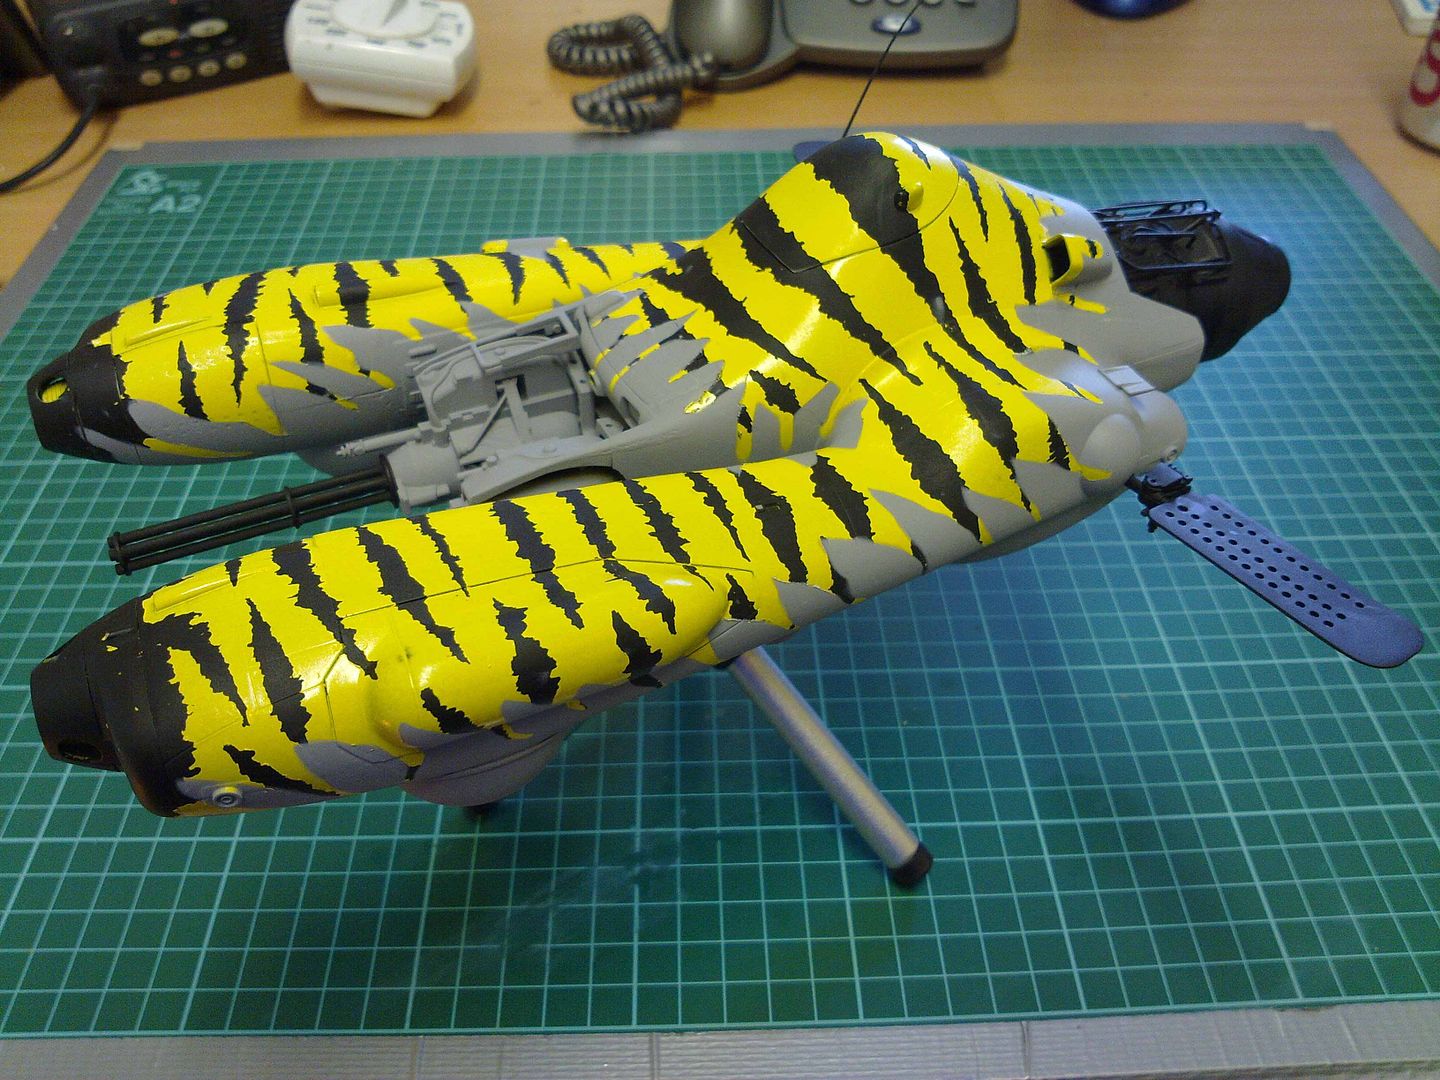
To mask it from the yellow to the greay primer? That was a cheap, white, locally available version of blu tack. It's rubbish for it's intended purpose, so i use it as a masking agent... And then throw it in the bin when i am done with it!
Viktor von Domm wrote:about the: I once read somewhere that the difference between an apprentice and a master, is a very large pile of very small tricks.
My pile of small tricks grows ever larger.
thats a very sound thought pattern...butb the road to that pile is sweaty and holds many brusies and cuts... i´ve read somewhere that in martial art before there wasn´t the concept of coloured belts...masters used their belts for such a long timje that a balck belt happend due long wearing...so newcommers would have cleaner and brighter belts...and when they mature then these get darkend by use...
That makes a lot of sense. Thanks for that little piece of info. I will remember that.
Viktor von Domm wrote:the new hydraulics i haven´t seen done in that way before but look very working nonetheless!
oh and one more thing... those repainted Star Wars models...why didn´t you too change the figures too?
Those were just quick builds. I didn't bother replacing Obi-Wan and Anakin. I suppose i should have.
Viktor von Domm wrote:besides the destroyer turned flyer is a very cool idea^^
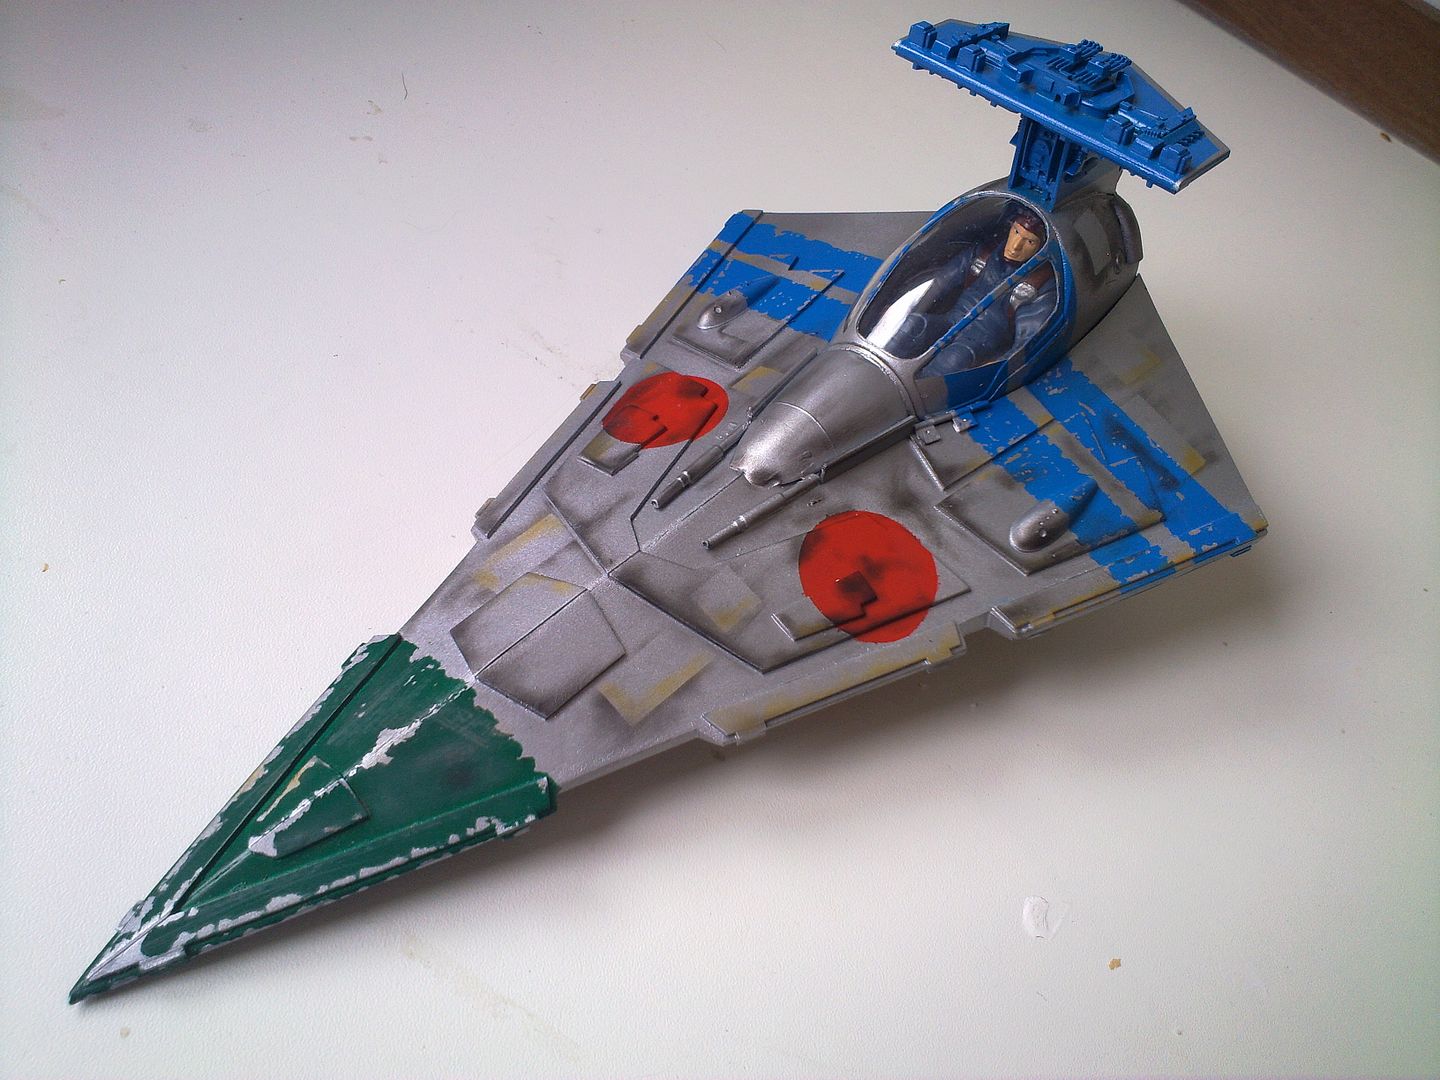
Thanks. That was almost completely scratchbuilt except the cockpit. Just an idea to make an "Awacs" Jedi Starfighter that pointed towards the Star Destroyer.
Nephilem wrote: You're doing some awesome work here... no wait, sorry. You're doing a LOT, of awesome work here. I agree with whalemusic360 too, you sell yourself short on your paint work.
The NASA Viper got a chuckle out of me too (and the WIP shots of that I forgot to say were really informative!)
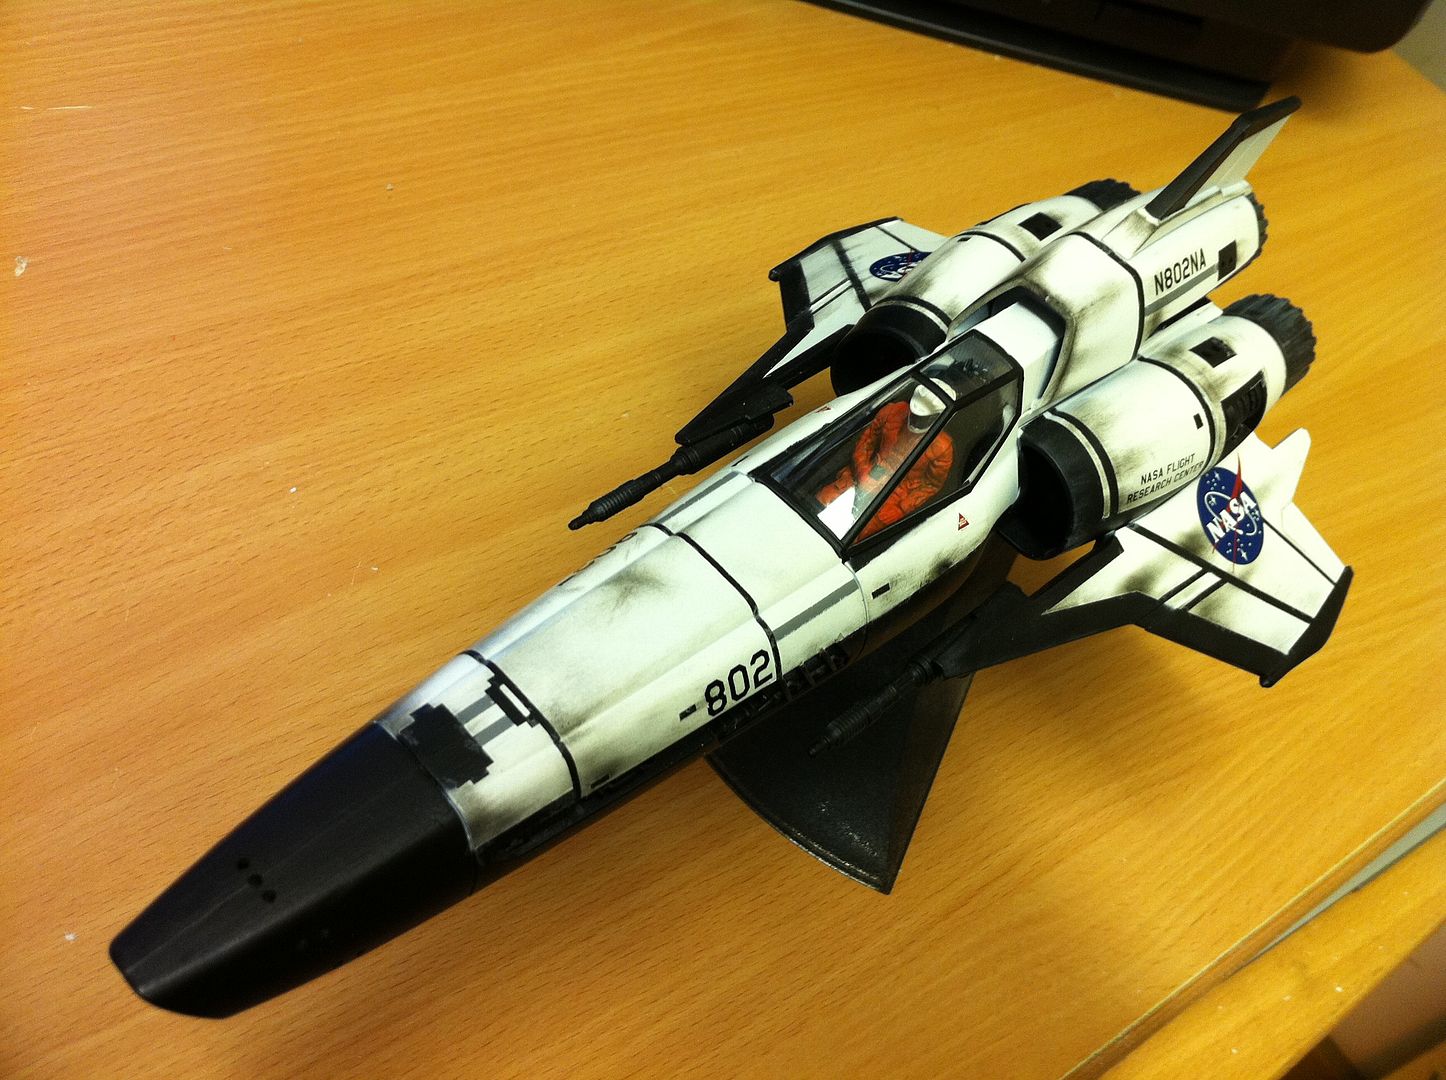
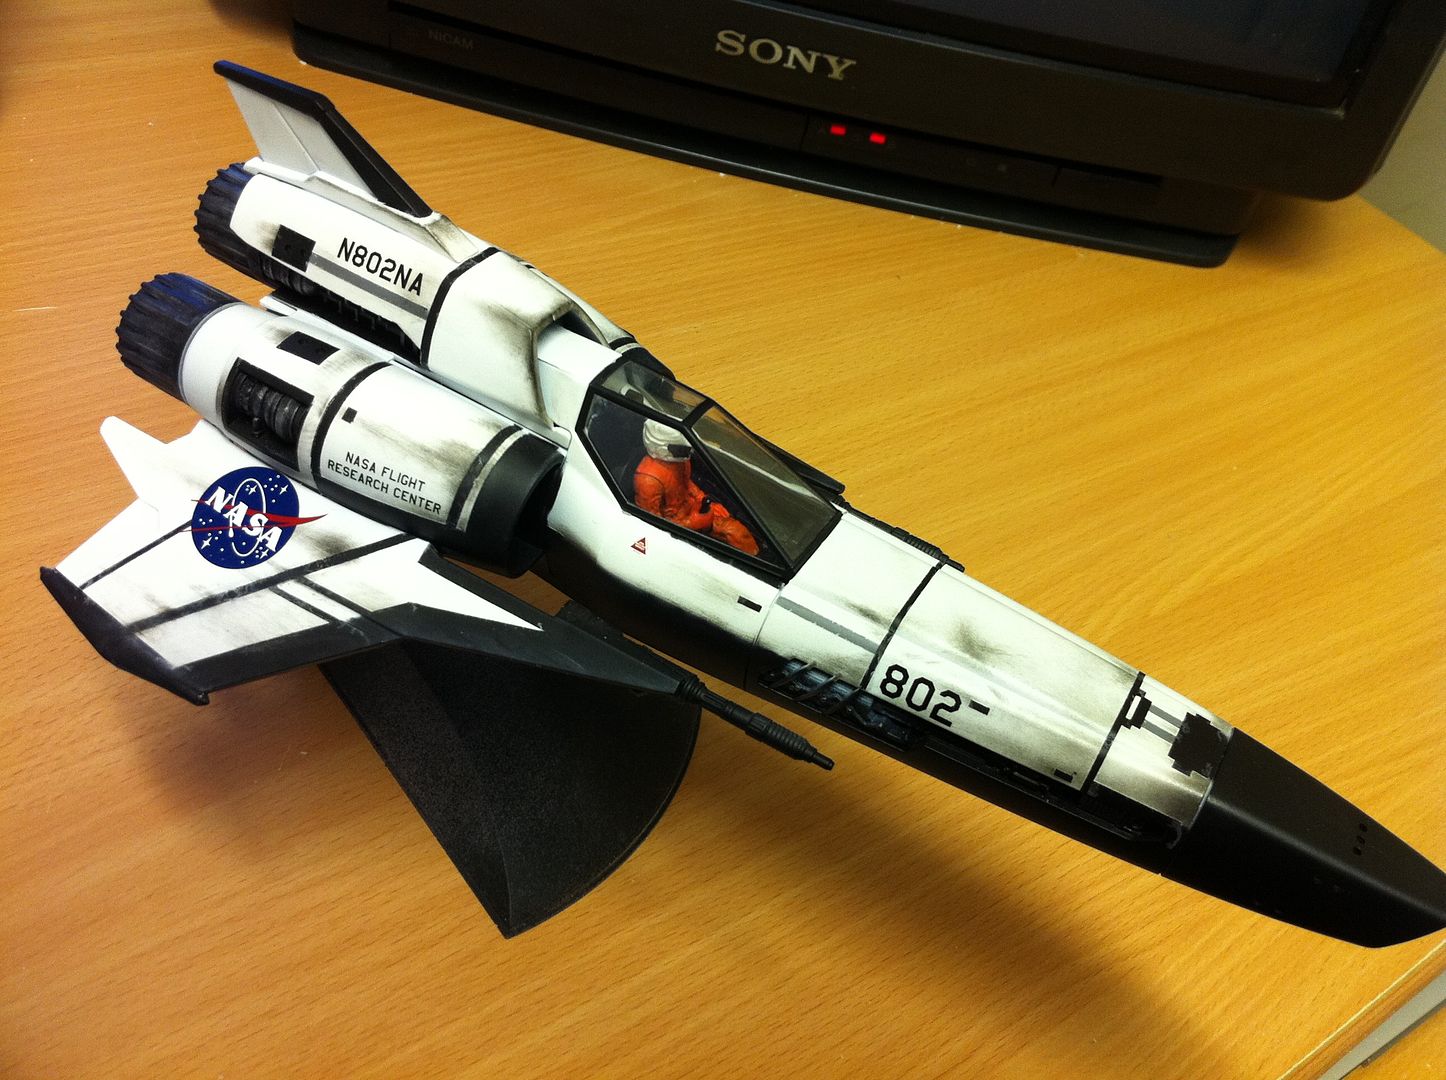
Thanks. That was built as a gift for my Brother's father in law. He is the head propulsion engineer for the shuttle at NASA. He has no clue about BSG, but will no doubt appreciate the paintjob...
Nephilem wrote: Any further plans for detailing the gear at this stage (I've a fascination with gribblies.. what can I say)? Really enjoying watching this project evolve!
Yes. There will be more details added. But i am trying to stick to the original Arvus recipe as much as possible.
2326
Post by: shasolenzabi
I have recently begun scratch-building in the last year or so, but this stuff is light years past my newbie level skills.
Sample pic: [/img]  Automatically Appended Next Post: Automatically Appended Next Post: Some GW bitz added.
18892
Post by: Bar
Very nice. The best part about scratchbuilding your own projects is that you can stick to the original designs if you like, or create totally new ones out of your own imagination.
It's almost addictive when you actually realise you are only limited by what you can imagine(Which is no limit at all...).
I picked up a Storm Raven today. I really like the shape. That might be the next project after the Arvus for the "1/20 treatment"...
Some small measure of movement today. The Nav lights arrived.
Enjoy.
http://www.youtube.com/watch?v=9DUNqrMcdJ8
25853
Post by: winterdyne
The soviet Falke is lush mate.
18892
Post by: Bar
winterdyne wrote:The soviet Falke is lush mate.
Thanks a lot. I get stick all the time because i never weathered it...
I am afraid to...
If you scroll down just past the 2/3rds mark of this gallery, you can see the build images(When you see the dashboard being decalled, that's the start)
I appreciate your kind words. I looked on your coolminiornot profile. Your painting is awesome. A standard i can aspire to but will never reach. Kudos!
18892
Post by: Bar
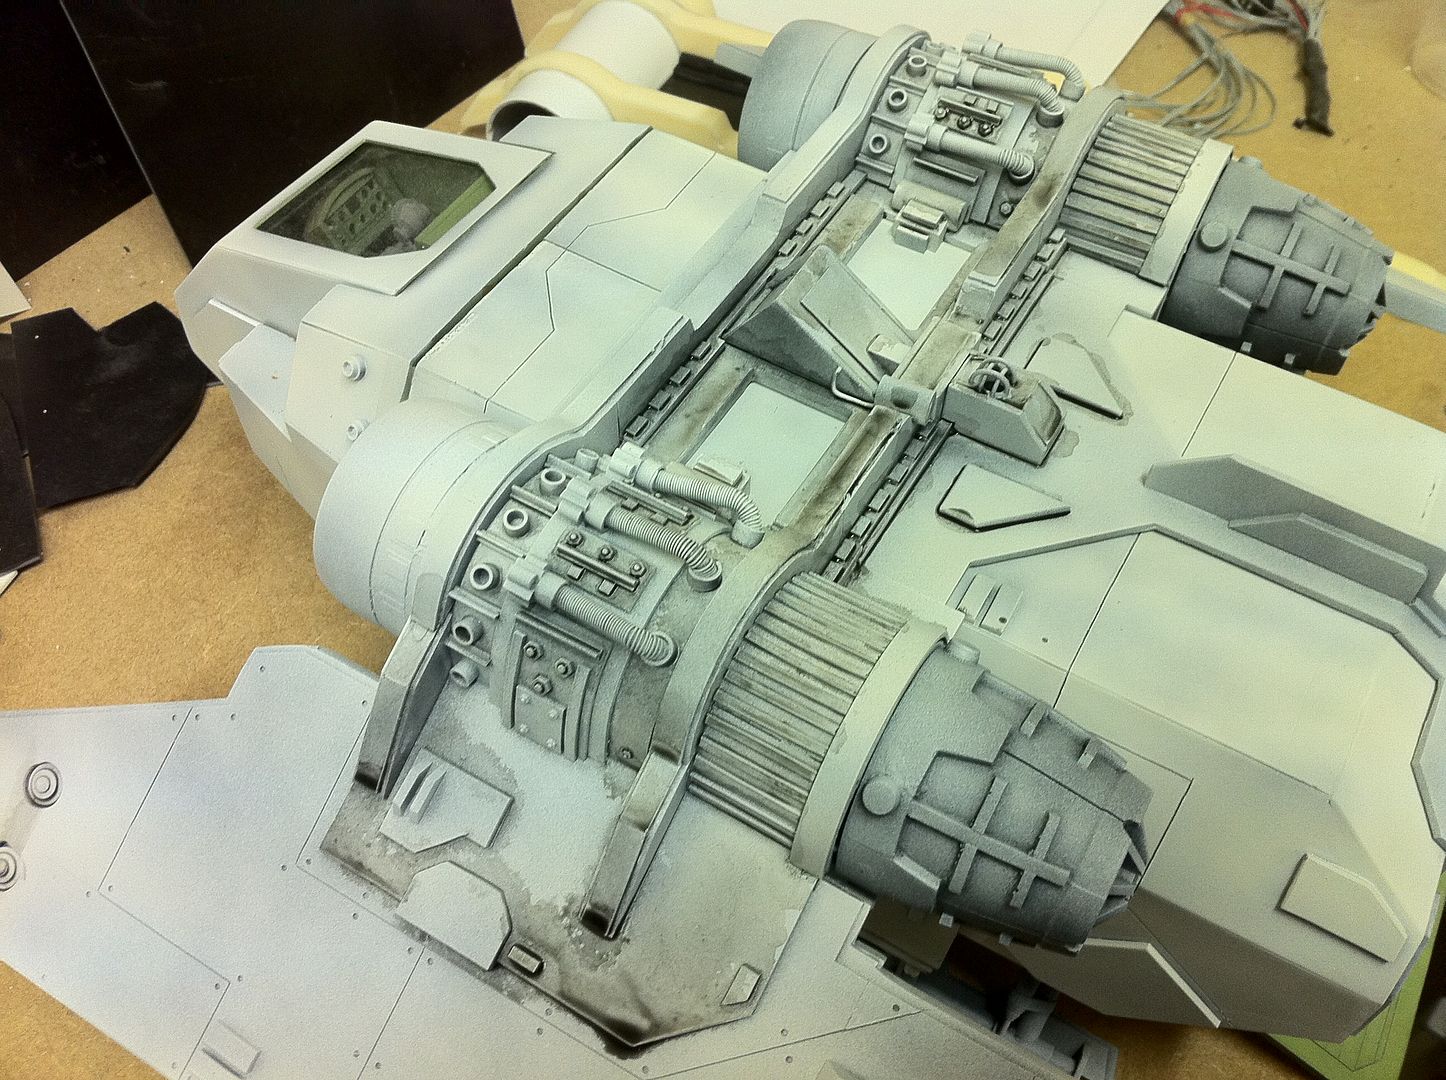
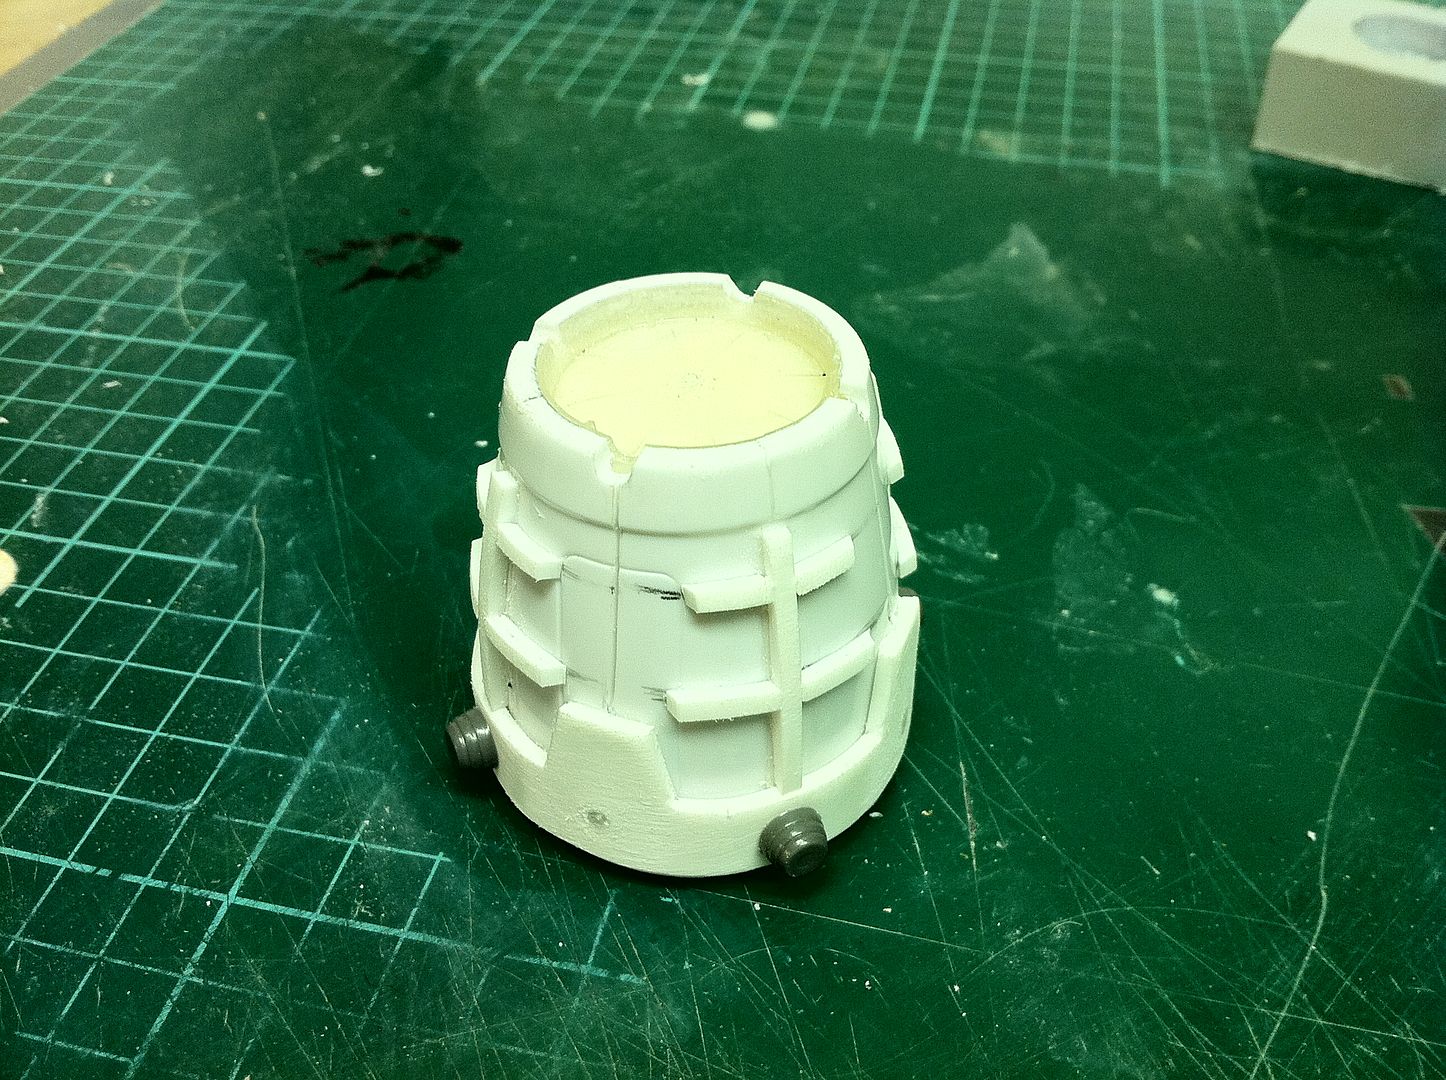
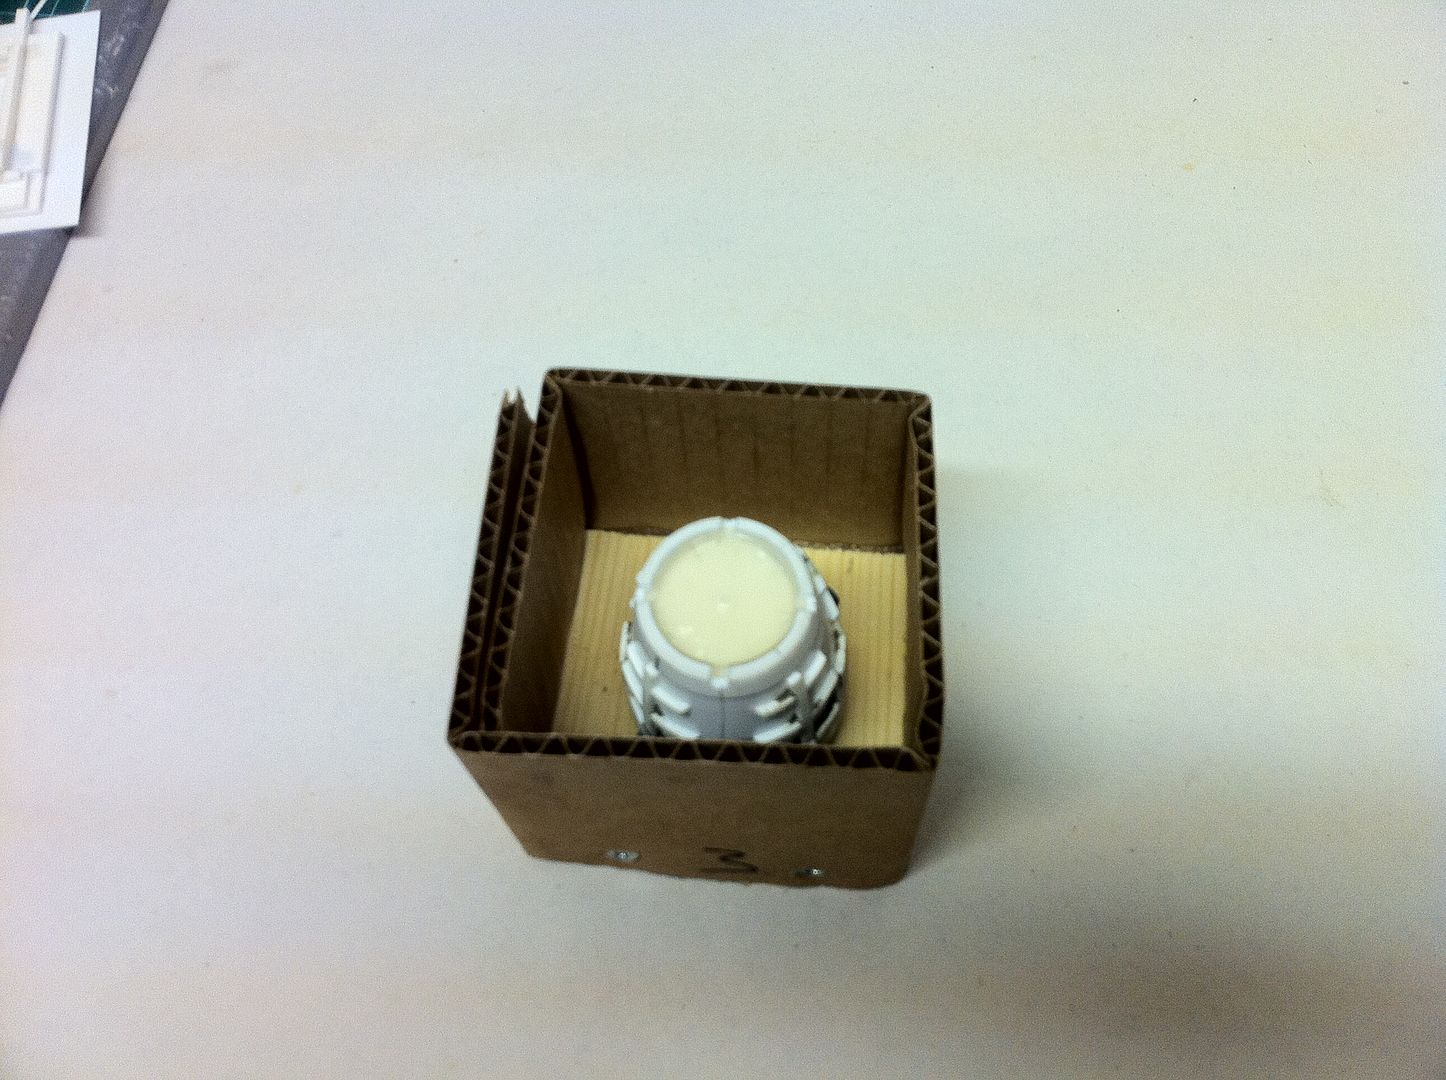
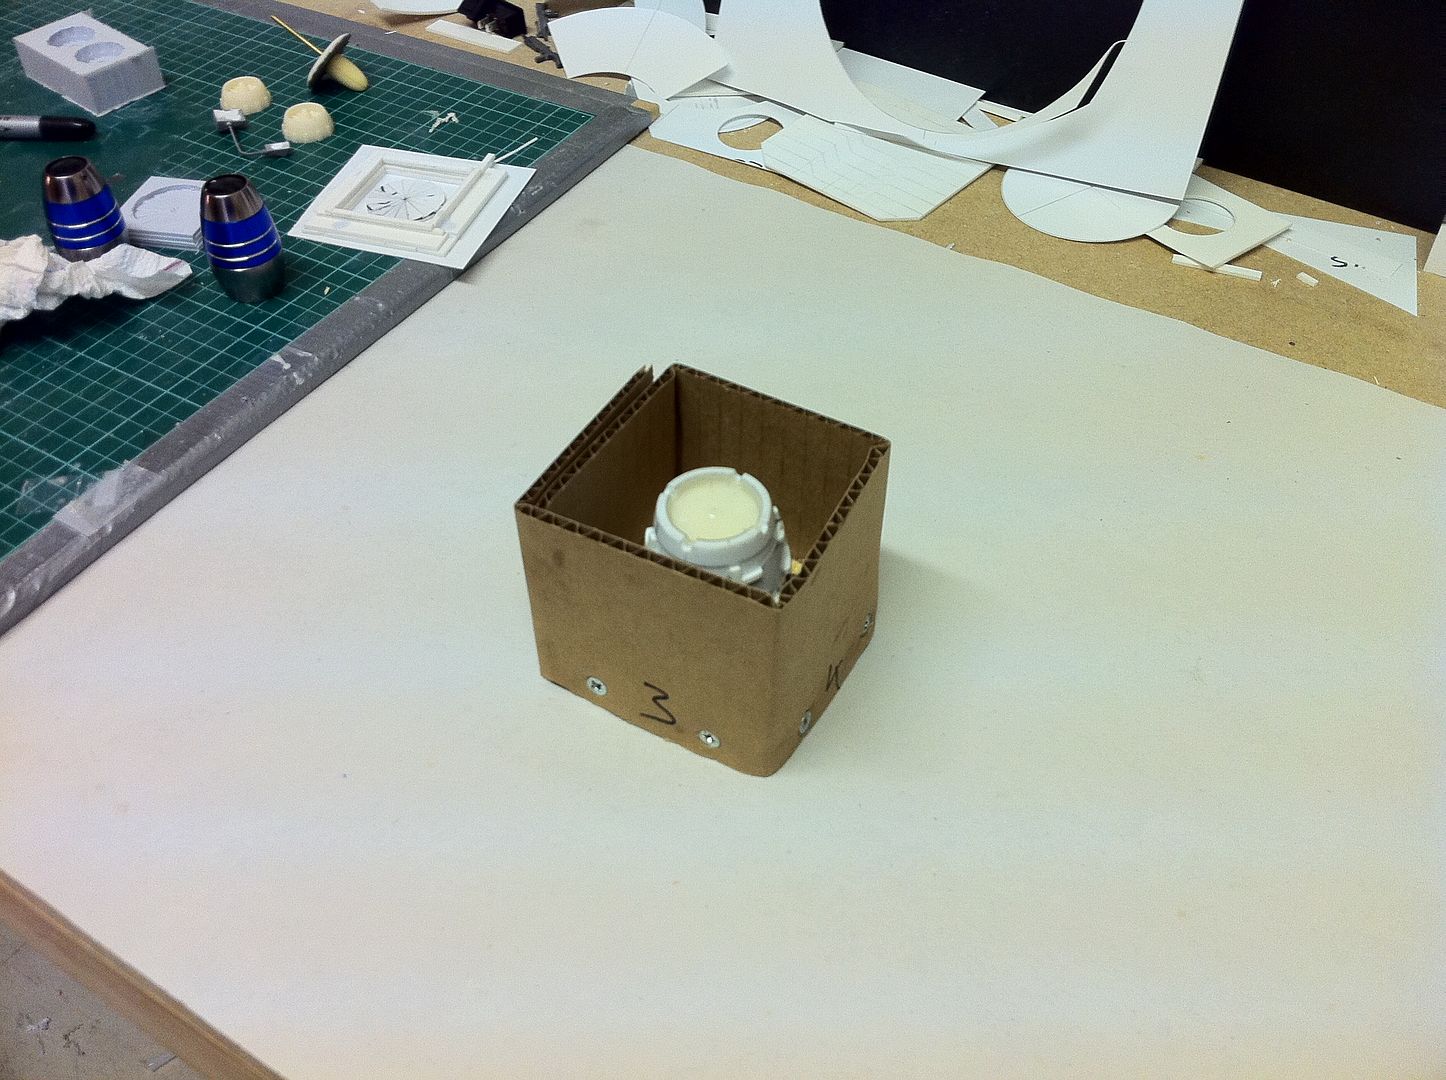
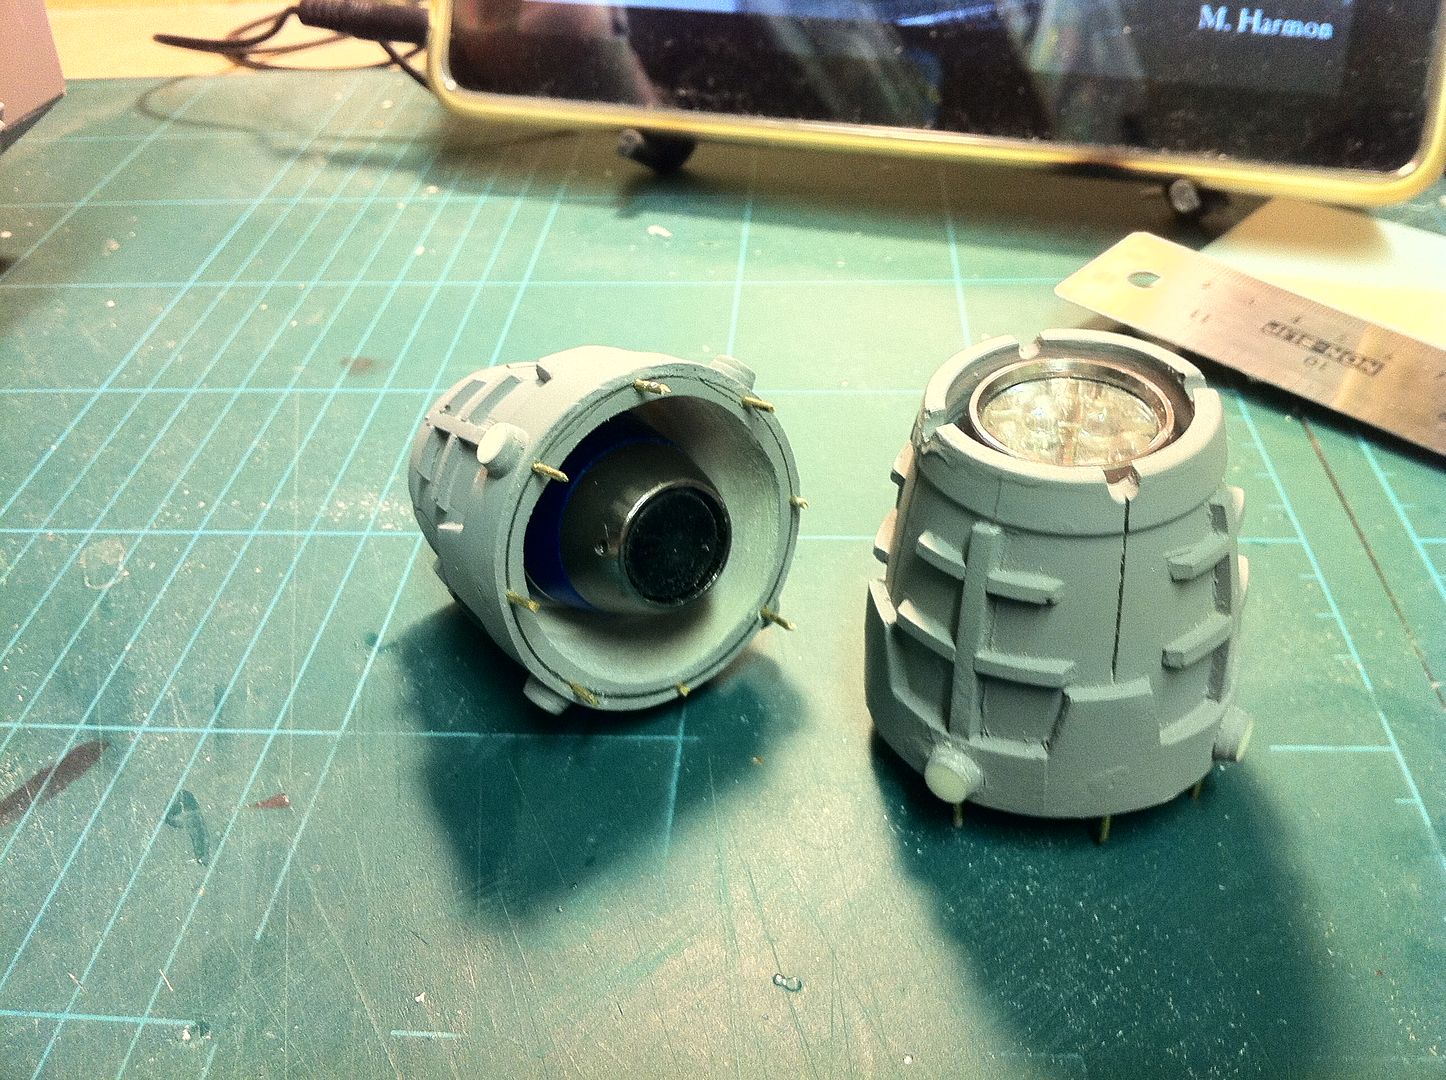
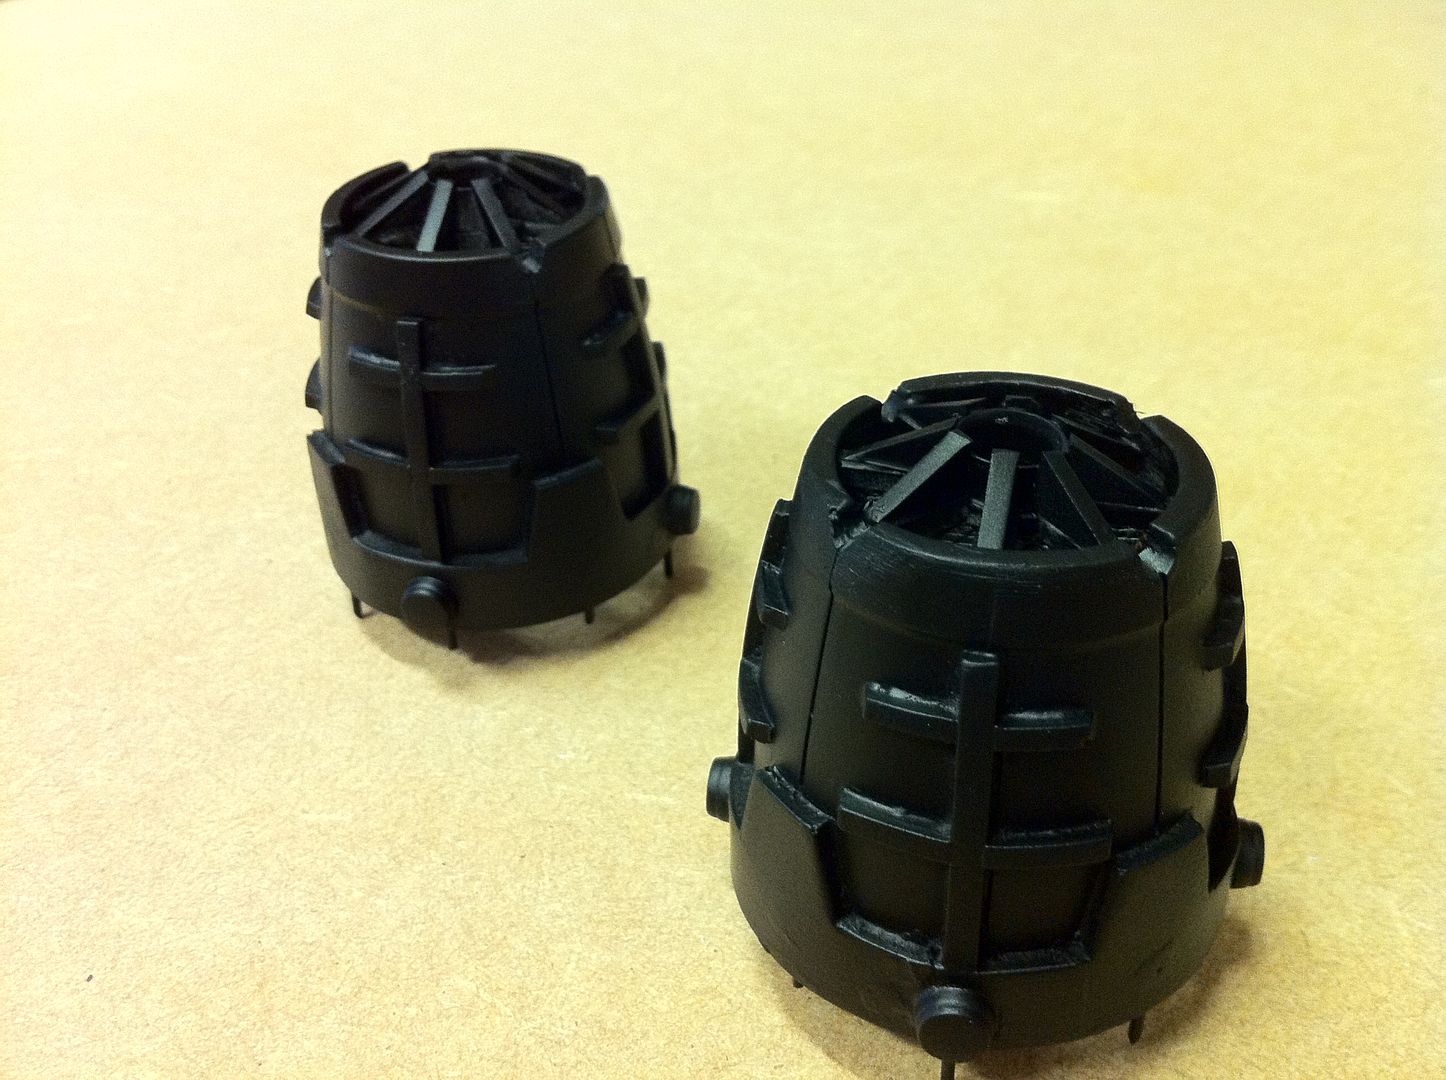
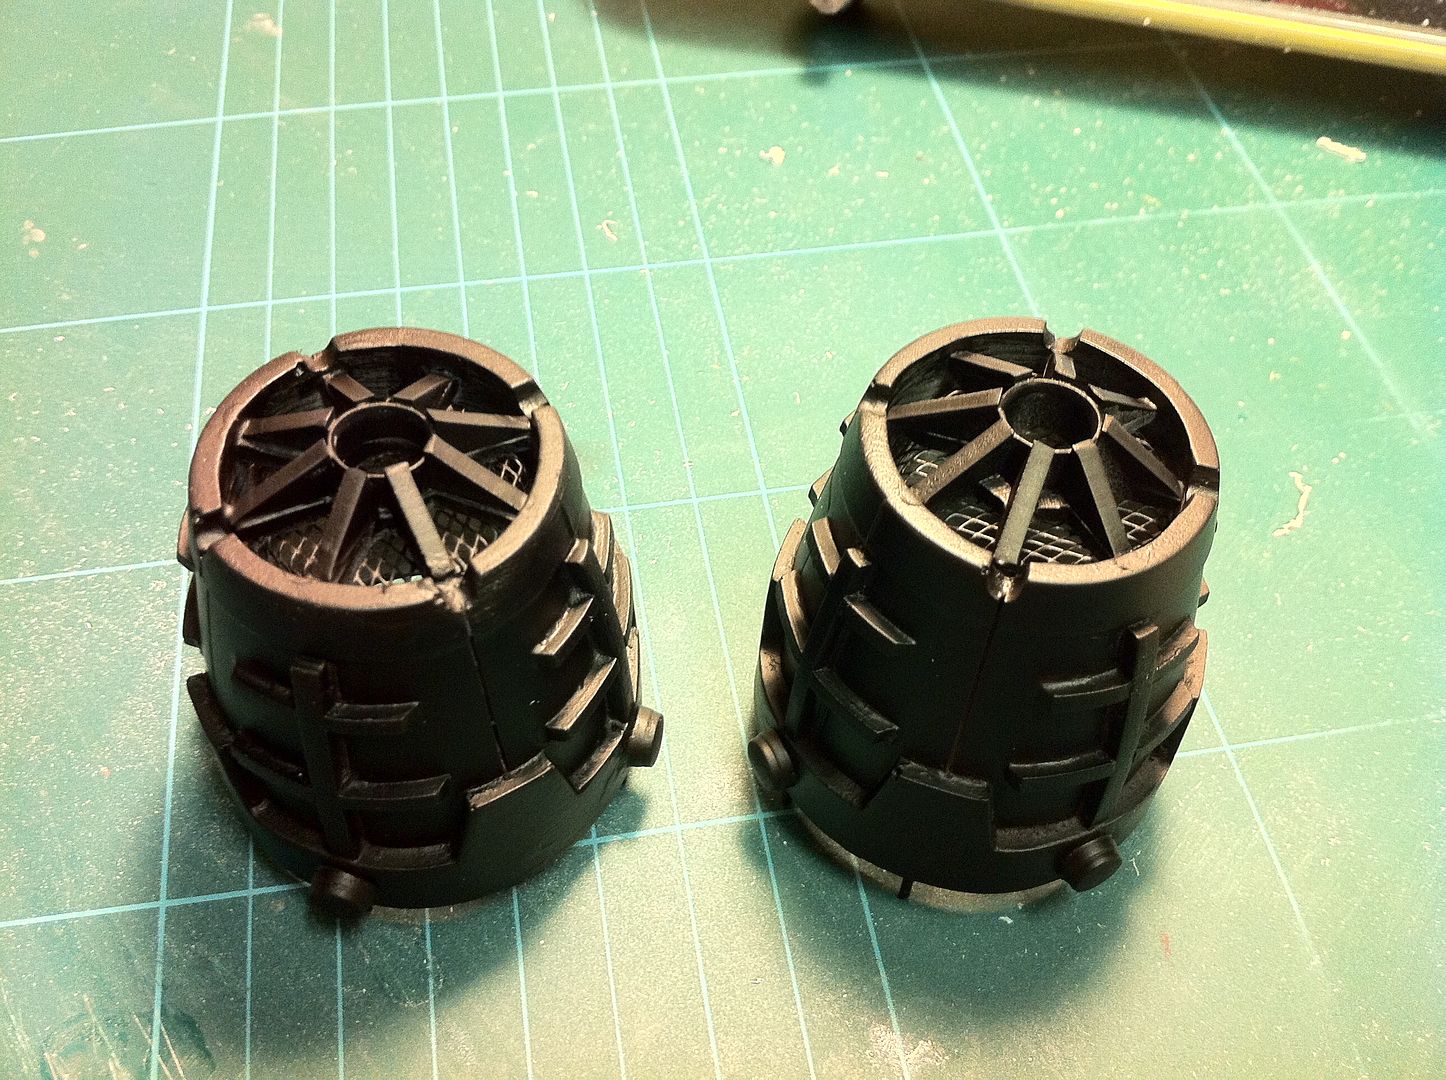
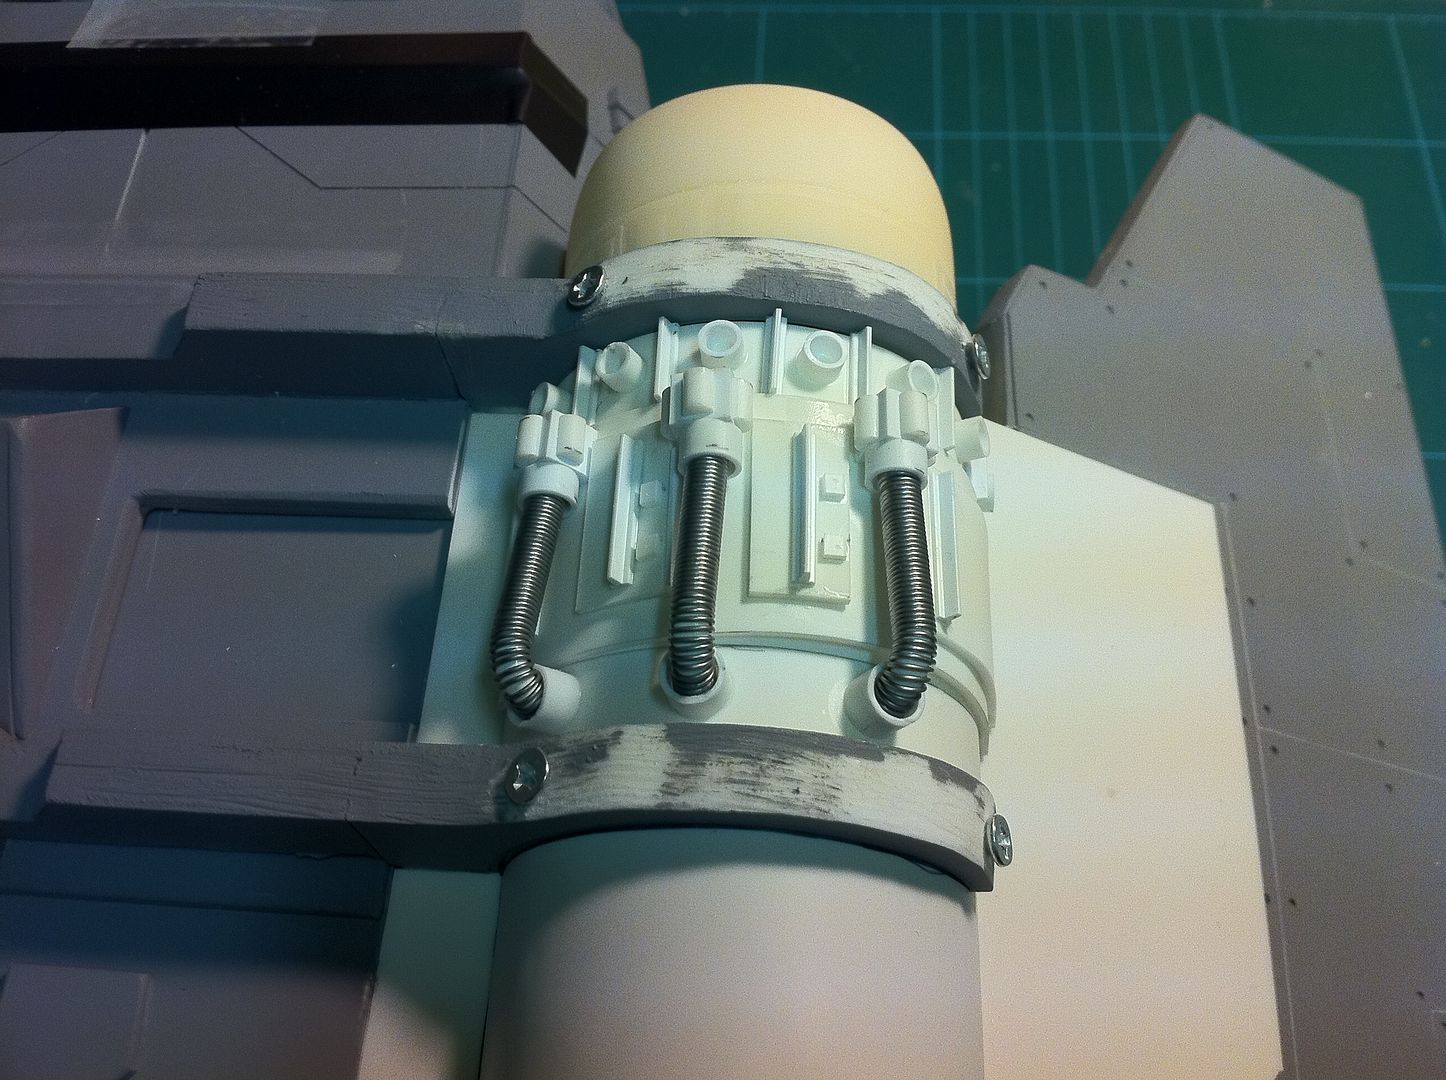
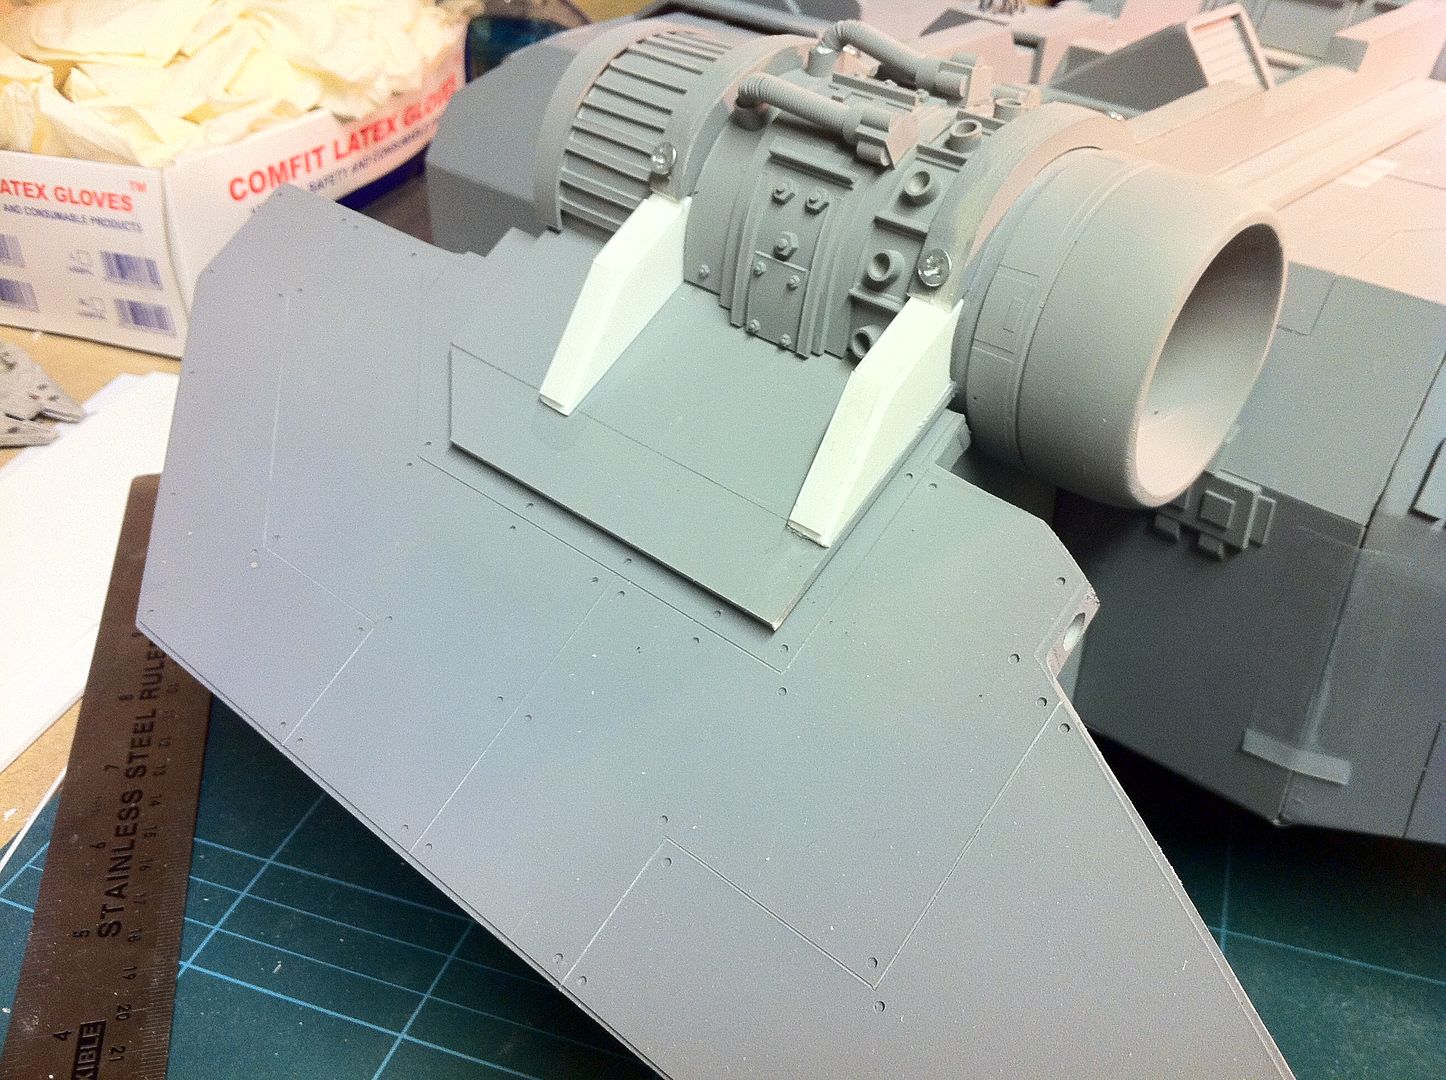
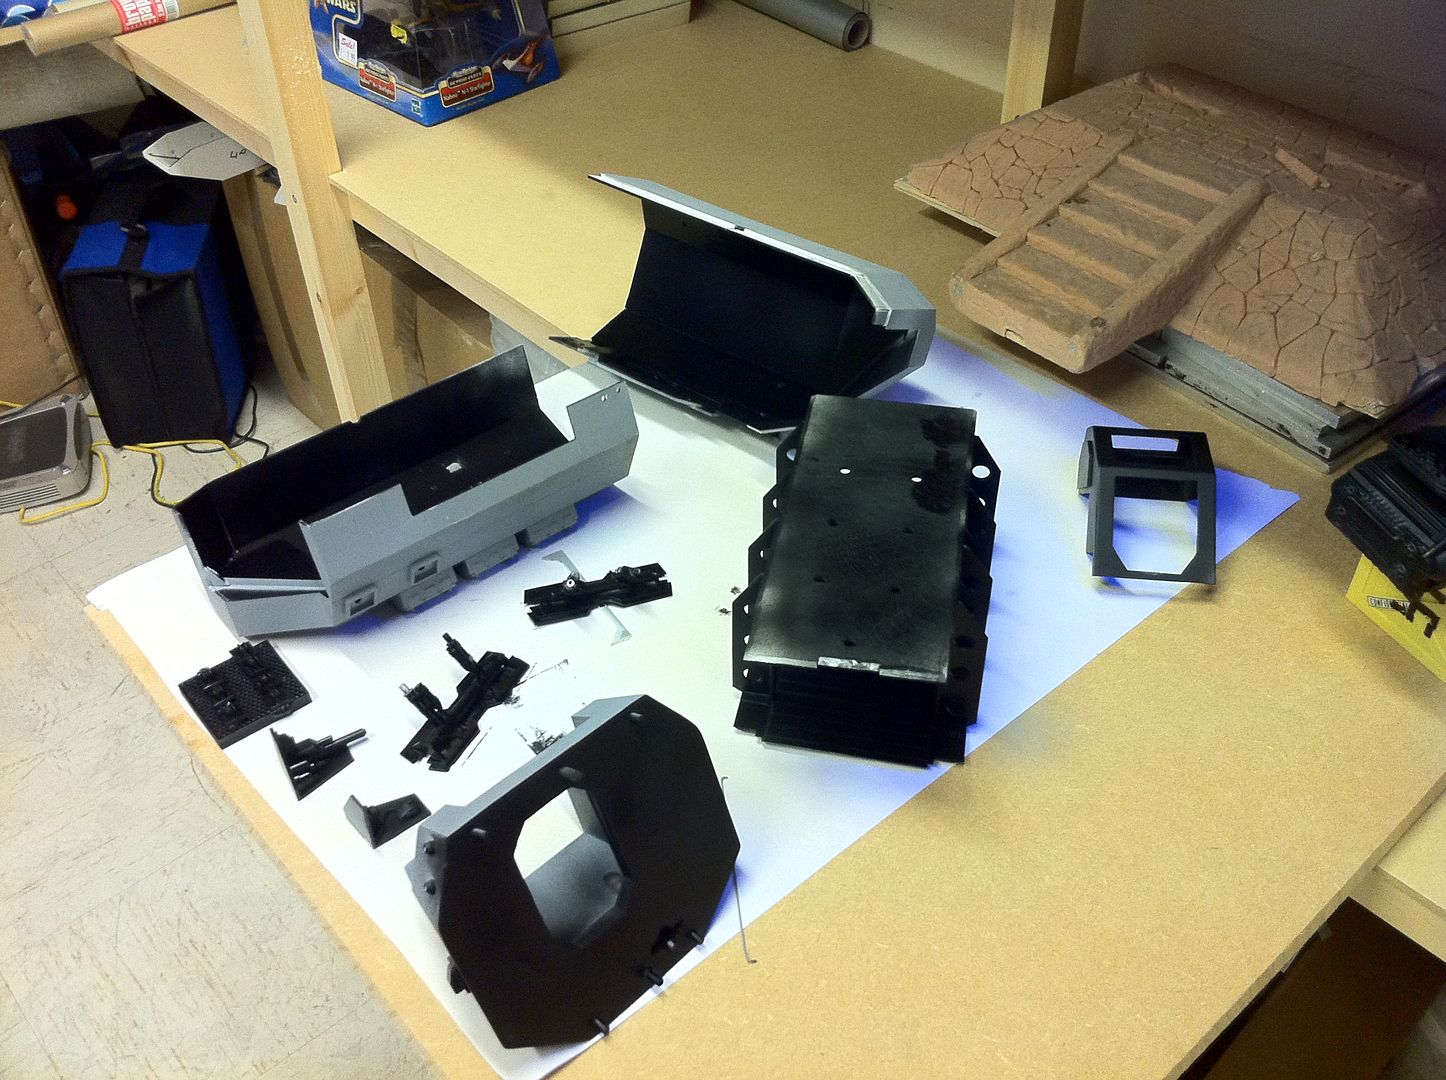
I have been working on the engine cone today.
I managed to find a kit which had the right profile, and chopped a bit off to be used as the piece.
I am moulding it right now and it will be ready on friday for me to make a couple of copies.
Here are the pics.
25853
Post by: winterdyne
You gonna bore that out after or is that stuff in the middle gonna be part of the mould itself?
18892
Post by: Bar
winterdyne wrote:You gonna bore that out after or is that stuff in the middle gonna be part of the mould itself?
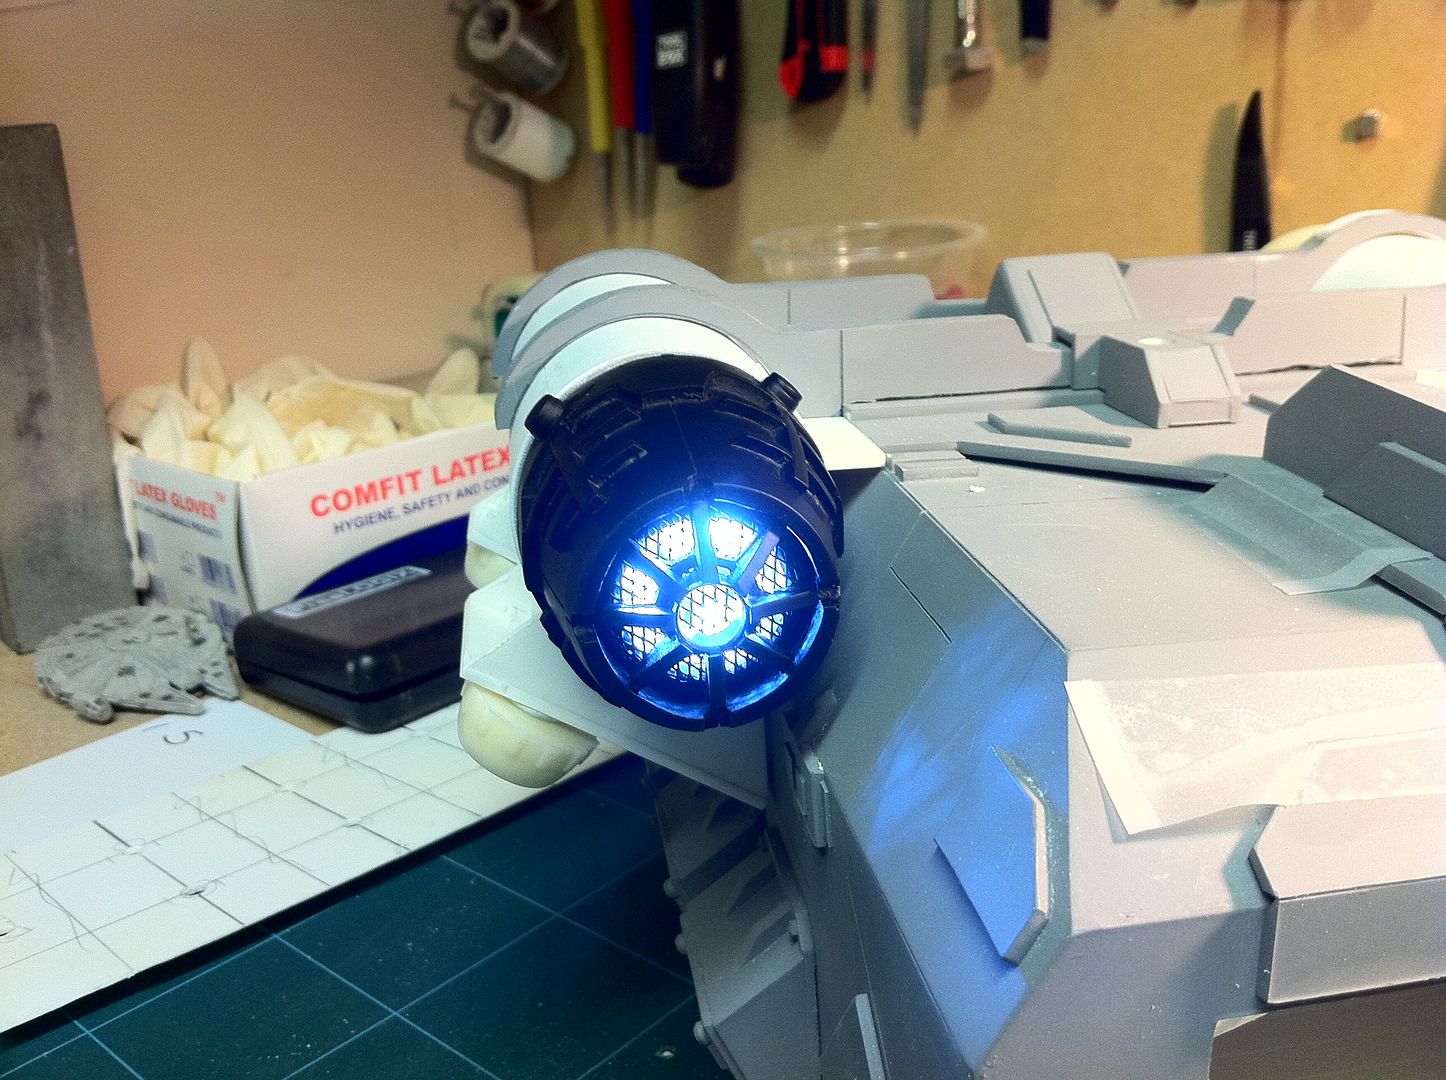
Well, i probably will bore it out, but i have an idea to try and insert the torch INTO the mould with the resin, meaning the torch will be INSIDE the cast part. It it works, the torch will light up the entire piece, and only the button to activate it will be on the outside...
If it works, i will be laughing. If it doesn't, i will have lost a £1 torch...

30139
Post by: 40k Ninja
Looks incredible. The wings look prefect. Nice job. 
41223
Post by: da big mek skarfang
that f22 raptor is da bomb dude!
2326
Post by: shasolenzabi
Bar wrote:Very nice. The best part about scratchbuilding your own projects is that you can stick to the original designs if you like, or create totally new ones out of your own imagination.
It's almost addictive when you actually realise you are only limited by what you can imagine(Which is no limit at all...).
I picked up a Storm Raven today. I really like the shape. That might be the next project after the Arvus for the "1/20 treatment"...
Some small measure of movement today. The Nav lights arrived.
Enjoy.
http://www.youtube.com/watch?v=9DUNqrMcdJ8
Thanks, i have to say, at 1/20 scale, you can add so much more detail than the little scales.
18892
Post by: Bar
shasolenzabi wrote:Thanks, i have to say, at 1/20 scale, you can add so much more detail than the little scales.
For sure.
It's a thin line of adding better details or adding totally new ones...
da big mek skarfang wrote:that f22 raptor is da bomb dude!
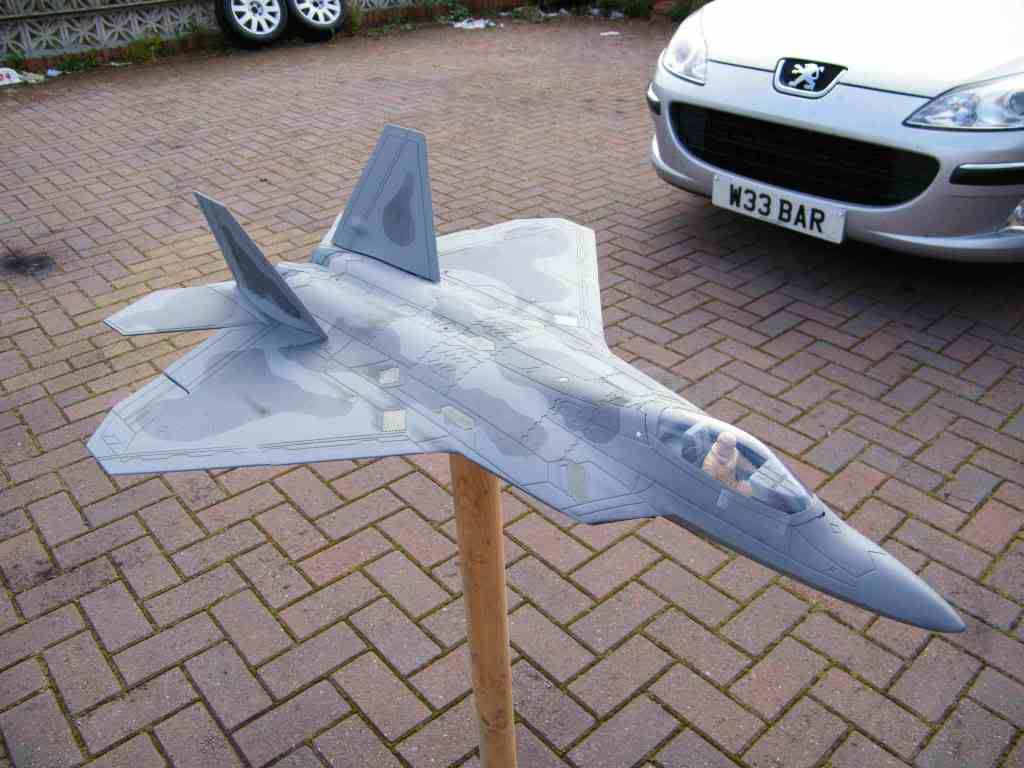
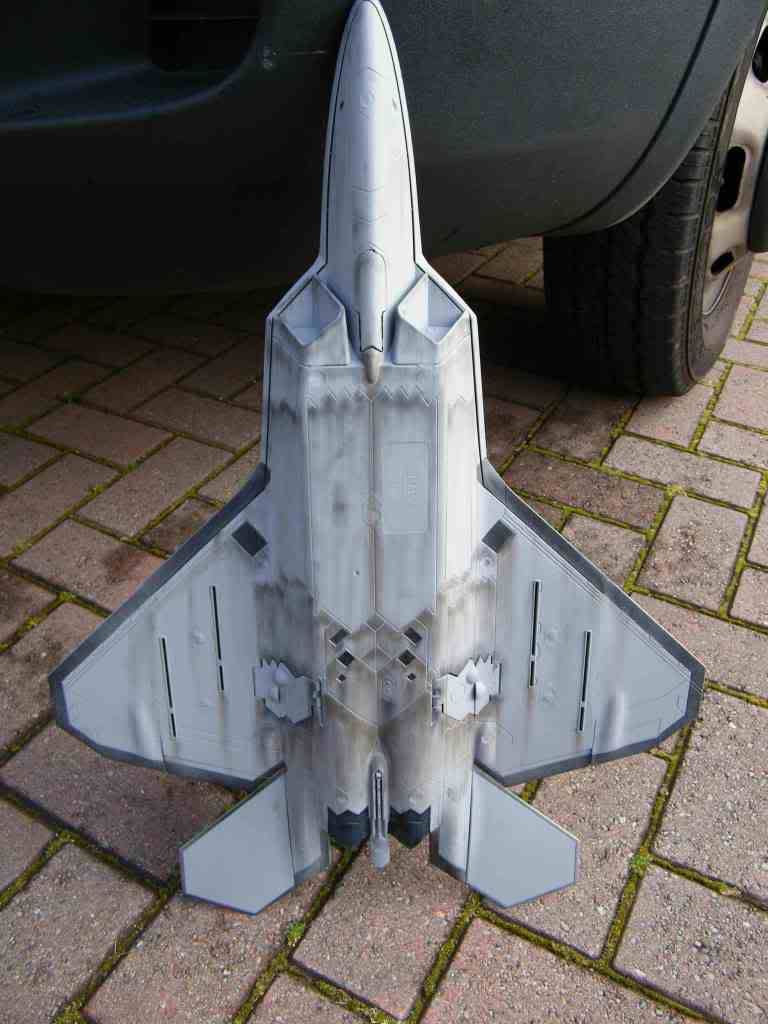
Thanks. It's a toy available from Toys R Us. About $20 from the US stores. And very well detailed. I have a few. Just for possible alterations. I already turned one into an F-35.
40k Ninja wrote:Looks incredible. The wings look prefect. Nice job.
Thanks a lot. It's not that hard. The ship is very angular.
Okay. I got the engine cone master made and cast, and got the torch seated in there. I only cast one today(The other was setting up in the mold while i took the pics of the first one all lit up), but it looks a million bucks.
Enjoy!
24297
Post by: Viktor von Domm
i have to really behave myself...that is so awsome looking my speach pattern might be injured for the connection of brain and mouth is severed...but since i am writing not all hope is lost^^
the engine litterally sent shivers done my spine....functionality and esign in one tight cool looking package!!!
18746
Post by: Heliodore
Now this is dedication! I wish I could graduate from hobby knife and ruler to all the great engineering tools you've utilised. Truly fine scale modeling at its best, giving some class to 40k, can't wait to see it done and painted!
18892
Post by: Bar
Viktor von Domm wrote:i have to really behave myself...that is so awsome looking my speach pattern might be injured for the connection of brain and mouth is severed...but since i am writing not all hope is lost^^
the engine litterally sent shivers done my spine....functionality and design in one tight cool looking package!!!
Thank you kindly.
I appreciate your kind words.
I am really trying to replicate the engine as faitfully as i can so that, even though it's not a perfect replica, it's perhaps close enough that you could imagine it came off the same assempby line as the Forgeworld version(Albeit in an earlier or later design iteration of the same shape).
Heliodore wrote:Now this is dedication! I wish I could graduate from hobby knife and ruler to all the great engineering tools you've utilised. Truly fine scale modeling at its best, giving some class to 40k, can't wait to see it done and painted!
Thanks a lot. This isn't much harder than cutting sheet. I just found something with close to the correct shape and detailed it appropriately.
By desing, i have subtly altered certain parts(I think mine is fatter than the forgeworld one, but that's because i wanted more room inside without drastically scaling the thing up too much), but as i said above, i want to capture the flavour of the original as much as possible.
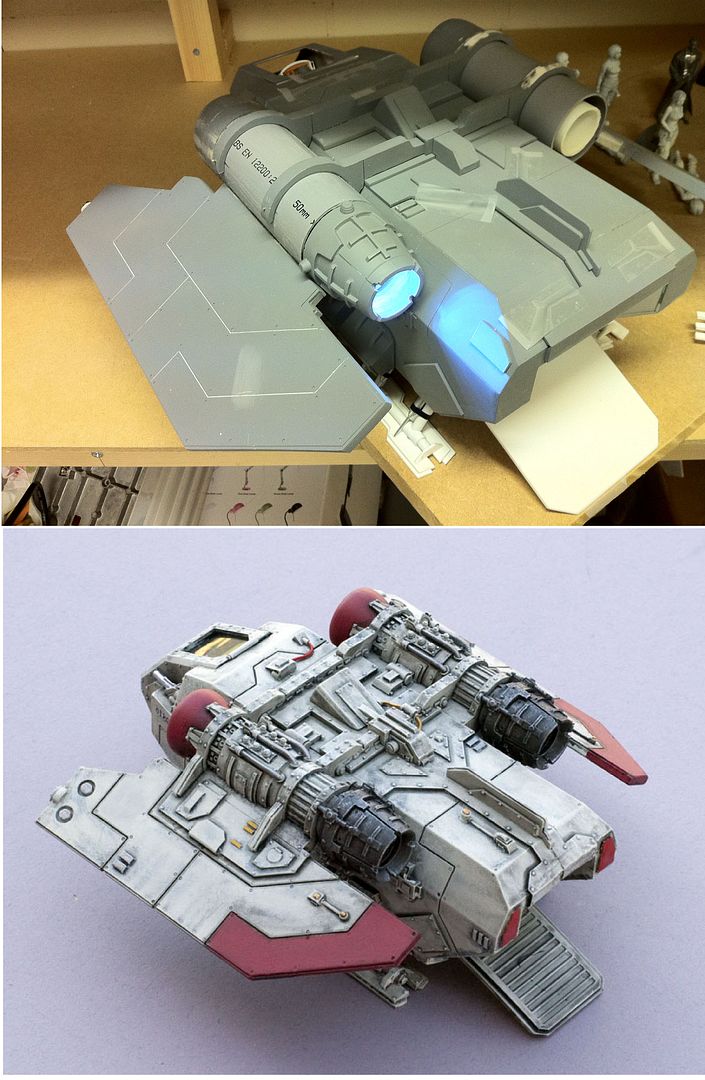
Here is a comparison image(Not quite the same angle, but i will try and get a better one tomorrow at work) which will show that i am getting close to the original(I never realised till now i have the engine cone 90 degrees off where it should be. I will fix that tomorrow):
3309
Post by: Flinty
Your Arvus is a true work of craft! Also you're not allowed to complain about your painting... ever!
18892
Post by: Bar
Flinty wrote:Your Arvus is a true work of craft! Also you're not allowed to complain about your painting... ever!
Okay. But i'll probably get someone else to paint the Arvus and figures, just to make sure the work didn't go to waste...
24779
Post by: Eilif
I just discovered this thread and I have to say that that's really top knotch stuff.
If I may make one observation. Nothing except for the cockpit truely ties it to the 1/20 scale. creating a second opaque or armored canopy cover could result in a ship that could also have game use as a 28mm drop ship, tank transporter or cargo hauler.
Also, your painting may not reach the hightest heights of what's seen on FSM, but it is excellent and far above what is commonly seen on gaming tables. Great work all around.
18892
Post by: Bar
Eilif wrote:I just discovered this thread and I have to say that that's really top knotch stuff.
If I may make one observation. Nothing except for the cockpit truely ties it to the 1/20 scale. creating a second opaque or armored canopy cover could result in a ship that could also have game use as a 28mm drop ship, tank transporter or cargo hauler.
Also, your painting may not reach the hightest heights of what's seen on FSM, but it is excellent and far above what is commonly seen on gaming tables. Great work all around.
Thanks. I know my painting is not to the highest standard. It's not the end of the world. I leave the skilled painters to weave their magic, and i weave my own...
As for the scale issue, my Brother has said the same thing. That if i made a two-man 28mm scale cockpit, it would make the Arvus a gigantic cargo/troop carrier.
But i always work in 1/20, which is why i scaled it up in the first place.
And thanks for your first comment.
I appreciate that.
29111
Post by: Nalyd
This work is amazing. I cannot even begin to think of how you come up with the little details. Just pure and simple talent.
Great work.
18892
Post by: Bar
Nalyd wrote:This work is amazing. I cannot even begin to think of how you come up with the little details. Just pure and simple talent.
Great work.
Thanks. Is there any specific little details that you'd like explained? It's all really simple stuff. I can probably explain each detail in a couple of sentences or less.
29111
Post by: Nalyd
Bar wrote:Nalyd wrote:This work is amazing. I cannot even begin to think of how you come up with the little details. Just pure and simple talent.
Great work.
Thanks. Is there any specific little details that you'd like explained? It's all really simple stuff. I can probably explain each detail in a couple of sentences or less.
Nah. I don't need anything explained ( thanks for the offer) my creative process in my brain is just not so great at coming up with the little bits. I tend to stick to converting things over scratch building. Also those LED lights with the metal guards are just awesome!
18892
Post by: Bar
Nalyd wrote:[Nah. I don't need anything explained ( thanks for the offer) my creative process in my brain is just not so great at coming up with the little bits. I tend to stick to converting things over scratch building. Also those LED lights with the metal guards are just awesome!
Okay. No worries.
Thanks for your kind words. It's not hard, really. When you realise that even general model making skills lend themselves to scratchbuilding, then nothing is beyond your ability to create from scratch.
And when you BELIEVE that, you can make anything.
10972
Post by: Ruglud
Wow, some really lovely work here and loving your other WIPS, your work bench looks amazingly tidy though which is worrying - far too organised 
Seriously though, I think scratch building is (for me) one of the most rewarding sides of this hobby. Hats of to you good sir...
BTW, I don't think anyone answered this for you ?
Bar wrote:Chibi Bodge-Battle wrote:* Do I see Glenrothes on that bus?
My bro used to live near in Pitcoudie, now in Burntisland
Just seen the Saltaire though your Dakkaflag is the stars and bars
I don't know how that happened. I am very much in Glenrothes... How do you go about changing the flag???
Your Brother used to stay in Pitcoudie? It's a small world. I am half a mile away from there...
The flag displayed next to your posts is set automatically based on your IP address. Sometimes this is detected incorrectly, so if you want it to be reset to a fixed override, PM a moderator or admin and they can lock your flag to a specific country. Hope that helps - I had the same when I joined - PMd Legoburner and he kindly fixed it for me.
25141
Post by: Chibi Bodge-Battle
oops sorry Bar!
Guilty as charged
Thank you Ruglud.
Keep up the good work, fascinating to watch!
18892
Post by: Bar
Eilif wrote: Chibi Bodge-Battle wrote: oops sorry Bar!
Guilty as charged
Thank you Ruglud.
Keep up the good work, fascinating to watch!
Thanks. Glad it's interesting to see.
Ruglud wrote: Wow, some really lovely work here and loving your other WIPS, your work bench looks amazingly tidy though which is worrying - far too organised
It's a but dusty right now. I have unexpectedly had to work from home today, so no more work on the Arvus right now. I might be able to go up there tonight. Or tomorrow perhaps. I want to get the engine details nailed down finally. There are so many small jobs needing done on this one befor eeach piece is finished. I look at it as a pile of small jobs, rather than an endless large pile...
Ruglud wrote:Seriously though, I think scratch building is (for me) one of the most rewarding sides of this hobby. Hats of to you good sir...
Thanks. I feel the same way. It's a pleasant experience seeing something that didn't exist before and now it does because you made it yourself.
Ruglud wrote:BTW, I don't think anyone answered this for you ?
The flag displayed next to your posts is set automatically based on your IP address. Sometimes this is detected incorrectly, so if you want it to be reset to a fixed override, PM a moderator or admin and they can lock your flag to a specific country. Hope that helps - I had the same when I joined - PMd Legoburner and he kindly fixed it for me.
Thanks. I'll see about getting that done today.
18892
Post by: Bar
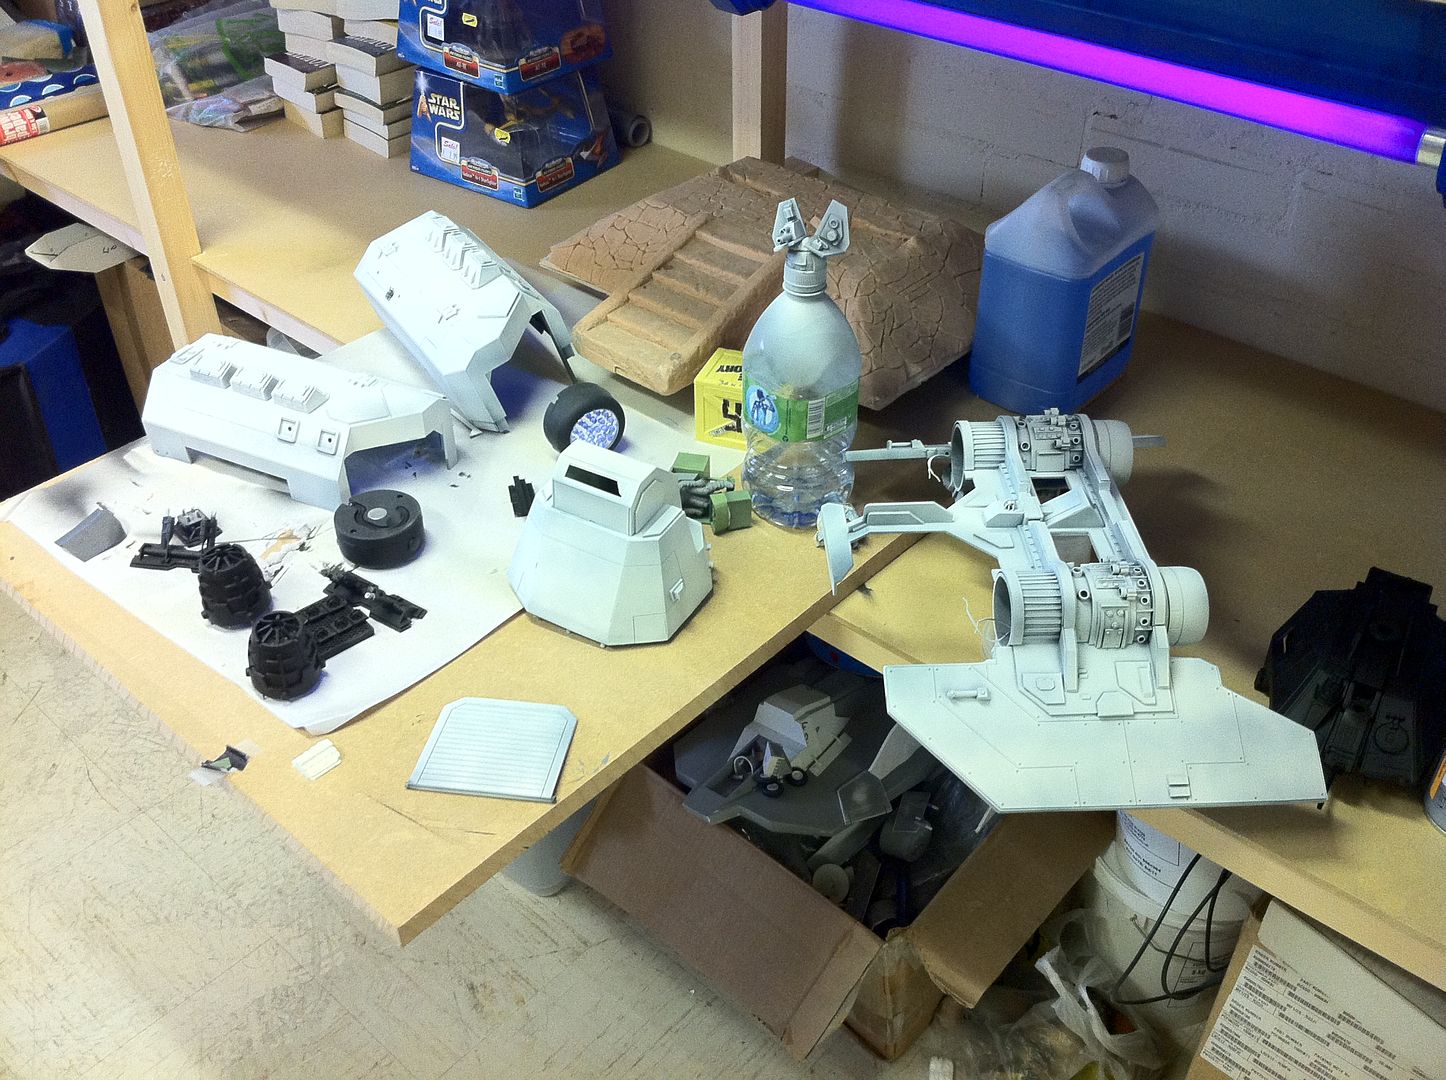
Okay. Not a huge update. Got up to work this morning and it was cloudy and, after an hour of pottering about, the sun came out, so i went home and got my pushbike and went out for a run to enjoy the sunshine...
But, while i WAS there, i got the second thruster cone hollowed out and primed, plus i was able to clean my workbench...(It was dusty, lol...).
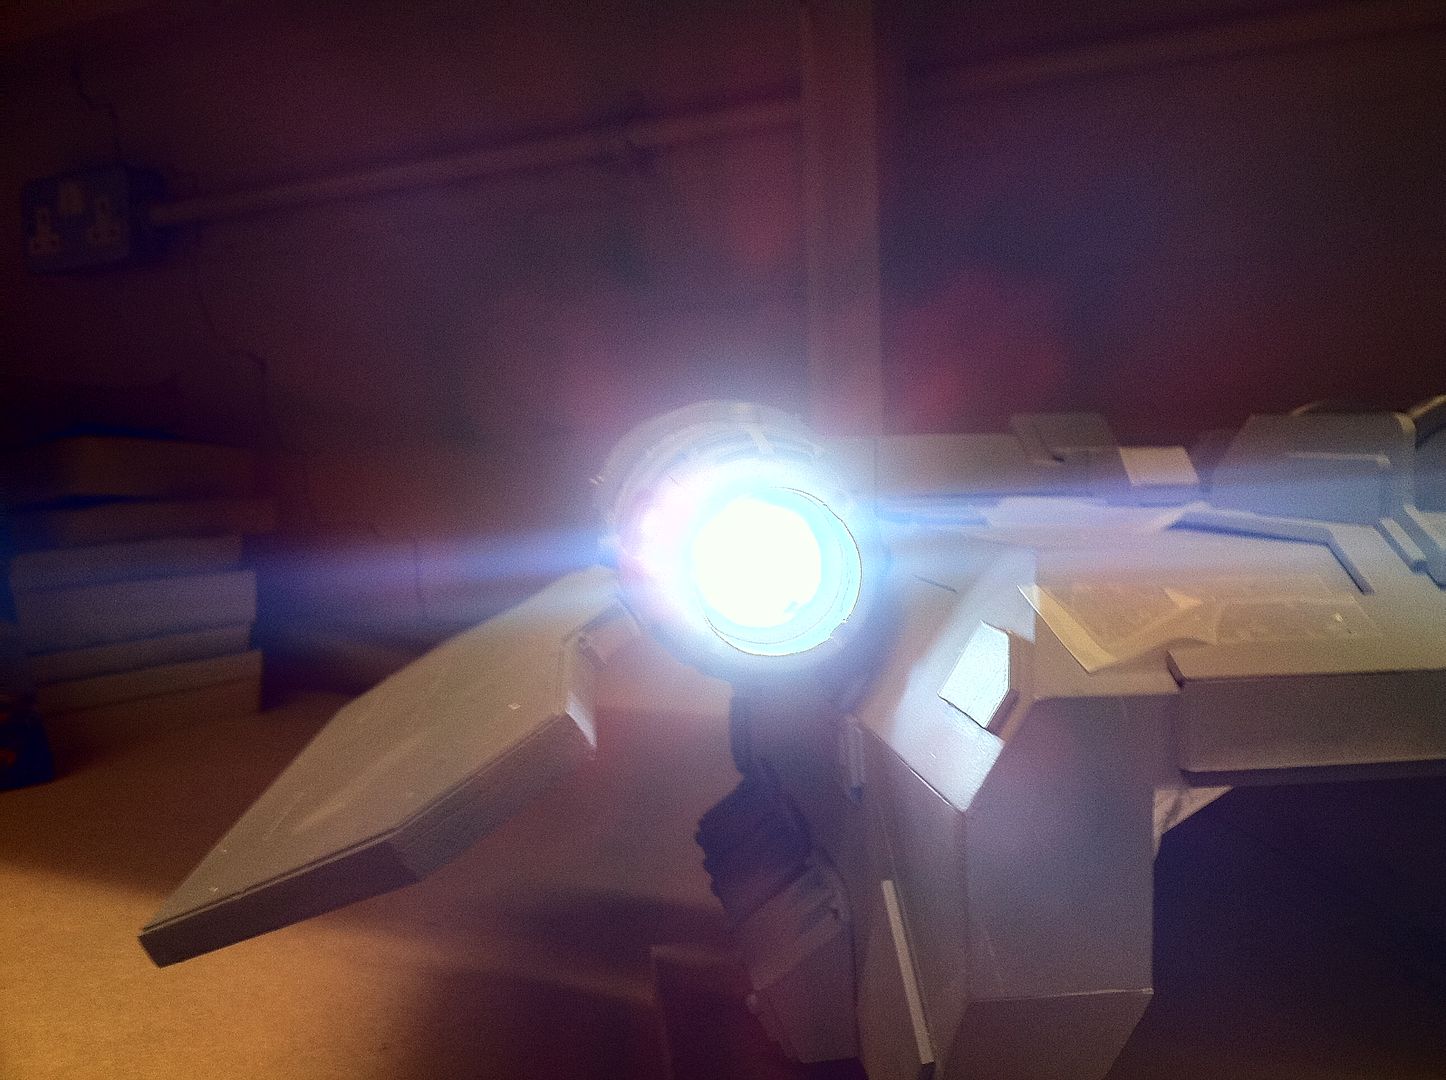
Anyway, just one pic. The engines turned on and the camera dazzled...
Enjoy!
25141
Post by: Chibi Bodge-Battle
You have been working the crew too hard by the looks of things, or have they just had a hard night and keeled over?
Looking fantastic, Bar
46334
Post by: TheBlueRedPanda
Wow, your work is amazing. I think the 1/20 scale really allows you to appreciate details that would otherwise be lost in heroic scale.
10972
Post by: Ruglud
Good job on cleaning the workbench !!
6356
Post by: Ghidorah
Bar wrote:
Somebody needs to get these slackers back in gear. Instead of laying there planking, they need to be busting out the rest of this Arvus...
Ghidorah
18892
Post by: Bar
Chibi Bodge-Battle wrote:You have been working the crew too hard by the looks of things, or have they just had a hard night and keeled over?
Looking fantastic, Bar
Lol. I never thought of that. Wasn't paying attention to them. I will pick them up for today's round of WIP images when i get to work.
TheBlueRedPanda wrote:Wow, your work is amazing. I think the 1/20 scale really allows you to appreciate details that would otherwise be lost in heroic scale.
Yes. It allows the details to pop i think.
And for images to really sell the size and scale of the dio.
Ruglud wrote:Good job on cleaning the workbench !!
Thanks. It's dusty once again...
Ghidorah wrote:Somebody needs to get these slackers back in gear. Instead of laying there planking, they need to be busting out the rest of this Arvus...
Ghidorah
Yeah. I'll be getting right on that when i get up to work in the next half hour or so.
Thanks for looking guys.
I'll have serious progress tonight. I swear.
18892
Post by: Bar
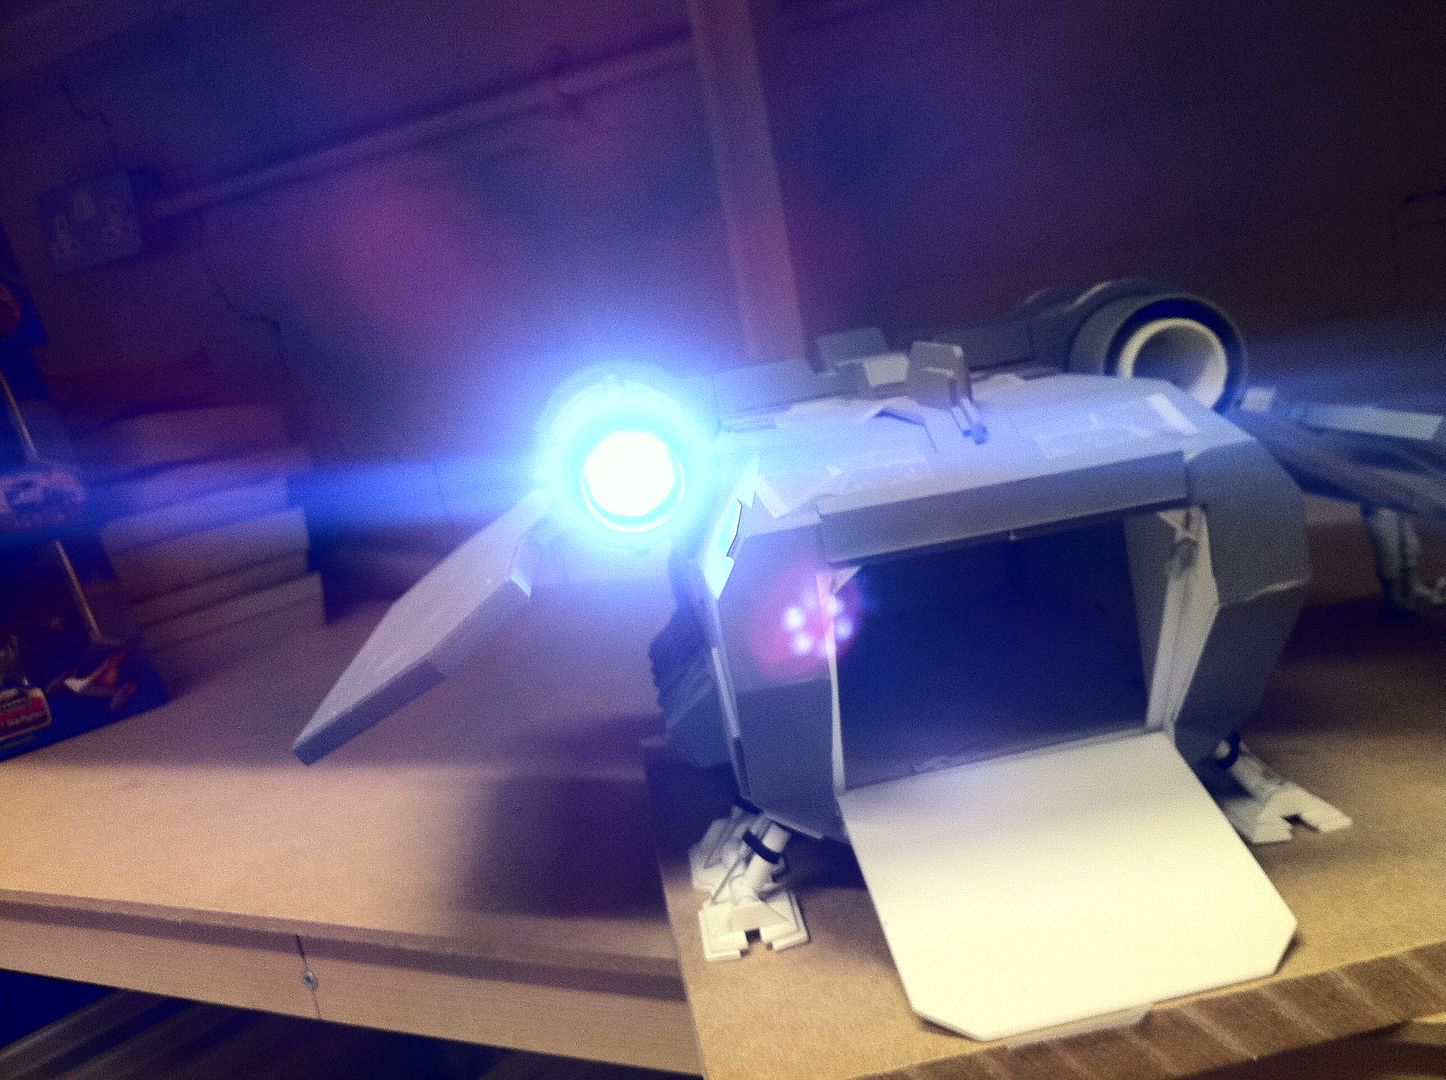
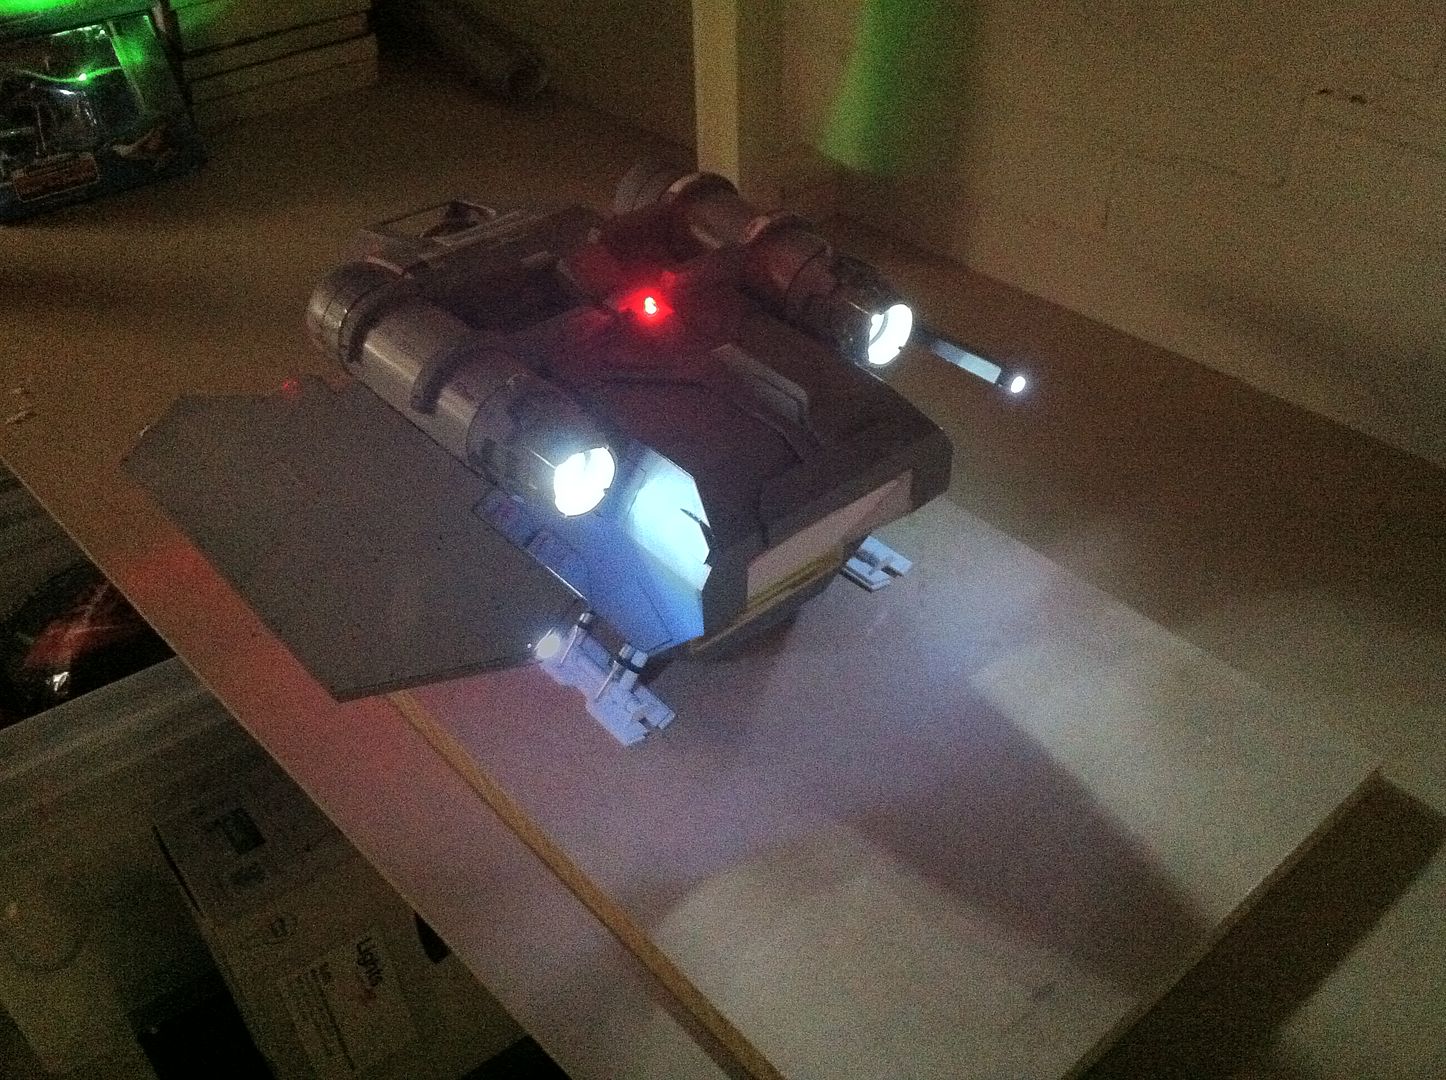
I got a little bit done on the Arvus today. I expect it will be well recieved. I certainly enjoyed doing the work anyway!
I did a few lighting tests of the nav light rig.
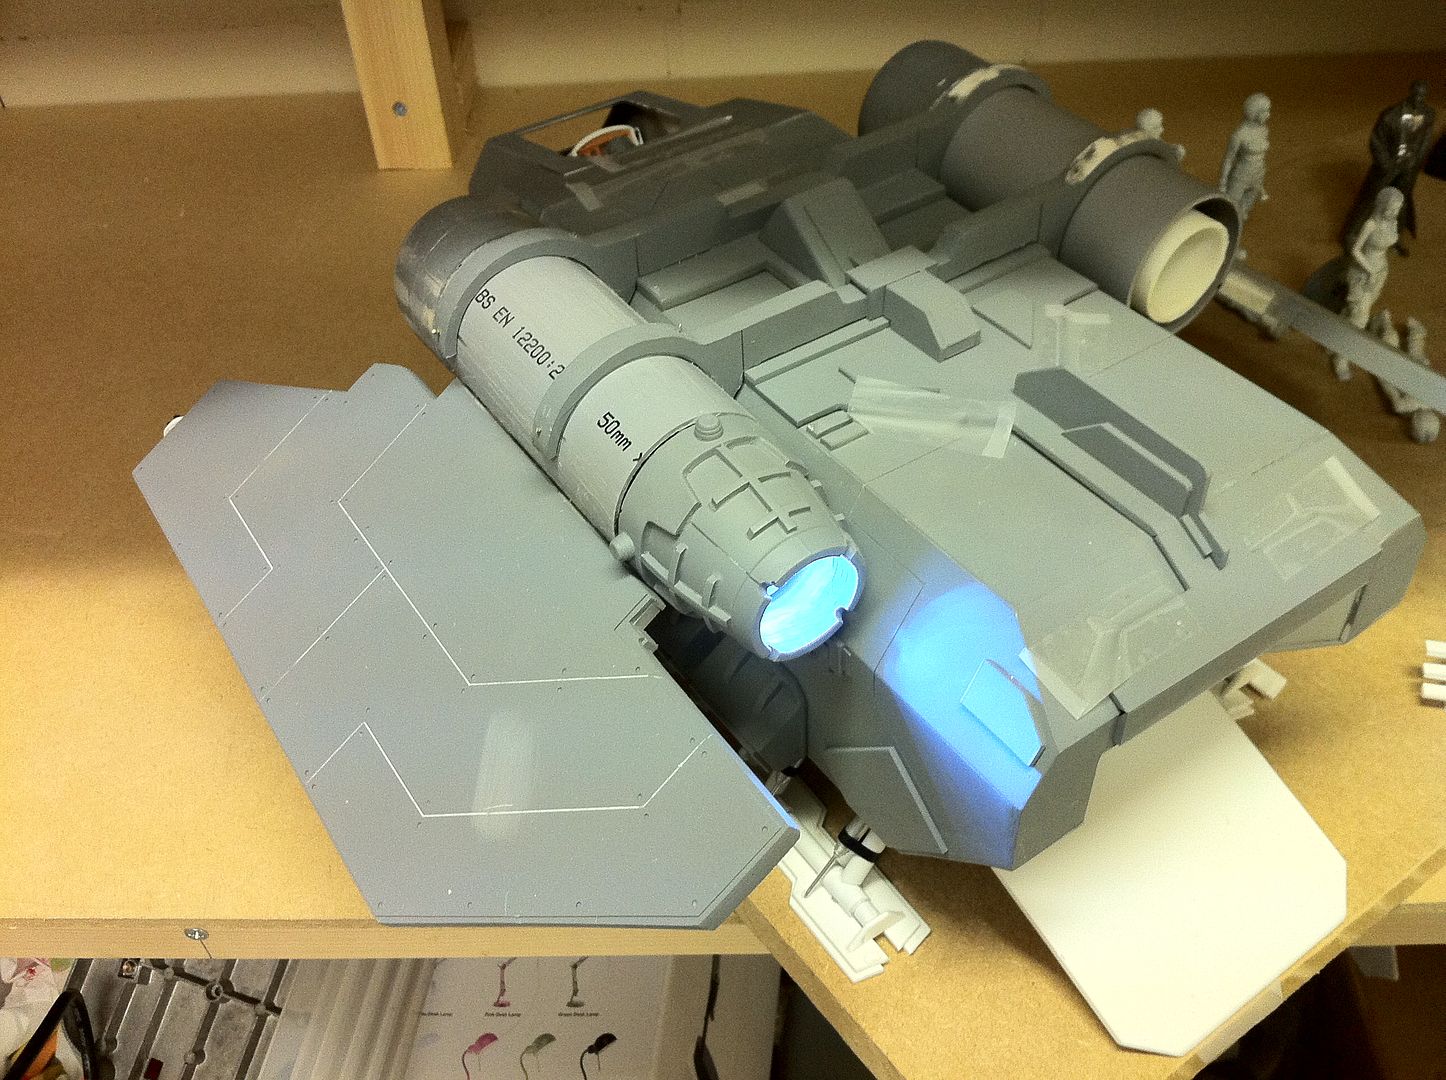
Pics and vids of that. I'd appreciate comments on how good that looks...
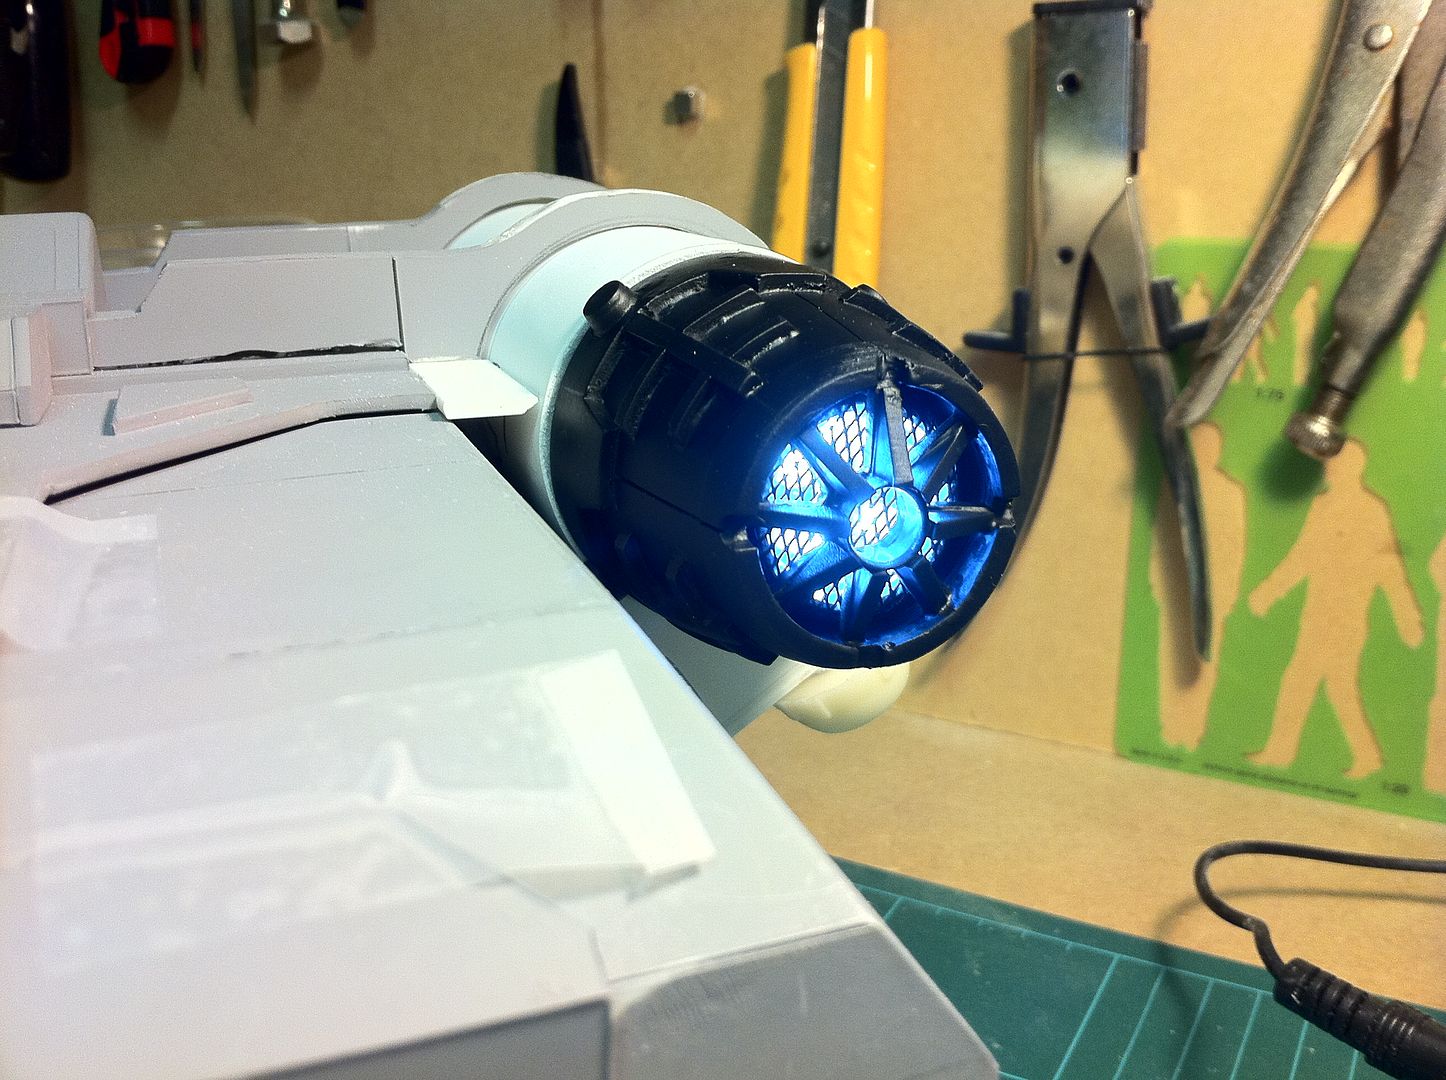
I realised a bit late in the game that the engines being totally hollow could be handy to stash the lighting rigs in, so i made a new set(Again...). These were skinned in styrene and the engine cones were gven location pegs. the torches are now well seated in the engine tips.
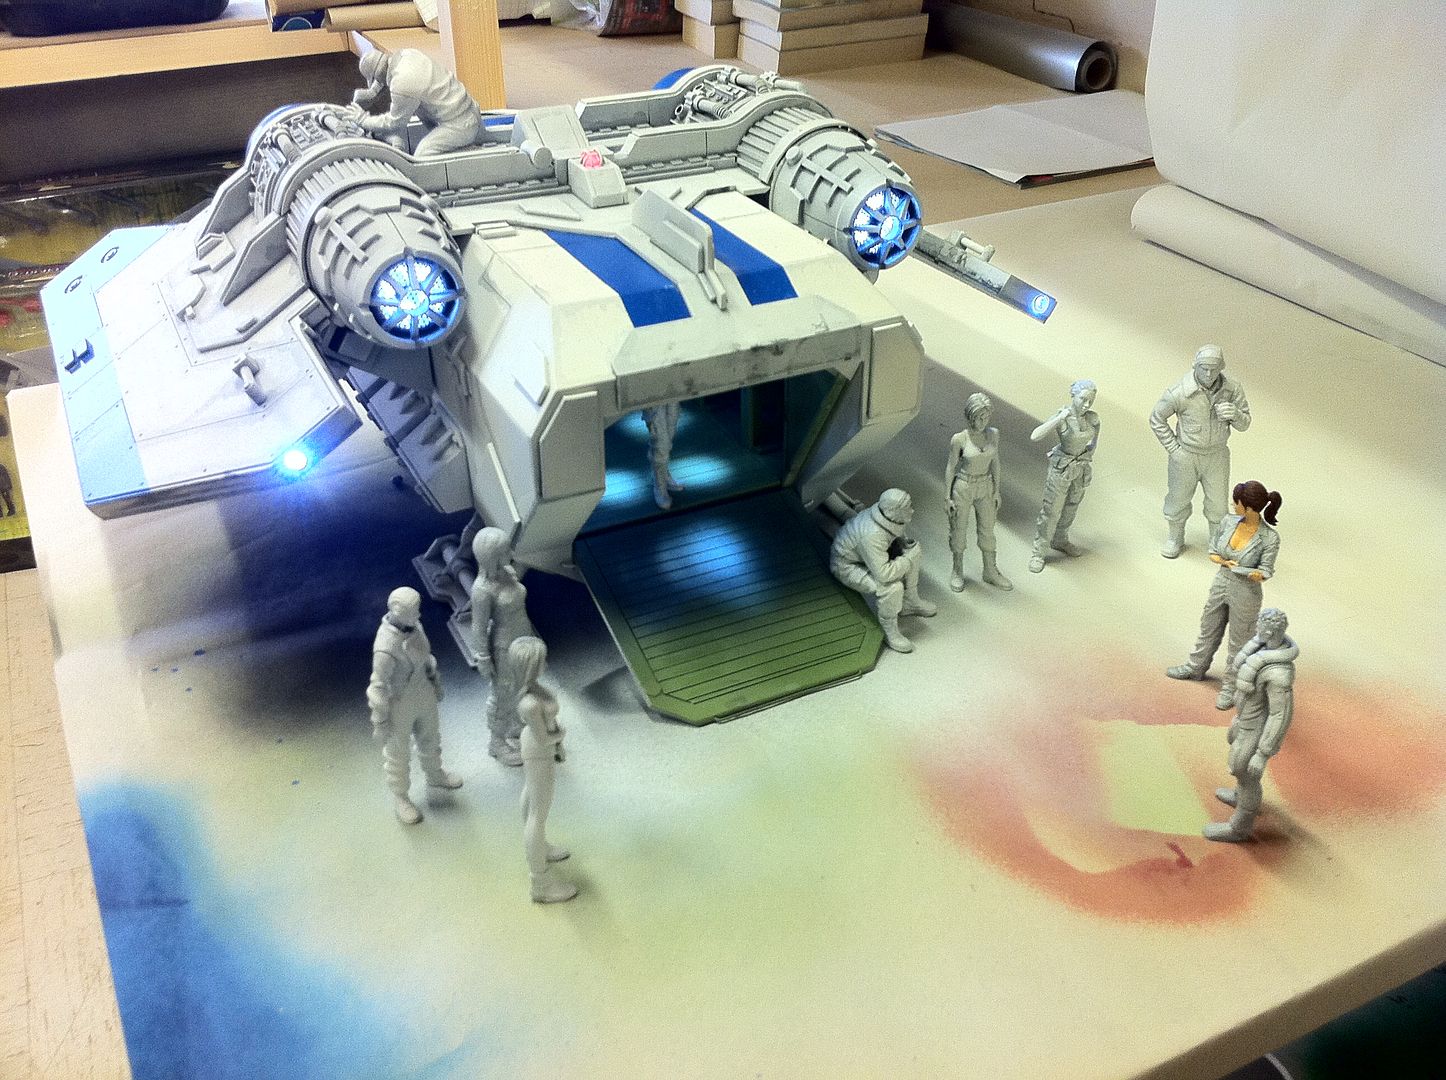
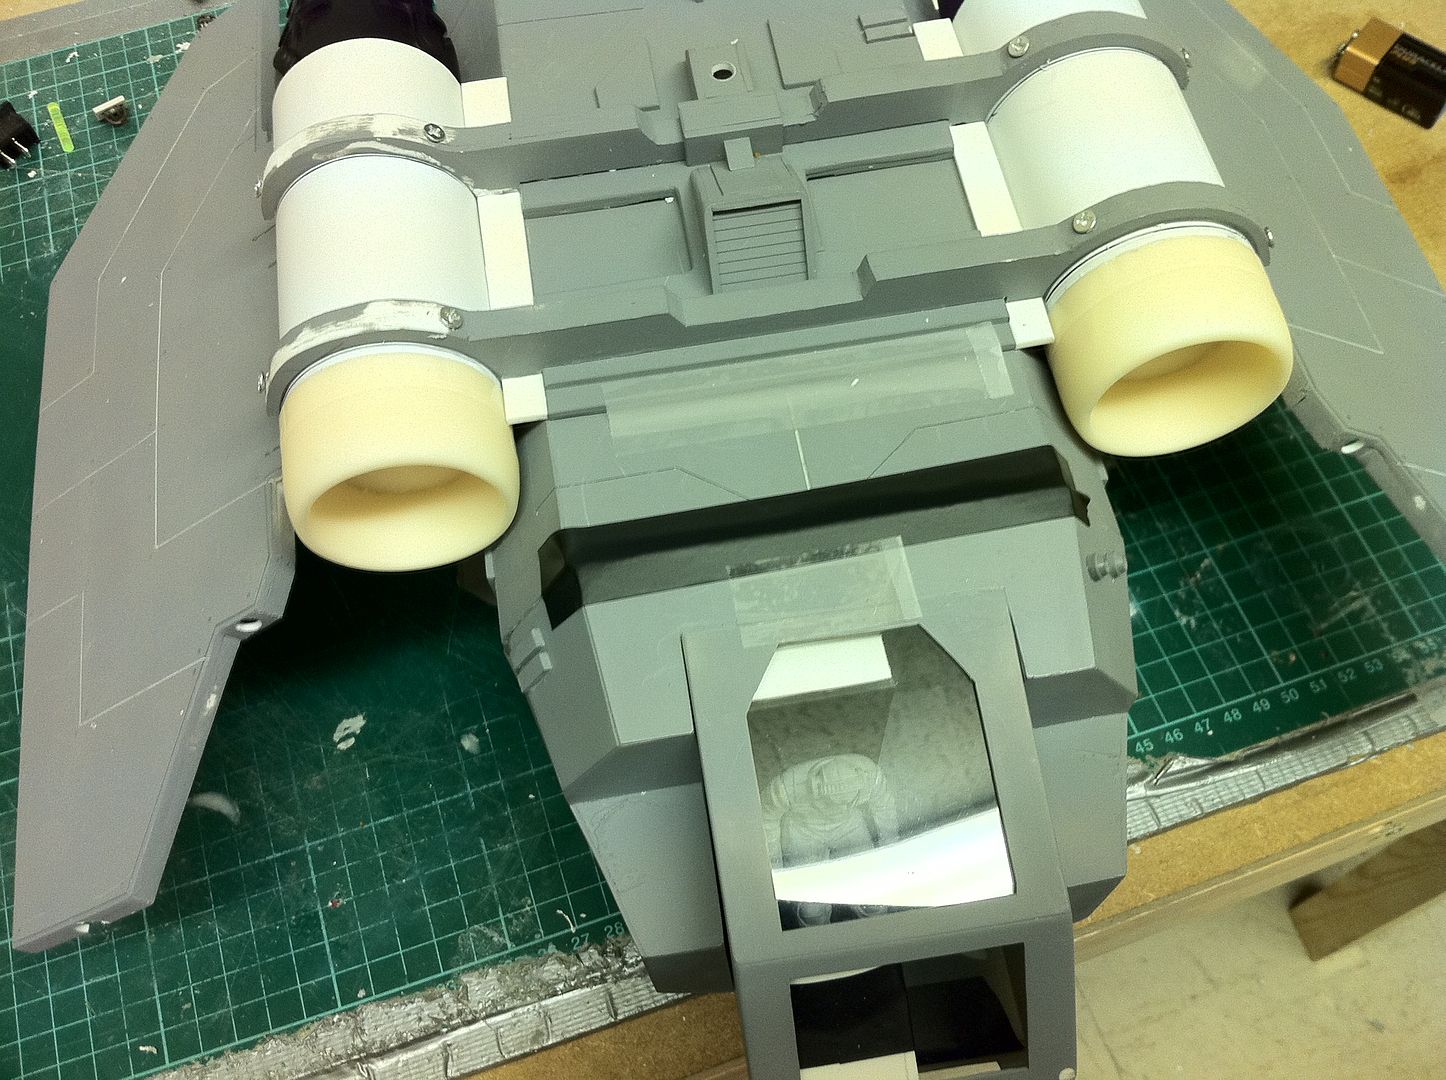
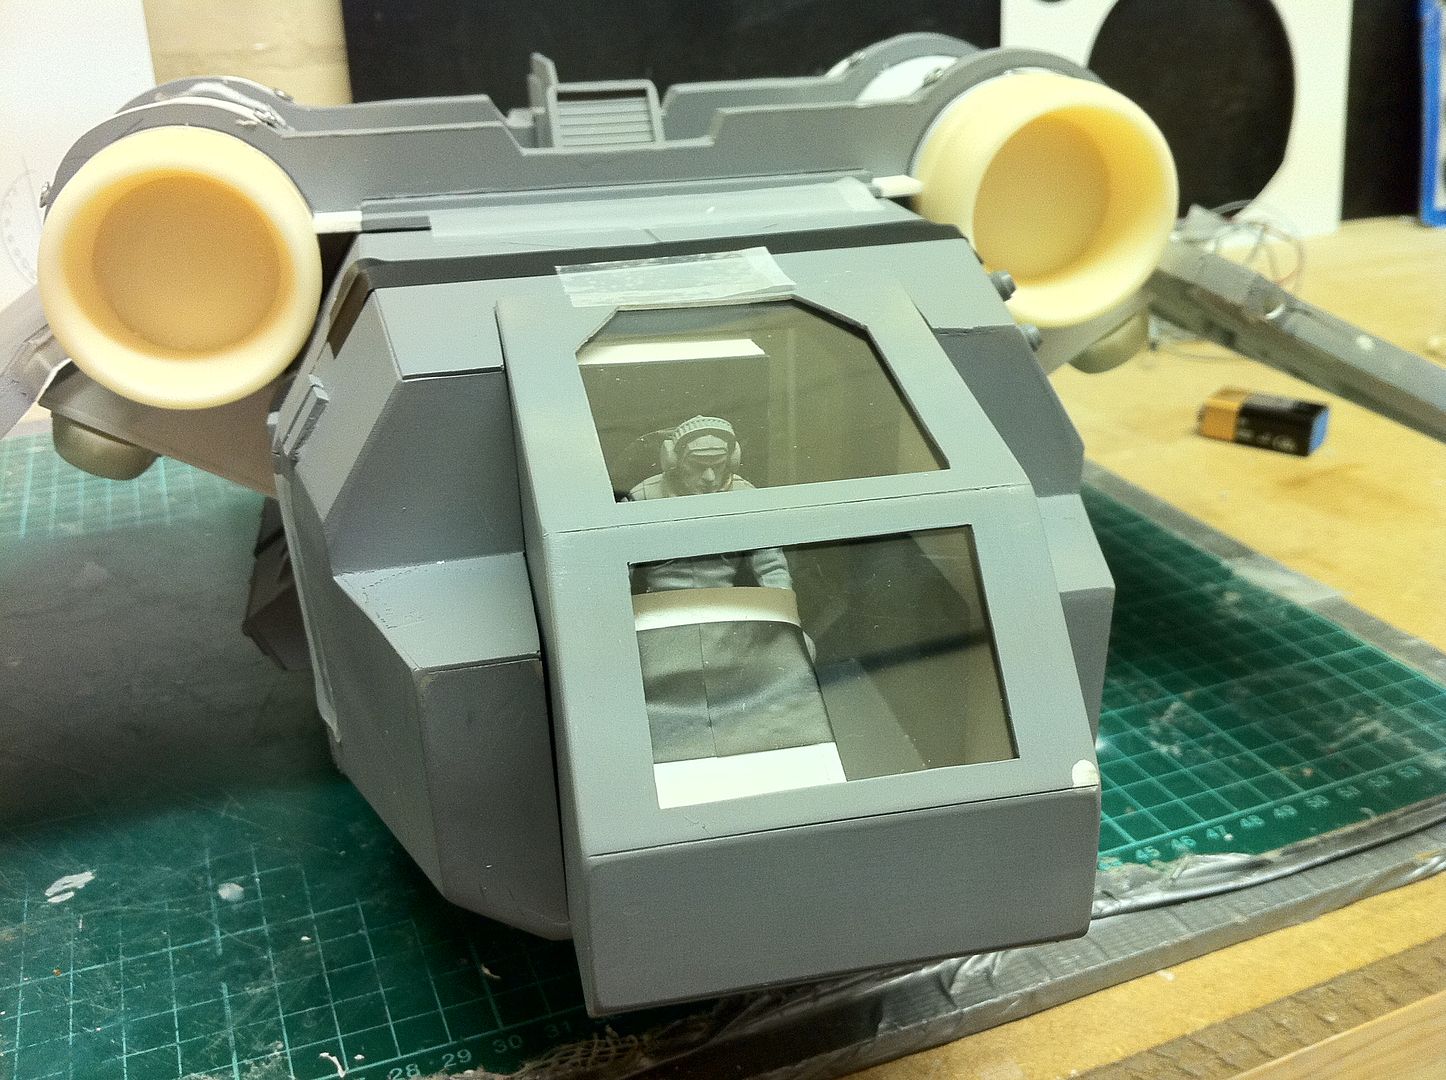
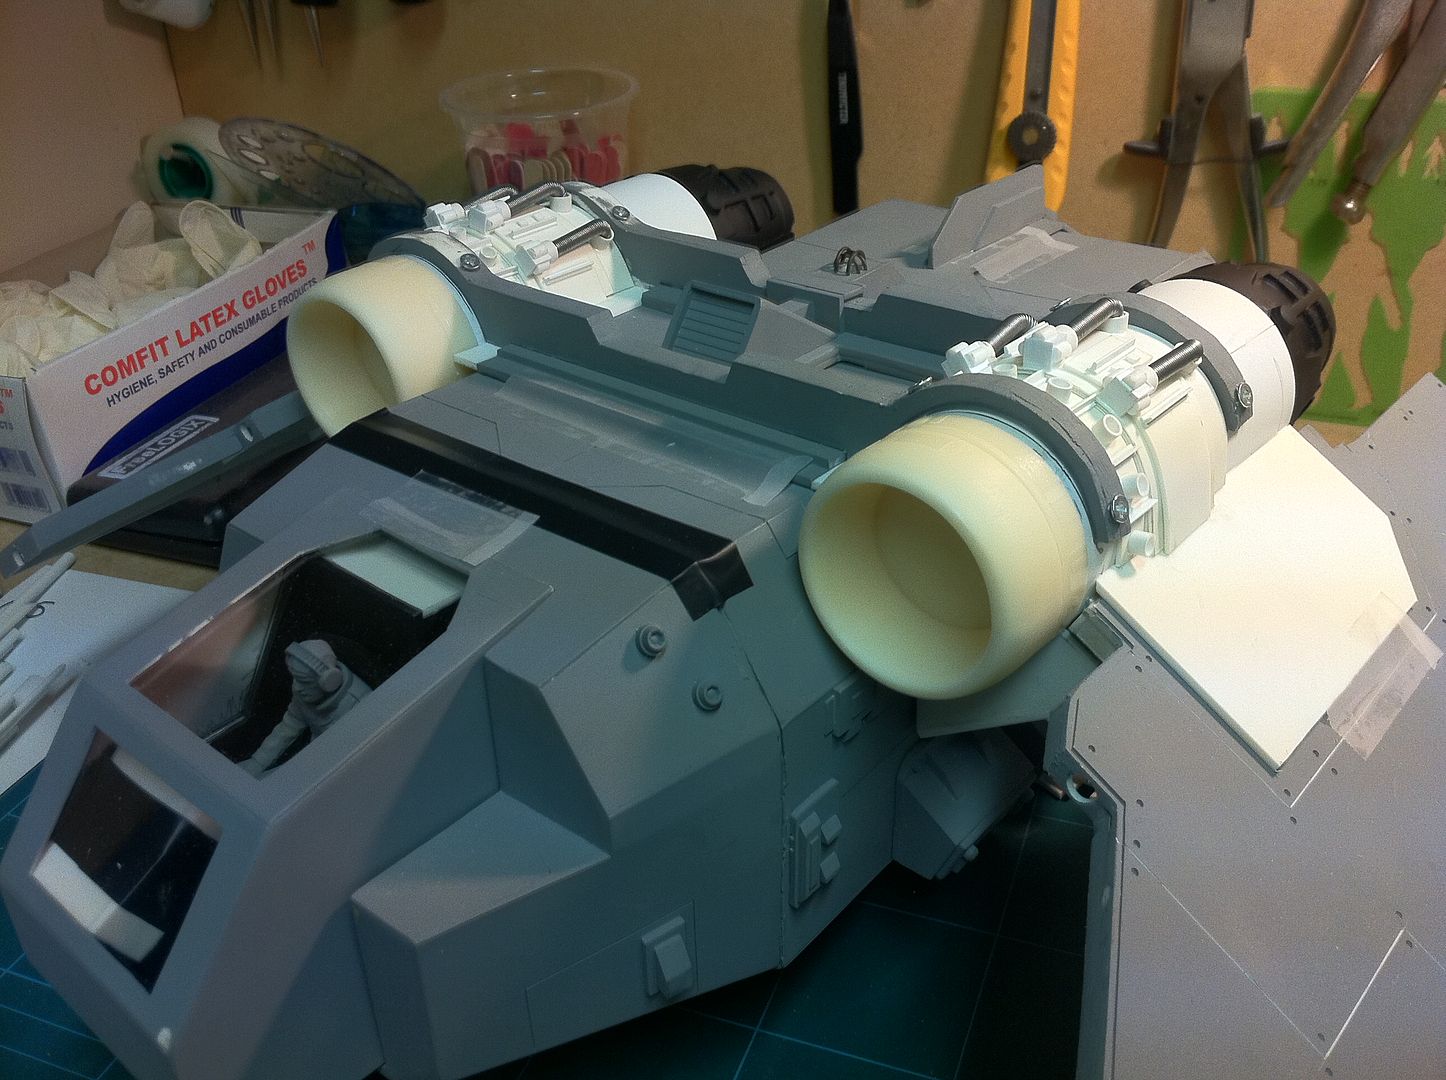
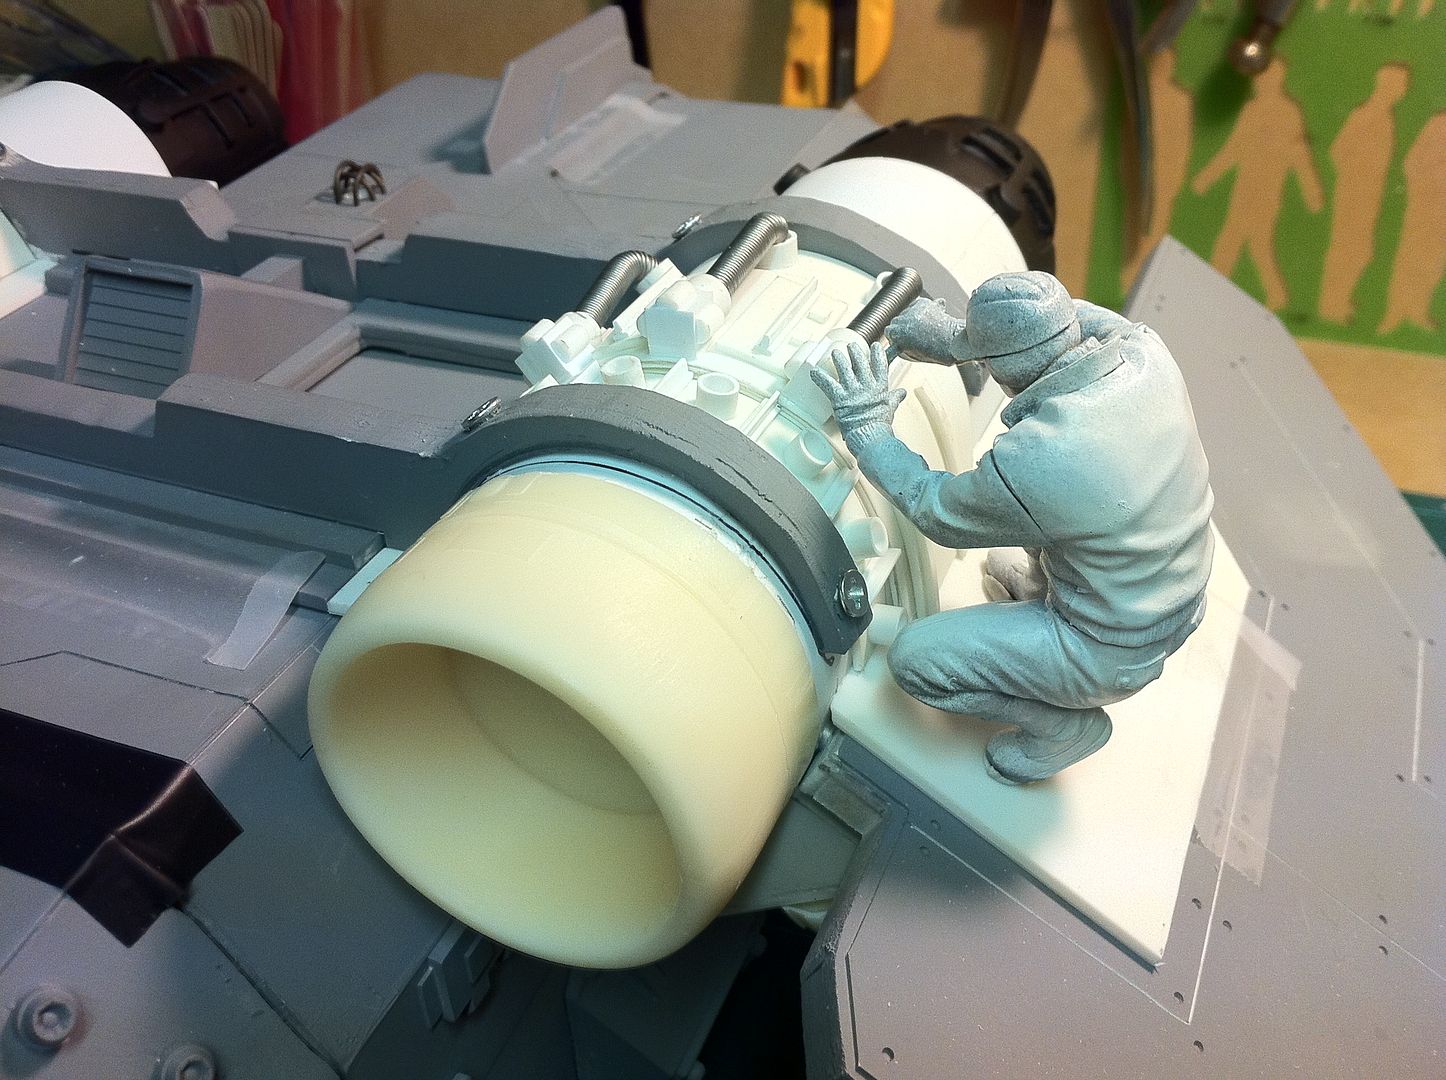
I also made the VTOL shoulders under the wings and blutacked on the lift fans to see what they looked like.
Feel free to be as verbose as you like.
Here are the pics.
Enjoy.
 http://www.youtube.com/watch?v=CCrQyf6o0J8
http://www.youtube.com/watch?v=wDyHVc9t0EU
http://www.youtube.com/watch?v=CCrQyf6o0J8
http://www.youtube.com/watch?v=wDyHVc9t0EU
24297
Post by: Viktor von Domm
just watched the vids of your lighttests and i have to say: when the engine torches are alight the magic truly works... my only concern is here that when they aren´t working the flat surface of the led torches looks a bit out of place...my idea here would be a clear cover that more resembles a enginelike look... don´t know what really woud suit that nonfunctioneing effect...
to the fans ...i think you will shortly felsh out the connection and position of the fans, as you mentioned you only bluetaced them in place for the look...the only thing i here can say is if you think the asymetrical look is what you wanted than i am fine with that... otherwise i would suggest either adding a fourth fan or put the midlle one truly in the middle...
beside those thoughts of mine all i can say is that i really enjoy this built^^
cheers, vik
18892
Post by: Bar
Viktor von Domm wrote: just watched the vids of your lighttests and i have to say: when the engine torches are alight the magic truly works... my only concern is here that when they aren´t working the flat surface of the led torches looks a bit out of place...my idea here would be a clear cover that more resembles a enginelike look... don´t know what really woud suit that nonfunctioneing effect...
That's fair comment. I really like this type of constructive criticism. If something doesn't look right, i like to know it from people.
As for an engine outlet, i will see what i can do. I have the day off today, and i am about to go back to work to see if i can get anything else done today. I will take this on board and try to get that fixed.
Viktor von Domm wrote:to the fans ...i think you will shortly felsh out the connection and position of the fans, as you mentioned you only bluetaced them in place for the look...the only thing i here can say is if you think the asymetrical look is what you wanted than i am fine with that... otherwise i would suggest either adding a fourth fan or put the midlle one truly in the middle...
beside those thoughts of mine all i can say is that i really enjoy this built^^
cheers, vik
Thanks a lot Vik. I appreciate all your comments.
As for the fans, although i am using a different part(And have very slightly modified the arrangement), the official position of the fans are two to the rear and one to the front on each side.
Here are pics of the Forgeworld kit(If you still think i should change it, let me know):

24297
Post by: Viktor von Domm
ok... i have to admit that by keeping it the "asymetrical" way you would be true to the FW model...with my laymen knowledge of aerodynamics tho i wonder if said setup would cause stability or the opposite...then again this is a sifi model and not a realistic one it just merely hints a nod towards realism...so i guess you should stick to your plan...
actually i too like constructive and even negative constructive criticism as this is so rare here on this board...and i think you are on to something truly grande here and i think now is still the good time to tweak and readjust ...it is the main thing i like about modeling...and your work is so much harder as you try to rebuild something as oposite to my work as i go to totally new boarders...thus shaving off a bit of the possabilities for constructive criticism^^ on my work^^
i had a quick and fleeting vision of a substance like:

but i am not sure if this might work and actually this might dampen serioulsy your lighteffect...ach such a poor world for not producing actual working jetengines for a 1:20 model...
vik
18892
Post by: Bar
Viktor von Domm wrote:ok... i have to admit that by keeping it the "asymetrical" way you would be true to the FW model...with my laymen knowledge of aerodynamics tho i wonder if said setup would cause stability or the opposite...then again this is a sifi model and not a realistic one it just merely hints a nod towards realism...so i guess you should stick to your plan...
Thanks. The way i see it is that the lift fans will be controlled by the pilot via a fly by wire system. And i think that (fully laden), the Arvus would be a bit "ass-heavy". I think that's why the rear set is a double line of fans on each side.
Viktor von Domm wrote:actually i too like constructive and even negative constructive criticism as this is so rare here on this board...and i think you are on to something truly grande here and i think now is still the good time to tweak and readjust ...it is the main thing i like about modeling...and your work is so much harder as you try to rebuild something as oposite to my work as i go to totally new boarders...thus shaving off a bit of the possabilities for constructive criticism^^ on my work^^
Sure. I would like people to tell me straight if they think i am going in the wrong direction.
And i appreciate you saying scratchbuilding your own designs are fun, but as you say, they never challenge you to totally stick to a predetermined design. Sometimes that is good too. Just stick to a specific design and try as hard as you can to get it right.
Viktor von Domm wrote:i had a quick and fleeting vision of a substance like:
but i am not sure if this might work and actually this might dampen serioulsy your lighteffect...ach such a poor world for not producing actual working jetengines for a 1:20 model...
vik
Thanks for that. I have come up with something waaaaay better... Let me know what you think of the pics below.
Some small measure of progress. It's my day off, so i was right back up to work and getting stuff done on the Arvus.
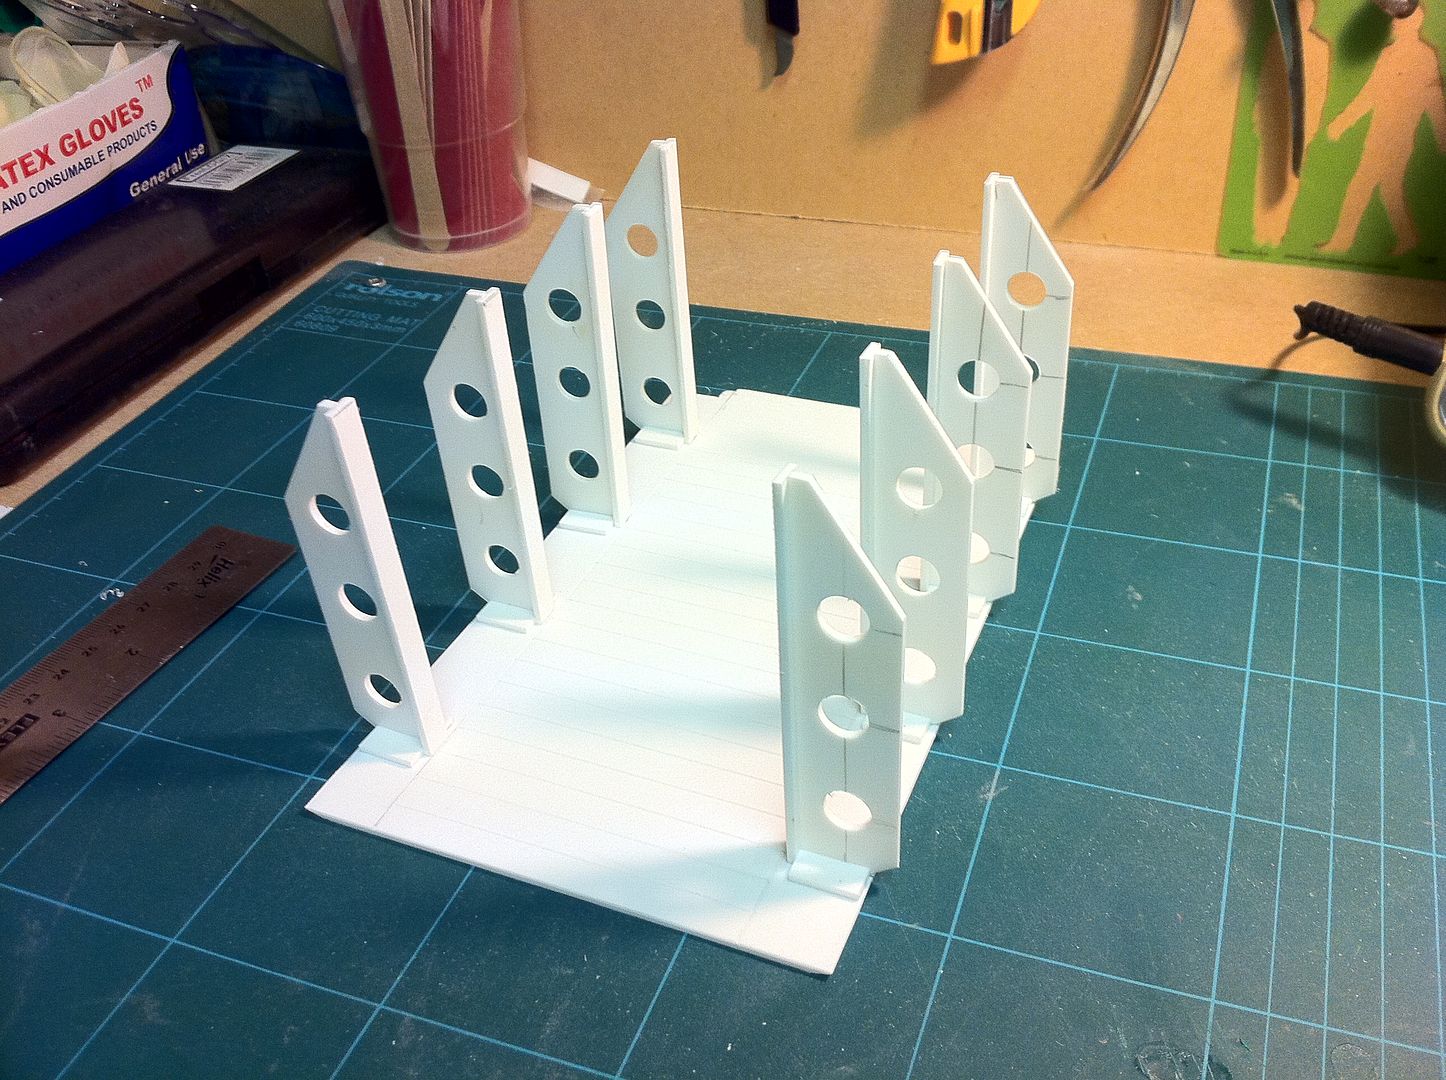
I got the internal bulkheads done. I then drilled them for that "Drilled H-Beam" look. They are attached to the floor, which is still wild, and the roof will glue on top, so the entire interior will slot inside in one piece. The floor has been scribed but i didn't get pics of that. Maybe tomorrow.
I also took on board a comment made Vik here about the engines... So i detailed the end caps of the thrusters and now it looks a bit better(There's less light getting out now, but they look a lot better when they are turned off).
Comments welcomed on that.
Enjoy the pics.

24297
Post by: Viktor von Domm
i bow before your ideas... a whole hell of a better idea in my book! now this is what i have to call a workable look!!! the engines are now a definte hit at the right spot! and i have to add that i now have a little TIE-Fighter feel about the engines...and thats something i say in a good way! yep that part of the model is truly done now^^
as for the H-beams... yep now the inner part of the arvus is forming up very well...i like that cold steal feel about the beams... that adds volumes to the functional look of the model! what did you say you wanted to add inside the cargospace...seats for deployments or cargo? either way the interior now looks the way that it could hold the purpose...
(somehow i fear my enthusiasm got the better of me and my language skills have much slipped during that post^^...)
by the way i like your style of taking athmospheric shots... that way the arvus looks so life like! and to tell you the truth... whenever i see that damsel i get a fuzzy feeling^^
cheers, vik
p.s. someday i have to make a model and stick to a design just to test my own abilities! and threads like this fully well count for motivating me^^
18892
Post by: Bar
Viktor von Domm wrote: i bow before your ideas... a whole hell of a better idea in my book! now this is what i have to call a workable look!!! the engines are now a definte hit at the right spot! and i have to add that i now have a little TIE-Fighter feel about the engines...and thats something i say in a good way! yep that part of the model is truly done now^^
There are actually a lot of details still needing added to the end cans for the proper look, but that's not a big job. Thanks for your kind words.
Viktor von Domm wrote:as for the H-beams... yep now the inner part of the arvus is forming up very well...i like that cold steal feel about the beams... that adds volumes to the functional look of the model! what did you say you wanted to add inside the cargospace...seats for deployments or cargo? either way the interior now looks the way that it could hold the purpose...
I am going tp put foldup seats inbetween the H-beams, and cargo hooks on the floor. I have just the parts for that. More on those later.
Viktor von Domm wrote:(somehow i fear my enthusiasm got the better of me and my language skills have much slipped during that post^^...)
It read fine for me. You are speaking better english than i speak German, so that's something.
Viktor von Domm wrote: by the way i like your style of taking athmospheric shots... that way the arvus looks so life like! and to tell you the truth... whenever i see that damsel i get a fuzzy feeling^^
Thanks. I actually just held the engine "torch" behind her to give a lot of shadow.
Viktor von Domm wrote:p.s. someday i have to make a model and stick to a design just to test my own abilities! and threads like this fully well count for motivating me^^
For sure.
The first one seems like the biggest challenge. When you realise you can build anything, there will be no stopping you...
Incidentally, i am getting closer to nailing down the final paint scheme. And for the interior i will be using Ford Highland Green. A friend of mine used this for the interior of a model recently and i was very impressed. It's a pale green the likes of which they usually paint the interiors of military vessels(No matter what the exterior looks like).
Here is an example of the Highland Green:
24297
Post by: Viktor von Domm
i guess to really make the model look like the real thing it needs a truly ugly paintscheme... that is not to say that it should be painted ugly...just the use of such depressive colorchoices all around the world uses in old hospitals and administrative offices and military vehicles/buildings...that cross between vomit green and poobrown...sounds gross? but i bet you have witnessed these depressing usage of colors in certain areas... it is that kind of look...
just did a google search and the Ford Highland Green is a quite positive color^^ looks good
by the way, will you add hazardstripes in the inside?
as for what to add to the engines... probably cables would be a nice thing...
The first one seems like the biggest challenge. When you realise you can build anything, there will be no stopping you...
and with lots of things mastery comes through practice... a virtue you show^^ fer sure^^
It read fine for me. You are speaking better english than i speak German, so that's something
pun or for real? i always wonder about the motivation for people to learn german... it is a nasty and hard language...lots of other languages that would be more fun in my book...but tastes might be different^^ and should^^
vik
18892
Post by: Bar
Viktor von Domm wrote: i guess to really make the model look like the real thing it needs a truly ugly paintscheme... that is not to say that it should be painted ugly...just the use of such depressive colorchoices all around the world uses in old hospitals and administrative offices and military vehicles/buildings...that cross between vomit green and poobrown...sounds gross? but i bet you have witnessed these depressing usage of colors in certain areas... it is that kind of look...
just did a google search and the Ford Highland Green is a quite positive color^^ looks good
The trick is not to make the paint scheme simply a cool one, but one that looks like a proper military craft. It's hard to get right. But i am hoping i manage.
Viktor von Domm wrote:by the way, will you add hazardstripes in the inside?
It will have all manner of the proper markings. And hazard stripes will be done, yes. I have a clever technique to do those without needing to mask and paint...
Viktor von Domm wrote:as for what to add to the engines... probably cables would be a nice thing...
Yes. There's still a whole hell of a lot needing done to the engines. They will be VERY detailed when i am done. But that is all finishing details. I am still building structure right now.
Viktor von Domm wrote:Bar wrote:The first one seems like the biggest challenge. When you realise you can build anything, there will be no stopping you...
and with lots of things mastery comes through practice... a virtue you show^^ fer sure^^
Thanks a lot. I look forward to the day you break your shackles and just build something specific as an exact replica! If i can inspire that in just one person reading that will be enough for me.
Viktor von Domm wrote:Bar wrote:
It read fine for me. You are speaking better english than i speak German, so that's something
pun or for real? i always wonder about the motivation for people to learn german... it is a nasty and hard language...lots of other languages that would be more fun in my book...but tastes might be different^^ and should^^
vik
I was being serious. I have never been motivated to learn another language.
I have been lazy by virtue of the fact that most people learn english, so it's never been enough of an issue.
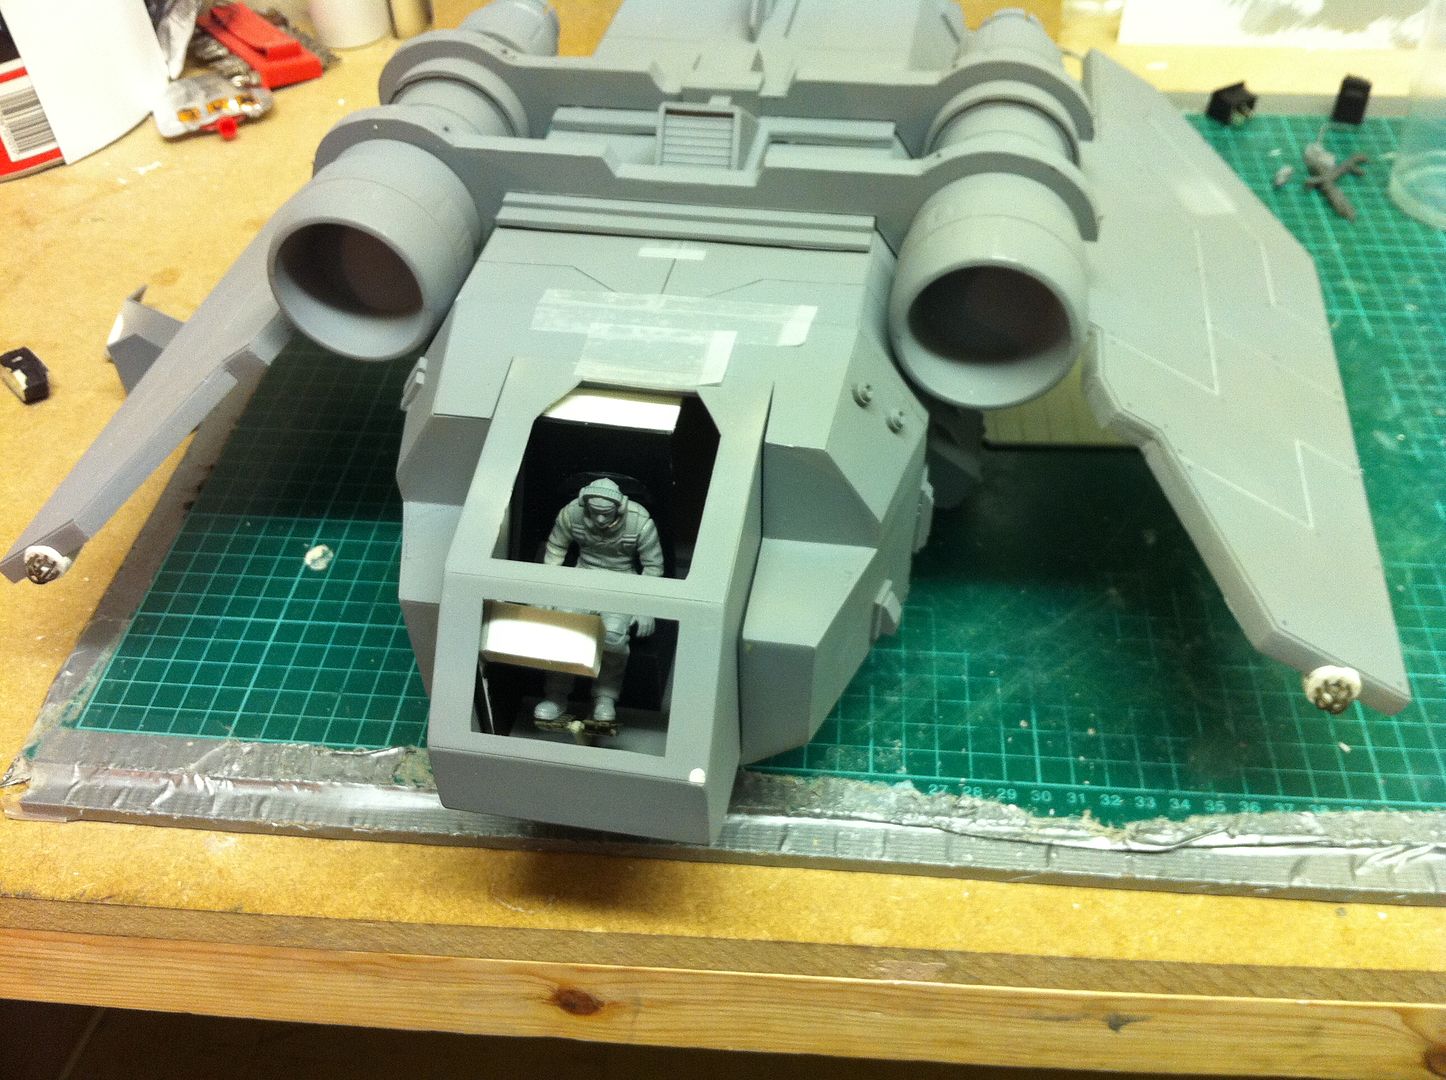
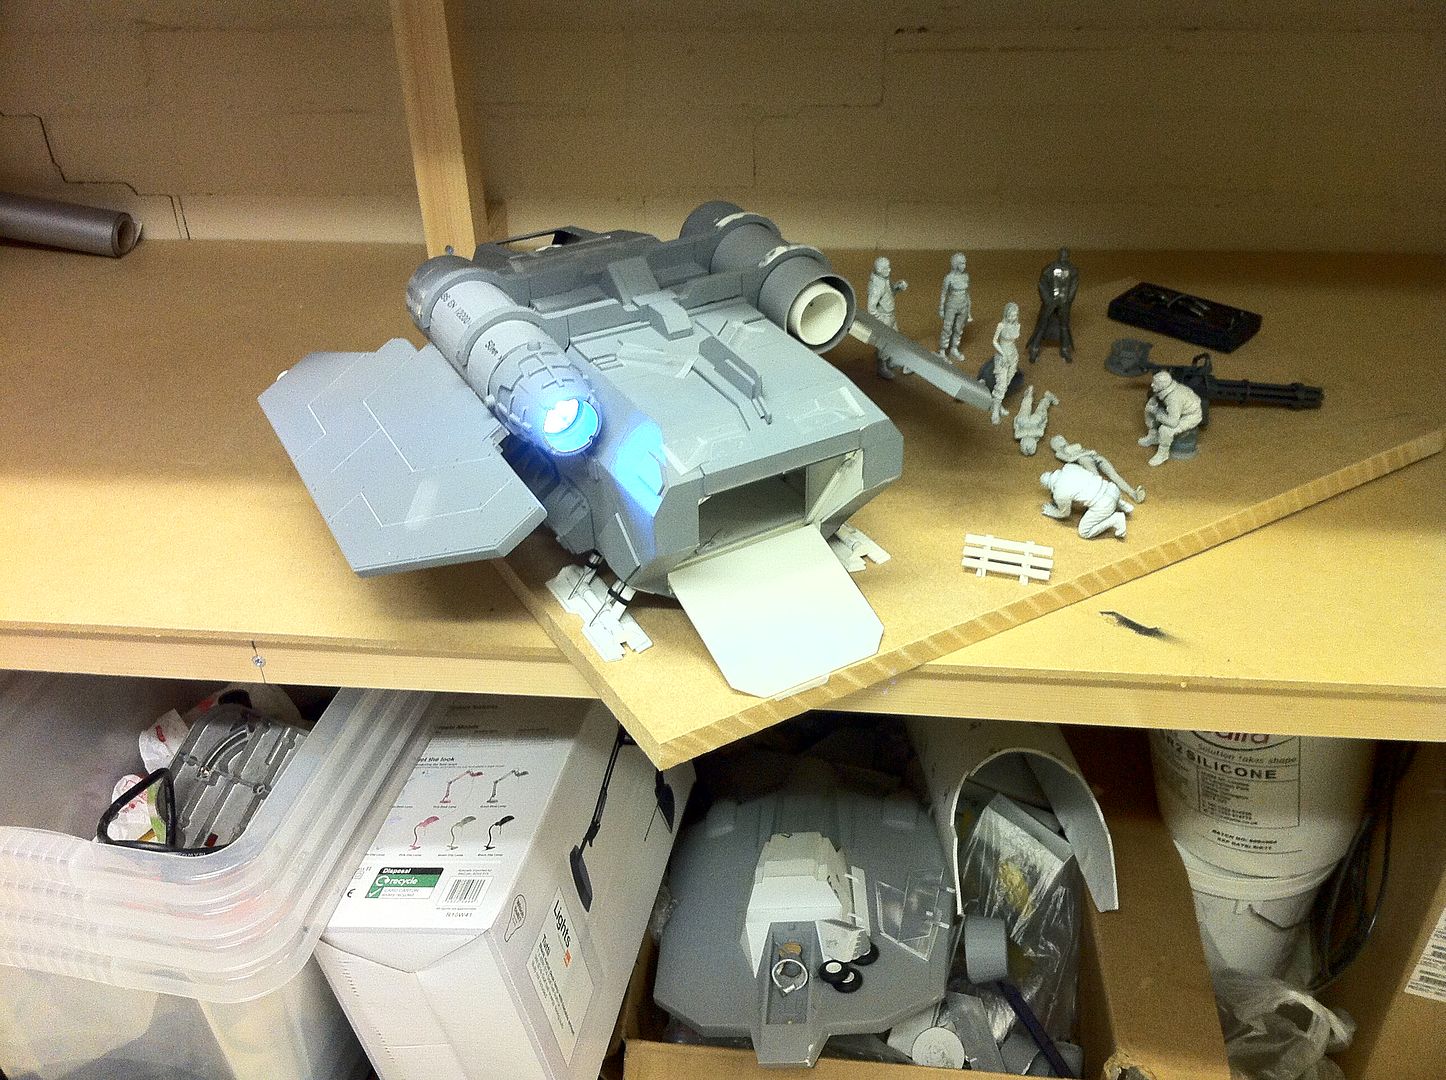
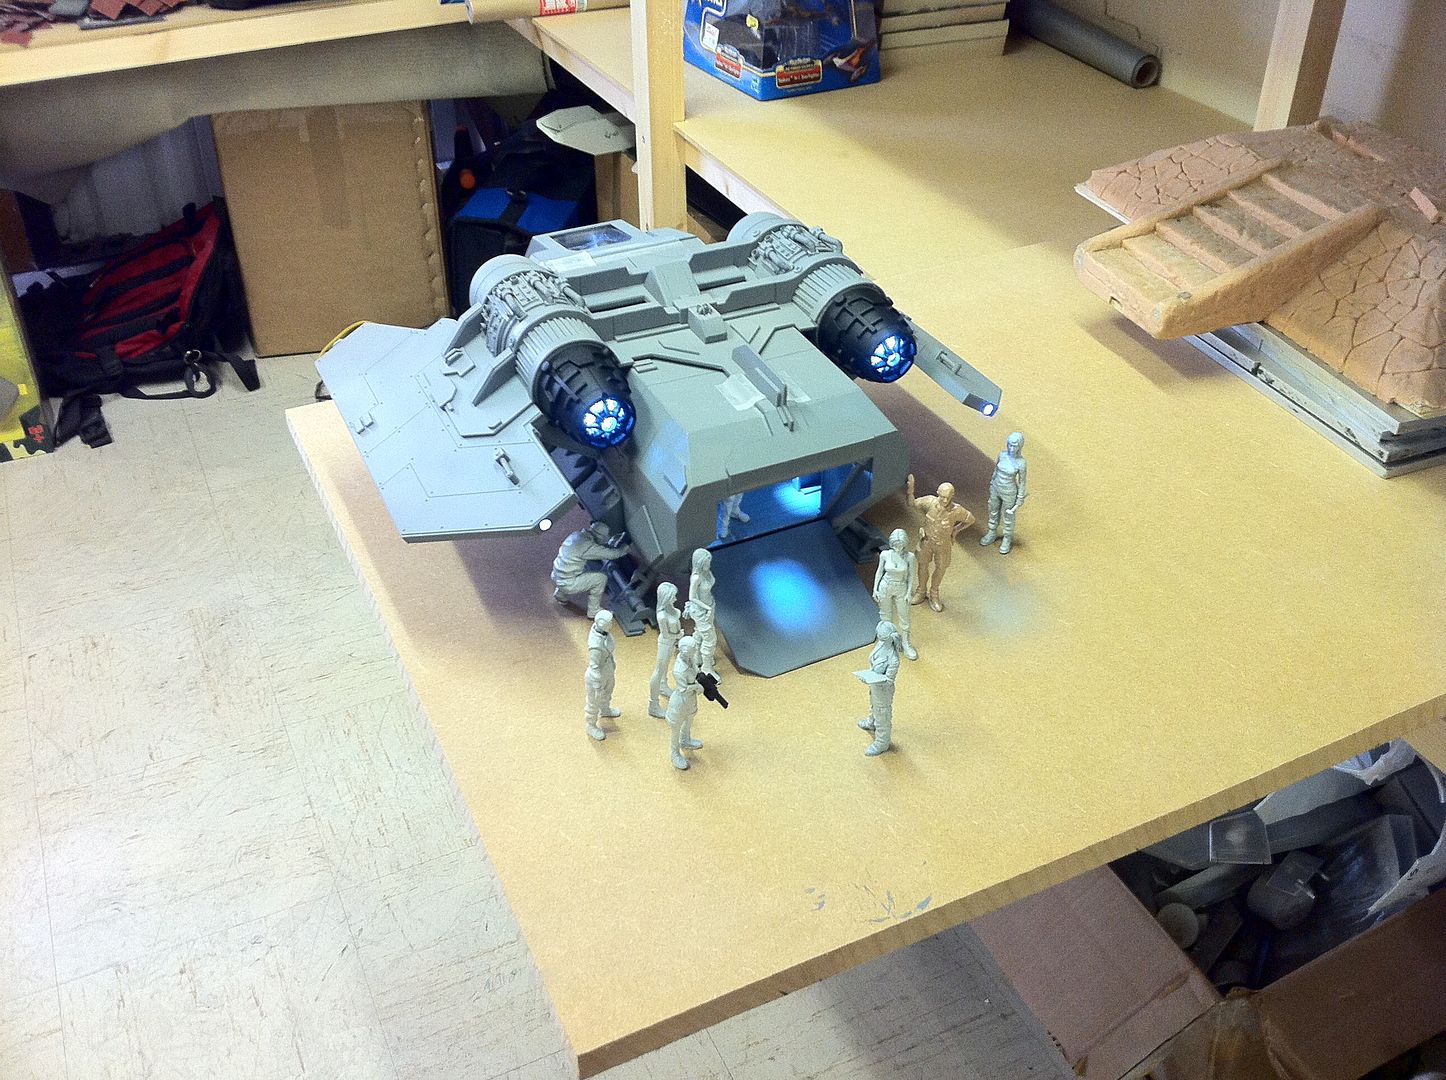
But i was being honest. Automatically Appended Next Post: Today at work, i WAS going to add the engine detailing(And to that end i screwed the engines in place on the half circle supports), but instead, i did a light test on the pilot's display(In low light and office light conditions. this fulfuls a dual purpose of making the cockpit seem more real, and also throws a LOT of light onto the pilot. I think it looks great), and also skinned the front end mould. I have been approached by a couple of people who also fancy giving this a go and(as it is), the front end mould takes more resin that the original Arvus kit, so by skinning the mould with plasticene and pouring sillicone into the gap, i can make skin castings and save maybe 50 to 70% of the resin used in the one i am making right now and it will be easier to add lights in the resultant casting.
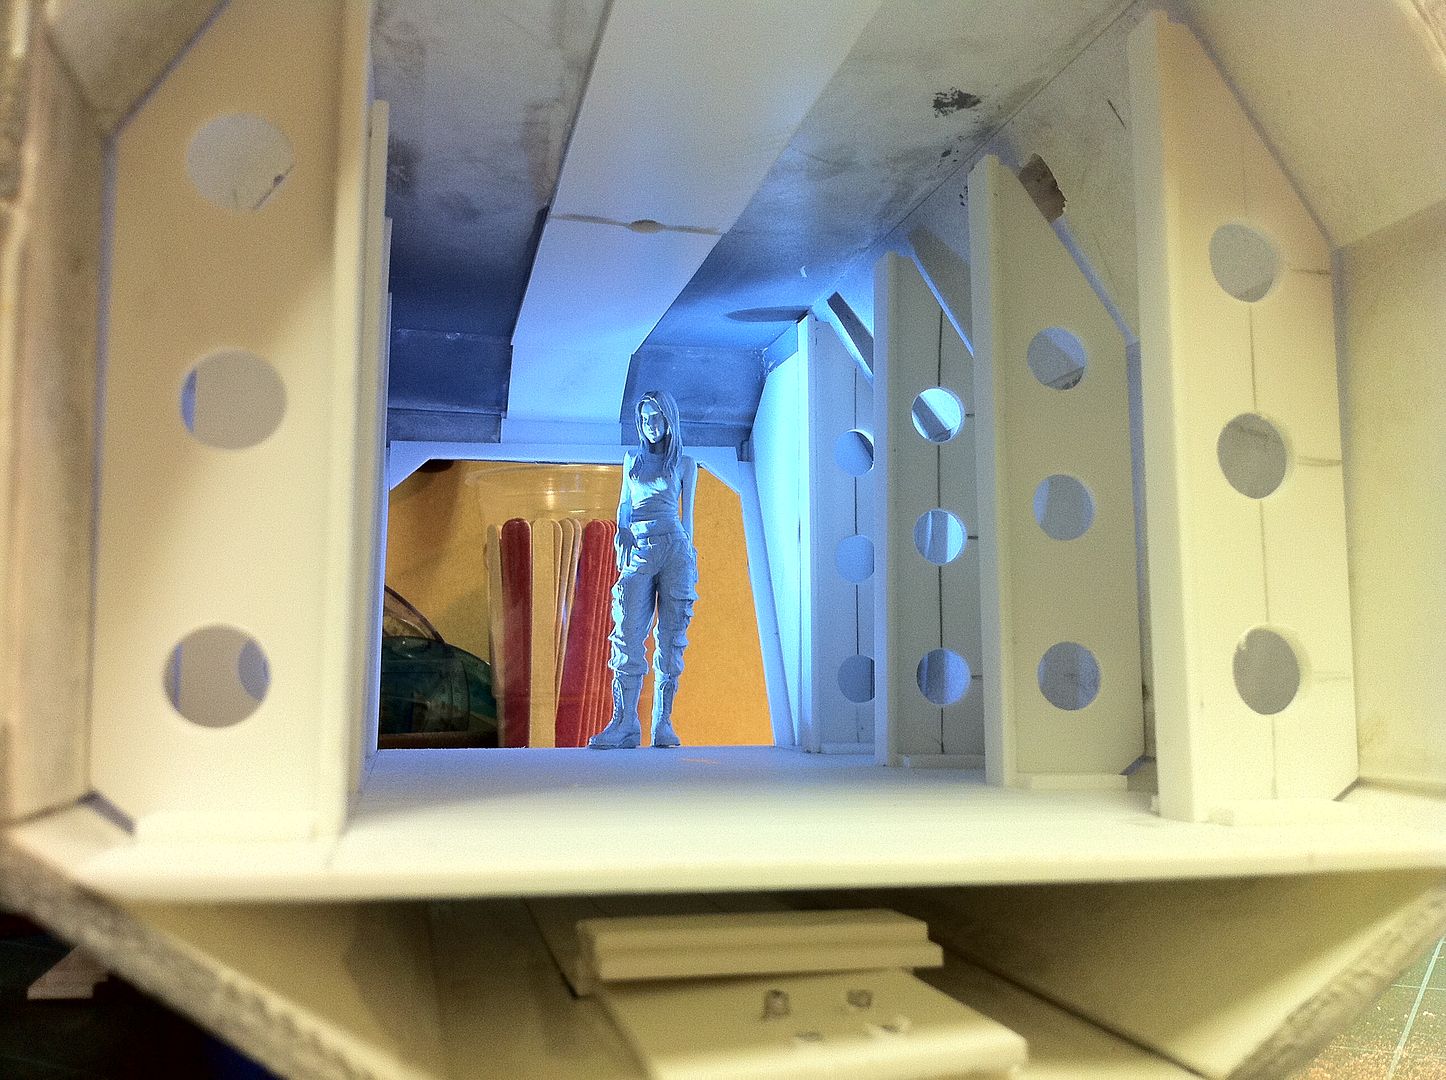
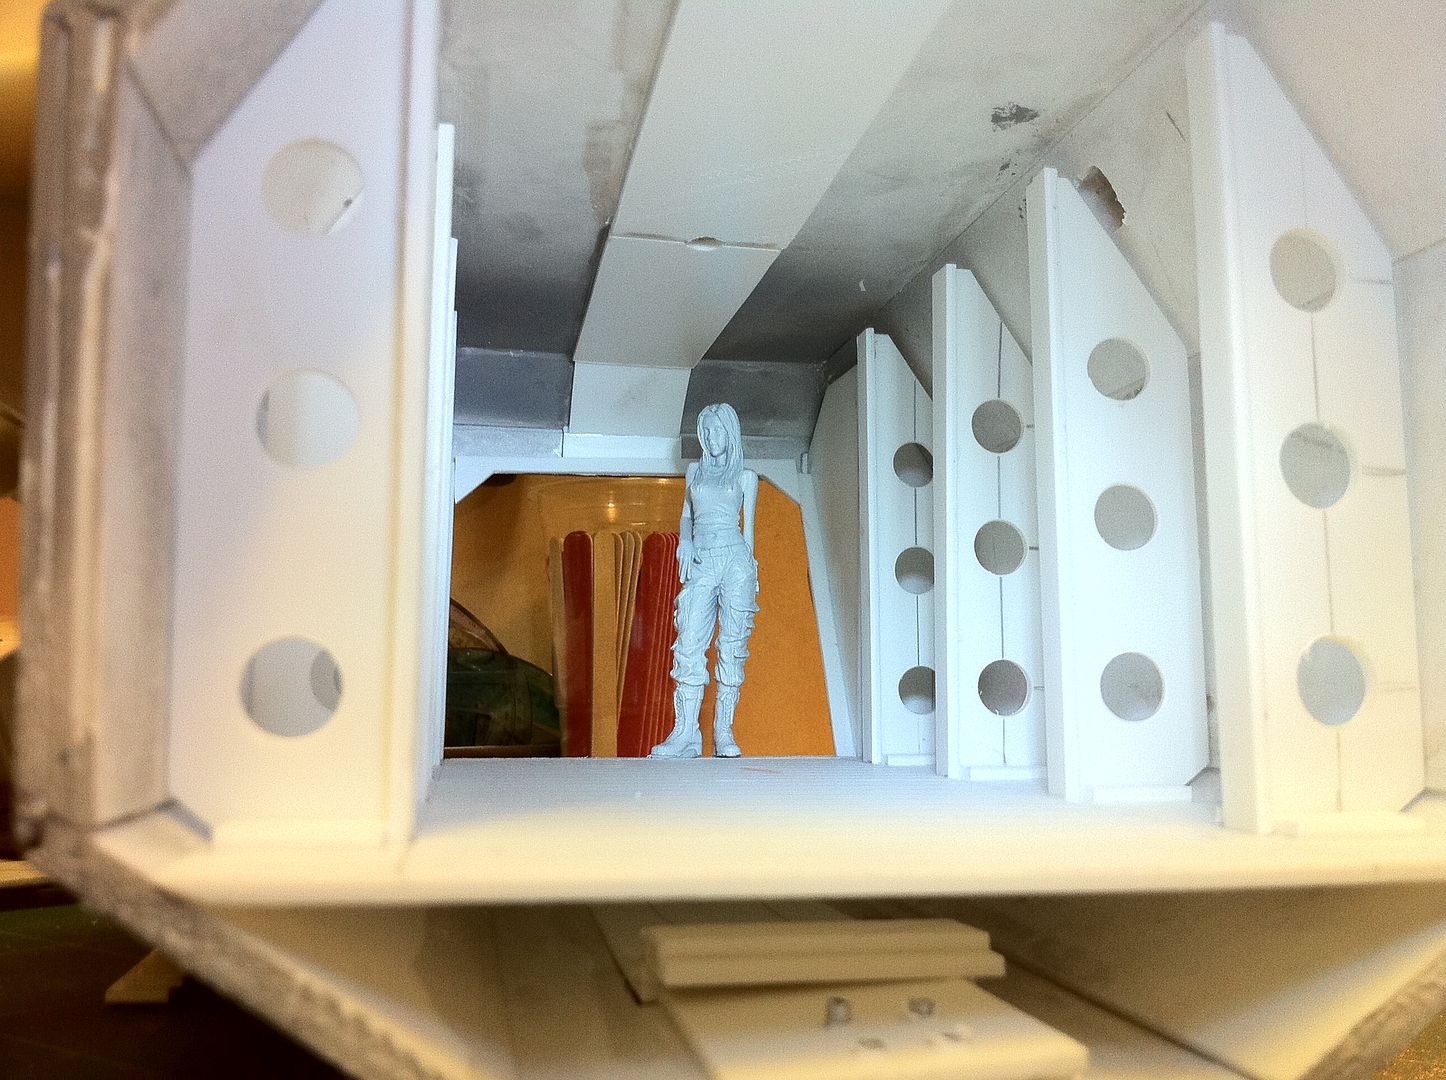
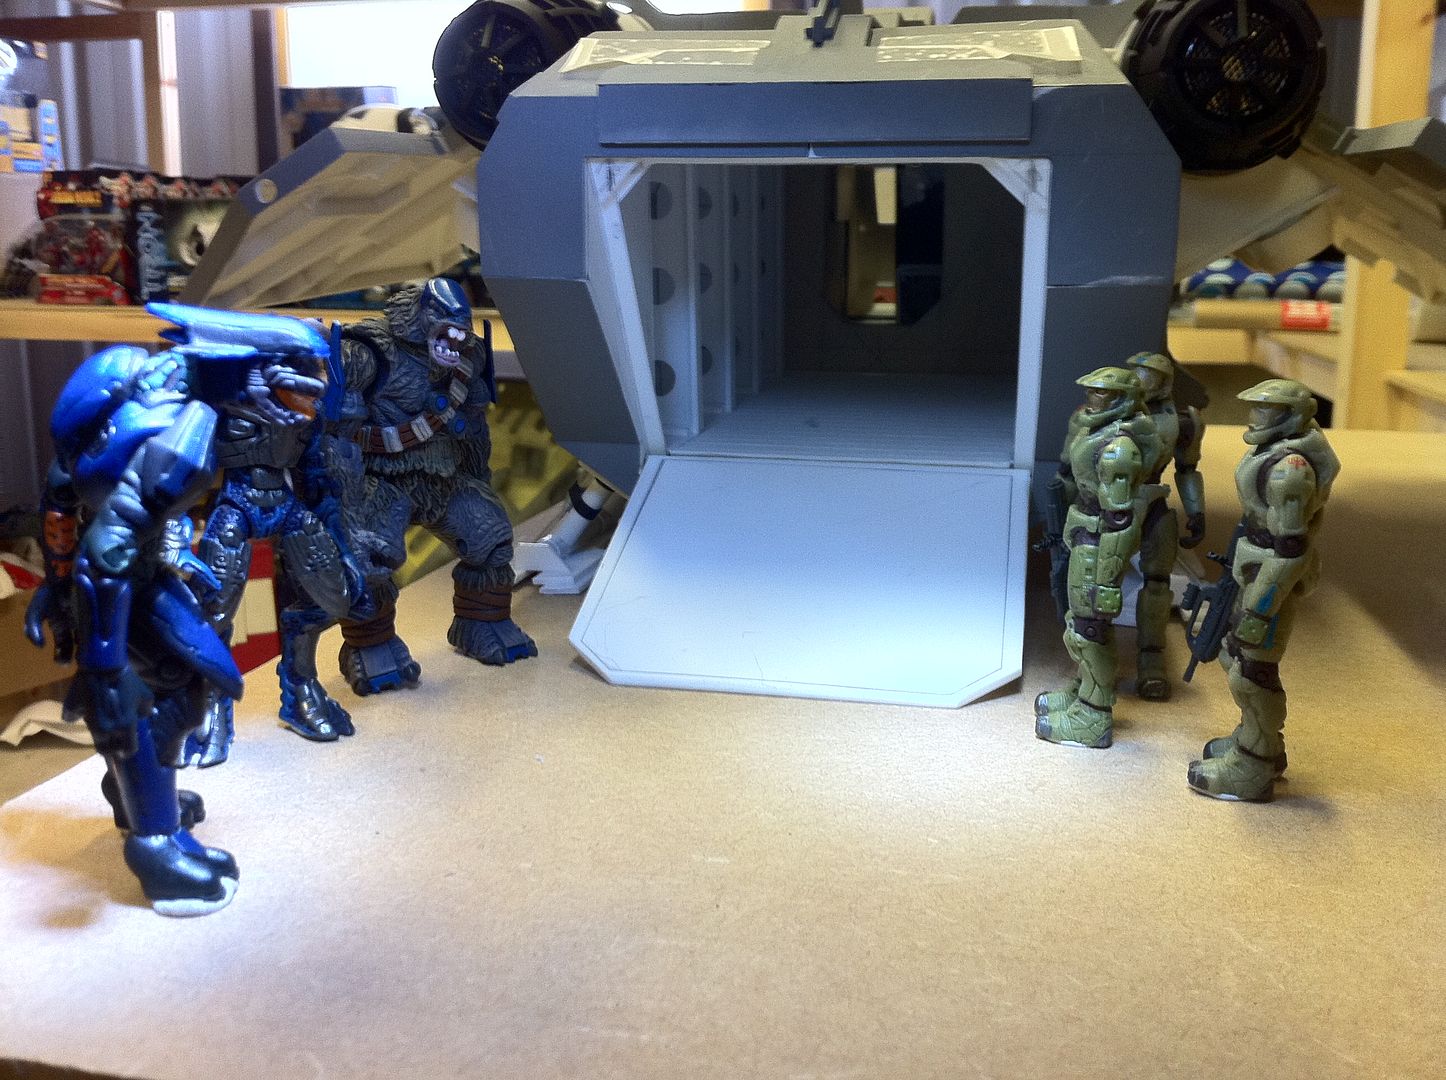
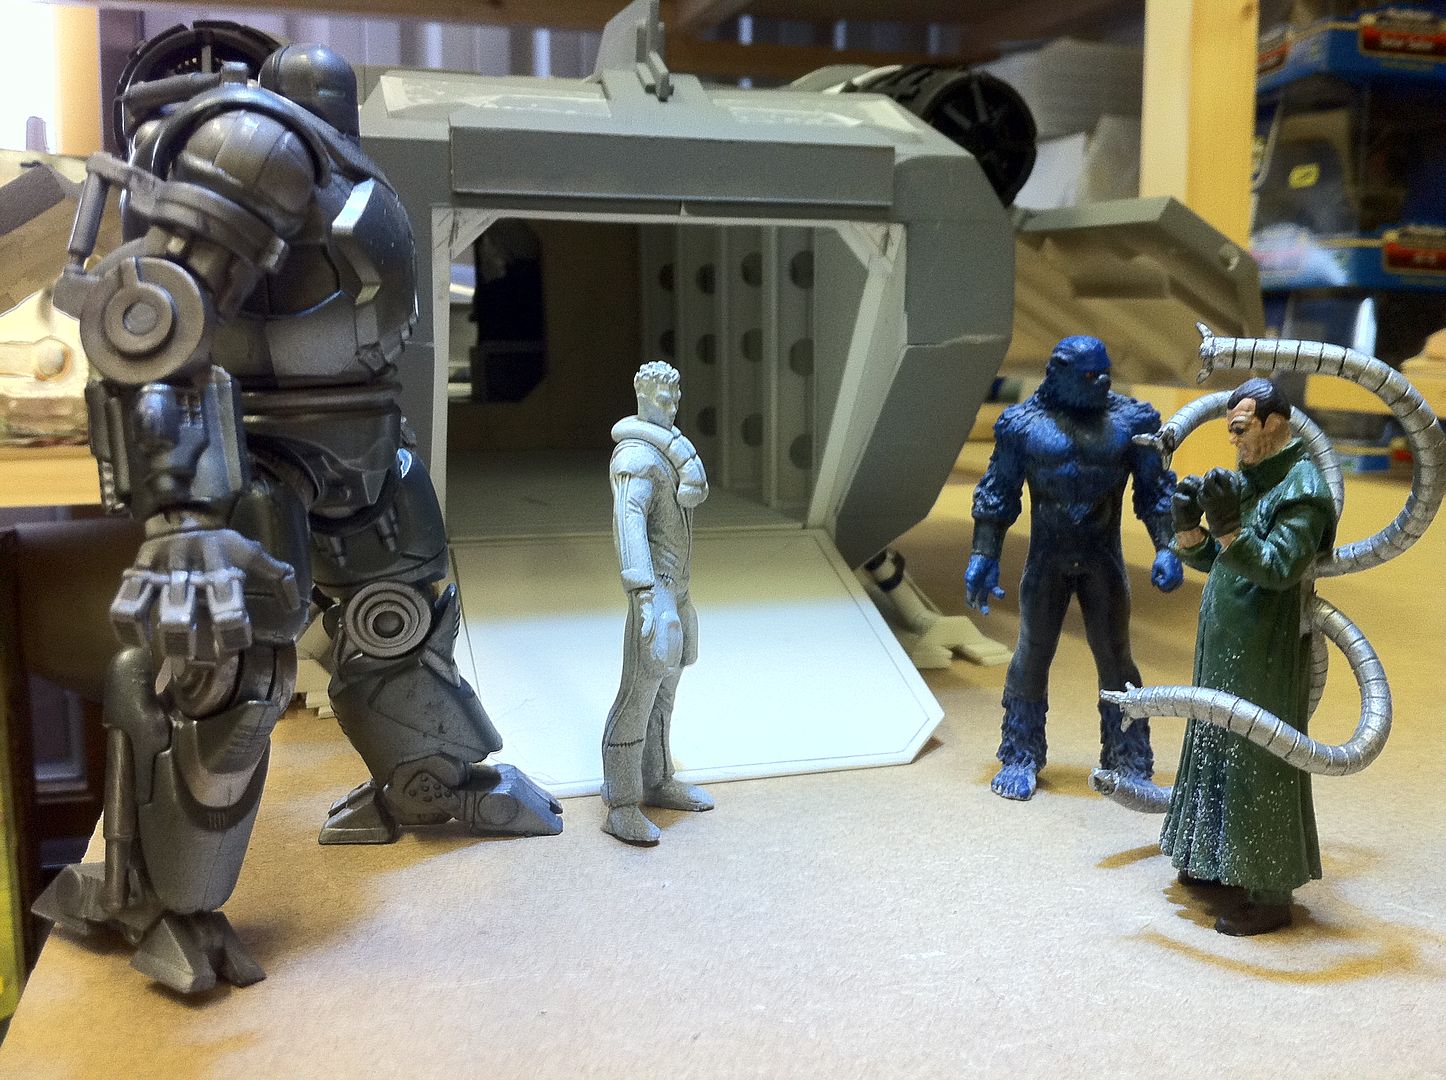
I also took some images of the craft with various figures standing around Halo figures, Marvel characters, and the standard Ma.K figures. You can see the interior bulkheads in the images. They really add a touch of realism to the interior.
The inside is still wild, as you can see from the first image. This will make it a loit easier to paint, that's for sure.
Enjoy the pics.

18892
Post by: Bar
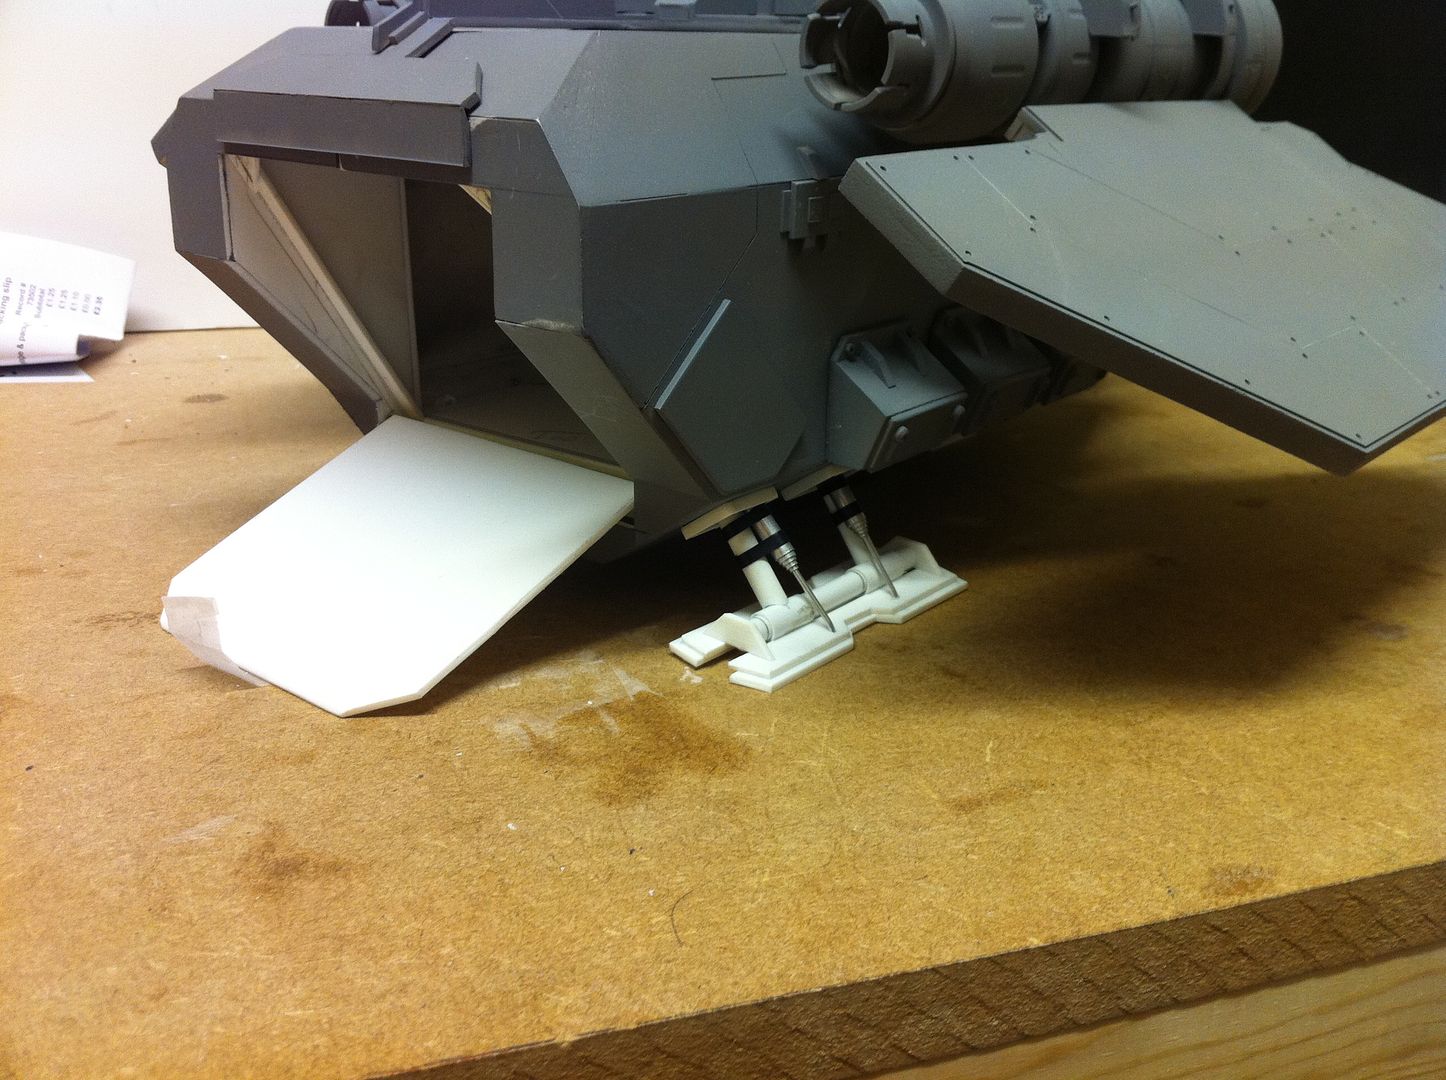
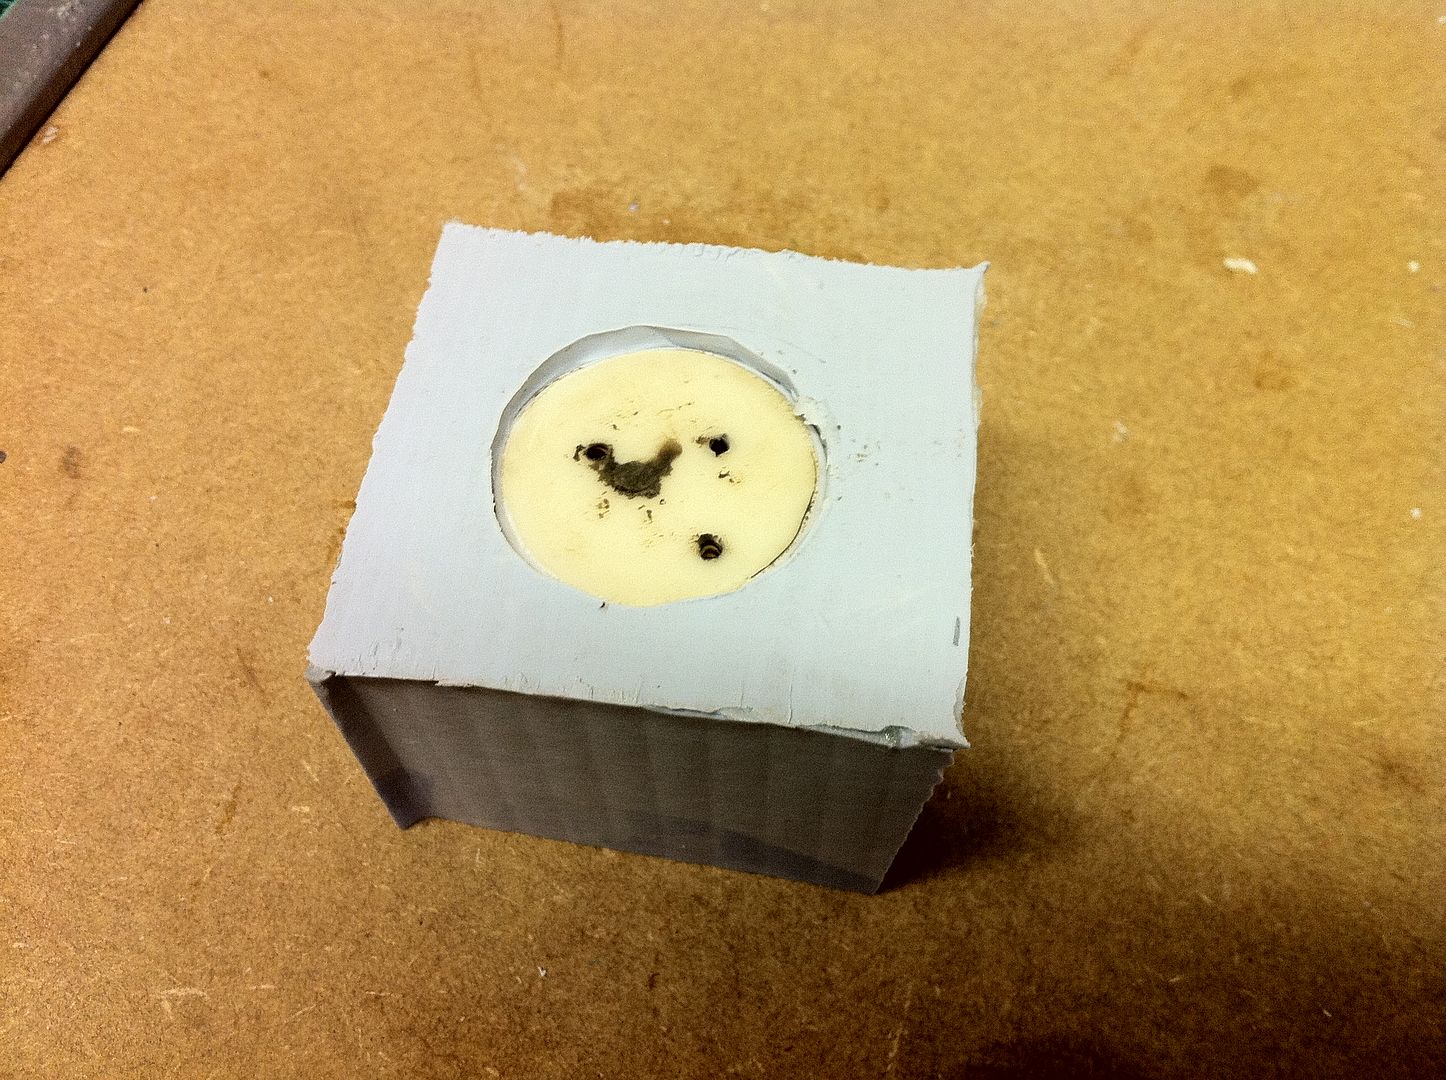
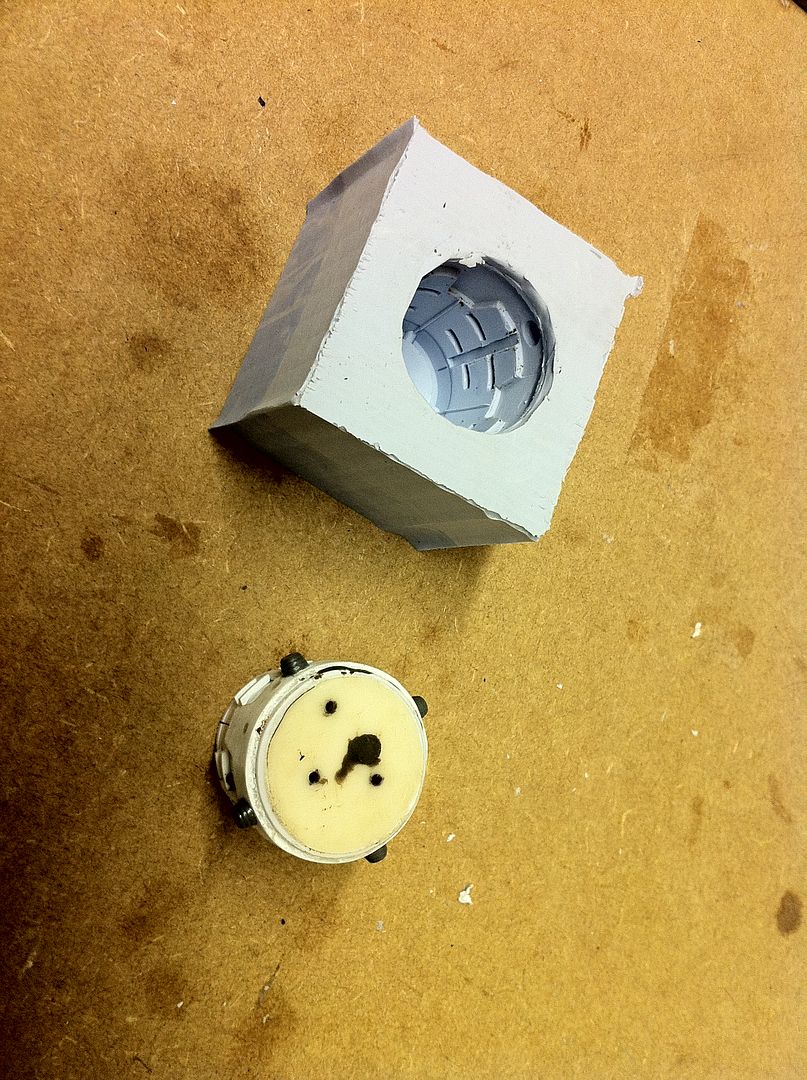
I popped out the skinned mould today and it looks very good. I have no need to make a front end right now,
but when i do, it will use less than half the resin it did before, lengthening the life of the mould.
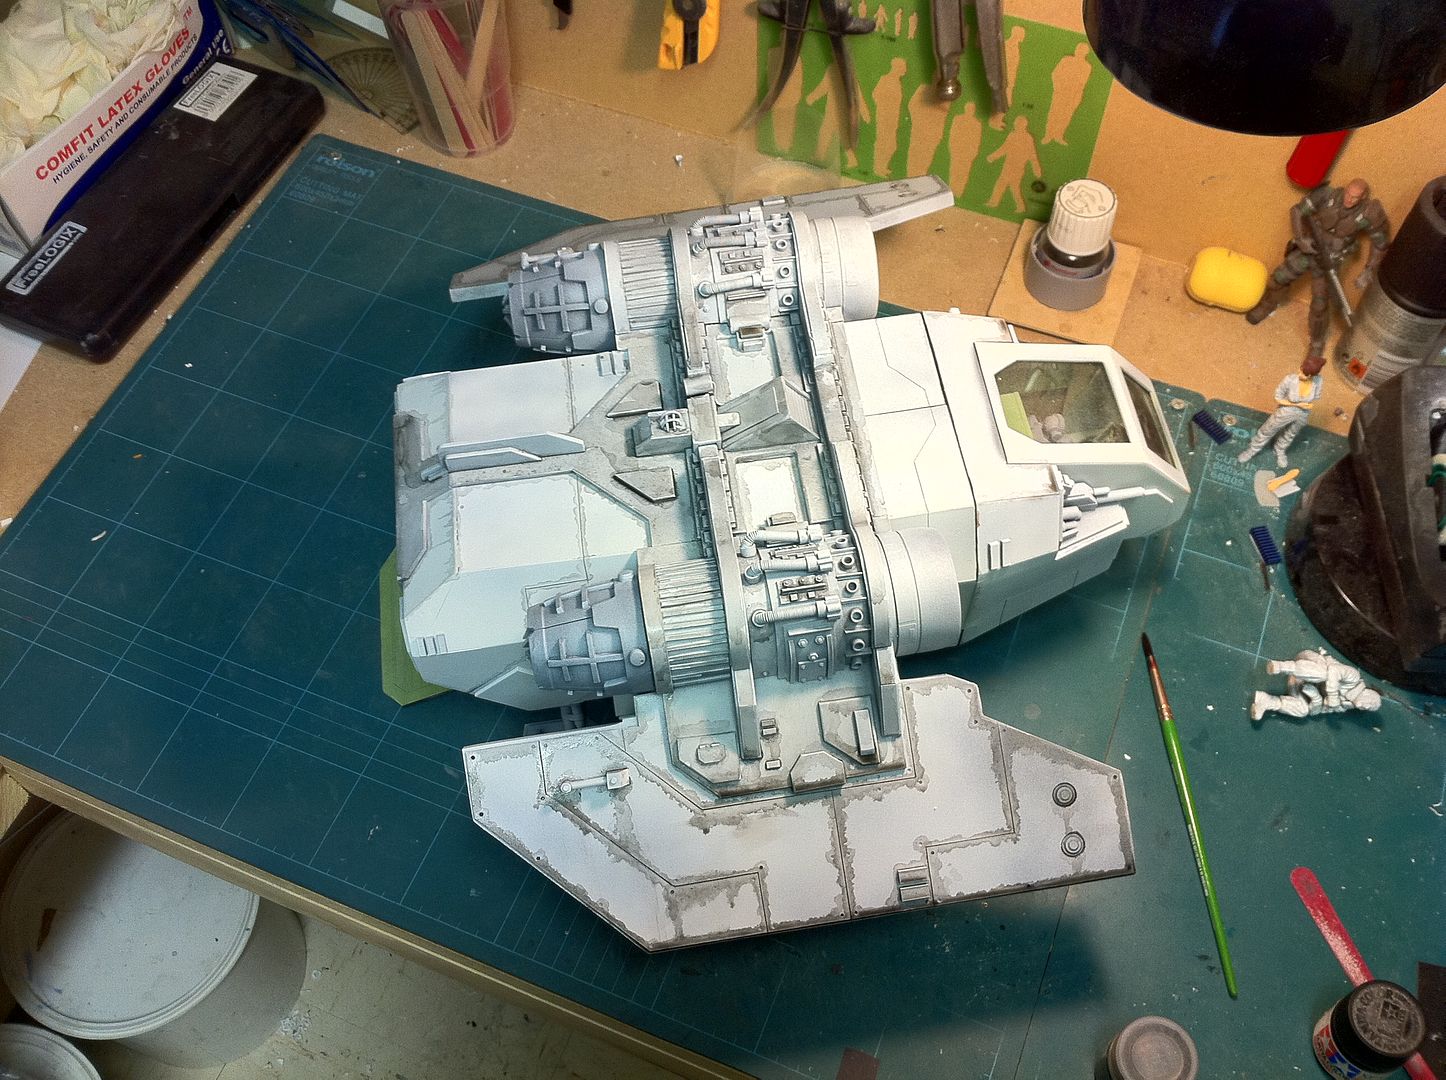
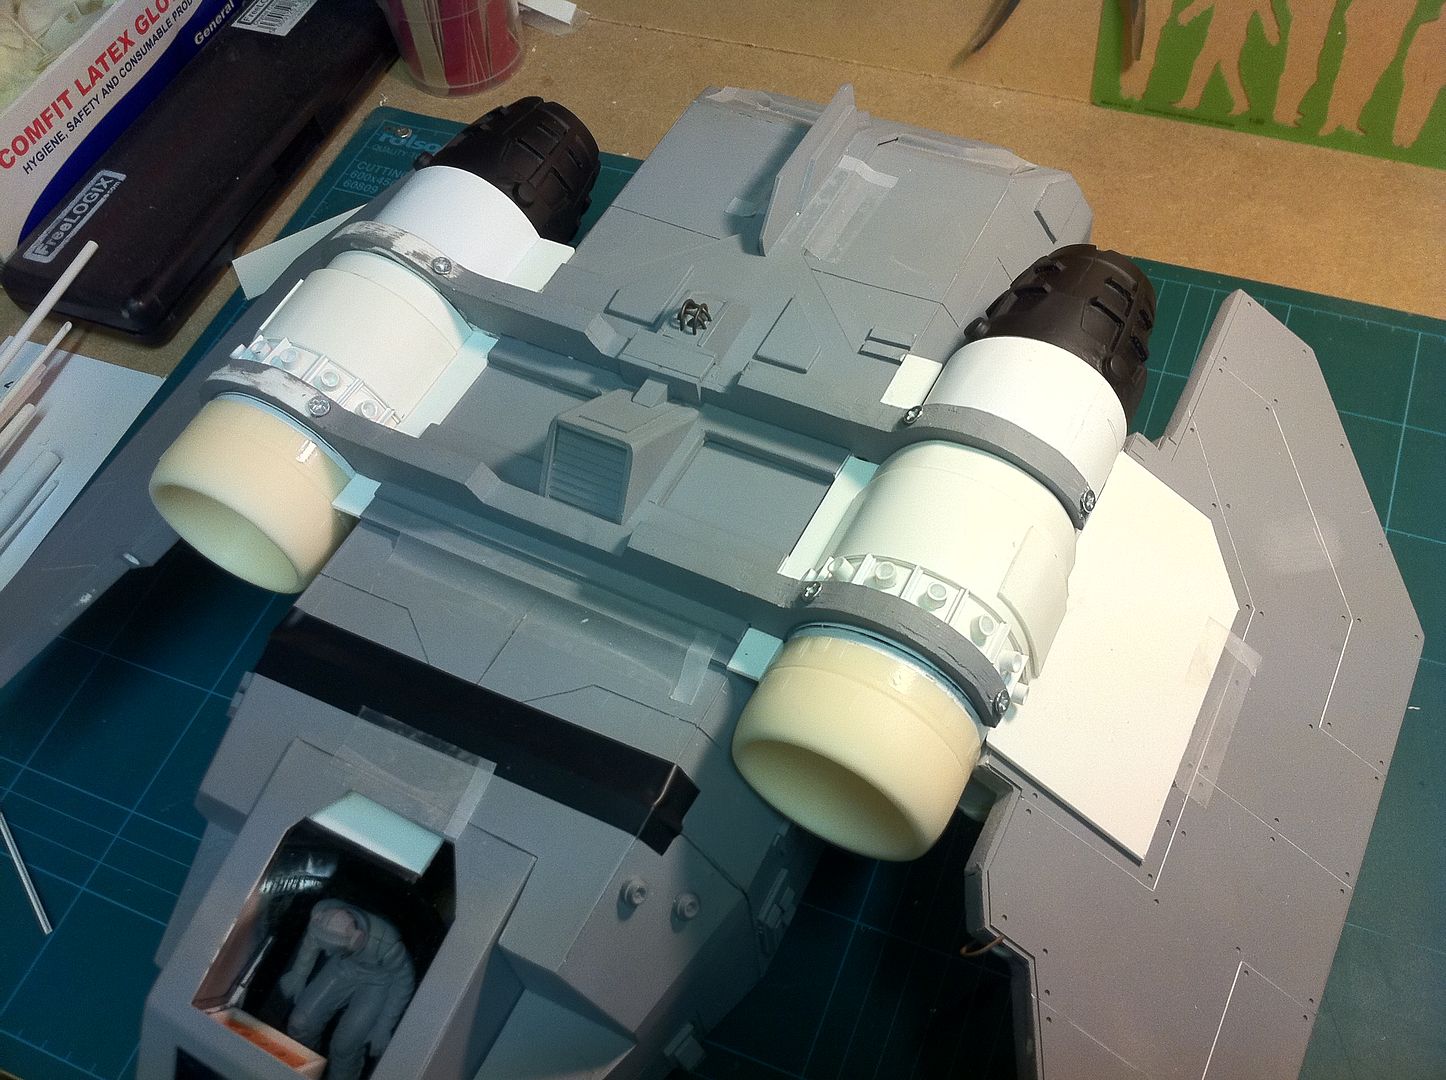
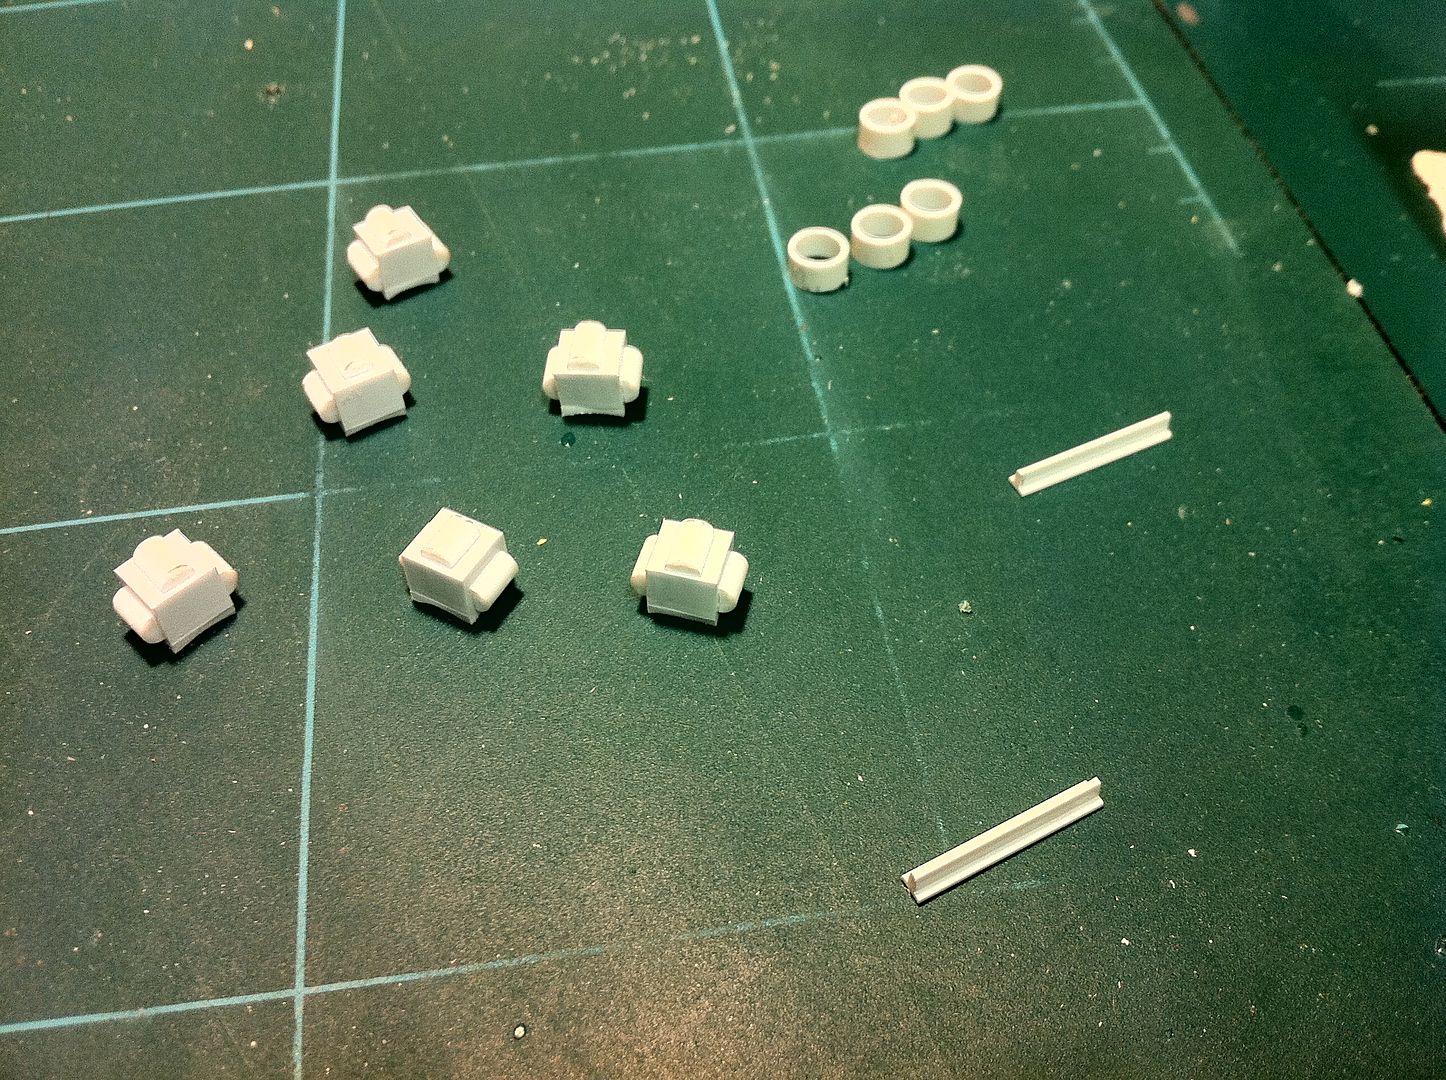
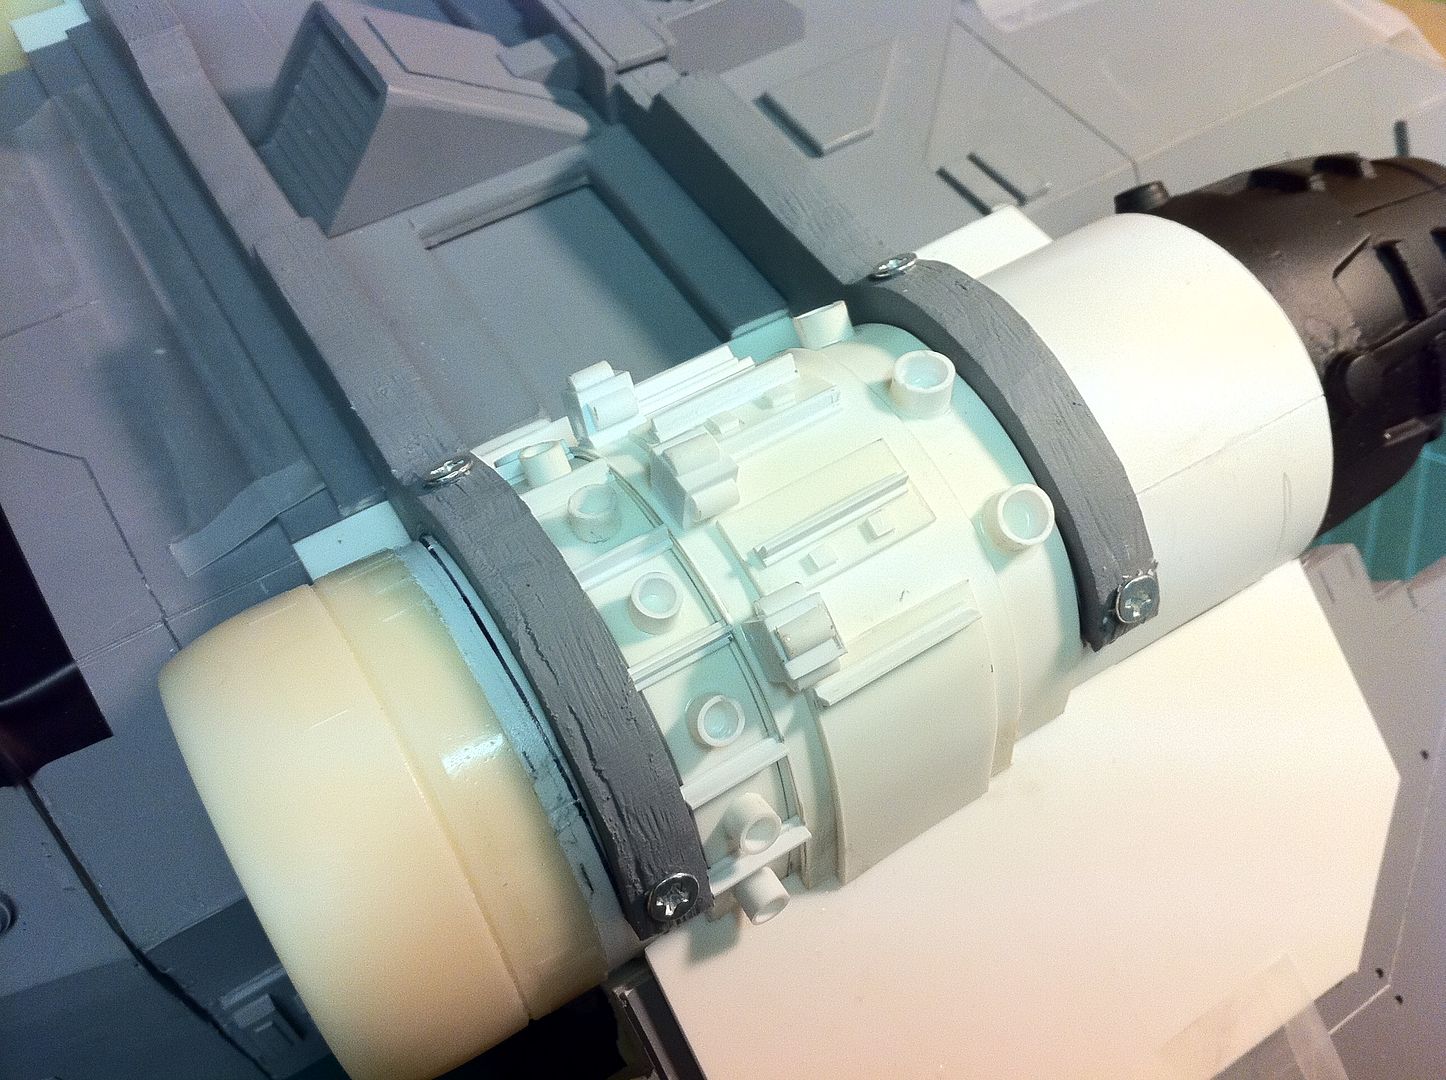
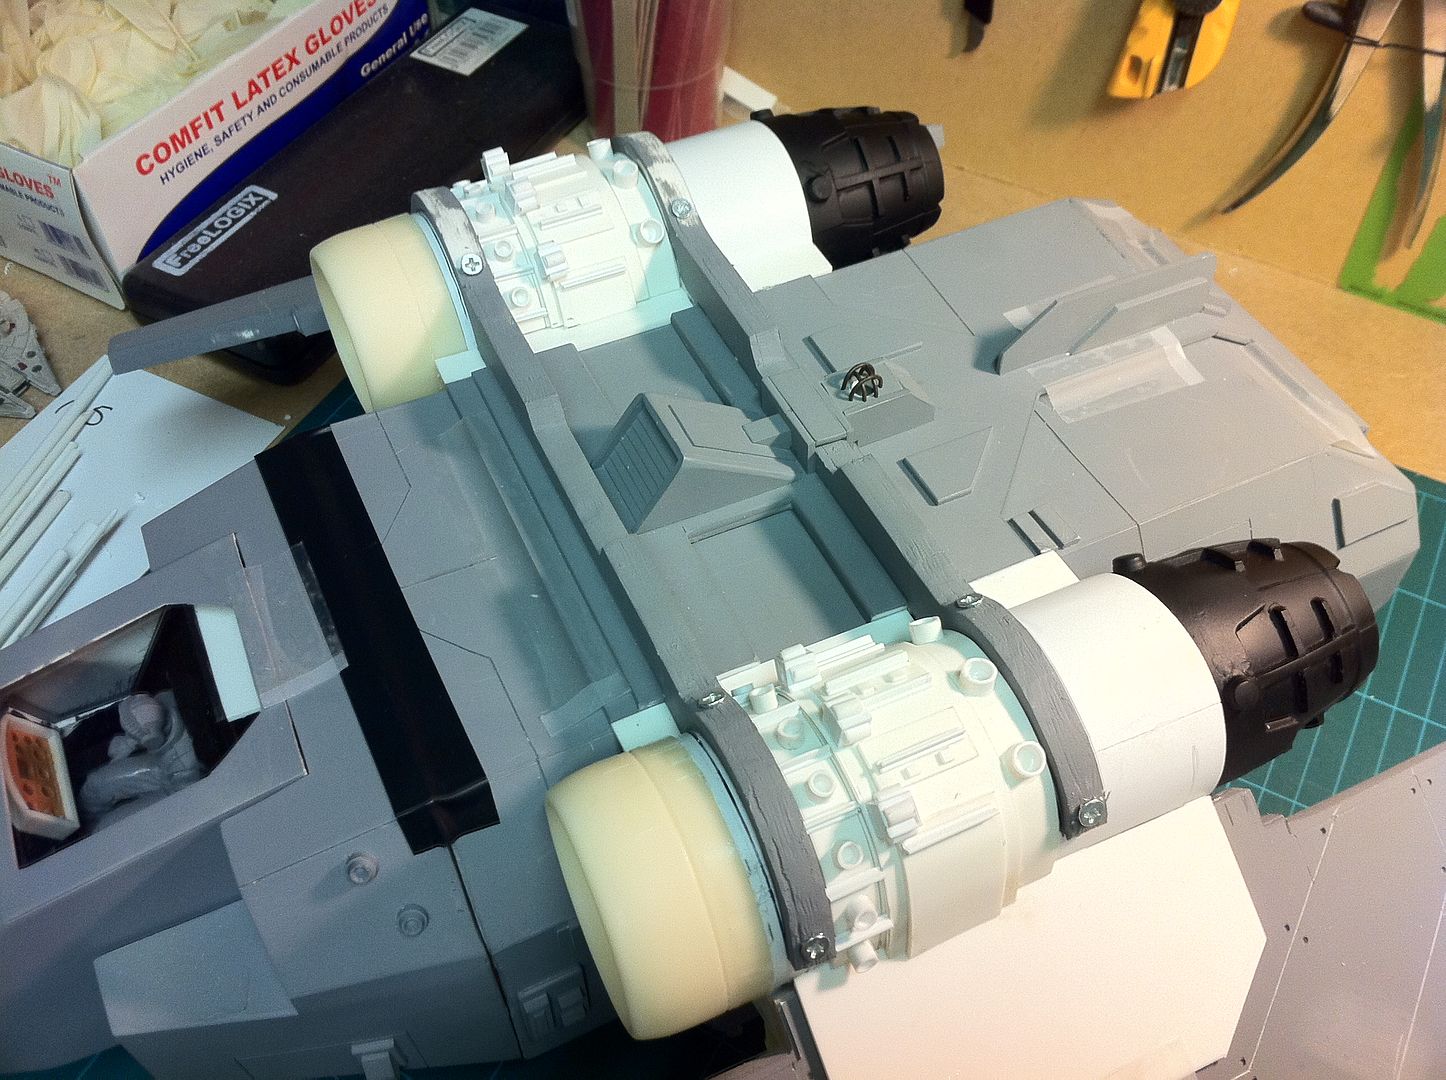
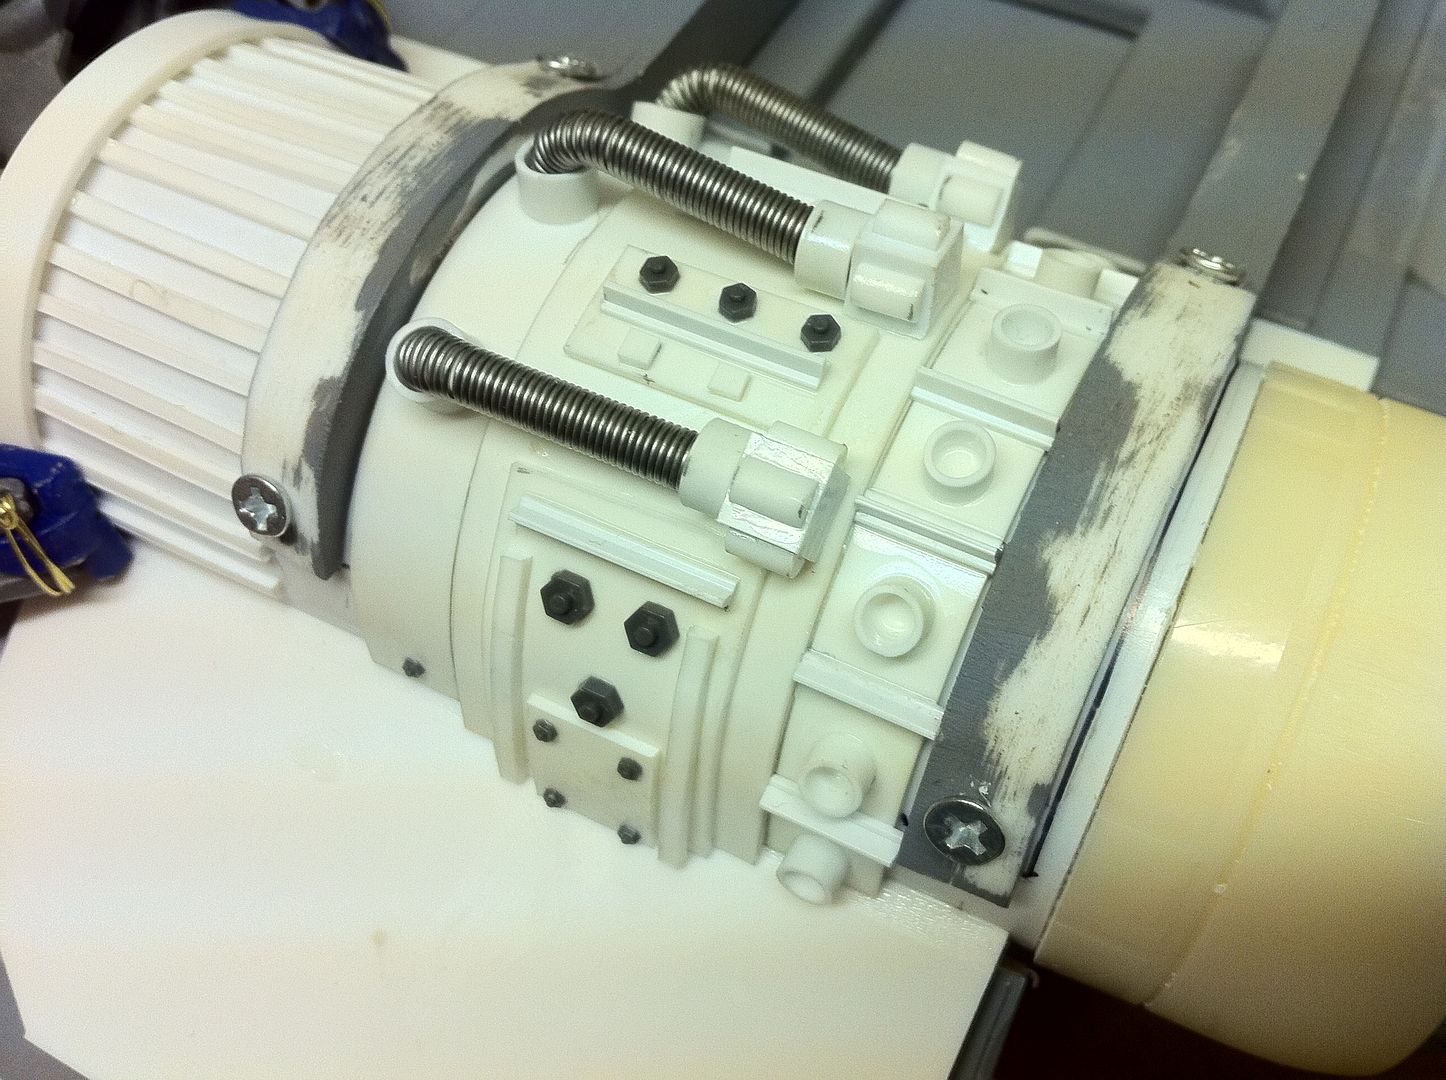
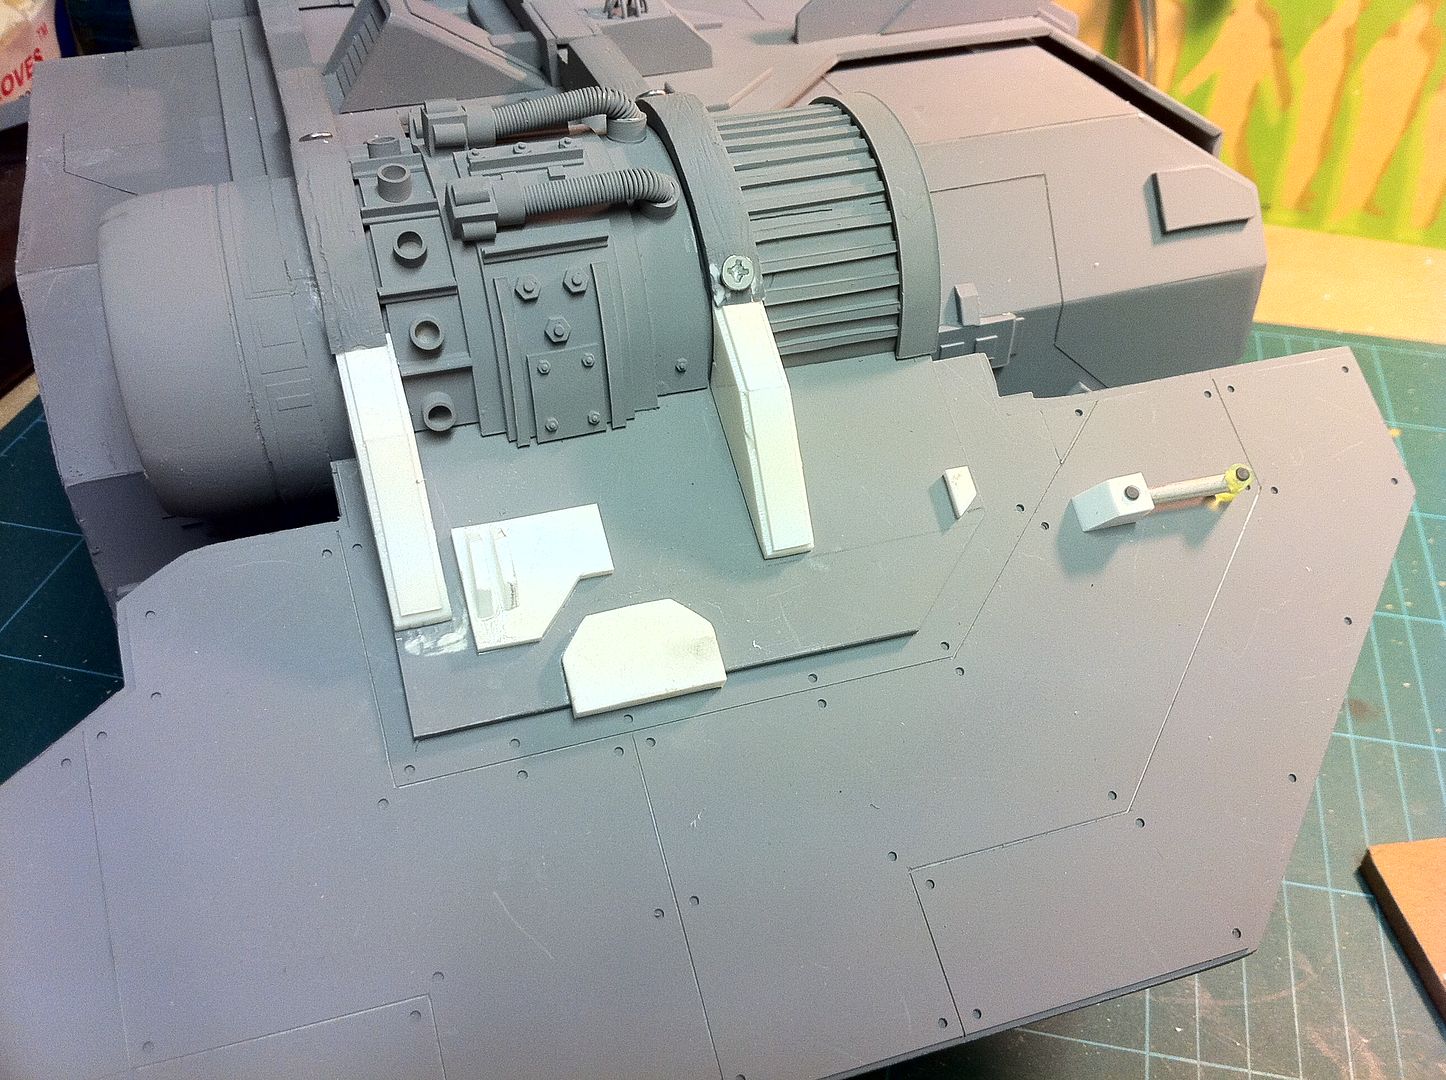
I also got a lot of work done on the engine details today(Finally. I thought i was NEVER going to get that started...)
There is only a small quadrant of the engine needing done(Under the wing. A part which will likely never get seen,
but i want to do it anyway). The detailing parts i used today are just evergreen stock, added in different
combinations, some solid square, some tube, some half round to try and replicate the bits on the original Arvus,
koto nut parts and vinyl tubing with very thin solder attached wrapped round.
Before i left work today i sprayed everything grey, including all previous parts that had signs of wear, and also any
recently made bits and bobs. It will all be ready to rock tomorrow. I'll get the rest of the engines detailed and
start on the interior stuff.
A couple of wing butresses and the wings are done(All except the skinning of the underside of the wings,
which cannot be done till the craft is painted, lighting installed and ready to have the wings sealed).
Interior mega detailing will commence tomorrow.
There will be hydraulics for the rear door(Which now has a stop bar to prevent it from opening too far),
oxygen cyllinders on the walls, fold down bench seats for passengers inbetween the bulkheads, a couple of
weapons racks(Shotguns, rifles, grenades etc) overhead storage bins for gear and packs and although it will not
be too visible, there is enough room behind the pilot's seat for a head. There will be a doorway with a "LADIES"
sign on it...
Anyway.
Here are the pics.

18892
Post by: Bar
As is always the way, i was at work since 0800 today but, due to a friend coming in who wanted me to make him a mould box for some gaming wall part he had, i managed to get two lines drawn on the arvus... In pencil...
I did get pics of the component parts as they are right now though, and a pic of the engine intake vane parts.
Here are the pics:
30139
Post by: 40k Ninja
Looks like it is comming along nicely. Great work, makes me inspired to do something like this.
18892
Post by: Bar
40k Ninja wrote:Looks like it is comming along nicely. Great work, makes me inspired to do something like this.
Thanks a lot. I'd like to see your works if you ever start something.
Is it an Arvus you'd like to build? Or something else?
8745
Post by: Llamahead
Glad to see you've finally got one of those tiny lazy people to actually help you. The details on the engine are superb and the light effect is great? Are you planning to do dials and a variety of colours on the dashboard?
18892
Post by: Bar
Llamahead wrote:Glad to see you've finally got one of those tiny lazy people to actually help you. The details on the engine are superb and the light effect is great? Are you planning to do dials and a variety of colours on the dashboard?
Lol. That's the only one who helps me out...
The dashboard WILL have dials. There also might be flashing buttons on the armrest. I am undecided on that.
More on that in later updates.
I added the engine details under the wing today. I didn't go overboard as no-one will ever see it because it will be hidden under the wing. But i will know it's there...
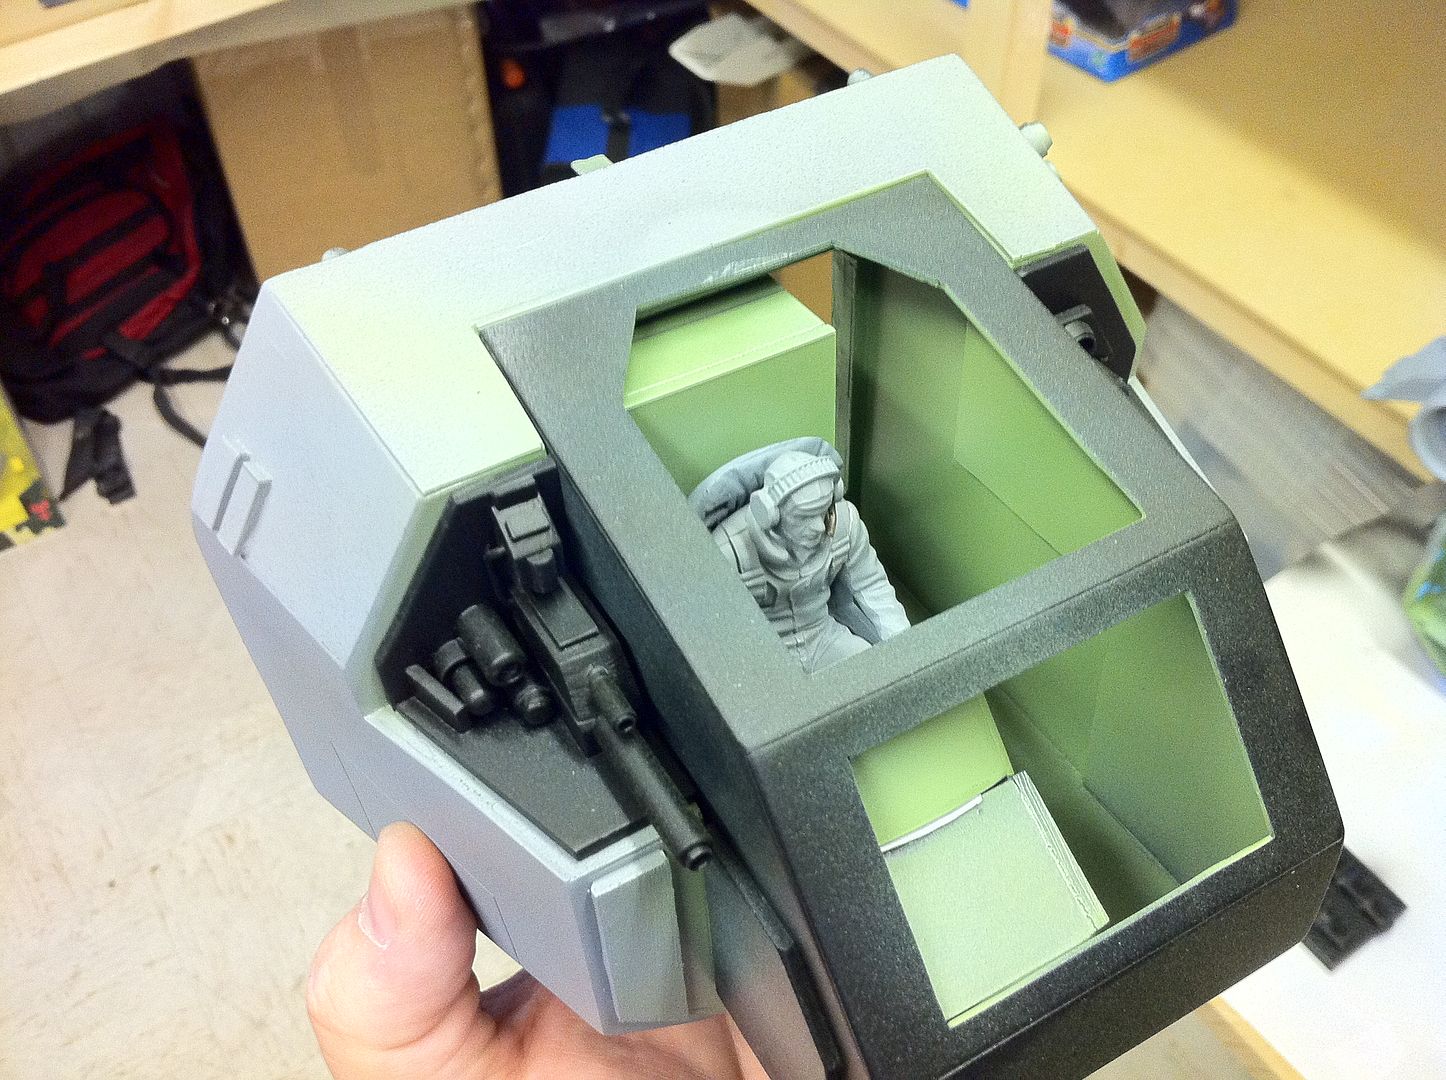
And for all the extra detail, the reason for that is that this build is absolutely gigantic. It deserves a bit extra, even if that is made up for this build. If the Arvus was real, you'd expect extremely fine detailing. Rest assured i WILL be going nuts with the detailing...
As it is, i am tempted to scribe new panelling on the whole craft BECAUSE it's so huge. A real craft would be COVERED in panels. All with rivetting. I have a rivetting tool for this one, incidentally.
I will accept thoughts on whether i should scribe the whole craft with new panelling. Feel free to chime in on that note.
I'll have to get a picture of it with me holding it. This one even dwarfs the 1/24 F-302 from Stargate i built a while ago(Not in wingspan of course, but in sheer volume).
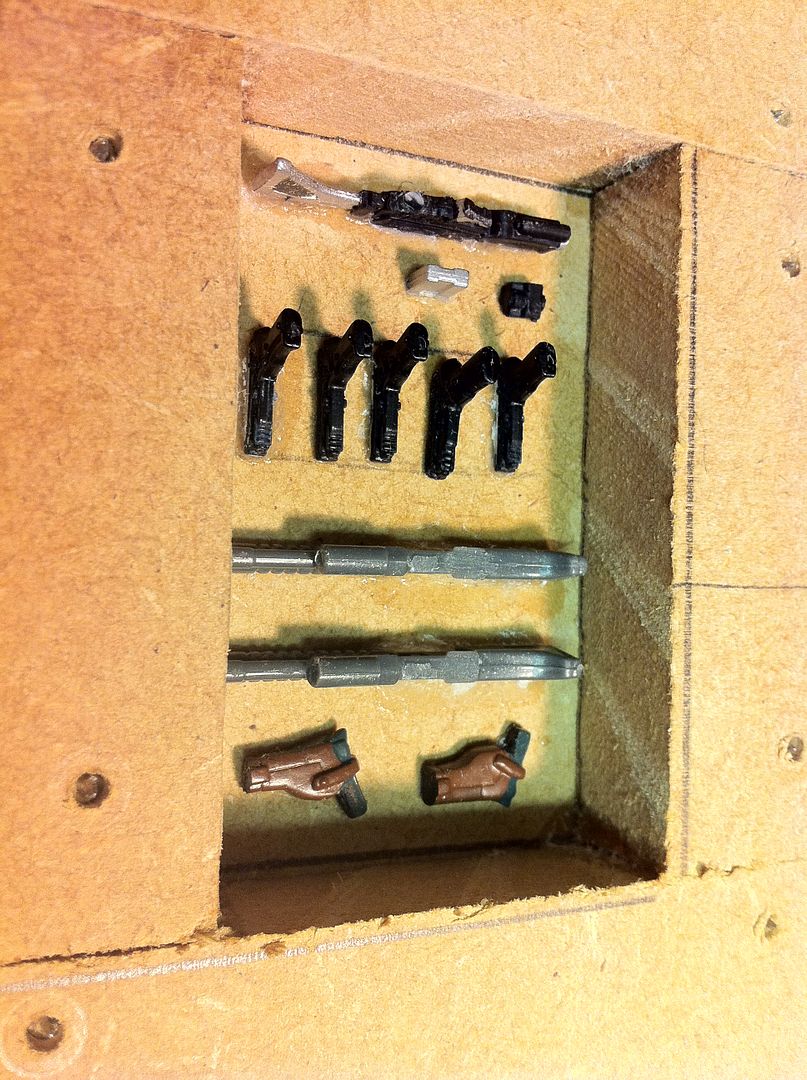
I Also found some weapons to use in the gun locker the Arvus will have. A GI JOE pistol(Slightly large in the scale i am doing, but at the back of the craft it will not be too noticable), a GI JOE rifle(I have cut that up into rifle body, scope mount, and ammo clip. I will cast multiples of the parts so i can not only have several rifles in the rack, i can also have a shelf full of extra ammo clips), two holstered Sigma Six pistols and two Megabloks HALO shotguns. The weapons locker will have enough to equip a ten man team with handguns, rifles and shotties, plus plenty of ammo for all weapons. The weapons locker will be on the front wall of the cargo bay, on the left after exiting the cockpit.
In addition, just for the hell of it, i took a picture of the mechanic gal standing at the back of the cockpit behind the pilot...
Here are the pics:

18892
Post by: Bar
Okey cokey.
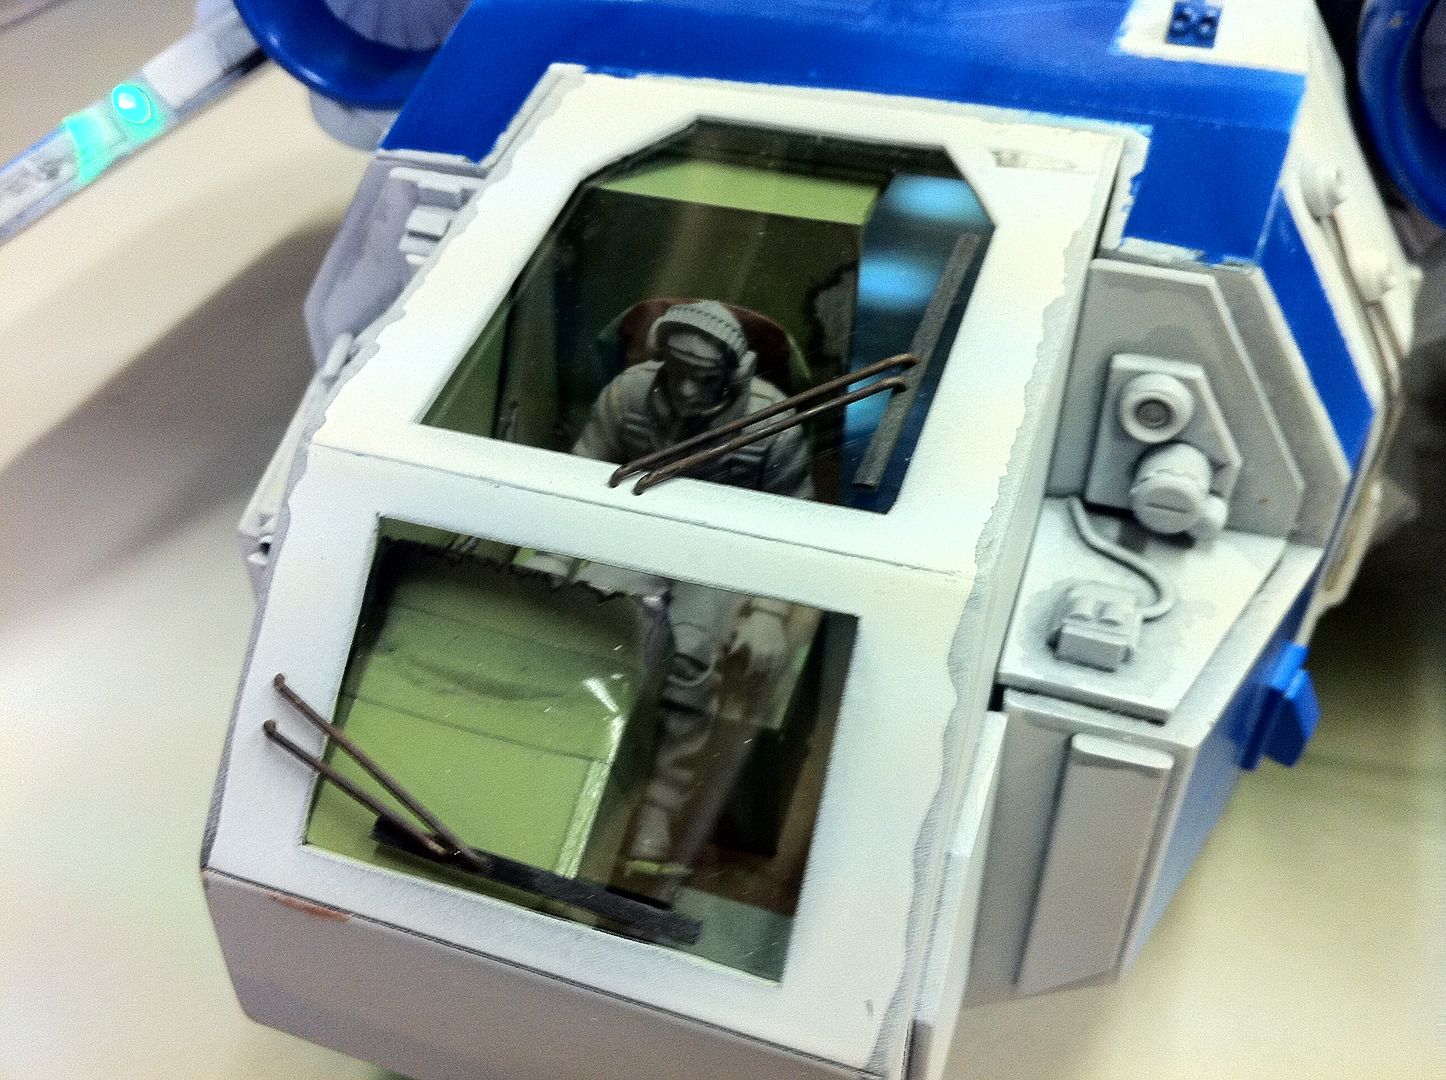
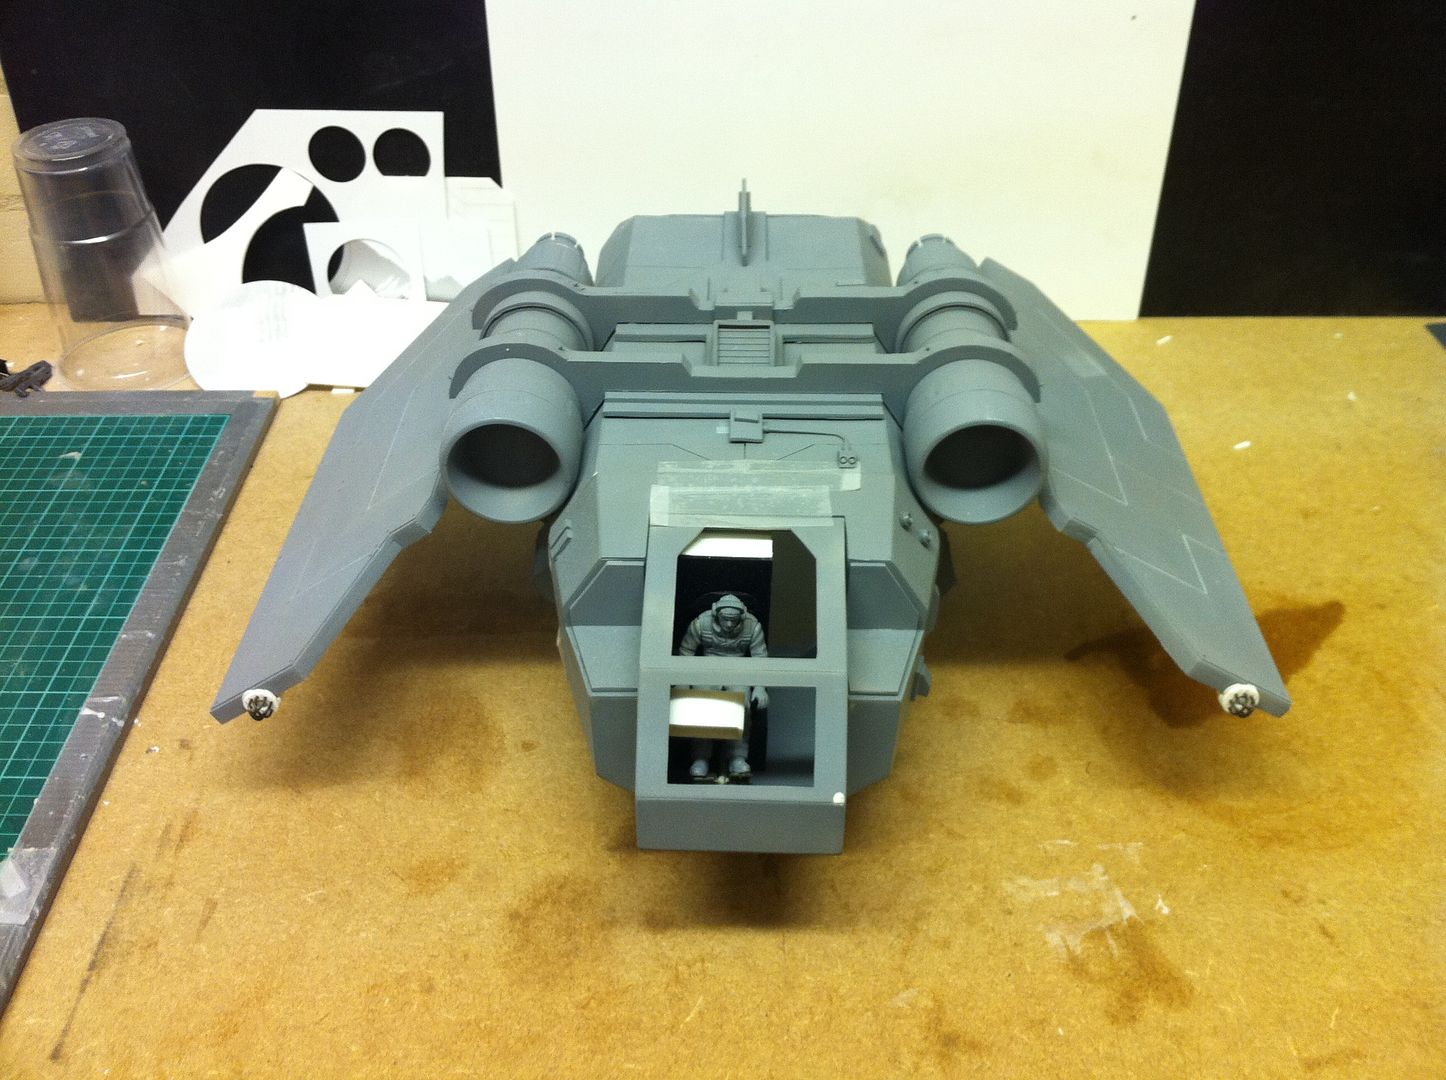
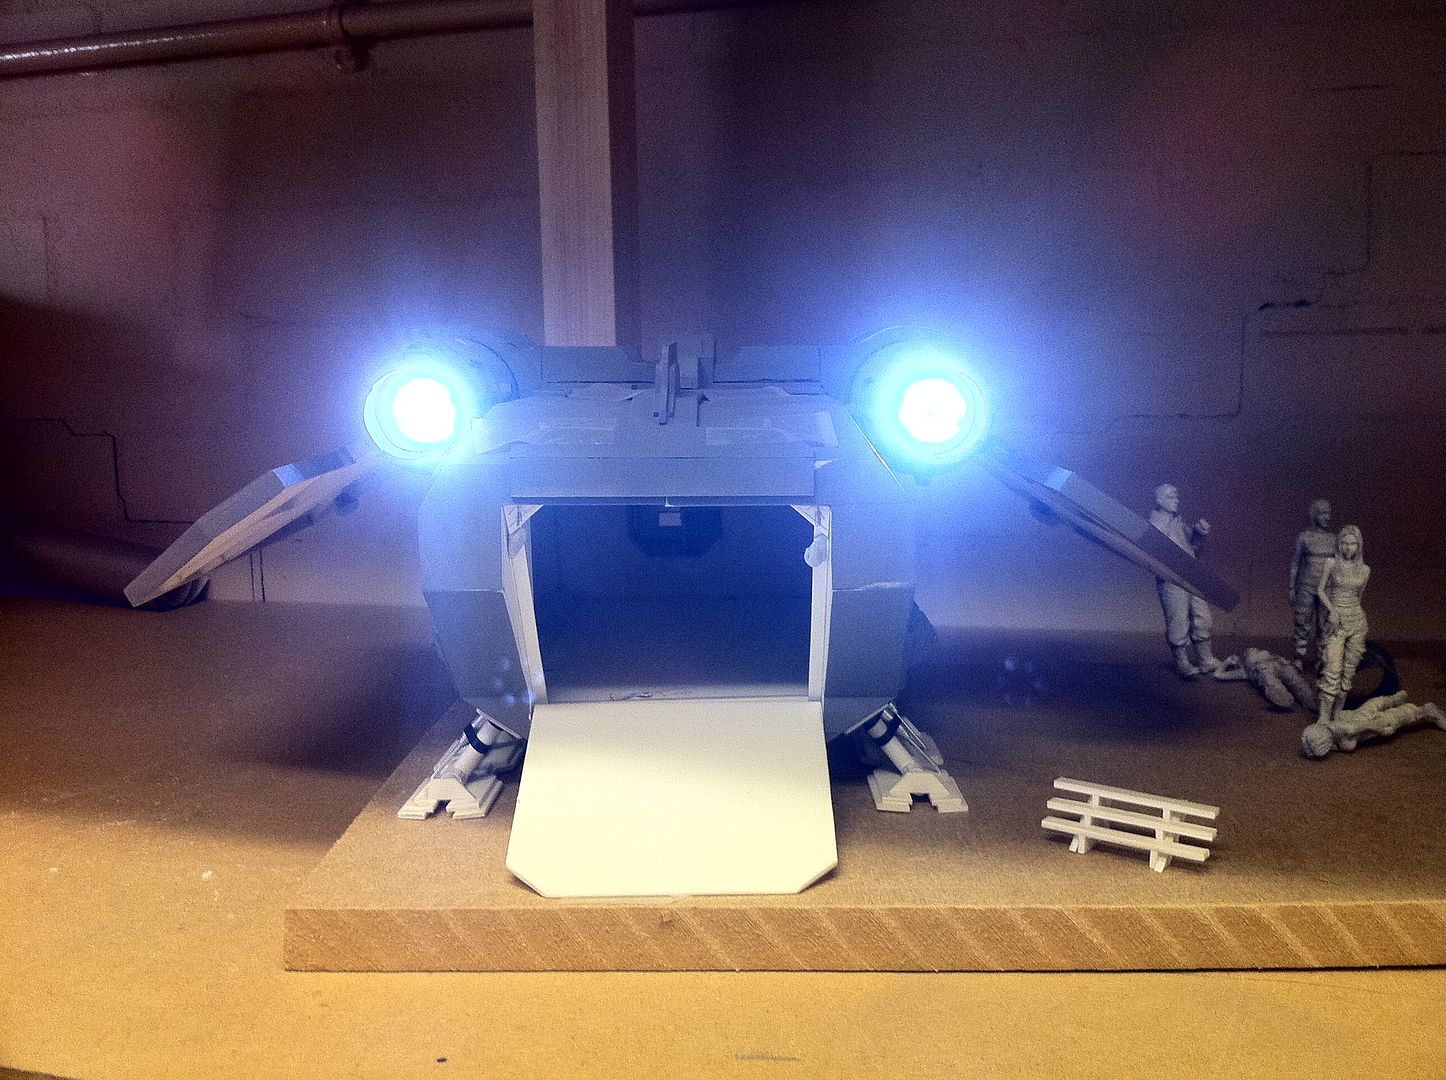
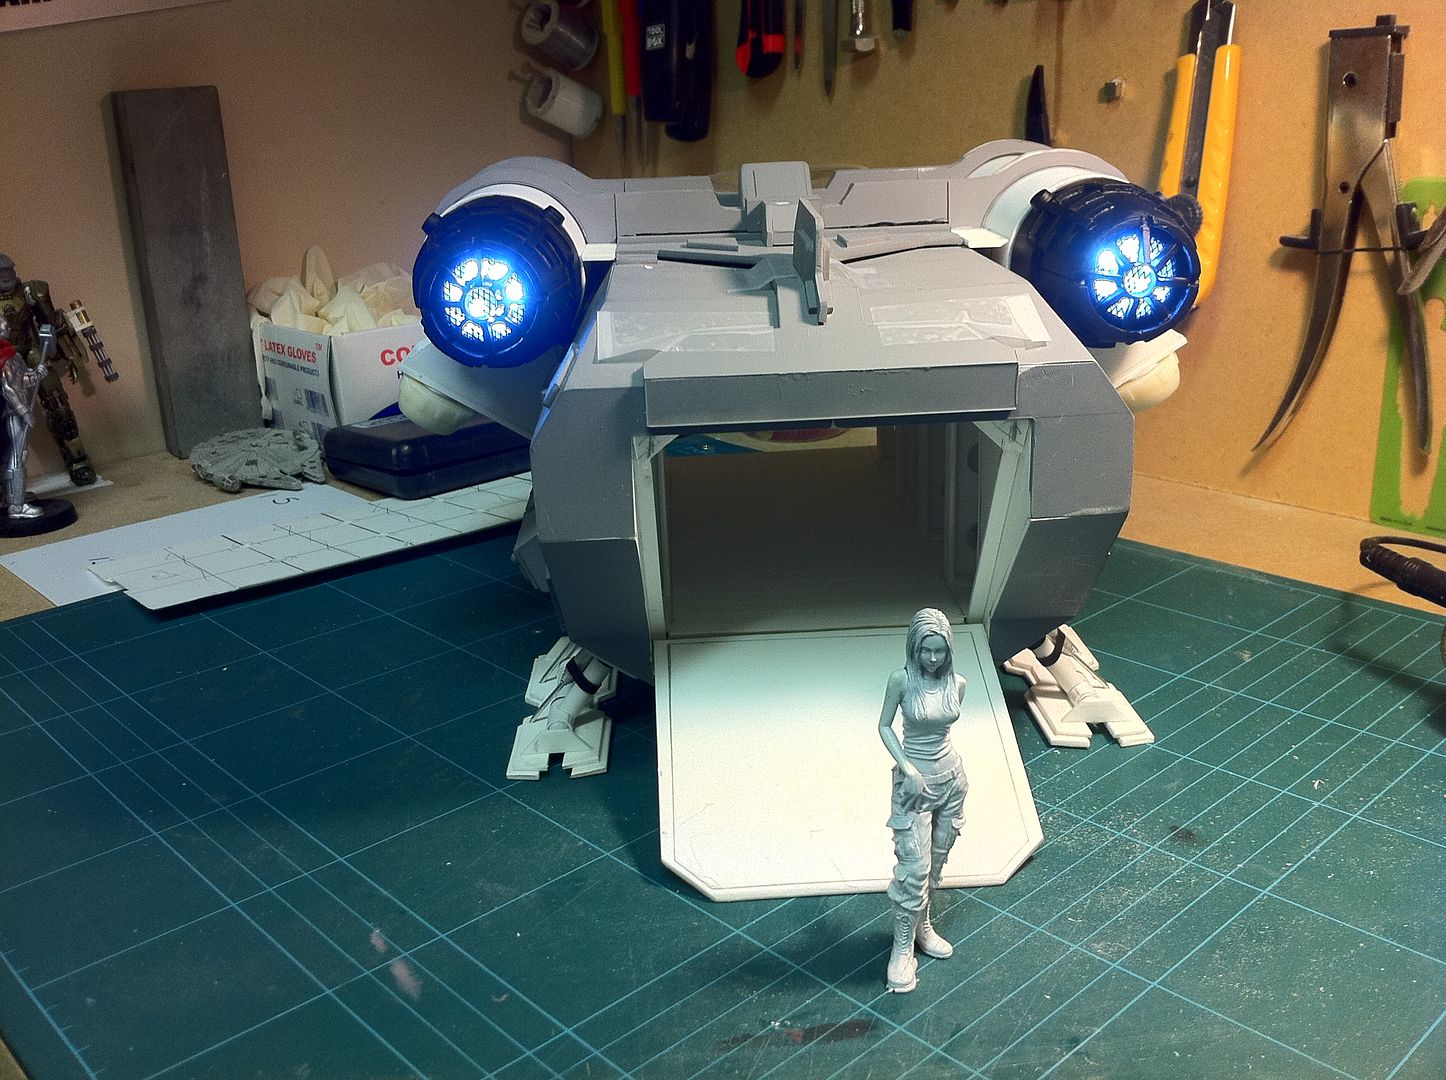
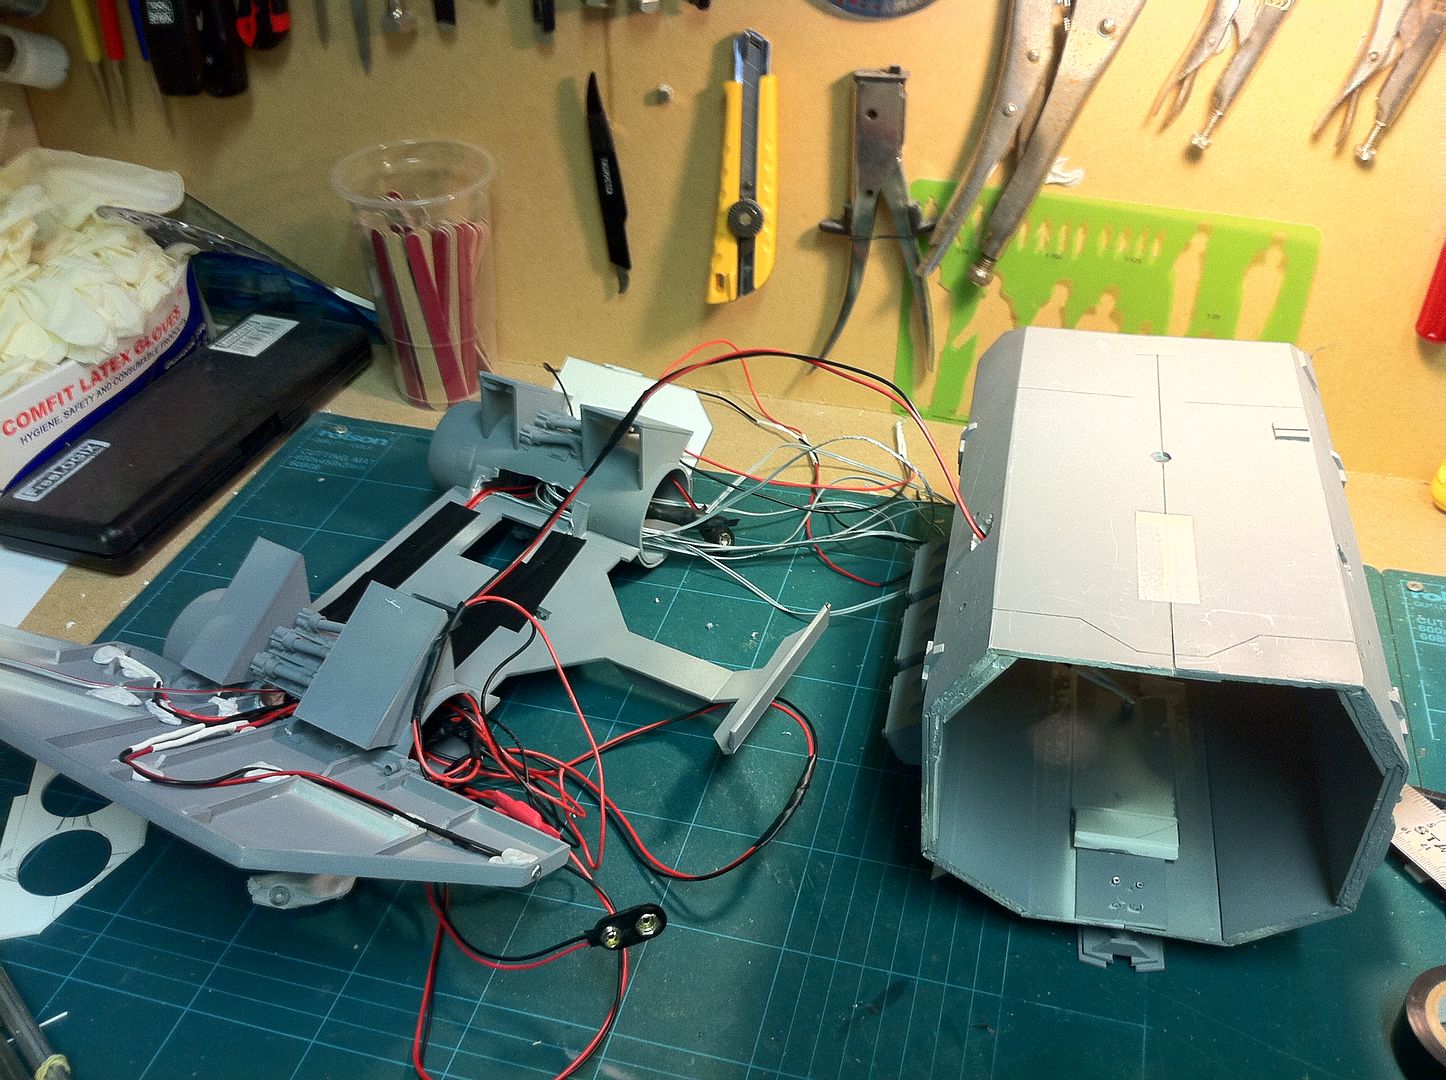
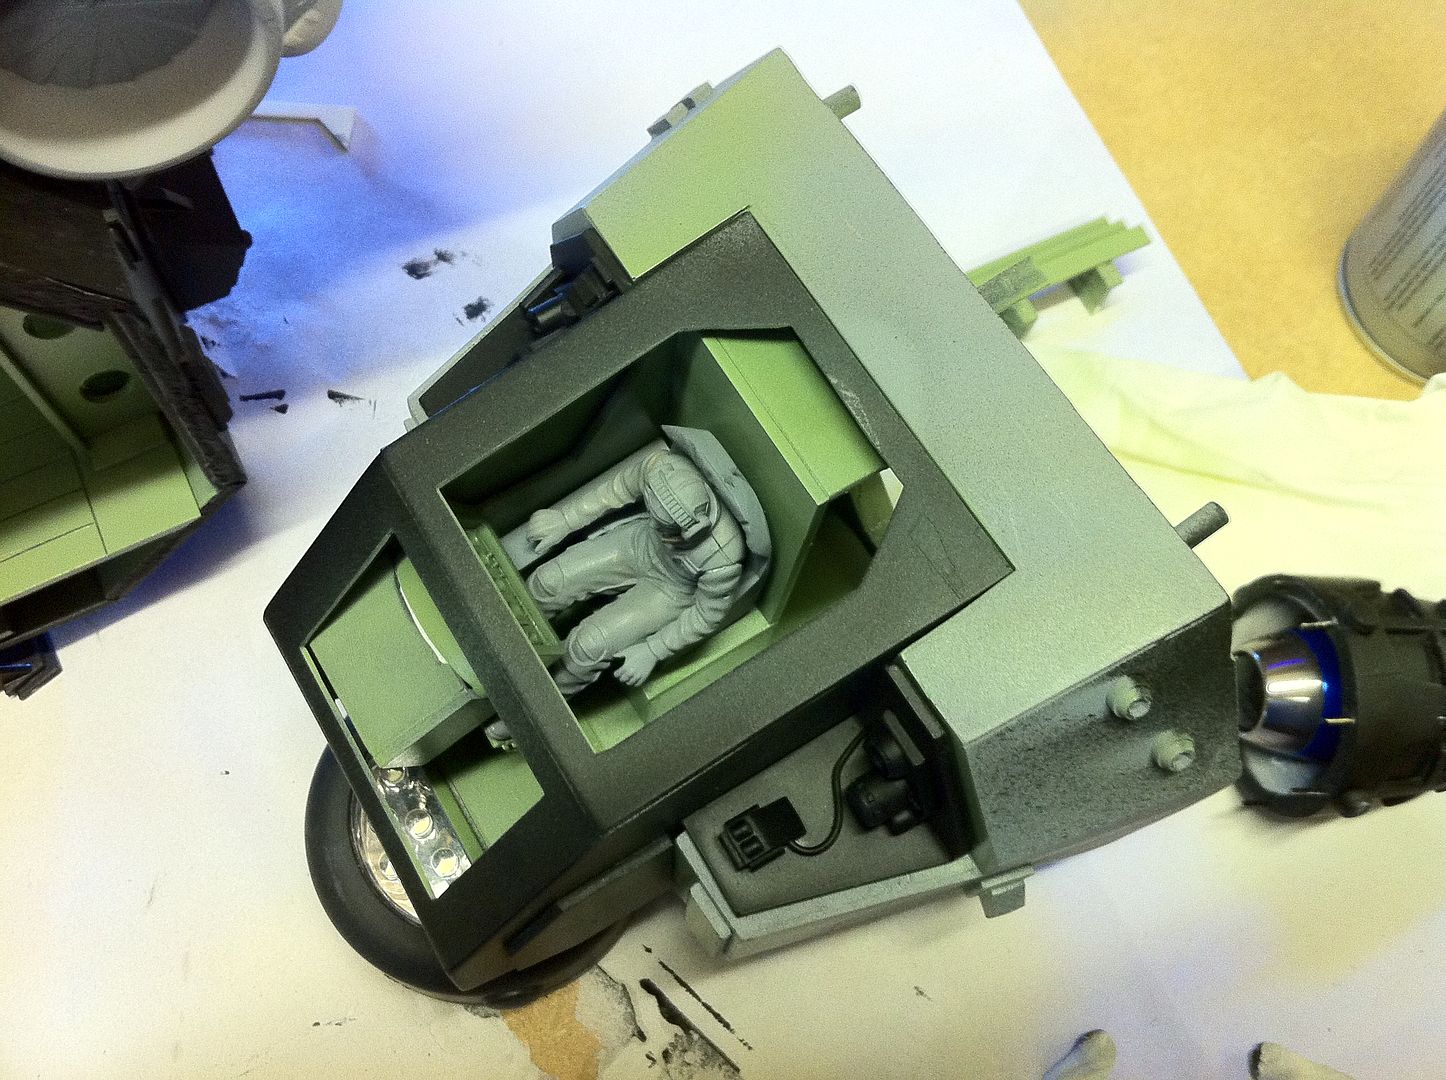
Time for a reasonable update. I hope everyone reading this is as impressed with the work here as i was when i flipped the switches to turn on the lighting systems today when i was finished.
First of all a list of what i got done.
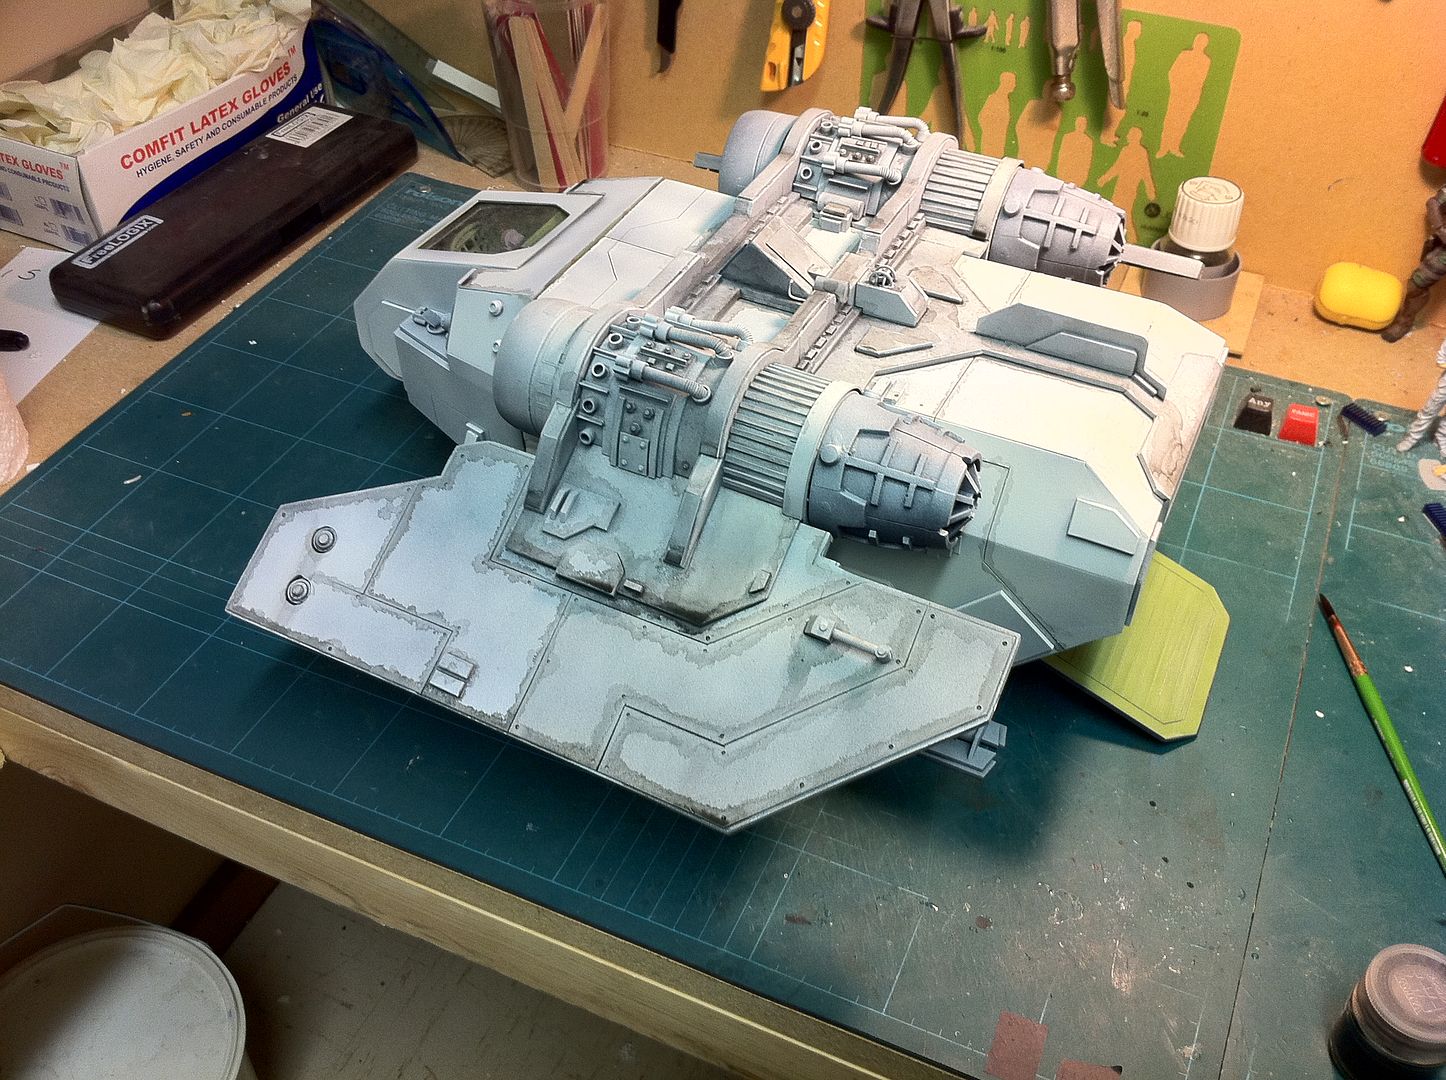
I got the upper wing support butresses finished finally. With them sanded into shape, i added the rest of the upper wing details.
I got the rest of the parts primed as i intend to show this off tomorrow to a few people i know. I decided i needed to do a full lighting test just to make sure there was room for everything, and that none of the lights needed extra cabling.
It turns out the cockpit dashboard light could do with being maybe 6cm longer. I'll get that done on wednesday at work.
But for now, everything seems to fit and, except for the undersides of the wings(Which i have yet to do), the craft is pretty much finished except for painting.
I have a few pics of the ship during the WIP stuff today, several of the lights all on, and three Youtube vids of the lights working.
I'd REALLY appreciate comments guys if you like the work.
Thanks for looking and enjoy today's update.
More soon, i promise.

And now the vids.
Enjoy!
http://www.youtube.com/watch?v=CVlNwJE8tlA
http://www.youtube.com/watch?v=zemu5cKicJg
http://www.youtube.com/watch?v=8FqKI25sXfI
24297
Post by: Viktor von Domm
wow...the amount of detail you have been putting on the arvus is astonishing! i was out for a coupla days due to some health issues and this is waht i have missed... darn...but i was at least able to recap it all and i have to say the engines now look really superb! though i have to say (i might have overscrolled this part...) how will you cover up the RL screws you used to but parts together?
also i just love the figure of the hulkbuster iron man! this is a very good model and could even fit in as a dreadknight for 28mm warhammer...also the halo soldiers look very good with the arvus and could fully well be droptroops for the compartment!
brilliant work all over!!!
cheers, vik
31627
Post by: FantasyBob
Oh god! so impressive! this is the best scratch build i'd evere seen here!
now, all you need is to create some good internal detail and a good crew!
18892
Post by: Bar
Viktor von Domm wrote: wow...the amount of detail you have been putting on the arvus is astonishing! i was out for a coupla days due to some health issues and this is waht i have missed... darn...but i was at least able to recap it all and i have to say the engines now look really superb!
Thanks. I have tried to keep the updates regular. I suppose it must be great to come back after a few days and see what i have done! I hope you are feeling better.
Viktor von Domm wrote:though i have to say (i might have overscrolled this part...) how will you cover up the RL screws you used to but parts together?
They are just placeholder items. When i am SURE i don't need to remove them again, they will be GLUED in place and the screws removed and the holes filled.
Viktor von Domm wrote:also i just love the figure of the hulkbuster iron man! this is a very good model and could even fit in as a dreadknight for 28mm warhammer...
That is "Iron Monger" from the first Iron Man film. I have a load of irona man figures though. They would all look coo, in there.
Viktor von Domm wrote:also the halo soldiers look very good with the arvus and could fully well be droptroops for the compartment!
Yeah. That would look great.
Viktor von Domm wrote:brilliant work all over!!!
cheers, vik
Thanks a lot. I appreciate everyone who takes the time to post, especially with opinions.
FantasyBob wrote:Oh god! so impressive! this is the best scratch build i'd evere seen here!
now, all you need is to create some good internal detail and a good crew!
Thanks. There will be a lot of details inside. I guarantee it!
24297
Post by: Viktor von Domm
Thanks a lot. I appreciate everyone who takes the time to post, especially with opinions.
18892
Post by: Bar
Okay guys. Got a bit done today. I stripped the Arvus again, and removed the lighting circuits. I needed to add about 12cm of cable to the dashboard light(It was a bit of a tight fit, which was one of the reasons for the test fitting. To make sure it all fit in).
With that done, i dremelled out a couple of holes in the rear VTOL shoulders and added in the switches for the lighting(Shouldn't be all that conspicuous when they are painted, but it will make it simple to turn on and off the seperate lighting systems. I don't actually care if people can see them, lol.
Then i scribed the rear hatch topside(I was going to add the ridged effect like the original, but i think the scribed lines look better. Lower key. Not too large.
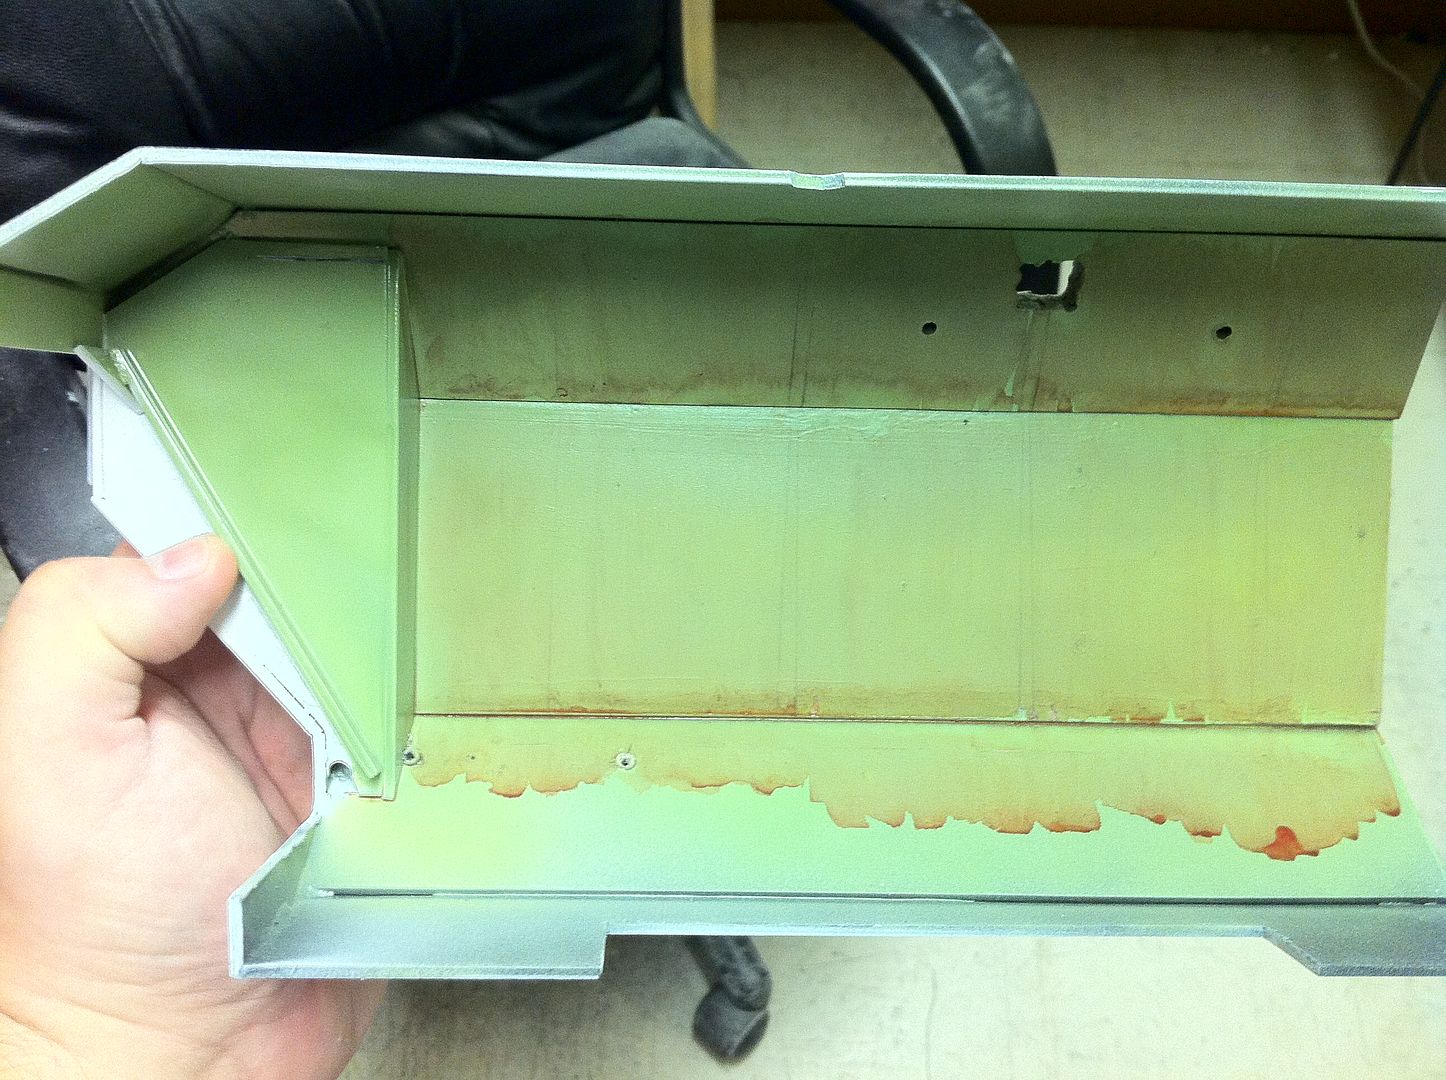
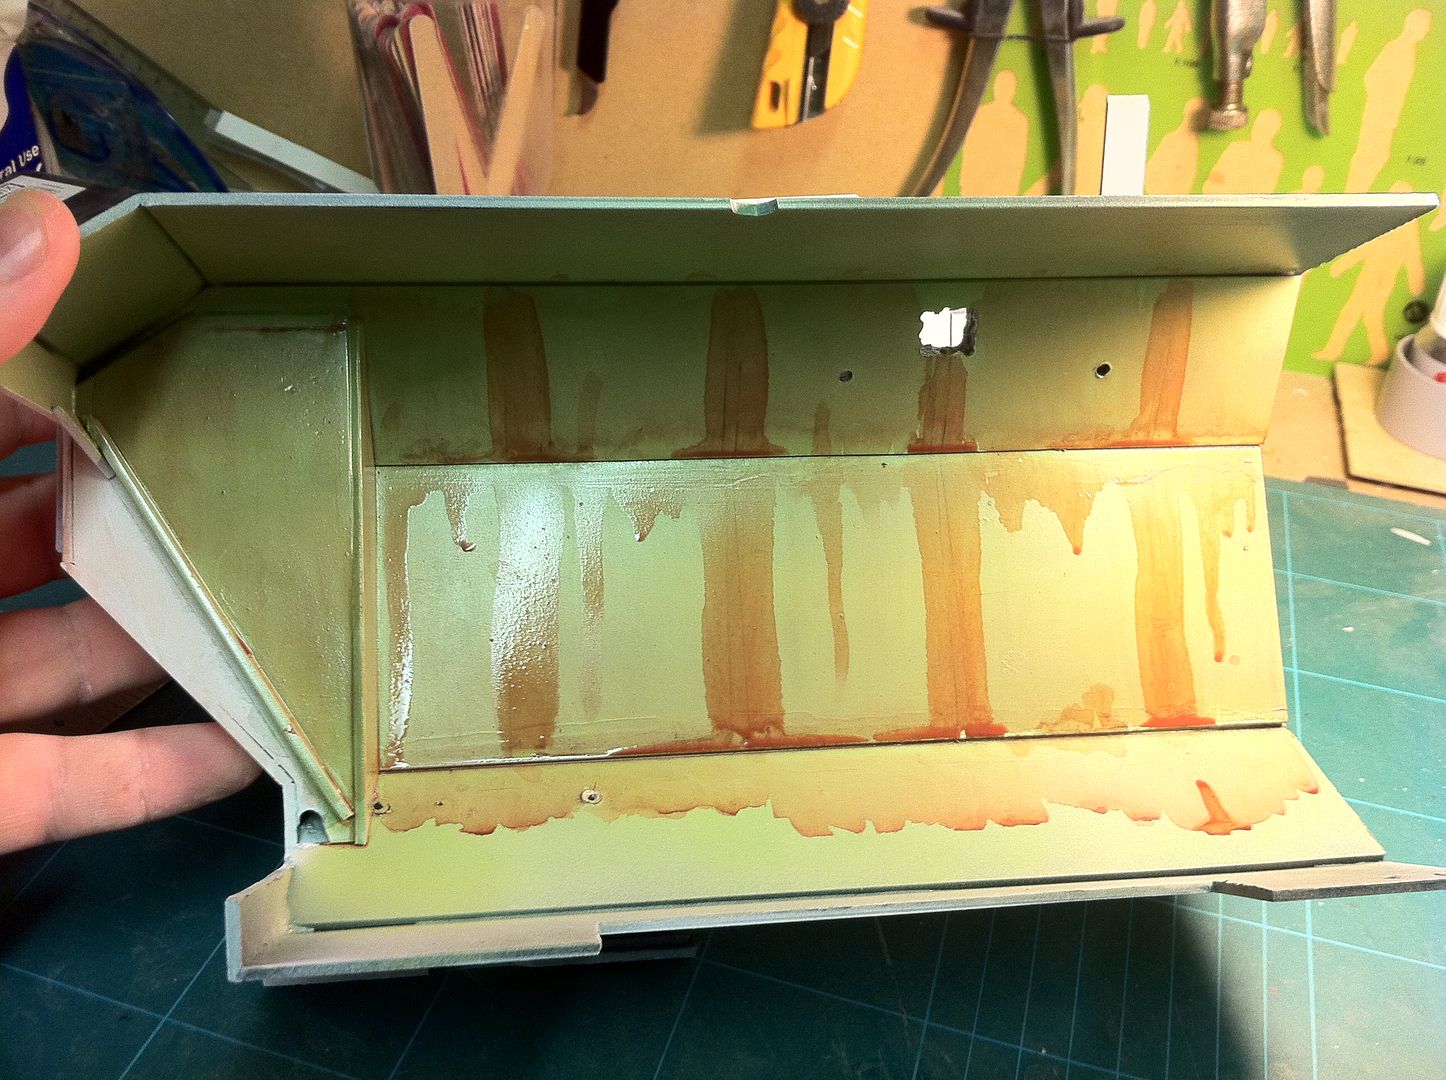
Anyway, i gave the ship two coats of black paint all over and then the interior green colour.
The exterior is mostly done. Just a few details to be finished off then i can get that basecoated too.
I think the interior colour looks good. Hats off to Chris for telling me about the colour. Thanks Chris!
Shouldn't be too long till it's all done.
Here is today's progress:

31627
Post by: FantasyBob
mmmh, what have you planned about interior and what about a crew!? hope we can see more wip soon!
3954
Post by: Gavvin
I haven't posted any comments because I have been so blown away by your work, that I didn't feel I had anything to contribute other than another comment mentioning how blown away i am by by your work.
17349
Post by: SilverMK2
Looking very sexy indeed.
18892
Post by: Bar
Gavvin wrote:I haven't posted any comments because I have been so blown away by your work, that I didn't feel I had anything to contribute other than another comment mentioning how blown away i am by by your work.
Lol. Thanks. Feel free to post any comments you like. I started off posting this WIP on about three forums, but eventually it was close to 20 forums i had the images posted at.
If no-one posts(And i get no reply notifications), i forget to update the threads...
SilverMK2 wrote:Looking very sexy indeed.
Thanks.
The overwhelming message i am getting from people is that my build is making them look at the Arvus in a new light. Like they never realised how cool it was till now.
The good news is that the diorama i am planning needs TWO of these things.
One will be turned off and buttoned up, with THIS one all switched on and ready to depart. With that in mind, i have made masters of all the hard to make parts so i can easily make another one for the dio.
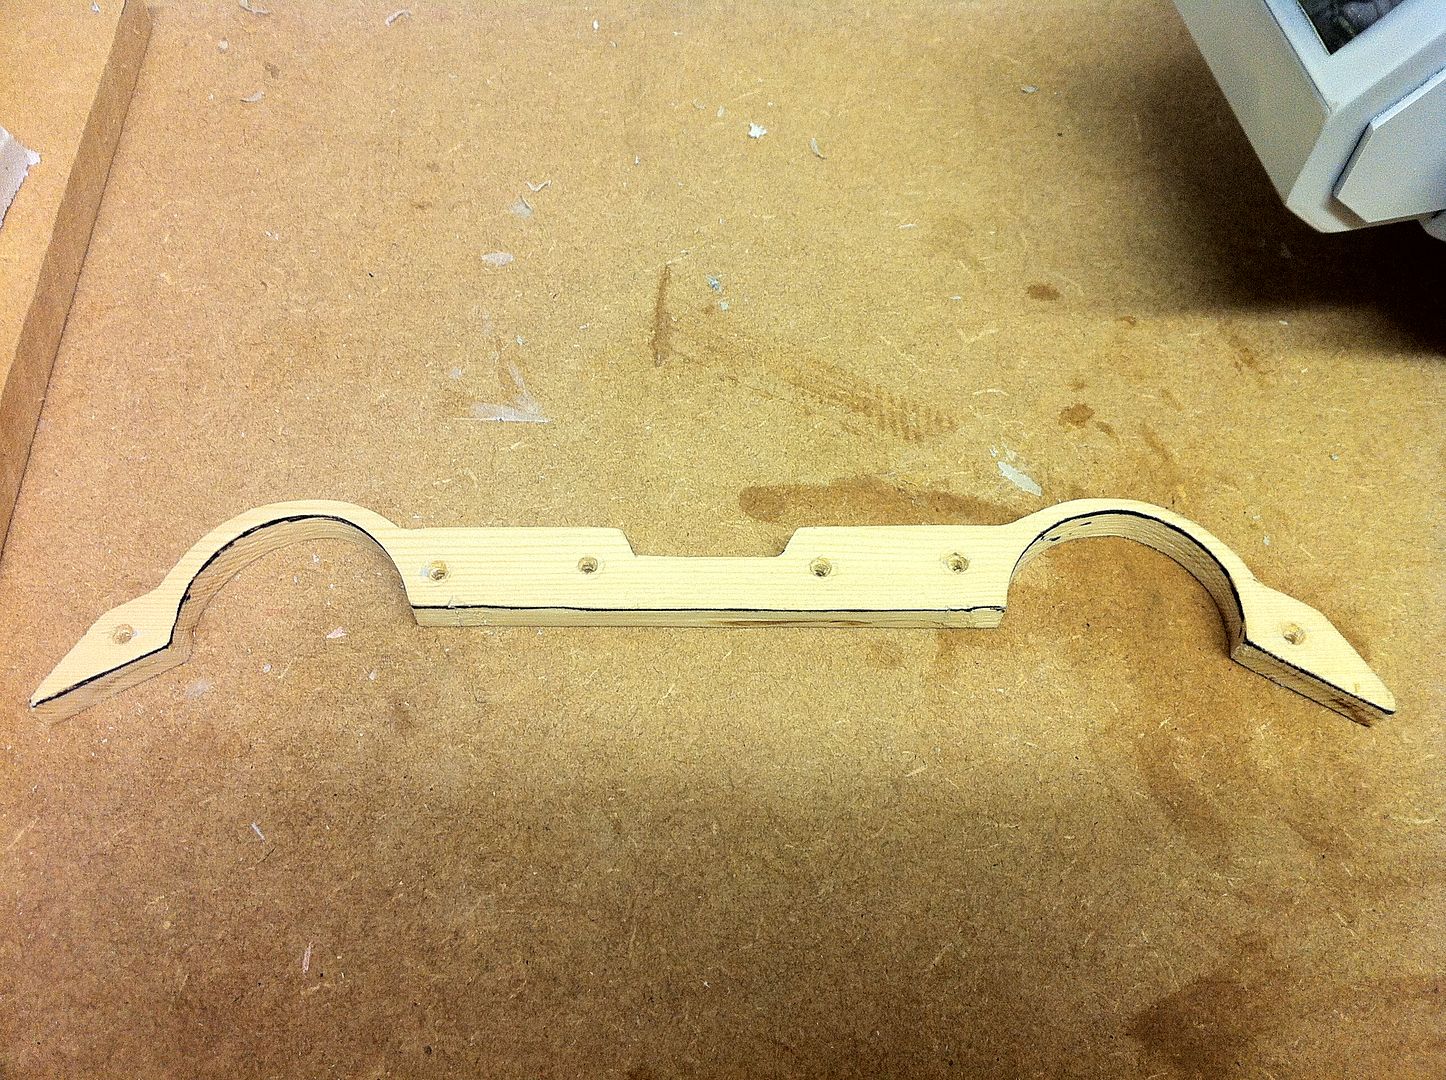

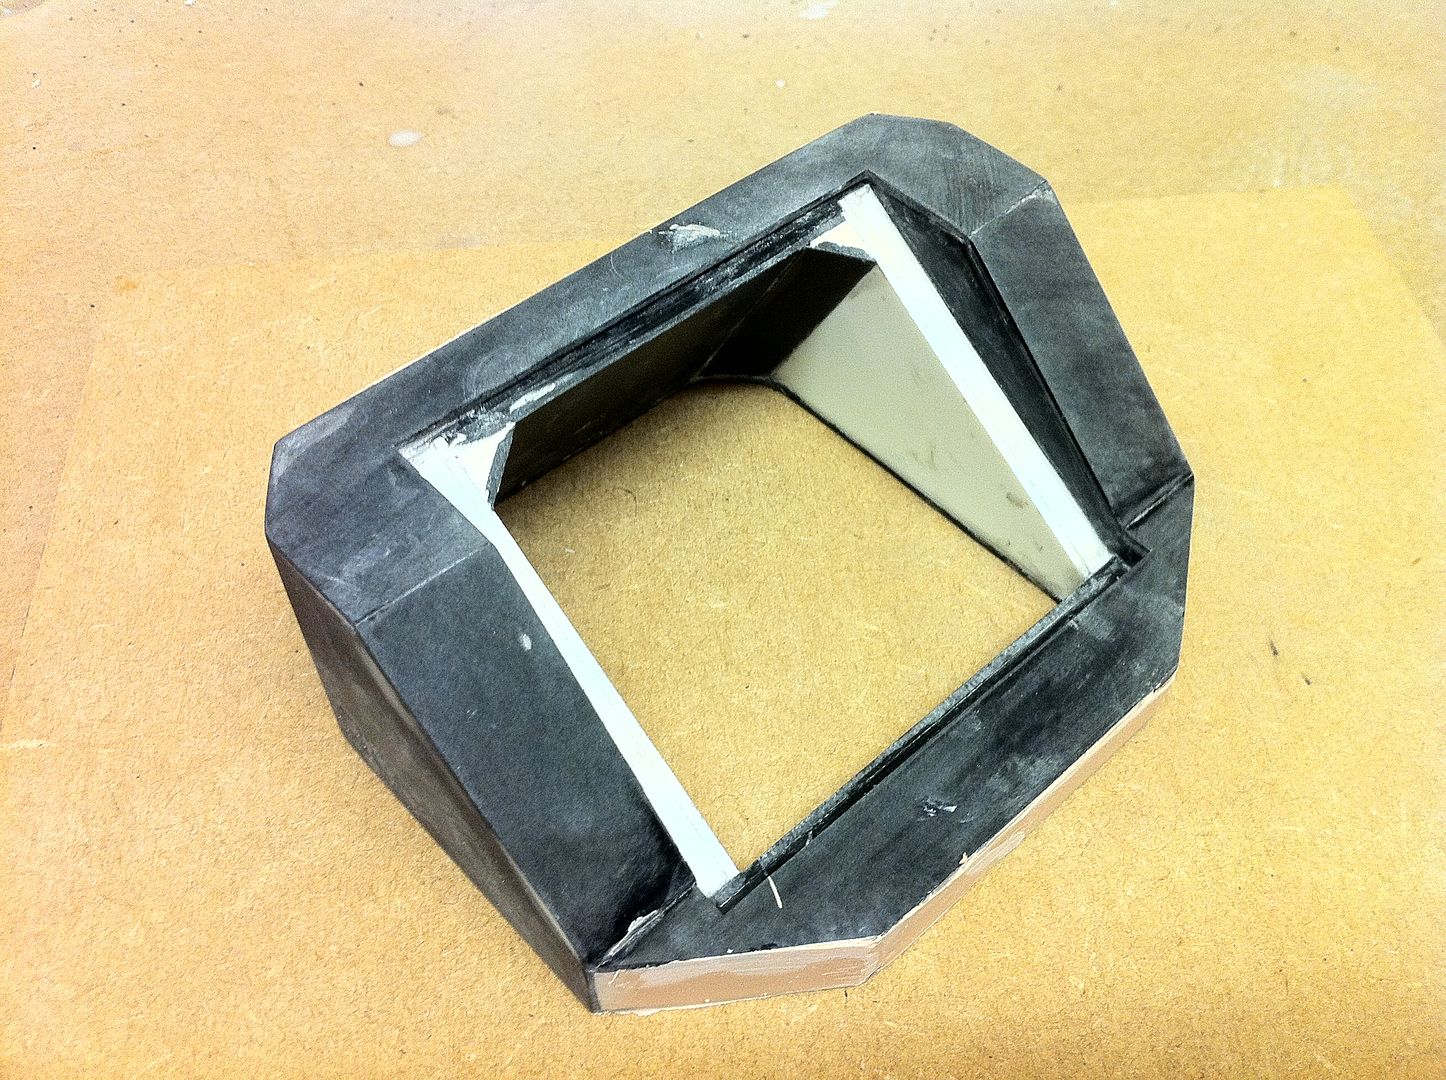
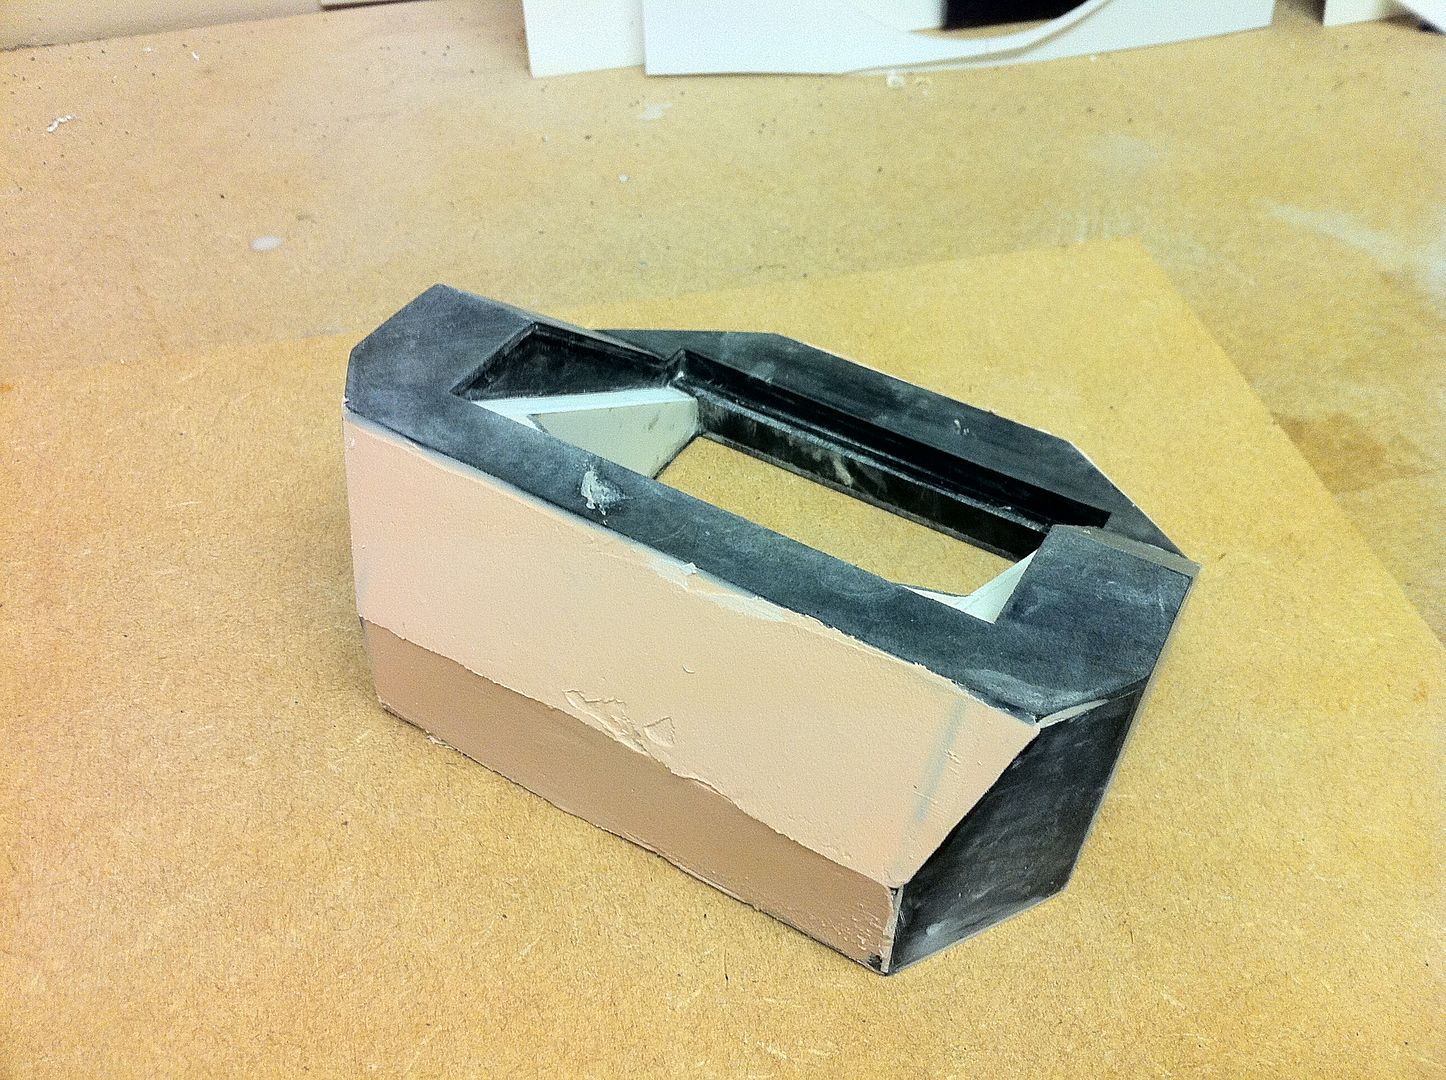
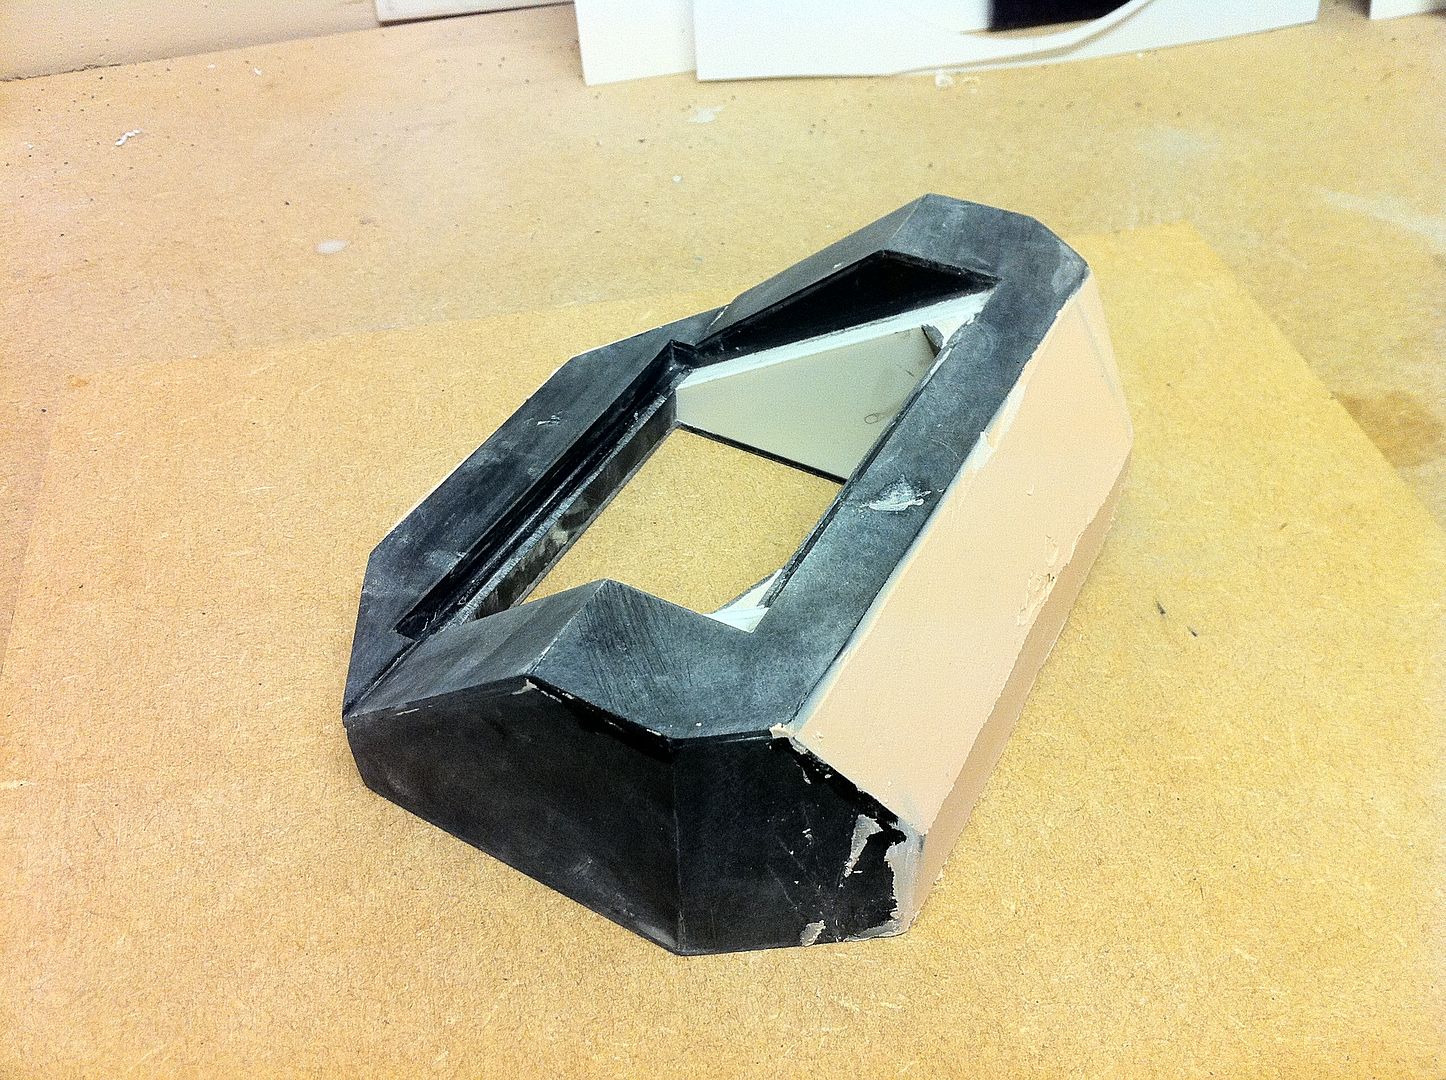
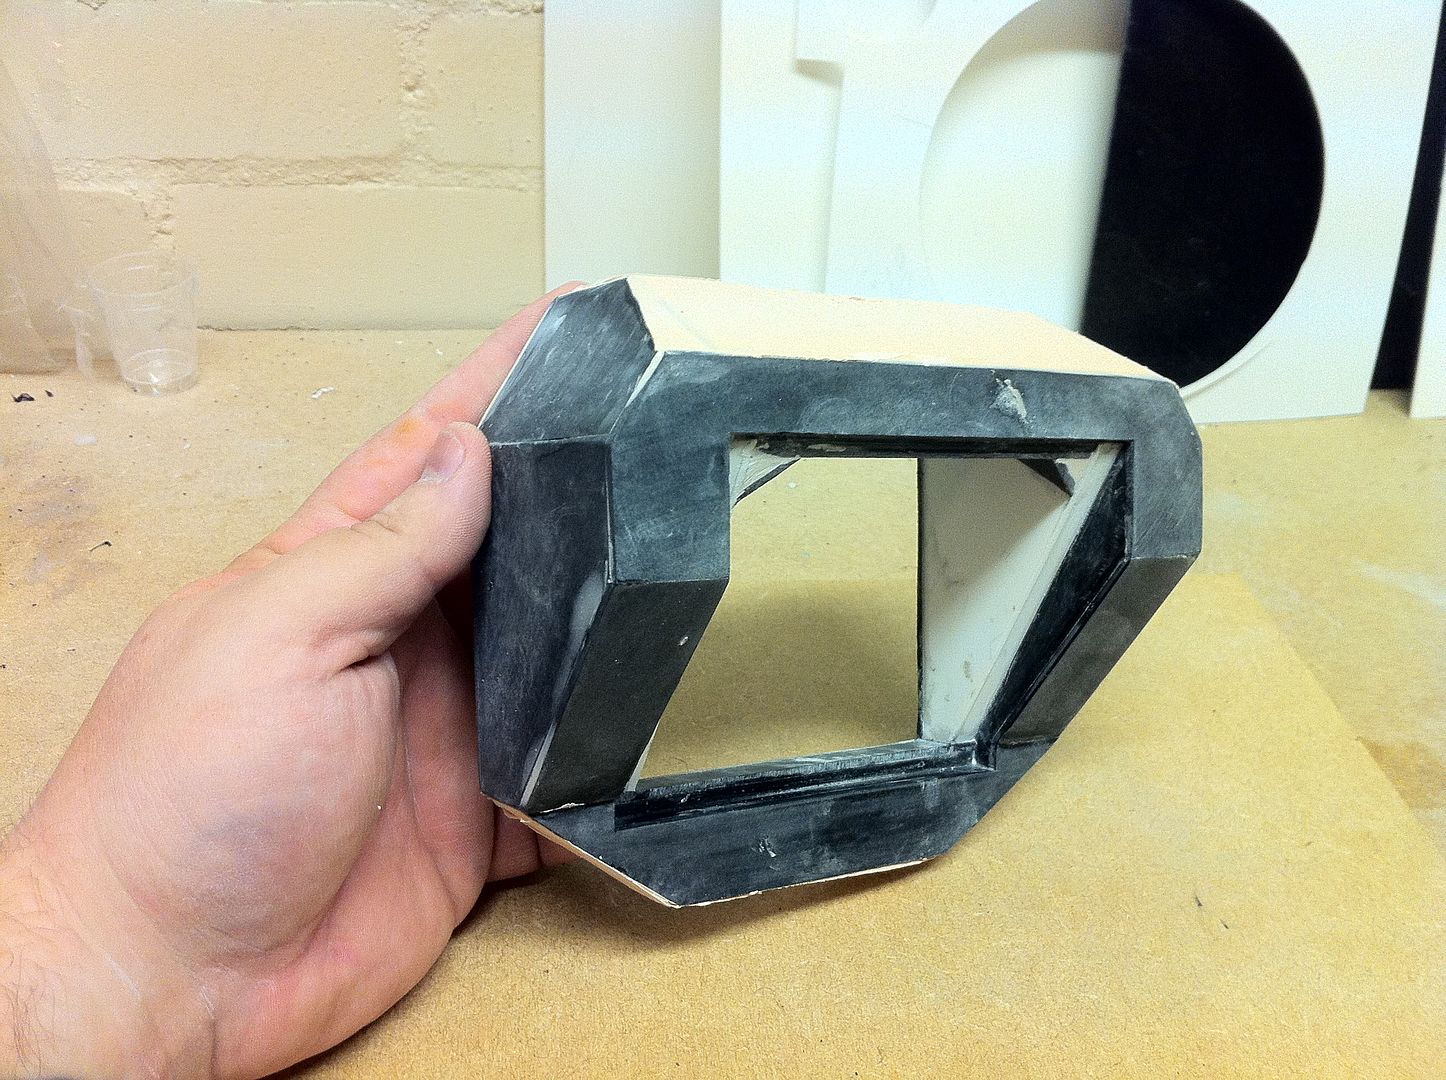
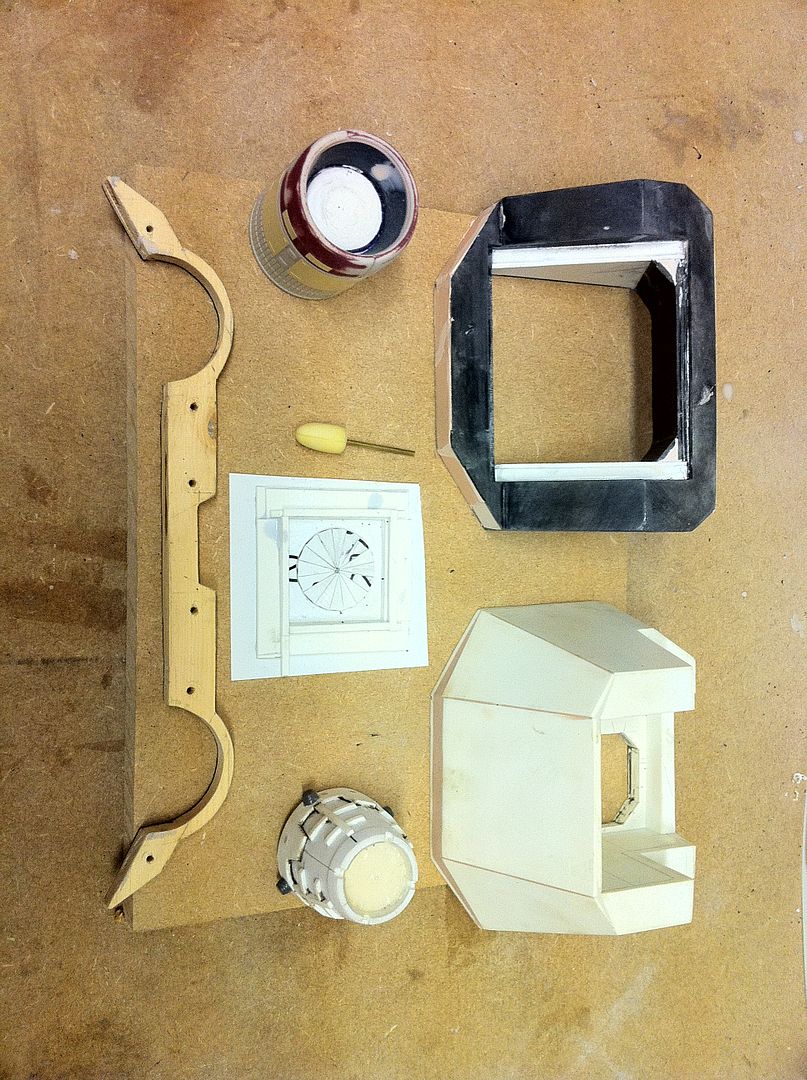
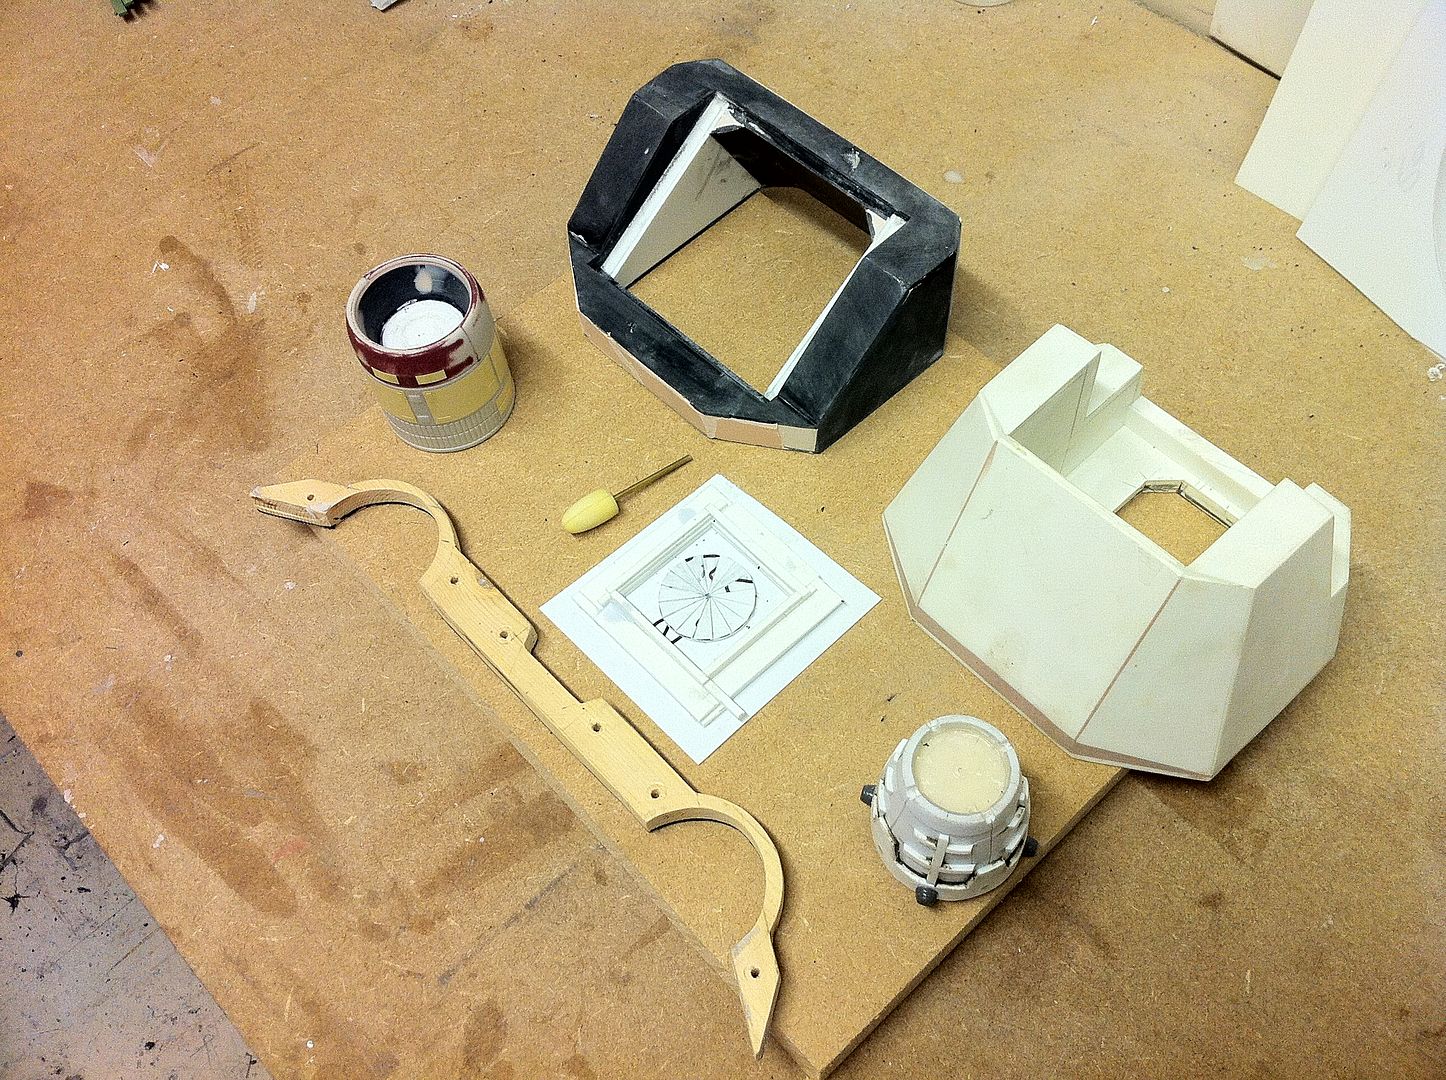
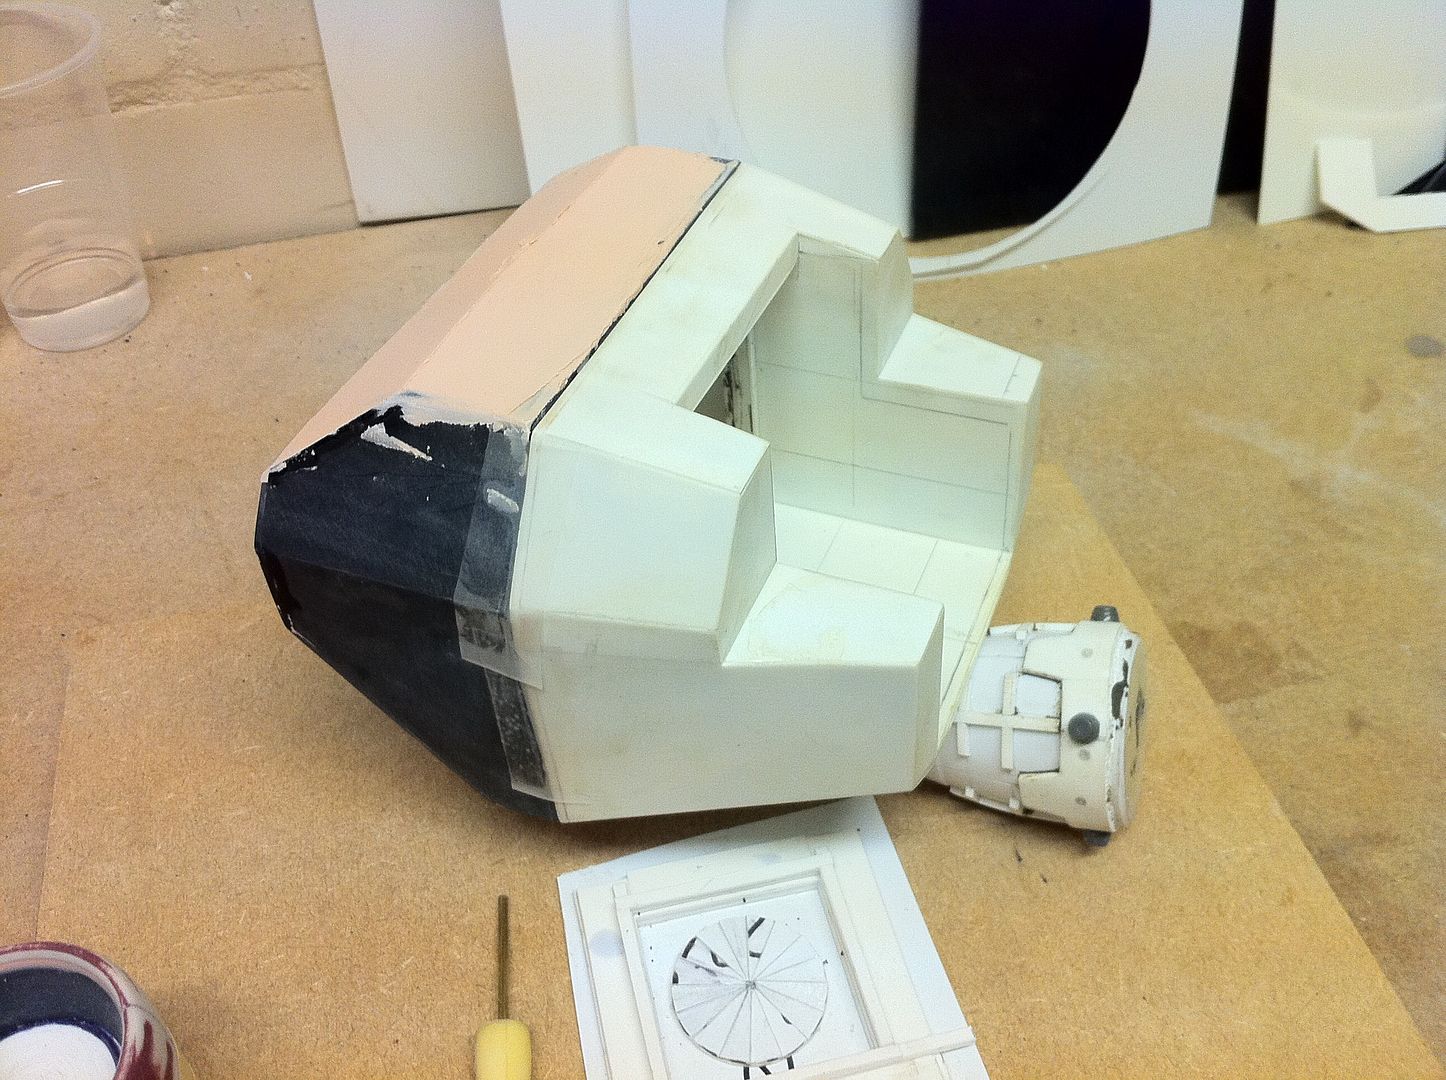
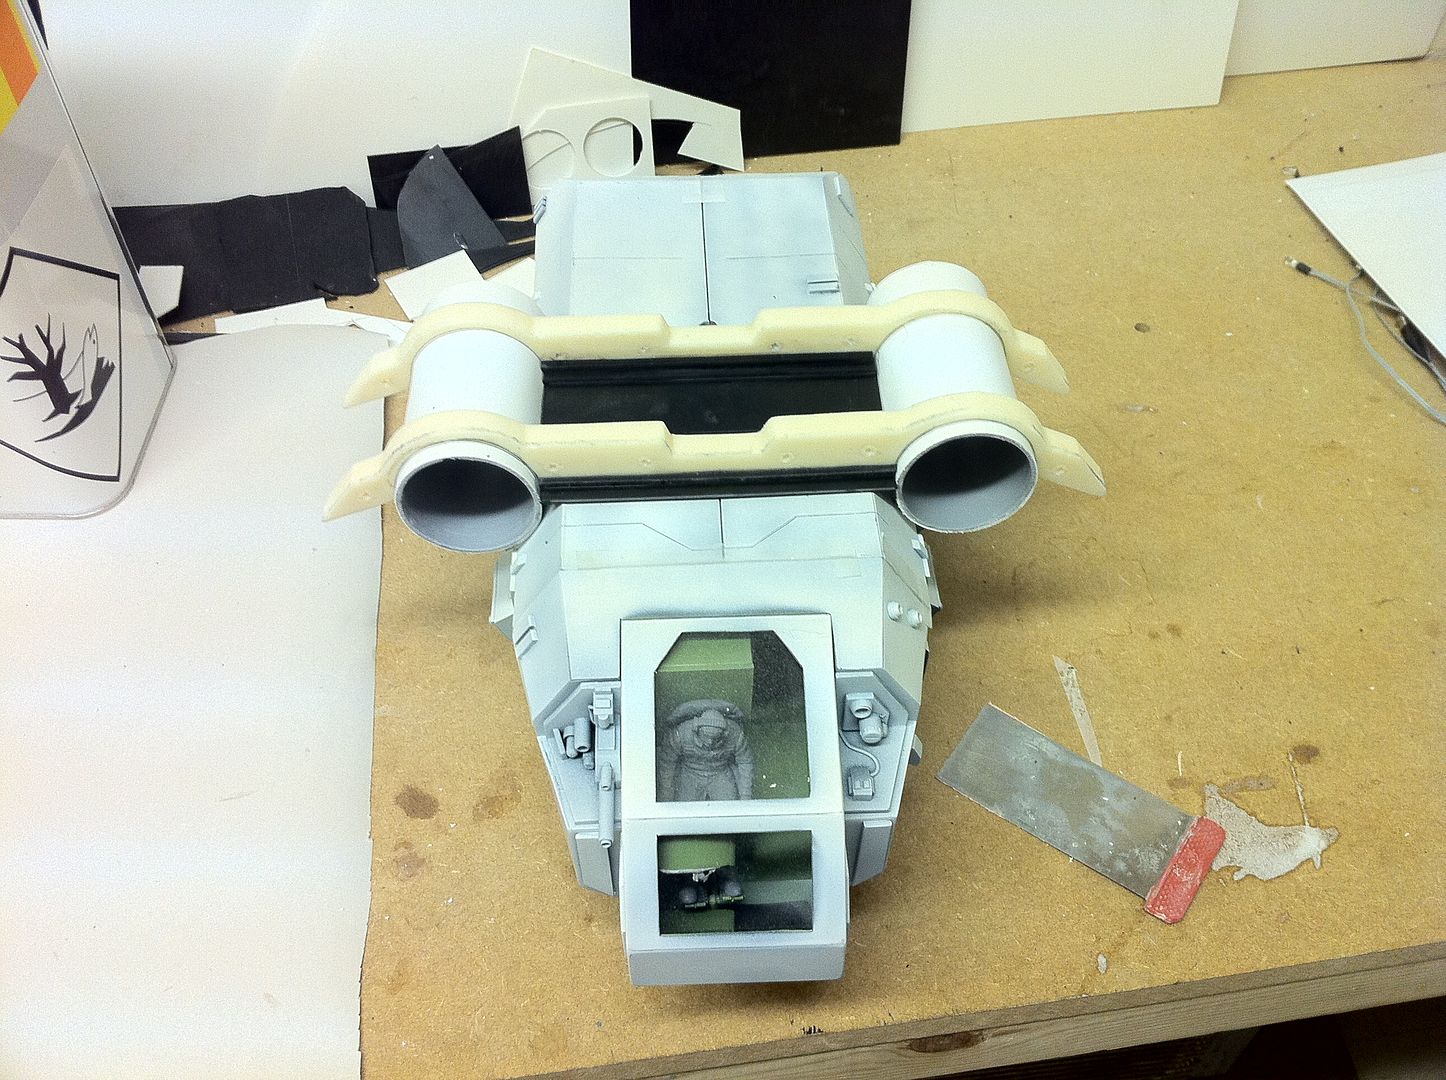
43612
Post by: Rawson
I really just don't have the words. "Well done" just sounds so lacking.
How many hours do you have into this bad boy now?
46324
Post by: Hatticus
Wow, just incredible!
18892
Post by: Bar
Hatticus wrote:Wow, just incredible!
Thanks. Glad you are enjoying it!
Rawson wrote:I really just don't have the words. "Well done" just sounds so lacking.
How many hours do you have into this bad boy now?
Thanks a lot. I'd struggle to put an hour amount on it.
But it's a lot. Although i'd hazard that i could build a totally new one in less than a week(If it didn't need lighting).
I have all the parts and moulds needed to crank out a new one for myself, with just styrene greeblies and sheet needed for the rest.
I suppose this build has taught me a lot, and i have learned a bit about how to go about lighting a build also from this one.
43612
Post by: Rawson
Bar wrote:Rawson wrote:I really just don't have the words. "Well done" just sounds so lacking.
How many hours do you have into this bad boy now?
Thanks a lot. I'd struggle to put an hour amount on it.
But it's a lot. Although i'd hazard that i could build a totally new one in less than a week(If it didn't need lighting).
I have all the parts and moulds needed to crank out a new one for myself, with just styrene greeblies and sheet needed for the rest.
I suppose this build has taught me a lot, and i have learned a bit about how to go about lighting a build also from this one.
I think the lighting really added a lot, especially the bay lights with the custom made cages.
3998
Post by: king88mob
I'm really digging some of the painting in progress shots as well please don't stop my only constructive comment is that I'm very curious to see what you are going to do with the canopy as I'm not convinced it holds it's own compared to the rest of the model.
Otherwise beatiful work. I really like the idea of using the washes to pre shade the panel lines.
22192
Post by: whalemusic360
You can add another +1 on making me want to get an arvus. that bad boy on my skyshield would make an awesome objective.
7632
Post by: Ghost in the Darkness
Awesomeness ... that is all.
31627
Post by: FantasyBob
mmmh, i have some doubt about the internal color: i think it's a a bit torusty, like if this Arvus is a really old modell that need several mantenaince. maybe this was your target from the start, or maybe not!?
18892
Post by: Bar
Rawson wrote:
I think the lighting really added a lot, especially the bay lights with the custom made cages.
Thanks. I had the LEDs in place there at one point, and they just looked like LEDs... With the cages, there *could* be bulbs stuck in there... And they look good when they are on(A few more shadows,
king88mob wrote: I'm really digging some of the painting in progress shots as well please don't stop my only constructive comment is that I'm very curious to see what you are going to do with the canopy as I'm not convinced it holds it's own compared to the rest of the model.
Do you mean the canopy frame, or the plastic glass?
The canopy frame is and always was a placeholder item. The original has a bevel to it that i haven't added yet. I'll need to make a new one. But that can wait till i get everything else done.
king88mob wrote: Otherwise beatiful work. I really like the idea of using the washes to pre shade the panel lines.
Thanks. It looks great in person. I can't wait to finish this.
whalemusic360 wrote:You can add another +1 on making me want to get an arvus. that bad boy on my skyshield would make an awesome objective.
It's a great design. Only the small size of the Forgeworld kit lets it down.
Ghost in the Darkness wrote:Awesomeness ... that is all.
Lol. Thanks. It's a fairly awesome model to hold in your hands, that's for sure. And heavy too!
FantasyBob wrote:mmmh, i have some doubt about the internal color: i think it's a a bit too rusty, like if this Arvus is a really old model that need several mantenaince. maybe this was your target from the start, or maybe not!?
In the pics above, the paint was still wet. Once it dried, it looked a lot duller.
The idea for the rust was that the dehumidifier on the airconditioning doesn't work right... And it's humid in there... It needs to be heavy, because the LEDs have such bright light that they wash the area out.
But it looks a lot better now.
40217
Post by: Ash 1
This is very cool. Just finished painting a couple of the FW Arvus models so very interested to see how this turns out.
18892
Post by: Bar
Ash 1 wrote:This is very cool. Just finished painting a couple of the FW Arvus models so very interested to see how this turns out.
Sweet. Got pics? Feel free to post them here.
18892
Post by: Bar
Sweet! Thanks for the pics. I have saved them for reference. Great work!
31627
Post by: FantasyBob
Bar wrote:
FantasyBob wrote:mmmh, i have some doubt about the internal color: i think it's a a bit too rusty, like if this Arvus is a really old model that need several mantenaince. maybe this was your target from the start, or maybe not!?
In the pics above, the paint was still wet. Once it dried, it looked a lot duller.
The idea for the rust was that the dehumidifier on the airconditioning doesn't work right... And it's humid in there... It needs to be heavy, because the LEDs have such bright light that they wash the area out.
But it looks a lot better now.
understand.....anyway, i'll hope you add more internal detail soon!
18892
Post by: Bar
FantasyBob wrote: understand.....anyway, i'll hope you add more internal detail soon!
To be honest, i can't think what else it needs in the craft other than a small amount of supplies and such. Perhaps a couple of fire extinguishers, and such like.
31627
Post by: FantasyBob
mmmh, so this is gonna be like a transporter only for supplies!? so, the only member of the crew is the pillot!?
18892
Post by: Bar
FantasyBob wrote:mmmh, so this is gonna be like a transporter only for supplies!? so, the only member of the crew is the pillot!?
Well, there would only ever be the pilot as crew(Unless there was a secondary position for a navigator. Which there isn't in this build).
But there will be jump seats for 14 "human sized" passengers(Not guys in power armour), if that's what you mean. They will slot between the girders.
And there will be handles hanging from the roof for standing passengers too(The artificial gravity system will counteract any gravitational forces during re-entry for the standing passengers, so they experience no more buffeting than on a subway journey).
But there's a decent amount of room inside in case it was just running cargo(And the seats could fold back against the walls for extra room).
But i have to admit there's nowhere an Alien queen(And two eggs) could hide in the ship, so even though it's a bit smaller, it has a bit more safety over the dropship in Aliens...

21364
Post by: FM Ninja 048
they say a picture's worth a thousand words....
11914
Post by: Nephilem
And the awesomeness just continues. The interior is looking suitably well worn for what is ostensibly a workhorse of the Imperium, although, at the same time it looks like it was recently used to evac a lot of casualties and they've not had time to hose it out yet.
Also... was that the Destiny I saw hiding off to one side in a few shots?
18892
Post by: Bar
FM Ninja 048 wrote:they say a picture's worth a thousand words....
Lol. You're not far away from me. When i am done, i will have to see about bringing it over to Edinburgh!
Nephilem wrote: And the awesomeness just continues. The interior is looking suitably well worn for what is ostensibly a workhorse of the Imperium, although, at the same time it looks like it was recently used to evac a lot of casualties and they've not had time to hose it out yet.
Thanks. Maybe they were transporting cows, lol.
Nephilem wrote: Also... was that the Destiny I saw hiding off to one side in a few shots?
It was indeed. I will PM you a few shots of it in a few minutes. Hang fire.
31627
Post by: FantasyBob
Mmmmmmhhh......really wanna see ore shoot! hope you post them soon, Bar!
43848
Post by: nectarprime
That is a damn nice model and a fine looking cat.
18892
Post by: Bar
nectarprime wrote:That is a damn nice model and a fine looking cat.
Thanks. His name is Jasper.
Three and a half feet long from whiskers to tail when he stretches out...
As for the Arvus, although i have posted all the images here, the full gallery is below in case anyone wants to check out the progression again:
http://s52.photobucket.com/albums/g19/All_the_good_usernames_are_taken/Arvus%20Lighter%20Build/?start=all
9394
Post by: Malika2
Wow...
39029
Post by: totallyrobot
Your scratchbuilding skills are excellent indeed. Thank you for sharing your build. I love seeing someone's plan come together.
Do you post on Fichtenfoo? If not, this should really be on there, they share your love of Maschinen Kreiger and all things scratchbuilt.
40217
Post by: Ash 1
That's a fantastic build, the hanger as well.
24297
Post by: Viktor von Domm
awsome built is there a chance you will built this hangar for the arvus? would be a hell of a dio!!!
many thanks for sharing this!
18892
Post by: Bar
Viktor von Domm wrote:awsome built is there a chance you will built this hangar for the arvus? would be a hell of a dio!!!
many thanks for sharing this!
Thanks. The Hangar is a project i thought about so i could display my WIPs for people in a scale environment. The idea is that when it's done, i can use it just as a camera box for taking pics of WIPs.
Ash 1 wrote:That's a fantastic build, the hanger as well.
Thanks a lot. I am waiting for a few large sheets of styrene to arrive so i can finish the hangar. That will be my next project.
totallyrobot wrote:Your scratchbuilding skills are excellent indeed. Thank you for sharing your build. I love seeing someone's plan come together.
Do you post on Fichtenfoo? If not, this should really be on there, they share your love of Maschinen Kreiger and all things scratchbuilt.
I doubt they'd be interested over there. I post on the Ma.K forum anyway, so Michael will see it there, and he has yet to comment
Malika2 wrote:Wow...
Thanks! It will be finished shortly for sure!
Then it's new owner will soon take delivery of it
24297
Post by: Viktor von Domm
Then it's new owner will soon take delivery of it
you can part with that... would be like selling a child for me...
Thanks. The Hangar is a project i thought about so i could display my WIPs for people in a scale environment. The idea is that when it's done, i can use it just as a camera box for taking pics of WIPs.
I am waiting for a few large sheets of styrene to arrive so i can finish the hangar. That will be my next project.
yeah *punches fist into the air*
i too am currently making a camera box/dio to better present my models/minis... a hangar done by you...be sure of my yet again wetted apetite of bar productions^^
18892
Post by: Bar
Viktor von Domm wrote: Bar wrote:Then it's new owner will soon take delivery of it
you can part with that... would be like selling a child for me...
It's only a model, lol...
Actually, the guy who is buying it wanted me to make ANOTHER one for him. But i told him i would just sell him this one(I will probably just make another one for me later on). I made master patterns of the engine braces, intakes, exhausts, front end and back end. I could probably rustle another one up in two weeks. I have already made a new engine cradle just to prove it was easy(Took about an hour). The cradle parts are sized to accept 50mm plumbing tube(I hid the lighting systems in there on this build).
I have a VERY special Arvus variant planned for the future. And the parts will be very handy for that.
Viktor von Domm wrote: Bar wrote:Thanks. The Hangar is a project i thought about so i could display my WIPs for people in a scale environment. The idea is that when it's done, i can use it just as a camera box for taking pics of WIPs.
Bar wrote: I am waiting for a few large sheets of styrene to arrive so i can finish the hangar. That will be my next project.
yeah *punches fist into the air*
i too am currently making a camera box/dio to better present my models/minis... a hangar done by you...be sure of my yet again wetted apetite of bar productions^^
Great idea Viktor. And thanks for your kind words.
You can see the lines i have drawn on the walls of the hangar. The upper lines are a gantry walkway, and doorways leading off. On the lower lever there will be staircase leading up to the other levels, and on the right there is a giant doorway(It will be closed, but it COULD lead to other hangars/storage areas).
The hangar will be generic. It could POSSIBLY be a bunker underground, or on the ground in an airfield, or in a large skyscraper, or it could even be a hangar bay in a starship. It will give me plenty of options for details.
24297
Post by: Viktor von Domm
this sounds like a good thing!!! such a high potential dio i had not in mind for my own needs but then again i am making a dio for outdoor scenes... and currently i wont make any flyers....so...^^
a new and special variant of the arvus too? well...i think we are in for a treat... i only hope you got paid handsomly for this beauty! as for the parts having master copies to use later i remember that you talked about that during the built, so it is only one built you give away but you have the potential to redo not from scratch but from a foundation so to speak^^
43553
Post by: Sharkvictim
Meh, it's okay I guess... I mean if you're into the the whole superbly intricate, detail-oriented craftsmanship thing... I suppose...
Before anyone flames me to hell and back I'm being sarcastic. This thing is remarkable.
18892
Post by: Bar
Sharkvictim wrote:Meh, it's okay I guess... I mean if you're into the the whole superbly intricate, detail-oriented craftsmanship thing... I suppose...
Before anyone flames me to hell and back I'm being sarcastic. This thing is remarkable.
Lol. Thanks. I got the humour right away. It's always good to have a laugh.
Viktor von Domm wrote:this sounds like a good thing!!! such a high potential dio i had not in mind for my own needs but then again i am making a dio for outdoor scenes... and currently i wont make any flyers....so...^^
a new and special variant of the arvus too? well...i think we are in for a treat... i only hope you got paid handsomly for this beauty! as for the parts having master copies to use later i remember that you talked about that during the built, so it is only one built you give away but you have the potential to redo not from scratch but from a foundation so to speak^^
Exactly. That was my thought on the subject. This one was not started as a commission. It was purely for me. It only changed when a member of another forum saw the WIP and offered to buy it.
I am getting a nice amount for it(Although i have three months work in this, you can't put a figure on the value of a piece like this, but lets say i am getting about 20 times the cost of the materials it took to make the craft), so i am glad to let it go for that amount.
The "variant" i have in mind is a non-orbit-capable "navy" version with outrigger wings and VTOL propellers. Kind of like a V22 Osprey.
24247
Post by: Ambull
Amazing modeling work, painting is excellent as well - I love seeing in progress stuff like this.
48376
Post by: Capitansolstice
Wow, cant wait to see the dio
18892
Post by: Bar
Capitansolstice wrote:Wow, cant wait to see the dio
Irony of ironies, the Arvus has been sold to a buyer in the US. Likely, i will not finish the Hangar in time for the Arvus to be show in there in it's full glory...
I will take plenty of images of the Arvus though...
And i do plan on making myself another one.
48376
Post by: Capitansolstice
WHAT!!!!!!!!!!!!!!!!!!!!!!!!!!!!!!!!!
oh well
18892
Post by: Bar
Capitansolstice wrote:WHAT!!!!!!!!!!!!!!!!!!!!!!!!!!!!!!!!!
oh well
Is this in referemce to the fact it has been sold, or that it will never be shown in the hangar?
48376
Post by: Capitansolstice
I wont be able to get to see it in the hangar. Oh well :(
18892
Post by: Bar
Capitansolstice wrote:I wont be able to get to see it in the hangar. Oh well :(
Sorry. I will build another one, i swear...
2326
Post by: shasolenzabi
Hmm, I come back to find more awesomeness! Interesting color patterns you chose, almost BSG like, and I do like the way that the gritty new BSG can also fit somewhat with a WH40K vehicle like the Arvus.
8266
Post by: Wolf
I only had to see the first few photos and just wow ! That got me straight away and the progress and attention to detail is superb ! Can't wait for more.
18892
Post by: Bar
shasolenzabi wrote:Hmm, I come back to find more awesomeness! Interesting color patterns you chose, almost BSG like, and I do like the way that the gritty new BSG can also fit somewhat with a WH40K vehicle like the Arvus.
I too enjoy the fact that the Arvus could comofrtably sit in several Scifi settings. It could concievably be a Star Wars craft too....
And the shape of the hull without wings is very similar to the look of the Bumblebee escape pod from the Pillar Of Autumn in Halo: Combat Evolved.
Wolf wrote:I only had to see the first few photos and just wow ! That got me straight away and the progress and attention to detail is superb ! Can't wait for more.
Thanks a lot. I have build everything on it from scratch and even i am impressed when i look at it...
48376
Post by: Capitansolstice
Bar wrote:Capitansolstice wrote:I wont be able to get to see it in the hangar. Oh well :(
Sorry. I will build another one, i swear...
YESSS!!!!!!
18892
Post by: Bar
Lol. As i said, i have all the parts to make a new one.
Next one will be olive drab with Halo style markings...
35639
Post by: gman1401
WOW! Absolutely amazing work!
31627
Post by: FantasyBob
so, yyou are going to build an angar too!? wow, amazing works!
2326
Post by: shasolenzabi
At this rate he could be the next Gerry Anderson!
Loved his stuff growing up, Space 1999, U.F.O., Thunderbirds, Fireball XL-5, Captain Scarlet, Stingray, and even Space Precinct
18892
Post by: Bar
gman1401 wrote:WOW! Absolutely amazing work!
Thanks a lot. I am not able to go to work today so it will have to wait till tomorrow for some updates.
FantasyBob wrote:so, yyou are going to build an angar too!? wow, amazing works!
Thanks. The hangar will be getting started soon when i get new styrene supplies sent in.
shasolenzabi wrote:At this rate he could be the next Gerry Anderson!
Loved his stuff growing up, Space 1999, U.F.O., Thunderbirds, Fireball XL-5, Captain Scarlet, Stingray, and even Space Precinct
What praise!
I doubt i will ever reach the heights of Gerry Anderson. He was probably younger than me when he got a start, and physical effects are no longer in vogue anymore.
Automatically Appended Next Post: totallyrobot wrote:Do you post on Fichtenfoo? If not, this should really be on there, they share your love of Maschinen Kreiger and all things scratchbuilt.
Well, i remembered that i had registered on there, so i have posted a WIP over there.
38659
Post by: tryanotherone
So, how is the current status?
24297
Post by: Viktor von Domm
cool! the cockpit is stunning....
by the way... did you actually start painting the clipboard maiden???^^
vik
18892
Post by: Bar
Viktor von Domm wrote:cool! the cockpit is stunning....
by the way... did you actually start painting the clipboard maiden???^^
vik
Yeah i did. It's not a pretty sight up close. I want to set fire to the result... And stamp on the ashes. And then bury the ashes at sea.
It works for long distance shots. It has taught me i was correct to realise i cannot paint figures...
Oh, what i would give for a set of these figures to get painted up by someone who knows what they are doing..
And thanks, by the way. I am proud of thw work i have done on this entire thing. The only project of mine that will outshine this one is my next project.
24297
Post by: Viktor von Domm
which is in fact the hanger....am i right.... (note to self...must stop drooling^^)
and don´t be to harsh to yourself, from my point of view it was quite nice to behold...
48376
Post by: Capitansolstice
holy wow.
18892
Post by: Bar
Capitansolstice wrote:holy wow.
Thanks! Glad you like it.
Viktor von Domm wrote:which is in fact the hanger....am i right.... (note to self...must stop drooling^^)
and don´t be to harsh to yourself, from my point of view it was quite nice to behold...
It's not pretty. I don't have the steady hand for painting small things unfortunately...
As for the next project... although the hangar will be getting done, my actual next project will be a 1/20 scale Rhino stealth fighter.
Here are the plans. It will be 95cm long(I made a one-half template, it is shown below next to a mirror for the full effect):
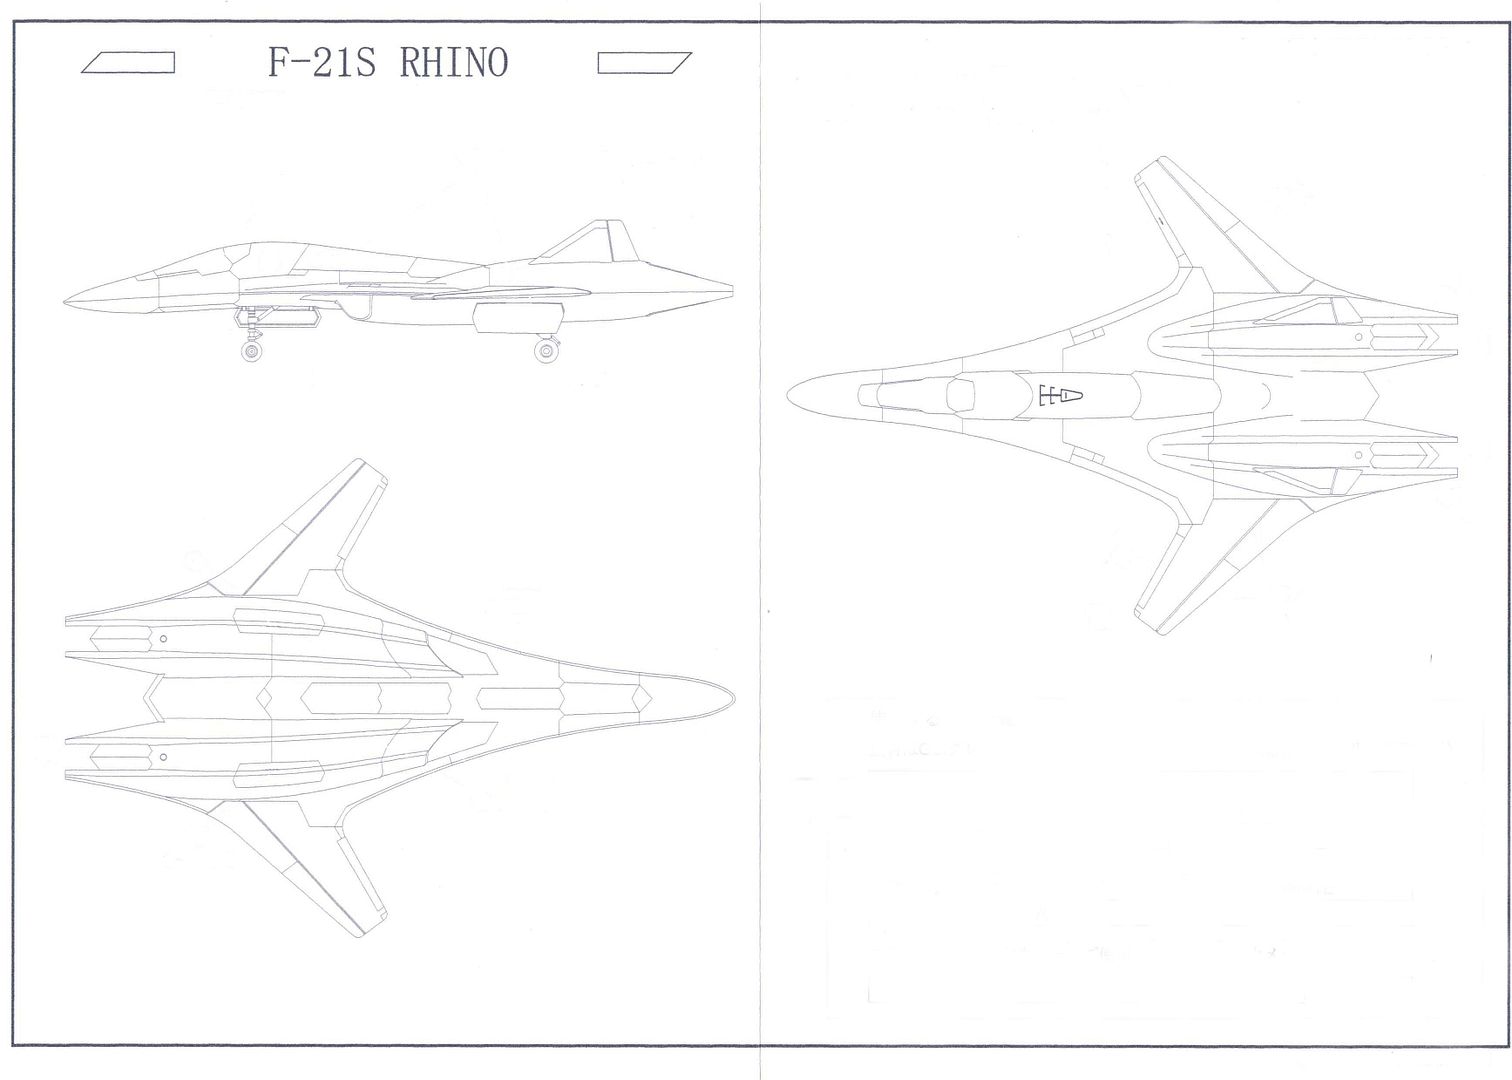
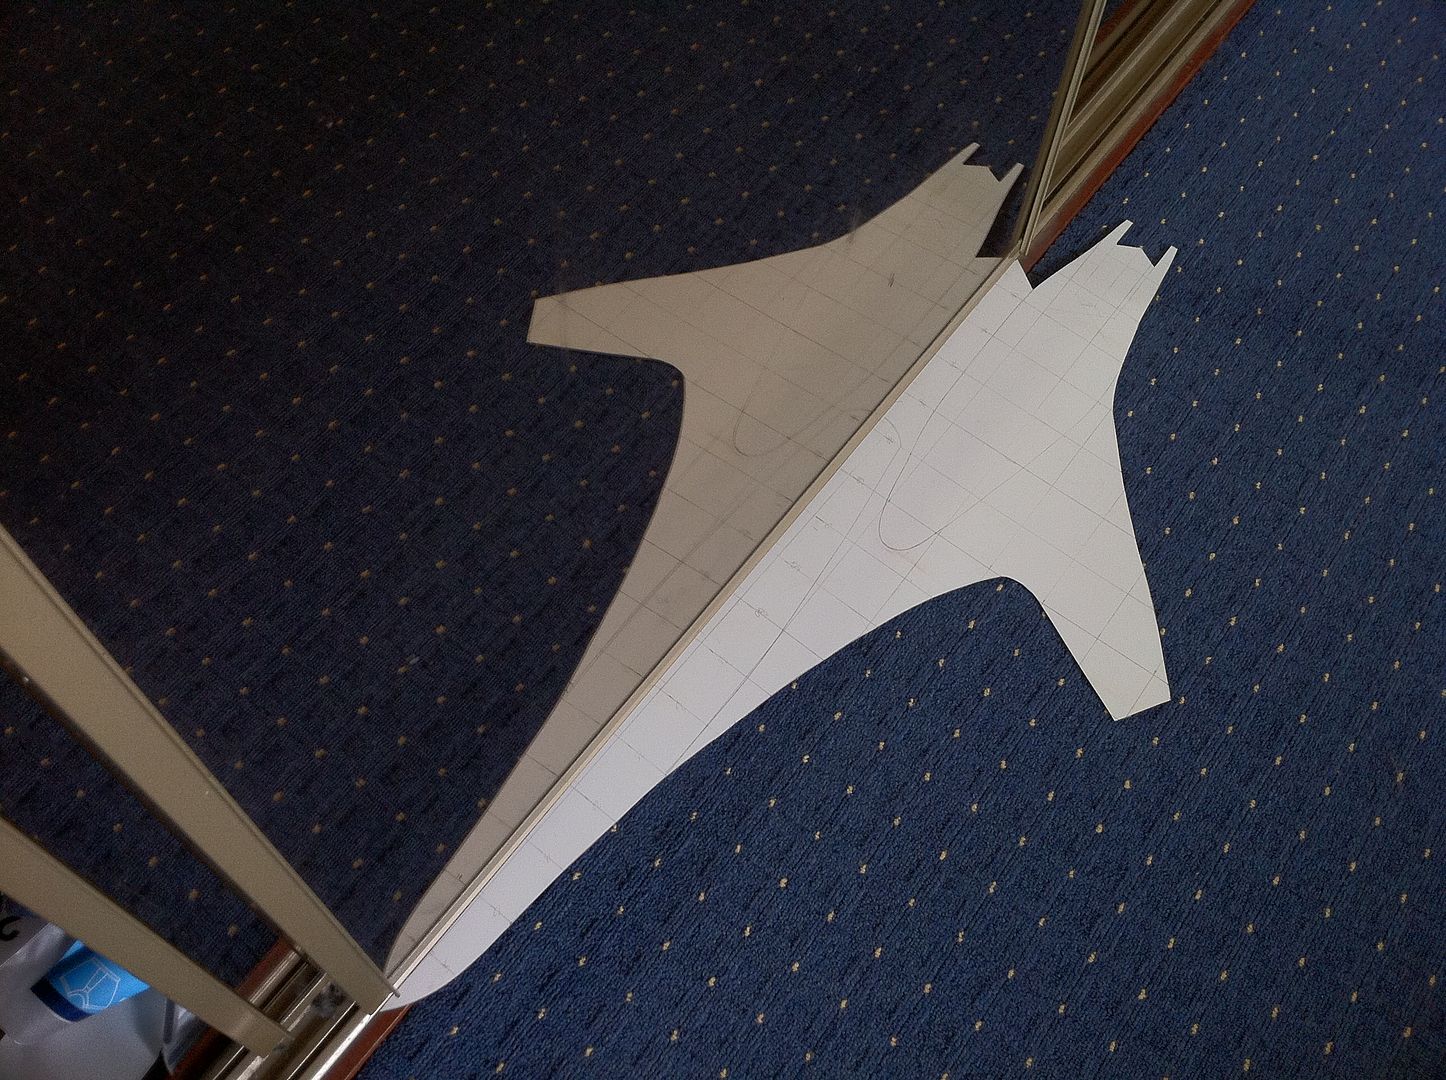
24297
Post by: Viktor von Domm
*gulp* that is huge...
er...
were is that design from?
is it a real fighter or some fictious concept?
18892
Post by: Bar
Viktor von Domm wrote:*gulp* that is huge...
er...
were is that design from?
is it a real fighter or some fictious concept?
It's a fictitious craft, made as a 1/144 scale injection kit from the Japanese low-volume manufacturer Aozora Model company: http://www.hlj.com/product/AOZ144-001
But i want a bigger one. It will be more than twice the length of the Arvus.
I am also considering making a single-stage-to-orbit booster for the plane so it could be a space fighter.
Kind of like the system on the HALO Sabre class orbital fighter: http://www.youtube.com/watch?v=CzLkcGWq-_4&feature=related
48376
Post by: Capitansolstice
woah
24297
Post by: Viktor von Domm
hmmmm this idea of a single-stage-to-orbit booster for the plane so it could be a space fighter
sounds really interresting and would fit that strange silhouette of that model quite good!
the size of that thing is quite good portrayed by that mirror pic of yours.... this will be huge indeed!... how do you achive that rounded outlook of that fighter? compared to the arvus this will be a totally different building process it seems...sandwiched layers maybe and then later on covering the edges with filler?
18892
Post by: Bar
Capitansolstice wrote:woah
Lol! Thanks! I love these one word posts. It occurs to me that you can take a look at this picture and assume the Arvus build was hard. But if you look at the full build you will see it was quite simple, layer upon layer, for a polished end result.
Viktor von Domm wrote:hmmmm this idea of a single-stage-to-orbit booster for the plane so it could be a space fighter
sounds really interresting and would fit that strange silhouette of that model quite good!
the size of that thing is quite good portrayed by that mirror pic of yours.... this will be huge indeed!... how do you achive that rounded outlook of that fighter? compared to the arvus this will be a totally different building process it seems...sandwiched layers maybe and then later on covering the edges with filler?
Yes. It's a simple technique. I will trace the outline of the jet onto a sheet of MDF. I will screw THAT sheet onto a second sheet of MDF. I will then get the outline cut out with a bandsaw.
That means i have two identical shapes of the outline. One will house the top form, and the other will house the bottom form.
The shape will be built up with frames of MDF to the cross sections and filled with body filler. The final result will be vacformed like my Arrowhead project( See here for the full gallery, and below for a few images):
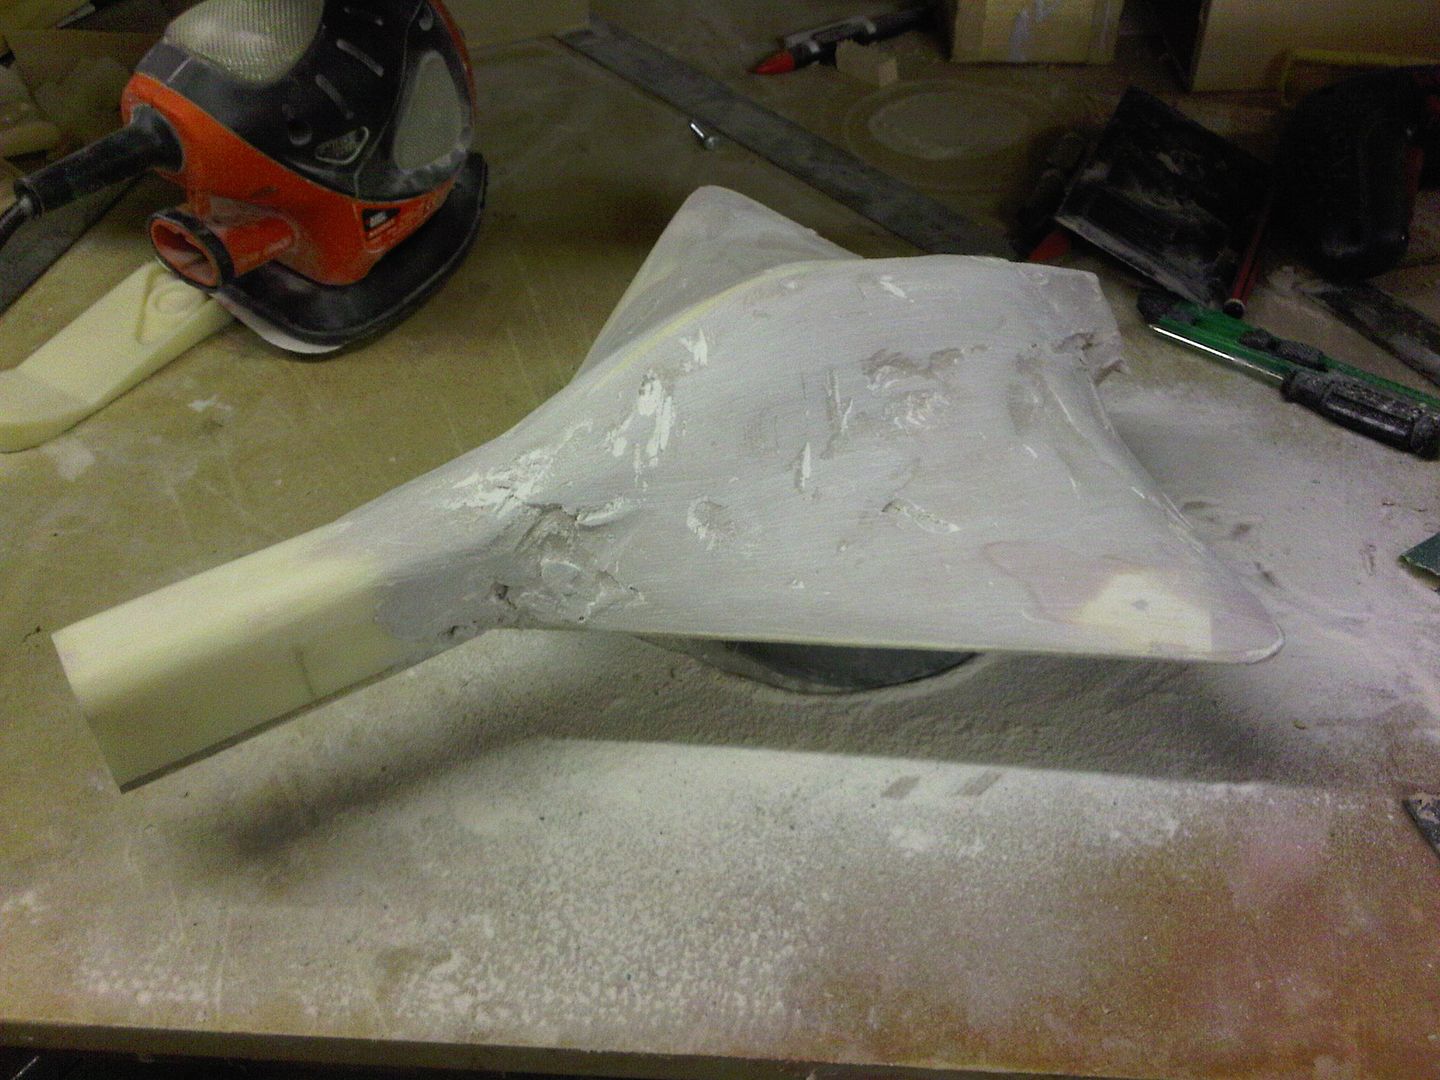
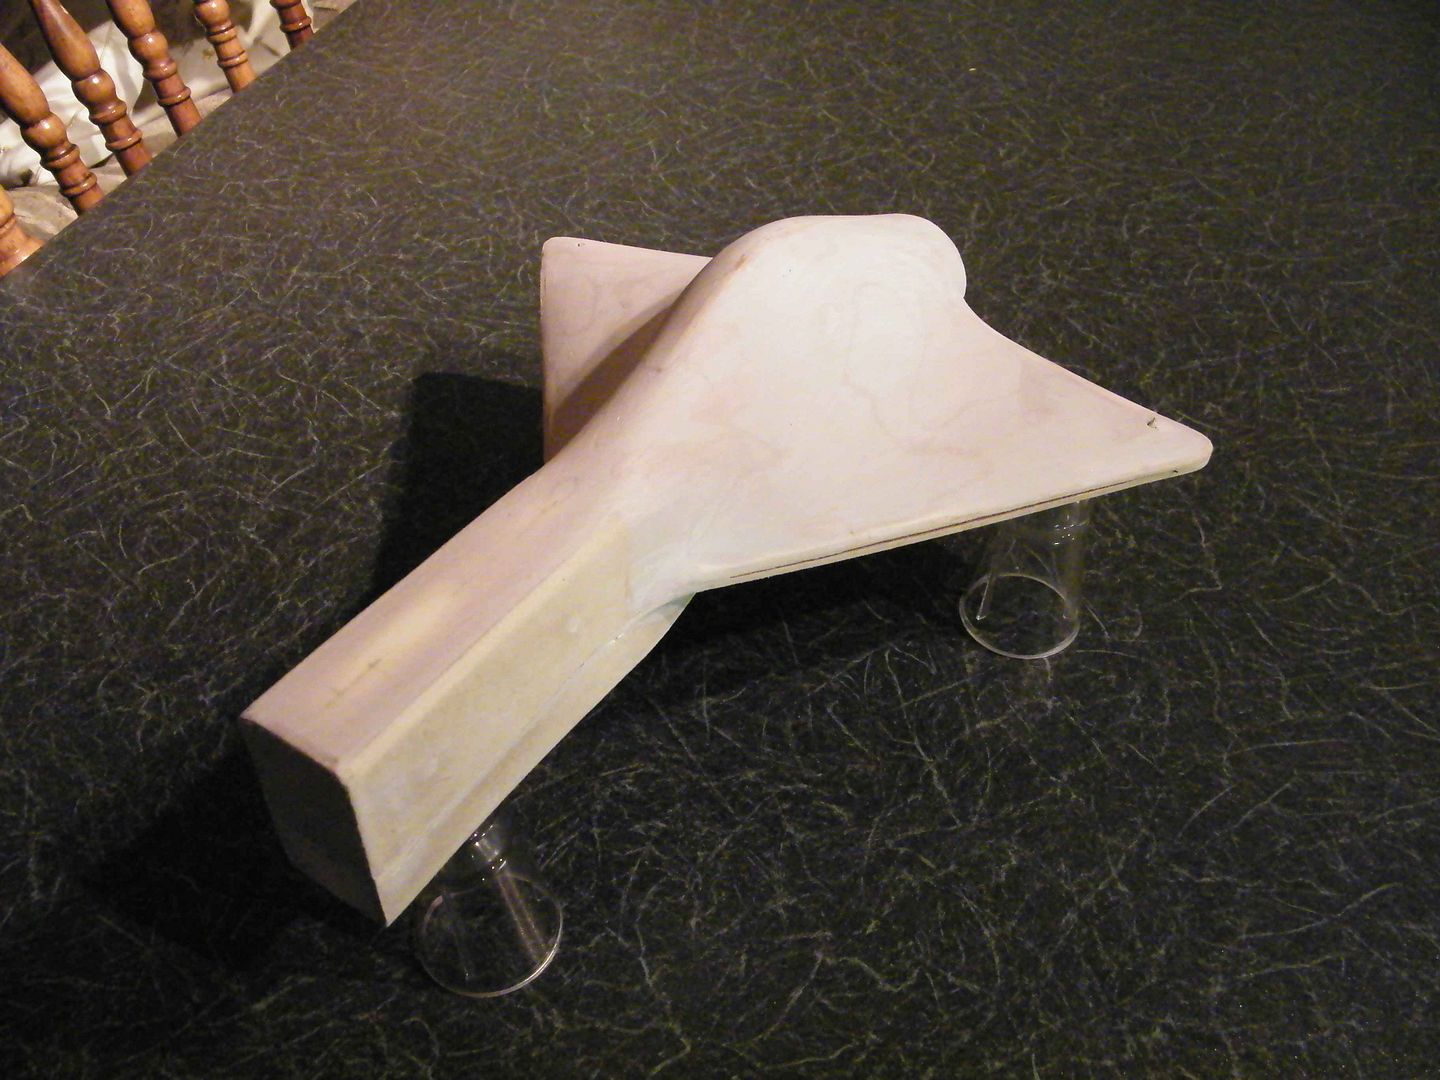
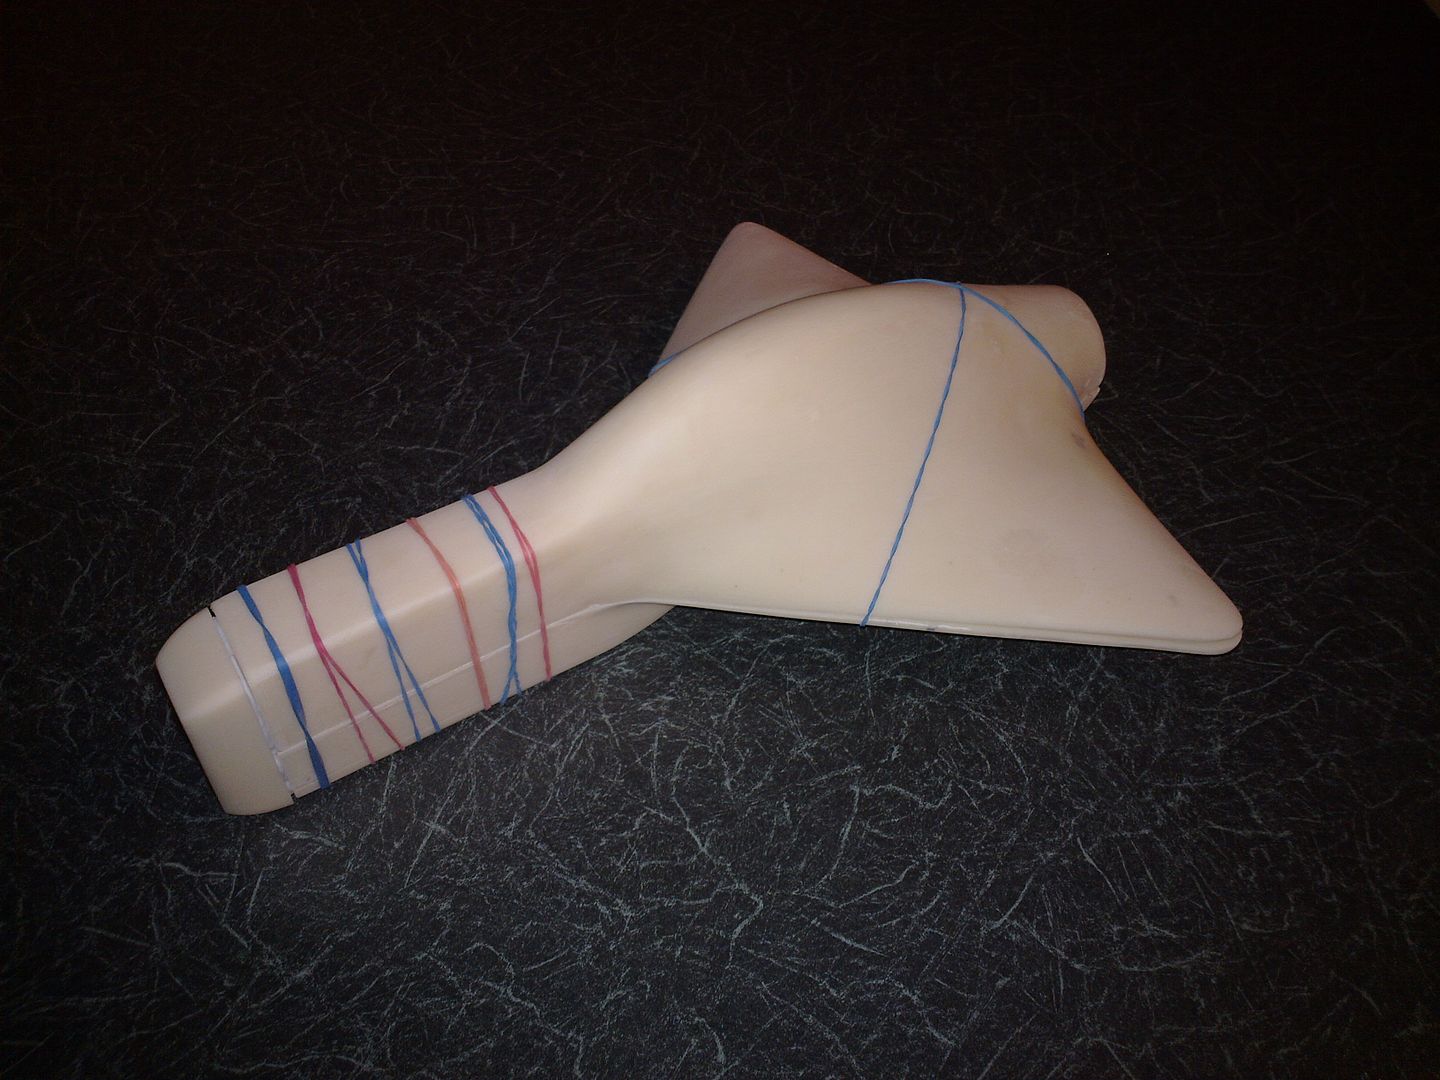
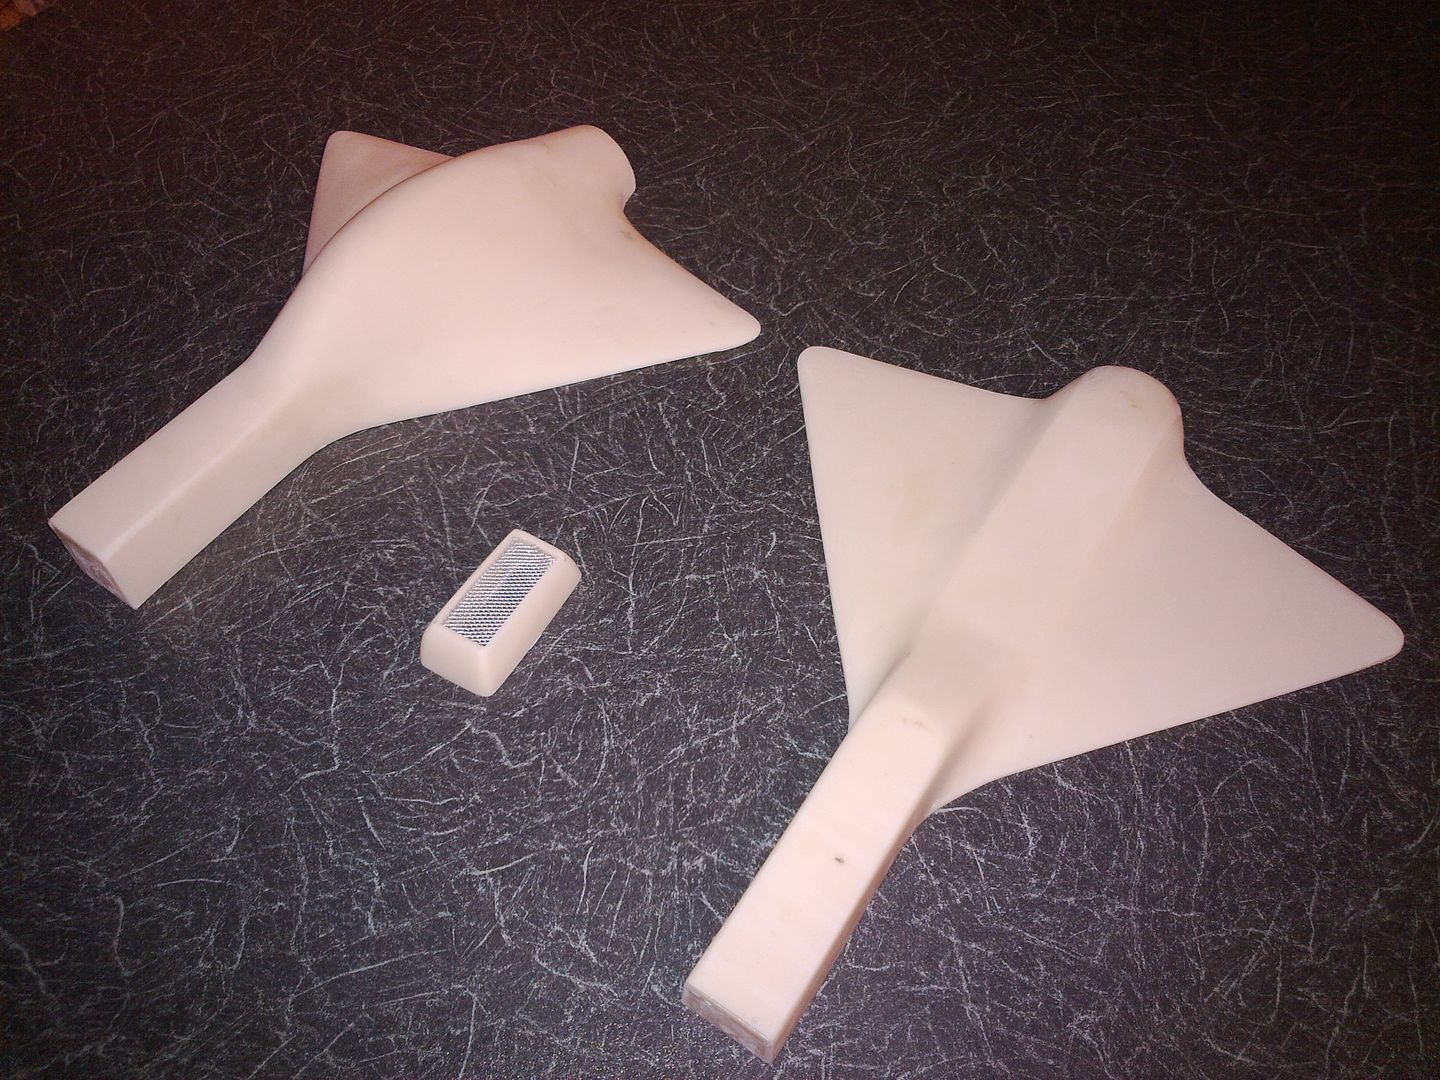
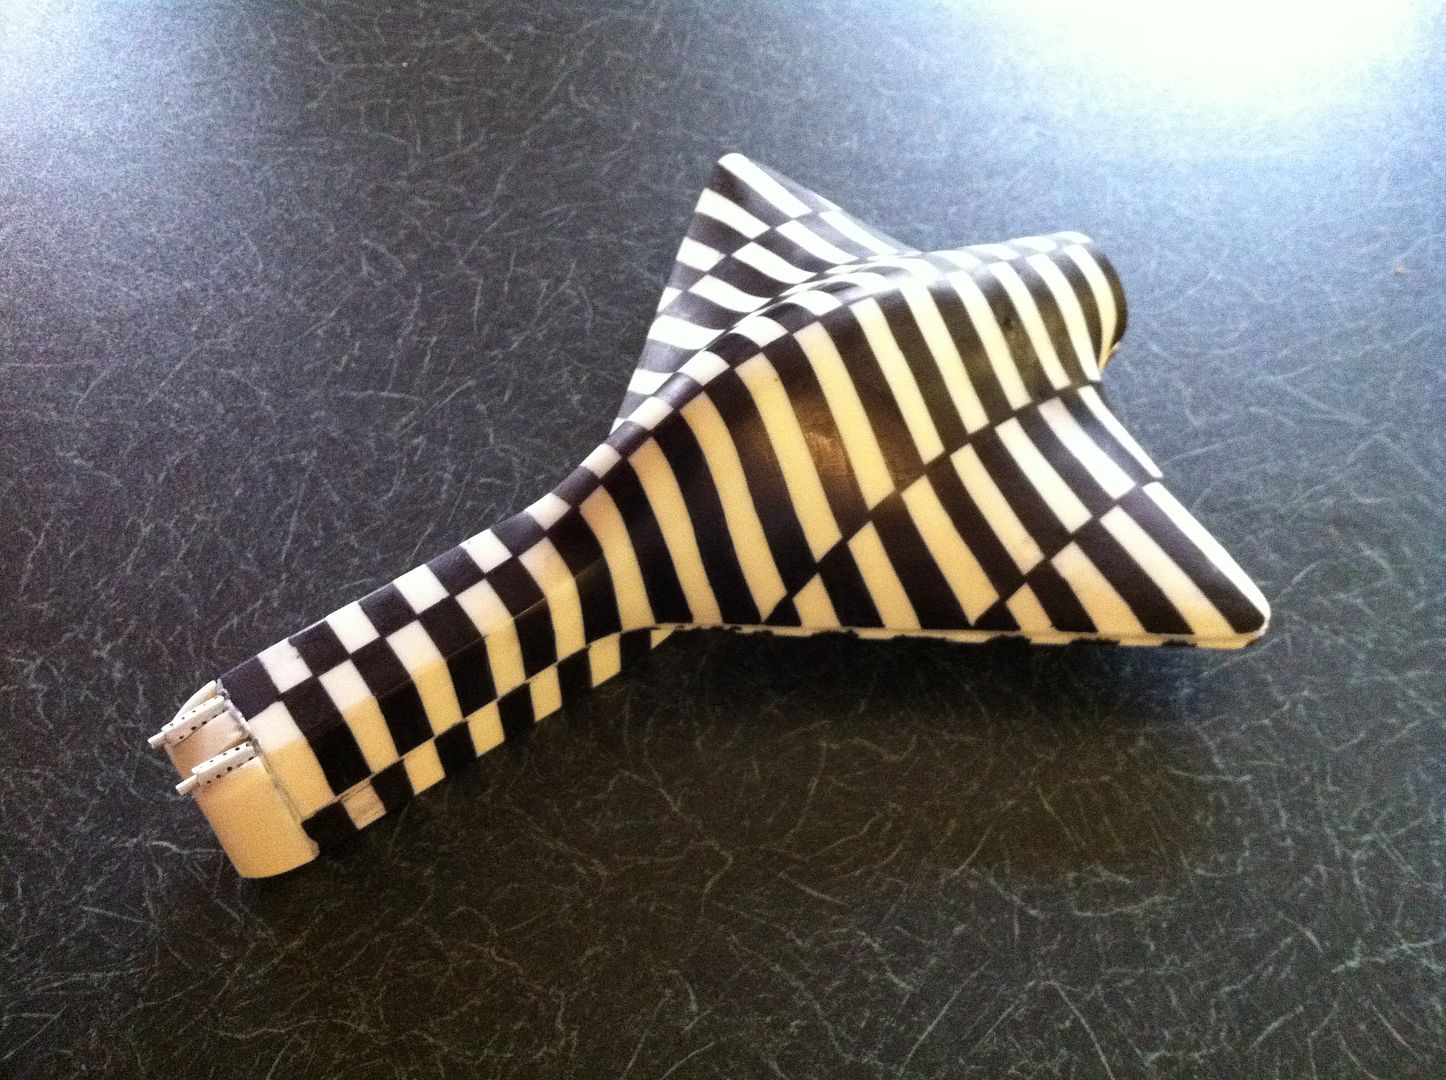
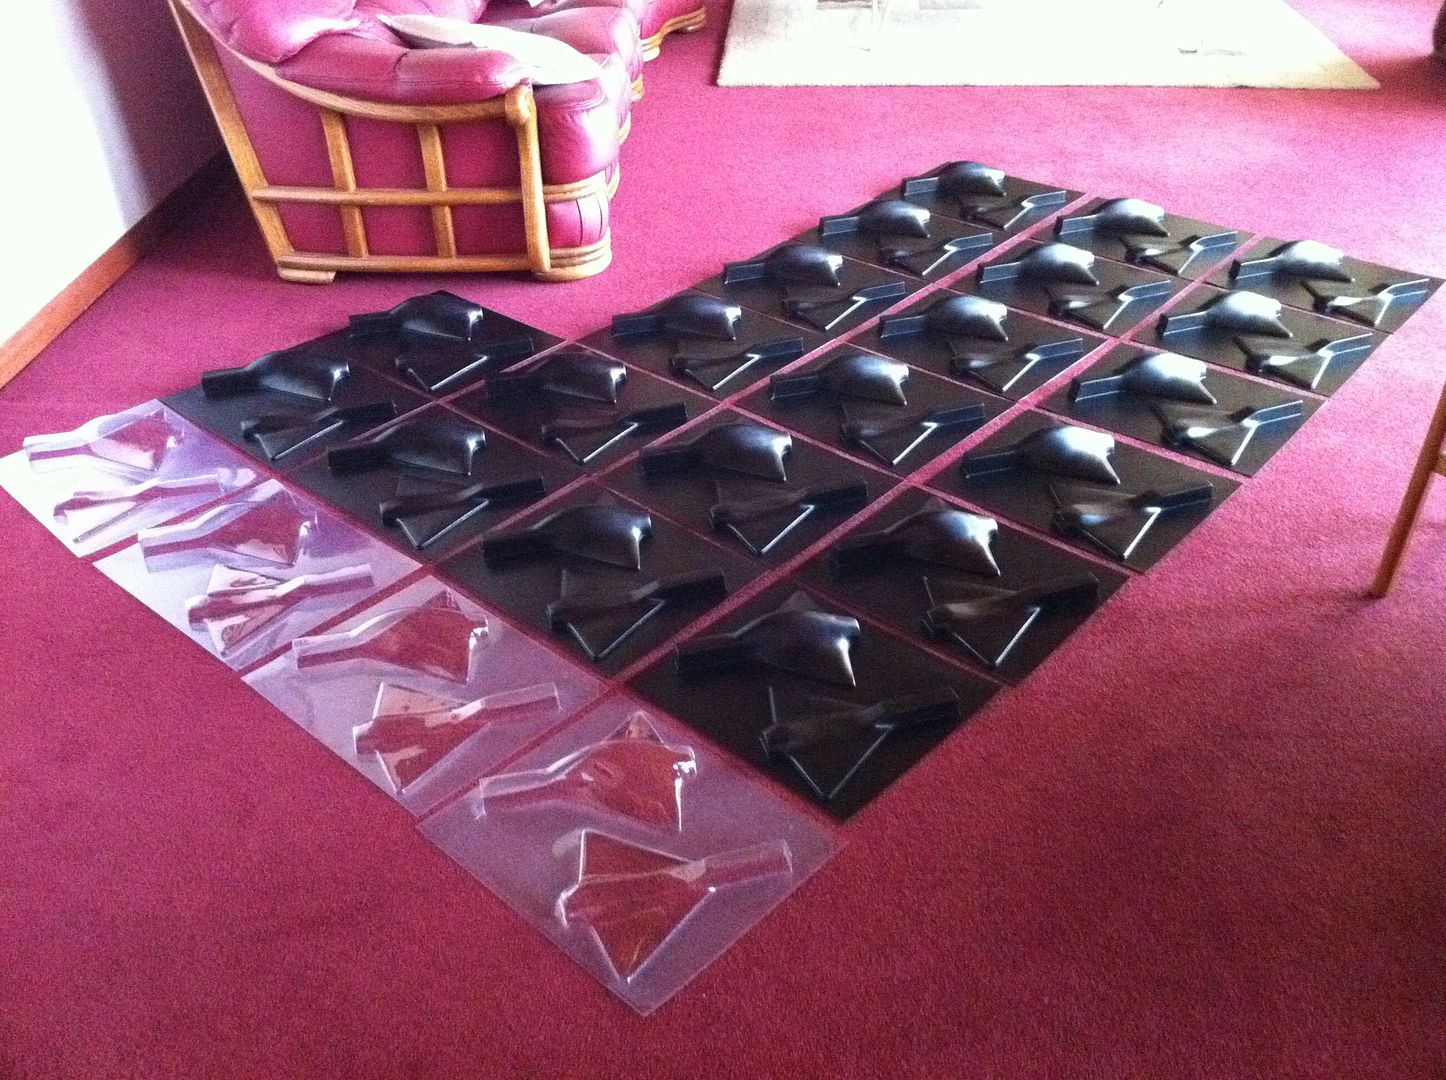
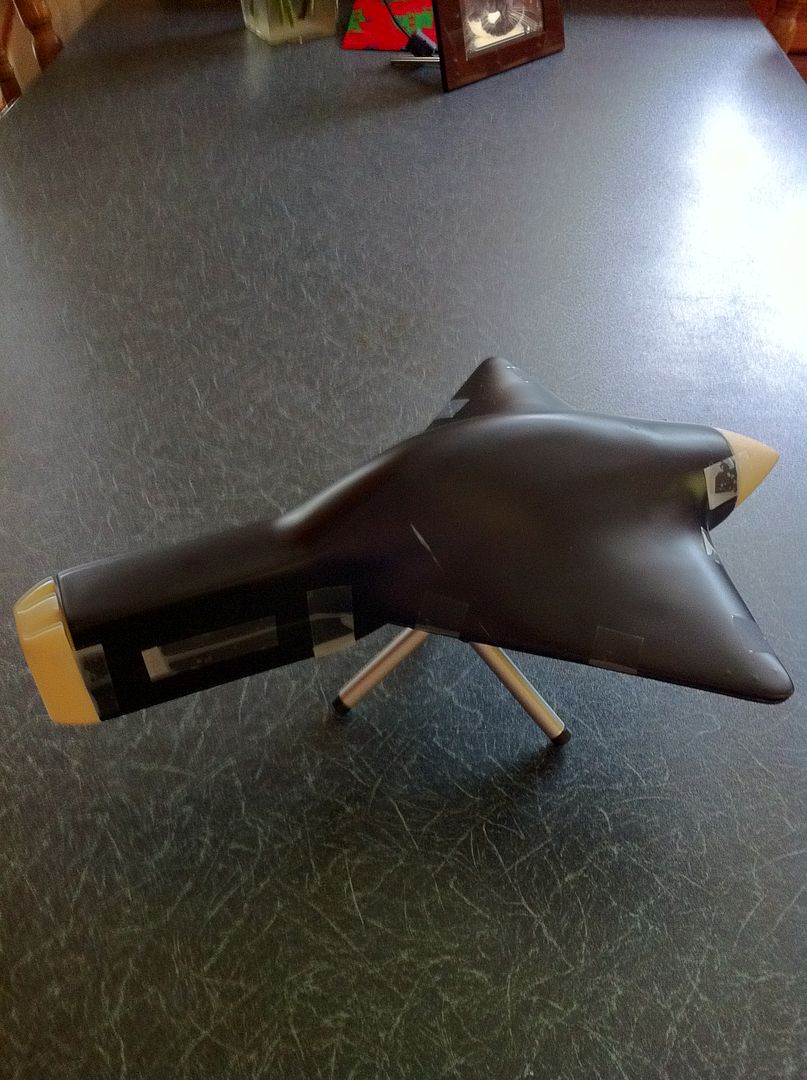
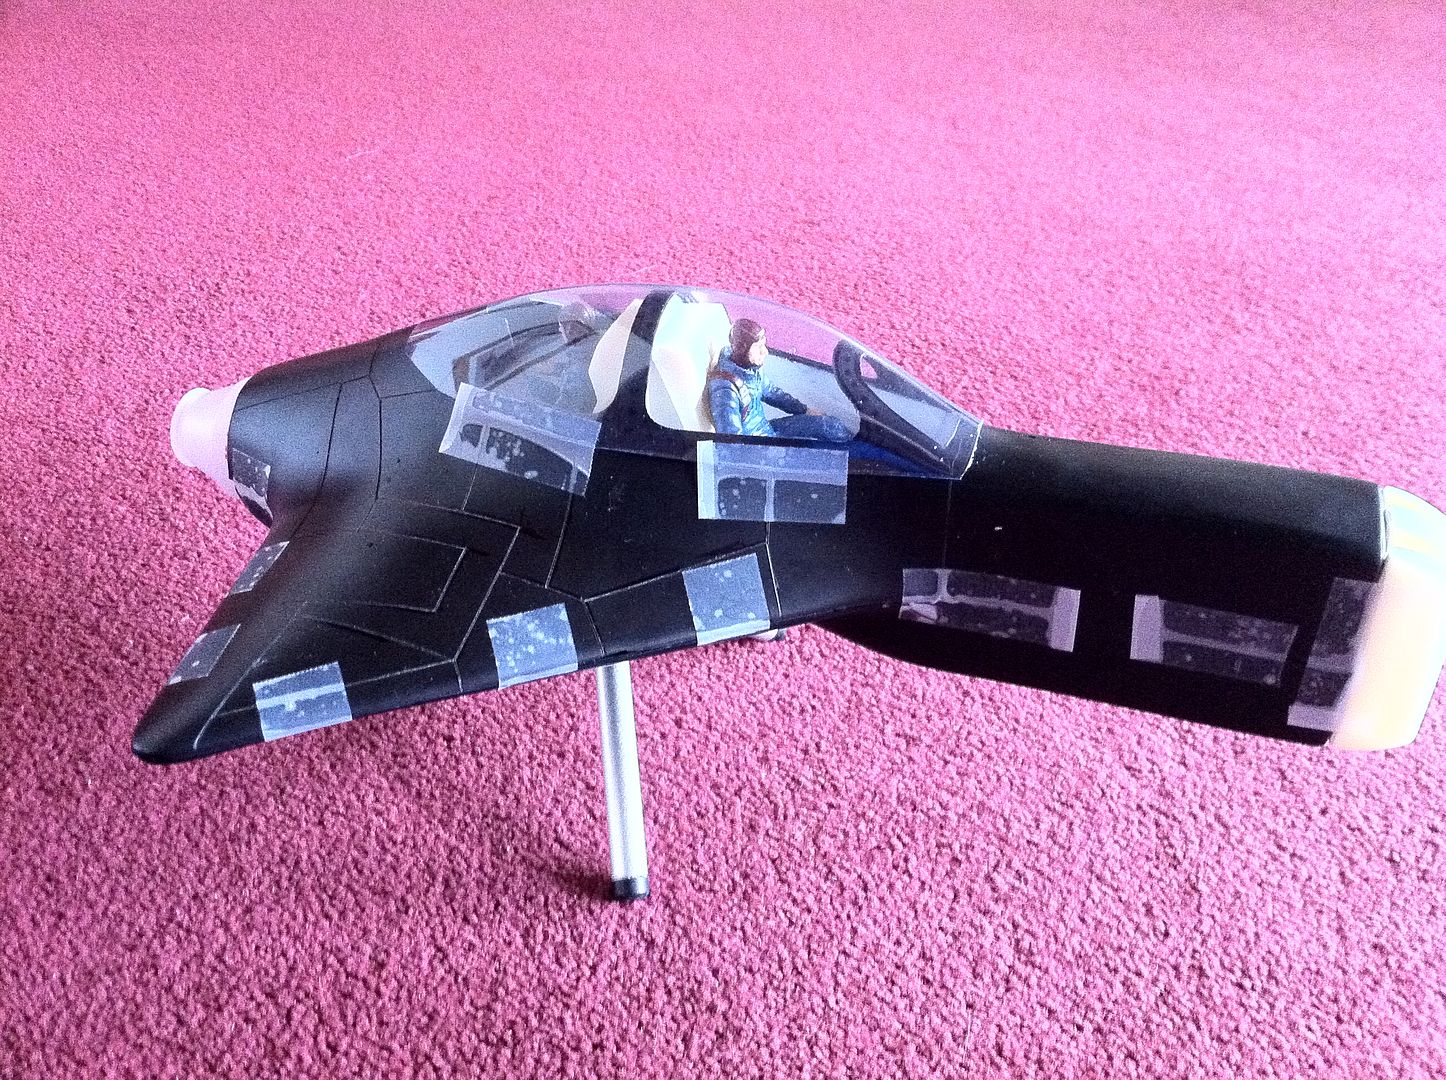
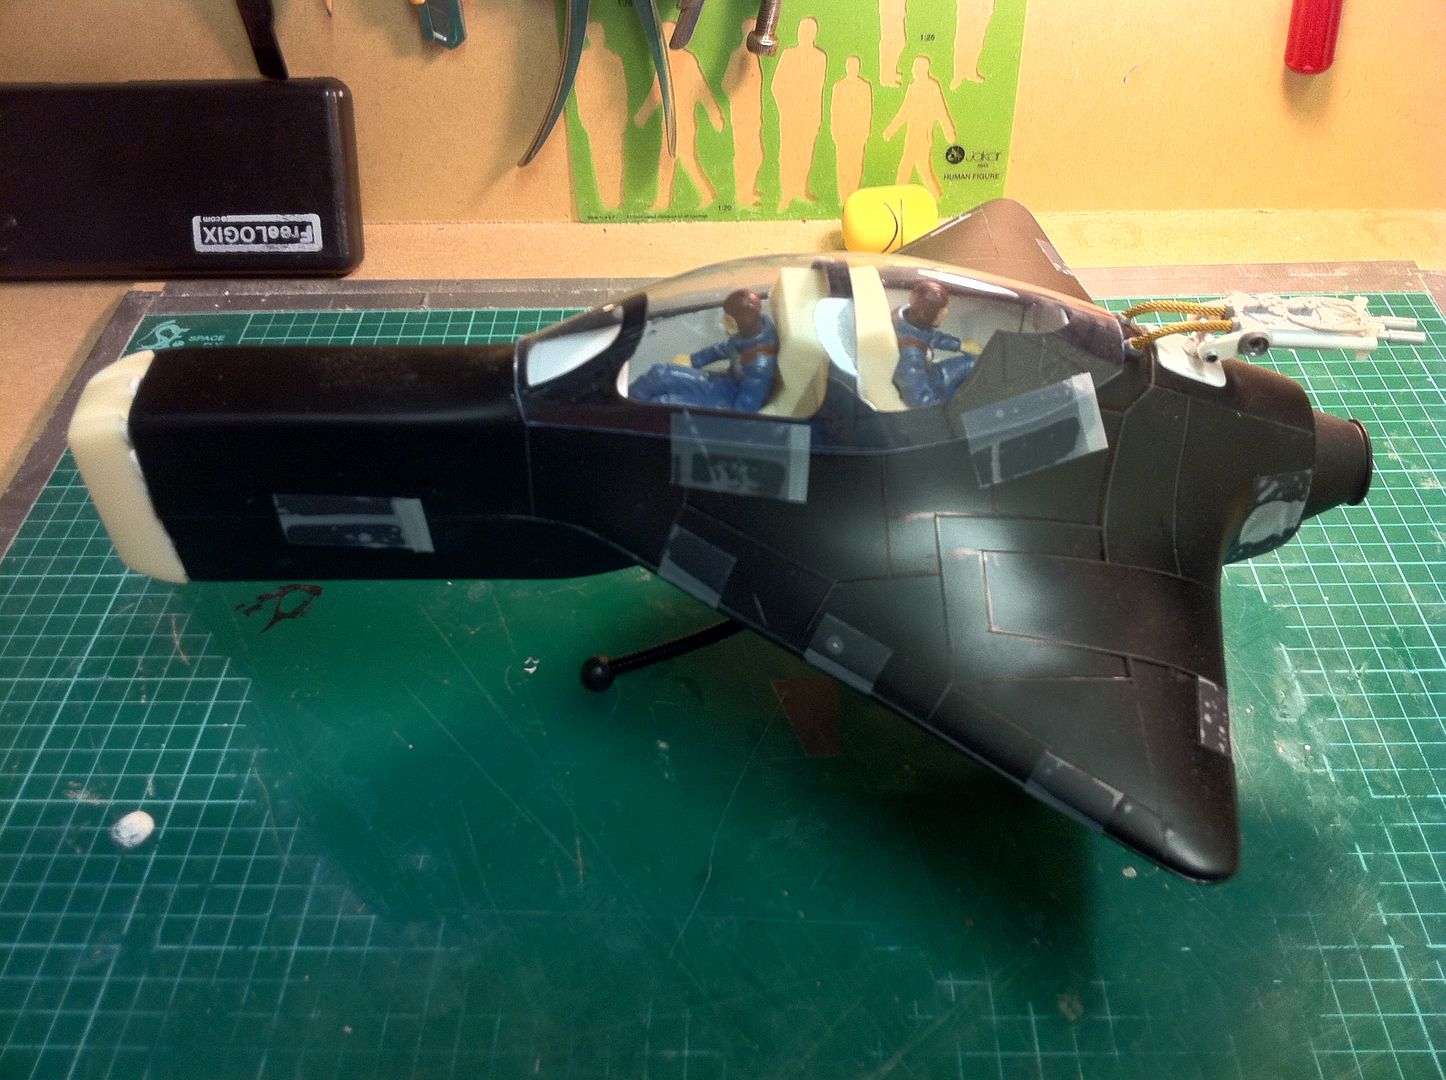
24297
Post by: Viktor von Domm
It occurs to me that you can take a look at this picture and assume the Arvus build was hard. But if you look at the full build you will see it was quite simple, layer upon layer, for a polished end result.
understatement of the day it seems to me^^
ok i get that idea with the mdf... it is sturdy and for a project that size it is a good choice!
even the vacuum process i can uderstand... but what for do you make millions of copies??? will you sell that stuff? very interresting...
18892
Post by: Bar
Viktor von Domm wrote: It occurs to me that you can take a look at this picture and assume the Arvus build was hard. But if you look at the full build you will see it was quite simple, layer upon layer, for a polished end result.
understatement of the day it seems to me^^
ok i get that idea with the mdf... it is sturdy and for a project that size it is a good choice!
even the vacuum process i can uderstand... but what for do you make millions of copies??? will you sell that stuff? very interresting...
That particular craft i gave all the copies away to people i know. But with the jet i will likely sell copies.
24297
Post by: Viktor von Domm
then i suggest you start a new thread right away.... so that peeps here might be your customers...would be a good way to promote this project! or rename this thread! that at least....i can see that this might have selling potential for sure!
18892
Post by: Bar
Viktor von Domm wrote:then i suggest you start a new thread right away.... so that peeps here might be your customers...would be a good way to promote this project! or rename this thread! that at least....i can see that this might have selling potential for sure!
Lol. I got in a bit of trouble before for posting Non-WarHammer craft on a Warhammer forum, so i will likely not be posting it here.
And about the understatement line you mentioned above...
Okay, it wasn't SIMPLE, but it was a simple set of techniques that delivered the end result.
If you go from one pic to the next, you can see the ship evolving and taking shape. And if you look carefully, you can see what i did to make the craft.
Like a set of instructions from a lego set. I would say that ANYONE here, could take my images and use them as information to build their own Arvus(In WH40K scale of course), and it would be that much simpler.
It all just starts off as plastic boxes cut to size.
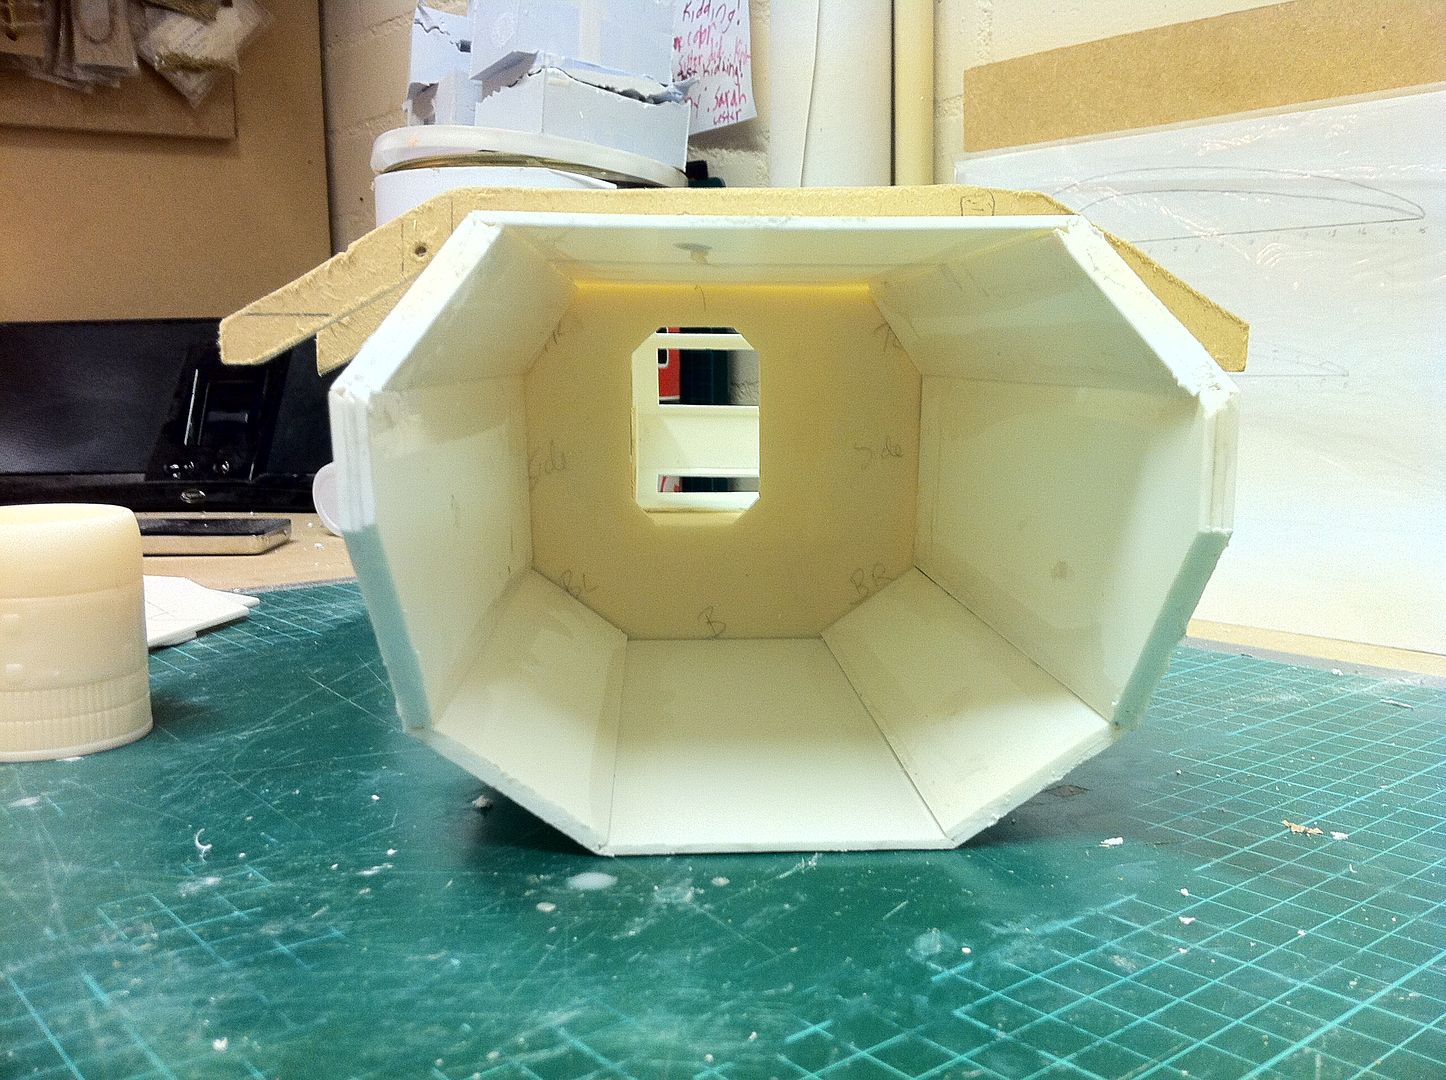
As with anything, scratchbuilding an existing design is ALL about looking at the design and breaking it down so it's easy to replicate. Trying to find a place to start the build and go from there.
24297
Post by: Viktor von Domm
Any sufficiently advanced technology is indistinguishable from magic
and
any technology distinguishable from magic ís insuffiecently advanced...
so...
but i understand where you are coming from! the lego refference is quite fitting and credits your work all the more as you indeed made a path that someone could follow to a nearly the same endresult...if all ingredients were there^^
well this is a tabletop forum and not a warhammer forum, so there is in my opinion room for something like that...i would if in doubt talk to a mod beforehand and then you know for sure...
18892
Post by: Bar
Viktor von Domm wrote: Any sufficiently advanced technology is indistinguishable from magic
and
any technology distinguishable from magic ís insuffiecently advanced...
Are you saying my build is like magic??? Lol.
If so, thanks.
Viktor von Domm wrote:but i understand where you are coming from! the lego refference is quite fitting and credits your work all the more as you indeed made a path that someone could follow to a nearly the same endresult...if all ingredients were there^^
I see where you are coming from with your comment but, honestly, the trick is not to think: "I can't build that", and start thinking: "How CAN i build that?". Even as a theoretical excercise(Work with me on this! If everyone reading this who has ever thought "I can't scratchbuild" could just think about the next step for the next couple of days):
look at a kit that can be bought(Perhaps that you would like but haven't bought yet, or one that is NOT a kit but you'd like it to be) and try and break the shape down into pieces in your head, so you would know where to start with the build.
For me, the Arvus was easier than most, as it was all flat surfaces. But even then, the front end was the most complicated and multifaceted area, which was why i made a master pattern and cast the piece.
Also, in my experience, the best thing is to try and work with what you have to hand. For the Arvus, i didn't have access to my lathe, so i couldn't turn the properly-proportioned intakes and i had to improvise. So i took an intake from a spare Star Wars ARC-170 toy, and used that. Is it accurate to the Forgeworld kit? No. Is it bad because of that? I don't think so. I rationalise it as just being a different version. There are many fighter jets which look far different ten years after the model was introduced, so it's safe to assume "upgrades" can cover many sins. Funnily enough, there is also a 1/72 ARC-170 kit out there(I have about seven copies of that kit), and those engines look PERFECT for a WH40K scale Arvus... I might try a little side project and build me a "normal scale" one...
In any case, if you are thinking along the lines of scratchbuilding, you will see a lot more things which can be useful to you when you are out and about. I collect the little plastic tops from yoghurt and cream cheese containers. Them make excellent mode base moulds(Just pour resin in them!).
I have even made a hoverbike from a shampoo bottle! Everyone has seen those little plastic eggs that come with an "Alien Embryo" in them? I used one of those to make an " Orbital escape pod"(The "wings" are for drag in the atmosphere, but they'd be closed for the re-entry burn).
You want to replicate a model kit that costs £55? Eyeball the shape and built it up with ribs then add filler. The rib technique works well with organic shapes. I scratchbuilt a Battlestar Viper that way. Here is a link to the gallery.
It's never about what you can't do. Only about what you THINK you can do. The more you try, the easier it will become to see how to make any shape. That's how i realised it. Now there is nothing i can't look at and visualise how to replicate it. I might do it a DIFFERENT way from the original creator, but it's good to think in a different way.
Viktor von Domm wrote:well this is a tabletop forum and not a warhammer forum, so there is in my opinion room for something like that...i would if in doubt talk to a mod beforehand and then you know for sure...
Sure thing. Once i get started i will ask someone in charge.
24297
Post by: Viktor von Domm
mate... you are right...in every sense of your latest statement...
and
you have so much confidence...this is something very rare in the trait of modeling you know that? most guys here show their stuff because they are unsure of their abilities and crave security about their builds.... you are i think not such a case...how this is acomplished i am truly baffled...but i think this is rare and i feel priviliged to get the chance to see a free mind at work!
i sometimes congratulate myself for thinking out of the box but often i see that when i am stuck with something it is that i am lacking atm in that department...
from time to time i had quite a huge collection of interresting packaging materials like your shampoobottle and similar objects... but recently i went the cardboard road as i wanted to go into a direction to get a more technological way of achieving certain aims...well...things like your thread here show me things i need to learn to get better and broaden my horizons...or to realize they are already broad enough and i just have to access my full potential...well sometimes the mind hurts form this kind of thinking^^
the ribcage methode i will hold dear... one day a project will benefit from this... i knew of that methode before but i never saw a connection to me and my projects so far.... that changed^^ and yep i in the terms of my earlier statement...see above post...think that your work is advanced enough to be compared with magic... well to tell you the truth you can compare apples with nukleat tech ... only the endresult might be nothing you can work with^^ but your work is even if a step by step anylize says different, an advanced way so the magic referrence does aply^^
may i ask a question before closing this comment? what is your professional backround? do you have anything craftsmanship like trained? sorry if i asked that earlier already and you answered it too already.... my mind is sometimes a bit like a sponge... it tries to suck up all info but it is so soggy and perforated^^
cheers for getting my head washed by you...
vik
18892
Post by: Bar
Viktor von Domm wrote: mate... you are right...in every sense of your latest statement...
Thanks!
Viktor von Domm wrote:you have so much confidence...this is something very rare in the trait of modeling you know that? most guys here show their stuff because they are unsure of their abilities and crave security about their builds.... you are i think not such a case...how this is acomplished i am truly baffled...but i think this is rare and i feel priviliged to get the chance to see a free mind at work!
I have built, and seen built, some amazing things, and have seen some spectacular scratchbuilds made by people with their bare hands. Ask yourself this: "If they can make it, why can't i?"
If it's a skill issue, that's fair enough. We aren't BORN with the skills we need. We pick them up as we go along. If it's a tools related issue(I don't have "Insert tool here", which i need for the job), you can still borrow the tool or find someone with one who could do that piece for you. The trick is allowing your mind to realise that you CAN make that hard to build item.
I will reveal here and now that my Arvus has cost less in materials than the Forgeworld kit. Of course, nearly four months of work isn't cheap. But it's a labour of love so it can't have a value put upon it anyway.
Viktor von Domm wrote:i sometimes congratulate myself for thinking out of the box but often i see that when i am stuck with something it is that i am lacking atm in that department...
Yeah. Lateral thinking helps. But if you are stuck with a detail, ask a friend. Even if they don't give you the right answer, sometimes just asking the question makes YOU realise the answer.
I have sometimes found that brainstorming with friends is a good technique of speaking your problem out loud. I do this with myself. It may seem crazy, but if you speak your problem out loud, and try to formulate a solution, you might think of one you never considered before. With practise, your lateral thinking gets better.
Viktor von Domm wrote:from time to time i had quite a huge collection of interresting packaging materials like your shampoo bottle and similar objects... but recently i went the cardboard road as i wanted to go into a direction to get a more technological way of achieving certain aims...well...things like your thread here show me things i need to learn to get better and broaden my horizons...or to realize they are already broad enough and i just have to access my full potential...well sometimes the mind hurts form this kind of thinking^^
Lol. I know what you mean. Sometimes your head CAN get full of things. It's best to take a step back and clear your mind. Maybe even a nap. It can even help to write your problem down and leave a note bside your bed before going to sleep. I once read a directed dreaming technique to calm your mind and fall asleep within five minutes that can really put your mind at ease:
Put in a pair of earplugs(There is a reason for this step). The earplugs dampen the sounds of the house(Which is perfect if you have kids running around, or TVs on making noise), but still allow you to feel your own heartbeat from your ear canals(This is an essential part). Lie down and once you are calm enough to hear your heart beating in your ears(Courtesy of the earplugs pressing tight to the walls of your ear), start counting your heartbeat(Heart range for rest should be between 55 to 75 beats i'd say). Use a bedside clock to check when it trips over to the next minute, and start counting beats with your eyes closed. Around about the 50-beat mark, open your eyes and check the clock. Wait till it rounds to the next minute and make a note of what your baseline beat count is(My resting rate is around 60, and with this technique it usually slows by around one beat every minute). Now you are set up. While counting your heartbeats in your head, picture yourself floating about 200 feet below the surface of the sea(It's warm and pleasant. You won't drown. It's just directed imagination). Think about the problem you need to solve in a general way. The sea is tinged your favorite colour(For me it's a clear red, but everyone has a different favorite colour). There is a light above the surface of the water as you look up. You are gently ebbing with the flow of the water. You are "standing up" arms at your sides, but not tight to your sides(Like the position you will be in lying on your back in bed). Still counting(The beats should actually be reducing slightly), you start to rise up through the water(Keep counting your heartbeat). As you break the surface of the water, you take off like superman, rising into the air over a vast ocean. Still counting, you are looking up towards the bright sky. Not too fast, but as you approach the clouds, think of your problems(Still counting heartbeats. Never stop couinting heartbeats and breathing steadily). Your problems are shaped like clouds. As you look up, your problems of the day drift towards you, you recognise them, but don't have time to dwell on them, as they pass below you and you are still rising, looking up. Still counting, you are rising higher towards the light, and leaving your problems far below. If some other problem "cloud" occurs, it will pass quickly by leaving you again with only the counting. After less than five minutes of this you will be in a shallow sleep. I find that once i get to less than 55 beats per minute, my mid starts shutting down. The bizarre thing is that sometimes you can dream a solution to your problem, and other times you come up with one after you wake... Either way it's a fast way to fall asleep, as you are always counting your own rythym from your heartbeat.
Viktor von Domm wrote:the ribcage methode i will hold dear... one day a project will benefit from this... i knew of that methode before but i never saw a connection to me and my projects so far.... that changed^^ and yep i in the terms of my earlier statement...see above post...think that your work is advanced enough to be compared with magic... well to tell you the truth you can compare apples with nuklear tech ... only the endresult might be nothing you can work with^^ but your work is even if a step by step anylize says different, an advanced way so the magic referrence does aply^^
If it helps you out, i am glad. Especially if it allows you to think down avenues you never considered before. Never be afraid to ask advice of someone who's opinion your trust or whose skills seem to surpass your own. They might come up with an idea you missed.
Viktor von Domm wrote:may i ask a question before closing this comment? what is your professional backround? do you have anything craftsmanship like trained? sorry if i asked that earlier already and you answered it too already.... my mind is sometimes a bit like a sponge... it tries to suck up all info but it is so soggy and perforated^^
I don't think you asked before. I am a taxi driver.
But i have been building models since i was 5, and scratchbuilding since the same time(I used to design folding paper models when i was in school). It's a lot of fun when you realise you can make anything. Liberating even.
Viktor von Domm wrote:cheers for getting my head washed by you...
vik
No worries my friend. Anytime.
True wisdom begins when you know that you know nothing. Strip away all the rubbish and you will be left with your answer every time. But don't be afraid to make mistakes along the way. That is another important way we learn what NOT to do next time.
Yesterday is history. Tomorrow is a mystery. But today is a gift. That is why it is called the present.
2326
Post by: shasolenzabi
Bar, more amazement as i see you work.
24297
Post by: Viktor von Domm
That is why it is called the present
beautiful play on words there...subtile and yet so meaningful!
i knew that you are a taxi driver but most peeps in that profession had other intentions before starting to drive...
but a livetime expierience in scratchbuilding beginning with papermodels folded is something i had in mind when asking the question^^
i sometimes have that phenomenon of solution- finding during or after sleeping... well the mind is not shutting down at all for real when in sleep...so... there is some processing going on...
the getting to sleep methode i have heard about.... in a way ....and i think this might actually work but currently i am only fining it hard to get to sleep when in serious personal problems.... if no pressing matters are too hard i can go to sleep thankfully quite easy...i hope this lasts!!!
But it's a labour of love
every one with their head screwed on right way i hope can see that!!! and it is all too easy to forget the inights about skills not being there from the beginning but have to be learned instead...and sometimes it is hard to ask someone for assistence or help...but the time here on dakka has teached me a lot and i think the bunch of peeps here are a helpful sort^^ and i try to do so too...depending on the subject and my own proweress^^
and not only do we have to ask for help but when help is offered we have to listen as well...as sometimes we are too closed up to apreciate it...
18892
Post by: Bar
shasolenzabi wrote:Bar, more amazement as i see you work.
Thanks a lot. I am always hoping that by posting a WIP like this, there might be someone watching that realises they might want to have a crack at something similar.
You can even use heavy card stock and white glue, but you CAN make those craft that exist only in your imagination.
Viktor von Domm wrote: That is why it is called the present
beautiful play on words there...subtile and yet so meaningful!
The full quote often reads: "The clock is running. Make the most of today. Time waits for no man. Yesterday is history. Tomorrow is a mystery. Today is a gift. That's why it is called the present."
But i like the truncated version better. I use it all the time.
Viktor von Domm wrote:i knew that you are a taxi driver but most peeps in that profession had other intentions before starting to drive...
but a livetime expierience in scratchbuilding beginning with papermodels folded is something i had in mind when asking the question^^
I work for my Father's business. Although i always considered art college and a career making models, with the state of that in the world right now, it's just as well i have something else behind me.
Viktor von Domm wrote:i sometimes have that phenomenon of solution- finding during or after sleeping... well the mind is not shutting down at all for real when in sleep...so... there is some processing going on...
the getting to sleep methode i have heard about.... in a way ....and i think this might actually work but currently i am only fining it hard to get to sleep when in serious personal problems.... if no pressing matters are too hard i can go to sleep thankfully quite easy...i hope this lasts!!!
Of course. The trick is never to try and find sleep. The greatest technique to sleep is to totally empty your mind, think of darkness and sleep will find you itself.
Viktor von Domm wrote:But it's a labour of love
every one with their head screwed on right way i hope can see that!!! and it is all too easy to forget the inights about skills not being there from the beginning but have to be learned instead...and sometimes it is hard to ask someone for assistence or help...but the time here on dakka has teached me a lot and i think the bunch of peeps here are a helpful sort^^ and i try to do so too...depending on the subject and my own proweress^^
and not only do we have to ask for help but when help is offered we have to listen as well...as sometimes we are too closed up to apreciate it...
Of course. If you need a solution, and cannot find it, ask someone else if they can see the solution.
Maybe they will give it to you. Maybe they will not and you will think of a way yourself, or can ask someone else. Either way, you will be better off than if you never asked anyone.
Never be afraid to ask for directions.
24297
Post by: Viktor von Domm
Never be afraid to ask for directions.
lol...that is so not me...saturday i wanted to go first time with my five year old son to the movies...well i was on bicycle and i went so far wrong.... called my wife...she showed me the way via my phone...then i got it... if i had asked someone in the street i could have cut short the finding process by 20 minutes...darn stupid i can get...^^ but if it is something do do with going creative i am fully capable to ask for help or brainstorm with others... in fact that is one of the major aspects why i have joined this board...
18892
Post by: Bar
Lol. You need to disconnect your ego from the things you do.
Remember that needing directions doesn't make you weak. It only means you currently don't know where you are.
48376
Post by: Capitansolstice
I read your whole thread, but I still think that its shocking that you put so much time and love into one model, thats more love than my entire guard army combined..... they are sitting on a shelf dusty and un painted
18892
Post by: Bar
Capitansolstice wrote:I read your whole thread, but I still think that its shocking that you put so much time and love into one model, thats more love than my entire guard army combined..... they are sitting on a shelf dusty and un painted
Thanks.
It is a subject i have long loved, and have always intended to replicate larger.
When you love a subject, it always shows in the build.
Of course now the project is in it's final stages and it's winding down.
Contrary to my previous statement, i am doing a 1/72 scale mode kit master next for a White Falcon Interceptor. That will be my next project. I reckon it might take a couple of weeks. It will be about 20cm long in that scale.
http://www.youtube.com/watch?v=A8019cDHJPs
48376
Post by: Capitansolstice
cool, it looks like a futuristic F-22
18892
Post by: Bar
Capitansolstice wrote:cool, it looks like a futuristic F-22
Yeah. I believe that's what they were going for in the show.
And(In the show), there are only five people in the world that fly them.
I have switched to that design because i may have uncovered a good source of reference for the build.
31627
Post by: FantasyBob
Bar, you are surprising me again......your works are allways amazing!
18892
Post by: Bar
Thanks. No updates right now. A friend has the Arvus and is weathering it for me.
31627
Post by: FantasyBob
Any news about the Arvus or the hangar!?
48376
Post by: Capitansolstice
Its looking older and older! (as in the weathering is looking nice
18892
Post by: Bar
Thanks. I am not sure how much weathering will be required yet...
5386
Post by: sennacherib
I love to see a nice scratch build, and dont get me wrong, you are doing a great job here with some simply amazing stuff, but thats not why i am posting. I LOVE your sultry mechanics and how they are all standing around conversing in each pic, the dudes that are working on the side of the vehicle here and there too are great. really like the work, but the sultry mechanics rock.
18892
Post by: Bar
sennacherib wrote:I love to see a nice scratch build, and dont get me wrong, you are doing a great job here with some simply amazing stuff, but thats not why i am posting. I LOVE your sultry mechanics and how they are all standing around conversing in each pic, the dudes that are working on the side of the vehicle here and there too are great. really like the work, but the sultry mechanics rock.
Thanks a lot. It's true that it's the figures that make a good diorama.
Here are links for them all:
http://starshipmodeler.biz/shop/index.cfm/product/1536_196/120-mak-figure-set-a.cfm
http://www.hlj.com/scripts/hljlist?SeriesID=968&Dis=2&DisplayMode=images&Sort=std&qid=UL2LAYGZ0WFEA&set=1&Maker2=BRK
38659
Post by: tryanotherone
Did your friend finish the weathering job?
Share some pics, pleae!
18892
Post by: Bar
tryanotherone wrote:
Did your friend finish the weathering job?
Share some pics, pleae!
Lol.
He hasn't got the weathering all done.
The buyer has disappeared from the face of the earth, so it's looking more and more like i will be keeping this one for myself.
As i didn't want the current colourscheme, i will give him a few more weeks, and if he doesn't contact me, i will do another few shemes.
My first idea was a NASA scheme. The underside all done in black, topside in white with the meatball logos on the wings. It's great to imagine this thing in the service of NASA, hauling people and cargo up to the ISS...
Then i was thinking of a USMC version. Maybe Marine 1 too.
The beauty of this build is that i can do all the schemes one after another, take plenty pics and get cracking on the next colourscheme on top.
Might happen.
Might not...
It's sitting on a shelf right now.
Dare i say it, the best replica of an Arvus ever and it's gathering dust on a shelf, lol.
24297
Post by: Viktor von Domm
he best replica of an Arvus ever and it's gathering dust on a shelf, lol.
quite the heretic deed right there!
hope it turns all out to your favor as you like it...tho i think if you still have it for your own then this can only be the best outcome^^
18892
Post by: Bar
Viktor von Domm wrote:he best replica of an Arvus ever and it's gathering dust on a shelf, lol.
quite the heretic deed right there!
hope it turns all out to your favor as you like it...tho i think if you still have it for your own then this can only be the best outcome^^
I suppose so.
It's likely to sit on that shelf indefinitely.
31080
Post by: RandyMcStab
Hi great stuff, exalted.
I'd like to see more weathing pics too as I'm looking to steal be inspired by some nice ideas.
I want to paint up my black Valk in a more realistic style and want some pointers, weathering black seems difficult. Pics in my thread, link below, but it's only bascoated ATM.
Keep up the awesome.
18892
Post by: Bar
RandyMcStab wrote:Hi great stuff, exalted.
I'd like to see more weathing pics too as I'm looking to steal be inspired by some nice ideas.
I want to paint up my black Valk in a more realistic style and want some pointers, weathering black seems difficult. Pics in my thread, link below, but it's only bascoated ATM.
Keep up the awesome.
You could get yourself a set of the tamiya weathering sets and highlight the valk's panel edges in a lighter colour, to show the wear along the panel gaps.
31627
Post by: FantasyBob
Any news about arvus or other model!?
18892
Post by: Bar
FantasyBob wrote:Any news about arvus or other model!?
Hey there. Thanks for the question, but the Arvus is sitting in a corner gathering dust.
As for other models, i am just beginning a 1/18, GI Joe scale Comanche helicopter hull.
Nothing to do with Warhammer(I'll only post about it this one time), but i will post the main shape drawn on styrene and the vacform risers just for you to see:
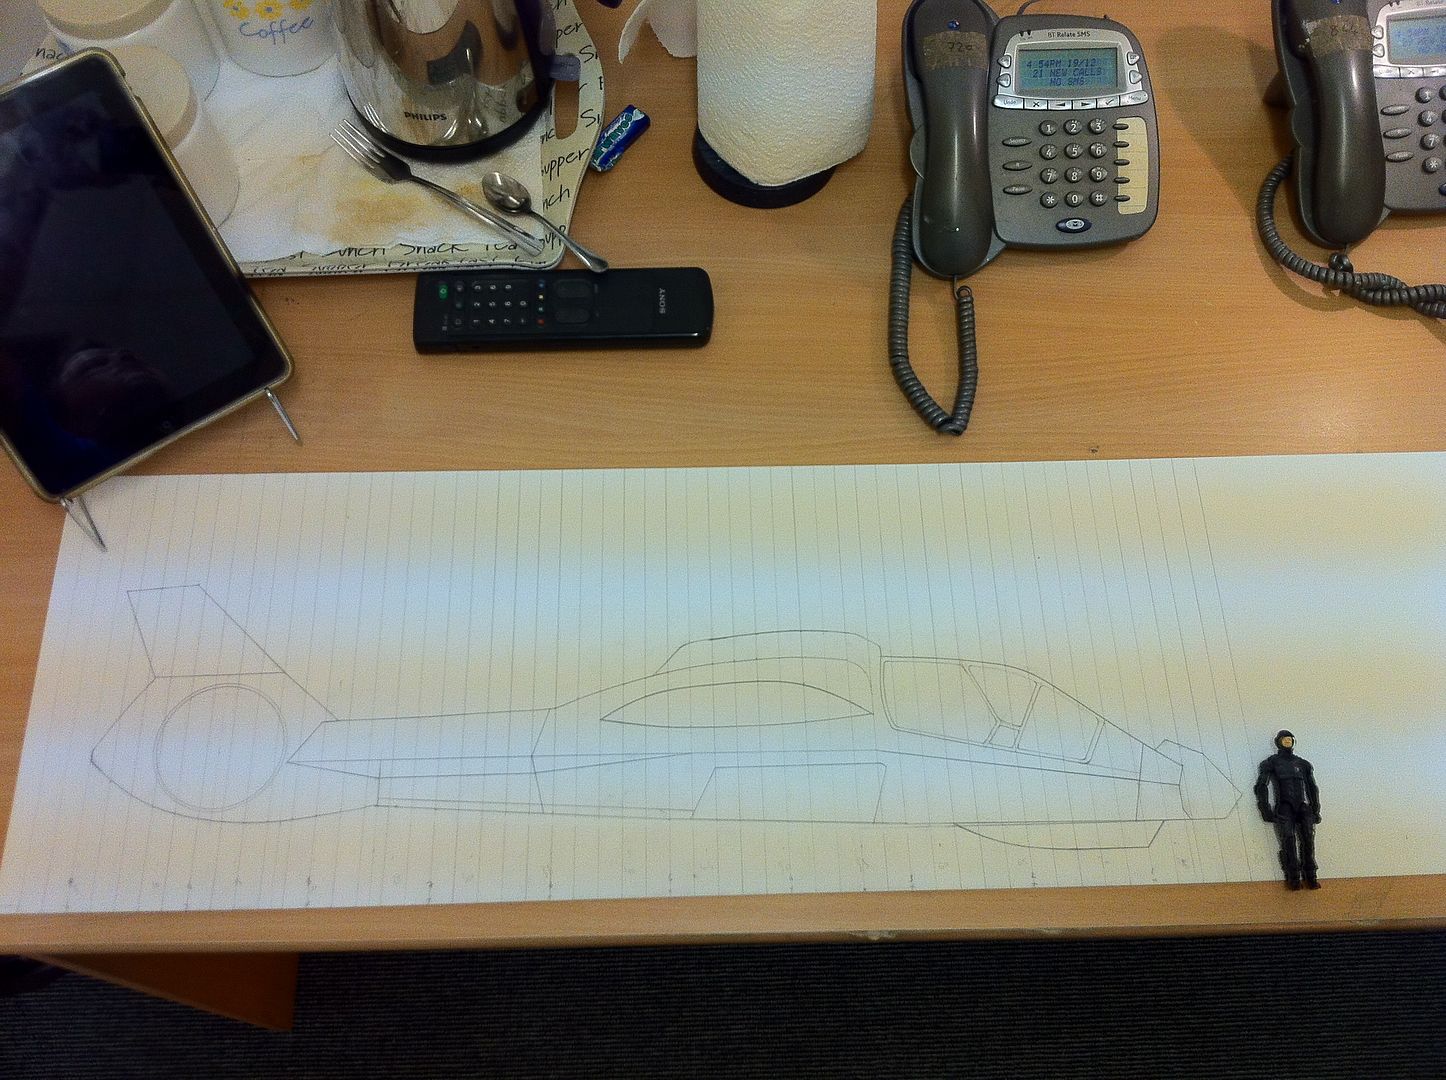
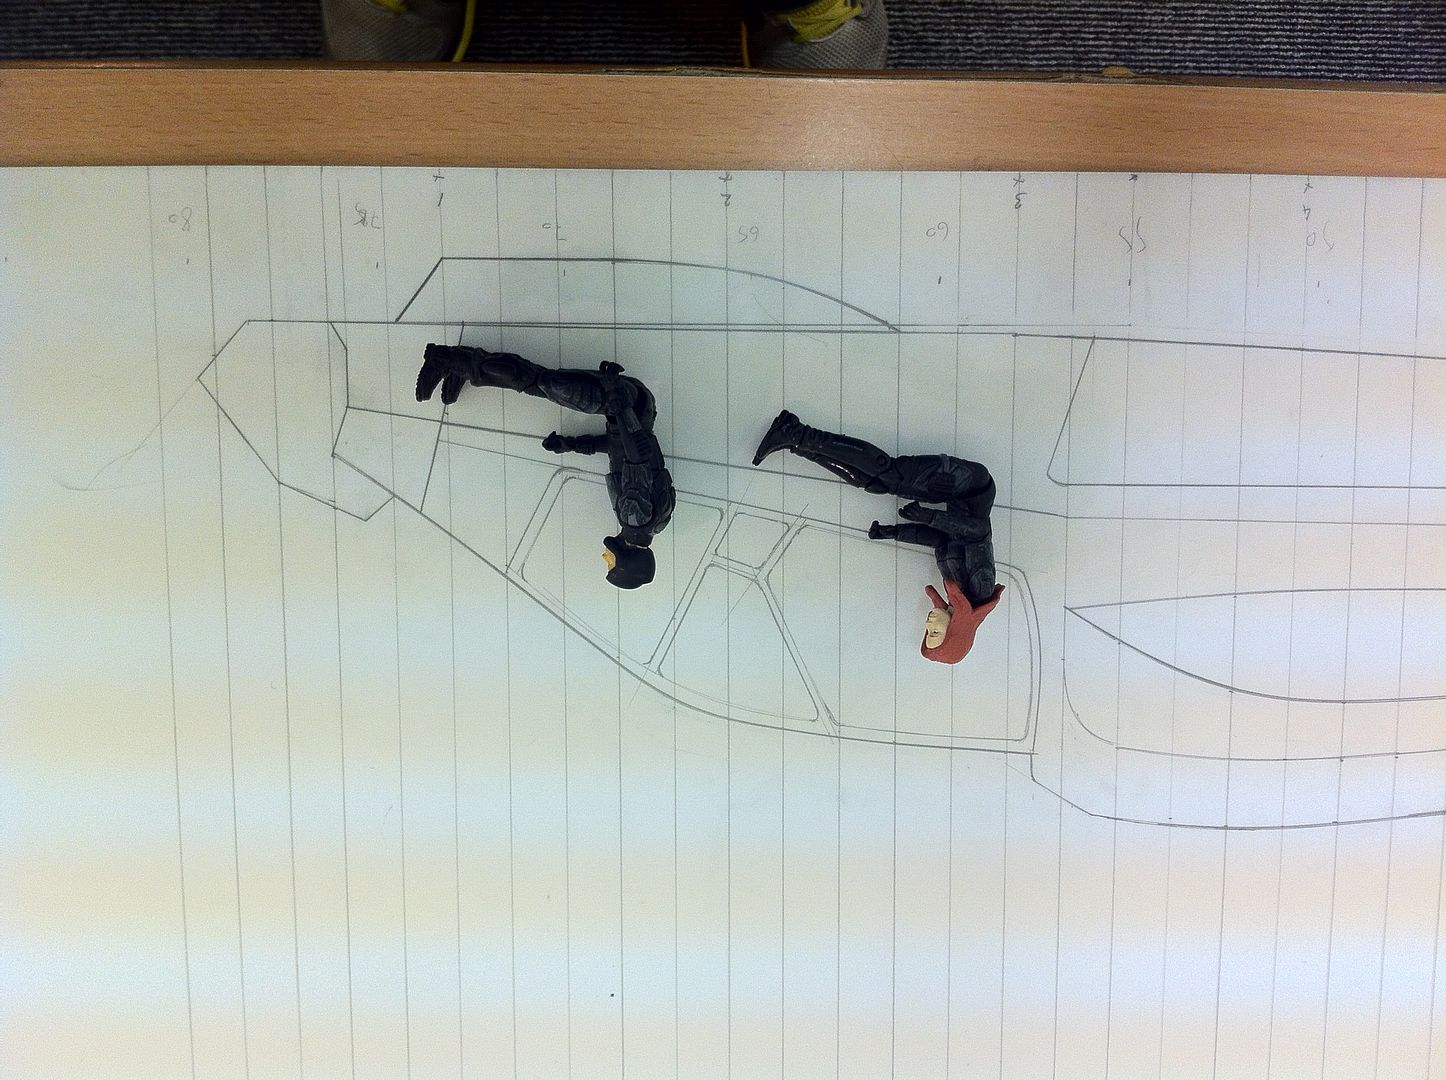
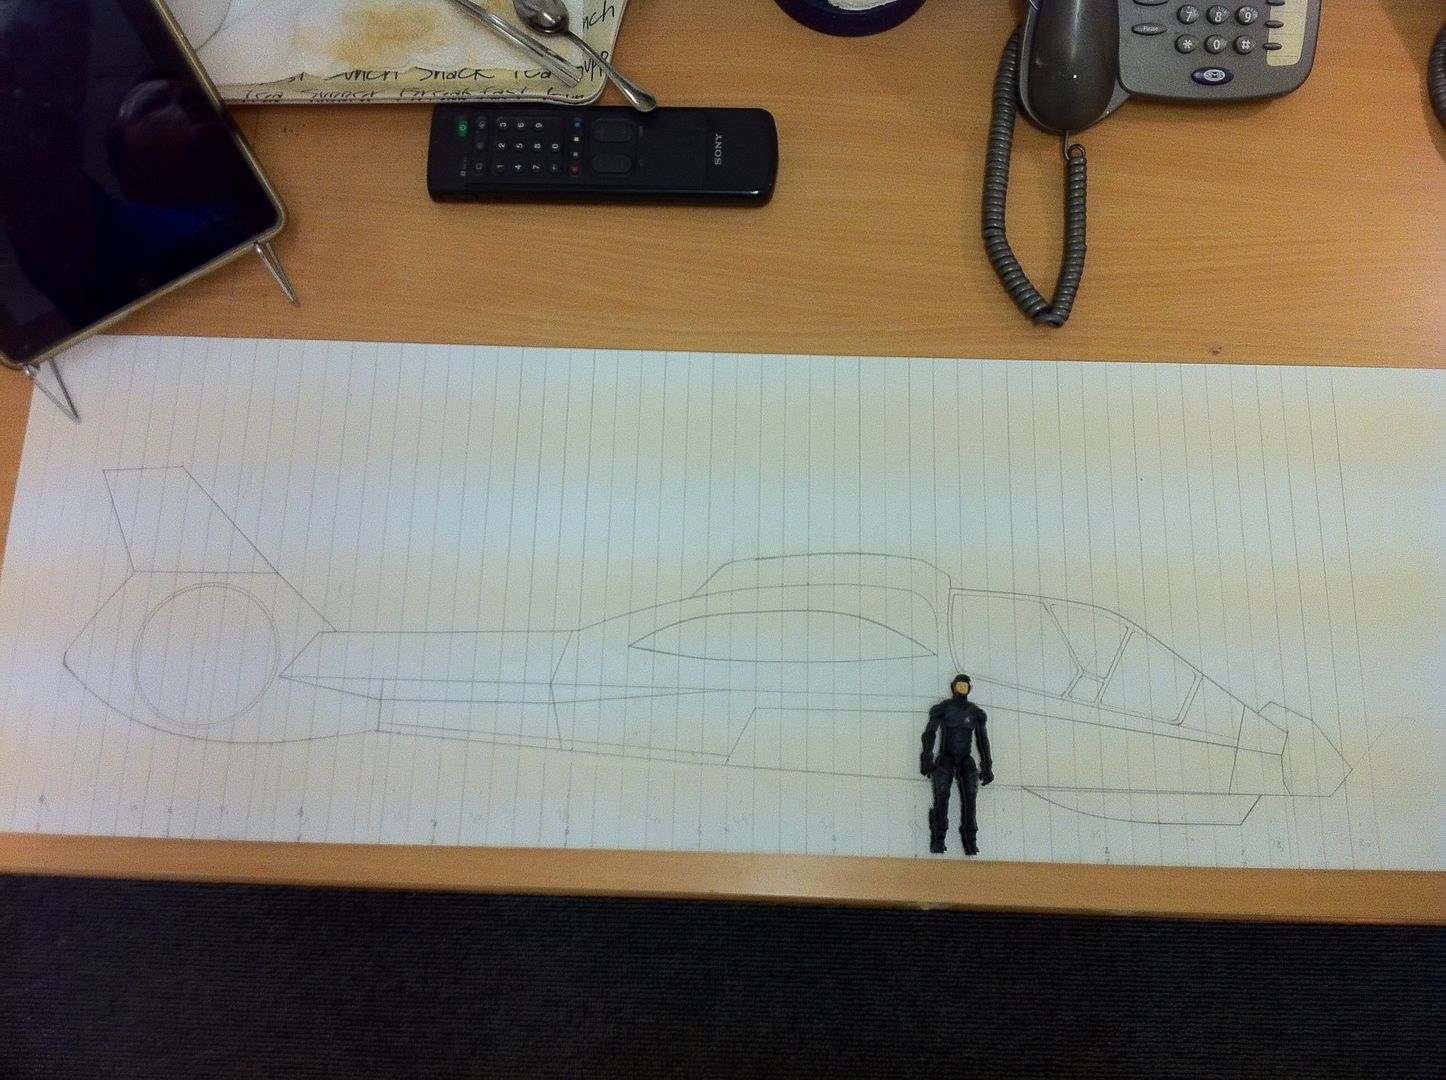
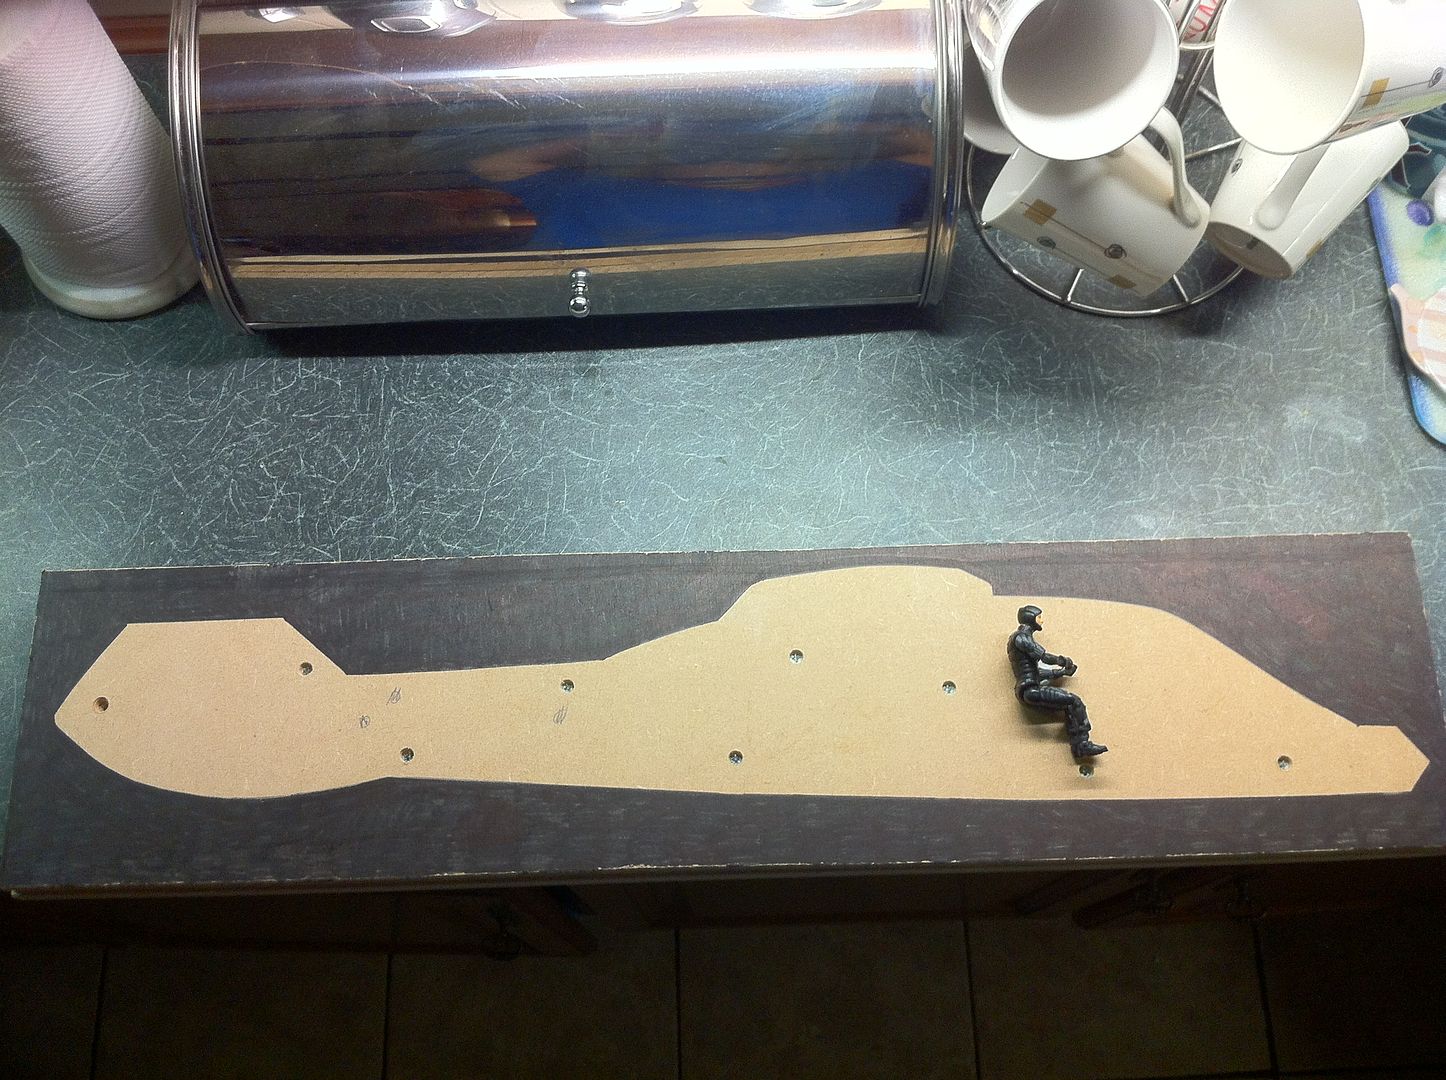
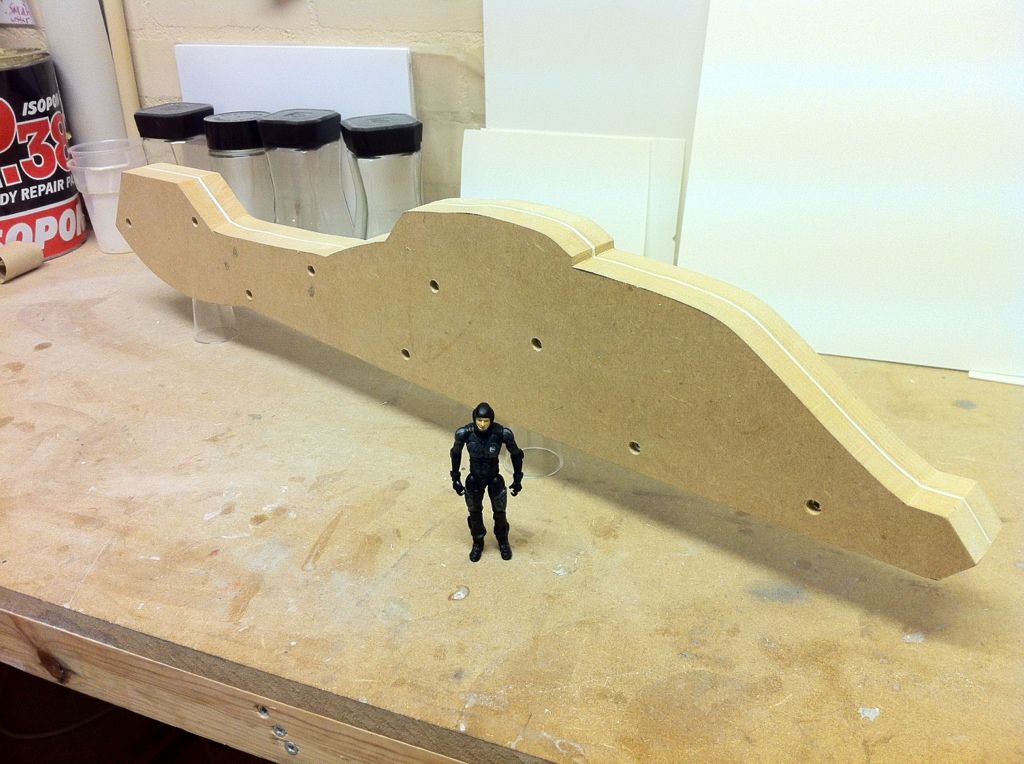

31627
Post by: FantasyBob
mmmmh, interessing......hope you gonna post more image soon!
18892
Post by: Bar
FantasyBob wrote:mmmmh, interessing......hope you gonna post more image soon!
Thanks a lot.
I doubt this is the place for a project about a GI Joe scale Comanche helicopter though.
If you want to follow the build, i have a WIP thread on the Fighting 1/18th forums:
http://forums.fighting118th.com/showthread.php?t=1993
43845
Post by: Skipphag da Devoura
Subbed.
|
|