Nice Technic bro i shall have to give this a go for my dudes basing ^^ but then again i am not tyranids so maybe wouldn't add effect as it would with having tyranids
I think those look pretty good! They seem very organic/gooey looking from that picture, just what i'd imagine for my nids. I'll have to try this out, thanks!
No problem mate!, its incredibly easy to do...
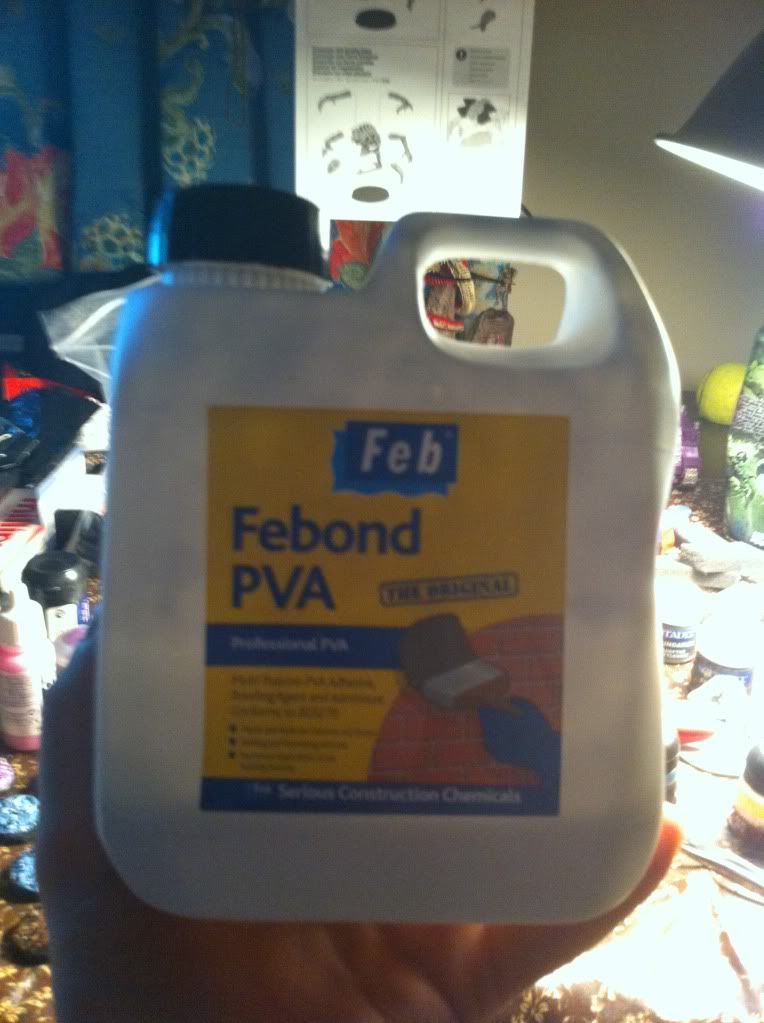
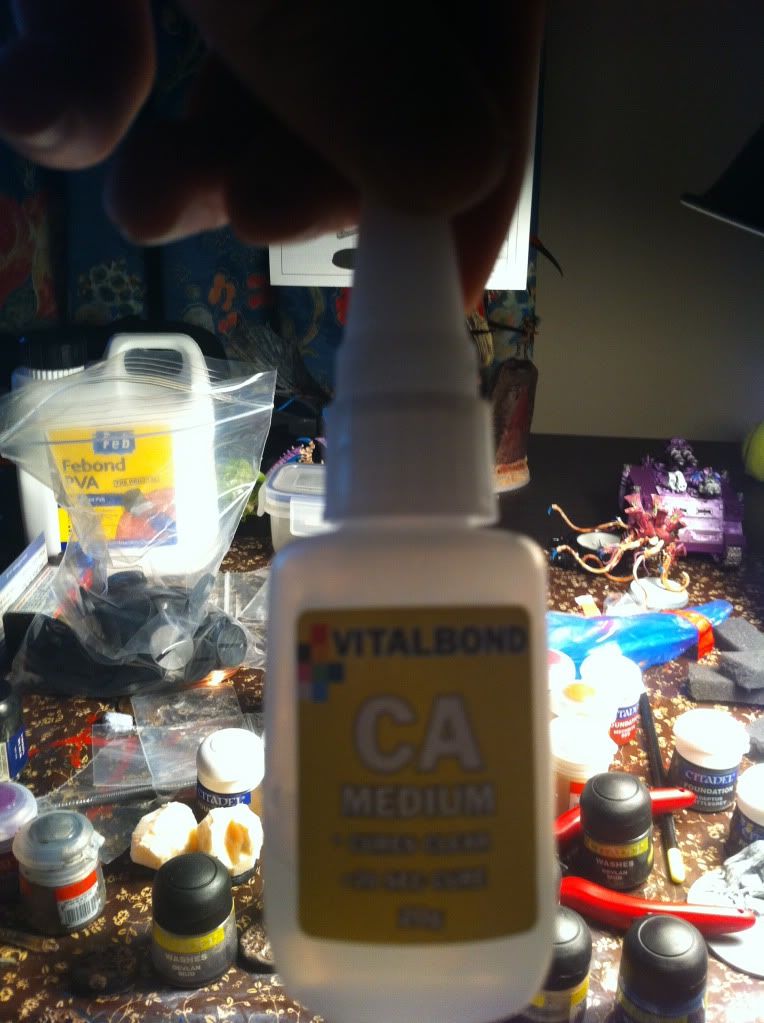
most of the time it takes is just letting the glue dry ...
im just about to try doing a more dynamic base, with a bit more height, maybe add it to a rock or something asif the goo/organic stuff is seeping upwards also!, ill post pictures of that too =] =]
cheers for looking and im glad you like the idea! =]
I've seen this around, and the more I see it, the more interested in it I am. I'm thinking I've gonna do this for my HQ and Elites first, follow up on the little guys later.
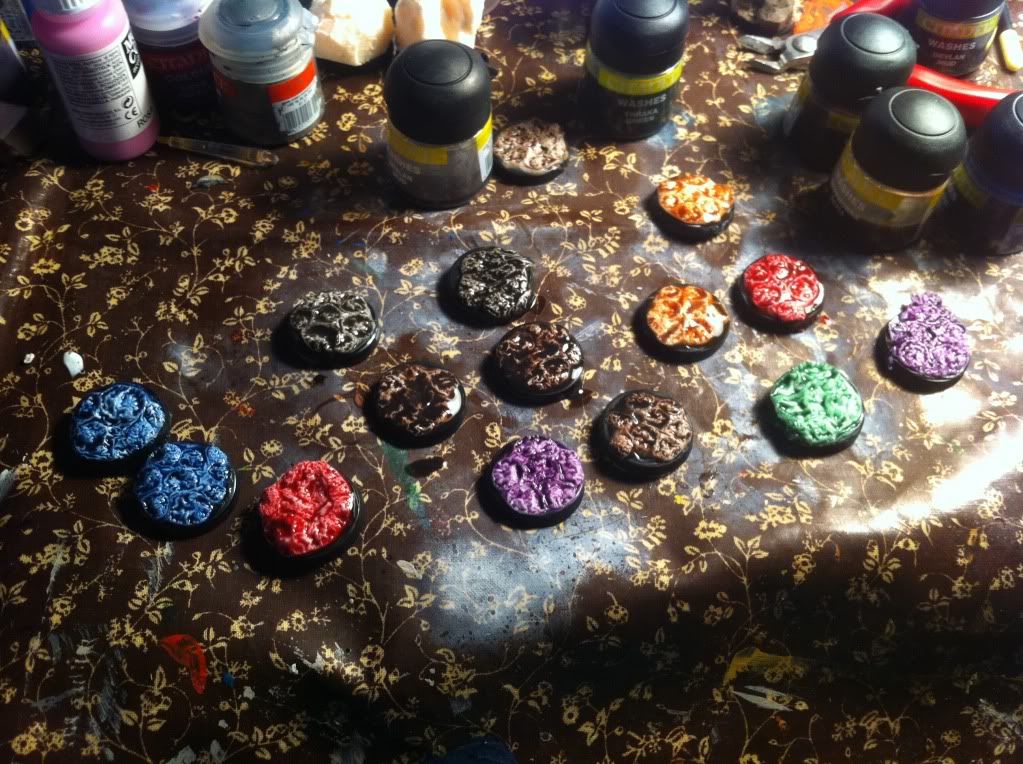
Thanks for showing it in multiple colors, gives a good idea in how it can be used in so many ways.
Image it..... 1 giant scabby patch in the middle, precisely where the Zoanthrope model is attached to the base.... kind of like it's sucking the life out of the very surface of the terrain....
fenrir1997 wrote:Image it..... 1 giant scabby patch in the middle, precisely where the Zoanthrope model is attached to the base.... kind of like it's sucking the life out of the very surface of the terrain....
that would be AWESOME!! ive still to base my venomthrope!... that may be the answer!! =] =]cheers for that idea man!
and an anti nid tau army?, interesting... my mates got that kinda idea aswell... he hates my army , lol (only coz i can kick his arse but ...lol )
fenrir1997 wrote:Image it..... 1 giant scabby patch in the middle, precisely where the Zoanthrope model is attached to the base.... kind of like it's sucking the life out of the very surface of the terrain....
that would be AWESOME!! ive still to base my venomthrope!... that may be the answer!! =] =]cheers for that idea man!
Dude, gonna need some pictures of this.
Only appropriate word: EPIC.
fenrir1997 wrote:Image it..... 1 giant scabby patch in the middle, precisely where the Zoanthrope model is attached to the base.... kind of like it's sucking the life out of the very surface of the terrain....
that would be AWESOME!! ive still to base my venomthrope!... that may be the answer!! =] =]cheers for that idea man!
and an anti nid tau army?, interesting... my mates got that kinda idea aswell... he hates my army , lol (only coz i can kick his arse but ...lol )
i can only assume your mate is me and i will have you know i dont "hate" your army i justthink you have too much and i very much believe that when my army is built up properly to a competative Size i wll give you an extreme good run for your money
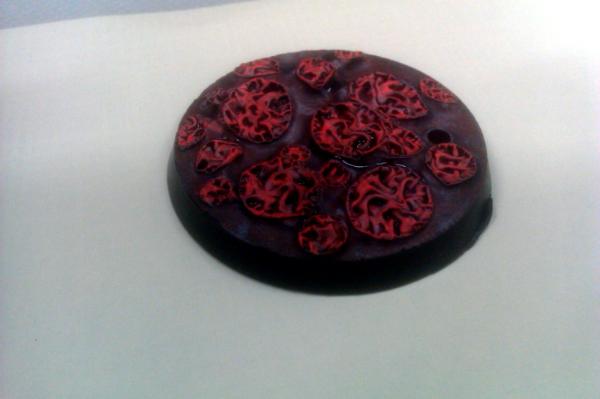
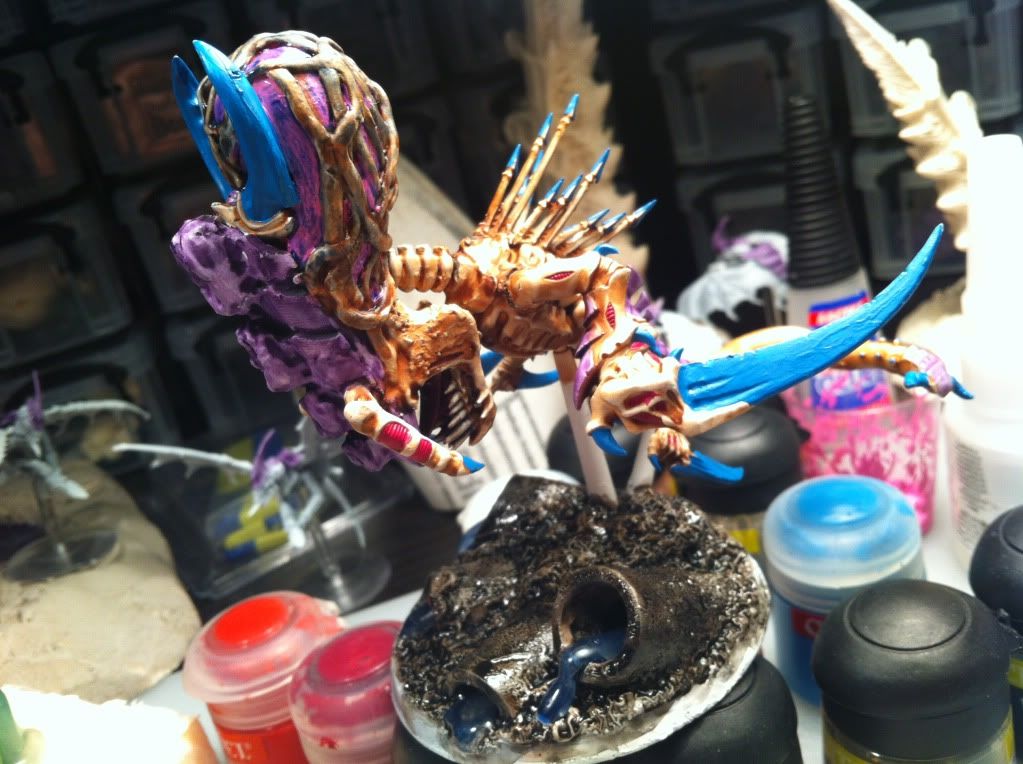
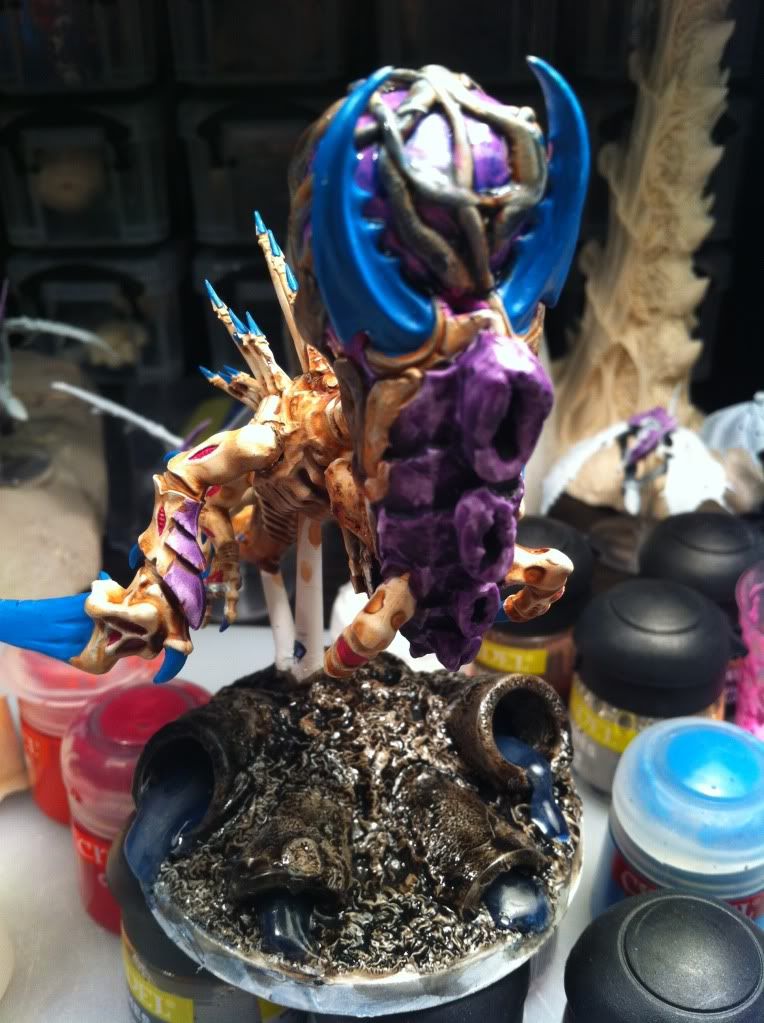
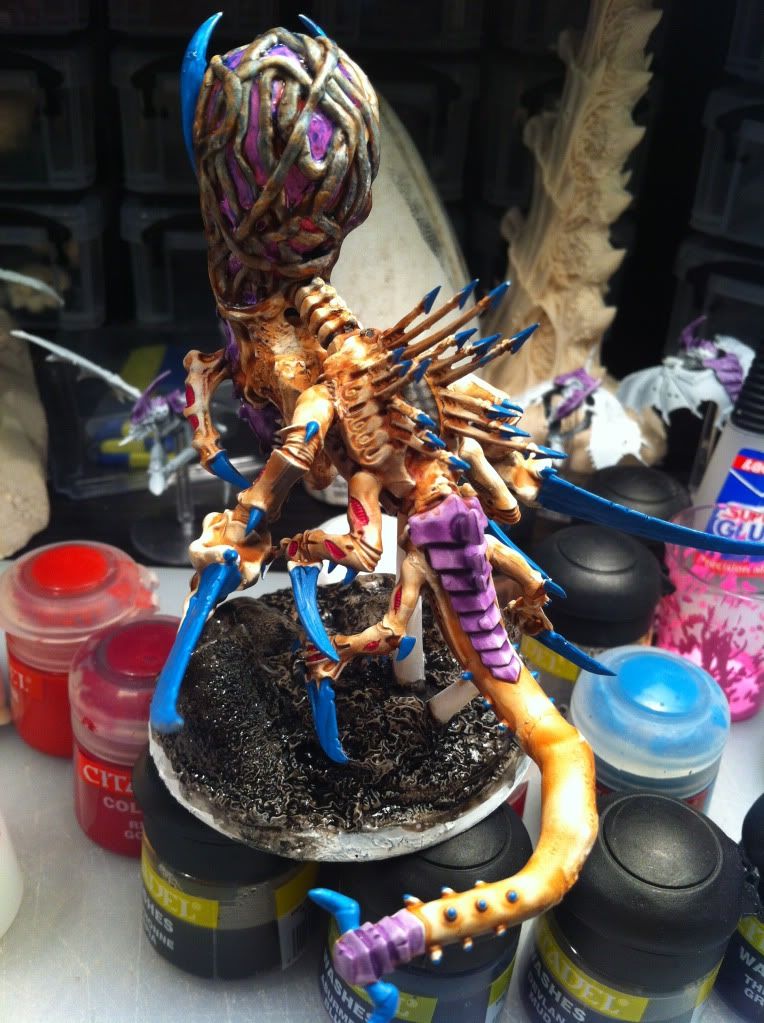
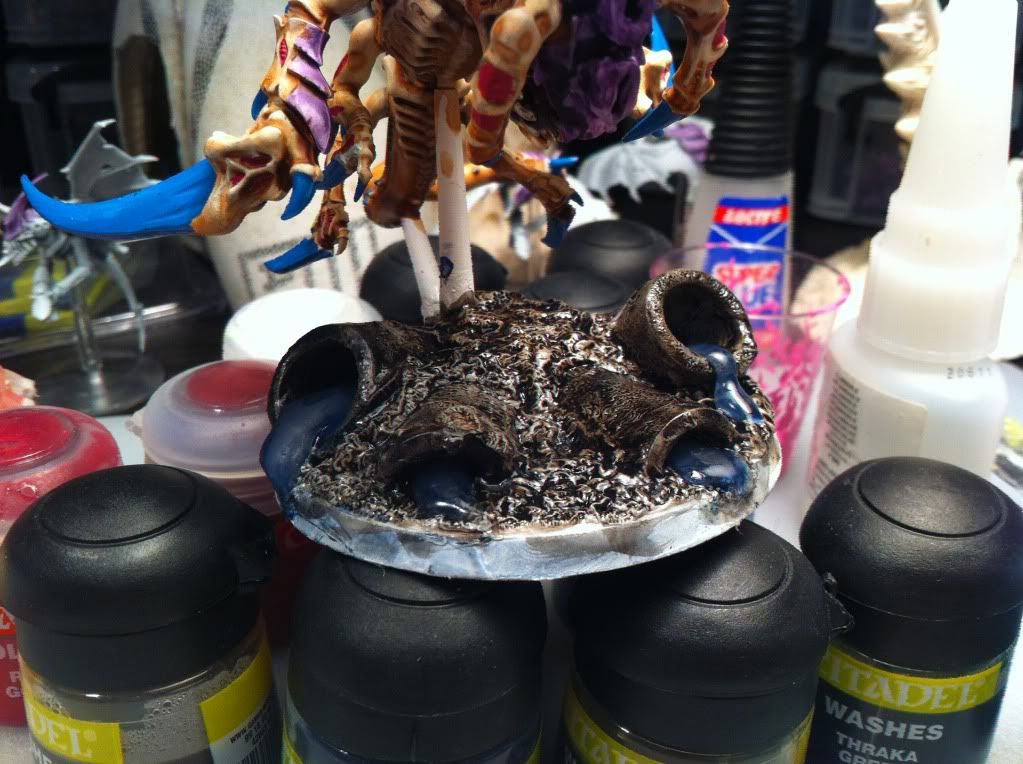
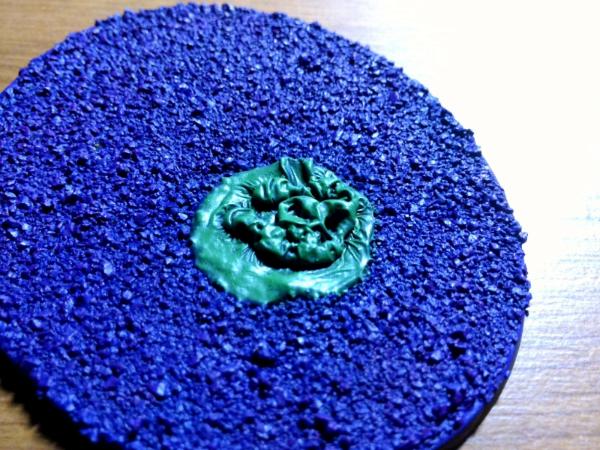
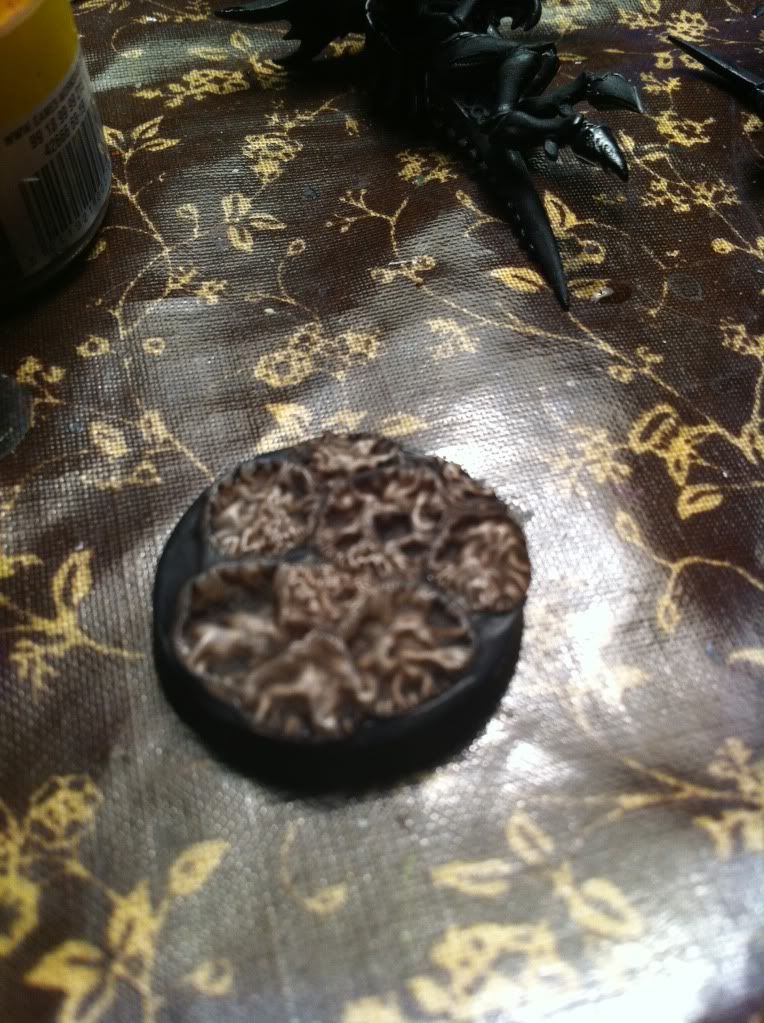
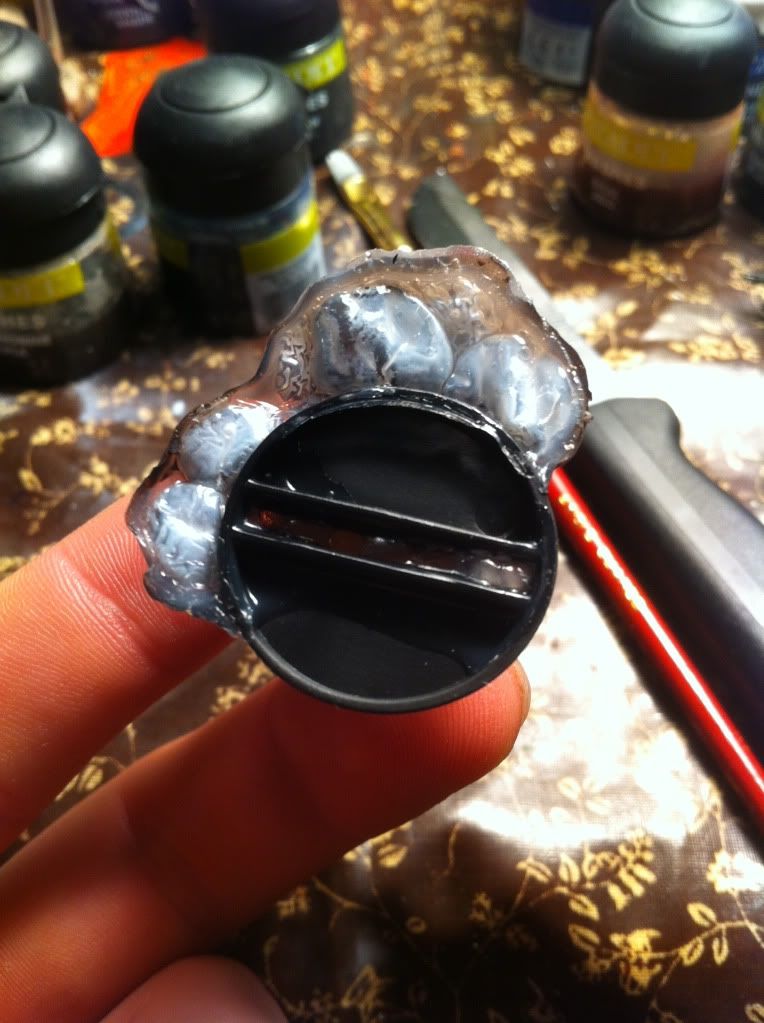
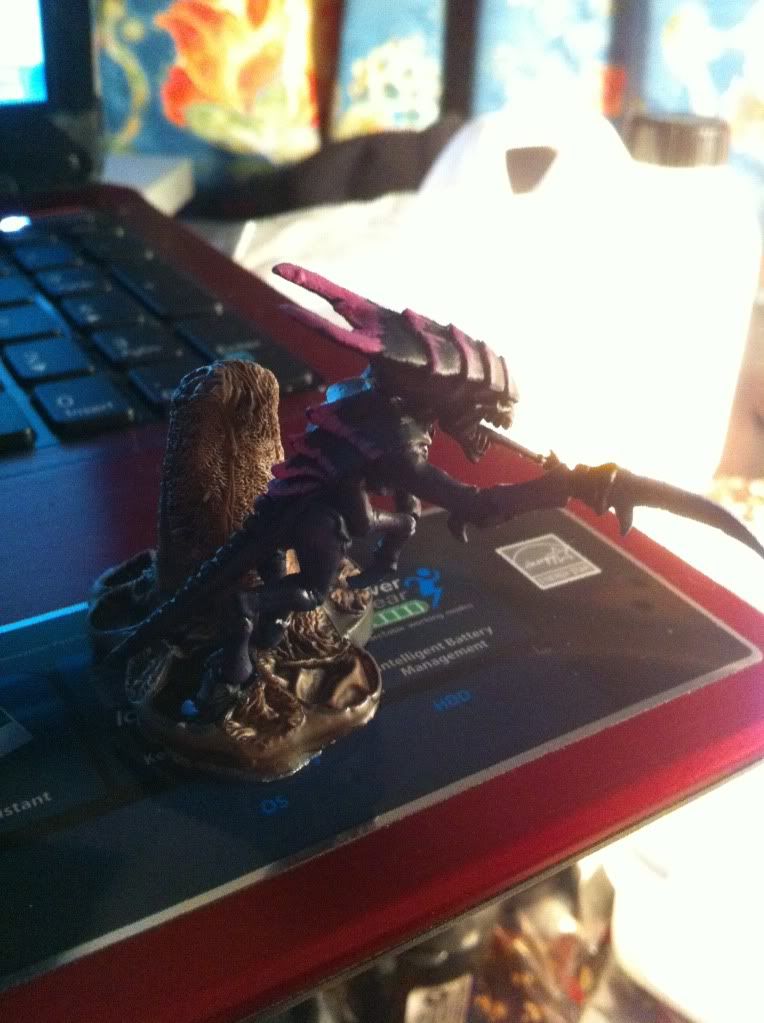
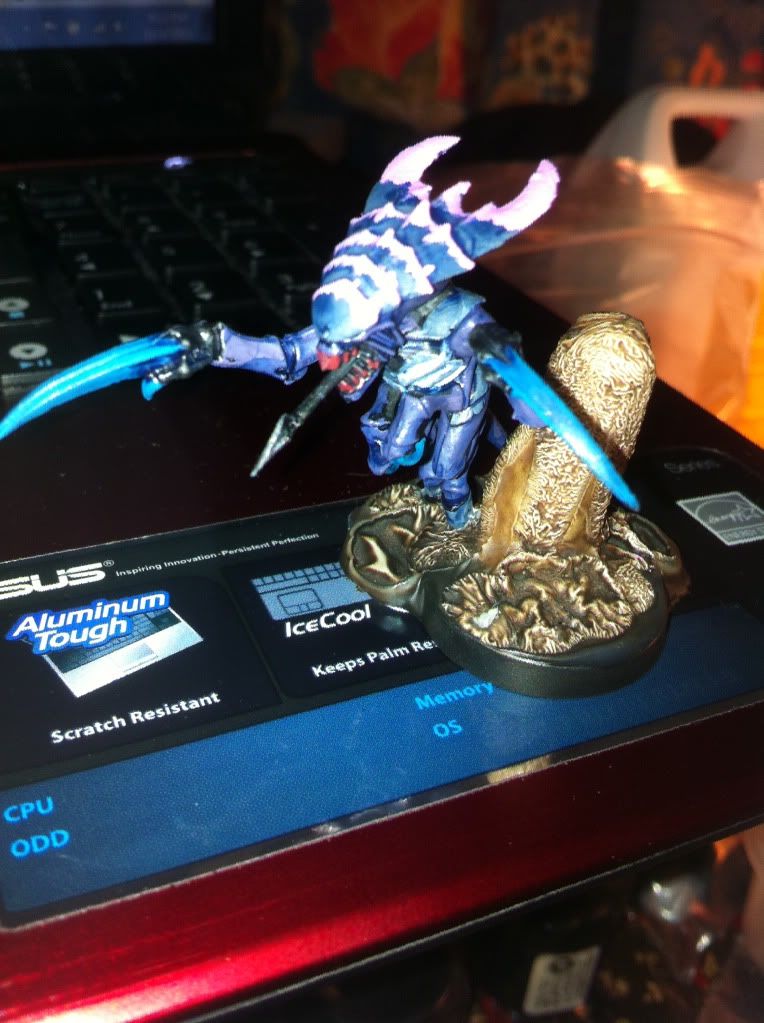
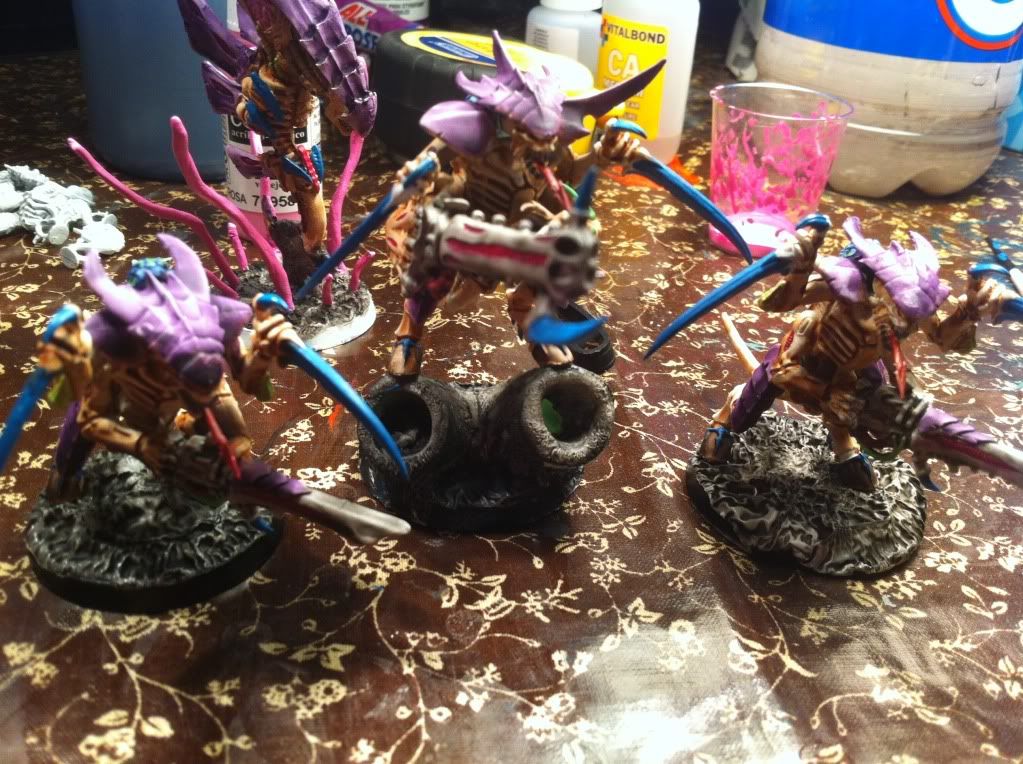
just gonna show you guys another base i did aswell as my Venomthropes base, (for fenrir1997)
sorry if the base looks rude... it wasnt intended to be that way! =[....lol but the way it turned out (texture wise) was fantastic... (cant really see very well on a photo! =[ =[)
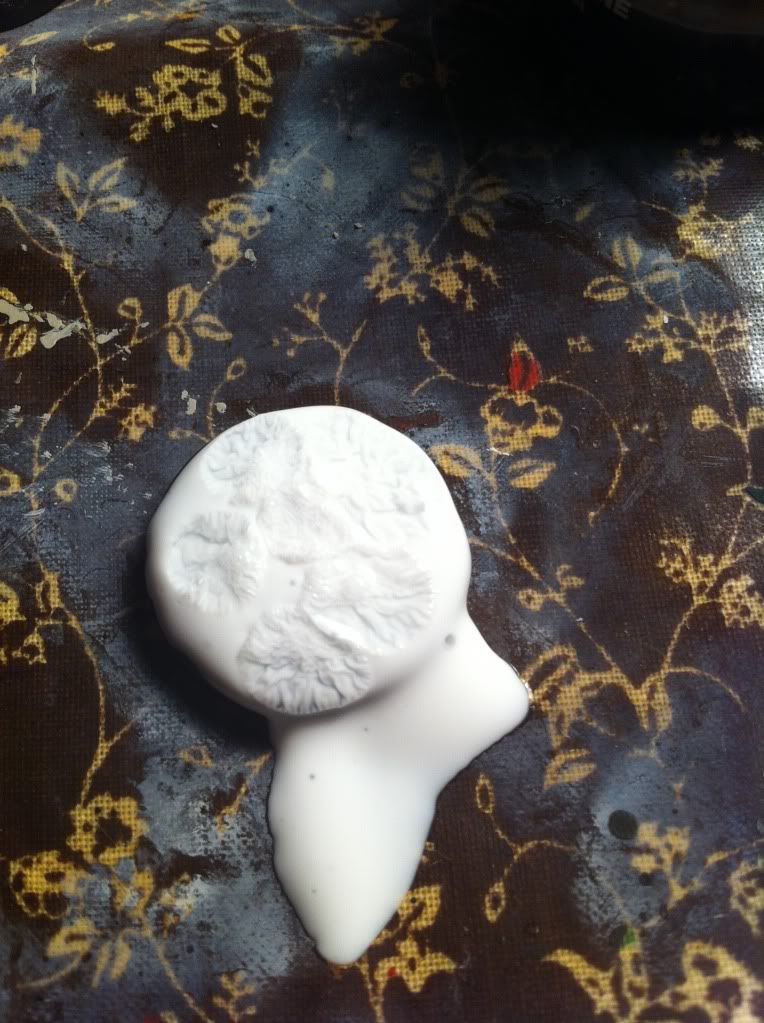
some things to consider for this , that i learned with practice :
1) you can vary the effect based on how tick of a layer of glue you apply it to .
2) you can also vary the effect based and how runny or thick the glues consistancy is .
3) i didnt learn this based on the introduction of tyranids into the game , i learned it when i got into chaos . it makes GREAT scabs and infected looking patches for chaos , or anyone else with lots of battle damage . to do so ; for small models , apply the glue carefully with a toothpick to the model then add just a tiny bit of the superglue carefully . it can make a great accent to some old school type daemon weapons .
4) it doesnt JUST work with glue , it works with acrylic paint too , and again will vary based on how thick the paint is , and how runny it is . it also gives a better effect in some ways since the paint is already colored , so all you need to do is drybrush it or ink it to meet your color goals . again with practice youcan apply it to small models to make gorey red scabs and puss . it can really spruce up a model , and on larger ones like defilers , is a great way to cover the joint between an organic component and a mechanical one .
5) you can also vary the effect based on how thick or thin the super glue is .
here is a defiler i did for a friend a couple years ago . all of the gore and poo seepage is superglue applied to craft paint
SirBuddlington wrote:just gonna show you guys another base i did aswell as my Venomthropes base, (for fenrir1997) ...... sorry if the base looks rude... it wasnt intended to be that way! =[....lol but the way it turned out (texture wise) was fantastic... (cant really see very well on a photo! =[ =[)
Oh my god.... That turned out even better than I had expected.. I'm actually excited to go grab my materials sooner than anticipated. Thanks for that, I appreciate it. Excellent work.
ADDITION:
My computer was just turned off, and I had a wonderful epiphany, that only includes 2 words:
GrandInquisitorOrdoXenos wrote:i was doing this 20 years ago
some things to consider for this , that i learned with practice :
1) you can vary the effect based on how tick of a layer of glue you apply it to .
2) you can also vary the effect based and how runny or thick the glues consistancy is .
3) i didnt learn this based on the introduction of tyranids into the game , i learned it when i got into chaos . it makes GREAT scabs and infected looking patches for chaos , or anyone else with lots of battle damage . to do so ; for small models , apply the glue carefully with a toothpick to the model then add just a tiny bit of the superglue carefully . it can make a great accent to some old school type daemon weapons .
4) it doesnt JUST work with glue , it works with acrylic paint too , and again will vary based on how thick the paint is , and how runny it is . it also gives a better effect in some ways since the paint is already colored , so all you need to do is drybrush it or ink it to meet your color goals . again with practice youcan apply it to small models to make gorey red scabs and puss . it can really spruce up a model , and on larger ones like defilers , is a great way to cover the joint between an organic component and a mechanical one .
5) you can also vary the effect based on how thick or thin the super glue is .
here is a defiler i did for a friend a couple years ago . all of the gore and poo seepage is superglue applied to craft paint
wow thank you for that! =] those models look fantastic! and i will give the small details a shot with the toothpick, could work out VERY nicely to make battle wounds on the carapace of my nids!
thanks again,
fenrir1997 wrote:
SirBuddlington wrote:just gonna show you guys another base i did aswell as my Venomthropes base, (for fenrir1997)
......
sorry if the base looks rude... it wasnt intended to be that way! =[....lol but the way it turned out (texture wise) was fantastic... (cant really see very well on a photo! =[ =[)
Oh my god.... That turned out even better than I had expected.. I'm actually excited to go grab my materials sooner than anticipated. Thanks for that, I appreciate it. Excellent work.
ADDITION:
My computer was just turned off, and I had a wonderful epiphany, that only includes 2 words:
Mycetic Spore.
haha yeah it really did turn out VERY nicely and i have you to thank for that!! =] =]
deffo get some materials and lemme see how you do! =] =]
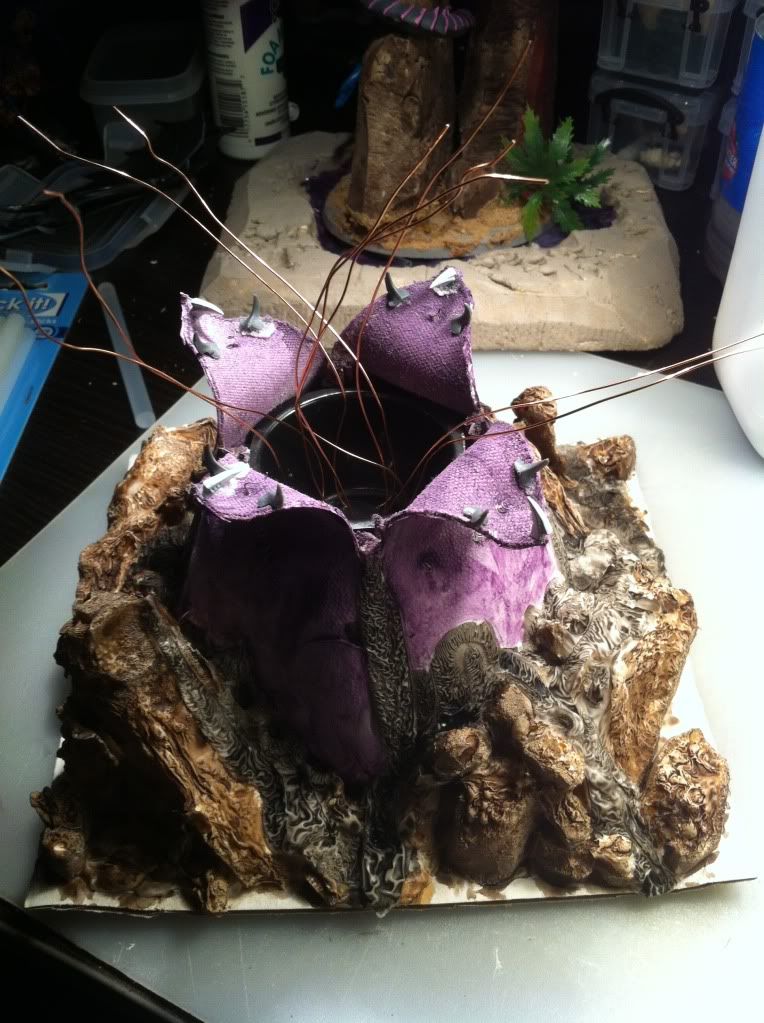
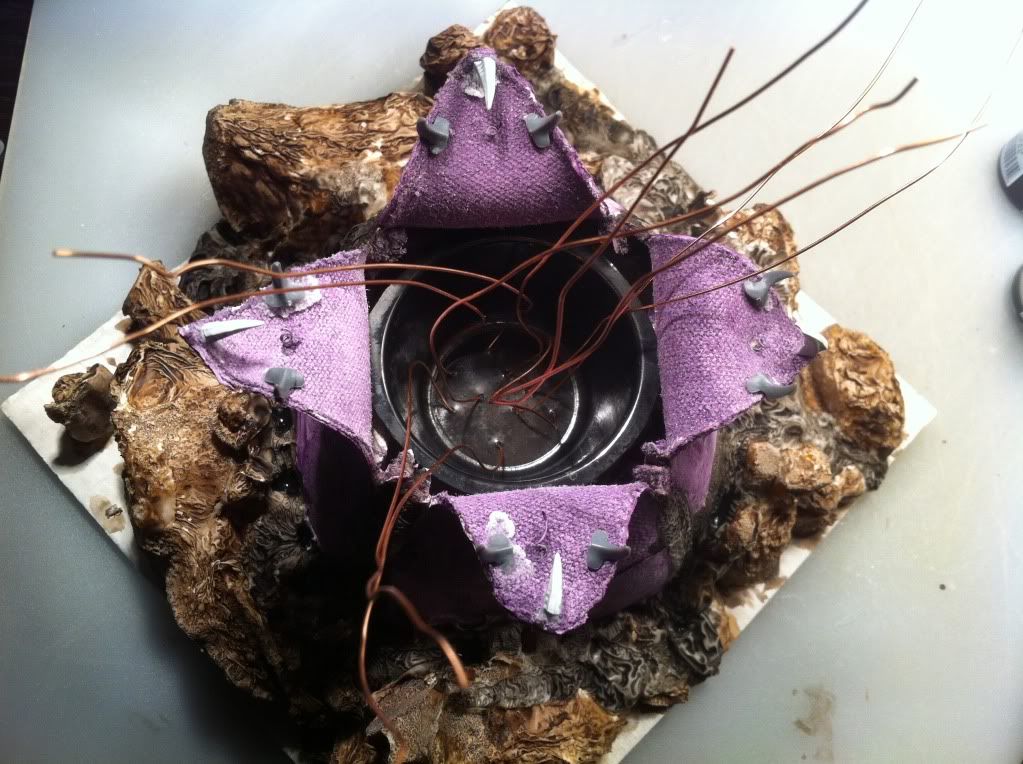
also aMycetic spore would work wonders like this i reckon... im actually in the process of making a mycetic spore, so ill deffo try this out on that! (if it doesnt work then im only wasting an old rugby ball and glue lmao!!!)
cheers again guys for showing interest in this! =] =]
JoeyHeadwounds wrote:The more I look at these the better I like them.
By the way, nice diorama in your avatar.
thats what i was like..... i did a couple then was like... hmmmm i dunno if i like these , but the more i looked at them closely the better they got!! =] =]
and honestly once youve done them for yourself rather than seeing just a photo, they look ALOT better
as for the diorama... its not mine, i found it online .... it is good though lmao
This is great! I am going to try this for my CSM, maybe paint it black with red highlights. It would be awesome for Slaanesh, but I have Khorne, I think it will still work though.
Wow, just... Wow. That's amazing for the amount of work it takes and the materials required, simply epic. So glad I haven't based my Zoey yet, because if I had I would have to rip it right back off again. I am now getting off my computer, going over to my workstation and getting busy, it's got me that fired up.
Karshtakavaar wrote:Wow, just... Wow. That's amazing for the amount of work it takes and the materials required, simply epic. So glad I haven't based my Zoey yet, because if I had I would have to rip it right back off again. I am now getting off my computer, going over to my workstation and getting busy, it's got me that fired up.
Aww im glad you liked the idea! =] =]
post up some photos of you zoanthrope once youve based the beast!, id love to see how others turn out! =] =]
killykavekommando wrote:Well, that base looks pretty rude, but it adds to the slight tongue-in-cheek humor of 40k, right?
Great job, makes me wish I played Tyranids.
haha yeah it is pretty rude, but it really wasnt meant that way lol
also it does kinda add to the humour side of 40klol,
this method would also work really well for wounds and such for any army,
just use smaller amounts of glue (obv) lol
Ian Sturrock wrote:Beautifully done. As soon as I've finished my GKs, I'm going right back to working on my nids, this way!
aww cheers im glad you like the idea man!, when you do get back doing your nids, id love to see some photos of them once they are finished (with this style of Base )
Snrub wrote:Dude this is a nifty method of getting a groovy effect. How did you find this?
i was looking on youtube, and someone was doing a very similar technique, not quite the same, but deffo similar, so i took his idea and made it my own in a sense,
started adding scenery into the bases so that they were abit more 3D,
and once i have my full army painted, all my models will have this technique on their bases =] =] and i cannot wait for that day to happen!, (also that will be a very pic heavy day for this thread lol)
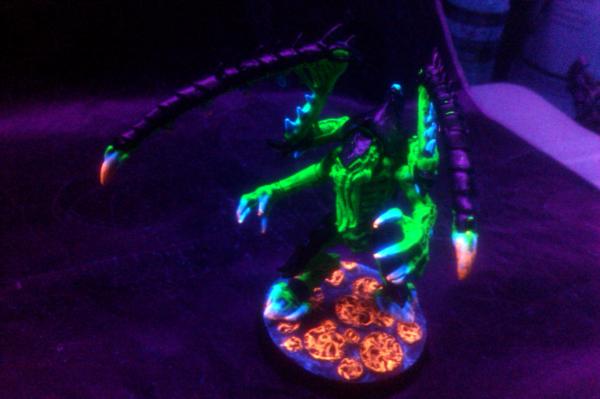
Hey, as promised, I got my Elmers, Loctite, and base together, and the evil-experiment is drying right now. I'll be posting a few pictures soon as I get a finished product, w/ and w/o the Lictor (and a change in lighting I think you'll find wicked cool)
Automatically Appended Next Post: Here goes:
Base w/o Lictor: As you can see, it's still a tad wet from the Badab Black. Was a bit excited for my results, can ya blame me?
Base w/ Lictor: Looks a hell of a lot better in person. Again, please excuse my photo quality. All I have is my phone (1.3 mp)
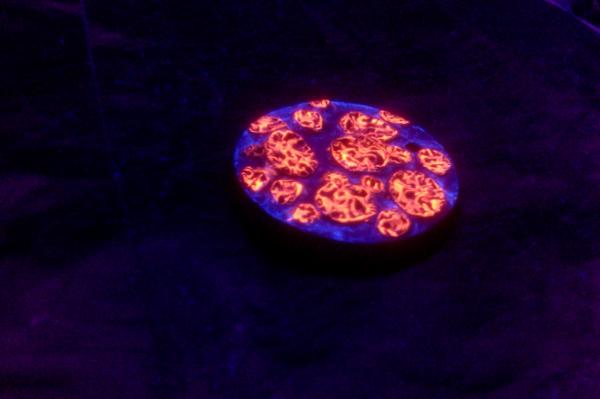
UV Lighting:
Spoiler:
Any tips on shooting photos in ultraviolet lighting? Had to photoshop these to get them somewhat clear. Found the darkest background I could find for my "photo-shoot."
fenrir1997 wrote:Hey, as promised, I got my Elmers, Loctite, and base together, and the evil-experiment is drying right now. I'll be posting a few pictures soon as I get a finished product, w/ and w/o the Lictor (and a change in lighting I think you'll find wicked cool)
Automatically Appended Next Post: Here goes:
Base w/o Lictor:
As you can see, it's still a tad wet from the Badab Black. Was a bit excited for my results, can ya blame me?
Base w/ Lictor:
Looks a hell of a lot better in person. Again, please excuse my photo quality. All I have is my phone (1.3 mp)
UV Lighting:
Spoiler:
Any tips on shooting photos in ultraviolet lighting? Had to photoshop these to get them somewhat clear. Found the darkest background I could find for my "photo-shoot."
Base w/o Lictor:
Base w/ Lictor:
looking superb!, did you paint it aswell as washing it yeah?, its looks fantastic!, now for the rest of the army?
well thats saying you like the outcome?, lol
you have done a great job with it though! =] =]
and nah i dont blame you for being excited lmao,
thats what i was like when i fisrt did mine, couldnt wait for the darn things to dry and mount the models ...lol
Yeah.
Primed rust-red with krylon, followed by white drybrushing to pop up the blaze orange a bit.
The deep sections were done with fluorescent blue straight onto the rust (thats why it's only visible under UV).
Following both of those colors was a big wash of Badab Black to tone it all down a bit.
I might amp it up again a touch with a real light drybrushing of blaze orange, but we'll see.
I love how it's so ridiculously obnoxious under UV, but so subtle in normal lighting. Pictures do no justice. Thanks again for this tut dude, it's wicked, and my whole army's gonna be getting it.
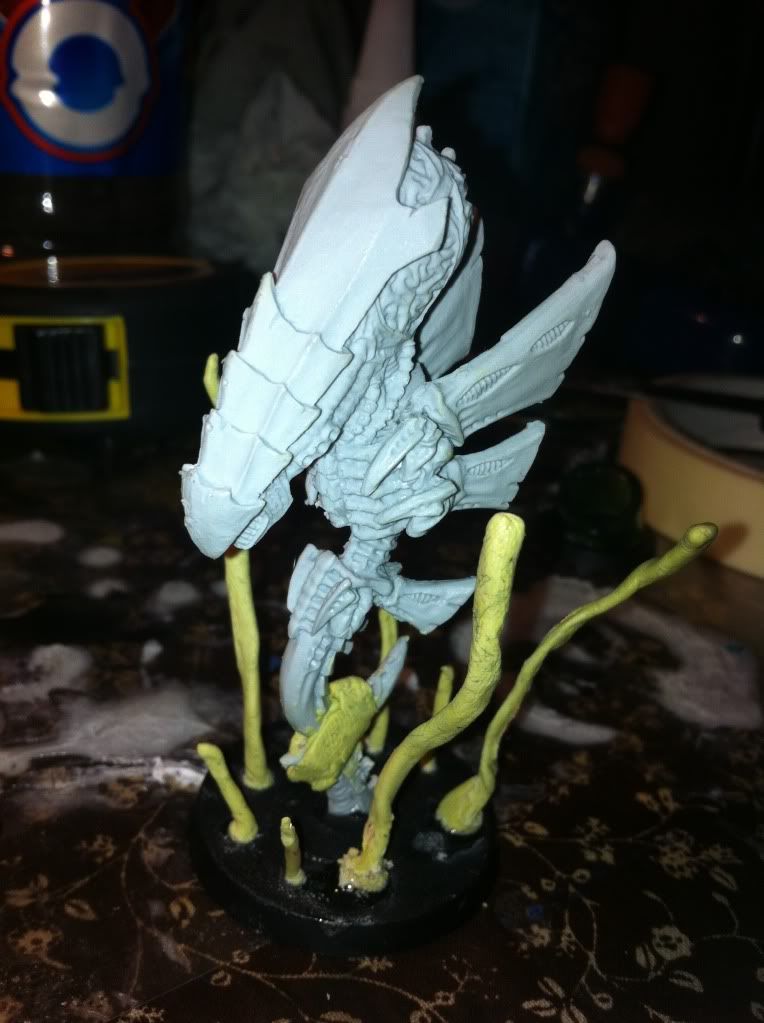
Fat_Little_Ripper wrote:Very nice Mycetic Spore pod SirBuddington.
I have to ask, what did you use for the pod itself? Looks like canvas to me.
Cheers mate! =] =]
the pod itself is actually an old rugby ball (small), cut in half, lol, ill be making a 2nd one soon with the other half of the ball!,
ill make a separate thread with a tutorial... i meant to do that this time, but forgot to take photos of the other stages lmao
I intend to use them on the rhinos as burst boils or something.
You think this could work as craters for raptors and assault marine who have just landed.
Mr.Awesome1 wrote:I intend to use them on the rhinos as burst boils or something.
You think this could work as craters for raptors and assault marine who have just landed.
ahh nice, yeah i reckon it could work if you do it right!
for craters, i would add a very small amount of pink foam to the sides and then do this affect round about it so it looks like the rocks! =] =]
just an idea (probably not very good, but im just bout to go to bed so my mind isnt quite awake yet ...lmao! =P
I loved the idea when you posted it, but never got around to trying it, I have done one base and am happy with the result. Would it be ok to post a pic of the outcome?
Wow. I'm just starting a Tyranid army, and this has got me super psyched. Besides the awesome bases, great job on the models too everyone! Especially love the Venomthrope, and the UV Lictor!
Question: What do you guys use for the odd bits of grass here and there?
Tpiddy wrote:Wow. I'm just starting a Tyranid army, and this has got me super psyched. Besides the awesome bases, great job on the models too everyone! Especially love the Venomthrope, and the UV Lictor!
Question: What do you guys use for the odd bits of grass here and there?
haha sounds good man, hope you enjoy painting and basing your nids, i personally LOVE them! they are always somuch fun to play around with!,
cheers for the compliments man =] =], and yeah im now using static grass and basing sand for the not so gloopy parts to my bases! =]
oh and everyone, i have a new couple of projects on the way!, so keep yours eyes open on this thread and i will have photos up very soon! =] =]
i definitely gonna try making some of these bases. While I'm not tyranid player, this could look a lot like lava with the right painting and would perfectly fit my blood letters. thanks, I've been searching for a good way to base those daemons
theflaminghorror wrote:i definitely gonna try making some of these bases. While I'm not tyranid player, this could look a lot like lava with the right painting and would perfectly fit my blood letters. thanks, I've been searching for a good way to base those daemons
nah i reckon it will work brilliantly for your bloodletters! if you were to paint it up right and add green stuff for lava bubbles and then put fake water over the top of that!, would look really awesome i think! =] =]
Totally agree with the guy who said the base looks like Zerg creep. Great job.
I'm planning on building a gaming table in 2012 and this gave me an idea for river terrain. Use PVA glue for the river and add some rocks for texture. Cover the rocks with PVA and then splash some super glue. Painted properly, I think it'll look like rapids or waves over the rocks.
StoneRaizer wrote:Totally agree with the guy who said the base looks like Zerg creep. Great job.
I'm planning on building a gaming table in 2012 and this gave me an idea for river terrain. Use PVA glue for the river and add some rocks for texture. Cover the rocks with PVA and then splash some super glue. Painted properly, I think it'll look like rapids or waves over the rocks.
ive been trying to think of ways that this idea could be used on a gaming table for a LONG time now, that is a Fantastic idea!,
i may give that a shot myself (just on spare foam or something) but yeah deffo going to give that a shot!, cheers mate! =] =]
Well, since you're looking for gaming table ideas for that technique, what about an oil field? Picture an oil derrick or oil pipeline and it's leaking oil from somewhere. Use this PVA/super glue technique to look like puddles of oil collecting from the leak.
so not to hijack the thread, but I did some pva w/ super glue on this base. Went with bright purple cuz I liked the zerg creep comment. This base is certainly better than just a usually brown/sand/grass. Thanks for the idea!
so not to hijack the thread, but I did some pva w/ super glue on this base. Went with bright purple cuz I liked the zerg creep comment. This base is certainly better than just a usually brown/sand/grass. Thanks for the idea!
mate that looks awesome with the grass added aswell, may need to do that with a few of mine! =] =]
also,cheers everyone! =]
Automatically Appended Next Post:
this is the model i will next be basing!, i cannot wait to start this! =] =]
Ok, Here are the pics of the bases that I finshed. I finally got some crazy glue!!! Hope you like them! I also did it on there adrenal glands, just to add a brainy look.
Automatically Appended Next Post: I have done 7 Gaunts totall so far. Hope you like!
Imperial Renegade wrote:Ok, Here are the pics of the bases that I finshed. I finally got some crazy glue!!! Hope you like them! I also did it on there adrenal glands, just to add a brainy look.
Automatically Appended Next Post: I have done 7 Gaunts totall so far. Hope you like!
mate they look great! i LOVE your idea for the adrenal glands =] =]
your models look awesome aswell =] =]
Ok, well, I took wine bottel cork and glued it to the base. Then I dunked it in pva glue, and then applyed crazy glue. Afterwards, I washed it with Bada Black, then hevily dry brushed lime green onto the base. I then washed that it Griffion Sepia, and then lightly dry brushed a german green ontop of that. Giving me the layerd look. I painted this base with valleho colors. Glad you like it.
Imperial Renegade wrote:Ok, well, I took wine bottel cork and glued it to the base. Then I dunked it in pva glue, and then applyed crazy glue. Afterwards, I washed it with Bada Black, then hevily dry brushed lime green onto the base. I then washed that it Griffion Sepia, and then lightly dry brushed a german green ontop of that. Giving me the layerd look. I painted this base with valleho colors. Glad you like it.
ahhh very nice, i like the layers of cork... it looks really cool! =]
Imperial Renegade wrote:Im glad you like it, I am very pleased!
and so you should be! =] =]
im going to get my hands on some cork and try this out if you dot mind! =], see what i can come up with!
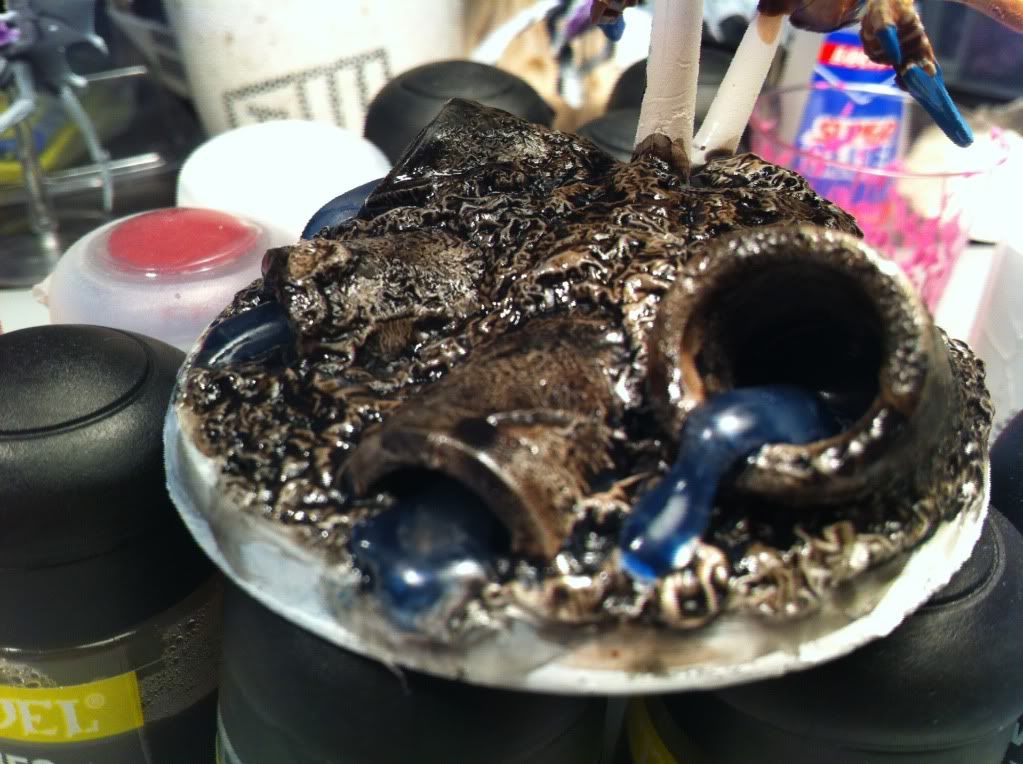
i also need a few ideas with what to add to my bases as i have the pipes, but id like to continue that industrial theme but i cannot think of anything other than pipes ...
Try almost like a digestive pool, that would look cool if you can think of a way to do it. I dont mind at all, I think you should try. I got the Idea From a Friend, so... Hope you come up with something, How do you do the tubes??
Imperial Renegade wrote:Try almost like a digestive pool, that would look cool if you can think of a way to do it. I dont mind at all, I think you should try. I got the Idea From a Friend, so... Hope you come up with something, How do you do the tubes??
ive actually got a half built digestion pool waiting to be finished!, not sure how im going to finish it off though ,
and haha cheers dude!, as for the tubes, they are just piping i bought from my local pet shop thats used to filtering fish tanks!
the stuff i buy is green see thru tubes!, then i just add the glue effect over the top and thats how it ends up! =] =]
Yo.... that Doom is freakin' wicked. Kudos on the conversion, it's rockin'.
And the bases: Sweet. Diggin' the ooze, and that multilayered cork base is very nice, gives a good contrast but can still match most typical game-boards.
This is awesome, I saw a tutorial for this basing style a while back too (on Heresy Online, I think?). I used it to quick base my Nurgle CSM army, and I was super happy with how I was able to get nice looking bases so easily. Though I ended up painting mine a olive green, then gloss varnishing it for a "swamp" feel:
Andrewgeddon wrote:This is awesome, I saw a tutorial for this basing style a while back too (on Heresy Online, I think?). I used it to quick base my Nurgle CSM army, and I was super happy with how I was able to get nice looking bases so easily. Though I ended up painting mine a olive green, then gloss varnishing it for a "swamp" feel:
Andrewgeddon, dude, why not just use this technique directly on the nurgle marines? It'd be a great way to convert normal marines to nurgle worshipers!
Thanks for the kind words, everyone. I just love the results of this basing technique, great results for minimal effort, was really happy with how they turned out.
burgerking ork wrote:Andrewgeddon, dude, why not just use this technique directly on the nurgle marines? It'd be a great way to convert normal marines to nurgle worshipers!
I actually found that my CSM turned Nurgle pretty well with a pretty simple job, without having to do too much converting. I had them all painted Boltgun, because I had originally wanted to play them as Iron Warriors. When I decided to go over to Nurgle, I really didn't want to strip all of them and repaint them. So, I just used some orange-brown paint to make them rusty, gave them a quick green wash, then drybrushed with some gross-looking green for slime. Done, quick and easy!
i also need a few ideas with what to add to my bases as i have the pipes, but id like to continue that industrial theme but i cannot think of anything other than pipes ...
I really like the stuff you did with the ooze from the pipes. I bet if you mixed that with some sand or just something to give it a little texture you could make it look really gut like. So you could put half a guardsman on the base with some cool guts leaking out of him.
I did something like that on my lone zoey. I made it sort of like the zoey had just risen from the grueling biomass beneath itself. maybe I will get pictures for this!
I'm a big fan of all the ideas other people are using with the original concept of this. I've seen pipes added in, the idea used for mutation, somebody used some chopped sprue to change the terrain a bit, I'm gonna use it to mess with the brains of my Zoe soon.... Way rockin'.
My next idea: What if you put some elmers down on the side of a tank, and just put down 1 big drop of super glue... think it'll look fairly good as battle damage? (eg: hole blasted in the side) If painted appropriately, of course.
Just wondering... could be an easy answer to my prayers, rather than attacking my rhino with a soldering iron...
you would need to be VERY careful you didnt use too much glue for the bullet holes and such!, but i reckon you could pull it off!, would also look amazing if painted well =] =] good luck with that one! =] =]
So I tried this at home with Citadel Modelling PVA Glue and I had some problems. Its been three days and the PVA glue hasn't turned transparent yet. The edges are clear but mostly the glue remains white. It did however create the fantastic texture.
I only used about .5cm in the thickest point and I probed around with my hobby knife and found all the white stuff is still un-dried glue.
I went out to Ben Franklin to try and find some more PVA glue but they didn't have any specific "PVA" glue. I remember someone saying that PVA glue is basically elmer's glue so I picked up some "Elmer's Craft Bond Fabric and Paper glue" which is white Elmer's glue that is acid free (also dries clear). When I tried it out, I found that it also has problems drying clear but I don't seem to get such a nice texture effect as using Citadel PVA.
Anyone have any luck with any Brand of glue Like Tack Glue, or Elemer's Glue all? I would just order what the OP used in the tutorial but I always get robbed on shipping because of where I live.
hey i replyed to your message also... i dont ever wait for it to go completely dry, once the top has tryed thats when you apply the wash or paint, so you are doing it correctly your just too patient lol...
(which in most cases is ok)
it should take about an hour for the top to dry then you can get to work on colours! =] =]
So I tried it with "Elmer's Glue All" from Walmart and it worked MUCH better. The flow is a little high for my needs but atleast now I'm on the right track.
Elmer's Craft Bond Fabric and Paper Glue is much thicker but does not create the "wrinkle effect" that I see here on the forums. Elmer's Glue All seems the way to go.
kshaw2000 wrote:I did something like that on my lone zoey. I made it sort of like the zoey had just risen from the grueling biomass beneath itself. maybe I will get pictures for this!
unfortunately the little tyranid "tail" looking thing that rose out of the ground could not take the weight of the comparitively oversized model and snapped.
SCIENCE TIME!
All glues either have a "resin + hardner" or "certain chemical evaporates" system that creates polymers (chain molecules) to form, thus, the bond between the 2 pieces you are gluing together.
Elmer's glue is water based. When the water is removed (typically via evaporation), it cures.
The "Hardener" for superglue (cyanoacrylate) is water. When water is added (in the correct amount) to cyanoacrylate, it cures.
Therefor...
The Cyanoacrylate sucks the water out of the Elmer's glue, causing the awesome little wrinkle effect we so admirably adore.
Excellent basing. Definately a must for a venomthrope.
Something I add is a gaunt tail or leg for wound rings. I place small metal rings 6-8mm on these posts to keep track of wounds.
A 3 wound model gets 2 rings. (last wound removes model) A guard retinue or biovore brood gets 3 rings. remove a ring then a model then a ring then a model...
It was so difficult keeping track since so many nids have multi wounds.
I used your idea to do the bases for my Tervigons.
After-birth leaves a gooey mess... I have since added a high gloss finish to the goop to make it look wet... no photo of the finished product as of yet.
Alright, next time I buy some Plague Marines, I'm giving this a shot. Hell, I might go grab one of my Rhinos and see if I can Nurglify it some, because that looks downright nasty.
I am thinking of creative ideas for another table for my gaming club. Running into this thread, I was thinking of making a Tyranid infestation table. Maybe something like all the outsides of the table having this effect ...and then having this effect in combination with grass a foliage, and then in the middle making it look like a normal grassy terrain. The idea being that it looks like the Tyranids "Creep" is enveloping from all sides.
Question would be, how do you guys think this technique would work on a large scale?
Jburch wrote: I am thinking of creative ideas for another table for my gaming club. Running into this thread, I was thinking of making a Tyranid infestation table. Maybe something like all the outsides of the table having this effect ...and then having this effect in combination with grass a foliage, and then in the middle making it look like a normal grassy terrain. The idea being that it looks like the Tyranids "Creep" is enveloping from all sides.
Question would be, how do you guys think this technique would work on a large scale?
On a large scale, it probably would look pretty wild. The only thing I'd be worried about is if it was cost effective. You can get PVA glue by the gallon, but for a cynoacrylate adhesive, that might be a little hard to come by. Unless if you use it sparingly. Also, if its not completely covered in it as you have mentioned, maybe it might be ok. Please post pics if you do this.
Jburch wrote: I am thinking of creative ideas for another table for my gaming club. Running into this thread, I was thinking of making a Tyranid infestation table. Maybe something like all the outsides of the table having this effect ...and then having this effect in combination with grass a foliage, and then in the middle making it look like a normal grassy terrain. The idea being that it looks like the Tyranids "Creep" is enveloping from all sides.
Question would be, how do you guys think this technique would work on a large scale?
On a large scale, consider where the wind would carry the spores that generate the Nid terraforming terrain. Those areas are where the Nid biostuff would be taking root and they would most likely be shaltered areas in many cases.
I would create at least two levels of terrain, that is, ground level and hilltop (but I would try to go for bare rock on the tops of the hills cuz there would be an explosion of color below).
Then I would tie two visual stories into the board: Gamers eye view and models eye view.
Gamers eye: what you said: Nid life creeping into a pocket of natural life from all around.(Terrain themes being xenos all round and natural in the middle here).
Models eye: Coming over a natural crest to see lots of other natural crests all around- but getting to the edge of that crest to find very prosperous nid life in the 'ground' level below, well sheltered against overhanging cliff walls and so on,
Your bases look excellent. I will be trying this 2 glue technique out as well.


 ...
...


 Might not be for several months though!