62373
Post by: JWMarines
First a little background...
I kind of inherited a bunch of marines about 7-8 years ago (aka, some guy said, "hey you want all this crap?"). Me, being of sound mind and seeing a couple hundred bucks of OOP marines, said, "yeah, sure. Leave them over there."
With him out the door I looked to see what was there. Turned out to be a 20+ static pose, plastic marines (you know the ones...), about a squad worth of multi-pose plastics, an OOP metal devastator squad, about 6 OOP Metal Assault marines w/ jump packs, rhino, metal Dark Angels Dreadnought, 13 or so OOP terminators, 11ish OOP metal Scouts, 3 bikes, a really old metal dark angels land speeder, and a number of Dark Angels characters and command guys and some tech marines and servitors to boot. Oh, and a TON of bits.
I stumbled across a single image of a Doom Eagles assault marine in the 3rd-ish edition codex and got attached to the color scheme. I also dig what little back story there is about them, so that's why I chose Doom Eagles. I decided to do a whole company because of that image that was in the back (or front) of the space marine codex many years ago... I think it was the entire ultramarines chapter, or a couple companies anyway, + all the OLD land raiders. Now they have the 2nd company pictured in the codex...they stole my thunder. Anyway...
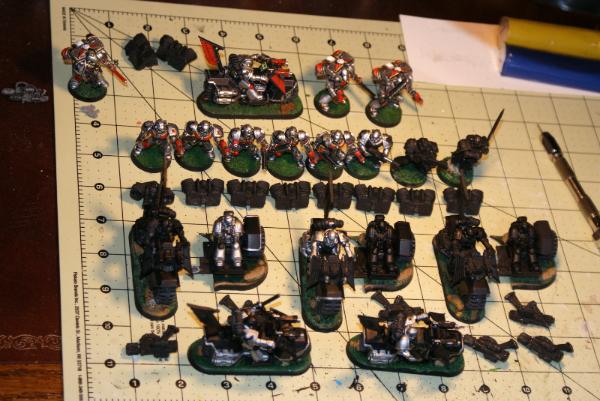
Status of the company is now:
HQ
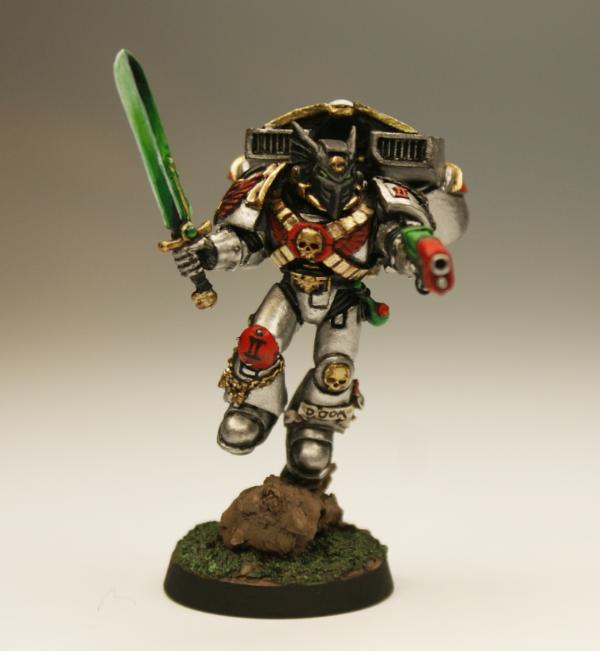
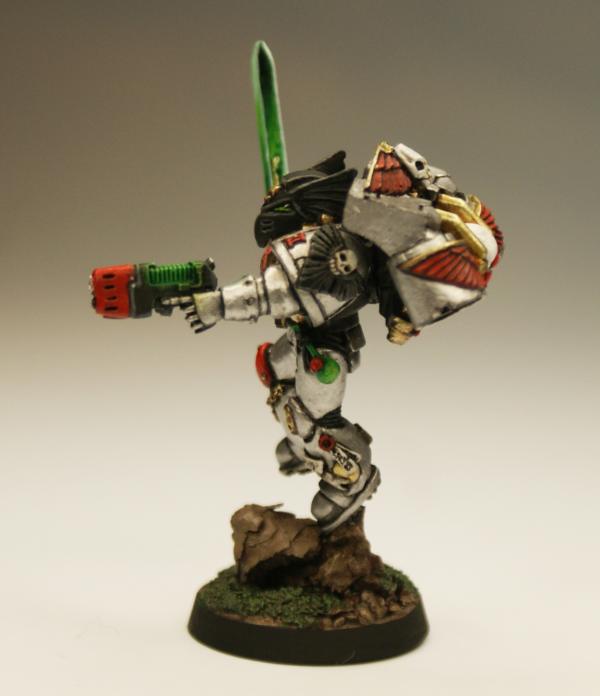
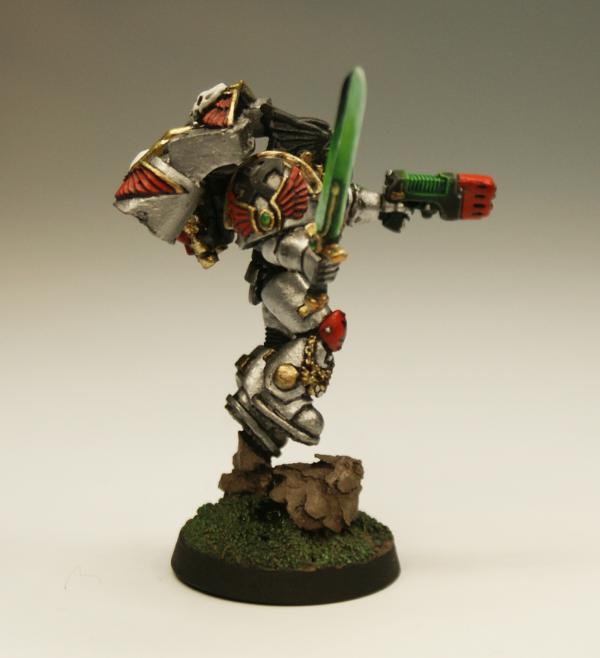
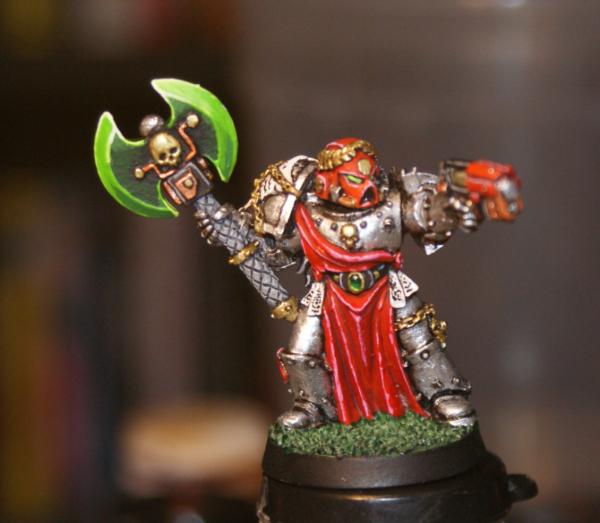
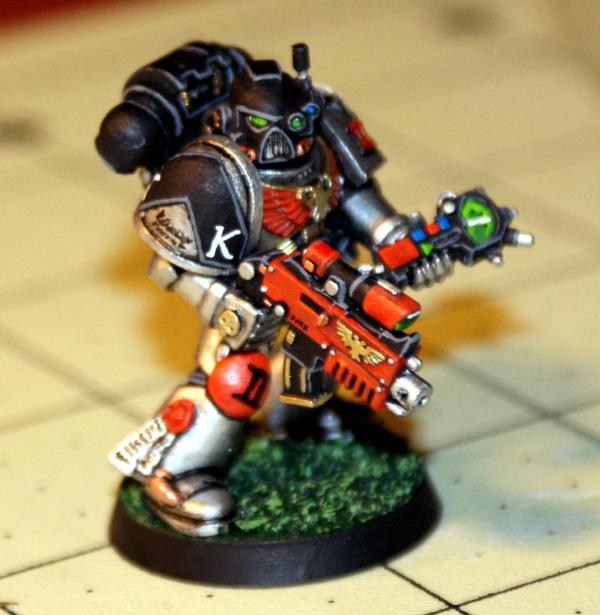
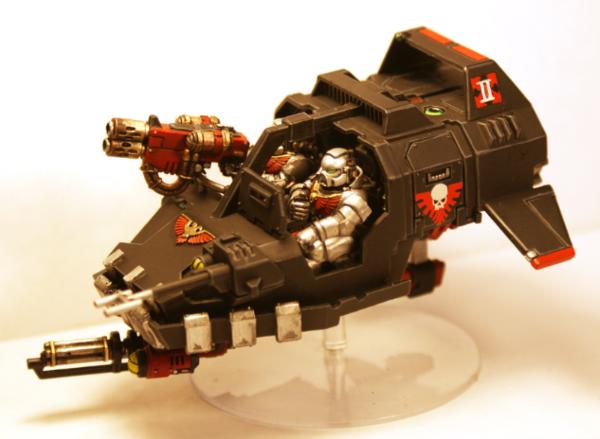
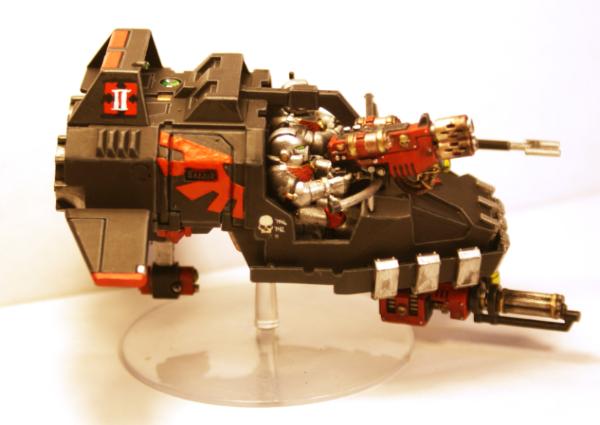
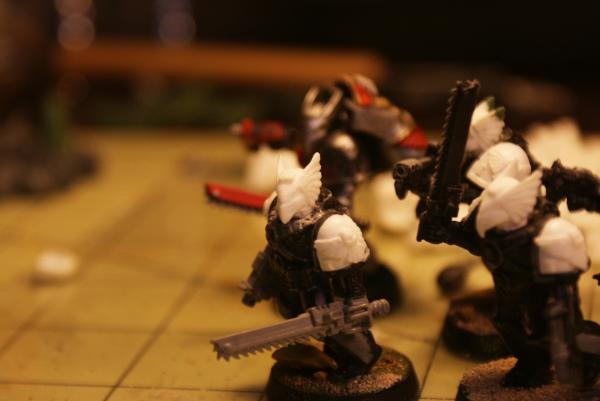
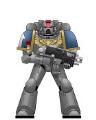
Captain: DONE Front Back
Company Command Squad: 0/6 done - Picked up the Reclusiam box, going to mix that in with all my other character-y models and see what's what.
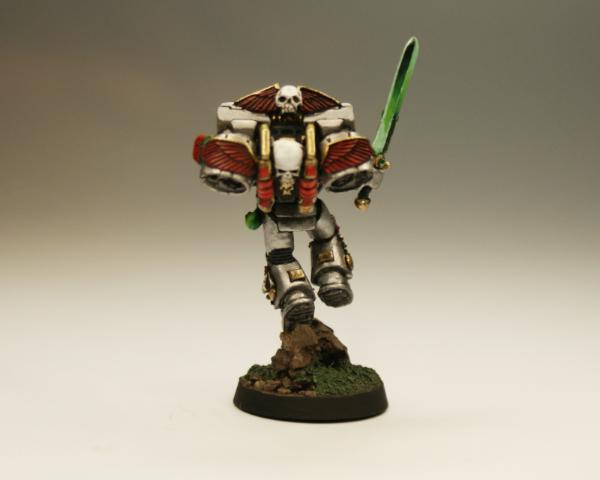
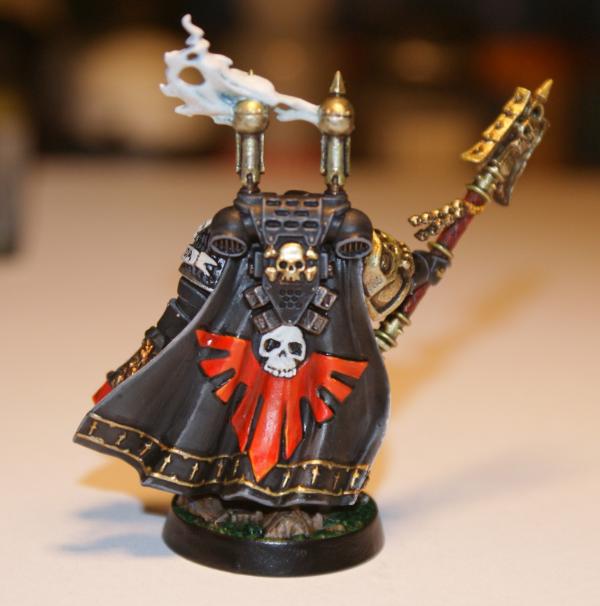
Chaplain: DONE Pic
Misc HQ Pieces: DV Libby, 2 different terminator libbies, termy chaplain, foot chaplain: Not really sure what I'm going to do with all of this stuff.
TROOPS
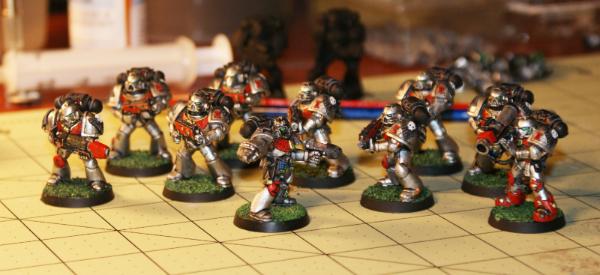
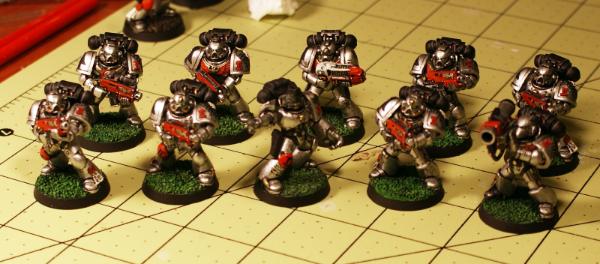
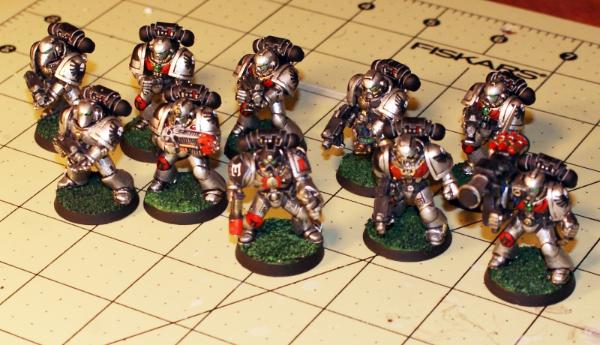
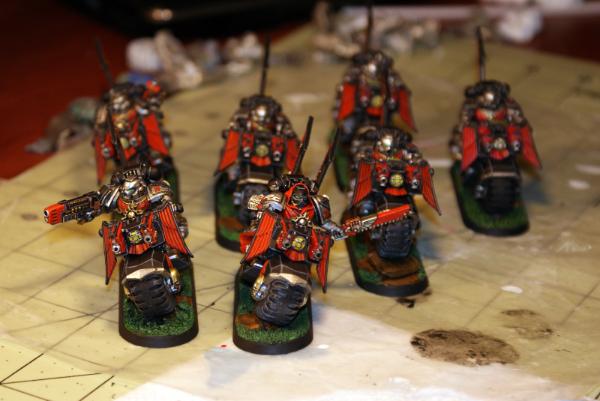
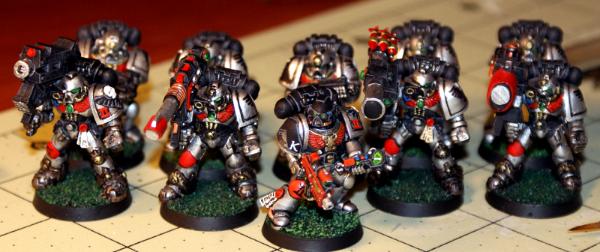
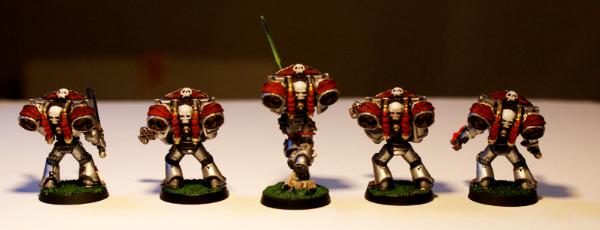
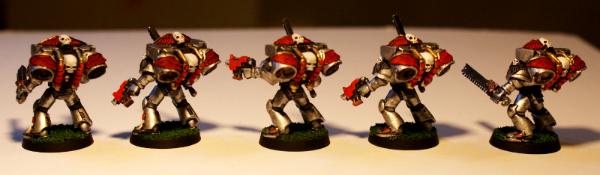
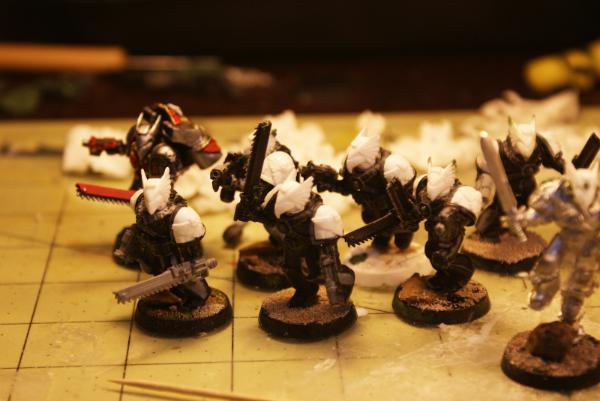
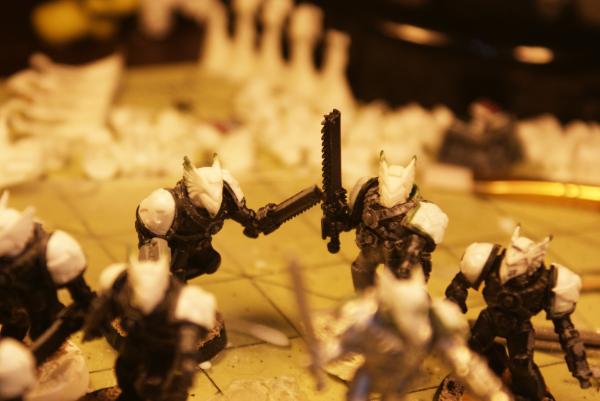
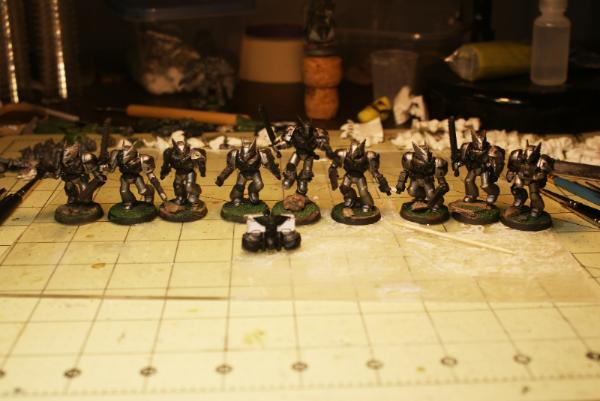
Alpha Tac. Squad: DONE Pic
Beta Tac. Squad: DONE Pic
Gamma Tac. Squad: DONE Pic
Delta Tac. Squad: DONE Pic
Epsilon Tac. Squad: DONE Pic
Scout Squad 1: 0/5
Scout Squad 2: 0/5
Scout Squad 3: 0/5
ELITES
Dreadnought #1: DONE Pic
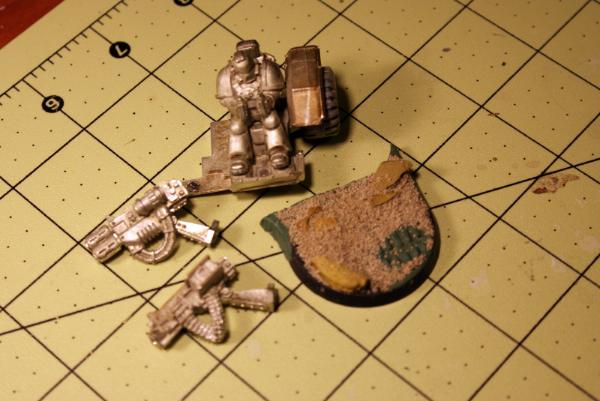
Dreadnought #2: 0/1 need to convert/build
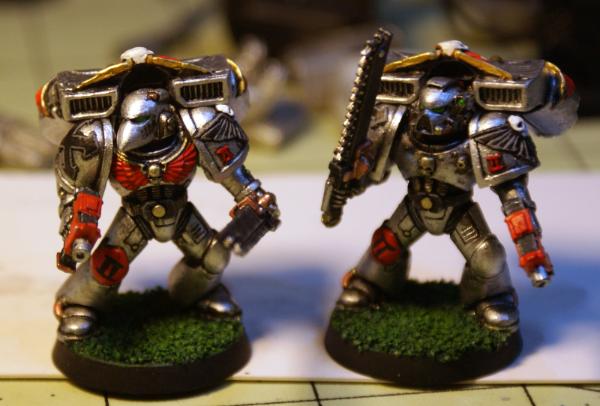
Terminator CC Squad: 0/10 done, conversions begun Pic
Terminator RA Squad: 0/10 done, conversions begun Pic
Sternguard Veteran Squad: 0/10 Converting models from DV set
Misc Techmarines & Servitors: haven't decided what to do with them, think I have 4-5 servitors and 2-3 techmarines
FAST ATTACK
Zeta Assault Squad: 1/10 need to build convert, paint others
Eta Assault Squad: DONE Pic
Theta Assault Squad: DONE Pic
Vanguard Veteran Squad (Jump): 0/10 need to convert/build/paint
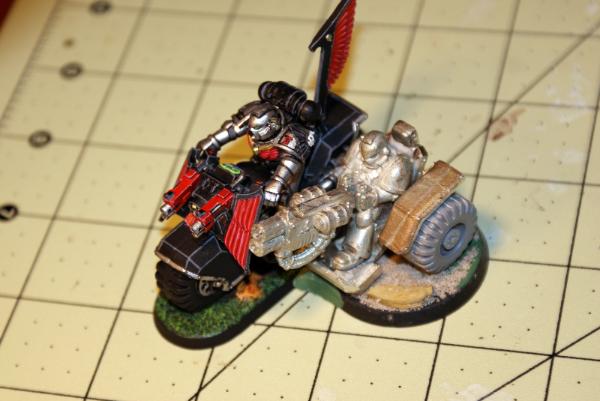
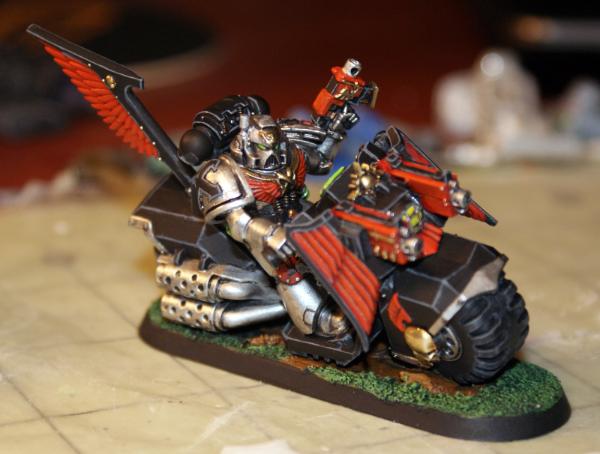
Vanguard Veteran Squad (Ground): 1/10 done Pic - This entire squad will be the metal veterans in the line with the guy pictured, need to convert/build/paint the remaining models
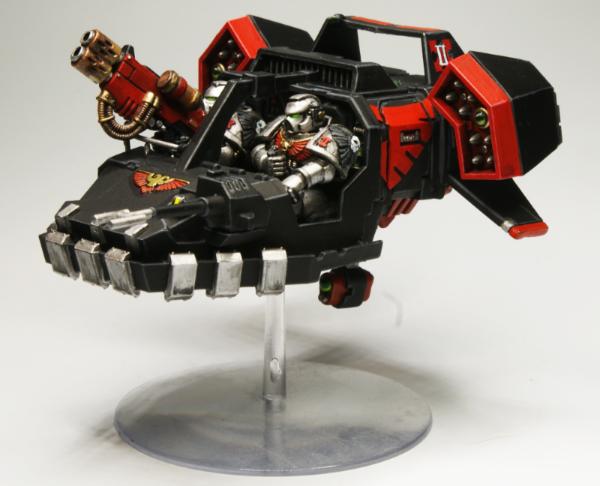
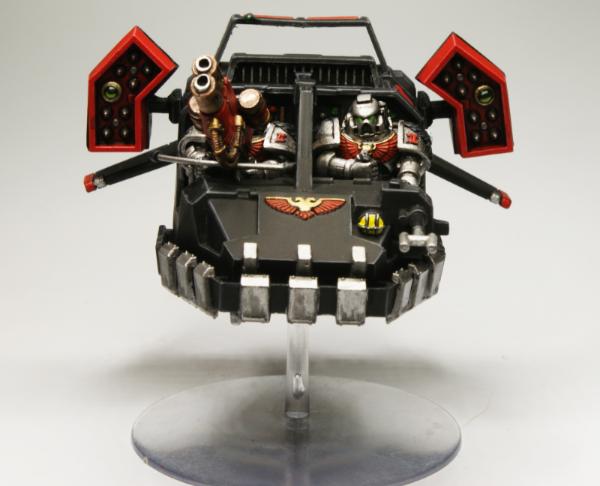
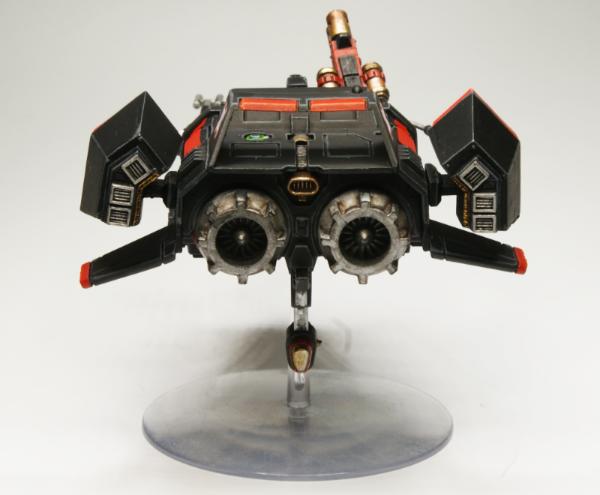
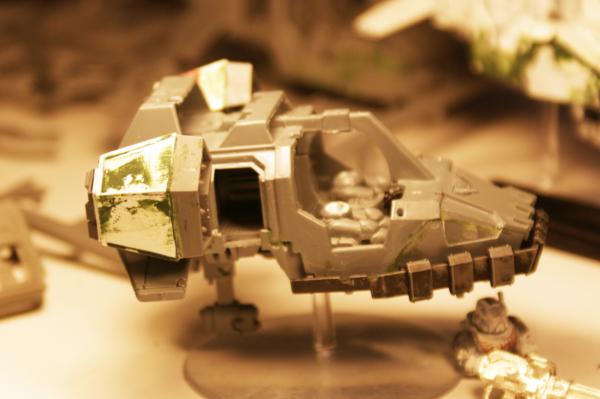
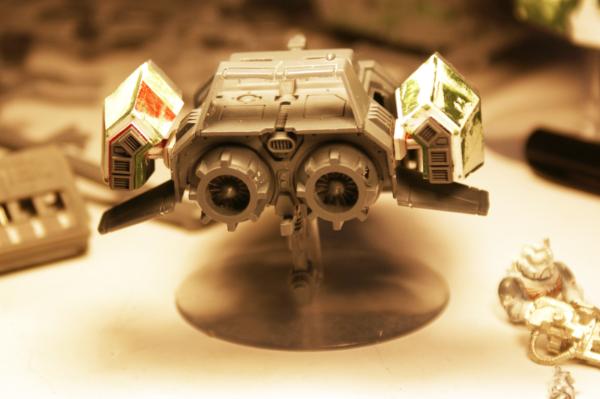
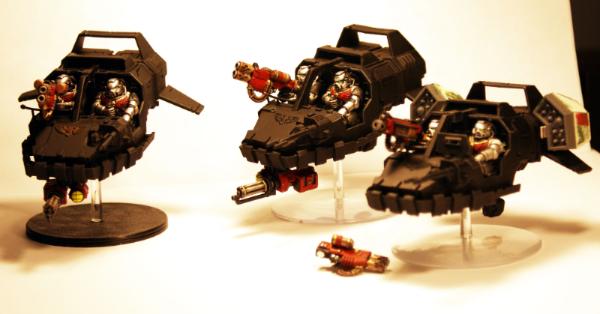
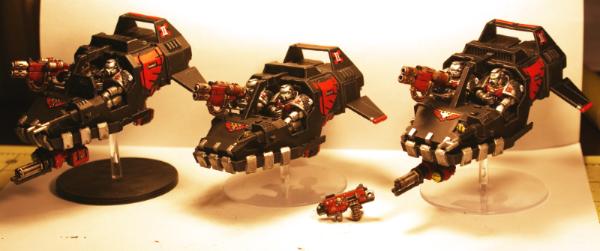
Land Speeders: DONE - 1 set of custom typhoon launchers built, all speeders magnetized to become any variant spec.
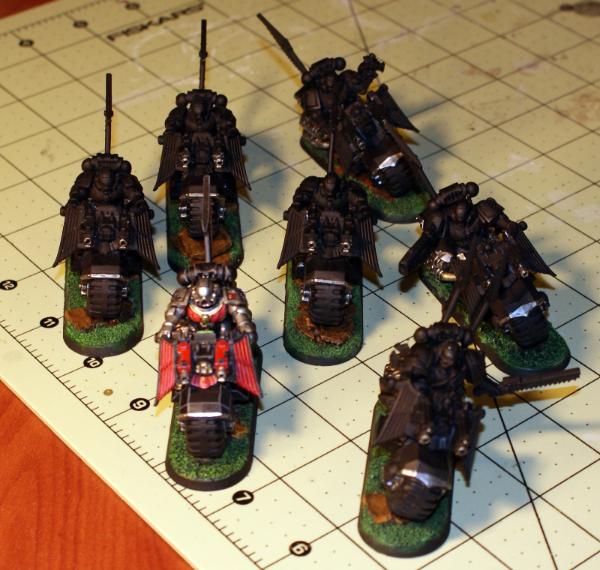
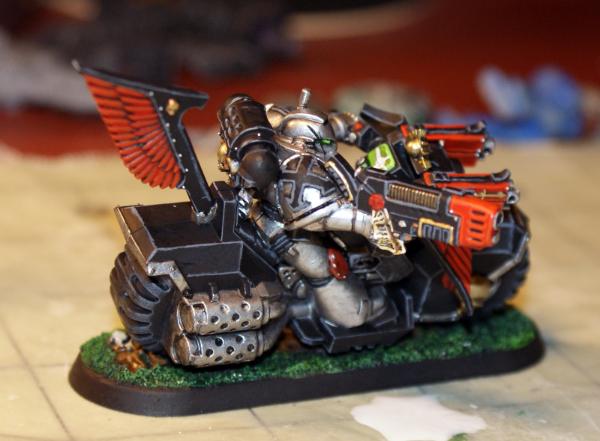
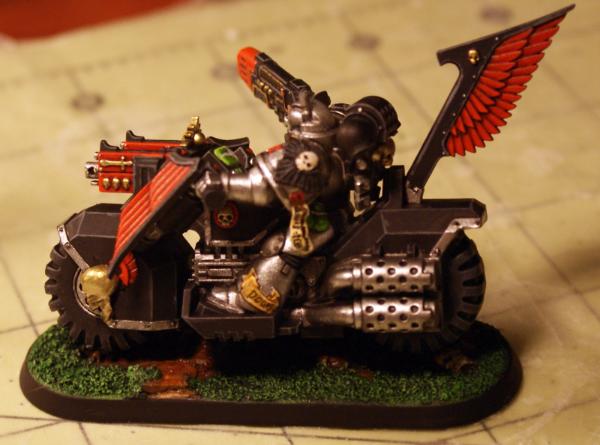
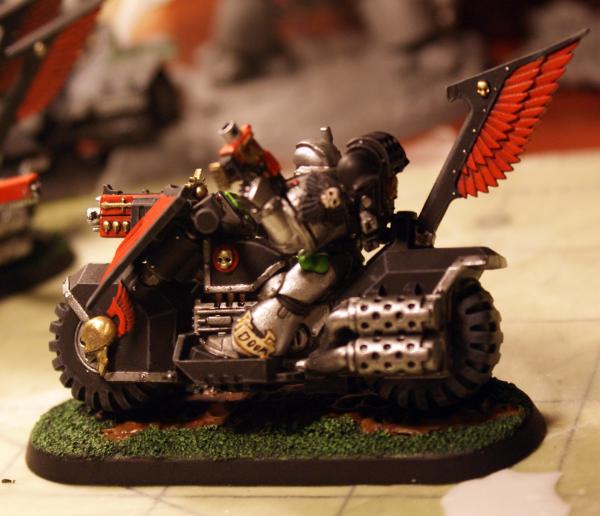
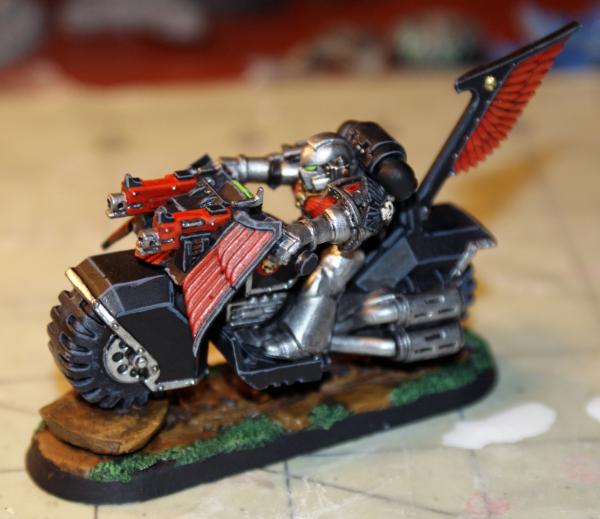
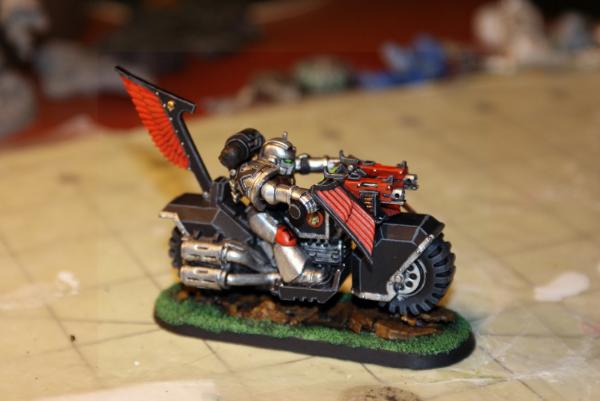
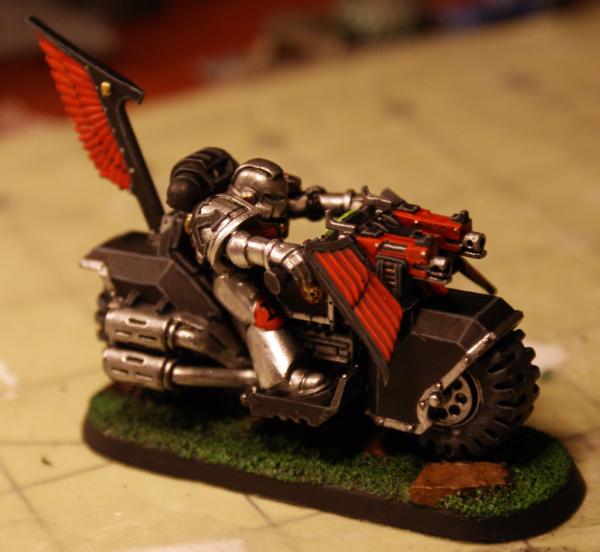
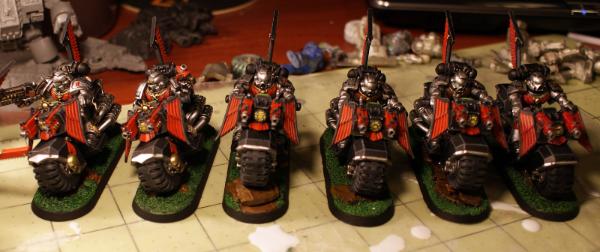
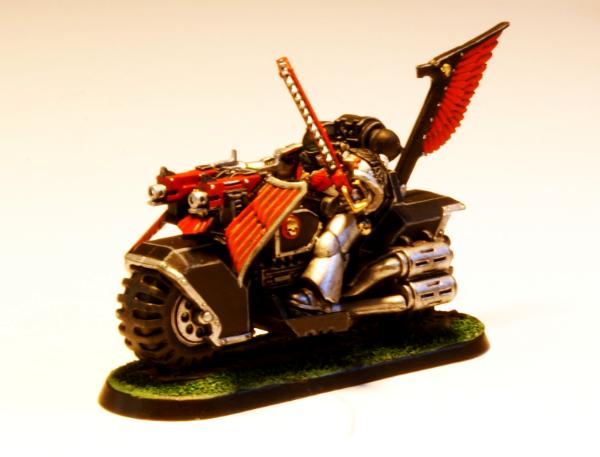
Bike Squad #1: DONE Bike #1, Bike #2, Bike#3
Bike Squad #2: DONE - Bike#1, Bike#2, Bike#3
Bike Squad #3: DONE - Bike#1, Bike#2, Bike#3
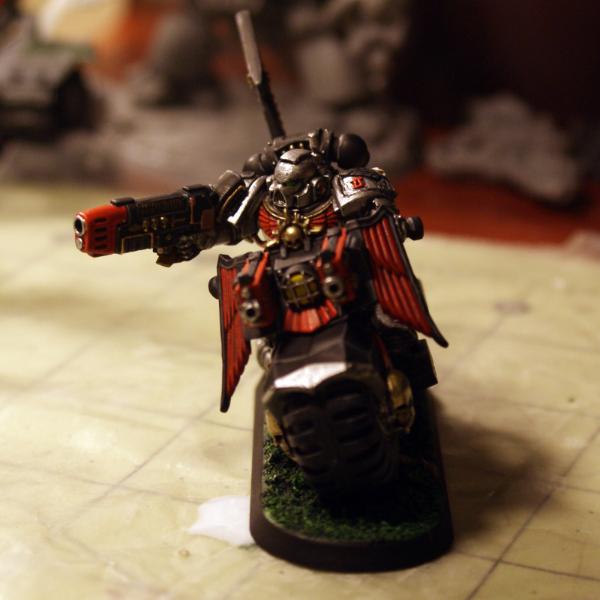
Attack Bikes: 3/3 Done - Pic
Scout Bikes: 0/3 Done, need to clean/convert/build/paint
HEAVY SUPPORT
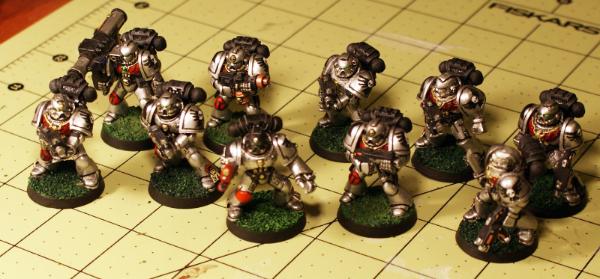
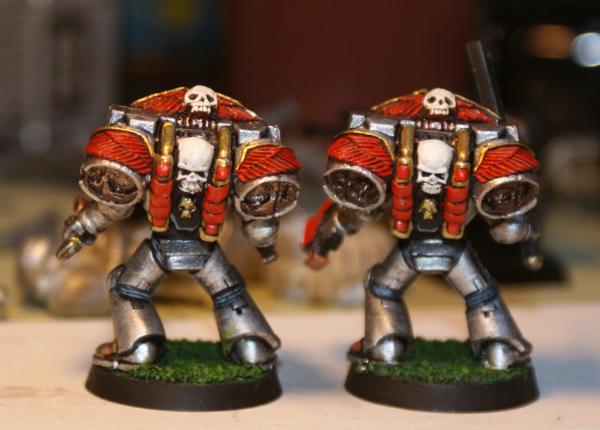
Iota Devastator Squad: DONE Pic
Kappa Devastator Squad: DONE Pic
Predator: 0/2 Done
Vindicator: 0/2 Done
Land Raider: 0/2 Done
OTHER VEHICLES
Razorback #1: Done pic1 pic2 pic3 pic4
Rhinobacks: 1/10 Done Rhinoback 1 I'm going to make all of my rhinos out of razorback kits and make each so that it can pop on any add on/mod. Planning 5 tac squad rhinos, 2 Devestator rhinos, and 1-2 for veteran use.
Drop Pods: 0/1 Done
62373
Post by: JWMarines
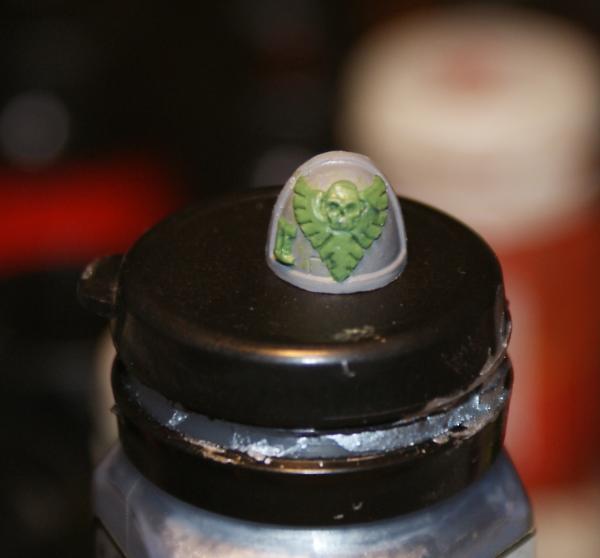
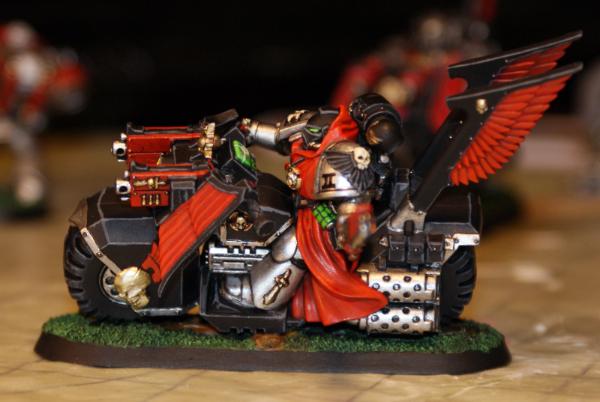
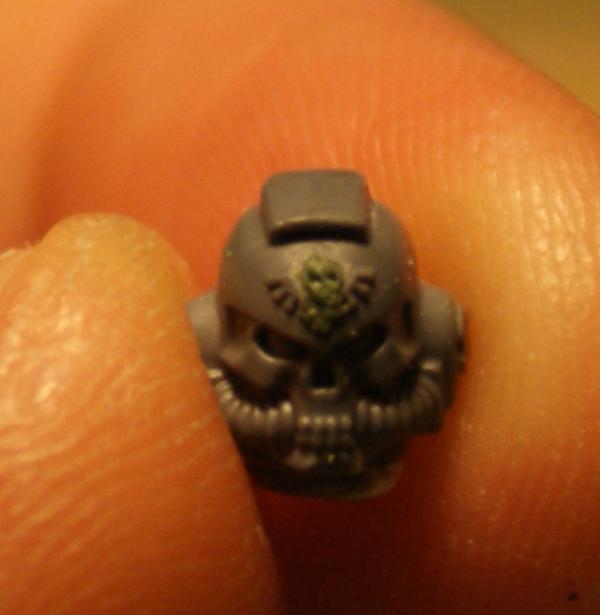
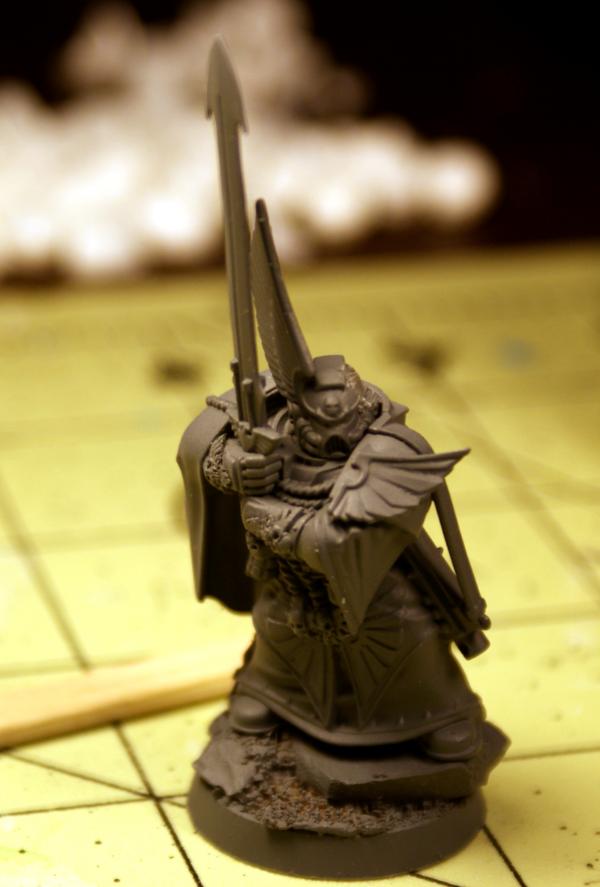
I was working on a veteran model for my HQ, pictured in the above post, but I wasn't happy with the axe. I just can't seem to figure out how I want to do it. I tried red and going into orange, but it I think I overused the orange and didn't get a good effect. I also, don't really want to just pull the color wheel out and go green... or blue... or purple... But I think I'm going to end up going green, though I think I'm going to start with black with a green wash and pull the edges up to scorpion + white. I don't know, if anyone has a suggestion, throw it out here.
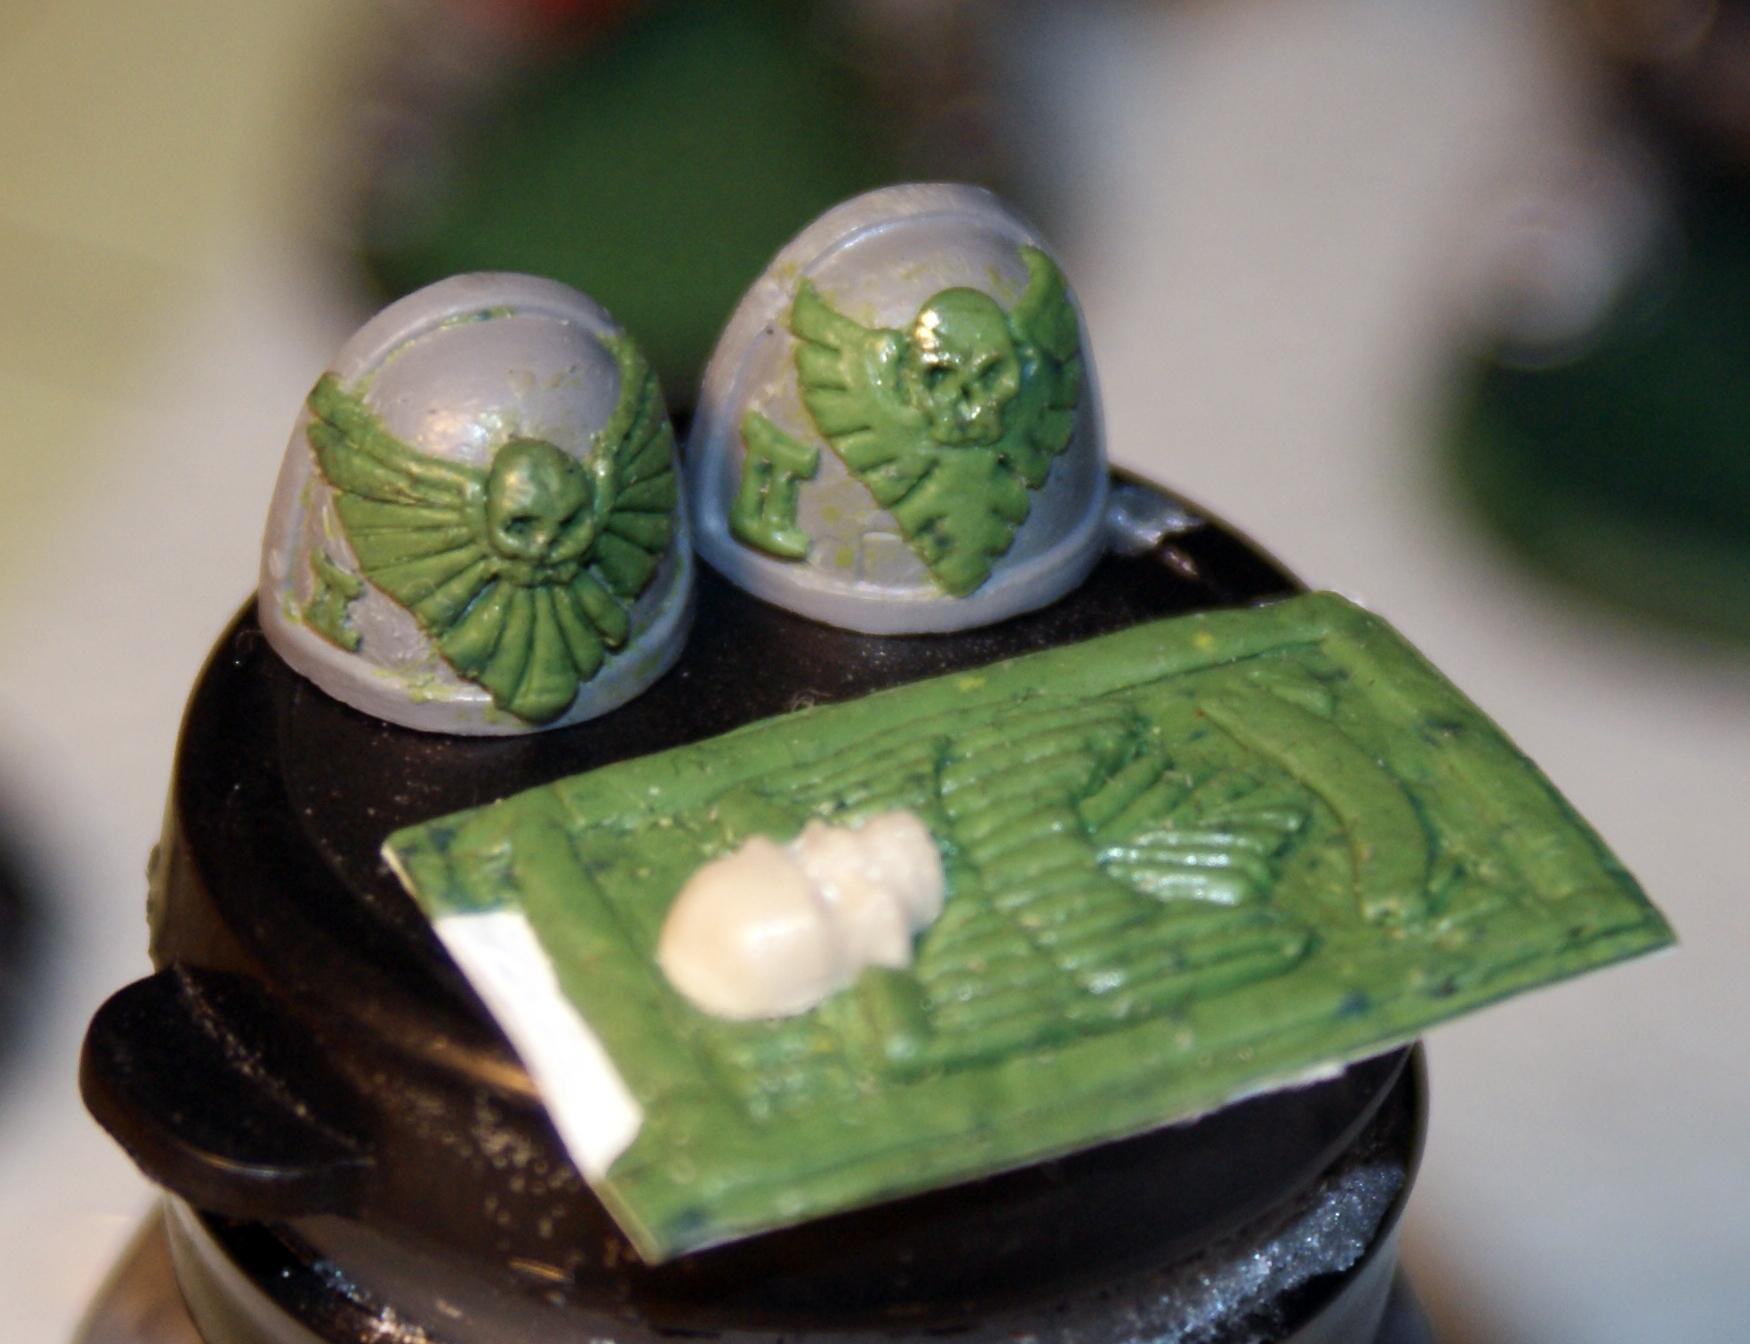
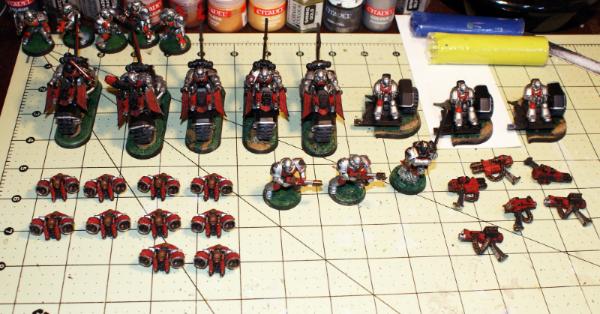
But my new project for the company is to cast my own shoulder pads and replace all replaceable ones on my models. I'm super tired of trying to freehand the damn eagle w/skull. This is going to be my first attempt at casting my own pieces, but I'm pretty happy with the master that I sculpted up. Check it out.
6098
Post by: ghostmaker
Got the models and the scheme and the shoulder pads. Time to rock and roll! Good luck
62373
Post by: JWMarines
...waiting for my first mold to dry... then hopefully I can try my first shoulder pad cast.
In the meantime I went with the black to green power axe on my example veteran
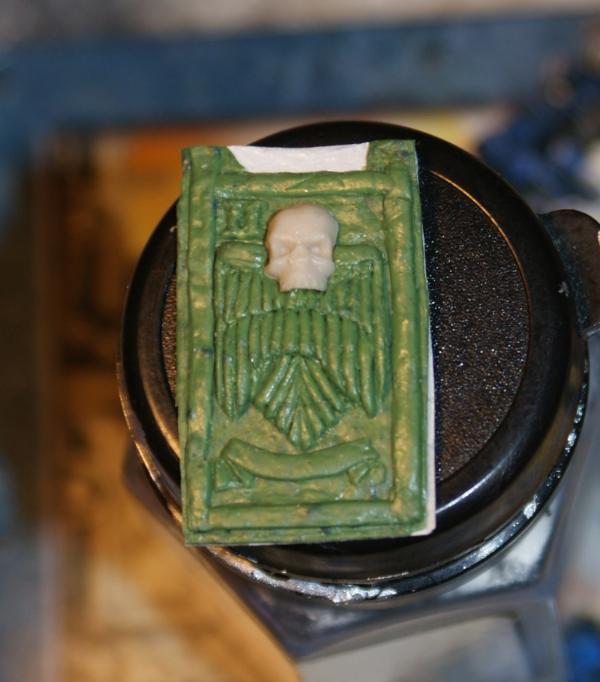
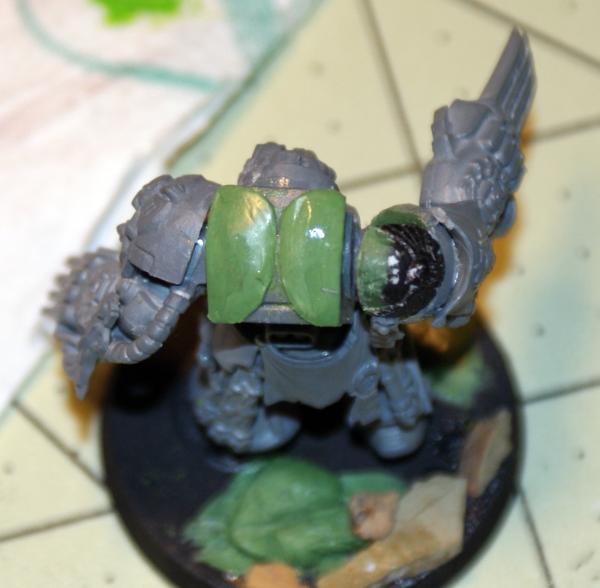
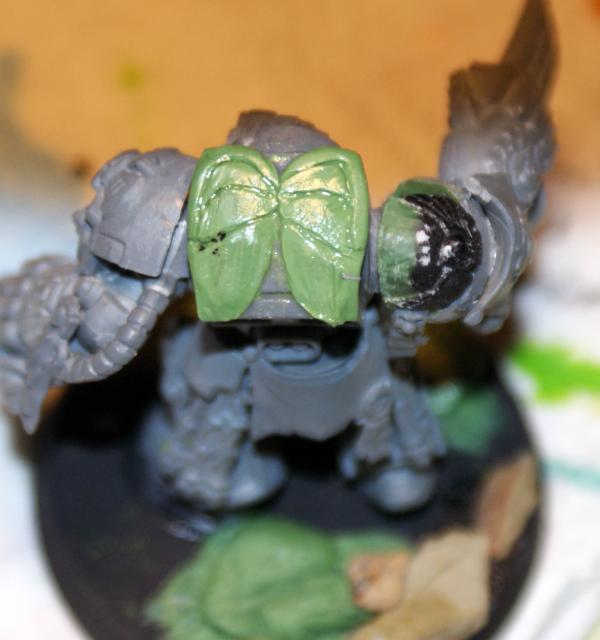
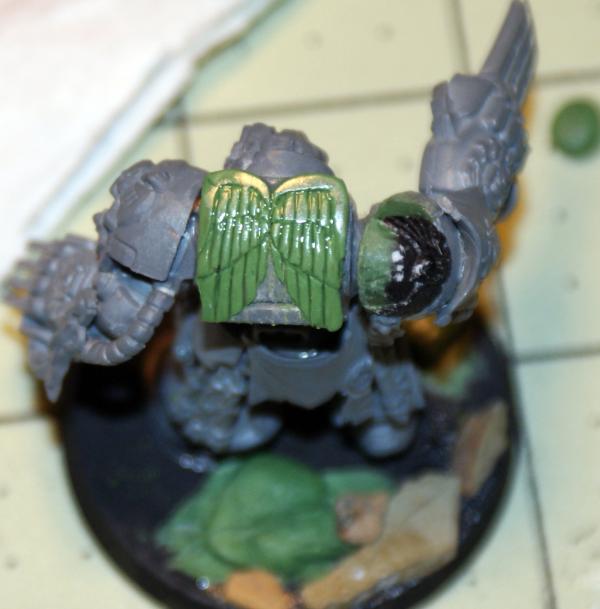
Then I started sculpting on a banner. Sadly, I think my green stuff is WAY too old, so it's tough to get it smooth at all. Still, I like how it turned out.
62373
Post by: JWMarines
Got a couple things in the works. I'm currently painting my Alpha and Beta tactical squads. I've ripped off the old left shoulderpads in preparation for my casting set that should come in soon. Also sculpted a new shoulder pad and will either use both for variation or pick the one that turns out better and go with that. Here's what they both look like: I only have 3 sergeants done at this point, so I need to build the sergeants for my 2 devastator squads and my remaining 2 tactical squads (based on fluff from http://wh40k.lexicanum.com/wiki/Doom_Eagles#.UC58-91lTsN I'm going with 3 jump pack assault squads vs. 2 and will have a 10 man detachment of Vanguard Veterans from 1st Co.) Once I get those sergeants built, painted, I'll start posting some pics of the squads. Just being back into the hobby for about a month now and being on here has given me a load of new ideas, techniques, skills, etc... So, a lot of the stuff that I had done with this company before I got back into it, I now want to redo, touch up, add to, and in general, improve. I'm glad I'm learning so much more these days, but it certainly makes for more work to do.
62373
Post by: JWMarines
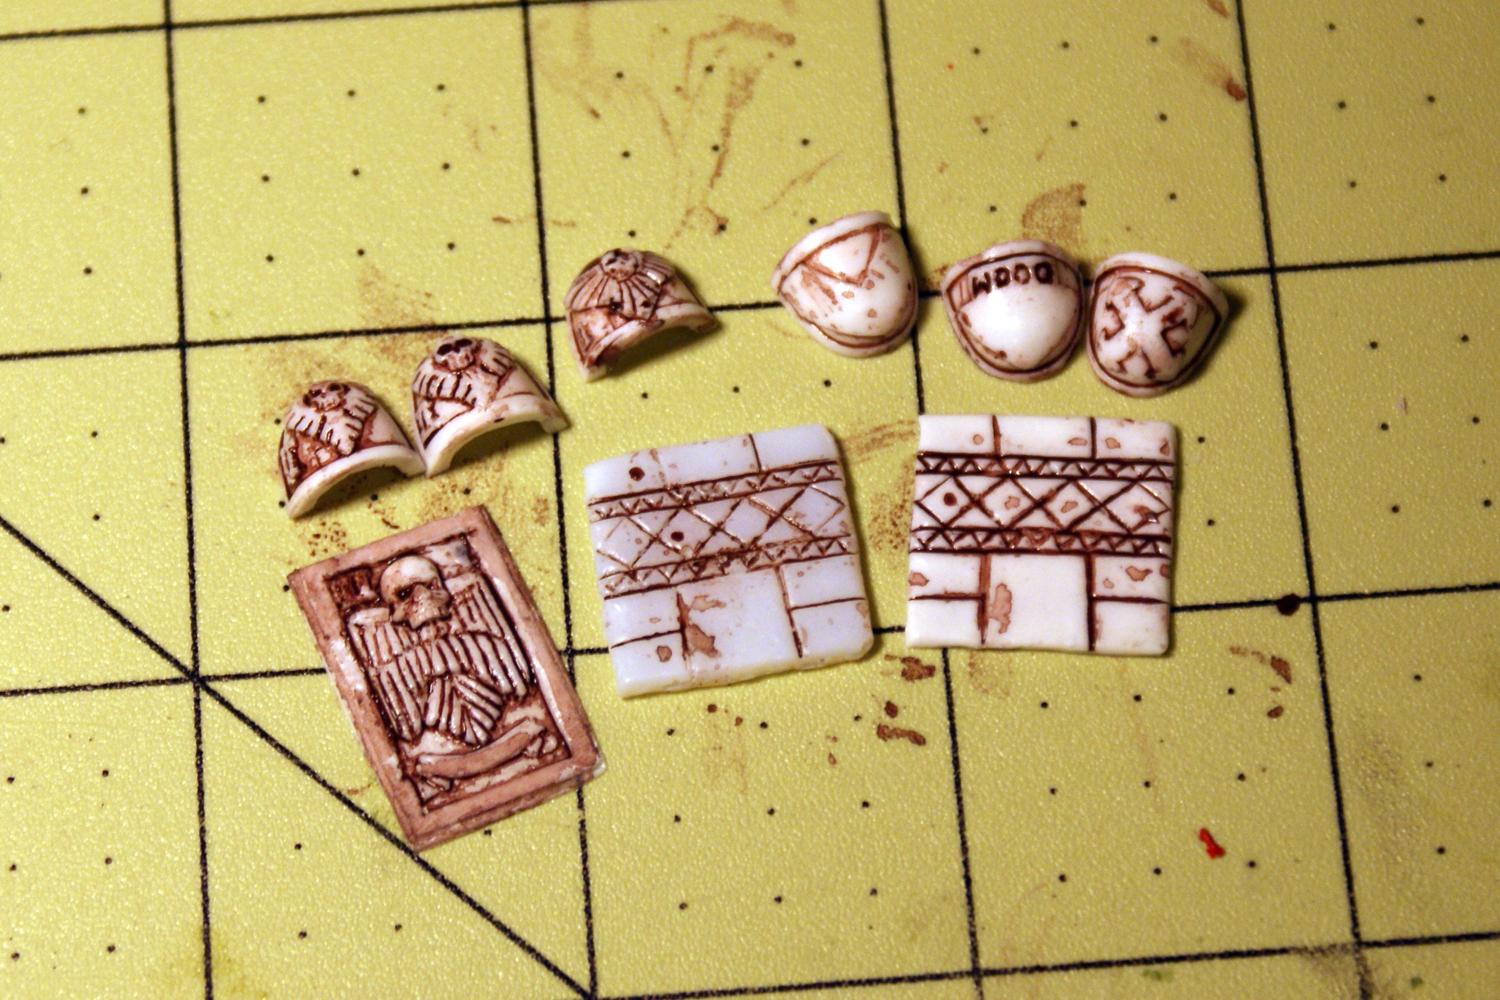
Got some decent results casting my custom shoulderpads... and a start to custom bases for my high elves too.
62373
Post by: JWMarines
Finally finished painting my Alpha squad (yeah I use greek letters and roman numerals at the same time)... Got molds made for my shoulderpads and fixed them all up with shiny new shoulders.
Next up is to swap out shoulderpads on Beta squad and get those finished up.
Status of the company is now:
Alpha Tac. Squad: DONE
Beta Tac. Squad: Needs shoulderpads & backpacks
Gamma Tac. Squad: Old shoulderpads, but DONE
Delta Tac. Squad: Old Shoulderpads, but DONE
Epsilon Tac. Squad: Old Shoulderpads, but DONE
Zeta Assault Squad: One model done, need to build convert, paint others
Eta Assault Squad: Need to purchase squad
Theta Assault Squad: Needs jump packs, other painting DONE
Iota Devastator Squad: Need Sergeant painted, rest DONE
Kappa Devastator Squad: Need Sergeant painted, rest DONE
None of the HQ, 1st Co detachments, scout detachment, or armory are done.
9598
Post by: Quintinus
Can't believe that barely anyone has posted on this thread so far, really nice work! The greenstuff shoulder pads and banner rule, I want to one day be able to do stuff like that.
62373
Post by: JWMarines
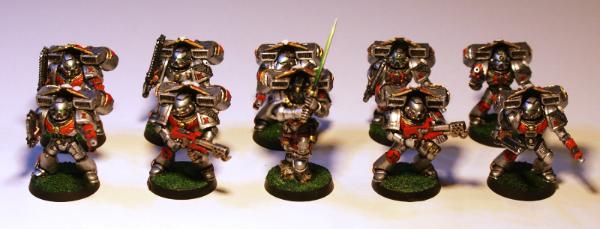
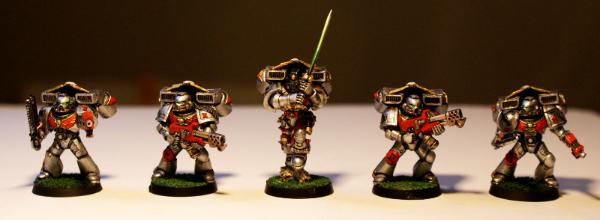
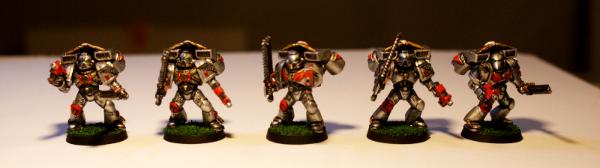
Thanks Vlad, I think the shoulder pads are working out pretty well. I have all of my Alpha and Beta tactical squads outfitted with the custom resin shoulder pads, along with my later created sergeants.
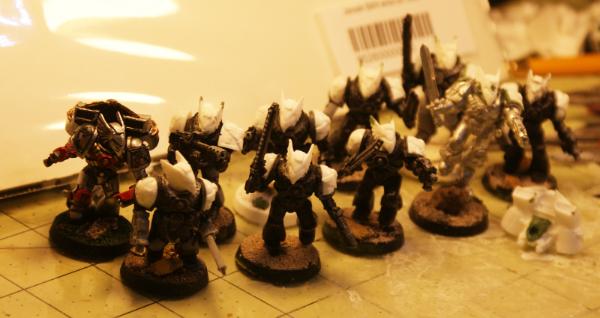
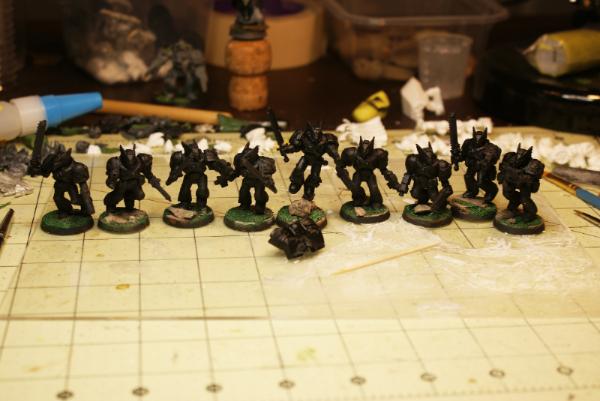
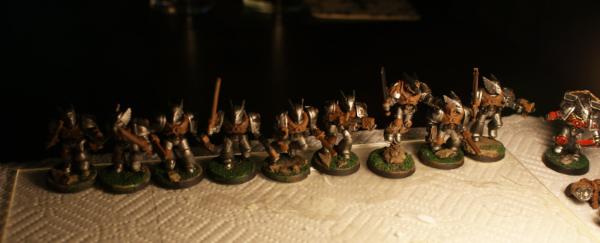
I've now got all of my Tactical squads complete. For the 2nd company I'm doing 5 Tac, 3 Assault, and 2 Devastator (just need to finish up painting the sergeants for these and they will be done.)
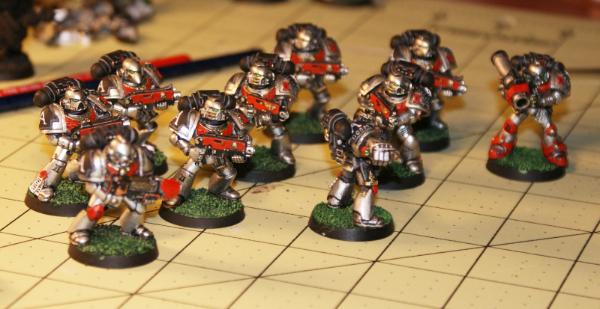
So here's my Tac squads.
Alpha
Beta
Gamma

Delta
Epsilon
All
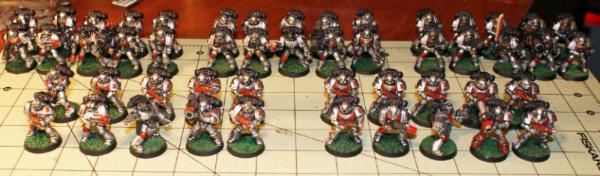
Status of the company is now:
Alpha Tac. Squad: DONE
Beta Tac. Squad: DONE
Gamma Tac. Squad: DONE
Delta Tac. Squad: DONE
Epsilon Tac. Squad: DONE
Zeta Assault Squad: One model done, need to build convert, paint others
Eta Assault Squad: squad purchased, need to strip, rebuilt, paint
Theta Assault Squad: Needs jump packs, other painting DONE
Iota Devastator Squad: Need Sergeant painted, rest DONE
Kappa Devastator Squad: Need Sergeant painted, rest DONE
None of the HQ, 1st Co detachments, scout detachment, or armory are done.
Thanks for looking!
Automatically Appended Next Post:
I've also been buying up some stuff on ebay... based on what I have and what is still incoming, these are the peripherals that I'll be able to add to the company soon.
- 1 x Land Raider
- 2 x Razorbacks
- 1 x Rhino (would like to get one for each Tac squad)
- 1 x Predator
- 1 x Drop Pod
- 3 x Land Speeders
- 2 x 5 Bike squadron (+attack Bike)
- 2 x Dreadnought
- 1 x 10 man CC Terminators (lightning claws)
- 1 x 10 man shooty Terminators
- 1 x 7ish(plan to go to 10) man Veteran Vanguard - ground assault
- 1 x 10 man Veteran Vanguard - Jump Packs
- 1 x 10 man Sterguard Veterans
- 2-3 x 5 man Scout squads
- 1 x 6 man HQ
62373
Post by: JWMarines
I finished up the sergeant for one of my devastator squads, so that squad is now officially complete. 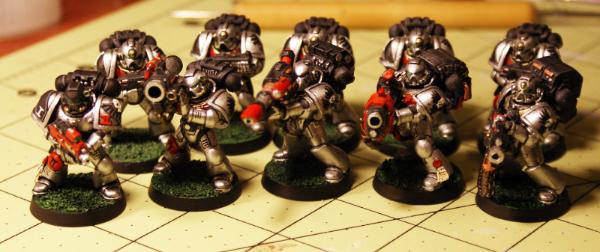 I picked up the DV LE box and took the 3 bikes in there and converted just a bit to tone down the sword part of the DA iconography, and threw a couple more skulls on there and inserted shoulder plates from the shoulderpads I've been casting where I could. The sergeant's right shoulder is a bit of a challenge but I might take a swing at it. I think I managed pretty well on the others. Lots of dremel cut-off wheel, x-acto and filing, but it worked. Also seems like a good way to get at the shoulder plates for some of my metal models. Here's some pics of my bikes in progress... I am continuing the front wing and wing banner-thing on the other bikes in my 2 squads. So with these 3 I have 10 built out with the wings on the front and back. I think I'm going to do the bikes Black, wings red and the standard silver troopers. 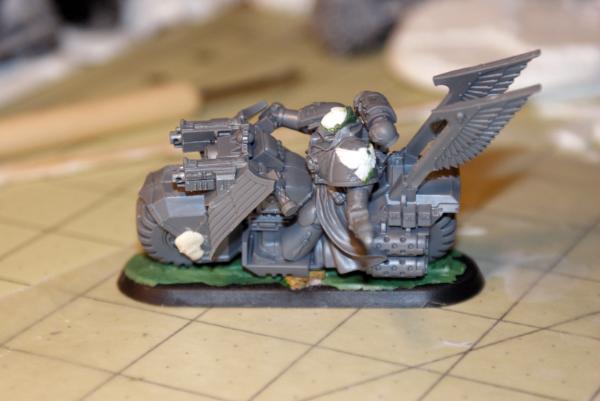 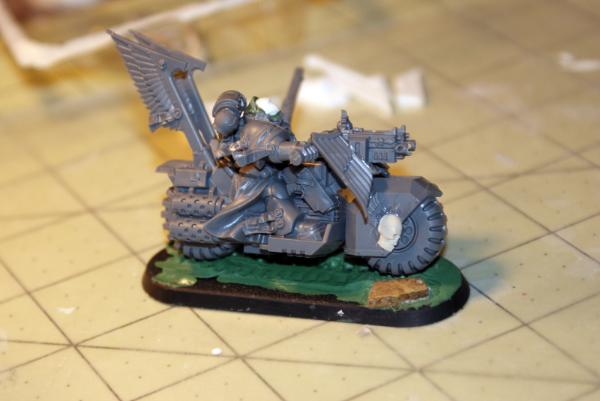 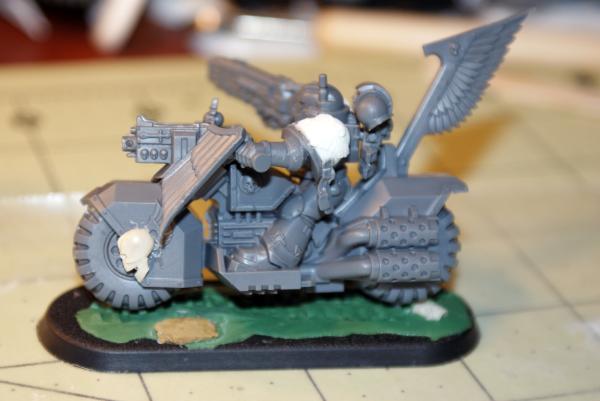 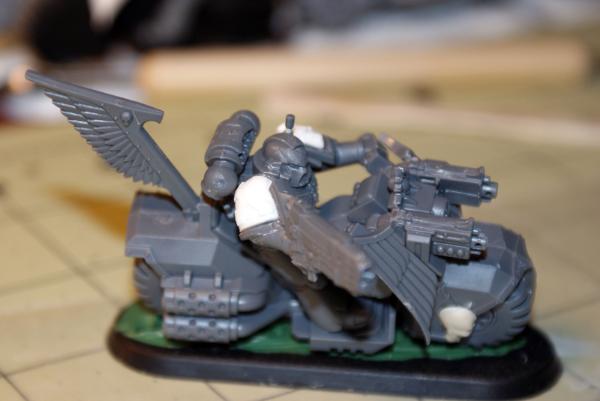 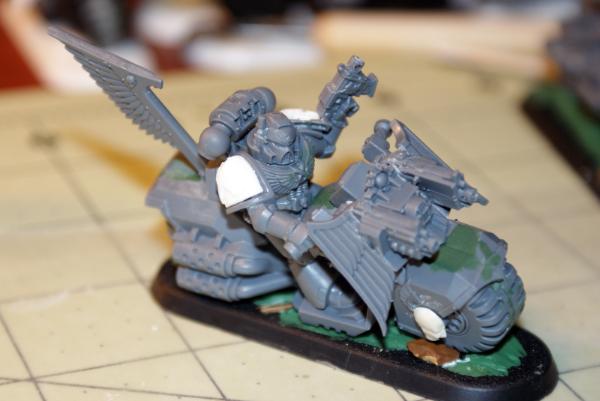 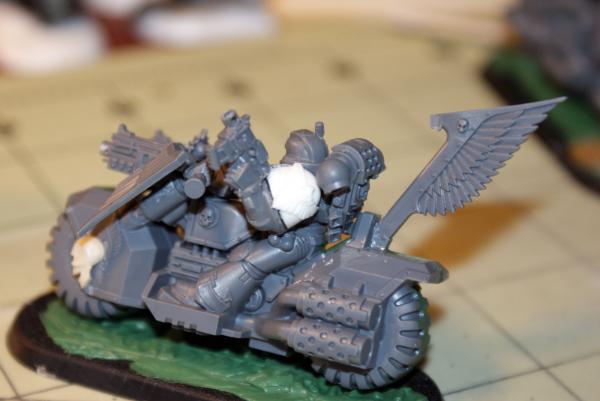 I took one of the wheels from my other bike and ran it through the green stuff that I put on these bases... my typical basing on this army started back in 2004-2005 and it was really basic, so I wanted to add a bit as I get away from the 25mm base squads.  That's it for now, thanks for following along!
62373
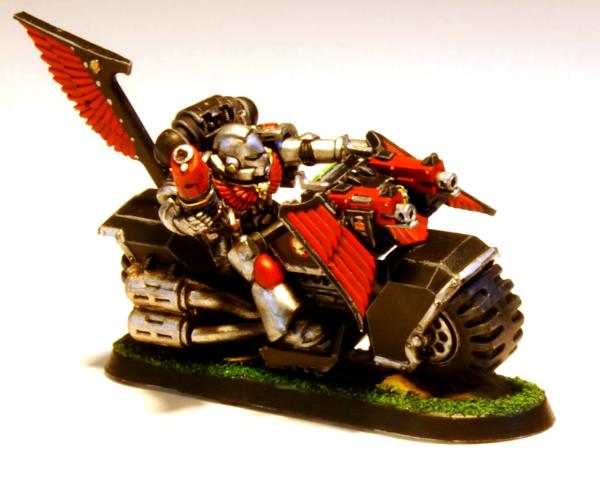
Post by: JWMarines
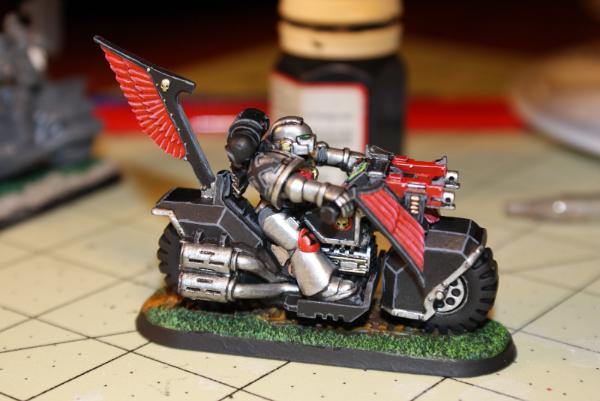
Finished up my first Bike! Well... mostly. I really haven't decided how much or what kind of weathering and battle damage to apply to any of this army. So, at this point I'm just going to do the basic paint and once I decide what I want to do, I'll do them all the same.
I'm not entirely pleased with my line highlighting. It's still a bit rough... I've tried using the side of my brush, but I haven't had a ton of success with that either. It worked the best on the front left fender/wheel guard, seen in the second pic below.
Also, I used pink to highlight the red on these... not sure if I'm happy with it or not.
Anyone got some thoughts or suggestions?
Oh, one more question... how do you guys think I should handle squad affiliation with my bike squadrons? My understanding is that the company will break out bikes for their marines when needed, so it's the battle squads that mount up on bikes... I think I could just ignore squad affiliation for these or give them one of the assault squad affiliations. Thoughts?

59509
Post by: Brymm
Great project! Great progress!
What methods did you use to create the molds/cast the pads? This is something I might want to look into trying considering how well yours turned out.
Keep it up!
43840
Post by: Deathshead420
My first 40k army ever I did a Doom Eagles army. I am now over to the chaos side but still have a place in my heart for the DE. Consider me subbed. The shoulder pads look very badass, I wish I would have tried that last year.
Where are the jump troops? Do you plan to run them as BA or c:sm? Thats where I went wrong I ran them as vanilla sm, wish I would have run them as blood angels.
62373
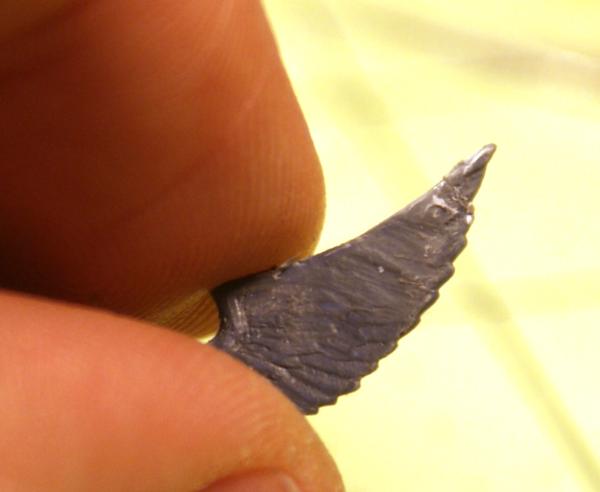
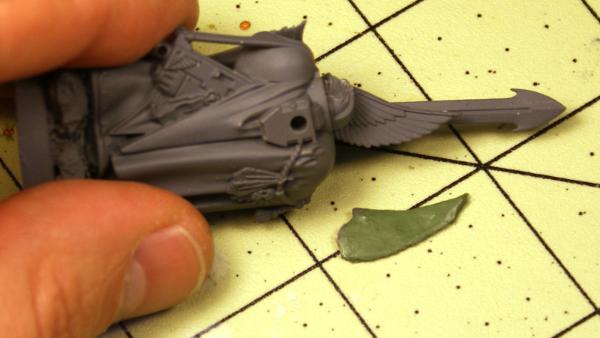
Post by: JWMarines
So the sculpts for the shoulderpads are just interpretations of the doom eagles iconography I saw on the rare GW assault marine you see, and from warhammer40k wiki and lexicanum. I did 3 different versions and decided to use the one for tac squads, one for assault/elites, and one for heavy support.
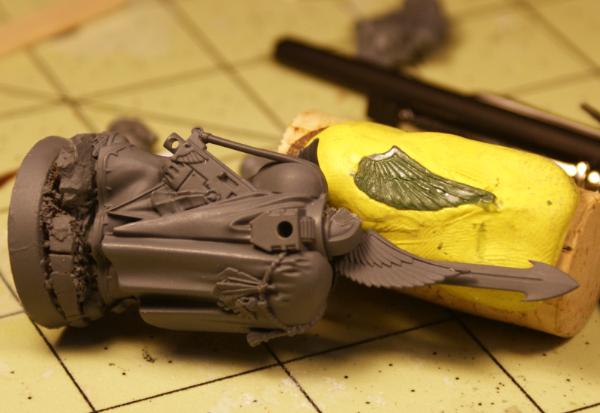
To make the molds I used Oomoo 25 Silicon and the same company's Smoothcast 300 2 part resin. In Blackhand's casting tutorial thread, there is a TON of info, and I now understand why Aretheon (sp?) recommends the Smoothcast 305 (longer pot life) as you really only have a minute or two of nice liquid consistency to get the resin into your molds.
Oh, yes... Jump Pack Assault squads... so I have one assault squad fully painted, but missing jump packs (I'm casting some for them and plan to cast up the same ones for all my jump pack marines.) So I haven't posted them up yet. I need to do some modifications to the base jump pack I'm going to cast, so that's still in the works.
I also just got another 10 man assault squad from ebay and got them into the stripping liquid... that will take a while to strip them down and rebuild that squad, and they'll need the custom jump packs I'm making too...
I started with 6 OOP metal assault marines with metal jump packs, and I've added 14 or 16 veteran vanguard marines. 9 of those will probably be a veteran vanguard jump squad with their sergeant being the metal Shrike model (with a few conversions of iconography). The rest of those vanguard I guess will fill out my metal jump squad... So, as a company they will have 30 jump pack assault marines and a 10 man vanguard detachment.
As to how I plan on playing them... I really haven't thought about that too much. They're from the Ultramarines line, so I feel like they need to be vanilla... but then there's the elite assault component to their story, so maybe BA is the way to go. I took this on more as a painting/modeling project and didn't really think too much about playing them. I have a World Eaters army to eat other armies with if need be. 
Thanks for the feedback guys!
43840
Post by: Deathshead420
They're from the Ultramarines line, so I feel like they need to be vanilla
That was why i picked vanilla, I was trying to be as fluffy as possible. In the end though when i seen how much more effective I could have made my army with the BA dex I really did come close to switching.
62373
Post by: JWMarines
hopefully at the end of the day I'll have PLENTY of models to field just about anything... though, I might consider picking up a Baal pred or two.
62373
Post by: JWMarines
Small update on the bike squadron progress...
I have 1 bike done, 9 others that have been converted to have the wing motif that the DV Box set bikes have. Here's the first batch, I put the finished bike in with these 6 that I'm currently painting. I have 3 more converted, but I need to fill a few holes before priming them.
I bought 2 attack bikes off ebay and have them sitting in some Super Clean to get rid of their nasty paint. And then...shocking even myself... I found a sidecar with both weapon options just sitting in my bits box.
I posted a question in the regular painting and modeling forum about whether or not to base an attack bike. They don't really make bases that work for them really well, but I got some advice from some people there and decided to make my own base for them. In that thread it was mentioned to magnetize the sidecar and the underside of some standard bikes. So... mini project... I built the sidecar I found in my bits box, magnetized both weapon options (metal so the magnets work OK, but they're really heavier than the magnets can take)... and added a magnet to the underside of a bike and the flange that you would normally glue to the underside of the bike. Again, with the entire sidecar assembly being metal it's a bit heavier than the magnets can easily take, but it works! To make this manageable, I took a 40mm base, cut off part of one side and then used green stuff to make the sidecar base flush up to the normal bike bases. I'm going to make a mold of the sidecar base and cast up a couple more for the sidecars I have to strip. All in all, I love this idea of magnetizing the sidecars... I'll be able to do anywhere between 9 bikes and 3 attack bikes or 12 normal bikes. And with all the sidecars having both multimelta and heavy bolters available, this is going to be a very flexible bunch of bikes.
Here's a pic of the sidecar on the base lined up with my painted bike:
And Here's a pic of the base, side car and magnetized weapon options:
Thanks for reading guys!
62373
Post by: JWMarines
Progress on two fronts to report!
#1 Bike Sergeant for my first bike squad is done.... When I say "done" I mean it's at the stage that I'm comfortable with, but I think I'm going to hold out until I get either much more of the company finished or until I finish the whole thing to do final highlights and maybe add some battle damage/wear and tear. For now I'll just think of the company as freshly refitted with repairs, replacements, and a fresh coat of paint haha. I've only been back at this for almost 2 months after well over 5 years away from the hobby, so I still feel like my fine detail work needs to improve before I really try to add those finishing touches.
Anyway, with the bike sergeant, I used the DV box set sergeant, but I hates me some bare heads, so I cut his head off (and some of my thumb) above the nose part of his mask and slipped in a sliced off marine head. The greenstuff work to mesh the two and add back in the cloak hood to the top turned out much less smooth than I wanted, but I went with it anyway. I also removed the sword from the front fenders and replaced it with a halved skull. Then I dremeled one of my cast shoulderpads that I'm using for assault troops to leave just the chapter icon and glued that in place on his existing shoulderpad. I think that covers the conversions that I did on this guy. So, here he is:

#2 I finally decided how I'm going to do my jump packs. I wanted something more than normal jump packs and I wanted it with iconography specific to the Doom Eagles... Fortunately, there was a pretty good starting point in existence; that being Shrike's jump pack. The iconography was pretty darn close to what Doom Eagles would use. I did need to make some changes. There's a bird skull on the back of the Shrike pack between the boosters, so I removed that and replaced it with a standard skull. There's also a smoke launcher or something that sits right above his head on the front of the pack. That had to go and I dremeled out a nice hollow for the head and a portion of underneath the top wings. I think on the Shrike model, his jump pack sits pretty high and back, but I needed it lower and more forward, thus the hollowing out where the marine's head will go...
Here's the result all painted up and mounted on an assault marine (he's already had his shoulderpads replaced with my custom ones):


That's it for now. Hoping to finish up more bikes soon as I cast up ~40 more jump packs and fill holes in them with green stuff...
Thanks for reading, thoughts, opinions, critiques, etc, ... more than welcome!
43840
Post by: Deathshead420
I love that back pack, well done.
31320
Post by: Knightley
The Biker sgt head is simply brilliant, I'm considering trying to recreate it somehow
62373
Post by: JWMarines
 Knightley wrote: Knightley wrote:The Biker sgt head is simply brilliant, I'm considering trying to recreate it somehow
Thanks! I think the hardest part is getting the cuts to match up between the existing mask part of the biker's head and the top of the marine head you're going to use.
Mine is rougher in person around the top of the "cheeks" of the mask. And I think if I had to do it over again I would have used more fill/head at the back to raise the head up a bit and create a bit more room for the eye lenses.
I made a cut with my xacto right where the mask nose part ends, then I used 3 different dremel bits to get that original head out of there. They are all carving/engraving bits. One is a very sharply pointed cone This One, one is basically a tiny engraving bit that works great for removing plastic material in hard to reach places One of These, and the last is a round-tip cone that removes bulk material pretty fast This One
Automatically Appended Next Post:
.... And now my ideas are getting out of control....
I've got pretty much everything I need to finish the Doom Eagles 2nd Company w/1st co, and scout detachments minus a couple extra vehicles... and time.
But I also had someone drop a Valhallan IG force on me many years ago... and I bought some SoB... and some GK....and another bunch of IG...anyway...
Ended up with: (not terribly familiar with IG models)
~53 Valhallan Infantry
~10 Beret wearing storm troopers (some metal, some plastic single pose)
~45 Cadian Infantry
~12 Steel Legion Infantry
a handful of commissars, ratlings, Ogryns, Rough Riders and misc 'who knows'
2 Chimera
1 Hellhound
6 Leman Russ (various barrels)
On the GK front:
1 Inquisitor
20ish Strikers
SoB:
1 Celestine
10ish Seraphim
6ish battle sisters
So...yeah...starting to think about one big ass imperial array. They're all battle brothers in terms of allies. And I think with the extra devoutness of the Doom Eagles, not to mention their color scheme, they should all fit together fairly nicely. If I need a break from Doom Eagles before the company is done, I have plenty to keep me going.
For the overall color schemes there's
- Doom Eagles (silver black red)
- Grey Knights (silver red gold)
- SoB (probably go with the black armor, red robes and white accents scheme)
- IG (I think I'll try out greys and reds for all of them. I like the way the Voystran vehicles are painted in the codex, but I would go more grey than they do with the brownish tint, but keep the red markings)
Oh and then theres the High Elf army I need to strip and repaint! YAY!
62373
Post by: JWMarines
Back to the Doom Eagles front....
more bikes progress!
I had 5 in progress here with silver and red done.
And here they are finished:
Plasma Gunner:
Bolt Pistol Guy:
Biker:
Biker:
Biker:
Group of the 5 I just finished + the first regular biker I finished:
All of the Bikes I have done as of now:
I got seriously tired of painting bikes during this, and I still have 3 bikes to touch up the conversions on, 3 sidecars to build and convert (and magnetize) and another 2 bikes to build/convert/magnetize... soooo tired of bikes.
I think next I'll paint my other devastator sergeant then maybe push on with some assault marines.
62373
Post by: JWMarines
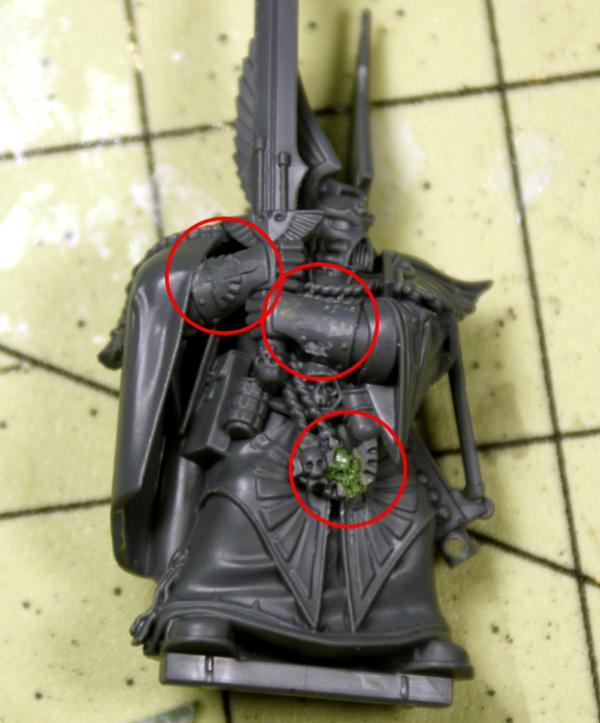
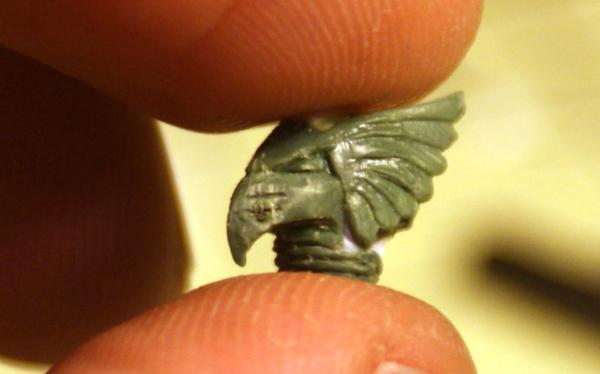
Shifting away from Bikes now, I started painting the sergeant for my other Devastator squad. Primed black, I started with a chainmail basecoat, then laid on a black wash for shading. I watered it down a bit and put it on heavy, so as I was waiting for that to dry, I picked up a Terminator sergeant that I began converting a couple weeks ago.
I started getting an idea in my head when I saw the vertical wings sticking up from the DV box Termy Sergeant's torso top. I honestly hate them pretty excessively, but it gave me the idea to try some kind of sculpted covering for the boring top of my Terminators. I had to wait for the wash on my Devastator sergeant anyway, so I decided to try to lay on the first sculpt layer of my Terminator top idea. Here's some WIP shots of where I am with it.
1st I layed down a relatively even depth of green stuff and marked out the areas where I would need to remove some material.
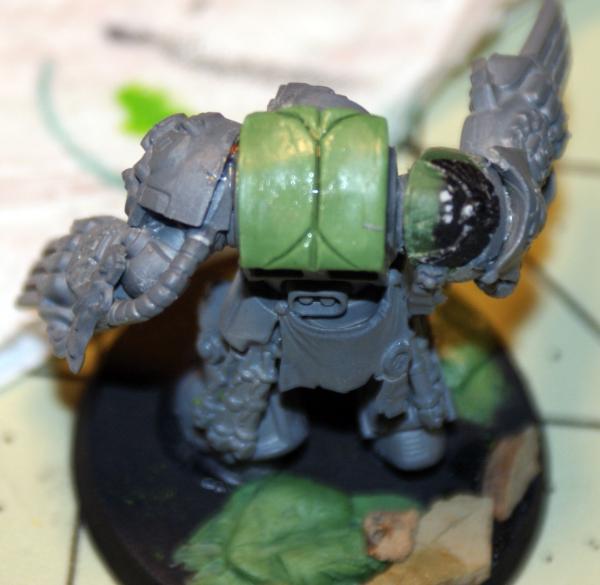
Then I removed said material:
Next I marked out the basic feather layers/shapes:
Then I went through and pressed in the lines of the feather divisions with a new x-acto blade and kind of smoothed them down a bit:
Added some more detail, but the green stuff is still a bit too soft to get hard detail into it. I plan to keep the feathers abstract rather than going for realistic detail. That will keep them in line with the way the rest of the wing motifs appear in the army. But that just reminds me that I need to smooth out the topmost parts of the wing and make it more angular. Beyond the wings, once they cure completely I'm going to potentially add a skull in there to really make it all Doom Eagle-y, and perhaps a few more details.
I want at the end to be able to cast more of these rather than try to sculpt 19 more of these things... To do this I may have to make a press mold or find some way to suspend him upside down into silicone to make the mold. Regardless, between the Terminator wings/crest and the jump packs I've already converted and created a mold for it, and all the other crap I'm likely to sculpt and convert for this project... I will have done a TON of these wing/skull customizations.
Thoughts, suggestions, critiques anyone?
39673
Post by: Gorgrimm
This is a spectacular project! Great color work. Nice to see the Doom Eagles en masse. You've got some really great conversions going on too.
62373
Post by: JWMarines
 Gorgrimm wrote: Gorgrimm wrote:This is a spectacular project! Great color work. Nice to see the Doom Eagles en masse. You've got some really great conversions going on too.
Thanks!
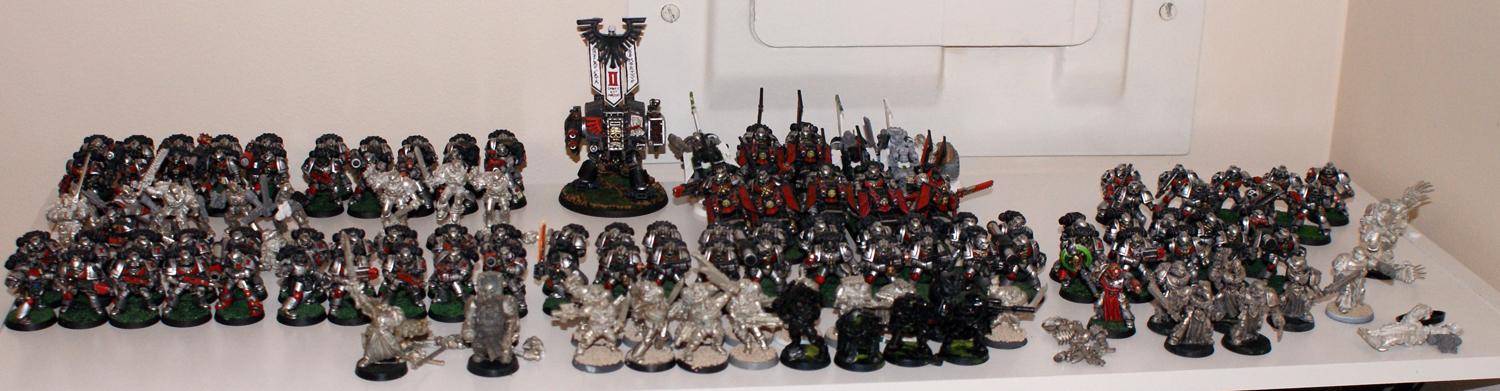
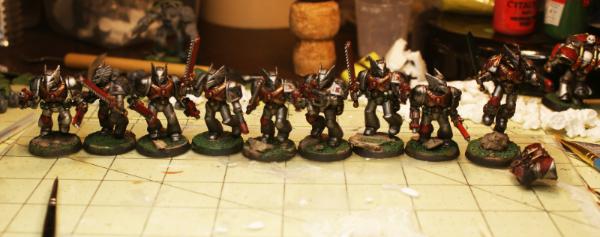
I've finished off the sergeant for my other Dev squad and figured I'd post a pic of ALL the progress I've made.
Here's the Sergeant

And him with the rest of Kappa Squad: (I know... drill the barrels... painted these guys 5+ years ago and the thought of drilling big holes into metal gives my hand cramps)
And here's everything I've got painted, plus some soon to be worked on stuff:
Thanks for following!
62373
Post by: JWMarines
Another update!
Being quite tired of working on bikes, tac squads, devastator squads and the like, I've decided that it's time to do a character.
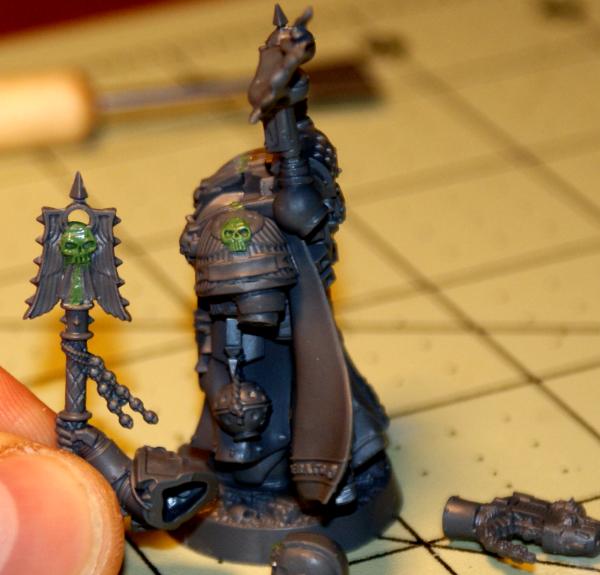
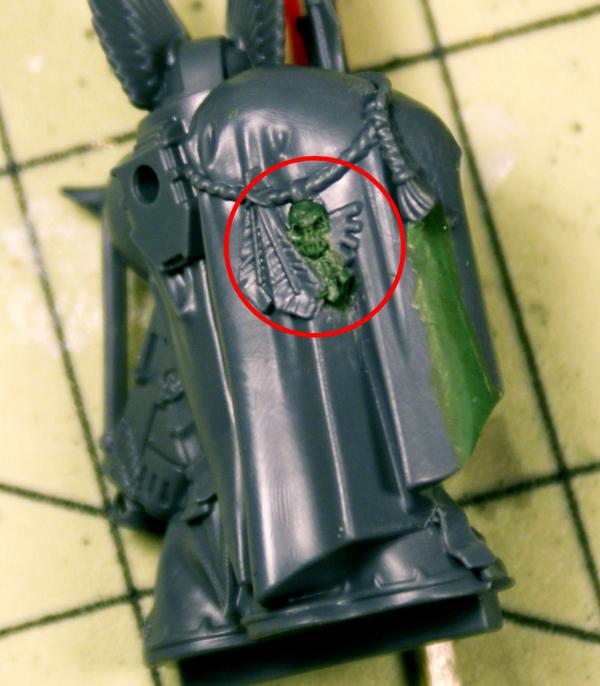
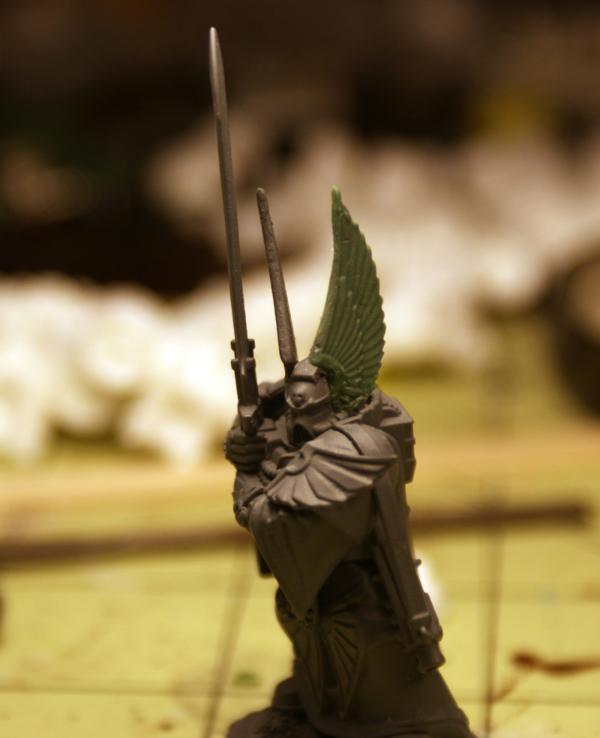
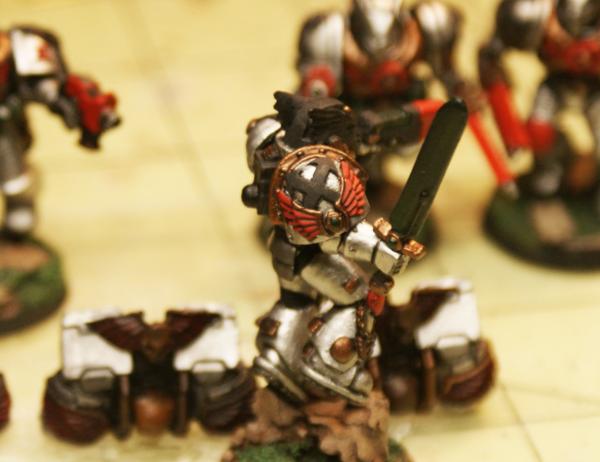
I've had the DV LE Box chaplain staring at me since I got it, so I decided to work on him. But GW went a bit nuts with the Dark Angels iconography on him...so, first things first: conversions!
1. Sword on head... gone! So small and I'm not sure I got it centered well (something I find I have problems with sculpting) but I think it will turn out well:
2. BIG Sword icon on the cloak... gone! It took a while to figure out how to turn this into a Doom Eagles symbol, but I think that extending the bottom extension of the wings and smoothing down the existing sword to act as a center feather... plus adding the skull... worked out well.
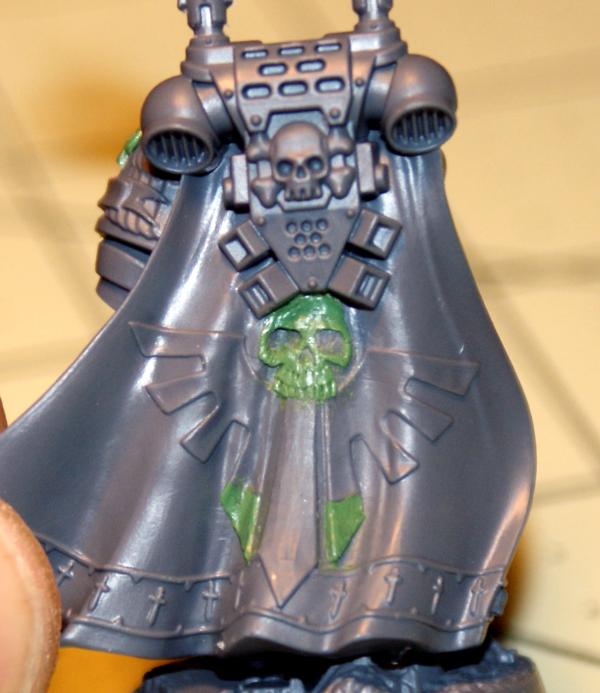
3. Angels on the Crozius, sword on the shoulderpad, swords on the plasma pistol and sword on the beltbuckle area (can't see in pic)... ALL gone! Once I managed to slice off enough of the robed guy on the crozius - on both sides - I had to add a bit of green stuff to give the effect of tail feathers and of course do skulls... I'm so happy with the skull I did on the shoulderpad. I think that'sthe best one I've done. Also, hard to see but removing the sword on each side of the plasma pistol also required re-establishing the casing lines on the front of the plasma pistol.
All in all, I'm rather happy with it. Letting the green stuff cure overnight and if it will stop raining, I'll basecoat him in the morning. I've been looking at exactly what to do with his robes and cloak - paintwise. Based on what I've done so far for the chapter/company the robes would be red. For the cloak I'm not sure. I think painting the inner part grey to white would contrast nicely. For the outer part of the cloak, maybe black?
It's nice to be working on something besides bikes and regular marines.
62373
Post by: JWMarines
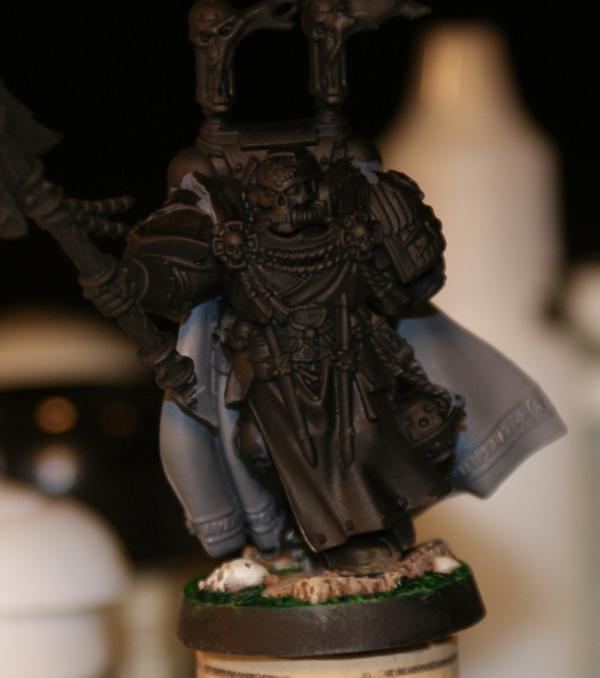
Chaplain Update!
He's now built, primed and in the process of being painted. I magnetized the plasma pistol hand in case I ever decide to use a different weapon. No plans on that yet.
I decided to go with a red robe, black outer cloak and white inner cloak. I started out by painting the base. Pretty generic. On the cloak I started with a nice smooth coat of Adeptus Battlegrey, then went up to codex grey, fortress grey, fortress/elf grey mix, elf grey, elf/white mix, skull white. I was doing a few pretty watery layers from fortress to white. My last few layers were basically glazes. I think if I tried to line highlight with pure white right now it might just screw up the effect. I also went in with a 8-1 water-baddab black wash and went into the cloak recesses and did a bit on the main parts. I had to wipe some excess off so the pigment didn't stain the white, but I think it added just a bit of depth. I did have to go back and add another thin layer of white to touch up the highlights.
Anyway, here's some WIP shots:

Thanks for reading!
62373
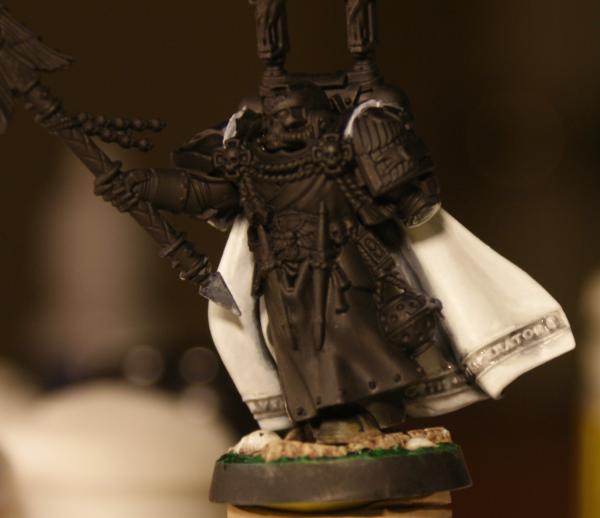
Post by: JWMarines
FINALLY getting back to it...
...and lets dig right in. The converted chaplain from the DV set is DONE. I'm pretty pleased with him, but I did have some paint problems stemming from having some paint in the old hex-flip-top bottles that's like 12+ years old, some from the hex-screw-top, some from the hex-screw-and-flip-top and some in the more recent circular flip-tops... Anyway, quite a bit was near death and I've had to recondition it as best as possible.
WOO!
62373
Post by: JWMarines
Quick update.
Since my Chaplain is out of the way, and my work station is set up in my new house, I have to get back to the bikes that I let gather dust for the last few months.
In terms of the models I have left, I have 3 bikes - one that will be a sergeant - that are converted to the wing motif that my finished bikes have. One of those is set up with sidecar magnets under it. In addition I have two bikes that were just horribly painted and modeled that I got as attack bikes on eBay. I seriously may just have to put them in the simple green for the 3rd time. These bikes will also get sidecar magnets if they are salvageable. Fortunately the sidecars that came with these bikes are metal and stripped down just fine. One sidecar I have primed and ready to paint the other two are in the midst of getting drilled and magnetized.
Somewhere along the way I picked up a biker chaplain... Don't think I'll ever use him, but I might just steal his bike if one of the horrid ones isn't salvageable.
Oh! Before I start the bikes I have 2 more jump packs primed and in progress... Hopefully I can knock those out pretty quick and start cranking out some assault marines soon. But I also have to start producing more jump packs again. I really want to get some Smooth cast 305 to hopefully cut down on the number of fills I have to do with GS.
More soon!
57811
Post by: Jehan-reznor
Love the greenstuffing nice project keep it up!
62373
Post by: JWMarines
Love the greenstuffing nice project keep it up!
Thanks!
I finished 2 jump packs for one of my assault squads. I originally bought these guys as a Space Wolves assault squad. I've had the base marines painted for many years now, but now that I'm back on the project, I just need to replace shoulder pads and add jump packs. So, here's the first two of this squad that I have done that to. I have 5 more that are ready for shoulders and jump packs (but I don't have the packs yet)... my two 'special weapons' marines from this squad just need to be replaced. I intend to set this squad up with 2 flamers, but the static pose plastic marines I have right now have GOT TO GO. Fortunately, I think I have plenty of extra parts from ebay to build a couple flamer assault marines.
Anyway, here's the two I just finished:
Thanks for reading!
62373
Post by: JWMarines
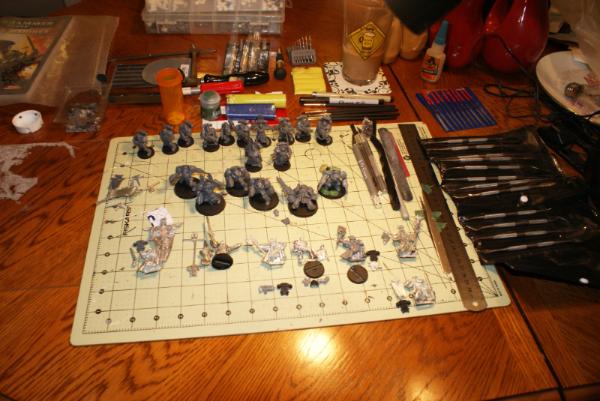
Finally ready to paint stuff again.
I had to do a lot of modeling work on my current batch of stuff to do. Made many more jump packs; fully converted 5 bikes - 3 of which are magnetized on the bottom to accept attack bike sidecars; cleaned up, built, and magnetized the sidecar flanges, bases, and weapon options; built two new flamer marines to replace the (2nd ed?!?!?!) uni-pose plastic bozos I had for this squad.; and sliced up the shoulders on a metal vanguard vet and replaced them with my customs for the sergeant.
Here's what's on the plate, some stuff partially painted and you can see my finished guide models at the top of the image.
62373
Post by: JWMarines
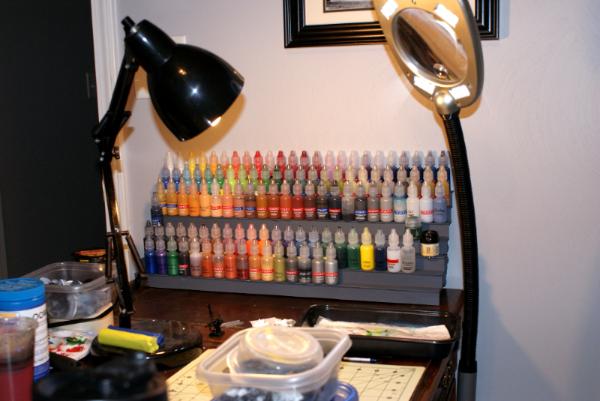
Just got a shipment of 100 15ml dropper bottles in... now I can transfer my 17 years worth of variously designed citadel paints pots into something where they won't get as crusty and drop particulates and chunks in the pots.
I wish they would make Deadly Nightshade again. And Chestnut ink.
62373
Post by: JWMarines
I finished blocking out the base colors on all the rest of the bikes, sidecars, jump packs, weapon options, flamer marines and sergeant.
Next up is washing them all before I begin the highlights.
62373
Post by: JWMarines
Progress on many fronts!
First, my first squad of assault marines is now done. This is mostly the squad that I built from a box of Longfangs many years ago and with the seven I decided to use were painted back then too. To this, I originally had 2 (2nd ed?) plastic mono-pose flamer guys, which I replaced with some ebay guys and added one of the vet. vanguard models as a sergeant. The flamer guys and sergeant were painted in the last week or so along with the jump packs of my own conversion/casting for the whole squad. Pics below:
Second, I ordered 100 15ml transparent dropper bottles from USPlastics. Once they came in I set about transferring years and years of citadel paints into the new bottles. In order to get any crusty stuff that had fallen into the pots, I strained them all through one half of a tea ball that I took apart. Yep. Took forever to do them all, had to wash the screen and funnel after each one...
And another project, if you notice what my paints are sitting on in the pic below... I bought one of those large styrene "For Sale" signs at a warehouse hardware store, sliced it up and put it back together in this format.
62373
Post by: JWMarines
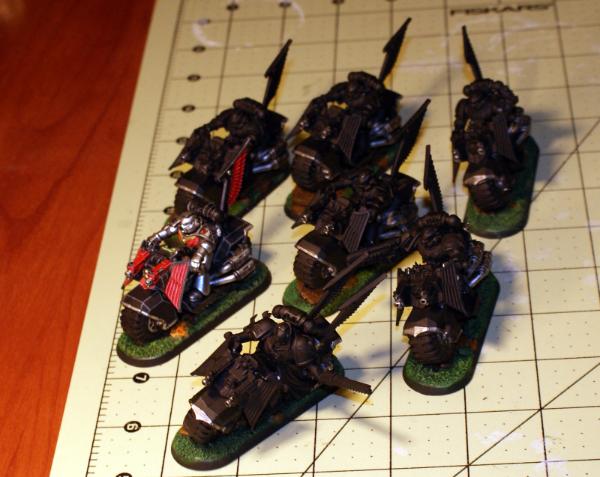
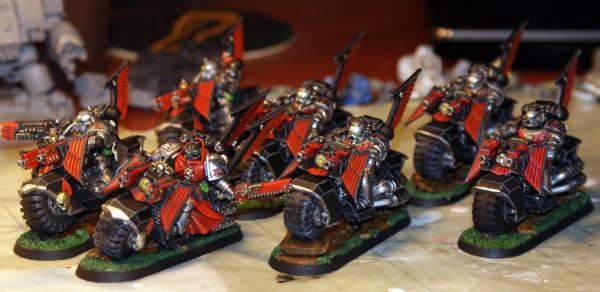
Finished up 2 more bikes yesterday and this now puts me with 3 squadrons of 3 bikes. I still have 3 more bikes (with magnetized bottoms to accept the magnetized sidecar flange) and the 3 sidecars to finish up.
Here's the two I just finished: (also working on improving my pictures... need to build a lightbox and get some clamp-on lights for it)
Here's a couple shots of the 3 bike squadrons:

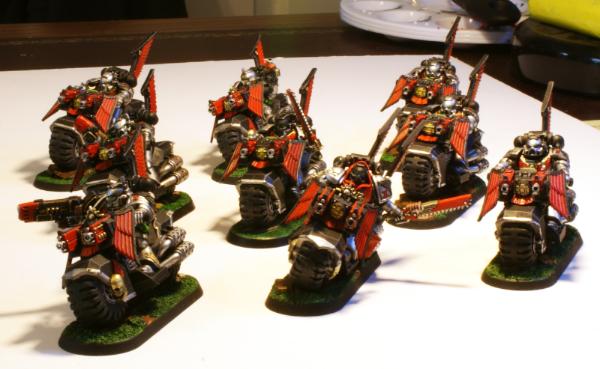
And now a question for you guys... I've seen a LOT of bikes completed on these forums, but I can't say I've ever noticed if people drill out the exhaust pipes or not. So, take a look at this shot and tell me what you think. To me, looking at them with drilled pipes makes me wonder why I never did that before now. And also makes me want to paint the part around the pipes in black to really pull out the fact that they are pipes resting in a housing of sorts (obviously to improve the mold/cast).
Thoughts?
59237
Post by: Tusken Sith Lord
Outstanding work there!
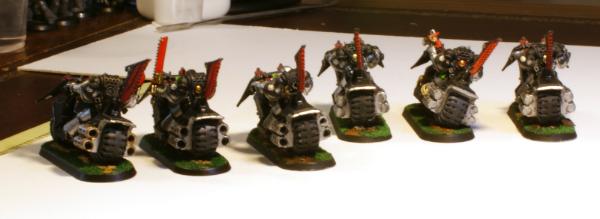
62373
Post by: JWMarines
Painting is done on the 3 detachable sidecars and one of the multimelta options. I've got base colors, primary wash, and the red 1st layer laid in on the rest of the multimelta/heavy bolter weapon options and the 3 magnetized bikes that will accept the sidecars. More to go, but I see the light at the end of the bike tunnel now... Pics soon!
Automatically Appended Next Post:
My brain is working on a weird level right now...
I was sitting here thinking about making my own combi weapons for the stern guard I'll get to one of these days and that led me to thinking about making a mold and being able to cast up lots of them, which led me to thinking about a cheap and effective centrifuge to reduce badly cast details at the extremities (something I have issues with on my jump packs)... And then I thought about just a simple hand cranked salad spinner. Yep salad spinner. One just like this. I really think that will work just fine, the hand crank gives pretty good force conversion through the gearing... Gonna have to get one and try that out now.
62373
Post by: JWMarines
Well I finished everything I had laid out for April... and there's still 11 days to go. Before I get into what's next.... Here's how the assault bikes turned out: 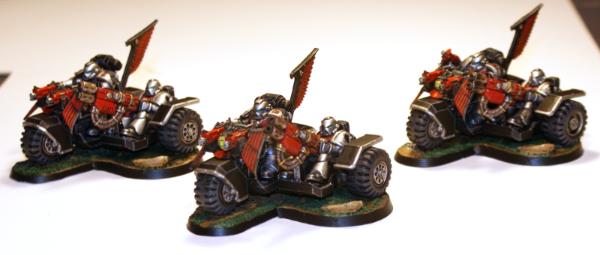 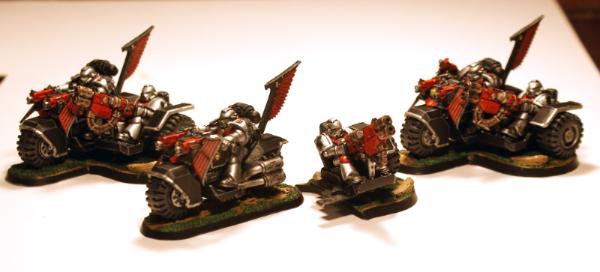 I honestly really rushed them and it shows in the line highlighting and some of the other details. Also, two of the bikes were ebay/trade pick-ups that had been painted such that no amount of simple green and scrubbing could get it all off - one even had a bumpy texture all over it that honestly felt like it was part of the model, though probably just bad primer... Enough excuses, I got lazy. Looking at the end of your twelfth bike, you just want to sprint to the finish. Now I'm in the position of not knowing what to do next. Everything needs conversions and customizations. More assault marines will need to wait until I buy more resin. Tanks have to wait; the other dread needs heavy conversion; HQ needs to be completely converted; sternguard have to be converted; Terminators need to be all Doom Eagled up... Leaves me with Scouts and Land Speeders... so now I'll dig out all my land speeder parts and see where I am.
62373
Post by: JWMarines
so this happened...

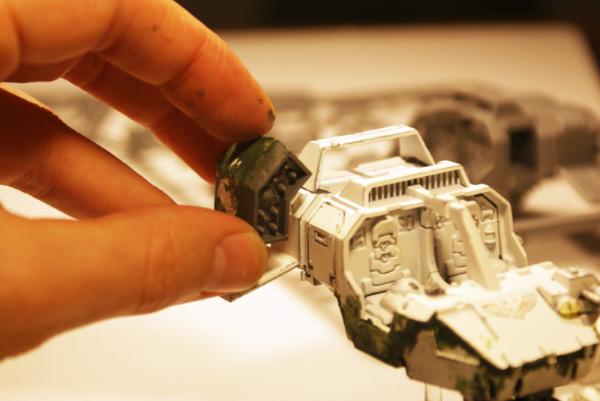
Somewhere along the way I picked up a Master of the Ravenwing box, must have been a clearance sale like 8 years ago. I'm not even sure if I have the models to run Doom Eagles as Ravenwing or if I even want to. I'll probably just use that speeder and maybe magnetize the driver's body if it ever happens that someday I want to run it as Ravenwing and use him... anywho... got the other two speeders from ebay and as you can see... they need some work. By some, I mean, a lot. I stripped them both, but the one still in white was clearly primed pretty well. The one that I got down to mostly bare plastic I almost completely tore apart and rebuilt. That one needs the least work. I have to build a new front antenna thing for the white one or might just ditch those all together as I'm not that fond of them.
Also from ebay I got two sets of the missle pod fronts and I guess backs from the storm talon set for a buck or so each with the idea of making my own typhoon pods that don't look so... just... there.
As to that, I've begun work making the new pod. Some styrene card and a lot of tweaking to get the angles the way I wanted them. It's hard to see how the angles are in the pics I've got, but the outer plates slope down toward the back end of the missle pod. Sadly, one end of it is longer than the other so I can't just mold/cast for exact replicas. I now have to make the matching one for the other side, and manage to get the angles and fit the same or similar enough that you can't tell.
Still WIP, I'll be adding some greenstuff, eagles and skulls and the like and maybe some plate lines or something so the plates don't look so plain. Hopefully more progress on these soon, I've got to get some more resin before I can cast any more of these anyway, so I'll probably just start working on modeling/painting the speeders and getting magnets in place
Here's the front:
Here's the back:
And here's where it will end up once I figure out and build a mounting mechanism for them.
Thanks for following along!
62373
Post by: JWMarines
Woo! I finished up the first full custom typhoon pods for my land speeders! I plan to pretty much magnetize every weapon option for every land speeder, so this is step 1. I now have to make 2 more sets... lol, but at least I know how and where to magnetize the other two in preparation for receiving typhoon launchers.
Sorry I don't have step by step pics of the build, but here's how they're looking now.
Both built:
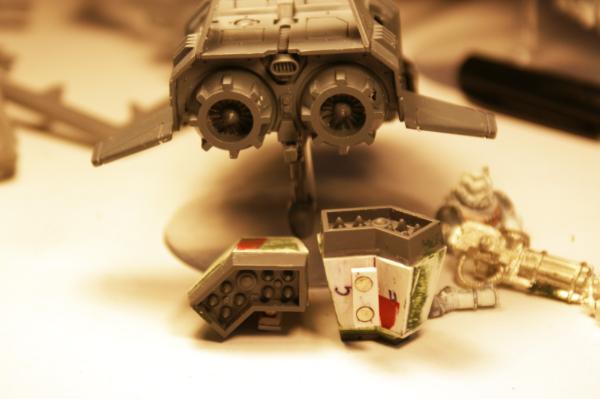
magnet attachment:
Front view:
Side View: I'm rebuilding this land speeder anyway, so don't mind the missing doors.
Back View:
They turned out much better than I expected, honestly. Not sure if I'm going to add chapter/company specific details or anything like that yet.
What do you guys think about taking them further with GS?
Thanks for reading!
62373
Post by: JWMarines
Just some build progress to report.
I finished magnetizing the hull of all 3 landspeeders to accept the typhoon variant and the tornado variant weapons. Unfortunately since the last one I built is the Master of the Ravenwing land speeder, I have these gigantic TL assault cannons and a huge TL heavy bolter, both in metal, so I on't think I'll be using them.
Other than magnetizing, repairing, filing, scraping mold lines, etc... I had build some new gun rails for the two ebay land speeders. I've had these spools of steel wire in my tool box for years and it worked pretty well for this. I just cut some lengths, which I bent to as close to the arc of the in tact one that I had, added some green stuff to each end and let that cure. Then I trimmed the GS down to the right shape for the end caps (I don't have any styrene rods that I could cut/drill/glue on). I really like how stiff the steel wire is for pinning and making things like this. I'm not really worried about it getting bent through normal game play or transporting because of that. The only downside to it is that it doesn't take to filing on the tips very well being steel. I need to get some new blades for my jeweler's saw so I can alleviate that issue. A cheap hack saw would work for this as well I guess.
I still haven't made another set of typhoon launchers yet, but I might get around to that one of these days.
Anyway, here's how they're looking now, I took this shot mainly to show the scratch-build on the gun rails.
Thanks for having a look!
[EDIT]....Ut Oh... my lady bought me Angron for our anniversary and it just arrived... Can I resist it long enough to paint these speeders? Only time will tell.
62373
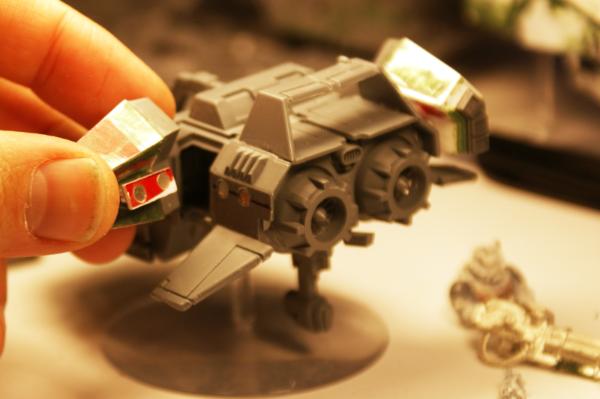
Post by: JWMarines
Made some progress this week toward getting the land speeders painted.
I decided I didn't want to bother with sculpting any details. I might do some work with paint but otherwise, they'll just have my custom shoulderpads.
So far I've gotten the front weapon options, pilots and cockpits done:
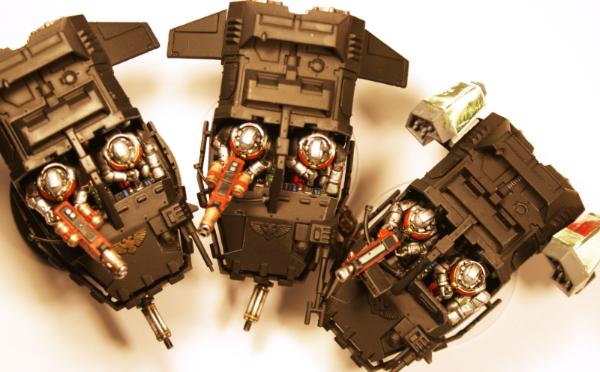
I ended up tossing a magnet in the bottom part of the multimeltas and h.bolter, and then since I don't have magnets small enough, I glued some pieces of steel wire to the gunner's control piece. Here's how the 3 speeders look together.
Not sure what exactly I want to do with the paint. I've considered a few options like painting big red wings up the side... no clue what exactly to do. I want them to look special, but maybe normal is OK too. Thoughts?
Thanks for reading!
62373
Post by: JWMarines
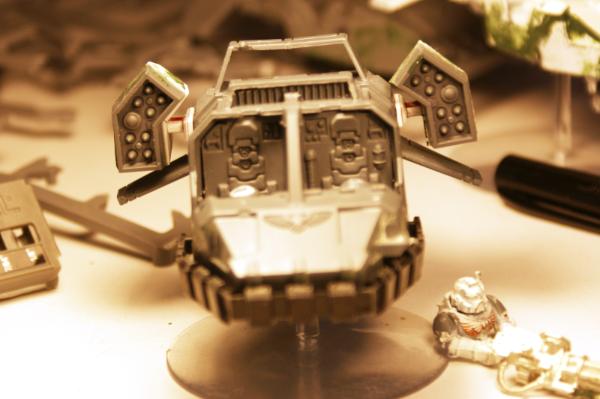
I need some opinions.
I've got a little bit of work left to finish up these land speeders. One thing left to do is the markings. I need something to designate Doom Eagles. I've got 2 things I've tried out and I need some opinions on which way to go.
The first is a Deathwing transfer that I altered and added a skull over. I'm not really thrilled with it, but since all of the speeders are magnetized for Typhoon launchers I had to move everything to the door.
The other option is a GS wing over the whole door section. I like this better, but I'm also wondering if I should do this on both sides.
What do you guys think?
62373
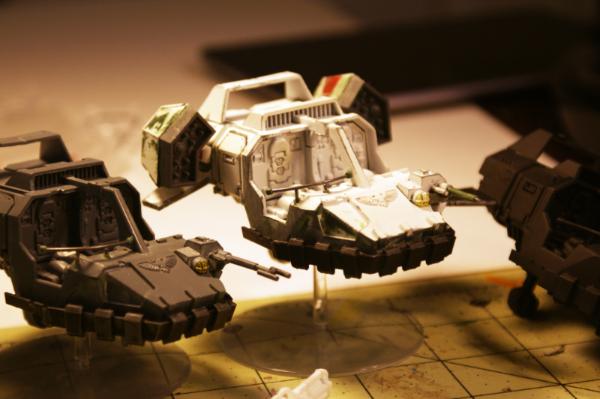
Post by: JWMarines
Well, I think my Land Speeders are done for now. I'm not going to build any more typhoon launchers until some other time. I'm ready for something new.
As with everything in the company so far, final details, battle damage, etc. I think I'm going to wait till the end to do once I've figured out what kind and how much I want to do. Since I've been back at modeling and painting I haven't tried my hand at a lot of things. The typhoon launchers were my first 'plasticard' experience and I really enjoyed that. Magnetizing is something I never did before returning to the hobby and I've found that to be a fulfilling hassle, hah!
Anyway, here's how the speeders turned out.
and the other side:
62373
Post by: JWMarines
So, I posted a To Do Board for April here last month and actually managed to finish everything on there PLUS 3 land speeders!
Here's what's on tap for May. I've got a lot of converting to do.
I've got Ezekiel and Azrael, an old Apothecary, Ultramarines Veterans and standard bearer from the honor guard box, Chief Librarian Tigurius, and the characters from the DV box.
And somehow I've got to get them all to look cohesive and Doom Eagle-y. Hurray for metal! I've got my jewelers saw ready to roll. I've got some extra 'character' models - Shrike, 4 AoBR captains, misc librarians and chaplains - and I need to convert something into a company champion. Honestly, I've been putting off the HQ mainly because I'm not that sure what to do with what I have.
So, I'll also be converting and painting the DV terminators. I've got some revised GS wings modeled onto a terminator, and once I get that spot the way I want it, I'll make a press mold for replication. Mostly I'll be just converting DA icons to DE icons.
The other thing I want to get done in May is to convert the tac squad from DV to Sternguard. I'll have to work out what loadout to run on them. Over in the tactics forum, most people seem to run with a mix of combi-meltas and combi-flamers, so I might just go 4/4 like that.
I don't get much feedback on this plog, but I would love to hear some different ideas. It's good to get out of your own head now and then. If anyone has converting suggestions or thoughts, they are welcome. Specifically as to the command squad conversions.
Anyway.
Here's the board for May!
62373
Post by: JWMarines
I dropped down to the tactics forum and asked about command squad load-out because it's been so long since I played an actual game that I have no idea, and I really wanted to model up the command squad such that I could actually do something with it.
I got couple good suggestions - one for a jump pack command and one for a plasma spam shooty command. I like those two options. BUT... the gear load-outs are too dissimilar to use the same models and just modularize the wargear.
Here's the two I like - one if I run the Doom Eagles with the BA dex and one if I run Vanilla.
Codex: Blood Angels
Captain in Power Armour, 160 pts (Melta Bombs; Jump Pack; Lightning Claw x2)
Honour Guard, 320 pts (, Chapter Banner, Equip with Jump Packs)
1x Blood Champion (Combat Shield; Power Armour; Jump Pack; Bolt Pistol; Chainsword; Power Lance)
1x Sanguinary Novitiate (Blood Chalice; Jump Pack; Bolt Pistol; Chainsword)
3x Honour Guard (Jump Pack; Melta Bombs; Paired Lightning Claw x3)
Codex: Space Marines
Space Marine Captain in Power Armour, 195 pts (Auxiliary Grenade Launcher; Digital Weapons; Hellfire Rounds; Melta Bombs; Artificer Armour; Combi-Plasmagun x1; Relic Blade x1)
Command Squad, 210 pts (Company Standard)
1x Apothecary (Bolt Gun; Chainsword)
1x Company Champion (Combat Shield; Power Armour; Melta Bombs; Bolt Pistol; Power Sword)
3x Veteran (Melta Bombs; Bolt Pistol x3; Plasma Gun x3)
For the jump pack guys I think I'm going to start with the Shrike model I have and build a Chapter Master/Honor Guard, that in smaller games would just count as a captain. I only have the Shrike model for this and haven't thought much about what to go with him, though Sanguinary guard models would work. I'll be using too many Vet Vanguard models throughout my assault squads to use those.
Anyway, on to what I started working on.
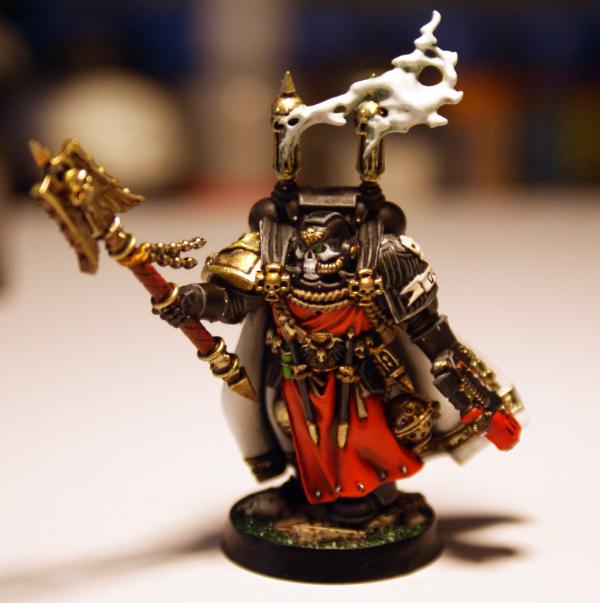
For the Vanilla command, I was going to use Azrael. Looking at the wargear, he just needs a meltabomb and a grenade launcher. But he also needs to have his head cut off, his helmet cut off of his little person familiar guy, the right side of the helmet resculpted, the rebreather coils around his head would have to go, then the head would have to get attached to the body. Yeah, sorry Az, but they remade you in a better robe/cloak, stole Ezekiel's pose and made it into snap-fit plastic for the DV set. Oh, and same wargear. SO! 2 hanging DA icons need to become DE icons, and two embossed DA icons on his gloves need to become DE icons... figure out something for the grenade launcher and done. I resculpted the icon on his back first: left the wings; cut out the sword; filled where the sword was with some GS and smoothed it down to build the wings together and add a tail section; the sculpted the skull. I tried my hand at a Forge World skull this time and it turned out pretty good, though it's pretty small, so it's not the easiest thing to get a good representation on. The DA icon hanging around his front is kind of hanging a bit free at the bottom, so I shaved down the sword on this part but left some of the structure of it to help hold the GS for the tail section. That's curing tonight to give a solid base to work on tomorrow. The two on his wrists shouldn't be too bad as there's a fairly accessible foundation to work on.
I'm not sure what other modifications I want to make to this model. I filled the gap from where he went together on his cloak and I need to fill a tiny spot on one of his helmet wings where the sprue broke off in the box before I could clip him out. Other than a couple fixes like that the only thing I'm thinking about doing is a Chapter badge on his exposed shoulder. I'll really have to do it thin as the cloak overlays it and I don't feel like trying to sculpt cloak on top of an embossed design... though honestly now that though it growing on me.... This guy is like the DV chaplain for me. I REALLY dig the model the way it is and I just have to change the icons, then sit on my hands and not touch anything else.
I'll get a pic up tomorrow of the icon revamp.
29345
Post by: Nashbashem
This is a really nice thread mate  I also heard at my local GW that just bring as many meltas as possible as all tanks/monsters will lose and you can insta kill other marines and really ruin Terminators days. Same would apply to other armies who have a good save. Plasma is also risky, a good few shots but a failure will resulting losing the model as it melts (which from my own experiance happens every...damn...time...
Also consider putting the Sternguard and other special weapon using units in Rhinos. Move to the opponent faster and you won't be killed by being shot at. Yes you might lose the Rhino but the guys will be OK and you would have moved them forward quicker than you could of by walking.
I will be persuming this will all be done for the Doom Eagles But thats just my 2-cents on your tactics opinions.
In regards to painting and modeling you have some great models and I am envious of your GS ability, also your painting is great really loving the look fo your army
Keep up the great work and consider me subbed and a regular contributor 
30672
Post by: Theophony
Wo your guys are coming together nicely those landspeeders look great with a different color to the marines armor. Can't give you any advice on the build for an army since I haven't played since third edition.
62373
Post by: JWMarines
Nashbashem wrote:This is a really nice thread mate I also heard at my local GW that just bring as many meltas as possible as all tanks/monsters will lose and you can insta kill other marines and really ruin Terminators days. Same would apply to other armies who have a good save. Plasma is also risky, a good few shots but a failure will resulting losing the model as it melts (which from my own experiance happens every...damn...time...
Also consider putting the Sternguard and other special weapon using units in Rhinos. Move to the opponent faster and you won't be killed by being shot at. Yes you might lose the Rhino but the guys will be OK and you would have moved them forward quicker than you could of by walking.
I will be persuming this will all be done for the Doom Eagles But thats just my 2-cents on your tactics opinions.
In regards to painting and modeling you have some great models and I am envious of your GS ability, also your painting is great really loving the look fo your army
Keep up the great work and consider me subbed and a regular contributor
Thanks for following Nashbashem. I could definitely see the plasmas having a bad game with 'Gets Hot!'. I guess the risk is worth the extra range, and if they can post up with some cover, the rapid fire. It makes me wonder if loading out the vets with a combi-melta or two would be better than all plasma. As for Rhinos, I'm buying pretty much all razorback kits and making them modular to go razor or rhino as needed. I haven't painted any yet. I got a hold of some ebay "gems" that must have been built - poorly - with plastic cement and then painted with gloss something. I've tried superclean, simple green, LATA, and even non-acetone nail polish remover... nothing works, but I think the LATA has gotten rid of some of the heavily painted areas. Anyway, at some point, I plan to have 9-10 rhinobacks for the company. I've got 4 now if the 2 "gems" can be salvaged. Also, probably going to get 1-3 more drop pods. Most of my decision making in these reguards has been, "well a company would probably have these assets, so I better get them". Much less strategic, lol.
Theophony wrote:Wo your guys are coming together nicely those landspeeders look great with a different color to the marines armor. Can't give you any advice on the build for an army since I haven't played since third edition.
Thanks Theophony, it's good to hear that my decision to go black with the vehicles and let the marines color scheme pop is appreciated.
62373
Post by: JWMarines
Well the lady nixed my plan to get some modeling done on the captain today. I managed to get one more sword to skull sculpt done. The DA wing icon on his wrists isn't allowing for easy enough Doom Eagles conversion, so I'm going to slice them off entirely and cut some DE eagles icons out of thinly rolled out GS and glue those on, then sculpt the skulls on top of that. Pics soon, promise!
29345
Post by: Nashbashem
Haha the old woman stealing hobby time trick :p we've all been there 
62373
Post by: JWMarines
Well, I'm sneaking some work in on the captain.
I've got the wing icons cut out for the wrists... damn they're small. I've got one more DA wrist icon to shave off a wrist, then glue on the DE wing emblems and sculpt the skulls. Overall these are minor modifications, but I hope the little details help tie everything together and make this project better.
Here's the pics:
- back detail icon
- front detail icon locations. You can see the hanging icon has been modified and I've got the DA icon shaved off one wrist.
- here's the replacement DE wings that will go on the wrists... man I hope I've got the sizing right, it tough to dry fit these.
Thanks for following along guys!
29345
Post by: Nashbashem
Simply amazing. How/why are you a greenstuff god?
62373
Post by: JWMarines
haha, I don't know if I qualify for that high of accolades, but thanks, Nash!
29345
Post by: Nashbashem
do you have any greenstuff tips/advice? I'd love to be able to do some crazy mods with the stuff
62373
Post by: JWMarines
 Nashbashem wrote: Nashbashem wrote:do you have any greenstuff tips/advice? I'd love to be able to do some crazy mods with the stuff
I really haven't done full model sculpting or anything, just detail work with it.
But here's a few tools I use and things I've learned.
Tools:
- hobby knife - fresh sharp blades help
- wax/clay carvers, I use this exact set
- clay shapers, I use: this exact set as far as I know this is the smallest head size
- I got a wooden handle clay sculpting set at Michael's I think, but I can't find a link on their site. All I really use out of that set is the very fine point needle point punches
- I just made my own tool with a toothpick and a strait pin, but I need to upgrade the handle to an old brush handle or something.
- honestly use whatever you've got laying around. I started with just a GW sculpting tool and a #11 blade hobby knife.
- water, wax paper
As to the medium, I only have ever used the kneadatite green stuff, but there are a bunch of others out there with different properties. Apoxiesculpt, for one, cures rock hard and is fileable and sandable. I want to try that one and a few others because I've heard they hold finer details better, plus you can file them to smooth them. With GS you almost have to get it perfectly smooth before it cures completely because it remains so flexible and doesn't take kindly to being filed once cured. If you're going to use green stuff, get this version of it. The tape strips cure in the middle and you waste some of it right there. The tubes, if you're like me and don't use that much at a time, will probably become unusable due to age before you use it up.
For tips and tricks...
1. Think in layers of what you want to do. Like with my wrist pieces, I made the wing icons, glued them on and now I will sculpt the skull on top of it.
2. Patience, do a layer and let it cure, don't try to sculpt too much at one time because if the putty isn't cure you could end up ruining the base part of what you're working on as you try to sort out the upper layers/details.
3. If something looks good, LEAVE IT ALONE! I've screwed up perfectly good stuff because I couldn't put the damn tools down and leave it alone.
4. If you're having trouble getting the GS blob to stick to the model, you can wash the model in case there's any oils on it from handling it, also, use a toothpick to put down a TINY drop of superglue in the center of where the GS will go and where it won't mess up any details you need to sculpt. GS in general, and uncured GS in particular, react VERY fast to set the superglue. You'll get a nice anchor to work from.
5. If the GS just won't hold ANY detail at all, let it sit for a while before you start working it. The working properties change as it cures. It starts really soft, mushy, and sticky - then loses some of each of those and starts to become a bit elastic as it cures. You just need to experiment with letting the GS sit for X number of minutes before you start working on it to see what feel you like working with. I like to do as much as I can while it's nice and soft, then after 30 minutes or so, I'll go back and try to do some more smoothing, re-establish any details that faded a bit, etc...
6. water/spit good for keeping the GS from sticking to you, your tools, your dog, your grandma's fine china, whatever. I've used olive oil for rolling out sheets of GS, but it's hard to work on with oil on it.
7. Say you've finished the detail you wanted to sculpt, and you still have 3/4 of the GS that you mixed up left over and it isn't cured yet. Make a shape. Roll it into a 'snake' like you used to do with playdough, only much thinner. Roll it into a sheet with whatever cylinder you've got handy. Whatever you can think of. If you've got enough left over put some olive oil or vasaline on a detail piece you made that you want to replicate (use a brush to get it in the nooks and crannies in a very thin layer, then mash that detail piece into the GS mound, or the other way around, and let it cure. The lubricant will keep the stuff from sticking together, but once cured you've got yourself a press-mold negative that you can lube up and press further leftover GS into to make more of that detail. I would use press molds for tiny details like those skulls I'm always sculpting... except I haven't gotten around to it.
I guess I had some stuff kicking around in my head afterall... lol
Let me know if there's a specific model you want to add a bit to or a specific type of modification. I'll help out however I can!
Automatically Appended Next Post: good grief, it's harder to glue these onto a curve than you would think.... Now on to skull sculpting.
26416
Post by: Young_Logan
Looking good, lovely use of the storm talon pods on the land speeder orgiginal and they dont look oversized either which is a plus, keep up the good work
Young Logan
62373
Post by: JWMarines
Got my supply drop from Blick...
- W&N 7's (1, 0, 00, and mini 0)
- 005 micron set with colors
- Liquitex matte, glaze, gloss, flow-aid, slow-dri
- Ooomoo 30
- smoothcast 300
time to get crackin!
29345
Post by: Nashbashem
Thanks for the tips! I've only currently got the GW tool which I've filed to make sharper and have a thinner point and ton of different scalpals with different blades. I will have to get me some of those clay shaping tools.
The Grand Master is coming along nicely
62373
Post by: JWMarines
That GW tool with the scalpel end and the mini, round spatula en is very versatile. Aside from that the silicone tip clay shapers are probably the next tools I would recommend. They smooth the GS so well.
42470
Post by: SickSix
I love your work! I really like the chaplain conversion and your devastator sergeant!!!
Inspiring work. Looking forward to more.
62373
Post by: JWMarines
 SickSix wrote: SickSix wrote:I love your work! I really like the chaplain conversion and your devastator sergeant!!!
Inspiring work. Looking forward to more.
Thanks! I think those two and my bike sergeant from the DV set are the best models I've completed for the company so far.
P.S. I'm working on a project to do an eagle marine head somewhat similar to what the spacewolves have with their wolf helmets. It's in the VERY VERY early stages right now, but here's where I want to go with it.
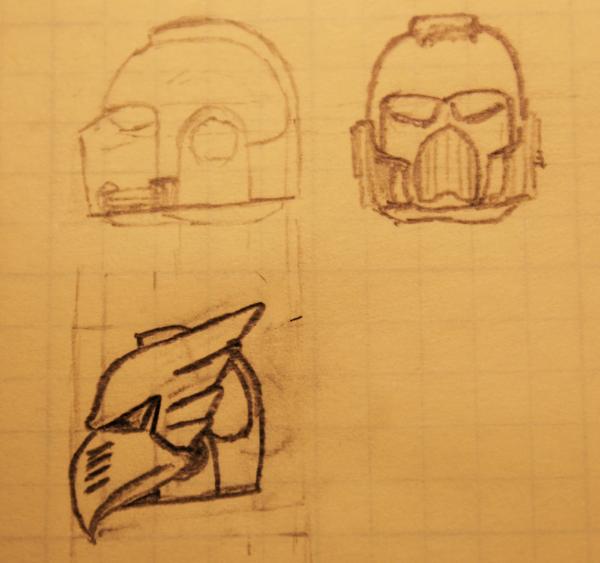
My drawing looks a bit more cartoon-y than I really want, but hopfully in the sculpt/build it will come out 'grimdark'.
29345
Post by: Nashbashem
Really good concept! I hope this turns out really well as it would make great heads for the stern and vanguards and maybe terminators and HQ. Can't wait to see a sculpt
62373
Post by: JWMarines
Holy crap my last update was 20 days ago... sheesh.
Lots of doings to report.
1st! I had this grand scheme of converting my entire HQ command squad and getting it painted up by the end of May... oh and terminators and sternguard too. HA! yeah... so... that didn't happen.
What did happen you ask?
1. a scratch built Whirlwind (needs detailing and painting)
2. Captain conversion done! Primed! Whoops too much primer on the helmet wing... hmmm wonder if this dremel nylon bristle tool would take that off? Well, it sure does! Along with all of the details! So... fix that. Yeah. Awesome.
3. Get a ways on my custom eagle helmet project. Get lots more ideas. Got lots more work to do.
But anyway, here's the goods!
Whirlwind Scratchbuild - from paperhammer template, using a $2 'No Tresspassing' Sign from Walmart that's roughly .03
Lots and lots of detailing, filling, riveting, drilling, etc... to go!
And here's what happened with the captain:
He was all ready to go!
Then he got a bit too much primer on the left (his left) helmet wing... so I tried the bristle wheel with my dremel and ummm... all the detail went away! Sadly, it had to come off 
And this is what a nylon bristle wheel will do to the dark grey GW plastics.
Whoops! Fill with GS, STAT!
Sculpt like mad...
Screw up a few things, try again, go go go, close? Nah, not really... press mold it is  Pretty damn close now!
BUT, it's WAY too flexible. Is there anything I can brush on it to firm it up?
So, off and on I've been trying to work on the custom helmet sculpt/mold/cast.
Here's the original sculpt:
And here's what it looks like on one of the Assault Marines I'm attempting to recover from ebay
Some of the casts have been decent, but none have been perfect. But I have enough now that I can work on perfecting it and work on some variants like a sergeant, comms array, targeting matrix, etc... here's the thread where most of that is going on: http://www.dakkadakka.com/dakkaforum/posts/list/525031.page
Thanks for following my crazy ramblings! C&C welcome as always. Love to hear some outside thoughts.
29345
Post by: Nashbashem
That is a pretty good sculpt there mate Would look amazing for Honourguard and Vets.
Can't wait to see it put into production
62373
Post by: JWMarines
Well, after much fiddling about and wasting time and not having much time and slowly working on it. I've got a pretty good 5 head sprue mold for the custom helmets I made. I've sent off a couple sprues to the guy who originally asked for someone to help him with his idea. And sent a few across the pond to the UK for a bystander who liked them and wanted some too!
It's not the most perfect sculpt and they aren't the most perfect casts, but I'm pretty proud of my first custom production work.
And here's what they look like painted up in Doom Eagles silver on an ebay recovery assault marine (I should have taken a pic of this guy before and after his putty surgery).


Maybe now I'll get the motivation to salvage the rest of that wreck of an assault squad from ebay.... or heck, maybe even finish painting my captain! HAH! That'll be the day.
29345
Post by: Nashbashem
Those helmets are legendary!! Suits them really well. Really good job
62373
Post by: JWMarines
Slow and steady wins the race, right?
Building this squad of assault marines is turning into a heck of a project on it's own.
First off, and I think I've mentioned this before, they were assembled originally with plastic glue... and then primed with some kind of enamel based crap. I tried stripping these with Superclean, Simple Green AND LATA. I managed to get most of the detail back, but couldn't get them totally clean. And then came the attempts to disassemble in the hope of repositioning some of these guys. That ended in some completely--and I mean right down the middle--torn apart torsos, collar sections coming off with the heads, belt sections separated from torsos, and shoulderpads being completely melted into the arms thus non-detachable. Not to mention the guy that built these originally used so much glue in some places that it created half a mm thick coatings on parts of the legs and backs. I ended up having to re-assemble in basically the same positions the guy had originally done.
Since I was replacing all of the shoulderpads but couldn't get most of them off of the arms (didn't have enough spare assault arm sets), I had to use my jewelers saw to cut the shoulderpad interior out inside the rim. Then I'd trim down my custom pads to fit in there. I still need to fill some gaps where the fit wasn't perfect, but these should work out alright. I had to do a similar thing with my DV bikers. Unfortunately this also meant that to get the saw in without completely hosing the chainswords in some cases I had to lop off the chainsword hand at the wrist and then pin it back on once I had cut out the shoulderpad interior.
For the heads it was a complete mess even trying to get them off of the torsos and in 2 cases part of the collar behind the head had to be resculpted after part came off during the head removal... bleh.
Now, the sergeant is built from a metal Vanguard vet. I had to saw the his left shoulderpad out like I did with the others and that went fine. For the right shoulder he already had a really nice wing motif going on at the bottom of the shoulderpad, so I left that and sculpted the assault squad icon on with it. For the head I had to saw the existing head off at an angle and then used my dremel with some material removal bits (that honestly don't work well on white metal) to get enough material out so that I could get a custom helmet in there. Even with that done I still had to cut down the custom resin helmet from the top of the neck to above the back horizontal raised section. I left the ear things from the metal helmet on there and wedged the cut down custom helmet between them. Then sculpted in the back of the helmet I had cut away, and pressed green stuff under the helmet to fill the void. Then I sculpted in some hose details and such around the bottom front of the helmet. Last bit was to add a tiny skull to the forhead section to make his helmet stick out as a sergeant.
Here's a pic of him. You can see some of the details I had to add in to the helmet and the shoulderpad rim I had to redo.

I still need to clean up all of the jump packs for these guys.
Here's the group with the one I've already painted:
Here's some more shots of the other guys:

Lots of little details to fix/resculpt/sculpt here before I can prime these guys, but they're coming along.
Cheers!
29345
Post by: Nashbashem
Good to see your still at it Real shame the previous owner really messed these up but at least your making them look awesome and giving them a new lease of life
Can't wait to see more
43588
Post by: Anpu-adom
I love the helms!
I'm definitely following this project now, Doom Eagles are on the short list of chapters that I want to paint up once my current Xenos kick is over. It is a great color scheme, but it may be too much silver after finishing my Necron army.
Keep up the great work.
32021
Post by: Malganess
Beastly helmet! really nice job with the green stuff.
76303
Post by: Warboss_Waaazag
I really love when hobbyists go all out for their armies and this is a great example of exactly that! Great sculpting work, great custom pieces, great casting, superb paintjobs. All around just an excellent army. Beautiful to look at. I'd love to find myself across the table from this.
62373
Post by: JWMarines
Nashbashem wrote:Good to see your still at it Real shame the previous owner really messed these up but at least your making them look awesome and giving them a new lease of life
Can't wait to see more
Thanks Nash! The sad thing is I've also got a predator, razorback and a rhino that the same guy mutilated. But, hey, the whole bunch was cheap cheap... so it's forcing me to grow and hone my recovery skills.
Anpu-adom wrote:I love the helms!
I'm definitely following this project now, Doom Eagles are on the short list of chapters that I want to paint up once my current Xenos kick is over. It is a great color scheme, but it may be too much silver after finishing my Necron army.
Keep up the great work.
Awesome man! Years ago when I painted the first batch of 2nd ed. static pose marines, I did them with rather bright silver. But with the limited fluff they have, the Doom Eagles could go in a really dark direction-- grimdark, even. I haven't REALLY painted any 1st company stuff (vets or terms) and I've been contemplating going only up to boltgun metal with minimal highlights of chainmail and then just a couple line highlights of mithril silver. (Yeah, I gots old paint - no clue what the new stuff is called) Even in their current brightness, I go with black for the backpacks, bikes, dreads, and vehicles. I feel like it keeps the brightness in check to some degree.
Malganess wrote:Beastly helmet! really nice job with the green stuff.
Thanks a bunch Malganess. These helms were my first sketch to cast project. They turned out pretty nice... a little quirky with being able to position them, but I like them.
Warboss_Waaazag wrote:I really love when hobbyists go all out for their armies and this is a great example of exactly that! Great sculpting work, great custom pieces, great casting, superb paintjobs. All around just an excellent army. Beautiful to look at. I'd love to find myself across the table from this.
Wow! thanks for all of that. It's nice to see that people appreciate the whole project. I don't think I knew what I was getting myself into when I decided to "build a whole company plus addon detachments".
I'm going to be doing a lot of filing, filling and sculpting tonight. Hopefully I'll have these 9 ready for primer tomorrow or Monday.
Cheers!
77250
Post by: MCRobot
Just want to put my two cents in and say that I'm totally impressed with your work. The helmets and shoulder pads in particular. Very inspirational!
62373
Post by: JWMarines
MCRobot wrote:Just want to put my two cents in and say that I'm totally impressed with your work. The helmets and shoulder pads in particular. Very inspirational!
Woohoo! Thanks man. Glad you like them.
I've finally decided that I can't stand doing any more filing or green stuffing on this squad. Dealing with all the rough areas, glue covered patches, broken/ripped sections... bleh, I'm just going to paint them up as best as I can and call it a squad.
In that vein...
Here comes the paint.
Basing...
Boltgun Metal... yep it's old.
Base coating the places that will be red or gold with Calthan Brown. I've used scorched brown before, but I wanted to try this because scorched actually is a bit too dark for the gold or red to go on significantly better than just painting them over black. We'll see how it goes.
Sorry for the darkness of the last image. I got this coffee table with a lid that is loaded with hinges/arms/springs and lets me pull the top up to desk height. So, I tried doing some painting on it tonight.
Anyway, they look like crap right now, but they always do when it's just base colors down.
Cheers guys! Hope you enjoy seeing the progress. I think I need to set up a good group shot after I finish these guys. What do you all think?
29345
Post by: Nashbashem
Hopefully your brilliant paint job can do them some justice
Looking forward to seeing them finished
62373
Post by: JWMarines
Nashbashem wrote:Hopefully your brilliant paint job can do them some justice
Looking forward to seeing them finished
Keeping the bar high for me... thanks. Haha
I guess I can't slack off so here's some updated progress pics!
In this one I've laid down all the base colors and shaded heavily with black wash.
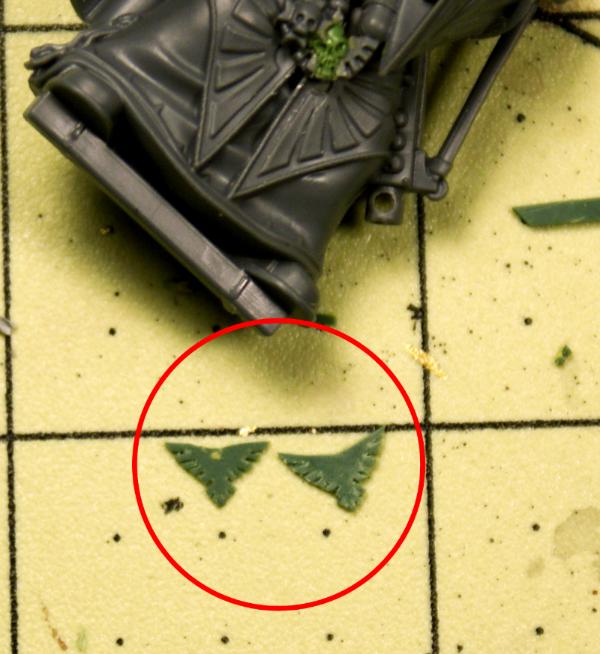
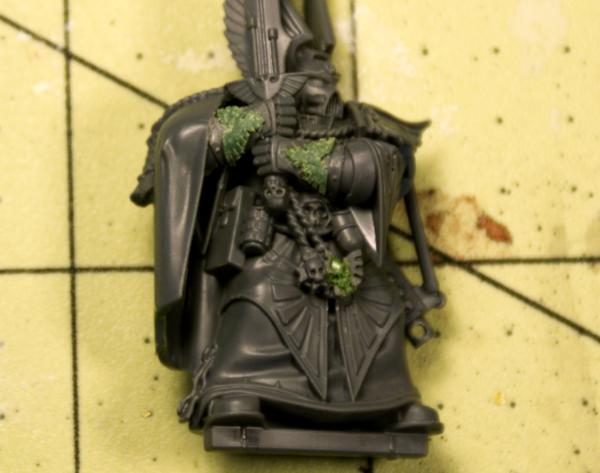
I wanted to show this shoulder detail because I don't think I ever did as I was building them. The wing motif was already a part of the vanguard shoulder, so I just added some green stuff for the assault icon.
I've gotten all of the main colors re-established post-black wash except for the gold. Hopefully I'll get the gold layer in and be able to start highlights today. I just realized that I still have to fix up 6 more jump packs for this squad. Yay.
19968
Post by: deadmeat85
Really great work on everything. Got some good ideas from this as well.
Keep up the good work, and consider me subed.
62373
Post by: JWMarines
 deadmeat85 wrote: deadmeat85 wrote:Really great work on everything. Got some good ideas from this as well.
Keep up the good work, and consider me subed.
Thanks for the support! If you have any questions about anything in particular, ask away!
So... I only got about half of the gold re-established post-wash. The woman's 'quick trip into town' turned into 6 hours and then she needed my help on a website template, so I only got a solid 2 hours in yesterday. Once I finish the gold it's on to highlights and jump packs. Then I think it's time I did some vehicles. I need to figure out a design for Rhino body doors and hatches and details. I'm still planning on doing as many Rhino-backs as I can so that I've got lots of options. As it stands I have 2 land raiders, 2 razorbacks, 1 rhino, 1 predator, 1 baal predator, 1 vindicator and 1 scratch-built whirlwind all waiting for me to do something with them. Oh, and a drop pod. Right now I'm thinking that I'm going to do some of the vehicle details similar to the wing motifs I put on my land speeders:
Basically rolled out GS cut into the shape and glued on. Though, for the doors I think I'm going to scratch build them and sculpt all the detail, then make a mold and duplicate!
Slight equipment discussion:
I've started using my W&N 7 series brushes that I picked up from Blick.com a few months ago. One thing I'm noticing is that they hold a point VERY well... sometimes too well. When you're trying to use one brush stroke to cover a somewhat wide surface it's hard to get the brush to fan out to a decent width in confined spaces. I guess maybe this is reason for me to learn a new technique. With citadel and other brushes that don't hold a point that well I think I got used to using just the very tip of the bristles. On my 7 series the tips are so pointed that it's TINY and that makes it hard to do coverage in a lot of places. Oh well, enough complaining about good brushes... You guys ever used these and have any tips for me?
19968
Post by: deadmeat85
Do you recommend picking up a W&N? I have only been using the Citadel brushes, and can relate to the fanning out for coverage.
Oh and one more thing, you said you are doing a battle company. Are you going to build another tactical squad to meet the 6 squad organization?
62373
Post by: JWMarines
deadmeat85 wrote:Do you recommend picking up a W&N? I have only been using the Citadel brushes, and can relate to the fanning out for coverage.
Oh and one more thing, you said you are doing a battle company. Are you going to build another tactical squad to meet the 6 squad organization?
I would say that if you find yourself buying a lot of brushes because the tip goes on whatever you're using, then the $12 or so for 1 W&N might be worth the investment. If you do buy one, buy a brush cleaning puck and clean the brush after each session. I recommend this one
For the company organization, I'm breaking with the standard battle company organization a bit even though Doom Eagles are an Ultramarines successor. So, since the Doom Eagles fluff is mostly about their jump troops, I decided to do 5 tactical, 3 assault, 2 devastator for a standard battle company. That means that even when I finish this current squad I still have one more to go... And then I'm probably doing 50-ish 1st company vets (20 terminator 30 power armor). I haven't decided what exactly I'm doing there, but I have a crap-load of models...probably more than I really need such that I might go back and replace the 2nd edition plastics I've already got painted.
19968
Post by: deadmeat85
That makes a lot of sense. Im doing somewhat the same thing for my HB Chapter. My ultimate goal is to build a whole chapter over the course of my hobby career. They are a mix of Iron Hands Clans with Imperial Fits thrown in.
62373
Post by: JWMarines
I've thought about doing that... and quickly realized that I'd go crazy... I've already got a plan to do a 3-pronged IG force with Cadians, Valhallans and Armor... and Sisters... and GK... and my massive High Elf force to redo... and Skaven... and my World Eaters to fix up to current standards...
I think I'm already insane.
But anyway, on to progress!
I finished the re-establishing the first layer of gold and then finished the bright silver highlights, as you can see in the pic. I've also got the blood red layer done but I haven't taken a pic of that.
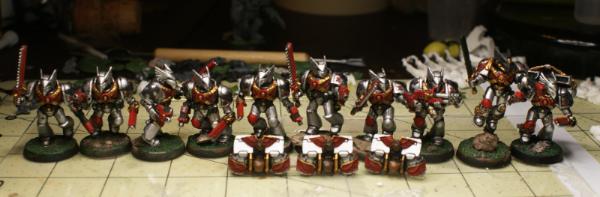
Next up: red, black, gold and green highlights... then some touch ups and I may even try OSL on my plasma coils and power sword for the first time ever.
Cheers guys!
43588
Post by: Anpu-adom
Very nice... very very nice.
62373
Post by: JWMarines
Ugh! Site launch week... Almost 30 hours logged in the last two days. But I still got some work in before this craziness started. I finished detailing all of the marines and filled/filed all of the jump packs I still needed. I have all of those painted up to the level of just needing to be highlighted. I'll hopefully finish up the jump packs tomorrow morning and post some good pics. Cheers guys, gonna grab some sleep. Automatically Appended Next Post: Well, that long-ass project is now done. The goal: create a unqiue, highly customized assault squad using custom jump packs, helmets and shoulderpads. The challenges: - ebay recovery assault marines - they really were almost not worth trying to recover and it took WAY too long to get them even to the point that I did (which is very far from perfect or ideal). - custom castings - I don't have the gear or skill or supplies required to create 'perfect' resin castings (if there is such a thing), so there was a lot of filling with green stuff and filing rough spots. And even some resculpting of details. But all in all, even the slightly rough finished product give a really nice flavorful feel. The results: 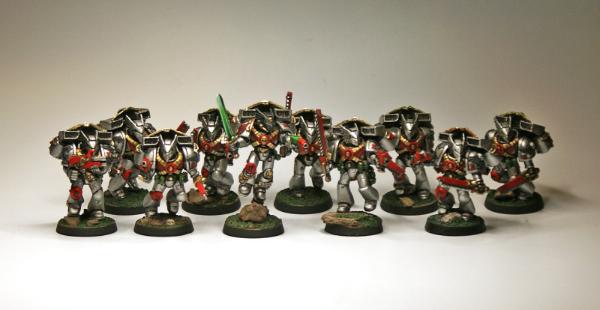 So there you have it. Custom sculpted/molded/cast helmets on a whole squad of assault marines.
29345
Post by: Nashbashem
See! I told you your painting would do them justice Loving them 
74800
Post by: Master Azalle
The helmets and backbacks make a great touch! I love the helmets, very well done, and incredibly unique!
62373
Post by: JWMarines
Anpu-adom wrote:Very nice... very very nice.
Too kind by far, thank you!
Nashbashem wrote:See! I told you your painting would do them justice Loving them
I will tell you this, just the feel of painting the clean, previously un-screwed with sergeant model was so much nicer than working on those recovery models. Not feeling like you have to recreate the details with just your brush is oddly freeing. Oh no... I just remembered that I have a mess of terminators that were handled in the same ham-handed fashion... not going to be fun.
Master Azalle wrote:The helmets and backbacks make a great touch! I love the helmets, very well done, and incredibly unique!
Thanks man! I think they've done their job and given me a nice distinguishing design element.
Now on to other projects! Well, I should say 'back to other projects'.
I'm going to be building a mess of tanks in the near future. Pretty much all of them are recoveries in some way... some will require more work than others... but one thing I want to do is magnetize a lot of options on everything. I've been following Varl's Salamanders Blog and seeing how he magentizes as many options as possible has inspired me. I've already done similar on my Land Speeders and to some degree my attack bikes. But I'm thinking that everything I can make turn into a Rhino/Razorback, should be able to do so.... Just not sure where I'm going to find all the extra bits... I've bought up some bits bags and collected quite a bit over the years, so I might have enough stuff to make up the difference. To be clear, I'm pretty sure I've got everything I need to get Rhinos out of everything. I'm not sure about being able to get razorbacks out of everything.
BUT.... I'm waiting on delivery of my copy of the new SM codex before I get to building out anything else. So, in the meantime, it's time to put some work in on a model I shelved a few months ago.
The Captain's getting some paint.
Here's a refresher of where he was:
I'm not 100% sure the color placement choices are right on this guy. His details are so layered that in order to keep the details looking distinct and not just blending in, I'm doing things a bit differently than I might have otherwise. If it doesn't work out I've got 2 bare copies of him I grabbed from ebay.
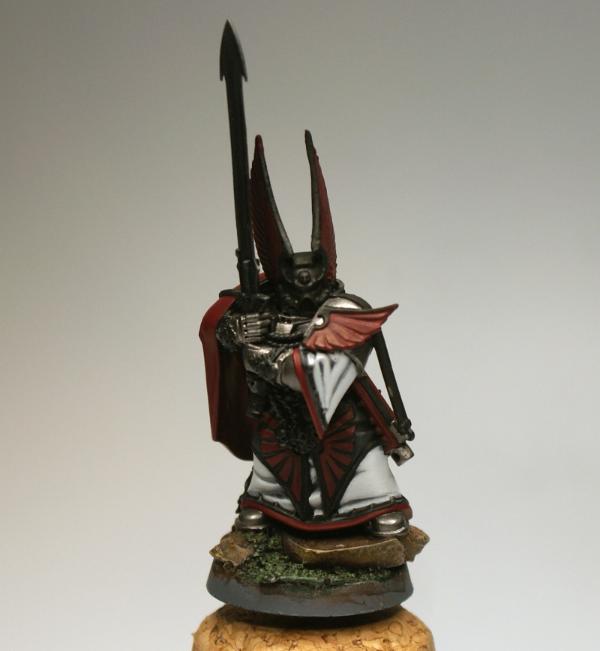
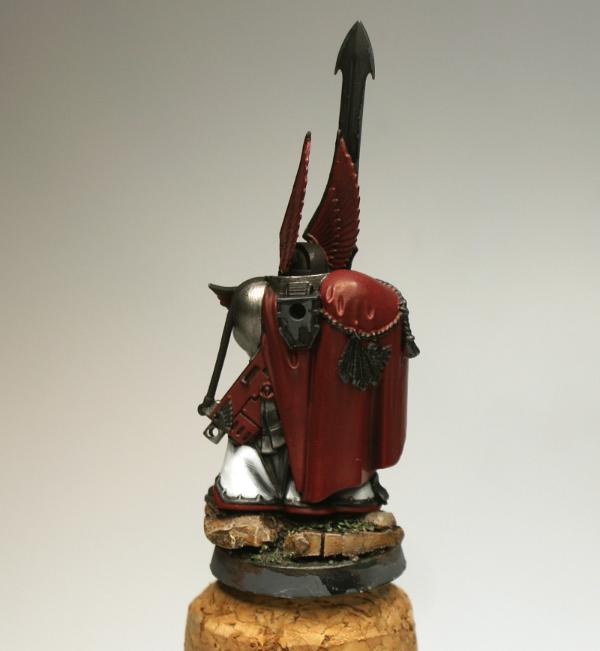
As you can see, I went with a white robe, black tabard - picking out the wing motif with red like I did on the back of the chaplain, then red outer cloak and picking out red details like the robe edging wings on the helmet and shoulder and the gun casing. I'm not sure where to go with the Doom Eagle chapter badges I did on his forearms. He's not going to really have the standard chapter badge that most of my marines have on his left shoulder due to the sculpt on this guy. That kind of makes me feel like I need to do them in black with white skull. Another part of me thinks red wings white skull - but there's going to be so many red wings on this guy that it might get to the "overkill" level. So heck, maybe gold is the route to go on these. Anyone got thoughts?
29345
Post by: Nashbashem
He's in command so he needs to be flashy
74772
Post by: the shrouded lord
Are you selling any of these helmets on eBay?
43588
Post by: Anpu-adom
I'd definitely go with Gold for the chapter symbol if you are worried about too much red.
I'm going to second the shrouded lord's question... will you be selling these on ebay?
62373
Post by: JWMarines
the shrouded lord wrote:Are you selling any of these helmets on eBay?
Anpu-adom wrote:I'd definitely go with Gold for the chapter symbol if you are worried about too much red.
I'm going to second the shrouded lord's question... will you be selling these on ebay?
I think I may have to work on them a bit more before I tried to sell many. The castings aren't all that clean. and they take some green-stuffing to get them really working nicely. That being said, feel free to PM me if you really want some and we'll work something out.
62373
Post by: JWMarines
Oh, he's going to be flashy!
I'm not sure if the red needs a fine line highlight in places or not. Also, right now I'm painting him as if his helmet is going to be black... But here's my issues with the helmet colors: 1. These guys are Ultramarines geneseed, so I feel like the helmets need to denote rank to some degree. 2. Currently sergeants have black helmets, veterans have red, non-vets have silver.
If I stay with black, maybe I could say that black on the helmet denotes 'officer'. Or I've thought about making force commanders have gold helmets, but I'm worried about how it will look in gold. Red and black together would seem to say 'veteran sergeant' to me.... Anyway, I'm leaving it alone and not adding any paint to it until I get some of the work done on the gold near his helmet. Its wait and see till later I guess.
Here's an updates of where he is now...
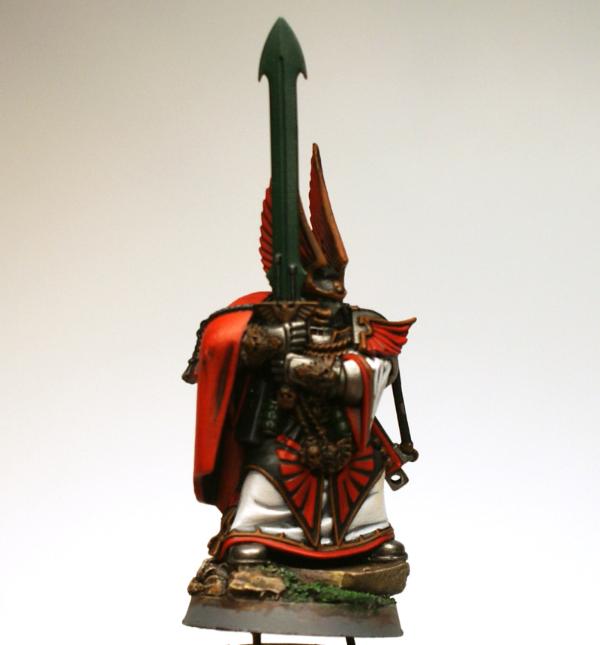
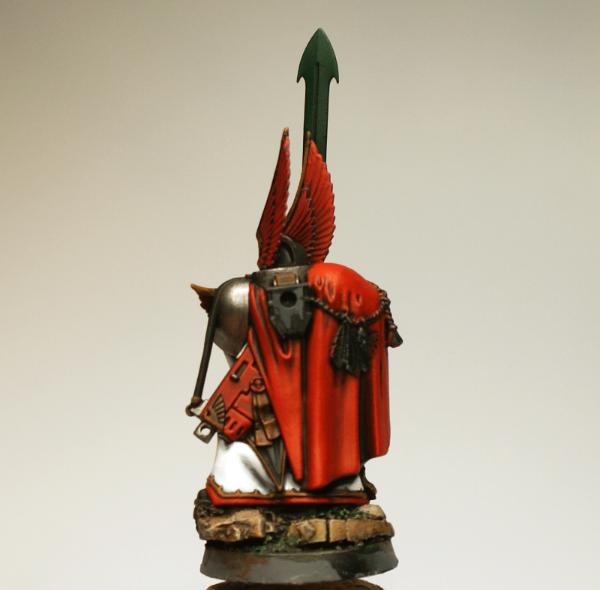
74800
Post by: Master Azalle
He's coming along nicely!
Habe you thought of a Red Helmet with a Black Stripe?
Or you could just leave it black, i mean he does have wings on his helmet... seems to scream - im the leader
62373
Post by: JWMarines
 Master Azalle wrote: Master Azalle wrote:He's coming along nicely!
Habe you thought of a Red Helmet with a Black Stripe?
Or you could just leave it black, i mean he does have wings on his helmet... seems to scream - im the leader
Thanks!
Not a bad thought at all... he does look pretty "in charge". I've thought about doing the red/black thing with the helmet, but that was my game plan for veteran squad sergeants... At this point I know I have to go back into all of my squads and work on options compatibili ty with the 6th ed 'Dex anyway. I'm really light on melta across the board, I may do some surgery on the serg/special/ HW marines in each squad and do magnetic options... I may even have to design and make my own grav guns... I don't feel like spending lots of $$ on grav bits.
I've already started designing for my next project: Rhino parts! So, I need to hurry up and polish this guy off.
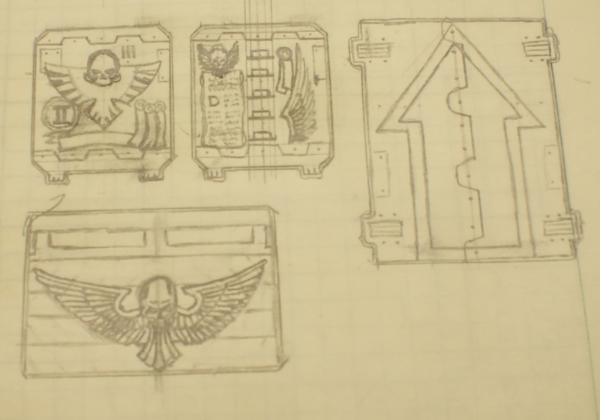
74800
Post by: Master Azalle
JW leave the helmet black with the golden accents and party on brother!
78432
Post by: mazzHammer
After reading through this thread from the beginning, I'm amazed. I am really enjoying seeing this army progress. Keep it up!
74772
Post by: the shrouded lord
well, if your gonna sell these on ebay, pm me IMMEDIATELY!
edited for missing word.
62373
Post by: JWMarines
Master Azalle wrote:JW leave the helmet black with the golden accents and party on brother!
Turned out nice I think!
mazzHammer wrote:After reading through this thread from the beginning, I'm amazed. I am really enjoying seeing this army progress. Keep it up!
Thanks man, glad you're enjoying the process
the shrouded lord wrote:well, if your gonna sell these on ebay, pm me IMMEDIATELY!
As soon as I get my act together I'll cast up some more. My next project is some scratch built/sculpted vehicle parts, so the casting supplies will be out of the closet. Hopefully my resin hasn't expired.
Anyway, I finished up my Captain!
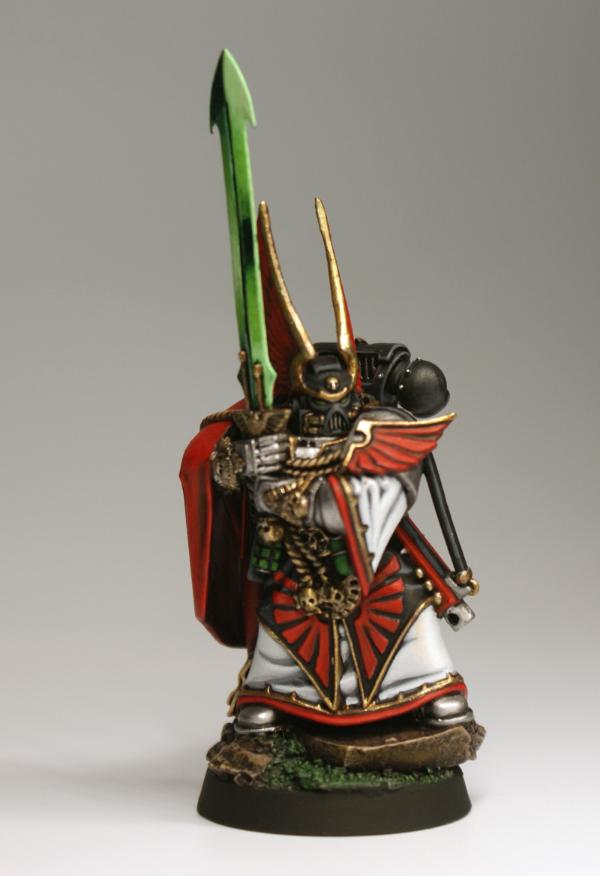
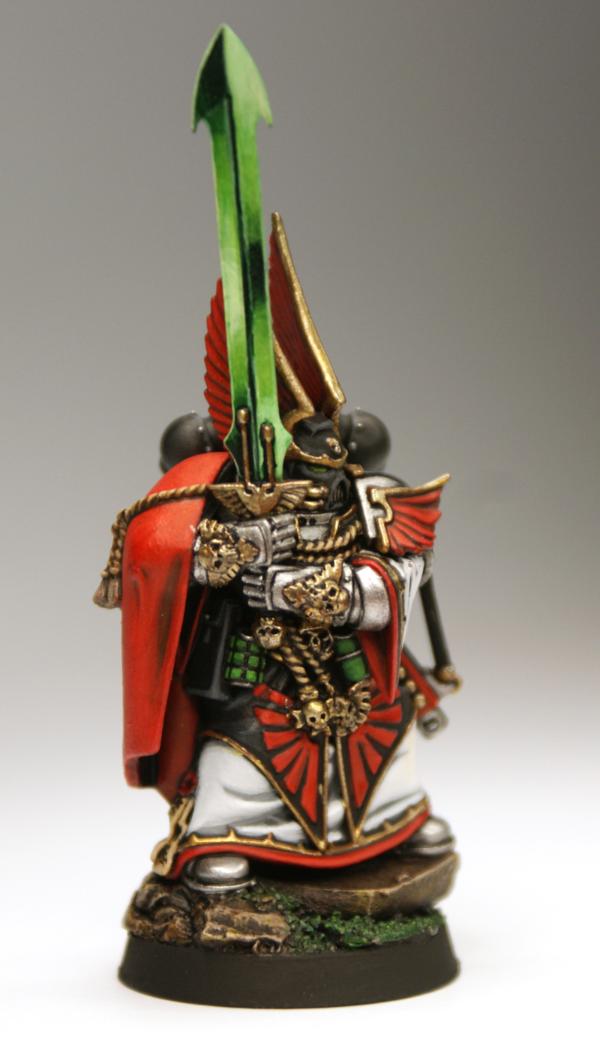

74800
Post by: Master Azalle
Well Done!
29345
Post by: Nashbashem
He is pretty sexual That is some very good work my friend. Be proud
62373
Post by: JWMarines
Thanks guys!
62373
Post by: JWMarines
The scratch building has commenced!
So, I showed off my design sketch earlier, and I'm staying somewhat close to the design but there's some details I'm changing up.
I'm building the doors and panels separately and will probably cast bare versions of my build designs. Also, I'll be press molding any details that sit flat on the door/panel surfaces. I want to be able to use this stuff in other places. Anyway, here's where I'm at with them right now:
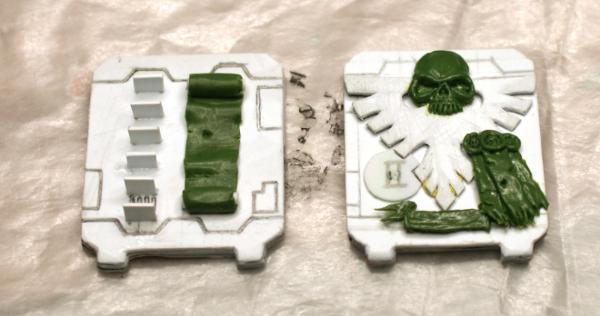
I think I'll be adding rivets to these doors as layered PVA dots. I've looked at a few other options and the only other thing I can think of that will work is to make up a whole bunch of green stuff balls... does not sound fun. I've welded the stair pieces to the one door with plastic glue, so the next stage there is to file them down even with each other and bring their height down a lot.
What do you guys think of them so far?
62373
Post by: JWMarines
A tank. No, really! I'm finally working on a tank!
First up is a recovery Razorback that I've probably mentioned here before as not worth trying to recover...
Anyway, I threw everything I could think of at this damn thing to chew through the gloss/enamel gak that was used as a primer on this thing. Superclean, Simple Green, LA's Totally Awesome, Purple Power... I even tried non-acetone nail polish remover (almost lost all the plastic to that one...). So, I thought this thing was hopeless. Well, there's something out there that will take off pretty much anything, I guess. And NOT harm plastic. Now, I couldn't tell if there was a little bit of a crumbly softness to the plastic right when I finished stripping or not and if there was it completely went away once the pieces were washed and dried. What is this miracle product you ask? Ethanol. Or whatever you can get in the 90%+ alcohol range. I tried with Denatured (99%ish) and 91% Isopropyl and they were equally effective, so pick the cheaper you can get. The key, it seems, to this stuff is to wet your painted surface with it a bit and then just dip a toothbrush in it and start scrubbing. When your toothbrush starts getting dry, dip again. It seems that "rubbing alcohol" is the right way to think of it.... or "scrubbing alcohol" for our purposed. I let this tank soak in denatured alcohol for 4+ hours. The paint won't slid off or almost disintegrate like with other products. But if you have something that you thought you'd NEVER be able to get the fraking paint off of, 5-10 minutes of scrubbing with 90%+ alcohol and poof, it's pretty clean. I cleaned some scouts handled the same way and it seriously took maybe 1 minute each to have them to bare plastic.
OK OK, on to the actual build...
First: I was doing all this lovely scratch-building of rhino parts and sculpting iconography and littanys and purity seals and cool crap like that... and this things doors and top hatch are welded in with loads of plastic glue. So, they're never coming up.
Second: I wanted to go as modular as possible with all of my rhino chassis and be able to run them as rhinos, razorbacks, preds, whatever. But... Aside from being a pain in my ass to try to acquire extra parts to do all that... I can't get the damn doors/hatches off of this one! Also, I'm thinking I'll just do rhino-backs for my squads and any predators/whirlwinds/vindi's/hunter/stalkers I build will get some modularizaton. The vindicators might not get anything else as the kit extras are a lot more involved than the pred/whirl but maybe complex to the same degree as the hunter/stalker. So, I guess what I'm saying is I'll have Pred/Whirls and Hunter/Stalkers and then probably a couple Vindicators and we'll see how much crossover I do after that.
For this tank, he's going to always be a razorback because I can't get that top hatch off. The only way I see him being a rhino is if I design a hatch cover for the turret opening or something... as it stands the turret is mounted with magnets (more for being able to remove it for transport and also have it stay in place when I want it to) as is the raised front hatch. I've got the other hatch with the storm bolter on it magnetized as well, to swap.
Right, so I guess I should show it to you, yes?
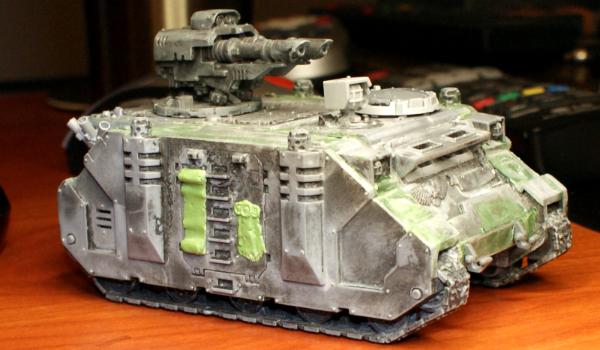
I filled and sanded my ass off on this one. The very front plate had two chunks of missing plastic from where the plastic tore off as I was trying to remove the hedge trimmer from the front.
So... After all the hassle this damn thing has brought me over the last year or so, I am quite pleased with where it is right now. Considering that I've got a predator and another razorback in the same condition this one was in... ugh... but doable. I will be shooting more WIP shots of the next one. You guys should see what these tanks start out as...
The timing is pretty good here too, as I get to try out my new toy!
43840
Post by: Deathshead420
Nice, congrats on the air. Love your doom eagles. Makes my old doom eagles look like utter garbage.
42687
Post by: Coyote81
Do you use a black wash or actually paint black in between the sections of silver to get that crisp separation? My marines are half silver and half blue and I don't get that same crisp separation.
62373
Post by: JWMarines
 Coyote81 wrote: Coyote81 wrote:Do you use a black wash or actually paint black in between the sections of silver to get that crisp separation? My marines are half silver and half blue and I don't get that same crisp separation.
I drown them in black wash. But I brush it on. Now on my captain I tried something new. I primed him with krylon gray indoor/outdoor primer, and the. Black washed him a lot... 5 ish coats 1:1 wash to thinner (I make a thinning mix of about 10:1:1 distilled water to flow aid to drying retarder). But when I'm doing the silver armor I base coat in boltgun metal, heavy black wash, layer in some chainmail, up to mithril silver. Then I'll take undiluted badab black and hit just the creases as again. The touch up heavy shade crevice washes really help the details pop out better I my mind. They don't always look like the most realistic shading, but hey this is the 'grimdark' future, so I take a few liberties too.
29345
Post by: Nashbashem
Looking forward to seeing your new airbrush in action
62373
Post by: JWMarines
Sorry for the lack of updates during this process. I was on and off working on the razorback slowly. Sadly I have 2 more tanks like this. Another Razorback and a Predator. The guy built them with so much plastic glue that there's little hope for getting the top hatches or doors off to do much modularization. The turret, front hatch and search light are all magnetized. I magnetized them mainly to start testing attachment points for how I want to do my future tanks. Though, I did do an alternate Storm Bolter hatch for this one, but I might just save that for future tanks that will actually use it.
Anyway, here it is all done.
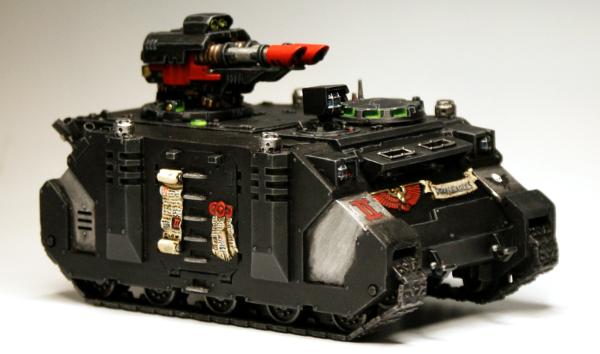
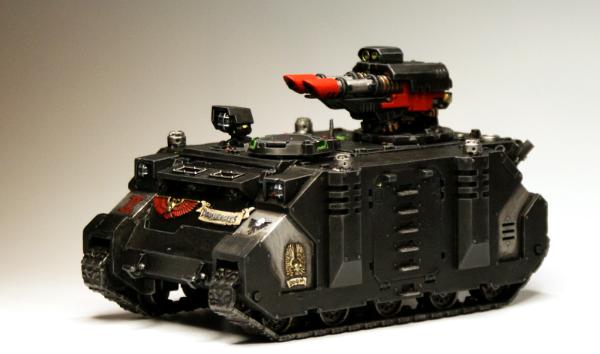
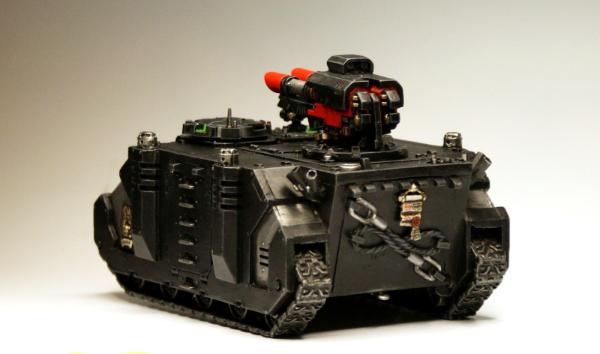
Strait on shot of two of the custom pieces I did for my vehicles. The scroll and triple purity seals. I've got both of these pressed into some Super Sculpey and have been popping out some green stuff duplicates to use on other vehicles. For the littanies, scrolls and purity seals on this one, I broke out my red, brown and green 005 micron pens in addition to the black that I normally use. Let me know what you guys think about the variation there.
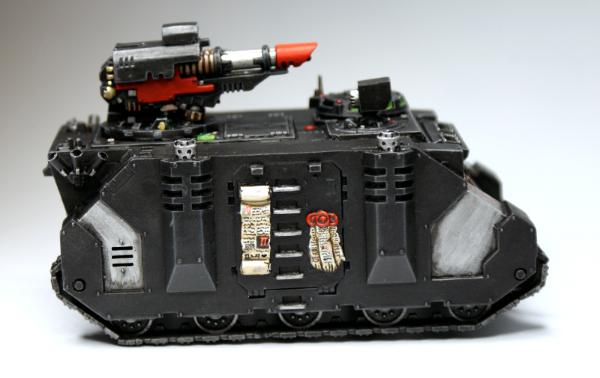
Cheers guys, C&C welcome as always!
62373
Post by: JWMarines
Well, I said I would post more WIP of what I'm dealing with on these recovery tanks and how I'm going about it, so here's the work to be done on the next Razorback...
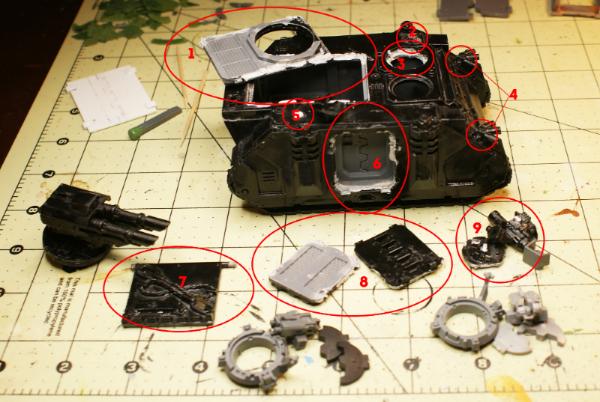
Wee!
So, the TO Do list looks like this:
0. Strip everything with alcohol since that's the only thing I've found that takes this particular paint off
1. Top Hatch/Turrets
a. Clean up/repair damage from removing the razorback hatch/turret plate.
b. Create/Prep replacement custom rhino top hatch
c. Set magnets
d. prep TL Lascannon turret
e. potentially build custom heavy flamer, assault cannon, TL plasma/Lascannon turret options... If I want all of the options available for the 7 or 8 Razorback/Rhinos I'm going to have I will probably have to custom build my own so that I can reproduce them... I can't afford that many bits.
2. Search Light
a. Repair damage from removal of search light
b. Set magnets for removable searchlight
3. Hatch opening
a. clean up/repair from removal of missile launcher hatch plug
b. clean up/prep regular hatch coverings
4. Smoke Launchers
a. remove smoke launchers and repair the plastic underneath
b. move smoke launchers somewhere else
5. Comms dish
a. repair damage from removal
b. set magnets for removable comms dish
6. Doorways
a. repair damage from door removal
7. Rear Door
a. repair the back door and reattach
8. Outer doors
a. create/prep custom doors
9. Hatch options
a. repair missile launcher hatch option
b. prep storm bolter hatch option
c. prep plain hatch option
d. set magnets for all options
As you can see, there's quite of bit of pain going on there. But at least with this one I managed to get the doors and all the hatches OFF, even if I tore some of the plastic. So, this will be a Rhino/Razorback dual purpose kit.
43588
Post by: Anpu-adom
Keep it up! It'll be quite the accomplishment when finished!
29345
Post by: Nashbashem
That Razorback is looking snazzy
And I don't envy your to do list
62373
Post by: JWMarines
Anpu-adom wrote:Keep it up! It'll be quite the accomplishment when finished!
Nashbashem wrote:That Razorback is looking snazzy
And I don't envy your to do list
Thanks for the encouragements, but I can clearly never leave well enough alone... Stripping the other razorback went pretty well and I've found out through experiment of sloth that if you leave a tank which is covered in glossy-who-knows-what-kind-of-primer in a tub of 99% alcohol for a week or so the paint will pretty much come right off if you look at it a bit cross. I found this out by leaving the recovery predator body in the tub after I had scrubbed my razorback.
And here's the bit where I can't leave well enough alone... I'm going ahead and cleaning up/patching/filing/filling/sanding/rebuilding/etc... 3 rhino-backs, 1 las pred-rhino-back, and 1 Baal pred-rhino-back. So, I'm going to do the preds as capable of being rhinos/razors because... Well other than doors/hatches (which I have designed and am producing my own variants of) I just need some razorback turret options. Also, I'm already doing so much magnetising, what's another couple tanks... I've been tossing around the idea of running this chapter as whatever codex I feel like at the time which is why I've got the Baal... At the end of this project I might be able to field just about any setup.
Once I start doing the options magnetisation I will shoot some more pics of that process.
29345
Post by: Nashbashem
Have you ever heard of the phrase "Bitten off more than you can chew"
47296
Post by: Biohazard
I've no idea why you don't have more followers on here. The quality of your work is outstanding. Excellent job on recovering the assault squad and the tanks, your take on the DV Chaplain and Master is incredible as well. The blending on the capes and sword just blew me away.
Consider me subbed and looking forward to what's next.
74772
Post by: the shrouded lord
Good god that is one fethed up razor.
I'm sick of these melon-fething blobs on this melon-fething rhino, am I right? Huh? HuH? Yeah I'm right.
How are the helmets going?
26790
Post by: Gitsplitta
 Biohazard wrote: Biohazard wrote:I've no idea why you don't have more followers on here. The quality of your work is outstanding.
I suspect there are a lot more followers than actually post. Lots of folks just like to lurk...
62373
Post by: JWMarines
Nashbashem wrote:Have you ever heard of the phrase "Bitten off more than you can chew"
Haha ha ha..ha... Yeah... I've heard my brain whispering that phrase a bit lately, lol!
Biohazard wrote:I've no idea why you don't have more followers on here. The quality of your work is outstanding. Excellent job on recovering the assault squad and the tanks, your take on the DV Chaplain and Master is incredible as well. The blending on the capes and sword just blew me away.
Consider me subbed and looking forward to what's next.
I really appreciate the kind words. As long as people are enjoying the work, the process, the progress, whatever, i'm happy. This gives me a place to toss some pictures and bounce ideas off of people as I go. So, in that respect, more active participation would be cool, but it's not holding me back!
the shrouded lord wrote:Good god that is one fethed up razor.
I'm sick of these melon-fething blobs on this melon-fething rhino, am I right? Huh? HuH? Yeah I'm right.
How are the helmets going?
Yeah, blobs. No more blobs of plastic cement would be great. In regard to the helmets, I was casting some rhino doors the other day and shot some resin into my helmet mold. The resin I have open right now is getting old so I wasn't expecting too much, but out of the 5 heads on the sprue, only 1 had a miscast wing. I could probably pop out quite a few good casts in a relative hurry if someone was in need....pm if you are a person in need of eagle helms.
Gitsplitta wrote: Biohazard wrote:I've no idea why you don't have more followers on here. The quality of your work is outstanding.
I suspect there are a lot more followers than actually post. Lots of folks just like to lurk...
Hi lurkers! Feel free to ask questions or just talk about random things.
62373
Post by: JWMarines
*Casts Resurrection*
Project lives again!
26790
Post by: Gitsplitta
Alright JW, bring it!
74772
Post by: the shrouded lord
HE LI KNEW THE STAFF OF AUM WOULD WORK!
62373
Post by: JWMarines
After an extended away, I got back in and cleaned up and built a Rhinoback magnetized for pure rhino and the heavy bolter or lascannon loadout of the razorback.
I've got everything primed and working on the base coat colors now. I'm at work so I can't post any pics, but I did an inventory of everything 'Space marine' that I have that's unpainted... it's a scary scary list. Part of me wishes I hadn't done the inventory, but I guess I needed to know.
The game plan now is to finish this Rhinoback and then assemble/convert and paint the final assault squad for the company. That also happens to be the last of the company standard 10 squads. Then at least I can say that the core of the company is done and not feel bad about working on peripheral units.
43588
Post by: Anpu-adom
So excited that many of my favorite dakka projects are seeing new life!
62373
Post by: JWMarines
 Anpu-adom wrote: Anpu-adom wrote:So excited that many of my favorite dakka projects are seeing new life!
I'm excited to get back to it! Too much dust collecting on my shelves. I need to get the boys out and take a group shot of everything painted as of now. The one on the first post is pretty outdated. Automatically Appended Next Post: Here we go... progress! It's actually happening!
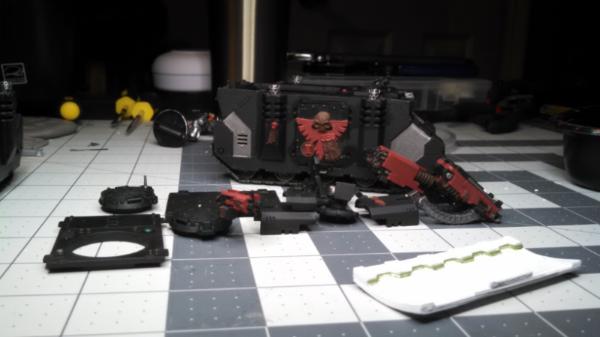
62373
Post by: JWMarines
Wheew... took me a month to get back at it, but hey, I got married and honeymooned in Paris.
Anyway, all that mess is done now, bring on the Doom Eagles!
Previously I posted some painting progress on my first Rhinoback (the other Razorback I have done had the razorback turret plate plastic welded in such a way that I couldn't get it out without destroying the top of the tank). I've now completed it. As with all my Doom Eagles stuff thus far, I have no idea to what degree I can or want to weather/battle damage them, so "complete" is a bit of a misnomer, but the core of the painting is done for now. The one big bit of battle damage to this piece are some deep gouges in the armor from the front-right track cover to the section over the left door. For now, I'm saying they got into a scrape with some 'nids and the damage wasn't too bad, so they haven't fixed it yet.
And here she is...
w/ all the parts
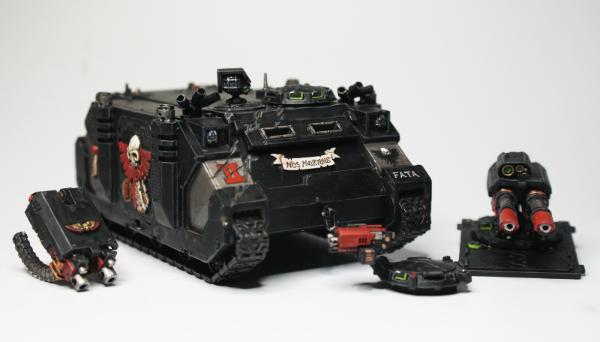
Left side w/ Heavy Bolter turret

Right side w/ Las Cannon Turret

Here's Alpha Squad posing for a photo op with their new ride

And here's the Razorback and Rhinoback together (focal depth was off on my camera, sorry)

Now I need to figure out what to do next. I really don't have a playable list of models painted, but I've only got one squad of assault marines unpainted before I've got the 10 core squads done... and I don't have a full command squad... no sternguard/vanguard... no terminators... no flyers... weak heavy support... hmmm.
I guess I'll have to drag a bunch of stuff out and stare at it for a while until inspiration or determination strikes.
74772
Post by: the shrouded lord
maybe...have a go at terminator helmets?
good to see you back, and congrats on finding a missus. i hope the catacombs didn't give you any trouble on your honey moon.
26790
Post by: Gitsplitta
Congratulations and welcome back! The models look wonderful and it looks like you have a plethora of good choices ahead of you. Good news for your readers anyway.
62373
Post by: JWMarines
Thanks guys!
 the shrouded lord wrote: the shrouded lord wrote:maybe...have a go at terminator helmets?
good to see you back, and congrats on finding a missus. i hope the catacombs didn't give you any trouble on your honey moon.
I've got some nice pics from the catacombs that I need to edit. Might even influence some work on my long-untouched World Eaters army.
Also. as of now I've been through the first 150 pages of a search for 'Terminator' in the dakka gallery... my interest in working up something really interesting for my terminators is now very high. Fortunately I've got my sketchpad here at the office!
62373
Post by: JWMarines
So, it begins!
I cut the front of one of my helmets off and modeled the back end so that it would fit in a terminator head space. I don't think I can work a wing motif onto it and have it function as a fully pose-able head. What do you guys think of it so far?
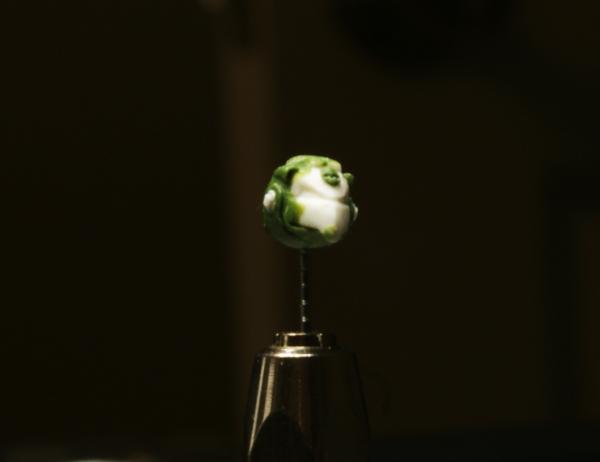
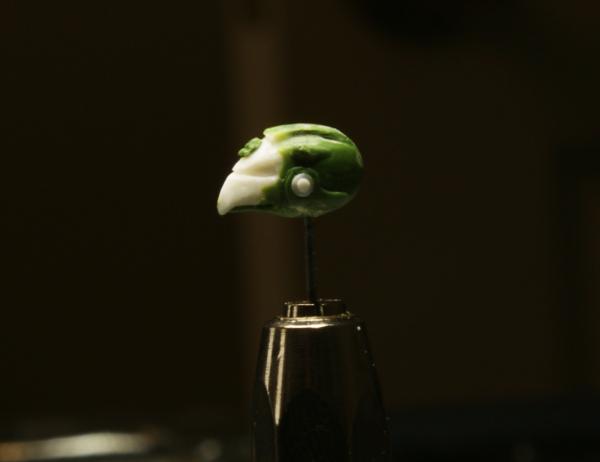
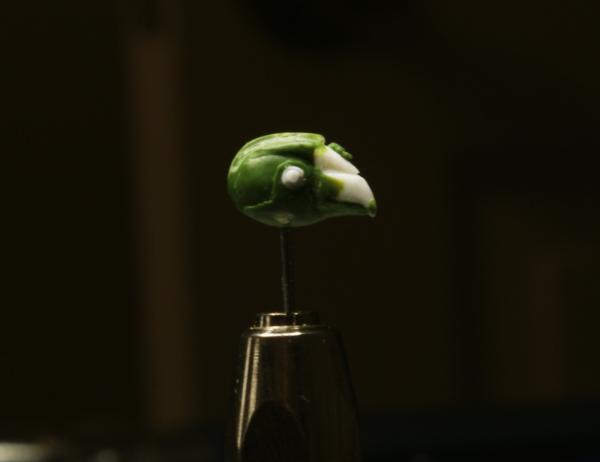
And I press molded one of my shoulderpad designs so that I could add the element to terminator shoulders without having to mold/cast a bunch of separate shoulders. The skull detail didn't turn out *that* great, but it'll be fine when painted.
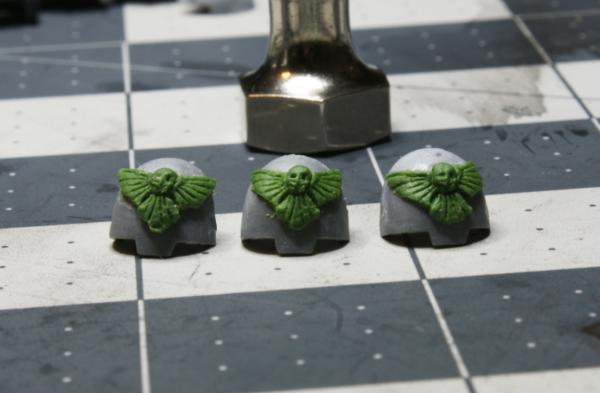
43588
Post by: Anpu-adom
Keep up the good work. When you feel that they are ready, I might need to order 10 or so Terminator Heads for that Doom Eagles army that I'll build one day.
26790
Post by: Gitsplitta
Excellent GS work.
30672
Post by: Theophony
Nice work on the helmet. Maybe the wings can be incorporated into the collar above the head, or have a wing on the shoulder pads.
29795
Post by: EyeamRai
Beautiful stuff here. Your skill with the green stuff is astounding! I can barely fill gaps with it. LOL
62373
Post by: JWMarines
Anpu-adom wrote:Keep up the good work. When you feel that they are ready, I might need to order 10 or so Terminator Heads for that Doom Eagles army that I'll build one day.
Thanks Anpu-adom! I cleaned it up a little this morning and cut the pin off. I need to mock it up on a terminator body and see how it fits.
Gitsplitta wrote:Excellent GS work.
Theophony wrote:Nice work on the helmet. Maybe the wings can be incorporated into the collar above the head, or have a wing on the shoulder pads.
EyeamRai wrote:Beautiful stuff here. Your skill with the green stuff is astounding! I can barely fill gaps with it. LOL
Thanks guys! I think I'm going to try to sculpt a huge wing motif sprouting from the arm joints on the sides of the torso, going up over the top and down the back like a thin detail skin. Probably going to overhang the vents on the back. Replicating it with press-molds and all that will be a pain in the butt, but I haven't seen a wing motif on the top of a terminator that I like. I've seen a bunch where the wings are basically attached to the top and stick up like the DV deathwing sergeant, but I don't really care for the look. \
We'll see how it goes!
88450
Post by: Leviathus
Love your Doom Eagles and the sculpts are fantastic!
74772
Post by: the shrouded lord
so. much. want.
62373
Post by: JWMarines
Mock-up Time!
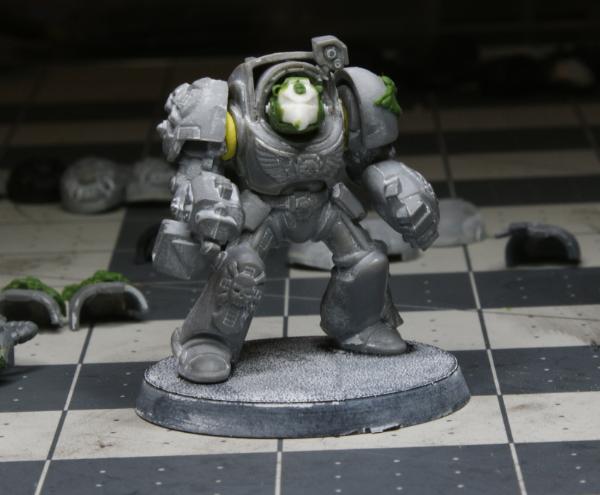

Getting a little bit of a Horus (Egypt not Heresy) vibe from the helmet. I might need to remove a little from the back.
26790
Post by: Gitsplitta
Given where the marine's shoulders and body should be... I think the head needs to be set in at least a bit farther. HOWEVER.... if you want to suggest that the bird head is actually just a mechanical extension and the actual marine's head is further back in the armor.... which is a cool idea come to think of it... you're good as is.
43588
Post by: Anpu-adom
I agree with Gits... it doesn't need much adjusting.. if at all.
Keep up the awesome work!
21254
Post by: lipsdapips
What an awesome blog! Had a blast reading through from start to this stage Consider me subbed! Regarding the terminator helmet, I really like the potential of the aesthetic, but do think it may need to be placed a little deeper
62373
Post by: JWMarines
Thanks for all the kind words everyone! I'm glad to have you guys following along
Here's some more progress on the terminator front:
I press molded the front of the eagle helmet and made a copy so that I could test how it looks painted up. The GS press copy came out a bit rough so it might not be a great painted head, but I can probably swap it out for a final cast later if need be. I also trimmed the back end down more and I think it seats better in the terminator head space. I reversed my thinking on doing some huge overblown wing motif around the top. I really couldn't come up with any designs that I thought were both visibly distinct and didn't look totally over the top.
In addition to that I went ahead and magnetized the shoulder joints and arms, added some details and got the base ready. I'm going to prime it today once the glue cures on the base.
Here's how he looks:
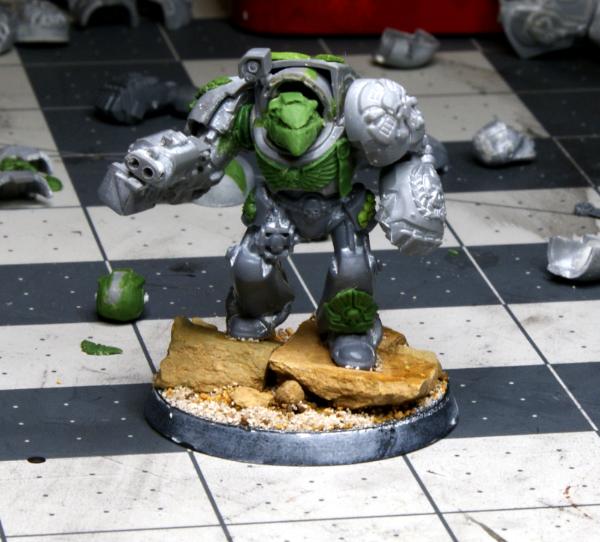
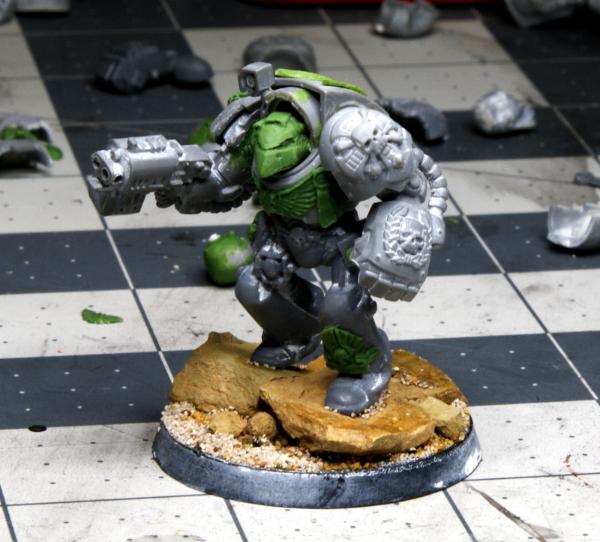

What do you guys think?
43588
Post by: Anpu-adom
I agree... the head sits better. It doesn't look like one of the aliens from the first part of Fifth Element anymore.
That termie looks great!
62373
Post by: JWMarines
Getting a little paint on it...
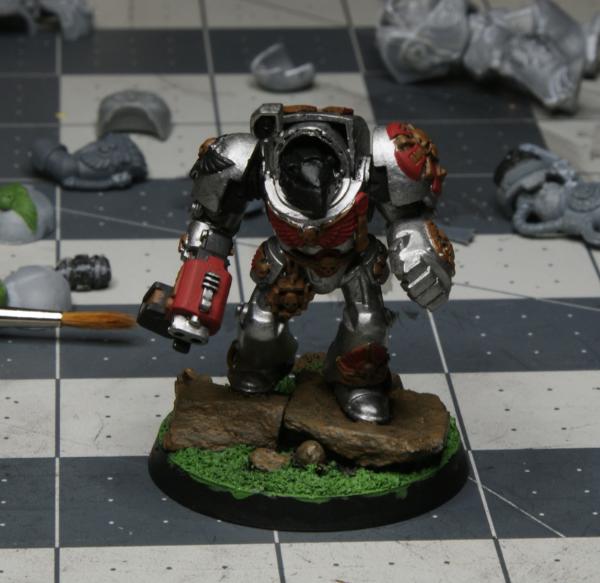
62373
Post by: JWMarines
First Terminator is done!
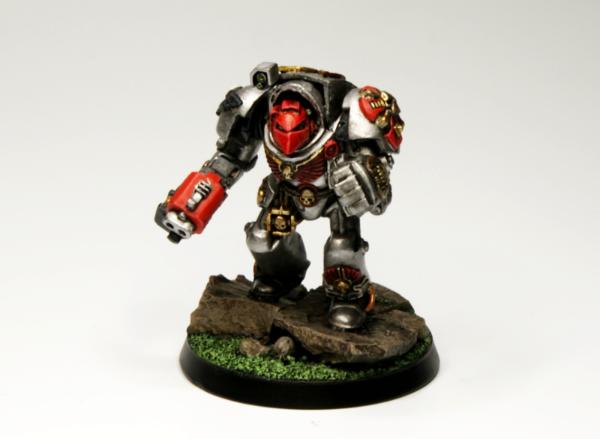
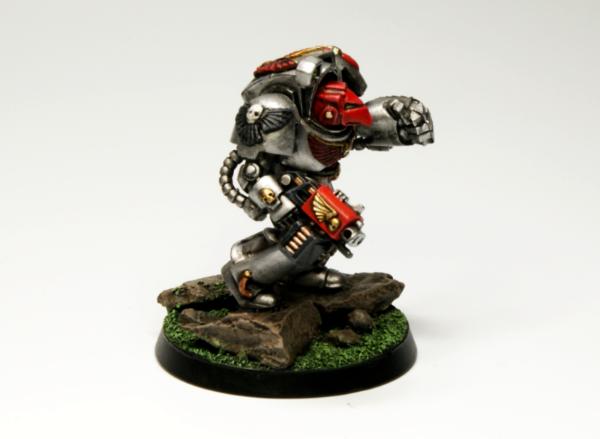

Also, while I was at it, I painted up a set of typhoon launchers that I customized for my land speeders.
and here's a group shot of a bunch of my favorite Doom Eagle models I've done:
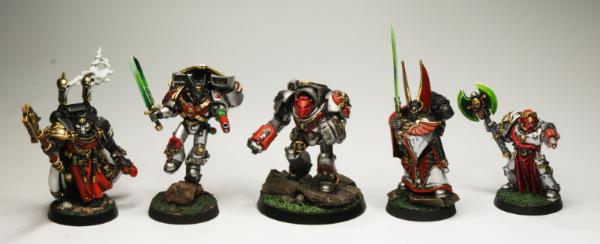
88450
Post by: Leviathus
Love that landspeeder!  and fantastic work on the termie.
74800
Post by: Master Azalle
the Term helms are most excellent! Well done sir well done!
62373
Post by: JWMarines
32mm bases. Cool. Awesome. Love it.
And sure, a whole new breed of Space Marines, why not?!

This is fine. Totally fine.
|
|