64808
Post by: CIsaac
So, I wargamed pretty heavily from 96 to 2007. I tripped, fell, landed on my DA army and crushed it flat (it wasn't in a hard case at the time), and tore my ACL and MCL at the same time. Six months of therapy later, I didn't want anything to do with the ruins of my army (or any of the undamaged ones) and everything got packed and my painting supplies were thrown out as they went bad. This was on top of a really bad experience in nearby gaming group (I just didn't want the same things they did and it wasn't anyone's fault, just didn't work out).
Long story shorter; I got involved in the Mantic KoW kickstarter and that got me to decide to get back into gaming. So... while I wait on my horde of fantasy figures (mostly requested the new Celestial Humans, not gonna see them until 2013)... I decided the right way to get back on the horse is to take my destroyed, boxed up Dark Angels army and rebuild it. Nearly every model was damaged (arms off, swords snapped, etc) except for my dreads and Whirlwind (praise be the Emperor).
I spent three days reassembling marines then bought the Dark Vengeance box set to add to them (I wasn't finished collecting at the time). The goal of my painting is always servicable, good looking tabletop quality minis. I've painted what I've considered show quality a couple times, but I'm ultra slow when it's anything beyond Base, Shade, Highlight.
Anyways, I was hoping the Dakka community could give me some basic thoughts on how I'm doing. I don't have a gaming group to ask for feedback currently.
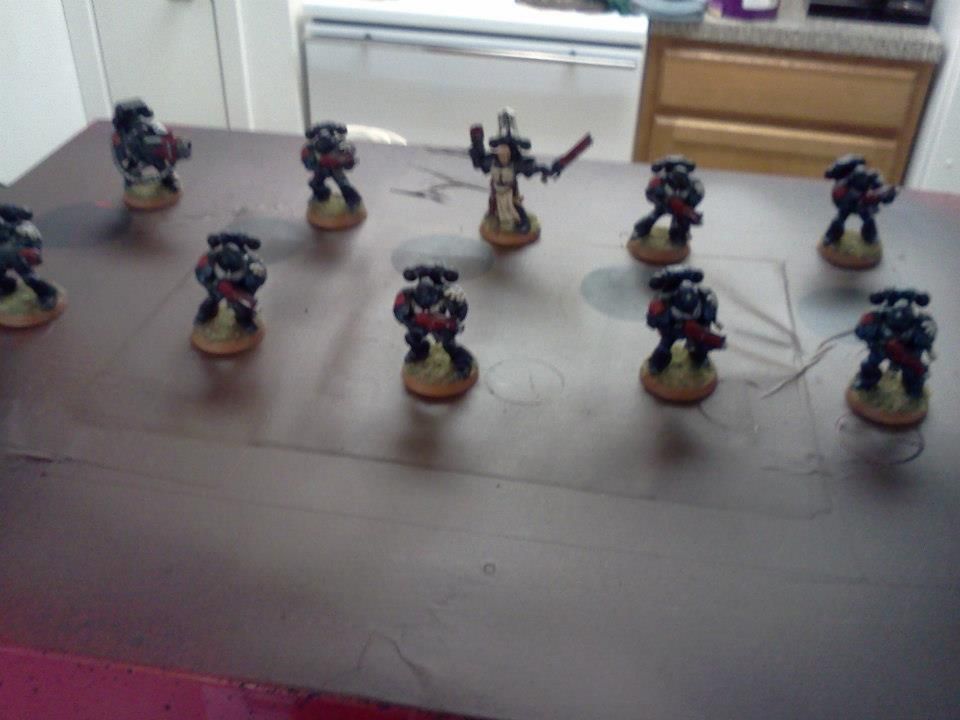
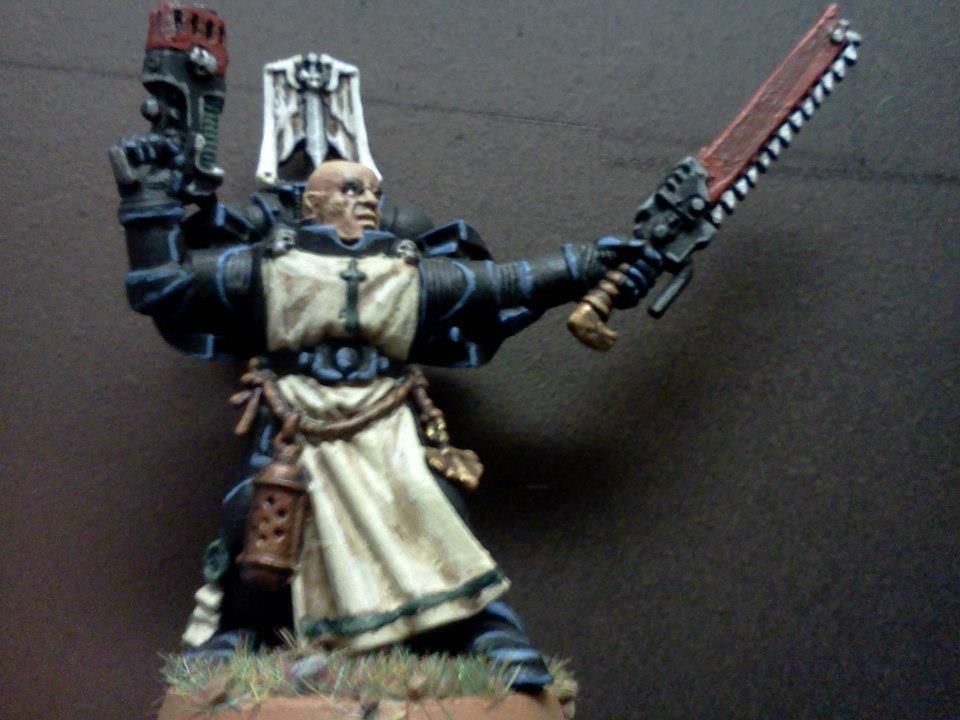
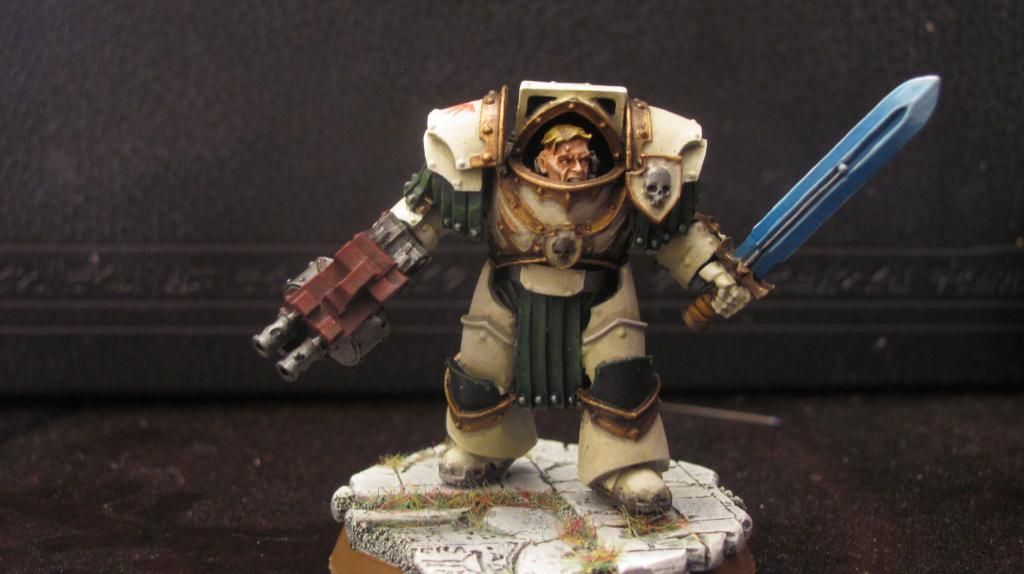
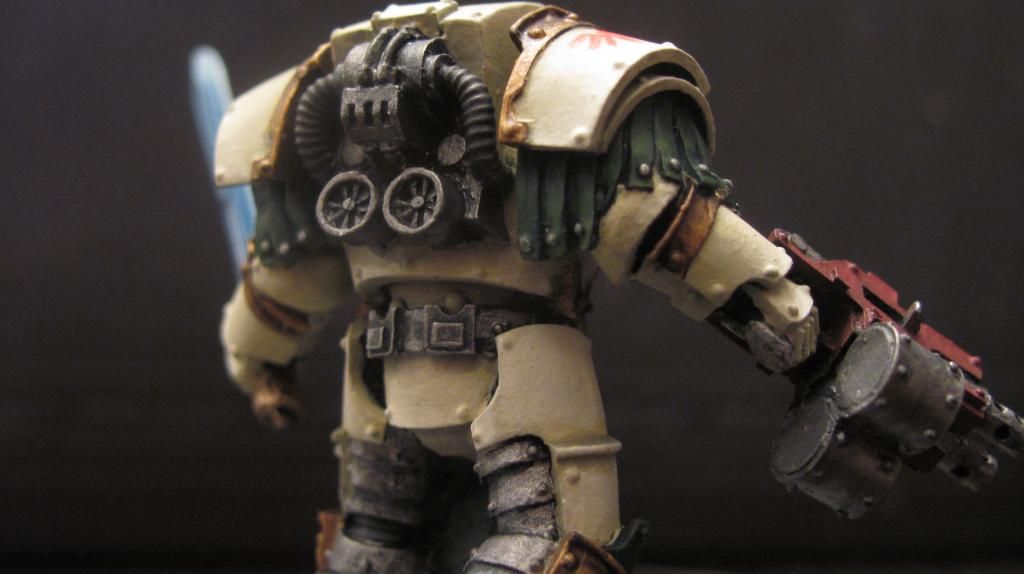
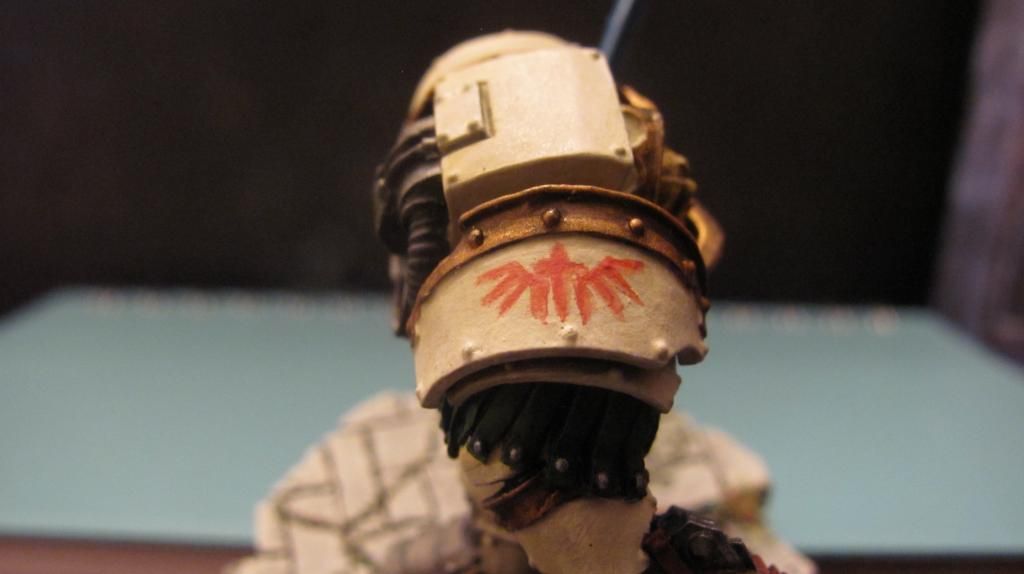
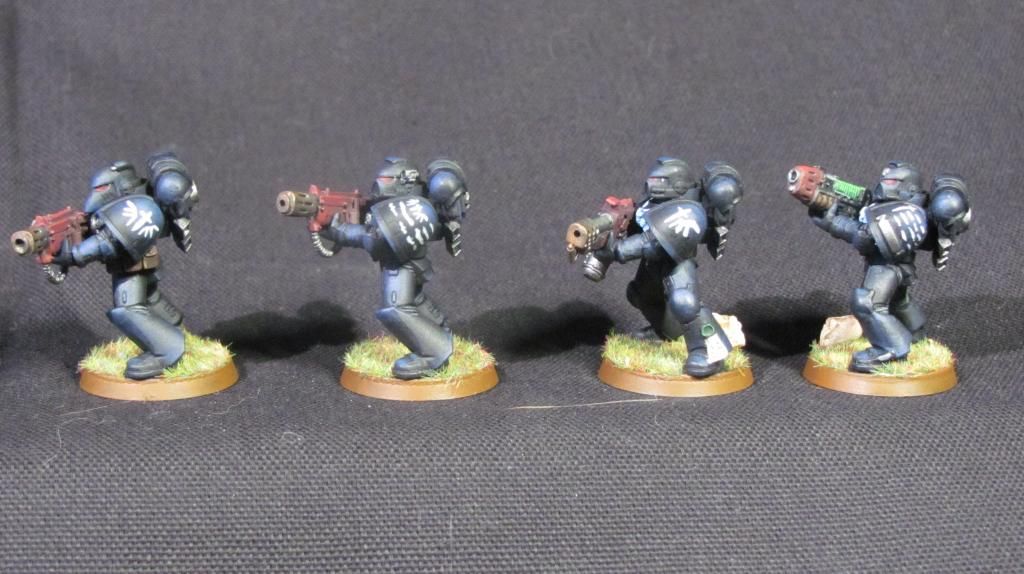
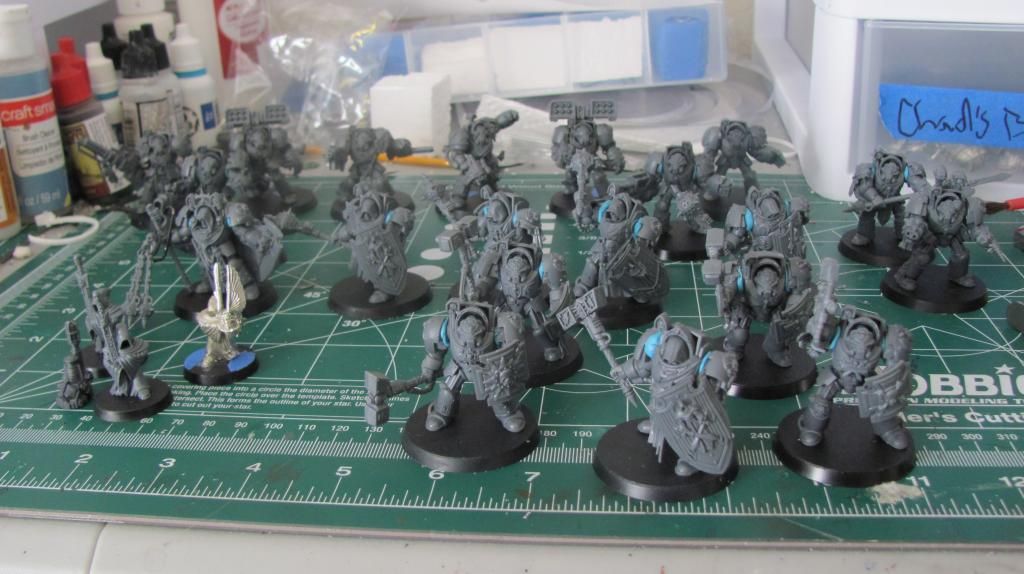
Without further ado, the DA successor chapter the 'Angels of Desolation' (AoAbsolution schema, but with the standard DA iconography, for laziness sake).
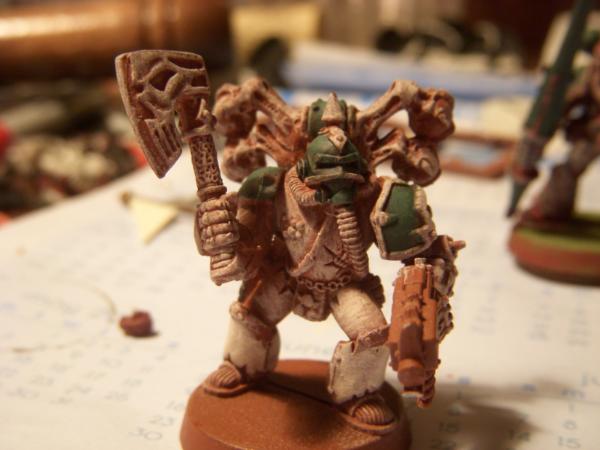
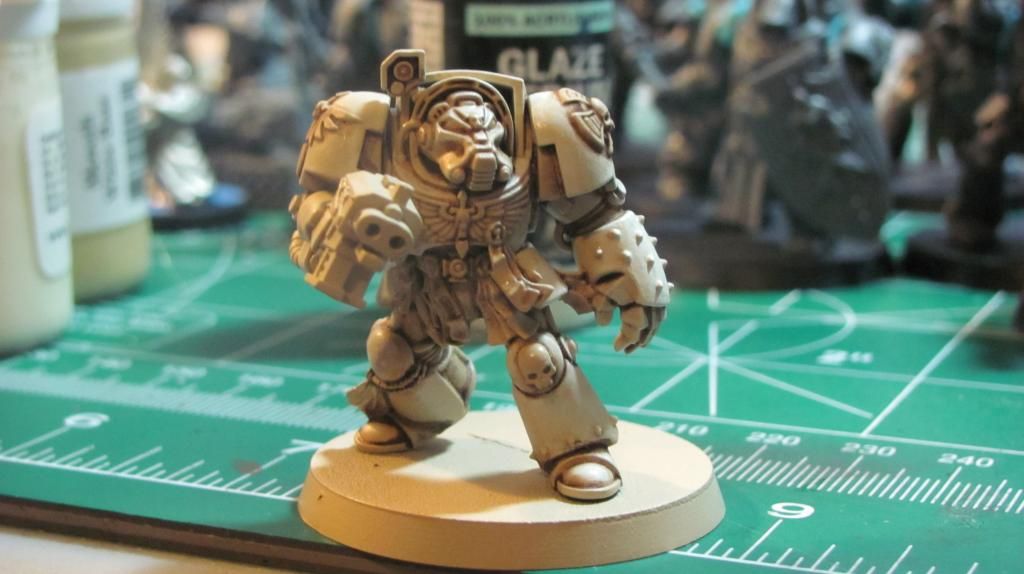
Dark Vengeance Tactical veteran sergeant:
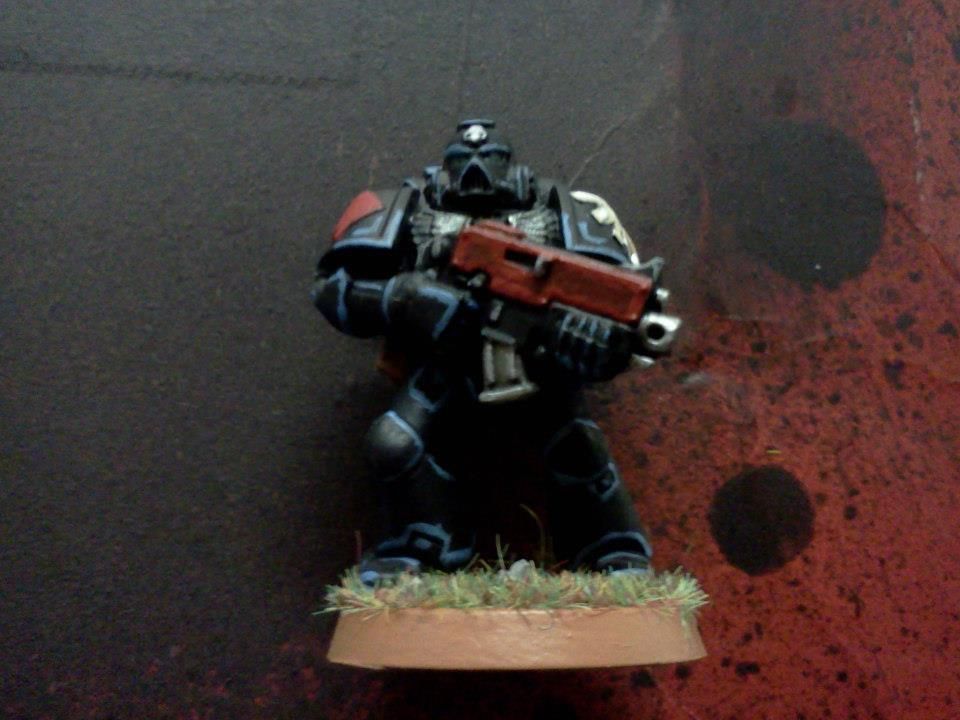
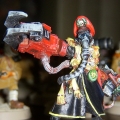
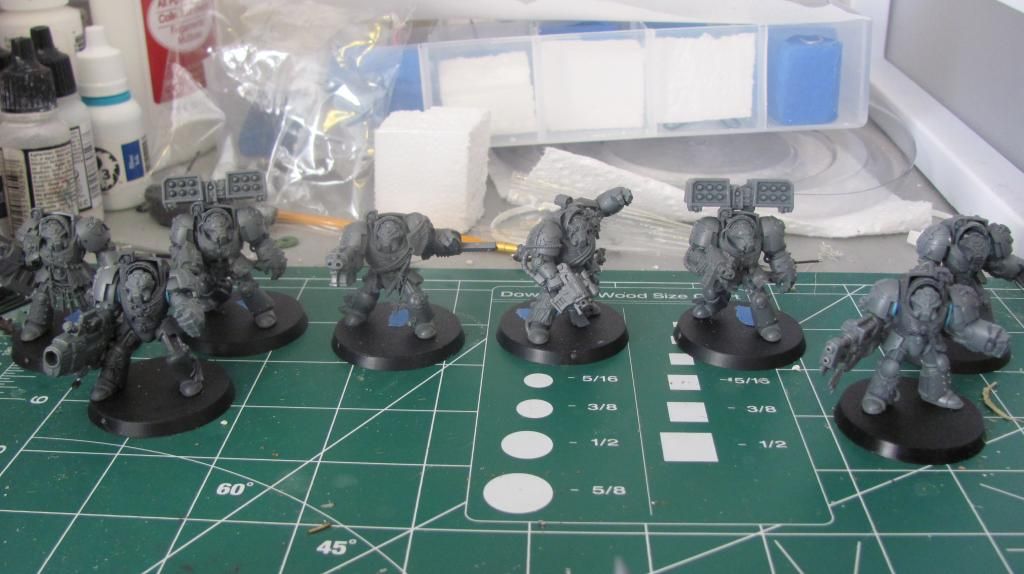
Dark Vengeance standard tactical marine:
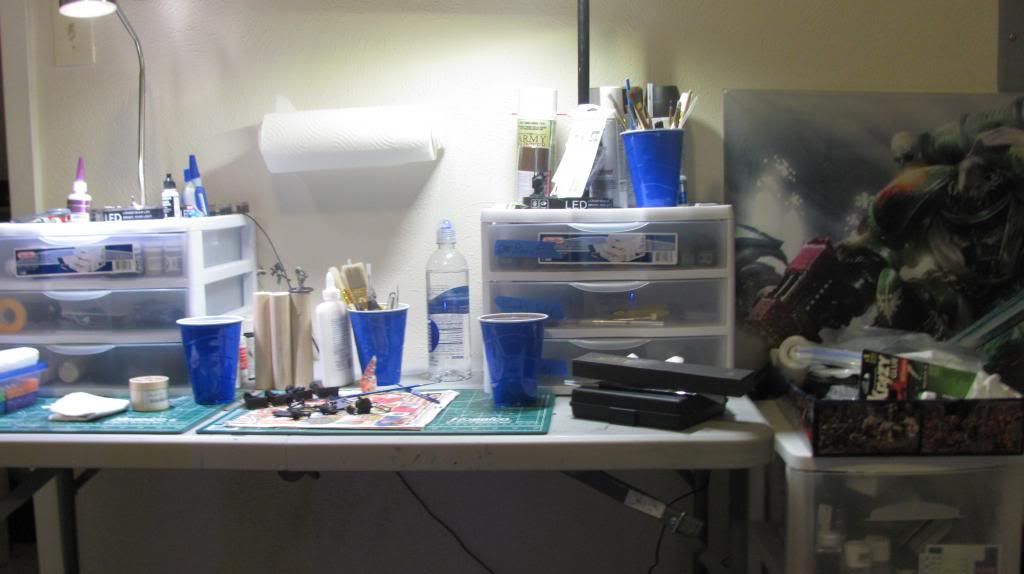
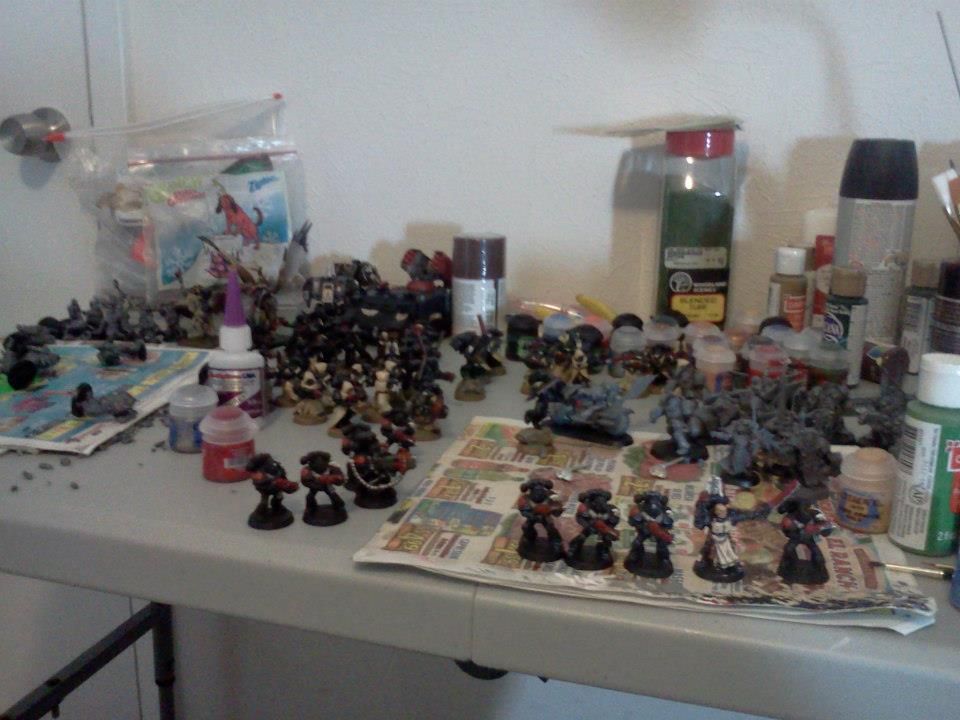
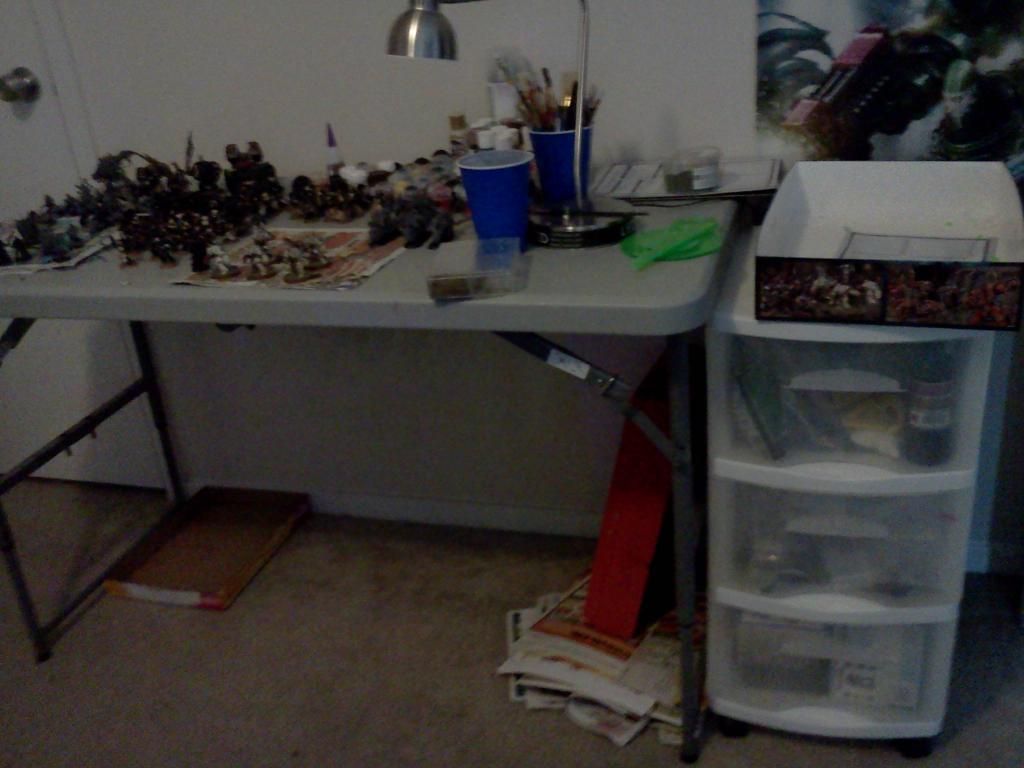
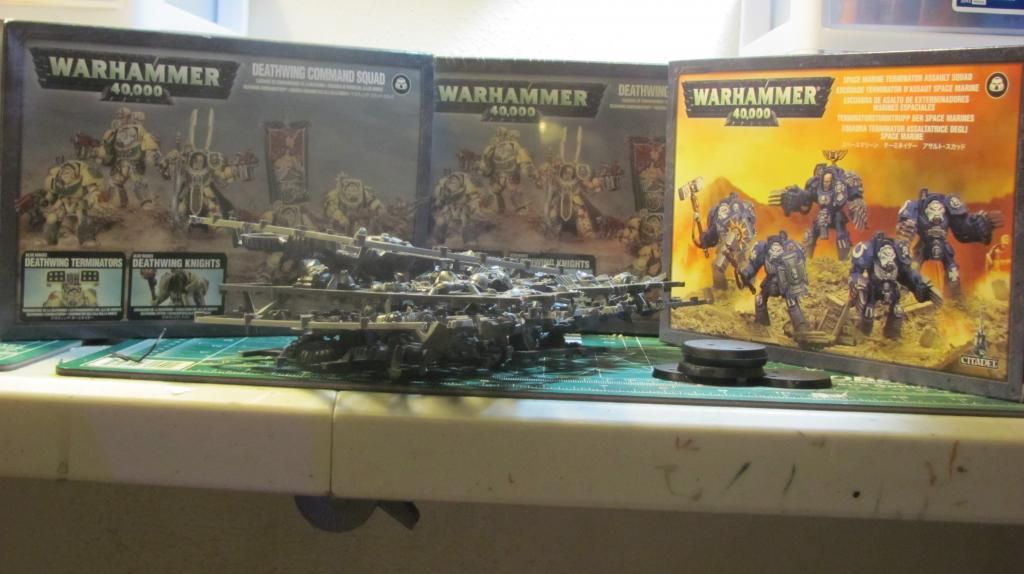
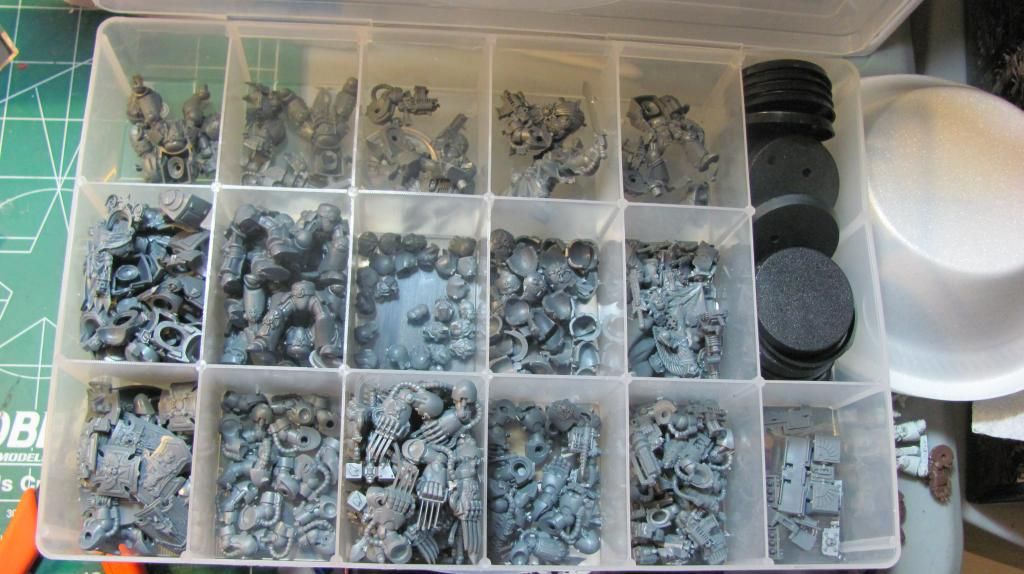
Just for fun -- my painting station. The repaired AoD armor can be seen on the table and I was partway done with the DV tacticals when this was taken.
[UPDATE]
Seeing as how I've resorted my Photobucket account for my own sake, it killed the image links in most of the older posts. Just going to put pics of finished items here to show what I've finished in the course of this thread:
The first completed item -- Dark Vengeance Tactical Squad
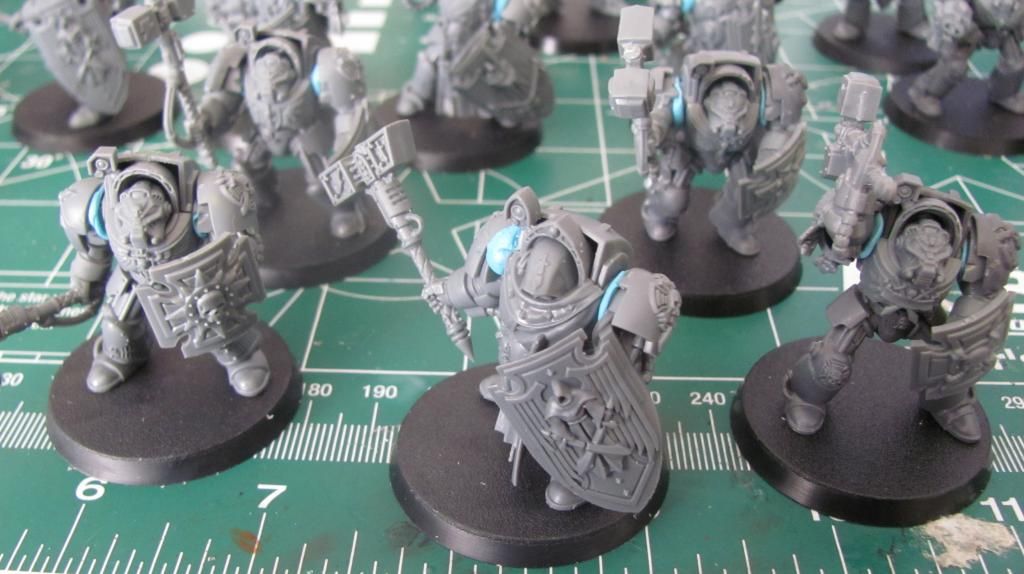
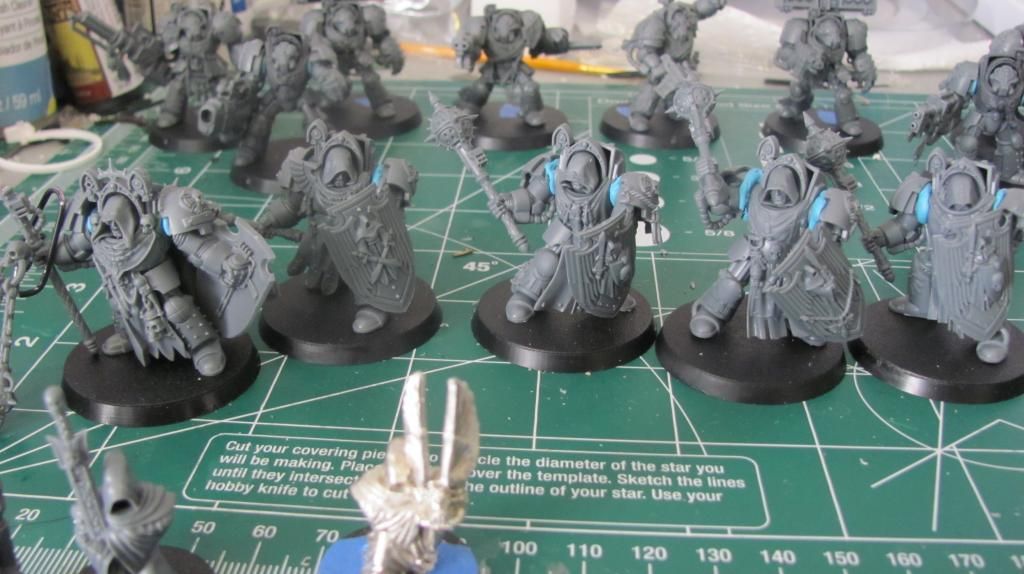
The Dark Vengeance Deathwing Squad with some closeups
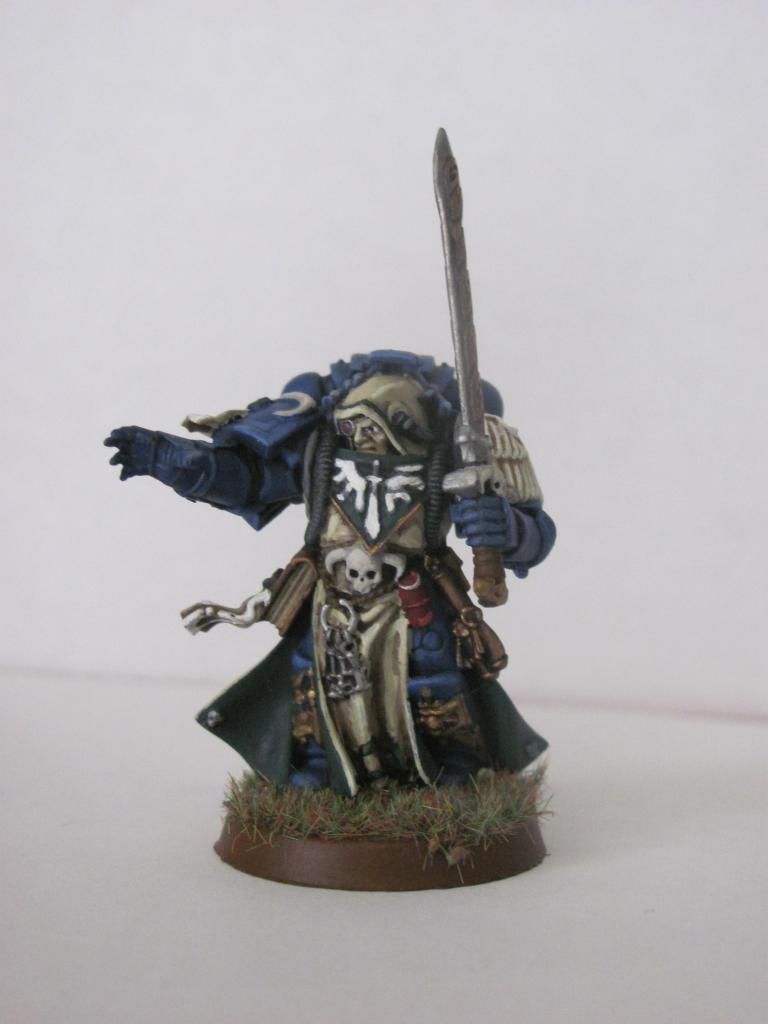
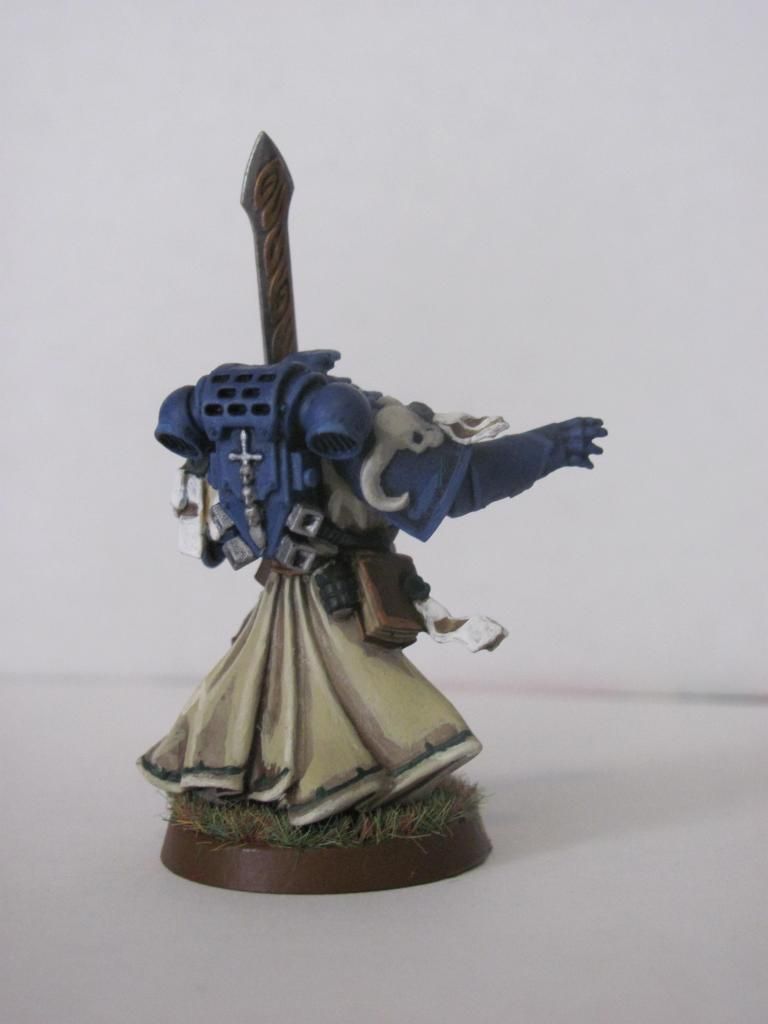
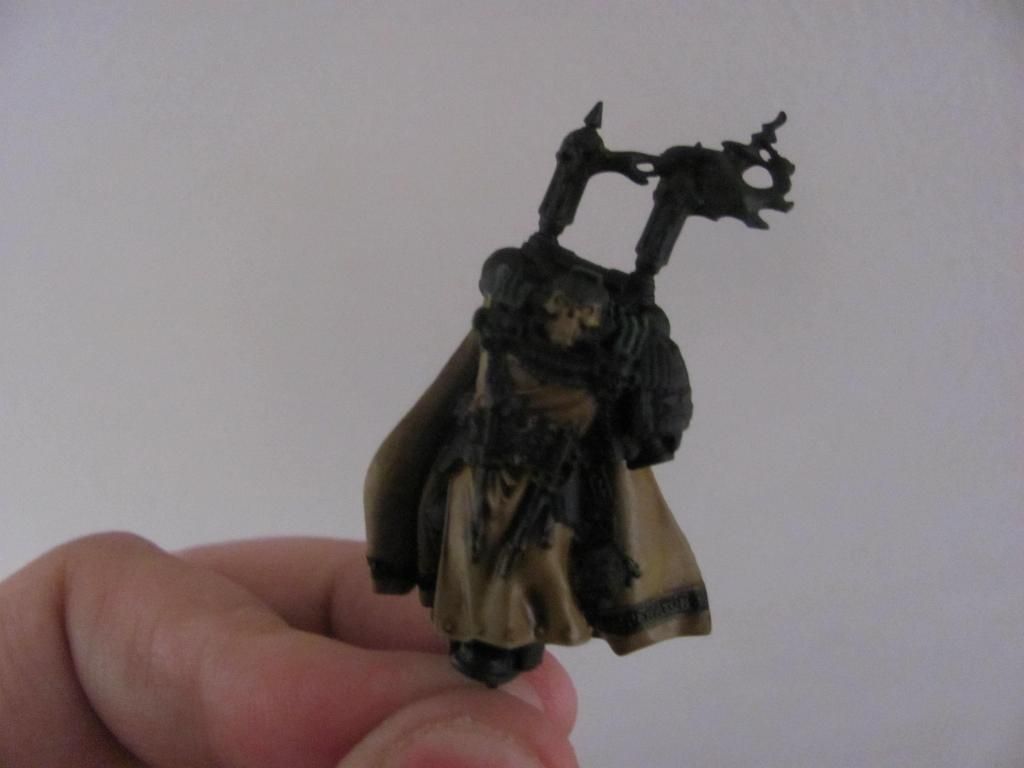
Dark Vengeance Librarian:
Predator restored from an eBay purchase:
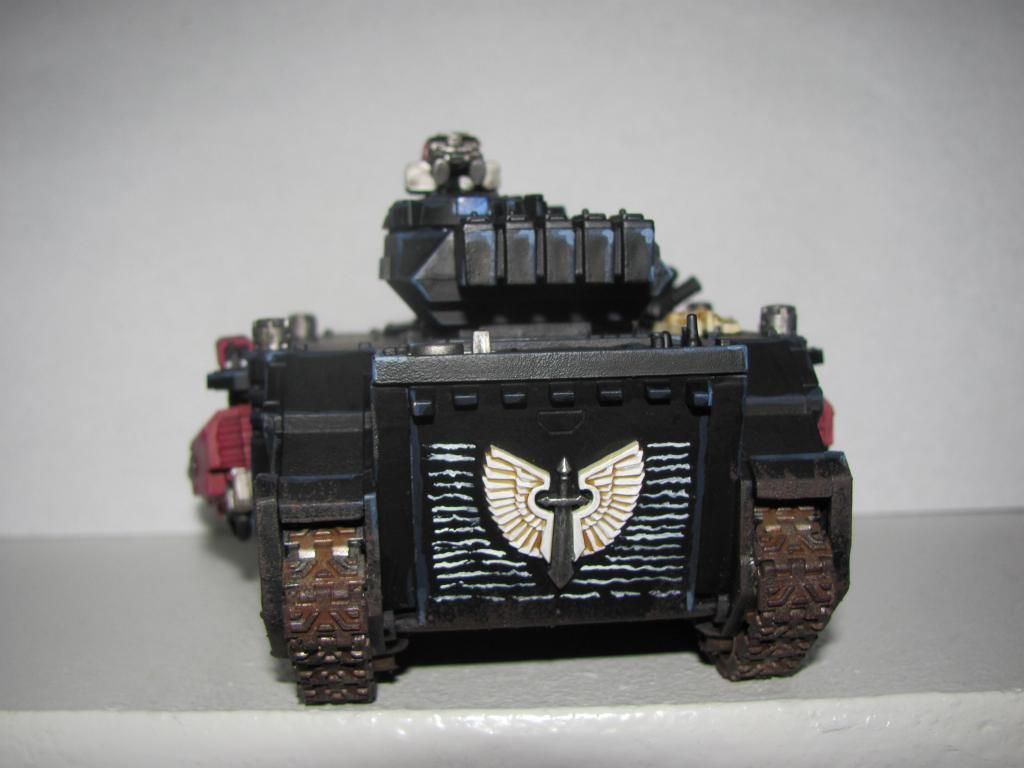
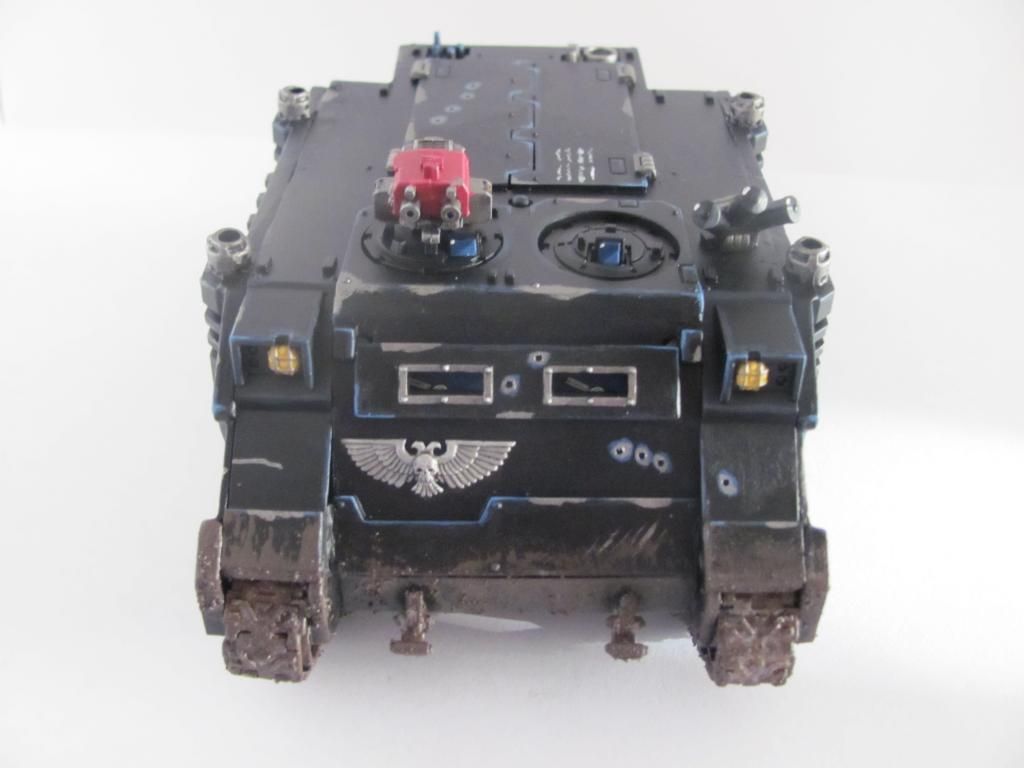
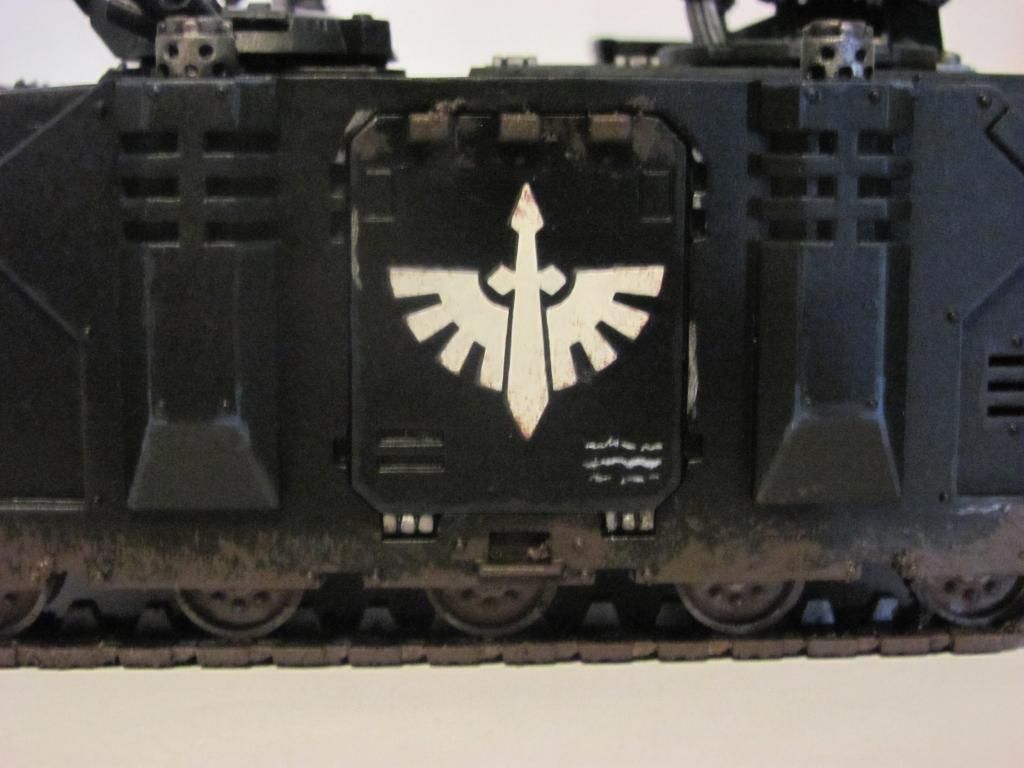
"Old Ironsides" the Rhino restored from a hellish original condition from eBay:
64808
Post by: CIsaac
Just bumping this real quick to see if I can get any feedback.
37097
Post by: blood lance
Loving those marines, they look fantastic!
Looking forward to seeing anything else you make for them.
38784
Post by: Fallen_Veteran
That bone armor needs a wash and the bone built back up. Did you base coat with that brown?
64808
Post by: CIsaac
 Fallen_Veteran wrote: Fallen_Veteran wrote:That bone armor needs a wash and the bone built back up. Did you base coat with that brown?
Yes, it's based with Linoleum Deck Brown from Tamiya. Quickly wetbrushed the whole model, then applied a second layer for smoothing on the armor plates. Thick highlight of 1:1 white/bone and then thinner highlight of white.
64808
Post by: CIsaac
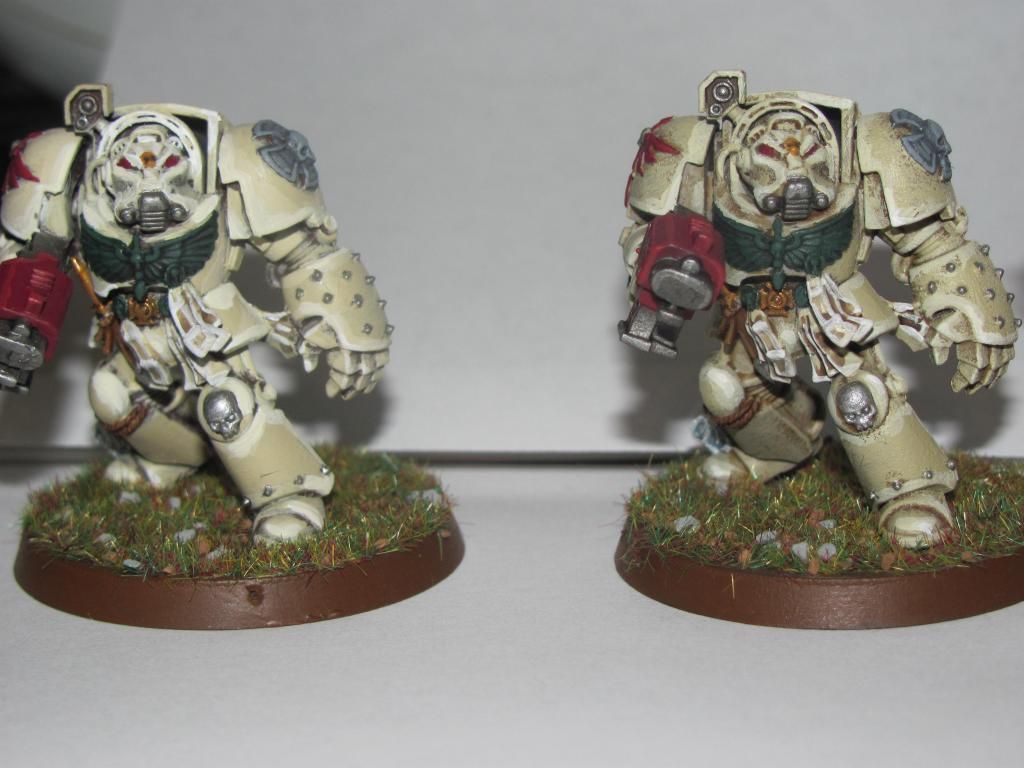
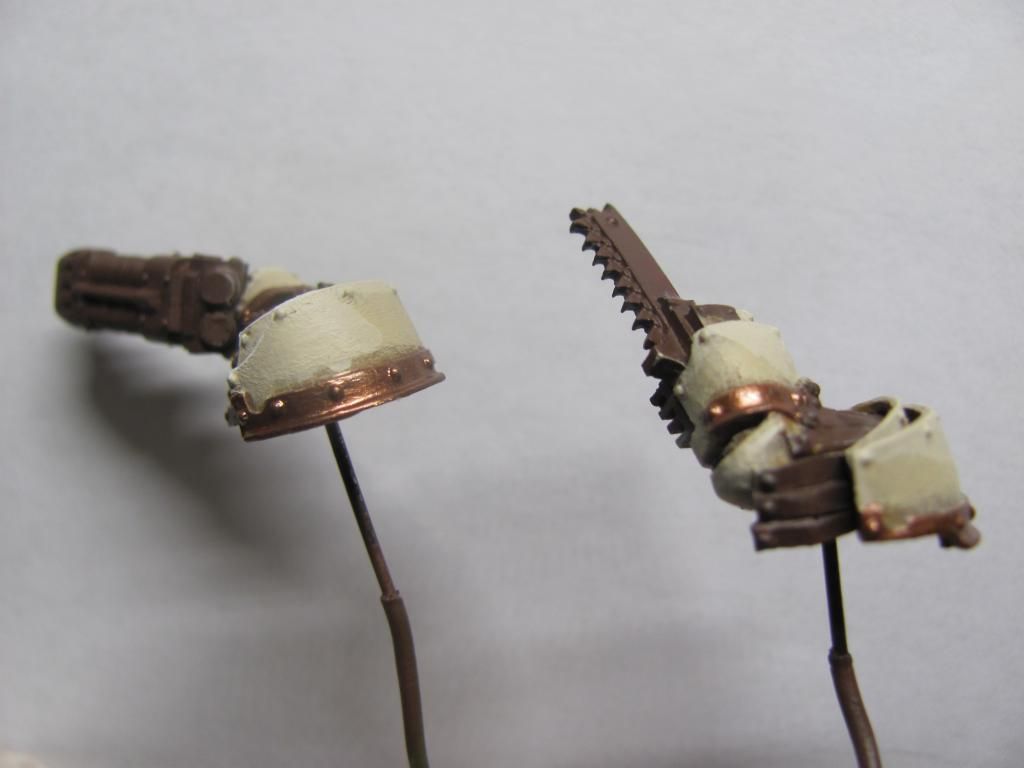
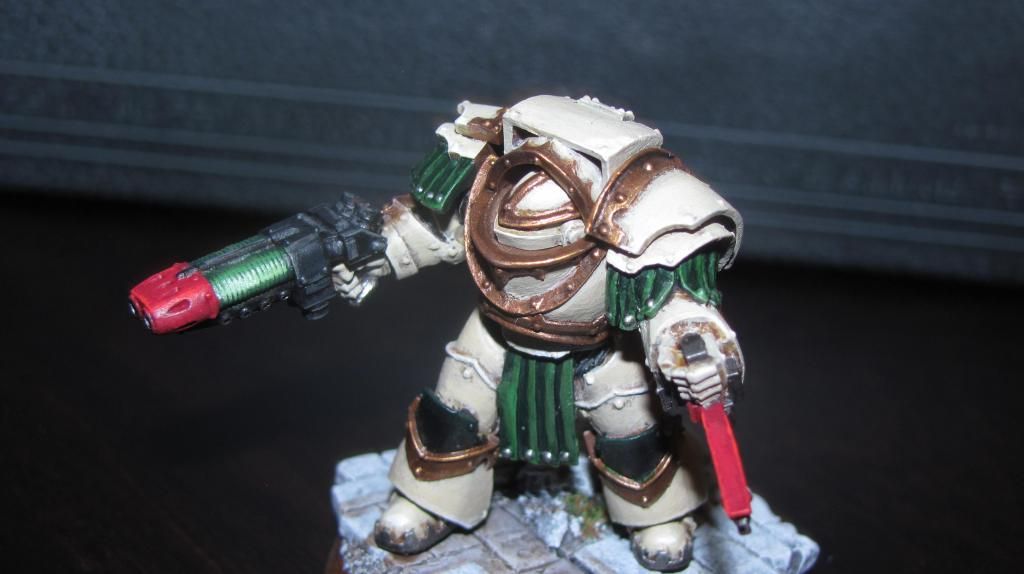
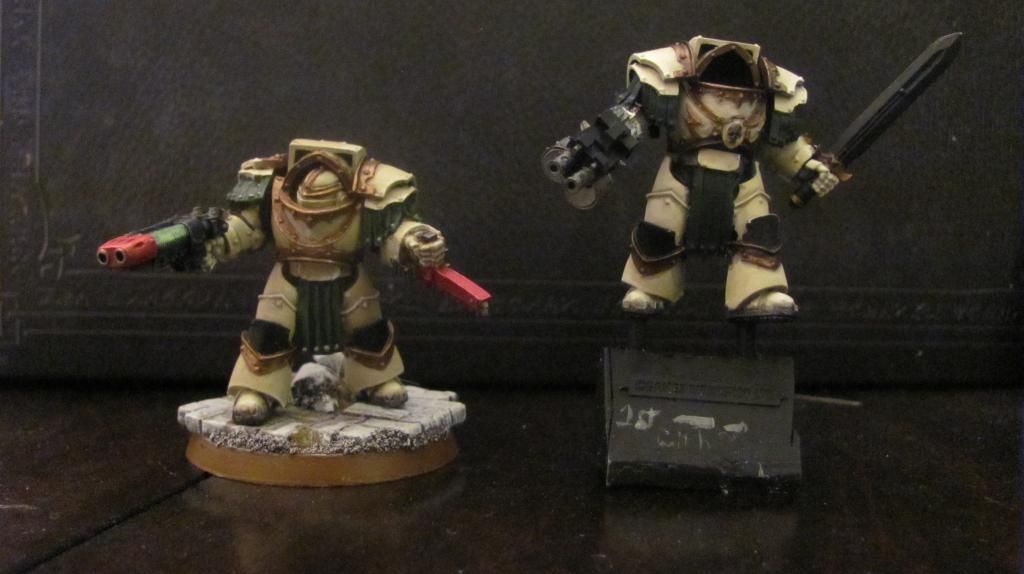
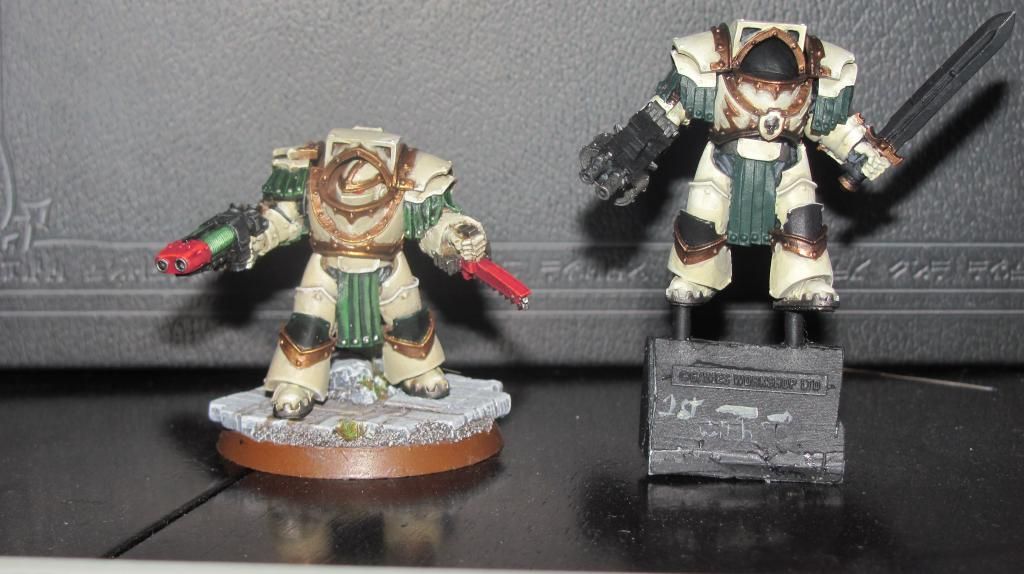
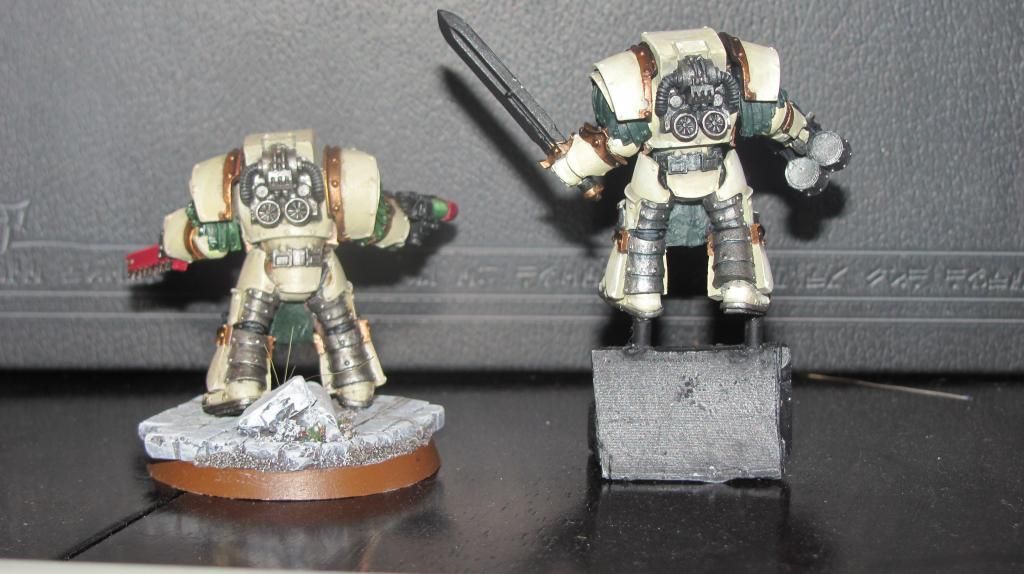
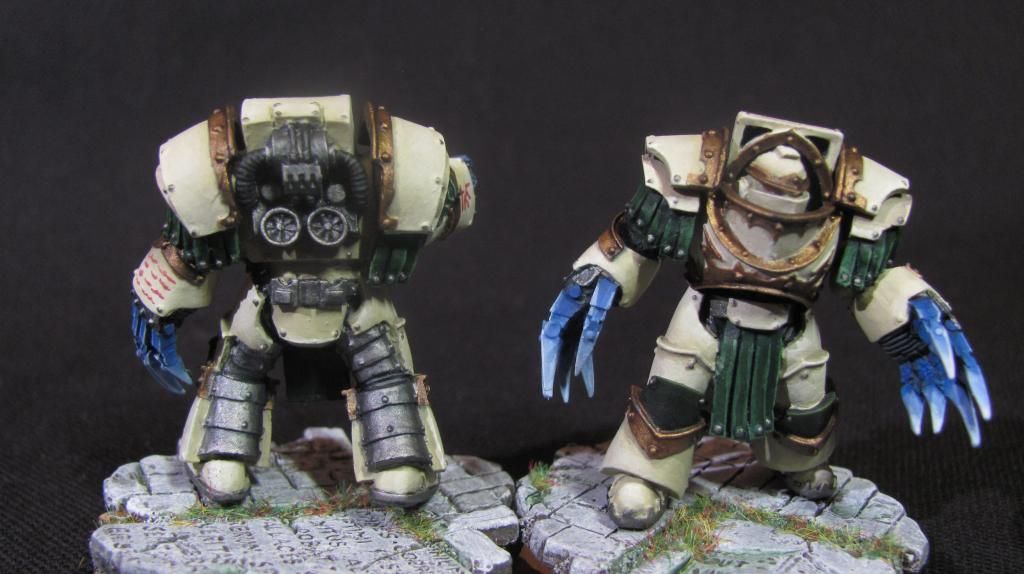
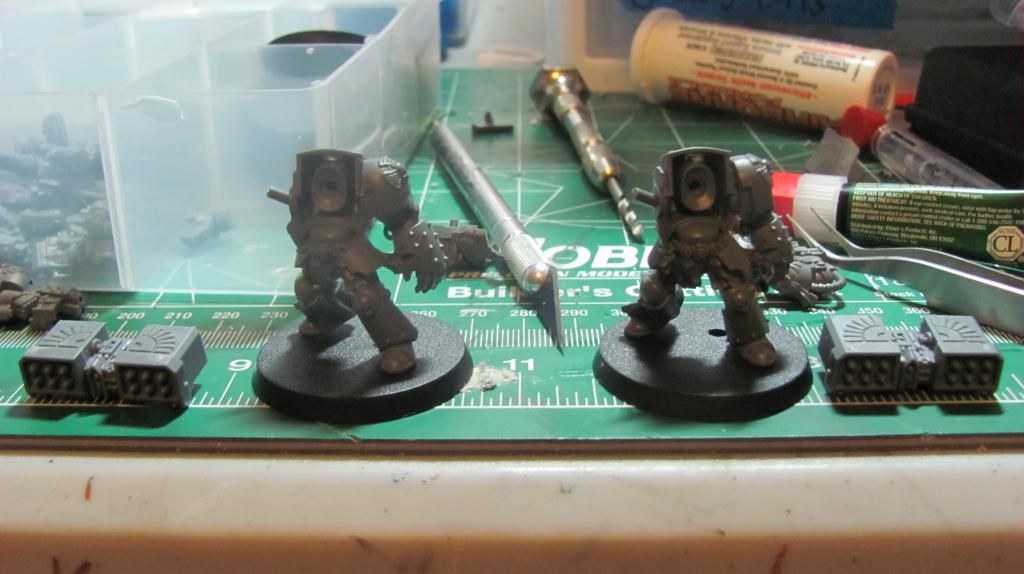
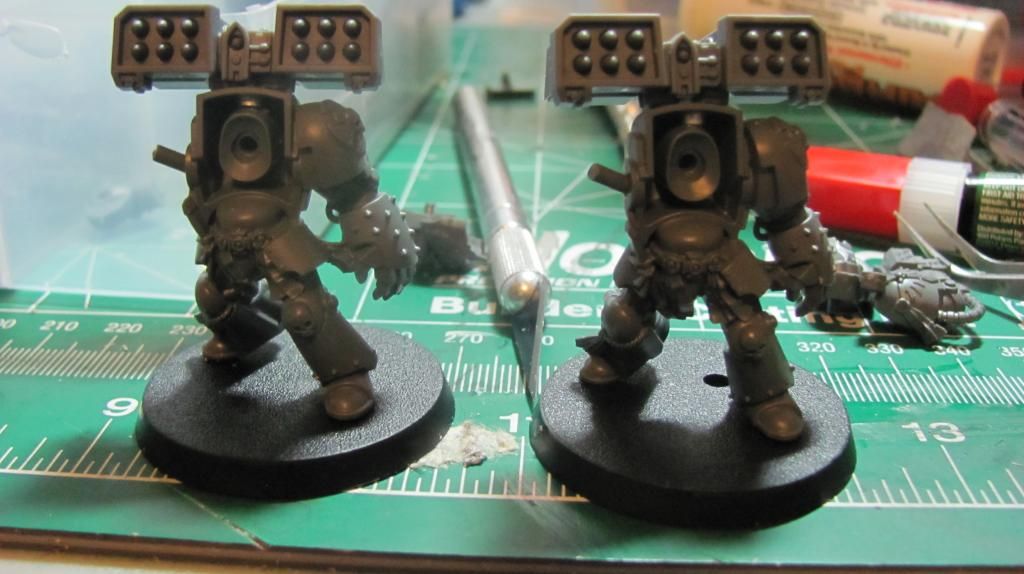
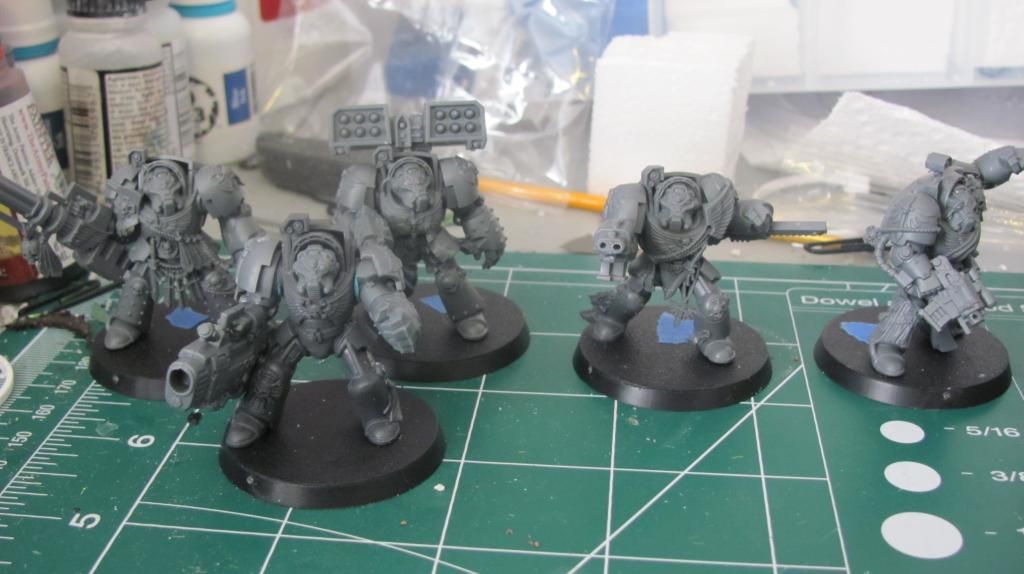
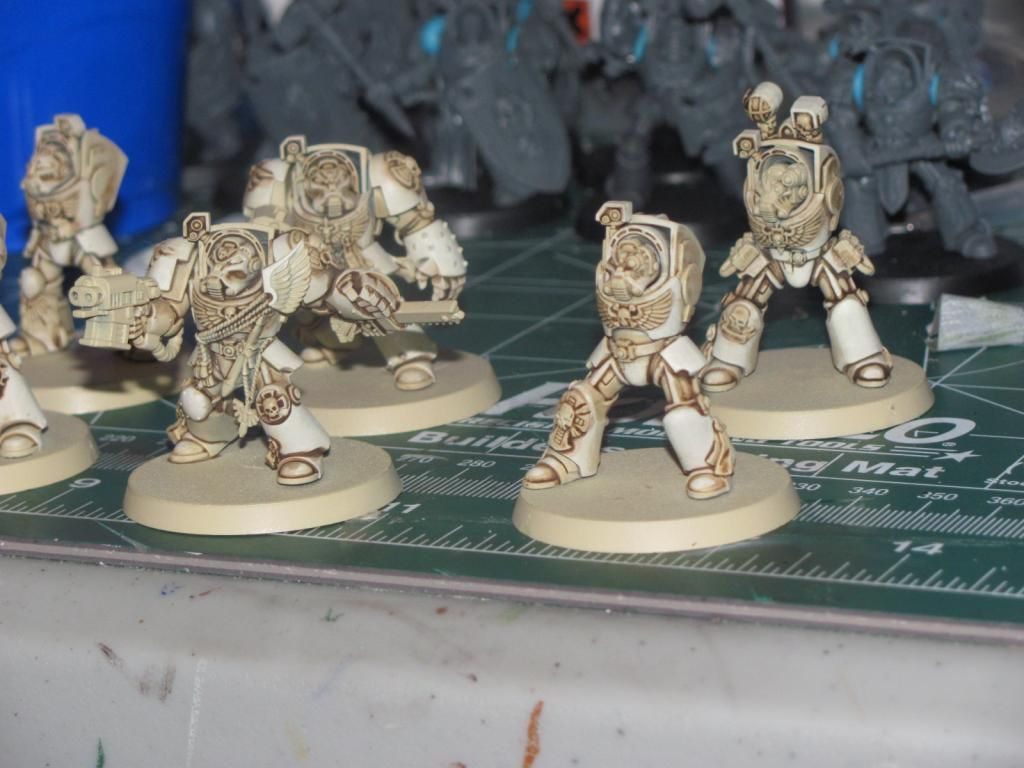
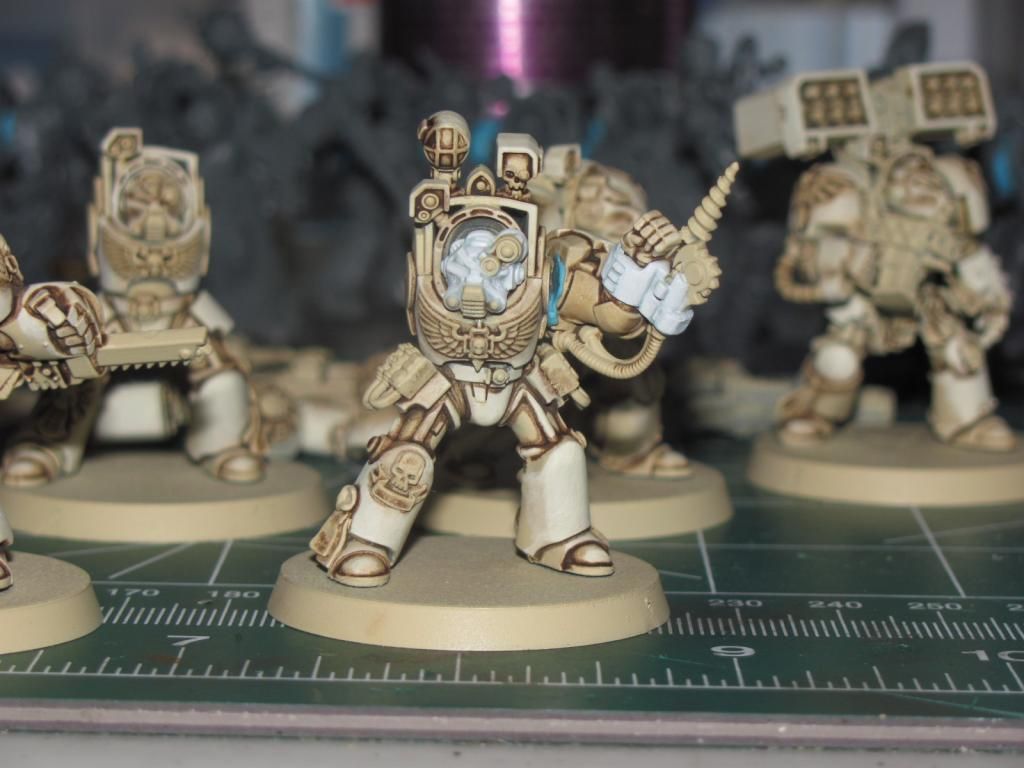
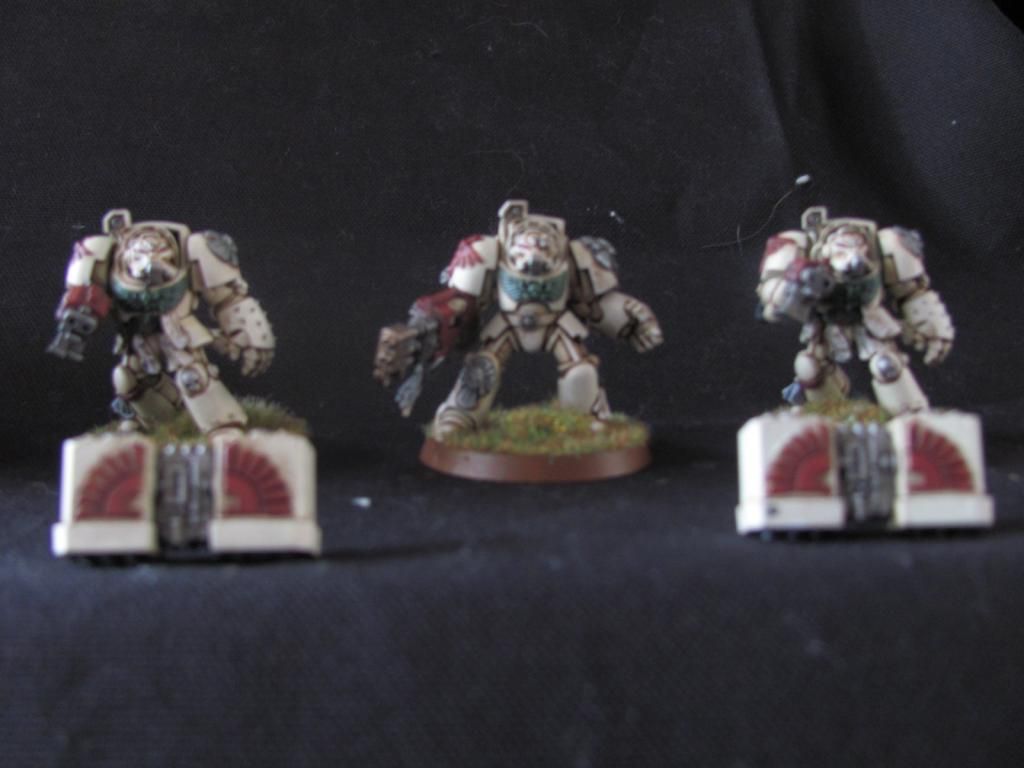
After reviewing my options, I decided to try a second armor test and changed up how I was painting my Deathwing termies. Please review and let me know what you think of how it looks. I have it side by side with the original (they're both the same pose from the DV box set).
I went with a Rakarth Flesh base over the brown primer. This completely covered the brown. I was going for the effect that Astelan has posted previously, but Rakarth Flesh just isn't the same as Dheneb Stone (though all the converters say it is and several sites said it is the same color - not really). After a Seraphim Sepia wash, I realised I was getting too dark, but tested on one leg with a drybrush of Rakarth Flesh. It was waaaaaay too dark.
I switched to Ushabti Bone after that for the drybrush. I did a 1:1 White:Bone mix for a highlight, then added more white for a further highlight. Touch of white at the corners.
How is it? Better, IMO, but I'm hoping for some feedback. The new one is the one on the right.

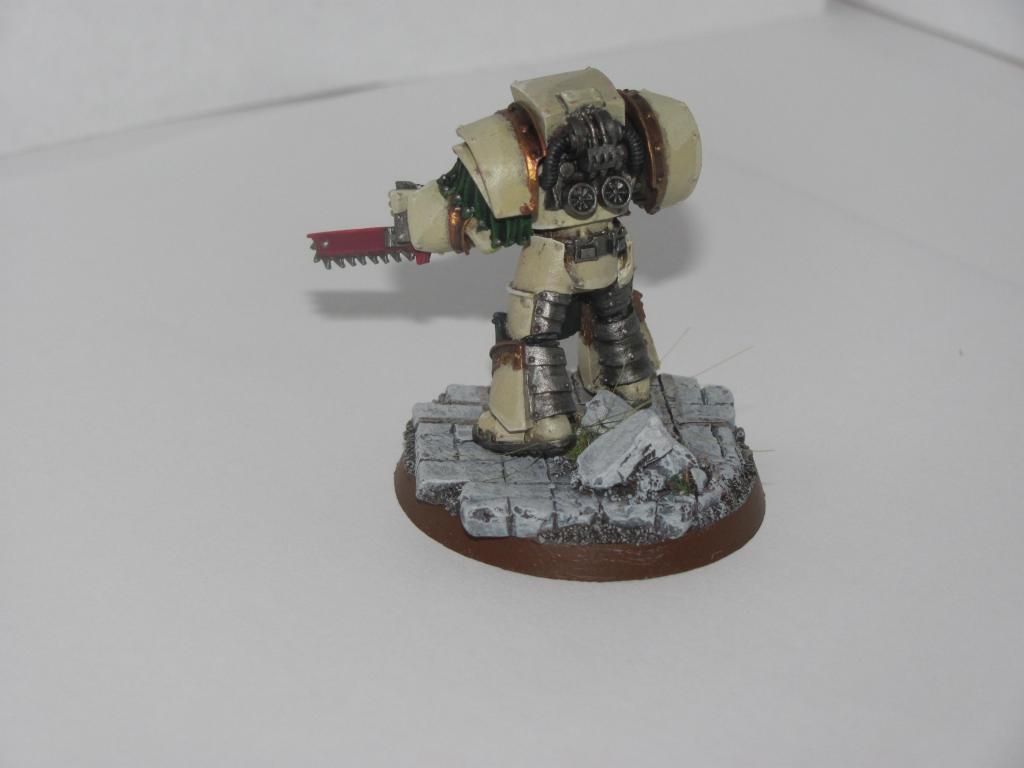
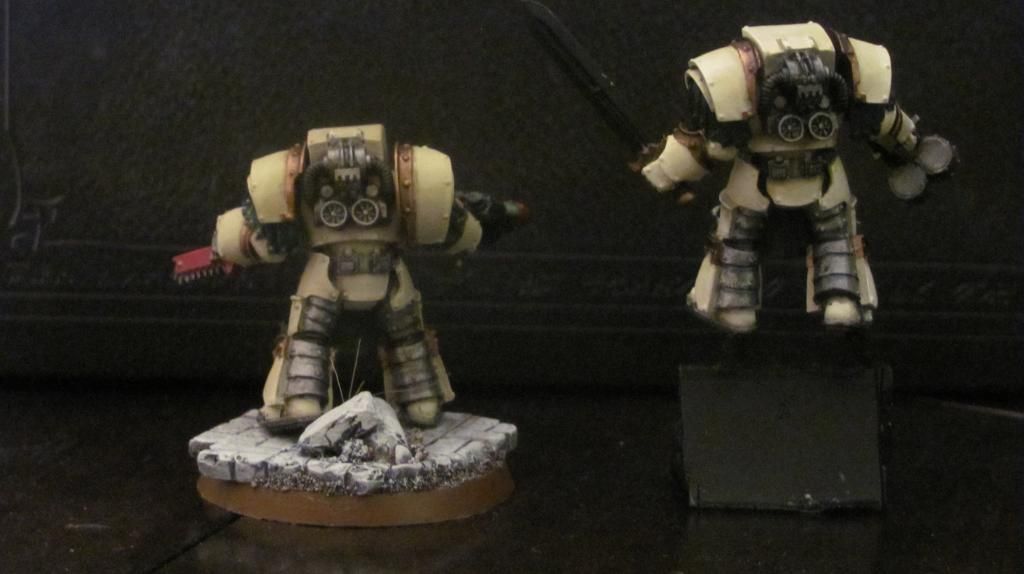
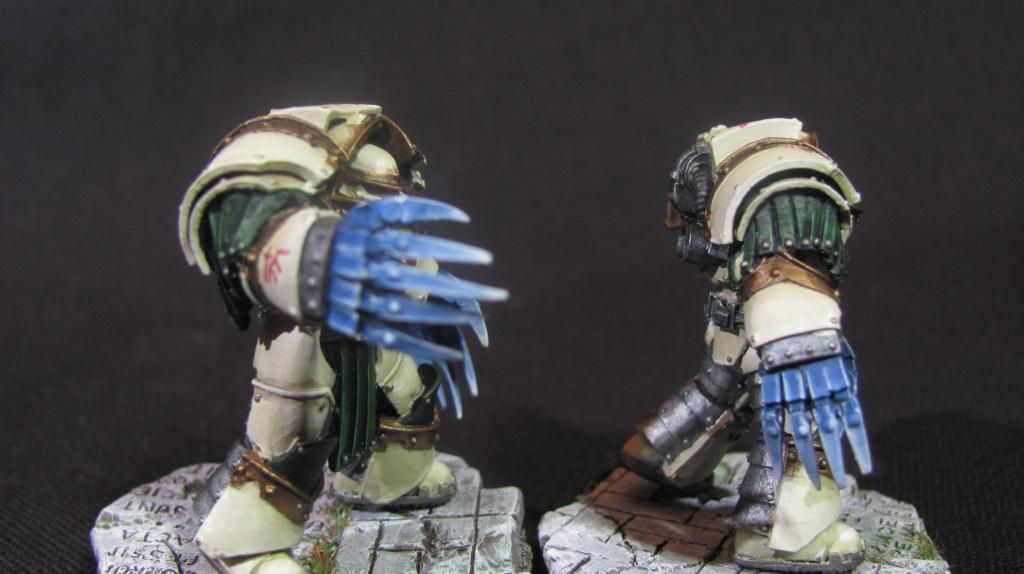
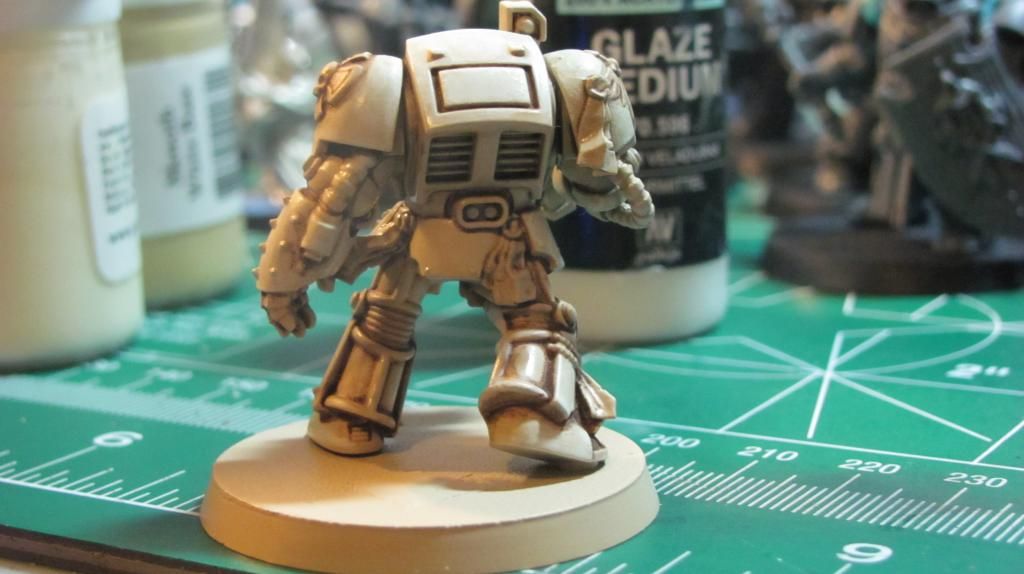
Another angle:

37781
Post by: AG.
The new version is much better.
The problem with the first model is the highlight colour is too harsh, with too many tonal steps between the base and the line.
Now that you've added a couple more layers in, it blends much easier on the eye.
There is nothing wrong with the original colour, you can still use it as a highlight - just on the corners/light flares.
64808
Post by: CIsaac
 AG. wrote: AG. wrote:The new version is much better.
The problem with the first model is the highlight colour is too harsh, with too many tonal steps between the base and the line.
Now that you've added a couple more layers in, it blends much easier on the eye.
There is nothing wrong with the original colour, you can still use it as a highlight - just on the corners/light flares.
I'm in agreement. I think, after such a long time away, I had lost the critical eye I used to have and couldn't figure out what was wrong with it without some feedback. It's much appreciated. 
64808
Post by: CIsaac
Been so busy this week I've barely been able to touch the minis. Really want to get this Deathwing squad done by next week.
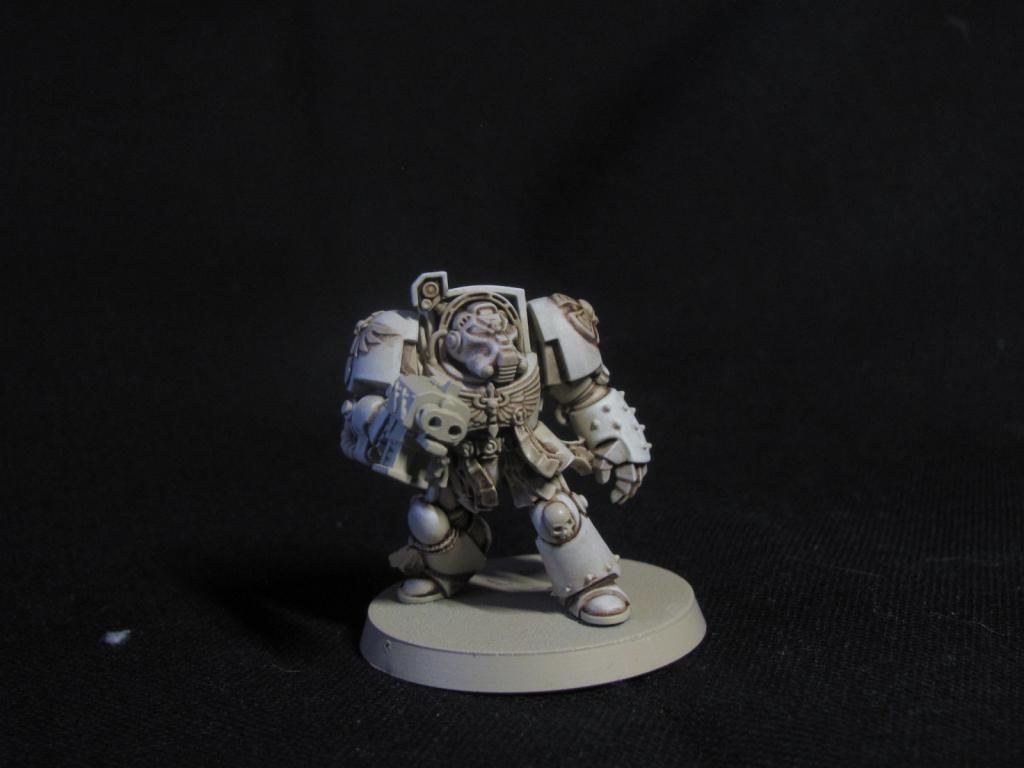
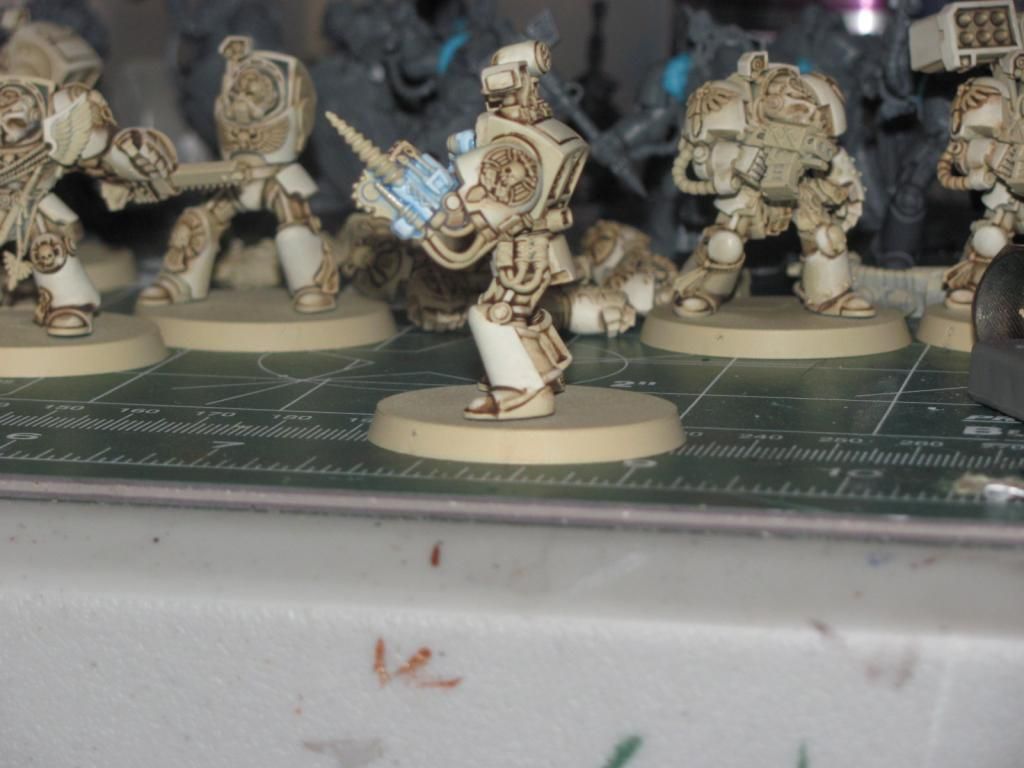
I started the Ushabti Bone drybrush stage on the remaining three terminators. I thinned the paint from the second terminator with some water (been reading up on that via Dakka). Here are the results of one at step 3 (stage 1 is Rakarth flesh, stage 2 is Seraphim Sepia wash)
No highlights have been done yet:

64808
Post by: CIsaac
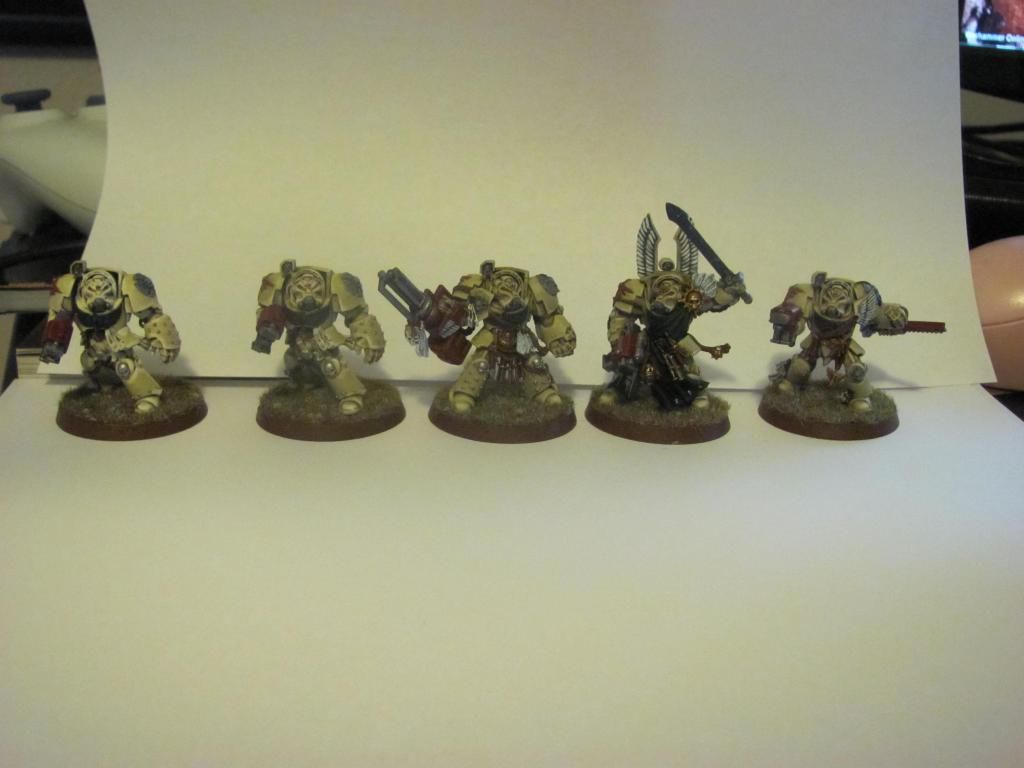
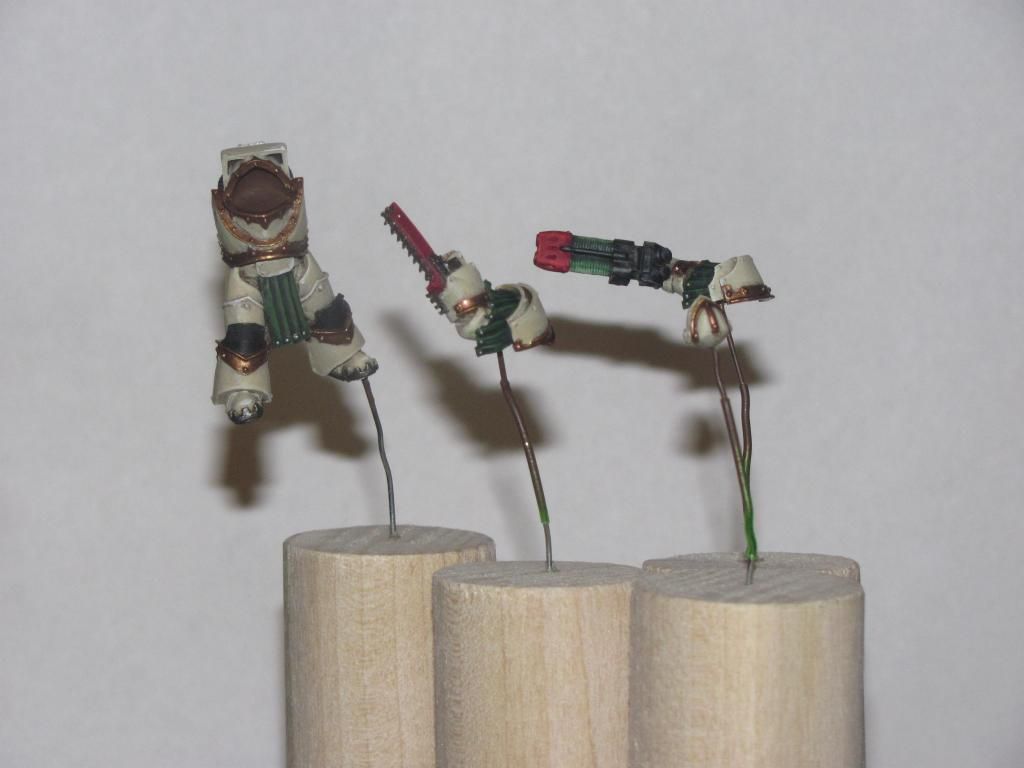
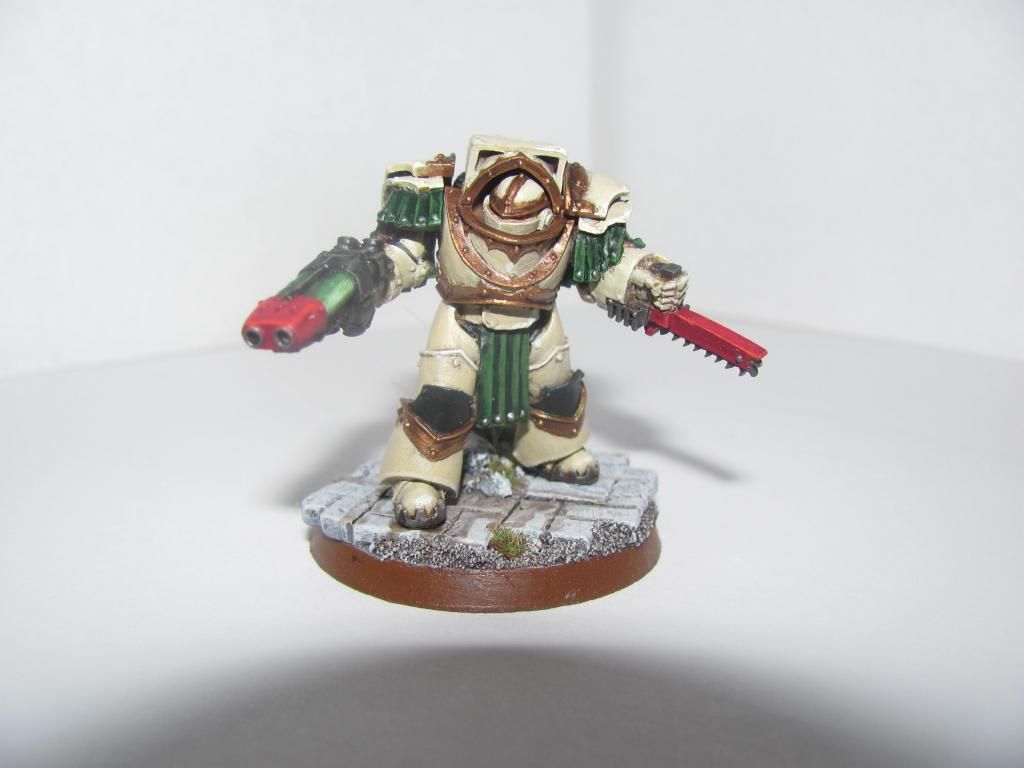
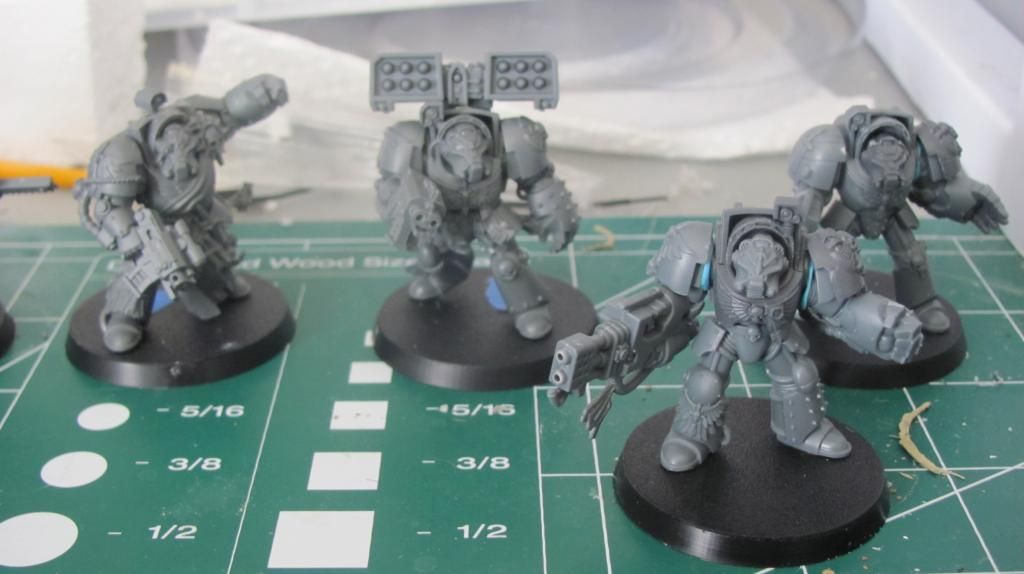
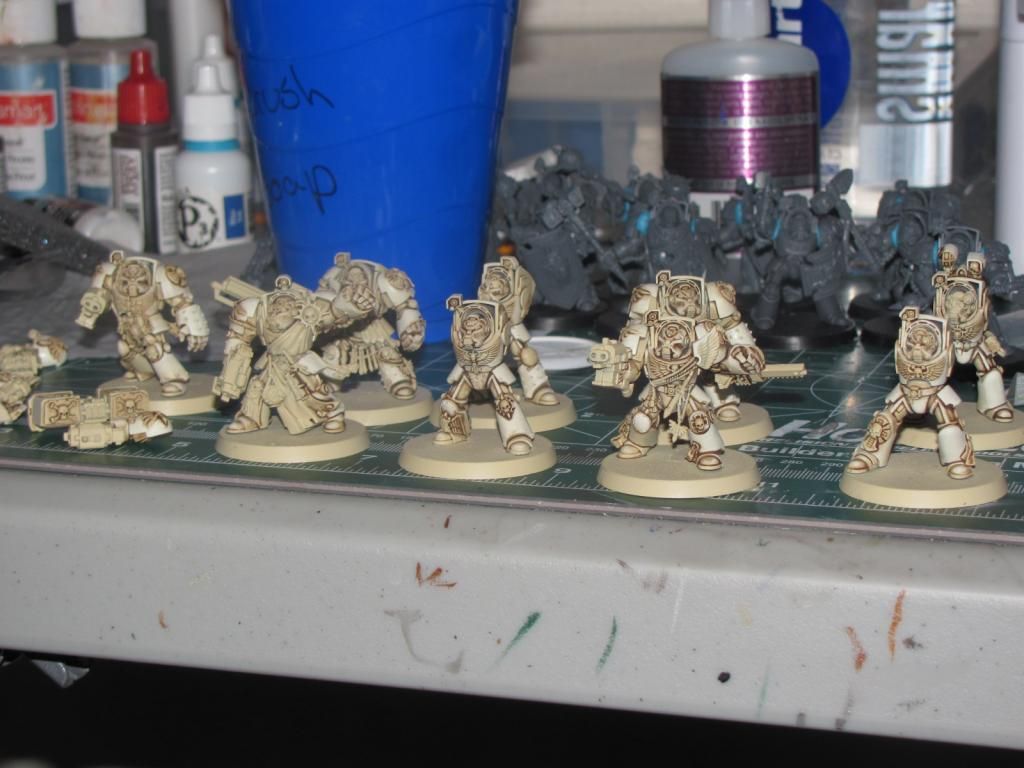
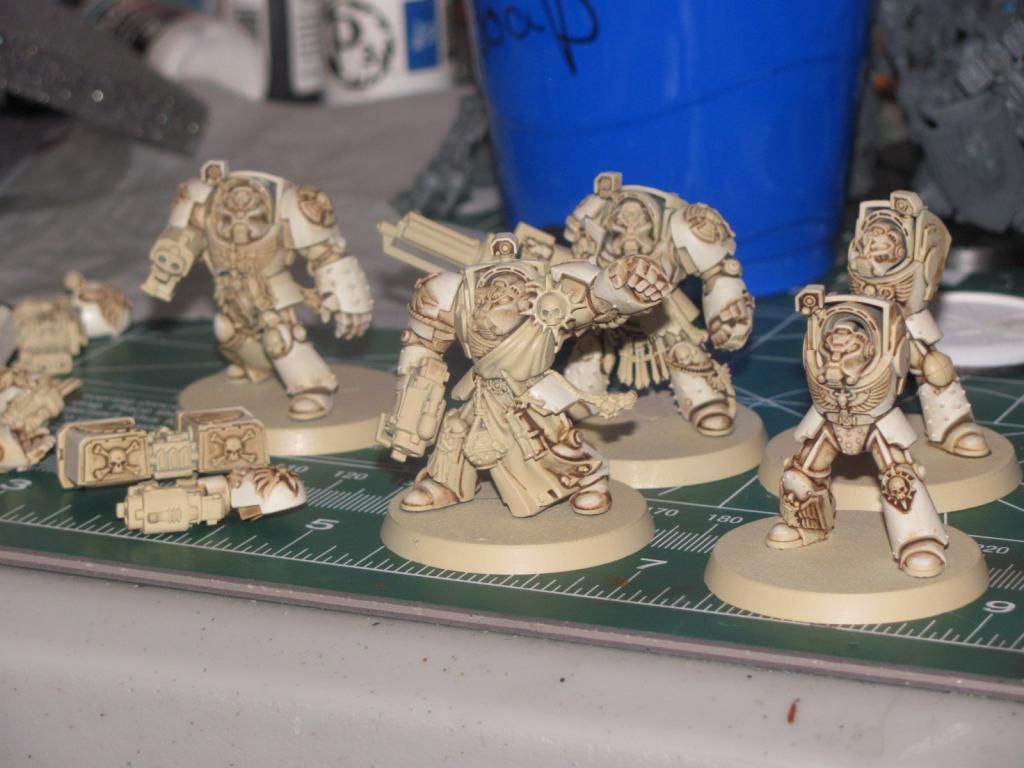
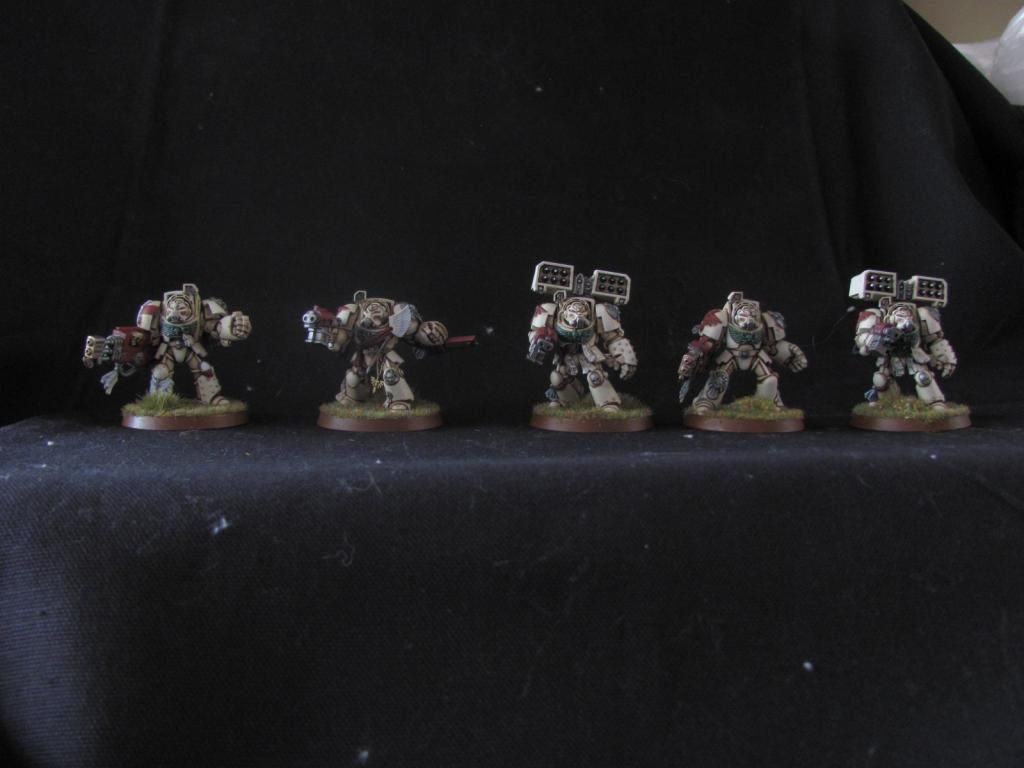
Well, after a lot of work, I've completed the Deathwing Terminator squad from the Dark Vengeance boxed set to my satisfaction.
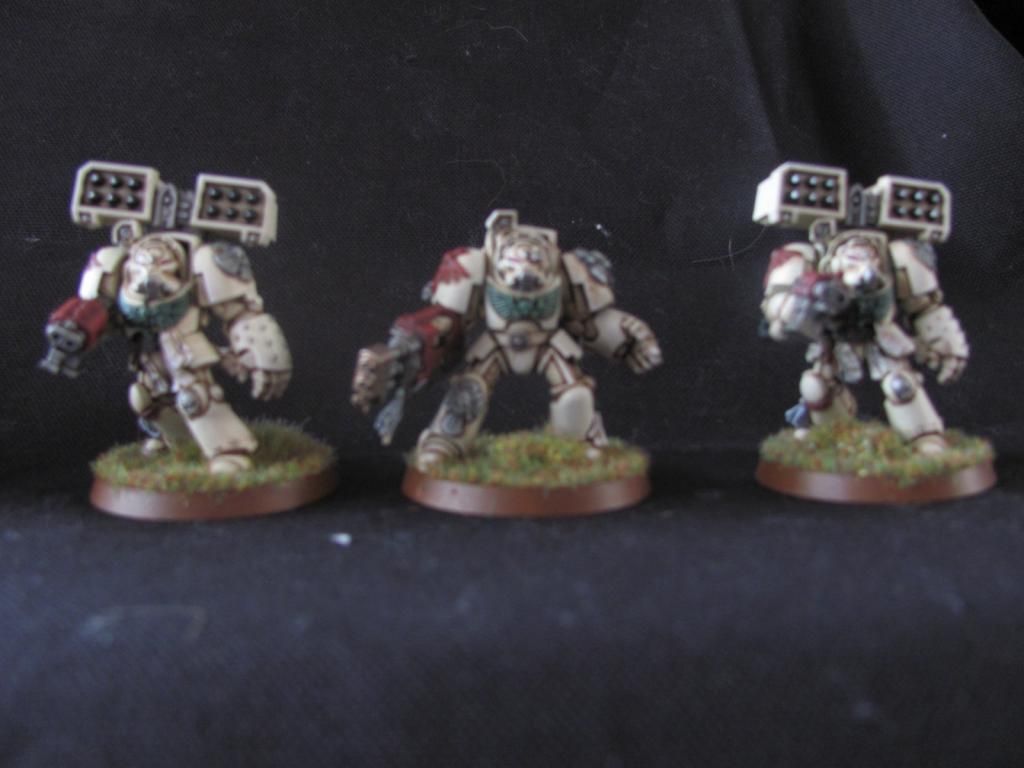
Here's the group, set up in order that I worked on their armor. The first test is the leftmost, the next test model is the one directly to the right of that, and the final three were done assembly line style together. I also tried to work on new techniques I've not used before as I tested things out. New things tried during the painting of this squad:
Thinning paint -- oh dear god, I will never not do this again. I love this.
Blending -- on the power sword; failure
Mixing metallics/non-metallics -- The basecoat for gold items was gehenna's gold/iyanden darksun 1:1 mix. In the end it felt like an unnecessary step. OTOH, mixing Brass Scorpion/Mournfang Brown worked well as a basecoat for the Sgt's incense and I only needed to highlight it.
Progressive Highlighting -- I had done it once before, several years ago (see the results here: back front), and was pleased with the results but I was so out of practice (having only done it once!) I was a touch daunted. The robes of the sergeant and the Crux Terminatus on each shoulder are three layers of highlight minimum. I think they turned out ok. The Commissar I did for my Steel Legion turned out well, imo. And, of course, the armor is many, many layers. The final three terminators are done as:
1) Rakarth Flesh
2) Seraphim Sepia wash
3) Ushabti Bone drybrush
4) Ushabti Bone highlight
5) Mix 3:2 Ushabti Bone/Ceramite White highlight
6) 1:1 Bone/White thinner highlight on key places
Wet Brush - if just needing a little, instead of working off a palette, just using a damp brush to pick up some paint out of the pot and do the fast detail/highlight. Worked fairly well.

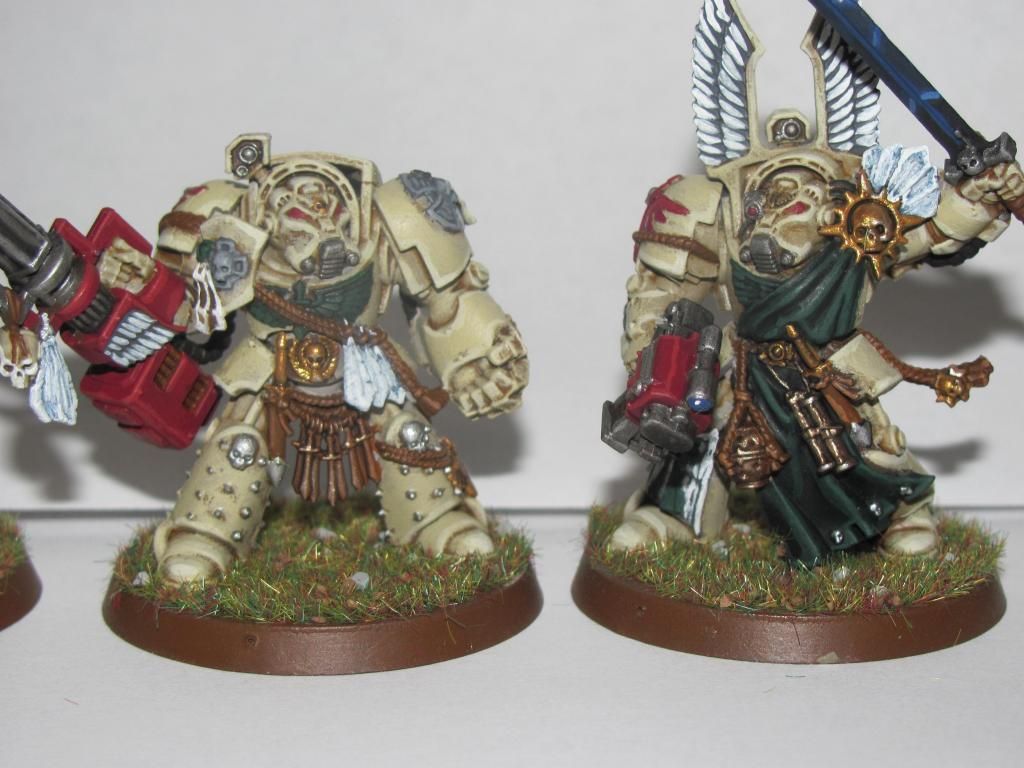
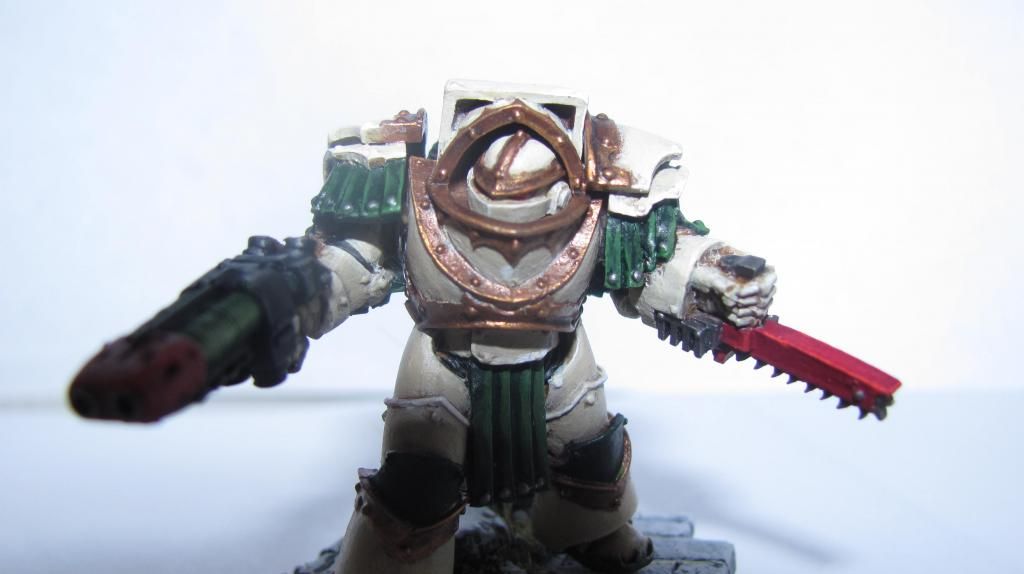
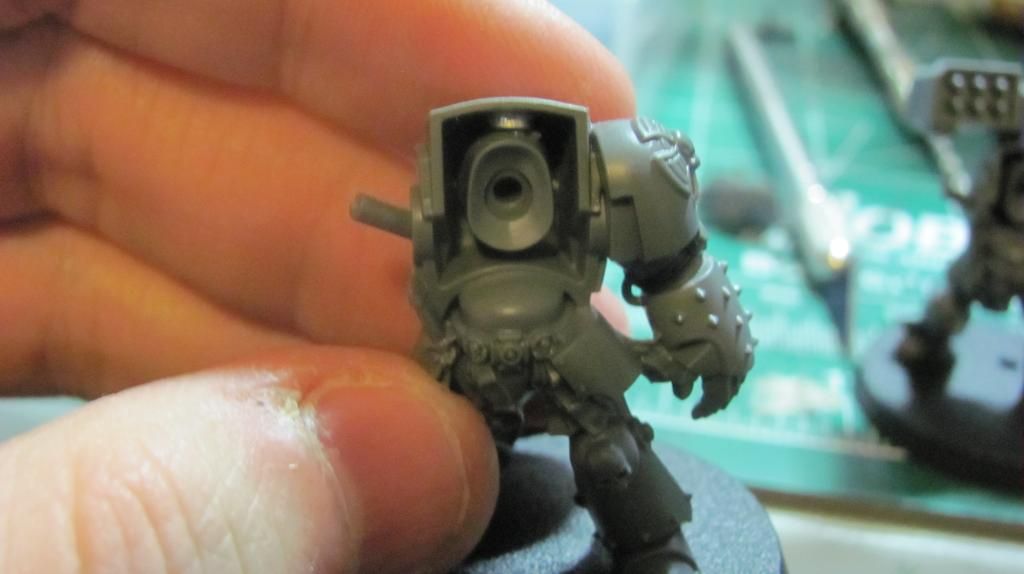
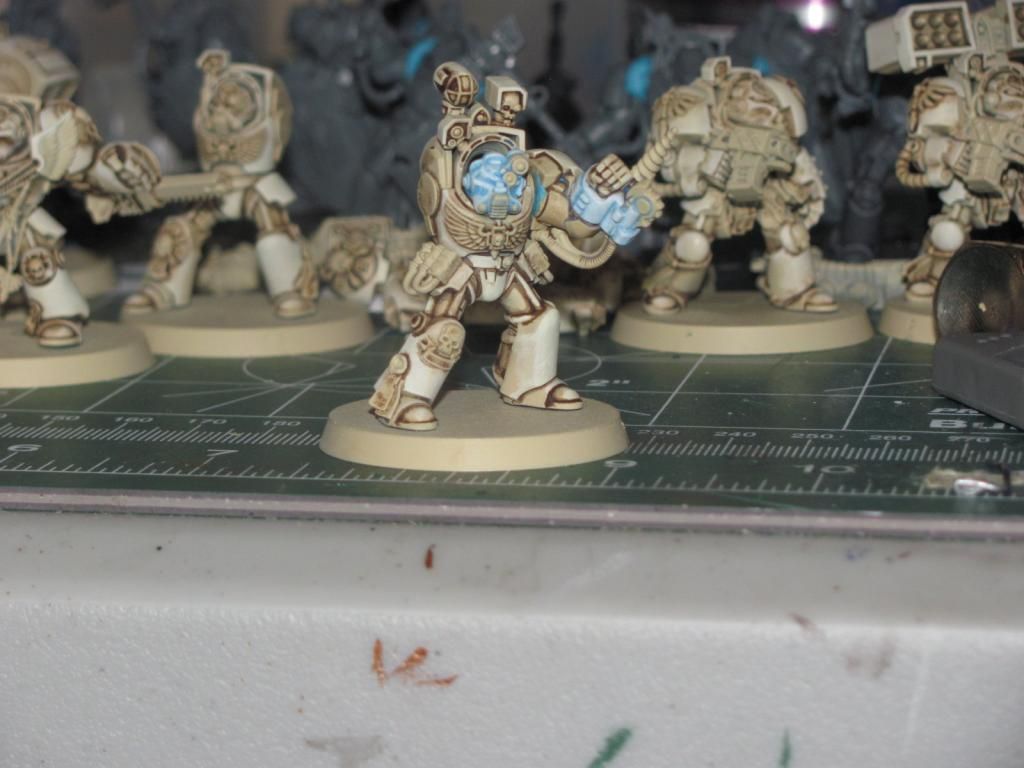
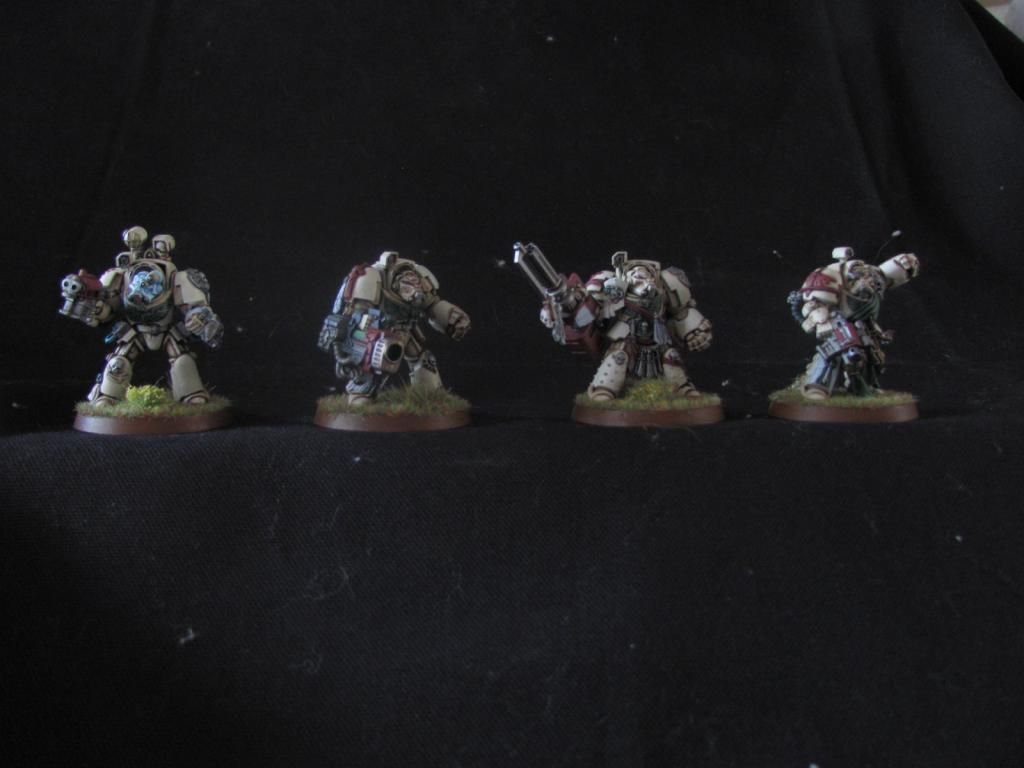
Here are the closeups of the two test models fully painted up. I did what I could to get them in line with the rest of the unit:

Closeup of the terminator sergeant and the assault cannon. This is the final armor method I decided on. I rather liked how it turned out. The sergeant's power sword? I'm very meh on it:

Well, throw me any feedback you can, I'd love it.
64808
Post by: CIsaac
For fun, I'm posting a pic of my full workspace. Just got some new rubbermaid shelves and that helped to get stuff off the table and the stack of boxes off the floor. I need to get some organization going for all my paints and then get a case/transport for the Space Marine army that is sitting on the table currently.
64808
Post by: CIsaac
Predator reclamation on the way from eBay. $26 with shipping for this:

It has a broken off pintle mounted storm bolter that was attached to the body instead of the turret. Once I receive it, it's getting a bath in Super Clean to clean off the paint job and break down the glue. I'll then be cleaning it with an old toothbrush and then washing it with water. Then the long road back to being a nicely painted medium tank.
While waiting for shipping (the seller was at the edge of Hurricane Sandy's zone), I'm starting to paint the Dark Vengeance librarian. WIP pics up as soon as I get the armor done.
64552
Post by: M4cr0Dutch
Hi Clsaac,
I have been painting Deathwing for a while now ( '94ish) and I have tried many many techniques. I have a feeling that the sepia wash is just too brown and dark for the Deathwing scheme. I can see that you have drybrushed over the top of it to knock it back, but there is another way if you are willing to try. I use a careful Kommando Khaki wash (it has a new name now, not sure which what it is  ) to add the darker tones. Depending on how much time I want to put into it, I will add a second Kommando Khaki wash in places to achieve an even darker colour, but it still blends into the bone tones in a much smoother manner. A bone glaze over the top blurs the interface between the colours quite nicely, or you can blend them when wet.
Good luck with your army, I look forward to seeing more!
64808
Post by: CIsaac
 M4cr0Dutch wrote: M4cr0Dutch wrote:Hi Clsaac,
I have been painting Deathwing for a while now ( '94ish) and I have tried many many techniques. I have a feeling that the sepia wash is just too brown and dark for the Deathwing scheme. I can see that you have drybrushed over the top of it to knock it back, but there is another way if you are willing to try. I use a careful Kommando Khaki wash (it has a new name now, not sure which what it is ) to add the darker tones. Depending on how much time I want to put into it, I will add a second Kommando Khaki wash in places to achieve an even darker colour, but it still blends into the bone tones in a much smoother manner. A bone glaze over the top blurs the interface between the colours quite nicely, or you can blend them when wet.
Good luck with your army, I look forward to seeing more!
Thanks for the info. I may try that on a test model and see how it works out.
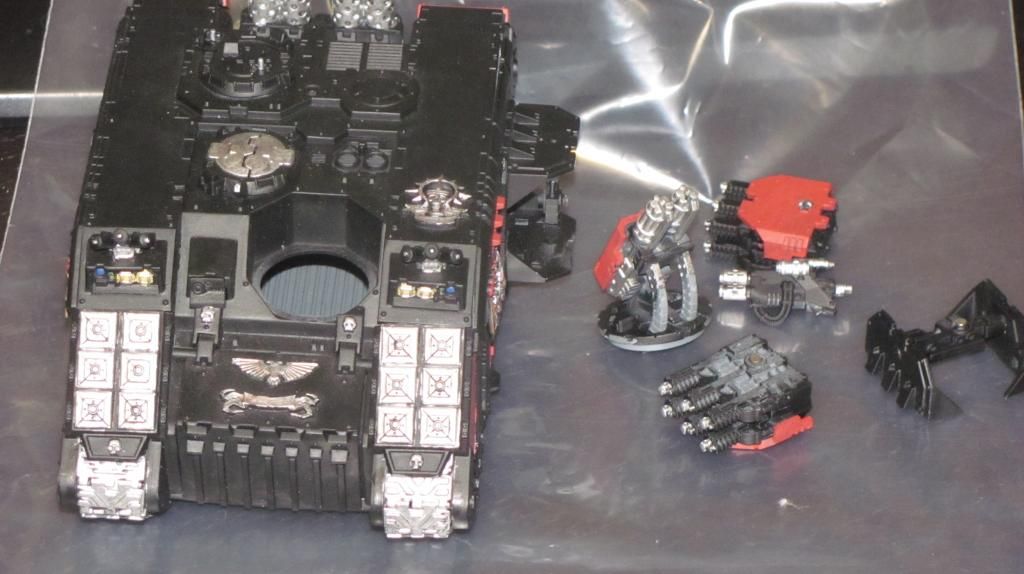
The predator annihilator arrived from my eBay seller today. It is missing one hatch and the pintle mounted storm bolter, as listed on the eBay auction (I'll get those from a bitz seller). The tank is ill-used and needing some real love. Here's what we have to start.
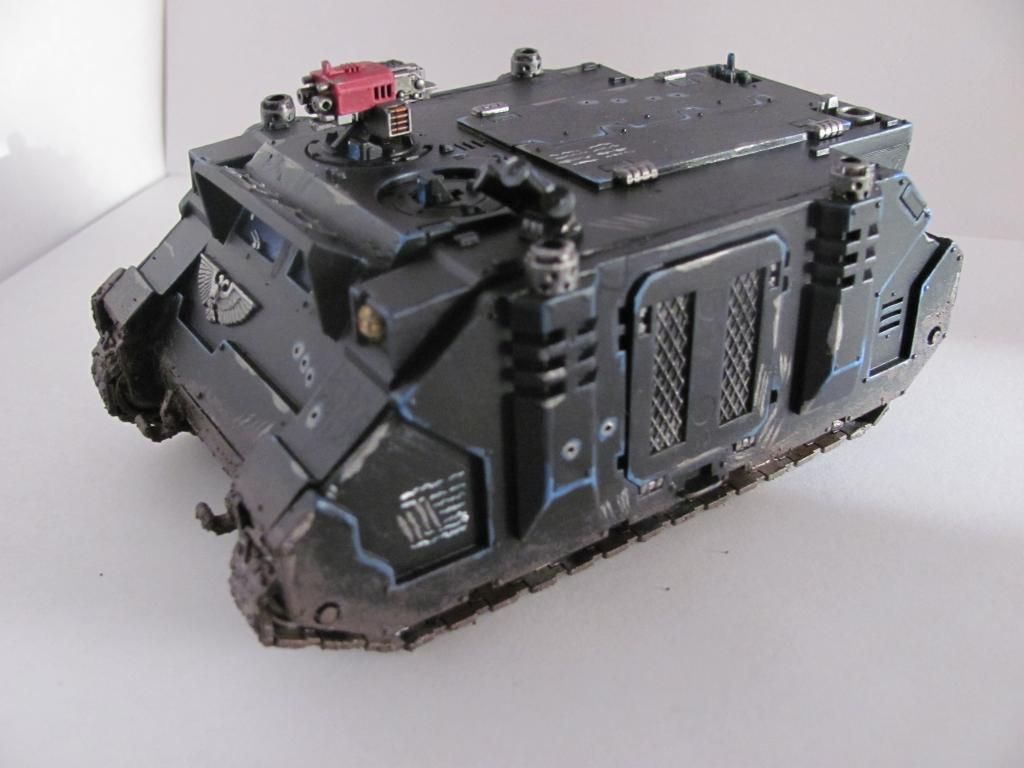
First, the overall tank:

As you can see, one sponson is off (from shipping, though it was bubble wrapped) and the guns are fairly immobile. The remaining sponson goes up and down. The turret is glued to two layers of back armoring (the original rhino double roof doors) and the pintle mount is on the body and not the turret. The paint job is poor, but at least it is not thick.
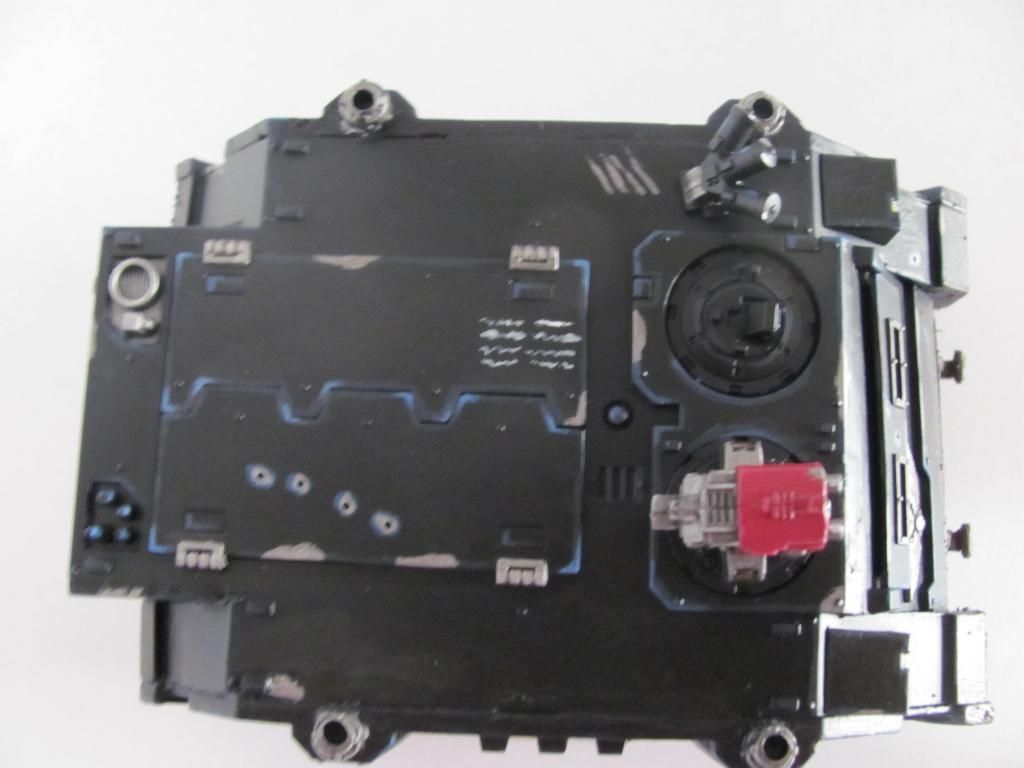
The underside:

As you can see, there are some bad gaps here and there, with the sponson guns being some of the worst.
The turret:

The turret just looks bad. There's lots and lots of glue all over the bottom of it and there are gaps in the guns. The guns still move up and down, but are very, very loose. Depending on how it feels during reconstruction I may glue them in place. As it is, they droop.
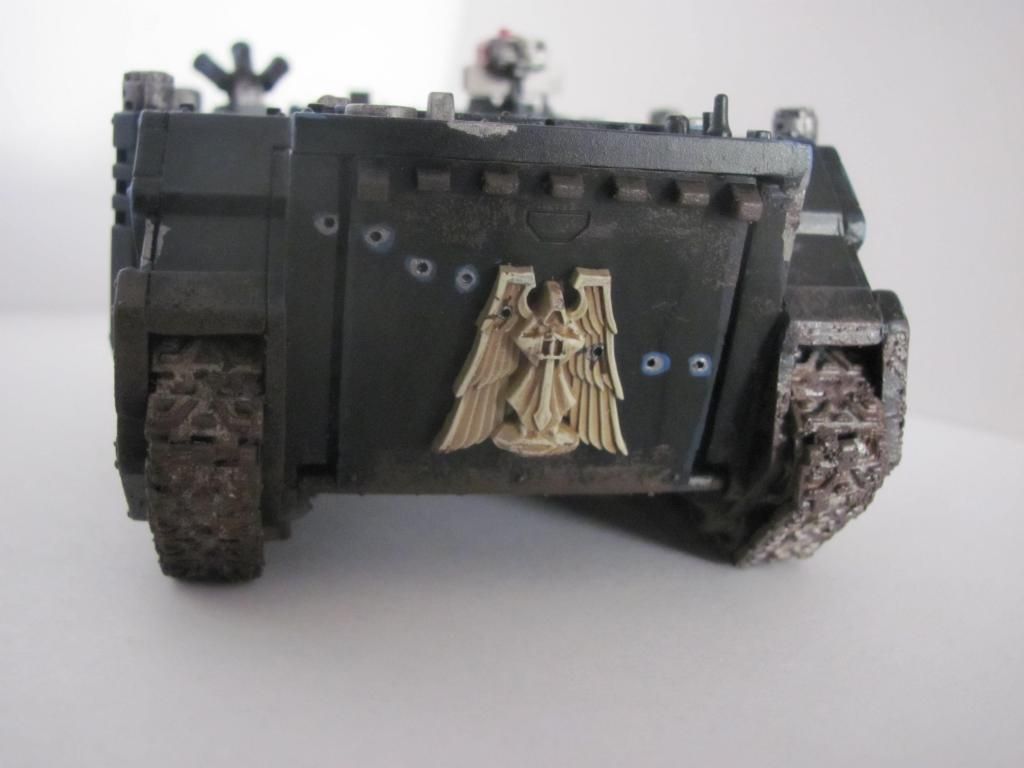
The body:

It appears to have been spraypainted Dark Angels Green and then not touched up. I can still see the sprue marks on the body. There's no structural damage, which is good.The flap over the front glacis still moves up and down, which is also good.
Where is it now? The entire tank is currently submerged in a tupperware container FULL of Castrol Super Clean. I have an old toothbrush waiting and tomorrow I'll 'decant' it and find out how well it's cleaned off.
EDIT: Spent the morning painting working on my Dark Vengeance Librarian. Armor and base coat on the robes are done. I've also done his face, which I'm particularly proud of. See the current pics here:
Front:

Back:

The armor is based Macragge Blue with a Nuln Oil wash. Followed that with a drybrush of original Macragge Blue followed by a much lighter drybrush of Altdorf Blue. Highlights are 1:1 Altdorf:Calgar blue mix. The base layer of the robes are a 1:1 of Rakarth Flesh:Ushabti Bone. I'm still trying to decide between leaving them as is and building up the highlights or running a Seraphim Sepia wash over it.
The face is done by mixing Ungor Flesh 2:1 with a craft store 'Antique White' (lighter version of Ushabti Bone) color to get a nice pallor. Angrax Earthshade wash, then highlights were a 1:1 Flesh:White mix to make him paler.
64808
Post by: CIsaac
And after 24 hours in a Super Clean bath, the tank now looks like the following:

It's currently sitting on paper towels drying.
That was the first time I've stripped something that large. Cleaning that off with an old toothbrush was one of the most exhausting things I've done while modelling. Holy hell.
Worst part is discovering the sheer amount of superglue that was allowed to drip down into the model. I'll have to sand down, trim parts of it. Even the superclean couldn't get it all. One of the sponsons was so heavily glued together that when trying to gently peel it apart, the piece that acts as the hinge/hanging support snapped clean in half. There was no reason for it to be glued like that, just poor model work.
So, that'll get pinned when the time comes and I have clean out the joint with a hobby knife. But here it is; ready for a new life.
PS: Funny side story -- why there's a flashlight in the picture and why you should always, always, always put a catch/strainer over the disposal. Little pieces and tracks like to go flying! Duct tape on the end of a long rod got me my missing piece, but I immediately set up a catch for future drops. It saved my fingers.
64808
Post by: CIsaac
Librarian completed!
Here is is, folks. Rather proud of him. Feedback is very, very welcome.
Front:

Rear:

64808
Post by: CIsaac
Another tank from eBay has arrived. Received a Rhino APC for $15, but DAMN is that thing messed up. Get what you pay for and all. I only have pictures I took from the eBay auction as that thing went STRAIGHT into the Super Clean tub for stripping after I looked at it.
Here it is, as originally received:

Not seen is the 'overbite' that the front glacis has over the bottom part of the hull. The assembly and paint job are both poor. The paint is also so thick that as of this writing, with about 16 hours in the Super Clean, the paint is just barely starting to come off. The blue moreso than the white. The white is applied so thickly that even heavy brush strokes with the toothbrush only removes a bit of the paint. The last tank, when scrubbing it, the paint just slid right off. There's a chance that whatever this guy used it might not be acrylic as it has a strange luster to it that acrylics usually don't have.
64808
Post by: CIsaac
Ugh. So the Rhino isn't stripping very well. It takes scrubbing after scrubbing and still isn't letting me peel the paint off completely. massive white blotches from the white underbelly coating all over. That and whatever glue was used is obviously plastic glue and I'm not sure how I'm going to peel the incorrect roof section off to replace it with the standard double doors. If anyone reading this has any ideas beyond what I've done, let me know. So far the Rhino has spent about three days submerged in Super Clean and most of the paint has come off, but it's very, very blotchy. It has a much different luster/consistency than normal acrylic paint. It might be enamel? I dunno. The superglue is also not breaking apart or becoming brittle. It might be a plastic glue and I already know debonder will eat the plastic. Is there a way to pull it apart without tearing up the model? I've popped the sides off the main body already and there's some slight breaking already (nothing that some putty won't clear up).
On a more positive note: The Predator Annihilator has been reassembled and the primer coat is currently curing on it. I need to set the roof of it on and then assemble the guns and painting can begin. What was a tank so badly glued and assembled together that the guns couldn't/wouldn't move now looks like all three guns will be moving again, even when one of the sponson struts snapped in half.
I successfully pinned it down the middle and glued it back together. I was very, very nervous drilling down through that.
64081
Post by: hdbbstephen
I like where this is going. I am re-learning how to paint, also, after 9 years away from the hobby. Currently I am working on Death Guard - building up a bone-color over red primer
Subscribed!
64808
Post by: CIsaac
 hdbbstephen wrote: hdbbstephen wrote:I like where this is going. I am re-learning how to paint, also, after 9 years away from the hobby. Currently I am working on Death Guard - building up a bone-color over red primer
Subscribed!
Thanks. Also really liking how the armor is turning out on that Plague Marine.
64808
Post by: CIsaac
And now an update on the first tank I received and stripped down, the Predator Annihilator. The stripping on this was rather straight forward, but there was a lot of leftover superglue on the track wheels that had to just be sanded down with a file. Still, I think I did a reasonably good job, reassembled the tank and primed it.
I greenstuffed the huuuge gap between the glacis and the roof as cleaning the glue from the original assembly in that area had left a sizable gap between the two pieces.
I've added base colors. There are no highlights or washes to this. This is just the first pass on the major colors:

64808
Post by: CIsaac
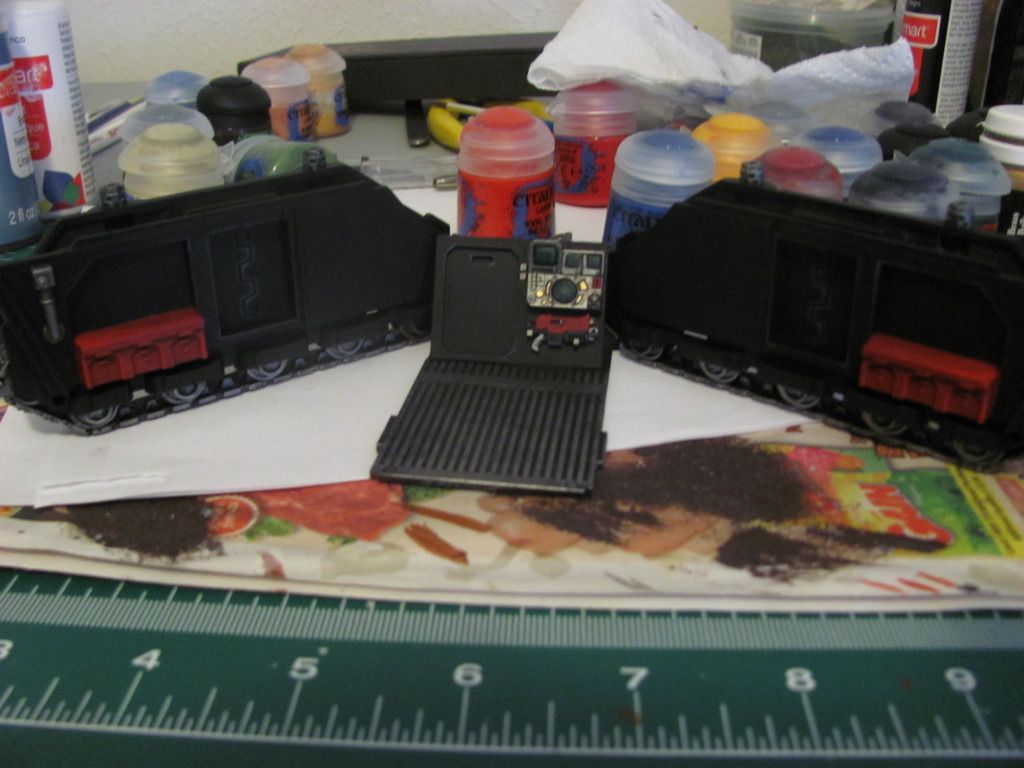
Next up on the painting carousel is my newly restored/reclaimed Rhino tank. After a lot of work, I've put it back together (it was a hellishly bad paint/assembly off eBay) and here's what I'll be painting over the next week.


Putty still needs to cure. I'll sand it flat once it does.
65132
Post by: TheGunslinger
The predator has a really nice, clean feel to it. The original Rhino makes me shudder though....can't wait to see it completed!
64808
Post by: CIsaac
 TheGunslinger wrote: TheGunslinger wrote:The predator has a really nice, clean feel to it. The original Rhino makes me shudder though....can't wait to see it completed!
Thanks for the feedback. I'll be going for a much rougher appearance for the Rhino. In honor of its origins. 
64808
Post by: CIsaac
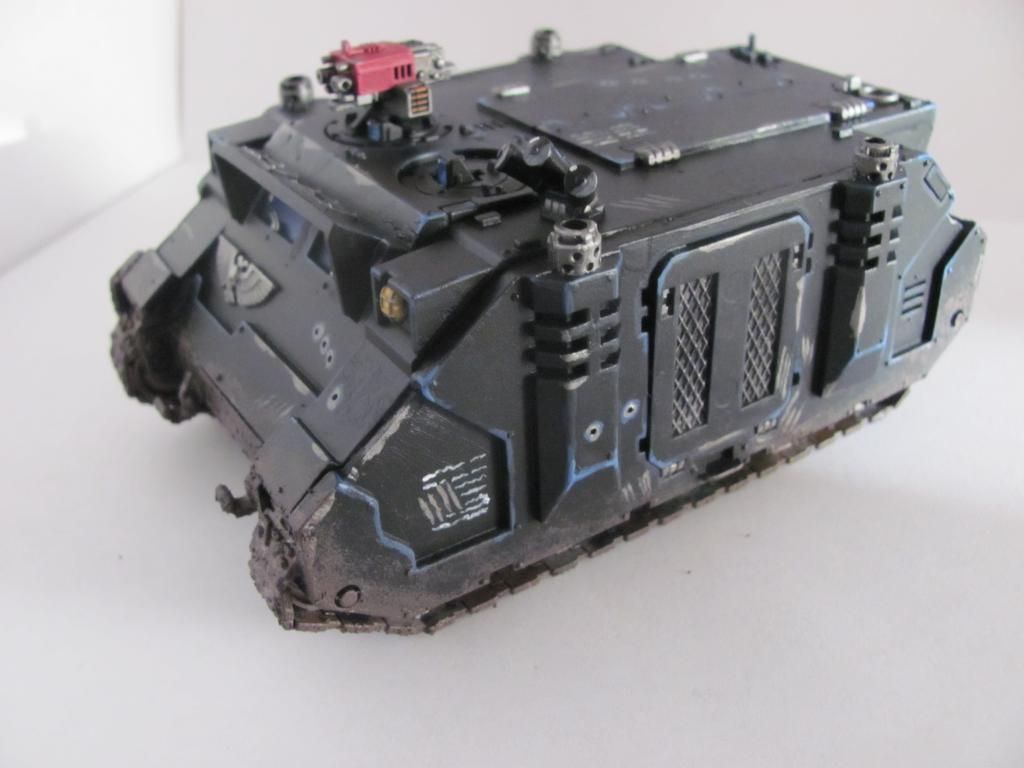
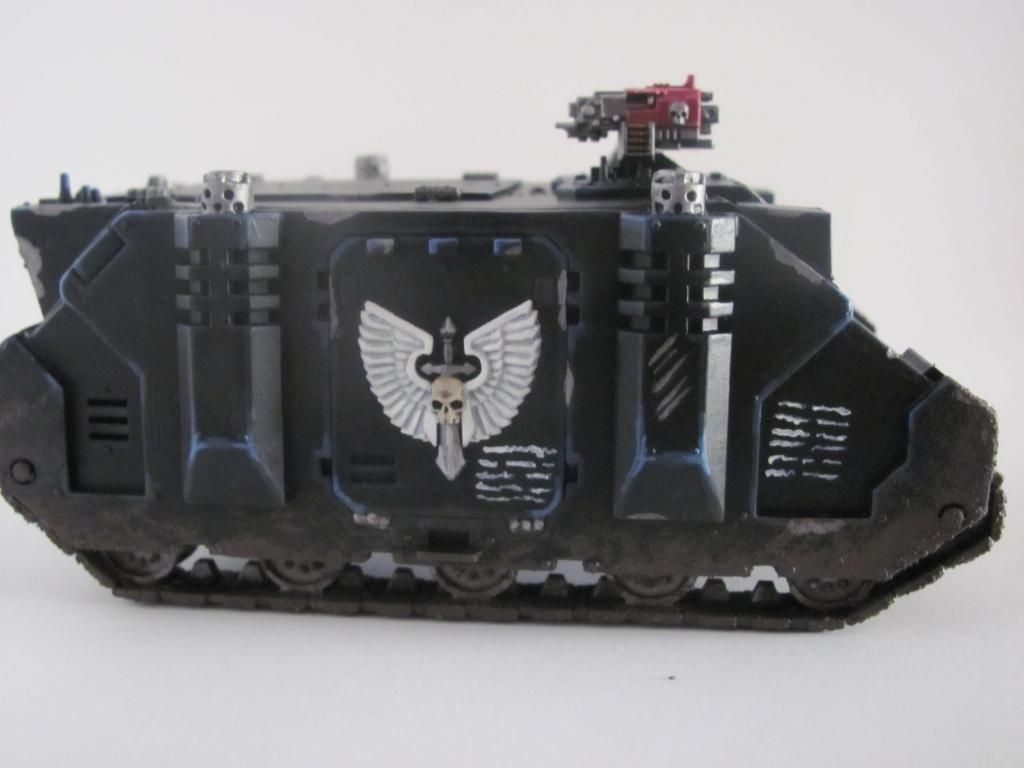
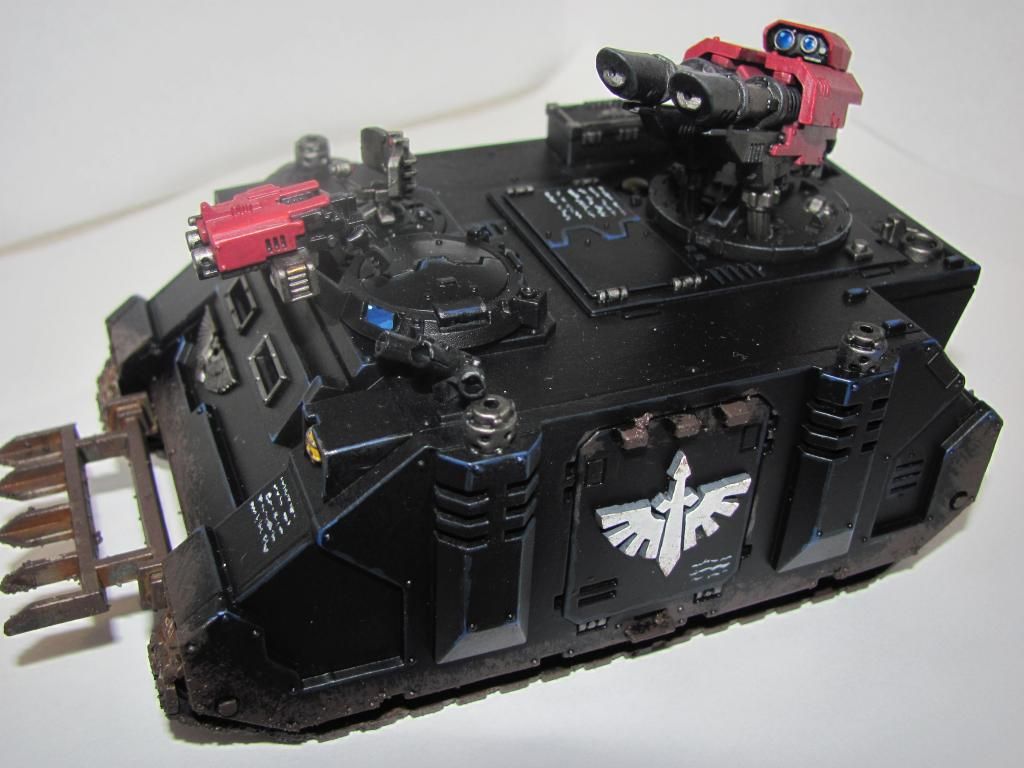
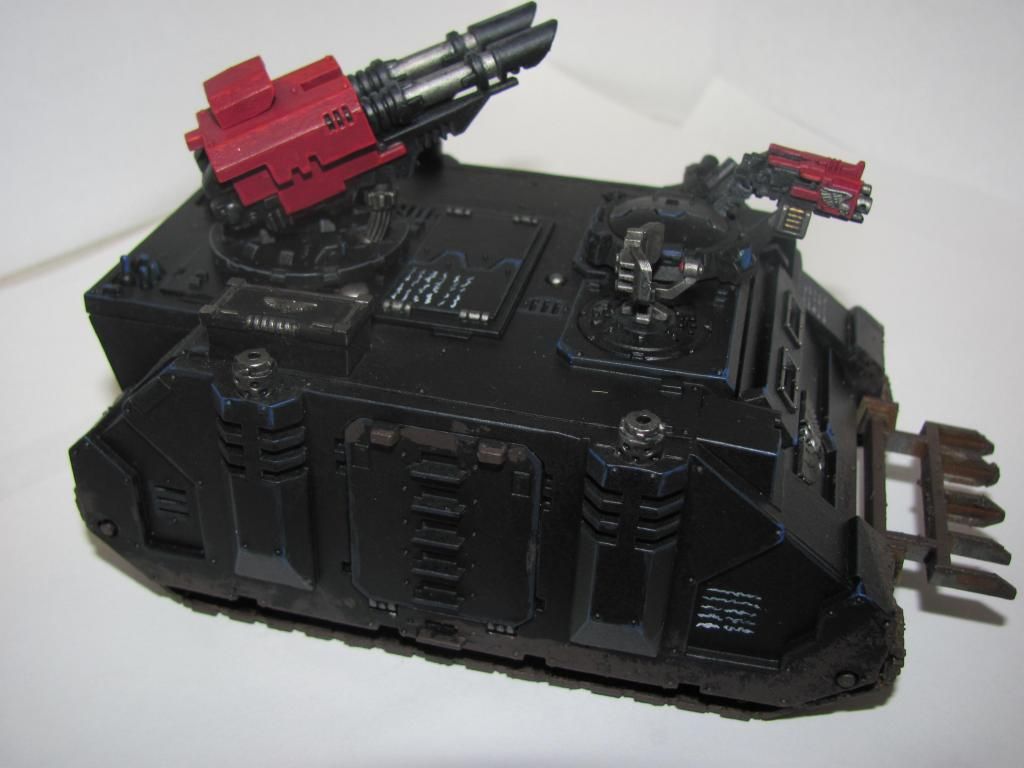
The Rhino reclamation is complete! Really pic heavy, so spoilered.
54946
Post by: El-Torrminator
Really liking the Librarian, the face in particular is excellent.
57666
Post by: giovanz81
Well done!!! I like your work!!! A little question: have you a foto of the Super Clean? The bottle or box 'cause i not know this product ! thank you!!!
64552
Post by: M4cr0Dutch
Nice job with the Rhino: good save!
64808
Post by: CIsaac
 giovanz81 wrote: giovanz81 wrote:Well done!!! I like your work!!! A little question: have you a foto of the Super Clean? The bottle or box 'cause i not know this product ! thank you!!!
I don't have my own photo of it, but here's a link to the US Amazon.com site and it has a picture of the product.
http://www.amazon.com/SUPER-CLEAN-DEGREASER----GALLON/dp/B000CCM63K/ref=sr_1_2?ie=UTF8&qid=1354195326&sr=8-2&keywords=super+clean
64808
Post by: CIsaac
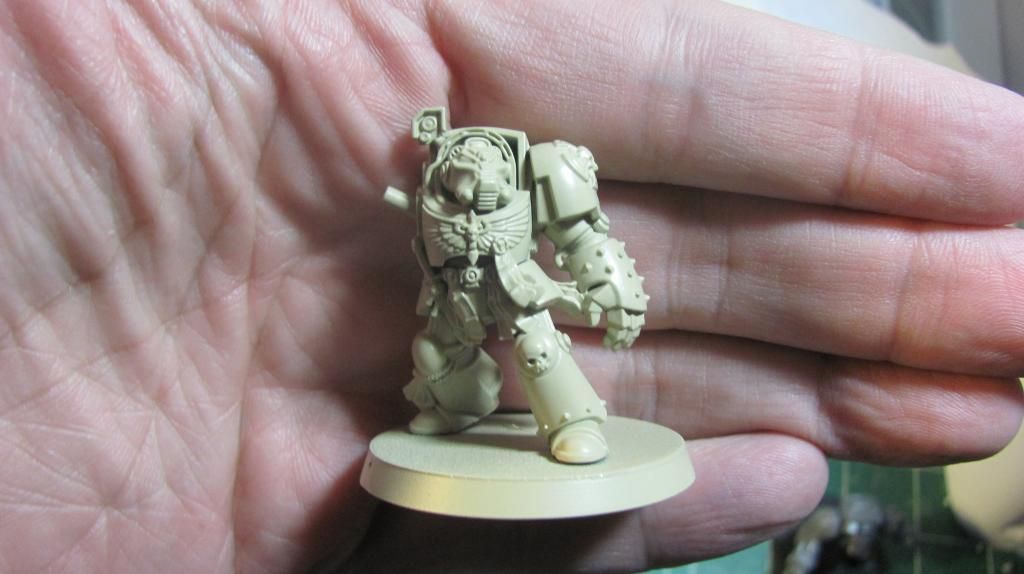
Woo! Just received my Cataphractii Terminators and my Forgeworld Mk2/4 Apothecaries. I LOVE the sculpts of these models and plan on adding the apothecary in MK4 armor to my PA command group and the Cataphractii will form the command squad for Belial. I love the idea of veterans of the chapter in truly ancient relics on the battlefield.
Automatically Appended Next Post:
... and as I inspect them, one of the lightning claws as a snapped claw. Damn it!
64808
Post by: CIsaac
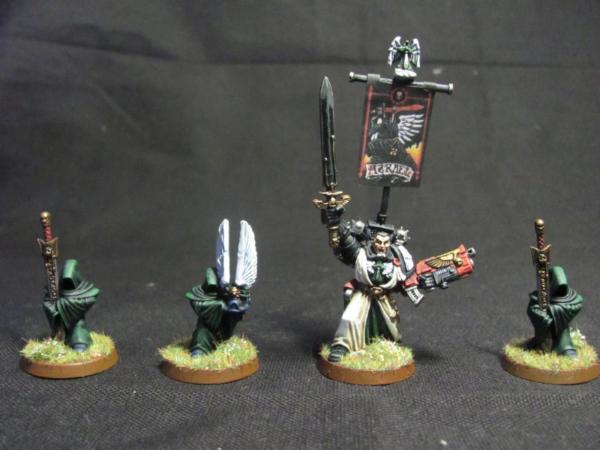
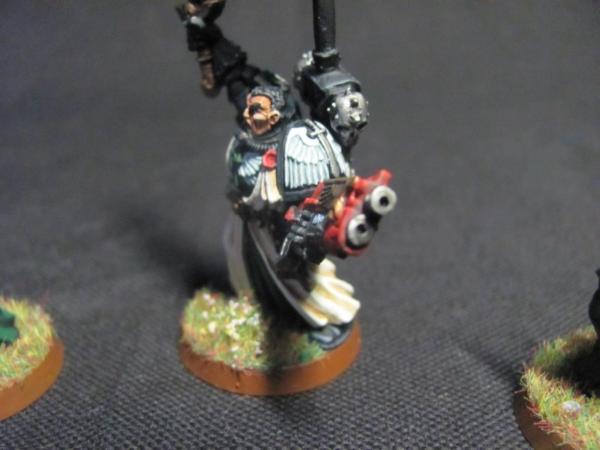
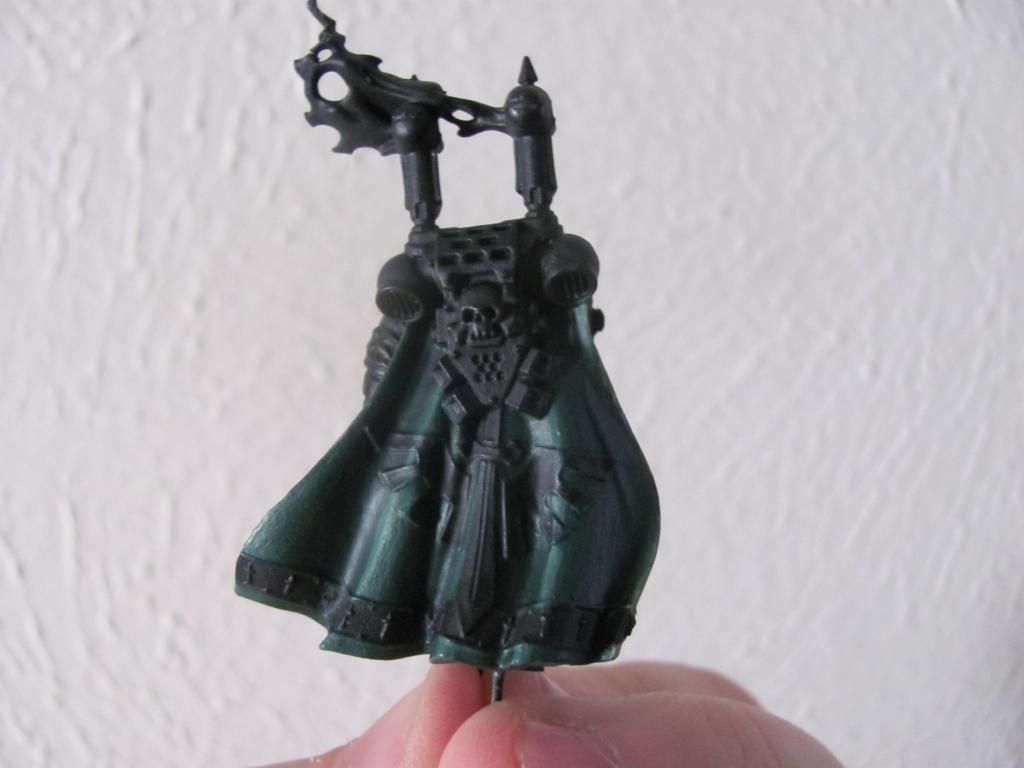
Ok, started working on the next model in my painting carousel. This is Interrogator Chaplain Seraphicus from the LE Dark Vengeance boxed set.
Primered with standard Krylon black. Set with pins for assembly later (though I'm already sorry that I put the front/back halves of the torso together). I'm still considering dumping the base he came with as it is just... bad.
I've finished the green on the back of the coat. It's a four stage highlight gradulally moving up to a very light green mix. The front of the robe/cloak are going to be a standard deathwing bone color. Changing up my coloring again (I was really, really happy with the bone color I got on the Rhino fixerupper) and I'm going with a Zandri Dust base, a Serpia wash, then layering highlights of Ushabti Bone, Screaming Skull, and then a touch of white mixed in. The pictures below were taking just as the Sepia wash finished drying.
I'll be doing a 3 stage highlight on the black armor. (1:1 Black/Macragge Blue, Altdorf Blue, then Calgar Blue final)
64808
Post by: CIsaac
My GF just gave me Winsor and Newton sable brushes for my birthday. Hopefully this does nothing but add to the quality of what I've been posting. The Chaplain is nearly done, but I've been sick as a dog all week so that's really slowed me down.
64808
Post by: CIsaac
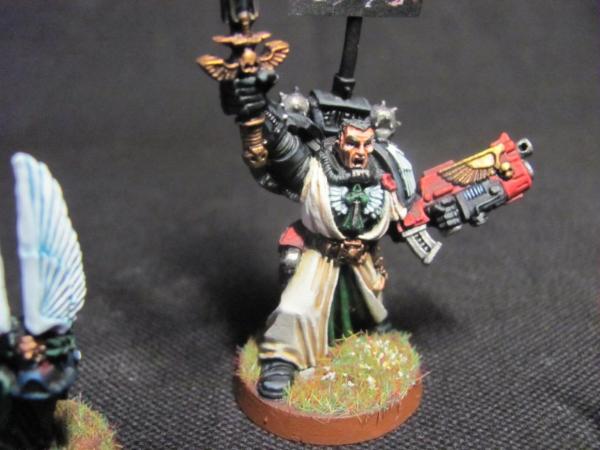
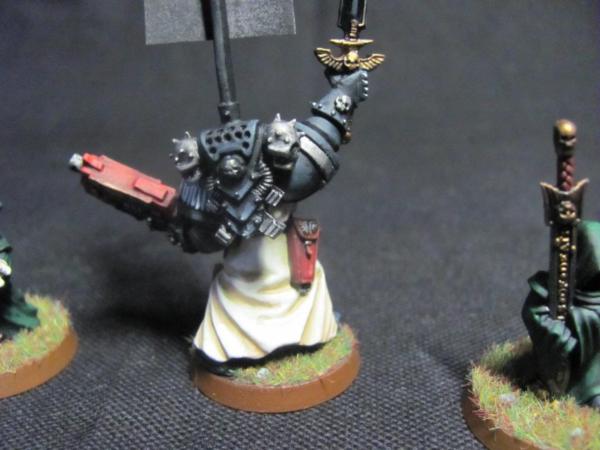
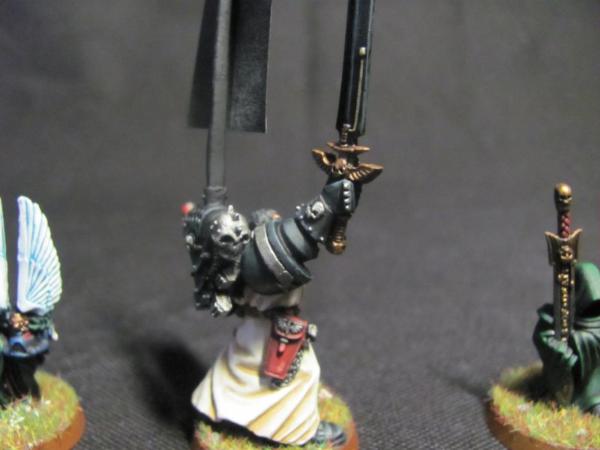
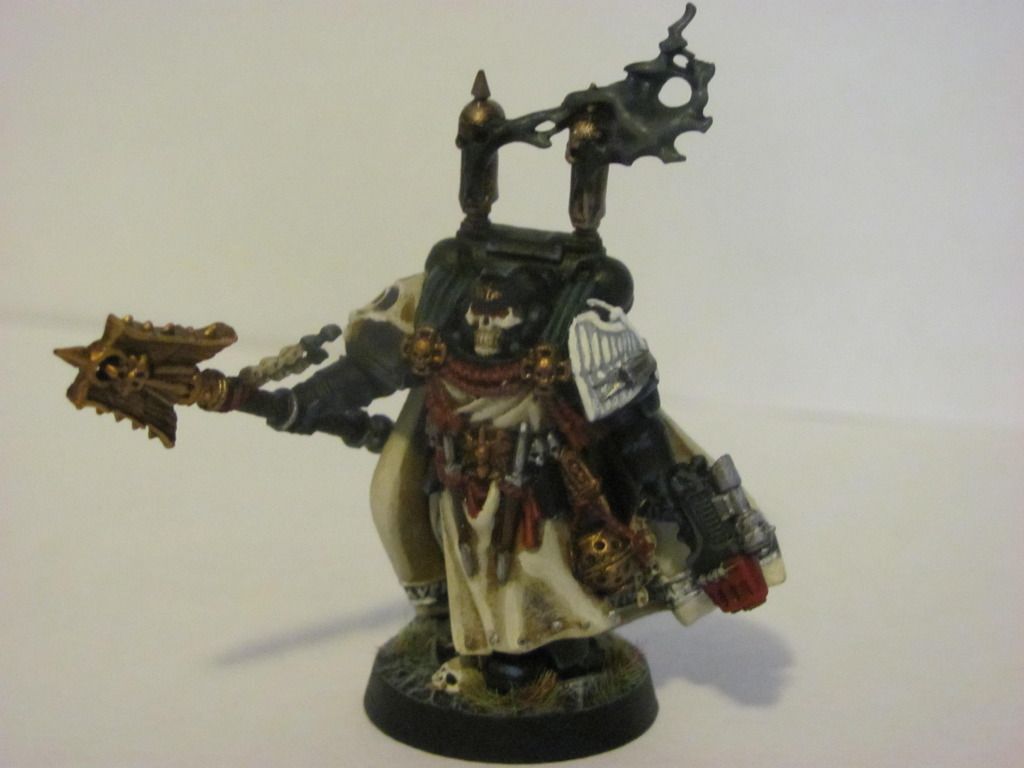
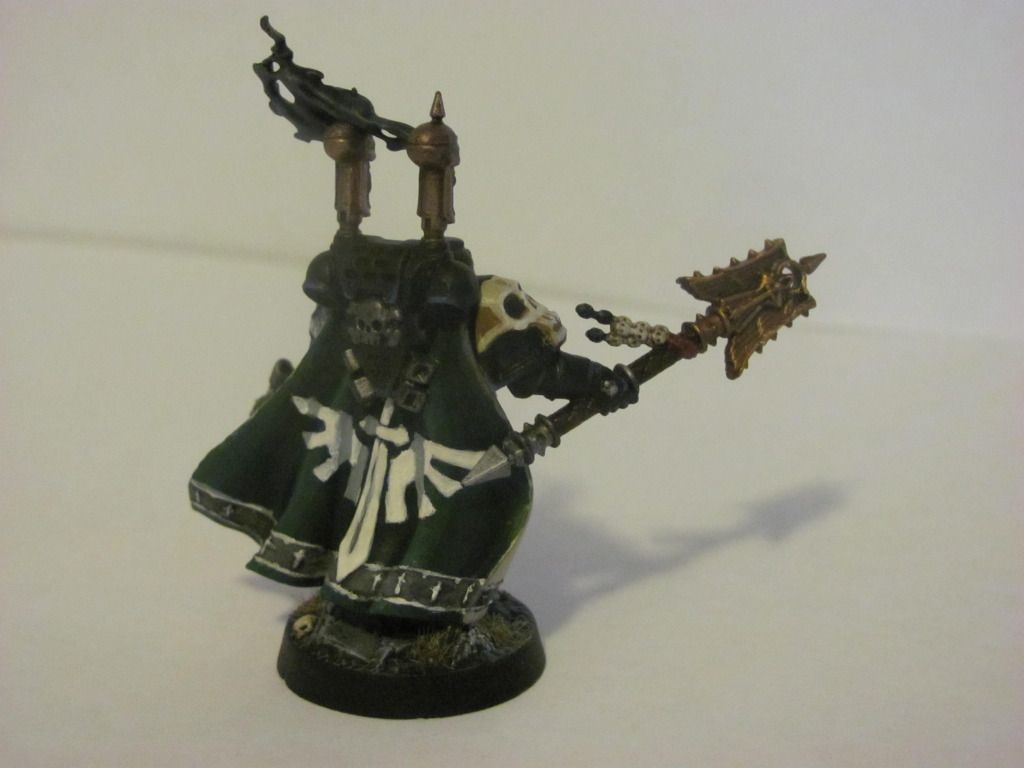
I completed my Seraphicus mini, the LE Chaplain from Dark Vengeance. I think I've done a better job on the robing this time around and made much more subtle highlighting for the black armor.
The reason that there are three black rosary beads on his Crozius are to represent Fallen that he's "redeemed".
50140
Post by: Sir Samuel Buca
That Chaplain is sweet, really well done, and you did a sterling job on that Rhino, reclamation. I'm subscribing to this thread, can't wait to see how the rest come out, keep up the good work.
64808
Post by: CIsaac
 Sir Samuel Buca wrote: Sir Samuel Buca wrote:That Chaplain is sweet, really well done, and you did a sterling job on that Rhino, reclamation. I'm subscribing to this thread, can't wait to see how the rest come out, keep up the good work.
Thanks. I'm hoping that I don't disappoint. Next up on the painting carousel is my Ravenwing bike squadron. I've got the three from Dark Vengeance which will be my sergeant, a plasma gunner, and a normal biker. I've also purchased a 3 man boxed Ravenwing bike squadron and I'll be making the rest of the six man squadron with that. I'll be making a second plasma gunner and I have a ooooooooooooooooooooooooooold 2nd edition attack bike (the sidecar and gunner are white metal!). I've got some extra Ravenwing bits (gunshield, back mounted feather thing, etc) and I'll be gussying it up.
With two plasma gunners in the squad I'm thinking Multi-melta over Heavy Bolter.
64808
Post by: CIsaac
Time for a quick update:
Moving on to my next project which is a Ravenwing bike squadron. I have the three bikes from Dark Vengeance (and I very, very much regret pre assembling them now), and they're going to be the toughest to paint. The next is a Ravenwing 3 bike boxed set. Finally I have two older assault bikes from the original 1996-2000 lifespan of the old 40K blue boxes. Sidecars are metal and I plan on make one a Multi-Melta and the other a Heavy Bolter so I can swap between them. I need to dig up bases for them as they used to come without them.
Here's a pic of model prep. Still partway through cleaning the older models.
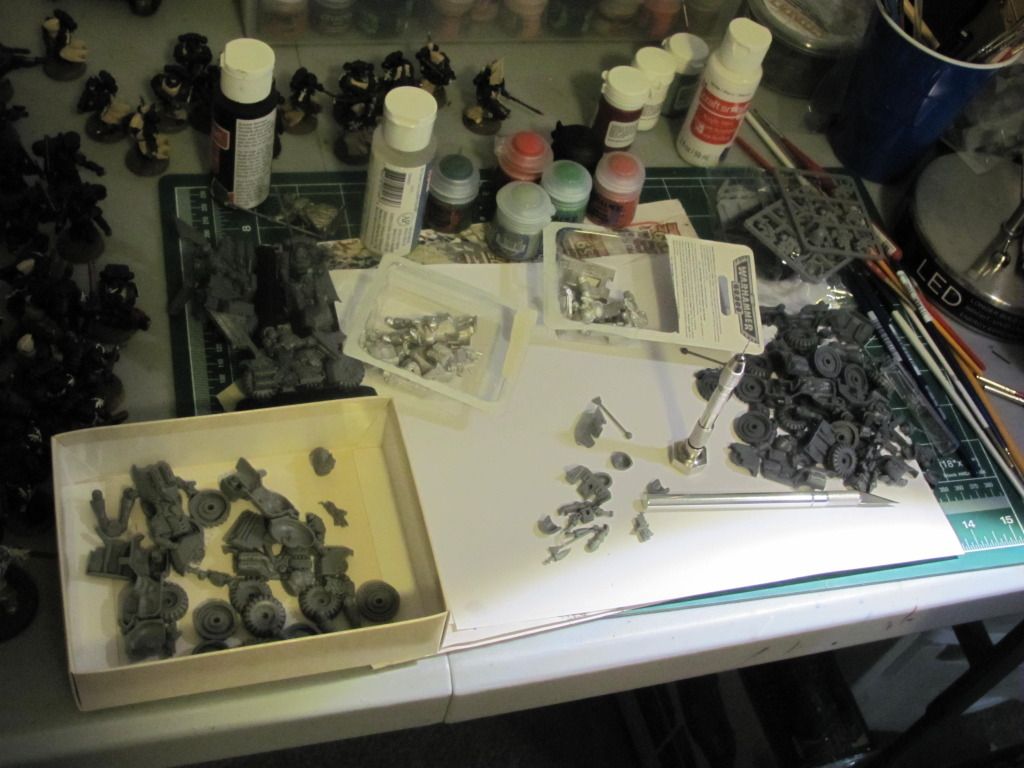
As of this writing I've also completed cleaning and filing down the metal bits.
I also really, really need to find a place to store my completed minis. Time to figure out the going rate on Battle Foam.
As an aside I got a Land Raider for my birthday. That'll go with my Cataphractii Terminators as their battle taxi. I'm thinking Deathwing Bone for the Land Raider.
64808
Post by: CIsaac
Long time since my last update. Here's what I've been up to aside from being swamped by RL due to the Holidays.
I broke my Dec '12 vow to complete my bike squadron. It's due to vastly underestimating how much time it would take to complete it due to how i had it set up. A couple lessons learned and I'll go into what I've got, initially planned, and where I'm at now.
1) I made the mistake of pre-assembling the foundation of the squadron, the three Dark Vengeance bikers. HUGE mistake due to all the hidden details. This was when I was just trying to get the set together so I could play quickie games. These may be my worst models in the entire squadron. It also made priming a bitch as I had to touch up numerous bare plastic spots. I still find a little periodically. There's going to be a massive black cleanup in one of my upcoming stages.
2) I had two 2nd Edition Attack bikes (metal sidecars!) and cleanup/prep on them was just a pain in the butt. I have not modeled metal in several years and this was a harsh wakeup call to why I prefer plastic. They're heavy, not so well cast, and generally took up a lot of time.
2a) As an aside it was a nice comparison on the quality of GW plastic. The newer bikes (brand new Ravenwing bike squad box set to fill out the squadron) compared to the 2nd Edition bikes was like a vast gulf. The details are much sharper and the plastic pieces fit together much more smoothly.
3) I am now sick of Leadbelcher. Dear Christ, if I never see that color again... but I will, because it's the Boltgun Metal of the current line.
4) Anyways... This is eight total bikes i'm painting. Two of them are attack bikes. It's the equivalent of about 20-25 foot troops. There is a LOT of plastic and metal to cover. The two attack bikes will have different weapons so I can switch them out. The squadron itself will have two plasma guns as their special weapons (to match the one that came with the DV box set).
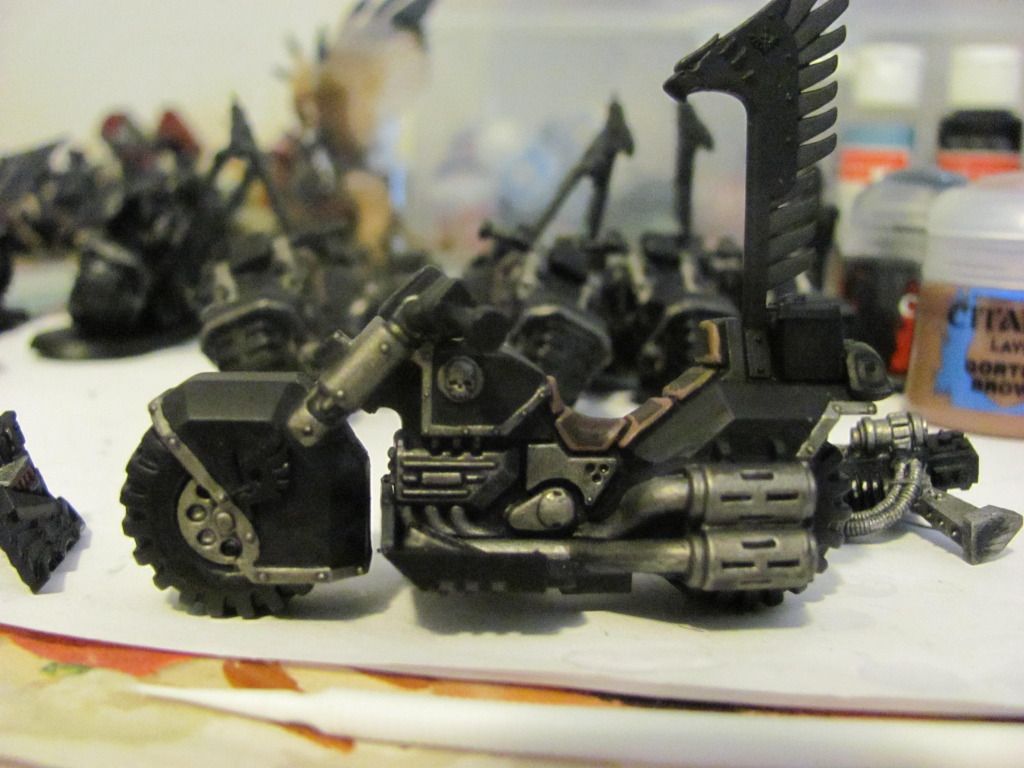
Here are current in progress pictures:
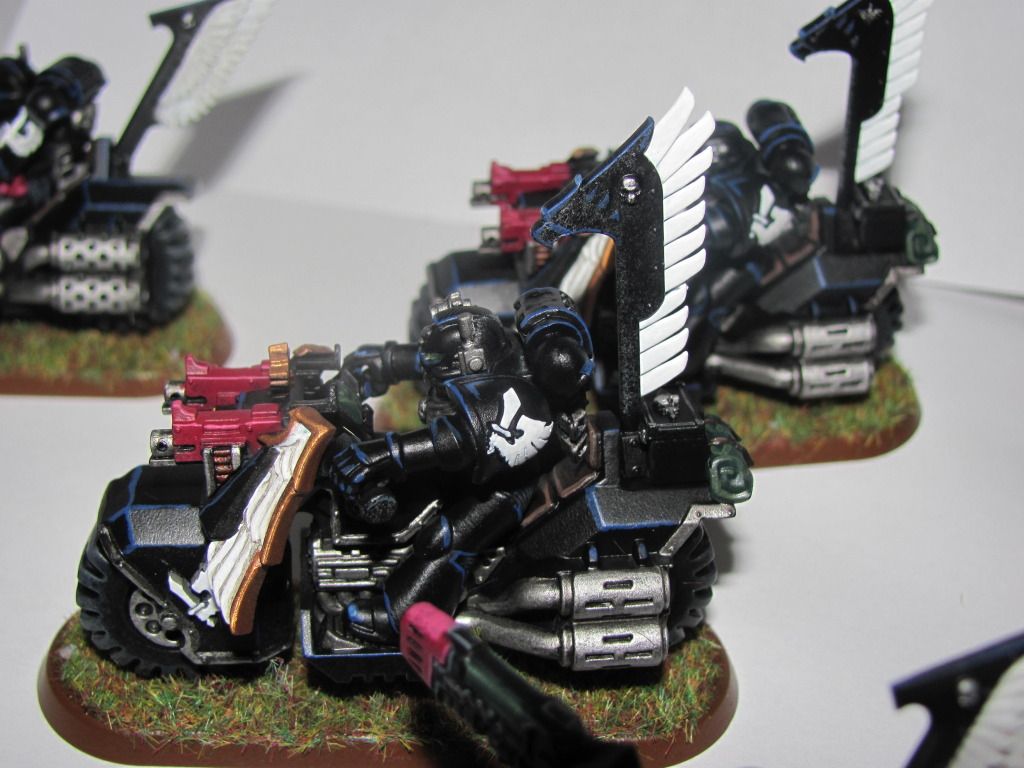
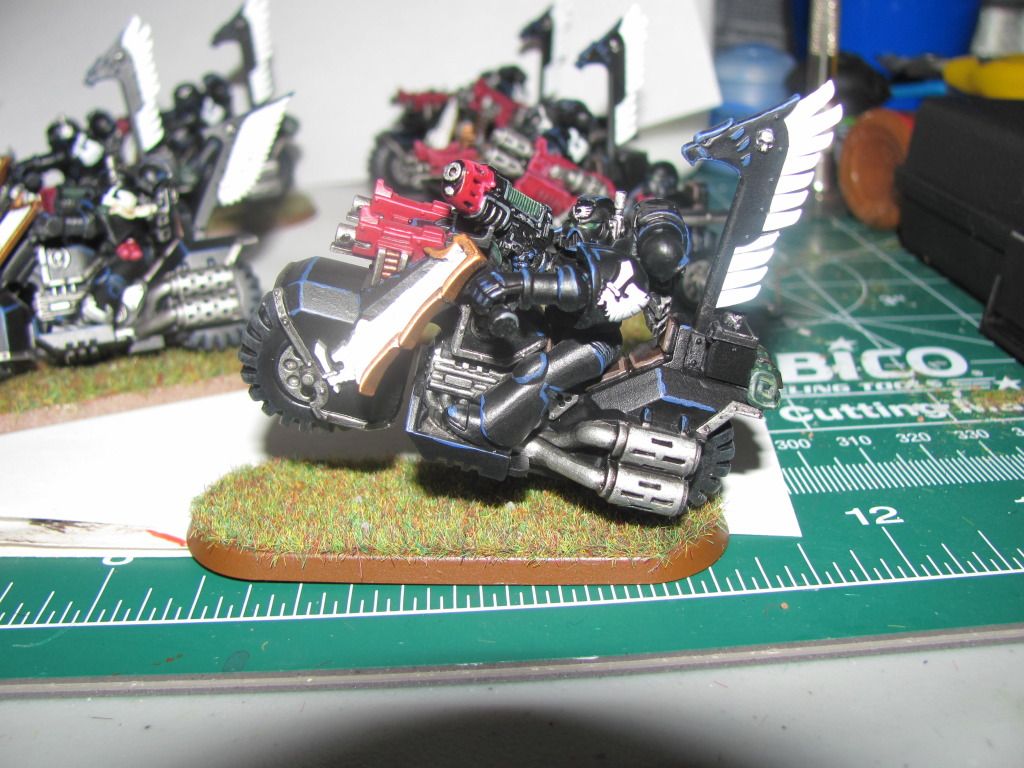
The full squadron in my workspace:

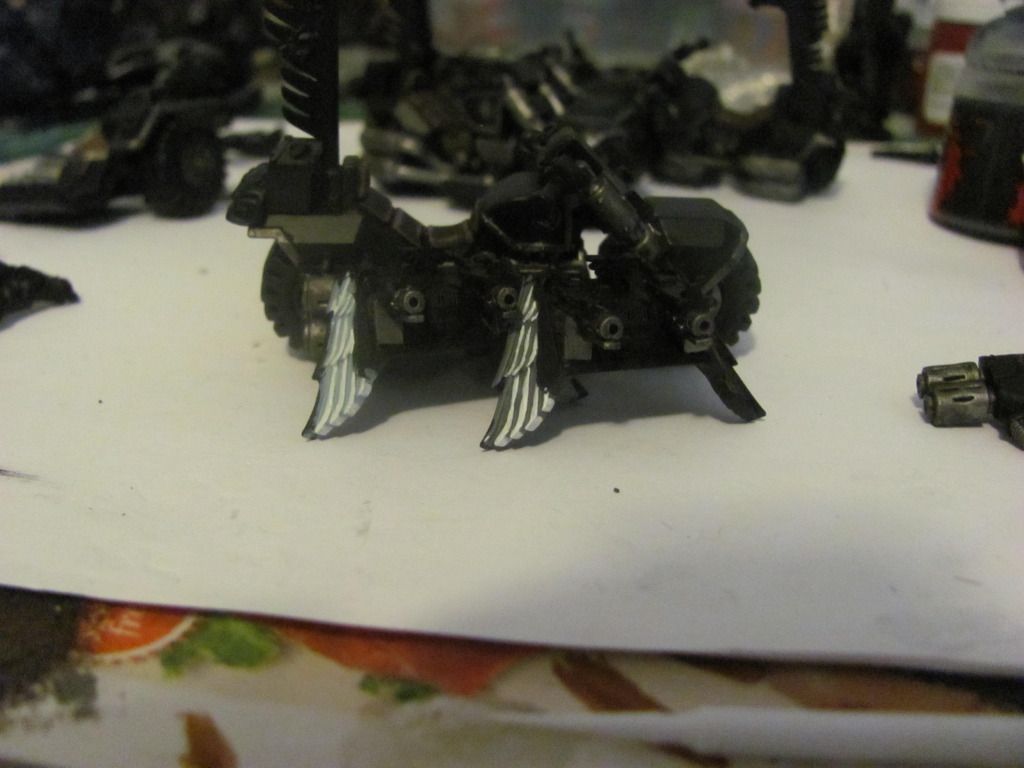
The current state of the individual bikes. Coming alone nicely, IMO. I need to highlight armor and the chrome. Seats are completely done.
Color test on the shields for the front of the bikes. Still not sure which.
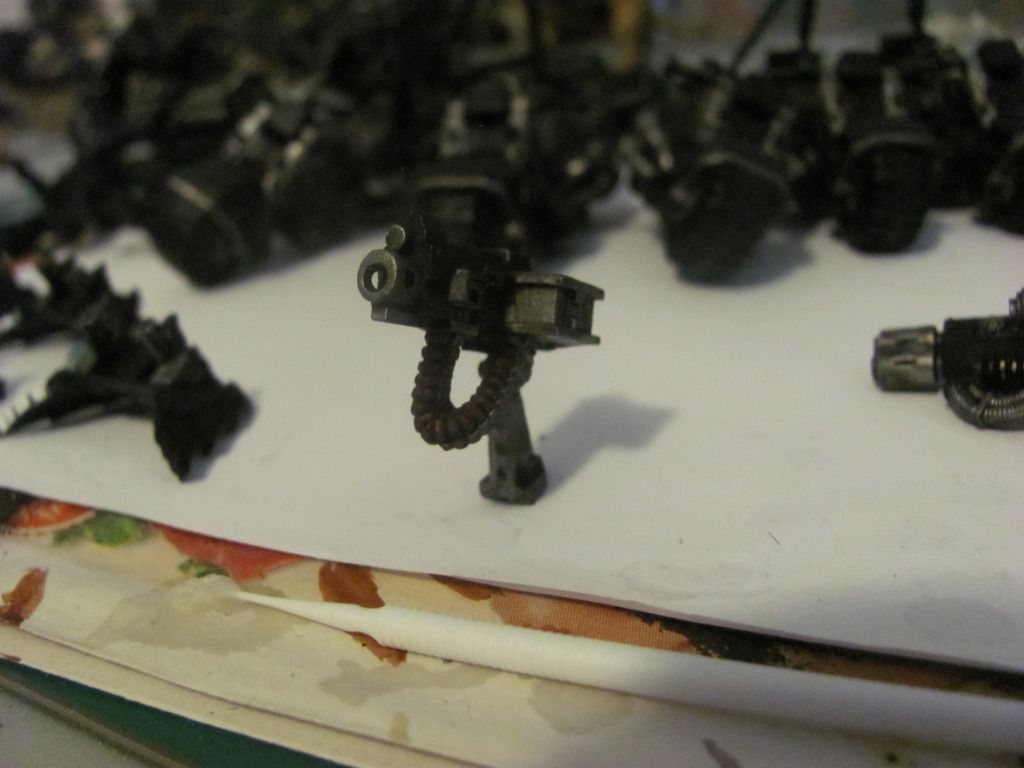
Closeup of the (metal) Heavy Bolter for the attack bike. Drilling out the barrel was very painful with just a pin vise and a cheap Ryobi drill bit. I don't own a dremel. The multimelta behind it was also drilled out.
64808
Post by: CIsaac
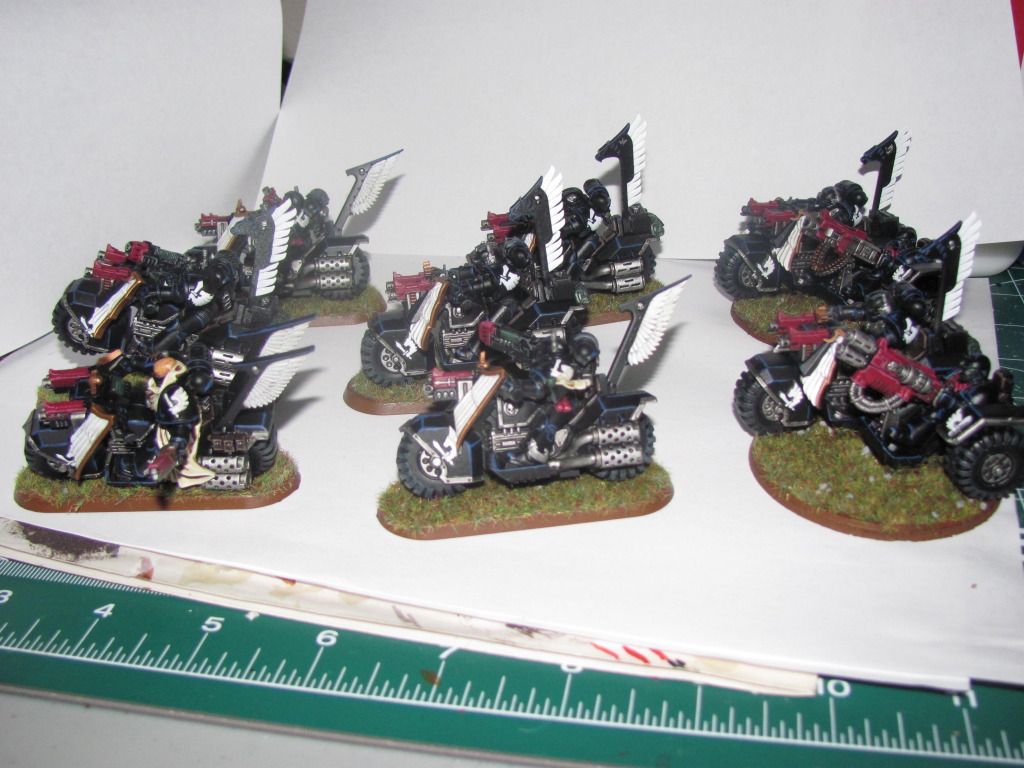
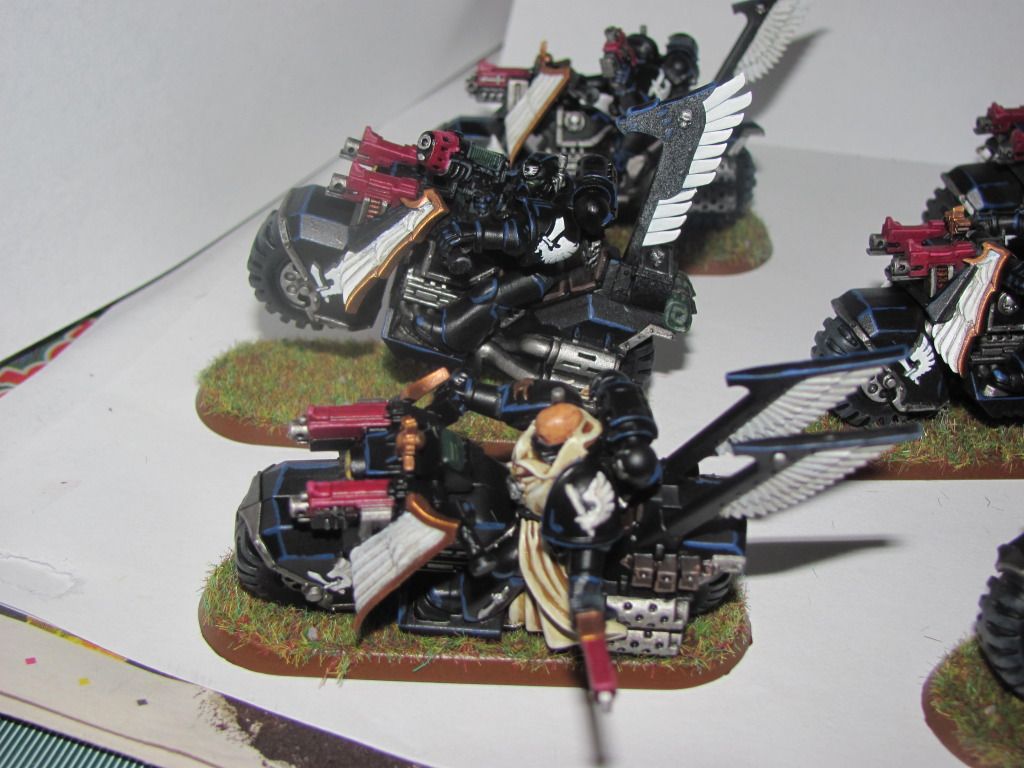
Finally. Finally. Finally. Finally done.
Ravenwing squadron is complete. After a brief scare with the varnish turning white, the Ravenwing squadron is completed and looking pretty good for tabletop quality.
There are two attack bikes so I can switch out when I want. I had two old plastic/metal hybrid bikes that were from 1996-98 and decided to go ahead and assemble and build them as part of the squad. The rider of the heavy bolter bike is TERRIBLY cast. I put the better one on the multi melta bike as that is likely the one to be on the table most of the time. I did a mild conversion on the extra plasma gunner, plus the obligatory wheelie.
Here are the shots of it:

64808
Post by: CIsaac
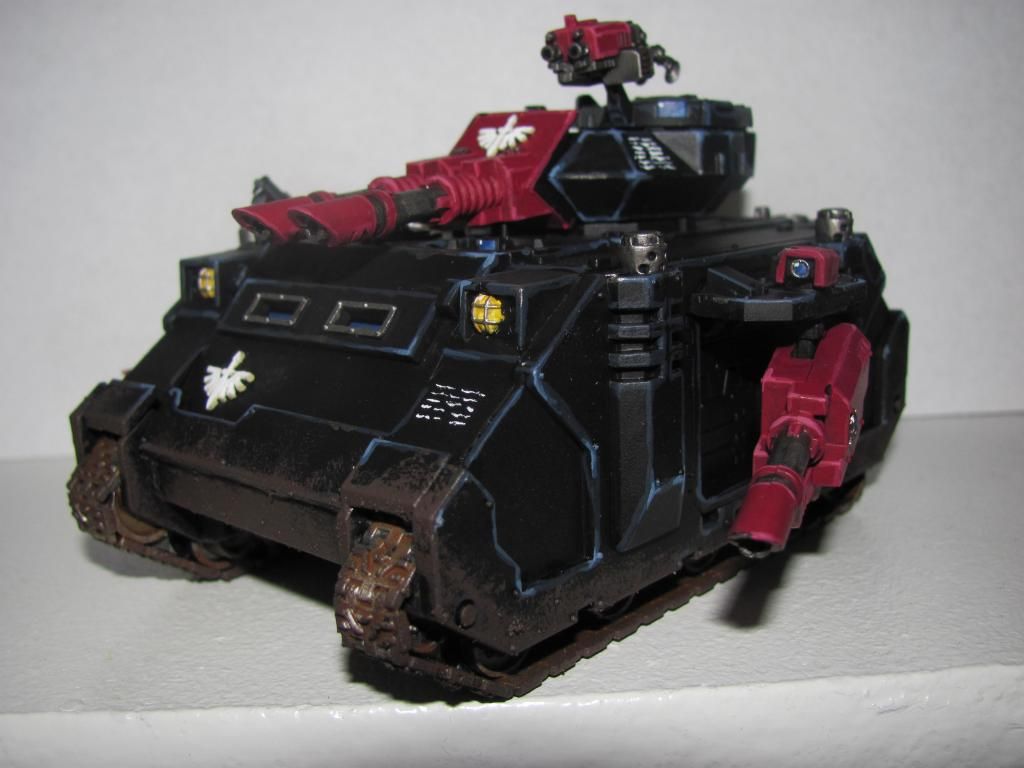
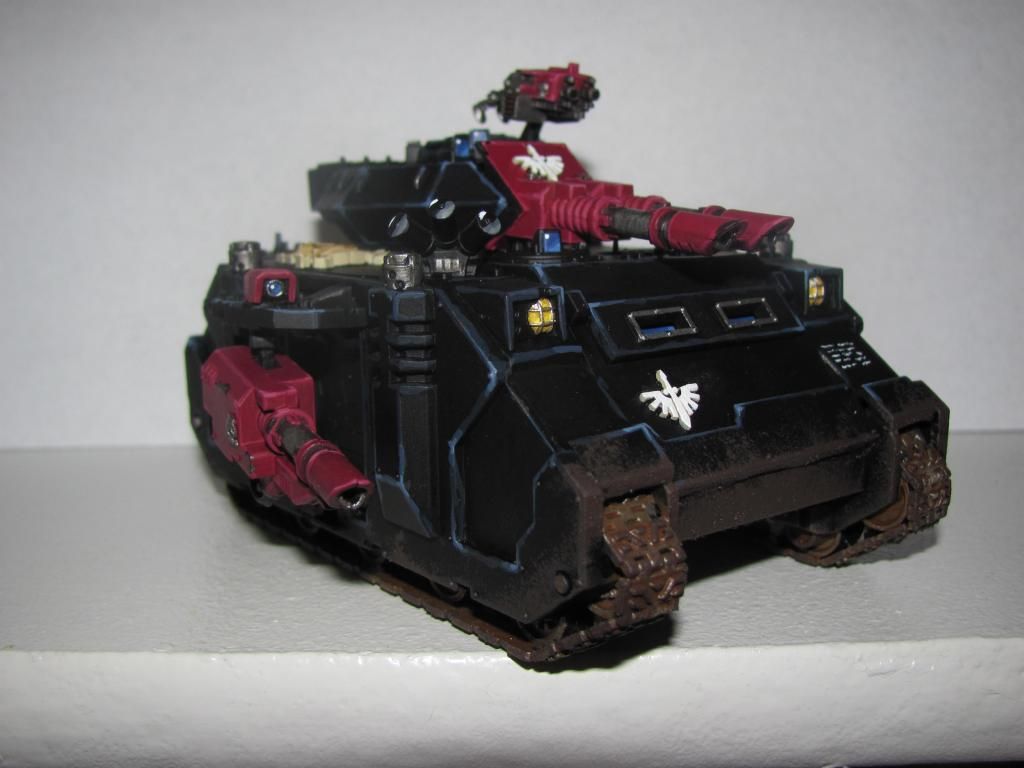
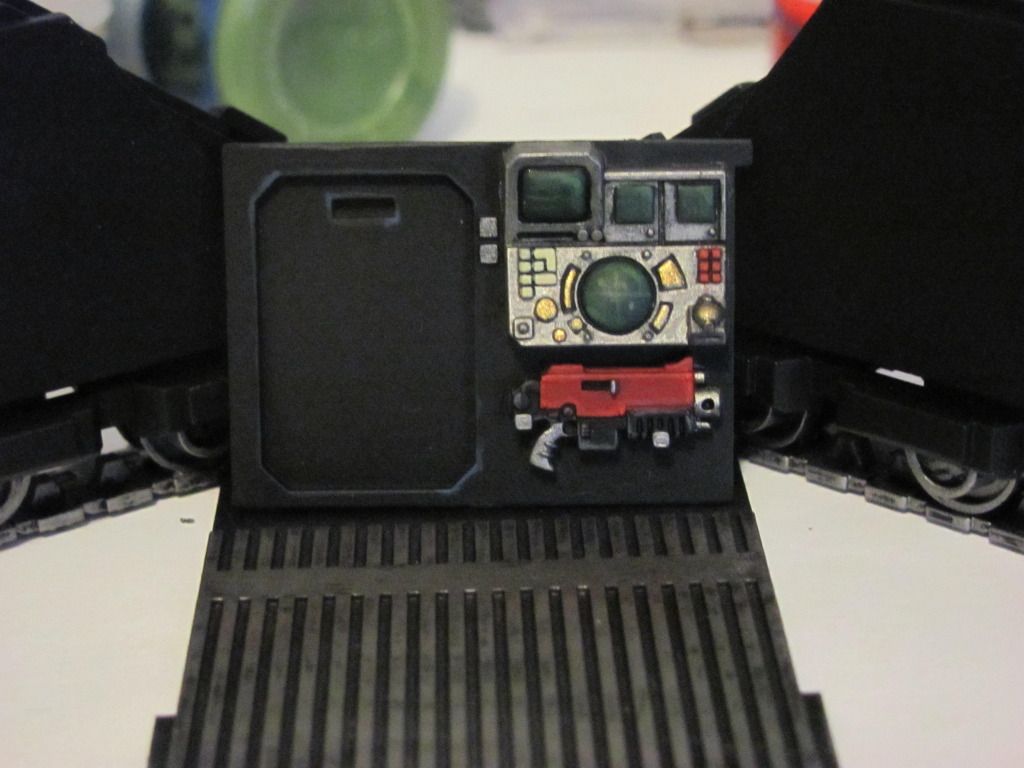
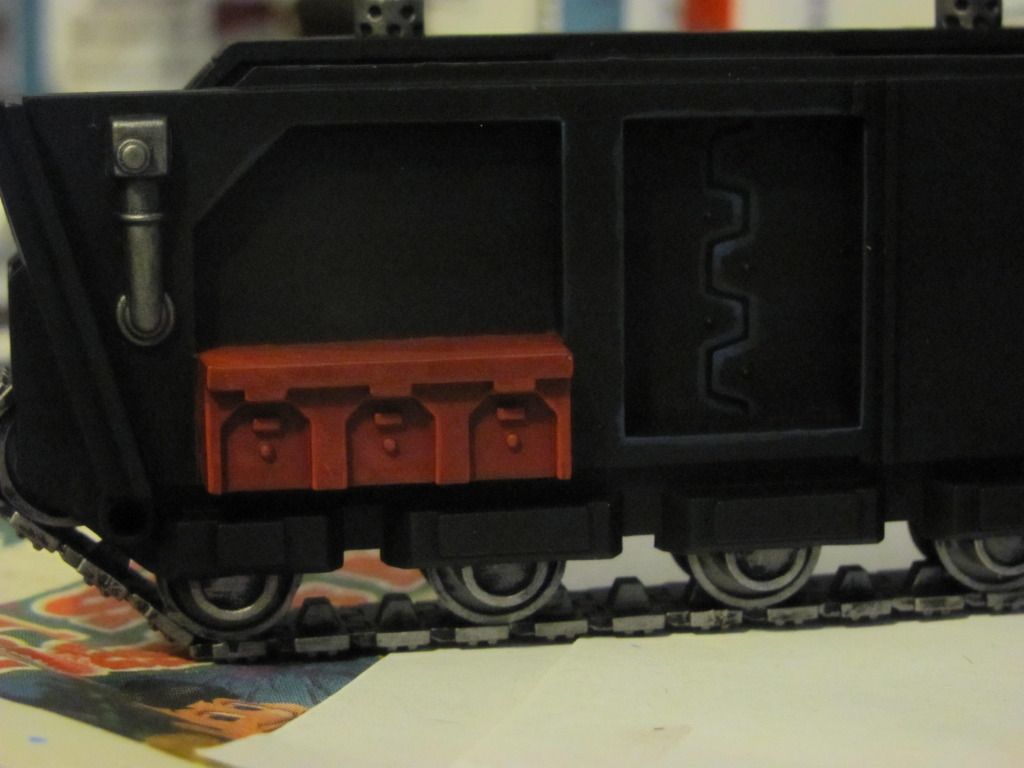
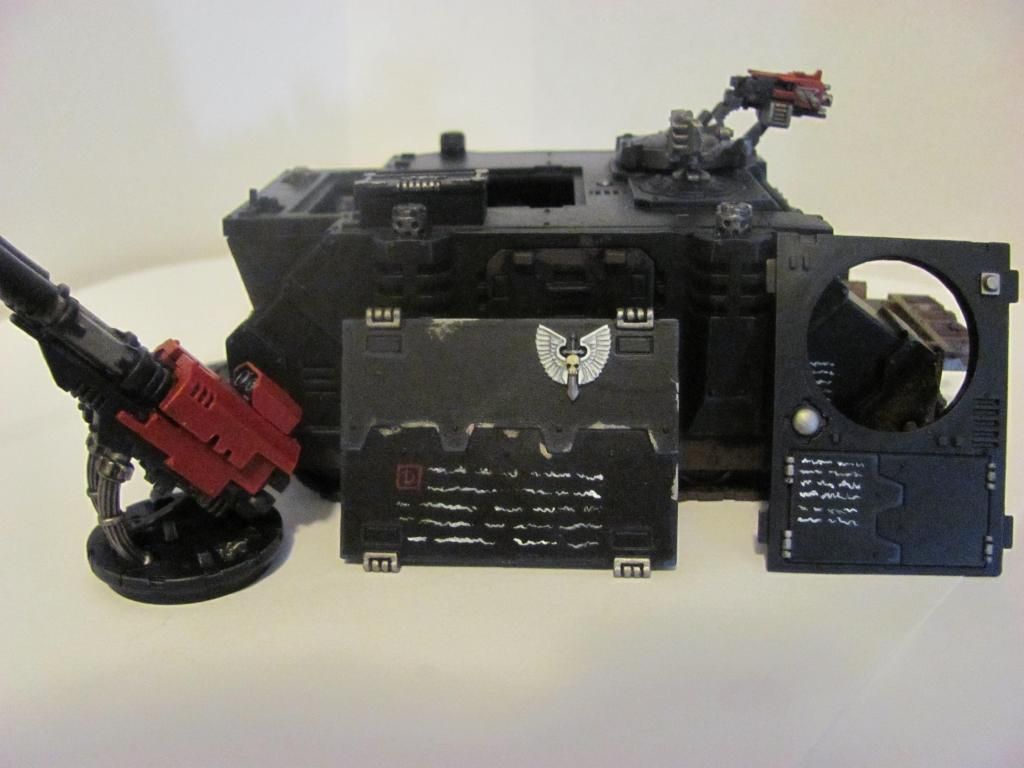
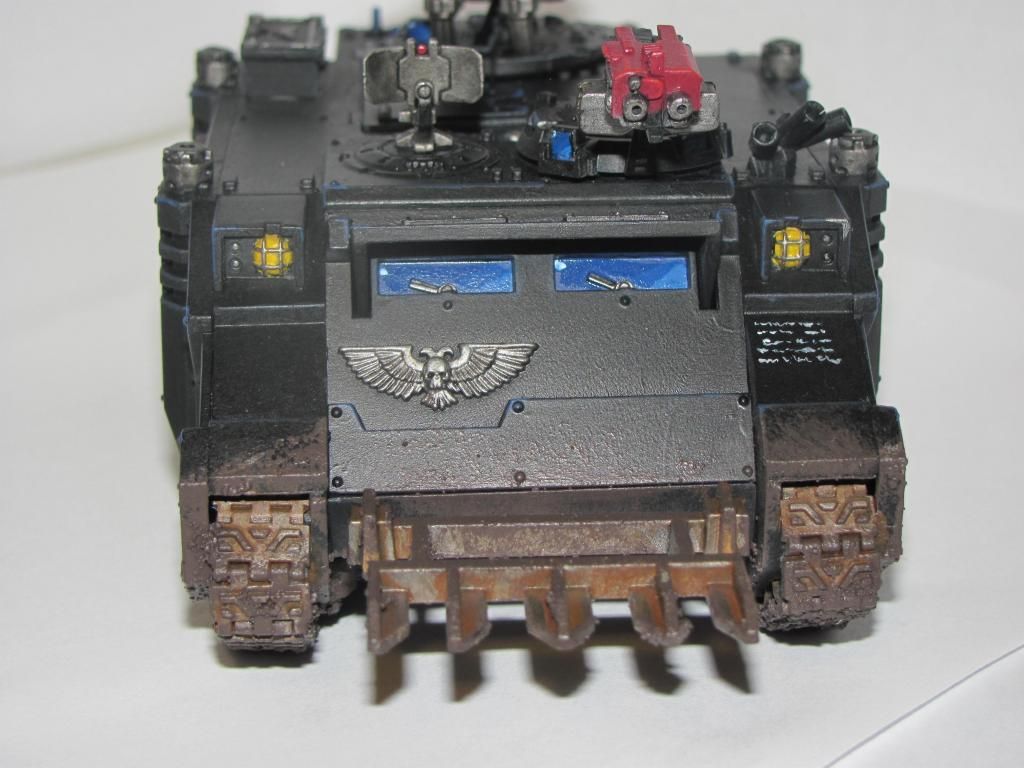
The Razorback is complete!
I had ANOTHER major varnish SNAFU. I ended up hastily repainting the back end, but the varnish did go on too thick and there's a couple spots here and there where you can see some thickness to it. Oh well. At this point, after having freaked out majorly over it and then had an emergency four hour repainting session, I'm done worrying. It's good enough, but flawed.
For the weathering I made sure to hit the edges of all the deployment ramps with some mud effects. I accidentally got some on the chapter symbols, then I thought about it and realized 'yeah, those would get messy slapping down into the mud' and left them as they ended up.
I also added a quicky alternate roof so it can be hot swapped into being a Rhino. If I get another Whirlwind turret, it can also act as that.
 Automatically Appended Next Post:
Oh... and for what's next?
How's this for a teaser?
64808
Post by: CIsaac
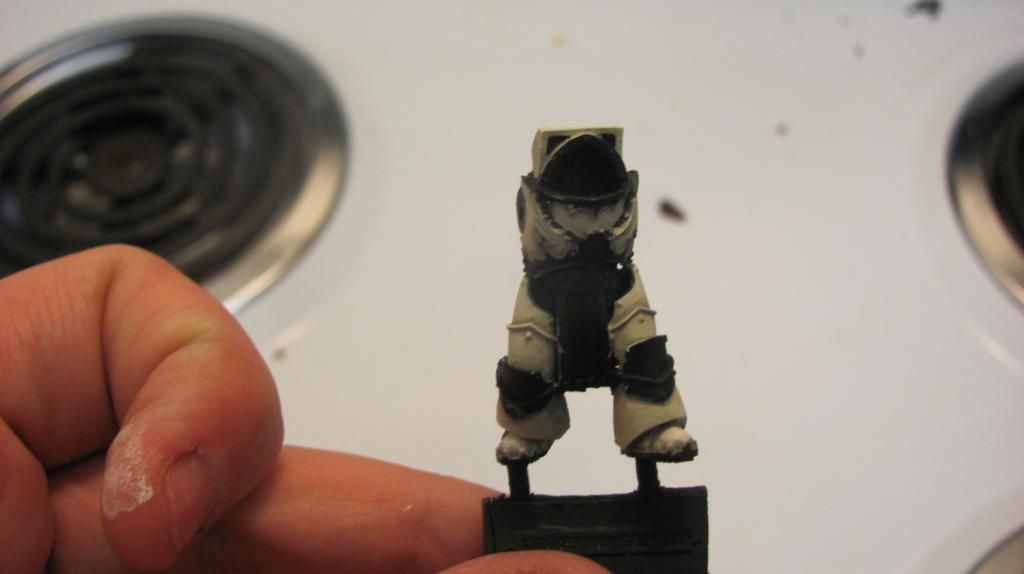
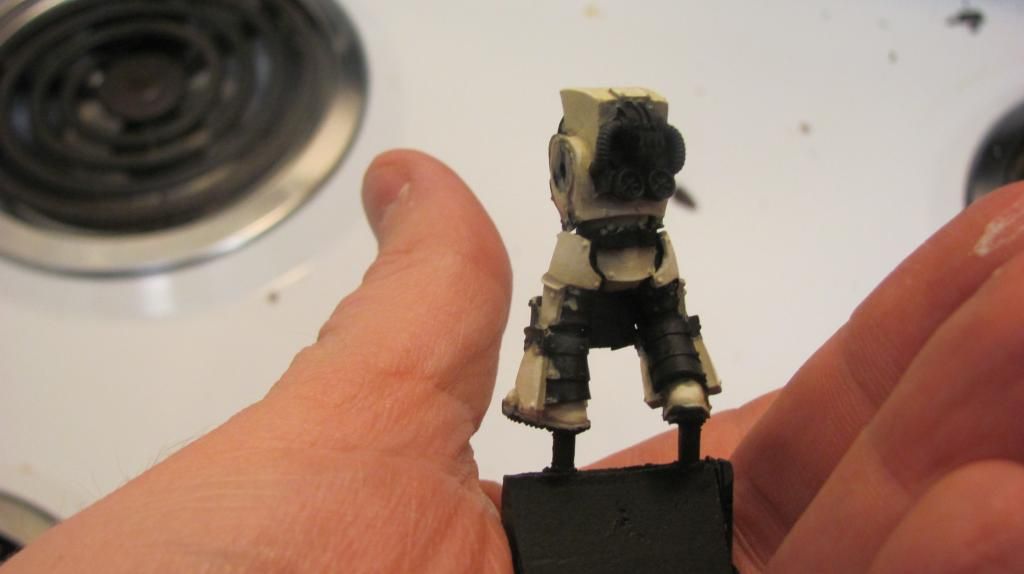
Ok, I've begun work on the test model for the Deathwing Cataphracti just to make sure I have the schema that I want to use for the assembly line down properly. This isn't going to be a proper squad, but veterans interspersed through my other squads to show that there are a few of these venerable suits in operation with the Unforgiven chapters.
I've mostly finished the armor itself, though I'm debating a very thin Ushabti Bone wash to help blend the highlights together. The gold is at the first stage. I'll get a heavy highlight, a Nuln Oil wash, then rehighlighting. Weapons will be Khorne Red highlighted up.
This is the plasma gunner and will "count as" a Plasma Cannoneer with Chainfist.
I have enogh that I will be making two Lightning Claw terminators (more for looks than how good they perform) and then I will be constructing stormshields out of plasticard to make two TH/ SS terminators and finally one will have a combi-bolter(count as storm bolter) and power sword and act as a veteran Sergeant.
64808
Post by: CIsaac
Any feedback on the Deathwing job? Could really use some and it would be vastly appreciated.
50140
Post by: Sir Samuel Buca
I like the Cataphractii so far, but the scheme looks a little Death Guard to me, maybe brighten the gold a little, or use some brighter colours on the straps?
But, it's your models, and they're not finished, it looks good though, keep it up.
I prefer apple pie.
64808
Post by: CIsaac
 Sir Samuel Buca wrote: Sir Samuel Buca wrote:I like the Cataphractii so far, but the scheme looks a little Death Guard to me, maybe brighten the gold a little, or use some brighter colours on the straps?
But, it's your models, and they're not finished, it looks good though, keep it up.
I prefer apple pie.
Thanks for the feedback.
I think I'll pass a thin wash of Screaming Skull over it. Should lighten the entire model and allow the highlights to flow together a bit better. The gold is just the base and I'll be hitting it up with a lighter shade of gold and then hitting the very tips of it with a light silver color to look like polished reflections of light.
64808
Post by: CIsaac
Ok, here's the progress I've gotten so far:
1) I washed and highlighted the gold
2) I painted the leather Caliban green and then highlighted up and washed it with green (tried Waywatcher Green glaze -- not impressed -- but it did do its job on the kneepads, where I put it to give it a 'so dark green it's black' feel to the knees.)
3) Did the plasma coils, and rest of the plasma "cannon".
4) Highlighted red up two levels and then washed it with a thinned version of the base red.
5) Washed the bone armor plates with a thinned screaming skull from GW.
6) Did cleanup on mistakes on the model.
7) You can't see it but I painted the power generator and the back leg armor plates in Leadbelcher and then washed with black and then re-highlighted in Leadbelcher. I wanted a heavy, armored feeling to the model. Bottom of the feet are done the same way.
Aside from the base, I'm ready to assemble him.
64808
Post by: CIsaac
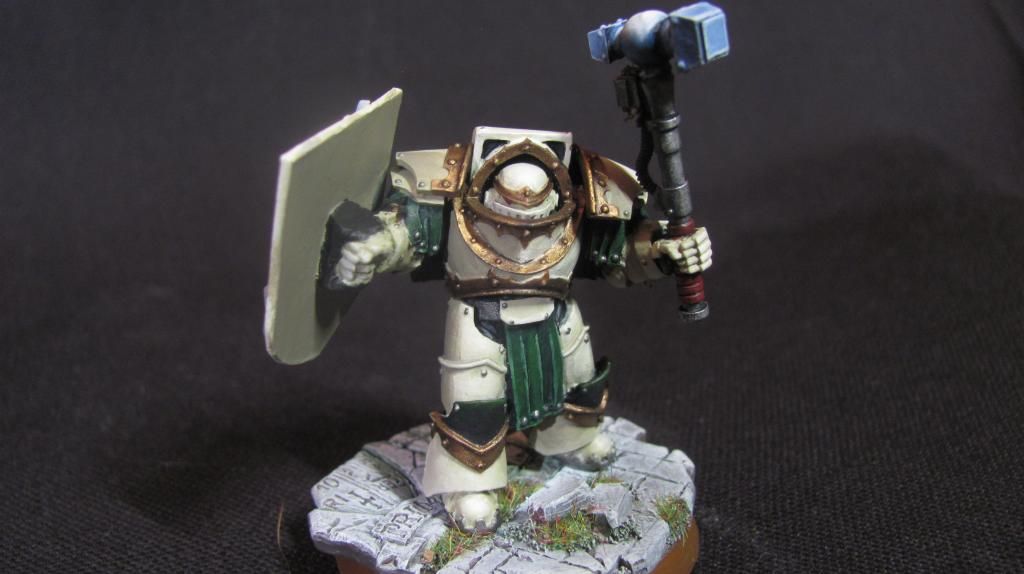
And here we go, the Cataphractii is complete.
This is the initial test model of six total. Feedback is very desired on this. There are a couple errors I didn't spot until digital photo closeups, so I've corrected most, just didn't go back and retake the photos. If you see anything PLEASE point it out anyways, as I may have missed something.
Thanks to my GF, the most beautiful woman in the world, who was able to get them in focus when I couldn't. I suck at digital photography.
64808
Post by: CIsaac
Ok, starting full work on the Cataphractii Terminators. These will be disbursed throughout my various terminator squads, so that's why there's not a lot of cohesion to their weapon selection.
I will be assembling:
1 Standard Sergeant Configuration (CombiBolter "counts as" Storm Bolter, with Power Sword)
2 Thunder Hammer/Storm Shield Terminators
2 Lightning Claw Terminators (because the claws just look cool and I want to paint them)
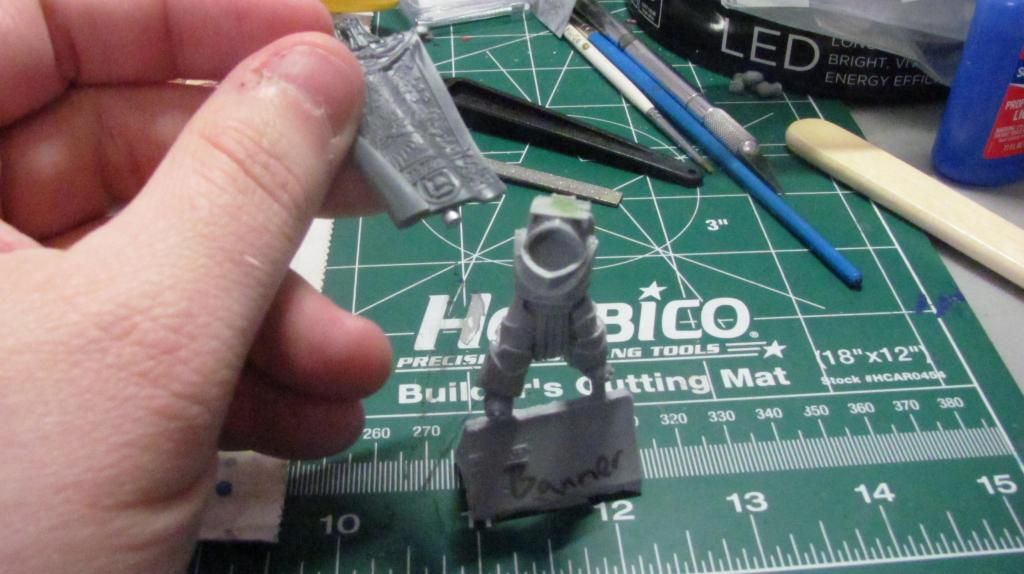
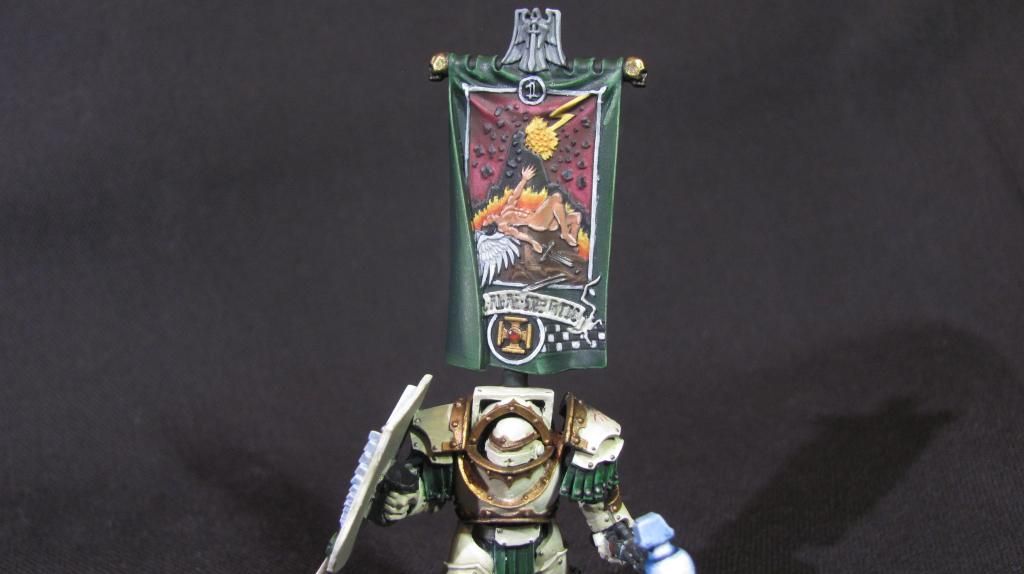
One of the TH/ SS Terminators has been magnetized with a rare earth magnet in the top of his body. I cut the banner from one of the Deathwing Command Squad boxes I have (haven't started prepping them yet) and got it read. I used a razor saw to level the bottom and attached the magnet. The magnets, btw, are 1/8th of an inch by 1/16th. I used a Ryobi brand 1/8th drill bit (actually a touch wider than the magnet, which was perfect) to drill the hole in the top. It just barely fit into my P3 brand Pin Vise.
The reason I did this (for fluff's sake) is that I wanted someone that would be trusted with the most ancient of chapter relics (the armor) to also be worthy of carrying one of the sacred standards into battle. It seemed to feel right for me story wise.
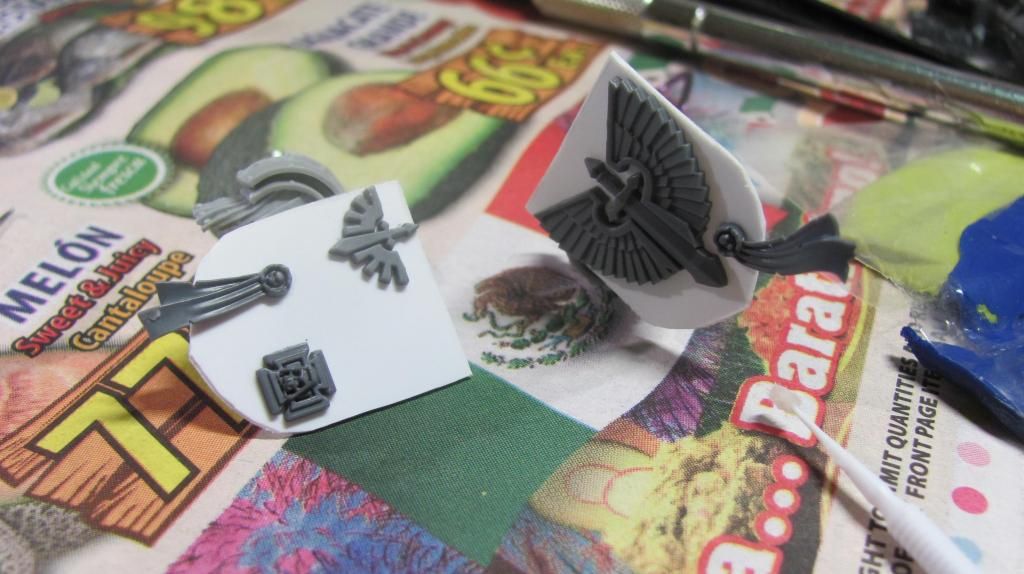
For the Storm Shields, I am going to cut plasticard into kite shields and glue various icons on them. For the hands I used hands from old 2nd Edition era plastic marine arms and trimmed them down and pinned them to the right arms. Just about everything on these models is/will be pinned. Weapons to wrists, shoulders to torso, etc.
I learned a lot about Resin safety, too. After the first day and starting to feel scratchiness as I breathed, I've purchased dust masks and keep the area ventilated. I also am vacuuming the floor regularly (after dusting the table clean so that the vacuum picks it up) with filtered vacuum. Better within a couple of hours. So now if I'm doing any kind of cut/sand/drilling on the resin models, I keep things clean.
I recommend this highly to EVERYONE.
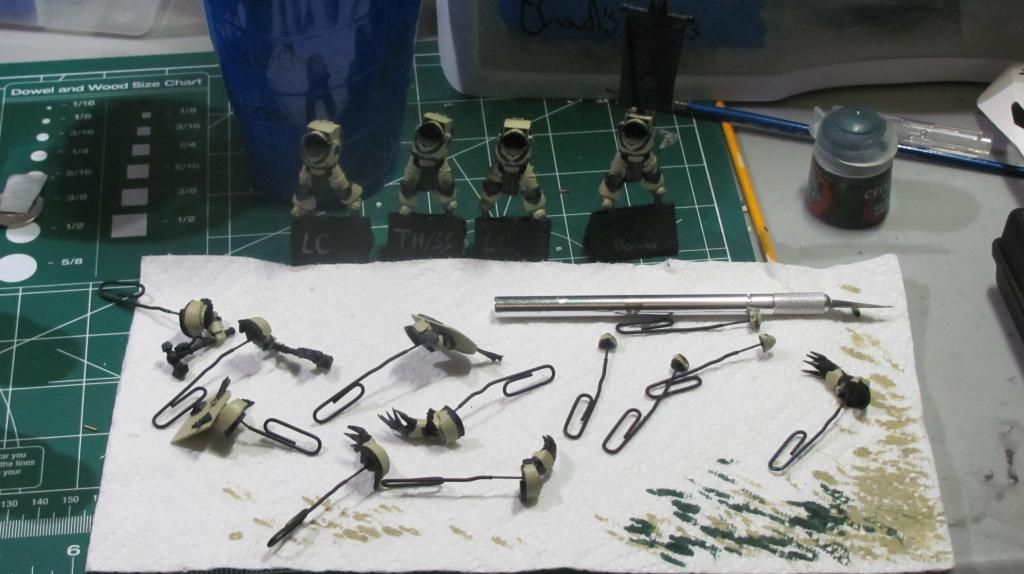
Anyways, here's the squad, with all pieces I'll be painting separately pinned onto paperclips for ease of access. Instead of dowels (as I don't have enough) I've left the bodies on their resin blocks so that I can just clip them off after finishing.
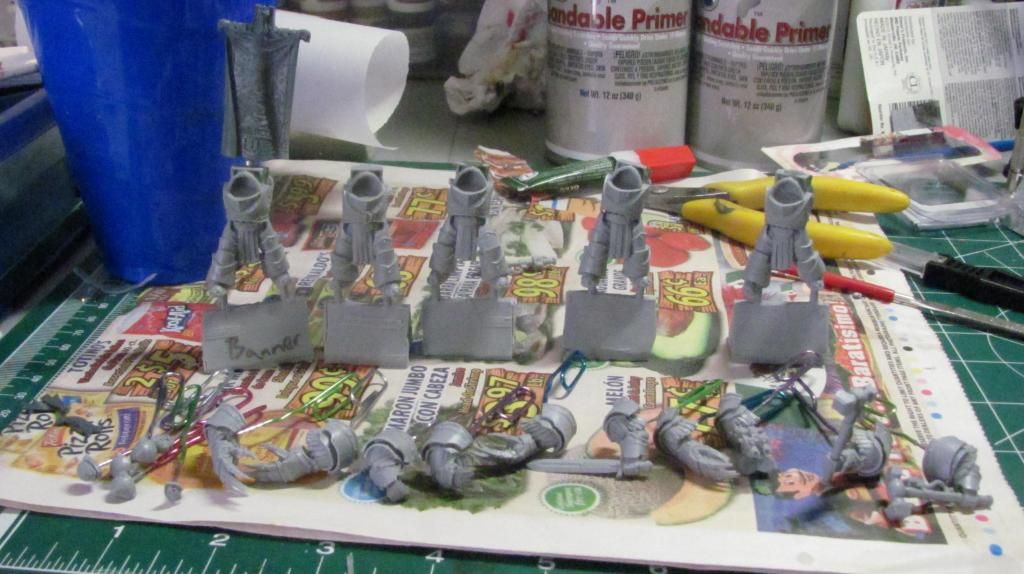
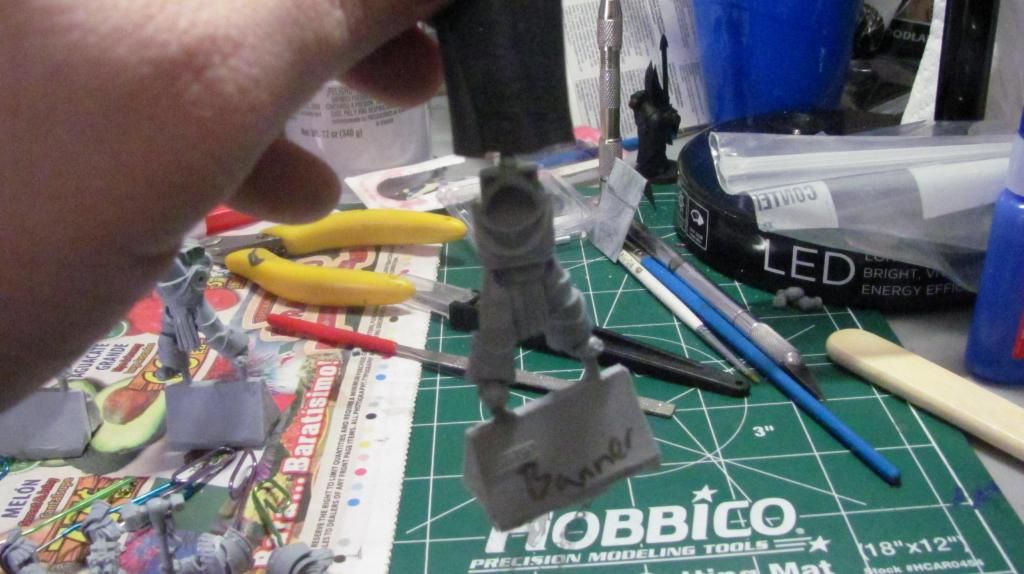
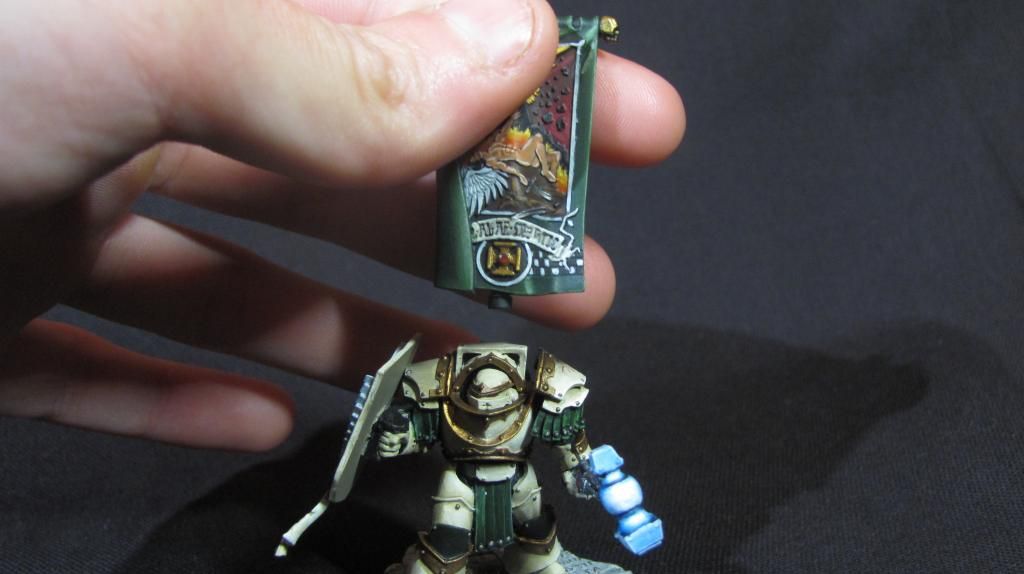
Closeups of the banner with magnetization:

Strong enough to pick the model up:
 Automatically Appended Next Post: Automatically Appended Next Post: Shields for the TH/ SS completed. Green stuff used to hold them onto the shield arms.
64808
Post by: CIsaac
Ok, I've changed some major things in how I'm painting. I had a nice painting tutorial with a Privateer Silver winner in their painting Grandmasters (arranged by the local Press Ganger). So, I am committing blasphemy and applying what I learned to a GW product (though I have been looking sideways at my Menoth a lot lately -- might use them to take a break from the wall of upcoming terminators and Land Raider I have to do next).
1) Switched primers to DupliColor Sandable Black Primer
2) Switched most primary colors to P3 from Citadel
3) Added Vallejo Glaze Medium and Additional Water to most paints on my palette.
This has resulted in much, much thinner paint (I think I finally get the 'consistency of milk' references) and multiple layering required for most things. This has allowed for much better 'dry' blending (wet blending is still tough for me), which has contributed to a much smoother overall look.
So, with this armor, I did the following, moving further and further away from the crevasses with each layer:
1) Based with 'Jack Bone
2) Layered 1:1 'Jack Bone and Menoth White Base
3) Layered Menoth White Base
4) Layered 1:1 Menoth White Base:Menoth White Highlight
5) Layered 1:2 Menoth White Base: Menoth White Highlight
6) Highlighted with Menoth White Highlight
7) Shaded with 1:1 'Jack Bone:Citadel Dawnstone to add additional shading
Results are below the spoiler tag:
64808
Post by: CIsaac
Quick update on my Cataphractii sergeant. Got the bases for all the metallics done. Base for the green leather done.
Mixed up a new wash for the metals. 1 part Beaten Purple (P3), 1 part Mournfang Brown, 1 part P3 Blue Ink, 1 part mixing medium, several parts water. Got a nice dark blue tint that I washed all the steel parts with aside from the feet.
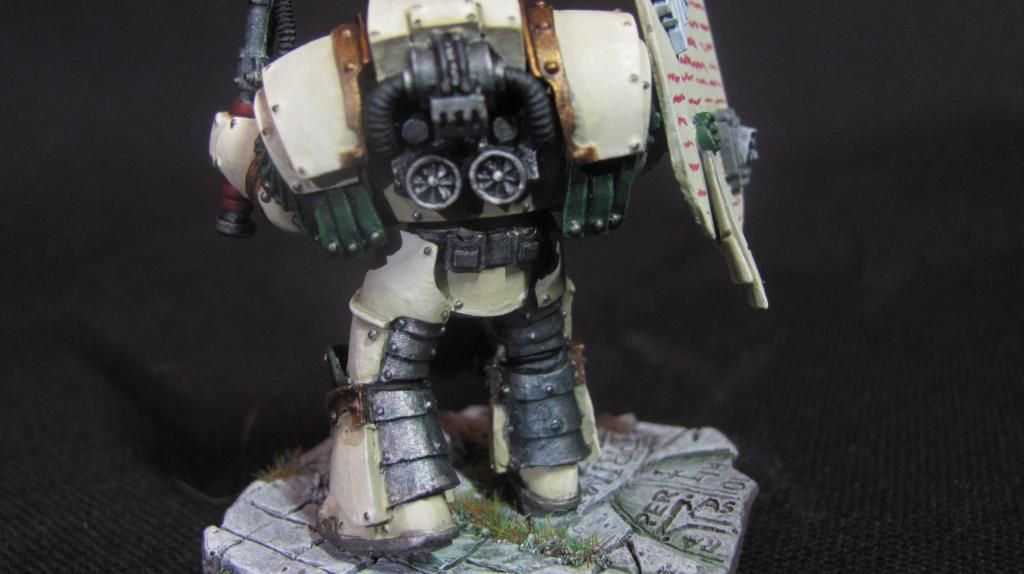
Front:
Back:
70053
Post by: GrimDork
This is a sick DA army. I love the black highlights, makes me wish I had gone with that kind of blue instead of the white-grey I'm using.
I still like the warmth of the first terminator trial, but both look awesome. I'm gonna have to keep checking for progress you've got some really cool stuff going on.
64808
Post by: CIsaac
 GrimDork wrote: GrimDork wrote:This is a sick DA army. I love the black highlights, makes me wish I had gone with that kind of blue instead of the white-grey I'm using.
I still like the warmth of the first terminator trial, but both look awesome. I'm gonna have to keep checking for progress you've got some really cool stuff going on.
Thank you! The next set of black armor I'm going to try a more zenithal approach. I think I'll test a standard marine from the Dark Vengeance set (I have a spare set I swapped with a friend for Chaos). I want more of the blue black on the upper surfaces of the model, building up to the light blue on the edging. This will leave the pure black most pointing down and under the shoulderpads.
On a tank, the idea would be that most of the top of the model would have that as the true base of the model with the lower sections of the vehicle fading to true black.
64808
Post by: CIsaac
First time trying a lot of new techniques. First freehand chapter symbol in ages.
New things I've done I haven't tried before (or it's been years):
1) Dry blending on armor and leather.
2) Freehand Chapter Symbol
3) Blonde Hair
4) Power Sword that's not just black, highlighted gray.
Spoilered below is my newly re-organized painting station. MUCH more room. It was absolutely covered in paint and stuff between myself and my GF's painting. Two $13 Sterlite drawer stations later and voila! Places for our paints and tools and bits.
70053
Post by: GrimDork
Ooh I like the power sword. Its simple yet effective. Hair looks good, and the chapter symbol looks solid.
64808
Post by: CIsaac
GrimDork wrote:Ooh I like the power sword. Its simple yet effective. Hair looks good, and the chapter symbol looks solid.
Thank you. I do hate how the camera adds a dozen flaws I never saw with my eyeballs.
I know I didn't go with a warmer armor, but it is a touch darker in person. It really is hard not to make it reflect with light which is why I've been avoiding flash in much of my photos as it washes out soooo badly.
The sword I'm tentatively happy with with one caveat: I wish I'd started a touch lower on the blade with the light colors. I dry blended the way up the blade and it looks too much like just the tip is bright (and the edges). Alternatively, it is a vast improvement on previous attempts. So I'll definitely be evolving it. When I do my two Lightning Claw Cataphracts, they will both be using the same color scheme on the claws themselves.
66122
Post by: dominiquekee
Many of the pics have been 'removed' I think (or is it just me)...
Lovely models and great painting. We should swap pics since I started only about 5 months back with the Dark Vengeance DA army as well...
64808
Post by: CIsaac
 dominiquekee wrote: dominiquekee wrote:Many of the pics have been 'removed' I think (or is it just me)...
Lovely models and great painting. We should swap pics since I started only about 5 months back with the Dark Vengeance DA army as well...
Thank you. The reason that they're "missing" is due to Photobucket. I have reorganized and re-linked them into the Original Post under the spoiler tags. It would take forever to edit every post in the thread since most are my own. 
And, also, time for an update. Today I worked on getting basecoating down on the remaining four Cataphractii Terminators. 2 Lightning Claw terminators and 2 converted Thunder Hammer/Storm Shield terminators. One of which has also been converted (as seen in a previous post) to be my magnetized banner bearer.
What you'll see is just many, many, many layers of 'Jack Bone. Also, one of the terminators had a major gouge in the side of his armor above the shoulder. I didn't notice it util the primer made it stand out. I had puttied them all up with green stuff but apparently this one was imperfect in the initial repair. A touch of super glue, some 1000 grain sandpaper and it is smooth again.
Check below for the progress:

64808
Post by: CIsaac
Quick daily update:
Finished basecoating all armor plating with 'Jack Bone from the P3 line.
Pulled out the Caliban Green and added lots of Vallejo Glaze Medium to it to get it flowing properly. Coated the base edges and backs of the banner in that color. Won't show up well on this photo, but it's meant to be dark:
64808
Post by: CIsaac
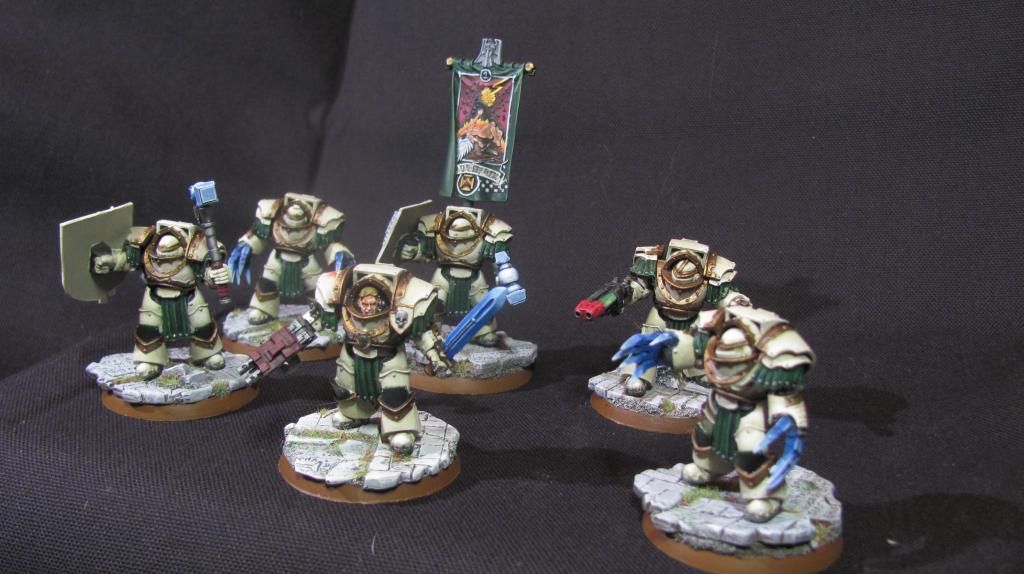
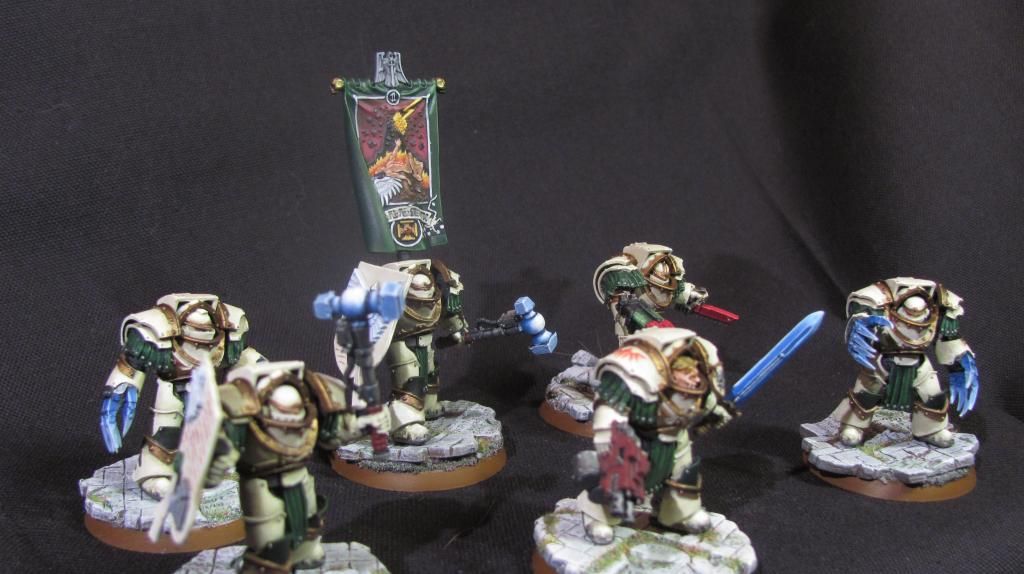
Finally. I've stayed up until near 3am getting this done and finished as I was so close to complete I could taste it. So I've sacrificed a lot of sleep to get this project done. It was a lot of fun, hard at a few points, and there were some colossal messups here and there but I powered through them. I thought I'd post it here first, get some feedback (followed by some sleep).
The entire squad (will typically be broken up amongst other squads as center piece models):
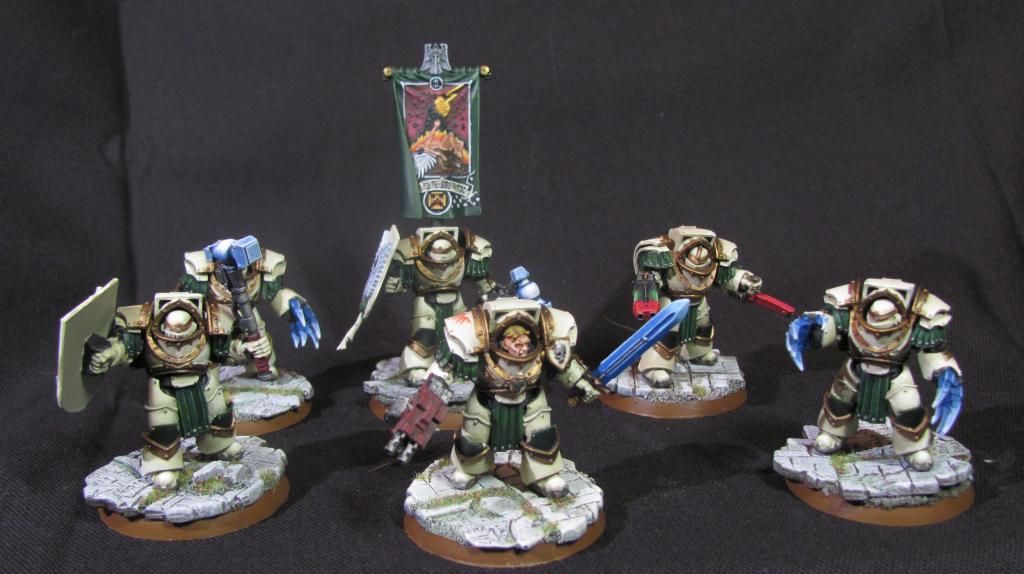
Banner Bearer with magnetized Deathwing banner (taken from the new Deathwing command squad box):
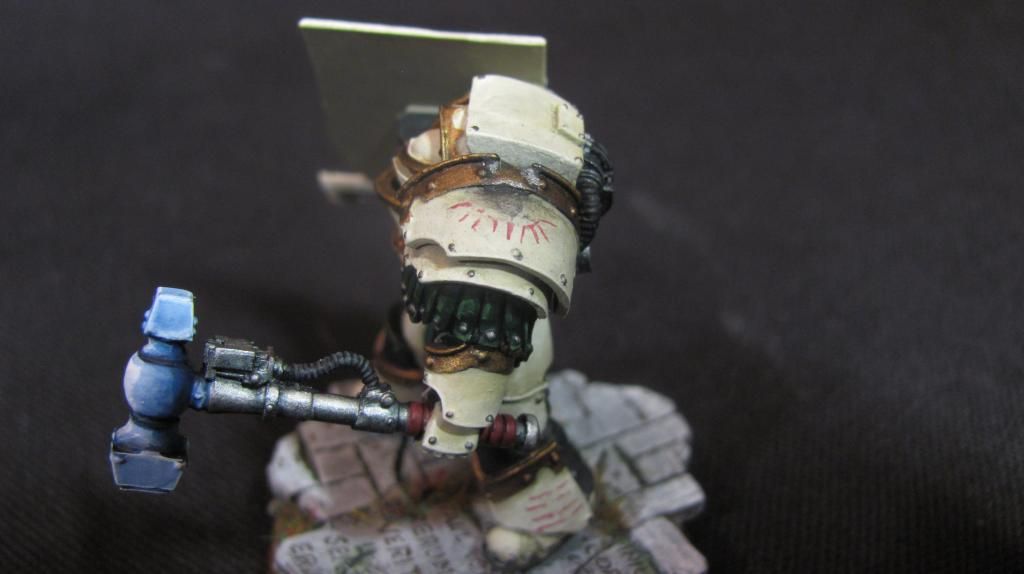
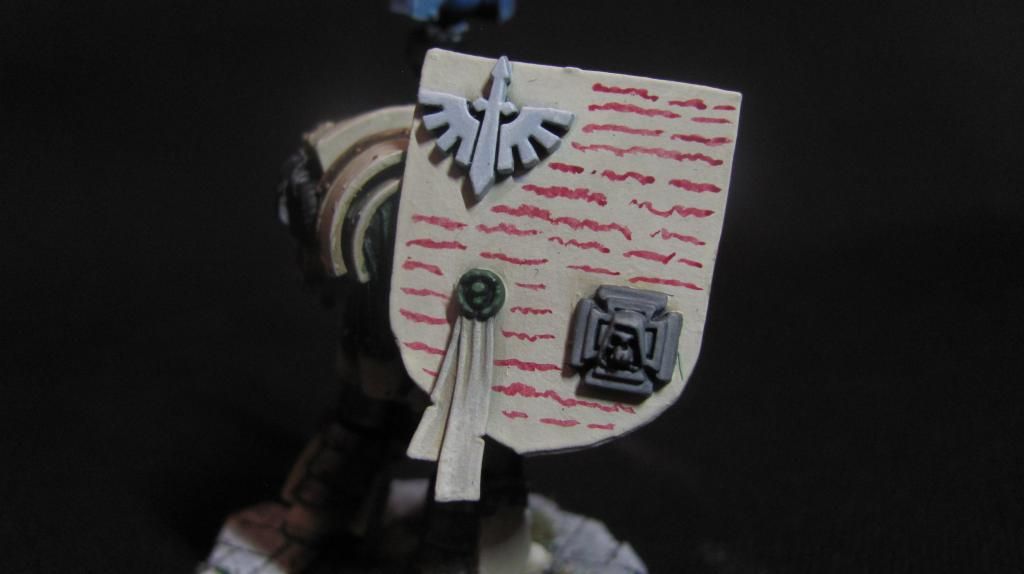
Banner Bearer's damaged shoulderpad -- This one is my fault. During cleanup and prep I started going waaaaay too fast with flush cutter and tore a chunk out. I had no spares, so... I decided to try some battle damage. This is my first attempt at using weathering powders (took some soot colored powder on q-tip and mashed it into the broken area, then highlighted the metal with P3 Pig Iron.
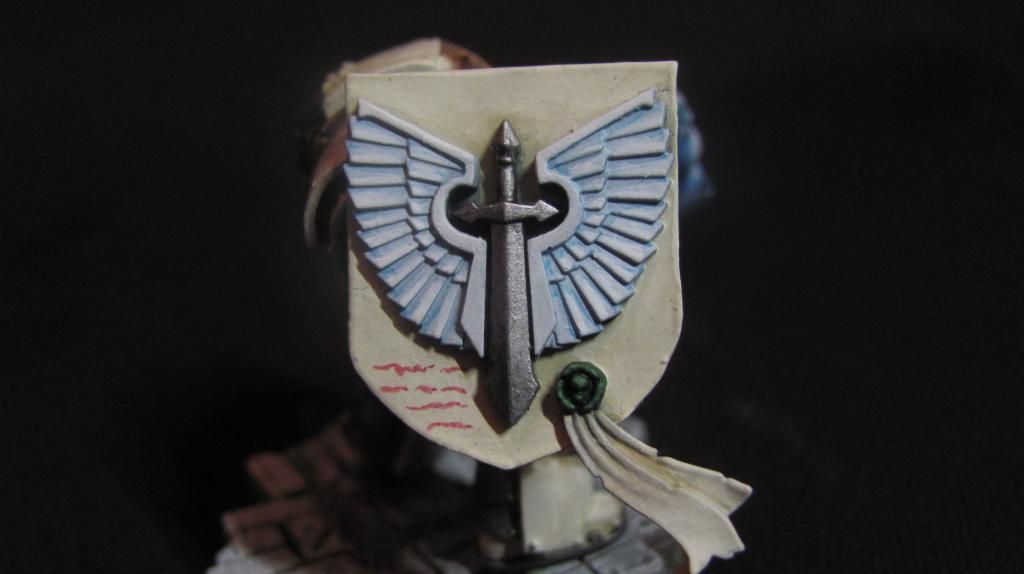
Plasticard Storm Shields:
Additional TH/ SS terminator:
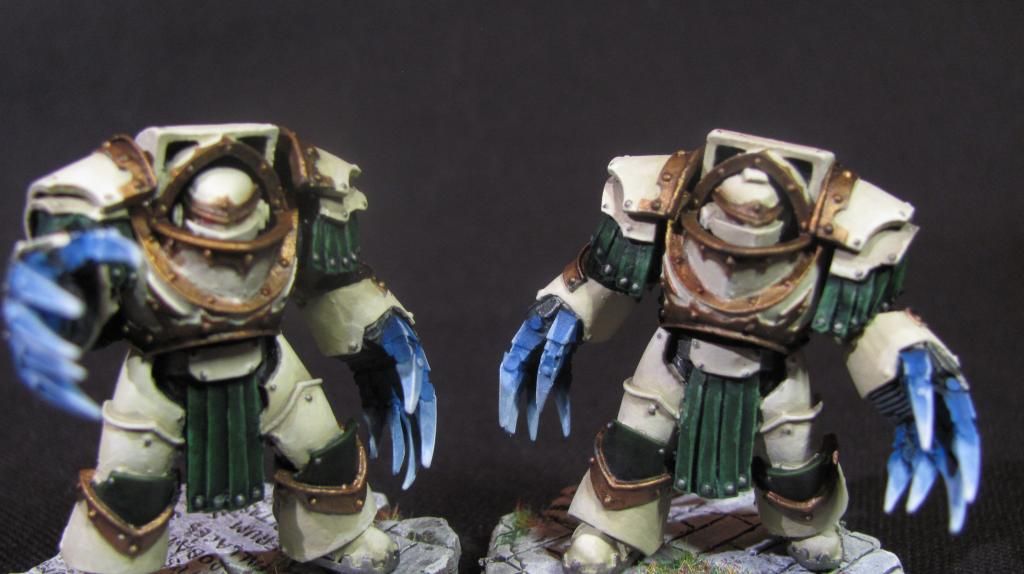
The Lightning Claw twins:
It was a lot of work, a lot of fun, and I definitely learned a lot about modeling and painting in going from the original one I started on to the final product. Sitting here on the desk next to me I think they look pretty good. I will definitely be looking at reducing the number of layers needed in the armor in future Deathwing models. It took a loooooooong time. Doing four of them in assembly line took about 15 hours. That's waaaaay too long. I did reduce the amount of time necessary to do the bases down to about 10-15 minutes each.
The banner is one of the things I'm most proud of. Surprisingly, that's my very first attempt at a fire effect.
70053
Post by: GrimDork
Got some really slick terminators there
They look good, I like the power weapons--the glow is obvious but not too in-your-face. It also pops right out against the bone armor.
I think you've done a pretty good job with your storm shields. They might look a little better if they had more of a curve to better match the way the armor is done, but I still like them. Maybe some guitar-string power cables or something, there's just a lot of flat space on 'em.
Really nice terminators I'll have to check back in sometime to see what else you're working on.
11038
Post by: G. Whitenbeard
Great stuff!
Very well done on the Terminators. I especially love the bases you did for them.
64808
Post by: CIsaac
GrimDork wrote:Got some really slick terminators there
They look good, I like the power weapons--the glow is obvious but not too in-your-face. It also pops right out against the bone armor.
I think you've done a pretty good job with your storm shields. They might look a little better if they had more of a curve to better match the way the armor is done, but I still like them. Maybe some guitar-string power cables or something, there's just a lot of flat space on 'em.
Really nice terminators I'll have to check back in sometime to see what else you're working on.
I tried to keep the shields busy, and I just couldn't figure a way to curve the plasticard that wouldn't eventually unfurl over time.
As far a the backs... I suck at greenstuff/sculpting. The handholds they have is just vaguely formed greenstuff left primer black so that it is negative space and doesn't get looked at too much. Though the guitar string isn't a bad idea for if I try something like this again in the future.
I feel I learned a lot about painting/modeling from this though. Compare these guys to the first post in this thread... at least in my eyes it's a world of difference. Automatically Appended Next Post:  G. Whitenbeard wrote: G. Whitenbeard wrote:Great stuff!
Very well done on the Terminators. I especially love the bases you did for them.
Thank you. The bases are presculpted from an eBay shop called Fantascape. They've got some pretty nice choices there. From there it was a matter of painting, weathering lightly, then adding some flock.
64808
Post by: CIsaac
Ok, so I'm trying to figure out what to paint next. I know I need to do my terminators, but I need a quick break from Deathwing Bone after what I just did.
And that's with 20 terminators + Land Raider left to go.
Going to work on 4 power armor special weapons tacticals to switch back to black for a bit and play with some zenithal armor highlighting. 2 melta gunners, a plasma gunner, and a flamer to be added to my assortment of choices for my tactical squads.
So far, I think my order of stuff to paint is:
4 Tacticals
20 Deathwing Terminators (5 Knights, 5 extra DV Deathwing, 5 TH/SS Terminators, 5 Deathwing Command/Extra DW)
1 Land Raider (Godhammer Pattern)
1 Belial
1 Company Command (Banner, Apothecary, extra tacticals)
1 Nephilim Fighter
2 Swappable Special Weapons Troopers for my Assault Squad (it currently has 1 plasma pistoleer and 1 flamer, I'd like 2 of both to swap as needed)
1 Razorback/Rhino
Azrael
Asmodai
Ezekiel
This will leave my remaining marines as:
3 extra DV bikers
1 extra DV Tac squad
Extra of Turmiel
2 Balthazars
Box set of old Devastators with metal weapons/plastic bodies
A few spare random tacticals and assault troopers, but largely that's it.
Things I don't have, but might grab in the future:
DA Vets box - to make Command HQ troopers with CC/BP
Drop Pods (don't have any)
Land Raider variant (Redeemer/Crusader)
Any thoughts on what I should prioritize ahead of what I have now? Anything that stands out?
The things that I see that will be fun to paint:
My apothecaries for my Command HQ are MK2/MK4 from Forgeworld. Great, great minis.
Belial is getting magnetized between PS/SB and TH/SS.
Land Raider - never got to put one of these big boys together before
I also found a full Cypher mini in the closet after the organizing. I am DEFINITELY painting him as something fun to do after a large squad/whatever.
70053
Post by: GrimDork
So its kind of a clip vs magazine quibble, but the stock land raider pattern is Phobos, its lascannons are of the godhammer variant
I think the land raider sounds really fun. I traded a buddy for a chaos one and am looking forward to reclaiming it for the emperor, kind of daunting though. It seems like the crusader has the most synergy in DA lists when coupled with a dakka banner, though the standard variant may make a neat power field hub to surround with predators and razorbacks. Having death wing vehicle and power fields available really opens up your land raider options.
It's on the backburner now, but I was having fun with my storm talon, nephilim is just its big brother so I'm sure that will be fun.
That seems like a lot of terminators to do all at once, but if you can get them done, most of the rest of your list is easier single-model projects.
64808
Post by: CIsaac
GrimDork wrote:So its kind of a clip vs magazine quibble, but the stock land raider pattern is Phobos, its lascannons are of the godhammer variant
I think the land raider sounds really fun. I traded a buddy for a chaos one and am looking forward to reclaiming it for the emperor, kind of daunting though. It seems like the crusader has the most synergy in DA lists when coupled with a dakka banner, though the standard variant may make a neat power field hub to surround with predators and razorbacks. Having death wing vehicle and power fields available really opens up your land raider options.
It's on the backburner now, but I was having fun with my storm talon, nephilim is just its big brother so I'm sure that will be fun.
That seems like a lot of terminators to do all at once, but if you can get them done, most of the rest of your list is easier single-model projects.
My GF (who's been painting WM/H Trolls lately) has been telling me that I'm going to drive myself batty with all those terminators. I want them done, though, as they're a major part of what my army is missing. The cataphracts were the 'first wave'. I'm also not planning on devoting quite as much time to each individual mini. I'm probably going to start the base color one step lighter on the armor and then pull it up to off white in three-four layers and then shade for depth.
My Cataphracts were 5 layers of blended armor, 1 layer of highlight, and 1 layer of shading. That takes a LONG time to do on a termie sized mini, let alone four at once.
Thanks for the info on the LR. I thought Phobos was the old RT variant of the LR. The more you know, I guess. I am looking forward to it, though. I love building tanks. Very fun part of the hobby. I'm at home with my hands slathered in glue.
Basically, if I get the things together I want, the only things I wouldn't have available to me would be:
The Storm Talon (which I do not like)
Landspeeders (just don't have any and HATE the Vengeance)
Black Knights (too expensive - need 4 boxes for a full squad)
Sammael
Techmarine(s)
The only thing from that list I feel I might want is the Black Knights or the Techmarine.
I like the concept of a tough shooty force with lots of Terminators, hence the Deathwing. I do have a squadron of Ravenwing with Attack Bikes. Rad Grenades from the Knights are a very nice synergistic thing, allowing Plasma to ID MEQ and weaker.
70053
Post by: GrimDork
I like the look of knights too but the cost is daunting. I may see if I can convert some kind of plasma talons for the DV bikers, its not even an actual plasma gun so I predict leeway. However those models are preeety static.
The grenades are awesome, you can do what you said, and you can drop their init down with the stasis grenades to go first
I think the old RT land raider was a phobos too, think they have more or less the same guns.
Techmarines can be really fun to convert, and being the cheapest way to get a powerfield, I recommend at least one
I like the way the chibi-talon looks, but the DA flyers are how it should have been. I may try to model mine into one via some extensions... Seems silly allying in nilla to take the thing.
64808
Post by: CIsaac
GrimDork wrote:I like the look of knights too but the cost is daunting. I may see if I can convert some kind of plasma talons for the DV bikers, its not even an actual plasma gun so I predict leeway. However those models are preeety static.
The grenades are awesome, you can do what you said, and you can drop their init down with the stasis grenades to go first
I think the old RT land raider was a phobos too, think they have more or less the same guns.
Techmarines can be really fun to convert, and being the cheapest way to get a powerfield, I recommend at least one
I like the way the chibi-talon looks, but the DA flyers are how it should have been. I may try to model mine into one via some extensions... Seems silly allying in nilla to take the thing.
If I was going to ally for a better flyer, I'd ally with IG, get me a guard blob, some Valks, and park Azrael in the blob for a 4++, Fearless blob and use Deathwing Assault for one hell of a hammer to that anvil.
70053
Post by: GrimDork
That's exactly what I'm painting right now!
That being the main reason I wanna convert my Talon. I use my DIY chapter for both DA and nilla, but the new DA list is more forgiving in terms of list building (smaller units viable, better splashable stuff like powerfields for leman russ etc). I have a TFC and a storm talon, but I don't really see myself tapping the C: SM codex as much as I used to.
I shall have to construct a suitably epic azreal to lead my IG blob, better visual appeal if the marine is towering over the guardsmen!
64808
Post by: CIsaac
GrimDork wrote:That's exactly what I'm painting right now!
That being the main reason I wanna convert my Talon. I use my DIY chapter for both DA and nilla, but the new DA list is more forgiving in terms of list building (smaller units viable, better splashable stuff like powerfields for leman russ etc). I have a TFC and a storm talon, but I don't really see myself tapping the C: SM codex as much as I used to.
I shall have to construct a suitably epic azreal to lead my IG blob, better visual appeal if the marine is towering over the guardsmen!
Micro Art Studio used to have Robed Terminator Legs (might have gone to Basicks.eu during their split) that you could build up from. Close to True-Scaled marine size and robed so you didn't know they were Terminator legs into of Power Armor. Put a Chapter House chest on it, sculpt the robe up, pose some arms with the sword and a helm-less sergeant head... voila... Azrael.
70053
Post by: GrimDork
Intriguing concept. I have a bucketload of space marine bitz laying around, I may stick with DA/marine parts and perch him on a suitably dynamic rock I'd kind of like to have him wearing the lion helm too, the watcher maybe with a scroll or something.
64808
Post by: CIsaac
GrimDork wrote:Intriguing concept. I have a bucketload of space marine bitz laying around, I may stick with DA/marine parts and perch him on a suitably dynamic rock I'd kind of like to have him wearing the lion helm too, the watcher maybe with a scroll or something.
Found the bits. They've moved to 'Basicks' when Micro Art split:
http://basicks.eu/shop/index.php?id_product=219&controller=product
Widen the chest a bit and then you can fit normal size shoulderpads and arms to it. In the end it's true scaled, but looks very impressive next to a guardsman.
Also, it's handy that they've got plastic watchers now for conversions.
70053
Post by: GrimDork
Now that I see them, they do look pretty spiffy. I'll have to keep those in mind, thanks.
64808
Post by: CIsaac
Quick update. Painted four tactical marines to "cleanse the pallet" before starting in on about a bazillion more Deathwing terminators. Put together four special weapon troopers real quick and tested how fast I could paint them to a good tabletop level. These are not at the level of my Cataphractii, but that's intentional. I was working on finding ways to do things quick but still looking respectable. Take a look at these:
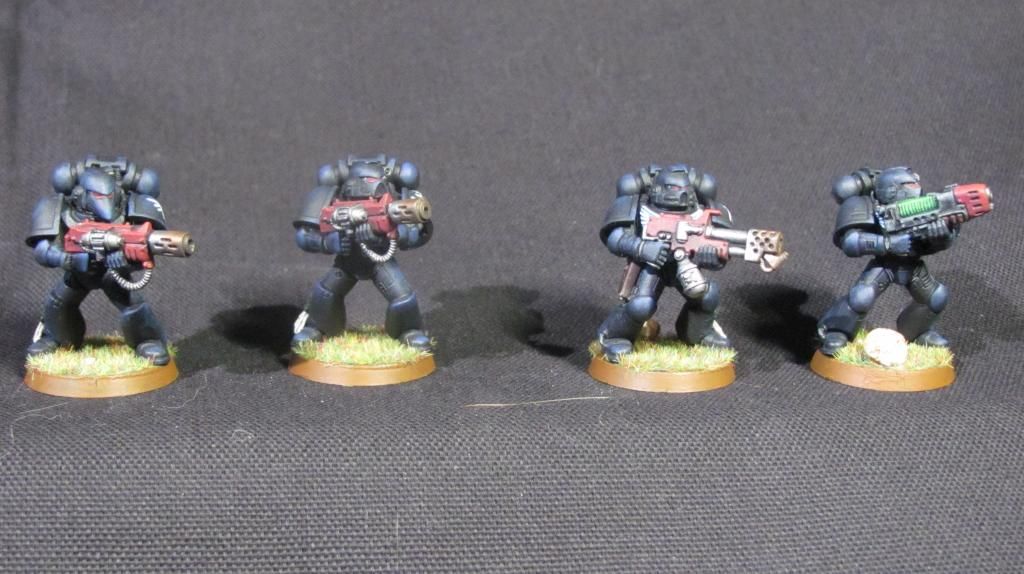
Spoilered below, for comparison, one of the first minis I did on returning, another tactical marine. Hopefully, you see some improvement:
Automatically Appended Next Post: And, now it begins:
 Automatically Appended Next Post: Automatically Appended Next Post: And all those boxes of terminators devolved down to:
64808
Post by: CIsaac
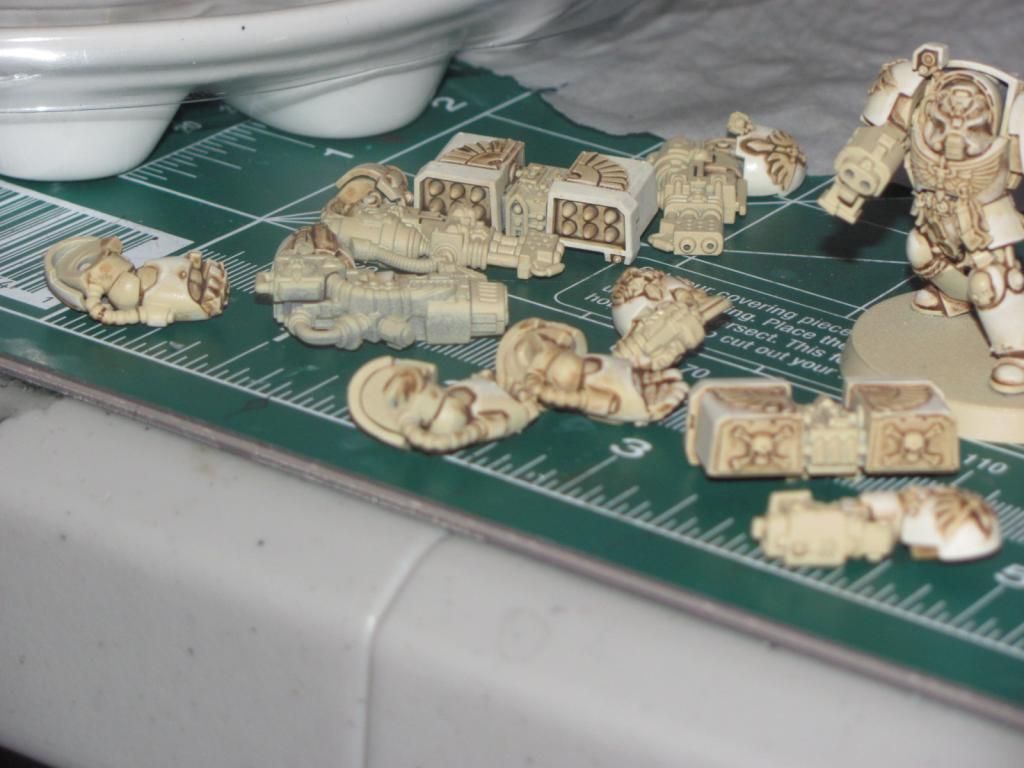
Thought I'd post what I've done to magnetize a couple of Cyclone Missile Launchers. I'm using standard SB/ PF terminators from the Dark Vengeance box set. I'll be magnetizing a couple of TH/ SS terminators in a similar manner as Deathwing has that option. This allows me to field just about any configuration of Deathwing squad that I want with Cyclones.
I drilled straight down through the roof of the top of the armor (which I'll putty over later) with a 1/8th inch bit. I used super glue to hold the magnet in place (the center bulge that holds the head of the armor serves as a handy spot to rest the magnet on). I then drilled very lightly into the bottom of the cyclone, just enough to dig out the shape of the magnet in the interior sides of the struts. I glued the opposite magnet into the space between said struts.

70053
Post by: GrimDork
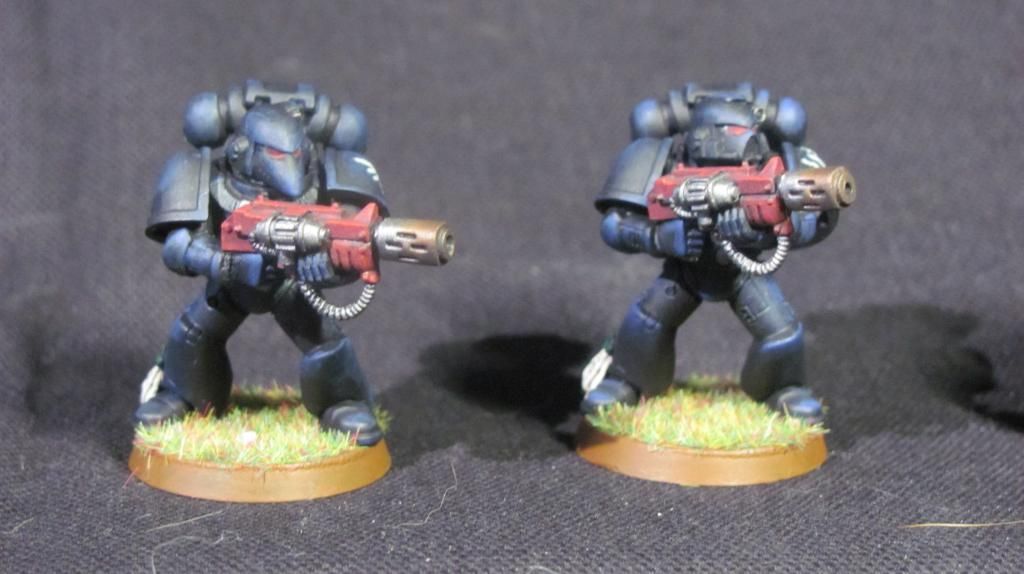
I think the marines look good. The highlights are subtler which keeps them dark and menacing. Nice weathering around the barrels and plasma glow too.
Magnets look good on the terminator, everything looks better with magnets!
64808
Post by: CIsaac
GrimDork wrote:I think the marines look good. The highlights are subtler which keeps them dark and menacing. Nice weathering around the barrels and plasma glow too.
Magnets look good on the terminator, everything looks better with magnets!
Thanks for the feedback on the marines. That's, ultimately, what I was going for. I was able to get painting down to about 2 hours per model (usually I sit at 4). Halving my speed and still getting good quality is definitely a good thing as far as I'm concerned. I did try some new colors with the plasma glow and I'm very happy with how it turned out.
Magnets are fun! I love having hot swappable stuff on my models.
When I get to my Nephilim, I'm thinking of magnetizing the mount for the Mega-Bolter and the TL LCs if possible.
70053
Post by: GrimDork
You had me at "hot swappable" 
I may have to try out that green for plasma, blue fits my scheme better but It always ends up washed out/not bright enough.
I'm a bit magnet-crazy myself, I've got at least 5 terminators that are more articulated than some action figures.
As for the nephilim-- there's a lot of area there, I'm sure you could hide a magnet or two pretty easily. I was going to say I've done the ones on the storm talon but the mount is completely different. If I were you I'd do the missiles/hurricane bolters too, never know when you may wanna try sticking a dark talon next to a banner of devastation.
64808
Post by: CIsaac
GrimDork wrote:You had me at "hot swappable"
I may have to try out that green for plasma, blue fits my scheme better but It always ends up washed out/not bright enough.
I'm a bit magnet-crazy myself, I've got at least 5 terminators that are more articulated than some action figures.
As for the nephilim-- there's a lot of area there, I'm sure you could hide a magnet or two pretty easily. I was going to say I've done the ones on the storm talon but the mount is completely different. If I were you I'd do the missiles/hurricane bolters too, never know when you may wanna try sticking a dark talon next to a banner of devastation.
Since I'm doing black armor on my Dark Angels I try to fit in dark green (to light green) wherever I can as a nod to the current color scheme.
I tried it once on the plasma coils and it seemed to work. The new greens I'm using though are the P3 line (still use Caliban Green from GW as the base as P3 doesn't have a dark/hunter green color). The top end color is Necrotite Green which is a nice, neon/dayglo green without being too pastel. The final tier of highlight is a 1:1 Green:White mix.
I'm definitely liking how magnetizing things work. I will be magnetizing Belial as well, so I can swap weapons. also dumping the crappy finecast posed arms and using the plastic oversized power sword and left handed bolter from the Deathwing command box set. I like that look/pose better for him than what they have (so he's posed like the commander that comes on the box art). That will come off and be swappable with a TH/ SS combo using the nice DW Knight shields and the DW specific hammer in that same box.
64808
Post by: CIsaac
I just got my replacement Belial from Games Workshop due to more problems than I can count (the worst of which being holes right through the sides of the vertical armor plates that run to each side of the back generator vents - just absolutely unworkable without using greenstuff to replace it).
Guess what? It's WORSE than the original model. WHAT THE feth GEE DUB!? There are even MORE holes in the same place on the model. Do you check this thing at all before putting it in the package? HOW MUCH DO YOU WASTE ON REPLACING THESE OVER AND OVER?! COME ON!
70053
Post by: GrimDork
Ouch! Sorry to hear about that dude. I can't get behind the whole finecast thing it seems kinda lame in general. Not that the old metals were perfect or anything but still. Good luck on your uhh third try?
64808
Post by: CIsaac
Two major things to update concerning my Dark Angels army. The first is that I just got a Land Raider Crusader reclaimation off eBay. Poorly assembled sponsons (the pivot/support that holds up the guns are updside down in both sponsons), and a wretched paint job. It was cheap, though. Sponsons came magnetized, too. That's a nice bonus.
It's here and here's how it looks five minutes before "bath time":
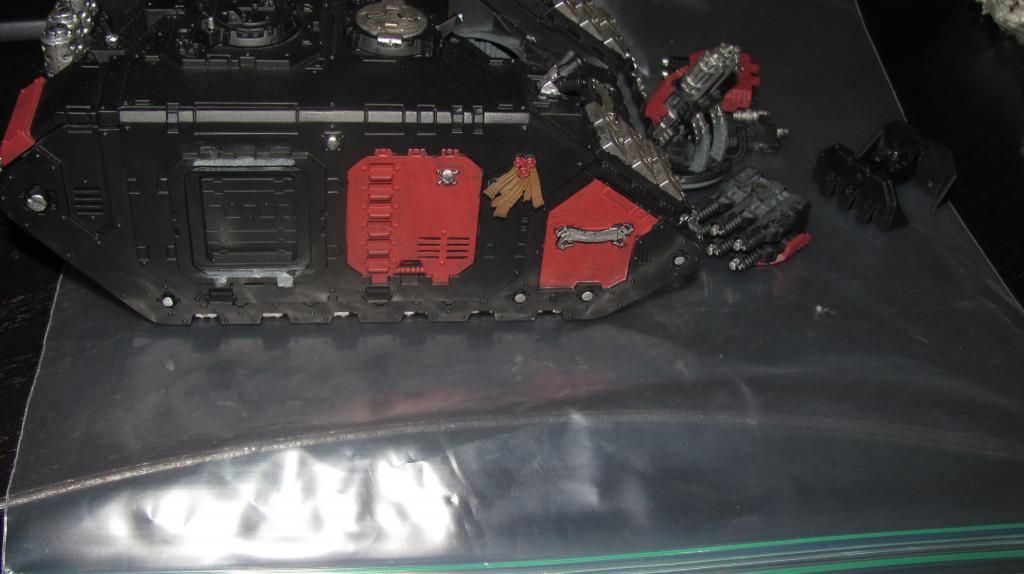
Lots of gaps throughout the model on first inspection as well. Also notice the raw plastic showing through on the guns? Anyplace primer couldn't easily reach, it wasn't painted. This was obviously assembled with no attempt to perform a partial assembly followed by painting. The interior is also raw, grey plastic. As I type this, it is soaking in Simple Green.
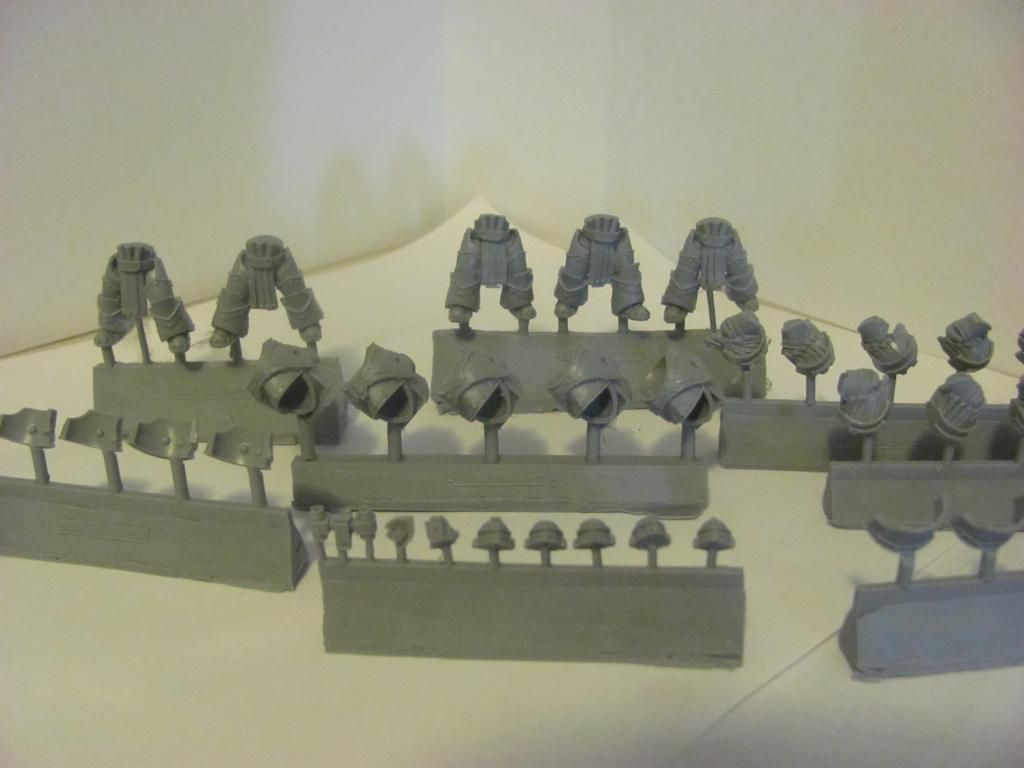
Now, for the next thing to show. I have completed first step assembly on the full list of Deathwing Terminators. 20 models now ready for priming. Most arms are removable and held on with poster tack for now (for ease of painting). One box of terminators was the generic Terminator Assault Squad. When it comes to torsos/legs, I mixed it up a bit so there's also some sort of Deathwing adornment on each of them. There were plenty of shoulderpads between too boxes to keep them kitted out, too. Here we go:
There are a lot of terminators sitting on my table right now --
Squad of 5 TH/ SS terminators. The sergeant is a Knight wielding a thunder hammer. Two of the TH/ SS terminators have magnets embedded into them so they can cart a Cyclone Missile Launcher around.
The squad of Knights. I dislike how only certain legs work with certain torsos. this really limits the posing. Also, my Sergeant is the exact same pieces from the box art and the left shoulder still required me to build it up with putty. Unacceptable.
Here are my shooty terminators. 2 Heavy Flamers, 1 Plasma Cannon, several SB/ PF options (one with chainfist). Two of the SB/ PF terminators have magnets for Cycolnes (as shown here). I did a minor conversion on the Dark Vengeance sergeant (as I didn't need any more of them). Cut the power sword and gauntlet off, then replaced with a PFist from the DW Command box. Also cut off its headdress and removed the feathers from the robe adornment (because of how they connected to the headdress). Closeups further down.
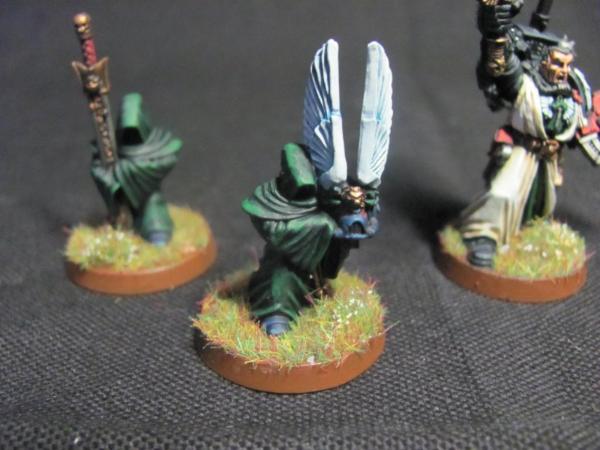
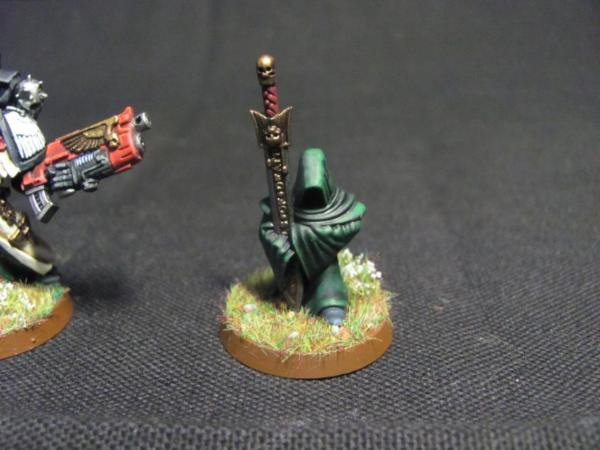
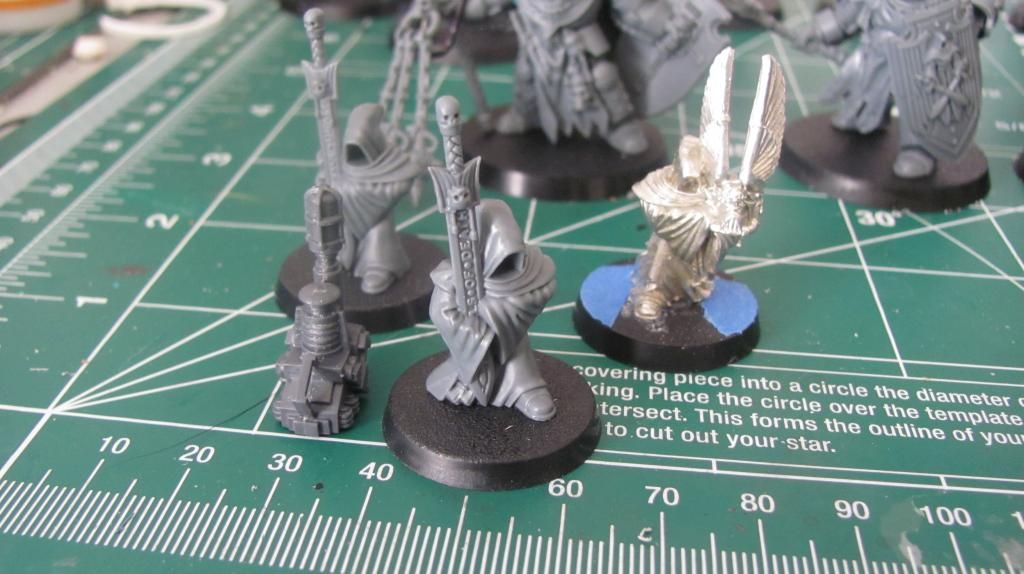
And finally, the Watchers in the Dark. I added Azrael's watcher in so I can just do all three at once. The device without a base is a teleport homer from the Assault Terminator box set.
So there we go. I've been busy, but haven't picked up a brush in several days.
So... huge assembly line, or smaller batches? Thoughts/opinions? Automatically Appended Next Post: Test model for my attempts to speed up the painting process. This is using Army Painter's Skeleton Bone as a primer/base. I will touch up any spots that the primer missed, highlight the armor, then seal it with Testor's Dullcote, then apply a wash of thinned oil paint (Van Dyke Brown). I will use thinned down mineral spirits to clean excess wash off, and then reseal with Dullcote.
Hopefully we can get one terminator's armor plating done in only an hour or so when I start. let's see how this goes.
70053
Post by: GrimDork
Thats a lot of TDA! I would think batches of 10 as a max and maybe 5 at a time even. I'm painting my first 5 dw individually but batches of 5 seem to fit larger terminator models better. The only way id consider more than 10 at a time is if I was gonna do base coats dip then seal, and even then it seems like a soul-mauling chore.
Good luck, looking forward to seeing some more painted nators.
64808
Post by: CIsaac
GrimDork wrote:Thats a lot of TDA! I would think batches of 10 as a max and maybe 5 at a time even. I'm painting my first 5 dw individually but batches of 5 seem to fit larger terminator models better. The only way id consider more than 10 at a time is if I was gonna do base coats dip then seal, and even then it seems like a soul-mauling chore.
Good luck, looking forward to seeing some more painted nators.
Thanks, man.
I've completed the armor on the first, test terminator. The highlighting took about 90 minutes (and I've already figured how to cut it to 60) and then I tested out how to use an oil wash for the first time. I used Van Dyke Brown with Odorless Mineral Spirits thinning it out. Here's the results:
Thoughts, opinions?
64808
Post by: CIsaac
Some better images of the Deathwing WIP

64808
Post by: CIsaac
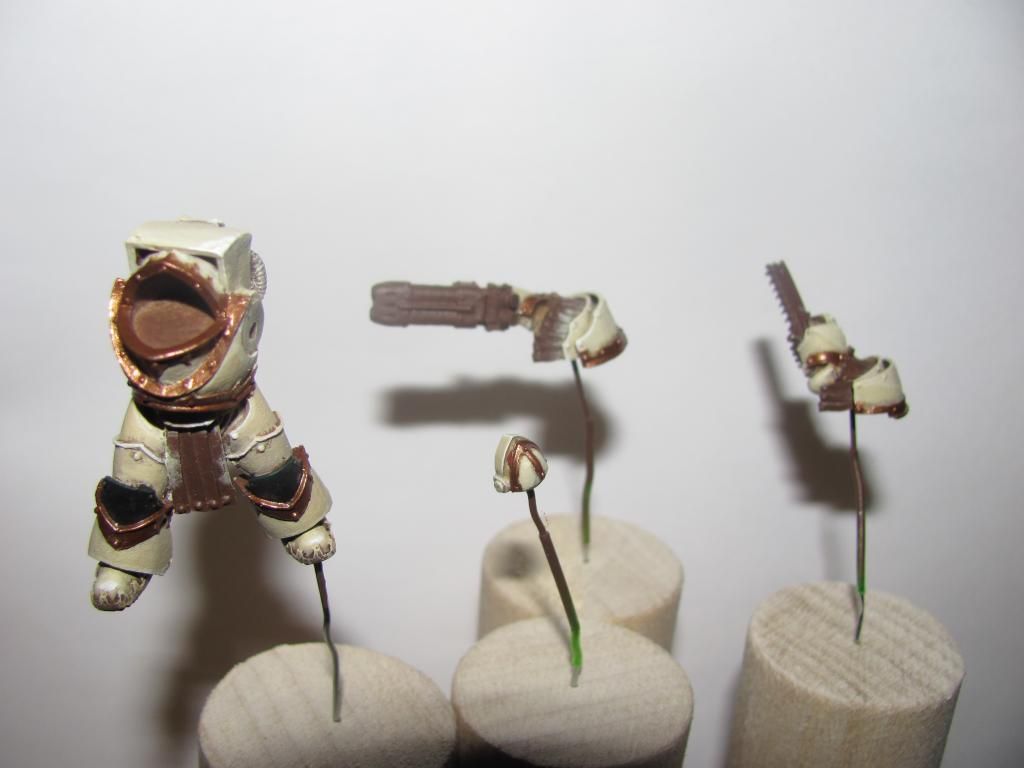
Completed armor and oil wash across all 8 WIP terminators (bringing total to 9 with the armor test model). Detail work is what remains.
Here's what I was able to do in about 6-7 hours of work:
Once I sat down and did it, the armor is doable in four steps:
1) Primer Bone/Beige color
2) Use Menoth White Highlight (very thin) to build up a couple of layers of highlight on raised parts.
3) Oil wash of Van Dyke Brown.
4) Cleanup using a Qtip dipped in Mineral Spirits.
The fastest part was application of the oil wash. If I had an air brush the first two steps could have probably taken 1/3rd to 1/2 the time.
EDIT: Oh, and before anyone can say it; yes, the Apothecary's face looks plain. That's because I haven't put any paint on it. It's getting rebased with Blue/White and built up to pure white for a cold white to reflect his position. Basically, very similar to the studio paint job.
70053
Post by: GrimDork
Thats some pretty sweet bone. I find the airbrush *can save Time but mine likes to cause complications so it only really saves me time on a good day.
Armor done is a good place to be, the newer terminators are festooned with detail, but its a significant step
64808
Post by: CIsaac
GrimDork wrote:Thats some pretty sweet bone. I find the airbrush *can save Time but mine likes to cause complications so it only really saves me time on a good day.
Armor done is a good place to be, the newer terminators are festooned with detail, but its a significant step
Thank you, thank you. I went with a much, much lighter bone color than the studio scheme. I've really liked how it turned out. It's much more reminiscent of the old Deathwing illustrations from 2E than the current images. Everywhere that the text talks about Deathwing colors, it's a "bone" color or a "bleached bone" (meant to point at their original color in the color line). Well, these are what bleached bones look like:
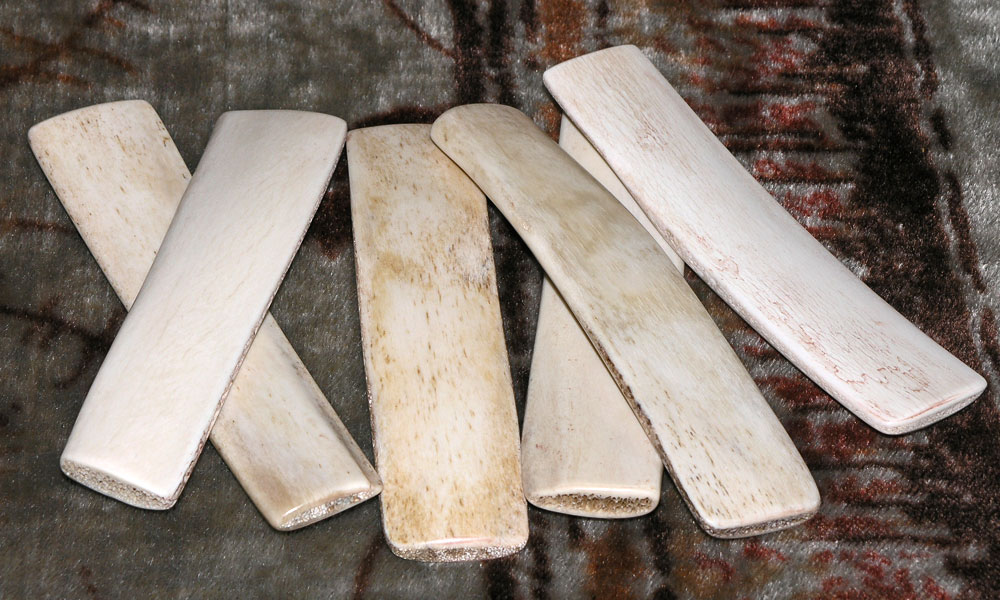
I think I'm a lot closer to that than I am to this:

70053
Post by: GrimDork
Definitely. The studio could be redubbed the creme crusaders as off white as they are. They're almost tan. It doesnt look bad but you are a lot closer to the actual bone.
64808
Post by: CIsaac
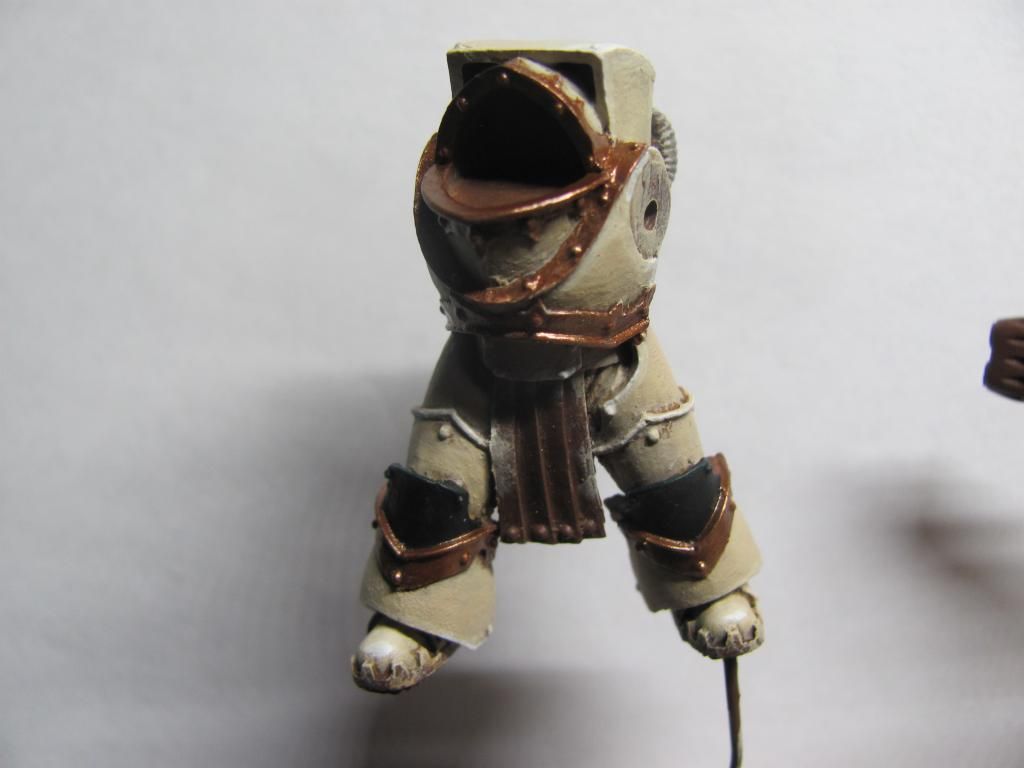
Another quick update. Did the cold white on the Apothecary's narthecium and helmet. The occulus piece will be silvered with a gem for the glass. Here we go:
64552
Post by: M4cr0Dutch
Thanks for posting the picture of the bones. I have been arguing for lighter Deathwing termies for a looong time.
64808
Post by: CIsaac
So, it's been a bit. Where've I gone? Reconstructive neck surgery. I had a ligament turn to bone, pierce my spinal sack, and nearly the cord. I am still in the hospital but I am looking at a couple more days therapy before release. So it'll be a bit before working on more painting.
51376
Post by: Zambro
Wow, nice DW!
70053
Post by: GrimDork
Good lord that sounds like no fun! When I disappear for weeks, its cause i've been too lazy to get things done, sounds like a painful excuse to have though :(
Feel better!
64808
Post by: CIsaac
GrimDork wrote:Good lord that sounds like no fun! When I disappear for weeks, its cause i've been too lazy to get things done, sounds like a painful excuse to have though :(
Feel better!
Well, great news is that I was eligible for outpatient therapy which can happen from home, and here I am, discharged to be with my girlfriend for a few months while on disability leave from work. Wooooo!
70053
Post by: GrimDork
Its good to stay busy!
64808
Post by: CIsaac
I went over the white on the apothecary of an oil wash of Winsor and Newton brand Cerulean blue after some feedback. This strengthened the shadows. To give you an idea o how runny this stuff is and see how it's poured down into the crevasses of the arm ( a 0 sized synthetic with mineral spirits cleared it out). This fills out your model's crevasses very, very fast.
51376
Post by: Zambro
Personally, i'm not a fan of the blue over the white. Everything else looks great though.
I wonder if it'll look better when it's finished?
64808
Post by: CIsaac
Zambro wrote:Personally, i'm not a fan of the blue over the white. Everything else looks great though.
I wonder if it'll look better when it's finished?
Well, white is defined by its shadows. I've always felt that a colder, bluer base worked better for surgical/cold white, whereas the more organic white of the majority of the armor is defined by the browner/earthier shadows.
And, of course, once details are picked out, that'll make a big change.
64808
Post by: CIsaac
As a get well present for my recent surgery all my coworkers got together and bought me a copy of Sammael (Ravenwing Master). I even got lucky and haven't found any standard Finecast flaws in it.
I've got some really awesome friends.
70053
Post by: GrimDork
Sweet action! RW sounds like it would be fun to play on occasion. He's burried under a mile of terminators though, so you had better get crackin!
64808
Post by: CIsaac
I received my box of Reaper Bones minis over the weekend. As a quick aside, I wanted to test to see how fast I could paint a 'ghost' mini using their translucent green minis. So I spent yesterday sorting them a bit and then tried one mini as a quick break from my Deathwing.
I used a thin wash of Reaper MSP 09010 Pine Green (1 part paint, 1 part mixing medium, 2 parts water) over the mini. I then drybrushed it with P3 Necrotite (neon) green. I spent more time waiting for the wash to dry than actually painting it.
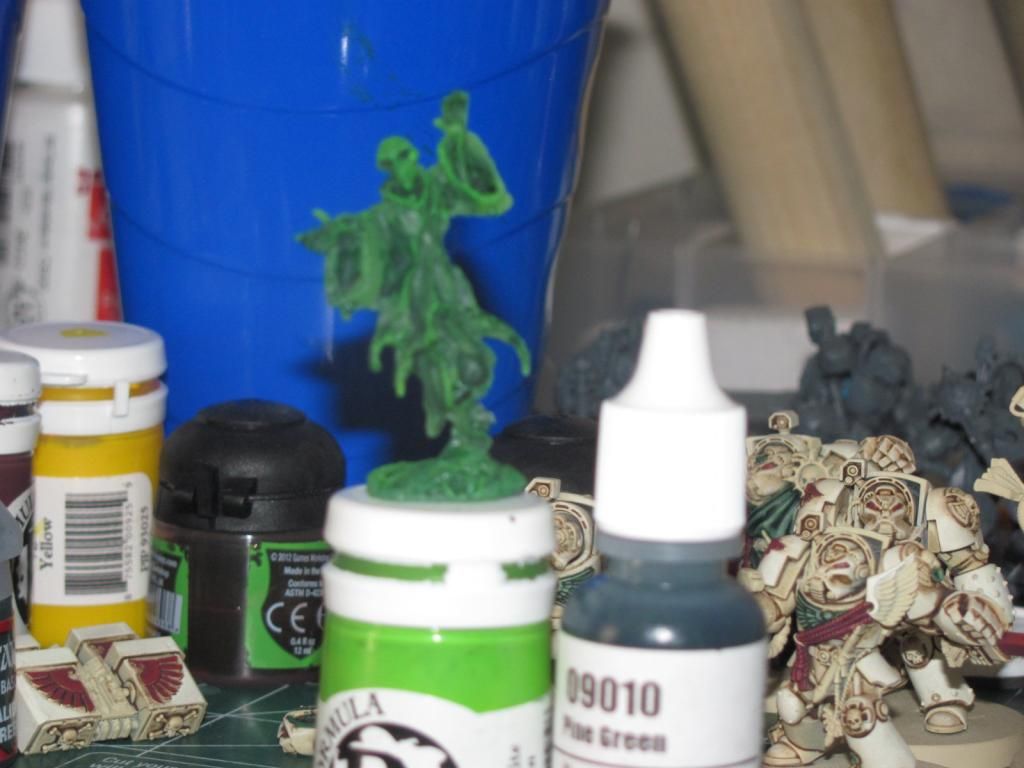
Also, too, you can see the current state my of Deathwing behind the ghost. Reds and Greens have been done. Moving on to steel colors next.
70053
Post by: GrimDork
Its a tad out of focus but it looks fairly ghostly to me. Green isn't my first thought for ghosts but its interesting at any rate.
Sounds pretty quick too.
64808
Post by: CIsaac
GrimDork wrote:Its a tad out of focus but it looks fairly ghostly to me. Green isn't my first thought for ghosts but its interesting at any rate.
Sounds pretty quick too.
I know. The Deathwing in the background ended up in better focus. Didn't feel like pulling the camera back out though. I'm being lazy during my convalescence.
But it was fast and quick. When it's just going to be a monster in a D&D game, that's all I need.
70053
Post by: GrimDork
For sure . Anything with 3 dimensions is much better than the little cardboard chips with monster faces on them you can cut out of the back of the book I mean those are better than beads, but minis usually make D&D more fun.
64808
Post by: CIsaac
Slowly but surely. Got the blacks done (as I needed to do those before steel). Tried out Reaper MSP Pure Black and it covers really, really well with just a touch of medium and water to thin it. I like it. I just can't spend that much time at the table looking down due to my neck atm. So hour or two painting sessions is all I'm up for.
64808
Post by: CIsaac
Ugh.
Where to begin?
It's been a long time since I've posted and since I've painted. On April 1, 2013, I have to have a double cervical spinal fusion performed on my neck and that essentially disabled me. Couldn't drive, couldn't work, couldn't even lift more than 2.5 kilograms (about 5 pounds in US terms). Three weeks after release, I'm out of the hospital and getting better and then I found out there's an infection in the wound. Back to the hospital and two more surgeries are required. Thanks to a truly gifted wound care specialist, I am past that scary moment.
These have not been a pleasant two months, but I'm on the mend and I'm picking up the brushes when and where I can. Considering my ceramic palette is on the upper end of what I'm allowed to carry (never mind my case full of paint), this has been a slow process. A project I thought I'd have done a week after I got out of the hospital due to the free time I would have (hah!) took much longer.
Healing takes a lot out of you, including any desire to do work on hobbies. Post operative exhaustion is something, having now experienced it, that gives new meaning to the term 'bone tired'. There's a level of tired you can be that just cannot be fought and is truly overwhelming. I didn't realize this before, but I am intimately familiar with it now.
This last week though, my energy has increased, my boredom has hit max levels, and I sat down and finished my ranged brigade of Deathwing terminators. These pictures come after only a few hours beyond the Testor's Dullcote drying on them. I had to go over them a few times having found that my hands were shaky on my initial work post operation.
These models were half done when the surgery happened. Armor + some details. See if you can spot what came after the surgery. I do feel there was some degradation due to my unsteady hands (they have improved).
And showing that I have magnetized the Cyclone Missile Launchers (there are two TH/ SS terminators who also have received magnets but have not been painted):
70053
Post by: GrimDork
Sheesh! When it rains it pours, huh? I wondered if there was a complication given how long you've been away from updating.
Glad to see you're back on the horse (so to speak) and the models look quite alright.
64808
Post by: CIsaac
So, that beautiful Sammael model that the guys from work bought me as a get well present? I determined I wanted to see it assembled and painted before I got back to work.
I started "Model Prep", the standard cleaning it, taking it off the sprues, and clearing mold lines, vent remains, dry fitting, and then finally assembly itself. Well, I couldn't tell on initial inspection, but when clearing out flash (loose product that forms in the miniscule space between two mold halves) it turns out that a section of the model didn't have flash on it, but had in fact been formed hollow. In attempting to carefully remove the flash, the underslung Plasma gun on the model collapses in on itself, revealing the interior to be an air bubble. When I inspected the model further, there were tiny bubbles all over it, giving it a bumpy texture in places.
After the issues with Belial (I did finally get a good one -- it took the CS rep breaking down, walking the floor, hand picking the sprues, and mailing them Fedex in non standard box), I am just really frakking done with Finecast. This wasn't just a random model I wanted to put together. My good, good friends took the time to find what I love and didn't have and get it for me. They did this without prompting and out of the kindness of their hearts and it utterly infuriates and devestates me at the same time. I had looked it over SEVERAL times and thought I had a good model. Only the model prep revealed the failings of the manufacturing process. So much was hidden by the utterly ridiculous amount of venting on the sprue as nearly all the bubbles/faults appear near the mold line/vents.
I cannot tell you how furious I have been all evening. I haven't wanted to TOUCH another model since this.
30672
Post by: Theophony
Glad your on the mend. My wife's grandfather had pretty much the same surgeries, but got a staff infection from it. Now he must get daily antibiotics for the remainder of his life as the infection really attacked his whole body. Good luck with the recovery progress.
The models you painted look awesome. Very nice job on the colors.
I haven't gotten any finecast because of issues like you mention. I have looked them over at the stores, but continue to pass from the flash I see on them.
70053
Post by: GrimDork
Gah! Cursed fail cast. Your struggles with gas new stuff makes me glad I'm steering away from them. so sorry to hear that they defected a gift of that nature.
64808
Post by: CIsaac
Theophony wrote:Glad your on the mend. My wife's grandfather had pretty much the same surgeries, but got a staff infection from it. Now he must get daily antibiotics for the remainder of his life as the infection really attacked his whole body. Good luck with the recovery progress.
The models you painted look awesome. Very nice job on the colors.
I haven't gotten any finecast because of issues like you mention. I have looked them over at the stores, but continue to pass from the flash I see on them.
Sorry to hear that. Infection was a constant fear and it was, unfortunately, realized. I am dutifully thankful for the luck that it was a surface infection only, and did not extend into the tissue deeply after it was debrided (reopened, cleaned, closed) by the surgeon.
As for Finecast, at this stage, I would recommend no one ever, ever purchase any of it. It is drek. Truly awful.
GrimDork wrote:Gah! Cursed fail cast. Your struggles with gas new stuff makes me glad I'm steering away from them. so sorry to hear that they defected a gift of that nature.
Yeah. It's infuriating. I've had very poor luck with it so far, and as a consumer, I feel I shouldn't be needing to rely on luck. I don't expect a 50/50 fail chance when I purchase a loaf of bread or a wrench. I'll do what I did with Belial, though, and will make GW replace it until it's a good version. They can eat these costs as a lesson in how not to make models.
70053
Post by: GrimDork
Pretty sweet. Its good to reward hard "work" with something fun, now and then
64808
Post by: CIsaac
Thanks, Grim. He didn't take anywhere near as long as I thought he would. Maybe 8-10 hours total. It helps that I knew exactly what I wanted to do with him.
Now on to the next set of terminators + Belial. Belial is getting magnetized between TH/SS and SoS/SB. The remaining terminators are 5 TH/SS termies and 5 Deathwing Knights and the Champion (with Blade of Caliban) from the command squad.
I've started today with primering Army Painter Bone. Already had one mishap (ugh). One of the smaller pieces caught sail as I was primering and rolled into a puddle of primer, obliterating all detail. This happened to be the upper torso of the Deathwing Knight sergeant, so I'm not happy about that. He's getting stripped now and will join the rest of the squad at a later date. Hopefully I'll be able to primer him seperately tomorrow, the still wet primer is already coming off the model in the Simple Green.
70053
Post by: GrimDork
I hate messing models up with primer. Its not quite as bad as screwing them up with too much (or improperly shaken, etc) sealer, but it still sucks to have a setback at what is supposed to be an easy stage.
I was working on a squad of DV terminators but the amount of detail they put into the DV sculpts is a bit... intense... to put it nicely. I miss painting skaven and skeletons, could do 5-10 in what it takes to paint one of those stinking terminators with all of their fiddly bits
64808
Post by: CIsaac
Ugh. So this is me decompressing after a horrific screwup on Belial.
So, that thing where I've said before -- always double check magnet polarities? Yeah. I didn't. I thought I had it marked right. I got the magnet in Belial's left torso twisted backwards and didn't realize until after I'd magnetized the arms. So... dig out two magnets or one? One it is. Glue used was Krazy Glue which I usually use on non-Plastic models due to the strength of the hold (joke's on me there).
Here's the correctly magnetized side:
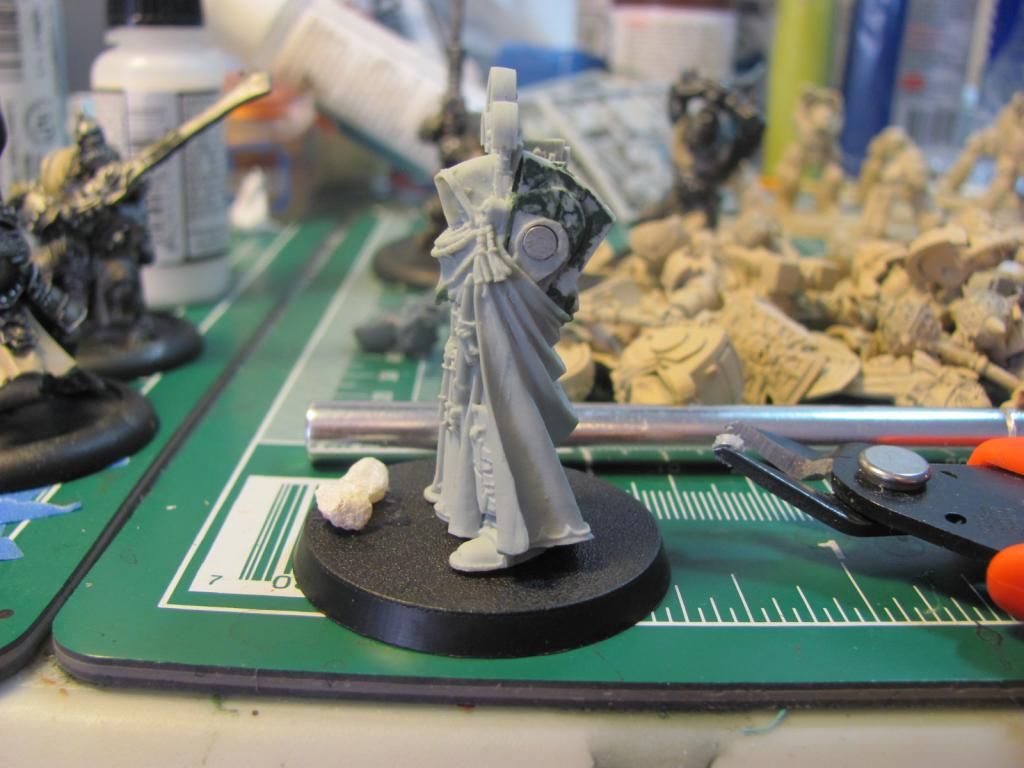
Here are all the neatly magnetized arms ( TH/ SS and SoS/ SB courtesy of spares from the Deathwing boxed set)
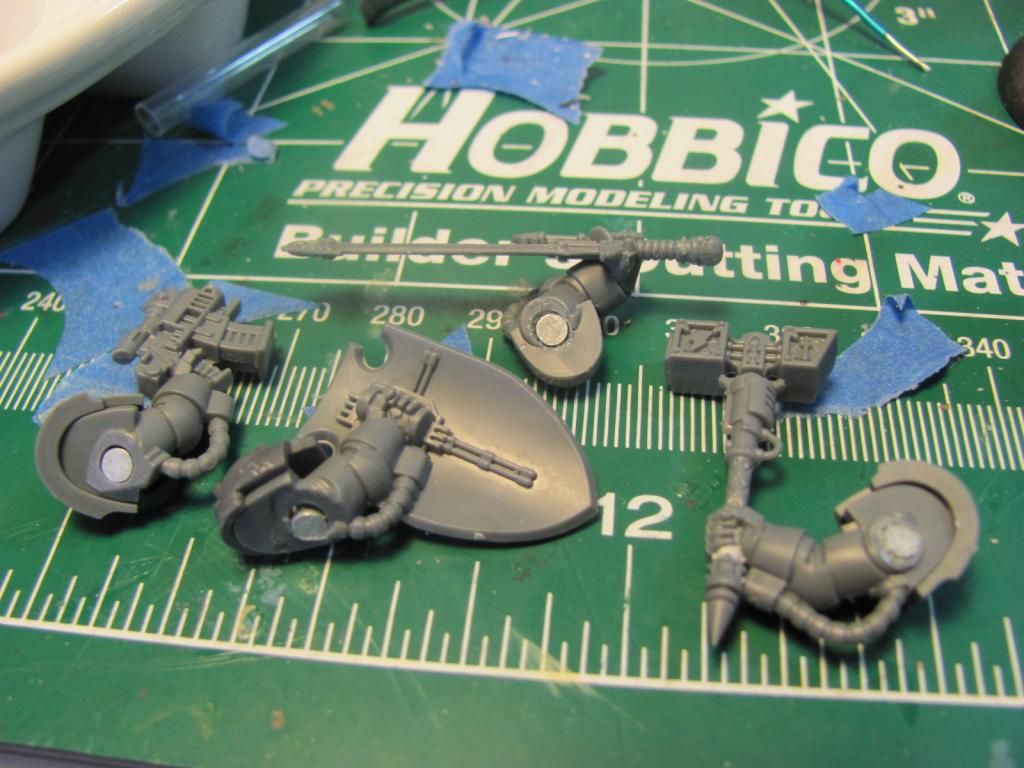
Here's the results of what you have to do to dig a magnet out of a Finecast torso:
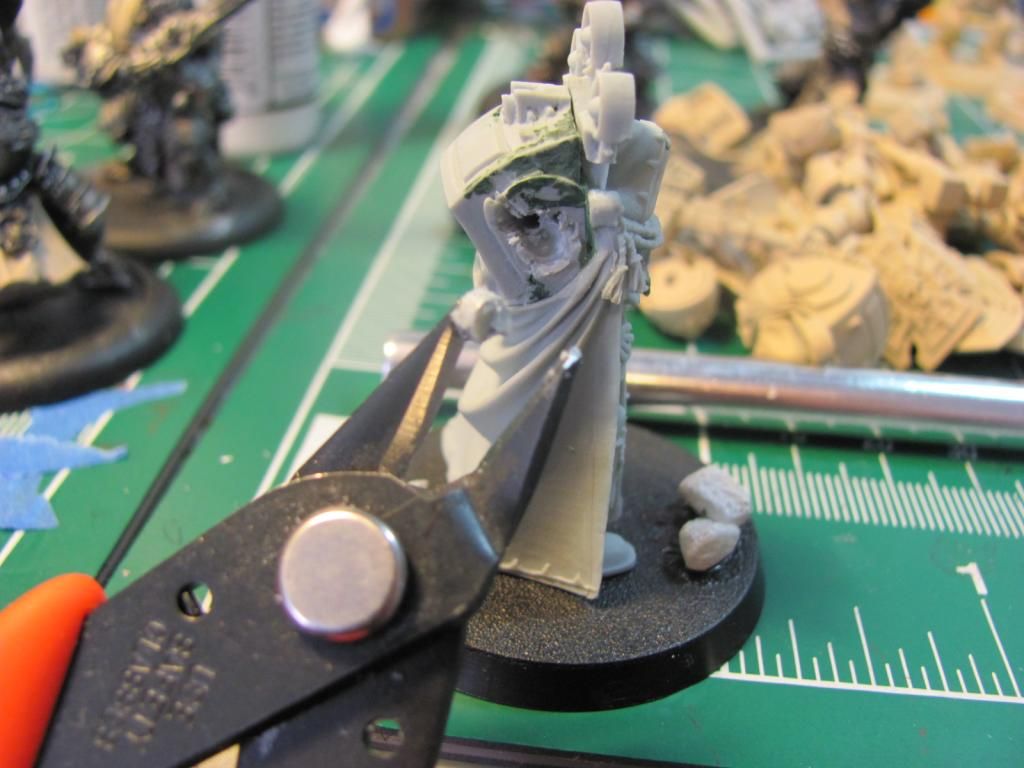
Here is my sacrifice to the Blood God Khorne after one of my best drill bits snapped and the pin vise went straight into my ring finger:
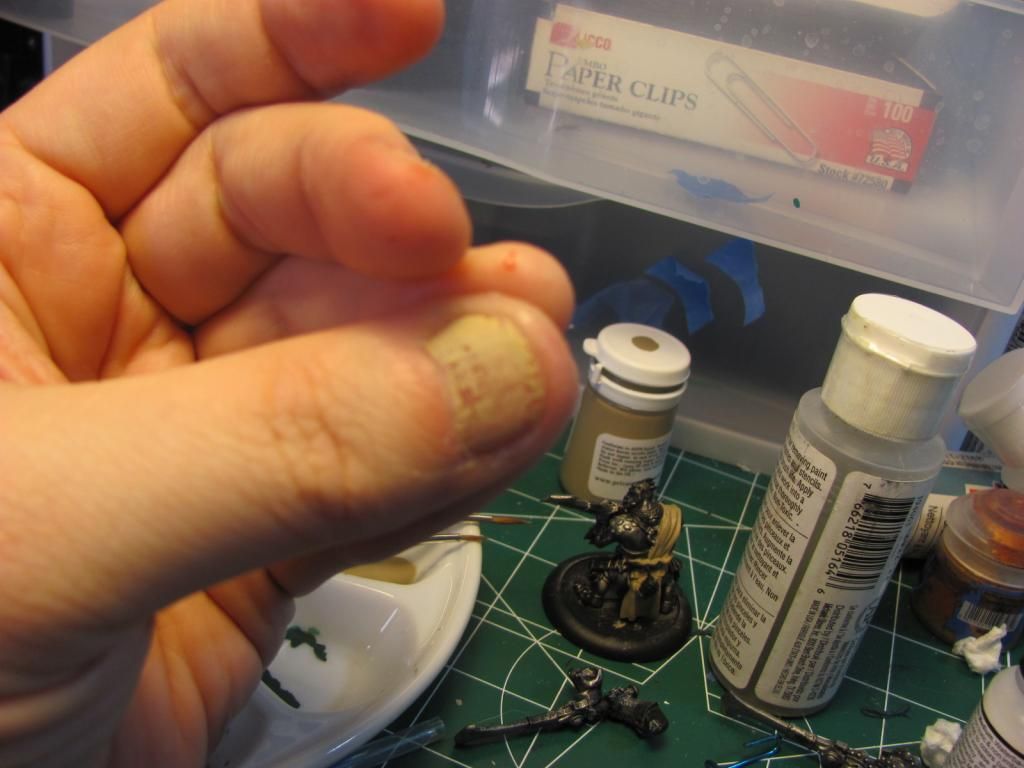
But, there is somewhat good news -- After about 30 minutes of sculpting, I got the side reasonably close to original shape so I can sand it and re-drill the magnet hole after it cures overnight:
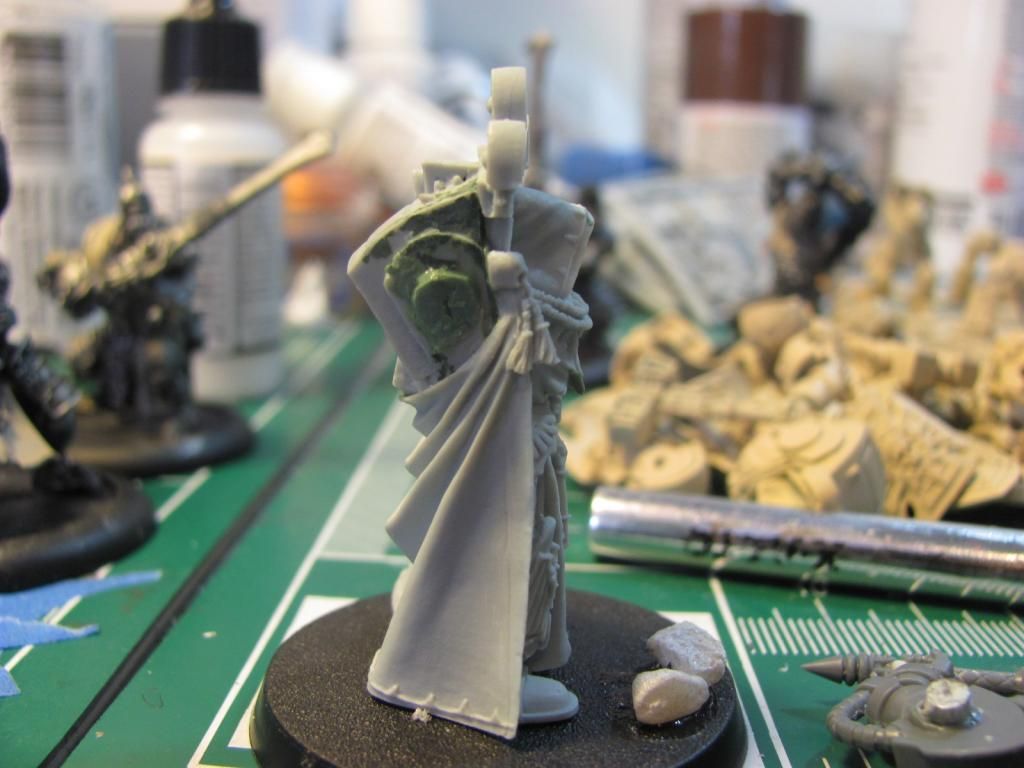
Showing that the sides are, in fact, even:

70053
Post by: GrimDork
I'm only laughing cause i've done it at least half a dozen times so far. I usually get the torso right but I mess up an arm, lose half the surrounding plastic in the battle. Its rough, but it looks like you've got him on the right track!
64808
Post by: CIsaac
Ok, primered up my next batch of terminators and got Belial correctly set up and primered. Here's what we're going with:
Eleven terminators (5 Knights, 5 TH/ SS, 1 Champ) all primered bone for quick painting:
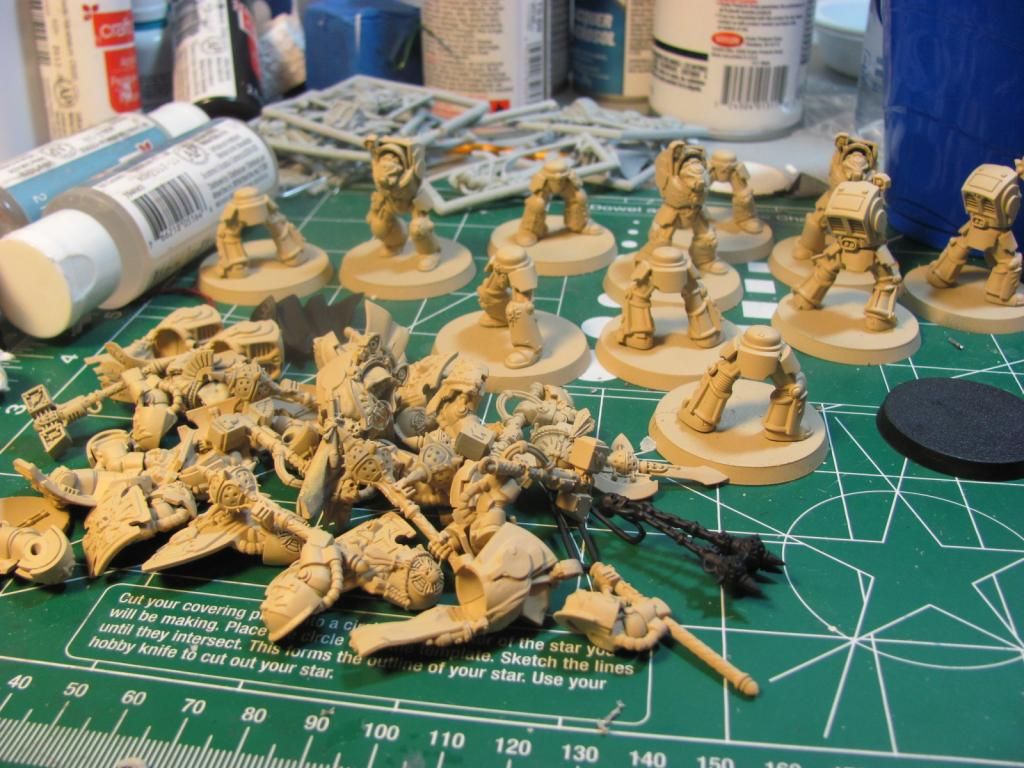
Belial primered black with his (working) magnetized arms:
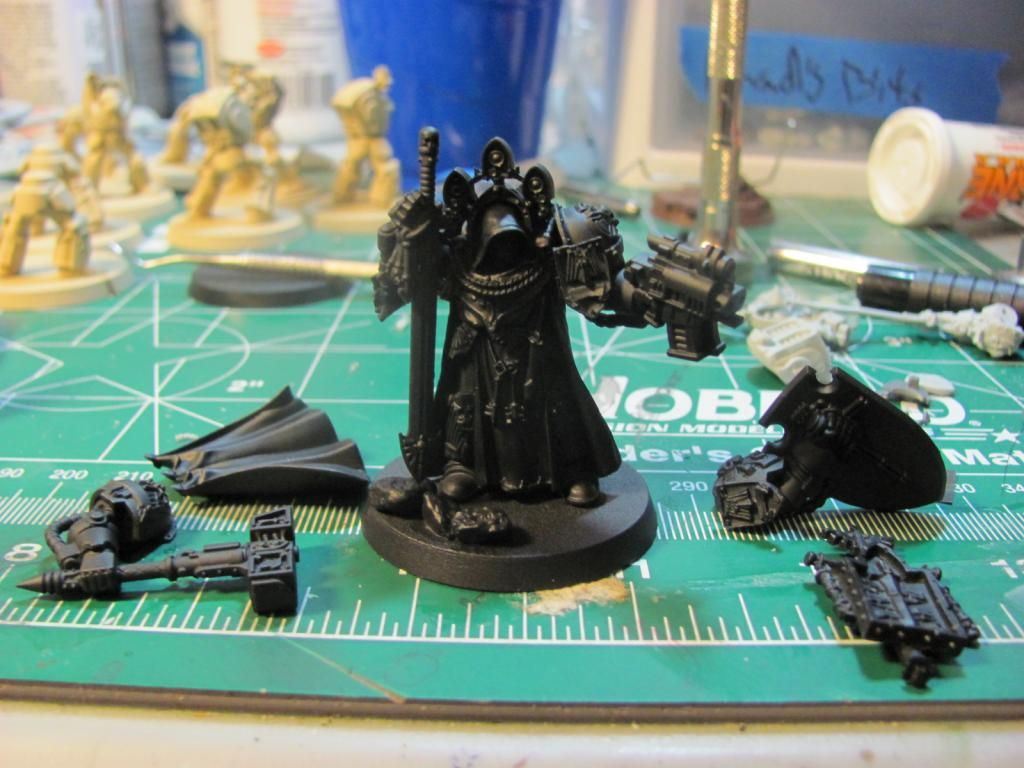
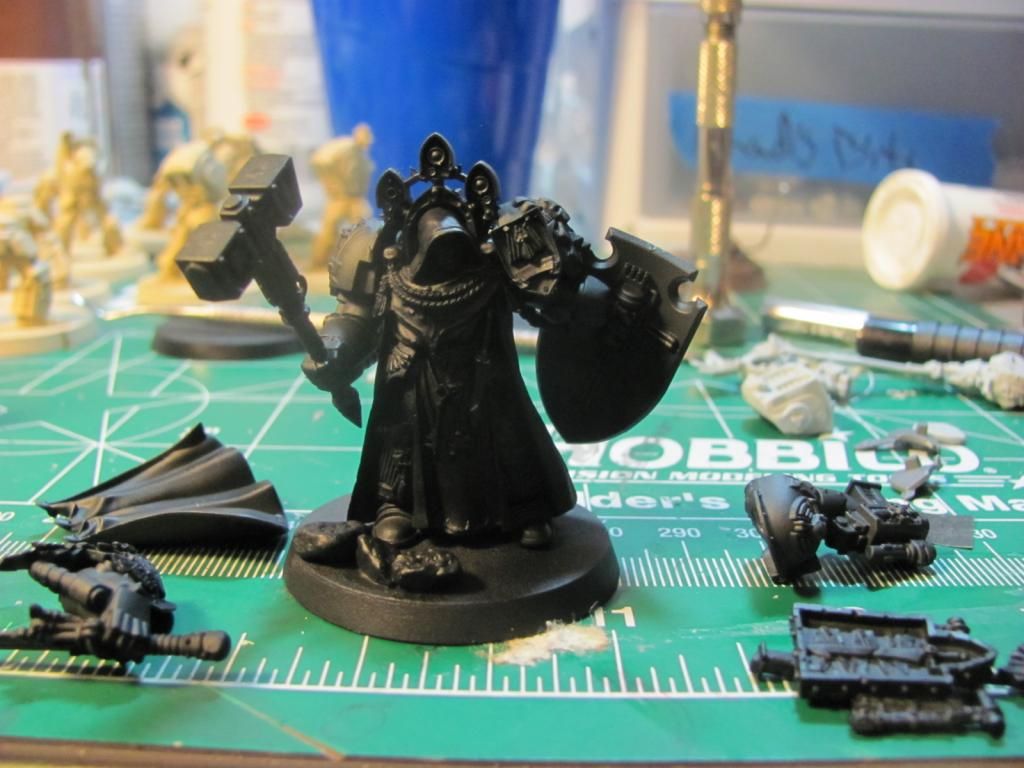
And this is all the different FineCrap sprues I had to go through before I got the bodies and accessories I needed that were in usable shape. The side of the armored body is still smoother, after priming, on the side I resculpted than the original. It's embarrassing that it's this bad. I can't defend GW to ANYONE. My GF went WarmaHordes specifically due to MY frustrations as a modeler. Ugh. I'll soon be posting another P&M blog for Protectorate of Menoth.
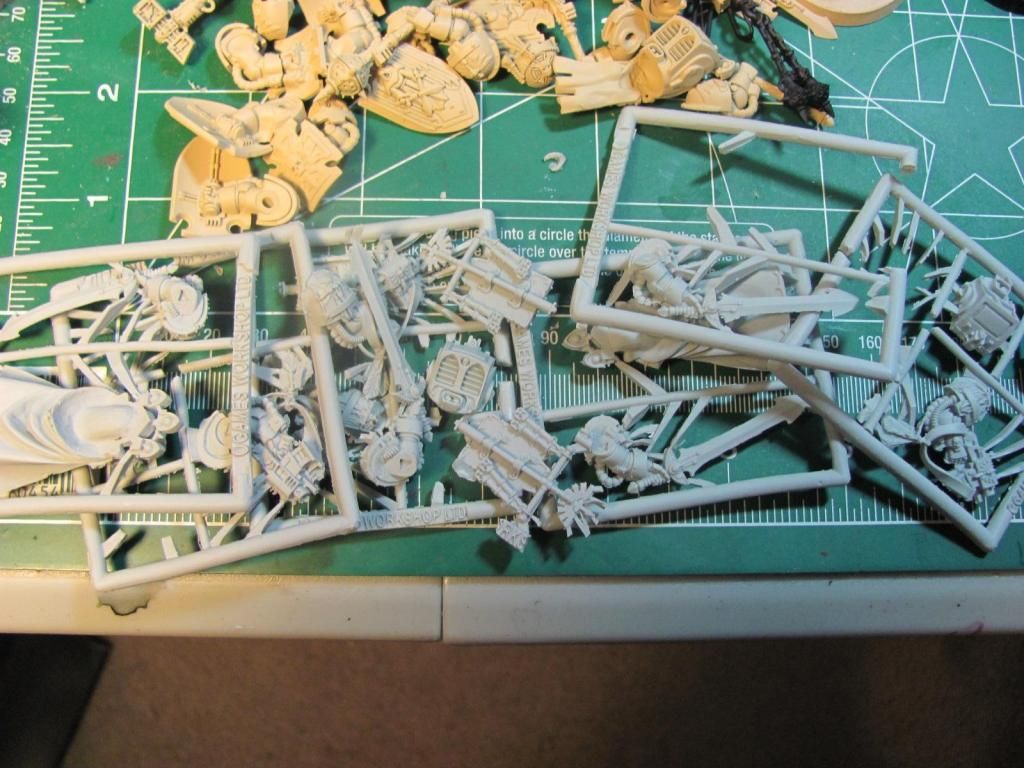
As you can tell, Belial has been reposed. I used spare arms from the Deathwing boxed set (the Commander/Sergeant arms) and it was such smoother sailing on those arms in comparison to the rest.
70053
Post by: GrimDork
Wowzers. Good customer service not making up for bad quality eh? Looked into warmahordes for a couple of minutes one day, didn't strike me, but I didn't give it much of a chance. However, a painting blog for such a thing, I could handle
The undercoated terminators look half-ready to go, always nice
64808
Post by: CIsaac
Ok, I'm going to be taking a break from Dark Angels/40K. My heart's not in it at the moment. The more I stare at Belial and the Deathwing blob, the less I want to do it. I'm finding I'm having fun and success painting my protectorate. I may come back to DA, but not for a bit.
When I have time I'll start a new thread for the Protectorate (and eventually Skorne).
It doesn't hurt that the GF has gotten into Mini-gaming and wants to play WM/H and doesn't want to have anything to do with GW after reading up on their business (and seeing my frustrations with Finecrap). That an the local 40K scene is definitely dying with WM/H replacing. It's much easier to find a WM game than 40K game nearby.
70053
Post by: GrimDork
While I weep for the retirement of this blog, I fully understand your sentiment. And if the lady is willing to play some other game then its decided, no choice to make
You had better get to work on your warmahordes blog! Miss watching your work progress.
Good luck and happy gaming!
|
|