70060
Post by: Heavens Eagle
Hi All!
I came into the hobby due to a number of the models slapping my "THAT's NEAT!" nerve and have been slowly drawn even further in over the last year. Before that I was all about building detailed scale models of aircraft and armor and that was after taking about 20 years off from almost every building hobby. (Yup the big D can do a number on ya!)
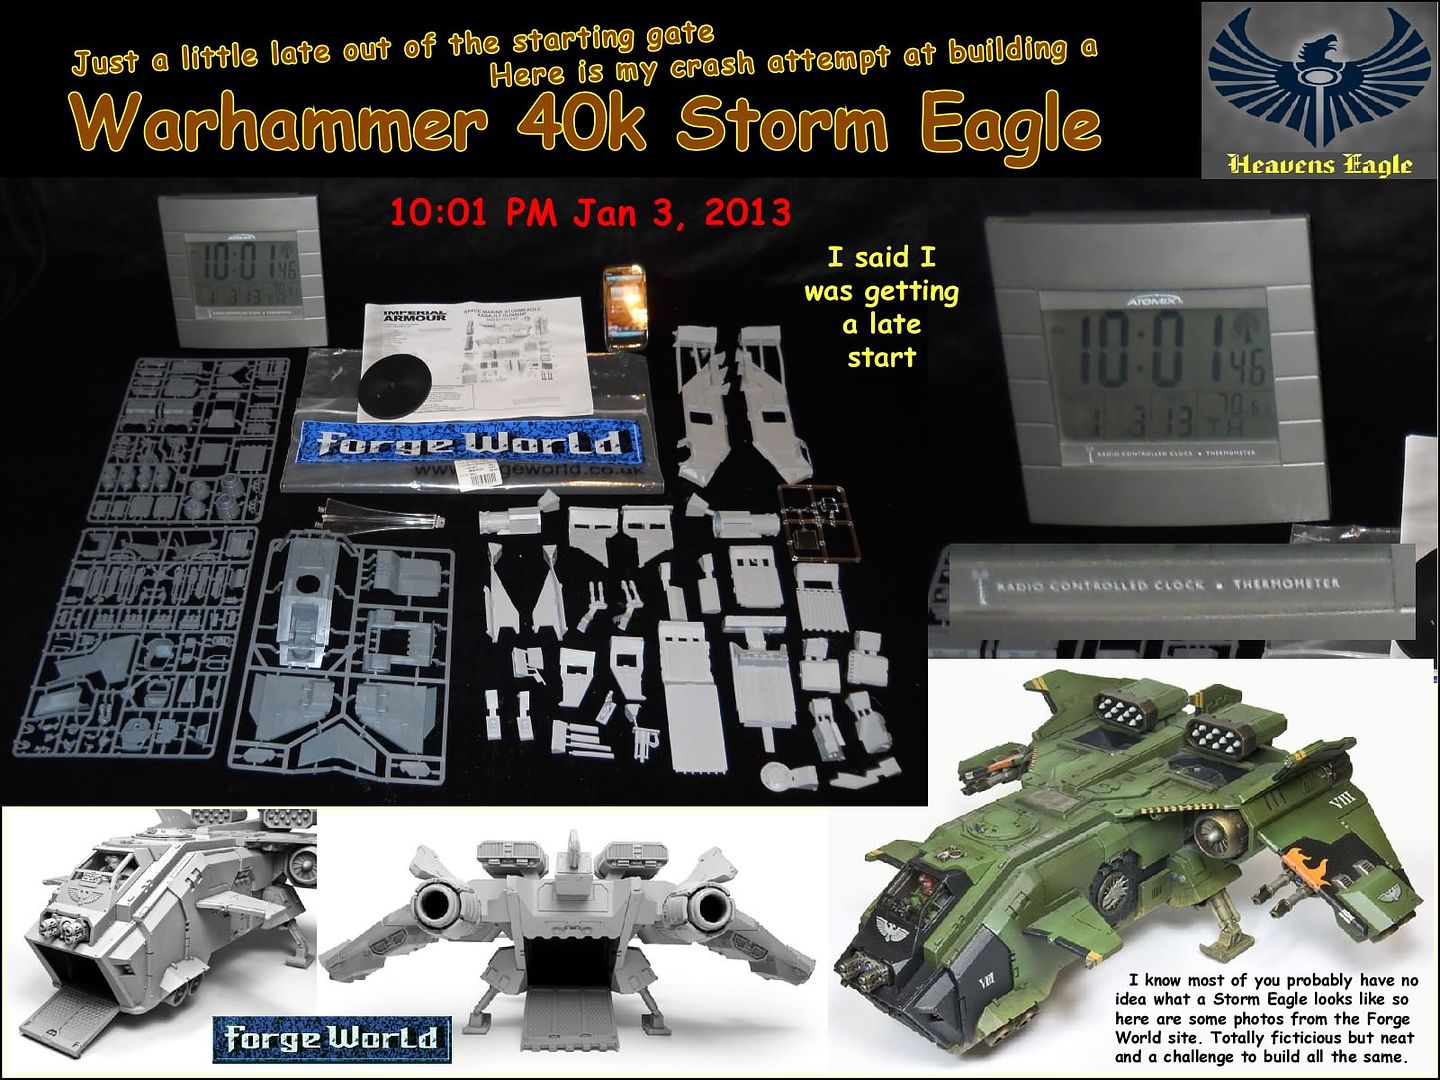
Anyway as to the Storm Eagle, several showed up for sale at my local hobby shop back in late December from some collections trading out. I picked up one and it hooked me in immediately. As there was a Group Build going on with another forum I now frequent that was a fund raiser for cancer research, I decided why not! I paid my donation on Jan 3rd and entered the Storm Eagle into the build which was to end Jan 31. The only snag to be eligible for a raffle at the end was to "finish" a build. I figured, no problem, Forge World stuff is supposed to build up fairly nicely and I should be able to finish it in time.
Famous - Last - Words! I only picked one of the more difficult to build kits. Should have known.
I try to document, photograph and explain my build progress as well as the processes. Mixed in are tools I use, as well as tools I make and have made.
So here is the first installment of the Forge World Storm Eagle build. I didn't manage to finish it in time for the raffle, but that is of no real consequence. It was for a good cause that I support. (lost my wife to cancer 10 years ago) Enjoy the posts! If you have any questions feel free to ask me!
 That's all for now, I will have a new post with more photos soon!
50038
Post by: sandant
Cue the classical music as you continue building with this precision.
I'll be tuning in.
44648
Post by: Baldsmug
Can't wait to see the rest!
51338
Post by: Ulterior
Subscribed! I have a storm eagle in parts on my work bench waiting to be assembled. It's been waiting for longer than I'd like to admit, more than likely due to being intimidated by the difficulty of the kit. Please post again soon!
70060
Post by: Heavens Eagle
Here is a new installment on building the Storm Eagle folks.
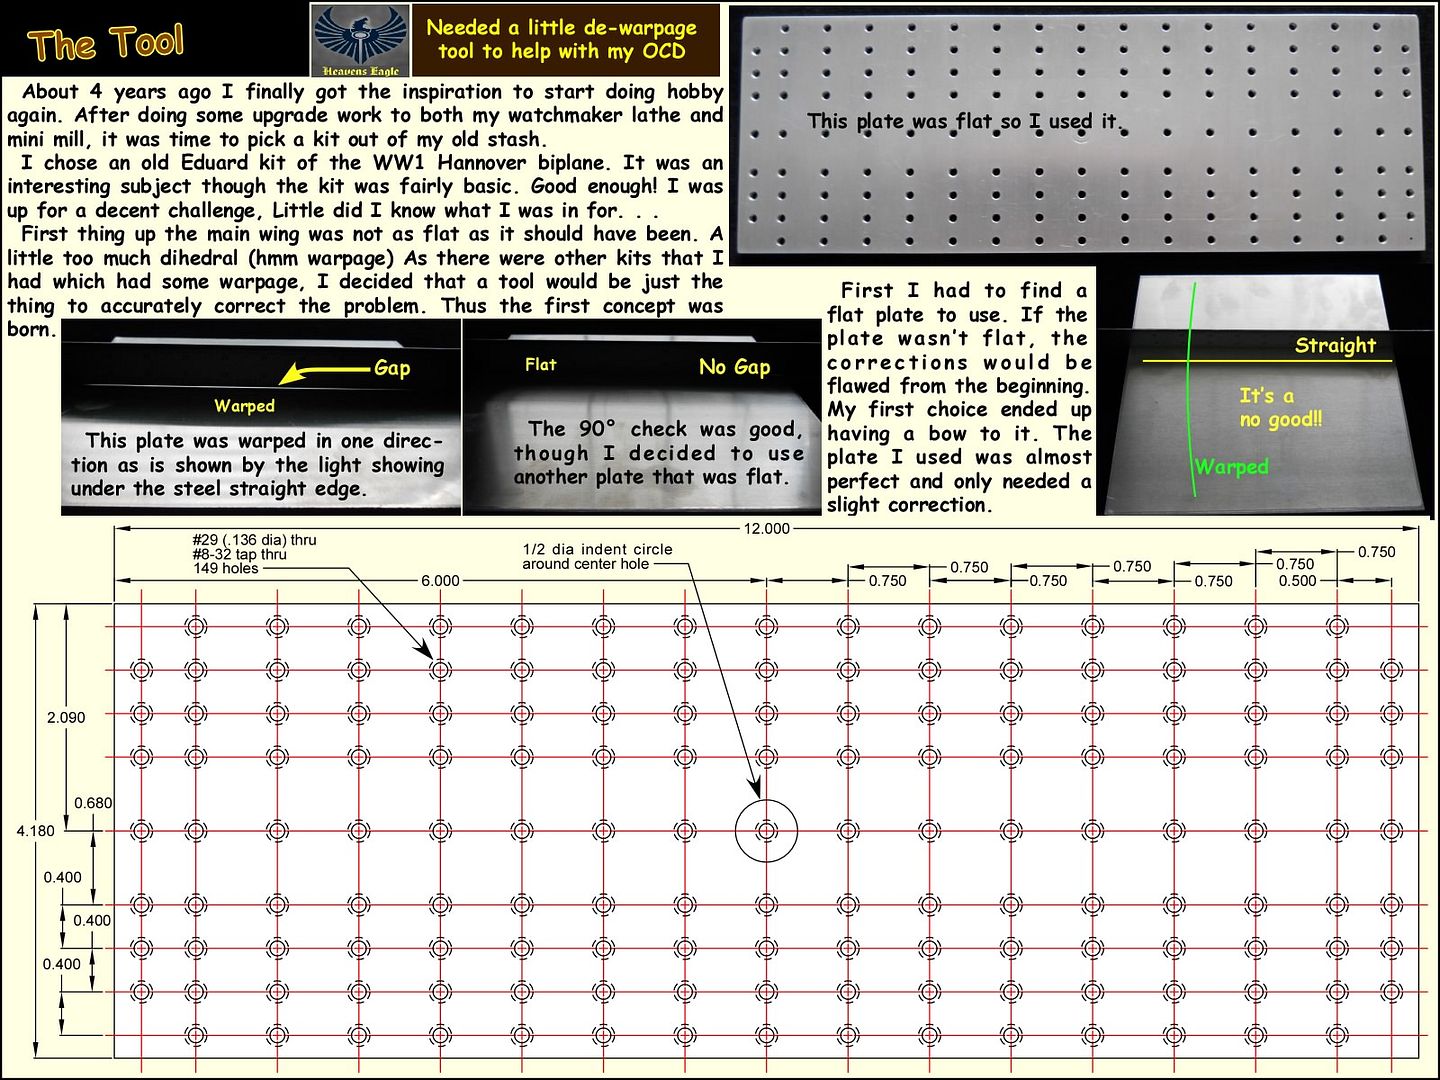
I hope you don't get intimidated by some of my methods and tools on this build. The plate and clamp tools that are in todays post are a tool I made a while back to correct some warpage on injection molded kits. The first kit I tried it on I managed to damage the warped part beyond salvage. They say you learn more from mistakes than from everything going nice and easy. I have found that out myself a number of times, (yup the hard way) but in the end was much better off for the experience. The one thing I have always maintained is to learn from others mistakes when and if possible.
Here is a brief intro into what I had on beginning this part of the build. Some others have told me that their kits were not nearly as warped as mine was. As to that, I am glad for them, and hope your kit is fairly warp free! If it isn't then I have some good help, advice and techniques to help you deal with the problems. So here is the graphics part of the post.
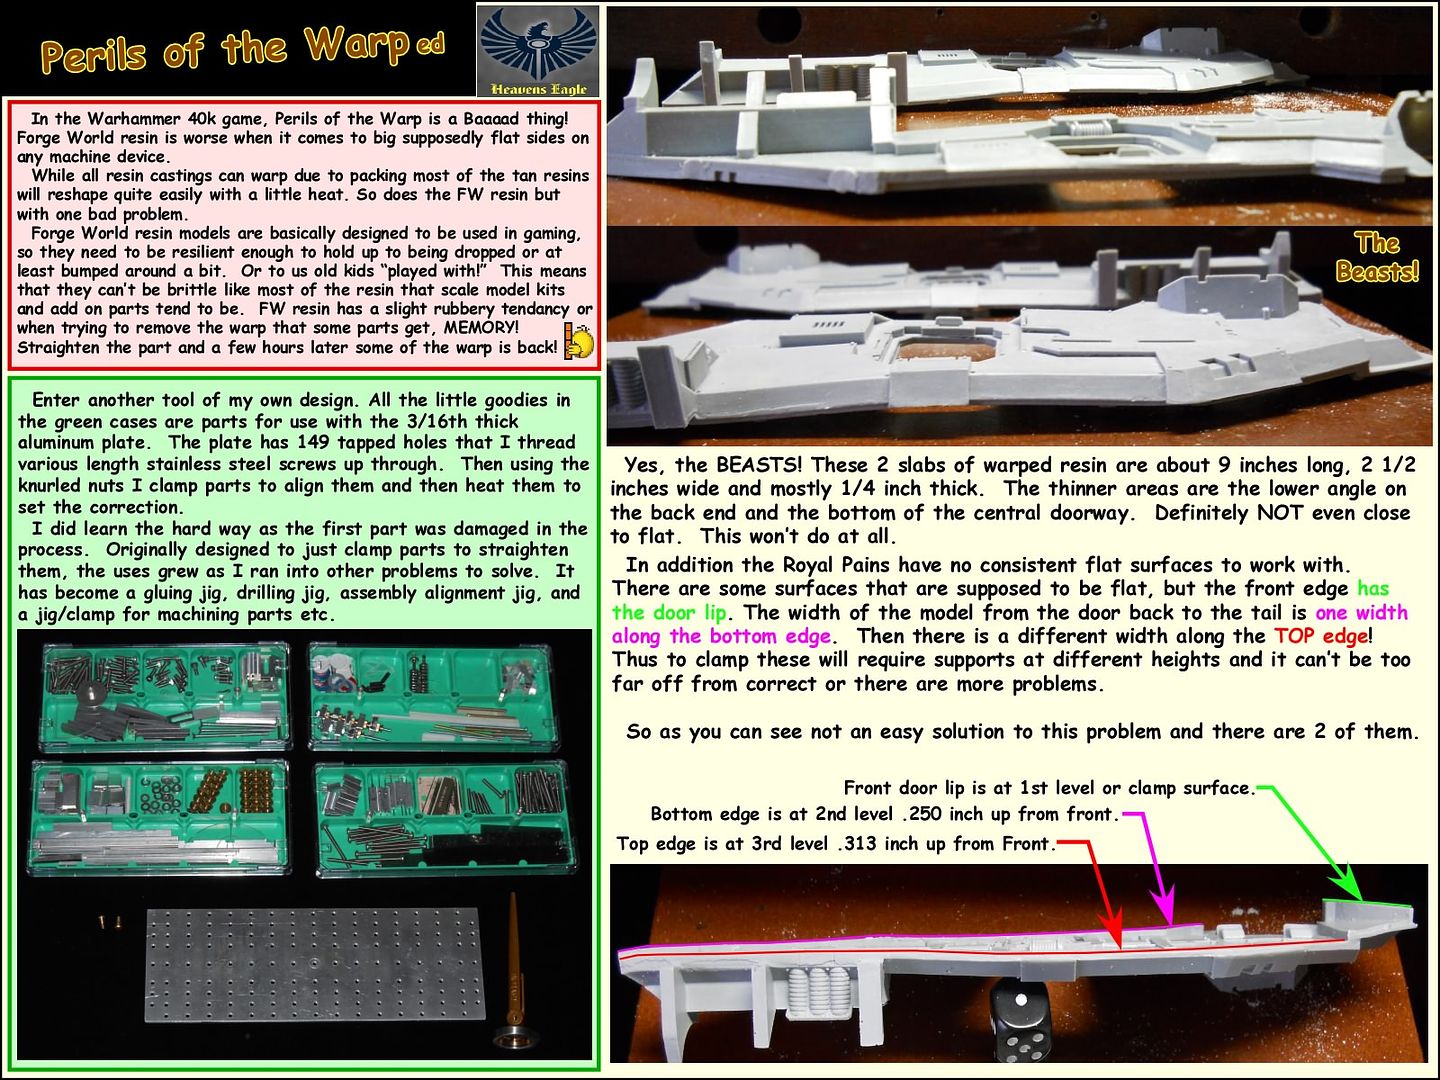
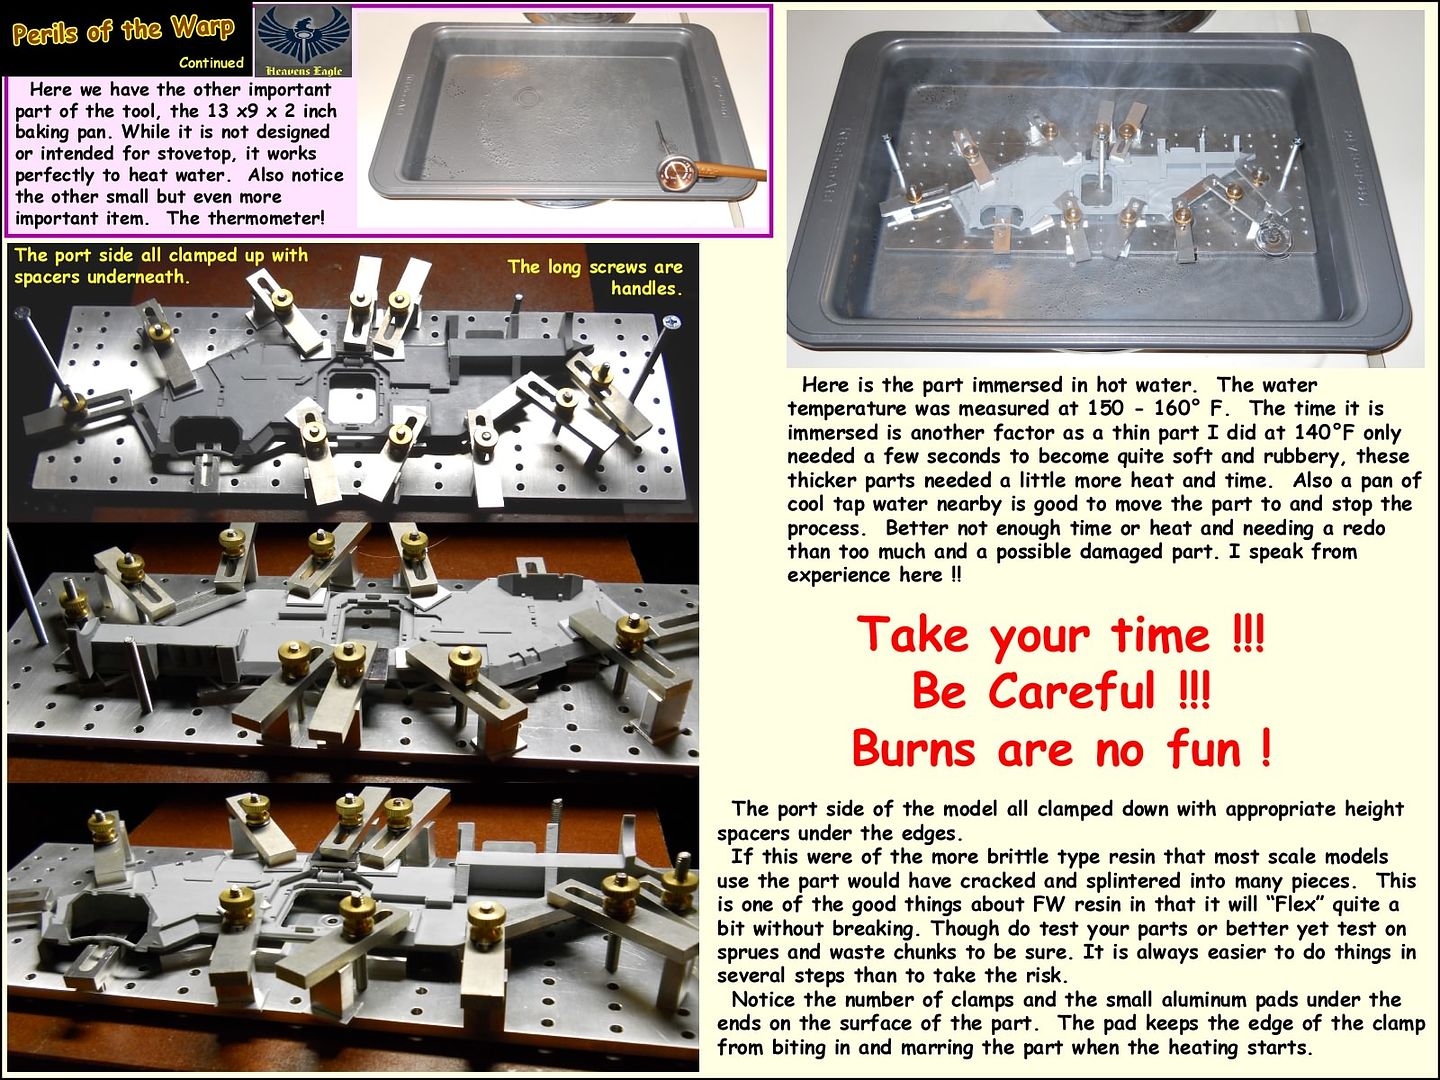
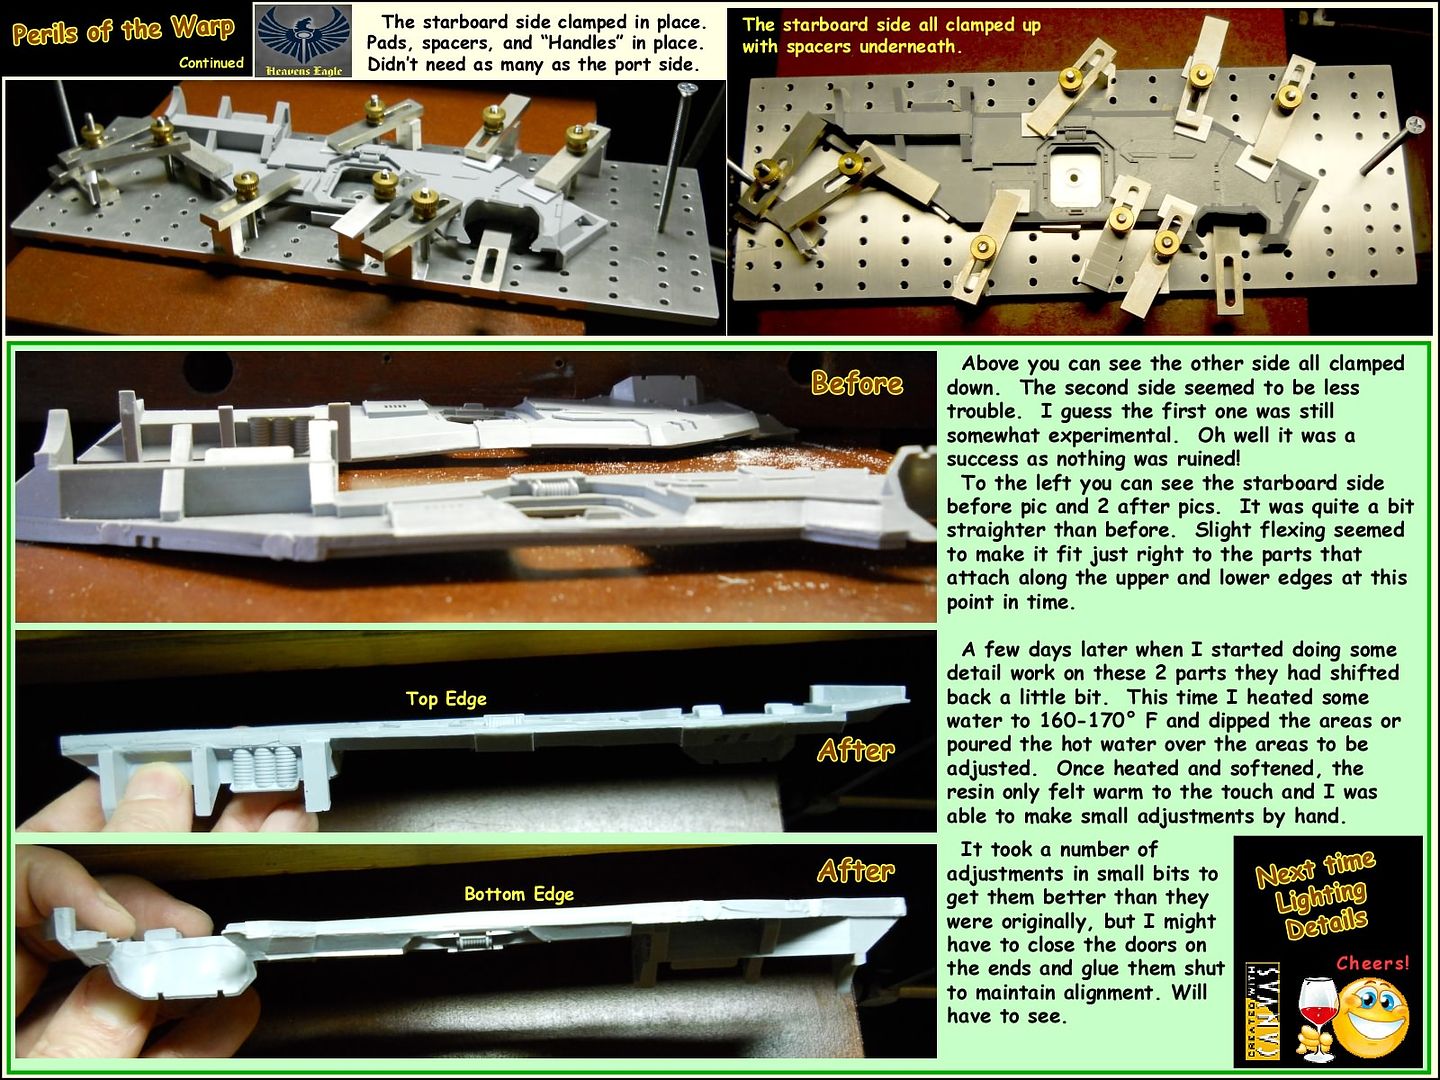 I basically got the parts close to straight here and after a few days had to redo some of the warpage removal as there was some memory in the parts that caused some of the warp to return. The way I removed the remaining warpage was to heat the water to about 170 degrees F and then dip just a small area of the part to heat it. I decided that it would be better to adjust areas and get them just right then do other areas rather than try and do it all at once. The all at once was fine for a start, but wasn't going to work for flip for small adjustments.
So I did the small areas as needed. One trick I devised was if the area was in the center of the part, I would use a gravy ladle and pour the hot water over just the spot I needed to heat. (for example the side pieces are quite long and the areas around the side doors were off) I would pour over one side then flip the part and pour over the other side keeping the water to just the area I wanted to adjust. By doing this the remainder wouldn't change shape.
As to the temperature, I found that while I would NOT put my hands in the water while it was at 170 degrees, the part was only warm to the touch, maybe quite warm but still comfortable to hold and manipulate. At 170 to 180 degrees though the resin would become quite pliable.
That's all for now. If you have any questions, or need some clarification please feel free to PM me or ask on the thread. I might have worked on past a problem you are having or found another solution and forgot to work it into the graphical posting.
Cheers and time for a beer, it's Friday!! Woo Hoo!
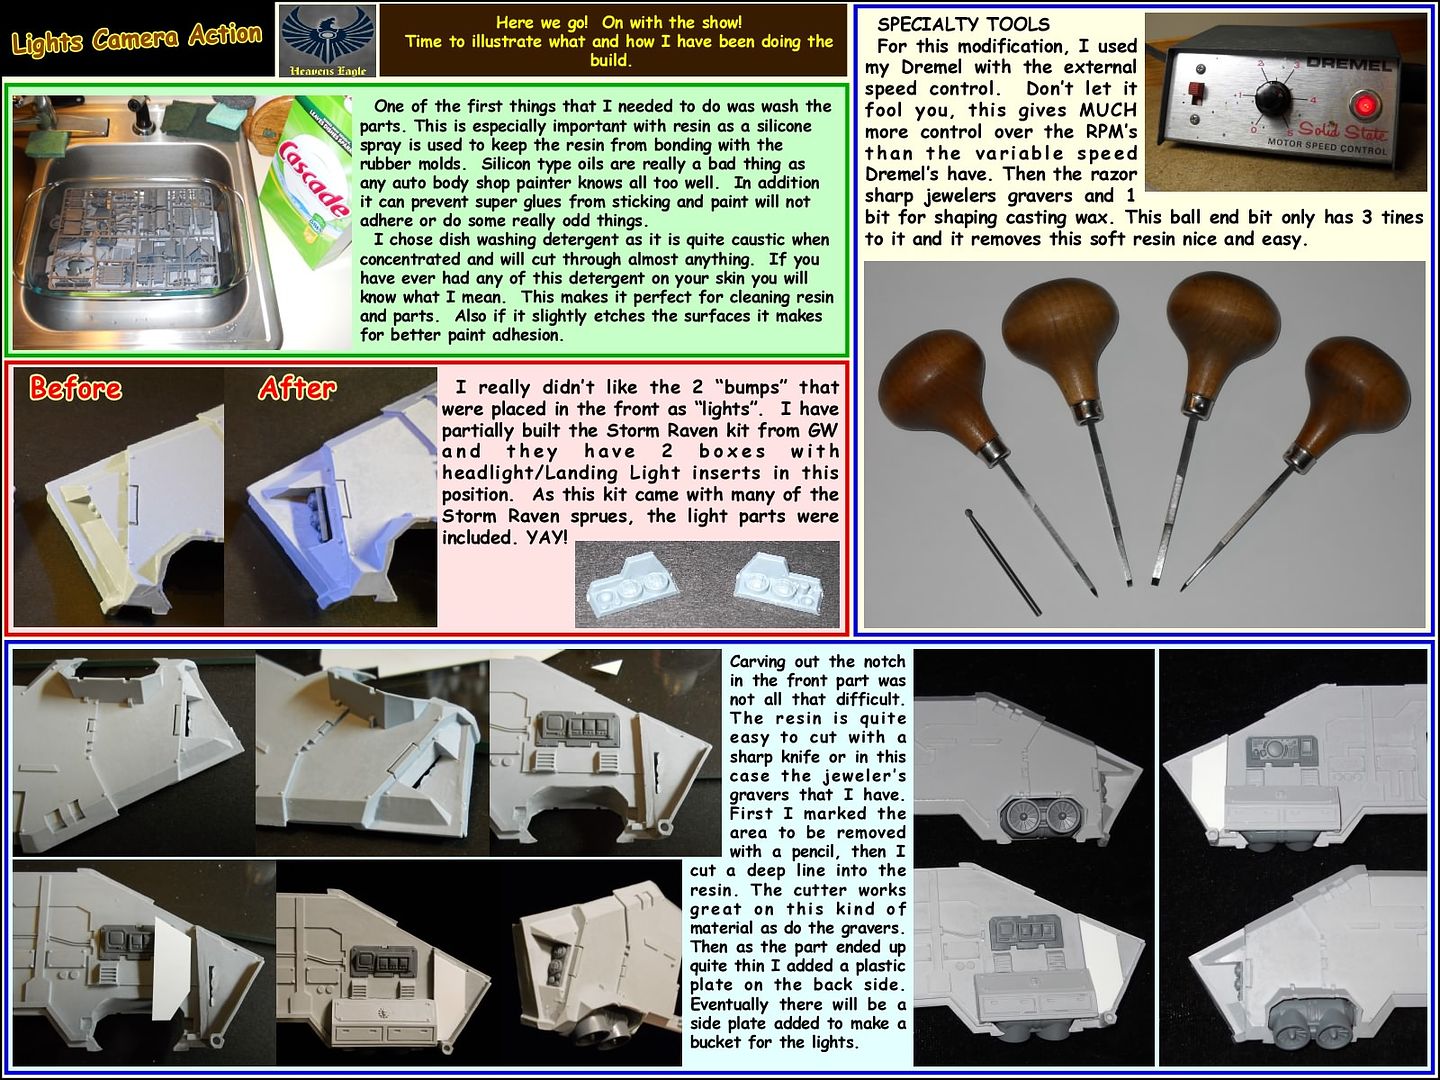
One other note, I am not lighting this with LEDs, it is referring to the lights on the front sides of the fuselage. (Which are quite plain and crappy looking) Check back for my solution!
70060
Post by: Heavens Eagle
HEY ALL!
I am going to go ahead and get this next section posted. It is a large post and covers a fair amount of ground. If something puzzles you, feel free to ask (you might not be the only one). I might even need to add some followup detail posts if something isn't clear enough.
If you have questions or a problem I might be able to help you solve, Please ask! It is amazing how solving someone else's problem can help me with something I have been pondering as well.
Again if anything needs clarification, please ask! I will do my best to help. Have a good weekend all and enjoy!
51803
Post by: Requiem
Suddenly filled with respect for people who can actually assemble this! Nice tutorial, lots of useful stuff in here
54386
Post by: reps0l
Good stuff. Not sure if this makes me more worried or more comfortable ordering a large FW model.
13625
Post by: phantommaster
Fantastically detailed Tutorial, might just buy a Storm Eagle so I can try it!! 
10377
Post by: Bikeninja
Would have loved some of these techniques when I built my Assault Ram.
70060
Post by: Heavens Eagle
Actually this is the first Forge World resin kit I have built. I do have a fair amount of scratch building and modification experience from scale model kits. There are a lot of techniques I learned over the years and one of them is how to think my way through solutions.
One thing to remember Reps01 is that the larger the parts (for example Thunderhawk parts) the more work it will probably take to get a good quality fit and build. It is still possible even with a really bad kit, the only difference is time and desire. There are many other ways to do a lot of the things I have been doing on this build. Some better, some easier, some not nearly as good. I have read some other reviews and builds of the Storm Eagle and they all agree that it isn't an easy kit, but most really liked the finished model. It seems that most took a lot less trouble and attention to detail than I am and were able to have the model together over a weekend. If all someone wants is a gaming piece and they are not particularly worried about appearance, a quick build is easily possible.
I am just really picky about how my models look, so I put much more effort into the build. Why not document the process if it might help someone that is dealing with some of the same problems. These posts are enjoyable to put together and the model has been work but the "Atta-boys" and "Kudos" are what really make it worth all the work.
A new post will be coming soon!
29223
Post by: frozenmilk
This is such a neat thread! Thanks for sharing your techniques with us, it's really interesting to see the tools and techniques you've come up with.
I'll certainly be subscribing.
42144
Post by: cincydooley
Heaven's Eagle is right: not an easy kit to build at all, but at the end the juice is worth the squeeze. I love how it looks finished, but I had a TON of trouble assembling the fuselage. Similar warping problems that he had, needed clamps and rubber bands for MULTIPLE places and even needed a second set of hands in a few parts. This was harder to build than my assault ram, without question.
69427
Post by: Demigod
Wow....this is one helluva detailed tutorial. Your modeling setup and tools are also off the hook, especially for a total beginner like me (still saving up to get my first models painted). Nice work!
20086
Post by: Andilus Greatsword
 Requiem wrote: Requiem wrote:Suddenly filled with respect for people who can actually assemble this! Nice tutorial, lots of useful stuff in here
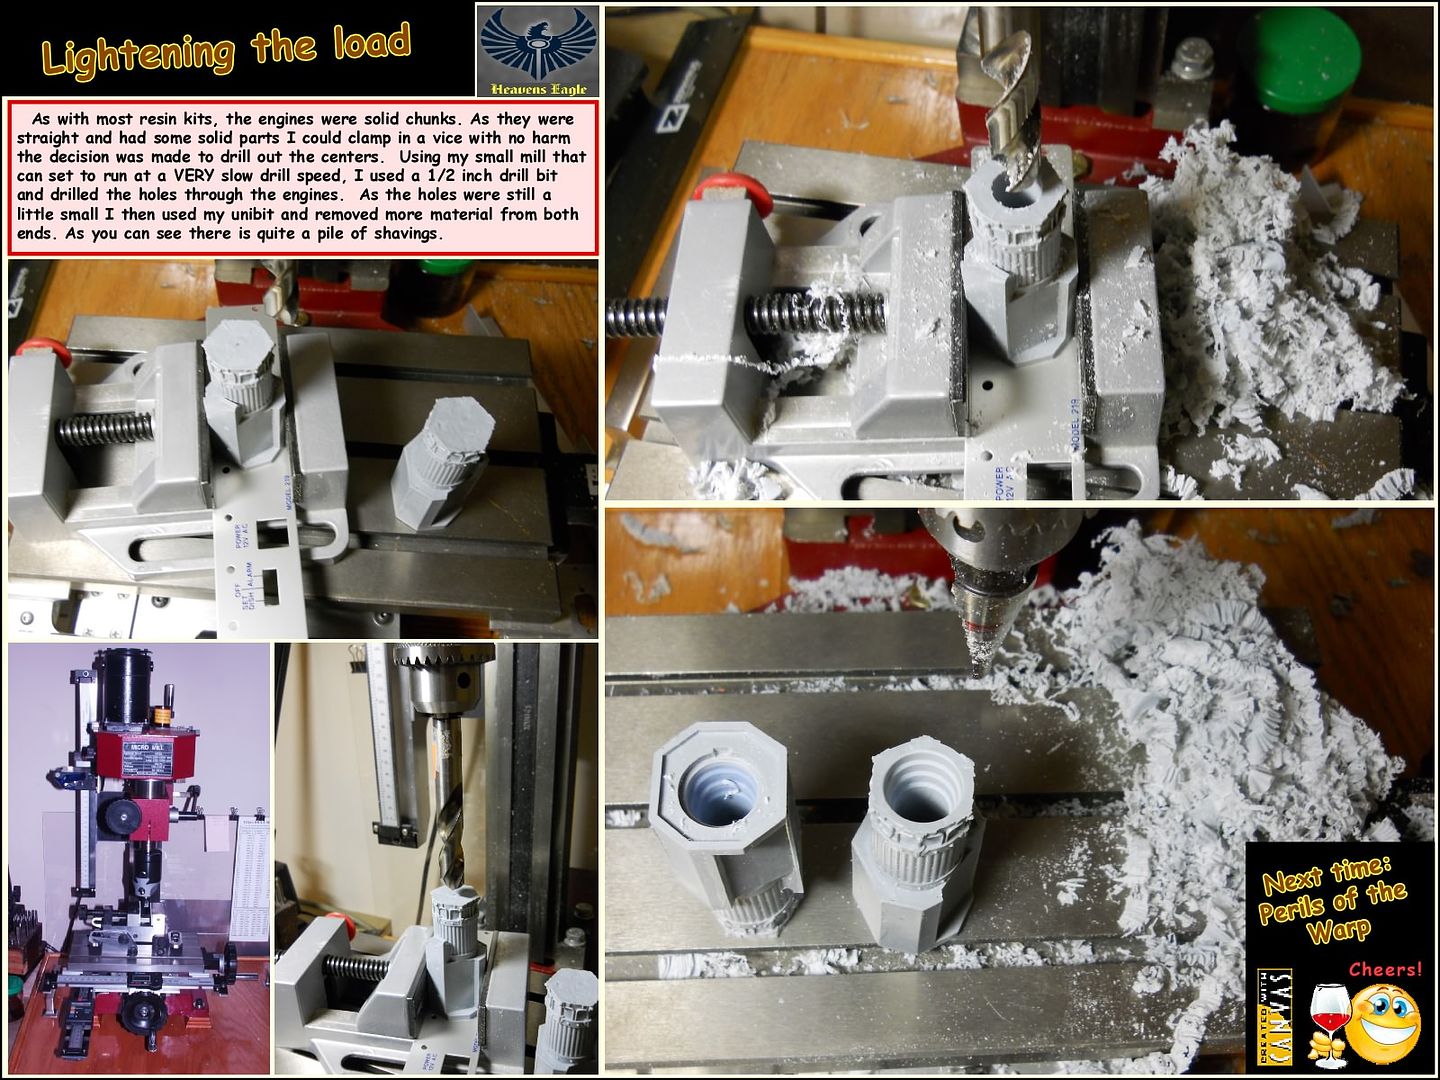
It's a lovely model, and the warping can actually be circumvented when you glue the hull together. I wish I'd thought to drill out the engines though, because the model certainly is rather heavy!
36660
Post by: godswildcard
At 12:03 Eastern Time I clicked on this thread, and at 12:05 Eastern Time, my brain exploded.
This is excellent work. I'm pretty sure that I couldn't do this in anything that would even compare the the quality of this build. Simple amazing. I'm saving the link in case I ever decide to spring for that thundhawk I've always wanted!
42144
Post by: cincydooley
godswildcard wrote:At 12:03 Eastern Time I clicked on this thread, and at 12:05 Eastern Time, my brain exploded.
This is excellent work. I'm pretty sure that I couldn't do this in anything that would even compare the the quality of this build. Simple amazing. I'm saving the link in case I ever decide to spring for that thundhawk I've always wanted!
I'd encourage you to wait on the T-Hawk. It's a rough, rough kit to build from what I've seen. The old mould coupled with the fact that there are large parts that can warp easily make it hard to assemble.
Plus, you can always hold out hope for the plastic one  .
The Assault Ram is really a fun build and is really fun to use in game. I'd encourage that over the Storm Eagle as a starter flyer 
Or hell, get a Warhound. Those are detailed, but fun builds too.
30773
Post by: warhawkstriker
Where was this when i was assembling mine in december! i love the model, but man is it a poorly cast set. i had to do alot of straightening in order to get things right, and one side of the fuselage is still bowed inward. my rear hatch was also way to big for the model, so i ended up sanding it down and magnetizing it to fit.
36660
Post by: godswildcard
 cincydooley wrote: cincydooley wrote:
I'd encourage you to wait on the T-Hawk. It's a rough, rough kit to build from what I've seen. The old mould coupled with the fact that there are large parts that can warp easily make it hard to assemble.
Plus, you can always hold out hope for the plastic one .
The Assault Ram is really a fun build and is really fun to use in game. I'd encourage that over the Storm Eagle as a starter flyer
Or hell, get a Warhound. Those are detailed, but fun builds too.
Excellent words. I will ponder this!
17349
Post by: SilverMK2
Some interesting tips and tricks here
70060
Post by: Heavens Eagle
 Andilus Greatsword wrote: Andilus Greatsword wrote:
It's a lovely model, and the warping can actually be circumvented when you glue the hull together. I wish I'd thought to drill out the engines though, because the model certainly is rather heavy!
I did do some of that "after" the major warpage was cleaned up. There was no way my particular kit would have gone together without the heavy de-warp I did initially to the parts. As it was the floor was still a little warped but as it is somewhat thin it flexed easily enough. The sides though are fairly thick and if they aren't relatively straight they will cause misalignment in the model if forced together. As it was the bulkhead in the center actually squared up the box of the fuselage. Then I attached the front top piece.
 warhawkstriker wrote: warhawkstriker wrote:Where was this when i was assembling mine in december! i love the model, but man is it a poorly cast set. i had to do alot of straightening in order to get things right, and one side of the fuselage is still bowed inward. my rear hatch was also way to big for the model, so i ended up sanding it down and magnetizing it to fit.
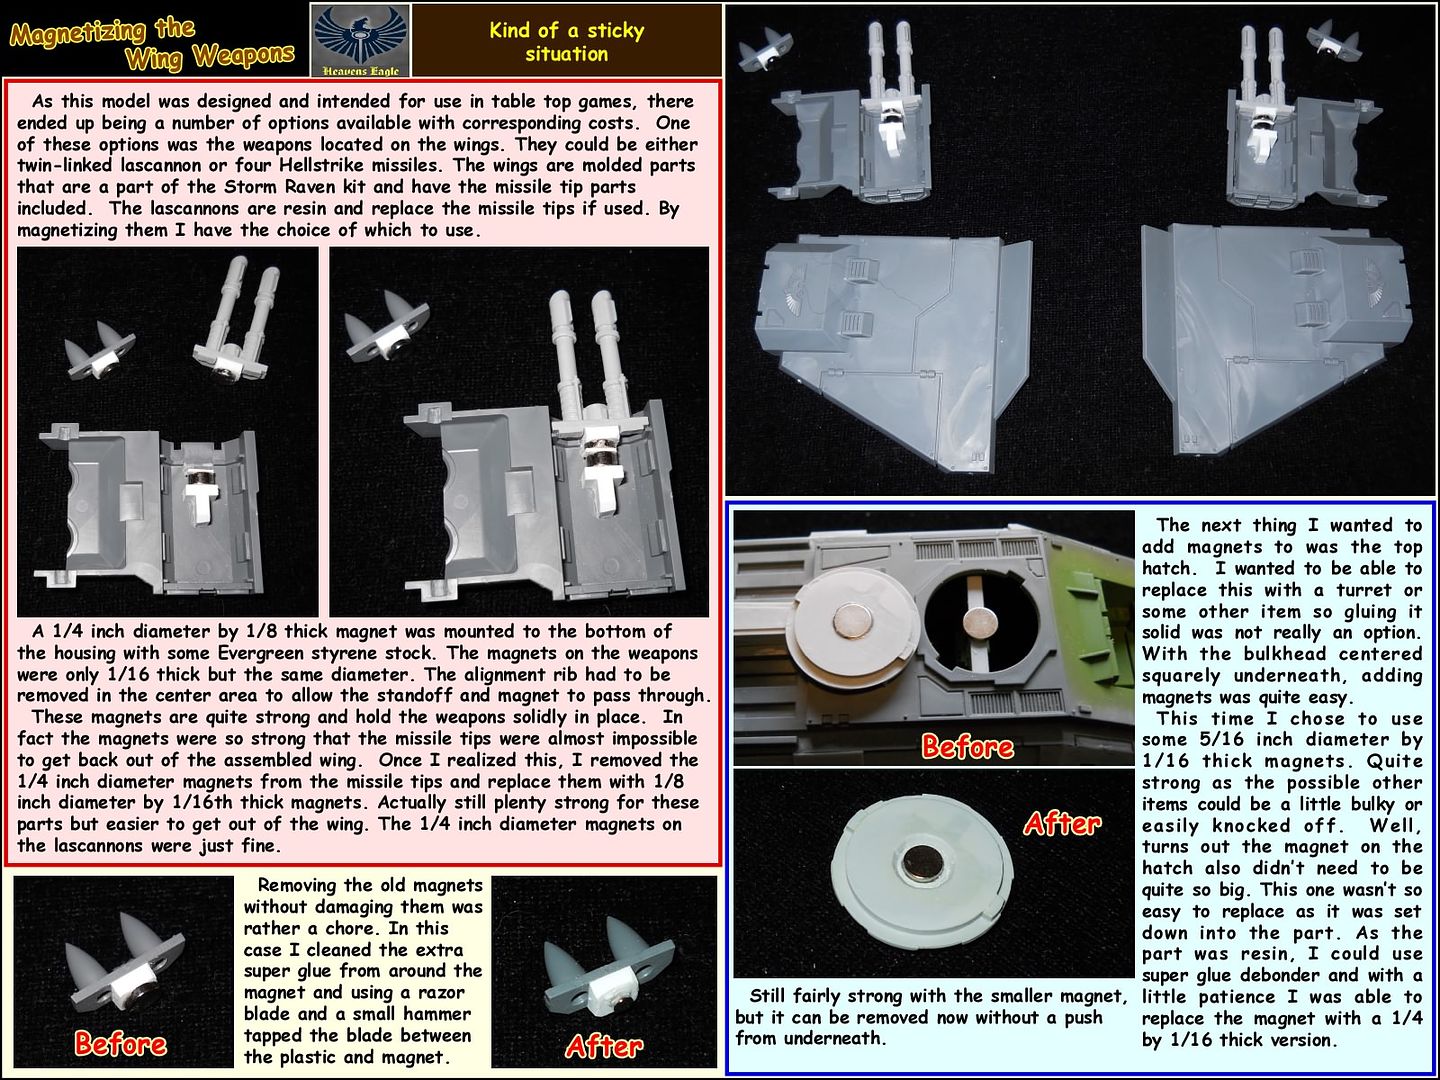
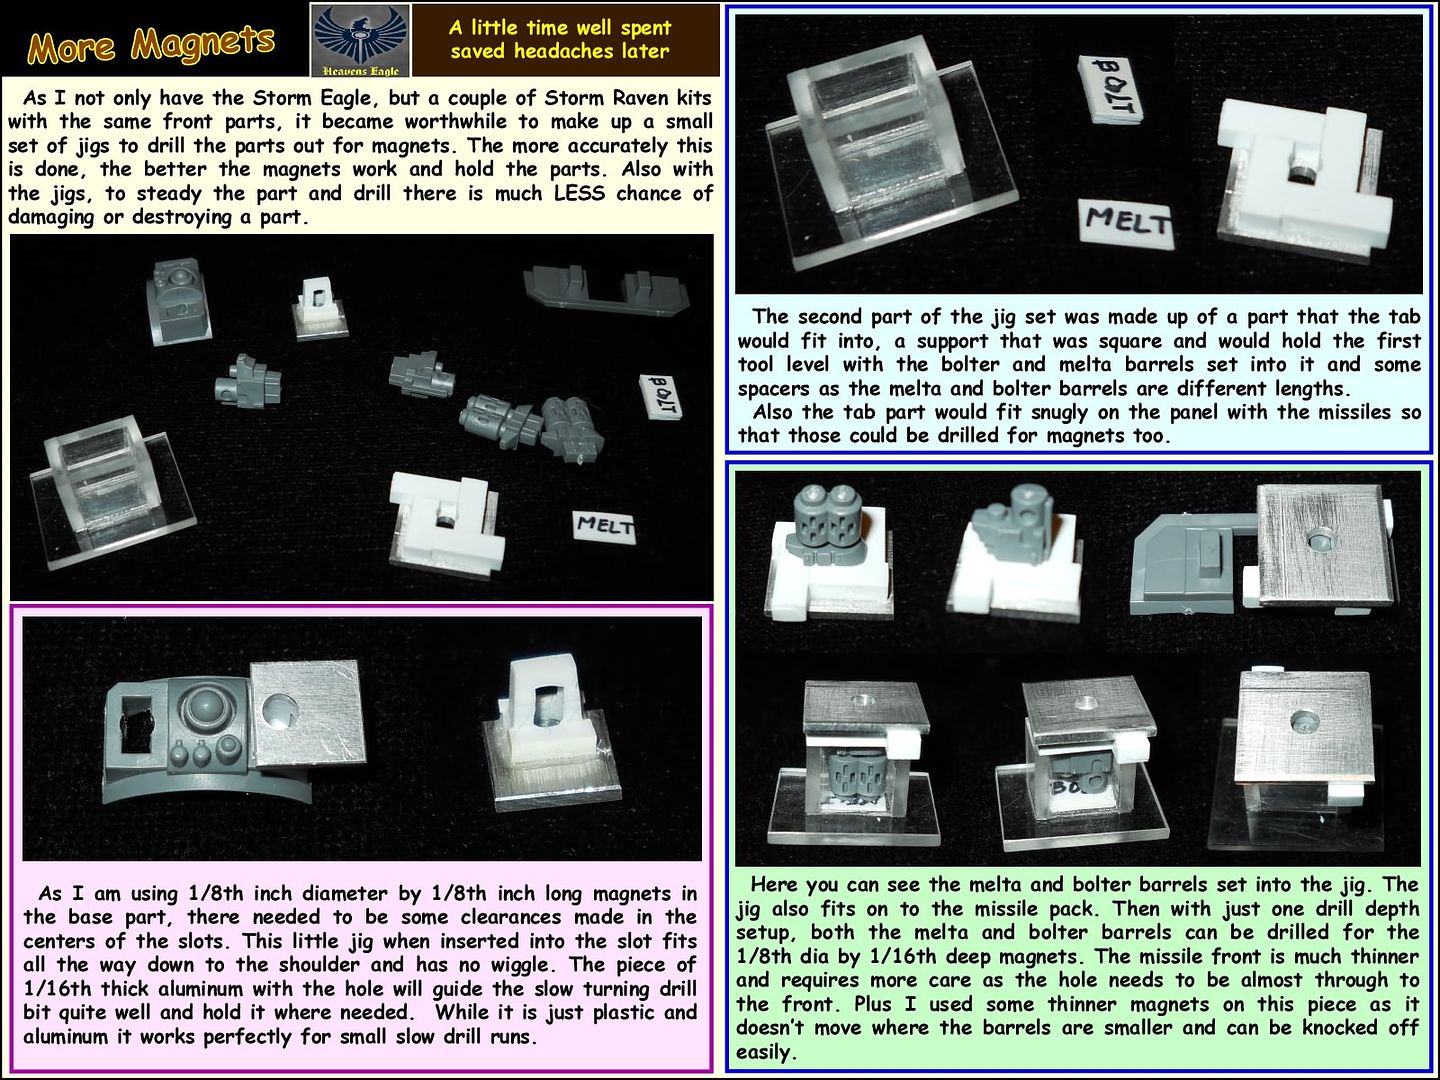
I had seen the Storm Eagle kit online, but only purchased it the last week of December. Someone in the local area sold my local hobby shop their collection and they had 2 of these in the collection. Something just grabbed me and I had to start it. As I work through this build, I am learning a lot. Some things are sinking in only after the fact. In my next installment I will show how I added some magnets to the weapons on the wings. Learned a little about size and strength of the magnets "after" the parts were magnetized and how it affects being able to remove the parts. Especially the missile tips that are used on the Storm Raven kit.
Another kit I picked up was the Thunderbolt kit. It is all resin and seems to have avoided a number of the problems that the Storm Eagle has. I was able to mostly dry fit the Thunderbolt together without too much trouble. Both wings on it have a slight twist warp, but compared to the SE they will be quite simple. Am currently making plans on how and what I want to build that as. As I also have the Thunderbolt pilot figure, I am thinking about a diorama of something from the Dan Abnet book "Double Eagle".
Forge World's Thunderbolt kit:
 My initial impression of this kit is that it might be suitable for a first resin kit. The parts are fairly well made and designed such that they shouldn't have too much warpage. As with any resin kit there will be a fair amount of cleanup and fit work, but not any more than expected. The Storm Eagle rather surprised me with how poorly everything fit, though most of the hard work is now behind me.
Automatically Appended Next Post: Time for the next installment on this build. With this installment all the posts will be caught up with the posts I have done on some other forums. As I am working on the next post for magnetizing the weapons and some other things, this needed posting. Enjoy!
My initial impression of this kit is that it might be suitable for a first resin kit. The parts are fairly well made and designed such that they shouldn't have too much warpage. As with any resin kit there will be a fair amount of cleanup and fit work, but not any more than expected. The Storm Eagle rather surprised me with how poorly everything fit, though most of the hard work is now behind me.
Automatically Appended Next Post: Time for the next installment on this build. With this installment all the posts will be caught up with the posts I have done on some other forums. As I am working on the next post for magnetizing the weapons and some other things, this needed posting. Enjoy!

 More coming soon!
30598
Post by: samk99
Looking good, wish i had the courage to take on something like that!
12313
Post by: Ouze
I'm really enjoying reading this. I love the look of this kit, but several people have posted here about how difficult of a build it was, and your notes really ram that home - I don't think I'm capable of building this yet. I'll have to live vicariously through your tale.
54386
Post by: reps0l
^Ditto.
29223
Post by: frozenmilk
I'm really enjoying reading this. I love the look of this kit, but several people have posted here about how difficult of a build it was, and your notes really ram that home - I don't think I'm capable of building this yet. I'll have to live vicariously through your tale.
I'm in the same situation, both in enjoying this build and in being nowhere near ready to build one of these myself.
Though that Thunderbolt does looks more my speed... 
42144
Post by: cincydooley
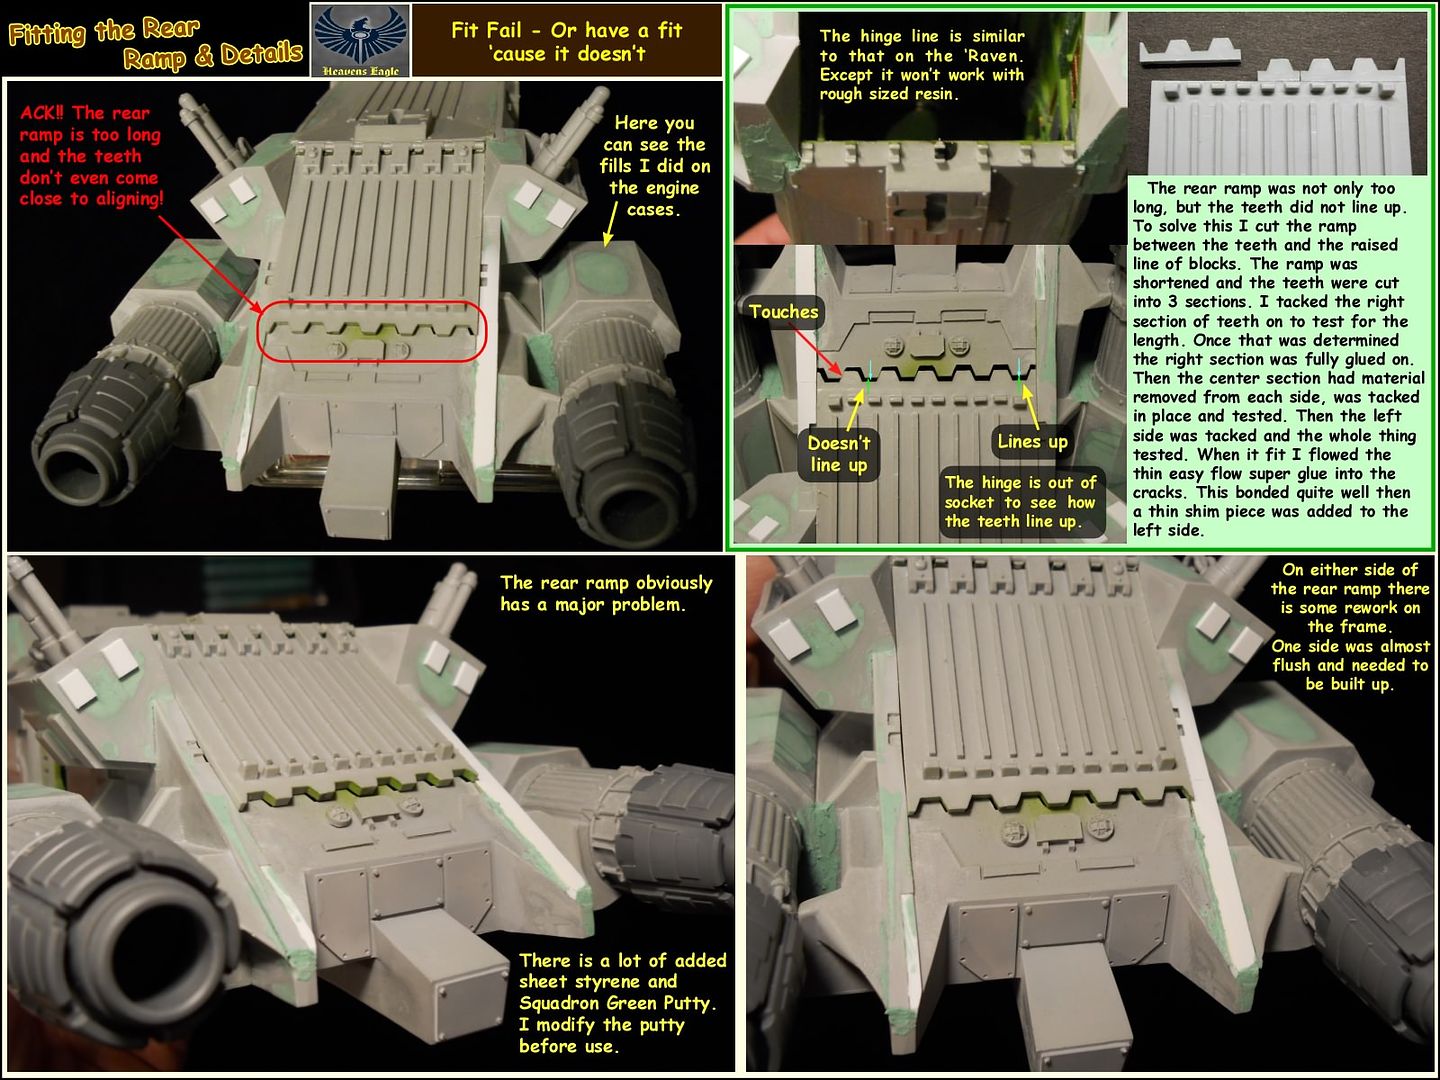
Man, that rear ramp was a frakking nightmare. I had to shave it significantly. It's almost as if it's the wrong part. Seems like you had that same experience.
44933
Post by: Mutley
Wow. Just....wow. Thank you so much for this blog! A goldmine of tips, techniques and knowledge here. I look forward to seeing more from your good self, sah!
53994
Post by: Millicant
This is an incredible tutorial. Thank you for your hard work putting it together!
I have to echo earlier comments - this makes me nervous about large Forgeworld kits! I already have a rather large aversion to resin... plastic is just so much easier for me.
That being said, you mentioned that the Thunderbolt dry-fits more easily - easily enough to recommend it as a first FW purchase? For that matter, any chance you'll do a similar write up on that guy? I have been lusting over it for a long time and have been hesitating mainly because I'm afraid to have to build it!
70060
Post by: Heavens Eagle
I probably will do one of these kind of info builds on the Thunderbolt when the time comes, though it won't be a straight build. I am already planning a lot of modifications and I need to re-read a couple of paperback books first.
As far as working with the Forge World resin, it is fairly easy to work with. Hardness is somewhere between the plastic GW kits and the Finecast resin. (I am not a real fan of the poor Finecast stuff) The Thunderbolt parts are definitely much better on the kit I have than the Storm Eagle parts. Of course there will still be a fair amount of clean up and touch up. That is just part of building the larger Forge World kits.
70060
Post by: Heavens Eagle
Here is the new post everyone! It ended up being quite large this time, but I am now caught up post to where I actually am on the build.
Enjoy and as always feel free to ask questions and let me know what you think!
 That's all for now! Stay tuned!
49292
Post by: Eiríkr
Stunning!
I love it.
43399
Post by: monkeyh
Great thread! FW models are lovely but fitting them together can be a real nightmare!
8666
Post by: Joyous_Oblivion
And I had really wanted one (three actually) of these models for a custom army project...but seeing the quality, or lack thereof in the model is making me very, very skeptical.
You've done an amazing job though, making it work.
36718
Post by: Lovepug13
I have my storm eagle in a metal kr case with custom cut foam.......they are easily broken so be sure to give this great model you are working on a decent storage system lol
70060
Post by: Heavens Eagle
Lovepug13 wrote:I have my storm eagle in a metal kr case with custom cut foam.......they are easily broken so be sure to give this great model you are working on a decent storage system lol
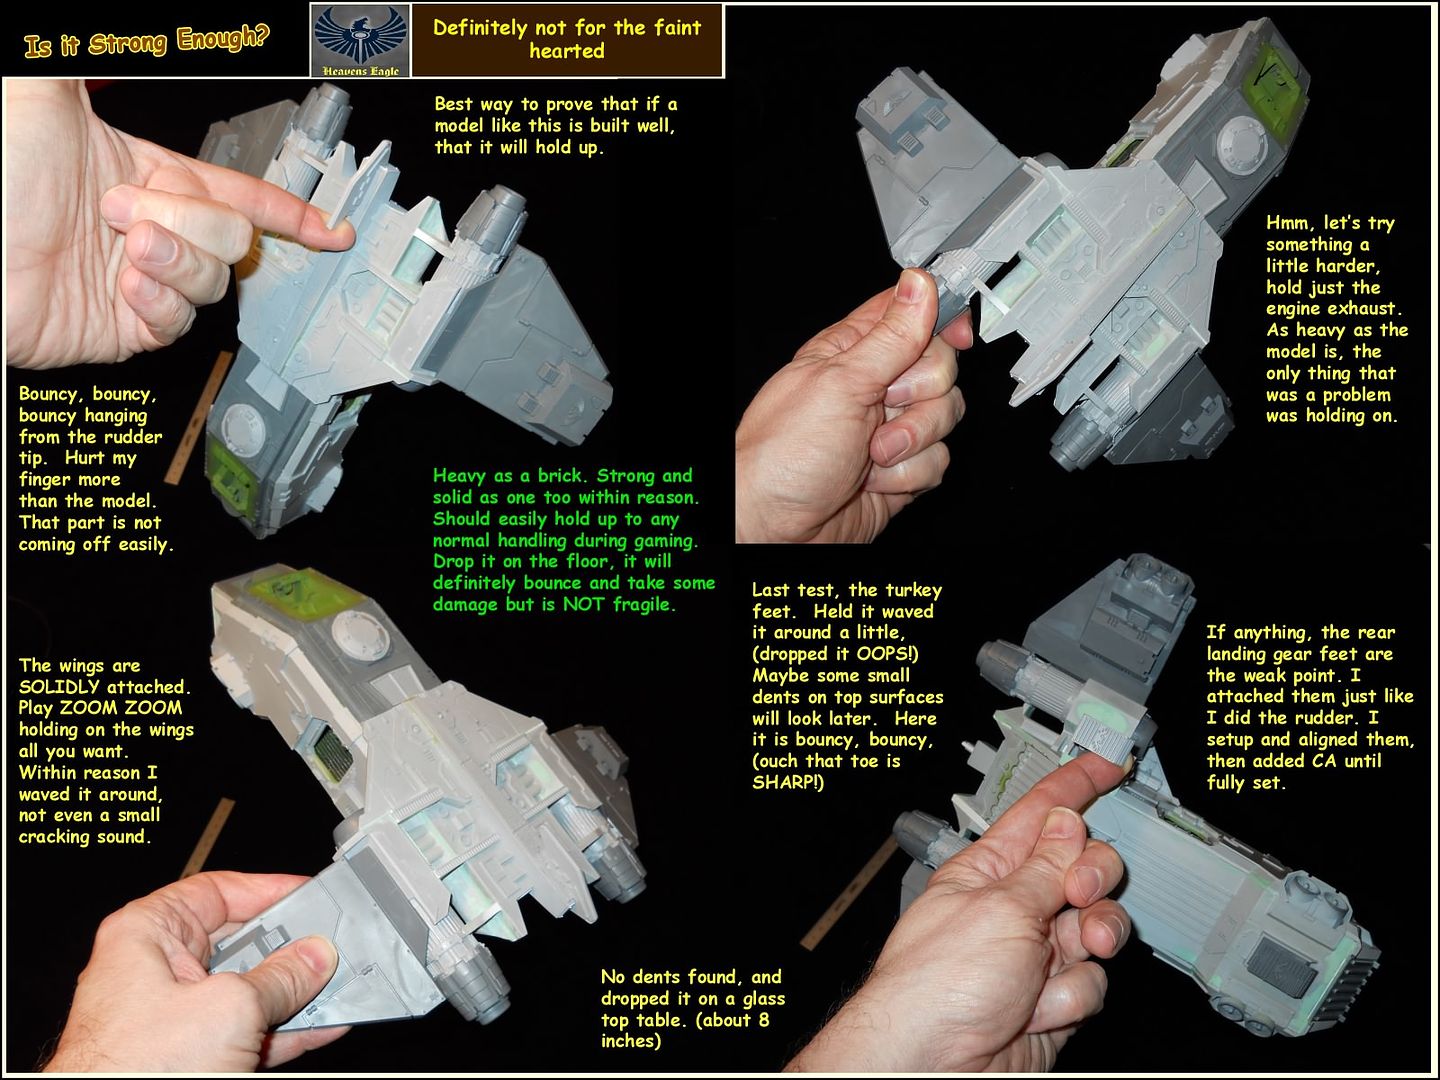
I'm glad you brought that up! Actually this build is quite strong. If I dropped it, whatever actually hit a hard floor might break, but with the care taken with fitting parts and the particular adhesives I am using it is really quite rugged. I saw one build where the guy was using some kind of brush on "super glue". The CA glues I use would turn the brush into a lump in short order, so I am not sure how well that particular adhesive actually would work in this case. I have no problem picking the model up by either wing they are that solid. The canard wings might pop if they get some heavy stress, but then again they might not, the glues I use are quite strong and the way it is attached makes a lot of difference as well as the prep. Even attempting to get any of the main parts apart would probably end up with things totaled.
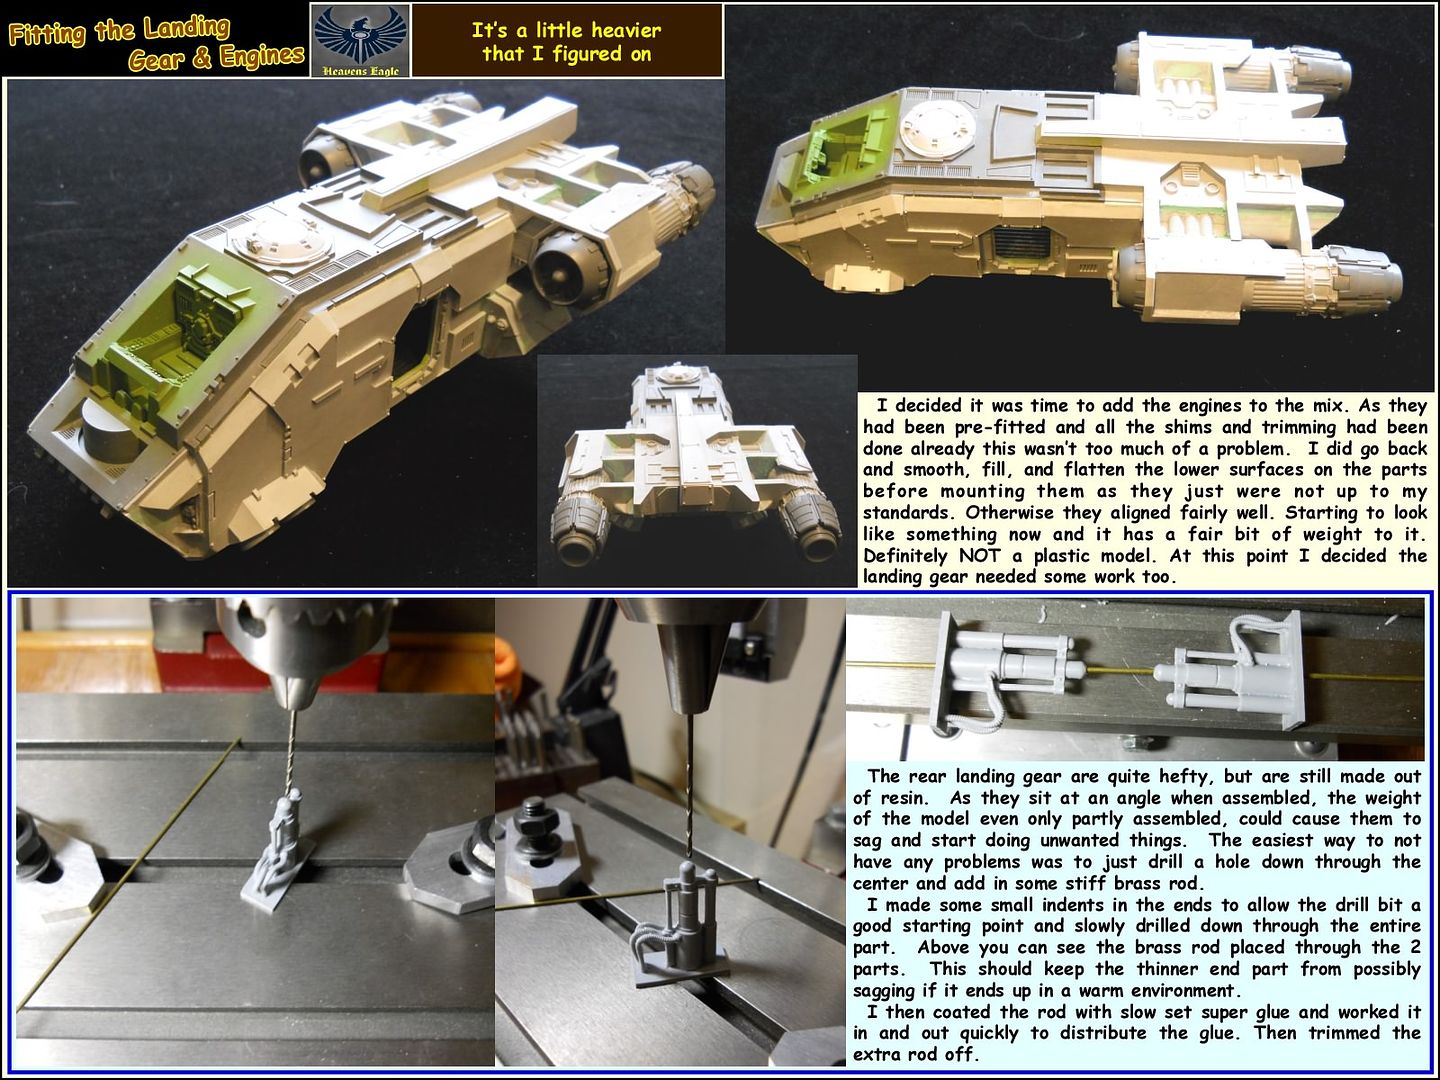
I actually did some tests, and while they don't quite do the same justice as a video would, this beast is quite solid. Even the rear landing gear are quite solid for what they are.
 So everyone, enjoy the bonus post! I had been intending to do this and
 LovePug13 just provided the right setting. Thanks!
36718
Post by: Lovepug13
My pleasure, I am paranoid handling mine......the model that is lol
70060
Post by: Heavens Eagle
Hi folks!
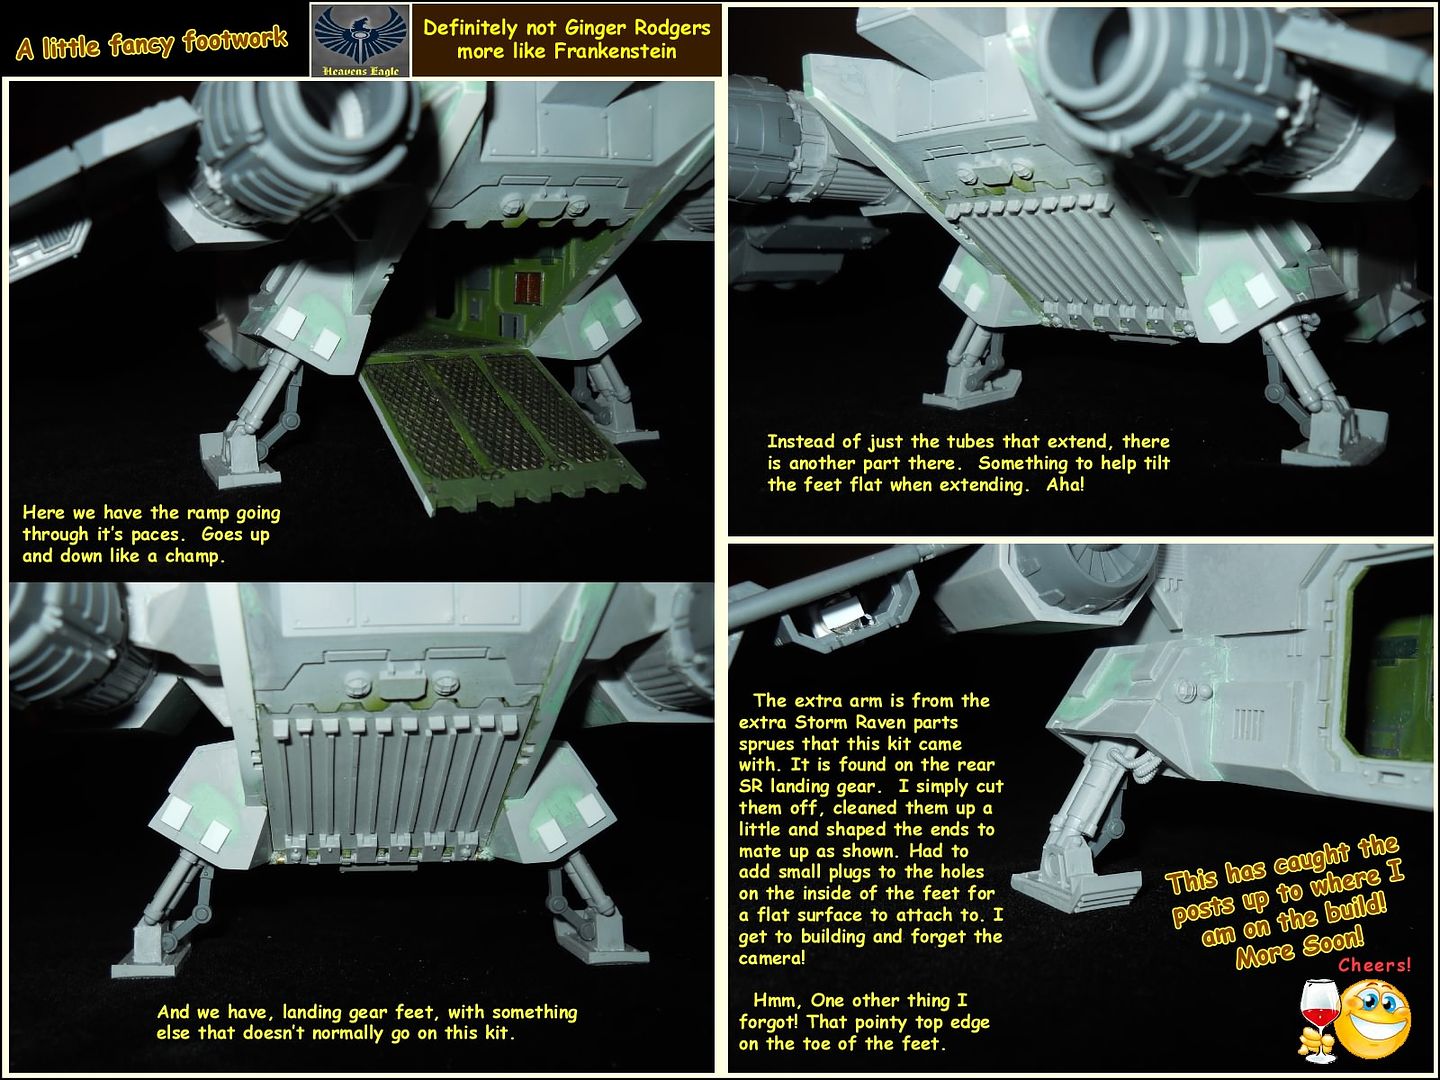
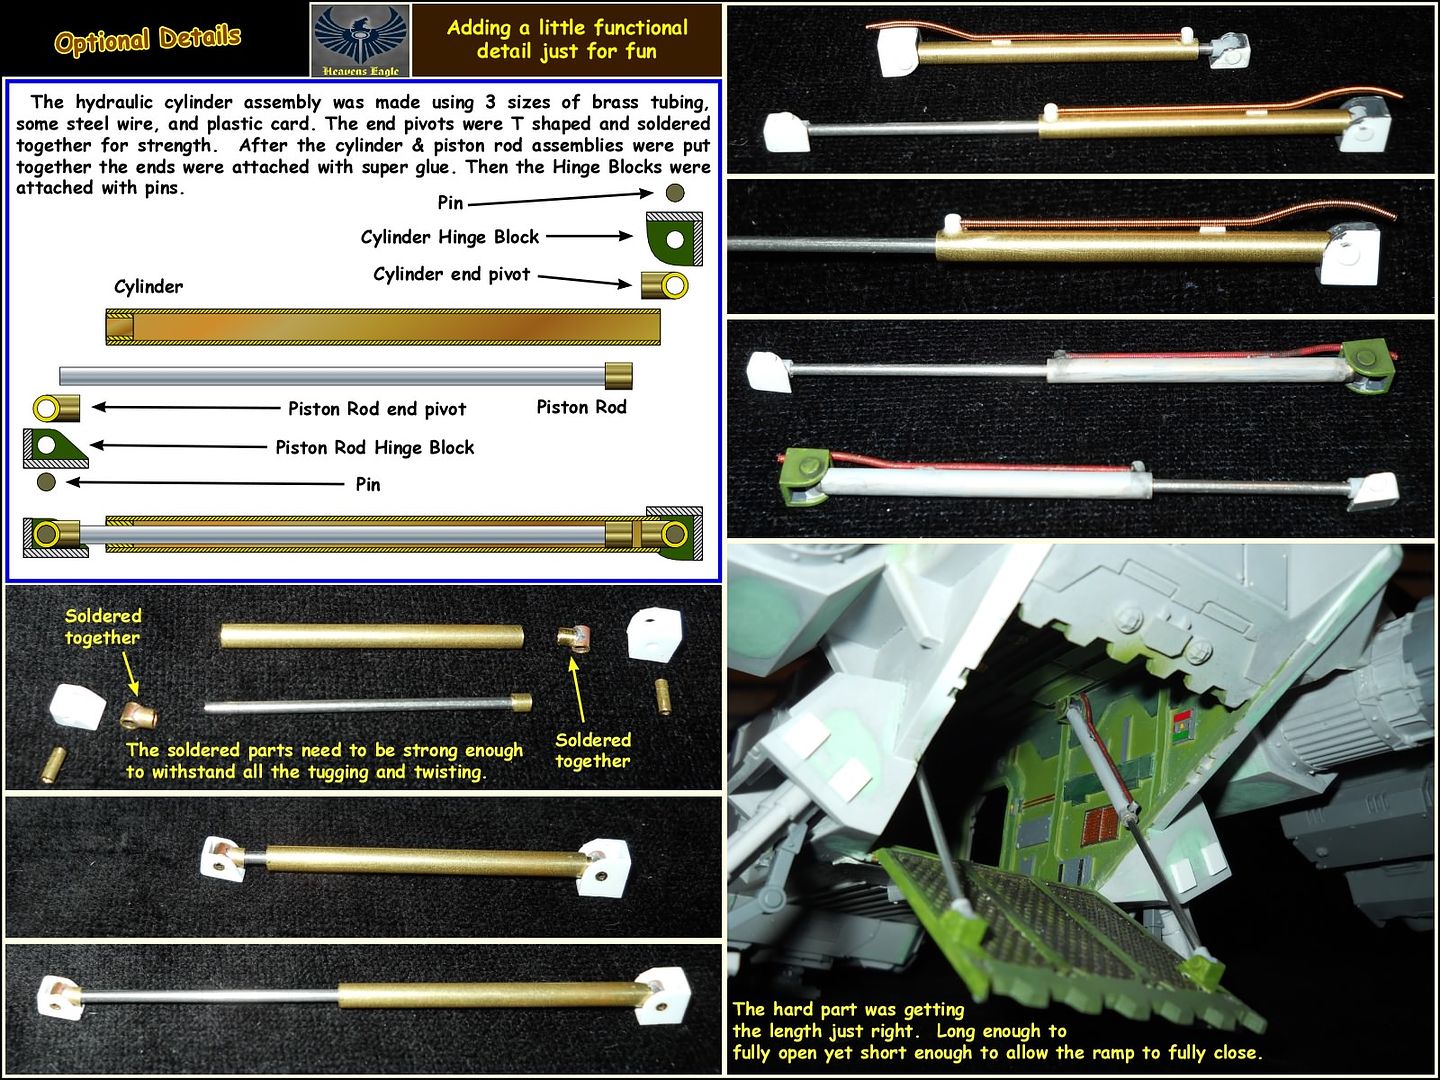
Still plugging away at the Storm Eagle, been working on some detail stuff and all of the detail stuff I have been working on is totally scratch. Added some plumbing behind the outer engine covers and added 2 hydraulic units to the rear ramp. I will show how I did all the parts, the seemingly hard stuff was actually quite easy if you have the base materials. I will probably have a new post later this weekend so keep your eyes open!
7161
Post by: Necroagogo
Lovepug13 wrote:I have my storm eagle in a metal kr case with custom cut foam.......they are easily broken so be sure to give this great model you are working on a decent storage system lol
Mine's in a BF tray, using their template.
This is a superb tutorial - would have made assembling mine sooooo much easier. I wish I had half your patience and skill, as mine looks like it was put together by Orks by comparison
51750
Post by: NoArmorSave
Awesome tutorial. I love it.
On another note, I would never consider purchasing this model. The amount of work and potential for a bad build is not worth it IMO. I prefer the GW plastics and smaller forge world stuff.
70060
Post by: Heavens Eagle
In looking around the internet, the reviews and builds on this particular model all show the same problems. It is not for the casual builder or someone new to the hobby. However if you want a unique model that few people will have and want to challenge yourself, it is that. I have not found another thread where someone went to the detail I have on building a kit.
While the kit has some major faults, it is a RESIN kit and as such will always be quite a bit more of a challenge to build. To me it seems obvious that the person that made the original sculpt (?) was not as experienced with some of the problems found in larger resin parts. If that were the case some things would probably have been done a fair amount differently.
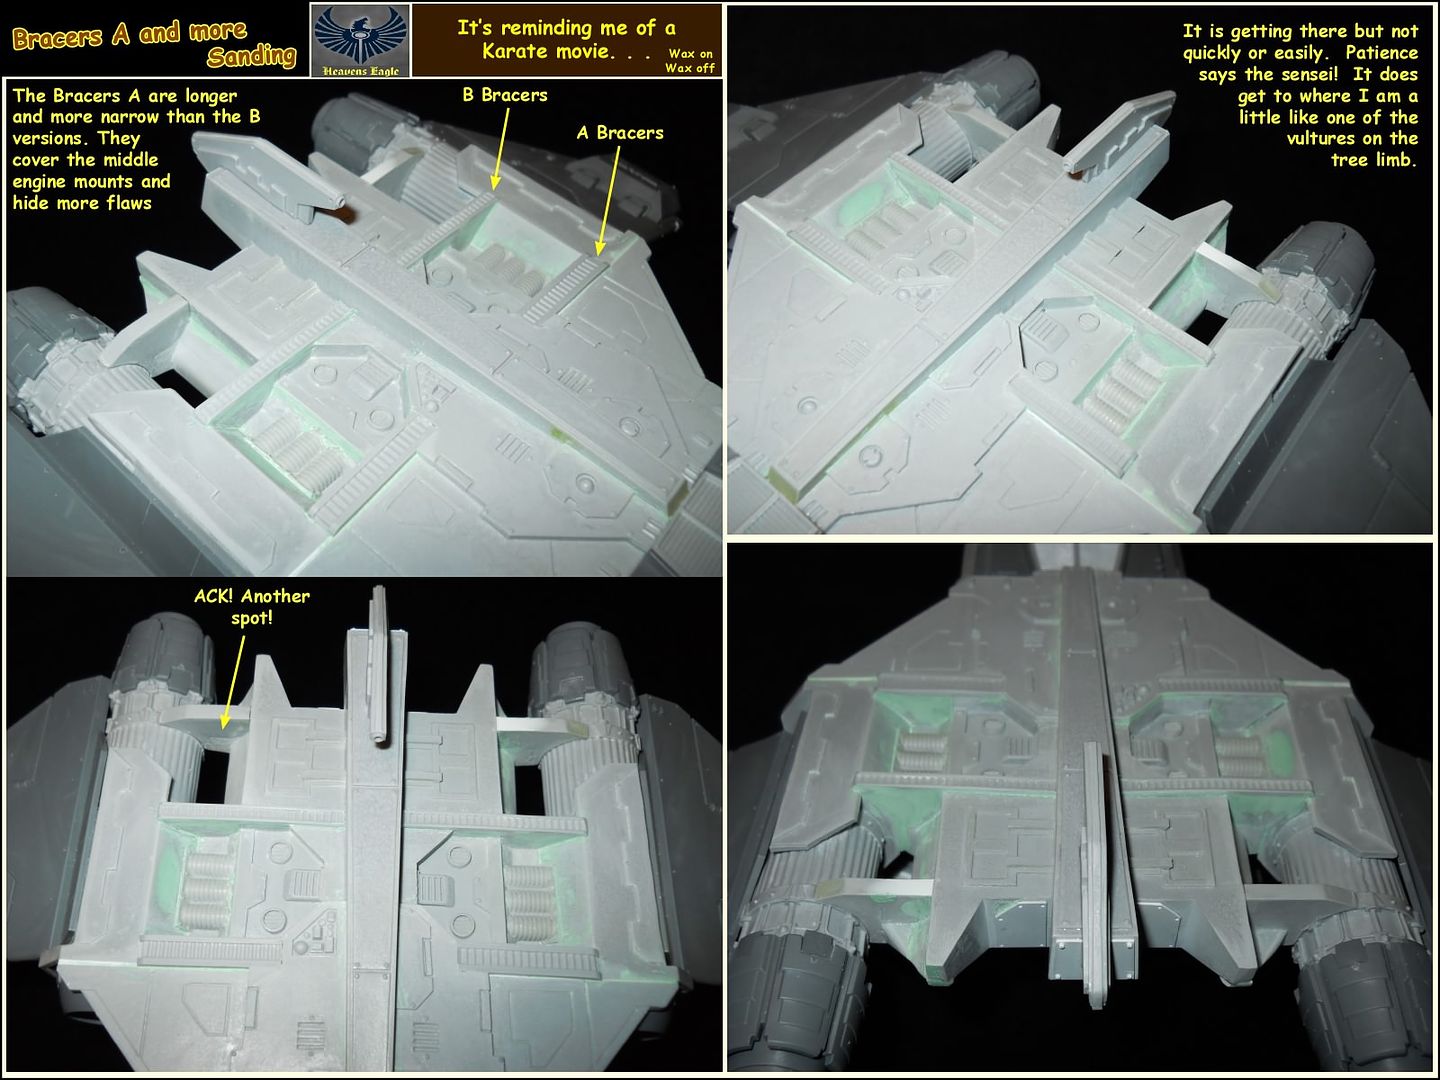
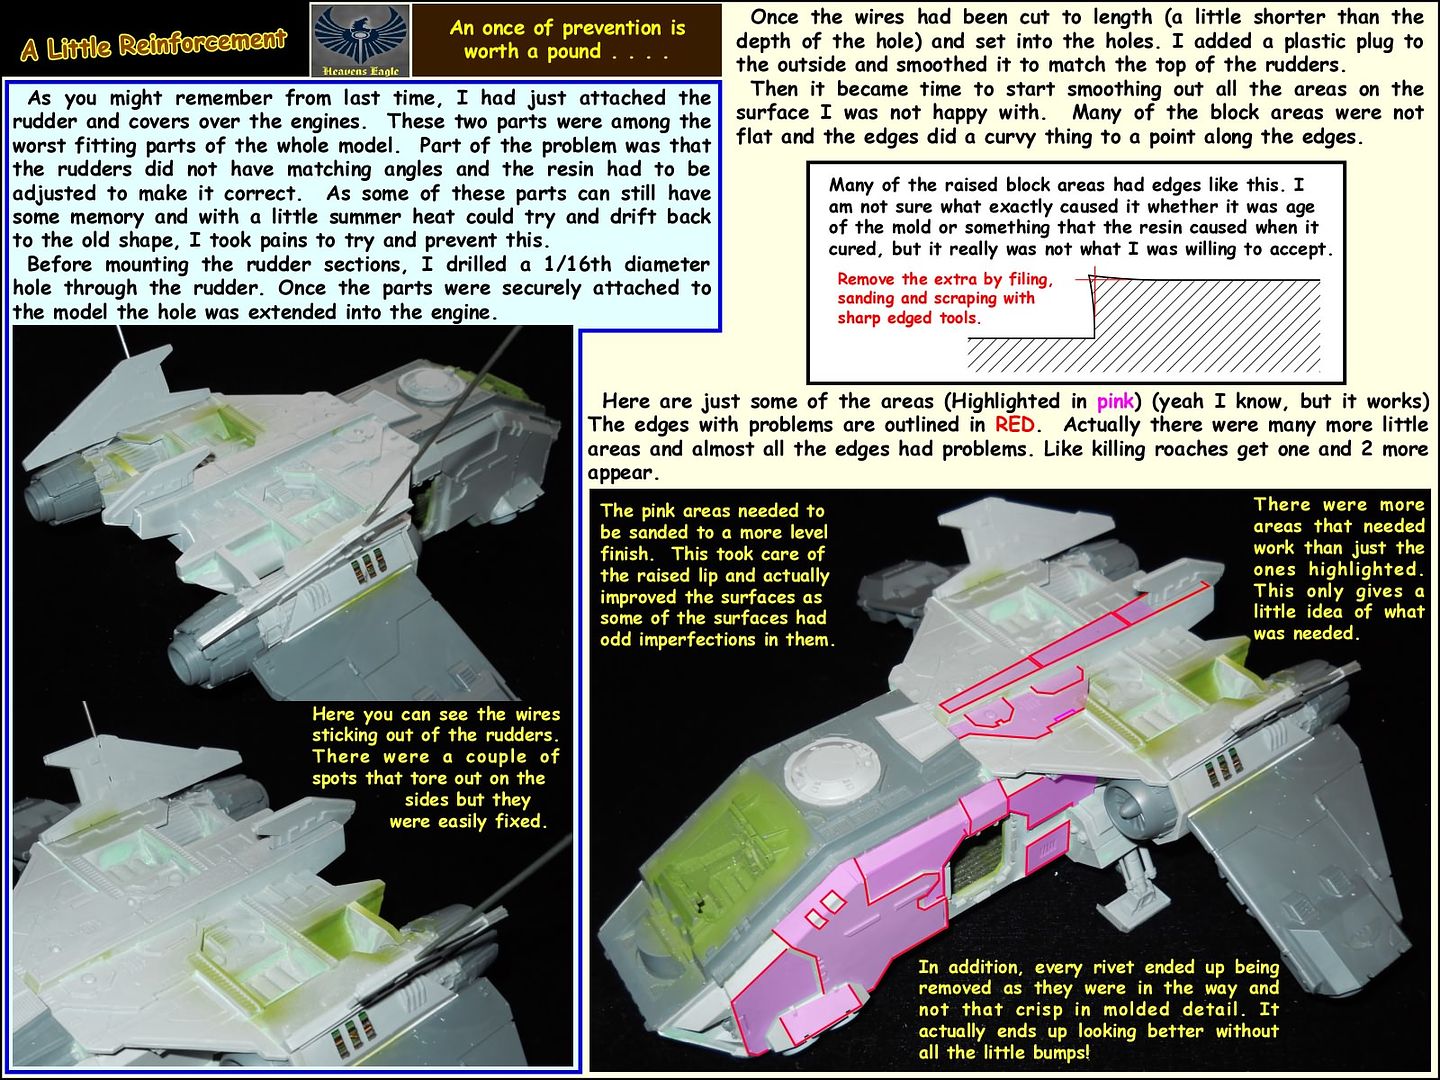
The reason I say that is the two rudder/engine cover pieces that I have been working on should have been 2 separate pieces each. One piece being the rudder and one being the engine cover. The parts would have been simpler to make AND would have been accurate to assemble.
As I bought this second hand, the warpage problems could very well have been from where it had been stored. A garage or attic on a hot Memphis day could easily soften the resin enough to allow things to reshape slightly.
As to resin model cost, while the material isn't all that expensive, the cost of the mold material, limited number of parts from a single mold, and the labor to make the parts, contribute a lot to the final cost. Personally if I were to make say a Thunder Hawk kit, a large part of the kit would be laser cut acrylic with resin detail to be added. This would solve many problems and the cost could be reduced. The kit would still be quite a challenge, but working with accurate parts solves many of the problems.
A better example would be the huge resin gate that FW has. That thing is mostly flat sides fitted together. The $1400 cost is quite prohibitive. If most of it were laser cut acrylic and then add resin details where needed, the parts would be lighter and easier to handle, and the labor, resin used, molds used would be greatly reduced.
Enough of that soapbox. Folks build and create as they have skills and desire. At the Memphis bunker one of the employees scratch built a version of the Storm Eagle using a Storm Raven kit and a Land Raider kit. To my eye not quite as pleasing lines as the FW kit, but still an impressive build and it took probably as much work as I have put into this kit. Don't get me wrong, it was a beautiful model and was painted exquisitely in a blue and light grey color scheme. Again the only limits are what do you want to attempt?
70060
Post by: Heavens Eagle
Hey All!
I have been busy the last couple of weeks. Have added some nice details and finally was able to attach the rudder pieces to my satisfaction. They were an absolute bear and were the straw that ka-bashed finishing this kit in time for a Group Build on another forum.
Anyway there is much goodness in this post so enjoy! As always questions and comments are welcome!

46016
Post by: IK-Painter
Just... wow - really stunning tutorial and a slew of great tips.
On another note, I've heard that FW casts can be bad, but this? Amazing how they justify to charge a premium price for a product which has to be corrected this much...
Cheers!
36660
Post by: godswildcard
I'm going to start an investigating you for possible use of Black Magic. The complexity and attention to detail is mind-boggling! Many kudos to you sir!
51138
Post by: AtariAssasin
Clearly, RESIN is a better quality material.... This is an impressive undertaking.
12313
Post by: Ouze
In an ideal world, all the awesome kits we like would be released in plastic. However, in this world, plastic is not an economical choice for small production runs that would never earn back the cost of the molds.
So, the alternatives are metal or resin. I daresay this tutorial would not exist if this model was metal, since there is no way to do as extensive cutting as the OP has done, at least not easily. In this case, resin clearly is the better choice.
Trying to put the blame on the resin material is.... misplaced. To put it differently, your statement is similar to me buying a Ferarri, immediately driving it into a hydrant, and then saying "Ferrari's suck". There is nothing wrong with resin and countless garage casters are putting out great kits with it every single day. Unfortunately, Forge World lacks the professionalism and skill of those random guys in their basements and garages.
70060
Post by: Heavens Eagle
Actually the real problems with this particular model do not stem from the material it is made out of. This particular resin is fairly easy to work with. It is easy to cut, especially with a sharp new #11 X-acto blade or one of my razor sharp jewelers gravers. It actually cuts and carves easier than the plastic parts of the kit.
As far as hardness and strength, the resin is almost the same as the plastic parts. So there are no real problems that should come from the materials part of the kit.
The problems on this kit stem from a poor master. While I have not done a lot of sculpting, or molds, the point is that you make the master as close to perfect as possible. Any flaw will be replicated over and over. This kit has those in abundance. At the moment I am cleaning up and filling areas around the side door recesses that were not finished properly on the master. These are not mold imperfections, these are square blocky undercuts where the sculptor just didn't fill it in. There should be no excuse for those flaws. On a figure, some of that can be left as it is part of the character. On an Ork type vehicle, they are slapped and clapped together and it is the rule rather than the thumb. So there is the starting point for problems.
Next you have fit between the parts. Again if the masters are just thrown together and the fit is "good enough for Go'ment wurk" there will be problems. Again the quality has to start with the very first piece. Accuracy or lack of it just compounds over the next steps.
Secondly there are the molds and the mold making process. All rubber molds will change size over time. Shrink a small amount usually, though the composition and hardness of the rubber can reduce this to a negligible amount. The mold parting lines and how they are ported also can have an effect on quality. Usually for production casting situations, the master is supported and the mold is poured around it all at once. Once the mold has fully set an experienced person using a new sharp scalpel will carefully cut the mold away from the part in such a way that the 2 halves sawtooth to each other for alignment. This is done with jewelry and many other molds. If this isn't done right there can be serious mismatch between the 2 halves and you have to deal with serious mold lines. The side slabs had a little problem with this, the upper rear part and rear landing gear housings were horrible.
Lastly the casting process can have a positive or negative effect on the finished parts. There are a number of ways this can be done. One is that the mold is placed in a machine that spins it and the liquid resin is added at the center of rotation and centrifugal force makes it fill the mold and hopefully push the bubbles out of the way. The gating to allow air to escape is very important as well as large enough gates to allow resin to enter. The Fine Cast minis are done this way, it is no wonder that they have an abundance of air bubbles and warpage to the cast. The spinning can deform the mold and items with a lot of small intricate detail will collect air bubbles. Usually FW models don't have too much surface detail, but looking at the parts the molds do deflect a little and cause some deformities.
Another casting process uses vacuum and air pressure to make the resin fill the mold cavities. Resin is poured in a mold and it is set in a pressure canister. A vacuum is drawn and held long enough to make the air purge from the liquid resin, then air is allowed back in and slowly brought up to pressure and held for a period of time. This usually doesn't cause mold deformation and usually removes all the air bubbles. The drawback is that it takes more time and equipment, and in production situations that equals money.
So the process is:
1. Make the master pattern- needs to be as accurate and perfect as possible.
2. Determine casting process and make the molds. Mold composition and how it comes apart are quite important.
3. Casting the parts and attention to the process and how consistent it is and how many defective parts come through.
In the case of the FW Storm Eagle, the very first step has the most issues and flaws. The only way to correct those is to either remake the masters or at least re work them to address the flaws. In the case of mixed media (plastic and resin) models, if the allowances have not been worked into the parts that mate up with the other media so that the "FINISHED" resin parts mate properly with both the plastic and each other, you end up with the fit problems that this kit has.
In the case of a single media kit, say the Thunder Hawk, since all the parts are resin, all the parts are cast and the molds are made in similar ways, it the fit between the master parts is good then the fit between the resin castings should be acceptable. Warpage will always be a problem, but if the molding is done in a consistent way that keeps problems to a minimum, even a large kit can be easily built.
So sorry for the long post, but as I understand it those are the processes. Where this particular kit has the most trouble is right from the master sculpt pattern. The only way that can be fixed is to fix the pattern or start over and make a new one. Until then we have what we have. It is possible to build it quickly if you are not too picky about appearance. Many of the faults could be covered by a nice paint job or a lot of Green stuff or putty. If however you want a kit that will make folks stop and have to check it out and look some more, the work will have to be done to repair almost everything.
Since I am absolutely OCD about doing this kind of stuff, it is getting the royal treatment.  Again folks, I much appreciate the wonderful comments and how many of you are following the thread. It's folks doing the "How'd you DO that?!?!" that keeps me going.
52163
Post by: Shandara
It's quite shocking how this kit fits together. The only big FW kit I have (Avenger Strike Fighter) fit almost perfectly, with minimal gaps needing to be filled.
Then again that's a complete resin kit and likely a better master...
It's amazing how you managed to turn these warped pieces into something that fits.
6679
Post by: mercer
Well done for building this, it looks a complete ball ache.
I would have to say I would be pretty pissed off if I got something like this from F.W. I keep seeing in your images how things do not fit right etc. Not something I would expect from an expensive model.
54500
Post by: hk1x1
I love your attention to detail, like all the pipe work behind the vents and those working ramp pistons, Excellent work.
21450
Post by: Stealershock
You are absolutely mental! The things you are doing are amazing, gorgeous, mind-blowing, and pretty frustrating all at the same time. I think I would have just hauled in for a refund after the second or third major moulding issue, you just seem to keep rolling with the punches and finding new, stunning ways to make the kit look perfect.
I can't even think of anything appropriate to say about it in terms of how good it is, or what I would do, but please, for the love of everything that is holy, keep at it, and I would love to see more work like this from you in the future.
Exhalted!
51338
Post by: Ulterior
So... Do you do commission assembly?
70060
Post by: Heavens Eagle
Thanks for the encouraging comments! The build is progressing. Mostly it has just been smooth and fill, repeat, and repeat again. Worked on the beast a lot this weekend doing a lot of fix on the outer surfaces.
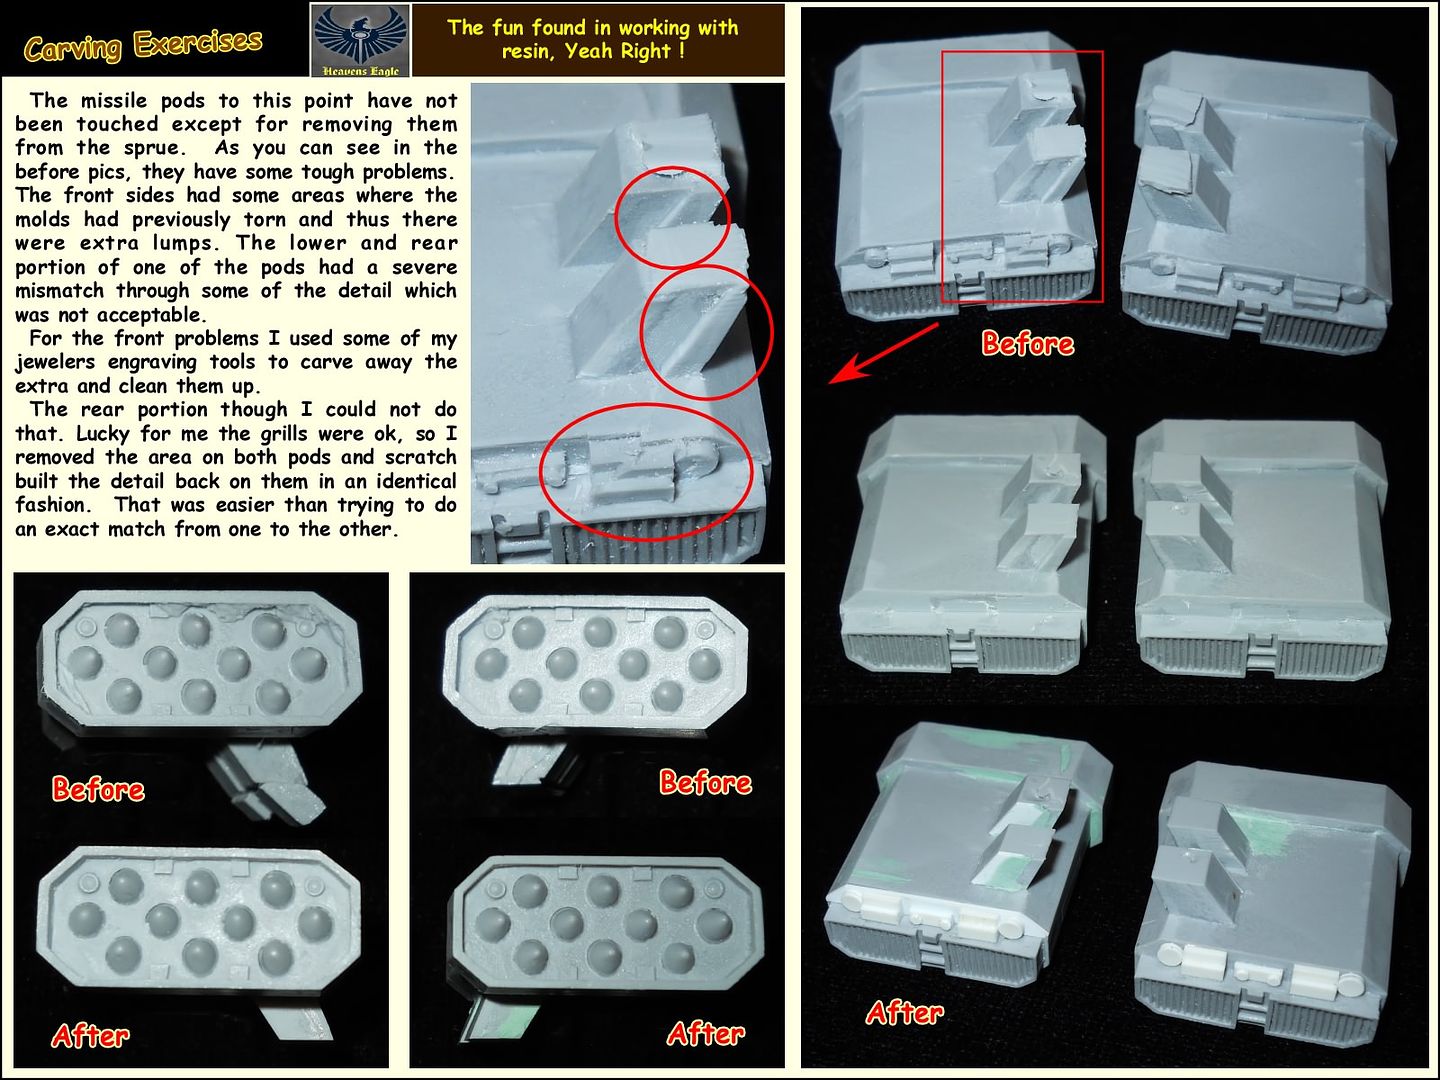
Also had to do some rebuild on the lower rear detail of the missile launchers. One of them wasn't too bad but had a fair amount of flash. The other one had a big error where the mold shifted and misaligned by about 1/16th of an inch right in the center of the detail. The only way to really fix it well was remove all that detail from both launchers and redo it from scratch. Came out looking better than it started on the original I think. Will probably noodle it up some more in some of the depressed and inset areas as these would be somewhat protected. Will see once I get all the basic clean up done.
Am also removing pretty much all of the rivets that are done in resin. Since they are not consistent and mostly just funny shaped bumps, and the fact they are in areas I need to clean up it is easier to remove and replace them. I have an old Waldron miniature punch set and have used it to make more out of .020 thick styrene. Much better and a lot sharper look.
I almost forgot, the front of the missile racks had some serious problems from where the molds had pieces torn out from previous pours. A little careful carving with the super polished sharp jewelry graving tools cleaned that all up and can't even tell that it was messed up now. The molds were still slightly distorted during the pour and thus some things just aren't quite as nice as a plastic molded part. Can't really do anything about that without a total scratch build redo of the launchers.
This would be a great model to make a plastic mold for. It would still use the Storm Raven parts and some small sprues could be made as accessories for either craft. However with GW's current trend on overpricing it's models the kit would cost more than the current FW model.
As of today, GW has announced about Games Day for 2013. I am going to seriously try and finish this build to enter into the Golden Daemon contest. It will just depend on a number of things though. Will know more in a couple of weeks.
As to commission work, sorry, I learned a long time ago that I need to pass on work for others. My hobby time I have found needs to be for my hobby, anything that makes it into a chore pretty much kills the hobby part for me. I am still getting myself up to speed after almost 20 years off of any hobby stuff and I am enjoying the building and new skills that I now have that were just dreaming when I built stuff 20 years ago. Wish now I had been able to do this all along, but that is the breaks.
All this that I have described should be coming up in a new post in the near future. All the positive "atta-boys" is what really gives the drive to continue.
20086
Post by: Andilus Greatsword
Hopefully you do get it done for Golden Daemon, I've like to see it and compare it to my Storm Eagle. I didn't have nearly as much trouble with mine, but then again I said "eh, good enough" a few times.
72511
Post by: Muzzah
Those home made tools look like Torture devices made for your naughty models.
Its comforting to know that it isnt just me who finds kits dont fit correctly. Though i wouldnt say i torture my models in the way you do. You have a great deal of skill and knowledge. Almost like one of those a car is born programmes on discovery. Your talent speaks for itself, and its been great learning from a modelling master.
Kudos
72112
Post by: Primarchz
Wow..very impressive presentation and work.
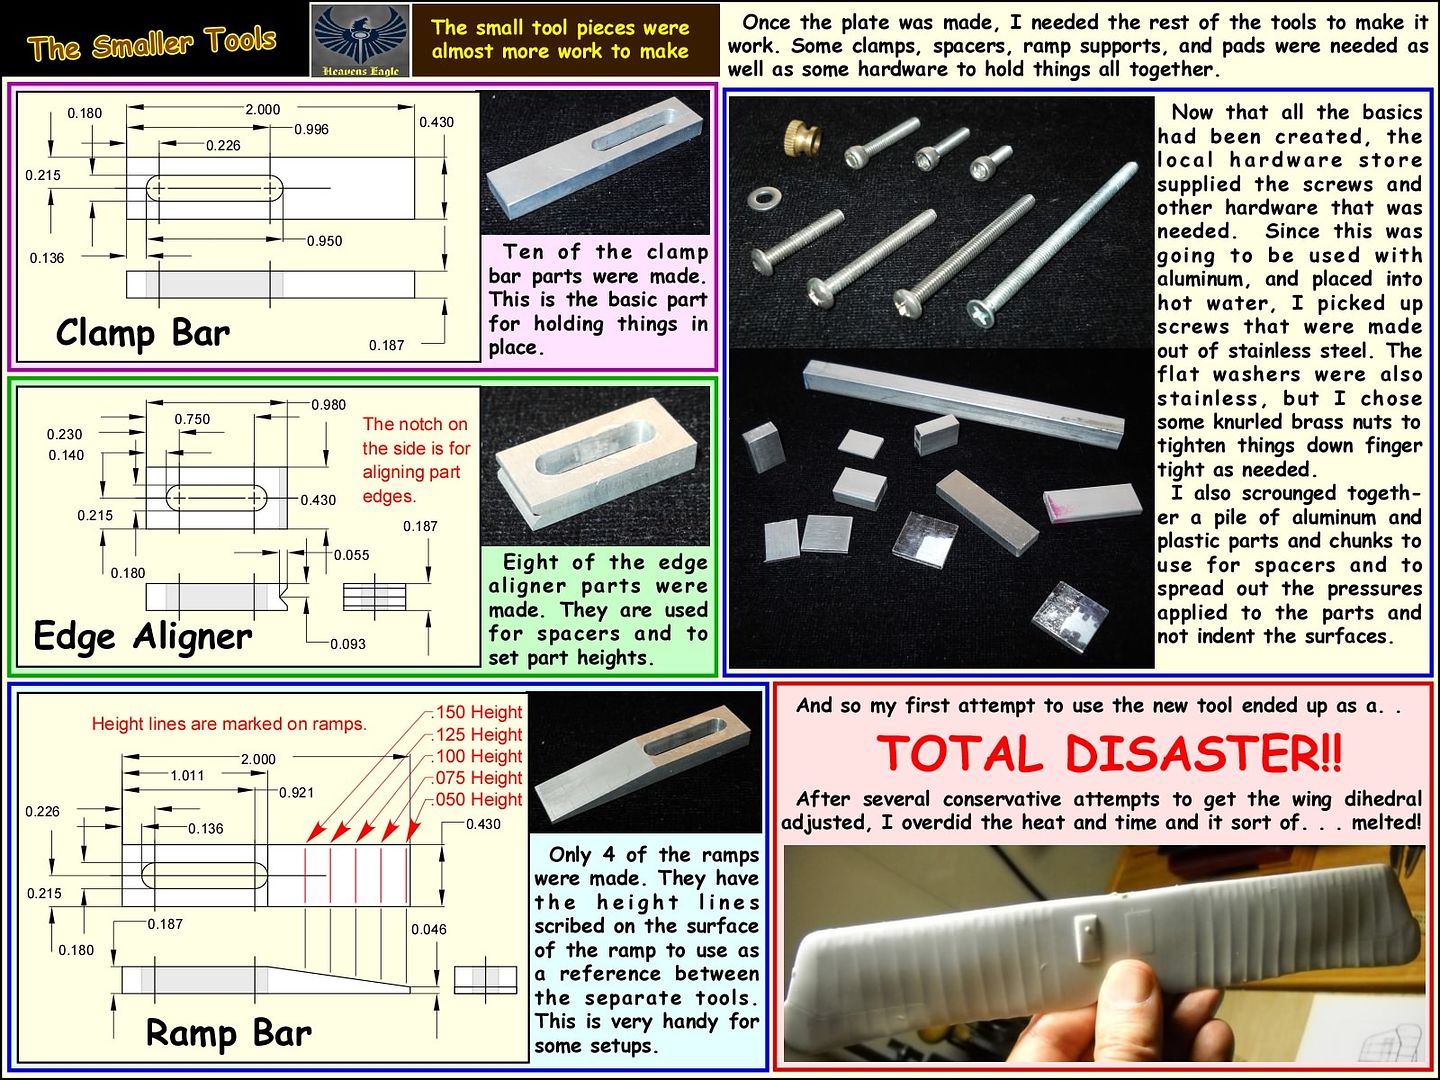
Can you pleeeaaase go into more detail about your tool you made for clamping, leveling, etc.? The type of parts you use for spacers, etc. Thanks
21954
Post by: EmperorsChampion
This is such an amazing thread and has so much great tips and tricks in it. But if anything I think it pulled me away from getting one. I think this made me realize how hard the model is and the level of difficulty. I even consider myself a decent modeler, but this is beyond me haha. I have a lot of respect for you and I cannot thank you enough for making something like this. Information of this nature should never be passed up.
53776
Post by: TheLionOfTheForest
Amazing attention to detail. I think you have turned me off from buying anything large from Forge World though, I dont fancy having to straighten tons of resin parts.
70060
Post by: Heavens Eagle
 Primarchz wrote: Primarchz wrote:Wow..very impressive presentation and work.
Can you pleeeaaase go into more detail about your tool you made for clamping, leveling, etc.? The type of parts you use for spacers, etc. Thanks
Don't fear Primarchz! I have heard your plea and will give everyone some info if they desire to build their own tool. Actually I am considering building a slightly larger plate. The one I have is perfect for the hot water dip for warped parts, but it could stand to be 2 inches longer and 2 inches wider when using it for a building jig. If you like how it works, it isn't really that hard to build, as long as you are willing to spend several hours drilling holes and then tapping the holes to your favorite screw size.
 TheLionOfTheForest wrote: TheLionOfTheForest wrote:Amazing attention to detail. I think you have turned me off from buying anything large from Forge World though, I dont fancy having to straighten tons of resin parts.
As I have stated before, don't let the level of trouble this model has hold you back from all large FW kits. I have seen the large titan type kits built up into gorgeous models! They are expensive, but are not like this kit in the least. Where the Storm Eagle has slab sides and mates up to plastic molded parts from the Storm Raven kit, many of the FW kits are a lot sturdier and do not have the problems this one has. If you really want to build a kit, do the research! Look all over the net for reviews and builds that other people have done. If you find the builds, but no information on how easy or difficult it was, simpley ask in a nice way. I don't know of many modelers that won't go into detail on their build if someone asks about it in a flattering way.
I have one other FW kit of the Thunderbolt. Out of the bag it seems to fit together much better than this one, (of course that won't stop me from doing every type of modification I can thik of to it). In the back of my mind I am picturing that one quite heavily damaged and having been somewhat crash landed on the tarmak with the valiant pilot just standing there looking at his pitiful ride. The crash crew already climbing over the craft and crew chief shaking his head wondering how he will fix it. That is for another time though.
Anyway, with ANY resin kit there will be more challenge to build it than you will find in a molded plastic model. Molded plastic is done in (hopefully) precision metal molds that don't shift and with care don't wear out. Resin is done in various types of rubber molds that by their design can flex and need to flex in order to remove the finishe parts. Large thick parts rarely will warp after they are made, though they might need a little tweak if the mold was overly flexed while the resin was curing.
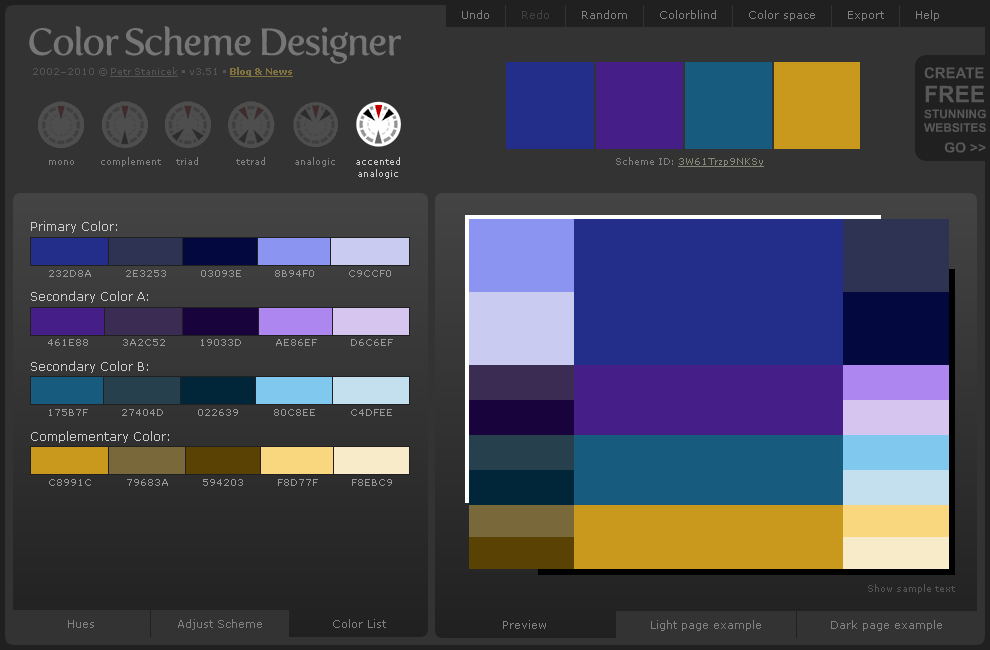
OK now I have a question for everyone, I don't know how to set up a poll on here, so I will just have to ask you to post. I do not actually have an army for this model yet. I am leaning toward doing a very obscure chapter and having it done up in a blue grey over an off white/tan. Anyway here is a color chart I created using This site. http://colorschemedesigner.com/
The basics for the colors I am thinking of using are mostly in this pic captured on the site. If you have some ideas or suggestions, I am open to most. Just a note up front, I am not fond of the color schemes where the colors are different either in half or quarters. Two color schemes where the colors are done for example Dark Angels. I won't use DA even though I like the colors as GW has put gouge (or as they say) goblin pricing on their DA models. I refuse to pay for that kind of larceny. So If you have some ideas, or can provide a link to the color scheme on "Color Scheme Designer" (the URL will have the Scheme ID in it) I am looking for ideas.
 Thanks all! There is more done on the model at this point and it really is very close to getting the exterior paint it richly deserves!
22687
Post by: MajorTom11
You are an effing crazy man! Awesome, such amazingly precise technical prowess... really floored... I'm not sure what is more work, fixing this storm eagle or building my pre-storm eagle storm eagle MT11 pattern stormraven from scratch... I have no idea how a kid is supposed to pull building this thing properly off...
70060
Post by: Heavens Eagle
 MajorTom11 wrote: MajorTom11 wrote:You are an effing crazy man! Awesome, such amazingly precise technical prowess... really floored... I'm not sure what is more work, fixing this storm eagle or building my pre-storm eagle storm eagle MT11 pattern stormraven from scratch... I have no idea how a kid is supposed to pull building this thing properly off...
Hey Tom! I found many of the GW "plastic" kits are fairly easy to assemble. By the time I was 10 these would all have been easy stuff. (of course that was a bit over 40 years ago) The actual Storm Raven kit isn't really much to look at. The wing locations are way too far back. I found a simple modification that requires 6 small cuts either with a knife (more difficult) or a razor saw (fairly easy) that transforms the whole look and balances out the model. Otherwise it seemed quite easy to build with just a little attention to fitting parts.
I did look in on your build, interesting conversion!
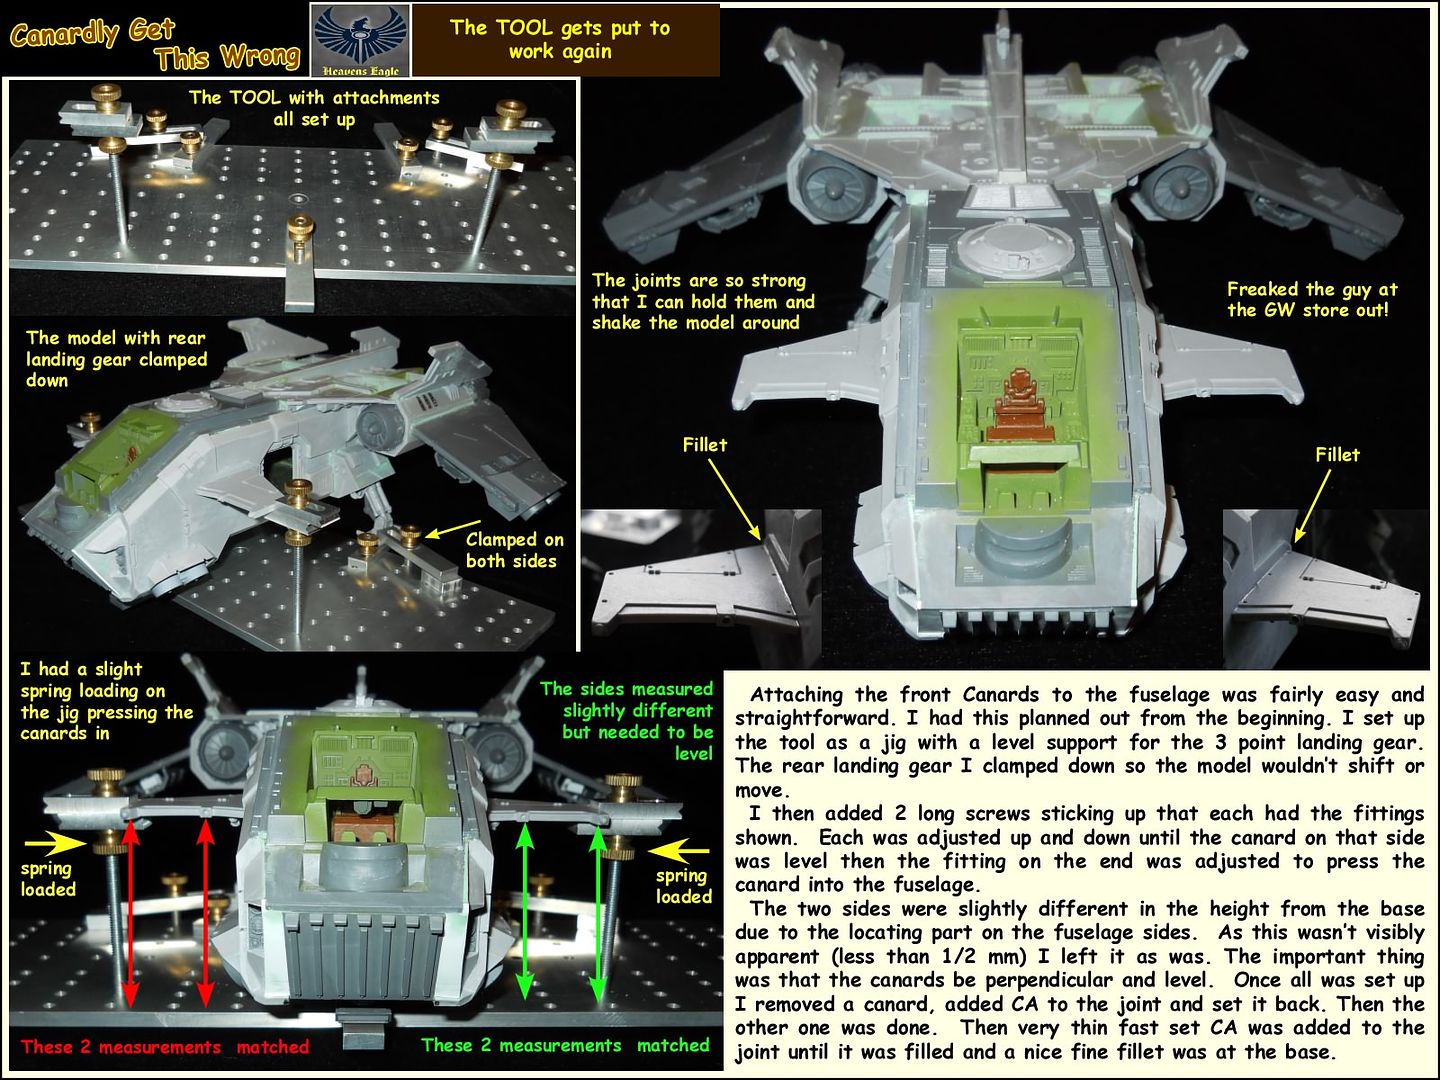
Well I had better get busy. I have a lot of new photos to put together The Beast is quite close to needing paint at this point. Automatically Appended Next Post: Oh! just a little bit of fun, I went to the World of Battle today, (the main corporate bunker here in Memphis) and took the Storm Eagle by so the staff could look at it. Freaked one of them out when I grabbed hold of one of the smaller parts of the model and shook it around. Then did it again when shaking it around only holding one landing gear. This model, even as heavy as the resin is, is quite sturdy. The trick is I DON'T use GW glues. I guess that most models that come in there are built a lot more delicately. That and many folks lack of experience with adhesives.
At another store one of the employees asked about the green filler (as the GW green stuff apparently doesn't stick to the resin for poo) It is interesting that with as much as GW makes it's workers tout the GW product line, in the end the glues and such are only so-so and even the loyalist Kool-Aid drinkers know this.
70060
Post by: Heavens Eagle
Hey everybody!
Here is a new post showing more progress. As I said just previously, the COLOR thing is slowly coming to front and center. ACK!
Before that though here are some more build details, tricks and tidbits! So enjoy!

 As I promised Primarchz I will be putting together a post on my tool jig with some drawings. Most of those parts were just done somewhat spur of the moment and while there was some rhyme and reason to how and why they are shaped as such, I never really documented it. I will get around to it, but will have to create all the docs from scratch. Bear with me, they are coming!
Now, time for a beer!
72112
Post by: Primarchz
Thanks!
Very creative stuff
72511
Post by: Muzzah
Still amazed by your attention to detail. I cant wait to see it finished.
70060
Post by: Heavens Eagle
I was asked a little while back if I could post some information on the tool I use to do the various things when building my models. Here is some information for all of you, it is a starting place if you desire to build your own. Some of the parts can be built to acceptable tolerances with simple tools and some time. Others (The pin mounts and 1-2-3 Blocks) have to be extremely accurate or they won't do the job. If you have any questions, feel free to ask, I will be glad to help.
 Enjoy! Next time I will have some more work on the Storm Eagle. I scratch built from plastic card a 3D logo for my SM Chapter. It is a slightly simplified version of my forum avatar with some small additions. It really turned out much better than I had expected. Now to make a rubber mold and make some resin duplicates to mount on the model. More on that next time!
73708
Post by: Hogun
Oh wow great. Mine is still in its box.
70060
Post by: Heavens Eagle
Heck mine showed up in a big baggie! So now you have many of the secrets and problem areas are known why aren't you building it?
53776
Post by: TheLionOfTheForest
This thread, while amazing in its depth has probably made me too afraid to ever purchase a kit like this from FW. I eventually wanted a warhoud but I don't even want to think about the issues you could have wih that model.
70060
Post by: Heavens Eagle
TheLionOfTheForest wrote:This thread, while amazing in its depth has probably made me too afraid to ever purchase a kit like this from FW. I eventually wanted a warhoud but I don't even want to think about the issues you could have wih that model.
I understand where you are coming from. However, think of it this way. Rather than building the whole thing at once, could you say build a foot or a leg? Yes it would be a bit more challenging than say slapping a Rhino or Eldar Falcon together in an hour or so, but that is where the difference is. This kit "can" be thrown together in a weekend, or you can spend a lot of time working on details.
I have spent the better part of the last 2 weeks making my avatar into a new logo for mounting on the side of the SE. It was a little intimidating before I started the process as I have not done much scratch building of that type of stuff. It turned out WAY far better than I had thought it would. The actual part was easy once I started making it. The challenge was making a rubber mold, ( a GOOD CRISP one) and then getting some good crisp bubble free casts. I have 3 different rubber molds of the 2 logo parts. The last was the best. (3rd time is the charm?) Getting the fast setting resin to cooperate and not generate bubbles was another chore that took many tries. I did finally figure it out and now can make professional type casts that are bubble free. (Woo Hoo!) It took practice though to get there and I have about a half dozen fails that came first. Luckily the parts are fairly small and don't use much resin. However because they are small it caused some other problems that I had to solve. Trial and error and now I should have an easier time making small resin parts. Say mini logos for shoulder pads.  If you are used to looking at a model assembly as "One Big Step" and then you are done, a kit like this will scare the poo out of ya. However, if instead, you back up and go OK here is step 1, lets just get all the pour gates cut off. Then you carefully cut them off and BOOM! Step 1 is done! Next step, clean up some of the parts, and so forth. I did not start out on this kit to build it all at once. I would have become overwhelmed as you seem to be. I just stepped back and took things one bit at a time. Right now I am a little burned out and need to work on something else for a little while. It might be the WW1 plane I have started and am working on the engine for it, or I might start building the custom base for the Storm Eagle. I might even pull out an armor kit, say a WW2 German half track Hanomag Kfz 251 variant. Just to build and look at something different with different problems that need to be solved. Heck one of the things that has me overwhelmed is what color scheme am I going to paint this monster!
If you really want a Warhound, then go for it! The kit does not have to be built in an afternoon, or even a weekend. Heck spend an afternoon just smoothing out parts and fixing little problems with them. Then once you are satisfied with a part, set it aside and grab another one. So what if it takes a couple of hours tweaking and shaving till 2 or 3 parts fit perfectly. That is part of the build. Have a beer and put a movie on the TV while you are working. I don't sit and concentrate on just the building, it is recreation for me. Kind of like doing a 3D puzzle but the puzzle part is solving the problems. Building this has made me so much of a better modeler, that I can't even begin to imagine what I might be working on this time next year.
Heck, I have spent several hours in the last few weeks just putting filler on problem spots and sanding off. Not in a big hurry, just working on it and every little step gets it closer to being done. One step was putting the front wings on. Took a couple of hours all said as I was being picky, but was enjoyable and once I had the wings glued on, the step was finished. That was my entire goal for the evening.
Years ago (when I was about 9 or 10) I got a model helicopter kit that was motorized. I was in such a rush to get it together and see it run that I totally messed it up. It didn't run, the tail booms sagged, and it was a disaster. If I had just been a little more patient at the time (and let my dad help me) it would have looked better and would have definitely run. This is no different. I just set attainable goals for each session and then if I don't quite make the goal, no big deal, it will get there next time.
53776
Post by: TheLionOfTheForest
It's not the multiple steps and quantity of parts. It's the issues with bent resin. I would have to do it right. And it would probably take me 6 months to gettogether. Maybe once my IG and BA armies are finished being painted.
70060
Post by: Heavens Eagle
LOL! I started this on Jan 3rd. I hope to have it finished before July 27.
The warpage problems were really about the least of the difficulties. The poor fit on things that had to fit or look like poo were the main problem. De-warping resin is actually fairly easy unless you have to get things to fit in a very precise way. The larger and heavier parts don't tend to warp or if they do it isn't much. The biggest problem is poorly designed masters and the bad fit problems that result from that. The larger titan kits don't have that just because of the way they fit together. It doesn't matter as much if a part is slightly shorter or longer as it only attaches at the ends, say an arm or leg.
The worst problems on the Storm Eagle were getting the box fuselage assembled and the engine covers/rudders mounted well. Everything else was just patience and adjusting things around the resin.
4271
Post by: Eisenhorn
 Heavens Eagle wrote:Actually this is the first Forge World resin kit I have built. I do have a fair amount of scratch building and modification experience from scale model kits. There are a lot of techniques I learned over the years and one of them is how to think my way through solutions. Heavens Eagle wrote:Actually this is the first Forge World resin kit I have built. I do have a fair amount of scratch building and modification experience from scale model kits. There are a lot of techniques I learned over the years and one of them is how to think my way through solutions.
What this means to the layman is that Heavens Eagle is a scratchbuilding monster.
The very best modelers all come from the Fine Scale Community.
I have seen Fine Scale work you cannot even wrap your head around.They regularly have to convert and scratchbuild and upgrade to make it as realistic as possible.
I have been studying the fine scale side of modeling for a few years now and it has propelled my work light years.
@Heavens Eagle this is a great tutorial for the Stormchicken but what is is in reality is one of the best how to build all model tutes I have read in a while.
I picked up some great tips,from this.
Quick question Do you prefer squadron green to squadron white?
If so,why.
70060
Post by: Heavens Eagle
 Eisenhorn wrote: Eisenhorn wrote:
Heavens Eagle this is a great tutorial for the Stormchicken but what is is in reality is one of the best how to build all model tutes I have read in a while.
I picked up some great tips,from this.
Quick question Do you prefer squadron green to squadron white?
If so,why.
Hey ya Eisenhorn! I have been meaning to get to this all week, but being single sometimes means that all my time is spent doing the needed stuff.
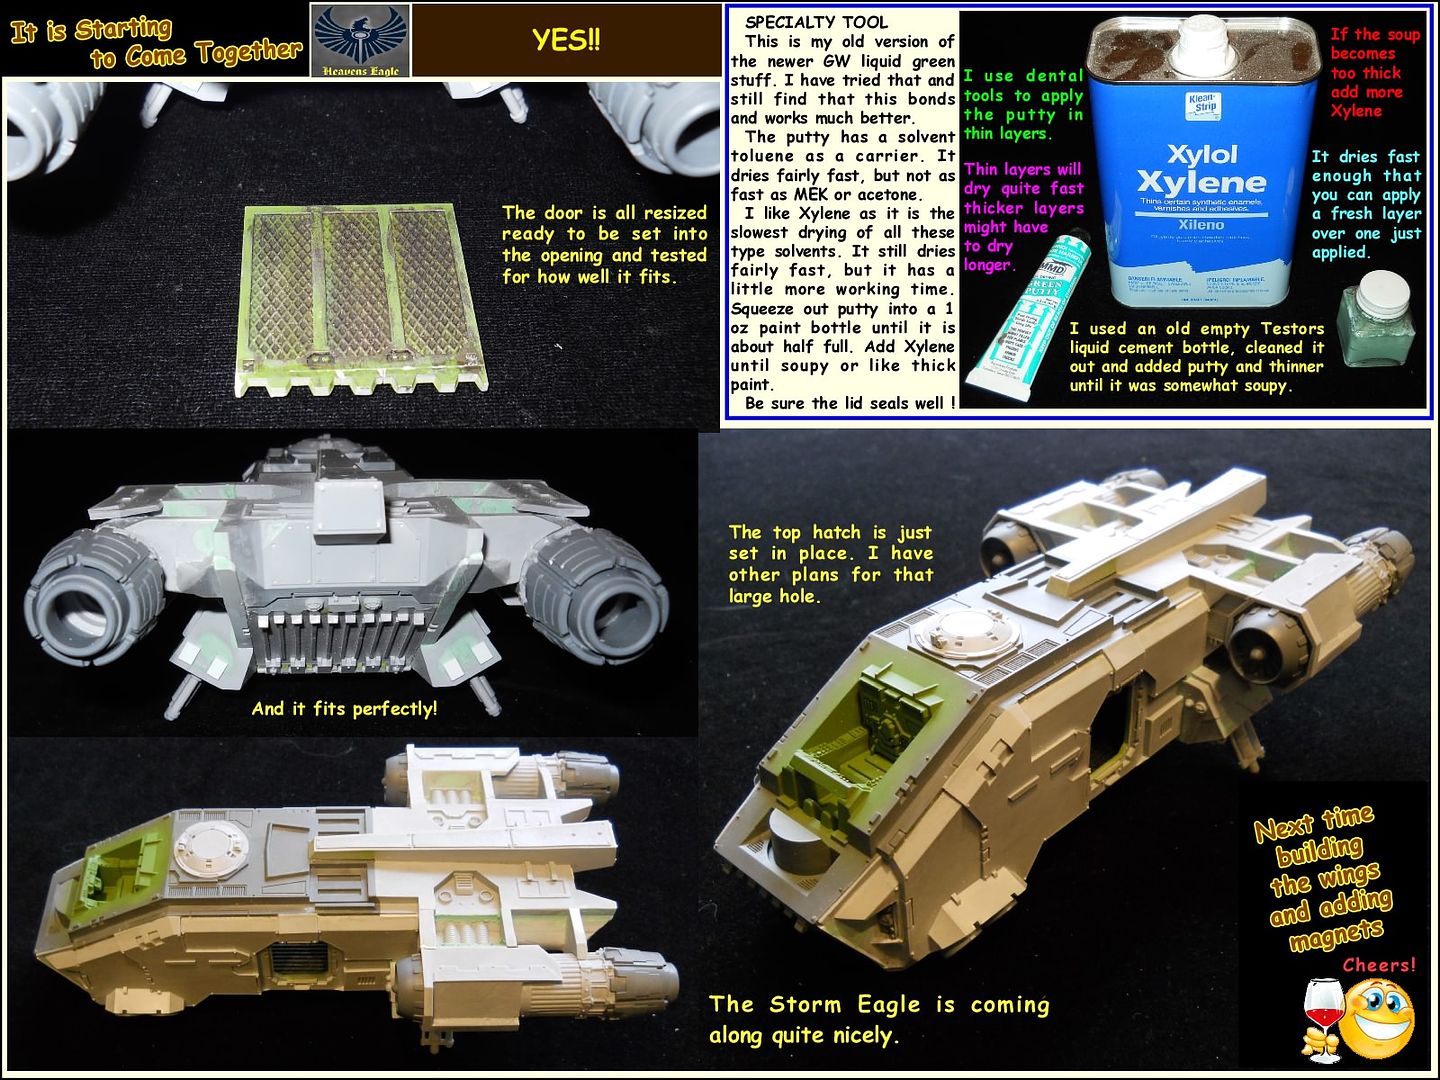
As to the Squadron Green and White, I have never used the white. In many ways I am still building like I did 20 years ago. (playing catch up on the new ways of doing things still) The green was the most prevalent available at the time. I learned that putting it in a bottle and adding a thinner to it made it work better. Being thinner it tends to flow out as you spread it and will bond a little better. Also if you use the right thinner it still dries fast, but it doesn't seem to "flash" dry. I use Xylene for a thinner. Yes, you can use acetone, lacquer thinner, MEK, and Toluene, but those tend to dry faster.
I based this on information I got off of the internet [1].
Solvent ------------ Boiling point
===============================
Acetone ----------- 56-57 °C --- 133-134 °F
MEK ---------------- 79.64 °C --- 175 °F
Water -------------- 100 °C ------ 212 °F
Toluene ----------- 111 °C ------- 232 °F
Xylene p ----------- 138.35 °C -- 281 °F
Xylene m ---------- 139 °C ------ 282 °F
As you can see the boiling point of water is lower than Toluene and Xylene. What this does in a putty is give you more working time and allows you to spread it thinner. Also as they are solvents, they will tend to bond better than water based stuff like the GW liquid green stuff. Whlie acetone, MEK and lacquer thinner work well for thinner for Squadron Green, they evaporate so fast that the putty will tend to cake up and not spread nicely. Once it is applied, I will tend to set it aside overnite unless it is a small touch up spot and is fairly thin. Thicker applications might need several layers done over time. It will stick and bond much better than any water based putties though.
I have also used an auto body putty called blue acrylic that is a solvent based putty and is light blue. It tends to dry too fast and I had problems with it splitting when put in a thin layer over a flat surface. I ended up just putting it aside and using the modified Squadron green exclusively. I believe that there is some info in one of my previous posts on how I mix the Squadron Green.
A nice variety of dental probes and spatulas is almost a must for applying the filler where and how you want it. Shaping and flowing it around while applying it makes the final sanding and smoothing go much faster.
--->MEK is short for Methyl Ethyl Ketone and is found in Testors liquid solvent cement
--->Acetone, Toluene, and Xylene can be found at hardware stores that carry paint. They are almost always available in 1 gallon cans though some places will carry 1 Quart sized cans as well.
--->[1] Reference is from Wikipedia for the solvent temperatures.
43903
Post by: jason2250
This is a very nice resource. While I don't have the patience or drive to do a lot of the things you've done, it's nice to see a good document for this thing get put together.
I'm not looking forward to the magnets in the front mounted weapon - that's going to be a bear. Want to let me borrow your jig? ^_^
Bending the resin hasn't been bad so far - nothing fancy for me - I just use CA glue to hold it together, then heat it up so it stops pulling - once three sides are glued and I can fit the bottom in, I heat up both ends and straightened it out - right as rain.
Looking forward to seeing you finish this one - it's going to be epic.
Best,
Paul
67700
Post by: SavageRobby
TheLionOfTheForest wrote:This thread, while amazing in its depth has probably made me too afraid to ever purchase a kit like this from FW. I eventually wanted a warhoud but I don't even want to think about the issues you could have wih that model.
FWIW, I had the same thought. It i took the plunge and got it anyways. I had it sitting around for a few weeks before I finally got the nerve to pull It out. I expected to spend weeks on it, at night and on weekends. Nope. Took a day and its basically done. I want to do a little green stuff in some seams here and there, but honestly - depending on the level of perfection you want - its that that bad of a model. Mine looks great, especially at table view. You have to know where to look to find the flaws, and they're not egregious (my first drop pod is way worse). Before this I had only assembled a few large resin models, and nothing on this scale.
70060
Post by: Heavens Eagle
jason2250 wrote:This is a very nice resource. While I don't have the patience or drive to do a lot of the things you've done, it's nice to see a good document for this thing get put together.
I'm not looking forward to the magnets in the front mounted weapon - that's going to be a bear. Want to let me borrow your jig? ^_^
Bending the resin hasn't been bad so far - nothing fancy for me - I just use CA glue to hold it together, then heat it up so it stops pulling - once three sides are glued and I can fit the bottom in, I heat up both ends and straightened it out - right as rain.
Looking forward to seeing you finish this one - it's going to be epic.
Best,
Paul
I could have sworn I replied to this already, but for some reason I don't find the post I thought I did. D'OH!!
Oh well, let's try again, my main comment is that you should be careful using heat to align your model "after" gluing the parts together with CA. While CA joints can be very strong if done right, it also has one thing that can be a problem, HEAT can weaken and break down the joints somewhat. I use CA a lot for tacking metal parts together. Then once done some heat and the parts almost fall apart. So you might want to do a tack together, de-warp, then flow thin CA into the joints until they are filled after the straightening process is done. That way you could avoid any weak glue problems.
As I have been mostly busy with "have to do's" lately, the progress has been a little slower than usual on the Storm Eagle. I have added 2 lazguns to some spots that "suddenly" looked vacant and needed something added. Then I have been working on my Chapter Logo to mount on the side doors. I was going to do a Heavens Eagles chapter, but got a slight inspiration a couple days ago where I can make a small addition to the logo and convert it to The Emperor's Eagles. According to 1000 Space Marine Chapter Index, Under the Cannon lists, there is a "Obscure Chapters" page. The listing refers to a French White Dwarf #74 (June 2000) page 45 for this chapter name. If anyone has this particular issue, a quick photo of the page would be HUGELY appreciated. Otherwise I am just flying by the seat of my pants on this.
Anyway, here are the tease photos. First the resin castings I made, attached to the Rhino sized doors that go on the sides of the Storm Eagle.
 Yes, those are resin castings I made. The master was carved out of sheet styrene and the sword is a separate piece that is mounted with some reinforcements. Then I had an epiphany and thought "Hmmm I wonder if part of a famous watch brand logo, adjusted slightly and placed behind the current parts would look good and do what I want, Hmmmm.
Using my favorite technical illustration program I worked up these concepts. I like it! The separate 5 tines just floating free really shouldn't be too much of a problem, I just have to make a small jig to align them before gluing. Here are the concepts:
 Well what do you all think? I like it myself, but am open to hearing any suggestions. Sometimes multiple suggestions can present a whole new "Outside of the Box" idea not remotely related to any of them. Comments and ideas are welcome.
I will be doing a couple more sizes of the logos, so with those I will make a detailed step by step on how I do it and why it works well. I am getting into crunch time to get this completed though. July 26th is coming up fast!
75369
Post by: Zhent
This is an incredible review of the entire process. While you have a number of tools not available to me, I'm hoping to at least manage a poor imitation of the work that you have done I have received a Storm Eagle just last week and I plan on making it my summer project to assemble and paint. I am sure this will be a great resource, and I'm using it as an opportunity to experiment with some customization as well - I've never been comfortable or proficient in using plasticard or styrene to build out models, but it looks like both those skills will be necessary before I am done.
A couple questions which I could not find answers to:
What kind of CA are you using? Zap Thin CA? The strength you have achieved in the model without pinning all the pieces together is pretty amazing.
If I do not have a fancy model straightening device, do you have any suggestions on how to get the walls of the Eagle straighter than they come shipped? I was looking at them, trying to find a way to flatten them against a solid surface such as my hobby desk, but I may have to resort to simply eyeballing it and bending them with my hands.
I've seen the green filler you are using throughout the process, and you have explained that you thin it a little bit. Is it something like this that you are using? http://www.amazon.com/gp/product/B000JCE6BI/ref=oh_details_o05_s00_i00?ie=UTF8&psc=1
Thanks, and I can't wait to see more progress! I'm sure I'll have more questions as I start building!
70060
Post by: Heavens Eagle
Hey Zhent!
Thanks for the questions. I have been working on my beast, just been busy with other things though I am now into crunch time and really need to get with the program. July 26 is a month away.
While the clamp and jig I have are custom built, you could use a 1/8th inch thick plate for a basis if you wanted something to clamp the parts to. The most important parts are:
1. Use a thermometer to observe the water temperature. Thus you can regulate what you are doing take as much guesswork out of the process.
2. If you decide to clamp the parts to a plate, DO NOT OVER TIGHTEN!!!!!!!!! Reread the parts where I go over
_ this. A pad plate between the part and the clamp and just snug enough to hold the part where you want it, no more.
3. I found that I had to do hand adjustments to the parts even after the clamp process. A good eye that can judge how straight a part is helps. For the large
_ flat sides dip only a section or area at a time and straighten until you are satisfied, then adjust another area. Another trick I used was a gravy ladle to
_ pour hot water over a particular area (both sides alternating) so as to not undo or cause problems with areas I didn't want heated.
4. Thin parts, like the rear ramp, heat and soften quickly, use cooler temps (150 - 160F) and SHORT immersion times on these parts. Add heat and or time in small increments as needed.
There are usually no really stupid questions, but the mistakes can be a bear!
As to the CA glues I use, they are available at Hobby Lobby or most decent hobby shops here in the USA. Here are some links to the types I use.
 For basic assembly, tacking parts in place and large parts I will use Insta-Cure + (plus) Gap filling (5-15 second) CA. It is a little thicker and slower setting and will give a little wiggle on alignment. As with any CA glue, the better the parts fit, the better the joint. Insta-Cure + Gap Filling
 To fill the thin little gaps I use the Insta-Cure Super Thin (1-3second) CA. Careful with this stuff as it can bond you and your fingers together before you even realize it. I apply it with an applicator made from a sewing needle. Apply until the thin gap is filled in, makes a super strong joint. Insta-Cure Super Thin
 The final part to using CA is the accelerator. I personally hate the spritz application as it goes everywhere except where you want it to go. I ended up with a large bottle of this type accelerator after my dad passed away. Unlike the older type I have this doesn't evaporate as fast, doesn't smell as bad, and doesn't seem to make the CA boil into white foam when applied. I apply it with a small dental probe with a 1/8 inch dia flat round end and let it flow over the CA to set it. It will prevent the white powder out gassing that can occur when liquid CA sets. Accelerator
 The Green putty I use is put out by Squadron and I have usually purchased it at my local hobby shop. There is a white variety also available and I have used blue acrylic auto body putty thinned as well. The Squadron Green though just works for me and is reliable. I found the blue acrylic was shrinking as it dried and gave some problems. A little experimentation here will help you find what works best for you and your skills. Here is a link for the Squadron Green Putty
Also, one last note, I buy the smaller bottles of CA. It usually goes bad before I use it up. The bottle types shown in the photos always work best as you can clear the drops of glue that are setting in the applicator tube. This keeps the tip clear and when it does plug a small drill will suffice to open it up. Also I never apply CA to small parts from the bottle. I take a piece of glass or old defunct watch crystal and put a drop or 2 on the crystal and use the CA from that for small applications. Then I have a place to put the bottles that hold them upright so that the tips stay relatively clear.
The Green putty I use is put out by Squadron and I have usually purchased it at my local hobby shop. There is a white variety also available and I have used blue acrylic auto body putty thinned as well. The Squadron Green though just works for me and is reliable. I found the blue acrylic was shrinking as it dried and gave some problems. A little experimentation here will help you find what works best for you and your skills. Here is a link for the Squadron Green Putty
Also, one last note, I buy the smaller bottles of CA. It usually goes bad before I use it up. The bottle types shown in the photos always work best as you can clear the drops of glue that are setting in the applicator tube. This keeps the tip clear and when it does plug a small drill will suffice to open it up. Also I never apply CA to small parts from the bottle. I take a piece of glass or old defunct watch crystal and put a drop or 2 on the crystal and use the CA from that for small applications. Then I have a place to put the bottles that hold them upright so that the tips stay relatively clear.
5182
Post by: SlaveToDorkness
Damn, this is EPIC!
70376
Post by: Cypher-xv
 sandant wrote: sandant wrote:Cue the classical music as you continue building with this precision.
I'll be tuning in.
How funny I'm listening to some now just I clicked into this thread. Gotta a lot of love for "Two Steps From Hell". For those that don't know this duo they wrote the music that was featured in the first and I think second trailer for the last trek film.
20392
Post by: Farseer Faenyin
Amazing modeling, sir! I wish I had the patience and skill...but alas...I slap stuff together, add some paint, so it can destroy things quickly!! A wife and kid doesn't help with 'gaming time' either. :-P
Again, amazing job. I love the Storm Eagle model, and it is worth tuning in just to see the attention you are giving it.
75369
Post by: Zhent
Heavens Eagle wrote:Hey Zhent!
Thanks for the questions. I have been working on my beast, just been busy with other things though I am now into crunch time and really need to get with the program. July 26 is a month away.
Great, thank you. As I'm living in an apartment without a lot of space to spread out or leave things set-up between hobby times, I'm currently straightening pieces using a flat piece of tile as a straight-edge; I simply heat the resin, then press it against the tile and hold it until it cools. After 2 or 3 heatings, most pieces end up straight enough that I can resolve any lingering issues with some Green-Stuff. I have never dealt with a model in quite this condition before, however, so I may need to expand my process a little bit.
Does drilling out the engines as you have significantly reduce the weight in the model? I don't have a mill, but I can bring the engines home at some point and use a hand drill if it is a significant improvement. Did you go all the way through the engine?
I have to ask another question - unless you specifically call out a change to the order you followed the instructions, did you do pretty much everything else 'by the book'? This past weekend I took all the pieces off the gates, so I'm going to start un-bending tonight and with the [US] holiday week this week, I hope to get a fair amount of progress done
70060
Post by: Heavens Eagle
Zhent wrote:
Great, thank you. As I'm living in an apartment without a lot of space to spread out or leave things set-up between hobby times, I'm currently straightening pieces using a flat piece of tile as a straight-edge; I simply heat the resin, then press it against the tile and hold it until it cools. After 2 or 3 heatings, most pieces end up straight enough that I can resolve any lingering issues with some Green-Stuff. I have never dealt with a model in quite this condition before, however, so I may need to expand my process a little bit.
Does drilling out the engines as you have significantly reduce the weight in the model? I don't have a mill, but I can bring the engines home at some point and use a hand drill if it is a significant improvement. Did you go all the way through the engine?
I have to ask another question - unless you specifically call out a change to the order you followed the instructions, did you do pretty much everything else 'by the book'? This past weekend I took all the pieces off the gates, so I'm going to start un-bending tonight and with the [US] holiday week this week, I hope to get a fair amount of progress done
As to straightening, a nice straight edge is a big help. Also dry fit the parts together. If it only needs to "flex" a little to have a tight joint, you are good to go, if there is a large gap, it will need more adjustment. (I am mainly talking about the 2 sides, the bottom and the forward top there) Also, the bulkhead can help square up the box of the fuselage. The more time and effort you put into the prep, the less work it will take to tweak the seams. Also if the parts fit together fairly well the joins will be stronger.
Does drilling out the engines as you have significantly reduce the weight in the model? I don't have a mill, but I can bring the engines home at some point and use a hand drill if it is a significant improvement. Did you go all the way through the engine?
I drilled them out just mostly as a lark. It did lighten those 2 parts a little, but overall it probably didn't affect the weight much. I did drill all the way through, but it was with a "VERY" slow drill speed on a tight set up. If I were to use a hand drill, I would start with the smallest diameter drill that had just enough length to go all the way through. That way if your pilot hole is a little off, you can correct for it, and it is easier to step up to just the next size to enlarge the hole. You just need SHARP drill bits, and SLOW speed.
I have to ask another question - unless you specifically call out a change to the order you followed the instructions, did you do pretty much everything else 'by the book'?
I examined the "book" and got a feel for how the parts had to go together. Of course there are some parts that just "have" to go together before others and most of those are pretty obvious. I decided to mount the engines later so as to better handle the box fuselage parts and not have those large heavy things in the way. The upper front piece had some alignment problems and it is "out there" where it can be seen. Getting it to fit is a compromise at best then go back and fix the problems that couldn't be dealt with during basic assembly. I know that some big problems or at least hassle factors were avoided by doing the build in the order that I have shown.
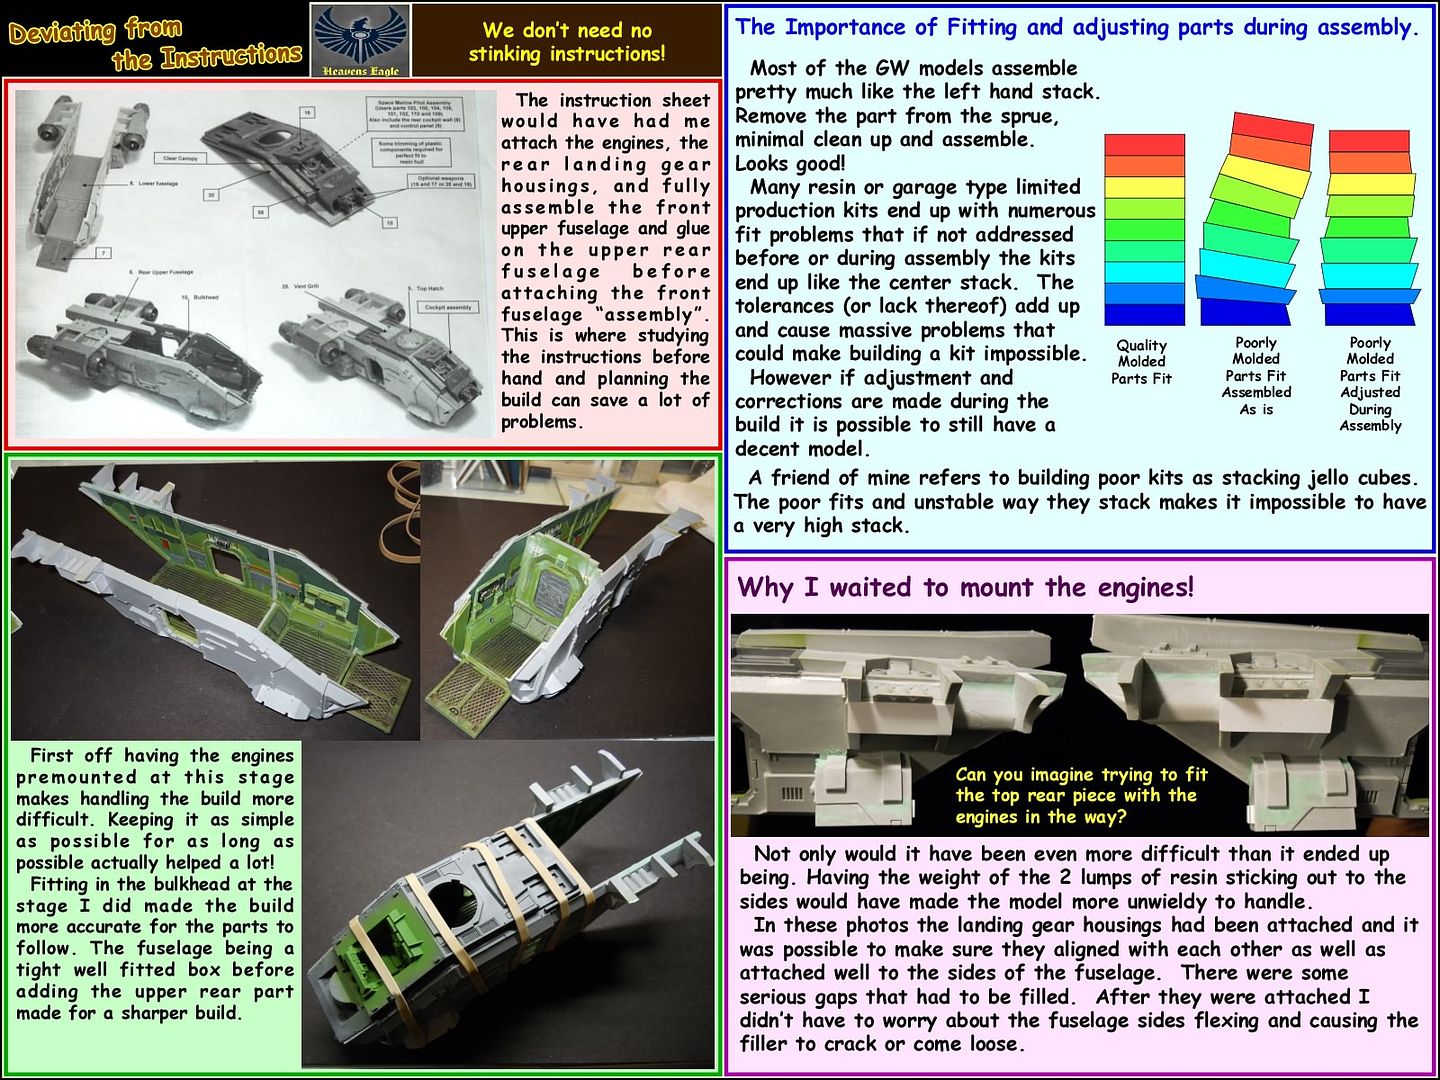
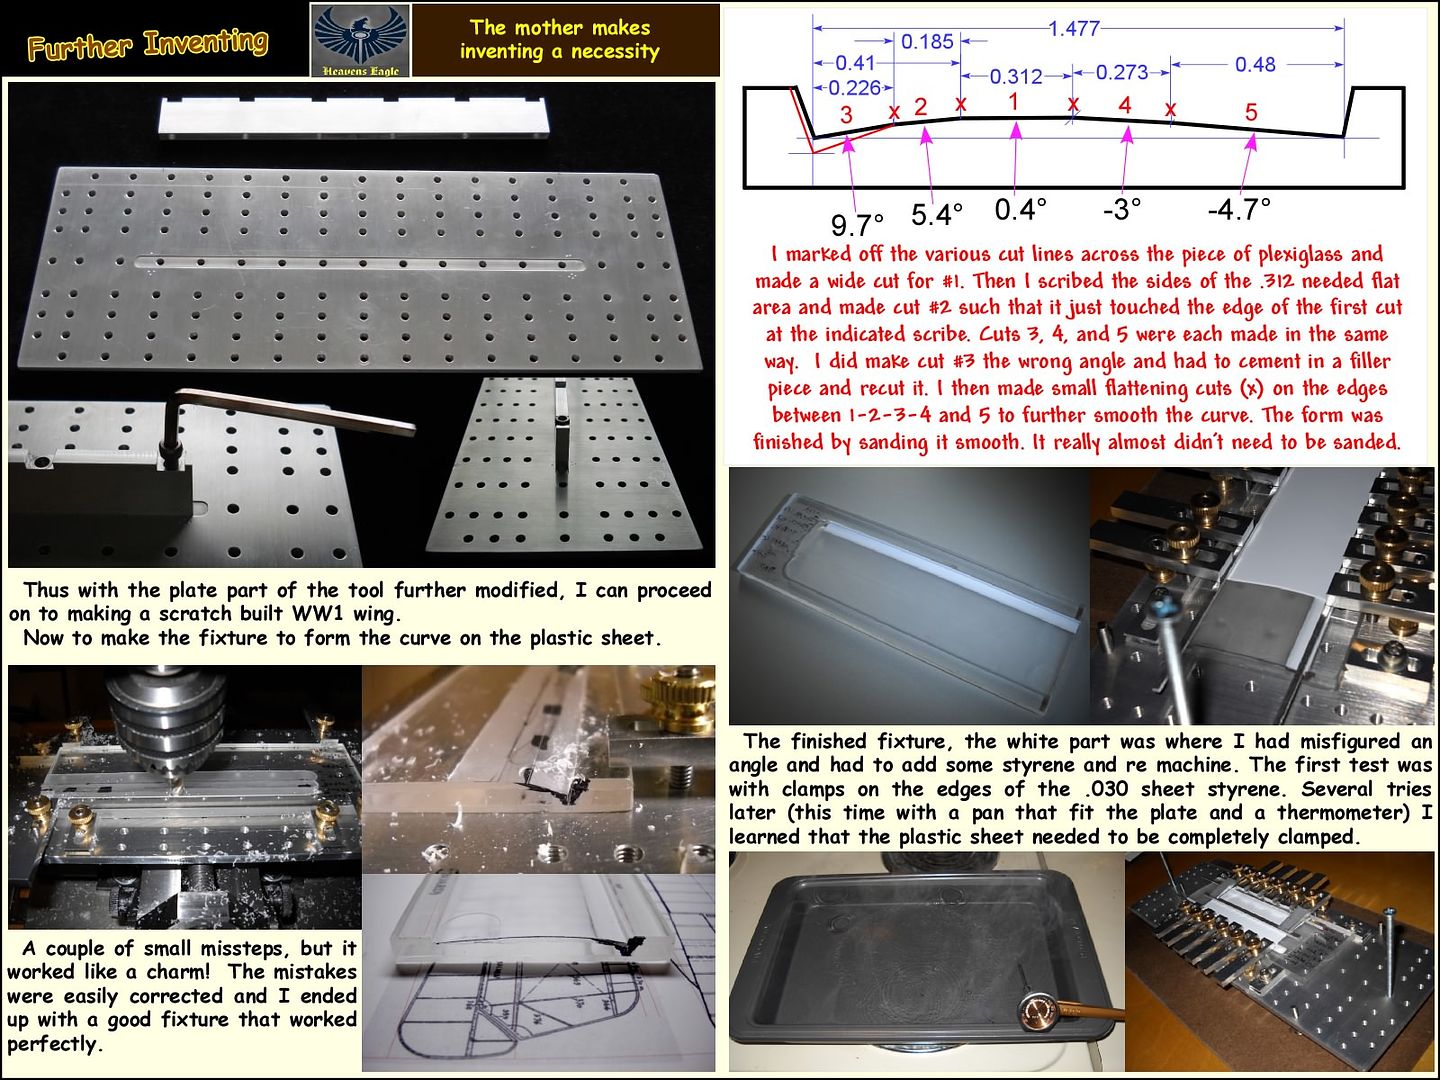
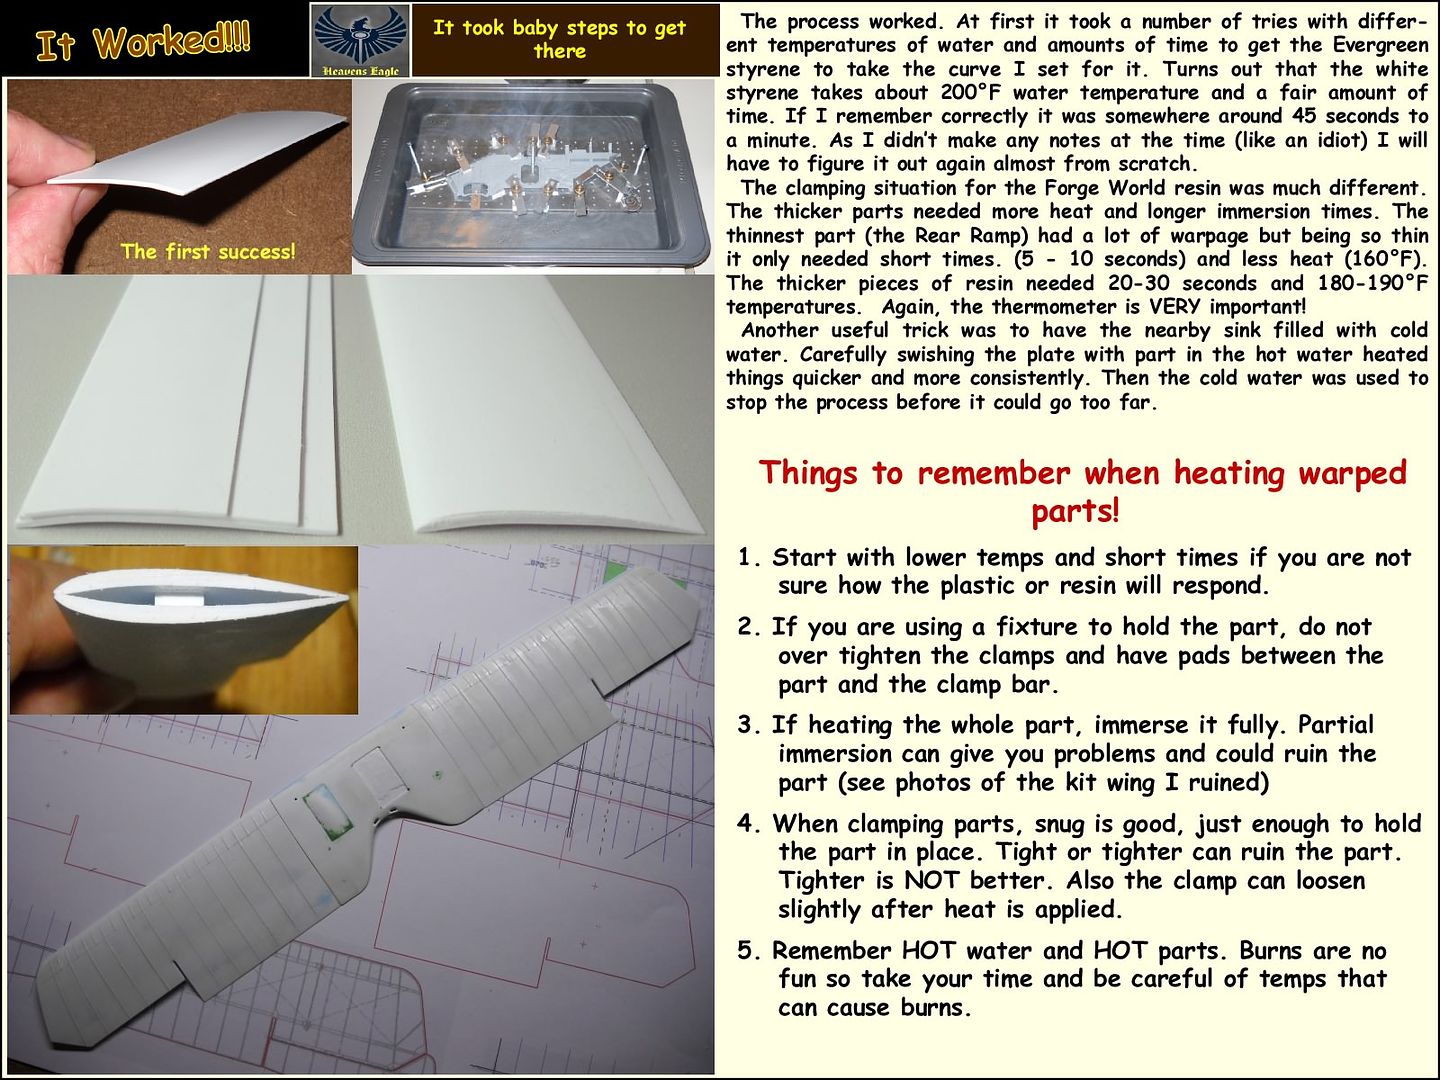
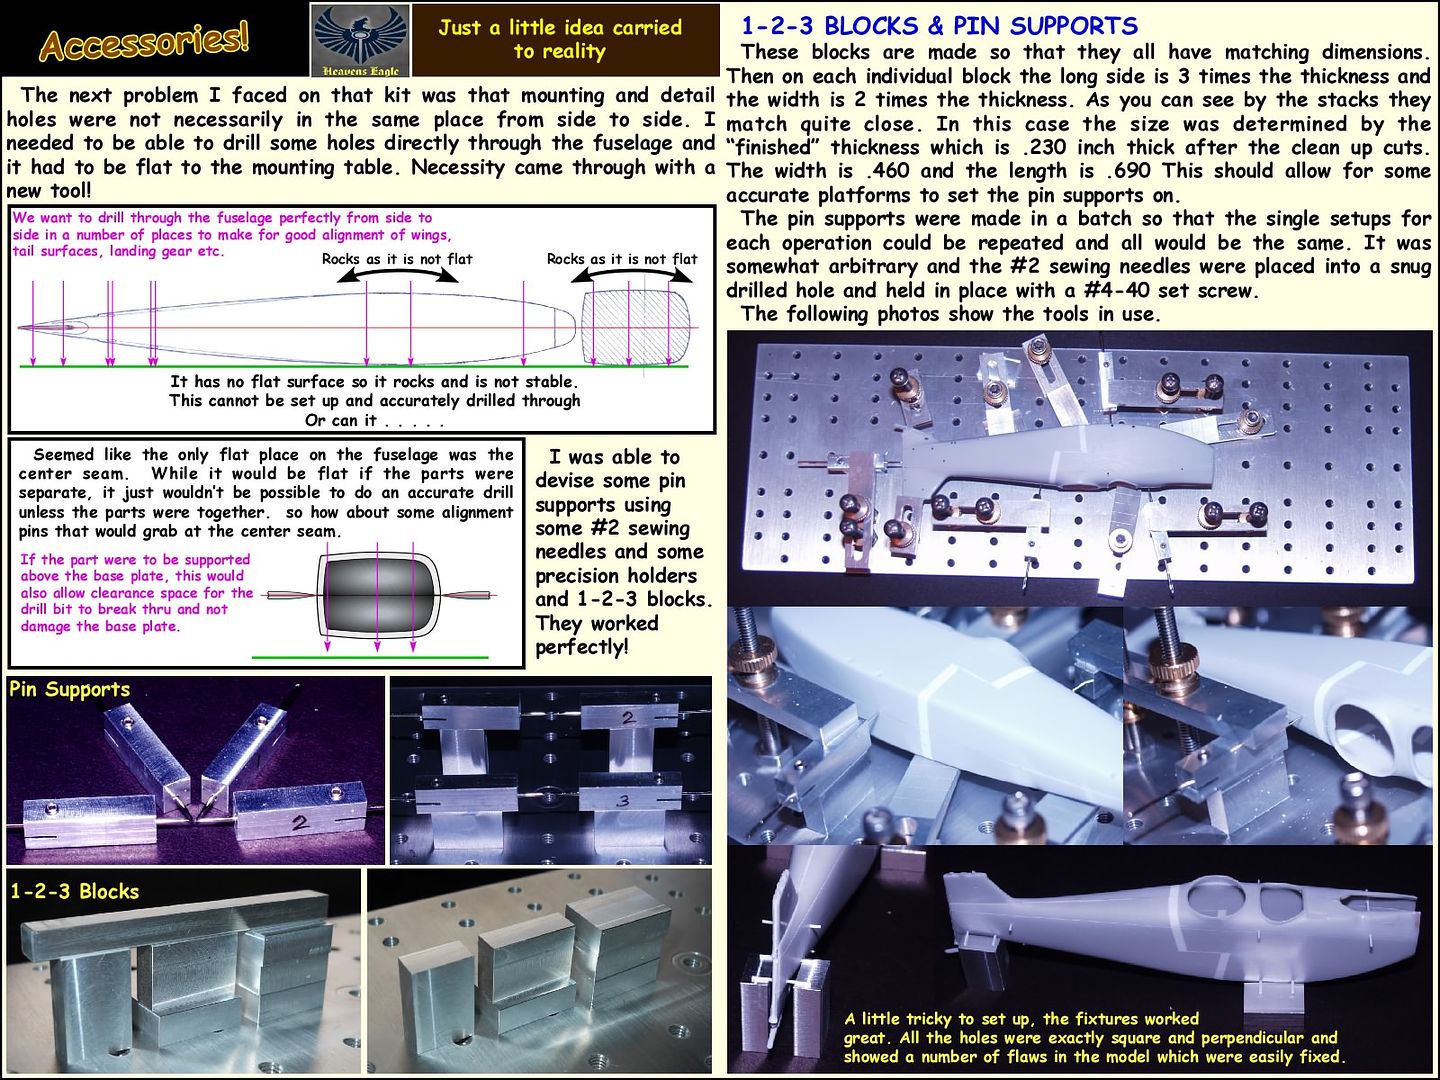
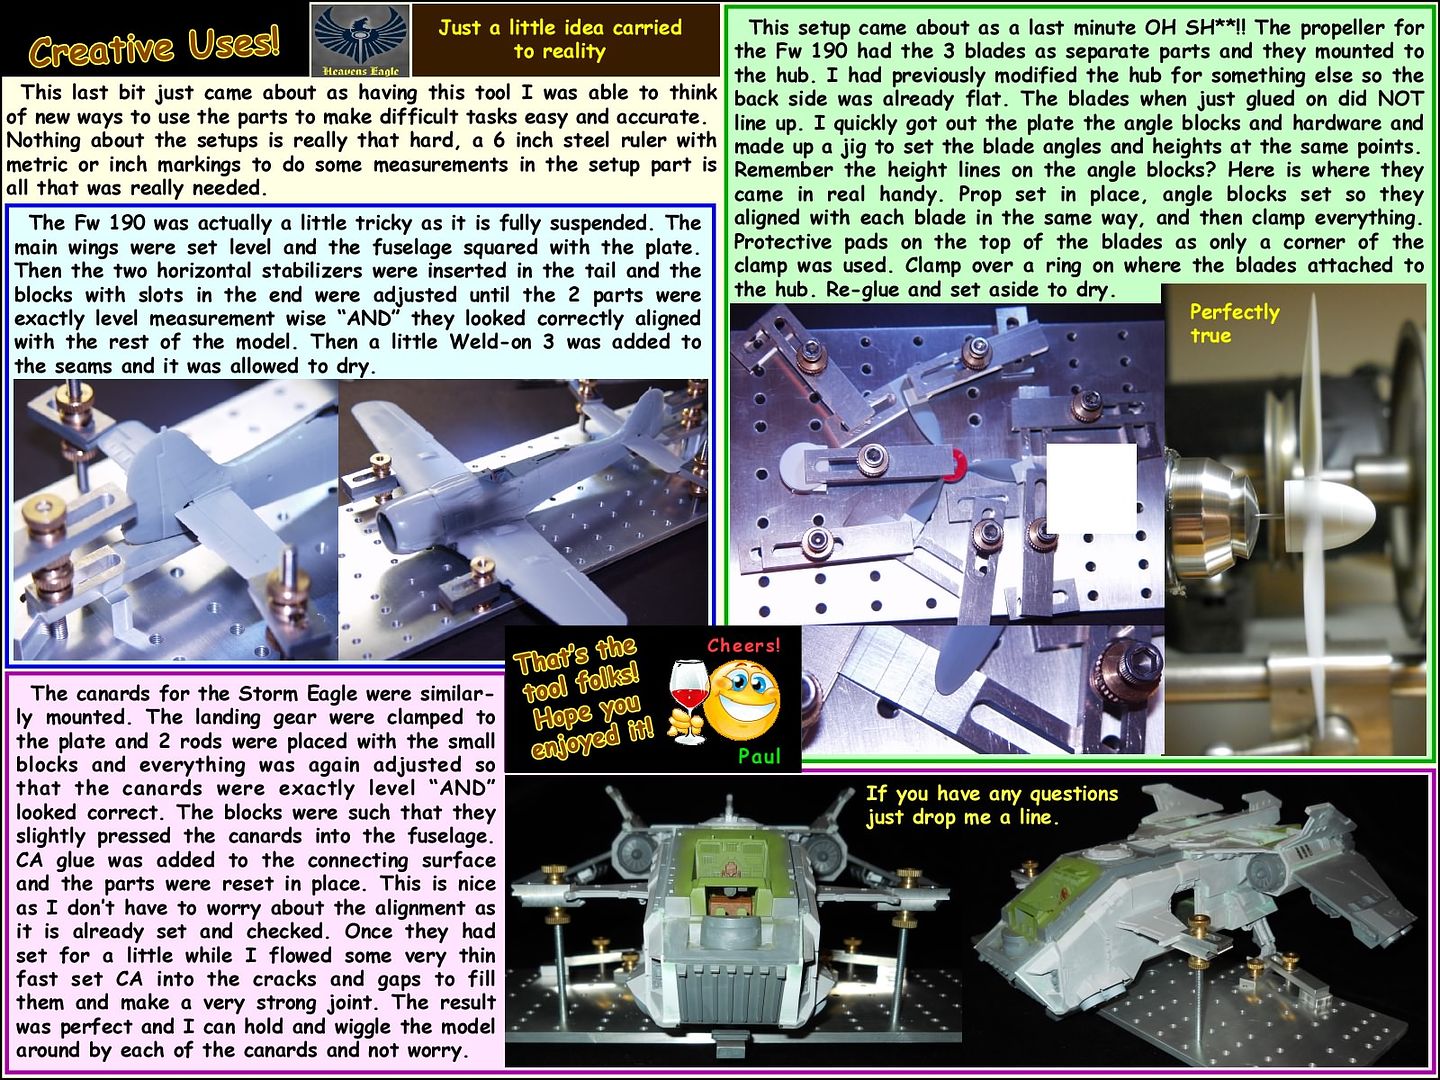
Here is a list (off the top of my head) of the various problems I dealt with In order:
<*>Warpage , I can't stress how important it is to straighten and dry fit. REPEAT REPEAT REPEAT It will take multiple times. If you decide to paint the interior, do so only just before gluing the fuselage parts together.
< >Assemble front hover engines and retaining parts in place once you are reasonably sure the sides are straight. The retaining parts can help with the floor alignment.
< >Be sure glue areas are clean down to resin. Paint in these areas will cause the model to fall apart.
<*>Large rubber bands are a necessary item! I Managed to dry fit the fuselage together without glue using the rubber bands. They will also help on closing slight gaps.
<->Enlarge the hinge pin holes (in the sides) for the front ramp just enough so that the pins are slightly snug but will still rotate. Tight is not good. If the ramp flexes before the pin rotates it will be too tight. Each side should stay put but a slight nudge can move it.
<*>The front ramp opening is not large enough. Fit this carefully. Some material needs to be removed from the sides of the opening, more at the bottom, less at the top.
<*>You can see how much by inserting the front ramp between the loose sides and then setting the floor in place. If I remember right it was about 1/16th of an inch too narrow and made gaps at the sides of the floor. I took the same amount off of each side bottom to top and ended up with too much off at the top. The opening was too narrow at the bottom but only slightly at the top.
<*>Glue the bottom to the sides first, Use blue tack, or play-dough or some thing sticky to hold the bulkhead in place and use rubber bands to hold the front top piece in place.
<*>Once the sides and bottom are set, remove the rubber bands, bulkhead and front upper part (cockpit) It might twist a little and the top of the sides might lean in slightly, no problem, that is where fitting the bulkhead in place and as square as you can make it does the trick. Remove tabs from bulkhead and add shim to the sides until it just fits squarely between the sides. If one side leans a little more than the other you will have to force the bulkhead to the floor and side to make it square. Refer to the photo section on that. I also added CA to the lower seams from the inside before attaching the top.
<*>Once the bulkhead is in place now fit the upper front. Rubber band it in place and flow thin CA into every little crack little by little. Add CA until the seams are filled.
<*>Fit and place the upper rear portion now. Refer to my photo sections for points that have to align. If you have gaps, this is where adding plastic card to build up the mounting areas is a plus. I found the GW Green Stuff putty to be still pliable to some extent several weeks later. That was fine for a fig, but this model is one big mis-alignment stress monster. The 2 part GW Green Stuff in my opinion won't hold the box frame together well.
< >Now fit the engines to the sides. You will probably need some plastic card for spacer, trim on the mounts (the curved back ones had problems) and also to make sure the engines are level with each other.
*+*The most difficult part is now behind you. (WOO HOO!!) It isn't an easy kit, but if you work on it in small steps or sections, it comes along and builds up well. The hardest part is sometimes having the patience to let the glues set up fully or fit, adjust, fit, adjust, and fit some more.
Here now is a quick In Process to show where it stands at this point. I have some work to do yet before I am ready to paint then out comes the airbrush and it is full tilt boogie!
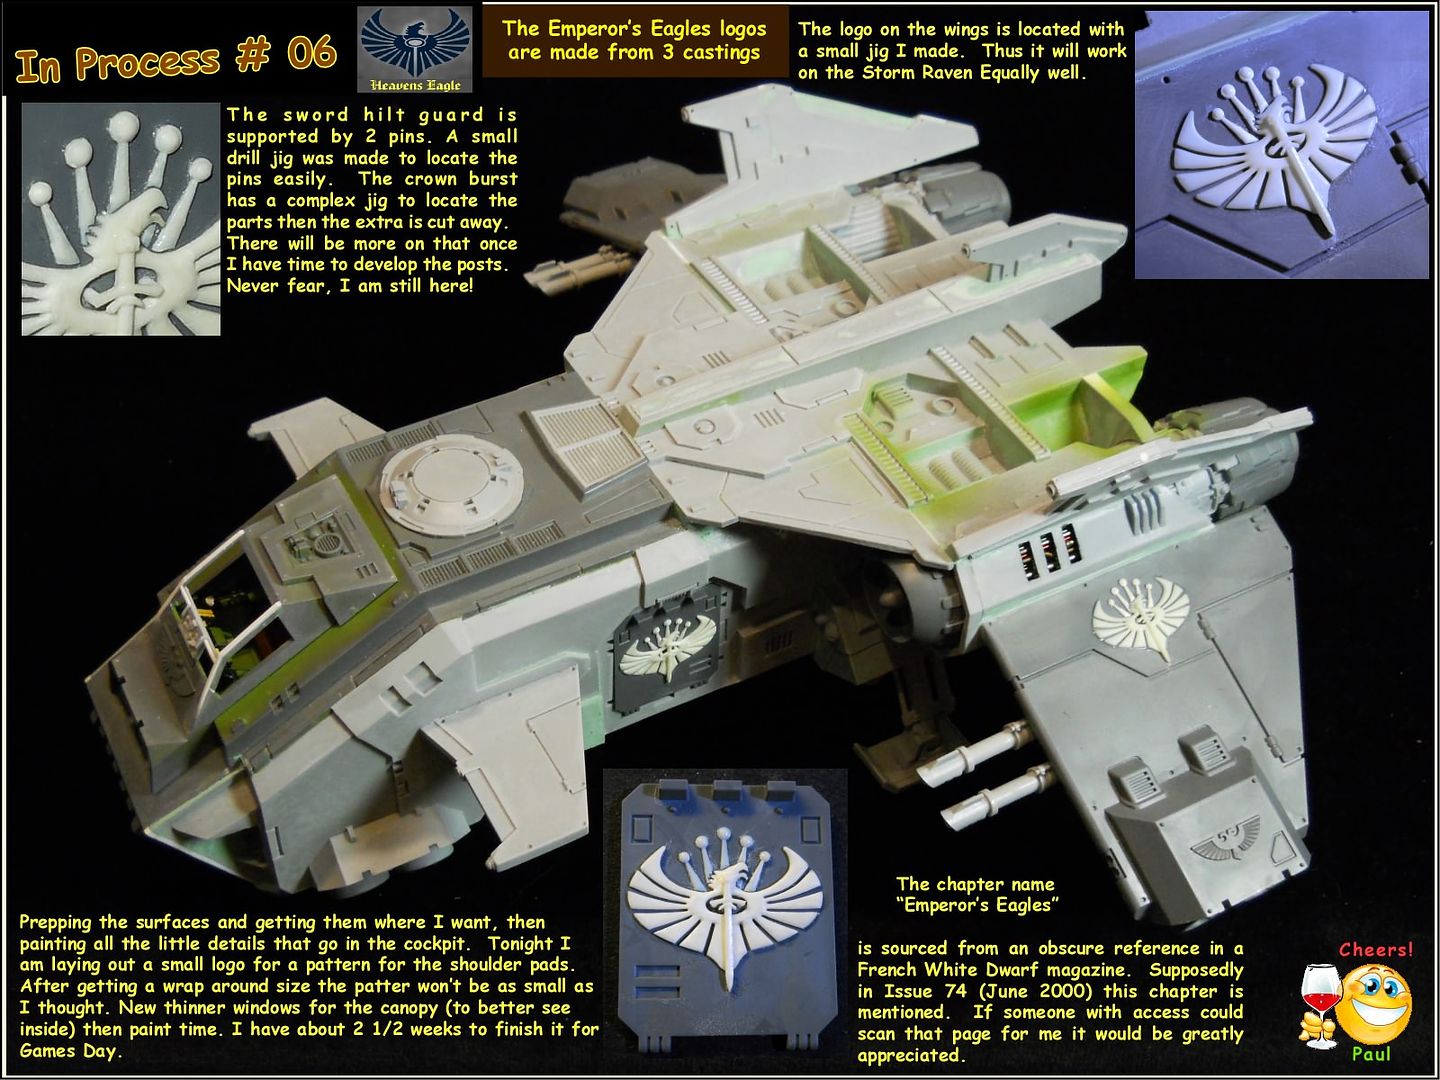 Well it is off to it then, I will do a big update with all the details after Games Day.
75369
Post by: Zhent
This is great, and thank you for all the information.
I have a couple of quetsions about your use of plasticard. I've purchased a couple of thicknesses of plasticard that came in 12" square sheets off Amazon. How do you go about keeping your cuts so clean and straight? Is it as simple as using scissors?
What thicknesses do you typically use? Are there other types you find regularly useful besides standard flat, white plasticard? I know Evergreen provides options with patterns pre-imprinted on some sizes.
Edit:
For anyone who is considering this model, or has been put off in part by the extreme detail that Heavens Eagle has put into his build, take heart! He is showing you a combination of a particularly poor cast and a particularly experienced model builder. I received mine just a few weeks ago, and after asking Forgeworld for replacements on a few pieces that were un-salvageable, I have been able to build the entire model with a minimum of difficulty, although not to the standard that HE has achieved. While it is an expensive model to use as practice, it's a great challenge if you are accustomed to some of the newer sculpts that Forgeworld has put out and want some experience really working with resin.
70060
Post by: Heavens Eagle
Zhent wrote:This is great, and thank you for all the information.
I have a couple of quetsions about your use of plasticard. I've purchased a couple of thicknesses of plasticard that came in 12" square sheets off Amazon. How do you go about keeping your cuts so clean and straight? Is it as simple as using scissors?
What thicknesses do you typically use? Are there other types you find regularly useful besides standard flat, white plasticard? I know Evergreen provides options with patterns pre-imprinted on some sizes.
Edit:
For anyone who is considering this model, or has been put off in part by the extreme detail that Heavens Eagle has put into his build, take heart! He is showing you a combination of a particularly poor cast and a particularly experienced model builder. I received mine just a few weeks ago, and after asking Forgeworld for replacements on a few pieces that were un-salvageable, I have been able to build the entire model with a minimum of difficulty, although not to the standard that HE has achieved. While it is an expensive model to use as practice, it's a great challenge if you are accustomed to some of the newer sculpts that Forgeworld has put out and want some experience really working with resin.
Well said Zhent! To be honest this has been a practice/ learning/ remembering how to do it, model for me. After many years off from building models I worked on some others and have them partially built before I jumped on this one. A lot of the nit picky stuff I do is just "my thing" and is not required to have a nice model for the table top.
As to your questions about plasticard, I have a fair amount of the Evergreen card. I found that plain jane sheet is the best for building and assembly. The textured stuff is there if I need a particular surfacing, but usually that is for some external detail or some basing detail.
As to the thicknesses I have everything from .005 inch thick to .080 thick. I finally measured each sheet with some calipers and noted the actual thickness up on a corner. This helps if you just happen to "NEED" a particular thickness, and helps to keep track of what the thickness is on a sheet.
As to cutting plastic card, I measure for where I want to cut the card and then use a small (usually 6" 15cm) steel ruler and a sharp knife to score the card. Thin card will usually cut, but thicker card I just score it. Then bend at the line and it will make a clean break. The raised burr along the sides of the cut can be then cleaned down and it is good. Thicker card needs several cuts so the score will be deep enough, but it just takes a little practice. Sometimes if it is a complex shape I will use my jewelers saw and just cut it out. It depends on what I am doing. Practice and some experimentation will show you more what you can do than my explanations. Different plastics will cut, bend, and break in different ways. The white Evergreen sheet is fairly soft but will cut and break with little problem. Other types or brands will work slightly different.
The thicknesses I use the most are .020 and .015 Then I will use .010 and .030 or other thicknesses as needed. Also Evergreen is available in narrow sheets, strips, squares, round rod, and some other shapes as well as the textured surfaces. I have acquired a fair amount of shapes and thicknesses over the years. The hard part is keeping is sorted so I can find what I want.
70060
Post by: Heavens Eagle
Well folks, I came to a conclusion/decision about trying to enter this guy in Games Day this year, "It aint happenin"! I could have tried to crash finish this, but would not have been happy with the results. I am still plugging away and in the process learning and relearning a number of things. While it is at a point where I could just "finish it" it would not do things justice and I would rather continue with the high grade work and be happy with what I finish with.
As this is the first 40k model I am building for my space marine chapter (actually it is the first 40k vehicle I have built) I am also designing other things that will be used on a couple of Storm Ravens, various tanks and what not. At the moment I am downsizing the Chapter logo to a size that will fit on a shoulder armor. I discovered that the resin once basically all set has a period of time where it can be curved and formed to about any shape. As I will be needing those for the marines in the cargo holds, it becomes part of the model. I also took some .015 thick clear lexan and made the glass in the cockpit from it. Lots thinner and less distortion. Fits snug, just have to trim the lower edges so everything will set down tight. Have even considered having the cockpit hatch where it will open in a similar way to a jet fighter. Just would have to add some more detail for the front gun/ missile assembly in front of the 'pit.
I will try and do a nice update in the next few days before Games Day. If you are coming to Games Day, drop me a line!
Toodles
28715
Post by: Apostle Pat
You are a surgeon of precision... good lord man.
54500
Post by: hk1x1
This is looking great, excellent work so far.
70060
Post by: Heavens Eagle
Yesterday was Games Day here in Memphis. My first Games Day! Was interesting to say the least, met people from Mexico, Canada, Spain, Germany, and of course England and the US. There were some really nice armies and minis to be seen as well as plenty of merchandise to purchase. Here is a quick update on all that and some news that some of you may not know.
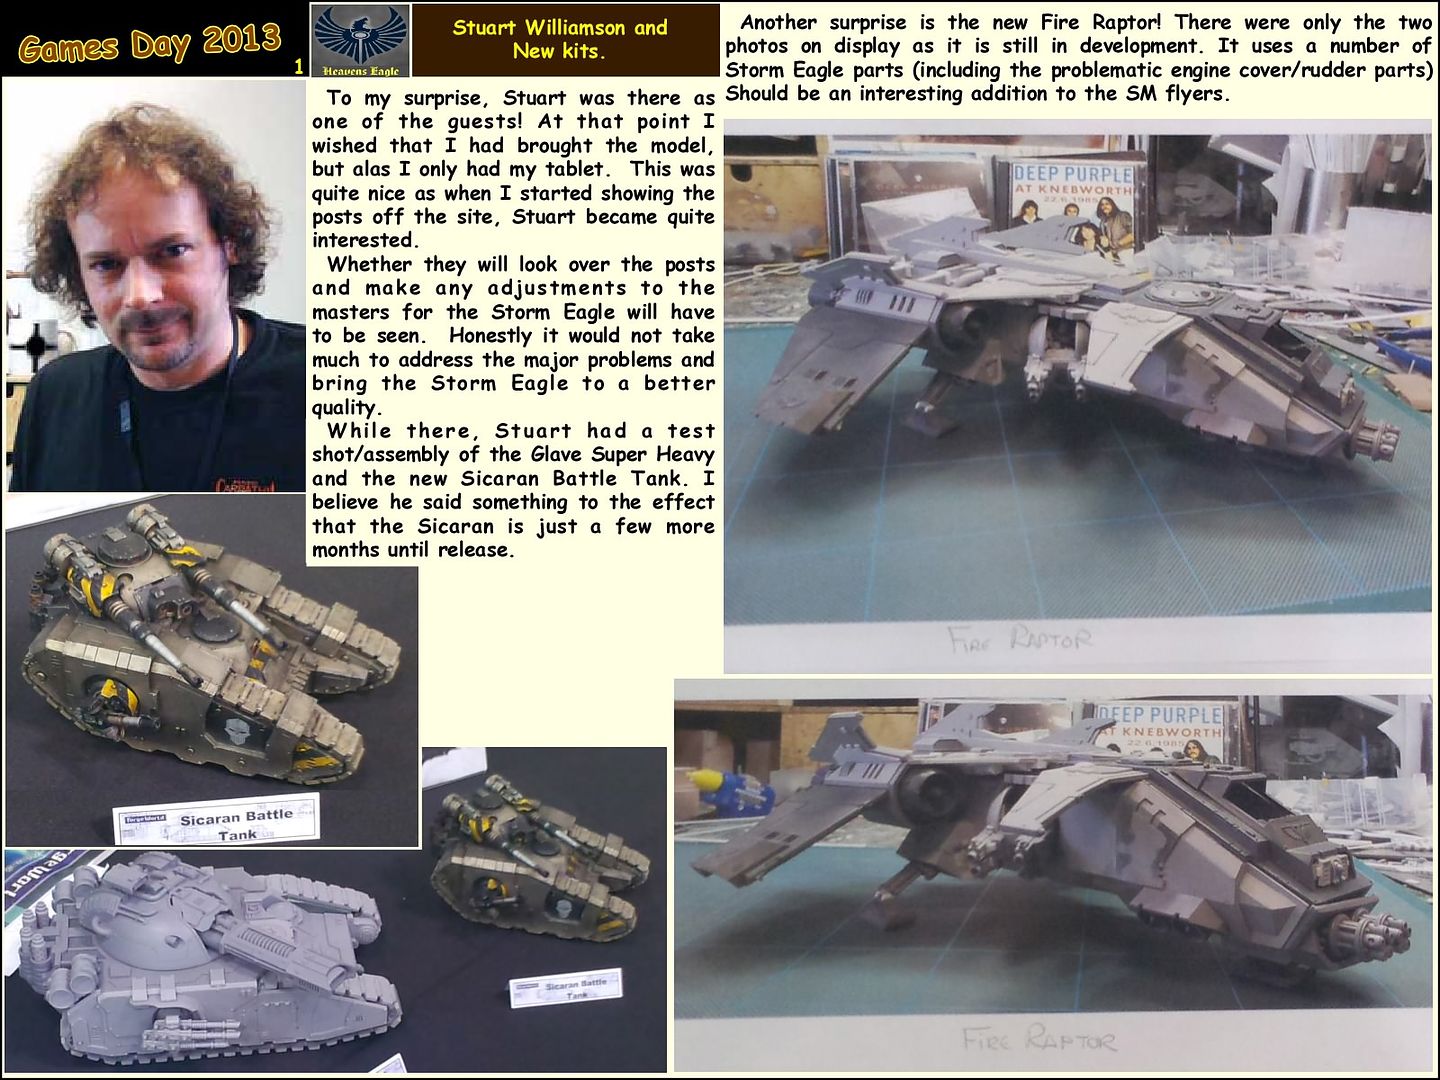
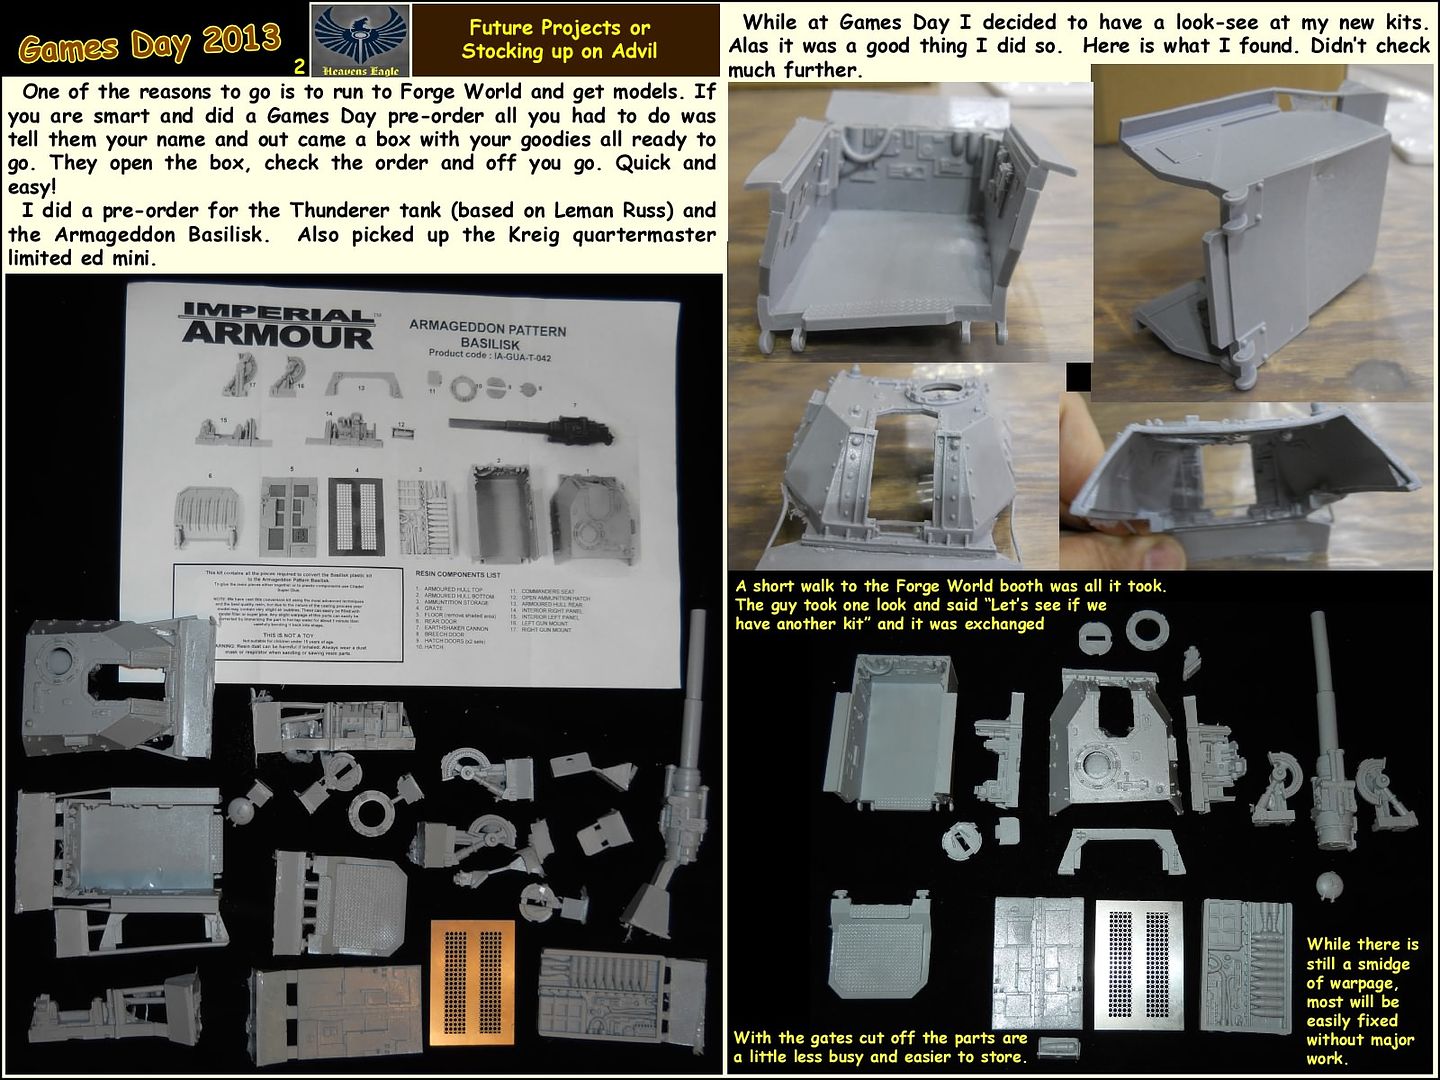
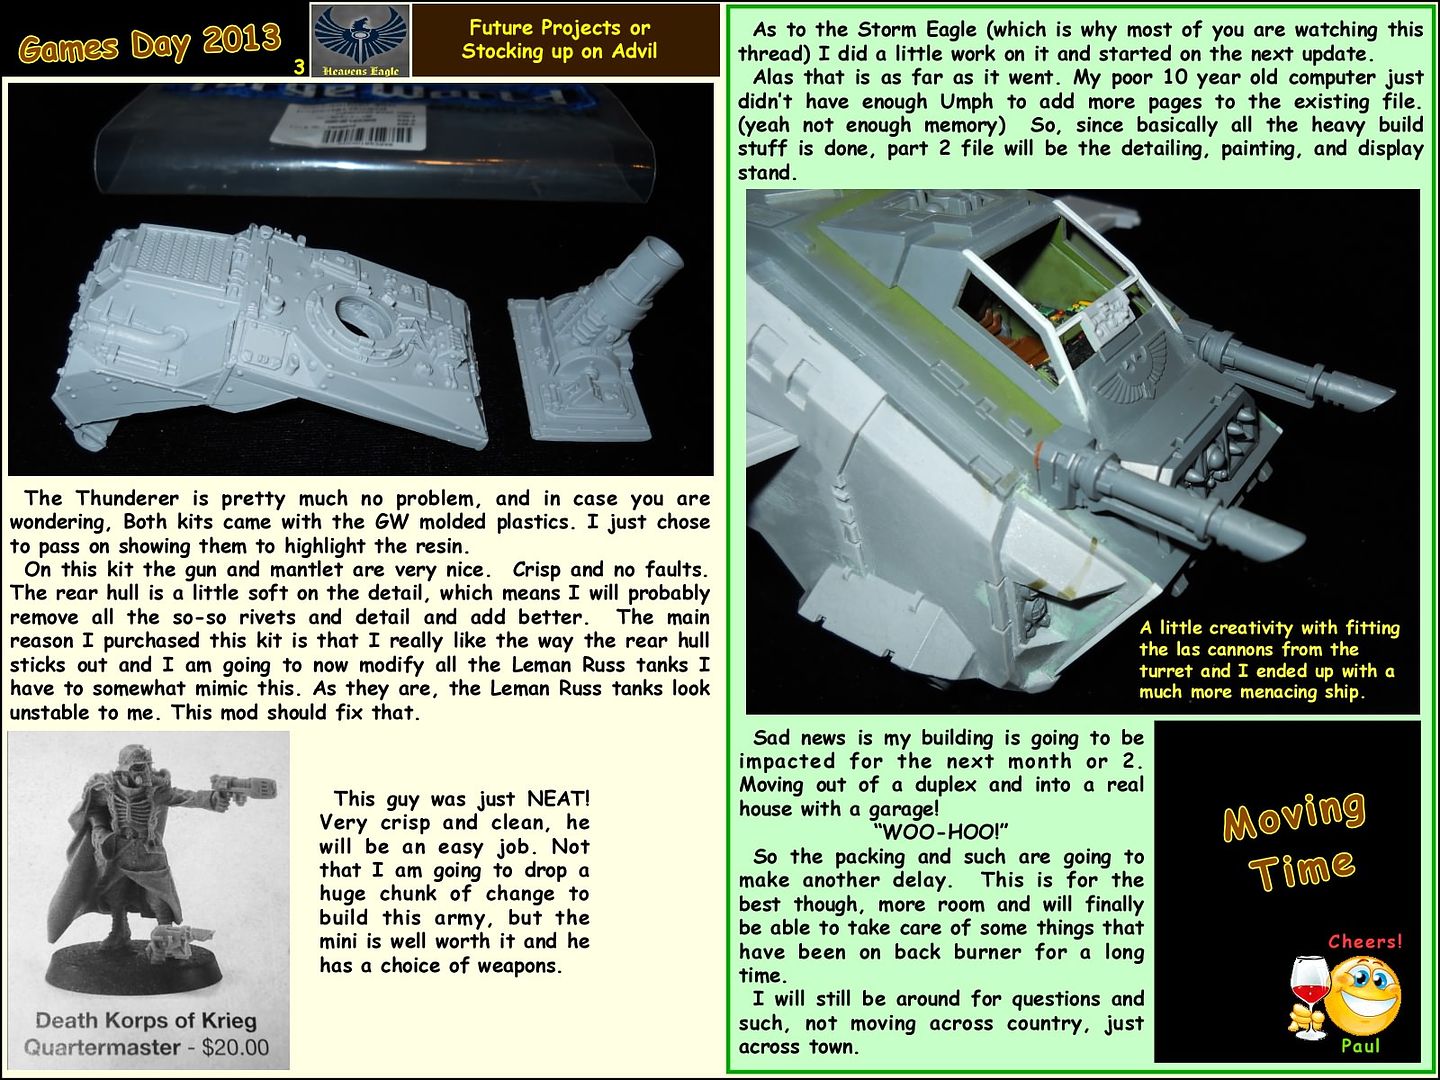 As I stated I will still be able to keep up with questions and such, just won't be able to generate new posts until I get the new place set up. (Shouldn't take too long as I will go through some 'puter withdrawal)
Those of you that I met at Games Day, I really enjoyed visiting and getting to know you! If you came here to have a look at this thread, send me a message so we can keep in touch.
76338
Post by: ThouShallNotHeal
Very detailed :O
12260
Post by: Davylove21
You have to be in the top percentile of hobbyists in terms of getting value for money. Massive kudos.
I myself struggled with the Armoured Proteus Land Raider. Doors didn't fit, tracks were a nightmare and the hull took forever to reshape.
Huge respect to you on getting that build together - FW should make it clear just how much it takes to actually build the bigger kits beyond "advanced users"!
70060
Post by: Heavens Eagle
 Davylove21 wrote: Davylove21 wrote:You have to be in the top percentile of hobbyists in terms of getting value for money. Massive kudos.
I myself struggled with the Armoured Proteus Land Raider. Doors didn't fit, tracks were a nightmare and the hull took forever to reshape.
Huge respect to you on getting that build together - FW should make it clear just how much it takes to actually build the bigger kits beyond "advanced users"!
Yeah Davy, I agree on the model difficulty ratings. I know many of the plastic kits on the market (planes, tanks, and automobiles) have a 1, 2, 3 rating system. However this doesn't even come close to what a kit like this entails. To be honest, many of the GW kits are a skill level 1 or 2 in that they are quite easy to assemble, and fit remarkably well even when a complex shape. Then you add some small resin parts and/or photo-etch and it becomes a skill level 3 which again many folks are capable of building without too much trouble if they have some experience.
Then we get into vac-u-form, full resin, and scratch building. Unfortunately those 3 particular skills can become quite intermixed. For example in Vac kits the parts are molded on a sheet of plastic. Detail wise they can be anywhere from poor ( like throw the sheet plastic out and start over) to really nice in that there is quite a lot of nice detail on the surface and it just needs to be cut out and glued. Any more these kits also include resin parts and photo-etch. A prerequisite skill is the ability to scratch build in order to make parts, fit parts, and know how to attach odd things and do so in a clean way.
Resin kits are more like the molded plastic kits and it really depends on the kit quality in order to determine what skill level it can be. Some are crisp and clean but again need the ability to scratch build though you will rarely need to make complex parts.
Scratch building can be anything from making a small shape, bracket or item to creating a whole new major part or assembly.
After reviewing these I would recommend the following ratings:
1, 2, and 3 are already stated and in use. Most GW plastic molded, Fine Cast and "simple" Forge World kits fit in these levels. Also individual figures can have fit problems, but a small part misfit is quite different from large multi-part misfits.
4. Skill level will require making parts from base plastics and other materials. Including major parts and assemblies that have major fit problems.
5. Skill level requires all previous skills and adds an ability to work with, reshape (de-warp) and form resin parts. It can also include making new master parts, molds, and resin casting.
6. Skill level requires all previous skills plus ability to work from accurate drawings to make parts, assemblies, and make accurate parts from base materials as well as work with fine delicate sheet plastic forms.
7. Skill level requiring advanced skills beyond just in building model kits. Ability to look past instructions and find problems from just a parts inspection. Metalworking, machining, microscopic manipulation and high level skills that take a model beyond just assembly and an ability to diagnose and solve problems in constructive ways. (basically a catch all for the "no one can build it kit" that is over and above trouble)
As I have stated throughout the building process this model is not for those new to model building. At the least the builder should be comfortable with levels 3 and 4 type builds and such that they can make parts and deal with serious fit problems.
At the least the Storm Eagle kit is a level 5 kit just due to the fit problems and warpage. It requires the ability to work with sheet plastic and ways to touch things up and make parts or corrections due to manufacturing issues. Most higher level resin kits are going to rate a minimum of a 4 and in this case I would rate the Storm Eagle closer to a 6. The 2 tank kits I picked up this weekend I would rate as a 3.5 for the Thunderer and a solid 4 to 4.5 for the Armageddon Pattern Basilisk. The Thunderbolt aircraft kit I have, would also rate at a 3.5 to a 4 quite nicely. Sometimes the ratings are not so much the difficulty of the kit as much as dealing with misshaped parts and warpage. If a part is quite solid so that it does not tend to warp and the casting is good and true it can really make the kit so much easier to build.
7686
Post by: Itto_Okami
Hi!!!!
I have nearly finished the assembly of my Storm Eagle! Not as profesional or exhaustive as yours, but I have followed your guide and have proved of very valuable help, so I owe you a great thank you!
I have a question regarding green stuff and filling the gaps. I'll use GW new liquid stuff, but I have an old pot and is a little cured and less fluid. Could I thin it with toluene or xylenol?
As soon as I finish it I'll post some shots.
Good luck with your moving!
70060
Post by: Heavens Eagle
 Itto_Okami wrote: Itto_Okami wrote:Hi!!!!
I have nearly finished the assembly of my Storm Eagle! Not as profesional or exhaustive as yours, but I have followed your guide and have proved of very valuable help, so I owe you a great thank you!
I have a question regarding green stuff and filling the gaps. I'll use GW new liquid stuff, but I have an old pot and is a little cured and less fluid. Could I thin it with toluene or xylenol?
As soon as I finish it I'll post some shots.
Good luck with your moving!
Thank You Itto! Glad my build guide was a help. That is why I made it and carried it to the detail level I did. If it is super detailed you can take it to the level you want.
As to the GW liquid Green Stuff versus the Squadron Green Putty; The GW Liquid Green Stuff is a water based filler type and adding the solvents will mess it up. They don't mix. Add a little water or an acrylic based thinner.
I found that the GW green stuff was a little bit on the brittle side and didn't bond all that well to flat surfaces. It would tend to chip and flake off. I had a lot of trouble using it on Fine Cast resin mini's and when I went to my Squadron Green Putty with Xylene (toluene works too) it actually bonds to the surfaces of the resin and works well.
I see that you are located in Spain? If so, the Squadron putty might not be readily available. In that case check for a fine putty in a tube that is solvent based. Toluene would be most likely the solvent in the tube type but read the label for contents, and experiment with it a little to see how well it spreads and how easy it is to work with and sand down. You might find something that works even better!
With that I look forward to seeing photos of your Storm Eagle. There were several in the US Games Day this weekend. After building mine it was quite easy to see where folks had just glued them together for use as a game piece and not worried too much about some of the fit problems. Generally they were fairly decent looking models, and the majority of the flaws would never have been noticed by most of those in attendance.
74736
Post by: ajmerrifield
Wow, completely and utterly epic write-up. Amazing work, man, seriously.
76807
Post by: Arkham
HI,
A picture from the french White Dwarf #74 / june 2000.
Not so much about the Emperor Eagles ...
I really search threw this issue and not find anything less regarding them. 
Sorry
1
76441
Post by: Denras
Incredible tutorial, although it has made me think twice about forge world products. At least till I get some more experience with regular plastic kits.
70060
Post by: Heavens Eagle
Arkham wrote:HI,
A picture from the french White Dwarf #74 / june 2000.
Not so much about the Emperor Eagles ...
I really search threw this issue and not find anything less regarding them.
Sorry
Please! You do not need to apologize!
I knew this was a very brief listing for this chapter. I did not expect a photograph to go with the caption. My gracious and heartfelt thanks to you for the time you took to look this up, photograph it, and post it for me. There is way more here than I expected Arkham.
What I was expecting was a small paragraph with some text and just the name, so this is wonderful!
Here is what the reference looks like at 1000 Space Marine Chapters:
 All I was hoping for was a confirmation of the name.
70060
Post by: Heavens Eagle
Hey all! Just hought I would drop a note to let everyone know what has been going on. It amounts to basically, "Geez I didn't realize I had SO MUCH STUFF!!!!!"
Tore down my main desktop today and both of the hobby rooms are down to large furniture only. This is being done off of my tablet, which works well for this. Have been thinking on the color "pattern" for the Storm Eagle, and I believe I have a concept for it in mind now. I just have to get my work space all put back together so I can do it.
On another note, I received the Mecharius Omega mode from Forge World. It was warped almost as bad as the Storm Eagle was, and this was with the large heavy parts. I believe I have an idea as to why so many of the FW resin kits end up so warped. First off, the large gates are left on. In the Mecharius Omega both track sides were warped from straight because setting flat on the table, the gate caused them to bend up from flat. The second problem is how the model is packaged for shipping. Everything is tossed in a plastic bag then tossed in a box with some bubble wrap. No care as to how the parts are setting against each other or the box. My hull bottom is quite warped from what it should be due to this. (and yes the large gate sticking out of one end didn't help)
On a positive note, for some reason there were 2 sets of the small parts in the box. This was good as one set was quite infected with "the warp". The other set was as it should have been. The worst piece was the rounded cage that fits over the rear of the main gun. That is pretty much a lost cause. Once I get settled and unpacked, I will contact FW about that.
Well it is getting late, and tomorrow is going to be a busy day. TTFN
70060
Post by: Heavens Eagle
Hey every one! I have not abandoned he thread, I have just been quite busy with unpacking and setting back up all the hobby stuff. In addition ATT did not have any DSL available at the new house. (DSL is in the area, just no ports left to hook up to) You would have thought that they would have told me that when I called in with the order. They said they sent me a notice in the mail (of course it still has not arrived).
Next option was to get cable, as I don't watch cable TV, it is a bit more of a bother. After setting up an install, that didn't go through either as the hook up is on a phone pole in the neighbor's yard next door. Long story short, internet is still in the future. UGH!
Good news is that my desktop should be up and running in the next couple of days and first job to do is to do a new update to post as soon as I have internet. It should be a decent update as it covers a number of custom mods and add ins.
I am still able to check my e-mail here at work on my mini tablet, so if you have questions I can still get them. It might be a little while before I can reply but I will reply.
Geez moving is a pain!
Be back soon!
63502
Post by: djz05
Really nice work. The small details you did (hydraulics, wiring under the wings' grill, stormraven lights) are awesome. Huge respect for the amount of time you put in.
The stormeagle was my first FW purchase, and you can add me to the long list of people with initial problems building it. Finally got the hull straight after 2 days of hot water/blowdryer and rubberbands. I wont say it looks great as yours, but i am quite proud of my end result.
5601
Post by: Kelly502
HE,
Thank you for taking the time to make such a great thread, you are a grand master modeler! Really enjoyed the read, and the pictures!
Will you come over and help me build my titan? I will get to GD Memphis next year, I'm over East of you in North West Arkansas. I look forward to more posts!!
Wow, I re-read that post I made at oh-dark-thirty and I think I was trying to say that I hope I run into you at Games Dat Memphis next year... If you paint the way you build I'd suggest entering in the contests if you haven't already.
61819
Post by: mikefrench178
I just thought I'd add that I bought a fire raptor at GD13 and there was little if no problems building it. I wonder if they fixed the "bending" issue or I was just lucky.
Thanks for a great thread.
2
73775
Post by: stormoffires
My word what a fantastic build mate!
A heads up to some, sometimes FW does produce terrible models and its worth an email or call to them. I had a necron shroud bomber that did not fit together at all and they sent be a whole new one, that was test fitted before the shipped it, still trying to salvage the first one but second was spot on! little fixing.
Also the drilling out of the engines is smart never thought about removing resin to lighten the model. I feel enlighted in the modeling aspect with all of this thank you.
70060
Post by: Heavens Eagle
Thanks for posting your photos of the Fire Raptor Mike! At Games Day here in Memphis back in July Stewart just had a couple of photos of a prototype. As I had my tablet with me and thus had a link to this tread he and I endedup visiting for a while about the 2 models. There are some parts thatare shared by the 2 kits (namely the engines, rudder fins, and the plastic Strm Raven parts) most likely you could end up with the same problems with the wing mounting and rudder fin angles.
Stormoffires this is only the first FW kit I have assembled. I do have others all of which have some problems. The last one I bought was the Mecharius Omega tank. It ws shipped over here in the August heat so I am not too sure how much of the warpage was from factory handling, and how much was due to heat during transit. All I know is that the 2 track "sides" still had the large gates attached and that the bend of the warpage looked to be from the gates not letting the 2 parts lay flat when shipped. There are 2 ways that this problem could be avoided; first FW could use a band sawto just lob off the large gate leaving a stub, or pack them better for shipping. I think it should be a bit of both as the gates add extra weight, are not really needed, and as in this instance can cause damage. Packing as I have seen in other resin kits I have purchased (WW2 model aircraft in large scales) is also not really up to par.
One last thing I will address in this post is that one fella on this forum PM'ed me a while back. Due to the difficulty in getting around the forums and internet stuff, I havenot really been able to reply as I should have, and I do apologize for that. He asked if I would consider building up a Storm Eagle for him as he isn't readily able to do so himself. While there is a part of me that would like to help him out, I learned a long time ago that if I do work for other folks I loose my hobby as it becomes a job and a chore. So I don't do consignment as a general rule. Sometimes it is had enough to just do the projects that are mine. Afterall this Storm Eagle project has been going on sice the first of the year.
Still don't have internet at the new house (UGH!) maybe sometime here soon.
56704
Post by: Lucazi
I just recieved my Eagle in the mail yesterday. After unboxing it and inspecting everything it looks in pretty tip-top shape to me. No major bends like in your tutorial. Your tutorial is amazing and I will be using it to build mine up. I'll post a pic once I have it at least built.
-Lucazi-
32280
Post by: Sven Dragonfire
Seriously talented, Superb model..... Well your finished article is. The techniques you employed are amazing. However I cannot beleive we pay that kind of money for such poor quality kits. I built the first casting of the Thunderhawk and it was a nightmare. I have built several other Forgeworld kits and they have all had problems - damaged parts, parts that just dont fit, miscasts. I could go on. Thank you for sharing this, It is an outstanding post.
12313
Post by: Ouze
Lucazi wrote:I just recieved my Eagle in the mail yesterday. After unboxing it and inspecting everything it looks in pretty tip-top shape to me. No major bends like in your tutorial.
We know at least some GWS staff read Dakka; I have to wonder is this thread resulted in a mold reworking.
I got a Fire Raptor recently which is very very similar, and had none of the issues seen in this tutorial (although I have issues with virtually every single FW order previous to this to some degree).
39502
Post by: Slayer le boucher
This thread is superb, and i didi learn a few things and the existence of helpfull tools.
But i can't stop thinking that for going through all this hardship only to make a decent "out of the box" model like it should be when you buy it, i had a great idea when i decided to kitbash myself a Stormeagle from a Stormraven and a Valkiry.
Really the amount of things you have to straigthen and correct its just ridiculous for a kit that cost 150$...
But you did an outstanding job doing it!
83662
Post by: justincase
Thanks for this thread, so much for me to learn and catch up on, this model is going to be a PITA.
While I would say my skil level is low, my demands on pefection are only slightly short on yours so I have my work cut out for me.
36040
Post by: Rhich
Requiem wrote:Suddenly filled with respect for people who can actually assemble this! Nice tutorial, lots of useful stuff in here
Truly an excellent write up and worthy of note.
Inspirational attention to detail !
19719
Post by: Loricatus Aurora
Great thread. Thank you for taking the effort to share and teach the knowledge.
|
|
