57963
Post by: Zogg
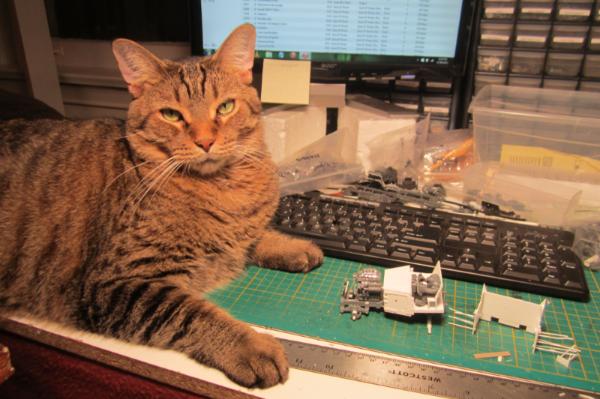
This is now my general blog of conversions, kit-bashes, and scratch-builds. It will be focused mainly on Orks, Imperial Guard, and Imperial civilians.
-----------
I fell in love with Orks back when 40K Second Edition was shiny and new. Then GorkaMorka came out and I was in conversion heaven. Unfortunately, my gaming group dispersed and real world priorities meant that my Orks got shelved.
Then a few years ago the revamped Ork Trukk piqued my interest, and I have been slowly getting back into the modeling game. I have been lurking on this forum for some time, scavenging tips and ideas from the many talented members here and I hope that my conversions might inspire some of you. Comments or questions are most welcome.
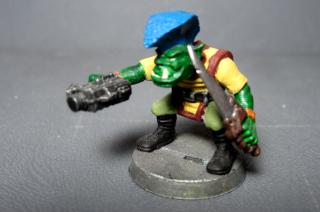
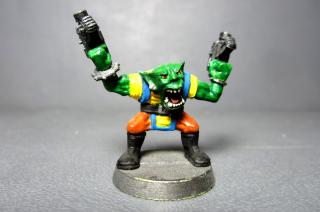
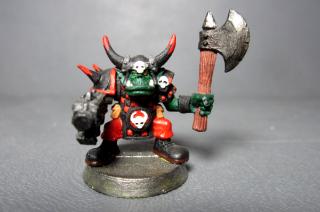
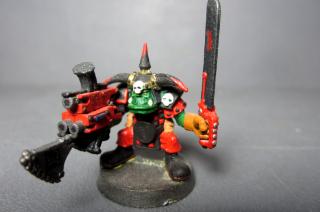
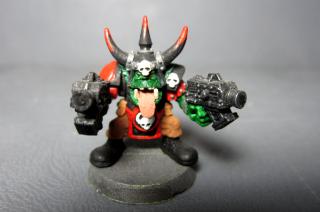
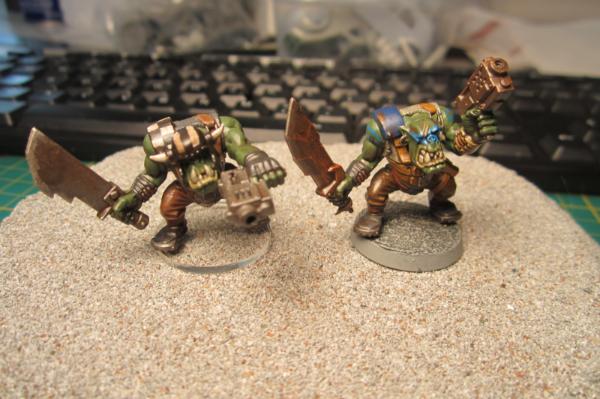
These are some of my old school Orks that I did many years ago. I think my abilities have gotten a wee bit better since then, but I'll leave that up to you to judge.
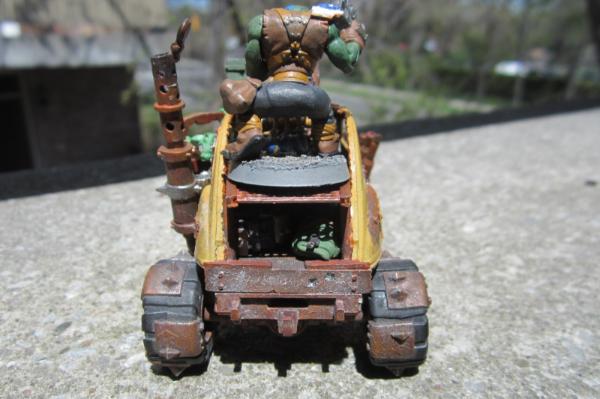
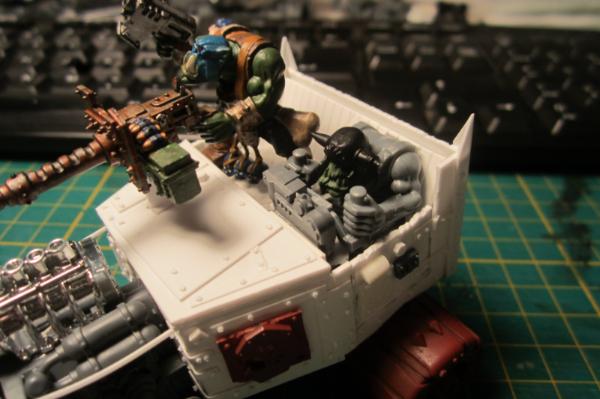
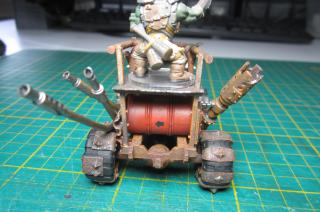
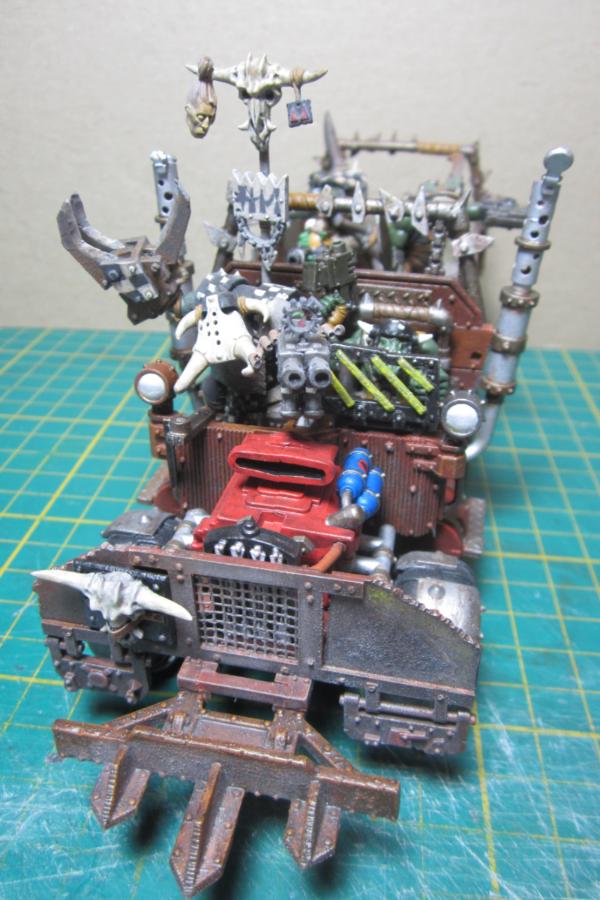
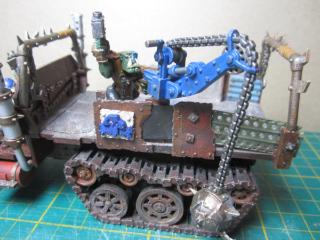
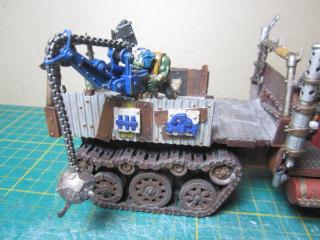
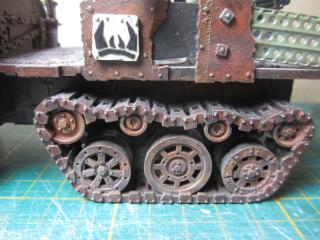
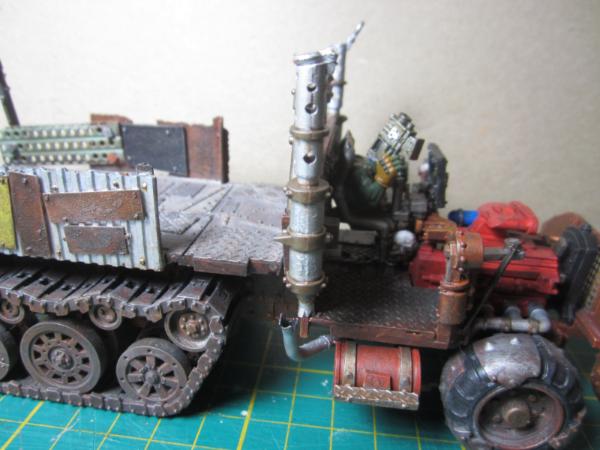
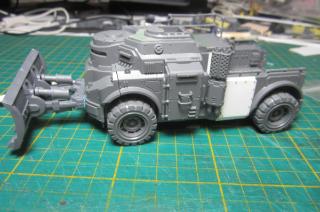
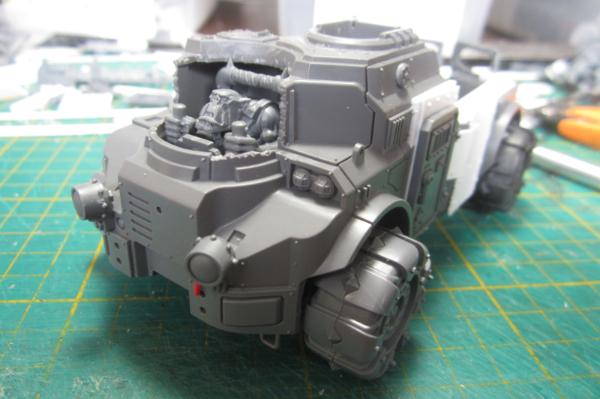
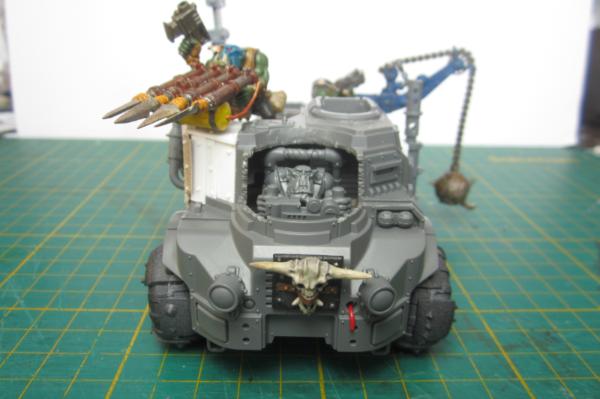
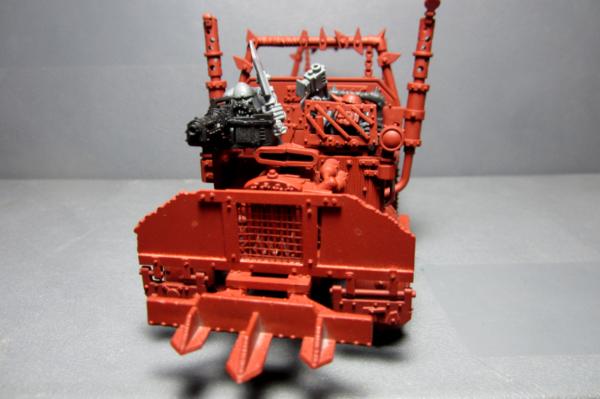
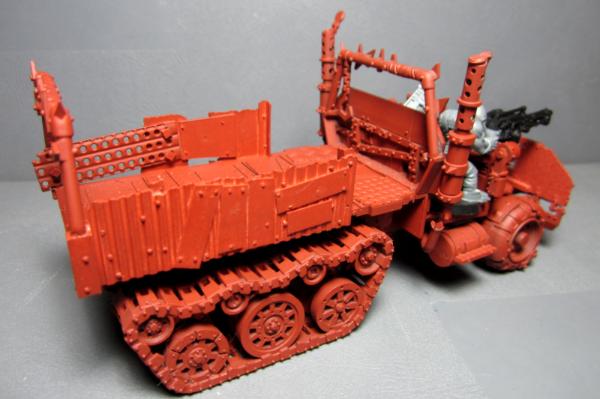
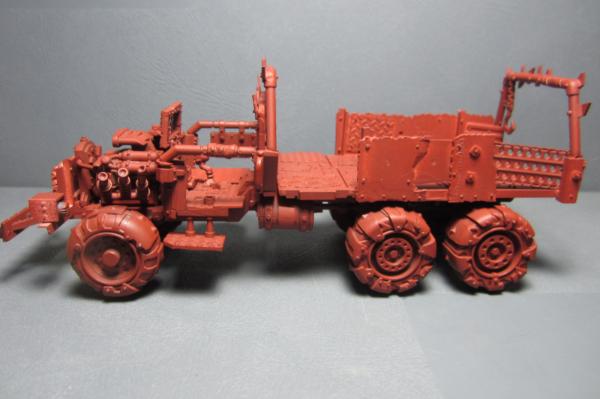
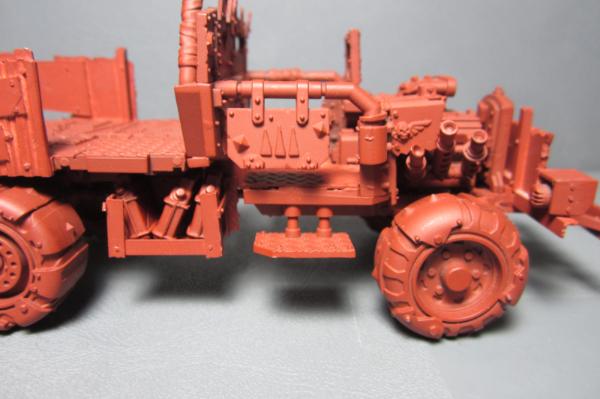
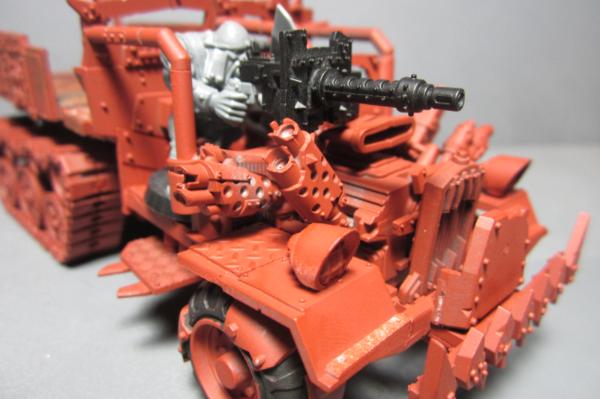
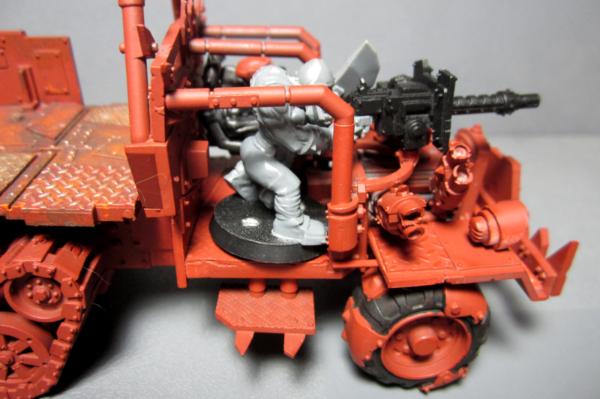
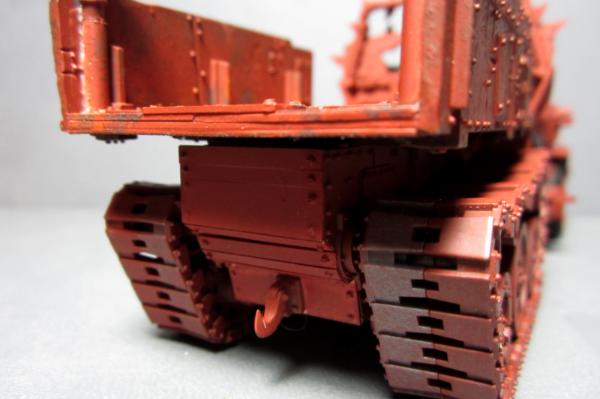
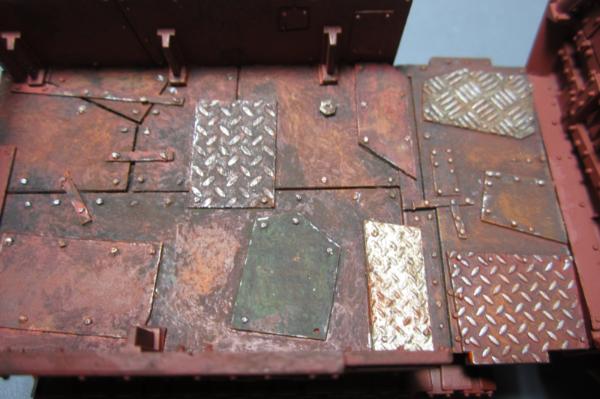
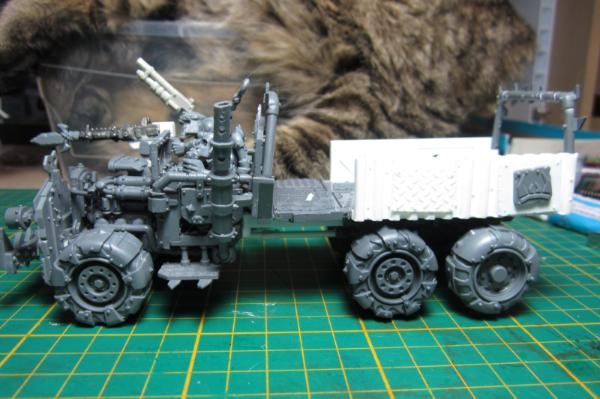
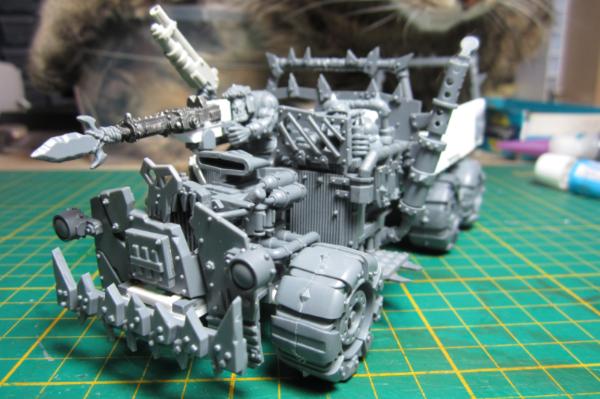
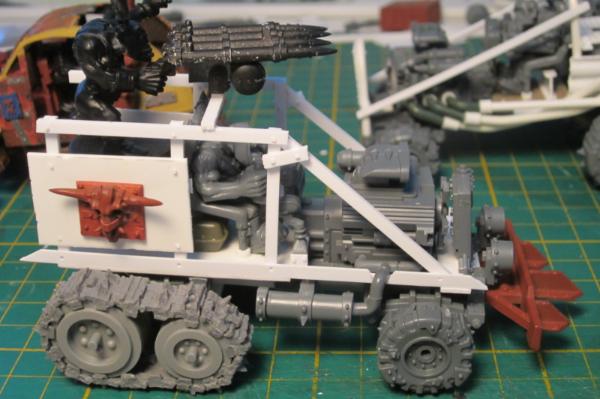
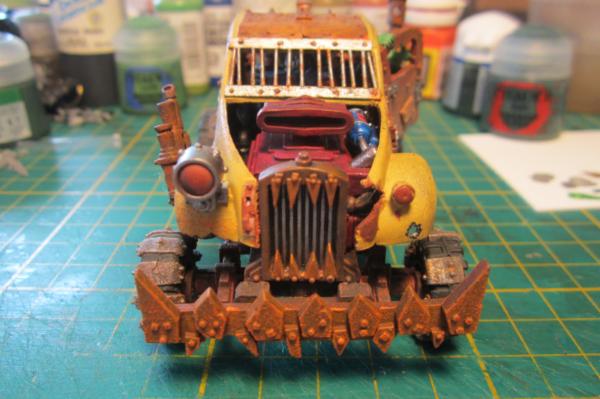
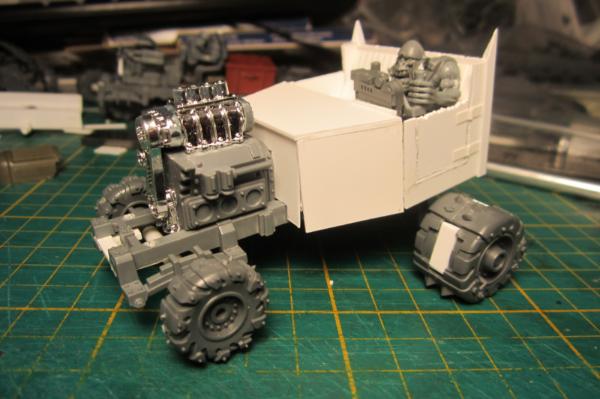
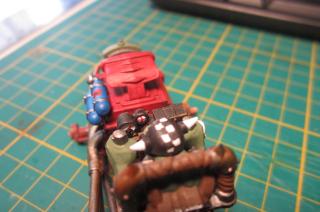
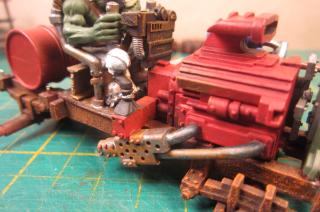
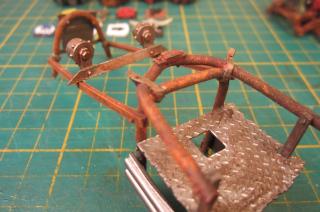
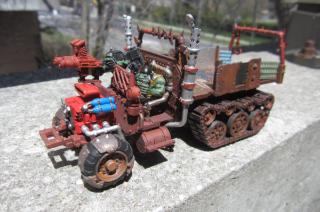
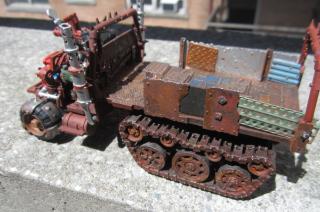
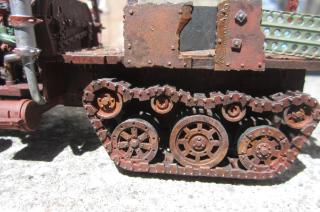
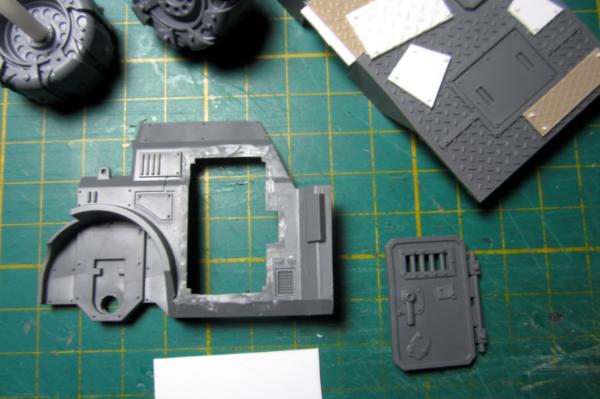
Here is one of my trukks. It's not completely glued together yet to make painting easier. The driver was primed separately and his right arm isn't primed at all (it's magnetized to allow a variety of weapons). The bed has been lengthened in order to fit over the battlewagon treads. In fact, all of my trukks have been lengthened, as I like the look better (and I can fit more boyz in the back – important in GorkaMorka).
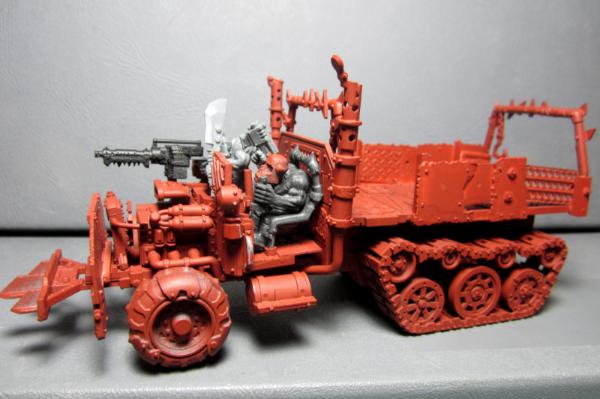
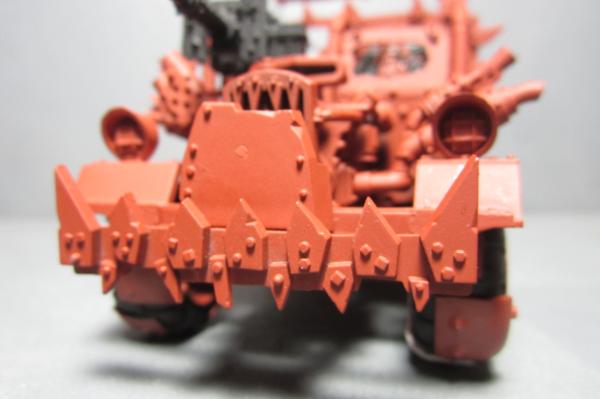
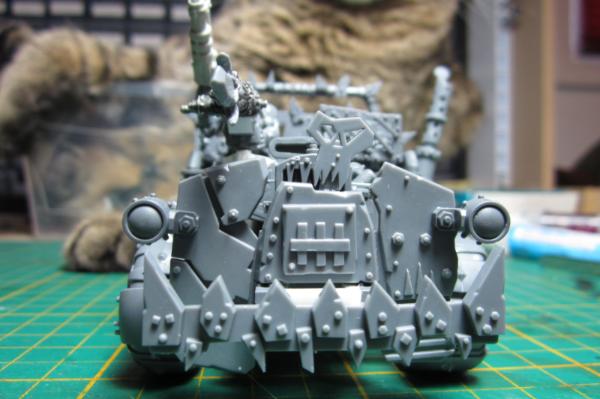
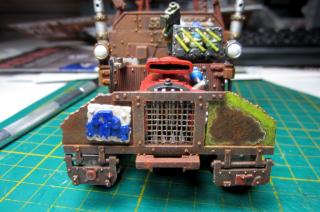
The reinforced ram is magnetized, allowing me to swap it out with an ordinary bumper. In addition, the front panel is magnetized to allow me to add glyph plates for whichever clan I want to play. My first four trukks (two with wheels, two with tracks) will be painted a generic rusty colour and will have magnetized panels for clan-specific glyph plates.
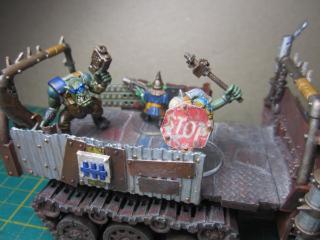
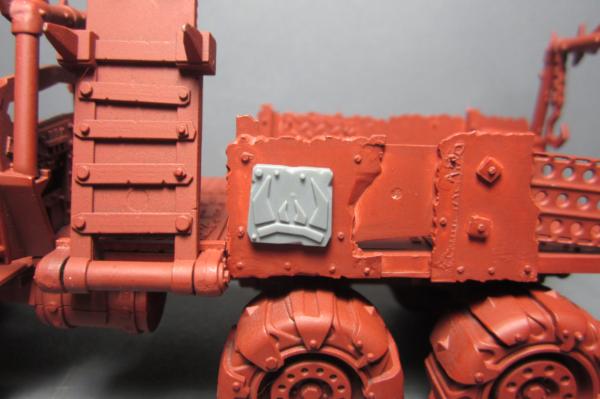
Here are the clan glyph plates. I will eventually make a mold and cast several of these in resin.
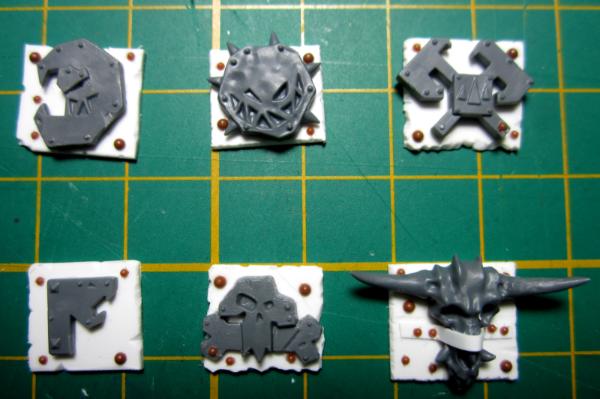
Here you can clearly see the magnets for the glyph plates.

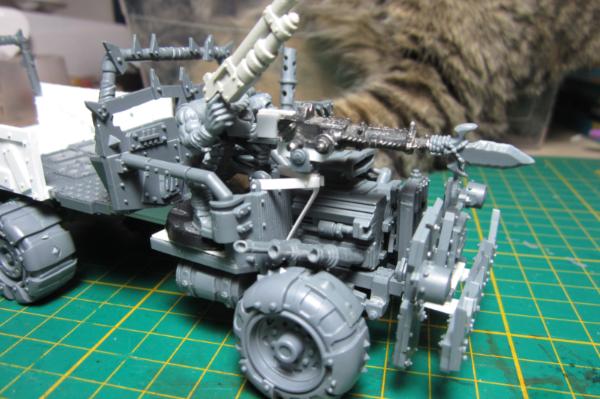
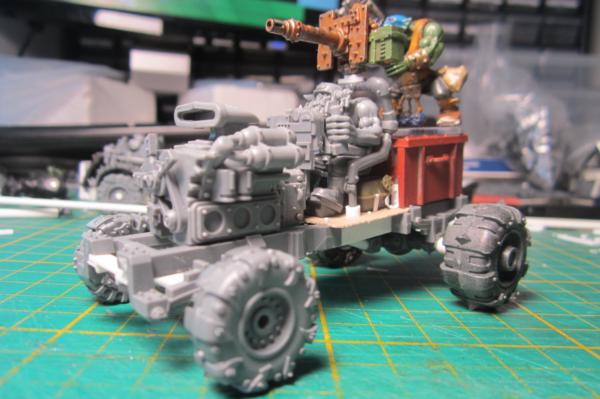
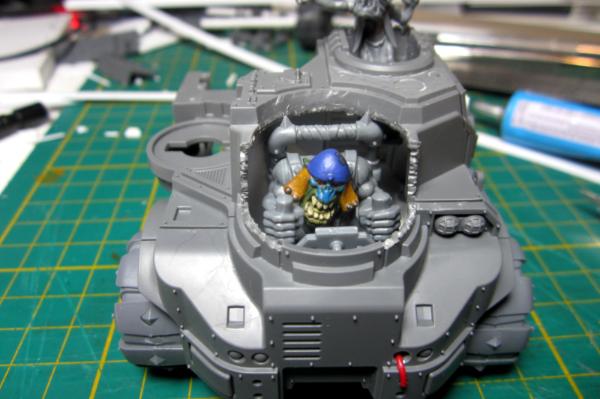
The gun and gunner's arms are all magnetized, allowing for easy weapon swaps.

The gunner can be removed entirely and replaced with an ordinary boy or nob.
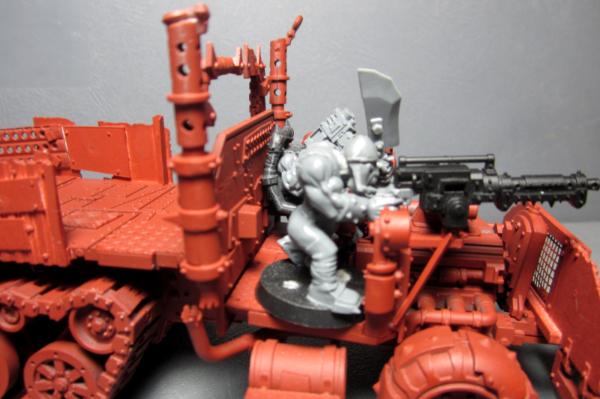
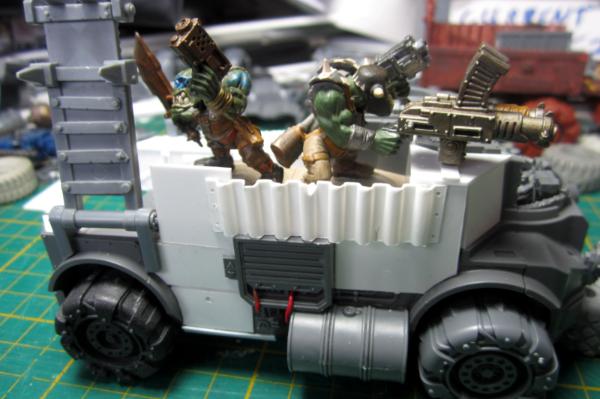
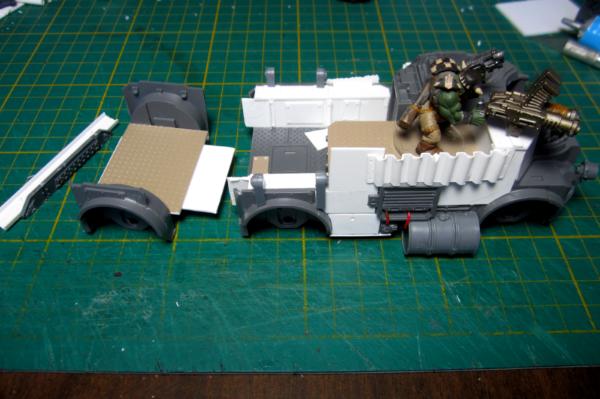
The bed itself is magnetized, eventually allowing me to swap it out with a large gun or a fifth wheel.
Stay tuned for more trukks.
57963
Post by: Zogg
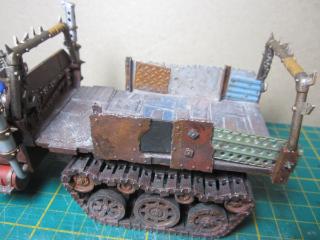
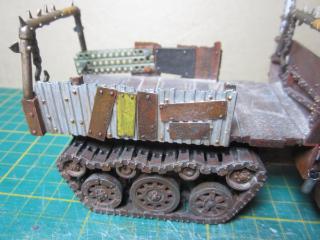
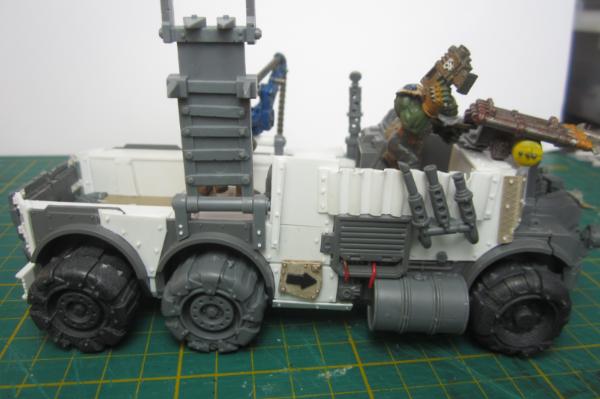
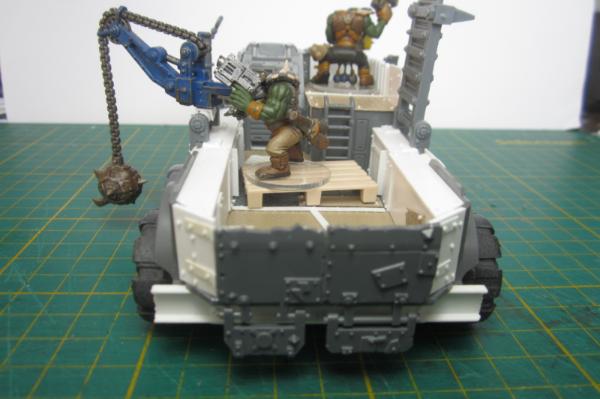
Here is my second trukk. I didn't put the driver in as he was being uncooperative. I think I have to shave the little tab off the bottom of his feet to get him to fit in properly.
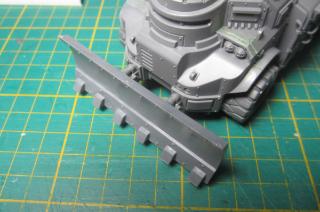
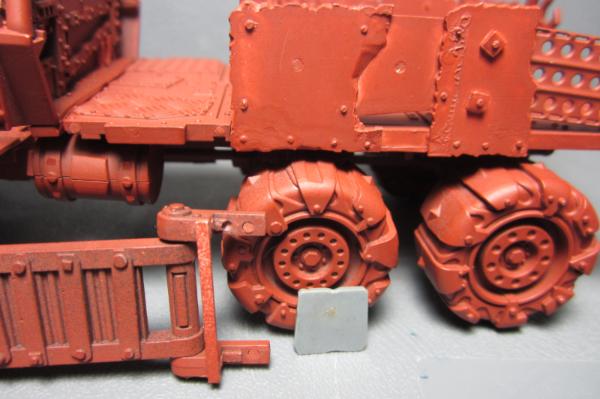
Both the glyph plate and boarding ladder are attached by magnets.
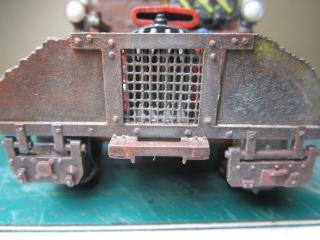
This shows the magnets, as well as a hole in the ladder attachment from my first attempt at putting in a magnet. These close-ups also really show where I need to fill in some gaps.
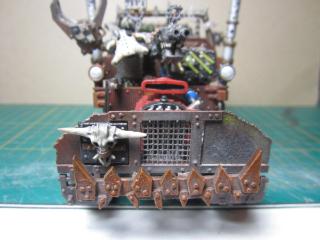
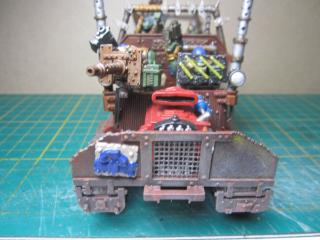
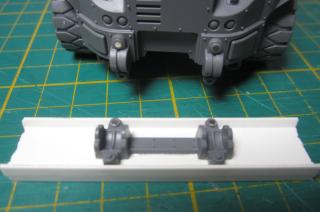
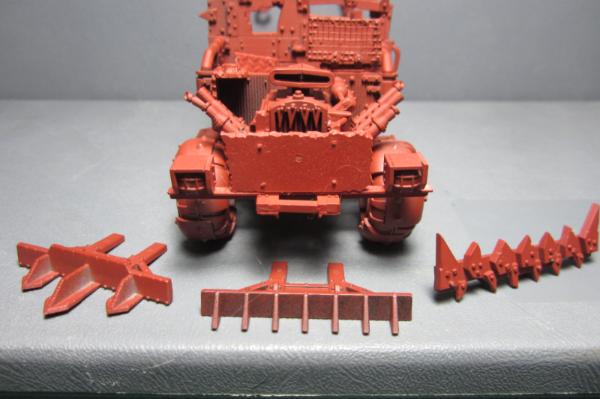
This shows the magnetized front plate. And some mould lines on the exhausts that I need to scrape.

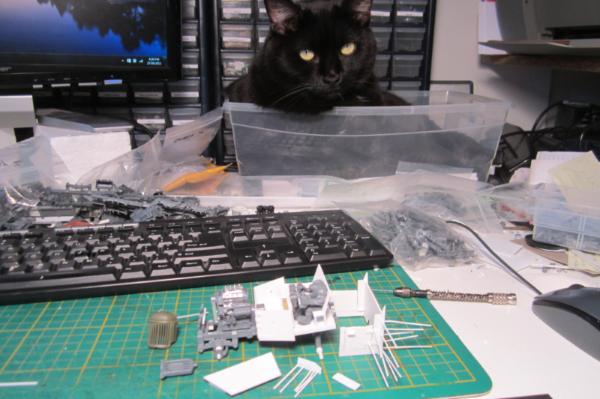
This shows some of the magnetized front bumpers I've made. And some cat hairs. Static cling and curious cats are the bane of my existence.
The gas cans are just sitting in there loose until I get around to painting them.
The magnetized glyph plate on the other side.
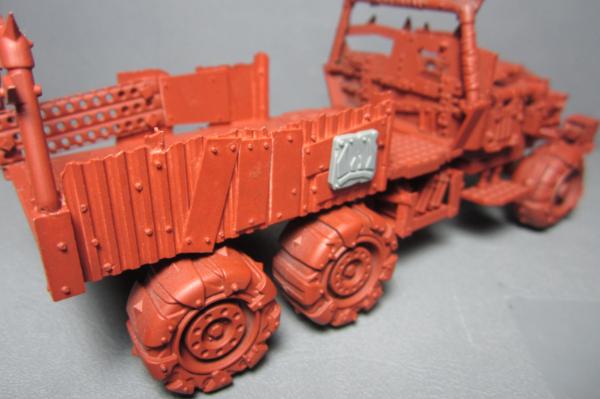
The bed itself is magnetized, which will allow me to swap it out for a big gun or a fifth wheel (a properly sized one, not the sad little one that comes with the trukk).
D'oh! I just realized I used the same bed in these pics as my first trukk. Oh well, aside from the side panels, it's basically the same.
57963
Post by: Zogg
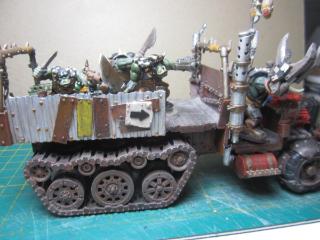
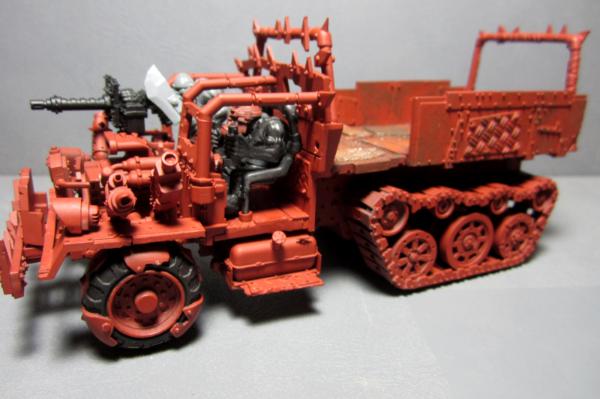
This is my third Ork trukk. I have started the painfully slow process (for me, anyway) of painting this one.
Spot for magnetized glyph plate.
Still a little gap-filling to do...

The headlights were a pain to make, but I like the end result.
More cat hairs. And I see a couple of spots where I still have to shave off the leftover sprue attachment nibs.
I was experimenting with the sponge method of painting to put some rust shades on the side panels.

Need a tow?
Experimenting with the Typhus Corrosion and Ryza Rust paints. So far I'm liking them. I especially like how Typhus Corrosion covers my many gluing smudges.
Comments and questions are welcome. 
57963
Post by: Zogg
Started working on trukk number 4.

37345
Post by: Boyz "R" Us
Nice modeling Zogg, really like the paint effect on the trukk bed too! Any chance of a group shot? All this is encouraging me to get working on my truck kits! 
82166
Post by: Urtyork Rotfang
I'm liking the corrisive look Zogg very effective, keep posting can't wait for the final finish.
One question though I'm starting to use magnets (when they arrive in the post) does painting them effect the magnatisum? & have you just glued them in the holes or used anything else to keep them in there? Last thing I want is to rip it out when changing arms (I'm using them on some killa kans) 
26790
Post by: Gitsplitta
Im in! Great looking work!
57963
Post by: Zogg
Thanks all!
@ Urtyork Rotfang
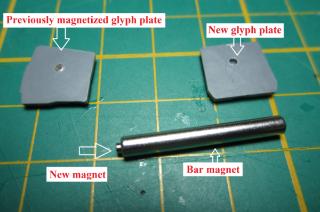
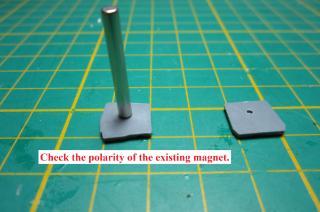
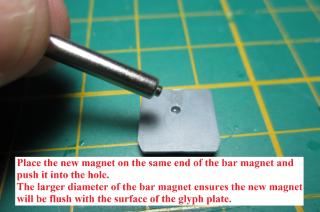
So far, it appears that primer doesn't inhibit the 'stickiness' of the magnets, but we'll see if that changes with some layers of paint and sealer. Of course, the items I'm attaching are pretty light, there might be a more noticeable effect with heavier things like killa kan arms. But if you use larger magnets, you should be good.
I just use superglue to attach the magnets, although I have had a couple that stayed in when I did a test fit to see if the hole was deep enough. Which can be a pain when the hole isn't deep enough. I've found that it's better to have the hole be a little too deep than not deep enough. As long as you don't push the magnet all the way in, that is. If you're making a number of interchangeable items, you want to make sure you keep the polarity consistent.
@ Boyz "R" Us
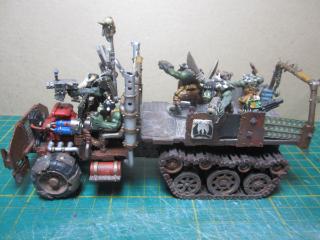
As requested. I left the drivers off as it's a bit of a pain to get them sitting right. And yes, build trukks. We need moar trukks.
And some progress on trukk number 4.
 Automatically Appended Next Post: Automatically Appended Next Post: Rivets!
82166
Post by: Urtyork Rotfang
 Zogg wrote: Zogg wrote:Thanks all!
@ Urtyork Rotfang
So far, it appears that primer doesn't inhibit the 'stickiness' of the magnets, but we'll see if that changes with some layers of paint and sealer. Of course, the items I'm attaching are pretty light, there might be a more noticeable effect with heavier things like killa kan arms. But if you use larger magnets, you should be good.
I just use superglue to attach the magnets, although I have had a couple that stayed in when I did a test fit to see if the hole was deep enough. Which can be a pain when the hole isn't deep enough. I've found that it's better to have the hole be a little too deep than not deep enough. As long as you don't push the magnet all the way in, that is. If you're making a number of interchangeable items, you want to make sure you keep the polarity consistent.
Thanks for that can't wait to give it a go still waiting for the delivery though!!! lol
57963
Post by: Zogg
Side walls attached.

30672
Post by: Theophony
Great work Zogg , nice and ramshackle without looking like.....junk?
57963
Post by: Zogg
Thanks Theophony.
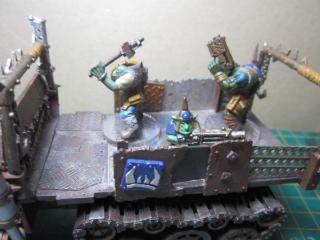
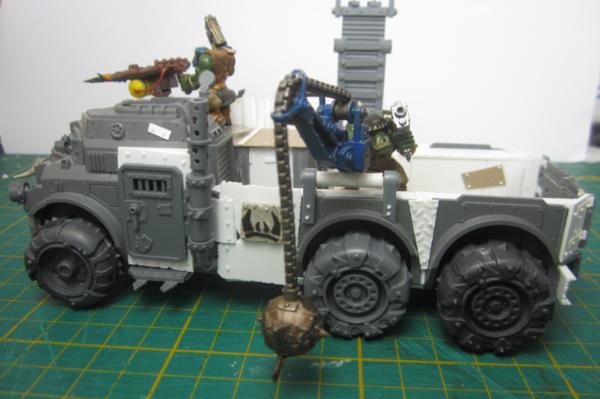
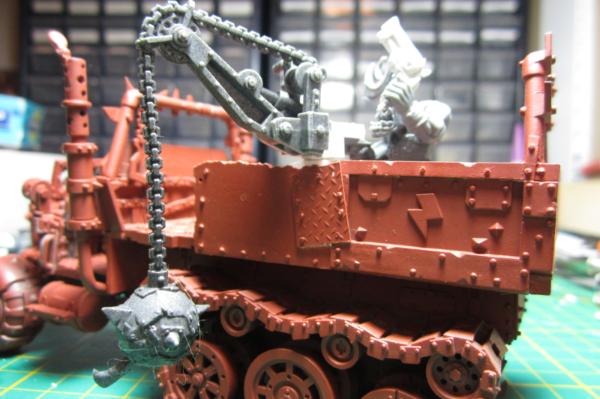
The sidewalls of each trukk has a spot where I can put a magnetized mount for a wrecking ball or big grabber.
Wrecking ball (complete with cat hairs).
Mounting pillar.
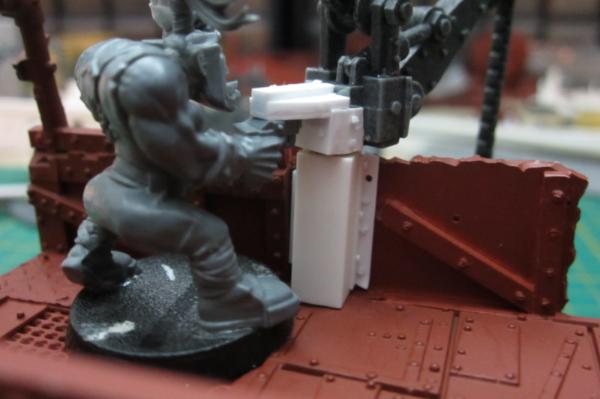
I've gone a little crazy with magnets.

30672
Post by: Theophony
What size magnets are those? They look super tiny  . The magnetic weapon mounts look great as well. I'm putting a link in my blog or your page, there's a few Ork lovers hat might swing by, and quite a few scratch builders as well.
57963
Post by: Zogg
Wow, thanks Theo. I'm a big fan of your work, especially the Necromunda scenery and janitorial servitors.
The magnets are indeed tiny. And fiddly. They're 1/16" diameter by 1/32" thickness. Unfortunately the batch I have include a lot of defective ones where the nickel plating came off and the magnets pretty much disintegrated into tiny little filings, which stick to the other magnets. Each time I want to use one, I have to spend time rolling it around on a piece of tape to pull off the filings, then inspecting it to see if the plating is about to come off.
82688
Post by: RobZie
Awesome stuff, very inspirational.
26790
Post by: Gitsplitta
That's an idea I'm going to have to nick... my wrecking balls keep breaking off anyway... mounting it that way may extend the life span.
76303
Post by: Warboss_Waaazag
These trukks look great! Excellent conversion jobs. I like how your weathering is coming out, too. Subscribed.
57963
Post by: Zogg
Thanks for the comments!
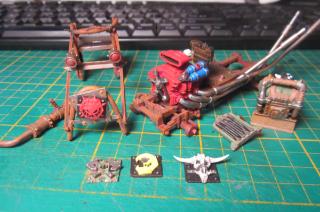
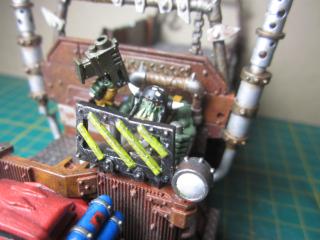
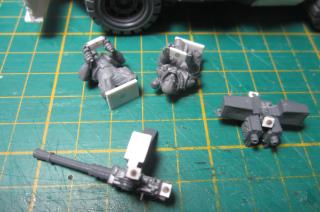
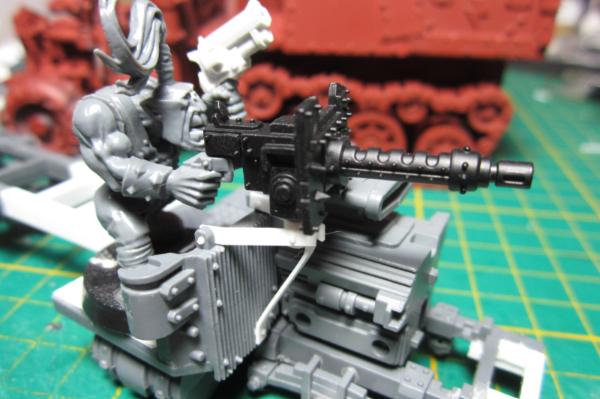
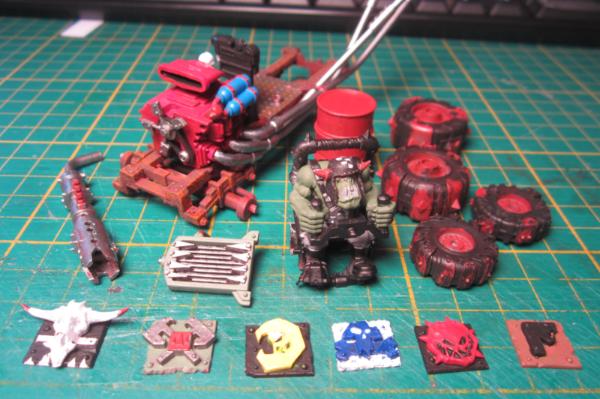
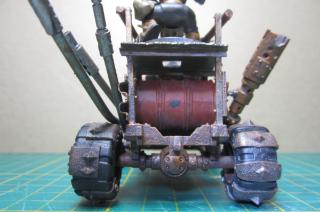
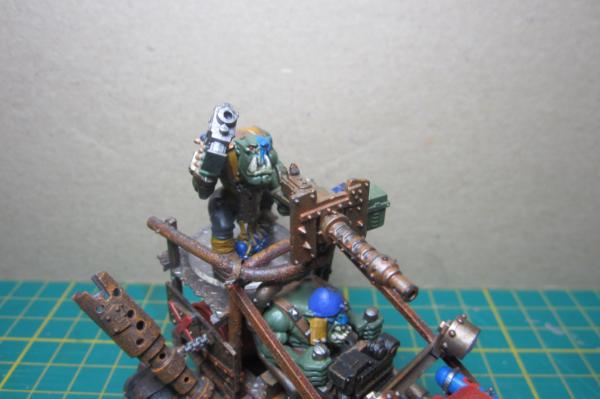
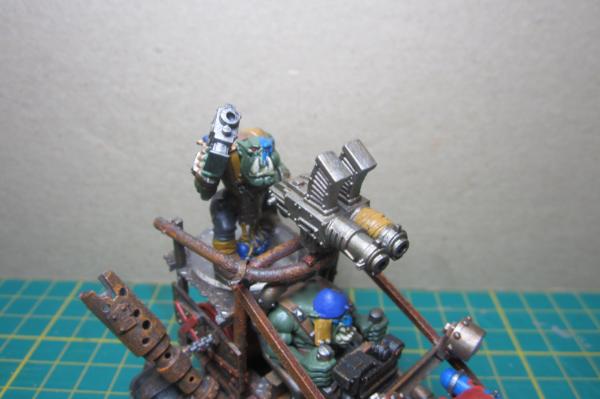
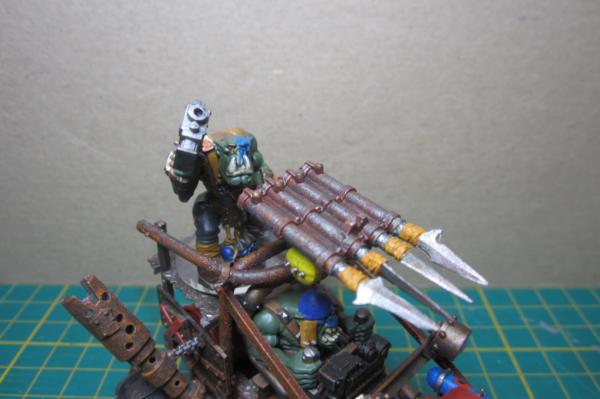
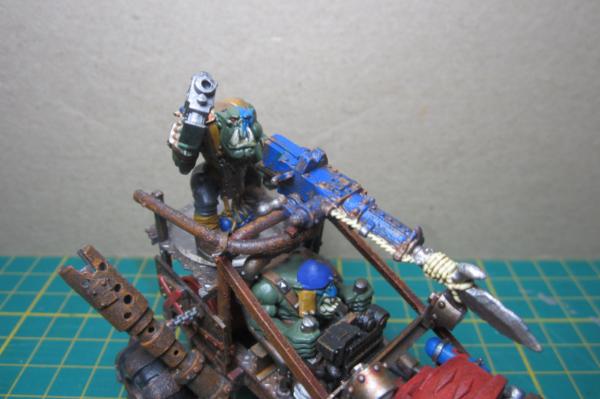
Here are close-ups of some of my magnetized big guns. I still have to make harpoon guns and linked shootas.
'eavy shoota
rokkit launcha

scorcha

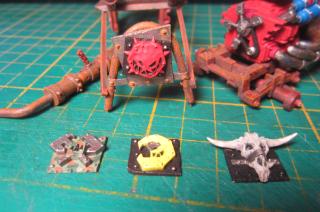
spear gun
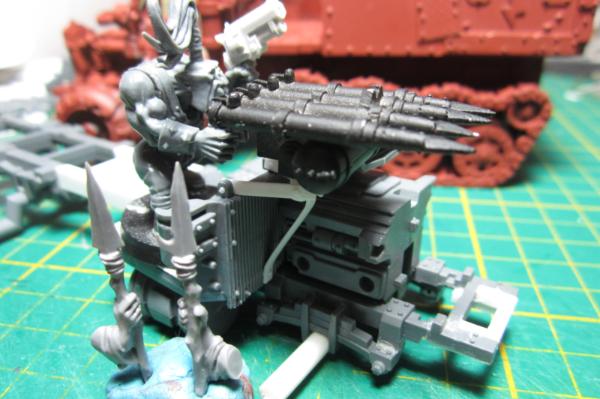
I'm going to replace the spear heads with ones from goblin spears shown in the foreground as they look a wee bit more orky.
65595
Post by: Camkierhi
Some really great work here, subbed.
Love the work on the trukks over all shape. Makes them look much better.
73071
Post by: jason1977
Where did you get the 6 shooter??? I must have!!!!
76303
Post by: Warboss_Waaazag
I like the simplicity of your weapon mounts.
22619
Post by: inmygravenimage
Very cool. You clearly have some game!
2326
Post by: shasolenzabi
Very nicely done trukks, i like 'em!
57963
Post by: Zogg
Thanks for the comments!
@jason1977
I get bitz from so many sources, it's difficult to remember where any specific item came from, but I'm pretty sure the six-shooter is from Zinge Industries.
http://www.dakkadakka.com/dakkaforum/posts/list/349840.page
I've picked up a number of items from him and he does nice work.
Small update... magnetized trukk bed.
82166
Post by: Urtyork Rotfang
Loving the look ... I'm joining you and going magnet crazy they've just arrived in the post!!! yipppeeeeeeee
65595
Post by: Camkierhi
Looks very good, but a little dark to me. Not sure, maybe a very very light dry brush with a metal, just to highlight. Like the texture, and does look effective.
22619
Post by: inmygravenimage
Agreed, lovely but a bit of metal along those sharp edges, as rust rubs back away, would work a treat.
57963
Post by: Zogg
Agreed. It is a wee bit dark. Although for the underside of the bed, I'm fine with that. And aside from some dings from rocks being kicked up by the tires, I don't know that there would be much bare metal showing from wear. Now the side panels on the other hand...
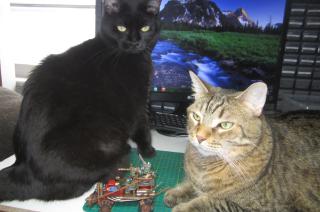
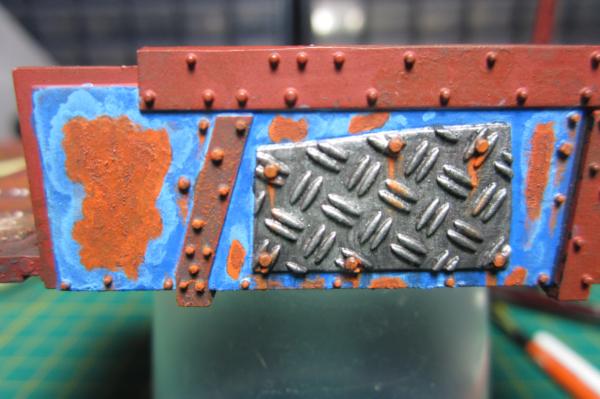
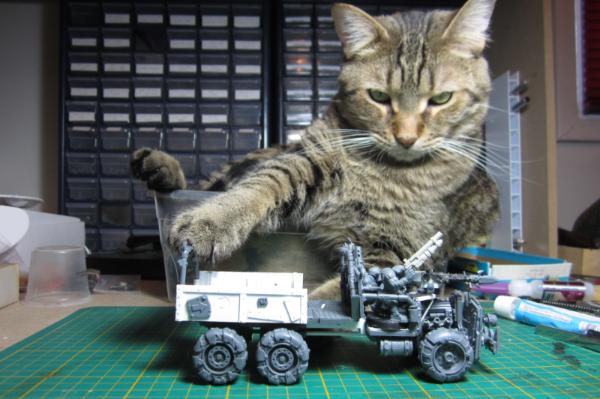
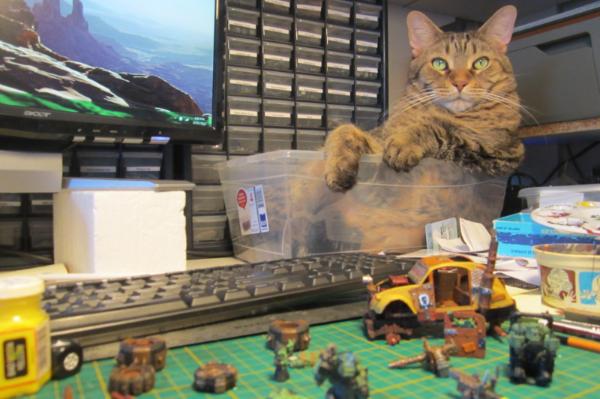
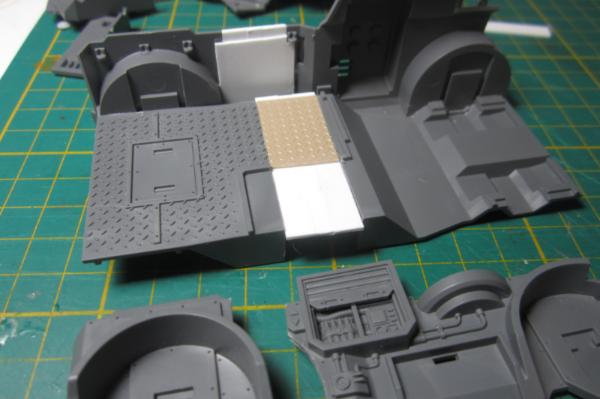
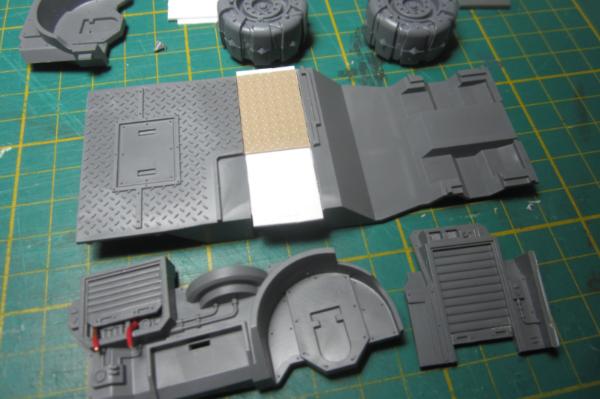
Speaking of side panels... some more experimenting. This is quite literally a "test bed" for painting. Supervised by one of my "helpers", Silk.

I painted one of the panels Astronomican Grey, then dabbed on some Typhus Corrosion and brushed on some Ryza Rust. It didn't come out quite as planned, but it is interesting.
I added a little Runefang Steel along some edges, and brushed some grey weathering chalk onto the bottom edge. These trukks are intended mainly for playing GorkaMorka, but on a former agriworld that is now a barren wasteland beset by ash storms and acid rain.
I'm getting closer to the look I want, but there's still something missing. Suggestions?
65595
Post by: Camkierhi
I am far from an expert on this.
Two suggestions.
1st I personally use a more orange than red rusty colour. I use hobgoblin orange, but that is ancient.
2nd is washes. Throw a watered down coat of sepia or earthshade over it. they add depth.
Please remember I am no expert here. If you are going for ash waste type I would say go with Angrax earthshade.
Please correct me people.
22619
Post by: inmygravenimage
I would agree about using an orange. I like using the dried bits on the edge of the pot  btw btw my car saw that last post and has gone off in a sulk.
That's what happens when you look at other cats on the internet and she catches you 
30672
Post by: Theophony
I'm going to have to say......having the cat there in the pic just made my night , with it being your avatar too I was waiting for its paw to pick up a paintbrush and point at different parts.  yes it's been one of THOSE nights at work, but I'm home now, and its sleepytime 
57963
Post by: Zogg
@Camkierhi
Playing around with washes was next on my list. Great minds...
@inmygravenimage
My cats are completely unconcerned with me looking at other cats on the internet. However, if I spend too much time on the computer and not enough time paying attention to them, they let me know. Insistently.
@Theophony
lol
An experiment with a painted panel that has rusted.
After some washes.
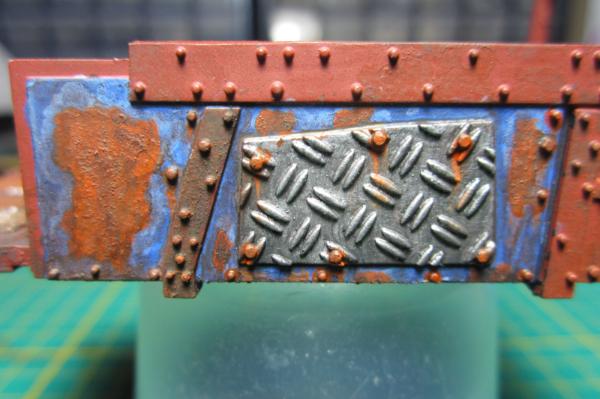
Again, not quite the look I was going for, but the learning continues...
65595
Post by: Camkierhi
Keep at it, you are close. Looks very good to me. The only thing hitting slightly off to me is the checker plate, the rivets are nicly rusted, but the plate looks very clean. Not sure. And again I say I am not an expert so don't go listening to me.
And with out pictures how do we know you are not a cat with thumbs?
57963
Post by: Zogg
@Camkierhi
Me, a cat with thumbs? Indulging in a hobby when not plotting to take over the... er... um... ha ha. <nervous laugh> I've said too much... <shifty eyes>
So now that I'm working again ( not on a convoluted scheme of world dominance), I'll likely only be posting once or twice a week.
So for now, a small update...
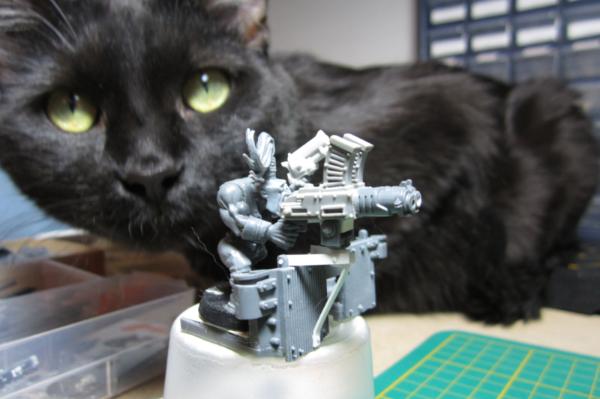
Magnetized linked shootas. And Velvet, my other "helper".
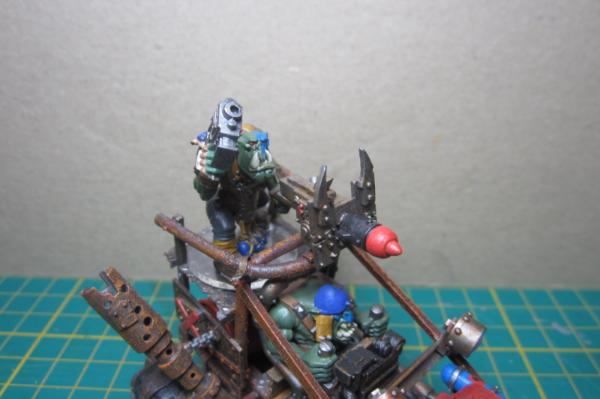
Magnetized harpoon gun.
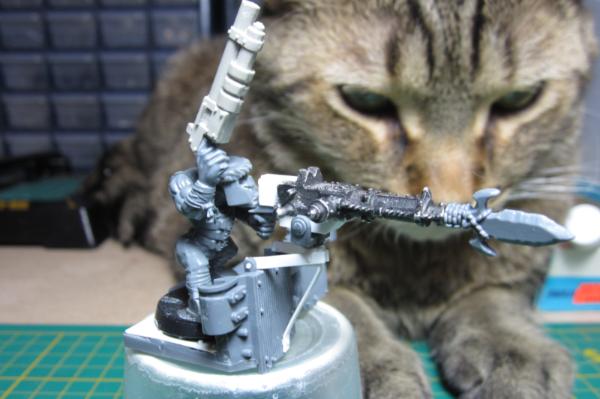
The shotgun is from Kromlech. They have some nice stuff.
http://www.dakkadakka.com/dakkaforum/posts/list/291012.page
82688
Post by: RobZie
That harpoon gun is a neat idea, could count as a Grabba claw. I like the rust spots on the blue panel too, care to share how you did that?, I have a similar blue on my ork vehicles and have been looking for something to break it up a bit. cheers. P.S your kitty cats are adorable 
57963
Post by: Zogg
@RobZie
My cats thank you for the compliment. The harpoon gun is originally from GorkaMorka. I just swapped the head with one from an Ork boar boy and added magnetized mounting gubbins.
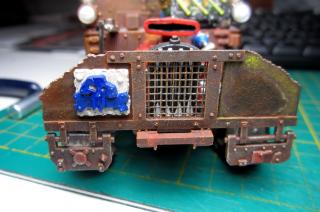
As for the blue panel...
I used pics like this one for inspiration..
http://i50.tinypic.com/21oa141.jpg
I initially painted the entire panel with either Lightning Bolt Blue or Ultramarine Blue (I don't remember which) and then put on spots of Electric Blue (I own some really old paints). Then in the center of each of the light blue spots, I put on Typhus Corrosion and brushed on Ryza Rust over that.
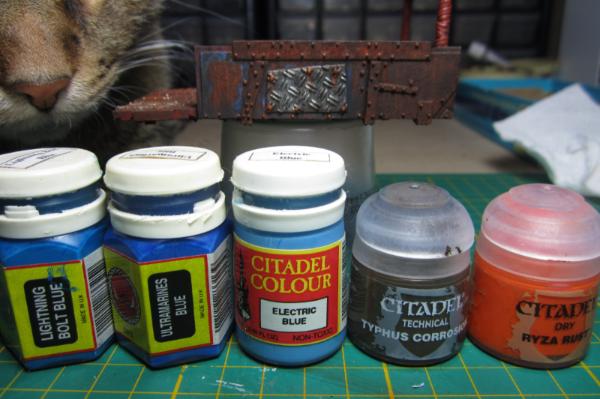
The rivets and streaks on the treadplate were done with the Macharius Solar Orange (I think). Then I had at it with some washes. I think at first I only used either the Brown or Armour washes (or both).
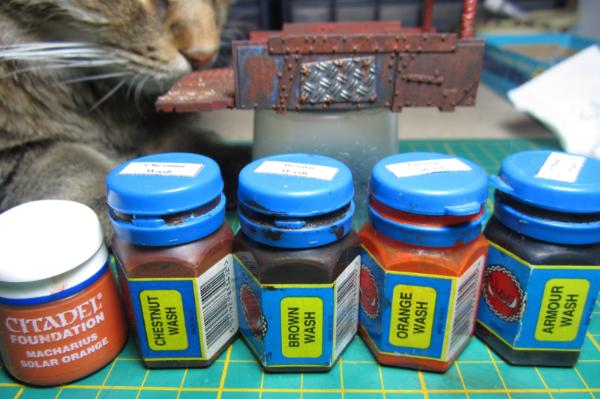
But eventually I ended up trying all the washes. Basically I slapped on stuff to see what it would look like.
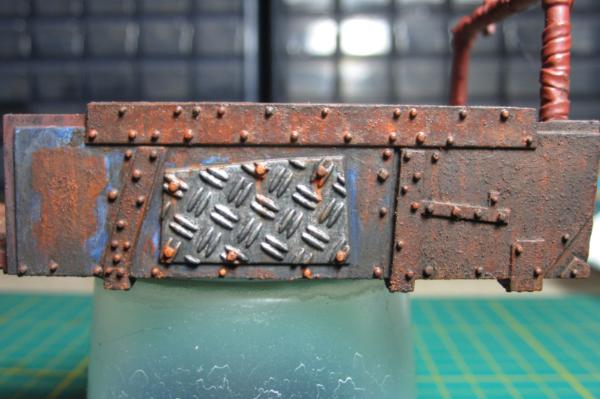
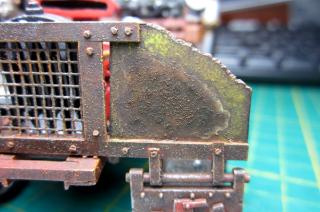
As for the end result, I think I overdid the washes on the blue part, although it looks good and grimy now. I like how the long top panel came out, and the right panel looks really corroded (click on the pic and zoom in to see the detail. You might even see a couple of cat hairs that ended up being part of the model).
82688
Post by: RobZie
Okay thanks a lot, that settles it im going to have to get the typhus/ Ryza combo everyone has been going on about. Looks great by the way.
57963
Post by: Zogg
@RobZie
Thanks and good luck.
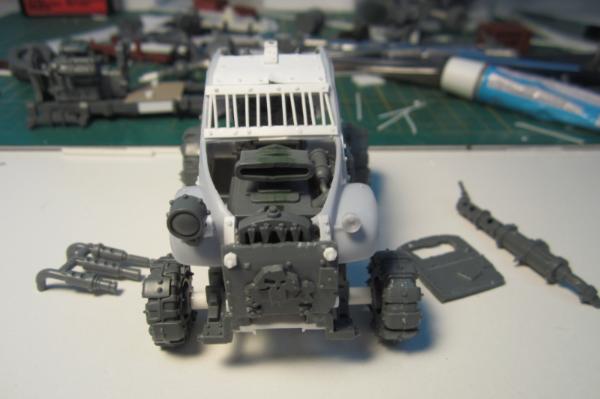
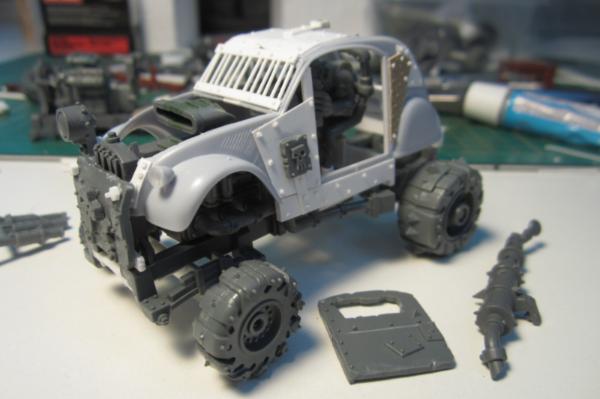
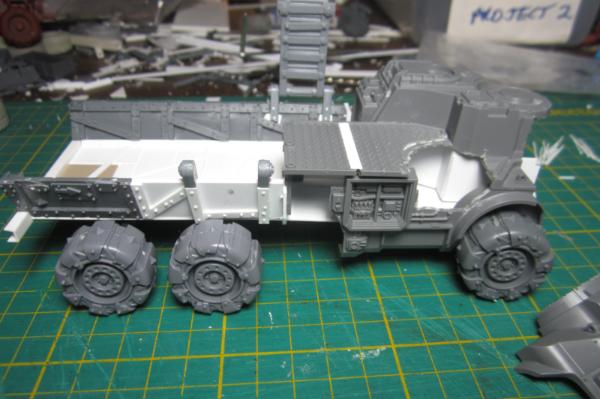
Trukk number 4 is now built.
Like my other trukks, the bumper and glyph plate are magnetized.
Silk approves of this trukk.
I will prime and paint the components before final assembly. But that won't be until this summer when it's warm enough to use spray primer on my balcony.
26790
Post by: Gitsplitta
Cat tested.... cat approved!
57963
Post by: Zogg
@Gitsplitta
LOL
Haven't been in a painting mood, and since I'm easily distra... ooh, shiny...
Er... as I was saying, I have trouble focusing on one project at a time, so here is a taste of things to come...

65595
Post by: Camkierhi
Love it all.
Harpoon looks brilliant (stealing that)
No 4 Looks perfect. Many people try to make the trukks look bigger and go OTT, you seem to have mastered it.
Really love the car, does it have a Cat-alitic Converter so the rest of us are safer?
82688
Post by: RobZie
I like where this is going.
57963
Post by: Zogg
Cat-alitic Converter... That's pawsitively horrible.
Static electricity and cat hair. *Sigh*
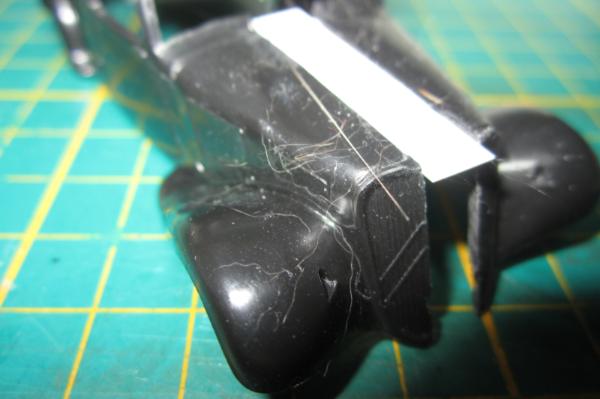
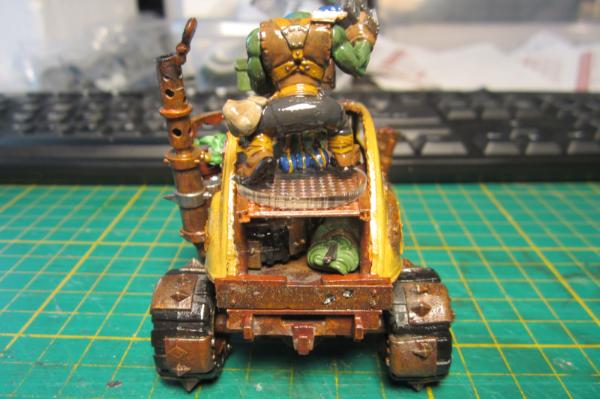
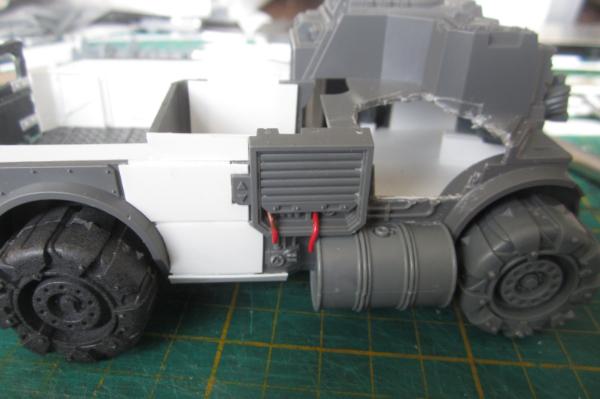
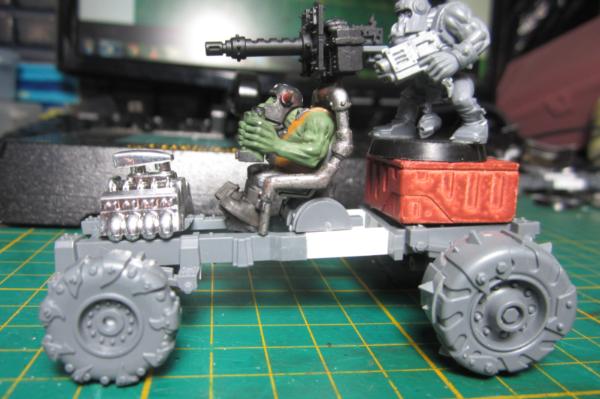
At this point most of it is just held together with blu- tac. I cut it down the middle to widen it a wee bit.
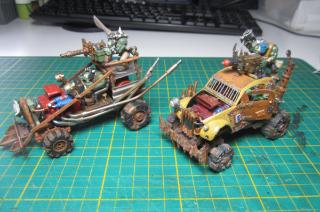
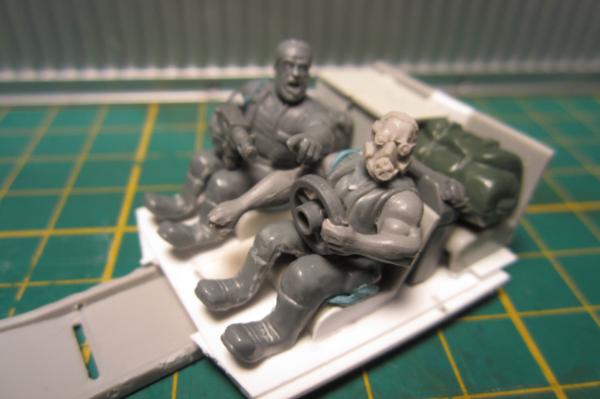
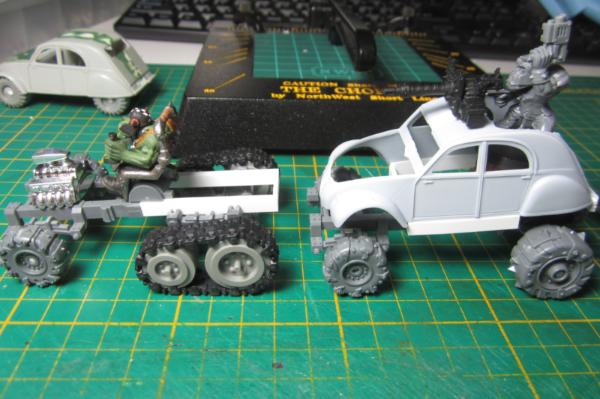
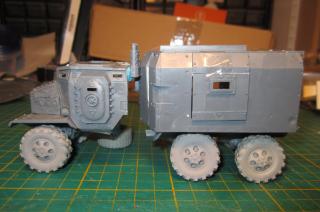
The 40K aesthetic seems to be squat and broad. I've seen a number of different opinions on which scale model vehicles works best with 40K, and for me the answer is none of them. At least as built. For smaller vehicles, like this car, I've found that 1/43 scale works, but the vehicle needs to be widened a bit. For larger vehicles, like the truck in the background, 1/35 works, but I lower the vehicle by using smaller tires and cutting the cab and hood so that it sits lower on the frame.
The driver seems to have leaned back too much. Right now he has that little old lady look.
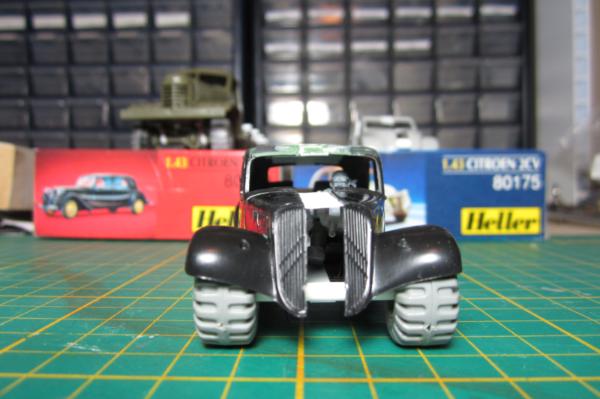
Whipped up a quick mock-up in MSPaint of my plan for the front.
65595
Post by: Camkierhi
Looking good.
76303
Post by: Warboss_Waaazag
Looks cool so far.
26790
Post by: Gitsplitta
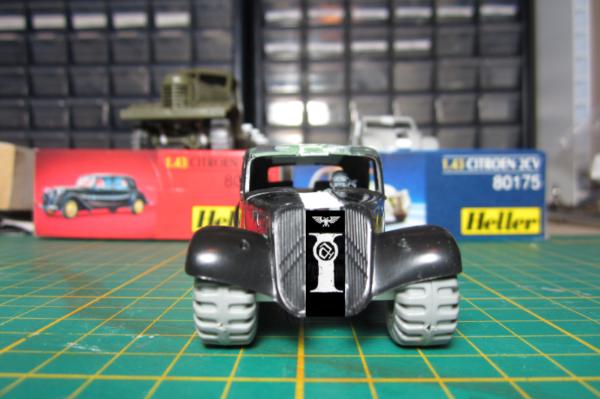
Wow... that looks... very Nazi.
I'm not suggesting you're trying for that... it's just how it strikes me.
82688
Post by: RobZie
 Gitsplitta wrote: Gitsplitta wrote:Wow... that looks... very Nazi.
I'm not suggesting you're trying for that... it's just how it strikes me.
Nope that eagle has two heads .
26790
Post by: Gitsplitta
That must be it. Just the look of the eagle with the round space in the design below...
57963
Post by: Zogg
Well, now I see it too. 
So my original plan was for it to be a Departmento Munitorum (hence the Munitorum symbol) vehicle with a driver and bodyguard in the front seat and a senior Munitorum clerk in the back. However, last night I got to thinking and I may change it to a company car for driving around a senior official in a merchant house. Corporations are going to factor into the fluff of the setting for my GorkaMorka/Necromunda-ish games, and a corporate official makes for a better objective.
57963
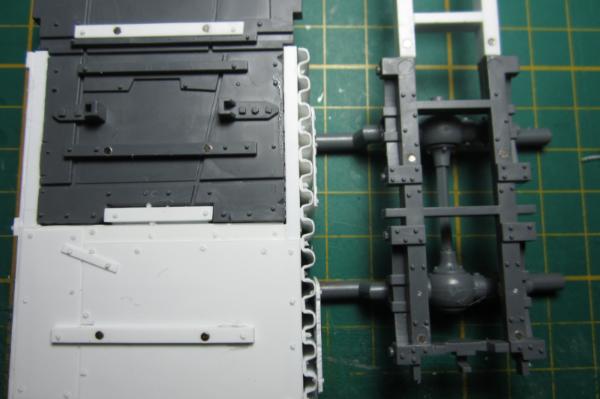
Post by: Zogg
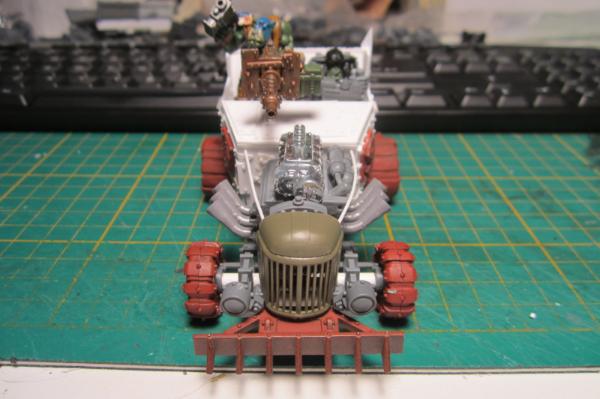
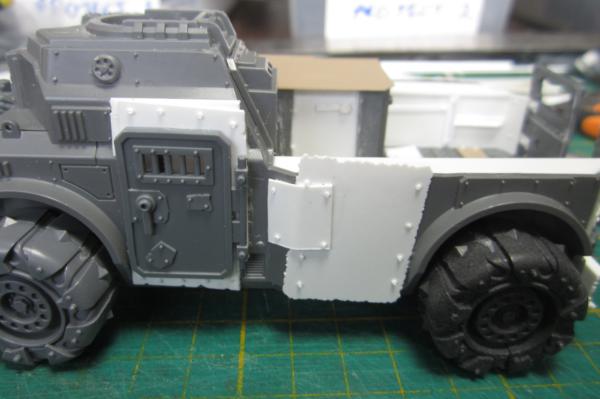
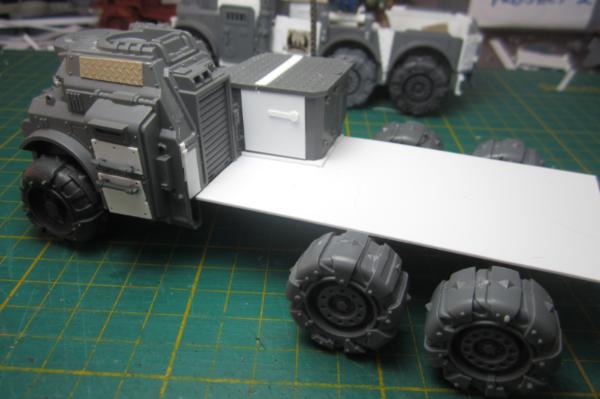
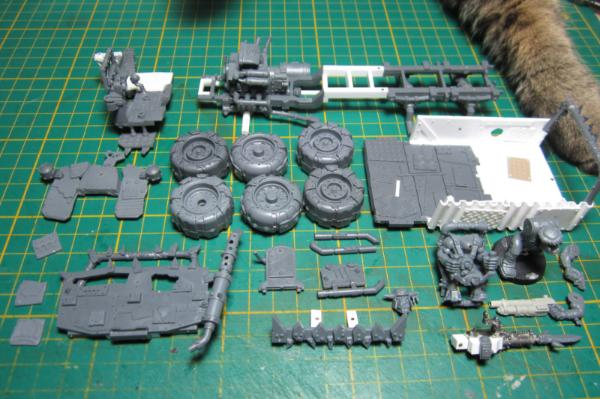
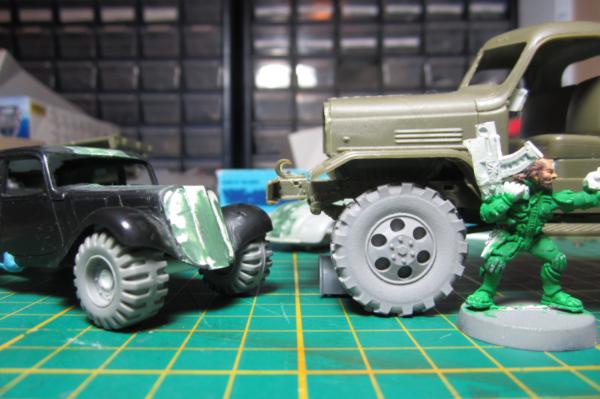
A while ago one of my local hobby shops had a sale on several 1/35 Chinese Jiefang CA-30 military trucks for $10 each. So I bought them all. Some will become civilian tractor-trailers or cargo trucks for use as objectives in 40K or GorkaMorka-ish scenarios. Some will be up-armoured and used by the PDF as a Chimera stand-in. At least a couple will be looted by Orks, and likely one or two will end up as scenery (wrecked from failed conversion attempts).
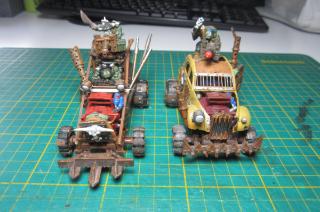
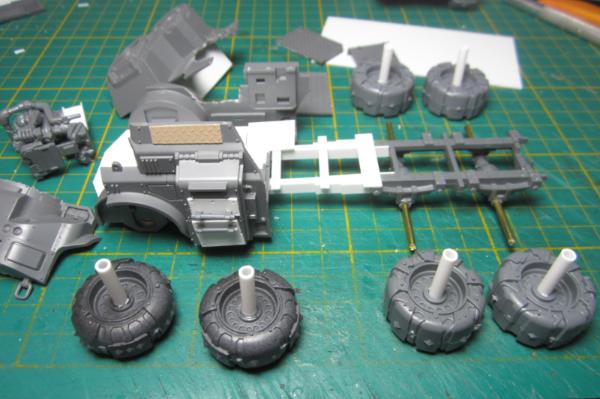
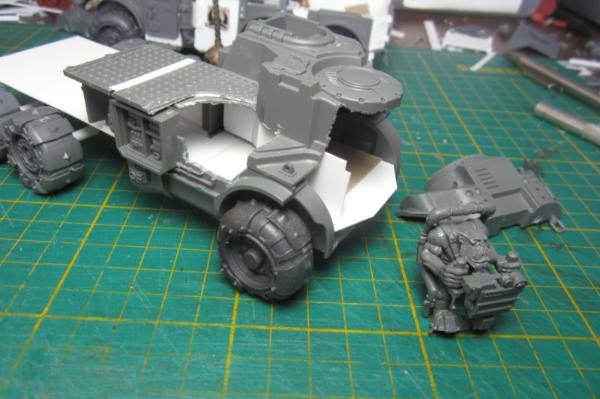
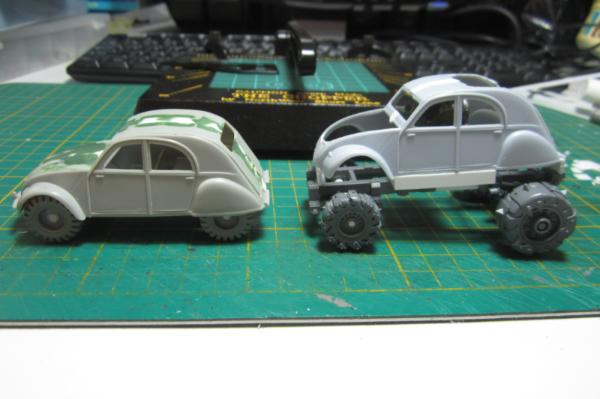
So the first pic is the stock version held together mostly by blu- tac to show the size as compared to the second pic, which is the cut down version (smaller tires, cab and bed lowered).
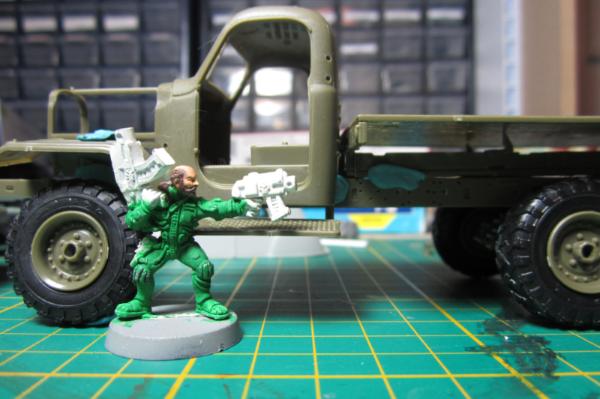 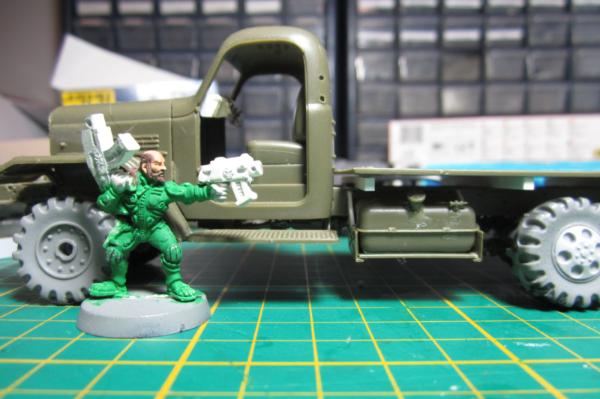
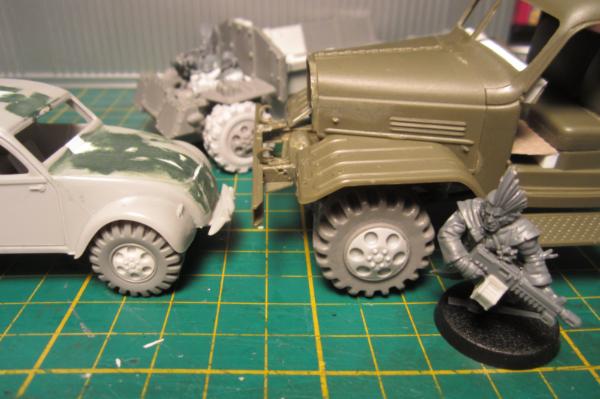
Another comparison of the stock vs the cut-down version against my widened 1/43 scale car.
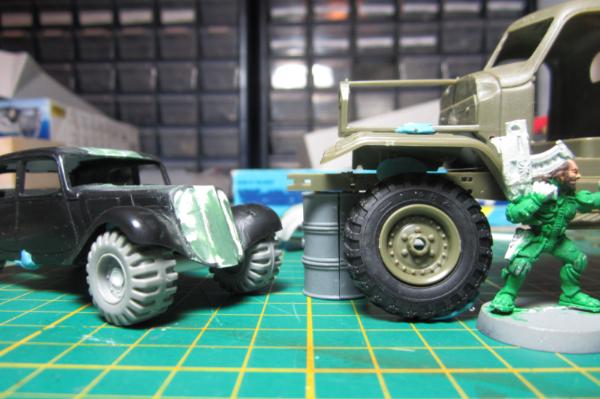 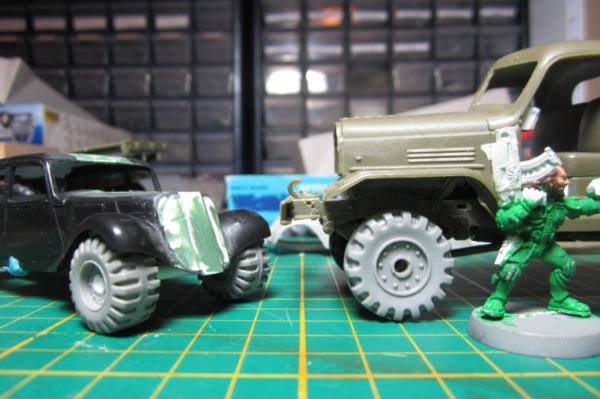
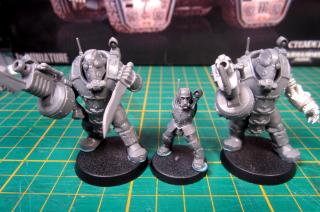
I think the cut-down version looks closer in scale to my poor unfinished Necromunda figure (Old Zeke with his one-in-a-million boltgun).
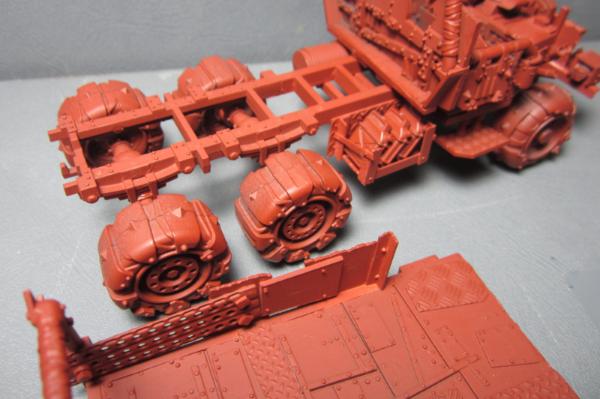
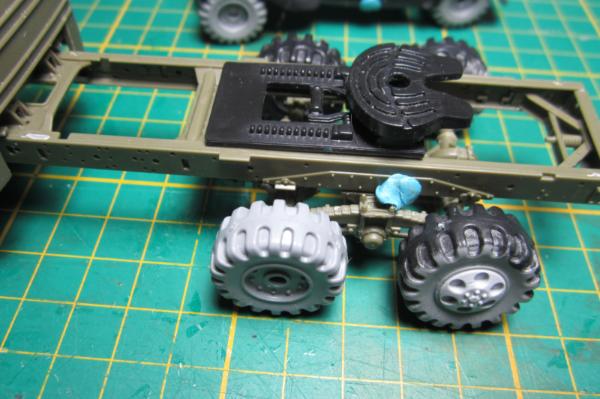
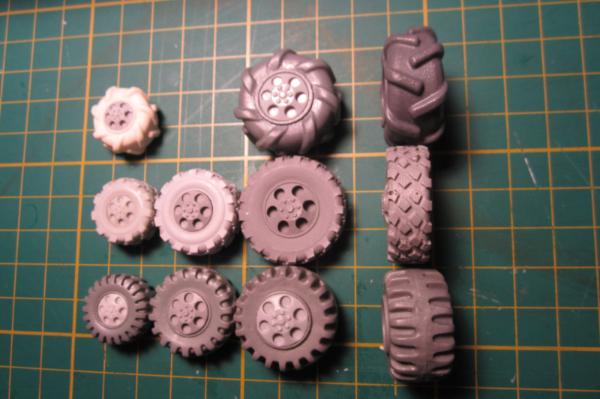
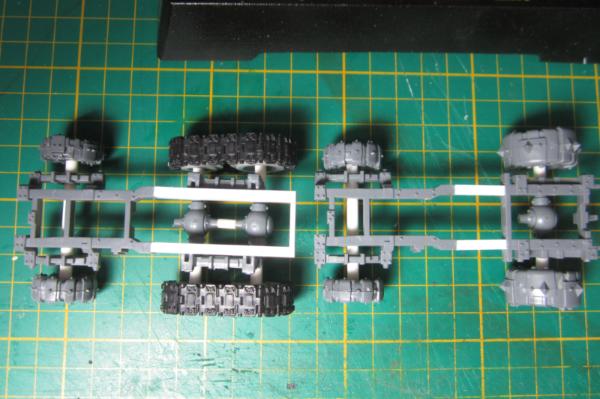
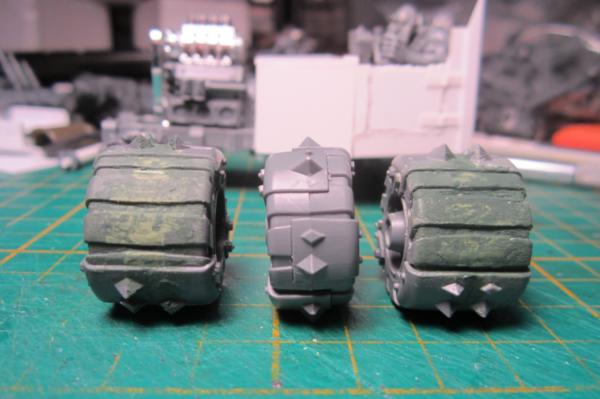
The top row of tires are from Zinge Industries (for my military vehicles) and the bottom row are GW (for my civilian vehicles). The small tires will be used on cars and light trucks, the medium size ones will be used on large trucks and tractor-trailers, and the large ones will be used on big honkin' military vehicles (a future build where I de-orkify a battlewagon and turn it into a military 8x8).
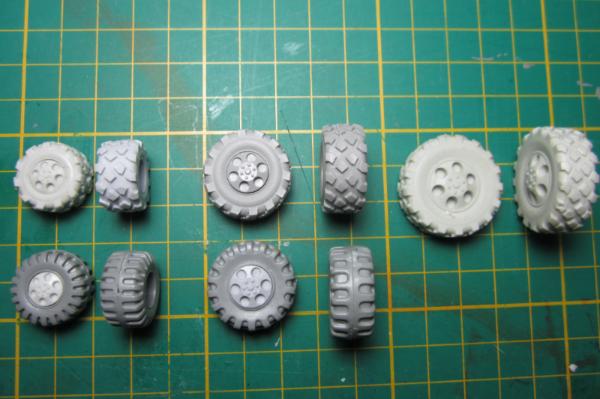
Although, IF (big if) I could make a civilian style tire the same size as Zinge's large tire, I could use it for my tractor-trailers and the middle size tires would be used for light duty trucks. This pic shows how the large tire makes the truck look.
Oh look. A fifth wheel (and not the ridiculously small one from the Ork trukk).
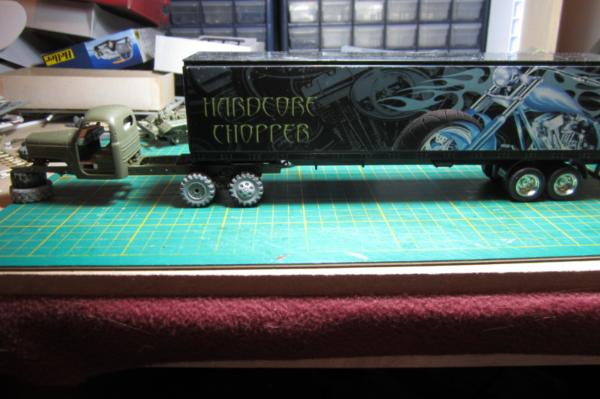
And with a 1/43 scale trailer.
Comments?
53347
Post by: Sasa0mg
You should make an orc chariot-like seat with leather leashes that hook onto your cats collars, so they can ride around on them like wild beasts :O
65595
Post by: Camkierhi
Looks brilliant, wheel sizes all good. Like the lowered truck.
Zinge is great stuff. Those large wheels could pass for civil, just. Interesting to see where this goes.
2326
Post by: shasolenzabi
Nice Ork vehicles, and now nice Imperial civvy vehicles! very nice!!
10028
Post by: zinge
Awesome Stuff Mate!
(Not at all biased )
30344
Post by: monkeytroll
Like what you're doing here, but I'll stay for Silk and Velvet
57963
Post by: Zogg
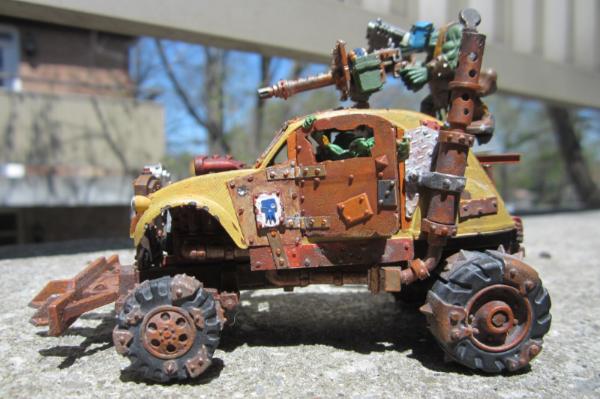
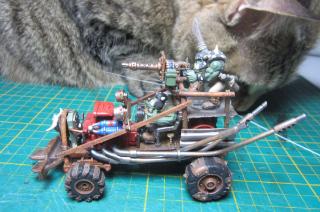
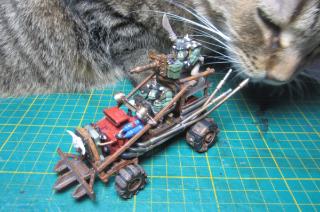
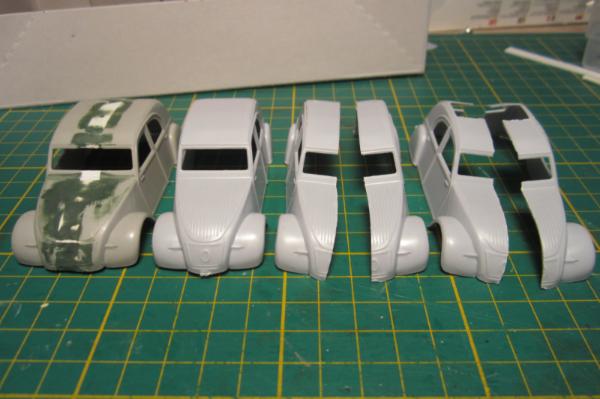
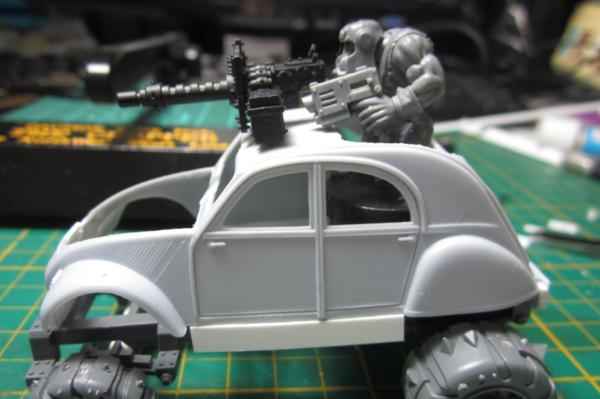
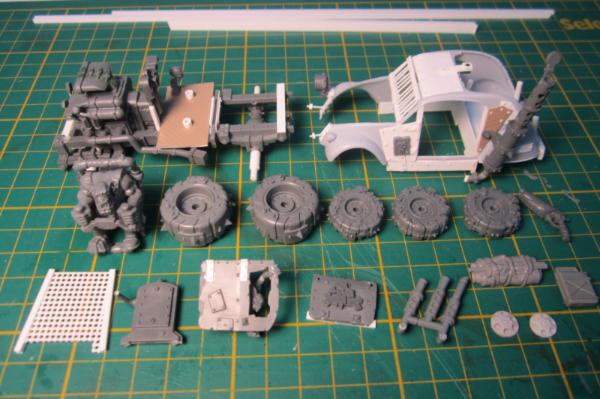
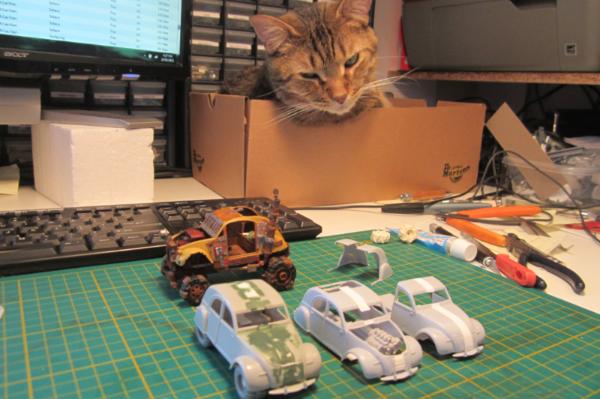
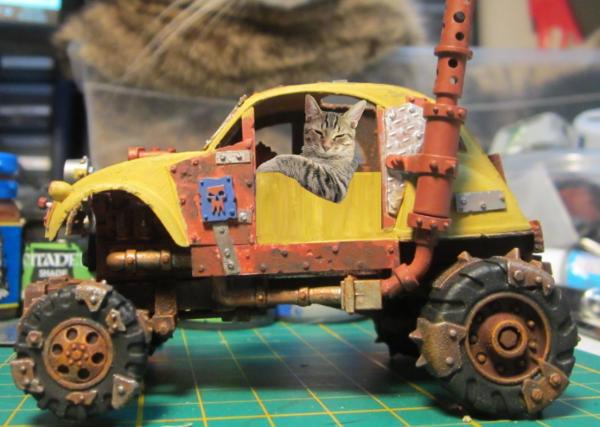
Thanks for the comments everyone. Here is another civilian car (because I can't just work on one, two or even five projects at once).
Sasa0mg wrote:You should make an orc chariot-like seat with leather leashes that hook onto your cats collars, so they can ride around on them like wild beasts :O
I like how you think. However, I suspect that Silk and Velvet would be somewhat less than thrilled with the idea.
monkeytroll wrote:Like what you're doing here, but I'll stay for Silk and Velvet
The first pic is for you.
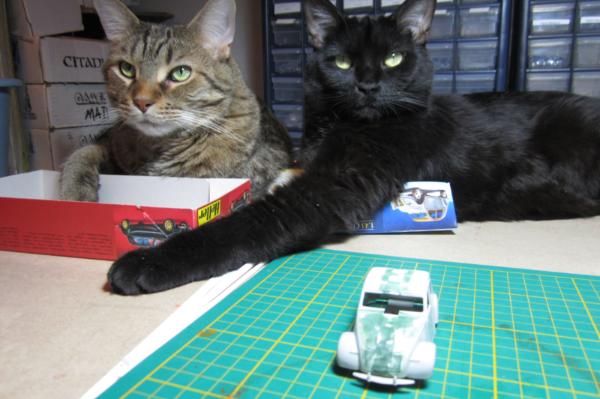
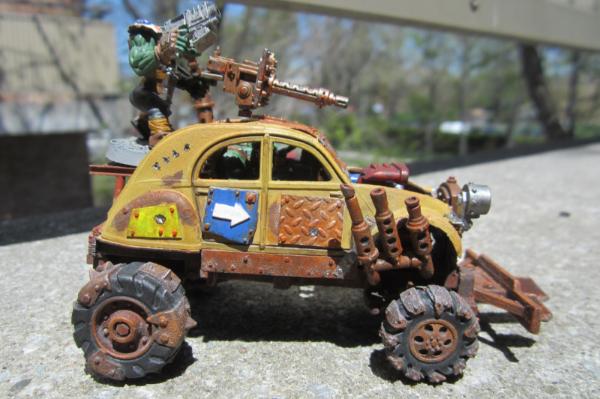
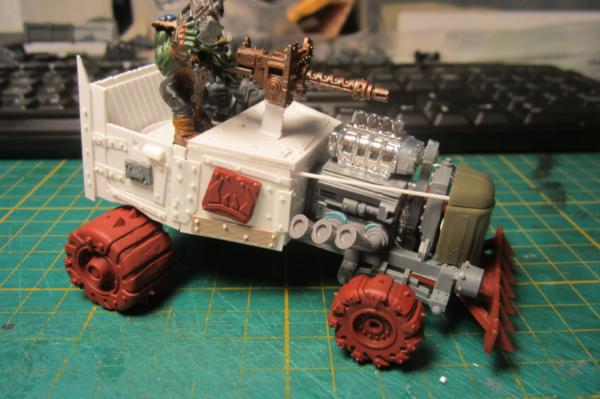
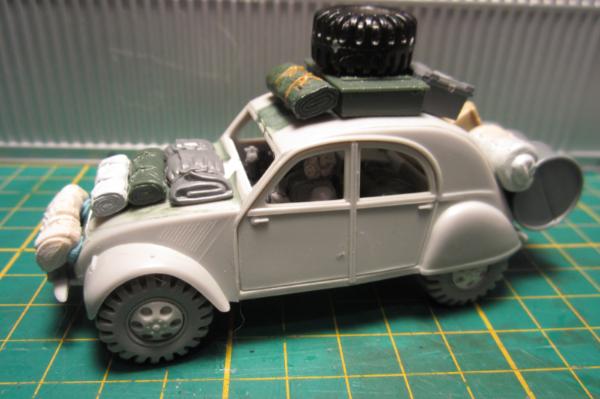
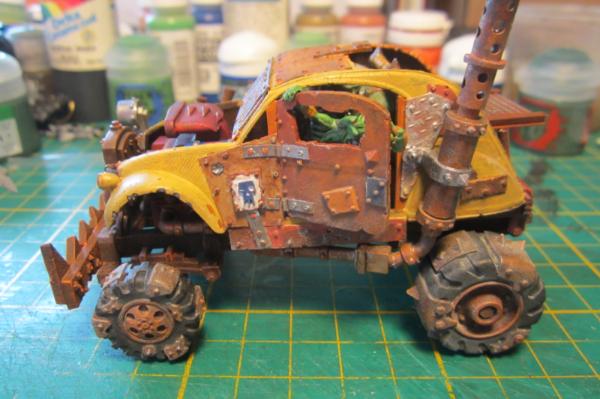
The stowage is just held on with blu- tac for the moment as I get an idea of how I want it to look. The finished product will of course have ropes and chains holding everything on.
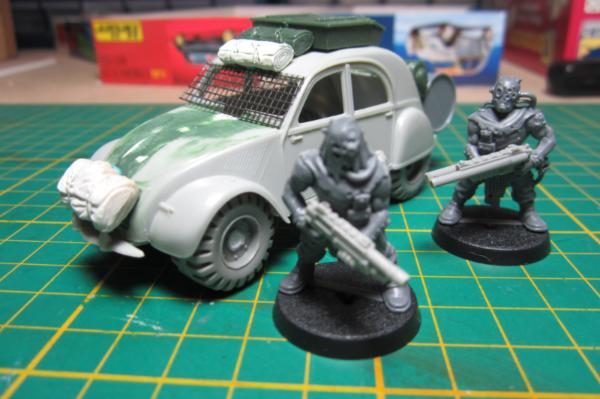
I see this as being something of a Mad Max type car for wasteland nomads.

I'll have to ding it up a bit too, add some bullet holes and such.
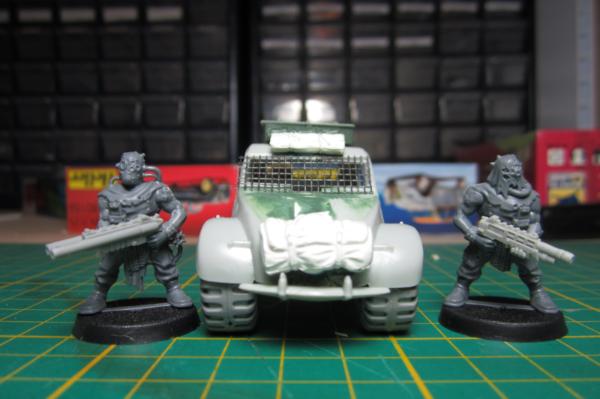
The shotguns are from Anvil Industry:
http://www.dakkadakka.com/dakkaforum/posts/list/401241.page
65595
Post by: Camkierhi
Used to have a 2CV.
This looks brilliant, and looks quite fitting. Got to say though, 2CV could never ever be considered seriously, except in "For your eyes only", the bond film.
Brilliant work and inspiring, keep it coming.
57963
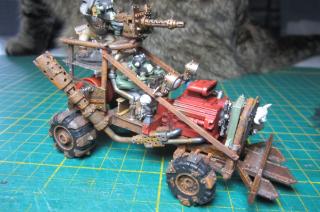
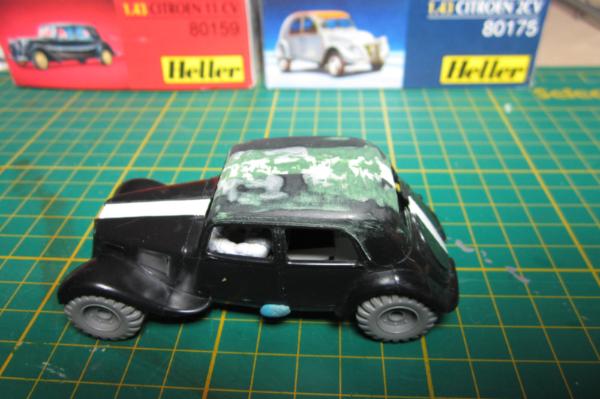
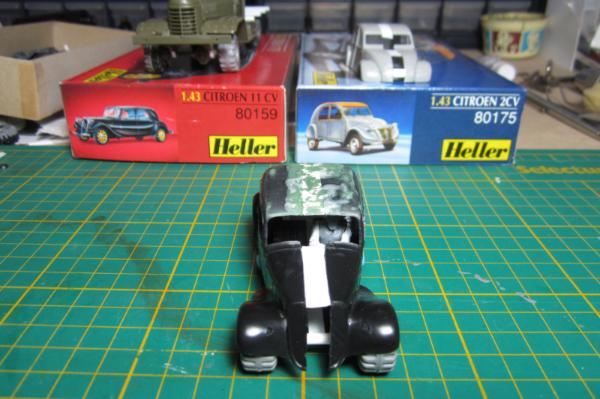
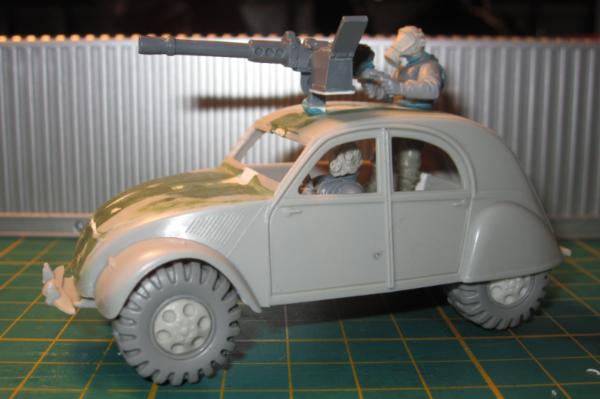
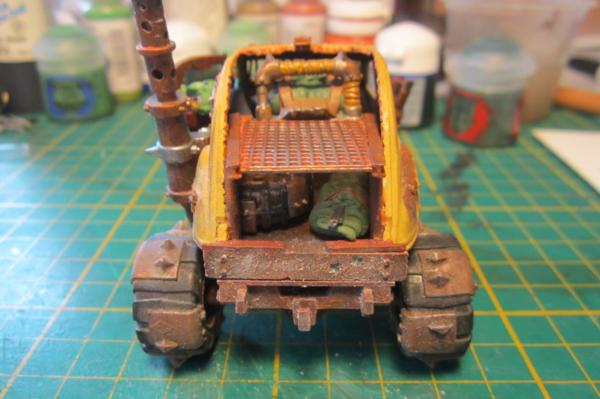
Post by: Zogg
So I'm torn between just putting a bunch of stowage on it and cutting a hole in the roof and mounting a heavy stubber. I plan for it to accompany a large water truck and some bikers as itinerant peddlers travelling through the wastes. Opinions?
65595
Post by: Camkierhi
Looks brilliant, most 2CV's had a folding cloth roof here. So cutting out the roof and sculpting a cloth roll at the back would work well. Also could still have stowage on bonnet.
57963
Post by: Zogg
I've decided to go with the stowage version, mainly because I already went through the trouble of smoothing out the roof. I still want to do a gun version, so of course the solution to that is to buy moar kits!
 Camkierhi wrote: Camkierhi wrote:Looks brilliant, most 2CV's had a folding cloth roof here. So cutting out the roof and sculpting a cloth roll at the back would work well. Also could still have stowage on bonnet.
I rather thought that was a cloth roof, but I think for my purposes I'm going to treat it as a steel roof.
<edit> The more I think about it, the more I'm leaning toward going back to treating it as a cloth roof. It makes sense from a fluff perspective for the world I'm creating. That means I'll have to come up with a way to model the fabric, as I've sanded the roof smooth...
Also, I so need to build a model of this:
http://upload.wikimedia.org/wikipedia/commons/2/2d/Citroen_2CV_Lieferwagen_1.jpg
Still a lot of GS work to be done.
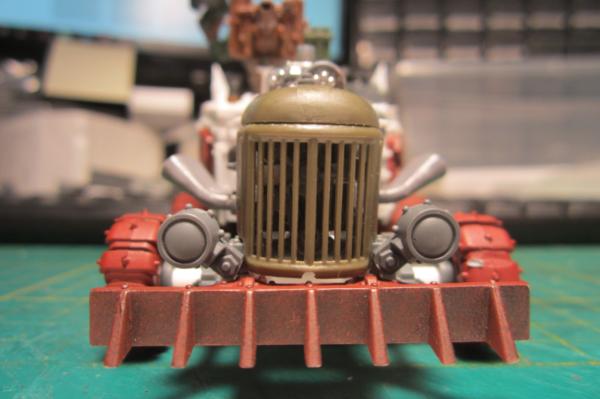
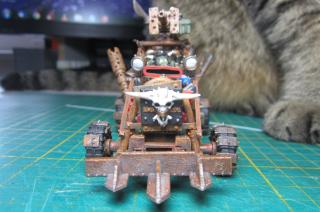
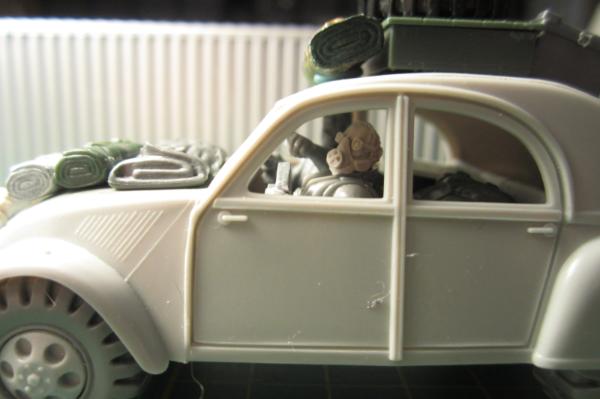
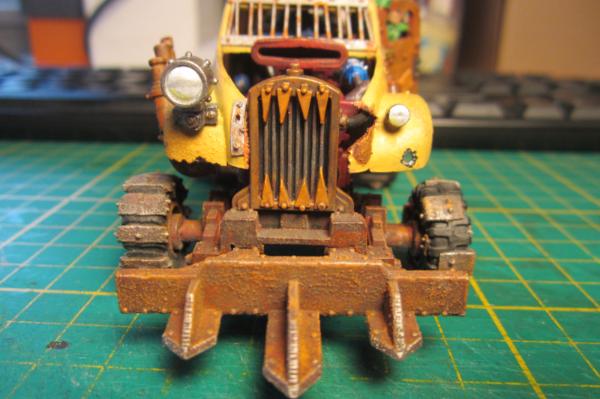
Possible placement of stowage.
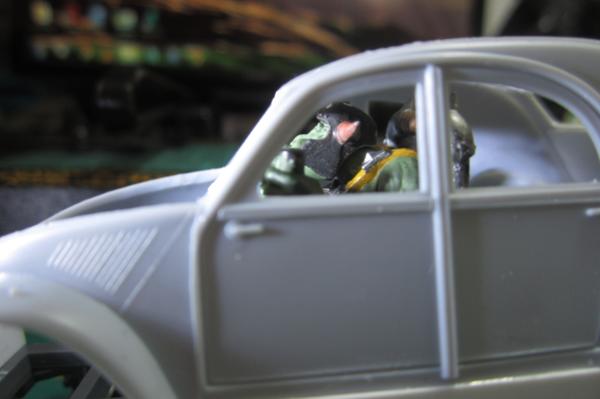
"Look over there!"
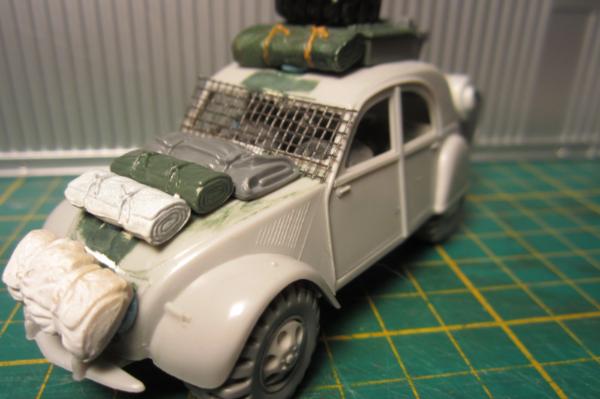
Found the front window grating.
30344
Post by: monkeytroll
If you're going with the stowage then I'd say you want to keep this version as a steel roof....as you said, moar kits can be got
57963
Post by: Zogg
@Monkeytroll
Moar kits have been got. Mangled English aside, I ordered 3 more, plus another Citroen 11CV and a Renault 4CV.
I found a large wheel that matches the look of GW's wheels!
The top two rows are from Zinge Industries (he does make a mid-size off-road tire, but apparently I neglected to buy any, something I'll have to remedy), the two on the bottom left are GW and the two on the bottom right are from Spellcrow. The Spellcrow ones have a wee bit smaller diameter than Zinge's large tires, but it's close enough to work. And with a little carving of the inner rim, Zinge's hubcaps fit as well. Now if I can just convince Zinge to make a version of his large military tire that is the same width as the other two large tires...
Now I just have to buy another 20 or so of Spellcrow's large tires to build my fleet of civilian tractor-trailers. My poor wallet...
57963
Post by: Zogg
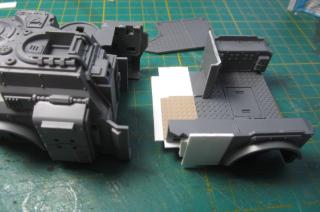
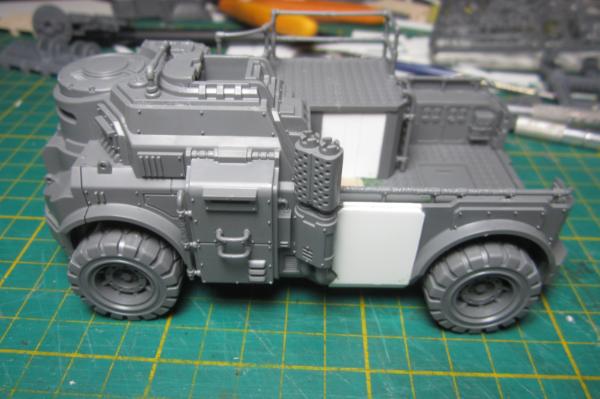
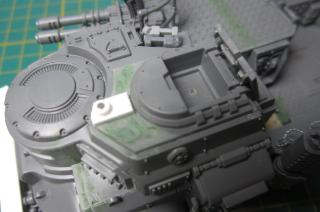
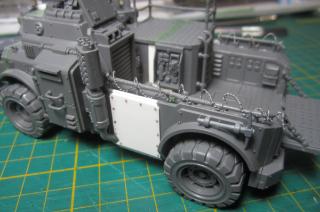
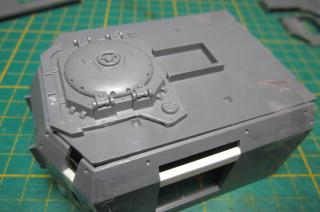
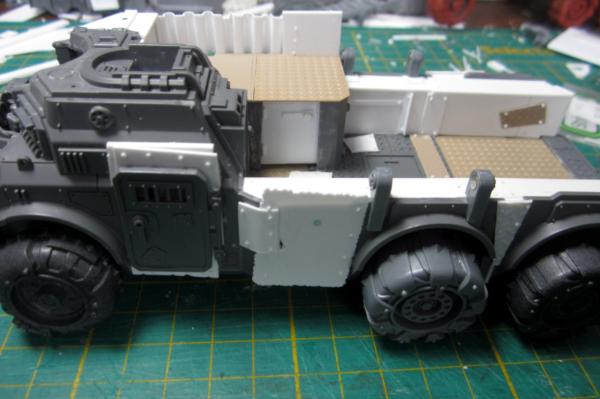
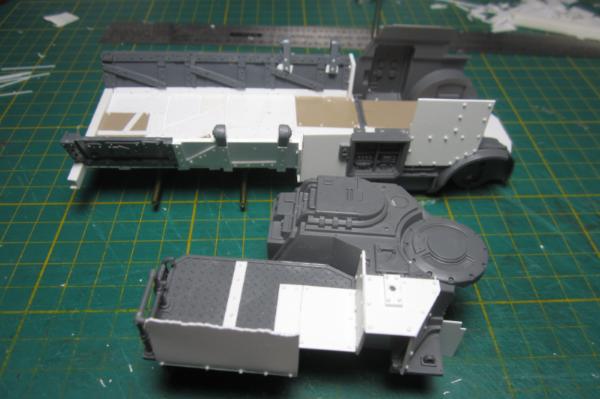
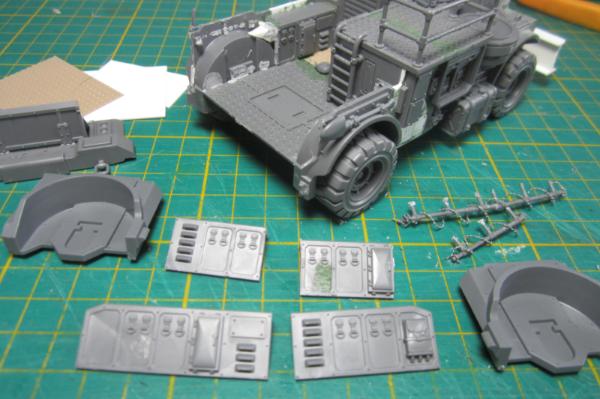
Here is a long-overdue update featuring some early pics of a Taurox conversion. I haven't really made much progress in the last two months. I really hate it when real life interferes with my hobby time.
First up, moar car kits. One will be for wasteland raiders with a roof-mounted heavy stubber, one will be converted to look like this: http://upload.wikimedia.org/wikipedia/commons/2/2d/Citroen_2CV_Lieferwagen_1.jpg
And one may end up being looted by Orks.
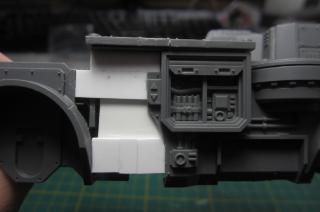
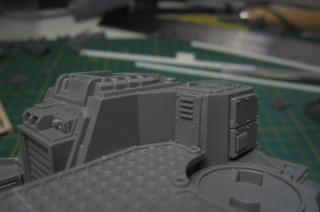
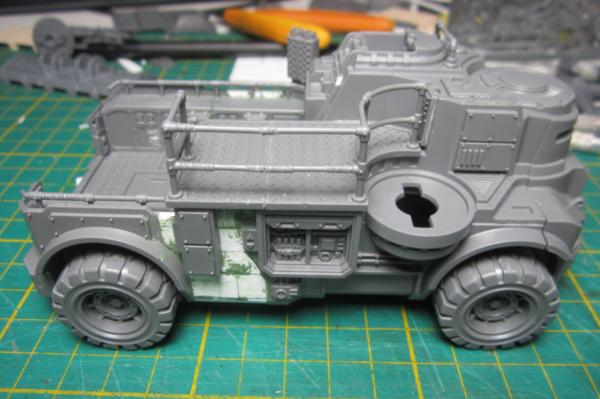
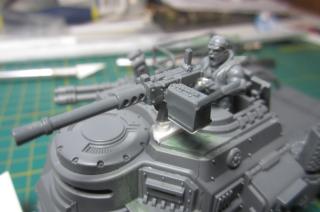
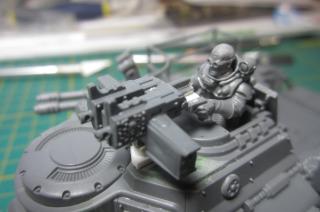
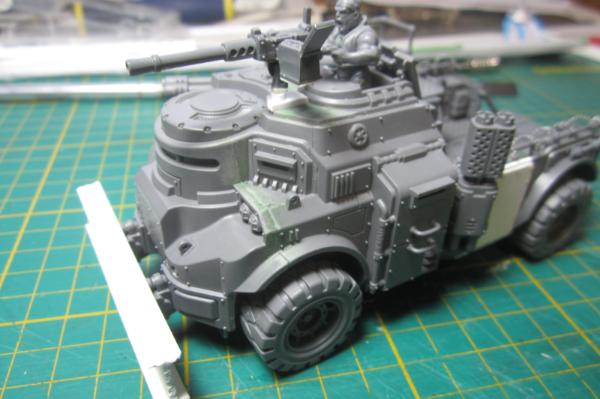
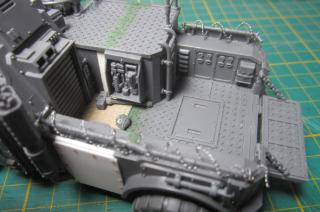
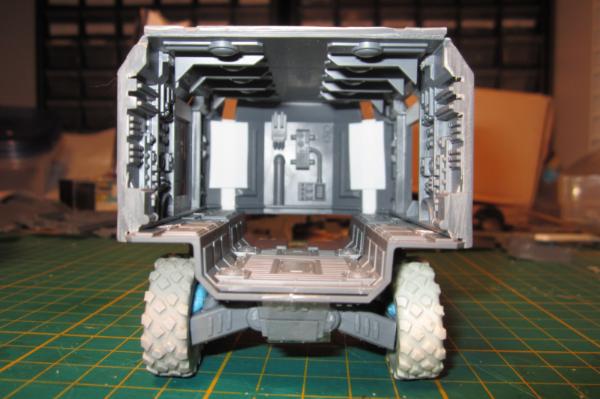
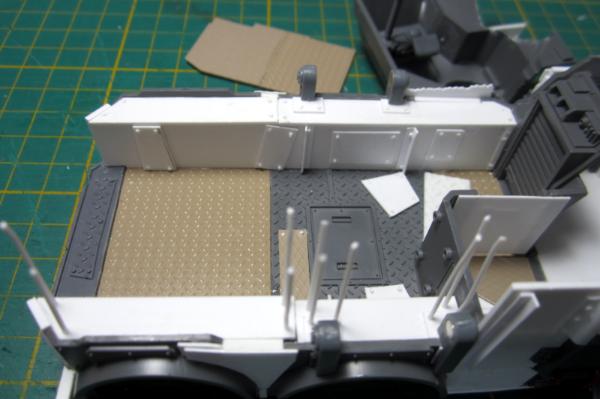
I'm still in the planning stages for my Taurox conversions, therefore everything is just being held together with tape and blu- tac. I'm planning for this to be an Adeptus Arbites vehicle.

My initial thought was to keep the sliding doors, but now I'm thinking of covering it over with armoured panels and putting in some gun ports like these ones: http://zinge.co.uk/index.php?route=product/product&path=18_127&product_id=551
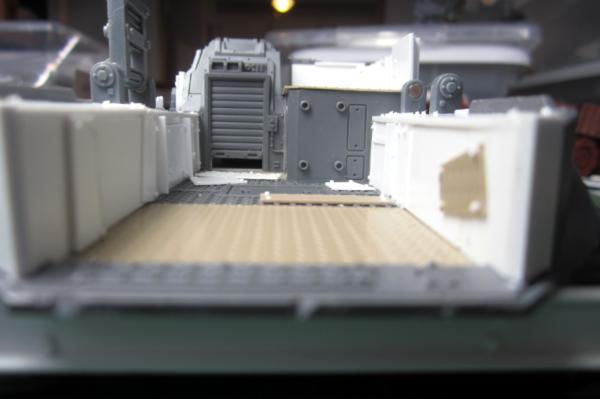
For the rear entry, I'm torn between using a Chimera-style ramp or a pair of doors.
I'm also planning on building a second conversion which will be an armoured truck for transporting guilder payments between towns. It will probably have heavier armour and a vault-style door in the back.
Should I keep the turret mounted on the cab (in which case it obviously wouldn't be able to fire to the rear), or should I mount it on the passenger compartment?
In any case, it will be some time before I am able to do any more work on this project as I am moving at the end of the month, and will in all likelyhood be moving again 3 months later. It may be into autumn before I am able to dive into this project again.
65595
Post by: Camkierhi
Well I like it, looks "meant to be". The wheels are spot on and the gunport idea is a goer, definately like that one.
57963
Post by: Zogg
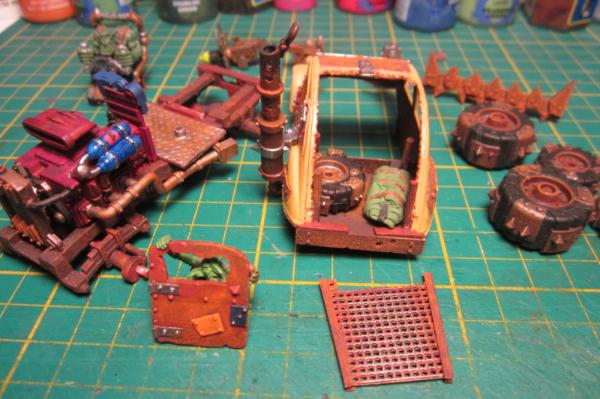
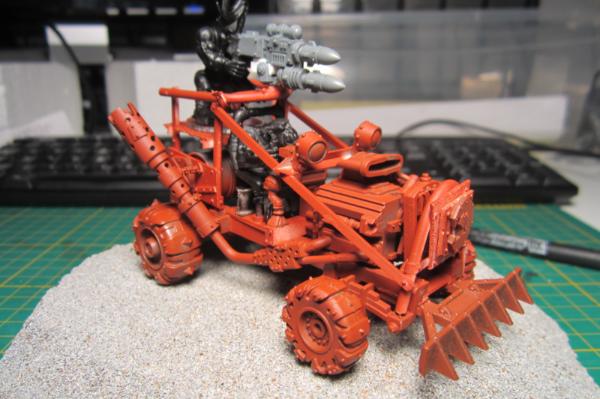
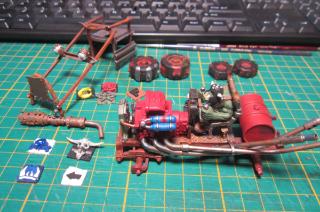
I'm back, with some WIP ork buggies. I finally got my work desk set up (only three months after moving) and I've been itching to do some conversions.
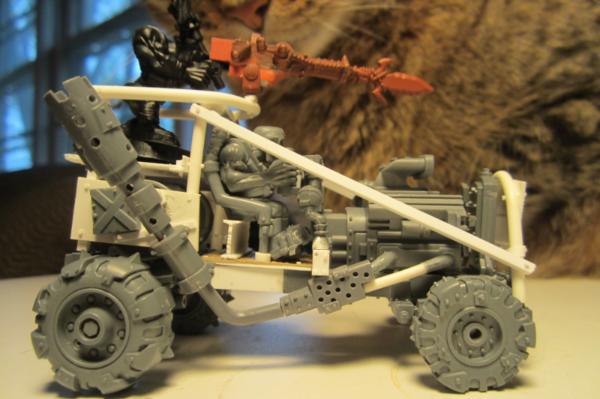
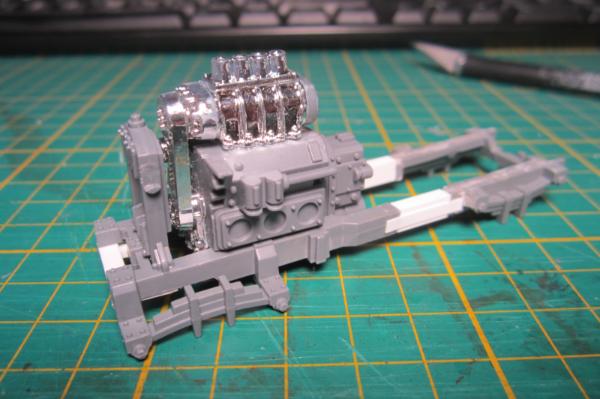
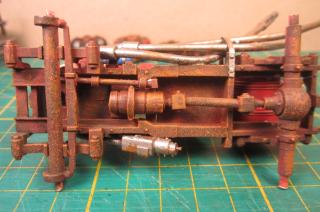
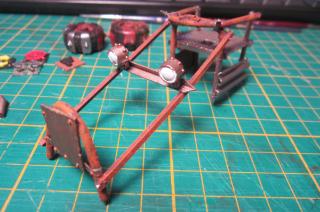
So here are the basic frames for my buggies:

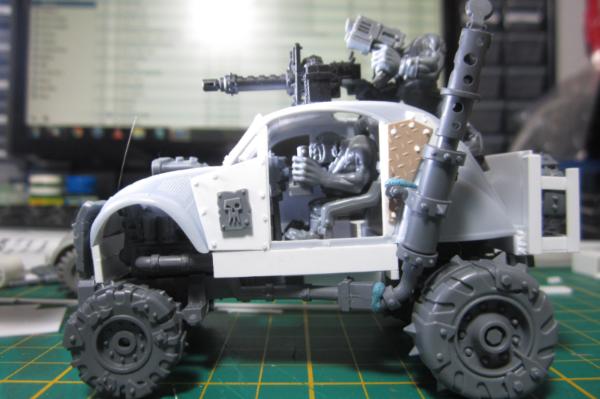
This is more or less the set up. I may have the driver reclined a wee bit more, and I'll be adding roll bars and exhaust pipes.
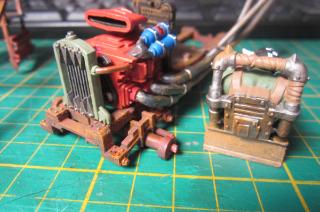
I'm thinking of using Zinge's V6 engine: http://zinge.co.uk/index.php?route=product/product&product_id=613
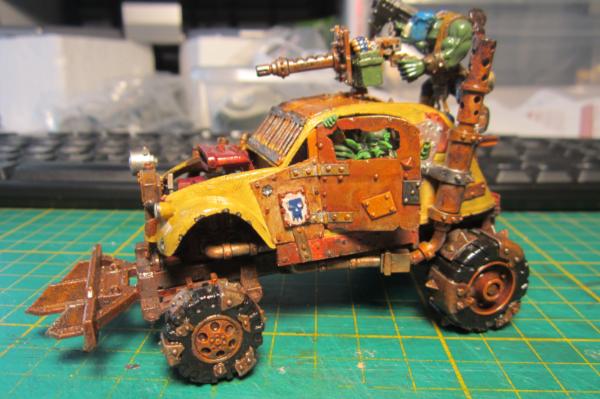
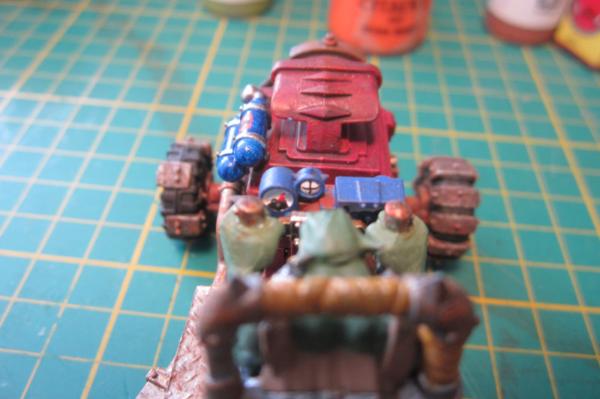
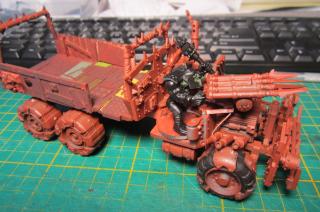
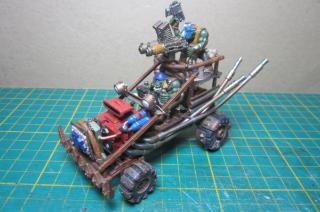
One of my civilian cars was looted by Deathskulls.
Ignore the fact that it's a Goff driving. I have to paint up a Deathskull driver.
Of course there will be a magnetic weapon mount.
Still lots of work ahead, but I'm pretty happy with the direction of things so far.
65595
Post by: Camkierhi
Loving it, looks great. Funny how the 2CV body fits so well with orks!
28415
Post by: lone dirty dog
They are so fitting for the Apoc and Ork theme
57963
Post by: Zogg
Thanks for the comments. Here's a quick update on the progress of my Deathskull buggy.
65595
Post by: Camkierhi
Looking spot on bud.
17927
Post by: Gogsnik
Hell yeah, seriously cool.
57963
Post by: Zogg
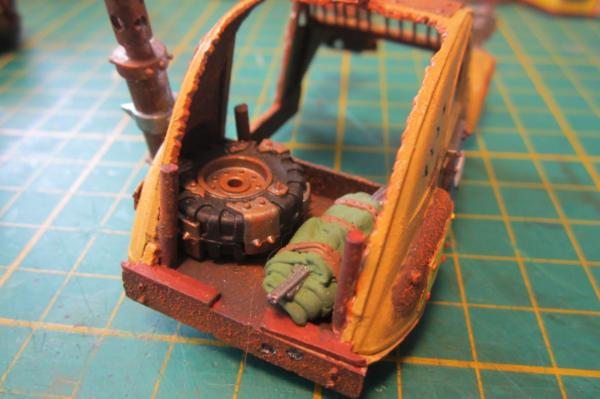
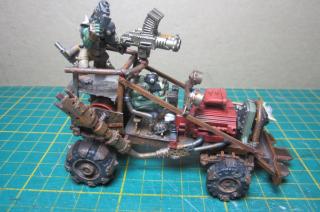
Thanks lads. Here's a small update on my first buggy.
With some bitz to be added...
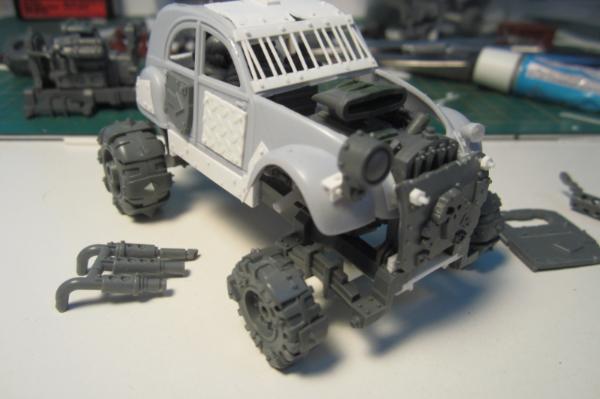
The beginnings of buggy #2 can be seen in the background, because I can't just work on one project at a time.
The headlight that came with the 2CV kit was a royal pain in the to assemble.
65595
Post by: Camkierhi
Looking fabulous. Like it a lot dude.
57963
Post by: Zogg
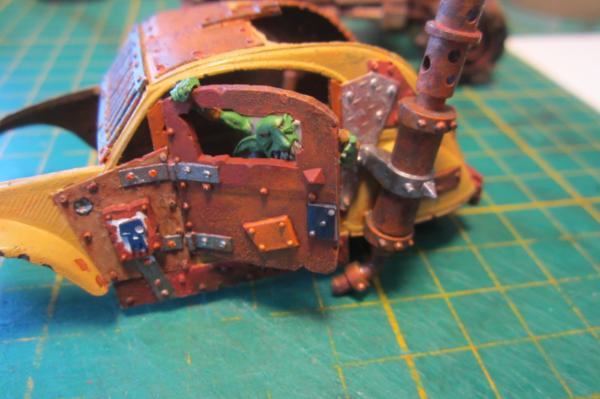
Thanks Cam. Made some progress with my Deathskulls looted warbuggy. As with all my pics, you can click on 'em for a closer look.
Bitz ready for priming.
Loosely assembled for pics (some bitz using blu- tac). I'll paint it first before final assembly.

The grot is in for some hurt if the door slams shut again.
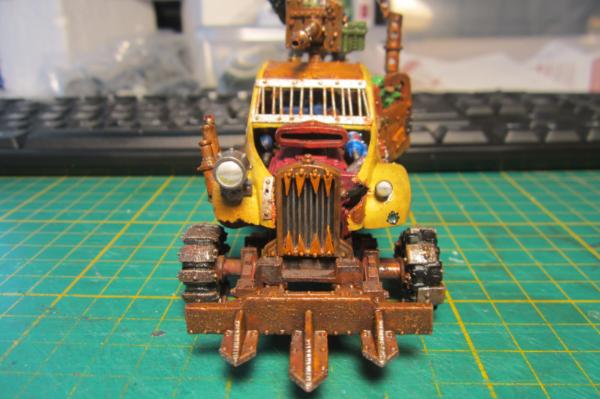
Mismatched headlights and Deathskull symbol.
The bumper is magnetic and can be replaced with a reinforced ram.
The hubcaps on the front wheels are from Zinge Industries.

Gunner's platform and stowage.
Worky bitz.

Now to paint it... unless I get distra... ooh, shiny.
63129
Post by: Littletower
Those are just great.
And I'd love to see your take on a train one too!
26790
Post by: Gitsplitta
Just a great little vehicle zogg...
30344
Post by: monkeytroll
Good to see you back in action after your move!
Great looking buggy, love the stowage compartment and the grot hanging out the door.
67098
Post by: nwns
Love it, ork 2cv...might have to nick that idea ;-)
57963
Post by: Zogg
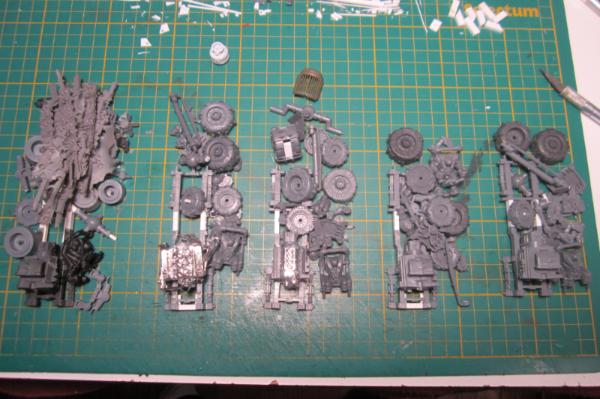
Thanks for the comments. Here is a pic showing my process for painting the tires.
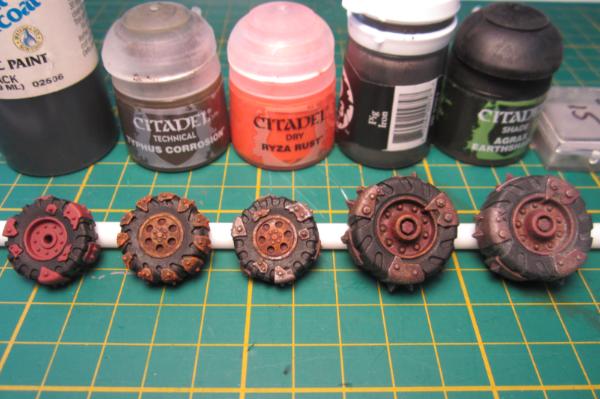
From left to right:
1. primed with Red Oxide primer and tire portion painted black
2. metal portions painted with Typhus Corrosion and drybrushed with Ryza Rust
3. metal portions lightly drybrushed with Pig Iron
4. washed with Agrax Earthshade
5. dusted with grey weathering chalk
I'm not sold on the Agrax wash. It really tones down the rust effect. Maybe I'll have to do another drybrush of Rust after the wash.
I'm also thinking of using the Army Painter Quickshade dip instead of the Agrax wash, as it will basically do the same effect and help protect the model as well.
Oh, and @Littletower, I do have plans for a train, but that project is down the road a ways. Watch this space.
57963
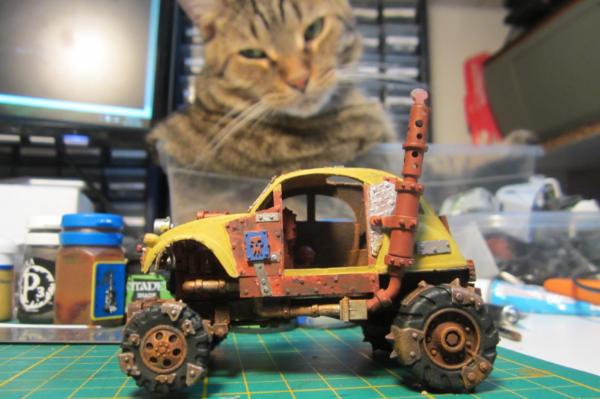
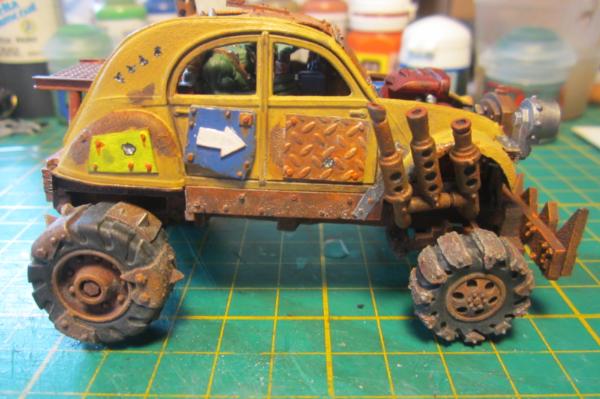
Post by: Zogg
A little painting progress. The yellow is more of a dull mustard colour in person.
10972
Post by: Ruglud
Awesome thread dude
The 2CV is fantastic
87654
Post by: ayoku
Epic 2cv pimping
Keep up the cool stuff!
Regards
Mark
30344
Post by: monkeytroll
'If I can get out of this tub, then that robo-mouse is mine'
57963
Post by: Zogg
Some work on buggy number two, as I haven't been in a painting mood lately.
What happens when you have a bunch of magnets and an opened box of super-sharp knife blades together in a drawer? A terrifying trap for unwary fingers, that's what.
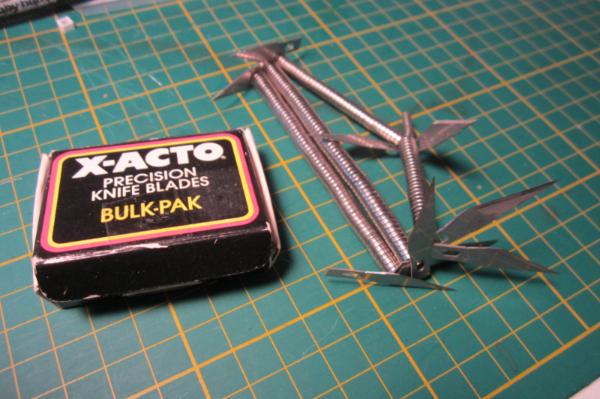
Oh, and thanks for the comments. LOL Monkeytroll.
65595
Post by: Camkierhi
Buggy looking awesome.
Nasty drawer ornament dude!
30344
Post by: monkeytroll
Buggy number 2 looking fine.
I'm hoping that's not the same drawer where you keep your candles in case of a power-cut!
57963
Post by: Zogg
Thanks for the comments. My "drawer ornament" was in with a bunch of tools I don't use on a regular basis. It didn't draw blood, but one of the blades did slide under my fingernail just enough to get my attention.
Got the exhaust done on the other side. Just a few more details and this one is ready for painting.

The front glyph plate, bumper and weapon mounts are all magnetic.
63129
Post by: Littletower
Dragster-buggy is definitively looking the part!
And I'll wait for the train, no rush, there seems to be a lot of good stuff coming in the meanwhile!
22619
Post by: inmygravenimage
Zogg, why do you have my cat?  Buggy looking cracking as always
30344
Post by: monkeytroll
Buggy looks great, exhaust pipes are very cool.
And I see kitzilla has escaped the tub and is definitely prowling for these pesky wheeled things....
65595
Post by: Camkierhi
Love the look of the buggy, got a knocked together feel to it, great stuff.
57963
Post by: Zogg
Buggy number 3. Still lots to do - finish the exhausts, mesh windscreen, moar rivets.
And of course, thanks for the comments. Keep 'em coming.
63129
Post by: Littletower
Looks great. Always loved Ork spiked bumpers!
57963
Post by: Zogg
After a long bout of the winter blahs, I'm finally painting again.
Here we see Overlord Silk keeping tabs on the progress.
Concentrating on getting the inner components finished so I can do the final assembly.
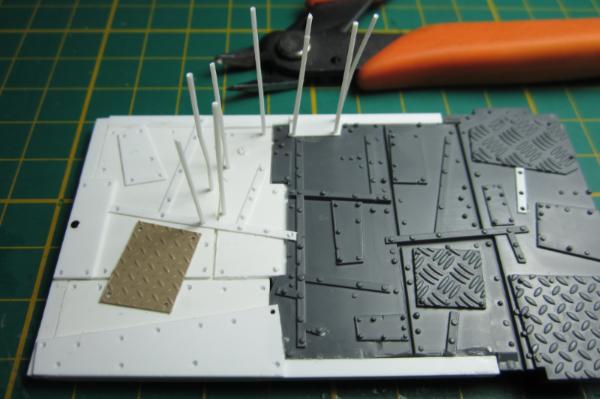
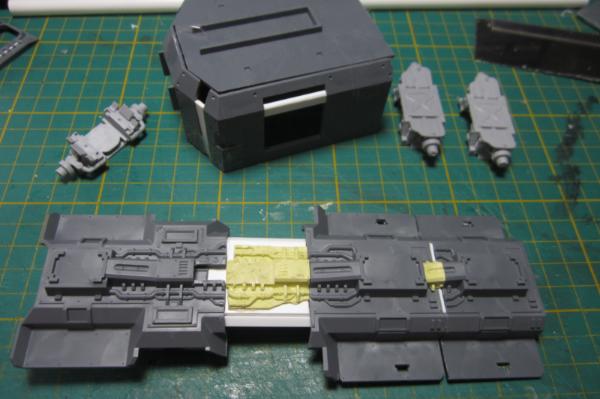
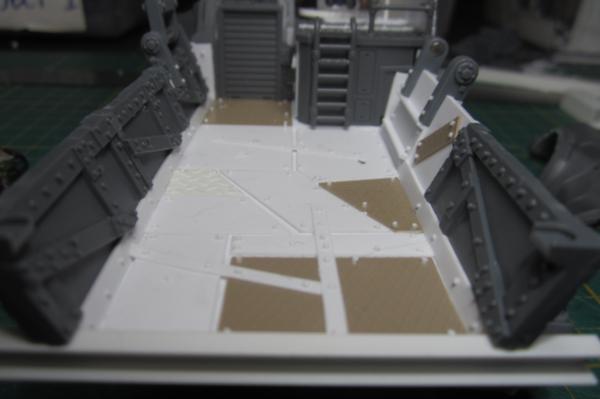
Just before Christmas I received a package. In it was 30 lbs. of plastic goodness.
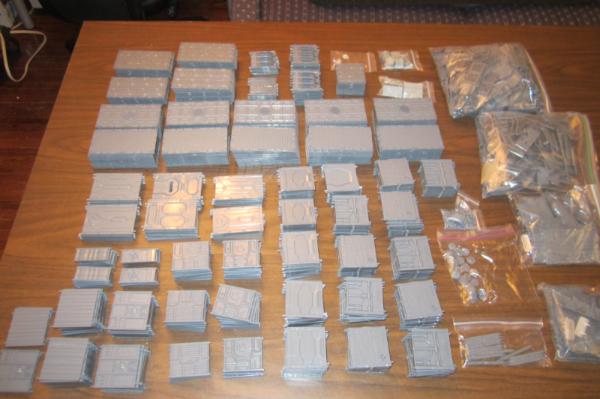
They're Makitainers, and I pledged entirely too much on their Kickstarter:
https://www.kickstarter.com/projects/rolljordan/maki-games-high-quality-modular-wargaming-terrain?ref=nav_search
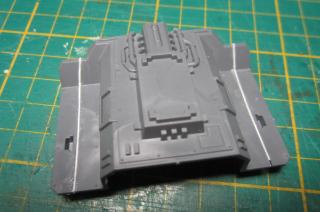
When built, they're pretty close in height to the old Necromunda bulkheads.
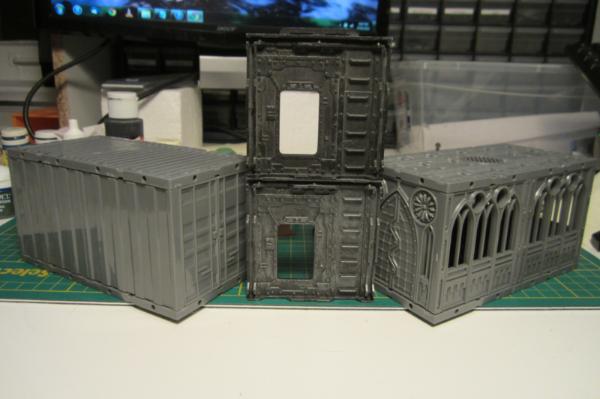
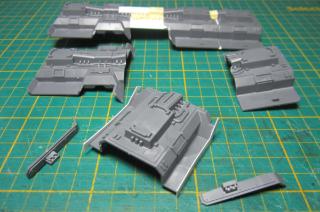
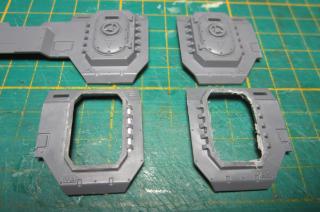
The details are nice, and they're quite sturdy, however many of the pieces need some work before they'll fit together properly. I was hoping that they would just click together like Legos, but such is not the case. Still, they'll make nice scenery. When I get around to assembling and painting them.
57963
Post by: Zogg
Some work on my civilian vehicles using the Heller 1/43 scale Citroen 2CV kit.

65595
Post by: Camkierhi
Still looking great
28415
Post by: lone dirty dog
Have you got shares in Heller I like the watchful eye as well
57963
Post by: Zogg
Thanks for the comments. I probably should get shares in Heller, as I own 7 kits (2 Citroen 11CV, 4 Citroen 2CV, and 1 Renault 4CV) and I want moar.
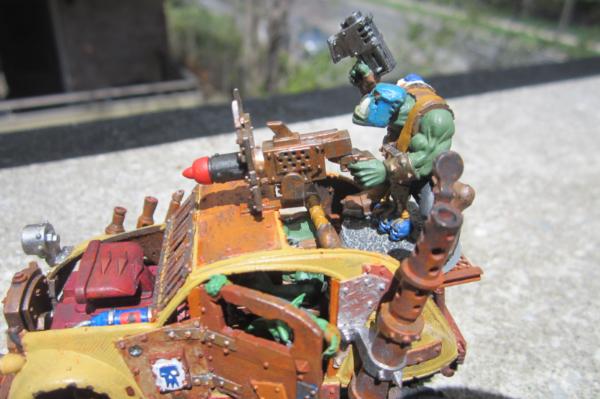
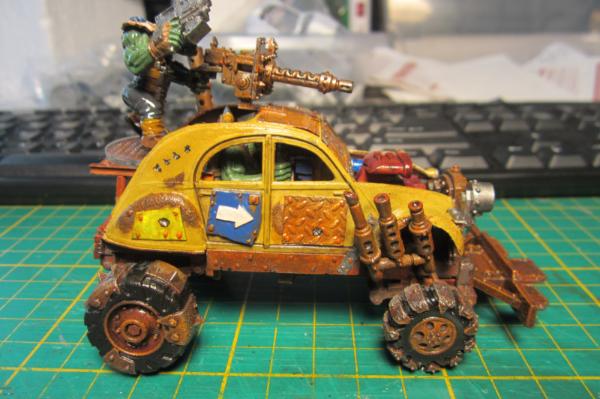
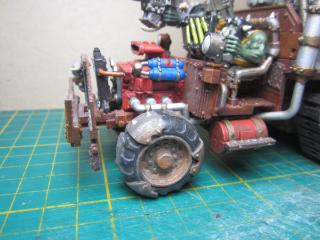
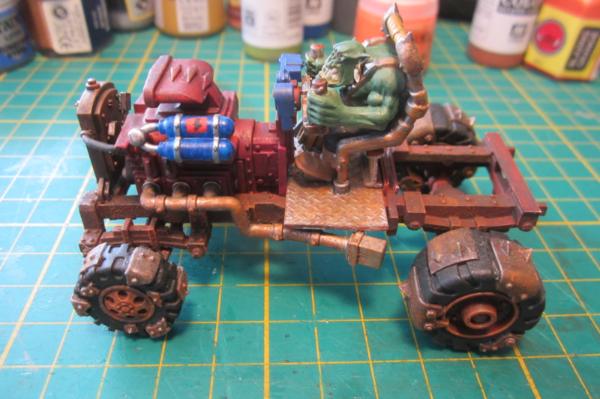
Some progress on my Deathskulls buggy. Driver added.
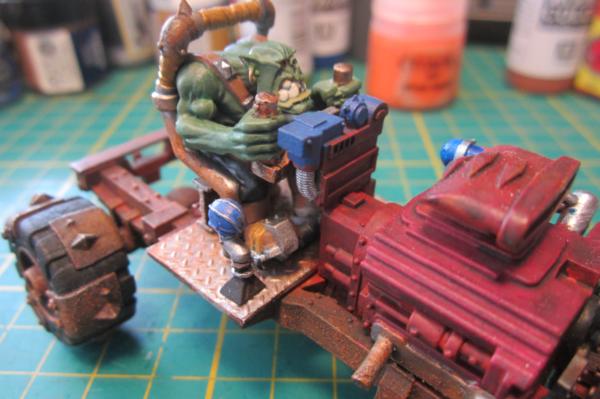
I like how the squig juice thruster bottles came out.
Not sure why I painted the dials. They won't be very visible once the buggy is assembled.
I guess you can see them a wee bit from the back.

Stowage.
Door added.
Getting there. Once the glue on the door is dried and I do a few touch-ups on the inside of the shell, it's time for final assembly and final paint touch-ups. Comments welcome.
26790
Post by: Gitsplitta
Oooh... I quite like that!
28415
Post by: lone dirty dog
Looking good all the detail adds to the charm, plus if you know it's there paint it
Nice job
57963
Post by: Zogg
Thanks for the comments.
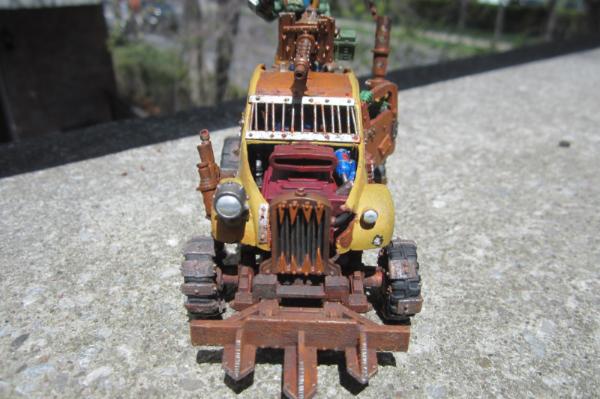
Deathskulls buggy finally assembled. A few more touch-ups and I call it done.
I still have to paint the headlights. Not looking forward to this part. I'm fairly sure I saw a quick tutorial somewhere on this site on how to paint headlights, but my search-fu is weak as I can't seem to find it.
Have to fix the gap in the bottom door hinge.
I dusted the wheels and bottom portion with grey chalk to show dirt picked up from traveling the ash wastes.
Comments or hints on how to paint the headlights are welcome.
26790
Post by: Gitsplitta
I just love that Zogg... nothing better in my book than an orkified VW Beetle. Bravo!
65595
Post by: Camkierhi
Looks brilliant bud.
I think Gits has a tut on lenses!
26790
Post by: Gitsplitta
Actually it's a tut done by Vent. You can find the link from his profile page.
57963
Post by: Zogg
Yep, that's the tutorial I was thinking of. Thanks.
After staring at the results of a google search on round headlights, I decided to try that method but using white. I like how the big one turned out. The small one could use some more work. Thoughts?
26790
Post by: Gitsplitta
Is that shading painted in or a reflection? I can't tell. (which is good)
I like it on the big one for sure.
57963
Post by: Zogg
A little from column A and a little from column B. I painted the headlights white, put a horizontal grey band across the middle and a little bit of yellow in the bottom left. The top half got a grey wash and then a dab of white in the top right. Then I gave it a wash of watered down Runefang Steel to give it a bit of shine.
26790
Post by: Gitsplitta
Excellent. I'll have to try that.
76303
Post by: Warboss_Waaazag
Buggy is looking great so far!
57963
Post by: Zogg
Did this a while back using MSpaint and forgot to post it.
26790
Post by: Gitsplitta
Perfect. The Zoggmobile ready to roll.
26790
Post by: Gitsplitta
Nice work Zogg, glad you got around to posting.
28415
Post by: lone dirty dog
Yes looks totally orky love the crazed paint job and the added gubbinz, actually I liked these so much I invested in 2 2CV's and a couple of other kits in that range and like I need another project
Anyway can't wait to see what you do next especially with those other kits
57963
Post by: Zogg
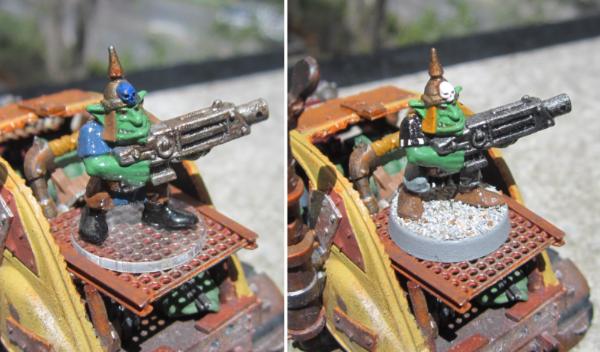
Finished pics of the looted buggy can be found here: http://www.dakkadakka.com/dakkaforum/posts/list/0/657524.page#8003969
So I'm waffling between standard and clear bases. Thoughts?
28415
Post by: lone dirty dog
For the vehicles use I would say clear for general play I would go detailed base, so I guess on that matter I helped none my bad
65595
Post by: Camkierhi
Buggy looking great.
Another person tempting me with this clear bases. I like them.
57963
Post by: Zogg
So instead of painting these two buggies...
...what do I do? Start building another one.
63129
Post by: Littletower
That is the true way! May you never run out of ongoing projects!
2326
Post by: shasolenzabi
Been a while since my last visit. I feel like I fell into a orky version of Mad Max,,,with cats involved!
28415
Post by: lone dirty dog
57963
Post by: Zogg
Littletower wrote:
That is the true way! May you never run out of ongoing projects!
I don't think there's any chance of that happening anytime soon.
shasolenzabi wrote:Been a while since my last visit. I feel like I fell into a orky version of Mad Max,,,with cats involved!
The Road Warrior was definitely a big influence on my builds. And having recently seen the new Mad Max, I'm very motivated to build more.
Exactly! And why start just one when you can start five?
57963
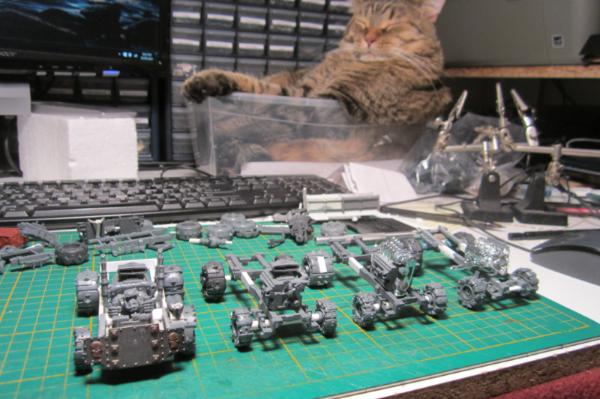
Post by: Zogg
A wee bit of progress on four of my warbuggies (with Supreme Overlord Silk resting in the background).
57963
Post by: Zogg
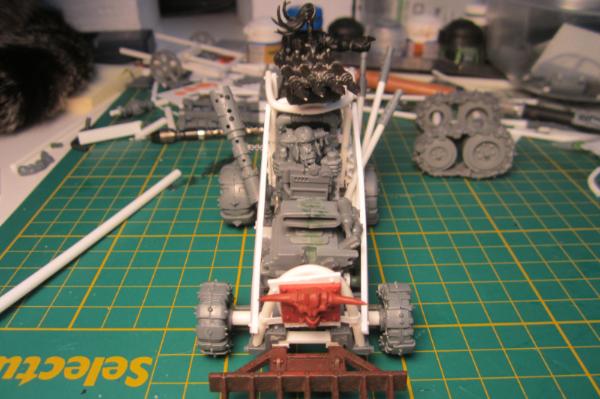
A bit more progress...
Buggy number 4. I'm going for a hot rod look. Still a lot of work left to do on this one.
Buggy number 5. This is a bare-bones buggy. I'm thinking of having the exhaust pipes sweep up and act as railings for the gunner.
97540
Post by: Kiblams
These look fantastic! I really need to start building the trukk conversions I have planned, only once the fort is finished though!
65595
Post by: Camkierhi
Excellent stuff bud, I am not a mega fan of the ork trukk, but the kit is brilliant for conversion as you are demonstrating.
57963
Post by: Zogg
Kiblams wrote:These look fantastic! I really need to start building the trukk conversions I have planned, only once the fort is finished though!
Thanks. Your fort is terrific and I look forward to seeing what you come up with for the trukk.
Camkierhi wrote:Excellent stuff bud, I am not a mega fan of the ork trukk, but the kit is brilliant for conversion as you are demonstrating.
Cheers. I'm not too keen on the stock ork trukk, but I think it looks pretty good when lengthened. And you're right, it has huge possibilities for conversions.
And now, mag wheels for the buggy pictured in the background.
76303
Post by: Warboss_Waaazag
Oooo! I love the double sized wheels!
28415
Post by: lone dirty dog
Nice idea on the wheels they look beastly indeed
57963
Post by: Zogg
Making some slow progress on buggy number four under the keen gaze of Velvet. I really need to clean up my workspace.
54500
Post by: hk1x1
Nice work on the buggy's, looking forward to seeing more. As for cleaning up your workspace, I'd probbally just dump everything in that box at the back there,
If their wasn't already a cat in it of course .
57963
Post by: Zogg
Thanks. Yeah, that bin has been claimed by my thugs... er, cats. Speaking of them, here is Silk looking at me like I owe him money. Must be feeding time.
26790
Post by: Gitsplitta
That looks awesome Zogg!
65595
Post by: Camkierhi
Looking fabulous bud, Proper old school Dragster vibe. Like the old Epic scale ones. Awesome work.
Not 100% on why you are worried about changing clan icons. I think of ork armies as a mix up of the whole lot anyways. But it is great thinking ahead like that and I can see how it might help.
Your army is going to look amazing anyway. I am starting to get a great feeling of a Kult of Speed.
57963
Post by: Zogg
Thanks for the kind words. Did a wee bit of painting this weekend on buggy #2 and some clan icons. Still a lot of work left to do.
 Camkierhi wrote: Camkierhi wrote:Not 100% on why you are worried about changing clan icons. I think of ork armies as a mix up of the whole lot anyways.
The plan is to use these in GorkaMorka, and to have several generic ones that can be used for any clan, rather than building three or four buggies for each of the six clans. Years ago I had come up with rules for each clan in GorkaMorka by combining bits of rules I found scattered throughout the interwebz and adding my own stuff. Unfortunately, shortly afterward my computer suffered a catastrophic failure and both hard drives were pooched. The cost for someone to attempt a recovery was at least $500 per hard drive, and I don't know which one my rules are on. So the drives sit in a box and wait for me to win the lottery,
52201
Post by: evildrcheese
Nice buggies. There's alot of great buggie conversions kicking about by the Ork players here on dakka!
EDC
65595
Post by: Camkierhi
Merry Crimbo.
I do like your colours. They are a nice matt, in a shiny world. The red seems to look particularly good. Sun bleached. Great work.
57963
Post by: Zogg
Cheers Cam. They're even more matte in person. The camera seems to add more shine to the model.
Some more painting done. The wheels still need a lot of work.
I like the effect of the wash of Vallejo Gunmetal Blue I used on the exhausts near the engine. I don't know why I insist on modelling the steering gubbins.
The headlights need some more work.
C&C welcome.
81837
Post by: Cleatus
Beautiful work. Very detailed. Every time I see something like this I am inspired to go work on my own stuff! Keep up the good work!
52201
Post by: evildrcheese
Great progress on the buggies. The rust looks amazing!
EDC
65595
Post by: Camkierhi
Yup, looking brilliant.
57963
Post by: Zogg
Thanks for the kind words.
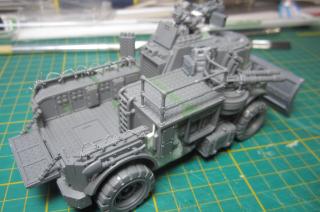
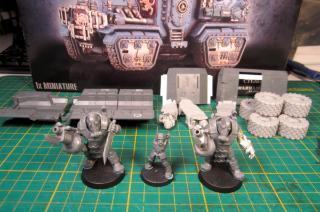
The buggy is nearly done, I just have to finish the wheels and do a couple of touch-ups. Until I get around to doing that, here's a taste of things to come. The start of an elite guard for guilders and an armoured car for Necromunda Arbiter games.
81837
Post by: Cleatus
Is that a Taurox in the background? Are you going to kitbash that?
57963
Post by: Zogg
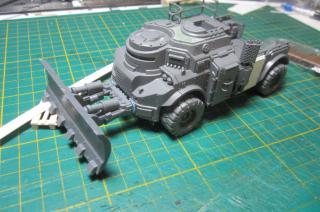
Yes it is, and you betcha.
Here is an early concept that I did a while back.
26790
Post by: Gitsplitta
Just love those exhaust pipes Zogg. They make a great pair. Very Mad Max.
65595
Post by: Camkierhi
Zogg wrote:It begins...
 [/quote
Intently watching....
Oh and second buggy is amazing bud, love the whole thing, those exhaust pipes kinda steal the show a bit, they are superb.
54500
Post by: hk1x1
Always wanted to do a Taurox conversion myself, so it'll be interesting to see where you take this.
Looks like your off to a good start .
10972
Post by: Ruglud
Ooh yeah. That's one model I fancy kit bashing as well to try and improve the 'off the shelf' version... Seen some really good versions elsewhere so the pressure is on you now (sure you're up to it though )
57963
Post by: Zogg
Thanks for the comments everyone.
Camkierhi wrote:Intently watching....
Oh and second buggy is amazing bud, love the whole thing, those exhaust pipes kinda steal the show a bit, they are superb.
I'm pretty happy with how it turned out. Next up on my painting list are probably some boyz and one of the four trukks I have primed.
hk1x1 wrote:Always wanted to do a Taurox conversion myself, so it'll be interesting to see where you take this.
Looks like your off to a good start .
Based on your current Knight project, I can see you doing some kind of mechanicus vehicle with lots of attachments.
Ruglud wrote:Ooh yeah. That's one model I fancy kit bashing as well to try and improve the 'off the shelf' version... Seen some really good versions elsewhere so the pressure is on you now (sure you're up to it though )
Yeah, the base kit is pretty fugly, but it has a lot of potential. Will you be doing an Ork looted version?
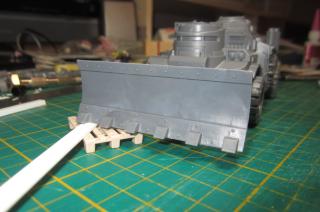
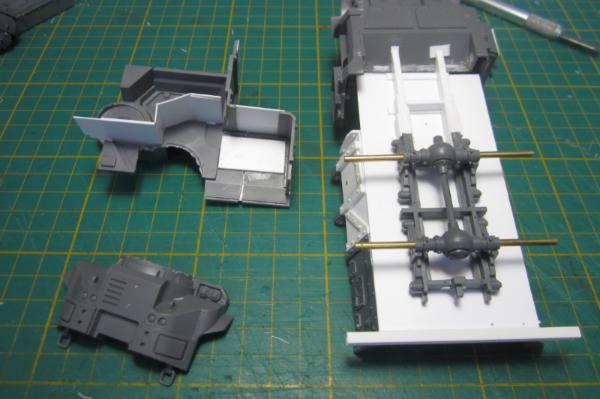
Why build one when I can build two? One will be a guilder armoured car, and the other will be for Necromunda Enforcers.
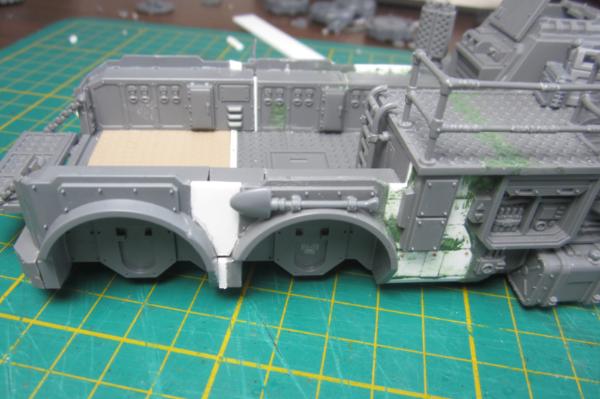
So I had cut off part of the track guards on one of the rear sections, and I don't even remember why. Obviously an idea that I abandoned. Since my current build uses the full width of that piece, I had to reattach the cut off bits. Luckily, I had a package of .015" strip styrene that was the same thickness as what was cut out by the razor saw. The lesson from this, make sure you're fully committed to a build before cutting anything.
And some other parts of the build...
57963
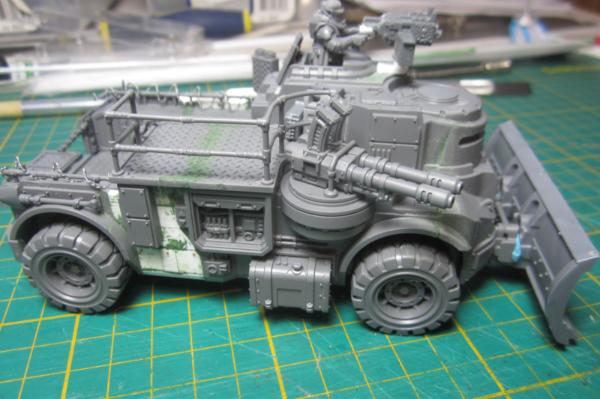
Post by: Zogg
I kinda hit a wall with the Taurox conversion. There are some design elements that I can't decide on, so I've set it aside to let it stew in the back of my brain. In the meantime, I've accomplished a few things....
Primed trukk #4 (and a wee bit of painting).
Assembled and primed trukk #5.
 
As always, pics can be clicked for larger views and C&C welcome.
57963
Post by: Zogg
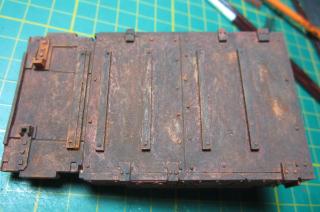
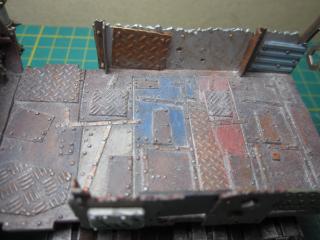
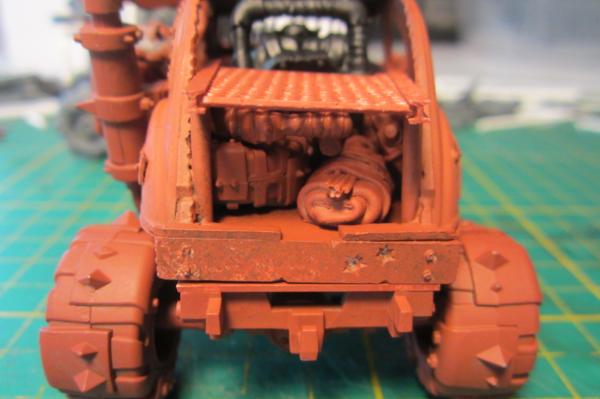
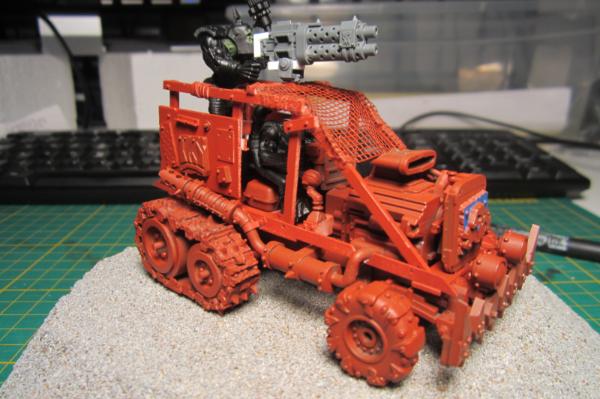
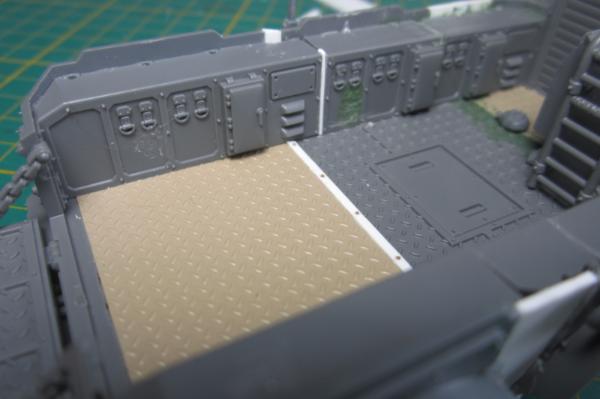
A bit of painting done on Trukk #1.
Silk wants me to put down the brush and feed him.
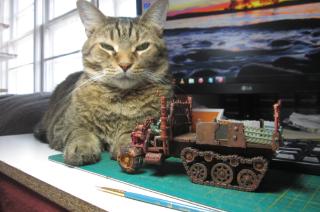
The floor of the trukk bed is pretty much done.

Took some pics outside to see what it looks like under natural light. Still a fair amount of work to be done in the cab area.
81837
Post by: Cleatus
Looking good!
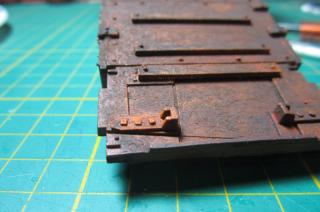
Those are Battlewagon tracks on the back, yes? They look really good on that Trukk.
57963
Post by: Zogg
 Cleatus wrote: Cleatus wrote:Looking good!
Those are Battlewagon tracks on the back, yes? They look really good on that Trukk.
Thanks. Yep, those are Battlewagon tracks. I had to extend the bed to fit over them. The bed is also magnetic, so at a future date I can add a fifth wheel for a trailer or even a big gun if the mood strikes me.

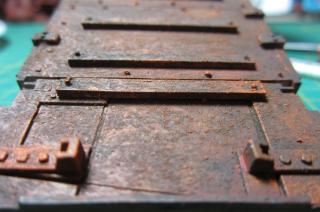
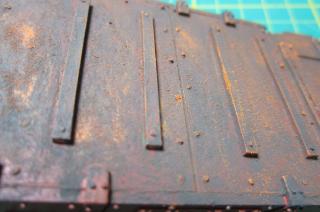
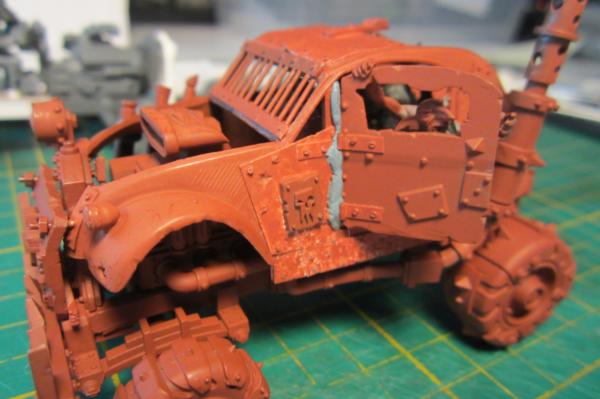
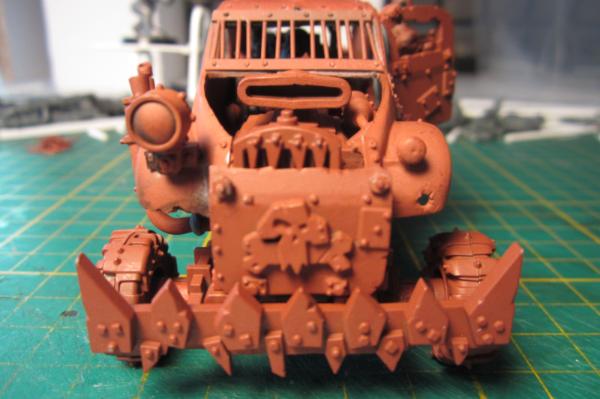
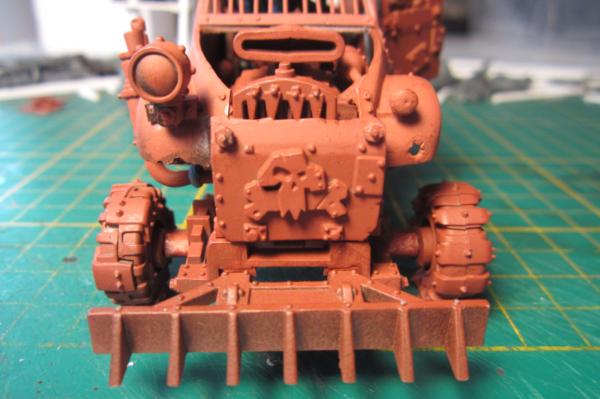
I was experimenting with washes and rust effects and came up with this:
But it wasn't quite right, so some more playing around and this is what I finally ended up with:
Spear chukka!

C&C welcome.
65595
Post by: Camkierhi
That's all looking pretty brilliant at the moment sir. Excellent job. You certainly have your eye in on these trukks. Great to see progress.
26790
Post by: Gitsplitta
Excellent effects on the front of that trukk. Very realistic!
67795
Post by: RexHavoc
That rust is superb!
95040
Post by: Guildenstern
love your stuff!
I went browsing through the pictures in the gallery for "ork trukk" a bit ago, and a lot of your work came up, was awesome, especially love your feline critic
26790
Post by: Gitsplitta
So nice! Reminds me that I need to get cracking and finish up the conversions on one of my own trukks!
65595
Post by: Camkierhi
That looks amazing bud. Great work. Love coming here to see your work.
52201
Post by: evildrcheese
That's one awesome looking trukk. Nice use of magnets, really cool.
EDC
57963
Post by: Zogg
Thanks for the kind comments everyone.
I finally got around to finishing buggy #2 with varnish and weathering chalk.
And some pics of completed big guns...
'eavy shoota
rokkit launcher
twin-linked shootas
spear gun
harpoon gun
I still have to finish a scorcha. And about a dozen or so more copies of each gun... and about 10 more buggies... and trukks, and bikes, and boyz, and civilian vehicles, and scenery... *sigh* So much to do.
52201
Post by: evildrcheese
There's always more to do, it's the very nature of the hobby.
Buggy looks great though, keep it up.
EDC
54500
Post by: hk1x1
This looks fantastic, it's really starting to come together now. Also I love the jury-rigged mining vehicle idea, really fits well with the cult background.
22619
Post by: inmygravenimage
Stunning. But the fact that you think you need to apologise for there being lots of pics is hilarious
26790
Post by: Gitsplitta
I think that's excellent work.
10667
Post by: Fifty
Good work on all of these vehicles. Looking really varied, but unified at the same time.
65595
Post by: Camkierhi
Now I want that kit even more, nice work, nice to see you about too.
95187
Post by: b-tone
Super cool vehicles!
52201
Post by: evildrcheese
Awesome work on the Goliath, so really cool converting going on.
EDC
57963
Post by: Zogg
Thanks for all the kind words. As is usual for me, rather than finishing one build, I start a couple more.
57963
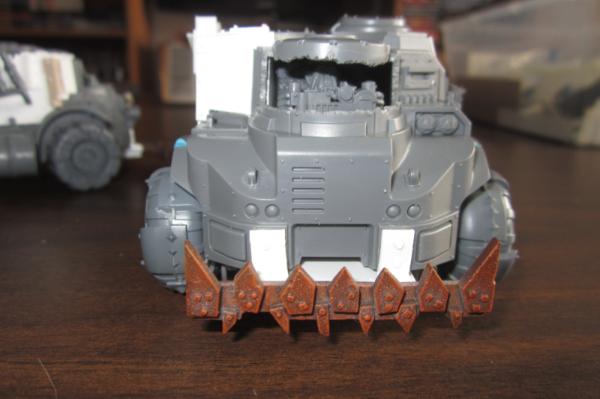
Post by: Zogg
The second truck will be very similar to the first. The third one, however...

57963
Post by: Zogg
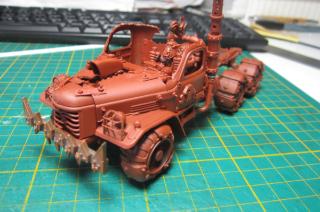
Some more work done on the looted truck.
And a couple of WIP shots.
 
Thoughts?
65595
Post by: Camkierhi
Nice work, still loving the look you are creating, sounds like rl got you busy, hope things are good and settle down for you.
57963
Post by: Zogg
Thanks Cam. So I did a little more work a while back and added a magnetized boarding plank.
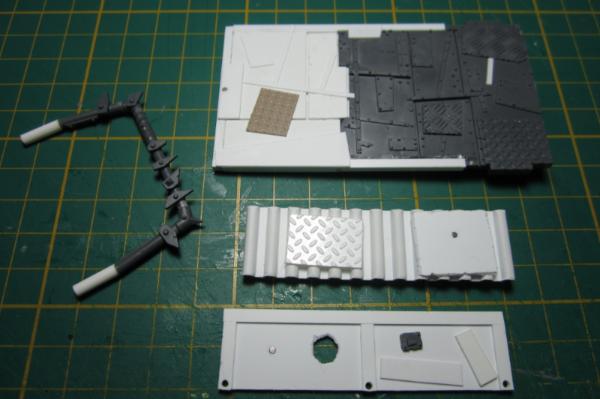
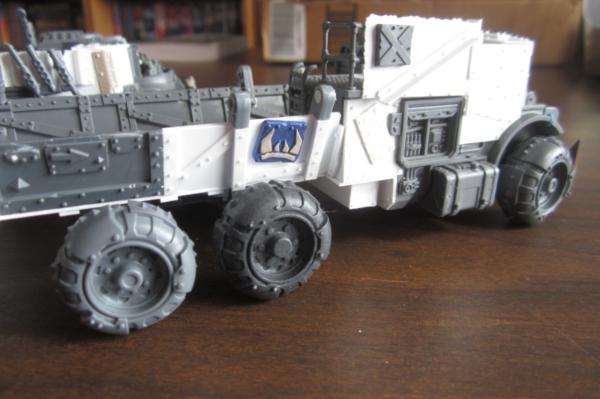
Then I decided to extend the bed, which involved tearing off the rear end that I had already built. More to come.
57963
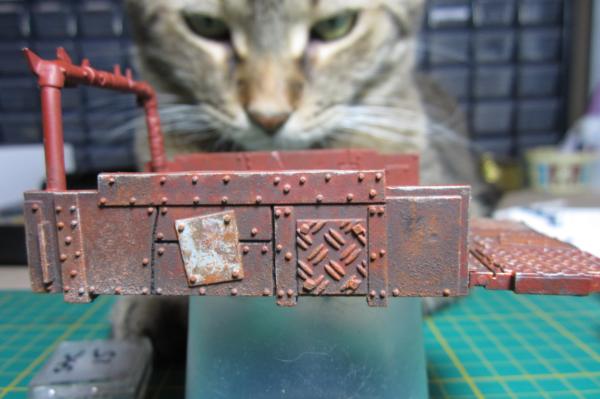
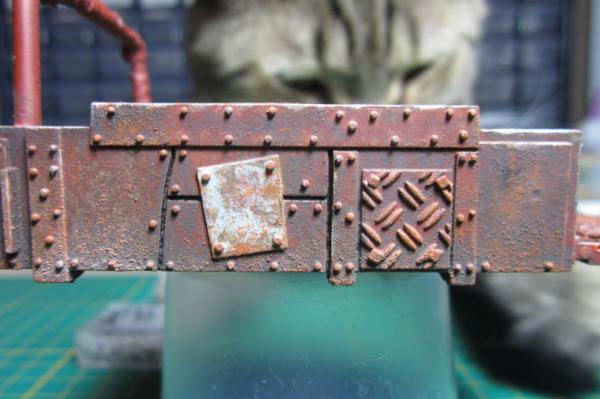
Post by: Zogg
I finished extending the bed of the looted goliath trukk.
Adding rivets.
I like how the partially raised sliding door turned out.
113751
Post by: Vallhund
Looking great! You extended the bed really well by the looks of it.
57963
Post by: Zogg
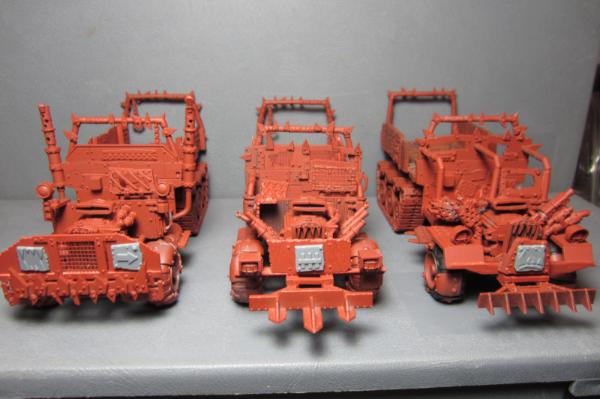
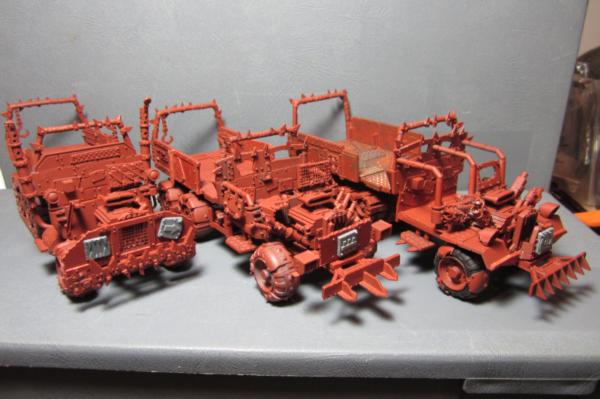
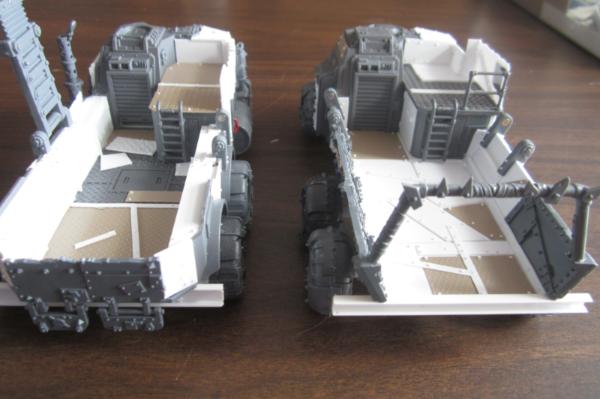
Thanks Vallhund. Picture dump incoming. My second looted goliath is all but completed.
Some bits from the ork trukk kit.
You can see the magnetic boarding plank mount and where I ripped out the goliath gun mount.
Final assembly of these parts will be after I paint the interior.
Magnetic weapon mount.

Cat hairs. Everywhere.
The glyph plate is magnetic.

Like my regular ork trukks, the bumper is magnetic so I have the option of putting on a reinforced ram.
Another magnetic glyph plate.
My two looted goliaths. The front glyph plate and driver's head on the left one are both magnetic.
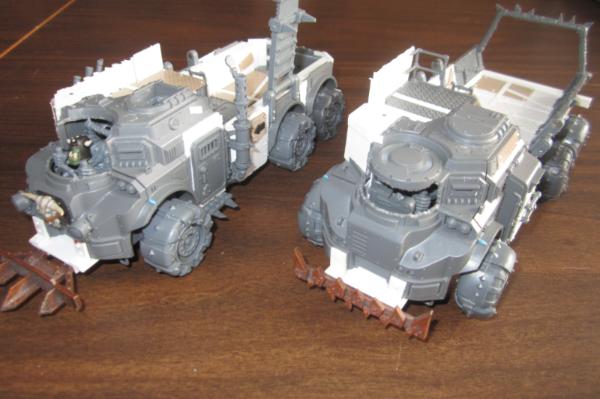
I just realized that I forgot to put exhausts on the second one. One more thing to do.
These have the same wheelbase and footprint of my regular ork trukks.
C&C welcome.
26790
Post by: Gitsplitta
That's great work right there... nicely done!
9910
Post by: CommissarKhaine
Some nice work. proves the kit is quite salvageable after all! I like the little top deck you added to incorporate the original shape, it gives it that irregular yet practical look I associate with greenskins.
57963
Post by: Zogg
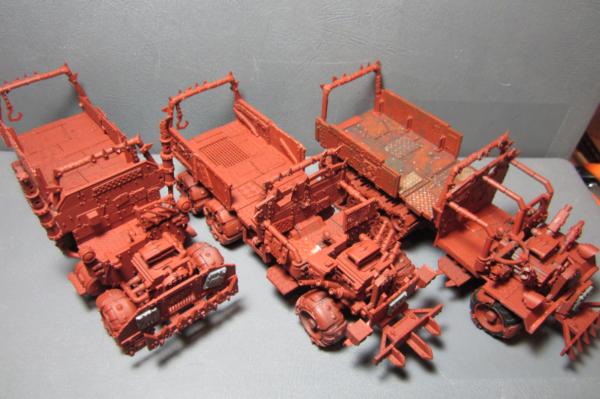
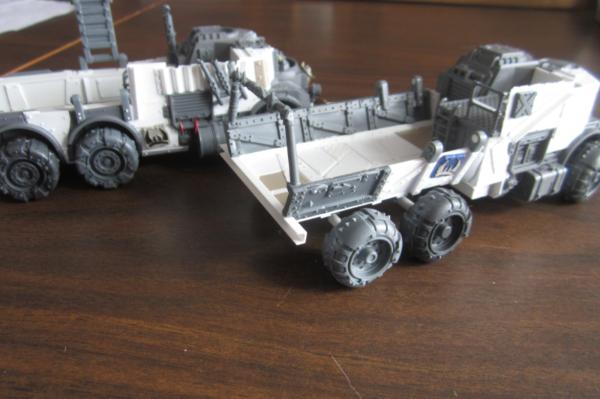
A much belated thanks to Gitsplitta and CommissarKhaine for your kind remarks.
After extending the beds of my looted Goliaths, I looked at my regular ones and said, "well crap, now I have to extend these too". Prying off the glued-on bits wasn't as difficult as I expected.


22619
Post by: inmygravenimage
Nice stretch job. Very impressive. Does it have a pool?
30344
Post by: monkeytroll
Nice! They do look fun to play with
3309
Post by: Flinty
Very cool conversions. Definitely look like they were just made out of the box. Thanks for sharing.
57963
Post by: Zogg
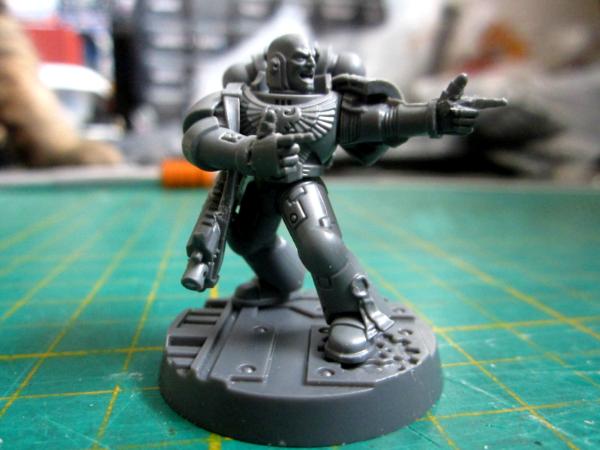
So it's been a while since I've posted on here. Nearly four years? 
I made this cheerful little Deathwatch marine a little while ago.
I haven't added a shoulder pad for his right arm yet as I'm still deciding on what chapter to make him from. Any suggestions?
More pics can be found on my blog.
81007
Post by: brushcommando
Welcome back! My instinct for this guy is that he's blissfully unaware that something horrible has happened to his chapter. Do you have any lamenter's or mantis warriors shoulder pads? Maybe a Crimson fist who's unaware that Rynn's world has just been devastated?
|
|