in here I will post pictures of both my armies: a large Ork band of speed-freaks, and dynasty of Necrons that I still haven't baptized.
Why Orks?
Because when I started 40k, I wanted to have fun. I never had any interest in Human faction in games where other races are available. This is true for tabletop role playing games, video games, ...
Why Evil Sunz?
Because "da red onez is fasta", because the red ones are actually faster, because it reminds me of Mad Max, because I have a motorcycle
Why Necrons?
Because of the first Allies matrix, damn you GW!!!
Basically, after the introduction of the Allies matrix, I decided that it was time for me to jump onto a 2nd faction.
I did not want any SM or IG.
I don't remember what was the Allies matrix for Orks in the edition that introduced that concept, but I think I then had the choice between Necrons, Tau, and CSM.
I never was attracted by the Tau robot, too manga style for me, and their Kroot are somehow similar to Orks.
CSM was clearly an option, but it was too close to SM, and I'm not really into all the gory aspect of Chaos.
Necrons had a full range of models at the time, and it may have been the 1st army to do so in a while, iirc a GW blog post.
I thought they were a nice complement to the Orks, more shooty, less wild, more organized, less bloodheaded, and I kind of liked their models.
First, a few terrain pieces (WIP):
Ork Walls - 3 made out of sprue sticks, foam, and thin "wood" for the base
Ork gas station(?) - made out of sprue sticks, foam, thin "wood" for the base
Here is a list of my Ork army (WIP):
Lords of War: Ghazghkull Thraka - built
Stompa - in the box
HQ: Wazdakka Gutsmek - built, primed
Grukk Face-Rippa - built, primed
Grukk Face-Rippa's squig - built, painted
Mad Dok Grotsnik - in the box
Weirdboy - primed
Boss Zagstruk - primed
Troops: Boyz - 25 Evil Sunz, a few finishing touches to be done, bases to be done
Boyz - 14 with sluggas, built
ArdBoyz - 30 with sluggas, built
Boyz - 38 with shootas, built
Boyz - 6 rokkit launcha, built
Boyz - 9 big shootas, built
Grots - 30 painted, a few finishing touches to be done, bases to be done
Elites: Nobz - 30+ built
Burnaz - 12 mostly painted, finishing touches to be done, bases to be done
Lootaz - 12 mostly painted, finishing touches to be done, bases to be done
Boss Snikrot - mostly painted, finishing touches to be done, base to be done
Meks - 4 built
Heavy Support: Flash Gitz - 7 home made from Black Orks, almost done, finishing touches to be done, bases to be done
Battlewagon - 2 built, 1 painted, details to highlight, 1 painted bud needs to be redone
Killa Kans - 3 Evil Sunz, 3 Bad Moonz Deff Dread - 1 Bad Moonz
Gorkanaut - mostly built
Morkanaut - built, primed, starting basecoat
Fast Attack: Trukk - 1 primed, basecoat partly done
Warbikers/Nob Warbikers - 17 primed
Dakkajet - mostly painted, a few finishing touches to be done, bases to be done
Dakkajet (made from a Warthog model) - primed, partial basecoat
Stormboyz - 10 primed
Warbuggies - 3 homemade, primed, partly basecoated
HQ: Overlord - in the box
Ovelord from the barge - basecoat, some highlight done
Obyron - painted, just needs some touches on the base
Anrakyr - in the box
Barge - primed, some basecoat done
Troops: Warriors - 24 mostly painted, need finishing touches on the gun, and bases
Elite: Deathmarks - 5 done
Stalker - 1 almost done, needs a few finishing touches
Nightbringer - 1 almost done, needs a base
Fast Attack: Scarabs - 6 done
Ghost Ark - mostly painted, needs a few finishing touches, and to be assembled
Tomb Blades - 6 primed
Heavy Support: Spyder - 1 done (maybe a few details left)
Doom Scythe - mostly painted, needs finishing touches on pilot and base
Doomsday Ark - mostly painted, needs a few finishing touches, and to be assembled
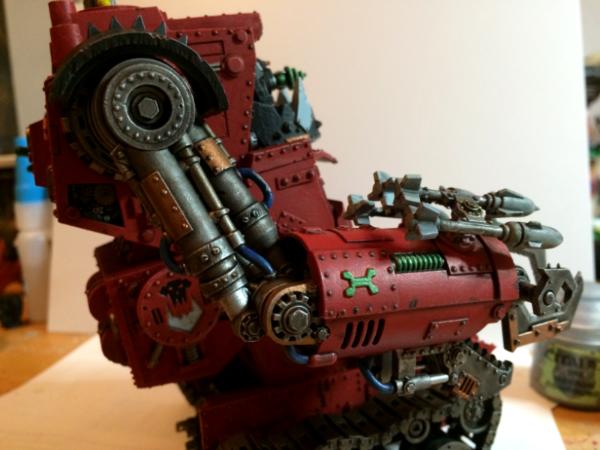
The base is a bit too high and the bike front wheel does not touch the floor ... which could also give the impression there's so much thrust coming from the engines that the bike is doing a wheelie
My Ork army is a mix of two different clans: Evil Sunz first, and Bad Moonz second.
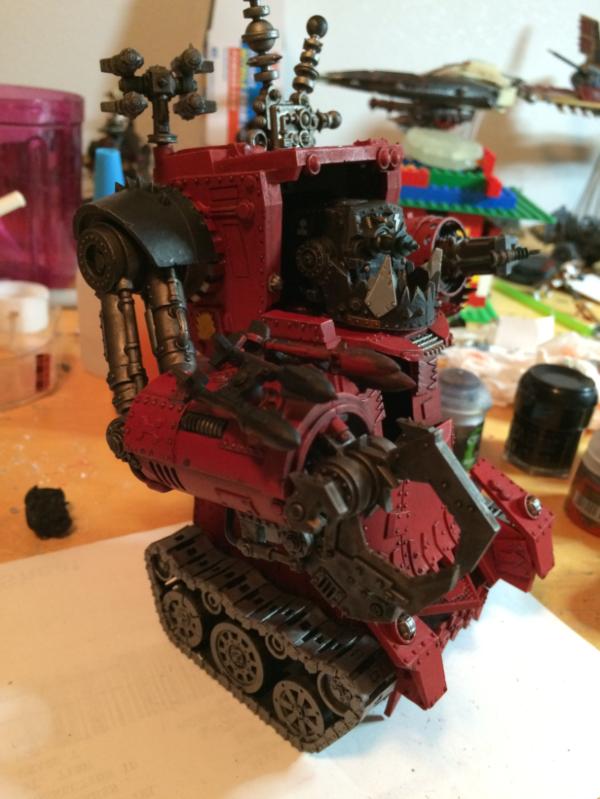
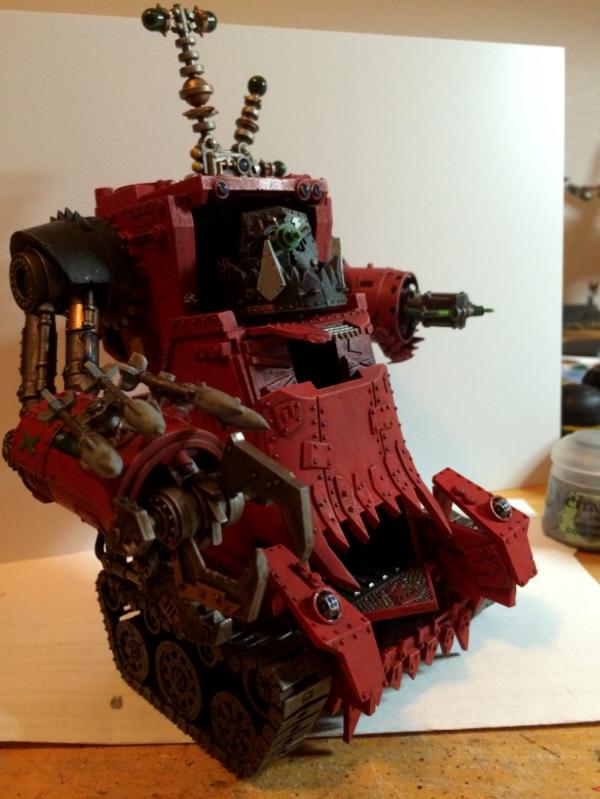
As a central piece for the Evil Sunz band, I wanted to have Wazdakka, for which there has never been a model I guess.
My first attempt at making my own Wazdakka was kind of a disappointment because of the size of the model: it was just slightly larger than a regular biker.
I got more bits in my bits-box, including large pieces from a battlewagon and a dakkajet/bommer, so I decided to restart that project.
For the biker, so far I am using the Warboss from the AOBR box set. I just had to remove part of his pants to allow him to sit on the bike.
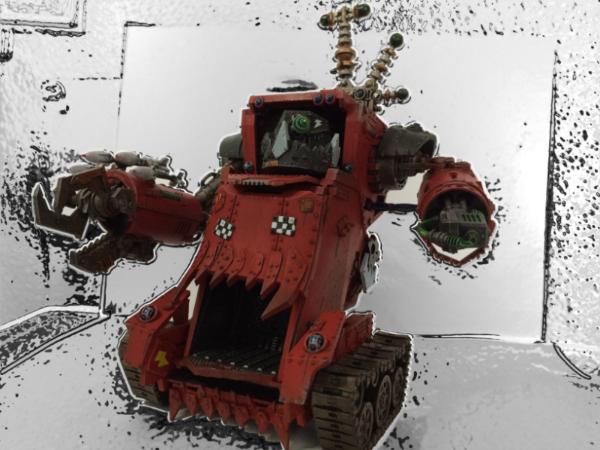
Before I go into the painting, I'd like to have some feedback from the community.
So here are a few pictures of the model, once primed.
My three other Kanz are wearing the colors of the Evil Sunz.
I tried to use some more dynamic poses, as I imagine these three "running" forward to engage the enemy, while the Bad Moonz Kans will surely shoot from afar
I decided to remove the magnets that I first thought to use to change their weapons, that's why a couple of arms are missing right now.
I have a pack of 30 goblins, that I consider as they should be by Orks: weak, without proper gear, and without a clan.
As such, they present a great diversity in colors: red from the Evil Sunz and yellow from the Bad Moonz exist, but blue and brown are also there.
Weapons are also dirtier than those of the boyz.
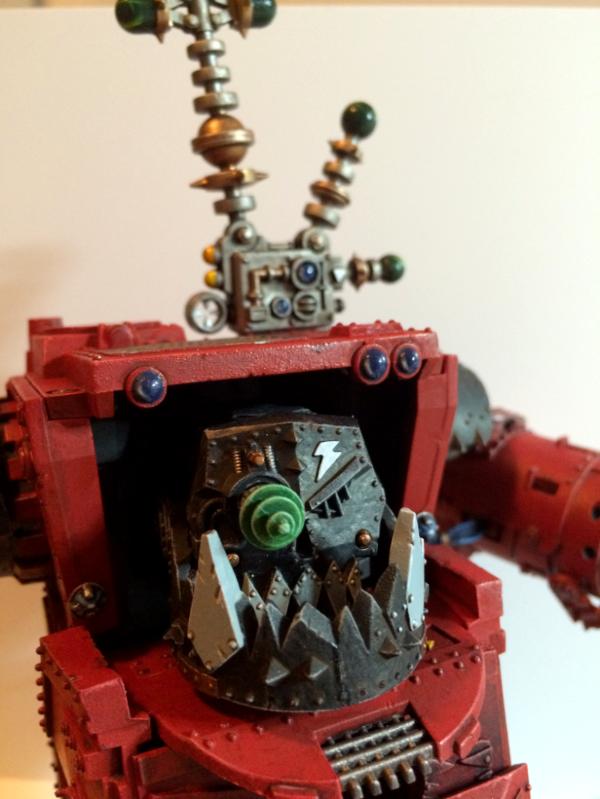
I got a StormClaw box and realized that the warboss in there is *very* similar to that of AOBR, which I use for my Wazdakka.
I thought I could use it as an alternate warboss, but for the Bad Moonz.
He could be a relative to Wazdakka or whatever you call two mushrooms that look alike
Anyway, this warboss has a nice squigg that I decided to paint blue, as I wanted something out of the ordinary for the warboss pet.
Here are a couple of pictures of the squigg, for which I will need to find a name pretty soon.
My Necrons warriors are very basic, as they should be, in my mind.
They are at the bottom of the pyramid (or monolith) so I wanted them to look very simple.
I used silver with layers of red wash, which gives a nuance to their appearance.
I haven't finished their guns, as I'm not really happy with the way they look now.
I like the idea of two Ork Clans mixed together, it gives a lot of opportunity to build in some variety in the massive green hordes; I think I'll steal that little idea for my own Orks if you don't mind
The Squig is really awesome, the colour scheme works really well, despite being quite out of the ordinary indeed
The Deathmarks are one of the unit that I really like about Necrons and that represents that cold/distant/mechanical flavor that I did not have with my Orks.
At first I wanted to make them look very dark and shiny, simply mixing some Boltgun Metal with lots of Badab Black, but I could not get a satisfying result.
So I decided to stay in the color scheme of the entire army, though they had to look superior to the Warriors.
Instead of getting them more shiny or golden, I went the other way, and made them less shiny.
I decided that Elite/HQ would have more white/ceramic-like color, obtained with multiple layer of Bleached Bone.
I have a squad of 5, here is the picture of 1 of them.
One of the unit that I really like in the Necron range is the C'Tan Shard of the Nightbringer (as much as I dislike the Deceiver).
His pose, mouth wide open, is terrifying, while his size and elegance are clear signs of superiority.
I kind of like the color scheme from GW website and the Necron codex: very dark, almost completely black, with just a single color coming from the body.
I went along a similar path, but at this time, GW just introduce their new technical paints, and I wanted to use the Blood for the Blood God to paint something else than blood.
After highlighting the cape of the C'Tan with some red, I thus decided to cover it with a layer of Blood, which I think works very well.
I also used red for the mouth.
However, for the rest of the body, I wanted something shiny, as the C'Tan are star's shards. But I did not want to use a color that would clash with the Blood cape.
I went for dry brushing the body with some silver.
Not sure I want to add anything, except for the base.
Another Necron model that I really like: the Canoptek Spyder.
I start t really like this color scheme, and I think it goes really nicely on the Spyder.
Ok, this is WIP, and I basically just started painting Vargard Obyron.
I want him to have similar color to the rest of the army, but with a noticeable difference.
Have a look below to see what I have so far.
Keep in mind it's WIP, and while the red looks messy, I will clean it up once I know the color(s) I will use for the armor.
So, I'm hesitating between a few options.
I want to have those red touches on him, but I don't know if I should have his armor black, white, gold, or silver.
I kind of like the way he looks now, apart from the mess. I like the color scheme, and that's why I think I should keep his armor black.
I will have some silver here and there, in the skeleton and maybe on the scythe.
What do you think?
Update: I have decided to keep a dominant black, but had the skeleton golden to balance, and highlight the edges of the black panels with some grey
The other HQ that I have so far is the overlord that comes in the Barge.
It's nice that it can be used on foot too.
For him, I have in mind to follow my color scheme, unlike what I imagine for Vargard Obyron.
So, the lord has to be mostly white, with touches of red, like the entire army, and gold should be more present than silver.
This is WIP.
I imagine silver in the remaining part of the skeleton.
Haven't really figured out what I want for the head yet.
Yet another Necrons model that I like. This is the first that I painted in my army, and though it is complete, I think I will go back to it sooner or later.
What I think I may change is the overall dominance of black: in the legs, the joints, the weapons, and the control seat. Shall I paint some sections of the legs with a different color? Bottom section, silver? What about the control seat?
The colour scheme is nice, personally I'd make Vargard's armour ceramic white too, otherwise the red markings won't be as noticeable. As for the Overlord, I'd go with a brass or golden face/helmet, to set him apart from the rest
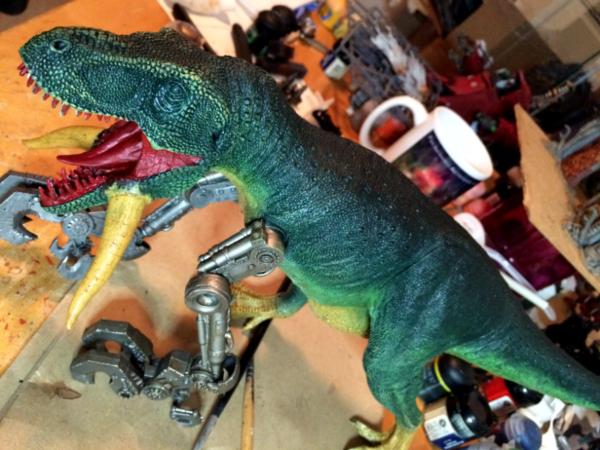
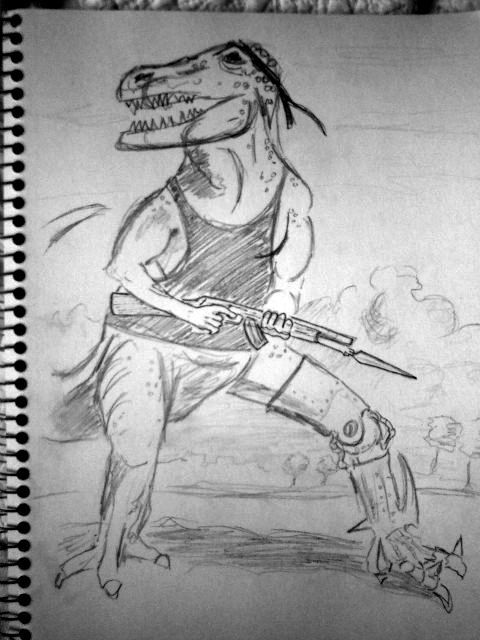
Been playing a bit more with Photoshop and those two dinosaurs ... and I have decided to purchase them. Hopefully, I won't need too much GS to fix all of this
Just got my Pegasus T-Rex and Triceratops today!!
First of all, I have to say those are of great quality: sturdy and heavy plastic, with a impressive amount of details on the skin, the horns, the eyes, the mouths ...
At $30-35 a piece, it's a steal!
If I can make just 1 Gargantuan Squiggoth, that's about $300 saved!
But I can imagine making 2, for 10% of the FW price!!!
Now let's start with some measurements:
1. Gargantuan Squiggoth
Length:
12-13 inches long, from tip of the horns to tip of the tail
Height:
8 inches to max height of howdah at the shoulder
7 inches to max height of howdah at the hip
6 inches to shoulder
5-5.5 inches to hip
Width:
2 inches at the head
5 inches max at the shoulder
4.5 inches at the hip
Howdah:
8 inches long max
8 inches wide max
4 x 4.5 inches for central piece
2 x 2 for "driver" piece
1.5 x 1.5 back piece
1 x 1.25 x 1.25 for side pieces
Thanks to Celso Mendez for his video on Youtube!
)
2. Pegasus Triceratops, which I wanted to use mainly for the Squiggoth's body
Length: 12 inches from horns to tail
Height: 4.5-5 inches at shoulder and at hip
Width: 3 inches at the hip
3. Pegasus Tyrannosaurus, which I wanted to use mainly for the Squiggoth's head
Length: 18.5 inches from mouth to tail
Height: 6-6.5 inches at head, shoulder and hip
Width: 3 inches at the hip
4. Battlewagon, for the howdah
Length: 6 inches for the whole cabin
Height: 2 inches for the cabin
Width: 4 inches at most for the cabin
Sooo, it looks like both bodies are good match to the Gargantuan Squiggoth, except in terms of width, where I may lack at least 1 inch. The length of the T-Rex is a bit too much, but it's mostly due to the tail, which is about 8 inches long.
For the howdah, a battlewagon cabin seems to be a very good match, and I may just need a bit of plasticard to get the extra inch here or there.
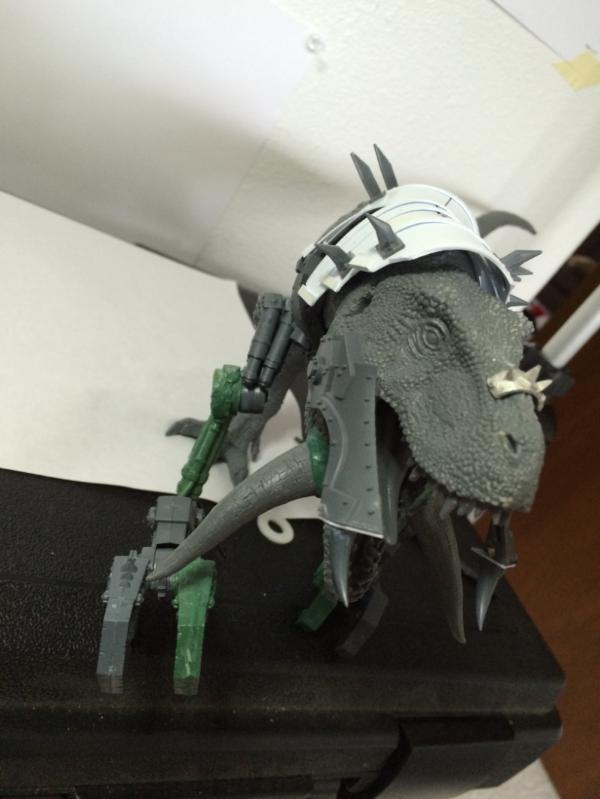
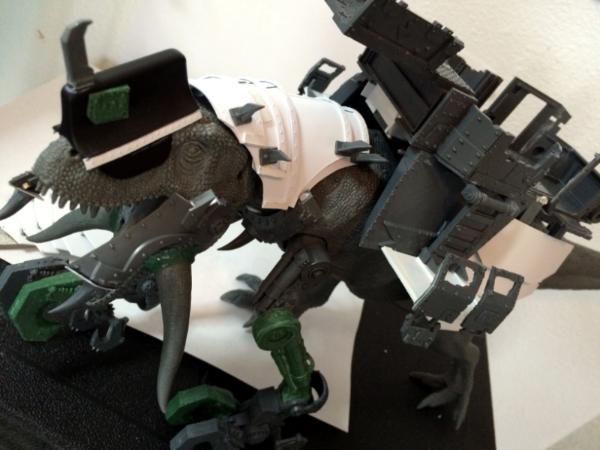
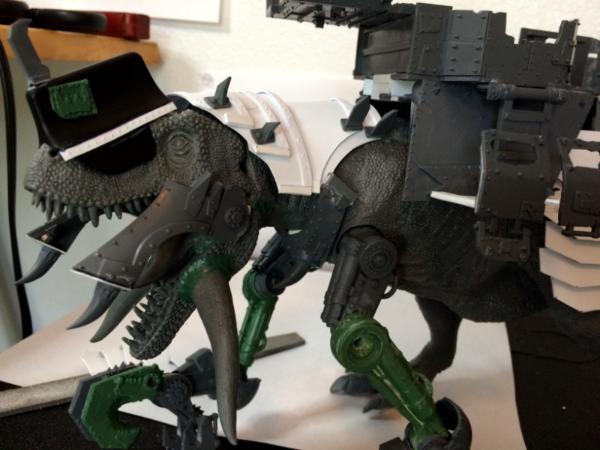
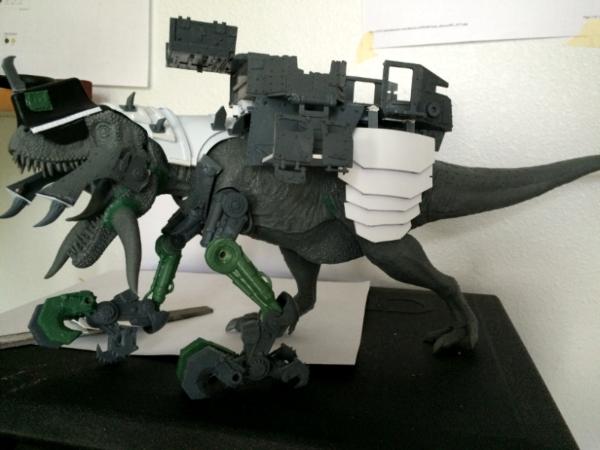
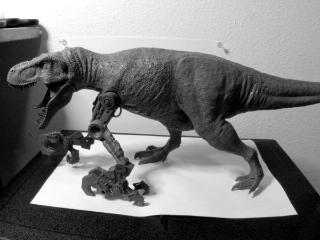
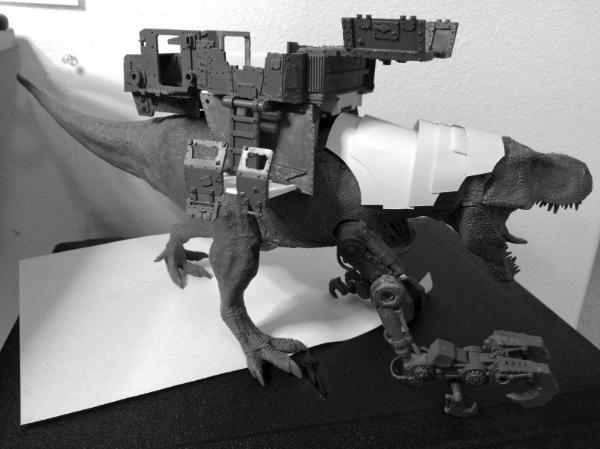
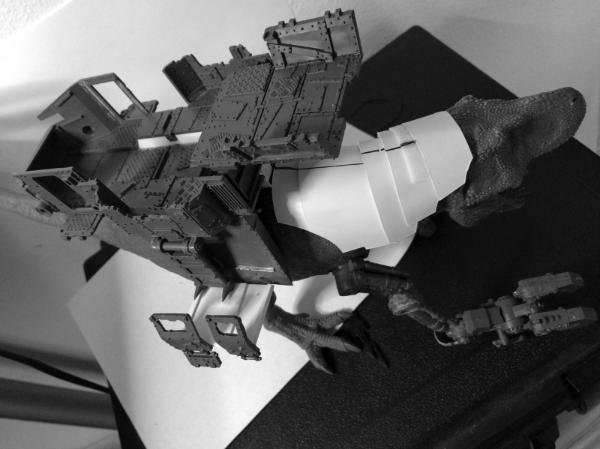
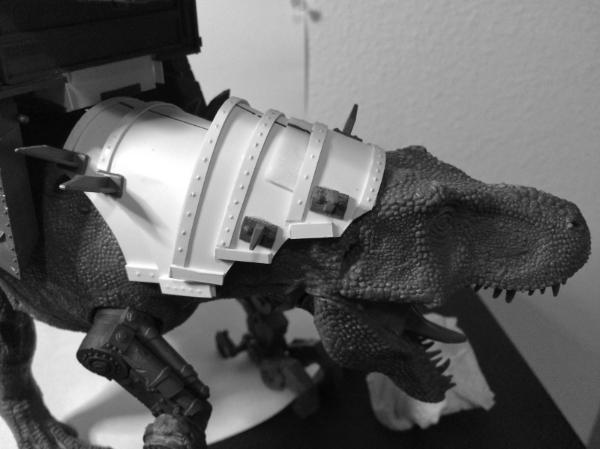
I remind you that my original plan was to swap the heads of both dinosaurs, to make them look different from the well known T-Rex and Triceratops. You can see a photo-montage of the T-Rex head on the Triceratops body a couple of messages above, but I put it back here, in its simplest form. I also add a montage of what a Triceratops head on a T-Rex body would look like.
I continue to believe that the 1st one is a very good match to the Gargantuan Squiggoth. As much as I like the effect of the Triceratops head on the T-Rex body, it looks more like a monstrous ugly bird to me, than a squiggoth.
Looking at the models, the necks are similar in their dimensions and the texture of the skin is also similar, though not identical. The Triceratops neck has a circumference of about 4.5 inches, while it's closer to 5 inches for the T-Rex. It should not be impossible to hide the misconnection with proper armour plates I guess. The natural shield on the Triceratops head would also help on that issue. One more thing, the head swapping will require some cutting: the Triceratops head is a separate piece, but the T-Rex head is connected to the body as a single piece (the inferior jaw and the tong are distinct pieces though). And as I said previously, these are heavy pieces of plastic.
Looks pretty cool, though I would make some bigger front legs for the trex body squiggoth. If you are not confident on making flesh legs, some bionic legs would look cool. Still keep the rearing up pose, but the larger front legs will help to balance the massive head and fortification on its back.
SilverMK2 wrote: Looks pretty cool, though I would make some bigger front legs for the trex body squiggoth. If you are not confident on making flesh legs, some bionic legs would look cool. Still keep the rearing up pose, but the larger front legs will help to balance the massive head and fortification on its back.
yup, agree with you, it needs stronger legs ... the most obvious difference between real life dinosaur and the monsters of 40k, is that the latter are significantly bulkier (and this is true for all other 40k figurines, including vehicles)
thanks a lot for the bionic legs idea!!
I was also thinking of making a copy of the back legs with some instamold and GS, and use these in place of the front legs
I have a couple of Battlewagon and a Trukk, that I may break apart to have the main structure, and then work out something with plasticard
However, I will start to build something with Legos to have a sense of how long/wide/heigh it can be and has to be
You could sculpt them with GS, but if that's not your strong side, you could just make bionic, metallic legs, sort of like these, but obviously larger.
Seriously, I'm no sculptor, so the way I see it, I either find some legs that have the good length and sort of the good "pose" on other toys ...
Or I find some bits in my Stompa box or somewhere else in my ork bits that I could use to make metallic legs
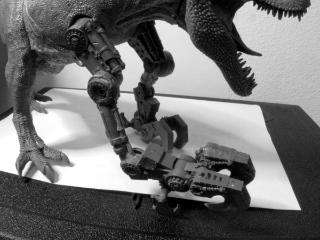
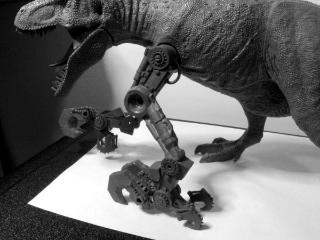
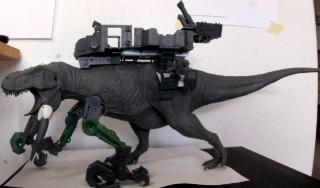
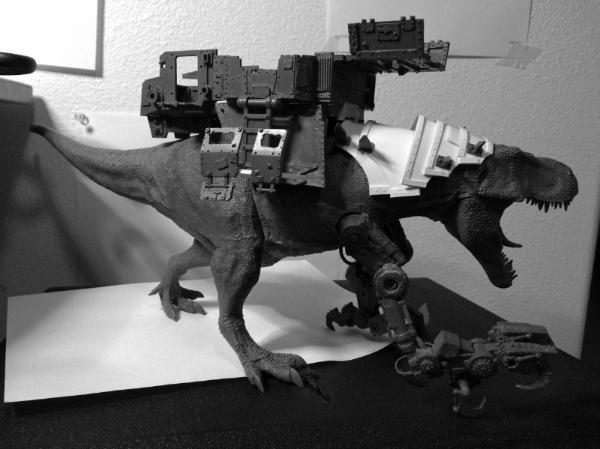
My issue right now is that the body of the TRex is clearly that of a bipede, so when I play with photoshop to add a pair of long front legs, it looks awkward ...
See below.
Yeah, that does look... creepy. How about making the whole T-Rex armoured up with Plasticard and Stompa Bitz, and try to blend in some mechanichal legs? I think the shape you've got going there would look great with mechanic stuff.
Automatically Appended Next Post: I googled around a bit, and found this. NO REGRETS!
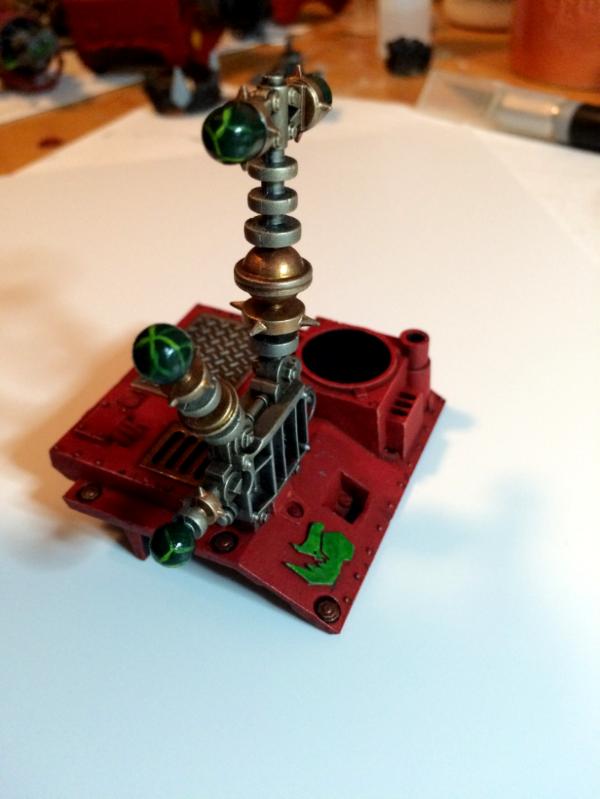
I need to stop thinking about my TRex/Squiggoth, so here is an update on my Ghost Ark / Doomsday Ark.
From the beginning, I wanted to magnetize it to be able to switch from one Ark to the other quickly.
It's easy to find people who did such thing, on Dakka, or Youtube.
Here is what I did:
1. I wanted to keep it simple, without the need to move many parts. Therefore, I decided to keep the "ribs" of the Ark always the same way: facing down
Having them facing up looks bad in the Doomsday Ark configuration, with the cannon above the ribs.
However, it looks okay with the warriors heads down in the ribs, or above the ribs.
2. I cleaned the inside of the "spinal column" so it was possible to insert a metallic rod in there.
I use a threaded one, 3/8 of an inch in diameter. I found those at Home Depot, and they fit perfectly.
Just had to cut it the right length, about 4 inches, and sand the edges to have a nice flat surface.
3. Magnets: originally, I thought I would move the "rib cage" up and down, depending on the type of Ark I would use, so I place magnets (3/8 inch in diameter) in the "crescent" part, where the "driver" is seated.
The one at the top will now strengthen the whole rib cage assembly. The one at the bottom will hold the cannon.
At the other extremity, I also placed a magnet on the prow. Again, this was in case I would turn the ribs up/down, which I won't do anymore.
4. You may wonder why the rod in the rib, if I don't turn the ribs up/down anymore.
Well, the rod will help connect the cannon or the warriors.
So, at one end of the cannon, I have a flat 3/8 inch magnet to connect to the "crescent" and two 1/8 by 1/6 magnets at the top of the cannon to connect to the rod, through the "spinal column", which I pierce at that position.
Likewise, I pierced the sides of the spinal column 12 times, and glued a 1/8 by 1/16 magnet to all warriors so they can be connected to the inside rod.
Have a look at the pictures below. I need to finish the painting with a few touches here or there.
Here are a few pieces of terrain that I decided to build using some of the sprues I collected over the year.
I started simple: some walls, and sort of a gas depot of some sort, both Orky.
The base decor is made of pieces of foam randomly placed with white glue. On top of that, I used a mix of water/white glue/sand.
I think I first based the whole thing yellow, then I used some Agrax EarthShade. Next will be some lighter color.
The building just got their basecoat of Leadbealcher, a wash of Nuln Oil, and a light brush of RuneFang Steel.
I have no clue Either because I wait enough time between each post, or because each post is long enough that Dakka does not merge them?
Or just because WAAAAAAAAAGH!!!
Ok, got some GW boxes yesterday that should help me with the Squiggoth conversion: a trukk and another battlewagon.
I have been thinking about other conversions after watching the youtube channel of Brad Hair: https://www.youtube.com/channel/UCSBvuVe_oJ374hooCag_YLw Watching his videos, I found out about the Pegasus Hobbies 1/32 scale Terminator Hunter Killer Tank and the Aerial Hunter Killer Machine.
See below for pictures.
Those would be of great use for Ork or Necron conversion.
In fact, I feel like both could be used as is for Necrons, though I'm not sure what the Tank could count as ... Obelisk?? Monolith?? Issue is it does not fit the "pyramid" style ...
However, I think I could make great use of the HK Tank bottom part (the 4 tank tracks) to replace the feet of a Stompa.
And then use the remaining parts as bits for other Ork or Necron models.
What do you guys think?
EDIT: found some measurements for the HK Tank:
"Now the measurements for the model from front tread to rear tread is just short of 12 an a quarter inch.Now the width from front tread cover to front tread cover is 9 inches. Height from bottom tread to the top of the head is roughly 8, and a half inches tall."
This seems a bit large, as is, compared to the Stompa: 9" to top of head 12" to smokestacks 7" wide (bottom of skirt) 7" long (bottom of skirt)
and for the Aerial HK:
"it is roughly 12 inches long and 8 inches wide."
while the Dakkajet is 9" wide, and 9" long
So both would need a little trimming here or there to better fit the GW models, but they seem to be on the good scale.
Love the paint scheme in your necrons, I'm always a little chicken about making my own scheme away from the original "box art". Fantastic job. I'm not an Ork-fan really, but love the Kanz and Dakkajet
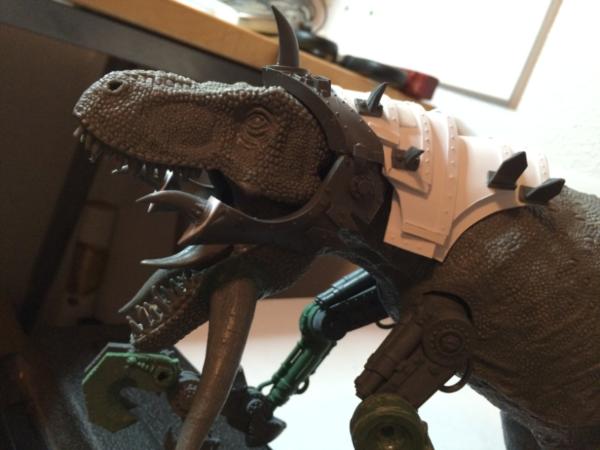
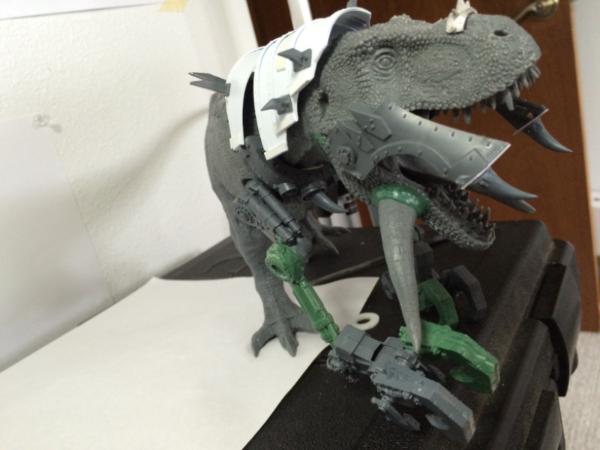
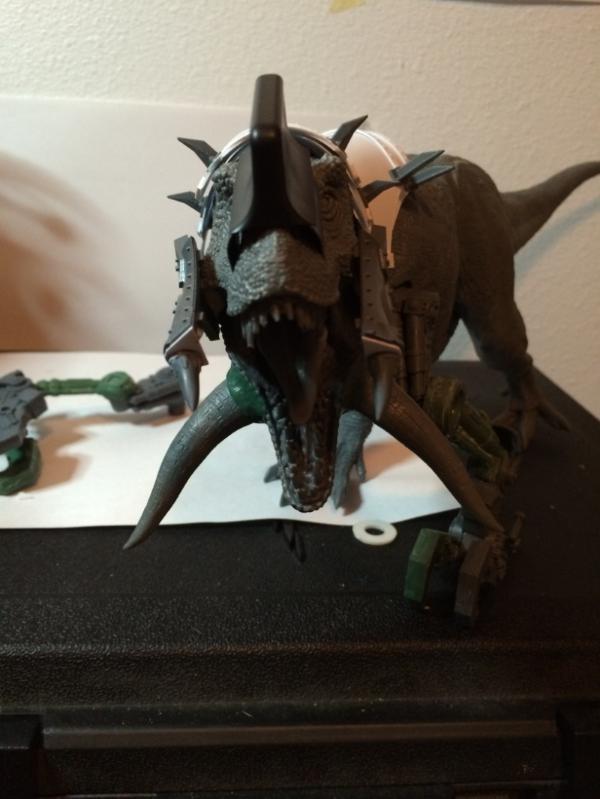
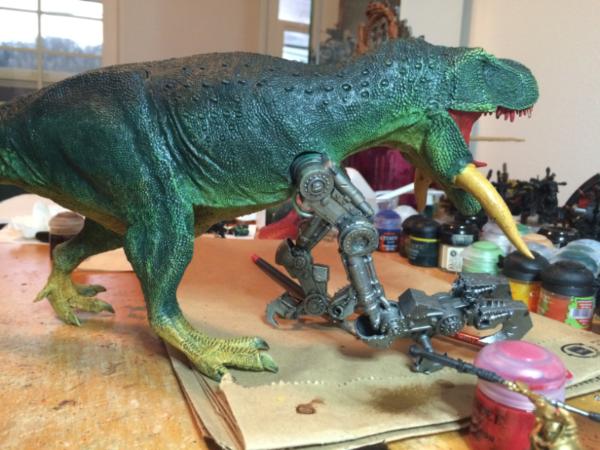
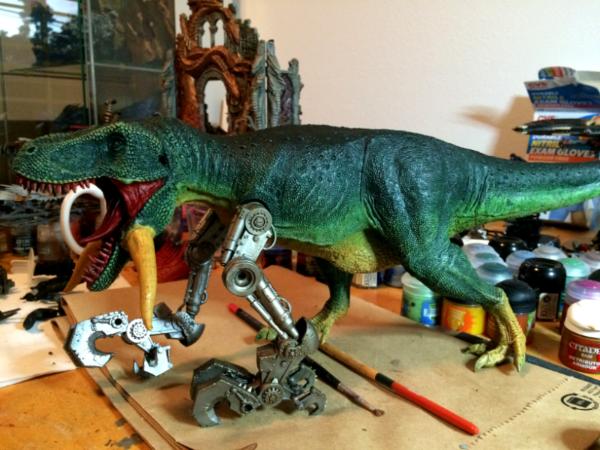
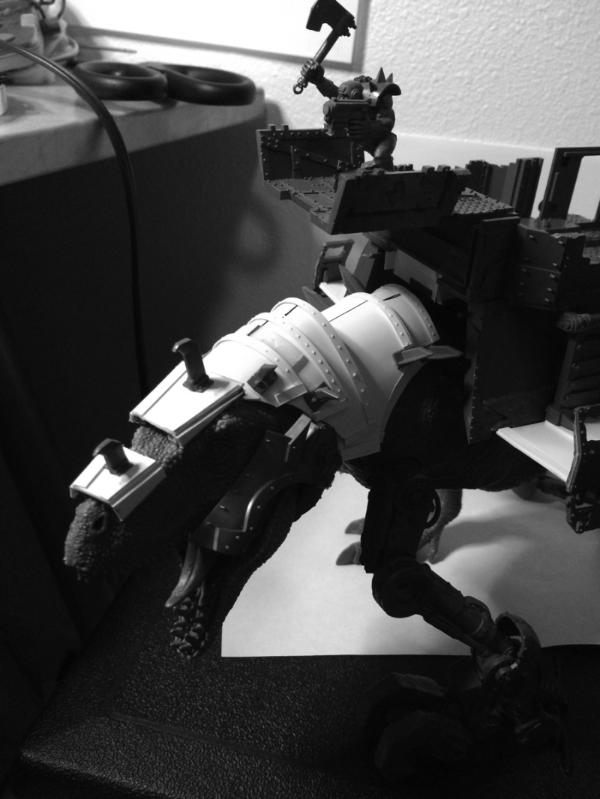
I thought it's about time I make a post dedicated to progress on the Gargantuan Squiggoth that I'm building. As you've seen in earlier posts, my original idea was to mix the bodies/heads of a T-Rex and a Triceratops. However, because (1) the body of the Triceratops is a little bit small and (2) I was afraid of breaking those heavy miniatures, I decided to keep the T-Rex as provided and modify its front legs. I thought I could just make "copies" of the back legs and put them in the front, but playing with Photoshop revealed it was looking awkward. I then followed the advice of Matthew and SilverMK2: making bionic legs.
For that, and because I haven't really any experience with sculpting, I used pieces from the 'Orkanaut box. Here is what I came up with:
And this is the whole beast:
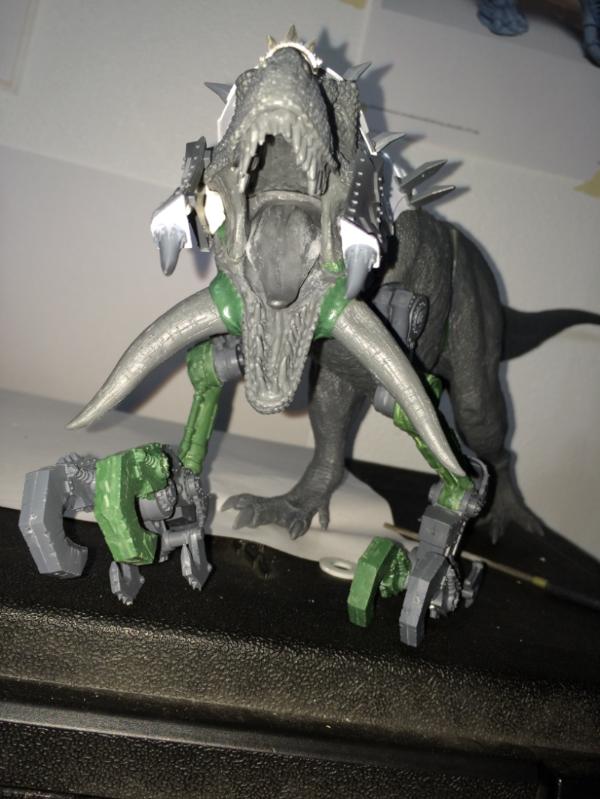
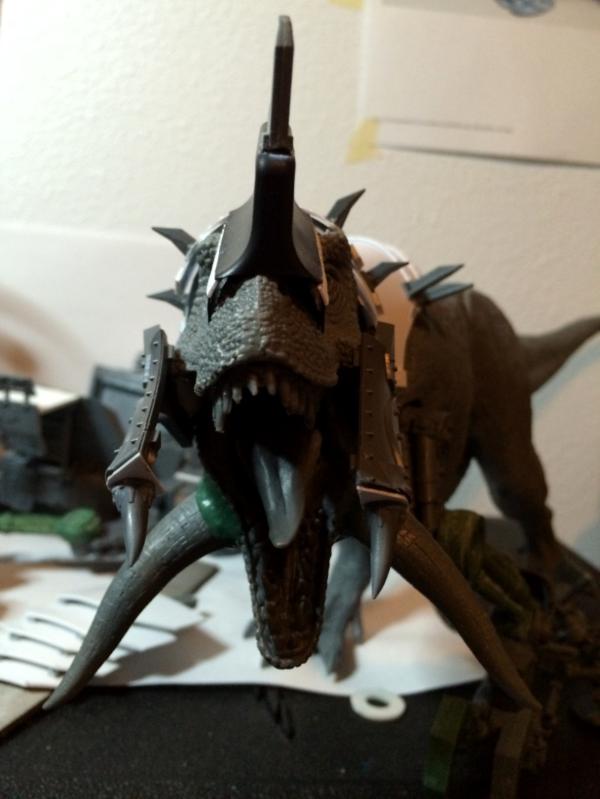
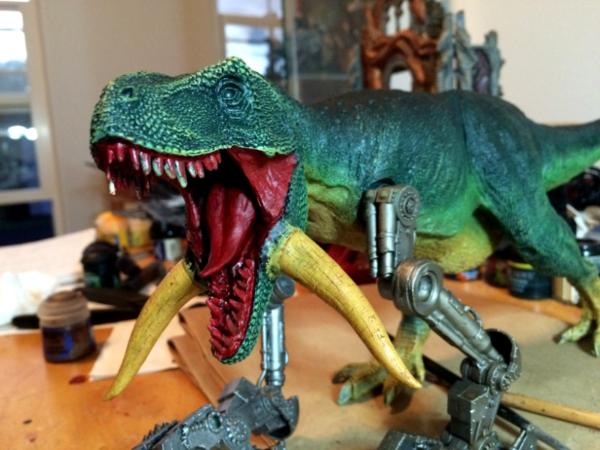
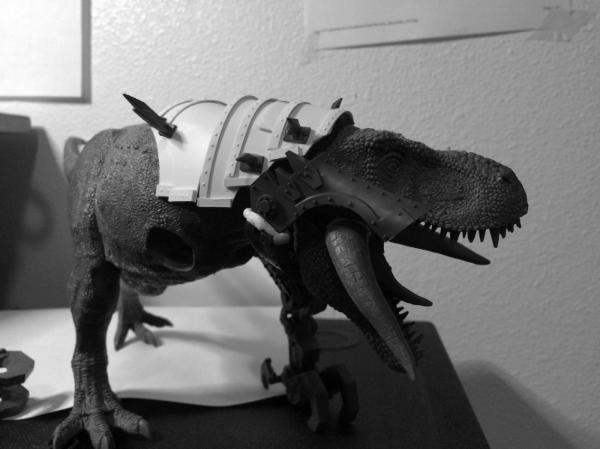
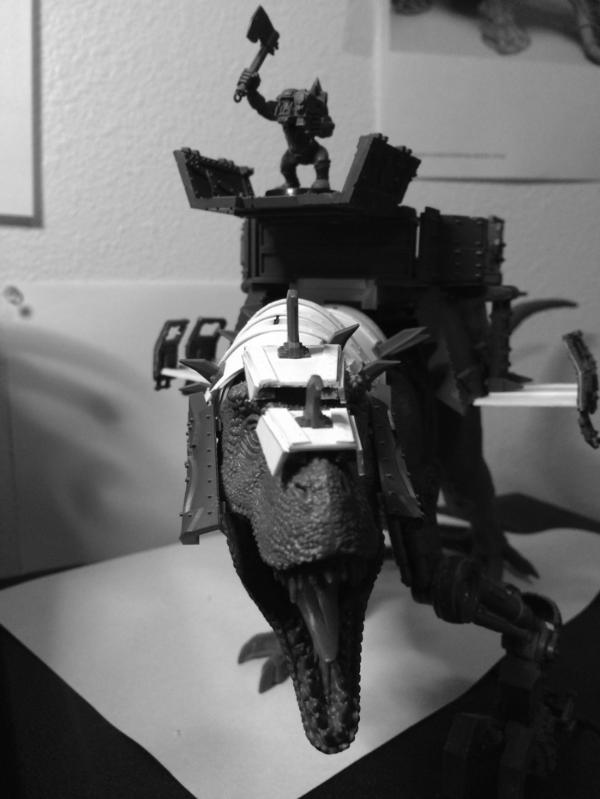
Now, I want to modify the face of the T-Rex so it looks less like the dinosaur and more like a Squiggoth, so I thought about adding a couple of tusks, using the horns from the Triceratops kit. For now, I use some glue pads to hold them in place.
Once this is decided, I guess the body will be done and I'll start working on the armor panels and the howdah.
Please feel free to post comments and advice!
Update March 23rd: Still waiting for some feedback on the tusks: keep them or not? move them or not?
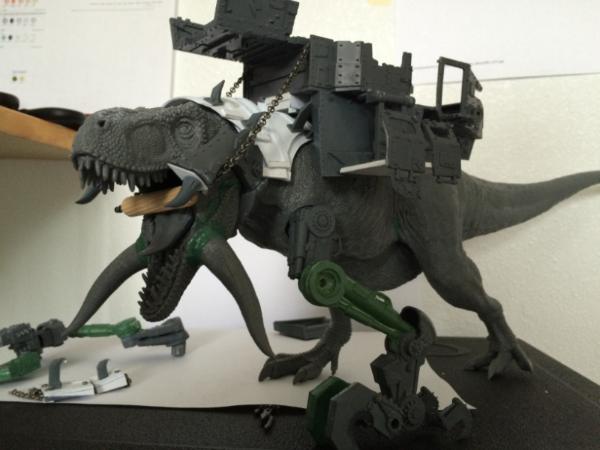
In the meantime I've started working on the howdah, using a Battlewagon kit and a Trukk kit:
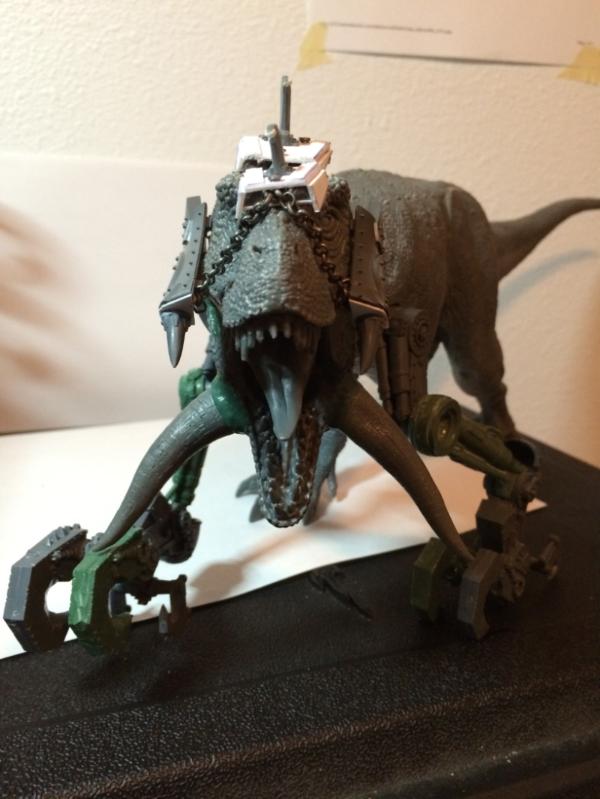
I intend to have a "pilot" at the front, holding two heavy chains that will go through the holes that are usually used for the deffrolla. There will be a big gun a the back. My main concern now is the armor of the beast ... I really have no clue how to work on it: plasticard? Do you think that will look orky enough?
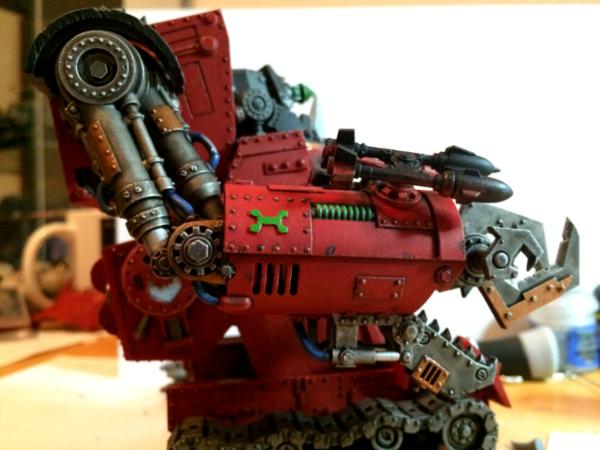
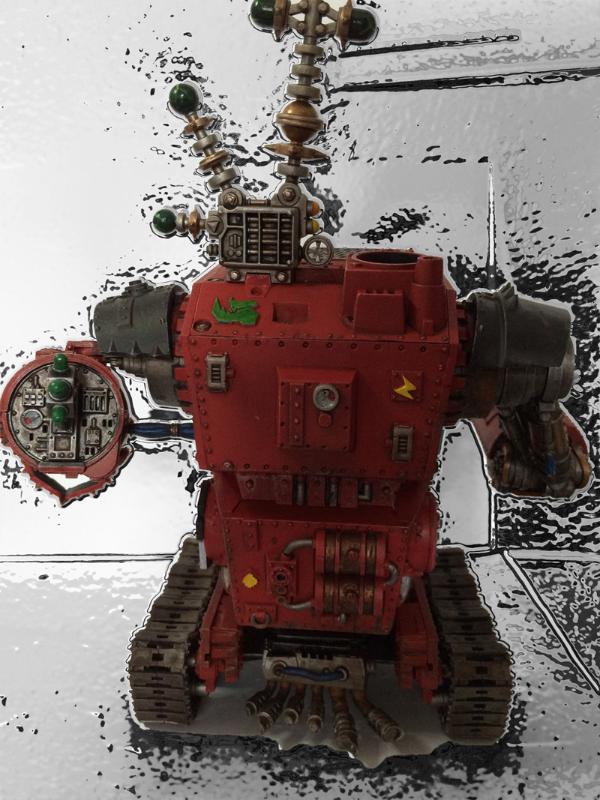
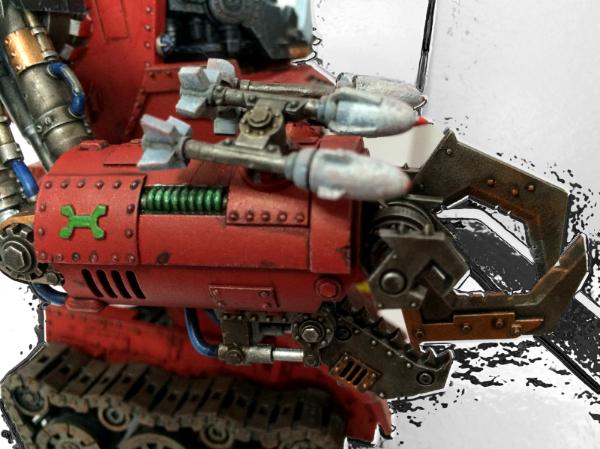
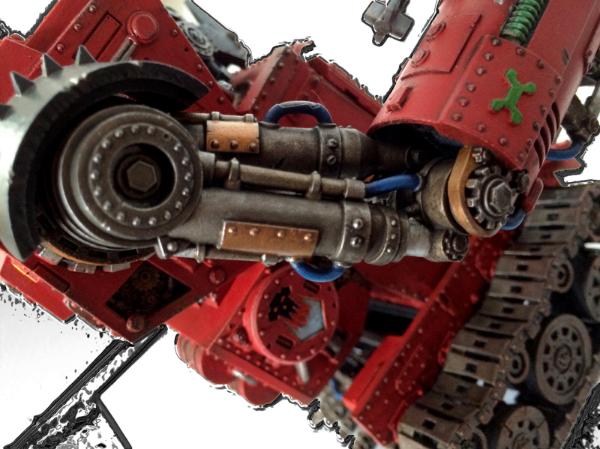
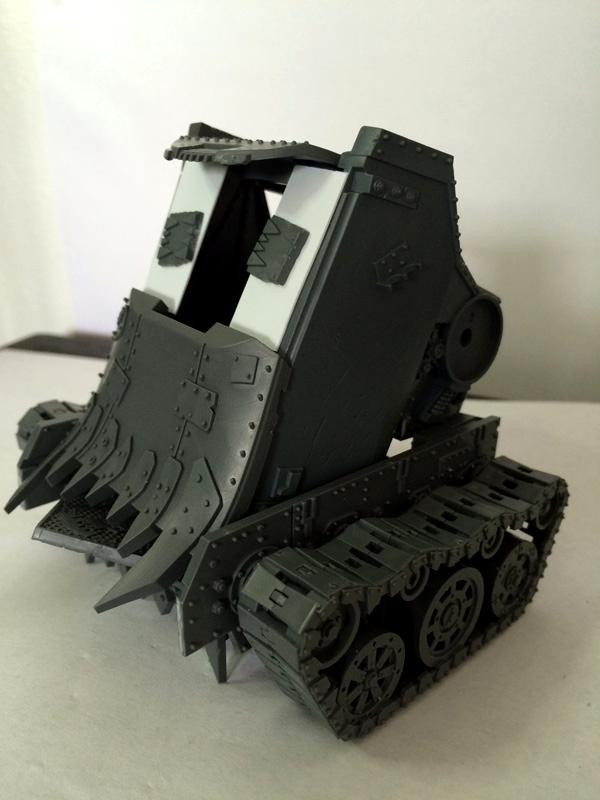
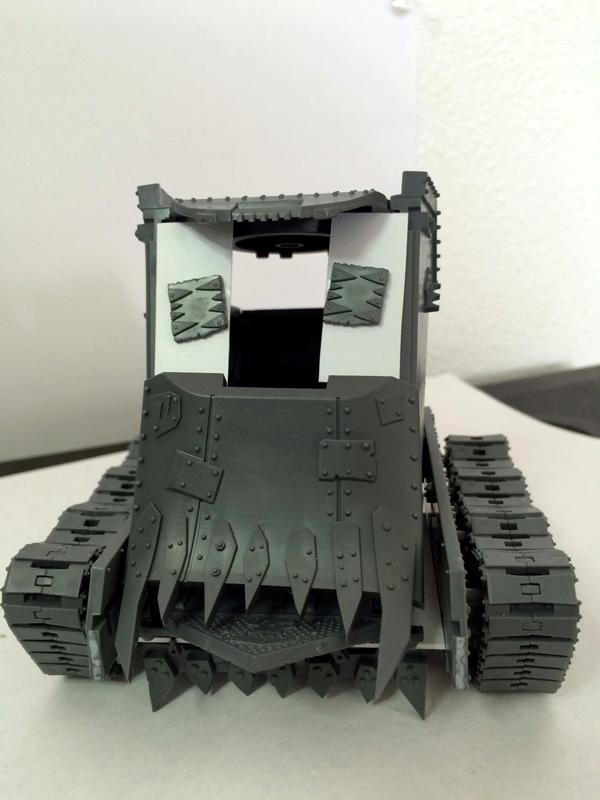
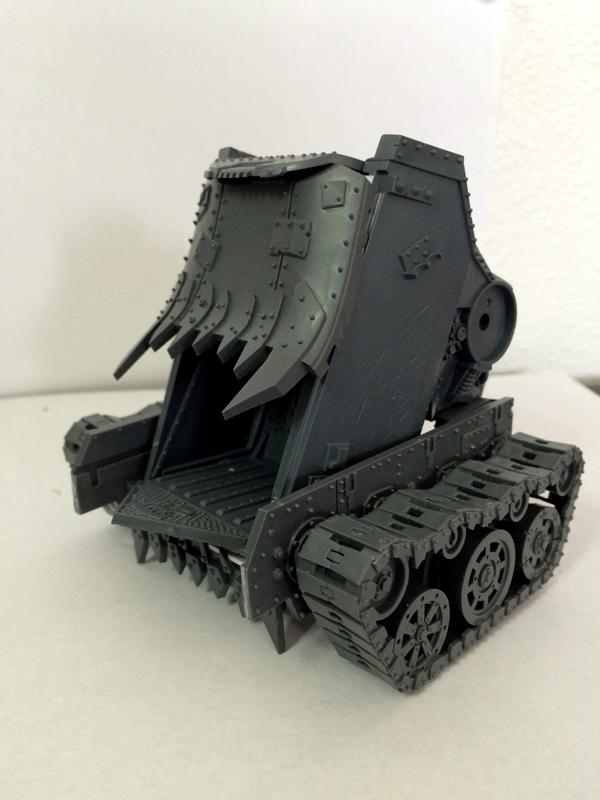
I have a couple of G/M'Orkanaut to build, and since I used some legs for the Gargantuan Squiggoth, I had to find an alternative for one of them. Since I used most of a Battlewagon kit for the howdah of the Squiggoth, I had the tracks left ... putting 2 and 2 together, I got this:
Not sure it appears clearly on the images, but the front "door" slides up/down. Of course, you have to imagine with the head and the arms, but I wanted to glue them only after I paint them
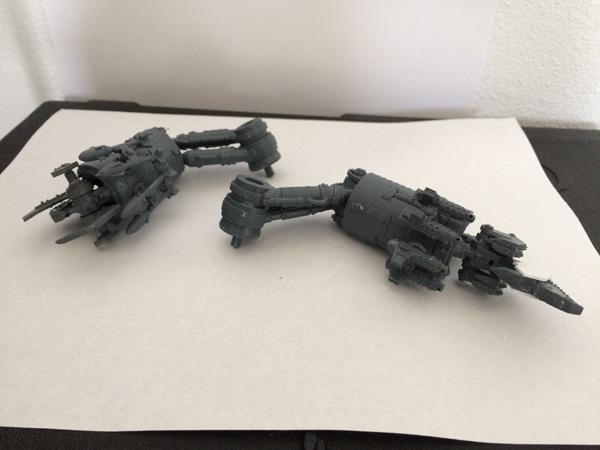
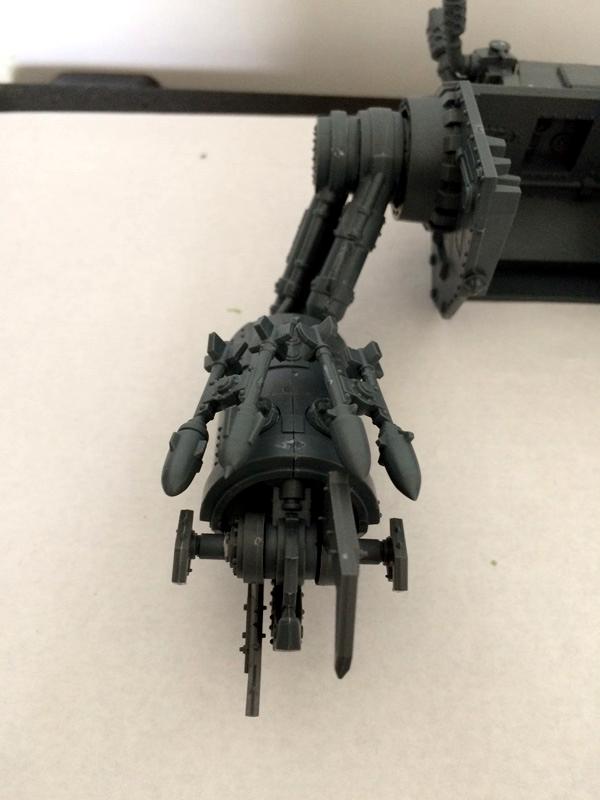
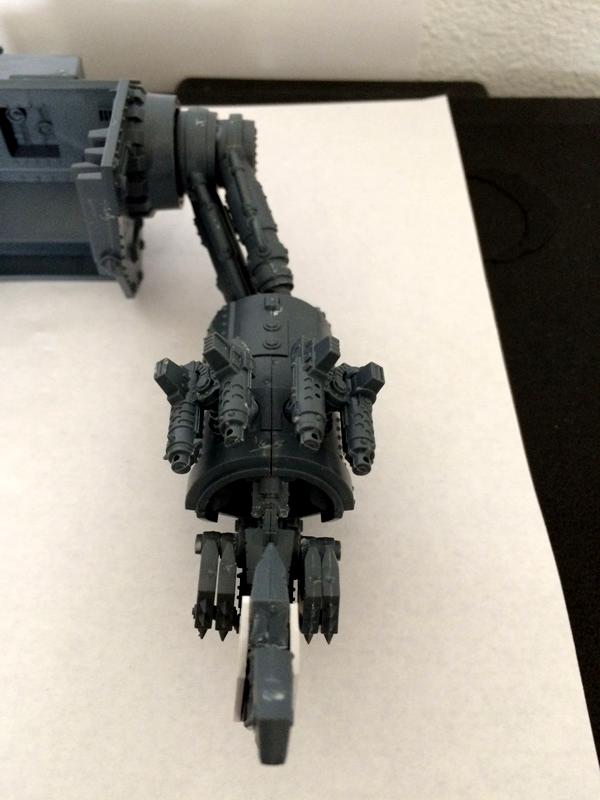
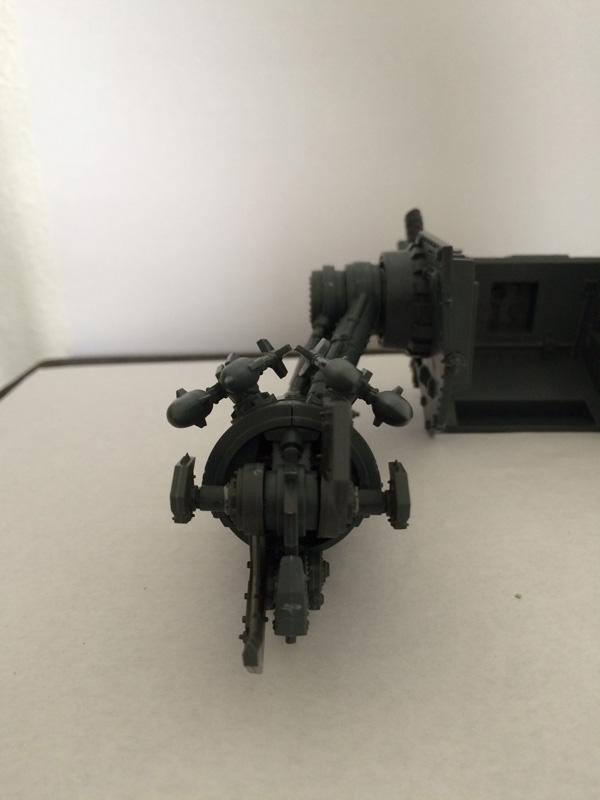
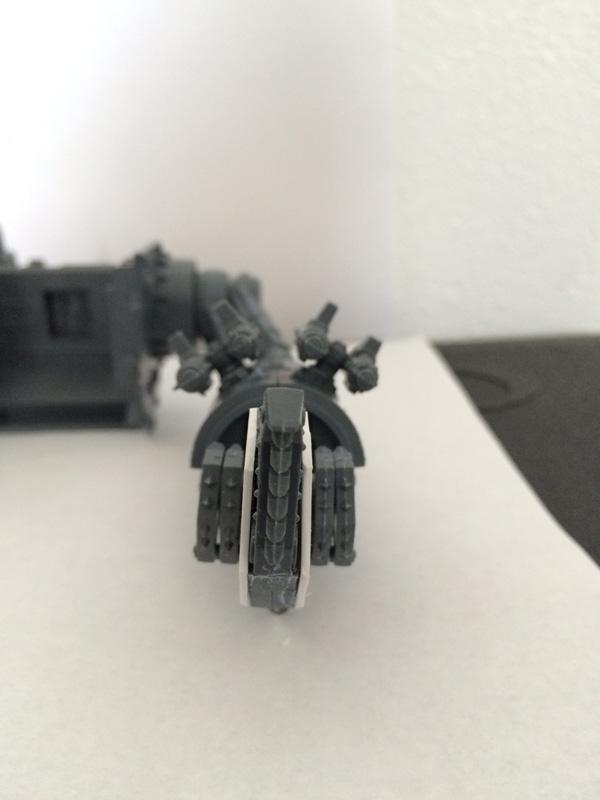
Talking about arms, here are the claws of Mork and Gork:
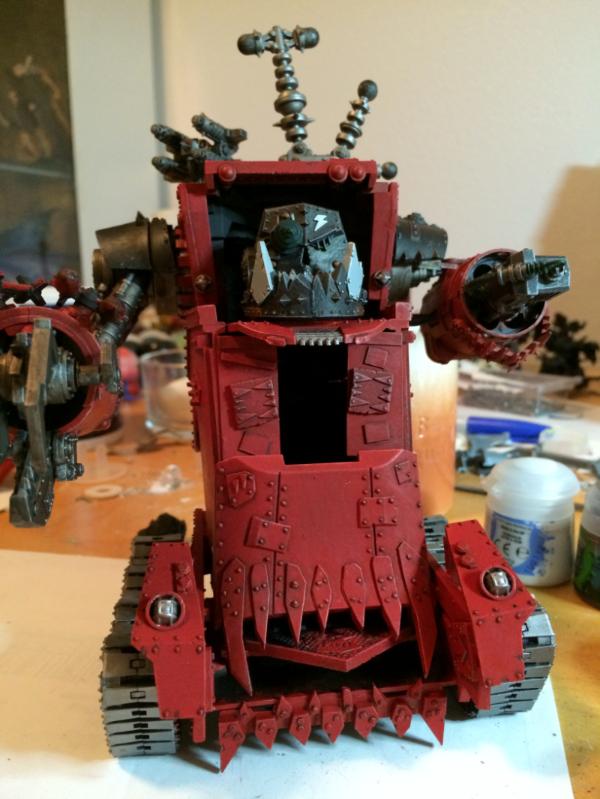
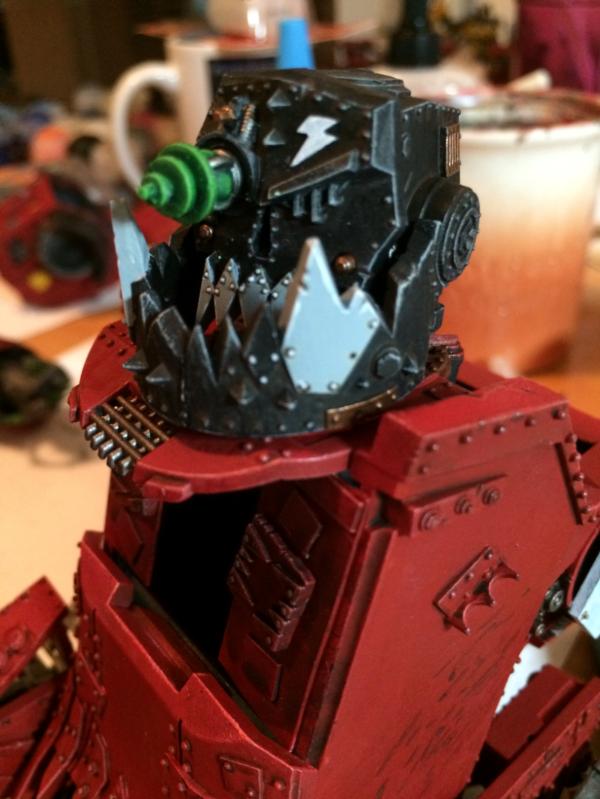
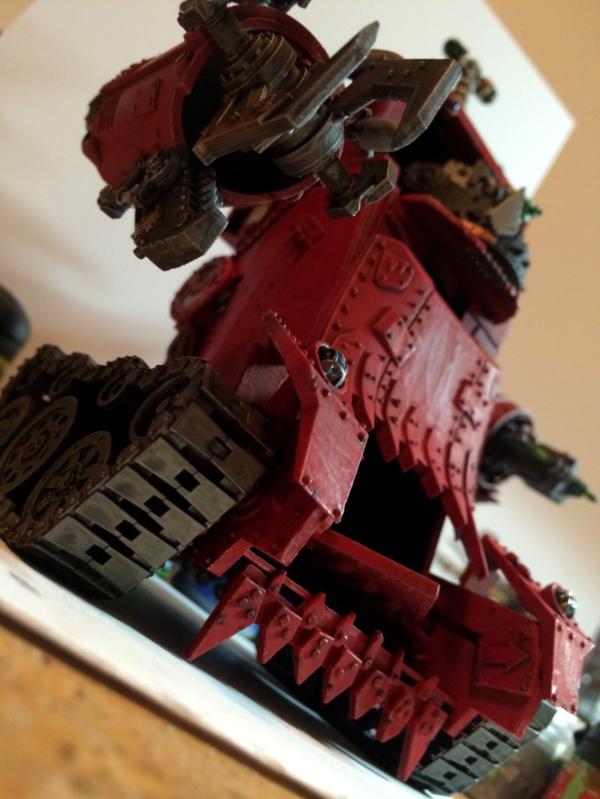
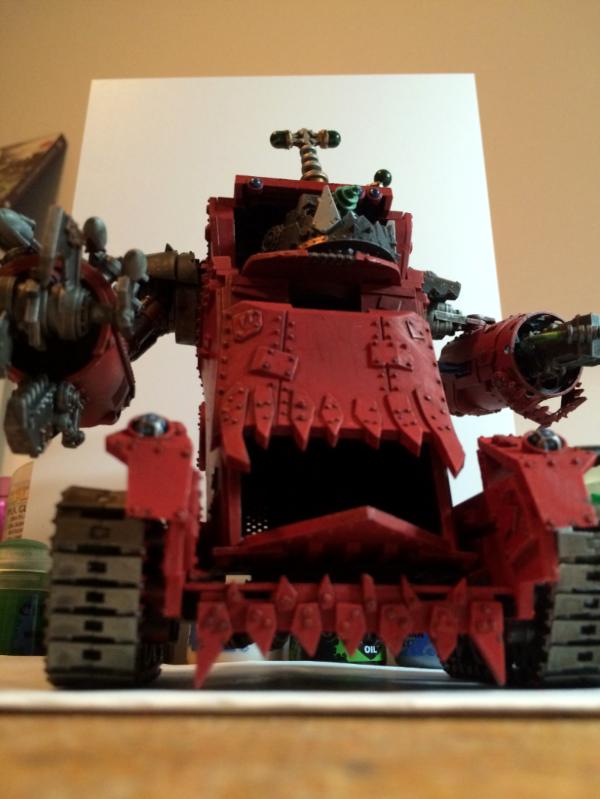
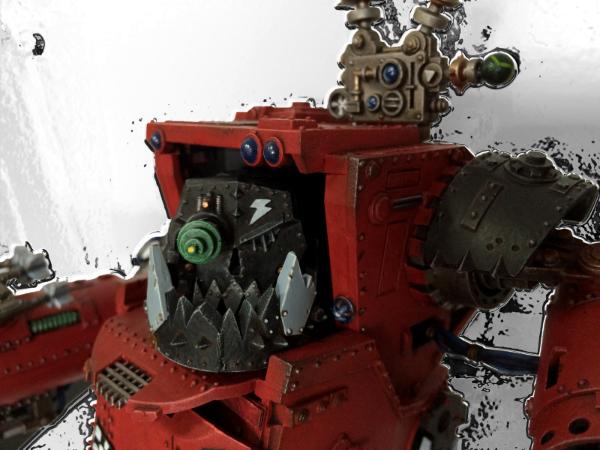
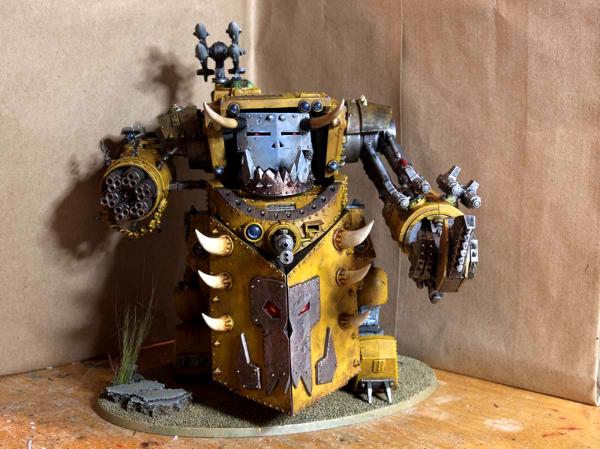
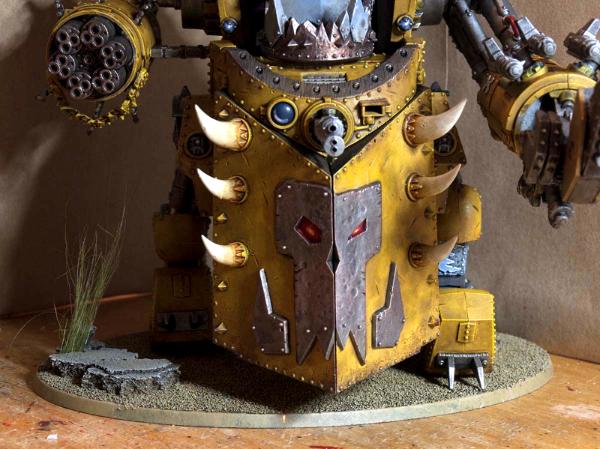
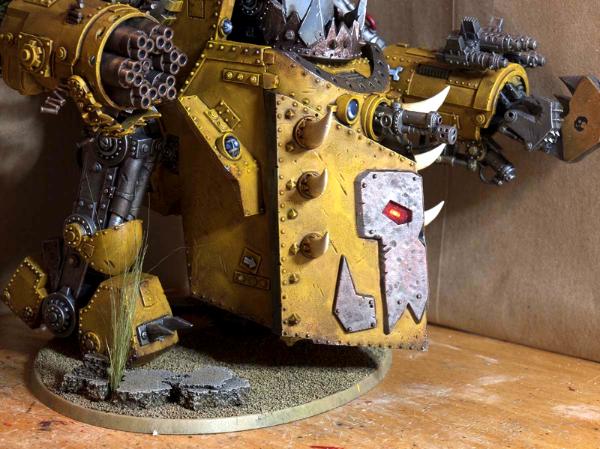
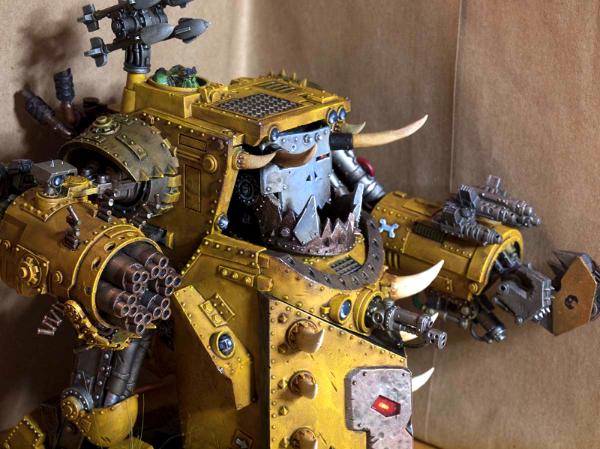
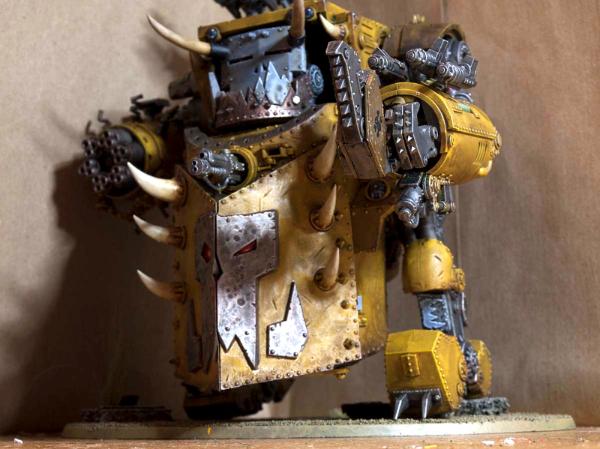
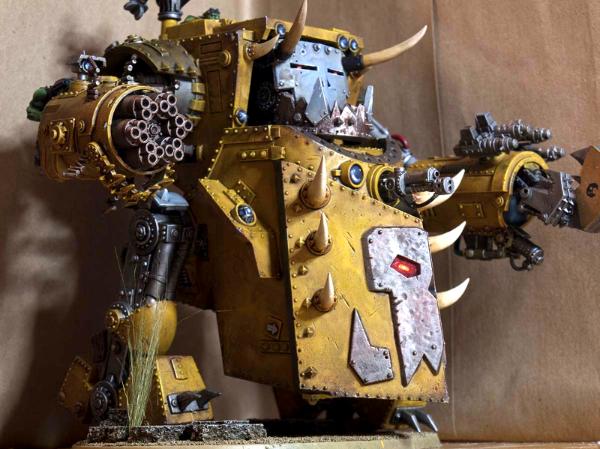
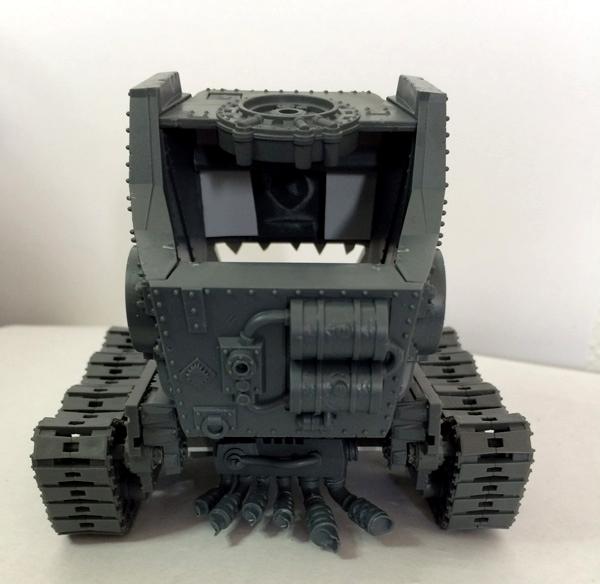
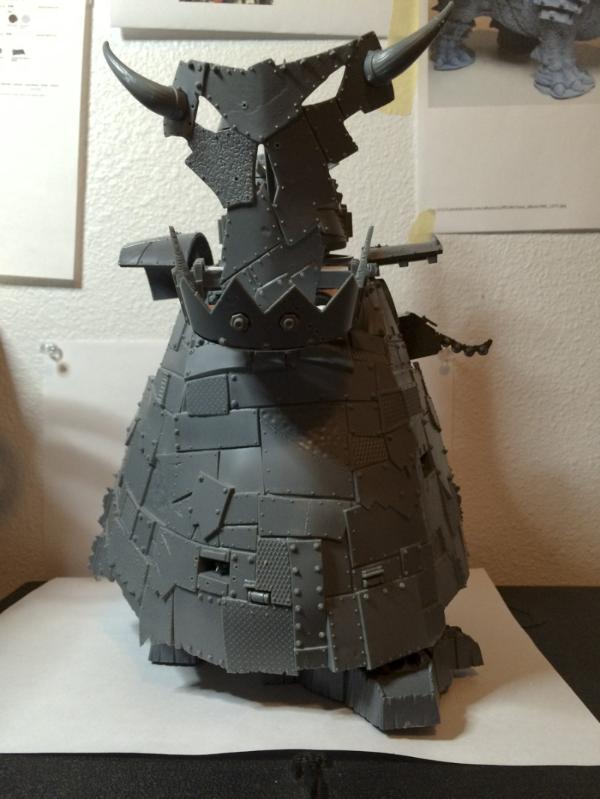
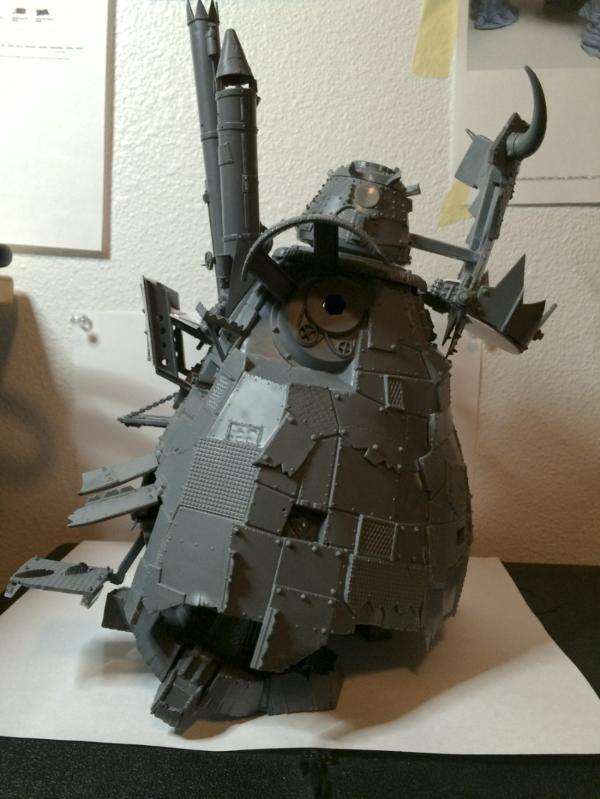
The latest piece in my collection is an Ork Stompa!
I've always wanted one, as I really think it exemplifies the Ork culture: a massive structure of metallic panels arranged together to look like some colossal Ork, with a giant gatlin mounted by another enormous gun and multiple rokkit on one side, and a giant choppa/chainsword on the other side, all of this with a giant belly that can contain up to 20 furious Orks!
The kit has so many options and glyphs and goblins to make the Stompa unique, I'm very happy I spent that much $ on it!
Now, I have a couple of critics:
1) the head is definitely too small
2) there should be an access point at the back of the Stompa, but there's only a very tiny door on the kit
Therefore, I decided to:
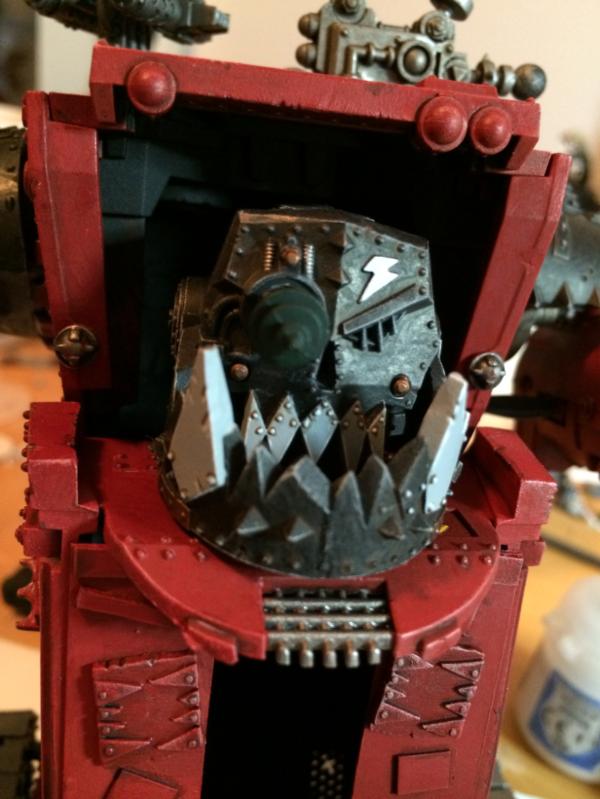
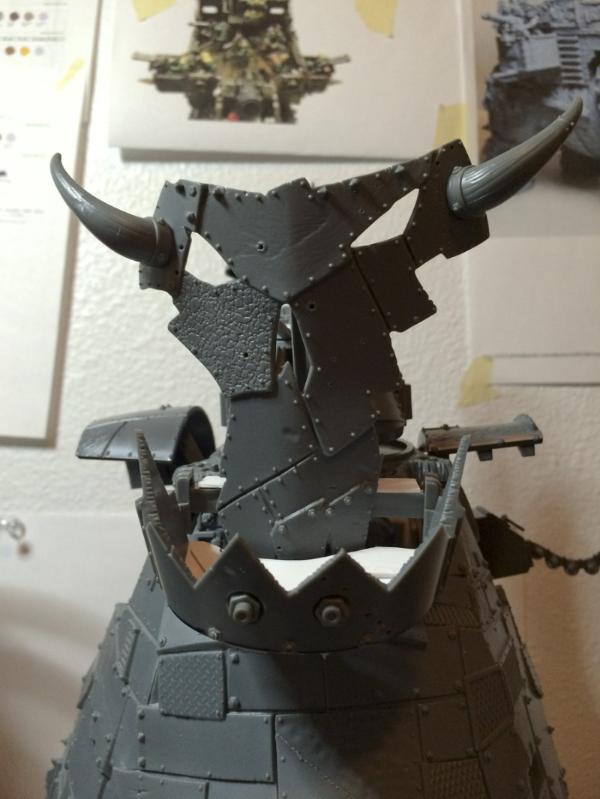
1) use the big ork face panel that can be put on the Stompa's belly as its head
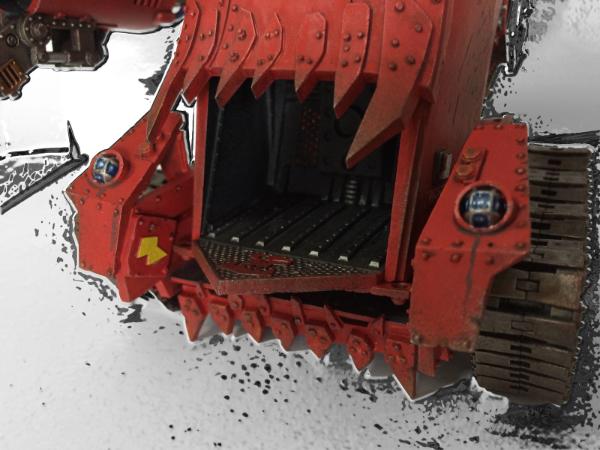
2) make a larger opening at the back of the Stompa by shifting the base about half an inch lower in the back
Easier to explain with pictures:
This is the head:
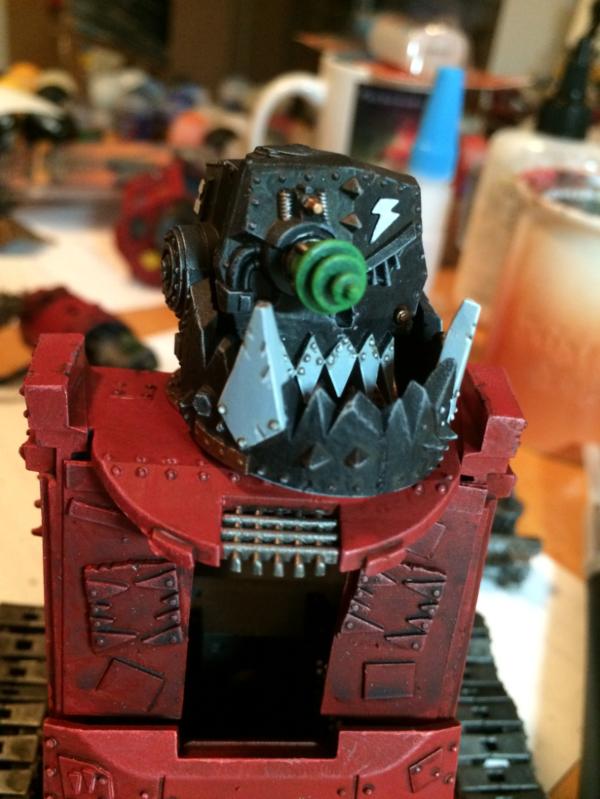
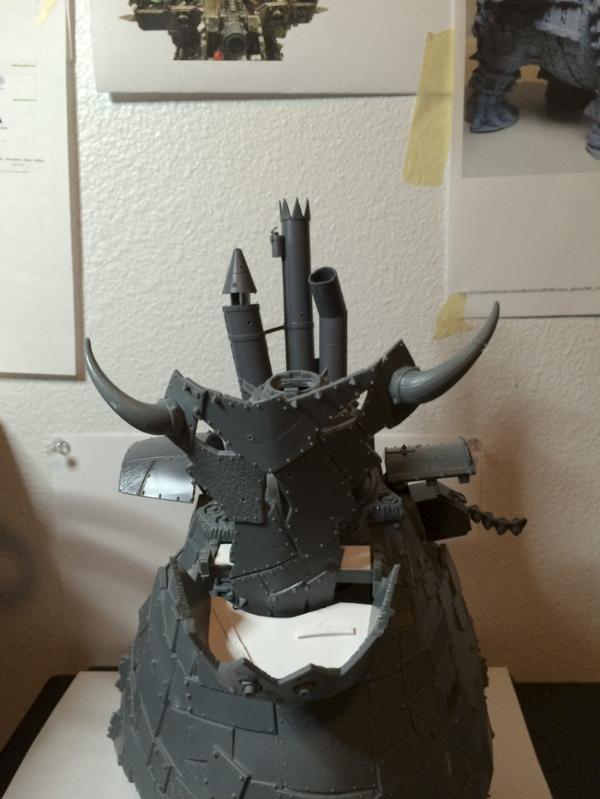
This is a view of the profile, so you can see how the head is mounted, as well as the back door:
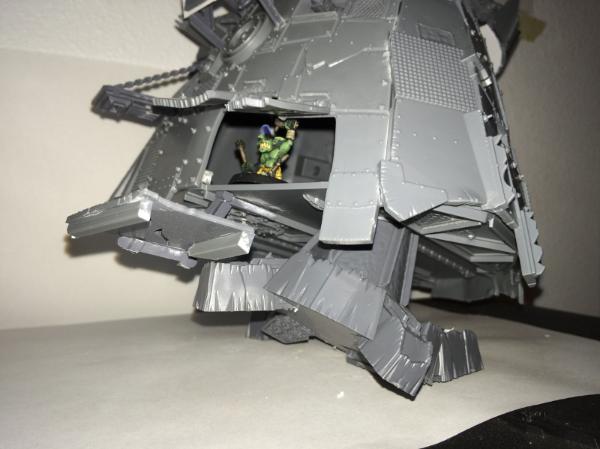
This is a zoom on the exit doors:
A goblin can fit perfectly in the door but an Ork could fit too, if I remove the base.
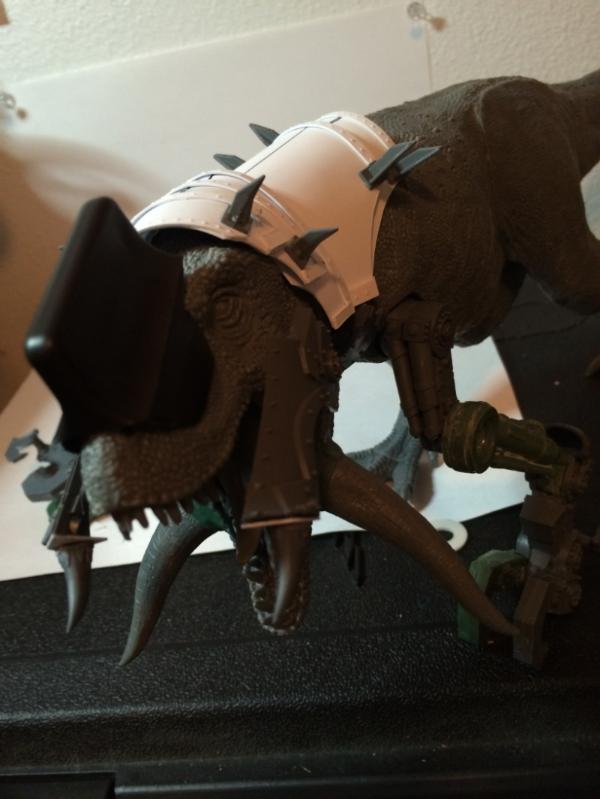
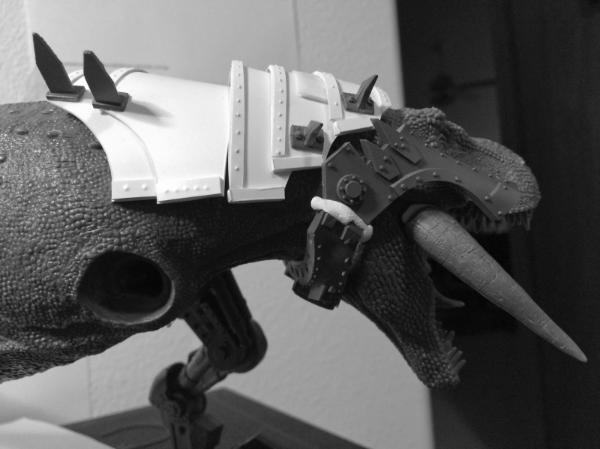
Progress on the armor plates, especially around the neck of the beast
I got my inspiration from the official squiggoth for these plates, and use thin plasticard to be able to give them the proper shape:
As you can see, I also added some large armor panels on the side of the howdah, using the front door of the Orkanaut kit, and I changed the orientation of the howdah (back & front).
I then added details to the panels, to make them look more orky:
The 3 panels at the front of the neck are glued together, and the 2 at the base of the neck too, but I haven't glued them all together yet. In fact, I first want to have the whole face done, and I'm still not decided on the tusks. So here is a little test I made, without the howdah:
I used pieces from a BattleWagon and an Orkanaut there.
Those are very easy to do, though they don't look as neat as what others may do.
I use 0.02" or 0.04" thick plasticard and a pushpin I basically use the pushpin to almost pierce the plasticard, while avoiding to do so. This will create "bumps" on the other side. In fact, piercing the plasticard just slightly may end up give a better effect when I'll drybrush them.
I did not invent that technique, but found it somewhere else on dakka ... someone was using nails instead of pushpin, though he/she was using the head, not the pointed tip, to avoid piercing the plasticard
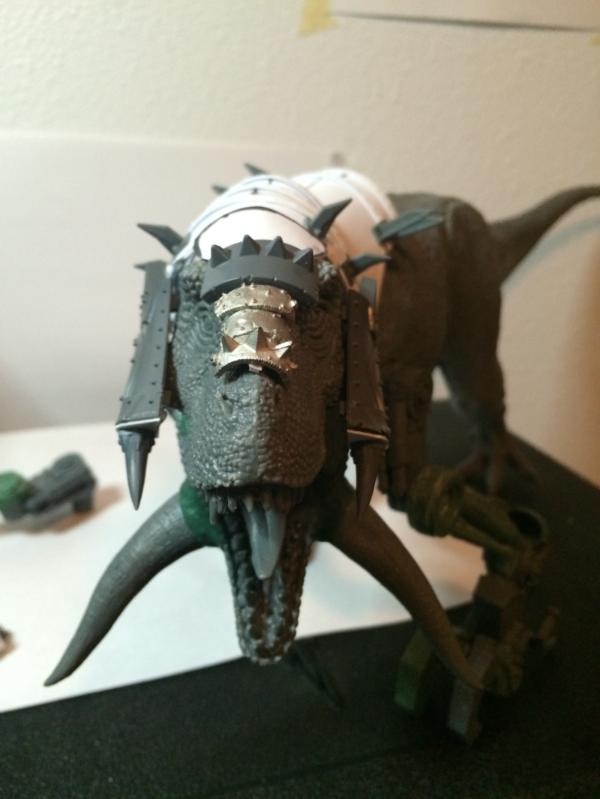
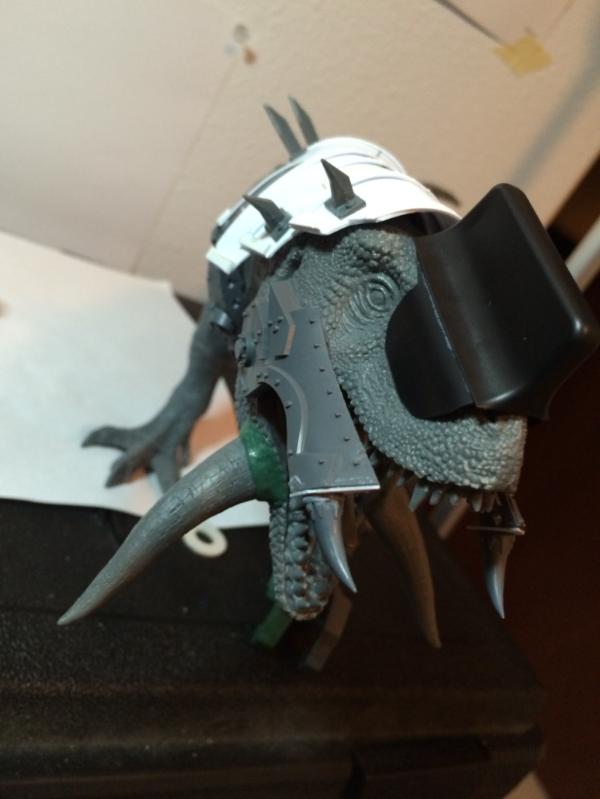
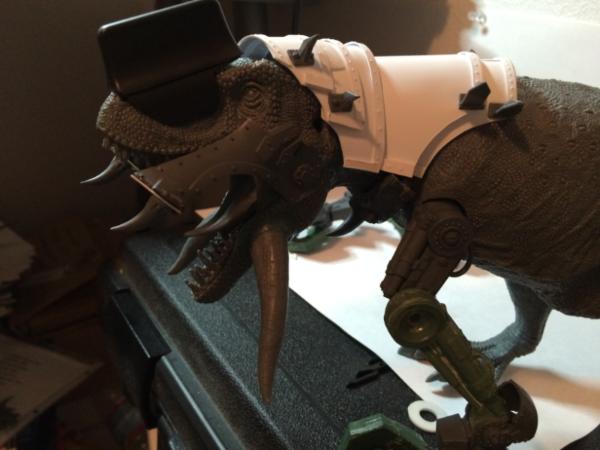
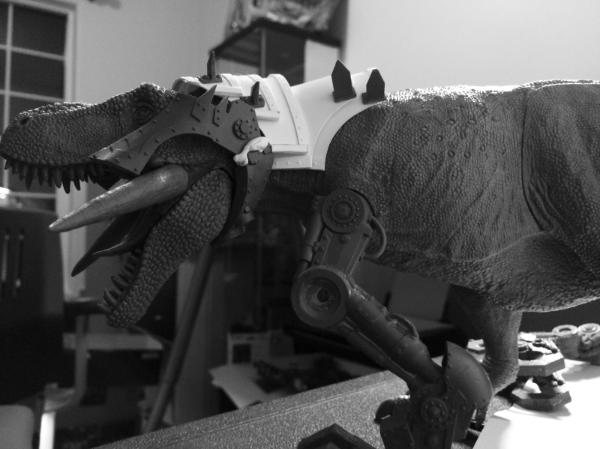
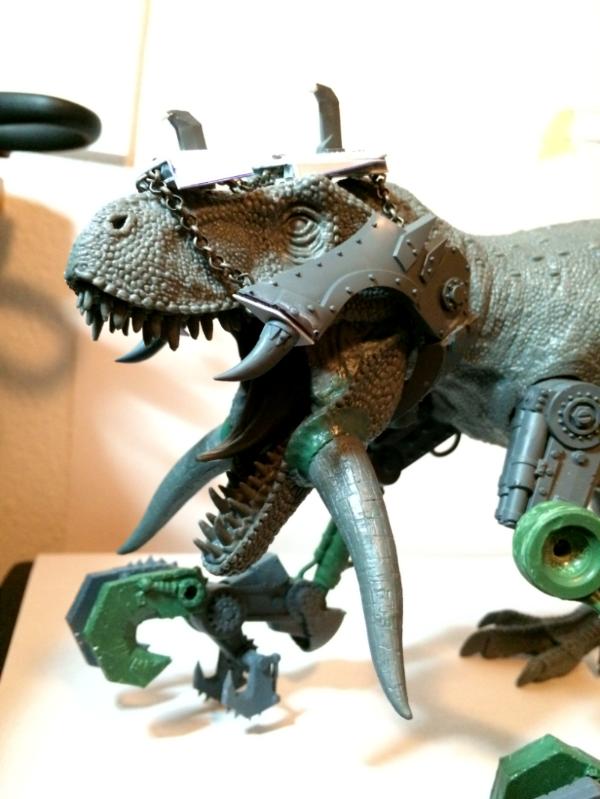
More progress on the armor plates on the face!
Got some metal chains from the local craft store, attached them on one panel with a nail, and connect them to another panel with a small magnet.
This way, I can easily remove the armor, paint the beast and the plates separately, and then put everything back together.
Also, I fixed the tusks with some green stuff ... did not do any sculpting besides making sure it was a smooth transition to the skin of the beast.
Here are some pictures:
I'm not entirely satisfied with the top panels, as they still look very flat.
What do you guys think?
Thanks for the comment on the tusks too, I wanted to do something like that, using the picture from the official garg. Squiggoth.
I'll see what I can do with some GS.
Yeah, I used .04 for those, but I also have .02, which is way more flexible.
However, my issue is more a question of design.
I'm even wondering if I should not remove those two small panels above the nose and just put some chains instead.
I need to search for some inspirations on google/image
You could take them away, but the horns directly on skin with some green stuff wound edging around them and the chains attached to the horns. I do like the panels though - they are reminiscent of the armour worn by Knights horses back in the day, but they would need to be less rigid and more like the shape of the armour you have around he base of the jaw
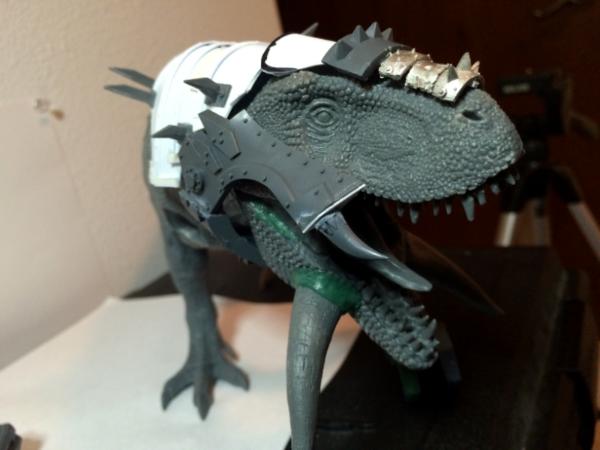
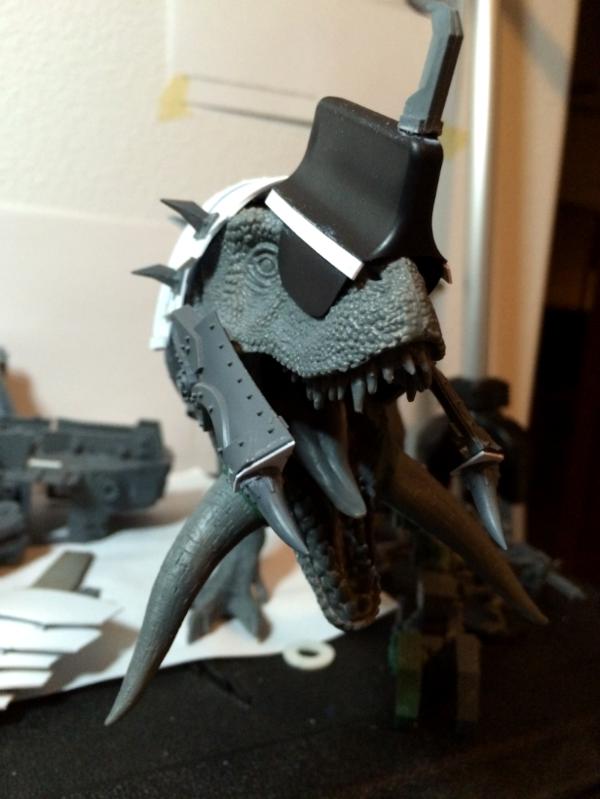
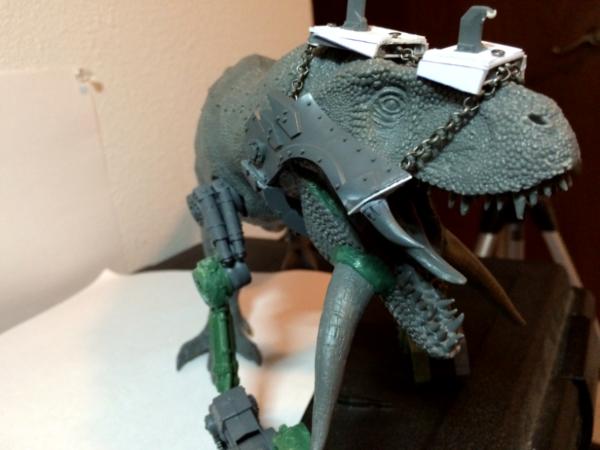
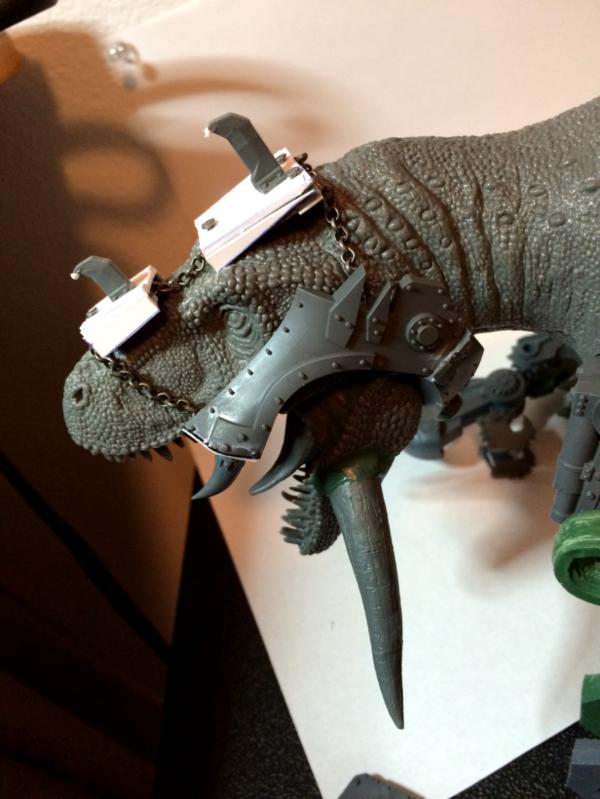
Quick update on the armor panels for the head of the beast, following your comments and advice!
I looked in my bitz box and found some piece that could serve to make a better protection on the top of the squiggoth face: shoulder pads for boyz and armor panels for the Gorkanaut
Here is what I came up with:
I have to put back the chains and add rivets to the large panel of plasticard, but I think I like that design much more than the previous one.
Those rounded bits look great. I wonder if you might want to add plates that extend from the sides to form metal fangs? Maybe they could be endcaps for a massive bit for controlling the beast (like the bit in a horse's mouth)?
Warboss_Waaazag wrote: Those rounded bits look great. I wonder if you might want to add plates that extend from the sides to form metal fangs?
Not sure I see what you mean ... I already have some sort of fangs on the side of the mouth, glued on the panels that are just below the eyes.
Warboss_Waaazag wrote: Maybe they could be endcaps for a massive bit for controlling the beast (like the bit in a horse's mouth)?
OOooooooh I love that idea!!!!
I though about having chains connected to the jaws' armor ... but this is so much better!
I could put a big rod (it's called a "snaffle" apparently) in the mouth of the beast instead
Jehan-reznor: oh yeah, I shall put a SM somewhere in that jaw!!!
Matthew: more dakka, yes, that will be on the howdah
This is my first real made-it-yourself kind of miniature, so It takes time to get all parts done properly.
I've been working on the armor panels for the back legs tonight, but haven't finished yet.
I have to find a way to make the howdah stable without fixing it to the body. I want to be able to paint the squiggoth by itself first, then the howdah/armor. So far, it's staying on the back without falling most of the time, but I need to think about an easy solution quickly.
I could simply pierce a hole on the back of the squiggoth to insert a screw/nail/magnet for instance.
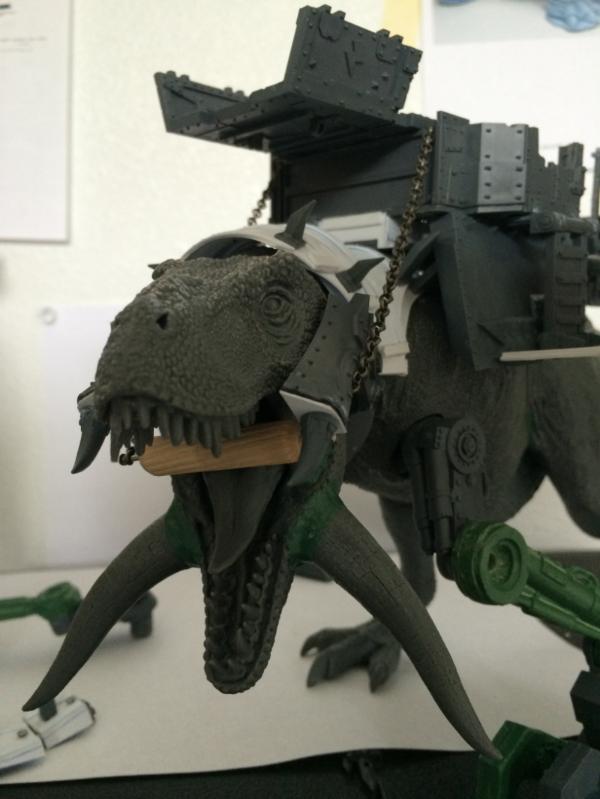
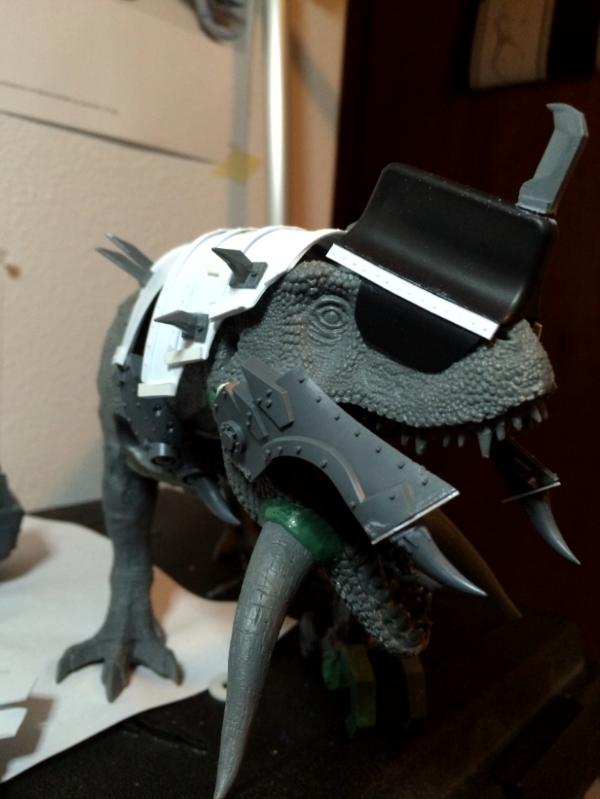
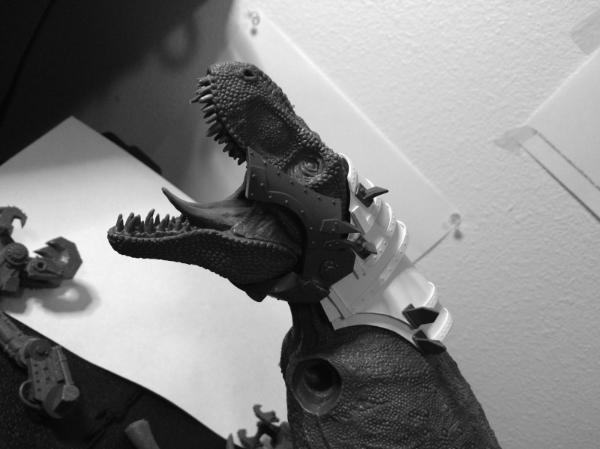
Hi there, quick update on the Squiggoth ... I was not 100% satisfied with the armor on the head, so I decided to rethink the whole thing.
I could not find a nice piece of armor for above the nose, and did not really like the one I made a few days ago.
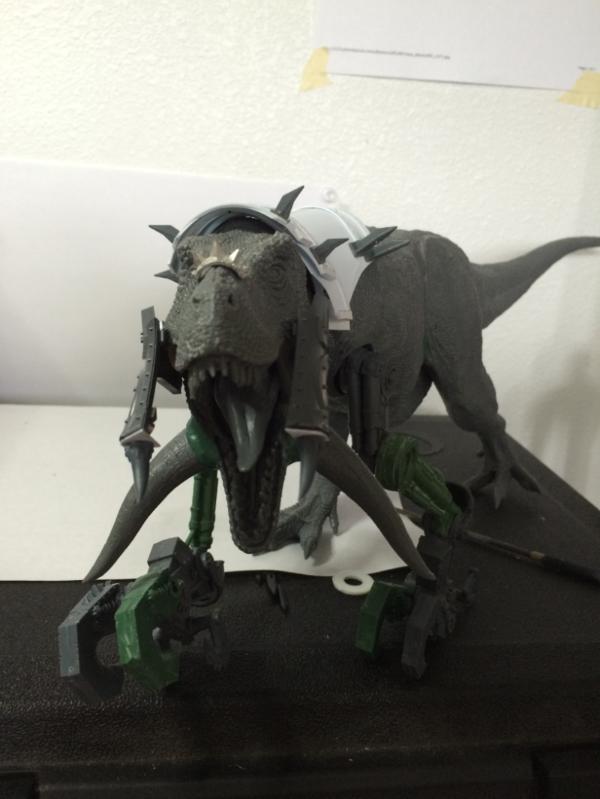
The piece that I put around the neck was removed, and put another way, which I kind of like, but I'd like to have your feedback on it:
What do you guys think?
Automatically Appended Next Post: What about this solution:
Do you like this better?
Automatically Appended Next Post: Last try for tonight:
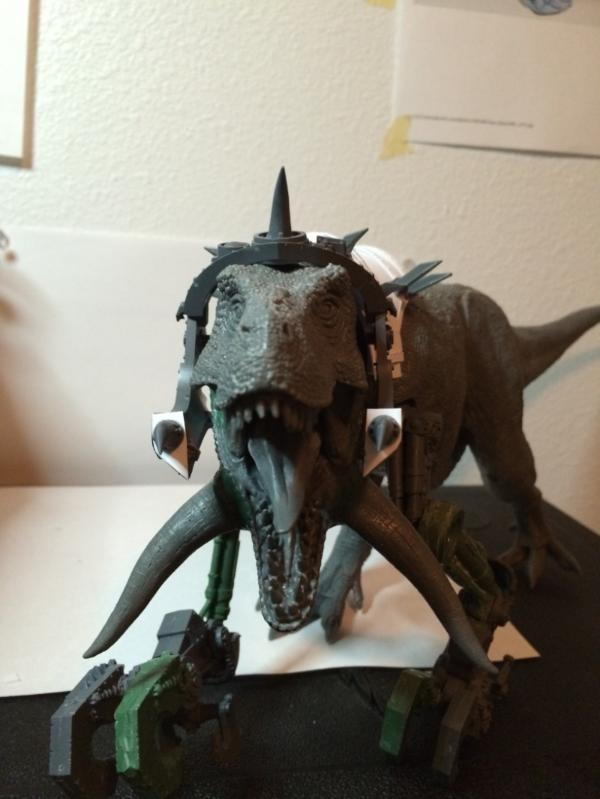
So, which one do you prefer?
(1) the one with the horn above the eyes,
(2) the simple one with almost nothing on top of the head
(3) the last one with the crest
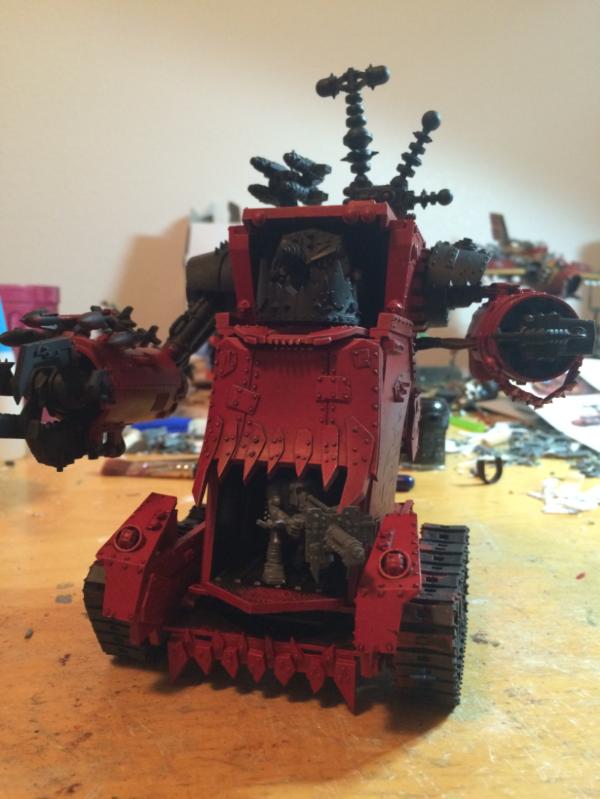
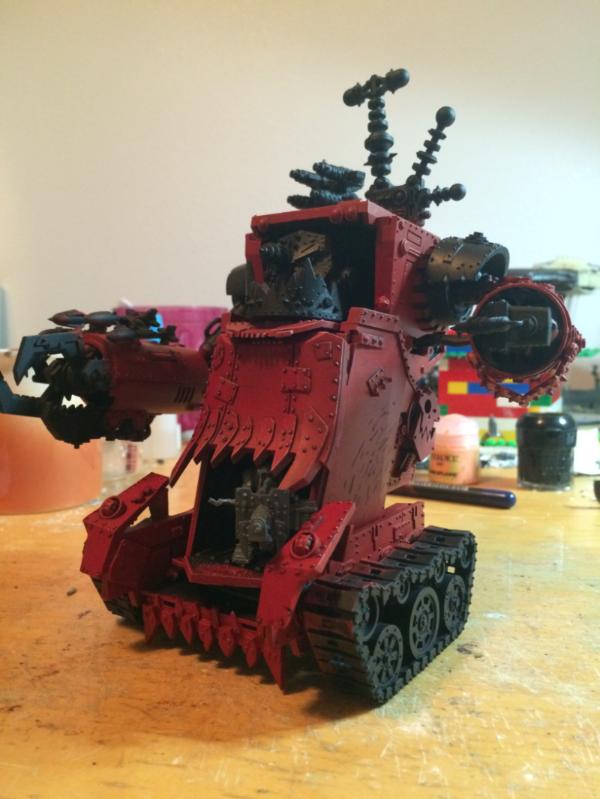
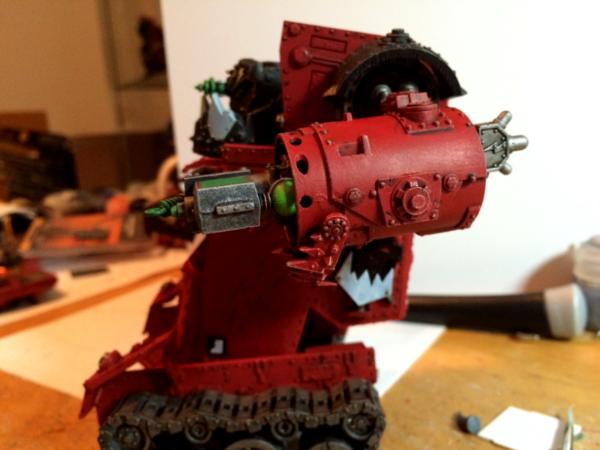
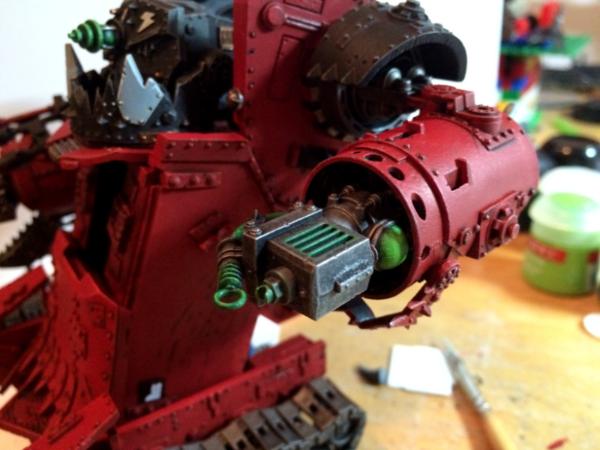
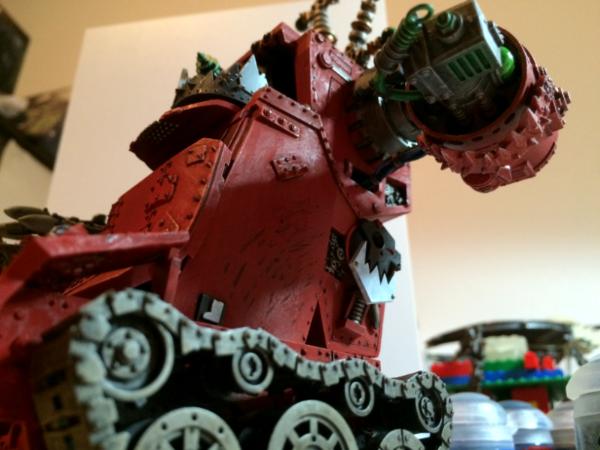
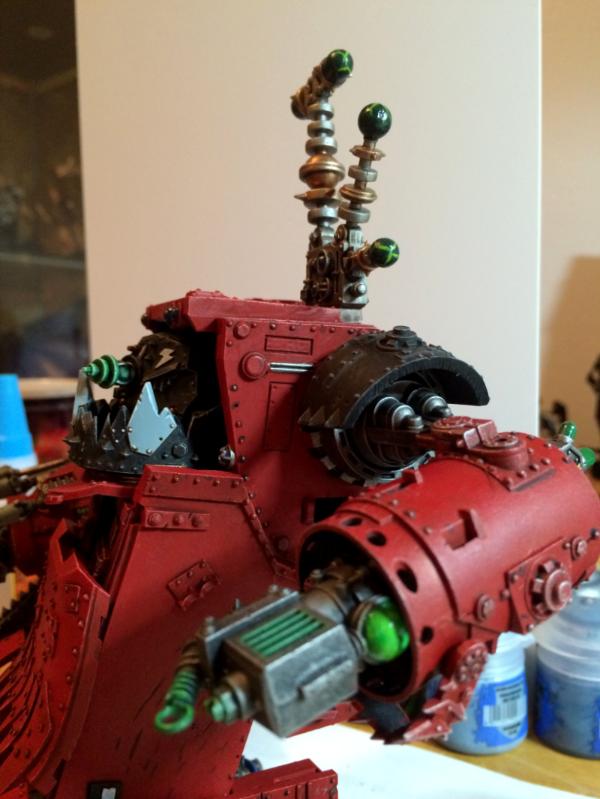
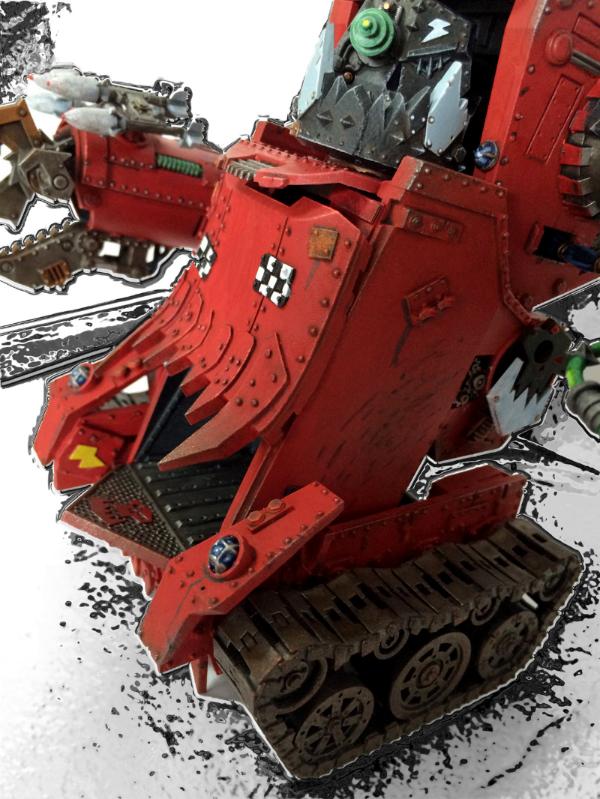
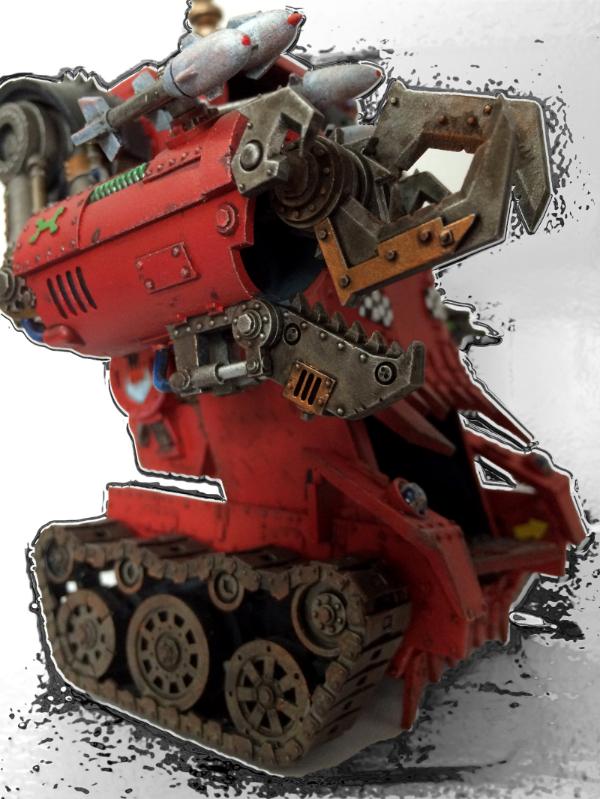
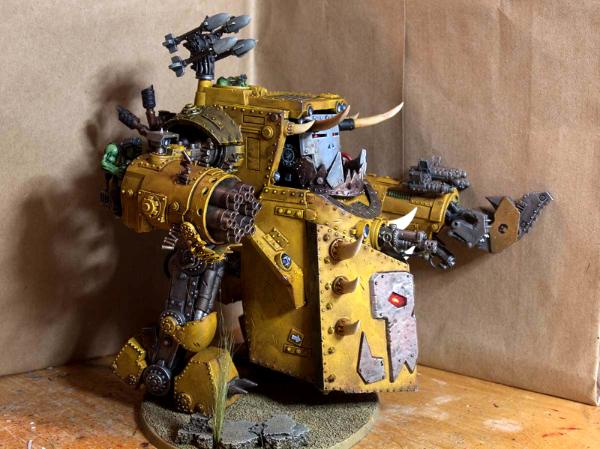
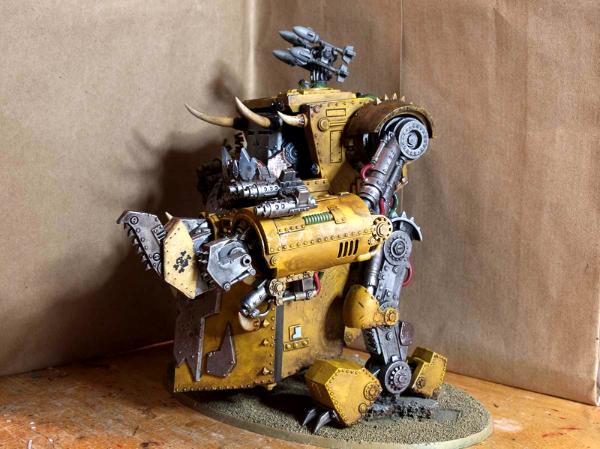
I made some progress on the Gargantuan Squiggoth, but the topic of this post is my converted Morkanaut. I used most of the legs for the Squiggoth so I had to find another option for the bottom part of the Morkanaut. I decided to use the tank tracks from a Battlewagon kit. Original pictures during building are posted here.
I've now finished all the building part and started painting it!
I've basecoated most armor panels in red, then shaded all those rivets and damages with Agrax Earthshade, and I started the highlight with Kindleflame.
Love the Morkanaut with tracks, I just assumed it was meant to have tracks after seeing your pics, then read your post and browsed online for the real deal - I think your's is better!
Your sguiggoth looks odd with the black crest and too bare with the small spike at the front. That said, I think the spike in the first picture looks out of place. It may be because it's too close to other spikes. You could try just having the collar from the first picture minus the spike and try one on the snout instead. Or just have a small section of battle-damage to the side of the snout where skin has been burnt/torn away and a sheet of steel is visible beneath??
TP^DC Deputy Manager wrote: Love the Morkanaut with tracks, I just assumed it was meant to have tracks after seeing your pics, then read your post and browsed online for the real deal - I think your's is better!
Your sguiggoth looks odd with the black crest and too bare with the small spike at the front. That said, I think the spike in the first picture looks out of place. It may be because it's too close to other spikes. You could try just having the collar from the first picture minus the spike and try one on the snout instead. Or just have a small section of battle-damage to the side of the snout where skin has been burnt/torn away and a sheet of steel is visible beneath??
Sorry if that's not helpful
Thanks a lot Deputy!
I was really happy when I first put those tracks under the Morkanaut, but then had to figure out how to open the front door. It took some high level engineering (at least from an Ork point of view) to find a solution
For the squiggoth, I agree that the bare crest was not a nice solution as is, but it was still my preferred solution, so I went on with it and added some rivets and a blade on top:
Does it look better that way?
I like your idea though about battle damage and skin being burnt!
I'll keep that in mind for when I'm decided with the armor design.
Matthew wrote:Beautiful! He looks a bit like Optimus Prime!
Thanks Matthew!
I did not have Optimus in mind though
Kustomer D wrote:Dude! This whole project is huge! It makes me feel like... damn it, get your ass up and build something orky - NOW!!!
I cant wait till you finish this giant!!!
Really awesome.
K D
Danke schöne KustomerD!
I realized it does not take much to build orky stuff: some platsic, bits from all over the place, and some crazy ideas (though I did not do anything too original so far).
My goal is to finish the Morkanaut this month, finish the building of the Gorkanaut and the Stompa, and finally make a decision for the gargantuan squiggoth.
Yeah, lots of giants to work on
Matthew wrote: Kustomer, you should totally do something Orky. After all, it's nflagey's fault I started Orks!
Damn you...
Really??
Orks, I think, are fun to paint and play as you can basically use whatever model (GW or not) and convert it in something Orky, and making your army unique.
I'm no expert in 40k or Orks, but that's how I feel about them
Oh, I dont want to start a discussion, if I should start something orky - I DO plan something in the future. Not quite as big as these cool things, but something fast - and orky.
I allready did some scratchbuilding (Trukk) and converting (Deffkopta to quads/ATV) but nothing quite as big as the awesome stuff nflagey showes us here.
And danke for your German - I'm always surprised to read something in German here
Kustomer D wrote: Oh, I dont want to start a discussion, if I should start something orky - I DO plan something in the future. Not quite as big as these cool things, but something fast - and orky.
I allready did some scratchbuilding (Trukk) and converting (Deffkopta to quads/ATV) but nothing quite as big as the awesome stuff nflagey showes us here.
And danke for your German - I'm always surprised to read something in German here
Keep up orking guys!
Ich habt auf dein schwimmingpool bitte Früstuck bitte ja?
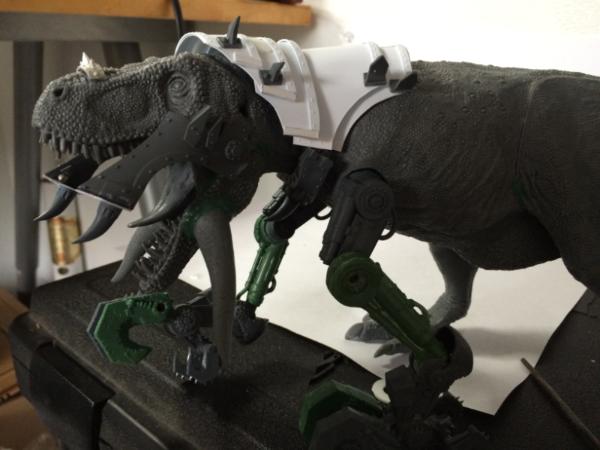
Update on the Gargantuan Squiggoth: I kind of like the crest design for the armor on the face so I decided to move forward with it. Here are a few pictures with most armor panels on the beast, including some on the legs (though without any rivets or other details so far)
Sorry I have not been here in a while ... change of work, lots of work!
My wife recently went to the UK for a week and I asked her to go to the local GW store if she wanted to bring something back to me I should have been a bit more precise because she got me some AoS Prosecutors Well, I like how they look, but they're not very orky so I was wondering if I could "simply" put an ork head in there and make some original stormboyz?
What do you guys think?
There are lots of symbols on the models that I would have to remove, but apart from that, do you think it could look nice?
Or do you think the wings + runes will make the models definitely un-orky?
These wings don't look very orky at all, same thing with the runes
The runes I can imagine painting them in a tone that will say "waaagh" but for the wings, I guess I'll need to break/rebuild them in a different way
If you see any conversion out there, please let me know!
Oh my, I should feel ashamed to resuscitate this, but that's my only blog about minis
I've been busy switching to a new job and adding some teaching duties this semester, so did not have much time for painting.
I finally got some time during the long Thanksgiving weekend to go back to my brushes.
I decided to attach the painting of my Gargantuan Squiggoth, even though I'm not done with building the howdah yet.
I kind of followed the GW tutorial for the Maggoth Lord so far for the skin.
Basecoated the mouth and the front legs too.
Not sure about what you call it, but yes, I guess it's blending
As I said, I followed the GW tutorial for the Maggoth Lord's skin.
The only thing is that I used slightly different colors.
I did not realize at first but the overall color scheme seems very "natural" ... until I found out that it is that of a T-Rex toys that my son has:
You fixed so many Sad T-Rex memes... nice work!
I love the wet blending... I have a croc blood bowl team that needs similar attention, though I'm loath to try it just now. Maybe when I get an airbrush.


 incredible!