76303
Post by: Warboss_Waaazag
Yes, making a lot of sense. The "cave" mouth looks fortified. Great work so far.
Automatically Appended Next Post:
Also, I hope you intend to seal all that foam before painting it. Elmers glue, modpodge, or similar work really well for that.
23638
Post by: GamesEtc
Looking good man. I always wanted to make a railroad, but with my sons love of "choo-choos" I would always be fighting with him over the use of it.
I cant wait to see how this turns out. =D
65595
Post by: Camkierhi
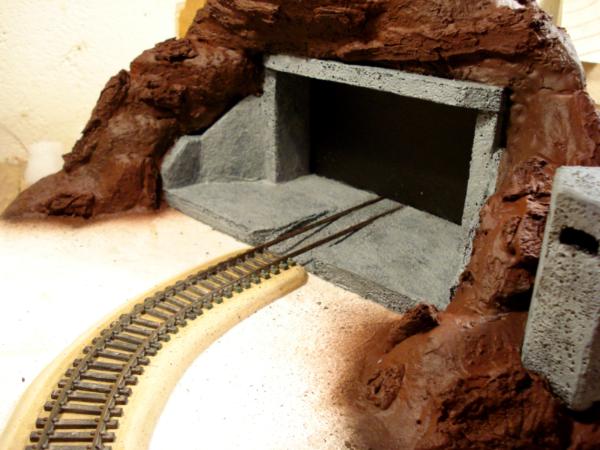
Looking fantastic. Is the little ramp an indication of the width of the track?
63129
Post by: Littletower
@monkeytroll: Sounds like a plan! Or, I could just try and build a real gaming table...
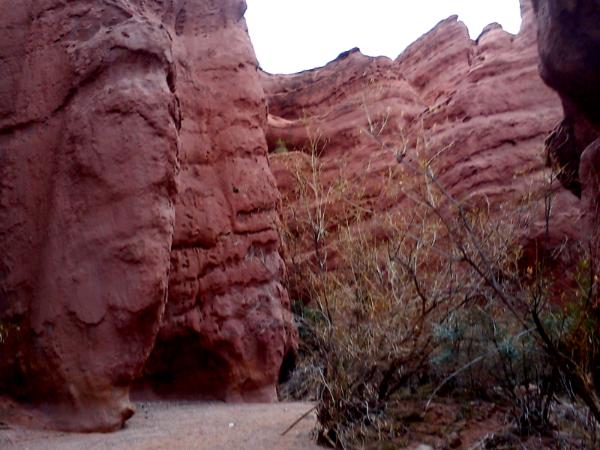
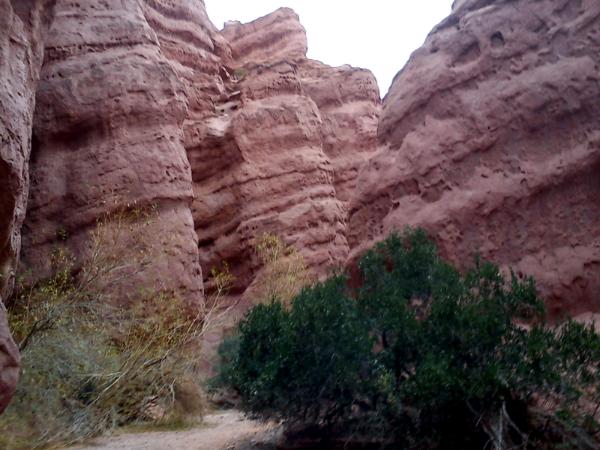
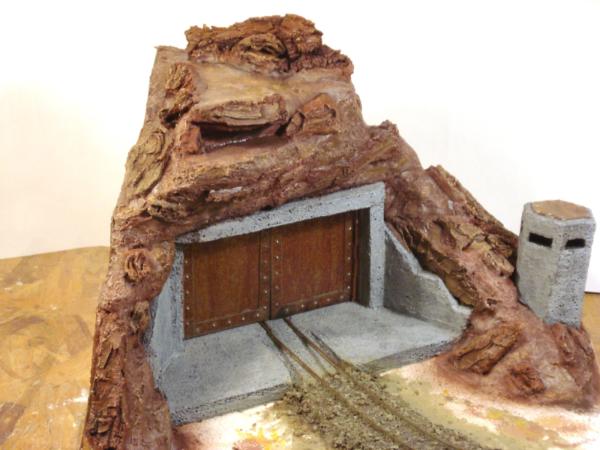
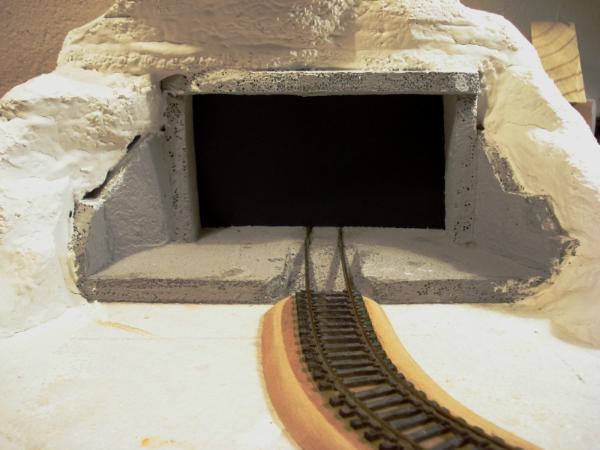
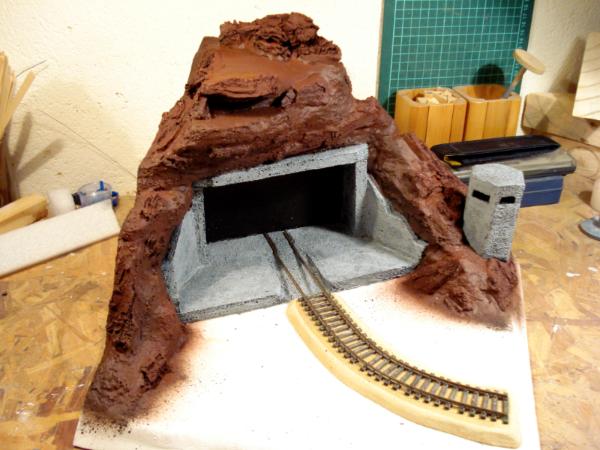
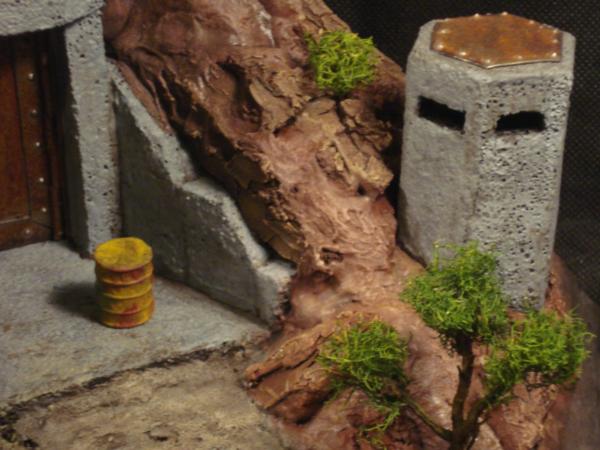
@Warboss_Waaazag: Thanks. I was going for something like this (reinforced more than fortified, but I guess the distinction would be a very fine line, if at all!):
And thanks for the advice on the sealing, too. I covered with dry wall filler, and I'll use only acrylics on it, without can-spraying, so no melt-down risk here.
@GamesEtc: Thank you! I know the feeling, it's always hard to make the cubs understand that Dad's toys are not actual toys (At least, not for them to play with!)
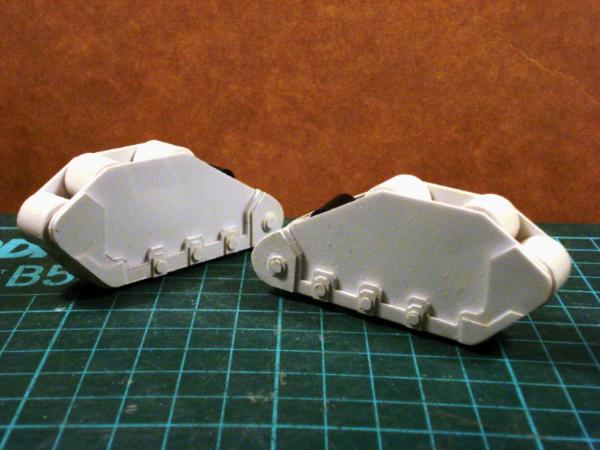
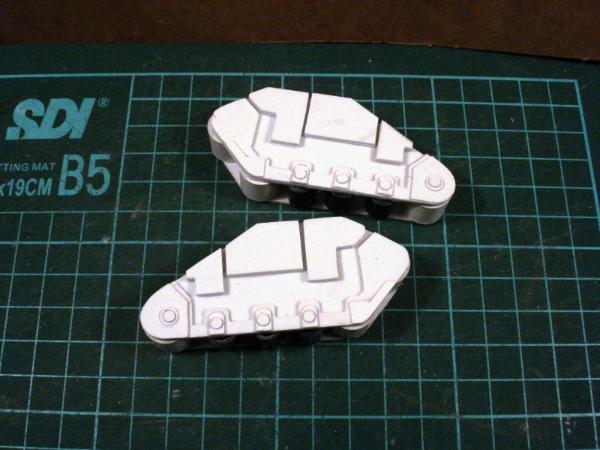
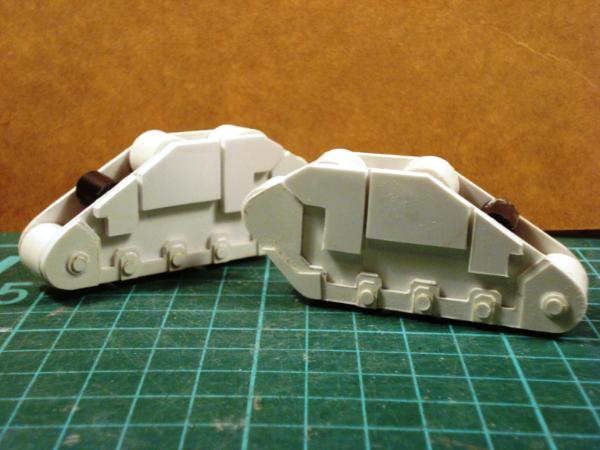
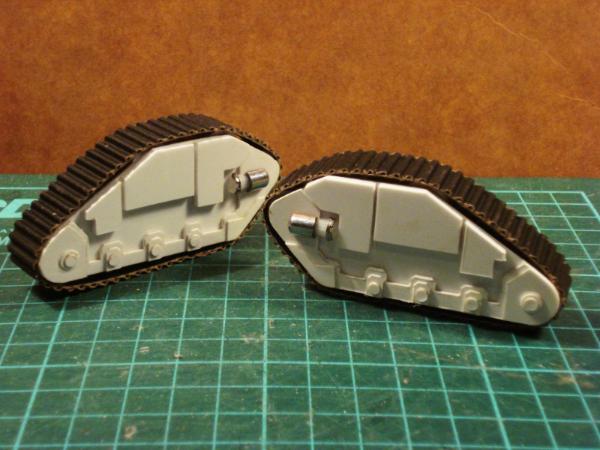
@Cam: It is, HO scale. Small for 28mm, but it can pass by a narrow gauge...
Those track sections are - with a few honourable exceptions, including yours truly - some of the oldest things around the house, and it's about time they got put to use again!
Speaking of filler:
Still hasn't dried since last night, so no more work on it for now.
C&C are welcome, as always.
Thanks for stopping by.
24297
Post by: Viktor von Domm
looks very promising...and the hole even looks a tad menacing 
40213
Post by: DiDDe
I like the looks of this  think it will turn out great
76303
Post by: Warboss_Waaazag
No, I think you've got it right. My words/your words, I think we mean the same thing. Your execution looks almost exactly like the upper left hand picture you posted.
72556
Post by: Red Harvest
A hand-vac is your best friend with that stuff. Or a shop-vac. How do you plan to make it durable?
I know, always questions...
63129
Post by: Littletower
@Vik: Thanks! Menacing, umm... I had planned a gate there (more of an entrance to an underground facility than a tunnel sort of way), but...
@DiDDe: Thank you, will try!
@Warboss_W: Glad it does, thank you. Yes, I was going for that, combined with the harder rock and stepper mountain side of the pics on the right, will have to see how that comes along...
@Red H: I did vacuum, and more than once! But those bits get charged and stick to everything, and keep coming back after cleaning up over and over! I think I'm done with them for the time being, so all is good!
Regarding durability, I've found the dry-wall filler cover quite enduring before, and the tall sides are walled in styrene. If needed, a polyurethane cover coat could add some extra protection against wear and chipping.
Ask away, asking questions is the proper way to wisdom  ! (And the make me think, too, and - sometimes - good things come out of that too  )
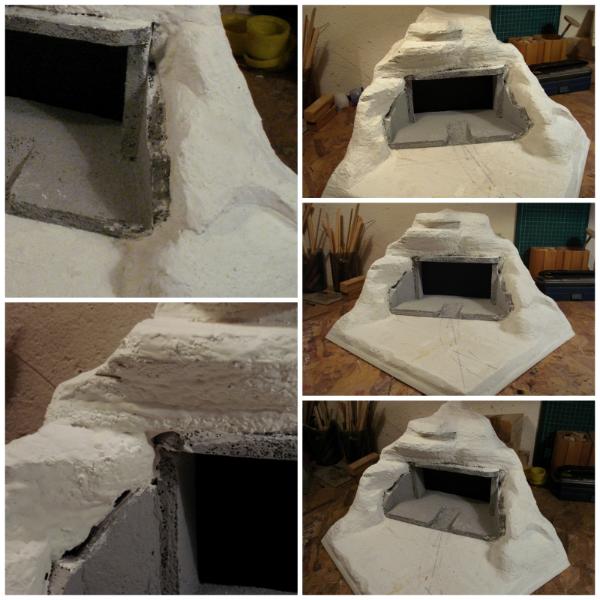
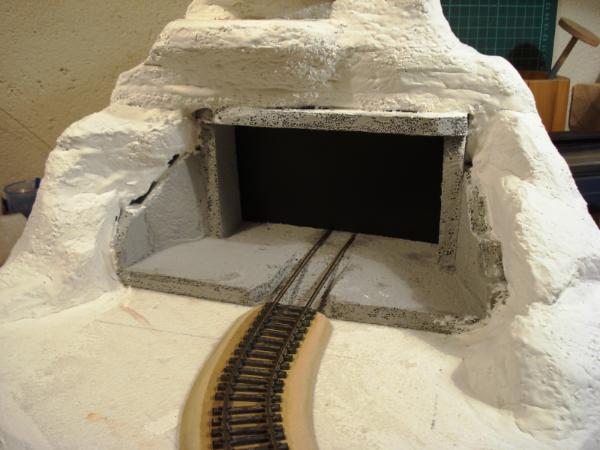
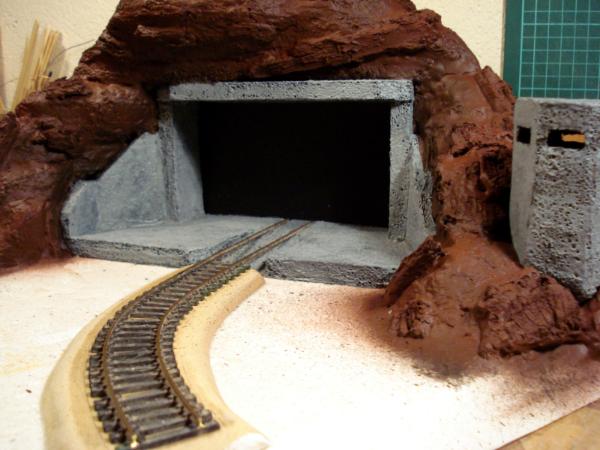
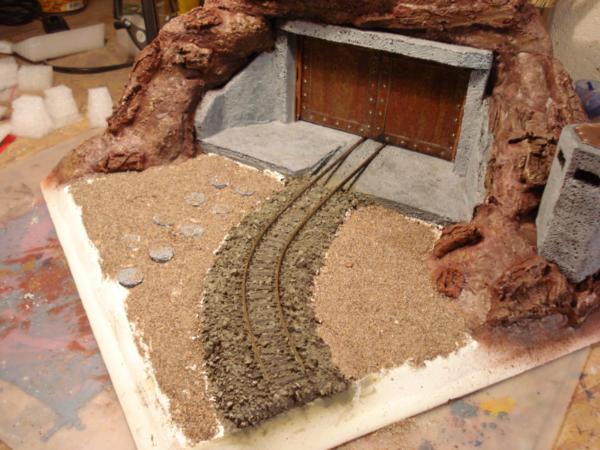
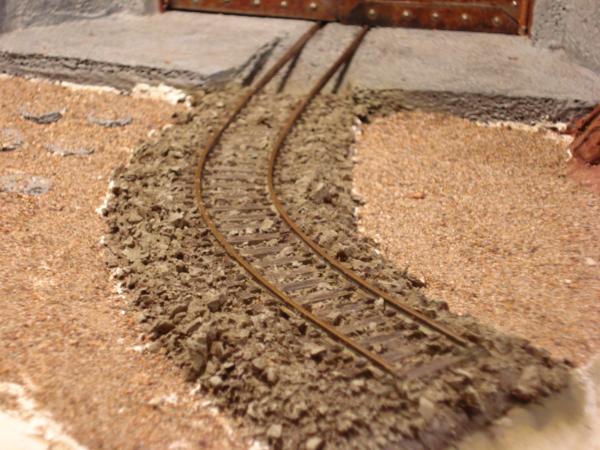
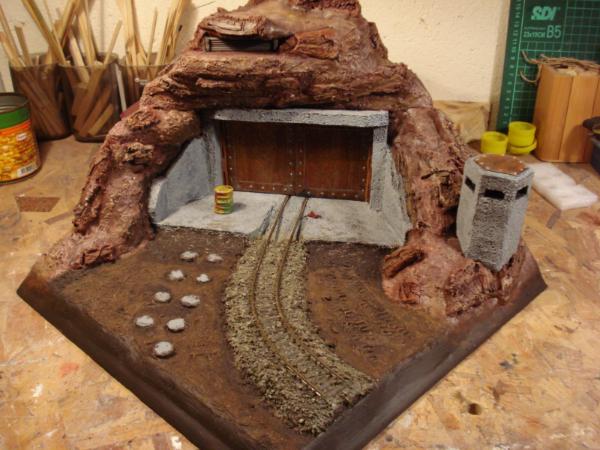
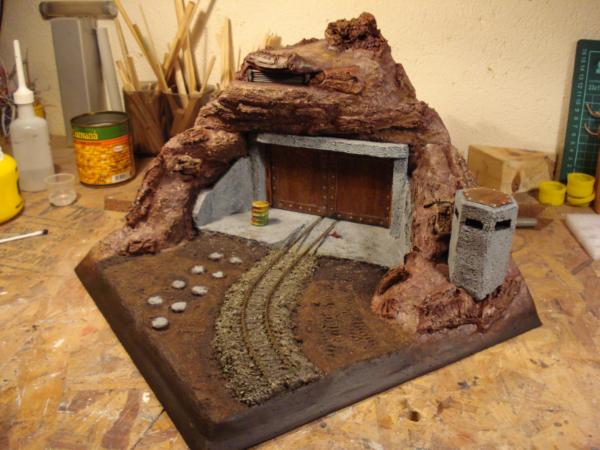
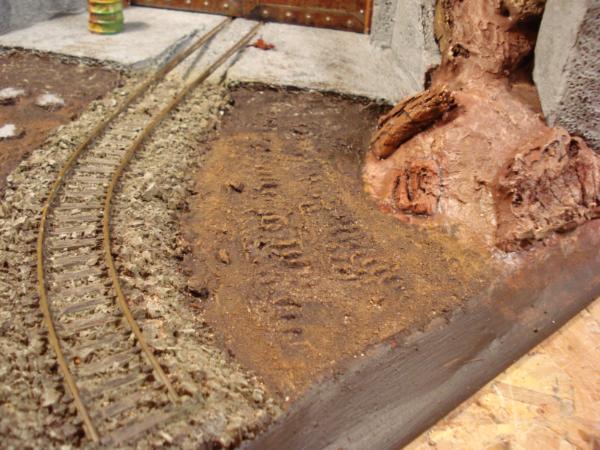
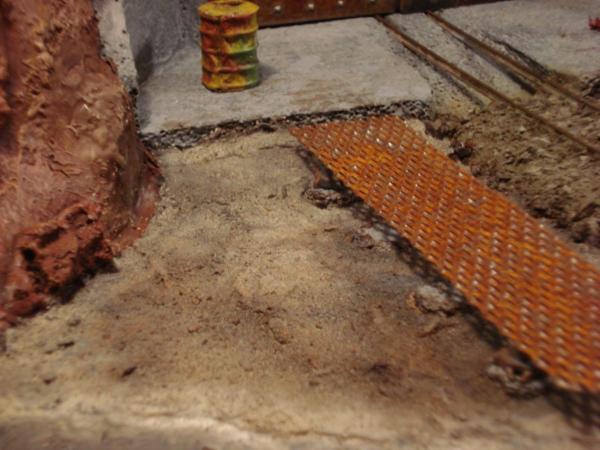
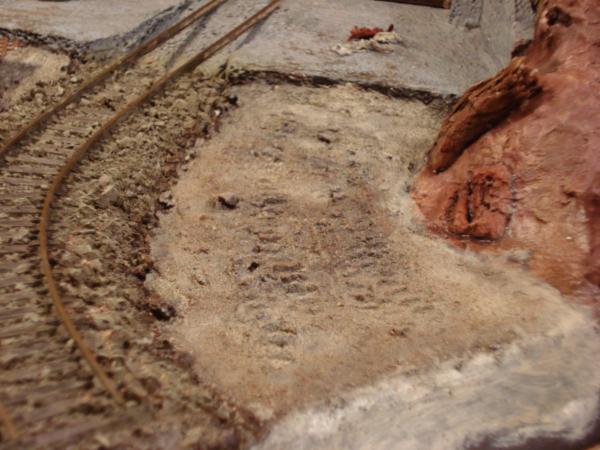
As said elsewhere, not much else done today, but at least got to lay down the track, and actually put it on theme:
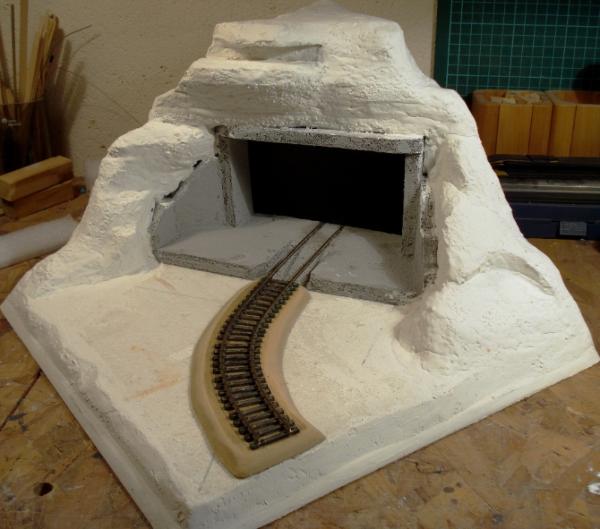
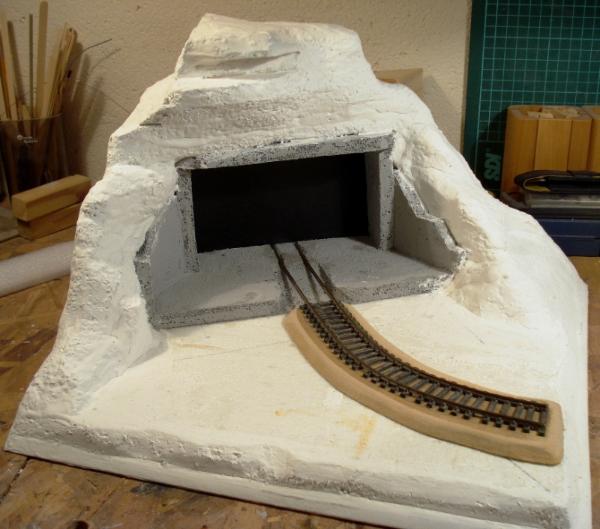
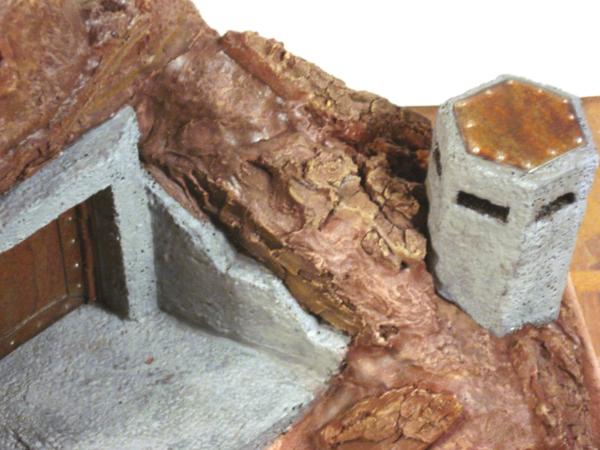
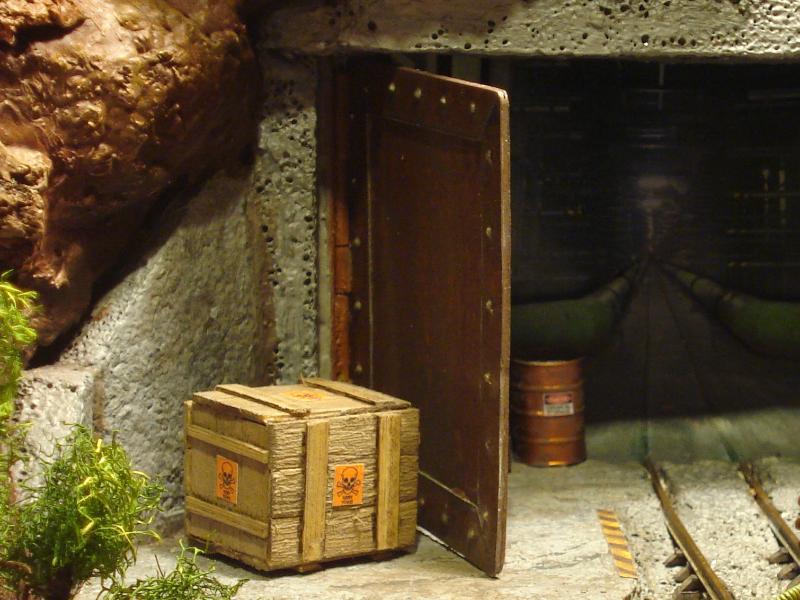
And close ups on the entrance-to-be:
Thanks for stopping by.
63129
Post by: Littletower
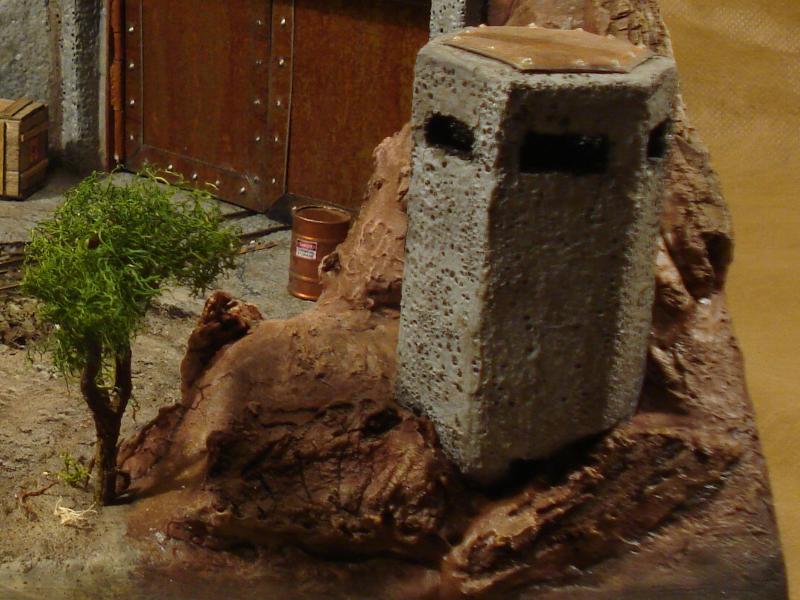
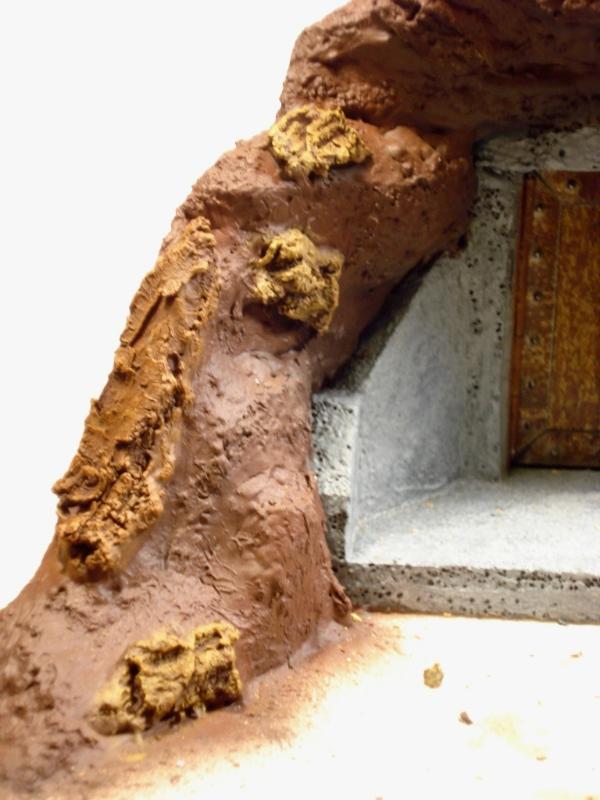
With long drying times between layers and such, I did not get around to write up an update until now, but work has been getting done. First step, added some rock textures: 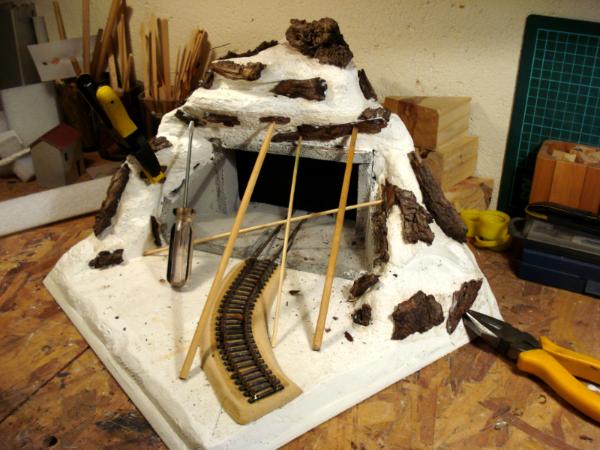 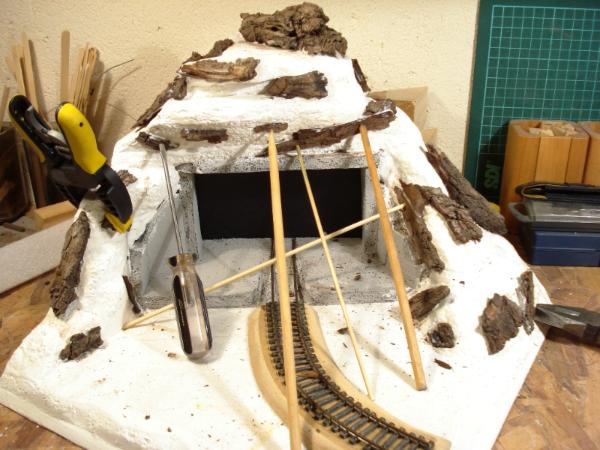 (Beams, supports and such are only there holding the pieces together until the glue dried; they are not going to be part of the final build. Or they might...) Closer up:  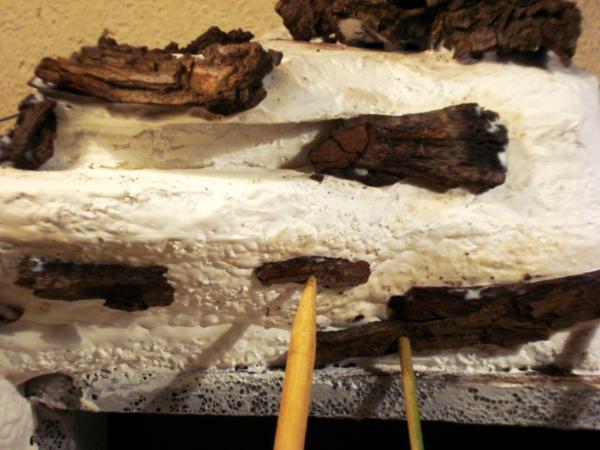 Next, the rocks got blended into the mountain-side (AKA, more filler, followed by more drying time): 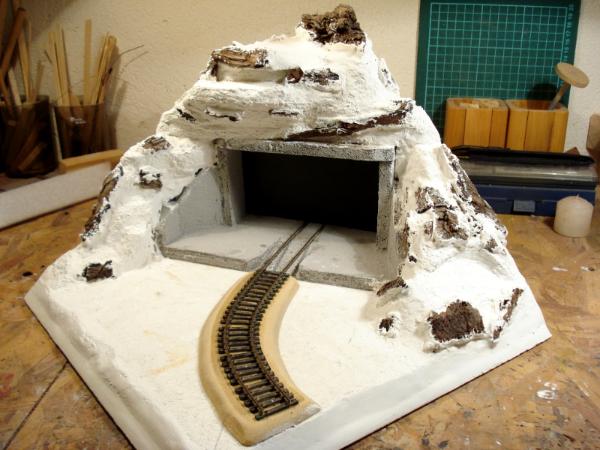 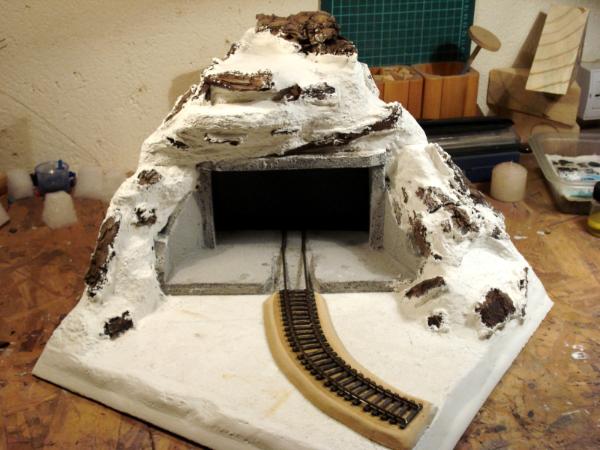 And closer up again: 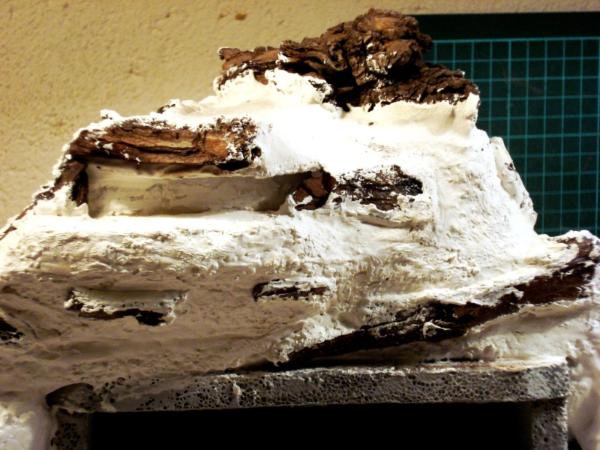 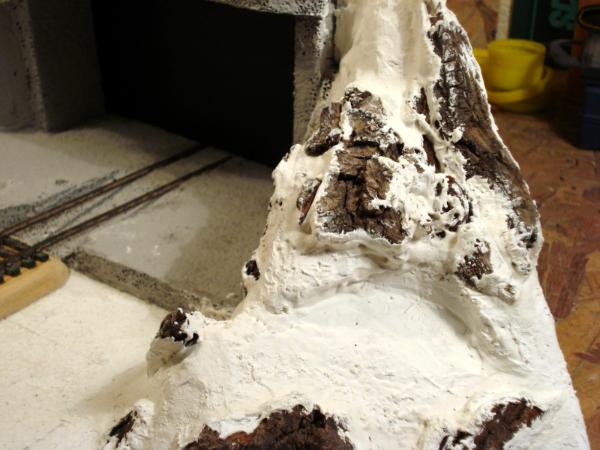 And mostly to give my poor little camera a break (the almost all white piece, light by workbench spotlights, was pushing it towards an impossible focus & unmanageable white-balance issue nervous breakdown) I laid down some colours on it too: 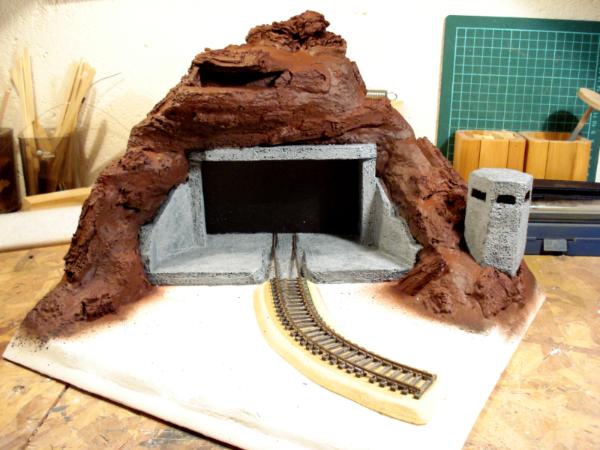 Ah, added a concrete guard-post/watchtower too, but I guess that was quite obvious by now. (I'll be uploading and posting some other pics and close ups of the present stage ASAP) The basic base (sounds odd, but that is what I actually meant) is about done, time to really get started on it now. C&C are most welcome. Thanks for stopping by. Edited for miss-types.
30344
Post by: monkeytroll
Damn man, that's a hefty slice of progress there.... 
Good work, nice job with blending the bark in so far...intrigued to see what goes on in the little overhang 
62749
Post by: Dr H
Ha, I did wonder at first, if those sticks were going to be part of the piece and then realised that they were glue supports. I often do the same sort of thing.
Good progress.
76303
Post by: Warboss_Waaazag
It's coming together!
63129
Post by: Littletower
@ MT:  , you noticed it? Now I will have to do something there, won't I? @Dr H: Thanks. Actually, I never saw them as more than gluing help until the pics. Now, they don't that bad, and I'm regretting not having made provisions for some supports on that style. maybe I can throw some in somehow... At least, definitively saved for a later use, though. @Warboss: Glad you approve. More to come. Cheers.
72556
Post by: Red Harvest
All roads lead somewhere. Yup. And that brown. Fudge Icing?
Your workbench has an OSB surface? Ouch, splintery.
Progressing nicely.
24297
Post by: Viktor von Domm
guard tower looks nice... and I am waiting for a HW emplacement in that lil overhang now^^...
looks very good and using bark pieces is a rather interesting way of adding more rocky texture!
cool progress!
63129
Post by: Littletower
@Red H: The brown base will - hopefully - take a turn towards reds and tans in the future (though it already should be reddish, will have to work on that!)
OSB indeed, floor polyurethane topcoated. Not many loose splinters or chips to speak of, heavy duty, and very "damageable" without provoking guilt ridden conscience pangs.
@Vik: I was thinking shutters and/or vents, would that do it?
Seen from the other side:
And close ups yet again:
Content with the overall texture, lots of detailing and brush work pending... (And that's only the background!)
Cheers.
24297
Post by: Viktor von Domm
Fresh air??? I thought th there is only war in whatever millennium your thinking for this project...
But of course vents would be the better choice in terms of realism...
63129
Post by: Littletower
I'll make them small vents!
63129
Post by: Littletower
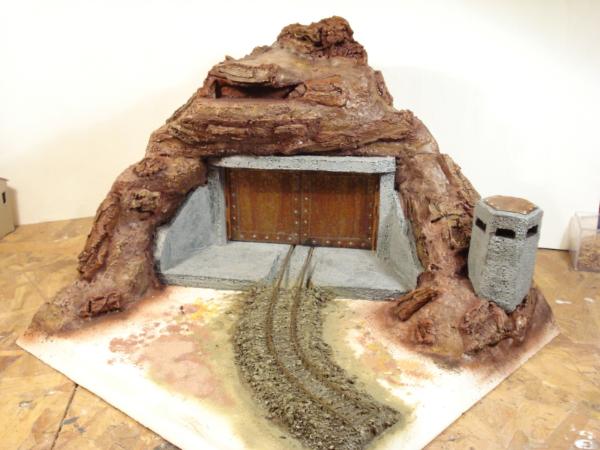
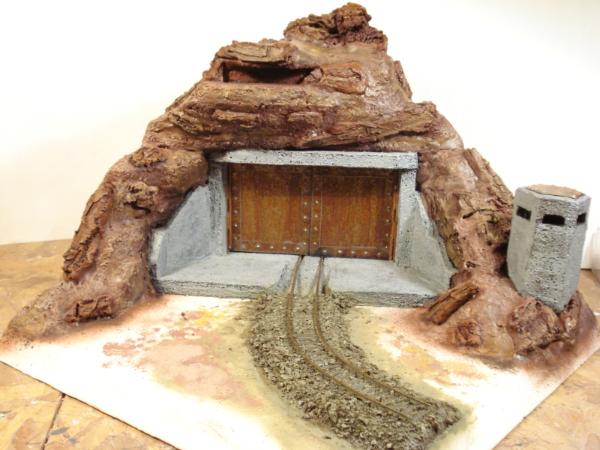
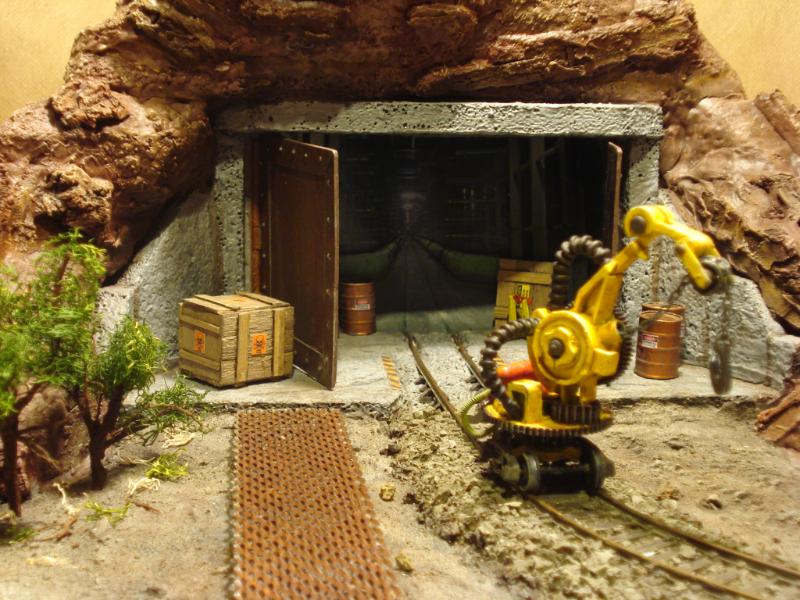
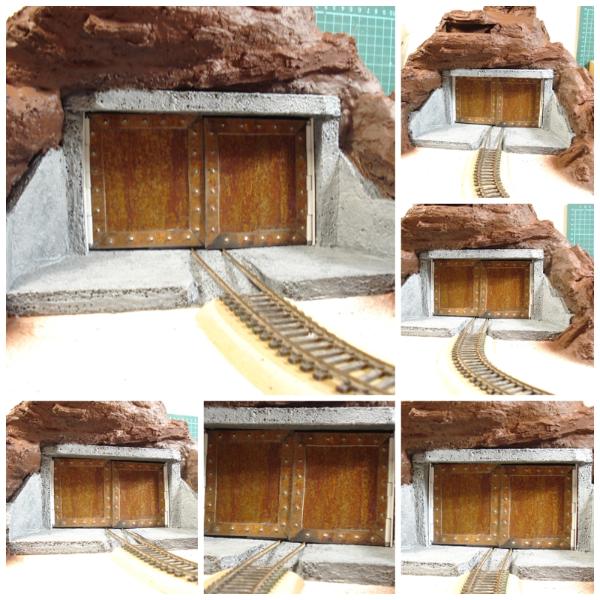
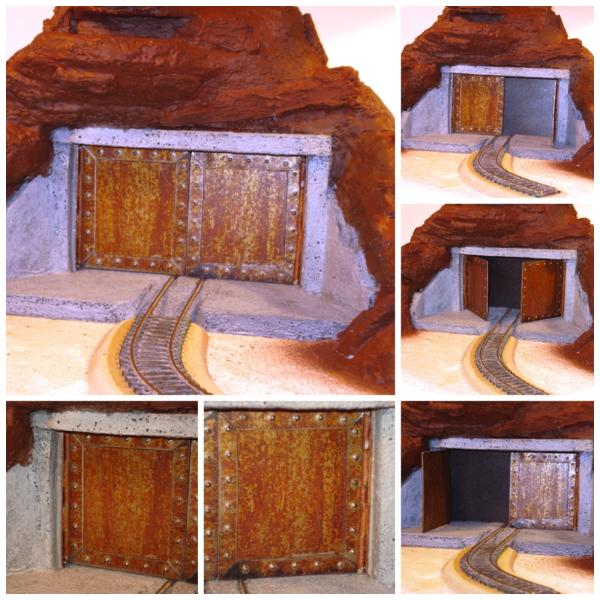
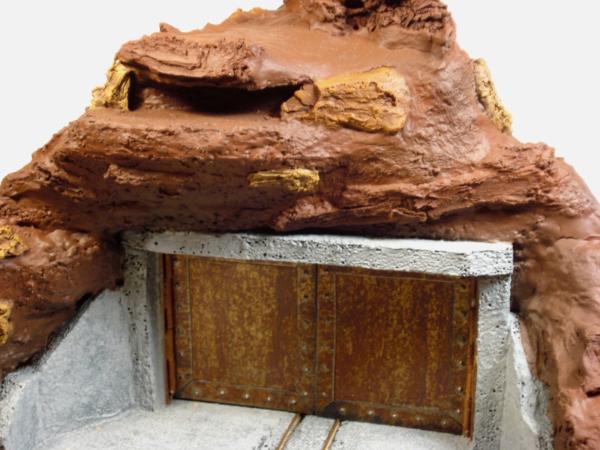
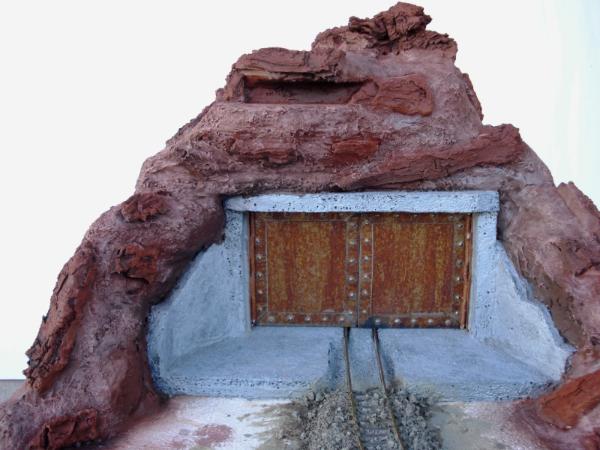
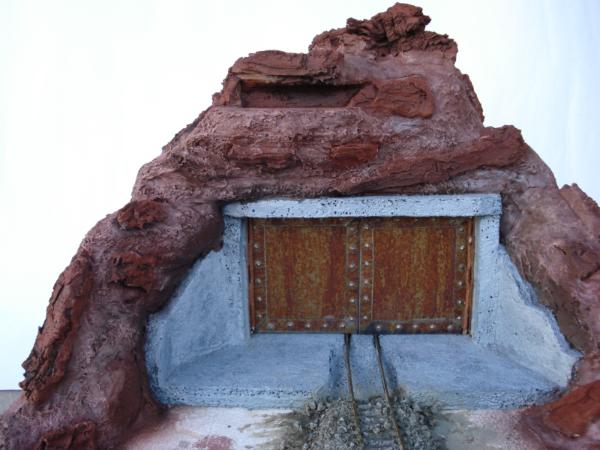
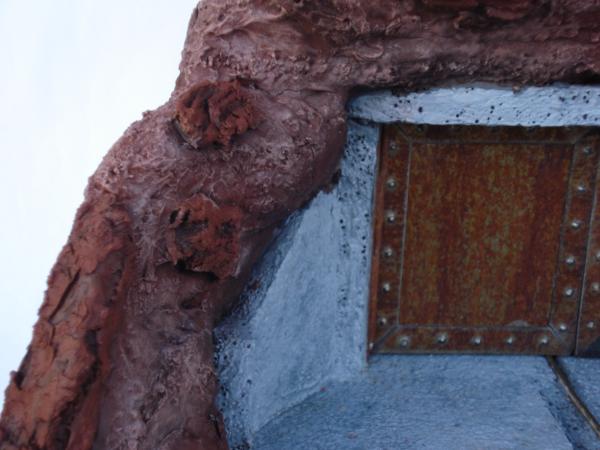
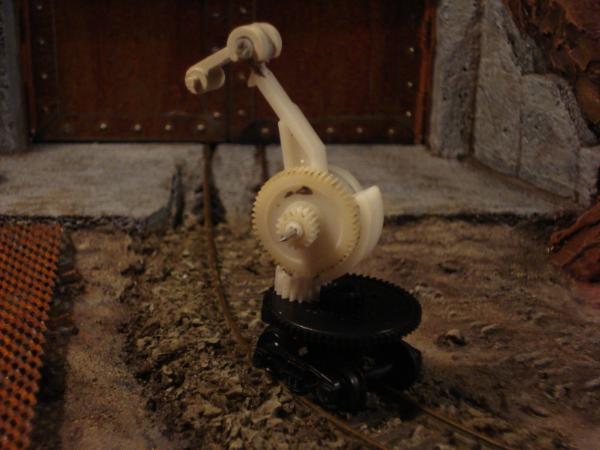
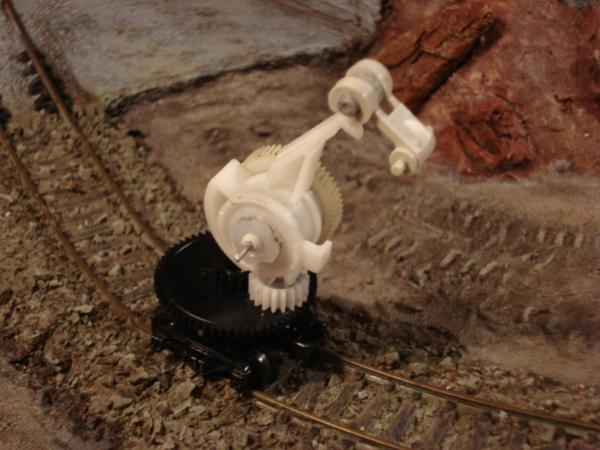
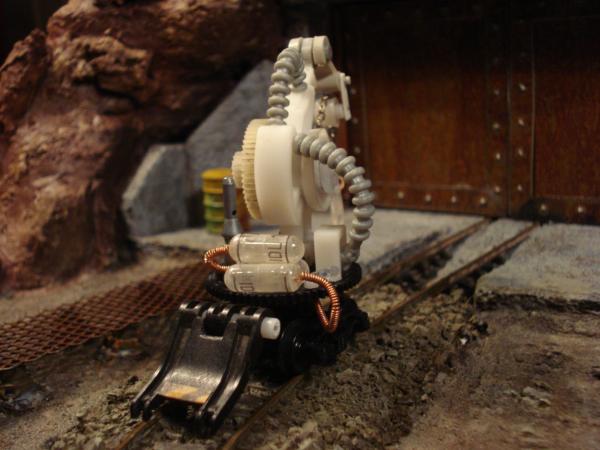
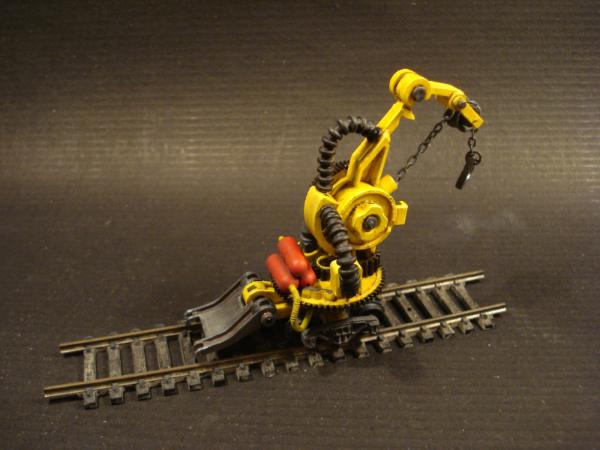
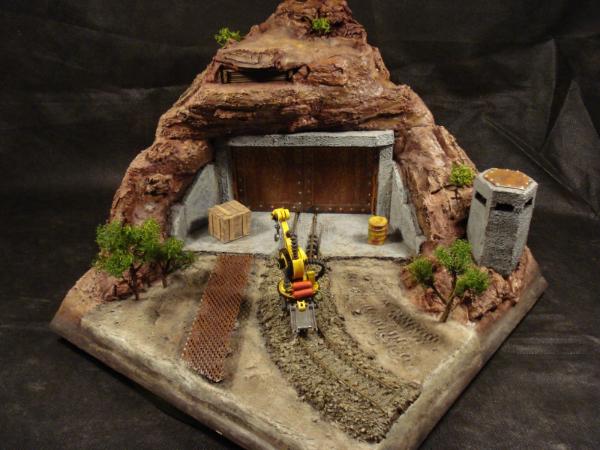
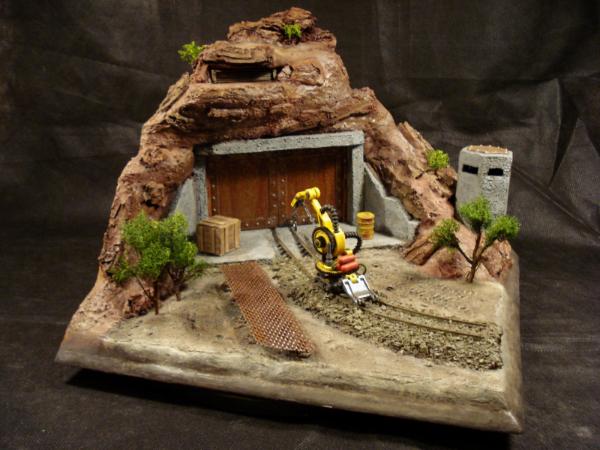
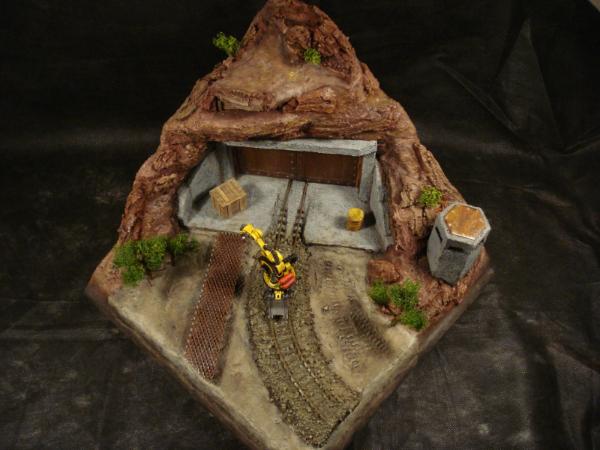
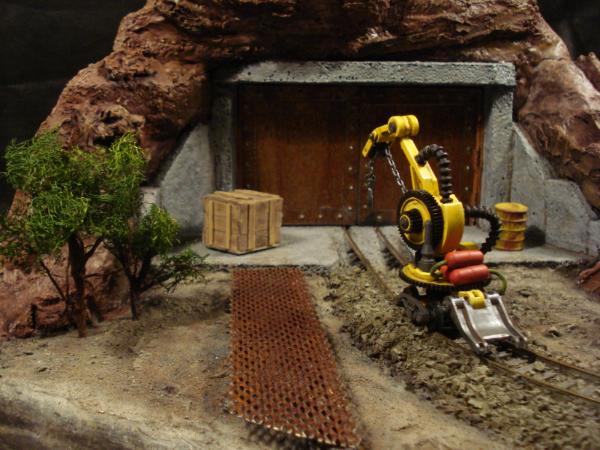
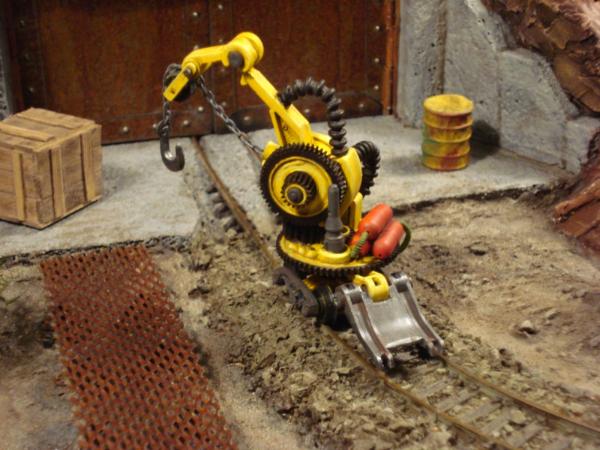
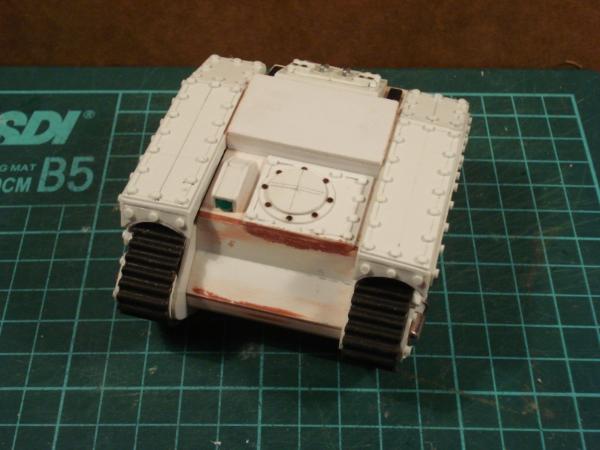
About to start on the main gate (Turns out it was an entrance of sorts, and not just a tunnel, after all), I decided to take a pot shot at some extra credit points, remembering this round added a new criteria:
 Red Harvest wrote: Red Harvest wrote:
... I would like to see contestants use materials in a way that require little or even no painting... .
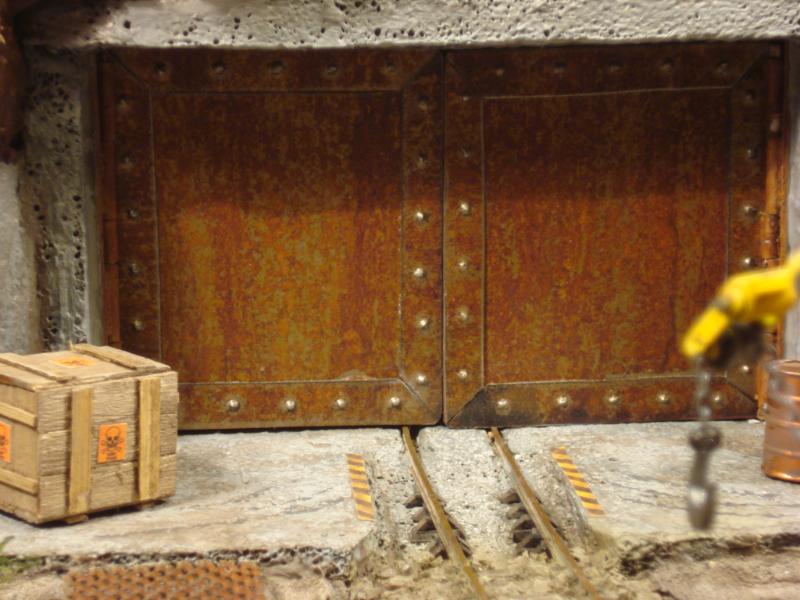
So, giving it some thought, I came up with what I guess is somewhat the reverse of NMM; True Metal Metallics (Or, though less resounding, real rusted scrap).
First, had to find a suitable piece of properly - and very - rusted metal sheet. Rusted metal is not that hard to find when you have a scrapyard. Sorry, mistyped that. I meant a lot of (s)crap in the yard.
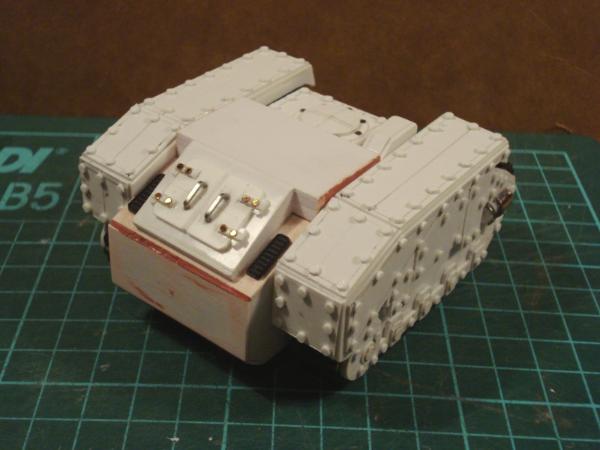
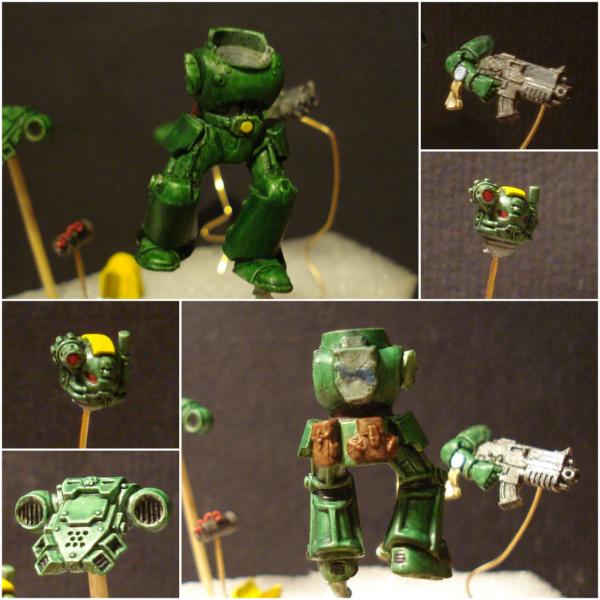
Once procured, cut to shape. Two main panels for the doors, and some side reinforcements. THIS is where rivets would come into play, some I had to add some to the gate. There was no way I was going to hole-punch some rivets from this stuff (You get to love styrene after working with actual metal, trust me). Instead, I embossed them on the reinforcement struts. By hand, hammer and an awl (Is that last one the right name for it?) Not perfectly aligned then, but close...
And put it together:
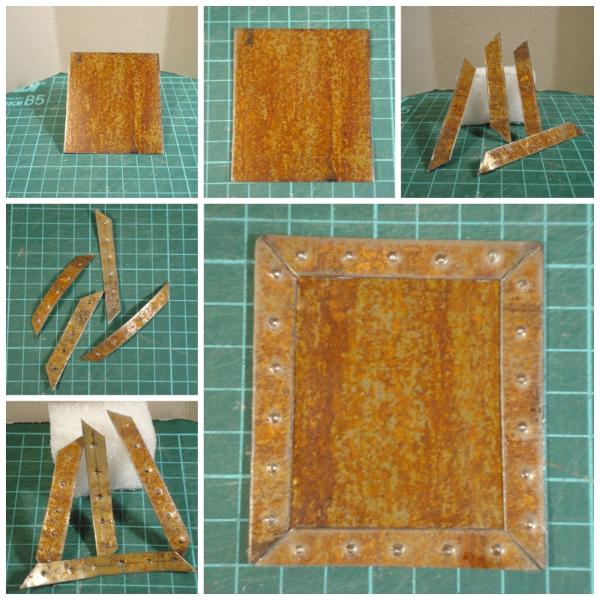
Closer look:
Not a single drop of paint on it! (Well, I did spray varnished some of it, but that was to prevent the rust from coming off)
C&C are welcome.
Cheers.
30344
Post by: monkeytroll
Cool bonus grabber there....and nice job with the embossed rivets
63129
Post by: Littletower
Thanks MT. When the going gets tough, every bit counts!
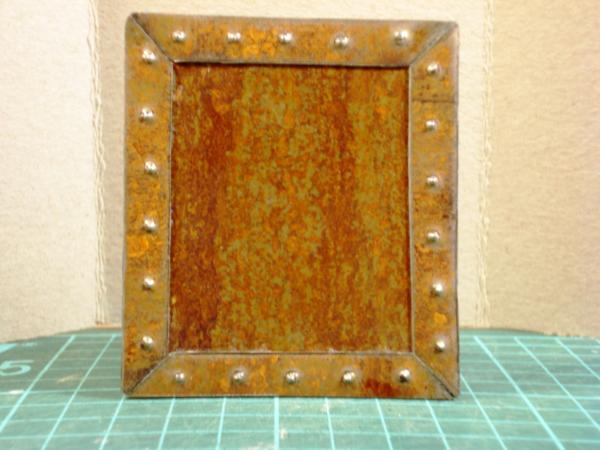
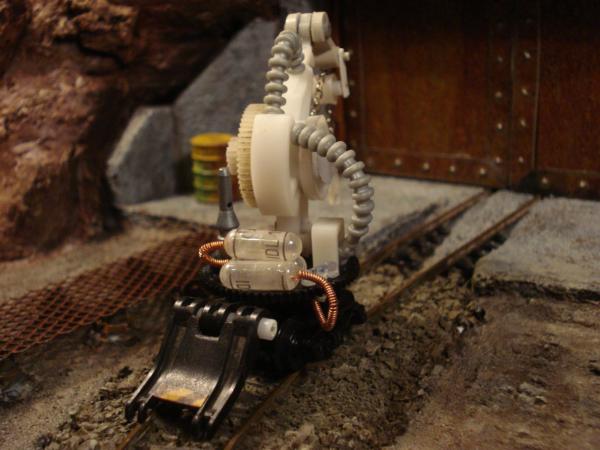
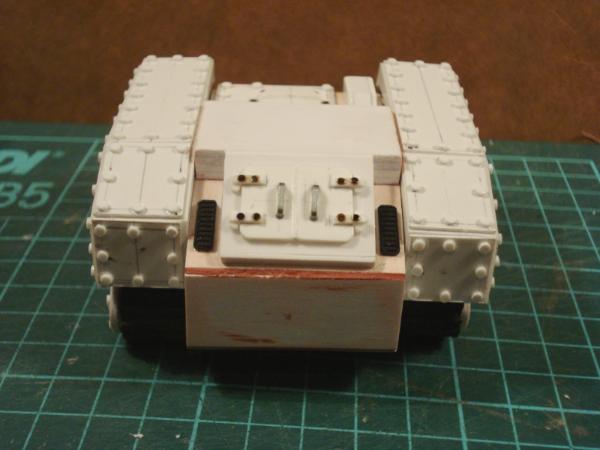
In between works on the gates, I applied the same concept to the tower top:
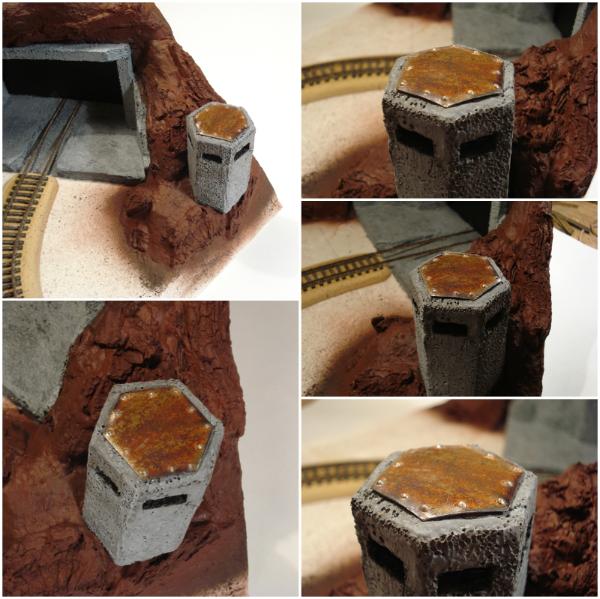
(Just placed on it for the pic, some more filing and forming to do before definitively fixing it on without gaps)
Thanks for stopping by.
76303
Post by: Warboss_Waaazag
Tower looks great. I love the metal plating.
72556
Post by: Red Harvest
Rust never sleeps. And I am impressed with that. Nice to see someone read my little post.
63129
Post by: Littletower
@Waaazag: Thanks, I think it came out all right, even if I say it myself 
@Red H: Never hurts to know the rules! (Besides, what joy would we get from breaking following them if we didn't? )
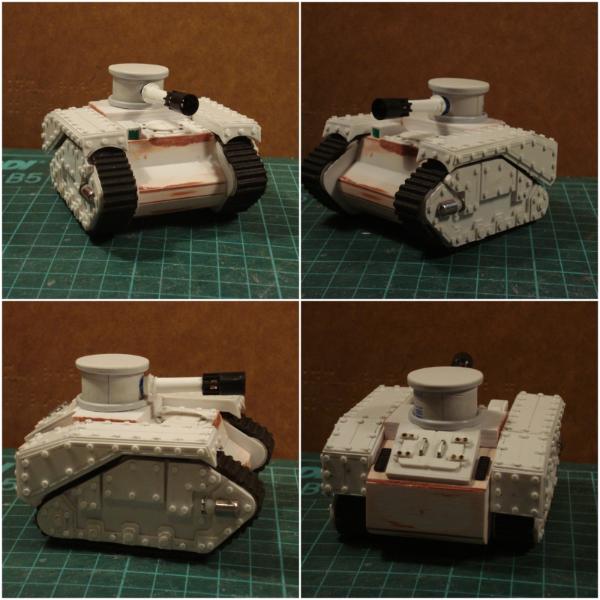
Propped in placed, fitting check (needs adjusting, BTW):
Maybe a double-headed eagle on the gates before putting those in?
C&C are welcome.
Cheers.
30344
Post by: monkeytroll
I think the gates look good as is...leave them plain and rusty
65595
Post by: Camkierhi
Well LT you excelling again. Whole piece looks amazing, agree with monkey, leave them as is, they look amazing.
63129
Post by: Littletower
Agreed then, no artwork on the doors.
Gates definitively placed:
On a very hobby-wise unproductive day, I spent most of it just trying to get the hinges to match the door colours, and then fixing them to the walls. So much for my future as a building contractor...
(Noticed when taking the pics that one of the hinges brushes onto the frame and the paint rubbed off )
Just that for today, but hey, at least the door swing!
Cheers.
30344
Post by: monkeytroll
Opening doors too
And shouldn't worry too much about potential employment there....most building contractors are trying to cover up the rust, not colour match it
26800
Post by: Commander Cain
Looking great so far! Those pre-rusted doors are brilliant.
63129
Post by: Littletower
@ MT: Thanks! guess I must have gotten that wrong, then... But covering up the rust? 
@Commander Cain: Thanks for dropping in.
Popping a question about options regarding the colours on the mountain-side:
Plan A, basically a single colour (as is now), and working on the tones, darkening the recesses and shadows, and lightning.. well, you know. True to the actual references, and potentially monochromatically boring.
Ref pics:
As in there, some green spot colour would come in the form of some plant life.
Plan B, to "differentiate" the most outcropping rocks with colour changes. Tried it out, using two possible tones:
(Timidly, I know, but I wanted to have an easy chance to go back in case it didn't work)
At a loss about which way to go from here, will sleep on it and see.
Any C&C will be most welcome.
Thanks for stopping by.
32169
Post by: Rogue Wolves
Really cool work you have here!
72556
Post by: Red Harvest
I do like the way those doors have turned out. Can't really give C&C. But it looks like you're on the right track.
76303
Post by: Warboss_Waaazag
I recommend using a dark brown wash over all the stone areas and once that dries, an overbrush on the whole mountainside in a 1:1 mix of your two browns, followed by a light drybrush of your lighter brown mixed with a touch of white. You're on the right track.
65595
Post by: Camkierhi
I would give it a wash to darken the recesses, then drybrush, but then I would add some darker "horizontal" stripes, to excentuate the "layers" of rock. Just one or two, here and there, just to break up the block colour. Then add a little salad. Probably some dried up old bushes.
Looking fabulous dude.
62749
Post by: Dr H
Good progress.
The use of different colours for the washes of different areas of the rock can help it look more natural. Similar to what I did on the wood of The Hut. A black wash in places, a purple wash in others, and a red wash in others (other colours are available, have a really close look at your reference pictures).
Build the variation in colour, if an area doesn't look right, wash over with another colour.
Then bring out the surface details with a dry-brush or two.
63129
Post by: Littletower
@Rogue Wolves: Hi there, and thank you!
@Red H: Thanks for checking in, hope I can get your feedback once the Comp's done!
@W. Waaazag, Cam & Dr H: Thank you all, really appreciate you taking the time, all noted and taken into account. Tried that advice, too, though still very much WIP.
I fell back from the coloured outcroppings by going over them again with the base colour, leaving only traces of the orange and ochre, and went a different direction:
Heavy drybrush of a lighter tone - pinkish hue, more alike the reference - on the flatter areas, and some shadowing/darkening on the recesses of (some, rest on their way) the protruding rocks:
Closer look of one the rocks:
One more - lighter, both in tone and coverage - dry-brush, and then a darker wash to bring it together, maybe? And a final dry-brush to recover the surface detail?
And the some different colour washes on the "harder" rocks, for extra variation. And the darker, longer horizontal stripes (mostly over the gate), to stress the layered texture there.
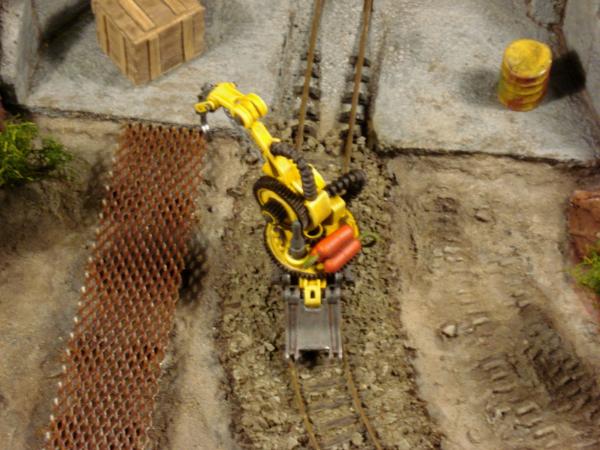
Put (and painted) some ballast around the tracks as well:
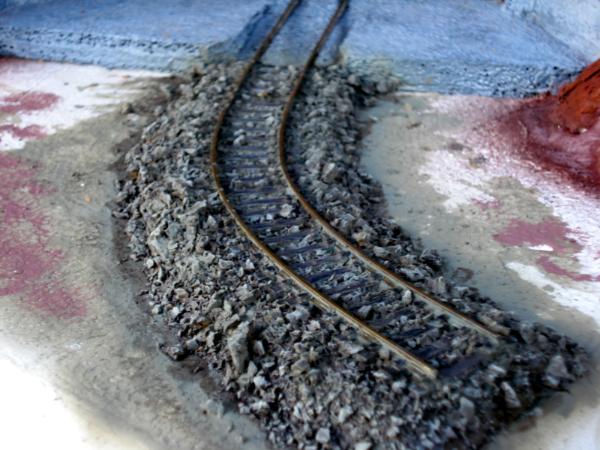
(Clean up pending!)
Might have (re)found the way?
C&C are always most welcome.
Cheers.
32169
Post by: Rogue Wolves
I am loving the redness of the rocks! Definitely sets a stark contrast to the man made blue.
63129
Post by: Littletower
83396
Post by: granander
How come the rails are hanging freely in the middle? It's been bugging me during the build so I just had to ask...
63129
Post by: Littletower
@granander: Don't now, just using some plans drawn by the same guy who designed the Thunderhawk... I mean, if that thing is supposed to fly, why wouldn't those rails hold on the air as well?
Seriously now, supports will go there. At some point. Before the deadline. Or I'll just call it a Thunderrail and leave as they are... No, maybe I'll better go with the supports.
Thanks for looking in.
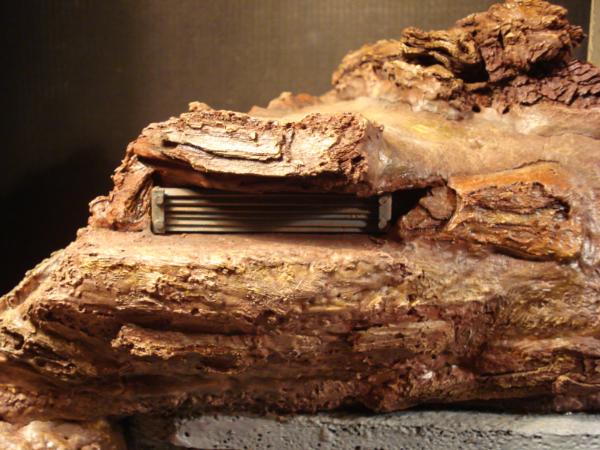
Meanwhile, I grilled the vent for the overhang over the doors:
Too cold and humid to spray today - and it's too small a piece to rattle the can for -, so I'll try some brush-on primer I got some time ago, and had been saving for a rainy day.
Cheers.
63129
Post by: Littletower
Started working on the last part of the base...
First, more drywall filler and some sand:
Beginnings of a secondary road (path, bah!) on the side:

Undercoated, too dark:
I found room for yet another road/path, just some tracks on the mud, on the other side, in case one (rail)road wasn't enough...
And the stepping stones on the left:

Sidetracking, mock-placed the vents in the overhang:
Lightening things up a bit...
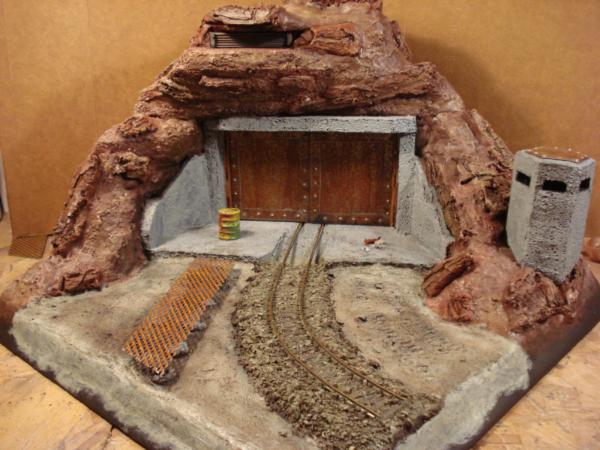
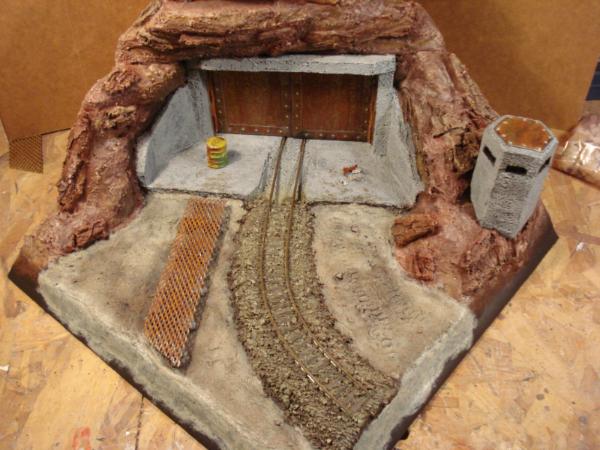
And the side path turned into a rusted iron (what else could it have been?) walkway...
Cut it too short (I did not want rusted metal spikes overhanging the base, but over did it!,  , will fix later)
The wheel prints are still there:
Still a long way to go, but going there!
C&C are welcome, as always.
Thanks for stopping by.
62749
Post by: Dr H
Good progress LT. 
68345
Post by: xXWeaponPrimeXx
*totally isn't jealous or anything*
>.>
30344
Post by: monkeytroll
Love the rusted walkway on the rock supports, very cool, and great rust effects.
Vent looks great (even if I'd have prefered some dodgy geezers being all shady-like up there )
Think you've caught just the right variation in the rock tones - hope you noted the colours for when you get round to the other four sides of the peak
63129
Post by: Littletower
@Dr H.: Thanks for dropping by!
@xXWeaponPrimeXx: Glad you are not !
@ MT: Notes? I was supposed to be taking notes?
Can't take credit for the rust in this one, though, it is mostly true rusted cutouts (Only painted parts are the hinges on the main gate and - WIP yet - the vent and walkway raisers). Will harden up the weathering on the vent, will that make it closer to your heart?
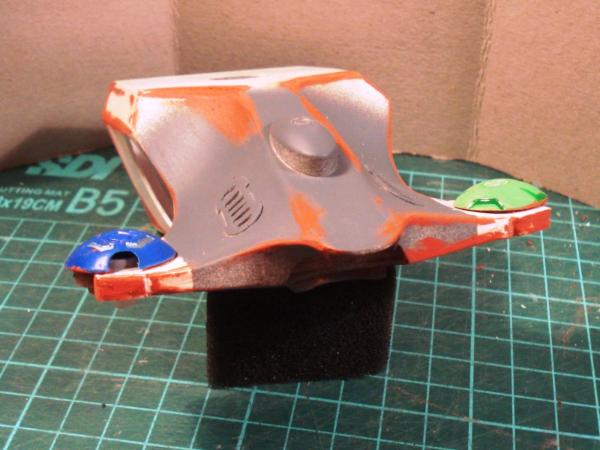
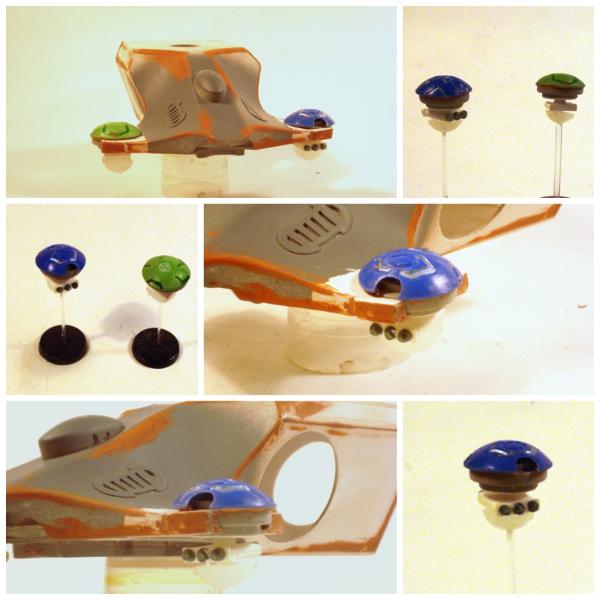
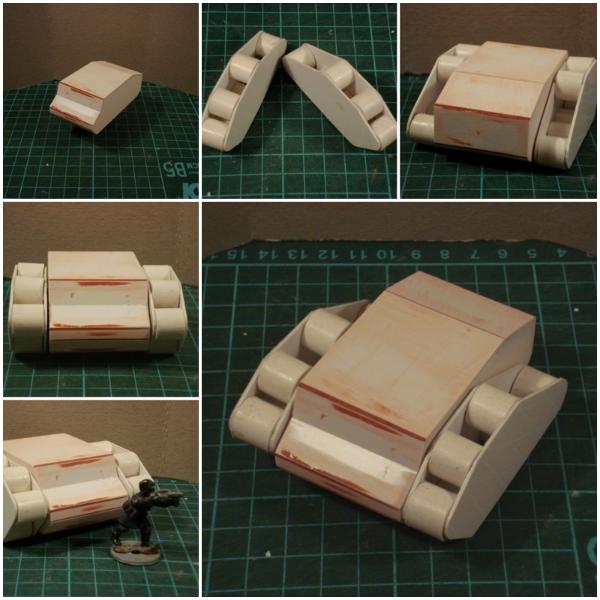
Change of pace, put the groundworks on hold for a bit and fiddled with something smaller fr a while, giving some care to the neglected Hammerhead-to-(mayb)-be, and gave a try at the drone pieces (Only the top parts, sans fins, for now):
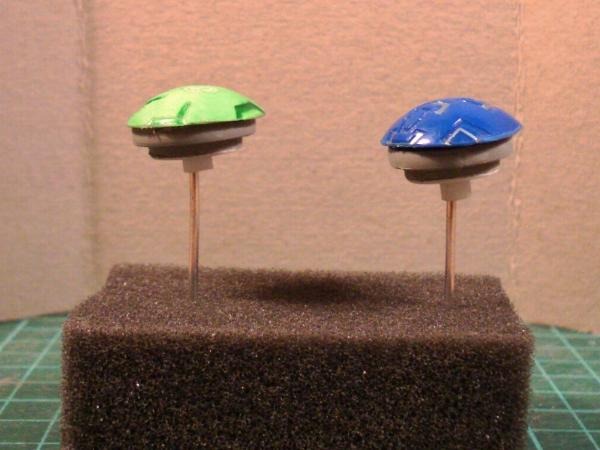
Compared to their true-blood sibling, for ease of reference
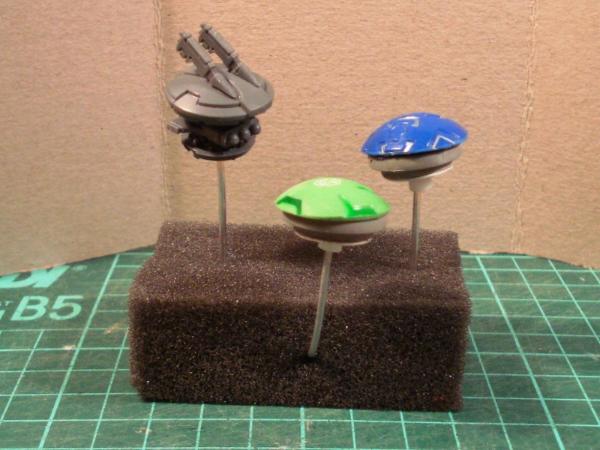
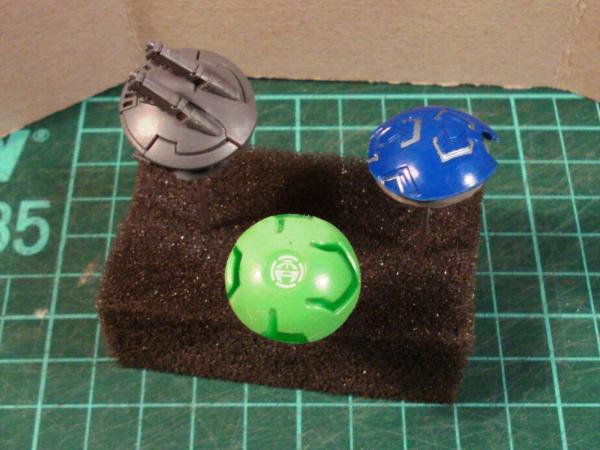
And temporarily placed, fitting check:
(The Hammerhead is in the process of getting a gap-filling nose-job too)
Cheers.
30344
Post by: monkeytroll
The mesh is real rust too? Excellent use of real materials - you've got those bonus points in the bag
In all the excitement I'd forgotten about your hammerhead...
62749
Post by: Dr H
@Dr H.: Thanks for dropping by!
Got to show that I am floating about occasionally.
Good job on the drone-alikes.
38276
Post by: M0rdain
Man you have got so much painting done already :S But it is looking great. I have not even primed my terrain yet lol.
73546
Post by: pfibp
As always nice love for details on the terrain piece.
The devil fish looks fine as well.
63129
Post by: Littletower
Disclaimer: Not an update, not much (nothing at all, truth be said ) to show yet.
@ MT: Real rusted mesh it is. Fresh from the scrapyard, too!
@Dr H: Good tag, drone-alikes; so be them be named now!
@M0rdain: I have painted some, but free time is a whimsical thing, comes and goes as it pleases (usually goes!) and, as you (don't) see, not much has happened in the last days.
@pfibp: Thanks. the fun is in the details! And so are supposed to be both God and the Devil... (Lots of room in the details, it seems).
Cheers.
26790
Post by: Gitsplitta
You need to get some support underneath those "floating rails" over the concrete...
63129
Post by: Littletower
@Gits: Will do, since nobody seems to be buying the levitating thingy idea ! Good to see you back around!
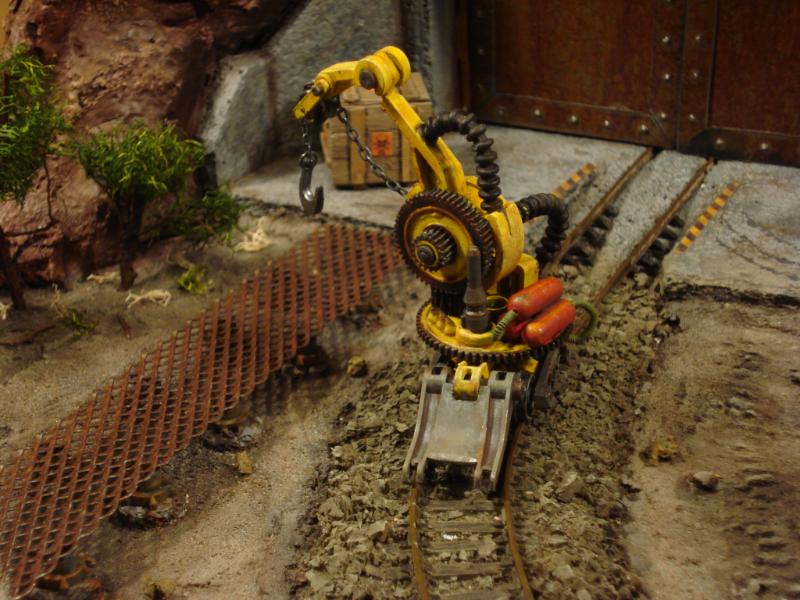
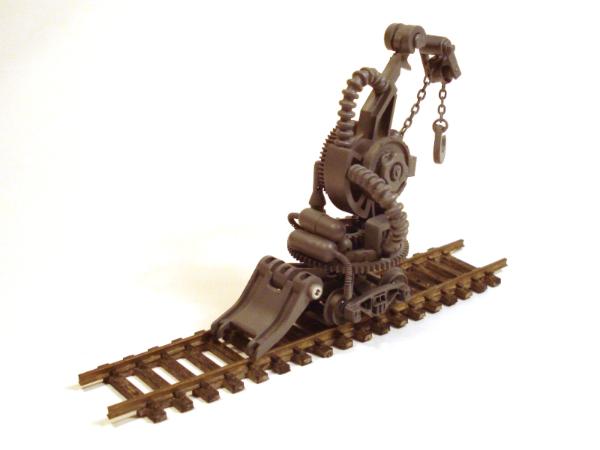
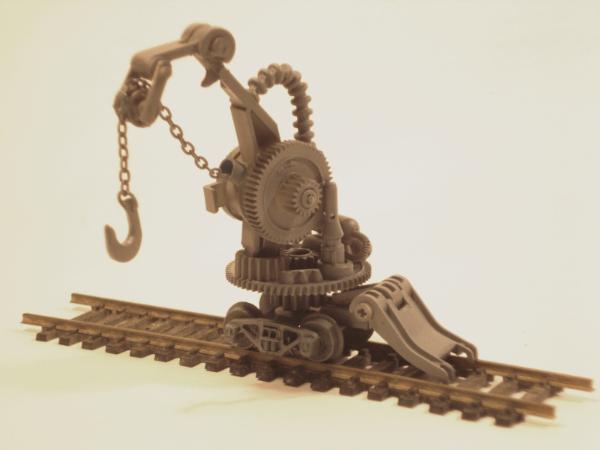
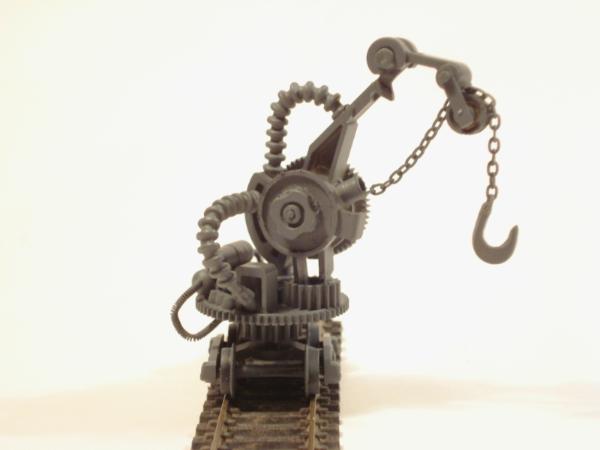
Last night's odd progress, having a couple hours to kill before I could pick one of the Cubs (and nothing on the TV to help keep me awake) after some cutting and glueing on the entrails of an inkjet printe and a former model train bogie:
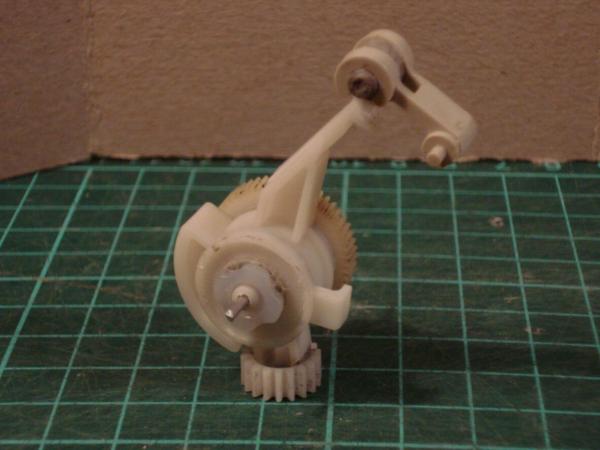
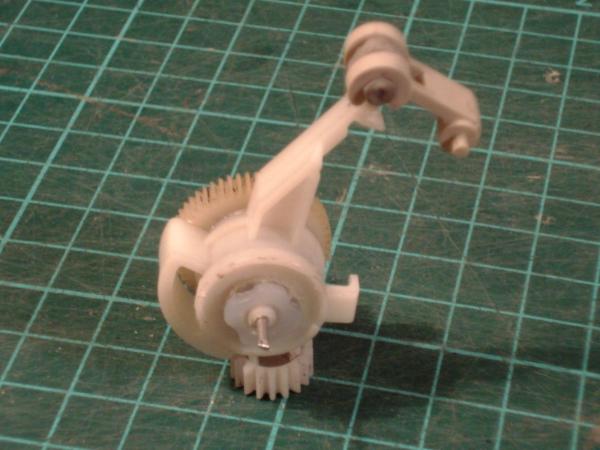
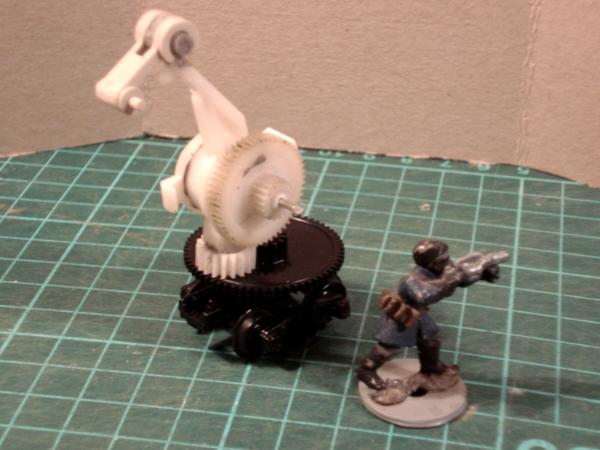
And for size reference:
With some more work, added details - rivets, of course - and a paintjob, it might do.
Your thoughts are welcome!
Thanks for stopping by.
65595
Post by: Camkierhi
Looks brilliant, just needs a cable or maybe a chain, there is a bit of cable coming your way, I think, cant remember now.
Over all looking great, the tire tracks are brilliant touch.
Hammerhead looking excellent also.
30344
Post by: monkeytroll
Everyone should have a clockwork dodo
Looks great, can imagine it looking very weathered and rusty...
63129
Post by: Littletower
Thanks, Cam! I was thinking a claw of sorts at the the end, but a dangling chain and a hook sounds very good, will try it out
I know a package is on the way, my lack of confidence on the post is keeping me on my toes!
Clockwork dodo? That really cranked a laugh!
As for the paint, I was thinking on an industrial equipment yellow base look - would contrast well with the base, I reckon -, with a well-used weathering on top.
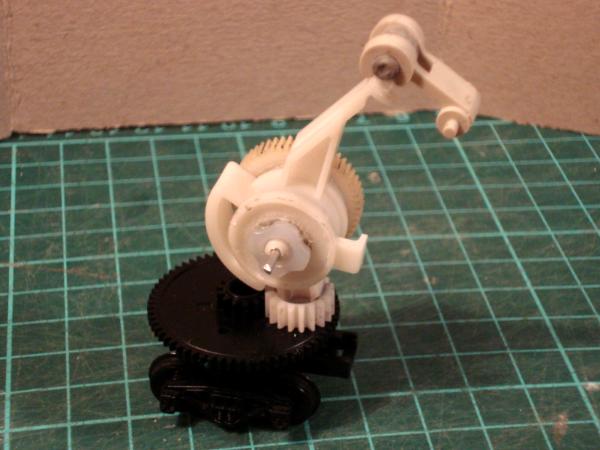
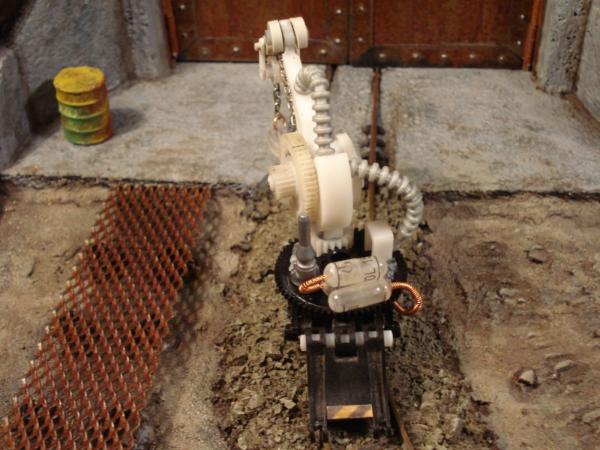
Mock-placed on the track:
As (barely) seen in the second pic, I also addressed the floating rails issue, will get a better shot of those for the next instalment.
Thanks for dropping by!
26790
Post by: Gitsplitta
Cool... a clock-work goose!
72556
Post by: Red Harvest
But does it drink?
I have a bunch of bits like that. Cool use of them. Inspirational too.
63129
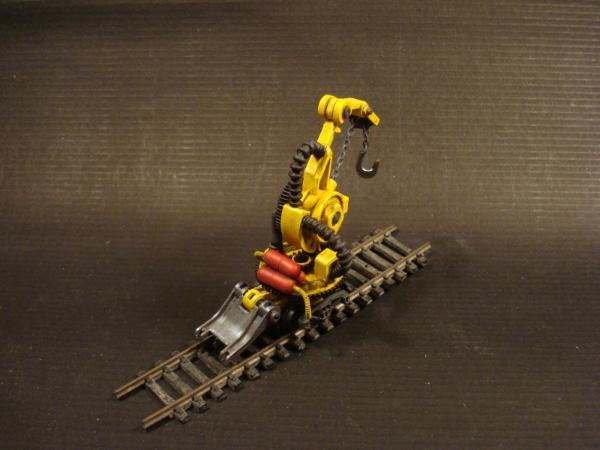
Post by: Littletower
@Gits: Thanks, but sorry, it's a Dodo!
@Red H: No, it doesn't. But it has a dozer (mini)blade! and hazard stripes!
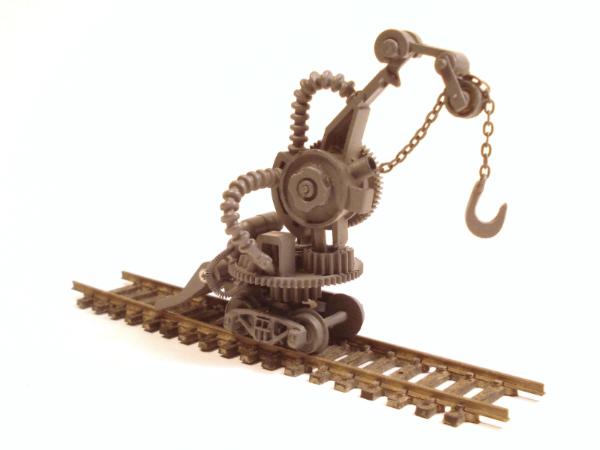
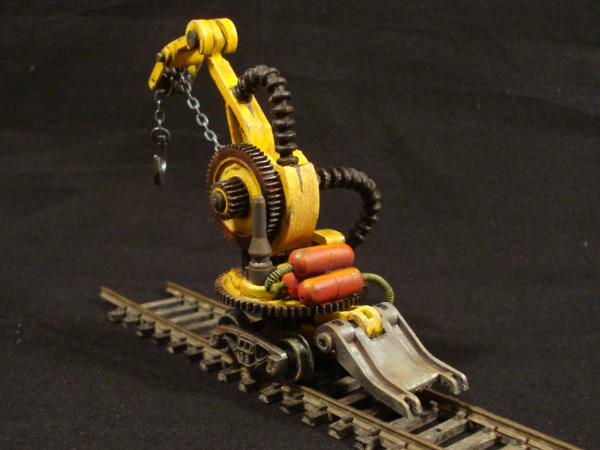
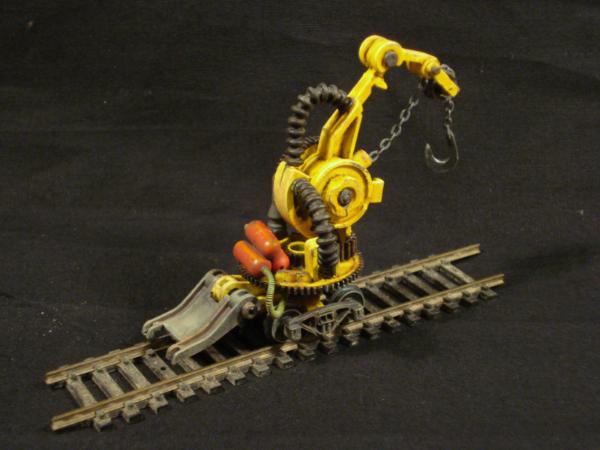
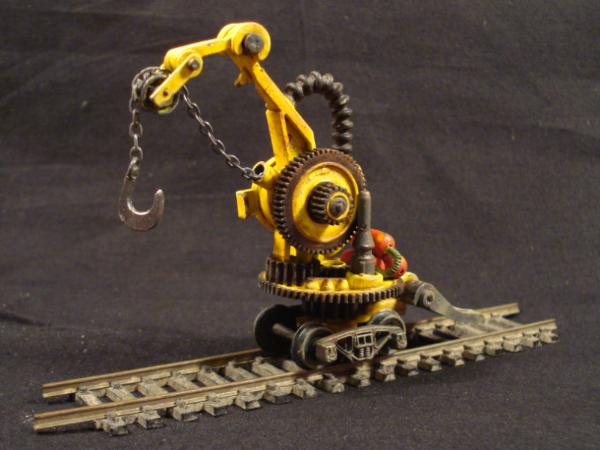
Might have gotten carried away a bit (I know that I got trigger happy with the cam!), but here is where it stands now: Mecha Dodo-Draisine
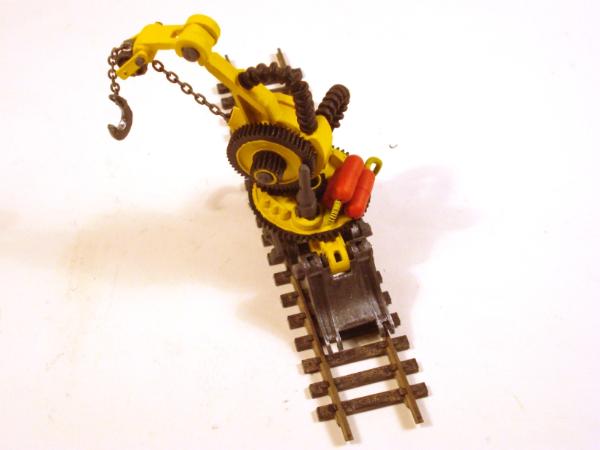
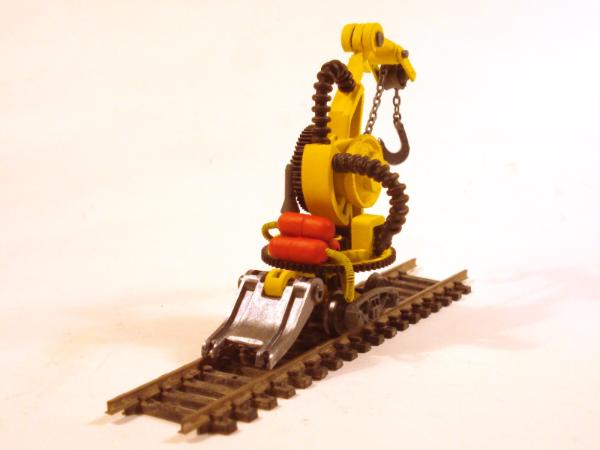
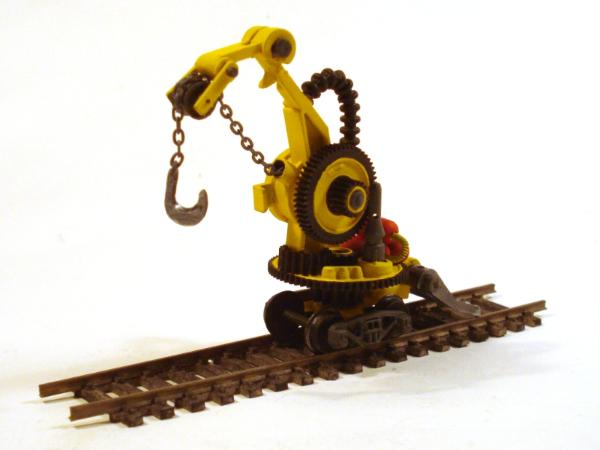
Front, crane, chain and hook:
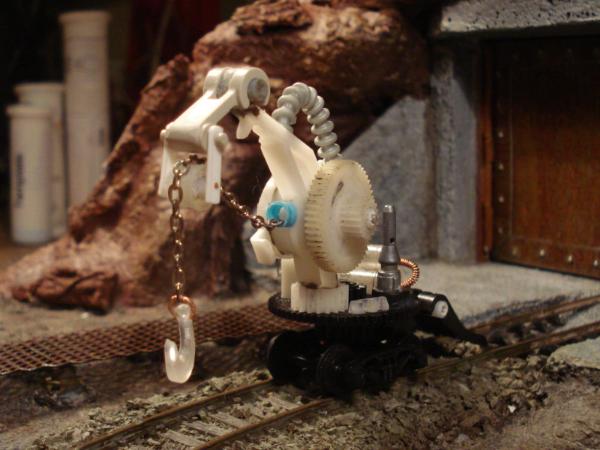
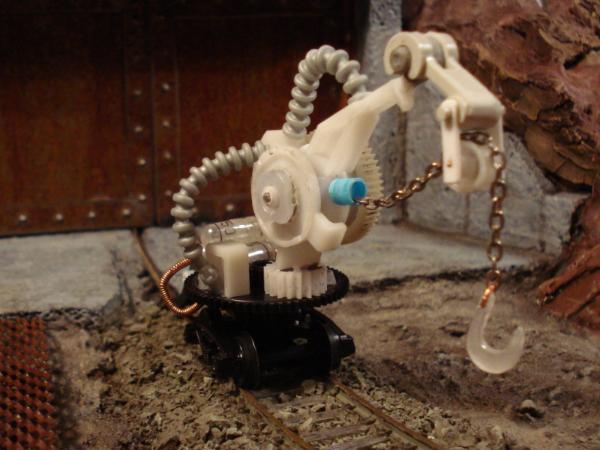
Sideways:
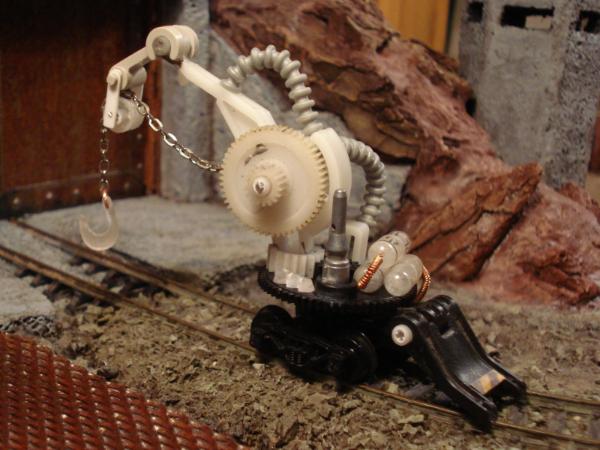
Dozer-blade/Pilot (cow-catcher) end view:
C&C are always welcome.
thanks for stopping by.
26790
Post by: Gitsplitta
Incredibly inspiring LT... bravo!
33919
Post by: Moltar
I come here solely for the eye-candy and it is delicious.
48594
Post by: dsteingass
That crane-thing is brilliant!
63129
Post by: Littletower
@Gitsplitta: Flattered, thanks!
@Moltar: You are welcome any time, and thank you.
@dsteingass: Thank you. It's great to see you back!
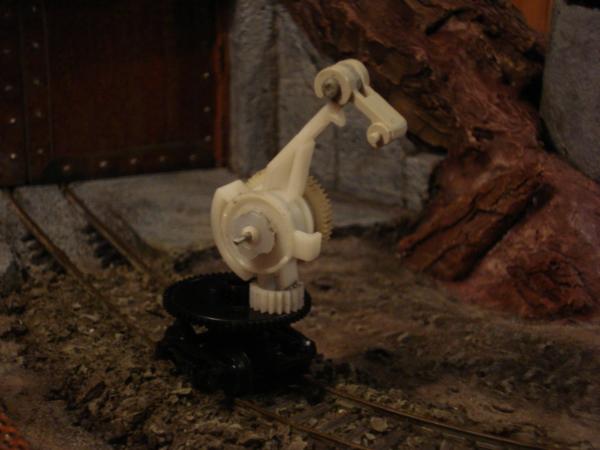
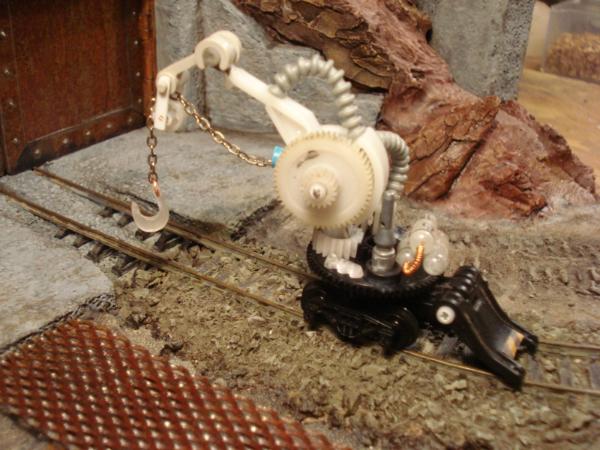
Primed, and once again it becomes something more than just the sum of its parts:
Thanks for stopping by.
76303
Post by: Warboss_Waaazag
Looks great so far.
63129
Post by: Littletower
Thanks, W_W!
Paint is next, will be trying some industrial gear yellow as base, and oil and grime to finish it up, yet undefined as to what to do in between...
C&C are welcome.
Cheers.
32676
Post by: Meph
Hehehe rail servitor, good stuff.
38276
Post by: M0rdain
Sorry for the delay, been on holiday but. Oooo that Dodo does look cool.
63129
Post by: Littletower
@Meph: Thanks. Yes, well, sort of
@M0rdain: Sorry those are over, but glad to have you back!
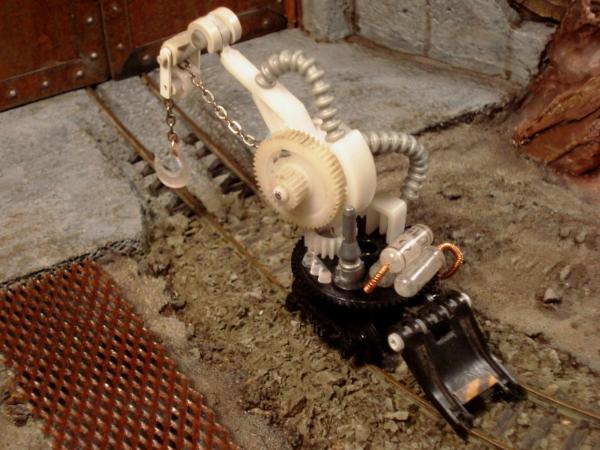
I could tell the sad and long story of the little ugly mechanical duckling that didn't want to turn yellow, but I wont. It did - though not without resistance - got some paint on. Not much. mostly only blocked yet, but progress nonetheless.

C&C is always welcome, and thanks for checking in.
72556
Post by: Red Harvest
El patito feo mecánico se ha transformado en un cisne steampunk. (o estímpunque?)
Those plastics do no take paint well at all. The only primer I have found which works is from Krylon (with Fusion for Plastic® technology. Lol) and is specific for hard to paint plastic. Looks like whatever you did worked well.
A construction equipment yellow? I would not have thought of that -- or to make such a thing in the first place. Which is why these P&M blogs are so cool. All sorts of original and creative stuff
30344
Post by: monkeytroll
Good job with getting the yellow on, coming together nicely now
63129
Post by: Littletower
@Red H: Never thought of translating that, I'd guess steampunk is OK (Otherwise, it'd be something like punk a vapor, and that doesn't do it at all ) Primer - Rust-Oleum 2x - grey this time, I've used the other two colours available (red - almost burgundy, not bad base for a very rusted finish - and white) without issue, even with low-adherence plastics such as these (I'm guessing heavy duty nylon for the printer gears). It was the yellow that played hard to catch and took a crazy number of coats to even start looking decent... It was either that or orange, and I figured this one was going to go along better with the terrain colours (orange would either blend in too much or crash with the sienna and umbers on the mountain side). Since CAT is black and yellow too, I might brand this one DBU . @ MT:Thanks, glad you appreciate it! Will see what the weekend brings... Cheers. Edited 5 times to show some people should not type - and less if not even using one's native language - on a Friday night after a too long week.
65595
Post by: Camkierhi
Its looking amazing my friend, amazing. Think I will have to try out Rustoleum for primer, I use that many different materials. Ithink the yellow will be perfect by the time shes weathers slightly, oh and will there be strips?
63129
Post by: Littletower
Thanks, Cam! I'm looking for a spot to put some hazard stripes as I type! Dozer could be a good place, but I kind of like the all-bare metal look, too...
Might mock something up and come back for checks later.
Managed to put some more time on the Drone-Alikes in between yellow coats:
(Brightness went over the roof in those, but they are just WIP pics)
Mustering courage to tackle the weathering on the Dodo next!
C&C are welcome.
Thanks for stopping by.
73546
Post by: pfibp
The crane looks really neat.
63129
Post by: Littletower
@pfibp: Thanks!
Painting stage two:

Thoughts, comments and criticism are always appreciated.
Cheers.
26790
Post by: Gitsplitta
Beautiful... now weather it.
63129
Post by: Littletower
Will do, as soon as I figure out some decent way to do it...
Ah, wait, found it: Gitsplitta's Chipping Tutorial and Gitsplitta's Sponge Rust & Soot Tutorial
Will give those a try next, belated thanks!
63129
Post by: Littletower
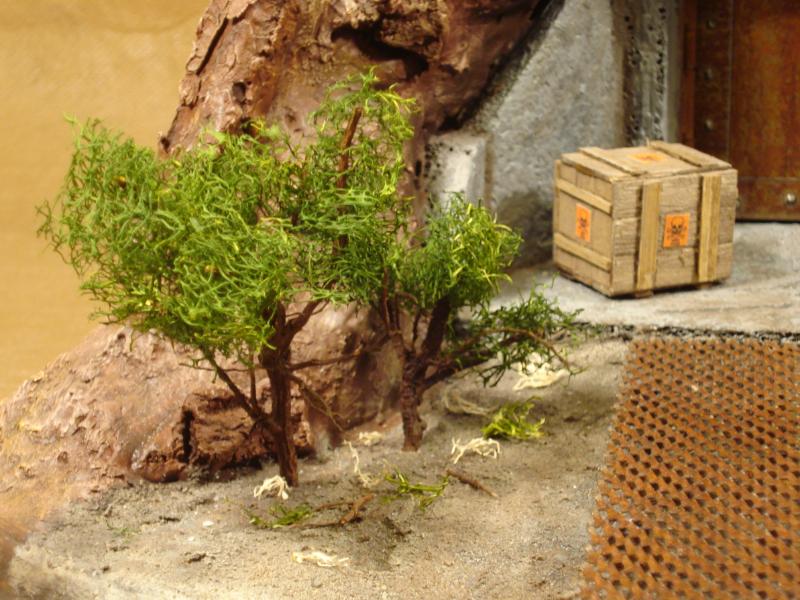
Didn't go on painting the draisine, but got some little woodworking and gardening done instead:
Side-views:
And above:
Ground view:
And close-ups:
Not done, but getting near(er).
C&C are welcome, as always.
Thanks for stopping by.
32169
Post by: Rogue Wolves
Wow. that is just really cool. The crane looks really nice!
30344
Post by: monkeytroll
Beautiful work Lt.
Stumped for criticism at the moment....
63129
Post by: Littletower
Thanks, Rogue Wolves and monkeytroll!
Forecast for the week is hectic, so not much will probable get done in the following days...
But the weathering and final detailing will be there.
PS: "Door scrapes around the entrance"? Brilliant First thing on the to do list now!
76303
Post by: Warboss_Waaazag
The terrain really looks good. Comes together quite nicely. I'm looking forward to seeing the weathering.
48594
Post by: dsteingass
63129
Post by: Littletower
@Dave: Those are great, thanks.
Such a heavy treatment would have required some forethought, though - some actual chipping scheme, at least -, and more texturing; I was thinking a slightly less mistreated state for this one...
Refs saved for a next, properly planned, massive rust effect, that will happen anytime!
In the meantime, and just because, a couple somethings totally unrelated:
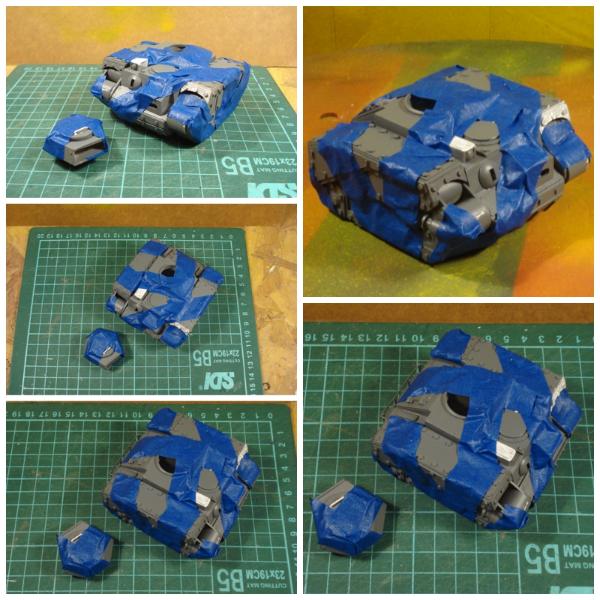
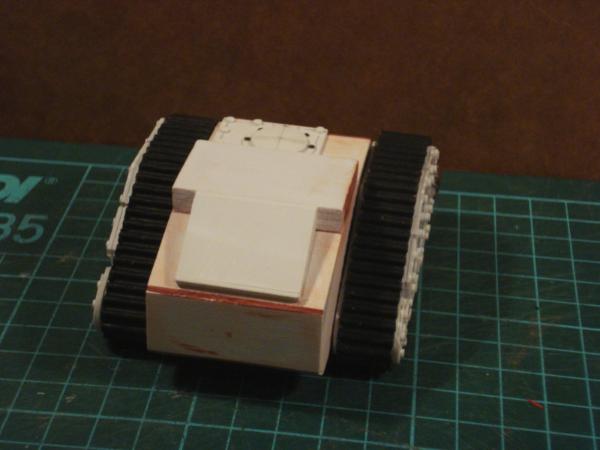
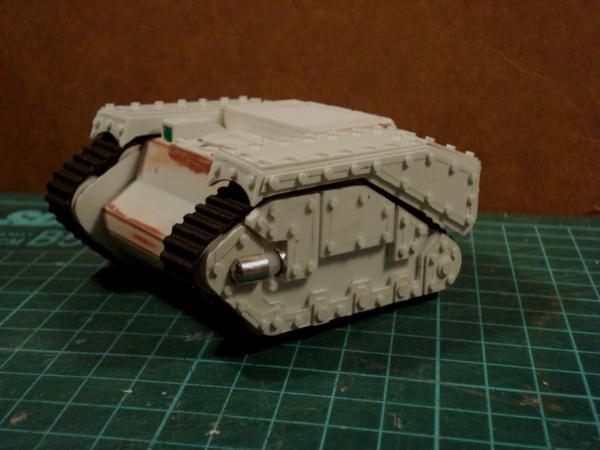
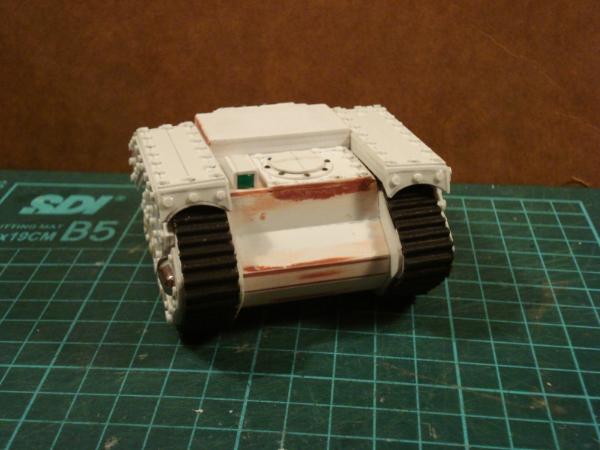
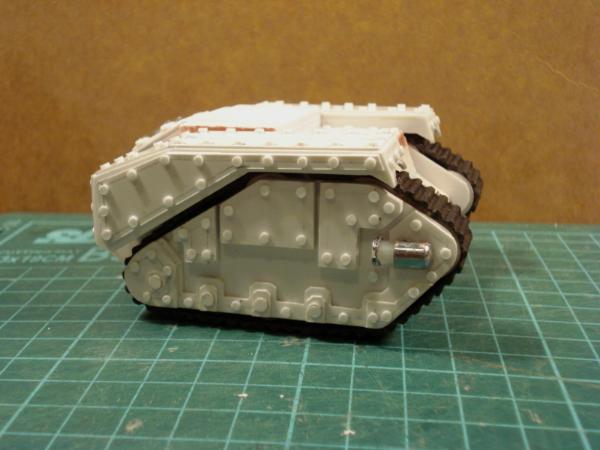
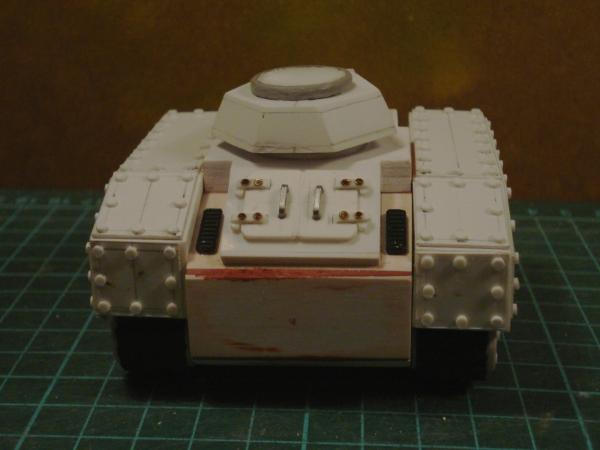
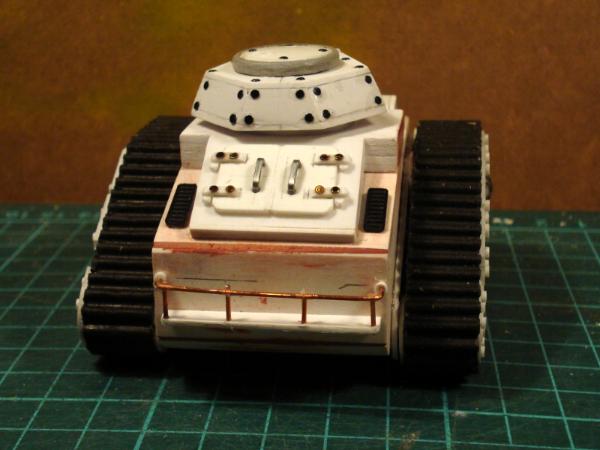
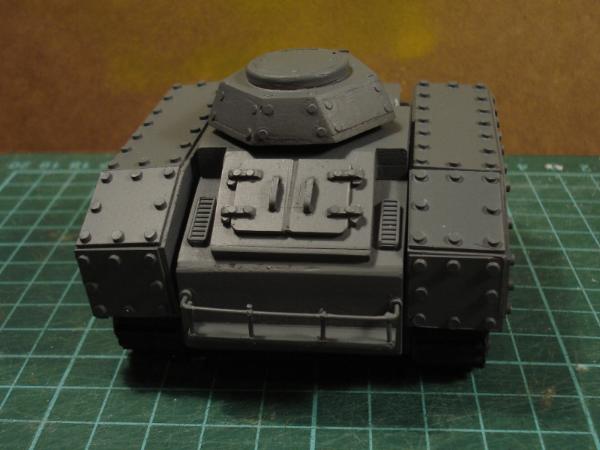
A very first stage WIP of a smallish tracked tank(ette); I was looking for a Centaur's pattern, found a Scorpion instead (closed instead of open topped, at least, do't know about dimensions):
(Tracks units are just tape-tacked in place for the pic)
And on the other hand, an attempt at six-legged servitor proxy I started to put together and I'm actually totally stuck at:
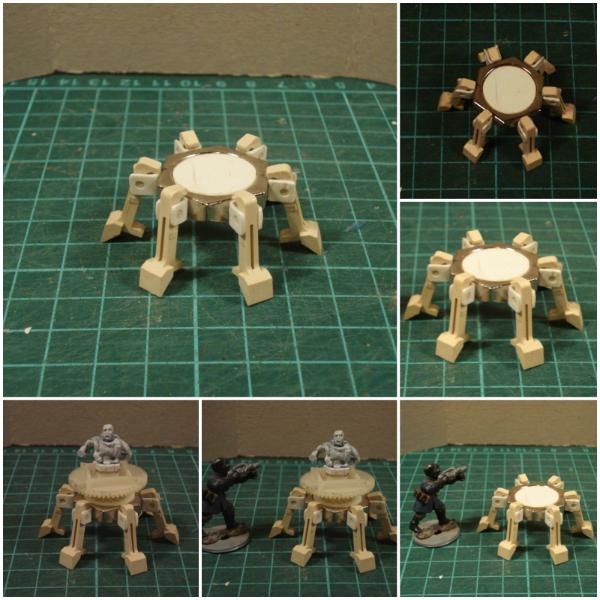
Chopped up figs and multi-legged things, I'm obviously under not too good influences lately...
Though I initially liked the concept for the legs, I see it too big now, the body gets "lost" on top of it, and I don't just see how to move it forward now.
I'll either save it for latter or just toss the bionic idea and topple it with gears and such...
That's all for now. What did you expect to see, a yellow Dodo?
Input, comments and suggestions are welcome.
Thanks for dropping by.
65595
Post by: Camkierhi
Tanky thing looks great, good size. Great deal of promise.
Legs look brilliant, lots of potential. Though you say they are a bit big, I would suggest make it a servator for your big tanks, heavy arms etc. Or what about a gun platform, a mobile Tarantula with twin linked heavy on top! Or maybe a mule, carrying packs and materials for your servator yet to be made?!
30344
Post by: monkeytroll
Sounds to me like you're having just the right sort of influences.......
Like the outline of the tankette - what sort of weapon load-out are you thinking of for it? Judging by the mini next to it I'd say it's a bit bigger than a centaur, they really are tiny things.
Servitor legs look good, but yeah, a little big for a human sized torso. Still, lots of options open for them...
Ogre torso, or possibly an ork nob should fit nicely on there for either a heavy weapon toting or heavy lifting type servitor
As Cam suggested it'll probably make a great base for a walking sentry gun
Room for a whole host of mechanical arms and tentacles coming from the platform for an insectile medical or engineering 'bot
Bottom stage of a rocket - or a micro drop-pod
The landing gear of an ornithopter
Mobile preacher's pulpit
Walking sentry post - a small tower with crow's nest on top of the leg unit
Mobile generator
Terminator torso could make the basis of a mechanicus magos
Drilling rig - screw protuding from underneath, with the housing and power atop it
Walking crane unit - similar body build to the dodo, but legged instead of rail-bound
Tubular body topped with a cupola/hatch from an imperial vehicle could be the start of a sentinel type, or an orky kan/dread
Clear tube for a mobile specimen jar
Possibly a sentinel hull and some forks for a walking fork-lift
Dreadnought torso may fit on there for a variant...
And now I think I'm re-stating ideas I had for Dr H's legs...... But most of those ideas would transfer to these legs too
62749
Post by: Dr H
Ahh, you're having a robo-leg dilemma.
Not a lot new I can suggest, but some expansions...
I'm liking the mobile turret idea,
and the mobile generator, but how about a mobile KFF-alike.
Walking specimen jar could become a psyker that can only survive in a kind of life-support tank, but can function like any other psyker... actually, that's a good idea, I might add that to my list...
Also, how about landing gear for a flying saucer a la Mars attacks. (that's already on my list)
Once you start adding arms and weapons and power units you'll soon find that the space up top gets filled.
63129
Post by: Littletower
Threefold thanks gents, amazing fuel for though in you insights. I will for sure keep coming back to those for future reference...
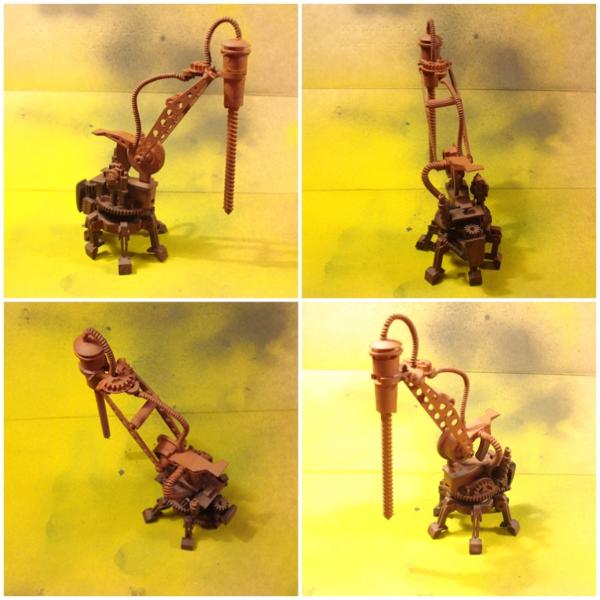
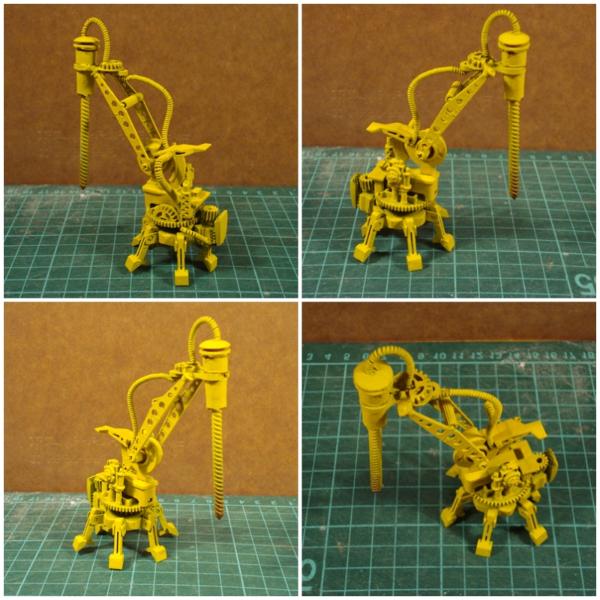
Tank has been put aside for a while, and attention was given to put something onto those legs then. Mix 'n matching two of the aforementioned ideas - hope some measure of justice has been made to them, too - a drilling six-legged Dodo cousin was hatched:
Hoses and cables coming next.
Further thoughts?
Cheers.
30344
Post by: monkeytroll
Excellent stuff, really like that. Those 'girder arms' are perfect, great find!
Hoses and cables will really bring it to life
Maybe bulk up the rear power plant a little bit just to balance it out?
62749
Post by: Dr H
Yeah, that works.
and, as MT said, needs something to counterweight the drill.
63129
Post by: Littletower
Once again, appreciated.
Tubes added, and, tackling the balance issue, straightened the drill downwards, and added an external engine overhanging the back to counterweight the arm.
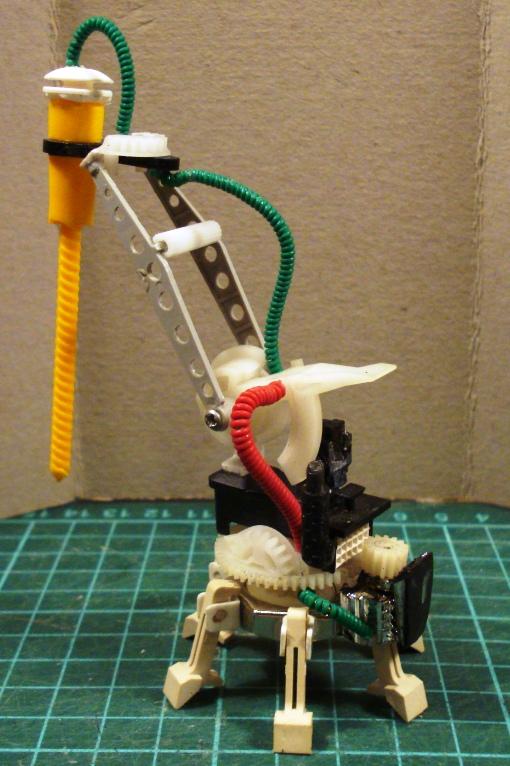
Turned out a quite decent experimental platform for some upcoming serious weathering tests...
Cheers.
72556
Post by: Red Harvest
Sooner or later you need to make a tachikoma.
63129
Post by: Littletower
@Red H: Might still do it... (Had to do some research there, though. I guess I'm a bit outdated on the genre, having dropped out somewhere between Cobra and Robotech in the mid late 80's!)
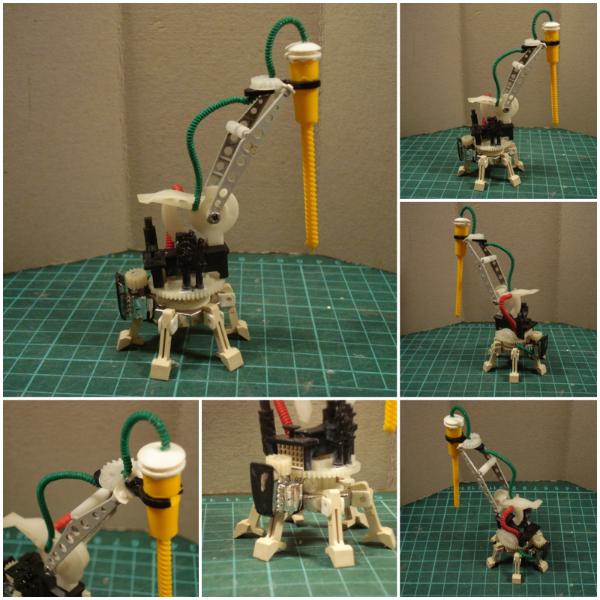
Just before calling the day - and the weekend - yesterday, got a last minute one-step prime and base rust:
Onto the week now!
Cheers.
73546
Post by: pfibp
Brilliant little drill.
I'm really amazed about what you did there wis all those different pieces.
30344
Post by: monkeytroll
Good job...the additional engine really helps with the balance, and it looks great with rusty primer in place
Very cool.
38276
Post by: M0rdain
I am going to have to keep an eye out for old printers to assault
72556
Post by: Red Harvest
 Littletower wrote: Littletower wrote:@Red H: Might still do it... (Had to do some research there, though. I guess I'm a bit outdated on the genre, having dropped out somewhere between Cobra and Robotech in the mid late 80's!)
Just before calling the day - and the weekend - yesterday, got a last minute one-step prime and base rust:
Onto the week now!
Cheers.
The only reason I know of them is because of the Manga and Anime influences to Infinity. Many of the robots are very tachikoma-esque, like these http://www.infinitythegame.com/infinity/en/2011/miniatures/kameel-remotes/ On the subject of 4 legged robots, for grins, google "US military robotic pack mule" and watch a few YouTube videos.
These little robots of your are very creative. I am impressed.
63129
Post by: Littletower
@pfibp: Thanks, it's good when things and bits do come together and make an actual something out of them!
@ MT: "Reinforcing" the back was a good call, thanks. And primer surely helps!
@M0rdain: Always! Printers are a great source of building materials and odd shapes. As are electronic appliances in general, construction dumpsters, recycling bins, road curbs... Maybe I should stop now...
@Red H: Thank you. And duly honoured, too . I missed the anime train growing up before cable TV - let alone Internet -, and having lost the knack for it once those became available... Maybe some catching up is due...
Got diverted to doing some woodworking for the weekend, only remarkable thing about that was the left overs, that might find an alternative use more suitable for this forum sometime...
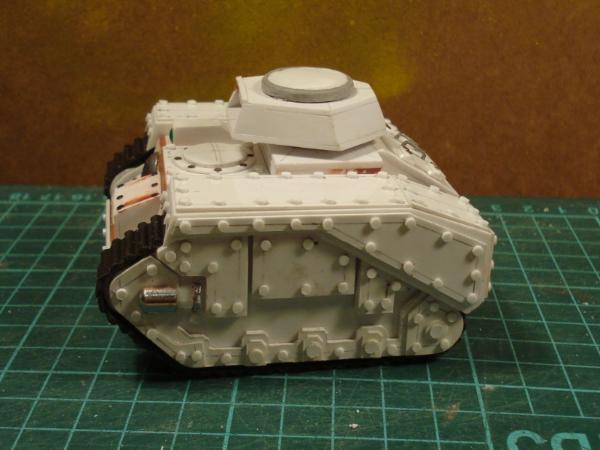
In between, I just blocked the yellow on the drill-robot thing, nothing of note there, besides how many coats that took, and went back to the tankette a bit: Haven't thought about the weapon load-out yet, just working from the bottom up, bulkied up the track units.
When there's not much progress to show, take a lot of pictures of the little there is!
Extra side armour panels:
And track tensors (is that the proper name for those?) and mock-tracks:

Reattached to the main hull for dry-fitting check:
That's about it for now!
C&C are welcome, as always.
Thanks for dropping by.
65595
Post by: Camkierhi
Looking brilliant, extra armour looking spot on.
72556
Post by: Red Harvest
Corrugated cardboard tracks? Hmmm. Perhaps some sloping parts or curved parts, just something to hide the boxiness?
Cable TV? What is that? I've never paid for TV. Never will. I think most of the good stuff is DVD only, or was.
Tensor is a mathematical term, IIRC. I encountered the concept ages ago in Physics classes. Are you referring to the road wheels or the other wheels? I think they are called idlers, or tension wheels.
63129
Post by: Littletower
@Cam: Thanks, and nice avatar, BTW
Hmmm as in Awesome, how come I never thought of that?, or as in I'm not so sure about those (or I am, and they just don't do it, but I'm too polite to say)?
Perhaps some sloping parts or curved parts, just something to hide the boxiness?
I thought boxiness was sort of a requirement for the 40k theme  Some slopes will be added with the superstructure over the basic hull. And the hatch is rounded...
Cable TV? What is that? I've never paid for TV. Never will. I think most of the good stuff is DVD only, or was.
DVD? I'm talking pre-VHS era here ! Five TV channels - one with such a poor reception that it almost didn't count! - broadcasting starting between 10 am and noon (awful when we stayed sick at home from school!) and a programming... Well, that last part hasn't really changed that much . Nowadays it just takes a bit longer to realize there's nothing to see, that's all.
Tensor is a mathematical term, IIRC. I encountered the concept ages ago in Physics classes. Are you referring to the road wheels or the other wheels? I think they are called idlers, or tension wheels.
True. did some better googling research. Idler (or tension) wheels, and a mechanism to adjust track tension (Draw bolts and cranked axles mentioned, among others).
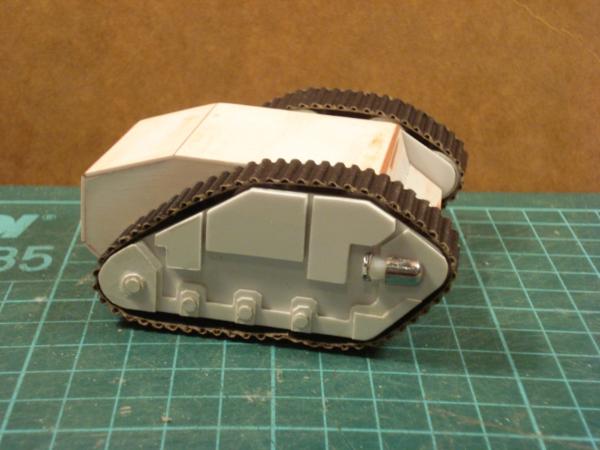
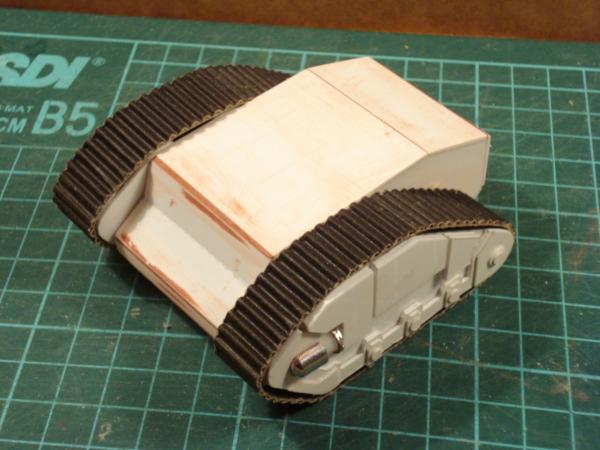
This thing over here:
I kind of like how those turned out, and they are shiny too!
Cheers.
2326
Post by: shasolenzabi
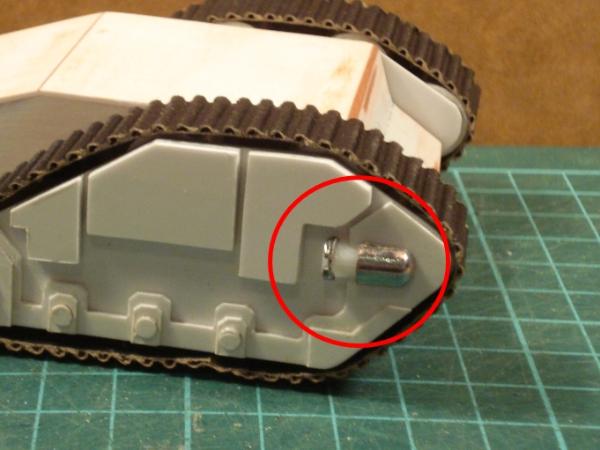
Word of advice with chrome plated plastic parts, you may wish to scrape that off as while shiny, they will also reject paint!
But like the light tank idea!
62749
Post by: Dr H
Ooo, shiny...
Nice work.
For me, the tracks are fine, but need those holes in the ends filled with something (or otherwise hidden).
72556
Post by: Red Harvest
Hmmm as in, I've used corrugated cardboard for stuff ages ago, and then stopped using it because it is, uhm, a problematic material. But it does look the part of band tracks. (a newish thing. A little research could explain it better than I.) I have no idea what that chrome piece is.
This Tanquecito is separate from the LoER entry, right?
63129
Post by: Littletower
@shasolenzabi: That raises a good point, thanks. Will run a primer test on a small cut-off before painting, and if that doesn't hold well, I'll sand those before hand.
@Dr H: Width trimmed, holes filed, tension properly adjusted, cardboard-obvious edges concealed... And that is only the tracks. Lots to do yet!
@Red H: Tankette is rather an independent project - a base for some serious weathering and heavy mud treatment, mostly -, the LoER "On the Road" piece has been waiting for some last parts (home colour printer did not live up to the tast!) to be procured, it'll get back to the workbench anytime now to be done before the deadline.
Cheers.
2326
Post by: shasolenzabi
No problem, I remembered it from making the orignal Klingon Battlecruiser kits and a motorcycle model years ago, the chrome would not hold the paint at all, or the glue, and I had to scrape and sand the heck to get anything to work.
72556
Post by: Red Harvest
Ah good. I can give real C&C then. Check out the Char B1 Bis, a French tank, for design ideas. I think it was what GW tried to copy when they made the Leman Russ. I've been pondernig the notion of scratch-building one for several years. Sooner or later I'll succumb.
76303
Post by: Warboss_Waaazag
Treads/side armor looks awesome! Automatically Appended Next Post: Red Harvest wrote:Ah good. I can give real C&C then. Check out the Char B1 Bis, a French tank, for design ideas. I think it was what GW tried to copy when they made the Leman Russ. I've been pondernig the notion of scratch-building one for several years. Sooner or later I'll succumb.
The Char B1 is my favorite tank design, as far as sheer size and tread mechanisms go.
63129
Post by: Littletower
Char B1 looks good, though for the period, I'll keep the British Mk I and successors at the top of my list!
HTML bouncing around after I followed that link, I found some nice-looking templates for trying those out at Landships II, in case the urge to build one gets too strong
Will get back to proper (meaning actual) progress, and maybe even pictures, as soon as possible.
Cheers.
89530
Post by: Miniature13
Some really interesting stuff you've got here. Making terrain or scratch building something is the part of the hobby i love most, just something so satisfying about the process. Going to keep my eye on this thread.
72556
Post by: Red Harvest
Excellent find on the Landships Le Agradezco.
I think there is an Arctic exploration vehicle that still uses that sort of track design, the Arctos Something to see anyway.
2326
Post by: shasolenzabi
Littletower wrote:Char B1 looks good, though for the period, I'll keep the British Mk I and successors at the top of my list!
HTML bouncing around after I followed that link, I found some nice-looking templates for trying those out at Landships II, in case the urge to build one gets too strong
Will get back to proper (meaning actual) progress, and maybe even pictures, as soon as possible.
Cheers.
I made a Char 1-b Bis into a malcador defender, used the turret and both 47mm guns,,,,,yes, it had 2 in the Tamiya kit, and made a Leman Russ Exterminatoir from that. I am likely goig to do some conversion of Mk-IV tanks to mobile platoon carriers.
63129
Post by: Littletower
@Miniature13: Hi, welcome, and thank you. Some more of that right below!
@Red H: As far as interesting designs go, I'd say the screw-propelled concept is the one most deserving entering the to-do list:

@shasolenzabi: Originally 1/35 kits? Those would make some quite bath-tub sized transports!
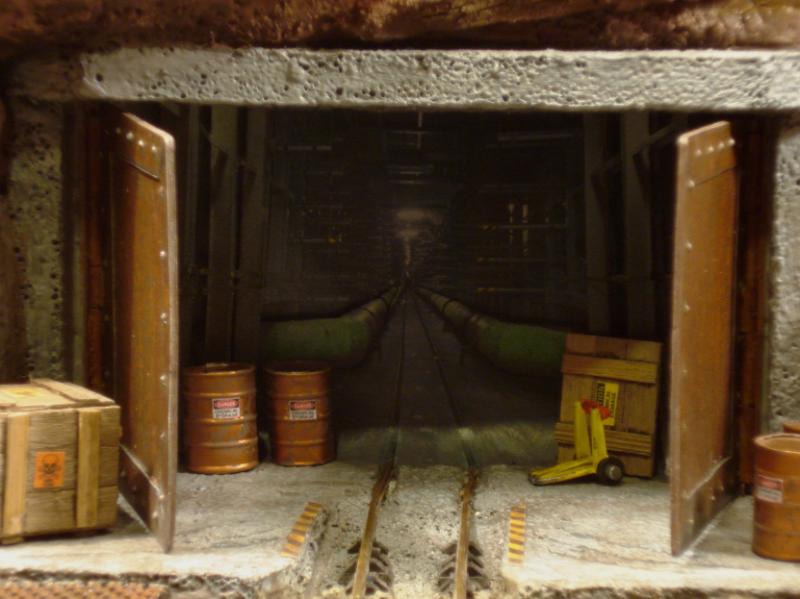
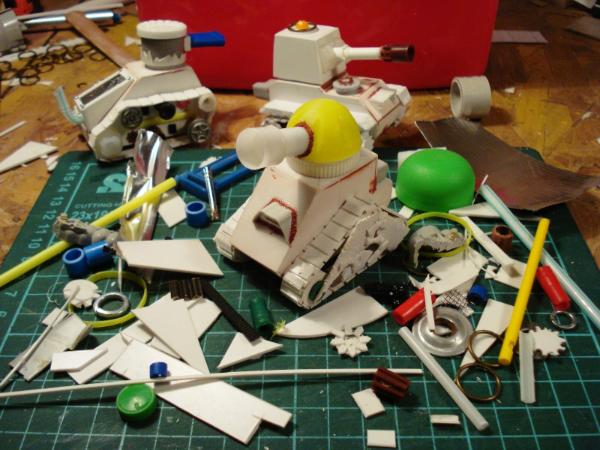
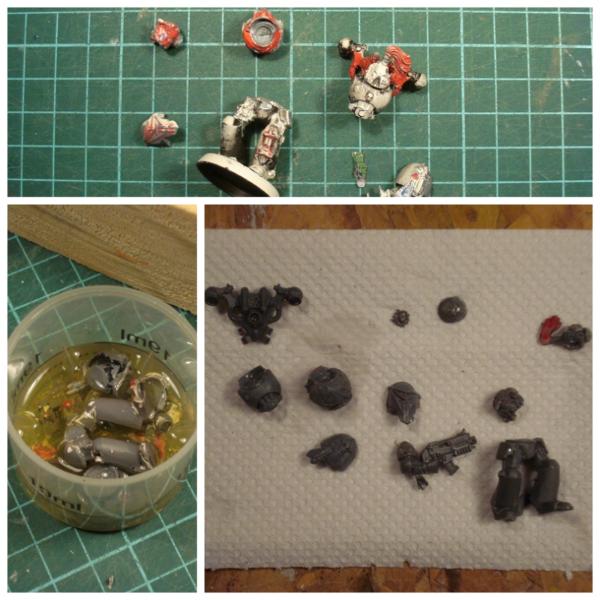
Jumping between projects - and with little time during the week - yield much progress anywhere, but managed to put a few more bits (and an initial case of rivet-pox) onto the tankette (more on that later), as well as addressing what should be the final stage of my LoER Comp entry: Interior decoration!
First mock-up:

Flat, and black & white. Reminds me of old-time TV!
Stepping up a notch:

More up-to-date : Full technicolor, and with a hint at 3D!
Two issues left: Blending the two floors (worried about how the printout will take paint), for one; and figuring out how to down-tone the gloss that makes getting a decent pict naught to impossible. The perceived misalignment in the tracks' perspective, on the other hand, is there to stay, I'm afraid, since it changes too much depending on the point of view to give it a decent definitive solution...
Grateful for your thoughts ans comments!
Thanks for stopping by.
26790
Post by: Gitsplitta
I like #2. I don't think you have to worry about blending the floors too much as the floors would likely look very different inside as opposed to outside. Different lighting, even different materials. More convincing if it's not consistent.
63129
Post by: Littletower
Thanks, Gits. The coloured one is the one staying on. The 3D layering of the prints worked out quite as expected, helped by some additional shadows on the the recesses.
Good point on the different floor colours too, might go that way instead of trying to make them look alike: inside vs outside contrast posses a good argument!
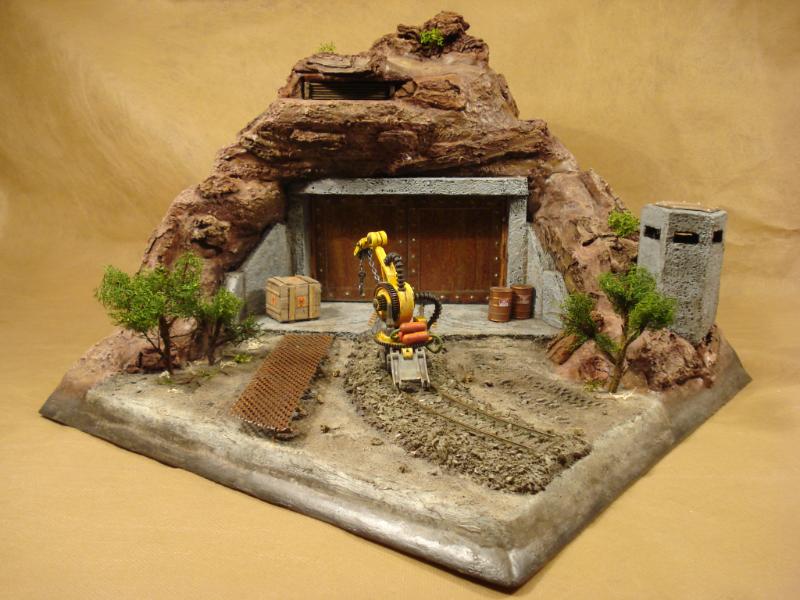
In an unexpected turn of events, eldest Cub and I found ourselves alone at home this evening, so we got chance for an actual - though small - game: Guard on Guard, 500 pts, patrol style, on a reduced board:
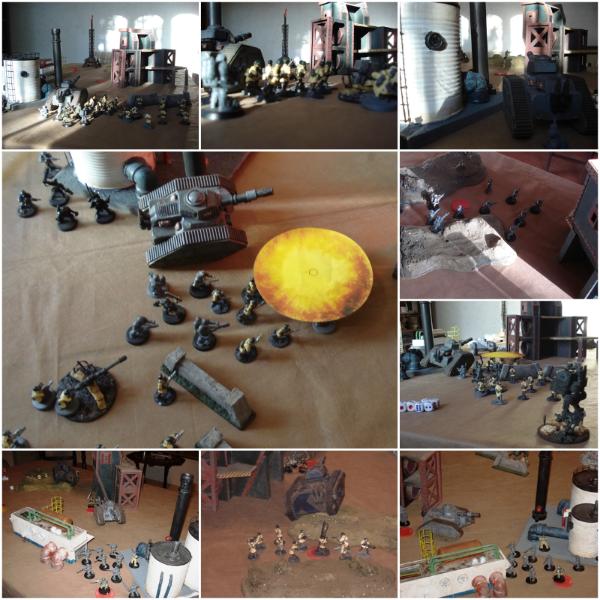
Three objectives (one on each deployment zone, third on the board centre), plus secondaries. Tight game, only defined at the closing of the sixth turn, after a failed - almost suicidal - attack left one of the sides completely outnumbered and without chance of a victory.
Cheers.
PS note to self: Must finish painting those troopers
22619
Post by: inmygravenimage
Looks fun; how.old is the Cub?
72556
Post by: Red Harvest
Littletower wrote:
PS note to self: Must get eldest cub to finish painting those troopers for me
Fixed for you. Saturday night gaming. Ah, good times
A screw propelled tank? Sure. Give it a try. Tank building is way down the queue for me, but there is a Char model in this thread, http://www.papermodelers.com/forum/armory/20123-char-b1-bis-scratch-build-1-25-a.html, but you'll need to register to download the stuff. I might do that.
63129
Post by: Littletower
@inmygravenimage: Indeed it is! Cub's fourteen, and into the game. The hobby, not so much... (Yet!)
@Red H: As for the painting comment, see above But we'll get to that, eventually...
Thanks for the link, will see into it
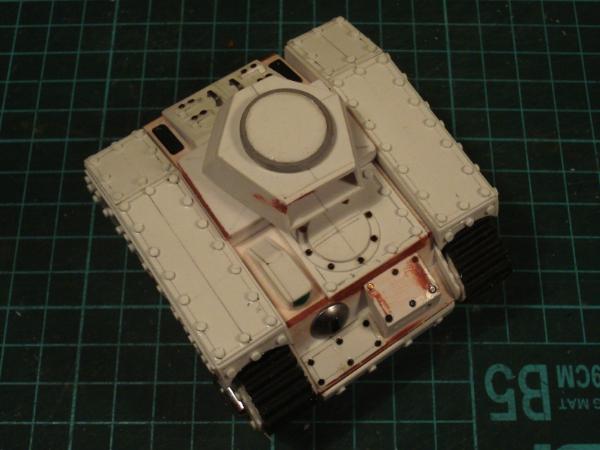
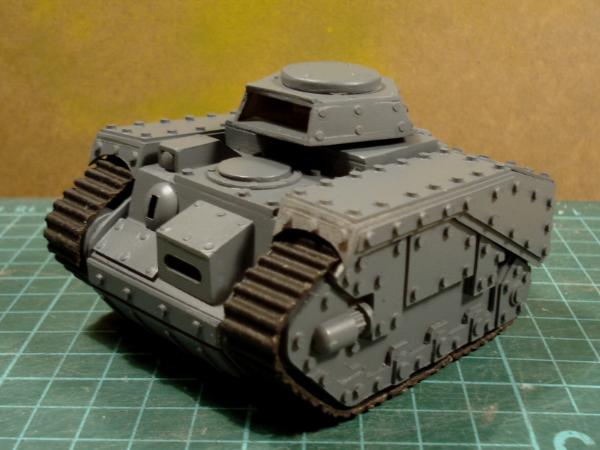
As mentioned before, some advance on the petite tank: Reworked tracks, some starting works on the unboxing of the hull, and first batch of rivets:
More to come, and any comments are, as always, welcome.
26790
Post by: Gitsplitta
Glad to hear your passing thing on to the next generation. Just show him how fun it is... the rest will come. Nice improvements on the tank hull.
63129
Post by: Littletower
Thanks Gits. Thanks, and yes, taking it easy! He's quite into it, has even get some friends to play as well, so all is well in that front. I reckon it's quite natural that he prefers gaming over building/painting for now, and. besides, being a game and a hobby, there's not an actual right/wrong answer, is it?
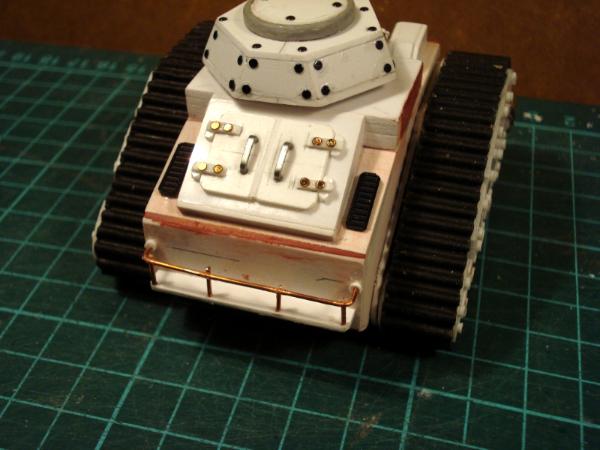
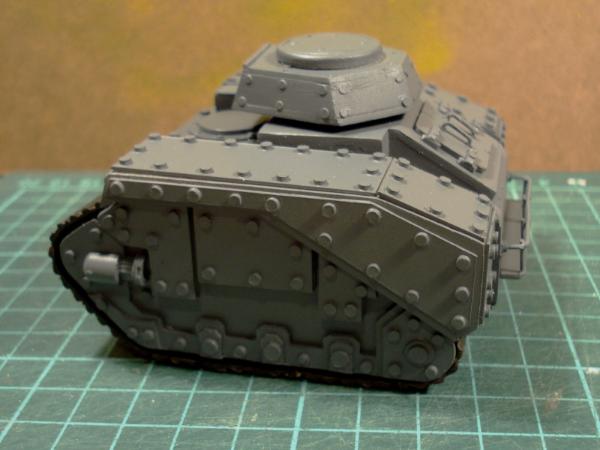
Got into full riveting mode, and added the track-guards, and some detail: engine door on the rear, side vents ( à la Red Harvest, though not up to his), and the beginnings of a front light:
Fenders are not definitively affixed yet, I'll probably move them backwards and lower them some before final mounting.
C&C are always welcome.
Thanks for stopping by.
65595
Post by: Camkierhi
Looking brilliant LT, hope your not getting too distracted from your LoER piece! Got to say this little tank does look brilliant though, giving me the bug for another tank. Automatically Appended Next Post: Littletower wrote:Thanks Gits. Thanks, and yes, taking it easy! He's quite into it, has even get some friends to play as well, so all is well in that front. I reckon it's quite natural that he prefers gaming over building/painting for now, and. besides, being a game and a hobby, there's not an actual right/wrong answer, is it?
Got into full riveting mode, and added the track-guards, and some detail: engine door on the rear, side vents ( à la Red Harvest, though not up to his), and the beginnings of a front light:
Fenders are not definitively affixed yet, I'll probably move them backwards and lower them some before final mounting.
C&C are always welcome.
Thanks for stopping by.
Looking brilliant LT, hope your not getting too distracted from your LoER piece! Got to say this little tank does look brilliant though, giving me the bug for another tank.
63129
Post by: Littletower
Thanks, Cam, glad you find it so!
Terrain piece is almost done, jut a couple (zillion) details to finish, plus picture taking, nothing to worry about!
, now I am worried!
(Problem is, most of those are paint-related, and haven't' got around to that lately)
As for the tanquecito, thinking about giving it a name. Had thought about a Centaur, probably too big and close-topped for that; initial template was a Scorpion, but I'll be departing from it more and more with the details (Liked the name, though).
Maybe Urisk?
Facing a turret dilemma now, will report back once sorted, or for help sorting it out.
Cheers.
76303
Post by: Warboss_Waaazag
That tankette is really coming along! I like the picture inside the doors of your train diorama, too. Looking awesome, Littletower.
2326
Post by: shasolenzabi
Very well armored tankette
as for @shasolenzabi: Originally 1/35 kits? Those would make some quite bath-tub sized transports!
The Char B-1 Bis is the same size as a FW Malcador(Length/height wise) I had to widen with external sponsons
The MK tanks will be between the treads as wide as a Leman or Chimera, but they are much longer, so I figure a 30man platoon carry, maybe 35(include the command team) as I built a well armed 25man carrier already from scratch and another 35man one from a 1/35 Alligator kit, figure the 4 of them can move my great coats across the no-man's lands and trenches of some enemies out there.
63129
Post by: Littletower
@Warboss_Waaazag: Thanks twofold!
@shasolenzabi: Seems then like I have a lot of building-catching up to do !
Having a hard time solving the turret issue.
The WWI - inter wars theme brought to mind the possibility of a cylindrical, pot-like turret. Classic looks usually favours more of a faceted look. Ah, choices...
Two alternatives:
Tall, cylinder shaped, mounting a heavy cannon (weapon can be changed/modified too, if required). Turret turns, barrel is mounted on a ball joint for independent swivel.
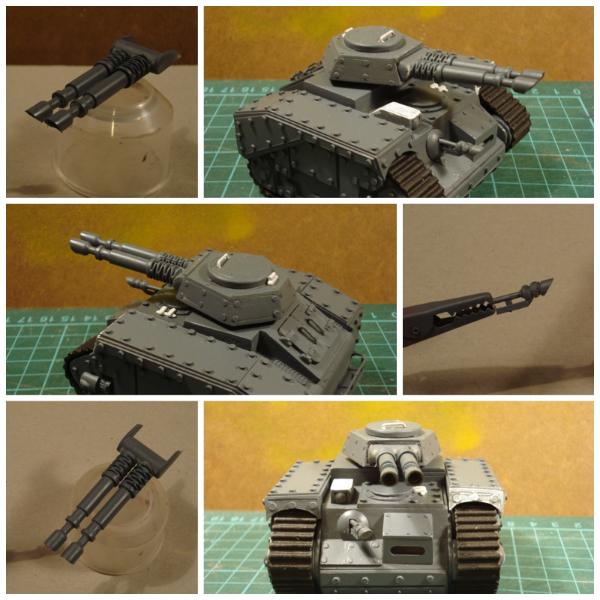
Gun is oversized, obviously, but for me, that's part of the 40K charm.
Or,
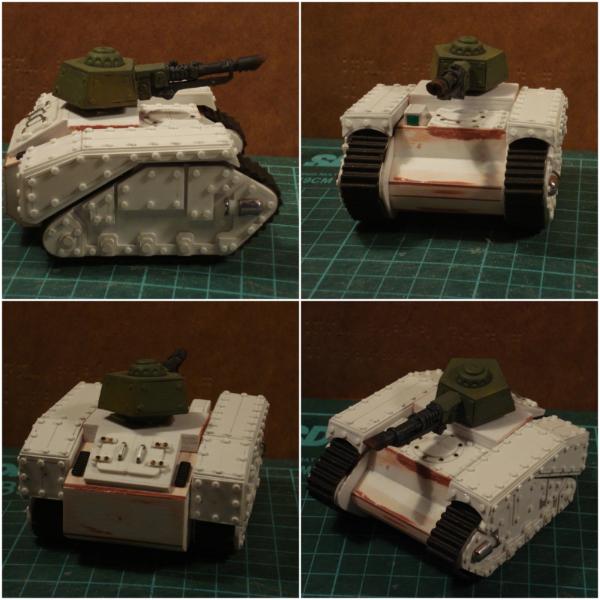
Pentagonal (and already riveted and partially painted, but that's because it was temporally commandeered from another piece!)
(Pics are zoomable in the Gallery)
Thought on the matter (or any matter, actually ) are, as always, very welcome.
Thanks for dropping by.
65595
Post by: Camkierhi
Oh grats on 25 pages BTW.
And angular turret looks better, though I would be tempted to go larger on the turret, but thats personal. Over all it looks fabulous.
25937
Post by: Nowlan
Both appear too small for the overall size of the hull, detracts from the overall aesthetic.
72556
Post by: Red Harvest
A larger turret, or ditch the turret for a cupola, and hull mount the gun. There looks to be too much of a gap between the turret and the hull too. To offer options.
63129
Post by: Littletower
@Camkierhi: Point taken. One for faceted and bigger.
@Nowlan: Long time no see, thanks for dropping by! And agreed, sometimes size does matter. Two down for bigger.
@Red H: Three for bigger; I'd call that a consensus. Not sure about a main hull mounted gun, but will try a new mock up before the final call.
Made the mistake of leaving the workbench a mess last weekend, and that - added to some long working hours, and a couple RL extras - discouraged any advancement during the week...
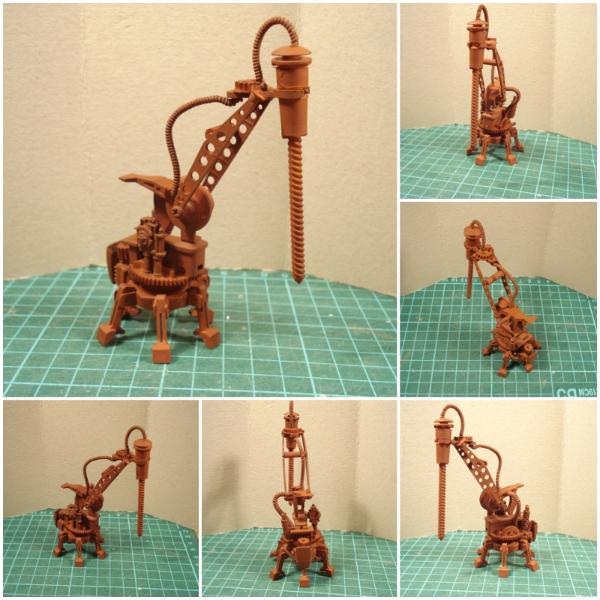
So, for lack of better things to show, some boring pre-shadowing and first basecoat pics of the drilll jig/servitor:
Thinking about finishing my LoER Entry this weekend, I've learnt better than to leave things up to the last minute...
Thanks for your thoughts and input!
Cheers.
32676
Post by: Meph
Wow, you keep pumping out amazing work, man. Excelent models.
2326
Post by: shasolenzabi
I do like the pentagonal turret for the tankette
63129
Post by: Littletower
@Meph: Thanks, hope this one doesn't disappoint
@shasolenzabi: As is, or larger yet? As soon as I get back to it I'll work on that, using this one as a base, but slightly bigger. And better fitting, of course.
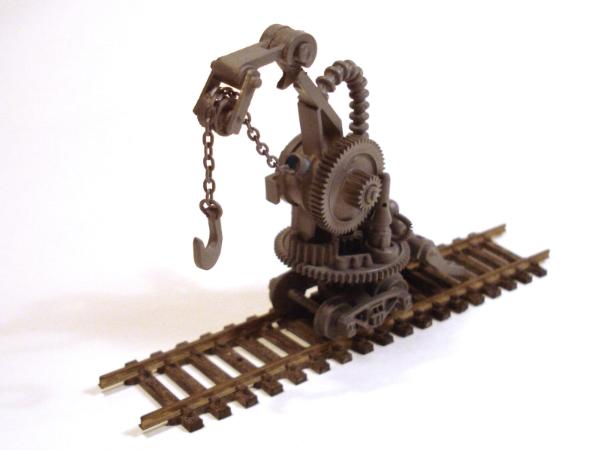
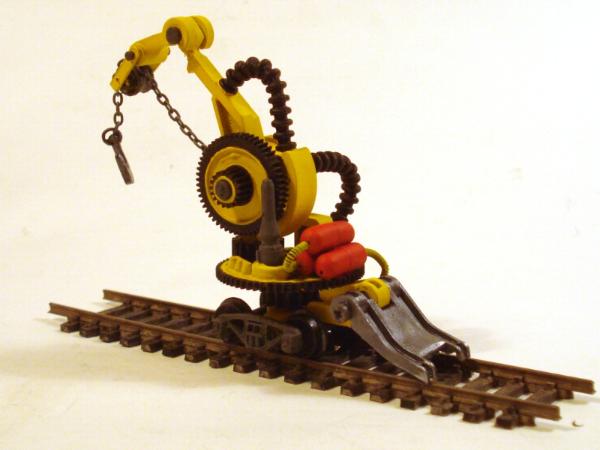
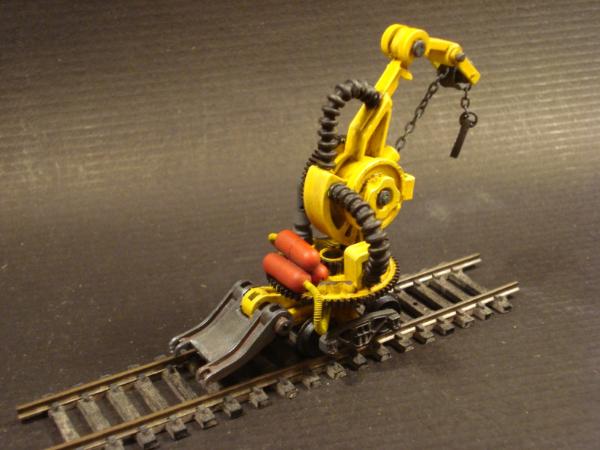
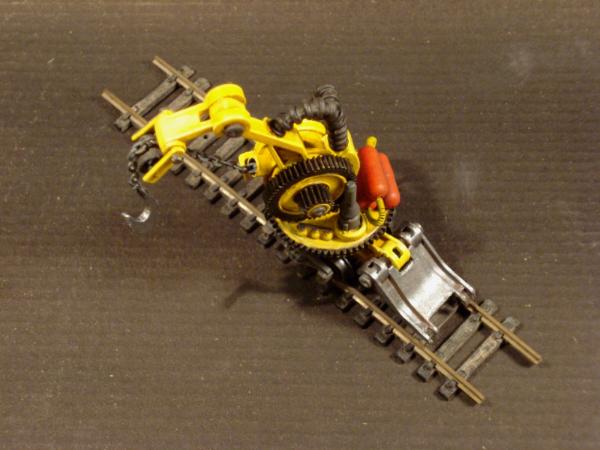
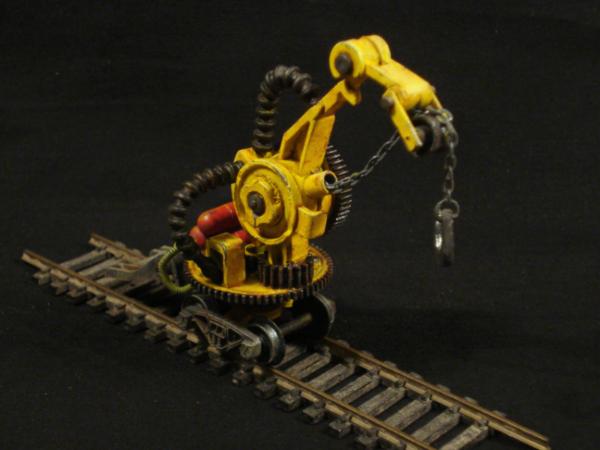
On the Comp's track, finished Dodo-servitor crane draisine:
C&C are welcome.
Thanks for dropping by!
2326
Post by: shasolenzabi
@shasolenzabi: As is, or larger yet? As soon as I get back to it I'll work on that, using this one as a base, but slightly bigger. And better fitting, of course.
Actually slightly bigger, and then is it a manned or unmanned servo turret?
62749
Post by: Dr H
Late to the conversation, but the turret could do with being larger. At least to fill up the majority of the space between the tracks.
Also, as noted from my tank project, spaced armour can make a small turret appear larger than it really is and can rectify the balance in this case.
Nice work on the things that I'm allowed to comment on.
76303
Post by: Warboss_Waaazag
Nice work on the Dodo! And as far as turrets go, I much prefer the cylindrical one.
26790
Post by: Gitsplitta
The crane turned out wonderfully! Beautiful work my friend.
65595
Post by: Camkierhi
Crane is spot on matey. Good work on the yellow. Going to be a good competition. You have knocked out a great piece yet again.
63129
Post by: Littletower
Thanks gents!
Tankette is in the back-burner for the time being, LoER Comp's deadline coming in next weekend, so efforts'll go there for now...
@shasolenzabi & Dr H: Will work on a bigger version - extra spaced armour, specially on the sides, does not sound bad at all, BTW -. As for the crewing issue, I'd guess commander manned turret/main gun, driver (maybe manning a secondary front-facing hull gun as well); if needed, an auxiliary loader if the heavy gun requires it.
@Warboss_Waaazag: So did I (on the drawing board at least, not so sure after dry-fitting it), but it seems the rounded one got out-voted! Saved for later use, of course, might get a come-back elsewhere...
@Gitsplitta & Camkierhi: Yellow is TOUGH! (Hats off to those brave ones that paint armies in it!), glad you approve!
As far as finishing touches go, scratched some scatter drum-barrels and crates to spread here and there:
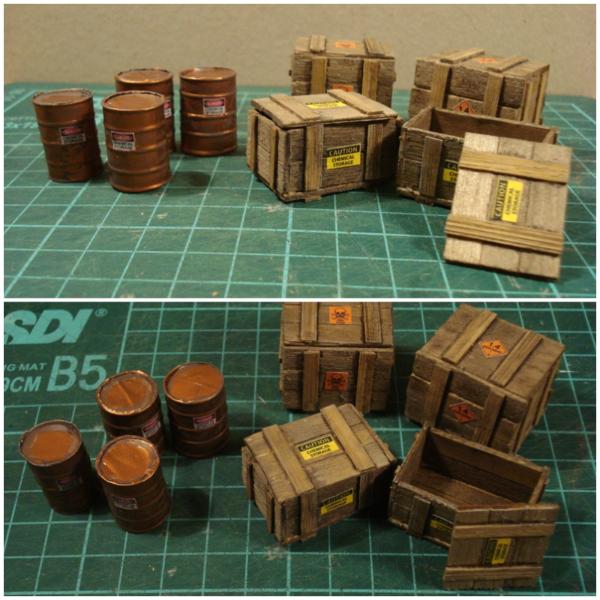
Almost there now...
Thanks for stopping by.
22619
Post by: inmygravenimage
Hmm. I definitely commented, but it seems to have been eaten by the warp. Anyway, great job, love the round turret!
65595
Post by: Camkierhi
Fantastic crates and barrels, brilliant.
52734
Post by: scrunty
Those crates are great, i think i might have to steal the idea though, ive been working with balsa wood/lolly-sticks a lot recently and these can eat up a bit more of my supply.
I also might have to steal the idea for the railway machine, i know my dad's got a load of broken/spare model rail knocking about.
Kudos on all the work, the attention to detail is fantastic and the finish is staggeringly good!
63129
Post by: Littletower
@inmygravenimage: Worry not, and thank you. That reopens the question, though, since the cylinder shaped turret is gaining adepts, too. Ah, decisions...
@Cam: Once again, thanks!
@scrunty: Hi, welcome, and thank you. Praise the coffee stirrer! Ideas are there for the taking, so please, go ahead. Same goes for the rail-based contraption, and best of lucks, too!
Last piece done and coloured:
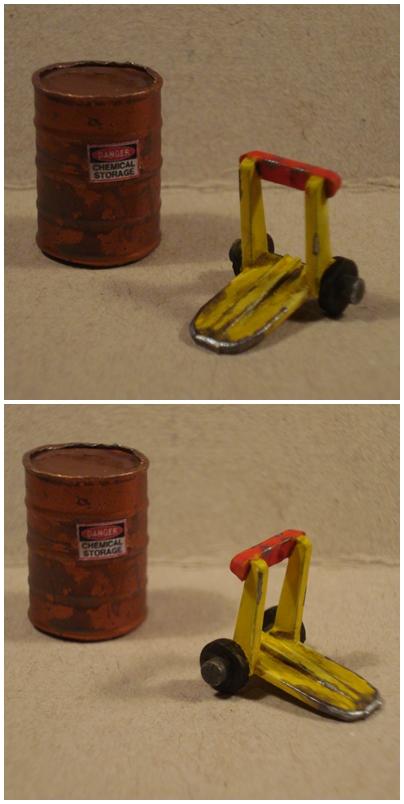
Now, where did I put that backdrop...?
Cheers.
22619
Post by: inmygravenimage
The metal edge on that is perfect
72556
Post by: Red Harvest
Te diré lo mero mero. I have that exact piece that you have so convincingly converted ( well, by just painting) into a hand truck. Never occurred to me to do that. Golpe de Maestro. Very cool.
It is some sort of bit from an old VHS cassette, for those of you who don't recognize it.
63129
Post by: Littletower
Thanks, Graven!
Red H: Just painting? Just painting? Painting is the though part, mind you!
Now, seriously: Thanks , flattered that you think it so!
Well, it's done; this is what I'm up to as now:
(Not proving an easy subject, by the way)
We'll see how those come out.
Cheers.
72556
Post by: Red Harvest
Scratch-building>???>???> Painting>Kit-bashing. The order of things. And no, nothing comes before Scratch-building, except the Almighty, who, if you don't mind a bit of blasphemy, proved to be one hell of a scratch-builder himself, eh?
63129
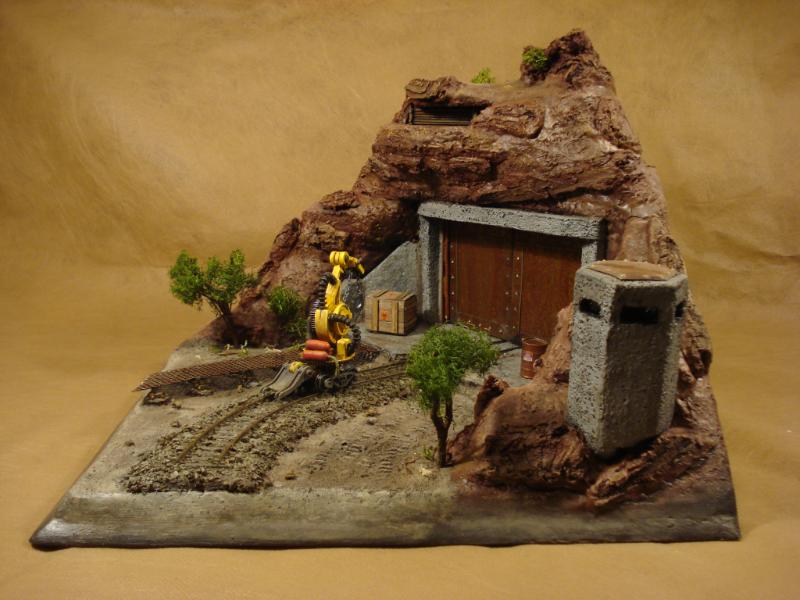
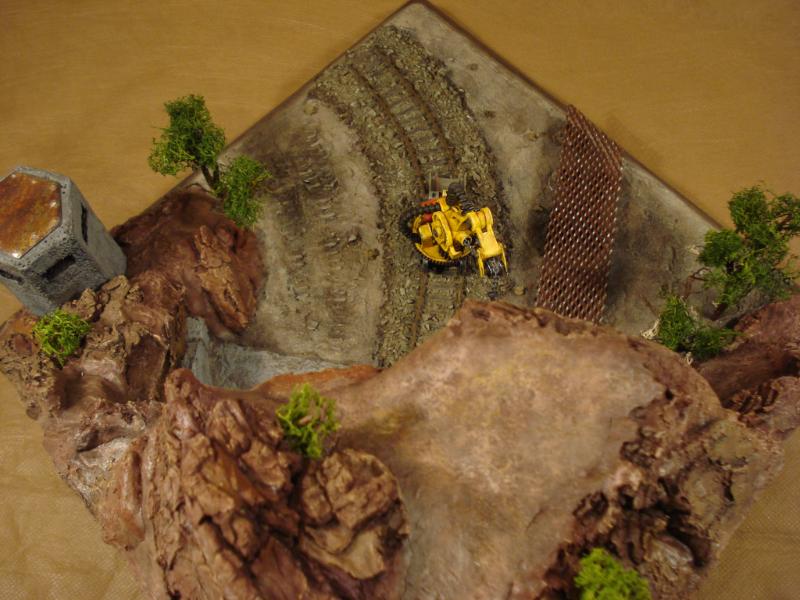
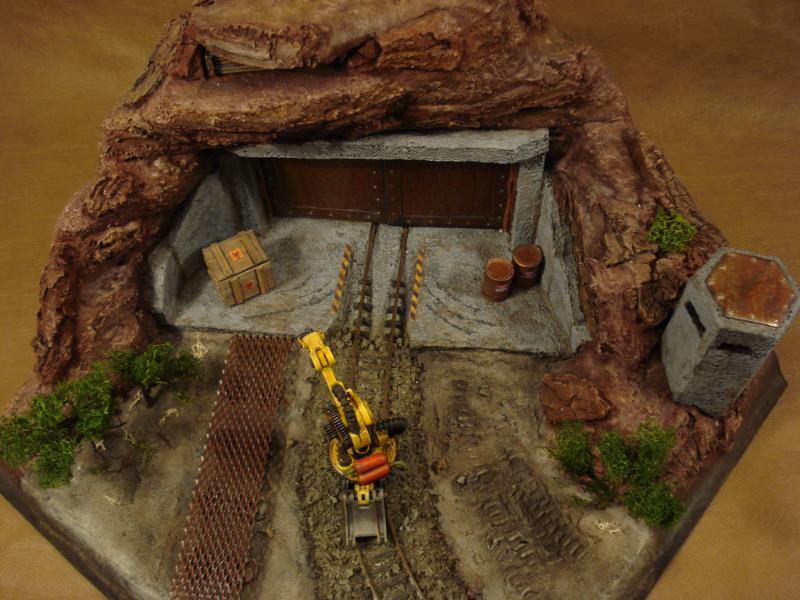
Post by: Littletower
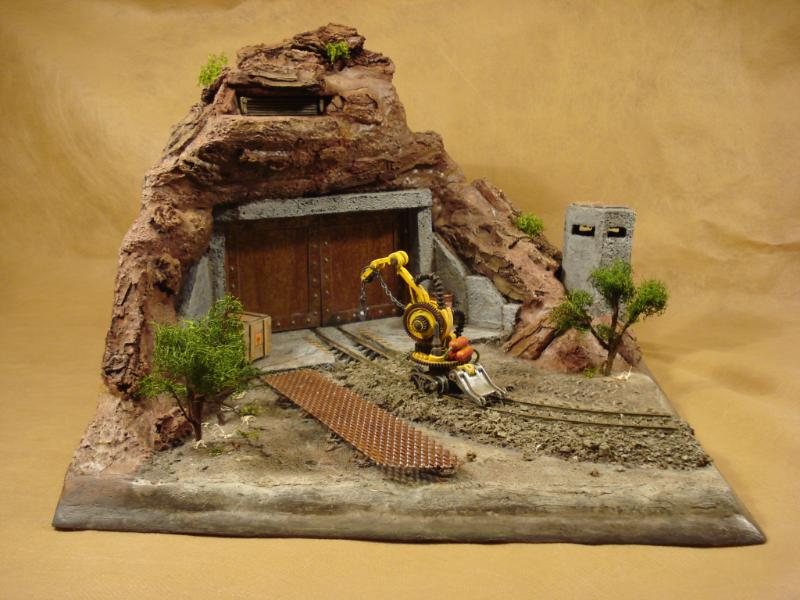
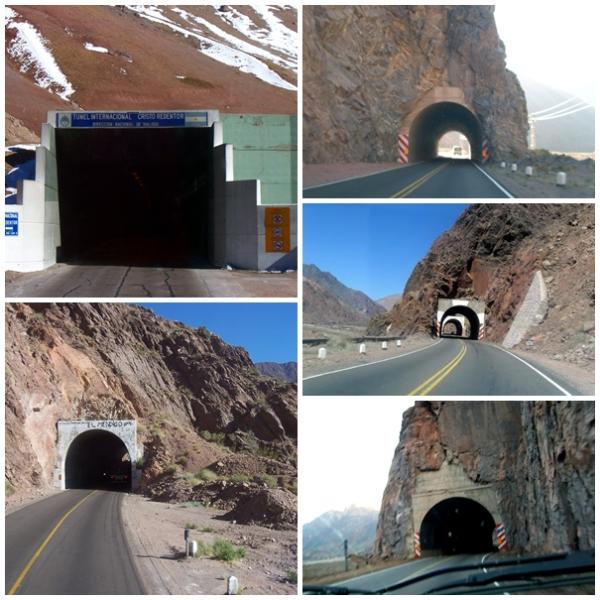
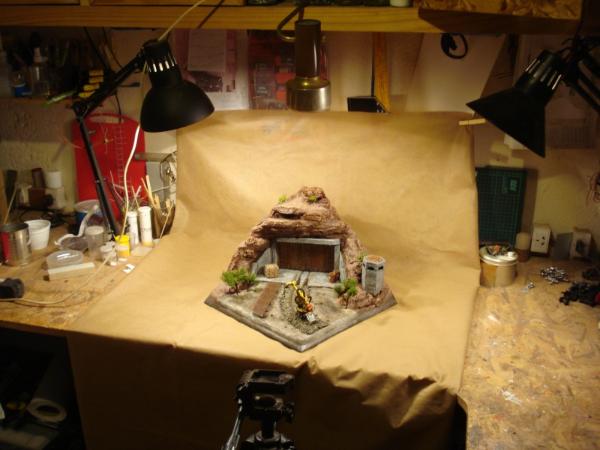
Tittle says it: LoER Terrain Comp Round 11: On the Road. All roads do lead somewhere

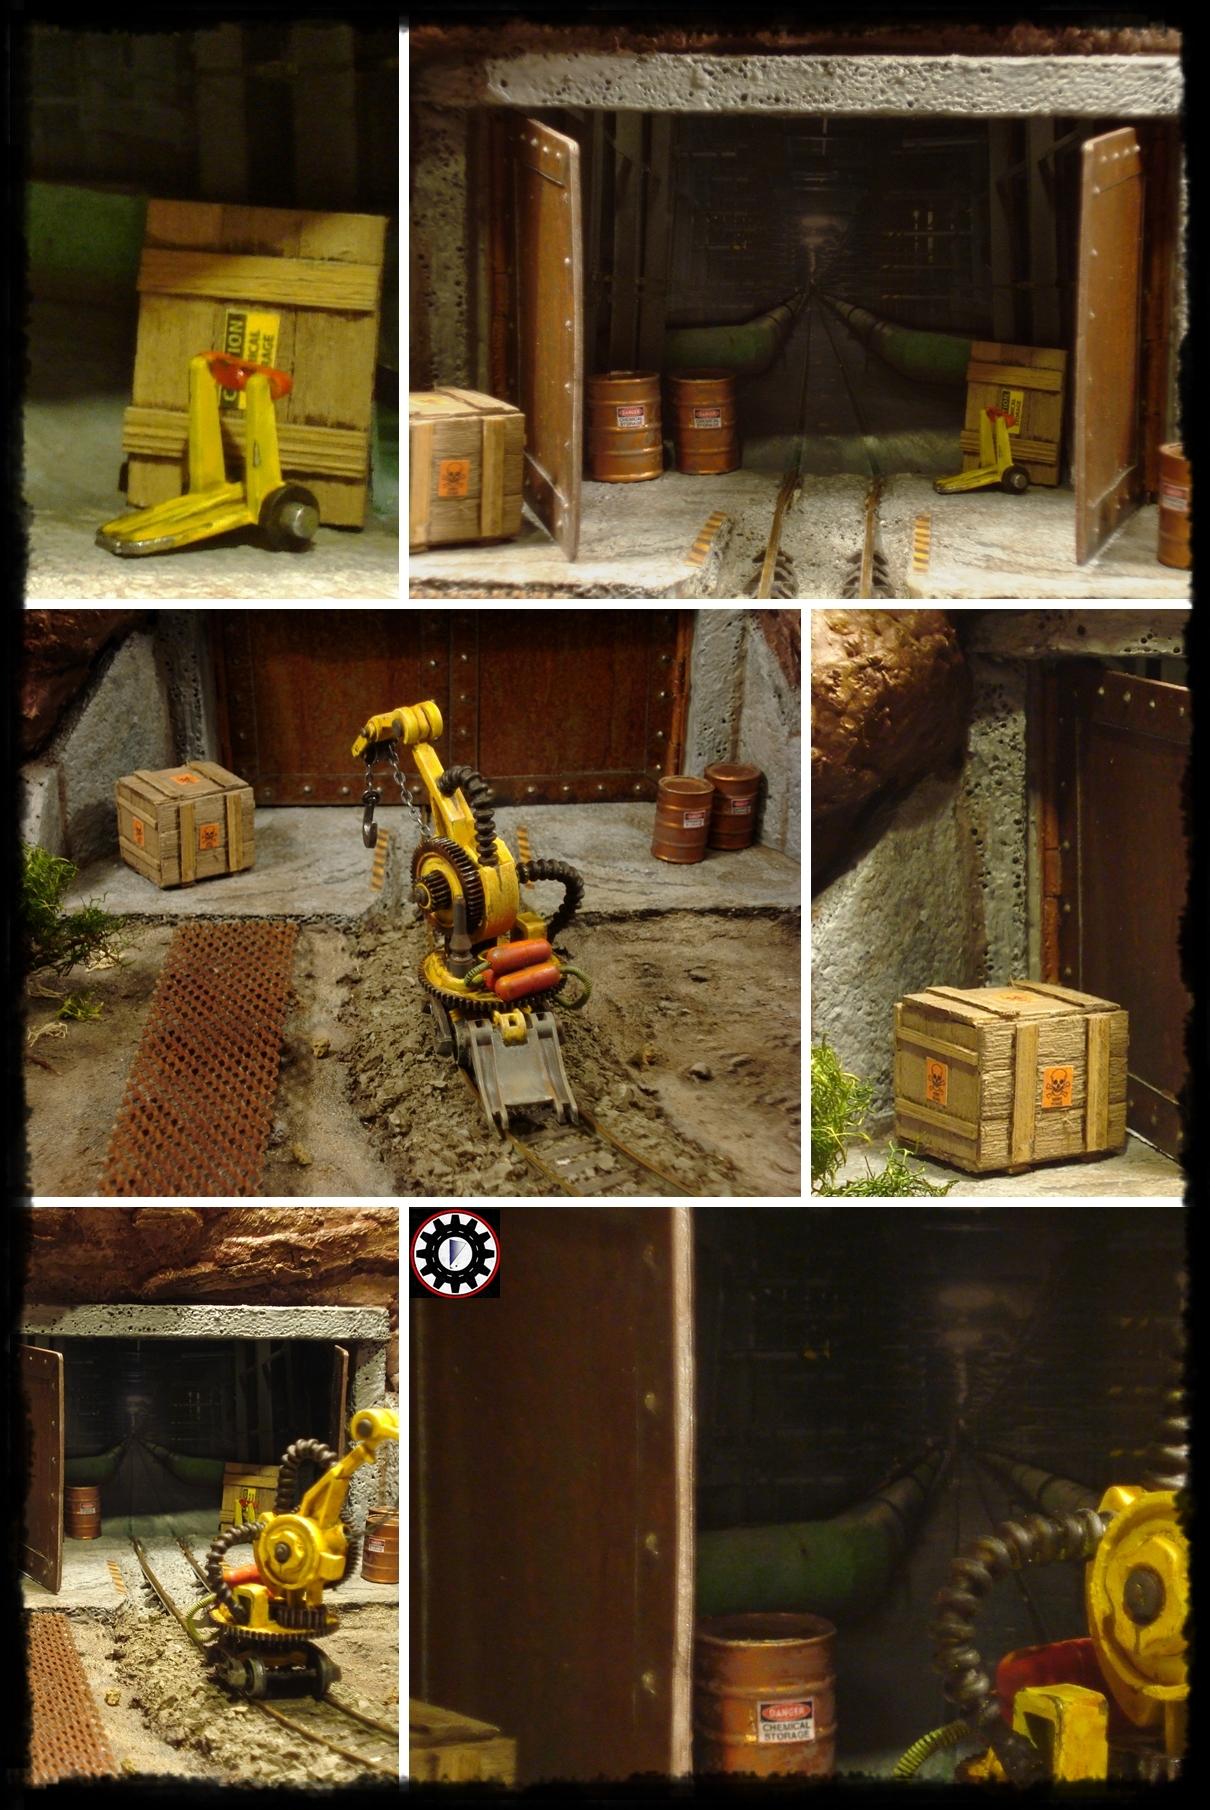
Mass picture blanket:
Wide shots:
Up-close and personal:
And a gate. A (rail)road must take somewhere:
Closing scene: leaving through an open gate:
Afterthought
Great theme. Lots of possibilities. Some interesting guidelines, too, and a couple new and/or different things I wanted to try.
Going over the rules:
Got the road there (three, actually, if given some leeway), and using some of those tracks sections I'd recently dug out from some long gone past was great. Scratchbuilt too ( sans said tracks) most of it, in one or another way.
As for size, I kept to my self-imposed 30x30cm square base, mostly because I've already done others like that, and I think (hope) uniformity might make them easier to store. (And I might be slightly OCD, but please keep it quiet about that)
Dioramas and/or playable terrain were permitted. This one I flopped: Not enough of a story for a diorama, hard to sell as a stand-alone terrain piece (not only it is a corner-only piece, the inside-facing sides are too tall, not to mention the abruptly ending rail-road.
Two new and novel criteria appeared: not-paint-requiring materials, and digital art, and printed surfaces. Those really sparked some interest, and I think it came out quite well.
As for the painting, I actually thought about the colour scheme beforehand, and how to come about to it: the basic landscape - red mountain, tan-grey riverbed, with hard-contrast green shrubbery - inspired by some timely real pics from one of the Cubs' school trip, plus the yellow, mechanical centerpiece (Not saying it worked out, though I like it, just that planned it in advance). The ground was the weakest part of my previous piece as well, so I tried to make it an important part of this one, to force proper care for it. I certainly spent quite some time on it, maybe it worked.
And fade.
Thanks everybody.
Cheers.
30672
Post by: Theophony
Great work LT . Ingenious crane design, but I must say when I saw your barrel and the dolly to move them I just burst out laughing thinking about the scene from breaking bad where they steal the 55 gallon drum of chemicals . No idea why, but it just tickled me the right way.
76303
Post by: Warboss_Waaazag
Amazing work, my friend. Just beautiful.
65595
Post by: Camkierhi
Outstanding LT, good luck.
26790
Post by: Gitsplitta
I think that might be some of your best work to date LT. Really wish you the best in the competition. Outstanding.
25937
Post by: Nowlan
Scene looks great. Have you given any thought to a small amount of garbage strewn about? Something to suggest humans have been working there. Doesn't even have to be anything major, just enough to suggest human interaction.
Even something minor like a discarded soda can or newspaper could do it, perhaps even some sort of notice on the metal doors?
63129
Post by: Littletower
Sorry Gents for the late reply, long-days week!
@Theophony: Thanks! And glad it cranked a laugh, too, never can have too much of that!
@Warboss_Waaazag: Thanks a lot!
@Camkierhi: Ditto. and good luck to you too (but just a bit less than mine, though )
@Gitsplitta: Thank you, Gits! I too think there's some change-for-the better from earlier builds, specially on the painting-side of things. Who knows, I might even grow a taste for it!
@Nowlan: Good call. It came up earlier too, and it is still missing. Will try to get to it before the Comp´s deadline next weekend (redoing the pics is the least attractive part of it), thanks for the input!
No pics, no progress, but the weekend is closer than yesterday!
Cheers.
2326
Post by: shasolenzabi
That is an amazing piece
30344
Post by: monkeytroll
Fantastic work Lt, that really is a great piece.
I think the dodo is my favourite part, that came out brialliantly, and I have a soft spot for junk-built items. However, full marks for the real rusty metal and the printed details, excellent use of materials there, and really embracing the ideas put out by Red in the rules.
63129
Post by: Littletower
@shasolenzabi: Thanks!
@ MT: Cheers! Indeed: sometimes, a rule or guideline, even a seemly minor one, turn out into a huge constraint. Others, they just spring up the right idea. Guess it worked that way this time!
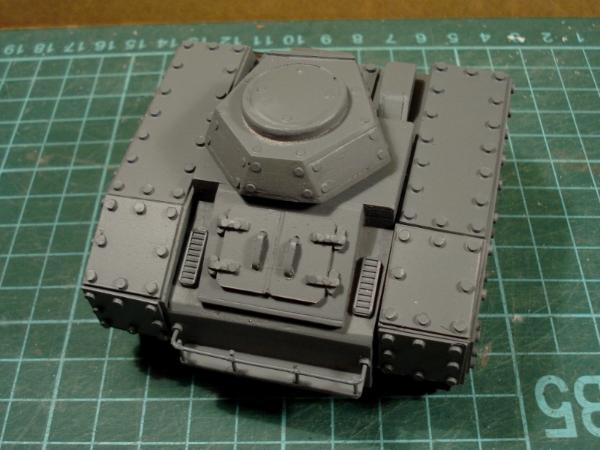
Back to the tank(ette), new turret plus some last details on the front:
I'd say this one might be the one.
C&C are welcome, thanks for stopping by.
PS: One of the advantages of getting less young (and that's as far as I'd go with that) is out-waking up everybody, and getting almost a couple hours of early Saturday morning good music and plastic crack!
65595
Post by: Camkierhi
Tank is looking amazing, turret looks perfect size to me, and like the shape too.
63129
Post by: Littletower
Glad you do, it's already riveted in place
Rear was looking rather naked, needed something else there. First though was a fuel tank ('cause, you gotta love an external fuel tank in an armoured vehicle), but I didn't want to extend it backwards. Extra plating would have gone against lower rear armour, so added a rack instead:
Thoughts on that?
Cheers
22619
Post by: inmygravenimage
Hmm. I feel like it needs some stowage. Some jerry cans up the back, or similar. Cool as duck though.
26790
Post by: Gitsplitta
I think it looks great LT. Would fit in perfectly with my grot tanks!
63129
Post by: Littletower
@inmygravenimage: Will do, worry not!
@Gitsplitta: Thanks (And let me know if you ever mean that for real, it'd be an honour!)
First step towards paint:


Might be time to start thinking about those missing weapons now...
C&C are welcome, as always.
Thanks for stopping by.
30344
Post by: monkeytroll
Looking great, love the stowage rack, and the turret fits really well.
Is that a hatch on top of the turret? If it is it could do with some hinges and possibly a handle.
63129
Post by: Littletower
It is (meant to) be a hatch indeed, and you are right, of course. Hinges will be on their way shortly, along with some final gap-fills that no amount of paint will be able to cover.
And guns. Must have some guns.
63129
Post by: Littletower
When in doubt, twin-link.
Worked out a solution to the pending weapons' load-out:
(Also, hinges added to both hatches, handle too on the turret one, and smoothed out some gaps, hand primed in white above)
And coming up next: Thoughts, comments, critiques and suggestions are always welcome.
Cheers.
26790
Post by: Gitsplitta
Looking very nice LT. I see a camo paint job on the horizon!
65595
Post by: Camkierhi
Interesting, and tank guns look spot on.
2326
Post by: shasolenzabi
That is a winner!
63129
Post by: Littletower
Thank you, gents.
As usual in life, not as good as imagined, nor as bad as feared:
Some minor seepages, an less definition than hoped for in a couple lines, but nothing unfixable.
Might still get some more done before calling the day today.
C&C are welcome, as always.
Thanks for dropping by.
26790
Post by: Gitsplitta
You'll get it sorted LT... don't sweat it. I think that's a very good start.
62749
Post by: Dr H
Good work and good choice in camo'.
Remember;
If you can't get can't get crisp lines, make a feature of the fuzziness. That can also work. Although it might be more difficult in this case.
65595
Post by: Camkierhi
Yup agree looks spot on matey, briliant start. By the time you have finished it will be awesome.
Got to say though, why does everyones spray booths look like a disco? Or is your tank at the disco? Someoe had some terminatorrs at the disco not long ago, can't remember now.
63129
Post by: Littletower
Once again, gentlemen, thanks.
@Gits: Please, you tell me, sample below.
@Dr H: Edge-sharpness flaws do not appear to be serious enough to justify changing horses now, more so being already near the middle of the river and all . Did some tidying up, and the weathering and further damage will have to work towards taking care of those left.
@Cam: That certainly cranked a laugh: Disco-mini-tank! Just massive layer over layer of over-sprays, no more But it does have a certain vibe to it, does it not?
Thoughts and comments are welcome.
Cheers.
PS: Does the driver's vision slit look like a mailbox to anybody else?
76303
Post by: Warboss_Waaazag
Nice. I think it could use a light drybrush of grey on the edges to weather the dark blue. Otherwise splendid.
2326
Post by: shasolenzabi
3-man light tank looks great!
63129
Post by: Littletower
@W_W: Thanks. Will do that (either on grey or a lighter blue/cyan), plus something to add some deph to the grey too, too flat yet.
And weathering after that.
@Shaso: Thank you, glad you think so, I'd have thought it'd be too small for you
2326
Post by: shasolenzabi
Littletower wrote:
@Shaso: Thank you, glad you think so, I'd have thought it'd be too small for you
Nah! I have thought of a scout tank or two myself, I know I ma noted for the behemoths for the most part, but there is something to be said for the wee ones
52425
Post by: Elnibbus
Ooooooooh... Nice tankette!
65595
Post by: Camkierhi
Looking great bud.
63129
Post by: Littletower
@shasolenzabi: Once this one's done, I'll get back to the bigger one, and try to catch up!
@Elnibbus: Thank you and welcome!
@Cam: Thanks, mate!
Long weekend came and went, back to normal (aka slower) gear now, will try to get some more done on the upcoming evenings, just not to loose the rhythm...
Cheers
26790
Post by: Gitsplitta
Very solid LT. Once you get done with the next steps as you already mentioned... it'll be looking really great!
30344
Post by: monkeytroll
Very nice, looking great so far.
And no, it didn't look like a mailbox till you mentioned it...now it does
57963
Post by: Zogg
Great job. Now you've made me want to dig my model railroad stuff out of storage.
63129
Post by: Littletower
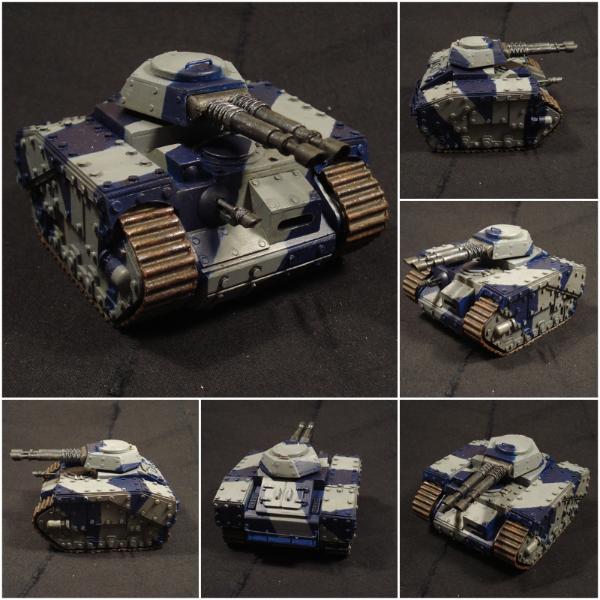
Some more done on the 'kette:
Wash and drybrushing, and barrel tips. Lens is just re-basecoated white, pending some colour.
Coming up, chipping and grime, and calling it done.
Thanks for stopping by.
26790
Post by: Gitsplitta
That's coming into focus nicely my friend. Stick with it.
30344
Post by: monkeytroll
Looking good, that's going to be a great little tank with some weathering, think your colour choice is really good for showing of some wear and tear
2326
Post by: shasolenzabi
That is looking very sweet!
83441
Post by: Boba Fett
The new turret looks pretty cool. Nice model! Do you plan to put some decals or freehands on that tankette?
10972
Post by: Ruglud
Amazing build (as always) and congrats on your 2nd place in the LoER terrain comp. That was an excellent piece of scenery.
63129
Post by: Littletower
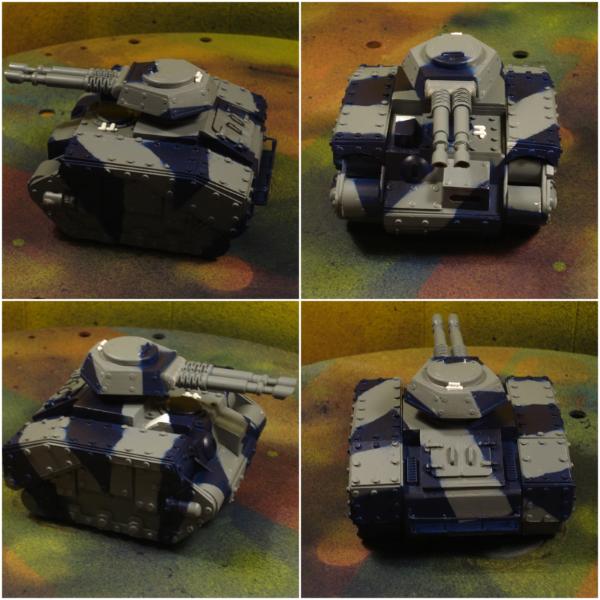
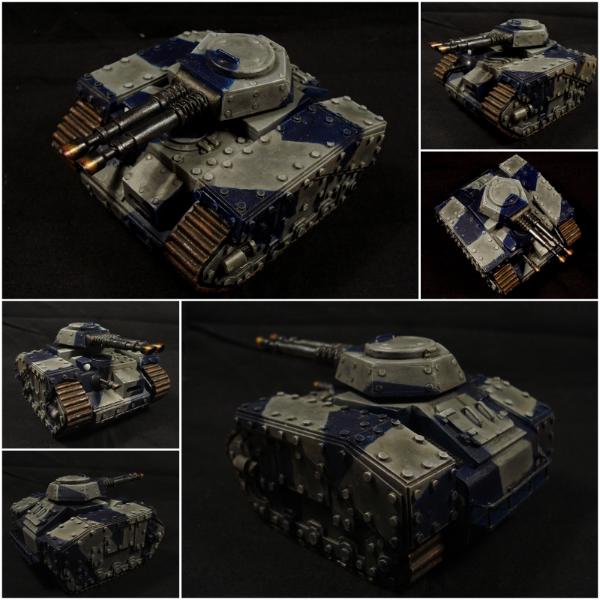
Thank you all, gents. Finished tankette, or how to ruin a decent paint-job in three easy steps: 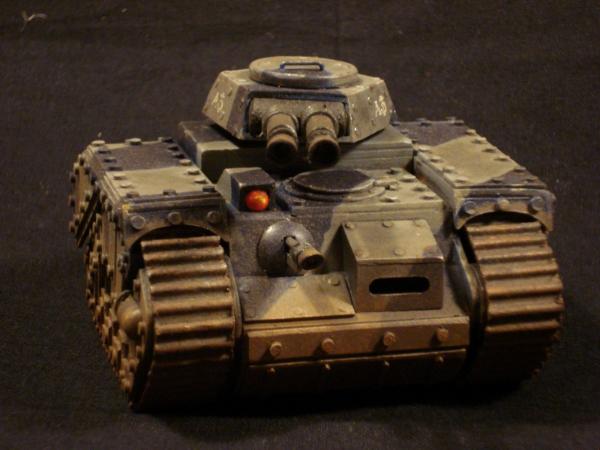  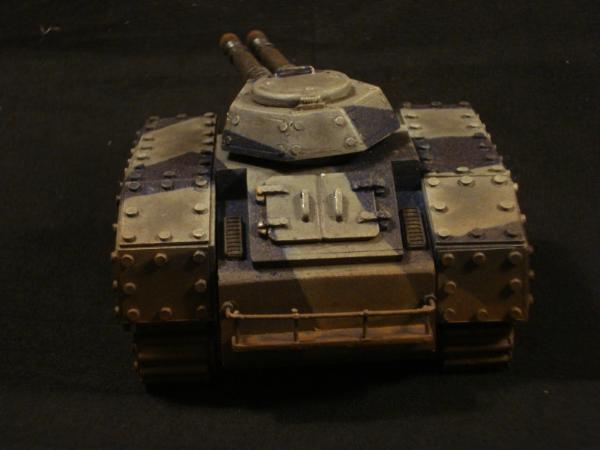 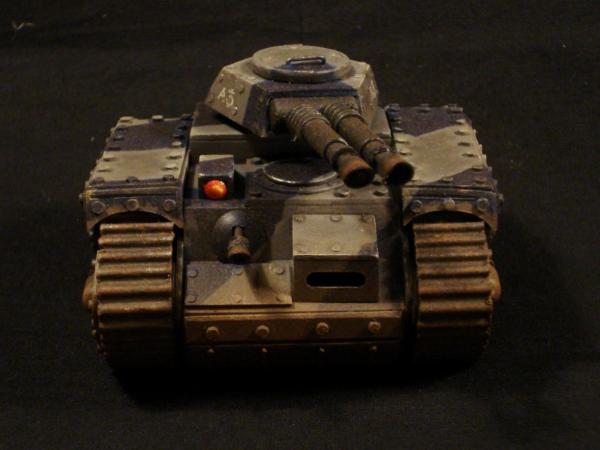 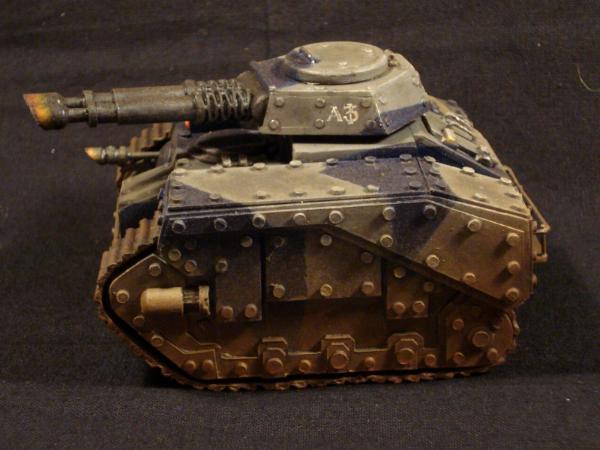 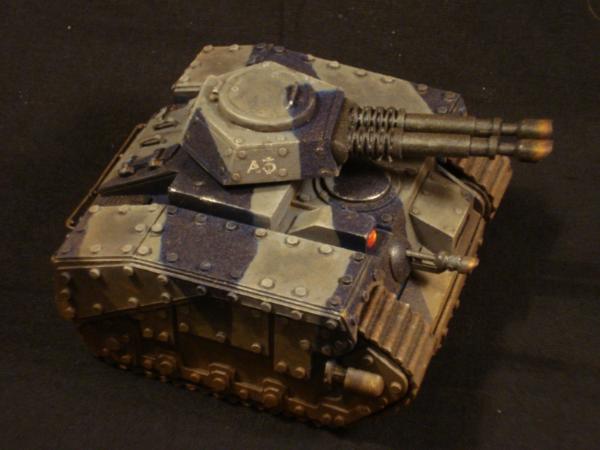 Thoughts, comments and criticism are always welcome. Cheers.
10972
Post by: Ruglud
Is it me or do the tracks look like they'll foul up in the curved armour guard at the front ?
Lovely little tankette though and great painting / weathering
63129
Post by: Littletower
Breaking news:
After just under two months travel time - fittingly reminiscent of wooden sail ships, only a few days after America's "discovery" anniversary - chez Camkierhi prize for the LoER 10 th Round is here:
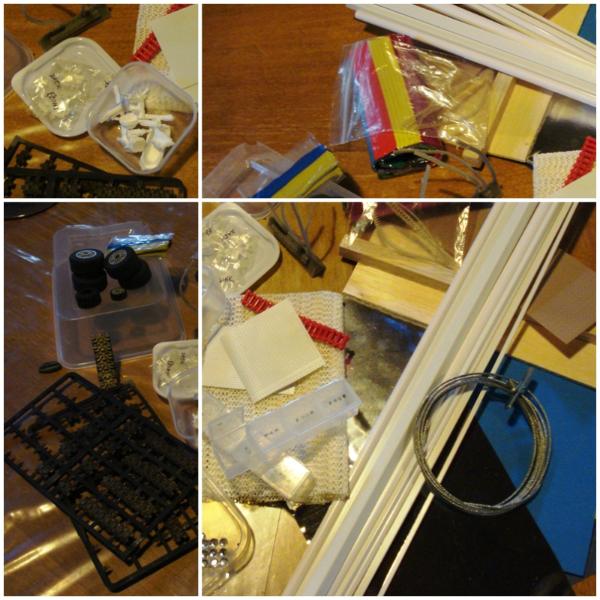
Plasticard tubes and rods, real tracks, green stuff, bins, cardboard, balsa, wheels, Zinge flexible-resin bits, and more! Even some Dr H's bathroom kits!
So good, I'm wondering if using it or framing it...
Normal programming will be resumed shortly.
@Ruglud: Pic perspective does help to the impression, but, yes, they'd do a bit, grazing on the raised part of the tracks. Should have shaved some more of from the track guards when I pushed them downwards, but didn't notice it. Hopefully, tabletop view will be more forgiving than close up shots! Good call.
Cheers.
30344
Post by: monkeytroll
Ooooh....supply drop....always a good day
Tankette looks great with the weathering...tread guards are just a minor thing, as you say probably not as noticeable on the tabletop. Nice job
63129
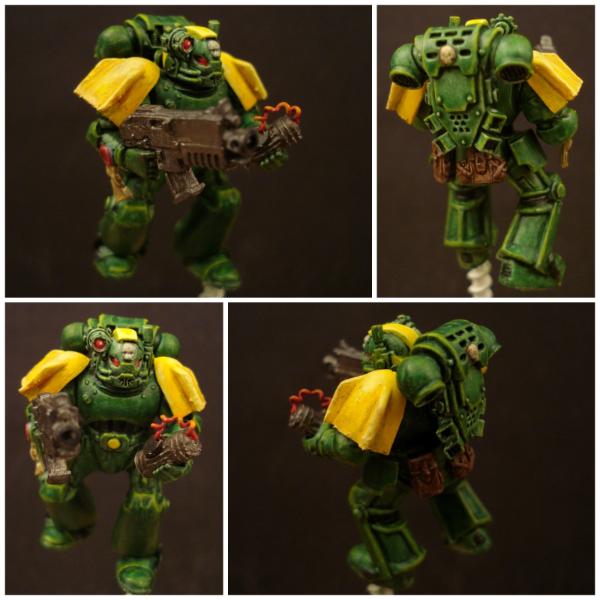
Post by: Littletower
In what has probably been my less productive couple of weeks, I've been trying to catch up with Gitsplitta's Second Annual Mantis Maker Competition.
To show something has been done, current state of affairs:
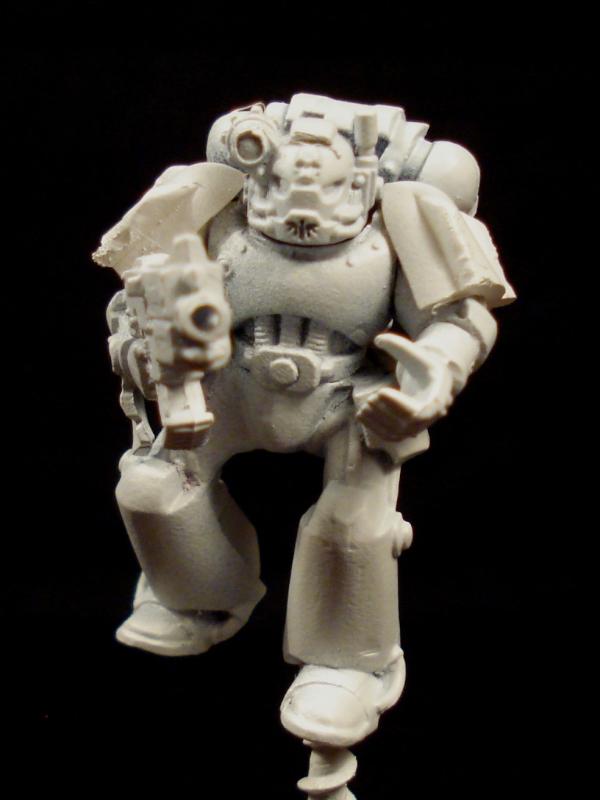
A brief story of the process up to date:
Marine and paint required, first thing was to go through my meagrest (I don't think that's an actual word, but it does depict it's minimal size) pile of bits. First issue: Only one pair of legs, and Terminator legs at that. Few torsos (some fronts, only two backs), a couple backpacks, three left arms and only one, bolter-holding, right arm. Two heads, and half a dozen pauldrons, quite ornate. Some of that, had apparently been dip-painted (Not dip-shadowed, just over-covered with paint).
Options been thus limited, I either switched projects or made do. Decided to give a try nonetheless.
Step one, bits and stripping:
Step two (I could have sworn I'd taken pics here, but apparently I did not. Or I misplaced them), fitting the parts.
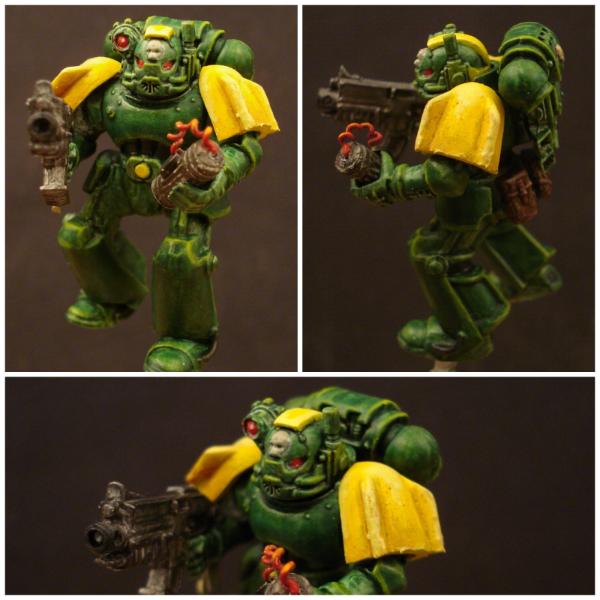
The Terminator legs do not fit a standard torso, so I gave them a lipo and reduced the waist girdle. Being at it, I removed some iconography (being a penitent bunch, I'd reckon they should keep their looks rather sober), and modified the position of both arms: originally, the left hand was holding the gun barrel. Opened the right arm to give it a single hand gun-hold, front-pointing, and cut and turned the left arm to have it holding something else in his sinister hand (will come that to that later on).
In going with the stripped look, the shoulder guards I had needed a serious file-work to leave them bare. Tried a different approach instead and gave him a scrap-made pair instead. Kind of worked out, so decided to keep those.
And cooked something up, pipe-bomb thingie, for the left hand.
Assembled:
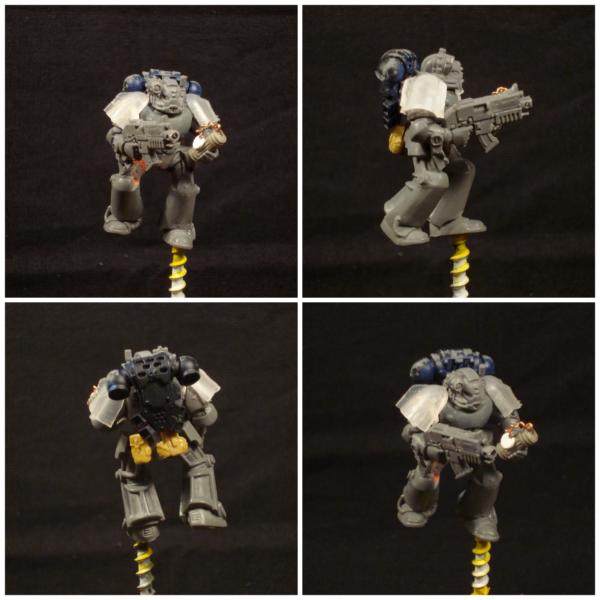
Ah, added some extra pouches at the back, too.
And after primer:
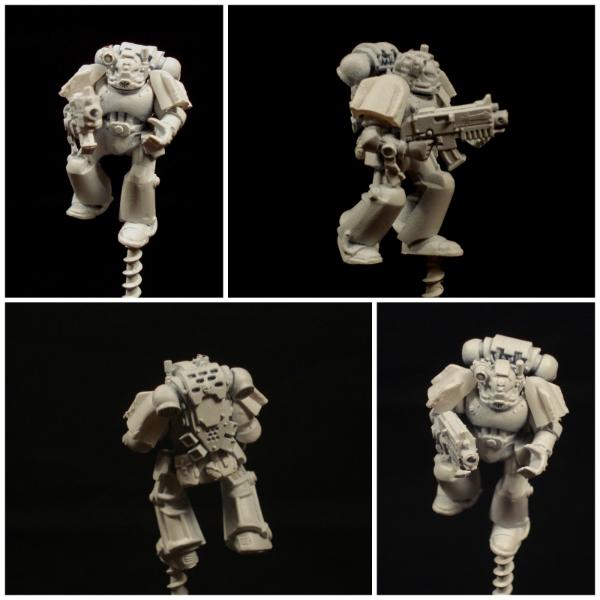
Some rough patches left to re-file (the emblem on the bolter resurfaced after the paint, and the pauldrons leave a lot to be desired yet, but a bit closer.
And that brings back the left-hand gear issue: I made the bomb first, not too sure about it I put together a blade - short sword or long knife sized - from a gaunt arm, as a possible alternative:
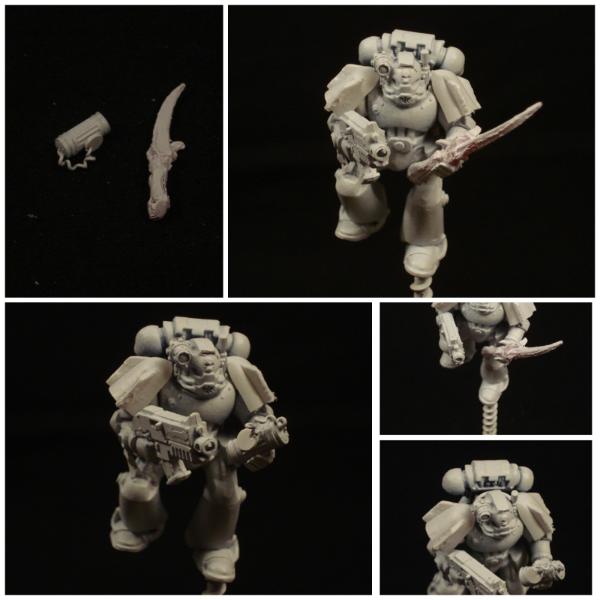
Less "crude" than the pipe-bomb, it might fit the recovered/refitted gear of an isolated Chapter; on the other hand, I'm not that sure if a xenos artefact would be used by somebody suspected of heresy and under probation...
That's all for now, any comments and critiques will we most welcome.
Thanks for stopping by.
62749
Post by: Dr H
Good work on the modifications. The legs seem to fit quite well.
The pose definitely says more "bomb" to me than "knife". Could still have the knife hanging from his belt though.
65595
Post by: Camkierhi
How to get in the spirit of the competition, the chapter that has to adapt and overcome, so LT adapts and overcomes, great work. Love the pie bomb.
30344
Post by: monkeytroll
Oh yes please....clown marines with pie bombs Come to think of it, that might explain the size of their vehicles....of course the rhino could never hold that many marines
Great work with the Mantis, certainly looksthe part, and that head fits in perfectly, slightly bug-like. Is it a from a centurion?
63129
Post by: Littletower
Thank you, gentemen.
Pi pe bomb stays, then.
And turning green, plus a little others here and there:
Still clueless about colours for the skull on the helmet and the purity seal(s). Also about better picture-taking, can´t seem to shake of the glare on the photos, it doesn't really shine as much, will have to get around to some diffuse lighting for the final mug entry shots.
@ MT: Sorry, random bits bag, can't say where it originally came from.
Hoping to put it back together before the weekend's over.
C&C are welcome, always.
Cheers.
30344
Post by: monkeytroll
I've always felt that skulls on the armour work best in metallics or bone colours (most of the time - there's always exceptions ). With the green and yellow of the MW's I'd say a natural bone type would work well - should stand out enough without actually screaming 'look at me' or clashing. And a classic red puriy seal is always going to work well against green armour. My 2 centavos.
65595
Post by: Camkierhi
Looking brilliant bud.
The green looks really nice. The seals and the skulls I looked at Gits's own for reference seems to be quite traditional, red wax and white paper.
If you are using a flash, just a sheet of paper in front of the flash will help, or similar for a light, mind you, be careful not to let it heat up!!
63129
Post by: Littletower
Bone skull, red wax. Got it. Or tried to...
Couldn't help myself, and stuck it back together:
Thoughts?
Thanks for stopping by.
30672
Post by: Theophony
I've got so much catching up to do.
Love the mantis warrior so far, great use of parts.
But the tankette looks so crisp that when I got to the finished picture I had to go back and see if you used lego to get the rivets so evenly spaced. Well done brother .
63129
Post by: Littletower
@Theo: No Lego, but pre-measuring has been allowed back since 6 th Ed came up, has it not? Thanks!
Some more on the MW: line highlights, backpack skull - had missed that one before, - started with the touch ups, too - still a lot of those left -.
Weathering, basing next, and gathering some needed courage to tackle the Chapter markings...
And building it up to theme, of course, that's yet to be done, too.
And the clock's ticking...
Thanks for dropping by.
63129
Post by: Littletower
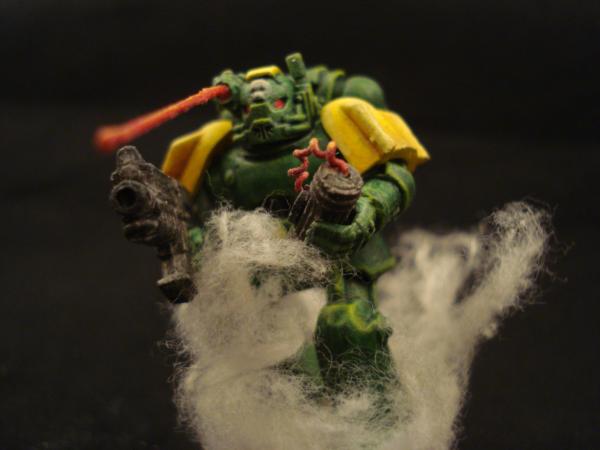
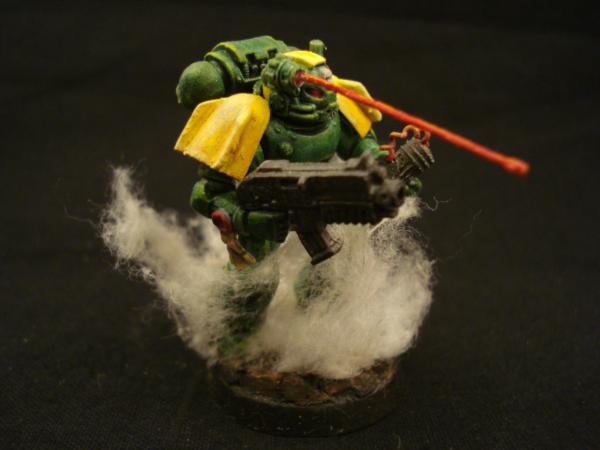
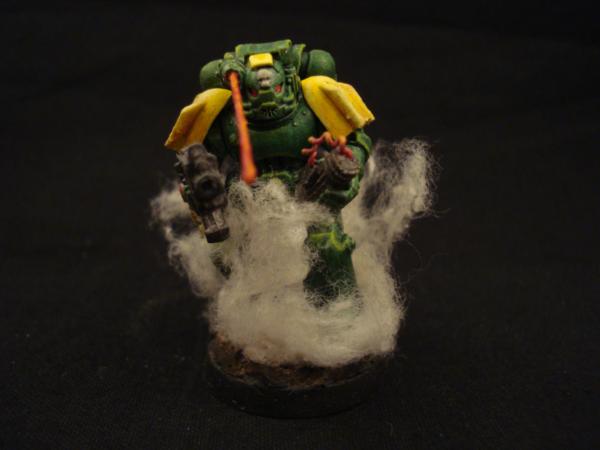
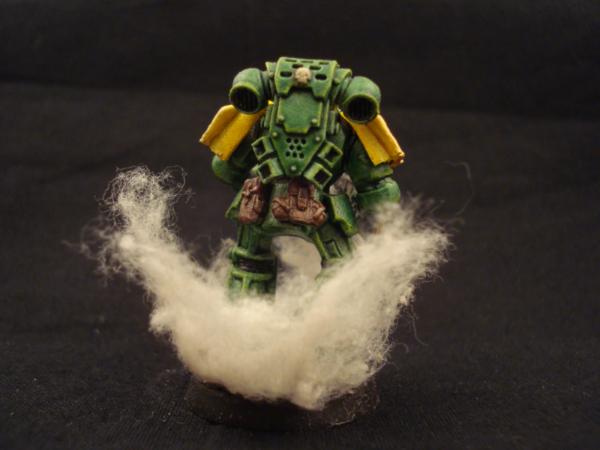
I have not failed. I've just found another way that won't work. A not Mantis in the Mist: 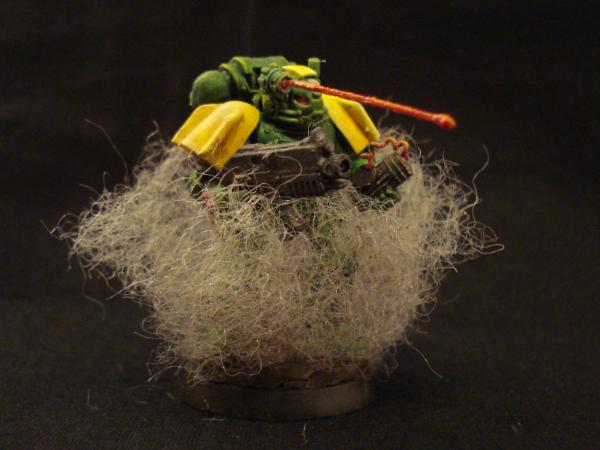  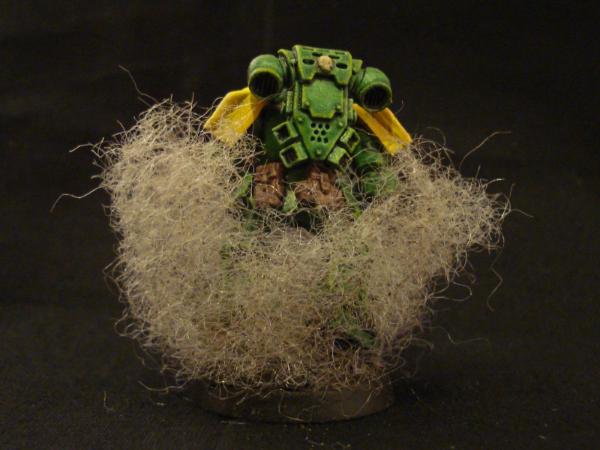 Does not look that bad at arms-length, up this close, on the other hand, not so good... Sounded like a good idea at the time... (Actually, I still like the idea, just clueless at how to pull it off) Back to thinking... Thoughts and comments are always welcome. Thanks for stopping by.
65595
Post by: Camkierhi
Use kappoc instead, think thats how it is spelt. The stuffing used incuddly toys, and some soft furnishings. White fluffy stuff. Tear it and it will be thinner, and much more mist like.
Model is looking fantastic matey.
26790
Post by: Gitsplitta
Wrong chapter. If it was a Carcharodon... it would be perfect!
65595
Post by: Camkierhi
Been there done that!
26790
Post by: Gitsplitta
Touche'
30344
Post by: monkeytroll
Just the one Cam? You need a squad
You just need to build a small container of dry ice in the base Lt....easy
62749
Post by: Dr H
Me too... kind of...
Anyway, back to LT's mantis...
I think with the mist, you need to stick to the mantra "less is more". You don't want to completely obscure your model, especially after all the trouble of giving him terminator legs. Try with just some strands and build up... maybe a kind of shell around him like a web (thinking out loud here, I've not tried smoke/mist in modelling myself)... Think in terms of how mist is represented in comics (long wispy trails), rather than trying to reproduce "real" mist. Just a thought, that may not work well.
30344
Post by: monkeytroll
Hmmm, seeing as how it's all halloweeny and that round here right now, has anyone had any experience with that spray cobweb stuff you can get? Would it be possible for instance to spray some onto a work mat, then pull and tweak at it with some tweezers to give it some shape and perhaps a spray of varnish to help keep said shape, before wrapping it round the figure?
And, well, if we're going there, then.....
63129
Post by: Littletower
That thing was supposed to be stuffing for toys and cushions (even hypo-allergenic!), look good when compressed - though too opaque for what I was trying for; when stretched and opened, fibers turned out too long and noticeable for a fog effect...
Dry ice might be it if the current test with cotton doesn't work out, I just wanted to try a "permanent" effect first. And the Cubs will surely appreciate the scrap ice cream that comes with it...
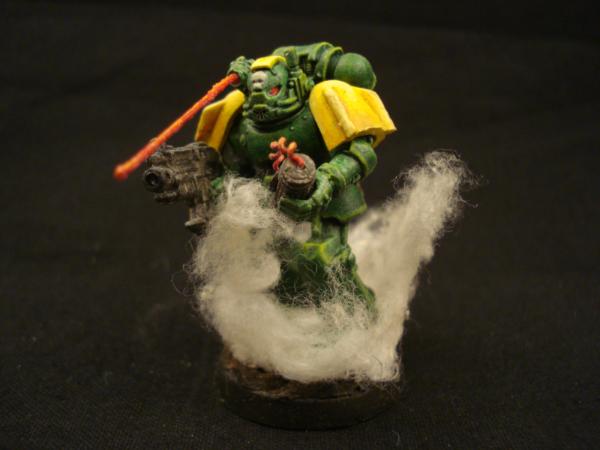
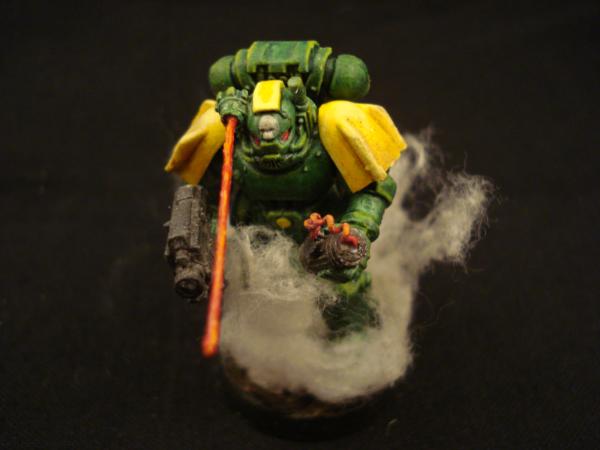
Great conversions all, that's why, not to be mini-mezied by them, I tried to make it look as if the beam was actually on... Turned out a bit on the thick side, though...
Either way, the painting is mostly done, so I put away those pesky, hair tipped sticks and got started on something else (barely begun, nothing picture worthy yet) more on the building side of things.
Cheers.
63129
Post by: Littletower
10972
Post by: Ruglud
Hah, you read my thoughts... Caught up with your thread earlier and was thinking about your options, eventually decided that 'less is more'. I reckon you have the effect spot on...
72556
Post by: Red Harvest
A little C&C... The stuffing needs some color variation to it. Sadly, I have no advise on how to do that.
Cotton filler would take washes readily enough. Not sure about the polyester stuff.
You could also put some foliage within the niebla too. dried grasses or such as would be proper for an arid climate.
Otherwise looks good. And painted in my old High School's colors too.
30344
Post by: monkeytroll
Oh, now that works a lot better than the previous version, looks more like it's flowing around him as he moves
62749
Post by: Dr H
Yeah that's more like it, wispy bits.
As Red said, a subtle colour to parts of the mist would add some depth to it. but keep them really subtle.
Good job. I like your thinking (as it's close to mine) and nice conversion.
10972
Post by: Ruglud
I'm sorry - I just realised that he reminds me of something from my youth... A bit of Mantis Magic maybe?
63129
Post by: Littletower
Thank you all.
I tried tinting the mist - natural cotton, as the synthetic stuffing fibres were too long for it - it before adding it to the base, the colour got "lost" when I stretched it... Might try again, if I figure out a way of doing it without the cotton lumping up with the moisture from the paint. I agree I'd look better, just not sure how to do it...
For now, a small preview of what's next on the bench:
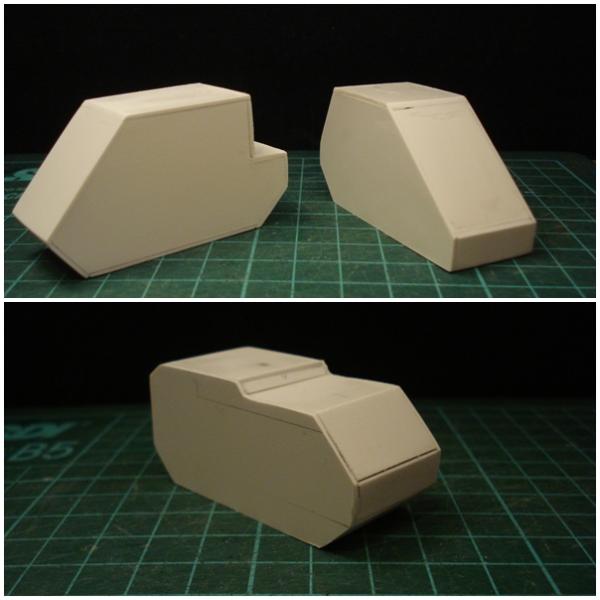
(Guides on the cutting mat are 1 cm apart, those are small)
Cheers.
40213
Post by: DiDDe
Those looks like chassis for some vehicles. perhaps teeny tiny tanks?
63129
Post by: Littletower
@DiDDe: Nailed it
Little more done before the weekend was over:
Tracks:
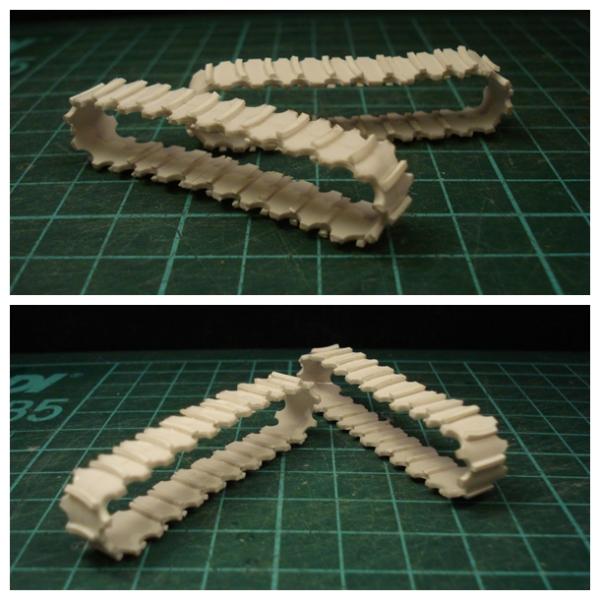
An engine:
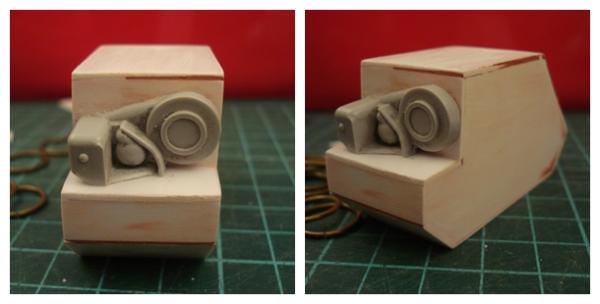
And rolling wheels:
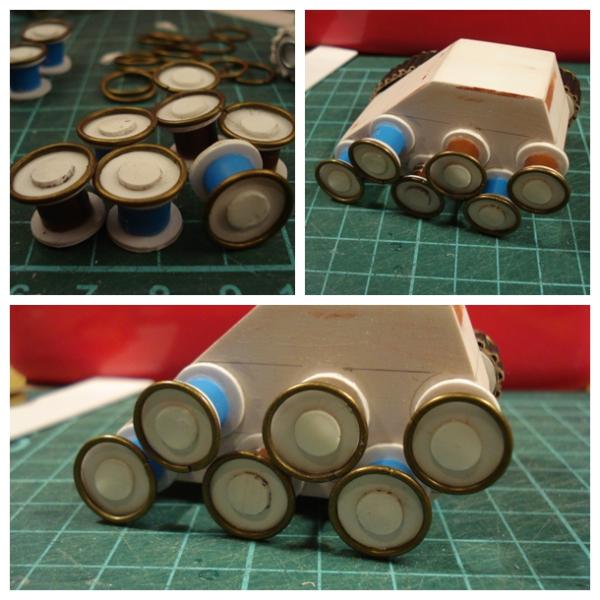
Tracks for one:
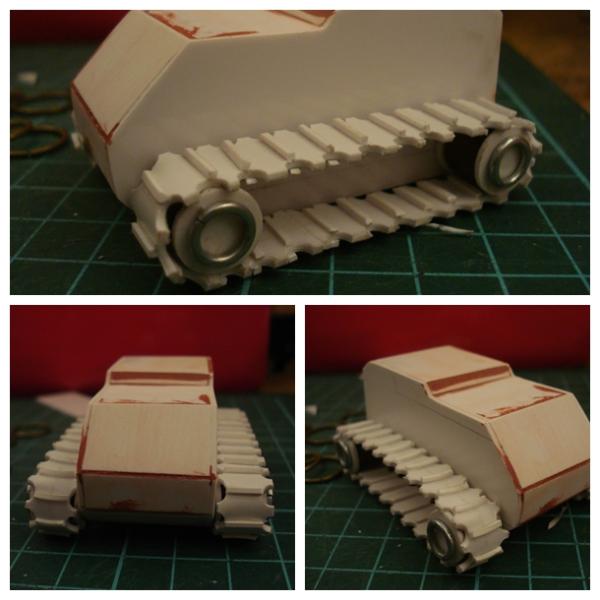
And partially for another:
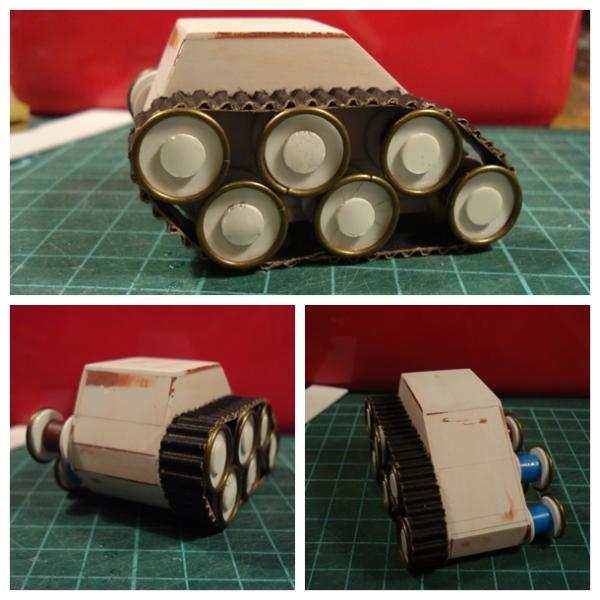
That's all I have for now.
C&C are welcome, as always.
Thanks for stopping by.
26790
Post by: Gitsplitta
Pretty nifty my friend!
30344
Post by: monkeytroll
Tiny tanks look interesting. Did you bend all those wheel rims yourself?
63129
Post by: Littletower
@Gits: Glad you approve so far!
@ MT: I didn't, (though I was tempted to say I had ). The ones on the first set of tracks are spring lock washers, pressed flat. The brass rings, are from/for craft jewellery supplies.
62749
Post by: Dr H
Nice work LT. Like the road wheels.
You will use a little putty to fill the gap in the metal rings won't you? Of course you will...
Nice shape to the little tracks too.
63129
Post by: Littletower
Plan thrice, measure twice, cut once.
@Dr H: The metals rings that stayed, got gap filed. Most of them did not.
Reworked the track system on one of the tanks, and got some more work done - not much - on the other two as well:
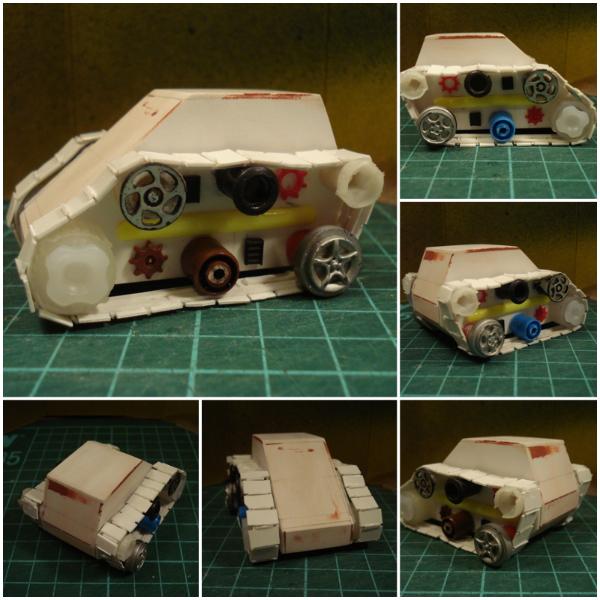
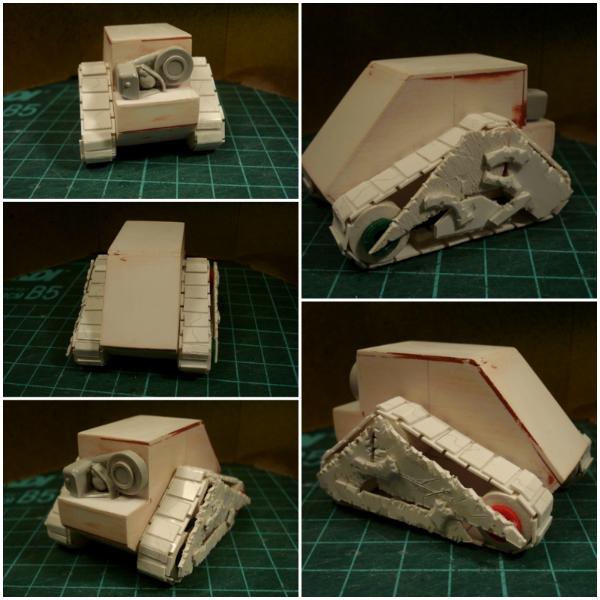
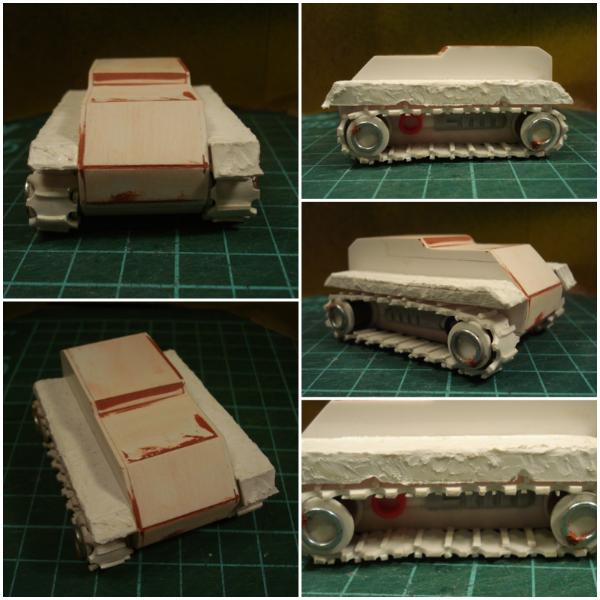
Thoughts are welcome!
Cheers
65595
Post by: Camkierhi
Just noticed the change in thread title as I was about to type.....That looks awesome and "ORKY", change of pace for you. love it.
Treads look brilliant and the panels look spot on to me. Nice wheels sets too, mixing it up adds a bit of class to it as well. Great stuff, looking forward to seeing where this goes.
26790
Post by: Gitsplitta
Excellent work. The plates on the outside of the second tank treads are really perfect.
62749
Post by: Dr H
Good good. Had total faith in you.
Good choice to change though. Much more Orky.
I like how the skirts spike forwards, that's a good look.
63129
Post by: Littletower
@Cam: Thank you! Will try to start working up next, we´ll see how that goes.
About the change of pace, absolutely. Trying to think outside matching angles and sharp-cut edges; it is not as easy as it sounds.
Though I think I'd recommend some ork-style building therapy every now and then to anybody that scratchbuilds: a refreshing change to the usual way of doing things.
@Gits: Thanks! You liking those is fundamental here, customer satisfaction and all !
Speaking of which: Tank 1 (The one with the assortment of wheels): Side-skirts or no side-skirts? I would not want to over cover the track assembly (wheels, bended threads and the add ons on the back did not turn out too bad), but I like - and I think they add a lot to the style - the look achieved on the second one with the plating. So?
@Dr H: Actually, I removed the metal-ringed wheels just to sidestep all the gap-filling!
Cheers.
10972
Post by: Ruglud
Looking mightily 'Grotty' in a good way LT
30344
Post by: monkeytroll
Nice
Changing out some of the wheels does add a more orky character to them, and as others have said, those side plates are an excellent addition.
63129
Post by: Littletower
Thanks you, gents.
A day's work worth: turrets and engines WIP.
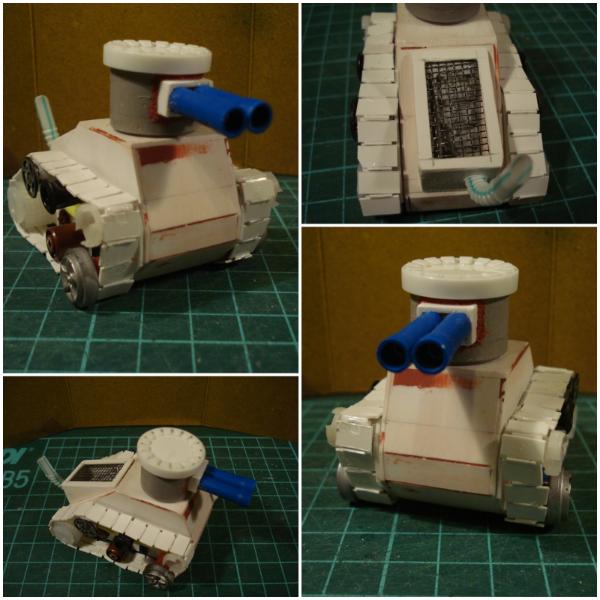
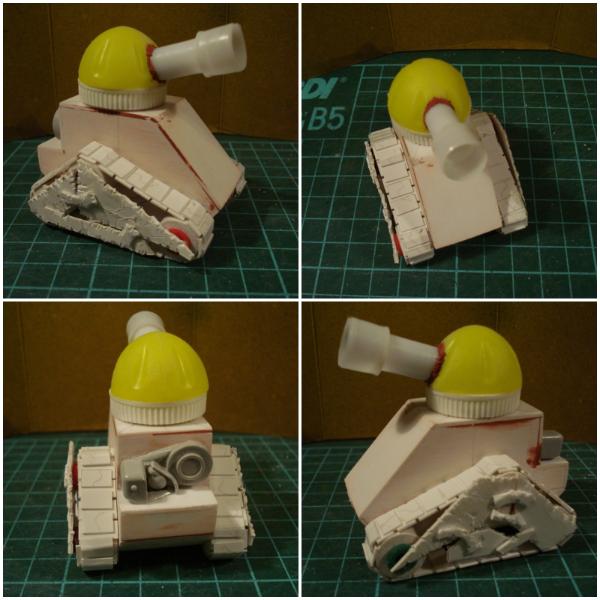
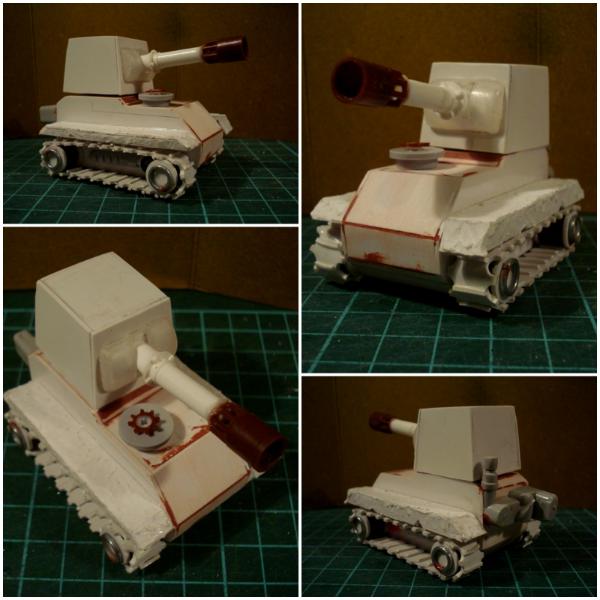
Extra armour panelling and other details coming up next.
Thanks for stopping by.
26790
Post by: Gitsplitta
Sweet!
65595
Post by: Camkierhi
Nice job, looking good.
30344
Post by: monkeytroll
Turrets in place = definitely grot tanks
63129
Post by: Littletower
Thank you, glad you like them so far!
Group shot:
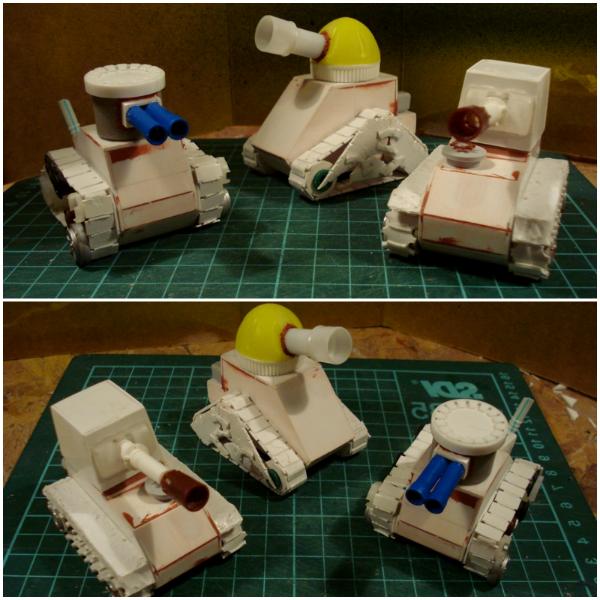
Cheers.
26790
Post by: Gitsplitta
I've actually started painting one of my two remaining unpainted grot tanks so I can clear space for yours!
72556
Post by: Red Harvest
Huey, Dewey and Louie? I like them.
They do look a bit naked. Rivets make excellent clothing for tanks
63129
Post by: Littletower
@Gits: That's great to hear, and glad YOU are doing the painting, BTW! I've seem to have left a lot of crevices and hard-to-reach spots there that I wouldn't want to have to deal with myself !
(Clarification side note: At least one of those - the full lot if he'd take it! - is for Gitsplitta, the idea behind this being a half challenge/half commission job)
@Red H: Rivets? These take rivets too? . Off to punch some, then!
Cheers.
26790
Post by: Gitsplitta
One of the things that I think makes the FW tanks look so good is that they're very busy. They're supposed to be made out of scrap laying around the mek shop (they get a 5+ invul as the bits that get blown off might not in any way be important to the functioning of the tank!). So as your considering the finishing... you might think about it from that perspective.
Oh and yes, I'd be delighted to take all three.
63129
Post by: Littletower
OK...
Trying to understand that... might be my unfamiliarity with Grot rules, or a language issue, but...
26790
Post by: Gitsplitta
Maybe I didn't explain it clearly enough. Grot tanks get a 5+ invulnerable save.
The fluff reason they get this is because grots aren't the most purposeful of builders. They just take whatever looks good and weld/rivet/bolt it together under the dubious direction of a senior rigger. But then again behind his back there's no telling what could get welded/riveted/bolted to the hull of the tank.
So the 5+ invul isn't due to some force-field or some such... it's because the bits that just got blown off might be completely unrelated to the actual functioning of the tank! I always liked that bit of fluff... very grotty.
So the grot tanks are kind of rolling scrap piles that have been haphazardly cobbled together. Detail the builds with that in mind and you'll have nailed the fluff perfectly! I think what you've done so far is fantastic!
65595
Post by: Camkierhi
Lucky Gits, looking spot on LT.
Just remember to disengage your logic circuits when your sticking panels on and you can't go wrong!
63129
Post by: Littletower
@Gits: Crystal clear. And the concept of things being blown off without actually affecting the running of the thing 'cause it just was there, though it didn't do anything to make it work, hilarious. I now understand better why you like them
@Cam: Great way to put it , thanks! Nice shock therapy for OCD, too, if I can pull it off!
Little got done here and there with what was left of the weekend, pics will come with some further progress later on.
Cheers.
30672
Post by: Theophony
Good looking little buggers you got there. My odd wouldn't allow me to build grot stuff, it's not symmetrical enough.
89231
Post by: ckig
Great scratch builds! Each one is very unique. Looking forward to seeing them finished
63129
Post by: Littletower
@Theophony: Exactly my point, and that's why I found it so amusing (once I got over my own symmetry issues, of course )
Tried my own sort of method acting technique: made a mess of my workbench (hence the pic above!), switched to hard rock (early nineties at the latest, BTW) and notched the volume up to the top (that last part is not actually true, conviviality, specially during weekends, takes precedence over inspiration!), and went for it. As I said before, very advisable change-of- course therapeutics!
@ckig: Thanks! The difficulty of keeping them different from each other came close second to the non-symmetry requirement, so glad it shows!
72556
Post by: Red Harvest
Symmetry is over-rated. But, Hmm, ah here it is, from my University days, http://www.youtube.com/watch?v=vkpg0tlcAZw I find that Pink Floyd* is good for going with the flow scratch-building.
Another alternative to the 'treasure pile' method (as seen above) is to have nothing on the workbench, and just randomly grab a piece or bit or what have you and apply it somehow. The accretion method.
However, I think even asymmetrical pieces still need balance.
*and a new album just out?? WTF??
62749
Post by: Dr H
So, which one is you, Red?
63129
Post by: Littletower
I'd bet you were thinking I'd grabbed the initial down payment and ran away! ! Nope, just normal contractor behaviour... So, unless anyone can show just cause why this one should not be called done, in which case let them speak now or forever hold their peace (sort of ), Grot Tank N3: 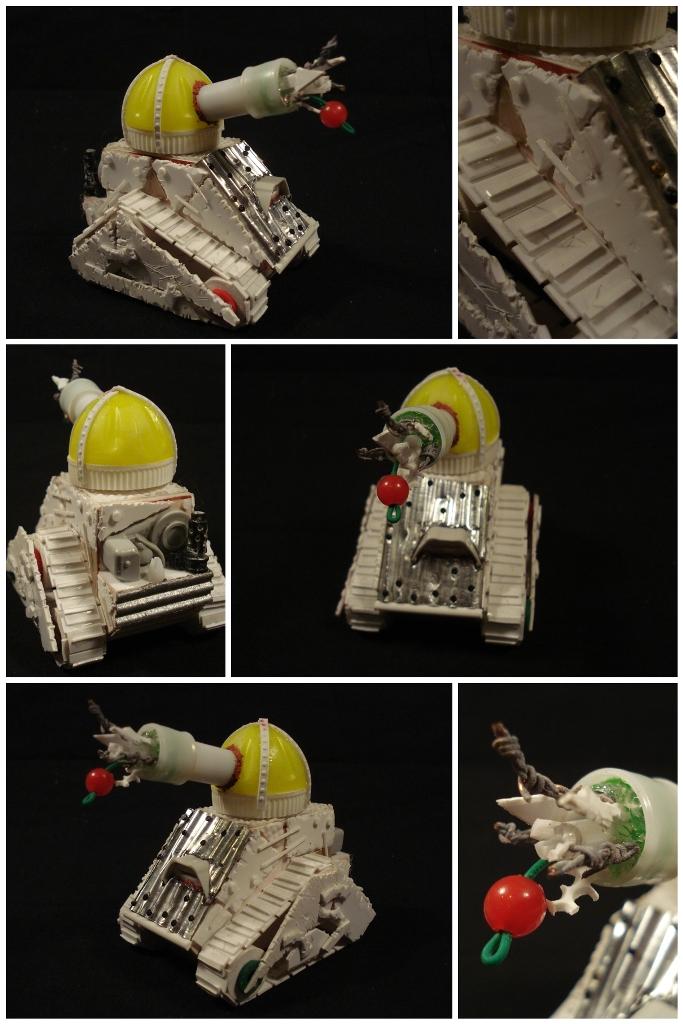 (More, albeit better, pictures available upon request) Thoughts and comments would be invaluable at this point! The other two are a little behind, but moving forth. Thanks for stopping by. PS: Now I realize, that the one I'd randombly named/numbered N3 is, of course, the first one to be finished. Edited for typos.
26790
Post by: Gitsplitta
Brilliant!
You nailed it my friend. Grotzooka is spot-on too.
63129
Post by: Littletower
Thank you Gits, glad you approve.
Work is progressing on it's two brothers, news soon if everything goes as planned (though, when does that happen?)
26790
Post by: Gitsplitta
Does the turret turn?
63129
Post by: Littletower
Turret(s) turn (and can be taken off), track armour skirts are snap-on (to allow painting beneath), and the blunderbuss-like ammo comes off too (ease of painting consideration too).
30344
Post by: monkeytroll
Snap-on skirts? Snazzy
Did you use some kind of clothing popper for that?
72556
Post by: Red Harvest
That one with the yellow turret, belongs to the Earl of Lemongrab?
Looks done to me. The detachability of stuff is neat.
62749
Post by: Dr H
Having been educated over in Gitsplitta's Ork thread, I don't need to ask why there is junk in the barrel.
Looks good and Orky.
26790
Post by: Gitsplitta
That's fantastic LT.... you've outdone yourself!
63129
Post by: Littletower
@ MT: Just stubs, matched to tight fit the hollow core of the drive "wheels" of the tracks. Never thought of clothing poppers, good call, saved for future reference.
@Red H: . Paint shall cover it all!
@Dr H: Where do you think I picked a word like blunderbuss? Not something usually learnt in a foreign - for me, - language class!
@Gits: , thanks!
Parts break-up:
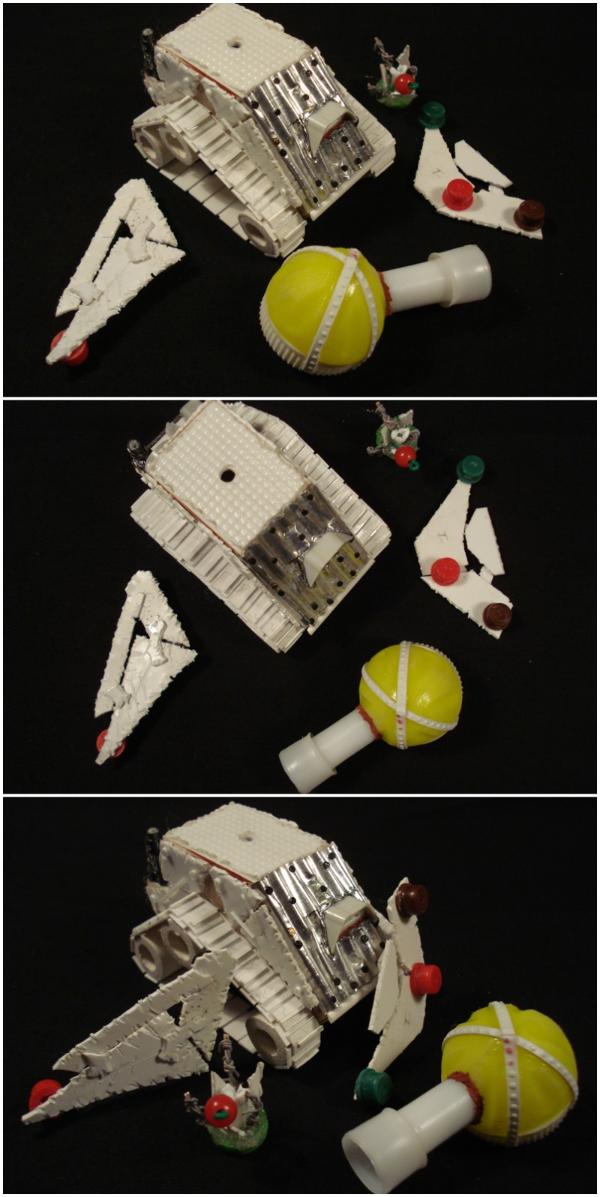
And higher res pics of Tank N° 3 in case zooming in is wanted:
Tank N° 2 coming up next!
Cheers.
52425
Post by: Elnibbus
Very characterful build indeed littletower!
63129
Post by: Littletower
Thanks, Elnibbus!
Grot Tank N° 2:
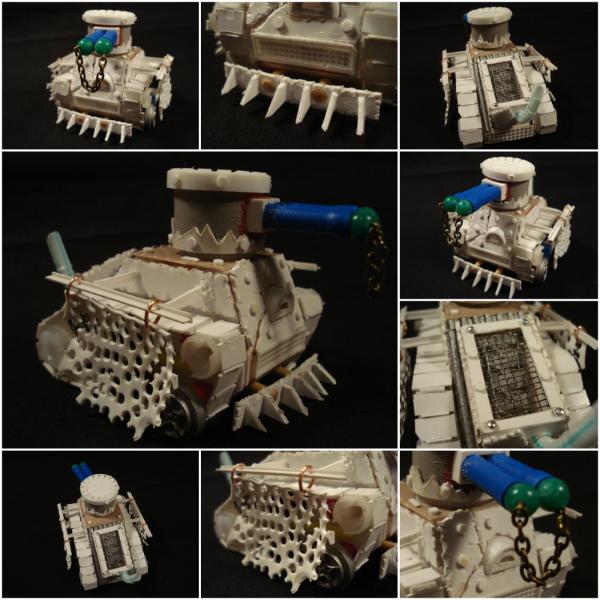
Turret turns and comes off, engine cover, side skirts and front spike-bumper are removable.
One more to go!
62749
Post by: Dr H
Blunderbuss is a good word as well as a pretty cool look for a gun.
And now you have a cannon-bolas. Nasty.
Good job. Like the engine cover.
And don't worry about finishing number 3 before 1 or 2. I'm doing that sort of thing all the time.
52425
Post by: Elnibbus
The chain-shot really makes that model- I can picture the crew driving up to a Carnifex or similar gribbly and ending up wrapping the shot round its legs
26790
Post by: Gitsplitta
Awesome... simply awesome.
63129
Post by: Littletower
Guess the double-barrelled ball & chain cannon paid off !
Almost done with the third one too, but not yet.
Question: Would adding a rocket pad (or is it rokkit?) over each track guard affect it's playability?
This is the one I'm asking about (old pic): I think it might otherwise look somewhat off next to the other two, maybe it needs some bulk higher on the sides... (could be stowage too, if rockets make it illegal, just went with those first for looks)
Any thoughts on the matter will be most welcome.
Cheers, and good night!
72556
Post by: Red Harvest
Very nifty. Can't wait to see them painted.
Trabuco? Or do Argentinos use a different term? Because we have lots of images of Pilgrims (the kind that landed on Plymouth Rock) toting blunderbusses, one actually hears the Spanish word. Then there are those very useful words you are never taught in school. I wonder if the forum language filter would catch them?
Are there still rules for the chain shot? There were in 2nd ed, and they were frikkin' hilarious Good times.
63129
Post by: Littletower
Red H: Painting is going to be carried over by Gitsplitta, these are custom made on his request. Trabuco is right, though most usually seen in pirate movies, not so much in out own historic representations
Tank N°1:
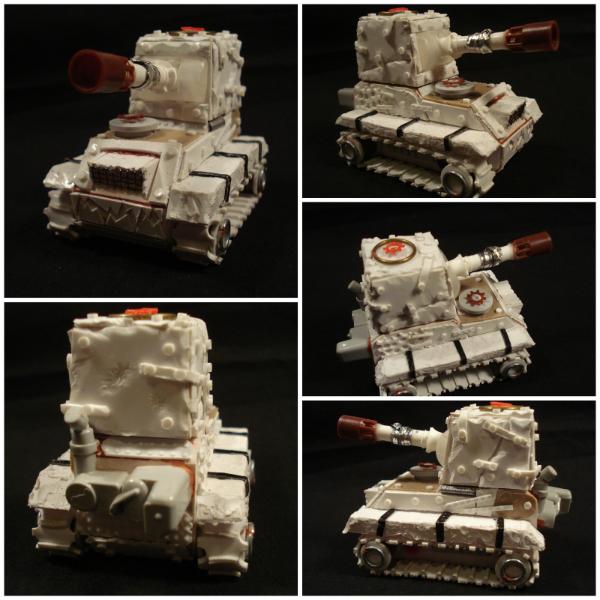
And a group shot:
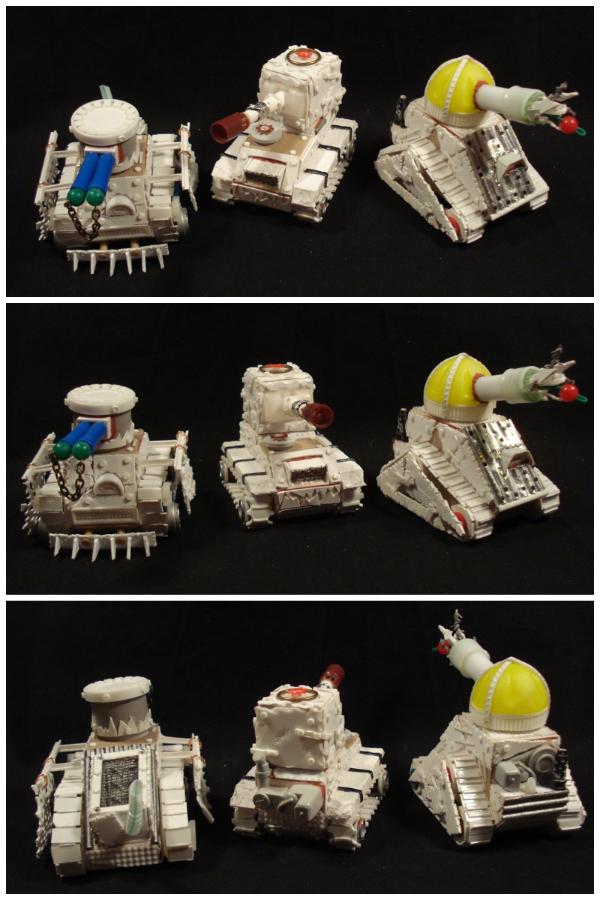
Still not sure if it needs or not some more bulk on the sides, it looking different from the other two is part of the idea of them being each hand-built, and the "oversized" turret gives it - IMHO, of course - a likeable look.
C&C are welcome, as always.
Thanks for stopping by.
26790
Post by: Gitsplitta
I like them all very much. I can see your point about tank #3... the big turret is awesome but the sides over the tread covers are a little wanting. A second weapon is only allowed on a "boss tank" and I already have two of those. I do like mounting gretchin on my tanks whenever possible... perhaps I could go through my models and add one seated on the track covers. Hmmmm.... have to think about it.
Brilliant work though... thank you so much for doing this!
30344
Post by: monkeytroll
They all look very nice, great looking group
I think your stubs are pobably a better idea than clothes poppers - too much risk of snapping something when trying to 'un-pop' I'd guess. For some reason my mind just went there when I saw snap-on Possible potential there for securing rotating parts though.....
72556
Post by: Red Harvest
Ah, well then. That's what I get for being distracted by the pictures
89231
Post by: ckig
Finished versions look great! Nice work on all of them. I think the middle one is my favourite
63129
Post by: Littletower
@Gits: Bulked up the sides a tad, and with not rokkets! Extra fuel drum, and sort of a crow's nest/standing platform for a ridding crew mangrot.
Still asymmetrical, but trying to yet keep it balanced.
@ MT: Thanks, glad you like them!
@Red H: No problema ! Actaully, I've grown somewhat fond of the little things,
@ckig: Ups! That's the one I changed a bit, hope it doesn't disappoint now !
Tank N°1, Mk II:
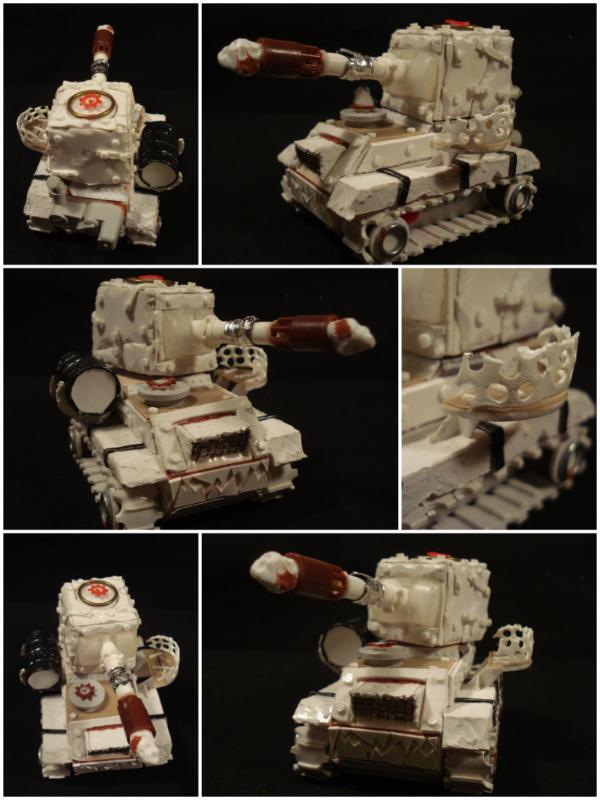
Updated group shot:
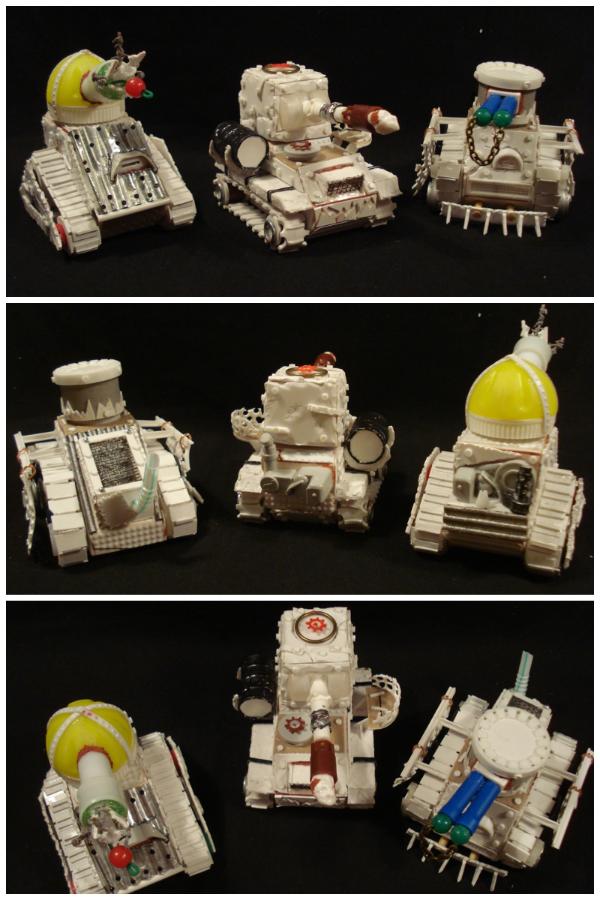
Guessing they're done for real this time!
Open to C&C , as always.
Thanks for checking in.
48248
Post by: kencotter
The changes you have made looks awesome love the crows nest sooo orky
63129
Post by: Littletower
Thanks, Kencotter! Good you think the additions play the part, too.
62749
Post by: Dr H
Good job LT. Nice trio of tanks.
26790
Post by: Gitsplitta
Perfect!
89231
Post by: ckig
Littletower wrote:@ckig: Ups! That's the one I changed a bit, hope it doesn't disappoint now !
I like it even more now
65595
Post by: Camkierhi
Great job letting your inner grot out to play, Gits is a lucky boy. Great stuff.
63129
Post by: Littletower
Finished and ready to post.
Grot Tank N°1
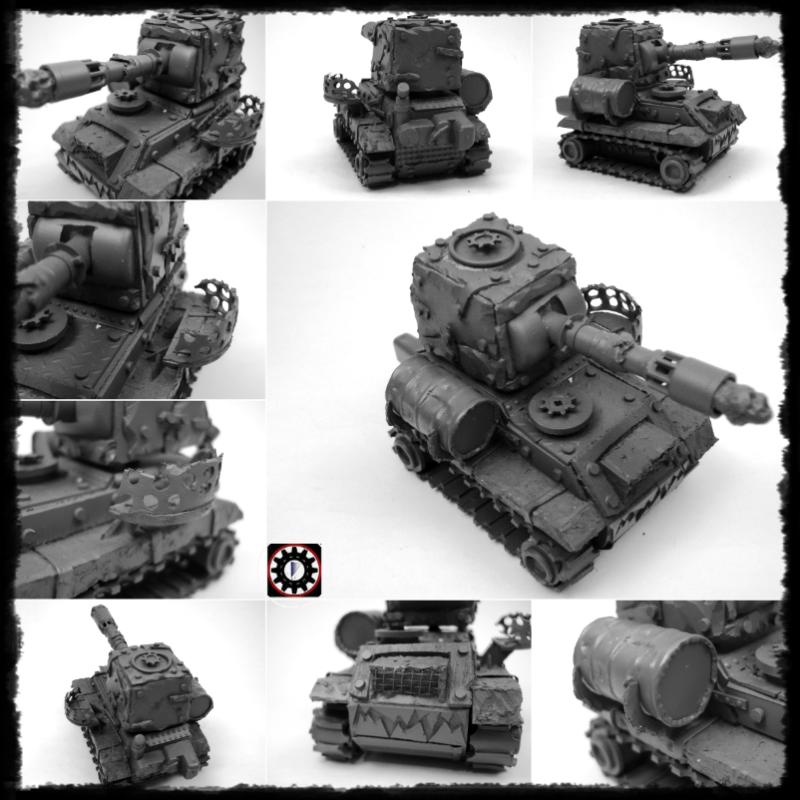 Grot Tank N°2
 Grot Tank N°3
 Grot Tank Squad
Thanks for ridding along.
Cheers
57963
Post by: Zogg
I like 'em all, but the ball-and-chain cannon is my favourite.
83396
Post by: granander
Always a pleasure to see your work, you have a very agile mind sir.
72556
Post by: Red Harvest
El tanque trabucón FTW, or should that be PLV. I can just hear it creaking and clanking along until it is in range then boom... How disrespectful is that? You've been shot with junk. And probably a few grots who got stuck in the barrel while loading it.
I hope Gitsplitta does a great job with the paint.
63129
Post by: Littletower
@Zogg: Thanks! Great compliment indeed.
@granander: Thank you, sir!
@Red H: Luckily, I'd already had breakfast when I read that this morning, or I would have spilled it all over the dinner when I burst out laughing! Tanquecito trabucon sounds funny enough, and above that, the mind-picture of a very offended blue-clad space smurf complaining about how disrespectful it was to have his mates blown away by a scrap shot
New project (believe it or not, another commission) is already on the bench, and I have not gotten pass the thinking-about-it / figuring-out-what-to-do stage of my LoER Comp entry yet...
Will see.
Cheers.
63129
Post by: Littletower
After a very unexpected turn of events (To make a long boring story into a short - though still boring - one: A friend of a friend knew a guy. Said guy has been around some, collecting miniatures - and even playing every now and then - for a long time. As it happened, his unpainted lot overgrew any chance of him putting them under the brush; mutual friend mentioned I fooled around with the hobby, we got in touch, and presto! I'm a commission painter now. Sort of).
Introduction over, I now have a dozen man Delaque Gang on the bench, waiting for some colour.
Prep work done:
Set up, coktail style:
White primer:
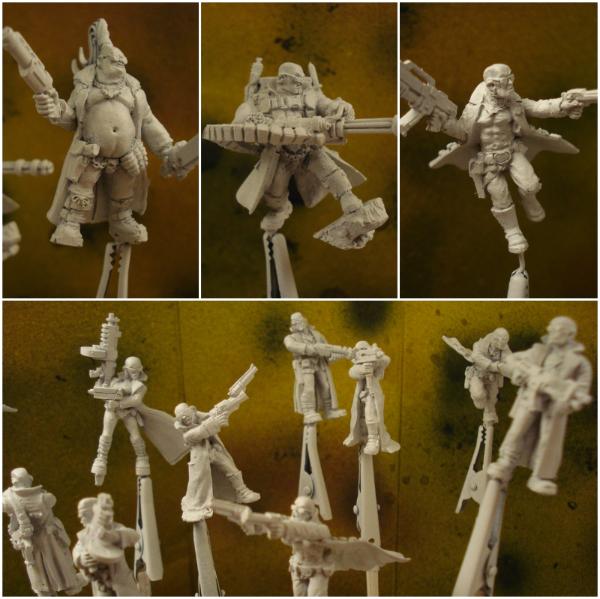
And a preventive earthen wash:
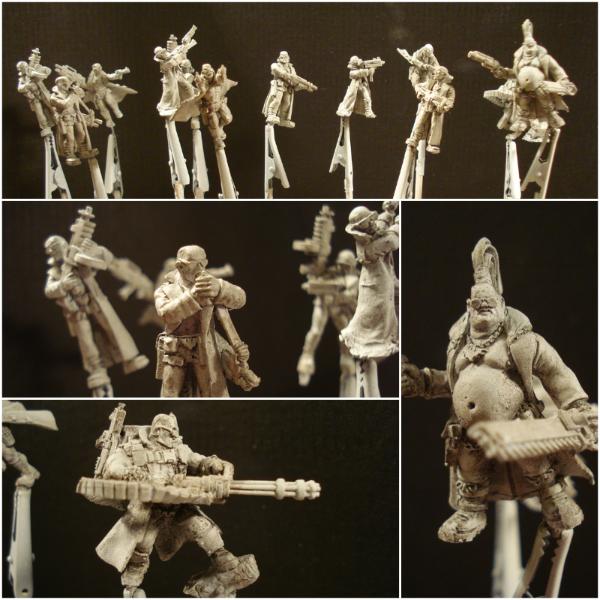
Colour scheme will be Heresy Miniatures' own Trenchcoat Warriors Gang style; expected result is (and I quote) "decent tabletop" (whatever that means!)
Cheers.
65595
Post by: Camkierhi
Congrats on the commisioning, Nice looking models, looking forward to your work on these.
63129
Post by: Littletower
Thanks, Cam. Nice models indeed, quite detailed, and normally - or close to - proportioned too.
Hardly update-worthy, but progress is progress, isn't it?
First dabs of colour:
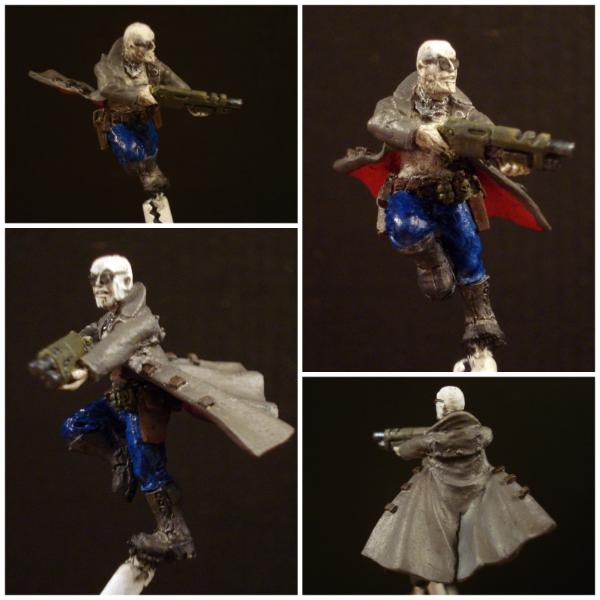
C&C are welcome.
Thanks for stopping by.
63129
Post by: Littletower
Some more done:
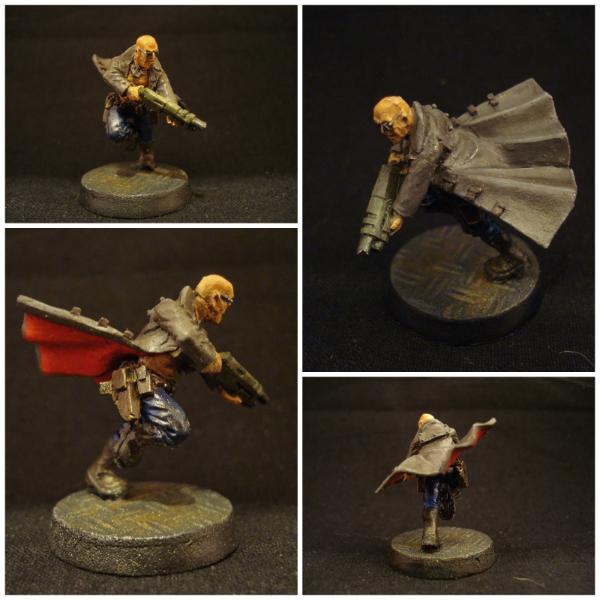
Thoughts and comments are always appreciated.
Cheers.
65595
Post by: Camkierhi
Excellent work, looking striking.
Tones all looking good, nice colour on the coat. Only question I have, are they meant to be denim jeans or blu pants? If Blue then brilliant job. If denim, maybe try very small highlight but using a diagonal hatching to show the material. To say that is the only thing I can see says everthing really brilliant job. And please feel free to ignore me as I am no painter.
72556
Post by: Red Harvest
Homer Simpson blue pants. Yeah.
If you want to stretch your painting muscles, perhaps paint the lining in the coat in a plaid, like a Burberry coat?
Looks good so far.
63129
Post by: Littletower
@Cam: Went for blue for this one, aiming at doing the rest - there's 12 in total - with a couple slight variations in tone/shade, so as to to have them similar but not fully "uniformed". Might try the jeans look on one or two as another one too.
Camkierhi wrote:... as I am no painter.
Shhh, neither am I, and here we are nonetheless. Just don't let people know about it and we'll be fine .
@Red H: The lining seemed to be actually stamped in the reference pics, but there's no relief in the minis I got. As much as I like the idea, there's no way I could pull it off free-handedly, less so with the coats already on and the rest of the figure getting on the way
Just got started with the batch-painting of the rest of the crew, nothing worth showing yet (from the inside out and dark to light colours, so only the pouches and badges done for now).
Thanks for checking in.
89231
Post by: ckig
Nice colour scheme! Red in the coat looks nice and vibrant. Nice contrast with the rest of the mini.
10972
Post by: Ruglud
I do like those Hasslefree gangers and always tempted to get some... good luck with the commission
83441
Post by: Boba Fett
Great minis! I really like the red on the coat, good look onthe comission
63129
Post by: Littletower
Thank you Gents!
@ckig and Boba, I can't take credit for the colour scheme - picked it up from the manufactures site - but I agree the red in the lining pops nicely contrasting with the darker tones of the rest, glad you approve!
@Ruglud: I think these are made by Heresy Miniatures, should appear under Sci-Fi Gangs. Not that I'm saying you should give in to that temptation, but...
Didn't manage to do any more painting today, but I got around to build something I've wanted to try my hand at for some time now:
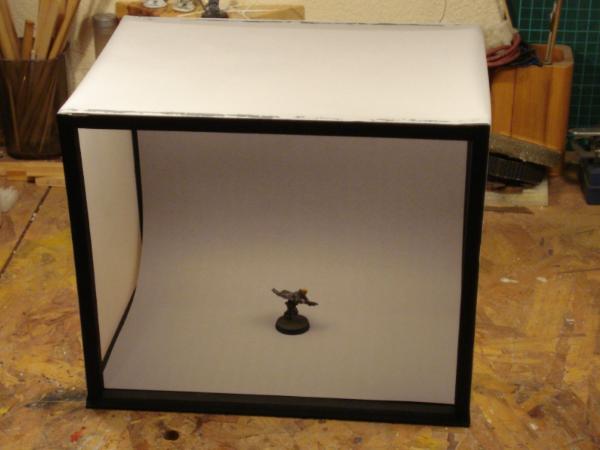
Made myself a light box!
Note to self Find something else to blame for poor looking results, now...
Will get back to painting soon!
Cheers.
65595
Post by: Camkierhi
Nice light box, always very useful.
2326
Post by: shasolenzabi
I would like to see a pic with a infantry mini next to it and see an idea of the size compared to a infantry man
65595
Post by: Camkierhi
Here you go Shas, since I am now the proud owner of said item....
1
2326
Post by: shasolenzabi
 Camkierhi wrote: Camkierhi wrote:Here you go Shas, since I am now the proud owner of said item....
That is sweet! It is like my own project which was inspired seeing this, making something smaller than a Russ. I am taking different routes with mine.
72556
Post by: Red Harvest
Lightbox is nice. What will you use for, erm, las luces? I'm guessing the sides and top are a translucent material?
As far as blaming poor results goes,the brushes are to blame. Or, the brushes have/hold the guilt. Literal translations are always fun.)
63129
Post by: Littletower
@Cam: Thanks for that reply! It looks good in it's new environment
@Shaso: It was originally meant to be a bit smaller, it sort of "grew up" on me during the building... Not taking into account 1mm thick styrene does add up in the end...
@Red H: MDF base, wooden rods structure, covered in translucent paper (tracing paper?), two alternative poster board back drops (black and a light, neutral, grey). For lightning, I've been using my workbench lamps, two - one on each side - articulated, long armed desk lamps, with high power equivalent (100 or 120 W) daylight bulbs. I'd wanted to make one for a while, had though of a foldable one (less cluttering of the shop if it were easy to put away, got tired of my "temporary" arrangement, so just put it together as is. Tried shooting a couple pics, seems to work, too.
The brushes, eh? Sounds good. Hook-tipped brushes will be the cause of all and any poor painting henceforth. The dude with the hook is always one of the bad guys, after all, isn't he?
As for a proper update, there´s no progress to report yet, but the weekend is almost here.
Cheers
|
|