106122
Post by: General Helstrom
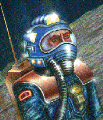
Hello! In this blog, I'm going to be painting lots of little men yellow. And tanks too. I've been doing so for a few months now and I've reached a steady pace where I feel I can keep a blog alive for a while.
I've tried that in the past (on various subjects) and failed tremendously  We'll see how this one goes!
There is a lot I want to talk about here. About yellow and its particular horrors for the miniature painter. About salvaging a second-hand Space Marine army and smelling like Dettol for a week. About airbrushes and compressors and hobby space negotiations with the girlfriend. About returning to wargaming after half a decade and finding my beloved Old World erased. About getting a bunch of thirty-somethings around a table drinking beer and pushing toy soldiers around, because life may be different now but maybe not that different. About people who refuse to return their books. But mostly, it will be about yellow. Angry little yellow men in steadily growing numbers.
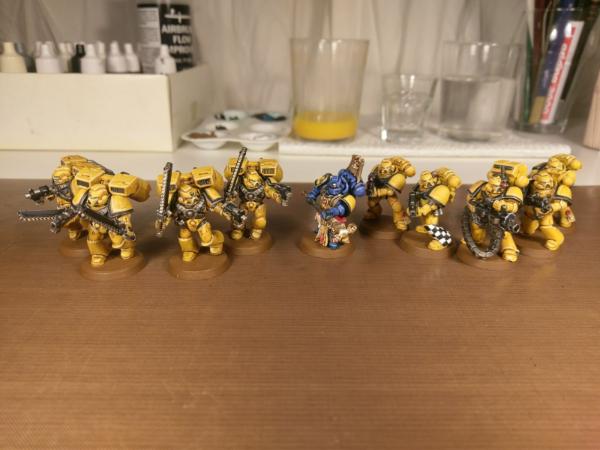
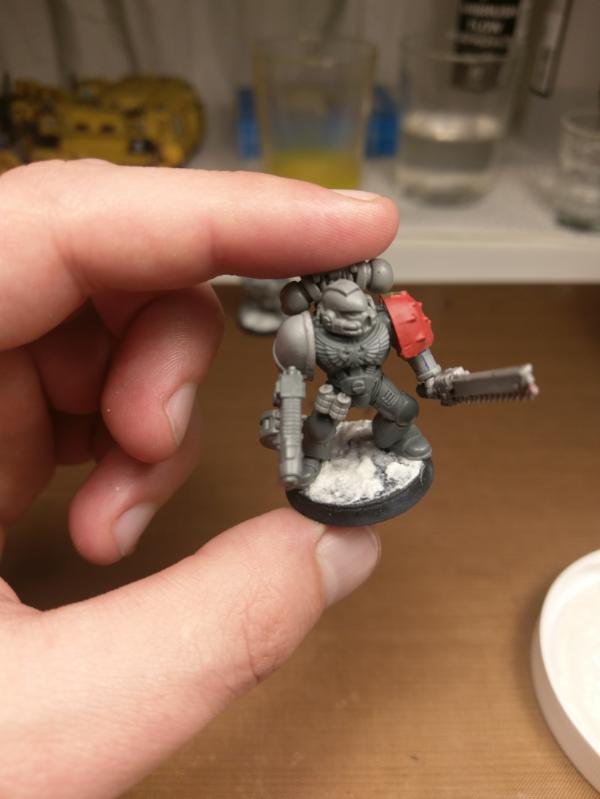
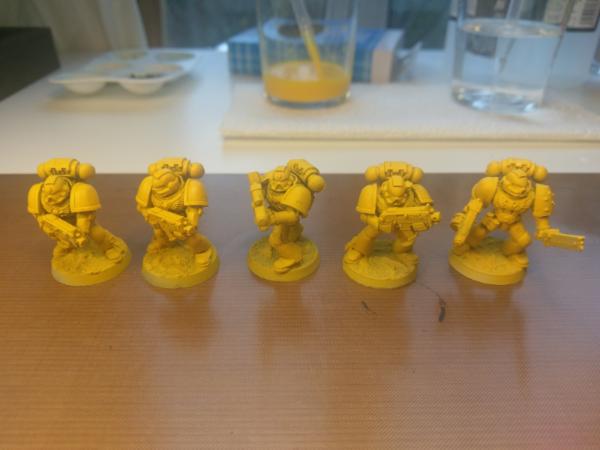
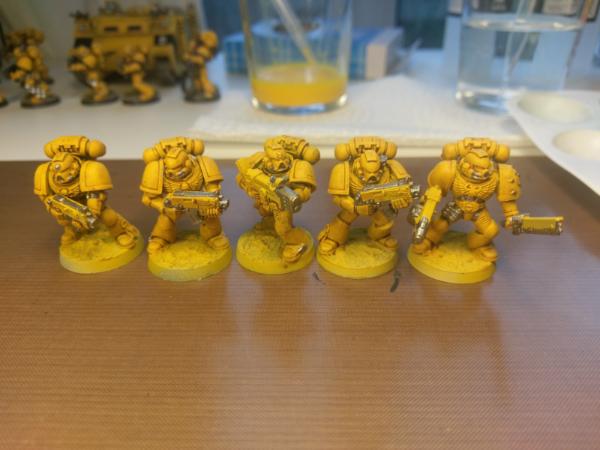
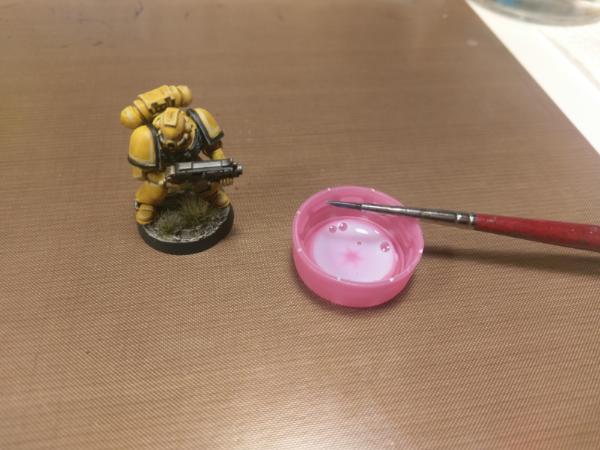
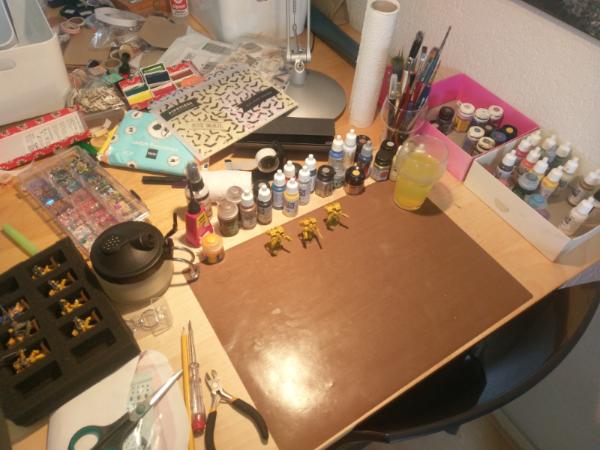
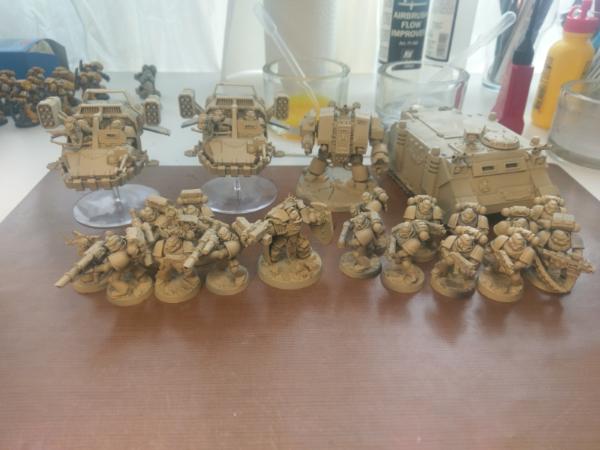
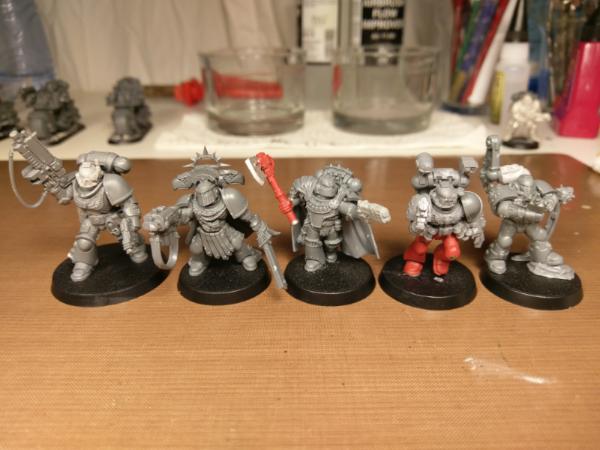
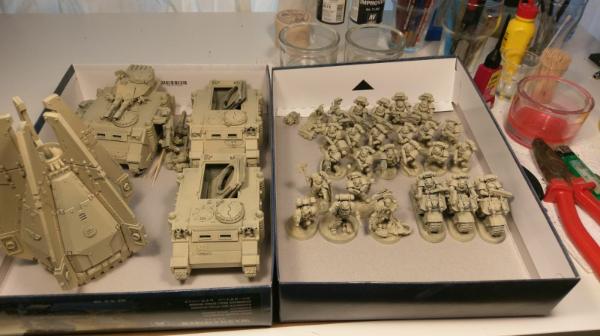
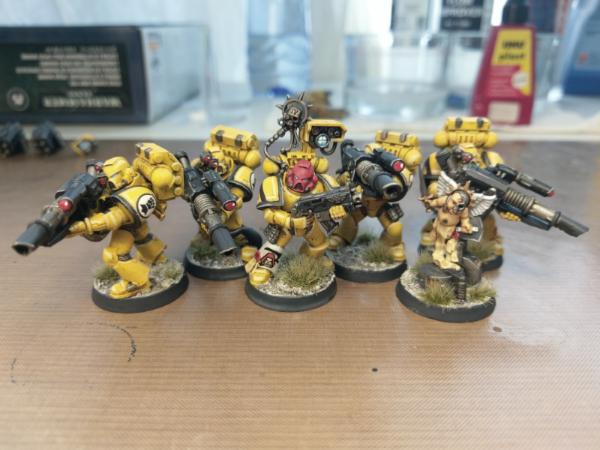
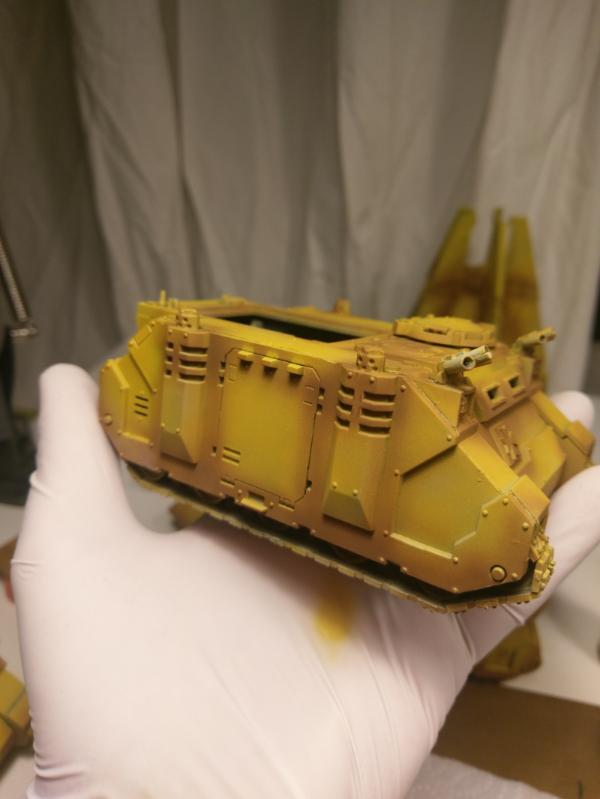
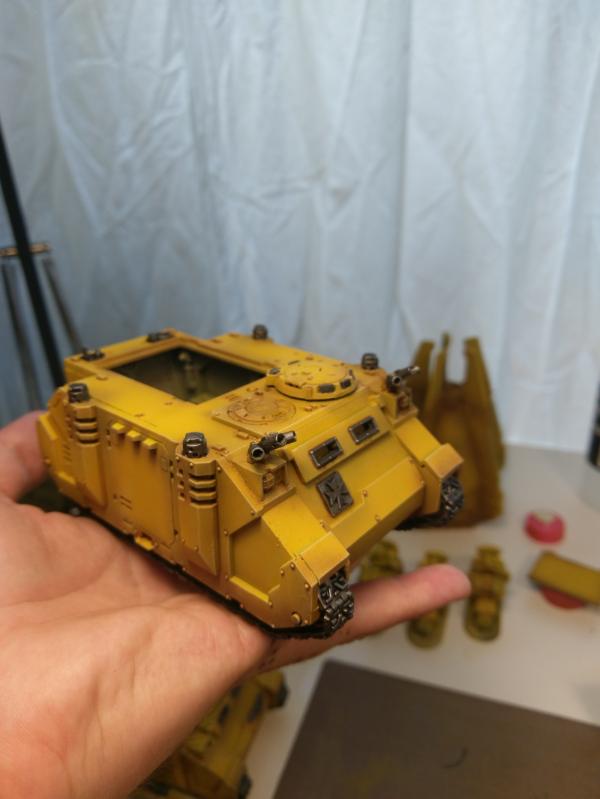
To start off with, have a picture of what's been done so far!

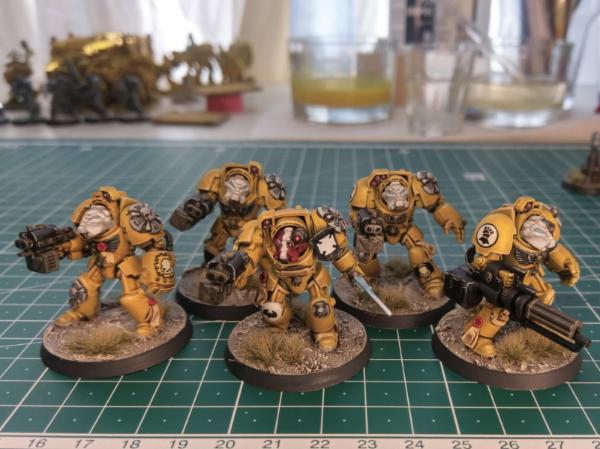
I have a yellow recipe I'm happy with and my basing sorted so it's time to crank up the production line. I'm hoping to maintain a rate of five Space Marines per week minimum. Yeah you laugh. This seems to be the maximum I can stand to batch paint and it takes me about two painting sessions (a good chunk of an evening each) to finish them. Here's where I am game-wise so far, with a 200 points Heralds of Ruin kill team painted and ready to roll:
Oh, right! Bases. I need to get back to those, it's game night tomorrow. See you next post 
91286
Post by: WarbossDakka
Awesome scheme mate! Don't worry about your model output, 5 is a perfectly reasonable number to batch paint (that's the number I paint Marines at as well).
The yellow is fantastic, mind sharing the recipe?
106122
Post by: General Helstrom
 WarbossDakka wrote: WarbossDakka wrote:Awesome scheme mate! Don't worry about your model output, 5 is a perfectly reasonable number to batch paint (that's the number I paint Marines at as well).
The yellow is fantastic, mind sharing the recipe?
Thanks!
I'll do a step-by-step on the recipe later (with pictures) but it's quite simple:
- Bone/sand-colored undercoat
- Yriel Yellow basecoat
- Seraphim Sepia all-over wash
- Heavy drybrush of Yriel Yellow
- Lighter drybrush of Vallejo Deep Yellow
- Line highlight of Vallejo Buff

What really makes it manageable for me is the Yriel Yellow basecoat as I apply it with an airbrush. No five thin coats brushed on, just a quick pass or two for a smooth and complete cover!
106122
Post by: General Helstrom
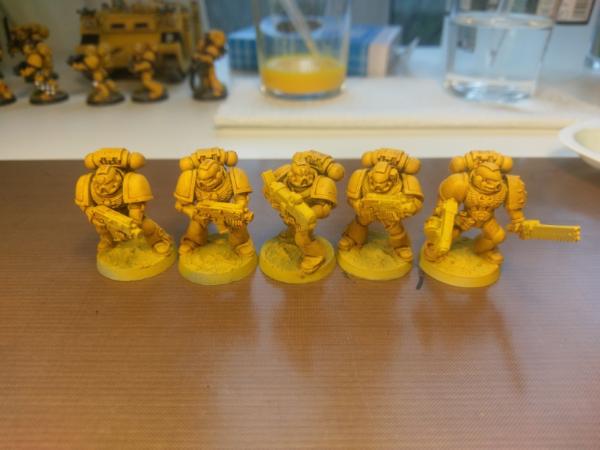
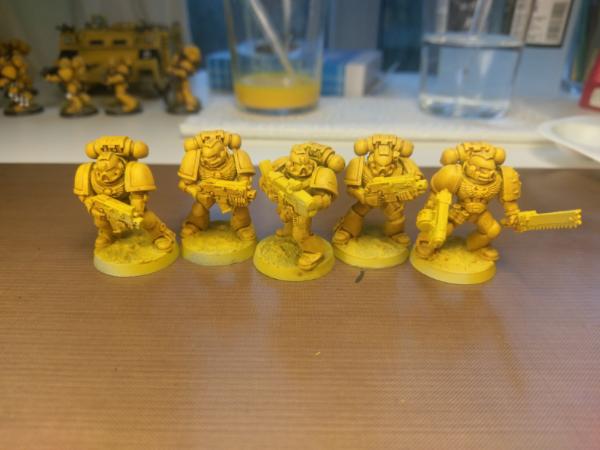
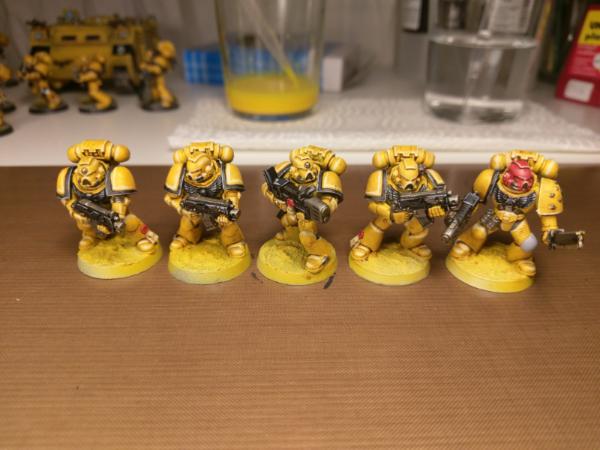
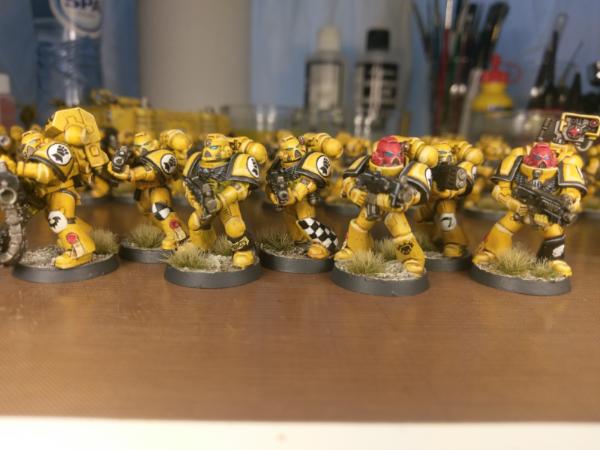
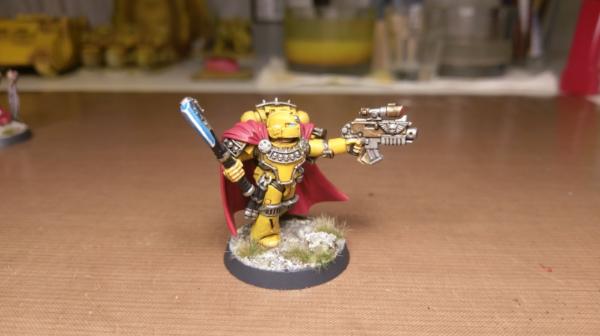
So, game night! To ease back into wargaming, I've joined a Heralds of Ruin Kill Team campaign along with friends old and new. We're playing warm-up games as everyone is getting their forces together. The real campaign is supposed to kick off in a couple of weeks. I'm cool either way - I've got models on the table and I'm rolling dice!
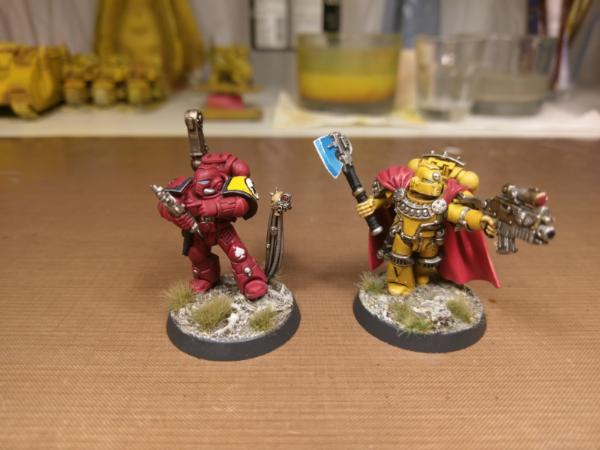
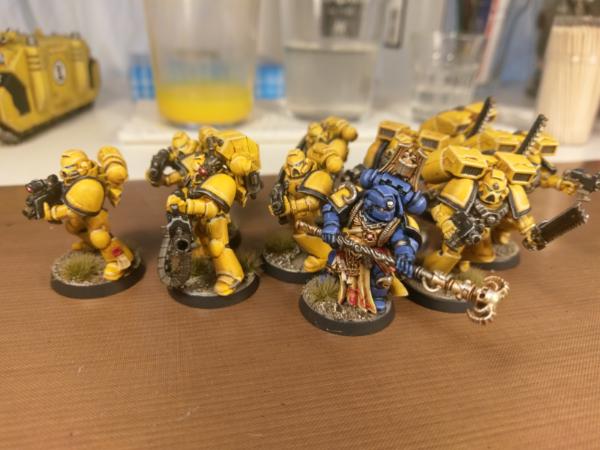 The Codicier and his band of Space Marines looking to reclaim the Emperor's misplaced literature. Nobody ever returns their books!
This night I went up against Steve and his Eldar. He had a list of Howling Banshees led by an Exarch and supported by a War Walker. Things started off well enough with the heavy bolter taking down the War Walker (thank you Tank Hunter special rule) after weathering all of its fire (thank you Power Armor). After that I figured I'd charge my Assault Marines into his Banshees. Kill 'em dead!
 Join the Marines, they said.
So, AP3 power swords happened and that was over real quick. The Fists fell back and did what they do best - sit on something and throw out bolter rounds! In this case it was, fittingly, a ruined Imperial aquila. The Fists made their stand and they woiuld not be shifted.
 Dakkadakkadakka!
In the end we both dipped below half strength and started taking Rout tests. I was the first to fail one and the game went to Steve! Well played to him and a lesson learned for me.
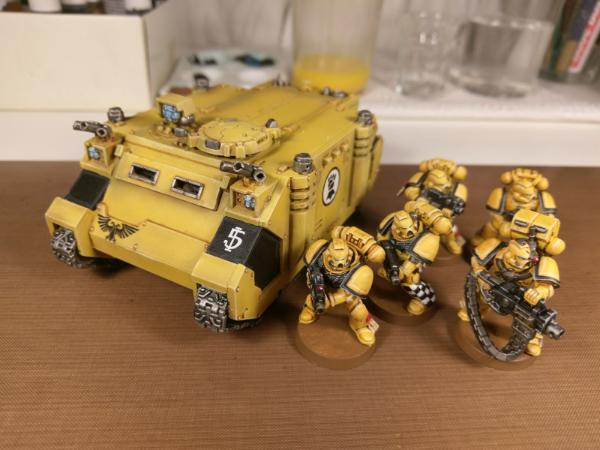
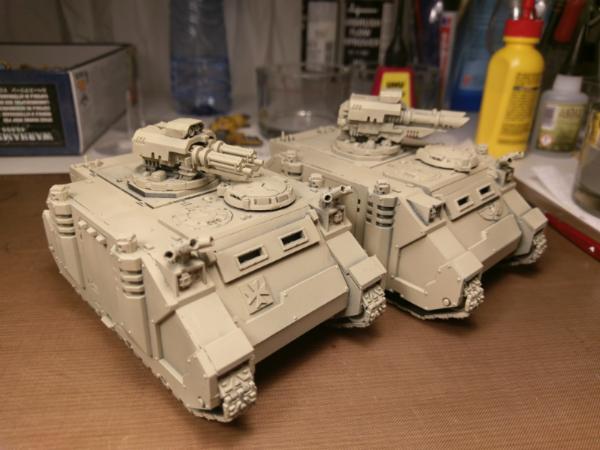
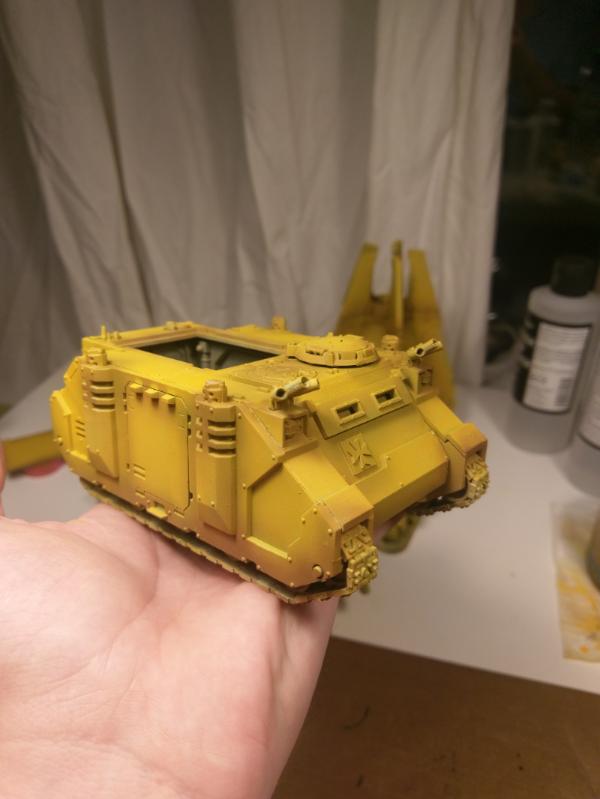
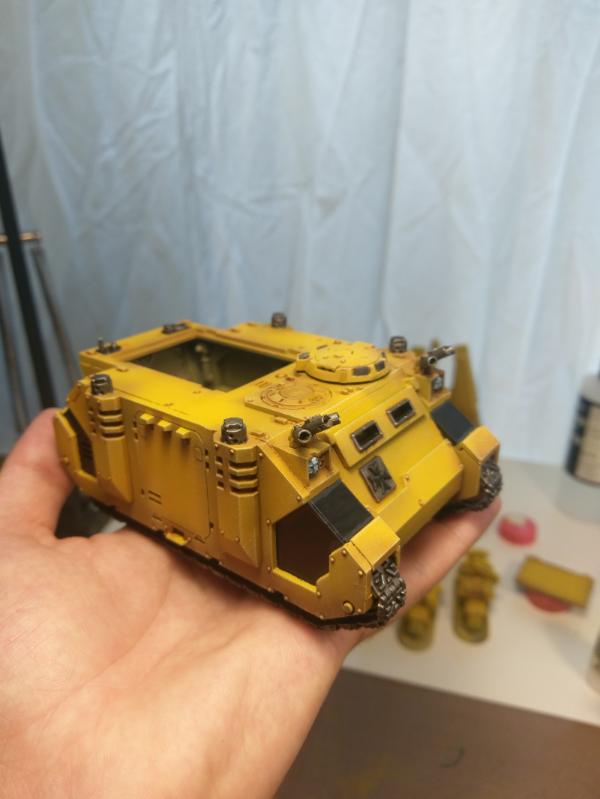
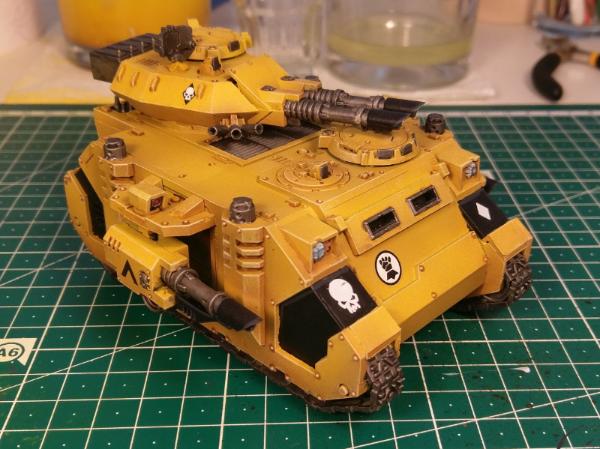
I'm happy with my little Kill Team and looking forward to more games with them. I'm also looking forward to finishing them as I have just received the required decals in the mail! After that it's on to the next bunch - five more tactical marines to complete a ten-man tactical squad. This will include a plasma gunner and a sergeant with combi-plasma, so I get to paint some cool glowy guns too. The eagle-eyed among you may have already seen their Rhino in the background. That's finished too and I'm really happy with how it turned out! The airbrush also made painting this Rhino a breeze and as soon as I paint the next one I'll do a step-by-step on that too.
 Vroom!
See you next time!
91286
Post by: WarbossDakka
Looked like a fun game! Nice work on the Rhino too, good edge highlight practice.
106122
Post by: General Helstrom
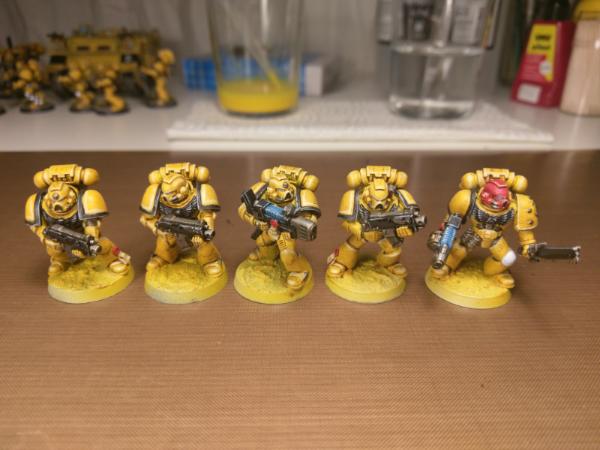
The next batch is in the works! I'm expanding the five Tactical Marines into a full squad by adding three more Marines with boltguns, one with a plasma gun and a Sergeant with a combi-plasma. This is the take-on-all-comers tactical squad I'm building my army around. They have the dakka to deal with most light to medium infantry, plasma to keep heavy infantry honest and a heavy bolter for extra oomph. Anti-tank and such will be provided by specialised support units.
I start by selecting a bunch of mongrels from the box. Did I mention I'm working off a second-hand ebay lot? Stripping them of their awful paintjobs took ages and will be the subject of a different post. You can tell that paint residue remains in various degrees on these models, depending on what type of cheap primer the previous owner abused them with. No worries: after a fresh coat of paint they'll look like new! I lay out the parts I want to use and then grab my trusty hobby knife and the pink bottle of UHU-plast that has been with me for about fifteen years. Does plastic glue ever go bad?
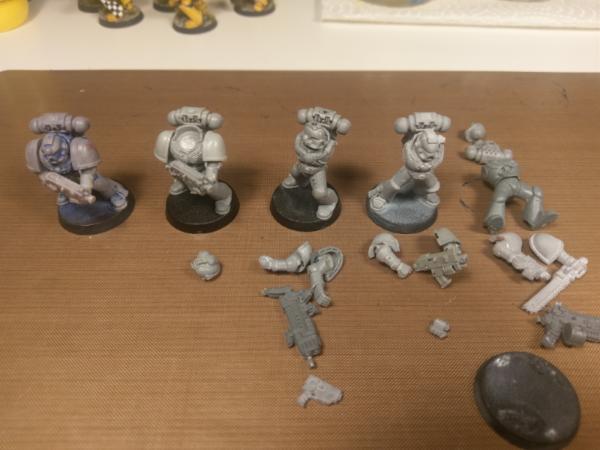
Then it's on to slicing and dicing. In the process I decided to put a different pair of arms on both the plasma gunner and the sergeant. You know, because of reasons. I found a studded shoulder pad for the boss and worked him into a suitably aggressive pose. The marines were assembled non-firing because their completed brothers are all firing. When they're all together the squad should have a nice mixed appearance.

When basing became more than "flock it and paint the edges green", a wonderful world of miniature landscaping was opened up for me. Over the years I've used all kinds of exotic materials to make my toys look pretty. Nowadays I go easy on myself and use ready-made products. In this case it's AK Interactive's endearingly straightforwardly named "neutral texture for earth". Similar products are available from Vallejo and GW. The nice thing about this stuff is that it can be thinned with water. I use a plastic bottle cap as a disposable little mixing pot. Always save those caps! It encourages you to drink more water too. See, wargaming is good for you

I like to apply basing materials before udercoating. The undercoat helps it set and gives it a solid colour to work from. With the AK Interactive stuff it's not really necessary as it is already well mixed with its gel carrier, but I've also used sand and other loose materials over PVA glue and found the added strength of the undercoat to be most welcome!

After a thin coat of texture, I use the stuff straight from the tub to build it up. I work the thick globs into the still-wet thin base layer. This goes on super easy and quick and it will look amazing once painted.
Now the texture paste just needs to dry and it's on to undercoating!
115
Post by: Azazelx
Nice work on these guys. The yellow you're using looks great!
106122
Post by: General Helstrom
 Azazelx wrote: Azazelx wrote:Nice work on these guys. The yellow you're using looks great!
Thanks! They might like to have a word with those Iron Warriors of yours
106122
Post by: General Helstrom
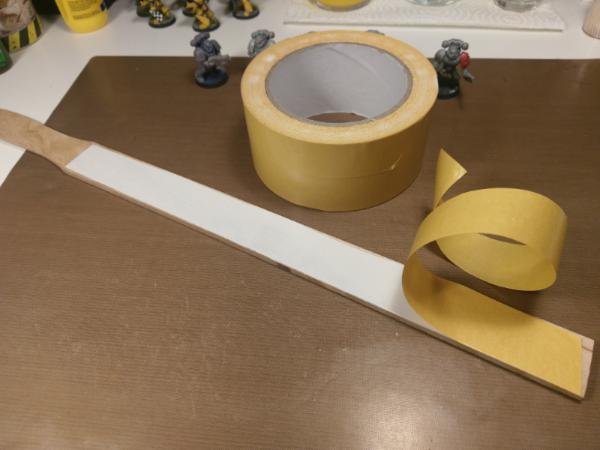
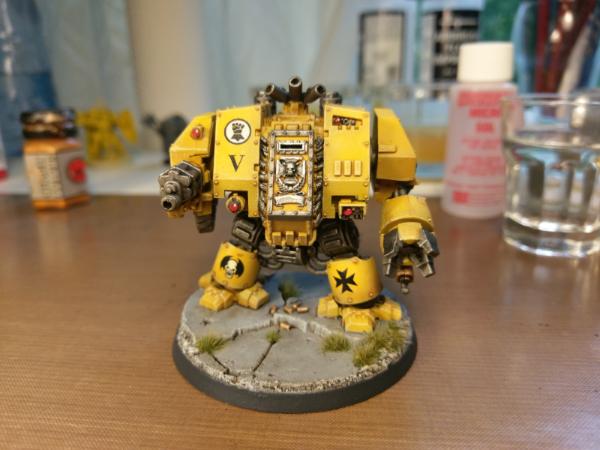
So I had the day off today. After shopping for groceries, assembling the new shoe cabinet and preparing tonight's roulade (sorry ladies, I'm taken) I had a few hours to spend on the next batch of Marines! With them all assembled and ready to go, I start by priming them. For this I mount them on a paint stirrer with a strip of double-sided tape. I got the stirrers for free at the hardware store where I bought the tape. Being Dutch, I also cut the tape in half lengthwise so I get twice the mileage out of it.
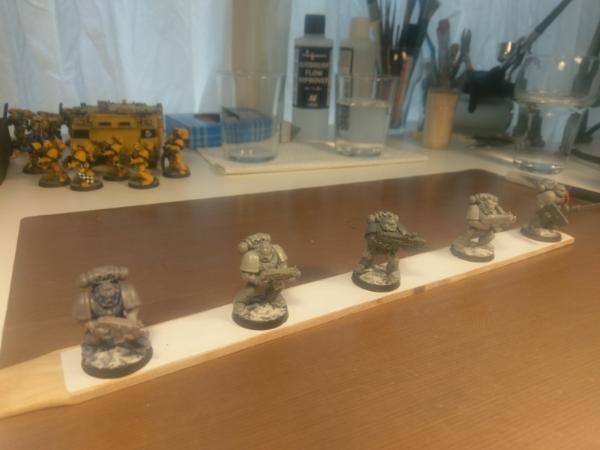
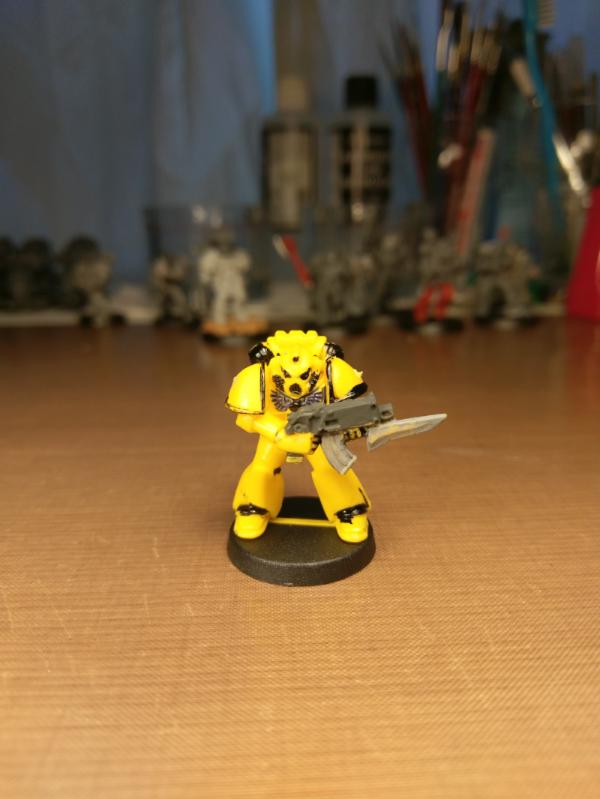
Then it's outside for the application of Army Painter's Skeleton Bone color primer.

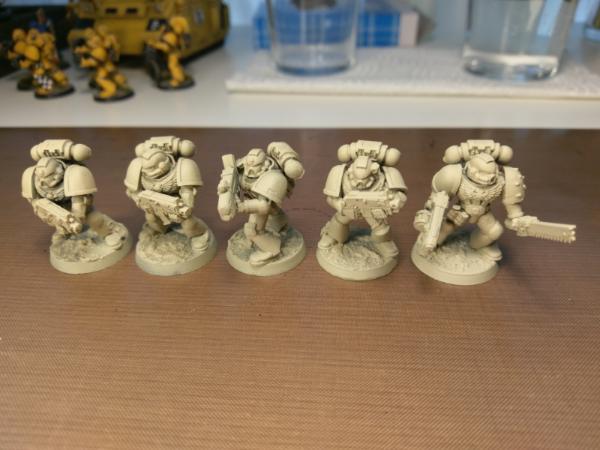
The mongrels clean up real nice with a smooth coat of primer. On to the painting table then. Yellow, as any painter will tell you, is awful to work with. It doesn't cover, it leaves brush strokes, it's contaminated by even the hint of a different color in your water jug... My chosen yellow is Games Workshop's Yriel Yellow. This is especially bad because it is a layer paint, which is GWs thinner, more translucent formula. Applying it as a basecoat with a brush would take as many as four layers to get a smooth, even finish with good coverage. Part of this is helped by the bone-colored primer. The rest is done by my newest friend, Mr. Airbrush! As a layer paint, Yriel Yellow is actually pretty good for airbrush work once thinned down properly and with the aid of a few drops of Vallejo Airbrush Flow Improver.
After the basecoat I wash them all over with GWs Seraphim Sepia. This dirties up the yellow considerably. I'll blend that down in the following steps but it will always show through. It's the effect that I'm after as I like my Imperial Fists to look a little gimy and worn. If you want a cleaner yellow, apply the wash with precision, brushing it into the recesses carefully and avoiding the flat areas.

To bring the color back up, I apply a hefty drybrush of Yriel Yellow. While drybrushing I take care to move 'against the grain' of any detail. I don't want the bristles to get in between armor plates or joints and mess up the nice sepia wash.
Finally I drybrush Vallejo Deep Yellow over more lightly as a first highlight. This completes the yellow recipe for now. I'll do a line highlight later on to really make it pop.
With the yellow base color completed it's time to block in the other colors and then move on to detailing and highlighting (with copious amounts of correcting in between). That will be the subject of next post!
110777
Post by: Samsonov
Very nice and a potential solution to some problems. How much paint do you get from a GW airbrush paint compared to a Vallejo one may I ask? They are more expensive by ml but what about things like how watery and such things?
106122
Post by: General Helstrom
I couldn't tell you exact numbers but I reckon the layer paint gets diluted with about 25% water and a few drops of flow improver to make it airbrush-ready. Frankly, compared to the cost of the miniatures I'm not too fussed about paying a few pennies more for a color I want
65162
Post by: TheDraconicLord
Loving the painted minis and the banter You have made me smile quite a few times while reading this, thank you 
110777
Post by: Samsonov
 General Helstrom wrote: General Helstrom wrote:I couldn't tell you exact numbers but I reckon the layer paint gets diluted with about 25% water and a few drops of flow improver to make it airbrush-ready. Frankly, compared to the cost of the miniatures I'm not too fussed about paying a few pennies more for a color I want
Sounds not bad. Another big advantage is that you can open the lid on a GW airpaint. Since it is difficult to judge how much you need, I can often use too much Vallejo and have to dispose of it, plus it can be harder to tell when you are going to run out. Additionally, running out half way through an undercoating session is a bit more annoying than running out of a typical paint, so it is good that I can get GW airbrush paint in a local shop rather than having to order Vallejo online.
106122
Post by: General Helstrom
 TheDraconicLord wrote: TheDraconicLord wrote:Loving the painted minis and the banter You have made me smile quite a few times while reading this, thank you
Happy to hear that! I aim to please
 Samsonov wrote: Samsonov wrote: General Helstrom wrote:I couldn't tell you exact numbers but I reckon the layer paint gets diluted with about 25% water and a few drops of flow improver to make it airbrush-ready. Frankly, compared to the cost of the miniatures I'm not too fussed about paying a few pennies more for a color I want
Sounds not bad. Another big advantage is that you can open the lid on a GW airpaint. Since it is difficult to judge how much you need, I can often use too much Vallejo and have to dispose of it, plus it can be harder to tell when you are going to run out. Additionally, running out half way through an undercoating session is a bit more annoying than running out of a typical paint, so it is good that I can get GW airbrush paint in a local shop rather than having to order Vallejo online.
Yeah it's cool, just takes a little getting used to to get the right consistency. As they say, it should be like milk!
You can actually open the Vallejo dropper bottles if you really want to - the dropper tip can pop right out. This usually happens by accident when you let some paint dry in the tip and you try to force it out by squeezing instead of being sensible. Ahem. I've ordered up a few dozen empty dropper bottles from China and plan to transfer my GW paints to them. They're a lot easier to work with I find. You could probably pre-thin a pot of GW paint in a dropper bottle and have it ready to go, now that I think about it.
106122
Post by: General Helstrom
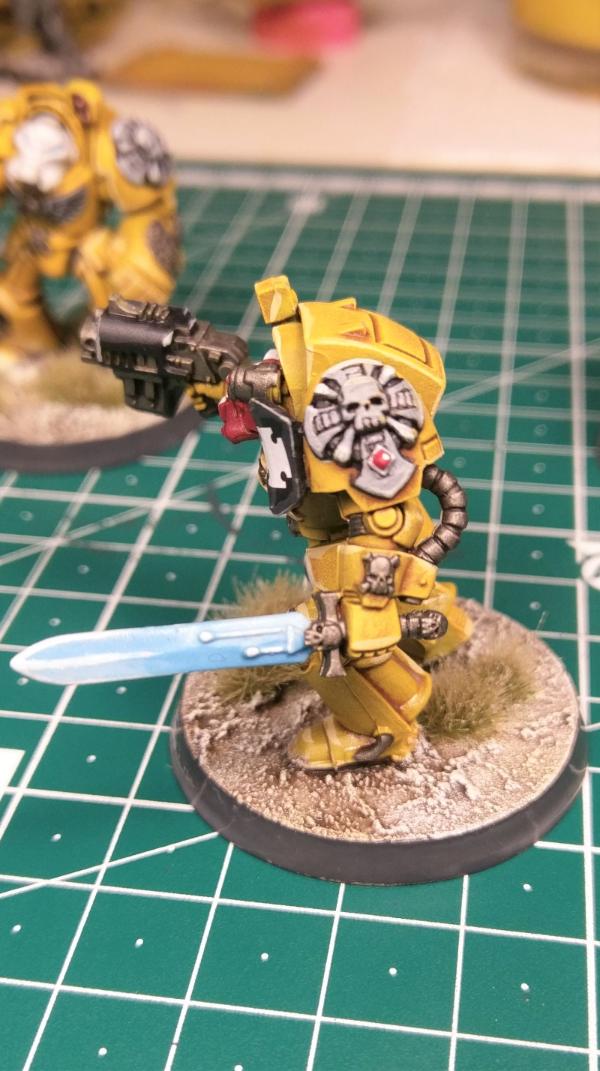
Where were we? Ah yes, the mongrels were all yellowed up. Time to work on the details. In this case I begin with the metal parts, giving them a coat of boltgun metal (yes, boltgun metal - it's even in the old hexagonal bottle with the black flip top). I do this because when possible I like to work "inside out" with my paints. That basically means starting at the skin of the figure, then working my way outward: skin > clothes > armor > decorations, for example. This is because I find it easier to paint things over an already painted area, rather than trying to squeeze my brush "under" the higher details. If that makes sense. If not - well this is the way I do it.
After the metallic it's on to trim and details. I take care to rinse all my water after using metallics because that glitter gets everywhere. If you've ever been to a strip club you'll know what I mean. At this point I used Vallejo Black for the shoulder pad trim, chest eagles and weapons casings, Vallejo Flat Red for the purity seal wax and the sergeant's helmet, and Vallejo Buff for the purity seal streamers. I then washed the metal with GW Nuln Oil, the red with GW Carroburg Crimson and the purity seal streamers with GW Seraphim Sepia.

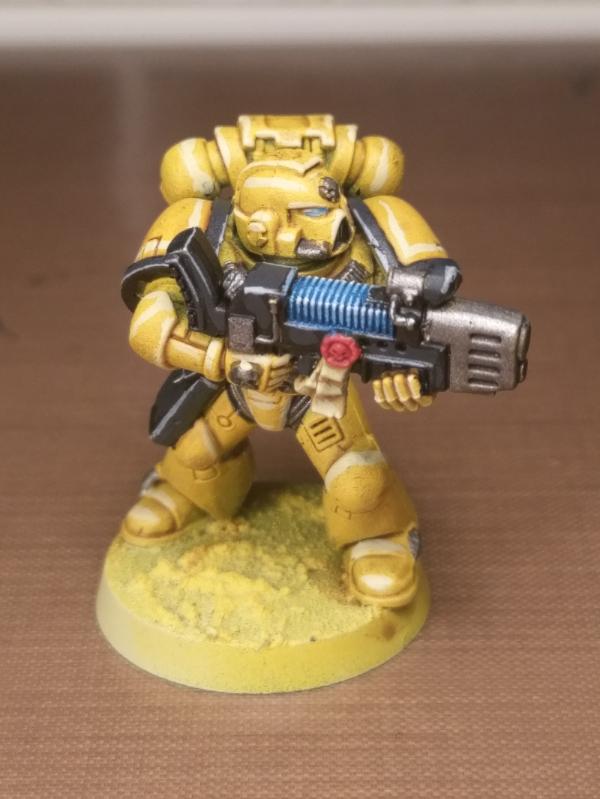
The most time-consuming part after blocking in the trim and detail colors is edge highlighting. I use Vallejo Buff on the yellow armor to create a sharp highlight. On the red helmet I mix Vallejo Buff and Flat Red first (using buff keeps it from turning pink too quickly) and apply it liberally to the raised areas. Then I take Vallejo Flat Flesh and carefully highlight the topmost edges. On the black areas I smear quite a lot of one of my abdsolute favorite paints: Vallejo German Grey. It's almost as awesome as GW's old Flesh Wash, though that was more due to the smell. I digress. I put on quite a lot of German Grey and then do the fine edges in Vallejo Light Grey. I also go back and smooth out the purity seal streamers a little with Buff. At this point I also decide to paint the sergeant's knee cap white, which I will do over a Light Grey basecoat.
Now we get to the last details. I do the eye lenses in blue. To achieve this I first paint them pure white, then apply a thinned down GW Lothern Blue as a wash. Easy if you have a steady hand! Me, I have to clean up afterwards with buff and yellow again. Such is life. The plasma coils I paint Vallejo Flat Blue and then drag a semi-dry brush across the ridges to lighten up the color, starting with Lothern Blue, then about 50/50 Lothern Blue and white, and then finally some pure white on the corner edges. It's like drybrushing but not quite as dry to avoid the chalky, dusty look you'd get normally. The sergeant's kneecap gets a nice smooth coat of white. These final touches mark the end of major painting operations.
We ain't done yet, of course. The finishing touch to these Marines will be the bases and transfers. Because that involves a lot of handling the model itself instead of holding it by the base, I give them a blast of matte varnish at this stage. We'll get to the finished touches next post!
52201
Post by: evildrcheese
These be some really nice looking IF!
EDC
106122
Post by: General Helstrom
Let's get these bad boys finished up! That means doing the bases and decals. For reasons of logistics I'm doing them in that order - the decals came in late from the printer. Normally I would do those first and the bases last to prevent any problems with static grass getting into all kinds of uncomfortable places. No biggie, just have to be a bit more careful during the decal stage.
Because the basing material has already been applied during assembly and has been coated by both the undercoat spray and the basecoat airbrush, it's perfectly prepared for its first coat for Vallejo Light Grey. Not much coverage is needed so I thin the paint down quite a lot at this stage. It's also an excuse to get a little sloppy after all that precise highlighting work!

I then smother the whole base in GW Agrax Earthshade (is there anything Agrax can't do?), drybrush the texture with Vallejo Buff and again with Vallejo White over the very tops to give a good strong contrast. I then finish up the base rims with Vallejo German Grey for a tight look. I'm considering changing the rims to a really dark brown, but I'm not sure about that yet. I have Vallejo Scorched Brown on the way for trials.


With the texture done, I put some PVA/wood glue in my palette. I know, I should have used a bottle cap for this. It's OK. Sometimes my brain just gets stupid like that. A simple toothpick is the perfect tool to put small amounts of glue under the tufts of MiniNatur Early Fall Grass, a two-tone tuft of light brown over green that looks really nice on a grey base. I aim for two or three tufts of different sizes per base.


And Bob's your uncle! The wood glue needs some time to really dry properly and the tufts tend to shed a few strands over time, so I leave them alone for a few hours and then hit them up with the old spray varnish. Now on to decals.
Decals take a little getting used to. In fact I messed up quite a few of them as it had been a long time since I last did this. Fortunately, with the right tools and a bit of trial and error, it quickly becomes pretty straightforward. First of all I prepare the surface areas (the shoulder pads, but also some greaves, kneepads etc) with some slightly thinned Vallejo Gloss Varnish. This creates a great surface for the decals to adhere to and prevents tiny air bubbles from messing things up. See that bottle cap? That would have been the correct way to set up the PVA/wood glue too.
The black squad markings aren't made by GW or Forgeworld anymore. Apparently everyone plays Ultramarines these days I whipped up these squad markings in a word processor, saved them as a PDF and - after a few test prints at hom to check the size - sent them off to a friendly print shop which does waterslide decal work. They came out really nice and the film quality is great. Here you see me cutting them out in individual markings and putting the first batch of Imperial Fist markings on a wet piece of kitchen towel to soak. I find this is a great way to soak a large number of decals at once while keeping control over where they go and which side is up!


Micro Set and Micro Sol are the go-to products for decal application and with good reason: they're great. I brush Micro Set onto the surface, slide the decal on, position it using either the brush or the tip of my hobby knife and then let it dry. After that it's coat after coat of Micro Sol to make the decal adhere to the compound curve of the shoulder pad. On simpler surface shapes it takes only one coat. These are solvents so they need to be used with care. They will soften acrylics when you use too much of the stuff for too long without letting it dry in between. And if you're a brush licker like me, just let me say - yuck.
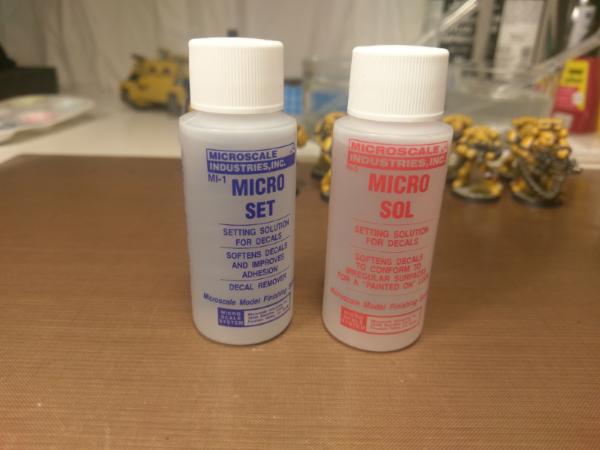
Why put myself and my angry little yellow men through that? Well, because the results after drying and a final coat of matte varnish are awesome. The decal film has completely melted into the varnish coat and become invisible, especially after the matte coat as the close-ups below demonstrate.


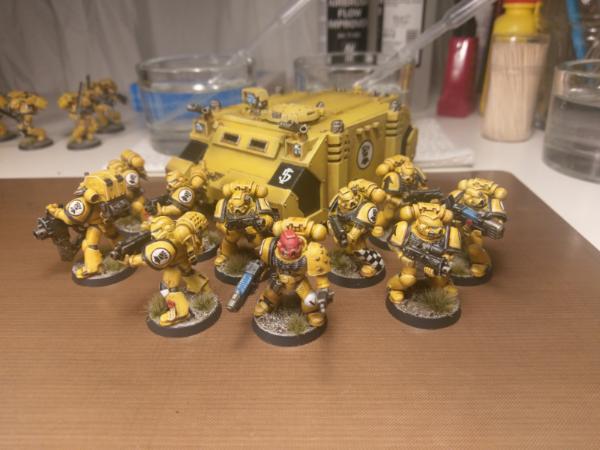
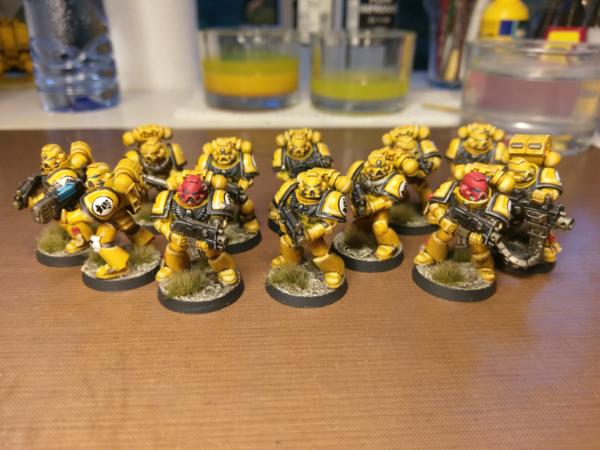
With all that done, the models are now truly completed! I've joined them with the other half of their squad and their Rhino for a final group shot. This week's target has been achieved! Next week I want to paint up a squad of five Devastators with Heavy Bolters because they just mesh so very well with Imperial Fists chapter tactics. I have a big box full of goodies on the way, including a second Rhino/Razorback, a pair of Land Speeders and some more Devastators. Also, replacement hobby knife blades and superglue. Good times.
Thanks for all the comments, see you next week!
107727
Post by: amazingturtles
That was really really neat, and also very helpful!
106122
Post by: General Helstrom
That's great to hear, thanks! What did you find helpful? And is there anything else you'd like to know more about? With the big how-to done I need new subjects to write about
106122
Post by: General Helstrom
Quick update! First of all, another game night and possibly the first real game in the Kill Team campaign (there's some confusion as to the organization). I played against Erik and his Khorne Daemonkin. He brought a pair of Cultist squads to the table, four Flesh Hounds and a Bloodletter as his leader. The Fists got into the swing of things, with the tactical marines quickly finding a crater to hole up in and the assault marines swinging around the flank. This resulted in the Flesh Hounds getting blown to bits and then chopped to finer bits while supportnig las fire from the cultists plinked harmlessly off the ceramite power armor. The bloodletter got into combat and cut down one assault marine, leaving himself exposed to the full fury of my team's bolter fire. That and the Librarian's Smite power took care of him. With no more leader to summon from, the team moved in to mop up the last squad of cultists in close combat. Their chainswords turned to rubber and it took them three rounds of combat to get it done. Still, my team suffered no more casualties and the Khorne team was almost completely wiped out. Victory to the Imperial Fists!
 Did somebody order some dakka?
 With a side dish of whoop-ass.
To fulfill my ambition of painting five marines per week, I prepped the following Devastator squad. They're about to get their basing material added and then it's on to priming.
 Did somebody order even more dakka?
I have plenty of time this week to work on them, so there's another finished squad to look forward to!
106122
Post by: General Helstrom
And done!
With four heavy bolters, this devastator squad makes use of two Imperial Fist chapter tactics rules: the re-rolls to hit for bolter weapons, and the Tank Hunters special rule for devastators. I'm banking on those bonuses to make the somewhat lackluster Heavy Bolter a thing of dread for light and medium infantry as well as light vehicles. This, I hope, should make these devastators excellent backfield defenders.
91286
Post by: WarbossDakka
That tutorial you did is pretty handy, specifically the decal section. They were always a pain, so I'll have to try them out. Thanks!
106122
Post by: General Helstrom
WarbossDakka wrote:That tutorial you did is pretty handy, specifically the decal section. They were always a pain, so I'll have to try them out. Thanks!
You're welcome, hope it helps!
One tip: don't let the decals soak on the paper towel for too long or the glue may become too diluted. I try to have no more than about five decals soaking at any one time.
91286
Post by: WarbossDakka
Aha, I'm usually too impatient to leave them for that long. Thanks for that tip though!
100273
Post by: STG
Great Plog, love me some imperial fists.
very helpful tutorial on yellow too, I may start a small yellow SM Force at some point in the far future.
13225
Post by: Bottle
These are some lovely looking Imperial Fists! Are you painting another 5 this week too?
106122
Post by: General Helstrom
 STG wrote: STG wrote:Great Plog, love me some imperial fists.
very helpful tutorial on yellow too, I may start a small yellow SM Force at some point in the far future.
Thanks! The yellow is a lot less trouble than I thought at first, especially if you're not too fussy about correcting mistakes. I tend to just dab then away with a wet brush as much as possible, then paint over it with Buff, Yriel Yellow and a bit of Seraphin Sepia. The color difference is noticeable up close but it really disappears into the detail of the miniature at even half an arm's length.
 Bottle wrote: Bottle wrote:These are some lovely looking Imperial Fists! Are you painting another 5 this week too?
Thanks! And yes, that's the plan. I have models on order to build my force out to 1,000 points but for now it'll be more tactical marines. Once the other miniatures are in I think I'll alternate between five marines one week and something special (like a vehicle) the other, just to keep things interesting.
106122
Post by: General Helstrom
I have a half-dozen new marines in the pipeline this week. As cool as that is (because that's six instead of five!), I've already shown how my process works on those. This time I'd like to talk about something else: hobby space!
When I 'seriously' got back into wargaming a while back, I'd been out of the loop for half a decade. My paints and brushes were in a box, my miniatures were in another, my bitz in yet another. In fact a large portion of my 40K bitz are still unaccounted for. I had part of an Imperial Guard army painted, a bunch of Terminators for a project that never got off the ground and some unpainted WFB Empire stuff. I sold off most of this junk and started setting aside a monthly sum of money to invest in new miniatures and gear. I also claimed part of the dining/gaming table for my painting and modeling, with the rest of the table going towards my girlfriend's crafts. That ended up looking something like this:
As far as hobby stations go, this is functional but only barely. In fact there's a lot wrong with it. To begin with, the one lamp (a bright and hot halogen desk lamp) is shared between both users. I have all my brushes and tools stuffed into one glass so I can slice open my fingers on my hobby knife when I'm fishing for the drill bits at the bottom. There's no good place for my airbrush stuff and there's no elbow room! So with my first self-assigned hobby allowance in hand I went over to IKEA to do some shopping. This is the result:
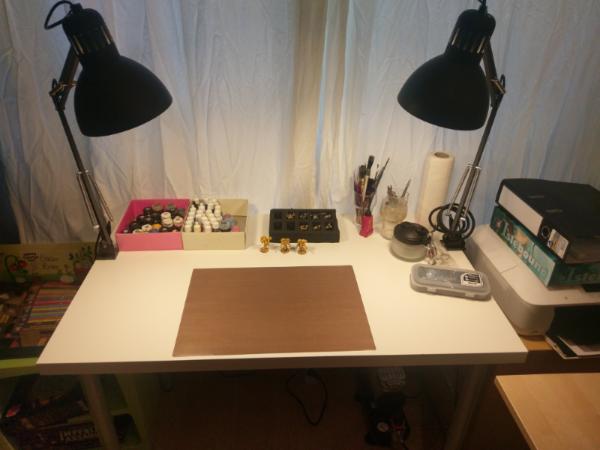
That is much better. First of all it's a dedicated space that doesn't need to be cleared out any time we have people over for dinner and/or boardgames. It's all mine! Of course it took a little negotiating with the girlfriend but fortunately, she's super cool and we actually paint our set of Imperial Assault minis together. Count me blessed On the practical side, it has a nice allotment of space without being huge, it has not one but two desk lamps with nice cool LED bulbs, I doubled my tool storage space through the crafty addition of a second glass and I got my airbrush set up properly. Off photo to the right is a small desktop cabinet with drawer space for paints, basing materials, decals and solvents and the other bric-à-brac that comes with the hobby. Sorted!
Then I knocked over a glass of dirty water which went into the power strip underneath my hobby station, causing a short-circuit and staining the floor in an odd blackish-brownish-purple color that took me ages to clean off. Ho-hum.
I decided I didn't really like my water glass anymore. There's a picture of it below. In the Netherlands, this is a common type of small beer glass. It's tall, light, and it even bulges out at the top so it's top-heavy. It's like it was designed to be easily knocked over! Now that I think about it, that would explain a lot of bar room spillage over the years. But I digress again. This monstrosity obviously would not do any longer. Alongside this water glass, I used two whisky glasses to hold the water for my airbrush (one clean for thinning and one dirty for dumping) and I figured I might as well replace those too. I have a bottle of Laphroaig that would see much better use of those glasses.


To the interwebs! For a hobby where people write page-length essays on which brand of toothpick is best for arranging static grass, there's a surprising dearth of material on how to store your water. I did find this article on the ever-amusing Massive Voodoo and I wholly recommend you give it read. Brush lickers beware! Anyway, I didn't really learn anything new and figured I'd just keep my eyes open for a while. And sure enough, casually cruising through a department store, I came across what I believe are the perfect water jugs for the clumsy hobbyist:

These are actually tea-light holders and they're cheap as chips. More importantly they are short, wide and heavy so they're pretty much impossible to topple by accident. They will hold enough water for my needs though I tend to refresh my water quite regularly anyway. I also decided to copy the practice of having two water jugs over to my regular brushwork, using one jug of dirty water for rinsing dirty brushes, and one of clean water for final rinsing and for thinning paints. This is the kind of hobby innovation that really makes my day! It's also what makes my girlfirend smile lovingly and say "that's nice, honey" with the sort of look you would give a child who has just found an oddly-shaped dog turd on the sidewalk.
Anyway, that's my setup and I'm pretty chuffed with it. It certainly helps not having any significant set-up or tear-down time and the double lighting is fantastic too. No more working in the shadow of my own hand!
100273
Post by: STG
A double lamp set up is something i've been looking at doing for a while. might jump in now!
52201
Post by: evildrcheese
Cool looking stuff dude.
EDC
107727
Post by: amazingturtles
General Helstrom wrote:
That's great to hear, thanks! What did you find helpful? And is there anything else you'd like to know more about? With the big how-to done I need new subjects to write about
Sorry to reply late, but all sorts of things were helpful, but particularly you showing how to get decals right. i struggle with those so much that i basically never even try anymore, but i might be able to change that now!
21542
Post by: Mad Monk's Mekshop
Looking sweet dude! I quite like the yellow loyalists, somuchso that I consider assembling a small strike force myself to add to my small Black Templar collection as they are classic brethren in arms! Will be eyeing this thread for future additions for sure.
Peace!
106122
Post by: General Helstrom
STG wrote:A double lamp set up is something i've been looking at doing for a while. might jump in now!
You should! I'm amazed at how much better it is than a single lamp. And I'm amazed I didn't get a second lamp ages ago.
Thanks!
 amazingturtles wrote: amazingturtles wrote:Sorry to reply late, but all sorts of things were helpful, but particularly you showing how to get decals right. i struggle with those so much that i basically never even try anymore, but i might be able to change that now!
Cheers man, good luck! It's the products that really makes it work, especially the gloss varnish - a smooth surface to apply the decals to is key.
 r3n3g8b0y wrote: r3n3g8b0y wrote:Looking sweet dude! I quite like the yellow loyalists, somuchso that I consider assembling a small strike force myself to add to my small Black Templar collection as they are classic brethren in arms! Will be eyeing this thread for future additions for sure.
Peace!
Thank you! Yeah they're all former VII Legion. I think they would look amazing together - the stark black and white of the Templars with the yellow of the Fists.
106122
Post by: General Helstrom
Right! That was two and a half weeks of getting nearly no painting done whatsoever. Harden up boys and girls because it won't be the last time
Life happened for a bit, and that was ok because then this showed up:
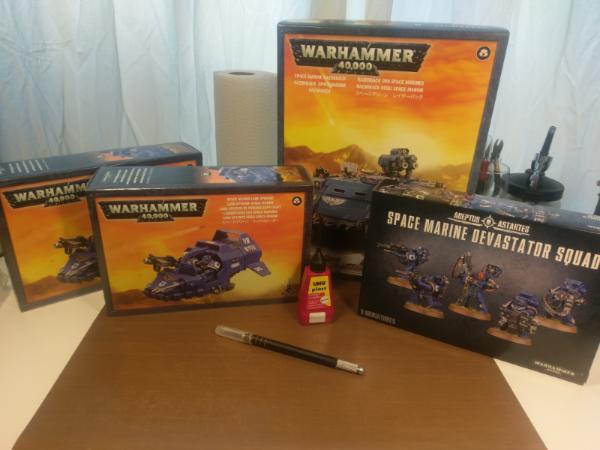
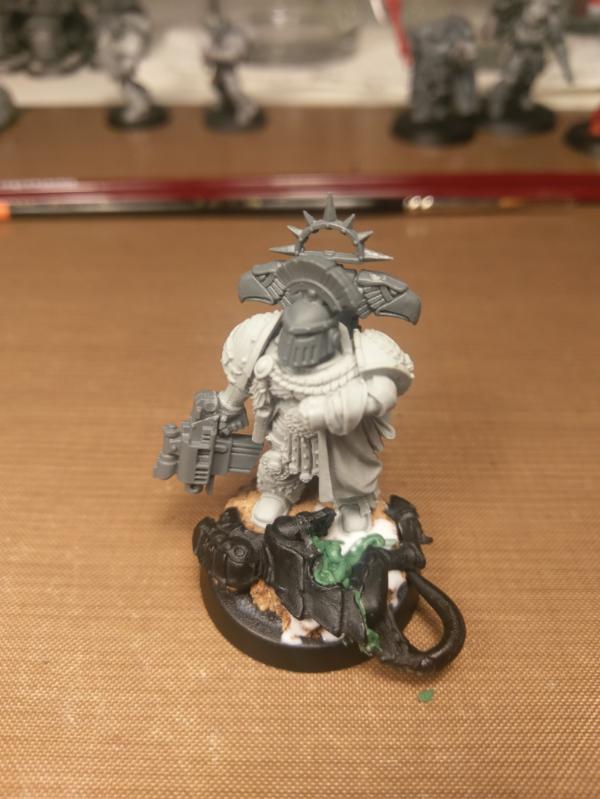
BAWKSES! Everything I've done so far has been from stripped second-hand fifth edition miniatures. It felt good to rip the shrinkwrap off some new boxes and see that awesome fresh dark plastic pop out. With a sharp knife, small pair of clippers and my trusty bottle of UHU-plast (which I'm starting to believe is fed from some alternate dimension as it never runs out) I got to work. I had also ordered up some bitz from various private sellers to make a Cataphractii Captain which I'm quite pleased with:
This strapping lad will take charge once I expand the army to 1500 points with the addition of some drop pods and a squad of Grav Devastators. Until then the Librarian is in command! With the new additions now assembled, based and undercoated, my paint queue looks like this:
Just this afternoon I hit them all up with the airbrush so they're sitting in their yellow base coat, with the vehicles pre-shaded. What I like about this queue is the variety. There's a Rhino for a quick evening's work, Land Speeders to either paint together or split up, a Dreadnought and the Cataphractii Captain for those "let's paint something different" moments and of course plenty of boots to bulk it out.
91286
Post by: WarbossDakka
Glue is undoubtedly from a pocket dimension, since I've been on the same pot for about 3ish years now. The nozzle does clog up a lot though, bit of a pain if I'm honest.
That's a good collection to paint up. I look forward to seeing what you do with it!
100273
Post by: STG
Very nice small army of reinforcements
21542
Post by: Mad Monk's Mekshop
Nice one! I do like a neat yellow space marine force in the making!
52201
Post by: evildrcheese
Cataphractii Captain looks really cool. That shield is boss.
EDC
110957
Post by: goblinpaladin
That shield really is ace. Is that a bit from a... place?
18410
Post by: filbert
Really smooth yellow, nice work.
My kids knocked my bottle of Micro Set over so I have been soldiering on with just the step 2 of the two step process! You can just about get away with using some ardcoat varnish in place of the Micro Set but I have to say, your decal work is particularly good.
106122
Post by: General Helstrom
Thanks for the kind words folks! The shield on the Cataphractii Terminator Captain is from the Deathwing Terminators sprue. I picked one with iconography just generic enough to pass off as Imperial Fists once I scraped off some of the detail to be replaced by a decal:
The surface is a little rough right now, but with some gloss varnish and a neat decal it should be pretty much invisible In fact I've found alternate colors and decals to be an excellent way to hide deformaties on some of the more run-down mongrels in my big box of hand-me-downs. Plus the occasional black greave, white knee pad or checkered armor section really helps to add visual interest to the squads:
The boys did well on the gaming table too last week, taking on a Tau kill team composed mostly of battlesuits. It turned into a slugging match with the Marines' BS4 proving a critical advantage, especially once their steady 6" a turn shooting advance got them within half range of the wretched Xenos. One highlight of the game was my dear Librarian making it into combat and beating a Tau battlesuit to death with his mighty stick! That'll teach him to return his books on time.

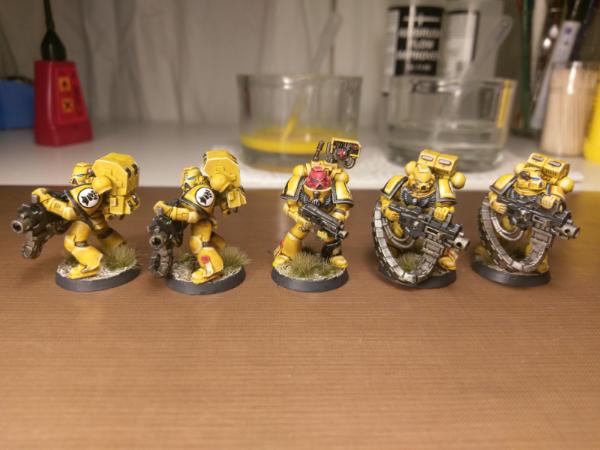
Finally I hade some making up to do on the painting front. I'm counting the assembly and prep time on my new minis as two weeks' worth of painting, because frankly yes, it took me that long. So in order to keep putting my money where my mouth is I had to do a double shift this week. I thus present you a whole dozen Marines painted over this past weekend:
This batch means I now have a painted second squad of Tactical Marines and a couple of spares, including one spare Sergeant because I don't know if combi weapons are really worth their points. Funny enough that whole discussion is about to become entirely academic now that 8th edition is around the corner. How about those grav cannon devastators I have ordered up? And the grav bikers? Is the dreadnought actually going to be worth its points? I'll just have to find out In the mean time, this is my finished 40K force so far. It actually looks like a full 2nd Edition army.
See you soon!
100273
Post by: STG
From what I've heard Dreadnoughts are going to become 8 wound beasts. That could be wrong tho.
Awesome little force you have there. I'd certainly like to give yellow a good but I'm not brave enough without an airbrush
96291
Post by: CragHack
That is one fine clean looking table over there And some nicely painted models as well.
106122
Post by: General Helstrom
STG wrote:From what I've heard Dreadnoughts are going to become 8 wound beasts. That could be wrong tho.
Awesome little force you have there. I'd certainly like to give yellow a good but I'm not brave enough without an airbrush
Thanks! I honestly would not have attempted this without an airbrush. I think it might be doable with a yellow undercoat spray, like the one sold by Army Painter.
 CragHack wrote: CragHack wrote:That is one fine clean looking table over there And some nicely painted models as well.
The table was a true labor of love! The models came out ok too
91286
Post by: WarbossDakka
Great progress, that's a whole lot of Marines done in one go! Do you do all 12 at the same time or batch them into certain numbers?
106122
Post by: General Helstrom
WarbossDakka wrote:Great progress, that's a whole lot of Marines done in one go! Do you do all 12 at the same time or batch them into certain numbers?
I split them into two batches of six. I'm getting quicker at painting these Marines, starting to discover shortcuts and 'danger areas' . Between the shoulder pad trim and the backpack exhausts for example. Taking a little extra care there saves me a lot of trouble touching up the paint later. I've also discovered that line highlighting the top panel lines looks just as good, if not better, than all the panel lines. More time saved!
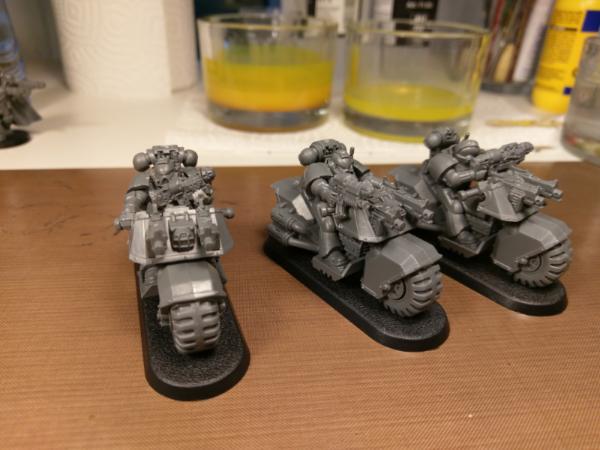
No painting this week I'm afraid though. I have a busy weekend ahead which includes taking the yellow boys out for their first proper 40K battle! It'll be 1000 points against my old friend Dennis, whith whom I started playing wargames some twenty years ago. Good times! I did get some bits in and assembled the last unit I need for now: three bikers with grav weaponry. Here's hoping they'll still be awesome in 8th Edition
106122
Post by: General Helstrom
So yeah, no new paintjobs this week, but I did get a proper battle in! I fought Dennis' Craftworld Eldar and had a blast. I suffered some atrocious dice during the first turn, failing to destroy a Wave Serpent with my lascannon devastators, then losing them all to return fire in the Eldar turn while Dennis raked in victory points by the fistful. I came back strong from turn 2 on though, disgorging my tactical squads in rapid fire range and sending bolter rounds all over the place. Close Range Bolter Drill rules! In the end the Eldar pulled way too far ahead in terms of victory points and I missed a few ciritcal shots that might have allowed me to table them if the battle had gone on for another turn. We lost, all smashed and bashed up, but we made the Eldar bleed dearly.
Lessons learned:
Top:
- Full tactical squads are ace and the heavy and special weapons work really well when you combat squad them apart.
- Grav guns are great at dealing with monstrous creatures in the open!
- Having T4 and 3+ armor saves all around is really really nice.
Meh:
- I'm not entirely sold on the Typhoon/Multi-Melta land speeders. Need more practice.
- Devastator squads on foot are hard to deploy correctly.
- Chasing single victory points here and there sucks. I need to focus on winning.
49179
Post by: Valhalla130
Really nice looking Fists. I wish I were as dedicated to painting as you are. I only have a terminator squad, tac squad and one bike painted.
How do you do the checkered patterns on the greaves? I'd like to steal that idea.
52201
Post by: evildrcheese
Nice updates. Sounds like you had a blast. I wouldn't worry too much about 8th, your force will certainly be playable. From what we've seen Devs and dreads are gonna be better. Not sure what Gravesend will look like though.
EDC
106122
Post by: General Helstrom
 Valhalla130 wrote: Valhalla130 wrote:Really nice looking Fists. I wish I were as dedicated to painting as you are. I only have a terminator squad, tac squad and one bike painted.
How do you do the checkered patterns on the greaves? I'd like to steal that idea.
Thanks man I've found that a permanent paint station helps a lot in actually getting stuff done. No setup or break-down time really lowers the barrier for me. It also makes shorter paint sessions practical, like sneaking in an hour before going to sleep. A personal target is nice too, as long as it's attainable, and frankly this P&M blog really helps because it turns out I thrive on praise
To do checkers, I basically cheat. I first paint the area white over a light grey. Then I use a sharp pencil to mark out the pattern. I then fill in the black squares with black paint, let it dry and clean up with more white paint. There is often some back-and-forth in this as I may over-correct with white and have to apply more black again. The more precisely you can fill in the squares, the better of course.
The best tip I can give you for precision (aside from thinning your paints) is to find your perfect stroke. What I mean is, find the way to move your brush that gives you the most precision. For me (and for many people) it's when I pull the brush directly towards me. Some people find a sideways stroke easier. Be mindful of this the next time you paint something and see what comes most natural to you. Once you have found your perfect stroke, any time you need to do any precision work (like checkers or eyes or whatever), turn the model so you can apply your perfect stroke. Don't turn your hand or paint in any other direction like diagonal or upwards, but always turn the model. That helps me a lot.
Finally, I try to keep the checkers limited to a few models to avoid them looking too much like New York cabs Lamenters 
 evildrcheese wrote: evildrcheese wrote:Nice updates. Sounds like you had a blast. I wouldn't worry too much about 8th, your force will certainly be playable. From what we've seen Devs and dreads are gonna be better. Not sure what Gravesend will look like though.
EDC
Yeah I'm really liking what I've seen so far of 8th. I just got my teeth kicked in by Adeptus Mechanicus (who brings Belisarius Cawl in a 1000 point game?) and it struck me how rigid the saves system has become. I either blew straight through units, negating everything, or completely failed to make a dent in those wrapped in layers of armor, invulnerable and re-rollable Feel No Pain. I'd love to have ten minutes alone with whoever came up with Feel No Pain...
Seriously though I had a great game and learned a lot again. For my second game of 40K since 3rd edition I think I did pretty well too, keeping my force together and on objective and unleashing the might of the noble close-range bolter drill as my primary weapon.
106122
Post by: General Helstrom
So I bet you're quite done watching me get curb-stomped, let's get back to painting! This week's project was the Dreadnought. I find it interesting to figure out where the line is between a large infantry model and a small vehicle. In the end I decided I'd let the model dictate it. If it has a lot of flat, angular surfaces (like a dread), I use my vehicle formula. If it has a lot of complex curves (like a Centurion), it gets the infantry treatment.
My vehicle formula is so easy it's not even funny. I use the airbrush to apply a base color of Yriel Yellow, then spray Vallejo Flat Earth into the recesses. I then airbrush Yriel Yellow again, preserving the Flat Earth in the deepest recesses. Seraphim Sepia wash goes in all the panel lines and around all the rivets, followed by a drybrush of Vallejo Dark Sand across all the sharp angles. That's the yellow done. After that I paint all the metal Boltgun Metal and wash it with Nuln Oil, do the detail work, finish the base and decals and hey presto! On this dreadnought I didn't even bother to clean up some of the boo-boos, writing them off as weathering instead.

The eagle-eyed (and slightly old) among you may have noticed some old WFB Undead transfers popping up here and there. I found a small stack of them when I pulled my wargaming stuff out of storage. I have no idea how I got them, as I have never collected Undead. That was back when they were all called Undead by the way, the Vampire Counts/Tomb Kings split came much later (and the Grand Alliance: Death came much later still, of course). Anyway, I'm liking the classic flaming skulls, bat wings and scythes iconography. I like to think my detachment of the 5th Company just came back from fighting some creepy necromancer and his shambling hordes, having adopted their enemy's heraldry as kill markings and badges of honor. Maybe this necromancer was holed up in an asteroid fortress which they had to board. Why an asteroid fortress? Come on. It's a space necromancer with space zombies in a friggin' asteroid fotress. There's more pulpy goodness in there than a paper mill run by strippers.
I'm running into a little 'update paralysis' in spite of the good doctor's encouraging words. I don't know if I want to invest my time right now into painting Grav Devastators or Typhoon Land Speeders that may need to be re-evaluated come 8th edition. I think I'm going to stick to some models which are always going to be useful, like more Rhinos and Tactical Marines, and worry about the specialists after 8th hits. I'll be on vacation for almost a month come June and if the rumors are anywhere near correct, 8th will be out by the time I come back.
100273
Post by: STG
Dread looks great. base provides a really nice contrast.
If i were you i would paint the landspeeder though. because whatever happens a multimelta and some anti tank missiles on a fast moving platform is always going to be useful when used in the right situation.
maybe not for a maxxed out grav squad.
110957
Post by: goblinpaladin
I agree. Land speeders are always cool.
Glad to see I'm not the only one who remembers Warhammer Armies: Undead. I'm even fond of that Nagash model.
49179
Post by: Valhalla130
That us a nice looking dread. Makes me almost want to get started on mine.
52201
Post by: evildrcheese
That's a lovely looking dread.
EDC
106122
Post by: General Helstrom
STG wrote:Dread looks great. base provides a really nice contrast.
If i were you i would paint the landspeeder though. because whatever happens a multimelta and some anti tank missiles on a fast moving platform is always going to be useful when used in the right situation.
maybe not for a maxxed out grav squad.
 goblinpaladin wrote: goblinpaladin wrote:I agree. Land speeders are always cool.
Glad to see I'm not the only one who remembers Warhammer Armies: Undead. I'm even fond of that Nagash model.
Fair points on the land speeders guys! With the apparent points hike on multi meltas though, I'm not so sure on the loadout. Yet. Fortunately I'm going to be out of the country for a few weeks and by the time I get back, 8th should be out along with all the material I need to make a more informed decision
Valhalla130 wrote:That us a nice looking dread. Makes me almost want to get started on mine.
Thanks guys!
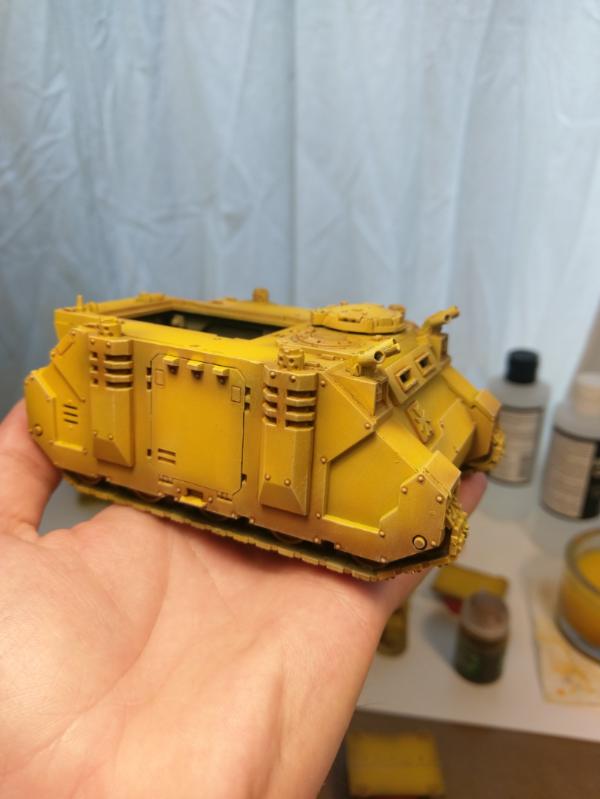
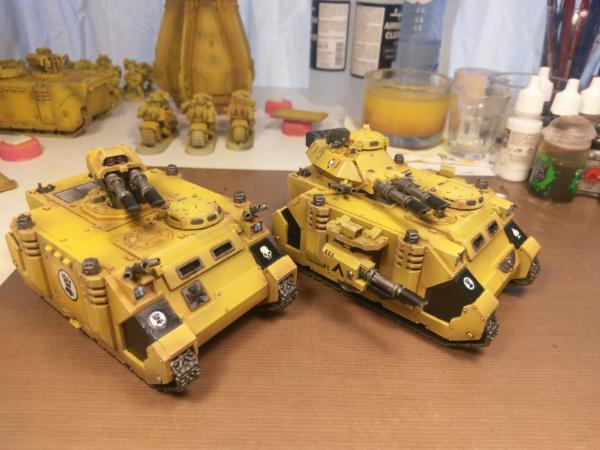
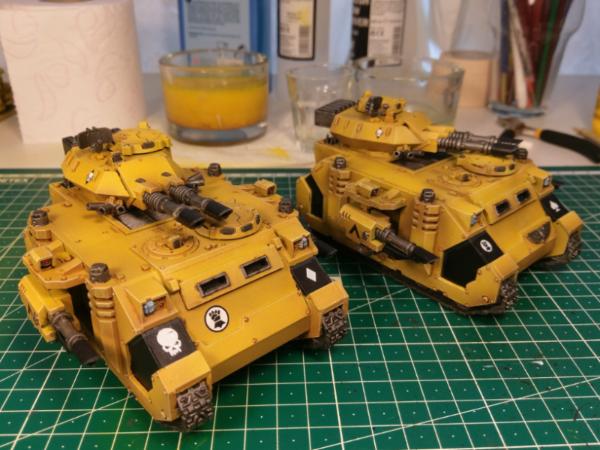
So with some interesting days this past week, all I got around to painting was this brand spanking new Rhino:
I love how clean-looking these are turning out! Yellow is fairly easy to over-weather and I'm not too fond on the banged-up CAT Bulldozer style look. On these vehicles I pretty much do no weathering whatsoever. I can always come back in later with some mild chipping and dusting. This Rhino does go to show that even with an airbrush, I am not immune to yellow's particular flavor of hell. Here is the new Rhine (right-hand side) next to the previous one:
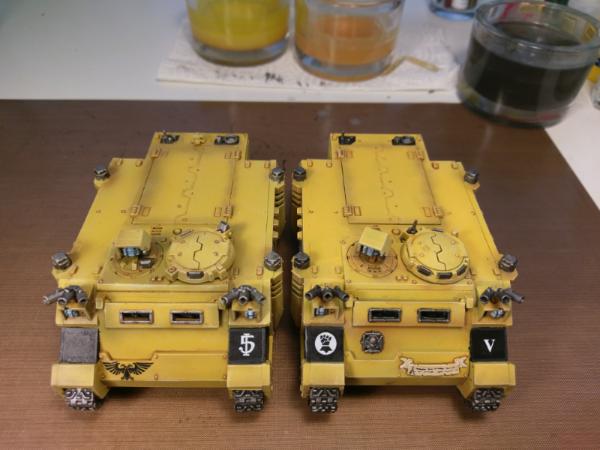
It may be a little hard to tell due to the lighting, but it is noticably richer in tone than the older one. This is because I boo-booed on my recipe. The first one was spray undercoated bone, pre-shaded with brown and then coated with yellow. On the new one I forgot to pre-shade, so I had to apply the brown over the yellow and then go back in with a second coat of yellow to blend it in nicely. Because airbrush layers are so absurdly thin, and yellow has all the pigmentation of a binge drinker's morning urine, the final result is quite different. Now, I can live with the difference and as long as they're not parked directly next to each other it's not even all that obvious. And I frankly like the result of the second Rhino better than the first - it even matches the infantry's tone more closely. Looks like I accidentally improved ny vehicle recipe!
As I said above, as of tomorrow I'll be out of the country for about four weeks vay-caytioning it up in Asia. When I get back the world as we know it will have ended and eighth age of grimdark will have begun. See you on the other side!
76303
Post by: Warboss_Waaazag
I really like the sort of "dustiness" of your yellow paint scheme. Nice work.
100273
Post by: STG
Rhino looking smart.
106122
Post by: General Helstrom
Right! So, where were we? Ah yes - I've been on vacation for nearly a month, came back to find 8th edition out and about, split the box with a friend, sold off the Primaris and got the index. We organized a "goodbye 7th edition" mega battle between the seven of us and had a blast, as well as a powerful reminder of why 7th edition really, really had to go. Have you ever tried to kill Belisarius Cawl? 'nuff said. To join in that battle I had to buy and build some more reinforcements, and then some more on top of that because I could get them second hand, and then a few more because of shifts apparent with the release of the index. Of course the fun doesn't stop there because now the codex is around the corner! The end result is a bit of a mess on my painting table at the moment, which I'm in the process of sorting out. Let's start from the top.
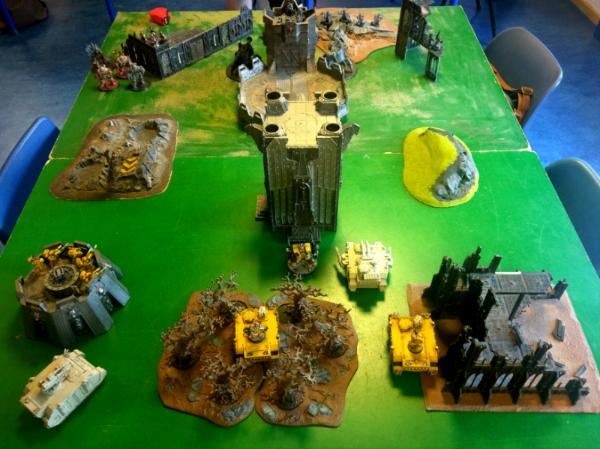
The 'goodbye 7th' mega battle was a blast. The forces of the Imperium deployed to bring the Emperor's Good News to the Eldar. As it happens the Imperium breached the dome of the Al'mere craftworld's medieval theme park, so the Eldar rushed to defend the classic Citadel Fortress!
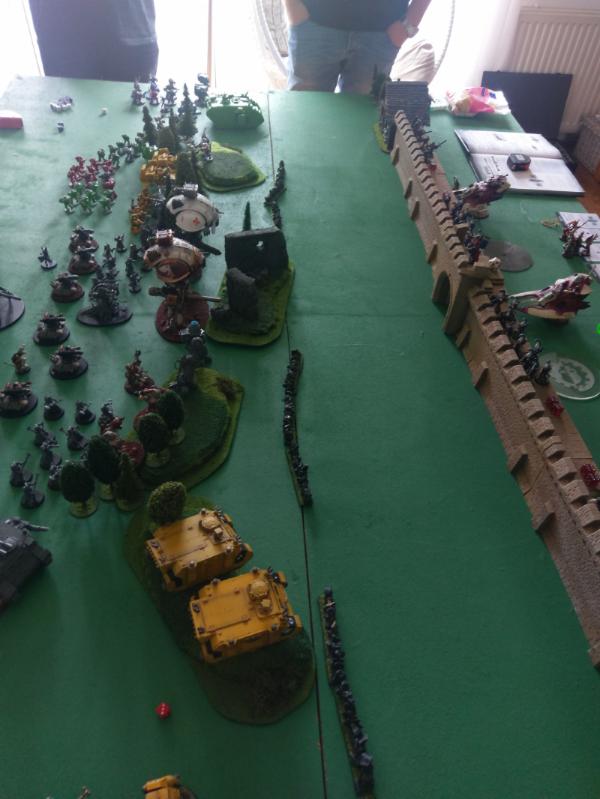
Steve's Sons of Medusa on the left flank, Lau's Mechanicum in the center and my Imperial Fists advancing on the right.
EXCUSE ME SIR DO YOU HAVE A MOMENT TO TALK ABOUT OUR LORD AND SAVIOR THE GOD-EMPEROR OF MANDKIND?
We killed a bunch of theirs, they killed a bunch of ours. It was great. Then we had a BBQ and we put away our massive pile of 7th edition books forever!
On the painting front, I worked on a squad of lascannon-armed Devastators but didn't quite get them finished yet.
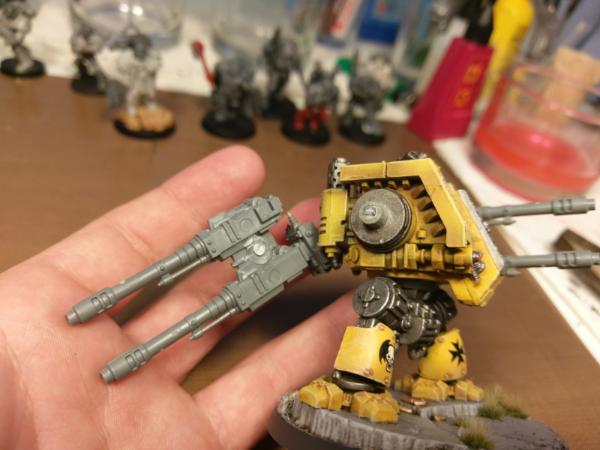
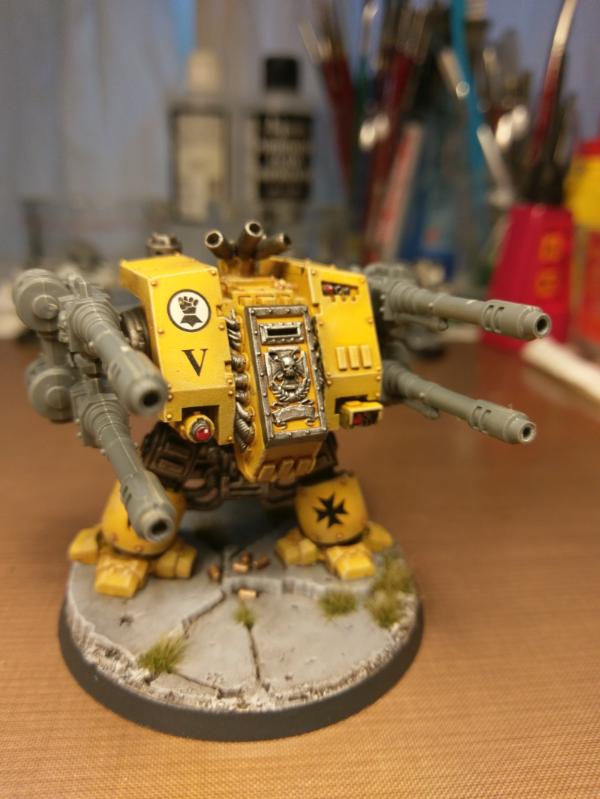
I did some more modeling too, starting with applying MAGNETS to my dreadnought and a quad autocannon from a second-hand Aegis defense line. They need some cleanup and a lick of paint but they're looking the business. When I field this as a venerable dreadnought with two twin autocannons, that's a lot of dakka going downrange.
I then dug into my growing bitz box, along with a Space Marine Commander set, to build up my command cadre. From left to right we have a Primaris Lieutenant, two Captains, an Apothecary at a full run and a Techmarine whose darn auspex keeps blinking "12:00".
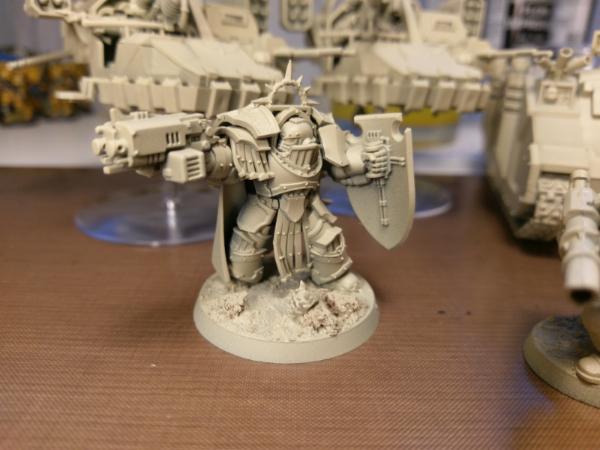
I wasn't quite happy with the first captain (on the left). As I was building him he turned out quite bland, and the more bits I stuck on the worse it got. He became just another overdressed fop pointing a gun at the enemy. Frustrated, I tried to find some upright Space Marine legs to give him a more dignified, supercilious pose. And I found none. Seriously, all Space Marines are in full-blown power stances straight out of School of Rock. Then I tried to convert my own and ended up ruining a perfectly good pair of legs. I had to go deeper, and eventually I came across the old Masters of the Chapter set. This has some amazing figures in it, oozing character and calm command. My eye fell upon the Master of the Rites:
Now, he's not much to look at in his original form, with his weird speakers and warty head, but a bit of cutting and bits swapping does wonders:
The remaining question is, why is he holding his cloak up like that? That question will be answered soon, when I get the last required bits in...
To round off on a somewhat random note, I recently visited my mother and she had found my old copy of Starquest (otherwise known as Space Crusade, an old GW/ MB collaboration based on Space Hulk) in the attic! That was the game which started me and my best friend Dennis on the amazing path of the wargamer in the mid 90s. Inside the battered old box, I found the very first Imperial Fists I ever painted - with gloss Humbrol enamel directly over bright yellow plastic. I like to think my skills have improved at least somewhat since those days:
Kinda cute though
Now, as I said, my painting table is a mess. I have an unassembled Razorback with another one and a drop pod on the way. I have an assembled Predator and characters that need their bases done up. Assembled, based and ready for undercoat are a third tactical squad, a squad of grav cannon devastators and a squad of bikers with plasma weapons. Finally I have two land speeders and a squad of lascannon devastators sitting in various stages of color. What I've done is enter all these units into a table, with colums marked from left to right "Built - Based - Undercoated - Basecoated." My Job for the coming week or so is to work through this table from left to right, making everythin is built, based, etc. in order so I end up with a queue of yellow figures that I can then paint. And just to make sure I have enough time I quit my job. That's dedication folks!
43709
Post by: boundless08
Welcome back broseph! Love the captain, he looks very imposing. You gonna do a big ass sword in the other hand? Or what about have him holding a cat? Imagine someone striding through the battlefield just petting his cat, absolutely oblivious to the death and destruction around him. I would not want to fight that mentalist!
10746
Post by: Corrode
These are some excellent Marines my dude, nice work.
106122
Post by: General Helstrom
 boundless08 wrote: boundless08 wrote:Welcome back broseph! Love the captain, he looks very imposing. You gonna do a big ass sword in the other hand? Or what about have him holding a cat? Imagine someone striding through the battlefield just petting his cat, absolutely oblivious to the death and destruction around him. I would not want to fight that mentalist!
No sword and no cat (but I like the way you think!), all will be revealed below...
Thanks!
I brought order to chaos over the weekend, getting all remaining figures assembled, based and undercoated. It was quite an undertaking but now I have this:
That is one drop pod, one Predator Annihilator, two convertible rhinos/razorbacks (turrets still awaiting magnets), a tactical squad, a squad of grav cannon devastators, a squad of bikers with plasma guns and the command cadre shown earlier. After doing all this assembly line work, today I sat down and focused on doing one mini and doing it well. I am pretty pleased with how he turned out! He will be my budget captain and I name this pice "don't bleed on my cape you xenos filth."


This guy was a lot of fun to do, from finding the right figure to base him on, to converting the captain and then the hormagaunt on the base, to spending an pleasant afternoon painting the whole thing. Here's a WIP shot with PVA blood and green stuff guts:
Now if you'll excuse me, I have a well-earned Old Fashioned with my name on it to enjoy 
43709
Post by: boundless08
ha love it! "Jeeves? JEEVES?! Look at this disgusting blighter beneath me. Do be a dear and clean him up, this cape is made from the finest Jokaero hide"
110957
Post by: goblinpaladin
He's phenomenal. I also love the scheme on that 'gaunt. Feels proper old school, although I don't know if it is a studio scheme.
106122
Post by: General Helstrom
boundless08 wrote:ha love it! "Jeeves? JEEVES?! Look at this disgusting blighter beneath me. Do be a dear and clean him up, this cape is made from the finest Jokaero hide"
Haha exactly! I guess he just got it back from the laundromatorium.
goblinpaladin wrote:He's phenomenal. I also love the scheme on that 'gaunt. Feels proper old school, although I don't know if it is a studio scheme.
Thanks man! The gaunt is painted in the same style as a Battle for Macragge set I once painted up with my best friend. It was ebayed and should be out there somewhere... I don't remember if it was an official scheme back then. I believe the old Tyranid codices had pages full of different color schemes so probably yes
Also, I painted the magnetized double twin autocannons for the dread:

110957
Post by: goblinpaladin
Ah, I love the rifleman set-up. I want to make one for my Mantis guys at some point. Nicely executed.
106122
Post by: General Helstrom
goblinpaladin wrote:Ah, I love the rifleman set-up. I want to make one for my Mantis guys at some point. Nicely executed.
Thanks Goblin, it was a fairly easy conversion and I think it looks quite effective. It is also murder on the battlefield!
Earlier this week I played my first game of 8th Edition, in a 1500 points match-up versus Laurens and his damnable Adeptus Mechanicus. We deployed "Hammer and Anvil" (opposing short sides of the table) with the Secure and Control mission (one 3VP objective in each player's deployment zone). My list was heavy on tactical squads and lascannons, his had Cawl, three robots and two dunecrawlers. It turned into a long-ranged shooting match with both sides too timid to cross no man's land. Some early setbacks on my end were redeemed when a drop pod full of grav cannon devastators wiped out Cawl's meatrobotshield, allowing the lascannon predator and the autocannon dreadnought to put the old heretic full of holes!

That's right, I killed Cawl. Cawl has been building up a fearsome reputation in our gaming group as being practically unkillable. The cry was often heard around our gaming tables:

That spell is now broken. 8th Edition is magical! I ended up losing the game by one VP, in fact by one die roll - at the end of round 6, we rolled up a seventh round which allowed him to march a single Dunecrawler into my deployment zone, netting him Linebreaker. All in all it was a great game and a very close run thing. The top performers were the Predator, the Venerable Dreadnought reliably chucking out eight shots a turn, and the good old tactical squads for holding the line when it mattered. Lessons learned:
- Lascannons only work in numbers. Anything less than four is likely to disappoint due to a bad dice roll here or there.
- When Lascannons work, they work.
- The Venerable Rifleman is a powerful unit, easy to position due to its small size and hard to get rid of.
- Being able to drop additional firepower where you want it, when you want it, is huge! Grav cannons may not be the firepower you need though.
- You don't win battles by camping out in your deployment zone.
So I'm working on new lists and I have a 10-man squad of Sternguard and a second Predator on the way. I'm very pleased with the core of my army and how it is performing so far though.
On the painting front, after finishing up the Dreadnought arms I found time on Friday to finish up the lascannon devs too. They took a lot more time than usual and I'm not entirely sure why. It was probably due to the lascannons themselves, with a lot of work going into their casings and targeter lenses. I'm happy with how they turned out, as well as their creepy cyber techno baby!
I also put some more work into my vehicles. First of all I built up the turrets for my convertible Rhinos/Razorbacks. The assault cannons were salvaged from my pair of Land Speeders:
Second I built and painted magnetized "twin storm bolters" to represent taking two storm bolters on a rhino. Honestly, at 2 points a pop they are a steal, making rhinos effective firing platforms at close range. But I had no room to fit a second storm bolter as I'd built the hatches without pintles. So I traded for some more storm bolters and just stuck them on top of each other. I like how they look like sort of a mini Hurricane. I'm not sure I like how they look like two storm bolters stuck on top of each other. Thoughts?
So that's it for this week, quite a productive one I must say! I hope to bash out a lot more next week, starting with either the convertible vehicles or the third tactical squad. Keep watching this space
51376
Post by: Zambro
So glad I followed the link from your showcase thread. Amazing stuff, and makes me want to keep the pace up on my Imperial Fists (working on the Primaris stuff now).
The double storm bolter looks cool. I think if you wanted to, you could remove the bottom most ammo mag, or at least join them up together with green stuff. Just something to make it look less like 2 storm bolters on top of each other.
Land Speeders are awesome. I play my 2 in almost every game. Typhoon Missiles and Heavy Bolters, though. They hose off infantry and can even threaten light tanks. Not a fan of MM on them, got to get too close with paper thin tanks...
Keep going, mate! Love your updates
106122
Post by: General Helstrom
 Zambro wrote: Zambro wrote:So glad I followed the link from your showcase thread. Amazing stuff, and makes me want to keep the pace up on my Imperial Fists (working on the Primaris stuff now).
The double storm bolter looks cool. I think if you wanted to, you could remove the bottom most ammo mag, or at least join them up together with green stuff. Just something to make it look less like 2 storm bolters on top of each other.
Land Speeders are awesome. I play my 2 in almost every game. Typhoon Missiles and Heavy Bolters, though. They hose off infantry and can even threaten light tanks. Not a fan of MM on them, got to get too close with paper thin tanks...
Keep going, mate! Love your updates
Thanks buddy! I took a look at your thread, your IF look awesome. A lot more beat up than mine
I actually took the MMs off the land speeders the other day and replaced them with heavy bolters. I find MMs too expensive in this edition to just throw around. They need a dedicated platform with some re-rolls to make them reliable, like a captain-backed devastator squad or something. With heavy bolters and typhoon launchers I think the speeders look like great standoff anti-infantry units, able to switch to an anti-tank role in a pinch. I heard they're getting a little cheaper too in the upcoming codex.
61618
Post by: Desubot
For a second i thought i was seeing double with those quad bolters.
106122
Post by: General Helstrom
A while ago I explained my vehicle recipe when I presented the dreadnought. Of course that was all words, and nobody really learns anything from words. So I did it again, but with pictures! Just yesterday I completed two new vehicles for my army and I'll take you through them step by step.
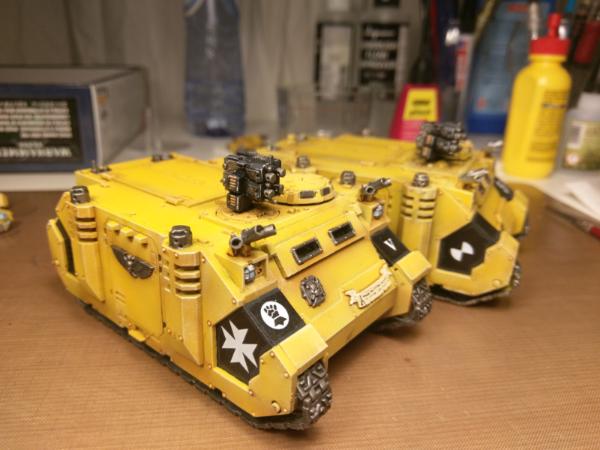
After assembly and undercoating in Army Painter Skeleton Bone, the first thing I do is airbrush the whole thing with a thin coat of Yriel Yellow, taking care to get into all the nooks and crannies. In this picture the rhino hathces are on, I actually mounted them and the razorback top plate on bottle caps with blu- tac so I could handle them separately:
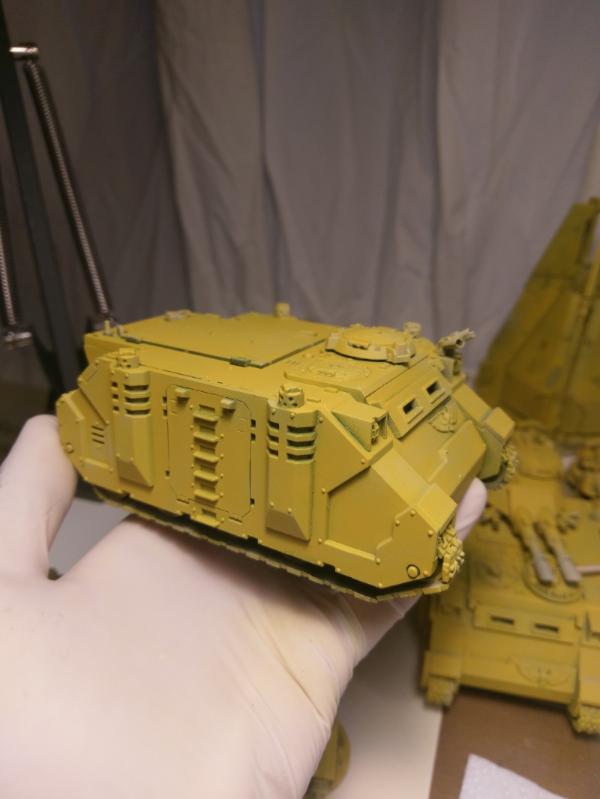
With the basecoat down it's time for pre-shading. I use Vallejo Flat Earth, again fed through the airbrush and sprayed into all the corners, joins and recesses. This gives a very dramatic effect as you can see below:
To tone it down, I hit the model up with another light coat of Yriel Yellow, this time avoiding the deepest recesses. The thinness of the coat leaves some of the brown shining through, and I leave the contrast more strongly where I want the most shade:
That marks the end of the airbrush stage. If the models are not being painted directly after this (I tend to airbrush in batches) I like to give them a coat of matte varnish now. The airbrush coats are very thin and easy to rub off at the edges and corners. Otherwise it is now on to washing! I use Seraphim Sepia and apply it to all the panel lines, joins, rivets and raised details to really make them stand out:

Finally I apply a drybrush of Vallejo Buff across all the raised edges. This picks out the edges and details nicely, while also contributing to a slightly dusty look:
That's the yellow done! It's also the end of the easy bit. Because of the way I've built up the yellow, it is very hard to re-create by brush, so any touch-ups are going to be very difficult to do. Over the next few stages, neatness is key. On the other hand I don't sweat it too much. Some smudging is 'weathering' If I do mess up, it will probably be on a recessed area so a little bit of Flat Earth brushed on usually hides it nicely. This next stage begins by applying Boltgun Metal to all the metal bits, followed by a wash of Nuln Oil. This includes the tracks. As this is a bit of a job and the wash needs to dry for a while, after this stage is the perfect time for a break!
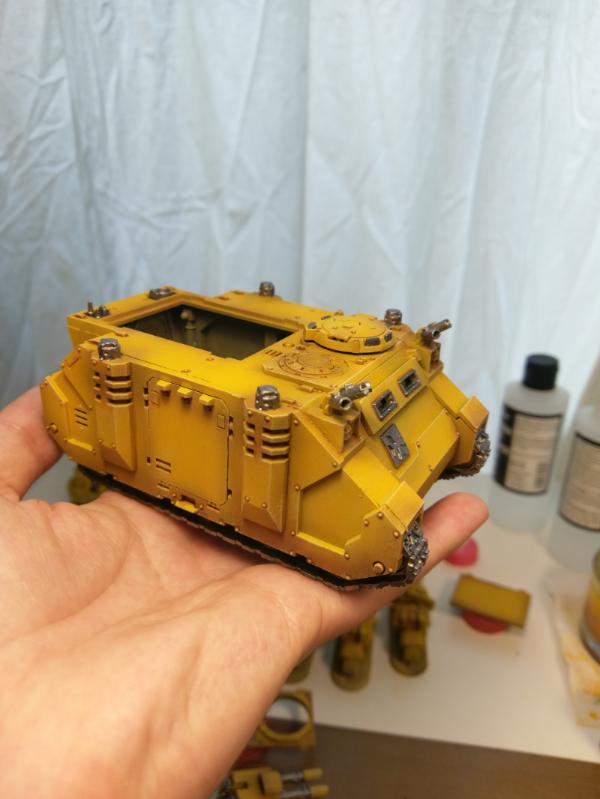
Once the metal bits are done and all brushes have been cleaned and all water has been refreshed (metallic flakes get everywhere if you're not careful), I paint in the black panels and details like weapon casings. I then highlight them subtly with German Grey. Of course you can use your company color of choice! I also paint the lamps and lenses white and wash them with the color I want them to be. On my vehicles i use watered-down Lothern Blue for the headlights and Carroburg Crimson for the... Turn signals? Targeter lenses also get Carroburg Crimson over a basecoat of Flat Red. Again, neatness is key at this stage!
And that's that, done! For final detailing I paint gloss varnish on those panels where I want decals, apply the decals using Micro Set and Micro Sol (as described earlier), then finally blast the whole thing with matte varnish. These two vehicles below took me about six hours after assembly and primer. During the airbrush stage I also basecoated and preshaded another rhino and a drop pod, as well as about a dozen infantry. Quite efficient I think!
51376
Post by: Zambro
Nice step through, thanks for sharing.
If you did the brown in the recesses over the initial army painter spray, then yellow over it, wouldn't that create the same result? And skip a stage in an already lengthy process?
Also surprised you glue the tracks in before you start. I always leave the tank tracks aside to airbrush separately. I find them a paint to paint with a brush.
106122
Post by: General Helstrom
Zambro wrote:Nice step through, thanks for sharing.
If you did the brown in the recesses over the initial army painter spray, then yellow over it, wouldn't that create the same result? And skip a stage in an already lengthy process?
Also surprised you glue the tracks in before you start. I always leave the tank tracks aside to airbrush separately. I find them a paint to paint with a brush.
Thanks! Glad you enjoyed it.
By building up the yellow in two coats (with the preshade in between) I achieve a deeper, richer tone which better matches the infantry. The difference is subtle but noticable when you put them side by side.
I do assemble my models fully before painting. Tracks are easy if you use a battered old Size Something Big brush And I've found that in general, if an area is hard to reach with a brush, it's not really worth putting a lot of effort into in the first place. I believe even dear Duncan said something to that effect recently. This army is being painted to a decidedly table-top standard. They need to look good at arm's length from a high angle. You don't want to flip these models upside-down, that's where the messy bits are!
106122
Post by: General Helstrom
Just a quick update this week, after churning out two tanks last week I decided to take it easy and work on a couple of characters. I present you my second captain and the techmarine:
Nothing terribly exciting. They look very red together, but they'll be operating far apart on the table so that should be OK The techmarine is to sit with the predators and lascannon devastators, giving repairs to the vehicles and maybe doing a little fighting if the need arises. He was kitbashed from Devastator parts (the legs, the robot arm and the servo-skull) along with techmarine bits from the vehicle accessory sprue and a Mk X helmet from a Primaris Lieutenant. I like how he's interacting with his auspex/remote control, trying to figure out why the razorback's machine spirit keeps blinking "12:00".
The captain is going to be dropping from the skies with a 9-strong squad of Sternguard to pepper the enemy with stratagem-infused boltery goodness! To that end I gave him a master-crafted boltgun which can be turned into the Primarch's Wrath. He is based on the Betrayal at Calth dark apostle, equipped with an old assault squad power axe and a boltgun upgraded with some aquilas, a scope and a purity seal.
91286
Post by: WarbossDakka
That's a useful tutorial GH for the yellow, very effective!
109164
Post by: Plodmarine
Some really nice Fists there, and you really know how to make that yellow pop! Looks great, I'll be subbed for more.
69494
Post by: OneManNoodles
The Sepia layer really makes the yellow much richer and vibrant, nice idea, might pinch that. Your technique isn't far off my own for yellow.
Great kit bashing on that techmnarine
106122
Post by: General Helstrom
Thanks guys! It's been so quiet here lately I was starting to think everyone had gone off somewhere
This week I'm looking at either some Tactical Marines or my last convertible Rhino-Razorback. I'm waiting for some stuff to come in to round out my army. Wayland Games is cheap and their service is top notch, but you sure do need patience...
106122
Post by: General Helstrom
Well that week was a bit of a dud as far as painting was concerned I did get some games in though and was introduced to the Deceiver + Zahndrek and Obyron shenanigans. Ouch! That experience also laid bare some deficiencies in my list which I am now in the process of fixing. Most of my hobby time last week was spent tweaking my lists. I decided I needed some Scouts to have more control over the deployment phase and limit the space for enemy deepstrikers. I also needed some Terminators to provide a counter to anything stompy making into my battle lines. And lastly I needed a proper army case so I don't have to wrap everything in paper kitchen towels every time I go out for a game! Of course I then also ran out of primer and found my dear old hexagonal pot of Boltgun Metal drying out.
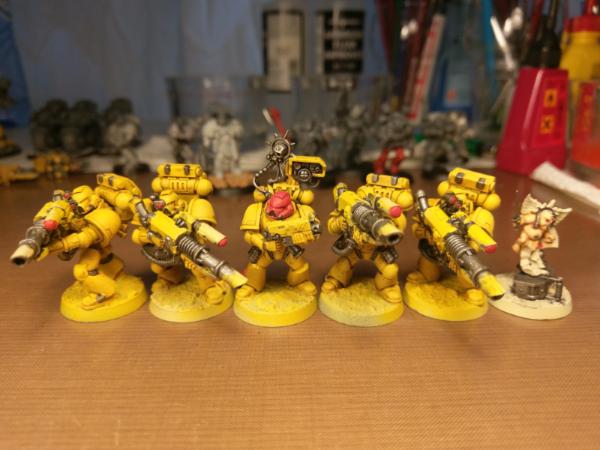
In the end I am now quite a few hobby dollars lighter and most of the stuff is still en route. I did get the Terminators in though and painted them up yesterday! Here they are:
I'm happy with how they came out, especially the white helmets. I used Ulthuan Grey for the first time and I love it. There are some details I quite like too, like the Sergeant's power sword and some of the decal work:
Blowing them up that big does painfully highlight the fact that I paint to an arm's length standard... Let's pretend we didn't see that
43709
Post by: boundless08
Woo more Crimson fists!
To me the painting is ace man. The highlights are great especially on both of the crux terminatus. And that decal on the power fist is boss. the bases are always great, I actually picked up a tub of AK neutral texture terrain after seeing it earlier on the blog, it's great stuff. What colours are you using for the base?
Also I'm feeling the same about my chaos list, need some termies. My army is just too slow and can't react well to things that pop up
30672
Post by: Theophony
Nice imperial fists . I never like looking at my pictures blown up either. Then you have to remember that the people who blow theirs up are aliens that must be purged 
106122
Post by: General Helstrom
boundless08 wrote:Woo more Crimson fists!
To me the painting is ace man. The highlights are great especially on both of the crux terminatus. And that decal on the power fist is boss. the bases are always great, I actually picked up a tub of AK neutral texture terrain after seeing it earlier on the blog, it's great stuff. What colours are you using for the base?
Also I'm feeling the same about my chaos list, need some termies. My army is just too slow and can't react well to things that pop up
Thanks man! I agree, the AK stuff is great. Gone are the days of messing around with wallpaper paste and digging sand out of the garden. I paint mine Vallejo Light Grey, give them a generous wash of Agrax, then drybrush with Vallejo Buff and finally a light drybrush of Flat White. GW equivalents would be Administratum Grey, Zandri Dust and Screaming Skull I think. The rims are German Grey, an almost-black grey.
 Theophony wrote: Theophony wrote:Nice imperial fists . I never like looking at my pictures blown up either. Then you have to remember that the people who blow theirs up are aliens that must be purged
Haha, agreed!
Well it's been another couple of weeks and I've got some stuff done. I am very happy with my lascannon-armed Predator. It packs a lot of firepower on a survivable platform that's easy to move around if needed. So I asked myself, what's better than a lascannon-armed Predator? Two lascannon-armed Predators! So I got another one and painted it, here it is by itself and beside its brother:
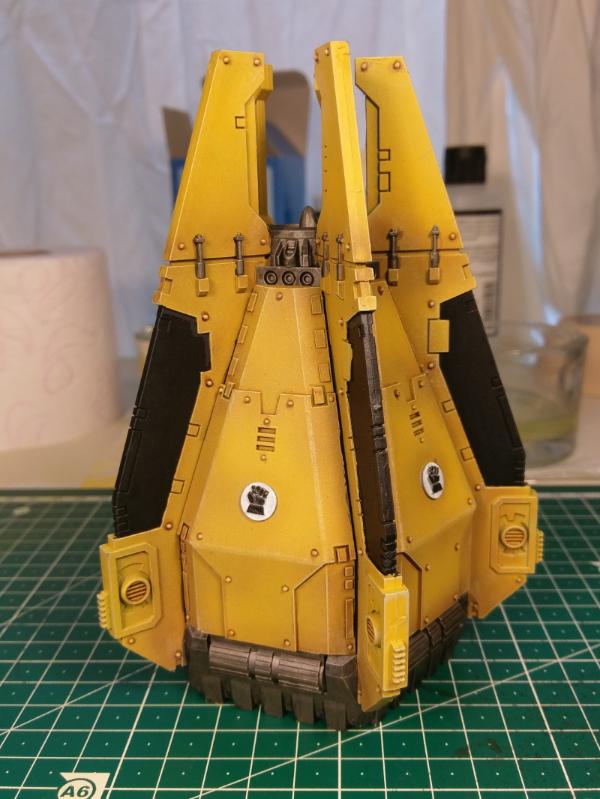
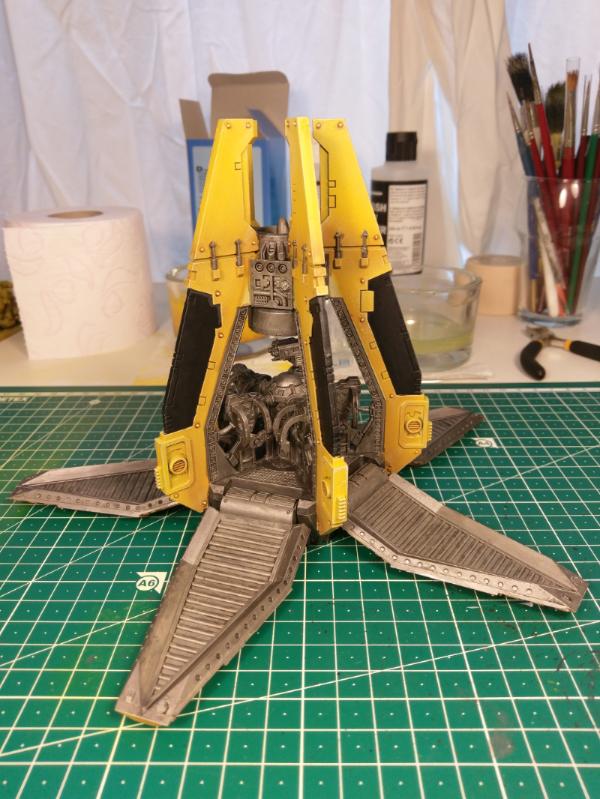
Another unit I've been quite impressed with is my drop pod full of Sternguard. I got a box of Mk 3 marines built to represent them, and while they are now in the paint queue I decided to paint up their ride first. It's not completely finished really - the interior needs some more work and I'd like to do some re-entry burn weathering on the outside. Also it has some unsightly gaps in the paintjob where the petals meet the fins... Not sure on how to fix that yet. But for now it's OK. I honestly didn't enjoy painting this one very much, due to the overly complicated interior and the fact that everything is either times five or times ten!
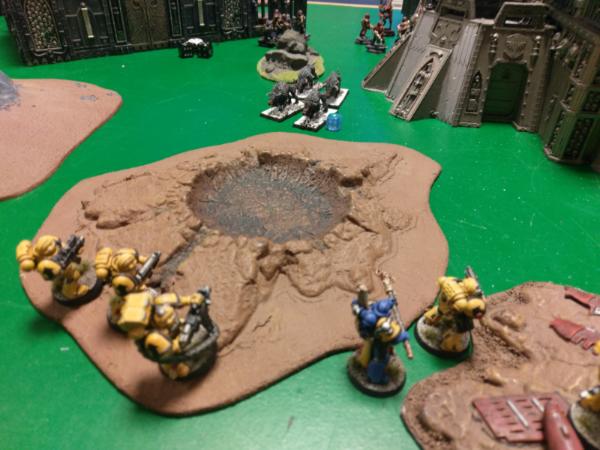
Yesterday evening the gaming club opened again after the summer break. There's a doubles tournament next month (which I won't be able to attend, sadly) and I volunteered my 2000 points army as practice for 2x1000 points of Eldar, Craftworld and Harlequins. This battle gave me one of the worst first turns I've ever experienced in wargaming. I got the initiative seized away from me, I could not land a shot to save my life and the few hits I did get in were quickly negated by my opponent's red-hot invulnerable saves. There are few things as depressing as having four lascannon shots negated by four 4+ invulnerables... Twice. I put almost my entire army's firepower into one Starweaver only to have it survive on one wound with its cargo intact :(
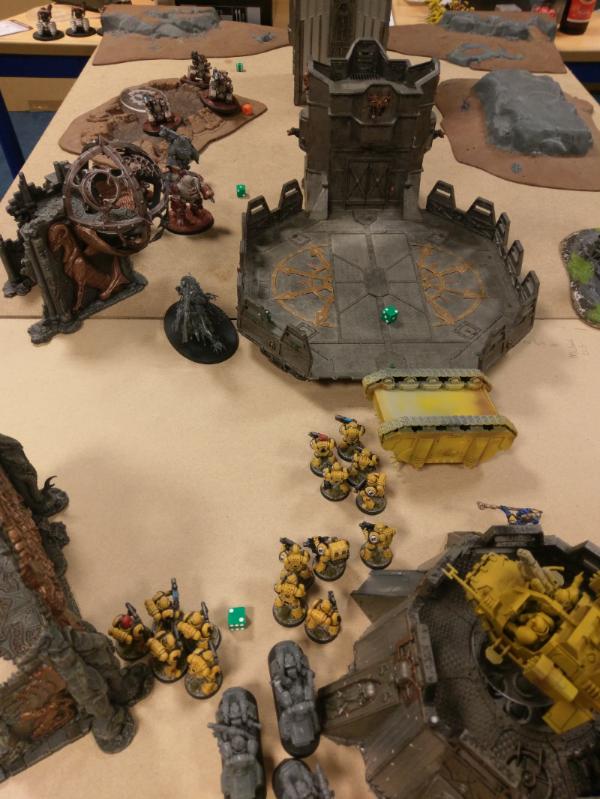
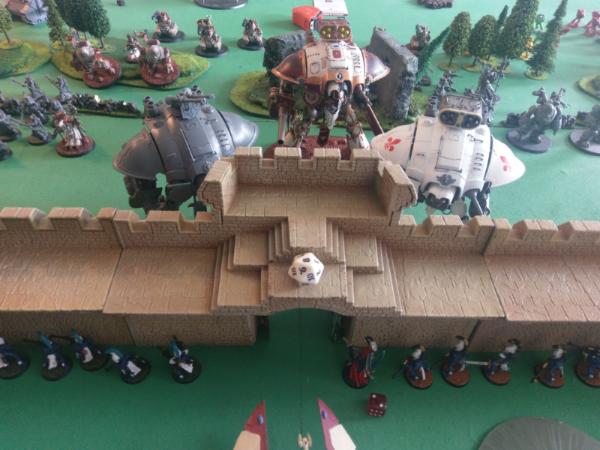
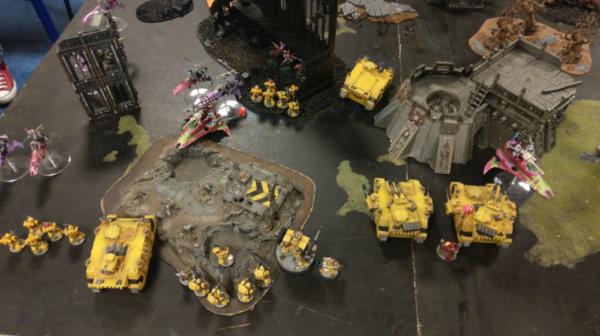 This is near the start of my first turn. The Eldar had blown up a Rhino on the far left, spilling out the tactical squad, they had wiped out my scouts in the ruins and had generally just got up in my face! I have just moved a tactical squad up the center to dakka down a Harlequin troupe in the ruins and I'm looking forward to murdering the Starweaver with concentrated lascannon fire so my deep striking Sternguard and Terminators can get at the squishies whithin. Unfortunately, by the end of turn one the table still looked much the same...
Having lost an entire turn due to horrible dice, then suffering the ferocious assault of the Harlequins on turn two with wave serpents full of Craftworld Eldar still on their way, I was almost ready to throw in the towel. But that would make baby Dorn cry. Imperial Fists are famously stubborn, even when the odds are greatly stacked against them, and we were going to hold damn it. And it paid off. When the dice gods were done messing around and physics returned to normal, the Fists proved their tenacity and gradually started taking the Eldar apart in volley after volley of disciplined bolter fire. In spite of having the initiative seized from me and comepletely fluffing my first turn, I won 13 to 8 on kill points. Yay!
106122
Post by: General Helstrom
With my astonishing Drop Pod and Predator leaving you all speechless I decided to give it a rest for a couple of weeks before returning with the next jaw-dropper: Sternguard!
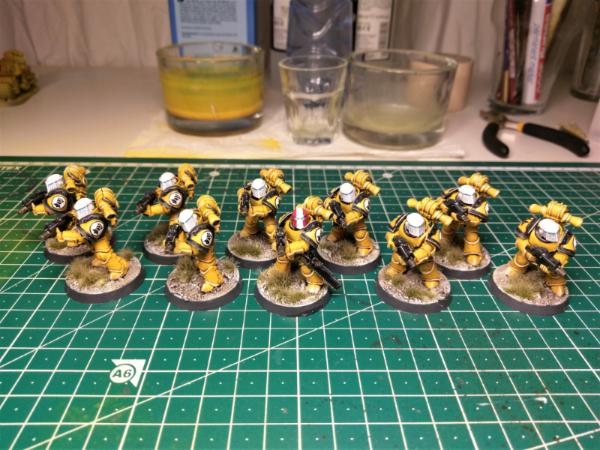
I've loved the Mk III armor since seeing the early sketches in 2nd or 3rd edition and was delighted to see them released in plastic. Before rejoining the fray of 40K I actually considered picking up 30K just because of these awesome kits. Turns out I could have my Mk III cake and eat it too by using them as Sternguard! Where "eat it" means play games with it, as no-one around here plays 30K. And I don't know what a Mk III cake would look like. I guess the expression is a little strained here. Moving on.
I painted the whole squad over one entire day and I really think I should stop doing that. I get burned out if my batch is too big and by the time I'm painting model #8, I'm more focussed on getting it done than doing it right. This leads to a lot of touching up later. That said, the Mk III paint up surprisingly easy due to a lack of elaborate detail. Of course that's also how I modeled them. I figured these guys in their ancient armor would stick closer to the ideals of the Great Crusade and its lack of frill. And it strikes me as a decidedly Imperial Fists thing to get rid of all your little battle honors and purity seals once you make it to the First Company. You've earned the white helmet and that is enough of a badge, now go field-strip your bolter again and then take five in the pain glove. Good lad.
What actually happened is I spent more time gaming and less time painting the past couple of weeks. My army is shaping up nicely and it is, in fact, almost finished. Insofar as an army is ever finished. I've got ten Scouts to paint up and then my regular line-up is all done. I'd like to acquire a Land Raider Crusader, a squad of Thunder Hammer Terminators and a Terminator Chaplain to give me a hard-hitting assault option, but that's future talk. I've also been eyeballing those sexy Rubric Marines and the infraggable Ahzek Ahriman as a possible second army. Then again, those new Leman Russ tank rules look very tempting too...
61618
Post by: Desubot
Slick work. but how were do the bullets come out of
i really need to get me mk3 kits
they do look awesome in yellow.
106122
Post by: General Helstrom
 Desubot wrote: Desubot wrote:Slick work. but how were do the bullets come out of
i really need to get me mk3 kits
they do look awesome in yellow.
I forgot to black for the barrels again didn't I
Thanks, I too like the way the Fists look in their older armor patterns, especially the Mk III.
100273
Post by: STG
I serioiusly love MK3 marines aswell. wish they were bigger though. predators look really good.
91286
Post by: WarbossDakka
Not sure if I'm a fan of white helmets against yelllow. Personally, red would look better, but it's solid painting either way. Great work!
106122
Post by: General Helstrom
STG wrote:I serioiusly love MK3 marines aswell. wish they were bigger though. predators look really good.
I like them this size since I missed the whole Primaris boat Hell, most of my angry little men are on 25mm bases still.
WarbossDakka wrote:Not sure if I'm a fan of white helmets against yelllow. Personally, red would look better, but it's solid painting either way. Great work!
Thanks man! As for the helmets... Well, Roboute was already apoplectic with rage when he found out what we did to his beloved Imperium, I figured I wouldn't rub any salt in the wound by messing up his color swatches as well.
Seriously though, I hear what you're saying - white doesn't exactly pop off yellow, almost any other bright color would do that better. I went for codex over looks on this one. I'd already sinned on their shoulder trim (which should have been white as well). Incidentally, my girlfriend thinks the sergeant looks like a Mexican wrestler 
69494
Post by: OneManNoodles
I Like the white helmets, I used them with my old fists army.
Nice work on the drop pod, I'm slowly putting one together atm, as I've not made one before I'm finding it an interesting experience.
Really nice yellow on the predators!
107470
Post by: 2ManyNids
Nice Sternguard, I'm using MKIII as them as well. The white helmets are a nice contrast with the slightly dirty yellow armour. I'm enjoying the blog so far and I can't wait to see more!
110957
Post by: goblinpaladin
Really like the Sternguard. Using MKIII is a great idea - plus, it's the best armour mark. My only thing is that the blue lenses are a bit indistinct against the white helmets.
94888
Post by: JamesY
I can't believe I haven't been in this blog before, really nice army you have here
106122
Post by: General Helstrom
Thanks for all the replies folks, it is appreciated
This weekend I went over to Frank's house for a 2000 point game. The day before that I had once again knuckled down with ten minis in the paint batch! This time it was Scouts, who turned out to be more work than I had anticipated. I'll have pictures of them up later. Still, I got them all finished and that meant I was bringing a fully painted 2000 point army to the table for the first time!

As this was a momentous occassion, the army was determined to give a good showing of itself. Winning first turn for the first time this edition, the mechanized infantry advanced and the Veterans drop podded and teleported in to lead the way:
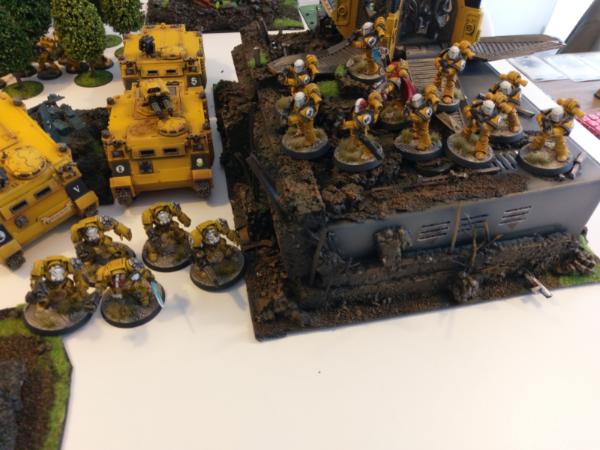
The brand new scouts watched from the trees as the entire spearhead was eaten by an angry Nightbringer:
So, I need an assault element. Even if just as counter-assault. I've known this for some time and I was hoping the Terminators could plug the gap with their power fists, but without character support that -1 To Hit really hurts. D3 damage is a little meh too. And the central problem I think is delivery. How do you get an assault unit into combat, reliably, without exposing it to all kinds of horrible firepower? Join me in the 40K Army Lists forum to crack this nut
110957
Post by: goblinpaladin
Oh, those sand tones on the scouts are great. They still look like Fists, but are also infiltration-ready. Is it the same sand tones that you use for basecoating? (I am remembering correctly that you use sand tones for basecoating, right?)
91286
Post by: WarbossDakka
Your force is shaping up nicely GH! 2000pts is always a good milestone to hit, so well done. Scouts have a lot of different textures and colours, so can require a bit more effort, despite being a fairly regular Troops choice.
49179
Post by: Valhalla130
Very nice Fists. I love the scouts. I plan to do up a squad or two of sniper scouts for my Fist army. I'm a bit slower than you, so it's nice to get inspiration from a great painter.
106122
Post by: General Helstrom
goblinpaladin wrote:Oh, those sand tones on the scouts are great. They still look like Fists, but are also infiltration-ready. Is it the same sand tones that you use for basecoating? (I am remembering correctly that you use sand tones for basecoating, right?)
Thanks! I do basecoat in Army Painter Bone, which is a few tones lighter than the Zandri Dust I used for these Scouts. I also have some new pictures of them:
WarbossDakka wrote:Your force is shaping up nicely GH! 2000pts is always a good milestone to hit, so well done. Scouts have a lot of different textures and colours, so can require a bit more effort, despite being a fairly regular Troops choice.
Yeah it feels great to have 2000 points ready to go. And it only took me half a year too I now have a box of Vanguard Veterans and one of Assault Terminators on the way to pad out my (sorely lacking) assault potential. I'd like to add a Land Raider Crusader at some point and then this army is pretty much finished, for the time being.
Valhalla130 wrote:Very nice Fists. I love the scouts. I plan to do up a squad or two of sniper scouts for my Fist army. I'm a bit slower than you, so it's nice to get inspiration from a great painter.
That's nice to hear Valhalla, I looked at your thread and your 3rd Company is coming together nicely! I've replied to subscribe
Yesterday I fought a 1500 point battle versus a Tau Battlesuit army and won handsomely, due in no small part to the inclusion of a squad of Terminators to help my Sternguard and a Lieutenant to help boost the firebase. I have some new kitbashes coming up in the next couple of weeks!
91286
Post by: WarbossDakka
Dipping a bit into conversions are we? I'm looking forward to it
106122
Post by: General Helstrom
Funny, I can see WarbossDakka's reply in the forum listing and in his profile but not in this thread... Let's see if posting another reply fixes it Fixed
It looks like I won't be doing too much kitbashing as it turns out the Vanguard Veterans kit has a lot of bits in it. A lot. I expect to get the new kits in tomorrow so then we'll see!
I did kitbash a jump pack Chaplain though and painted him today. The legs and torso are from an ebay lot of assault marines I got cheap. They turned out to be undercoated quite thickly with some red gunk that won't come off. This has clogged a lot of the detail but I think he came out OK with some added bits and a paintjob.
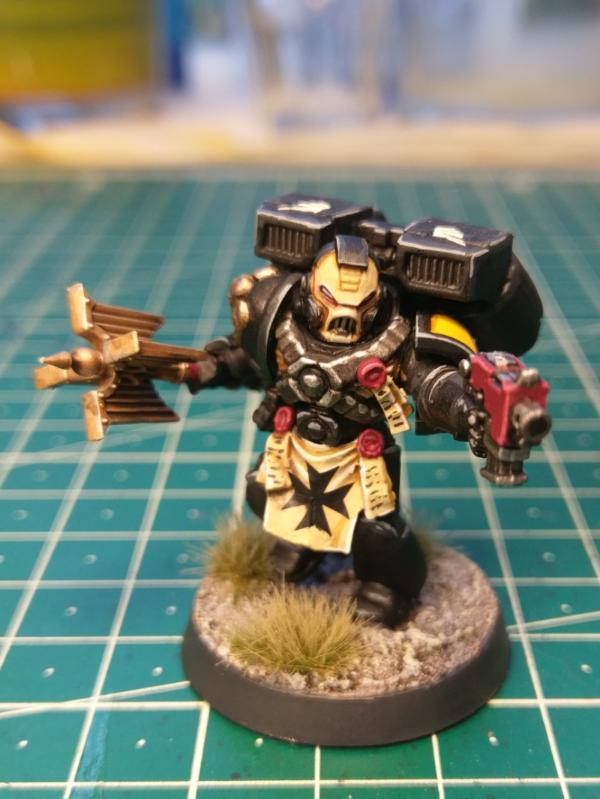
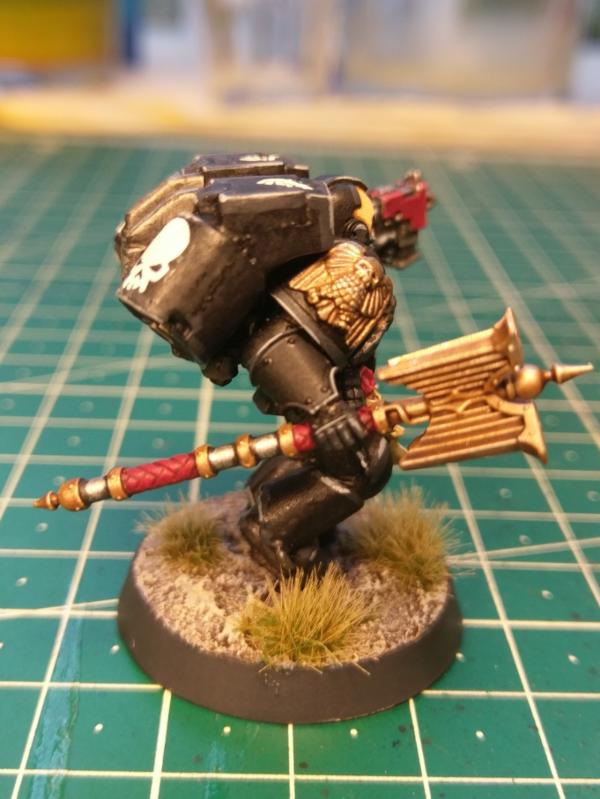
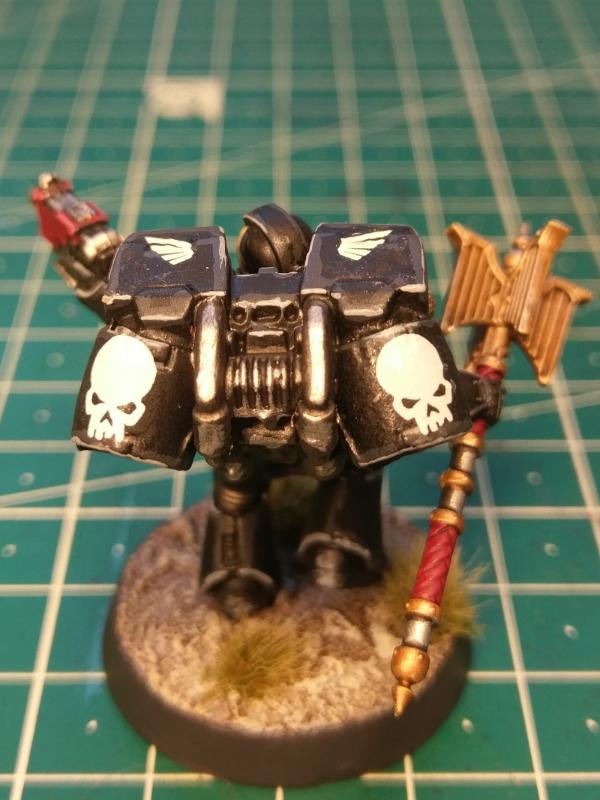
106122
Post by: General Helstrom
Long time no see, friends
Those two marathon stints really turned me off painting for a bit, not entirely sure why. Saturation I guess! I've been more focused on getting games in, planning my next projects (I have a Blood Bowl set to paint and I'd like to make a table with scenery) amd catching up on reading the Ahriman series. Maybe I should do a Thousand Sons army next... Oh so much to do!
Anyway, I got back behind my paint station this week and the fruits are apparent: five Hammernators all ready to go! I now only have a squad of five Vanguard Veterans to go before I can consider this army complete.
Unless I decide to get my hands on that Stormraven I've been eyeballing. Or the Land Raider...
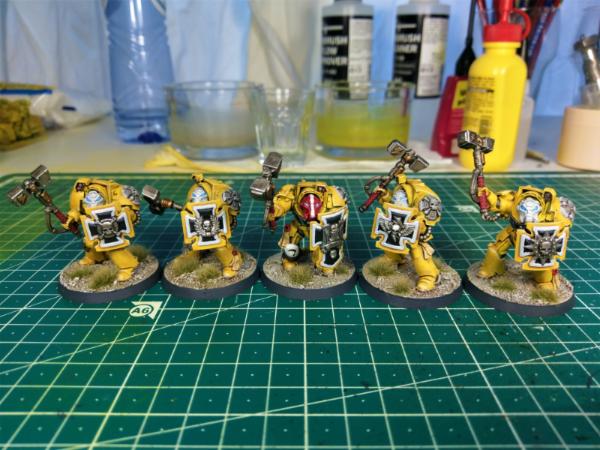
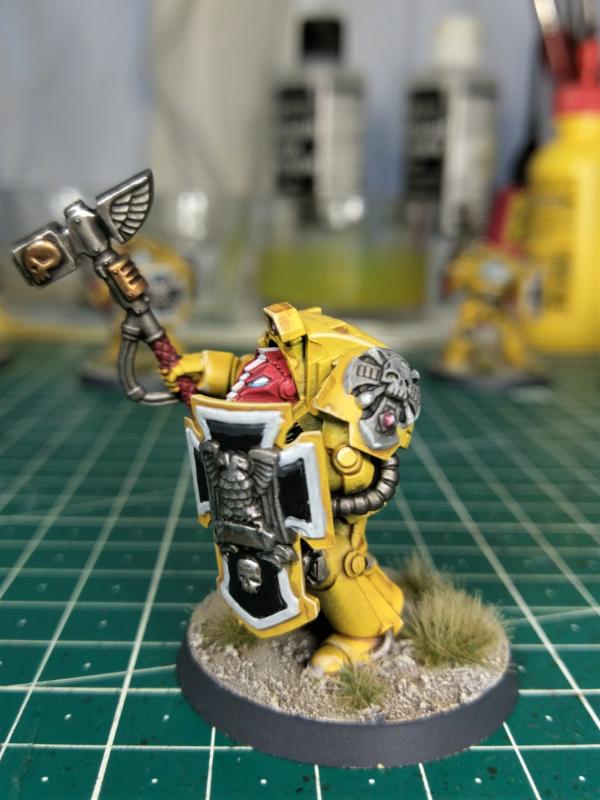
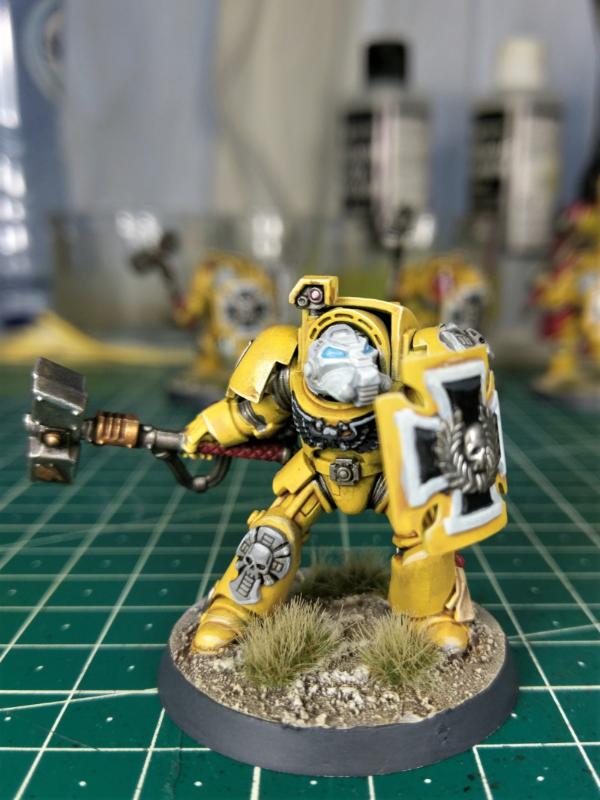
72327
Post by: fantasy.40k
Looking Good 
17353
Post by: Cosmic
This blog is excellent! Amazing yellow recipe, and a gorgeous looking army. Keep up the awesome work!
91286
Post by: WarbossDakka
Nice Termies. I would recommend making the lenses more of a solid colour rather than just putting a glaze over the white helms. It'll really help make the head a focal point, so it'll do a good job of bringing it all together. Well done!
109164
Post by: Plodmarine
Gorgeous Termies! Really making that yellow pop. Jealous now.
49179
Post by: Valhalla130
Nice.
106122
Post by: General Helstrom
Thanks guys!
Dakka: I see what you mean about the lenses and I may go back in and touch some pure white into the Terminators' eyes (like I did on the sergeant, his eyes are a bit more solid). They do look a little washed out now.
106122
Post by: General Helstrom
Hey, whoa, where did time go? Oh well. What's six months between friends right?
I got a new job (yay me!) and kind of crapped out on painting for a while (boo me!) but I did just finish some odds and ends - namely a squad of Vanguard Veterans and some officers I was still missing:

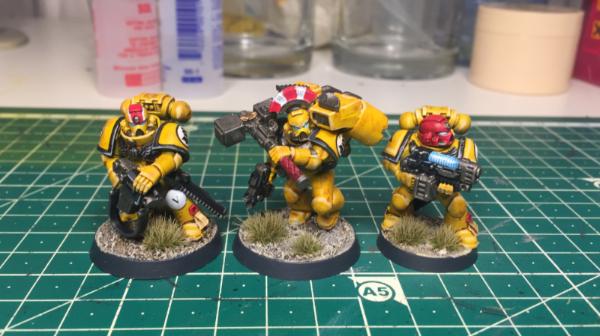
Not my best work I think, but solid tabletop quality. This actually marks the end of major painting operations for my Imperial Fists. They're done! Well, insofar as an army is ever truly done. I've been a little disappointed with the Space Marine assault options so far. The thunder hammer terminators are too hard to deliver into combat reliably and even then they suffer from too few attacks and the -1 to hit. These vanguard veterans have faired much the same. I now have a solid hunk of cheese on my painting table - three, in fact. Three soon-to-be-shiny Custodes Cheese Captains on Cheese Bikes to really take the fight to the enemy
|
|
