| Author |
Message |
 |
|
|
|
|
Advert
|
Forum adverts like this one are shown to any user who is not logged in. Join us by filling out a tiny 3 field form and you will get your own, free, dakka user account which gives a good range of benefits to you:
- No adverts like this in the forums anymore.
- Times and dates in your local timezone.
- Full tracking of what you have read so you can skip to your first unread post, easily see what has changed since you last logged in, and easily see what is new at a glance.
- Email notifications for threads you want to watch closely.
- Being a part of the oldest wargaming community on the net.
If you are already a member then feel free to login now. |
|
 |
2010/10/27 07:50:41
Subject: Tales from the Woodchipper : Thunderhawks GO GO GO !!!!!!!
|
|

Kinebrach-Knobbling Xeno Interrogator
Segmentum Solar IOXB-1771A9
|
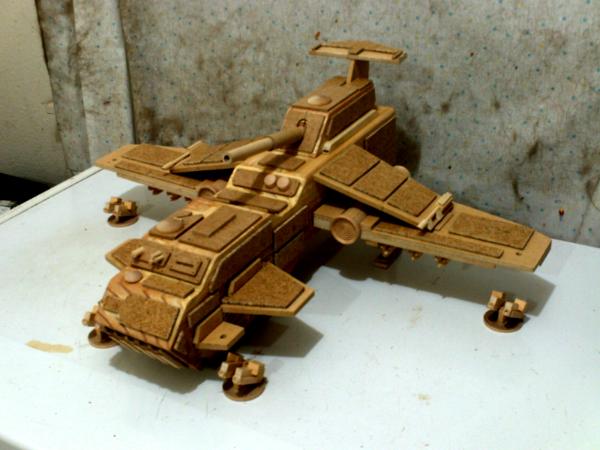
It all began with a whining noise : “huhhhhhhh mfrghhhh hurmrffffff I will never have a thunder hawk “ a friend of mine kept complaining when I would visit about his not having a thunder hawk for his WH40k army . I told him I didn’t have the tools to do one right , but he didn’t care .
Now I don’t play 40k anymore , I got out when 3rd came out , but I still build the figs from time to time and ebay them or what ever ………… and he was taking some of my stuff for me to sell to his friends , and I decided to finally break down and buy a table top band saw . With the band saw I can do more precise cutting so my build options open up quit a bit . He wanted very vanilla gunship’s so he can mod them him self .
Now the first step in building something successfully is to do some research on the subject . So I googled thunder hawk gunship images and got lots of useful stuff to plan the project out . Most notably I cam e across this thread which had plans I could print out and put to use : http://www.dakkadakka.com/dakkaforum/posts/list/242372.page
Next came the blueprints :come up with a plan , you don’t necessarily have to write it down , but for something this complicated , it really does help , especially if you plan to be able to build more than just one , and plan to be able to build more as needed . Using Clthomps’s blueprints I started to do a foam board mock up . I wasn’t satisfied with the size , so I added an inch to the width and 2 inches to the length . This required me to scale up the wings and canards as well . Once I was satisfied with the size increase , I sat down and made templates of the resized plans onto poster board and then looked at all the materials I would need …………………
Now first let me say I hate foam board and paper models , they may look nice once you have finished them , but they are not nearly sturdy enough for me to want to deal with , so I decided wood would be the best option . YES it would be a bit heavy , but they would also be sturdy enough to last . And better yet , when I scaled it up it turned out I could save A LOT of time because a section of 4X6 post would be the perfect width for the hull , so I could cut it out of ONE piece as opposed to several pieces and then dealing with angles and gluing them all together right .
So here is the run down of materials , enough to build 6 thunder hawk gunships
1 sheet of foam board $1
2 sheets of poster board $.50 each at the dollar store
1 4X6X12 wood post $18
2 sheets of HDC $6 each
1 2X4X10 board $2.08
1 bag of wooden dowels from craft store $1.99
2 1 inch wide dowels $6 for the pair .
Wood filler $4
Wood glue $4
22pc bag of “wooden nickels” from craft store $3
Package of wooden axels I bought at craft store in wood section $2
2 packages of wooden checkers pieces I got at the craft store in the wood section $3 for the pair
Heavy card stock free from last job , came with something else as a packing material .
Some odds and ends I had in my project bins .
Next thing to do is cut the wood down to a more workable size . I went to my dads place and got his help since he has a circular saw and a few other tools I needed access to .
Next I traced the templates onto the wood post sections and the HDC , and of course then I used the band saw to cut them out .


I live in a apartment so there are some things I cant do here . I went back to my dads place and used a power sander with heavy 60 grit sand paper to smooth the surfaces down . This was especially important because there were some knots in the wood and such so those sections had to be sanded flat a bit more . It was discovered that some of the angles are a bit hard to cut right because the saw is a bit small , and the work surface on it is not fully level on both sides so I could only get a 90 degree angle on one side of the blade . I there fore decided to re-cut the lower rear section of the hull to make it easier to deal with and correct the angles a bit more . One of the problems with cutting the hull from a post with the band saw is that the wood grain can swerve and curl , and if there is a knot or anything of that nature , it can cause the blade to curve and turn around it when the blade guard is opened up this far . Not having a table top sander , it was easier to re-cut the hull than to try correcting it by sanding . Ideally I would also have better results with a larger heavier duty band saw , but I am happy with this one for my need ATM
After that the hulls were coated with wood filler to fill in the grain gaps and ensure smoothness of the finished product , allowed to dry and then sanded down again with a 200 grit sand paper . One of the next tools on my list is a bench sander , which will negate the need for all but a small amount of wood filling , and will negate the need for 2 sandings
Next the parts were assembled , and glued into place .
Because the project is wood , and the hulls are solid , I can drill into the hull using a power drill and auger bits . This allows me to glue the wings INTO the hull as opposed to ONTO the hull . This will make it MUCH sturdier . Because of this , the wings , canards , and forward gun mounts all have tabs that I insert into the augured out slots to glue them in . Now the augured slots are rounded , and the tabs are square , so in order to fit them in , I took my dremel and rounded the edges . Doing this allowed me to make each one a snug fit . And just to ensure the wings stay put , I used a electric stapler with finishing nails to secure the wings , and used 2 ton epoxy to glue the wings canards , and gun mounts into place

The inch wide wooden dowels were used to make the engines . I CAREFULLY used the band saw to cut the dowels length wise to create the engine sections that will lay on top of the wing . While this may seem bland by some , you can add in wires and card stock plates to add visual depth to the engines . I my self never saw the point of having open engines on something like this , I like the idea of at least some armored plating around the engine since that’s what keeps the craft flying .
The wings are made out of 2 quarter inch thick pieces of the hardboard glued together to make it thicker . On the lower piece I traced out a “wooden nickel” at the leading edge outer tip , and cut it out to fit the gun mounts I am putting in . each mount is wooden nickel with a 1/4inch hole drilled in the center . After the wing sections are glued together , I place a gun mount into the slot to use as a guide . I drill a quarter inch hole into the upper wing section . This will allow me to glue the gun monts in in such a way that they can still turn .

The same is done with the forward gun mounts only there is no upper and lower sections , only the upper . Section .
The dorsal cannon mount had to be upsized to match the new dimensions and was made from a 2X4 that I ripped down to 1½X2X5 with a 45 degree slant cut on the front . The tail assembly had a space cut out so that it can fit against the cannon box .
After the gun ships finished drying , they were coated with wood glue . This water proofs them and makes the surfaces more readily accept paint and other modifications . This was allowed to dry


Now if you are following along and building your own thunder hawks , at this point , once the glue dries you can run through the apartment with it held high , in your under ware and a cape , making space ship noises , if for no other reason than to annoy your neighbors and give them something to talk about .
To create the panels I just used heavy duty card stock and glued it onto the surface . And after they dried I used another coat of watered down wood glue to water proof the card stock . Allow this to dry . Clean up any bumps or roughages on the card stock as much as possible now that its hardened by the glue .

Now its ready for priming and painting . I left the gun mounts empty so my friend can outfit it as appropriate .

At this point I have 3 done , and 3 just waiting assembly , one of which will be “orkified” , but it primarily the same as the others . I will refer to these as primus template , I plan to make a couple more modifications to the template and then refer to that one as secondus template . All future thunder hawks (should I have reason to make more ) will most likely be the new secundus template design .
Each weighs in at just under 5 pounds , which considering the size and that its solid wood , isn’t bad at all , and means they will last a heck of a lot better than resin or foam board/cardstock .
I rushed to assemble3 of them , the remaining three I will do one at a time and finish in a couple of weeks when I get a bit of free time .
Next on my planning board is an upscale version of the secondus template to deliver vehicles , first the 2 vehicle version , then the 6 or 8 vehicle version .
But in the mean time , I will work on some terrain projects to get some spare cash , and MORE TOOLS to make it easier and faster to build them !!!!!!!
|
|
This message was edited 1 time. Last update was at 2010/10/27 07:59:24
"I was not born , i sprang from the head of the GodEmperor as he contemplated a particularly vile joke ." |
|
|
 |
|
2010/10/27 08:33:28
Subject: Tales from the Woodchipper : Thunderhawks GO GO GO !!!!!!!
|
|

Longtime Dakkanaut
The ruins of the Palace of Thorns
|
Very nice. Far from as detailed as the resin version, but that is, of course, inevitable. As you say, it also allows for personalisation by the new owners.
On the Secundus version, will you be adding any taper to the nose? I think it is the single change that could make most differnce to the style of the thing.
|
|
|
|
|
|
2010/10/27 08:56:53
Subject: Re:Tales from the Woodchipper : Thunderhawks GO GO GO !!!!!!!
|
|
Kinebrach-Knobbling Xeno Interrogator
Segmentum Solar IOXB-1771A9
|
NO SOUP FOR YOU ! .........  TNX
one problem with so many of the 40k scratch builds is that there are so many of them , so unless you want to make your own from the start , there are soooooooo many differing views .
the secundus will actually be much more simplified , and ironicaly thus i will have more options to make it more deluxe and producethem faster .
i hope this makes sense
if you look at the pic of the HULL with the wing hole augered out , you can see the top has a number of cuts on the dorsal side . right now the hull takes 11 cuts to make the hull , i plan to lower that to 6 . the area where the cockpit window is will be left off , the top of the cockpit will be level with the top of the plank , and the 3 cuts behind the dorsal side of the cockpit will be left out . i will create the raised gun deck useing 2 pieces instead of just one : first a thinner deck with angled side , and the cannon housing will sit on top of that .
the new cockpit will bemade using a small raised deck that just off the front of the dorsal side , another piece will abut that and creat the cockpit , more along the lines of the epic figure .
one more possible modification to the hull that i am considering is to add 3 cuts to the bottom of the hull to make a notch , and make the wings as one piece rather than 2 so that it just slides into the notch as opposed to having to auger out holes , but thats still to be determined once i get a few more tools to try one out .
|
"I was not born , i sprang from the head of the GodEmperor as he contemplated a particularly vile joke ." |
|
|
|
|
2010/10/27 09:02:25
Subject: Re:Tales from the Woodchipper : Thunderhawks GO GO GO !!!!!!!
|
|

Boosting Black Templar Biker
Australia, NSW, Blue Mountains
|
Sweet.
|
DOUBLE RAINBOW ALL THE WAY ACROSS THE SKY!! WHAT DOES IT MEAN?!  |
|
|
|
|
2010/10/27 10:09:20
Subject: Tales from the Woodchipper : Thunderhawks GO GO GO !!!!!!!
|
|
Veteran Wolf Guard Squad Leader
|
Very nice looks better than the Forgeworld one would love to see it painted
|
DC:80S++G+M+B+IPw40k96#-D++A++++/fWD180R+T(T)DM+
Please check out my Wolves: http://www.dakkadakka.com/dakkaforum/posts/list/333299.page
Space Wolves Ragnars Great Company (4000) 
Ultramarines IV Company (4000)  
Cadia's Foot your Ass (3000)  
Khorne's Fluffy Bunnies (2500)   
Praetorian Titan Legion (3 big angry robots + 1 skinny tech priest) 
High Elves, Empire, Dark Elves, Brettonians |
|
|
|
|
2010/10/27 17:34:10
Subject: Tales from the Woodchipper : Thunderhawks GO GO GO !!!!!!!
|
|
Wicked Warp Spider
|
HA!
This is all kinds of awesome.
|
|
|
|
|
2010/10/27 17:54:18
Subject: Tales from the Woodchipper : Thunderhawks GO GO GO !!!!!!!
|
|

Mekboy Hammerin' Somethin'
|
|
|
|
|
|
|
2010/10/27 18:25:13
Subject: Re:Tales from the Woodchipper : Thunderhawks GO GO GO !!!!!!!
|
|
Kinebrach-Knobbling Xeno Interrogator
Segmentum Solar IOXB-1771A9
|
thnx guys .
the 3 i built so far are as vanilla as i could make them , so that whom ever ends up with them can customize them how ever they like , the friend that i built the first two for has made some castings of various bits he wants to put on them so that they become more customized for his armies . the third , he says his friends will want , if i dont trade or sell it at a local con this weekend , so we will seee what happens ,
the 4th and 5th will robably be the same basic vanilla build , but the 6th will be orky , and i have always enjoyed building orkness , so that one i will probably build and paint myself all the way to finished . i am thinking the orks would probably replace the battle cannon with a plasma cannon of some sort , and the bolters with auto cannons .
my friend said he would give me pics of his 2 when they are finished , so i will post them , or he can since i guess he comes here alot so ...............
|
"I was not born , i sprang from the head of the GodEmperor as he contemplated a particularly vile joke ." |
|
|
|
|
2010/10/27 22:06:19
Subject: Tales from the Woodchipper : Thunderhawks GO GO GO !!!!!!!
|
|

Regular Dakkanaut
|
Great work!
|
 The flesh is weak! The flesh is weak! |
|
|
|
|
2011/01/09 12:20:02
Subject: Re:Tales from the Woodchipper : Thunderhawks GO GO GO !!!!!!!
|
|
Kinebrach-Knobbling Xeno Interrogator
Segmentum Solar IOXB-1771A9
|
since i didnt have to rush to get them done , i have been kinda remiss about getting the last 3 done .
i finaly got around to working on #4 this last week , and since i didnt have to rush to get it done , i am building it so it will be paint and play ready . instead of using card stock to make the pannels , i am useing 1/8 inch thick hard board , so its alot more like heavy armor panels .
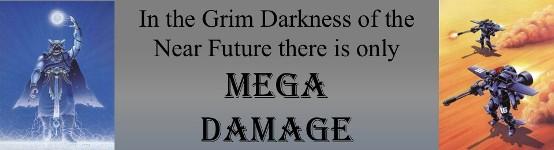
i made the heavy bolters and lascannons out of wood , and the bombs to .
i will post some pics in the next week or so one i am done with it .
but i am posting this right now because i have a question . as i said above , i dont play wh40K anymore . one of the options is that it can have 18 bombs split between 6 pylons under the wings . it doesnt say what kind of bombs they are or anything more specific , so i am wanting to know what are the rules for "bombs" ?
|
"I was not born , i sprang from the head of the GodEmperor as he contemplated a particularly vile joke ." |
|
|
|
|
2011/01/09 19:35:21
Subject: Tales from the Woodchipper : Thunderhawks GO GO GO !!!!!!!
|
|
Phanobi
|
Wow cool can I have one please *Flashes her eyes* please?
I'll try and find the rules in IA 2.
|
http://www.dakkadakka.com/dakkaforum/posts/list/463976.page (Space Sharks and Tau)
DJ @ http://www.rockindocradio.net
Mon, Thursday+Fri 06am - 09am EST
We refuse to take sides in this anymore. And we refuse to let you turn us against one another. We know who we are now, we can find our own way between order and chaos...
It's over because we've decided it's over. Now get the hell out of our galaxy! Both of you.
"Whoever takes purple sash is purple, and follows purple leader." I follow purple tau. Theophony
|
|
|
|
|
2011/01/11 03:10:52
Subject: Re:Tales from the Woodchipper : Thunderhawks GO GO GO !!!!!!!
|
|
Kinebrach-Knobbling Xeno Interrogator
Segmentum Solar IOXB-1771A9
|
CAN YOU HEAR THE ROAR OF THE ENGINES ?!?!?!?!?!?!?!?!?!?!?!?!??!?!
BEHOLD THE FIRE BRINGER !
since i didnt have to rush it , i took my time to build body #4 and went the distance with it .
she's outfitted for a bombing support role . with the 18 bombs under her wings .
i still need to attach the bolter sponsons , glue on the las cannons , and the uper gun deck . i am waiting to do so for a while as i had an epifany last night about how to do the flight stands for these , and need to be able to flip her on her back to drill the peg holes .
the plates are made from 1/8 hard board .
after the way this one has come along , i think i will do all my thunder hawks slowly like this so they will each be individual and have their own unique personality .
shes a whole new batch of badness ................................... if only i still played the game :(
i imagine her painted bone , bringing the deathwing to reclaim their home world from the stealer germs .........................
this is a close up of her weapons
|
"I was not born , i sprang from the head of the GodEmperor as he contemplated a particularly vile joke ." |
|
|
|
|
2011/01/11 04:08:38
Subject: Tales from the Woodchipper : Thunderhawks GO GO GO !!!!!!!
|
|
Blood-Raging Khorne Berserker
|
I have done a thunderhawk in 5mm card you did very well I did one in 5mm card and it looks great.
|
 Chaos rules you all drool! Blood for the Blood God! Chaos rules you all drool! Blood for the Blood God!
10,000 pts Black Legion
2,000 pts Traitor Catchian Guard (1067th).
8,000 point Sam Hain Eldar.
2,000 pts Squat Biker Force.
1,500 Orc Hoard (painting for a friend).
|
|
|
|
|
2011/01/12 21:32:53
Subject: Tales from the Woodchipper : Thunderhawks GO GO GO !!!!!!!
|
|
Deranged Necron Destroyer
|
How much does it weight?
|

malfred wrote:Buy what you like.
Paint what you love.
|
|
|
|
|
2011/01/12 22:08:35
Subject: Tales from the Woodchipper : Thunderhawks GO GO GO !!!!!!!
|
|
Blood-Raging Khorne Berserker
|
My Thunderhawk is bigger than the one in that pic, I guess I will use it as a Mark II version that means a Transporter 2 Rhino sized vehicles and 50 Marines or Guardsmen. I so want a Stormhawk for that all impressive 100 Marines/Guardsmen, think about the shock factor in a APOC game....100 Marines deep striking into your back door.
|
Chaos rules you all drool! Blood for the Blood God!
10,000 pts Black Legion
2,000 pts Traitor Catchian Guard (1067th).
8,000 point Sam Hain Eldar.
2,000 pts Squat Biker Force.
1,500 Orc Hoard (painting for a friend).
|
|
|
|
|
2011/01/13 03:07:23
Subject: Tales from the Woodchipper : Thunderhawks GO GO GO !!!!!!!
|
|
Monstrous Master Moulder
Secret lab at the bottom of Lake Superior
|
That looks amazing! My only concern is weight... For a flying base (you could just play it with landing gear, no base. That actually makes more sense), you could do some type of dowel.
I bet that's a lot sturdier than plasticard ones!
|
Commissar NIkev wrote:
This guy......is smart 
|
|
|
|
|
2011/01/13 05:12:13
Subject: Re:Tales from the Woodchipper : Thunderhawks GO GO GO !!!!!!!
|
|
Kinebrach-Knobbling Xeno Interrogator
Segmentum Solar IOXB-1771A9
|
it weighs about 5 pounds . and believe me , i have already taken into consideration the weight for it . thats why it i am just now working on the flight base idea , i only just figured out how to do it and make it work .
she'll sit about 10 inches or so off the board .
|
"I was not born , i sprang from the head of the GodEmperor as he contemplated a particularly vile joke ." |
|
|
|
|
2011/01/13 14:11:48
Subject: Re:Tales from the Woodchipper : Thunderhawks GO GO GO !!!!!!!
|
|
Annoyed Blood Angel Devastator
|
I'm really excited to see how this turns out in the end. Love seeing people scratch build Titans and Ships. Thanks for sharing with us. 
|
 2000+ pts 2000+ pts
 2000+ pts 2000+ pts |
|
|
|
|
2011/01/13 22:38:43
Subject: Tales from the Woodchipper : Thunderhawks GO GO GO !!!!!!!
|
|
Kinebrach-Knobbling Xeno Interrogator
Segmentum Solar IOXB-1771A9
|
micahaphone wrote:
I bet that's a lot sturdier than plasticard ones!
yes , and it also doent melt or warp if left in a hot car 
for those old timers out there that remember first ed , they had a vehicle called a grav attack . once i am ndone with the other 2 thuinder hawk bodies in about 3 weeks or so , i plan to make a grav attack out of wood and post another toutorial about it .
|
"I was not born , i sprang from the head of the GodEmperor as he contemplated a particularly vile joke ." |
|
|
|
|
2011/01/14 03:46:26
Subject: Tales from the Woodchipper : Thunderhawks GO GO GO !!!!!!!
|
|
Crafty Bray Shaman
|
Wow, she's a butte!
|
|
|
|
|
|
2011/01/14 03:55:58
Subject: Tales from the Woodchipper : Thunderhawks GO GO GO !!!!!!!
|
|

[MOD]
Otiose in a Niche
|
Wow nice!
|
|
|
|
|
|
2011/01/14 04:09:23
Subject: Tales from the Woodchipper : Thunderhawks GO GO GO !!!!!!!
|
|
Horrific Howling Banshee
NC
|
That looks fantastic! Any chance you might want to sell one?
|
|
|
|
|
2011/01/14 04:46:44
Subject: Tales from the Woodchipper : Thunderhawks GO GO GO !!!!!!!
|
|
Kinebrach-Knobbling Xeno Interrogator
Segmentum Solar IOXB-1771A9
|
NobleSeven wrote:That looks fantastic! Any chance you might want to sell one?
i think they are cost prohibitive to sell . with these last 3 , i would have to sell them for about $350ish each with their flight stands to justify the work and cover the shipping . i can trade them localy for about $300 because i dont have to pack and ship them . :(
i am a long way off from doing the secundus template that i am planning , i need about $500 more in tools to be at that stage , where i could build them easier and faster .
as it is , each one is unique in that its not an exact replica of the others , all the sides are off just a bit from each other , so while they are all the same width , i have to cut the plates individualy to fit the surfaces , do some corrections with the fittings and such . but subscribe to this thread , and when i get to the point of doing the secundus templates , they will be much more cookie cutter , so i wont have to work as hard to spend as long on each and can pack and ship them partialy assembled in 6 or 7 pieces that you could slap together and paint .
|
"I was not born , i sprang from the head of the GodEmperor as he contemplated a particularly vile joke ." |
|
|
|
|
2011/01/17 22:58:57
Subject: Re:Tales from the Woodchipper : Thunderhawks GO GO GO !!!!!!!
|
|
Kinebrach-Knobbling Xeno Interrogator
Segmentum Solar IOXB-1771A9
|
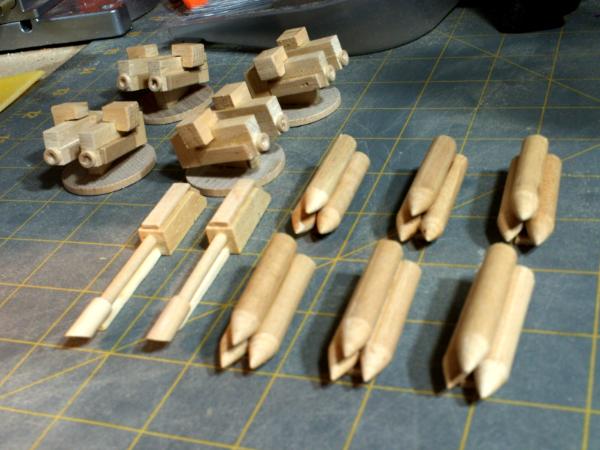
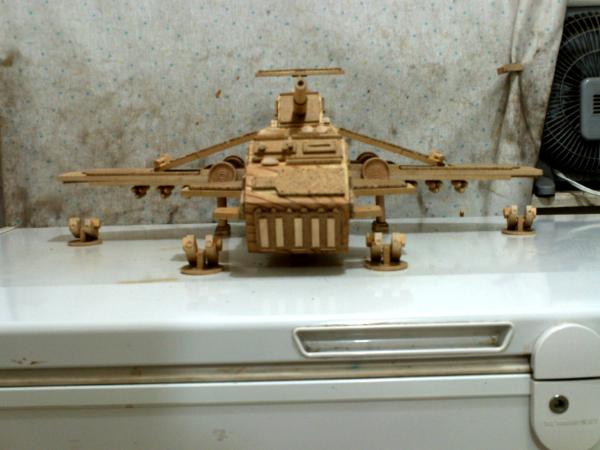
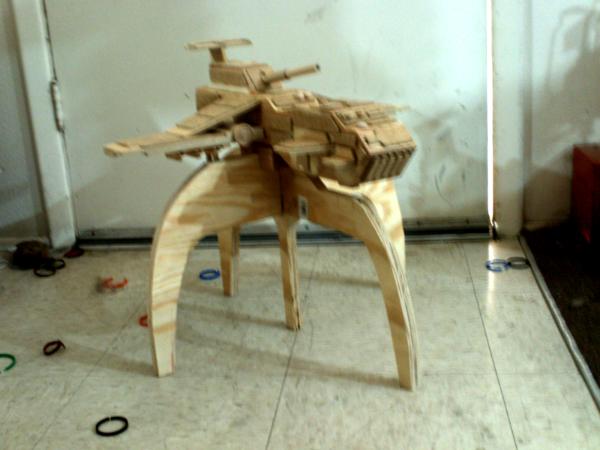
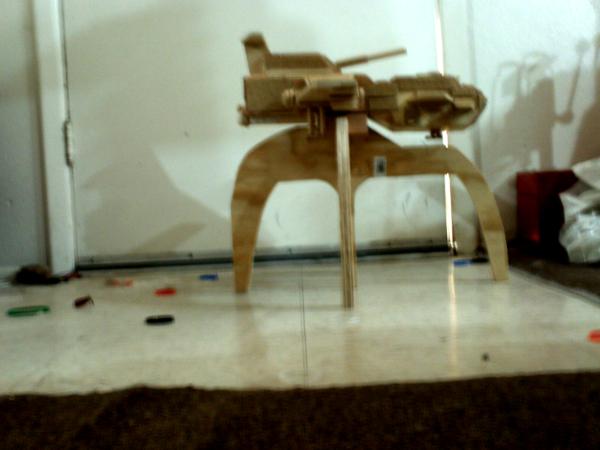
first attampt at a flight base . the next version will be a little wider , not so tall and thin looking . and the legs will be thinner
the thunderhawks i am leaving primed only so who ever ends p with them can paint them to their chapter colors , but i plan to paint the flight stands before trading/selling them . i am going to paint them kinda flame glows at top , greyish cloudyness in middle and dirt color toward bottom .
|
"I was not born , i sprang from the head of the GodEmperor as he contemplated a particularly vile joke ." |
|
|
|
|
2011/01/17 23:19:11
Subject: Tales from the Woodchipper : Thunderhawks GO GO GO !!!!!!!
|
|
Loyal Necron Lychguard
|
I'll have to say I really don't like that flight base.
|
|
|
|
|
2011/01/17 23:52:16
Subject: Re:Tales from the Woodchipper : Thunderhawks GO GO GO !!!!!!!
|
|
Kinebrach-Knobbling Xeno Interrogator
Segmentum Solar IOXB-1771A9
|
niether do i , BUT it was an important first try .
without this one , the next one would be this one , and not a MUCH better one , though even the second one may be another step on the path to the final version depending on how it turns out .
i should also point out that this one is still rough cut . i havent sanded it or anything , so it will change a TINY bit once its finished .
so let me ask you guys , its about 11 inches from ground up to the bottom of the thunderhawk . would it bother anyone if it was say 3 or so inches lower ? how about only 6 inches from the table top ? how low is to low ?
|
"I was not born , i sprang from the head of the GodEmperor as he contemplated a particularly vile joke ." |
|
|
|
|
2011/01/18 00:50:18
Subject: Tales from the Woodchipper : Thunderhawks GO GO GO !!!!!!!
|
|
Deranged Necron Destroyer
|
What if you made something conical/triangular almost like GW's flying stand. That gets wider at the base and out it at an angle so it looks a bit more interesting and less like an ATAT walker
|
malfred wrote:Buy what you like.
Paint what you love.
|
|
|
|
|
2011/01/18 05:24:16
Subject: Re:Tales from the Woodchipper : Thunderhawks GO GO GO !!!!!!!
|
|
Kinebrach-Knobbling Xeno Interrogator
Segmentum Solar IOXB-1771A9
|
the problem with that is that since it weighs 5 pounds , i either have to make it heavier , OR much wider .
if its heavier it becomes a pain to lug around and move .
if its wider , then its got a huge foot print on the table so its hard to maneuver around troops and terrain on the field . doing it as stilts allows it to be more easily moved and set around the table without interfearing with the rest of the table .
the area of the stilts is being reduced to about 9 square inches ( touching the table ) total as opposed to about 100 square inches for a solid one like GW does .
so let me repeat , i dont play WH40k anymore , i do this KIND of stuff to trade and sell to others , to use for OTHER games , or just for something interesting to do . the thunderhawks fall under the trade/sell , and interesting to do catagories .
so i am reworking the pattern .
from all the pics i have seen of the resin one and those made by others , i havent seen any with flight stands , so i dont think anyone else has made any , or that the original one comes with one .
how high off the table does it really have to be , to justify being above the table as opposed to on it ?
OR do the rules not allow for there to be figures under it , thus making the conical flight stand actually necessary under the rules ? i would think the conical flights stands would be kinda detrimental to moving the flyers around the fields .
|
|
This message was edited 1 time. Last update was at 2011/01/18 05:29:24
"I was not born , i sprang from the head of the GodEmperor as he contemplated a particularly vile joke ." |
|
|
|
|
2011/01/18 06:43:53
Subject: Tales from the Woodchipper : Thunderhawks GO GO GO !!!!!!!
|
|
Loyal Necron Lychguard
|
Usually large flyers like these have a thick plexiglass cylinder that is socketed into a large wooden plinth. For something as heavy as this, you're probably looking at a 250mm (or even bigger) base that's relatively thick, probably with something heavy glued to the top of it.
10-12" is about an average hight, too.
The stand you made is functional, but it is just too large and stange to use in a game.
|
|
|
|
|
2011/01/18 12:22:12
Subject: Re:Tales from the Woodchipper : Thunderhawks GO GO GO !!!!!!!
|
|
Decrepit Dakkanaut
|
Flight base, goto the hardware store and buy some metal rods and assemble a base like you normally would. That flight base not only looks bad, but with terrain and armies on the board, your going to be hitting something. If the weight is to much for a single metal rode, then switch to lag bolts. Your thunderhawk will be really heavy, but youll be able to rest a car on it, and it wont take up so much room
|
|
|
|
|
|
|