| Author |
Message |
 |
|
|
|
|
Advert
|
Forum adverts like this one are shown to any user who is not logged in. Join us by filling out a tiny 3 field form and you will get your own, free, dakka user account which gives a good range of benefits to you:
- No adverts like this in the forums anymore.
- Times and dates in your local timezone.
- Full tracking of what you have read so you can skip to your first unread post, easily see what has changed since you last logged in, and easily see what is new at a glance.
- Email notifications for threads you want to watch closely.
- Being a part of the oldest wargaming community on the net.
If you are already a member then feel free to login now. |
|
 |
2012/02/01 21:46:12
Subject: Carving Minis for Fun and Profit- the Real Deal
|
|

Fresh-Faced New User
|
Hey all! This is Anvildude, in my new guise as RedIronGames. I'll still be using my other profile for general wargaming discussions, but this profile is for showcasing the work I'm doing for my up-and-coming (hopefully) miniatures business (as well as for any business I do through Dakka).
Without further ado, I present to you my trials and tribulations as I venture out of my comfort zone and into the world of Miniatures Modeling!
Now, I've already done business in the realm of custom scenic bases and casting, (if you want to see some examples, visit my Gallery or contact me) but, to go along with a Steampunk RPG that I'm developing, I am also looking at creating a line of miniatures. I've been an avid follower of RSJake's Female Commissar sculpting blog, and have hopefully taken something away from that- I'm also a student of the Arts currently- but I know that I can still use a lot of work when it comes to sculpting and carving things that are as small as tabletop minis. I saw how much the Dakka blog helped RSJake, and decided that it certainly wouldn't hurt to have one of my own- additionally, I've had people asking to see what I've been up to. And so, the thread you see before you. Let's jump in, then! Any and all comments, criticisms and reactions are welcome, and encouraged.

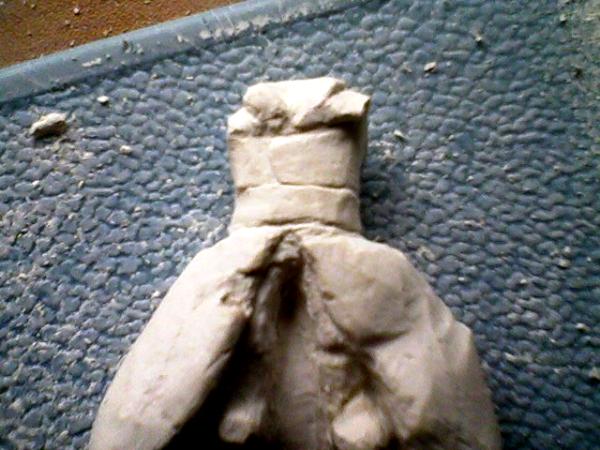
This is my own attempt at a more traditional 'additive' process. As you can see, I haven't gotten very far with it. I'm planning on continuing, but honestly, I have little idea where to go once I get to the boots and such. I'm using Milliput 2-part sculpting clay (or whatever it's called-don't have the box right now) and I'm finding it sticky and hard to work with, with either fingers or tools.
However, as terrible as I am with additive sculpting, I've gotten decently practiced at subtractive sculpture, carving away from materials to create what you want.
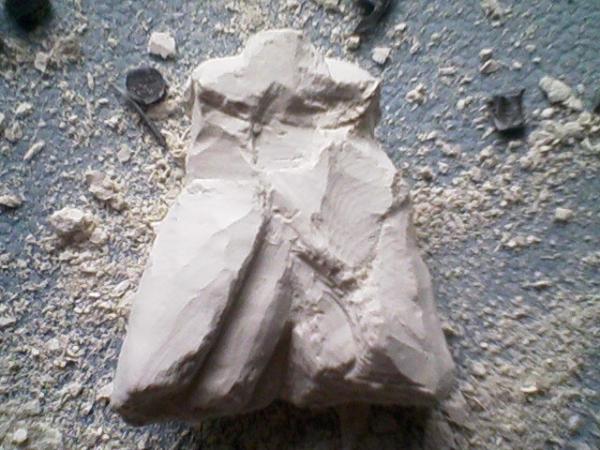
Here you can see what I've done using a dried block of Crayola Air-dry clay (it's cheap and is decently strong and crumble-resistant when it hardens). In case you can't tell from the 3 above images, I'm going for a long coat over a figure standing akimbo (legs apart). This first mini will be male, and all the minis I'll be doing for a while are going to be arm and headless, as I'm planning on having them sold in sections, for ease of conversion and customization- these are meant primarily as RPG minifigs, and I know exactly how frustrating it is when you find that perfect mini to represent your character, only to have them holding entirely the wrong weapon, with incorrect headgear.
|
|
|
|
 |
|
2012/02/01 22:14:37
Subject: Re:Carving Minis for Fun and Profit- the Real Deal
|
|
Frenzied Berserker Terminator
|
Well, you did say you were going slow, but I can see what you are going for! 
Carving is not for me. I've tried in wood and bars of soap, not pretty. You go with what you are comfortable with.
And you said this your first one right? It might turn out you need to scrap it and completely start over. Don't sweat over it. Like you said, it's an inexpensive medium.
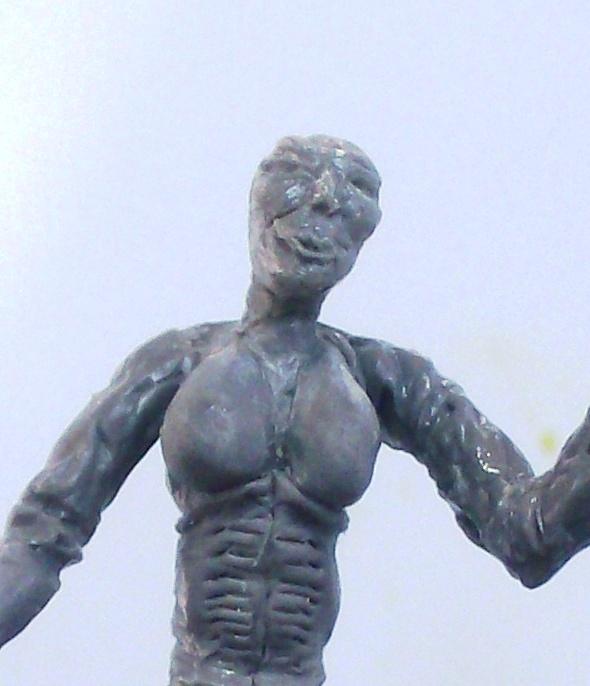
Need I remind you of what my first one started out looking like? *shudder*
Just keep at it. Practice, practice, practice.
And if you get to the point that you don't want to do it...I have some great ideas for a steampunk long coat soldier!  
|
|
This message was edited 1 time. Last update was at 2012/02/01 22:14:59
|
|
|
|
|
2012/02/01 22:26:48
Subject: Carving Minis for Fun and Profit- the Real Deal
|
|

Shroomin Brain Boy
|
ok...this is all very early...ut i wish you all the luck for this new enterprise!
and your first outcome of your fist new personna post is that i got a bit of an eductation from you...'additive' process...and subtractive sculpture...now i am a bit more eductated thank to you...
i am eager to see how this develops... and i too have tried to carve where mere adding didn´t work... tho i want to know... have you tried powertools like a dremel for this line of work? justa mere knife... well you use the tool you are comfortable with...
cheers, vik
|
|
|
|
|
|
2012/02/01 23:16:50
Subject: Carving Minis for Fun and Profit- the Real Deal
|
|
Fresh-Faced New User
|
Oh jeeze... I don't think I have any bits small enough that I could use my Dremel. I might end up doing just that for roughing things out, but I think I'll stick to hand-tools for the small delicate stuff- that piece you see there is only about an inch long.
@Jake- You know, I never thought of using soap for this, I might have to try that! I did soap carving when I was younger, for a school project on "To Kill a Mockingbird", but haven't touched it as a medium since.
|
|
|
|
|
|
2012/02/01 23:18:00
Subject: Re:Carving Minis for Fun and Profit- the Real Deal
|
|
Frenzied Berserker Terminator
|
Just don't get it wet!
|
|
|
|
|
|
2012/02/01 23:22:59
Subject: Carving Minis for Fun and Profit- the Real Deal
|
|
Shroomin Brain Boy
|
well the uneasy thing with a dremel is... you can quickly carve way too much out in a spiltsecond... so i think by hand is for much better control...
|
|
|
|
|
|
2012/02/03 03:16:36
Subject: Re:Carving Minis for Fun and Profit- the Real Deal
|
|
Fresh-Faced New User
|
@ Vik- that is certainly true- also, you have to be careful of the bits, too. I tried using my Dremel once to slice a slab of that clay in half, and the bit broke right off inside it!
@ Jake- For a second there, I thought you were talking about the clay! But then again, might want to get the Soap wet for ease of carving.
Update time!
No pics quite yet, since the weather was somewhat overcast, leaving the lighting sub-par. However, there's not much to say, either. I decided, after comparison with some other models I had, that I'd attempt to shrink it down even further than it was, and after deciding on a final hight, started work on the boots. Did a little belt detailing on some scrap, and I think I'll be able to get the small details pretty well- anything that doesn't work (chips or such) I'll fill in with Green Stuff or my Milliput, or perhaps with some more clay- I'm going to experiment with re-hydrating the stuff.
There will also be some other additions to the blog- While at my FLGS today, it was suggested that I create some terrain objective markers for Flames of War (got a lot of players here), so expect to see some tiny statues, columns and chimneys with tomorrow's picture update!
New favorite tool- needle tool.
|
|
|
|
|
|
2012/02/03 09:14:06
Subject: Carving Minis for Fun and Profit- the Real Deal
|
|
Shroomin Brain Boy
|
sounds good...it is always a good decision to diversify to a certain point... makes you more stable in business...
|
|
|
|
|
|
2012/02/06 17:31:26
Subject: Re:Carving Minis for Fun and Profit- the Real Deal
|
|
Fresh-Faced New User
|
And on that note, here's something for you!
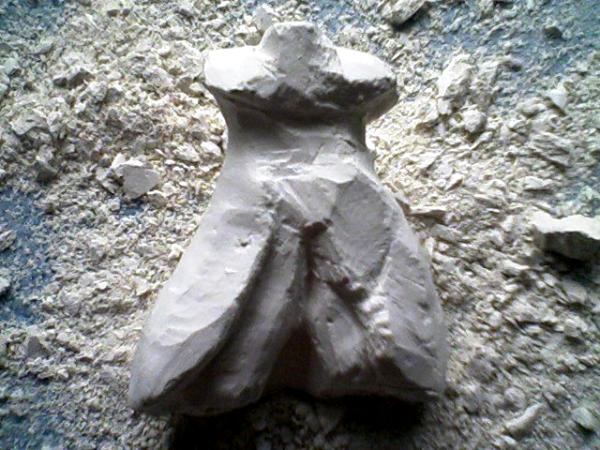
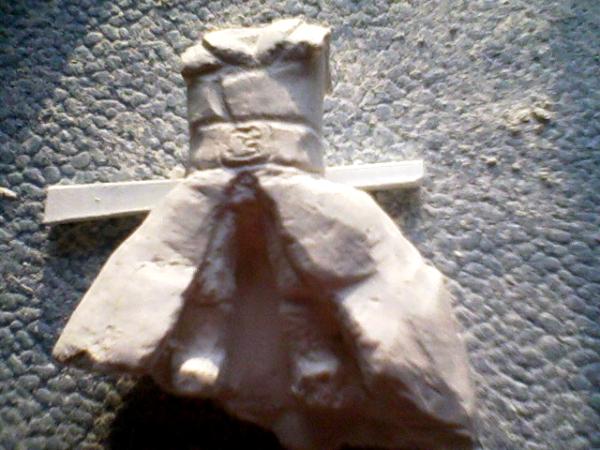
I've not been able to make too much more progress, but I think I've managed to find the correct scale, and I'm starting to add a little detail. Pay no mind to that chip in the coat- it'll get fixed with either putty or a good shaving down.
Again, not the best image, but I'm working with my cell phone here, and it's rather old. As you can see, I'm starting to shape the legs and feet, and putting at least the outlines of the belt and lapel on- this figure is going to be wearing a 'Greatcoat', closed, so there'll be one of those shoulder-pieces, as well as some buttons or clasps along the edge you can see on the chest there, and a rather large belt.
What say you- should I put on pockets on the outside, or not? And is there anything you can see immediately wrong with the proportions? The coat's gonna be trimmed and shaved down considerably- I'm keeping it big right now for structural integrety and a place to grip.
|
|
This message was edited 1 time. Last update was at 2012/02/06 17:32:14
|
|
|
|
|
2012/02/06 17:39:22
Subject: Re:Carving Minis for Fun and Profit- the Real Deal
|
|
Frenzied Berserker Terminator
|
Well, I am the last person to give advise on proportions! But it looks like the legs are a bit short, but it also might be the length of the coat that is throwing the perspective off. You said you were leaving it long for grip, so that might be it.
I think it would be difficult to get the small details with carving, like belt loops and buttons and such, are you going to try that? Or will you use GS to add the small details?
Pockets? I say yes for the troops, not so much for leaders. But it depends on the look you are going for.
Looking good so far.
|
|
|
|
|
|
2012/02/06 18:05:23
Subject: Carving Minis for Fun and Profit- the Real Deal
|
|
Fresh-Faced New User
|
I think you may be right about that- also, looks as though the whole upper torso may be a little large- I'll have to shave it down a bit, I guess.
The minis I'm making will be primarily for an RPG that I'm also developing, so less Troopers and Leaders, and more Characters. The Greatcoat is a specific item, so it'll be consistent across all characters wearing it, while the arms and heads will allow for customization. The minis will be at a scale that they could be used for Wargames, but they'd probably be better suited for Leader types.
Tiny details like buttons and belt loops will be done in GS (if I can get it to behave) or something like Sculpy or even Plasticard shavings. Pockets will be similar, if I don't just carve them from the excess.
|
|
|
|
|
|
2012/02/06 20:52:10
Subject: Carving Minis for Fun and Profit- the Real Deal
|
|
Shroomin Brain Boy
|
for my taste the coat is definatly too wide...and the legs to thin and too short... i understand why you choose to carve rather than build up with GS or other stuff... but a substructure like something resembling my PC robots would help you immensly i think... i don´t want to be the devils advocate here but i think soon the lapels will break off... to make it right it needs to be very thin and this wont stand kidly to carvings... honestly i want to see you make those models and make good progress with the game and the needed minis, but i can´t see this working out the way you want it to do... tho i will cross hard my fingers for you to proove me wrong^^
cheers mate, vik
|
|
|
|
|
|
2012/02/06 21:02:15
Subject: Carving Minis for Fun and Profit- the Real Deal
|
|
Fresh-Faced New User
|
Oh, it's certainly going to be difficult. I'm just gonna take it slow, see if I can't get it there- this stuff is surprisingly strong, so if I just scrape or sand, I should be fine.
However, if the 'lapels' do become an issue, I'll just carve them off and put a thin GS sheet over instead, or do it with uncovered shoulders. Might do that regardless, as the design could look better that way.
|
|
|
|
|
|
2012/02/06 21:39:43
Subject: Carving Minis for Fun and Profit- the Real Deal
|
|
Shroomin Brain Boy
|
by the way... have you been looking into my thread recently? the robot kit... i guess it will be finished by the end of the week as promised^^
|
|
|
|
|
|
2012/02/09 00:59:02
Subject: Re:Carving Minis for Fun and Profit- the Real Deal
|
|
Fresh-Faced New User
|
I have. I await with eager breath.
And now, for an update!
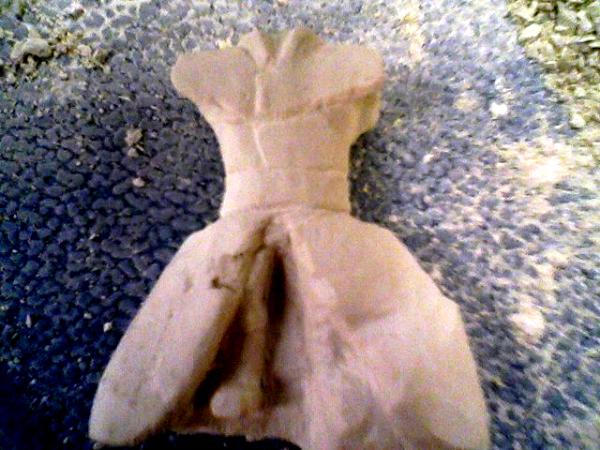
I'm hoping that shaving the shoulders down has fixed most of the sizing issue. I've decided that I'll keep the extra shoulder fabric very small and close- the one side I'm actually going to have to fix a little, but that's not too big a deal, I think. You can see I've been working on the other leg as well- it's actually more done than that- this picture is a day or two old.
I'm coming up on that point where the rough-work is done, and I'll have to start detailing things. I just hope I can get the detail right at that scale, is all.
|
|
|
|
|
|
2012/02/09 08:37:54
Subject: Carving Minis for Fun and Profit- the Real Deal
|
|
Shroomin Brain Boy
|
will you carve the greatcloak more? i can see it could look like billowing around in a strong gale for extra dramatic effect tho^^
and yep, on that scale details are a tough nut!
as for the robot kit... how many parts would you want to see in the kit? alternative boilers, heads and torso? how many arms and legs?
|
|
|
|
|
|
2012/02/12 21:47:14
Subject: Re:Carving Minis for Fun and Profit- the Real Deal
|
|
Fresh-Faced New User
|
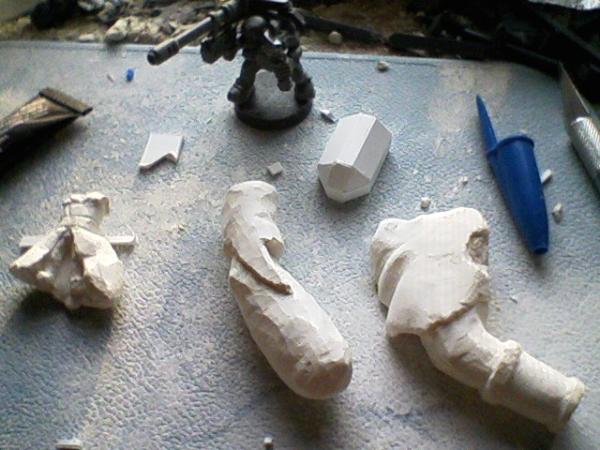
Another Update! This is actually a couple days old, just didn't get around to uploading it till now. More work on the mini- it's properly called an Engineer's Torso, as that's the specific class this is meant for (not preventing you from using it for other things, of course!). I've started on some of the finest details- the belt buckle and collar, and I've started trimming the bottom back- when it's done, it should hang about at the ankles, I think. Also working more on the other foot and leg. I actually broke the toe off, but that may have been for the best, and I'll use GS to replace it. I've done more work since, on the lapels and making the buckle look right, as well.
And here's something special! These are two arms that I'm creating for my 'Make your own Giant' Kit. The one with the cloth is pretty much finished, and the other is still in the process of being carved- it wasn't completely hardened when I started, so I'm waiting to do the closer detail. As you can see, these are rather large, and really aren't the best for Wargaming- at least not at the 28mm scale or smaller, though I do plan on using the completed products in my own Heirotitan for Fantasy (it has no proper scale or kit, so I figure why not), and of course it'll work fine for RPG monsters, as there are those in classes that make them that large comparatively. I'll also be making smaller versions of this, more suitable for 28mm scale.
The boxy bit is my first foray into Plasticard. I'm making a little Steampunk mechanical Spider- either ridden or not- and that's going to be the bottom of the abdomen. To come is the other end's slant and connection point, legs, boiler and piston, as well as the thorax and cockpit. It'll be very, very small as well, suitable either as a larger model in 28mm (in that it'll use a 40mm base or so) or as an enemy or ally in RPGs. I'm hoping to add enough detail and character that it'd be an interesting model just to have, as well. In the top you can see one of my Lootas, too.
|
|
|
|
|
|
2012/02/12 22:19:25
Subject: Carving Minis for Fun and Profit- the Real Deal
|
|
Shroomin Brain Boy
|
ok...the torso is now taking quite a god shape! a rather great development going on there...
the belt buckle looks like a dragon to me?
and the legs are now way more convincing too...
seing the arms and the spider thingy... i think you are close to filing and sanding now... seems a huge model on either acount but i am very interested in seeing how these turn out!
good luck!
|
|
|
|
|
|
2012/02/14 03:03:59
Subject: Carving Minis for Fun and Profit- the Real Deal
|
|
Fresh-Faced New User
|
Yeah, the Giant's gonna be HUGE. That's why I'm also making a smaller one- but I hope this bigger one will be interesting to buyers as well.
Thank you for the compliments on the torso! It's even further along now, and I expect I'll be ready to put it in the mold soon!
|
|
|
|
|
|
2012/02/14 04:13:51
Subject: Carving Minis for Fun and Profit- the Real Deal
|
|
Lustful Cultist of Slaanesh
|
I must say I do like some of the sculptures bro! You should show em to me in real life sometime! This is gateway Nate btw
|
Heavy Bolter: 36" 5 4 Heavy 3- Do not disturb
 2500pts~ Mentors Legion 2500pts~ Mentors Legion
 1500pts~ Rouge guard 1500pts~ Rouge guard
  3500pts~ Ultramarines' Fallen 8th Assault Company, Now with Nurgle like Space Wolves!! 3500pts~ Ultramarines' Fallen 8th Assault Company, Now with Nurgle like Space Wolves!! 
 2500+pts~ 2500+pts~
|
|
|
|
|
2012/02/14 08:10:24
Subject: Carving Minis for Fun and Profit- the Real Deal
|
|
Shroomin Brain Boy
|
mate we need more pics before you go to press^^
|
|
|
|
|
|
2012/02/24 06:24:00
Subject: Re:Carving Minis for Fun and Profit- the Real Deal
|
|
Fresh-Faced New User
|
More updates! It may seem as though I'm slowing down a bit, but in reality I'm speeding up (or at least working at the same pace, though off camera).
Without further ado, I present the Scorpion Tomb abdomen, the rough-hewn torso of the Giant, the other arm, and the Tomb Scarab!
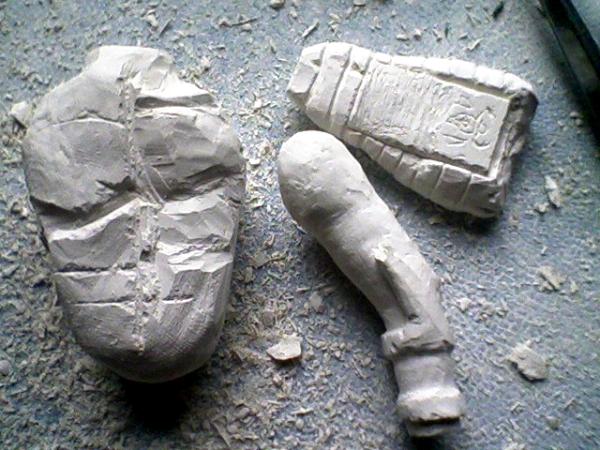
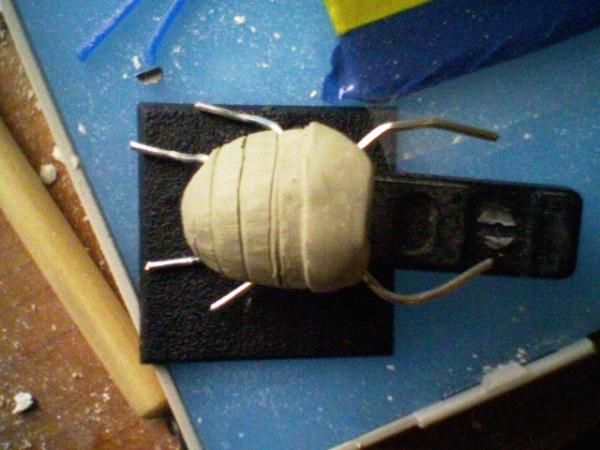
The Scarab is on a 40mm base, and is being done by the request of LordJackal on the Khemri Forums- though it's open for sale to anybody, and indeed already has quite a lot of interest on those forums. It is of course still a Work In Progress- what you see here is minus a head, legs (more than the armature anyways), wings and/or wing cases.
The Scorpion Tomb (see what I did there?) is meant as either a replacement for the current GW model for those that don't like it, or as simply a generic giant Egyptian scorpion construct with a sarcophagus on its back.
And of course, the mix-n'-match Giant kit is gaining more pieces all the time. They'll be available in themed packages allowing you to create a single Giant, or singly, for when you just don't want to bother sculpting a torso or legs.
|
|
This message was edited 1 time. Last update was at 2012/02/24 06:25:04
|
|
|
|
|
2012/02/24 09:52:04
Subject: Carving Minis for Fun and Profit- the Real Deal
|
|
Shroomin Brain Boy
|
the upper right pice is the scorpion tomb abdomen? interesting... but needs maybe some parts for sizecomparrision?
|
|
|
|
|
|
2012/02/24 22:09:48
Subject: Re:Carving Minis for Fun and Profit- the Real Deal
|
|
Frenzied Berserker Terminator
|
I found some stuff you might find interesting. I think it's interesting! I might use it myself.
http://www.sculpt.com/catalog_98/CastingMaterials/HydroShrink.htm
It's HydroShrink: Basically, you can sculpt a model that is twice the size that you want to end up with, if it's bigger, you can add more detail to it. Then, make a mold of it, use this HydroShrink, and the material will shrink 51%! (kind of a random number, but whatever.) Then you can make a mold of the shrunken piece, and make copies from that!
There is also something out there that does the opposite! Not that we would use it, but using the same process, the material increses 6 times the origianl's size!
I've been in the "Google" zone today!
Anyway, what you have is coming along well! I myself have been too busy to do much, and this weekend isn't looking much better. *sigh*
|
|
|
|
|
|
2012/02/24 22:21:35
Subject: Carving Minis for Fun and Profit- the Real Deal
|
|
Shroomin Brain Boy
|
that sounds like a miracelous material... and the smaller package is about one litre...is that pricey stuff or is it an acceptable price? i have no clue...
|
|
|
|
|
|
2012/02/24 22:30:31
Subject: Re:Carving Minis for Fun and Profit- the Real Deal
|
|
Frenzied Berserker Terminator
|
It's pricey, I'm sure it's a good deal though. Unless you have a huge range of minis to make even smaller. I really don't know, but since it's the only thing like this I have found...I guess it's this or nothing.
I have been thinking of using this to make large skulls, and then reduce them to 28mm scale.
|
|
|
|
|
|
2012/02/24 22:57:01
Subject: Carving Minis for Fun and Profit- the Real Deal
|
|
Shroomin Brain Boy
|
that could be a good idea... and if you used dark arts of some other fellas stuff you could get still away with it as it is a new scale then... like using a playmobil skull...and after the shrinking...28mm heroic scale...
|
|
|
|
|
|
2012/02/25 05:47:43
Subject: Carving Minis for Fun and Profit- the Real Deal
|
|
Liche Priest Hierophant
|
Heh. Get an actual full-sized skull, and keep using the stuff until you've got one of the proper size. Perfect detail!
|
GENERATION 8: The first time you see this, copy and paste it into your sig and add 1 to the number after generation. Consider it a social experiment.
If yer an Ork, why dont ya WAAAGH!!
M.A.V.- if you liked ChromeHounds, drop by the site and give it a go. Or check out my M.A.V. Oneshots videos on YouTube! |
|
|
|
|
2012/02/25 12:54:59
Subject: Carving Minis for Fun and Profit- the Real Deal
|
|
Shroomin Brain Boy
|
so you are now off to get your shovel?^^
|
|
|
|
|
|
2012/02/25 13:18:00
Subject: Carving Minis for Fun and Profit- the Real Deal
|
|

Power-Hungry Cultist of Tzeentch
|
This is looking promising. So will these be IG size or Bigger/Smaller?? Hope you keep going with this!
|
 Imperial Guard 500+ pts Imperial Guard 500+ pts
 Space Marine 3000 or so pts Space Marine 3000 or so pts
  Chaos Space Marine 1000 pts Chaos Space Marine 1000 pts
  Dark Angles (White Scars successor) Dark Angles (White Scars successor)
P&M Blog - New and possibly better! With more updates (I hope)
http://www.dakkadakka.com/dakkaforum/posts/list/534002.page
|
|
|
|
|
|
|