| Author |
Message |
 |
|
|
|
|
Advert
|
Forum adverts like this one are shown to any user who is not logged in. Join us by filling out a tiny 3 field form and you will get your own, free, dakka user account which gives a good range of benefits to you:
- No adverts like this in the forums anymore.
- Times and dates in your local timezone.
- Full tracking of what you have read so you can skip to your first unread post, easily see what has changed since you last logged in, and easily see what is new at a glance.
- Email notifications for threads you want to watch closely.
- Being a part of the oldest wargaming community on the net.
If you are already a member then feel free to login now. |
|
 |
2018/11/03 18:13:49
Subject: Re:Battle Brush Studios' Commission Painting Log - Massive update! 40k, WHFB, Historicals, Infinity, ..
|
|

Buttons Should Be Brass, Not Gold!
|
@Dysartes: Yikes, thanks for the heads up. Fixed them now.
@Commander Cain: Thanks very much! The flags make the whole thing.  I love historical wargaming. Changed the whole way I view miniaturre gaming and made me enjoy it again.
Right, what's ALMOST as good as being at CRISIS or actually playing wargames, just quieter, less fun and a bit sad? Getting out all the things you'd usually use for it and make some army shots! 
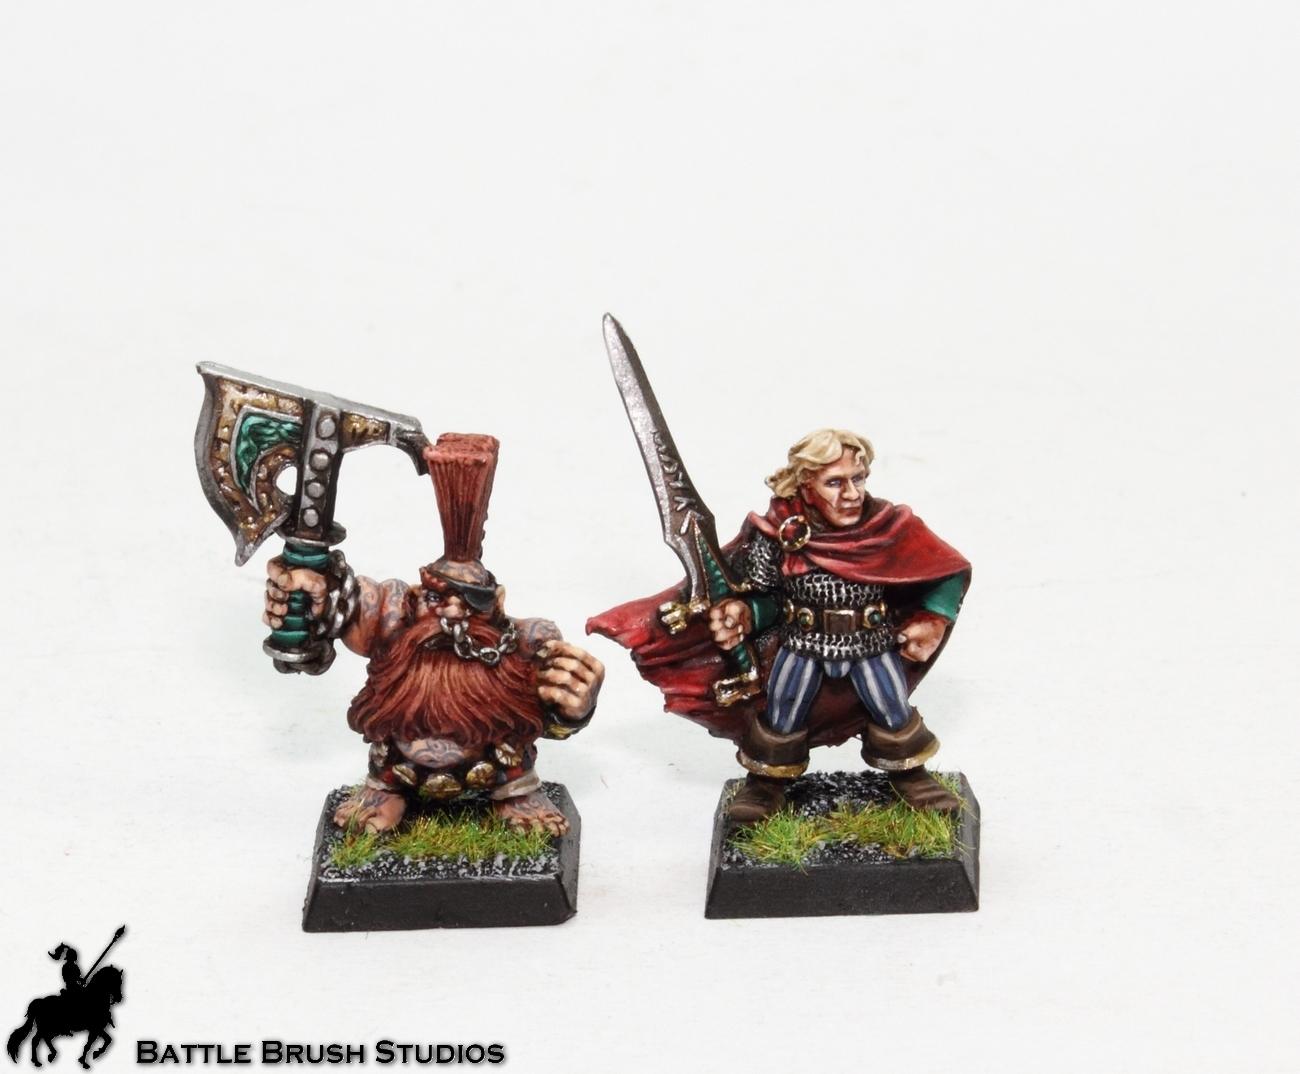
Saxons, led by the king:
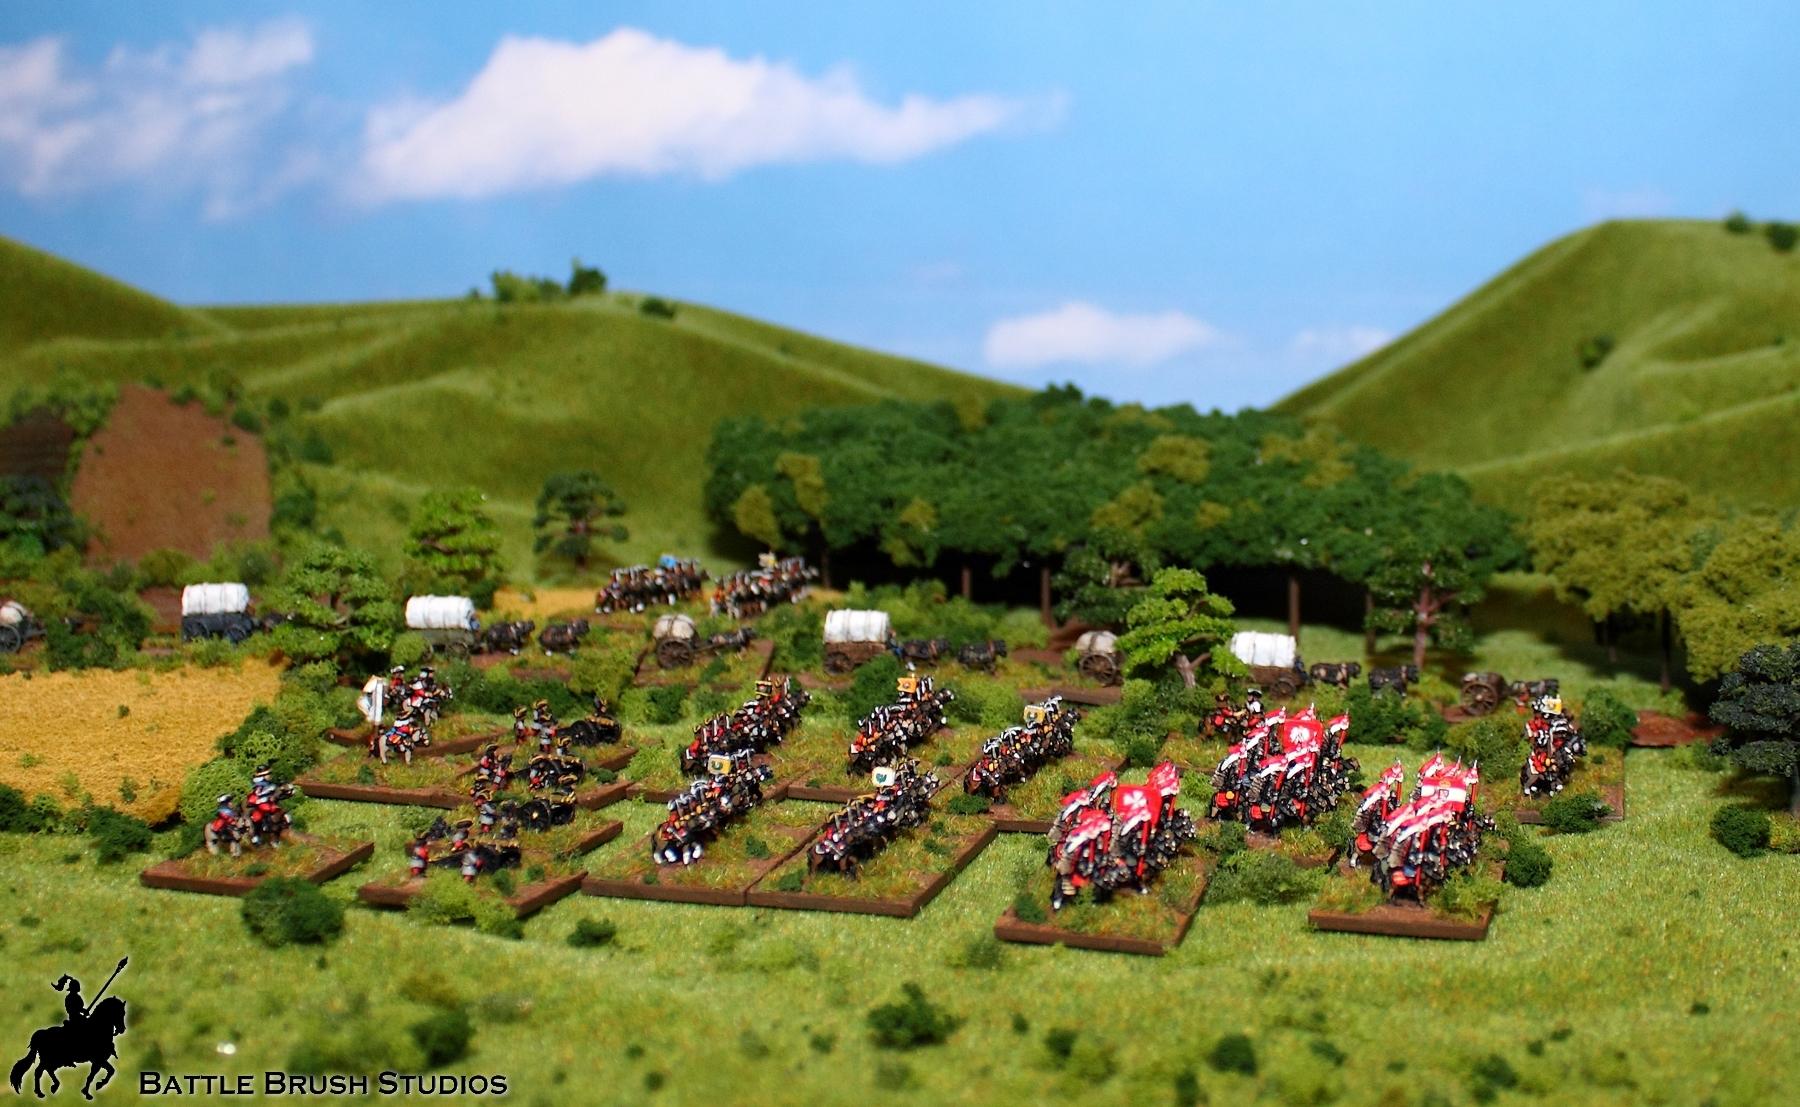
Polish and Swedish cavalry are storming towards each other, Saxon cavalry in the back is bewildered and caracoles on.
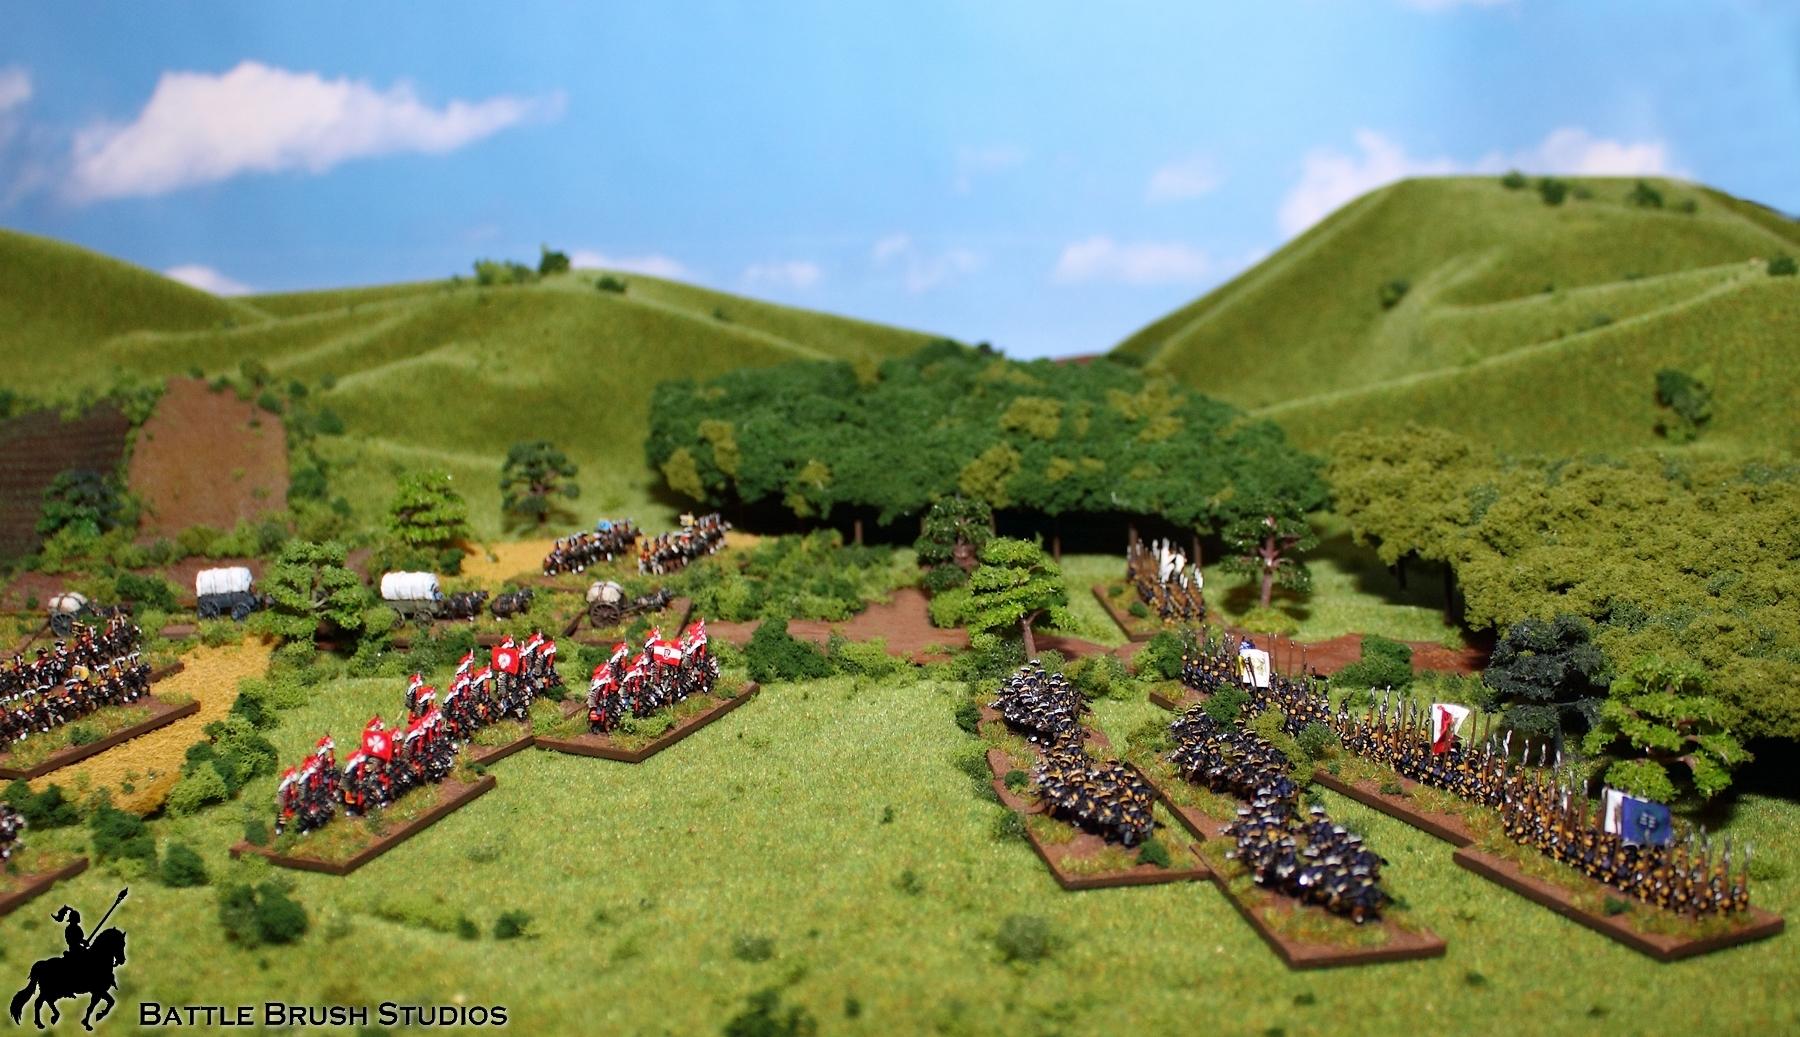
Swedish reinforcements, led by the king:

Russian reinforcements, led by the Tsar:
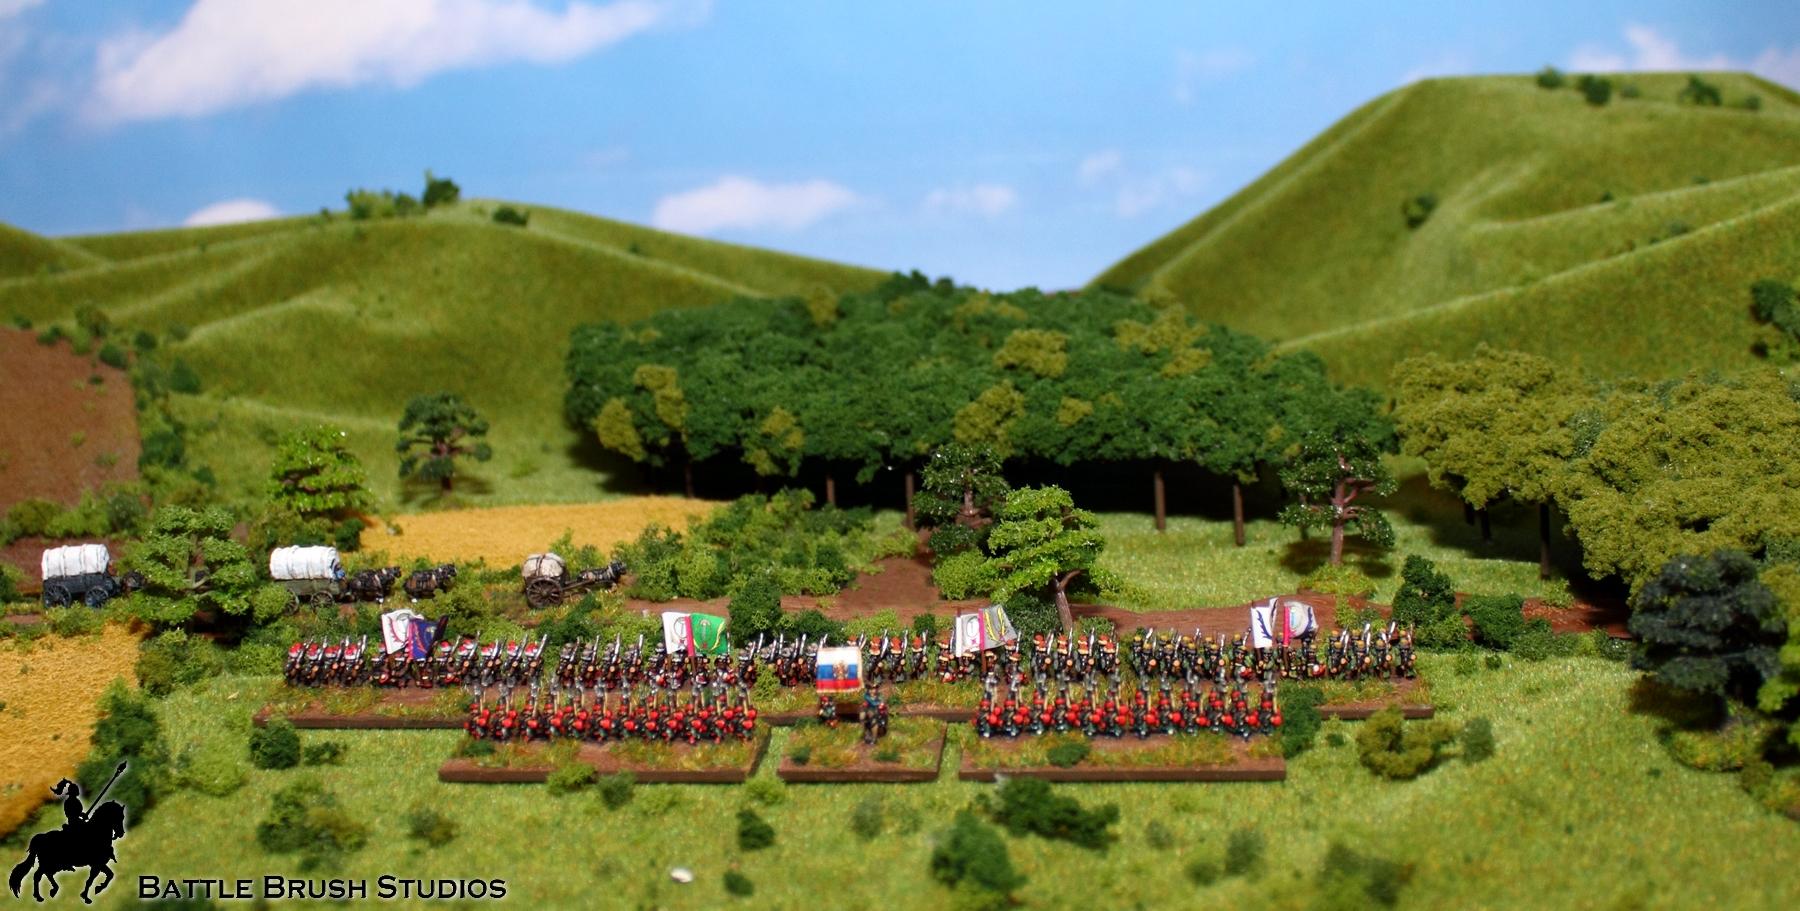
Right, that's that for this project (until further notice). Hope you like the figures and scenery! If you would like to have a similar looking army - you know where to find me.
|
|
|
|
2018/11/05 14:10:49
Subject: Re:Battle Brush Studios' Commission Painting Log - Massive update! 40k, WHFB, Historicals, Infinity, ..
|
|
Buttons Should Be Brass, Not Gold!
|
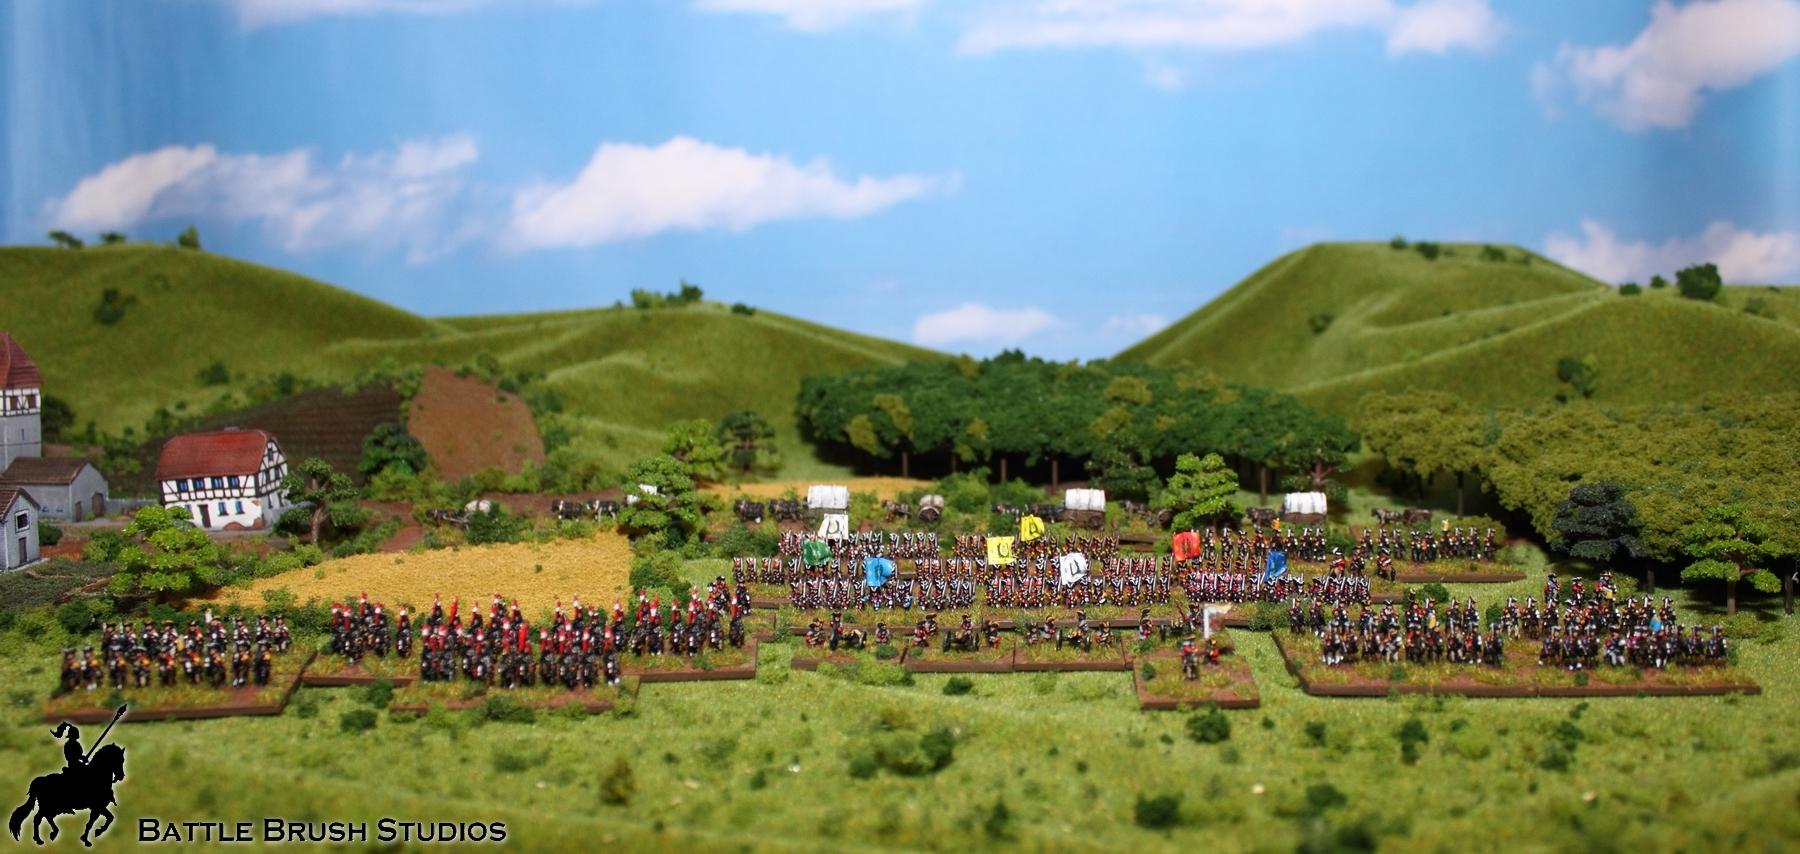
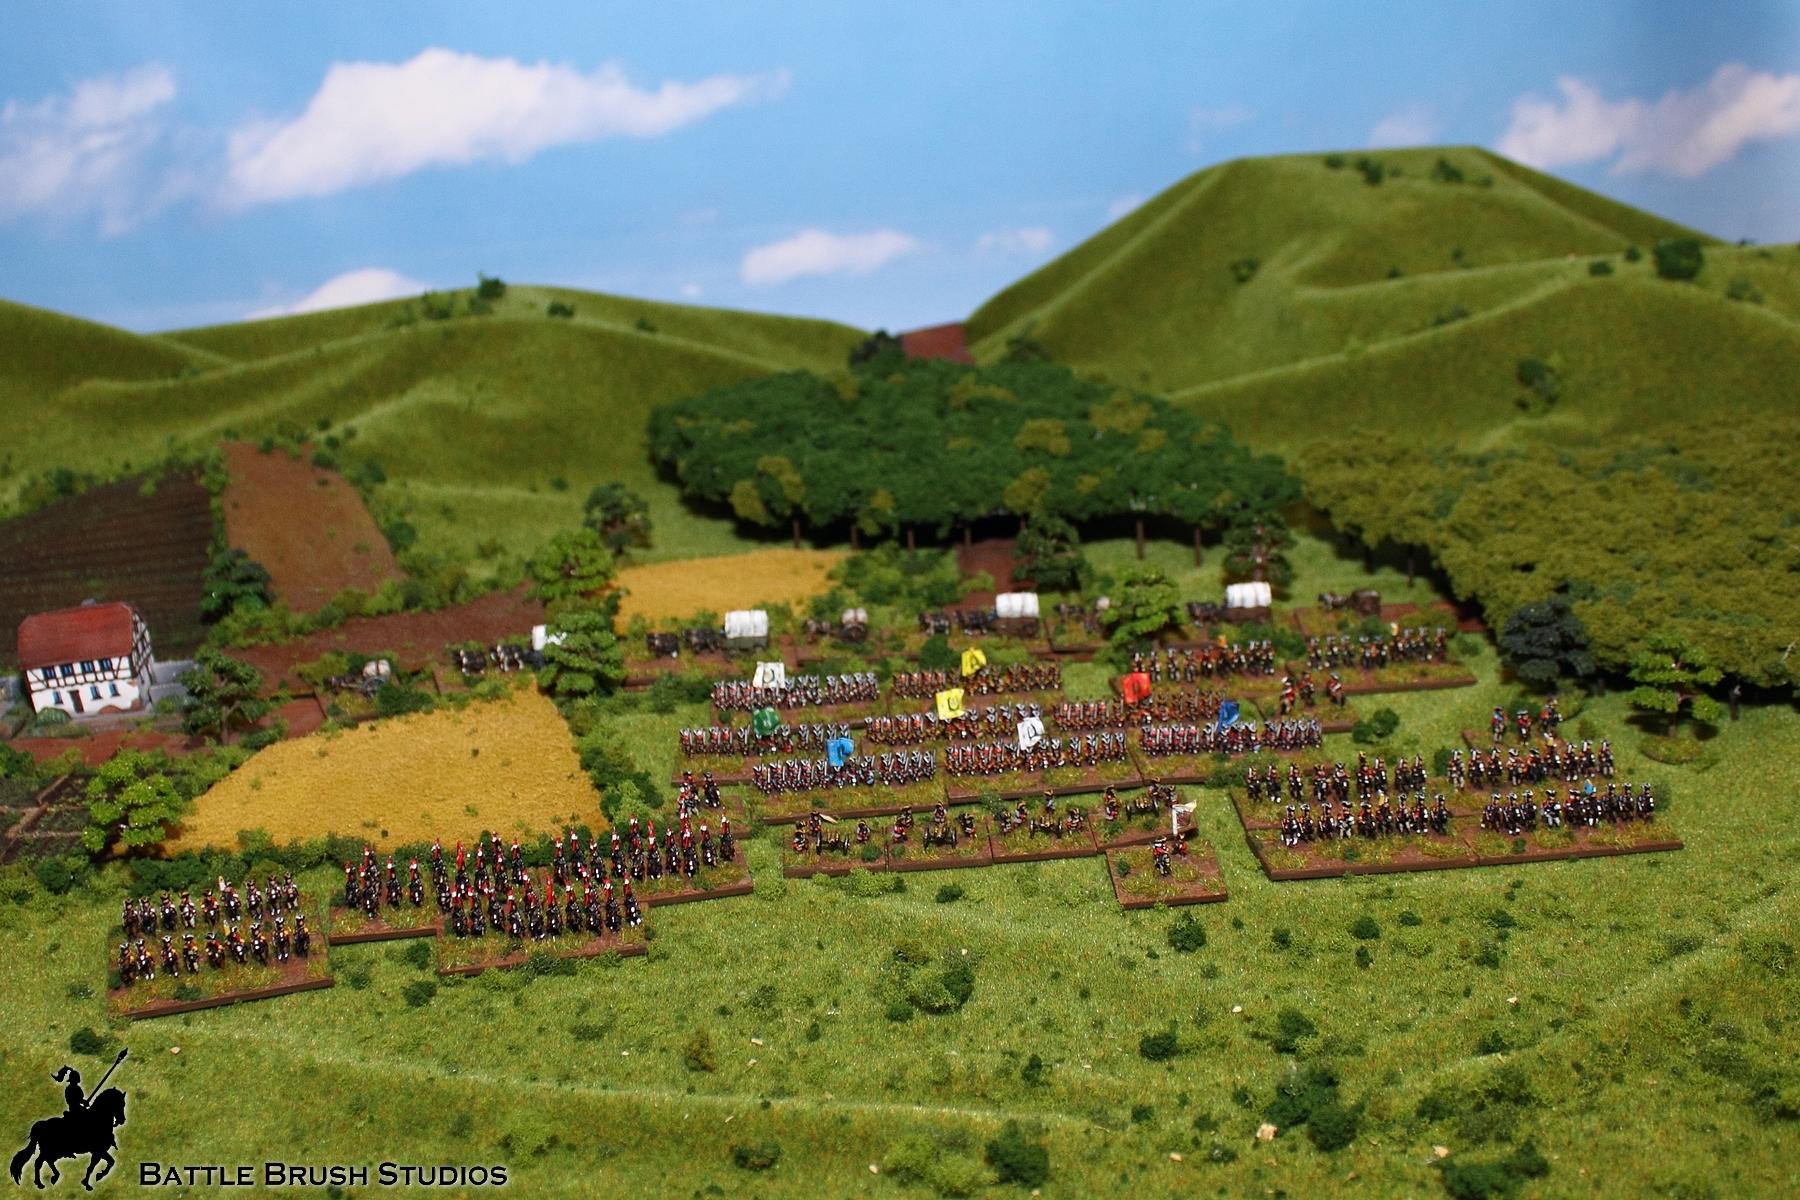
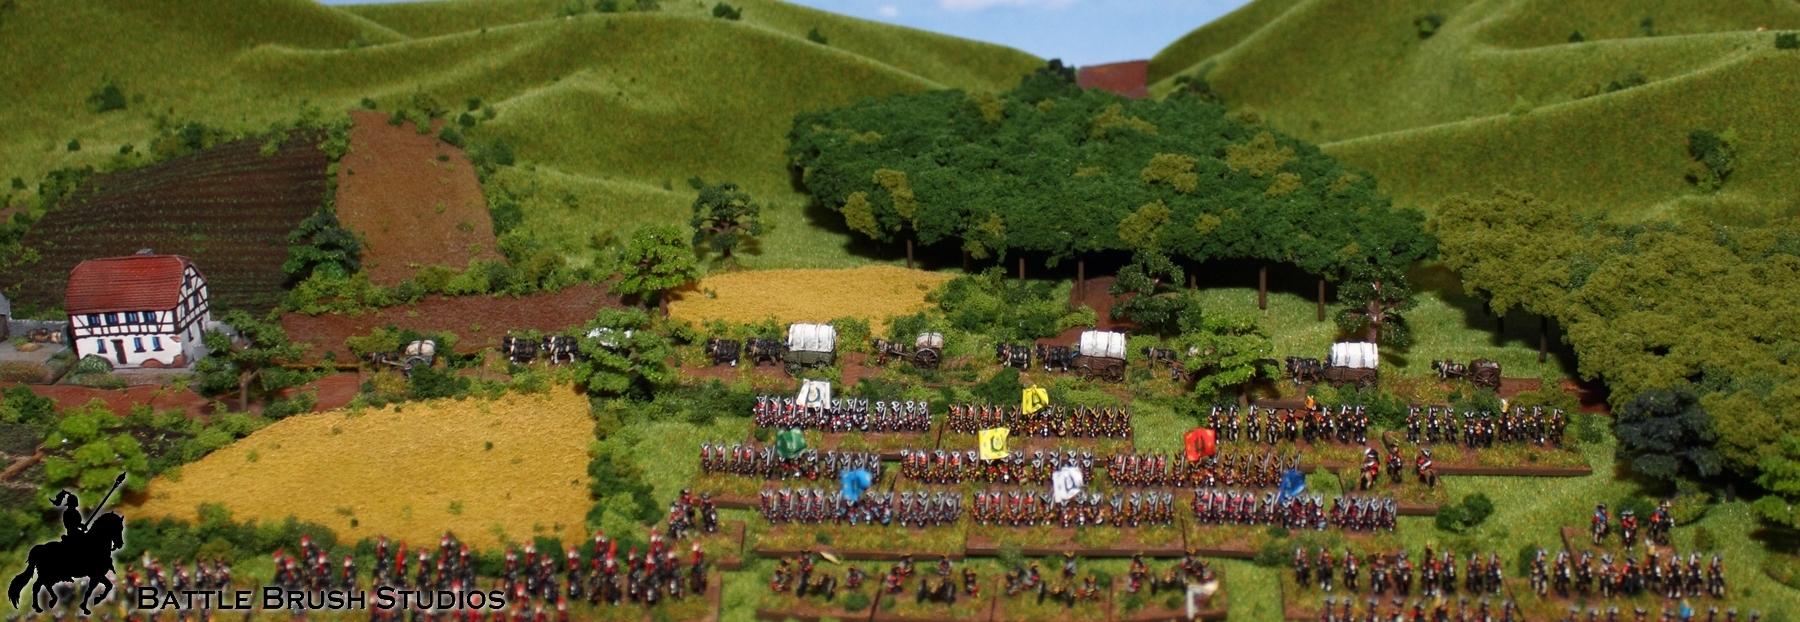
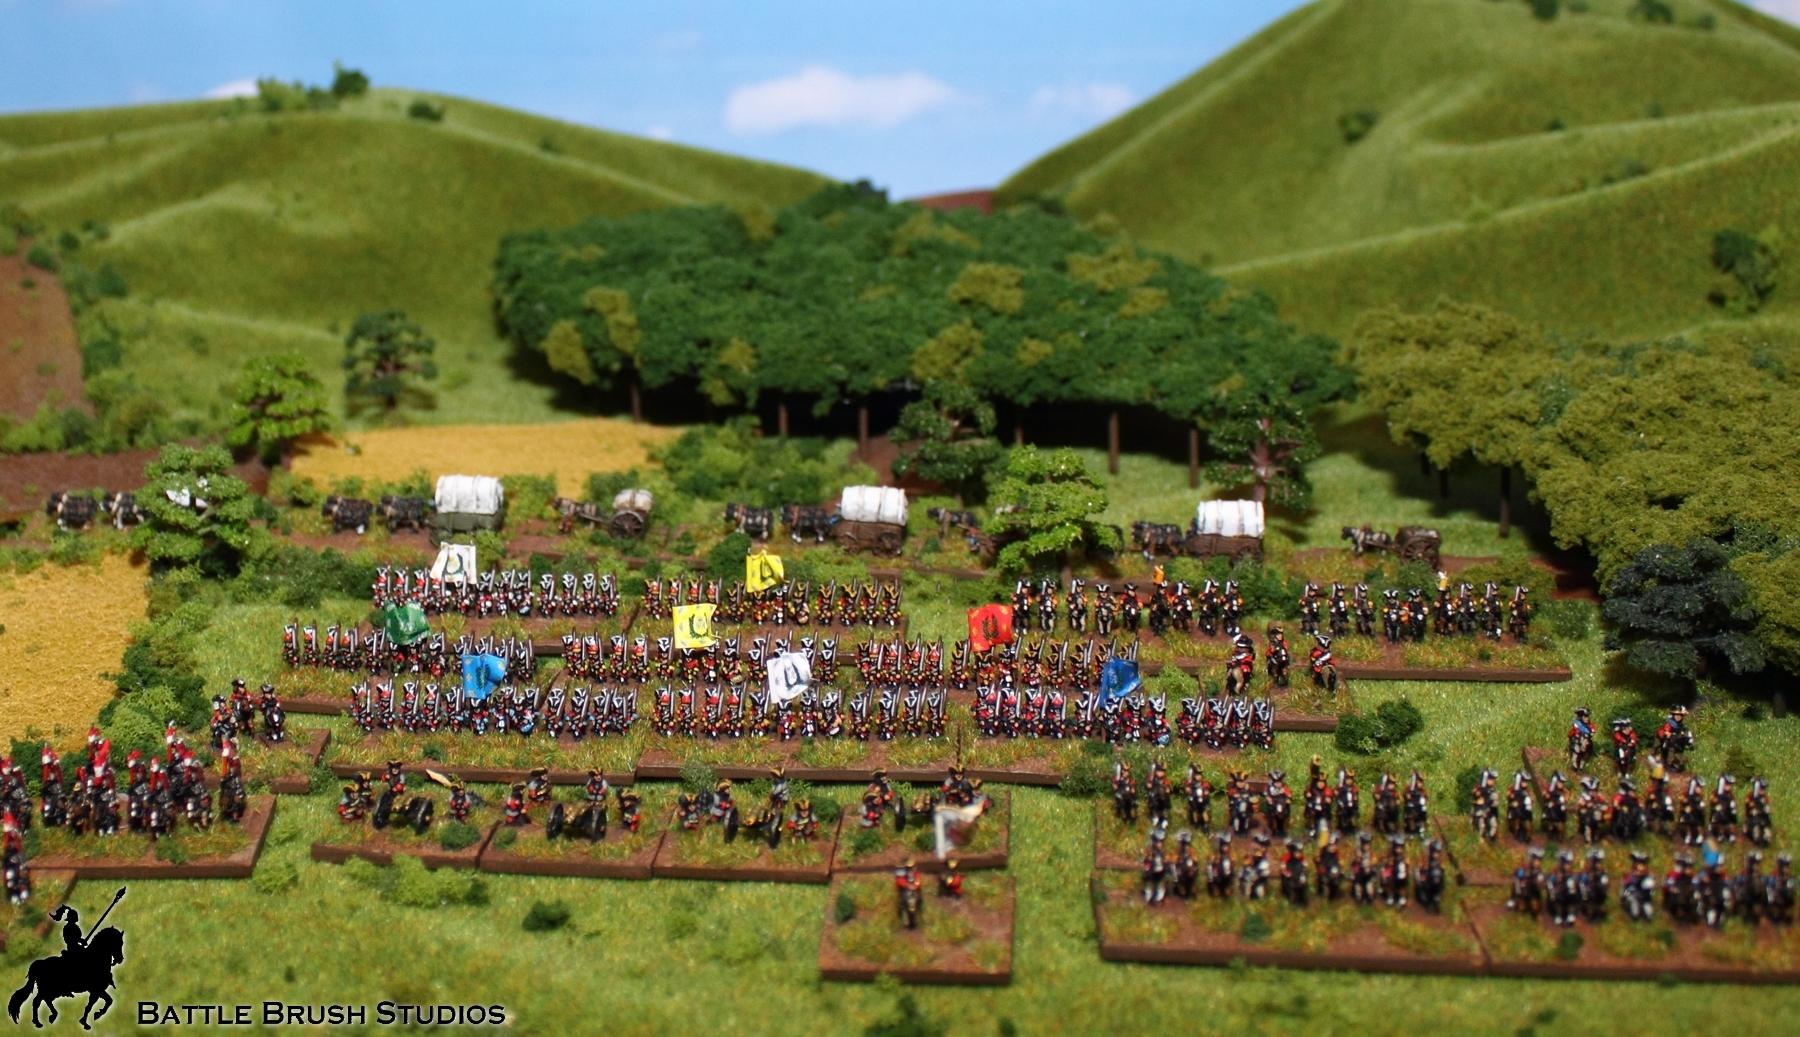
Right-o, peeps. I had all the 6mm terrain set up for a photoshoot already, so I thought it's a nice occasion to put the 6mm Napoleonics I have so far painted on the table. For the first time ever - all my Nappy stuff!
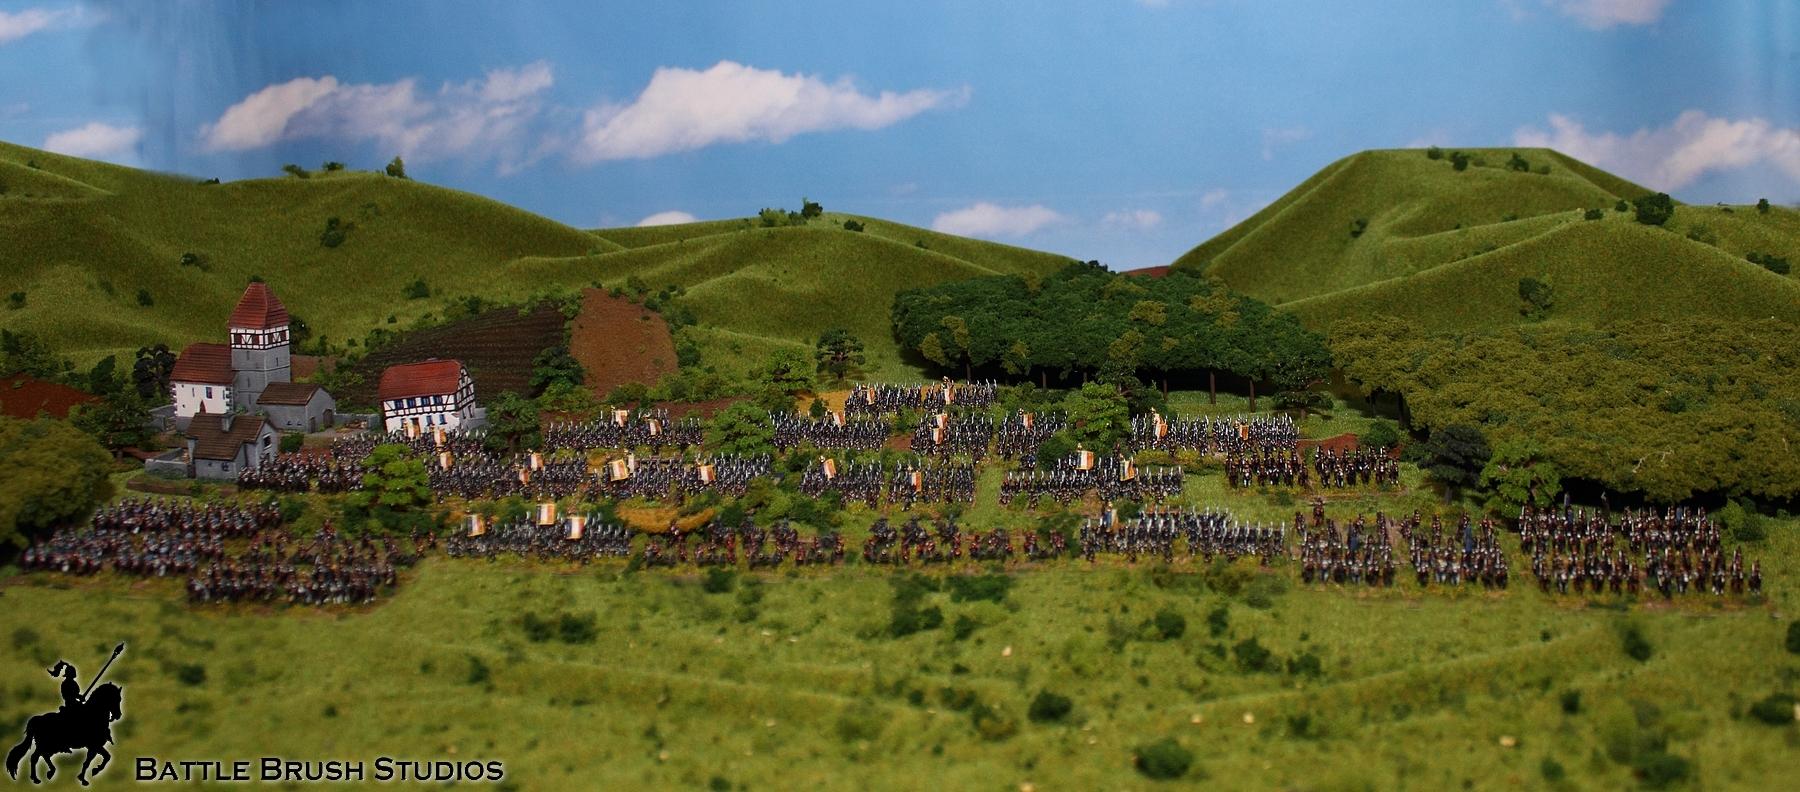
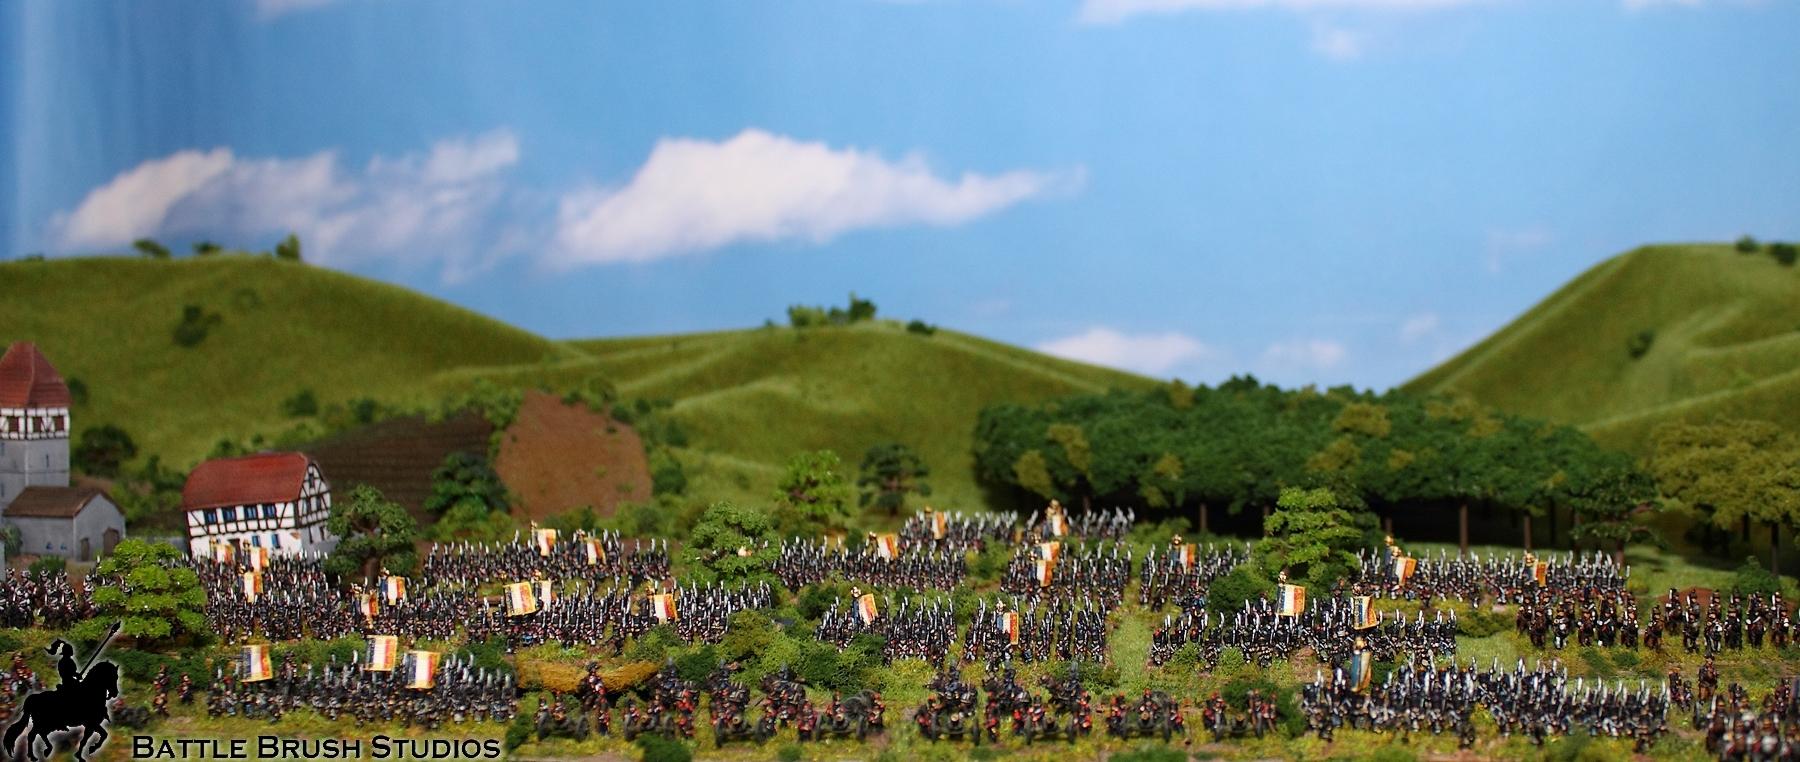
Unshoop'd:
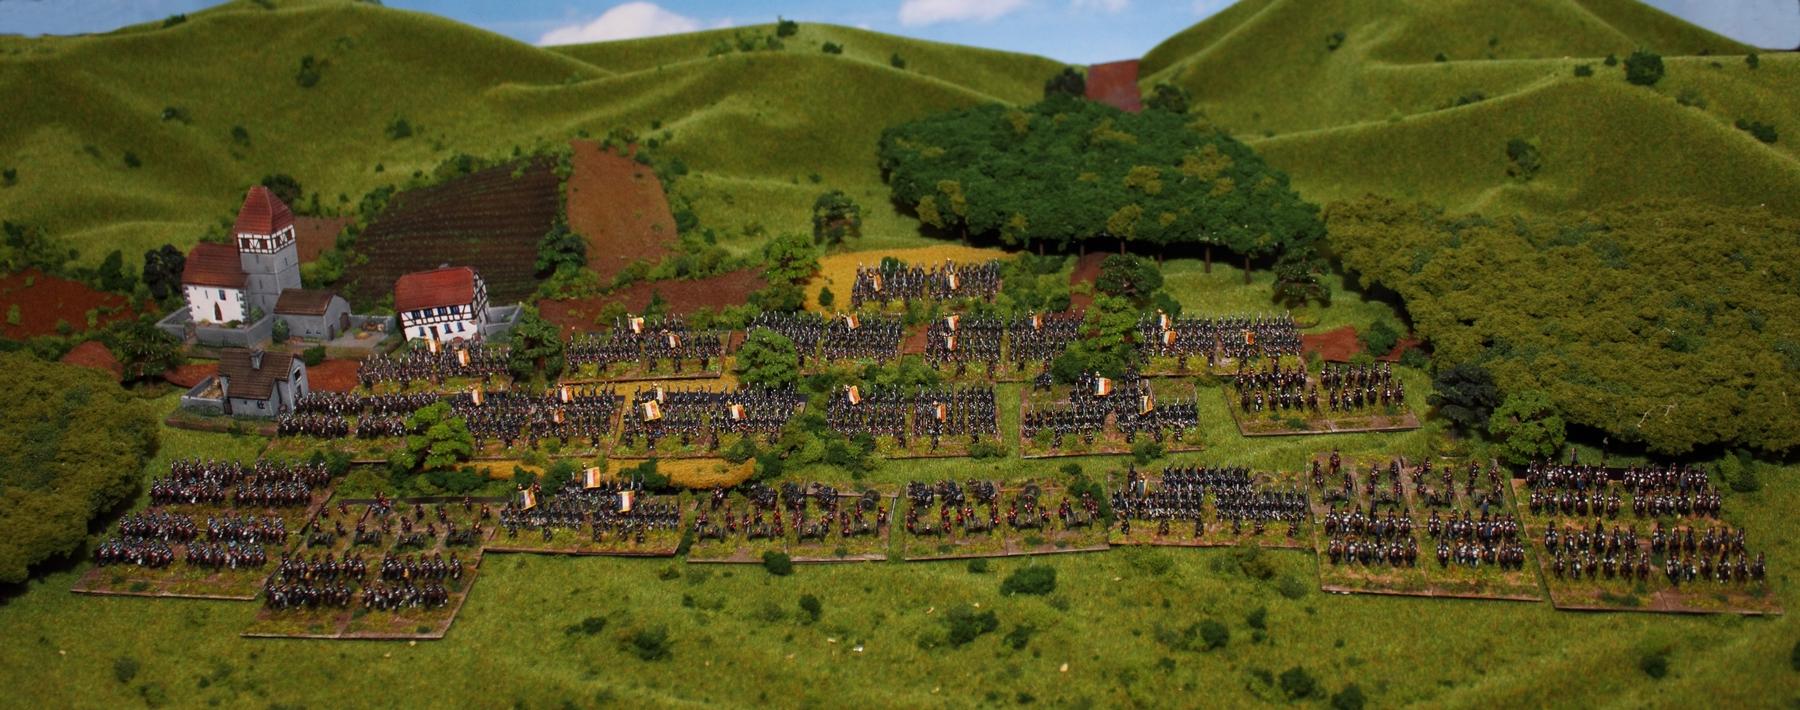
Hope you like them!
|
|
|
|
2018/11/13 23:18:55
Subject: Re:Battle Brush Studios' Commission Painting Log - Massive update! 40k, WHFB, Historicals, Infinity, ..
|
|
Buttons Should Be Brass, Not Gold!
|
@Captain Brown: Thanks very much once more, Sir!
@Dr H: Cheers. Just glad the little Nappy chaps made it on the table for once.
Right, people. It's been a bit quiet in here for the past days because I had to prepare for a show (the annual fall show VIVAT).
Here's my report of the day:
https://www.battlebrushstudios.com/2018/11/show-report-vivat-2018.html
...for the show I also made a thing:
Apart from that I'm currently working on odds and ends, which is horribly time-consuming for relatively little "reward". But that's what I do, I guess. 

A 6-pdr gun to add to the WW2 paras I did in early 2017. The same gentleman I do these for also gave me this 28mm figure of the Earl of Uxbridge at Waterloo (the dude on the horse). Very interesting figure. Horse and rider are cast in one piece. He looks a smidgeon small for 28mm. The casting quality is excellent. This one's from a range of limited editions of historical figures (with a HEAVY British slant) released by Wargames Illustrated.
Then there's a single Infinity figure I'm doing for another customer; the 3rd Highlanders Grey Rifles dude (the LMG version).
Last but not least there's the big dude in the back. a 1/9th bust of a Polish Lancer of the Imperial Guard. I started painting this guy and I wonder if I'll ever find time to proceed painting him.
|
|
|
|
2018/11/15 14:19:51
Subject: Re:Battle Brush Studios' Commission Painting Log - Massive update! 40k, WHFB, Historicals, Infinity, ..
|
|
Buttons Should Be Brass, Not Gold!
|
@Camkierhi: Thanks very much; always great to see people enjoying the reports of our little wargames shows.
@Gitsplitta: Thank you. Yes, it was. Quite relaxed. Very November-y and calm, but a great show once again.
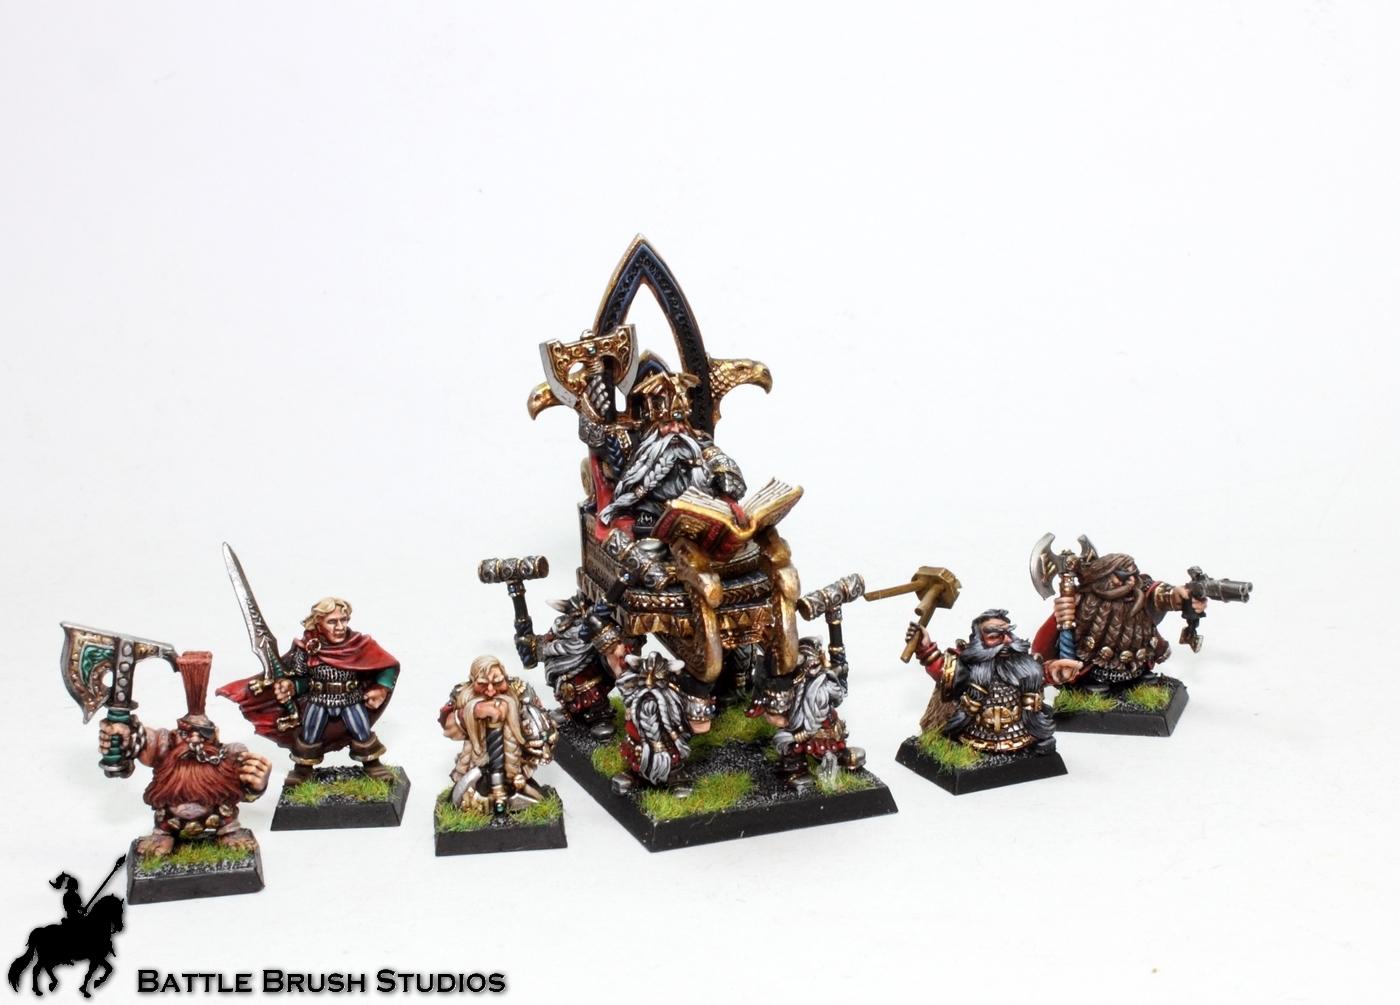
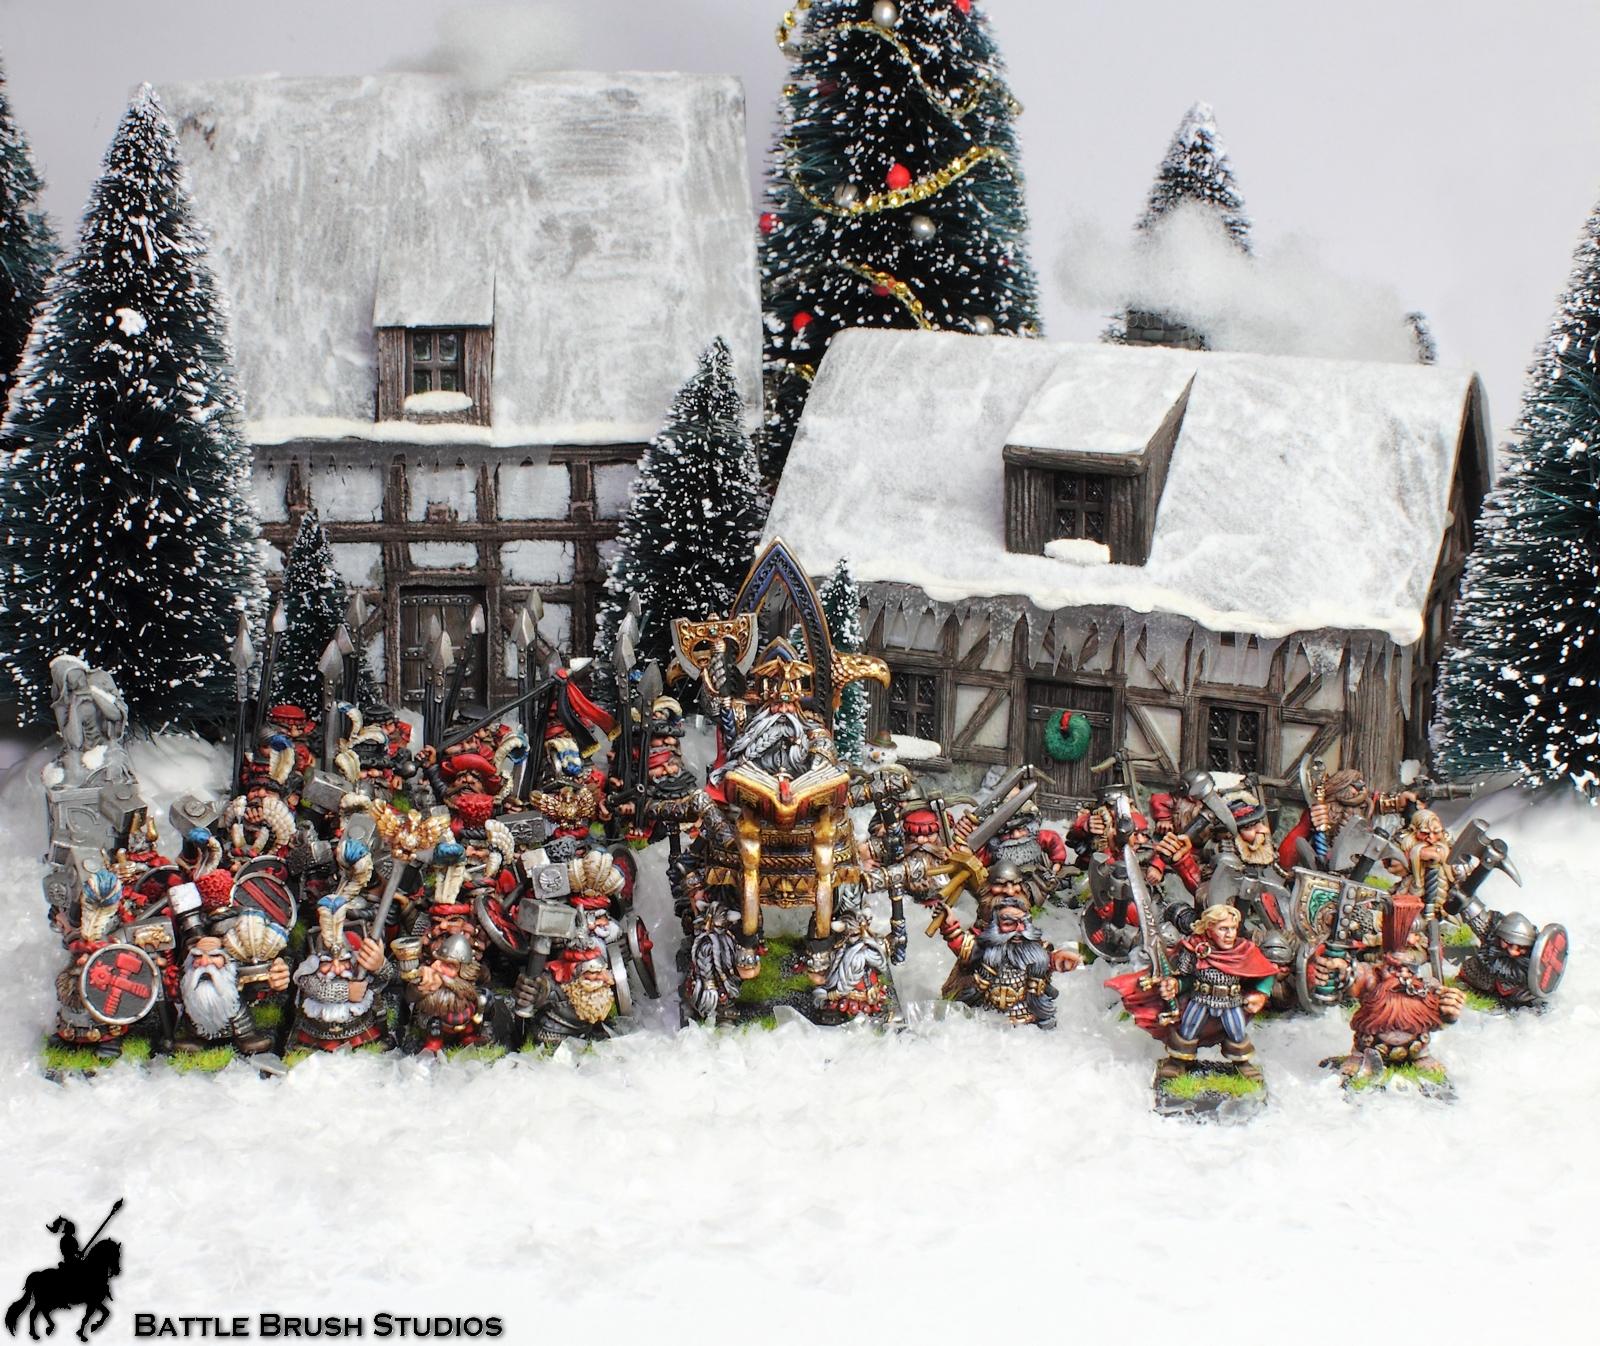
Right, time for a new Fantasy project. A few weeks ago I was sent a box full of Marauder Dwarfs. Im not big on Dwarfs (ha!), but I know that these are the prettiest Dwarfs out there. Lovely, lovely sculpts with a lot of "character", the right amount of armour and beard, and .. just look at them! You gotta love'em.

These are to be added to an existing army and thus I not only have the colour scheme set, but also a style I'll have to try to emulate, while making them look pretty in my view as well. Always tricky.
So I cleaned the little guys and did some dry-fitting with bases. While doing so I realized that I hadn't done this fiddly "do I put this one on a horizontally or diagonally slotted base so he'll rank up with the rest of the unit?" business in quite a while.
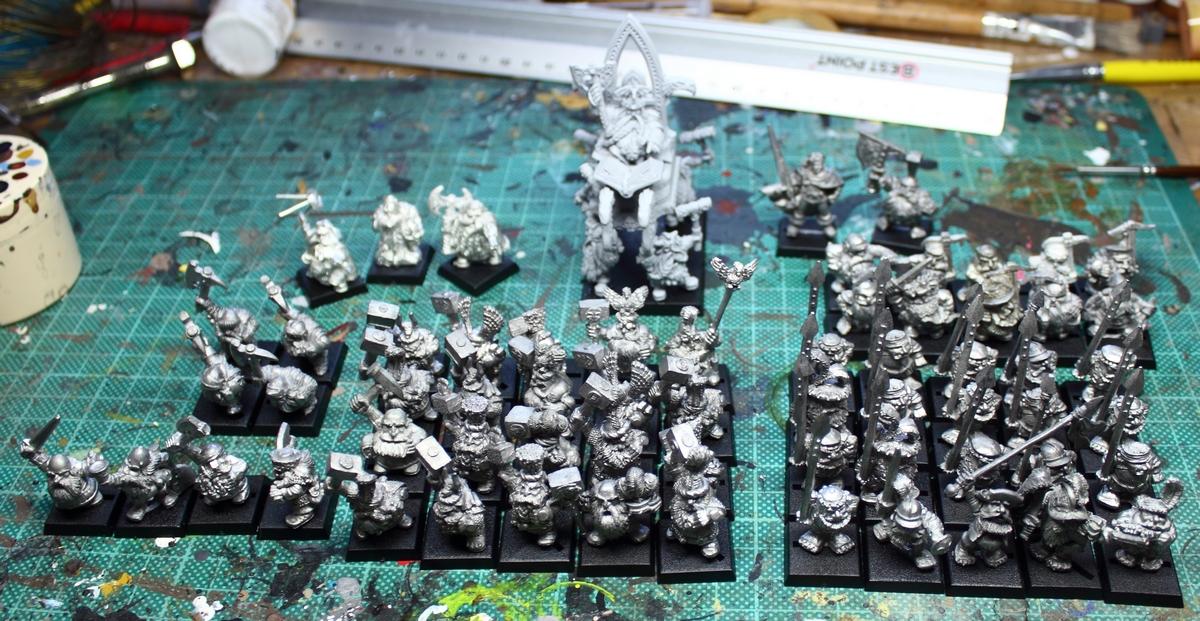
As you can se we have sizeable units of Hammerers and Spearmen there, as well as a unit of 10 quarrelers, 4 clansmen, 4 Ironbreakers, 3 Kings on foot, Thorgrim and the dynamic duo of Grotek and Felix. The kings are all newer models, but they fit well, because they're the excellent sculpts from one of the more recent releases (including the one that's leaning on his axe handle). They're a bit taller than the Marauder dwarfs and of course are covered in "detail", which makes them more regal looking than the rank and file.
Right, that's that. Over the next weeks I'll paint those chaps, starting right after getting some final detail infos I still need. Hope you'll find this project interesting.
|
|
|
|
2018/11/25 15:26:43
Subject: Re:Battle Brush Studios' Commission Painting Log - Massive update! 40k, WHFB, Historicals, Infinity, ..
|
|
Buttons Should Be Brass, Not Gold!
|
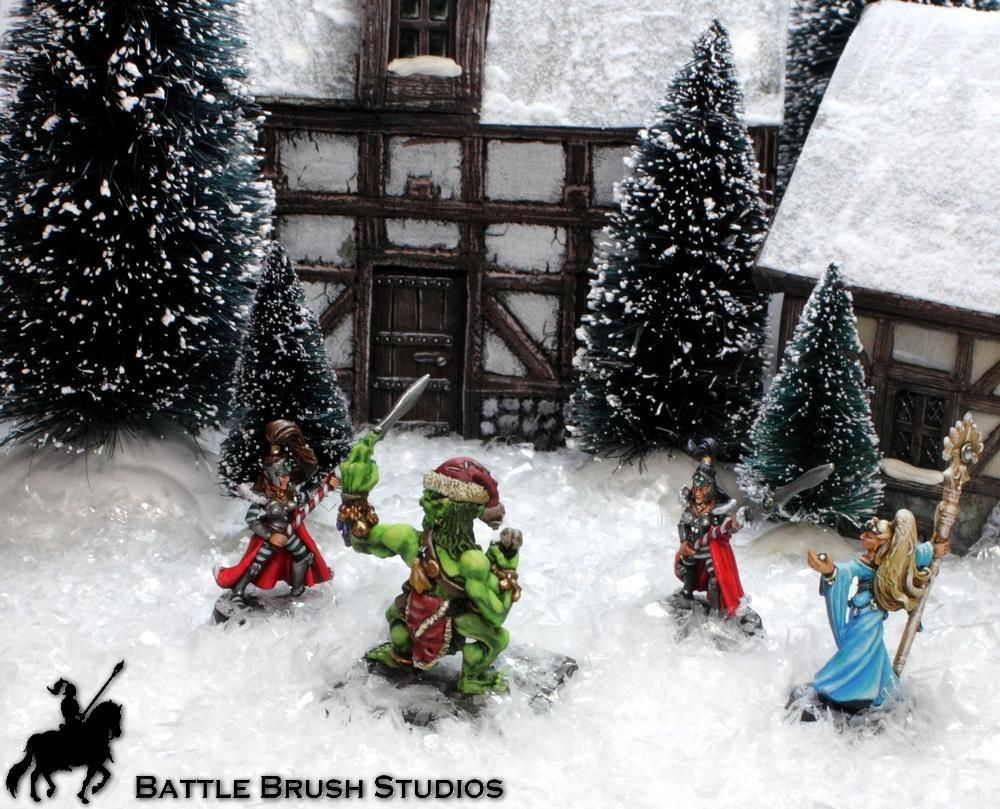
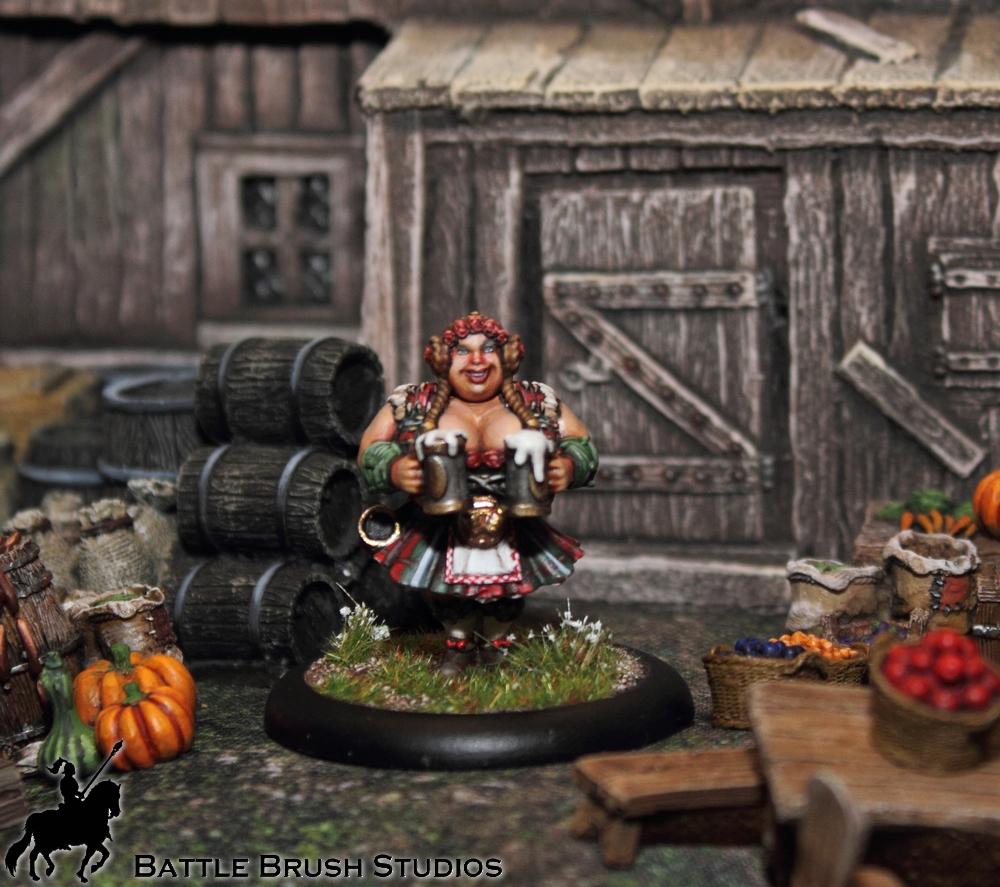
@Dysartes: Thanks very much. It's basically an addition to a plastics army as far as I understand it. @Captain Brown: Oh yes, it is. I have three or four Marauder Dwarfs in my "box of nice and old GW figures", but I've never seen this many in one place at once. Right, I did some test figures now: 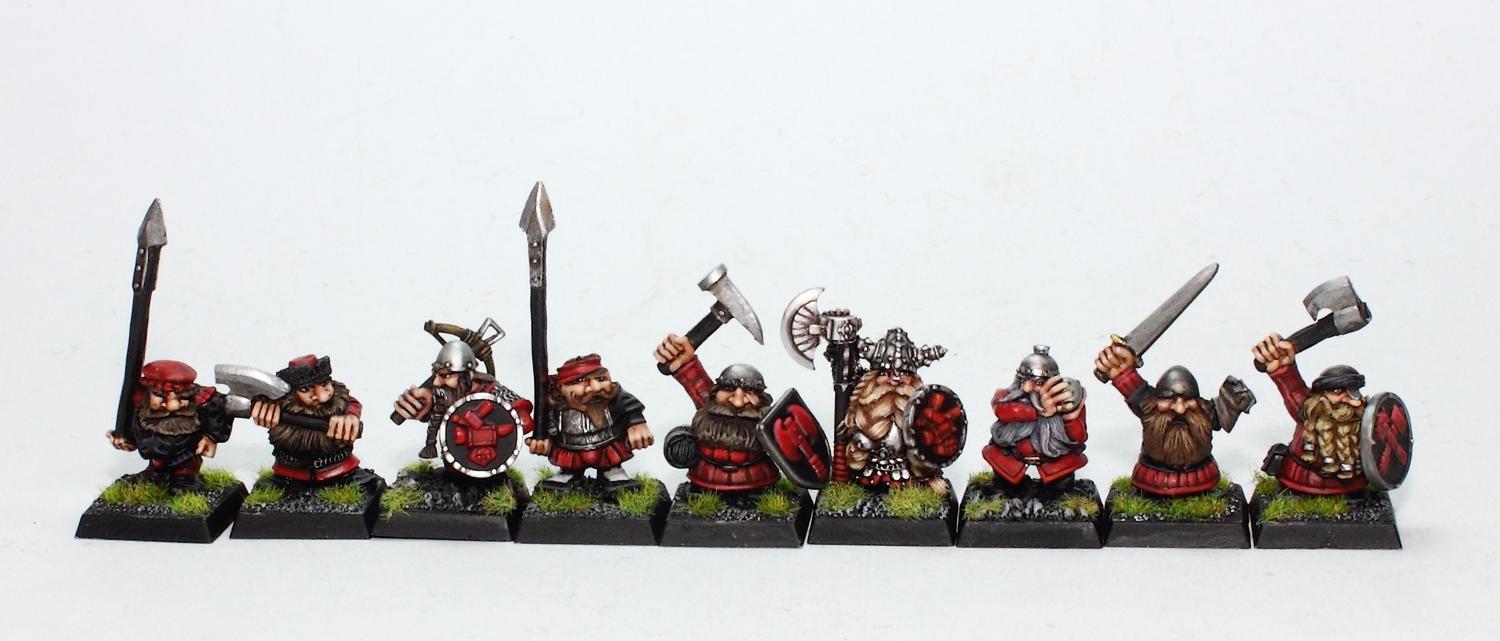 As I'd mentioned above, these are an addition to an existing army. I got three example figures along with them (the champ, the dude with the cannonball and the crossbow dwarf in this photo), and I did my best to match the colour scheme, style and so on. The dudes in the picture aren't quite done year, but this will be circa what they're supposed to look like. The test minis I did were met with great joy, so I can go ahead on the project now. Last week, in the middle of the night, somehow I got the idea of a christmas-themed game in my mind and I got really enthusiastic about it. We all know these cool people who do special christmas games at their gaming clubs or with their gaming pals. I want to be that cool too. So I'm currently looking for a way to make this happen with the least amount of work involved, because time for christmassy things is tight. So far I mapped out some general ideas in my mind and started painting the Everqueen as an ice queen and two Maiden Guard figures as christmas elves. 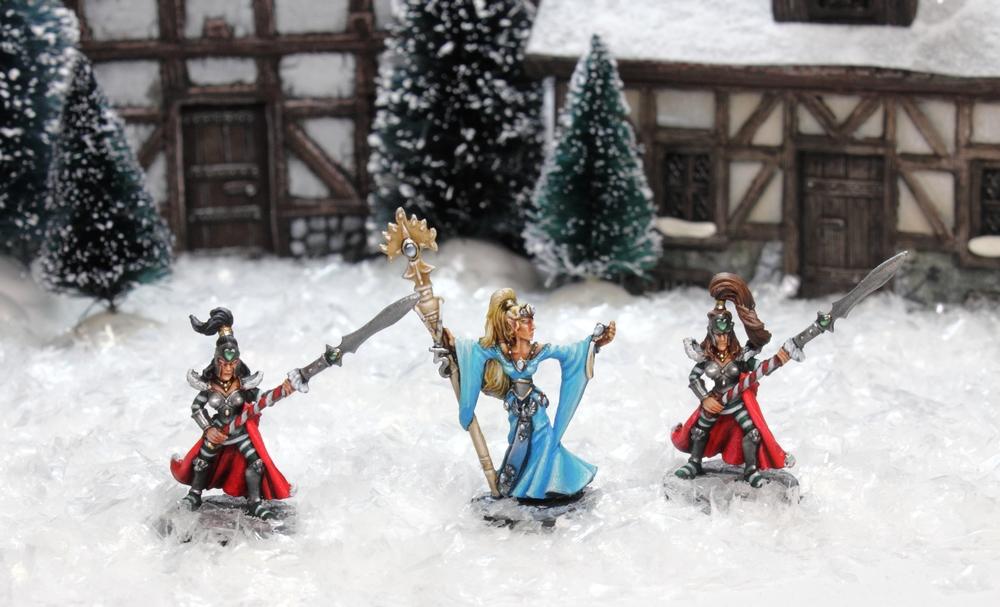  I also experimented with 'wintering up' some houses and gathering ideas for a winter table.
|
|
This message was edited 1 time. Last update was at 2018/11/25 15:30:33
|
|
|
|
2018/11/26 17:18:35
Subject: Re:Battle Brush Studios' Commission Painting Log - Massive update! 40k, WHFB, Historicals, Infinity, ..
|
|
Buttons Should Be Brass, Not Gold!
|
@Gitsplitta: Yar, hope it leads somewhere.
Right, no news on the Dwarfs front (just painting a whole lotts flesh for now), so here's something to contrast Dwarves and pink flesh - the nasty troll who tries to steal christmas. For deception reasons he's wearing a badly made santa's hat and redid his loincloth.
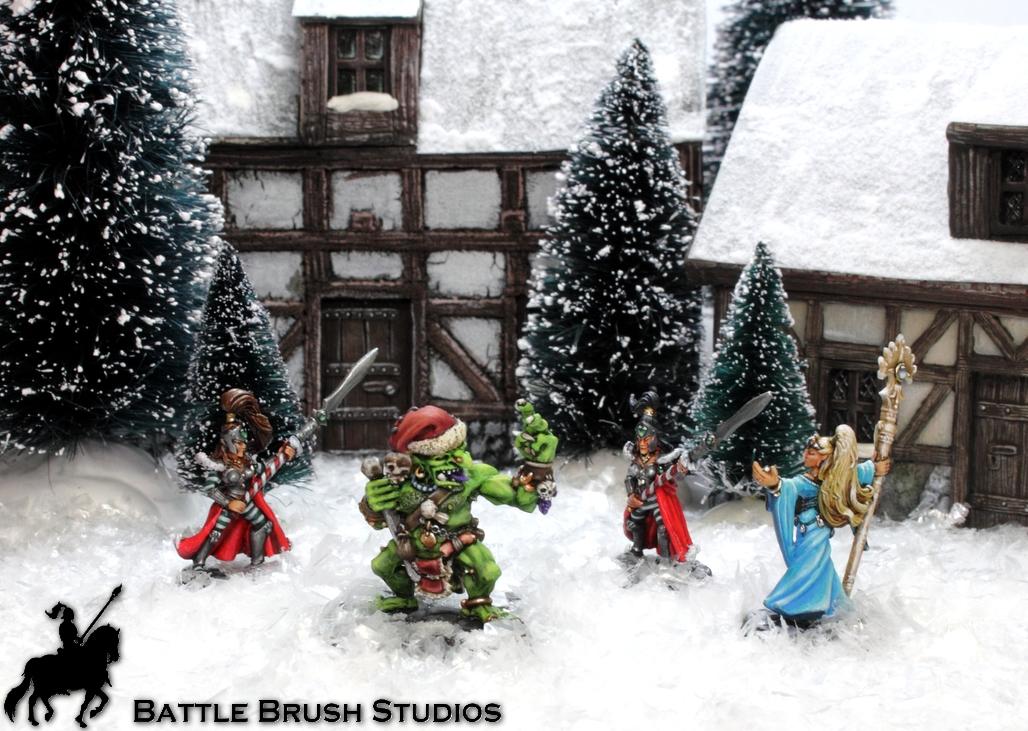
I also neatened up the elves a bit. Here we see the christmas elves trying to set the troll's head straight.
|
|
|
|
2018/11/29 16:18:24
Subject: Re:Battle Brush Studios' Commission Painting Log - Massive update! 40k, WHFB, Historicals, Infinity, ..
|
|
Buttons Should Be Brass, Not Gold!
|
Right, here's finally an update on the things I'm actually supposed to do:
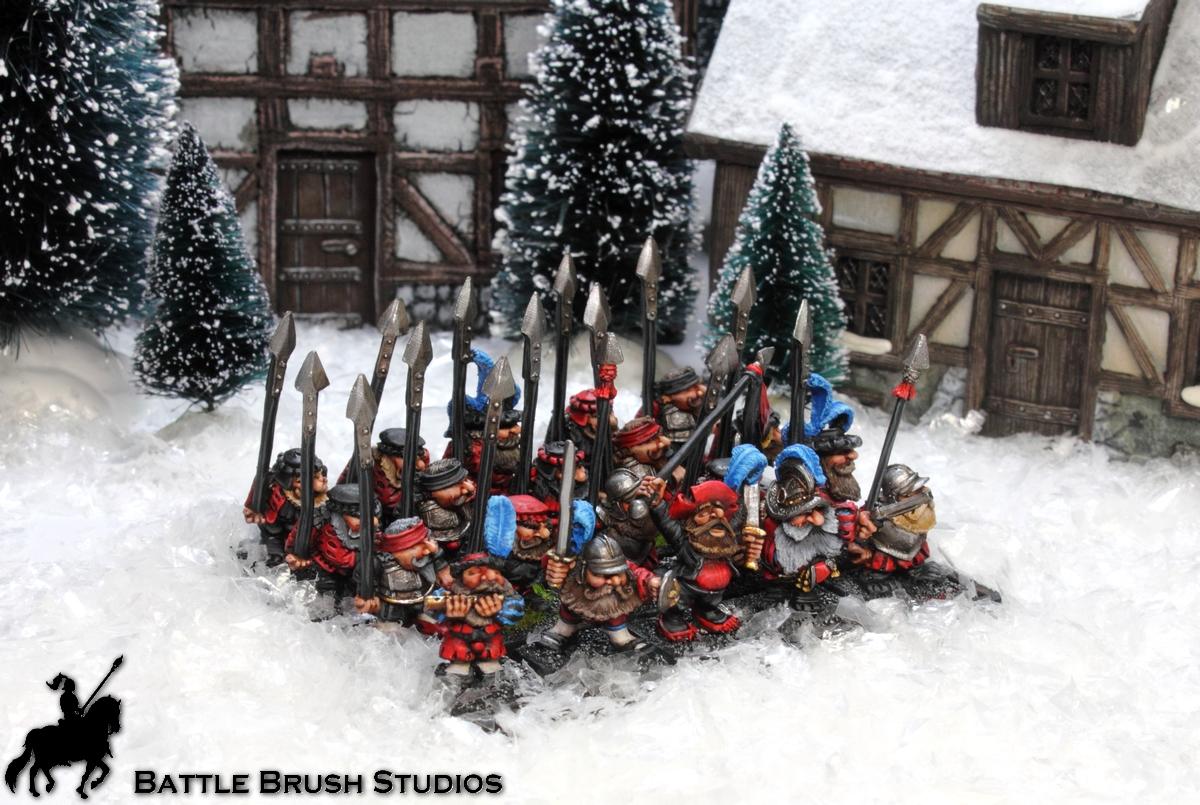
20 Dwarf Spearmen. Not quite done yet, but getting there. Hope you like them!
|
|
|
|
2018/12/04 14:52:56
Subject: Re:Battle Brush Studios' Commission Painting Log - Massive update! 40k, WHFB, Historicals, Infinity, ..
|
|
Buttons Should Be Brass, Not Gold!
|
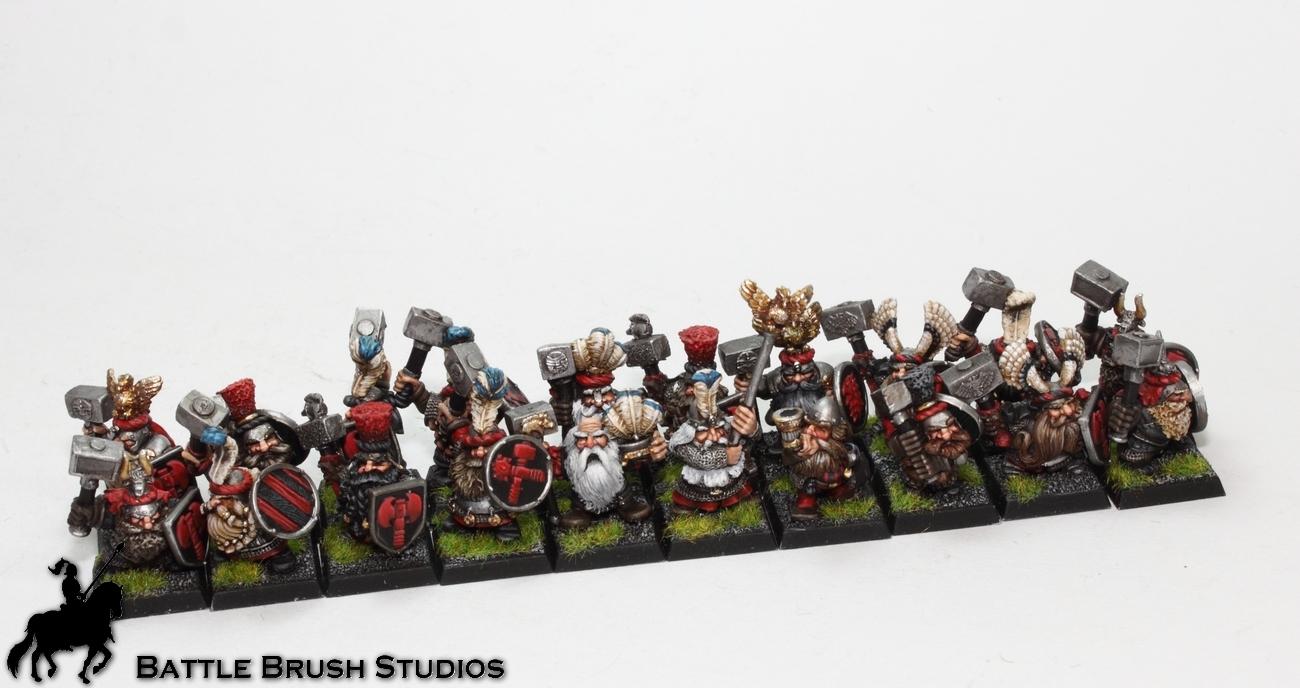
Update on the Dwarfs!
Spearmen have been finished, a king and Quarrellers have been added.
Next: lots of Hammerers and a few Ironbreakers. Hope you like them!
|
|
|
|
2018/12/06 15:48:30
Subject: Re:Battle Brush Studios' Commission Painting Log - Massive update! 40k, WHFB, Historicals, Infinity, ..
|
|
Buttons Should Be Brass, Not Gold!
|
@Gitsplitta: Yeah, well... they're cheery types.
Slight change:
I repainted the feathers to be a bit more subtle now (either all white or mostly white with blue tips) so they don't look too overpowering. What do you think?
|
|
|
|
2018/12/09 16:07:34
Subject: Re:Battle Brush Studios' Commission Painting Log - Massive update! 40k, WHFB, Historicals, Infinity, ..
|
|
Buttons Should Be Brass, Not Gold!
|
@Captain Brown: Oh yes, do they ever. Best Dwarfs out there if you ask me.
@Dysartes: Thanks very much! They're quite enjoable to work with.
@Cosmic: Cheers!
@nerdfest09: Thank you, Sir!
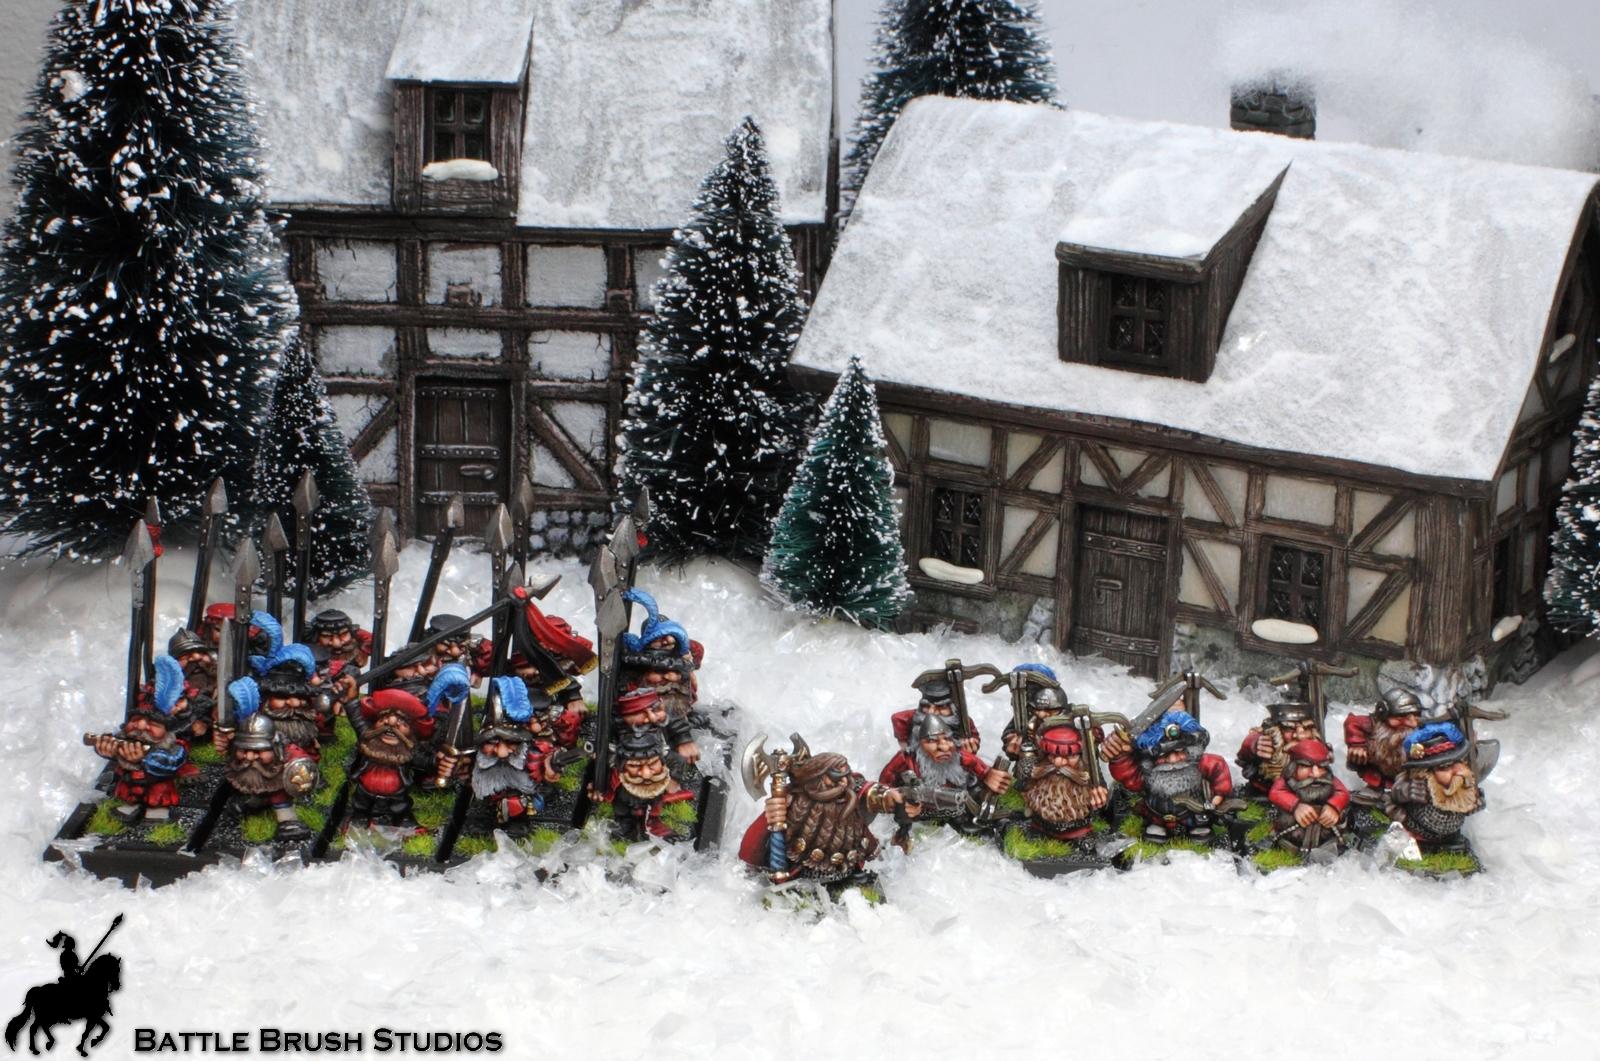
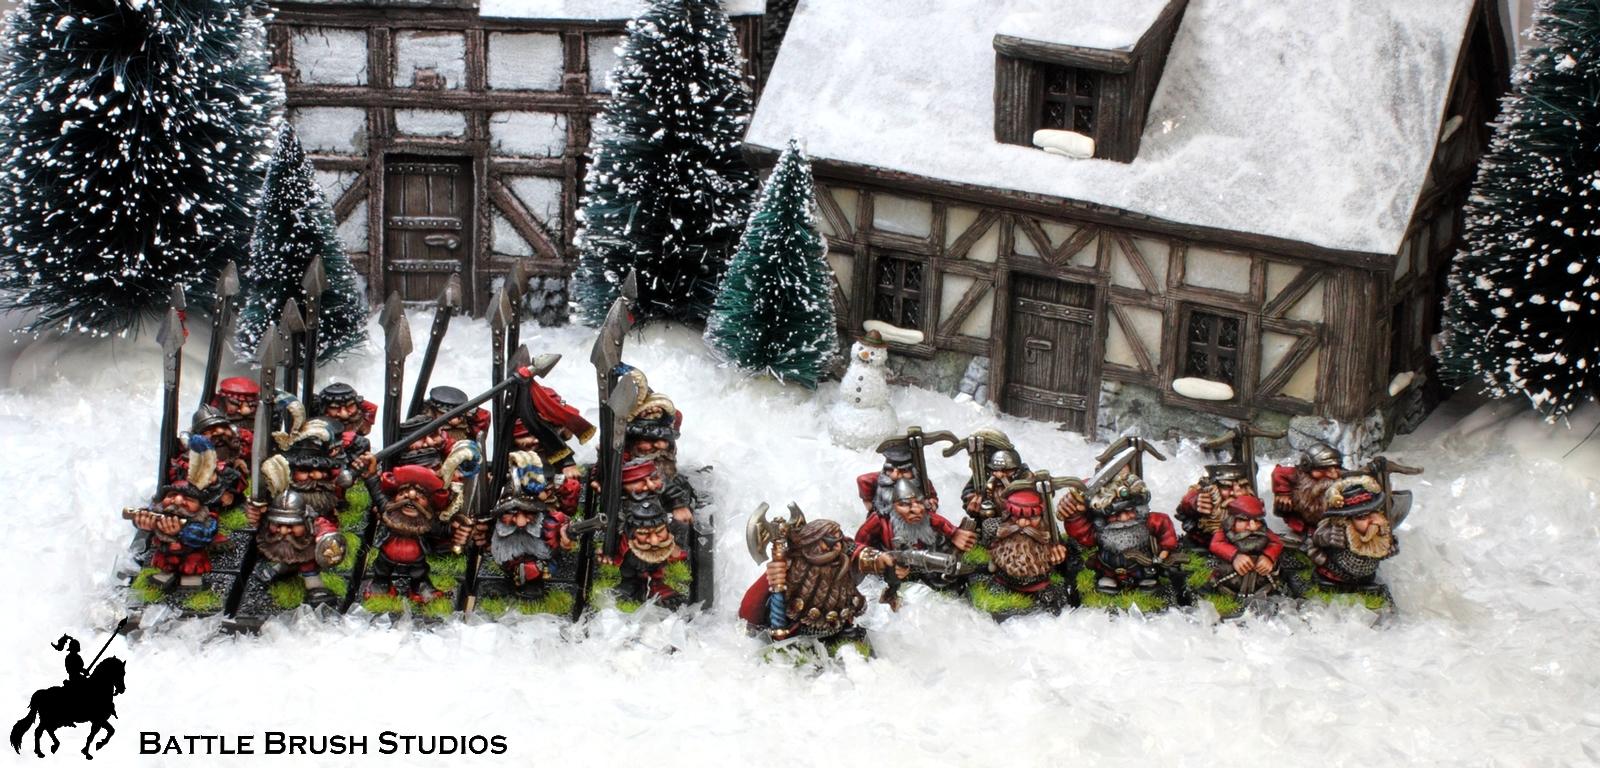
Right, update!
Hammerers added, another Thegn added, Ironbreakers and Clansmen added.
I also did up the tree last night. :p Hope you like them!
|
|
|
|
2018/12/13 00:49:05
Subject: Re:Battle Brush Studios' Commission Painting Log - Massive update! 40k, WHFB, Historicals, Infinity, ..
|
|
Buttons Should Be Brass, Not Gold!
|
@Gitsplitta: Yeah, isn't it. Thank you!
@Captain Brown: Cheers! Same here! Well, except maybe in the 4th edition Dwarfs army book.
Right, there hasn't been an update for a while. I actually had one, but didn't like the way the houses in the background looked, so I never posted it. Instead here's a bigger update now.
Here's Grotek and Felix finished, as well as the last king on foot (the angry gentleman with the barstool in hand), and of course, hard to miss, it's Thorgrim! He's still WIP.
You know, for these Dwarfs not at all being meant to be christmas-related, they fit incredibly well with the christmas background. I mean Thorgrim's got this huge white beard, the red cloak, he's sittting in something that looks exactly like a sled, he's got the big golden book in which he can see who's been noughty or nice...
|
|
|
|
2018/12/16 14:12:48
Subject: Re:Battle Brush Studios' Commission Painting Log - Massive update! 40k, WHFB, Historicals, Infinity, ..
|
|
Buttons Should Be Brass, Not Gold!
|
@Camkierhi: Thanks very much! Hullo. The past Friday I had a game of Over Malvern Hill by Stand To Games.  Stand To Games are a relatively new wargames rules publishing company (I think since 2016?). They're the guys behind the Albion Triumphant supplements for Black Powder, Forager, Rise again and Fight and Over the Hills. As far as I know this is their first tour into the ACW. The rules (A4 format, ring bound, full colour) aim to depict battles of 2-3 brigades or more per side. Once more Cpt.Shandy (of The Raft fame: https://wargamingraft.wordpress.com/) had prepared a very nice scenario and provided his 15mm collection to play with. We play a game based on the battle of Blackburn's Ford which took place on 18th July 1861, three days before the first battle at Bull Run / of Manassas.  The green Unionist troops were looking for a way across Bull Run river to meet the equally green army of the secessionist states. Blackburns Ford was identified as one of the possible ways across the river. Scouts had spotted a rebel artillery battery, but no infantry. Brigade commander Israel B. Richardson was sent out with his infantry brigade, a battery of cannon and a squadron of cavalry to cross the river. 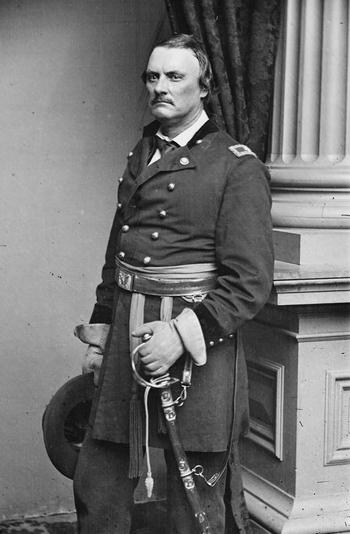 Israel B. Richardson Israel B. Richardson The Confederate side was well aware of the importance to keep the enemy from doing just that, so every single possible river crossing was being guarded by at least one brigade. Blackburn's Ford was under the command of a certain James Longstreet. The sloped banks of the river were (and still are) heavily vegetated, so his brigade was well hidden from Union scouts. 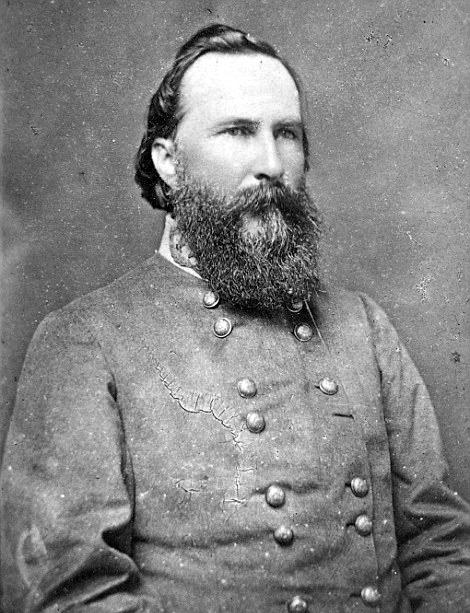 James Longstreet James Longstreet On our gaming table all of that looks like this: 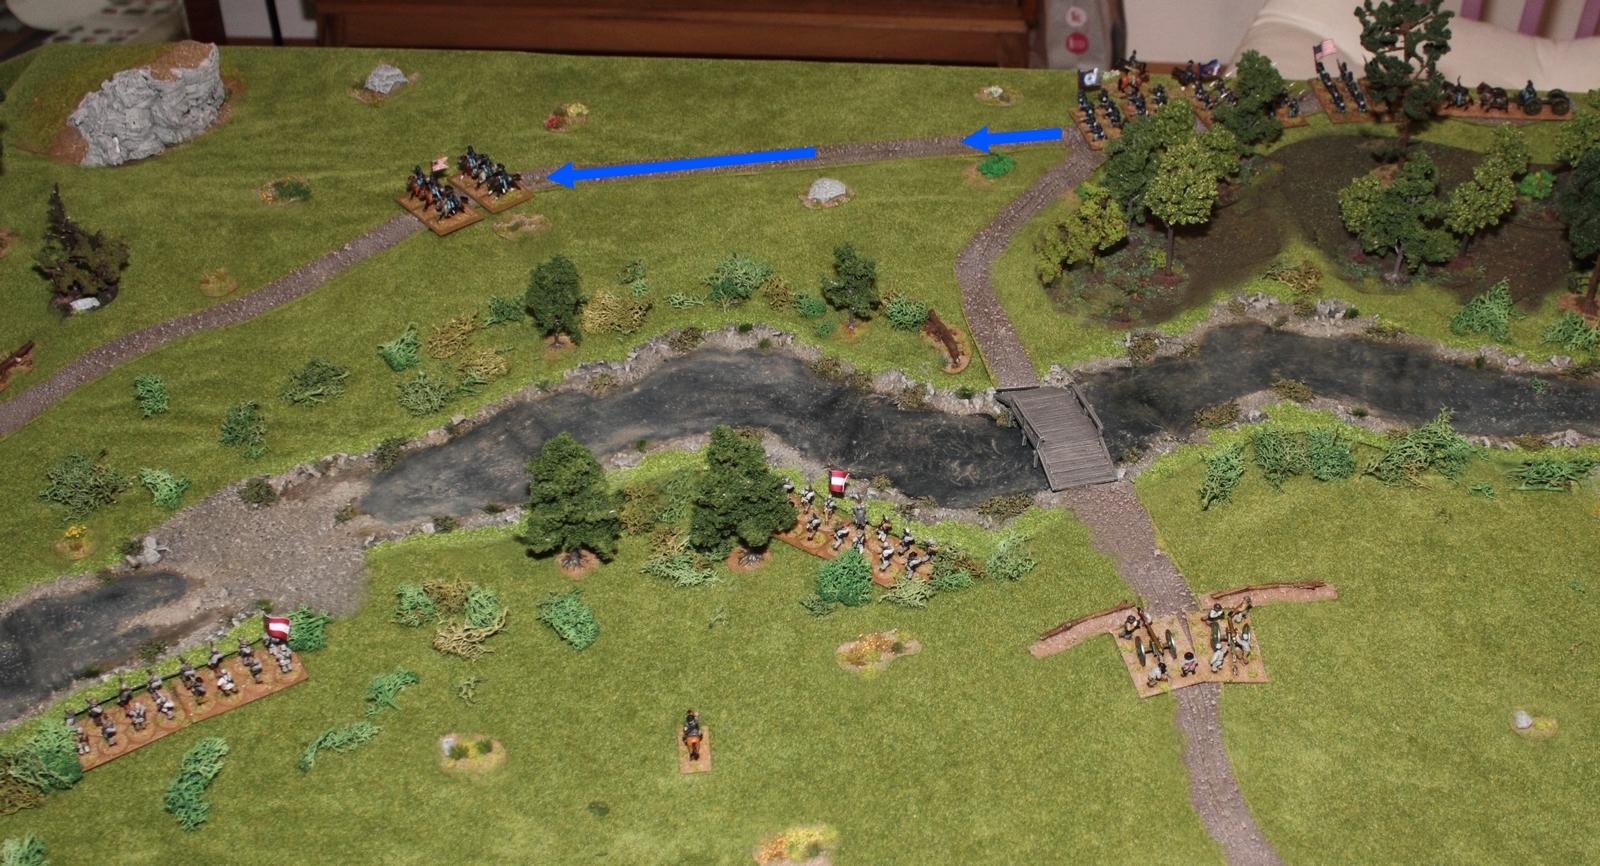 At the centre you can see Bull Run river, the bridge in the right is Blackburn's Ford, behind it you can see the Confederate artillery battery. The ford in the left is another possible river crossing. The rebel brigade under Longstreet (2 infantry regiments from Virginia, 1 artillery battery of good old Washington Artillery in a fortified position), to be deployed anywhere on their side of the river. I play the defenders in this scenario. Richardson's Union brigade (3 infantry regiments, 1 artillery battery [typically a bit stronger than the rebel artillery], 1 cavalry squadron) enters the table on turn 1 via the road in the North. Cpt.Shandy plays the union force. 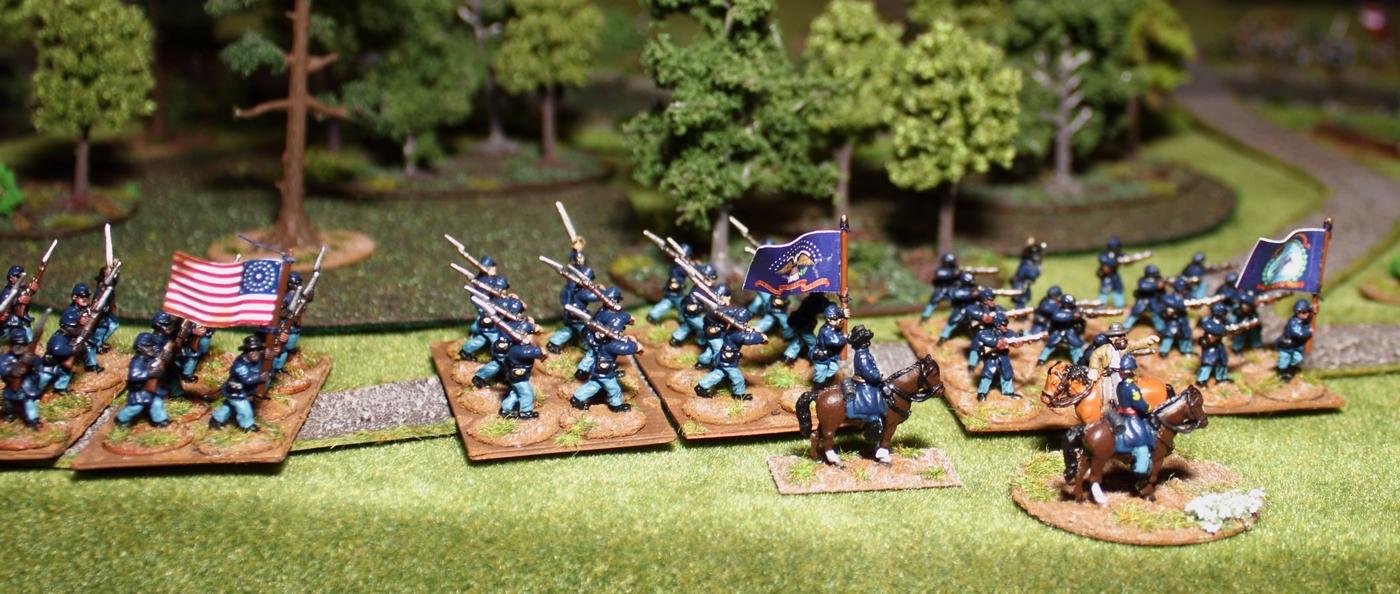 To complicate things, the river banks are heavily overgrown with bushes, small trees, etc.  Mid-green fields depict LOS-blocking, difficult terrain (1" of viewing distance in and out), the dark green fields (essentially everything with a dark brown base) depict thick forests, which are even more difficult to maneuver in. Neither can be traversed by artillery. From turn 3 we roll for reinforcements. If they don't show up in turn 3 they automatically arrive at turn 4. The Union force wins if they either force the rebel force to retire or if by the end of the game they hold a position (without any immediate danger) on the other side of the river. The rebels win if they prevent the opposition from doing either by the end of the game. Cpt.Shandy sends the cavalry down the road to scout ahead. His infantry follows in open column, as well as the limbered artillery. The annoying thing of course is that his columns are open to being fired upon by my artillery as they pass Blackburn's Ford.  After a turn of such fire Cpt.Shandy orders the cavalry back and dismount to act as a screen to his infantry columns. A wise move, unfortunately this led to a.) the dismounted cavalry sitting a bit too close to the cannons and b.) the dismounted cavalry getting out of Richardson's command radius, and thus they were pretty much unable to do anything. The cavalry takes a battering and falls back in a safer distance.  After these initial shots immediately another Union brigade arrives. Another 3 infantry regiments and 1 artillery battery. The brigade is led by a young officer named William T. Sherman. Richardson's Brigade marches further down the road and seems to aim to simultaneously attack the ford to my left as Sherman's brigade attacks Blackburn's Ford. Luckily for me rebel reinforcements arrive shortly thereafter in the shape of Jubal A. Early's brigade: 3 infantry regiments (among them the good men of the 7th Louisiana) and an artillery battery. This one set up right next to their comrades of the Washington Artillery to set up a big battery. However, Richardson's brigade splendidly marching to their left looked so scary that they limber up again to set up to protect the left river crossing.  Not a second too early, as a first Yankee regiment crosses the ford and changes formation to line. To their left the sole Union regiment with fancy new rifled muskets take position to give covering fire. However, they got nobody to shoot at as I have my regiment opposite to them retire into the woodland to meet anybody crossing the river without exposing themselves.  The Union regiment who has made it axcross the river now sits in an unfortunate situation: enemies to their left and right, another enemy regiment to their front, as well as enemy artillery. The latter two can't see them at the moment, but still, they're there. And the woodland prevents any friendly support fire from across the river. Richardson is well aware of the importance of the next moments, so he personally whips another regiment across the river to support the spearhead. 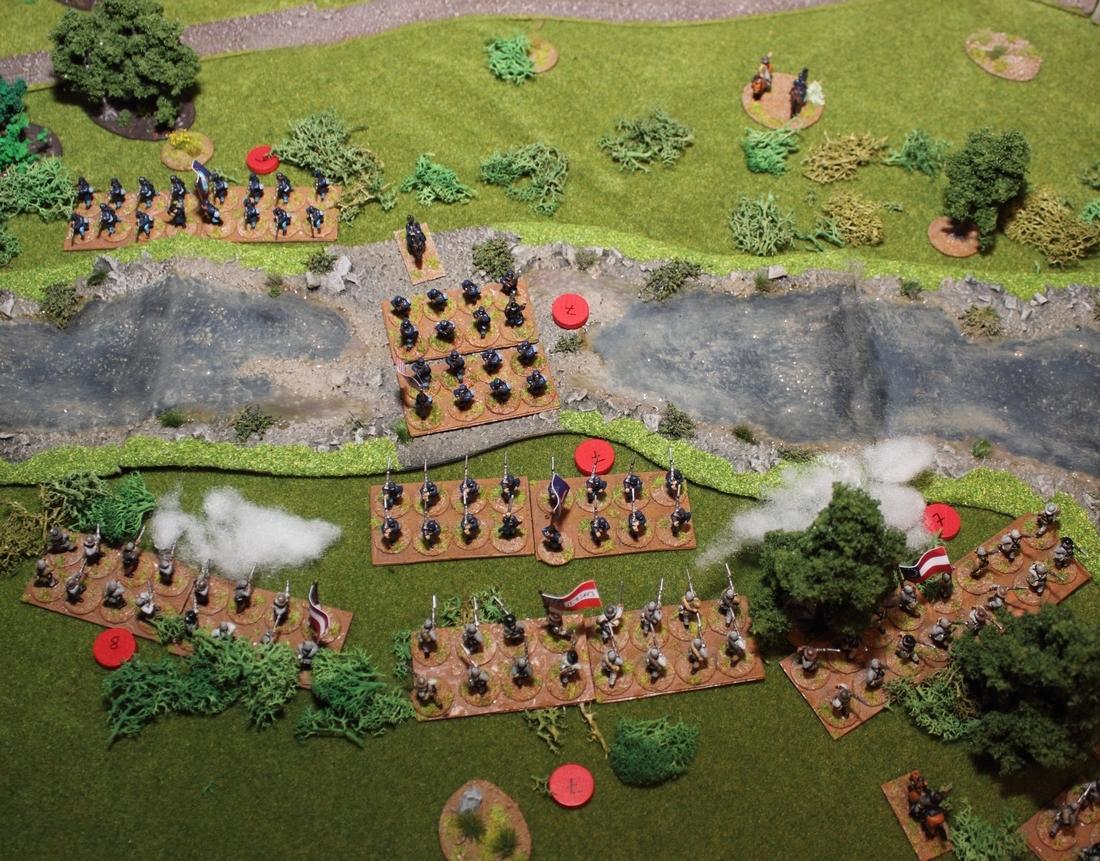 Unfortunately the inexperienced soldiers hesitate to charge bayonet. The union line stays put, returning fire at the rebel regiments at short range. 2 out of 3 of my regiments are able to fire at them, because space is a little tight. In the mean time Sherman has brought up his cannon to fire at my artillery across the river at Blackburn's Ford. Counter-battery (and counter-counter battery) fire ensues. I roll a bit better (and got the advantage of fortifications), so my artillery performs well in this duel. In the mean time the other two regiments of Early's rebel brigade (the strong 7th Louisiana and a smaller Virginian regiment in the far right) take position to the left and right of the ford. With his brigade stretched out like that, Early has a bit of a hard time keeping an overview. 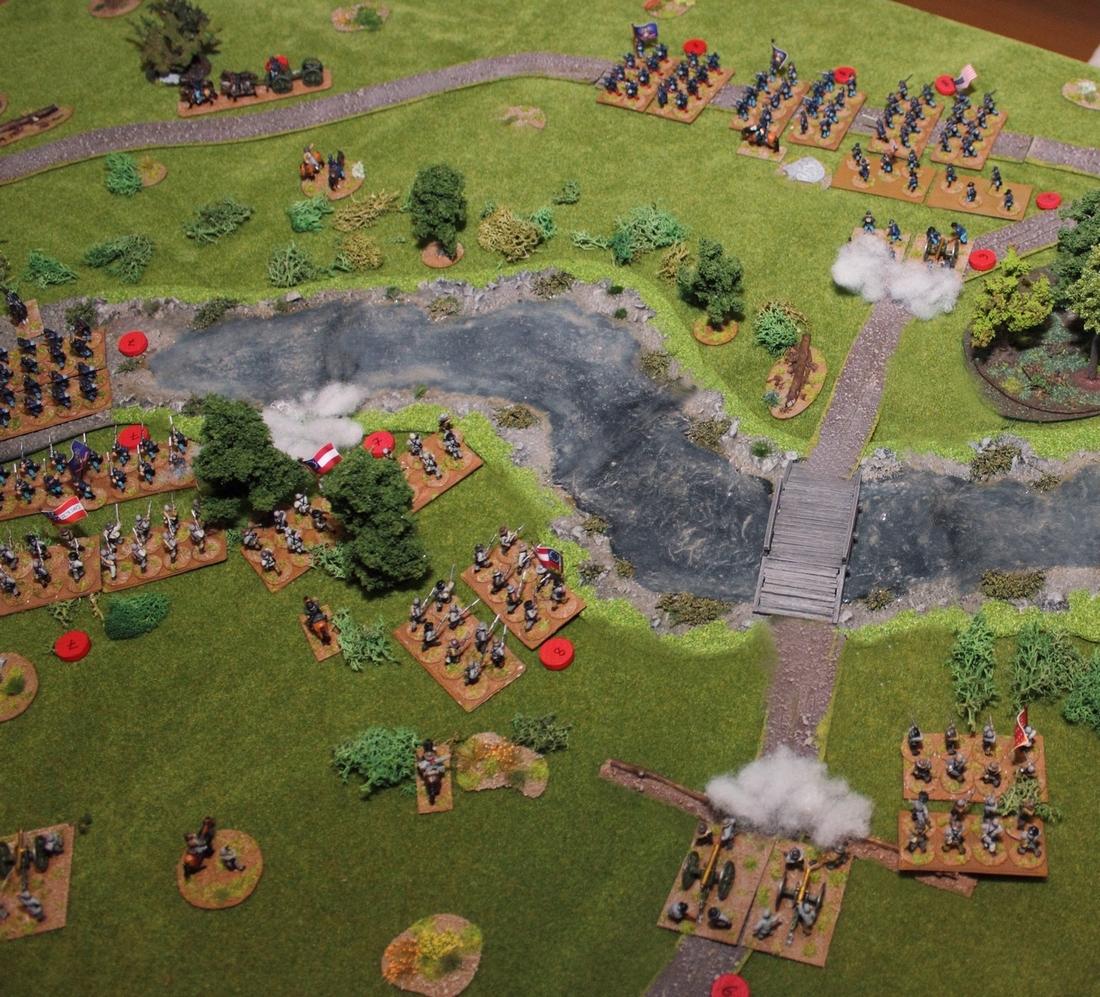 On the left river crossing the Union regiment takes a lot of fire. Ultimately they have to retreat back across the river, through the ranks of their comrades following up. 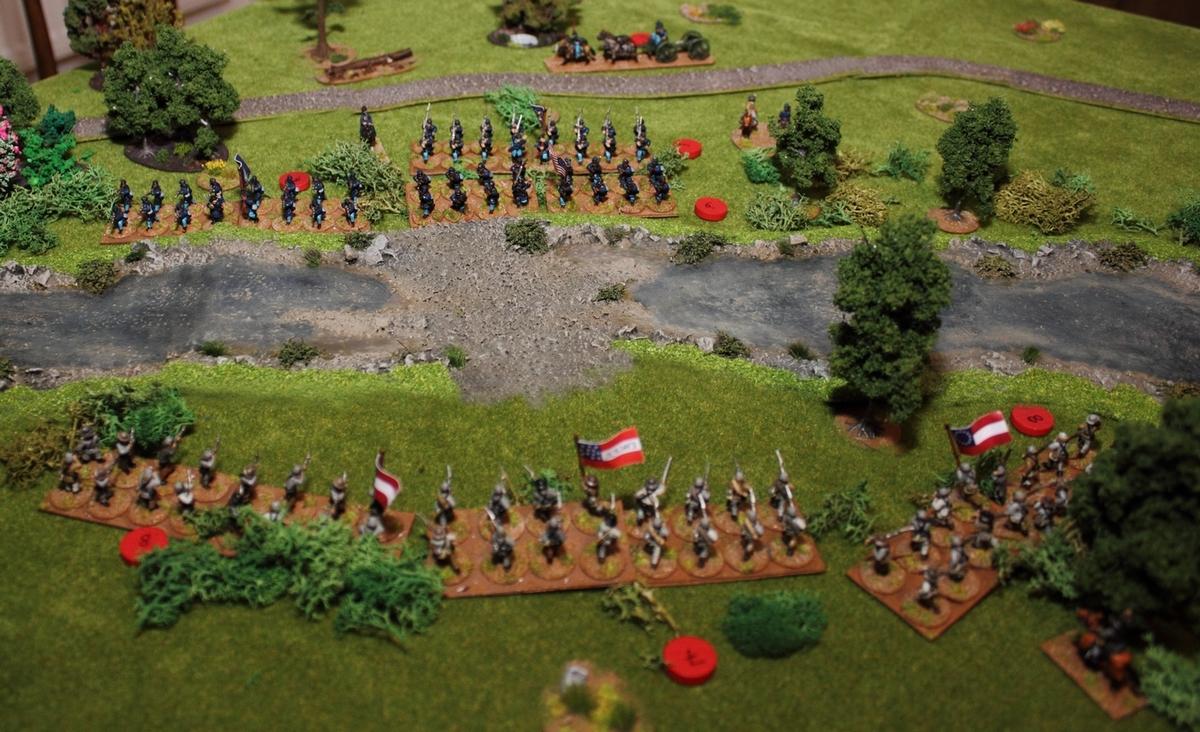 The attack at the left ford seems to be repulsed for now. Still, I keep my regiments back and hidden in the overgrowth. After a cunning attempt at setting up my infantry guarding the left to be enfiladed (which only failed because the Yankee troops on the left folded a moment too early) Sherman, after a short skirmish across the river, aims to force a decision in a frontal attack across Blackburn's Ford. 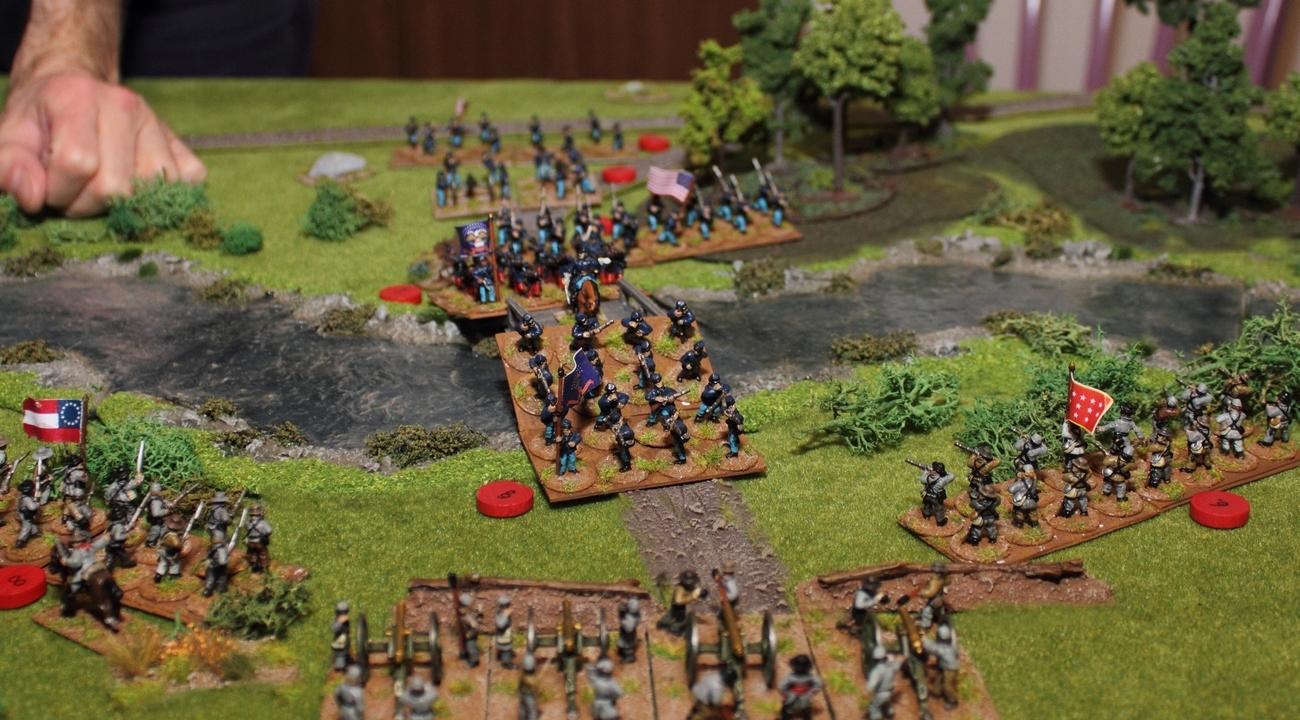 At this point the gun battery of Early's brigade has moved back to line up with the Washington artillery again and the attack crumbles under the combined canister fire of the two batteries. The brave men of the Union regiment storming on breaks, flee, and lead to some confusion among the ranks of the following infantry. The Yankee attack on Blackburn's Ford is repulsed, it's a victory for the Confederacy. 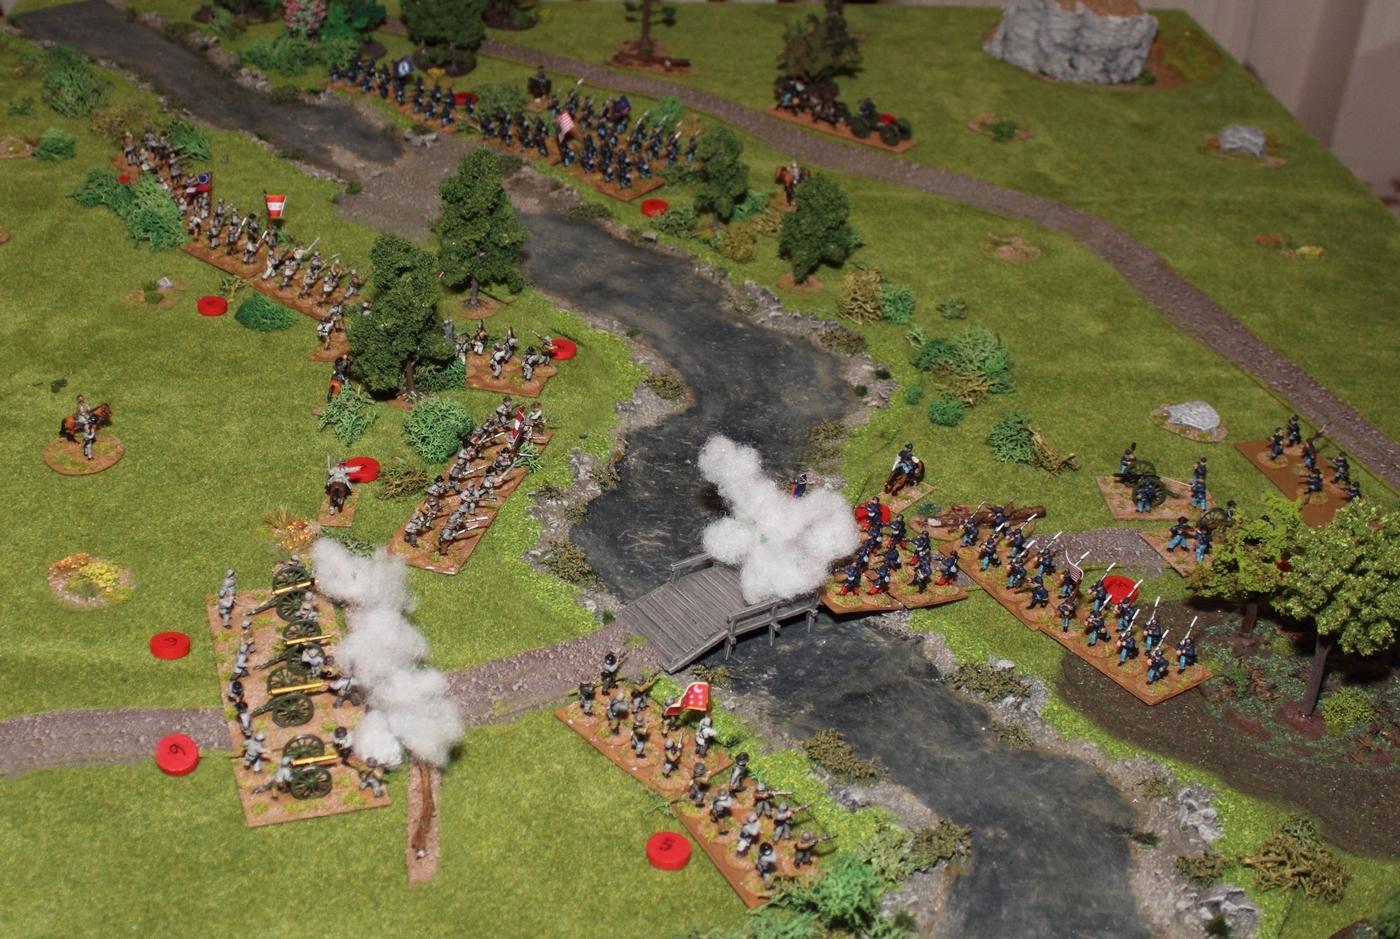 Nice set of rules, that Malvern Hill. There's no gimmick to them, but they work. Including explanation of the basic rules and a little consultation of the rulebook here and there we managed to play the game in about 2.5 hours. The turn sequence is clever (and if I remember not unlike the General de Brigade family of rules): The turn starts with player Blue's movement phase (followed by a rally phase), then player Red fires, player Red moves (and rallys) and then play Blue gets to fire. Firing first and moving later I think is a pretty good mode for games set between the 17th and 20th century. Units who fire in their fire phase may not move during the following movement phase (which is why we use cotton wool to mark units who fired). Each unit has a number of Fatigue points on which their combat value/strength is based. These aren't only being tracked for the unit individually, but also for the whole brigade (= the sum of fatigue points of all units in the brigade). Loss of Fatigue points depicts a mix of disorder, fatigue, dead/wounded and morale and reduces the unit's strength in combat (and base of morale rolls). The clever thing is that by Rallying commanders may replenish units' fatigue points, however the fatigue damage on the overall brigade Fatigue score 'sticks'. This means that the overall brigade morale and coherency will wane over time. If a brigade has taken so and so many % of Fatigue damage they start to falter. What also added to the game was something Cpt.Shandy had already used in his Over Malvern Hill solo test game: A deck of friction cards. You can read more about this here in the report of his first game: https://wargamingraft.wordpress.com/2018/12/14/first-game-of-over-malvern-hill/ Put shortly: card drawing mechanics rock. You can do as much and as little as you like, you can tailor make them to fit a scenario, and you can introduce them to pretty much any game. I recommend having a look at these rules. Works really well for ACW battles. Many thanks to Cpt.Shandy for another fun game, and I hope that you enjoyed this little battle report!
|
|
This message was edited 1 time. Last update was at 2018/12/16 14:18:27
|
|
|
|
2018/12/17 20:14:05
Subject: Re:Battle Brush Studios' Commission Painting Log - Massive update! 40k, WHFB, Historicals, Infinity, ..
|
|
Buttons Should Be Brass, Not Gold!
|
Right, that's done then.
Hope you like them!
|
|
|
|
2018/12/21 22:11:37
Subject: Re:Battle Brush Studios' Commission Painting Log - Massive update! 40k, WHFB, Historicals, Infinity, ..
|
|
Buttons Should Be Brass, Not Gold!
|
@Captain Brown: Thanks very much! Yus, they're the nicest Dwarfs around. @Dysartes: Cheers! It was a fun game indeed. Heyhey, last night we had our first Very Special Christmas Game( tm). Here's my AAR of the whole affair: http://skirmishwargaming.com/advanced-song-of-blades-and-heroes-christmas-special/  5 players (3 in the latter half of the game due to bedtime), good fun. Temporarily winterized terrain and such. And just a really, really nice game. Hope you enjoy the report!
|
|
This message was edited 4 times. Last update was at 2018/12/21 23:03:55
|
|
|
|
2018/12/23 17:13:32
Subject: Re:Battle Brush Studios' Commission Painting Log - Massive update! 40k, WHFB, Historicals, Infinity, ..
|
|
Buttons Should Be Brass, Not Gold!
|
|
|
|
|
2018/12/25 10:42:08
Subject: Re:Battle Brush Studios' Commission Painting Log - Massive update! 40k, WHFB, Historicals, Infinity, ..
|
|
Buttons Should Be Brass, Not Gold!
|
Right guys, it's time!

|
|
|
|
2018/12/26 13:55:17
Subject: Re:Battle Brush Studios' Commission Painting Log - Massive update! 40k, WHFB, Historicals, Infinity, ..
|
|
Buttons Should Be Brass, Not Gold!
|
Two-part recap of 2018 done, review of Northumbrian Tinsoldier minis in the can as well. Here's a nice photo (at least I think so):
Hope you like them as well!
|
|
|
|
2018/12/29 02:23:54
Subject: Re:Battle Brush Studios' Commission Painting Log - Massive update! 40k, WHFB, Historicals, Infinity, ..
|
|
Buttons Should Be Brass, Not Gold!
|
Heyhey, I've got days off now. For some reason making or painting terrain has become my "i got time off and can't be bothered to do anything else" thing.
I got myself the Kill Team rulebook for christmas because virago said the rules were fun. Cpt.Shandy said he'd be interested in playing some Sci-fi skirmish game (not necessarily Kill Team) AND I got my sister's BF a squad of Blood Angels for christmas, so he may want to play Kill Team or other sci-fi squad-level things at some point in the future as well. So I painted some contemporary/sci-fi scatter terrain:
Ork for scale. :p Hope you like them!
|
|
|
|
2019/01/10 13:18:21
Subject: Re:Battle Brush Studios' Commission Painting Log - Massive update! 40k, WHFB, Historicals, Infinity, ..
|
|
Buttons Should Be Brass, Not Gold!
|
@Camkierhi: Thanks very much!
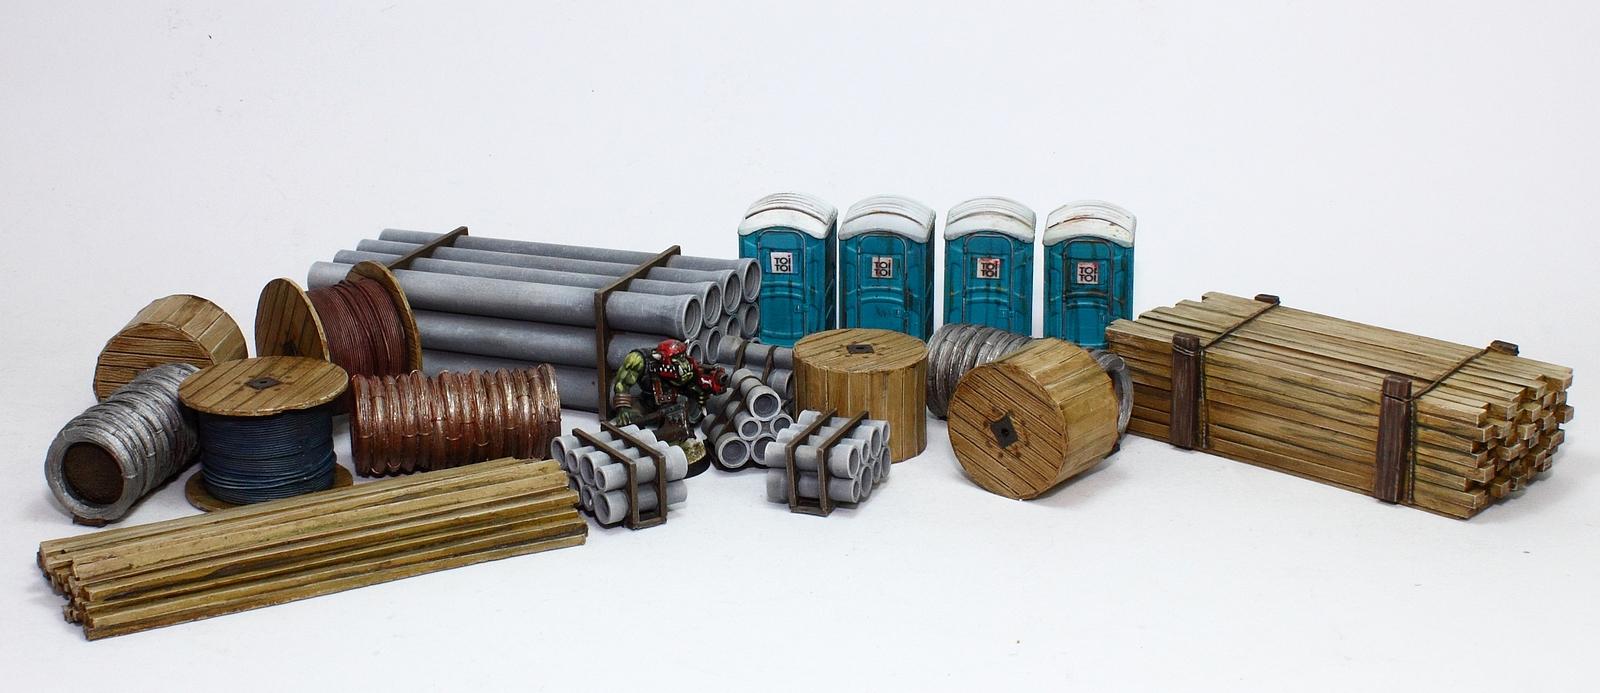
@Dysartes: I bet. He's just looking for a place to hide, because in the picture you can't see the 20 other guys who do their business behind the wood stacks and pipes to avoid the suspicious portable loos.
Well, I'm back. Hope you had a good start into 2019!
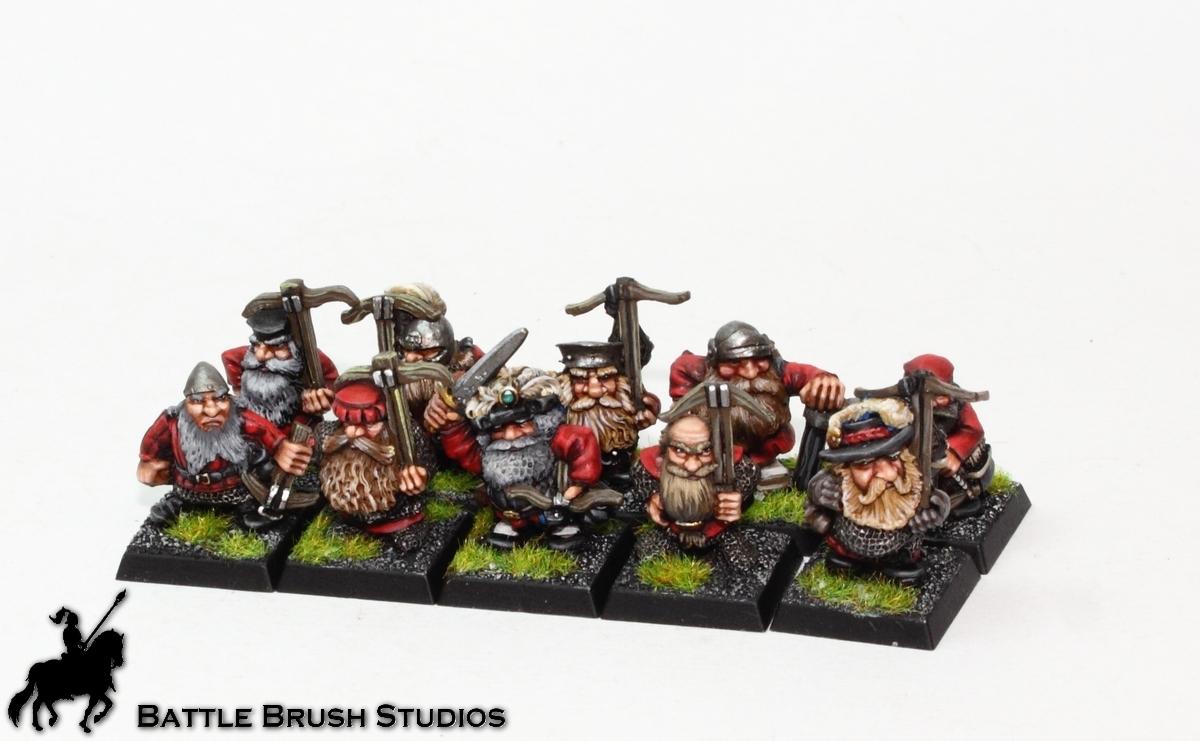
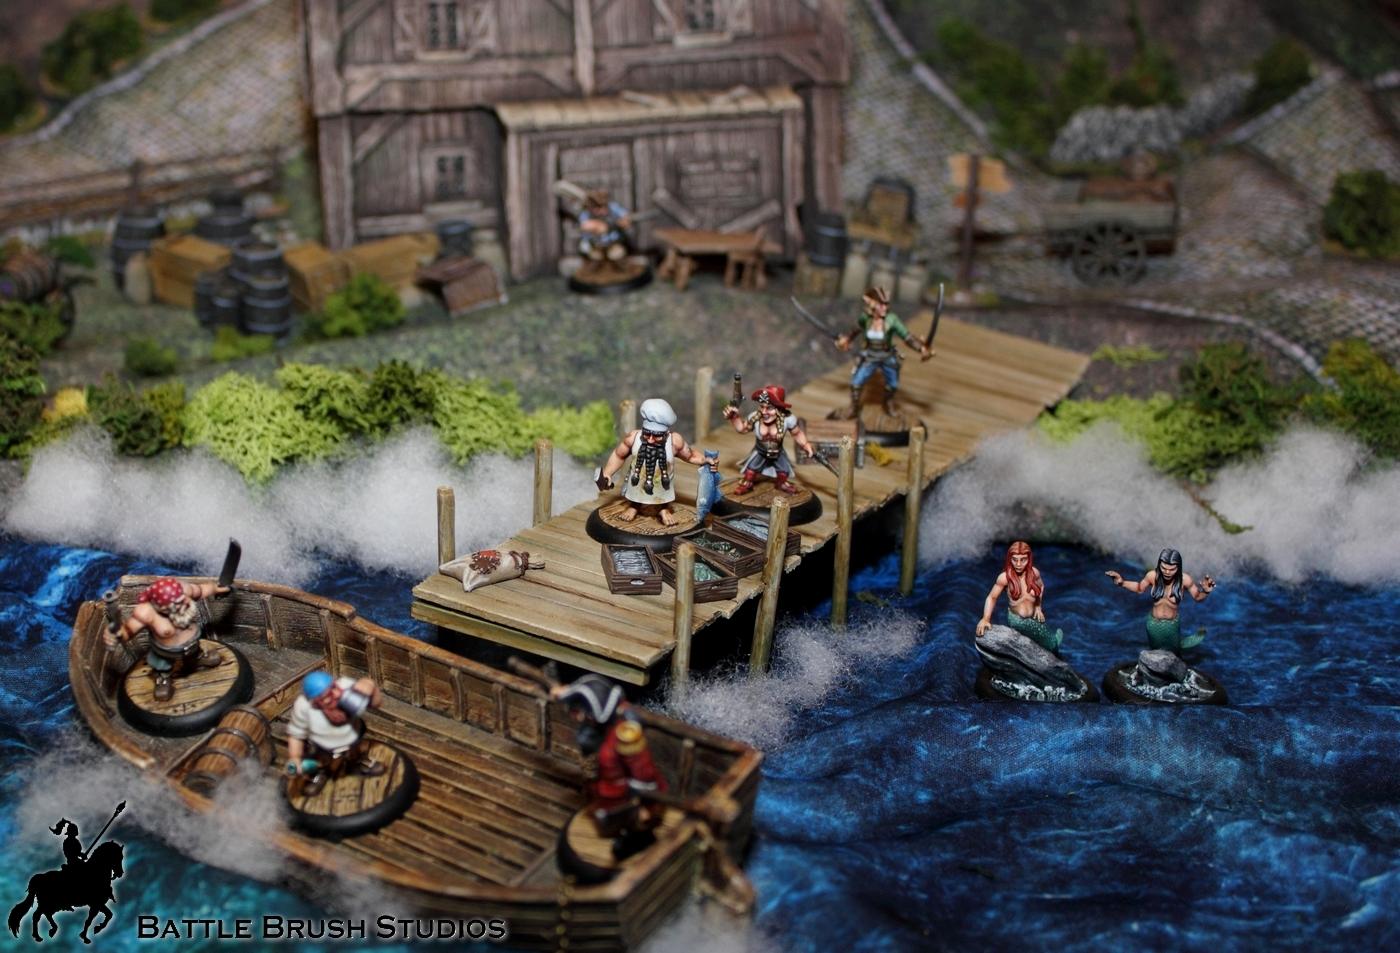
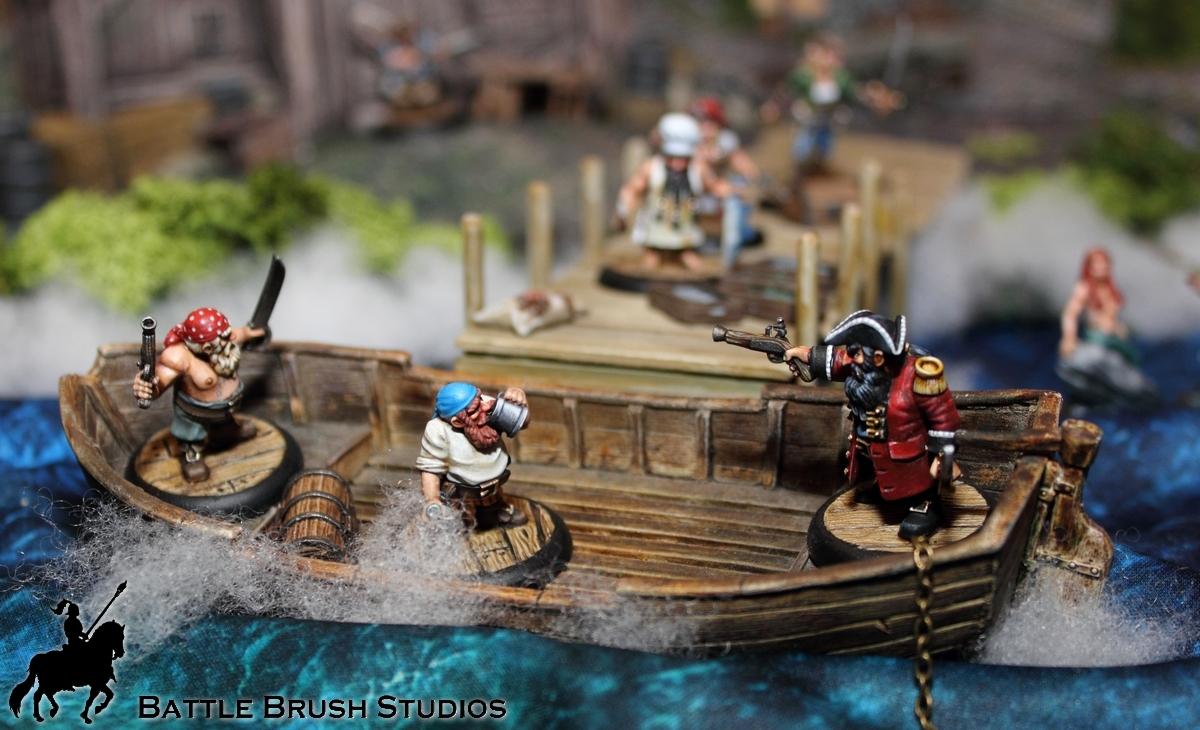
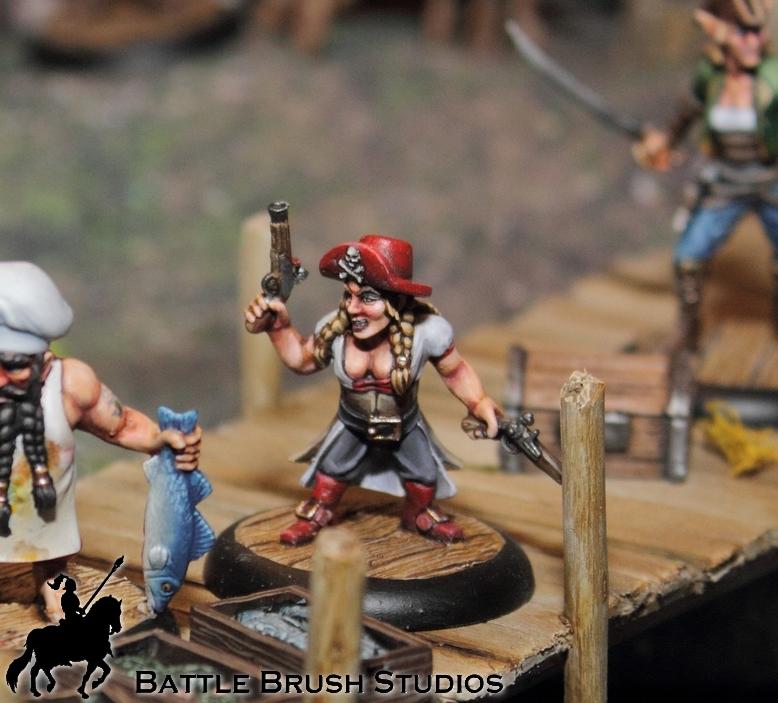
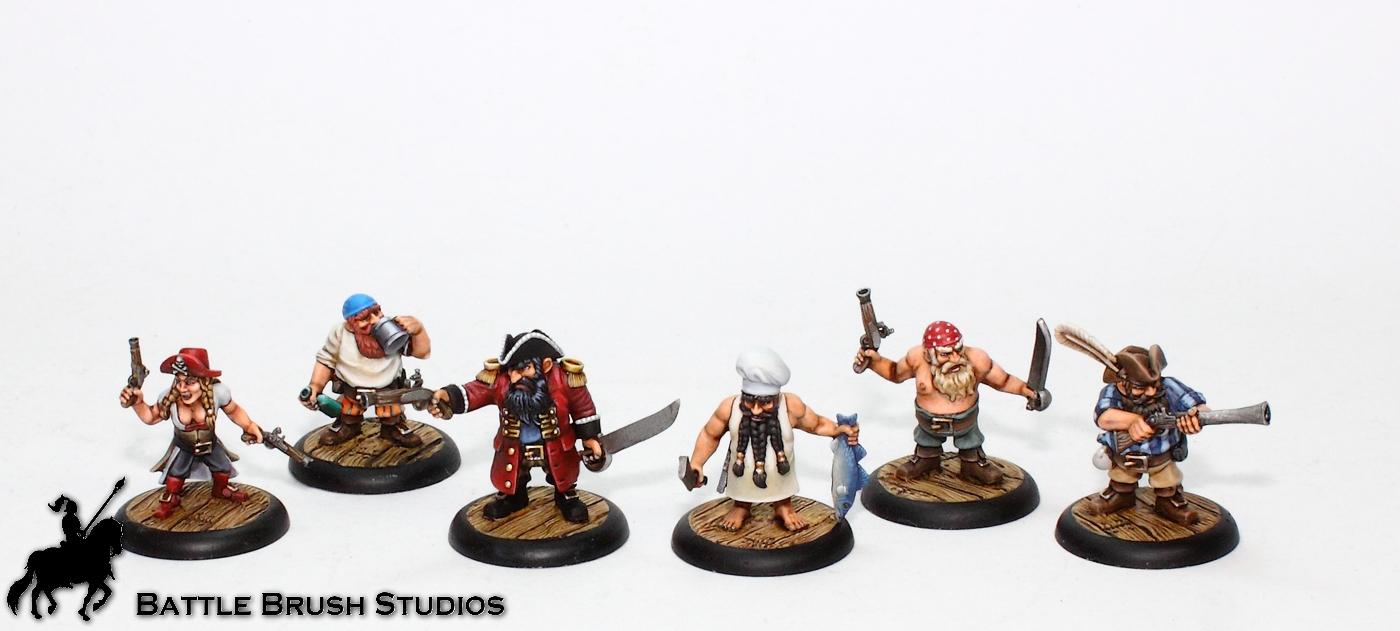
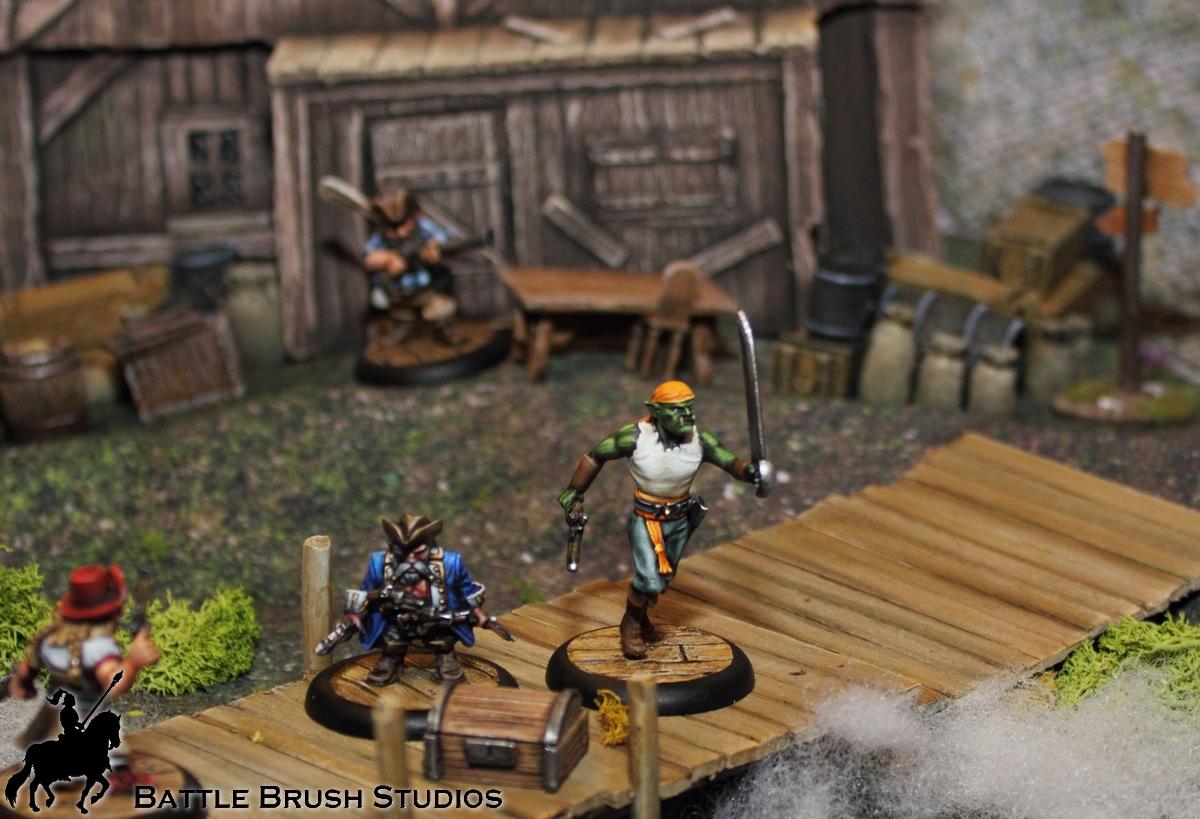
I'm currently working on some pirates for Pirates of the Dread Sea by Dead Earth Games. Here's a WIP of some Dwarfs:

These are from last year's Kickstarter. As far as I know the figures will be sent out to backers within the next few weeks.
Hope you like them so far!
|
|
|
|
2019/01/11 17:15:20
Subject: Re:Battle Brush Studios' Commission Painting Log - Massive update! 40k, WHFB, Historicals, Infinity, ..
|
|
Buttons Should Be Brass, Not Gold!
|
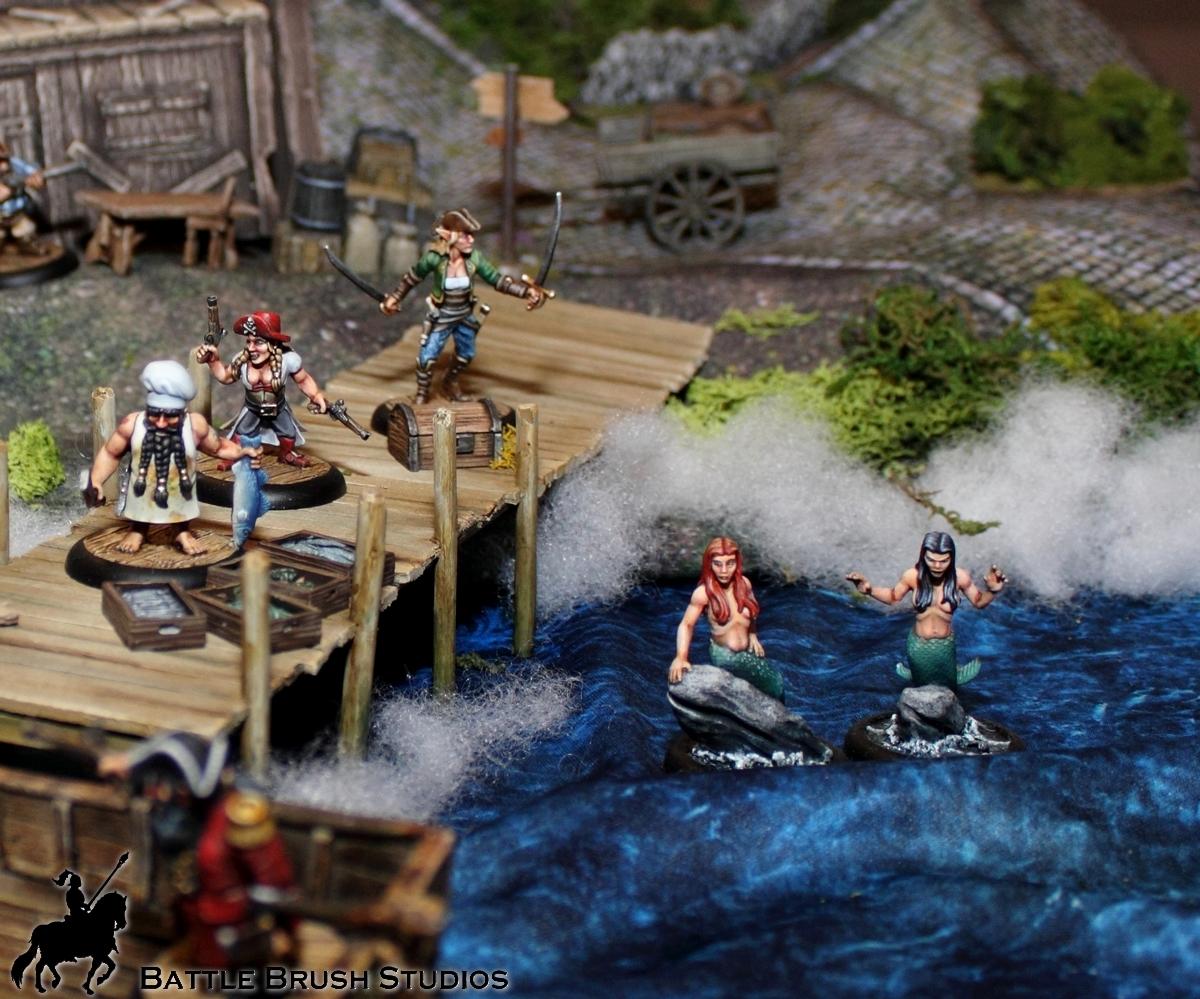
@Theophony: Yeah, not well I'm afraid. These are from a pretty huge range. The pirates here measure 24-28mm foot to eye. They're said to go OK with GW's new dwarfs if that helps.
Another WIP shot:
Slowly slogging through these figures. But tonight I'm allowed to go out and play a game. That'll be fun.
|
|
|
|
2019/01/12 18:05:44
Subject: Re:Battle Brush Studios' Commission Painting Log - Massive update! 40k, WHFB, Historicals, Infinity, ..
|
|
Buttons Should Be Brass, Not Gold!
|
@Dysartes: Yup, 'Make'em come for the fish and make'em stay for the Dwarves" my dad used to say. Once. He was kinda drunk.  Right, last night I had my first game of 2019! Following the trend of last year it was another game of Sharp Practice with Cpt.Shandy's great 15mm ACW collection. We used an Ambush scenario based on suggestions from Wargames Illustrated #365:  Ambushes are one of the very basics of warfare on a tactial level, but a bit problematic to depict on the tabletop. The worst case being that a player knows that at turn 3 exactly from the middle of the long table edge over there [x] units of type [y] will show up and attack me. This is quite contrary to every single principle of an ambush. The suggestions from the WI magazine come in very handy and are pretty cleverly thought out. Basically the idea is that in this scenario neither of the players know WHO gets ambushed. Our forces start with the mission to secure and hold a crossroads in the middle of a small hamlet of buildings. For this each of us has 3 groups of line infantry and a group of Native American troops as irregular skirmishers. At a certain point in time the additional forces lying in ambush spring into action. On whose side they fight will only be decided at this point, so until the very moment the ambush springs you don't know if you're the one getting ambushed of it it's the other guy. Either way, at this point the objective of the ambushed side changes to "get your troops off the table as safely and quickly as possible". OR of course try to be a hero and still fulfill the original mission. Which of course is tough. Cpt.Shandy, my opponent in this game, has played such a scenario before. Here's his battle report: https://wargamingraft.wordpress.com/2018/04/08/ambush-a-sharp-practice-aar/ Another thing to me of course was the premier of indian troops in a game of Sharp Practice: 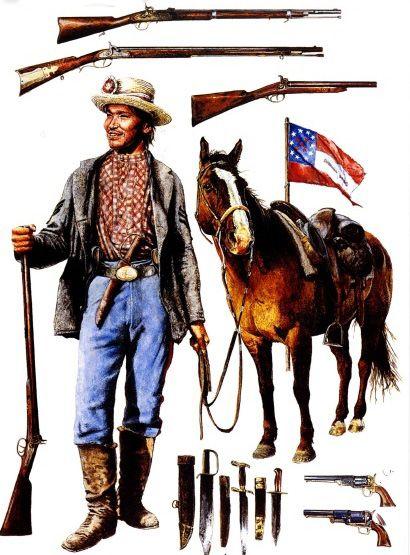 For more information on how the models were converted and about the role of native american troops in the Civil War, have a look at Cpt.Shandy's excellent article here: https://wargamingraft.wordpress.com/2018/07/21/native-americans-in-the-acw/
The Game This is what the game looks like: 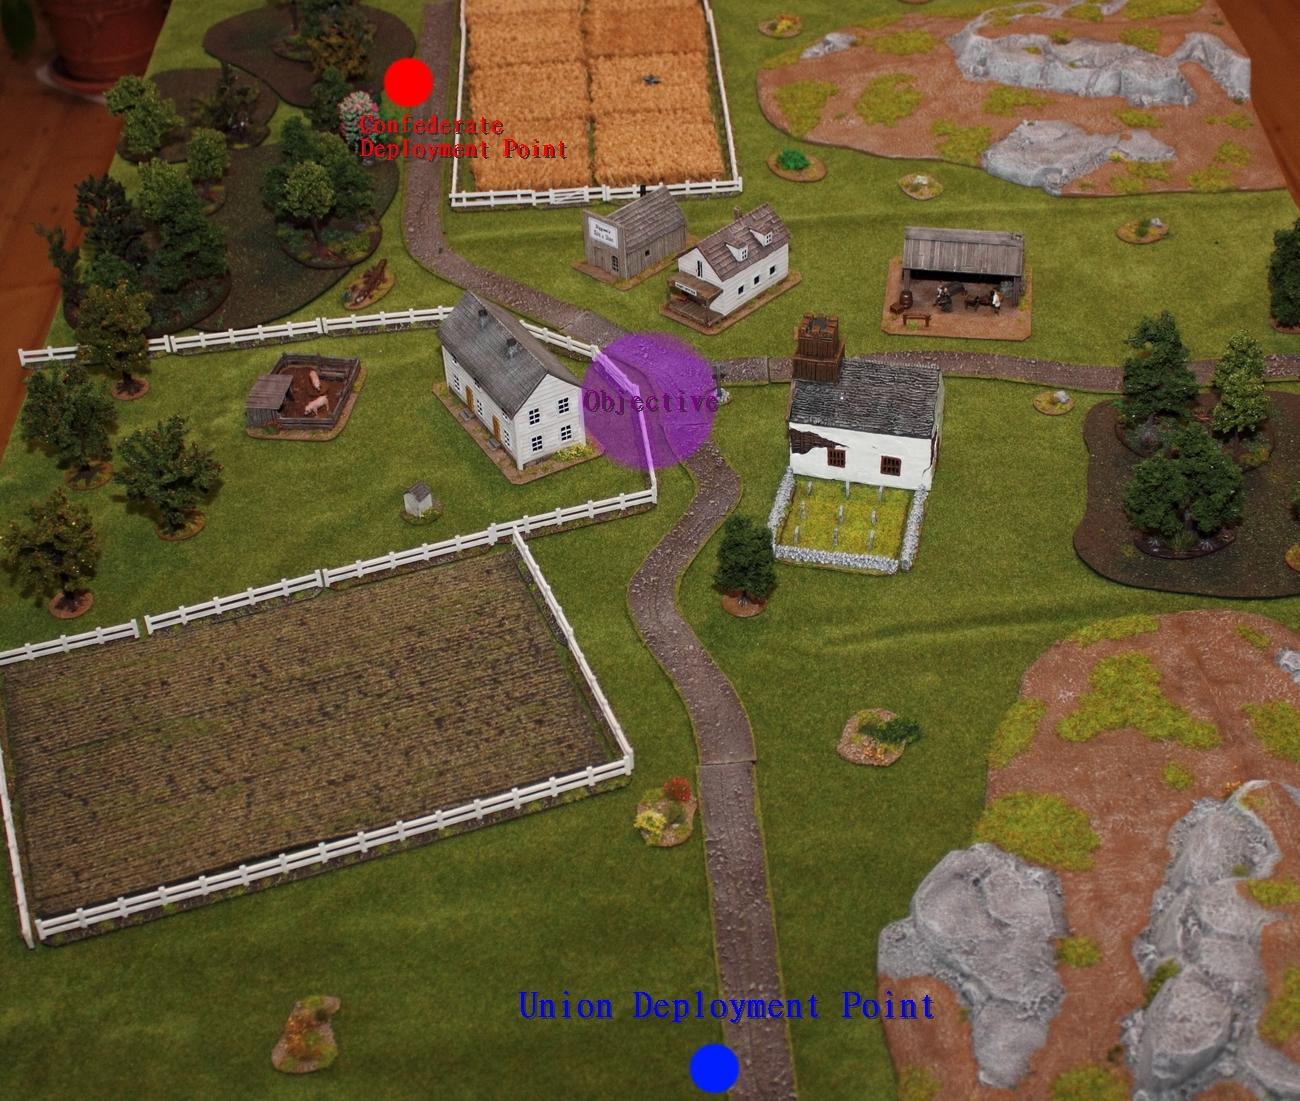 Once more I took the role of the Confederate commander, Cpt.Shandy played the Yankee troops. In the beginning each side has a Level 3 Leader, 3 groups of infantry and a group of Cherokee / Union Indian Brigade (classed as irregular skirmishers), each with a Level 1 leader. My infantry had the Rebel Yell special characteristic. I think the Union troops had the usual Stubborn characteristic. My Cherokee got Prominent Leader, Buck&Ball, Aggressive and something else. The Union Indian Brigade were less aggresssive and went out without a Prominent Leader. Instead they go rifled muskets whereas my native americans only had smoothbore muskets. Controlling the objective provides a bonus to Force Morale, to give a bit of an incentive to players to take the objective. I start the game by leading my infantry and skirmishers onto the table, line infantry in open column. 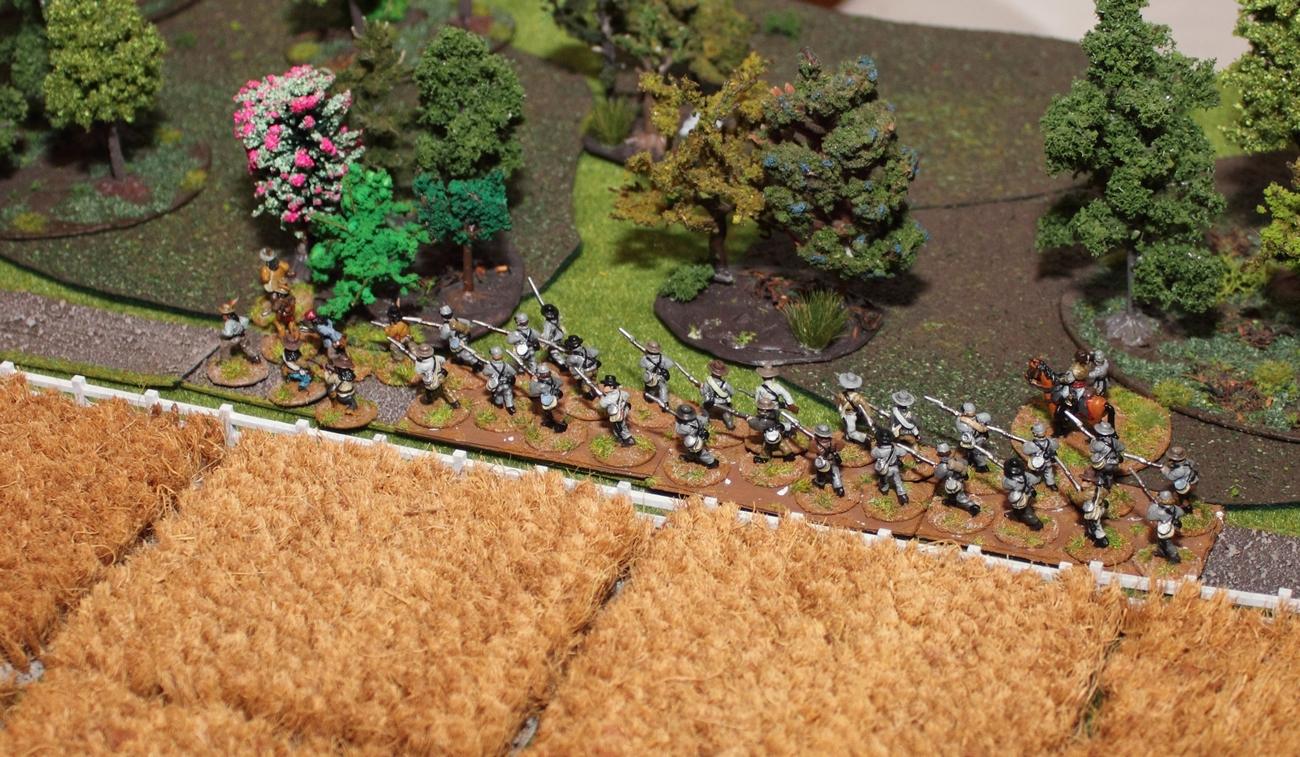 My opponent follows suit, albeit his troops seem to be able to advance much, much faster. His Indian Brigade group advances across a field and immediately opens fire at my skirmishers. 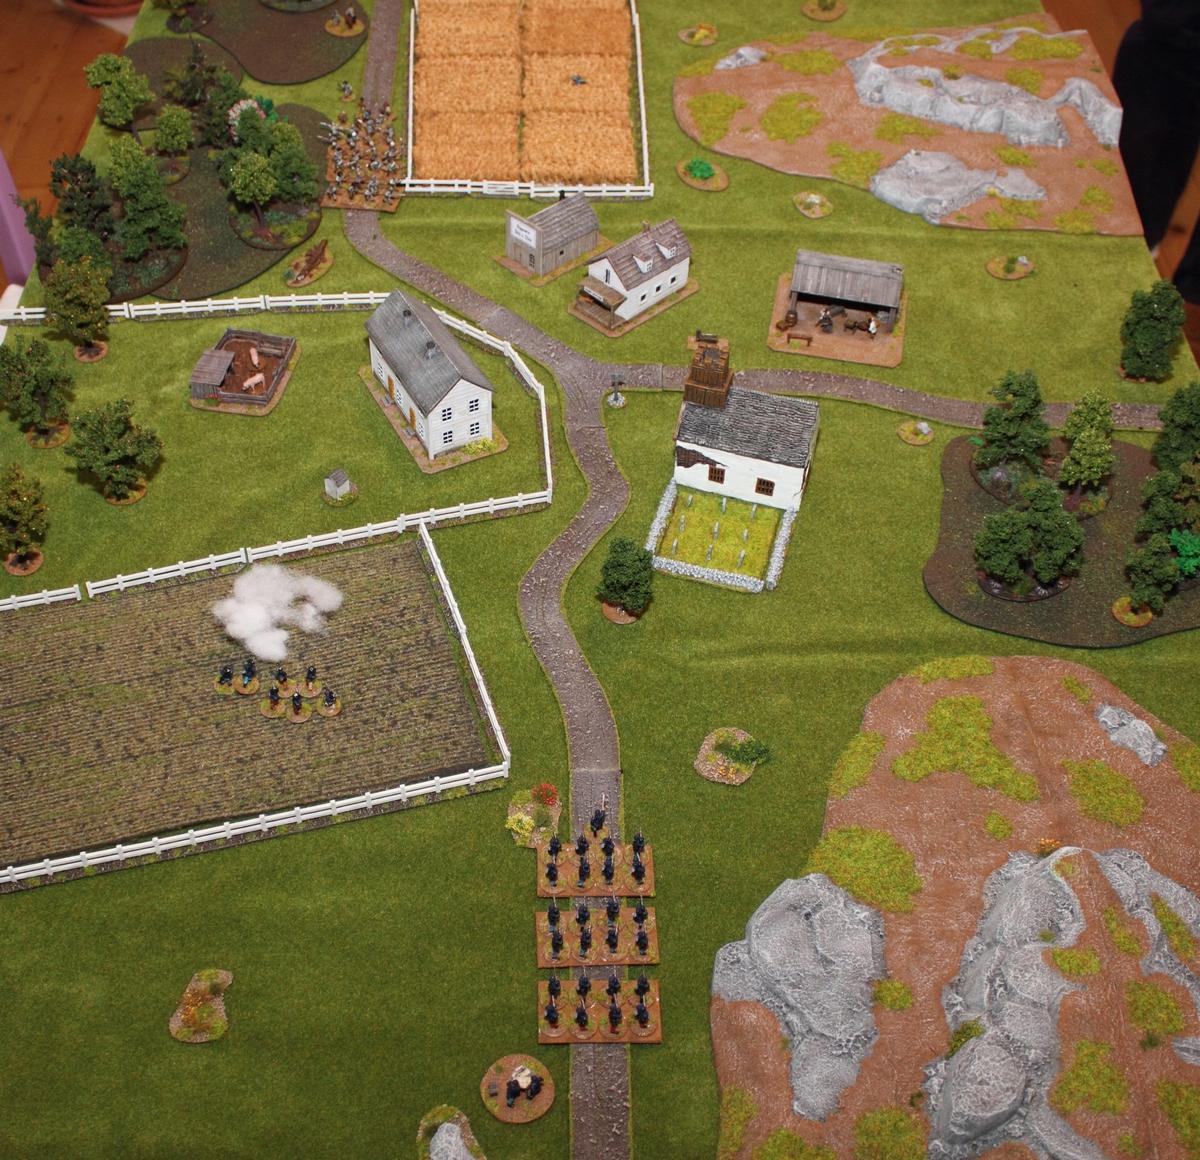 An overview of what happens during the first few turns: The Yankee column svivels to the right and marches around the built up area. Union skirmishers take cover behind a fence and keep firing at my approaching force. Seeing as how the chaps in blue advances very quickly and my dudes being very slow thus far I have to act defensively. The plan is to have my commander take two groups, form line in front of the Union skirmishers and blast them to hell. Then I hop over the fence and take the crossroads while the Union line troops are being harassed and delayed by my own skirmishers and a single group of infantry. Once the crossroads is secure, the commander can rush over to help with that. IF I was to be ambushed I can still retreat along the road I came onto the table relatively unharmed, seeing as to my left there'd be forests and to my right LOS-blocking, high-standing crops. Perfect plan, what could go wrong? 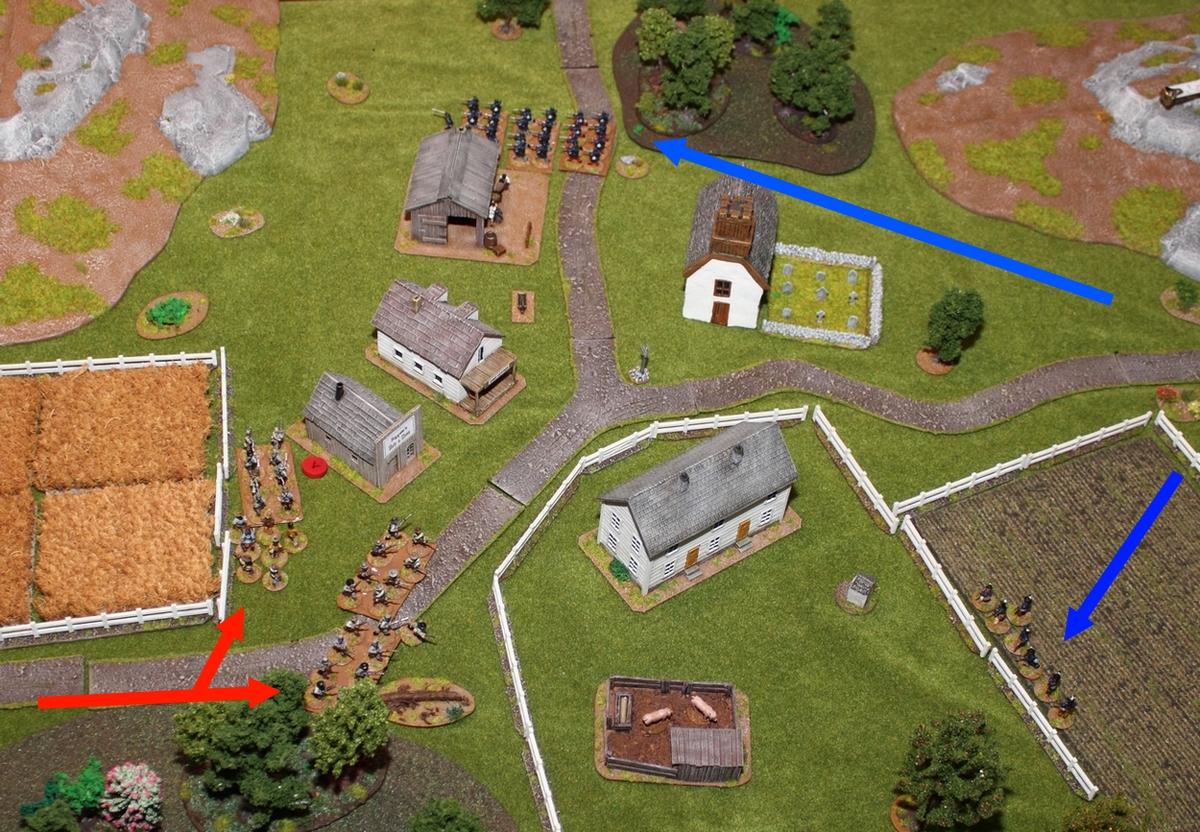 Unfortunately my guys refuse to advance swiftly. At all. Appearantly they heard rumours of beastly Natives sitting behind every rock. So my guys act all 'sticky' and time passes. Possibly sitting back is even to my advantage, as groups of figures appear on the hill across the table. 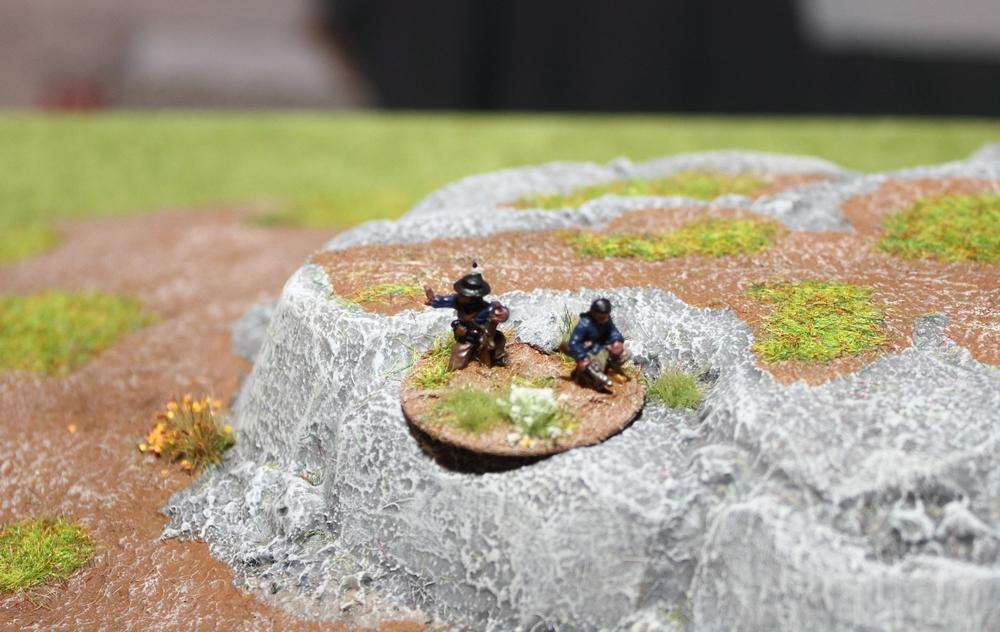 Two more groups of Native Americans in blue jackets enter the table, carrying all-new rifled muskets. Oh my. 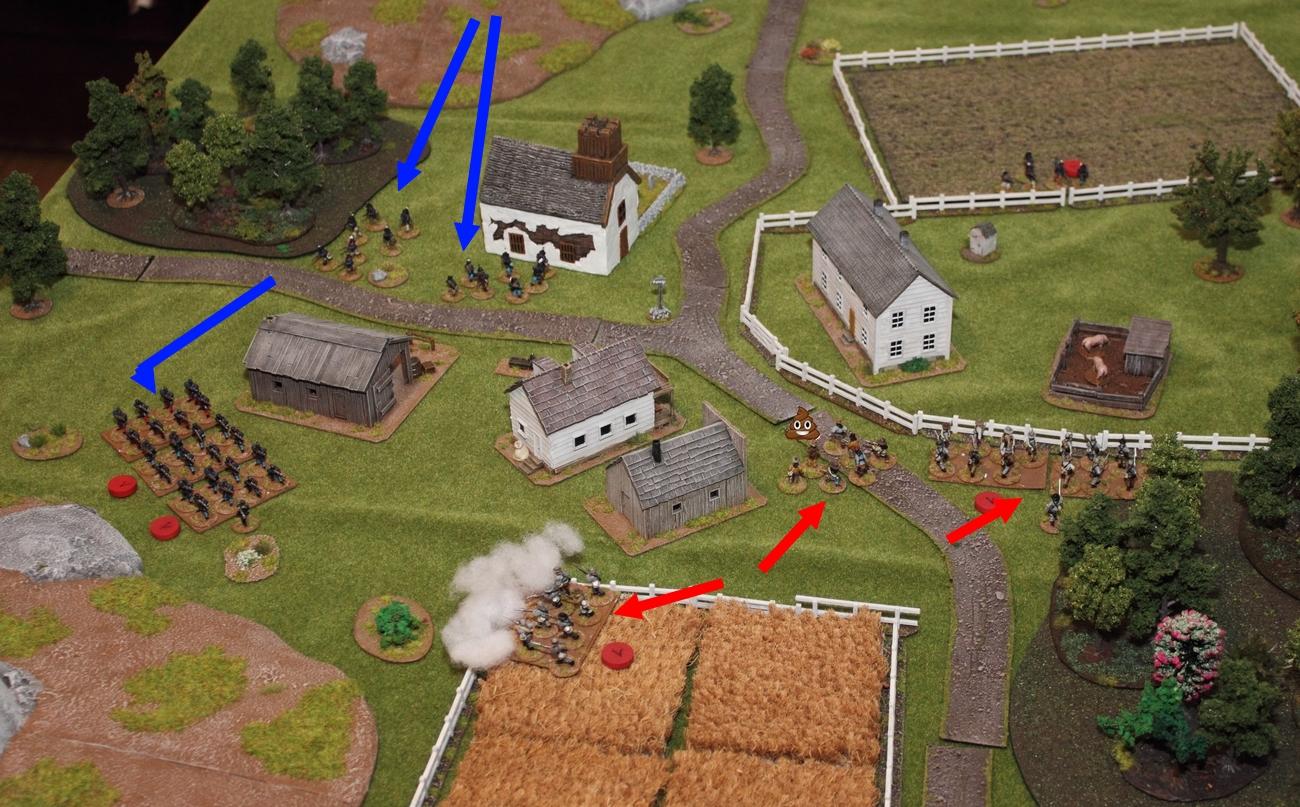 In the photo above you can see what happens next: I proceed with my plan on the right flank. Present, Fire, Bang!, the Union skirmishers across the field take a fair amount of damage. On my left I send my infantry into the cornfield. In the last game I've had good exeriences with single groups of infantry using the cover of cornfields to delay larger formations. My Cherokee moved to the right to fill the gap in the centre. Their Prominent Leader, using dramatic gestures to encounrage his men, steps into Something Horrible. This effectively reduces his status (from 1 to 0), because his best mokassins are all messed up and his men are well amused. The leader would have to find a source of water to wash off the Horrifying Substance, otherwise it would be very, very hard to get the Cherokee to do anything at all. He considers the usual options: Church, stoup - impossible; the enemy's swarming all over the church. Trough in the pig pen - uuuuurgh. Not if this can't be avoided at all. Also, in direct line of fire of the slight decimated Union skirmishers. Then he gazes to his left and the problem is solved: 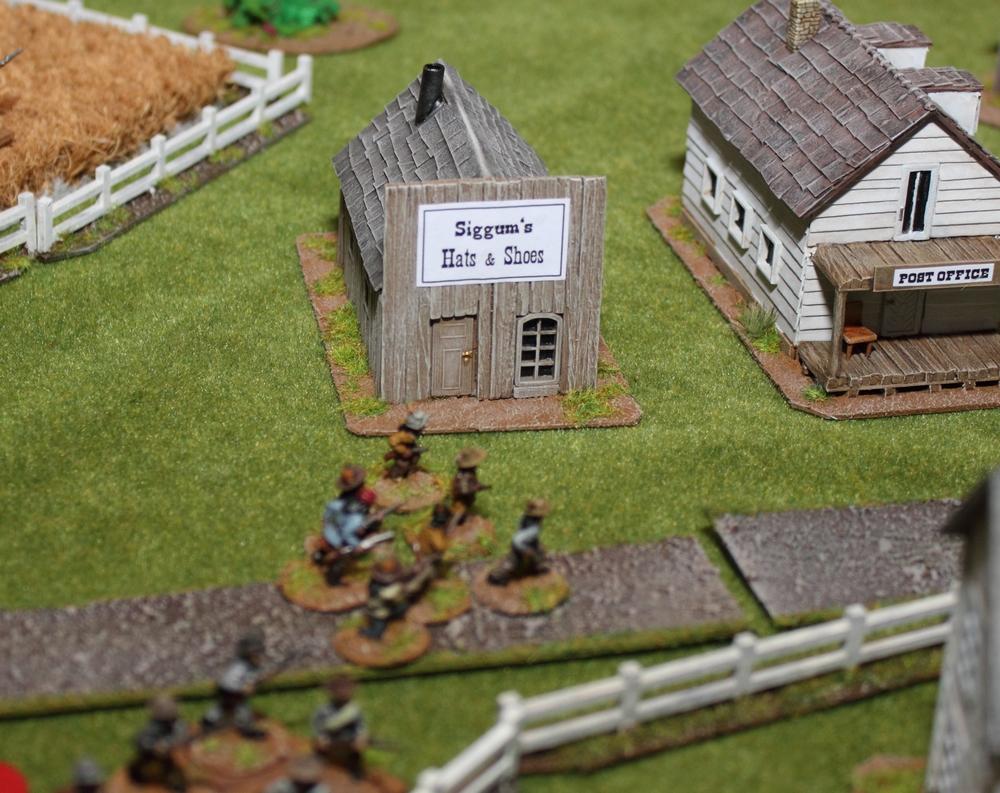 Through a coincidence only possible in Sharp Practice the whole affair took place right in front of a shoe store! The Cherokee decide to do a shopping tour. At my left other remarkable things happen: The Union line troops are mighty unimpressed by the random shots my guys take at their column. They form up in close column (or rather attack column), lower bayonets and charge my line infantry! 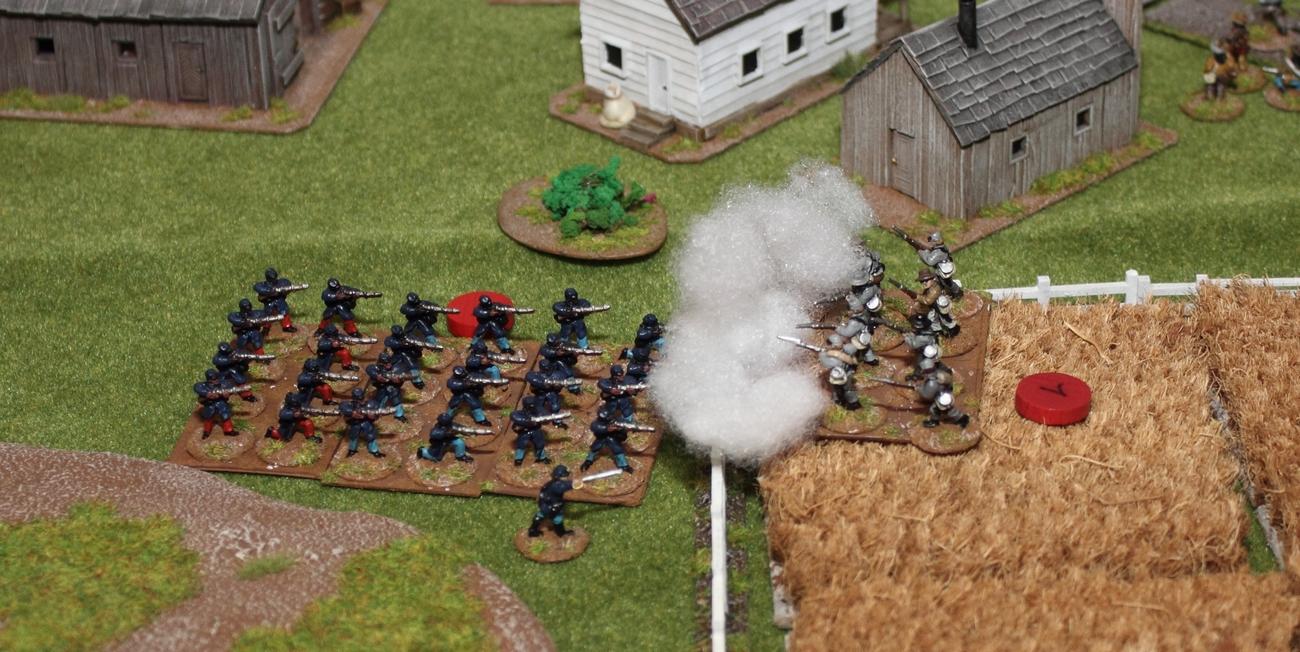 My guys get beat up bad and retreat. In the mean time the Cherokee shop for shoes and hats. Here and there one of them takes a shot at the union column, but due to lack of volume of fire the results are minimal. At this point I decide to retire off the table. My officer has his line on the right turn around and - true to their form - they sloooooooooooowly start making their way back down the road. While doing so the rampaging Union infantry had made it through the cornfield to meet my infantry. During the whole chaos my officer accidently gets pitchforked into a ditch by the road. Lateron some men would claim (outside earshot) that he had dove there to take cover. In this second bayonet charge carried out by the Union within a short timeframe they again prevail with minimal casualties. my infantry group gets routed off the table. My commander, once he looks up from his ditch screams at the remaining group of infantry to leg it and follows suit. Now all I have left on the table is the Cherokee still sitting in the shoe store, but they realize that it's time to take off too. Again, very slowly. In war it is said that complicated things become very simple, but the simple things become very complicated. Like crossing a road in new, and not yet broken in pumps. My stalking skirmishers get fired at from both sides (first time the union infantry fire this game, before that they've only used their bayonets), and THEN they get charged by Union Native troops and break. Bad, bad things. 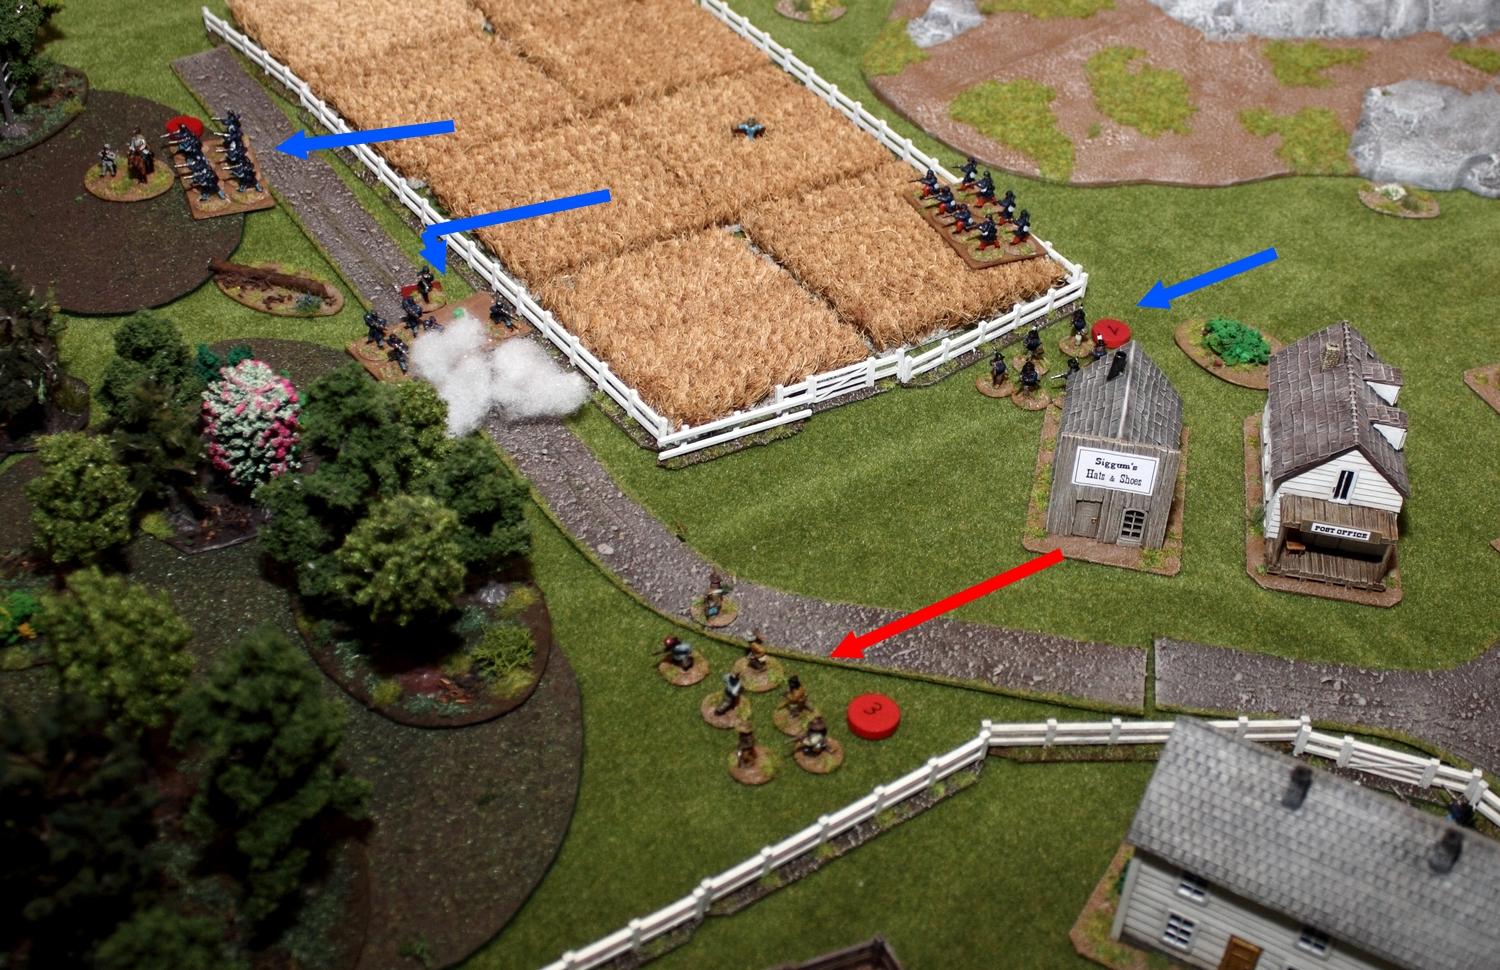 To make their victory total the remaining union troops take out my deployment point and caputure the crossroads. It's a Victory for the Union!  Debriefing Debriefing Another fun game. The ambush scenario is very, very interesting. We changed it a little, so it makes more sense (like making the ambushing force a fair bit larger). Of course adding another Sergeant (lvl1 leader) to each side would have made things easier. But you have to make do with what the scenario provides. Irregular skirmishers are fun to use. The rules never cease to provide a fun game with memorable moments and a good narrative. The shoe store I think made its debut in this game and already became somewhat of an MVP. The subtle conversion work done by Cpt.Shandy on the native american troops are something behold; i strongly suggest looking at his article on his blog (link above). As always, fun was had and a good start into the gaming year 2019!
|
|
This message was edited 2 times. Last update was at 2019/01/22 15:57:07
|
|
|
|
2019/01/13 01:09:38
Subject: Re:Battle Brush Studios' Commission Painting Log - Massive update! 40k, WHFB, Historicals, Infinity, ..
|
|
Buttons Should Be Brass, Not Gold!
|
@Gitsplitta: Glad you liked it!
@Dysartes: Here's a review of the Sharp Practice rules I wrote: http://skirmishwargaming.com/sharp-practice-rules-introduction-review/, and there are some youtube videos out there as well if that's your thing. Bascially what kept my troops from moving as fast as I wanted and much slower than my opponent's was bad luck. A combination of being a bit unlucky with activations ( SP uses a card activation system which doesn't guarantee that all of your dudes may move/act each turn), and movement is rolled for with dice. If a unit is activated they basically have 2 actions. Each action they may spend on rolling 1d6 and move this distance in inches (they also may roll a third d6, but take some morale damage due to disorder and such). Almost all of these rolls I just didn't do well on. It happens. The game's whole focus is modelling command&control (and the problems thereof) and battlefield friction. So things can always go a bit wrong, and in this game quite a few things went wrong.
|
|
|
|
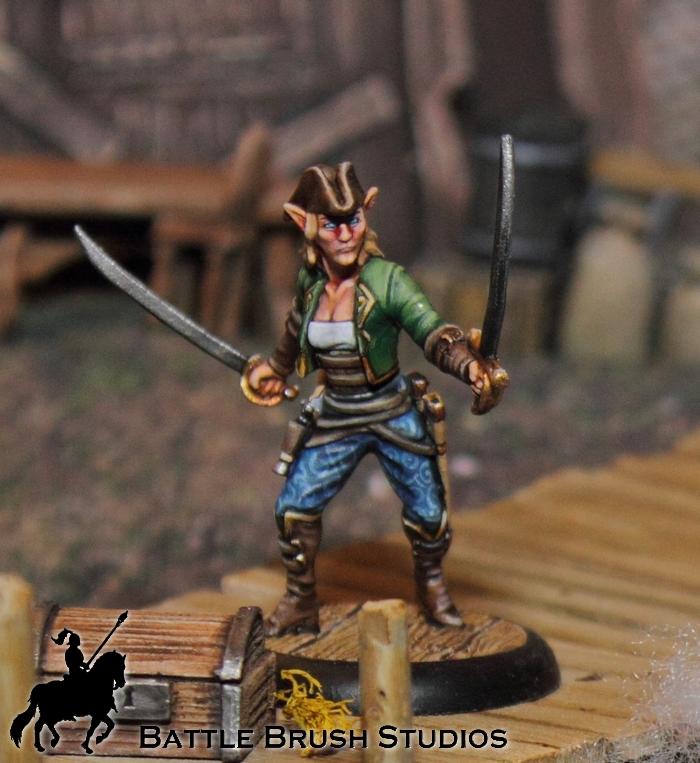
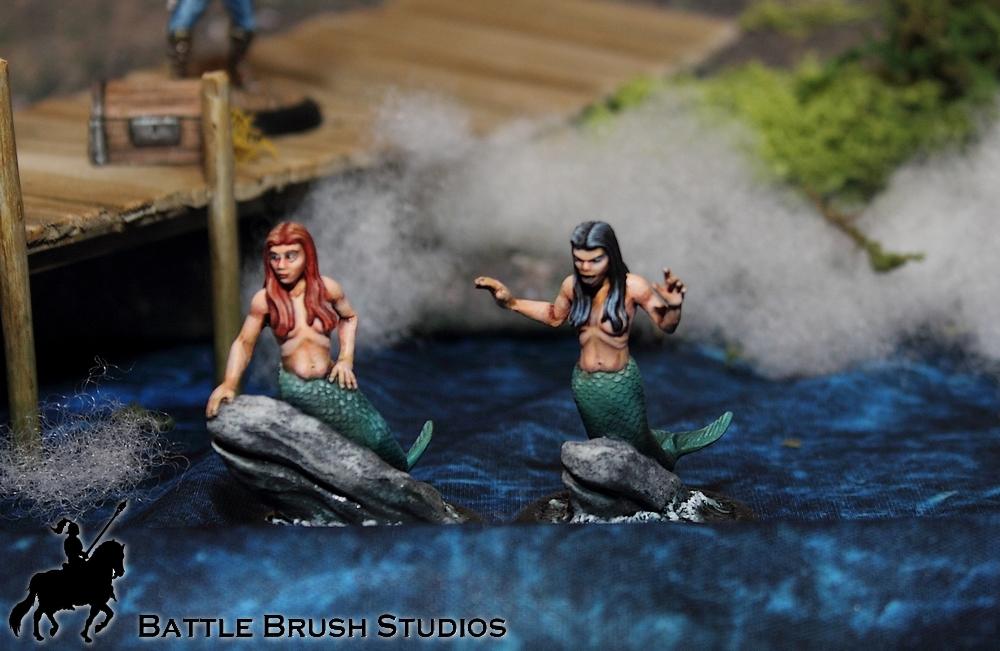
2019/01/15 00:38:03
Subject: Re:Battle Brush Studios' Commission Painting Log - Massive update! 40k, WHFB, Historicals, Infinity, ..
|
|
Buttons Should Be Brass, Not Gold!
|
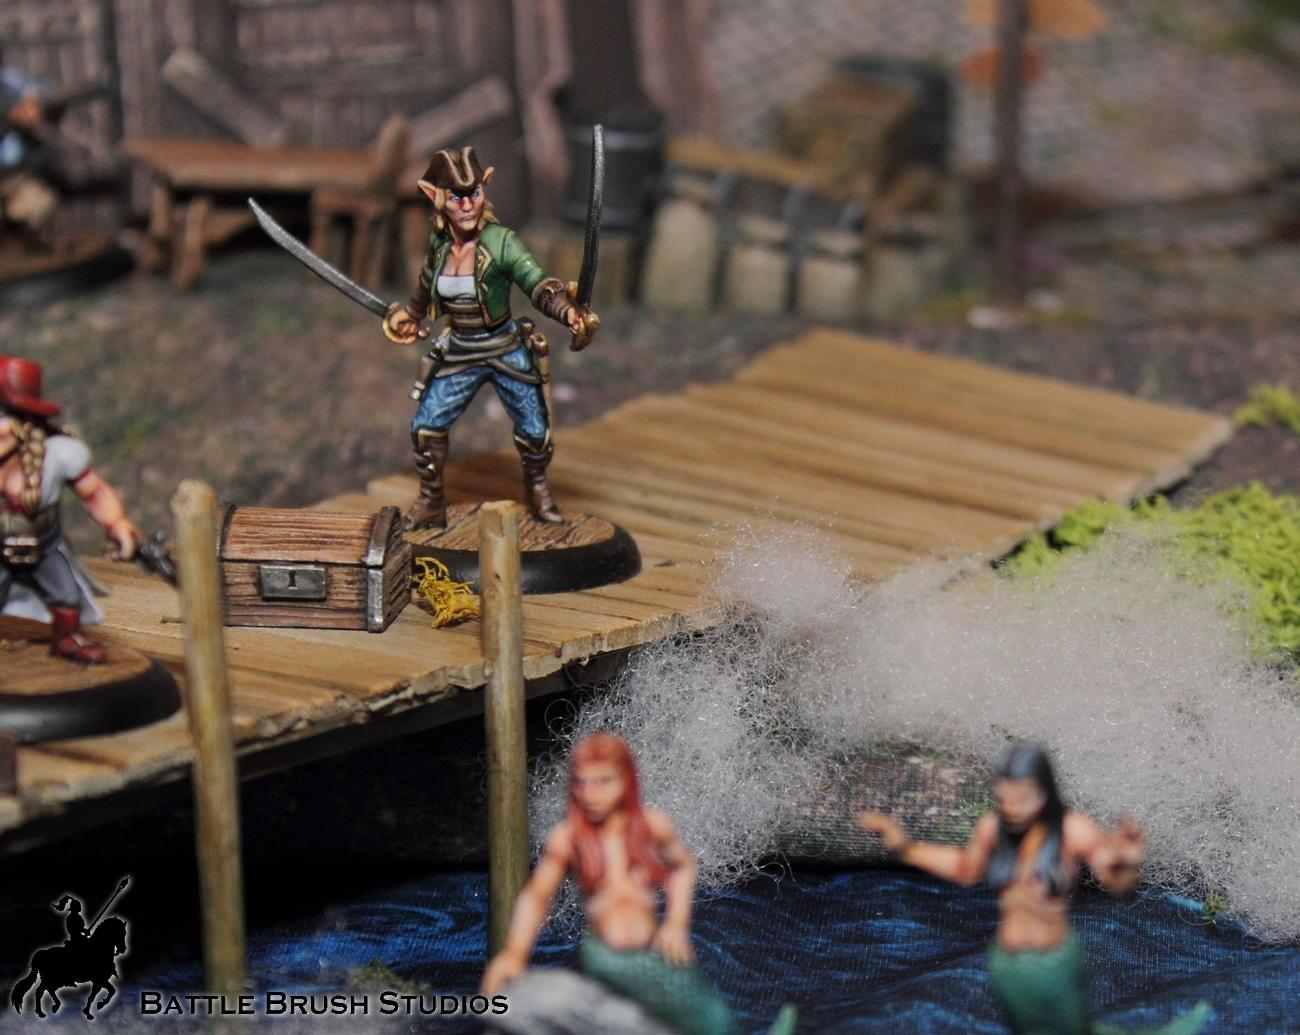
Right, I'm back. They're still WIP at this point. The Dwarves are almost done now, the Elf is done, the Mermaids require a bit more work. 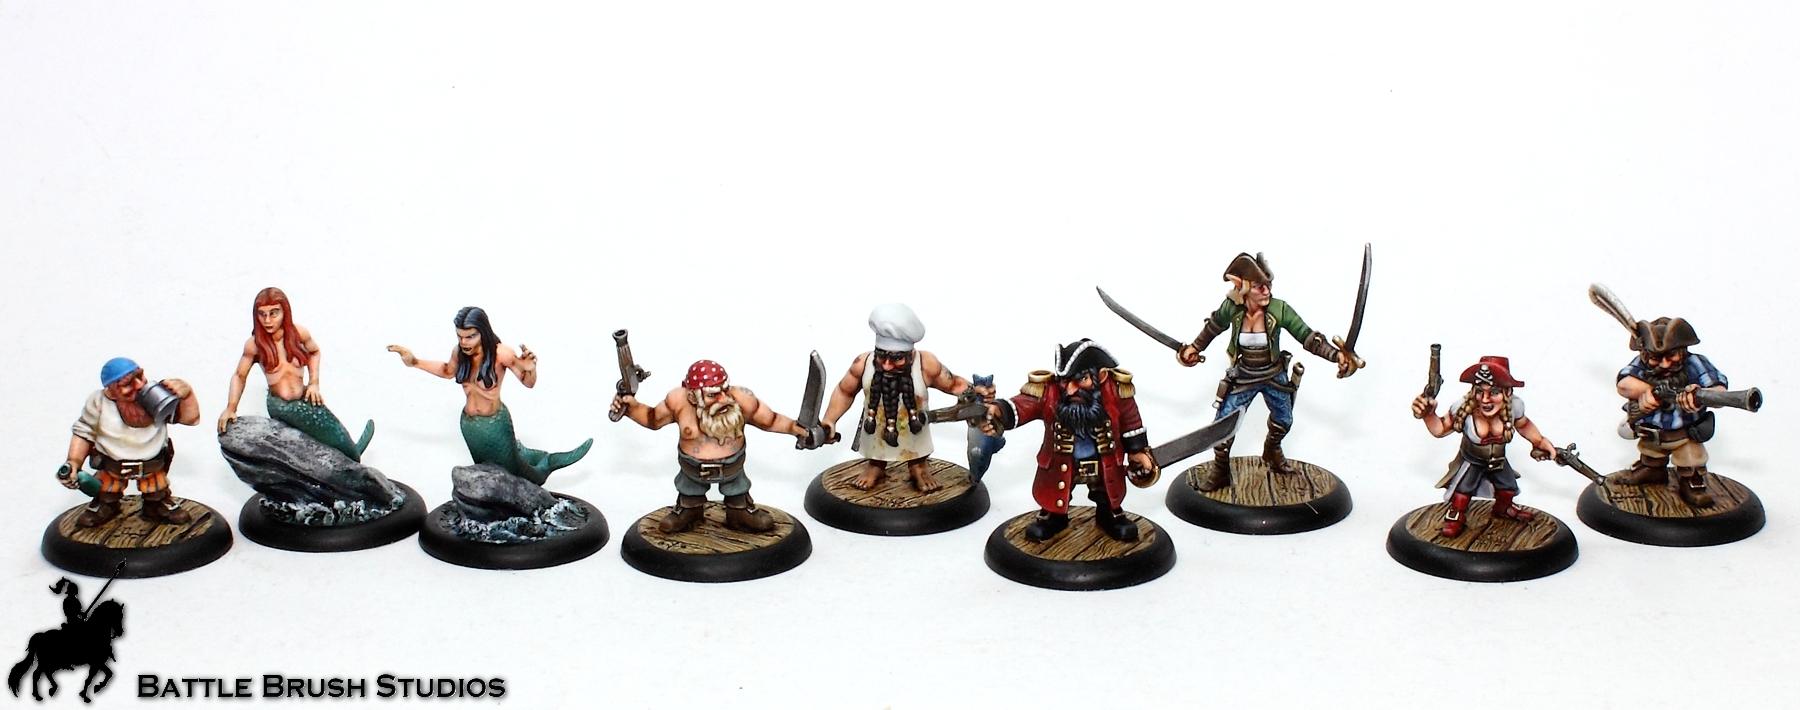 There's an Orc as well; I'll paint him once everything else is finished. Hope you like the figures so far! KS pledges will be shipped over the next weeks, the figures will be available through DEG's online store in about 2 weeks. And there's another KS in the pipeline for more human pirates and more. I think that'll start in February.
|
|
This message was edited 1 time. Last update was at 2019/01/15 00:38:18
|
|
|
|
2019/01/16 14:45:17
Subject: Re:Battle Brush Studios' Commission Painting Log - Massive update! 40k, WHFB, Historicals, Infinity, ..
|
|
Buttons Should Be Brass, Not Gold!
|
@Captain Brown: Thanks, Sir! For some reason ACW (one of the periods I thought of as not interesting to me) is all I play these days.
@Gitsplitta: That was the general goal.
Hi peeps. Sorry, just another WIP shot, but tarted up to the max:
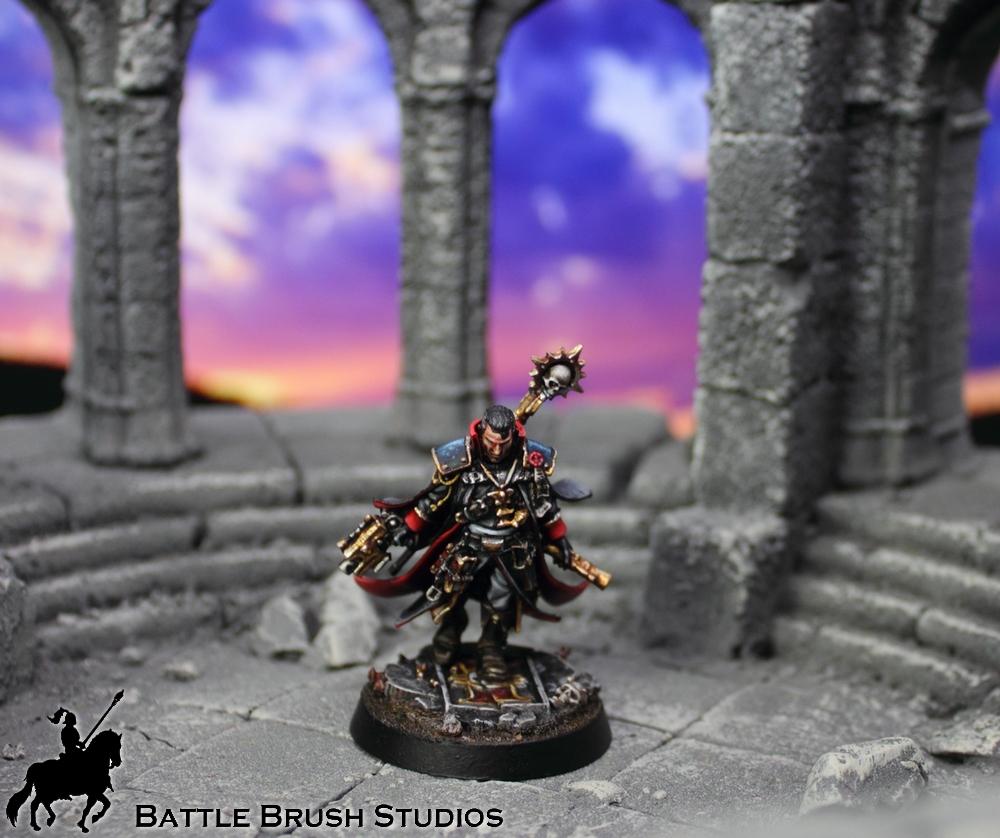
It's another Eisenhorn! This time I was asked to make the shoulder armour blue-ish grey instead of the regular turquoise. Hope you like him so far!
|
|
|
|
2019/01/19 12:05:10
Subject: Re:Battle Brush Studios' Commission Painting Log - Massive update! 40k, WHFB, Historicals, Infinity, ..
|
|
Buttons Should Be Brass, Not Gold!
|
@Gitsplitta: Cheers, much appreciated! The different colour on the shoulder armour instantly made him look like a "dark" colour variant on the same dude. Like when in Street Fighter you choose a different skin. @Dysartes: Oh no you didn't. Right peeps, the past days I've been preparing a whole lot of Infinity figures and finished Eisenhorn and the Mermaids. Oh, and I painted some Gloomhaven minis. No proper picture updates yet, but I did play things last night. 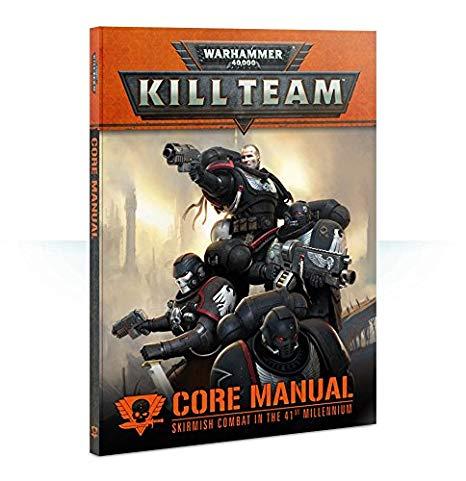 We decided to give Kill Team a go. So I wrote up a list, got out some minis and was off.  Death Skull Kommandos Nob (Power Klaw) Death Skull Kommandos Nob (Power Klaw), 7 Death Skull Kommandos, 3 Gretchins, 1 Death Skull Loota 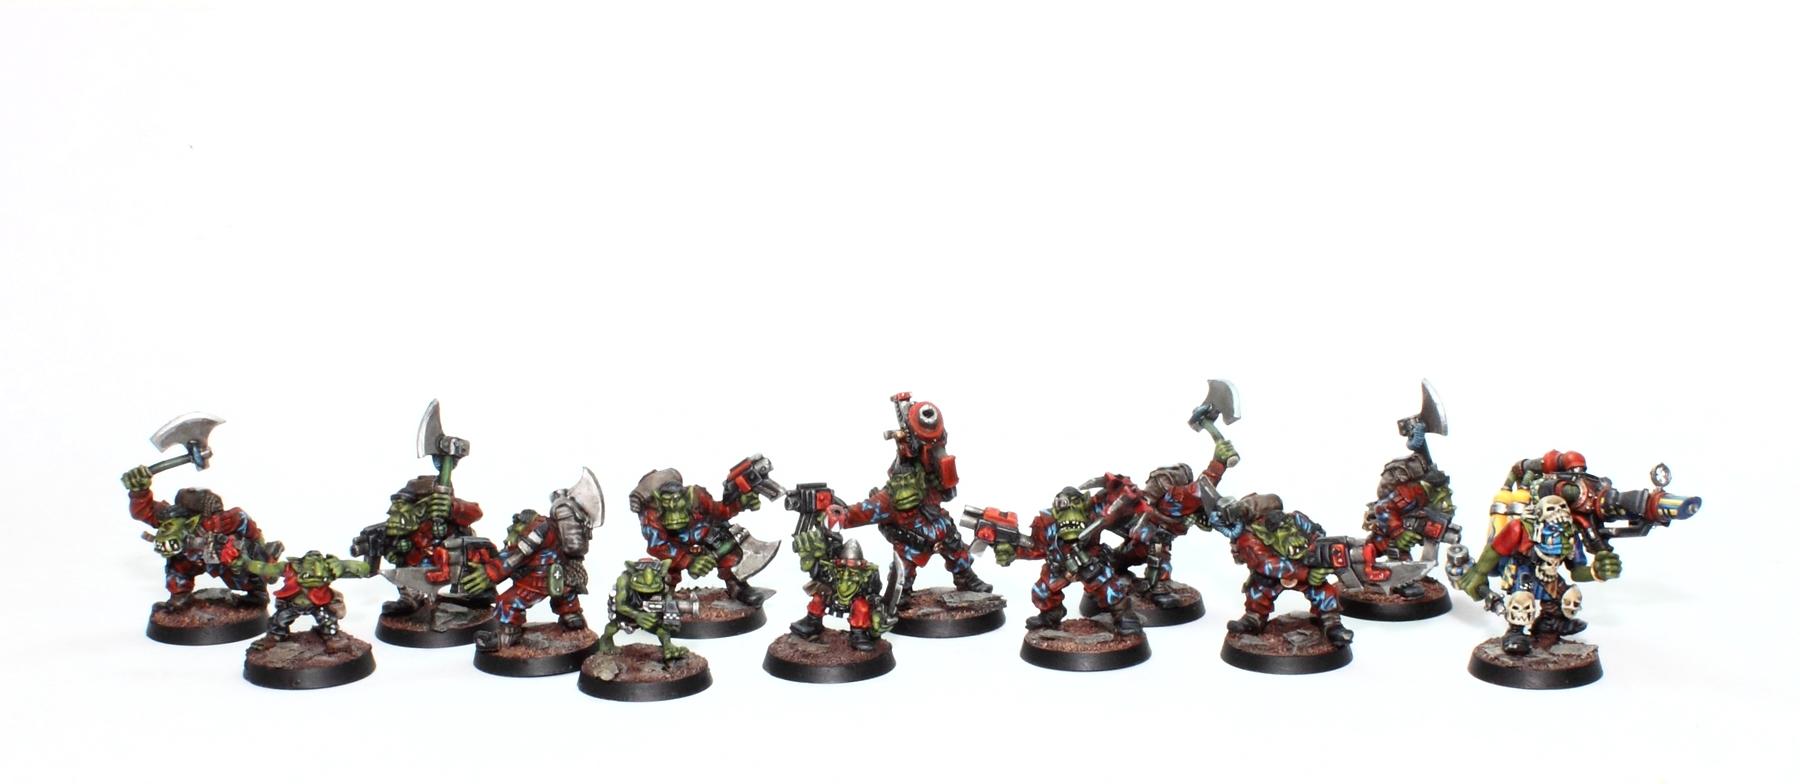 Virago played Blood Angels of course, and had chosen a Scouts Kill Team he'd painted recently.  Sergeant (Chainsword, Bolt Pistol), 2 Scouts with Shotguns, 2 Scouts with Boltguns, 2 Scouts with Bolt Pistol/Close Combat Weapons, 1 Scout with Sniper Rifle, 1 Scout with heavy Bolter 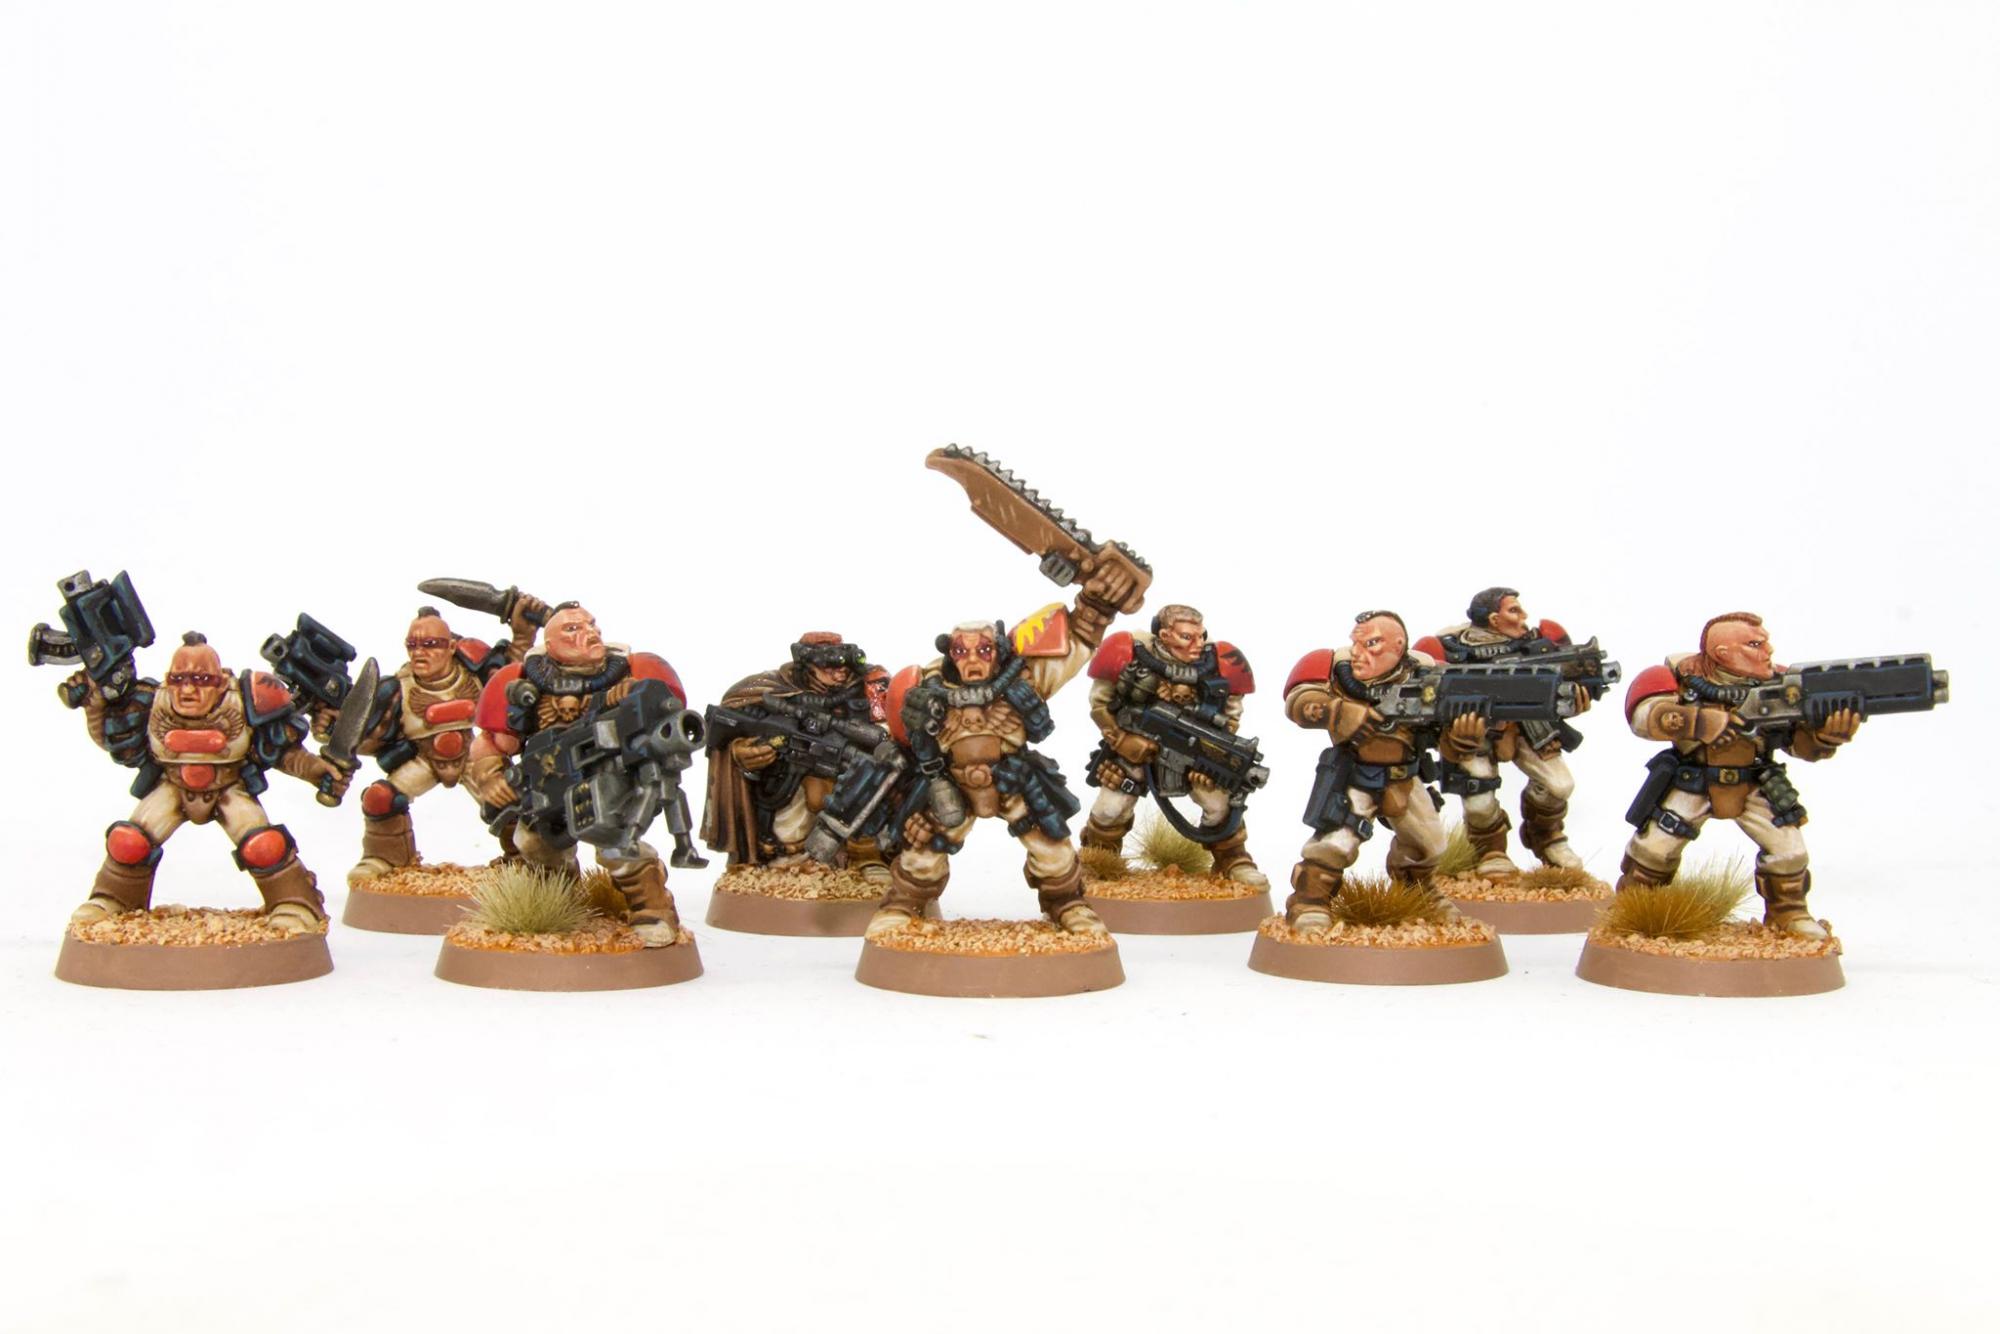 The scenario was "Cut Supply Lines", so my Kommandos were to get in there and capture or destroy three supply stashes. The Space Marines were to stop them from doing so. 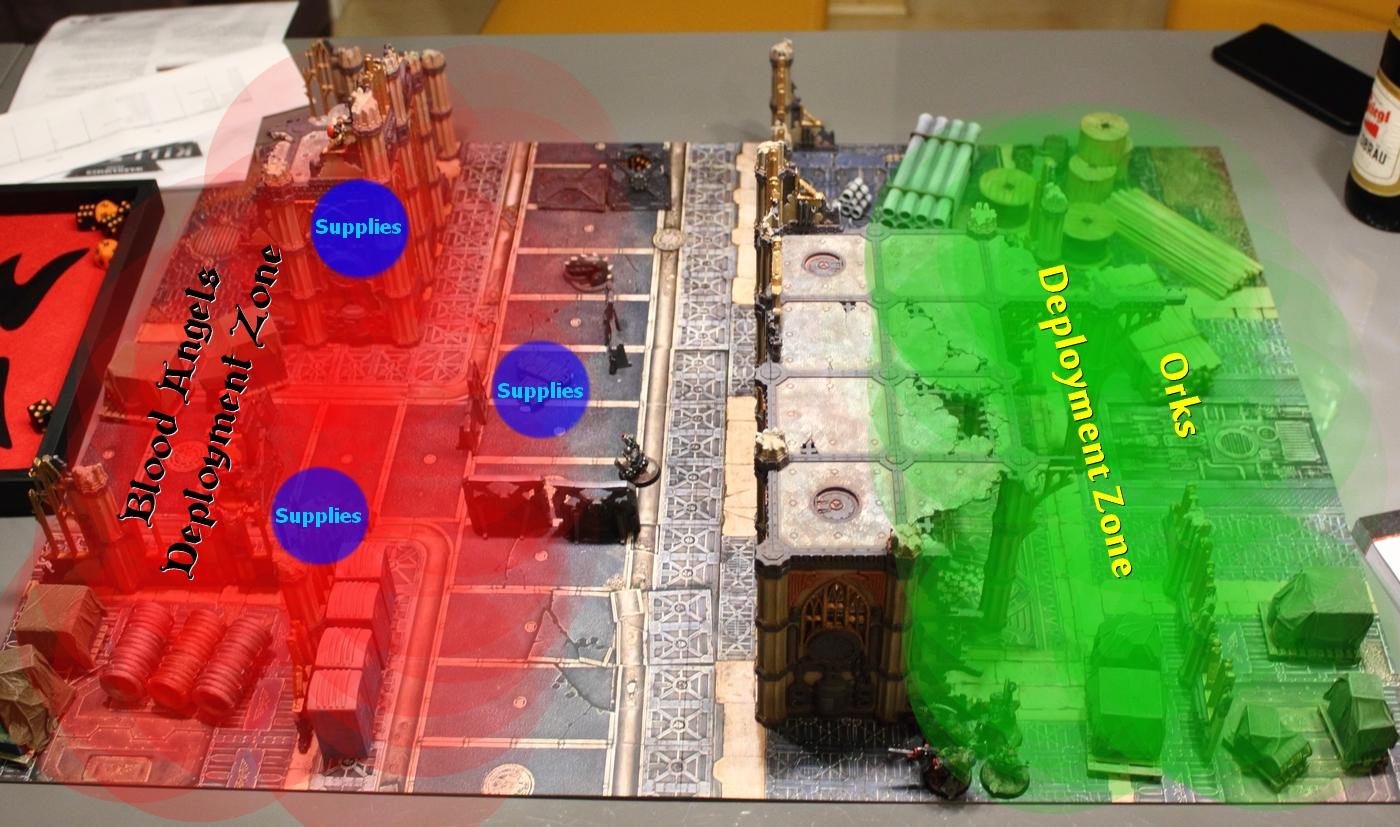 In reality it looked like this: 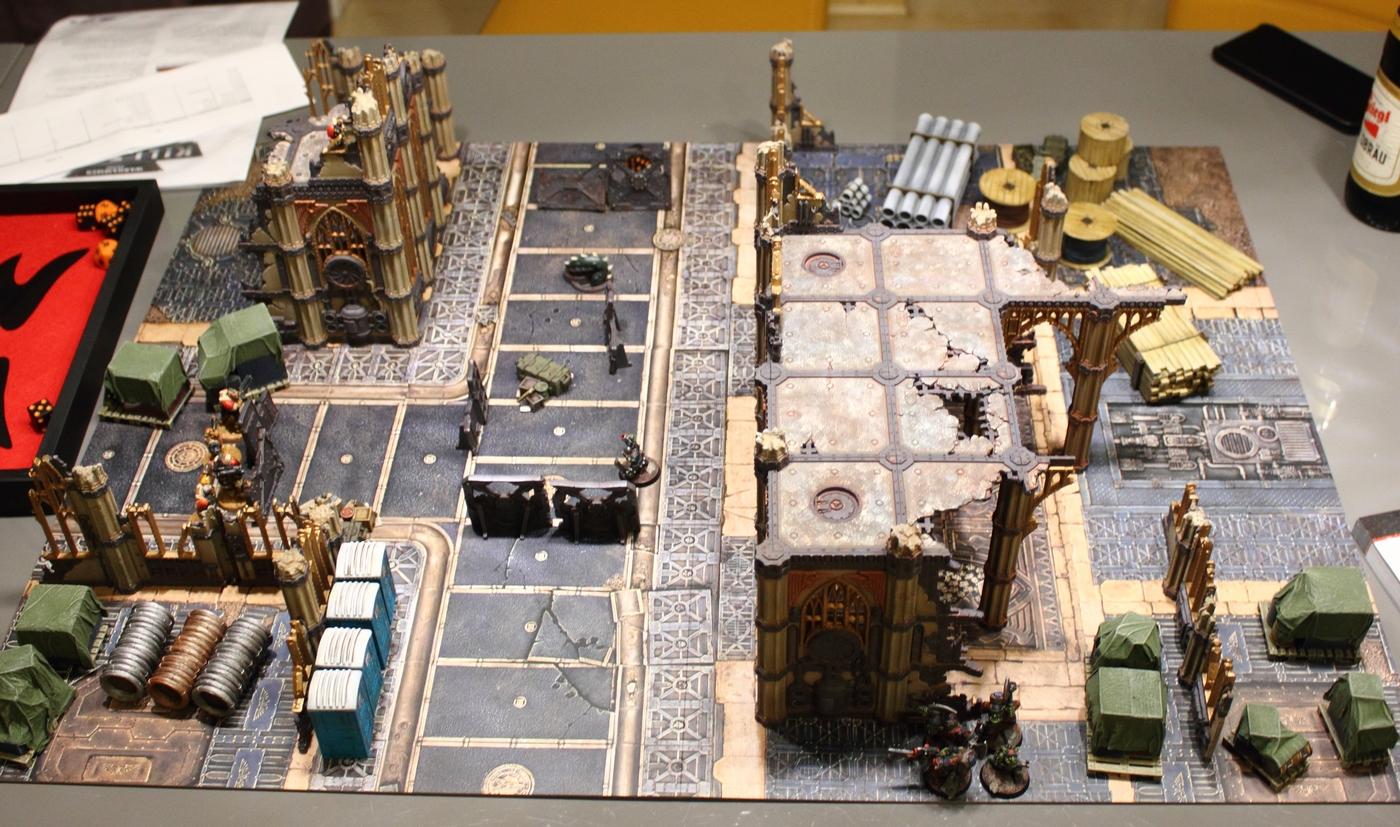 (please excuse the horrible photos) 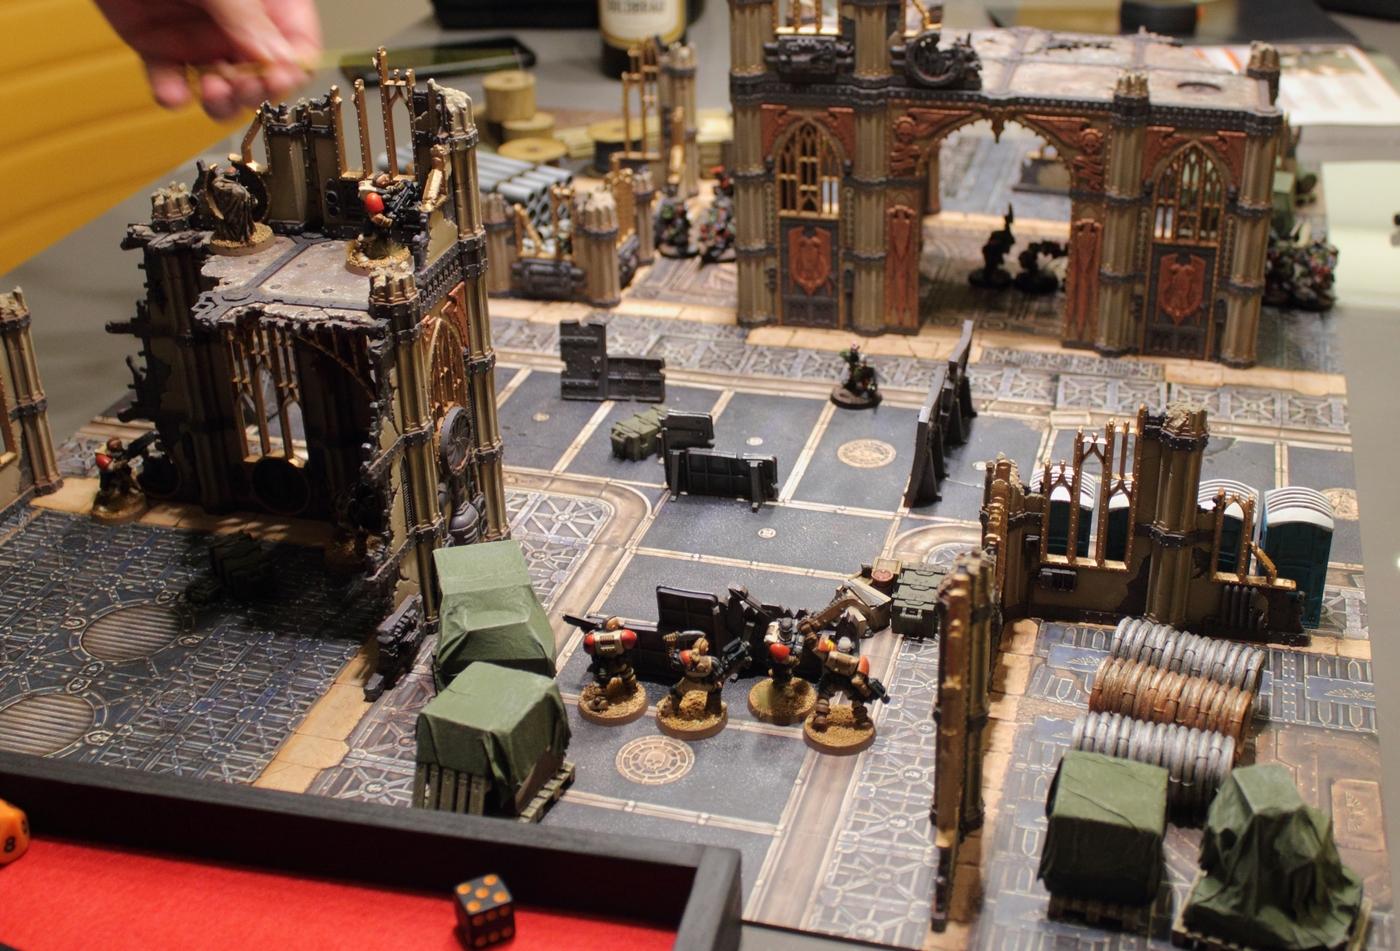 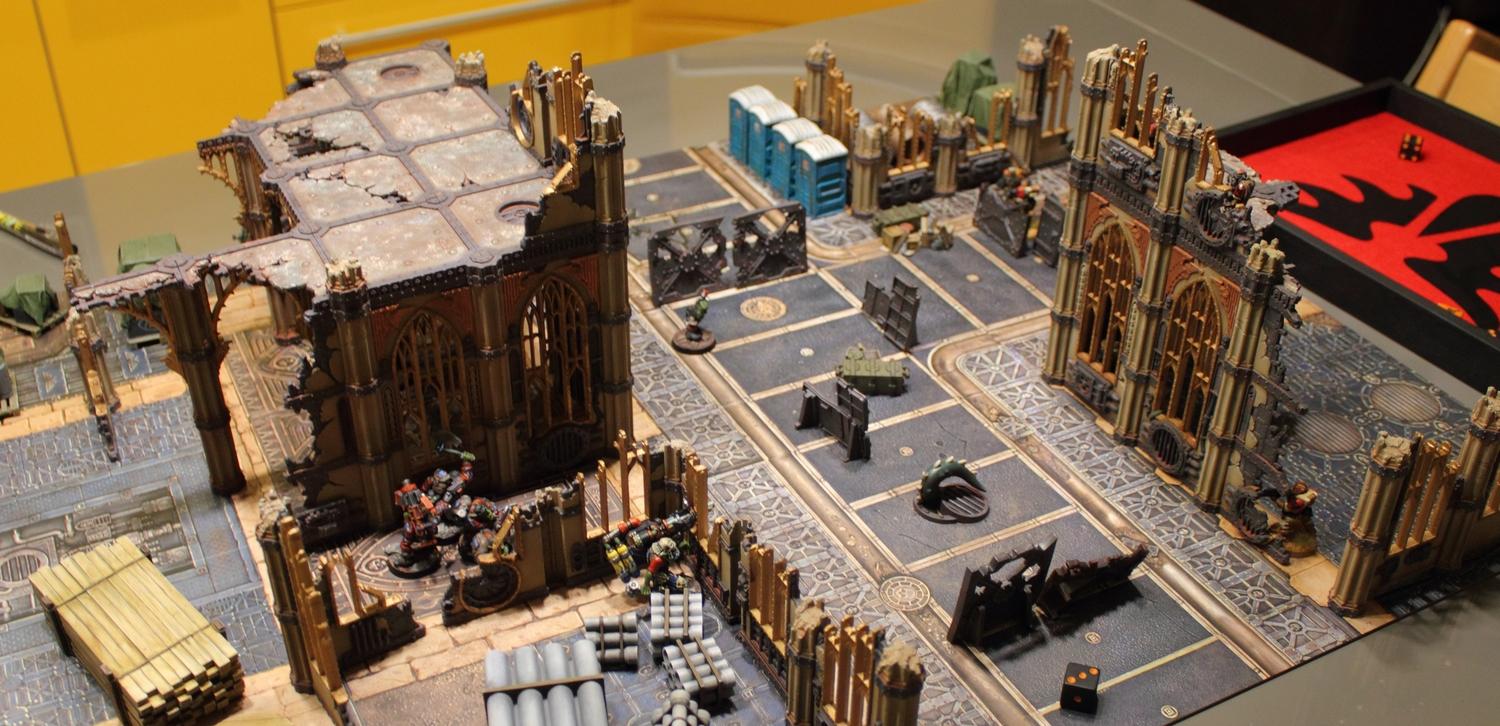 The Heavy Bolter scot and sniper took position on top of a building.  Here's the first and last picture of my beautiful Loota. He got shot by the sniper on turn #1: 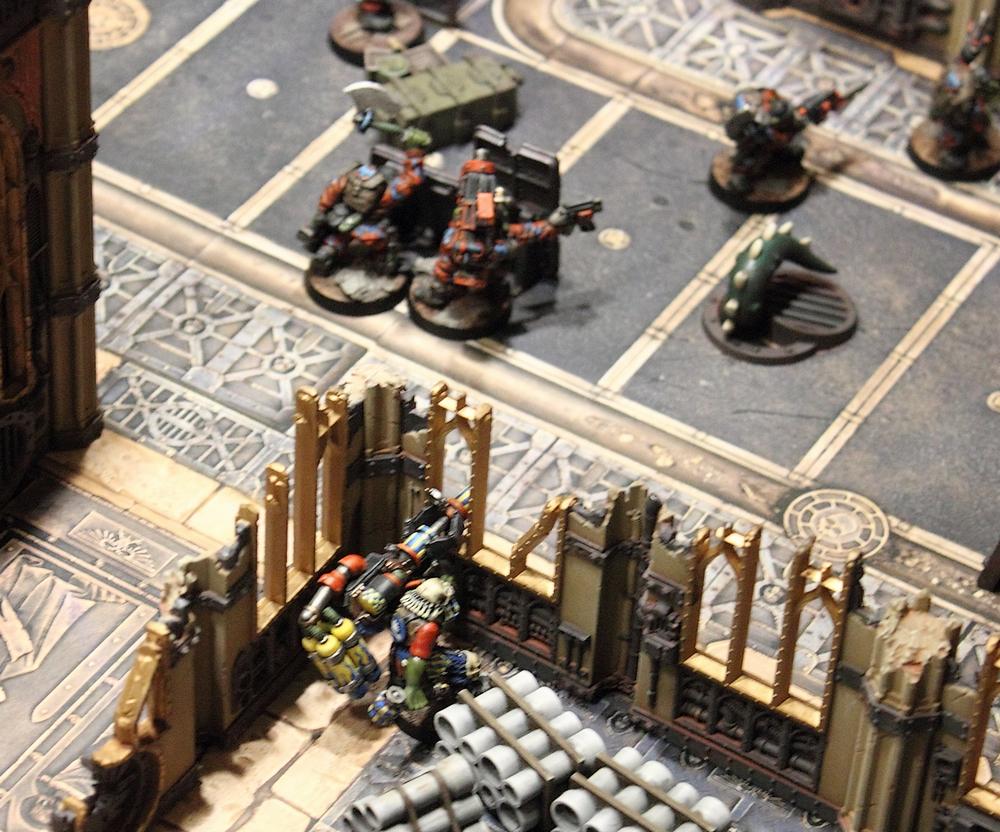 Bascially I had my Orks run across the street while the Space Marines were firing at them: 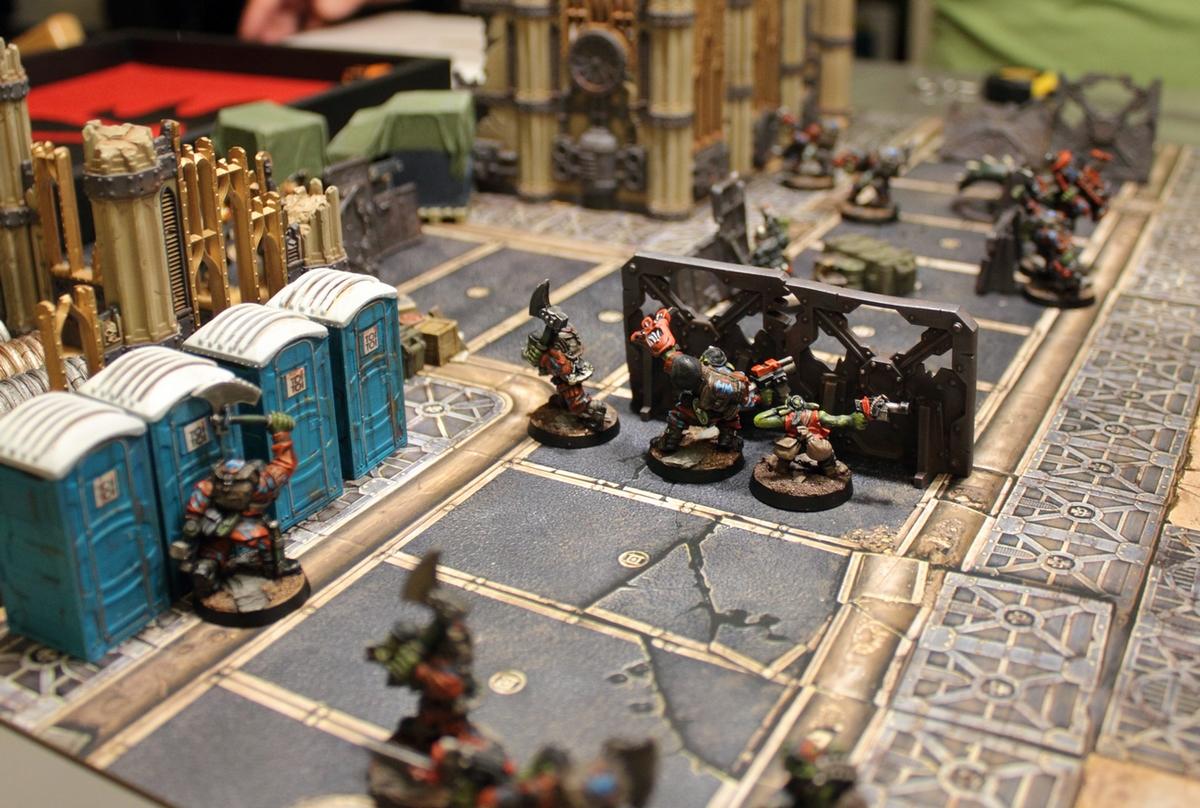 At some point I made it into close combat, but the dice failed me: 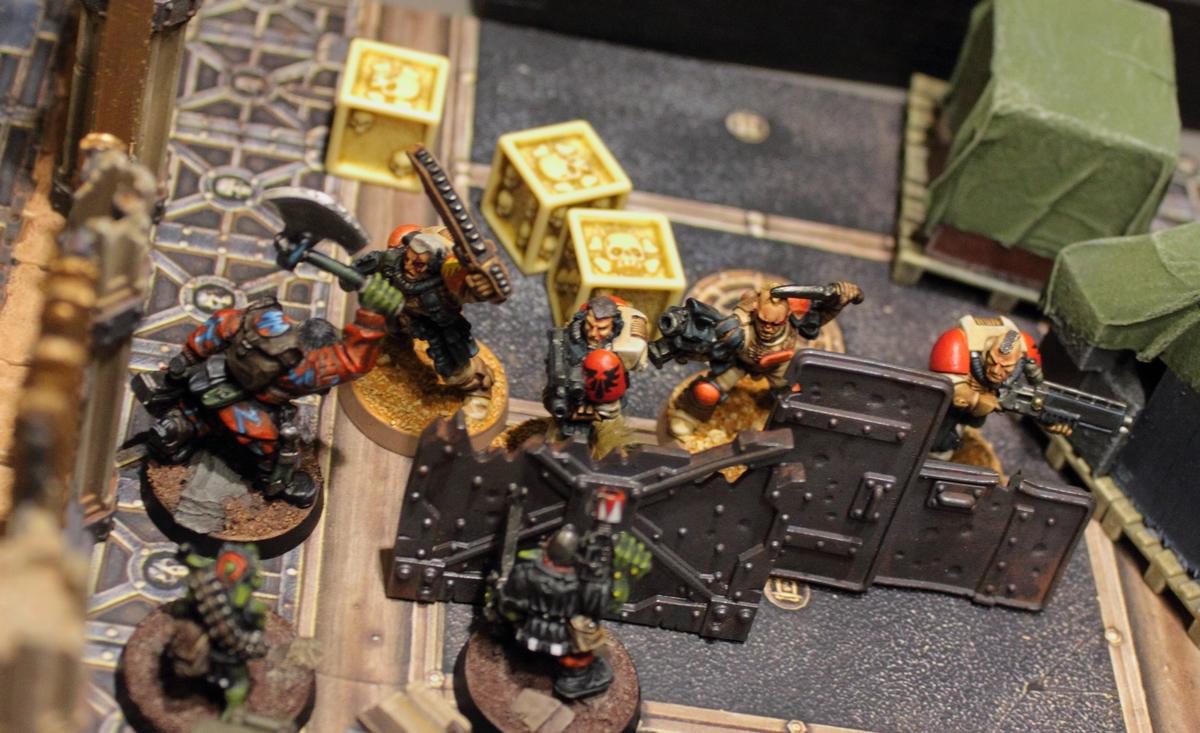 In the end (at the point at which my whole Kill Team was killed or shaken) I had managed to blow up two out of three supply stashes. The Space Marines won with a score of 4-1.  Yupp, Kill Team. It's quick. Of course it doesn't look as impressive as 40k dows, but squad-level skirmishy things on small boards never look as impressive as ...larger skirmish things or battles. But it's fast. These gimmicky strategy cards are pretty important to get, I'm afraid. The various abilities are spread across two to six different places in the rulebook, so I suggest either getting those or making them yourself and sleeving them. Makes life much easier and the game playable. As a boiled down version of 40k these rules work well. So if you like playing 40k, but don't enjoy playing 40k Kill Team is your rules set of choice. Our game in particular was good fun. Pretty figures (very well fitting for Kill Teams), pretty terrain. I should familiarize myself with the rules a bit more and get some cards done.But yeah, good times. Thanks to virago for yet another nice game. ...and because Kill Team is so fast I was given a go at another condensed GW game: 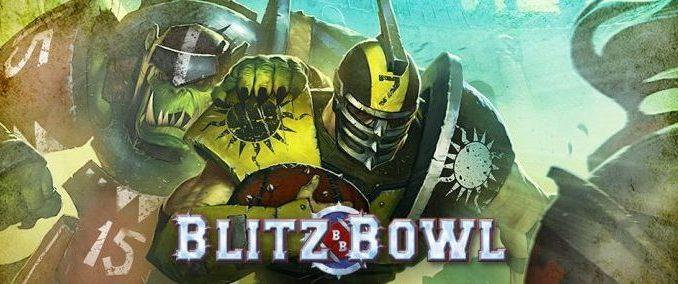 Virago is a huge fan of BloodBowl and thus went on a journey to get this game. It's a bit of a weird release, because BlitzBowl is part of GW's thrust to get back into toy stores and the high street stores in general. Which is an incredibly clever and applaudable move, because that's where GW belong. If it wasn't for kids spotting the likes of Space Hulk, Space Crusade, HeroQuest, Battle Masters, or BloowBowl many of us wouldn't be here in wargaming and neither would be GW. 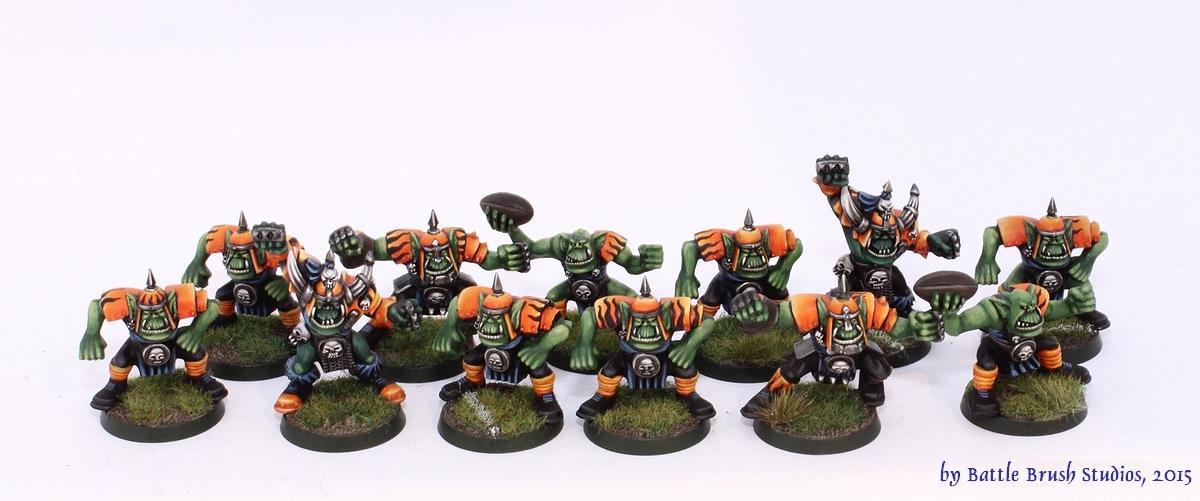 My Blood Bowl Team My Blood Bowl Team Problem is that nowadays toy stores are in a problematic situation, so you have to find BlitzBowl in the first place. Apart from that it seems to really pay off to compare prices between possible sources. In the end virago found the game at Gamestop of all places. Yup, seems like going there is an option now, but only for boardgames. It's a complicated world we live in. Judging from this release policy I also misjudged BlitzBowl. I had expected it to be a fun little board/card game, kinda like BB Team Manager. Couldn't be further from the truth. It bascially is half a Bloodbowl. Or Dungeonbowl with only one room and a fraction of the rules (and craziness). Apart from that it's same as always: Playing field, spaces, figures (albeit smaller teams with a set number and kinds of players). Coincidently I had my BB team with me that night, the Orkakringer Schnittaz. They're an incredibly unsuccessful team. 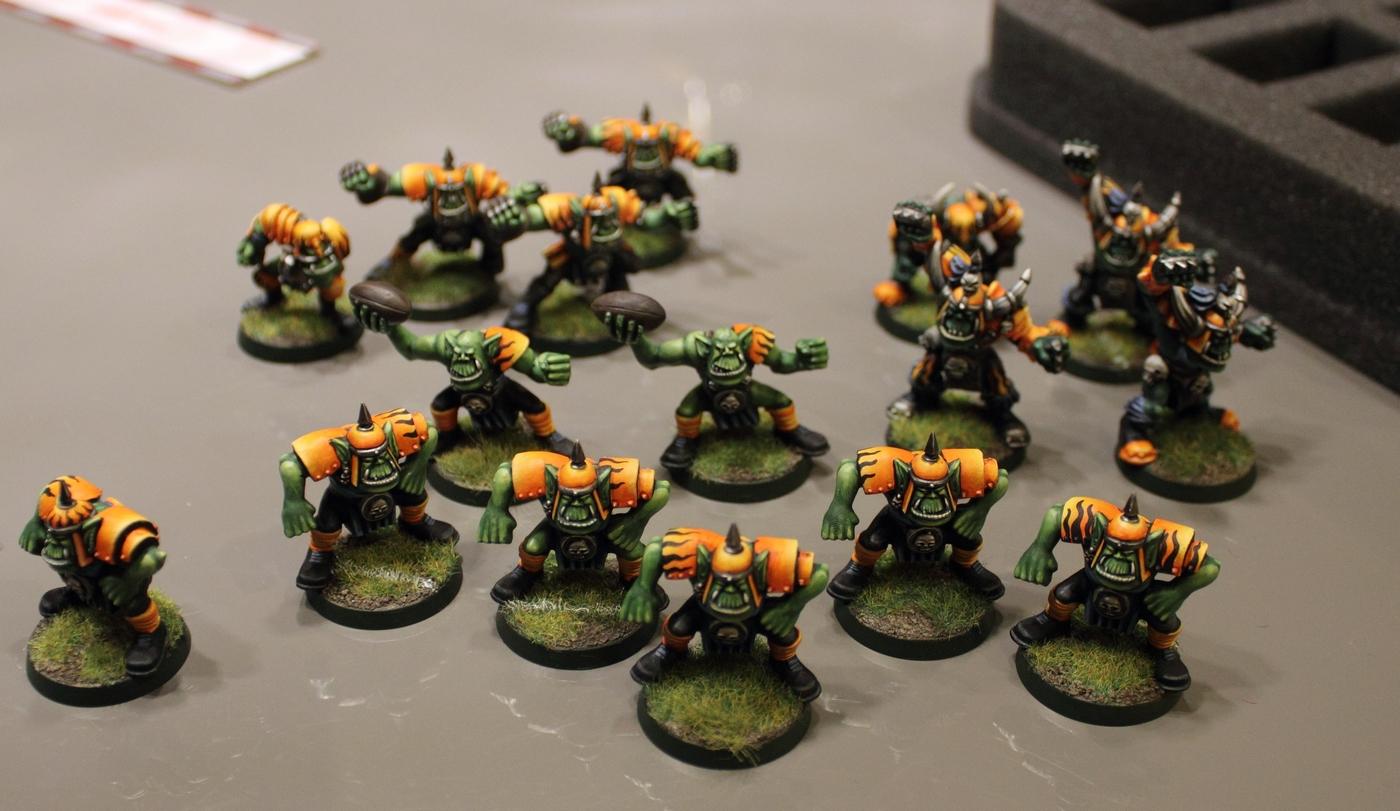 So we did the classic Orcs vs. Humans match-up: 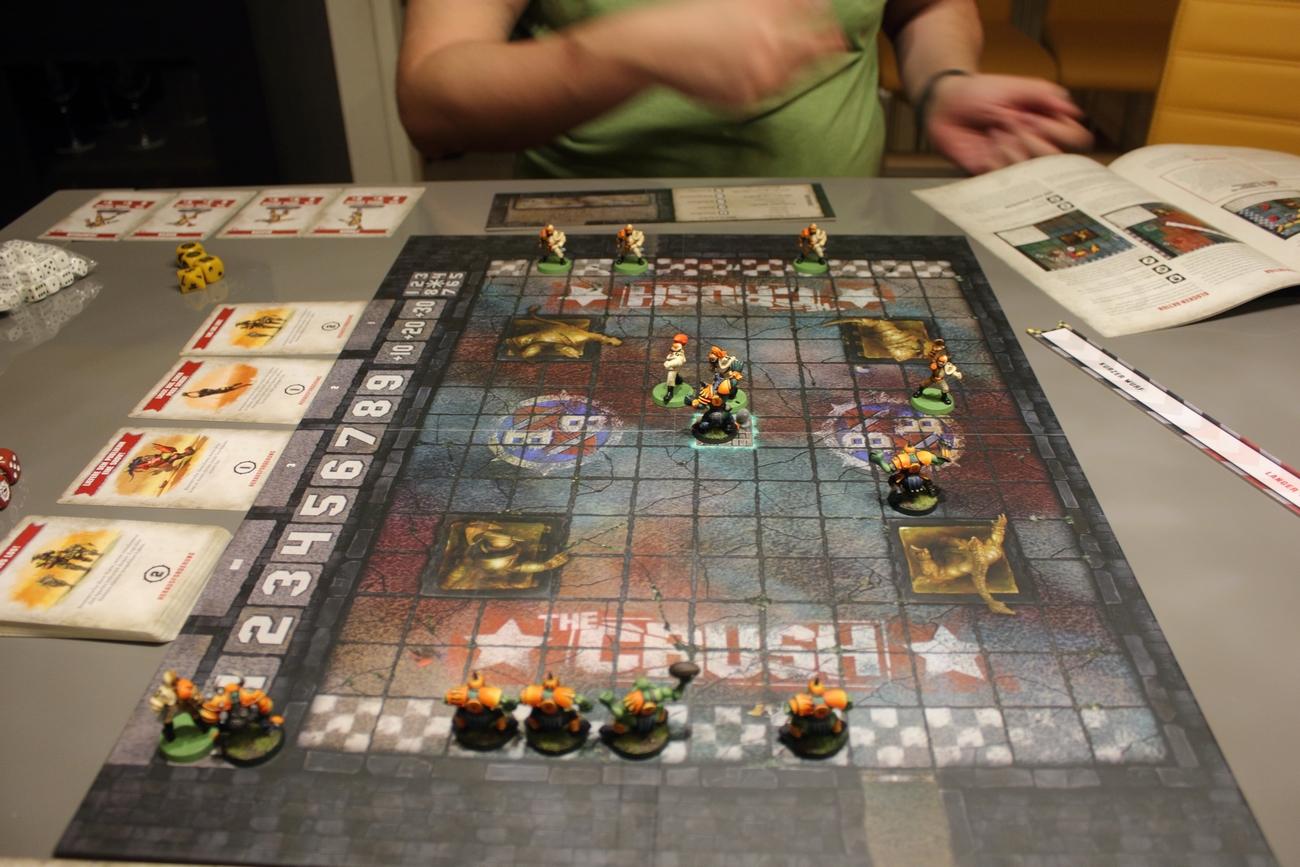 Each side has 3 Linemen, 1 Blitzer, 1 Thrower and a Catcher in case of the human team. The Orcs get a Black Orc instead of the catcher. The twist to the game is the cards lying next to the board, which get replaced each turn. Touchdowns will get you 3 victory points, but the cards will also get you these. The cards lying out basically work a bit like achievements in video games. They'll ask players to do a successful pass, tackle down an opposing player, get two players into the endzone and so on. If a player manages to do what one of the cards lying out ask for they may take this card and get victory points. On top of that each of the cards has a little bonus on the backside and if you get one you can play it for that bonus later on. So that's another incentive to get these cards. If the card deck is all played out or if one of the sides is more than 10 points ahead of the other the game ends. The rules themselves are a bit different to regular Blood Bowl. Each player's turn encompasses 3 actions they may spread out across models or only use them on one model. This of course, along with the fact that the field is pretty small, makes touch-down potentially happen very often, but this won't be enough to win the game at all. It's all about incorporating these cards as well. Still feels like BloodBowl, just in a condensed form. Meaning I got smashed. In(to) a condensed form. :p But it's a fun little game. I think it's very suited for not only when time's tight, but also for things such as taking the game with you on holidays.
|
|
This message was edited 1 time. Last update was at 2019/01/19 14:21:04
|
|
|
|
2019/01/25 11:34:46
Subject: Re:Battle Brush Studios' Commission Painting Log - Massive update! 40k, WHFB, Historicals, Infinity, ..
|
|
Buttons Should Be Brass, Not Gold!
|
|
|
|
|
2019/01/27 20:15:02
Subject: Re:Battle Brush Studios' Commission Painting Log - Massive update! 40k, WHFB, Historicals, Infinity, ..
|
|
Buttons Should Be Brass, Not Gold!
|
@Cosmic: Yeah, they're pretty cool. Virago took care to make them look nice.
@Dysartes: Cheers!
Right, now for the last two dudes of this batch - a sort of prototype Dwarf, and the Orc:

Also, here's special edition Esters for Guild Ball:
As always, excellent quality from Steamforged, and they really have fun with those special edition figures. Good stuff.
Hope you like the minis!
|
|
|
|
2019/02/08 01:23:16
Subject: Re:Battle Brush Studios' Commission Painting Log - Massive update! 40k, WHFB, Historicals, Infinity, ..
|
|
Buttons Should Be Brass, Not Gold!
|
@Gitsplitta: What do you mean "used to be"?
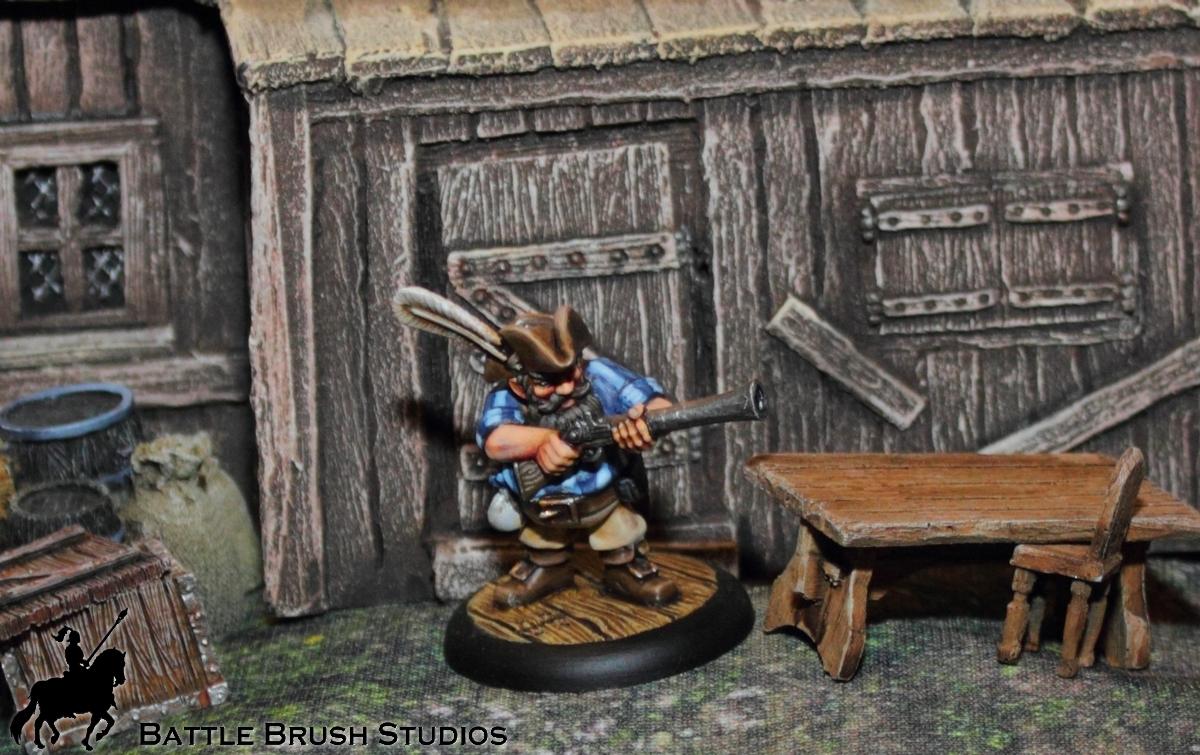
Heyhey, I'm currently working on getting a TON of tiny little projects off the work schedule, which is incredibly time consuming in relation to actual outcomes, so bear with me if updates come a bit less swiftly these weeks. The past 10 days I've been working on Gloomhaven minis, Freebooter's Fate, Infinity and By Fire and Sword minis.
But currently I'm working on something else entirely - figures for the Grenadier Guards of the Guard Camel Regiment from 1885!
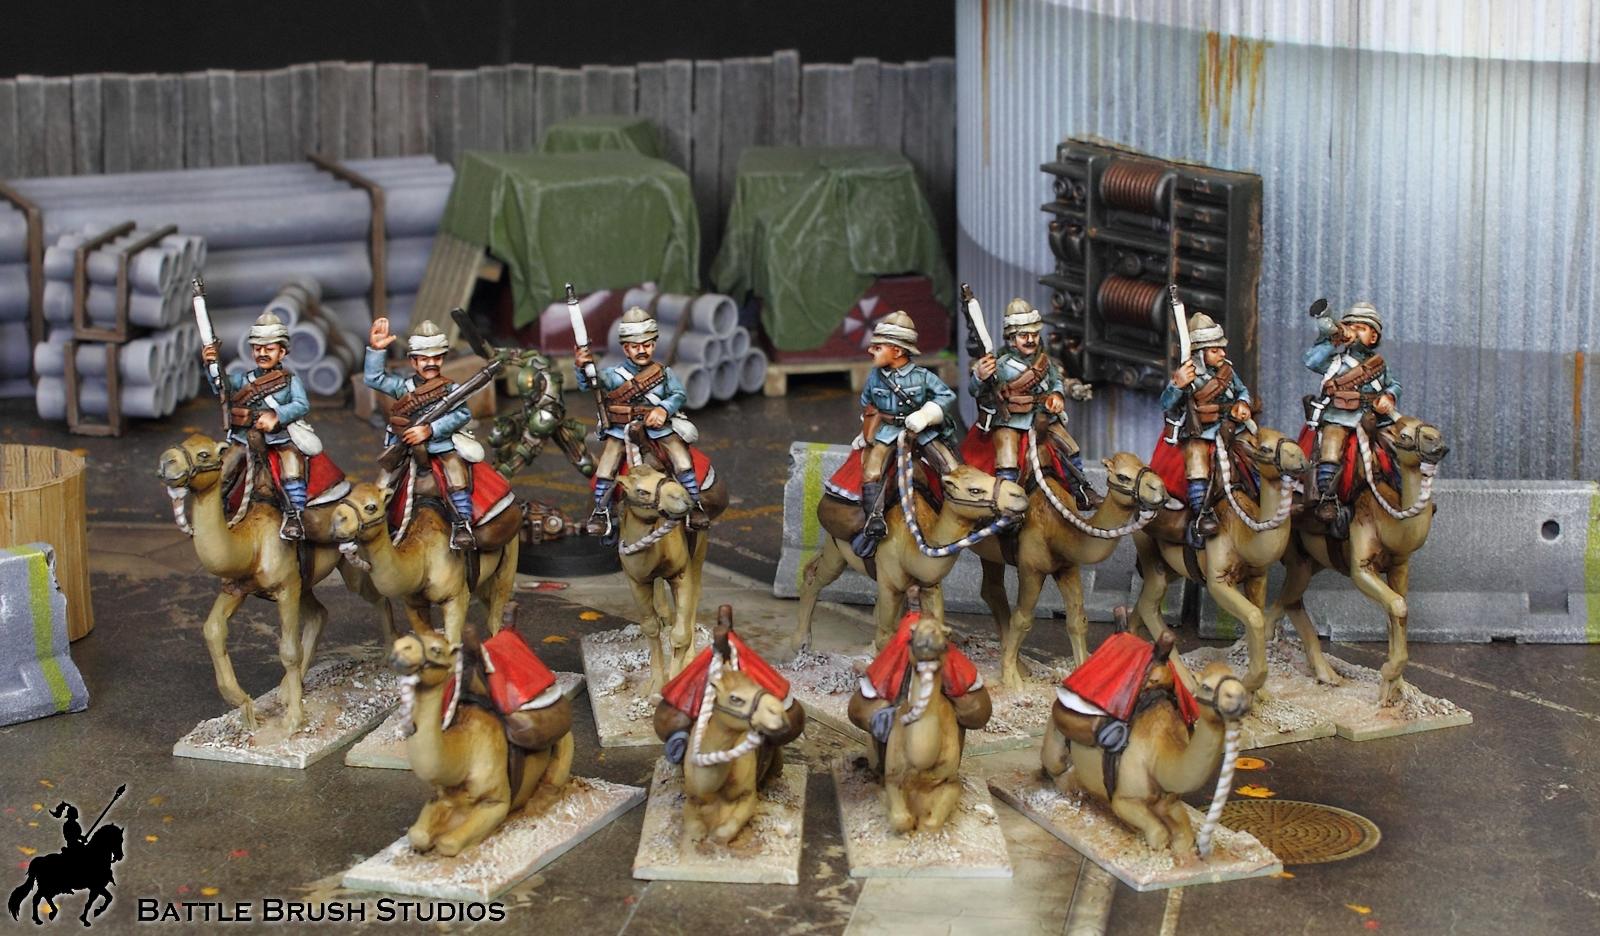
...with an entirely unfitting backdrop. But my photo table is currently made up like that and this is just a WIP shot.
28mm Perry miniatures. Until I started working on these I knew NOTHING about the Mahdist Uprising. Now I know a tiny little bit, and quite a bit about Grenadier Guards of the Guard Camel Regiment's uniforms. 8 camel-mounted dudes (the flag bearer preferred to stay back on the painting desk), and 4 more camels at the rest. In the future I'll also add a bunch of dismounted dudes.
Hope you like them so far!
|
|
|
|
2019/02/10 20:02:14
Subject: Re:Battle Brush Studios' Commission Painting Log - Massive update! 40k, WHFB, Historicals, Infinity, ..
|
|
Buttons Should Be Brass, Not Gold!
|
@Dysartes: Next time someone complains about painting horses I'll point them in the direction of painting bloody camels. The resting camels come with a slightly disgruntled looking handler. Must be him. @Cpt.Brown: Thanks very much! @Gitsplitta: Cheers. They're pretty much done now, but I have to sort out some confusion about rank insignia. Not exactly sure what goes on the sleeves of the officer and especially the NCO. In the mean time - I played Sellswords and Spellslingers again last Friday, courtesy of Cpt.Shandy who provided figures, table and scenario. All I did was bring my own hero figures and the camera. Sellswords and Spellslingers, released in early 2018, is one of the latest works of industrious veteran rules smith Andea Sfiligoi who also wrote Four against Darkness, Rogue Stars, the legendary Song of Blades and Heroes and its derivates and many other nice things. The rules were published by Ganesha Games. 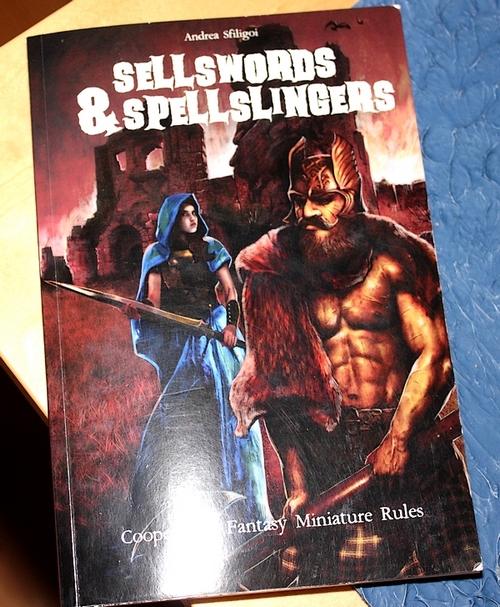 What sets this game apart is that it's a completely cooperative fantasy miniature game. This positions it right between dungeon crawler board games (like Decent and Heroquest) and Pen&Paper RPGS (like GURPS, The One Ring, etc.). Each player plays one or multiple hero characters. Baddies are all played by an AI which is built into the game, which works really quick and efficient. At its core Sellswords and Spellslingers is based on D20 rolls; as with most games written by Sfiligoi everything starts with activation rolls. It's a player's turn, the player chooses one of their characters they want to activate. Then they roll one, two or three d20. 8 or more means the die may be used for a hero action, any dice showing less than 8 means a card is drawn from the events deck. 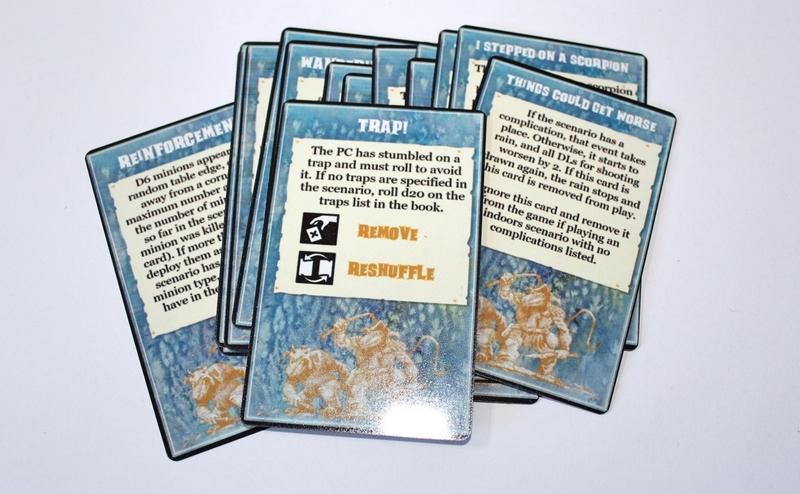 Most of the time these cards will activate or spawn enemy models. Some of them are scenario-relevant event cards. Enemies who get activated act in a very simple manner. Scenario design is a large part of the game, if you don't want to play the same thing over and over. This also means though that you can do ANYTING with these rules and really get some fun adventures going on your games table. The event cards are delivered in pdf form along with the game, so you have to print them yourself. However, you can also order professionally printed decks. Apart from event cards there's also a large number of spell cards, potion cards and monster cards. The base game contains 30 different monster types on cards 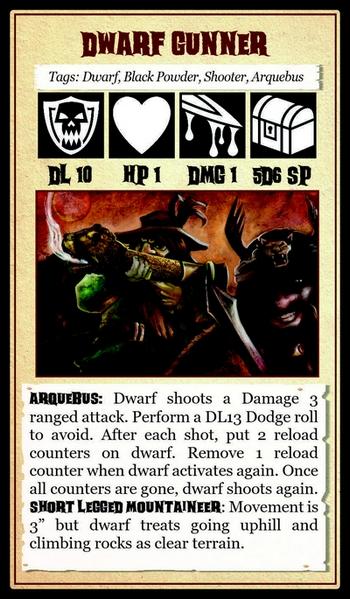 These monster cards give you all the informations about a monster type to play it in the game: the creature's Danger Level (bascially the target of your D20 roll when fighting the creature), hit points, close combat damage, the loot they drop when slain and of course special rules. Based on this simple scheme you can design your own creature types or adapt creatures from other games without a problem. So much for the rules, now let's go on to the game. Beware: it's getting spooky. 
Original artwork by the great Tom Jenkins, cover layout by Eerie Magazine The fishing hamlet Inmutz is overrun by horrible creatures. They crawled out of the sea at night. They look remotely human, but with scaly skin, claws and heads like fish or frogs. They are just known as the Deep Ones. Inhabitants who managed to flee beg a group of adventuring heroes to visit the hamlet to find clues about why these monsters suddenly attacked them and what their motifs could be. 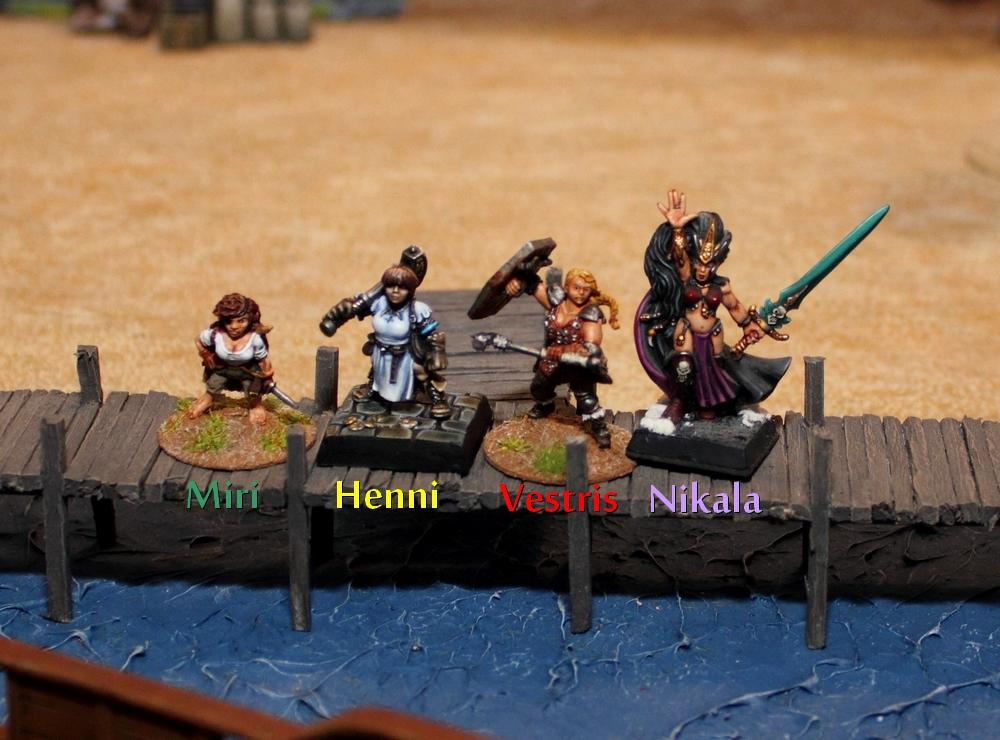 The rag-tag band of heroes consists of: Miri , a halfling thief (bow, dagger, Free Disengage, Greedy) Vestris , a human fighter (Shield, Armour, Warhammer) These two veterans of several aventures are played by Cpt.Shandy. The other two, adventuring newbies, are played by me. Henni Hinkel von Hammerfall , a Dwarf warrior with an extrla large sledge hammer and even bigger ambitions to see the world. (Two-Handed Sledge Hammer, Martial Block, Battlelust, Impulsive) and Nikala, a Dark Elf Soceress (Spells: Magic Dart, Deathcurse), who really only wants to collect money for a passage back to Naggaroth. She doesn't like the beach, and she dislikes the crabs, the sun, sea monsters, long walks, waiting, sand and unfathomable horrors beyond our comprehension even more. To learn about the motifs of the Deep Ones there are five clues strewn across the table. We have to get to as many of them as possible and then interpret them correctly (ie roll an intelligence check). Two of them are to be found in the hamlet, two more on the beach and the fifth is to be found on a mysterious boat lying at the pier.  There are still groups of Deep Ones lurking in and around Inmutz and without a doubt more will show up once alerted. Nobody knows what they are doing. Looting? Are they looking for something? Or are they just lurking? Nobody knows. At the moment two groups of 3 Deep Ones each are in the area, plus a Deep One Assassin and a sort of leader wearing a robe, so he may either be a spellcaster or he looted a nice dress. The two warriors immediately sprint towards the first clue. Nikala follows at half speed, unhappy with what the salty sea breeze is doing to her hair. As a sudden gust of wind ruins her 'do completely. The soceress is really miffed now. Even worse (depening on who you ask) - the wind carried a stray air elemental ashore! 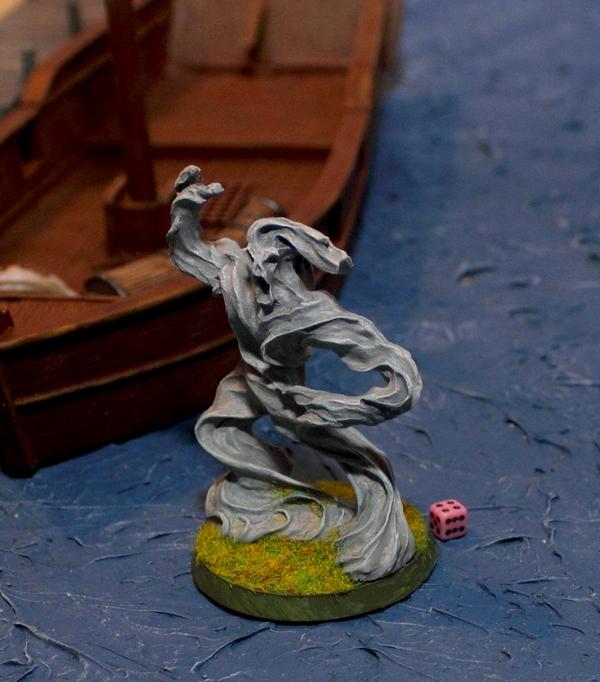 This comes as a surprise, especially seeing as how an air elemental is really tough, especially if all we have is non-magical weapons. The sorceress is tangled up with trying to fix her hair, so the half-hearted magic darts thrown at the air elemental mostly miss. A cunning Deep One uses the opportunity to lunge at Henni who was just about to prepare to combat the air elemental. She loses one hit point (out of 4). 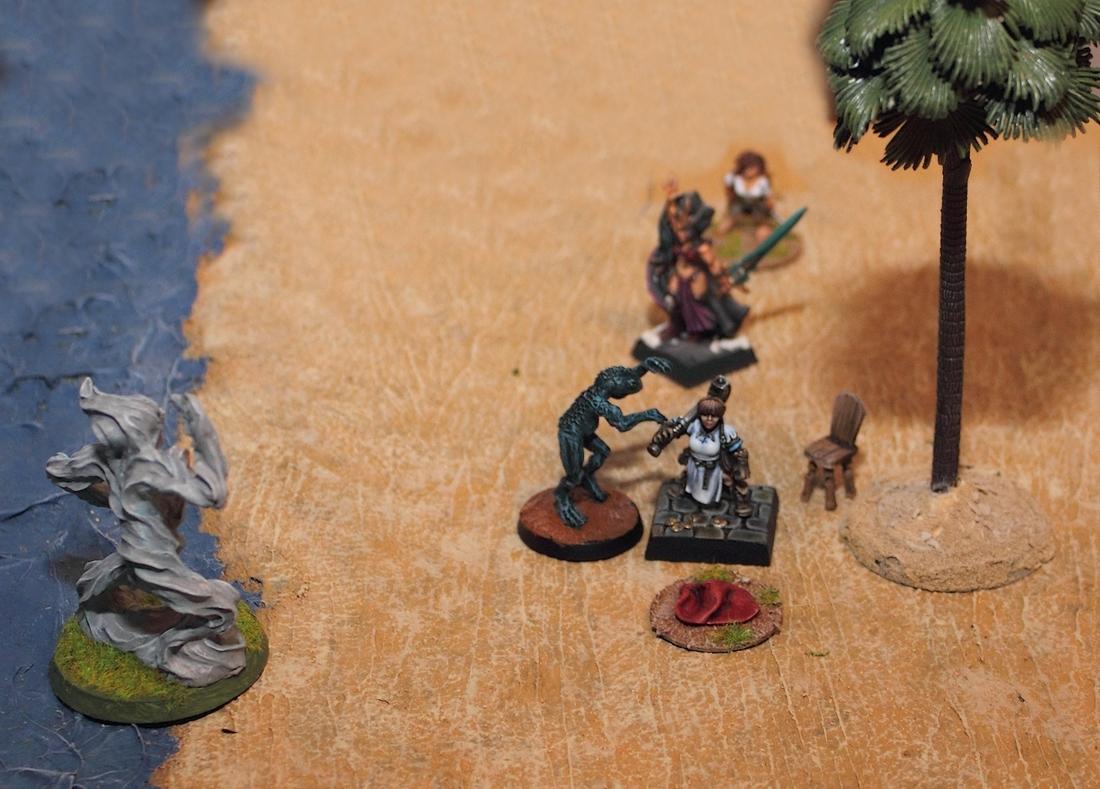 Fortunately repeated hammer blows to the head proves effective against Deep Ones. The air elemental though is drawing ever closer and the magic darts fail to do any serious damage. This will have to be decided in bloody mêlée. Faced with the huge elemental Henni freezes. In the last moment Vestris leaps to her aid and duels the monster. 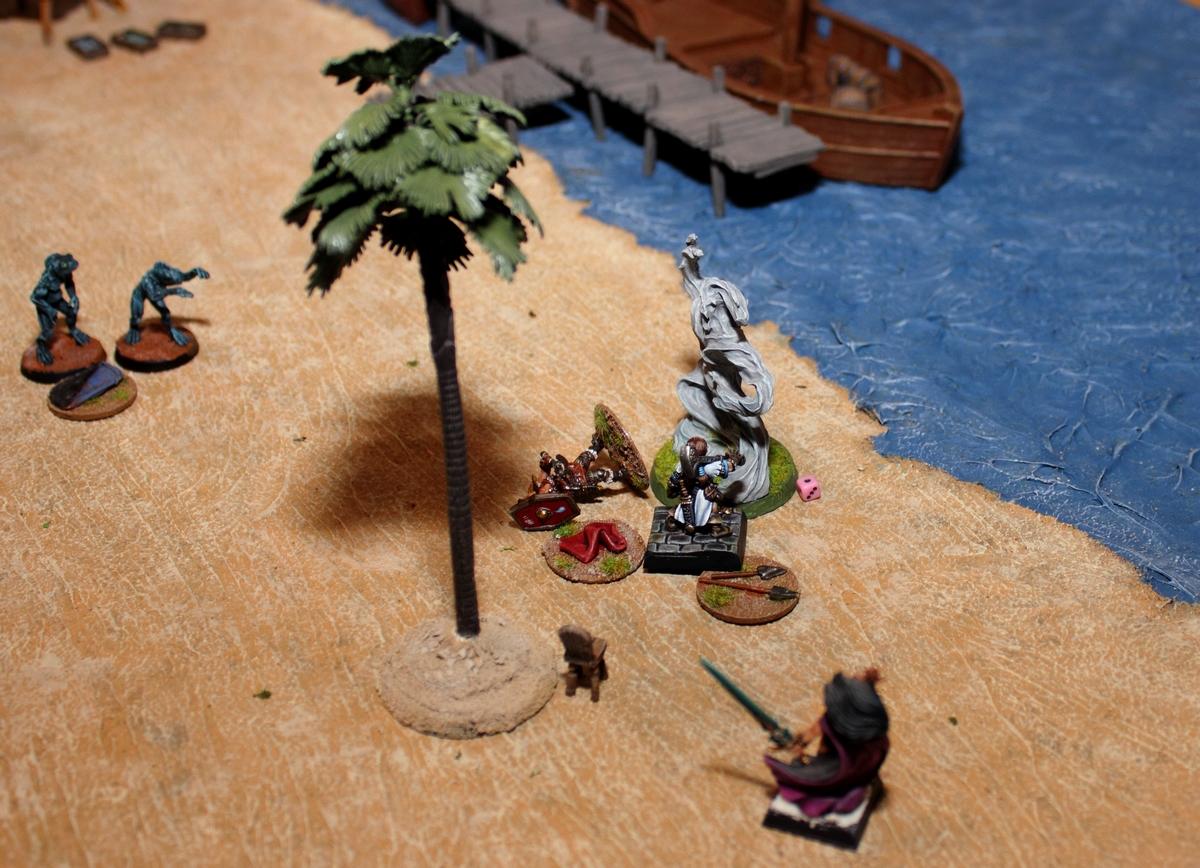 The red towel is the first clue to inspect. The other round markers on the ground are loot markers left by slain enemies. The red towel is the first clue to inspect. The other round markers on the ground are loot markers left by slain enemies. She fights bravely, but eventually the elemental's attacks take their toll on Vestris and the warrior goes down. Henni manages to get herself together and finally kills the elemental. Meanwhile Nikala is embarassed about her lacklustre spellcasting so far and that Vestris got hurt to to this fact. That makes the sorceress angry. A group of Deep ones, drawn in by the noise of combat, fall victim to a mix of Deathcurses by the Dark Elf and Miri's arrows. Now that the most immediate dangers are taken care of Henni looks after her downed comrade. Fortunately Vestris is just KO'd. She'll be out for now, but can be recovered once all the business is done here. So the first clue is being investigated, and then rolled up and put under Vestris' head. For comfort and to pin the clue in place. Now rain sets in. This means two things: Time for drama and a malus for ranged attacks. We've been delayed by the air elemental for too long; now it's time to move. Miri jumps over the stone wall to search the hamlet by herself. The short-legged Dwarf and the Dark Elf with the ill attitude and high-heeled boots would only slow her down. Finally activation rolls go better for us now and our heroines proceed with the mission.  Miri dashes into the cursed hamlet of Inmutz using shadows and debris to stay out of sight. She grabs one of the clues on her way. One more to get in the hamlet, but this one's more tricky. A mysterious lamp next to the former grocery storage building. The place is swarming with Deep Ones; the produce is strewn on the ground and already mostly spoilt. In the mean time Henni sees the mysterious boat which had just appeared the night before the attack slowly drift off to the sea, along with possibly clues. 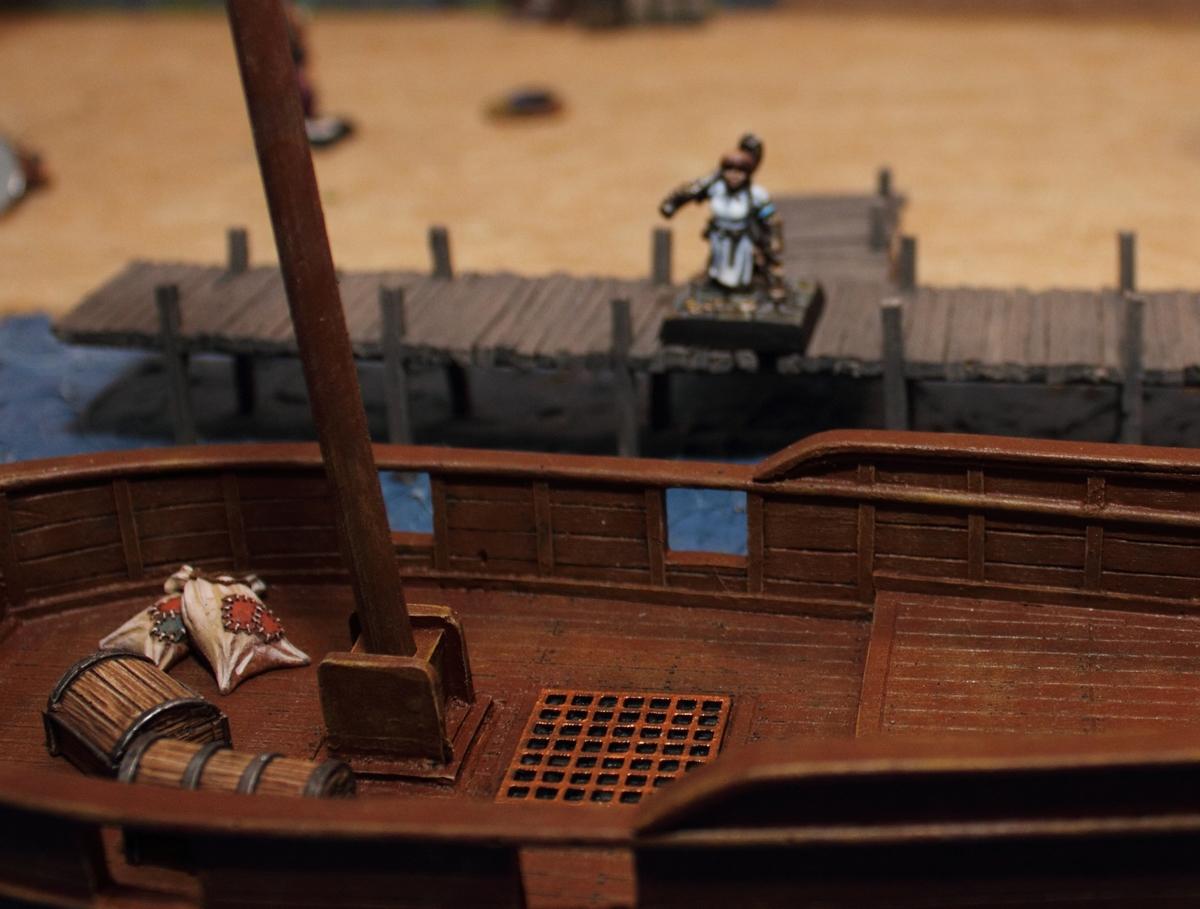 The planks are wet with rain, and Dwarfs have a general disdain for things which force their boots to leave the ground, but a true adventurer has to jump occasionally (so the stories say), so Henni runs up the landing stage and jumps onto the boat. She is enormously proud about this step to be a real adventuring hero. A nasty Deep One who crawls up the prow of the ship to ambush her... 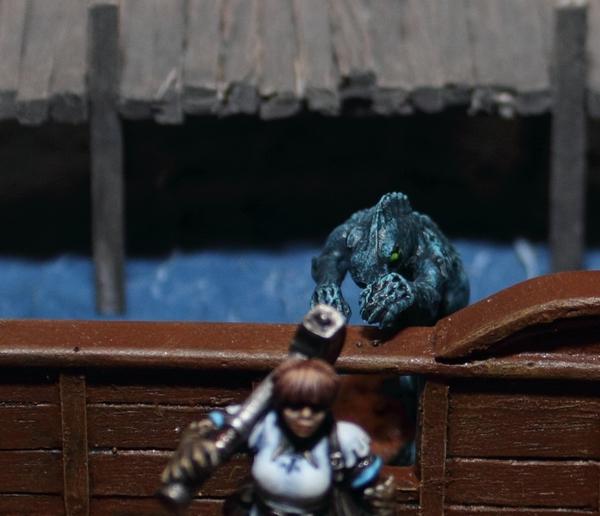 ..is swiftly dealt with by a good whack across the head. With the boat slowly drifting out onto the sea Henni has no time to lose and starts digging through the ship's cargo for clues. She finds something and even makes it safely off the ship moments before it goes off onto open waters. Nikala is having trouble with all of this. The rain killed any hope for her hairdo and one of her boots' heels snapped right off as she almost plummeted into a hole. Now the shower ends and with it the winds of magic turn. She can feel her powers surging and magic energy sparks around her fingertips. The next ugly fishthing or elementalthing or whatever-thing will get a good load of this, she mutters to herself. [That was an event card, strengthening spellcasting rolls for the rest of the game] There she spots the Deep Ones Warlock over at the hamlet's entrance. A sorcerer duel. Delightful. 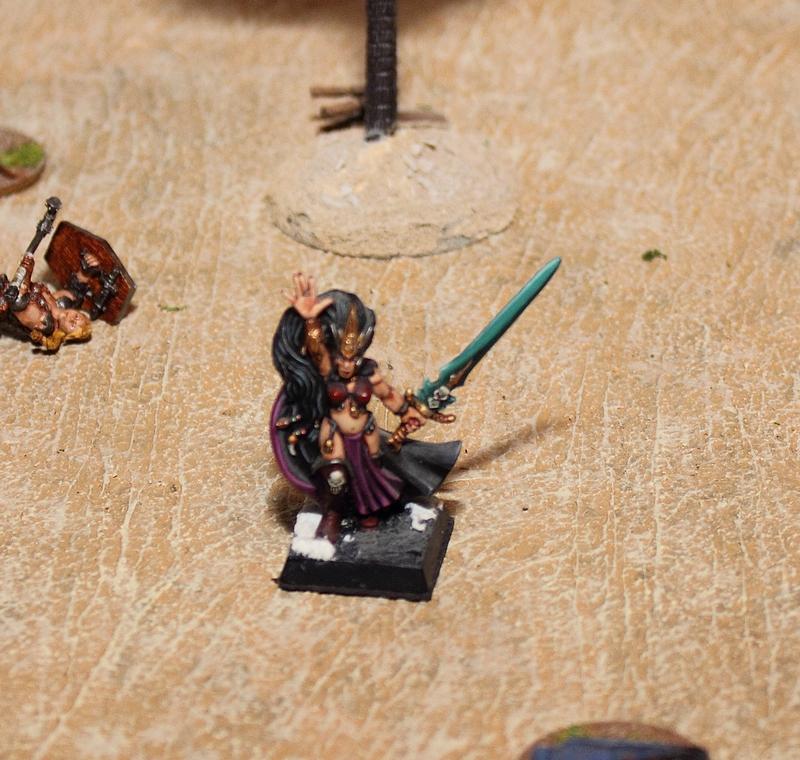 Meanwhile in Inmutz Miri snuck up to the second-to-last clue. While she investigates the shadows around her come to life. 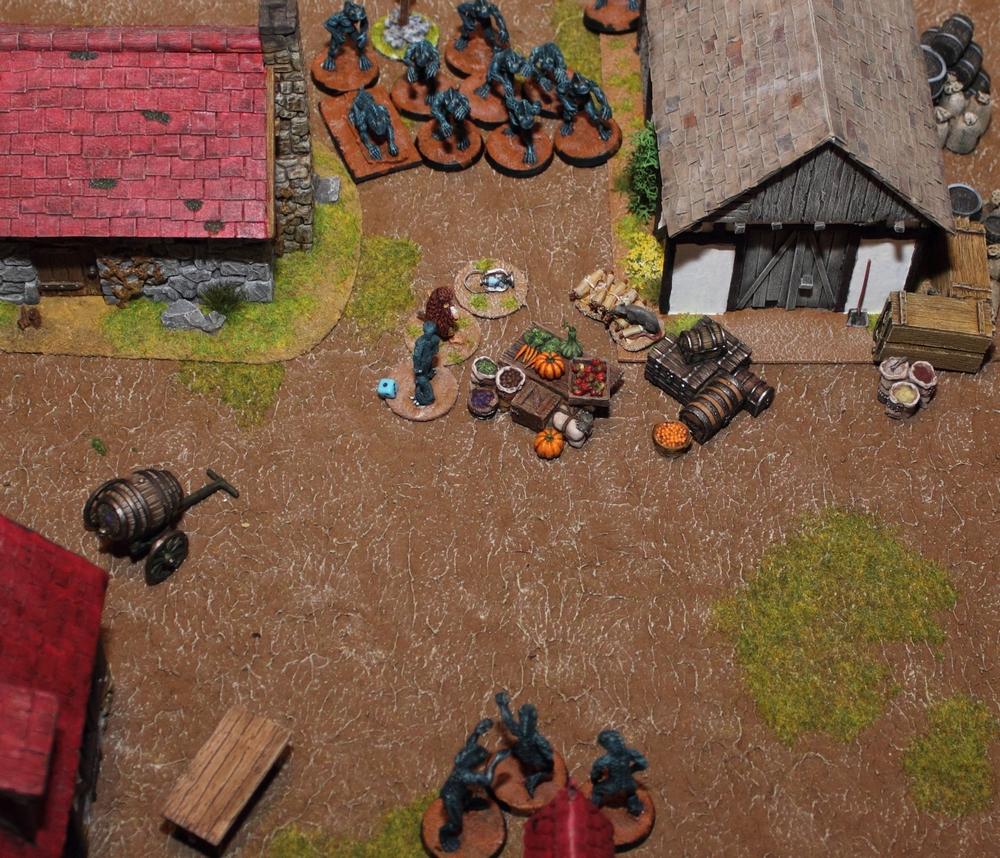 The Deep Ones Assassin charges at Miri from behind. A Rogue duel. Perfect. 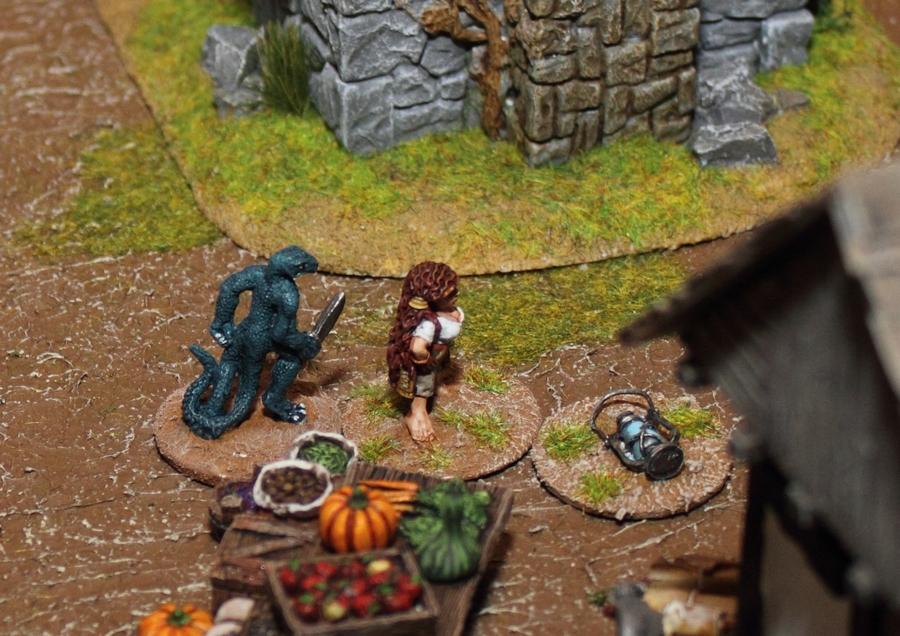 Despite the moment of surprise the halfling outsmarts the abomination. She wants to return to investigate the clue, but can't resist grabbing any valuables she can find on the Deep One. This costs important seconds, and just as Miri is done stuffing her pockets and having figured out the clue the horde comes for her. 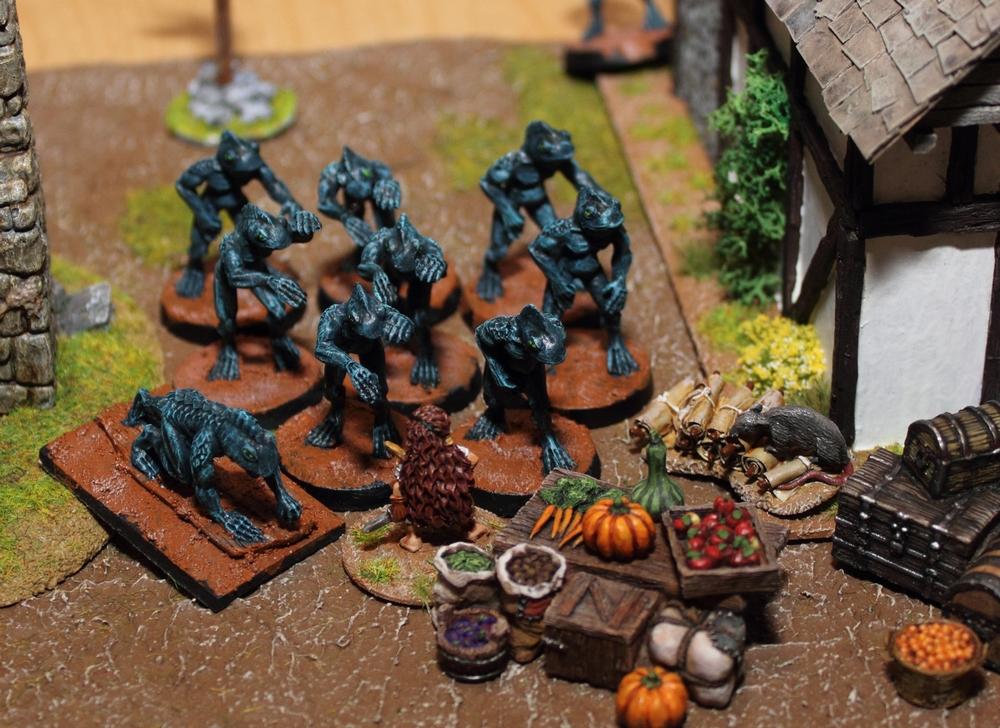 She manages to flee the onslaught of claws, teeth and scales, but is lightly wounded in the process. The only thing to do now is flee the hamlet. Three hordes of Deep Ones are in hot pursuit, but Miri is faster. 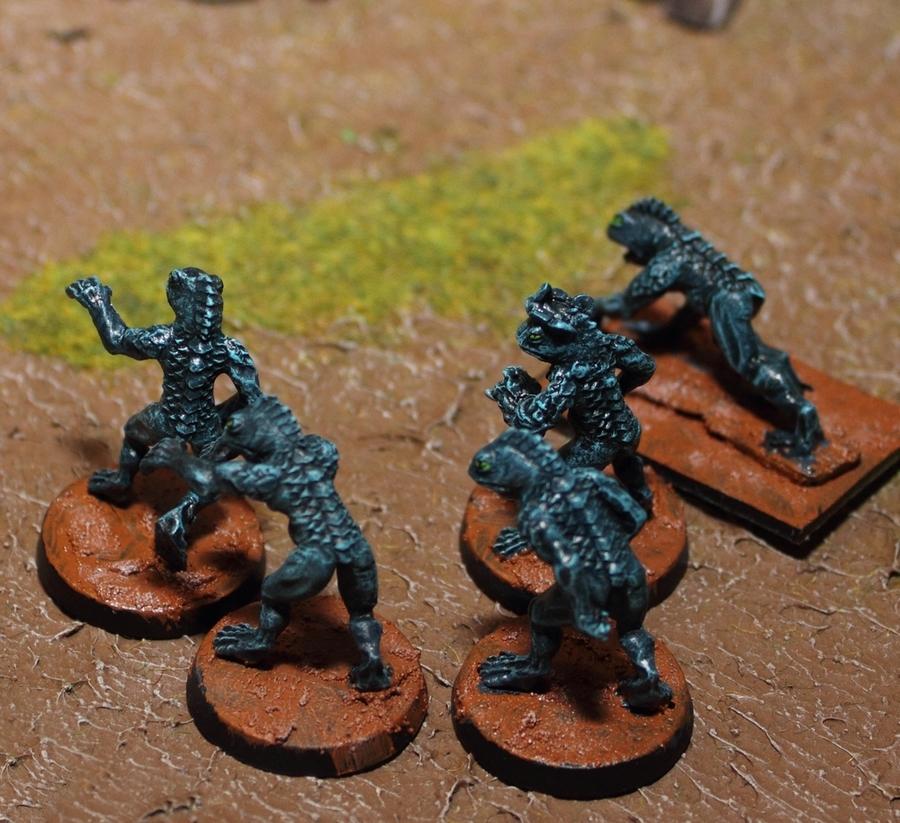 As she gets closer to the hamlet's entrance she hears a torrent of insults and curses being shrieked, howled, bellowed, gargled and croaked. The sorcerer's duel is in full swing, with Nikala clearly coming out on top. The wavering Deep Ones Warlock is finally finished off by a pincer attack of Miri and Henni (who had run up the beach again to help Miri out with her pursuers). Miri, delivering the fatal blow to the warlock, once more couldn't resist grabbing his valuables and a magic potion the creature carried with him. Now it's really time to go home. A bit earlier Henni had used the élan from her boat jumping episode to investigate the final clue at the fisher's hut. 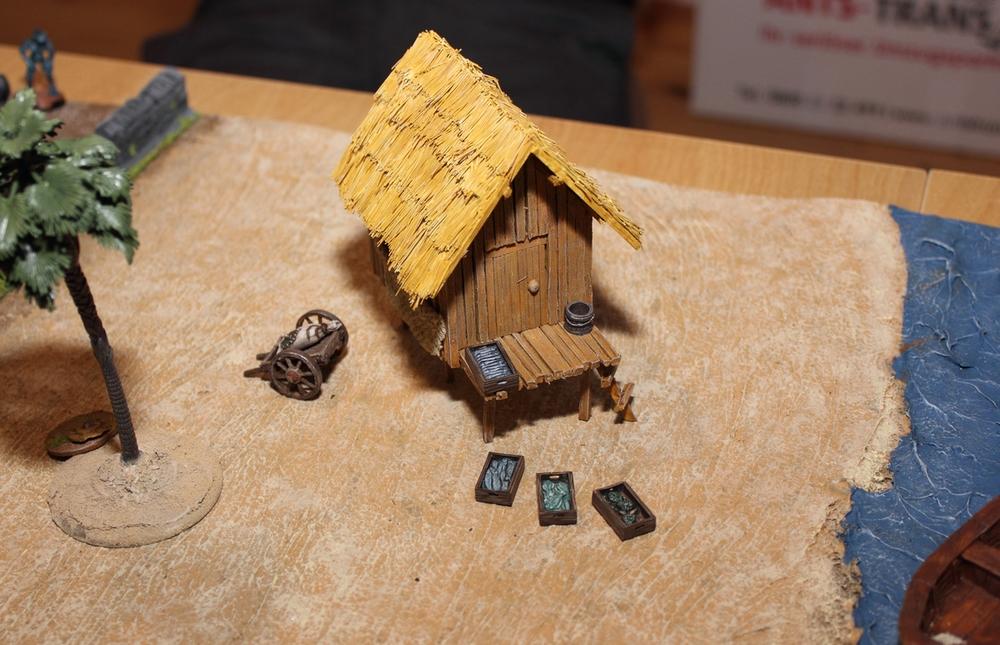 All done. Last thing we have to do was pick up Vestris before the flow sets in and she's pulled out into the ocean and then it's off to the next Inn. Clues have to be put together. Maybe then we'll get a better idea of what the Deep Ones are after. 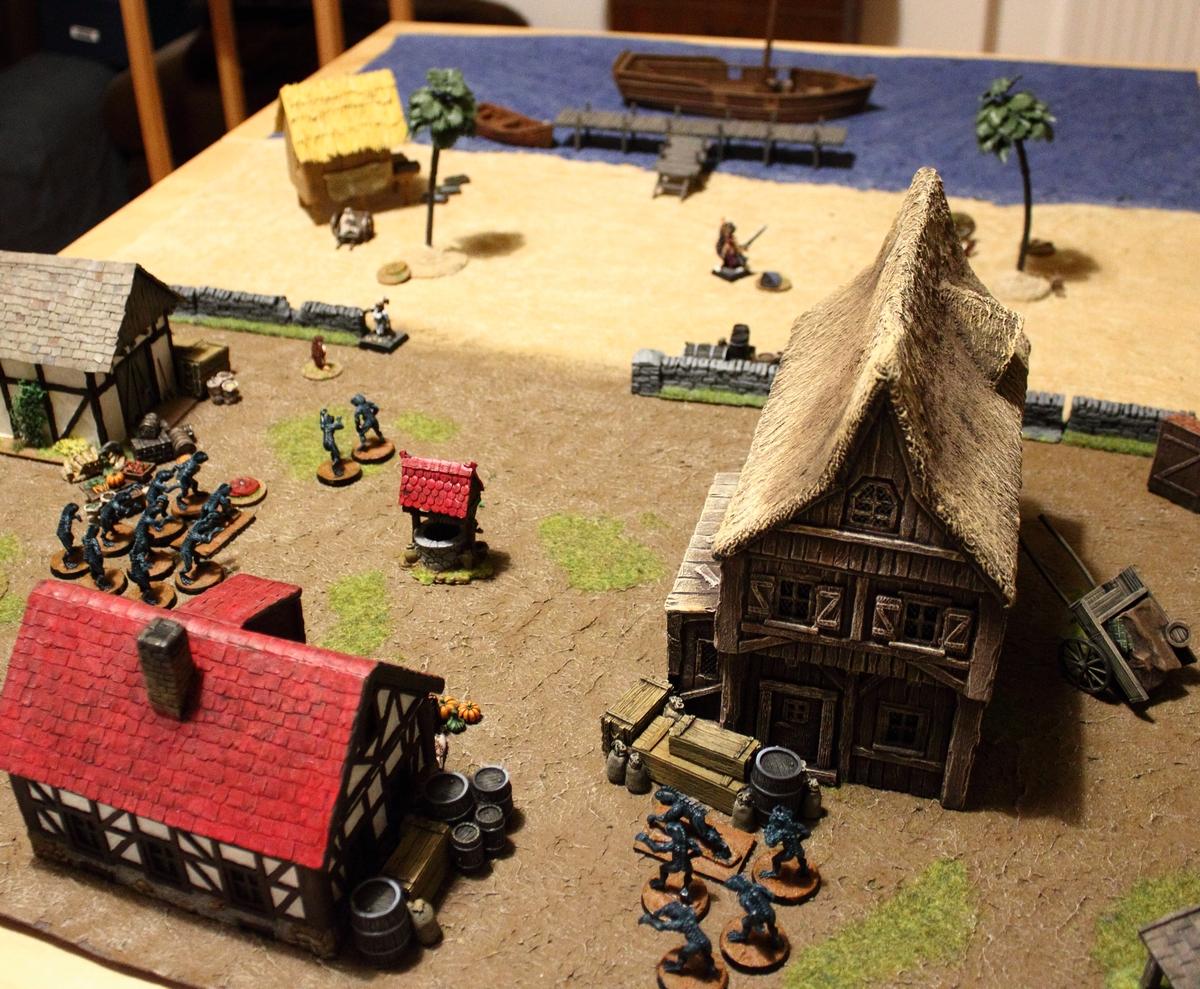 Apart from the fact that Vestris got hurt, the whole thing is a great success. We managed to investigate all the clues, and Miri managed to grab a whole lot of money too. The fact that the air elemental popped up right on turn#1 was of course remarkable, but in hindsight probably for the best as at this point we were still fresh and all lumped together. In my mind Sellswords and Spellslingers is a game which thoroughly succeeds at what it set out to do. Of course it's a bit of a strange one, sitting between two worlds. It requires a bit of preparation, especially if you play more often, so scenarios don't get repetitive and if you want to play it all with miniatures you should prepare a collection of quite a few evil minion models (deep ones, goblins, skeleton warriors, giant spiders, Orcs, etc). For the very last group of Deep Ones who spawned we'd run out of Deep One figures, so a group of Night Goblins popped up as stand-ins! So you either get a whole lot of minis (never been a huge problem for wargamers, I hear), or you make the scnearios fit you collection. OR of course you use printed markers. The rulebook supplies you with hundreds of monster markers in pdf form which you can print and put on the table this way. The Genasha Games website suggests having 3-8 monsters at hand for each player character in the game, as well as 1-2 boss monsters as a general suggestion. Games take place on a 36"x36" sized table, by the way. The event deck is a simple and clever design. Events get discarded after they are played out, so as the game progresses there are relatively more monster activation and monster spawn cardsin the deck. This leads to naturally progressing tension in the game with a climax of hordes of enemies, and thus putting some time pressure on the players to get the job done. Another plus of the event deck is that no DM/ GM/umpire is required. Even to the person who designed the scenario 90% of how the game plays out will be a surprise. Of course it's very important, as with any role playing game, that the game is played as a campaign rather than single games. Then Sellswords and Spellslingers works really well. I hope that you enjoyed this game report! Thanks to Cpt.Shandy for the scenario and another good game. I'm looking forward to more adventures with these characters!
|
|
This message was edited 4 times. Last update was at 2019/02/10 20:05:10
|
|
|
|
2019/02/10 21:30:16
Subject: Re:Battle Brush Studios' Commission Painting Log - Massive update! 40k, WHFB, Historicals, Infinity, ..
|
|
Buttons Should Be Brass, Not Gold!
|
@Dysartes: Yeah, it looks quite different to many other new releases. But then these have to struggle with stuff like hefty page limitations (such as Osprey publications) or having to push miniatures sales (such as Warlord's releases). I like the style of the Ganesha Games illustrations, especially the stuff which is by different artists. Always preferred different art styles in rulebooks as opposed to streamlined, corporate design illustrations of commercial figures available from that company.
|
|
|
|
|
|
|