| Author |
Message |
 |
|
|
|
|
Advert
|
Forum adverts like this one are shown to any user who is not logged in. Join us by filling out a tiny 3 field form and you will get your own, free, dakka user account which gives a good range of benefits to you:
- No adverts like this in the forums anymore.
- Times and dates in your local timezone.
- Full tracking of what you have read so you can skip to your first unread post, easily see what has changed since you last logged in, and easily see what is new at a glance.
- Email notifications for threads you want to watch closely.
- Being a part of the oldest wargaming community on the net.
If you are already a member then feel free to login now. |
|
 |
2015/12/17 12:37:23
Subject: Re:Toy's n' That....
|
|

Powerful Chaos Warrior
|
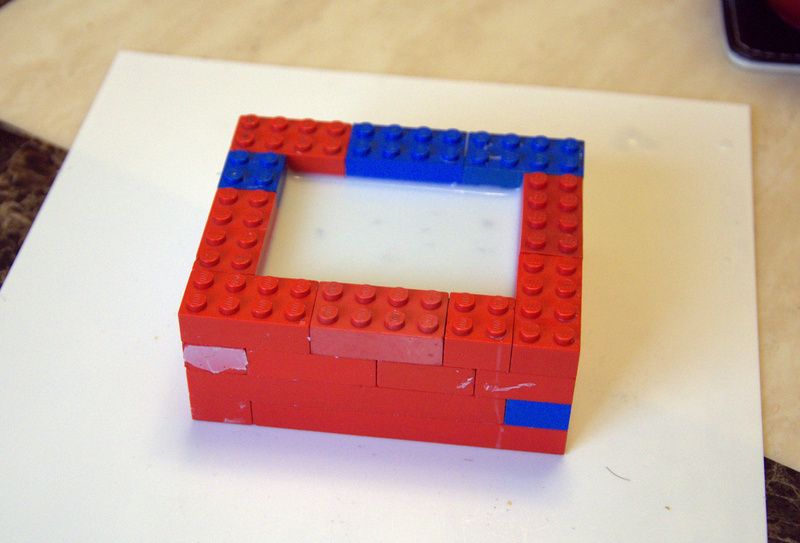
Ok, well, despite my lack of pictures I am still making progress. Kinda. This is being a steep learning curve I must say. My first attempt completely failed due to not mixing the silicone correctly. I finally managed to get the mix right.... Lesson 1 learnt
Unfortunately, in the second attempt, the second 'block' of silicone completely stuck to the first meaning I had to (VERY carefully) cut it apart to get the original out. I did use some mould release spray but apparenty not enough (lesson 2 learnt). Originally I had planned to put the channel for the resin on his waist/top but due to me not cutting it out correctly I was forced to put the channel on the other side (the bottom). This means I'm going to struggle to keep the air bubbles out of things like the toes and tips of the cloak *sigh*. At least the mould still fits together well.
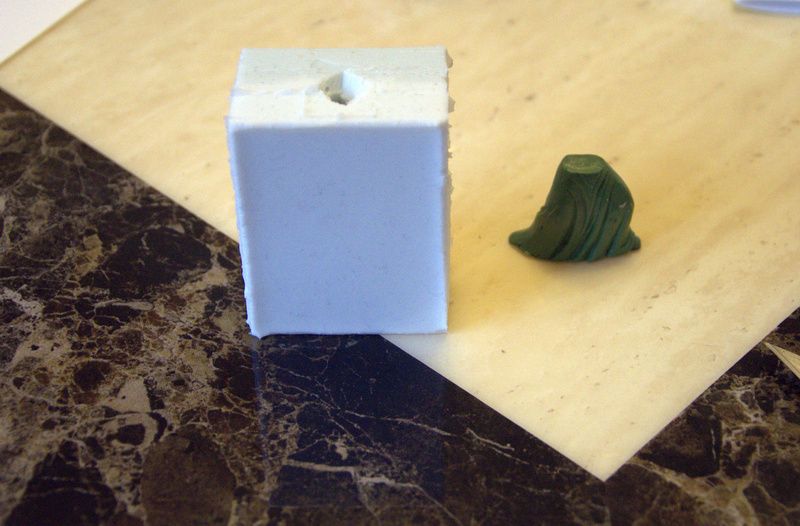
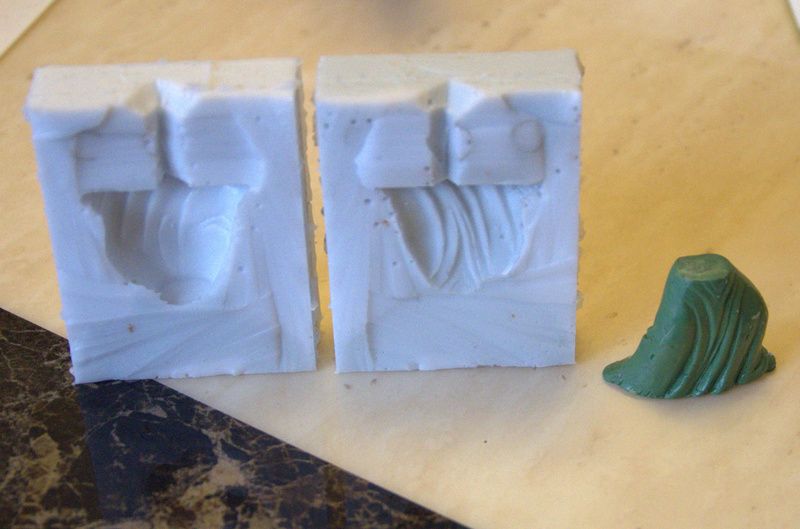

Next mould is on the go. Lets see if this one goes better
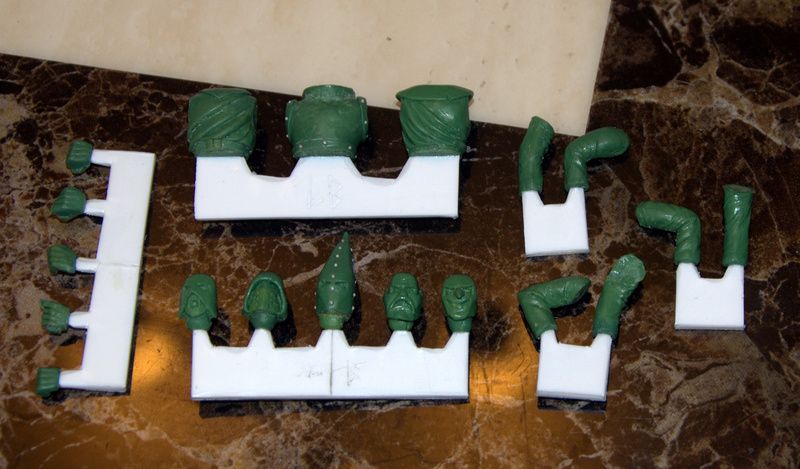
Still.. I'm getting there. Here's some pictures of the Sculpts on some sprue's.
|
|
|
 |
|
2015/12/17 18:16:22
Subject: Re:Toy's n' That....
|
|

Nasty Nob
|
Nice work. Looking forward to seeing your casting results.
|
|
|
|
|
|
2015/12/17 18:56:07
Subject: Toy's n' That....
|
|
Omnipotent Lord of Change
|
Stunning project log, both the Mad Max crew and the INQ stuff! Bravo on the 54mm metal modeling, that's some intense stuff ... and makes me want to bust out my INQ dudes too 
- Salvage
|
|
|
|
|
|
2015/12/18 00:39:02
Subject: Re:Toy's n' That....
|
|
Mekboy Hammerin' Somethin'
|
When making moulds I always rub Vaseline over the first half and then spray with mould release. I like to get plenty of Vaseline under the part to be moulded as well, so that when you put it into the first half of the mould the Vaseline helps form a seal that stops the rubber pooling underneath as sometimes I have bits that pop up after I've poured the second half and thanks to the Vaseline I can pull off the bits of rubber that pooled under the model. It isn't a perfect solution and it's best if the piece does not pop up but, in a pinch, it stops you getting what looks like two models squidged together.
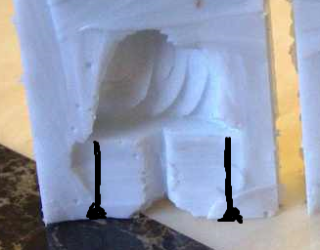
For the air release I like to have two or more vents so that as I pour resin into the main pour hole the air can get out up the others. You needn't worry too much though about your current mould. Just cut channels into the mould, these can be very thin slivers, sliced from the mould or big channels and obviously, when you've made a cast and seen where the air naturally goes you can cut a channel there and the air then has somewhere to escape. With your current mould I would recommend cutting two narrow channels up from either end of the robe as vents, like so:
I recommend using used matches (I use one every day with a spirit stove but they ain't exactly expensive so you could use unused ones too) to make sprue as they are very easy to cut to whatever shape you need and to make sure that only a small area touches the model, thus reducing clean up after cutting the sprue off your cast pieces.
I've also started injecting my resin using syringes and using a sawed off syringe tip for the main pour hole; you'll only have to sacrifice one syringe because once you start casting you just make sure the mould is full and use the resin cast of the syringe piece in future moulds. What that means is you can 'plug in' the syringe into the mould and then inject the resin.
|
|
This message was edited 2 times. Last update was at 2015/12/18 00:43:00
Be Pure!
Be Vigilant!
BEHAVE!
Show me your god and I'll send you a warhead because my god's bigger than your god. |
|
|
|
|
2015/12/18 11:48:45
Subject: Re:Toy's n' That....
|
|
Powerful Chaos Warrior
|
Thanks for the comments chaps and thanks for the advice on the Vents. I went ahead and added them. As you can see...
Well. I may have been a bit excited/impatient so skipped ahead and tried out some resin.
2 Part Resin. Mix, pour, wait an hour and open mould..... Did it work?
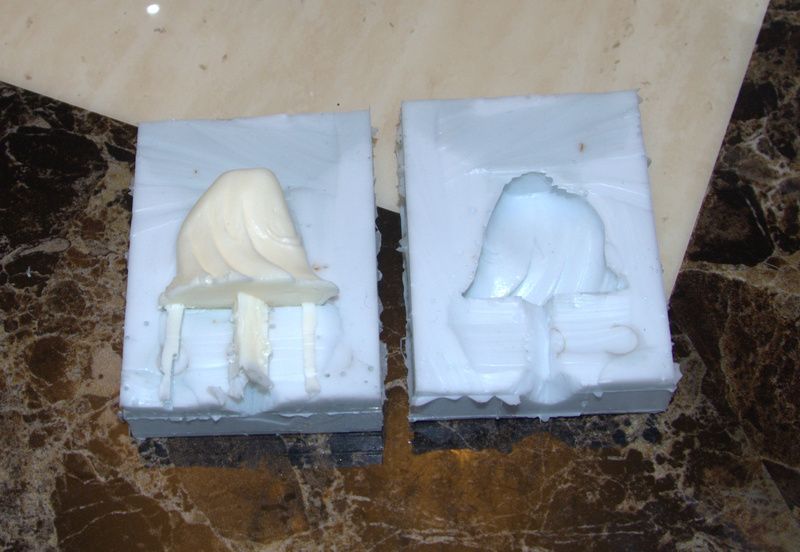
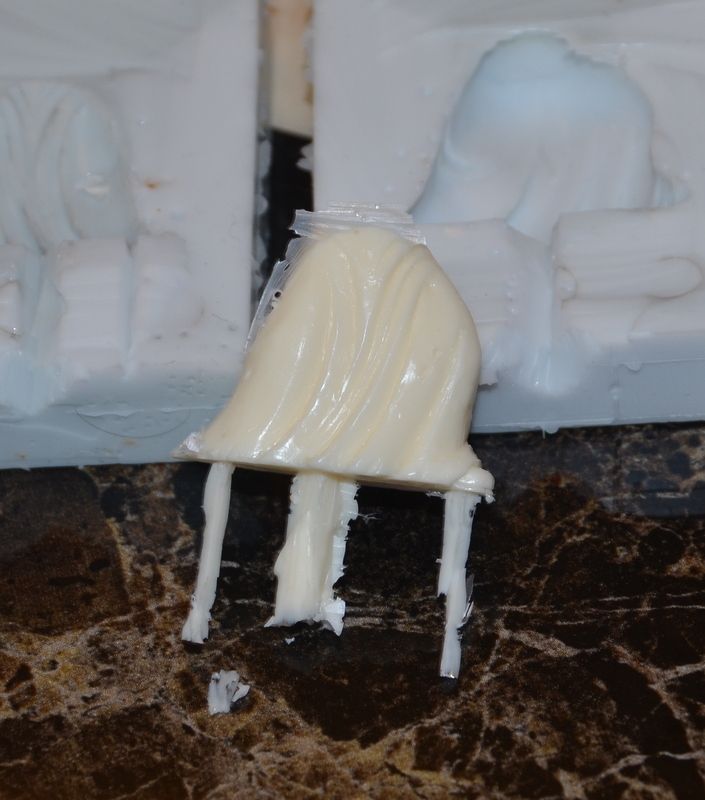
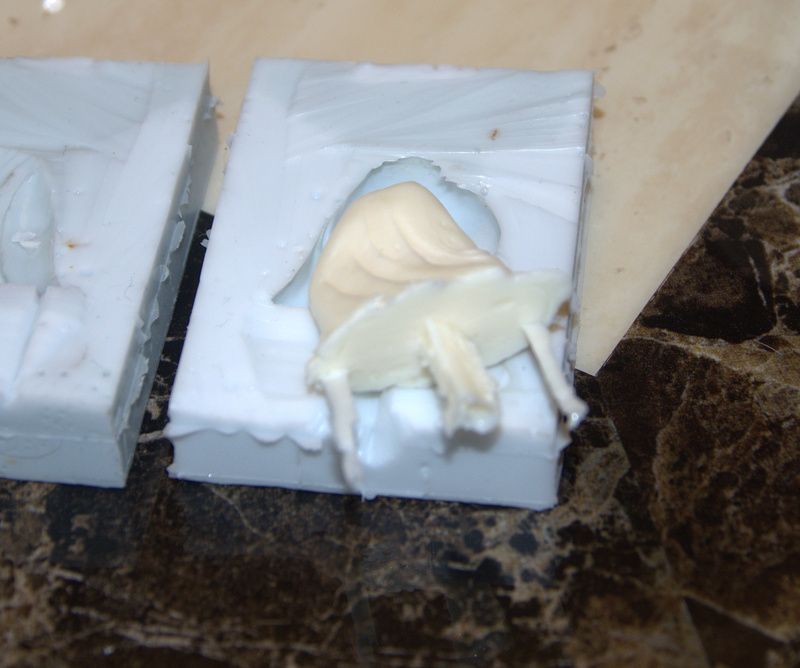
Well, praise the Emperor. It looks like it did. There are only TWO AIR BUBBLES AND THEY ARE TINY!!!! One is on the waist so you wont see it anyway and there is a tiny one on his toe. I can live with that. Not bad for a first attempt.
|
|
|
|
|
2015/12/19 00:18:21
Subject: Toy's n' That....
|
|
Mekboy Hammerin' Somethin'
|
Looks like a great cast. One other trick I've used doing my own moulds is that, for certain areas you always get an air bubble no matter what you try so I mix up a small amount of resin and then put a drop into that part of the mould and poke it around with a stirring stick, then put the mould together and pour the rest of the resin. It doesn't always work I have to say but it's another little thing to try. And whilst it does help in any way what-so-ever, I bought a 2oz bottle of So-Strong Black Colour Tint, cost me about £18 which may seem like a lot but you literally need the tiniest drop mixed in with the resin to get a very nice grey resin; totally useless, looks nice!!
|
Be Pure!
Be Vigilant!
BEHAVE!
Show me your god and I'll send you a warhead because my god's bigger than your god. |
|
|
|
|
2015/12/19 17:14:14
Subject: Re:Toy's n' That....
|
|
Powerful Chaos Warrior
|
Thanks for the advice (again). I put a few drops of resin in the mould first and roll it around the mould before I pour the rest of the resin in. It helps I think, it doesn't get rid of all of them but the odd one or two small ones I can live with. A tint sounds like a cool dea if I ever start producing these guys to sell but when it's just me and a few other players I think Ill leave it for now. Or at least until Christmas is out the way with!
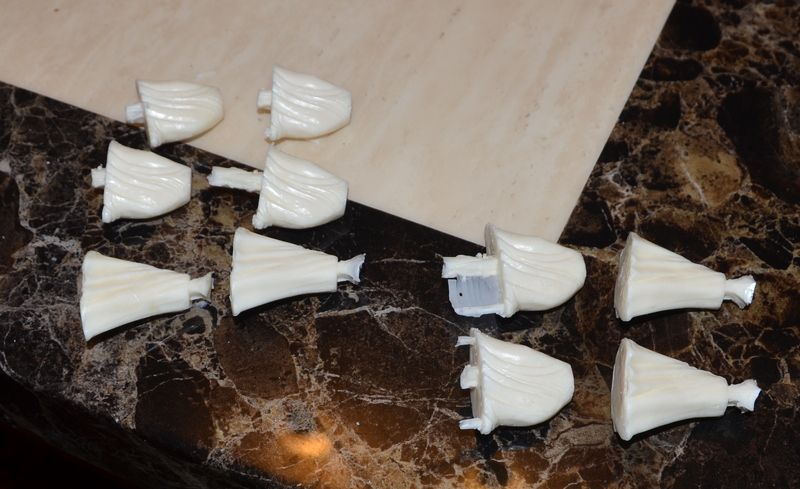
Been at the production line since my last post. 10 sets of legs (only 2 types though as the 3rd mould is still under way). The four on the right are 'perfect' with no air bubbles. The 6 on the left have air bubbles but it's nothing a touch of green stuff wont sort out.
|
|
|
|
|
2015/12/19 19:18:31
Subject: Toy's n' That....
|
|
Pious Palatine
|
Looks like you're getting some good results from the casting!
EDC
|
|
|
|
|
2015/12/23 10:57:30
Subject: Re:Toy's n' That....
|
|
Powerful Chaos Warrior
|
More progress. I currently have 6 sets of 3 legs (for sale). These are the best of the bunch but there are a few small bubbles in the toes and maybe a couple where you wont see them (in the base/waist join). I am getting better though.
.... and here's my Ten. The worst of the bunch so far! You can probably see the air bubbles. Some are worse than others.
My next order of silicone has arrived so I'm currently giving the Torso's a bath of silicone  Hopefully Ill get the first casts of them done tomorrow and give you a sneak peek - just so long as they're not an embarrassment.
|
|
|
|
|
2015/12/24 12:24:35
Subject: Re:Toy's n' That....
|
|
Powerful Chaos Warrior
|
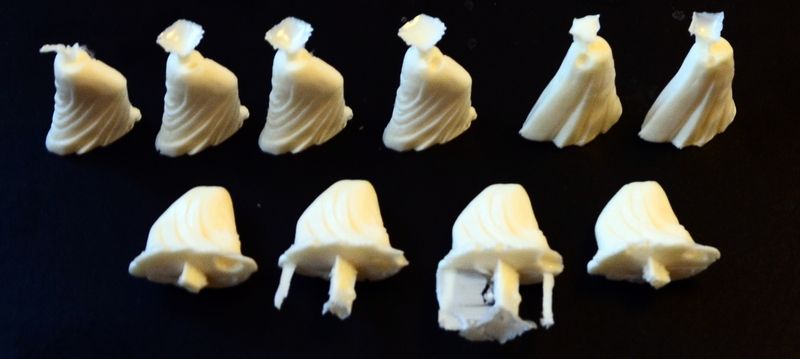
Ok, the mould for the Torso's came out pretty well. After a few tries casting up I ended up widening the 'pour' point or whatever you call it as I was having trouble getting rid of all the air bubbles.
Here's two casts after the alterations.

A couple of rejects gave me something to play with. My 'squad' is coming along nicely

Next moulds are under way.
|
|
|
|
|
2016/01/01 12:04:08
Subject: Re:Toy's n' That....
|
|
Powerful Chaos Warrior
|
|
|
|
|
|
2016/01/01 12:09:54
Subject: Toy's n' That....
|
|
Blood-Drenched Death Company Marine
|
Oh wow, that Jade Tigers scheme looks very pretty and the check pattern seems to be very neat indeed.
|
|
|
|
|
|
2016/01/04 11:28:36
Subject: Re:Toy's n' That....
|
|
Powerful Chaos Warrior
|
Right, a little update. My 10 Cultists are equipped and the holes filled in.
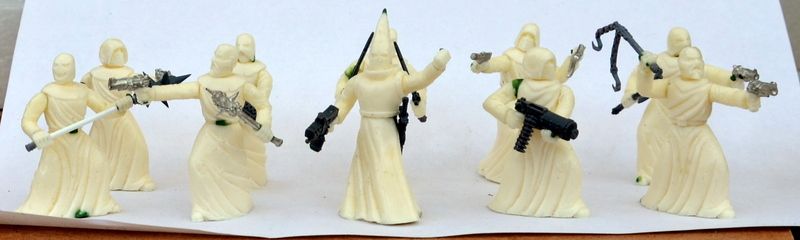
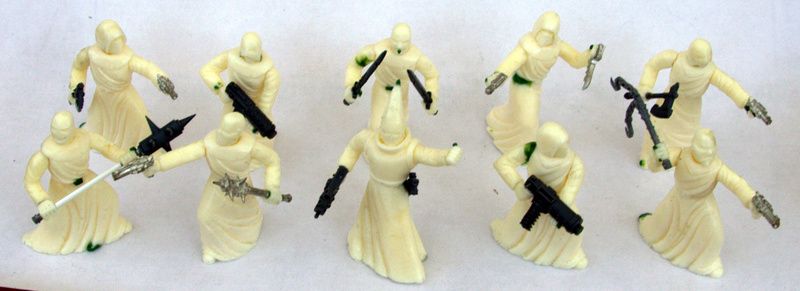
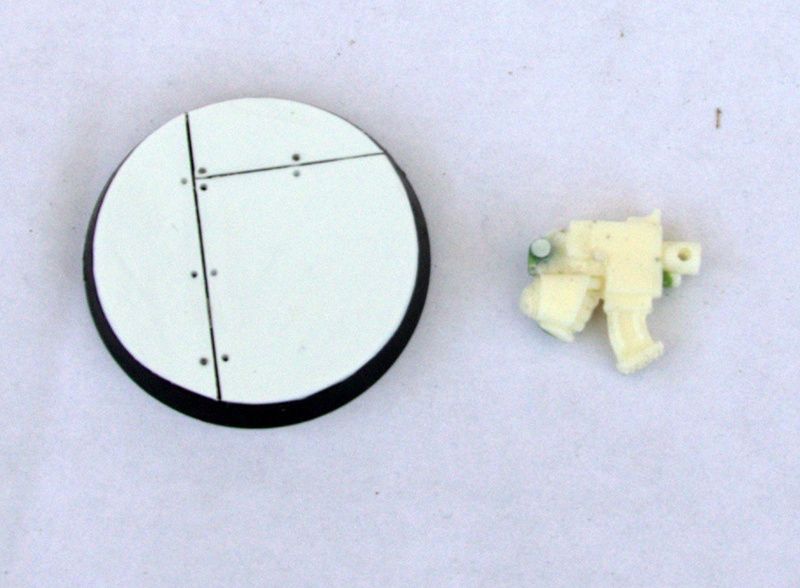
I'm also making/casting up some bases. For two reasons really, I don't think I have enough spare 40mm bases kicking around and (this is the main reason really) I really can't be bothered making 10 different bases when their cloaks will cover up most of the base anyway. So...
Oh, yeah, I made a Bolt pistol out of a failed cast of a Marine Bolter. It's a bit rough n' ready but it was just a test piece. I'm going to have a proper crack at it when I get around to doing my Space Wolf.
|
|
|
|
|
2016/01/10 19:57:17
Subject: Re:Toy's n' That....
|
|
Powerful Chaos Warrior
|
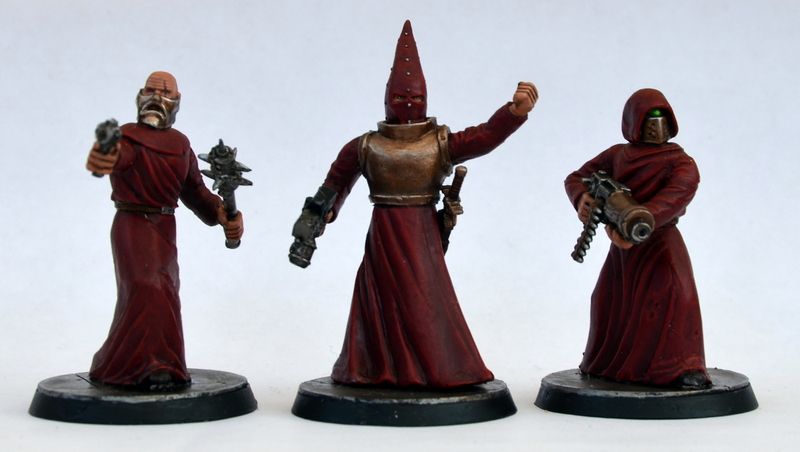
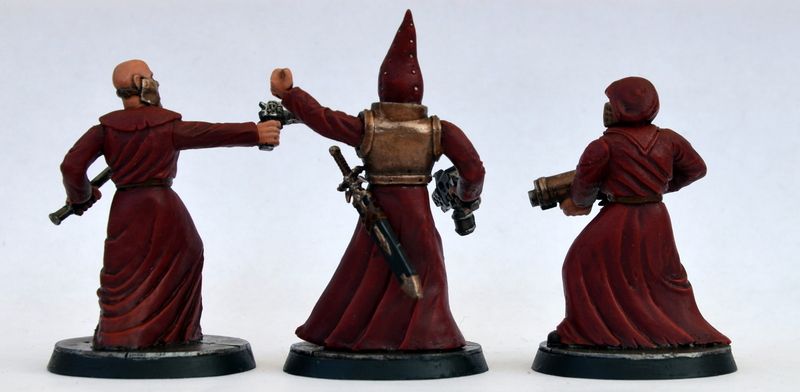
Cultists are done. Painting is pretty basic and slap-dash but they'll do for NPCs.
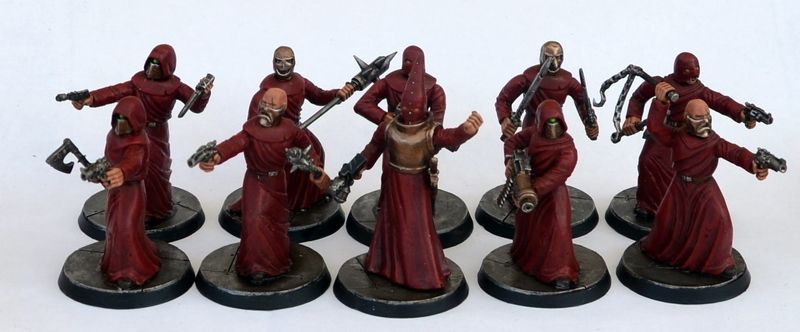
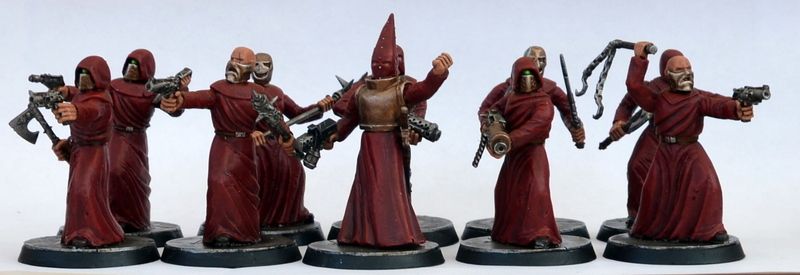
This is 'The Set' I'll put up on Ebay
|
|
|
|
|
2016/01/11 04:24:58
Subject: Toy's n' That....
|
|
Mekboy Hammerin' Somethin'
|
Oh boy, now that's pretty damn awesome! It's fantastic to see these come together and turn out so well. "Come to Chaos!"
I saw a very interesting tool on ebay the other day, basically it was a rolling pin with detail on it, similar to your base, and you just roll it over some green stuff and voila, sci fi bases done! When I get around to it, I think I may try my hand at making my own because like you say (having done it myself) it really can get boring making endless bases when a lot of the detail ends up covered over but then my OCD kicks in and I know I'll never be happy with one identical base.
|
Be Pure!
Be Vigilant!
BEHAVE!
Show me your god and I'll send you a warhead because my god's bigger than your god. |
|
|
|
|
2016/01/11 15:04:48
Subject: Toy's n' That....
|
|
Omnipotent Lord of Change
|
Damnation! The crew look really solid all together and painted up. Really quite impressed! And the 28mm(-ish) weapons work fine - I had some doubts before paint, but clearly unfounded ones
- Salvage
|
|
|
|
|
|
2016/01/12 21:01:05
Subject: Toy's n' That....
|
|
Powerful Chaos Warrior
|
Boss Salvage wrote:Damnation! The crew look really solid all together and painted up. Really quite impressed! And the 28mm(-ish) weapons work fine
Cheers mate. Glad you like 'em. They don't look so great up close but they will suffice :0
Boss Salvage wrote:I had some doubts
Ouch..... I find your lack of faith........ disturbing
Gogsnik wrote:Oh boy, now that's pretty damn awesome! It's fantastic to see these come together and turn out so well. "Come to Chaos!"
I saw a very interesting tool on ebay the other day, basically it was a rolling pin with detail on it, similar to your base, and you just roll it over some green stuff and voila, sci fi bases done! When I get around to it, I think I may try my hand at making my own because like you say (having done it myself) it really can get boring making endless bases when a lot of the detail ends up covered over but then my OCD kicks in and I know I'll never be happy with one identical base.
Aye my mate has one of those and it looks pretty damn cool!! It is a great way of doing quick bases but you'll use a lot of Green stuff up pretty fast if you have a lot to do. All those bases are the same lol. You just can't really tell because they're covered so much
|
|
|
|
|
2016/01/16 17:54:03
Subject: Re:Toy's n' That....
|
|
Powerful Chaos Warrior
|
|
|
|
|
|
2016/01/27 11:33:34
Subject: Re:Toy's n' That....
|
|
Powerful Chaos Warrior
|
|
|
|
|
|
2016/01/30 20:44:46
Subject: Re:Toy's n' That....
|
|
Powerful Chaos Warrior
|
|
|
|
|
|
2016/02/01 14:32:43
Subject: Toy's n' That....
|
|
Omnipotent Lord of Change
|
Cultist looks solid, and damn if that marine isn't already the business  Like how you've cut the shoulder pads down (as detailed earlier).
- Salvage
|
|
|
|
|
|
2016/02/03 10:29:41
Subject: Re:Toy's n' That....
|
|
Powerful Chaos Warrior
|
Cheers mate. The Shoulder pads were a cobble-together job from a conversion I did way back when the model first came out. Bless my young and not so competent self. It needed rescuing and that's how it ended up!
Right, been toying with this guy. Honestly, this has been the hardest thing to cast/mould up EVER. I keep getting bubbles regardless of what I do so I'm not going to be mass producing this rage inducing model. I also had one side of the mould fail as air bubbles got stuck in parts of him (mainly the gap between his leg and coat). Still, here's one I made earlier. With the Chain sword with 2 missing teeth.
This guy is going to be my Investigator/Interrogator for an Inquisitorial warband. An Ex Arbite Investigator. This is before his Inquisitor and the rest of his warband was ambushed and murdered by Cutists. He now works Undercover as a Bounty Hunter trying to track them all down.
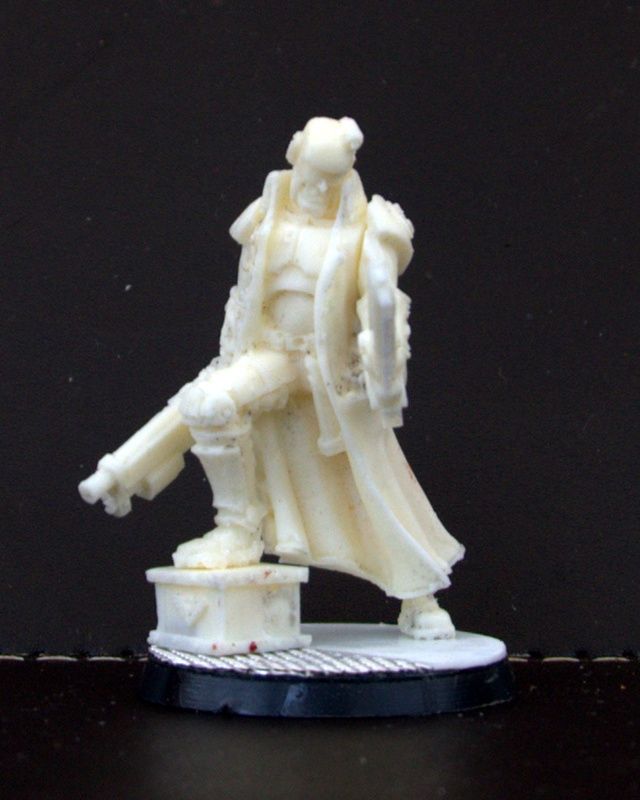
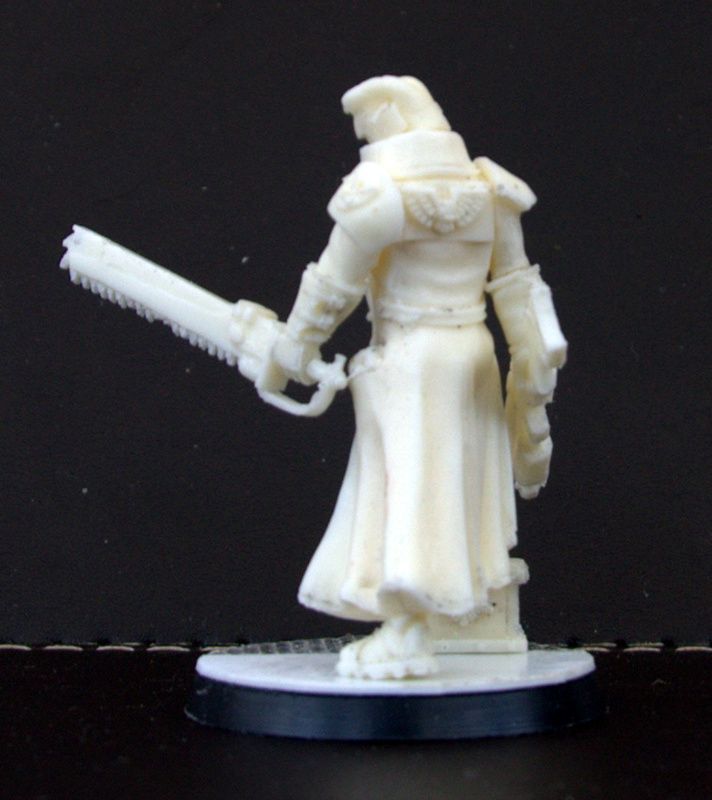 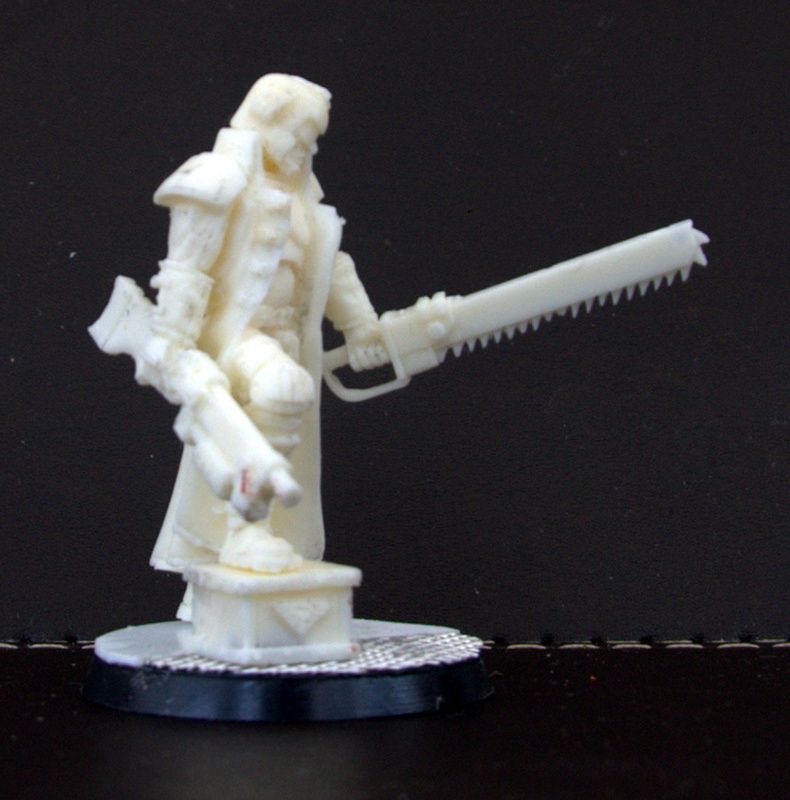
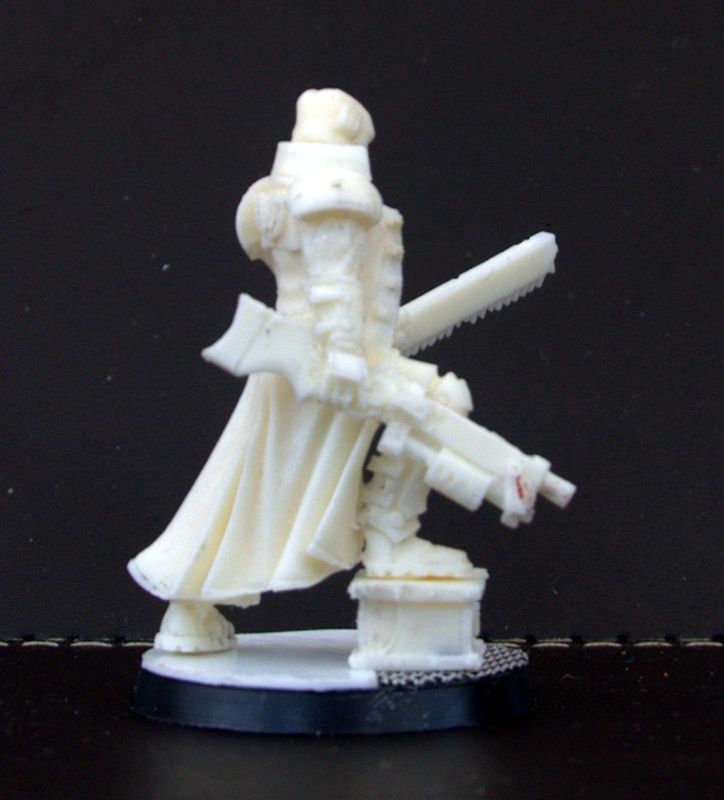
As you can see, there's a few bubbles on this one. The tip of his lapel and his belt buckle for example. Nothing too bad to fix though.
|
|
This message was edited 1 time. Last update was at 2016/02/03 10:32:45
|
|
|
|
|
2016/02/03 13:19:44
Subject: Toy's n' That....
|
|

Arch Magos w/ 4 Meg of RAM
|
That's a piece of gorgeousness right there. Lovely sculpt. Cast seems to have come pretty damnnice. The flow on his overcoat especially nice work
|
|
|
|
|
|
2016/02/03 22:33:20
Subject: Re:Toy's n' That....
|
|
Powerful Chaos Warrior
|
It is, but that's because GW sculpted it It's a cast of their Arbite model. I only have the one so I'm going to cast up each 'original' I have in order to game with. It means I can chop, change and convert to my hearts content without cutting up originals.
Well, the chainsword I made. I so I'll claim that.
|
|
|
|
|
2016/02/05 00:07:17
Subject: Re:Toy's n' That....
|
|
Mekboy Hammerin' Somethin'
|
Fantastic results and the painting is great, I'm especially loving that green on the marine.
 Lord Borak wrote: Lord Borak wrote:I also had one side of the mould fail as air bubbles got stuck in parts of him
You can try mixing up a small amount of rubber and then poking it around into the trouble areas to make sure those bubbles don't form and then mix up a larger batch of rubber to finish the mould and you can do that at any point really and the fresh rubber should fuse nicely to the pre-poured stuff. You can (and I know from experience that this works) coat the part as I say, poke out all the air bubbles and, if there's a decent-ish layer of rubber, jam down the failed mould half on top; needless to say this is more of a salvage job than a sure fire method but, occasionally a mould can be so messed up it's worth a try and I have done this so it does work.
|
|
This message was edited 1 time. Last update was at 2016/02/05 00:14:14
Be Pure!
Be Vigilant!
BEHAVE!
Show me your god and I'll send you a warhead because my god's bigger than your god. |
|
|
|
|
2016/02/08 12:28:19
Subject: Re:Toy's n' That....
|
|
Powerful Chaos Warrior
|
PAINTED STUFF. Marine is done.
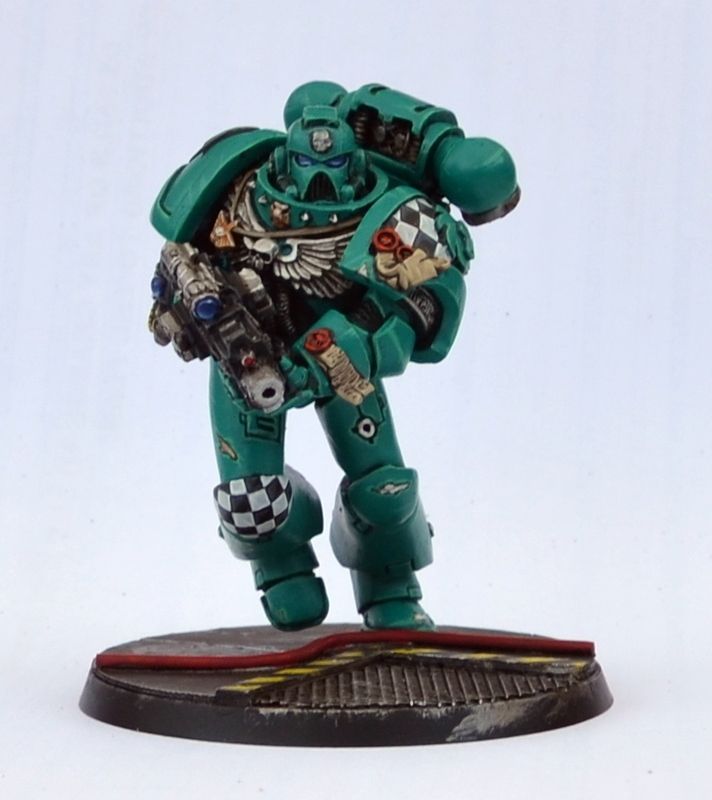
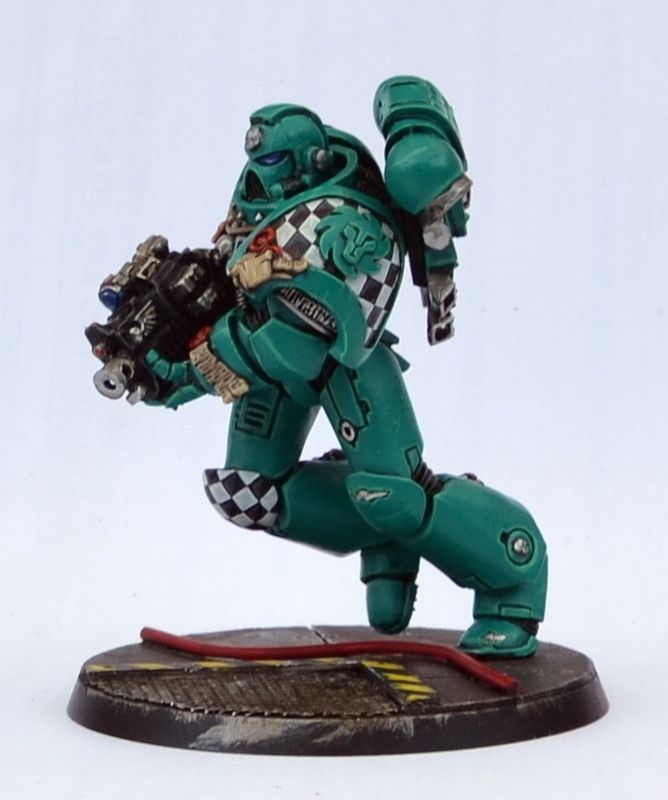

I say 'done' but I have forgotten to add a squad number to his left knee pad. I should also add some weathering to his feet..... Ah well, that's for another day. Oh, and I need to neaten up his base lol.
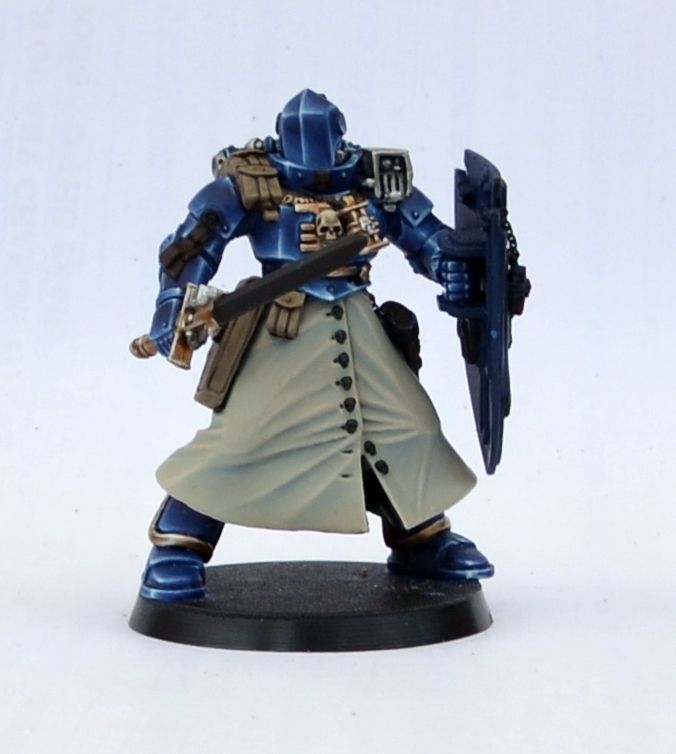
Oh, and just to prove to you I am still working on MrBlue. Here's some more W.I.P. The skirt and brown is still W.I.P but the metals are done. Looking for ideas on what colour to do the sword and it's scabbard.
Gogsnik:
Cheers for the tip. I did do that with the mould on the second attempt. I think it has more to do with the fact that the original wasn't as 'clean' as it should have been so air bubbles stuck to it. :S
|
|
This message was edited 1 time. Last update was at 2016/02/08 12:29:39
|
|
|
|
|
2016/02/08 16:37:26
Subject: Toy's n' That....
|
|
[SWAP SHOP MOD]
Decrepit Dakkanaut
OH-I Wanna get out of here
|
If you wanna go full crazy, you could try some Sky-Earth NMM. Give it that mirrored look.
|
|
|
|
|
2016/02/08 23:15:06
Subject: Re:Toy's n' That....
|
|
Powerful Chaos Warrior
|
You know what, I think you're right. I'll keep it simple and go for silver but I think I'll go for a 'normal' silver than the chrome effect. I don't trust my painting ability to be honest.
|
|
|
|
|
2016/02/09 02:10:08
Subject: Re:Toy's n' That....
|
|
Mekboy Hammerin' Somethin'
|
That's a beautiful model and I thought the marine was impressive! I love the helmet too. I'm not one to offer advice on paint schemes, not my strong suit, but how about white in a sort of cracked ice kind of style? It'd be a variation on the pristine silver/steel look. Anyway, you've got my wanting to dust off my old Inquisitor models as if I didn't have enough to get on with as it is!
|
Be Pure!
Be Vigilant!
BEHAVE!
Show me your god and I'll send you a warhead because my god's bigger than your god. |
|
|
|
|
2016/02/10 00:01:27
Subject: Toy's n' That....
|
|
Stealthy Grot Snipa
|
That... Is... Stunning...
Astonishing paint jobs and the sculpts are amazing. You, sir, are an artist.
|
|
|
|
|
|
|
|


