Necron and Nurgle Terrain I thought some might be interested in a few terrain project I have cooking. A staffer here at Blue Table started a Necron army and that got me totally inspired. I did the Nurgle stuff at the same time as an afterthought, but it grew into it’s own enormous thing.
I shot some video, it’s a little dark, and my voice is very nasally (oh, I despise that). But I also took some still photos which are much clearer.
Blue Table Painting: Gallery List The Nurgle Terrain YouTube - Blue Table Painting- Seven Altars of Nurgle I cut some various shapes from different thickness hard styro, cut out larger chunks with a steak knife. Then I used a soldering iron with the tip removed (be sure to have massive ventilation for this part) to burn out irregular forms around the edges. Notably, I actually burned some holes all the way through as well as creating some nurgle-esque circular trefoils. Lastly, I used the glue gun to sprooge on some raised forms to complete the nurgly effect. This also helped cover up the gaps around the joins.
The pieces were then painted black with acrylic housepaint and left to dry in a well-ventilated area overnight.

For painting I mixed equal parts white/black/dark green (a camo green like Russian Green) and drybrushed that on as a base. Then a lighter shade of green was used to highlight the high areas, but not so much as an artificial gleam from an imaginary light source (like traditional highlighting) but rather a mottling, or a nurgly blight on the stone in patches. This was followed up by an equal-part mix of ivory/brown/yellow for some sporadic bright spots, areas at the corners or around features that I wanted to stick out.
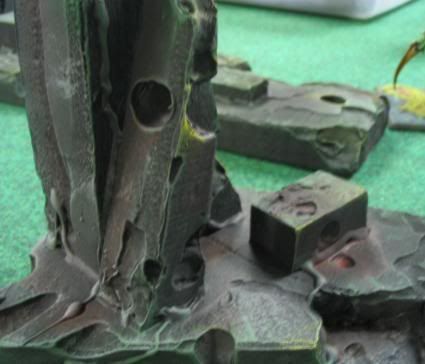
Lastly, I made a wash of red/brown paint and worked it into the cracks here and there, like blood or gore oozing from the stone. Also hints of blood on the altars and dribbling down from open sores on the rock.
The Necron Terrain YouTube - Blue Table Painting- Necron World part 01 This project is not done, there are still three HUGE pieces left to do. When completed is should make for a thick table of
40K terrain.
The first thing to do was cut various sizes of trapezoids. Each one was twice as wide at the bottom as on the top. The larger pieces were cut from 2” thick hard styro and the remainder from 1” thick hard styro. Then they each got a pass over the belt sander to flatten the sides and sharpen up the edges.
I was also inspired by the spine-shaped tubes and backs on some of the models. So, I sanded out some round cylinders of hard styro and cut them into discs. Then, I sanded them down aggressively into wedge-shapes. Using some square pieces of styro to space them out, I glued them together like power cables coming up out of the ground and connecting to the buildings.

Wearing quality safety goggles is a must while using the belt sander.
I had a lot of fun gluing them together. Oh, I also made some square flats both for the bases and for the raised areas.
I also thought wouldn’t it be fun to make a huge ultra-Monolith out of hard styro?. That is totally do-able. And use VDR rules to make it work. Heh.
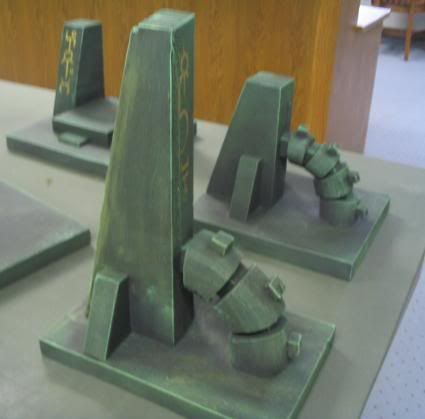
After blackening the terrain and letting it dry overnight I picked two shades of green: a dark camo-green and a light cold green. The dark green was carefully drybrushed evenly on the surface, leaving only black areas in the recesses. Then a similarly cautious drybrush of the light color around the edges to complete the pieces. The gold runes are based on patterns I got out of the Necron book, with some variation. It’s actually Vallejo Brass, which seemed like just the right shade.


