Alpha Cleanse – 1500 points Lots of 1s on the dice rolls to determine mission and level.
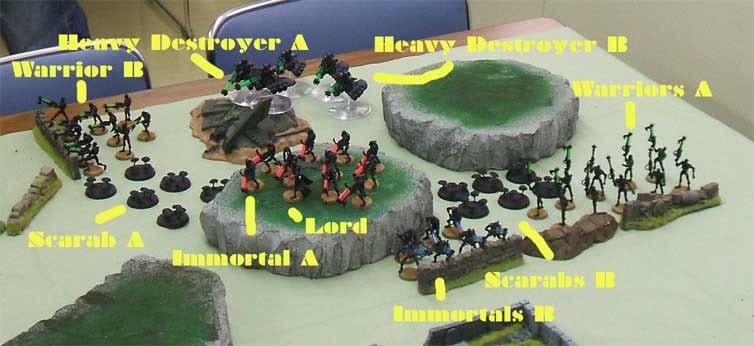
Necron list Lord: Gaze of Flame, Solar Pulse, Veil of Darkness
Warriors[A] x 10
Warriors
x 10
Scarabs[A] x 6
Scarabs[B] x 6
Immortals[A] x 10
Immortals[B] x 7
Heavy Destroyers[A] x 3
Heavy Destroyers[B] x 2
Phase Out: 11 models
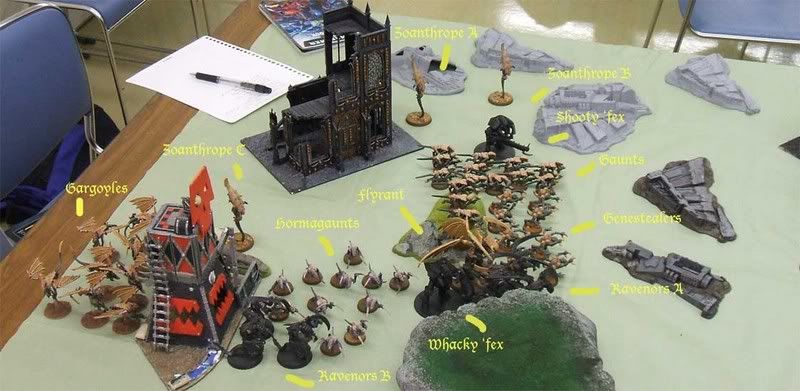
[b] Tyranid List: I suffered heavy casualties before the game, with the
CC ‘fex losing both scything talons and a crushing claw in transit, all of the ravenors also losing at least one arm and the venom cannon coming off the shooty 'fex. Strangely, it was only those unpainted models that seemed to suffer. Even the Flying Hive Tyrant, whose wings seem to have a preternatural will to be anywhere but on his back, made it through okay.
Hive Tyrant: Flesh Hooks, Winged, Scything Talons (x2), Warp Field
Hormagaunts x 12
Gaunt Brood x 14: Fleshborer
Genestealers x 8: Extended Carapace, Flesh Hooks
Gargoyles x 8
Ravener[A] x 3: Rending Claws, Scything Talons, Devourer
Ravener
x 3: Rending Claws, Scything Talons, Devourer
Carnifex: Bonded Exoskeleton; Enhanced Senses, Extended Carapace, Reinforced Chitin; Barbed Strangler; Venom Cannon
Carnifex: Adrenal Glands, Bonded Exoskeleton, Extended Carapace, Reinforced Chitin, Spine Banks, Crushing Claws; Scything Talons
Zoanthrope [A] [B] [C]: Synapse Creature, Warp Blast
My opponent won the dice off, but gave me first turn (sensible, since the only thing I could do was throw myself at him).
[b] Tyranid 1:
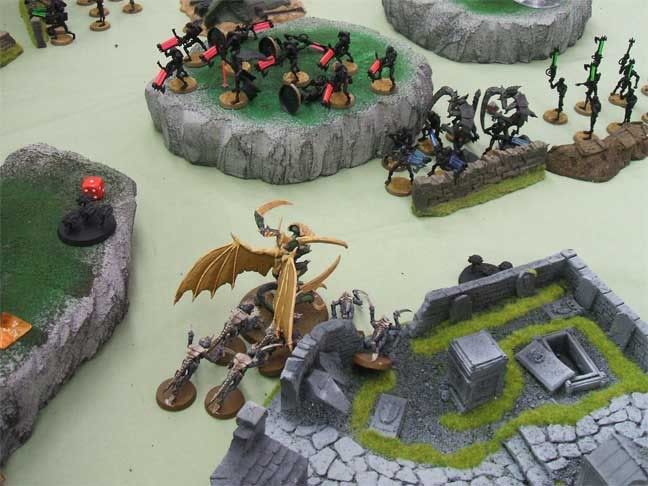
Movement: Everything advanced, with the Gargoyles sneaking off behind the Cemetery to work their way around and nail Warriors
when they were worrying about bigger things. This plan might’ve worked better, if I hadn’t forgotten that Gargoyles are Jump Infantry, and get to move 12 inches, instead of 6. With the exception of my gargoyles, my army was divided so that all the shooty was going down the right side, while all the stabby was heading down the left.
[b] Shooting: I rolled pretty well on my Fleet rolls, but the shooty 'fex and Zoanthrope [C], firing at Immortals[A] failed to accomplish anything. The Necron player didn’t even need to roll armor saves.
 Necron 1:
Movement: Both sets of scarabs came up the middle, Scarab[A] hopping up on the middle hill and heading for the back of my lines (bizarrely stopping about six inches from my assault ‘fex), while Scarab
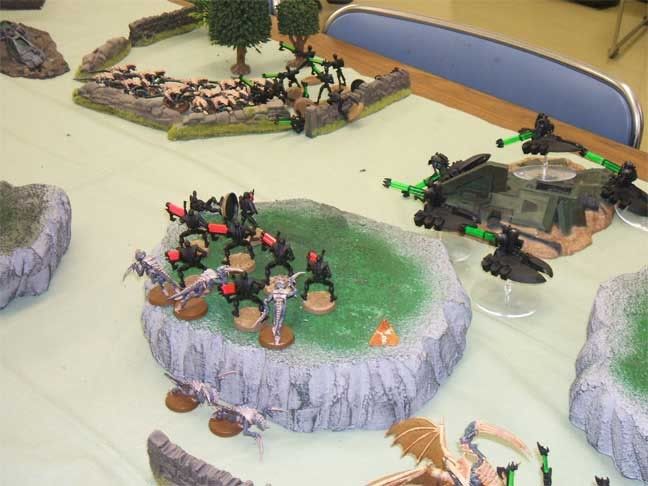
stretched out between the cemetery and the hill, forming a tar pit to slow up my assault forces and hopefully leave them staring down all the gunlines once the combat finished. The heavy destroyers all hopped up on the rearmost hill for better LOS. Immortals[A] formed into a better firing line.
[b] Shooting: Warrior[A] killed 5 Hormagaunts. The heavy destroyers managed to put one wound on the Hive Tyrant. Warriors
killed one Genestealer. Immortals[A] wiped out the entire Genestealer squad, while Immortals[B] took down one Ravenor.
[b] Tyranid 2:
Movement: I was counting on the number of targets presented to help buff the survivability of my troops, as well as having more shots used up on the bigger, tougher targets. That plan certainly failed in regards to my genestealers. With the stealers wiped out, I was hoping to get everyone else through that open kill zone as quick as I could.
Shooting: Once more, I rolled well on the fleet moves. Zoanthropes
&[C] were now in range of Immortals[A], and they managed to knock down one, with the Carnifex’s Barbed Strangler taking out two more.
[b]Assault: 
The Hive Tyrant charged into Scarabs
, smashing three bases, and taking one wound in return, while the accompanying Hormagaunts accounted for 2 more bases. The surviving two Ravenors[B] made it into CC with Immortals[B], taking one 1 wound, and rending 1 Immortal.
[b]
Necron 2: 1 Immortal got back up. The Lord teleported Immortal
out of combat with the Ravenors (I realized how clever the set up was then, because almost the entire army was within six inches of the Lord at the start), reappearing in the back of my table quarter, leaving me with the unsavory prospect of six Gauss Blasters and a Staff of Light coming at the rear of my forces.
[b] Movement: Warriors
jumped the wall, moving up to get my gaunts and ravenors into rapid-fire range. Immortals[A] formed a circle around the perimeter of the hill in order to make assault more difficult. Warriors[A] advanced on where Ravenors[B] were standing around with a grasping limb up their anal orifice, bringing them into rapid-fire range. Both Heavy Destroyer units advanced back towards the spaceship wreckage.
[b] Shooting: Despite the volume of fire, Warriors
only managed to inflict 3 wounds on the raverors, killing one, and leaving the last at one wound. Warriors[A] on the other hand, tore Ravenors[A] apart, wiping out all three. Immortals [A] put the last wound on the remaining Ravenor. Immortals[B] and the Lord failed to hurt Zoanthrope[A], but the Heavy Destroyers managed to take three wounds off the shooty 'fex.
[b] Assault: The whacky 'fex and Tyrant finished stomping the scarabs into welding solder, with the ‘fex lumbering back towards where Immortals
reappeared, the Hormagaunts heading towards Immortals[A] while the Flyrant advanced upon Warriors[A].
[b]
Tyranid 3:
Movement: Once more, everything I have goes scurrying forward.
Shooting: The Gargoyles, still puttering along at a 6’, keep getting 2s on their fleet rolls as they change course to come through the graveyard. The Gaunts manage to knock down one Warrior. This is the only time all game that I remember to use my “Livng Ammunition” reroll. Zoanthropes
&[C] along with the shooty 'fex turn around to shoot at Immortals[B] and miss badly with everything, save the Barbed Strangler, which, in a surge of 5s and 6s, wounded the entire squad plus Lord. The dice surge continued unabated, with the Necrons then making all of their armor saves.
[b] Assault: The Gaunts charge into assault and knock down three Warriors, while the Flyrant tears into Warriors
, killing three outright. The hormagaunts throw themselves up the hill against Immortals[A], inflicting one casualty.
[b]
Necron 3: 1 Immortal [A] and two Warriors [A] made their We’ll Be Back roll and stood up. Realizing that he might not be so lucky next time, the Lord teleported himself and Immortals
the heck out of Dodge, attempting to reappear near the graveyard to ambush my Gargoyles. Fortunately, a 8 inch scatter back the way they came takes them out of range of the Gargoyles, and right back into range of the shooty 'fex and Zoanthropes[B]&[C].
[b]
Movement: The Heavy Destroyers advance-
Shooting: -and annihilate Zoanthrope
. The Lord and Immortals [B] took some potshots at the whacky 'fex, but accomplished nothing.
[b]Assault: The Hive Tyrant took down three more warriors, but they held fast and the battle dragged on. The Gaunts failed to wound Warriors
, but suffered one casualty. With Zoanthrope[B] dead, they were out of synapse range, and so broke, falling back towards Zoanthrope[A], leaving them right out in the open in front of the Heavy Destroyers.
[b]Tyranid 4:
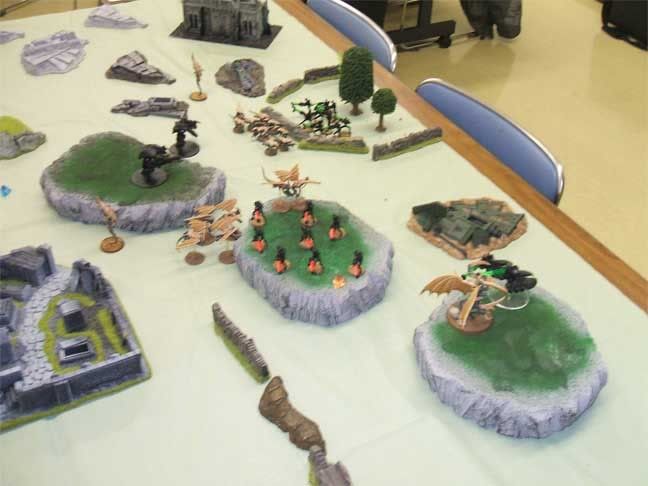
Movement: I finally remembered that Gargoyles move 12”, so they finally made some progress, ripping through the graveyard and coming up behind Immortals
.
Shooting:
The Gargoyles fleeted forward. Having fled back into the Synapse range of Zoanthrope[A], the Gaunts turned around, and opened fire on Heavy Destroyers[A] knocking down two of them. Zonathrope[A], finally getting its act together, blew away the third.
[b] Assault: The Gargoyles descend upon Immortals
and the Lord, with whacky 'fex crashing in on the other side. The Gargoyles knocked down one, and taking three wounds in the process. Whacky 'fex tears three Immortals into scrap. The Necrons whiff their Leadership roll to stay in combat, whiff their Initiative roll to flee, and are turned into decorative ash trays by Stabby’s single attached crushing claw. The Lord becomes a nice spittoon. The ‘fex starts heading towards where Warriors[B] are causing trouble, while the Gargoyles head towards Immortals[A] The Hive Tyrant kills two more Warriors, they fail their leadership roll, break, and the much faster Flyrant begins work on a new line of art deco codpieces, then moves towards Heavy Destroyers[B]. Victory through phase out seems quite likely at this point.
[b] Necron 4: The remaining two Heavy Destroyers in [A] fail their
WBB roll.
Movement: Heavy Destroyer
falls back towards the hill in the corner, getting a line of fire on the Flyrant. Warriors[B] finishes ranking up behind the wall and waits for the gaunt’s counterattack.
[b] Shooting: The heavy destroyers manage to take The Tyrant down to one wound. Warriors
kills five more Gaunts. Immortals[A] wipe out the Hormogaunts suffering no casualties.
[b] Tyranid 5:
Movement: Shooty 'fex takes up a nice shooting position on top of the central hill. Whacky 'fex keeps on trucking towards the remaining Warriors. The Flyrant stops an inch away from the heavy destroyers.
Shooting: Shooty 'fex managed to rip apart two Immortals with its Barbed Strangler and obliterated one more with it’s venom cannon. Gaunt shooting took down one more Warrior.
Assault: The heavily wounded Flying Tyrant charged the Heavy Destroyers, killing one, then running down the other when it broke from combat. The Gaunts leapt back over the wall, pulling down three Warriors.
Necron 5: Two warriors and two Immortals stood back up.
Assault: 1 Warrior, and 2 Gaunts went down in the subsequent fracas.
Tyranid 6:
Movement: The Hive Tyrant bears down on the Immortals, whacky 'fex got into charge range of where the Warriors were making a mess of my gaunts. Shooty 'fex lumbered towards the Immortals, preparing to lend its talons to the fray.
Assault: At this point, time out is called, and both sides pause for tea and mochi, as everybody either whiffs, or makes their save in this turn of combat. No casualties to either side.
Necron 6:
Assault: The Immortals slaughter the rest of the Gargoyles, losing two of their own in return. Three Gaunts trade their lives for two Warriors, and the game grinds to a close with 9 Necrons still on their feet. Unfortunately, since Phase Out is calculated at the start of the Necron turn, and there isn’t a turn 7, outright victory slips through my grasping talons.
All occupied quarters are contested, and so don’t count towards victory. When victory points were tallied up, due to my inability to adequately whittle down that last expensive Immortals squad, he ended up leading me by about a hundred points, and so the game concluded in a draw. Things might’ve been different had all three of my monstrous creatures not gone off to play ‘hide the pseudopod’ in turn six.
Closing comments: I really enjoyed the way my Flying Tyrant just completely ripped the pants off of everything that crossed it’s path, and when combined with a trailing unit of Hormogaunts is real nasty when thrown against anything not geared up for close combat. I’m disappointed that being Alpha level, I didn’t get to be more creative with my setup, deep striking in the Gargoyles, and Infiltrating the Ravenors. This meant that I started the game with all my units hugging the edges of my deployment quarter, and my first phases were a headlong rush, trying to get my units into contact without getting shot to pieces. In hindsight, I probably should’ve tried to screen my genestealers behind my gaunts, giving the cheaper, more numerous unit a chance to soak up casualties. The ravenors would’ve been better off if I’d remembered that they had a 12” charge range, but as with the Gargoyles movement, I had them pegged at 6”. Still, for my first game with the ‘nids, and a very different play style than my usual
IG and Necron armies, I think I did pretty well.


