| Author |
Message |
 |
|
|
|
|
Advert
|
Forum adverts like this one are shown to any user who is not logged in. Join us by filling out a tiny 3 field form and you will get your own, free, dakka user account which gives a good range of benefits to you:
- No adverts like this in the forums anymore.
- Times and dates in your local timezone.
- Full tracking of what you have read so you can skip to your first unread post, easily see what has changed since you last logged in, and easily see what is new at a glance.
- Email notifications for threads you want to watch closely.
- Being a part of the oldest wargaming community on the net.
If you are already a member then feel free to login now. |
|
 |
2007/07/29 14:12:45
Subject: Citi Fight Board Help
|
|

Knight of the Inner Circle
|
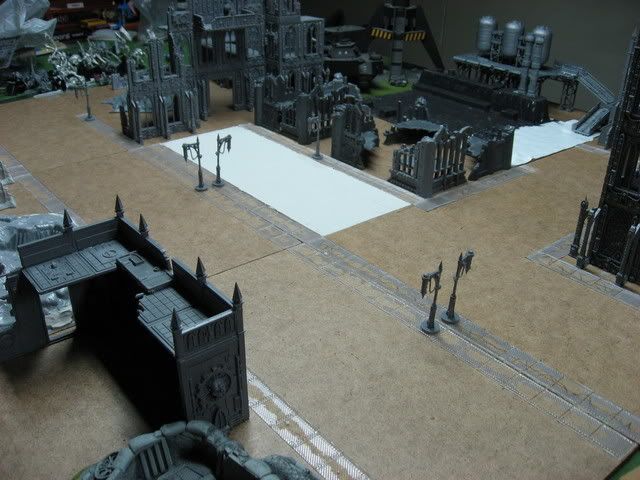
Here is what I been working on the past few months and at a turning point.. The modular boards I made are 16" x 16" hard board that makes a 4' x 4' area eventually I want to fill my whole 8' x 4' table. What my question is should I glue the buildings down to the boards?? I want the most flexible I can get and glued the sidewalks down and want your thoughts on what to do next. 
|
|
|
|
 |
|
2007/07/29 23:51:46
Subject: RE: Citi Fight Board Help
|
|
[DCM]
Illustrator
|
Looks awesome so far. But if you want the most flexibility, don't glue the buildings down. If you want to add tons of detail to each modular section, glue them down and go nuts, you still have lots of game play flexibility with your 16" sections. I personally like to go the hyperdetail route and make things a bit more static, and since you're already rolling a modular board, you really don't get much better chance to do some really awesome detail work and still have a really playable board.
|
-Aaron
Call For Fire
DA:80+S+GM(DPC)B++++I+Pw40k99+D++A++/mWD247R++T(M)DM+++++ |
|
|
|
|
2007/07/30 13:15:35
Subject: RE: Citi Fight Board Help
|
|
Hellacious Havoc
|
the only thing about gluing them down is that they can look odd if you place them on the table when it's non modular, otherwise I say go for it. I've had to many battles where people knock the buildings over when they reach in.
Also, if you glue them down. I suggest moving the buildings in 1-2"s to allow models to pass along the side. that way if you put two buildings next to each other, it will create an allyway for them to pass through.
Otherwise, your table looks good.
|
|
|
|
|
2007/07/30 14:22:02
Subject: RE: Citi Fight Board Help
|
|
Tunneling Trygon
|
The whole point of using the 16"x16" sections (or any size section), is that you can move them around, rotate them, and create a variety of layouts while still having pretty heavily built up terrain. If you're committed to the idea of having sections like that, then I would suggest that you do glue down on them and really go to town on the whole section. Then (as has been mentioned) you might also have all the edges be half of a road, so you end up with a grid of roads, but more than just leaving the space, use the street lamps, build up curbs, use textured paint, etc. to get a cool looking road.
But that's if you want to use sections. I prefer to build terrain pieces on a "footprint" of hardboard, and then place them on a table. The footprint is just the minimum area required to model up the terrain piece, plus an inch or two for stability, and maybe some extra details (barrels, lamps, etc). This locks you in a lot less, but it also denies (or at least frustrates) some cool modelling options, like doing roads, lamp posts (as you have) etc. It's more stylized, rather than realistic, but I think it's more playable.
In the end, you're playing on the terrain, not just sitting back admiring it. I think it's more important that it be useable and flexible than it be maximum pretty. I've seen lots of really neat looking terrain that was covered in rubble, killed tanks, etc. etc. Looked nice, but there was nowhere to stand a model up, all the surfaces are uneven and tippy. What you've got looks great, lots of flat surfaces to stand on, not too much clutter.
Also think about symmetry in the terrain. I like to put the terrain down as symmetrically as possible so that both sides are on roughly the same footing. For some missions that's not as good of an idea, but for generic battles, it's nice to have the ability to give both sides similar amounts of cover in their deployment zone, similar cover to advance to, etc.
Regardless, what you have now is very cool, and you can't go wrong with that start.
|
|
|
|
|
|
2007/07/30 14:22:22
Subject: RE: Citi Fight Board Help
|
|
Regular Dakkanaut
|
Good start, but man is that one CLEAN destroyed city. Need some rubble in there. After all, if half a building fell down, it would be in piles around what's still standing.
For what to glue the buildings down with, either regular CA glue would be fine as would a 5-minute epoxy. Both will give a great bond between wood and plastic. But like the other guys said, try to give about 1-2" of empty space around each building. I'd do 2" where it faces a street, 1" on other sides.
You've also got a lot of room for other obstacles and stuff in there. Big empty streets just beg for blown up vehicles, barricades, craters and all sorts of stuff.
-Hans
|
I hate making signatures:
Mainly because my sense of humor is as bad as my skill at this game. |
|
|
|
|
2007/07/31 01:19:25
Subject: RE: Citi Fight Board Help
|
|
Knight of the Inner Circle
|
Thanks for the help and Ideas... I didn't even think of people knocking over buildings when reaching.. That point helped me push to gluing them down and go the ultra detail way. I plan to use Liquid nails to glue them. I have never used it before is that one of the better things to use?? I used PDA glue to glue the side walks down but after putting the street texture and rubble and paint I don't think they will go anywhere. I got a old meat grinder off my mom and been grinding up old sprues and collecting unused bits to make clutter.
|
|
|
|
|
|
2007/07/31 12:14:41
Subject: RE: Citi Fight Board Help
|
|
[DCM]
Illustrator
|
I've used balled up paper covered with tape and then cover the tape with spackle to build up areas of rubble so i'm not wasting material, let it dry and you've got a good base to start from, plus you can push in some sprue and other stuff while it's drying. If you've got some, use some of the leftover building pieces and use them as rubble as well, gives it more of a realistic feel.
I'm really looking forward to seeing what your table will look like finished ^_^. Do keep us all updated on the progress!
|
-Aaron
Call For Fire
DA:80+S+GM(DPC)B++++I+Pw40k99+D++A++/mWD247R++T(M)DM+++++ |
|
|
|
|
2007/07/31 14:07:18
Subject: RE: Citi Fight Board Help
|
|
Tunneling Trygon
|
I plan to use Liquid nails to glue them. I have never used it before is that one of the better things to use?? I'm not sure what it'd be like in that application. I've used it in construction before (like framing carpentry), and if I recall it's rather thick. Probably won't spread very well, and might actually create fit problems for you. I think it's for bigger, less precise work where the fit isn't as good. I think I'd recommend PVA glue. It forms a very strong bond with anything that's going to allow it to soak in (wood, hardboard), and it's not as brittle as CA glue, plus a lot cheaper. It's also a lot nicer to work with in large amounts, you can spread it around with a finger without giving up a layer or three of skin like you would with CA.
|
|
|
|
|
|
|
|


