| Author |
Message |
 |
|
|
|
|
Advert
|
Forum adverts like this one are shown to any user who is not logged in. Join us by filling out a tiny 3 field form and you will get your own, free, dakka user account which gives a good range of benefits to you:
- No adverts like this in the forums anymore.
- Times and dates in your local timezone.
- Full tracking of what you have read so you can skip to your first unread post, easily see what has changed since you last logged in, and easily see what is new at a glance.
- Email notifications for threads you want to watch closely.
- Being a part of the oldest wargaming community on the net.
If you are already a member then feel free to login now. |
|
 |
2007/09/26 14:42:16
Subject: Stone Walls - A Quick How - To
|
|

[DCM]
Illustrator
|
Well, went surfing through some Black Gobbo the other day and noticed a nice little how-to and decided to give 'er a go! Here's the ol' URL: http://us.games-workshop.com/games/lotr/gondor/terrain/small/default.htm
Have to say, I'm kind of impressed with the results for such a quick and easy project. I chose to use it on a small simple wall to try out some techniques I might end up using later on for terrain on my table. I started off using just a small bit of pink insulation foam that I had laying about. I decided to start with a reliable old sharpie marker to get the lines down. Well, after finishing all the line work, I went to begin cutting into the foam and where there was sharpie, there was no longer nice solid foam, it ate away at the foam just enough so that when you cut directly into the line, you pulled up all the sharpie mark instead of making a neat little cut. So long story short don't use sharpie for this project. Well, I went back, cut out a new piece (which sucks because the piece I had was really already perfect shape....), and got a ball point pen that did the trick for me. I lined everything out which took longer than it really should have because I'm too into perfecting rocks now all of a sudden x.x... 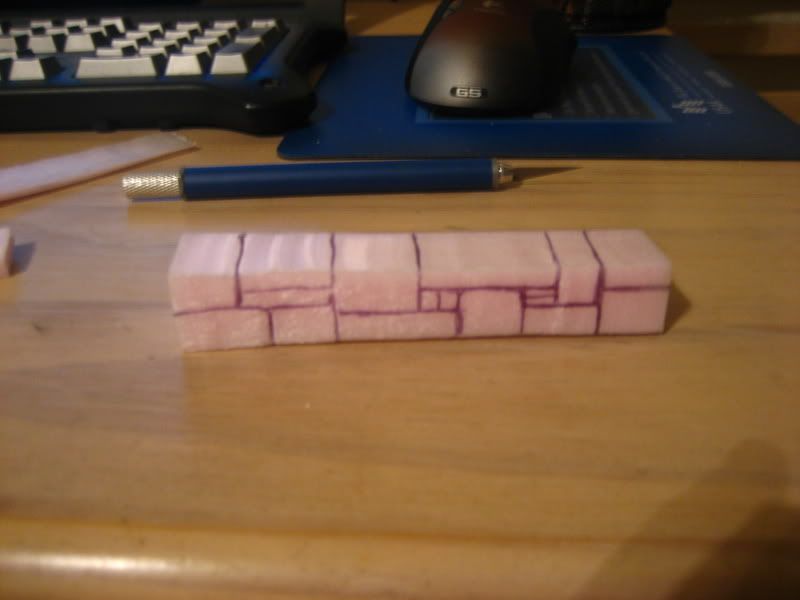 After that I got to cutting in the lines. To start out I just cut a thin shallow line right on top of the drawn lines, then I took a pencil like the tutorial said and pressed it into the cuts. This really doesn't work as easily as you expect it to. You've gotta really get in there with the pencil and go over the same spots multiple times. I ended up pulling the knife back into service in a lot of spots that were being stubborn. I weathered them a bit by trying to sand out some corners, but again, not the greatest of results from this. Sanding is awesome on most materials/projects. But for this one, it just seemed to texture the foam in a way I really wasn't too keen on. So I don't really suggest sanding all that much. I would just stick to the knife on this one. After trying to sand, I cut out some corners, and added some cracks and divets to complete the weathering. 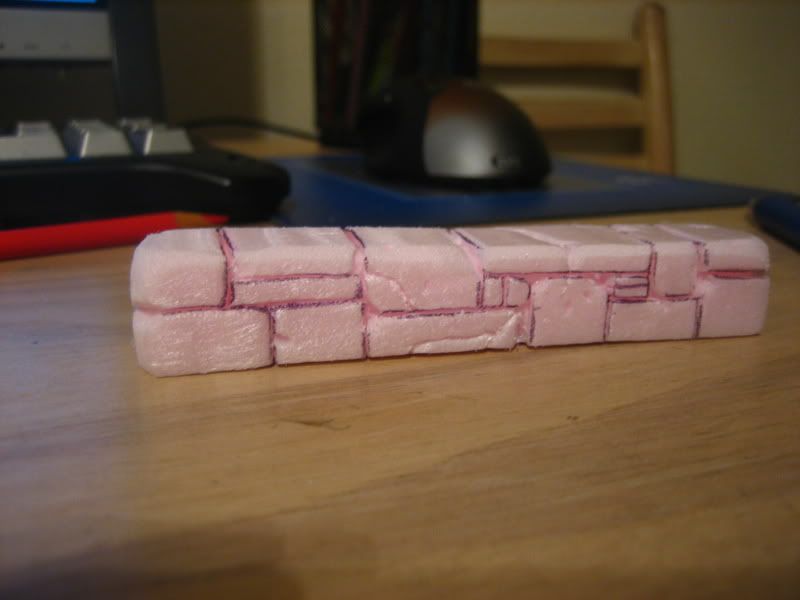 Remember, Foam Melts with Spraypaint, so be sure you don't go nuts with the ol' primer can. I used a bit of dark interior latex paint I've been using on my table project for a 'primer' here. Marines in for scale of course.  Then I set to painting. It's a Codex Grey base with a Fortress Grey highlight around the edges and cracks, and very lighting drybrushed all over with Fortress as well. I added some weathering around the base of the model then with Bestial Brown, very lightly highlighted with Snakebite Leather. Using a very thinned out wash of Chaos Black, I added 'drainage' from cracks and divits. After it was all said and done, I did a quick drybrush over it all with Bleached Bone. 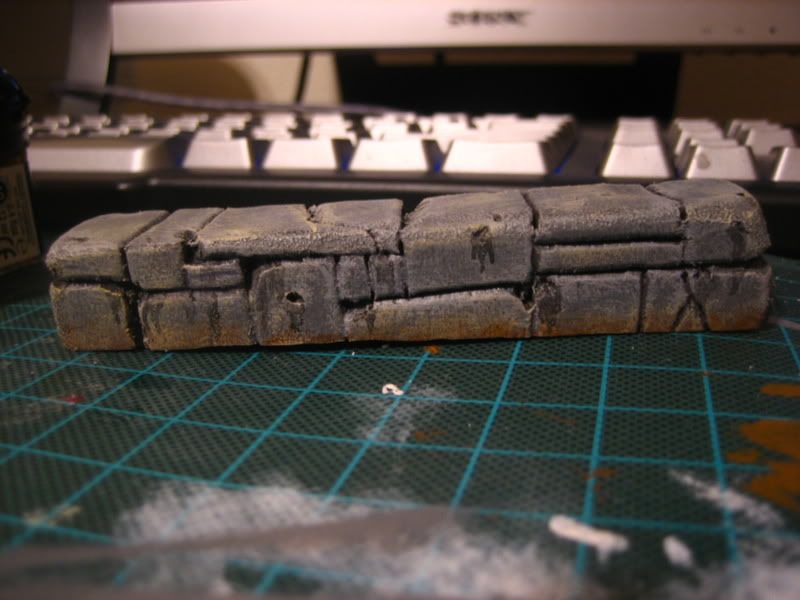 When the paint was finished and dry, I pulled out the Woodland Scenics Blended Turf I've had sitting around for years. To add this I just painted on some PVA Glue (Elmers FTW!) and dipped it into the container. I found that it took two or three dips until I wasn't seeing wet glue spots anymore. 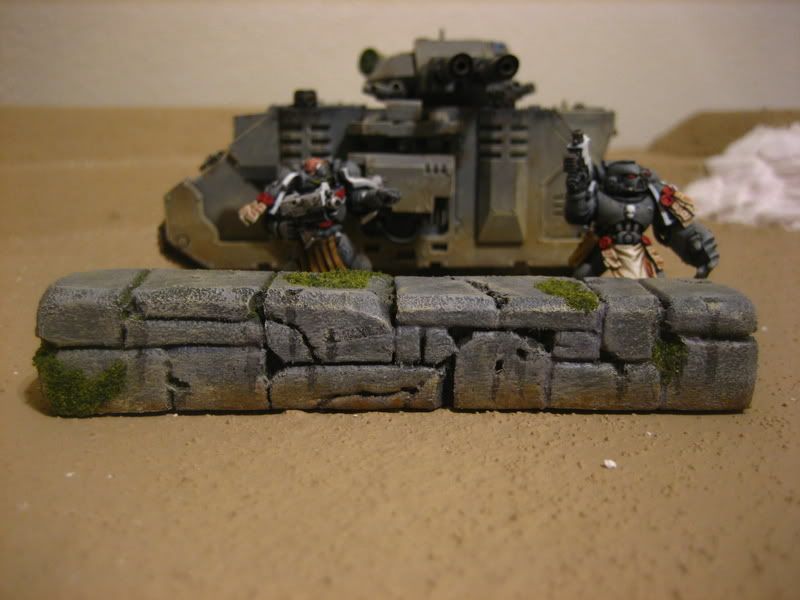 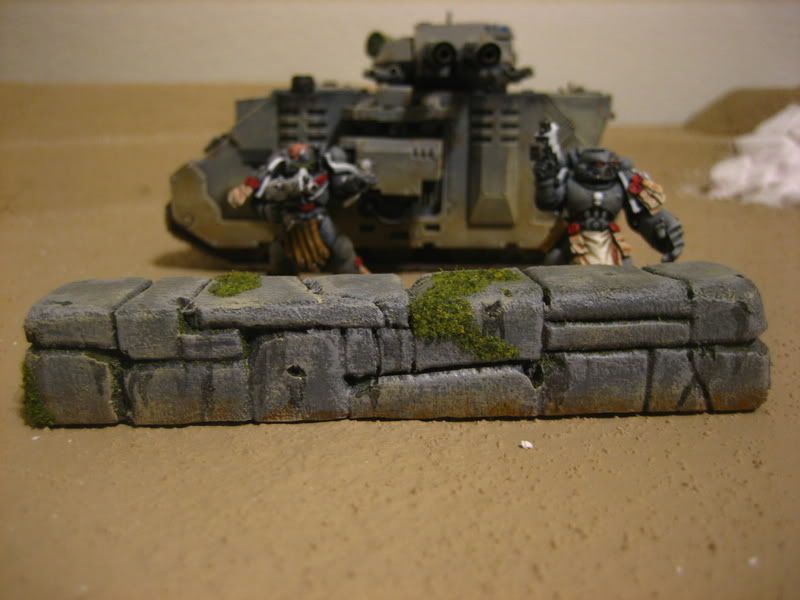 And it's done! Just waiting for the glue to finish drying and I'll hit it with a quick Matt Varnish. Hope this helps someone out there ^_^. I know I type a lot sometimes, but I'm hoping that you'll all be able to learn from the mistakes I make x.x..... All in all, a really easy but effective method. It would definitely work wonders on a full building or ruins. I suggest you give it a go ^_^.
|
-Aaron
Call For Fire
DA:80+S+GM(DPC)B++++I+Pw40k99+D++A++/mWD247R++T(M)DM+++++ |
|
|
 |
|
2007/09/26 17:24:28
Subject: RE: Stone Walls - A Quick How - To
|
|

Executing Exarch
|
That looks pretty nice and fuss-free. When (not if!) you do a bigger project using this, be sure to post it! My only complaint would be that some of the stains don't seem natural; wouldn't one expect them mainly to extend down from grooves or indentations rather than appear on flat rock? I could be wrong, though.
Cool marines too.
|
Wehrkind wrote:Sounds like a lot, but with a little practice I can do ~7-8 girls in 2-3 hours. Probably less if the cat and wife didn't want attention in that time.
|
|
|
|
|
2007/09/27 11:38:03
Subject: RE: Stone Walls - A Quick How - To
|
|
[DCM]
Illustrator
|
Posted By tegeus-Cromis on 09/26/2007 10:24 PM
That looks pretty nice and fuss-free. When (not if!) you do a bigger project using this, be sure to post it! My only complaint would be that some of the stains don't seem natural; wouldn't one expect them mainly to extend down from grooves or indentations rather than appear on flat rock? I could be wrong, though.
Cool marines too.
Bigger project: I'm sure I'll do one eventually >.>... As for the rock stains, I did try and keep them contained to the spots that had a indentation or long groove. The photo might be a bit deceptive as to what is an indentation and what is just paint. And thanks on the marines ^_^ you can check out that whole other project in the P&M Blogs >.>...
|
-Aaron
Call For Fire
DA:80+S+GM(DPC)B++++I+Pw40k99+D++A++/mWD247R++T(M)DM+++++ |
|
|
|
|
2007/09/27 20:43:26
Subject: RE: Stone Walls - A Quick How - To
|
|

Bonkers Buggy Driver with Rockets
Right behind you...
|
Yes that turned out very nicely. I really like the effect you made on it all. Perhaps a blade screwdriver would work better than a pencil for the grooves?
|
|
|
|
|
|
2007/09/28 00:15:16
Subject: RE: Stone Walls - A Quick How - To
|
|
Fixture of Dakka
|
Nice wall Aaron and it's always nice to see someone take the effort to share a "how to".
|
 
Don't set your mind to one side.
-Nevermore
|
|
|
|
|
2007/09/28 03:29:50
Subject: RE: Stone Walls - A Quick How - To
|
|

Fresh-Faced New User
Katrineholm, Sweden
|
Very nice looking wall and a quick, simple how-to even a monkey could understand!
Excellent!
//Bopp
|
|
|
|
|
2007/09/28 07:28:03
Subject: RE: Stone Walls - A Quick How - To
|
|
Homicidal Veteran Blood Angel Assault Marine
|
Posted By Bopp on 09/28/2007 8:29 AM
Very nice looking wall and a quick, simple how-to even a monkey could understand!
Excellent!
//Bopp
So easy even a cave-man could do it?
|
I play  
I will magnetize (now doing LED as well) your models for you, send me a DM!
My gallery images show some of my work
|
|
|
|
|
2007/09/29 03:35:02
Subject: RE: Stone Walls - A Quick How - To
|
|
[DCM]
Illustrator
|
thanks guys. It's nice to be able to put the time in to get info out there that will help people on their own endeavors.
As for the bladed screwdriver, are you referring to a flat tip? I think it would work, but might pull on the sides of the 'rocks' a bit much and tear at the foam. A cross tip could work too but again, might pull the foam and tear it. Now, if you could find a metal tipped tool that is similar to a pencil that you could heat up to make the foam a bit pliable you'd be golden. A soldering iron comes to mind, but that might be a bit...too hot.
|
-Aaron
Call For Fire
DA:80+S+GM(DPC)B++++I+Pw40k99+D++A++/mWD247R++T(M)DM+++++ |
|
|
|
|
2007/09/30 01:16:34
Subject: RE: Stone Walls - A Quick How - To
|
|

Highlord with a Blackstone Fortress
Adrift within the vortex of my imagination.
|
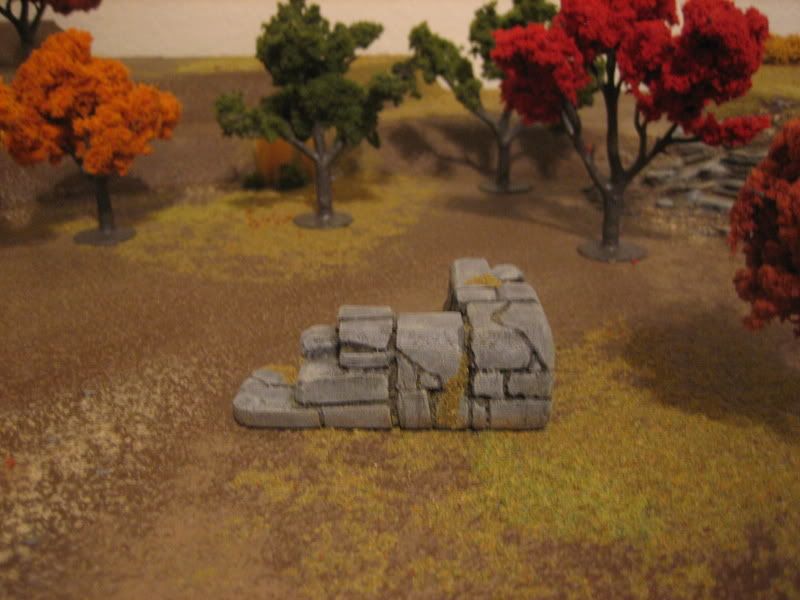
Nice effort, but I dont like how it came out.
The orginal piece was too square. It doesnt fit a wall at all, also its too isolated, even when imagining it with other similar peices. Because it is so wide.
A block like that could be a fallen stone pylon, in which case it needs breaking up a bit or the foundations of an ancient building part uncovered, in which case it could have survived alone but would need to be 'flush' with the ground in order to show that it is part buried.
As it is the piece is clearly lying on the ground, rather than placed in it. You ned to base the stonework or greenstuff a fringe around it to firmly root it in the ground. To help it fit more flushly to a textured gaming table base the pece with felt and paint the edges of the felt with a brown ink wash.
If you want a wall, halve the width, and preferably make it slightly higher. Not much though so that the miniatures, which are firing in an 'open ground' pose don't look odd behind it. A thinner wall may have troubles standing up, which can be avoided by basing the wall, or providing an L shaped section.
|
n'oublie jamais - It appears I now have to highlight this again.
It is by tea alone I set my mind in motion. By the juice of the brew my thoughts aquire speed, my mind becomes strained, the strain becomes a warning. It is by tea alone I set my mind in motion. |
|
|
|
|
2007/09/30 06:46:33
Subject: RE: Stone Walls - A Quick How - To
|
|
[DCM]
Illustrator
|
Posted By Orlanth on 09/30/2007 6:16 AM
Nice effort, but I dont like how it came out.
The orginal piece was too square. It doesnt fit a wall at all, also its too isolated, even when imagining it with other similar peices. Because it is so wide.
A block like that could be a fallen stone pylon, in which case it needs breaking up a bit or the foundations of an ancient building part uncovered, in which case it could have survived alone but would need to be 'flush' with the ground in order to show that it is part buried.
As it is the piece is clearly lying on the ground, rather than placed in it. You ned to base the stonework or greenstuff a fringe around it to firmly root it in the ground. To help it fit more flushly to a textured gaming table base the pece with felt and paint the edges of the felt with a brown ink wash.
If you want a wall, halve the width, and preferably make it slightly higher. Not much though so that the miniatures, which are firing in an 'open ground' pose don't look odd behind it. A thinner wall may have troubles standing up, which can be avoided by basing the wall, or providing an L shaped section.
Thanks for the comments Orlanth, you're right that this piece doesn't really look 'right' or even 'finished' for that matter. I didn't go into this project thinking of creating a complete terrain piece, instead I was really only exercising a new technique and thought I'd bring everyone else along for the ride ^_^;. You've made some good points as to what to look for in a more completed piece, and you will more than likely see a much more complete piece when I move to make terrain for my foothills table project. This how to was just to see if the technique worked well enough for me to use in the future, and to help others who might want to give it a go.
|
-Aaron
Call For Fire
DA:80+S+GM(DPC)B++++I+Pw40k99+D++A++/mWD247R++T(M)DM+++++ |
|
|
|
|
2007/09/30 09:22:17
Subject: RE: Stone Walls - A Quick How - To
|
|
Fixture of Dakka
|
It doesn't look like a New England wall, but it looks very much the stone walls I have seen at some estates. I do agree that the base would be nice.
|
Don't set your mind to one side.
-Nevermore
|
|
|
|
|
2007/09/30 09:39:56
Subject: RE: Stone Walls - A Quick How - To
|
|
[DCM]
Illustrator
|
Posted By scarab on 09/30/2007 2:22 PM
It doesn't look like a New England wall, but it looks very much the stone walls I have seen at some estates. I do agree that the base would be nice.
Speaking of, I need to get some research photo's of some of the old ones out in the woodlands around NE. If you happen to have any in your backyard folks >.>...ya know..don't forget me ^_-
|
-Aaron
Call For Fire
DA:80+S+GM(DPC)B++++I+Pw40k99+D++A++/mWD247R++T(M)DM+++++ |
|
|
|
|
2007/09/30 23:03:03
Subject: RE: Stone Walls - A Quick How - To
|
|
Fixture of Dakka
|
I would have to go for a little walk. Lots of stone walls in my hiking. You hike up some big mountain and someone else was there first. And they built a big stone wall! Damn.
|
Don't set your mind to one side.
-Nevermore
|
|
|
|
|
2007/10/01 03:31:06
Subject: RE: Stone Walls - A Quick How - To
|
|
Fixture of Dakka
|
It actually reminds me a lot of the low walls they have all over the PennState main campus, as both retaining walls and just decoration/seperation. A lot are oddly low and wide, just enough to cut a slope flat to put in a sidewalk or divide an area enough to provide a sense of seperation (and give skate boarders something to do perhaps.) A look like yours might be really cool in a city scape for such retaining walls and the like. One almost never sees things like that on tables.
All the walls I have seen in the wilds of PA have flatter stones, usually field stones, though some have a look similar to that, only narrower. They can be really low though, and tend to taper into nothingness unless at a gate or corner, or a scorch mark where there used to be a barn etc.
|
|
|
|
|
|
2007/12/30 19:14:04
Subject: Stone Walls - A Quick How - To
|
|
[DCM]
Illustrator
|
Got bored while waiting for some paint to dry on a modular hill section for my table and saw an L-shaped piece of foam at my feet and got to whittling away at it with the hobby knife. I ended up skipping the pencil step for this piece and just cut into the foam at angles to get the separation for each stone. I wanted to try and get multiple levels on this one, making it feel less like a big pillar and more like a defunct wall section. It's just as thick as the last piece, if not thicker, but it looks more natural than the last one. I'm happy with the results for the time invested.
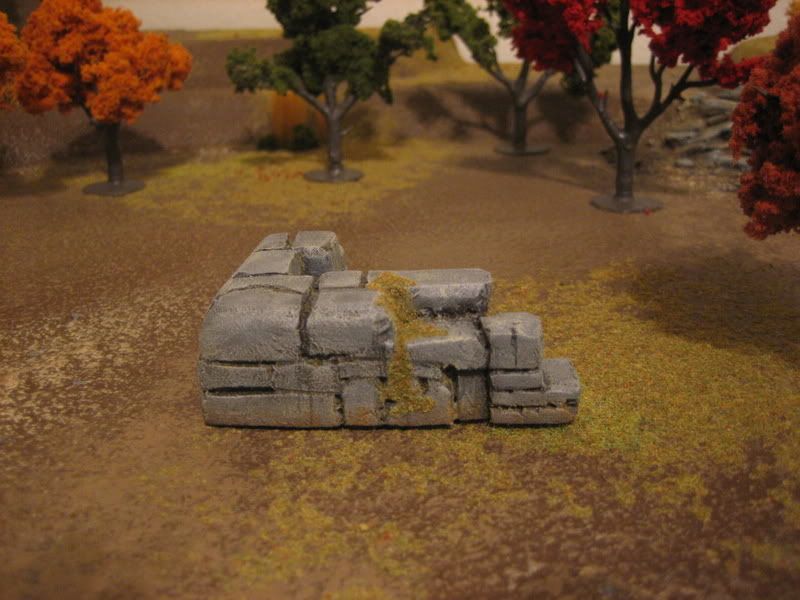

This was merely a time killer, again not a finished or completed piece, but it does it's job as an easy quick piece of modular terrain. I'll end up basing this one for sure down the road when I do the same for my tree templates.
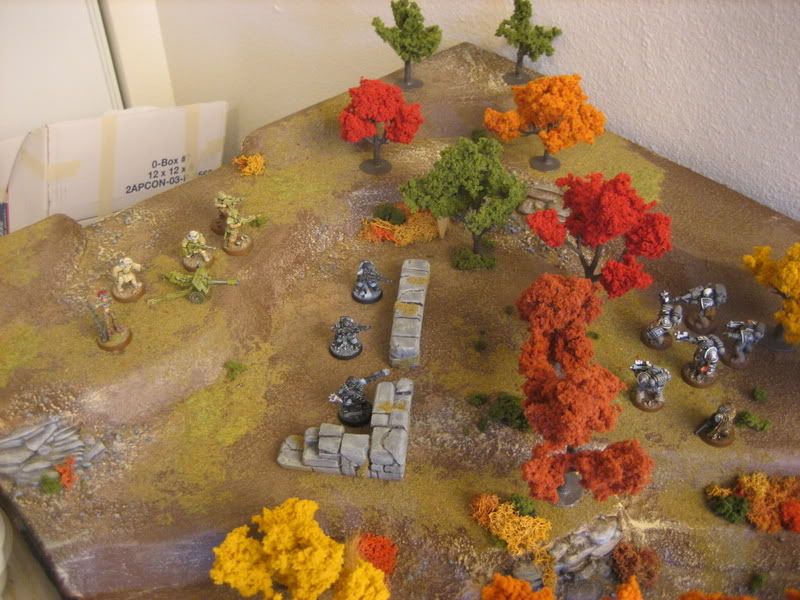
And an action shot:
Comments, critiques, and suggestions welcomed. And feel free to post your own walls as well.
|
-Aaron
Call For Fire
DA:80+S+GM(DPC)B++++I+Pw40k99+D++A++/mWD247R++T(M)DM+++++ |
|
|
|
|
2007/12/31 17:32:09
Subject: Re:Stone Walls - A Quick How - To
|
|
Kabalite Conscript
|
I notice you have a nice game table with plenty of hobby trees. I was wondering if you have any pointers on making hobby trees look as good as yours out of the kits. I took a stab at hobby trees once, although it was some time ago, and my trees looked really sickly.
What brand of glue do you like to use? Do you work on your trees in layers? Any little pointers would be nice.
Also, love the wall sections.
|
Love means never having to say you're ugly. |
|
|
|
|
2007/12/31 17:36:20
Subject: Stone Walls - A Quick How - To
|
|
[MOD]
Madrak Ironhide
|
Points for fast and easy. They pass the "tabletop" test. I
don't see enough stone walls in my life to really examine
it the way Orlanth does, so nice work!
|
|
|
|
|
|
2007/12/31 19:33:10
Subject: Re:Stone Walls - A Quick How - To
|
|
[DCM]
Illustrator
|
Dr Phibes wrote:I notice you have a nice game table with plenty of hobby trees. I was wondering if you have any pointers on making hobby trees look as good as yours out of the kits. I took a stab at hobby trees once, although it was some time ago, and my trees looked really sickly.
What brand of glue do you like to use? Do you work on your trees in layers? Any little pointers would be nice.
Also, love the wall sections.
I don't really bother with the kits. Too much time/effort...
I just buy them as is from the Woodland Scenics line. Only thing you have to do is reposition the limbs and put them on the base.
|
-Aaron
Call For Fire
DA:80+S+GM(DPC)B++++I+Pw40k99+D++A++/mWD247R++T(M)DM+++++ |
|
|
|
|
|
|


