I noticed another thread in here about the Baneblade kit so I decided to make one from the total fanboy point of view!
This is just a little review of the recently released Baneblade kit. Like many in the US I’ve been wanting the Forgeworld one for a while but just couldn’t get around paying that much for a tank. 100 bucks? I can make that work.

Yeah, everything in Apocalypse is bigger…even the kits. The box was obscenely large, but there are a bunch of sprues to deal with. The overall detail is great and even without the tank accessory sprue or the new command tank sprue it comes with a few extra greeblies that are good for some added effects. It also comes with a few options for tank commander torsos and head/arm options along with a free standing officer. Unlike the one from the tank accessory sprue this guy’s wearing a long coat so he would actually make a pretty good commissar or something. The power sword included actually looks like it could be wielded by a human and is a great looking weapon as opposed to the normal 2x4 with an edge sharpened that they usually carry. The thing that impressed me the most though was this:

The barrels are actually hollow! The heavy bolters and autocannons actually have the side vents hollowed out as well. Nice! This is above what I expect to see from an injection molded kit and I am definitely impressed!

With such long pieces I expected some warping and I wasn’t disappointed. The track housing sides actually come in two pieces which makes it difficult to try to flex them straight again without breaking the joint that you just glued. The best bet is to just glue the long sections together and then glue the wheel sections to those and hold them down as tightly as possible until the glue dries. Then, finish the two halves and glue them together while trying to hold them as straight as possible. The glue (I use zap-a-gap) should hold the pieces firmly after a few seconds of pressing them together. You may want to clip out the long section of track to hold the bottom straight as well as one of the top sections of track guard. This will require 4 hands to accomplish though so that may not work out.

It was at this point that I sunk some magnets into the top track guard piece. You can see the first one above. I used 3 on each so that I could reconfigure the side panels and sponsons for use as the Hellhammer or whatever.

You’ll probably want to paint the inner side of the tracks as well as the under side of the track guards before you glue the tracks down or else it will be hard to do so later.

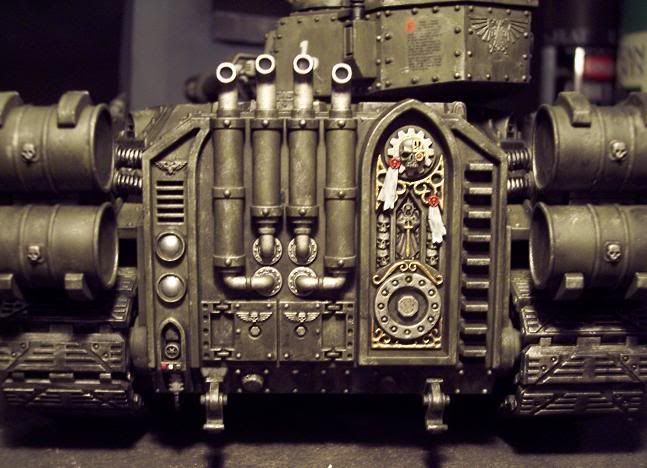
You might want to do the same with the ball mount of the demo cannon too. Of course, it didn’t do me any good since I ended up painting mine steel! It will just keep you from having to paint it, then rotate it a tiny bit, then paint the part you missed, then rotate, etc. The whole thing could be avoided by just gluing the thing in place but what fun is that?


The next great adventure is gluing the two sides onto the main hull. The bottom is actually two pieces that are glued together first. There wasn’t a big issue with warping on these parts (in my kit) but the fact still remains that you’ll have to line up three hull pieces to the two track guard sides and at this point the kit is just big enough to make that sort of a pain. I went against the instructions and left the back off and I think that’s the way to go. I lined the edges of the three hull parts with glue and set them into one of the track guards, then quickly put the other side on. Then, I held it as tightly as possible to let the glue do its work. I highly recommend doing multiple dry fit tests during this phase. [NOTE] In the pic above the rear top section of the track guards are only pushed into place. They were not glued on until later. Do NOT glue these down without fist attaching the fuel lines that go there or they will make life hard later on. I left them off as long as I could because I was going to try something else, but in the end just decided to go with what they had.

With the back still off I set the top of the hull in. Since the track guards were glued firmly in place this made for a little bit too tight of a fit. I saw that coming though so I tapered the inner edge of the entire top piece to help it slide in better. I recommend this but be warned! Be careful where you take off since some of the edges will be visible when the piece is set in place! I had to shape a small piece of sprue to cover up a blank spot I created by doing this.

The real important part is making sure the back of the top piece snaps between the fuel inlet pieces on the track guards.

Once that looks good it’s safe to glue the back on and seal up the inside.

On the small turret weapons there is something to watch out for! The instructions do not make it clear which way the cylinder for the weapon mount goes into the main body. It wouldn’t make a difference except that the flat spot where the weapon attaches is skewed slightly. After fit testing the weapon it looks like the way pictured above is the correct way to put the pieces together.
Everything else was pretty straight forward and the instructions are pretty adequate to get by on.

My Preciouss.
How can I not criticize anything though? I cannot stand it when pieces are cast without ease of modeling in mind. It may be easier to cast a part in a certain way but when it comes time to build the kit a little bit of extra effort on the mold making side really goes a long way. The fuel drums! The fuel drums are in a three part cast but the seam is right down the middle of the drum! This is the same as all of the other fuel drums GW produces as well! With a little more effort one side of the piece could have the entire round leaving the other half as a half tube shape. Then, we wouldn’t have to try to scrape down a seam that is sandwiched between two raised edges!

I had to use putty to get mine smooth. Also, this kit was obviously not designed to compete in a contest because it lacks the attention to detail that judges look for. It takes it for granted that no one will ever crouch down and shine a flashlight under the track guards because that area is just hollow. For gaming though this kit is a masterpiece. All of the main hatches and access lids are separate so they can be modeled open. If a modeler was crazy enough they could scratch build interiors to be seen inside. The engine compartment doors actually cover up some simple engine looking parts but if someone was going through the trouble of super detailing an interior they should probably just cut those pieces out and start over.
Is it wrong for a man to have romantic feelings for a plastic model kit? The answer, of course, is no. All in all I give it an A+! This kit had everything I was looking for in a gaming model kit, plus a bit more. I actually like the end result better than the Forgeworld one too! I ended up magnetizing many of the parts because I just cannot stand to have options go unused (as if I’m ever going to make this thing into a Hellhammer). I’ve got magnets on the sides to move the armor plates and sponsons around, I’ve got magnets in the sponsons to swap between heavy boters and hearvy flamers, I’ve got a magnet on the turret to swap out the main cannon for the Hellhammer cannon, and I’ve got magnets for the pintle heavy stubber (stubber included in kit), and hunter-killer missile. I should probably re-check the book and make sure I can take a HK missile!