Amazingly the game this week is Cleanse. Ive never had good luck with this mission but I was just so happy to play anything besides Secure and Control I would have taken anything. Although I lost my notes for this one I remember how it went well enough. Plus this was a short game since I got called away to work halfway through. I decided I needed to get back to basics and get reacquainted with my pure guard forces so I dropped the Witch Hunters and went with straight up Imperial Guard. This week it was James again and he brought his nids. Yeah, cleanse vs nids. This should end well.
Scenario: Cleanse
Armies: Imperial Guard vs Tyranid Swarm
Imperial Guard
Note: The icons for the Company Command Squad and the 1st Platoon Command Squad are transposed. Also the psyker on the Company Command Squad is not pictured.

Command Platoon CO Junior Officer with Storm Bolter and 4 guardsmen with 2 Plasmaguns, a Sanctioned Psyker, and a Sentinel with a Lascannon

4 Hardened Veterans with 3 Meltaguns and a Veteran Sergeant with a Bolter

1st Platoon - CO junior officer with Bolt Pistol and Power Weapon, 4 guardsmen with 3 Flamers, a Sanctioned Psyker with an Honorifica Imperialis, Force Weapon, and Laspistol, Red, Green, and Black squads each have 10 guardsmen with a Plasma Gun and Light Infantry

2nd Platoon - CO junior officer with Laspistol &
CCW and 4 guardsmen with a Lascannon, Red, Green, and Black squads each have 10 guardsmen with a Missile Launcher

3rd Platoon - CO junior officer with Laspistol &
CCW and 4 guardsmen with a Heavy Bolter, Red and Green squads each have 10 guardsmen with a Heavy Bolter

Hellhound

Hellhound

4 Rough Riders with Hunting Lances and a Veteran Sergeant with Hunting Lance and Bolt Pistol

Basilisk with Indirect Fire

Demolisher with Hull Heavy Bolter and Plasma Cannon Sponsons

Demolisher with Hull Heavy Bolter and Plasma Cannon Sponsons
Tyranids
I didnt get an army list from James but this is probably pretty close

Shooty Hive Tyrant

10 Genestealers

10 Genestealers

10 Genestealers

10 Genestealers

Carnifex

Carnifex

Carnifex

Carnifex

Carnifex

Carnifex
Deployment
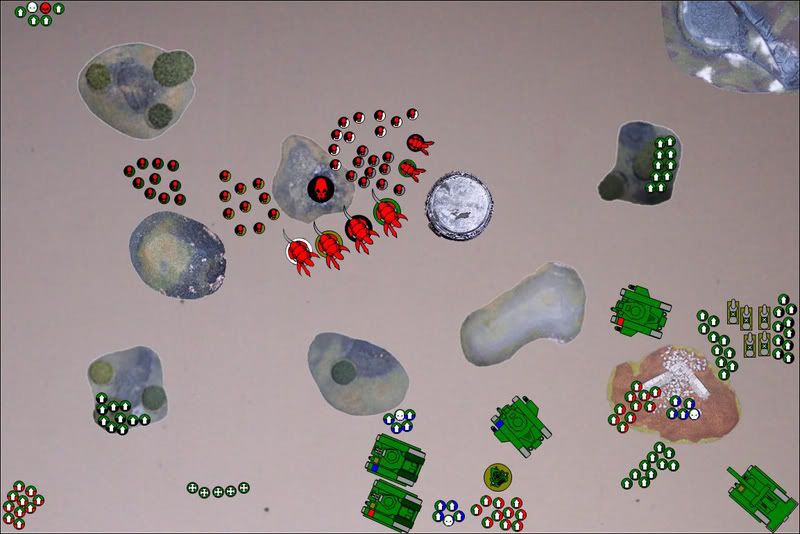
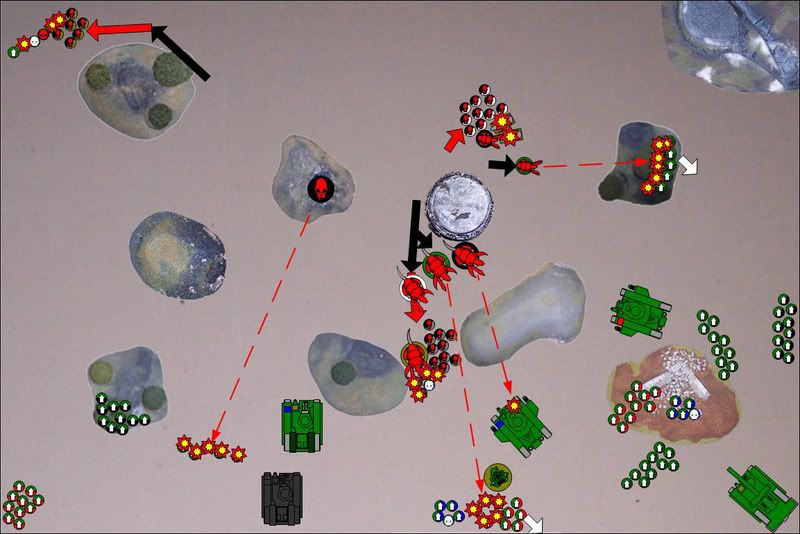
Even though getting closer to the nids is pretty stupid I infiltrate my Light Infantry Platoon around the table and leave the command squad nestled right at the back of the enemy zone. With the psyker there I might be able to pull off a kill on one of those fexs before the squad gets annihilated. At the very least the nids will have to peel off a unit to deal with them. The Hellhounds are set up to cover the vets who will be aiming for carnifexs as well. The game will just come down to how well I can damage the carnifexs.
Turn 1 IG
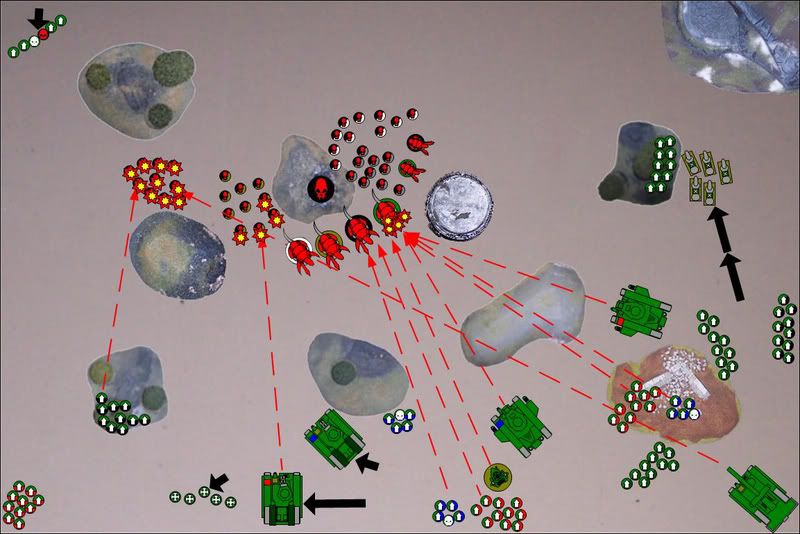
I breath a huge sigh of relief as I get to choose to go first. The vets actually take a step back and set themselves up to move against any bugs assaulting the Hellhound nearby. The Roughriders get an excellent fleet roll and move behind the forest to back up the lone squad there and the Hellhounds move out to cover the left side. One unit of Genestealers gets all but wiped out by an amazing Earthshaker shot and the infantry squad in the woods finish off the survivors. One of the Hellhounds also causes some damage to another unit while everything else concentrates its fire on one carnifex bringing it close to death but not quite there. Great! At this rate Ill only need 6 more turns of everything firing to take out the carnifex horde!
Turn 1 TS
One unit of stealers breaks away to deal with the infiltrating command squad while the rest of the force pushes forward shielding the wounded fex. The Hive Tyrant destroys the exposed Hellhound by firing at it instead of charging it and the vets get ready to turn right back around and charge forward again. The other carnifexs cant quite seem to damage the other tanks making this quite a merciful round for my guard.
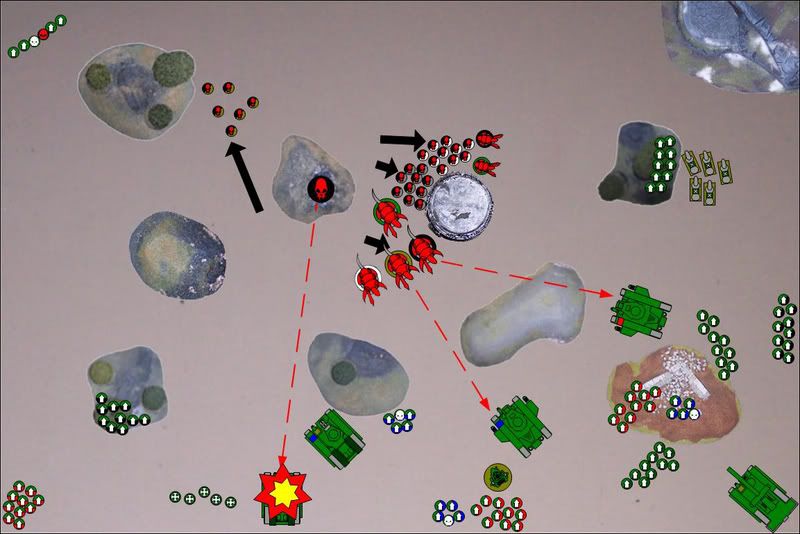
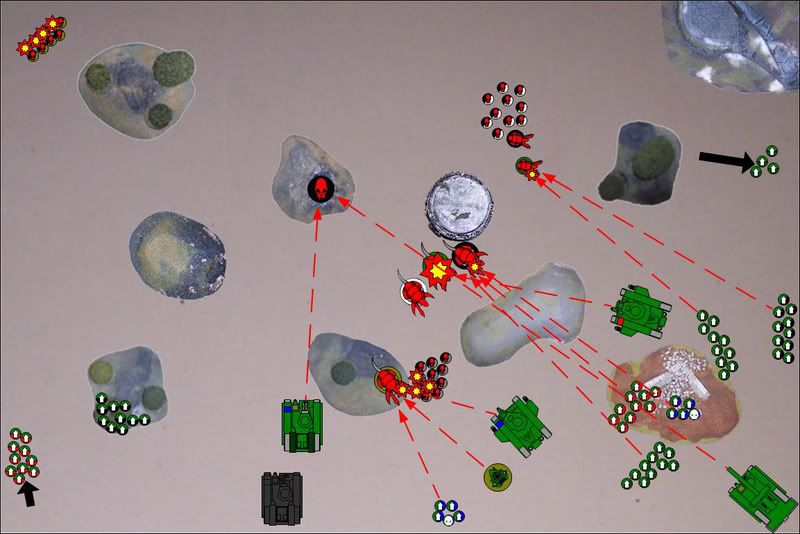
Turn 2 IG
The Basilisk tries to work its magic again but misses completely leaving the command squad in the backfield to fend for itself. The vets and Hellhound move up but the Hellhound cant harm the tyrant. Everything in the middle concentrates fire on the fexs again but only scores two wounds on the mob. On the right the fire is even less effective leaving it up to the Roughriders who charge the two carnifexs by the water tank but only manage to get three of themselves killed. Ive said it before and Ill say it again folks! The best turns are the ones where you kill more of your own units than the enemys. This was truly a great turn for me.
Turn 2 TS
The stealers charge the command squad in the backfield killing 3 but the squad passes its morale check. The Hive Tyrant wipes out the vets with some devastating shooting. The badly wounded Carnifex blows away half of the squad next to the Sentinel causing the rest to flee while another scores a shaken result on the Demolisher covering the center. The Genestealers follow one of the fexs into combat with the exposed command squad and kill them all leaving only the officer behind. The fex on the left and Genestealers easily finish off the Roughriders and the other fex nearby kills almost the entire infantry unit hiding in the woods over there causing that unit to fall back.
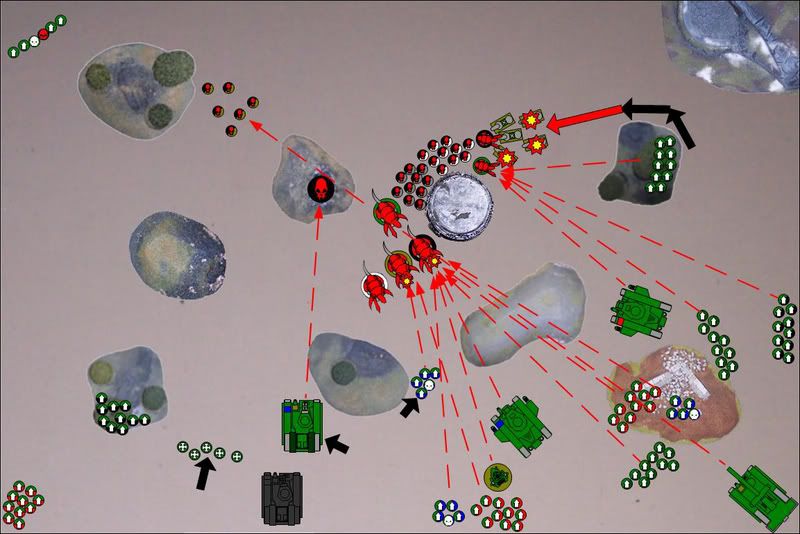
Turn 3 IG
The Basilisk and Hellhound try in vain to damage the Hive Tyrant while finally the badly wounded Carnifex is taken down. More massed fire scores another wound on the fex to its left and a well placed Demolisher round scores a wound on the fex in the woods on the left also taking out 2 of the stealers busy killing the officer. The two squads on the right score a wound on their target Carnifex as well and the infantry unit that was falling back on that side rallies but takes a few steps back anyway to avoid a charge. The stealers finish off the remnants of the command squad in their backfield and begin their search for new prey.
Turn 3 TS
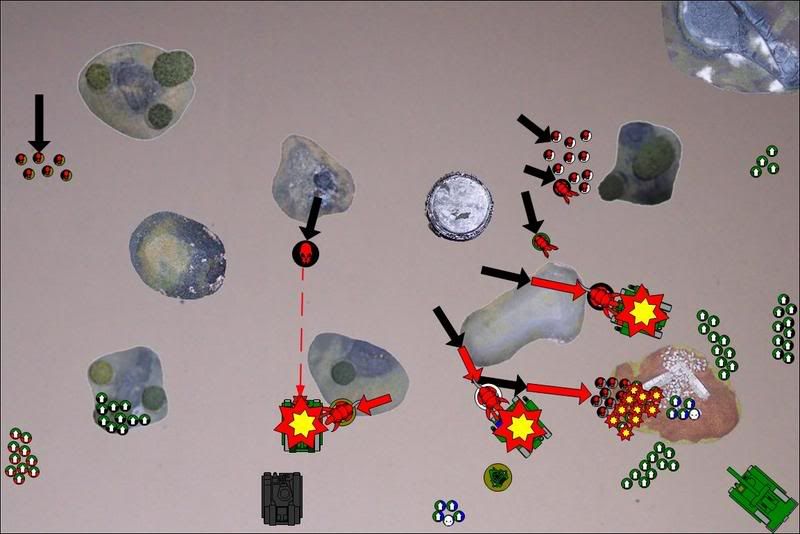
The tyrant finally makes its move and stuns the Hellhound while the nearby Carnifex finishes the tank off. Two other fexs destroy a demolisher each and the Genestealers in the middle wipeout an infantry squad. With the tanks gone this looks like the end for the poor Imperial Guard.
Turn 4 IG
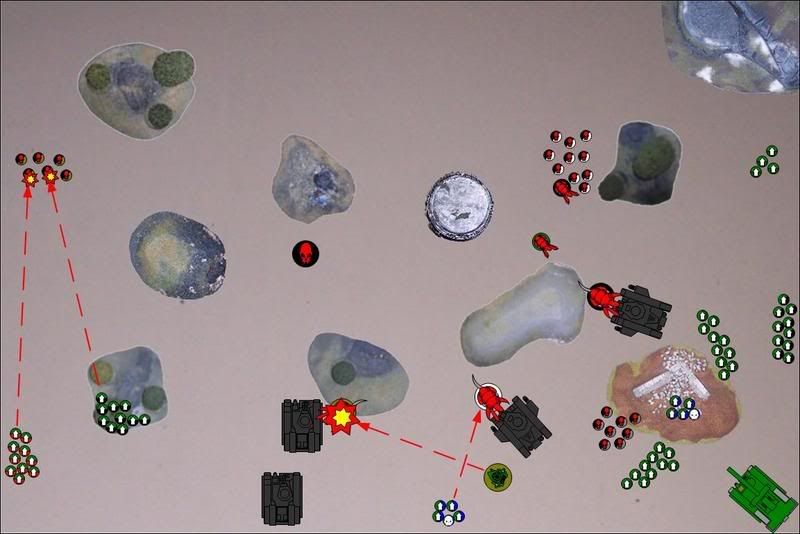
The two infiltrating units on the left open up on the stealers but can only kill two. The Sentinel scores its first hit of the day and actually manages to kill a Carnifex with it! Unfortunately the game ends there as I get called away to work. It looked like this one was quickly going into the toilet anyways so I concede victory to James.
Results:
Imperial Guard Concession
Tyranid Swarm - Victory
Post Battle Report:
Well, that sucked. Ive just never had good luck with trying to bring down Carnifexs. I dont know what I could have done different. I wanted to be more mobile especially with this scenario but sacrificing firing to move just seems silly. I suppose on the left I could have been much more aggressive but with the two Hellhounds and the vets getting blown away so easily it probably wouldnt have made much difference.


