Hello Dakka!
So I finally got that game against my buddy John's Salamanders (JAWeyemuller here on Dakka), and it was definitely an event. I was able to finagle John into giving me some post-battle insight on his side of the fight, too, so I was able to expand my usual format with a turn-by-turn commentary. Without too much pre-prattle...
Here're the lists:
Salamanders
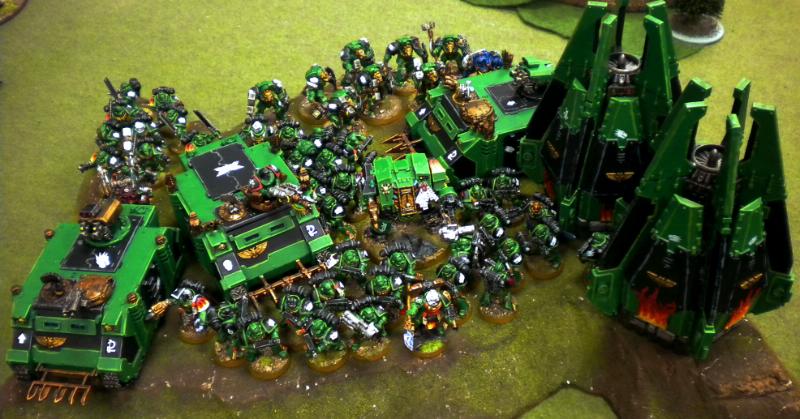 HQ
HQ
-Forgefather Vulkan He’Stan
-Codicier Librarian Pira’es w/
TDA SS, Gate of Infinity/Might of the Ancients
Elites
-8 Assault Terminators w/
TH/
SS
-Dreadnought w/ Heavy Flamer/
DCCW, Twin-linked Heavy flamer, Drop Pod
-Techmarine w/ Servo Harness and
PW
Troops
-10 man
Tac Squad w/Flamer
ML,
PF combi-melta Razorback
-10 man
Tac Squad w/Flamer
ML,
PW combi-melta Razorback
-10 man
Tac Squad w/Meltagun
MM,
PF combi-melta Rhino
Fast Attack
-10 man Assault Squad (remove jump packs) w/ 2 flamers,
TH, Drop Pod w/ beacon
Tyranids
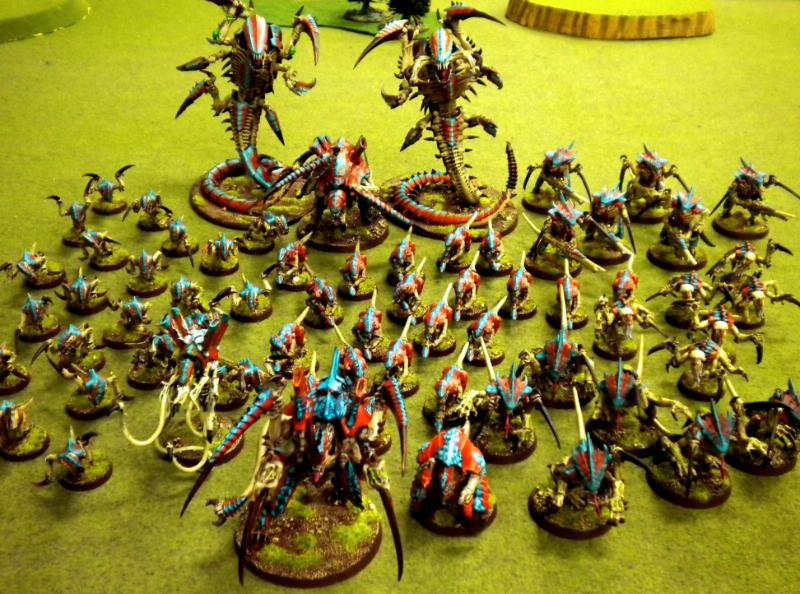 HQ
HQ
- The Swarmlord
- 1 Tyrant Guard
Elites
- Venomthrope
- 6 Ymgarl Genestealers
Troops
- 6 Shooty Warriors w/ Deathspitters, Strangler
- 5 Fighty Warriors w/ glands, rending claws
- 20 Termagants
- 22 Hormagaunts w/ toxin sacs
- Tervigon w/ Catalyst, glands, sacs
Heavy
- Trygon Prime w/ glands
- Trygon w/ glands
Mission: Seize Ground
Deployment: Dawn of War
I lose the roll to pick and deploy, But John wisely cedes first turn to me, so I take it and deploy in the south half.
Objectives: We rolled a total of 5 objectives, and I won the roll to place first. The objectives were placed as shown:
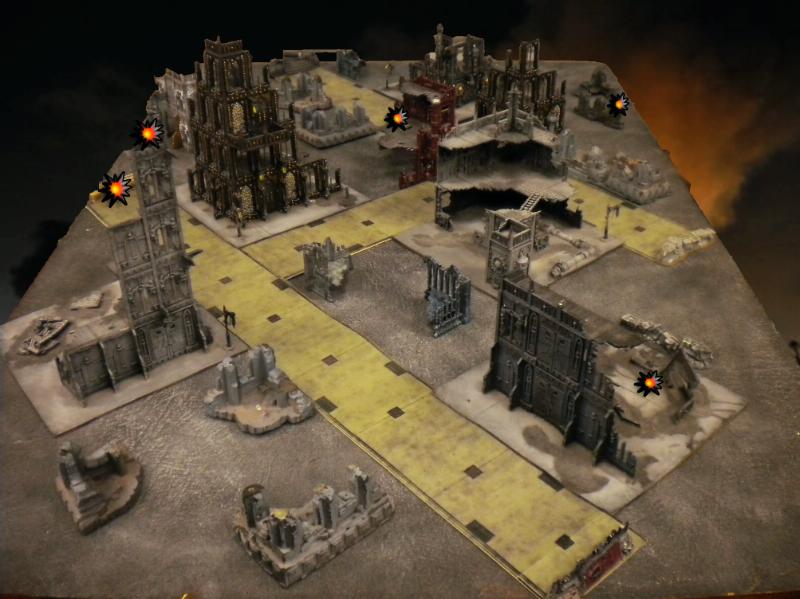
Two near my table edge, one in the ruined Administratum building in the foreground, and one behind some ruined walls on the other end; two near his edge, one on the top spire of the tall grey building, and one near the roadblock behind the big black Sanctum. The final objective was center-east, just next to the street behind the red Mechanicum building.
Ymgarls are Dormant, I select the area of ruins with the tall spire holding an objective.
Deployment:
Tyranids: Tervigon and the Shooty Warriors go down first, lurking in the smaller black Sanctum building. Tervigon goes behind the low wall on the ground floor and the Warriors take up shooting positions in the upper floors. The Trygons are in reserve to deep strike, everything else is walking on turn 1.
Salamanders: One combat squad with a
ML takes up positions on the top floor of the grey-and-white Administratum building, another combat squad with a
ML from a different unit takes the tall grey Administratum building with the high-ground objective. Drop Pods are deploying normally, everything else is coming on turn 1.
John declines to attempt to seize.
Turn 1
Tyranids: Hormagaunts walk on in the clearing between the two large ruins, Swarmlord with Guard, Venomthrope, and the fighting Warriors walk on behind the large grey Manufactorum ruin in the center. Termagants scuttle up on the east flank, swarming around the objective there. Tervigon walks out from behind the ruin onto the street. Warriors shoot the Marines in the Administratum directly across from them on John’s edge, kill one with the Barbed Strangler, and pin them. Everyone else runs to get in position. The main battle-line of Hormagaunts/Swarmlord/etc. jostle about, the Tervigon rolls a 5 and darts across the street to gain some cover behind the small red Manufactorum.
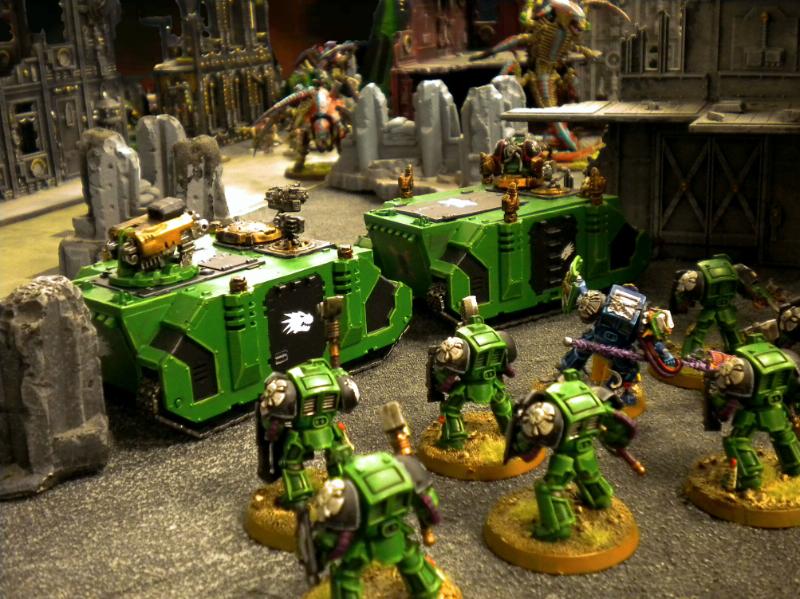
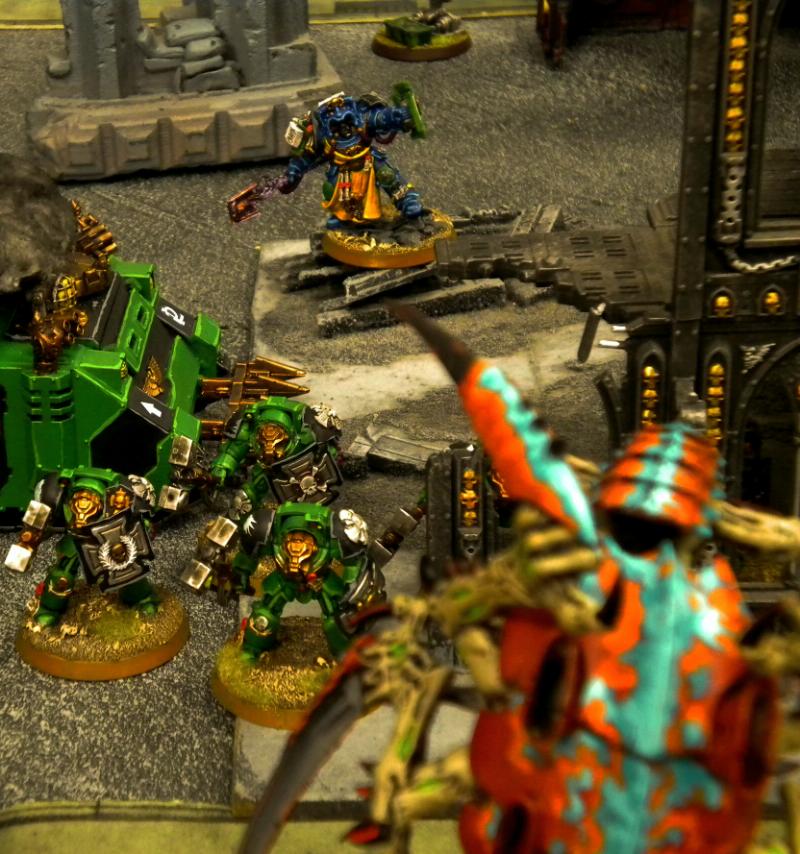
Salamanders: One of the two Pods hits the ground right in the middle of my burgeoning battleline and the Dreadnought clambers out. Two Razorbacks and a Rhino packing Tactical marines roll on across from the Tervigon; one Razorback and the Rhino wall up in front of the Terminators with the Librarian. The Dread lights up the fighting Warriors, five wounds get through and drop one Warrior with two wounds outstanding. The main force bunker up by John’s edge.
 Turn 1 Thoughts
Travis:
Turn 1 Thoughts
Travis: Going first in an objective mission sucks. My general plan at this point was to consolidate the two objectives on my half and make a solid push for the central objective to lock the win. I was confident in the Ymgarls to deal with the chumps holding his one objective in the tall building, and the objective on his board edge was all his.
John: I usually choose to go second in objective based missions, especially if I am playing a faster opponent (Eldar, Tau,
DE, flying circus
IG etc.). While this strategy generally benefits fast moving armies more than mine I felt I had the maneuverability edge on Travis’ army thanks to the two Razorbacks, the Rhino, the pods and my Librarian with Gate. I felt my objective in the tall building was safe thanks to its height and my lack of knowledge as to where the Stealers would be coming in (boy was I wrong!). The objective in the center, on my board edge, and his southern edge were my primary concerns I was more than happy to cede control of the objective in the southwest corner on his side.
Turn 2
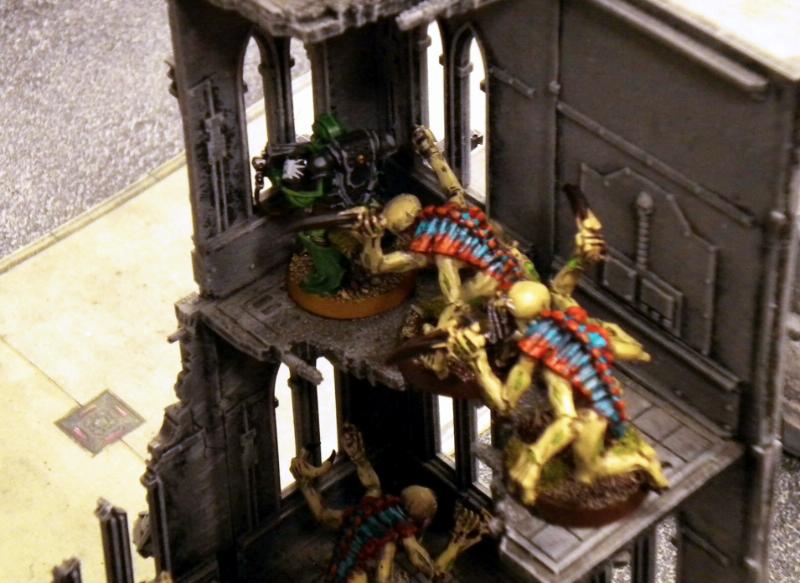
Tyranids: Both Trygons and the Ymgarls arrive. The Ymgarls pop up underneath the Combat Squad in the tall building with the objective. Trygon Prime scatters 11” toward John’s lines from a position just my side of the tall black Sanctum, Trygon scatters 9” to the east from its original placement in the middle of the cross-street. Swarmlord moves to assault the Dreadnought, fighty Warriors get out of the way. Hormagaunts spread out to claim the objective in the Administratum building near the southwest corner. Venomthrope moves up the street toward the Tervigon, Hormagaunts hold. Tervigon spawns Termagants, rolls 3-3-1 for a total of 7, then moves further up the street to bring its Stinger Salvo in range of the tanks. Another kill for the Barbed Strangler, but the squad passes its pinning test this time. Bio-electric pulse and Containment Spines hit the centermost Razorback hard, stripping off its guns and shaking it. Tervigon’s shooting fails to produce a result. The new unit Termagants aims its fleshborers at the Dread’s rear armor, and manage to strip off its power fist and shake it twice! The Swarmlord strides in on the Dreadnought, hits twice, and causes some damage, but the Dread’s still holding on. Ymgarls warp for attacks, charge the Marines in the building above them and wipe out 4 of the 5, losing none of their own number. The last Salamander holds on!
 Salamanders:
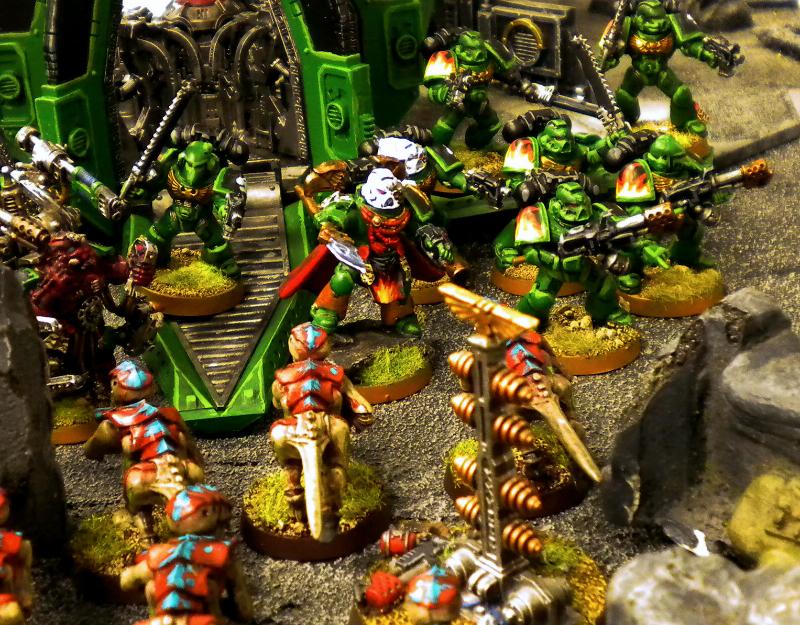
 The second Pod thunders down right in front of my big swarm of Termagants, and out steps Vulkan followed by a Techmarine and an assault squad with 2 flamers. The tank wall holds, while the Terminators with the Librarian advance on the Trygons. A torrent of Melta fire and Krak missiles slams into the Trygon, inflicting 3 wounds. Flamer death from Vulkan’s squad roasts all the Termagants in one volley! The Swarmlord destroys the Dread, causing an explosion that kills two of the 7 Termagants, then consolidates toward Vulkan. Ymgarls warp for strength and wipe out the last Marine facing them and consolidate up toward the objective.
 Turn 2 Thoughts
Travis:
Turn 2 Thoughts
Travis: The gang’s all here! Now that I could see where he was concentrating his force, I figured he was thinking the same as me as far as objectives were concerned. I decided to stick to the plan (always a good choice, I’ve found), and since the Ymgarls were on the way to doing exactly what I had planned for them, I felt comfortable leaving the Hormagaunts to my western objective and then forgetting about that flank. Vulkan had to die; and there would be more on that side soon. I felt a little bad for my Trygons, given how badly they were going to die, but hey, that’s war for you.
John: It was between the bottom and top of turn 2 when I remarked to a friend observing the game: “I lost,” which he wisely agreed with. It was at this point I decided, for better or worse, to play for the draw. By keeping the objectives near my “castle”, focusing on continued contesting of the objective I just roasted his termagaunts off of and use of my superior maneuverability to make a run at the center objective, I hoped to garner that draw. You will notice all my movements of transports, Gate of Infinity casts etc., from this point on are designed to keep this strategy in place and hope for a turn 5 early ending… Or a miraculous turn 6!
Turn 3
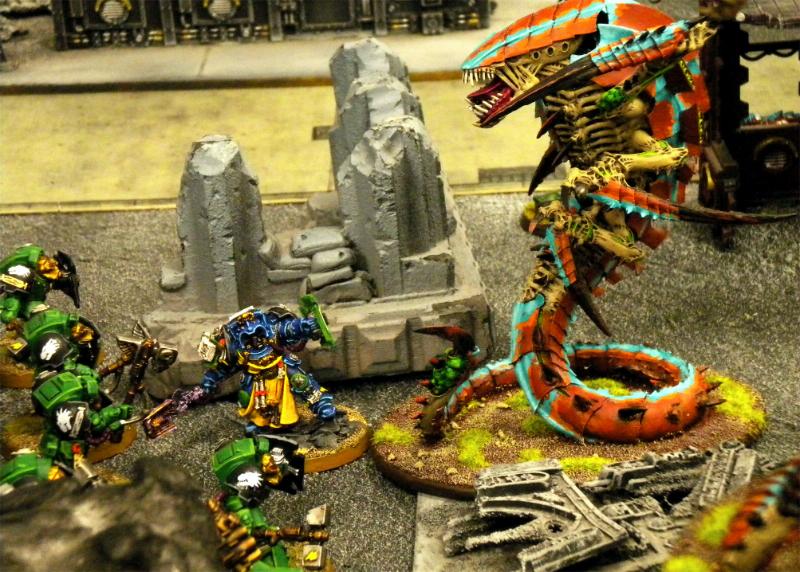
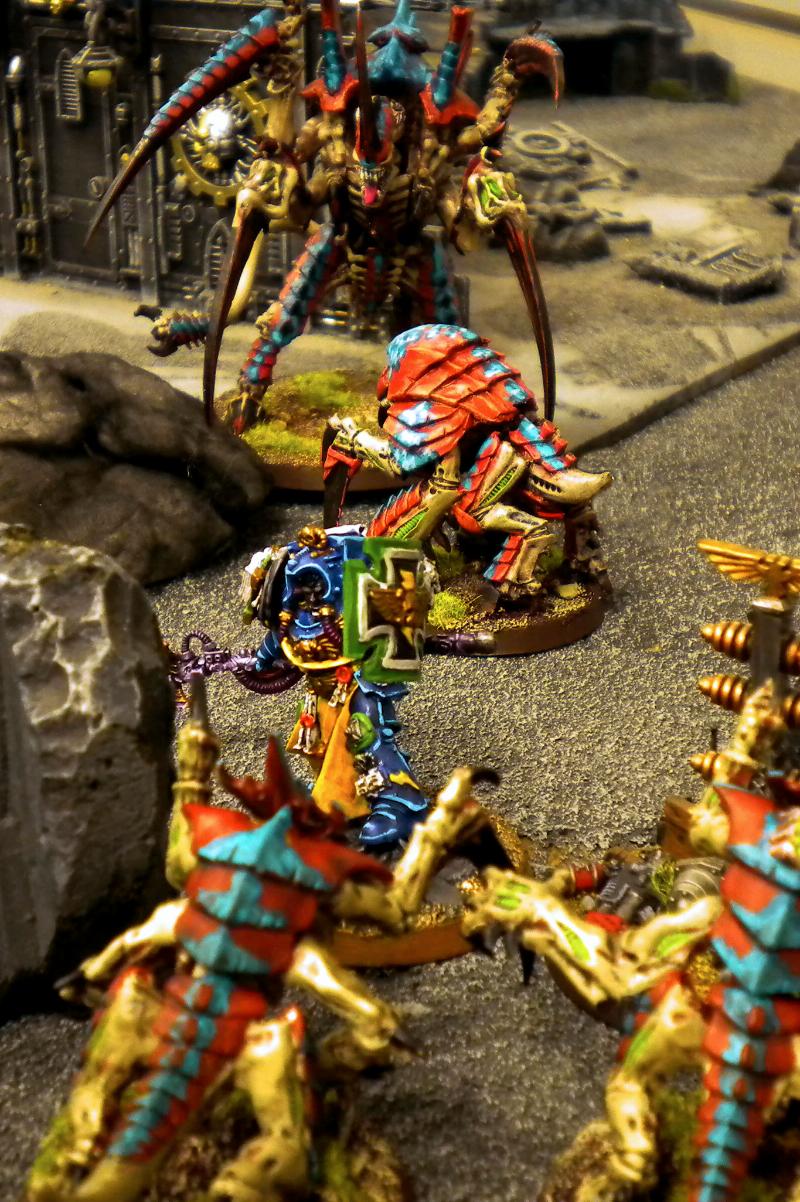
Tyranids: Trygon Prime holds in the building, Trygon moves up toward his main force. Tervigon advances up a bit. Fighting Warriors roll low on difficult terrain and move toward Vulkan while Swarmlord turns the corner, headed the same direction. Hormagaunts spread their line out to maintain Synapse, Venomthrope moves up toward the center by the Tervigon and the 7 Termagants. Tervigon heads back toward the Dreadpod. Shooting Warriors fire into Vulkan’s squad with little effect, Swarmlord gives himself and the Guard Preferred Enemy and drops Paroxysm on Vulkan’s Squad. Volleys from the Trygons take the tracks off the damaged Razorback. Tervigon hits the pod and cracks it open, causing an explosion that kills a Termagant. Swarmlord assaults Vulkan’s squad, allocates its attacks on the Forgefather, and wounds him twice. Vulkan passes both his invulnerable saves, but after the re-rolls forced by the Bonesabres, a wound gets through and Vulkan dies instantly. Attacks from the Tyrant Guard kill two more Marines, and return attacks put two wounds on the Swarmlord. The Marines fail their morale check, but make their No Retreat! Saves.
Salamanders: The Marines in the trashed Razorback get out, and the Terminators move to get an assault vector on the Trygon. Tank wall begins to split with the Razorback moving slightly south toward the road, Rhino stays put. Melta and Missile fire puts three wounds on Trygon Prime, potshots from the Drop Pod kill one of the 7 Termagants. The Librarian fails his Psychic test for Might of Heroes thanks to Shadow in the Warp. The Terminators charge Trygon through difficult terrain and lose two to the monster’s claws before annihilating it and consolidating back toward Trygon Prime. Swarmlord kills grinds down some more Marines and takes another wound from the Techmarine in return. The Marines fail their morale check but make their saves.
 Turn 3 Thoughts
Travis:
Turn 3 Thoughts
Travis: I had the opportunity in this turn to try to kill both of John’s remaining independent characters, but I decided to put attacks on the squad of Terminators instead of the Librarian; this would prove to be my undoing! At this point I was thinking that softening the Terminators up was the best play; if the game had gone all the way, they would have been able to move on my powerbase and I decided to try and cut their numbers early. Silly me, planning for the game to go long; I should know better!
John: This turn was rather push button for me, I only needed to do everything I was set up for and begin my preparation for the next turn. Because of this I am going to walk through the assumptions I made during turn 3 looking toward turn 4. I assume (incorrectly) the only reliable way for me to deal with the last Trygon is my
TH/
SS terminators (this is the reason I consolidate toward Trygon Prime) but I also need to start thinking about objectives. I know the Swarmlord is going to finish eating the Assault Squad and Techmarine next turn and I can’t rely on the Pod to stay alive to contest the objective. I decide I need to split off my Librarian next turn and gate nearer to the center of the table into the bottom of a Mechanicus building with no
LOS to the bottom level keeping him safe from shooting. Had I realized I didn’t need the
TH/
SS terminators to deal with the Trygon I would have had a chance to win! Please note the movement of the Razorback towards the road, it’s all part of an overall plan.
Turn 4
Tyranids: Trygon Prime slithers down from the building and gets in position to eat the disembarked Marines. Tervigon, Venomthrope, and the last few Termagants hold on the street near the center objective, Hormagaunts fan out some more to maintain the Synapse range which is slowly moving away from them. Fighting Warriors continue to shank difficult terrain rolls and manage to barely get in objective range only after a good run. Shooting Warriors take a Strangler shot at the Terminators and get a couple wounds with no kills. Trygon Prime rolls up on the combat squad of Tactical Marines, eats them without incident, and consolidates 6” back toward the objective on the center north of the table. Swarmlord grinds down some more Marines, this time they pass their morale test, though it’s down to just the Techmarine and a couple Marines.
Salamanders: The tank wall finally breaks completely, with the Rhino driving through the wrecked building toward Trygon Prime and the objective, and the Razorback moves out onto the road to take up a position down the street from the Tervigon. Marines disembark from the Rhino and level their guns at Trygon Prime. Terminators move away from the Librarian toward the remaining Trygon, then the Librarian uses Gate of Infinity (he is outside Shadows of the Warp) and lands in the small ruined Manufactorum just east of the Tervigon and right near the Swarmlord fight, he is completely out of
LOS. Another round of Melta fire finally drops Trygon Prime, Missile fire from the Combat Squad in the building put a wound on the Tervigon. Potshots from the Drop Pod kill the Termagants down to one, despite 5+ cover saves from the Venomthrope. Swarmlord finally finishes off the last of Vulkan’s squad but rolls a 1 to consolidate and jostles slightly toward the Librarian.
 Turn 4 Thoughts
Travis:
Turn 4 Thoughts
Travis: Two turns, two Trygons wasted. I’ve realized a weakness here; those models are huge! There was terrain all over the board that would have covered an
MC 50%, but I couldn’t get to any of it without neutering my Trygons. So, I relegated them to speedbump/kill-what-you-can/be-scary-then-die duty. I think they did well enough. At least they kept those damn Terminators running in circles for a turn (heavy sigh from John)! The dice let me down a bit here, I was hoping for a better consolidation from the Swarmlord so I could sic him on that stupid Librarian. Alas, not to be.
John: So far my plan is working out well. The only problem is my
TH/
SS terminators are now left way out of the fight with no Gate to help them. This error, I realized later that night after getting home from the store, cost me the game. I think I got too held up on fighting for the draw to properly think through the use of my terminators. All I need to pull out the draw now is to move the Razorback along the road up to the center objective, Gate to the southern one, and have the game end! (don’t worry man, counting on the stars to align against me in the last turns of a game is usually a good play! –Travis)
Turn 5
Tyranids: Ymgarls continue camping their objective, as do the fanned-out Hormagaunts. Tervigon and the last Termagant move up to claim the center objective with the Venomthrope right behind. Fighting Warriors get in position around the objective at the south edge, Swarmlord rolls low for difficult terrain and moves resignedly toward the Drop Pod. Stinger Salvo from the Tervigon fails to produce any results against the Razorback pointing at it; Barbed Strangler fire kills a Terminator but fails to pin them. Swarmlord hits the Drop Pod and vaporizes it.
Salamanders: Tactical Marines embark their Rhino and roll over to the objective on the center north table edge. The Razorback, with the combat squad inside, drives 12” distance on the road to contest the center objective next to the Tervigon; Terminators advance a full 6” through difficult terrain and get dangerously close to the last Termagant. The Librarian passes his psychic test for Gate of Infinity on an exact 9 (5,3,1) despite Shadows, and lands right next to the fighting Warriors and the objective on the southeast edge. Terminators roll a 5 for difficult terrain and come up just short of making it to the Termagant.
 Turn 5 Thoughts
Travis:
Turn 5 Thoughts
Travis: All I’m doing at this point is praying to the hive mind to give me one more turn! If I get one more, the Librarian’s dead, that stupid Razorback is dead with the squad inside bailed out in a bad position, I clamp down two objectives and jam up the center so hard with Tervigon, Venomthrope, Swarmlord and Guard, and the back-pocket shooting Warriors that there’s no way he can get through to push me off again.
John: This is where you can see my plan has both worked perfectly and failed me horribly. The pitiable use of my Terminators, coupled with my unfounded fear of the Trygons, has left them out of range of the Tervigon, Termagaunt, and Venomthrope. Better use of them (i.e. not going after the last Trygon) would have had them within assault range of ALL those units! I am however perfectly placed to contest all the necessary objectives while being in control of one giving me a set up for the draw (which was my plan since the middle of turn 2 anyways). Now all I need is a good die roll for random game length…
Random Game Length: We have instituted a rule in the store that it’s the responsibility of the player who’s on the line to roll for random game length. That way it’s their own fault if they roll for the extra turn that will see them destroyed. In this example, John made a balls-to-the-wall play for a draw at the end of 5; if we went to six I had the game in the bag. He rolled the dice and it came up a 1! Draw!
Final Thoughts
Travis: What a great game! I’m always happy when a list that I know is solid and well-tested has to lay it all out against me in the last few moments, and the best possible result is to force nothing more than a draw. And this was one of those games; John avoided a loss on this one by the tips of the hair on his chinny-chin-chin. If it wasn’t for the Swarmlord’s inability to maneuver through rubble and that damnable Razorback’s spot-on Marty Mcfly impression at the last moment, it would have been a W for the bugs. Regardless, it was a great time and as fun to watch as well as play, evidenced by the rotating cast of spectators we had throughout! I’m off to ask whichever powers will listen: why oh why is it my fate for random game length rolls to knife me in the back so consistently?
John:This was a really good game. I feel like I had a strong grasp of what I needed to do and how I had to get it done the entire time. I hadn’t played the new Tyranids yet and I gave the awesomely huge, well sculpted, and beautifully painted Trygons too much credit. I got the draw I had hoped, and planned for, but I missed my chance to pull out the win by not using my most potent unit (
TH/
SS terminators) in a prudent manner. I think if I were to play Tyranids again I would bring more meltaguns on my
tac squads instead of flamers. Overall I can’t really complain, it was my game to draw and I did. If I can give an overall strategy tip to players reading this, don’t get so caught up in playing for a draw that you miss that chance at a win, and also remember to utilize your armies’ mobility to your advantage. Whether that mobility manifests itself in the complexities of the Gate of Infinity or the simple use of a road to gain extra movement, always remember in 5th mobility is the key to victory.
Man of the Match
Travis: I have to give it to the Swarmlord; despite falling short in the last few turns, the thing was a monster all game. His kill tally includes the Dreadnought, the Techmarine, Vulkan, his assault squad, and the Pod they rode in on. And if he’d have gotten one more turn he would have added that pesky Librarian to the list, or maybe eaten the Delorean Razroback and then gotten a chance at those Terminators!
John: This is tough; I don’t really feel any one unit was awesome for me. The Assault squad pod of flamer doom (trademark pending) did fairly well. They roasted an entire squad of gaunts and held up the Swarmlord for 3 turns. The only other unit who stood out was the Librarian for gripping a draw from the clutches of defeat at the last second with a clutch psychic test on
3d6! I am going to go ahead and give this one a tie between the two.
Final Grades:
Travis
Swarmlord: A-, he did his job excellently and was a huge threat all game, but I’d have liked to roll higher than a 3 for some of those late-game difficult terrain tests.
Venomthrope: C+, he was out of his element against an army that wasn’t interested in assault, but he did keep the Termagants in cover and a few even lived because of it.
Ymgarl Genestealers: B+, I love these guys. Every game I’ve used them, they show up, charge something, and kill it. This game was no exception. They ended up in a bad spot though, camping an objective that was effectively out-of-play anyway, and unable to really make a move to contest anything else given the heat they would have taken,
Hormagaunts: B, they did precisely nothing except keep me from losing a game I should have, by all accounts, won. Can’t ask for much more than that.
Termagants: D/C+, the ones I bought in my army list died without as much as a whimper, the ones I spawned took some fire and kept an extra Troops target on a key objective.
Fighty Warriors: D, they couldn’t manage to get themselves through the rubble in time to charge anything, and couldn’t get around the objective enough to block the Librarian’s last-minute play.
Shooty Warriors: C+, did some shooting, killed some Marines, didn’t die. Not bad, not good… but not bad.
Tervigon: B, only because it didn’t die and planted it’s bulk over the central objective and kept John’s last turn rally from being a win. Otherwise it was unimpressive in this game.
Trygon Prime: B, he effectively wrecked one of the Razorbacks and ate the squad inside; I wasn’t expecting him to hold up to Salamanders firepower, just hang around for a while and force John to divert resources to him, which he did.
Trygon: C, he killed a couple Terminators, then died like the speedbump he was. Thunderhammers hurt.
John
Vulkan He’Stan: B, he helped roast an entire squad but died quickly to the Swarmlord. I give him a B and not a C+ simply because it’s
HIS chapter tactics that make my army awesome.
Librarian: C+, only reason he gets a C+ and not a D is because his turn 4 and 5 Gate hijinks saved the game for me. Otherwise he continues to be the most lackluster
HQ choice of all time (for my army anyways).
Techmarine: A, I love Techmarines, they have all sorts of shooting and combat abilities plus they are only 90 points. He put 3 total wounds on the Swarmlord, and aided in the burninating of a whole gaunt squad. What more could I have wanted from 90 points?
Dreadnought: F, dropped in didn’t do much but put a few wounds on some warriors and promptly died. The only reason I didn’t take an Ironclad is I don’t own one, and we wanted fully painted
WYSIWYG armies for this game. I am definitely buying an Ironclad…
Assault Terminators: B+, they failboated at the end through my own poor play and bad assumptions about the resiliency of the Trygon. These guys never fail to do an amazing job, even when that job is only to distract my opponent and allow the rest of my army to go for the win, which does happen quite often (unfortunately Travis is too well seasoned a player to fall for such nonsense, I
apparently am not because I focused too much on the Trygon).
Tactical Squads: A+, they always do great at what they are supposed to do which is shoot, not assault, and claim objectives.
Razorbacks/Rhinos: A+ what more can I want from 35-40 point transports? Nothing.
Assault Squad: C, they helped annihilate a squad and hold up the Swarmlord, not much else.
That's it! Thanks to John for both the game and taking the time to throw in his two cents after the fact. Thanks for reading!
-Dis.


 Capture and Control, the blog!
 The Circle of Life Spins again!
 My most recent Battle Report:
 3000 Points
 500 Points


 4500 Tau Army
  4000+
4000+
 6000+ Order. Unity. Obedience.
 Thousand Sons 4000+

 &
&  fighting fot the greater good.... wait what!?
 1500 Tau

 1500 Eldar
 1750 Dark Eldar coven
  Deff Gearz 2,000+pts. (50% painted),
  Retribution 57pt.(70% painted),
  FOW
FOW 


 ]1500 (+3000 wip)
 ]1500
]1500

 ]1500 wip


 3.300
3.300  3.100
3.100  5.500
5.500  2.500
2.500  3.000
3.000
 Tau
Tau  CSM
CSM 
