| Author |
Message |
 |
|
|
|
|
Advert
|
Forum adverts like this one are shown to any user who is not logged in. Join us by filling out a tiny 3 field form and you will get your own, free, dakka user account which gives a good range of benefits to you:
- No adverts like this in the forums anymore.
- Times and dates in your local timezone.
- Full tracking of what you have read so you can skip to your first unread post, easily see what has changed since you last logged in, and easily see what is new at a glance.
- Email notifications for threads you want to watch closely.
- Being a part of the oldest wargaming community on the net.
If you are already a member then feel free to login now. |
|
 |
2018/01/12 00:17:07
Subject: Re:Inqu][sitor
|
|

Sword-Bearing Inquisitorial Crusader
|
 lone dirty dog wrote: lone dirty dog wrote:Sounds like a plan mate and look forward to seeing the alteration, no worries hope the pics help 
Yep they did - see below - Thanks LDD!
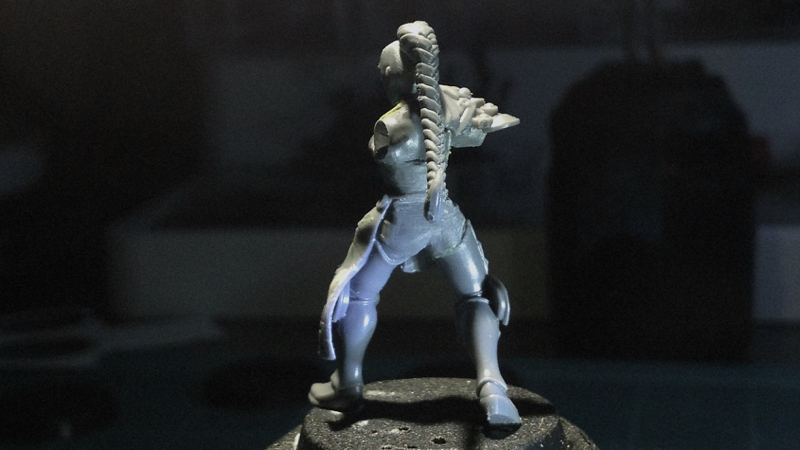
WIP work on a new character, the Scout - kind of threw her together over the last few days and didn't take a lot of pics, so these are basically end-of-construction pics, with only green-stuff patch-up work to go.
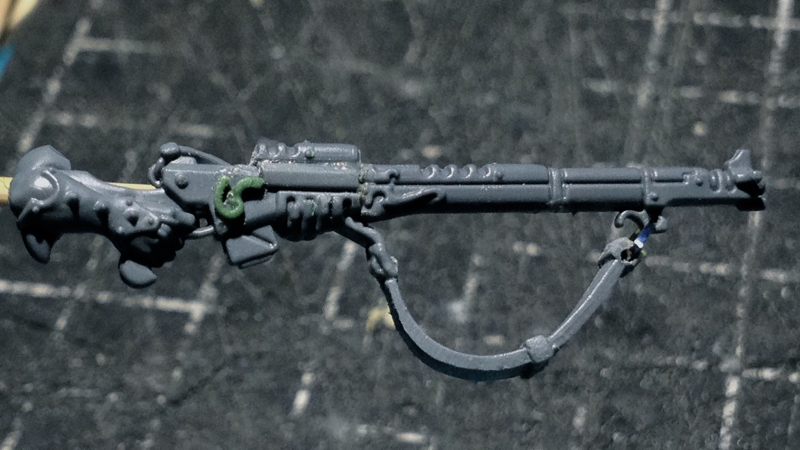
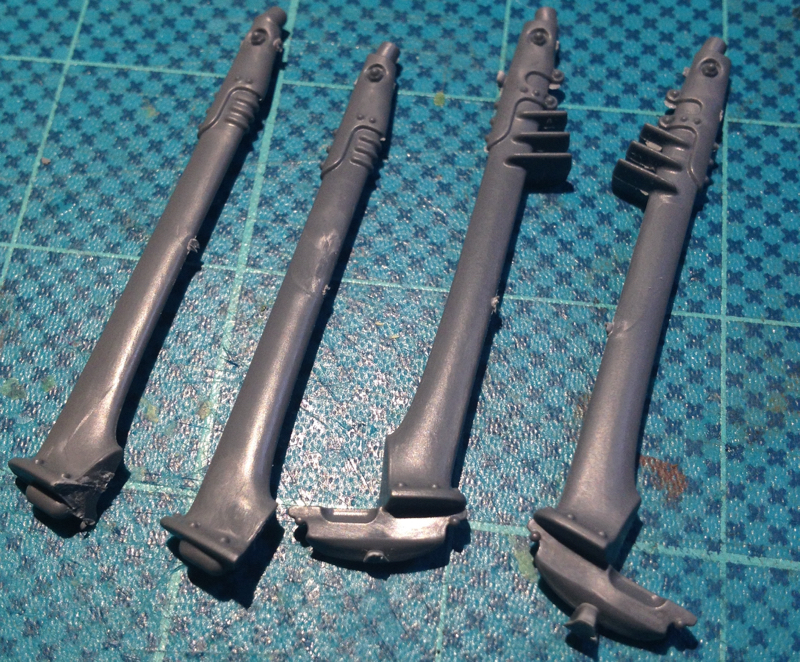
Took a rifle/arm from a Necromunda sprue (similar to this one):

And an Admech rifle (again, similar to this one):

And the boring Necromunda rifle becomes a much cooler Scout rifle:

Torso is from an old Dark Elf Cold One Knights, left arm is the now-staple Admech 'bionic' to attach to the left hand on the rifle:

Made the kneeling legs from a Tau Fire Warrior and some Dark Eldar legs various, with a bit of choppy-chop on the back foot to get it into position:

And yes - that is a Witch Elf screaming face as a (hopefully) cool shoulder pauldron - belt from the Necromunda sprue:

And with rifle in position:


Still hunting around for a decent head for the Scout - we'll get back to that later...
Speaking of heads - the on-going saga of the Witch Finder's gas-mask continues:

Pretty sure I'm done with the mask - now just to green-stuff that last hair strand:

Thanks for looking!
|
|
|
|
2018/01/17 10:10:21
Subject: Inqu][sitor
|
|
Sword-Bearing Inquisitorial Crusader
|
youwashock wrote:The legs on Scout are magnificent. Really choice modeling. The mask looks good as well.
Thanks youwasshock! That mask almost undid me...
lone dirty dog wrote:Yes have to agree the scout legs are some great conversion work, your eye for piecing is rather amazing.
Thanks LDD!
lone dirty dog wrote: I also like the use of the DE knight torso, not something that springs to mind for such a conversion but reinforces the heritage.
That DE torso has a long history of failing to fit a myriad of conversion attempts... so I'm really happy to find somewhere to use it, and with the consistent GW up-sizing each new range, those old DE torsos are now just the right size
lone dirty dog wrote:The only thing I have a little issue with is the rifle, don’t get me wrong you have meshed them together well but they still look like to separate pieces.
I think you need to reflect the ornate detail from the Ad-Mech rifle on to the Escher, to blend it into one piece would benefit from some simple GS work which I know you are more than capable of doing successfuly.
Goddamn you

Better?
PS - this is absolutely the smallest and fiddliest thing I ever attempted to sculpt...
|
|
|
|
2018/01/27 03:58:24
Subject: Re:Inqu][sitor
|
|
Sword-Bearing Inquisitorial Crusader
|
Turaxa wrote:Take this as constructive criticism on what is shaping up to be a great figure, but have you considered modifying the strap so that the front end attaches to the cleat that's near the gun's muzzel? The rear attachment point looks solid but overall the strap seems a little short.
Goddamn you ...
Ynneadwraith wrote:Kickass fiddly detail work! I'm very impressed 
Now...to think up something else fiendishly fiddly to suggest in an offhand manner
No more please!!!
lone dirty dog wrote:It’ll do :
Thanks!
Dr H wrote:Nice work, Lamby. 
Thanks!
complex57 wrote:This is absolutely fantastic. Keep up the awesome work.
Thanks!
So, thanks to Turaxa made the change to the strap on the Scout's rifle, here's the (admittedly better looking) result (although it looks like I'll need to sand the new strap bit down a little thinner):
Meanwhile; took a Sisters of Silence body, added the bare back of a Daemonette, and did some cut-n-sand sculpting to give her a proper butt to get this:


The head is a Daemonette head with the weird hair cut off and the skull sanded bald, and an Eldar Wyches hair part added:

As usual, it's about this point in construction where I start to wonder what load-out she's going to get...
Thanks for looking!
|
|
|
|
2018/01/30 21:21:34
Subject: Re:Inqu][sitor
|
|
Sword-Bearing Inquisitorial Crusader
|
lone dirty dog wrote:Early stages always have me guessing as to where you’re going with a model, the legs and torso match up quite well.
Those demonette heads always have that weird forehead, so are you going to be making her look more human ?
The Wyches hair is a good call.
Thanks LDD - often, it's the same for me... I mash some bits together and get sort of 1/4 of the way in and have to then think: " Mmm, how to finish?"
- Ah, the Daemonette head - I'm tempted to whack a pair of steampunk googles on her and be done with it but I'll probably end up doing some frustratingly tiny micro-surgical sculpting to 'humanise' her...
And so: thanks to Lysimachus, the new Witchfinder retinue member has found her calling - as a Gladiatrix!
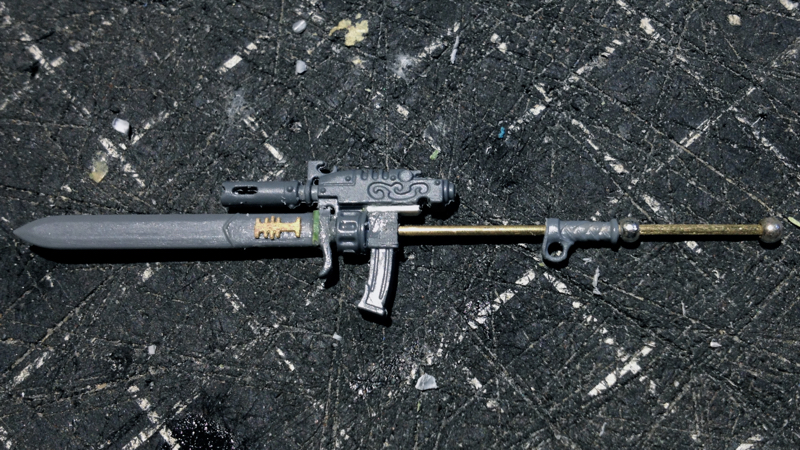
And with that - and the new GW Custodes release - came the idea for her weapon: the Gun-Spear!
Started with the coolest gun ever designed by GW:

Some careful knife work (to retain that wonderful detailing) and some re-gluing brings us to this:

Added a Sisters of Silence right forearm to the right upper arm and drilled through the fist to insert the brass rod for the basic 'spear' haft:

Drilled through the magazine-well and power-thingy to position the gun then trimmed and oh-so-very-carefully drilled into that Sister's blade to get the basic concept sorted for the Gun-Spear:

And an Escher arm combined with the Sister's open hand gives us the left arm:

Next up - a firing mechanism for the Gun on the Spear haft, some sort of power-source, maybe some cabling, and clean up the gun-to-blade transition.
Still working up the nerve to resculpt the Daemonette forehead and nose...
Thanks for looking!
|
|
|
|
2018/02/05 00:41:58
Subject: Re:Inqu][sitor
|
|
Sword-Bearing Inquisitorial Crusader
|
lone dirty dog wrote:I’m loving the stance you have created with her, it’s almost like a guard stepping forward in a defensive manner, that moment before actually attacking.
How you decide to combine weapons is a mystery to me, any idea as to the finish for the bottom section of her boom spear ?
Good luck with the forehead detailing it’s a real pain trust me ha ha
Also I have to say as much as I can admire other people’s conversion and builds I never really wish to own them, however I have found myself wishing quite a few times to owning yours so for that I say well done sir ........ and I hate you for it lol 
Thanks LDD!
- See below for bottom section ideas...
- I cheated and sanded the forehead bump away, then sculpted a new nose - see below
Dr H wrote:Nice work. Good pose.
Thanks Dr H!
DarkSoldier wrote:Why does that weapon have both a sickle and drum magazine? Does it have some sort of dual-feed system so the wielder can switch between two different ammo types for various targets?
Hi DarkSoldier - I'm not sure but I think the round thing on these Admech weapons is not a drum magazine but a power-supply... or it could be a dual-magazine set-up, as you say
Detailing ideas for the Gun Spear - might add a skull above the trigger-handle.. might also add a power-unit down towards the base...
And I take it back - the little detail on the Scout's gun is not the smallest thing I've ever sculpted - this new nose for the Gladiatrix is!


Needs a bit more careful sanding with some super-fine paper - it wasn't until I took these pics I noticed it's a bit crooked at the bottom but I think I'll leave it like that cos it looks like it's been broken - and she's a Gladiatrix after all!
Thanks for looking!
|
|
|
|
2018/02/10 21:04:22
Subject: Inqu][sitor
|
|
Sword-Bearing Inquisitorial Crusader
|
 lipsdapips wrote: lipsdapips wrote:So much character in all of these miniatures! I envy and admire your ability to sculpt and convert with such proficiency. Great stuff!
Thanks lipsdapips! Dr H wrote:Noses are tricky to do at this scale.  Good job.
Thanks Dr H! lone dirty dog wrote:Yes I agree with Dr H nose are a fiddly thing to do, either build in stages or carve back to shape. Personally I build in stages as I hate carving as if you over do it the whole lot is knackered, so good luck with the shaping mate
Thanks LDD! - I actually drilled through her weird septum and sculpted version 1 over the pre-existing end of her nose - Version 2 I ended up cutting away her original nose entirely and sculpted in the new nose as one piece - which was then scraped down even smaller with a blade - I won't be doing that again The Witch Hunter and the Gladiatrix are done (only some minor clean up required before spraying.) Here's the Witch Hunter with hair and coat-tails complete:    Ah crap - just noticed the hole in her left shin whoops! And the Gladiatrix, nose surgery and Gun Spear complete, left arm and belt kit added:      One retinue member to go - I wonder who/what she will be... Thanks for looking!
|
|
This message was edited 1 time. Last update was at 2018/02/10 21:05:59
|
|
|
|
2018/04/25 23:28:08
Subject: Inqu][sitor
|
|
Sword-Bearing Inquisitorial Crusader
|
kestral wrote:Great sculpting. I have mixed feelings about the nose surgery but it was skillfully done!
Thanks kestral!
youwashock wrote:Lethal ladies are looking lovely.
Thanks youwasshock!
lone dirty dog wrote:Sounds like the nose has been a little challenging but the end result is looking good, although it still looks a little flat towards the end/tip of the nose unless you want that unique look.
How you missed that whole though  ha ha
You say the witch hunter is finished but her feet look a little WIP, I think the model could benefit from some detailing like buckles and maybe some kind of sole that blends into the heel pins.
Thanks LDD!
- tbh, the nose-job is just to get a different face from the standard GW ones; femme faces are quite lacking if you don't want the screaming Dark elf look
- see below for the sad tale of the Witch Hunter...
Yes, yet again, a return... and of course, rather than finishing anything - returning with a new character!
A quick explanation in my defence: since my last post the Witch Hunter suffered a calamitous casualty at the teeth of Chaos - otherwise known as my cat  - the only portions that survived were the arms and the head, as they were detached at the time of the creature's assault
I started rebuilding her - hopefully even better than before - but the motivation soured a little, so to breathe life back into my mojo, I've started on another character - though I'm not quite sure where she fits in the cantos of either the Rogue Traders, Kallatar's retinue, or the Witch Hunters... or possibly even something new.
Anyways - since I have quite a few of these old Daemonette bodies lying around, I started with one them:

And with the long skirts of Neferata from the Mortachs of Nagash:

Off with her legs!

Working on getting rid of the hanging jewel-things - sometimes over-exuberant knife work means greenstuff/milliput repairs:

And here's the body and the skirt together - took a bit of knife-work to get the torso to sit facing forward rather than sideways like Neferata's torso sits:
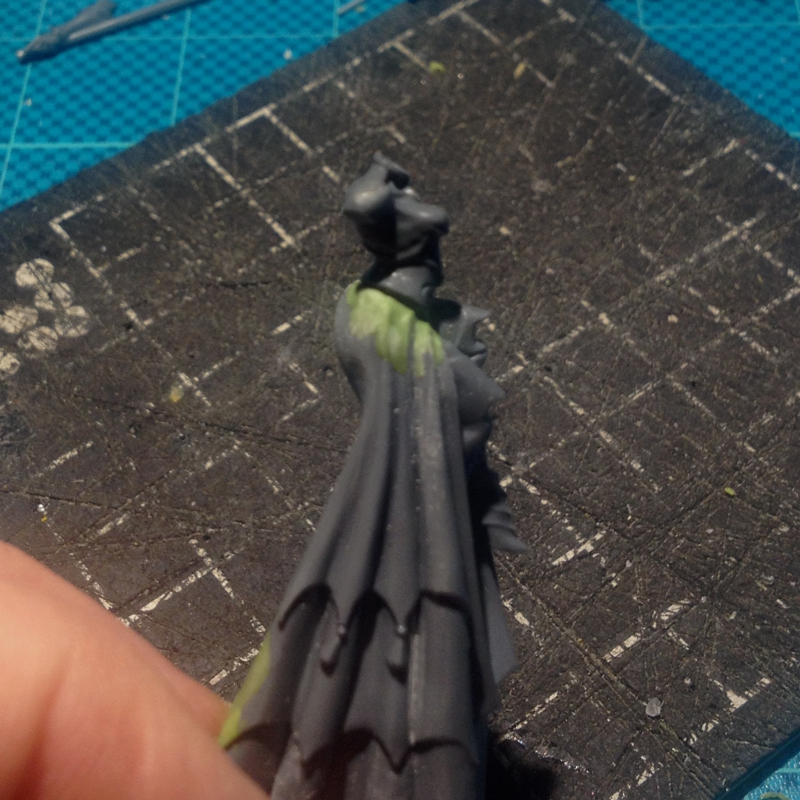
And here's the components of the left arm and sword - I set the Dremel up as a lathe to turn the greenstuff/milliput hilt:
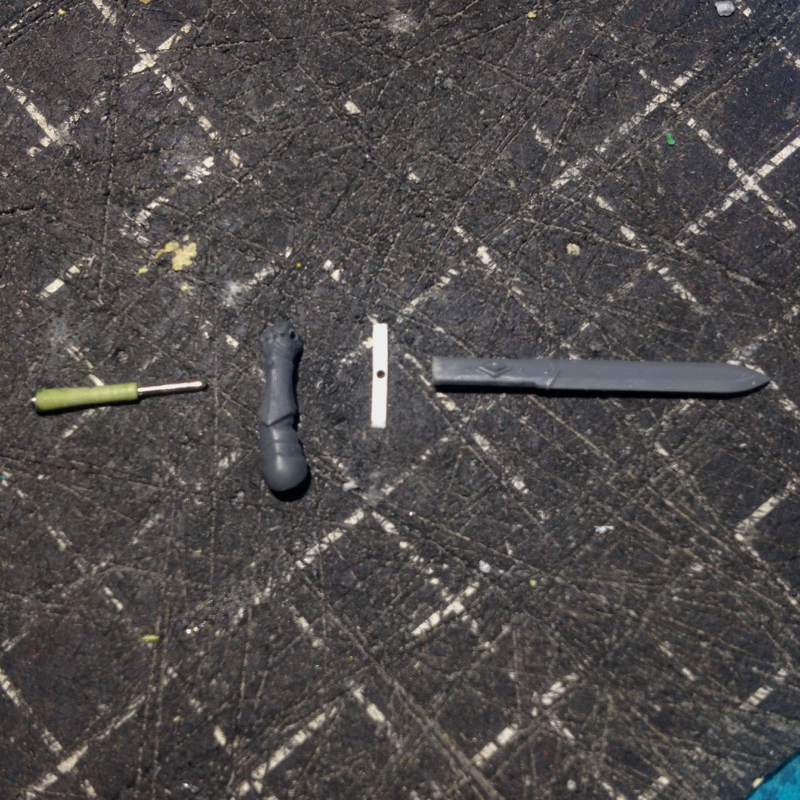
And all attached:
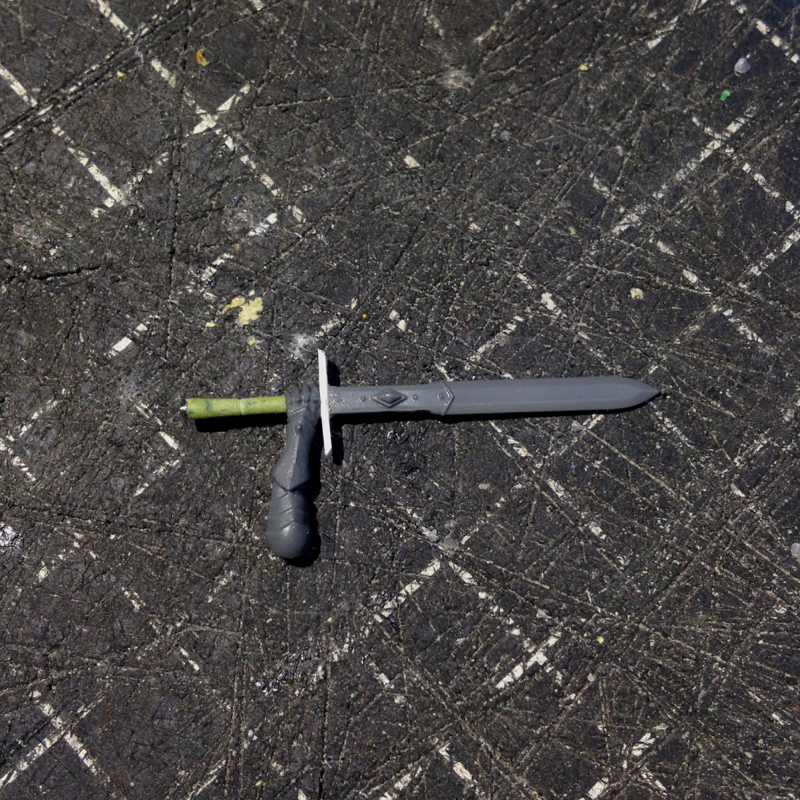
Hopefully there'll be much more to come in a better timeframe than previously!
And as always - thanks for looking!
|
|
This message was edited 1 time. Last update was at 2018/04/25 23:29:11
|
|
|
|
2018/06/05 01:14:42
Subject: Inqu][sitor
|
|
Sword-Bearing Inquisitorial Crusader
|
Dr H wrote:Shame to hear of the daemon-feline assault. Good start to the new addition. Nice sword.
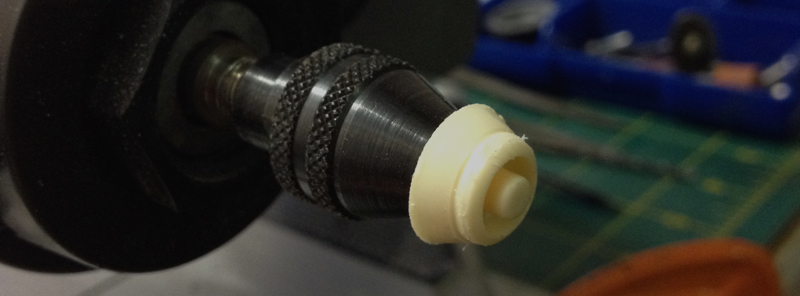
Thanks Dr H! Big H wrote:Dremel as a lathe ! Mind. Blown  Could you send a pic, a tutorial or link on how to set this up as I have a "spare" Dremel !
Thanks Big H Here you go - Dremel (fake Dremel anyway) as a lathe:  This shows lathing detail into brass tubing - to lathe a 50/50 mix of GS and milliput, I stick a blob of the mix on a wire or pin, roll the blob into a sausage and leave enough pin extended so I can insert the pin into the collet of the Dremel head - I'll take some pics next time I'm doing it lipsdapips wrote:Good headway on a cool character! Let's hope that the inquisition apprehends this fowl beast that savaged your miniature :(
Thanks lipsapips! Boss Salvage wrote: Big H wrote: Big H wrote:Dremel as a lathe ! Mind. Blown Could you send a pic, a tutorial or link on how to set this up as I have a "spare" Dremel !
Seriously. I was still thinking about this this morning and shaking my head in wonder. Great start on the new gal, even if she's being birthed from tragedy  - Salvage
youwashock wrote:She is looking quite grand. Way to rebound from disaster!
Thanks youwasshock! lone dirty dog wrote:As far as resurrections goes I think this is actually an improvement and the body posture makes for an interesting pose.
I think the cat has actually inspired a build here, maybe you found your muse
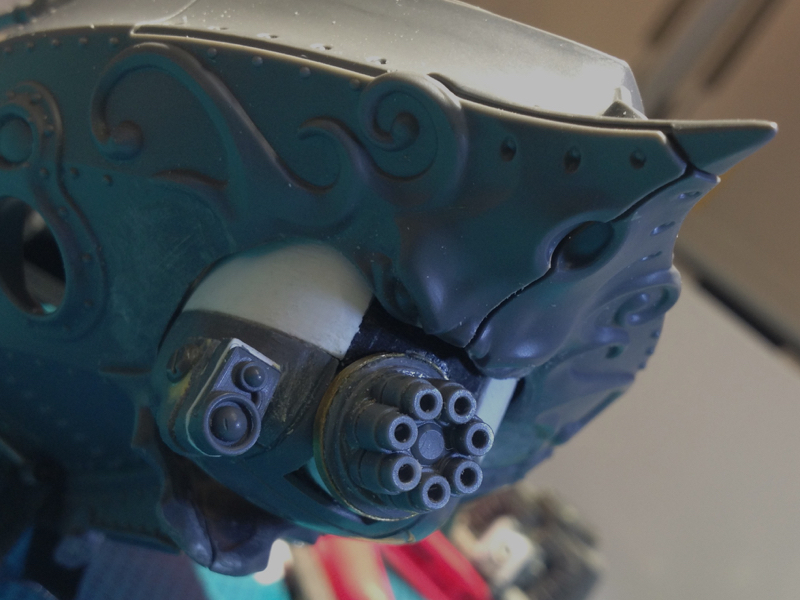
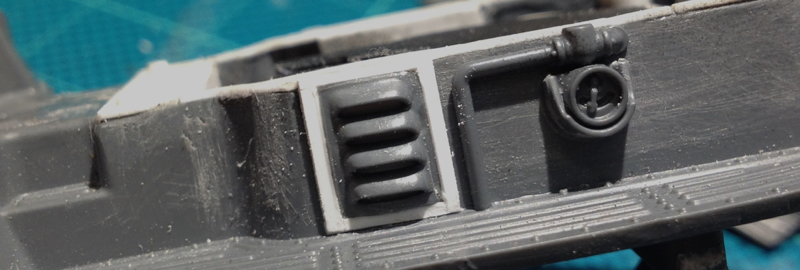
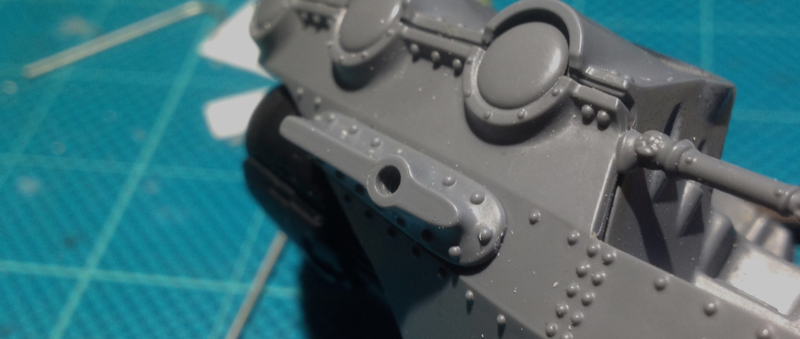
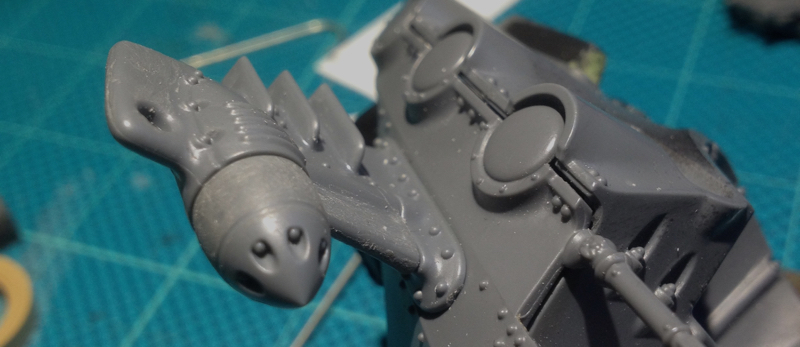
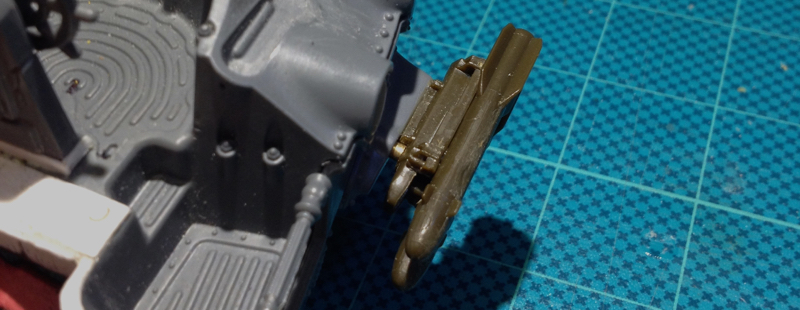
Thanks LDD! - I'm still rebuilding the original Witch Hunter, the skirt is yet another new character Thanks all!!! K][LL YOUR DARLINGS... To move ahead, sometimes you have to kill your darlings... Suffering from some major hobby mojo for some time now - it's been well over a year since I last put paint-to-model, for instance - I decided that while the idea of building the Captain's 'raptor-like' dropship was (and remains) a goal, the execution of the Hemlock conversion had gone awry; meaning, I had the top, the tail, and the VTOL thrusters, but couldn't come up with a decent hull and flightpod design that took the fighter and made it a dropship - which after all, was the initial intention. So - typically me - I started on a new ride for the Rogue Trader crew and the Inquisitor Kallatar's retinue. Recently inspired of the brilliant techno airships of the artist Ian McQue 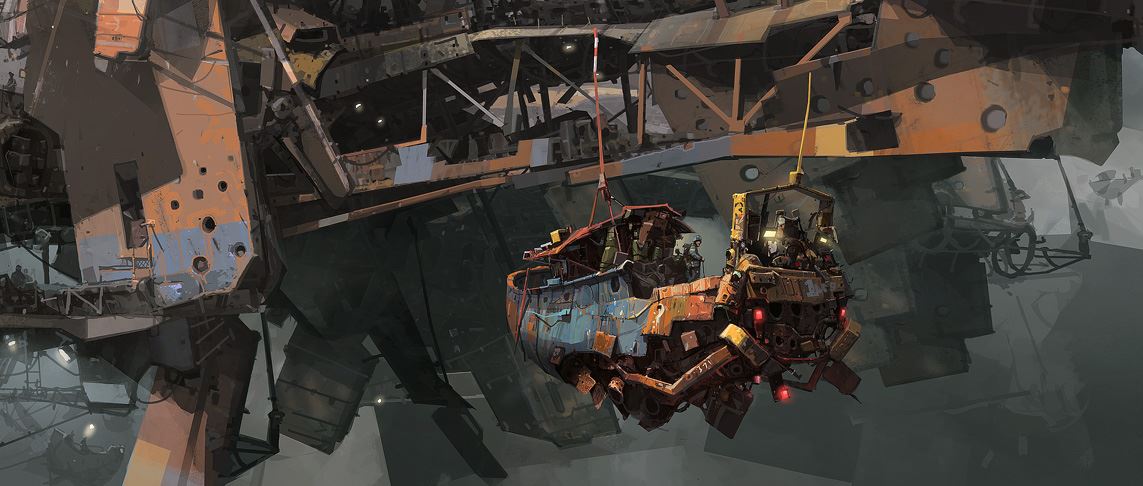 ... and discovering the more retro look of the Kharandon airships - vs the ultra-sleek Eldar Hemlock - work commenced on converting an Arkanaut frigate into a 40k-esque Inquis][tor/steampunk transport... Though I quickly discovered that scale-wise, there was no way the frigate could conceivably carry enough people to function as a troop-transport; so another quick change of tack (haha - see what I did there?) and the frigate-into-transport plan morphed into the frigate-into-Gun Skiff plan. So first up - what else? - guns!!! Upper turret with twin-linked rotating 100mm cannon - made from some Imperial Guard tank bits and strips of styrene: 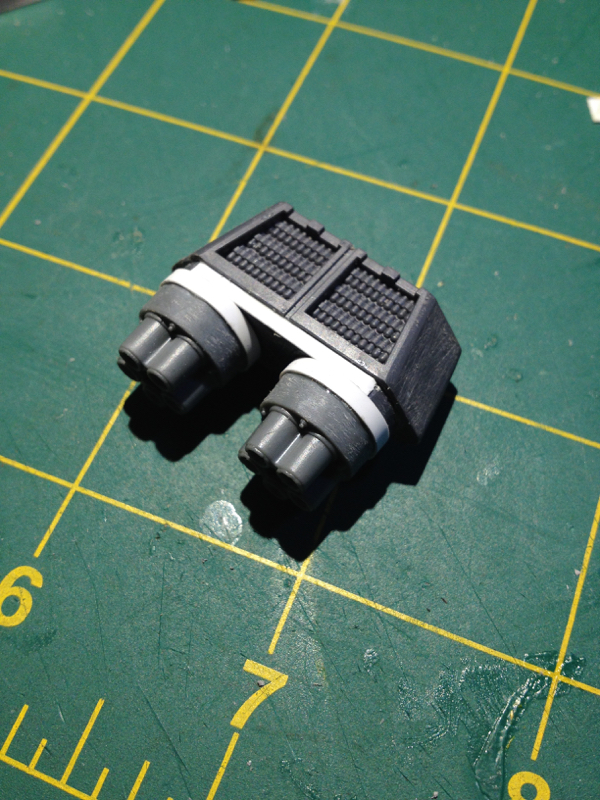 Of course, then I realised those midget rounds in the mag-trays are just too small calibre for the barrels size, so covered them up with some styrene sheet and milliput/greenstuff: 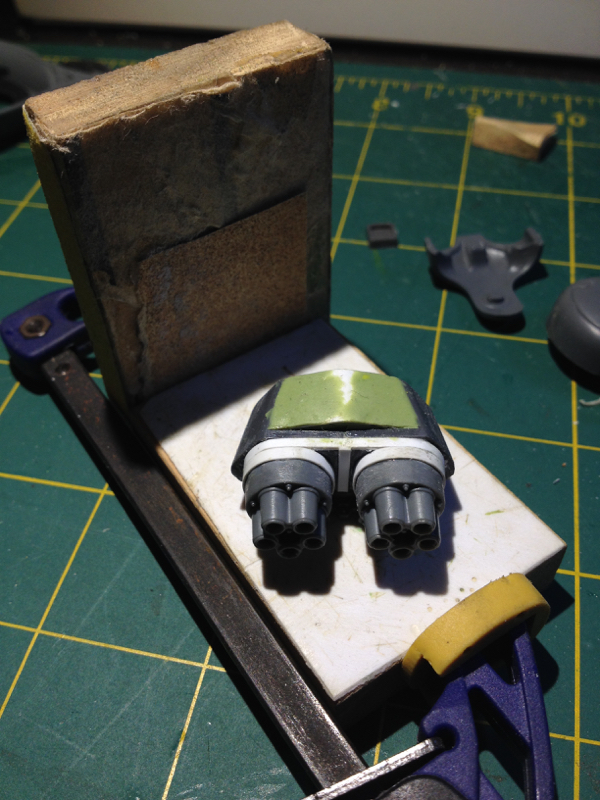 With the upper deck cannon fleshed out, time to build the lower turret that will replace the mouth/beard of the Arkanaut frigate - so took this old Tau turret shell: 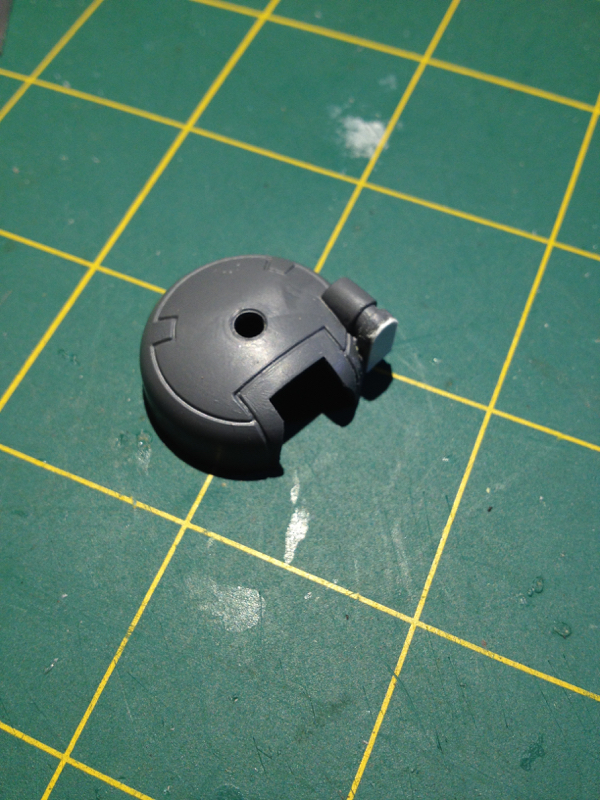 Added a styrene rim to this plumbing tubing: 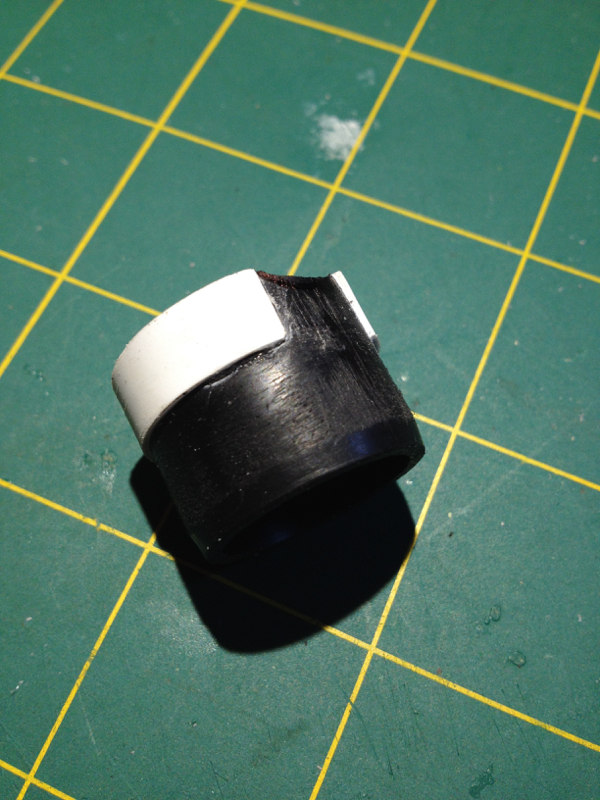 Detailed up the mini-gun barrel from the Nemesis Dreadknight: 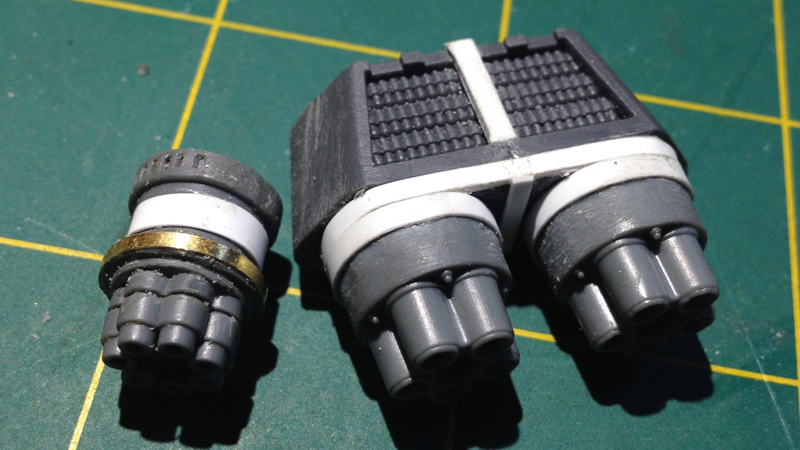 and look at that - a Minion gun! 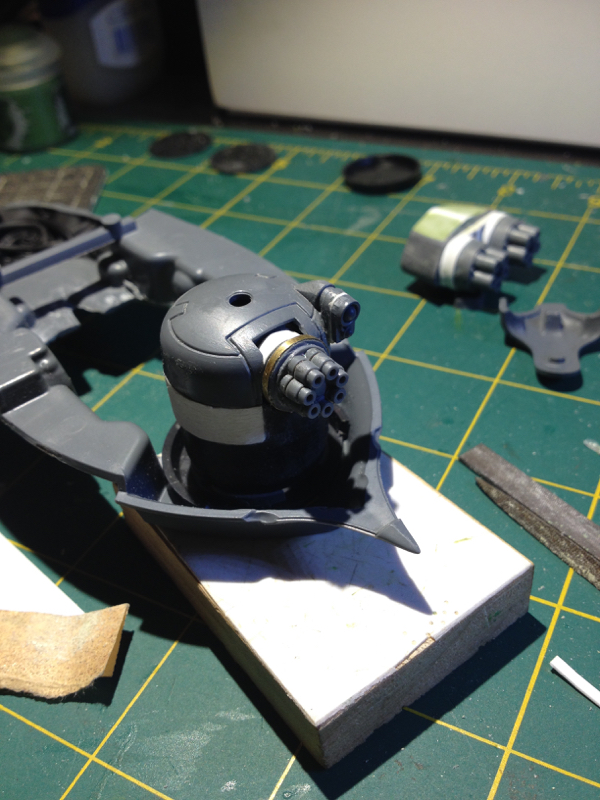 Made some additions to the frigate's turret bed: 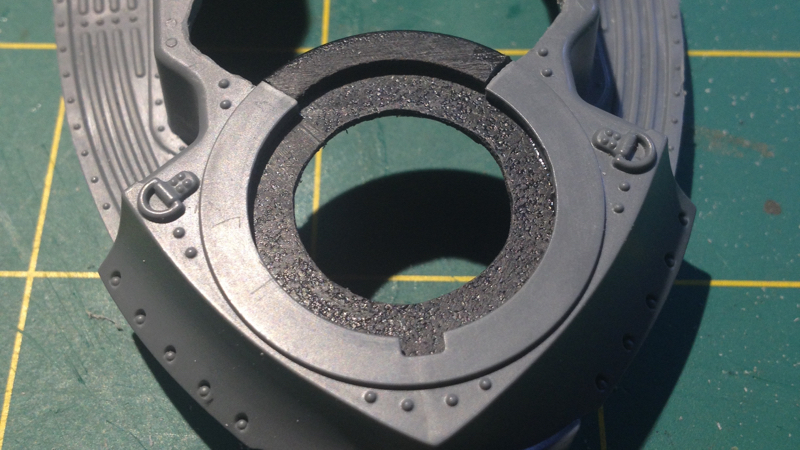 Then used some superglue dots and a handy clip-thingy to tack the hull halves together...  Then took a hacksaw and carefully... OMG what have I done!!!  Oh well, too late to back out now!!! So I just kept cutting and sanding... 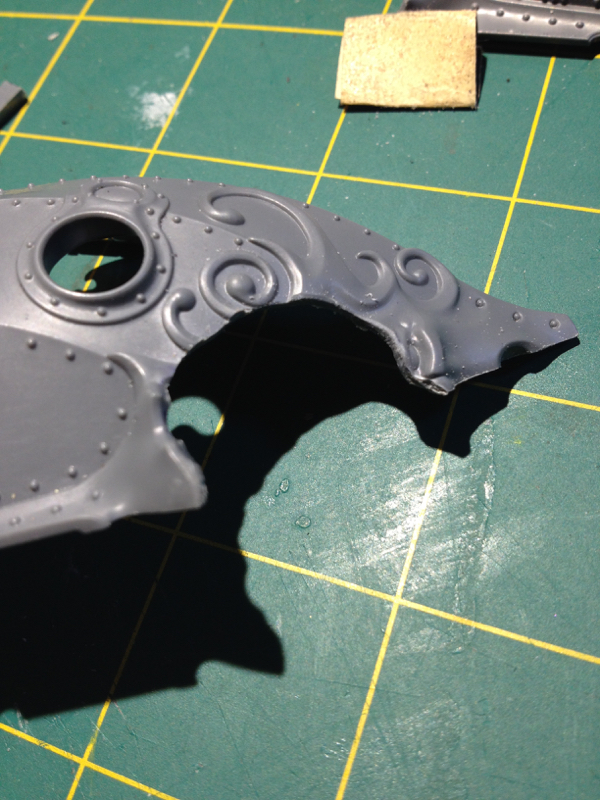 Until we ended up with this: 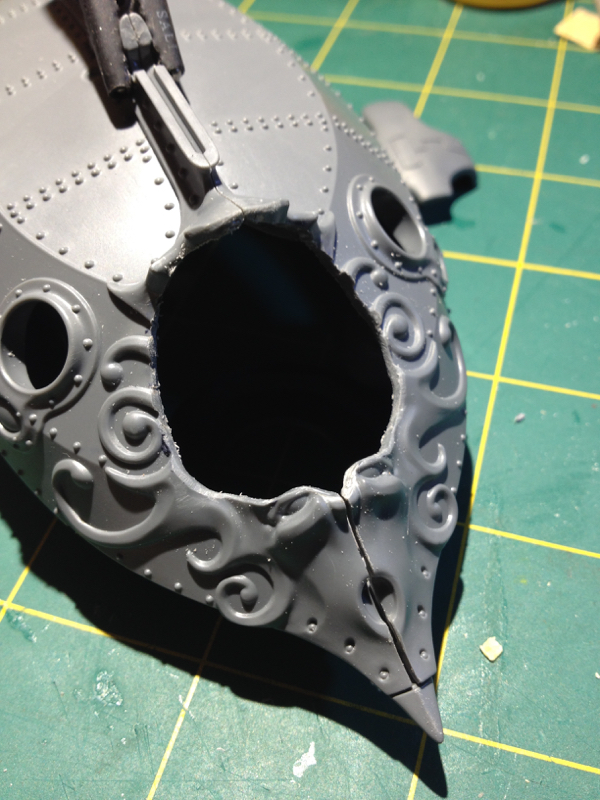 Aaaaaand... Unfortunately, the lower turret support pylon doesn't quite fit in the hole yet, so no pic today of the weaponry in place. Tune in soon for more mad modelling adventures!
|
|
This message was edited 1 time. Last update was at 2018/06/05 01:15:39
|
|
|
|
2018/06/07 09:09:35
Subject: Inqu][sitor
|
|
Sword-Bearing Inquisitorial Crusader
|
youwashock wrote:This promises to be grandiose.
Cheers youwashock!
monkeytroll wrote:Catching up on a few missed years. Great work as always. Loving the rogue trader crew, and the ideas for both ships.
Had to Google arkanauts - bloody hell, just been expressing my surprise at various kits that have appeared in the last few years, now have to add dwarves air ships to that list  and
Look forward to seeing you chop that up.
Thanks monkeytroll!
On with the WIP.
Here's where we left off the build last time:
Kharadron Beardy-Face now Mini-Gun Angry Face!
Deciding to leave the guns alone for a bit, it was time for some work on the stern of the ship.
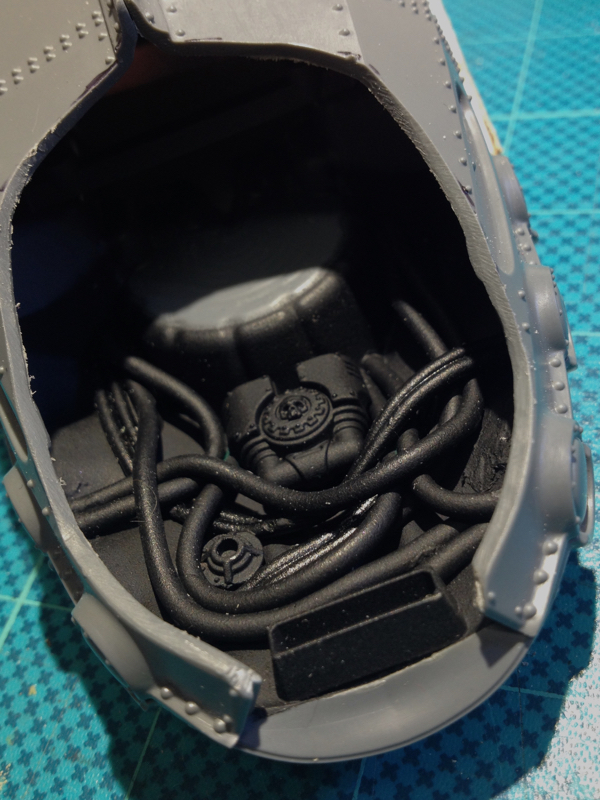
Took some 1/35th tank parts, part of a Space Marine Centurion power-pack, and lengths of old wire - mostly DC power leads and bits of Iphone cable my daemon-cat has chewed off electronic devices around the house - and threw it all together into some tech detail that nobody will ever see again after this.
Next - the McQue-esque engine cut-out.
Eyeballed the curve on the hull halves, drew a reference line, took one of those "O frack what am I about to do?" breaths, and let rip with the Dremel...
Leaving this:
Then took some engine parts from the Space Marine vehicle range, added some caps of those squeezy mini-bladders and sketched out some thrusters:
Might have to trim a fraction more out of the hull where the nozzles are just touching, but I like it so far:
Remember, this is upside down for construction purposes - the skiff flies the right way up!
Then it was back to the guns.
Added some detail to the back of the twin-linked cannon using a part from a Hemlock Wraithfighter, a random plastic ring from something cut in two, and another 1/35th tank part cut in half to get the two yellow bits:
And then finally got both upper and lower weapons in place for a pic:
Still lots to do but I'm feeling the vibe with this one!
Thanks for looking!
|
|
|
|
2018/06/14 10:53:39
Subject: Inqu][sitor
|
|
Sword-Bearing Inquisitorial Crusader
|
whalemusic360 wrote:Very cool so far. Really like the concept behind it.
EmberlordofFire8 wrote:I might have to make one of these...
Big H wrote:So much genius here!
Really really cool ! I am watching the airship for all the ideas I can mine for my own stalled projects, and the Dremel lathe is just awesome and so simple actually, like most good ideas !
inmygravenimage wrote:I love varied uses of bottle caps, makes my little LoeR heart sing.
Dr H wrote:Good work. liking what I'm seeing.
Thanks all!!! Back again with more Gun Skiff gun stuff - a curved barrel shroud for the upper mini-gun. Xbox grill looked perfect for what I had in mind, except there's no way to bend it into the shape I needed - so did some prep work on it prior to vacuforming: 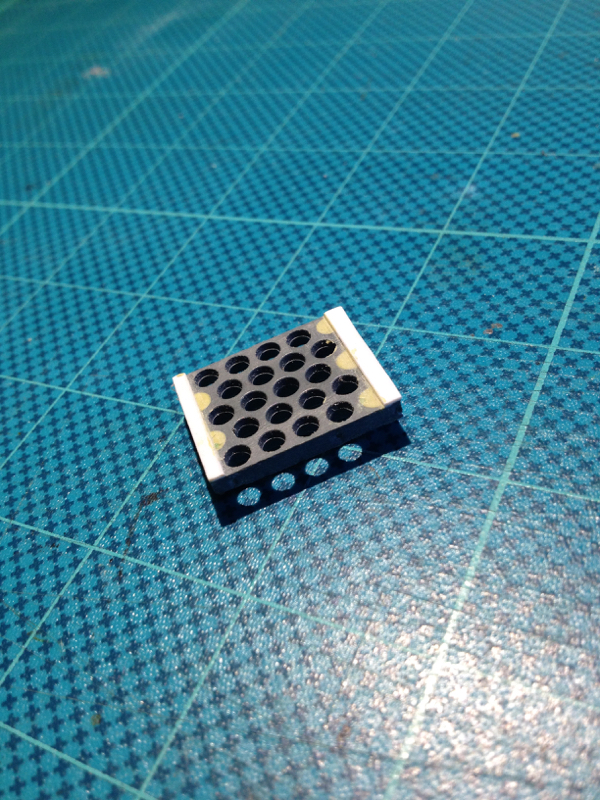 Used the home-made vacuformer to make a thinner and therefore flexible copy: 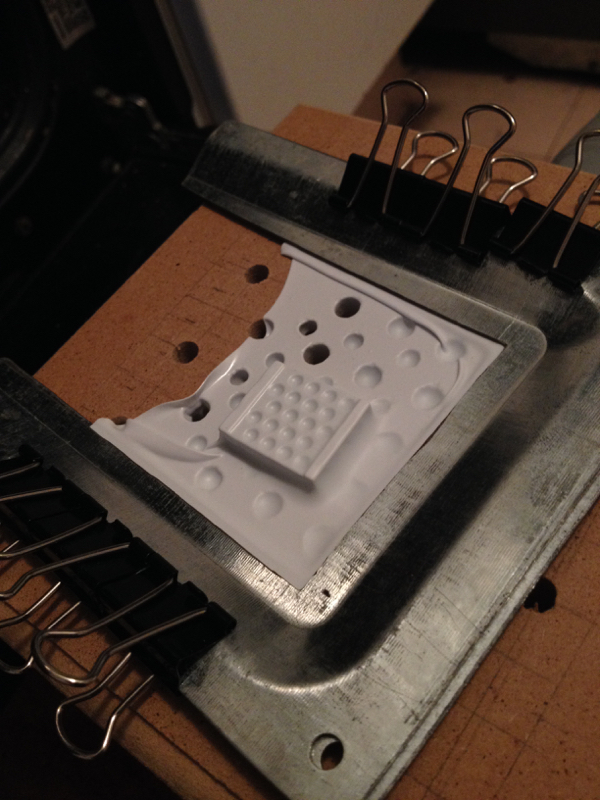 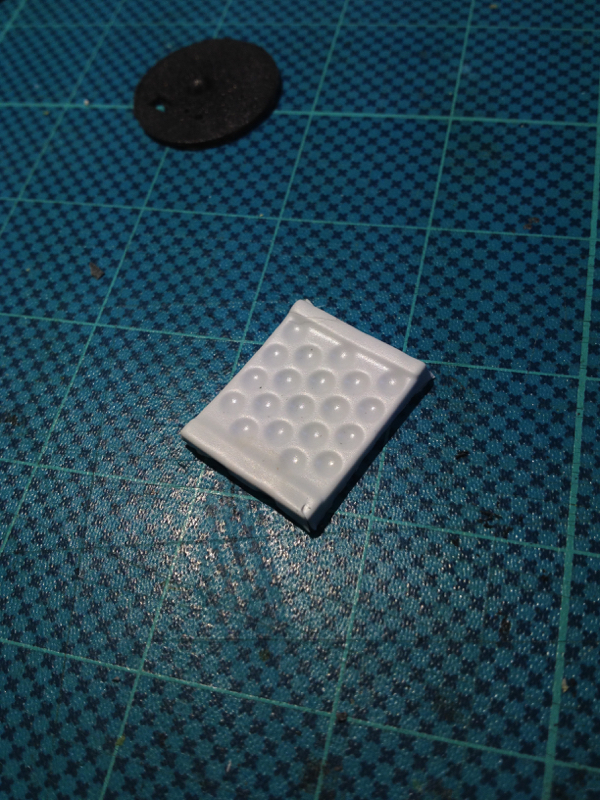 Sanded it until the bumps became holes, cleaned the holes up with a sharp blade: 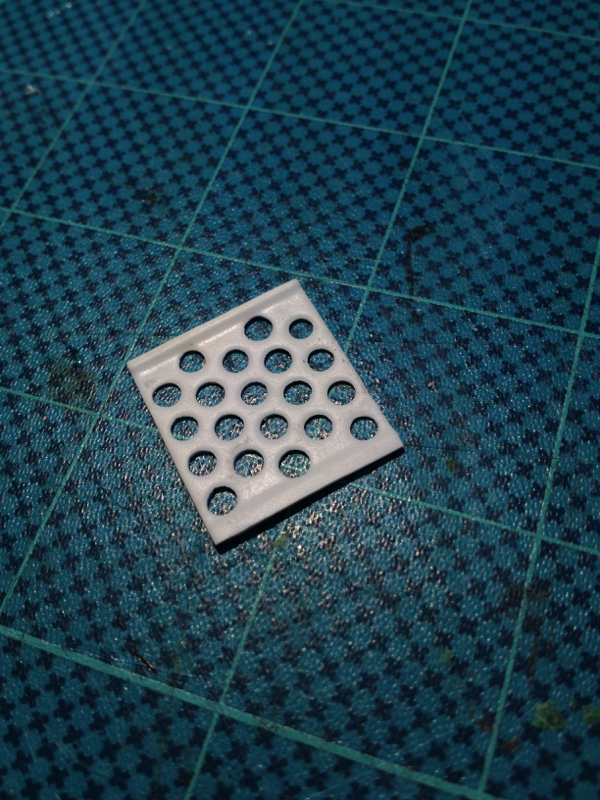 Cut it in half through the middle and glued up this structure: 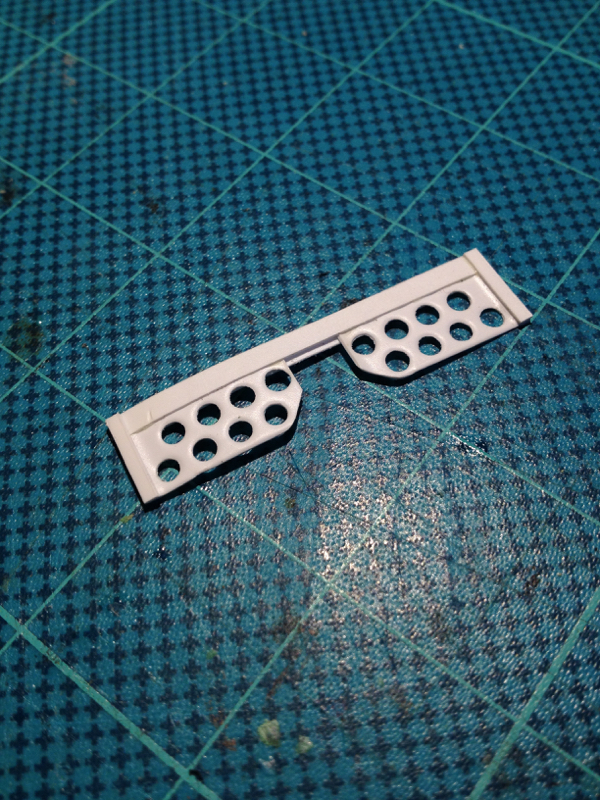 Undercoated the inside with Krylon black, then used boiling water to bend it into shape... 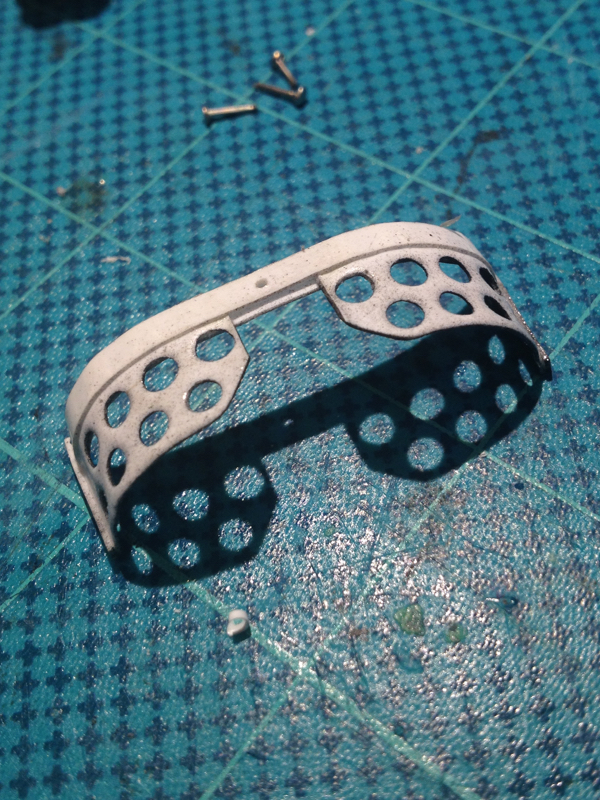 And glue and aggressive clamping did the rest: 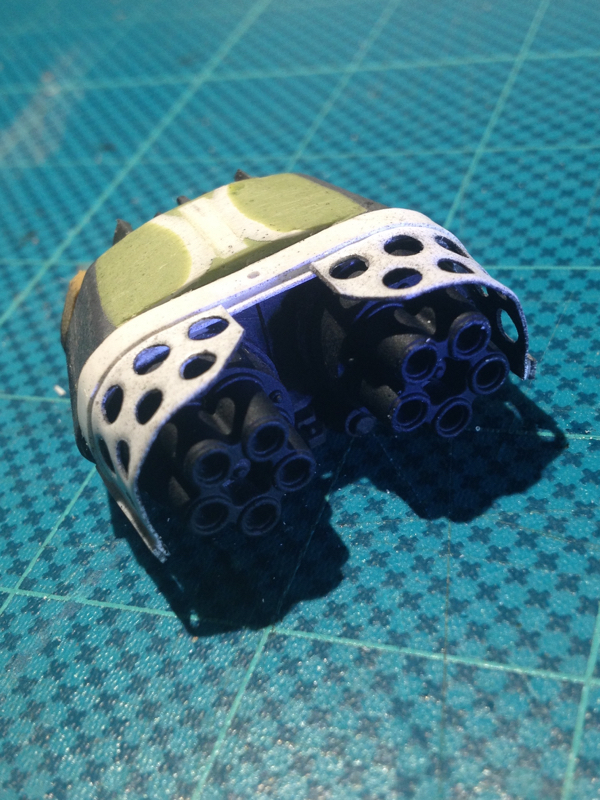 Hopefully I'm done with the gun detailing, so next time it will be back to the engines! Thanks for looking!
|
|
This message was edited 1 time. Last update was at 2018/06/14 10:54:07
|
|
|
|
2018/06/15 11:57:47
Subject: Inqu][sitor
|
|
Sword-Bearing Inquisitorial Crusader
|
inmygravenimage wrote: Lamby wrote: Lamby wrote:
Used the home-made vacuformer to make a thinner and therefore flexible copy:
Of course you did.  Because you're some kind of arcane, mad technowizard who conjures up a vacuformer out of a bit of ply, bulldog clips and a hoover 
Amazing stuff, I'm awestruck.
Thanks inmygravenimage!
- vacuformer explanation below
Big H wrote: inmygravenimage wrote: inmygravenimage wrote: Lamby wrote:Used the home-made vacuformer to make a thinner and therefore flexible copy:
Of course you did. Because you're some kind of arcane, mad technowizard who conjures up a vacuformer out of a bit of ply, bulldog clips and a hoover
Amazing stuff, I'm awestruck.
This.
I consider myself quite handy at knocking things together and creating stuff from other items, But you are killing it!
Perhaps you could start a thread or article on your handy machines ??!!??
(Only half in jest....)
Thanks Big H!- vacuformer explanation below!
whalemusic360 wrote:How most people would do it:
Get plasticard.
Cut plasticard.
Bend and poke holes in plasticard.
How Lamby does it:
Take apart Xbox.
Modify fan vent from Xbox.
Build vacuformer.
Make vacumold of Xbox bit.
Trim vac made shape.
Sand the hell out of it.
Cut to desired shape.
Build parts from plasticard.
Heat and bend.
All for a heat shield that is a minor detail! You are crazy man.
Haha thanks whalemusic360!
- I'll try to explain a little of my madness...
- I attempted to drill out a series of holes in a plasticard sheet but it never quite worked out - either my holes would be slightly out of alignment, or the larger drill bit would tear in the hole
- I salvaged that old Xbox from a sidewalk throwout years ago... I've used a lot of the mesh bits on bases!
- The grill holes were the right shape, size and distance apart - so it made made a good template
- A homemade sanding block with really aggressive sandpaper made short work of it - about 10 minutes of sanding
MacPhail wrote:Man, really excellent scratchbuilding... I'm working backwards with 20 pages to go and already I'm inspired on multiple levels. Well done!
Thanks MacPhail!
monkeytroll wrote:You had me at home-made vacuformer.
Haha thanks monkeytroll!
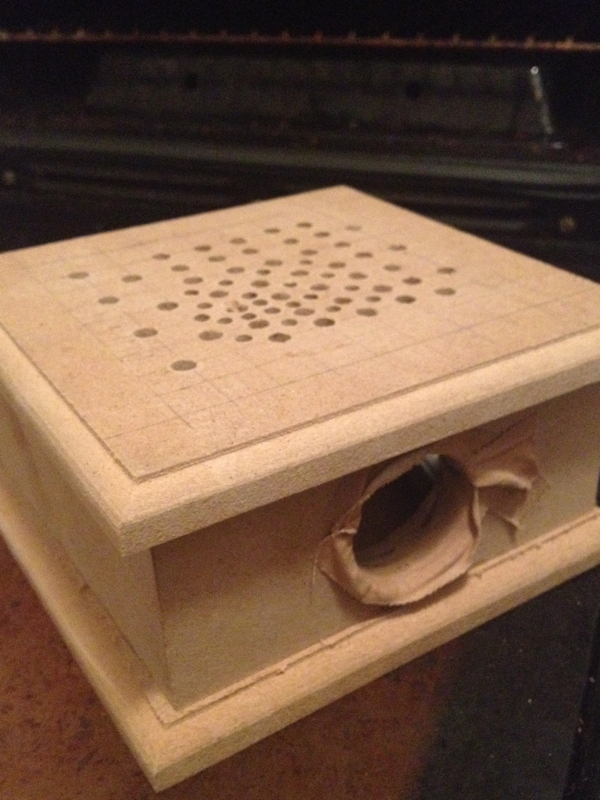
Since the homemade vacuformer seems to be a bit of a hit, here's a pictorial explanation:
- The vacuum chamber is an MDF craft box.
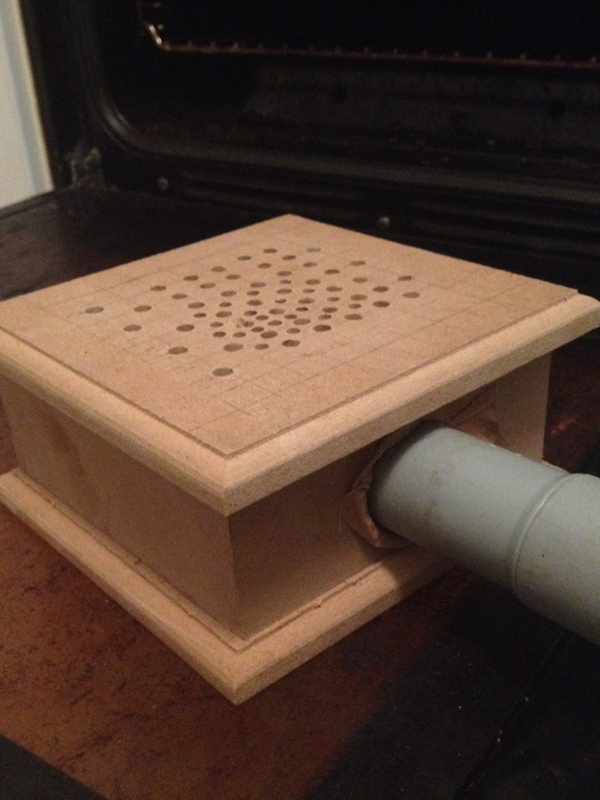
- I drilled an admittedly quite haphazard series of holes in the lid, and drilled out a hole in the side slightly larger than the hose on my vacuum cleaner
- To get a seal I used strapping tape, it has a rough external texture that grips around the vacuum cleaner nozzle.
To do the actual vacuforming, you need:
- A vacuum cleaner
- A heat source - I just use the griller in my oven
- A buck - the thing you want to make a copy of - in the case above it was that piece of Xbox grill
- Some sheet styrene
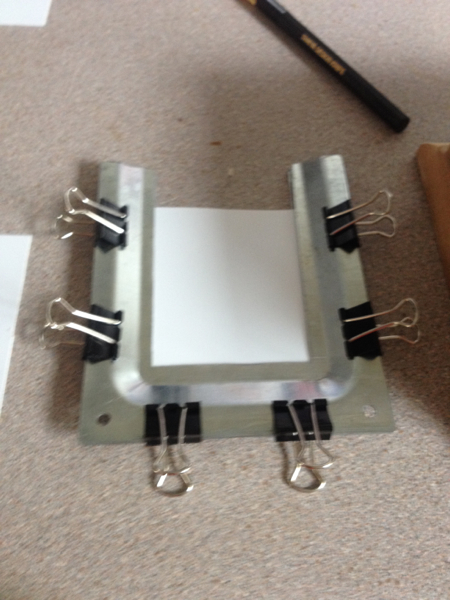
You clamp the styrene between a metal frame of sorts:
Turn the vacuum cleaner on with your buck on the top of the vacuum box.
Allow the styrene sheet to deform under your heat source until it's sagging about the same height as your buck.
Whip the hot styrene out and quickly drop it over the buck - the vacuum cleaner sucks the hot styrene sheet down over your buck and hopefully makes a good copy (otherwise known as a pull)
Points:
- Use a pair of BBQ tongs not your fingers to hold the frame under the griller heating element - things get hot fast!
- Your buck has to be able to take the heat of melting styrene
- To get a good pull, raise your buck slightly above the actual vacuum chamber top - for the Xbox grill I glued some sprue to get a little height
This mini vacuformer was my test build - I plan to make a bigger one.
As usual, this was not my idea originally - watch this video from Fon Davis:
https://www.youtube.com/watch?v=WXhJHArFsrM
And this one from Bill Doran at Punished Props:
https://www.youtube.com/watch?v=Gx66mS7U2vY&t=1s
Thanks!!!
|
|
|
|
2018/06/26 01:17:50
Subject: Inqu][sitor
|
|
Sword-Bearing Inquisitorial Crusader
|
alabamaheretic wrote:dude this thread is nuts it gets better and better
Big H wrote:At the moment I don't know why I need a vac former, I just know I'm going to build one first chance I get !
monkeytroll wrote:Excellent work, thanks for the explanation.
Big H - once you build one you'll find plenty of uses I'm sure. Same as every other tool we make or buy
Dr H wrote:Good work, Lamby. On the model and the vac-former.
Thanks all for your kind comments!
On with the show:
I blame Star Wars.
Well, Star Wars modellers to be correct - and mostly this guy
Tagamo Modelworx
I learned more about lighting models in one night binge-watching his videos than any amount of reading Instructables and the like.
But as I was watching, this thought snuck into my brain: Lighting models - mmmm...
So of course, not content with my usual OCD-style modelling, now I'm adding LEDs to the engines - cos why make it simple when you can make it insanely detailed, right?
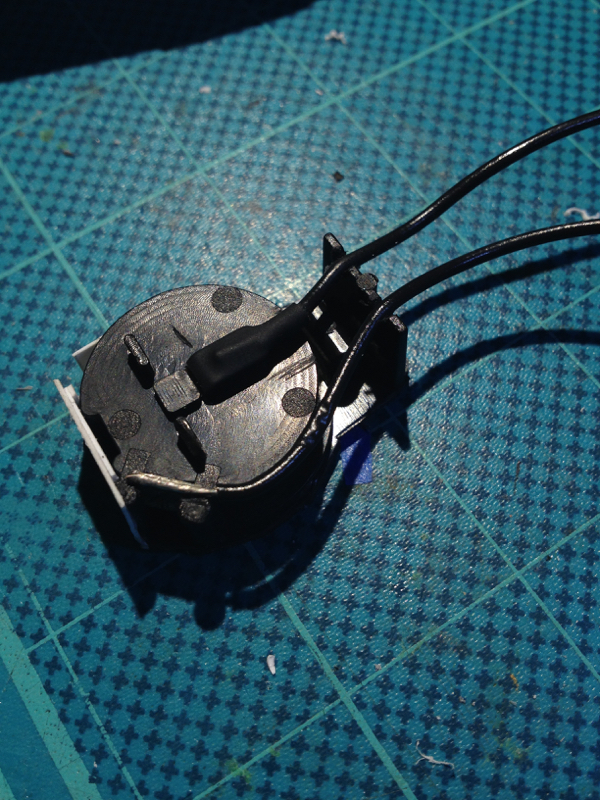
Not wanting to spend too much money on all this, found a LED bike light in the junk pile, and harvested the twin watch-battery power supply and the LEDs from it.
Of course, had to mod the power supply a bit by adding the leads - which meant I had to learn to solder, cos up till now my electronics experience comes from making circuits in simple IED training aids (real life job) where we twist and tape, as the training aids invariably get blown apart... anyway:
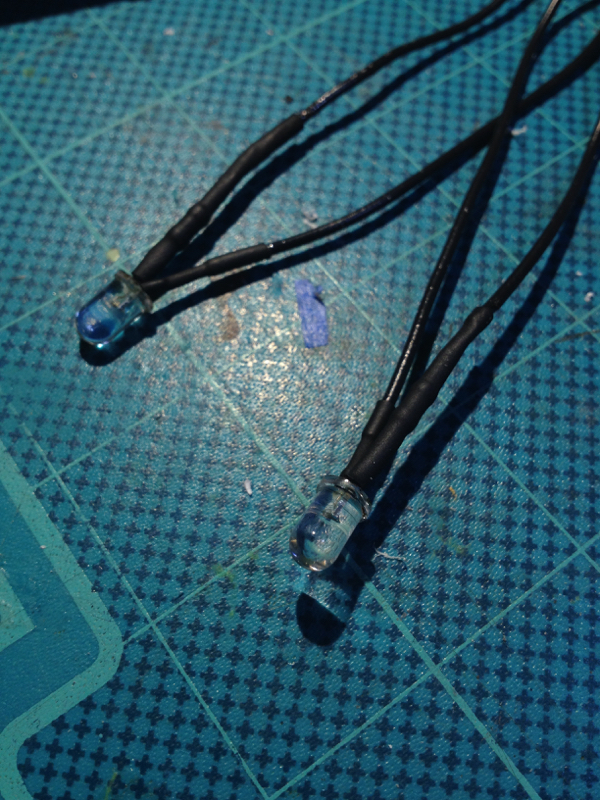
And here's the harvested LEDs with resistors added:
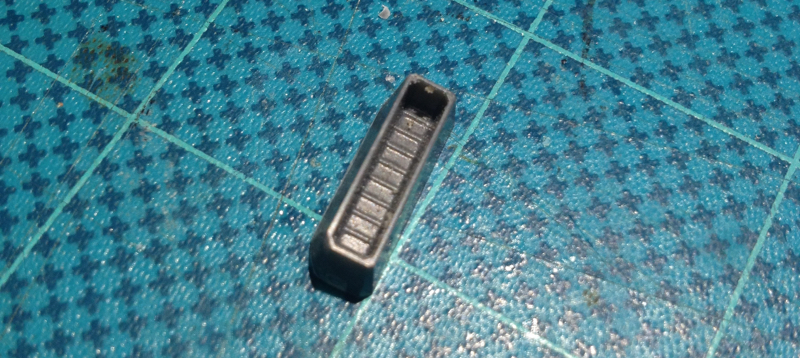
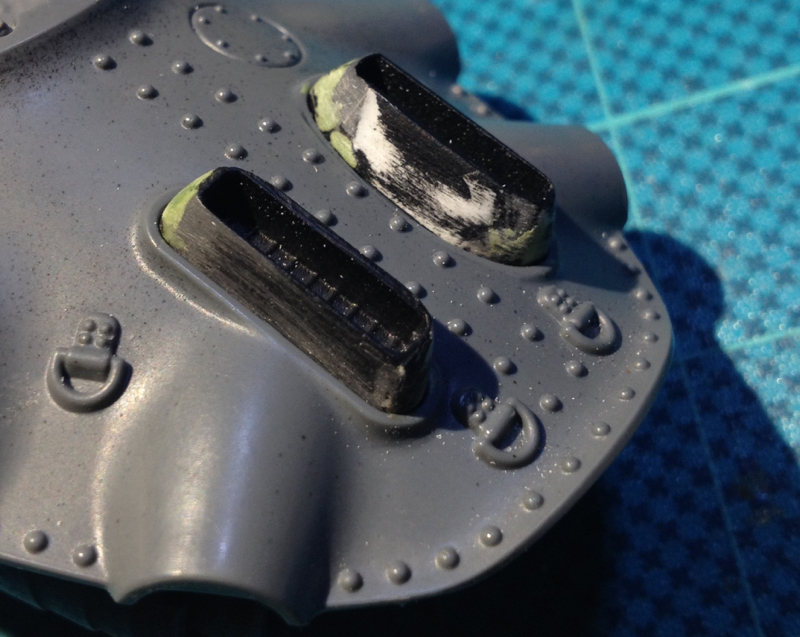
Took a switch from an old Nerf gun - yes, you read that correctly :
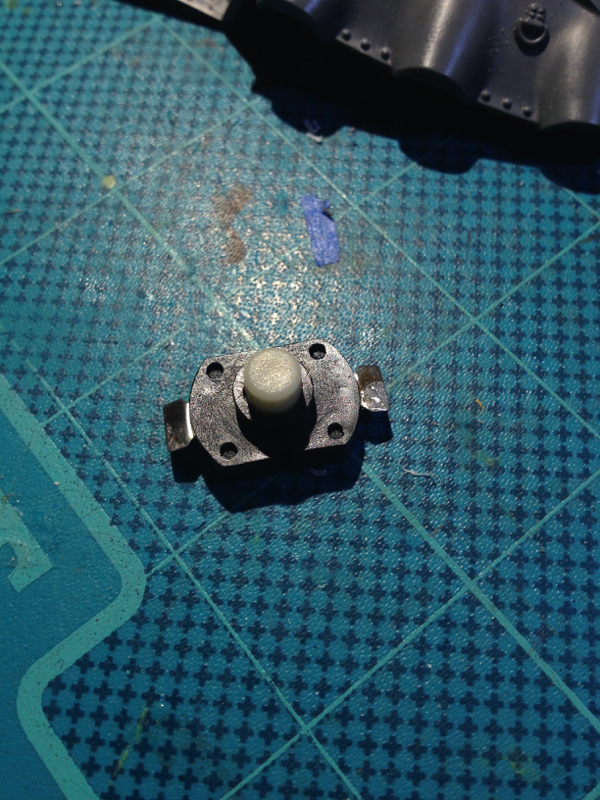
Made a hole in the side of the decking to take the switch:
And added some detail to hide the fact it is indeed, a switch:
Then, in the interest of keeping up the momentum of the actual design and building of this thing, I left off the electronics there til another day.
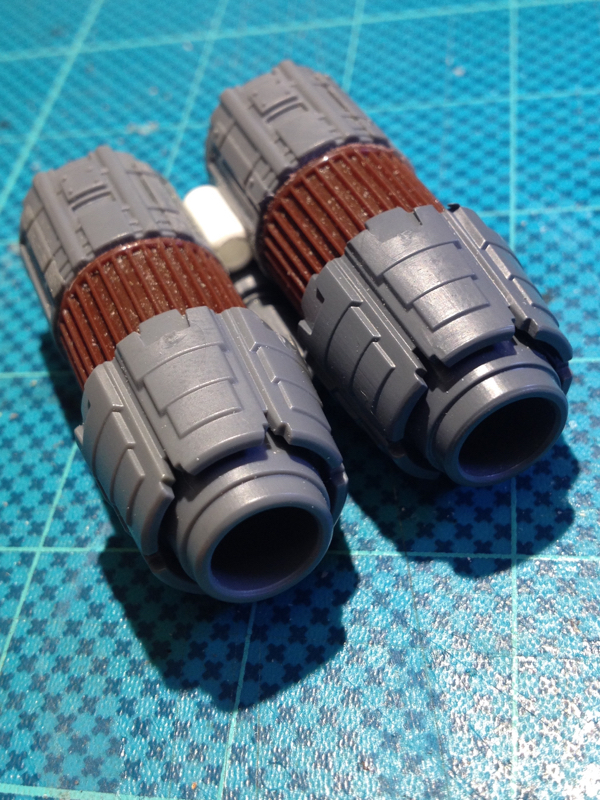
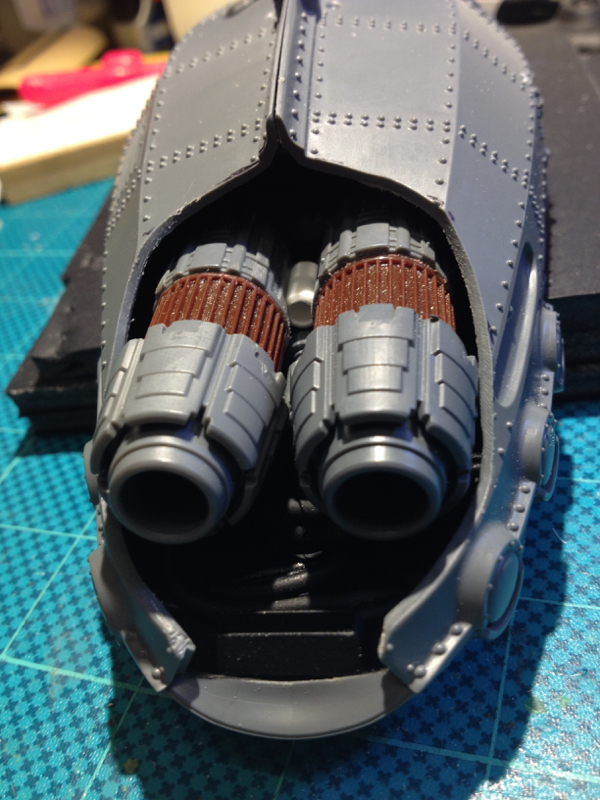
Looking at the main engines I thought they looked a bit plain, so made these pipes:
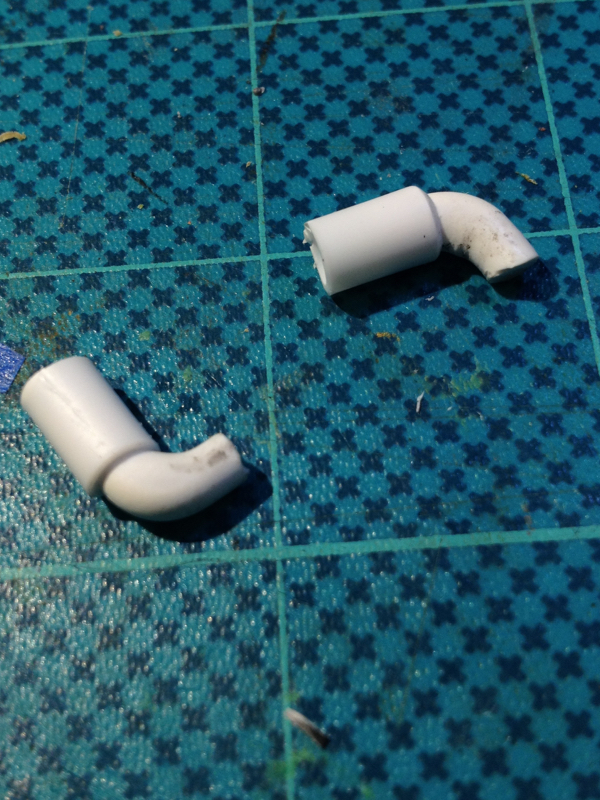
And added them to the inner cylinders:
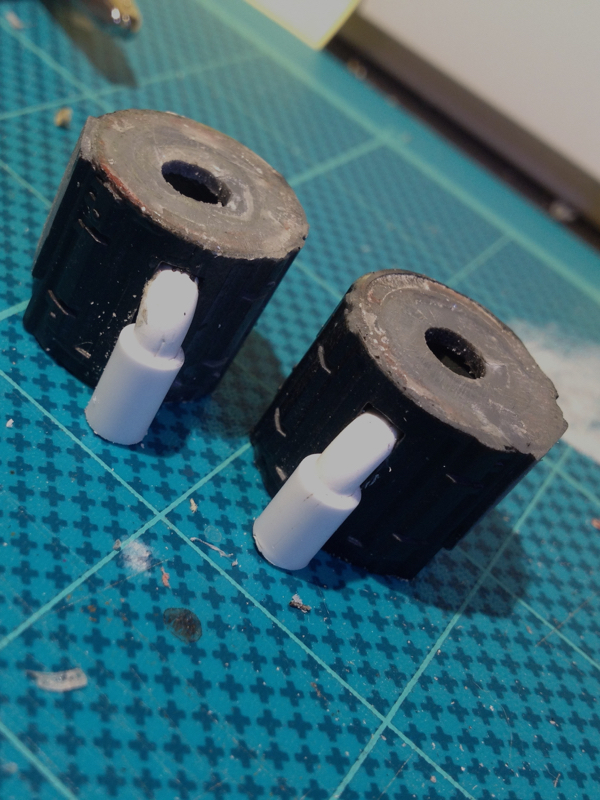
Then I mixed up a batch of epoxy and glued both engines together, and completely failed to take a pic when they were done, whoops.
More to follow!
|
|
|
|
2018/06/27 00:55:38
Subject: Inqu][sitor
|
|
Sword-Bearing Inquisitorial Crusader
|
inmygravenimage wrote:More mad science? No final pic?! You filthy tease!
Haha yes sorry about that - will get to it today (hopefully...)
monkeytroll wrote:Well obviously it needed lights
Of course - once I saw those light rigs in the Star Wars models I was hooked
|
|
|
|
2018/07/21 02:35:50
Subject: Re:Inqu][sitor
|
|
Sword-Bearing Inquisitorial Crusader
|
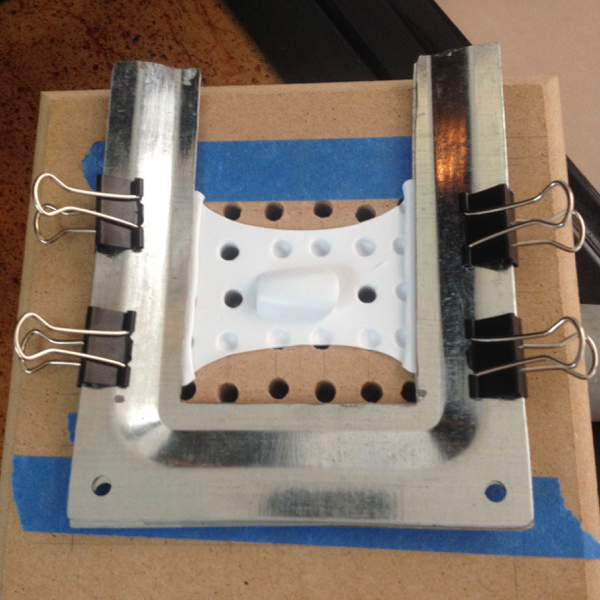
Real life pause over - time to get these fething engine lights done! Engine detailing: 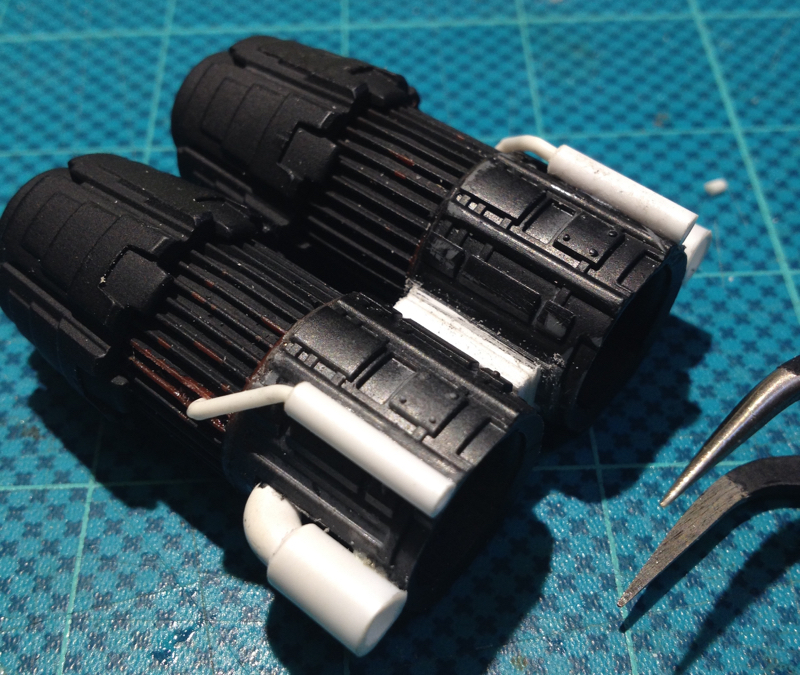 And covered with Krylon Fusion primer: 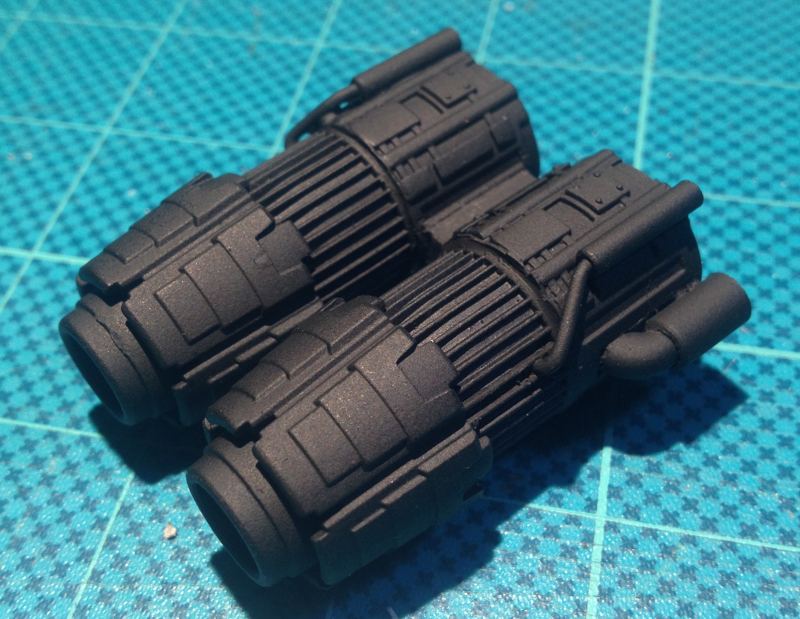 Added supporting braces internally to the top deck cavity: 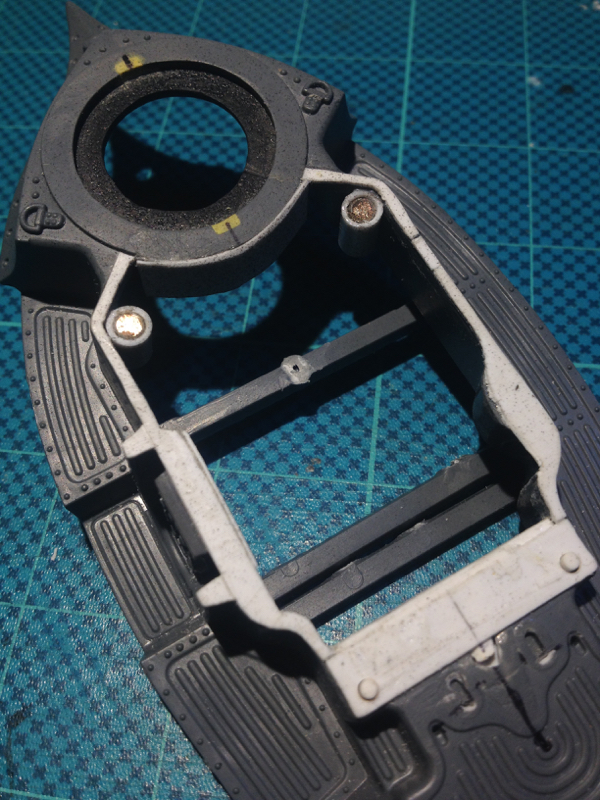 Note the magnets to take this removable though as yet un-detailed decking plate: 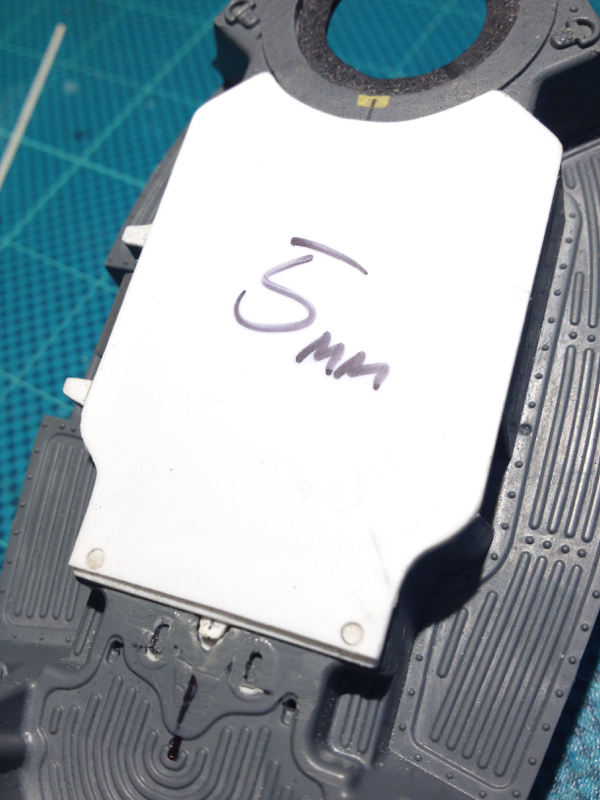 Finished soldering (and re-soldering... and re-re-soldering...) the wiring harness and tinted the bright white LEDs with Tamiya Clear Blue - which worked surprisingly well:  Seriously underestimated the size of the wiring harness vs the cavity, and spent a lot longer than it should have taken to get it all to fit: 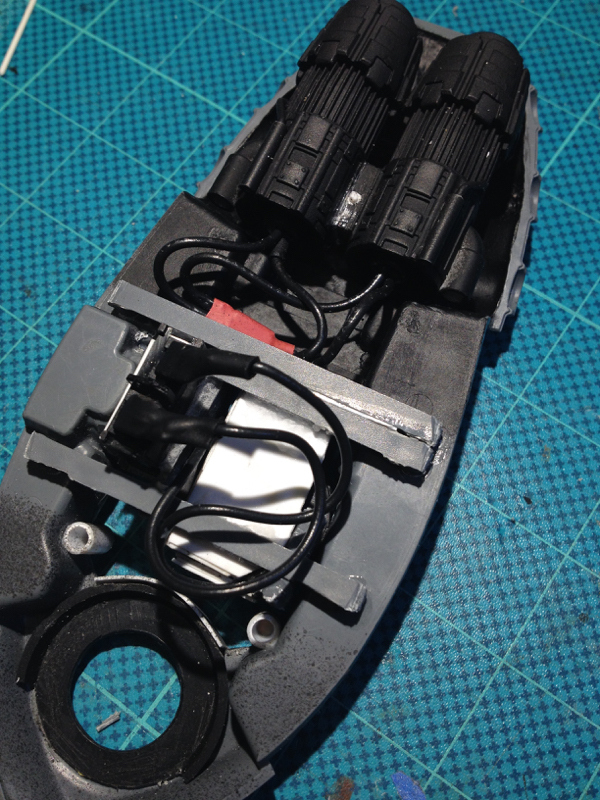 You might notice the switch has been changed out - the Nerf gun switch decided to cease working about after I'd soldered everything up the first (two) times, so I caved in and bought a good solid switch - which is why the top decking is now removable: 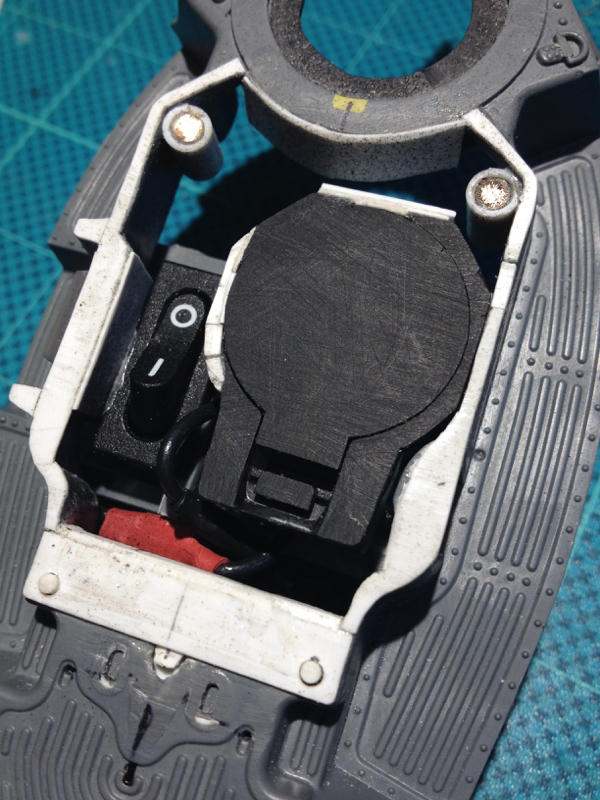 Finally though - we have engine lights! 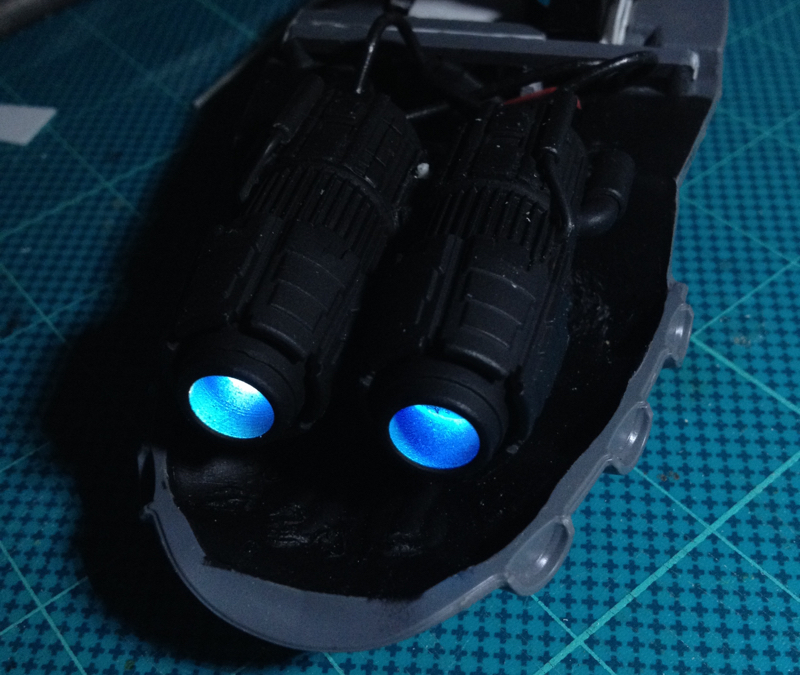 Things I have learned during this process: 1. Good soldering is a lot harder than it looks 2. Test, test and re-test your circuit after every step! 3. Harvesting LEDs and battery mounts and switches for free is good in theory but in practice, not so much Now I can (hopefully) speed up the rest of this build! Thanks for looking!
|
|
This message was edited 1 time. Last update was at 2018/07/21 10:53:03
|
|
|
|
2018/07/30 03:24:19
Subject: Inqu][sitor
|
|
Sword-Bearing Inquisitorial Crusader
|
MacPhail wrote:Wow... Very cool work on those engines. I suddenly want to build a fully mechanized Elder or Tau force just to light the whole thing with blue engines...
Dr H wrote:Worth the effort. Looks cool.
Thanks guys!
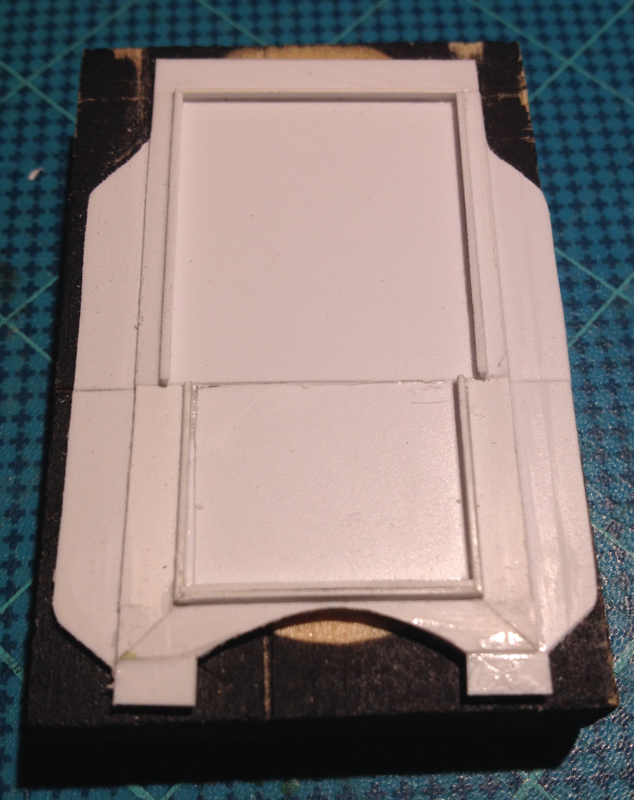
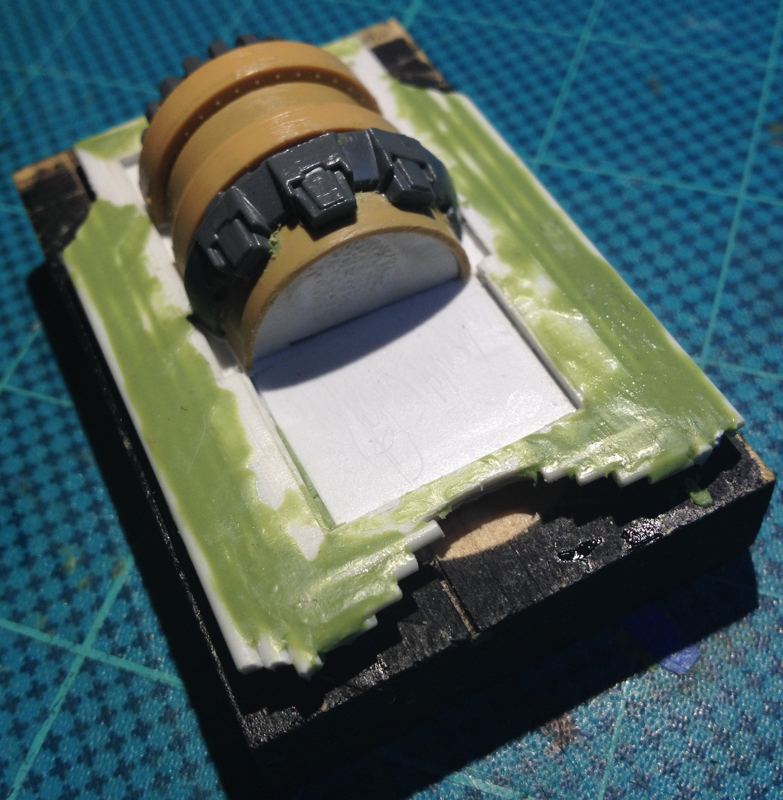
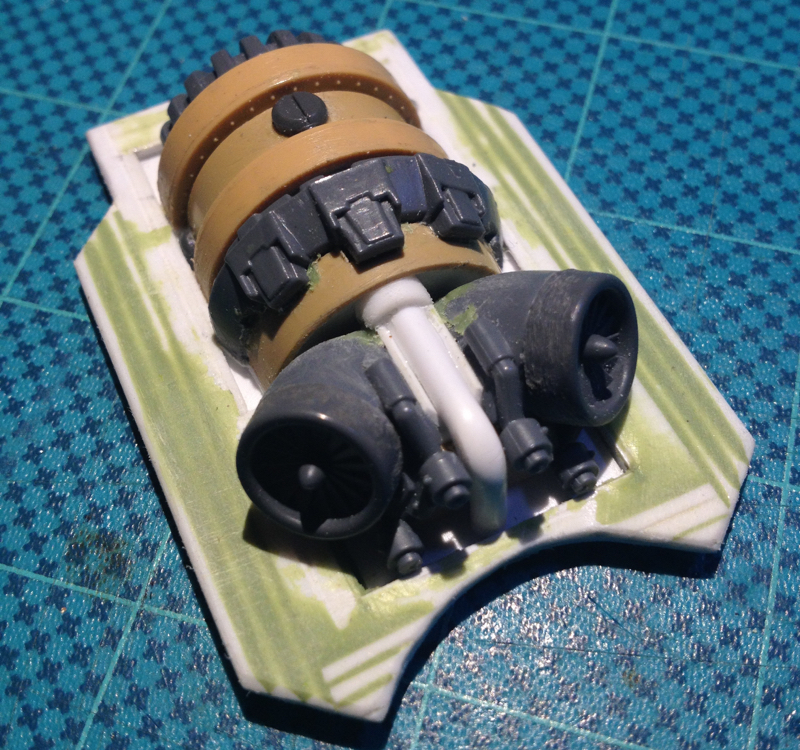
With the thrusters completed (for the moment anyway) moved on to detailing the removable top deck plate.
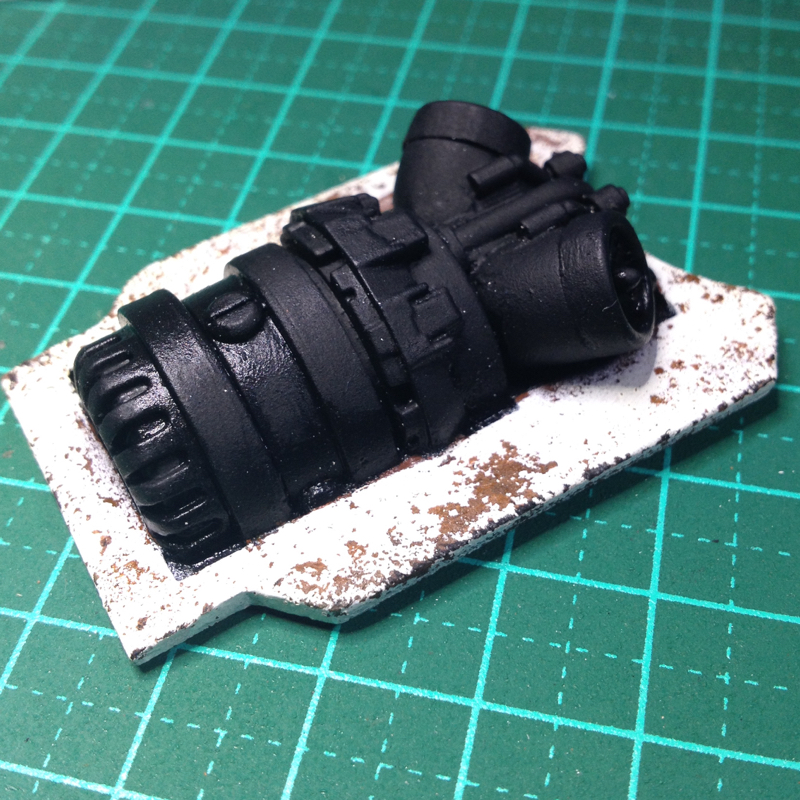
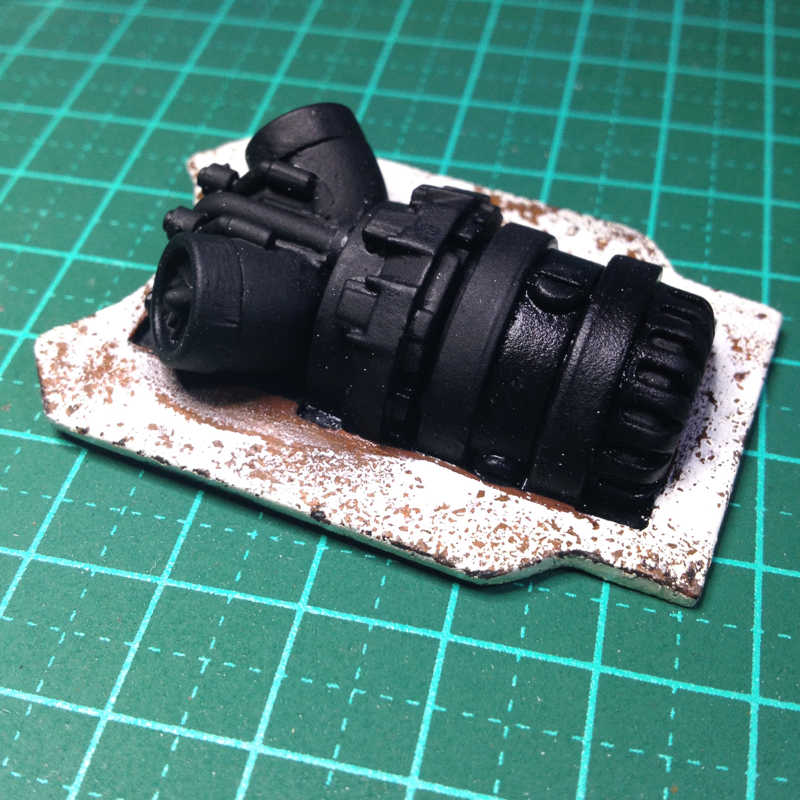
Found some 1/35th tank drive wheels, a Landraider turret ring, and a Space Marine bike wheel, glued them together to make a bit of an engine, then cut them in half - you'll see why shortly:
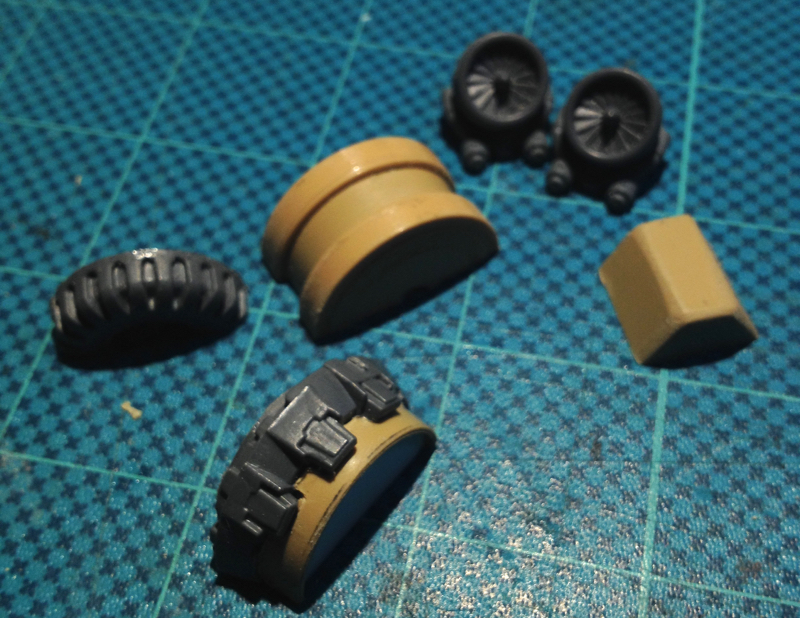
As there's a switch and battery pod under the deck plate, I'm going to have to fake the look of the supposedly cylindrical upper engine section, so built the small edge around the inner rectangular shape of the deck plate:
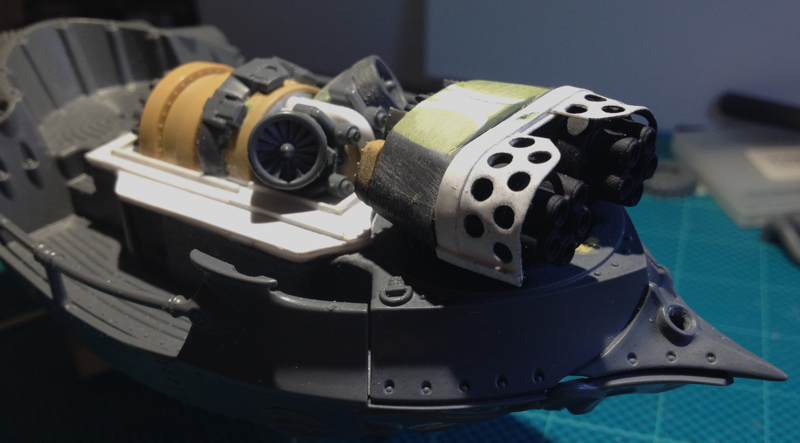
Here's the engine sections fitted into the cutout - the main intakes are two Space Marine backpacks with a small turbine fan from one of the Space Marine flyers added:
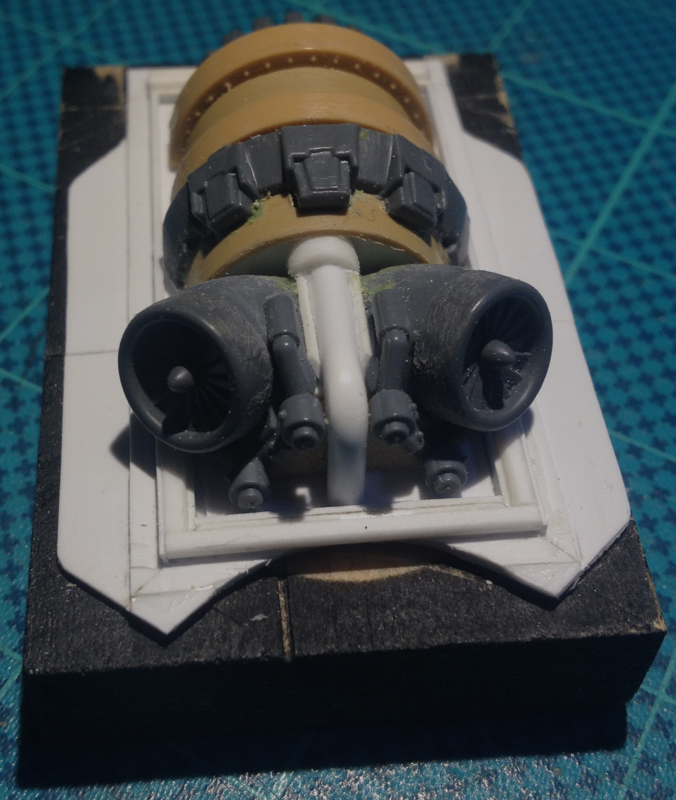
And here's how it sits with the main turret in place:
Thanks for looking!
|
|
|
|
2018/08/09 22:07:56
Subject: Inqu][sitor
|
|
Sword-Bearing Inquisitorial Crusader
|
Thanks Dr H!
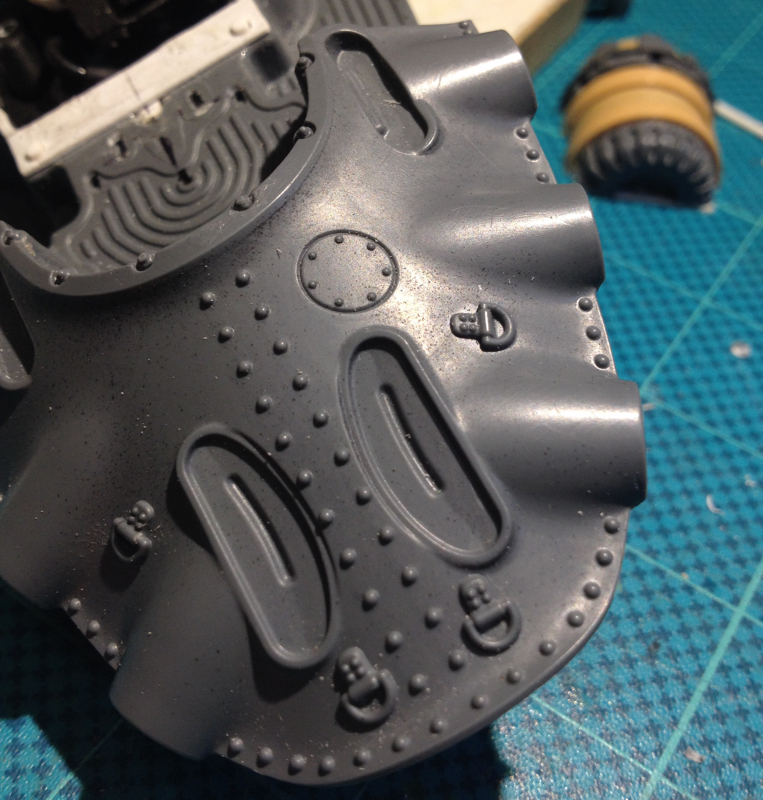
Decided to add more weight and depth to the removable upper deck, so added styrene and a GS/milliput mix:
Then cut to shape and sanded smooth, and here's the result:
I may end up going back in to add a line or two of rivets, but for now, it's done.
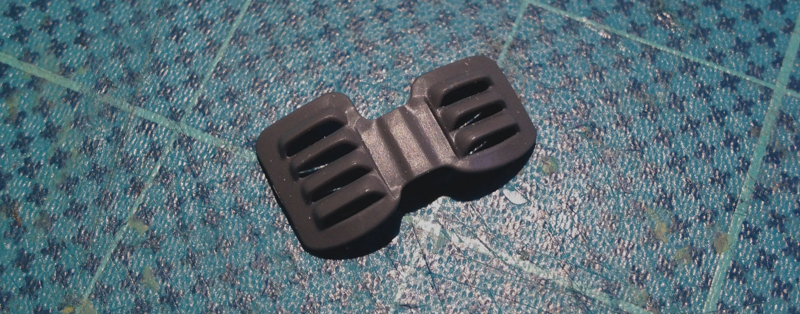
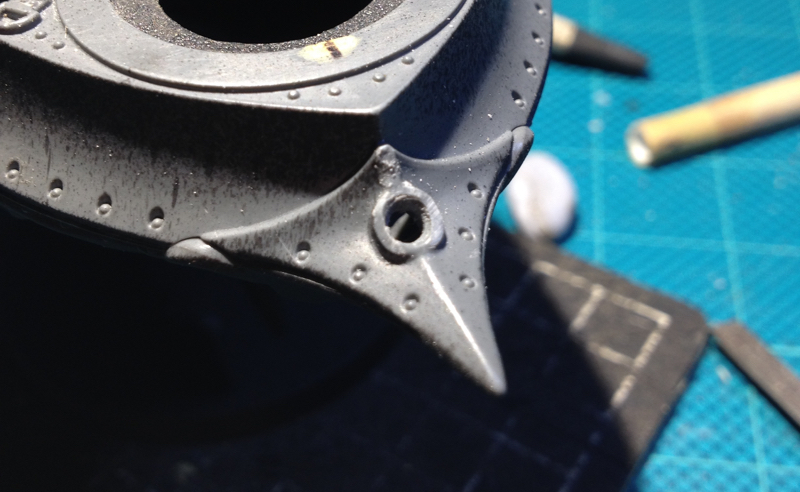
Moving on - the gaps where the air-ballon support structures usually attach have been bugging me for a while, so time to fix that:
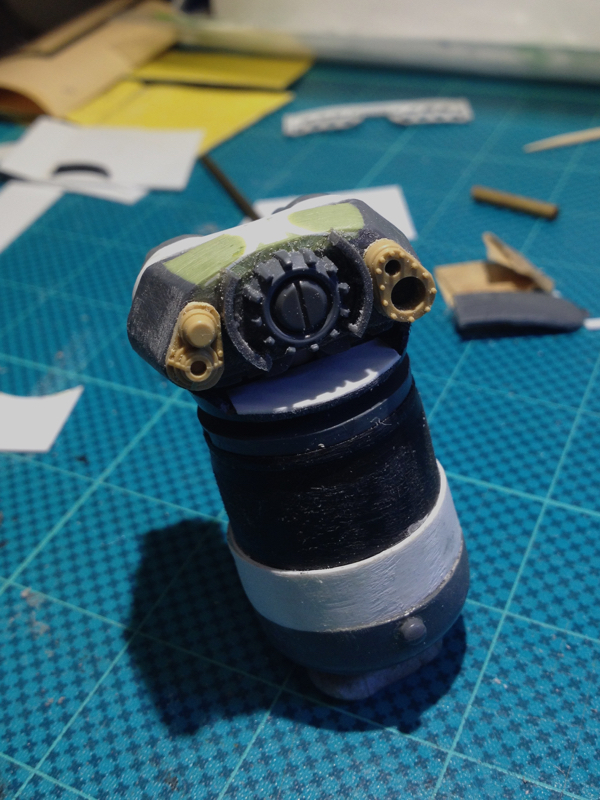
Took two of these Gundam vent thingys:
Which fairly obviously are the wrong shape, so a bit of styrene and GS/milliput shaping and sanding, and we end up with this:
Thanks for looking!!!
|
|
|
|
2018/09/05 04:57:53
Subject: Inqu][sitor
|
|
Sword-Bearing Inquisitorial Crusader
|
Thanks Dr H!
Just back from yet another work-related hiatus, so on with the show!
With the more complicated phase of the build coming to an end (I think), time for more detailing.
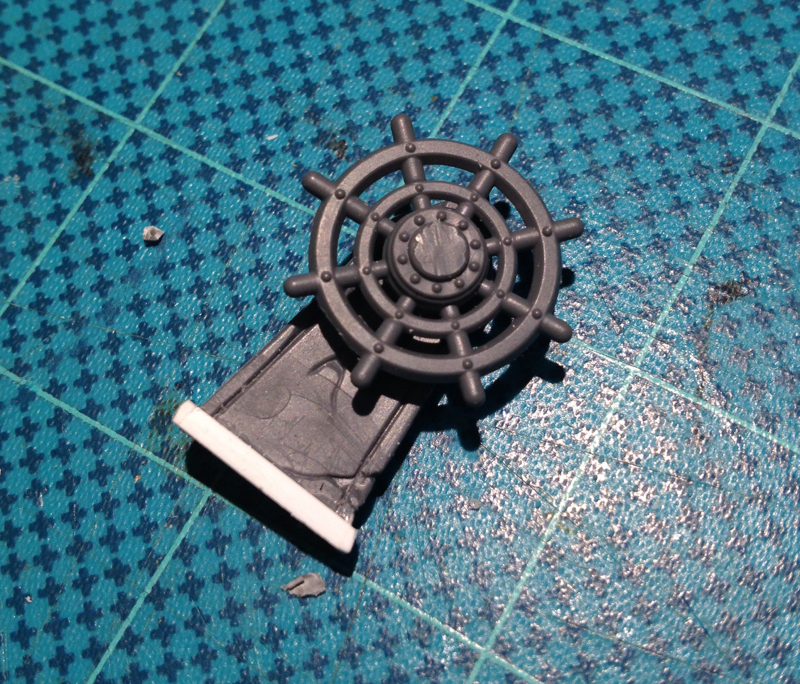
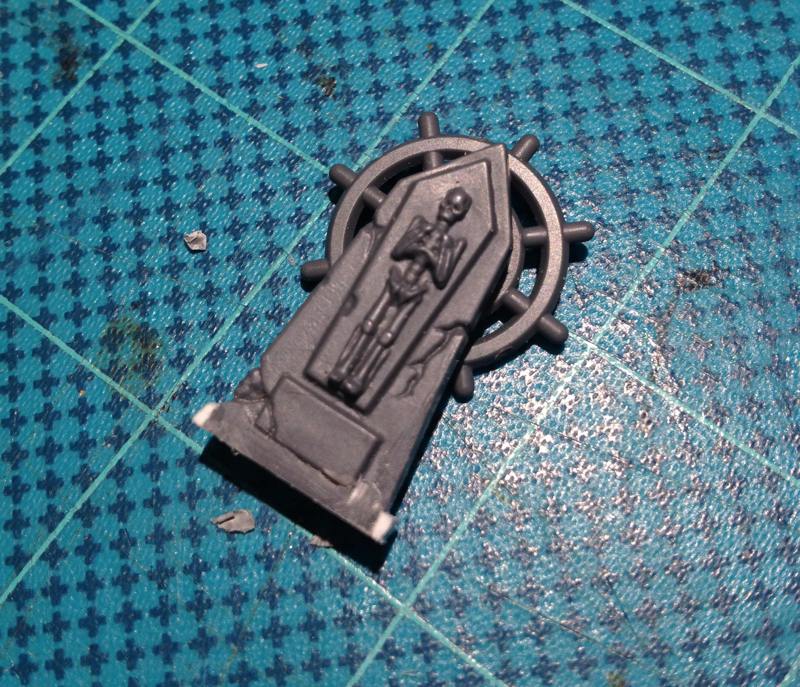
Made the helm pedestal using an old Warhammer gravestone and the larger Ironclad wheel:
Added some more bits to the engine area (everything not sprayed black) including a sheet-styrene bulkhead - most of these bits will never really be seen of course...

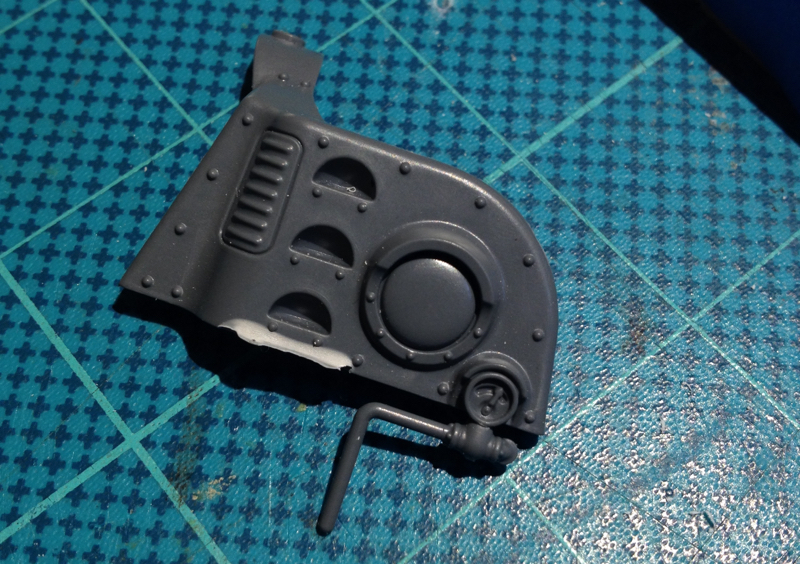
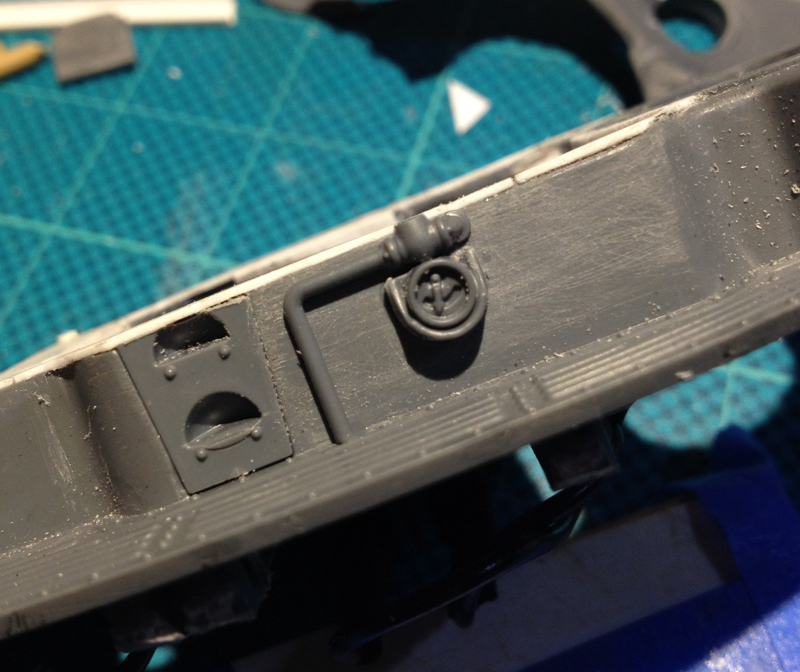
Then took the plumbing and gauge from this unused section of the Frigate:
and attached it to the side hull:
Plenty more to follow, thanks for looking!
|
|
|
|
2018/09/06 02:25:14
Subject: Inqu][sitor
|
|
Sword-Bearing Inquisitorial Crusader
|
Thanks inmygravenimage!!!
|
|
|
|
2018/09/15 11:56:00
Subject: Inqu][sitor
|
|
Sword-Bearing Inquisitorial Crusader
|
Thanks Dr H!
So, another round of detailing over the last two weeks.
Took the sealing tab off a honey squeeze-container:
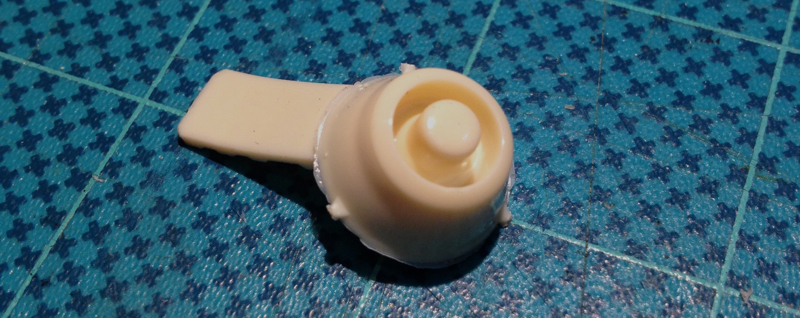
Spent some time on the Dremel-lathe:
Ended up with this fill-in greeblie:
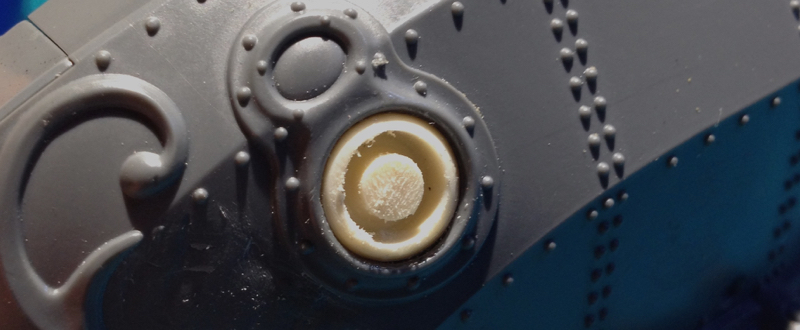
Next up - took this vent thingy from the Frigate kit:
And with some slice n dice and some fiddly styrene work:
Moving on - been wondering for a while what to do with these wing stubs:
Tried the wing minus the propellors:
But didn't like them cos overall they seemed to unbalance the model.
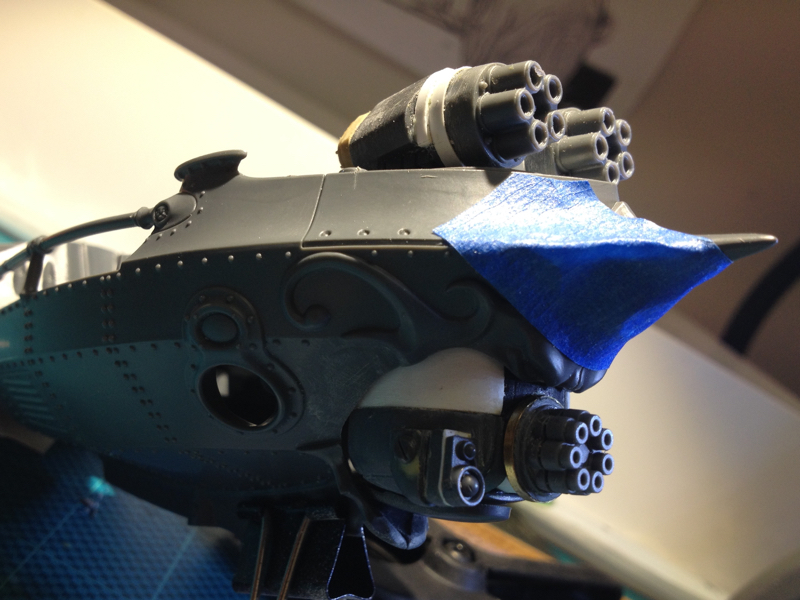
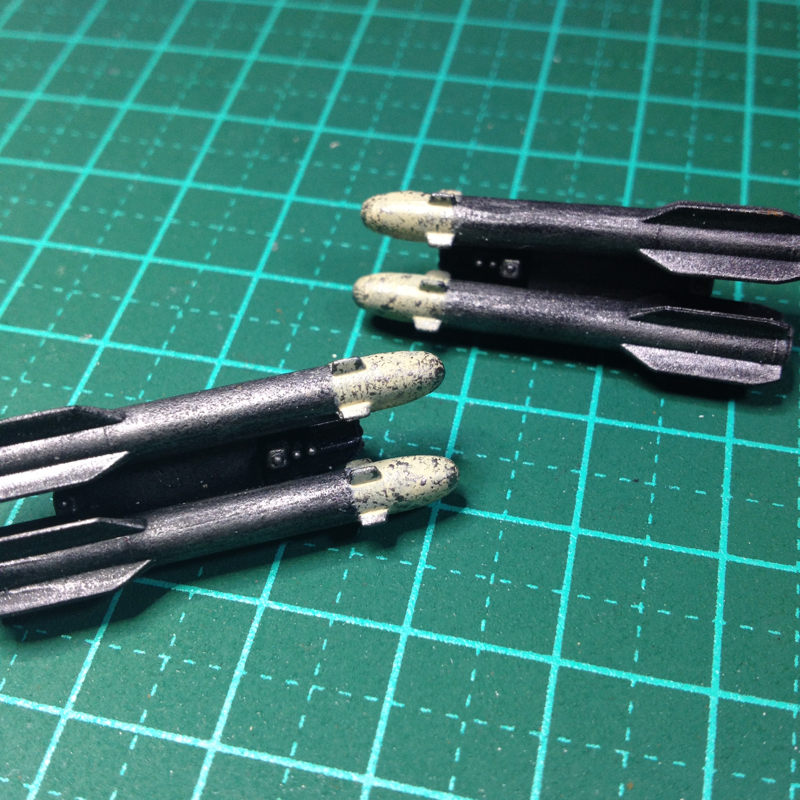
So I went on a bitz hunt through many, many containers of plastic crack, and eventually found a set of rocket-pods from a 1/35th scale Cobra (I think...) which with a bit of slice n dice ended up looking like this:
Then finished up the week with some minor details:
Next week I'll be gluing the hull halves on, building the last of the housing for the chin-turret, then a final round of detailing and the end is nigh!
Thanks for looking!
|
|
|
|
2018/09/23 02:15:05
Subject: Inqu][sitor
|
|
Sword-Bearing Inquisitorial Crusader
|
 Dr H wrote: Dr H wrote:Good job.
What do you use for a cutting tool with your dremel lathe? I did a bit the other week and found my razor saw the most useful, but felt like I needed something better.
Can't go wrong with some Hellfire missiles.
Thanks Dr H!
Generally I use small files when lathing, and switch to sandpaper (glued to a cardboard strip for some strength) to finish.
I've also use a mini-hacksaw blade and a pocket knife
Michael the Giant Sword Maker michaelcthulhu uses a much bigger setup than we miniature-makers i.e. a massive drill press; but he uses a grinder as his cutter - so I do wonder if a second Dremel might be the answer, especially for harder substances?
|
|
|
|
2018/09/27 04:14:35
Subject: Inqu][sitor
|
|
Sword-Bearing Inquisitorial Crusader
|
Carlovonsexron wrote:I'm loving this conversion so much! It's an inspiration!
monkeytroll wrote:Some lovely detailing there
Thanks!
As I mentioned a while back when presenting this character's WIP for the first time, I'm still undecided as to where she fits into the cantos.
But as I'm waiting on a final set of bits to complete the Gun Skiff and commence painting it, I decided to glue the torso to the skirt/leg section, pin and glue the arms and GS the connections:
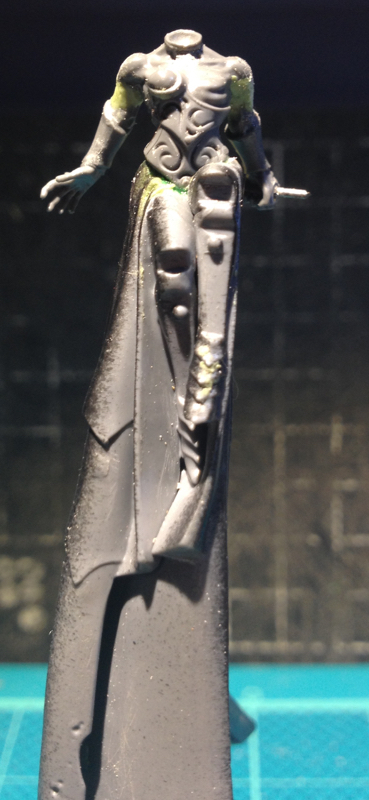
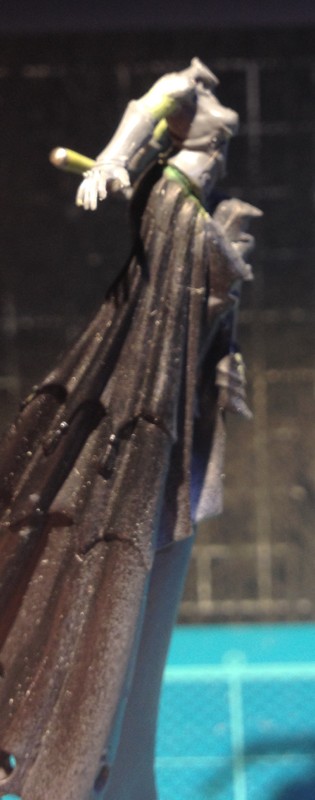
Sharp-eyed viewers may notice that the sword seems to missing both its cross-guard and blade - that's because the previously built styrene cross-guard snapped off.
So I removed the blade, then took this watch part:
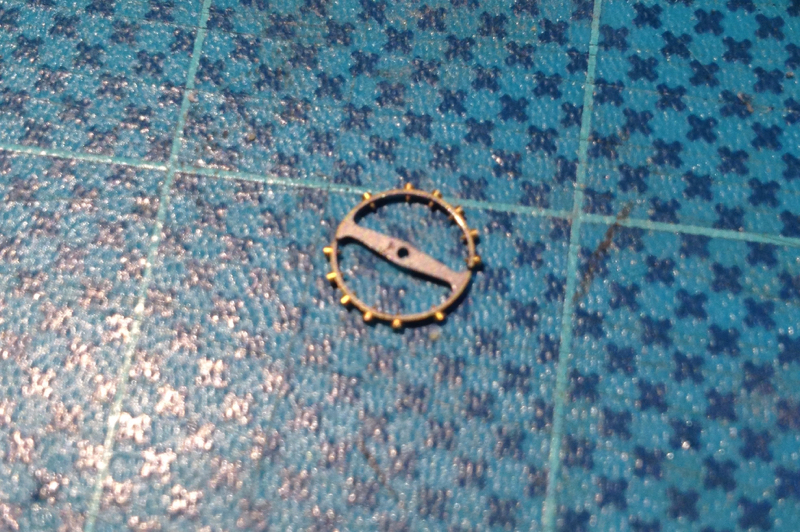
And reduced it to this:

And then GS/glued it back onto the protruding pin, which leaves us with this:

So, now I'm faced with the usual converting-a-Daemonette dilemma, which is basically having to sculpt the missing female breast... but:
What if I was to leave the torso as is?
Thoughts?
As always - thanks for looking!
|
|
|
|
2018/09/28 02:48:11
Subject: Re:Inqu][sitor
|
|
Sword-Bearing Inquisitorial Crusader
|
monkeytroll wrote:Plenty of reasons for a character to have just one, and as you still have to decide where she sits, then there's plenty of potential for creating story there. As long as the rest of the figure looks like it's not a daemonette then it should be fine.
Alternatively things like a half-cape or some kind of bandolier could be used.
whalemusic360 wrote:I think if you left it as is, it is to obviously a demonette torso instead of whatever re-imagined goodness you have in mind.
Thanks monkeytroll and whalemusic360!
While I can write a decent fluff piece explaining the missing breast, I think I'll be forever explaining how she is NOT a daemonette i.e. the mini on its own will not tell the story properly, and as whalemusic points out, it still looks like a daemonette torso.
I like the idea of a half-cape - might experiment with that a little.
Thanks for your input!!
|
|
|
|
2018/09/30 12:42:04
Subject: Inqu][sitor
|
|
Sword-Bearing Inquisitorial Crusader
|
Carlovonsexron wrote:I wonder if getting some "blue stuff"/"oyumaru" to make a mold of the right breast with green stuff. would help. I can't figure out if you could just flip a molded brest over to make it match.
Thanks for your input, Carlosexron!
- so, no; can't just copy the right breast because the weird armour swirl has to be mirrored
- however, if I sculpt a bit more armour over the right breast, then I'll use blue-stuff to make a GS/milliput copy - then go back in with a sharp needle and do the detailing
- pics in a few days
For now:
Last detailing round on the Gun Skiff!
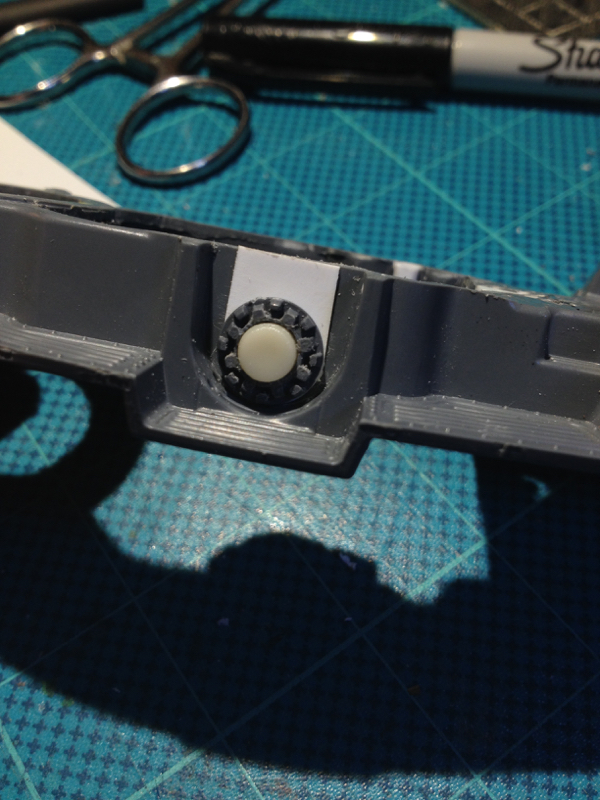
Took these fore mast parts:
Glued them up, sliced them down, and glued them into place:

Did a similar thing with the aft masts, but added some skulls for a bit of swag:


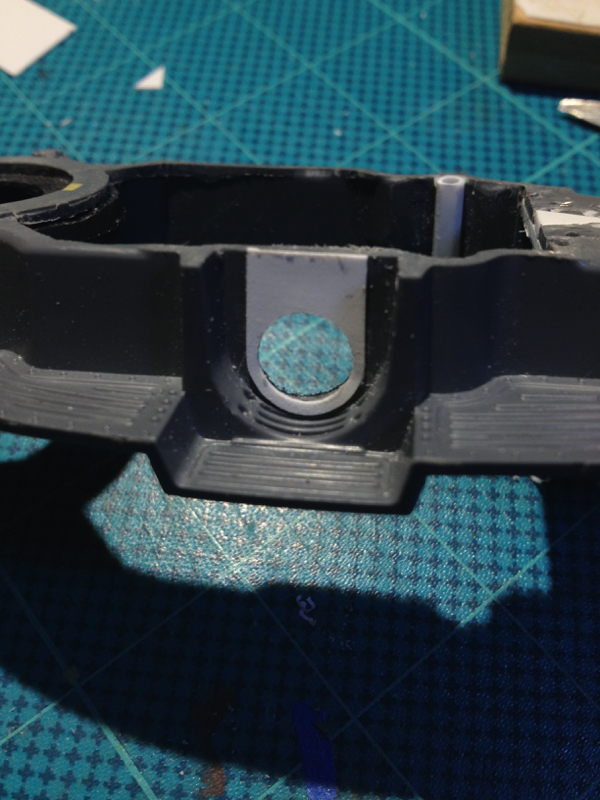
And finally, this hole has been bugging me for a long time:
So took this wing bit and the good old brass etch ][ part:

And ended up with this:

And I'm happy to report I started on the first layers of paint tonight.
Thanks for looking!
|
|
|
|
2018/10/26 08:04:47
Subject: Inqu][sitor
|
|
Sword-Bearing Inquisitorial Crusader
|
inmygravenimage wrote:Gloriously bonkers, as always. She's a beast!
Thanks!!! Dr H wrote:Good detail work. On the boob issue: As an alternative option, rather than add the missing boob, have you considered removing the "spare" boob? Either leave it flat-chested, or sculpt on a non-boob-armour armoured chest piece. Go against the sci-fi grain and have more realistic armour. Just to be different... But it would give you a nice space for detail.
Thanks Dr H! - I'm sculpting 2nd breast now, but I may come back to your idea as it's rather intriguing... godardc wrote:Ok so this is the first time in my life that I read a full 30 pages blog in a row !
How have I missed this blog for so long ?!
You are an artist, sir, and you paint as well as you convert.
My two favourites are the jaw-dropping female inquisitor with hat, simply one of the best inquisitor I have seen, and the simple but effective gunner of the Rogue Trader (the others are awesome too, don't worry).
Keep it up with the great stuff !
I would have one question, however: how do you do ? Do you have a big box of bitz and you randomly try things, or do you have an idea then you buy the bitz ? The GW range is so huge
Hi godardc - thanks for your comments! Kallatar is still probably my most satisfying creation... not the hardest - I think that honor belongs to the Samurai (forged steel swords and those fething sleeves!!!) - but my most satisfying because she came out exactly as I envisioned her the moment I saw the original mini... also, I really wanted to do a male to female conversion because I'd never seen anyone do it before. Mostly I don't think too hard initially about a concept, I sort of see a pic of a mini and a conversion idea will gestate ... Sometimes the idea comes instantly - for instance, the Gutrot conversion came the moment I saw the model! Sometimes it takes a while; in the case of the Wild Child mech suit, I hated the actual mini, but the idea of a female wearer started to grow and I was in the midst of building the the other steampunk retinue for Kallatar and slowly, slowly... I also hunt for cool looking bits amongst the GW range and see what happens in my chaotic mind... My creative side is suppressed by my work - which is both tactical and technical - so it's overactive and I have more ideas than time to create them. I usually come up with a character, write lots of notes in my little notebook of secret stuff that no-one ever sees, even my wife! - and then start looking at either bits I have... and usually have to buy some other bits, some of which I might not use In the case of the female minis - I don't like the GW range in general when it comes to females - though it's getting better, I will admit - so I'm always trying to come up with a better female. Mostly tho - it's the expanding story that seems to drive my mini designs - if you start reading the fluff from the very beginning, you'll see each new retinue has some connection to the progressive storyline. I'm also heavily influenced and inspired by other modellers, especially Migsula - he's the reason I started on True Scale marines (before everyone started making them the easy way, using Primaris marines...) Meanwhile... Extremely short one pic update - Gun Skiff on the painting bench with first rust layer added and handy Ian McQue reference pic in the background! 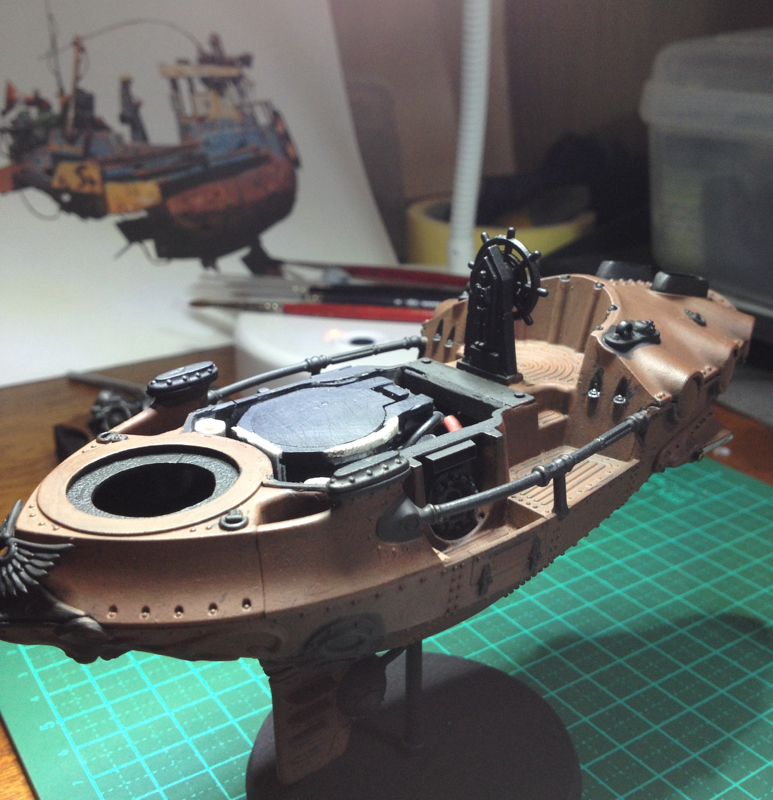
|
|
This message was edited 4 times. Last update was at 2018/10/26 08:21:19
|
|
|
|
2018/10/30 02:41:59
Subject: Re:Inqu][sitor
|
|
Sword-Bearing Inquisitorial Crusader
|
 EmberlordofFire8 wrote: EmberlordofFire8 wrote:I honestly cannot wait until it's finished. What colour is the figurehead going to be? I think an oxidised bronze would look amazing, but that might just be me...
Thank you EmberlordofFire!
You've guessed correctly - a few pieces of metallics like the wing-emblem will be a brass/bronze with green/blue oxidation, to compliment and contrast the rusty steel effect much of the rest of the model will have.
Painting at last - slowly, but still...
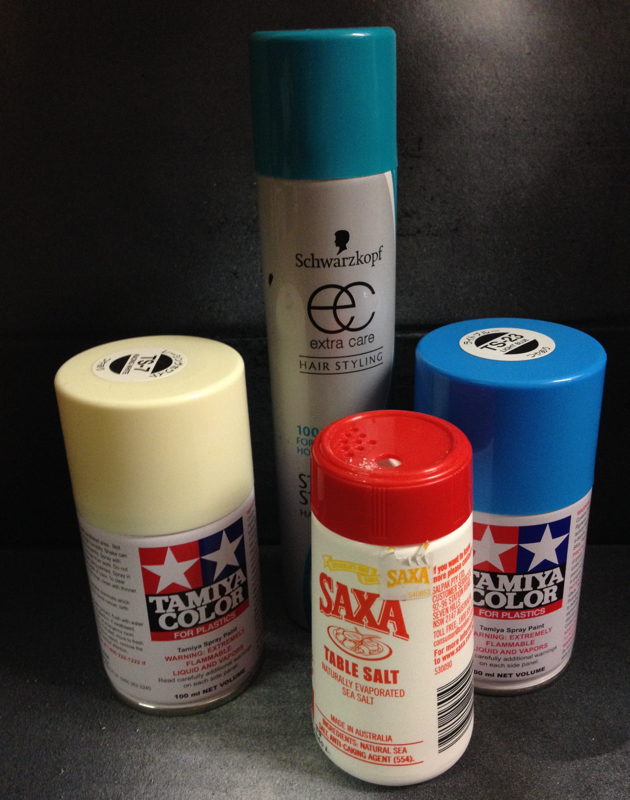
Need to do a test run of some Tamiya spray colors as I don't own an airbrush.
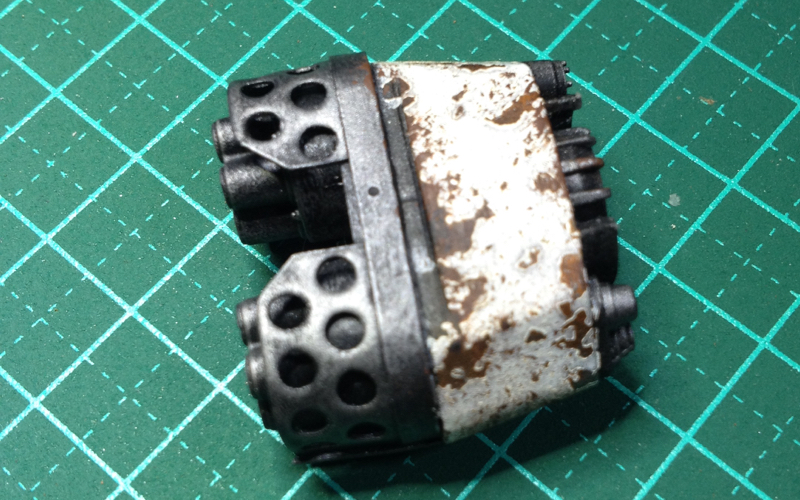
So, following the first layer of Vallejo Flat Brown, did some drybrushing/speckling with GW Ryza Rust, then some sponging-on of GW Leadbelcher to get this:
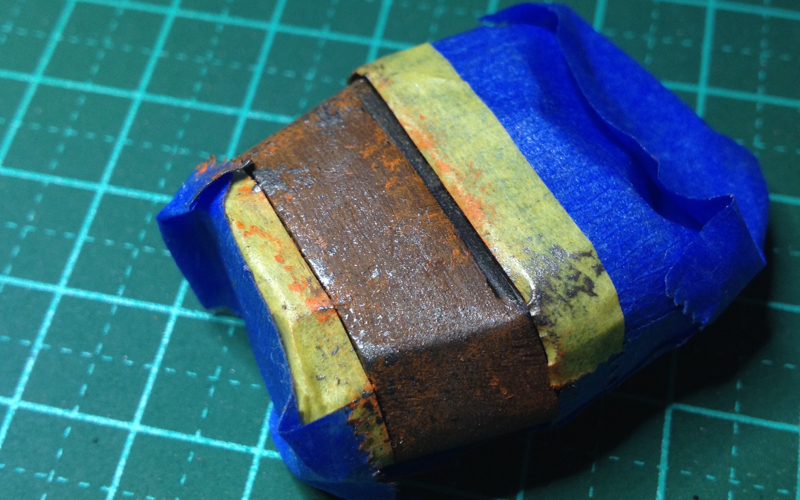
I really like this effect, so much of the hull below the 'waterline' will be bare metal/rust - adds interest because the whole model won't be just one or two painted surfaces.
Following a protective gloss varnish coat, sprinkled salt onto the wet surface:
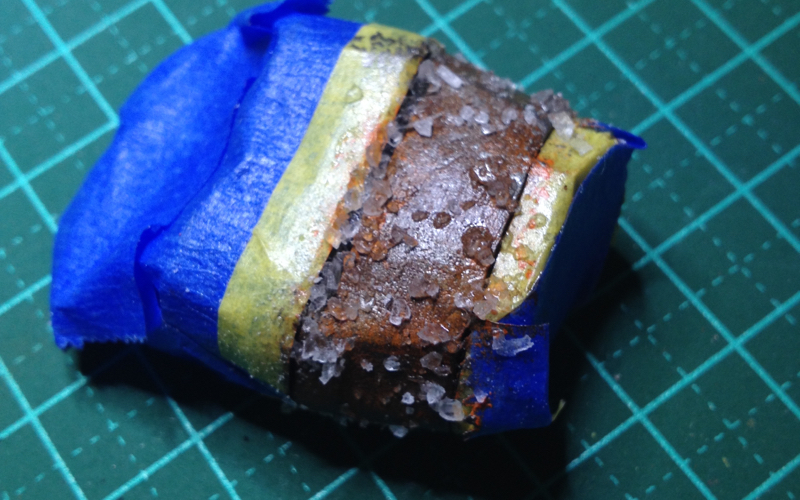
Unfortunately the water-method seems to dissolve a lot of the salt, so I will have to invest in some cheap hairspray - also, with hairspray as the medium between the gloss coat and the sprayed color layer, you can selectively remove areas with a bit of light scrubbing with a stiff brush or toothbrush or even a toothpick.
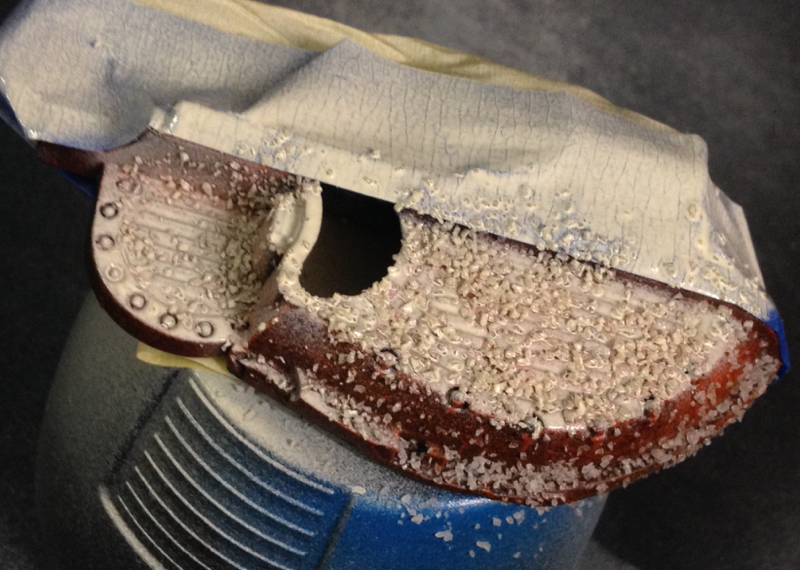
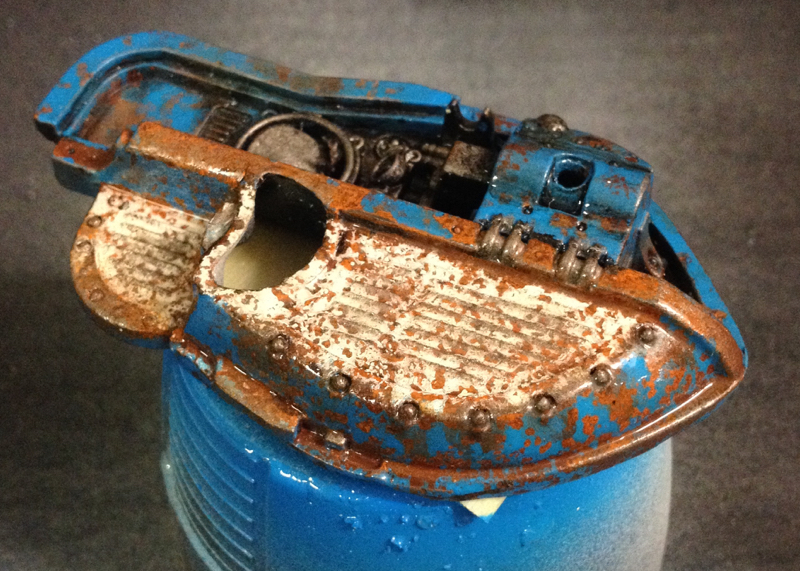
Then sprayed Tamiya Flat White over the top:
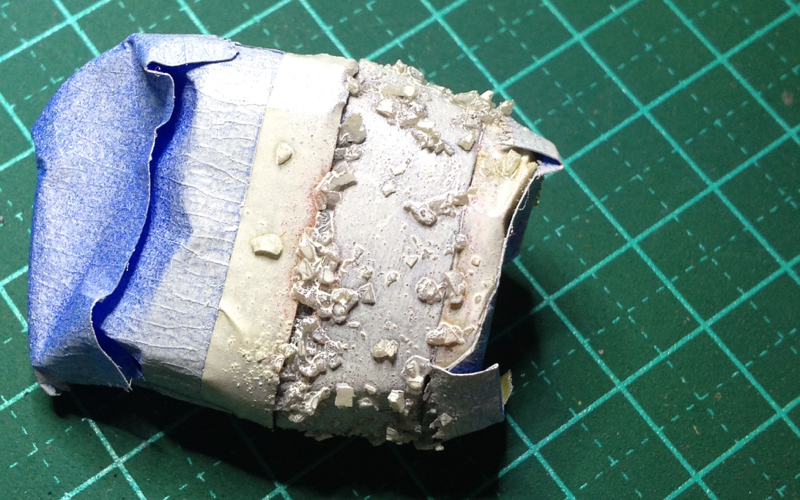
Which left me with this effect:
Now, you might notice the Flat White has flowed around the salt and left a small raised edge - this was due to over-eager spraying on my behalf.
While I'm okay with the result, I'll be redoing it next weekend (no hobby time during the week at the moment.)
Things I'm going to change are:
Brush on a Ryza Rust/VJ Orange mix to lighten the VJ Flat Brown rusty undercoat;
Let the gloss coat dry overnight;
Crush the salt more so the chips are smaller and more random - also sponge on liquid frisk in some targeted areas where I need the rust to show through;
Spray the Tamiya Flat White in a series of layers with drying time between them.
Thanks for looking!
|
|
|
|
2018/11/06 07:19:52
Subject: Inqu][sitor
|
|
Sword-Bearing Inquisitorial Crusader
|
youwashock wrote:Never cease to amaze. Like, ever.
inmygravenimage wrote:That's a serious salt weather tutorial there
monkeytroll wrote:Oh, that's lovely that is. Some proper distressing.
I actually like the raised edges in places, as though the oxidation is pushing at the paint.
Dr H wrote:Good job on the rustiness.
Yeah, the raised paint can be due to the rust underneath bubbling it up.
Big H wrote:Awesome work.
I have to agree, the slight raised edge does look exactly like rust bubbling the paint, I'd leave it as a happy coincidence!
Thank you kind sirs!
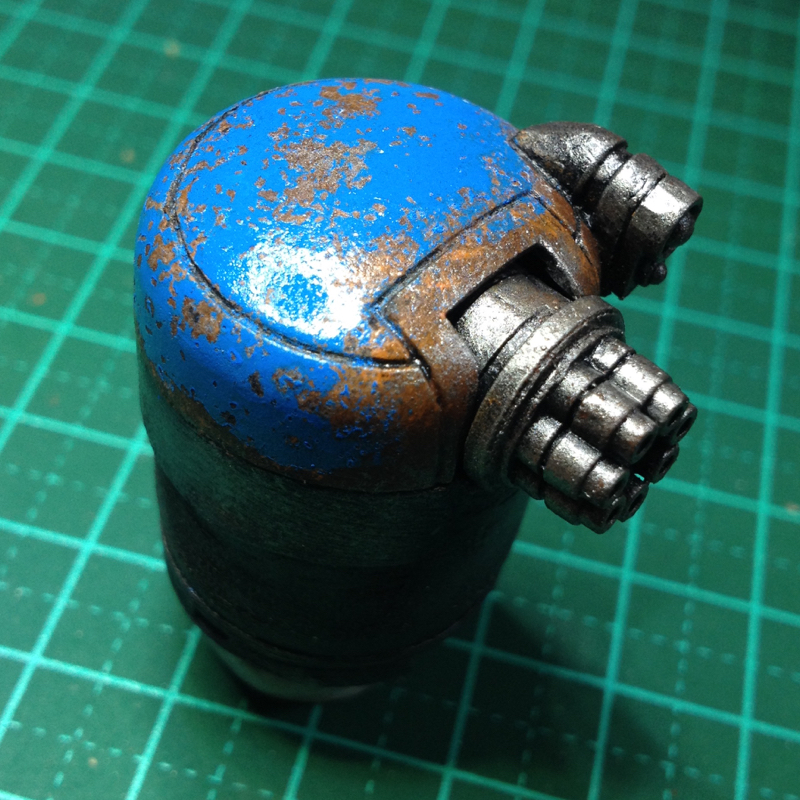
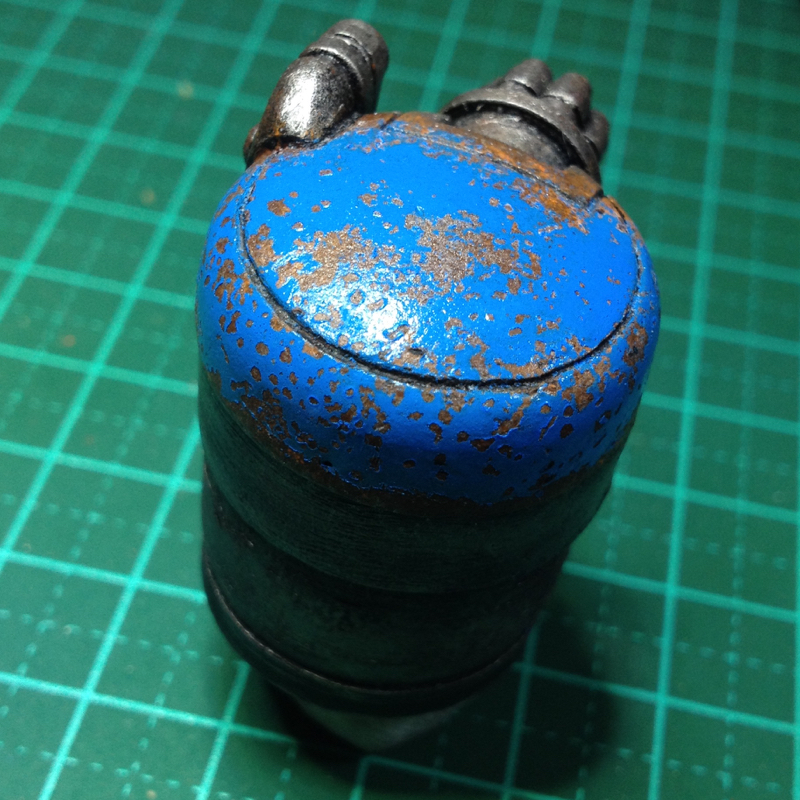
Second test run for the Gun Skiff with hairspray, salt and Tamiya spray colors:
Bit of salt overkill - after this test I've decided to use a mix of the larger salt bits from the previous post and this regular size:
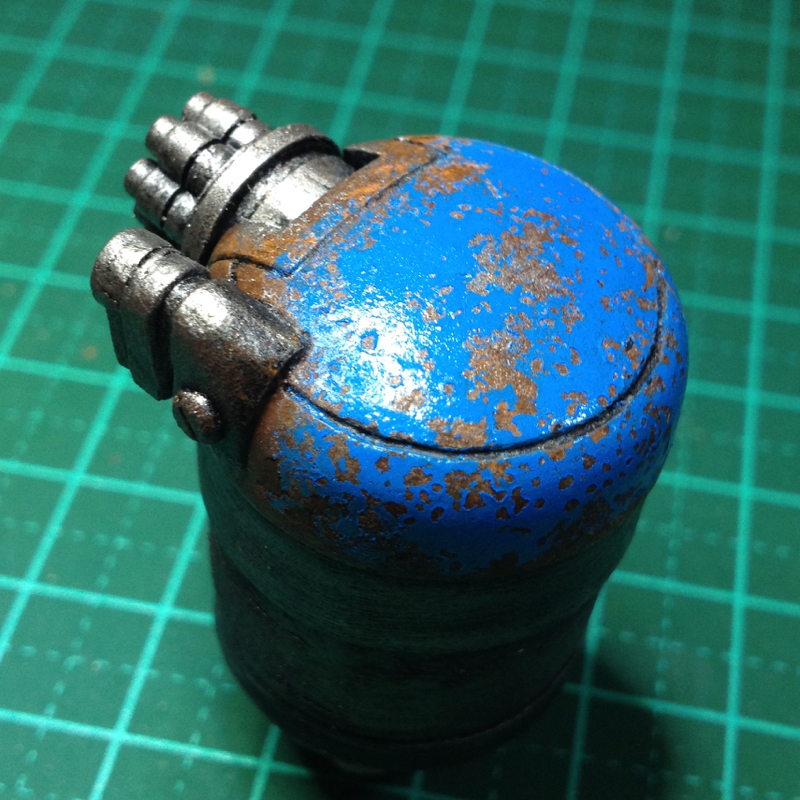
And here's the result after masking the flat white spray and applying the blue:
Using the hairspray makes it easier to get the salt to stick but I did leave it on for too long before spraying the colors, so it was a bit sticky at this stage - so, since the Tamiya sprays are gloss anyway, I applied Tamiya flat clear spray to knock it back to matte.
I'll do some test with painting over the matte coat with oil washes and some lighter blue highlights, but I think I now have a decent recipe and - more importantly - a sequence of layers to paint the actual Gun Skiff next weekend.
Also noted that on average 80% of people who commented (across 4 forums) said they liked the overdone paint effect, so I'm taking that onboard and will 'wet' spray on the final version, rather than here where it was 3 light 'dry' coats.
Finally, I now have an Instagram account inquisitor_lamby, where I will post updates to my blog, now renamed from The Dying Ground to Inqu][sitor
Thanks for looking!
|
|
|
|
2018/11/07 02:03:45
Subject: Re:Inqu][sitor
|
|
Sword-Bearing Inquisitorial Crusader
|
 monkeytroll wrote: monkeytroll wrote:In that one the effect on the blue looks to have worked better - I'm guessing that's a result of the ridged area. Still all looks great though
Thanks monkeytroll!
I think you're right; though I tested out drybrushing some silver onto the ridges over the flat white and it's just made the effect less clear, unlike the blue.
My solution is to do the silver areas over the rust coat but before the spray coat - then after removing the salt and because of the hairspray layer, I can carefully scrape back the flat white on the ridges... hopefully!
|
|
|
|
2018/11/19 00:41:31
Subject: Inqu][sitor
|
|
Sword-Bearing Inquisitorial Crusader
|
JoeRugby wrote:Lovely stuff dude
well as lovely as rust can be anyway
Haha thanks JoeRugby - personally, I love rust
Dr H wrote:I think the second attempt is a bit too evenly spread. The first attempt is more random in the size and position of the rusty areas.
Rather than sprinkling the salt all over the piece, try placing the salt in occasional large clumps with areas of minimal salt between, and focus some rusty areas where water would gather and where the paint would be chipped off from impacts etc. less can be more. Think of the rust areas as trying to join up rather than stay separate.
Thanks Dr H!
Agreed, and you'll (hopefully) see in this update I targeted with the salt rather than complete randomness.
Thanks guys!
A painting update!
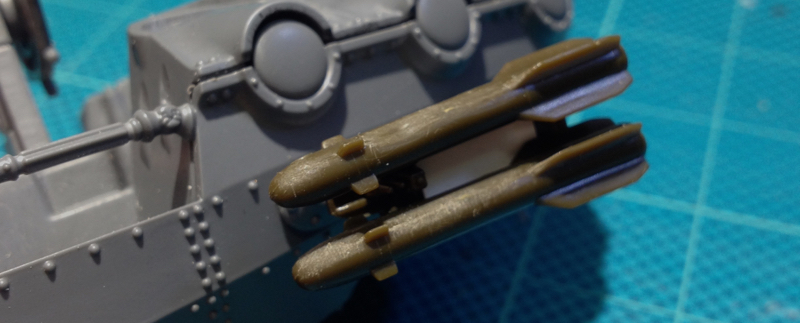
Missiles first: Vallejo Sand sponge-chipped with GW Leadbelcher:
Then the hairspray + salt technique with the Tamiya Racing White on the upper decking - this particular white is a pain to work with, to get decent coverage it has to be almost too thick:
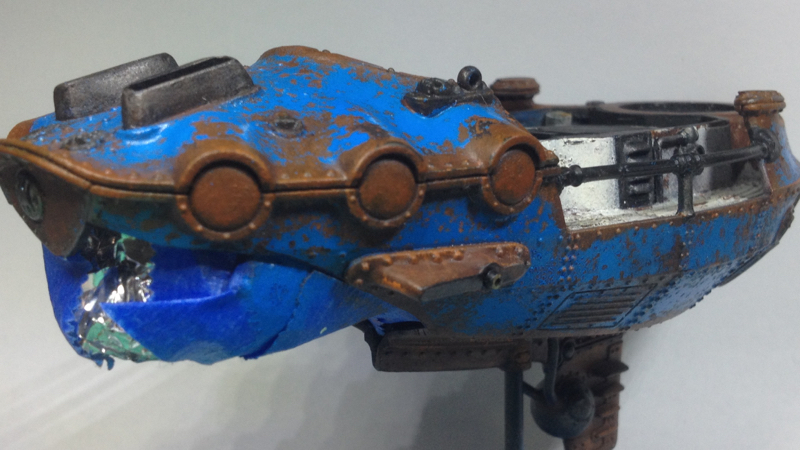
On this side you can see an ugly and unrealistic straight edge of rust vs paint - my masking was rushed, so lesson learned there - I went back in after this pic with a toothpick and scraped away at the straight white edge to get a more natural look:
Third time lucky on the upper turret
|
|
This message was edited 1 time. Last update was at 2018/11/19 21:47:28
|
|
|
|
2018/11/20 10:01:24
Subject: Inqu][sitor
|
|
Sword-Bearing Inquisitorial Crusader
|
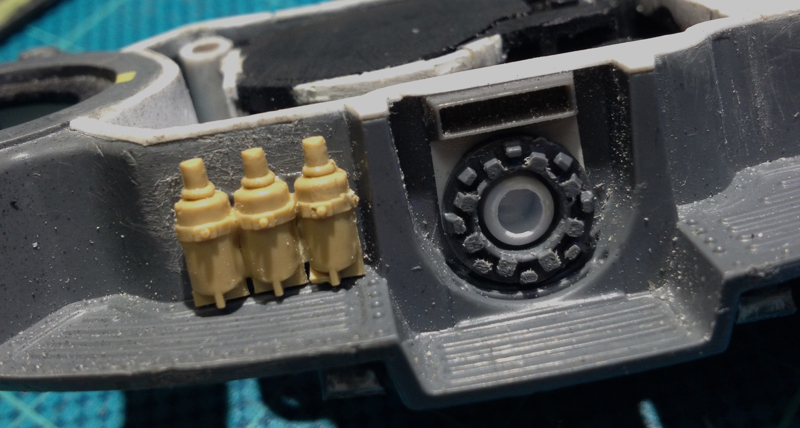
Another painting update - applied the salt+hairspray technique to the lower turret using the Tamiya Light Blue - which is much more user-friendly than the Racing White!
Also applied the hairspray in a 3 lighter coats instead of the drenching I gave it in the second test - the lighter coats appear to give better control over the actual chipping process:
Next up - applying the blue to the hull itself.
Thanks for looking!
|
|
|
|
2018/12/04 04:38:33
Subject: Inqu][sitor
|
|
Sword-Bearing Inquisitorial Crusader
|
Dr H wrote:Good work. Looking nice.
monkeytroll wrote:Great work on the lower turret, that is some textbook rusting right there. Very nice indeed
Thanks guys!
And that's the spraying of the hull finished!
Next up - detailing the metallics (silver and brass), maybe some hazard striping, then oils and pastel-powders - oh, and the engine parts, mustn't forget those!


Thanks for looking!
|
|
|
|
|
|