| Author |
Message |
 |
|
|
|
|
Advert
|
Forum adverts like this one are shown to any user who is not logged in. Join us by filling out a tiny 3 field form and you will get your own, free, dakka user account which gives a good range of benefits to you:
- No adverts like this in the forums anymore.
- Times and dates in your local timezone.
- Full tracking of what you have read so you can skip to your first unread post, easily see what has changed since you last logged in, and easily see what is new at a glance.
- Email notifications for threads you want to watch closely.
- Being a part of the oldest wargaming community on the net.
If you are already a member then feel free to login now. |
|
 |
2018/06/05 01:33:37
Subject: Inqu][sitor
|
|

Walking Dead Wraithlord
|
This promises to be grandiose.
|
|
|
 |
|
2018/06/05 18:29:42
Subject: Re:Inqu][sitor
|
|

Fixture of Dakka
|
Catching up on a few missed years. Great work as always. Loving the rogue trader crew, and the ideas for both ships.
Had to Google arkanauts - bloody hell, just been expressing my surprise at various kits that have appeared in the last few years, now have to add dwarves air ships to that list  and
Look forward to seeing you chop that up.
|
|
|
|
|
|
2018/06/07 09:09:35
Subject: Inqu][sitor
|
|

Sword-Bearing Inquisitorial Crusader
|
youwashock wrote:This promises to be grandiose.
Cheers youwashock!
monkeytroll wrote:Catching up on a few missed years. Great work as always. Loving the rogue trader crew, and the ideas for both ships.
Had to Google arkanauts - bloody hell, just been expressing my surprise at various kits that have appeared in the last few years, now have to add dwarves air ships to that list and
Look forward to seeing you chop that up.
Thanks monkeytroll!
On with the WIP.
Here's where we left off the build last time:
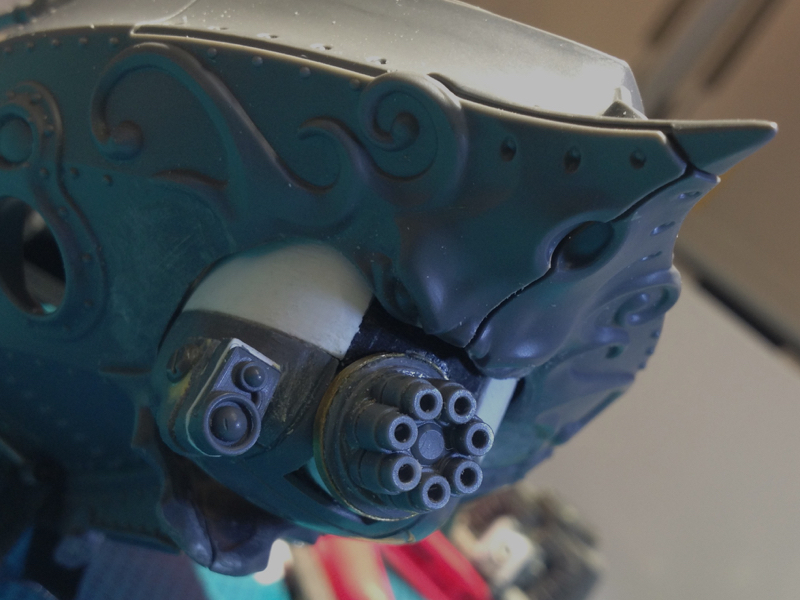
Kharadron Beardy-Face now Mini-Gun Angry Face!
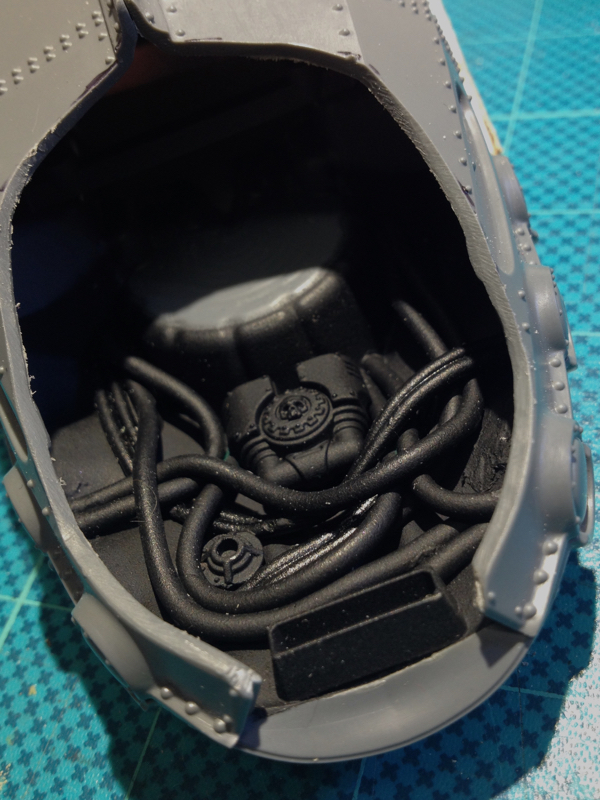
Deciding to leave the guns alone for a bit, it was time for some work on the stern of the ship.
Took some 1/35th tank parts, part of a Space Marine Centurion power-pack, and lengths of old wire - mostly DC power leads and bits of Iphone cable my daemon-cat has chewed off electronic devices around the house - and threw it all together into some tech detail that nobody will ever see again after this.
Next - the McQue-esque engine cut-out.
Eyeballed the curve on the hull halves, drew a reference line, took one of those "O frack what am I about to do?" breaths, and let rip with the Dremel...
Leaving this:
Then took some engine parts from the Space Marine vehicle range, added some caps of those squeezy mini-bladders and sketched out some thrusters:
Might have to trim a fraction more out of the hull where the nozzles are just touching, but I like it so far:
Remember, this is upside down for construction purposes - the skiff flies the right way up!
Then it was back to the guns.
Added some detail to the back of the twin-linked cannon using a part from a Hemlock Wraithfighter, a random plastic ring from something cut in two, and another 1/35th tank part cut in half to get the two yellow bits:
And then finally got both upper and lower weapons in place for a pic:
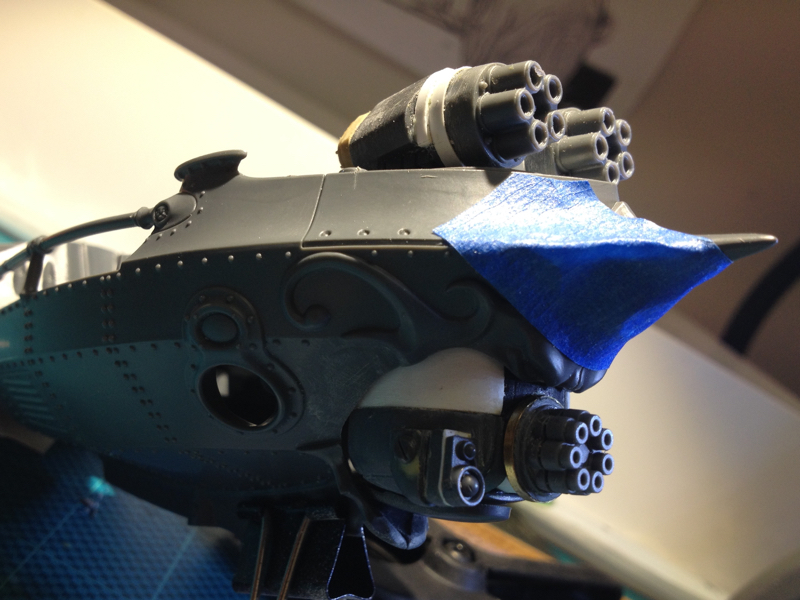
Still lots to do but I'm feeling the vibe with this one!
Thanks for looking!
|
|
|
|
|
|
2018/06/07 12:03:47
Subject: Inqu][sitor
|
|
[SWAP SHOP MOD]
Decrepit Dakkanaut
OH-I Wanna get out of here
|
Very cool so far. Really like the concept behind it.
|
|
|
|
|
2018/06/07 15:29:26
Subject: Re:Inqu][sitor
|
|

Warning From Magnus? Not Listening!
|
I might have to make one of these...
|
|
|
|
|
|
2018/06/07 20:23:26
Subject: Re:Inqu][sitor
|
|

Longtime Dakkanaut
|
So much genius here!
Really really cool ! I am watching the airship for all the ideas I can mine for my own stalled projects, and the Dremel lathe is just awesome and so simple actually, like most good ideas !
|
|
|
|
|
|
2018/06/08 10:53:13
Subject: Inqu][sitor
|
|
Decrepit Dakkanaut
|
I love varied uses of bottle caps, makes my little LoeR heart sing.
|
Theophony"... and there's strippers in terminator armor and lovecraftian shenanigans afoot."
Solar_Lion: "Man this sums up your blog nicely."
Anpu-adom: "being Geek is about Love. Some love broadly. Some love deeply. And then there are people like Graven.  |
|
|
|
|
2018/06/09 22:35:10
Subject: Inqu][sitor
|
|
Mastering Non-Metallic Metal
|
Good work. liking what I'm seeing. 
|
     Mastodon: @DrH@dice.camp Mastodon: @DrH@dice.camp
The army-                   ~2295 points (built). ~2295 points (built).
 
* -=]_,=-eague Spruemeister General. * A (sprue) Hut tutorial *
Dsteingass - Dr. H..You are a role model for Internet Morality!  // inmygravenimage - Dr H is a model to us all // inmygravenimage - Dr H is a model to us all
Theophony - Sprue for the spruemeister, plastic for his plastic throne! // Shasolenzabi - Toilets, more complex than folks take time to think about! |
|
|
|
|
2018/06/14 10:53:39
Subject: Inqu][sitor
|
|
Sword-Bearing Inquisitorial Crusader
|
whalemusic360 wrote:Very cool so far. Really like the concept behind it.
EmberlordofFire8 wrote:I might have to make one of these...
Big H wrote:So much genius here!
Really really cool ! I am watching the airship for all the ideas I can mine for my own stalled projects, and the Dremel lathe is just awesome and so simple actually, like most good ideas !
inmygravenimage wrote:I love varied uses of bottle caps, makes my little LoeR heart sing.
Dr H wrote:Good work. liking what I'm seeing.
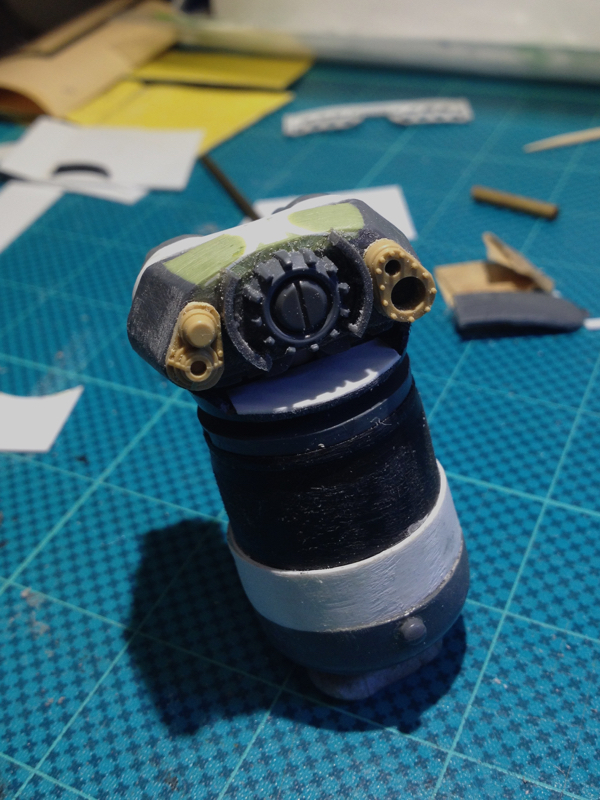
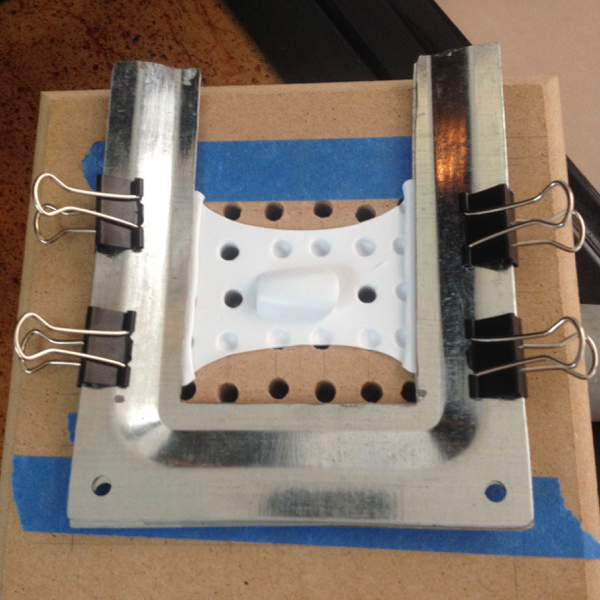
Thanks all!!! Back again with more Gun Skiff gun stuff - a curved barrel shroud for the upper mini-gun. Xbox grill looked perfect for what I had in mind, except there's no way to bend it into the shape I needed - so did some prep work on it prior to vacuforming: 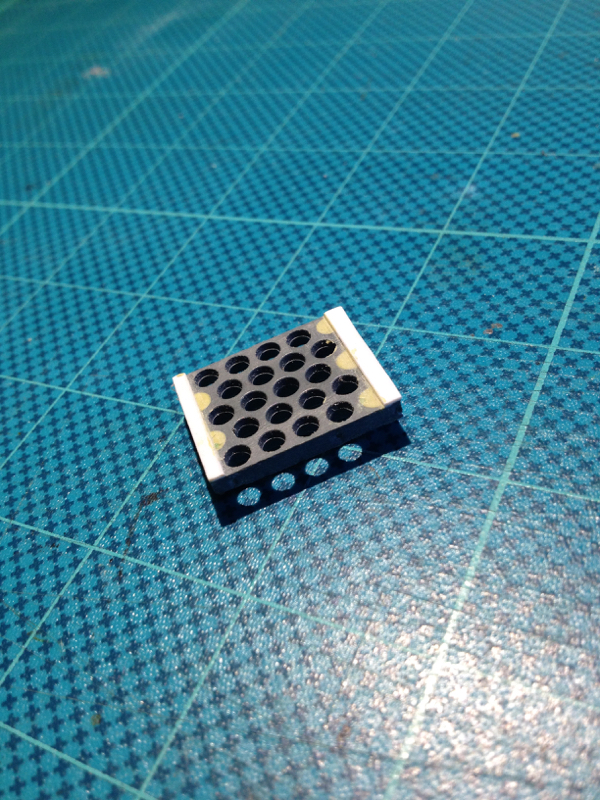 Used the home-made vacuformer to make a thinner and therefore flexible copy: 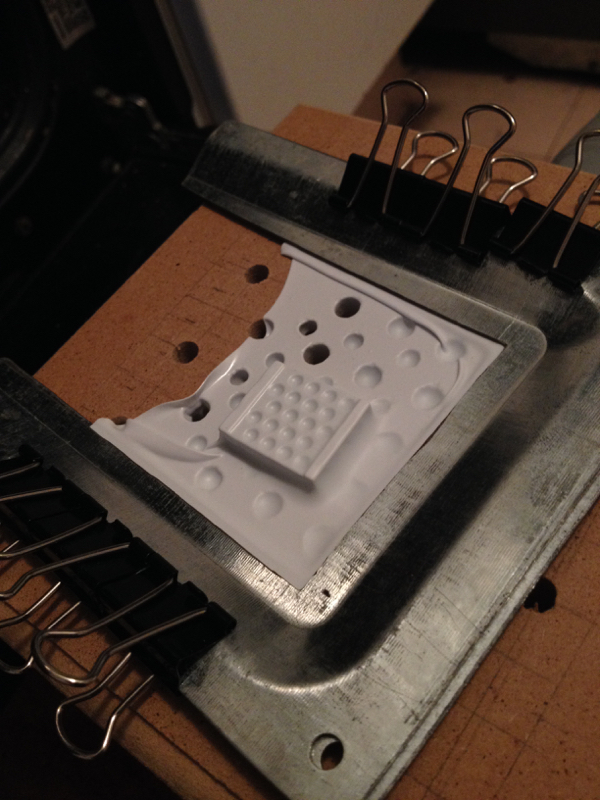  Sanded it until the bumps became holes, cleaned the holes up with a sharp blade:  Cut it in half through the middle and glued up this structure:  Undercoated the inside with Krylon black, then used boiling water to bend it into shape...  And glue and aggressive clamping did the rest: 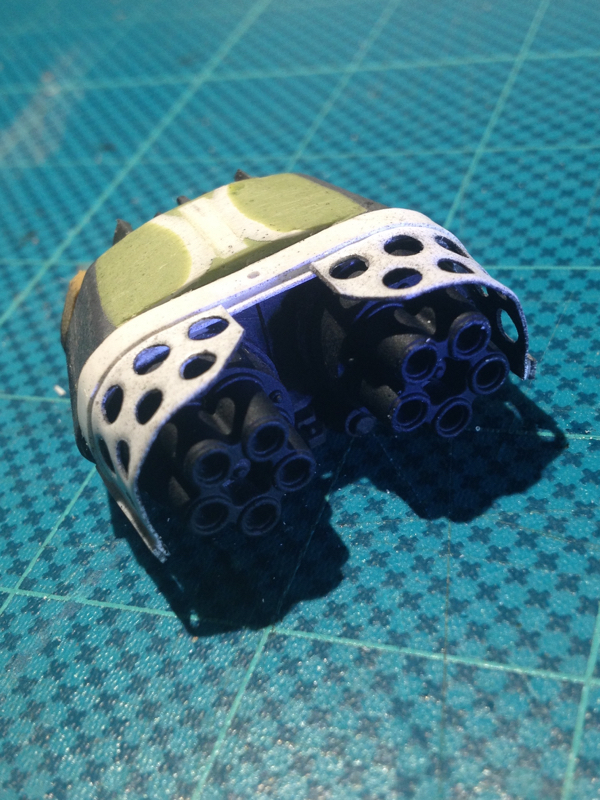 Hopefully I'm done with the gun detailing, so next time it will be back to the engines! Thanks for looking!
|
|
This message was edited 1 time. Last update was at 2018/06/14 10:54:07
|
|
|
|
|
2018/06/14 11:20:57
Subject: Inqu][sitor
|
|
Decrepit Dakkanaut
|
 Lamby wrote: Lamby wrote:
Used the home-made vacuformer to make a thinner and therefore flexible copy:
Of course you did.  Because you're some kind of arcane, mad technowizard who conjures up a vacuformer out of a bit of ply, bulldog clips and a hoover 
Amazing stuff, I'm awestruck.
|
Theophony"... and there's strippers in terminator armor and lovecraftian shenanigans afoot."
Solar_Lion: "Man this sums up your blog nicely."
Anpu-adom: "being Geek is about Love. Some love broadly. Some love deeply. And then there are people like Graven. |
|
|
|
|
2018/06/14 14:08:18
Subject: Inqu][sitor
|
|

Longtime Dakkanaut
|
 inmygravenimage wrote: inmygravenimage wrote: Lamby wrote:
Used the home-made vacuformer to make a thinner and therefore flexible copy:
Of course you did. Because you're some kind of arcane, mad technowizard who conjures up a vacuformer out of a bit of ply, bulldog clips and a hoover
Amazing stuff, I'm awestruck.
This.
I consider myself quite handy at knocking things together and creating stuff from other items, But you are killing it!
Perhaps you could start a thread or article on your handy machines ??!!??
(Only half in jest....)
|
|
|
|
|
|
2018/06/14 14:17:28
Subject: Inqu][sitor
|
|
[SWAP SHOP MOD]
Decrepit Dakkanaut
OH-I Wanna get out of here
|
How most people would do it:
Get plasticard.
Cut plasticard.
Bend and poke holes in plasticard.
How Lamby does it:
Take apart Xbox.
Modify fan vent from Xbox.
Build vacuformer.
Make vacumold of Xbox bit.
Trim vac made shape.
Sand the hell out of it.
Cut to desired shape.
Build parts from plasticard.
Heat and bend.
All for a heat shield that is a minor detail! You are crazy man.
|
|
|
|
|
2018/06/14 15:27:24
Subject: Inqu][sitor
|
|
Preacher of the Emperor
|
Man, really excellent scratchbuilding... I'm working backwards with 20 pages to go and already I'm inspired on multiple levels. Well done!
|
|
|
|
|
|
2018/06/14 18:00:30
Subject: Re:Inqu][sitor
|
|
Fixture of Dakka
|
You had me at home-made vacuformer.
|
|
|
|
|
|
2018/06/15 11:57:47
Subject: Inqu][sitor
|
|
Sword-Bearing Inquisitorial Crusader
|
inmygravenimage wrote: Lamby wrote:
Used the home-made vacuformer to make a thinner and therefore flexible copy:
Of course you did. Because you're some kind of arcane, mad technowizard who conjures up a vacuformer out of a bit of ply, bulldog clips and a hoover
Amazing stuff, I'm awestruck.
Thanks inmygravenimage!
- vacuformer explanation below
Big H wrote: inmygravenimage wrote: Lamby wrote:Used the home-made vacuformer to make a thinner and therefore flexible copy:
Of course you did. Because you're some kind of arcane, mad technowizard who conjures up a vacuformer out of a bit of ply, bulldog clips and a hoover
Amazing stuff, I'm awestruck.
This.
I consider myself quite handy at knocking things together and creating stuff from other items, But you are killing it!
Perhaps you could start a thread or article on your handy machines ??!!??
(Only half in jest....)
Thanks Big H!- vacuformer explanation below!
whalemusic360 wrote:How most people would do it:
Get plasticard.
Cut plasticard.
Bend and poke holes in plasticard.
How Lamby does it:
Take apart Xbox.
Modify fan vent from Xbox.
Build vacuformer.
Make vacumold of Xbox bit.
Trim vac made shape.
Sand the hell out of it.
Cut to desired shape.
Build parts from plasticard.
Heat and bend.
All for a heat shield that is a minor detail! You are crazy man.
Haha thanks whalemusic360!
- I'll try to explain a little of my madness...
- I attempted to drill out a series of holes in a plasticard sheet but it never quite worked out - either my holes would be slightly out of alignment, or the larger drill bit would tear in the hole
- I salvaged that old Xbox from a sidewalk throwout years ago... I've used a lot of the mesh bits on bases!
- The grill holes were the right shape, size and distance apart - so it made made a good template
- A homemade sanding block with really aggressive sandpaper made short work of it - about 10 minutes of sanding
MacPhail wrote:Man, really excellent scratchbuilding... I'm working backwards with 20 pages to go and already I'm inspired on multiple levels. Well done!
Thanks MacPhail!
monkeytroll wrote:You had me at home-made vacuformer.
Haha thanks monkeytroll!
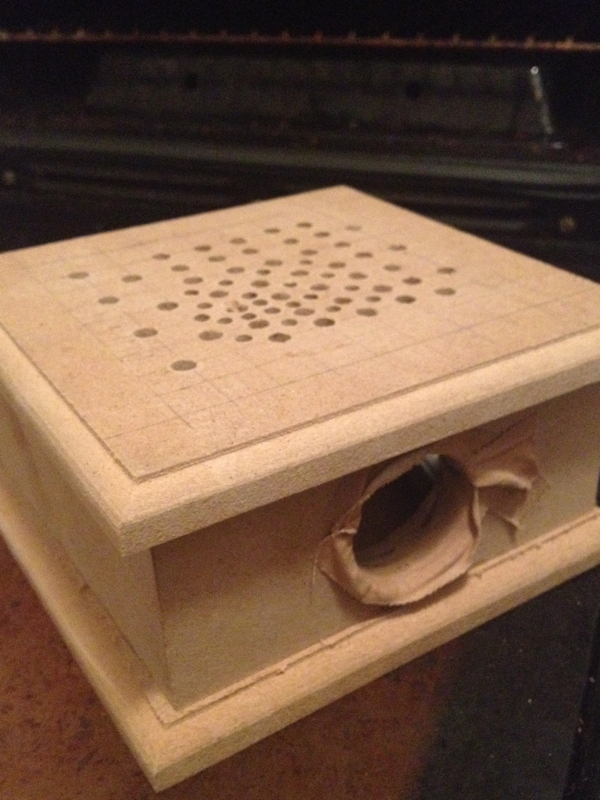
Since the homemade vacuformer seems to be a bit of a hit, here's a pictorial explanation:
- The vacuum chamber is an MDF craft box.
- I drilled an admittedly quite haphazard series of holes in the lid, and drilled out a hole in the side slightly larger than the hose on my vacuum cleaner
- To get a seal I used strapping tape, it has a rough external texture that grips around the vacuum cleaner nozzle.
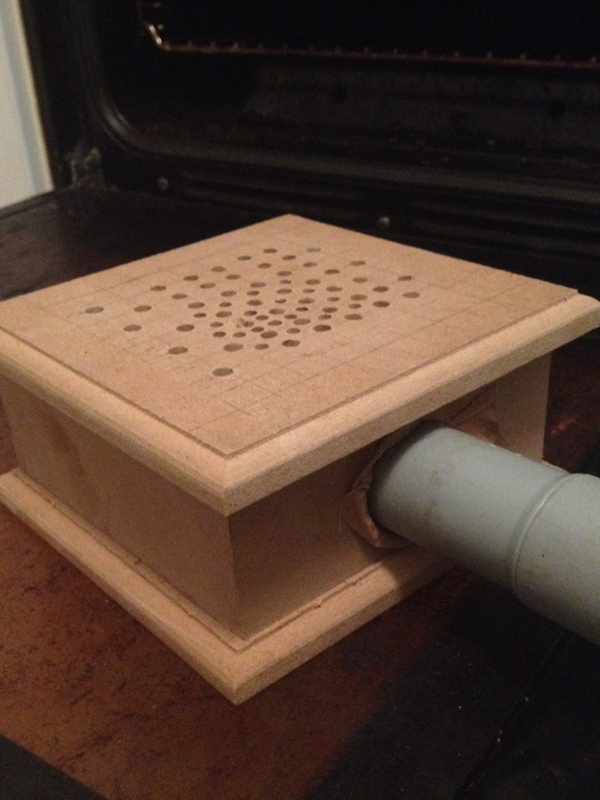
To do the actual vacuforming, you need:
- A vacuum cleaner
- A heat source - I just use the griller in my oven
- A buck - the thing you want to make a copy of - in the case above it was that piece of Xbox grill
- Some sheet styrene
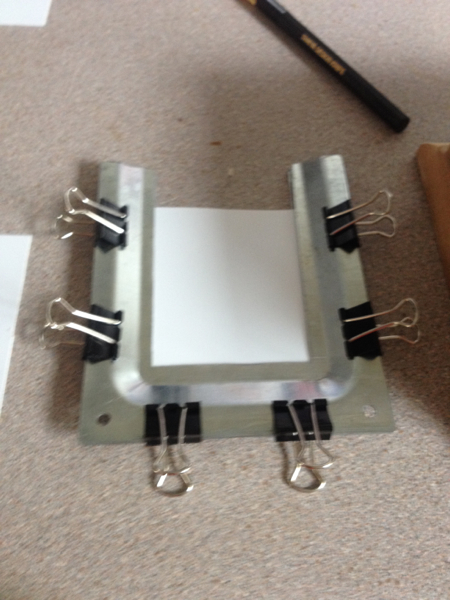
You clamp the styrene between a metal frame of sorts:
Turn the vacuum cleaner on with your buck on the top of the vacuum box.
Allow the styrene sheet to deform under your heat source until it's sagging about the same height as your buck.
Whip the hot styrene out and quickly drop it over the buck - the vacuum cleaner sucks the hot styrene sheet down over your buck and hopefully makes a good copy (otherwise known as a pull)
Points:
- Use a pair of BBQ tongs not your fingers to hold the frame under the griller heating element - things get hot fast!
- Your buck has to be able to take the heat of melting styrene
- To get a good pull, raise your buck slightly above the actual vacuum chamber top - for the Xbox grill I glued some sprue to get a little height
This mini vacuformer was my test build - I plan to make a bigger one.
As usual, this was not my idea originally - watch this video from Fon Davis:
https://www.youtube.com/watch?v=WXhJHArFsrM
And this one from Bill Doran at Punished Props:
https://www.youtube.com/watch?v=Gx66mS7U2vY&t=1s
Thanks!!!
|
|
|
|
|
|
2018/06/16 00:29:30
Subject: Inqu][sitor
|
|
Executing Exarch
|
dude this thread is nuts it gets better and better
|
|
|
|
|
2018/06/16 15:31:13
Subject: Re:Inqu][sitor
|
|
Longtime Dakkanaut
|
At the moment I don't know why I need a vac former, I just know I'm going to build one first chance I get !
|
|
|
|
|
|
2018/06/16 19:02:01
Subject: Re:Inqu][sitor
|
|
Fixture of Dakka
|
Excellent work, thanks for the explanation.
Big H - once you build one you'll find plenty of uses I'm sure. Same as every other tool we make or buy
|
|
|
|
|
|
2018/06/17 20:02:30
Subject: Inqu][sitor
|
|
Mastering Non-Metallic Metal
|
Good work, Lamby. On the model and the vac-former.
|
Mastodon: @DrH@dice.camp
The army- ~2295 points (built).
* -=]_,=-eague Spruemeister General. * A (sprue) Hut tutorial *
Dsteingass - Dr. H..You are a role model for Internet Morality! // inmygravenimage - Dr H is a model to us all
Theophony - Sprue for the spruemeister, plastic for his plastic throne! // Shasolenzabi - Toilets, more complex than folks take time to think about! |
|
|
|
|
2018/06/26 01:17:50
Subject: Inqu][sitor
|
|
Sword-Bearing Inquisitorial Crusader
|
alabamaheretic wrote:dude this thread is nuts it gets better and better
Big H wrote:At the moment I don't know why I need a vac former, I just know I'm going to build one first chance I get !
monkeytroll wrote:Excellent work, thanks for the explanation.
Big H - once you build one you'll find plenty of uses I'm sure. Same as every other tool we make or buy
Dr H wrote:Good work, Lamby. On the model and the vac-former.
Thanks all for your kind comments!
On with the show:
I blame Star Wars.
Well, Star Wars modellers to be correct - and mostly this guy
Tagamo Modelworx
I learned more about lighting models in one night binge-watching his videos than any amount of reading Instructables and the like.
But as I was watching, this thought snuck into my brain: Lighting models - mmmm...
So of course, not content with my usual OCD-style modelling, now I'm adding LEDs to the engines - cos why make it simple when you can make it insanely detailed, right?
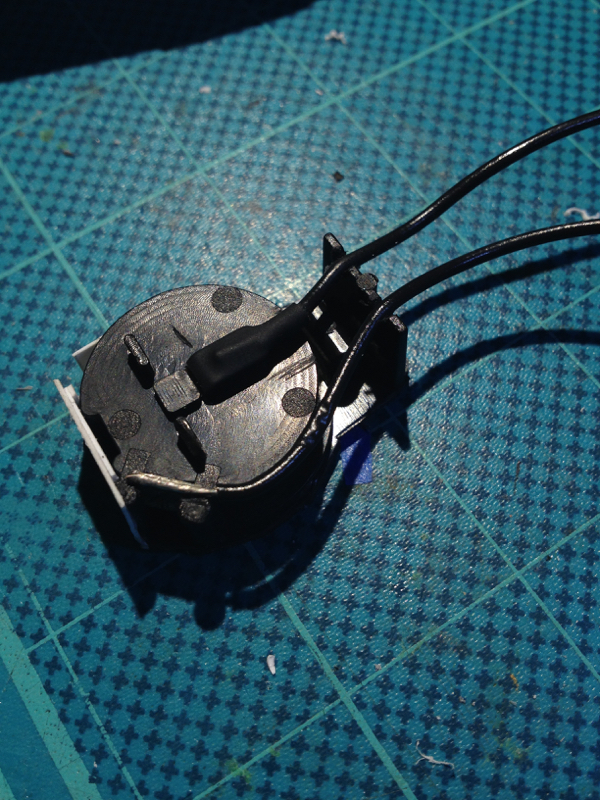
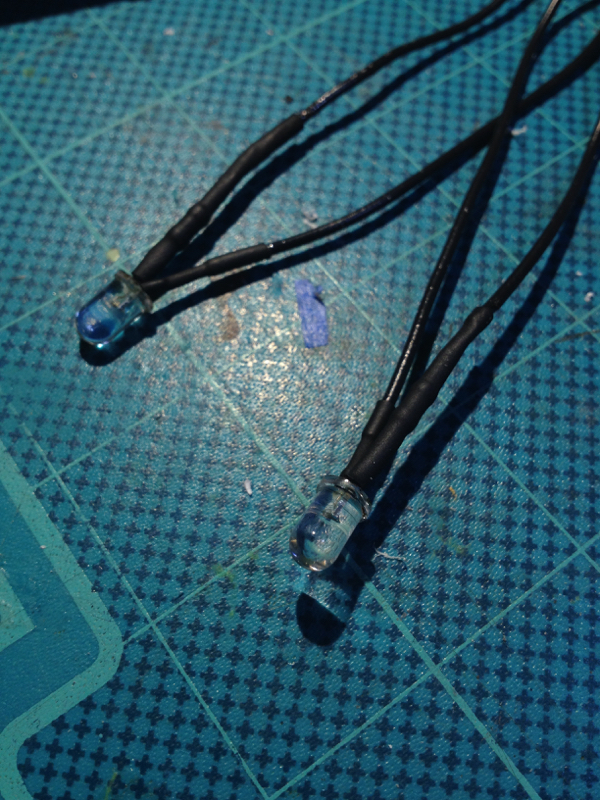
Not wanting to spend too much money on all this, found a LED bike light in the junk pile, and harvested the twin watch-battery power supply and the LEDs from it.
Of course, had to mod the power supply a bit by adding the leads - which meant I had to learn to solder, cos up till now my electronics experience comes from making circuits in simple IED training aids (real life job) where we twist and tape, as the training aids invariably get blown apart... anyway:
And here's the harvested LEDs with resistors added:
Took a switch from an old Nerf gun - yes, you read that correctly :
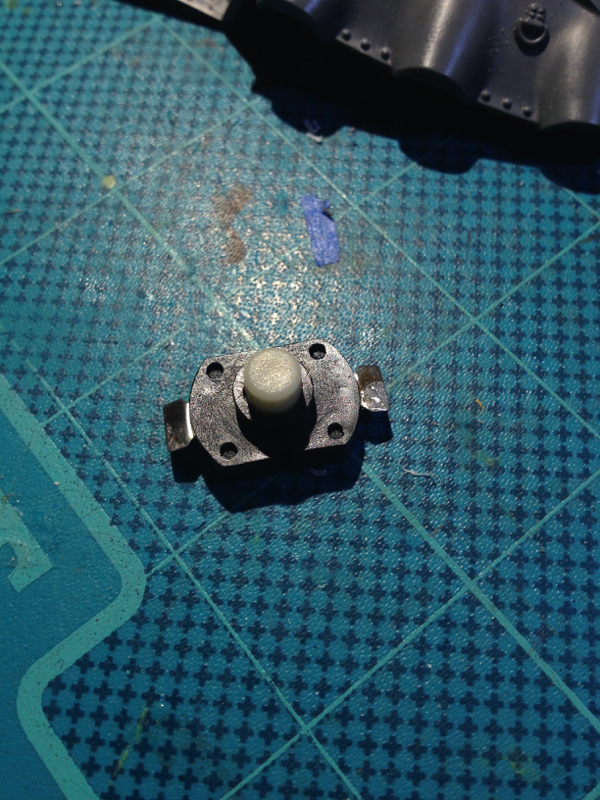
Made a hole in the side of the decking to take the switch:
And added some detail to hide the fact it is indeed, a switch:
Then, in the interest of keeping up the momentum of the actual design and building of this thing, I left off the electronics there til another day.
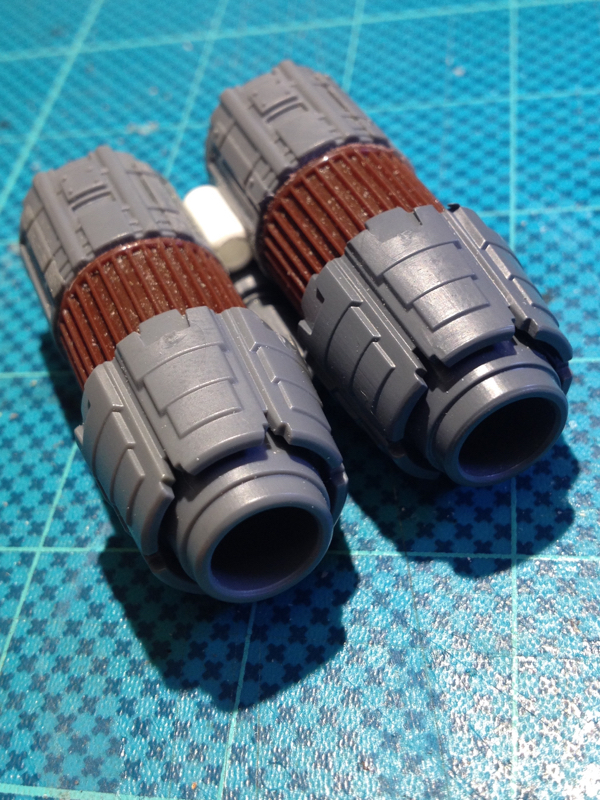
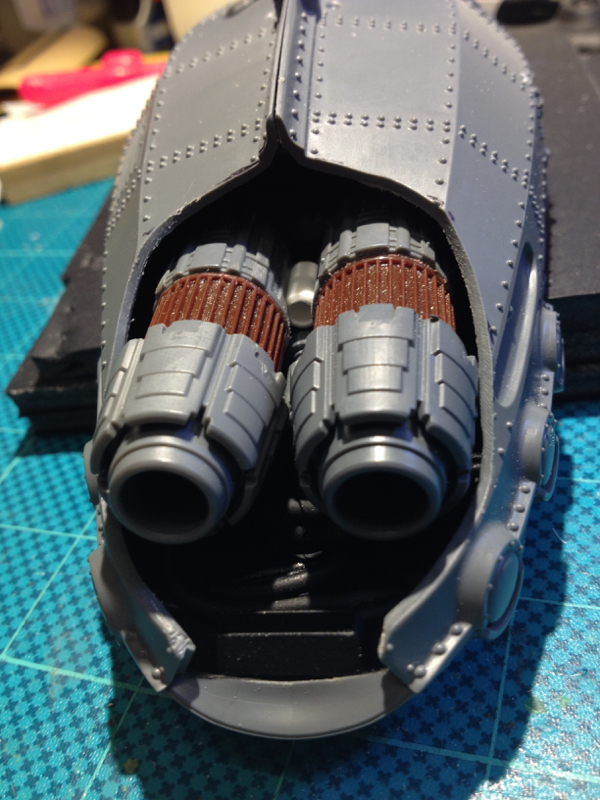
Looking at the main engines I thought they looked a bit plain, so made these pipes:
And added them to the inner cylinders:
Then I mixed up a batch of epoxy and glued both engines together, and completely failed to take a pic when they were done, whoops.
More to follow!
|
|
|
|
|
|
2018/06/26 07:48:05
Subject: Inqu][sitor
|
|
Decrepit Dakkanaut
|
More mad science? No final pic?! You filthy tease!
|
Theophony"... and there's strippers in terminator armor and lovecraftian shenanigans afoot."
Solar_Lion: "Man this sums up your blog nicely."
Anpu-adom: "being Geek is about Love. Some love broadly. Some love deeply. And then there are people like Graven. |
|
|
|
|
2018/06/26 09:45:27
Subject: Re:Inqu][sitor
|
|
Fixture of Dakka
|
Well obviously it needed lights
|
|
|
|
|
|
2018/06/27 00:55:38
Subject: Inqu][sitor
|
|
Sword-Bearing Inquisitorial Crusader
|
inmygravenimage wrote:More mad science? No final pic?! You filthy tease!
Haha yes sorry about that - will get to it today (hopefully...)
monkeytroll wrote:Well obviously it needed lights
Of course - once I saw those light rigs in the Star Wars models I was hooked
|
|
|
|
|
|
2018/07/21 02:35:50
Subject: Re:Inqu][sitor
|
|
Sword-Bearing Inquisitorial Crusader
|
Real life pause over - time to get these fething engine lights done! Engine detailing: 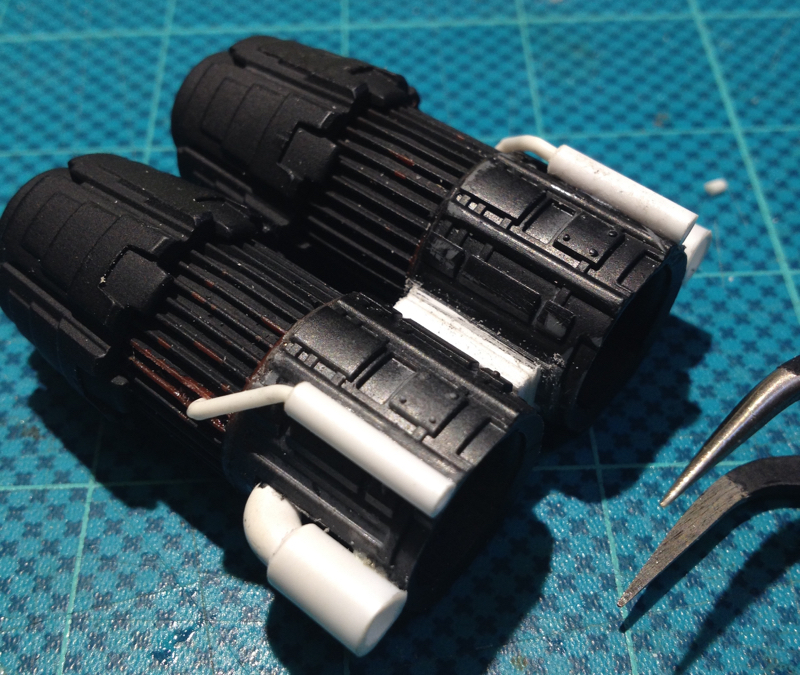 And covered with Krylon Fusion primer: 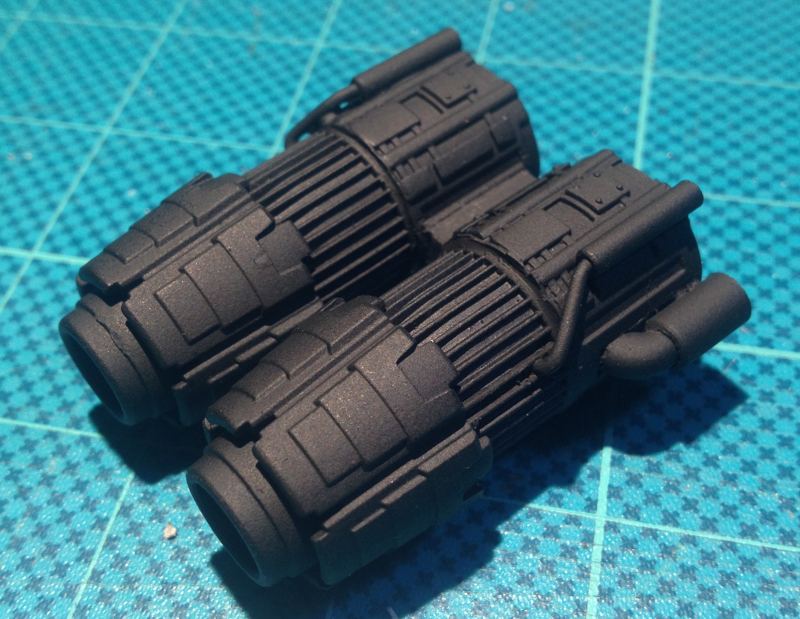 Added supporting braces internally to the top deck cavity: 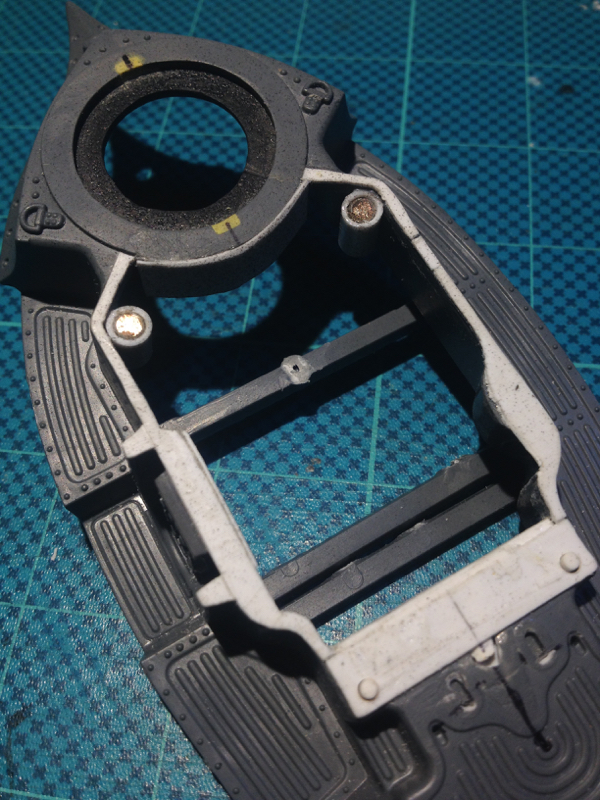 Note the magnets to take this removable though as yet un-detailed decking plate: 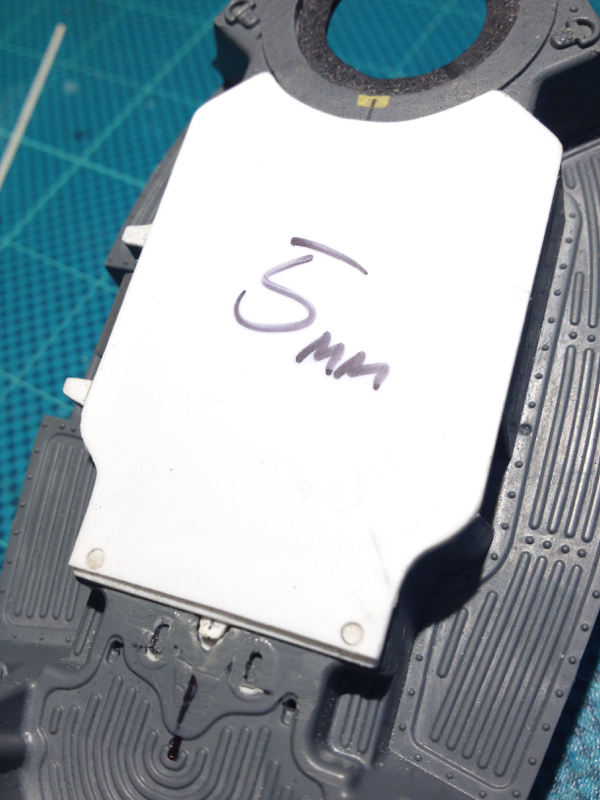 Finished soldering (and re-soldering... and re-re-soldering...) the wiring harness and tinted the bright white LEDs with Tamiya Clear Blue - which worked surprisingly well:  Seriously underestimated the size of the wiring harness vs the cavity, and spent a lot longer than it should have taken to get it all to fit: 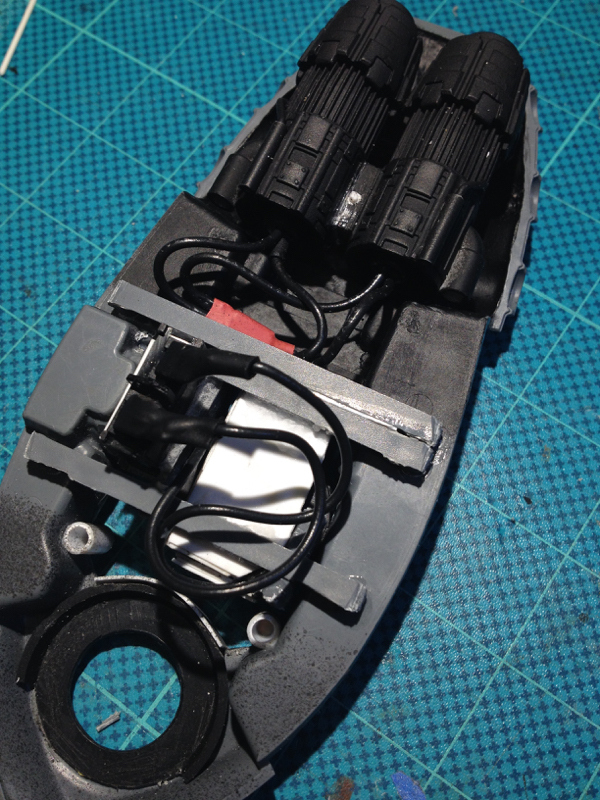 You might notice the switch has been changed out - the Nerf gun switch decided to cease working about after I'd soldered everything up the first (two) times, so I caved in and bought a good solid switch - which is why the top decking is now removable: 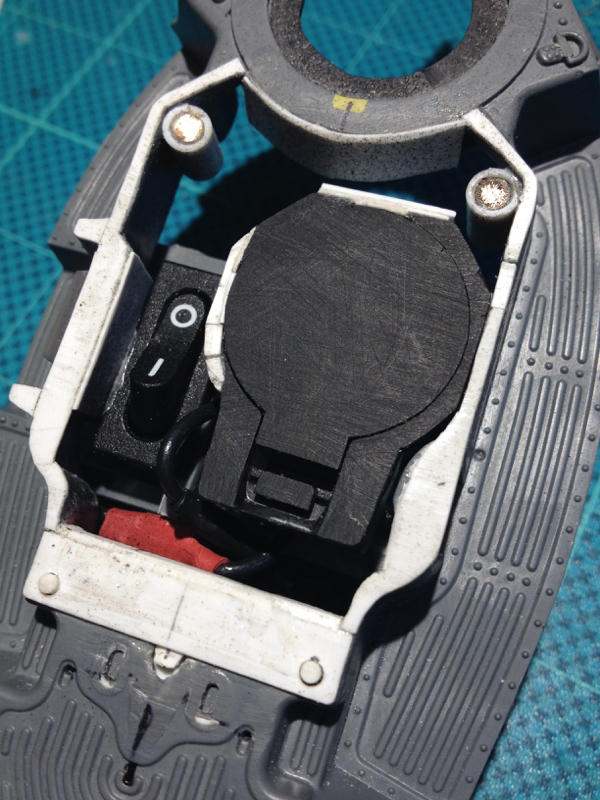 Finally though - we have engine lights! 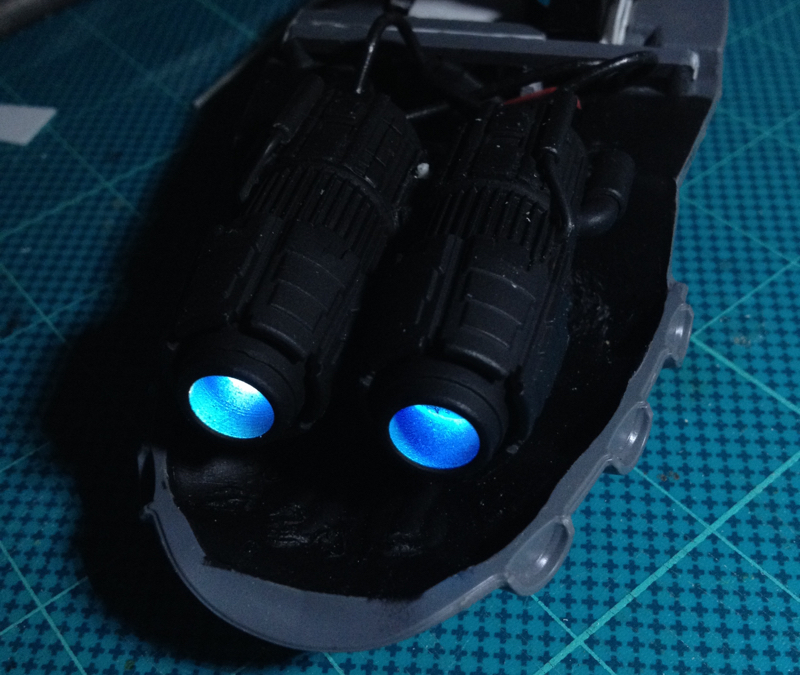 Things I have learned during this process: 1. Good soldering is a lot harder than it looks 2. Test, test and re-test your circuit after every step! 3. Harvesting LEDs and battery mounts and switches for free is good in theory but in practice, not so much Now I can (hopefully) speed up the rest of this build! Thanks for looking!
|
|
This message was edited 1 time. Last update was at 2018/07/21 10:53:03
|
|
|
|
|
2018/07/21 13:40:33
Subject: Re:Inqu][sitor
|
|
Fixture of Dakka
|
Definite thumps up from me....
|
|
|
|
|
|
2018/07/21 13:54:39
Subject: Inqu][sitor
|
|
Preacher of the Emperor
|
Wow... Very cool work on those engines. I suddenly want to build a fully mechanized Elder or Tau force just to light the whole thing with blue engines...
|
|
|
|
|
|
2018/07/21 15:01:18
Subject: Inqu][sitor
|
|
Mastering Non-Metallic Metal
|
Worth the effort. Looks cool.
|
Mastodon: @DrH@dice.camp
The army- ~2295 points (built).
* -=]_,=-eague Spruemeister General. * A (sprue) Hut tutorial *
Dsteingass - Dr. H..You are a role model for Internet Morality! // inmygravenimage - Dr H is a model to us all
Theophony - Sprue for the spruemeister, plastic for his plastic throne! // Shasolenzabi - Toilets, more complex than folks take time to think about! |
|
|
|
|
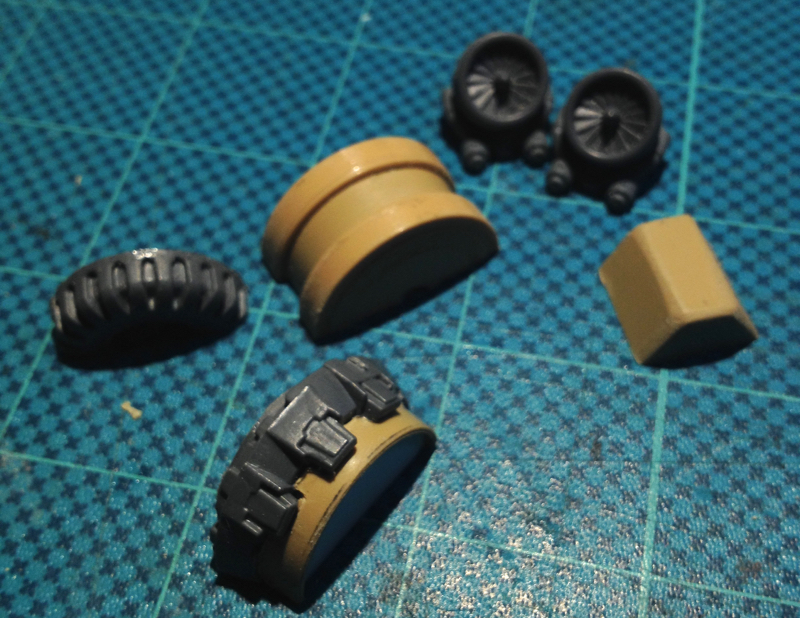
2018/07/30 03:24:19
Subject: Inqu][sitor
|
|
Sword-Bearing Inquisitorial Crusader
|
MacPhail wrote:Wow... Very cool work on those engines. I suddenly want to build a fully mechanized Elder or Tau force just to light the whole thing with blue engines...
Dr H wrote:Worth the effort. Looks cool.
Thanks guys!
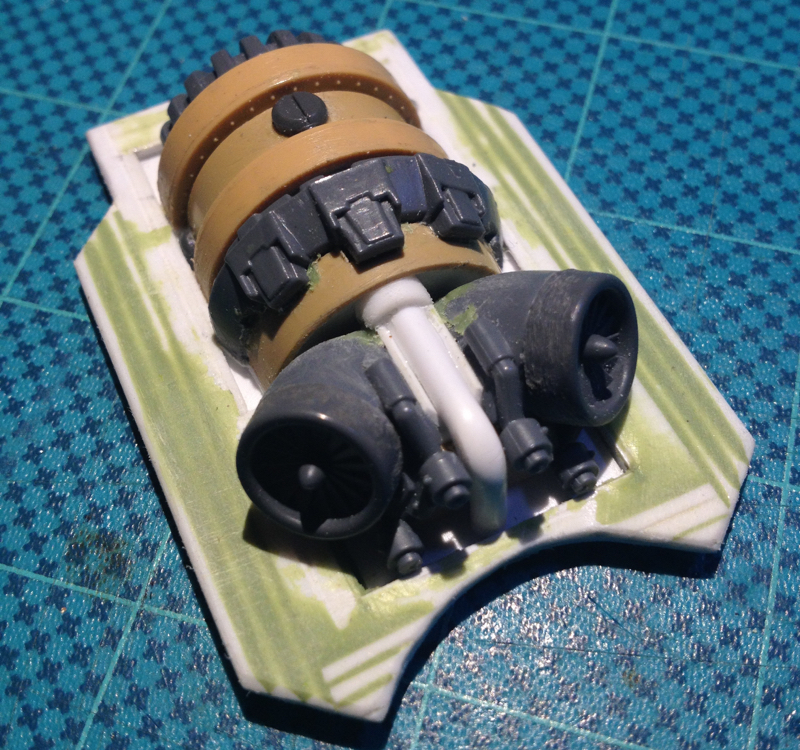
With the thrusters completed (for the moment anyway) moved on to detailing the removable top deck plate.
Found some 1/35th tank drive wheels, a Landraider turret ring, and a Space Marine bike wheel, glued them together to make a bit of an engine, then cut them in half - you'll see why shortly:
As there's a switch and battery pod under the deck plate, I'm going to have to fake the look of the supposedly cylindrical upper engine section, so built the small edge around the inner rectangular shape of the deck plate:
Here's the engine sections fitted into the cutout - the main intakes are two Space Marine backpacks with a small turbine fan from one of the Space Marine flyers added:
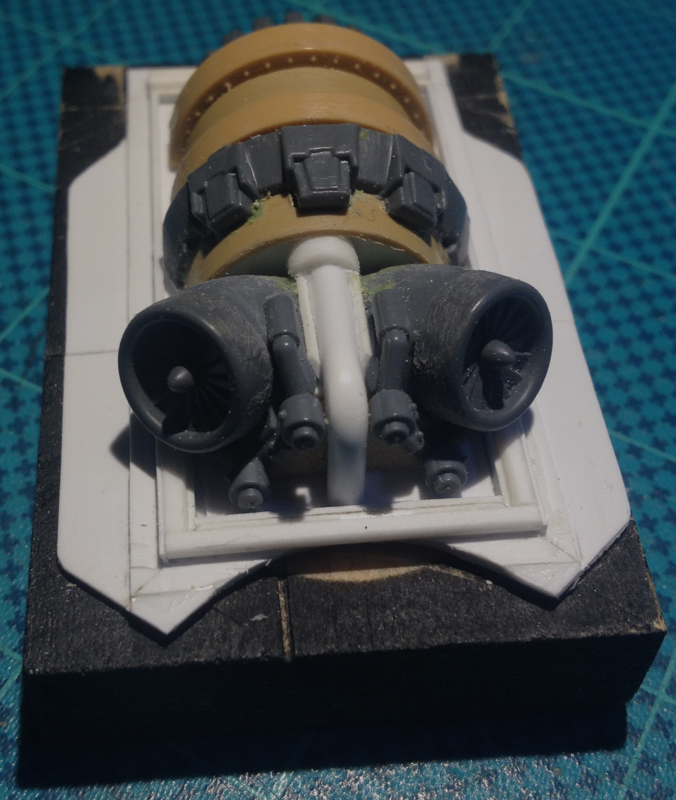
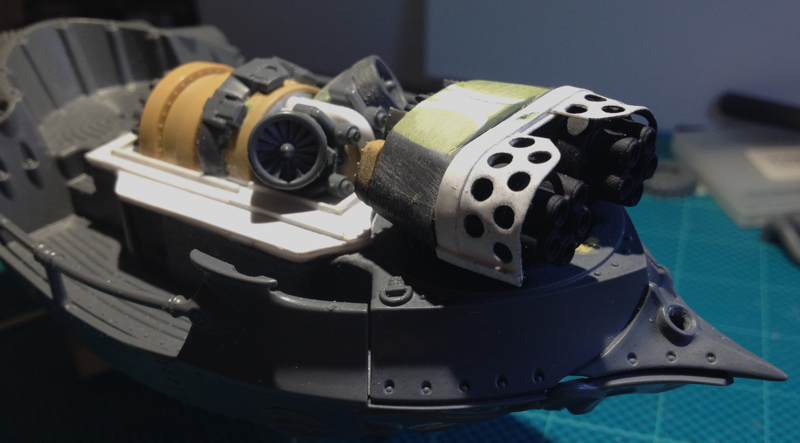
And here's how it sits with the main turret in place:
Thanks for looking!
|
|
|
|
|
|
2018/08/07 13:39:32
Subject: Inqu][sitor
|
|
Mastering Non-Metallic Metal
|
Good engine 'bash. Nice idea for a lid.
|
Mastodon: @DrH@dice.camp
The army- ~2295 points (built).
* -=]_,=-eague Spruemeister General. * A (sprue) Hut tutorial *
Dsteingass - Dr. H..You are a role model for Internet Morality! // inmygravenimage - Dr H is a model to us all
Theophony - Sprue for the spruemeister, plastic for his plastic throne! // Shasolenzabi - Toilets, more complex than folks take time to think about! |
|
|
|
|
2018/08/09 22:07:56
Subject: Inqu][sitor
|
|
Sword-Bearing Inquisitorial Crusader
|
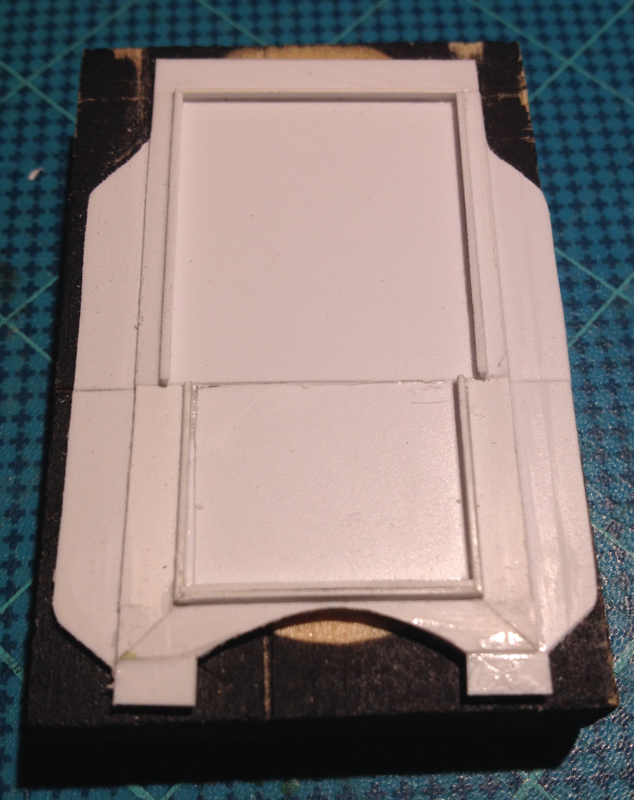
Thanks Dr H!
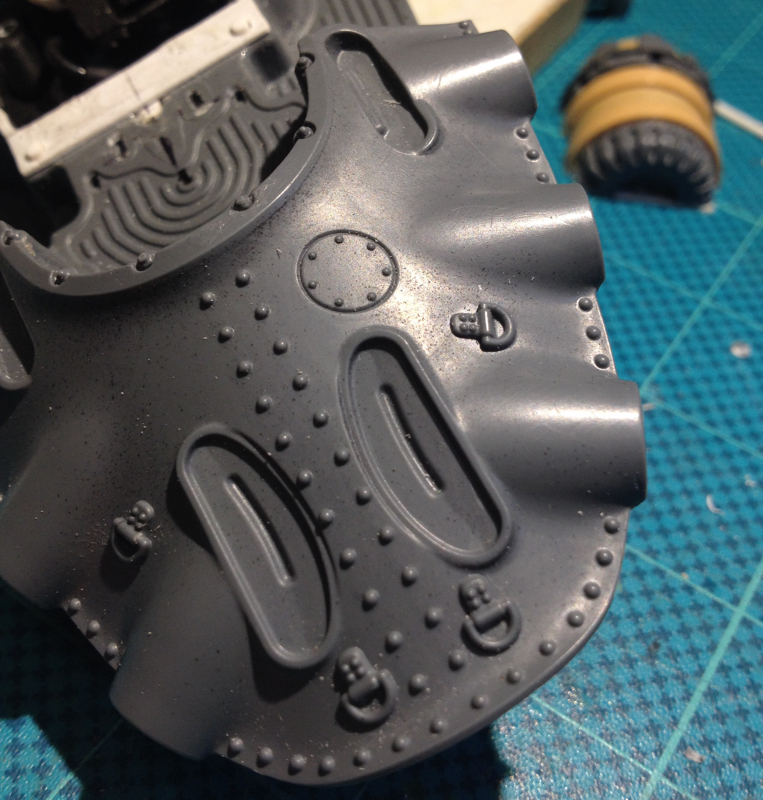
Decided to add more weight and depth to the removable upper deck, so added styrene and a GS/milliput mix:
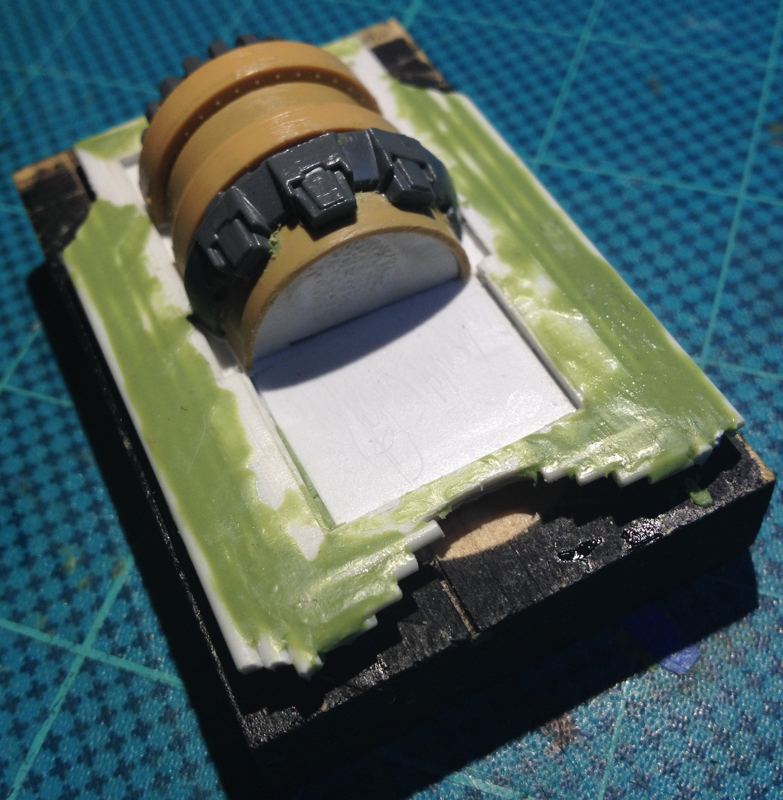
Then cut to shape and sanded smooth, and here's the result:
I may end up going back in to add a line or two of rivets, but for now, it's done.
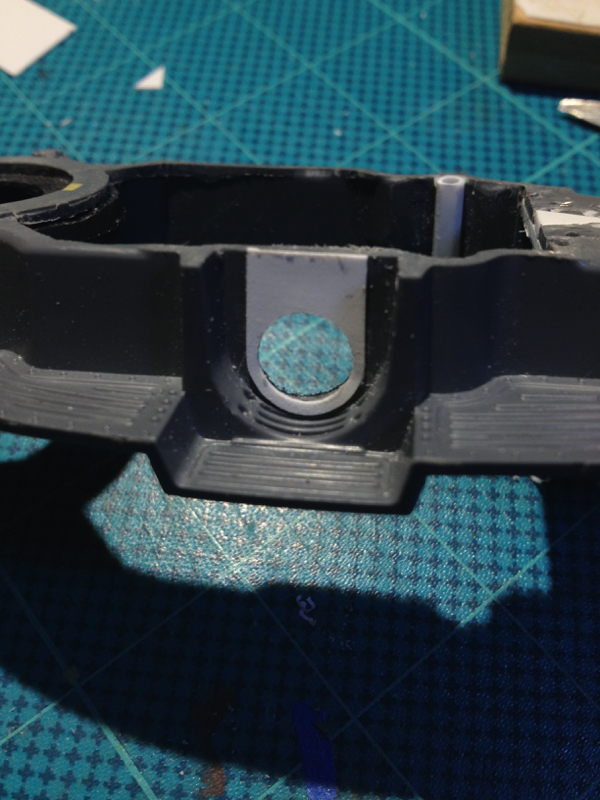
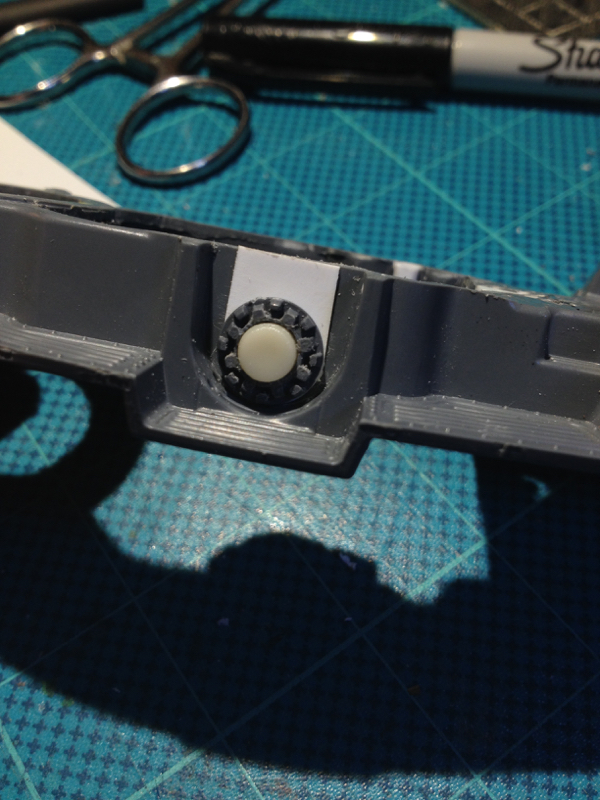
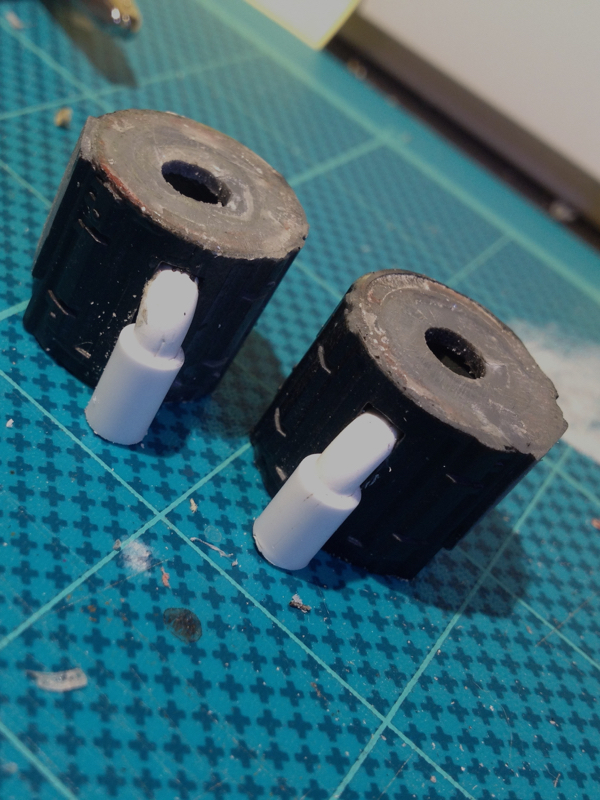
Moving on - the gaps where the air-ballon support structures usually attach have been bugging me for a while, so time to fix that:
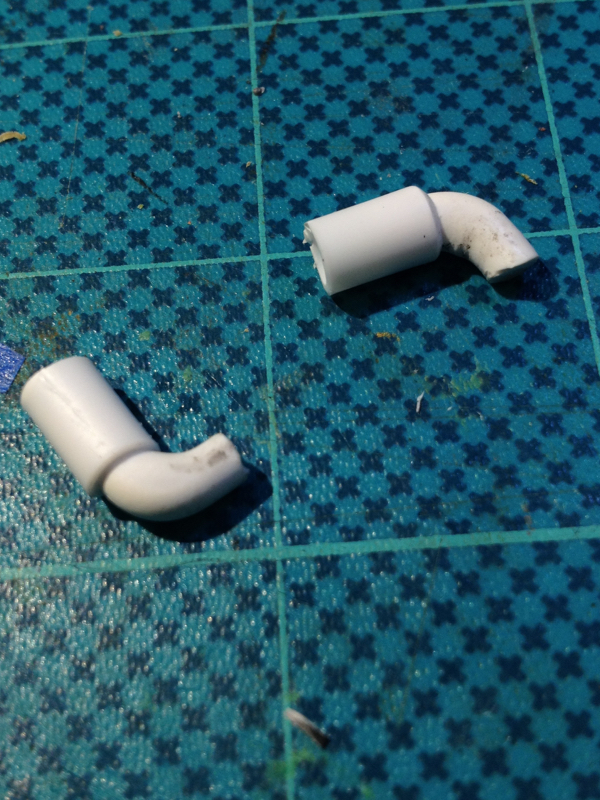
Took two of these Gundam vent thingys:
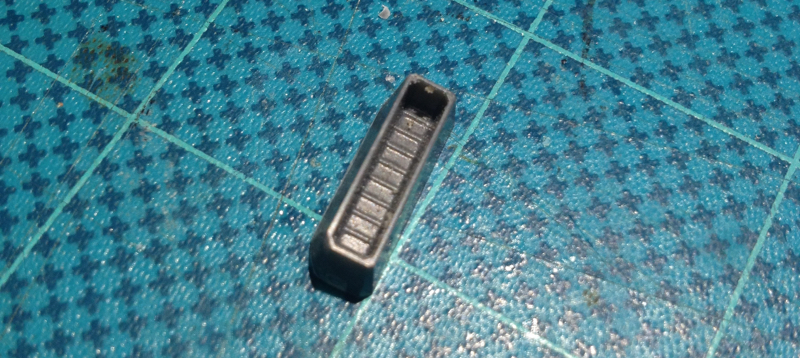
Which fairly obviously are the wrong shape, so a bit of styrene and GS/milliput shaping and sanding, and we end up with this:
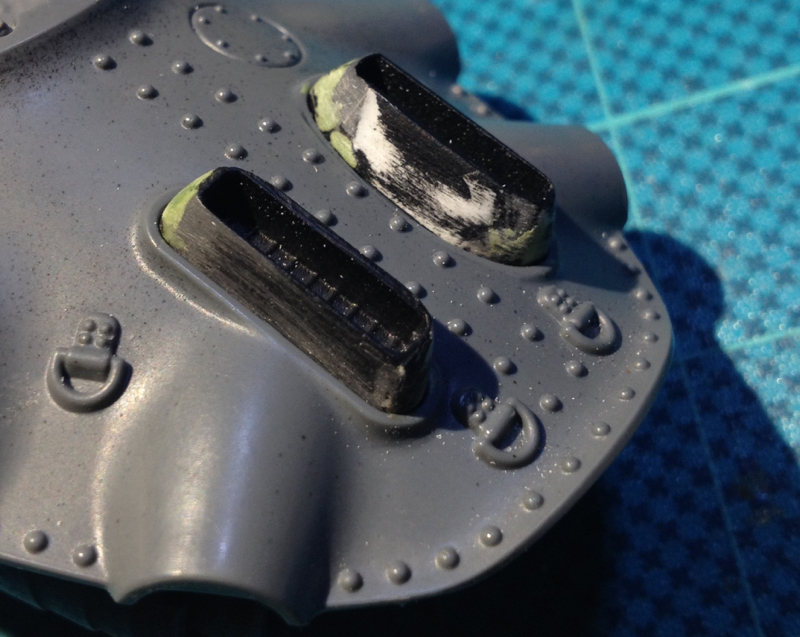
Thanks for looking!!!
|
|
|
|
|
|
|
|


