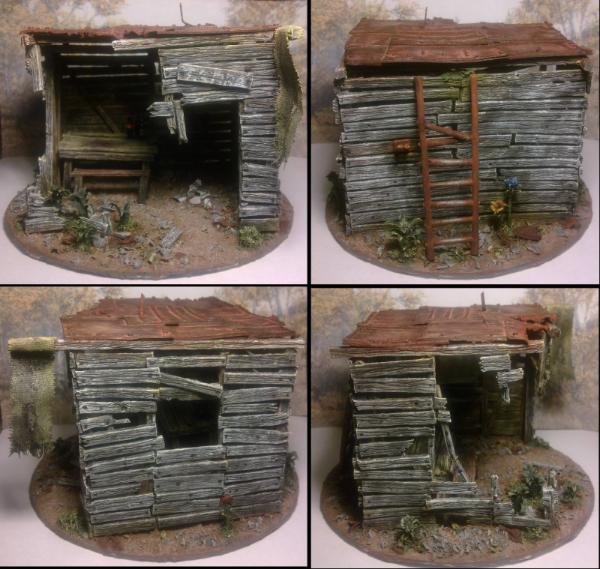
I made this hut from wood that was carved from plastic sprue, it's sitting on a base of mostly dried paint, it has a table and bench made from sprue, with bottles made from sprue and there is a scattering of plants made...from...sprue, and a ladder ... made ... from ... sprue, and a roof made from scrap card. In this tutorial, I will explain and show you how it was done.

This came about as a competition piece for a recycling challenge by Briancj
here. The challenge was to create a piece of terrain from recycled modelling materials that would usually be thrown away after a novice/new modeller has just finished his or her first army.
Examples of possible materials were given as paint pots, plastic sprues, bits of dried putty, dried paint, packaging materials, and leftover plasticard.
When this was originally posted I was in the process of making some close-combat weapons from scratch and this involved (amongst other things) carving swords from sprue and I was trying to encourage the use of sprue for many modelling uses (as it is awesome stuff which you can do almost anything with and should not be thrown away). So, I decided to see if it was possible to make wooden planks and therefore a wooden hut out of only sprue just to show that it was possible. I tried one plank and I liked how it looked and therefore entered the competition to see if it really was possible.
It turned out that it was possible and due to that success, and the interest of many people in how it was done from the start, I took many pictures and explained the steps as I went along. But in the interest of future modellers who may want to do something similar or are just looking for inspiration I thought that I would write up a full tutorial of how, you too, can build yourself a wooden hut from sprue and a few scraps.
Now, a few things before we start:
I went through 2 scalpel blades during the making of this hut and I use 2 scalpels for different uses (one has stronger blades for heavy duty cutting and the other I use for carving and scraping) and I blunted 2 blades. So if you only have one scalpel make sure you have plenty of spare blades available as they will become blunt quickly.
More importantly, this process will generally involve much cutting towards yourself. Although this can be minimised and you should take precautions to avoid any nasty cuts (not least, keeping an "eye" on the sharpness of the blade you are using. A relatively blunt blade will result in worse cuts than a good, new, sharp blade). You have been warned, so on your head be it, if you cut yourself.
The required materials.
Sprue. Quite a lot of sprue. I used most of the sprue from one full Eldar Guardian sprue, one full Termagant sprue, one half of the Dire Avenger double sprue and some of a Tyranid Warrior sprue. So that should give you a good idea of the quantity required, although this does produce a fair amount of small scrap pieces of sprue (as you cut off the small bits that the models join to) as it's mostly the long sections you will want.
and you will want a base of some kind. I used a CD as I had some laying about for just this purpose and part of the competition rules was that the piece had to be a similar size in footprint to a CD, so that worked out nicely.
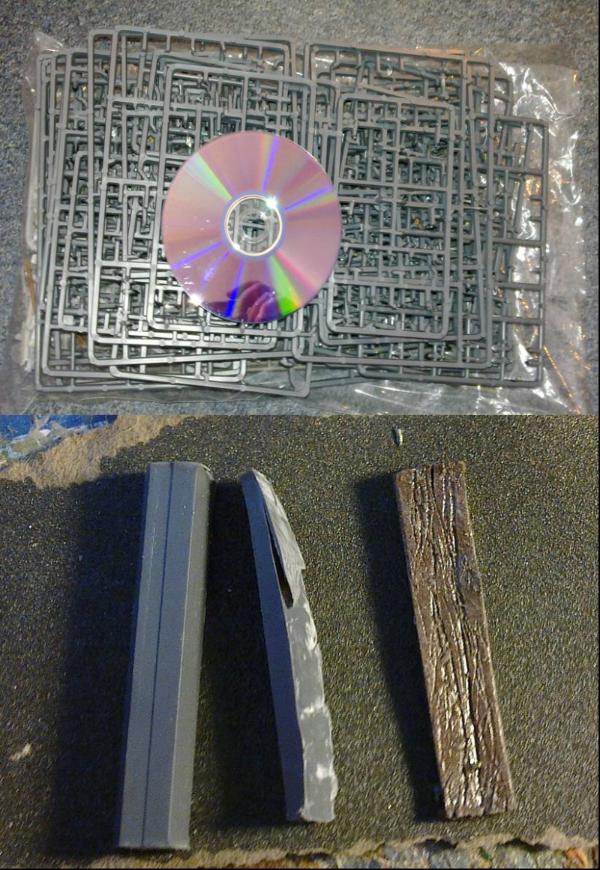
Fig. 1. (top) This was how I started out. Inside that pile of sprue is a hut wanting to get out. (bottom) A brief glimpse of how the wood is produced.
The first thing I will cover is how to make a piece of sprue look like a piece of wood, as this is the most important technique for anyone wanting to make something out of "wood" even if it isn't a hut.
1. (Fig. 2-1)
First find yourself a piece of sprue and remove all the sticking out bits (clippers will be fine for this as it'll be tidied up later).
Then, cut it to length. I use a Number 10 blade in my scalpel and this allows me to use a rocking motion to cut the sprue, little by little, into two (Don't try to go all the way through in one go as you'll likely end up snapping your blade and/or cutting yourself).
Clean up any rough edges from where you removed the bits earlier, before continuing.
2. (Fig. 2-2)
This is probably the most difficult step (yep, it's downhill from here).
Using the same technique that you used to cut the sprue to length, cut the sprue in half, lengthways (the shorter the plank/sprue the easier this step is).
There's two ways this can be done and will give you the results shown in the diagram in Fig. 2. I'm cutting along the green line as this leads to a variety of sizes of wooden planks. The red line will give you all identical pieces with non-parallel faces, this will however allow you to make an overlapped look to the final wall/fence but will not be covered in this tutorial.
You have to be careful to get the cut as straight as you can, but a little unevenness can be solved afterwards with your scalpel and/or gives a bit of variation to your wood (and also can result in some nice broken planks if that is what you desire).
3. (Fig. 2-3)
You pieces will likely end up bent after step 2 but can just be straightened by hand and any rough patches can now be fixed by removal or gluing with polystyrene cement.
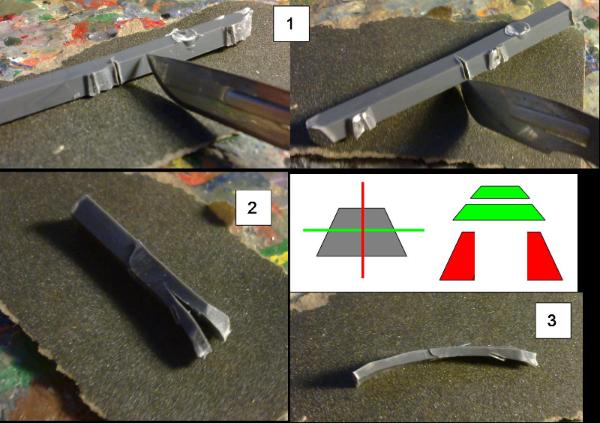
Fig. 2. Separating the sprue into "plank" shapes.
Edit:
Notes of sawing sprue for planks
The best / most efficient way I can see to produce the planks would be to hold many lengths of sprue, side by side, between two pieces of wood (for example) so that they are all straight and lined up.
Then saw down their lengths (from one end to the other) using a razor saw. The more you hold together, the more planks you cut at one time.
I state a razor saw not because I've used one, but because I don't have one and I can't cut straight enough with a jeweller's saw (I can't saw in a straight line to save my life it seems

)
The alternative I have come up with, using my jeweller's saw, is to saw part-way into each side of the individual pieces (along the length) of sprue and then, using those cuts as a guide, finish off the cutting with my scalpel.
This second method has some advantages and disadvantages:
You have to cut each sprue individually

Whereas the razor saw can cut many at once.
Each piece is much quicker, easier and less painful than doing the method shown in my original tutorial.

With the saw line as a guide, the resulting planks are more consistently straight, with less rough edges than with the scalpel alone method.
The more you saw, the easier it is to finish off with the scalpel. But the longer it takes (the sawing is the slow part). So it's a trade off for ease Vs time.

I'll be sawing my planks from now (and buying a razor saw

).
End of Edit.
4. (Fig. 3-4)
The "wood" texture is built up by successive scratches with the side of the point of your scalpel (this gives thicker lines than using the cutting edge of the tip).
Starting at one end, make many small scratches of roughly the same length and try to cover the whole width of the sprue, the more lines the better the result. Do not press too hard as successive passes in later steps will deepen some of the grooves.
5. (Fig. 3-5)
Moving further up the sprue, keep making small scratches of even depth to the same length, making sure that you fit in as many lines as possible.
However, continue your scratches to the bottom end of the sprue and allow the scalpel to follow whatever path it likes. This will deepen certain grooves that were there from the previous step and eventually the scalpel will only fall into those grooves and will therefore leave some of the grooves as smaller scratches.
I have found that occasionally switching the scalpel round so that I'm scratching with the other side of the tip will aid the randomness of the resulting pattern as the blade will tend to follow different paths depending on which way it is facing.
6. (Fig. 3-6)
Continue this way along the sprue.
Once the grooves are deep enough at the lower end of the sprue you do not need to keep going over them and you therefore work your way up the sprue, all the time keeping the leading end of your scratches as evenly spaced as possible and allowing repeated passes to deepen grooves at random.
7. (Fig. 4-7)
Keep this going until you reach about half way up the sprue, then turn it around...
8. (Fig. 4-8)
Using the same technique, start at the other end and work your way towards the middle.
9. (Fig. 4-9)
Make sure to go over the middle, where the two halves meet, until the grooves are an equal depth and appear to continue the whole length of the piece.
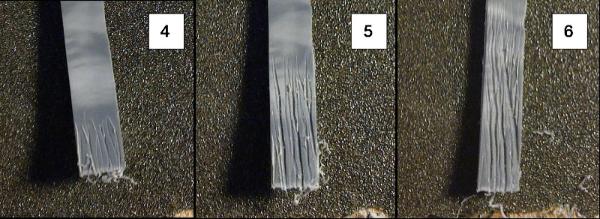
Fig. 3. Early stages of "wood" texture.
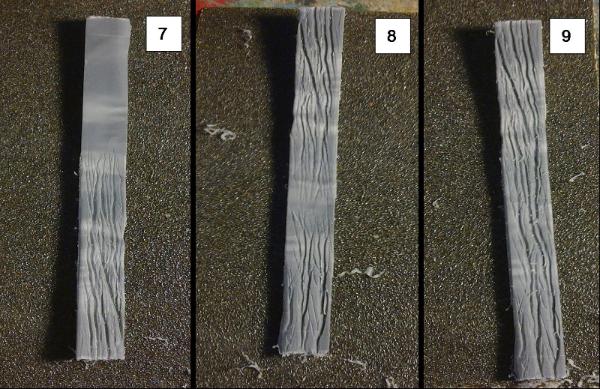
Fig. 4. Final stages of "wood" texture.
10.
Repeat this for each side of your piece of sprue. The ends of the planks can also be roughened up with small cuts and even splits and lost pieces can be added.
A square-cross-section beam is produced with the same technique, but instead of cutting the sprue in half in step 2, you want to shave off the angled edges of the sprue and then the texture is applied in the same way as the planks, but on all four sides.
and that's it, you are ready for construction and painting.
On a side note, this is not necessarily the best or only method for producing a wood grain effect. I experimented with using a wire brush (Fig. 5), but I found that it did not give as random a pattern as the scalpel method above.
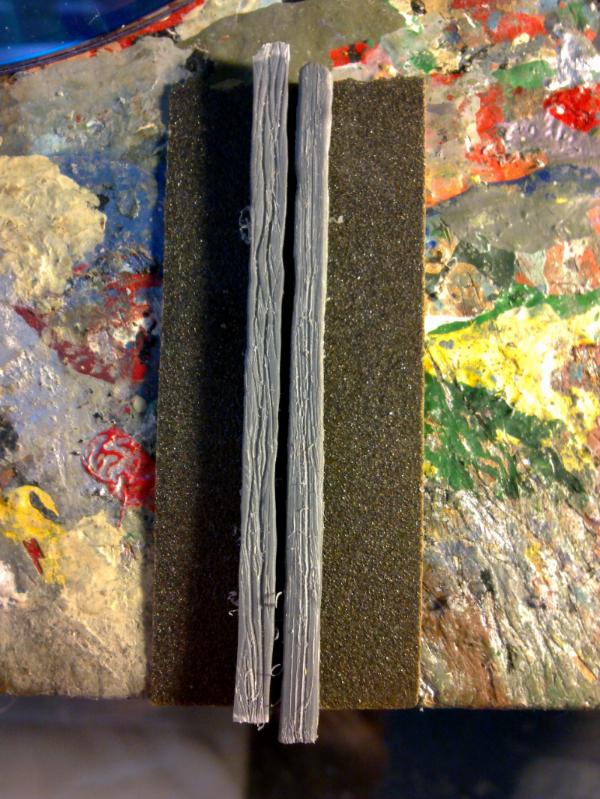
Fig. 5. Wood grain produced by scalpel (left) and by wire brush (right).
After a while you should have a nice pile of "wood" collected and you can think about planning your building/hut.
Also, broken planks (Fig. 6) that have resulted from this technique can be doctored to look better with careful use of your scalpel and non-broken planks can be broken if needed.
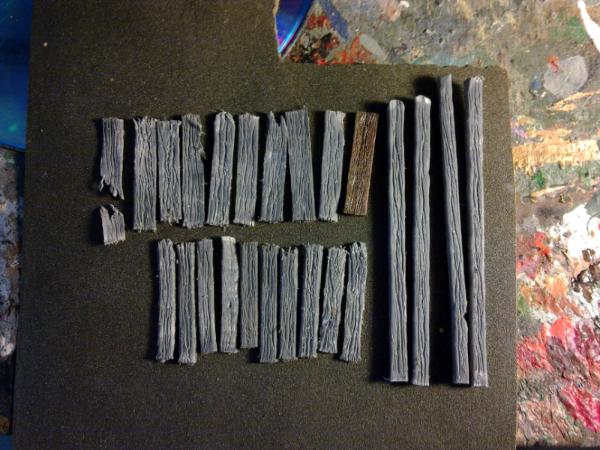
Fig. 6. A selection of wood produced, including some broken planks.
Once you have started on the wood and found how much you are willing to build (it is quite time consuming but good for some nice hobby zen), you can then start planning what it is you are going to build.
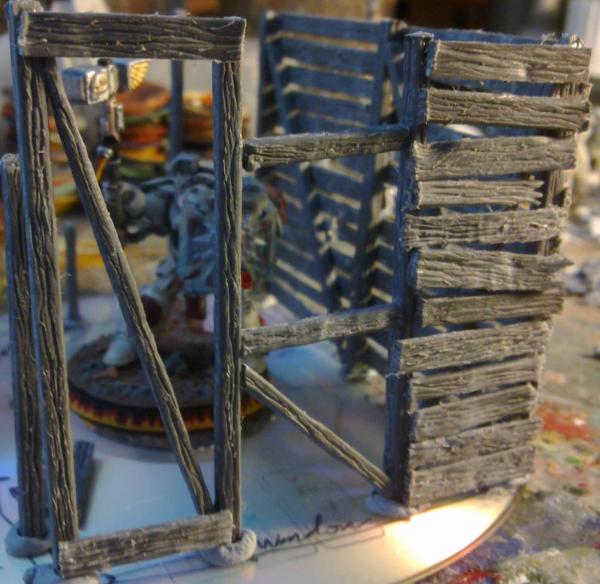
I had decided on a hut, which required a door, window and a table and chair (which later became a bench). I marked the position and size of these things on a plan of the hut's shape and decided where the uprights would go that will have the planks "nailed" to, to form the walls (Fig. 7). I also decided that one corner of the hut would be ruined to a) allow some access to the interior for moving models around and b) to add some interest to the terrain piece as a whole.
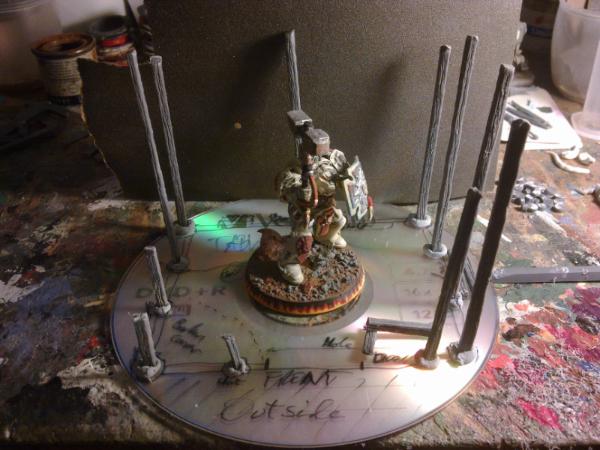
Fig. 7. Planning your Hut.
As I already had some short planks cut and ready, these set the gaps between the uprights for the walls. However I decided that the rear wall of the hut will consist of longer planks (again to add some more interest to the model). This then required me to make some longer planks (Fig. 10) and I found that longer planks are harder the cut straight when splitting the sprue, but not impossible.
I had calculated roughly how many planks I should need to fill the rear wall (having decided how tall the structure was going to be) and so set about gluing the frame together (Fig. 9) and laying the planks on (without glue to start with).
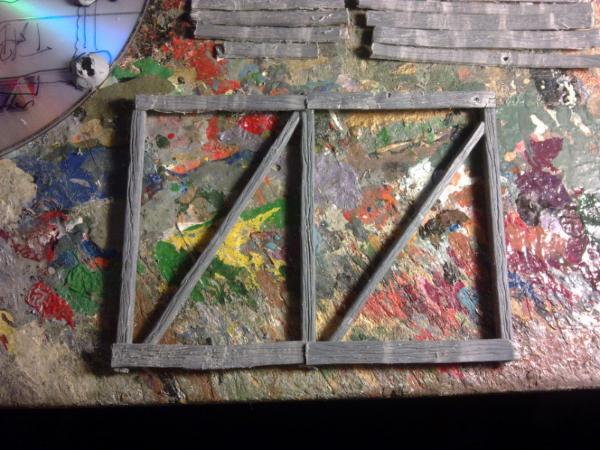
Fig. 9. Frame for the rear wall of the hut.
I added cross beams to give the final structure some strength and to give more contact points for attaching the planks to. The ends of the cross beams were cut at an angle to lay up against the uprights and give a larger area to glue. The upper and lower planks were glued on to create a solid frame to work with when positioning the other planks.
However, when I came to laying the planks on I found that I seemed to be short on planks (Fig. 10). However, many were much longer than necessary for the width of the wall and careful arranging and matching of planks allowed me to gain extra planks from cutting the longer planks into two. The extra planks allowed me to fill the whole wall (Fig. 11).
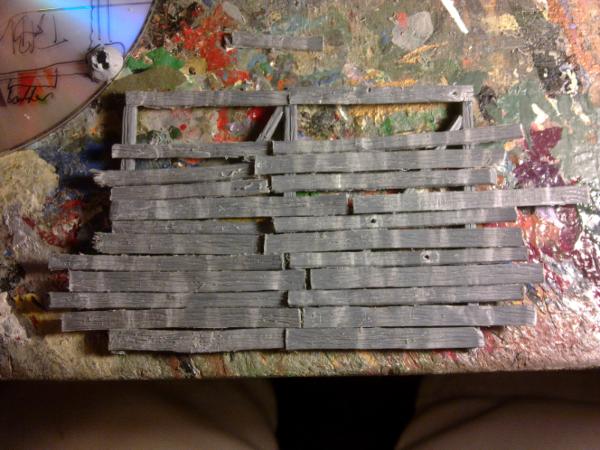
Fig. 10. Laying the planks out without glue.
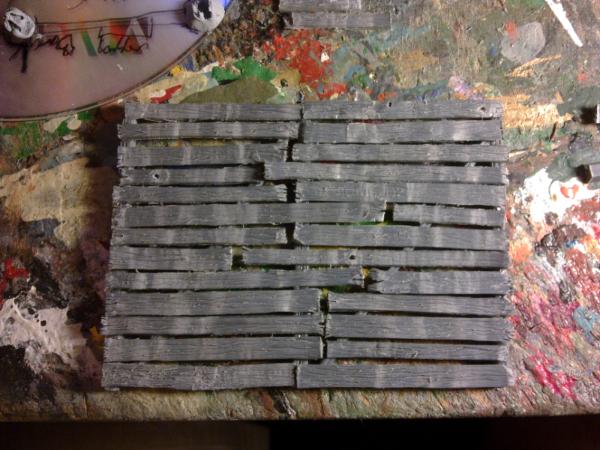
Fig. 11. Planks in place for the rear wall.
This is where the cross beams came in handy, as some planks only needed to reach across to those and not all the way into the middle (Fig. 12). This gave the wall a more roughly-built look where planks were nailed up where they fitted and the wall was not built with a nice selection of evenly cut planks used for a well-planned wall.
Fig. 12. Inside of the rear wall showing cross beams.
The rear wall was then stood upright and a cross beam was added to the next upright along the wall, ensuring that both remain vertical while the glue sets (Fig. 13). The window had already been added by this point, which helped keep the upright vertical and near parallel.
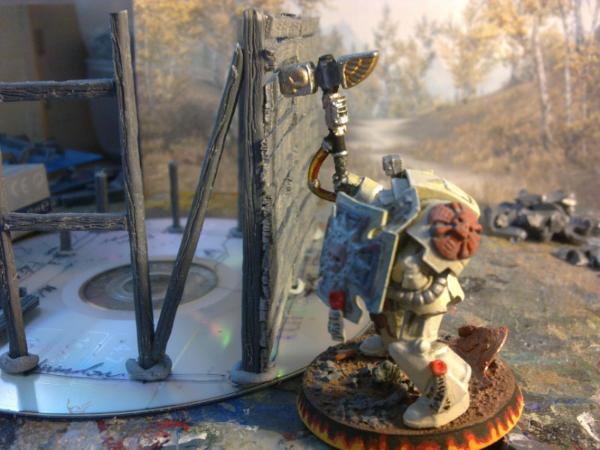
Fig. 13. Terminator #1 helps with construction (it is actually holding the wall upright).
The planks were then added to the first wall section in the same manner that was used for the rear wall, starting with the top and bottom planks and then filling in the other planks from the bottom (Fig. 14). This gave a nice solid corner for the building and the cross beams were then added for the rest of the wall (Fig. 15).
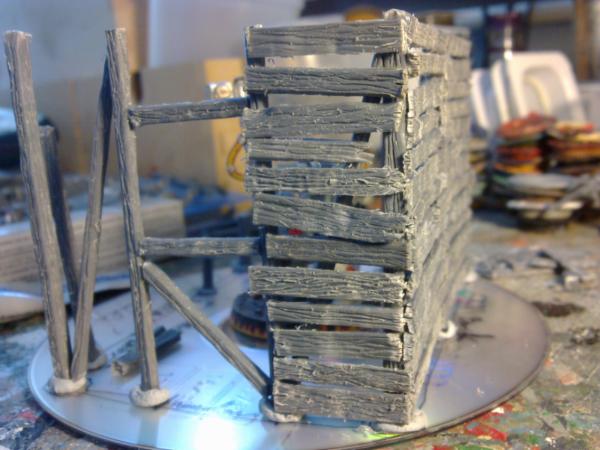
Figs. 14 and 15. Building the side wall and window.
At certain places, the planks from neighbouring sections would overlap (Figs. 16 and 17). This could be rectified by cutting all the planks to the correct length, but to keep with the hastily constructed feel for this hut I decided to let some of the planks overlap and look like one was nailed to the other underneath. In other areas I made use of the cross beams to avoid the overlap in a similar fashion as to what was done on the rear wall. The hanging/loose plank in the top-middle section is also another way to avoid overlapping the planks and was glued to the plank under it to make it secure. Broken planks were attached so that they still had two contact points, using the cross beams, this makes sense that if a plank was pulled off from one end, for example, it would likely break just before a beam that it had been nailed to.
Figs. 16 and 17. Completing the second wall and window.
A cross brace was added from the top of the middle upright of the rear wall to the top of the nearest upright of the second wall to ensure a solid corner (Fig. 18) and with that all glued in place the structure was plenty stable enough to support itself.
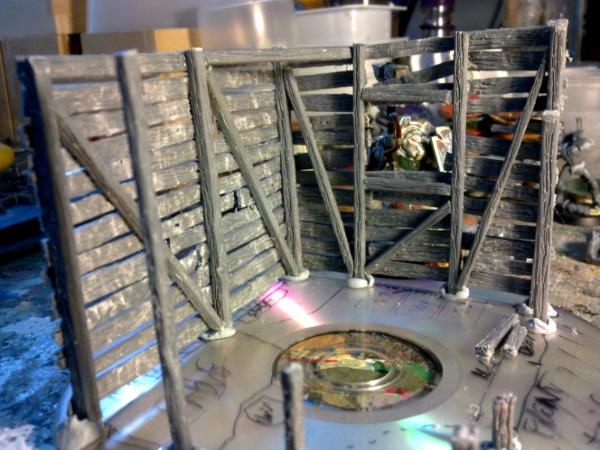
Fig. 18. The inside of the first corner with the cross brace visible at the top-middle of the picture.
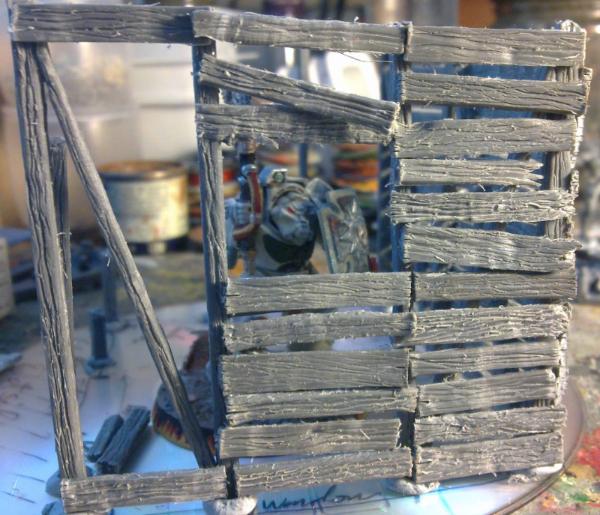
The next portion of the build was quite tricky due to the broken nature of the doorframe and so I didn't get any pictures of it being built.
The doorframe was constructed separately from three beams; one long beam for the full height of the door, one short length for the top of the door which needs to be longer than the final width of the door, and one very short, broken piece for what is left of the other side of the doorframe. The two upright beams (long and very short) were glued to the underside of the ends of the horizontal beam as this would normally be sitting on top of the other beams as a real lintel would.
Another upright beam fragment was required to attach the planks above the door to and this was glued to the side of the door frame so that it came to the same height as the rest of the hut (Fig. 19).
This doorframe was then attached to the rest of the hut by 3 planks initially. These were attached at the very top of the hut, at the top of the doorframe and a short plank at ground level. The rest of the space was then filled in with other planks and a cross brace was added from the top of the upright to the nearest upright of the side wall (in a similar manner to the side and rear walls were attached).
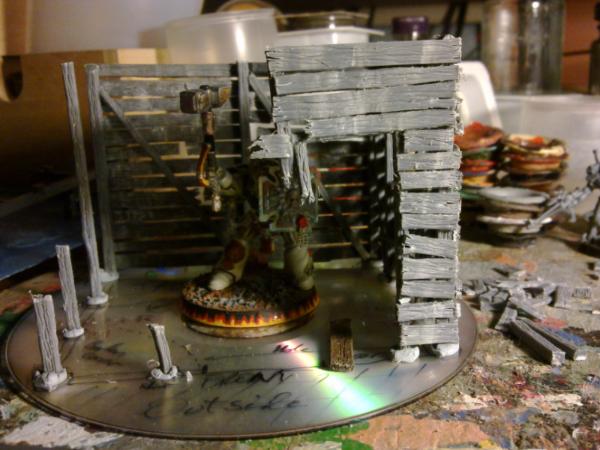
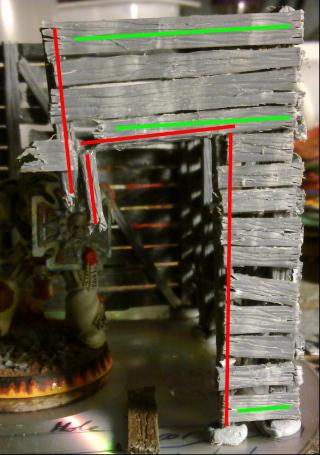
Fig. 19. The doorway construction, red lines indicate the position of the beams and green lines indicate the first, anchor planks.
The other side wall was then constructed in a similar manner with cross beams, planks and a cross brace to the rear wall. However, As this was to be the damaged side only the rearward section was built complete. The middle section (which must be noted didn't have a window before the hut was damaged) has a cross beam that had snapped in the middle: This was done by taking an undamaged beam and cutting a zig-zag through it with a scalpel and then gluing it together at an angle. Planks and fragments of planks were then glued on where I liked (Fig. 20).
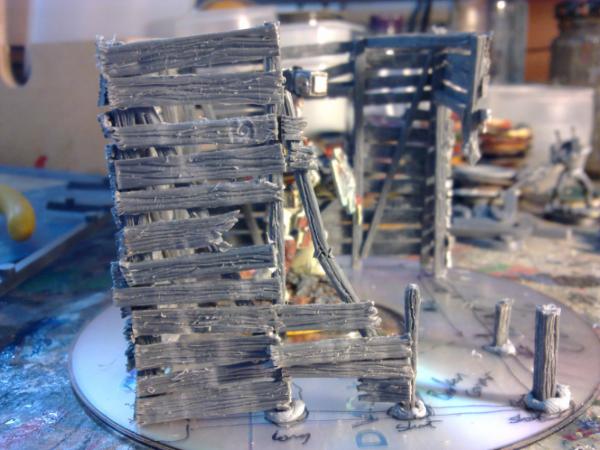
Fig. 20. Broken side wall.
Before building the final corner of the hut I had to create the base. This is because the final remnants of the hut in that corner aren't connected to the rest of the hut in any significant way and so require gluing to the base.
The CD was covered with tissue paper that was covered with a water/PVA mixture and was allowed to dry before proceeding.
The actual basing was performed in the same way I do my army pieces, with dried paint. When I find a paint pot has dried out to the point that it's no longer usable for painting I will scrape out the contents (I did this initially to save the pot) and let it dry completely.
This is not entirely necessary and you can base however you like, but I then separate out the lumps of paint into size groups (as sometimes you just want to one large rock) and I pick out any pieces that are of an unusual shape (e.g. ones that will never look like a rock but can look like bits of pottery or rusty metal, see later). To the smallest grade of dried paint I tend to add all the other bits of dust and debris you find builds up on your modelling board/table; paint/plastic scrapings or that fine powder that you get from sanding plastic or putty. I usually collect all this stuff up between models and save it for later.
Back to the model, I wanted a pathway from the door to the far corner that looked more worn and was free of the larger rocks and this is where the separating of the various grades of dried paint comes in handy. I took the finest powder and sprinkled it onto PVA in the shape of the path I wanted (Fig. 21) and then I used a larger grade of paint for the rest of the base (I actually worked section by section, but do how you would normally) and then gave the rest of the model a sprinkle of the finest grade to fill any gaps. Tip off the excess and pick out any bits that don't look right or are sitting funny on the base. Once that's done I glued down the hut and the remnants of the broken corner's uprights and let it all dry (Fig. 22).
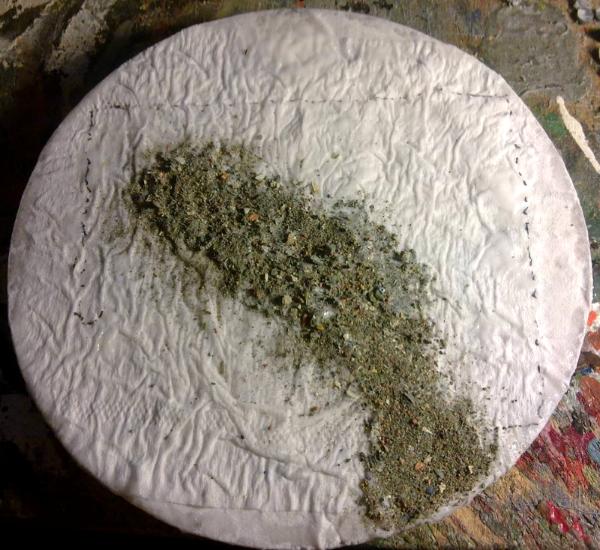
Fig. 21. Gluing dried paint to the base for form mud and rocks.
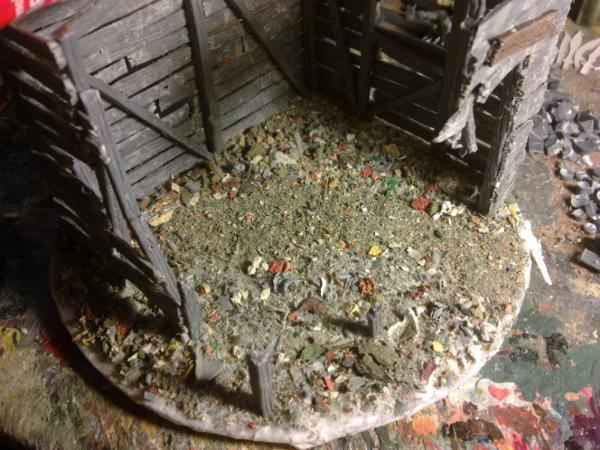
Fig. 22. The base of dried paint fragments with the hut and last beams glued down.
Once the glue was dry I added a few more extras to the base from my "odd shape" collection (Fig. 23). The white shapes in the shadow below the window were to become some broken pottery, I added some large rocks and lumps of rusty metal behind the hut and added a few leftover planks to the broken corner; some are "nailed" to the uprights and some are laying on the ground.
Once I was happy with everything on the base it was completely covered (not the hut, just the base) in a water/PVA mixture (~2:1) to seal it all to the surface.
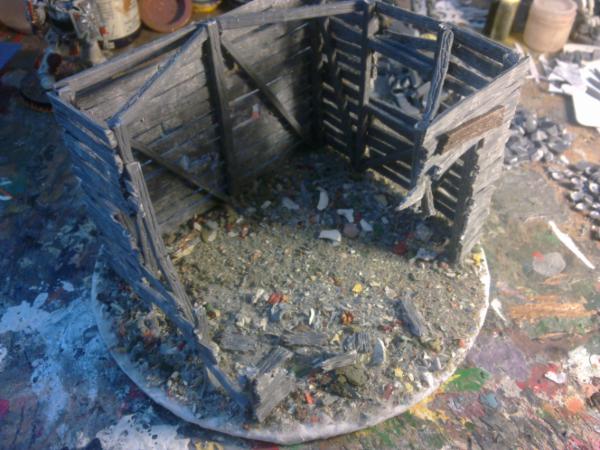
Fig. 23. Finalising the basing.
Now that the base and hut are complete it's time to do the roof. First it needs a frame. This was made from the same kind of wooden beams that were used for the uprights of the hut (Fig. 24). It was built to be flush to the sides of the hut but slightly overhang the rear and the front by enough for a possible awning (see later). Small pegs were added to the frame to stop it sliding off the hut as it will be left removable for ease of access.
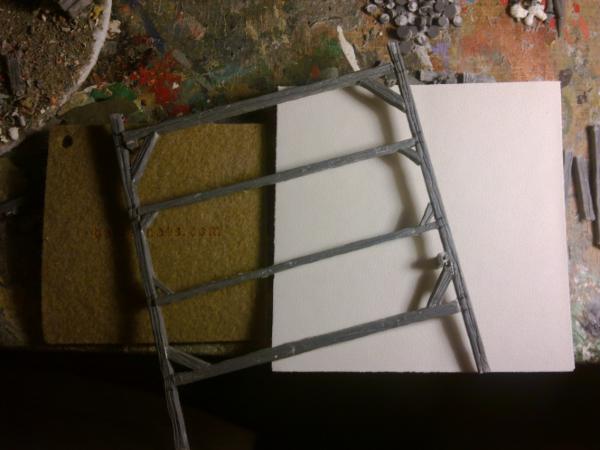
Fig. 24. The roof frame (ignore the other things there).
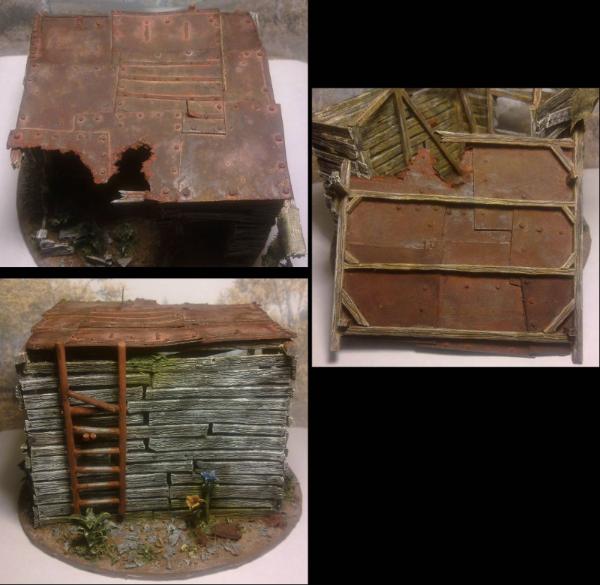
The initial plan was for a corrugated metal roof, but I was unable to find any suitable material for that and settled on metal plates instead.
The metal plates (Fig. 25) were made from scrap card that was cut into "not" squares and some were layered up to give a variety of thicknesses from one layer to 3 layers.
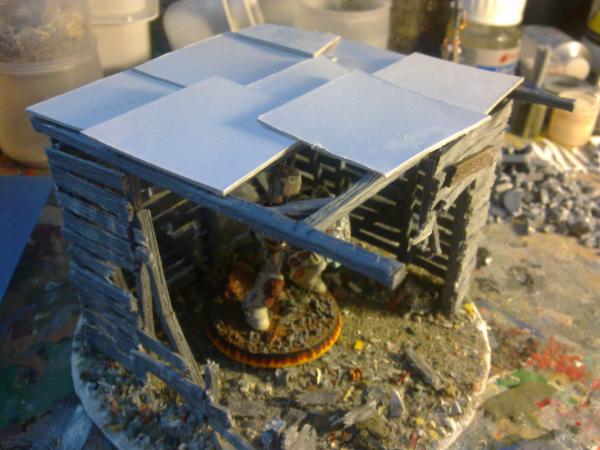
Fig. 25. Metal plates from card.
The metal plates were then arranged in a suitable pattern on the roof and glued together and then glued to the frame. Some further details and rivets were added to some of the plates to make them less plain (Fig. 27). The rivets (made from spare putty, rolled into a thin sausage and cut into rivets) were positioned along the edges of the plates to show how they were held together and larger rivets were positioned over where the wooden frame was, where the roof would be held to the frame. Some rivets were positioned on the underside of the roof to match those from the top to show them going all the way through (Fig 28). Then the whole roof (not the beams) was covered in a water/PVA mixture to seal the card.
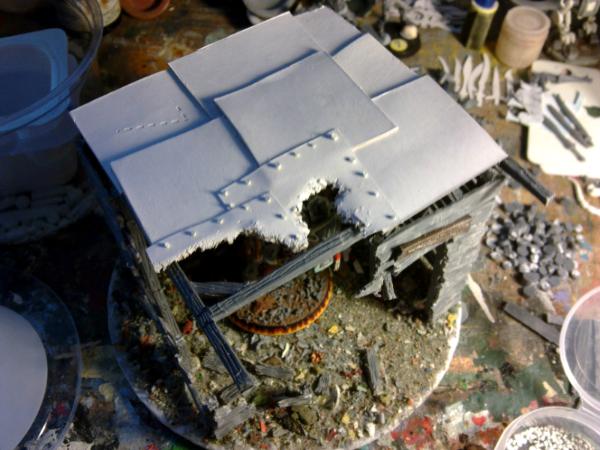
Fig. 26. Rearranged metal plates and practice rivets.
The two thin plates at the front were rust damaged by repeatedly stabbing with a scalpel and the rough edges were bend downwards slightly. The wooded frame that was left exposed by the hole was removed to look like it was broken. A piece of cloth (in my case I used climbing tape that I had used to protect my thumb while performing the sprue carving) was added to the remaining post at the front of the roof to represent what's left of the awning.
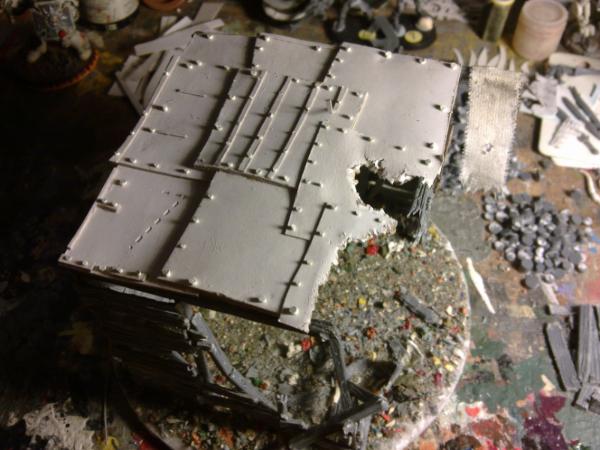
Fig. 27. Final details to the roof.
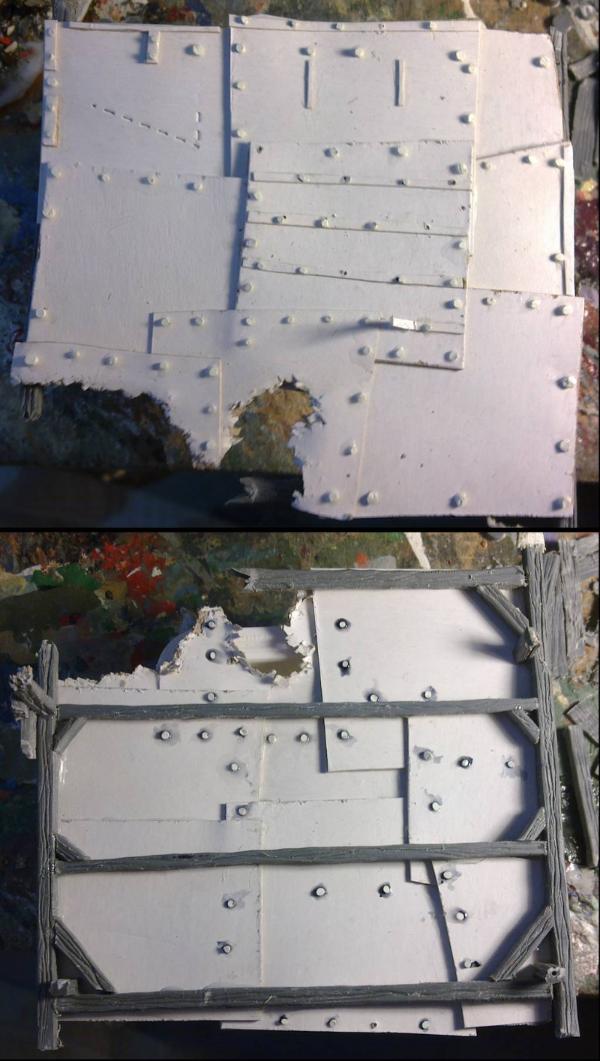
Fig. 28. Roof detail and rivets.
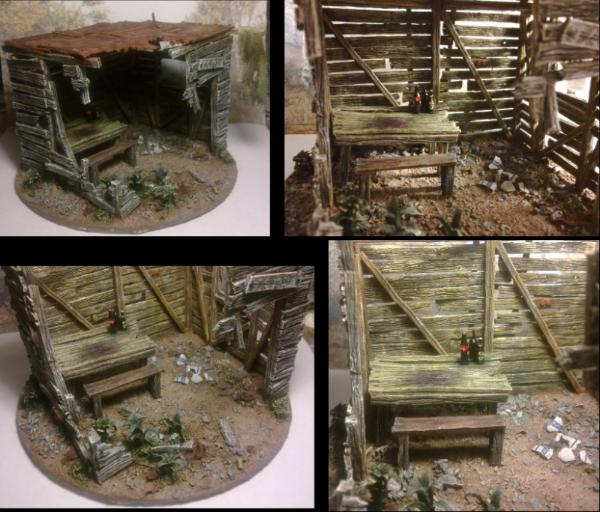
A table was made from sprue by making a rectangle of beams with 4 equal length beams for legs and then placing planks of "wood" across the top and the bench was made by sticking two planks together side-by-side and then gluing 4 legs to the underside (Fig. 29). These were left removable and not glued down.
Bottles were also carved from sprue for the table. These were made by carving and sanding the sprue until it has a circular cross-section with the thickness of the main body of the bottle you want. Then carve the neck at one end of your length of sprue (use real bottles for reference) and smooth with sandpaper. Once you're happy with the shape you can then cut the bottle from the sprue to the length you desire and then carve the next bottle.
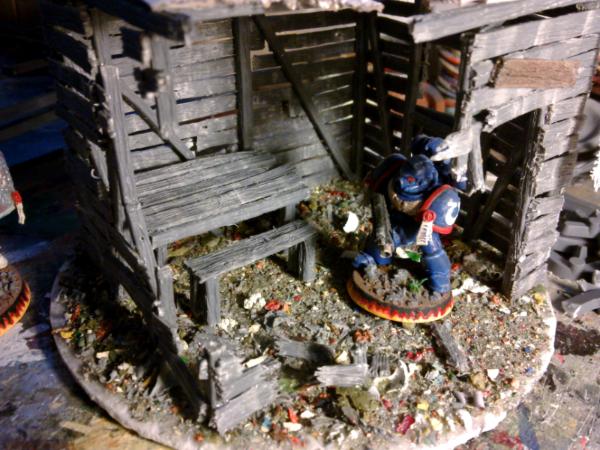
Fig. 29. Where'd that table and bench come from?
Plants were then added (Fig. 30) also using some sprue shavings for small bushes (glued down with PVA and/or superglue, don't use plastic cement for these). I followed this
tutorial to make them, so there's no need to cover them here.

Fig. 30. Sprue Plants added.
A ladder and hook were made from sprue (Fig. 31). The pieces for the ladder were just carved and sanded down to a spherical cross-section and glued together and more putty rivets were added. The hook was just made from scraps (a square and two bent "not" plant stems).
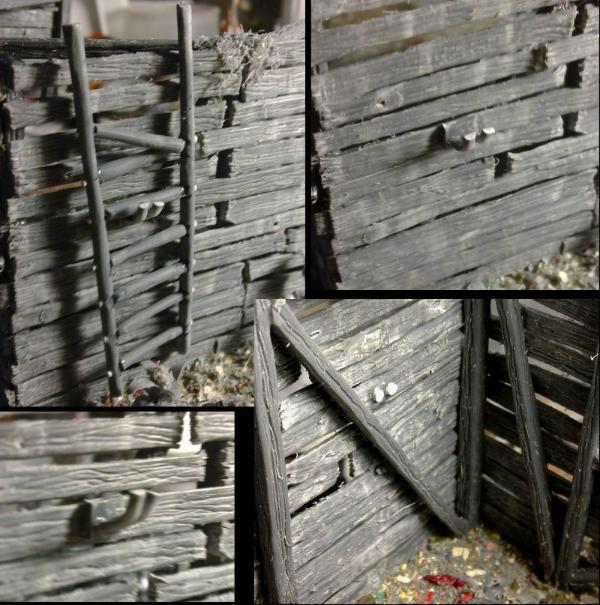
Fig. 31. Ladder and hook.
...and that's it for building. Then you just need to paint it.
Painting your wooden hut.
Before starting the painting I spent a lot of time looking for pictures of various types of wood and studying them very closely to pick out all the colours that make up the overall colour you see as "wood". I will encourage you to do the same, really look closely at the wood you want to replicate; you will be amazed at the number of different colours and shades present in that wood and that is what you need to replicate to make your "wood" look as real as possible. Having done this, I then spent quite a while trying different colour combinations on a scrap bit of hut that I wasn't using to perfect the technique required and the final colour result. Do this as well, it will help you.
On another note, the paints that I use are very rare in this corner of the miniature war-gaming community. I will attempt to supply you with correct or near-as-possible translations from my Humbrol Enamel paints to
GW/Citadel Acrylic paints. I have a range of paint conversion charts that I usually use to convert what others do here into the paints that I use, but there is more Humbrol paints than
GW paints so there is not always a direct conversion and sometimes there isn't one, even if I go via Vallejo paints. However I will do my best and I will be showing pictures of my paints so you can judge for yourself as well (or even suggest better matches). Also, apologies if these are the older, out-of-date paint names or a mixture of the old and new, I'm working with what I've got and really don't know which is which.
After all the testing of wood colours I decided to give the planks of the hut a sort of old, driftwood colour that would only be visible on the inside because the outside would be painted to be a grey, sun-bleached colour. The beams I wanted to look like a stronger, more substantial wood and so would be painted a brown, healthier colour than the planks. The table-top ended up being similar to the planks for the walls, but the bench I decided would be made from nice, hand-picked pieces of wood (because if you're going to sit on it, you're going to take more care about it's quality), and that is where I started painting...
But before that I gave everything a thin coat of very dark brown (Fig. 32), this was 33 (Black = Chaos Black) with a little 186 (Brown = Bestial Brown) mixed in. This was watered down to get into all the details and give the deep shadows, but was largely covered up in the end.
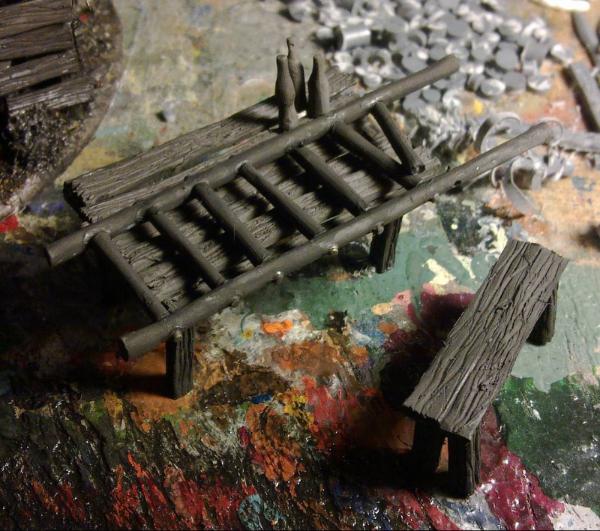
Fig. 32. Base coat of very dark brown.
The bench (Fig. 33) was painted to be a slightly red coloured wood (using mahogany as a reference).
Over the base colour the following were dry-brushed;
186(Brown = Bestial Brown) + a small amount of 60(Scarlet ~ Blood Red),
71(Satin Oak ~ Bleached Bone) not as heavily as the previous coat,
34(White = Skull White) lightly and in patches to give variation to the colour,
and then a wash with 33(Black = Chaos Black) Also patchy for variation and in dots to represent the nails.
The legs were done the same but without the added red and the black wash was concentrated more towards the ground to show the dampness seeping into the legs.
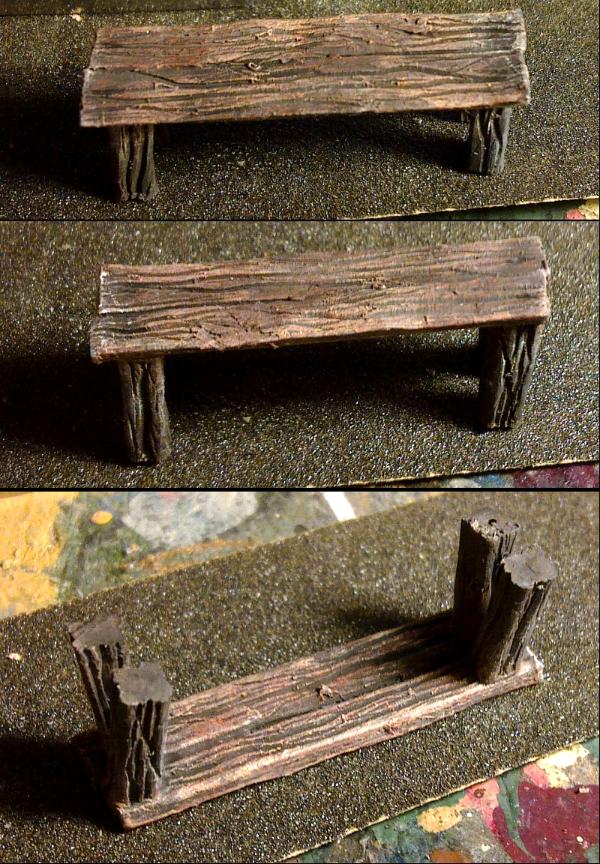
Fig. 33. Wooden bench.
For the table (Fig. 34), I painted the legs and frame first with the same paints that were used for the legs of the bench;
Over the base colour the following were dry-brushed;
186(Brown = Bestial Brown)
71(Satin Oak ~ Bleached Bone)
34(White = Skull White) lightly and in patches to give variation to the colour,
and then a wash with 33(Black = Chaos Black) Also patchy for variation and again concentrated towards the ground.
The frame and legs were masked off and the planks were then painted as follows;
Over the base colour the following were dry-brushed;
83(Ochre = Camo Green)
71(Satin Oak ~ Bleached Bone),
34(White = Skull White) lightly and in patches to give variation to the colour,
and then a wash with 33(Black = Chaos Black) in patches and streaks, but more heavily on the underside of the table and in two concentrated patches under the bottles and in the position of the bloodstain.
Once that paint had dried I painted the bottles with 21 (Gloss Black = Chaos black + gloss) with a little 20 (Gloss Crimson = Scab Red + gloss) for the wine bottle, and a little 10 (Gloss Service Brown ~ Scorched Brown + gloss) for the "Nuka"cola bottle. The "Guinness" bottle was left with just the black, but the difference between these bottles is actually a bit too subtle and could have done with more of the red and brown added. The labels were added later.
The bloodstain was painted with 1321 (Clear Red =
? ), keeping within the black wash area (where the "blood" has soaked into the wood) from earlier and then more black wash was added to the middle of the red patch to darken that further. Dots of black wash were also used for the nails on the planks.
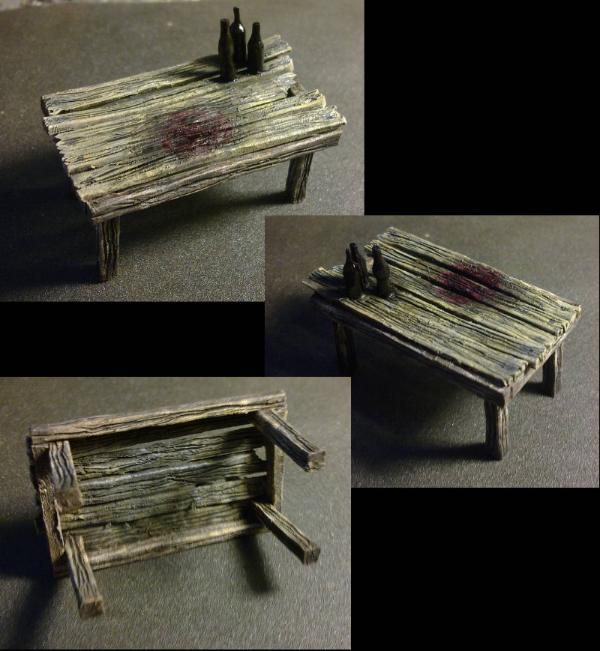
Fig. 34. Wooden table.
I then moved on to the hut, starting with the inside. This was because while painting the planks some paint is likely to spill through the (many) gaps to the other side and it would be better for the bleached colour to spill through to the inside rather than the inside darkening the outside.
As before, the wood was base coated with very dark brown, and then the beams were dry-brushed with 186(Brown = Bestial Brown). The planks and beams (only partially) were dry-brushed with 83(Ochre = Camo Green), and then everything was dry-brushed with 71(Oak ~ Bleached Bone) (Fig. 35).
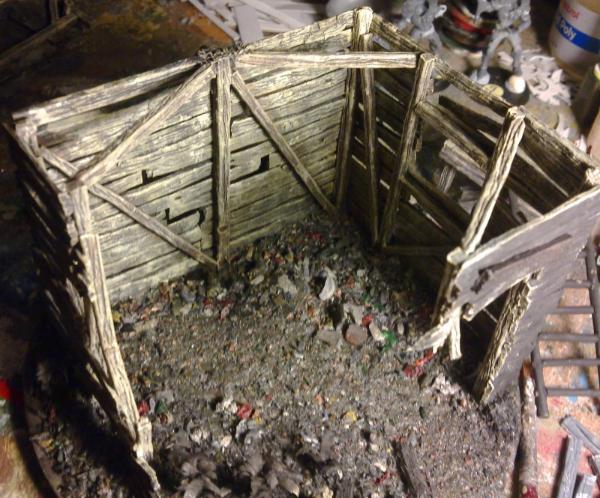
Fig. 35. Inside after dry-brushing with 186, 83 and 71.
The beams and planks were then given a wash with 33(Black = Chaos Black) in patches and streaks to give uneven shades and definition to the texture Fig. 36).
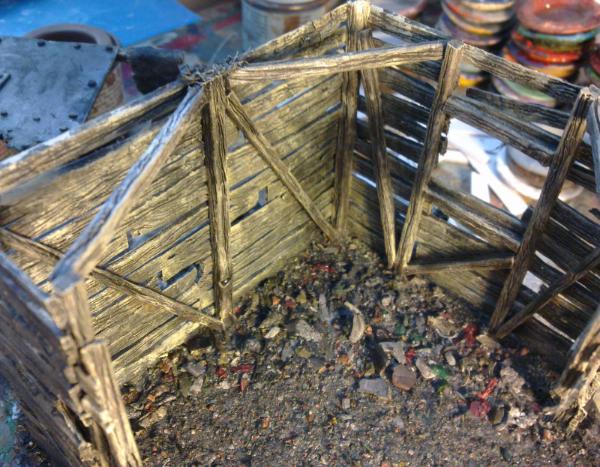
Fig. 36. Inside after the irregular black wash.
The beams were then given a wash with 186(Brown = Bestial Brown). Once that had dried everything was given a patchy dry-brush with 63(Sand ~ Iyanden Darksun) (Fig. 37).
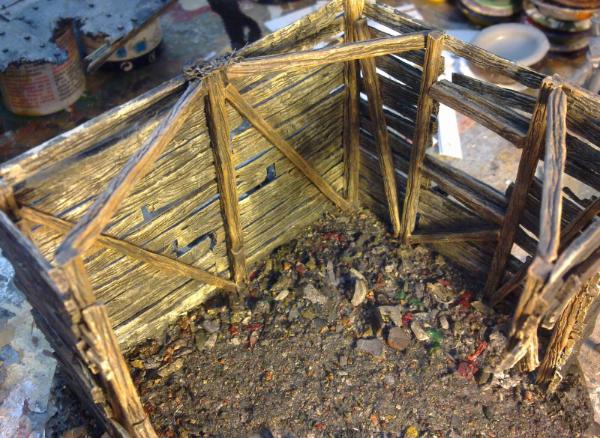
Fig. 37. Inside after a wash of 186 on the beams and a dry-brush of 63 on all surfaces.
Finally the wood was completed by an irregular dry-brush of 34(White = Skull White) (Fig. 38). Weathering, dust/dirt, mould and rust were left until later.
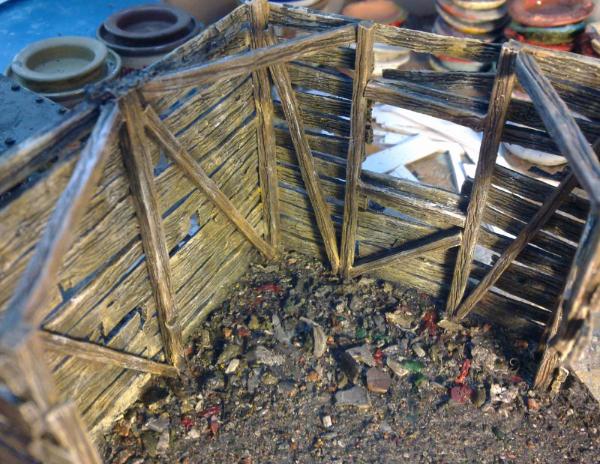
Fig. 38. Inside complete after an irregular/patchy dry-brush of 34 over everything.
The outside was started with a dry-brush of 27(Sea Grey = Codex grey) and this was followed by a dry-brush of 64(Light Grey ~ fortress Grey) and then a dry-brush of 34(White = Skull White) (Fig. 39).
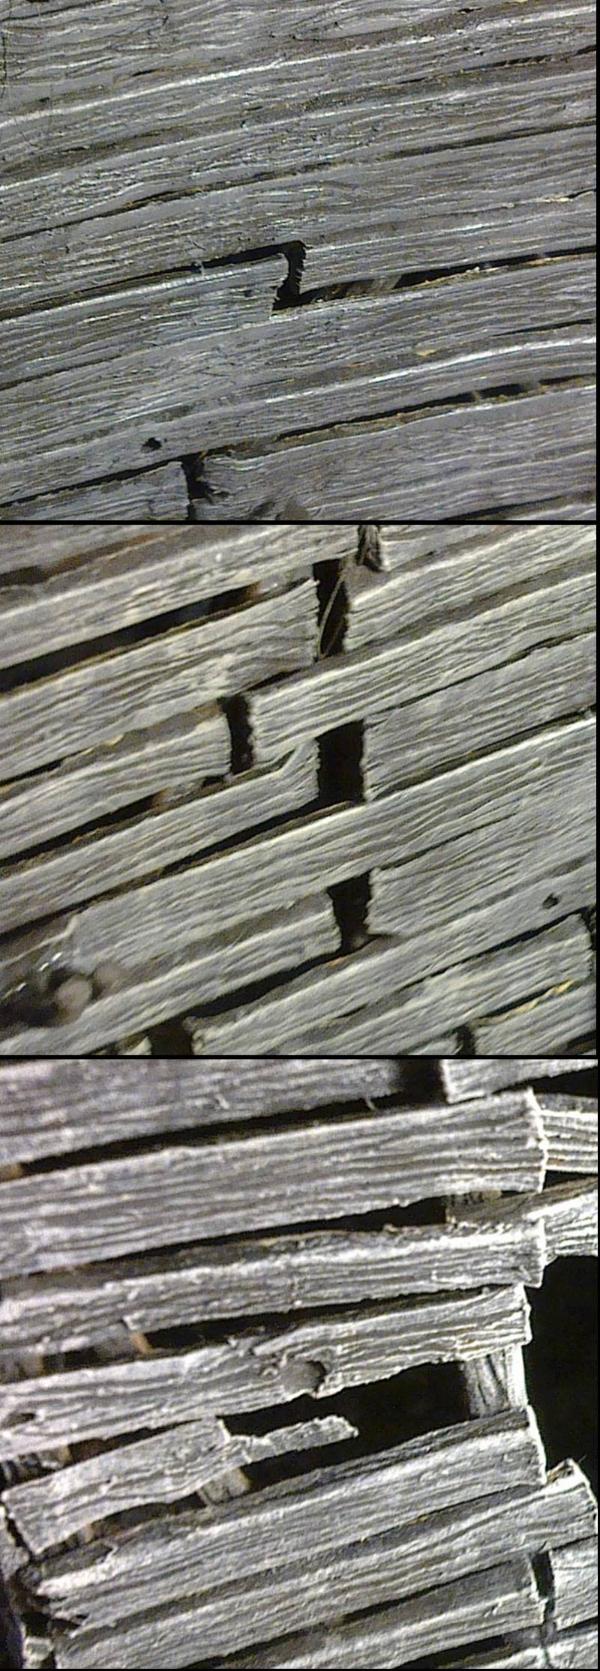
Fig. 39. The outside with (top) a dry-brush of 27, (middle) a dry-brush of 64 and (bottom) a dry-brush of 34.
The outside was then given an irregular/patchy wash of 33(Black = Chaos Black) focussing on area near the ground, roof, overlapping planks the ladder hook and plants (Fig. 40).
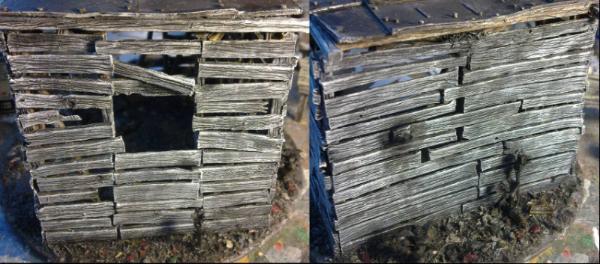
Fig. 40. The outside after an uneven wash of 33.
Then it was time to do what shall be known as anti-weathering. This is a process of adding the wood colour back to the bleached wood where it would actually be in the shade and therefore not be bleached by sunlight.
The first thing to do is plan where you will be adding this effect by looking for area of the wood where things like the roof and other planks overhang and would therefore shade the wood, these are likely areas that you have darkened with the black wash in the previous step. Paint these parts with 186(Brown = Bestial Brown) only lightly or use a wash but be careful so it doesn't go where you don't want it to.
There wasn't much on my hut in the end, a little along the roofline and a couple of loose planks. I also used the technique in areas that will acquire moisture, such as the plant growing under the roof and the ladder hook (Fig. 41), but these will have more paint added at a later date to further represent their influence (green for the plant and "rust" for the hook).
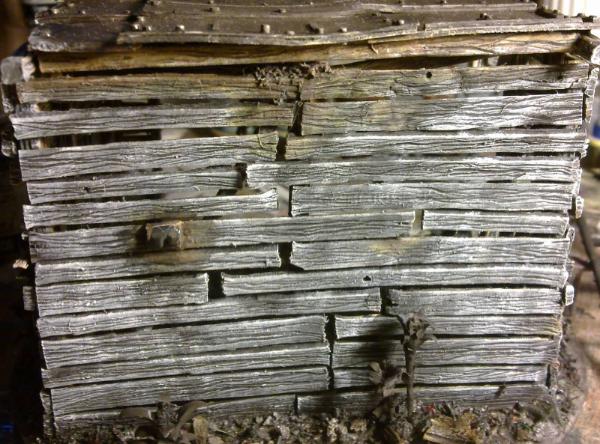
Fig. 41. Anti-weathering 186 wash.
After the brown has dried you then want to dry-brush some 83(Ochre = Camo Green) without completely covering the previous brown in the darkest areas and starting to think about blending the brown towards the grey without extending the non-bleached area too far (Fig. 42).
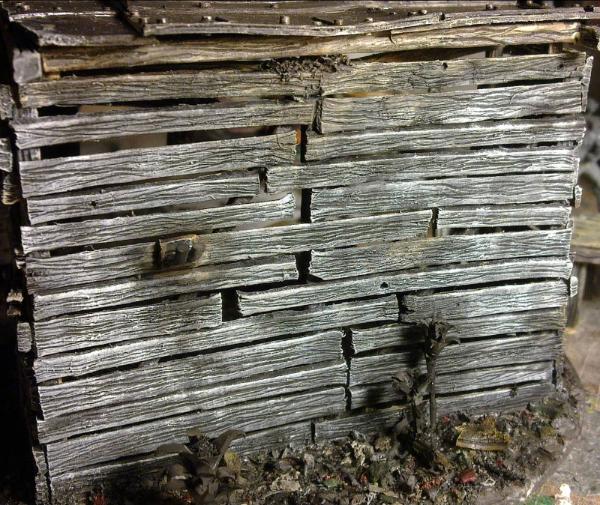
Fig. 42. Anti-weathering blended in.
The final stage of the anti-weathering is a dry-brush of 71(Oak ~ Bleached Bone) to complete the blend between the brown and the grey (think of it that as the wood has been bleached it went from the brown, through ochre, through oak/bone to dark and then light grey). This is followed by a black wash over the whole area to darken the grey and complete the blend/effect (Fig. 43).
The outside wood is then finished off with a patchy dry-brush of white and nails are added for the planks with black wash. You can even add a name plate if you like (Fig. 43).
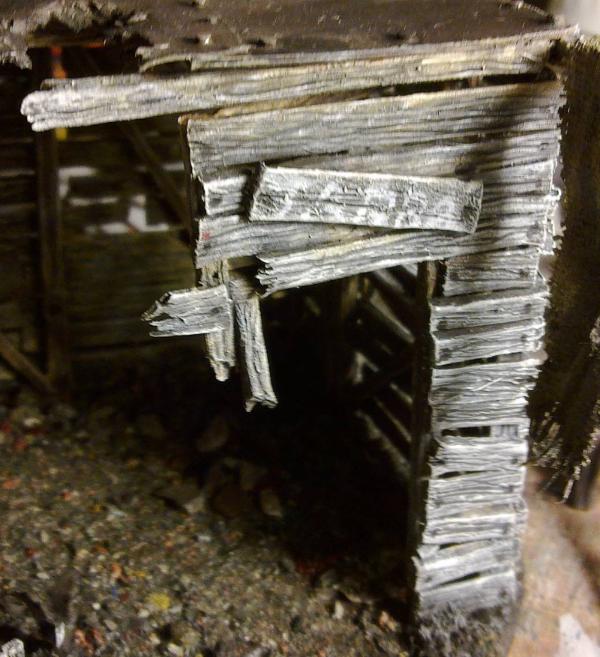
Fig. 43. Final details to the outside.
Then came time to paint the rusty roof. Again, I encourage you to search for and study many pictures of rusty things and look at the many colours that make up the whole.
This is also where the colours of paint become complicated as I wasn't using paints straight from the pot and I tend to mix colours by eye without keeping track of how much I added of a particular paint. So you will have to just match the colours as best you can, however, as with painting wood you can't really do rust wrong. There is such a wide variety of colours of rust (and wood) that almost anything will work, within reason.
With that in mind the first colour to be added was a red-ish brown (that also included some black to darken it) that was used to cover everything that was to be rusty metal (Fig. 44). Also note that the underside of the roof was painted at the same time as the top and isn't greatly different.
...and remember the fine dried paint dust that was used for the mud on the base... a small sprinkle of this in your paint can add that rough texture/flakes that you get on rust. Who needs weathering powder?!
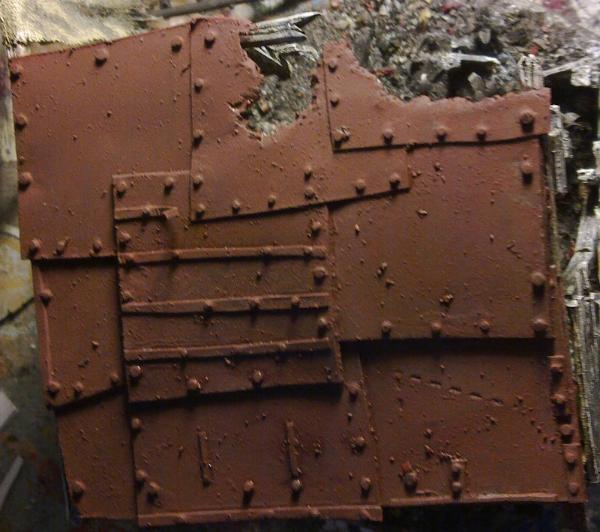
Fig. 44. Red-brown base layer.
The next colour added to the rust was a colour I noticed from a few images of very old rust; purple, applied as a wash and kept as non-uniform as possible (Fig. 45).
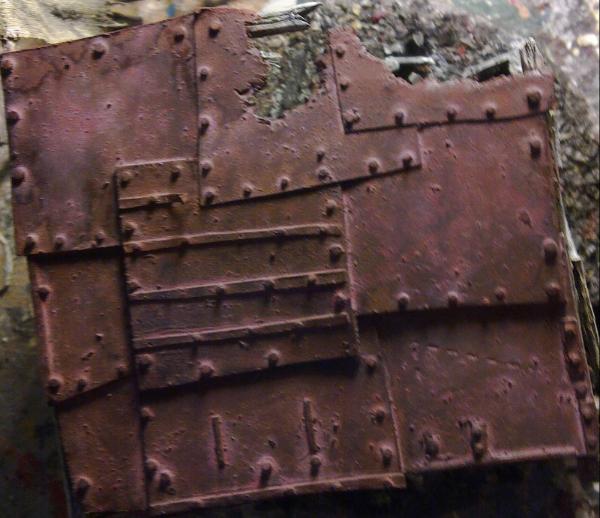
Fig. 45. Purple wash.
After that, I wanted to make the plates look individual (as if they had been added at different times and were made from differing grades of metal), so I started to add different colours in different quantities to different plates. Such as a red-ish wash (Fig. 46) that used the same paints as the base coat, but a larger quantity of red, and an orange wash (Fig. 47) that included both orange and yellow paint.
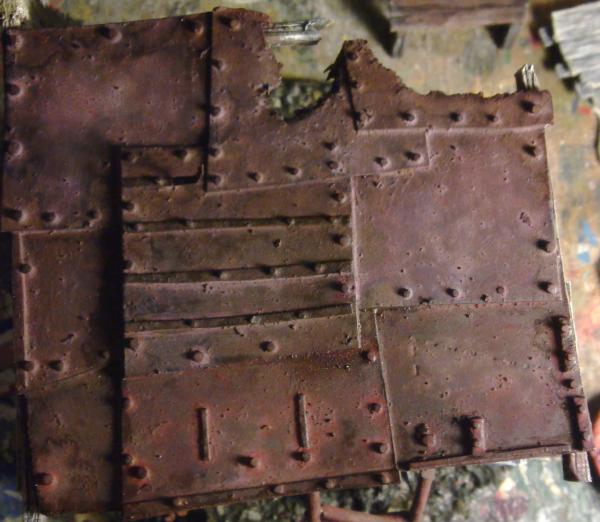
Fig. 46. Red-ish wash for some plates.

Fig. 47. Yellow/orange wash for other plates.
However, after these I decided that I quite liked the red wash effect and the orange wash was a little too light. So I used a black wash to darken some of the lighter patches and added some more red wash to some areas.
It's also worth noting that when I was applying the washes I would slap on a little of the wash and then spread it, direct it and remove it from areas by applying (quite large) quantities of white spirit and moving it about with my brush. You will want to use water for this with your water-based Acrylic paints, although you will want to reduce the surface tension as much as possible to achieve the same effect as an oil-based paint such as I'm using. Also, due to the large pools of solvent that resulted, I often got many "high water" marks on the roof. I reduced but didn't necessarily remove most of these marks with more evenly spread layers of solvent. The final result (Fig. 48) was quite pleasing even if I'm not entirely sure how it was achieved (I just kept going until it looked right).
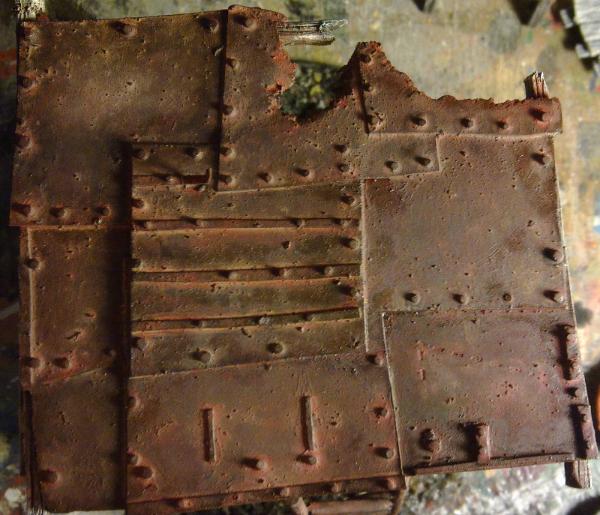
Fig. 48. Finished roof.
Once that was done, it was only the base left to do. My basing technique leaves many surprises for the modeller when you come to paint it as the collection of random scrap bits can start to look like more than just rocks, even after you have picked out the more obvious shapes.
First job is to paint everything on the base with 186(Brown = Bestial Brown) (Fig. 49). After this coat most of the smaller lumps of dried paint will look like a mud texture and the larger lumps will mostly look like rocks. However, there will be some bits that can look like many other things (It's good exercise for your imagination) such as pieces of scrap metal (that may or may not be rusty), wood, plant matter (dead leaves etc...) or something more exotic. It's up to you and what it looks like to you, although quite often most bits will look like rocks in the end if you paint them like rocks.
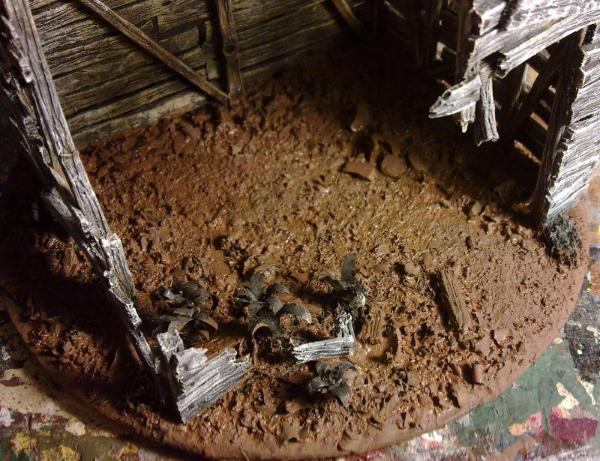
Fig. 49. Initial brown layer for the base.
Usually, the next step is for me to dry-brush unevenly with 62(Leather ~ Snakebite Leather), however I found that the last of my pot had dried out (more basing material) so I mixed some 71(Oak ~ Bleached Bone) with 186(Brown = Bestial Brown) to make a light brown and used that (Fig. 50).
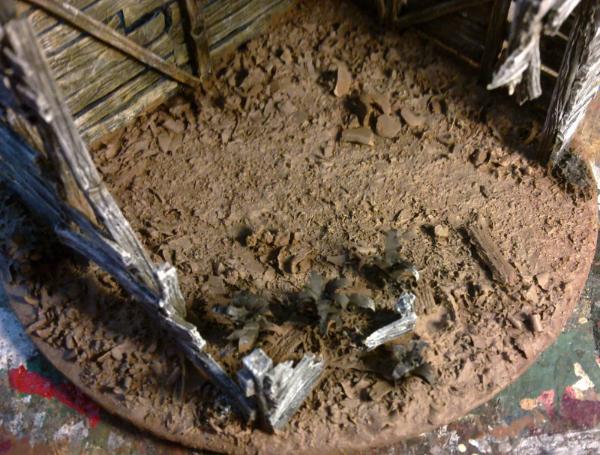
Fig. 50. Dry-brush with light brown.
After this I paint anything that looks like a rock with 27(Sea Grey = Codex grey) and try not to get too much on the mud (Fig. 51). Any slips can, and will, be touched up with brown later. I also painted the few pieces of scattered wood at the front of the hut with grey as they will also be bleached (a couple of pieces of wood further into the hut were painted as the interior wood and not bleached wood).
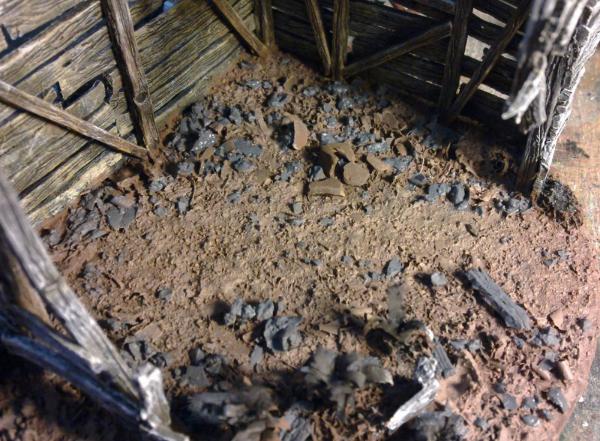
Fig. 51. Paint the rocks and some of the wood.
I then painted the broken pottery (that I added intentionally) with 147(Light Grey ~ Fortress Grey + Skull White) before edge highlighting it with 34(white) and giving the rest of the mud and rock a light dry-brushing with white (Fig. 52).
The bleached wood was dry-brushed with 64(Light Grey ~ Fortress Grey) and then an uneven black wash followed by a dry-brush with white in patches.
The rusty metal, the ladder and it's hook were painted with a red-brown, given a black wash and then a light dry-brush of 82(Orange Lining ~ Fiery Orange). The ladder was also given a light dry-brush of 53(Gunmetal = Boltgun Metal) on the rungs as well as spots of 82(Orange Lining ~ Fiery Orange). A wash of the red-brown was used on the wood surrounding the hook to show the rust affecting the wood (Fig. 53).
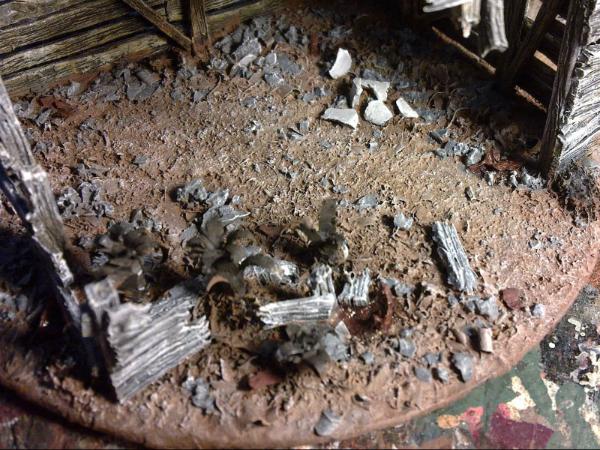
Fig. 52. Dry-brushing with white and painting the random items.
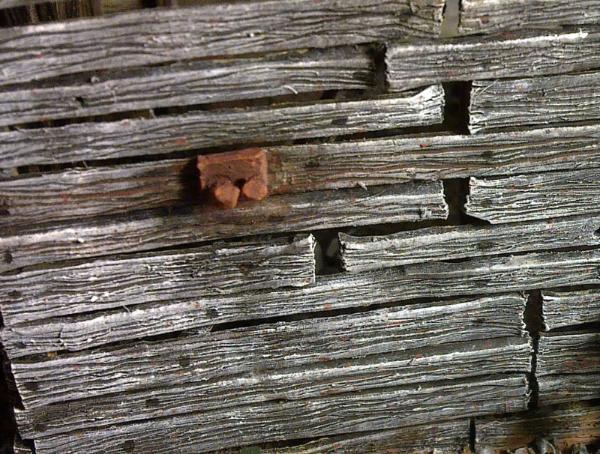
Fig. 53. Rusty ladder hook and it's affect on the surrounding wood.
To complete the effect of the broken pottery I wanted a design painted on to tie the pieces together rather than leave them as a scattering of white pieces. I chose 25(Blue ~ Ultramarine Blue) as there isn't much blue in the rest of the build so will help to make it stand out. I went for a simple design of lines and a zig-zag as it is only meant to be a minor detail and my fine painting skills aren't good enough for anything better (Fig. 54).
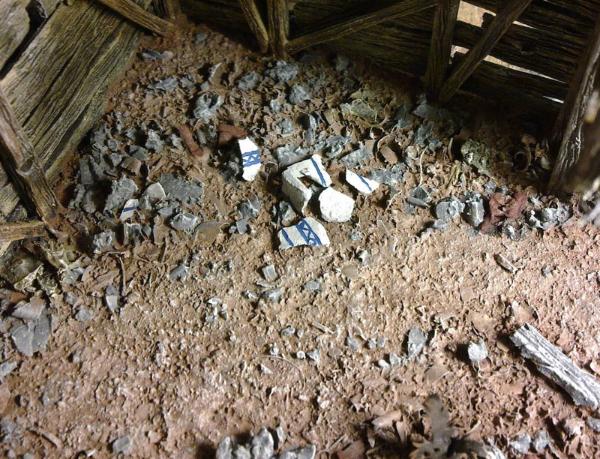
Fig. 54. Broken pottery details.
After touching up any painting slips on the mud and rocks, it was time to paint the plants. These started with the very dark brown that everything started with, but they were then painted with 195(Dark Green ~ Dark Angel Green) and this included anything on the base that looked like a dead leaf/plant (Fig. 55).

Fig. 55. Base layer on the plants.
Most of the plants were then given a wash with 155(Olive Drab ~ Desert Yellow) except for the two plants that I had given serrated leaves to (centre of Fig. 56); these were given a layer of a mixture of 30(Dark Green ~ Scaly Green) and 144(Intermediate Blue ~ Shadow Grey) so that they had a blue-ish tint (as I though they looked a bit like Nirnroots).
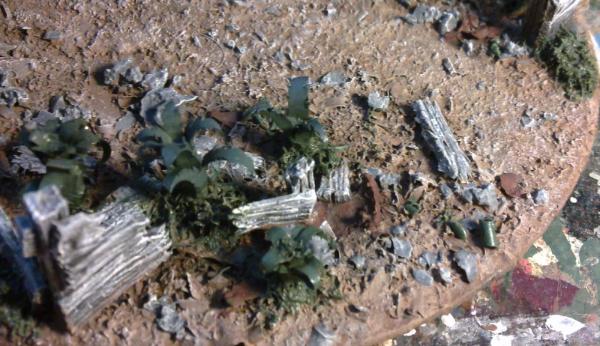
Fig. 56. Differentiating the plants.
The plants were finished with a dry-brush of 80(Grass Green ~ Goblin Green), then 63(Sand ~ Iyanden Darksun) and a touch of 71(Oak ~ Bleached Bone) to give the impression of drying/dieing leaves. The two "nirnroots" were given a dry-brush to their edges with a mixture of 71(Oak ~ Bleached Bone) and 65(Aircaft Blue ~ Space Wolf Grey) (Fig. 57).
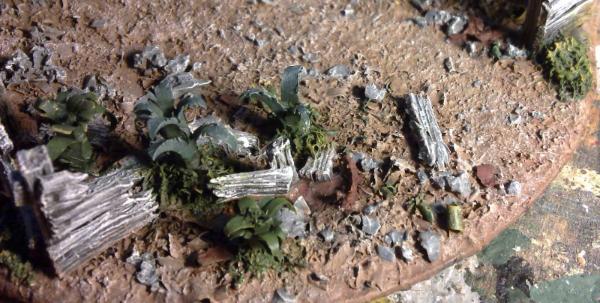
Fig. 57. Finished green plants.
Some of the wash of 155(Olive Drab ~ Desert Yellow) was used on the wood where the plant life would have affected it and all the visible leaves were given a thin black line down their centre (Fig. 58).
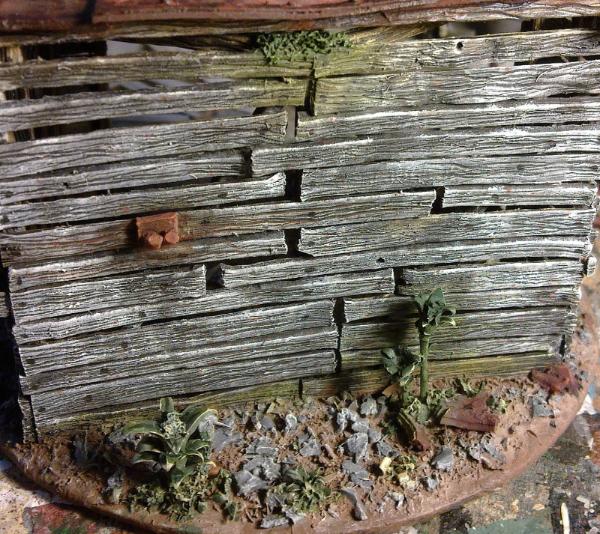
Fig. 58. Final plant details and mouldy wood.
The very last job to do were the flowers. I again looked for inspirational pictures and decided to do red, blue and yellow flowers.
The red flower (Fig. 59) was painted with a mixture of 60(Scarlet ~ Blood Red) and black and then highlighted with 60(Scarlet ~ Blood Red) and a drop of black wash in the centre.
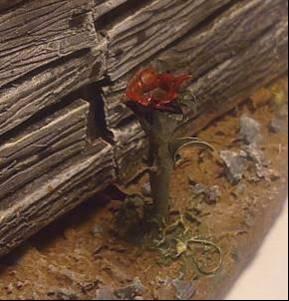
Fig. 59. The red flower.
The blue flower (Fig. 60) was painted with 25(Blue ~ Ultramarine Blue) with a highlight of 65(Aircaft Blue ~ Space Wolf Grey) and a dot of black wash in the centre.
The yellow flower (Fig. 60) was painted with 82(Orange Lining ~ Fiery Orange), highlighted with 24(Trainer Yellow ~ Badmoon Yellow) and a dot of black wash in the centre.
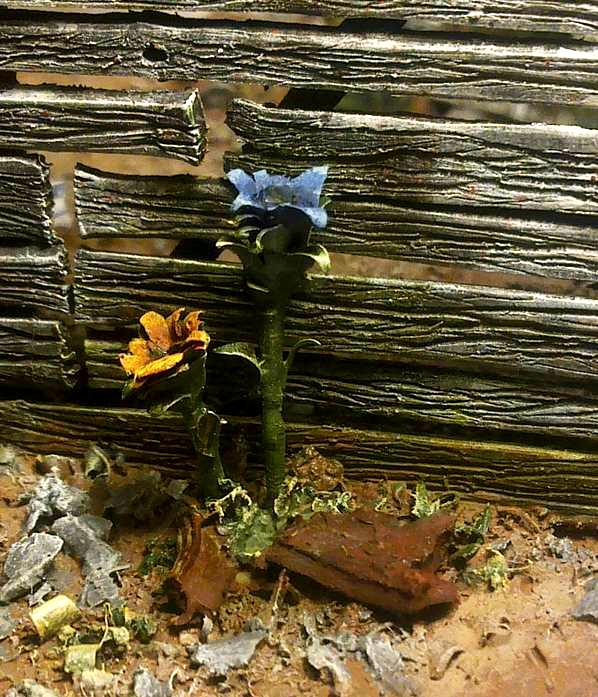
Fig. 60. The blue and yellow flowers.
This last picture (Fig. 61) is a collection of the paints that I used for the hut so you can judge for yourself which paints you may want to use.
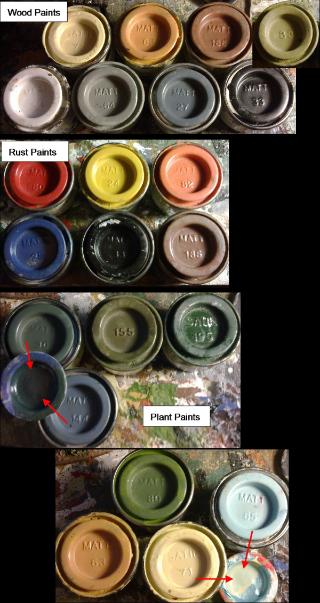
Fig. 61. Sprue Hut Paints.
and that is it, all done, now go forth and make things from sprue.


 very thorough descriptions and great photo references


 blog!
blog! 1,500 Points II
  125
125


 My P&M Blog :


 1500pts
 2000pts
  2000pts plus several small AOS armies